

Philips HS990/33 User Manual [pt]
990

English page 3
Français page 15
Deutsch Seite 27
Nederlands pagina 39
Italiano pagina 50
Español página 62
Português página 74
2

3
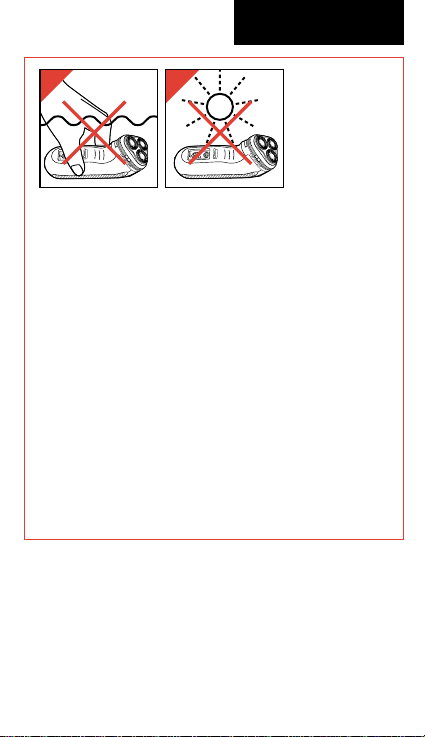
1 Do not allow the shaver to become wet.
2 Do not leave the appliance in a position
where it can become damaged by direct
sunlight or other heat source.
- Before first use or
- if the shaver has not been used for a
month or longer
it should be charged for a period of at
least 8 hours (irrespective of the reading
on the display).
If the batteries are completely empty, it may
take some time (3-5 minutes) before
information appears in the display.
• Please bear in mind that your skin may
need two to four weeks to become fully
accustomed to the Philishave shaving
system.
■■■ Important
English
1
2
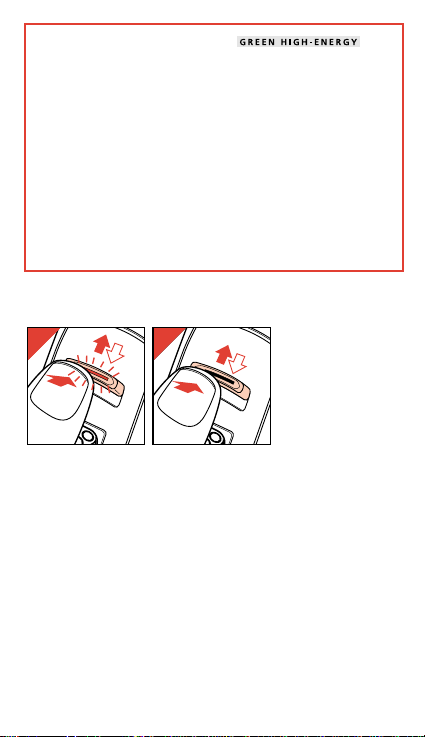
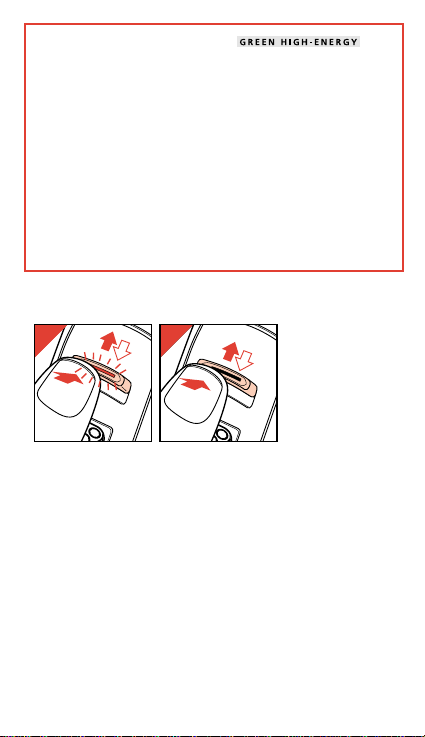
■■■ Switching on/off
The slider switch has a locking knob which prevents
the shaver from being switched on accidentally.
3 To switch on: keep the locking knob depressed,
slide the switch upwards and release.
The switch will automatically return to the original
position. The pilot light in the switch will be
illuminated.
4 To switch off: push the switch upwards again.
The pilot light in the switch will go out. When
released, the switch will automatically return to the
original position.
4
To protect the environment, this
rechargeable Philishave appliance is
equipped with nickel-hydride batteries.
These contain less than 0.01% cadmium.
Yet we advise you to ensure that the batteries
are separated from the normal household
refuse and that they are disposed of at an
officially assigned place when discarding your
appliance in due course. Please refer to section
“Protecting the environment”.
43

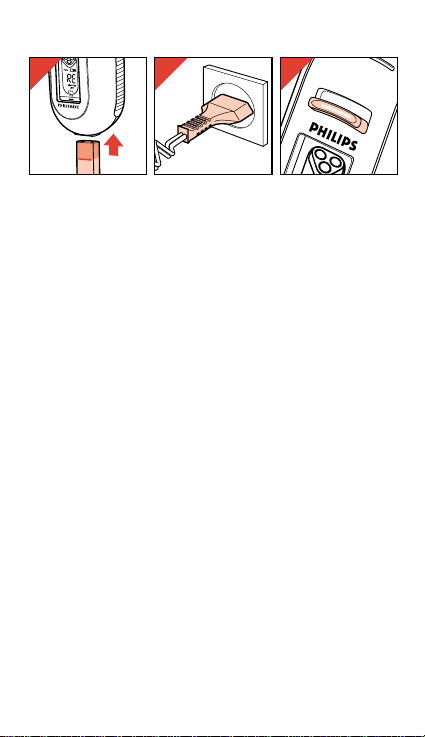
■■■ Charging
5 Insert the small plug into the shaver. Ensure
that the plug is pushed fully home. (Note the
indication mark.)
6 Mains voltages: 12 - 240 Volts. (The shaver
adjusts automatically.)
7 Ensure that the shaver is switched off. (Pilot
light in the switch not illuminated.)
The shaver can also be charged from a
12 - 24 Volts (DC) supply using cord connector
type HP 1957. (Available from Philips retailers or
Authorised Service Dealers.) Charging from a
12 - 24 Volts (DC) supply requires approx. 32 hours.
• It is advisable to charge the shaver at temperatures between 5° and 35° C (41° and 95° F).
This guarantees maximum life from the
rechargeable batteries.
• If you keep the shaver in the case when
charging ensure that the lid is left open to
prevent overheating.
• Before first use (or if the shaver has not been
used for a long time) it should be charged for a
period of at least 8 hours.
5
5
990
6
7

• Recharging: 60 minutes. The shaver is fully
charged when the green pilot light starts to flash
and the word “FULL” is displayed.
The shaver will not be damaged by leaving it
connected to the mains supply after it is fully
charged. However, it is not advisable to charge the
shaver permanently as this would shorten the life
of the rechargeable batteries.
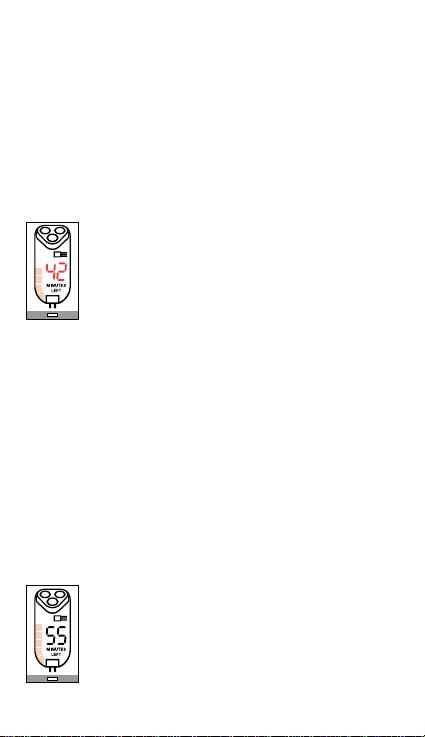
■■■ Signals
Minutes Left. On the display you can
always check the amount of shaving time
which is still available for you until the
reserve energy is reached.
This “Minutes Left” indication applies to
you personally, as it is based on the
amount of power you consume per minute.
This is dependent upon the type of skin, the type of
beard, shaving habits and how often the trimmer is
used.
The shaver memory needs some time to gather the
data. As a result, the indicated available shaving time
may vary especially during the initial period.
Regular cleaning of the shaver means that less
battery energy is consumed, so that more shaving
time becomes available.
Energy meter. The blocks always tell how
much energy the rechargeable batteries
contain.
(The indications of the energy meter do not
apply to the shaving performance.)
6

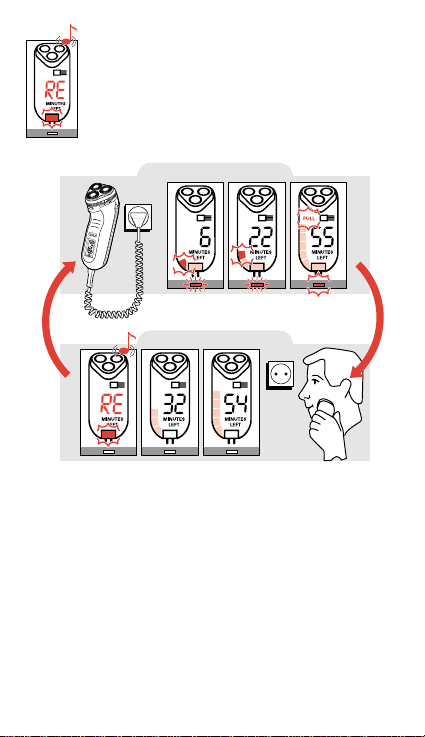
Sound signal + RE + mains plug =
Recharge!
If there is a sound signal audible after switching off
-and RE (= reserve capacity) is indicated on the
display together with a flashing mains plug symbol
then this indicates that it is time to recharge the
shaver.
7
CHARGING
CORDLESS SHAVING

■■■ Have you missed out charging?
If you have delayed recharging until the reserve
capacity has been used up, the shaver will switch off
automatically. If this happens, you can give the
shaver a quick charge (sufficient for one cordless
shave):
- Charge the shaver until the required number of
shaving minutes (“minutes left”) are shown on the
display.
■■■ Shaving directly from the mains supply
(wall socket)
- If you wish you can connect the shaver to a wall
socket using the mains cord and shave directly
from the mains supply.
8
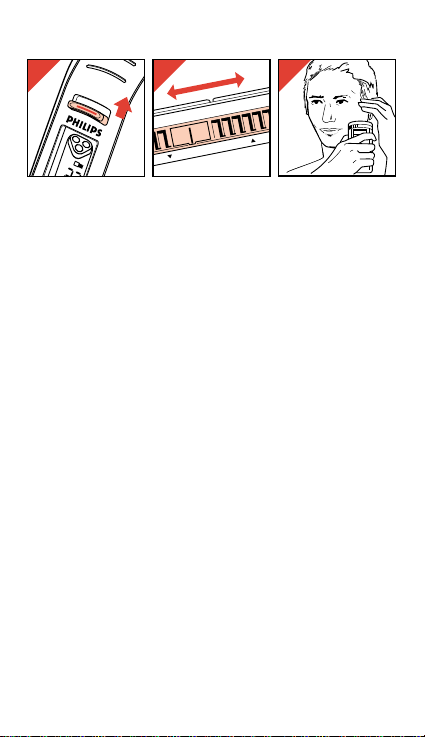
■■■ Shaving
8 Switch on. (Pilot light comes on.)
9 The comfort control can be adjusted to suit
skin sensitivity.
Start with the control set to position 1 (for sensitive
skin) and then try other positions to find the one
that suits you best.
10 Move the shaving unit quickly over the skin
and especially against the direction of the hair
growth, stretching the skin with your free hand to
bring the hairs into an upright position.
• Best results are obtained if the skin is dry.
Preferably shave before or some time after
washing.
• If required apply a pre-shave lotion. This can be
particularly helpful if the climate is warm and
humid.
9
8
9
1 2 3 4 5 6 7 8 9
10

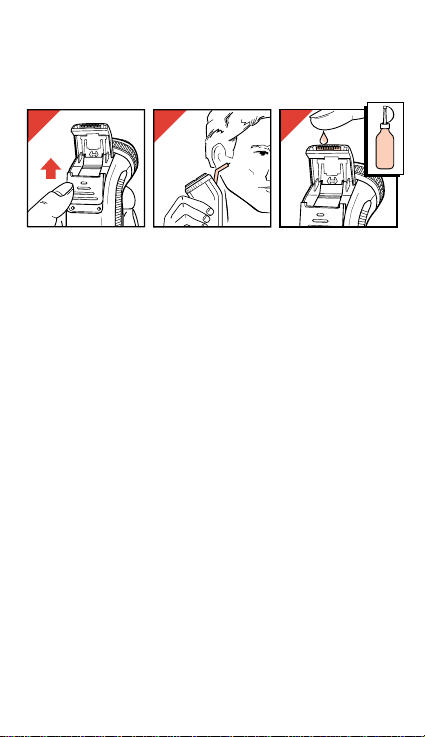
■■■ Trimmer
The trimmer can be engaged whilst the motor is
running.
11 To engage the trimmer push the slide
upwards.
To disengage move the slide downwards.
Brush the trimmer clean after each use.
12 The trimmer has been especially designed for
grooming sideburns, moustache and beard.
The trimmer is not required for long hairs in the
neck area; these hairs can easily be shaved off
with the shaving unit.
13 Maintenance (every six months)
Apply two drops of light machine oil to the teeth of
the trimmer.
10
11
12
13
OIL
■■■ Cleaning
• Always ensure that the mains cord is disconnected
and the shaver is switched off before carrying out
maintenance or cleaning.
• Handle the shaving heads carefully to avoid
causing damage.
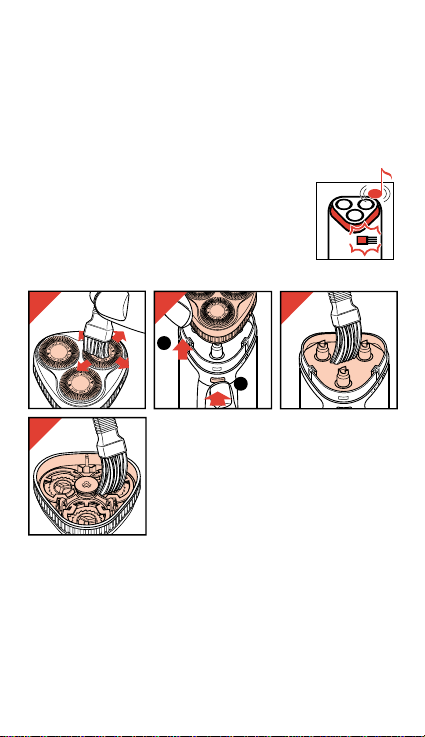
• Advice: Clean the shaver if the display
indicates so when switching off.
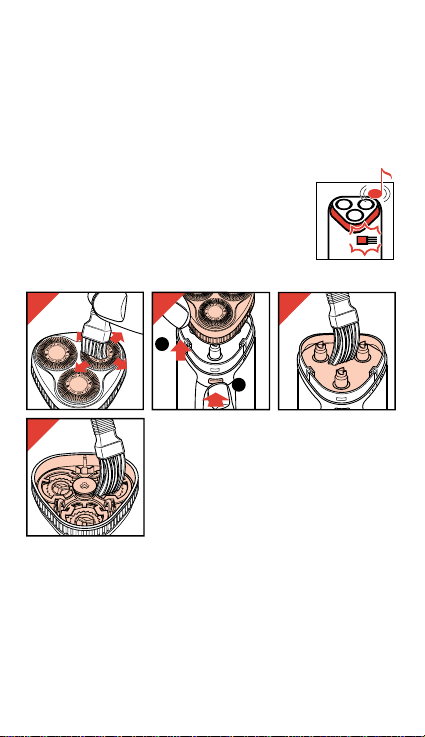
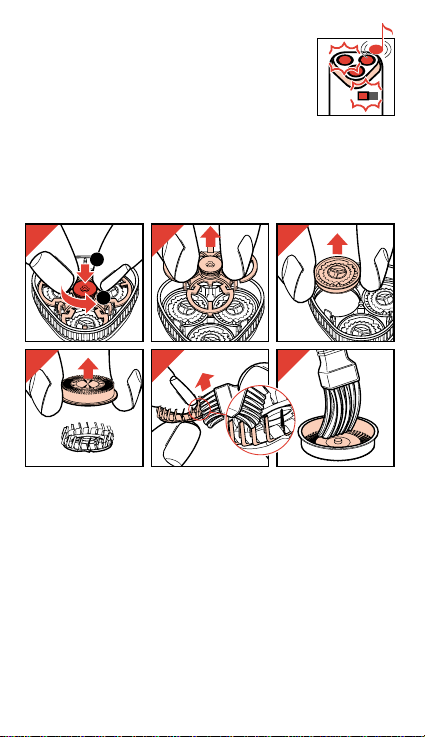
14-17 The hair chamber and brush
symbols accompanied by a sound
signal indicate that the shaving head
slots and the hair chamber require
cleaning.
- (Fig. 14) Use the short bristled brush to clean the
shaving head slots.
- (Fig. 15) To remove the shaving unit depress the
retaining button (1) and lift the shaving unit from
the shaver (2).
- (Fig. 16/17) Remove hairs from the chamber and
shaving unit using the long bristled brush.
11
14
17
15
2
16
1
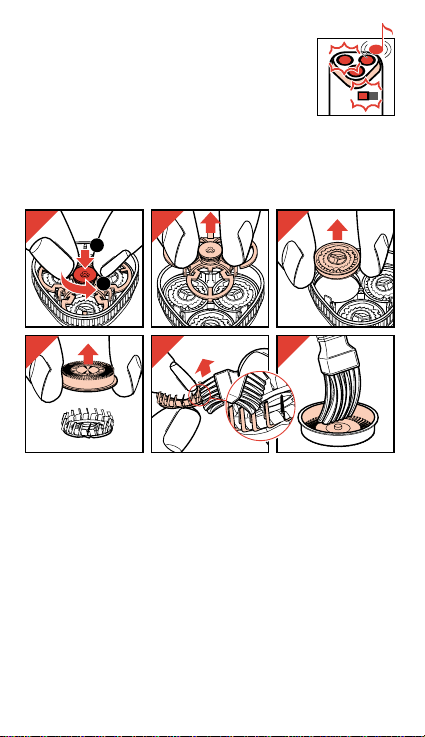
14-29 The shaving heads symbol
(together with the hair chamber and
brush symbols and the sound signal)
indicates that the shaving head slots,
the hair chamber and the shaving unit
(guards and cutters) should be
cleaned.
First clean the shaver head slots and hair chamber
as previously described. (See figs. 14-17.)
Then proceed with figs. 18-29 for cleaning the
shaving unit.
- (Fig.18-19) Release and remove the retaining plate.
The shaving heads remain in the shaving unit.
- (Fig. 20) Remove only one shaving head (guard
and cutter) at a time for cleaning to ensure that the
cutters and guards do not become mixed.
Each cutter has been ground together with the
guard.
If the guards and cutters are mixed, it may take
some weeks before optimal shaving performance
is restored.
- (Fig. 22) Clean the cutter by brushing only in the
direction of the arrow using the short bristled brush.
12
18
1
21 22 23
19 20
2
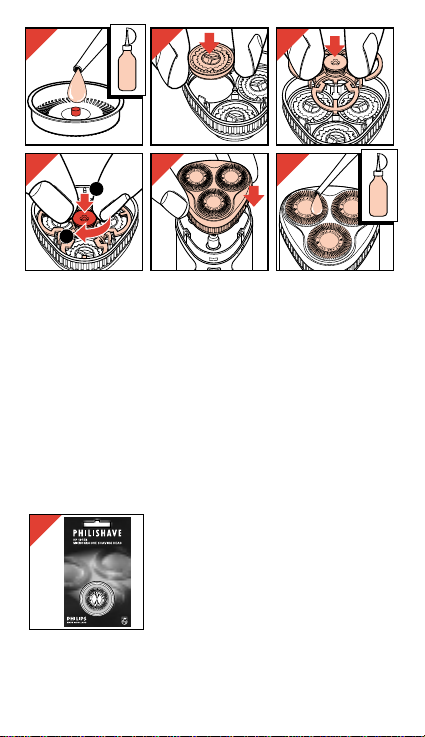
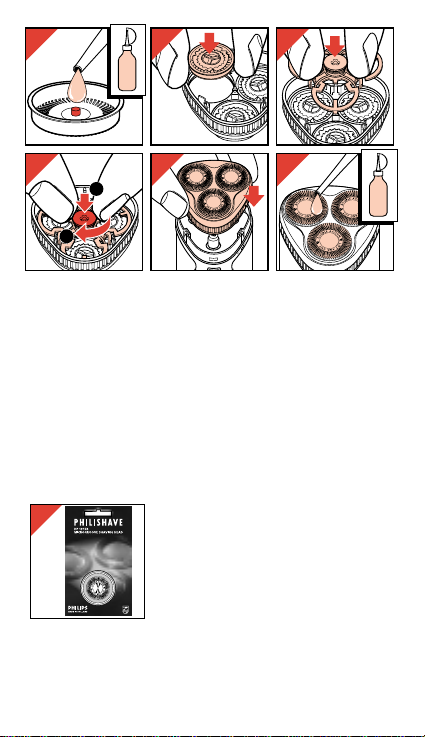
- (Fig. 24 & 29) If you have a very dry skin, or if
degreasing liquid (e.g. alcohol) has been used to
clean the shaving heads, lubricate the shaving
heads with one drop of light machine oil.
As an alternative to using light machine oil for
lubrication you may use the specially formulated
Philishave cleaner/lubricant type 389 SHC/1
available from Authorised Philips Service Dealers.
■■■ Replacement shaving heads
30 Use only Philishave replace-
ment heads type HP 1915 R when
replacing worn or damaged
shaving heads.
13
24 26
25
OIL
27 28
1
2
29
30
OIL
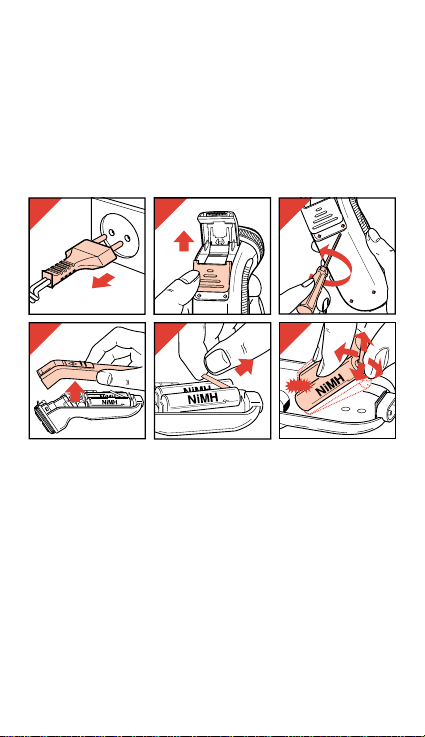
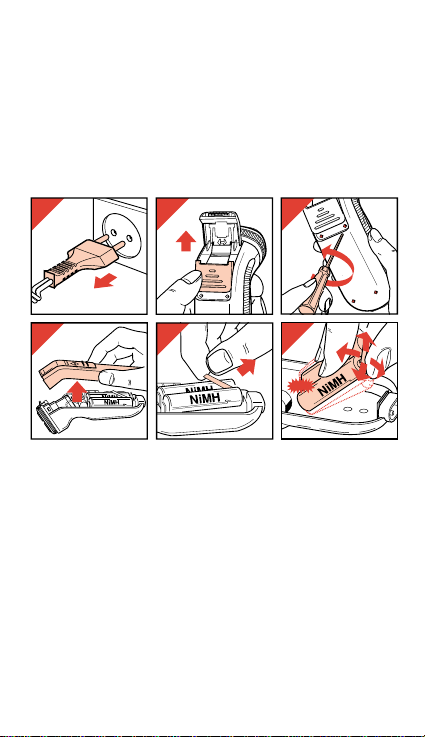
■■■ Protecting the environment
31-36 When eventually discarding your shaver
please remove the rechargeable batteries and
dispose of them at an officially assigned refuse site.
Please note: You can also take the appliance to a
Philips Service Centre. The staff will be happy to help
you.
- (Fig. 31) First ensure that the shaver is
disconnected from the mains supply.
- Before removing the batteries should be
completely empty. Let the appliance run until the
motor stops.
- (Fig. 33) Use a small screwdriver (blade width
approx. 3 mm) or a Torx T-8 type screwdriver.
- (Fig. 35 & 36) The batteries may be recognised by
the print NIMH.
Do not connect the appliance to the mains power
after the batteries have been removed.
14
31
34
32
35
33
36

15
1 Evitez tout contact de l’appareil avec l’eau.
2 Ne laissez pas l’appareil exposé à de fortes
chaleurs ou aux rayons directs du soleil.
- Lors de la première charge, ou
- après une longue période de non-utilisation (1 mois ou plus), rechargez l’appareil
pendant au moins 8 heures (sans tenir
compte des indications portées sur
l’afficheur).
Si les accumulateurs sont complètement
vides, l'affichage n'est pas instantané
(attendre dans ce cas 3 à 5 minutes après la
mise sous tension).
• Lorsque vous utilisez le système de rasage
Philishave pour la première fois, il est
important de savoir qu’une période
d’adaptation de la barbe de 2 à 4 semaines
est nécessaire pour obtenir l’efficacité
optimale du rasage.
■■■ Important
Français
1
2
Pour ménager l'environnement votre rasoir
rechargeable Philishave est équipé de piles
à l'hydrure de nickel. Celles-ci contiennent
moins de 0.01% de cadmium.
Nous vous conseillons toutefois lorsque vous
vous débarrassez de l'appareil en fin
d'utilisation, de ne pas jeter les piles dans les
ordures ménagères ordinaires mais de les
déposer à un endroit désigné à cet effet par les
pouvoirs publics. Veuillez vous référer au
chapitre “Protection de l'environnement”.
■■■ Interrupteur marche/arrêt
Avec sécurité contre la mise en marche involontaire.
3 Mise en marche : appuyez sur la sécurité, faites
glisser l’interrupeur vers le haut et relâchez.
L’interrupteur revient automatiquement à sa
position initiale. Le témoin lumineux s’allume.
4 Arrêt: poussez l’interrupteur à nouveau vers le
haut. Le témoin lumineux s’éteint. L’interrupteur
revient automatiquement à sa position initiale.
16
43
■■■ Recharge
5 Branchez d’abord le cordon sur le connecteur
en l’enfonçant jusqu’à la ligne repère.
6 Tensions d’utilisation: 12 - 240 V. (Le rasoir
s’adapte automatiquement.)
7 Assurez-vous que le rasoir est bien sur la po-
sition arrêt. (Le témoin lumineux doit être éteint.)
Le rasoir peut aussi être rechargé sur 12 - 24 Volts
continu en utilisant le cordon type HP 1957.
(Disponible chez votre revendeur ou réparateur
agréé.)
Sur 12 ou 24 Volts, il faut au moins 32 heures de
charge.
• Les meilleures conditions thermiques de
charge des accumulateurs sont atteintes à des
températures ambiantes situées entre 5° C et
35° C.
• Laissez le coffret de rangement ouvert si vous
rechargez votre rasoir en le laissant à
l’intérieur.
• Avant la première utilisation (ou après une
longue période de non-utilisation) rechargez
l’appareil pendant au moins 8 heures.
17
5
990
6
7
• Recharge rapide: 60 minutes. La charge est
complète lorsque le témoin vert se met à clignoter
et l’indication “FULL” apparaît.
Une charge de plus longue durée n’abîme pas les
accumulateurs. Toutefois, leur durée de vie peut
être affectée si vous laissez le rasoir branché en
permanence sur le secteur.
■■■ Affichage
Afficheur. Grâce à l’afficheur, il vous est
toujours possible de connaître l’état de
charge de votre rasoir, ainsi que le temps
d’utilisation restant à votre disposition.
L’indication “minutes left” prend en consi-
dération des facteurs personnels, tels que
les types de peau et de barbe, les habitudes de
rasage et le temps d’utilisation de la tondeuse.
Si l'appareil est chargé pour la première fois après la
vente, ces indications sont inconnues. L'affichage se
fait donc sur une valeur standard pré-programmée de
55 minutes.
Les indications peuvent varier pendant la période
initiale d'utilisation (quelques semaines), le temps de
fournir à la mémoire de votre rasoir les informations
nécessaires.
Un nettoyage régulier de votre rasoir a pour effet de
réduire la consommation d’énergie, ce qui permettra
un nombre de rasages supplémentaires.
Bloc d’énergie
Le bloc d’énergie vous indique en perma-
nence la quantité d’énergie disponible.
(Les indications affichées n’influent pas sur
les performances de rasage.)
18
Signal sonore + RE + cordon =
Recharge !
- Si le signal sonore reste audible
- et si les indications RE (= réserve) + cordon
clignotent
vous devez recharger votre rasoir.
19
RECHARGE
RASAGE SANS CORDON

■■■ Vous avez oublié de recharger votre rasoir?
Si les accumulateurs de votre rasoir sont
complètement déchargés, il vous est possible de
faire une charge ultra rapide (pour un rasage par
exemple) :
- Mettez en charge votre rasoir jusqu’à ce que le
temps de rasage “minutes left” apparaisse sur
l’afficheur.
■■■ Rasage direct avec le cordon secteur
- Il est possible si vous le désirez de vous raser en
utilisant le rasoir directement branché sur le
secteur.
20

■■■ Rasage
8 Mettez en marche.
9 Le sélecteur de coupe peut être ajusté en
fonction de la sensibilité de la peau.
Commencez sur la position 1 (pour peau sensible)
et cherchez ensuite la position qui vous paraît la
plus agréable.
10 Déplacez rapidement la tête de rasage sur la
peau. Pour obtenir un meilleur rasage, tendez la
peau pour redresser les poils et rasez à rebroussepoils avec des mouvements circulaires.
• On obtient les meilleurs résultats quand la peau
est bien sèche. Il est donc préférable de se raser
avant de se laver ou quelque temps après.
• Utilisez éventuellement une lotion de pré-rasage,
ce qui assure un rasage plus agréable,
particulièrement en climat chaud et humide.
21
8
9
1 2 3 4 5 6 7 8 9
10
■■■ Tondeuse
La tondeuse peut être mise en service pendant que
le moteur fonctionne.
11 Pour cela, faites glisser le curseur vers le haut.
Pour arrêter la tondeuse, ramenez le curseur vers
le bas.
Nettoyez la tondeuse avec la brosse après chaque
utilisation.
12 La tondeuse a été spécialement étudiée pour
les favoris, la moustache et la barbe.
Il n’est pas nécessaire d’utiliser la tondeuse pour
éliminer les longs poils du cou; ceci peut être fait
avec les têtes de rasage.
13 Entretien (tous les 6 mois)
Mettez deux gouttes d’huile pour machine à coudre
sur la tondeuse.
22
11
12
13
OIL
■■■ Nettoyage
• Débranchez toujours l’appareil avant tout entretien.
• Manipulez les têtes de rasage avec précaution afin
d’éviter toute détérioration.
• Il est recommandé de nettoyer votre rasoir
quand l’indication apparaît sur l’afficheur.
14-17 Les symboles compartiment à
barbe et brosse accompagnés d’un
signal sonore vous indiquent que vous
devez nettoyer votre rasoir.
- (Fig. 14) Nettoyez les fentes des têtes de rasage
avec les poils courts de la petite brosse.
- (Fig. 15) Enlevez l’unité de rasage (fig. 2) en
appuyant sur le bouton (1).
- (Fig. 16/17) Brossez l’intérieur avec les poils longs
de la brosse.
23
14
17
15
2
16
1
14-29 Le symbole têtes de rasage
(compartiment à barbe + brosse +
signal sonore) vous indique que vous
devez nettoyer l’unité de rasage
(grilles et couteaux).
Nettoyez tout d’abord les têtes de
rasage et le compartiment à barbe
comme décrit précédemment (voir fig. 14-17). Puis
procédez au nettoyage de l’unité de rasage ellemême (fig. 18-29).
- (Fig. 18-19) Retirez l’unité de rasage.
- (Fig. 20) Faites glisser une tête de rasage (grille +
couteau) hors du support en prenant soin de ne
pas mélanger les grilles et les couteaux.
Les grilles et les couteaux sont rôdés par paire.
Leur interversion apporterait une diminution
importante des performances et plusieurs
semaines seraient nécessaires pour retrouver une
qualité de rasage optimale.
- (Fig. 22) Brossez-les dans le sens de la flèche
avec les poils courts de la brosse.
24
18
21 22 23
19 20
1
2
- (Fig. 24 & 29) Si vous avez nettoyé les têtes avec
de l’alcool, ou bien si vous avez une peau très
sèche, lubrifiez les grilles avec une goutte d’huile
pour machine à coudre.
Vous pouvez également utiliser le lubrifiant spécial
Philishave réf. 389 SHC/1 disponible chez les
revendeurs.
■■■ Remplacement des têtes de rasage
30 Les têtes de rasage usagées
ou endommagées ne doivent être
remplacées que par des têtes
Philishave, de type HP 1915 R.
25
24 26
25
OIL
27 28
1
2
29
OIL
30
■■■ Protection de l’environnement
31-36 Lorsque vous souhaiterez vous débarrasser de
votre rasoir, retirez les accumulateurs et déposezles dans un endroit assigné à cet effet.
Remarque - Vous pouvez également déposer votre
appareil chez un réparateur agréé qui pourra vous
conseiller.
- (Fig. 31) Avant tout assurez-vous que la prise
secteur est débranché.
- Ensuite vérifiez que les accumulateurs sont
complètement déchargés. Si ce n'est pas le cas,
laissez le rasoir en marche jusqu'à arrêt complet
du moteur.
- (Fig. 33) Dévissez les vis à l’aide d’un petit
tournevis (largeur environ 3 mm) ou un tournevis
de type Torx T-8.
- (Fig. 35 & 36) Vous pouvez reconnaître les piles à
la surimpression NIMH.
Ne branchez jamais l’appareil sur le secteur après
avoir retiré les accumulateurs.
26
31
32
33
34
35
36
27
1 Der Rasierer darf nicht mit Wasser in
Berührung kommen.
2 Legen Sie das Gerät nicht an einen Platz,
an dem es Schaden nehmen könnte, z.B.
in die Hitze oder in direktes Sonnenlicht.
- Laden Sie das Gerät mindestens 8 Stunden auf, wenn Sie es einen Monat oder
länger nicht benutzt haben (unabhängig
von den Angaben auf der Anzeige).
Bei völlig entleerten Batterien kann es eine
Weile dauern (etwa 3 bis 5 Minuten), bis die
Information auf der Anzeige erscheint.
• Sollten Sie zum ersten Mal ein PhilishaveGerät verwenden, so beachten Sie bitte, daß
Ihre Haut 2 bis 4 Wochen braucht, um sich
an das neue Rasiersystem zu gewöhnen.
■■■ Wichtig
Deutsch
1
2
 Loading...