Philips HS8040 User Guide

Philips HS8040 User Guide

1

1

8

2

A

3

10

B

9

4

5

6

11

7

12

English 6 Indonesia 23

40

Bahasa Melayu 57

75

TiếngViệt 88

104

118

HS8040

English

Important

Read this user manual carefully before you use the appliance and save it for future reference.

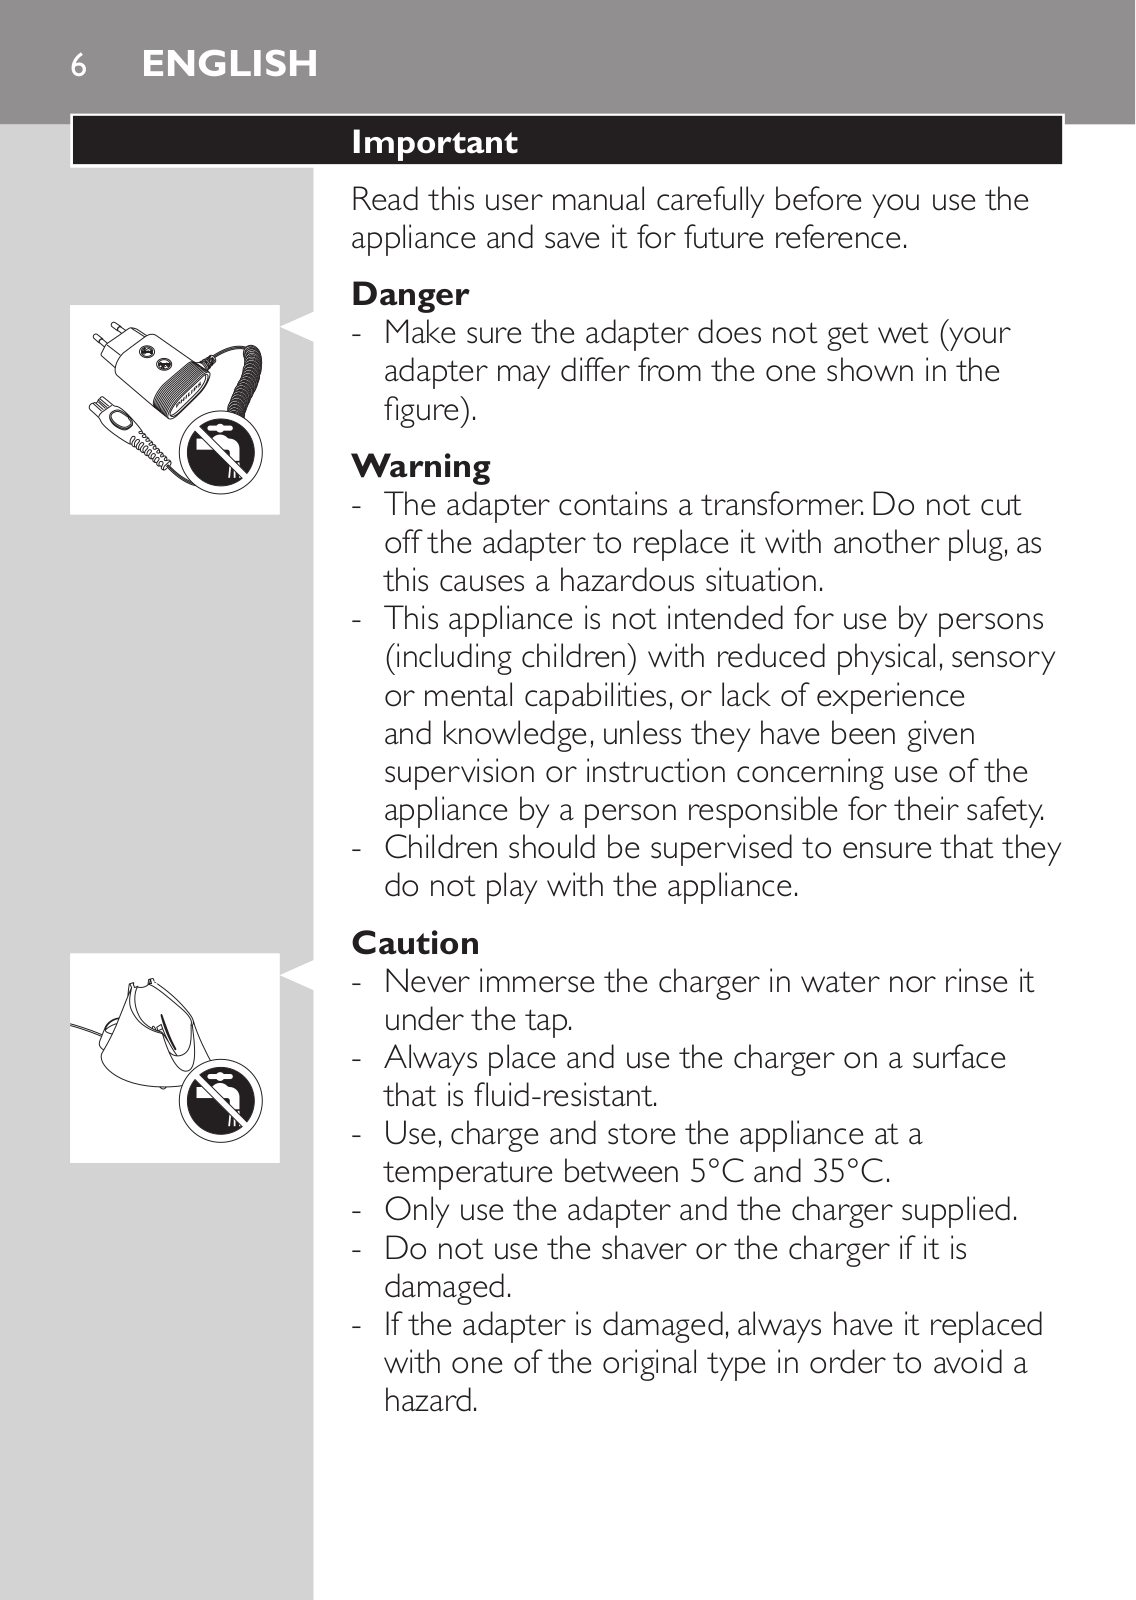
sure the adapter does not get wet (your adapter may differ from the one shown in the figure).

Warning

-The adapter contains a transformer. Do not cut off the adapter to replace it with another plug, as this causes a hazardous situation.

-This appliance is not intended for use by persons

(including children) with reduced physical, sensory or mental capabilities, or lack of experience

and knowledge, unless they have been given supervision or instruction concerning use of the appliance by a person responsible for their safety.

-Children should be supervised to ensure that they do not play with the appliance.

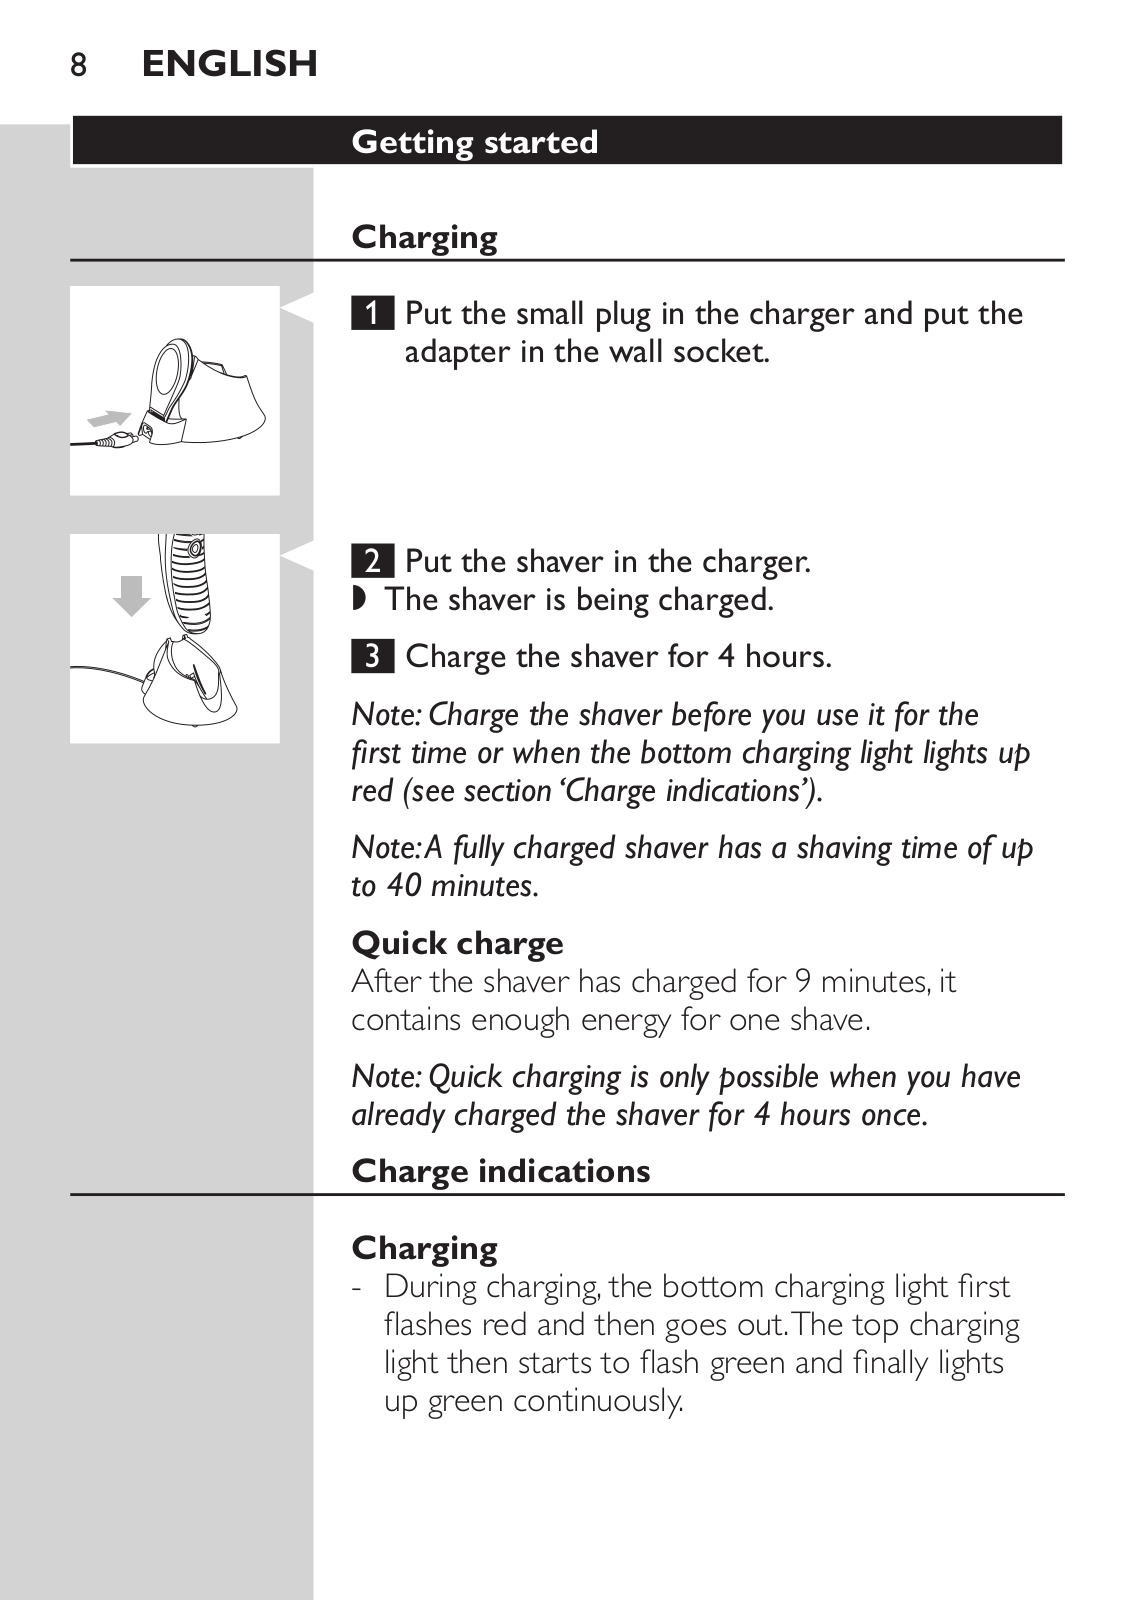
Never immerse the charger in water nor rinse it the tap.

-Always place and use the charger on a surface

that is fluid-resistant.

- Use, charge and store the appliance at a temperature between 5°C and 35°C.

-Only use the adapter and the charger supplied.

-Do not use the shaver or the charger if it is damaged.

-If the adapter is damaged, always have it replaced with one of the original type in order to avoid a hazard.

English

Compliance with standards

shaver complies with the internationally approved safety regulations and can be safely used in the bath or shower and cleaned under the tap.

-This Philips appliance complies with all standards regarding electromagnetic fields (EMF). If handled properly and according to the instructions in this user manual, the appliance is safe to use based on scientific evidence available today.

General

-The adapter transforms 100-240 volts to a safe low voltage of less than 24 volts.

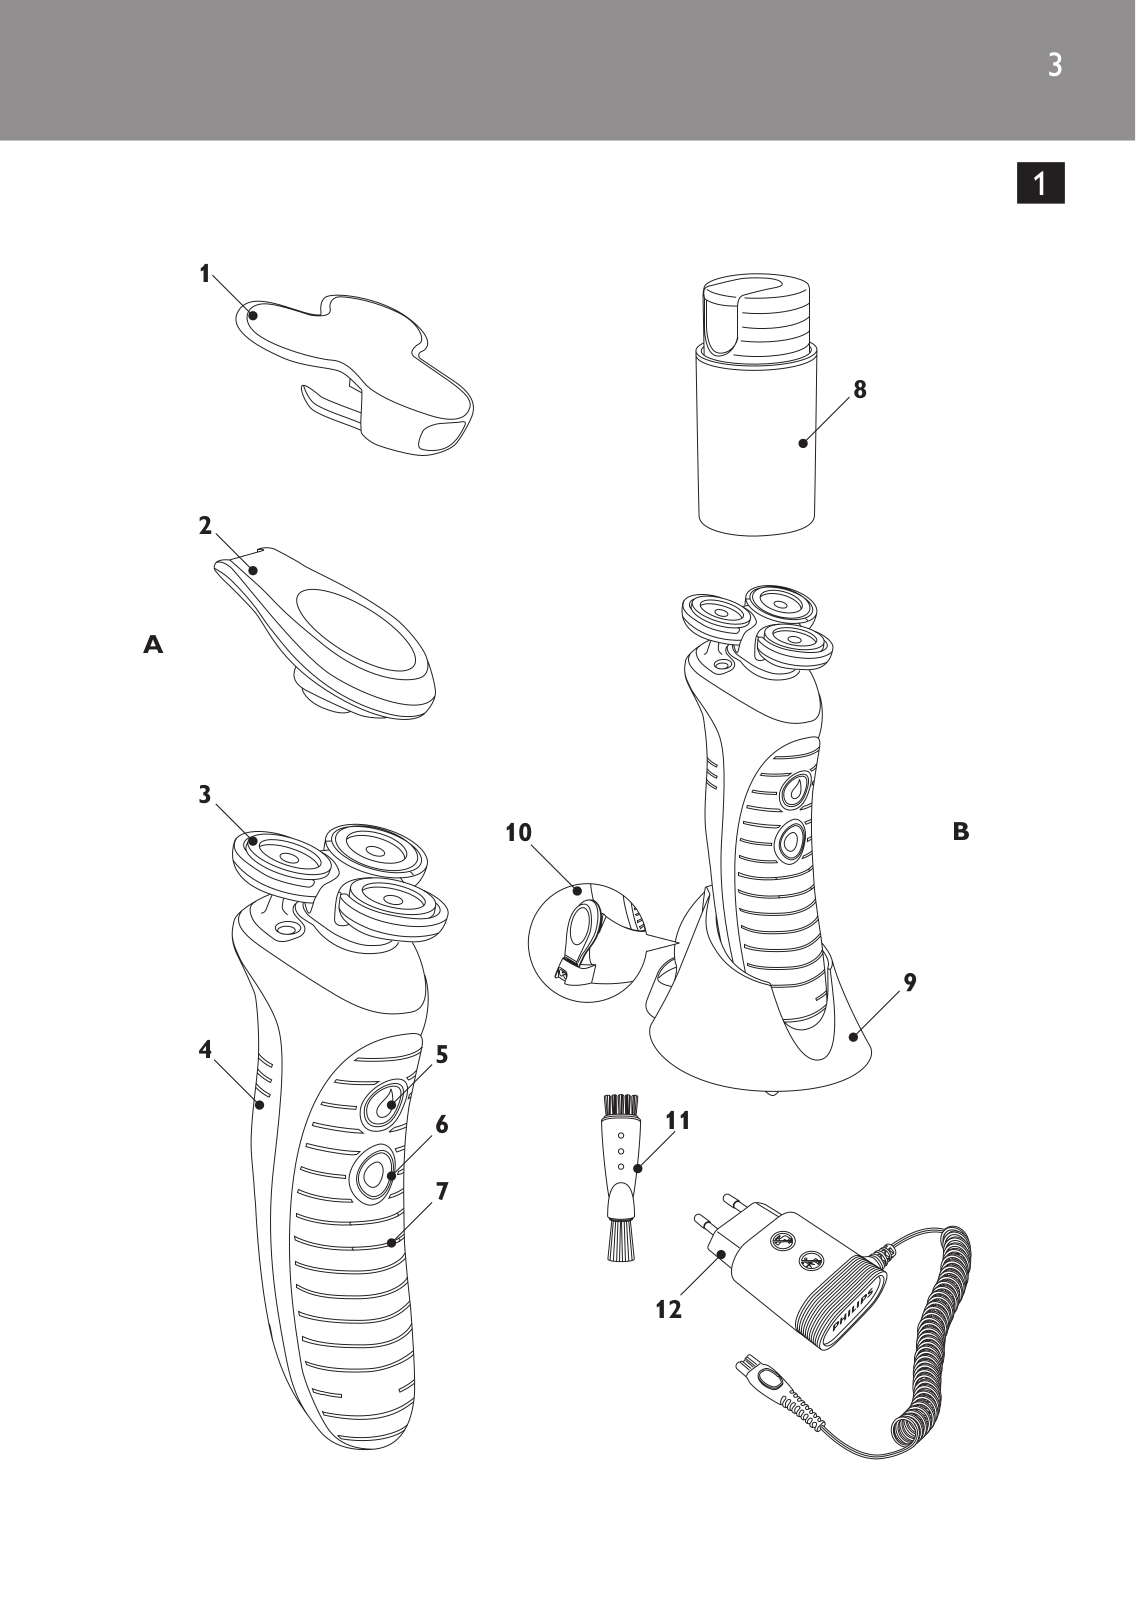
Overview (Fig. 1)

A Shaver

1 Protection cap

2Trimmer

3 Shaving unit

4 Shaving conditioner cartridge

5 Shaving conditioner button

6On/off button

7Charging lights B Accessories

8 NIVEA FOR MEN shaving conditioner bottle

9Charger

10Trimmer holder

11Cleaning brush

12Adapter (your adapter may differ from the one shown in the figure)

English

Getting started

Charging

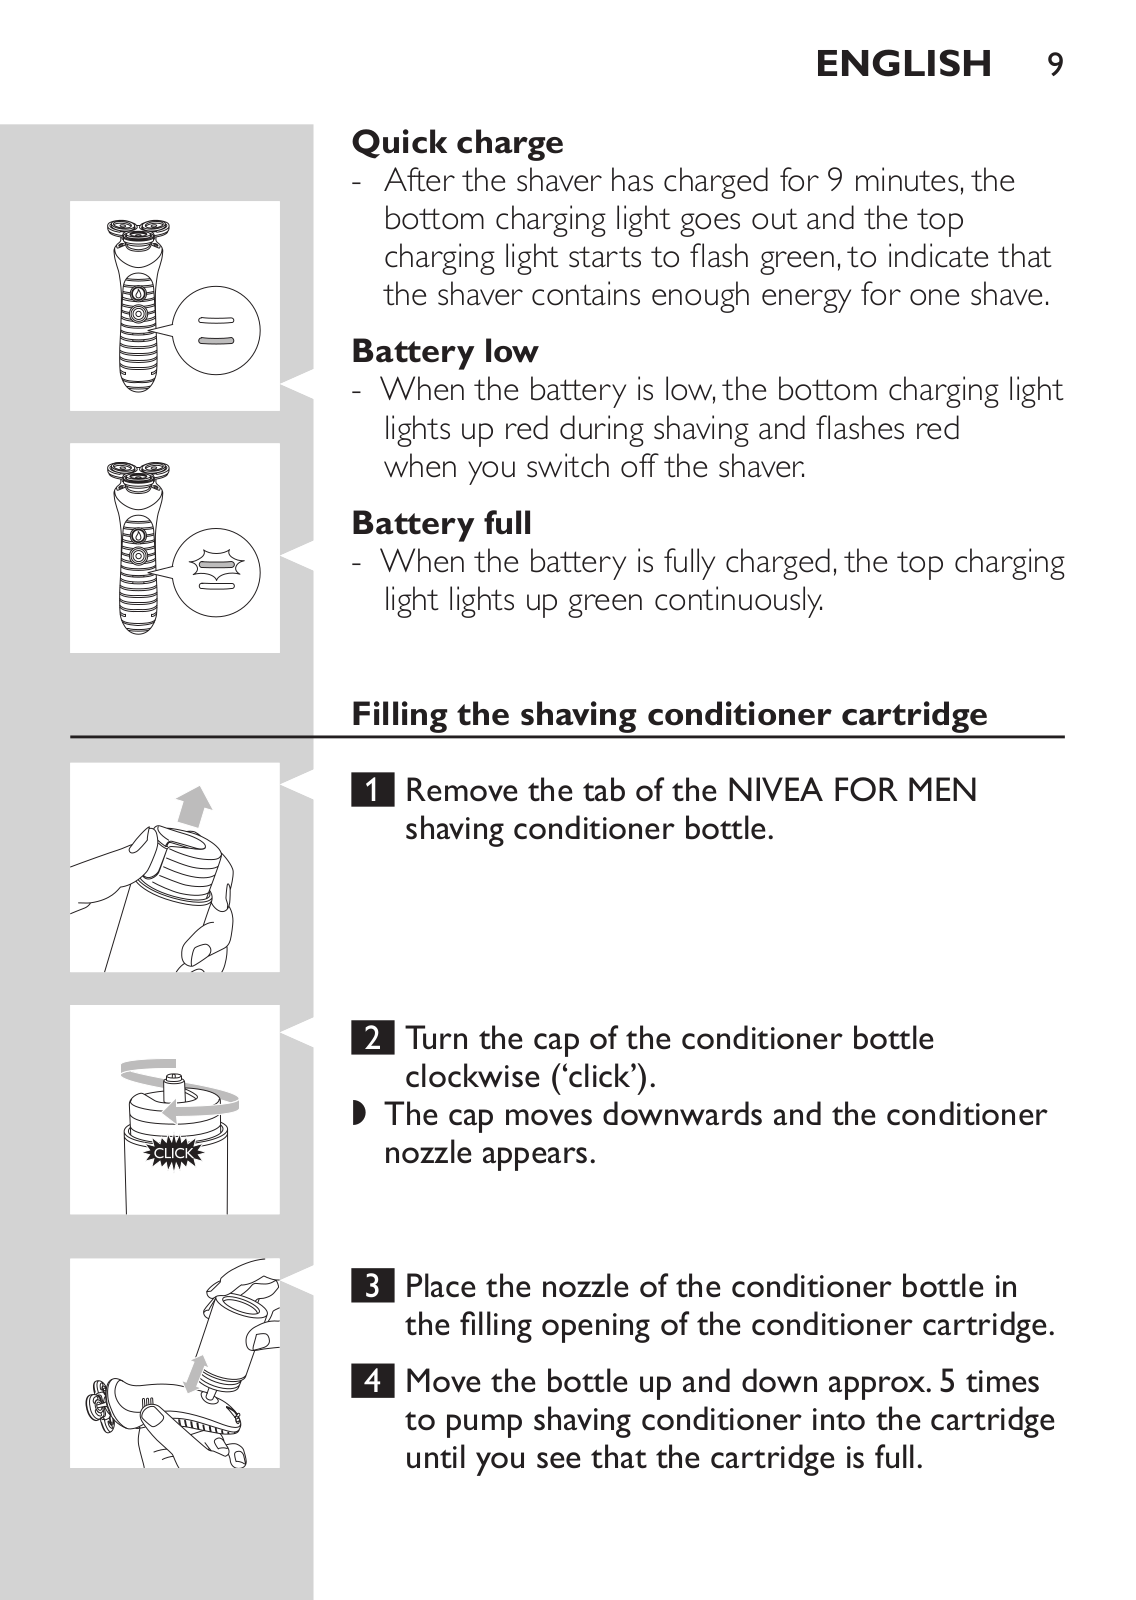
1 Put the small plug in the charger and put the adapter in the wall socket.

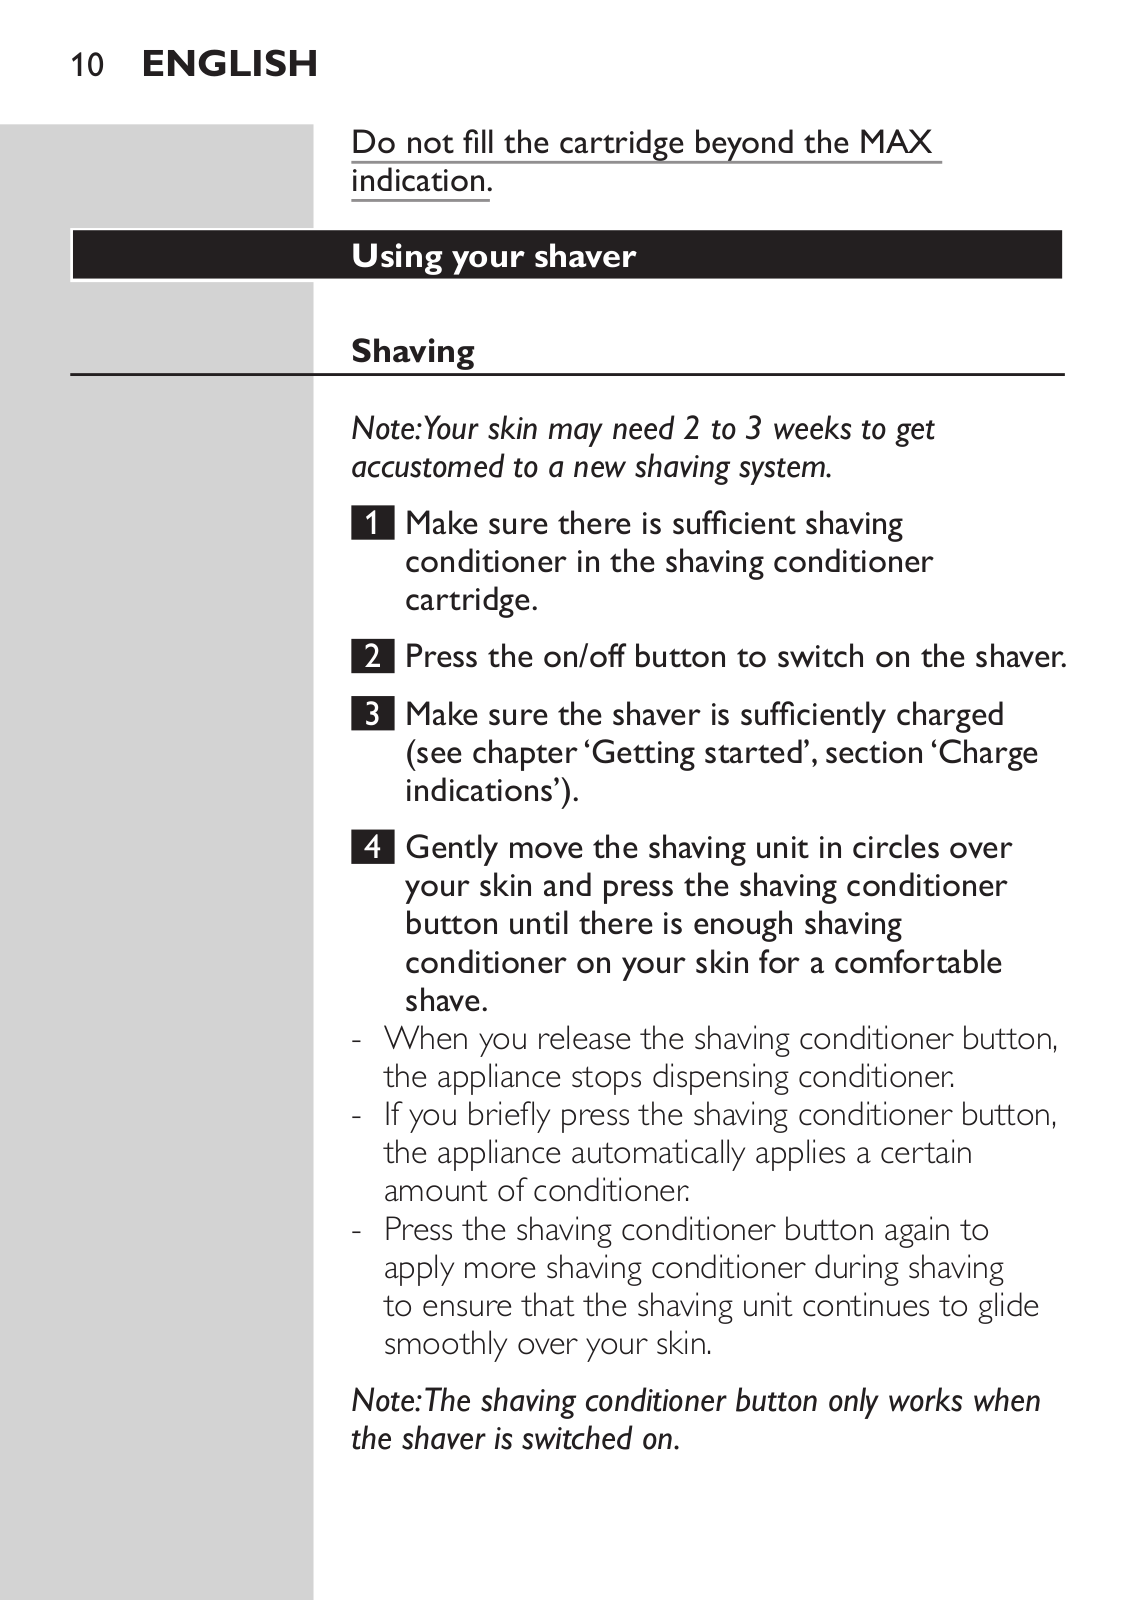
2 Put the shaver in the charger. , The shaver is being charged.

3 Charge the shaver for 4 hours.

Note: Charge the shaver before you use it for the first time or when the bottom charging light lights up red (see section‘Charge indications’).

Note:A fully charged shaver has a shaving time of up to 40 minutes.

Quick charge

After the shaver has charged for 9 minutes, it contains enough energy for one shave.

Note:Quick charging is only possible when you have already charged the shaver for 4 hours once.

Charge indications

Charging

-During charging, the bottom charging light first flashes red and then goes out.The top charging light then starts to flash green and finally lights up green continuously.

English

Quick charge

-After the shaver has charged for 9 minutes, the bottom charging light goes out and the top charging light starts to flash green, to indicate that the shaver contains enough energy for one shave.

Battery low

When the battery is low, the bottom charging light lights up red during shaving and flashes red

when you switch off the shaver.

Battery full

When the battery is fully charged, the top charging light lights up green continuously.

Filling the shaving conditioner cartridge

Remove the tab of the NIVEA FOR MEN shaving conditioner bottle.

Turn the cap of the conditioner bottle clockwise (‘click’).

,The cap moves downwards and the conditioner nozzle appears.

Place the nozzle of the conditioner bottle in the filling opening of the conditioner cartridge.

4Move the bottle up and down approx. 5 times to pump shaving conditioner into the cartridge until you see that the cartridge is full.

10 English

Do not fill the cartridge beyond the MAX indication.

Using your shaver

Shaving

Note:Your skin may need 2 to 3 weeks to get accustomed to a new shaving system.

1

2

3

4

Make sure there is sufficient shaving conditioner in the shaving conditioner cartridge.

Press the on/off button to switch on the shaver.

Make sure the shaver is sufficiently charged

(see chapter ‘Getting started’, section ‘Charge indications’).

Gently move the shaving unit in circles over your skin and press the shaving conditioner button until there is enough shaving conditioner on your skin for a comfortable shave.

-When you release the shaving conditioner button, the appliance stops dispensing conditioner.

-If you briefly press the shaving conditioner button, the appliance automatically applies a certain amount of conditioner.

-Press the shaving conditioner button again to apply more shaving conditioner during shaving to ensure that the shaving unit continues to glide smoothly over your skin.

Note:The shaving conditioner button only works when the shaver is switched on.

English 11

Note:This shaver can be used in a way similar to a razor blade:you can use the shaver on a wet face. Unlike a conventional electric shaver,this appliance has no hair chamber that collects stubble.To prevent stubble from falling on your clothes,apply sufficient shaving conditioner while shaving.

5Thoroughly clean the shaver after every use (see chapter ‘Cleaning’).

Slide the protection cap onto the shaver to prevent damage.

Tips for optimal gliding and a smooth shaving result

-Gently move the shaver in circles over your skin.

-Do not exert too much pressure on the shaver, as this may cause skin irritation.

-To ensure proper gliding, apply shaving conditioner regularly.

-You can also use the shaver in the bath or shower.

Trimming

Note:Because of the new open design,you hear the cutting action of the trimmer more clearly than with other trimmers.This is normal.

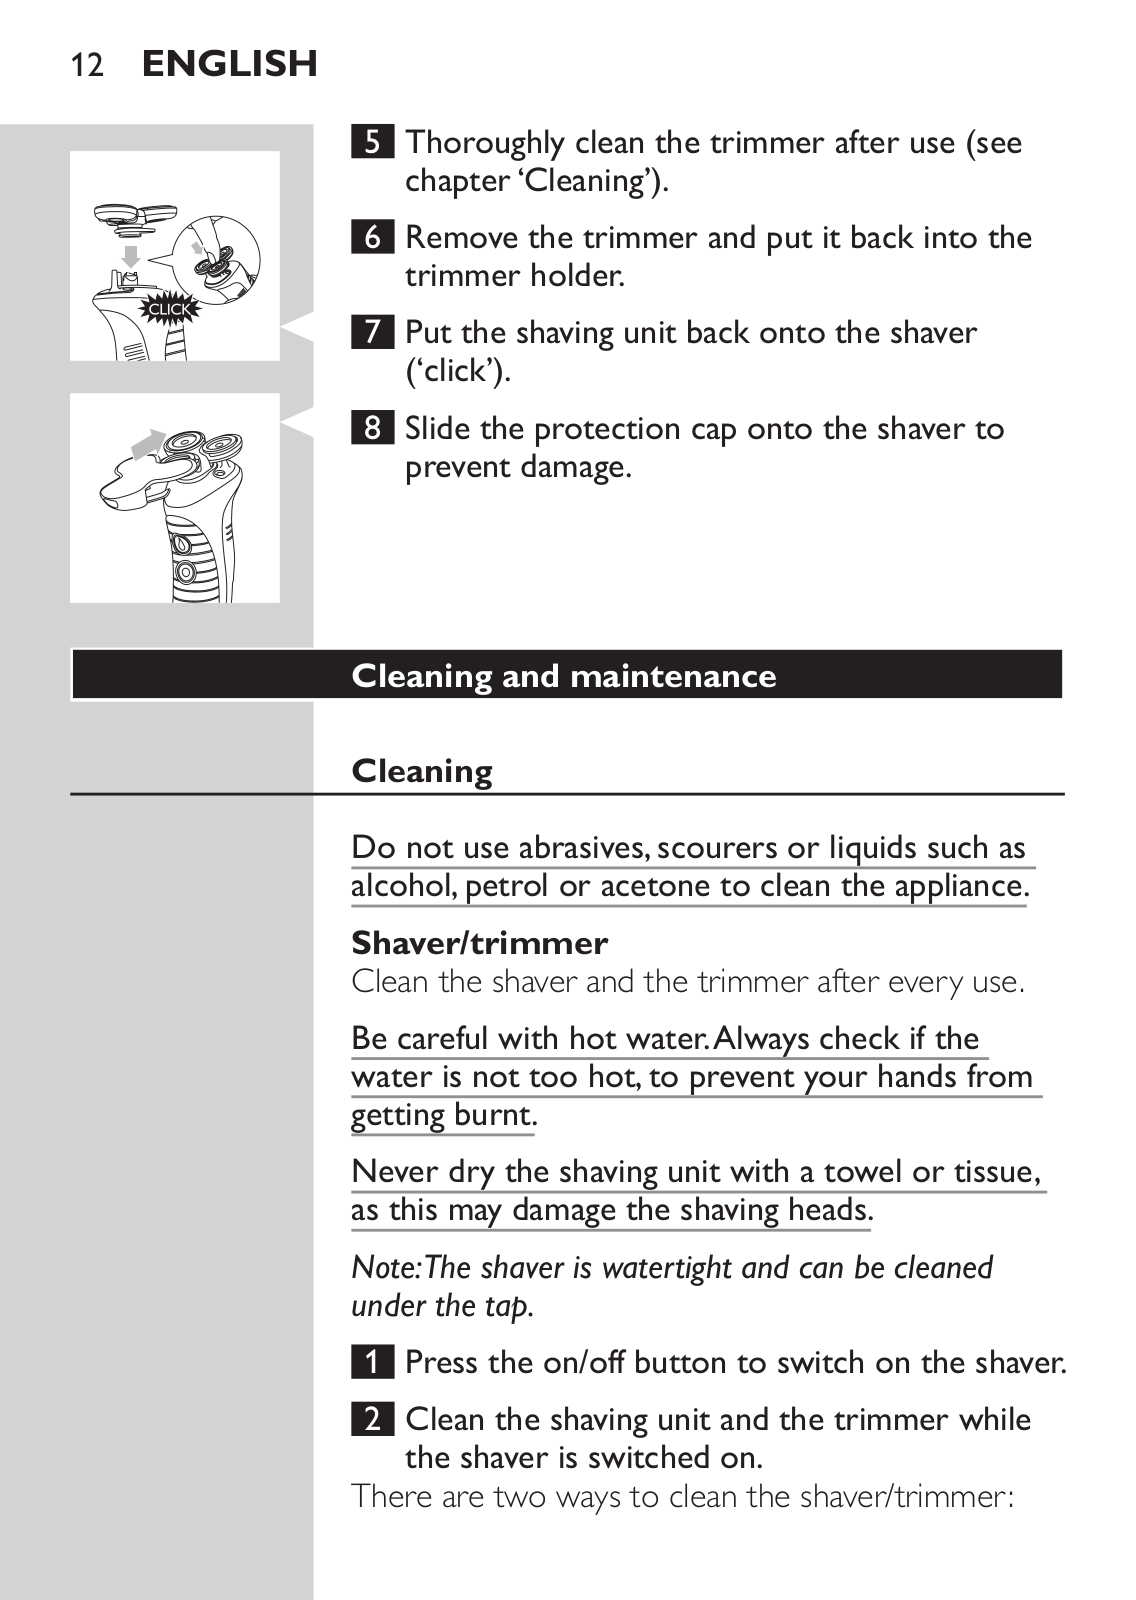
Pull the shaving unit off the shaver.

Take the trimmer out of the trimmer holder on the charger and put it on the shaver (‘click’).

3Press the on/off button to switch on the shaver.

4Use the trimmer to groom your sideburns and/or moustache.

12 English

5Thoroughly clean the trimmer after use (see chapter ‘Cleaning’).

6 Remove the trimmer and put it back into the trimmer holder.

Put the shaving unit back onto the shaver (‘click’).

Slide the protection cap onto the shaver to prevent damage.

Cleaning and maintenance

Cleaning

Do not use abrasives, scourers or liquids such as alcohol, petrol or acetone to clean the appliance.

Shaver/trimmer

Clean the shaver and the trimmer after every use.

Be careful with hot water.Always check if the water is not too hot, to prevent your hands from getting burnt.

Never dry the shaving unit with a towel or tissue, as this may damage the shaving heads.

Note:The shaver is watertight and can be cleaned under the tap.

1Press the on/off button to switch on the shaver.

2Clean the shaving unit and the trimmer while

the shaver is switched on.

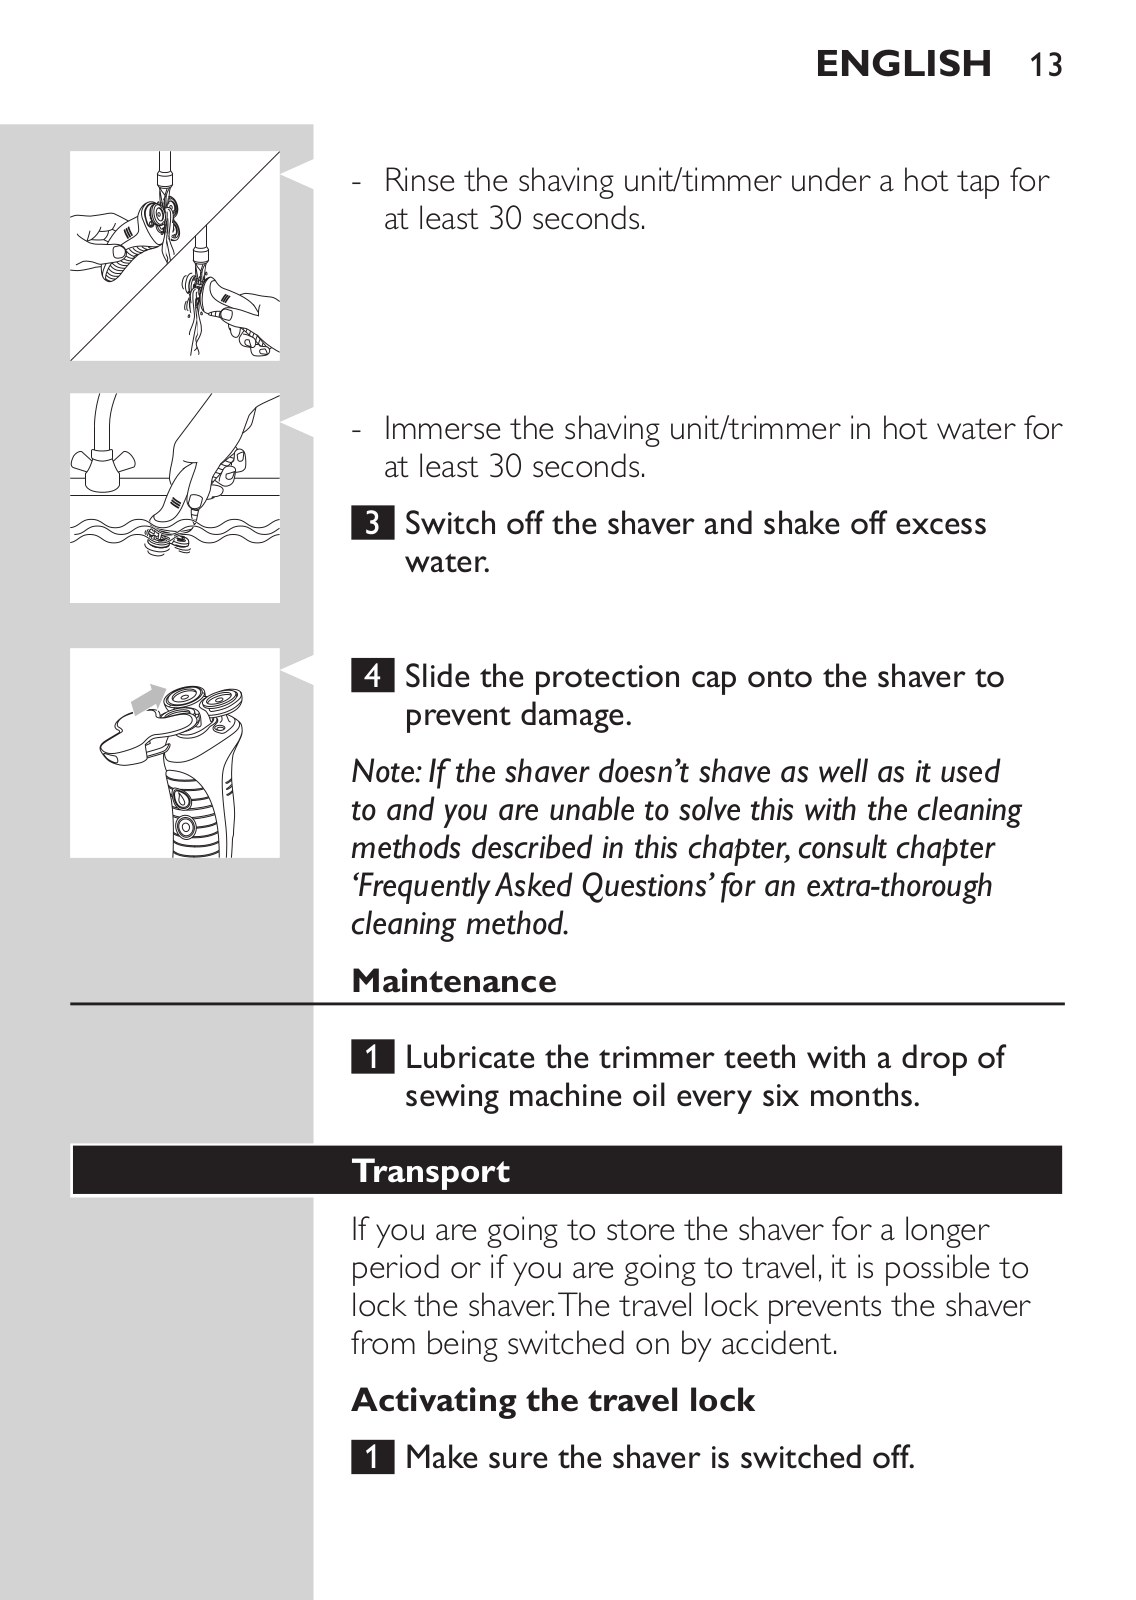
There are two ways to clean the shaver/trimmer:

English 13

Rinse the shaving unit/timmer under a hot tap for least 30 seconds.

Immerse the shaving unit/trimmer in hot water for least 30 seconds.

3Switch off the shaver and shake off excess water.

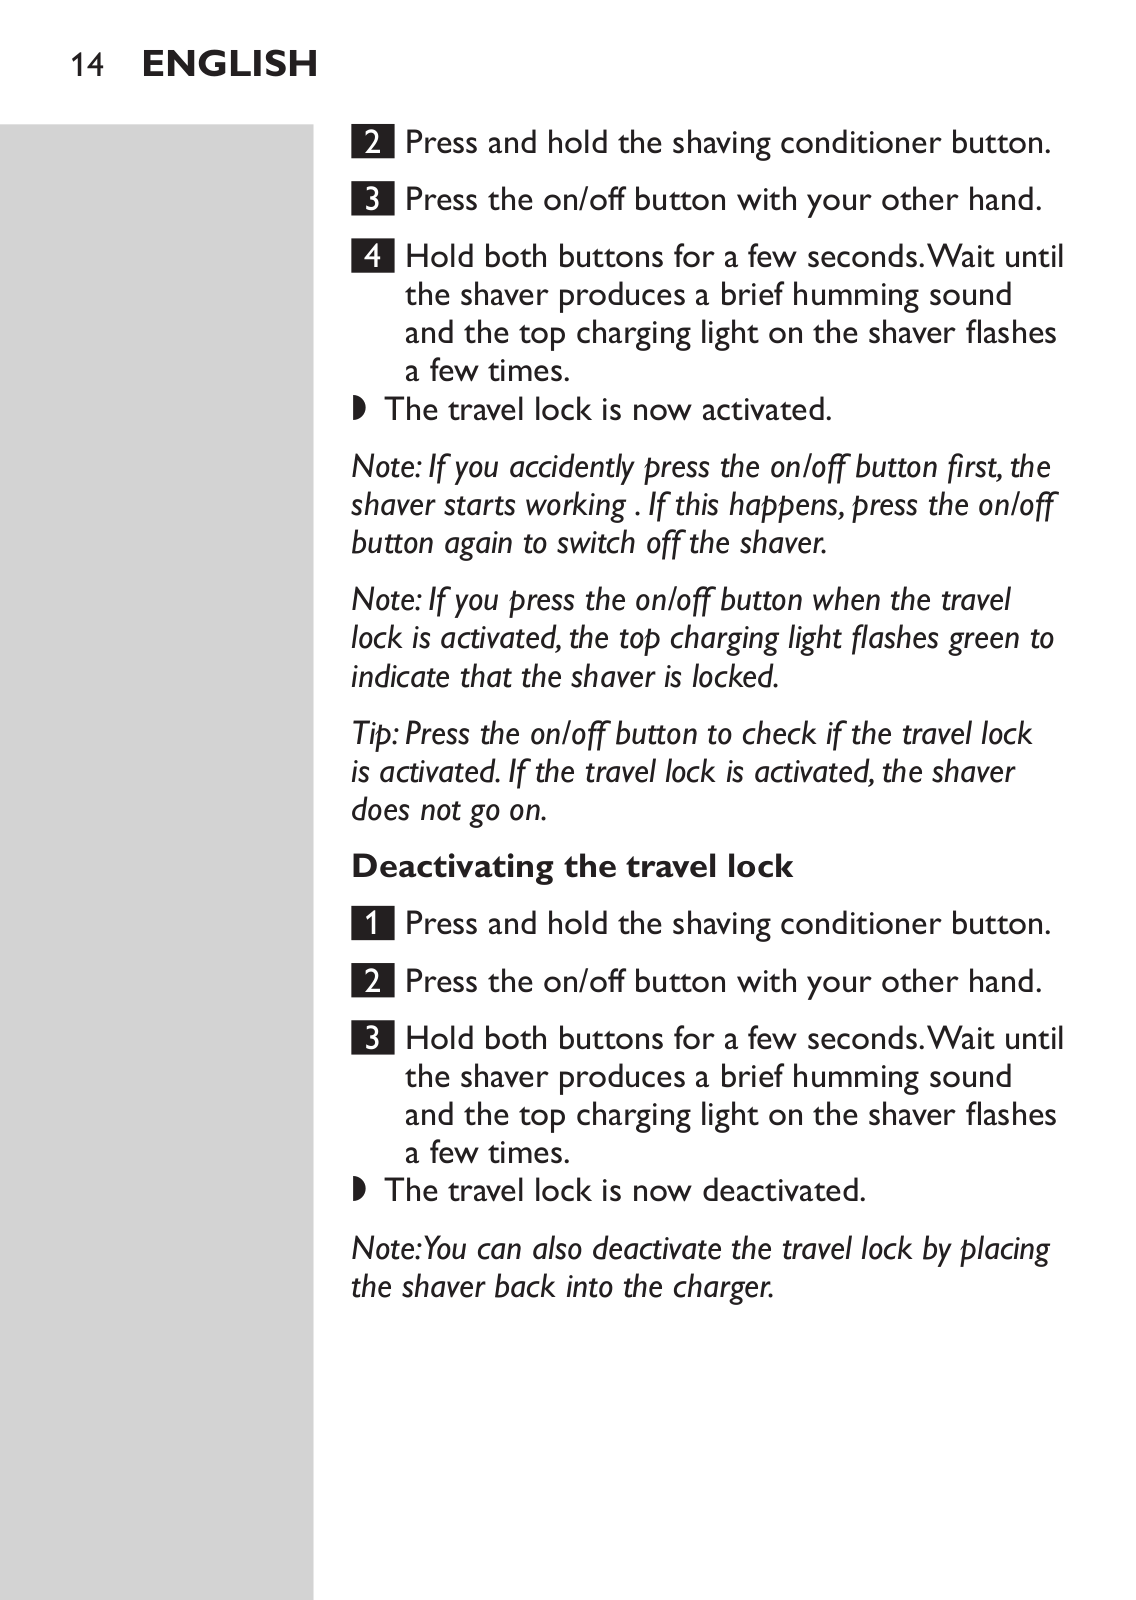
Slide the protection cap onto the shaver to prevent damage.

Note:If the shaver doesn’t shave as well as it used to and you are unable to solve this with the cleaning methods described in this chapter,consult chapter ‘Frequently Asked Questions’for an extra-thorough cleaning method.

Maintenance

1Lubricate the trimmer teeth with a drop of sewing machine oil every six months.

Transport

If you are going to store the shaver for a longer period or if you are going to travel, it is possible to lock the shaver.The travel lock prevents the shaver from being switched on by accident.

Activating the travel lock

1 Make sure the shaver is switched off.

14 English

2Press and hold the shaving conditioner button.

3Press the on/off button with your other hand.

4Hold both buttons for a few seconds.Wait until the shaver produces a brief humming sound and the top charging light on the shaver flashes a few times.

,The travel lock is now activated.

Note:If you accidently press the on/off button first,the shaver starts working .If this happens,press the on/off button again to switch off the shaver.

Note:If you press the on/off button when the travel lock is activated,the top charging light flashes green to indicate that the shaver is locked.

Tip:Press the on/off button to check if the travel lock is activated.If the travel lock is activated,the shaver does not go on.

Deactivating the travel lock

1Press and hold the shaving conditioner button.

2Press the on/off button with your other hand.

3Hold both buttons for a few seconds.Wait until the shaver produces a brief humming sound and the top charging light on the shaver flashes a few times.

,The travel lock is now deactivated.

Note:You can also deactivate the travel lock by placing the shaver back into the charger.

English 15

Replacement

Shaving conditioner cartridge

For hygienic reasons, we advise you to replace the shaving conditioner cartridge twice a year.You can order a new shaving conditioner cartridge from

Philips Consumer Care by telephone.To find its phone number, visit www.philips.com and click on ‘Philips Consumer Care’.

Remove the shaving conditioner cartridge from the shaver.

Insert the lug at the top of the new shaving conditioner cartridge into the slot in the rim of the shaver (1).Then press the bottom part of the cartridge with your thumb (2) to attach the cartridge to the shaver (‘click’).

3Fill the shaving conditioner cartridge (see chapter ‘Getting started’).

Shaving unit

Replace the shaving unit every year for optimal shaving results.

Only replace the shaving unit with an HS85 Philips Shaving Unit.

Pull the old shaving unit off the shaver.

Put the new shaving unit on the shaver (‘click’).

16 English

NIVEA FOR MEN shaving conditioner bottle

Only use NIVEA FOR MEN shaving conditioner bottles.

Disposal

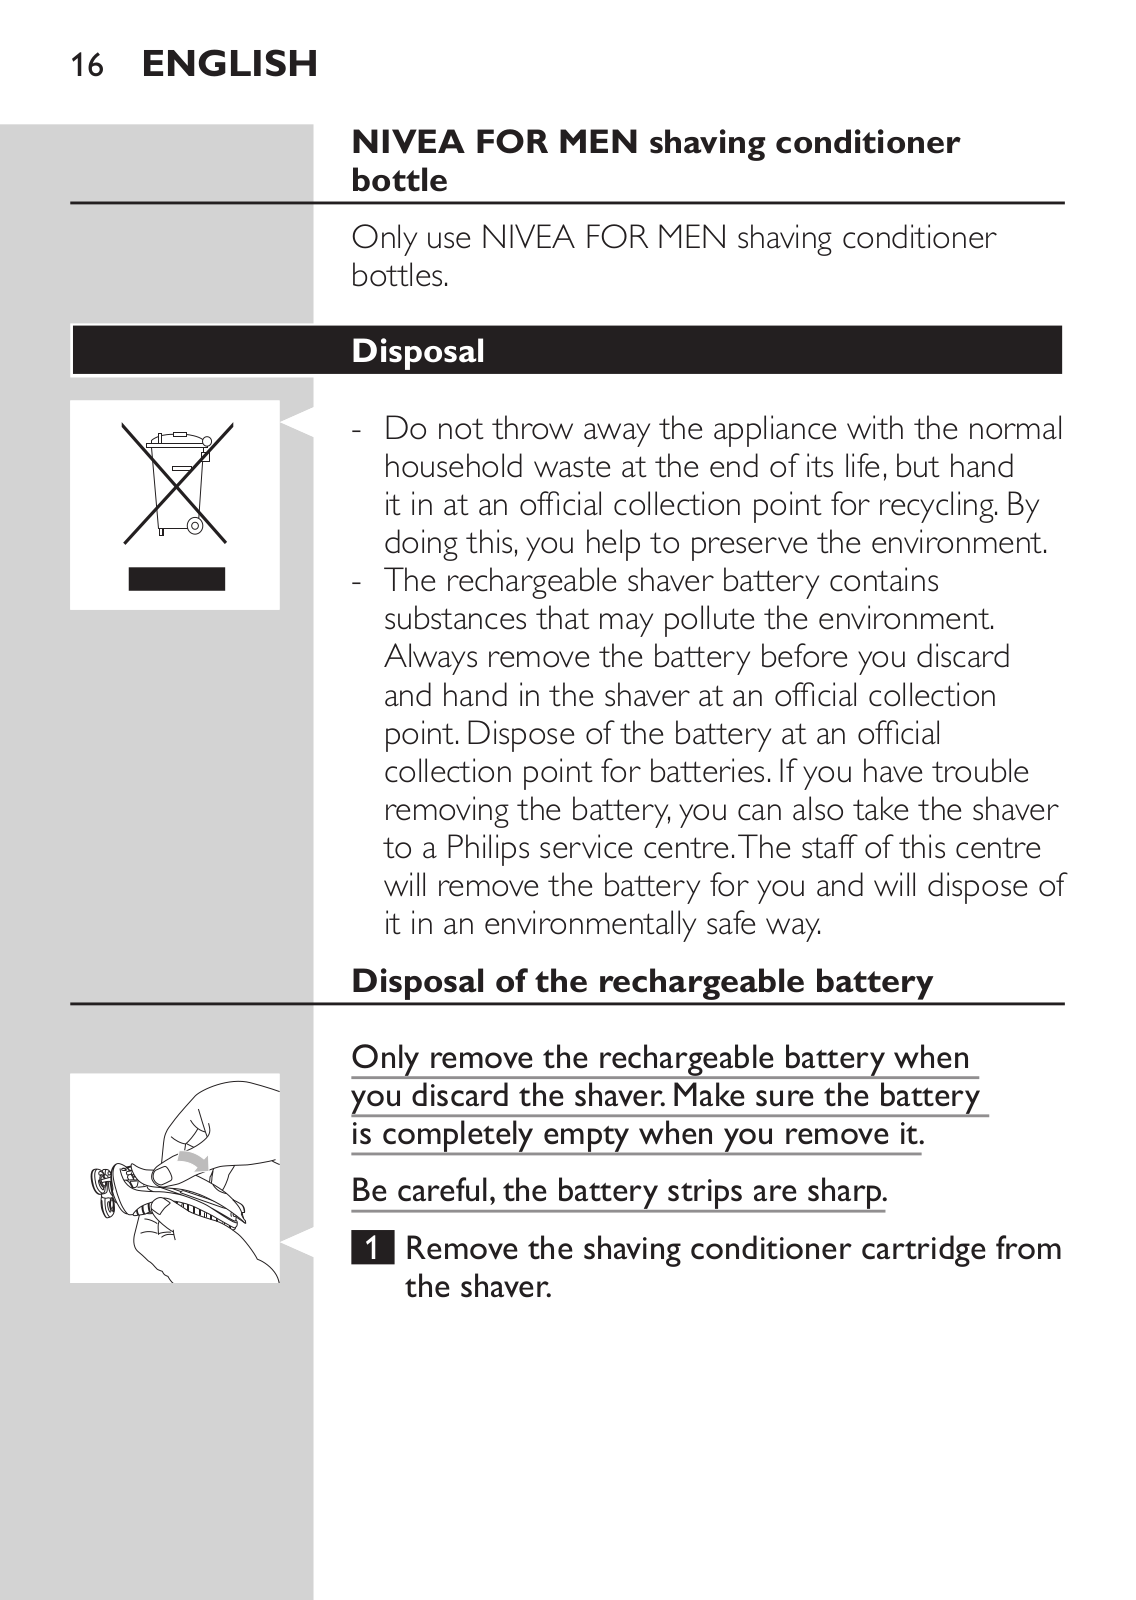
Do not throw away the appliance with the normal household waste at the end of its life, but hand

it in at an official collection point for recycling. By doing this, you help to preserve the environment.

- The rechargeable shaver battery contains substances that may pollute the environment. Always remove the battery before you discard and hand in the shaver at an official collection point. Dispose of the battery at an official collection point for batteries. If you have trouble removing the battery, you can also take the shaver to a Philips service centre.The staff of this centre will remove the battery for you and will dispose of it in an environmentally safe way.

Disposal of the rechargeable battery

Only remove the rechargeable battery when you discard the shaver. Make sure the battery is completely empty when you remove it.

Be careful, the battery strips are sharp.

Remove the shaving conditioner cartridge from the shaver.

English 17

Undo the three screws at the back of the shaver.

Remove the back panel of the housing with a screwdriver.

4 Remove the rechargeable battery.

Guarantee and service

If you need information or if you have a problem, please visit the Philips website at www.philips.com or contact the Philips Customer Care Centre

in your country (you find its phone number in the worldwide guarantee leaflet). If there is no Customer Care Centre in your country, go

to your local Philips dealer or contact the Service Department of Philips Domestic appliances and

Personal Care BV.

Guarantee restrictions

The shaving heads (cutters and guards) are not covered by the terms of the international guarantee because they are subject to wear.

The conditioner cartridge is a disposable item and is not covered by the terms of the international guarantee.

Frequently asked questions

This chapter lists the questions most frequently asked about the shaver. If you cannot find the answer

18 English


to your question, contact the Customer Care Centre


in your country.


Question

Answer


Why doesn’t

You may not have applied enough shaving


the shaving unit

conditioner. Press the shaving conditioner button


glide smoothly

until a sufficient amount of NIVEA FOR MEN


over my skin?

shaving conditioner has been released.This makes


the shaving unit glide smoothly over your skin again.


Why doesn’t

You may not have cleaned the shaver properly.


the shaver

Thoroughly clean the shaver (see chapter ‘Cleaning


shave as well as

and maintenance’).


it used to?


Long hairs may be obstructing the shaving heads.


Clean the shaving heads by following the steps of the


extra-thorough cleaning method described below.


The shaving unit may be damaged or worn. Replace


the shaving unit (see chapter‘Replacement’).


Why

The battery may be empty. Recharge the battery


doesn’t the

(see chapter‘Getting started’).


shaver work


when I press


the on/off


button?


The travel lock may be activated. Deactivate the


travel lock (see chapter ‘Storage and transport’,


section‘Transport’).


Dried shaving conditioner may block the shaving


heads in the shaving unit. Clean the shaver


thoroughly before you continue shaving (see chapter


‘Cleaning and maintenance’).


English 19


Question

Answer


You may not have reassembled the shaving unit


properly after extra-thorough cleaning.When you


reassemble the shaving unit, make sure you turn each


guard anticlockwise until it locks into position.


Why does

One of the conditioner holes may be blocked. Rinse


little shaving

or soak the shaving unit. If this does not work, pump


conditioner

shaving conditioner into the shaving conditioner


come out of

cartridge until conditioner starts to come out of the


the holes even

blocked hole. If this does not work either, try the


though there

following method: 1) Switch off the shaver 2) Pull the


is enough

shaving unit off the shaver 3) Put your finger on the


conditioner in

hole that is not blocked 4) Switch on the shaver 5)


the cartridge?

Press the shaving conditioner button several seconds


until conditioner starts to come out of the blocked


hole again.


You may not have put the shaving heads back into


their original holders. One of the shaving heads does


not have a shaving conditioner hole in its centre and


needs to be placed in a specific holder. Make sure


you put the shaving head without conditioner hole in


the correct holder.This is the holder that is closest to


the on/off button when the shaving unit is assembled


on the shaver.


Why

The shaving conditioner cartridge is almost empty.


doesn’t any

Refill the cartridge (see chapter‘Getting started’).


shaving


conditioner


come out


of the holes


when I press


the shaving


conditioner


button?


20 English


Question

Answer


Why does the

Due to the new open design, you hear the cutting


trimmer make

action of the trimmer more clearly than is the


more noise

case with other trimmers.This is normal and does


than other

not mean that there is something wrong with the


trimmers?

trimmer.


I dropped the

Place the cutters in the shaving head holders with


shaver and

the cutter legs pointing upwards. Place the guards


the shaving

onto the holders (over the cutters) and turn them


unit fell apart.

anticlockwise until they lock into position. One of the


How should I

guards does not have a shaving conditioner hole in


reassemble the

the centre and needs to be attached onto a specific


shaving unit?

holder.This is the holder that is closest to the on/off


button when the shaving unit is assembled on the


shaver. If the cutters and the guards have become


mixed up, it may take several weeks before optimal


shaving performance is restored.


Why does the

You probably did not reassemble the shaving unit


shaver suddenly

properly. Place the cutters in the shaving head


produce a

holders with the cutter legs pointing upwards. Place


strange noise?

the guards onto the holders (over the cutters)


and turn them anticlockwise until they lock into


position. One of the guards does not have a shaving


conditioner hole in the centre and needs to be


attached onto a specific holder.This is the holder


that is closest to the on/off button when the shaving


unit is assembled on the shaver. If the cutters and


the guards have become mixed up, it may take


several weeks before optimal shaving performance


is restored.


English 21

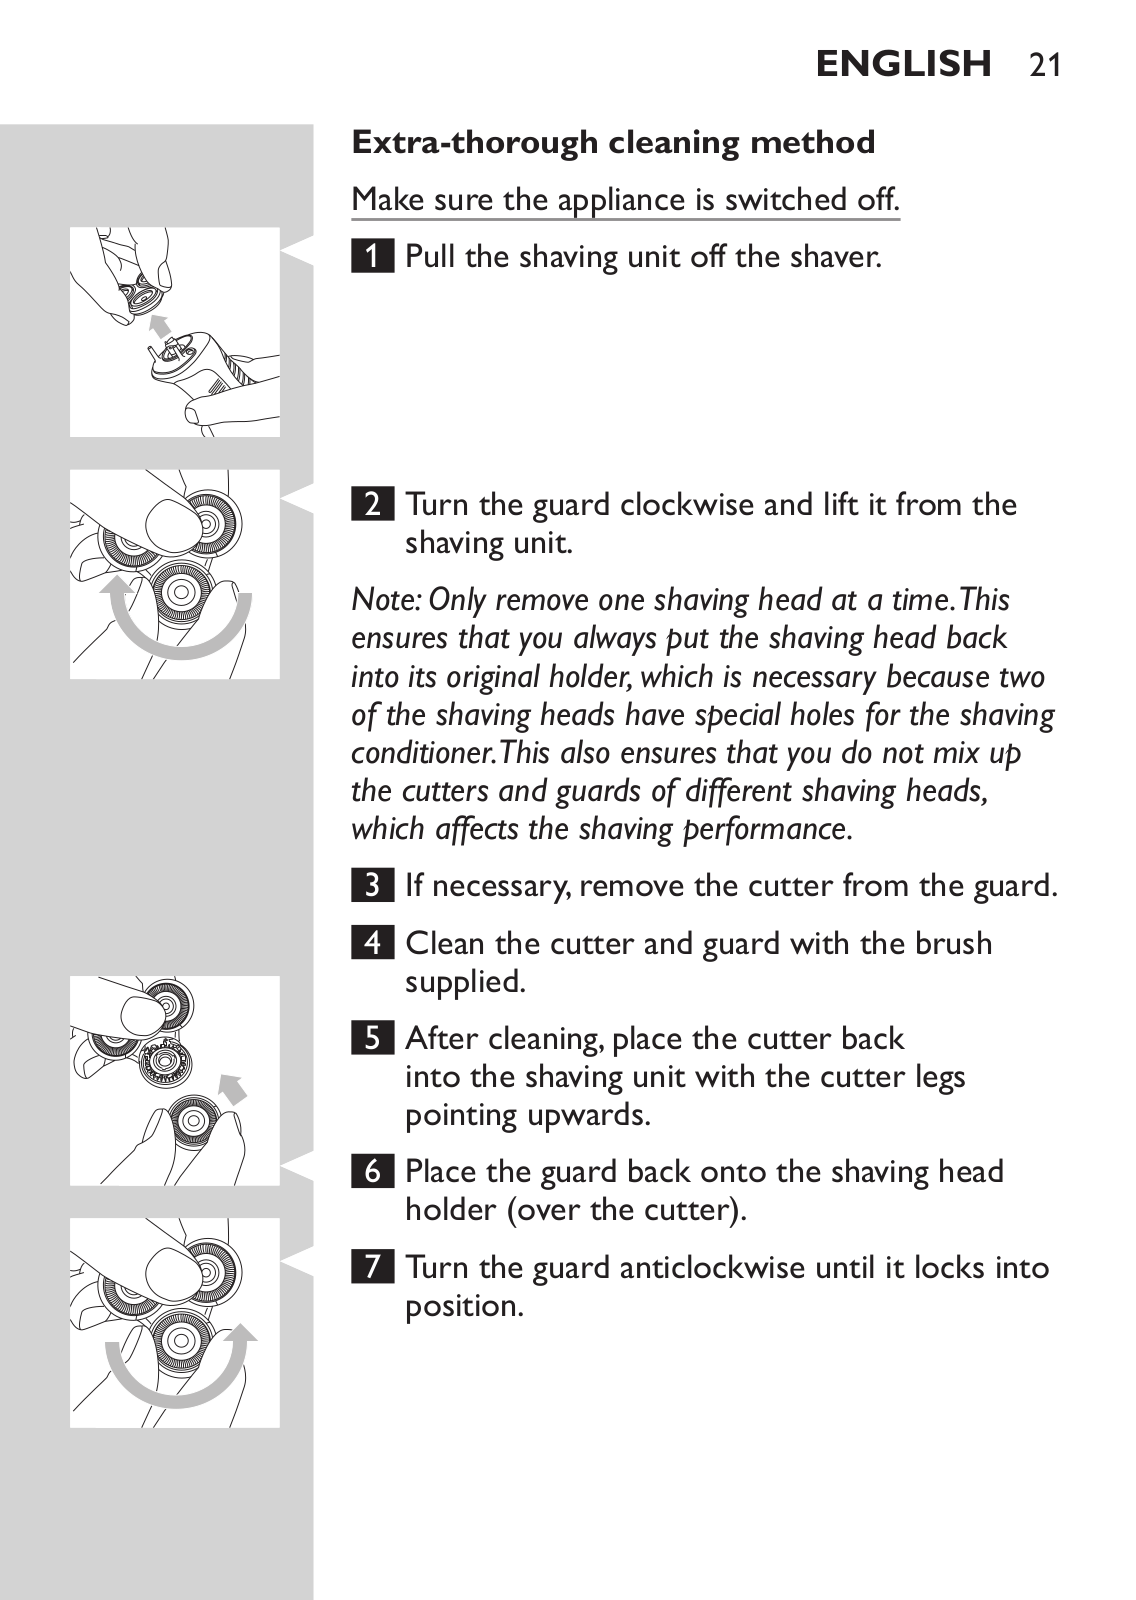
Extra-thorough cleaning method

Make sure the appliance is switched off.

Pull the shaving unit off the shaver.

Turn the guard clockwise and lift it from the shaving unit.

Note:Only remove one shaving head at a time.This ensures that you always put the shaving head back into its original holder,which is necessary because two of the shaving heads have special holes for the shaving conditioner.This also ensures that you do not mix up the cutters and guards of different shaving heads, which affects the shaving performance.

3If necessary, remove the cutter from the guard.

4Clean the cutter and guard with the brush supplied.

5After cleaning, place the cutter back into the shaving unit with the cutter legs pointing upwards.

Place the guard back onto the shaving head holder (over the cutter).

Turn the guard anticlockwise until it locks into position.

22 English

Put the shaving unit back onto the shaver (‘click’).

Indonesia 23

Penting

Bacalah petunjuk pengguna ini secara seksama sebelum Anda menggunakan alat dan simpan untuk referensi di kemudian hari.

Pastikan jangan sampai adaptor basah (adaptor mungkin berbeda dengan yang ada dalam

gambar).

Peringatan

-Adaptor berisi trafo. Jangan memotong adaptor dan menggantinya dengan steker lain, karena dapat membahayakan.

-Alat ini tidak dimaksudkan untuk digunakan oleh orang (termasuk anak-anak) dengan cacat fisik, indera atau kecakapan mental yang kurang, atau kurang pengalaman dan pengetahuan, kecuali jika mereka diberikan pengawasan atau pengarahan mengenai penggunaan alat oleh orang yang bertanggungjawab bagi keselamatan mereka.

-Anak kecil harus diawasi untuk memastikan mereka tidak bermain-main dengan alat ini.

-hati

Jangan merendam pengisi daya dalam air, ataupun membilasnya di bawah keran.

-Selalu letakkan dan gunakan pengisi daya pada permukaan yang tahan terhadap cairan.

-Gunakan, isi baterai dan simpan alat pada suhu antara 5 °C dan 35 °C.

-Gunakan adaptor dan pengisi daya yang disertakan saja.

-Jangan gunakan pencukur atau pengisi daya jika sudah rusak.

-Jika adaptor rusak, gantilah selalu dengan salah satu tipe yang asli agar terhindar dari bahaya.

24 Indonesia

standar

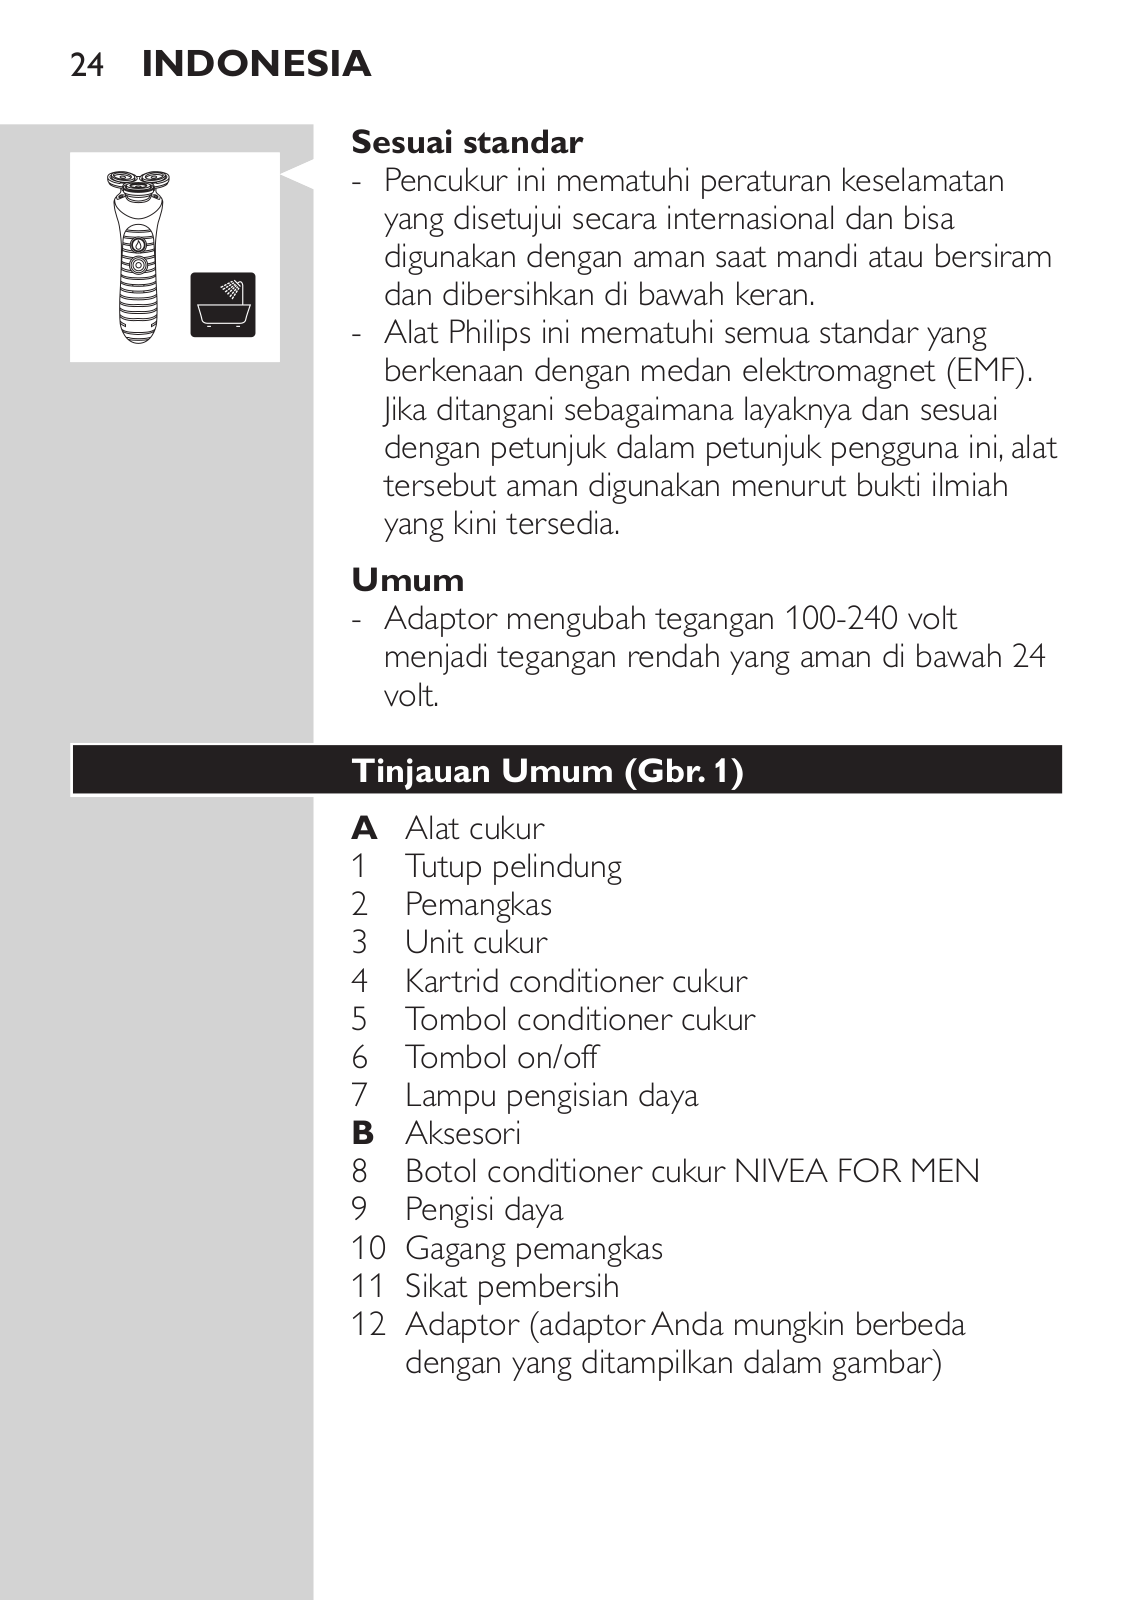
Pencukur ini mematuhi peraturan keselamatan disetujui secara internasional dan bisa

digunakan dengan aman saat mandi atau bersiram dan dibersihkan di bawah keran.

-Alat Philips ini mematuhi semua standar yang berkenaan dengan medan elektromagnet (EMF).

Jika ditangani sebagaimana layaknya dan sesuai dengan petunjuk dalam petunjuk pengguna ini, alat tersebut aman digunakan menurut bukti ilmiah yang kini tersedia.

Umum

-Adaptor mengubah tegangan 100-240 volt menjadi tegangan rendah yang aman di bawah 24 volt.

Tinjauan Umum (Gbr. 1)

A Alat cukur

1 Tutup pelindung

2 Pemangkas

3 Unit cukur

4 Kartrid conditioner cukur

5Tombol conditioner cukur

6Tombol on/off

7Lampu pengisian daya

B Aksesori

8 Botol conditioner cukur NIVEA FOR MEN

9Pengisi daya

10Gagang pemangkas

11Sikat pembersih

12Adaptor (adaptor Anda mungkin berbeda dengan yang ditampilkan dalam gambar)

Indonesia 25

Persiapan awal

Pengisian daya

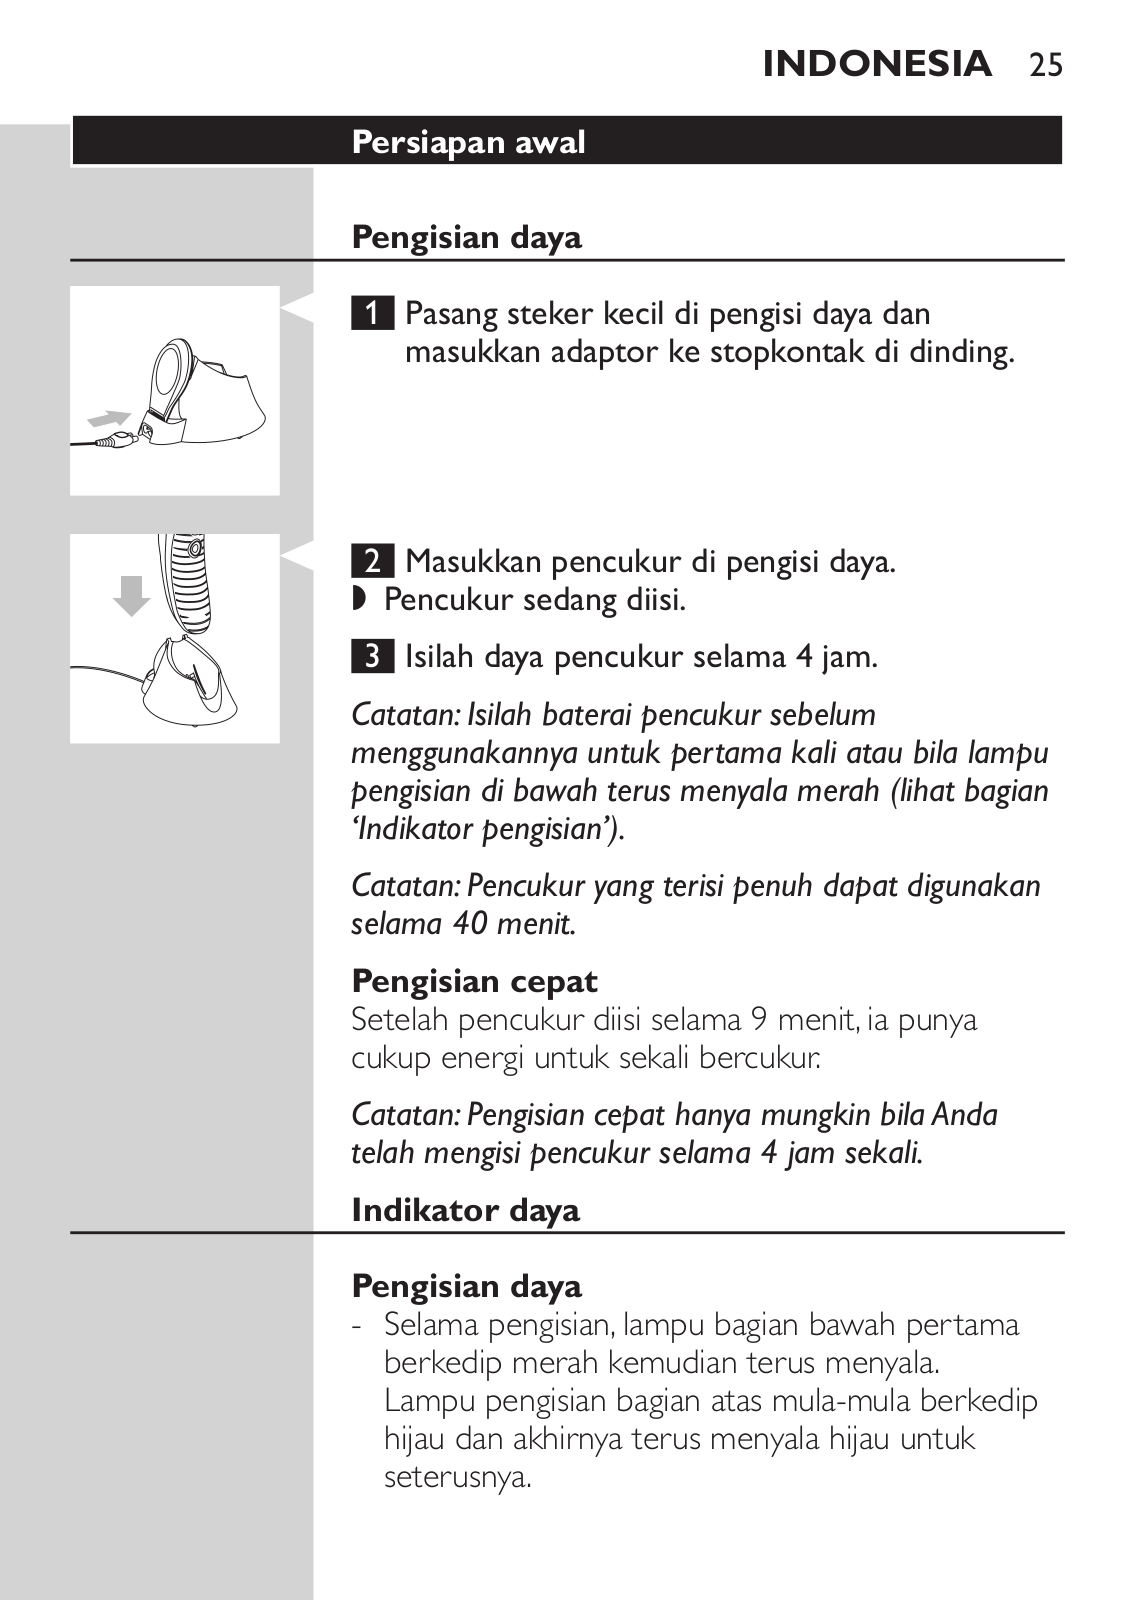
1Pasang steker kecil di pengisi daya dan masukkan adaptor ke stopkontak di dinding.

2Masukkan pencukur di pengisi daya.

,Pencukur sedang diisi.

3Isilah daya pencukur selama 4 jam.

Catatan:Isilah baterai pencukur sebelum menggunakannya untuk pertama kali atau bila lampu pengisian di bawah terus menyala merah (lihat bagian ‘Indikator pengisian’).

Catatan:Pencukur yang terisi penuh dapat digunakan selama 40 menit.

Pengisian cepat

Setelah pencukur diisi selama 9 menit, ia punya cukup energi untuk sekali bercukur.

Catatan:Pengisian cepat hanya mungkin bila Anda telah mengisi pencukur selama 4 jam sekali.

Indikator daya

Pengisian daya

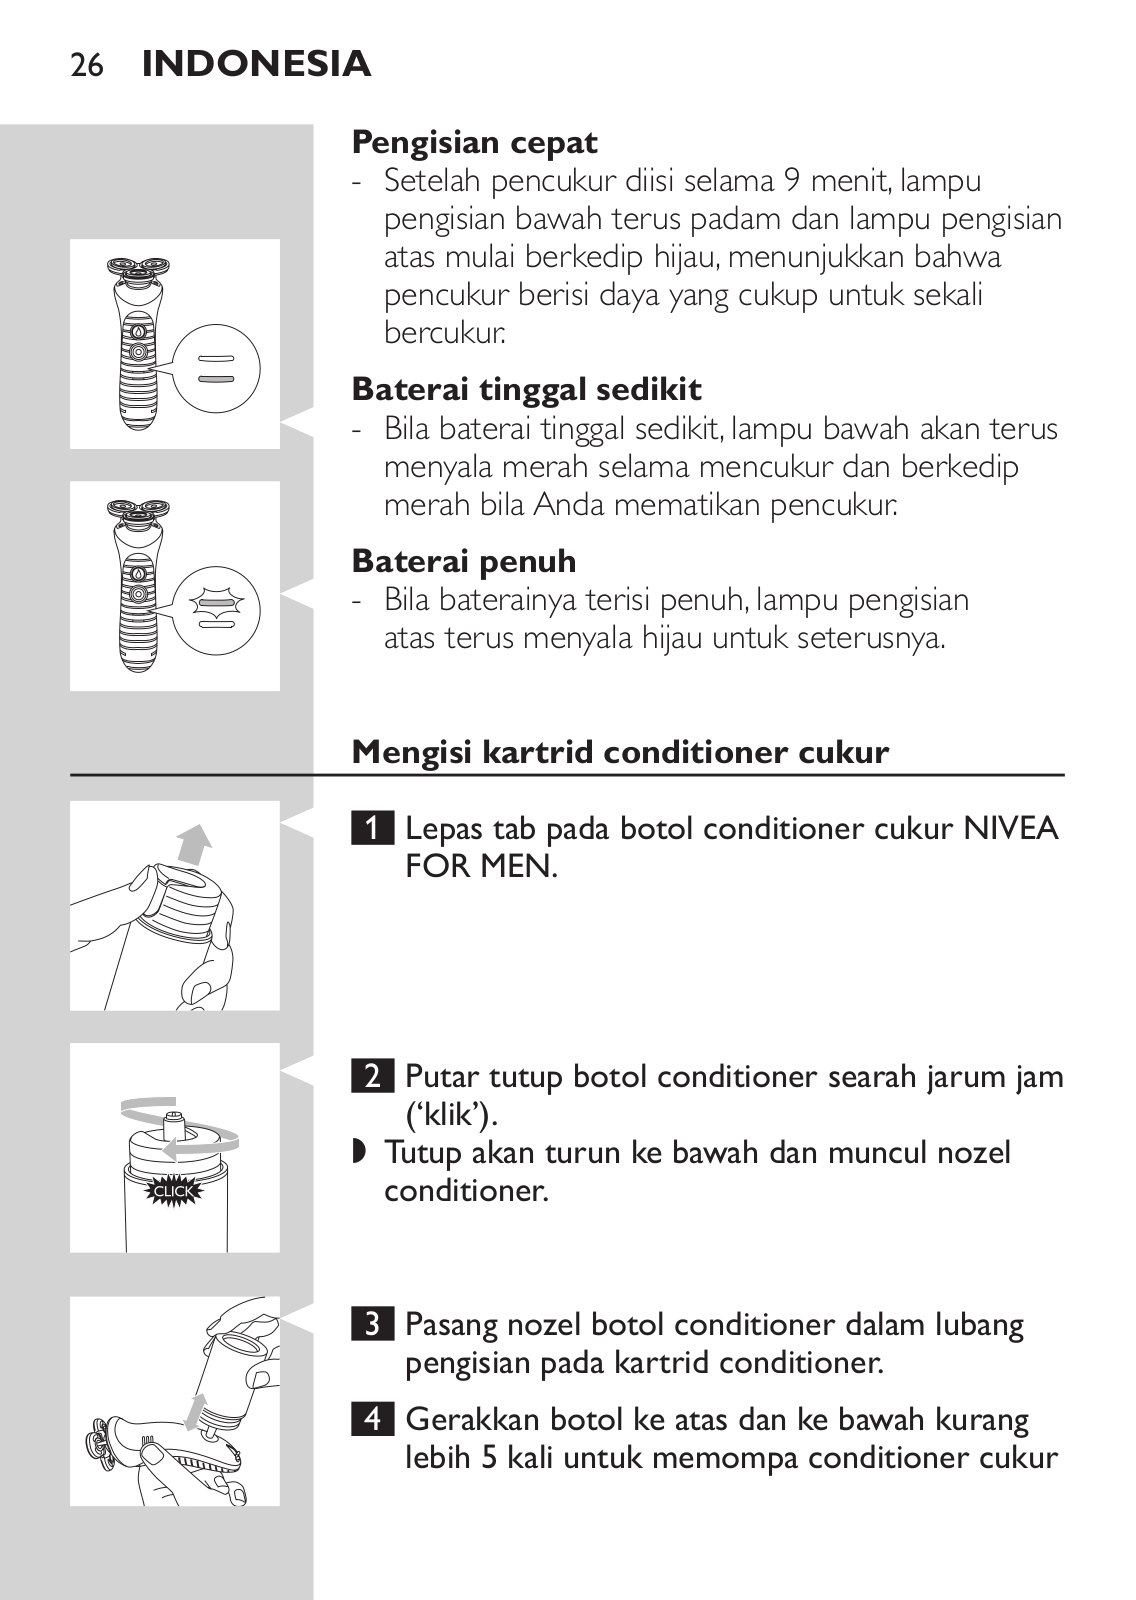
-Selama pengisian, lampu bagian bawah pertama berkedip merah kemudian terus menyala.

Lampu pengisian bagian atas mula-mula berkedip hijau dan akhirnya terus menyala hijau untuk seterusnya.

26 Indonesia

Pengisian cepat

-Setelah pencukur diisi selama 9 menit, lampu pengisian bawah terus padam dan lampu pengisian atas mulai berkedip hijau, menunjukkan bahwa pencukur berisi daya yang cukup untuk sekali

bercukur.

Baterai tinggal sedikit

Bila baterai tinggal sedikit, lampu bawah akan terus menyala merah selama mencukur dan berkedip merah bila Anda mematikan pencukur.

Baterai penuh

Bila baterainya terisi penuh, lampu pengisian atas terus menyala hijau untuk seterusnya.

Mengisi kartrid conditioner cukur

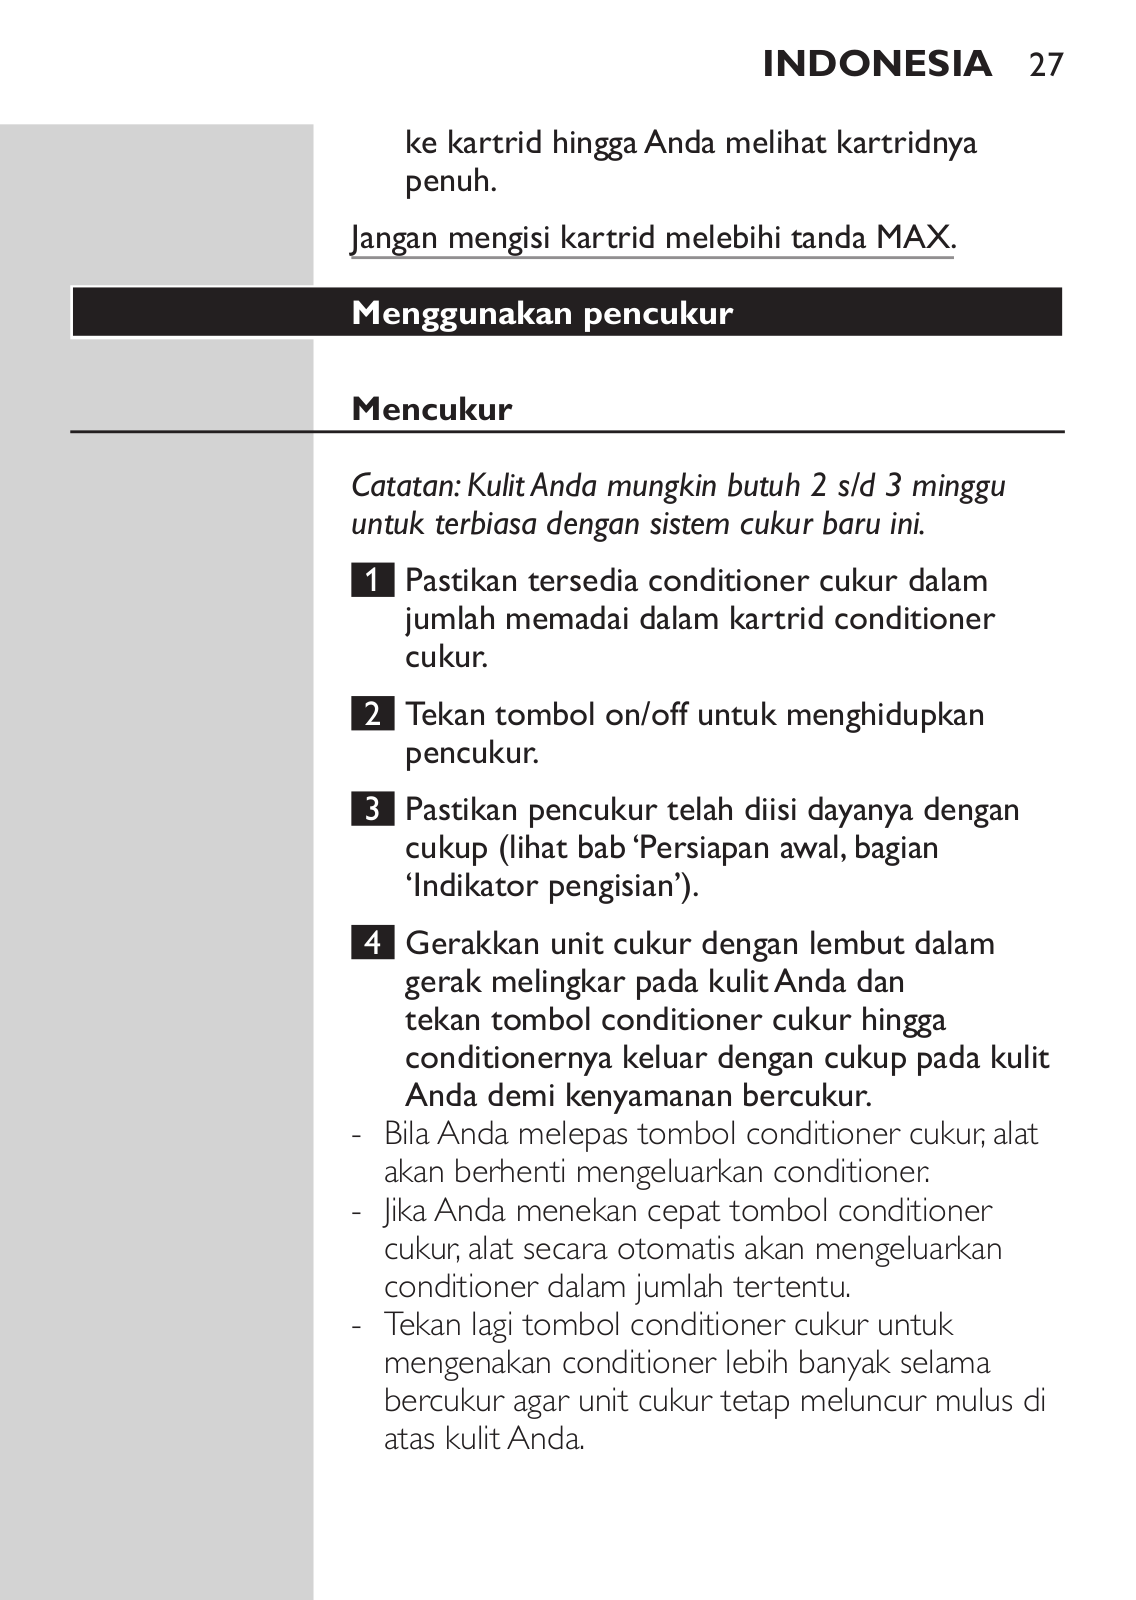
Lepas tab pada botol conditioner cukur NIVEA

FOR MEN.

Putar tutup botol conditioner searah jarum jam (‘klik’).

, Tutup akan turun ke bawah dan muncul nozel conditioner.

Pasang nozel botol conditioner dalam lubang pengisian pada kartrid conditioner.

4 Gerakkan botol ke atas dan ke bawah kurang lebih 5 kali untuk memompa conditioner cukur

Indonesia 27

ke kartrid hingga Anda melihat kartridnya penuh.

Jangan mengisi kartrid melebihi tanda MAX.

Menggunakan pencukur

Mencukur

Catatan:Kulit Anda mungkin butuh 2 s/d 3 minggu untuk terbiasa dengan sistem cukur baru ini.

1Pastikan tersedia conditioner cukur dalam jumlah memadai dalam kartrid conditioner cukur.

2Tekan tombol on/off untuk menghidupkan pencukur.

3Pastikan pencukur telah diisi dayanya dengan cukup (lihat bab ‘Persiapan awal, bagian ‘Indikator pengisian’).

4Gerakkan unit cukur dengan lembut dalam gerak melingkar pada kulit Anda dan tekan tombol conditioner cukur hingga

conditionernya keluar dengan cukup pada kulit Anda demi kenyamanan bercukur.

-Bila Anda melepas tombol conditioner cukur, alat akan berhenti mengeluarkan conditioner.

-Jika Anda menekan cepat tombol conditioner cukur, alat secara otomatis akan mengeluarkan conditioner dalam jumlah tertentu.

-Tekan lagi tombol conditioner cukur untuk mengenakan conditioner lebih banyak selama bercukur agar unit cukur tetap meluncur mulus di atas kulit Anda.

28 Indonesia

Catatan:Tombol conditioner cukur hanya bekerja bila pencukurnya dihidupkan.

Catatan:Pencukur ini bisa digunakan dengan cara yang mirip dengan silet:Anda bisa menggunakan pencukur pada muka yang basah.Tidak seperti halnya cukur listrik biasa,alat ini tidak memiliki penampung yang mengumpulkan potongan bulu.Agar potongan bulu tidak jatuh pada pakaian,kenakan conditioner secukupnya saat bercukur.

5Bersihkan pencukur dengan saksama setiap selesai menggunakan (lihat bab ‘Membersihkan’).

6Geser tutup pelindung pada pencukur untuk

mencegah kerusakan.

Tips agar gerakannya optimal dan hasil cukurnya licin

- Gerakkan dengan perlahan pencukur dalam gerak melingkar di atas kulit Anda.

-Jangan terlalu keras menekan pencukur, karena dapat menyebabkan iritasi kulit.

-Untuk meluncur dengan mulus, kenakan conditioner cukur secara teratur.

-Anda juga bisa menggunakan pencukur di saat mandi atau bersiram.

Memangkas

Catatan:Karena desain baru yang terbuka,Anda akan mendengar bunyi pemangkas yang sedang digunakan dengan lebih jelas daripada pemangkas lain.Ini adalah normal.

Indonesia 29

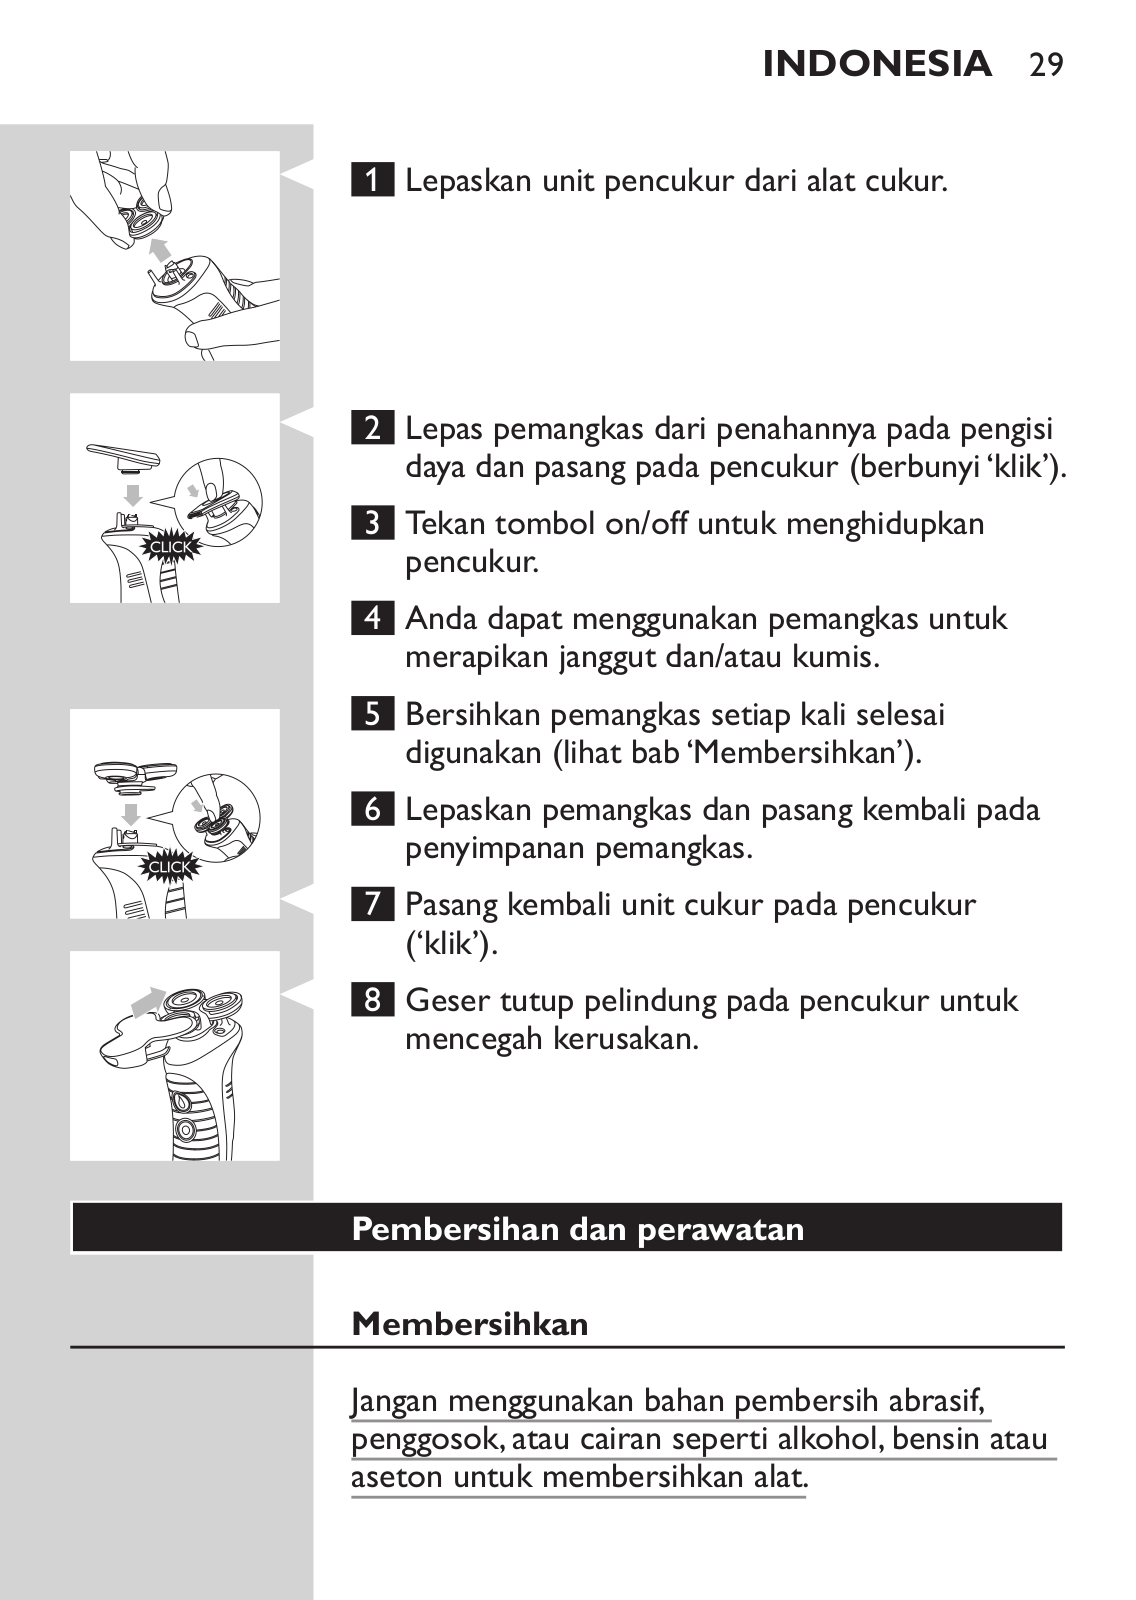
1 Lepaskan unit pencukur dari alat cukur.

2 Lepas pemangkas dari penahannya pada pengisi daya dan pasang pada pencukur (berbunyi ‘klik’).

3 Tekan tombol on/off untuk menghidupkan pencukur.

4Anda dapat menggunakan pemangkas untuk merapikan janggut dan/atau kumis.

5Bersihkan pemangkas setiap kali selesai digunakan (lihat bab ‘Membersihkan’).

6 Lepaskan pemangkas dan pasang kembali pada penyimpanan pemangkas.

7Pasang kembali unit cukur pada pencukur (‘klik’).

8 Geser tutup pelindung pada pencukur untuk mencegah kerusakan.

Pembersihan dan perawatan

Membersihkan

Jangan menggunakan bahan pembersih abrasif, penggosok, atau cairan seperti alkohol, bensin atau aseton untuk membersihkan alat.

30 Indonesia

Pencukur/pemangkas

Bersihkan pencukur dan pemangkas setiap selesai menggunakan.

Hati-hati dengan air panas. Selalu periksa apakah air tidak terlalu panas untuk mencegah luka bakar pada tangan Anda.

Jangan sekali-kali mengeringkan unit pencukur dengan handuk atau kertas tisu, karena dapat merusak kepala pencukur.

Catatan:Alat ini kedap air dan dapat dibersihkan di bawah keran.

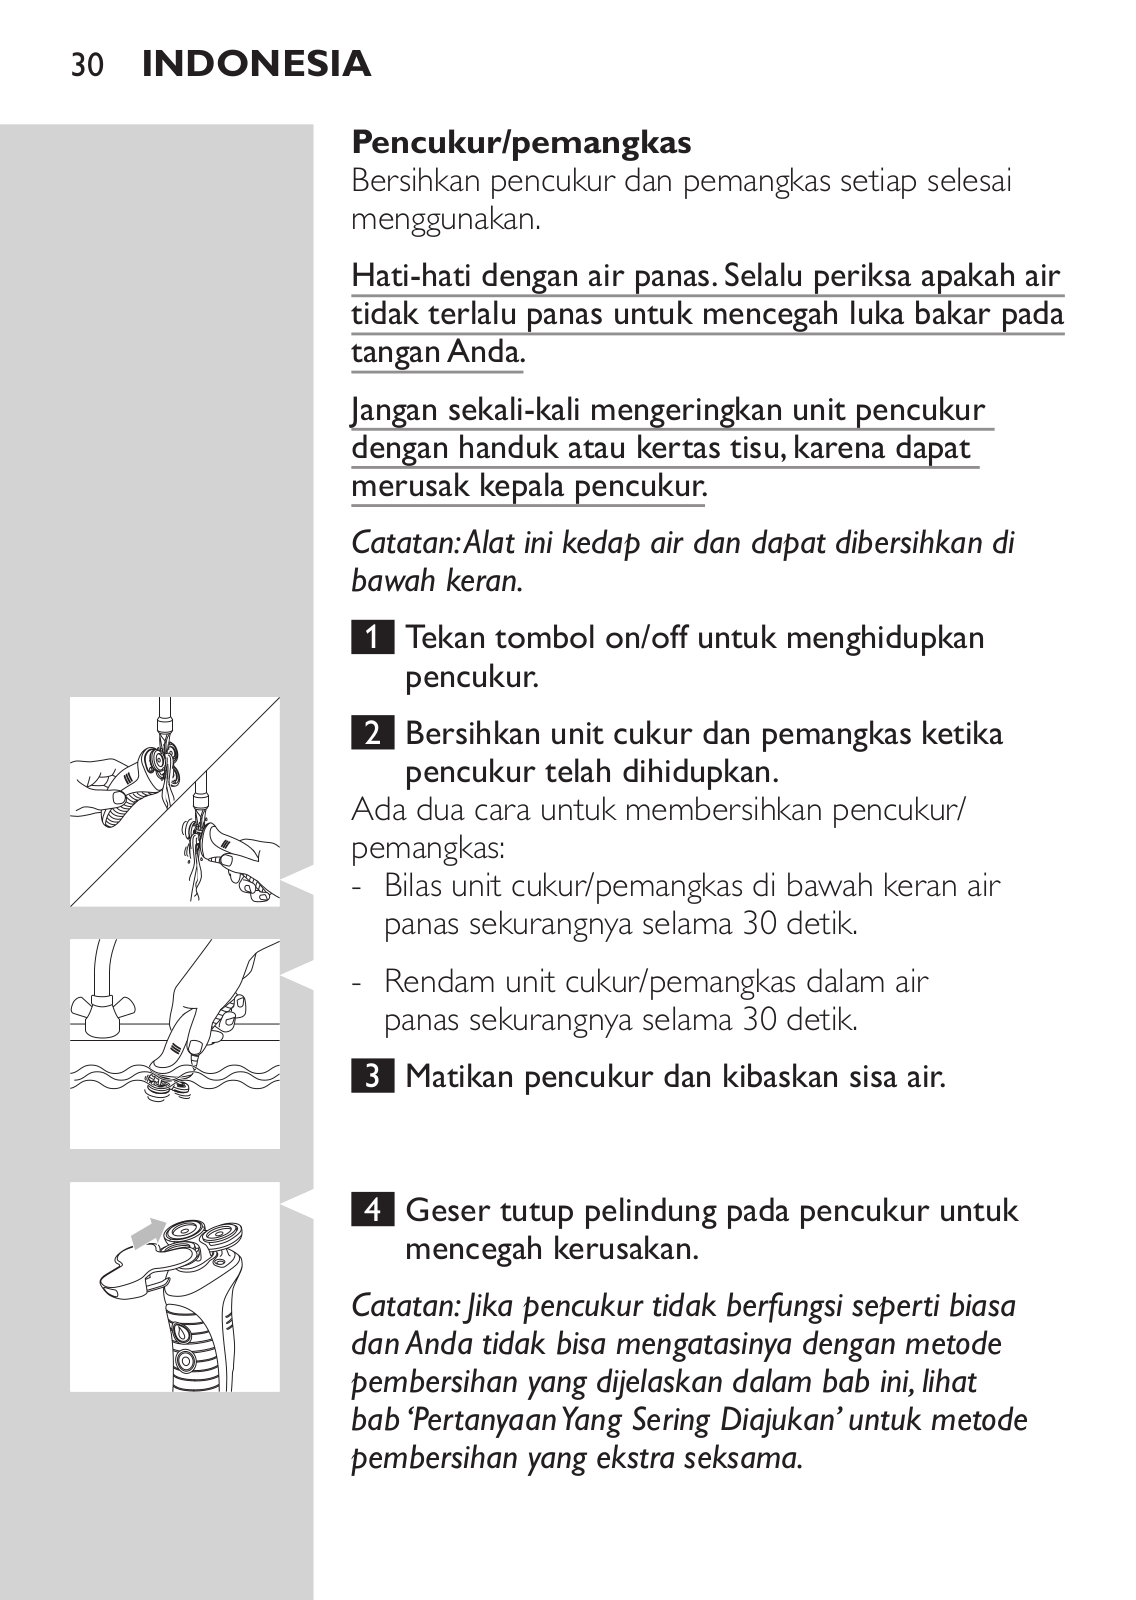
1Tekan tombol on/off untuk menghidupkan pencukur.

2 Bersihkan unit cukur dan pemangkas ketika pencukur telah dihidupkan.

Ada dua cara untuk membersihkan pencukur/ pemangkas:

Bilas unit cukur/pemangkas di bawah keran air panas sekurangnya selama 30 detik.

Rendam unit cukur/pemangkas dalam air panas sekurangnya selama 30 detik.

3 Matikan pencukur dan kibaskan sisa air.

Geser tutup pelindung pada pencukur untuk mencegah kerusakan.

Catatan:Jika pencukur tidak berfungsi seperti biasa dan Anda tidak bisa mengatasinya dengan metode pembersihan yang dijelaskan dalam bab ini,lihat bab‘PertanyaanYang Sering Diajukan’untuk metode pembersihan yang ekstra seksama.

Indonesia 31

Perawatan

1Lumasi gigi pemangkas dengan satu tetes minyak mesin jahit setiap enam bulan.

Membawa

Jika Anda akan menyimpan alat cukur untuk waktu yang agak lama atau jika sedang bepergian, Anda dapat mengunci alat cukur.Travel lock mencegah pengaktifan alat cukur yang tidak disengaja.

Mengaktifkan travel lock

1Pastikan pencukur telah dimatikan.

2Tekan dan tahan tombol conditioner cukur.

3Tekan tombol on/off dengan tangan lain.

4Tahan kedua tombol selama beberapa detik.Tunggu hingga

pencukur mengeluarkan dengungan singkatdan lampu pengisian atas pada pencukur berkedip beberapa kali.

,Travel lock sekarang diaktifkan.

Catatan:Jika Anda tidak sengaja menekan tombol on/ off dulu,pencukur akan mulai bekerja.Jika ini terjadi, tekan lagi tombol on/off untuk mematikannya.

Catatan:Jika Anda menekan tombol on/off ketika travel lock diaktifkan,lampu pengisian atas berkedip hijau untuk menandakan pencukur telah dikunci.

TipTekan tombol on/off untuk memeriksa apakah travel lock diaktifkan.Jika travel lock diaktifkan, pencukur tidak akan hidup.

Menonaktifkan travel lock

1 Tekan dan tahan tombol conditioner cukur.

32 Indonesia

2Tekan tombol on/off dengan tangan lain.

3Tahan kedua tombol selama beberapa detik.Tunggu hingga pencukur mengeluarkan dengungan singkat dan lampu pengisian atas pada pencukur berkedip beberapa kali.

,Travel lock sekarang dinonaktifkan.

Catatan:Anda juga bisa menonaktifkan travel lock dengan memasang kembali pencukur pada pengisian daya.

Penggantian

Kartrid conditioner cukur

Untuk alasan kesehatan, kami sarankan Anda mengganti kartrid conditioner cukur dua kali setahun. Anda dapat memesan kartrid ccukur baru dari Philips Consumer Care melalui telepon. Untuk menemukan nomor teleponnya, kunjungi www.philips.com dan klik ‘Philips Consumer Care’.

1

2

3

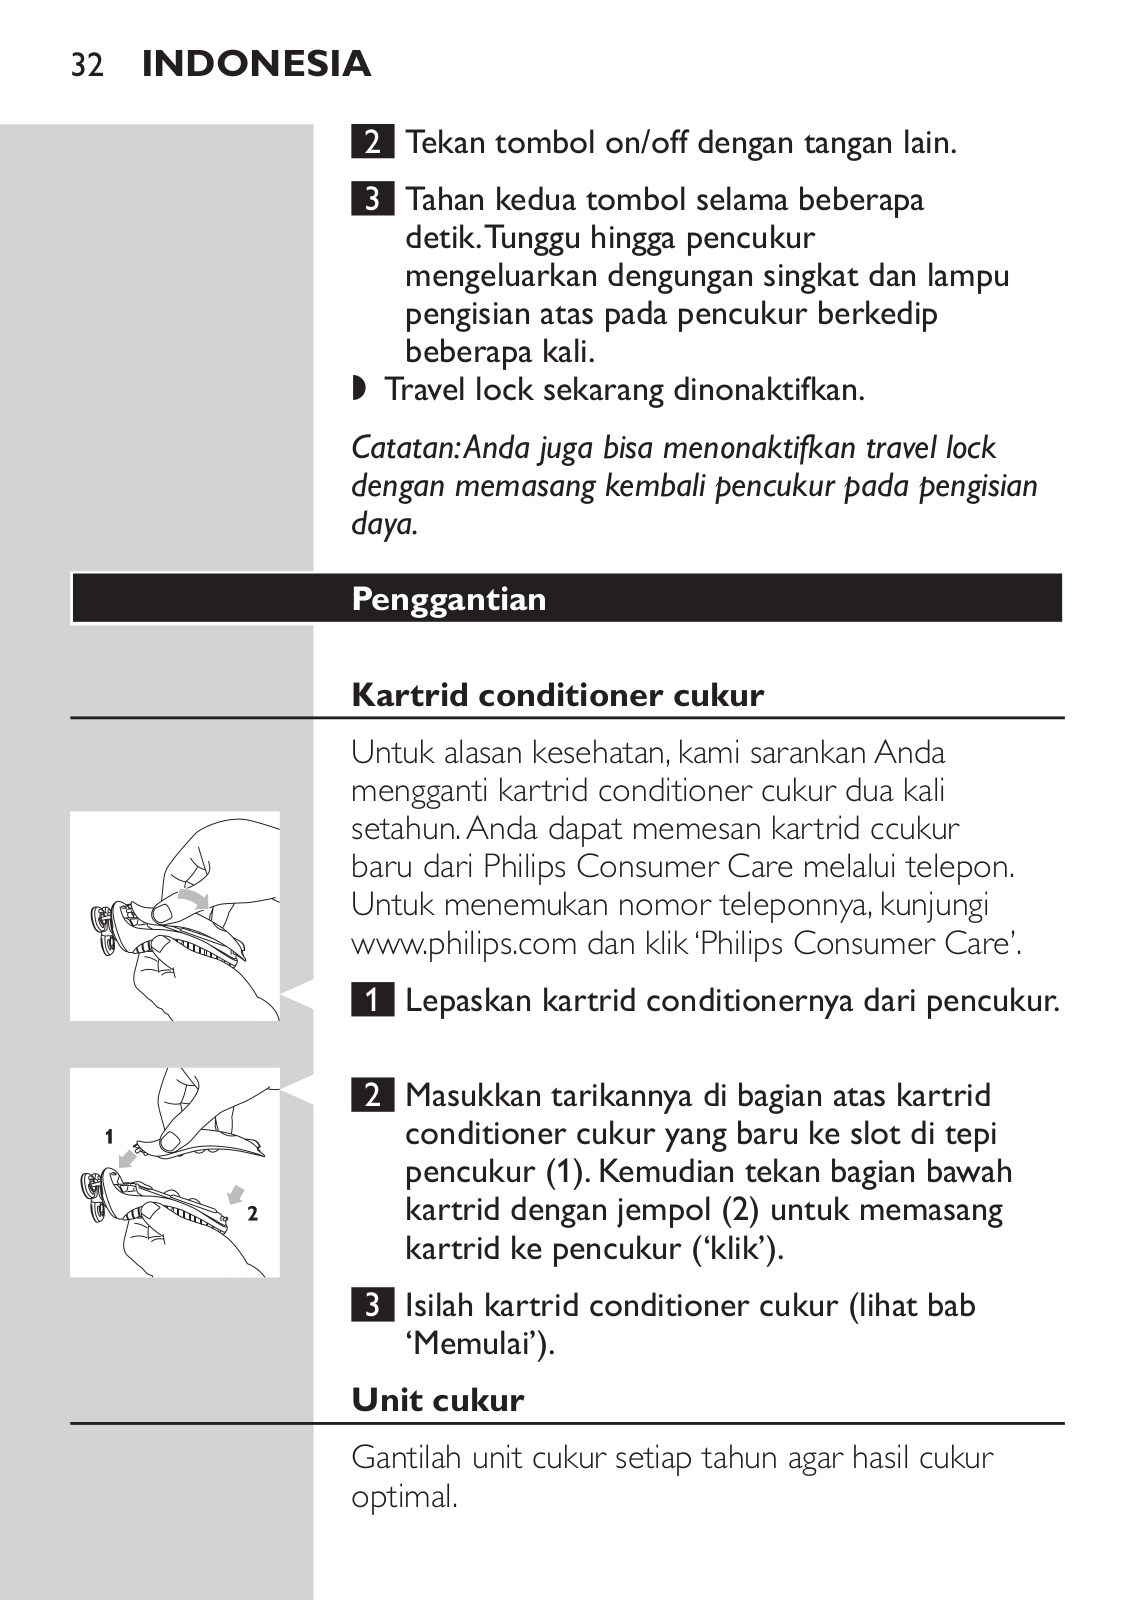
Lepaskan kartrid conditionernya dari pencukur.

Masukkan tarikannya di bagian atas kartrid conditioner cukur yang baru ke slot di tepi pencukur (1). Kemudian tekan bagian bawah kartrid dengan jempol (2) untuk memasang kartrid ke pencukur (‘klik’).

Isilah kartrid conditioner cukur (lihat bab ‘Memulai’).

Unit cukur

Gantilah unit cukur setiap tahun agar hasil cukur optimal.

Loading...
+ 106 hidden pages