

Page 1
Essence
HR7752
Recipes & Directions for use
Przepisy i instrukcja obsługi
Reţete şi Instrucţiuni de utilizare
Рецепты и Инструкции по эксплуатации
Recepty & Návod k použití
Recepti in navodila za uporabo
Рецепти та інструкції з використання
приладу
Page 2

2
Page 3

3
I
H
J
G
F
E
C
D
B
A
K
L
M
N
P
Z
O
Q
R
S
T
U
V
Y
W
X
Page 4

4
Page 5

ENGLISH 6
POLSKI 22
ROMÂNĂ 38
РУССКИЙ 54
ČESKY 73
MAGYAR 88
SLOVENSKY 104
УКРАЇНСЬКІЙ 120
HR7752
5
Page 6

ENGLISH6
Parts and accessories
A Motor unit
B Speed control
P = Pulse
0 = Off
1 = Lowest speed
2 = Highest speed
C Screw cap (must be placed to use bowl
functions)
D Food processing bowl
E Tool holder
F Lid of food processing bowl
G Feed tube
H Pusher
I Kneading hook
J Metal blade + protective cover
K Slicing insert medium
L Shredding insert medium
M Insert holder
N Emulsifying disc
O Gear housing meat mincer
P Cutter housing meat mincer
Q Wormshaft
R Cutter unit
S Screw ring
T Medium grinding disc,4 mm dia.
U Coarse grinding disc,8 mm dia.
V Separator
W Sausage horn
X Tray
Y Pusher
Z Release lever
Introduction
This appliance is equipped with an automatic
thermal cut-out system.This system will
automatically cut off the power supply to the
appliance in case of overheating.
If your appliance suddenly stops
running:
1 Pull the mains plug out of the socket.
2 Turn the knob to position 0 to switch the
appliance off.
3 Let the appliance cool down for
60 minutes.
4 Put the mains plug in the socket.
5 Switch the appliance on again.
Please contact your Philips dealer or an
authorised Philips service centre if the automatic
thermal cut-out system is activated too often.
CAUTION: In order to avoid a hazardous
situation,this appliance must never be connected
to a timer switch.
Page 7

ENGLISH 7
Important
◗ Read these instructions for use carefully and
look at the illustrations before using the
appliance.
◗ Keep these instructions for use for future
reference.
◗ Check if the voltage indicated on the
appliance corresponds to the local mains
voltage before you connect the appliance.
◗ Never use any accessories or parts from
other manufacturers or that have not been
specifically advised by Philips.Your guarantee
will become invalid if such accessories or
parts have been used.
◗ Do not use the appliance if the mains cord,
the plug or other parts are damaged.
◗ If the mains cord of this appliance is damaged,
it must always be replaced by Philips or a
service centre authorised by Philips,in order
to avoid hazardous situations.
◗ Thoroughly clean the parts that will come
into contact with food before you use the
appliance for the first time.
◗ Do not exceed the quantities and preparation
times indicated in the table.
◗ Do not exceed the maximum content
indicated on the bowl,i.e. do not fill beyond
the top graduation.
◗ Unplug the appliance immediately after use.
◗ Never use your fingers or an object (e.g.a
spatula) to push ingredients down the feed
tube while the appliance is running.Only the
pusher is to be used for this purpose.
◗ Keep the appliance out of the reach of children.
◗ Never let the appliance run unattended.
◗ Place the lid on the bowl in the right position.
The build-in safety lock will now be deblocked
and you will be able to turn the appliance on.
◗ Switch the appliance off before detaching any
accessory.
◗ Always switch the appliance off by switching
to speed setting 0.
◗ Wait until moving parts have stopped running
before you remove the lid of the appliance.
◗ Never immerse the motor unit in water or
any other fluid,nor rinse it under the tap.Use
only a moist cloth to clean the motor unit.
◗ Remove the protective cover from the blade
before use.
◗ Never use the cutter unit in combination with
the separator and sausage horn.
◗ Do not attempt to grind bones,nuts or other
hard items.
◗ Never reach into the tray. Always use the
pusher.
◗ Let hot ingredients cool down before
processing them (max.temperature
80cC/175cF).
◗ For application times,please refer to the
tables further in these instructions for use.
◗ Unplug the appliance immediately after use.
Page 8
ENGLISH8
Using the appliance
Food processing bowl
C
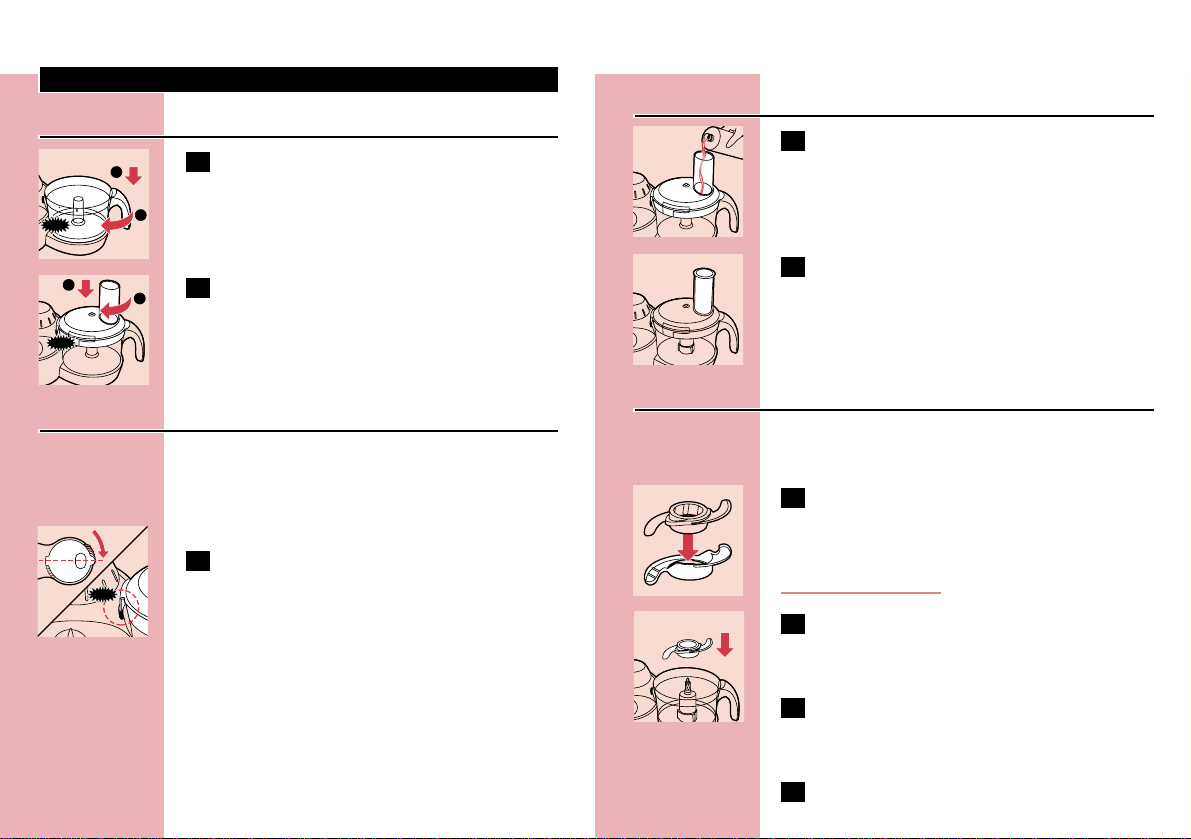
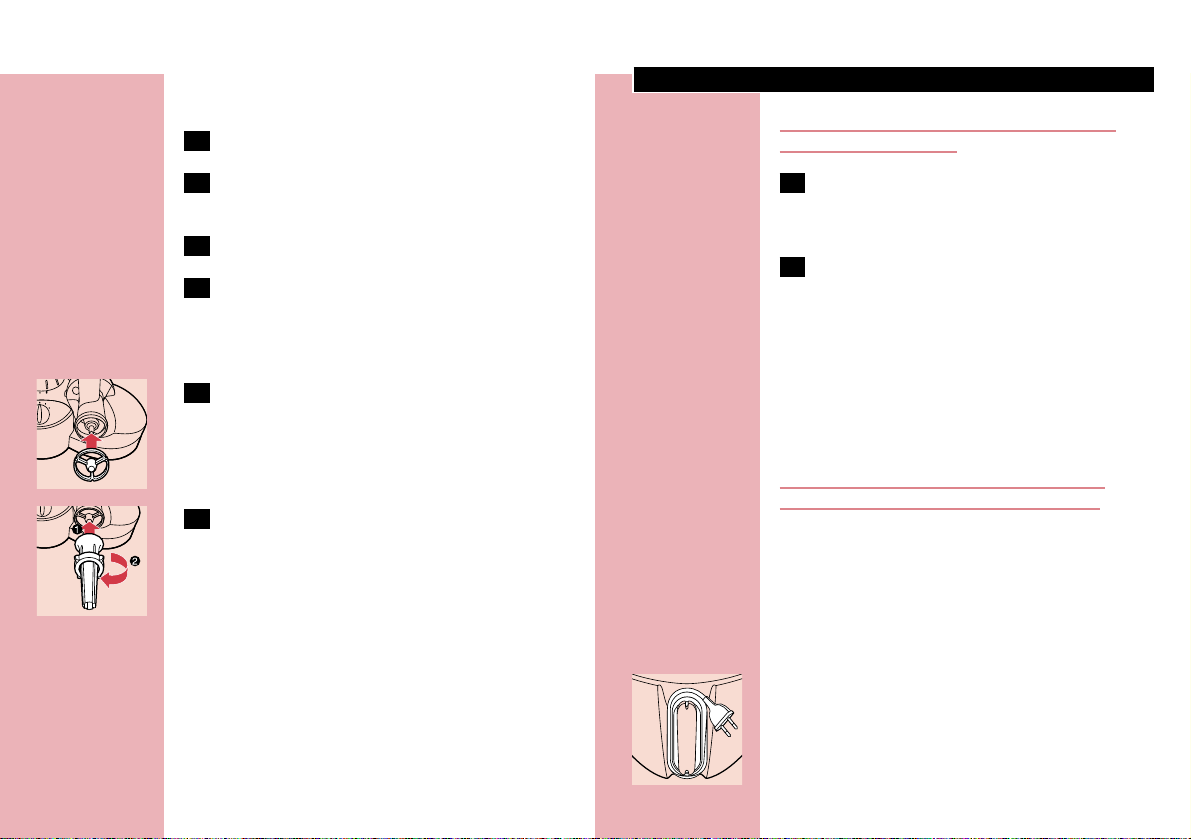
1 Mount the bowl on the food processor by
turning the handle in the direction of the
arrow until you hear a click.
C
2 Put the lid on the bowl.Turn the lid in the
direction of the arrow until you hear a
click (this requires some force).
Built-in safety lock
The motor unit,the bowl and the lid have been
provided with marks.The appliance will only
function if the dot on the motor unit is placed
directly opposite the dot on the bowl.
C
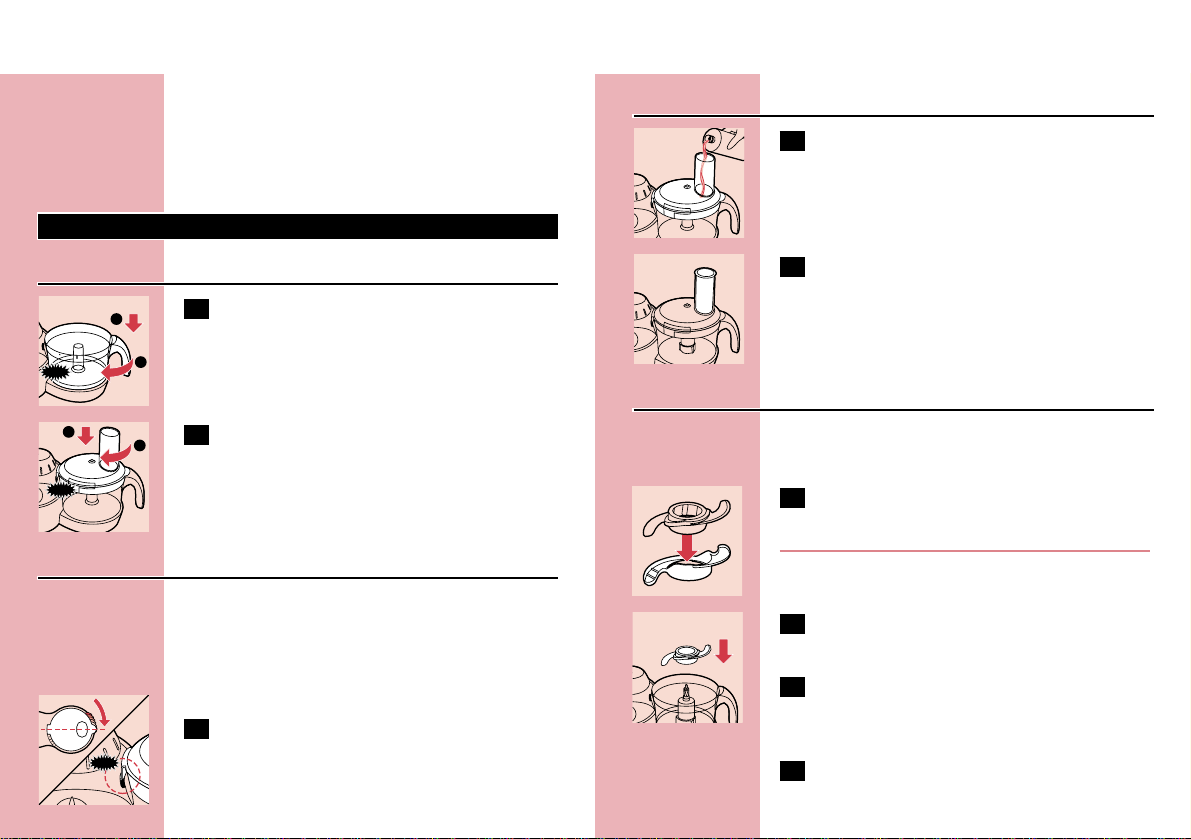
1 Make sure that the line on the lid and the
line on the bowl are directly opposite each
other.The projection of the lid will
complete the shape of the handgrip.
CLICK
Feed tube and pusher
C
1 Use the feed tube to add liquid and/or
solid ingredients.Use the pusher to push
solid ingredients through the feed tube.
C
2 You can also use the pusher to close the
feed tube in order to prevent ingredients
from escaping through the feed tube.
Metal blade
◗ The metal blade can be used for chopping,
mixing,blending and pureeing.
C
1 Remove the protective cover from the
blade.
The cutting edges of the blade are very sharp.
Avoid touching them!
C
2 Put the tool holder in the bowl and the
blade on the tool holder that stands in the
bowl.
3 Put the ingredients in the bowl.Pre-cut
large pieces of food into pieces of approx.
3 x 3 x 3 cm.Put the lid on the bowl.
4 Put the pusher in the feed tube.
CLICK
1
2
1
2
CLICK
Page 9
ENGLISH 9
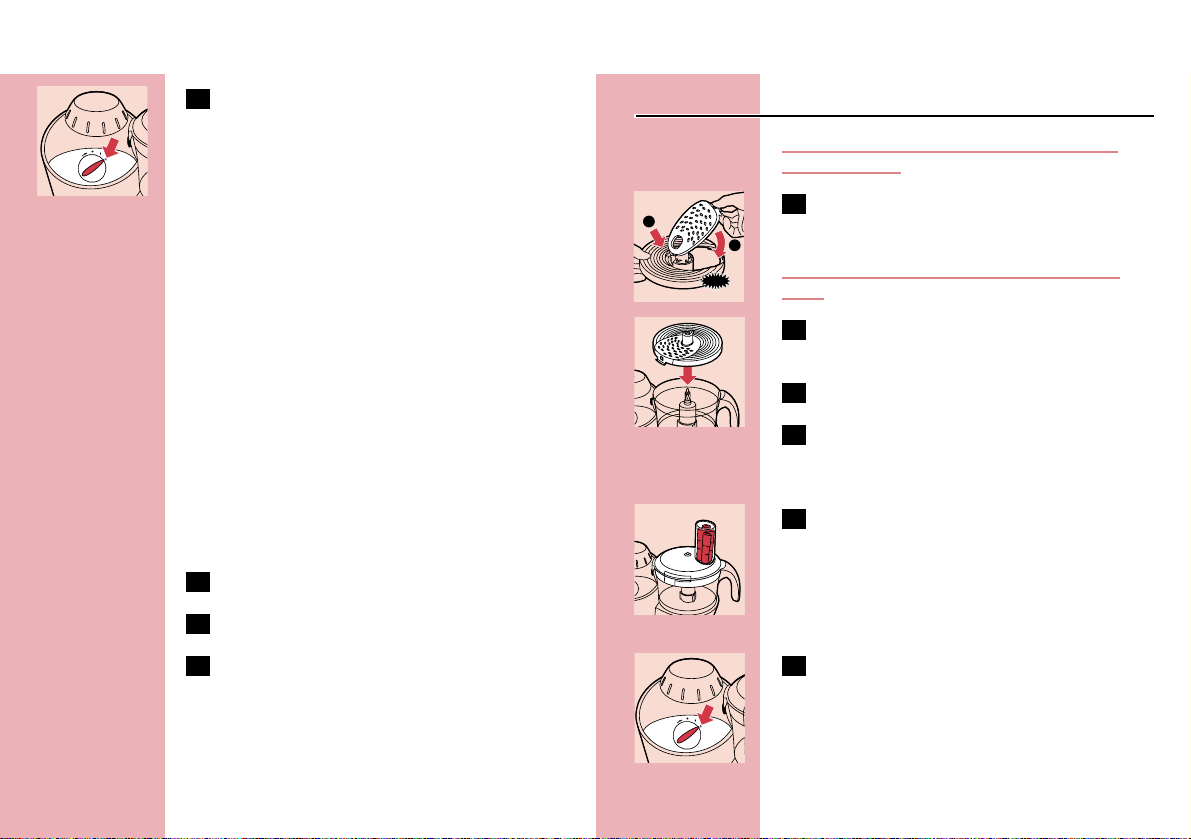
C
5 Select the maximum speed (position 2) on
the speed control.
- The process will continue until switched to
position 0 (off).
◗ Switch to position 1 to decrease the speed.
Tips
◗ If you chop onions,use the pulse function
several times to prevent them from becoming
too finely chopped.
◗ Do not let the appliance run too long when
you are chopping (hard) cheese.The cheese
will become too hot,will start to melt and
will turn lumpy.
◗ Do not use the blade to chop very hard
ingredients like coffee beans,turmeric,nutmeg
and ice cubes,as this may cause the blade to
get blunt.
If food sticks to the blade or to the inside of the
bowl:
1 Turn the appliance off.
2 Remove the lid from the bowl.
3 Remove the ingredients from the blade or
from the wall of the bowl with a spatula.
Inserts
Never process hard ingredients like ice cubes
with the inserts.
C
1 Put the selected insert in the insert holder
before you place it onto the toolholder.
Cutting edges are very sharp. Avoid touching
them!
C
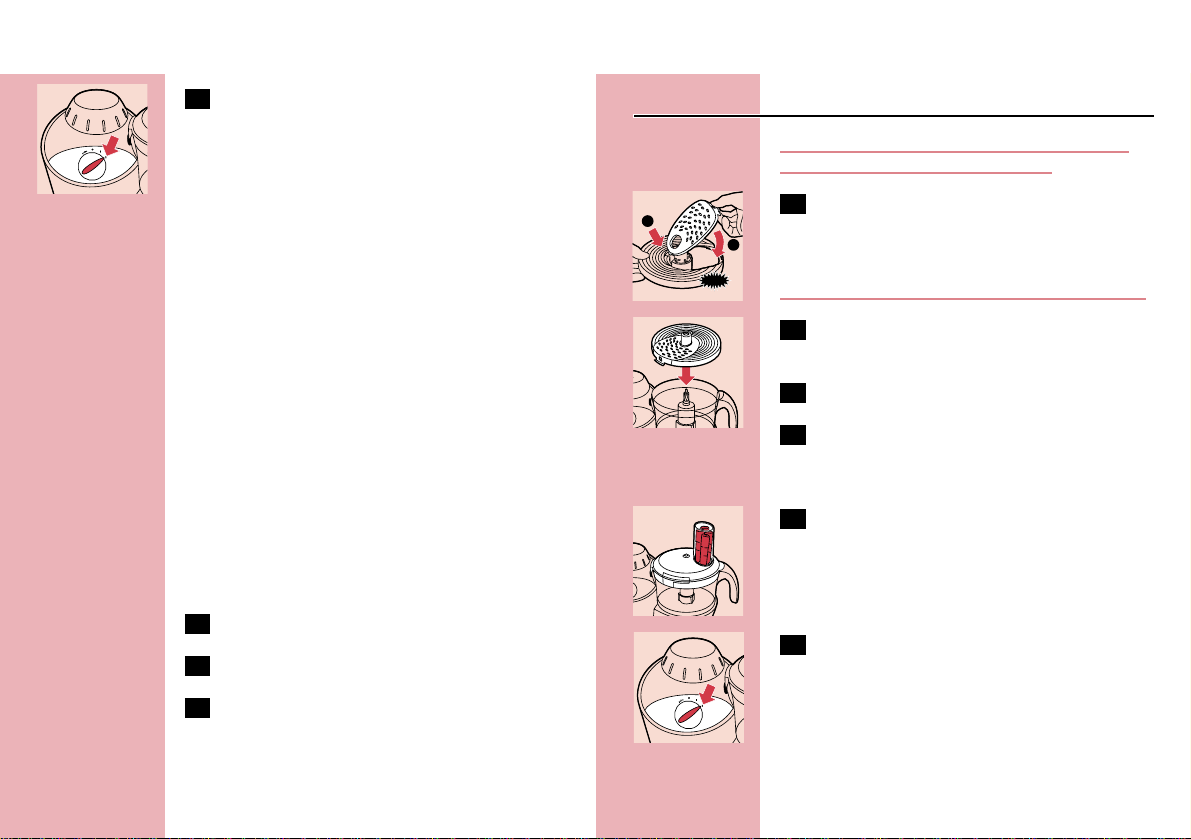
2 Place the insert holder onto the tool
holder that stands in the bowl.
3 Put the lid on the bowl.
4 Put the ingredients in the feed tube.Pre-
cut large chunks to make them fit into the
feed tube.
C
5 Fill the feed tube evenly for the best
results.
When you have to cut large amounts of food,
process only small batches at a time and empty
the bowl regularly between the batches.
C
6 For shredding and slicing,select the
maximum speed (position 2) on the speed
control.
The process will continue until switched to
position 0 (off).
◗ Switch to position 1 to decrease the speed.
CLICK
2
1
Page 10

ENGLISH10
C
7 Press the pusher lightly onto the
ingredients in the feed tube.
◗ If you are shredding soft vegetables or fruits,
you can decrease the speed to position 1,to
prevent the shredded vegetables and fruits
from turning into puree.
C
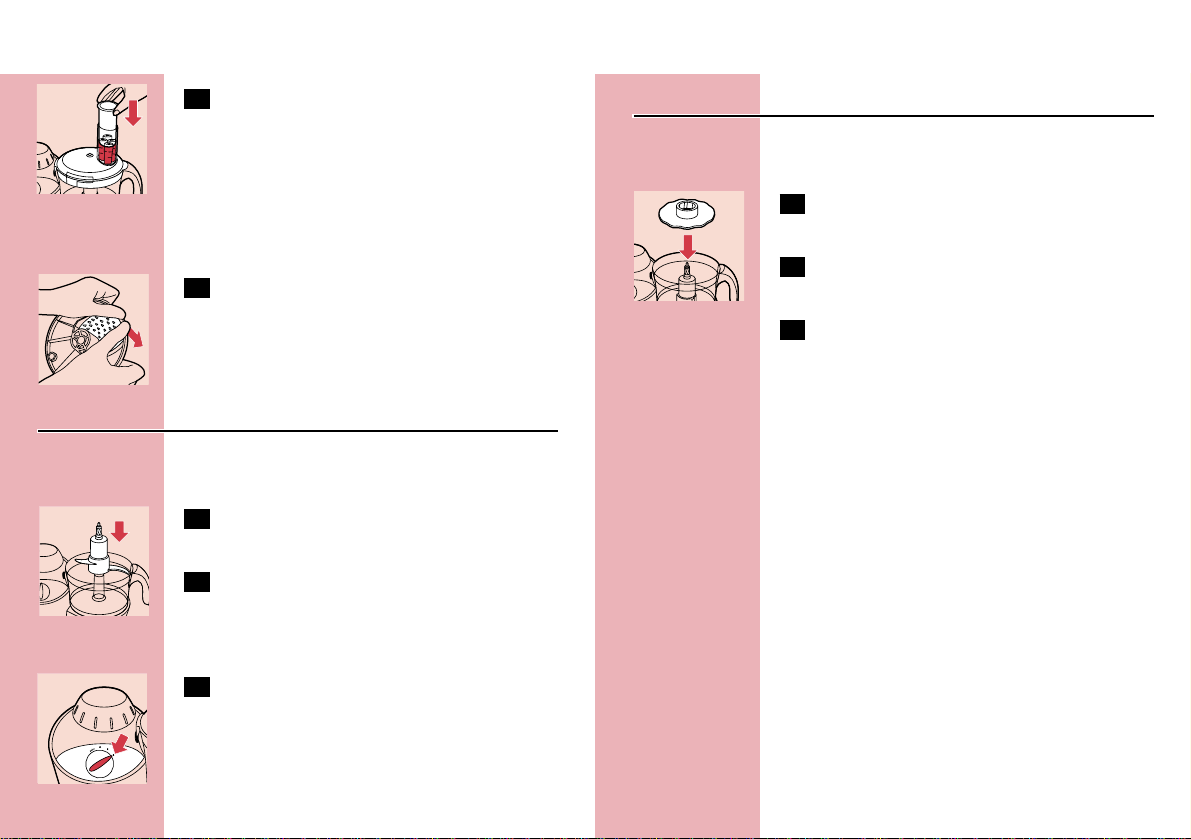
8 To remove the insert from the insert
holder, take the insert holder in your
hands with its back pointing towards you.
Push the edges of the insert with your
thumbs to make the insert fall out of the
holder.
Kneading hook
The kneading hook can be used for kneading
bread dough and for mixing batters and cake
mixtures.
C
1 Put the bowl on the motor unit and place
the kneading accessory onto the driving
shaft.
2 Put the ingredients in the bowl and fasten
the lid onto the bowl.Place the pusher in
the feed tube to prevent ingredients from
splattering during the kneading process.
C
3 Select the maximum speed (position 2) on
the speed control.
Emulsifying disc
You can use the emulsifying disc to prepare
mayonnaise,to whip cream and to whisk egg
whites.
C
1 Put the emulsifying disc onto the tool
holder that stands in the bowl.
2 Put the ingredients in the bowl and put the
lid on the bowl.
3 Select the minimum speed (position 1) to
obtain optimal results.
Tips
◗ When you want to whisk egg whites,make
sure the eggs are at room temperature.
◗ Take the eggs out of the refrigerator at least
half an hour before you are going to use
them.
◗ All the ingredients for making mayonnaise
must be at room temperature.
Oil can be added through the small hole in the
bottom of the pusher.
◗ If you are going to whip cream,the cream
must be taken straight from the refrigerator.
Please observe the preparation time in the
table.Cream should not be whipped too long.
Use the pulse function to have more control over
the process.
Page 11
ENGLISH 11
Meat mincer
The meat mincer can be used for mincing meat
and making sausages.
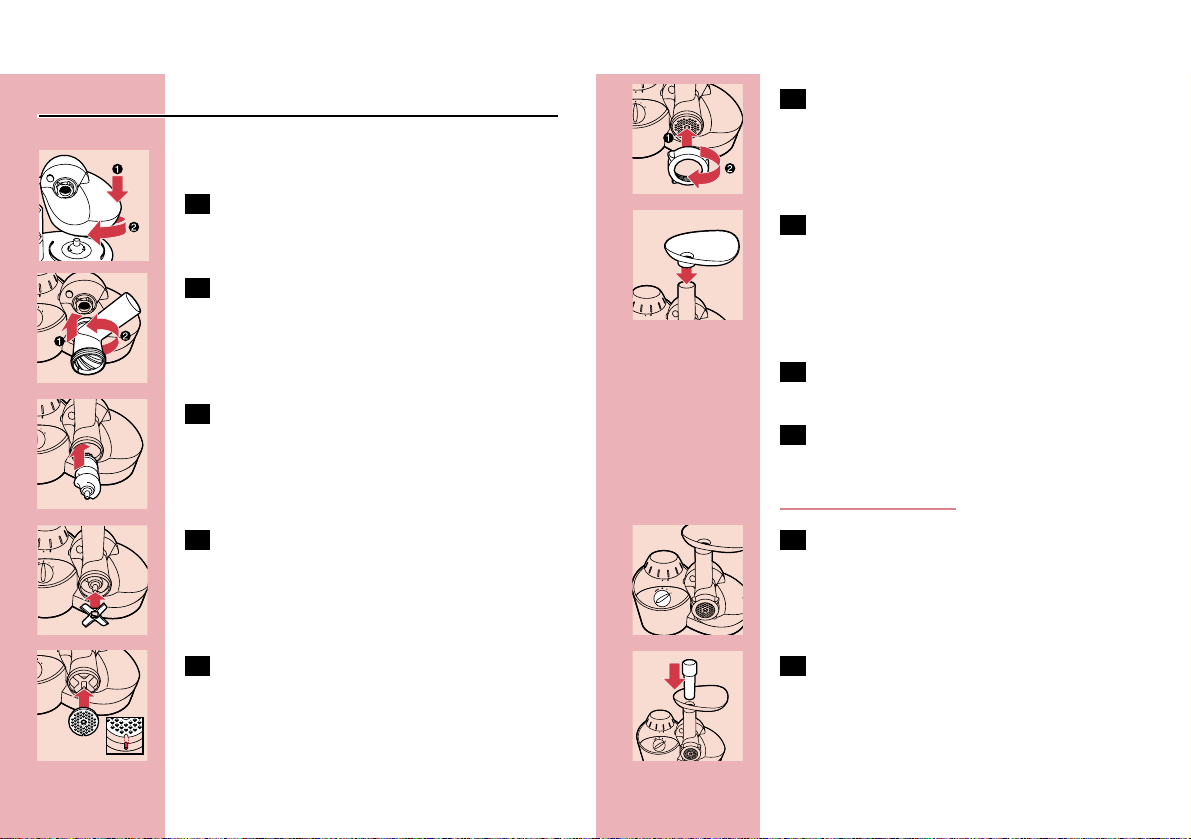
C
1 Attach the gear housing to the motor unit.
You will hear a click when you have assembled
these accessories correctly.
C
2 Attach the cutterhousing onto the motor
unit.
C
3 Insert the worm shaft into the cutter
housing,the plastic end first.
C
4 Place the cutter unit onto the worm shaft.
The cutting edges should be at the front.
C
5 Place the medium grinding disc or coarse
grinding disc (depending on the
consistency you prefer) onto the worm
shaft.
Make sure the notches of the grinding disc fit
onto the projections of the mincer head.
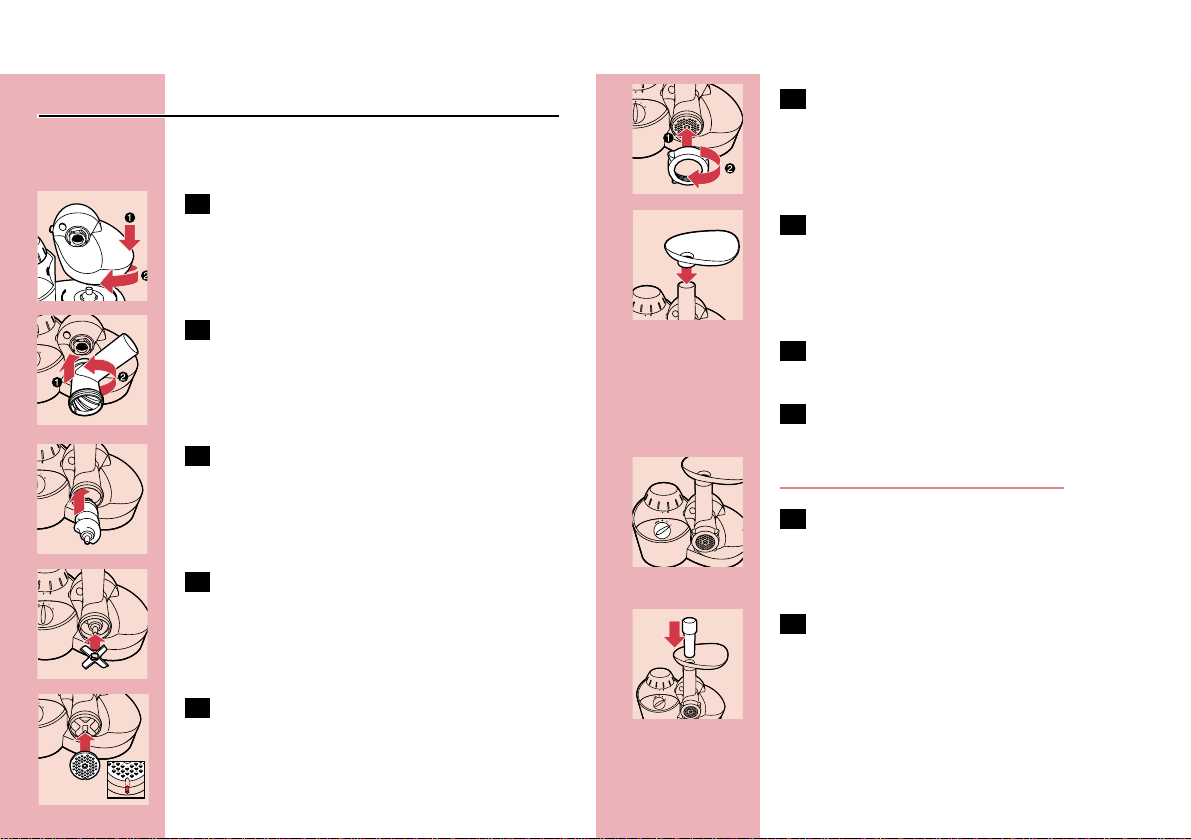
C
6 Turn the screw ring in the direction of the
arrow on the cutter housing until it is
properly fastened.
C
7 Place the tray on the upright part of the
cutter housing.
Mincing meat
1 Cut the meat into 10cm-long,2cm-thick
strips.
2 Remove bones,pieces of gristle and sinews
as much as possible.
Never use frozen meat!
C
3 Select speed setting 2 for mincing meat
C
4 Put the meat in the tray. Use the pusher to
gently push the meat into the cutter
housing.
◗ You can mince 1.3 kg meat per minute.
(Use lean pork without fat and sinews).
◗ For steak tartare,mince the meat with the
medium grinding disc twice.
Page 12
ENGLISH12
Making sausages
1 Mince the meat.
2 Unplug the appliance and remove the
screw ring after you have finished mincing.
3 Remove the grinding disc.
4 Remove the cutter unit.
◗ Leave the worm shaft in the cutter housing
when you are going to make sausages.
C
5 Place the separator in the cutter housing.
C
6 Place the sausage horn on the cutter
housing and screw the ring on the cutter
housing.
The appliance is now ready for making sausages.
Tips
◗ Put the sausage skin in lukewarm water for
10 minutes.Then slide the wet skin onto the
sausage horn.Push the (seasoned) minced
meat into the cutter housing.
◗ If the skin gets stuck onto the sausage horn,
wet it with some water.
◗ Use speed setting 1 to make sausages.
Cleaning
Always unplug the appliance before you start
cleaning the motor unit.
1 Clean the motor unit with a damp cloth.
Do not immerse the motor unit in water
and do not rinse it either.
2 Always clean the parts that have come into
contact with food in hot water with
washing-up liquid immediately after use.
◗ The bowl,the lid of the bowl, the pusher and
the accessories can also be cleaned in a
dishwasher.
These parts have been tested for dishwasher
resistance based on DIN EN 12875.
Clean the metal blade, and the inserts very
carefully.Their cutting edges are very sharp!
Make sure that the cutting edges of the blades
and the inserts do not come into contact with
hard objects.This could cause them to become
blunt.
Certain ingredients may cause discolourations on
the surface of the accessories.This does not have
a negative effect on the accessories.The
discolourations usually disappear after some time.
C
◗ Wind the (excess) mains cord around the reel
on the back of the appliance.
Page 13

ENGLISH 13
Cleaning of meat mincer
Meat left behind in the cutter housing may be
removed from the inside of the appliance by
passing a slice of bread through the cutter
housing.
1 Before you clean the appliance,switch the
appliance off and remove the plug from the
wall socket.
2 Press the release lever and turn the whole
cutter housing in the direction of the
arrow.
C
3 Remove the pusher and the tray.
4 Unscrew the screw ring and remove all
parts of the cutter housing.
Do not clean the parts in the dishwasher!
5 Wash all parts that have come into contact
with meat in hot soapy water
IMMEDIA TEL Y AFTER USE.
6 Rinse them with clear hot water and dry
them IMMEDIATELY.
◗ We advise you to lubricate the cutter unit and
the grinding discs with some vegetable oil.
Guarantee & service
If you need information or if you have a problem,
please visit the Philips Web site at ww.philips.com
or contact the Philips Customer Care Centre in
your country (you will find its phone number in
the worldwide guarantee leaflet). If there is no
Customer Care Centre in your country,turn to
your local Philips dealer or contact the Service
Department of Philips Domestic Appliances and
Personal Care BV.
Page 14

ENGLISH14
Solution
Turn the bowl/or lid clockwise until you hear a click.
Make sure that the points on the bowl and on the lid
are placed directly opposite each other.
The automatic thermal cut-out system has probably cut
off the power supply to the appliance because it has
overheated.1) Switch the applaince off (position 0).
2) Unplug the appliance. 3) Let the appliance cool down
for 60 minutes.4) Put the mains plug in the socket.
5) Switch the appliance on again.
Check if you have really turned the bowl and the lid
clockwise as far as the point where you hear a click.
If both the blender and the food-processing bowl have
been mounted correctly,only the blender will function.If
you want to use the food-processing bowl,detach the
blender and close the fixing hole with the screw cap.
Problem
The appliance doesn't
switch on.
The appliance has
suddenly stopped
running.
The kneading or
mixing accessory
doesn't turn.
Both the blender jar
and the food
processing bowl are
attached,but only the
blender works.
Troubleshooting guide
Application times
10 - 60 sec.
60 - 180 sec.
10 - 60 sec.
10 - 60 sec.
Application
Chopping,pureeing, mixing
Kneading
Slicing,shredding,
Whisking,whipping, emulsifying
Mincing
Accessory
P
{
gh
å
Accessories and applications
Applications
Salads,raw
vegetables
Salads,raw
vegetables
Breadcrumbe
d dishes,au
gratin dishes
Garnishing,
soups,sauces,
au gratin
dishes
Sauces,pizzas,
au gratin
dishes,
fondues
Garnishing,
sauces,pastry,
puddings,
mousses
Procedure
Cut the vegetables into pieces
that fit into the tube.Fill the
tube with the pieces and slice
them while pressing the pusher
lightly.
Cut the vegetables into pieces
that fit into the tube.Fill the
tube with the pieces and slice
them while pressing the pusher
lightly.
Use dry,crispy bread.
Use a piece of rindless
Parmesan and cut it into pieces
of approx.3 x 3 cm.
Cut the cheese into pieces that
fit into the tube.Press carefully
with the pusher.
Use hard,plain chocolate.
Break it into pieces of 2 cm.
Acces
sory/s
peed
P / 2
j / 2
P / 2
P / 2
k/ 2
P / 2
Max.
quanti
ty
500g
500g
100g
200g
200g
200g
Ingredients &
results
Apples,
carrots,
celeriac shredding
Apples,
carrots,
celeriac slicing
Bread crumbs
- chopping
Cheese
(Parmesan) chopping
Cheese
(Gouda) shredding
Chocolate chopping
Quantities and preparation times
Page 15

15ENGLISH
Applications
Purees,soups
Baby and infant
food
Salads,
garnishing
Bread
Pizza
Apple pies,
sweet biscuits,
open fruit flans
Procedure
Use cooked peas or beans.If
necessary,add some liquid to
improve the consistency of the
mixture.
For a coarse puree, add only a
little liquid.For a fine puree,
keep adding liquid until the
mixture is smooth.
Put the cucumber in the tube
and press it down carefully.
Mix warm water with yeast and
sugar.Add flour,oil and salt and
knead the dough for approx.90
seconds.Leave to rise for 30
minutes.
Follow the same procedure as
for bread dough.Knead the
dough for 1 minute.
Use cold margarine, cut the
margarine into 2 cm cubes. put
the flour in the bowl and add
the margarine. Mix until the
dough has become crumbly.
Then add cold water while
mixing.Stop as soon as the
dough starts to turn into a ball.
Allow the dough to cool
before further processing.
Acces
sory/s
peed
P / 2
P / 2
g / 1
{ / 2
{ / 2
{ / 2
Max.
quanti
ty
250g
500g
2
cucum
bers
500g
flour
750g
flour
300g
flour
Ingredients &
results
Cooked peas,
beans pureeing
Cooked
vegetables and
meats pureeing
Cucumbers slicing
Dough (for
bread) kneading
Dough (for
pizzas) kneading
Dough
(shortcrust
pastry) kneading
Applications
Luxury bread
Puddings,
soufflees,
meringues
Sauces,jams,
puddings,baby
food
Garnishing,
dips
Sauces,soups,
garnishing,
herb butter
Salads,
garnishing and
barbecue
sauces
Steaks tartar,
hamburgers,
meat balls
Procedure
First mix yeast, warm water
and some sugar in a separate
bowl.Put all ingredients in the
bowl and knead the dough
until it is smooth and does not
stick to the bowl (takes approx.
1 minute).Leave it to rise for
30 minutes.
Use egg whites at room
temperature. Note:use at least
2 egg whites.
Tip:add a little lemon juice to
prevent the fruit from
discolouring
Peel the garlic. Press the pulse
button several times to avoid
chopping the garlic too fine.
Use at least 150g.
Wash and dry the herbs before
chopping.
All the ingredients must be at
room temperature. Note:use
at least one large egg, two small
eggs or two egg yolks.Put the
egg and a little vinegar in the
bowl and add the oil drop by
drop.
First remove any sinews or
bones.Cut the meat into
10cm-long,2cm-thick strips.
Max.
quanti
ty
500g
flour
4 egg
whites
500g
300g
Min.
50g
3 eggs
1000g
Ingredients &
results
Dough (yeast)
- kneading
Egg whites whisking
Fruit (e.g.
apples,
bananas) chopping
Garlic chopping
Herbs (e.g.
parsley) chopping
Mayonnaise emulsifying
Meats (lean,
streaky) mincing
Acces
sory/s
peed
{ / 2
å / 1
P / 2
P / 2
P / 2
˙ / 1
/ 2
Page 16

ENGLISH16
Applications
Various cakes.
Salads,
puddings,nut
bread,almond
paste
Salad,cooked
food,stir-fries,
garnishing
Salad,cooked
food,stir-fries,
garnishing
Garnishing,
cream,icecream
mixtures
Procedure
The ingredients must be at
room temperature. Mix the
softened butter and the sugar
until the mixture is smooth and
creamy.Then add milk,eggs and
flour.
Use the pulse button for
coarse chopping. Stop the
process if you want a coarse
result.
Peel the onions and cut them
into 4 pieces.Stop the process
after 2 pulses to check the
result.
Peel the onions and cut them
into pieces that fit into the
tube. Note: use at least 100g.
Use cream that comes straight
from the refrigerator.Note:use
at least 125ml cream.The
whipped cream is ready after
approx.20 seconds.
Acces
sory/s
peed
{ / 2
P / 2
P / 2
g / 1
å / 1
Max.
quanti
ty
4 eggs
250g
500g
300g
500ml
Ingredients &
results
Mixture (cake)
- mixing
Nuts chopping
Onions chopping
Onions slicing
Whipping
cream whipping
Recipes
Courgette Sandwich Spread
Ingredients:
- 2 courgettes
- 3 cooked eggs
- 1 small onion
- 1 tbs.vegetable oil
- parsley
- 2-3 tbs.sour cream
- lemon juice,Tabasco sauce, salt,pepper,currypowder, paprika
B
Wash and dry the courgettes and shred them
with the fine shredding insert in the foodprocessing bowl.Transfer the shredded courgette
to a dish,sprinkle salt on it and leave for about
15 minutes so that the salt extracts the liquid
from the shredded courgette. Cut the onion in
4 pieces and chop them fine together with the
garlic clove. Remove parsley leaves from the stalks
and chop them.
B
Then put the shredded courgette on a clean towel
and press the liquid out.Pour some oil into a pan
and fry the chopped onions and garlic lightly,add
the shredded courgettes.All liquids should
evaporate from the ingredients.Allow the fried
ingredients to cool down for a while.Peel the eggs
and chop them in the food processing bowl for a
few seconds.Add the other ingredients to the food
processing bowl,season them and mix them with
the blade.Serve on toasted white bread.
Page 17

ENGLISH 17
Fruit cake
Ingredients:
- 180 g dates
- 270 g prunes
- 60 g almonds
60 g walnut
- 60 g raisins
- 60 g sultanas
- 240 g rye full grain flour
- 120 g wheat flour
- 120 g brown crystal sugar
- pinch of salt
- 1 sachet baking powder
- 360 g butter milk
B
Put the metal blade into the bowl.Put all in the
ingredients into the bowl and mix them for
30 seconds at max.speed.Bake the fruit cake in
a 30 cm long baking tin for 40 minutes at 170cC.
Leek Quiche
Ingredients for the dough:
- 250g wheat flour (or wholemeal wheat flour)
- pinch of salt
- 1 tbs honey
- 20g fresh yeast or 1/2 sachet of dry yeast
- 100g butter
- 6 tbs lukewarm water
Ingredients for the filling:
- 500g leeks
- vegetable oil
- 4 eggs
- 500g sour cream
- salt,pepper, 1-2 tbs. of flour if needed
B
Put all the ingredients in the bowl and knead into
a consistent dough.Let the dough rise for about
30min.
B
Slice the leeks with the slicing insert. Put some oil
in a pan and fry the sliced leeks for a few
minutes. Put the rest of the ingredients in the
blender jar and let the blender run until you have
reached a creamy consistency.Add 1-2 tbsp of
flour to thicken the mixture.
B
Grease a baking tin with a diameter of 24cm and
cover the bottom and sides evenly with dough.
Spread the leek mixture onto the dough and pour
the rest of the ingredients over it.Bake in a
preheated oven for about 40min at 180cC. Can
be served warm or cold.
Hungarian-style goulash
Ingredients:
- 1 tbsp oil
- 1 medium onion
- 1 tsp paprika
- 400 g beef or pork
- 1 green pepper
- 1 tomato
- salt
- 200 g carrots
- 300 g potatoes
- caraway seeds
B
Wash the meat and cut it into 2 cm cubes.Peel
the onion and chop it in the food processing bowl
using the metal blade.Core the green pepper and
slice it into rings using the slicing insert. Peel the
tomato,remove the pips and cut it into thin strips.
Page 18

ENGLISH18
Fry the chopped onion in the oil until soft.Remove
from the heat and sprinkle the paprika over the
onion,add the meat and fry over a high heat for a
few minutes while stirring constantly.Add the
green pepper,the tomato and salt to taste, cover
the pan and braise in its own juice over a
moderate heat until almost tender.
B
Meanwhile,peel and slice the carrots using the
slicing insert and peel and dice the potatoes.Add
them to the meat and pour enough cold water for
the amount of soup you want to make (approx.
1,2 litres).Season with a pinch of caraway seeds
and simmer until everything is soft as butter,
adding more salt if necessary.
B
Serve hot.You could add a garnish of green
pepper rings and serve sharp cherry paprika on a
separate plate.
Hazelnut Bread Ring
Ingredients dough:
- 500 g sieved flour
- 75 g sugar
- 1 tsp.salt
- 1 egg
- 250 ml milk (at 35cC)
- 100 g butter, softened
- 30 g fresh yeast (for dry yeast, read the
instructions on the package)
Filling:
- 250 g chopped hazelnuts
- 100 g sugar
- 2 sachets of vanilla sugar
- 125 ml cream
B
Heat oven to 200cC. Mix milk, yeast and sugar in
the bowl for 15 seconds using the kneading tool.
Add flour,salt, butter and egg.Knead the dough
mixture for 2 minutes. Put the dough into a
separate bowl and cover it with a damp cloth and
allow the dough to rise in a lukewarm place for
20 minutes.
B
Chop the hazelnuts using the metal blade.Mix
ingredients for the filling.Roll the dough out into a
rectangular shape.Spread it with the hazelnut
mixture,then roll it up into a ring. Put the ring in a
buttered spring-release tin. Let the ring rise for
20 minutes. Brush some whipped egg yolk onto
the top and place the tin on a rack in the centre
of the oven.Bake for 25 - 30 minutes at 200cC.
Chocolate cake
Ingredients:
- 140 g butter, softened
- 110 g icing sugar
- 140 g chocolate
- 6 egg whites
- 6 egg yolks
- 110 g granulated sugar
- 140 g wheat flour
Filling:
- 200 g apricot jam
Glaze:
- 125 ml water
- 300 g sugar
- 250 g grated chocolate
- whipped cream,if desired
Page 19

ENGLISH 19
B
Heat oven to 160cC. Cream butter with icing
sugar using the metal blade.Melt the chocolate
and mix in.Add egg yolks one by one to the
mixture and mix until creamy.Whip the egg white
with the granulated sugar until stiff and foamy
using the metal blade.Add the egg white foam to
the mixture and stir in gently.Then fold in flour
with a spatula.Put the cake mixture into the
greased baking tin.Bake for one hour at 160cC.
The first 15 minutes the oven door should be kept
slightly ajar.
B
Allow the cake to cool for a while in the baking tin
(24 cm),then turn it onto a wire rack to cool
further.Cut the cake horizontally in half,spread
one half with apricot jam and put the two halves
together again.Heat the rest of the jam until
syrupy and spread it over the top of the cake.
Prepare the icing.Boil water,add sugar and
chocolate and cook over low heat.Stir continuously
until it has a smooth and of spreadable
consistency.Put the icing on the cake and allow it
to cool.Serve the cake with some whipped cream.
Broccoli soup (for 4 persons)
Ingredients:
- 50g mature Gouda cheese
- 300g cooked broccoli (stalks and florets)
- cooking liquid of the broccoli
- 2 boiled potatoes in pieces
- 2 stock cubes
- 2 tbsp whipping cream
- curry
- salt
- pepper
- nutmeg
B
Shred the cheese.Puree the broccoli with the
boiled potatoes and some of the cooking liquid of
the broccoli.Put the broccoli puree and the
remaining liquid and stock cubes into a measuring
beaker and fill it up to 750ml.Transfer the soup to
a pan and bring it to the boil while stirring.Stir in
the cheese and season with curry,salt,pepper and
nutmeg and add the cream.
Pizza
Ingredients for the dough:
- 400g flour
- 1/2 tsp salt
- 20g fresh yeast or 1.5 sachets dried yeast
- 2 tbsp of cooking oil
- approx.240ml water (35cC)
For the topping:
- 300ml sieved tomatoes (tinned)
- 1 tsp mixed Italian herbs (dried or fresh)
- 1 onion
- 2 cloves garlic
- salt and pepper
- sugar
Ingredients to be spread on the sauce:
- olives,salami, artichokes,mushrooms,anchovies,
Mozzarella cheese, peppers, grated mature
cheese and olive oil according to taste.
B
Place the kneading hook in the bowl.Put all the
ingredients in the bowl and select the maximum
speed (position 2).Knead the dough for approx.
90 seconds until a smooth ball has formed. Put
Page 20

ENGLISH20
the dough in a separate bowl,cover it with a
damp cloth and leave it to rise for about
30 minutes.
B
Chop the onions and garlic with the metal blade
in the food processing bowl and fry them in a pan
until they are transparent.Add the sieved
tomatoes and the herbs and simmer for about
10 minutes. Season to taste with salt, pepper and
sugar.Allow the sauce to cool down.
B
Heat the oven to 250cC.
B
Roll the dough out on a floured worktop and
make two round shapes.Place the dough shapes
on a greased baking tray.Spread the topping on
the pizza,leaving the edges free.Spread with the
desired ingredients, scatter some grated cheese
over the pizza and drip some olive oil over it.
B
Bake the pizzas for 12 to 15 minutes.
Vegetable and potato fry
Ingredients:
- 1 egg
- 50 cc milk
- 1 tbsp flour
- 1 tsp coriander
- salt and pepper
- 2 large potatoes (about 300 g)
- 100 g winter carrots
- 150 g celery
- 50 g sunflower seeds or 2 tbsp corn from the
cob
- oil to fry
B
Using the metal blade,mix the egg,milk, flour,
coriander,salt and pepper.
B
Shred the peeled potatoes, the scraped carrots
and the cleaned celery with the coarse shredding
insert and add to the egg mixture. Stir the
vegetables,the egg mixture and the sunflower
seeds or corn from the cob together in a bowl.
B
Heat the oil in a frying pan and fry 8 flat patties
on both sides until they are golden brown.Allow to
drain on kitchen paper.
B
Cooking time:3-4 minutes.
Bread (white)
Ingredients:
- 500 g bread flour
- 15 g soft butter or margarine
- 25 g fresh yeast or 20 g dried yeast
- 260 ml water
- 10 g salt
- 10 g sugar
B
Assemble the kneading hook in the bowl.Put flour,
salt and margarine or butter in the bowl.Add the
fresh or dried yeast and the water.Put the lid on
the bowl and turn it into the direction of the arrow
until you hear a click.Select the maximum speed
(position 2) and mix the dough (for the maximum
kneading time see the chapter Quantities and
preparation times).
B
Remove the dough from the bowl,put it in a large
bowl,cover with a damp tea towel and allow to
rise in a warm place for 20 minutes.After rising,
flatten the dough again,and shape into a ball.
B
Return the dough to the bowl, cover with the
damp cloth and leave it to rise for another
Page 21

21ENGLISH
20 minutes. Flatten it again, and roll it up.
B
Place the dough in a greased baking tin,and leave
it to rise for another 45 minutes. Bake the bread
in the lower part of a pre-heated oven.
B
Bake the bread at about 225cC in the lower part
of a pre-heated oven in about 35 minutes.
Page 22

POLSKI22
Wstęp
Urządzenie to zostało wyposażone w
automatyczny termiczny system odcinający
dopływ prądu.W przypadku przegrzania system
ten automatycznie odcina dopływ prądu do
urządzenia.
Jeśli urządzenie nagle się zatrzyma:
1 Wyjmij wtyczkę z gniazdka ściennego.
2 Przestaw pokrętło na pozycję 0, by
wyłączyć urządzenie.
3 Odczekaj 60 minut, aż urządzenie ostygnie.
4 Włóż wtyczkę do gniazdka ściennego.
5 Włącz ponownie urządzenie.
Skontaktuj się ze sklepem lub autoryzowanym
punktem serwisowym firmy Philips, jeśli
automatyczny termiczny system odcinający
dopływ prądu włącza się zbyt często.
UWAGA: W celu uniknięcia niebezpiecznych
sytuacji, urządzenie to nie może być podłączone
do wyłącznika czasowego.
Części i akcesoria
A Część silnikowa
B Regulator obrotów
P = praca pulsacyjna
1 = najniższe obroty
0 = wyłączone
2 = najwyższe obroty
C Nakrętka (musi być zamontowana, by można
było używać miski malaksera)
D Miska malaksera
E Uchwyt na akcesoria
F Pokrywka miski malaksera
G Lej wsypowy
H Popychacz
I Mieszak
J Metalowe ostrze + osłonka zabezpieczająca
K Wkładka tnąca na plastry
L Wkładka średnio ścierająca
M Uchwyt wkładek
N Tarcza emulgująca
O Przekładnia maszynki do mięsa
P Część tnąca maszynki do mięsa
Q Ślimak
R Nożyk
S Pierścień
T Tarcza średnio ścierająca, na wiórki o średnicy
4 mm
U Tarcza grubo ścierająca, na wiórki o średnicy
8 mm
V Separator
W Lejek do kiełbas
X Taca
Y Popychacz
Z Dźwignia zwalniająca
Page 23

POLSKI 23
Ważne
◗ Przed pierwszym użyciem urządzenia
przeczytaj instrukcję obsługi i zapoznaj się z
poniższymi rysunkami.
◗ Zachowaj tę instrukcję na przyszłość.
◗ Zanim podłączysz urządzenie, sprawdź,czy
napięcie wskazane na urządzeniu odpowiada
lokalnemu napięciu sieciowemu.
◗ Nigdy nie używaj akcesoriów ani części
zamiennych innych producentów lub takich,
których nie zaleca firma Philips. Używanie
takich akcesoriów lub części zamiennych
spowoduje unieważnienie gwarancji.
◗ Nie używaj urządzenia, jeśli przewód
zasilający, wtyczka lub inne części są
uszkodzone.
◗ Jeśli przewód urządzenia ulegnie uszkodzeniu,
musi być wymieniony w autoryzowanym
punkcie serwisowym firmy Philips.Pozwoli to
uniknąć niebezpiecznych sytuacji.
◗ Przed pierwszym użyciem dokładnie umyj
wszystkie części urządzenia stykające się z
żywnością.
◗ Nie przekraczaj maksymalnej ilości
produktów ani czasu ich obróbki podanych w
tabeli.
◗ Nie przekraczaj maksymalnej zawartości
wskazanej na misce, to znaczy nie przekraczaj
górnej linii podziałki.
◗ Natychmiast po zakończeniu pracy wyłącz
urządzenie z gniazdka ściennego.
◗ Gdy urządzenie jest włączone, nigdy nie
popychaj produktów w leju wsypowym
palcami lub innymi przedmiotami (np.łopatką).
W tym celu używaj wyłącznie popychacza.
◗ Przechowuj urządzenie w miejscu
niedostępnym dla dzieci.
◗ Nie pozostawiaj włączonego urządzenia bez
nadzoru.
◗ Miskę przykrywaj pokrywką tylko w
odpowiedniej pozycji.Wbudowany zamek
bezpieczeństwa zostanie wówczas
odblokowany i tylko wtedy będzie można
włączyć urządzenie.
◗ Wyłączaj urządzenie przez odłączeniem
każdego akcesorium.
◗ Zawsze wyłączaj urządzenie, przestawiając
regulator obrotów na pozycję 0.
◗ Przed zdjęciem pokrywki z urządzenia
odczekaj, aż wszystkie części ruchome się
zatrzymają.
◗ Nigdy nie zanurzaj części silnikowej
urządzenia w wodzie ani innym płynie. Nie
spłukuj jej bieżącą wodą. Do czyszczenia
części silnikowej używaj wyłącznie wilgotnej
ściereczki.
◗ Przed każdym użyciem zdejmuj z ostrza
osłonkę zabezpieczającą.
◗ Nigdy nie używaj nożyka w połączeniu z
separatorem i rożkiem do kiełbas.
◗ Nie miel kości, orzechów lub innych twardych
składników.
◗ Nigdy nie wkładaj palców do tacy. Zawsze
używaj popychacza.
◗ Odczekaj, aż gorące składniki ostygną, zanim
poddasz je obróbce (maksymalna temperatura
80cC/175cF).
Page 24
POLSKI24
◗ Czas stosowania poszczególnych funkcji
znajdziesz w tabelach w dalszej części
niniejszszej instrukcji obsługi.
◗ Natychmiast po zakończeniu pracy wyłącz
urządzenie z gniazdka ściennego.
Użycie urządzenia
Miska malaksera
C
1 Zamontuj miskę na malakserze,
przekręcając uchwyt w kierunku
wskazanym strzałką, aż usłyszysz
charakterystyczne kliknięcie.
C
2 Umieść pokrywkę na misce. Przekręć
pokrywkę w kierunku wskazanym przez
strzałkę, aż usłyszysz charakterystyczne
kliknięcie (wymaga to użycia nieco siły).
Wbudowany zamek bezpieczeństwa
Na części silnikowej, misce oraz pokrywce
znajdują się specjalne oznaczenia. Urządzenie
będzie działało tylko wtedy, jeśli znak na części
silnikowej będzie znajdować się dokładnie
naprzeciwko znaku na nakrętce.
C
1 Upewnij się, czy linia na pokrywce oraz
linia na misce znajdują się dokładnie
naprzeciwko siebie.Wybrzuszenie
pokrywki dopasowuje się do kształtu
uchwytu.
Lej wsypowy i popychacz
C
1 Lej wsypowy służy do dodawania płynnych
i stałych składników.Do przepychania
stałych składników przez lej wsypowy służy
popychacz.
C
2 Można także używać popychacza jako
zatyczki w celu zapobieżenia wypadaniu
produktów z leja.
Metalowe ostrze
◗ Metalowe ostrze służy do rozdrabniania,
miksowania, mieszania i ucierania.
C
1 Zdejmij osłonkę zabezpieczającą z ostrza.
Krawędzie ostrza są bardzo ostre. Nie dotykaj ich!
C
2 Umieść uchwyt na akcesoria w misce, a
następnie na nim zamontuj ostrze.
3 Włóż składniki do miski. Duże kawałki
pokrój na mniejsze o wymiarach ok.
3 x 3 x 3 cm. Załóż pokrywkę na miskę.
4 Włóż popychacz do leja wsypowego.
CLICK
CLICK
1
2
1
2
CLICK
Page 25
25POLSKI
C
5 Wybierz maksymalną prędkość (pozycja 2)
na regulatorze obrotów.
- Urządzenie będzie działało aż do momentu
przestawienia na pozycję 0 (wyłączone).
◗ Aby zmniejszyć obroty, przestaw regulator na
pozycję 1.
Porady
◗ Jeśli rozdrabniasz cebulę,używaj funkcji pracy
pulsacyjnej - dzięki temu unikniesz zbyt
drobnego posiekania cebuli.
◗ Uważaj, by urządzenie nie działało zbyt długo
podczas rozdrabniania sera (żółtego).
Wówczas bowiem ser rozgrzewa się za
bardzo i zaczyna się topić i kleić.
◗ Nie używaj ostrza do rozdrabniania bardzo
twardych składników, takich jak ziarna kawy,
kurkuma, gałka muszkatołowa czy kostki lodu.
Ostrze może się stępić.
Jeśli produkty przykleją się do ostrza lub do
ścianek miski:
1 Wyłącz urządzenie.
2 Zdejmij pokrywkę z miski.
3 Łopatką usuń rozdrobnione składniki z
ostrza i ścianek miski.
Wkładki
Nigdy nie próbuj rozdrabniać wkładkami takich
twardych produktów, jak kostki lodu.
C
1 Umieść wybraną wkładkę w uchwycie
przed zamocowaniem jej na uchwycie na
akcesoria.
Krawędzie tnące są bardzo ostre. Nie dotykaj ich!
C
2 Umieść uchwyt wkładki w uchwycie na
akcesoria, który znajduje się w misce.
3 Załóż pokrywkę na miskę.
4 Włóż składniki do leja wsypowego.
Wcześniej potnij produkty na kostki,które
zmieszczą się w leju.
C
5 Aby osiągnąć najlepsze rezultaty, napełniaj
lej wsypowy równomiernie.
Jeśli masz do rozdrobnienia duże ilości składników,
poddawaj jednorazowo obróbce małe porcje i
opróżniaj miskę regularnie.
C
6 Do ścierania i cięcia na plastry wybierz na
regulatorze obrotów maksymalną
prędkość (pozycja 2).
Urządzenie będzie działało aż do momentu
przestawienia na pozycję 0 (wyłączone).
◗ Aby zmniejszyć prędkość,przestaw regulator
na pozycję 1.
CLICK
2
1
Page 26
POLSKI26
Tarcza emulgująca
Tarcza emulgująca służy do przyrządzania
majonezu, ubijania śmietany i piany z białek.
C
1 Załóż tarczę emulgującą na uchwyt na
akcesoria znajdujący się w misce.
2 Włóż składniki do miski i przykryj miskę
pokrywką.
3 Ustaw minimalną prędkość (pozycja 1),by
uzyskać najlepsze rezultaty.
Porady
◗ Jeśli zamierzasz ubić pianę z białek, upewnij
się, czy jajka mają temperaturę pokojową.
◗ Wyjmij jajka z lodówki co najmniej pół
godziny przed ubijaniem.
◗ Wszystkie składniki przeznaczone do
przyrządzania majonezu powinny mieć
temperaturę pokojową.
Olej można dodawać przez mały otwór na
spodzie popychacza.
◗ Jeśli zamierzasz ubijać śmietanę, śmietana musi
być wyjęta prosto z lodówki. Należy
przestrzegać czasu obróbki podanego w
tabeli. Nie należy ubijać śmietany zbyt długo.
Aby lepiej kontrolować proces obróbki, używaj
funkcji pulsacyjnej.
C
7 Popychaczem lekko popchnij produkty
znajdujące się w leju wsypowym.
◗ Gdy ścierasz miękkie warzywa lub owoce,
możesz zmniejszyć prędkość, przestawiając
regulator na pozycję 1. Dzięki temu
rozdrabniane warzywa i owoce nie zamienią
się w papkę.
C
8 Aby wyjąć wkładkę z uchwytu, weź w ręce
uchwyt, tylną częścią skierowaną do
siebie. Przyciśnij brzegi wkładki kciukami
tak, aby wkładka wypadła z uchwytu.
Mieszak
Końcówka ta służy do wyrabiania ciasta
drożdżowego lub przyrządzania rzadkich ciast.
C
1 Ustaw miskę na części silnikowej i
zamontuj mieszak na wałku napędowym.
2 Włóż składniki do miski i przykryj miskę
pokrywką. Umieść popychacz w leju
wsypowym, by zapobiec rozchlapywaniu
składników podczas mieszania.
C
3 Wybierz maksynalną prędkość (pozycja 2)
na regulatorze obrotów.
Page 27
27POLSKI
Maszynka do mięsa
Maszynkę do mięsa można wykorzystywać do
mielenia mięsa i robienia kiełbas.
C
1 Do silnika dołącz przekładnię.
Gdy poprawnie zainstalujesz akcesoria, usłyszysz
kliknięcie.
C
2 Dołącz obudowę części rozdrabniającej
maszynki do części silnikowej.
C
3 Do części tnącej maszynki włóż ślimak, od
strony końcówki z tworzywa sztucznego.
C
4 Na ślimaku umieść nożyk. Krawędzie tnące
powinny znaleźć się z przodu.
C
5 Umieść na ślimaku tarczę średnio lub
grubo ścierającą (zależnie od wymaganej
konsystencji).
Sprawdź, czy w nacięcia w tarczy ścierającej
wsunięte są występy głowicy maszynki.
C
6 Zamocuj pierścień na maszynce obracając
nim w kierunku wskazanym strzałką.
C
7 Na górnej części maszynki umieść tacę.
Mielenie mięsa
1 Potnij mięso na paski o długości 10 cm i
grubości 2 cm.
2 Usuń możliwie wszystkie kości, kawałki
chrząstek i ścięgna.
Nigdy nie używaj zamrożonego mięsa!
C
3 Do mielenia mięsa wybierz prędkość 2.
C
4 Włóż mięso do tacy. Stopniowe wsuwanie
mięsa do maszynki wykonuj używając
popychacza.
Możesz zemleć 1,3 kg mięsa na minutę.
(Używaj chudej wieprzowiny bez tłuszczu i
ścięgien.)
◗ Aby zemleć mięso na befsztyk tatarski
dwukrotnie zmiel mięso na tarczy średnio
ścierającej.
Page 28

POLSKI28
Robienie kiełbas
1 Zmiel mięso.
2 Po zmieleniu mięsa wyjmij wtyczkę z
gniazdka ściennego i odkręć pierścień.
3 Wyjmij tarczę ścierającą.
4 Wyjmij nożyk.
◗ Jeśli chcesz robić kiełbasy, pozostaw ślimak w
maszynce.
C
5 Umieść separator w maszynce.
C
6 Załóż na maszynkę lejek do kiełbas i
dokręć pierścień.
Urządzenie jest teraz gotowe do robienia kiełbas.
Porady
◗ Osłonkę (jelito) na kiełbasy włóż na 10 minut
do ciepłej wody. Następnie nasuń mokrą
osłonkę (jelito) na lejek do kiełbas.Wepchnij
(przyprawione) mielone mięso do maszynki.
◗ Jeśli osłonka przyklei się do lejka do kiełbas,
zwilż ją wodą.
◗ Przy robieniu kiełbas ustaw prędkość na
wartości 1.
Czyszczenie
Przed przystąpieniem do czyszczenia części
silnikowej zawsze wyłączaj urządzenie z sieci.
1 Wytrzyj część silnikową wilgotną
ściereczką. Nie zanurzaj części silnikowej w
wodzie ani jej nie spłukuj.
2 Zawsze bezpośrednio po zakończeniu
obróbki myj części, które kontaktują się z
żywnością. Myj je w gorącej wodzie z
płynem do mycia naczyń.
◗ Miskę, pokrywkę miski,popychacz oraz
akcesoria można myć w zmywarce.
Części te zostały poddane testom
wytrzymałościowym na zmywanie w zmywarce na
podstawie DIN EN 12875.
Bardzo uważaj przy myciu metalowych or az
nakładek. Krawędzietnące są bardzo ostre!
Upewnij się, czy krawędzie tnące ostrzy oraz
wkładek nie stykają się z twardymi przedmiotami.
Mogą one spowodować stępienie ostrzy.Niektóre
składniki mogą powodować przebarwienia na
akcesoriach. Nie wpływa to negatywnie na
działanie tych akcesoriów. Po pewnym czasie
przebarwienia na ogół same znikają.
C
◗ Przewód sieciowy zwiń wokół uchwytów
umieszczonych na tylnej ściance urządzenia.
Page 29

POLSKI 29
Czyszczenie maszynki do mięsa
Mięso pozostałe wewnątrz maszynki do mięsa
można usunąć od wewnątrz urządzenia
przepuszczając przez nią kromkę chleba.
1 Przed umyciem urządzenia wyłącz je i
wyjmij wtyczkę z gniazdka ściennego.
2 Wciśnij dźwignię zwalniającą i obróć całą
maszynkę do mięsa w kierunku wskazanym
strzałką.
C
3 Wyjmij popychacz i tacę.
4 Odkręć pierścień i wyjmij z maszynki
wszystkie części.
Nie myj części maszynki w zmywarce do naczyń!
5 Wszystkie części wchodzące w kontakt z
mięsem umyj w gorącej wodzie z
dodatkiem płynu do mycia naczyń
NATYCHMIAST PO UŻYCIU.
6 Opłucz je czystą gorącą wodą i
NATYCHMIAST je osusz.
◗ Radzimy naoliwić nóż i tarcze tnące niewielką
ilością oleju roślinnego.
Gwarancja i serwis
Jeśli potrzebujesz informacji lub jeśli masz jakiś
problem skontaktuj się z Działem Obsługi Klienta
(numer telefonu znajdziesz w Karcie
Gwarancyjnej) lub też najbliższym punktem
serwisowym sprzętu AGD, autoryzowanym przez
firmę Philips (patrz: wykaz w Karcie
Gwarancyjnej).
Page 30

30 POLSKI
Rozwiązanie
Przekręć miskę lub pokrywkę w kierunku zgodnym z
ruchem wskazówek zegara, aż usłyszysz kliknięcie.
Upewnij się, że oznaczenia na misce i na pokrywce
znajdują się dokładnie naprzeciwko siebie.
Prawdopodobnie z powodu przegrzania urządzenia
automatyczny system termiczny odciął dopływ prądu.
1) Wyłącz urządzenie (pozycja 0). 2) Wyjmij wtyczkę z
gniazdka ściennego. 3) Pozwól urządzeniu wystygnąć
przez godzinę. 4) Włóż wtyczkę do gniazdka.
5) Włącz urządzenie ponownie.
Sprawdź, czy dobrze przekręciłaś/eś miskę i pokrywkę w
kierunku zgodnym z ruchem wskazówek zegara, aż do
momentu kliknięcia.
Jeśli zarówno blender, jak i miska malaksera są
zamontowane prawidłowo, działał będzie tylko blender.
Jeśli chcesz używać miski, odłącz blender, a przeznaczony
na jego podłączenie otwór zaślep nakrętką.
Problem
Urządzenie nie chce
się włączyć.
Urządzenie nagle
zatrzymało się.
Akcesoria do
wyrabiania ciasta lub
do mieszania nie
obracają się
Zarówno dzbanek
blendera, jak i miska
malaksera są
podłączone do
urządzenia, ale pracuje
tylko blender.
Co robić w razie problemów
Akcesoria i proces obróbki
Ilości produktów i czas obróbki
Czas obróbki
10 - 60 sekund
60 - 180 sekund.
10 - 60 sekund
W zależności od ilości.
10 - 60 sekund
Zastosowanie
Rozdrabnianie, ucieranie, miksowanie
Wyrabianie ciasta
Slicing, shredding
Mielenie mięsa
Ubijanie, emulgowanie
Akceso
ria
P
{
gh
å
Zastosowanie
Sałatki, surówki
Sałatki, surówki
Potrawy
obtaczane
bułką tartą,
zapiekanki
Desery,
polewy
Przystrajanie
dań, zupy, sosy,
zapiekanki
Sosy, pizza,
zapiekanki,
fondue
Postępowanie
Potnij warzywa na kawałki,
które mieszczą się do leja.
Wypełnij nimi cały lej i tnij
warzywa, delikatnie popychając
je popychaczem.
Potnij warzywa na kawałki,
które mieszczą się do leja.
Wypełnij nimi cały lej i tnij
warzywa, delikatnie popychając
je popychaczem.
Użyj suchego, chrupiącego
pieczywa.
Aby uzyskać lekki krem, użyj
miękkiego masła
Użyj sera bez skórki i potnij go
na kawałki o wielkości ok. 3cm
x 3cm.
Potnij ser na kawałki,które
zmieszczą się do leja
wsypowego. Przyciśnij
delikatnie popychaczem.
Akces
oria /
prędk
ość
obrot
ów
P/ 2
P/ 2
P/ 2
P/ 2
P/ 2
Proces
ściera
nia /
k
Maksy
malna
ilość
500g
500g
100g
300g
200g
200g
Składniki i
rezultaty
obróbki
Jabłka,
marchew, seler
- ścieranie
Jabłka,
marchew, seler
- cięcie na
plastry
Bułka tarta rozdrabnianie
Krem maślany
(creme au
beurre) ubijanie
Ser
(parmezan) rozdrabnianie
Ser (gouda) ścieranie
Page 31

3131POLSKI
Zastosowanie
Przystrajanie
dań, sosy,
wypieki,
puddingi, musy.
Puree, zupy
Potrawy dla
dzieci i
niemowląt.
Sałatki,
przystrajanie
dań
Chleb
Pizza
Postępowanie
Użyj twardej czekolady bez
dodatków. Połam czekoladę na
dwucentymetrowe kawałki.
Użyj gotowanego groszku lub
fasoli.W razie potrzeby, dodaj
nieco płynu, aby poprawić
konsystencję masy.
Aby uzyskać gęste puree dodaj
niewielką ilość płynu.Aby
uzyskać delikatne puree,
dodawaj płynu, aż masa będzie
zupełnie gładka.
Włóż ogórek do leja
wsypowego i delikatnie
przyciśnij.
Wymieszaj ciepłą wodę z
drożdżami i cukrem. Dodaj
mąkę, olej i sól.Wyrabiaj ciasto
przez ok. 90 sekund. Odstaw
do wyrośnięcia na 30 minut.
Postępuj tak samo jak przy
cieście na chleb.Wyrabiaj ciasto
przez minutę.
Akces
oria /
prędk
ość
obrot
ów
P/ 2
PD/
2
P/ 2
g / 1
P / 2
P / 2
Maksy
malna
ilość
200g
250g
500g
2
ogórki
500 g
mąki
1000
g mąki
Składniki i
rezultaty
obróbki
Czekolada rozdrabnianie
Gotowany
groszek, fasola
- ucieranie
Gotowane
warzywa i
mięso ucieranie
Ogórekkrojenie w
plastry
Ciasto (na
chleb) wyrabianie
Ciasto (na
pizzę) wyrabianie
Zastosowanie
Szarlotka,
herbatniki,
placki z
owocami
Placek
drożdżowy
Pudding, suflet,
beza
Sosy, dżemy,
puddingi,
pokarm dla
niemowląt
Postępowanie
Użyj zimnej margaryny, potnij ją
na dwucentymetrowe kawałki.
Wsyp mąkę do miski i dodaj
margarynę. Mieszaj, aż ciasto
stanie się kruche. Dodaj zimną
wodę, ciągle mieszając. Przestań
mieszać, gdy tylko ciasto
zacznie formować się w kulę.
Przed dalszą obróbką odczekaj,
aż ciasto ostygnie.
Najpierw w osobnej misce
wymieszaj drożdże, ciepłą
wodę i trochę cukru.Włóż
wszystkie składniki do miski
malaksera i wyrabiaj ciasto, aż
będzie gładkie i nie będzie
przyklejać się do ścianek
naczynia (około minuty).
Zostaw ciasto do wyrośnięcia
na pół godziny.
Użyj jajek o temperaturze
pokojowej. Uwaga: weź co
najmniej 2 jajka.
Wskazówka: dodaj trochę soku
z cytryny, aby zapobiec
ciemnieniu owoców.
Akces
oria /
prędk
ość
obrot
ów
P / 2
P / 2
A / 1
P / 2
Maksy
malna
ilość
300 g
mąki
500 g
mąki
4
białka
500g
Składniki i
rezultaty
obróbki
Ciasto
(kruche) wyrabianie
Ciasto
(drożdżowe) wyrabianie
Piana z białek ubijanie
Owoce (np.
jabłka, banany)
rozdrabnianie
Page 32

POLSKI 3232
Zastosowanie
Przystrajanie
dań, dipy
Sosy, zupy,
przystrajanie
dań, masło
ziołowe
Sałatki,
przystrajanie
dań, sosy
barbecue
Stek tatarski,
hamburgery,
pulpety
Różne ciastka.
Postępowanie
Obierz czosnek.Aby uniknąć
posiekania czosnku za drobno
zawsze używaj funkcji
pulsacyjnej.Weź co najmniej
150g czosnku.
Przed posiekaniem umyj i osusz
zioła.
Wszystkie składniki muszą mieć
temperaturę pokojową. Uwaga:
weź co najmniej jedno duże
jajko, dwa małe jajka lub dwa
żółtka. Umieść jajko z odrobiną
octu winnego w misce i
stopniowo dodawaj olej po
kropelce.
Najpierw wyjmij ścięgna i kości.
Potnij mięso na paski o długości
10 cm i grubości 2 cm.
Składniki muszą mieć
temperaturę pokojową. Mieszaj
miękkie masło z cukrem, aż
powstanie gładka i lekka masa.
Następnie dodaj mleko, jajka i
mąkę.
Akces
oria /
prędk
ość
obrot
ów
P / 2
P / 2
˙ / 1
/ 2
P / 2
Maksy
malna
ilość
300g
Weź
co
najmni
ej 50 g
3 jajka
1000g
4 jajka
Składniki i
rezultaty
obróbki
Czosnek siekanie
Zioła (np.
pietruszka) siekanie
Majonez emulgowanie
Mięso (chude)
- mielenie
Masy (do
ciast) miksowanie
Zastosowanie
Sałatki,
puddingi, chleb
z orzechami,
pasta
migdałowa.
Sałatki,
potrawy
gotowane,
potrawy
smażone,
przystrajanie
Sałatki,
potrawy
gotowane,
potrawy
smażone,
przystrajanie
Przystrajanie
potraw, kremy,
mieszanki z
lodami.
Postępowanie
Użyj przycisku funkcji
pulsacyjnej, jeśli chcesz posiekać
orzechy grubiej. Jeśli zadawala
się uzyskany stopień
rozdrobnienia, wciśnij przycisk
STOP.
Obierz cebulę i pokrój ją na
ćwiartki. Po dwóch cyklach
pulsacyjnych sprawdź rezultat.
Obierz cebulę i potnij ją na
kawałki, które zmieszczą się do
leja wsypowego. Uwaga: weź
co najmniej 100g cebuli.
Weź śmietanę prosto z
lodówki. Uwaga:użyj co
najmniej 125ml śmietany. Po ok.
20 sekundach bita śmietana jest
gotowa.
Akces
oria /
prędk
ość
obrot
ów
P / 2
P / 2
g / 1
S / 1
Maksy
malna
ilość
250g
500g
300g
500ml
Składniki i
rezultaty
obróbki
Orzechy rozdrabnianie
Cebula siekanie
Cebula krojenie w
plastry
Bita śmietana ubijanie
Page 33

3333POLSKI 33
Przepisy
Kanapkowa pasta z cukinii
Składniki:
- 2 cukinie
- 3 gotowane jajka
- 1 mała cebula
- 1 łyżka stołowa oleju roślinnego
- pietruszka
- 2-3 łyżki stołowe kwaśnej śmietany
- sok z cytryny, sos tabasco, sól,pieprz, proszek
curry, mielona papryka
B
Cukinię umyj i wysusz, a następnie rozdrobnij ją w
misce malaksera za pomocą wkładki drobno
ścierającej. Przełóż rozdrobnioną cukinię do
naczynia, posyp solą i zostaw na około 15 minut,
aby puściła sok. Przekrój cebulę na ćwiartki i
rozdrobnij ją wraz z czosnkiem. Posiekaj też liście
pietruszki (bez łodyg).
B
Przełóż rozdrobnioną cukinię na czystą ścierkę i
wyciśnij sok. Do rondla wlej odrobinę oleju,
podsmaż posiekaną cebulę i czosnek, następnie
dodaj cukinię. Podgrzewaj do chwili, aż odparuje
cały sok. Odstaw na chwilę do ostygnięcia. Obierz
jajka i przez kilka sekund rozdrabniaj je w misce
malaksera. Do miski włóż pozostałe składniki,
przypraw je i wymieszaj za pomocą ostrza.
Podawaj na opiekanych kromkach białego chleba.
Ciasto z owocami
Składniki:
- 150 g daktyli
- 225 g śliwek suszonych
- 100 g orzechów ( 50 g migdałów i 50 g
orzechów włoskich)
- 50 g rodzynek
- 50 g sułtanek
- 200 g pełnoziarnistej mąki żytniej
- 100 g mąki pszennej
- 100 g brązowego cukru
- szczypta soli
- 1 torebka proszku do pieczenia
- 300 g maślanki
B
Zamontuj w misce metalowe ostrze.Wrzuć do
miski wszystkie składniki i miksuj przez 30 sekund
na maksymalnych obrotach. Ciasto piecz w
30-centymetrowej brytfannie przez 40 minut w
temperaturze 170cC.
Quiche z pora
Składniki na ciasto:
- 250 g mąki pszennej (lub razowej mąki
pszennej)
- szczypta soli
- 1 łyżka stołowa miodu
- 20 g świeżych drożdży lub 1/2 paczki drożdży
suszonych
- 100 g masła
- 6 łyżek stołowych letniej wody
Składniki na farsz:
- 500 g pora
- olej roślinny
- 4 jajka
- 500 g kwaśniej śmietany
Page 34

34 POLSKI34
- sól, pieprz, w zależności od potrzeb 1-2 lyżki
mąki
B
Wrzuć wszystkie składniki do miski i wyrabiaj do
chwili, gdy osiągną kosystencję ciasta. Pozostaw je
na pół godziny do wyrośnięcia.
B
Potnij pora za pomocą nakładki tnącej na plastry.
Do rondla wlej nieco oleju i przez kilka minut
podsmażaj posiekanego pora. Resztę składników
wrzuć do blendera i miksuj, aż składniki będą
miały kremową konsystencję. Dla zagęszczenia
dodaj 1-2 łyżki stołowe mąki.
B
Posmaruj tłuszczem brytfannę do pieczenia o
średnicy 24 cm, a następnie na spodzie i
ściankach rozprowadź równomiernie ciasto. Nałóż
farsz na ciasto, dorzucając pozostałe składniki.
Piecz w rozgrzanym piekarniku około 40 minut w
temperaturze 180cc. Może być podawane na
zimno lub gorąco.
Gulasz po węgiersku
Składniki:
- 1 łyżka oleju
- 1 średnia cebula
- 1 łyżeczka papryki
- 400 g wołowiny lub wieprzowiny
- 1 zielona papryka
- 1 pomidor
- sól
- 200 g marchwi
- 300 g ziemniaków
- kminek
B
Umyj mięso i pokrój na 2-centymetrowe kawałki.
Obierz cebulę i posiekaj ją w misce malaksera
przy użyciu metalowego ostrza.Wydrąż paprykę i
pokrój ją w pierścienie, używając nakładki tnącej
na plastry. Obierz pomidora, wykrój pestki i pokrój
w cienkie paseczki. Podsmaż na oleju posiekaną
cebulę, aż będzie miękka. Zdejmij z ognia i posyp
papryką w proszku, dodaj mięso i ciągle mieszając
smaż przez kilka minut na dużym ogniu. Dodaj
pokrojoną paprykę, pomidora i sól do smaku,
przykryj rondel i duś we własnym sosie na średnim
ogniu aż do miękkości.
B
Tymczasem obierz marchew i pokrój ją za
pomocą nasadki tnącej na plastry, obierz także
ziemniaki i pokrój je w kostkę. Dodaj je do mięsa i
wlej tyle zimnej wody, ile chcesz uzyskać zupy
(około 1,2 litra). Dopraw kminkiem i - dodając soli,
jeśli to konieczne - duś do chwili, aż wszystko
będzie miękkie jak masło.
B
Podawaj na gorąco.Możesz przystroić krążkami
papryki, a na oddzielnym talerzu podawać ostrą
czerwoną paprykę.
Rolada z orzechami laskowymi
Składniki na ciasto:
- 500 g przesianej mąki
- 75 g cukru
- 1 łyżeczka soli
- 1 jajko
- 250 ml mleka (35cC)
- 100 g miękkiego masła
- 30 g świeżych drożdży (jeśli użwasz drożdży
suszonych, stosuj się do instrukcji na
opakowaniu)
Page 35

35POLSKI 35
Nadzienie:
- 250 g posiekanych orzechów laskowych
- 100 g cukru
- 2 torebki cukru waniliowego
- 125 ml śmietany
B
Nagrzej piekarnik do 200cC. Mleko, drożdże i
cukier mieszaj w misce przez 15 sekund,
wykorzystując końcówkę do wyrabiania ciasta.
Dodaj mąkę, sól, masło i jajko. Wyrabiaj ciasto
przez 2 minuty. Przełóż ciasto do innej miski,
przykryj wilgotną ścierką i postaw na 20 minut w
ciepłym miejscu, by wyrosło.
B
Posiekaj orzechy laskowe, używając metalowego
ostrza.Wymieszaj składniki na nadzienie.
Rozwałkuj ciasto w prostokątny kształt. Nałóż
masę z orzechów laskowych, a następnie zroluj.
Włóż do wysmarowanej masłem formy do
pieczenia. Odstaw, by ciasto porosło jeszcze
20 minut. Górną część posmaruj żółtkiem, a
następnie wsuń blachę na ruszt umieszczony
pośrodku piekarnika. Piecz 25 - 30 minut w
temperaturze 200cC.
Ciasto czekoladowe
Składniki:
- 140 g miękkiego masła
- 110 g cukru lukrowego
- 140 g czekolady
- białko z 6 jajek
- 6 żółtek
- 110 g cukru pudru
- 140 g mąki pszennej
Nadzienie:
- 200 g dżemu morelowego
Polewa:
- 125 ml wody
- 300 g cukru
- 250 g utartej czekolady
- ewentualnie bita śmietana
B
Rozgrzej piekarnik do temperatury 160cC.
Wymieszaj masło z cukrem glazurowym,
wykorzystując metalowe ostrze. Rozpuść i dodaj
czekoladę. Następnie dodaj żółtka - jedno po
drugim - i mieszaj do momentu, aż masa będzie
miała kremową konsystencję. Metalowym ostrzem
ubij na sztywno białka z cukrem pudrem. Do masy
dodaj pianę z białek i delikatnie wymieszaj.
Łopatką wmieszaj mąkę. Przełóż ciasto do
natłuszczonej blachy do pieczenia. Piecz przez
godzinę w temperaturze 160cC. Przez pierwsze
15 minut drzwiczki piekarnika powinny być nieco
uchylone.
B
Pozwól ciastu nieco ostygnąć na blasze do
pieczenia (24 cm), a następnie przewróć je na
drucianą kratkę do dalszego wystudzenia. Przekrój
ciasto w poziomie na połowę, na jedną część
nałóż dżem morelowy, a następnie złącz
ponownie obydwie połowy.Resztę dżemu rozgrzej,
a gdy stanie się płynny, polej nim całe ciasto.
Przygotuj glazurę. Zagotuj wodę, dodaj cukier i
czekoladę i gotuj na małym ogniu. Ciągle mieszaj,
aż masa będzie na tyle gładka, że da się
rozsmarować na cieście. Nałóż polewę na ciasto i
poczekaj do wystygnięcia. Podawaj z odrobiną bitej
śmietany.
Page 36

POLSKI36
Zupa z brokułów (dla 4 osób)
Składniki:
- 50 g dojrzałego sera Gouda
- 300 g gotowanych brokułów (łodygi i kwiaty)
- wywar z gotowania brokułów
- 2 gotowane pokrojone ziemniaki
- 2 kostki rosołowe
- 2 łyżki stołowe bitej śmietany
- curry
- sól
- pieprz
- gałka muszkatołowa
B
Rozdrobnij ser. Utrzyj brokuły z gotowanymi
ziemniakami i odrobiną wywaru z gotowania
brokułów. Przelej masę brokułową, pozostały
wywar oraz kostki rosołowe do pojemnika z
podziałką i dopełnij go do objętości 750 ml. Przelej
zupę do rondla i zagotuj, ciągle mieszając. Dodaj
ser i dopraw curry, solą, pieprzem oraz gałką
muszkatołową, a następnie dodaj śmietanę.
Pizza
Składniki na ciasto:
- 400g mąki
- 1/2 łyżeczki soli
- 20 g świeżych drożdży lub półtorej paczki
suszonych
- 2 łyżki stołowe oleju
- około 240 ml wody (35cC)
Sos:
- 300 ml przetartych pomidorów (z puszki)
- 1 łyżeczka włoskiej mieszanki ziołowej (suszonej
lub świeżej)
- 1 cebula
- 2 ząbki czosnku
- sól i pieprz
- cukier
Składniki do dodania na sos:
- oliwki, salami, karczochy, pieczarki, anchovies, ser
mozzarella, papryka, dojrzały ser (starty),
ewentualnie oliwa z oliwek
B
Zamontuj mieszak w misce. Umieść wszystkie
składniki w misce i włącz urządzenie, ustawiając
najwyższe obroty (pozycja 2).Wyrabiaj ciasto
przez około 90 sekund, aż uformuje się gładka
kula. Przełóż ciasto do innego pojemnika.
Pozostaw przykryte wilgotną ściereczką do
wyrośnięcia na 30 minut.
B
Za pomocą metalowego ostrza posiekaj w misce
malaksera cebulę wraz z czosnkiem, a następnie
podsmażaj je w rondlu do chwili, aż będą szkliste.
Dodaj przetarte pomidory oraz zioła i duś je
przez około 10 minut. Dodaj sól, pieprz i cukier do
smaku. Zostaw sos do ostygnięcia.
B
Rozgrzej piekarnik do 250cC.
B
Na powierzchni posypanej uprzednio mąką
rozwałkuj ciasto na dwa okrągłe placki. Ułóż je na
natłuszczonej brytfannie.Polej sosem. Zostaw
wolne miejsce na brzegach pizzy.Ułóż dowolne
dodatki, zetrzyj trochę sera i pokrop oliwą.
B
Włóż do piecyka i piecz przez 12-15 minut.
Page 37

POLSKI 37
Placki warzywno-ziemniaczane
Składniki:
- 1 jajko
- 50 ml mleka
- 1 łyżka stołowa mąki
- 1 łyżeczka kolendry
- sól i pieprz
- 2 duże ziemniaki (około 300 g)
- 100 g marchwi
- 150 g selera
- 50 g ziaren słonecznika lub 2 łyżki stołowe
otrąb
- olej do smażenia
B
Przy użyciu metalowego ostrza wymieszaj jajko,
mleko, mąkę, kolendrę, a także sól i pieprz.
B
Rozdrobnij za pomocą nakładki grubo ścierającej
obrane ziemnaki, oskrobaną marchew i umyty
seler, a następnie dodaj do jajka rozmieszanego z
mlekiem i przyprawami.Wymieszaj razem w
misce warzywa, mleko z jajkiem oraz nasiona
słonecznika lub otręby.
B
Rozgrzej olej na patelni i usmaż 8 placków po
obu stronach na złotobrązowy kolor. Odsącz z
tłuszczu na papierowym ręczniku.
B
Czas smażenia: 3-4 minuty.
Chleb (biały)
Składniki:
- 500 g mąki chlebowej
- 15 g miękkiego masła lub margaryny
- 25 g świeżych drożdży lub 20 g suszonych
- 260 ml wody
- 10 g soli
- 10 g cukru
B
W misce zamontuj mieszak.Wsyp do miski mąkę,
dodaj sól, margarynę lub masło.Dodaj świeże lub
suszone drożdże oraz wodę. Przykryj miskę
pokrywką i obróć ją w kierunku wskazywanym
przez strzałkę, aż usłyszysz kliknięcie.Wybierz
najwyższe obroty (pozycja 2) i mieszaj ciasto
(maksymalny czas wyrabiania znajdziesz w
rozdziale "Ilość składników i czas przygotowania").
B
Przełóż ciasto do większej miski, przykryj wilgotną
ścierką i na 20 minut pozostaw w ciepłym miejscu
do wyrośnięcia. Po wyrośnięciu ugnieć ciasto,a
następnie uformuj z niego kulę.
B
Ponownie włóż ciasto do miski, przykryj wilgotną
ścierką i pozwól wyrosnąć przez kolejne 20 minut.
Ugnieć je ponownie i zroluj.
B
Włóż ciasto do natłuszczonej brytfanny i pozwól
rosnąć przez następne 45 minut. Piecz chleb,
ustawiając brytfannę w dolnej części nagrzanego
piekarnika.
B
Chleb wypiekaj w temperaturze 225cC. w dolnej
części nagrzanego piekarnika przez około
35 minut.
Page 38

ROMÂNĂ38
Componente şi accesorii
A Bloc motor
B Reglaj viteză
P = Impuls
0 = Oprire
1 = Viteză minimă
2 = Viteză maximă
C Dop filetat (trebuie poziţionat pentru a
putea folosi funcţiile bolului)
D Bol pentru prepararea alimentelor
E Ax central
F Capac bol pentru prepararea alimentelor
G Tub de alimentare
H Dispozitiv de împingere
I Cârlig de frământare
J Cuţit + dispozitiv de protecţie
K Disc feliere medie
L Disc radere medie
M Ax discuri
N Disc de emulsionare
O Carcasă angrenaj pentru tocător de carne
P Carcasă ansamblu cuţit pentru tocător de
carne
Q Ax al melcului
R Ansamblu cuţit
S Inel Filetat
T Disc tocare medie, 4 mm dia.
U Disc tocare mare, 8 mm dia.
V Sită
W Pâlnie pentru cârnaţi
X Ta v ă
Y Dispozitiv de împingere
Z Mâner de declanşare
Introducere
Acest aparat este echipat cu o siguranţă termică
automată.Acest sistem va opri automat
alimentarea cu curent a aparatului în cazul
supraîncălzirii.
Dacă aparatul se opreşte brusc:
1 Scoateţi ştecherul din priză.
2 Comutaţi butonul pe poziţia 0 pentru a
opri aparatul.
3 Lăsaţi aparatul să se răcească 60 de
minute.
4 Introduceţi ştecherul în priză.
5 Porniţi din nou aparatul.
Vă rugăm să contactaţi furnizorul Philips sau un
centru Philips autorizat dacă siguranţa termică
automată se declanşează prea des.
ATENŢIE: Pentru a evita situaţiile nedorite
datorate resetării greşite a siguranţei termice, nu
conectaţi aparatul la un întrerupător comandat de
un ceas electronic.
Page 39

ROMÂNĂ 39
Important
◗ Citiţi instrucţiunile de utilizare şi consultaţi
imaginile înainte de a începe să folosiţi
aparatul.
◗ Păstraţi instrucţiunile pentru consultări
ulterioare.
◗ Verificaţi dacă tensiunea indicată pe aparat
corespunde tensiunii locale înainte de a
conecta aparatul.
◗ Nu folosiţi accesorii sau componente de la alţi
producători sau care nu au fost recomandate
de către firma Philips. În caz contrar,garanţia
nu mai va fi valabilă.
◗ Nu folosiţi aparatul dacă ştecherul, cablul sau
alte componenente sunt deteriorate.
◗ Dacă se deteriorează cablul de alimentare al
aparatului, acesta trebuie înlocuit de Philips
sau un centru service autorizat Philips, pentru
a evita situaţiile nedorite.
◗ Curăţaţi foarte bine componentele care vin în
contact cu alimentele înainte de a utiliza
aparatul pentru prima oară.
◗ Nu depăşiţi cantităţile şi duratele de
preparare indicate în tabel.
◗ Nu depăşiţi cantitatea maximă indicată pe bol,
adică nu umpleţi bolul peste gradaţia cea mai
înaltă.
◗ Scoateţi aparatul din priză imediat după
utilizare.
◗ Nu împingeţi ingredientele cu degetele sau cu
alt obiect (cum ar fi o spatulă) în timp ce
aparatul funcţionează. Pentru acest scop aveţi
dispozitivul special de împingere.
◗ Nu lăsaţi apartul la îndemâna copiilor.
◗ Nu lăsaţi aparatul să funcţioneze
nesupravegheat.
◗ Aşezaţi capacul pe bol în poziţia corectă.
Dispozitivul de siguranţă încorporat va fi
deblocat şi veţi putea porni aparatul.Atât
blocul motor cât şi dopul filetat au fost
marcate cu repere.Aparatul va funcţiona doar
dacă reperul de pe blocul motor va coincide
cu cel de pe dopul filetat.
◗ Opriţi aparatul înainte de a demonta vreun
accesoriu.
◗ Opriţi întotdeauna aparatul comutând butonul
pe poziţia 0.
◗ Aşteptaţi până ce părţile mobile se opresc
înainte de a scoate capacul.
◗ Nu introduceţi blocul motor în apă sau în alt
lichid, şi nici nu-l clătiţi sub jet de apă. Utilizaţi
o cârpă umedă pentru a curăţa blocul motor.
◗ Îndepărtaţi învelişul protector de pe cuţit
înainte de utilizare.
◗ Nu folosiţi niciodată ansamblul cuţitului
împreună cu sita şi pâlnia pentru cârnaţi.
◗ Nu încercaţi să tocaţi oase, nuci sau alte
alimente dure.
◗ Nu introduceţi degetele în tavă.Folosiţi mereu
dispozitivul de împingere.
◗ Lăsaţi ingredientele fierbinţi să se răcească
înainte de a le procesa (temperatura max.
80cC/175cF).
◗ Pentru durata aplicaţiilor, consultaţi tabelul de
mai jos din acest manual de utilizare.
◗ Scoateţi aparatul din priză imediat după
utilizare.
Page 40

ROMÂNĂ40
Utilizarea aparatului
Bol pentru prepararea alimentelor
C
1 Montaţi bolul pe robot răsucind de mâner
în direcţia săgeţii până auziţi clic.
C
2 Puneţi capacul deasupra bolului. Răsuciţi
capacul în direcţia săgeţii până ce auziţi clic
(acest lucru necesită puţin efort).
Dispozitiv de siguranţă încorporat
Blocul motor, bolul şi capacul sunt inscripţionate
cu nişte repere. Aparatul va funcţiona doar dacă
reperul de pe blocul motor este aşezat exact în
sensul opus semnului de pe bol.
C
1 Asiguraţi-vă că semnul de pe capac şi cel
de pe bol sunt în sens invers unul faţă de
celălalt. Proeminenţa capacul va coincide
cu forma mânerului.
Tub de alimentare şi dispozitiv de împingere
C
1 Folosiţi tubul de alimentare pentru a
adăuga lichide şi/sau alte ingrediente
solide. Folosiţi dispozitivul de împingere
pentru a împinge ingredientele solide pe
tubul de alimentare.
CLICK
C
2 Puteţi, de asemenea, folosi tubul de
alimentare pentru a evita ca ingredientele
să dea pe-afară.
Cuţit metalic
◗ Cuţitul metalic poate fi folosit pentru tocare,
mixare, amestecare şi pasare.
C
1 Îndepărtaţi învelişul protector de pe cuţit.
Lamele cuţitului sunt foarte ascuţite. Nu le atingeţi!
C
2 Puneţi axul central în bol şi cuţitul pe ax.
3 Puneţi ingredientele în bol.Tăiaţi bucăţile
mari de alimente în cubuleţe de 3 cm.
Puneţi capacul deasupra bolului.
4 Puneţi dispozitivul de împingere în tubul de
alimentare.
C
5 Selecţionaţi viteza maximă (poziţia 2) a
reglajului vitezelor.
- Operaţia va continua până comutaţi pe poziţia
0 (oprire).
◗ Comutaţi pe poziţia 1 pentru a micşora viteza.
1
2
CLICK
1
2
CLICK
Page 41

41ROMÂNĂ
Sugestii
◗ Dacă tocaţi ceapă, folosiţi funcţia impuls
pentru a preveni tocarea prea măruntă.
◗ Nu lăsaţi aparatul să funcţioneze prea mult
timp când radeţi brânză/caşcaval. Brânza sau
caşcavalul se încălzesc şi încep să se topească,
făcând cocoloaşe.
◗ Nu folosiţi cuţitul pentru tocarea
ingredientelor foarte dure cum ar fi boabe de
cafea, şofran, miez de nucă şi cuburi de gheaţă,
întrucât aţi putea toci cuţitul.
Dacă ingredientele se lipesc de cuţit sau de
interiorul vasului:
1 Opriţi aparatul.
2 Scoateţi capacul de pe bol.
3 Dezlipiţi ingredientele de pe cuţit sau de
pe pereţii bolului cu ajutorul spatulei.
Discuri
Nu procesaţi niciodată ingrediente dure, cum ar fi
cuburile de gheaţă, cu discurile.
C
1 Puneţi discul selectat pe portdisc înainte
de a-l poziţiona pe axul central.
Marginile discurilor sunt foarte ascuţite! Evitaţi s
le atingeţi.
C
2 Aşezaţi portdiscul peste axul central din
bol.
3 Puneţi capacul peste bol.
4 Puneţi ingredientele în tubul de alimentare.
Tăiaţi alimentele mari în bucăţi mai mici
care să intre în tubul de alimentare.
C
5 Pentru cele mai bune rezultate, umpleţi
complet tubul de alimentare.
Când trebuie să procesaţi cantităţi mari de
alimente, procesaţi pe rând cantităţi mici şi goliţi
regulat bolul.
C
6 Pentru radere şi feliere, selecţionaţi viteza
maximă (poziţia 2) a reglajului vitezelor.
Operaţia va continua până comutaţi pe poziţia 0
(oprire).
◗ Comutaţi pe poziţia 1 pentru a micşora viteza.
C
7 Împingeţi uşor ingredientele cu dispozitivul
de împingere pe tubul de umplere.
◗ Dacă radeţi legume sau fructe moi, puteţi
micşora viteza pe poziţia 1 pentru a evita
transformarea legumelor sau a fructelor rase
în piure.
C
8 Pentru a scoate discul de pe portdisc, luaţi
portdiscul în mână şi împingeţi cu buricele
degetelor discul, până ce acesta iese de pe
portdisc.
CLICK
2
1
Page 42

ROMÂNĂ42
Cârlig de frământare
Cârligul de frământare poate fi folosit pentru
frământarea aluatului de pâine sau a aluaturilor de
prăjituri.
C
1 Puneţi bolul pe blocul motor şi introduceţi
accesoriul de frământare pe arborele
motor.
2 Puneţi ingredientele în bol şi fixaţi capacul
pe bol. Poziţionaţi dispozitivul de
împingere în tubul de alimentare pentru a
preveni stropirea din timpul frământării.
C
3 Selecţionaţi viteza maximă (poziţia 2) a
reglajului vitezelor.
Consultaţi tabelul pentru a vedea perioadele de
preparare recomandate.
Disc de emulsionare
Puteţi folosi discul de emulsionare pentru a
prepara maioneză, pentru a bate frişcă sau a bate
albuşuri de ouă.
C
1 Puneţi discul de emulsionare pe axul
central din bol.
2 Puneţi ingredientele în bol şi închideţi
capacul.
3 Pentru a obţine rezultate optime,
selecţionaţi viteza minimă (poziţia 1).
Sugestii
◗ Când doriţi să bateţi ouă, aveţi grijă ca acestea
să fie la temperatura camerei.
◗ Scoateţi ingredientele din frigider cu cel puţin
o jumătate de oră înainte de a le folosi.
◗ Pentru prepararea maionezei,toate
ingredientele trebuie să fie la temperatura
camerei.
Uleiul poate fi turnat prin orificiul din dispozitivul
de împingere.
◗ Dacă intenţionaţi să faceţi frişcă bătută, luaţi
smântâna direct din frigider.Vă rugăm să
consultaţi tabelul pentru durata de preparare.
Frişca nu trebuie bătută prea mult timp.
Folosiţi funcţia impuls pentru a avea mai mult
control asupra procesului de preparare.
Tocător de carne
Tocătorul de carne poate fi folosit pentru tocarea
cărnii sau prepararea cârnaţilor.
C
1 Montaţi carcasa angrejului pe blocul motor.
Dacă accesoriile sunt montate corect veţi auzi un
clic.
C
2 Montaţi portcuţitul pe blocul motor.
Page 43

43ROMÂNĂ
C
3 Introduceţi axul melcului în carcasa
ansamblului cuţitului, cu capătul de plastic
înainte.
C
4 Poziţionaţi ansamblul cuţitului pe axul
melcului. Marginile tranşante trebuie
poziţionate în faţă.
C
5 Poziţionaţi discul de tocare medie sau
mare (în funcţie de consistenţa dorită) pe
axul melcului.
Aveţi grijă să fixaţi şanţurile discului de tocare pe
capătul tocătorului.
C
6 Înşurubaţi inelul filetat în direcţia săgeţii pe
carcasa cuţitului până se fixează.
C
7 Poziţionaţi tava în partea superioară a
carcasei cuţitului.
Tocarea cărnii
1 Tăiaţi carnea în bucăţi de 10 cm lungime şi
2 cm lăţime.
2 Scoateţi oasele, cartilagiile sau zgârciurile
atât cât se poate.
Nu tocaţi carne îngheţată!
C
2 Selectaţi viteza 2 pentru tocarea cărnii
C
4 Introduceţi carnea în tavă.
◗ Puteţi toca 1,3 kg de carne pe minut.
(Folosiţi carne de porc slabă).
◗ Pentru biftec tartar, tocaţi carnea cu discul de
tocare medie de două ori.
Prepararea cârnaţilor
1 Tocaţi carnea.
2 Scoateţi aparatul din priză şi scoateţi inelul
filetat după ce aţi terminat de tocat.
3 Scoateţi discul de tocare.
4 Demontaţi cuţitul.
◗ Lăsaţi melcul în carcasa cuţitului dacă doriţi că
preparaţi cârnaţi.
C
5 Montaţi sita în carcasa cuţitului.
Page 44

ROMÂNĂ44
C
6 Poziţionaţi pâlnia pentru cârnaţi pe carcasa
cuţitului şi înşurubaţi inelul filetat.
Aparatul este pregătit pentru prepararea
cârnaţilor.
Sugestii
◗ Puneţi membrana pentru cârnaţi în apă
călduţă timp de 10 minute.Apoi culisaţi-o pe
pâlnie. Împingeţi carnea tocată (condimentată)
în carcasa cuţitului.
◗ Dacă membrana rămâne lipită de pâlnie,
umeziţi-o cu puţină apă.
◗ Folosiţi viteza 1 pentru prepararea cârnaţilor.
Curăţare
Scoateţi întotdeauna aparatul din priză înainte de
a începe curăţarea blocului motor.
1 Curăţaţi blocul motor cu o cârpă umedă.
Nu introduceţi blocul motor în apă şi nici
nu-l clătiţi.
2 Curăţaţi întotdeauna componentele care
au venit în contact cu alimentele cu apă
caldă şi detergent de vase, imediat după
folosire.
◗ Bolul, capacul bolului, dispozitivul de
împingere şi accesoriile (cu excepţia vasului
blenderului) pot fi curăţate şi în maşina de
spălat vase.
Aceste componente au fost testate pentru
rezistenţă la spălatul în maşina de spălat vase
conform normelor DIN EN 12875.
Curăţaţi cuţitul metalic, unitatea cuţitului din
blender şi discurile cu foarte mare grijă. Lamele
sunt foarte ascuţite!
Aveţi grijă ca marginile ascuţite ale cuţitelor şi
discurilor să nu vină în contact cu obiecte dure.
Există riscul tocirii acestora.
Anumite ingrediente pot cauza decolorarea
suprafeţei accesoriilor.Acest lucru nu afectează
accesoriile. Decolorarea dispare de obicei după
un anumit timp.
C
◗ Înfăşuraţi (surplusul) de cablu în jurul
înfăşurătorului din spatele aparatului.
Curăţarea tocătorului de carne
Carnea rămasă în interiorul aparatului poate fi
îndepărtată tocând o felie de pâine.
1 Înainte de a curăţa aparatul, opriţi-l şi
scoateţi ştecherul din priză.
2 Apăsaţi mânerul de declanşare şi răsuciţi
toată carcasa cuţitului în direcţia săgeţii.
C
3 Scoateţi dispozitivul de împingere şi tava.
Page 45

ROMÂNĂ 45
4 Deşurubaţi inelul filetat şi scoateţi toate
accesoriile din carcasa cuţitului.
Nu spălaţi aceste accesorii în maşina de spălat
vase!
5 Spălaţi toate accesoriile care au venit în
contact cu carnea, cu apă caldă şi
detergent de vase IMEDIAT DUPĂ
UTILIZARE.
6 Clătiţi-le cu apă curată fierbinte şi uscaţi-le
IMEDIAT.
◗ Vă recomandăm să ungeţi ansamblul cuţitului
şi discurile de tocare cu puţin ulei vegetal.
Garanţie şi service
Dacă aveţi nevoie de informaţii sau aveţi alte
nelămuriri, vizitaţi-ne pe site-ul web Philips la
www.philips.com sau contactaţi Departamentul
Clienţi Philips din ţara dumneavoastră (veţi găsi
numărul de telefon în pliantul de garanţie
internaţională). Dacă nu există un astfel de centru
în ţara dumneavoastră, apelaţi la furnizorul Philips
sau contactaţi Departamentul Service Philips
pentru Aparate Electrocasnice şi de Îngrijire
Personală BV.
Soluţie
Răsuciţi bolul/sau capacul în sensul acelor de ceasornic
până auziţi clic. Asiguraţi-vă că reperele de pe bol şi cele
de pe capac coincid.
Sistemul termic de oprire automată a întrerupt
furnizarea curentului în cazul supraîncălzirii. 1) Opriţi
aparatul (poziţie 0). 2) Scoateţi ştecherul din priză.
3) Lăsaţi aparatul să se răcească 60 de minute.
4) Introduceţi ştecherul în priză. 5) Porniţi din nou aparatul.
Verificaţi dacă aţi înşurubat bolul şi capacul până când s-
a auzit clic.
Dacă atât vasul blenderului cât şi bolul pentru
prepararea alimentelor au fost montate corect, doar
blenderul va funcţiona. Dacă doriţi să folosiţi bolul
pentru prepararea alimentelor, demontaţi blenderul şi
închideţi orificiul cu ajutorul dopului filetat.
Problemă
Aparatul nu porneşte.
Aparaul s-a oprit
brusc.
Accesoriul de
frământare sau de
mixare nu se învârte.
Atât vasul blenderului
cât şi bolul pentru
prepararea alimentelor
sunt montate, dar nu
funcţionează decât
blenderul.
Ghid de depanare
Durata aplicaţiei
10 - 60 sec.
60 - 180 sec.
10 - 60 sec.
10 - 60 sec.
Aplicaţie
Tocare, pasare, mixare
Frământare
Feliere, radere
Batere, emulsionare
Tocare
Accesoriu
P
{
gh
å
Accesorii şi aplicaţii
Page 46

ROMÂNĂ46
Aplicaţii
Salate, legume
crude
Salate, legume
crude
Preparate
pané, gratinate
Garnituri,
supe, sosuri,
mâncăruri
gratinate
Sosuri, pizza,
mâncăruri
gratinate
Ornamentări,
siropuri,
produse de
patiserie,
budinci, spume
Procedură
Tăiaţi legumele în bucăţi astfel
încât să intre pe tubul de
alimentare. Umpleţi tubul şi
radeţi în timp ce apăsaţi uşor
dispozitivul de împingere.
Tăiaţi legumele în bucăţi astfel
încât să intre pe tubul de
alimentare. Umpleţi tubul şi
radeţi în timp ce apăsaţi uşor
dispozitivul de împingere.
Folosiţi pâine uscată, crocantă.
Folosiţi o bucată de Parmezan
decojit şi tăiaţi-o în bucăţele de
aprox. 3 x 3 cm.
Tăiaţi brânza în bucăţele ce pot
intra în tubul de alimentare.
Apăsaţi cu grijă dispozitivul de
împingere.
Folosiţi ciocolată menajeră tare.
Rupeţi-o în bucăţi de 2 cm.
Acces
oriu/vi
teză
P / 2
A / 2
P / 2
P / 2
k / 2
P / 2
Cantit
ate
max.
500g
500g
100g
200g
200g
200g
Ingrediente şi
rezultate
Mere, morcovi,
ţelină - radere
Mere, morcovi,
ţelină - feliere
Pesmet mărunţire
Caşcaval
(Parmezan) radere
Brânză
(Gouda) radere
Ciocolată radere
Cantităţi şi perioade de preparare
Aplicaţii
Piureuri, supe
Mâncare de
bebeluşi şi
copii
Salate,
garnituri
Pâine
Pizza
Procedură
Folosiţi mazăre şi fasole gătită.
Dacă este necesar, adăugaţi
puţin lichid pentru a da o
anumită consistenţă pastei.
Pentru un piure mai consistent,
nu adăugaţi mult lichid. Pentru
un piure moale, adăugaţi lichid
până ce acesta capătă
consistenţa dorită.
Puneţi castravetele în tubul de
alimentare şi apăsaţi-l uşor.
Amestecaţi apă caldă cu
drojdie şi zahăr.Adăugaţi făină,
ulei şi sare şi frământaţi coca
timp de aprox. 90 secunde.
Lăsaţi coca să crească timp de
30 de minute.
Urmaţi aceeaşi procedură ca
pentru coca de pâine.
Frământaţi timp de 1 minut.
Acces
oriu/vi
teză
P / 2
P / 2
g / 1
P / 2
P / 2
Cantit
ate
max.
250g
500g
2
castra
veţi
500 g
făină
1 kg
făină
Ingrediente şi
rezultate
Mazăre sau
fasole fierte pasare
Carne şi
legume gătite pasare
Castraveţi feliere
Cocă (pentru
pâine) frământare
Aluat (de
pizza) frământare
Page 47

ROMÂNĂ 47
Aplicaţii
Plăcinte de
mere, biscuiţi
dulci, tarte cu
fructe
Pâine specială
Budinci,
sufleuri,
meringues
Sosuri, gemuri,
budinci,
mâncare
pentru
bebeluşi
Procedură
Folosiţi margarină rece, tăiată
cubuleţe de 2 cm. Puneţi făina
în bol şi adăugaţi margarina.
Mixaţi la viteza cea mai înaltă
până ce aluatul devine
fărâmicios, apoi adăugaţi apă
rece în timp ce mixaţi. Opriţi
fământarea imediat ce aluatul
începe să capete forma unei
mingi. Lăsaţi aluatul să se
răcească înainte de a continua
prepararea.
Amestecaţi mai întâi drojdia,
apa călduţă şi puţin zahăr întrun vas separat. Puneţi toate
ingredientele în bolul robotului
şi frământaţi coca până ce se
omogenizează şi nu mai
rămâne lipită pe pereţii vasului
(durează aprox. 1 minut). Lăsaţi
coca să crească timp de 30 de
minute.
Folosiţi albuşuri păstrate la
temperatura camerei. Notă:
folosiţi cel puţin 2 albuşuri.
Sugestie: adăugaţi puţin suc de
lămâie pentru ca fructele să nu
se oxideze.
Acces
oriu/vi
teză
P / 2
P / 2
A / 1
P / 2
Cantit
ate
max.
300g
făină
500 g
făină
4
albuşu
ri
500g
Ingrediente şi
rezultate
Aluat (fraged)
- frământare
Cocă (drojdie)
- frământare
Albuşuri batere
Fructe (de ex.
mere, banane)
- tocare
Aplicaţii
Garnituri,
sosuri
Sosuri, supe,
garnituri, unt
cu verdeaţă
Salate, sosuri
pentru
garnituri şi
friptură
Biftec tartar,
hamburger,
chifteluţe
Diverse
prăjituri.
Procedură
Curăţaţi usturoiul.Apăsaţi de
câteva ori butonul impuls
pentru a evita pisarea prea fină
a usturoiului. Folosiţi cel puţin
150 g.
Spălaţi şi uscaţi verdeaţa înainte
de a o toca.
Toate ingredientele trebuie să
fie la temperatura camerei.
Notă: folosiţi cel puţin un ou
mare, două ouă mici sau două
gălbenuşuri de ou. Puneţi oul şi
puţin oţet în vas şi adăugaţi ulei
câte puţin.
Mai întâi îndepărtaţi zgârciurile
sau oasele.Tăiaţi carnea în
bucăţi de 10 cm lungime şi 2
cm lăţime..
Ingredientele trebuie să fie la
temperatura camerei. Mixaţi
untul moale cu zahărul până ce
compoziţia devine onctuoasă.
Apoi adăugaţi laptele, ouăle şi
făina.
Acces
oriu/vi
teză
P / 2
P / 2
˙ / 1
/ 2
P / 2
Cantit
ate
max.
300g
Min.
50g
3 ouă
1000g
4 ouă
Ingrediente şi
rezultate
Usturoi pisare
Verdeaţă
(pătrunjel) tocare
Maioneză emulsionare
Carne (slabă,
împănată) tocare
Aluaturi
(prăjituri) mixare
Page 48

ROMÂNĂ48
Aplicaţii
Salate, budinci,
pastă de
migdale,
cornuri cu
nucă
Salate,
mâncare gătită,
soté-uri,
garnituri
Salate,
mâncare gătită,
soté-uri,
garnituri
Garnituri,
frişcă,
preparate pe
bază de
îngheţată
Procedură
Folosiţi butonul impuls pentru
o tocare mai mare. Opriţi
repede procesul de tocare
dacă nu doriţi o tocare
măruntă.
Curăţaţi cepele şi tăiaţi-le în
patru. Opriţi procesul de
tocare după 2 impulsuri pentru
a verifica rezultatul.
Curăţaţi cepele şi tăiaţi-le în
bucăţi care să încapă pe tubul
de alimentare. Notă: folosiţi cel
puţin 100g.
Folosiţi smântână proaspăt
scoasă din frigider.Notă: folosiţi
cel puţin 125ml de smântână.
Frişca bătută este gata după
aprox. 20 de secunde.
Acces
oriu/vi
teză
P / 2
P / 2
g / 1
S / 1
Cantit
ate
max.
250g
500g
300g
500ml
Ingrediente şi
rezultate
Nuci - tocare
Cepe - tocare
Cepe -feliere
Frişcă bătută batere
Reţete
Pastă de dovlecei pentru tartine
Ingrediente:
- 2 dovlecei
- 3 ouă fierte
- 1 ceapă mică
- 1 lingură ulei vegetal
- pătrunjel
- 2-3 linguri smântână
- suc de lămâie, sos Tabasco, sare, piper,curry,
ardei paprika
B
Spălaţi şi ştergeţi dovleceii, apoi radeţi-i cu ajutorul
discului de radere fină în bolul de preparare a
alimentelor. Puneţi dovleceii raşi într-o farfurie,
presăraţi sare şi lăsaţi aproximativ 15 minute ca
sarea să absoarbă zeama din dovleceii raşi.Tăiaţi
ceapa în 4 şi tocaţi-o mărunt împreună cu
usturoiul. Curăţaţi pătrunjelul şi tocaţi-l.
B
Puneţi apoi dovlecelul ras pe un şervet curat şi
stoarceţi zeama din el. Puneţi puţin ulei într-o
cratiţă şi căliţi ceapa tocată şi usturoiul, adăugaţi
apoi dovleceii. Lăsaţi să se evapore zeama din
ingrediente. Lăsaţi apoi ingredientele să se
răcească puţin. Decojiţi ouăle şi tocaţi-le în bolul
pentru prepararea alimentelor timp de câteva
secunde.Adăugaţi celelalte ingrediente în bol,
condimentaţi şi mixaţi totul cu cuţitul.A se servi
pe pâine albă prăjită.
Page 49

ROMÂNĂ 49
Prăjitură cu fructe
Ingrediente:
- 150 g curmale
- 225 g prune
- 100 g nuci (50 g migdale/50 g alune)
- 50 g struguri
- 50 g sultanine (un fel de stafide fără sâmbure)
- 200 g făină de secară
- 100 g făină de grâu
- 120 g zahăr nerafinat
- un vârf de cuţit sare
- 1 pliculeţ praf de copt
- 300 g zer
B
Introduceţi cuţitul în bol. Puneţi ingredientele în bol
şi mixaţi ingredientele 30 de secunde. Coaceţi
prăjitura într-o tavă de copt cu o lungime de
30 cm timp de 40 de minute la 170cC.
Quiche de praz
Ingrediente pentru cocă:
- 250 g făină de grâu (sau făină de grâu
completă)
- un vârf de cuţit sare
- 1 lingură miere
- 20 g drojdie proaspătă sau 1/2 plic de drojdie
uscată
- 100g unt
- 6 linguri apă călduţă
Ingrediente pentru umplutură:
- 500 g praz
- ulei vegetal
- 4 ouă
- 500 g smântână
- sare, piper, 1-2 linguri făină, dacă e necesar
B
Puneţi toate ingredientele într-un bol şi frământaţi
până obţineţi o cocă consistentă. Lăsaţi coca să
crească timp de 30 de minute.
B
Tăiaţi prazul rondele cu ajutorul discului de feliere.
Puneţi puţin ulei într-o tigaie şi căliţi prazul câteva
minute. Puneţi restul ingredientelor în vasul
blenderului şi lăsaţi blenderul să funcţioneze până
ce amestecul se omogenizează.Adăugaţi 1-2
linguri de făină pentru a îngroşa compoziţia.
B
Ungeţi o tavă de copt cu diametrul de 24 cm şi
întindeţi bine coca pe fundul şi pe marginea tăvii.
Întindeţi compoziţia cu praz deasupra aluatului şi
turnaţi restul ingredientelor peste compoziţie.
Coaceţi în cuptorul încins timp de 40 de minute la
180cC. Poate fi servit rece sau cald.
Gulaş unguresc
Ingrediente:
- 1 lingură ulei
- 1 ceapă mijlocie
- 1 linguriţă paprika
- 400 g carne de vită sau porc
- 1 ardei iute
- 1 roşie
- sare
- 200 g morcovi
- 300 g cartofi
- chimen
B
Spălaţi carnea şi tăiaţi-o în cubuleţe de 2 cm.
Curăţaţi ceapa şi tocaţi-o în bolul pentru
Page 50

ROMÂNĂ50
prepararea alimentelor cu ajutorul cuţitului.
Curăţaţi ardeiul de seminţe şi tăiaţi-l rondele
folosind discul de feliere. Curăţaţi roşia de coajă,
scoateţi sâmburii şi tăiaţi-o feliuţe. Căliţi ceapa în
ulei până se înmoaie. Luaţi-o de pe aragaz şi
presăraţi paprika, adăugaţi carnea şi lăsaţi să se
prăjească la foc iute câteva minute, amestecând
continuu.Adăugaţi ardeiul iute, roşia şi sare după
gust, acoperiţi tigaia şi lăsaţi să fiarbă înăbuşit la
foc potrivit până se fragezeşte.
B
Între timp, curăţaţi morcovii şi tăiaţi-i felii cu
ajutorul discului de feliere, apoi curăţaţi şi tăiaţi
cartofii cubuleţe. Adăugaţi-i peste carne şi turnaţi
o cantitate de apă suficientă pentru supa pe care
doriţi s-o preparaţi (aprox. 1,2 litri). Condimentaţi
cu un vârf de cuţit de chimen şi lăsaţi să fiarbă la
foc mic până se fragezeşte, adăugând puţină sare.
B
A se servi fierbinte. Puteţi garnisi cu rondele de
ardei iute şi puteţi servi ardei iute roşu pe o
farfurie separată.
Colac cu alune
Ingrediente pentru aluat:
- 500 g făină cernută
- 75 g zahăr
- 1 linguriţă sare
- 1 ou
- 250 ml lapte (la 35cC)
- 100 g unt, moale
- 30 g drojdie proaspătă (pentru drojdia uscată,
citiţi instrucţiunile de pe ambalaj)
Umplutură:
- 250 g alune măcinate
- 100 g zahăr
- 2 pliculeţe zahăr vanilat
- 125 ml frişcă
B
Încălziţi cuptorul la 200cC. Mixaţi laptele, drojdia
şi zahărul într-un bol timp de 15 secunde cu
ajutorul accesoriului de frământare. Adăugaţi
făina, sarea, untul şi oul. Frământaţi coca 2
minute. Puneţi coca într-un bol separat şi acoperiţio cu o cârpă umedă. Lăsaţi coca să crească la loc
călduţ timp de 20 de minute.
B
Tocaţi alunele cu cuţitul. Mixaţi ingredientele
pentru umplutură. Întindeţi coca cu făcăleţul, în
formă dreptunghiulară. Întindeţi deasupra crema
de alune, apoi rulaţi coca în formă de colac. Puneţi
colacul într-o tavă unsă cu unt. Lăsaţi colacul să
crească timp de 20 de minute. Ungeţi colacul cu
gălbenuş de ou şi poziţionaţi tava pe un grătar în
centrul cuptorului. Coaceţi 25-30 de minute la
200cC.
Tort de ciocolată
Ingrediente:
- 140 g unt, moale
- 110 g zahăr glazurat
- 140 g ciocolată
- 6 albuşuri
- 6 gălbenuşuri
- 110 g zahăr tos
- 140 g făină de grâu
Umplutură:
- 200 g gem de caise
Page 51

ROMÂNĂ 51
Glazură:
- 125 ml apă
- 300 g zahăr
- 250 g ciocolată rasă
- frişcă bătută, opţional
B
Încălziţi cuptorul la 160cC. Omogenizaţi untul cu
zahărul glazurat cu ajutorul cuţitului metalic.Topiţi
ciocolata şi încorporaţi-o.Adăugaţi gălbenuşurile
unul câte unul în compoziţie şi amestecaţi până
ce obţineţi o cremă onctuoasă. Bateţi cu ajutorul
cuţitului albuşul cu zahărul tos până se întăreşte
spuma de albuş.Adăugaţi spuma de albuş peste
cremă încorporând-o treptat. Încorporaţi apoi făina
cu o spatulă. Puneţi aluatul într-o tavă unsă cu
unt. Lăsaţi-o la copt o oră la 160cC. Lăsaţi uşa
cuptorului întredeschisă primele 15 minute.
B
Lăsaţi prăjitura să se răcească puţin în tavă
(24 cm), apoi răsturnaţi-o pe un grătar pentru a
se răci complet.Tăiaţi prăjitura în două pe
orizontală, ungeţi jumătate cu jem de caise şi
acoperţi-o cu cealaltă jumătate. Încălziţi restul
gemului până devine siropos şi ungeţi prăjitura.
Preparaţi glazura. Fierbeţi apă, adăugaţi zahăr şi
ciocolată şi fierbeţi la foc mic. Amestecaţi continuu
până ce capătă o consistenţă omogenă, uşor de
întins. Puneţi glazura peste prăjitură şi lăsaţi-o să
se răcească.A se servi cu frişcă bătută.
Supă de broccoli (pentru 4 persoane)
Ingrediente:
- 50 g brânză Gouda
- 300 g broccoli fiert
- supa în care a fiert broccoli
- 2 cartofi fierţi cubuleţe
- condimente pentru ciorbă tip vegeta
- 2 linguri smântână
- curry
- sare
- piper
- miez de nucă
B
Radeţi brânza. Faceţi un piure din broccoli, cartofii
fierţi şi puţin din supa în care a fiert broccoli.
Puneţi piureul de broccoli, restul supei şi
condimentele tip vegeta într-un vas gradat şi
turnaţi 750 ml.Vărsaţi supa într-o tigaie şi fierbeţio amestecând continuu. Încorporaţi brânza şi
condimentaţi cu curry,sare, piper şi miez de nucă,
adăugând la sfârşit smântâna.
Pizza
Ingrediente pentru cocă:
- 400g făină
- 1/2 linguriţă sare
- 20 g drojdie proaspătă sau 1,5 plic drojdie
uscată
- 2 linguri ulei pentru gătit
- aprox. 240 ml apă (35cC)
Pentru topping:
- 300ml pastă de tomate (la conservă)
- 1 linguriţă verdeaţă amestecată (uscată şi
proaspătă)
- 1 ceapă
- 2 căţei de usturoi
- sare şi piper
- zahăr
Page 52

ROMÂNĂ52
Ingrediente de presărat peste sos:
- măsline, salam, ciuperci, anşoa, mozzarella, ardei,
caşcaval ras şi ulei de măsline după gust.
B
Introduceţi cârligul de frământat în bol. Puneţi
toate ingredientele în bolul de mixare şi
selecţionaţi viteza maximă (poziţia 2). Frământaţi
coca aproximativ 1 minut până capătă forma
unei mingi. Puneţi coca într-un alt castron,
acoperiţi-o cu o cârpă umedă şi lăsaţi-o la crescut
timp de 30 de minute.
B
Tocaţi ceapa şi usturoiul cu cuţitul metalic în bolul
de preparare, apoi căliţi ceapa într-o tigaie.
Adăugaţi roşiile şi verdeaţa, şi lăsaţi să fiarbă la
foc mic timp de 10 minute. Condimentaţi după
gust cu sare, piper şi zahăr. Lăsaţi sosul să se
răcească.
B
Încălziţi cuptorul la 250cC.
B
Întindeţi coca pe masa de lucru pe care aţi
presărat făină şi întindeţi coca în două foi rotunde.
Puneţi cele două foi de cocă pe tava unsă.Turnaţi
toppingurile pe blatul de pizza şi adăugaţi câteva
picături de ulei de măsline.
B
Coaceţi pizza 12-15 minute.
Legume şi cartofi soté
Ingrediente:
- 1 ou
- 50 cl lapte
- 1 lingură făină
- 1 linguriţă coriandru
- sare şi piper
- 2 cartofi mari (aprox. 300 g)
- 100 g morcovi
- 150 g ţelină
- 50 g seminţe de floarea soarelui
- ulei pentru prăjit
B
Mixaţi oul, laptele, făina, coriandrul, sarea şi
piperul folosind cuţitul.
B
Radeţi cartofii curăţaţi de coajă, morcovii şi ţelina
spălată cu ajutorul discului de radere mare şi apoi
adăugaţi compoziţia pe bază de ou.Amestecaţi
legumele, compoziţia cu ou şi seminţele de floarea
soarelui în bol.
B
Încălziţi ulei într-o tigaie şi prăjiţi 8 chifteluţe plate
pe ambele părţi până se rumenesc. Lăsaţi să se
scurgă pe o bucată de hârtie de bucătărie.
B
Durata de prăjire: 3-4 minute.
Pâine (albă)
Ingrediente:
- 500 g făină
- 15 g unt sau margarină moale
- 25 g drojdie proaspătă sau 20 g drojdie uscată
- 260 ml apă
- 10 g sare
- 10 g zahăr
B
Montaţi cârligele de frământare în bolul de
mixare. Puneţi făina,sarea şi margarina sau untul
în bol.Adăugaţi drojdia proaspătă sau uscată şi
apa. Puneţi capacul deasupra bolului şi răsuciţi-l în
direcţia săgeţii până auziţi clic. Selecţionaţi viteza
maximă (poziţia 2) şi frământaţi coca (pentru
durata maximă de frământare, consultaţi capitolul
Cantităţi şi durate de preparare).
Page 53

ROMÂNĂ 53
B
Scoateţi coca din bol, puneţi-o într-un castron
mare, acoperiţi-o cu un prosop umed de bucătărie
şi lăsaţi-o să crească la loc cald timp de 20 de
minute. După ce a crescut,aplatizaţi coca cu
mâna, apoi frământaţi-o în formă de minge.
B
Răsturnaţi din nou coca în castron, acoperiţi-o cu
un prosop umed şi lăsaţi-o la crescut încă 20 de
minute.Aplatizaţi-o din nou, apoi întindeţi-o cu
făcăleţul.
B
Întindeţi coca într-o tavă unsă, şi lăsaţi-o la crescut
încă 45 de minute. Coaceţi pâinea în partea de
jos a cuptorului încins.
B
Coaceţi pâinea la aproximativ 225cC în partea
de jos a cuptorului încins timp de 35 de minute.
Page 54

РУССКИЙ54
Детали и комплектующие
A Блок электродвигателя
B Регулятор скорости
P = импульсный режим
0 = Выкл.
1 = Минимальная скорость
2 = Максимальная скорость
C Навинчивающийся колпачок (должен быть
установлен, для того чтобы можно было
пользоваться чашей)
D Чаша для обработки продуктов
E Держатель для насадок
F Крышка чаши для переработки продуктов
G Загрузочный бункер
H Толкатель
I Насадка-тестомешалка
J Металлический нож + защитный чехол
K Ломтерезка для нарезки ломтиками
средней толщины
L Терка для средней степени измельчения
M Рамка для ножей-вставок
N Диск-измельчитель
O Корпус редуктора мясорубки
P Корпус ножевого блока мясорубки
Q Червячный вал
R Ножевой блок
S Копъцо c резъбой
T Диск средней степени измельчения
(диаметр 4 мм)
U Диск предварительного измельчения
(диаметр 8 мм)
V Сепаратор
W Рожок для приготовления колбасок
X Загрузочный поддон
Y Толкатель
Z Ручка выключения
Введение
Данный электроприбор оснащен аварийным
термовыключателем,который отключает подачу
электроэнергии в случае перегревания прибора.
При неожиданной остановке
электродвигателя:
1 Выньте вилку сетевого шнура из
розетки электросети.
2 Для выключения электроприбора
переведите кнопку выключателя в
положение 0.
3 Дайте электроприбору остыть в
течение 60 минут.
4 Вставьте вилку сетевого шнура в
розетку электросети.
5 Включите электроприбор повторно.
В случае слишком частого срабатывания
аварийного выключателя обратитесь в
торговую организацию или уполномоченный
сервисный центр компании "Филипс".
ПРЕДУПРЕЖДЕНИЕ:Во избежание
возникновения опасной ситуации запрещено
соединять электроприбор с реле времени.
Page 55

РУССКИЙ 55
Внимание
◗ Прежде чем начать пользоваться
электроприбором, внимательно прочитайте
настоящее руководство по эксплуатации и
ознакомьтесь с иллюстрациями.
◗ Сохраните настоящее руководство по
эксплуатации в качестве справочного
материала.
◗ Прежде чем подключить прибор к
электросети, убедитесь в том,что
напряжение,указанное на приборе,
соответствует напряжению электросети в
вашем доме.
◗ Используйте только детали или
комплектующие, произведенные или особо
рекомендованные компанией «Филипс». В
противном случае вы утрачиваете право на
гарантию.
◗ Не пользуйтесь прибором при
повреждении сетевого шнура, штепсельной
вилки или других деталей.
◗ В случае повреждения сетевого шнура его
следует заменить в торговой организации
или в уполномоченном сервисном центре
компании «Филипс», чтобы избежать
опасности при эксплуатации прибора.
◗ Перед первым применением прибора
тщательно промойте все детали, которые
будут контактировать с пищевыми
продуктами.
◗ Не превышайте количества загружаемых
продуктов и время их обработки, указанные
в таблице.
◗ Не заполняйте чашу выше отметки
максимального уровня.
◗ Сразу же после окончания работы
вынимайте вилку сетевого шнура из
розетки электросети.
◗ Во время работы электроприбора
запрещается проталкивать продукты в
загрузочный бункер пальцами или какимилибо предметами (например, лопаткой). Для
этой цели пользуйтесь только толкателем.
◗ Храните электроприбор в недоступном для
детей месте.
◗ Запрещается оставлять включенный
прибор без присмотра.
◗ Установите крышку на чашу в правильное
положение.Теперь встроенная блокировка
разблокирована и вы можете включить
электроприбор.
◗ Выключите электроприбор, прежде чем
снять с него какую-либо насадку.
◗ Всегда выключайте электроприбор,
устанавливая переключатель скорости в
положение 0.
◗ Прежде чем снять крышку с
электроприбора, подождите до полной
остановки движущихся деталей.
◗ Запрещается погружать блок
электродвигателя в воду или другие
жидкости, а также промывать этот блок
под струей водопроводной воды. Для
очистки блока электродвигателя
пользуйтесь влажной тканью.
◗ Прежде чем пользоваться ножом, снимите
с него защитный колпачок.
◗ Запрещается пользоваться ножевым
блоком вместе с сепаратором и рожком для
приготовления колбасок.
Page 56

РУССКИЙ56
◗ Не рекомендуется размалывать кости,орехи
или какие-либо другие твердые продукты.
◗ Запрещается проталкивать мясо в
отверстие загрузочного лотка вручную.
Пользуйтесь только толкателем.
◗ Прежде чем обрабатывать горячие
продукты,дайте им остыть (максимальная
температура - 80
◗ Время обработки различных продуктов
указано в таблице данного руководства по
эксплуатации ниже.
◗ Сразу же после окончания работы
вынимайте вилку сетевого шнура из
розетки электросети.
Как пользоваться электроприбором
Чаша для обработки продуктов
C
1 Установите чашу на кухонный
процессор, повернув ручку в
направлении стрелки до щелчка.
C
2 Установите крышку на чашу.Поверните
крышку в направлении стрелки до
щелчка (для этого потребуется
приложить некоторое усилие).
Встроенная блокировка
На блок электродвигателя, чашу и крышку
нанесены отметки.Электроприбор будет
работать только в том случае, когда отметка на
блоке электродвигателя расположена точно
напротив отметки на навинчивающемся
колпачке.
C
1 Убедитесь в том, что линия на крышке и
линия на чаше находятся точно друг
против друга. При этом выступ крышки
будет дополнять форму ручки.
Загрузочный бункер и толкатель
C
1 Для добавления жидких и/или твердых
ингредиентов используйте загрузочный
бункер.Для продвижения твердых
ингредиентов вниз по загрузочному
бункеру пользуйтесь толкателем.
C
2 Вы можете также воспользоваться
толкателем для того,чтобы закрыть
загрузочный бункер,не допуская
выброса продуктов через загрузочный
бункер.
Металлический нож
◗ Металлический нож предназначен для
измельчения, перемешивания,
купажирования и приготовления пюре.
CLICK
CLICK
CLICK
1
2
1
2
Page 57

РУССКИЙ 57
C
1 Снимите с ножа защитный колпачок.
Режущие кромки ножа очень острые. Не
прикасайтесь к ним!
C
2 Установите рамку для ножей-вставок в
чашу, а ножи-вставки в рамку,
установленную в чашу.
3 Положите в чашу ингредиенты.
Предварительно нарежьте крупные
куски продуктов кубиками размером
около 3 х 3 х 3 см.Закройте чашу
крышкой.
4 Поместите толкатель в загрузочный
бункер.
C
5 Установите регулятор скорости в
положение 2 (максимальная скорость).
- Процесс обработки будет продолжаться до
переключения регулятора в положение 0
(выкл.).
◗ Для уменьшения скорости переведите
регулятор скорости в положение 1.
Полезные советы
◗ При измельчении лука несколько раз
включайте импульсный режим, чтобы не
допустить чрезмерного измельчения лука.
◗ При измельчении твердых сортов сыра не
включайте электродвигатель надолго.Сыр
может нагреться,начнет плавиться и
слипаться в комки.
◗ Не пользуйтесь ножом для измельчения
очень твердых ингредиентов, таких как
кофейные зерна, куркума, мускатный орех и
кубики льда. Нож может затупиться.
В случае налипания продуктов на нож или
внутреннюю поверхность чаши:
1 Выключите прибор.
2 Снимите с чаши крышку.
3 С помощью лопатки очистите
прилипшие продукты с лезвия ножа или
со стенок чаши.
Ножи-вставки
Запрещается пользоваться ножами-вставками
для обработки твердых ингредиенто
например, кубиков льда.
C
1 Перед тем как устанавливать рамку для
ножей-вставок на держатель для
насадок, вставьте в рамку нож-вставку.
Режущие кромки ножей-вставок очень острые
Не прикасайтесь к ним!
C
2 Установите рамку для ножей-вставок на
держатель для насадок, имеющийся в
чаше.
CLICK
2
1
Page 58

РУССКИЙ58
3 Закройте чашу крышкой.
4 Поместите ингредиенты в загрузочный
бункер,предварительно нарезав крупные
куски так, чтобы они проходили в
загрузочный бункер.
C
5 Для получения наилучших результатов
заполняйте загрузочный бункер
равномерно.
Если вам необходимо измельчить большое
количество продуктов, разделите их на
небольшие порции и регулярно освобождайте
чашу после обработки каждой порции.
C
6 Для измельчения и нарезки установите
регулятор скорости на максимальную
скорость (положение 2).
Процесс обработки будет продолжаться до
переключения регулятора в положение 0
(выкл.).
◗ Для уменьшения скорости переведите
переключатель в положение 1.
C
7 Слегка нажимайте толкателем на
ингредиенты, находящиеся в
загрузочном бункере.
◗ При измельчении мягких овощей или
фруктов вы можете уменьшить скорость,
переведя переключатель в положение 1,
чтобы не допустить чрезмерного
измельчения овощей и фруктов до
состояния пюре.
C
8 Для того, чтобы извлечь нож-вставку из
рамки, возьмите рамку для ножейвставок в руки так, чтобы ее заднее
ребро было направлено в вашу сторону.
Нажмите на края ножа-вставки
большими пальцами, и он выпадет из
рамки.
Насадка-тестомешалка
Насадка-тестомешалка может использоваться
для замешивания теста для выпечки хлеба, для
приготовления взбитого жидкого теста и
смесей для кекса.
C
1 Установите чашу на блок
электродвигателя, установите насадкутестомешалку на приводной вал.
2 Поместите ингредиенты в чашу и
закройте чашу крышкой. Поместите
толкатель в загрузочный бункер,чтобы
избежать разбрызгивания продуктов при
замешивании.
C
3 Установите регулятор скорости на
максимальную скорость (положение 2).
Page 59

РУССКИЙ 59
Диск для эмульгирования
Вы можете пользоваться диском для
эмульгирования для приготовления майонеза,
взбивания сливок и сбивания яичных белков.
C
1 Установите диск для эмульгирования на
держатель для насадок, расположенный
в чаше.
2 Поместите ингредиенты в чашу и
закройте ее крышкой.
3 Для достижения оптимальных
результатов выберите минимальную
скорость (положение 1).
Полезные советы
◗ Сбивать яичные белки лучше всего,если
они имеют комнатную температуру.
◗ Выньте яйца из холодильника по крайней
мере за полчаса до их обработки.
◗ Все ингредиенты для приготовления
майонеза должны иметь комнатную
температуру.
Вы можете добавлять масло через небольшое
отверстие в днище толкателя.
◗ Если вы собираетесь взбивать сливки,
берите их прямо из холодильника.Время
взбивания должно соответствовать
указанному в таблице. Сливки не надо
взбивать слишком долго.
Используйте импульсный режим для большего
контроля за приготовлением.
Мясорубка
Мясорубка может применяться для
приготовления мясного фарша и колбасок.
C
1 Подсоедините корпус редуктора к
блоку электродвигателя.
Если вы осуществили сборку правильно, вы
услышите щелчок.
C
2 Уctaнoвите ножeвoй oтceк нa бпок
зпектродвигaтeпя.
C
3 Вставьте червячный вал в корпус
ножевого блока пластиковым концом
вперед.
C
4 Установите ножевой блок на червячный
вал. Режущие кромки должны
находиться впереди.
C
5 Поместите диск средней степени
измельчения или диск предварительного
измельчения (в зависимости от
консистенции фарша, которую вы
хотите получить) на червячный вал.
Убедитесь в том, что выступы на головной
части мясорубки вошли в выемки на диске для
измельчения.
Page 60

РУССКИЙ60
C
6 Поворачивайте кольцо с резьбой в
направлении, указанном стрелкой на
корпусе ножевого блока, до упора.
C
7 Установите загрузочный поддон на
вертикальный выступ корпуса ножевого
блока.
Перемалывание мяса
1 Порежьте мясо кусочками длиной
10 см, толщиной 2 см.
2 Удалите по возможности кости,хрящи
и сухожилия.
Запрещается перемалывать замороженное
мясо!
C
3 Для перемалывания мяса выберите
скорость 2
C
4 Положите мясо в поддон.Аккуратно
проталкивайте мясо толкателем в корпус
ножевого блока.
◗ За минуту можно перемолоть 1,3 кг мяса.
(Свинина должна быть постной, без жира и
сухожилий).
◗ Для мяса по-татарски рекомендуем
перемолоть мясо дважды, используя диск
средней степени измельчения.
Приготовление колбасок
1 Сделайте фарш.
2 По окончании перемалывания
отсоедините прибор от сети и снимите
кольцо с резьбой.
3 Снимите диск для измельчения.
4 Снимите ножевой блок.
◗ Если вы хотите готовить колбаски, оставьте
червячный вал в корпусе ножевого блока.
C
5 Поместите сепаратор в корпус
ножевого блока.
C
6 Установите рожок для приготовления
колбасок и наверните кольцо с резьбой
на корпус ножевого блока.
Прибор готов для приготовления колбасок.
Полезные советы
◗ Положите оболочку для колбасок на
10 минут в теплую воду. Затем натяните
влажную оболочку для колбасок на рожок.
Поместите мясной фарш (приправленный)
в корпус ножевого блока.
◗ Если оболочка прилипает к рожку, смочите
ее водой.
◗ Для приготовления колбасок выберите
скорость 1.
Page 61

61РУССКИЙ
Очистка
Перед очисткой блока электродвигател
всегда вынимайте вилку сетевого шнура из
розетки электросети.
1 Очищайте блок электродвигателя
влажной тканью. Запрещается погружать
блок электродвигателя в воду или
промывать его под струей воды.
2 Каждый раз сразу же после работы
промывайте горячей водой с моющим
средством детали, контактирующие с
пищей.
◗ Чашу, крышку чаши, толкатель и
принадлежности можно мыть также в
посудомоечной машине.
Эти детали прошли испытание на
устойчивость к мытью в посудомоечной
машине в соответствии с DIN EN 12875.
Будьте очень осторожны при очистке нож
ножевого блока блендера и ножей-вставок
Режущие кромки этих деталей очень острые!
Убедитесь, что лезвия ножа, ножевого блока
блендера и ножей-вставок не вступают в
контакт с твердыми предметами, которые
могут их затупить.
Под воздействием определенных продуктов
цвет поверхности деталей может измениться.
Эксплуатационные качества деталей при этом
не ухудшаются. Через некоторое время цвет
деталей, как правило, восстанавливается.
C
◗ Намотайте излишек сетевого шнура вокруг
барабана, расположенного на задней
панели электроприбора.
Очистка мясорубки
Мясо, оставшееся в корпусе ножевого блока,
можно удалить из мясорубки, пропустив через
нее кусок хлеба.
1 Перед очисткой прибора отключите его
и выньте вилку сетевого шнура из
розетки электросети.
2 Нажмите на ручку выключения и
отверните целиком корпус ножевого
блока в направлении стрелки.
C
3 Уберите толкатель и снимите
загрузочный поддон.
4 Отверните кольцо с резьбой и выньте
все детали из корпуса ножевого блока.
Не рекомендуется мыть детали мясорубки
посудомоечной машине!
Page 62

РУССКИЙ62
5 Промойте все детали,
контактировавшие с мясом, в теплой
мыльной воде СРАЗУ ЖЕ ПОСЛЕ
ИСПОЛЬЗОВАНИЯ МЯСОРУБКИ.
6 Ополосните их в чистой теплой воде и
СРАЗУ ЖЕ высушите.
◗ Рекомендуем смазывать ножевой блок и
диски для измельчения растительным
маслом.
Гарантия и обслуживание
По поводу дополнительной информации или в
случае возникновения каких-либо проблем
обращайтесь на Web-сайт компании «Филипс»
по адресу: www.philips.com или в центр
компании «Филипс» по обслуживанию
потребителей в вашей стране (вы найдете его
номер телефона на международном
гарантийном талоне). Если подобный центр в
вашей стране отсутствует, обратитесь в вашу
местную торговую организацию компании
«Филипс» или в сервисное отделение
компании Philips Domestic Appliances and
Personal Care BV.
Продолжительность
обработки
10 - 60 сек.
60 - 180 сек.
10 - 60 сек.
зависит от количества
10 - 60 сек.
Операция
Измельчение, приготовление пюре,
перемешивание
Замешивание теста
Slicing, shredding
Перемалывание мяса
Смешивание, взбивание,эмульгирование
Прина
длежн
ость
P
{
gh
å
Функции, принадлежности и операции
Решение
Поверните чашу/или крышку по часовой стрелке до
щелчка. Убедитесь в том, что отметки на чаше и
крышке расположены точно друг против друга.
По-видимому, автоматическое устройство
защитного отключения отключило прибор от сети
вследствие перегрева электроприбора. 1) Выключите
электроприбор (положение 0). 2) Выньте вилку
сетевого шнура из розетки электросети. 3) Дайте
электроприбору остыть в течение 60 минут.
4) Вставьте вилку сетевого шнура в розетку
электросети. 5) Снова включите электроприбор.
Проверьте, повернули ли вы чашу и крышку по
часовой стрелке до щелчка.
Если кувшин блендера и чаша для переработки
продуктов установлены правильно, будет работать
только блендер. Если вы хотите использовать чашу
для переработки продуктов, отсоедините блендер и
закройте монтажное отверстие, завинтив защитный
колпачок.
Проблема
Электроприбор не
включается.
Электроприбор
неожиданно перестал
работать.
Насадка для
перемешивания или
тестомешалка не
вращаются.
Установлены и
кувшин блендера, и
чаша для
переработки
продуктов, но
работает только
блендер.
Поиск и устранение неисправностей
Page 63

РУССКИЙ 63
Объемы продуктов и время обработки
Применение
готового
продукта
Салаты, блюда
из сырых
овощей
Салаты, блюда
из сырых
овощей
Панированны
е блюда,
блюда,
обжаренные в
сухарях
Десерты,
украшение
кондитерских
изделий
Гарниры, супы,
соусы, блюда,
обжаренные в
сухарях
Описание процедуры
Нарежьте овощи на кусочки,
проходящие в загрузочный
бункер. Заполните бункер
кусочками и нарежьте их
ломтиками, осторожно
проталкивая вниз толкателем.
Нарежьте овощи на кусочки,
проходящие в загрузочный
бункер. Заполните бункер
кусочками и нарежьте их
ломтиками, осторожно
проталкивая вниз толкателем.
Используйте сухой,
хрустящий хлеб
Для получения воздушного
продукта используйте
размягченное масло.
Используйте сыр Пармезан
без корки, нарезав его
кубиками размером 3 х 3 см.
Прин
адлеж
ность
/скор
ость
P/ 2
P/ 2
P/ 2
P/ 2
P/ 2
Макси
мальн
ое
колич
ество
500 г
500 г
100 г
300 г
200 г
Ингредиенты
и результат
обработки
Яблоки,
морковь,
корень
сельдерея шинкование
Яблоки,
морковь,
корень
сельдерея нарезка
ломтиками
Панировочны
е сухари измельчение
Сливочные
кремы взбивание
Сыр
(Пармезан) измельчение
Применение
готового
продукта
Соусы, пицца,
блюда,
обжаренные в
сухарях,
фондю
Гарниры,
кремы,
кондитерские
изделия,
муссы
Пюре, супы
Блюда для
детского
питания
Салаты,
гарниры
Описание процедуры
Предварительно нарежьте
сыр на кусочки, проходящие в
загрузочный бункер.
Осторожно проталкивайте
их вниз толкателем.
Используйте твердый
шоколад без добавок.
Предварительно поломайте
его на кусочки размером 2
см.
Используйте вареные фасоль
или горох. При
необходимости для
улучшения консистенции
добавьте немного жидкости.
Для приготовления
грубоизмельченного пюре
добавьте небольшое
количество жидкости. Для
приготовления жидкого пюре
продолжайте добавлять
жидкость до тех пор, пока
смесь не станет однородной.
Поместите огурец в
загрузочный бункер и
осторожно протолкните его
вниз.
Прин
адлеж
ность
/скор
ость
Испол
ьзуетс
я диск
/ k
P
P / 2
P/ 2
g / 1
Макси
мальн
ое
колич
ество
200 г
200 г
250 г
500 г
2
огурц
а
Ингредиенты
и результат
обработки
Сыр (Гауда) тонкое
измельчение
Шоколад измельчение
Вареные
горох, фасоль
приготовлени
е пюре
Вареные
овощи и мясо
приготовлени
е пюре
Огурцы нарезка
ломтиками
Page 64

РУССКИЙ64
Применение
готового
продукта
Хлеб
Пицца
Пирог с
яблоками,
печенье,
открытые
пироги с
фруктами
Описание процедуры
Смешайте теплую воду с
дрожжами и сахаром.
Добавьте муку,растительное
масло, соль и замешивайте
тесто в течение
приблизительно 90 сек.
Дайте тесту подняться в
течение 30 минут.
Выполните процедуру,
аналогичную процедуре
замешивания теста для
выпечки хлеба. Замешивайте
тесто в течение 1 минуты
Используйте холодный
маргарин, нарезанный
кусочками размером 2 см.
Всыпьте в чашу муку и
добавьте маргарин.
Замешивайте до тех пор,
пока тесто не станет
рассыпчатым. Затем,
продолжая перемешивать,
добавьте холодную воду.
Прекратите перемешивать,
как только тесто начнет
принимать форму шара.
Прежде чем обрабатывать
тесто дальше, дайте ему
остыть.
Прин
адлеж
ность
/скор
ость
P / 2
P / 2
P / 2
Макси
мальн
ое
колич
ество
500 г
муки
1000 г
муки
300 г
муки
Ингредиенты
и результат
обработки
Тесто (для
выпечки
хлеба) замешивание
Тесто (для
пиццы) замешивание
Тесто (для
кондитерских
изделий из
песочного
теста) замешивание
Применение
готового
продукта
Хлеб высшего
качества
Пудинги,
суфле,
меренги
Соусы,
джемы,
пудинги,
детское
питание
Описание процедуры
Сначала смешайте в
отдельной емкости теплую
воду с дрожжами и
небольшим количеством
сахара. Поместите все
ингредиенты в чашу для
перемешивания и
замешивайте тесто, пока его
поверхность не станет
гладкой и тесто не
перестанет прилипать к
стенкам чаши
(приблизительно 1 минуту).
Дайте тесту подняться в
течение 30 минут.
Используйте яичные белки,
имеющие комнатную
температуру. Примечание:
используйте не менее 2
яичных белков.
Совет: для того, чтобы цвет
фруктов не изменился,
добавьте немного лимонного
сока.
Прин
адлеж
ность
/скор
ость
P / 2
A / 1
P / 2
Макси
мальн
ое
колич
ество
500 г
муки
4
яичны
х
белка
500 г
Ингредиенты
и результат
обработки
Дрожжевое
тесто замешивание
Яичные белки
- сбивание
Фрукты
(например,
яблоки,
бананы) измельчение
Page 65

РУССКИЙ 65
Применение
готового
продукта
Гарниры,
подливы
Соусы, супы,
гарниры,
ароматизиров
анное масло
Салаты,
гарниры и
соус для
барбекю
Бифштексы,
гамбургеры,
фрикадельки
Описание процедуры
Очистите чеснок. Нажимайте
на кнопку импульсного
режима несколько раз, чтобы
не допустить чрезмерного
измельчения чеснока.
Используйте порцию чеснока
не менее 150 г.
Перед измельчением
вымойте и обсушите зелень.
Все ингредиенты должны
иметь комнатную
температуру. Примечание:
используйте не менее 1
крупного яйца, или 2 мелких
яиц, или 2 яичных желтков.
Разбейте в чашу яйцо, влейте
немного уксуса и добавляйте
по каплям растительное
масло.
Сначала удалите сухожилия и
кости. Порежьте мясо
кусочками длиной
10 см, толщиной 2 см.
Прин
адлеж
ность
/скор
ость
P / 2
P / 2
˙ / 1
/ 2
Макси
мальн
ое
колич
ество
300 г
Не
менее
50 г
3
яйца
1000g
Ингредиенты
и результат
обработки
Чеснок измельчение
Зелень
(например,
петрушка) измельчение
Майонез взбивание
Постное
мясо измельчение
Применение
готового
продукта
Различные
виды выпечки
Салаты,
пудинги,
сдобный хлеб
с орехами,
миндальная
масса
Салаты,
готовые
блюда,
гарниры
Салаты,
готовые
блюда,
гарниры
Описание процедуры
Ингредиенты должны иметь
комнатную температуру.
Перемешивайте
размягченное масло и сахар
до тех пор, пока смесь не
станет однородной и
пышной. Затем добавьте
молоко, яйца и муку.
Для грубого измельчения
пользуйтесь кнопкой
импульсного режима. Если
вам нужны дробленые орехи,
своевременно прервите
измельчение.
Очистите лук и разрежьте
каждую луковицу на 4 части.
Нажмите 2 раза на кнопку
импульсного режима и
проверьте результат.
Очистите лук и нарежьте его
на кусочки, проходящие в
загрузочный бункер.
Примечание: одна порция
должна составлять не менее
100 г.
Прин
адлеж
ность
/скор
ость
P / 2
P / 2
P / 2
g / 1
Макси
мальн
ое
колич
ество
4
яйца
250 г
500 г
300 г
Ингредиенты
и результат
обработки
Смеси для
приготовлени
я пирожных смешивание
Орехи измельчение
Репчатый лук
- шинкование
Репчатый лук
- нарезка
кусочками
Page 66

РУССКИЙ66
Применение
готового
продукта
Украшение
блюд, кремы,
мороженое
Описание процедуры
Доставайте сливки из
холодильника
непосредственно перед
взбиванием. Примечание:
порция сливок должна
составлять не менее 125 мл.
Для приготовления
требуется около 20 секунд.
Прин
адлеж
ность
/скор
ость
S / 1
Макси
мальн
ое
колич
ество
500
мл
Ингредиенты
и результат
обработки
Взбитые
сливки взбивание
Рецепты
Кабачковая паста для сэндвичей
Ингредиенты:
- 2 кабачка
- 3 вареных яйца
- 1 небольшая луковица
- 1 столовая ложка растительного масла
- петрушка
- 2-3 столовые ложки сметаны
- лимонный сок, соус Табаско, соль, перец,
порошок карри, паприка
B
Вымойте и обсушите кабачки, нашинкуйте их
ножом-вставкой для тонкого измельчения в
чаше для обработки продуктов. Переложите
нашинкованные кабачки на блюдо, посыпьте
солью и оставьте на 15 минут, для того
чтобы соль впитала в себя сок из
нашинкованных кабачков. Разрежьте луковицу
на 4 части и тонко измельчите ее вместе с
зубком чеснока. Отделите листья петрушки
от стеблей и измельчите их.
B
Затем переложите нашинкованные кабачки
на чистое полотенце и отожмите из них
жидкость. Налейте на сковороду
растительное масло, слегка обжарьте
измельченные лук и чеснок и добавьте
нашинкованные кабачки. Вся жидкость
должна выпариться. Дайте обжаренным
ингредиентам немного остыть. Очистите
яйца и в течение нескольких секунд
измельчите их в чаше для обработки
Page 67

РУССКИЙ 67
продуктов. Добавьте в чашу для обработки
пищи остальные ингредиенты, приправы и
перемешайте ножом. Подавайте на
обжаренных ломтиках хлеба.
Фруктовый пирог
Ингредиенты:
- 180 г фиников
- 270 г чернослива
- 60 г миндаля
60 г грецких орехов
- 60 г изюма
- 60 г кишмиша
- 240 г ржаной муки грубого помола
- 120 г пшеничной муки
- 120 коричневого сахара
- щепотка соли
- 1 пакетик пекарского порошка
- 360 г жирного молока
B
Установите в чаше металлический нож.
Поместите в чашу все ингредиенты и
перемешивайте их в течение 30 секунд на
максимальной скорости. Выпекайте пирог в
форме длиной 30 см в течение 40 минут при
температуре 170cC
Пирог с луком-пореем
Ингредиенты для теста:
- 250 г пшеничной муки (или обойной
пшеничной муки)
- щепотка соли
- 1 столовая ложка меда
- 20 г свежих дрожжей или 1/2 пакета
сушеных дрожжей
- 100 г масла
- 6 столовых ложек теплой воды
Ингредиенты для начинки:
- 500 г лука-порея
- растительное масло
- 4 яйца
- 500 г сметаны
- соль, перец, 1-2 чайные ложки муки, если
требуется
B
Поместите все ингредиенты в чашу и
замешивайте до получения теста плотной
консистенции. Дайте тесту подняться в
течение приблизительно 30 минут.
B
Нашинкуйте лук-порей насадкой для
нарезания. Налейте на сковороду немного
масла и поджаривайте лук в течение
нескольких минут. Поместите оставшиеся
ингредиенты в кувшин блендера и взбивайте
до консистенции сметаны. Добавьте 1-2
столовые ложки муки для того, чтобы смесь
стала более густой.
B
Смажьте жиром форму для выпечки
диаметром 24 см и равномерно покройте
тестом дно и боковые стенки формы.
Распределите луковую смесь на тесте и
залейте ее оставшимися ингредиентами.
Выпекайте в предварительно нагретой
духовке в течение 40 минут при
температуре 180cС. Подавайте в теплом
или холодном виде.
Page 68

РУССКИЙ68
Гуляш по-венгерски
Ингредиенты:
- 1 столовая ложка растительного масла
- 1 луковица среднего размера
- 1 чайная ложка паприки
- 400 г свинины или говядины
- 1 зеленый перец
- 1 помидор
-соль
- 200 г моркови
- 300 г картофеля
- семена тмина
B
Вымойте мясо и нарежьте его кубиками
размером 2 см. Очистите лук и измельчите
его в чаше для обработки продуктов
металлическим ножом. Удалите сердцевину
из зеленого перца и нарежьте его кольцами с
помощью регулируемого диска для нарезки
ломтиков. Снимите кожицу с помидора,
выньте зернышки и нарежьте помидор
тонкими полосками. Обжарьте измельченный
лук в растительном масле до мягкости.
Снимите сковороду с луком с плиты и
посыпьте лук паприкой, добавьте мясо и
обжаривайте на сильном огне при
постоянном перемешивании в течение
нескольких минут. Добавьте зеленый перец,
помидор и соль по вкусу, накройте сковороду
и тушите при умеренном нагревании в
собственном соку, пока мясо не станет
почти мягким.
B
В это время очистите и нашинкуйте
морковь с помощью регулируемого диска для
нарезки ломтиков, очистите и нарежьте
кубиками картофель. Добавьте к мясу
морковь и картофель и влейте холодную воду
для такого количества супа, которое вы
хотите получить (приблизительно 1,2 л).
Приправьте щепоткой семян тмина и
кипятите на медленном огне, пока все
продукты не станут мягкими как масло. При
необходимости добавьте соль.
B
Подавайте горячим. В качестве гарнира вы
можете использовать кольца зеленого перца
и подать на отдельном блюде острый перец.
Кольцо с начинкой из лесных
орехов
Ингредиенты для теста:
- 500 г просеянной муки
- 75 г сахара
- 1 чайная ложка соли
- 1 яйцо
- 250 мл молока (при 35cС)
- 100 г размягченного масла
- 30 г свежих дрожжей (при использовании
сушеных дрожжей см. инструкции на
упаковке).
Начинка:
- 250 г измельченных лесных орехов
- 100 г сахара
- 2 пакетика ванильного сахара
- 125 мл сливок
Page 69

РУССКИЙ 69
B
Нагрейте духовку до 200cС. В течение
15 секунд замешивайте тесто из молока,
дрожжей и сахара с помощью тестомешалки.
Добавьте муку, соль, масло и яйцо.
Замешивайте тесто в течение еще двух
минут. Переложите тесто в отдельную
емкость, накройте его влажной тканью и
дайте подняться в течение 20 минут в
теплом месте.
B
Измельчите лесные орехи металлическим
ножом. Перемешайте ингредиенты начинки.
Раскатайте тесто и придайте ему
прямоугольную форму. Распределите по
поверхности прямоугольника ореховую смесь,
скатайте тесто и придайте ему форму
кольца. Положите кольцо на смазанную
маслом форму для выпечки с пружинным
устройством. Дайте кольцу подняться в
течение 20 минут. Кисточкой смажьте
верхнюю поверхность кольца взбитым
яичным желтком и поместите форму в
центр духовки. Выпекайте 25-30 минут при
200cС.
Шоколадный кекс
Ингредиенты:
- 140 г размягченного масла
- 110 г сахарной пудры
- 140 г шоколада
- 6 яичных белков
- 6 яичных желтков
- 110 г сахара-песка
- 140 г пшеничной муки
Начинка:
- 200 г абрикосового джема
Глазурь:
- 125 мл воды
- 300 г сахара
- 250 г тертого шоколада
- взбитые сливки, по желанию
B
Нагрейте духовку до 160cС. С помощью
насадки для перемешивания взбейте крем из
масла и сахарной пудры. Расплавьте шоколад
и добавьте его при перемешивании.
Добавьте в смесь по одному яичные желтки
и перемешивайте до получения
кремообразной консистенции. С помощью
насадки для перемешивания взбейте яичные
белки с сахаром-песком до состояния густой
пены. Добавьте в смесь взбитые в пену белки
и осторожно перемешайте. Затем
осторожно добавьте лопаткой муку.
Положите полученную смесь в смазанную
жиром форму для выпечки. Выпекайте в
течение 1 часа при 160cС. В течение первых
15 минут дверца духовки должна быть
немного приоткрыта.
B
Дайте кексу немного остыть, не вынимая
его из формы (24 см), затем переверните на
проволочную решетку для дальнейшего
остывания. Разрежьте кекс в
горизонтальном направлении на половины,
намажьте на одну из них абрикосовый джем
и снова сложите половины вместе. Нагрейте
оставшийся джем до сиропообразного
Page 70

РУССКИЙ70
состояния и нанесите его на поверхность
кекса. Приготовьте глазурь. Вскипятите
воду, добавьте в нее сахар и шоколад и
кипятите при слабом нагревании. Постоянно
перемешивайте до получения гладкой и
пастообразной консистенции. Нанесите
глазурь на кекс и дайте ей остыть.
Подавайте кекс со взбитыми сливками.
Суп из брокколи (на 4 персоны)
Ингредиенты:
- 50 г выдержанного сыра Гауда.
- 300 г вареной брокколи (стебли и соцветия).
- Отвар от брокколи.
- 2 нарезанных кусочками клубня отварного
картофеля
- 2 бульонных кубика
- 2 столовые ложки сливок для взбивания
- карри
-соль
- перец
- мускатный орех
B
Натрите сыр. Приготовьте пюре из
брокколи, отварного картофеля и некоторого
количества отвара брокколи. Переложите
приготовленное пюре и оставшийся отвар
вместе с бульонными кубиками в мерную
емкость и доведите объем до 750 мл.
Перелейте смесь в кастрюлю и, помешивая,
доведите ее до кипения. Примешайте сыр,
добавьте карри, соль, перец, мускатный орех
и сливки.
Пицца
Ингредиенты для теста:
- 400 г муки
- 1/2 столовой ложки соли
- 20 г свежих дрожжей или 1,5 пакета
сушеных дрожжей
- 2 столовые ложки кулинарного жира
- приблизительно 240 мл воды (35cС).
Для начинки пиццы:
- 300 мл консервированных протертых
томатов
- 1 столовая ложка смеси итальянских трав
(сухих или свежих)
- 1 луковица
- 2 зубка чеснока
- соль и перец
- сахар
Ингредиенты, распределяемые поверх соуса:
- оливки, салями, артишоки, грибы, анчоусы, сыр
Моззарелла, стручковый перец, тертый
выдержанный сыр и оливковое масло по
вкусу.
B
Установите в чаше насадку для замешивания
теста. Положите в чашу для перемешивания
все ингредиенты и выберите максимальную
скорость (положение 2). Замешивайте тесто
в течение приблизительно 90 секунд до
образования гладко вымешанного шара.
Переложите тесто в другую емкость,
накройте ее влажной тканью и дайте
подняться в течение приблизительно
30 минут.
Page 71

РУССКИЙ 71
B
С помощью металлического ножа измельчите
лук и чеснок в чаше для перемешивания и
обжаривайте их до тех пор, пока они не
станут прозрачными. Добавьте протертые
томаты и зелень и кипятите соус на
медленном огне в течение приблизительно
10 минут. Приправьте по вкусу солью,
перцем и сахаром. Дайте соусу остыть.
B
Нагрейте духовку до температуры 250cС.
B
Раскатайте тесто на посыпанной мукой
поверхности и, разделив его на 2 части,
придайте им форму круга. Поместите эти
круги в смазанные жиром формы для выпечки.
Поместите на поверхность пиццы начинку,
оставляя края свободными. Разложите поверх
желаемые ингредиенты, посыпьте пиццу
тертым сыром и сбрызните оливковым
маслом.
B
Выпекайте пиццу в течение 12-15 минут.
Обжаренные овощи и картофель
Ингредиенты:
- 1 яйцо
- 50 мл молока
- 1 столовая ложка муки
- 1 чайная ложка молотого кориандра
- соль и перец
- 2 крупных картофелины (приблизительно
300 г)
- 100 г моркови
- 150 г сельдерея
- 50 г семян подсолнечника или 2 столовые
ложки зерен кукурузы с початка
- подсолнечное масло для жарки
B
Металлическим ножом перемешайте яйцо,
молоко, муку, кориандр, соль и перец.
B
Нашинкуйте очищенный картофель, морковь
и очищенный сельдерей с помощью ножавставки для грубого измельчения и добавьте
их к яичной смеси. Перемешайте вместе
овощи, яичную смесь и семена подсолнечника
или зерна кукурузы в чаше.
B
Разогрейте растительное масло на
сковороде и обжарьте 8 плоских овощных
котлет с обеих сторон до золотистого
цвета. Обсушите их на кулинарной бумаге.
B
Время приготовления: 3-4 минуты.
Хлеб (белый)
Ингредиенты:
- 500 г хлебопекарной муки
- 15 г мягкого масла или маргарина
- 25 г свежих дрожжей или 20 г сушеных
дрожжей
- 260 мл воды
- 10 г соли
- 10 г сахара
B
Установите тестомешалку в чаше для
перемешивания. Положите в чашу муку, соль и
маргарин или сливочное масло. Добавьте
свежие или сухие дрожжи и воду. Закройте
чашу крышкой и поверните ее в направлении,
указанном стрелкой, до щелчка. Выберите
максимальную скорость (положение 2) и
перемешайте тесто (максимальное время, в
течение которого может выполняться
замешивание, см. в разделе «Объемы
продуктов и время обработки».
Page 72

РУССКИЙ72
B
Выньте тесто из чаши, перенесите его в
большую емкость, накройте влажной тканью
и дайте подняться в теплом месте в
течение 20 минут. Поднявшееся тесто
раскатайте вновь и придайте ему форму
шара.
B
Положите тесто обратно в емкость,
накройте влажной тканью и дайте
подняться в теплом месте в течение
20 минут. Вновь раскатайте и закатайте.
B
Выложите тесто в смазанную жиром
хлебопекарную форму и оставьте еще на
45 минут. Выпекайте хлеб в нижней части
предварительно нагретой духовки.
B
Выпекайте хлеб при температуре около
225cС в течение приблизительно 35 минут
в нижней части предварительно нагретой
духовки.
Page 73

ČESKY 73
Díly a příslušenství
A Motorová jednotka
B Regulace rychlosti
P = Impuls
0 = Vypnuto
1 = Malá rychlost
2 = Velká rychlost
C Šroubovací uzávěr (musí být nasazen aby byla
mísa funkční)
D Nádoba na potraviny
E Držák nástrojů
F Víko nádoby na potraviny
G Tubus pro vkládání potravin
H Pěchovač
I Hnětací hák
J Kovové nože + ochranný obal
K Krájecí vložka střední
L Řezací vložka střední
M Držák vložek
N Emulgační kotouč
O Kryt převodů mlýnku na maso
P Kryt nožů mlýnku na maso
Q Hnací hřídel
R Nožová jednotka
S Přítlačný kroužek
T Mlecí kotouč střední, průměr 4 mm
U Mlecí kotouč hrubý, průměr 8 mm
V Separátor
W Plnicí nástavec
X Zásobník
Y Pěchovač
Z Uvolňovací páčka
Úvod
Tento přístroj je vybaven automatickým
termickým vypínačem.V případě přehřátí motoru
se přístroj automaticky vypne.
Když přístroj náhle přestane pracovat:
1 Vytáhněte síťovou zástrčku ze zásuvky.
2 Přístroj vypněte otočením knoflíku do
polohy 0.
3 Nechte přístroj 60 minut vychladnout.
4 Zasuňte síťovou zástrčku do zásuvky.
5 Znovu zapněte přístroj.
Pokud by automatický vypínač vypínal přístroj
příliš často, spojte se se servisem firmy Philips.
VÝSTRAHA:Abyste zabránili případné
nebezpečné situaci, nesmíte přístroj nikdy připojit
k časovému spínači (timeru).
Page 74

ČESKY74
Důležité
◗ Přečtěte pečlivě následující instrukce a
sledujte přitom příslušná vyobrazení.
◗ Návod uschovejte pro případná pozdější
nahlédnutí.
◗ Než přístroj připojíte do sítě zkontrolujte, zda
napětí ve vaší světelné síti souhlasí s údajem
napětí na typovém štítku přístroje.
◗ Ve spojení s přístrojem nikdy nepoužívejte
žádné jiné příslušenství nebo doplňky, pokud
to není firmou Philips výslovně doporučeno.V
takovém případě byste též ztratili garanční
nároky.
◗ Pokud byste zjistili jakékoli poškození
síťového přívodu nebo jeho zástrčky, ihned
vyřaďte přístroj z provozu.
◗ Přívodní kabel musí být vždy vyměněn v
autorizované opravně firmy Philips nebo
přímo v servisním středisku této firmy abyste
zabránili vzniku nebezpečných následků.
◗ Než přístroj poprvé použijete, umyjte pečlivě
všechny jeho díly, které přicházejí do přímého
styku s potravinami.
◗ Nemixujte nadměrná množství potravin a
nepřekračujte dobu mixování, která je
uvedena v tabulce.
◗ Nikdy nepřekračujte maximální obsah, který
je vyznačen na nádobě, neplňte ji nad toto
označení.
◗ Po použití vždy přístroj vypněte.
◗ Nikdy nestrkejte prsty (ani stěrku) do nádoby
plnicím tubusem pokud je přístroj v chodu.
Smíte použít výhradně pěchovač.
◗ Přístroj uchovávejte vždy mimo dosah dětí.
◗ Nikdy nenechávejte přístroj pracovat bez
dozoru.
◗ Na nádobu položte víko správným způsobem.
Tím bude odblokováno bezpečnostní zajištění
a přístroj bude možno zapnout. Motorová
jednotka a šroubovací uzávěr jsou označeny
značkami. Přístroj lze uvést do funkce jen v
případě, že jsou obě značky proti sobě.
◗ Před odejmutím příslušenství musí být přístroj
rovněž ve vypnutém stavu.
◗ Vždy vypínejte přístroj otočením přepínače
rychlosti do polohy 0.
◗ Než odejmete víko,vyčkejte až se motor zcela
zastaví.
◗ Nikdy nesmíte motorovou jednotku ponořit
do vody nebo do jiné kapaliny. Nesmíte ji též
mýt pod tekoucí vodou.K čištění motorové
jednotky používejte vždy jen navlhčený hadřík.
◗ Před použitím nožů nejprve sejměte jejich
ochranný obal.
◗ Nikdy nepoužívejte nožovou jednotku ve
spojení se separátorem a plnicím nástavcem.
◗ Nikdy nerozmělňujte kosti,ořechy nebo jiné
tvrdé potraviny.
◗ Nikdy nesahejte do zásobníku.Vždy používejte
pěchovač.
◗ Horké potraviny před zpracováním ochlaďte.
Jejich nejvyšší teplota smí být 80cC.
◗ Doby zpracování zjistíte v tabulce, která je
součástí tohoto návodu.
◗ Po použití vždy přístroj vypněte.
Page 75

ČESKY 75
Použití přístroje
Nádoba na potraviny
C
1 Nádobu nasaďte na přístroj a otočte ji
rukojetí ve směru šipky tak daleko až
uslyšíte zaklapnutí.
C
2 Na nádobu nasaďte víko.Víko otočte ve
směru šipky až uslyšíte zaklapnutí (to
vyžaduje trochu síly).
Vestavěný bezpečnostní vypínač
Motorová jednotka, nádoba a její víko jsou
opatřeny značkami. Přístroj lze zapnout jen tehdy,
když je značka na motorové jednotce přesně proti
značce na nádobě.
C
1 Zkontrolujte, zda linka na nádobě a linka
na víku jsou přesně proti sobě.
Plnicí tubus a pěchovač
C
1 Tubus pro vkládání potravin používejte pro
nalévání tekutin nebo vkládání tuhých
přísad.Tuhé přísady pak přitlačujte
pěchovačem.
CLICK
C
2 Pěchovačem můžete též plnicí tubus
uzavřít abyste zabránili případnému
vystřikování tekutých potravin tubusem.
Kovové nože
◗ Kovové nože lze používat k sekání, mixování,
míchání a k výrobě pyré.
C
1 Sejměte z nožů ochranný kryt.
Nože jsou velmi ostré. Dbejte náležité opatrnosti!
C
2 Do nádoby vložte držák nástrojů a nože
do držáku v nádobě.
3 Do nádoby vložte potraviny.Větší kusy
potravin nakrájejte na kostky o hranách asi
3 cm. Na nádobu položte víko.
4 Do tubusu vložte pěchovač.
C
5 Zvolte největší rychlost (poloha 2).
- Přístroj zůstane v chodu dokud nezvolíte na
spínači polohu 0.
◗ Přepněte do polohy 1, tím rychlost zmenšíte.
1
2
CLICK
1
2
CLICK
Page 76

ČESKY76
Praktické rady
◗ Pokud sekáte cibuli, použijte několikrát
mžikovou funkci aby nebyla cibule nasekána
příliš jemně.
◗ Pokud sekáte například tvrdé sýry, nenechte
přístroj běžet příliš dlouho.Sýr se totiž
sekáním nadměrně ohřeje, začne měknout a
může zhrudkovatět.
◗ Nože nepoužívejte pro drcení nadměrně
tvrdých přísad jako jsou káva,ořechy, kurkuma
nebo kostky ledu.Nože by se příliš brzy otupily.
Pokud by potraviny ulpěly na nožích:
1 Vypněte přístroj.
2 Sejměte víko z nádoby.
3 Potraviny odstraňte ze stěn nádoby nebo z
nožů pomocí stěrky.
Vložky
Vložky nikdy nepoužívejte pro zpracování tvrdých
potravin jako jsou například kostky ledu.
C
1 Zvolenou vložku vložte do jejího držáku
než ji umístíte do držáku nástrojů.
Řezací hrany jsou velmi ostré. Pozor při dotyku!
C
2 Držák vložek vložte do držáku nástrojů,
který je v nádobě.
3 Na nádobu nasaďte víko.
4 Potraviny vkládejte plnicím tubusem.Větší
části potravin předem rozřežte.
C
5 Potraviny vkládejte postupně a
rovnoměrně.
Zpracováváte-li větší množství potravin, vkládejte
je postupně a v malých dávkách. Nezapomeňte
včas nádobu vyprazdňovat.
C
6 Pro drcení a řezání zvolte největší rychlost
(poloha 2).
Přístroj zůstane v chodu dokud nezvolíte na
spínači polohu 0.
◗ Přepněte do polohy 1, tím rychlost zmenšíte.
C
7 Potraviny v tubusu jemně přitlačujte
pěchovačem.
◗ Drtíte-li měkkou zeleninu nebo ovoce, můžete
rychlost zmenšit (poloha 1), abyste ze zeleniny
nebo ovoce nevyrobili pyré.
C
8 Přejete-li si vyjmout vložku z držáku
vezměte držák vložek do rukou tak,že
jeho zadní část směřuje k vám. Zatlačte
hrany vložky prsty tak, aby z držáku
vypadla.
1
CLICK
2
Page 77

ČESKY 77
Hnětací hák
Hnětací hák můžete použít pro zpracování
různých těst nebo koláčových směsí.
C
1 Na motorovou jednotku upevněte nádobu
na hnací hřídel a nasaďte hnětací
příslušenství.
2 Do nádoby vložte přísady na nádobu
upevněte víko. Pěchovač zasuňte do
plnicího tubusu abyste zabránili
vystřikování obsahu.
C
3 Zvolte největší rychlost (poloha 2).
Viz tabulku vhodných dob zpracování.
Emulgační kotouč
Emulgační kotouč můžete použít pro přípravu
majonézy, k šlehání krémů nebo vaječných bílků.
C
1 Nasaďte emulgační kotouč na držák
nástrojů v nádobě.
2 Do nádoby vložte potraviny a nasaďte
víko.
3 Zvolte nejmenší rychlost (poloha 1),
abyste zajistili nejlepší výsledek.
Praktické rady
◗ Pokud šleháte vaječné bílky, dbejte na to, aby
měly pokojovou teplotu.
◗ Pokud vejce vyjímáte z chladničky, vyjměte je
alespoň půl hodiny před jejich zpracováním.
◗ Také všechny ostatní přísady pro výrobu
majonézy musí mít pokojovou teplotu.
Olej můžete přilévat otvorem na dně pěchovače.
◗ Pokud se chystáte podávat šlehaný krém,
vyjměte ho bezprostředně před tím z
chladničky. Dodržujte dobu přípravy,
uvedenou v tabulce. Krém nesmí být šlehán
příliš dlouho.
Použijte mžikovou funkci, abyste měli lepší
kontrolu nad přípravou.
Mlýnek na maso
Mlýnek na maso může být použit pro mletí masa
a výrobu omáček.
C
1 Připevněte převodovku na motorovou
jednotku.
Pokud jste tuto práci realizovali správně, uslyšíte
zaklapnutí.
C
2 Upevněte nádobu s noži na motorovou
jednotku.
Page 78

ČESKY78
C
2 Vložte hnací hřídel do nožové skříně a to
plastickým koncem dopředu.
C
3 Nožovou jednotku umístěte na hnací
hřídel. Krájecí břity musí být vpředu.
C
4 Na hnací hřídel nasaďte střední nebo
hrubý mlecí kotouč (podle vašeho přání).
Přesvědčte se, že zářezy na kotouči souhlasí s
otvory na hlavě mlýnku.
C
5 Otočte kroužkem ve směru šipky na
nožové skříni až dosáhnete řádného
upevnění.
C
6 Umístěte zásobník na svislou část nožové
skříně.
Masový mlýnek
1 Maso rozřežte na proužky 10 cm dlouhé a
2 cm tlusté.
2 Pokud to bude možné, vyjměte kosti,
kousky chrupavek a šlachy.
Nikdy nepoužívejte zmrzlé maso!
C
3 Pro práci používejte rychlostní nastavení 2.
C
4 Vložte maso do zásobníku. Pěchovačem ho
jemně přitlačujte do nožové skříně.
◗ Za minutu můžete zpracovat až 1,3 kg masa.
(Použijte libové vepřové maso bez šlach).
◗ Pro tatarské bifteky zpracovávejte maso
středně hrubým kotoučem dvakrát po sobě.
Výroba uzenek
1 Rozsekejte maso.
2 Když jste hotovi, přístroj odpojte a
odejměte šroubovací kroužek.
3 Sejměte mlecí kotouč.
4 Sejměte nožovou jednotku.
◗ Ponechte náhon v nožové skříni, pokud
chcete vyrábět uzenky.
C
5 Do nožové skříně vložte separátor.
Page 79

ČESKY 79
C
6 Nasaďte plnicí nástavec na nožovou skříň a
zašroubujte kroužek nožové skříně.
Přístroj je nyní připraven pro výrobu uzenek.
Praktické rady
◗ Vložte uzenkové střívko na 10 minut do
vlažné vody. Pak natáhněte mokré střívko na
plnicí nástavec.Vtlačte (okořeněné)
zpracované maso do nožové skříně.
◗ Pokud lze střívko natáhnout na plnicí nástavec
jen ztuha, můžete je trochu navlhčit vodou.
◗ Použijte rychlostní nastavení 1.
Čištění přístroje
Před čištěním motorové jednotky vždy předem
odpojte přístroj od sítě.
1 Motorovou jednotku čistěte pouze
navlhčeným hadříkem.Nesmíte ji nikdy
ponořit do vody ani ji vodou oplachovat.
2 Všechny díly, které přicházejí do styku s
potravinami, myjte v horké vodě s
přídáním vhodného mycího prostředku a
to po každém použití.
◗ Nádobu, její víko, pěchovač a příslušenství
(vyjma sklenice mixéru) lze mýt v myčce
nádobí.
Tyto díly byly testovány pro pro mytí v myčce
nádobí podle DIN EN 12875.
Pečlivě vyčistěte kovové nože, nožovou jednotku
mixéru a též její vnitřek. Nože jsou velmi ostré!
Dbejte na to, aby ostří nožů nikdy nepřišlo do
styku s tvrdými předměty, které by je mohly
otupit.
Některé druhy potravin mohou způsobit
zabarvení povrchu příslušenství.To nemá na funkci
příslušenství žádný negativní vliv. Po určitém čase
toto zabarvení obvykle zmizí.
C
◗ Nadbytečný síťový přívod můžete navinout
kolem zadní části přístroje.
Čištění mlýnku na maso
Zbytky masa, které zůstaly v nožové skříni, můžete
odstranit tak, že tímto prostorem protlačíte plátek
chleba.
1 Než začnete přístroj čistit, vypněte ho a
odpojte od sítě.
2 Stiskněte uvolňovací páčku a otočte celou
nožovou skříní ve směru šipky.
C
3 Vyjměte pěchovač a zásobník.
4 Obšroubujte kroužek a odejměte všechny
díly nožové skříně.
Tyto díly nemyjte v myčce nádobí!
Page 80

80 ČESKY
5 Všechny díly, které přicházejí do styku a
masem, umyjte v horké mýdlové vodě
IHNED PO POUŽITÍ.
6 Opláchněte tyto díly čistou horkou vodou
rovněž IHNED.
◗ Doporučujeme namazat nožovou jednotku a
mlecí kotouč trochou rostlinného oleje.
Záruka a servis
Pokud byste potřebovali jakoukoli informaci nebo
měli nějaký problém, podívejte se na internetovou
stránku www. philips.com, případně kontaktujte
Informační středisko firmy Philips, jehož telefonní
číslo naleznete na letáčku s celosvětovou zárukou.
Řešení
Otočte nádobu nebo její víko tak daleko až uslyšíte
zaklapnutí. Přesvědčte se, že značky na nádobě a na víku
jsou proti sobě.
Automatický teplotní vypínač pravděpodobně z důvodu
přehřátí přístroj vypnul. 1) Vypněte přístroj (poloha 0).
2) Odpojte přístroj od sítě. 3) Nechte přístroj asi
60 minut vychladnout. 4) Zasuňte zástrčku zpět do sítě.
5) Přístroj znovu zapněte.
Zkontrolujte, zda jste správně nasadili nádobu a její víko
tak, že slyšitelně zaklaplo.
Pokud jsou mixérová sklenice a nádoba na potraviny
řádně nasazeny, bude v činnosti pouze mixér. Přejete-li si
používat nádobu na potraviny, sejměte mixér a
našroubujte krycí uzávěr.
Problém
Přístroj nelze zapnout
Motor se náhle zastavil
Hnětací nebo šlehací
příslušenství se neotáčí
Je nasazena mixérová
sklenice i nádoba na
potraviny, ale pracuje
pouze mixér.
Praktické rady
Aplikační doba
10 až 60 sekund
60 až 180 sekund
10 až 60 sekund
10 až 60 sekund
Aplikace
Sekání, výroba pyré, šlehání
Hnětení
Krájení, drcení
Šlehání, emulgování
Drcení
Příslušenství
P
{
gh
å
Příslušenství a aplikace
Page 81

ČESKY 81
Použití
Saláty, syrová
zelenina
Saláty, syrová
zelenina
Příměs do jídel
Zdobení,
polévky,
omáčky
Omáčky, pizzy,
fondy.
Zdobení,
omáčky,
cukrovinky,
pudinky
Postup
Zeleninu nakrájejte na kousky,
aby se vešly do tubusu.Tubus
naplňte rozkrájenými kousky a
při krájení je lehce přitlačujte
pěchovačem.
Zeleninu nakrájejte na kousky,
aby se vešly do tubusu.Tubus
naplňte rozkrájenými kousky a
při krájení je lehce přitlačujte
pěchovačem.
Použijte suché a křehké pečivo.
Parmezán bez kůry rozřežte na
kousky o hraně asi 3 cm a ty
pak vkládejte do plnicího
otvoru.
Sýr, rozřezaný na kousky,
vkládejte do plnicího otvoru.
Opatrně přitlačujte
pěchovačem.
Použijte tvrdou a hladkou
čokoládu. Rozlamte ji na kousky
asi 2 cm.
Přisluš
enství/
rychlo
st
P / 2
A / 2
P / 2
P / 2
k / 2
P / 2
Nejvě
tší
množs
tví
500 g
500 g
100 g
200 g
200 g
200 g
Přísady a
výsledek
Jablka, mrkev,
celer strouhání
Jablka, mrkev,
celer - krájení
Strouhanka rozsekání
Sýr
(parmezán) rozsekání
Sýr (gouda) strouhání
Čokoláda rozsekání
Množství a doba zpracování
Použití
Pyré, polévky
Dětská a
kojenecká
výživa
Saláty, zdobení
Chléb
Pizza
Jablkový závin,
sladké piškoty,
dorty
Postup
Použijte vařený hrách nebo
fazole. Pokud je to třeba,
můžete do směsi přidat trochu
tekutiny.
Pro hrubší pyré nepřidávejte
příliš mnoho tekutiny. Pro
jemné pyré přidejte jen tolik
tekutiny až je směs hladká.
Vložte okurky do plnicího
otvoru a opatrně je přitlačujte.
Smíchejte horkou vodu s
kvasniceni a cukrem. Přidejte
mouku a zpracovávejte
výsledné těsto asi 90 sekund.
Nechte ho kynout asi 30 minut.
Realizujte stejný postup jako
pro chlebové těsto. Pracujte asi
1 minutu.
Použijte chladný margarin, který
rozřežte na kostky asi 2 cm.
Vložte všechny přísady do
nádoby a zpracovávejte tak
dlouho, až je těsto měkké.
Během zpracovávání přidejte
vodu. Práci ukončete až se z
těsta začne vytvářet koule. Před
dalším zpracováním nechte
těsto vychladnout.
Přisluš
enství/
rychlo
st
P / 2
P / 2
g / 1
P / 2
P / 2
P / 2
Nejvě
tší
množs
tví
250 g
500 g
2
okurk
y
500 g
mouky
1000
g
mouky
300 g
mouky
Přísady a
výsledek
Vařený hrách,
fazole - výroba
pyré
Vařená
zelenina a
maso - výroba
pyré
Okurky krájení
Těsto (pro
chléb) hnětení
Těsto (pro
pizzu) hnětení
Těsto (pro
cukrářské
pečivo) hnětení
Page 82

ČESKY82
Použití
Luxusní pečívo
Pudinky, suflé,
sněhové
pusinky
Omáčky,
džemy,
pudinky, dětská
výživa
Zdobení
Omáčky,
polévky,
zdobení,
bylinkové
máslo
Saláty, zdobení,
omáčky
barbecue
Postup
Nejprve zpracujte těsto, teplou
vodu a cukr ve zvláštní nádobě.
Dejte vše do nádoby a
zpracovávejte je až je těsto
hladké a nelepí se na nádobu
(asi 1 minutu). Nechte ho
kynout asi 30 minut.
Bílky by měly mít pokojovou
teplotu. Poznámka:použijte
nejméně 2 bílky.
Rada: abyste předešli zabarvení
šťávy, přidejte trochu citrónové
šťávy. Pro zjemnění pyré
můžete přidat trochu tekutiny.
Česnek oloupejte. Použijte
mžikový spínač, abyste předešli
příliš jemnému rozsekání.Vložte
nejméně 150 g česneku.
Bylinky nejprve omyjte a
usušte.
Všechny přísady mají mít
pokojovou teplotu. Poznámka:
použijte nejméně 1 vejce, dvě
malá vejce nebo dva vaječné
žloutky. Do nádoby vložte
vejce, přidejte trochu octa a
přikapávejte olej.
Přisluš
enství/
rychlo
st
P / 2
A / 1
P / 2
P / 2
P / 2
˙ / 1
Nejvě
tší
množs
tví
500 g
mouky
4
vaječn
é bílky
500 g
300 g
min.
50 g
3
vejce
Přísady a
výsledek
Těsto (kynuté)
- hnětení
Vaječné bílky šlehání
Ovoce (např.
jablky, banány)
- sekání
Česnek rozsekání
Bylinky (např.
petržel) rozsekání
Majónéza emulgování
Použití
Tatarské
steaky,
hamburgry,
masové koule
Různé pečivo.
Saláty, pudinky,
pečivo,
mandlové
těsto
Saláty, vařené
potraviny,
zdobení
Saláty, vařené
potraviny,
zdobení
Zdobení,
různé použití
krémů
Postup
Nejprve odstraňte šlachy a
kosti. Maso rozřežte na proužky
10 cm dlouhé a 2 cm tlusté.
Přísady mají mít pokojovou
teplotu. Mixujte měkké máslo s
cukrem tak dlouho až vznikne
jemná krémová směs. Pak
přidejte mléko, vejce a mouku.
Použijte mžikové tlačítko.
Zastavte proces při dosažení
požadované hrubosti.
Z cibule odstraňte slupku a
cibuli rozdělte na 4 díly.
Zastavte proces po 2
impulsech, abyste předešli příliš
jemnému rozsekání.
Z cibule odstraňte slupku a
rozřežte ji tak, aby prošla
plnicím otvorem. Poznámka:
použijte nejméně 100 g.
Použijte krém vyjmutý přímo z
chladničky. Poznámka:použijte
nejméně 125 ml krému. Krém
je ušlehán přibližně za
20 sekund.
Přisluš
enství/
rychlo
st
/ 2
P / 2
P / 2
P / 2
g / 1
S / 1
Nejvě
tší
množs
tví
1000
g
4
vejce
250 g
500 g
300 g
500
ml
Přísady a
výsledek
Maso (libové)
- drcení
Směsi
(dortové) mixování
Ořechy rozsekání
Cibule rozsekání
Cibule krájení
Šlehaný krém
- šlehání
Page 83

ČESKY 83
Recepty
Courgett-sendvičová pomazánka
Přísady:
- 2 courgetty
- 3 vařená vejce
- 1 malá cibule
- 1 lžíce rostlinného oleje
- petržel
- 2 až 3 lžíce kyselé smetany
- citrónová šťáva, tabasco, sůl, pepř, curry, paprika
B
Umyjte a osušte courgetty a nastrouhejte je
strouhací vložkou v nádobě pro potraviny.Obsah
pak přesypte do mísy, posypte solí a nechte asi
15 minut stát, aby sůl extrahovala tekutinu z
nastrouhaných courgett. Rozkrájejte cibuli na 4 díly
a rozsekejte ji spolu se stroužkem česneku.
Otrhejte listy petržele ze stonku a též je
rozsekejte.
B
Pak vložte nastrouhané courgetty na čistý ručník a
vytlačte z nich tekutinu. Z přísad by měla zmizet
všechna tekutina. Pak nechte přísady chvíli
vychladnout. Oloupejte vejce a krátce je v téže
nádobě rozsekejte. Přidejte další přísady do
nádoby, ochuťte je a vše zamíchejte kovovými
noži. Podávejte na toustovém chlebu.
Ovocný koláč
Přísady:
- 150 g datlí
- 225 g sušených švestek
- 100 g ořechů (50 g mandlí/ 50 g vlašských
ořechů)
- 50 g hrozinek
- 50 g sultánek
- 200 g plnozrnné pšenice
- 100 g pšeničné mouky
- 100 g hnědého krystalového cukru
- špetka soli
- 1 sáček prášku do pečiva
- 300 g podmáslí
B
Do nádoby vložte kovové nože. Pak vložte přísady
a míchejte je maximální rychlostí asi 30 sekund.
Koláč pečte na 30 cm dlouhém plechu asi
40 minut při teplotě 170cC.
Pórkový Quiche
Přísady pro těsto:
- 250 g pšeničné mouky
- špetka soli
- 1 lžíce medu
- 20 g čerstvého droždí nebo 1/2 sáčku
sušeného droždí
- 100 g másla
- 6 lžic vlažné vody
Přísady pro náplň:
- 500 g pórku
- rostlinný olej
- 4 vejce
- 500 g kyselé smetany
- sůl, pepř, 1 až 2 lžíce mouky
B
Všechny přísady vložte do nádoby a vytvořte
hnětením kompaktní těsto.Těsto nechte asi
30 minut kynout.
Page 84

ČESKY84
B
Nakrájejte pórek krájecí vložkou. Dejte na pánev
trochu oleje a opékejte nakrájený pórek několik
minut. Zbytek přísad vložte do mixéru a mixujte
až do krémové konzistence. Přidejte 1 až 2 lžíce
mouky k zahuštění.
B
Pečicí plech o průměru 24 cm vymažte tukem a
na dno a na strany neneste těsto. Pórkovou směsí
těsto pokryjte a navrch nasypte zbytek přísad.V
předehřáté troubě na 180cC pečte asi 40 minut.
Podávejte teplé nebo studené.
Guláš na maďarský způsob
Přísady:
- 1 lžíce oleje
- 1 střední cibule
- 1 lžička papriky
- 400 g hovězího nebo vepřového
- 1 zelený pepř
- 1 rajské jablíčko
- sůl
- 200 g mrkve
- 300g brambor
- kmín
B
Umyjte maso a rozkrájejte je na kostky o hraně
asi 2 cm. Oloupejte cibuli a rozsekejte ji v nádobě
kovovými noži.Vykrájejte zelený pepř a rozřežte jej
na kroužky krájecí vložkou. Oloupejte rajská
jablíčka, vyjměte jádro a nakrájejte je na plátky.
Osmažte nasekanou cibuli na oleji až změkne.
Sejměte ji z ohně a na cibuli nasypte papriku,
přidejte maso a nechte několik minut povařit za
stálého míchání. Přidejte podle chuti zelený pepř,
rajče a sůl. Pánev přikryjte a obsah poduste při
přiměřené teplotě až změkne.
B
Mezitím oloupejte a rozkrájejte mrkev krájecí
vložkou a oloupejte a nakrájejte na kostičky
brambory.Vše přidejte k masu a přilijte tolik vody,
až získáte potřebné množství polévky (asi 1,2
litru). Ozdobte trochou kmínu a povařte až bude
vše měkké jako máslo. Můžete přidat sůl, pokud je
to třeba.
B
Podávejte teplé. Můžete vše ozdobit kroužky
zeleného pepře.
Koláč s lískovými ořechy
Přísady do těsta:
- 500 g prosáté mouky
- 75 g cukru
- 1 lžička soli
- 1 vejce
- 250 ml mléka (teploty 35cC)
- 100 g měkkého másla
- 30 g čerstvého droždí (při použití sušeného
droždí se řiďte pokyny na jeho obalu)
Náplň:
- 250 g rozsekaných vlašských ořechů
- 100 g cukru
- 2 sáčky vanilkového cukru
- 125 ml krému
B
Předehřejte troubu na 200cC. Smíchejte mléko,
droždí a cukr po dobu 15 sekund s použitím
hnětacího příslušenství. Přidejte mouku, sůl, máslo
a vejce.Těstovou směs zpracovávejte asi 2 minuty.
Pak těsto přemístěte do jiné nádoby, přikryjte ho
Page 85

ČESKY 85
mokrým hadříkem a nechte asi 20 minut na
mírně teplém místě kynout.
B
Lískové ořechy rozsekejte kovovými noži. Smíchejte
přisady pro náplň.Těsto vytvarujte do pravoúhlého
tvaru. Posypte ho směsí s lískovými ořechy a
srolujte ho. Pak ho nechte asi 20 minut znovu
kynout. Potřete žloutkem a umístěte do středu
pečicí trouby. Pečte 25 až 30 minut při teplotě
200cC.
Čokoládový koláč
Přísady:
- 140 g měkkého másla
- 110 g polevového cukru
- 140g čokolády
- 6 vaječných bílků
- 6 vaječných žloutků
- 110 g granulovaného cukru
- 140 g pšeničné mouky
Náplň:
- 200 g merunkového džemu
Poleva:
- 125 ml vody
- 300 g cukru
- 250 g strouhané čokolády
- šlehaný krém, pokud je požadován
B
Troubu předehřejte na 160cC. Utřete máslo a
cukr do krémové konzistence. Rozpusťte
čokoládu a přimíchejte ji. Přidejte žloutky jeden po
druhém a vše rozmíchejte do krémové podoby.
Ušlehejte bílek s granulovaným cukrem do tuha
kovovými noži. Přidejte bílek do směsi a dobře vše
promíchejte. Pak přidejte mouku. Vše dejte na
vymaštěný plech. Pečte hodinu při teplotě 160cC.
Prvních 15 minut nechte dvířka trouby pootevřená.
B
Ponechte koláč chvilku vychladnout ještě na
pečicím plechu (24 cm). Koláč rozřízněte
vodorovně na dvě poloviny.Jednu polovinu natřete
merunkovým džemem a obě poloviny přiložte na
sebe. Pak zbytek džemu ohřejte a rozetřete ho na
horní část koláče. Připravte si polevu. Uveďte do
varu vodu, přidejte cukr a čokoládu a za stálého
míchání vytvořte polevu krémové konzistence.Tuto
polevu nalijte na koláč a nechte ji vychladnout.
Koláč můžete podávat se šlehaným krémem.
Polévka z brokolice (pro 4 osoby)
Přísady:
- 50 g zralého sýru Gouda
- 300 g vařené brokolice (stonky a květy)
- voda, v níž se brokolice vařila
- 2 vařené brambory v kouscích
- 2 nakrájené stonky
- 2 lžíce šlehaného krému
- curry
- sůl
- pepř
- muškátový ořech
B
Nastrouhejte sýr.Vyrobte pyré z brokolice s
vařenými bramborami a s vodou, v níž se brokolice
vařila. Pyré z brokolice a zbylou vodu nalijte do
odměrné nádoby a doplňte do 750 ml. Přeneste
tuto směs na pánev a přiveďte ji za stálého
míchání do varu.Vmíchejte sýr a ochuťte solí, curry,
pepřem a muškátovým ořechem a přidejte krém.
Page 86

86 ČESKY
Pizza
Přísady pro těsto:
- 400 g mouky
- 1/2 lžičky soli
- 20 g čerstvého droždí nebo 1,5 sáčku sušeného
droždí
- 2 lžíce stolního oleje
- asi 240ml vody (teplé 35cC)
Pro potření pizzy:
- 300 ml rajského protlaku
- 1 lžička italských bylinek (sušené nebo čerstvé)
- 1 cibule
- 2 stroužky česneku
- sůl a pepř
- cukr
Přísady do omáčky:
- olivy, salám, ar tyčoky, houby, ančovičky, sýr
Mozarella, pepř, strouhaný zralý sýr a olivový
olej, vše podle chuti.
B
Do nádoby vložte hnětací hák.Všechny přísady
vložte do nádoby a zvolte největší rychlost (poloha
2). Hnětení by mělo trvat asi 90 sekund až těsto
získá tvar koule. Pak těsto vyklopte z hnětací
nádoby do druhé nádoby, přikryjte je vlhkým
hadříkem a nechte asi 30 minut kynout.
B
Rozsekejte cibuli a česnek v nádobě na potraviny
a pak je v pánvi osmažte až jsou transparentní.
Přidejte propasírovaná rajská jablčka a bylinky a
vše povařte po dobu asi 10 minut. Ochuťte solí,
pepřem a cukrem. Omáčku nechte vychladnout.
B
Ohřejte troubu na 250cC.
B
Uválcujte těsto na pomoučené podložce nebo
utvořte dva kruhové tvary.Těsto pak položte na
vymaštěný plech. Pizzu rozestřete a kraje
ponechte volné. Pizzu doplňte všemi přísadami,
posypte sýrem a polijte trochou oleje.
B
Pizzu pečte 12 až 15 minut.
Zeleninová a bramborová smaženina
Přísady:
- 1 vejce
- 50 ml mléka
- 1 lžíce mouky
- 1 lžička koriandru
- sůl a pepř
- 2 velké brambory (asi 300 g)
- 100 g zimní mrkve
- 150 g celeru
- 50 g slunečnicových semen nebo 2 lžíce
kukuřičného zrna
- olej na smažení
B
Kovovými noži rozšlehejte vejce, mléko, mouku,
koriandr, sůl a pepř.
B
Rozstrouhejte oloupané brambory, oškrábanou
mrkev a celer s použitím hrubé strouhací vložky.
Vše přidejte do vaječné směsi. Smíchejte zeleninu,
vaječnou směs a slunečnicová semínka nebo
kukuřičná zrna v nádobě.
B
Ohřejte olej v pánvi a opečte 8 placiček po obou
stranách do zlatově hněda. Nechte je osušit na
kuchyňském papíru.
B
Doba pečení: 3 až 4 minuty.
Page 87

ČESKY 87
Pečivo (bílé)
Přísady:
- 500 g mouky
- 15 g jemného másla nebo margarínu
- 25 g čerstvého droždí nebo 20 g sušeného
droždí
- 260 ml vody
- 10 g soli
- 10 g cukru
B
Do nádoby vložte hnětací hák, nasypte mouku, sůl
a přidejte margarín nebo máslo. Doplňte čerstvým
nebo sušeným droždím a vodou. Na nádobu
nasaďte víko a zajistěte ho otočením podle šipky
až zaklapne. Zvolte největší rychlost (poloha 2) a
těsto zpracujte (dobu hnětení zjistíte v příslušné
tabulce).
B
Pak vyjměte těsto z nádoby a vložte ho do jiné
široké nádoby. Přikryjte ho vlhkým ručníkem a
nechte ho v mírně teplém prostoru asi 20 minut
kynout. Po vykynutí těsto vyjměte a vytvarujte ho
do koule.
B
Těsto vraťte zpět do původní nádoby,opět ho
přikryjte vlhkým hadříkem a nechte 20 minut
kynout. Znovu ho vyrovnejte a pak ho stočte.
B
Těsto položte na vymaštěný pečicí plech a nechte
ho kynout dalších 45 minut. Pak ho pečte v dolní
části předehřáté trouby.
B
Těsto pečte při teplotě 225cC v dolní části
trouby asi 35 minut.
Page 88

MAGYAR88
Alkatrészek és tartozékok
A Motoregység
B Sebességszabályzó gomb
P = Impulzus gomb
0 = Kikapcsolva
1 = Legalacsonyabb sebesség
2 = Legnagyobb sebesség
C Csavaros fedél (a munkatál tetejére kell
helyezni, annak használatához)
D Robotgép munkatál
E Eszköztartó
F Robotgép munkatál fedő
G Ételadagoló nyílás
H Nyomórúd
I Dagasztó horog
J Fém kés + védosapka
K Közepes finomágú szeletelo betét
L Közepes finomságú aprító betét
M Betéttartó
N Kevero tárcsa
O Fogaskerék házas húsdaráló
P Vágóházas húsdaráló
Q Csigatengely
R Vágókés
S Menetes perem
T Közepes finomságú daráló tárcsa, 4 mm
átméroig
U Durva daráló tárcsa, 8 mm átméroig
V Szétválasztó
W Kolbásztölto
X Adagoló tálca
Y Nyomórúd
Z Oldó kar
Bevezetés
A készülék automatikus kikapcsoló rendszerrel
rendelkezik.A rendszer automatikusan kikapcsolja
a készüléket, ha túlmelegszik.
Ha a készülék hirtelen megáll:
1 Húzza ki a fali konnektorból a hálózati
csatlakozó dugót.
2 Fordítsa a gombot 0 állásba a készülék
kikapcsolásához.
3 Hagyja a készüléket 60 percig hűlni.
4 Dugja vissza a fali konnektorba a hálózati
csatlakozó dugót.
5 Kapcsolja be ismét a készüléket.
Kérem lépjen kapcsolatba a Philips kereskedőjével
vagy a Philips szakszervizzel, ha az automatikus
kikapcsoló rendszer túl gyakran mőködésbe lép.
FIGYELMEZTETÉS:A veszélyhelyzetek elkerülése
érdekében a készüléket soha ne csatlakoztassa
időkapcsolóhoz.
Page 89

MAGYAR 89
Fontos
◗ Mielőtt a készüléket használná, olvassa el
gondosan a használati útmutatót és nézze meg
az ábrákat.
◗ ÷rizze meg a használati útmutatót, hogy
később is átolvashassa.
◗ Használat előtt ellenőrizze, hogy a készüléken
feltüntetett feszültség megfelel-e a helyi
hálózati feszültségnek.
◗ Soha ne használjon semmilyen tartozékot vagy
alkatrészt, ami más gyártótól származik vagy
amelyet a Philips nem hagyott jóvá. Ha ilyen
tartozékokat vagy alkatrészeket használ,
garanciája érvénytelenné válik.
◗ Ne használja a készüléket, ha az elektromos
csatlakozó vezeték,a csatlakozó dugó vagy
egyéb alkatrész meghibásodott.
◗ A veszélyhelyzetek elkerülése érdekében: ha a
készülék hálózati csatlakozó vezetéke sérült,
csak Philips szakszervizben cseréltesse ki.
◗ A készülék első használata előtt alaposan
tisztítsa meg azokat a részeket, amelyek az
étellel érintkezni fognak.
◗ Ne lépje túl a táblázatban megadott
mennyiséget és elkészítési időt.
◗ Ne lépje túl a munkatálon jelzett maximális
űrtartalmat, vagyis ne töltse a tálat a legfelső
fokbeosztáson felül.
◗ Használat után rögtön húzza ki a hálózati
csatlakozó dugót a fali konnektorból.
◗ Soha ne használja az ujjait vagy más tárgyat
(pl. kenőlapátot) a hozzávalók ételadagoló
nyílásba töltéséhez, a készülék működése
közben. E célra csak a nyomórudat használja.
◗ Tartsa távol a készüléket gyermekektől.
◗ Soha ne működtesse a készüléket felügyelet
nélkül.
◗ Tegye fel megfelelően a munkatál fedőjét.A
beépített biztonsági kapcsolót kikapcsolja és a
készüléket bekapcsolhatja.A motor egység, és
a csavaros fedél jellel vannak ellátva.A
készülék csak akkor fog működni,ha a
motoregységen szereplő jel pontosan
szemben áll a csavaros fedélen található jellel.
◗ Bármelyik tartozék levétele előtt kapcsolja ki
a készüléket.
◗ A készüléket mindig a sebességszabályzó
gomb 0 állásba kapcsolásával kapcsolja ki.
◗ Mielőtt a készülék tetejét levenné, várjon míg
a mozgó részek megállnak.
◗ Soha ne merítse a motoregységet vízbe vagy
más folyadékba, ne öblítse le csapvíz alatt sem.
A készülék tisztításához csak nedves ruhát
használjon.
◗ Használat előtt vegye le a védősapkát a
vágóegységről.
◗ Soha ne használja együtt a vágókést a
szétválasztóval és a kolbásztöltovel.
◗ Soha ne kísérletezzen csont, dió vagy más
kemény anyag darálásával
◗ Soha ne érjen az adagoló tálcához. Használja a
nyomórudat.
◗ Feldolgozás előtt hagyja lehűlni a forró
hozzávalókat (max. hőmérséklet 80cC/175cF).
◗ A használati időkhöz nézze meg a használati
útmutatóban található táblázatot.
◗ Használat után rögtön húzza ki a hálózati
csatlakozó dugót a fali konnektorból.
Page 90

MAGYAR90
A készülék használata
Robotgép munkatál
C
1 Tegye a munkatálat a konyhai robotgépre.
A fogantyút a nyíllal jelzett irányba addig
fordítsa, amíg kattanást hall.
C
2 Tegye a fedőt a munkatálra. Forgassa a
fedőt a nyíllal jelzett irányba,míg kattanást
hall (ehhez szükséges némi erőkifejtés).
Beépített biztonsági kapcsoló
A motoregység, a munkatál és a fedő is jelekkel
van ellátva.A készülék csak akkor fog működni, ha
a motoregységen lévő jel pontosan szemben áll a
munkatálon lévő jellel.
C
1 Győződjön meg róla, hogy a fedőn
található vonal és a munkatálon található
vonal pontosan szemben állnak-e
egymással.A fedő kinyúló része beleillik a
fogantyúba.
CLICK
Ételadagoló nyílás és nyomórúd
C
1 Az ételadagoló nyílást a folyékony és/vagy
szilárd hozzávalók adagolásához használja.
A nyomóruddal a szilárd hozzávalókat
adagolja az ételadagoló nyíláson keresztül.
C
2 A nyomórudat arra is használhatja,hogy
megakadályozza az ételadagoló nyílásból a
hozzávalók kiömlését.
Fém vágóegység
◗ A fém vágóegységet aprításra, keverésre,
turmixolásra és pépesítésre használhatja.
C
1 Vegye le a védősapkát a vágóegységről.
A vágóegység vágóélei nagyon élesek. Ne érjen
hozzájuk!
C
2 Tegye az eszköztartót a munkatálba és a
vágóegységet az eszköztartóra úgy, hogy
álljanak a munkatálban.
3 Tegye a hozzávalókat a munkatálba. Előre
vágja fel a szilárd élelmiszereket körülbelül
3 x 3 x 3 cm-es darabokra. Helyezze a
fedőt a munkatálra.
CLICK
1
2
1
2
CLICK
Page 91

MAGYAR 91
4 Tegye a nyomórudat az ételadagoló
nyilásba.
C
5 Válassza a legnagyobb sebességfokozatot
(2-es fokozat) a sebességszabályzó
gombbal.
- A munkafolyamat addig folytatódik,míg
0 fokozatra kapcsol (kikapcsolva).
◗ Kapcsoljon 1-es fokozatra a sebesség
csökkentéséhez.
Tanácsok
◗ Ha hagymát aprít, használja néhányszor az
impulzus funkciót, nehogy a hagymát túl
finomra vágja.
◗ Ne hagyja a készüléket túl sokáig működni, ha
kemény sajtot aprít.A sajt túlságosan
felmelegedhet, olvadni kezd és csomóssá
válik.
◗ Ne használja a vágóegységet nagyon kemény
hozzávalók aprítására (pl.: babkávé,
szerecsendió és jégkocka),mivel a vágóegység
éle kicsorbulhat.
Ha az élelmiszer a vágóegységhez, vagy a munkatál
belsejébe ragad:
1 Kapcsolja ki a készüléket.
2 Vegye le a fedőt a tálról.
3 Távolítsa el a vágóegységre vagy a
munkatál falára ragadt élelmiszert a
kenőlapáttal.
Betétek
Soha ne dolgozzon fel kemény hozzávalókat (pl
jégkockát) a betétekkel.
C
1 Tegye a kiválasztott betétet a betéttartóra,
mielőtt az eszköztartóra helyezi.
A vágóegység vágóélei nagyon élesek. Ne érjen
hozzájuk!
C
2 Helyezze a betéttartót a munkatálban álló
eszköztartóra.
3 Tegye a fedőt a munkatálra.
4 Tegye a hozzávalókat az ételadagoló
nyílásba.A nagyobb darabokat vágja fel
előre úgy, hogy beleférjenek az ételadagoló
nyílásba.
C
5 Egyenletesen töltse meg az ételadagoló
nyílást a jobb eredmény érdekében.
Ha nagyobb mennyiségű ételt kíván felvágni,
először csak kisebb adagot dolgozzon fel, ürítse ki
a munkatálat, majd jöhet a következő adag.
C
6 Aprításhoz és szeleteléshez válassza a
legnagyobb sebességet (2-es fokozat) a
sebességszabályzó gombon.
CLICK
2
1
Page 92

MAGYAR92
A munkafolyamat addig folytatódik,míg
0 fokozatra kapcsol (kikapcsolva).
◗ Kapcsoljon 1-es fokozatra a sebesség
csökkentéséhez.
C
7 Finoman nyomja a nyomóruddal az
ételadagoló nyílásba a hozzávalókat.
◗ Ha puha zöldséget vagy gyümölcsöt aprít,
visszakapcsolhat 1-es sebességfokozatba,
nehogy a feldarabolt zöldségek és gyümölcsök
püréssé váljanak.
C
8 Vegye ki a betétet a betéttartóból,a
betéttartót úgy fogja, hogy a háta Ön felé
mutasson. Nyomja meg a betét széleit az
ujjaival, hogy a betét kiessen a tartóból.
Dagasztó horog
A dagasztó horgot kenyértészta, tészta és
süteménykeverékek dagasztásához használhatja.
C
1 Tegye a munkatálat a motoregységre és
helyezze a dagasztó tartozékot a
meghajtótengelybe.
2 Tegye a hozzávalókat a munkatálba és
rögzítse a fedőt a munkatálba. Helyezze a
nyomórudat az ételadagoló nyílásba,hogy
dagasztás közben a hozzávalók ne
fröccsenjenek ki.
C
3 Válassza a legnagyobb sebességfokozatot
(2-es fokozat) a sebességszabályzó
gombbal.
Nézze meg a táblázatban a hozzávetőleges
elkészítési időket.
Keverő tárcsa
A keverő tárcsát majonéz készítéséhez, tejszín és
tojásfehérje felveréséhez használhatja.
C
1 Tegye a keverő tárcsát az eszköztartóba,
ami a munkatálban áll.
2 Tegye a hozzávalókat a munkatálba és
tegye a fedőt a munkatálra.
3 Válassza a legkisebb sebességet (1-es
fokozat az optimális eredmény eléréséhez.
Tanácsok
◗ Ha tojásfehérjét ver fel,a tojások
szobahőmérsékletűek legyenek.
◗ Felverés előtt legalább egy félórával vegye ki a
tojásokat a hűtőszekrényből.
◗ Majonéz készítésekor az összes hozzávaló
szobahőmérsékletű legyen.
Adjon hozzá olajat a nyomórúd tetején lévő kis
nyíláson keresztül.
◗ Tejszín felverésekor a tejszínt a
hűtőszekrényből kivéve rögtön használja fel.
Nézze meg a táblázatban az elkészítési időt.
A tejszínt ne verje túl sokáig.
Page 93

MAGYAR 93
A munkafolyamat során többször használja az
impulzus funkciót a megfelelő eredmény elérése
érdekében.
Húsdaráló
A húsdarálót hús darálásához és kolbász
töltéséhez használhatja.
C
1 Szerelje fel a fogaskerék házat a motor
egységre.
Kattanást fog hallani amikor ezeket a tartozékokat
megfeleloen szerelte fel.
C
2 Csatlakoztassa a vágóházat a
motoregységre.
C
3 Tegye be a csigatengelyt a vágóházba a
muanyag végével elore.
C
4 Tegye a vágókést a csigatengelyre.A
vágóéleknek elore kell mutatniuk.
C
5 Tegye (a kívánt összetételtol függoen) a
közepes vagy dúrva daráló tárcsát a
csigatengelyre.
Figyeljen, hogy a daráló tárcsa hornyai rámenjenek
a húsdaráló fej kiemelkedéseire.
C
6 Forgassa a menetes peremet a vágóházon
lévo nyíl irányába amíg megfeleloen
megszorul.
C
7 Tegye az adagoló tálcát a vágóház felso
részére.
Húsdarálás
1 Darabolja fel a húst 10*2 cm-es csíkokra.
2 Távolísa el csontokat és amennyire
lehetséges a porcogókat és az inakat.
Soha ne daráljon fagyasztott húst.
C
3 Válassza a 2 sebességfokozatot a hús
darálásához.
C
4 Tegye a húst az adagoló tálcára.A
nyomórúd használatával óvatosan nyomja a
húst a vágó házba.
◗ Percenként 1,3 kg húst darálhat le.
(Sovány húst használjon, zsíros rész és inak nélkül).
◗ Vagdalt húshoz (bifsztek) közepes daráló
tárcsával kétszer darálja le a húst.
Page 94

MAGYAR94
Kolbász töltés
1 Darálja le a húst
2 Miután befejezte a hús darálását húzza ki a
készülék csatlakozó dugóját a fali
konnektorból és vegye le a menetes
peremet.
3 Vegye ki a daráló tárcsát
4 Vegye ki a vágókést.
◗ Hagyja a csigatengelyt a vágóházban amikor
kolbászt akar tölteni.
C
5 Tegye a szétválasztót a vágóházba.
C
6 Tegye a kolbásztöltot a vágóházra és
csavarja a gyurut a vágóházra.
A készülék kész kolbász töltésre.
Tanácsok
◗ Áztassa a belet 10 percig langyos vízben.
Ezután húzza fel a nedves bort a kolbász
töltore. Nyomja az elkészített darált húst a
vágó házba.
◗ Ha a bor megakad a kolbász tölton, kevés
vízzel nedvesítse meg.
◗ A kolbász töltéshez válassza az 1 fokozatot.
Tisztítás
A motoregység tisztítása előtt mindig húzza ki a
hálózati csatlakozó dugót a fali konnektorból.
1 Nedves ruhával tisztítsa a motoregységet.
Ne merítse a motoregységet vízbe, és ne
öblítse le csapvíz alatt sem.
2 Használat után rögtön tisztítsa meg az
étellel érintkezett részeket forró,
mosogatószeres vízben.
◗ A munkatálat, a munkatál fedelét, a
nyomórudat és a tartozékokat (kivéve a
turmix kancsót) tisztíthatja mosogatógépben
is.
Ezen részek mosogatógép tűrését a DIN EN
12875 szabvány szerint ellenőrizték.
Tisztítsa meg a késeket, a turmixgép vágóegységét
és óvatosan illessze vissza őket.A vágó élek
nagyon élesek!
Győződjön meg róla, hogy a kések vágóélei és a
betétek nem érintkeznek-e kemény tárgyakkal. Ez
a kések csorbulásához vezethet.
Egyes hozzávalók a tartozékok felületén
elszíneződést okozhatnak. Ez nem befolyásolja a
tartozékok használhatóságát.Az elszíneződés kis
idő múlva rendszerint megszűnik.
C
◗ A (felesleges) hálózati csatlakozó vezetéket
csévélje fel a készülék hátuljára.
Page 95

MAGYAR 95
A húsdaráló tisztítása.
A vágóházban lévo húsmaradékot néhány szelet
kenyér ledarálásával eltávolíthatja a készülékbol.
1 A készüléket tisztítás elott kapcsolja ki és a
fali konnektorból húzza ki a csatlakozó
dugót.
2 Nyomja le a kioldó kart és a teljes
vágóházat fordítsa el a nyíl irányába.
C
3 Vegye ki a nyomórudat és az adagoló
tálcát.
4 Csavarja le a menetes peremet és szereljen
le minden tartozékot a vágóházról.
Mosogatógépben NE tisztítsa a tartozékokat.
5 Használat után azonnal mosogasson el
minden hússal érintkezo tartozékot forró,
mosogatószeres vízben.
6 Forró vízzel öblítse le oket és AZONNAL
szárítsa meg.
◗ Azt tanácsoljuk, hogy kevés növényi olajjal
olajozza be a vágókést és a daráló tárcsákat.
Garancia és szerviz
Ha információra van szüksége, esetleg probléma
merül fel, keresse fel a Philips www.philips.com
Web-lapját,vagy lépjen érintkezésre a lakóhelyén
lévő Philips Vevőszolgálattal (a telefonszámot
megtalálja az egész világra kiterjedő
garancialevélen). Ha nincs Vevőszolgálat a
lakóhelyén, forduljon a Philips készülékeket árusító
szaküzlethez, vagy lépjen érintkezésbe a Philips
Háztartási Készülékek és Szépségápolási termékek
Szerviz Osztályával.
Page 96

MAGYAR96
Megoldás
Fordítsa a munkatálat vagy a fedőjét az óramutató járás
irányába kattanásig. Győződjön meg róla, hogy a
munkatálon és a fedőn lévő pontok pontosan szemben
helyezkedjenek el.
Az automatikus kikapcsoló rendszer valószínűleg
kikapcsolta a készüléket, mivel az túlmelegedett
1) Kapcsolja ki a készüléket (0 fokozat).
2) Feszültségmentesítse a készüléket.
3) Hagyja a készüléket lehűlni 60 percig.
4) Dugja vissza a fali konnektorba a hálózati csatlakozó
dugót. 5) Ismét kapcsolja be a készüléket.
Ellenőrizze, hogy a munkatálat és a fedőt tényleg az
óramutató járásával egyező irányba forgatta-e kattanásig.
Ha a turmix kancsót és a robotgép munkatálját
megfelelően szerelte fel, csak a turmixgép működik. Ha
használni akarja a robotgép munkatálját is, szerelje le a
turmix kancsót és zárja le a rögzítőnyílást a csavaros
fedővel.
Probléma
A készülék nem
kapcsol be.
A készülék hirtelen
megáll.
A dagasztó vagy a
keverő tartozék nem
forog.
A turmix kancsót és a
robotgép munkatálját
felerősítette, de csak a
turmixgép működik.
Hibaelhárítás
Tartozékok és alkalmazások
Alkalmazási idők
10-60 másodperc
60-180 másodperc
10-60 másodperc
10-60 másodperc
Alkalmazás
Apróra vágás, pürésítés, összekeverés
Dagasztás
Szeletelés, darabolás
Habosítás, habverés, keverés
Darálás
Tartozék
P
{
gh
å
Alkalmazások
Saláták, nyers
zöldségek
Saláták, nyers
zöldségek
Pirított
zsemlemorzsa,
csőben sültek
Köretek,
levesek,
szószok,
csőben sültek
Eljárás
Vágja a zöldségeket olyan
darabokra, hogy beférjenek az
ételadagoló nyílásba.Töltse meg
az ételadagoló nyílást a
darabokkal és szeletelje fel
őket, miközben a nyomórúddal
finoman benyomja a darabokat.
Vágja a zöldségeket olyan
darabokra, hogy beférjenek az
ételadagoló nyílásba.Töltse meg
az ételadagoló nyílást a
darabokkal és szeletelje fel
őket, miközben a nyomórúddal
finoman benyomja a darabokat.
Száraz, ropogós kenyeret
használjon.
Használjon kéregnélküli
parmezán sajtot és vágja fel 3 x
3 cm-es darabokra.
Tartoz
ék/seb
ességf
okoza
t
P / 2
A / 2
P / 2
P / 2
Maxi
mális
menn
yiség
500g
500g
100g
200g
Hozzávalók és
eredmények
Almák,
sárgarépák,
zeller - aprítás
Almák,
sárgarépák,
zeller szeletelés
Zsemlemorzsa
- aprítás
Sajt
(parmezán) aprítás
Mennyiségek és elkészítési idők
Page 97

MAGYAR 97
Alkalmazások
Szószok,
pizzák, csőben
sültek, fondük
Köretek,
mártások,
cukrászsütemé
nyek, pudingok,
habok
Pürék, levesek
Bébi- és
csecsemőétele
k
Saláták,
köretek
Kenyér
Eljárás
Vágja fel a sajtot darabokra,
majd töltse az ételadagoló
nyílásba. Óvatosan nyomja a
nyomórúddal.
Kemény, keserű csokoládét
használjon.Törje 2 cm-es
darabokra.
Főtt borsót vagy babot
használjon. Ha szükséges,adjon
hozzá némi folyadékot a
keverék sűrűségének
javításához.
Sűrűbb püréhez csak kevés
folyadékot adjon. Finom
püréhez addig ne adjon
folyadékot, míg simára nem
keverte.
Tegye az uborkát az
ételeadagoló nyílásba és
finoman nyomja lefelé.
Keverjen össze meleg vizet
élesztővel és cukorral. Adja
hozzá a lisztet, az olajat és a
sót, majd kb. 90 másodpercig
dagassza a tésztát. Hagyja kelni
30 percig.
Tartoz
ék/seb
ességf
okoza
t
k / 2
P / 2
P / 2
P /2
g / 1
P / 2
Maxi
mális
menn
yiség
200g
200g
250g
500g
2 db
ubork
a
500g
liszt
Hozzávalók és
eredmények
Sajt (Gouda) aprítás
Csokoládé aprítás
Főtt borsó,
bab - pürésítés
Főtt zöldségek
és húsok pürésítés
Uborka szeletelés
Tészta
(kenyér) dagasztás
Alkalmazások
Pizza
Almás piték,
édes kekszek,
gyümölccsel
töltött
sütemények
Luxury kenyér
Pudingok,
szufflék,
habcsók
Szószok,
dzsemek,
pudingok, bébi
ételek
Eljárás
Olvassa el a kenyérdagasztásnál
leírtakat. Dagassza a tésztát 1
percig.
Hideg margarint használjon,
amit 2 cm-es kockákra kell
vágni.Tegye a lisztet a
munkatálba és adja hozzá a
margarint. Keverje össze, míg
omlós nem lesz.Aztán keverés
közben adjon hozzá hideg vizet.
Kapcsolja ki a készüléket, amint
a tészta labda formájú nem
lesz. Hűtse le a tésztát a
további feldolgozás előtt.
Először keverje össze az
élesztőt, a meleg vizet és némi
cukrot külön tálban.Tegye az
összes hozzávalót a munkatálba
és dagassza addig, míg el nem
válik az edény falától (kb. 1
perc). Hagyja kelni 30 percig.
Szobahőmérsékletű tojásokat
használjon. Megjegyzés:legalább
2 tojásfehérjét használjon.
Tanács: adjon hozzá kis
citromlevet, hogy
megakadályozza a gyümölcsök
elszíneződését.
Tartoz
ék/seb
ességf
okoza
t
P / 2
P / 2
P / 2
A / 1
P / 2
Maxi
mális
menn
yiség
1 kg
liszt
300g
liszt
500g
liszt
4
tojásfe
hérje
500g
Hozzávalók és
eredmények
Tészta (pizza)
- dagasztás
Tészta (olcsó
édessütemény
ek) - dagasztás
Tészta (kelt) dagasztás
Tojásfehérje
hab - habosítás
Gyümölcs (pl.
alma, banán) aprítás
Page 98

MAGYAR98
Alkalmazások
Köretek,
mártások
Szószok,
levesek,
köretek,
fűszeres vaj
Saláták,
köretek és
barbecue
szószok
Tatár bifsztek,
hamburgerek,
húsgolyók
Eljárás
Hámozza meg a fokhagymát.
Nyomja be az impulzus
gombot néhányszor, hogy
megakadályozza a fokhagyma
túl apróra vágását. Legalább
150 grammot használjon.
Mossa meg és szárítsa meg a
fűszereket aprítás előtt
Minden hozzávaló
szobahőmérsékletű legyen.
Megjegyzés: legalább egy
nagyobb tojást, két kisebb tojást
vagy két tojássárgáját
használjon.Tegye a tojást a
kiecetezett munkatálba és adja
hozzá cseppenként az olajat.
Először is szedjen ki minden
inas részt és csontot a húsból.
Darabolja fel a húst 10*2 cmes csíkokra.
Tartoz
ék/seb
ességf
okoza
t
P / 2
P / 2
˙ / 1
/ 2
Maxi
mális
menn
yiség
300g
Minim
um
50g
3 tojás
1000g
Hozzávalók és
eredmények
Fokhagyma aprítás
Fűszerek (pl.
petrezselyem)
- aprítás
Majonéz kikeverés
Húsok (sovány,
kövérebb) darálás
Alkalmazások
Különböző
sütemények
Saláták,
pudingok,
mogyoró
kenyér,
mandulás
tészta
Saláta, főtt
ételek, kevert
sültek, köretek
Saláta, főtt
ételek, kevert
sültek, köretek
Köretek, krém,
fagylalt
keverékek
Eljárás
A hozzávalók
szobahőmérsékletűek legyenek.
Keverje össze az olvasztott
vajat és a cukrot, amíg lágy és
krémes keveréket kap.Azután
adja hozzá a tejet, a tojásokat
és a lisztet.
Használja az impulzus gombot
a durvább apróra vágáshoz.
Állítsa le a munkafolyamatot, ha
durvára vágott mogyorót
szeretne.
Hámozza meg a hagymát és
vágja négyfelé. Két impulzus
után ellenőrizze az eredményt.
Hámozza meg a hagymákat és
vágja akkora darabokra, hogy
beleférjenek az ételadagoló
nyílásba. Megjegyzés: legalább
100g hagymát szeleteljen fel.
A hűtőgépből kivett tejszínt
rögtön felhasználhatja.
Megjegyzés: legalább 125 ml
tejszínt verjen fel.A tejszínhab
kb. 20 másodperc múlva kész.
Tartoz
ék/seb
ességf
okoza
t
P / 2
P / 2
P / 2
g / 1
S / 1
Maxi
mális
menn
yiség
4 tojás
250g
500g
300g
500ml
Hozzávalók és
eredmények
Keverék
(sütemény) keverés
Mogyorófélék
- aprítás
Hagyma aprítás
Hagyma szeletelés
Tejszínhab felverés
Page 99

MAGYAR 99
Receptek
Cukkini szendvics krém
Hozzávalók:
- 2 cukkini
- 3 főtt tojás
- 1 kis hagyma
- 1 evőkanál zöldségolaj
- petrezselyem
- 2-3 evőkanál tejföl
- citrom lé, tabasco szósz, só, bors, curry por,
paprika
B
Mossa és szárítsa meg a cukkiniket és a
munkatálba illesztett finom aprító betéttel aprítsa
fel.A felaprított cukkiniket öntse át egy edénybe,
hintse meg sóval és hagyja 15 percig állni, hogy a
só kioldja a felaprított cukkini nedvességtartalmát.
Vágja a hagymát négybe és fokhagymagerezddel
együtt vágja finomra. Szedje le a petrezselyem
leveleket a szárról és vágja apróra a leveleket.
B
Aztán tegye a felaprított cukkinit száraz
törlőkendőre és nyomja ki a folyadékot belőle.
Öntsön egy kis olajat egy serpenyőbe és süsse
világosra a felaprított hagymát és fokhagymát,
adja hozzá a felaprított cukkinit.A hozzávalókból
az összes víznek el kell párolognia. Hagyja egy
ideig hűlni a megsütött hozzávalókat. Pucolja meg
a tojásokat, tegye a robotgép munkatálba és vágja
néhány másodpercig a készülékben.Adja hozzá a
többi hozzávalót is, ízesítse és keverje össze a
vágóegységgel. Pirított fehér kenyérrel tálalja.
Gyümölcstorta
Hozzávalók:
- 150 g datolya
- 225 g aszalt szilva
- 100 g dió (50 g mandula/50 g dió)
- 50 g mazsola
- 50 g nagyszemű mazsola
- 200 g teljes őrlésű rozsliszt
- 100 g fehér búzaliszt
- 100 g barnacukor
- egy csipetnyi só
- 1 zacskó sütőpor
- 300 g író
B
Tegye a fém vágóegységet a munkatálba. Az
összes hozzávalót tegye a munkatálba, és keverje
őket 30 másodpercig a legnagyobb
sebességfokozaton. Süsse a gyümölcstortát egy
30 cm hosszú sütőformában 40 percig 170 °C-on.
Póréhagymás Quiche
Hozzávalók a tésztához
- 250 g búza liszt (vagy korpás búzaliszt)
- egy csipetnyi só
- 1 evőkanál méz
- 20 g friss élesztő vagy 1/2 csomag száraz
élesztő
- 100 g vaj
- 6 evőkanál langyos tej
Hozzávalók a töltelékhez:
- 500 g póréhagyma
- zöldségolaj
- 4 tojás
Page 100

MAGYAR100
- 500 g tejföl
- só, bors, 1-2 evőkanál liszt, ha szükséges
B
Minden hozzávalót öntsön a munkatálba és
dagassza, míg össze nem áll a tészta. Hagyja a
tésztát kb. 30 percig kelni.
B
Szeletelje fel a póréhagymát a szeletelő tárcsával.
Tegyen egy kis olajat egy serpenyőbe és néhány
percig süsse a felszeletelt póréhagymát.A
hozzávalók maradék részét tegye a turmix
kancsóba és és hagyja a turmixgépet addig
működni, míg krémes állagú masszát nem kap.
Adjon hozzá 1-2 evőkanál lisztet, hogy
besűrűsödjön a keverék.
B
Zsírozzon ki egy kb 24 cm-es átmérőjű
sütőformát és egyenletesen helyezze bele a
tésztát úgy, hogy a sütőforma oldalára is jusson.
Terítse szét a tésztán a póréhagyma keveréket és
öntse rá a többi hozzávalót is. Előre melegített
sütőben kb. 40 percig süsse 180cC-on. Hidegen
és melegen is tálalható.
Magyaros gulyás
Hozzávalók:
- 1 evőkanál olaj
- 1 közepes hagyma
- 1 evőkanál paprika
- 400 g marha vagy disznóhús
- 1 zöld paprika
- 1 paradicsom
-só
- 200 g sárgarépa
- 300 g burgonya
- köménymag
B
Mossa meg a húst és vágja 2 cm-es kockákra.
Hámozza meg a hagymát és vágja apróra a
robotgép munkatálban a fém vágóegységet
használva.Vegye ki a zöld paprika magházát és
szeletelje fel karikákra a szeletelő tárcsa
segítségével. Hámozza meg a paradicsomot,
távolítsa el a szárát és vágja vékony csíkokra.
Süsse puhára az olajban a felaprított hagymát.
Vegye le a tűzről és szórja bele a paprikát, adja
hozzá a húst, és állandó keverés mellett magas
hőfokon pár percig süsse a húst.Adja hozzá a
zöld paprikát, a paradicsomot és ízlés szerint sót,
fedje le a lábast és párolja a saját levében
közepes hőfokon, míg majdnem puha nem lesz a
hús.
B
Közben tisztítsa meg és szeletelje fel a sárgarépát
a szeletelő tárcsát használva, hámozza meg és
kockázza fel a burgonyát.Adja ezeket a húshoz és
öntsön annyi hideg vizet rá, amennyi levest
szeretne (kb. 1,2 litert). Ízesítse egy csipetnyi
köménymaggal és lassú tűzön főzze addig a
levest, míg minden hozzávaló vajpuha nem lesz,
némi sót hozzáadva, ha szükséges.
B
Forrón tálalja. Díszítésül zöld paprika karikákat
rakhat a leves tetejére és erős paprikát is
felszolgálhat hozzá külön tányéron.
Mogyorós kenyérkoszorú
Hozzávalók a tésztához:
- 500 g szitált liszt
- 75 g cukor
- 1 teáskanál só
- 1 tojás
- 250 ml tej (35cC-os)
 Loading...