

Page 1

HR 7712
Page 2

2
English Page 4
• Keep page 3 open when reading these
operating instructions.
Nederlands Pagina 11
• Sla bij het lezen van de gebruiksaanwijzing
pagina 3 op.
Italiano Pagina 18
• Prima di usare l'apparecchio, aprite la pagina 3
e leggete attentamente le istruzioni per l'uso.
Español Página 26
• Desplegar la página 3 al leer las instrucciones
de manejo.
Norsk Side 34
• Slå opp på side 3 før De leser videre.
Svenska Sid 41
• Ha sidan 3 utvikt när ni läser bruksanvisningen.
Suomi Sivu 48
• Pidä sivu 3 auki samalla kun luet käyttöohjetta.
Ελληνικά Σελίδα 56
• Ανοίξτε την σελίδα 3 για τισ οδηγίεσ
χρήσεωσ.
Page 3
3
1
A
O
C
L
M
E
K
D
B
G
F
I
H
J
N
Page 4
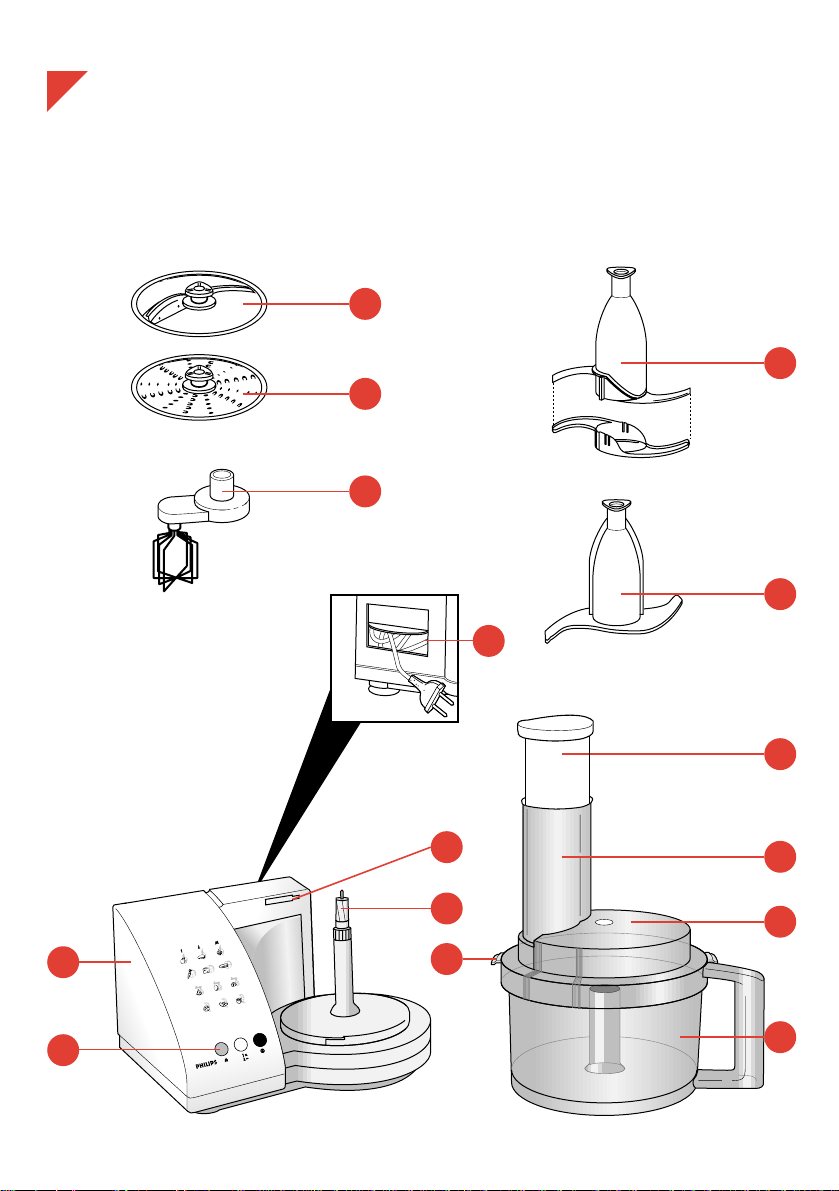
General description (fig. 1)
A Motor unit
B Bowl
C Cover of bowl
D Ridge of cover (locks and unlocks the
built-in safety lock)
E Safety lock
F Metal blade £
G Slicing disc § (double-sided)
AA
= thin slicing
[ = thick slicing
H Grating disc ¶ (double-sided)
AA
= extra fine grating
[ = fine grating
I Kneading accessory ^
J Whisk ß
K Drive shaft
L Food chute
M Pusher
N Switches
II
= On / Off
M = "Moment" (release = stop)
Y1 = minimum speed
W2 = maximum speed
O Cord storage
Graphic instructions
Left to the symbols of the various applications
you can see a picture of the accessory to be
used.
On the top line is adviced to switch on selecting
either M (“Moment”) or
II
(“Continuous”), in
combination with speed setting Y1 (“minimum
speed”) or W2 (“maximum speed”).
Please also refer to the tables.
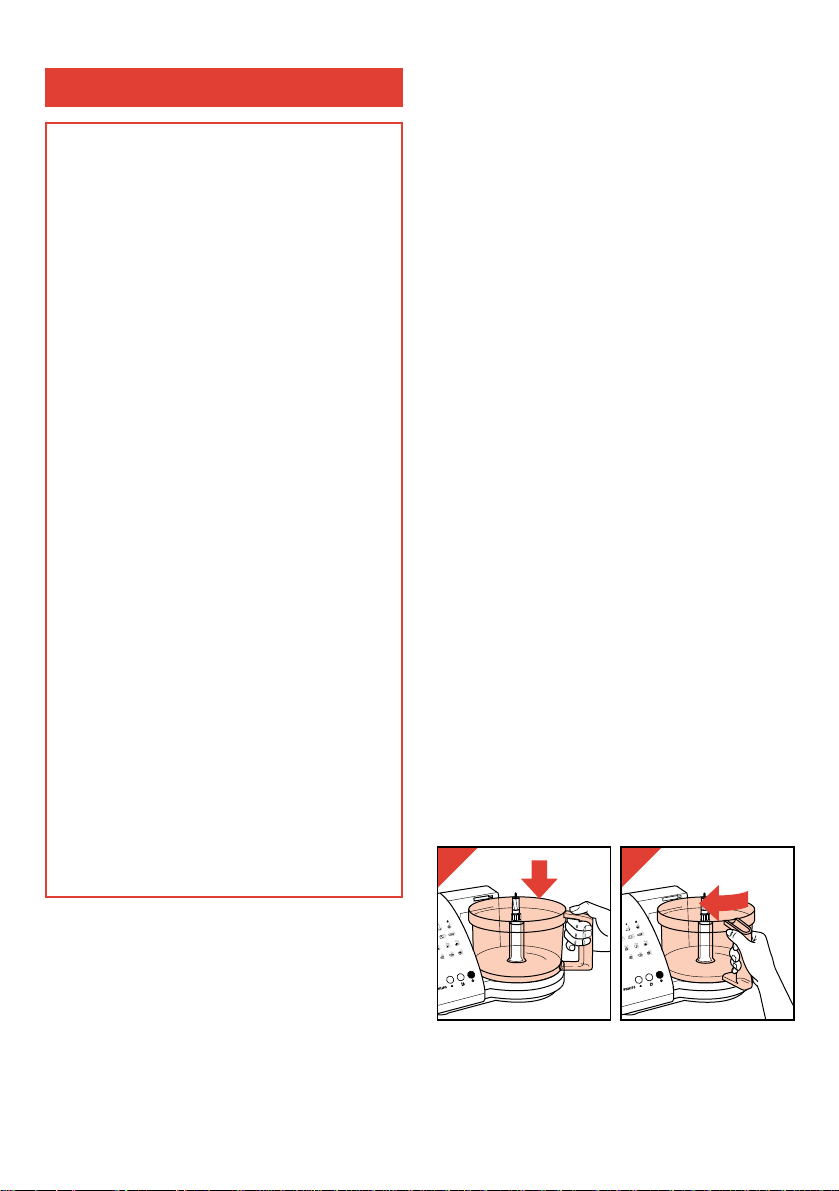
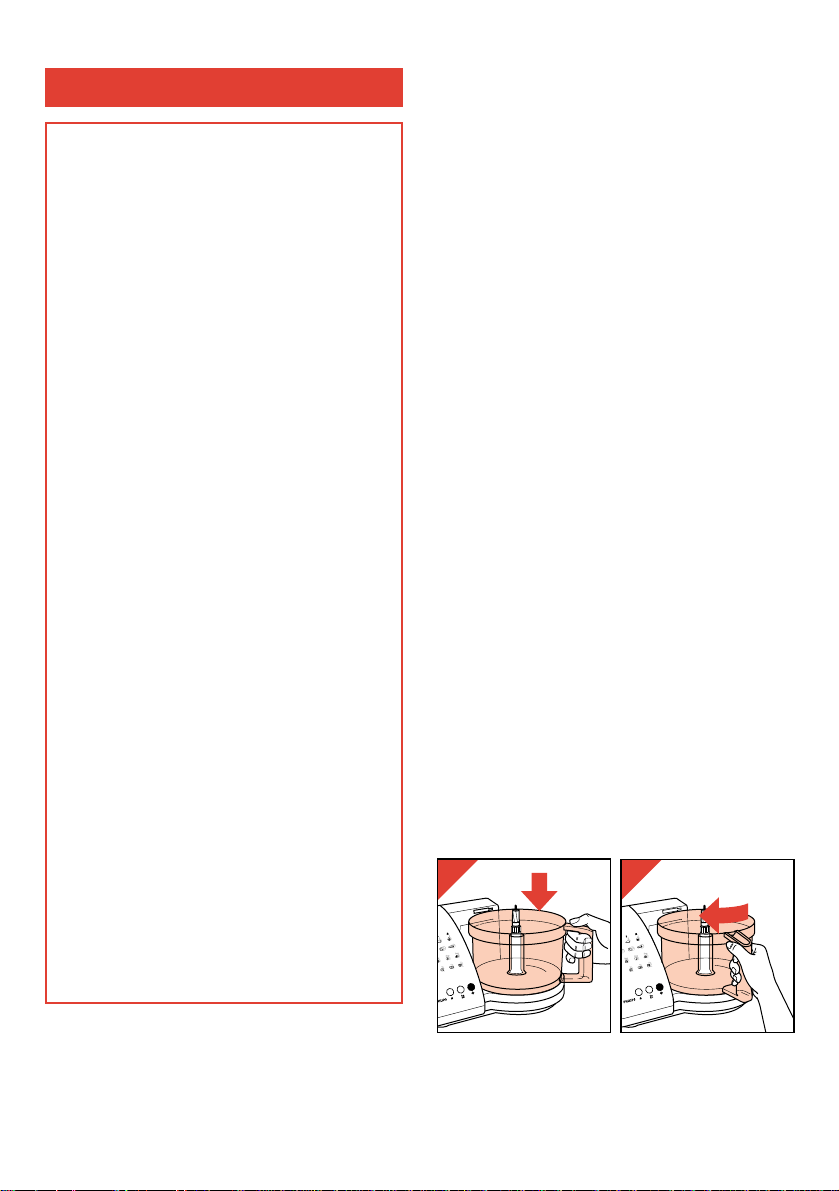
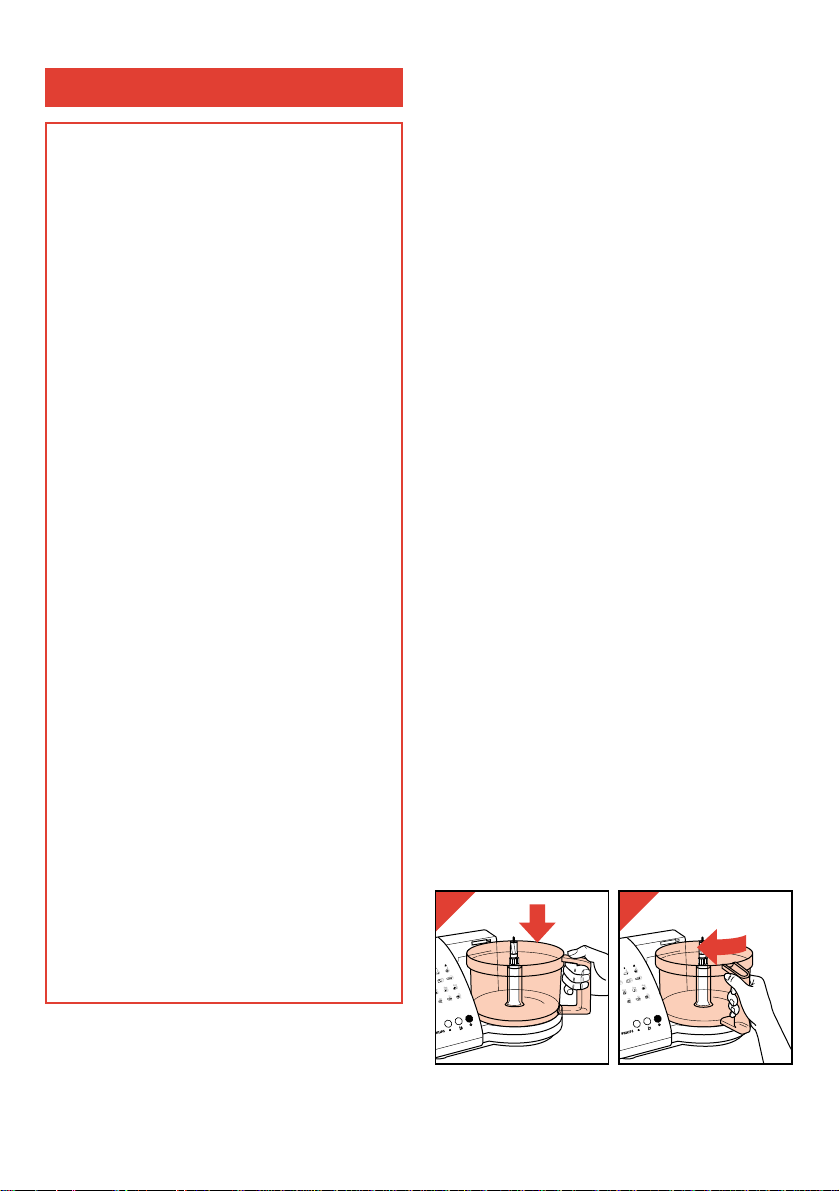
Positioning the bowl
- Position the bowl as indicated in fig. 2.
- Move the handle in the direction of the arrow
until it stops (fig. 3).
English
Important
• Read the instructions in conjunction with
the illustrations before using the
appliance. Keep page 3 folded out when
reading.
• Do not leave the appliance operating
unattended.
• Do not allow children to operate the
appliance.
• Care must be taken when handling the
metal blade and the slicing disc as these
are very sharp.
• Remove the protective cap from the
metal blade before use.
• Let the rotating parts come to a complete
stop before opening the cover.
• Never put your fingers or e.g. a spatula
into the food chute while operating.
• Remove the mains plug from the wall
socket after use.
• If the mains cord of this appliance is
damaged, it must only be replaced by
Philips or their service representative, as
special tools and/or parts are required.
• Prior to initial use, wash all the parts
which come into contact with food.
• Never immerse the motor unit in water or
any other liquid. Do not rinse either.
• When mixing or blending fluids, do not
fill above the maximum level indication
on the bowl.
• Do not exceed the maximum quantities
and processing times indicated in the
tables.
• Place the lid on the bowl in the right
manner. The built-in safety lock then
becomes unlocked and the appliance can
be switched on.
• Keep these instructions for future
reference.
4
2
3
Page 5

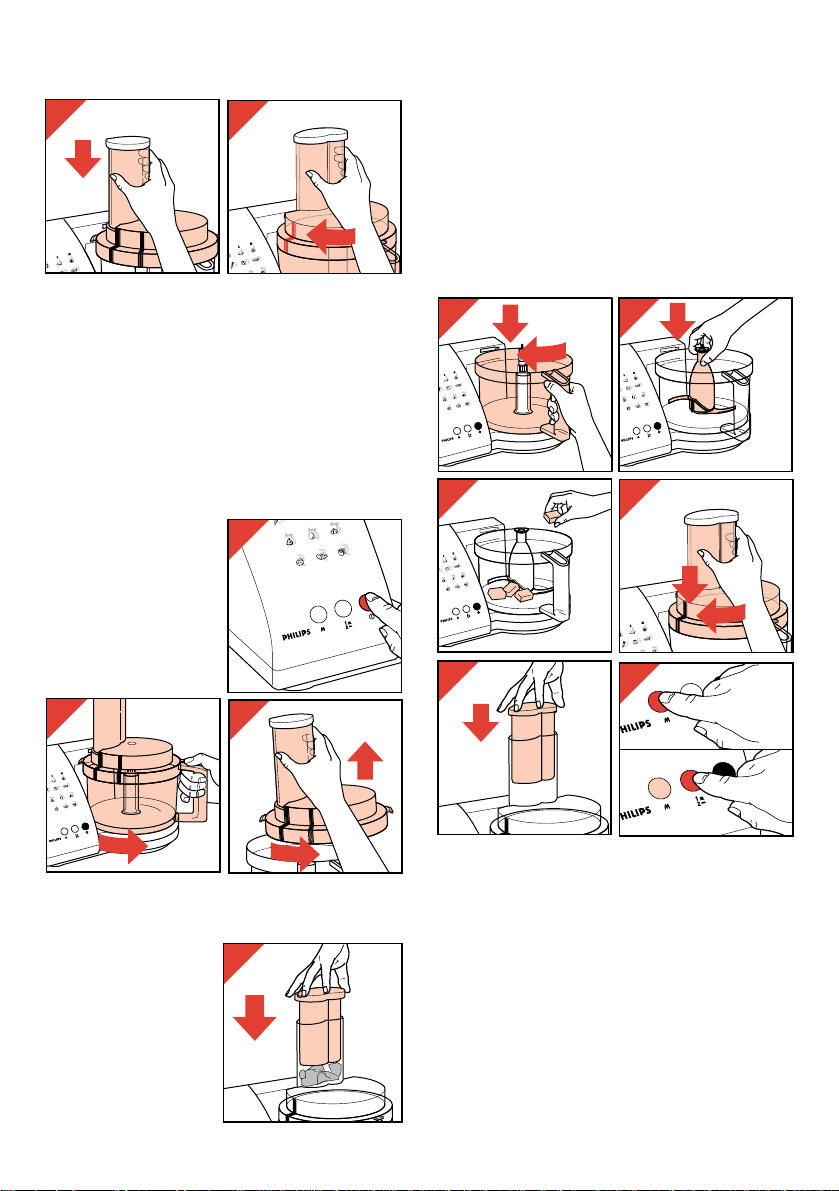
Positioning the cover
- Position the cover as indicated in fig. 4.
- Move the cover firmly in the direction of the
arrow until it stops and the markings on the
cover and on the bowl (handgrip) meet (fig. 5).
Built-in safety lock
Only if the cover has been screwed correctly
onto the bowl, the built-in safety lock is released
so that the appliance can be switched on.
After use
- Switch off (fig. 6).
- Remove the bowl from
the appliance (fig. 7)
- Release the cover
from the bowl (fig. 8).
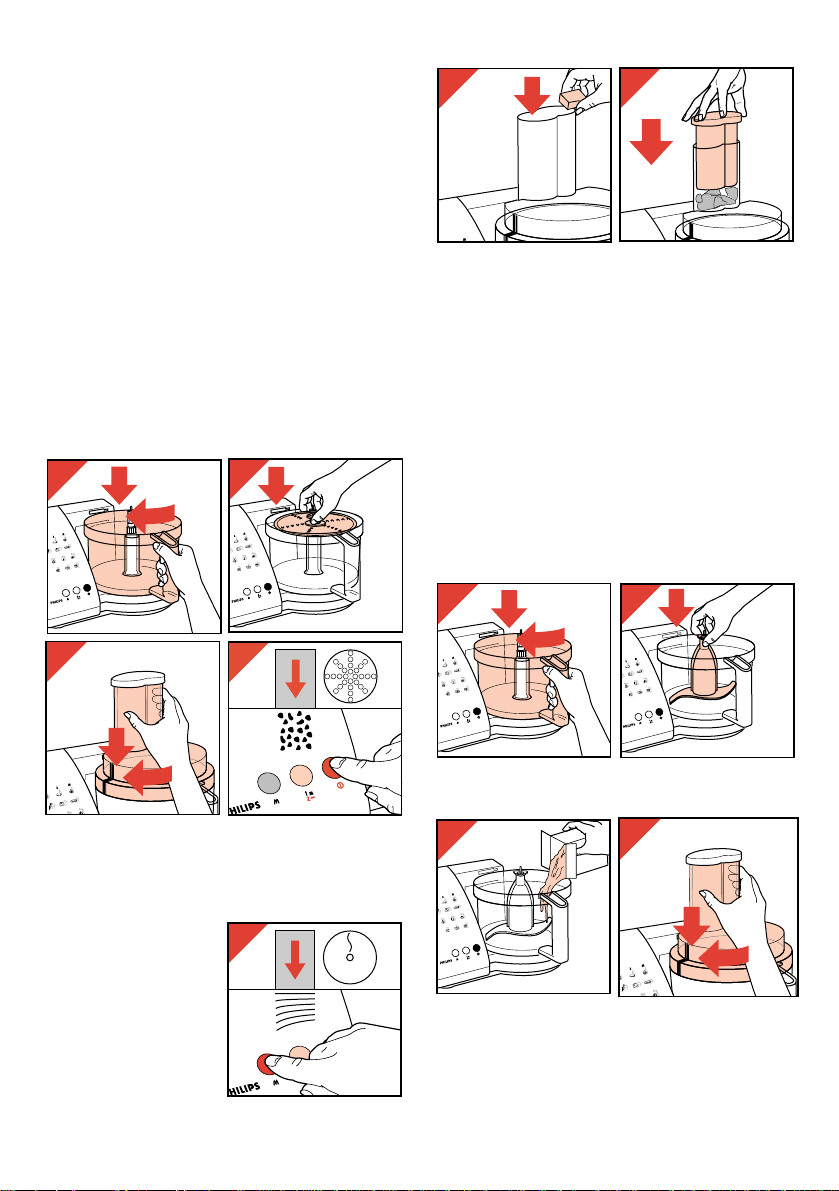
Food chute and pusher
• Use the pusher to
feed ingredients
through the food
chute (fig. 9).
• You can keep the pusher in the food chute to
serve as a stopper while operating. This will
prevent splashing and making dust.
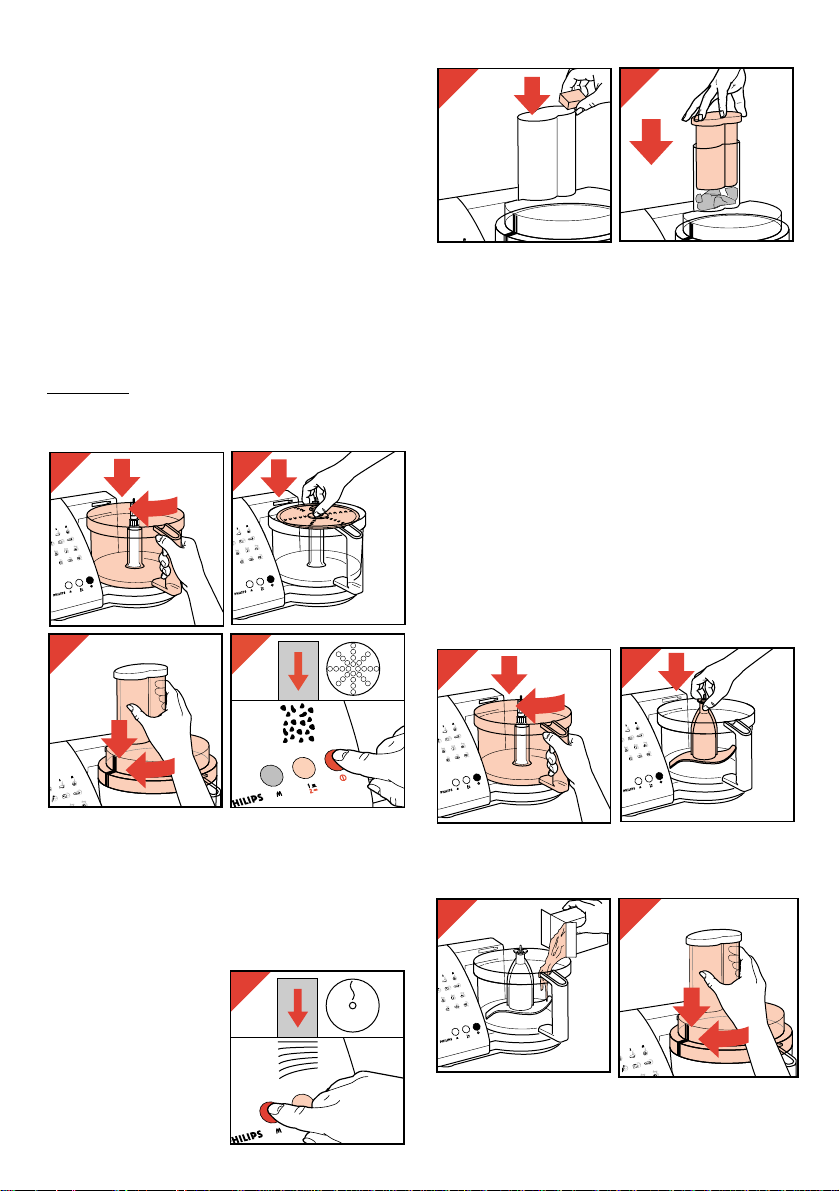
Metal blade £
Take care: the cutting edges are very sharp!
• The metal blade is suitable for chopping,
mixing, blending, puréeing and making dough
for pastry and shortbread.
- Position the bowl (fig. 10) and then the metal
blade (fig. 11).
- Put the ingredients into the bowl (fig. 12).
- Place the cover (fig. 13) and put the pusher into
the food chute (fig. 14).
- Switch on selecting M in combination with Y1
or W2 (fig. 15).
Please refer to the tables.
Tips:
• Pre-cut large pieces into cubes of about
3 cm (or 1").
• Avoid overprocessing due to excessive
operation. (Also when using the M setting.)
5
5
4
10
12
1
2
11
13
7
6
1
2
14
15
8
2
1
9
Page 6
• When chopping (hard) cheese, take care not to
keep the motor running too long. Then the
cheese could get warm and turn lumpy.
• If food should get caught around the metal
blade, or when particles of food should stick to
the inside of the bowl:
- first switch the appliance off,
- take the cover from the bowl
- and remove the food from the metal blade or
from the bowl using the spatula.
• Do not chop very hard ingredients, such as
coffee beans, nutmeg and lumps of ice: these
would blunt the metal blade.
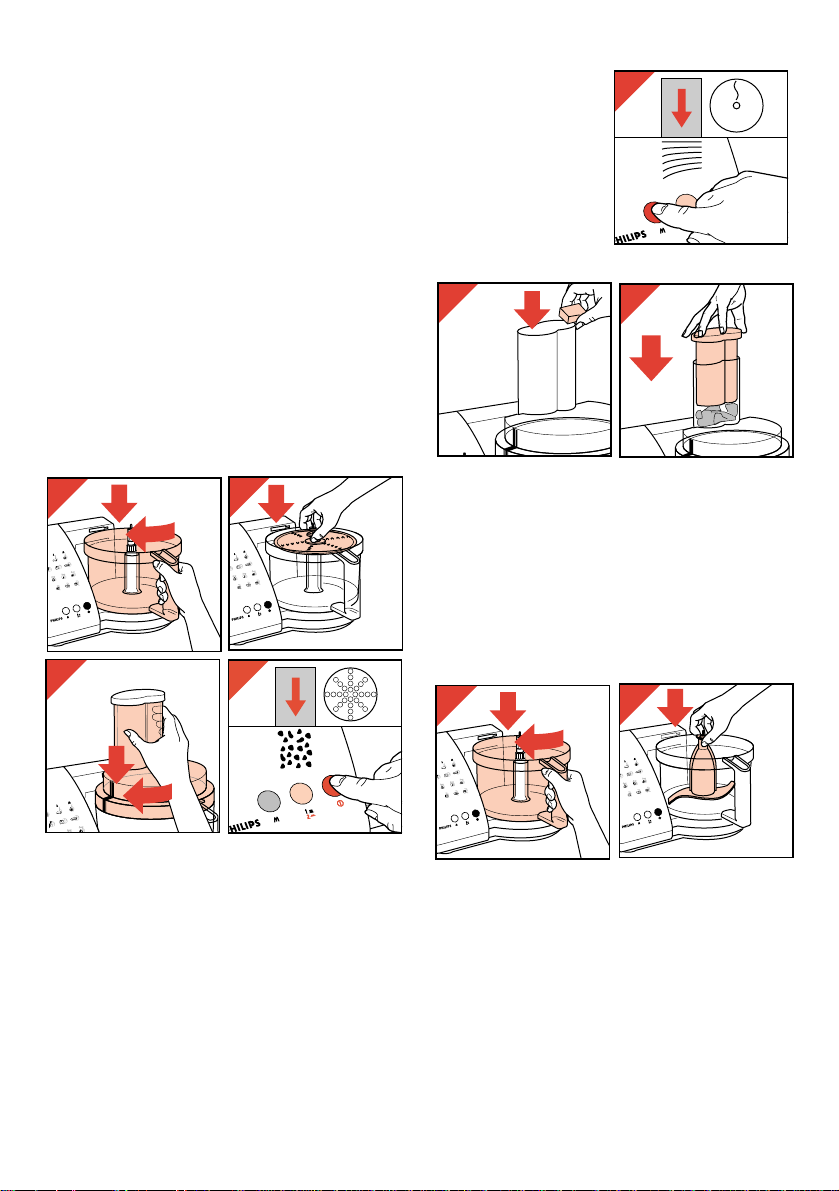
Slicing disc § and grating disc ¶
Take care: the cutting edges of the slicing
disc are very sharp!
Therefore, always hold the disc by its central
plastic holder.
- Position the bowl (fig. 16).
- Position the disc with the side to be used facing
upwards. (AAfor thin slicing or fine grating; [ for
thick slicing or coarse grating.) (fig. 17).
- Place the cover
(fig. 18).
- For grating switch on
selecting IIin
combination with W2
(fig. 19).
- For slicing switch on
selecting M in
combination with Y1
or W2 (fig. 20).
(Also refer to the
tables.)
- Feed the ingredients into the food chute
(fig. 21).
- Press the ingredients downwards using the
pusher (fig. 22). Apply steady and moderate
pressure.
Tips :
• Pre-cut large pieces to make them feed into the
chute.
• Fill the food chute evenly for the best results.
• Empty the bowl every now and then when
processing large amounts.
Kneading accessory ^
• The kneading accessory is suitable for kneading
bread dough and mixing batters.
- Place the bowl (fig. 23) and then the kneading
accessory (fig. 24).
- Put the dry ingredients into the bowl (fig. 25)
and place the cover (fig. 26).
6
16
17
22
23
24
25
26
2
20
21
18
19
1
2
1
2
1
2
1
Page 7
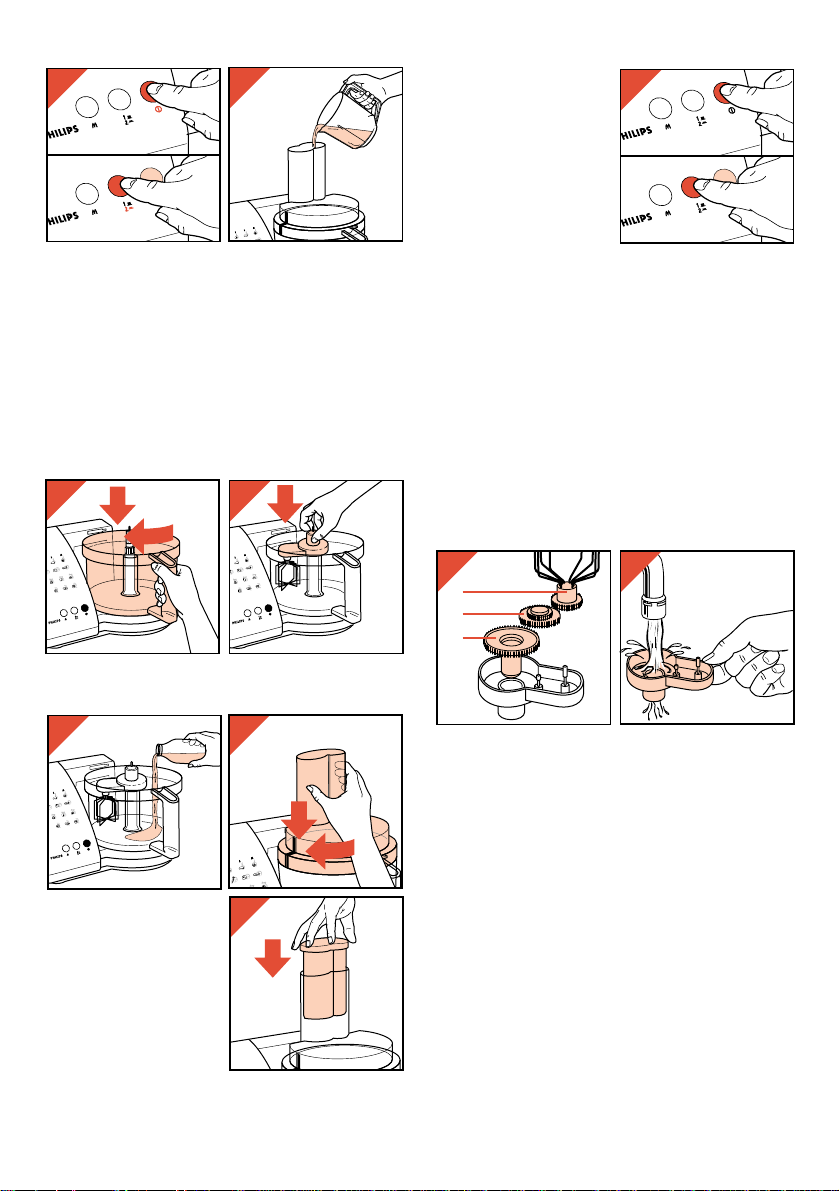
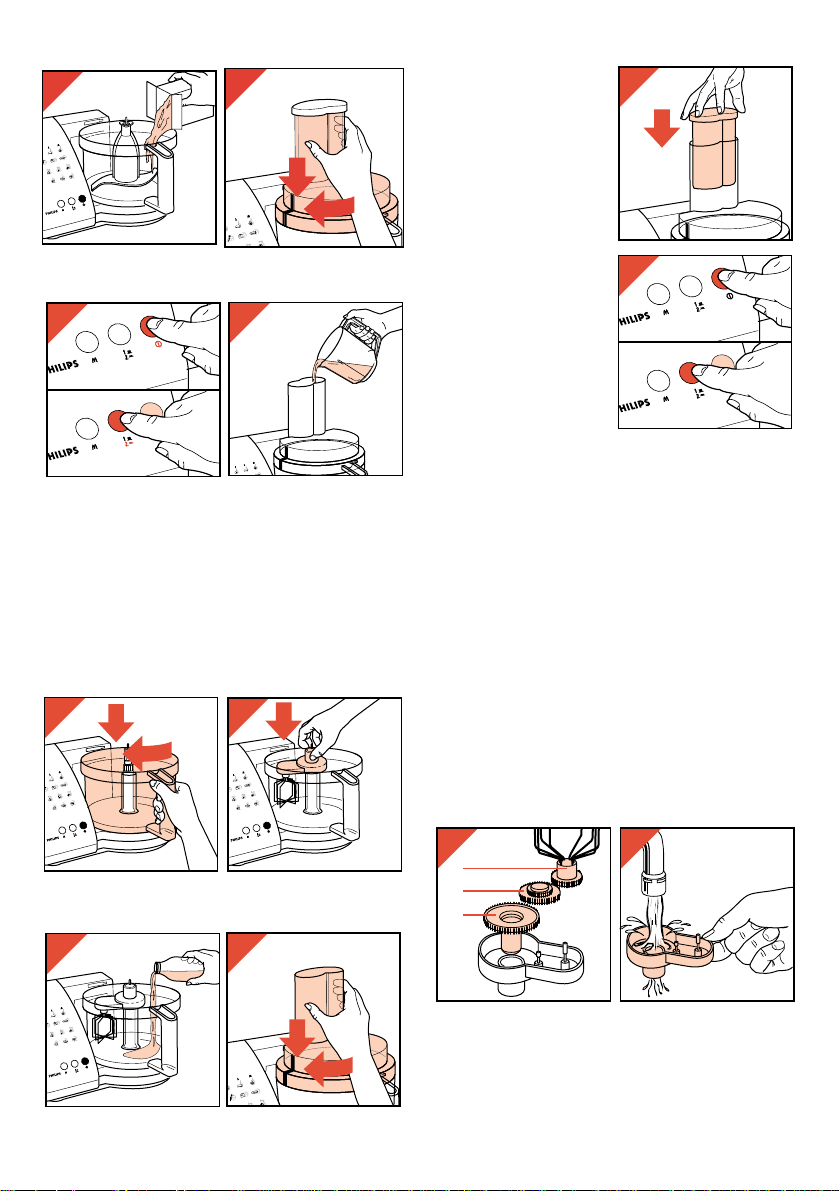
- Switch on selecting IIin combination with W2
(fig. 27).
- Add the water via the food chute (fig. 28).
Whisk ß
• The whisk is suitable for whisking whole eggs,
white of egg, "toppings" for desserts, instant
pudding and cream. (Also refer to the tables.)
Please note: Do not use the whisk for
making batter!
- Position the bowl (fig. 29) and then the whisk
(fig. 30).
After that, put the
ingredients into the
bowl (fig. 31) and
place the cover
(fig. 32).
- Place the pusher into
the food chute to shut
it off (fig. 33).
- Switch on selecting I
in combination with
Y1 or W2 (fig. 34).
Please refer to the
tables.
Cleaning
• Always remove the plug from the wall socket
before cleaning the motor unit.
The motor unit may be wiped with a damp cloth.
Never immerse the motor unit in water. Never
pour water over it.
• Wash the items which have been in contact with
the food in warm soapy water immediately after
use. Do not clean in a dishwasher.
• Take care when cleaning the metal blade and
slicing disc: the cutting edges are very sharp!
• Ensure that the cutting edges do not come into
contact with hard objects as this might make
them blunt.
• Do not use scourers, abrasives, etc.
• The gear of the whisk accessory can be easily
disassembled to enable thorough cleaning
(fig. 35, 36).
7
30
29
34
33
36
2
1
3
32
2
31
28
27
1
2
1
35
Page 8

8
Ingredients
Apples
- puréeing
- slicing
- grating
Baby/infant/
diet food
- puréeing
Batter
(biscuit)
- stirring
Batter (cake)
- stirring
Batter (light)
- blending
Beetroot
- slicing
- grating
Black radish
- grating
Breadcrumbs
Cabbage
- slicing
- grating
Carrots
(uncooked)
- slicing
- grating
Cheese
- chopping
- grating
Max.
quantity
Switch
- on &
speed
Accessory
Procedure Applications
500 g
500 g
3 eggs
200 g
flour
500 g
liquid
100 g
250 g
I 2
M 1/2
I 2
I 2
I 2
I 2
I 1/2
M 1/2
I 2
I 2
I 2
M 1/2
I 2
M 1/2
I 2
M - 2
I 2
£
V
¶
£
©
©
£
V
¶
¶
£
V
¶
V
¶
£
¶
Purée cooked apples.
Pre-cut uncooked apples into cubes
(3 cm or 1").
Coarse: add a little liquid.
Fine: if necessary add some extra
liquid for the smoothest results.
Ingredients at room temperature.
Stir mixture of eggs and sugar at
speed 2 until stiff. Then add the
sifted flour. Continue stirring
carefully at speed 1.
Ingredients at room temperature.
The ingredients may be put into the
bowl simultaneously. Use selfraising flour or plain flour with
baking powder. Stirring time approx.
1 minute.
First put liquid into the blender jar.
Then add the dry ingredients.
Put in tip first
Use dry, crisp bread
Pre-cut
Insert into the food chute tips
downwards. Fill the food chute
completely.
Use rindless cheese (e.g.
Parmezan), pre-cut in cubes of 2
cm. Select pos. M for coarse results
and speed 2 for fine powder.
Press carefully with the pusher.
Baby/infant food
Pastry, salads.
Infant food.
Baby food.
Cakes, Swiss Roll,
Pastry.
Cakes etc
Pancakes, wafers,
crepe, fritters.
Oven dishes.
Garnishing, raw
food, salads.
Garnishing, raw
food, salads.
Food coated with
breadcrumbs,
gratinated dishes.
Cooked vegetables,
coleslaw.Raw food
salad
Oven dishes.
Garnishing,
raw food.
Garnishing,
au gratin, soups,
sauces, croquettes.
Sauces, fondue,
pizza, au gratin
dishes.
Page 9

9
Chicory
- slicing
Chocolate
- chopping
Courgette
- slicing
Creams
Cucumber
- slicing
- grating
Dough
(tart, pie,
dumplings)
Dough
(bread, pizza)
or dough with
yeast
Dough
(pastry)
Eggs
- whisking
(egg white)
- beating
(whole egg)
Fruit
- chopping
- puréeing
Herbs
- chopping
200 g
250 g
300 g
flour
500 g
flour
(bread)
400 g
flour
4 eggs
4 eggs
500 g
500 g
M 1/2
M - 2
M 1/2
I 2
M 1/2
I 2
M 2
I 2
I 2
I 2
I 2
M 2
I 1 / 2
M 2
V
£
V
£
V
¶
£
©
£
ß
ß
£
£
£
Insert into the food chute heads
upwards, filling the food chute
completely.
Use hard, pure chocolate. Break
into cubes of 2 cm. The first few
times usepos. M. Then speed 2 for
a fine chop. Max. chopping time =
45 sec.
Use soft butter for airy results.
Use cold butter/margarine and cold
water. Put flour into the bowl. Top
with 2 cmlarge pieces of butter/
margarine. Mix on speed 2 until
mixture resembles bread crumbs.
Then add water while mixing. Stop
as soon as dough forms into a ball
(about 15 sec.). Cool dough before
further processing.
Put all dry ingredients into the bowl.
Mix for 5 secs. Then add the water
while mixing. Max. kneading time:
1.5 minute. You may finish
kneading manually. Knead filling
for bread through dough by hand.
Use cold butter or margarine, cut
into 2 cms pieces. Put all ingredients into bowl simultaneously. Mix
until mixture forms into a ball (after
approx. 30 secs.). Cool dough
before further processing.
Use eggs on room temperature.
Make the bowl and whisk free from
grease.
Tip: use a little lemon juice to
prevent discolouring.
Use raw, firm, seedless fruit.
Use cooked or soft fruit.
Wash and dry herbs.
Salads, soups.
Garnishing, sauces
pastry, mousse,
pudding.
Oven dishes, soups.
Pastry, desserts.
Salads, raw food.
Fruit tarts, apple
dumplings, pies,
quiche.
Bread, brioche,
pizza, tart.
Apple pie, sweet
biscuits, open fruit
flans.
Pudding, soufflé,
meringues,
garnishing.
Scrambled egg,
omelet.
Salads, jam, cakes.
Sauces, jam,
pudding, baby food.
Sauces, soup,
garnishing,
seasoned butter.
Page 10

10
Leek
- slicing
Mayonnaise
Meat, fish,
poultry
- chopping
(lean beef)
- chopping
(streaky
meat)
Milkshake
Nuts
- chopping
Onions
- chopping
- slicing
Pulses
- puréeing
Tomatoes
- puréeing
Vegetables
(uncooked)
- chopping
- puréeing
(cooked)
- puréeing
Whipped
cream
- whisking
3 large
eggs
500 g
400 g
500 ml
liquid
250 g
500 g
500 g
750 g
500 g
500 g
750 g
500 ml
M 1/2
I 2
M 2
M 2
I 2
M 2
M 2
M 1/2
I 2
I 2
M - 2
I 1/2
I 1/2
I -
1 / 2 / 1
V
£
£
£
£
£
£
V
£
£
£
£
£
ß
Insert into the food chute heads
upwards. When processing thin
leek, fill the opening completely.
Use ingredients at room
temperature. Mix eggs with
vinegar, lemon juice or mustard and
if desired herbs for 10 secs. Then
add 175 ml oil via protective cap.
Stop when oil is completely mixed
in. You can control the thickness by
adjusting the egg/oil ratio.
First remove sinews, bones,
including fishbones. Pre-cut into
cubes of about 3 cm or 1".
Max. chopping time = 30 secs.
Chop at position M for coarser
results.
Pre-cut into cubes of 3 cm or 1".
Chop until desired fineness is
obtained. Wash the bowl
immediately after use.
Use cooked beans or peas. You
may add some liquid for a better
consistency.
Pre-cut tomatoes into 4 pieces.
Pre-cut.
Pre-cut.
Use cream which has been cooled
to refrigerator temperature. Process
at least 125 ml. Begin at speed 1.
Switch over to speed 2. When
cream is almost ready switch back
to speed 1.
Soups, cooked leek.
For French fries,
salads, cocktails,
fondue and
barbecue sauces.
Steak tartare,
sandwich spreads,
hamburgers.
Minced meat,
sausage.
Salads, garnishing,
bread, pastry,
pudding.
Salads, sauces,
soups.
Soups, raw food,
oven dishes.
Purées, soups.
Sauces,
soups.
Salads, raw food,
soup.
Vegetable purée,
soups.
Soups, sauces.
Garnishing, cream,
ice-cream mixtures,
pastry.
Page 11
Algemene beschrijving (fig. 1)
A Motorgedeelte
B Kom
C Deksel van kom
D Nok van deksel
(schakelt de ingebouwde beveiliging in en uit)
E Ingebouwde beveiliging
F Sikkelmes £
G Snijschijf § (dubbelzijdig)
AA
= dun snijden
[ = dik snijden
H Raspschijf ¶ (dubbelzijdig)
AA
= extra fijn raspen
[ = fijn raspen
I Kneedhulpstuk ©
J Klopper ß
K Aandrijfas
L Vulopening
M Stamper
N Schakelknoppen
II
= Aan / Uit
M = "Moment" (loslaten: motor stopt)
Y1 = minimum snelheid
W2 = maximum snelheid
O Snoeropberging
Symbolen op het apparaat
Links van de symbolen van de diverse
toepassingen ziet u een afbeelding van het te
gebruiken hulpstuk.
Daarboven wordt geadviseerd het apparaat het in
te schakelen op stand M (“Moment”) of
II
(“Continu”), in combinatie met snelheid
Y1 (“minimum snelheid”) of W2 (“maximum
snelheid”).
Zie ook de tabel.
Kom plaatsen
- Zet de kom op zijn plaats zoals in fig. 2 wordt
aangegeven.
- Draai de handgreep in de richting van de pijl tot
de kom niet verder kan (fig. 3).
Nederlands
Belangrijk
• Lees de gebruiksaanwijzing en bekijk alle
tekeningen voordat u het apparaat in
gebruik neemt.
Houd pag. 3 uitgeklapt bij het lezen.
• Laat het apparaat niet zonder toezicht
werken.
• Laat kinderen niet het apparaat bedienen.
• Pas op bij het beetpakken van het sikkel-
mes en de snijkant van de snij- / raspschijf. Deze zijn scherp.
• Verwijder vóór het gebruik de
beschermhoesjes van het sikkelmes.
• Laat de draaiende delen altijd eerst tot
stilstand komen vóórdat u het deksel
open draait.
• Steek nooit uw hand of bijvoorbeeld een
spatel in de vulopening, terwijl het
apparaat is ingeschakeld. Alleen de meegeleverde stamper is hiervoor geschikt.
• Haal na gebruik de stekker uit het
stopcontact.
• Indien het snoer van dit apparaat is
beschadigd, dient het uitsluitend te
worden vervangen door een door Philips
daartoe aangewezen reparateur, omdat
voor de reparatie speciale
gereedschappen en/of onderdelen vereist
zijn.
• Was alle delen die met voedsel in
aanraking komen af, voordat u het
apparaat in gebruik neemt.
• Dompel het motorgedeelte nooit in water
of in een andere vloeistof. Spoel het ook
niet af.
• Als u vloeistoffen klopt of mengt, vul dan
de kom niet hoger dan de bovenste
streep van de maatverdeling.
• Overschrijd niet de maximale hoeveelheden en bewerkingstijden, zoals aangegeven in de tabellen.
• Plaats het deksel op de juiste manier op
de kom. Dan wordt de ingebouwde
beveiliging ontgrendeld en kan het
apparaat worden ingeschakeld.
• Bewaar deze gebruiksaanwijzing.
11
2
3
Page 12
Deksel plaatsen
- Zet het deksel zo op de kom als in fig. 4 wordt
aangegeven.
- Draai het deksel met enige kracht in de richting
van de pijl tot het deksel niet verder kan.
De merktekens op het deksel en op de kom
(handgreep) staan dan tegenover elkaar (fig. 5).
Ingebouwde beveiliging
Alleen als u op de juiste manier het deksel op
de kom hebt vastgedraaid, is de ingebouwde
beveiliging ontgrendeld,
zodat u het apparaat
kunt inschakelen.
Na gebruik
- Schakel het apparaat
uit (fig. 6).
- Verwijder de kom van het apparaat (fig. 7).
- Draai het deksel los van de kom (fig. 8).
Vulopening en
stamper
• Gebruik de stamper
om ingrediënten door
de vulopening te
voeren (fig. 9).
• U kunt tijdens het gebruik de stamper in de
vulopening zetten om deze af te sluiten. Zo
voorkomt u spatten en stuiven.
Sikkelmes £
Pas op: de snijkanten zijn erg scherp!
• Het sikkelmes is geschikt voor hakken, mixen,
mengen, pureren en het bereiden van
korstdeeg, kruimeldeeg en zandtaartdeeg.
- Plaats de kom (fig. 10) en daarna het sikkelmes
(fig. 11).
- Doe de ingrediënten in de kom (fig. 12).
- Plaats het deksel (fig. 13) en zet de stamper in
de vulopening (fig. 14).
- Schakel in op stand M, in combinatie met Y1
of W2 (fig. 15).
Zie ook de tabellen.
Tips:
• Grote stukken kunt u het best vóórsnijden tot
blokjes van ongeveer 3 cm.
• Het voedsel kan snel tè fijn gehakt worden: laat
het apparaat dus niet te lang achtereen werken!
12
5
4
10
1
2
11
7
6
8
1
9
12
14
2
13
1
2
15
Page 13
(Ook niet als u de momentstand M gebruikt.)
• Let er bij het hakken van (harde) kaas op, dat u
het apparaat niet te lang achtereen laat draaien.
De kaas wordt dan te warm en gaat klonteren.
• Als voedsel om het sikkelmes is geslingerd, of
wanneer stukjes voedsel tegen de binnenkant
van de kom kleven:
- schakel dan eerst het apparaat uit,
- neem het deksel van de kom,
- verwijder de ingrediënten van het sikkelmes of
van de kom met behulp van de spatel.
• Hak geen zeer harde ingrediënten, zoals
koffiebonen, nootmuskaat en ijsklontjes: deze
zouden het sikkelmes bot maken.
Snijschijf §en raspschijf ¶
Pas op: de snijranden van de snijschijf zijn
erg scherp!
Pak daarom de schijf altijd vast bij het
handgreepje.
- Plaats de kom (fig. 16).
- Plaats de schijf, met de zijde die u wilt
gebruiken naar boven. ( | voor dun snijden of
fijn raspen; [ voor dik snijden of grof raspen.)
(Fig. 17).
- Plaats het deksel (fig. 18).
- Doe de ingrediënten in de vultrechter.
- Plaats de stamper op de ingrediënten en druk
deze lichtjes aan.
- Voor raspen: schakel in op stand I,in
combinatie met W2 (fig. 19).
- Voor snijden: schakel
in op stand M, in
combinatie met Y1
of W2 (fig. 20).
(Zie ook de tabellen.)
- Doe de ingrediënten in
de vultrechter (fig. 21).
- Druk de ingrediënten
rustig en gelijkmatig
omlaag met de
stamper (fig. 22).
Tips:
• Snijd te grote stukken voedsel vóór, zodat ze in
de vulopening passen.
• Vul de opening gelijkmatig voor de beste
resultaten.
• Maak de kom regelmatig leeg als u grote
hoeveelheden verwerkt.
Kneedhulpstuk
©
• Het kneedhulpstuk is geschikt voor het kneden
van brooddeeg en het mengen van beslag.
- Plaats de kom (fig. 23) en dan het kneedhulpstuk (fig. 24).
13
16
17
22
23
24
20
21
18
19
1
2
1
2
1
2
Page 14
- Doe de droge ingrediënten in de kom (fig. 25)
en plaats het deksel (fig. 26).
- Schakel in op stand IIin combinatie met W2
(fig. 27).
- Voeg het water toe via de vulopening (fig. 28).
Klopper ß
• De klopper kunt u gebruiken voor het luchtig
opkloppen van eieren, eiwit, “toppings” voor
desserts, instant pudding en slagroom.
N.B.: Gebruik de klopper niet voor beslag!
- Plaats eerst de kom (fig. 29) en vervolgens de
klopper (fig. 30).
- Doe dan de ingrediënten in de kom (fig. 31) en
plaats het deksel (fig. 32).
- Zet de stamper in de
vulopening om deze
af te sluiten (fig. 33).
- Schakel in op stand I
in combinatie met
Y1 of W2 (fig. 34).
Zie ook de tabellen.
Schoonmaken
• Haal altijd de stekker uit het stopcontact,
voordat u het motorgedeelte gaat
schoonmaken.
U kunt het motorgedeelte schoonmaken met
een vochtige doek.
Dompel het motorgedeelte niet in water en
spoel het niet af.
• Maak de delen die met voedsel in aanraking zijn
gekomen meteen na gebruik schoon in warm
sop. Niet schoonmaken in de afwasmachine.
• Maak het sikkelmes en de snijschijf voorzichtig
schoon: de snijranden zijn erg scherp!
• Zorg ervoor dat de snijranden van het sikkelmes
en van de snijschijf niet met harde voorwerpen
in aanraking komen: hierdoor zouden ze bot
kunnen worden.
• Gebruik geen schuursponzen, schuurpoeder
e.d.
• De tandwielen van de klopper kunnen eenvoudig van hun plaats worden genomen, zodat
u ze goed kunt schoonmaken (fig. 35, 36).
14
30
29
34
33
36
2
1
3
32
2
31
28
27
25
1
26
2
1
2
35
1
Page 15

15
Ingrediënten
Appels
- pureren
- snijden
- raspen
Baby-/ kinder-/ dieetvoeding
- pureren
Beslag
(biscuit)
Beslag
(cake)
Beslag
(lichte
soorten)
Bietjes
- snijden
- raspen
Chocolade
- hakken
Courgette
- snijden
Crèmes
Deeg
(zandtaart)
Max.
hoeveelheid
Inschakelen &
snelheid
Hulpstuk
Bereidingswijze Toepassingen
500 g
500 g
3 eieren
200 g
bloem
500 g
vocht
200 g
250 g
400 g
bloem
I 2
M 1/2
I 2
I 2
I 2
I 2
I 1/2
M 1/2
I 2
M 2
M 1 / 2
I 2
I 2
£
V
¶
£
©
©
£
V
¶
£
§
£
£
Gekookte appels.
Ongekookte appels vóórsnijden in
stukjes van 3 x 3 x 3 cm.
Grof: een weinig vocht toevoegen.
Fijn: bij ongelijkmatig resultaat wat
extra vocht toevoegen.
Ingrediënten op kamertemperatuur.
Klop mengsel van eieren en suiker
stijf op snelheid 2. Hierna de
gezeefde bloem toevoegen en
voorzichtig doormengen op
snelheid 1.
Alle ingrediënten op kamertemperatuur. De ingrediënten
mogen gelijktijdig worden
toegevoegd. Gebruik zelfrijzend
bakmeel of bloem + bakpoeder.
Ca. 1,5 minuut mengen.
Eerst het vocht in de beker.
Vervolgens de droge ingrediënten.
Gebruik harde, pure chocolade.
Breek in stukjes van 2 cm Eerst
enkele keren stand M. Daarna voor
fijn resultaat snelheid 2.
Max. 45 sec. hakken.
Gebruik zachte boter voor een
luchtig resultaat.
Boter/margarine moet koud zijn.
Snijd boter/margarine in stukjes
van 2 cm. Alle ingrediënten tegelijk
in de kom doen. Meng tot zich een
bal vormt (ca. 40 sec.) Koel het
deeg voordat het verder verwerkt
wordt.
Baby-/kindervoeding, gebak,
salades.
Kleutervoeding.
Babyvoeding.
Diverse taarten,
Swiss Roll,
gebakjes.
Cakes e.d.
Pannekoeken,
flensjes, frituur,
wafels.
Ovenschotels.
Garnering,
rauwkost.
Garnering,
sauzen, gebak,
pudding, mousse.
Ovenschotels,
soepen.
Gebak, desserts.
Appeltaart, koekjes,
open vruchtegebak.
Page 16

16
Deeg
(pie- of
korstdeeg)
Deeg
(gist- of
brooddeeg)
Eieren
- kloppen
(eiwit)
- loskloppen
(heel ei)
Fruit
- hakken
- pureren
Groenten
(ongekookt)
- hakken
- pureren
(gekookt)
- pureren
Kaas
- hakken
- raspen
Komkommer
- snijden
- raspen
Kool
- snijden
- raspen
300 g
bloem
500 g
meel
4 stuks
4 stuks
500 g
500 g
500 g
500 g
750 g
250 g
M 2
I 2
I 2
I 2
M 2
I 1 / 2
M 2
I 1 / 2
I 1 / 2
M 2
I 2
M 1 / 2
I 2
M 1 / 2
I 2
£
©
ß
ß
£
£
£
£
£
£
¶
§
¶
§
¶
Gebruik koude boter/margarine en
koud water. Bloem in de kom;
boter/margarine in stukjes van 2
cm erop. Meng op snelheid 2 totdat
het mengsel lijkt op broodkruimels.
Hierna tijdens het mengen water
toevoegen. Stop als het deeg een
bal vormt (ong. 15 sec.). Koel het
deeg voordat het verder verwerkt
wordt.
Doe alle ingrediënten in de kom,
behalve het water. Meng gedurende ca. 5 sec. Voeg vervolgens
tijdens het mengen water toe.
Max. 1,5 minuut kneden. U kunt
het deeg met de hand nakneden.
Vulling voor gevuld brood met de
hand door het deeg kneden.
Breng de eieren op kamertemperatuur.
Maak de kom en de klopper vetvrij.
Tip: gebruik wat citroensap om
verkleuren te voorkomen.
Gebruik ongekookt, stevig fruit
zonder pit.
Gebruik gekookt of zacht fruit.
Vóórsnijden.
Vóórsnijden.
Gebruik korstloze harde kaas (bijv.
Parmezaanse), in stukken van 2 x
2 x 2 cm. Kies stand M voor grof
resultaat, of snelheid 2 voor fijn
poeder. Max. 1 minuut hakken.
Voorzichtig met de stamper
aandrukken.
Vóórsnijden.
Vruchtetaart,
appelbollen,
pasteien,
quiche.
Brood, brioche,
pizza, vlaai.
Pudding, soufflé,
schuimgebak,
garnering.
Roerei, omelet.
Salades, jam,
gebak.
Sauzen, jam,
pudding,
babyvoeding.
Salades, rauwkost,
soep.
Groentenpuree,
soep.
Soepen, sauzen
Garnering, gratineren, soepen,
sauzen, kroketten.
Sauzen, fondue,
pizza, gratineren.
Salades, rauwkost.
Kookgroente,
koolsla.
Rauwkost.
Page 17

Mayonaise
Milkshake
Noten
- hakken
Paneermeel
Peul-
vruchten
- pureren
Prei
- snijden
Rammenas/
rettich
- raspen
Slagroom
- kloppen
Tomaten
- pureren
Tuinkruiden
- hakken
Uien
- hakken
- snijden
Vlees, vis,
gevogelte.
- hakken
(mager)
- hakken
(doorregen)
Wortelen
(ongekookt)
- snijden
- raspen
3 grote
eieren
500 ml
vocht
250 g
100 g
500 g
500 ml
750 g
500 g
500 g
400 g
I 2
I 2
M 1 / 2
I 2
I 2
M 1 / 2
I 2
I
1 /2 /1
I 2
M 2
M 2
M 1 / 2
M 2
M 2
M 1 / 2
I 2
£
£
£
£
£
V
¶
ß
£
£
£
§
£
£
§
¶
Alle ingrediënten moeten op
kamertemperatuur zijn. Meng ei
met azijn, citroensap of mosterd
en evt. kruiden gedurende 10 sec.
Hierna via veiligheidsdeksel 175
ml olie toevoegen. Stop als de olie
geheel is vermengd. De dikte van
de mayonaise bepaalt u d.m.v. de
verhouding ei/olie.
Salades, garnering, brood,
amandelspijs, pudding.
Gebruik droog, bros brood.
Gebruik gekookte bonen of
erwten. Voeg wat vocht toe voor
een gelijkmatig resultaat.
Steek prei met de groene delen
naar boven in de vulopening. Bij
dunne prei: vul de opening geheel.
Invoeren met de punt naar
beneden.
Neem slagroom op koelkasttemperatuur. Minimaal 125 ml
verwerken. Begin op snelheid 1.
Schakel dan over op snelheid 2.
Als de slagroom bijna klaar is:
terugschakelen naar snelheid 1.
Tomaten in 4 stukken snijden.
Was en droog de kruiden.
Vóórsnijden in stukken van 4 cm.
Hak tot gewenste fijnheid. Was de
kom direct na gebruik af.
Verwijder eerst zenen, graten en
botjes. Snijd het vlees/de vis in
stukken van 3 cm. Max. 30 seconden hakken.
Hakken op stand M voor grof
resultaat.
Invoeren met de punt naar
beneden. Vul de opening geheel.
Cocktail-, fondue-,
barbecuesauzen,
frites.
Paneren, gratineren.
Purees, soepen.
Soepen, gekookte
prei.
Garnering,
rauwkost, salades.
Garnering,
ijsmengsels,
pudding, gebak.
Sauzen, soepen.
Sauzen, soepen,
garnering,
kruidenboter.
Salades, sauzen,
soepen.
Soepen, rauwkost,
ovenschotels.
Filet Américain,
spreads,
hamburgers,
tartaar.
Gehakt, worst.
Ovenschotels.
Garnering,
rauwkost.
17
Page 18
Descrizione generale (fig. 1)
A Blocco motore
B Contenitore
C Coperchio del contenitore
D Linguetta del coperchio (per bloccare e
sbloccare la chiusura di sicurezza incorporata)
E Dispositivo di sicurezza
F Lama di metallo £
G Disco per affettare § (da usare da entrambi
i lati)
A = fette sottili
[ = fette più grosse
H Disco per grattugiare ¶ (da usare da
entrambi i lati)
AA
= extrasottile
[ = sottile
I Accessorio per impastare ^
J Frusta ß
K Albero motore
L Apertura per inserimento cibo
M Pestello
N Pulsanti
I = acceso/spento
M = “funzionamento ad intermittenza”
(rilasciare per spegnere)
Y1 = Velocità minima
W2 = Velocità massima
O Vano del cordone di alimentazione
Istruzioni grafiche
A sinistra dei simboli corrispondenti a ciascuna
applicazione è riprodotto l’accessorio da
utilizzare.
Sulla riga superiore è consigliato di accendere
l'apparecchio selezionando M (funzionamento ad
intermittenza) o I (funzionamento continuo), in
combinazione con la velocità Y1 (velocità
minima) o W2 (velocità massima).
Osservare attentamente le figure.
Per posizionare il contenitore
- Posizionate il contenitore come indicato nella
fig. 2.
- Spostate l’impugnatura in direzione della freccia
fino a quando si arresta (fig. 3).
Italiano
IMPORTANTE
• Prima di usare l’apparecchio, leggete
attentamente le istruzioni per l’uso
corredate di illustrazioni. Durante la
lettura tenete aperta la pag. 3.
• Non allontanatevi mentre l’apparecchio è
in funzione.
• Tenete l’apparecchio lontano dalla
portata dei bambini.
• Fate attenzione alla lama di metallo e al
disco per affettare perché sono affilati.
• Togliete il cappuccio di protezione prima
di usare la lama di metallo.
• Non togliete il coperchio fino a quando le
parti rotanti non sono completamente
ferme.
• Non infilate mai la mano o la spatola
nell’apertura di inserimento cibo mentre
l’apparecchio è in funzione.
• Staccate ogni volta la spina dalla rete di
alimentazione quando avete terminato di
usare l’apparecchio.
• Se il cavo di alimentazione di questo
apparecchio si dovesse rovinare,
occorrerà farlo sostituire da un Centro
Assistenza autorizzato Philips perchè
occorrono speciali attrezzature e/o
ricambi.
• Prima di usare l’apparecchio per la prima
volta, lavate bene tutte le parti che
andranno a contatto con gli alimenti.
• Non immergete mai il blocco motore
nell’acqua o in altri liquidi, nemmeno per
risciacquarlo.
• Quando amalgamate o frullate i liquidi
non superate l’indicazione del livello
massimo indicato sul vaso.
• Non superate le quantità massime e i
tempi indicati sulla tabella.
• Sistemate in modo corretto il coperchio
sul contenitore. Solo in questo modo il
dispositivo di sicurezza incorporato si
sblocca e l’apparecchio può essere
messo in funzione.
• Conservate queste istruzioni per ulteriore
consultazione.
18
2
3
Page 19

Per posizionare il coperchio
- Posizionate il coperchio come indicato nella
fig. 4.
- Ruotate il coperchio nella direzione della
freccia fino ad arresto. Assicuratevi che le
tacche riportate sul coperchio corrispondano a
quelle del contenitore (fig 5).
Dispositivo di sicurezza incorporato
Il dispositivo di sicurezza incorporato verrà
sbloccato, permettendo quindi il funzionamento
dell’apparecchio, solo
se il coperchio è stato
avvitato in modo corretto sul contenitore.
Dopo l’uso
- Spegnete
l’apparecchio (fig. 6)
- Togliete il contenitore dall’apparecchio (fig. 7)
- Togliete il coperchio dal contenitore (fig. 8)
Apertura di
inserimento cibo e
pestello
• Usate il pestello per
inserire gli ingredienti
dall’apertura di inserimento cibo (fig. 9).
• Potete lasciare il pestello nell’apertura di
inserimento cibo per evitare la fuoriuscita dello
stesso ed evitare schizzi.
Lama di metallo £
Attenzione: i bordi della lama di metallo sono
molto taglienti.
• La lama di metallo è adatta per tritare,
mescolare, amalgamare, frullare, impastare
torte e biscotti.
- Inserite il contenitore (fig. 10) e la lama di
metallo (fig. 11).
- Introducete gli ingredienti (fig. 12).
- Mettete il coperchio (fig. 13) e introducete il
pestello nell’apertura di inserimento cibo
(fig. 14).
- Per l’accensione premete il pulsante M, e
premete il pulsante Y1 oppure il ÄW2.
Osservate attentamente le figure.
Consigli:
• Tagliate gli ingredienti grossi in cubetti di circa
3 cm.
• Evitate di far funzionare l’apparecchio troppo a
lungo (anche quando l’apparecchio è in
posizione M).
19
5
4
10
1
2
11
7
6
8
1
9
12
14
2
13
1
2
15
Page 20
• Quando grattugiate il formaggio, abbiate cura
di non far funzionare il motore troppo a lungo; il
formaggio potrebbe riscaldarsi e formare dei
grumi.
• Se il cibo dovesse raccogliersi attorno alla
lama di metallo o alle pareti del contenitore:
- spegnete l’apparecchio
- togliete il coperchio del contenitore
- togliete il cibo dalle lame e dalle pareti
usando l’apposita spatola.
• Non tritare ingredienti molto duri, come ad esempio chicchi di caffè, noce moscata e cubetti di
ghiaccio: la lama ricurva potrebbe danneggiarsi.
Disco per affettare § e disco per grattugiare ¶
Attenzione: i bordi del disco sono molto taglienti.
Afferrate sempre i dischi dall’apposita presa in
plastica posta al centro.
- Posizionate il contenitore (fig. 16)
- Mettete il disco con il lato da utilizzare rivolto
verso l’alto (A per affettare/grattugiare
finemente, [ per ottenere fette più grosse e
grattugiare più grossolanamente) (fig. 17)
- Mettete il coperchio (fig. 18).
- Per grattugiare selezionate la velocità W2 e
accendete
l’apparecchio con il
pulsante I (fig. 19).
- Per affettare selezionate la velocità Y1 o
W2 e accendete l’ap-
parecchio premendo il
pulsante M (fig. 20).
(Osservate attentamente le figure).
- Inserite gli ingredienti attraverso l’apertura di
inserimento (fig. 21).
- Infilate il pestello nell’apertura di inserimento e
premete delicatamente gli ingredienti (fig. 22).
Esercitate una pressione moderata ma
costante.
Consigli:
• Tagliate i pezzi più grossi per facilitarne
l’introduzione attraverso l’apertura.
• Riempite l’apertura di inserimento in modo
uniforme per ottenere risultati migliori.
• Svuotate più volte il contenitore nel caso di
grossi quantitativi di cibo da affettare o
grattugiare.
Accessorio per impastare ^
• L’accessorio per impastare è adatto per
preparare pasta da pane e da dolci.
- Posizionate il contenitore (fig. 23) e
successivamente l’accessorio per impastare
(fig. 24).
- Inserite gli ingredienti asciutti nel contenitore
(fig. 25) e mettete il coperchio (fig. 26)
16
17
22
23
24
25
26
2
20
21
18
19
20
1
2
1
2
1
2
1
Page 21

- Selezionate la velocità W2 e accendete
l’apparecchio con il pulsante I (fig. 27).
- Aggiungete acqua attraverso l’apertura di
inserimento. (fig. 28).
Frusta ß
• La frusta è adatta per sbattere le uova intere o
il solo albume, per preparare le farciture dei
dolci, per i budini e le creme. (Osservate
attentamente le figure).
Attenzione: non usate la frusta per fare la
pasta.
- Posizionate il contenitore (fig. 29) e
successivamente la frusta (fig. 30).
Solo a questo punto
inserite gli ingredienti
nel contenitore
(fig. 31) e applicate il
coperchio (fig. 32).
- Inserite il pestello
nell’apertura di
inserimento e
spingetelo verso il
basso (fig. 33).
- Selezionate la
velocità Y1 o W2 e
accendete l’apparecchio premendo il
pulsante I (fig. 34).
Osservate
attentamente le
figure.
Pulizia
• Prima di pulire la base motore, togliete sempre
la spina dalla presa di corrente. La base
motore può essere pulita con un panno umido.
Non immergete mai la base motore nell’acqua.
Non versate mai acqua sulla base motore.
• Lavate i pezzi che sono venuti a contatto con il
cibo con acqua saponata subito dopo averli
utilizzati. Non metteteli in lavastoviglie.
• Fate attenzione quando pulite la lama e il disco
per affettare: le lame sono molto taglienti!
• Assicuratevi che i bordi taglienti degli accessori
non urtino oggetti duri perché si potrebbero
danneggiare.
• L’ingranaggio della frusta può essere
facilmente smontato per la pulizia (figg. 35,36)
21
30
29
34
33
36
2
1
3
32
2
31
28
27
1
2
35
1
Page 22

Ingredienti Quantità Interruttore Acces- Procedura Applicazioni
massima e velocità sorio
Alimenti per 500 gr. Per un risultato grossolano Alimenti per l'infanzia
l'infanzia aggiungere un po' di liquido
- frullare I - 2
£ Per frullare più finemente aumen-
tate la percentuale di liquido.
Barbabietola Cibi al forno, guarniture,
- affettare M - 1/2
V crudité, insalate.
- grattugiare I - 2
¶
Carne, pesce, Togliete nervi, ossa e lische. Bistecche alla tartara,
pollame Tagliate la carne a dadini di 3 cm.paté per tartine,
- spezzettare 500 gr M - 2
£ Temp max. di lavorazione: hamburger.
(carne magra di 30 secondi. Carne trita, salsicce.
manzo) Per ottenere pezzipiù grossi
- spezzettare 400 gr M - 2
£ selezionate la posizione M.
(carne grassa).
Carote (crude) Infilate le carote dall'apposita Cibi al forno, guarnizioni,
- affettare M - 1/2
V apertura con la punta rivolta crudité.
- grattugiare I - 2
¶ verso il basso. Se le carote non
sono grosse utilizzate l'apertura
più piccola (avendo cura di
staccare la guida dal pestello)
Cavolo Verdure cotte, insalata di
- affettare M - 1/2
V Tagliate a pezzi prima dell'uso. cavolo, crudité.
- grattugiare I - 2
¶ Insalate, crudité.
Cetrioli
- affettare M - 1/2
V
- grattugiare I - 2 ¶
Cioccolato 200 gr. Usate cioccolato puro. Guarniture, salse, paste
- tagliare a pezzi M - 2
£ Spezzetatelo in dadini da 2 cm. dolci e salate, mousse,
circa. Dapprima selezionate la budini.
posizione M, poi la velocità 2 se
desiderate ottenere pezzi più
piccoli. Tempo max. di
lavorazione = 45 secondi
Cipolle Tagliate le cipolle a dadini di Insalate, salse, minestre.
- tritare 500 gr. M - 2
£ 3 cm. Fate funzionare Minestre, crudité, cibi
- affettare M - 1/2
V l'apparecchio fino ad ottenere la al forno.
consistenza desiderata. Lavate il
contenitore subito dopo l'uso.
Crema 250 gr. I - 2
£ Usate burro ammorbidito per Paste dolci e salate,
ottenere una crema più soffice. desserts.
Erbe aromatiche Lavate e asciugate le erbe. Salse, minestre,
- tritare M - 2
£ guarniture,
burro aromatizzato.
Formaggio 250 gr. Togliete la crosta al formaggio Guarnizioni, gratin,
- tagliare a pezzi M - 2
£ (es. parmigiano), tagliatelo a minestre, salse,
dadini di 2 cm. Selezionate crocchette.
la posizione M se volete ottenere Salse, fondute, pizza,
pezzi più grossi e la velocità 2 cibi gratinati.
- grattugiare I - 2
¶ se preferite il formaggio
grattugiato fine. Premete
delicatamente con il pestello.
22
Page 23

23
Frappé 500 ml. I - 2 £
di liquido
Frutta Avvertenza: aggiungete un po' Macedonie, marmellate,
- spezzettare 500 gr. M - 2
£ di succo di limone affinché la torte.
- frullare 500 gr. I - 1/2
£ frutta mantenga inalterato il suo Creme, marmellate,
colore. budini. Alimenti
Usate frutta cruda, soda e priva per l'infanzia
di semi.
Usate frutta cotta o molto
morbida.
Indivia Introducete l'indivia a testa in Insalate, minestre.
- affettare M - 1/2
V giù nell'apertura, avendo cura di
riempirla completamente.
Legumi 500 gr. Usate fagioli o piselli già cotti. Puré, minestre.
- frullare I - 2
£ Potete aggiungere del liquido
per migliorarne la consistenza.
Maionese 3 grosse I - 2
£ Usate gli ingredienti a Patatine fritte, insalate,
uova temperatura ambiente. salse cocktail, fondute
Mescolate le uova con aceto, e salse da barbecue.
succo di limone, senape ed
eventuali spezie per 10 secondi.
Aggiungete poi 175 ml di olio
attraverso l'apposito forellino
sulla calotta di protezione e
fermate l'apparecchio quando
l'olio è completamente
amalgamato. Potete regolare la
densità della maionese
modificando la proporzione
uova/olio.
Mele 500 gr. Per frullare mele cotte. Alimenti per l'infanzia,
- frullare I - 2
£ Tagliare le mele crude a dadini paste dolci e salate,
- affettare M - 1/2
V di 3 cm circa. insalate.
- grattugiare I - 2
¶
Noci - tritare 250 gr. M - 2 £ Insalate, guarnizioni,
pane, dolci, budini.
Pangrattato 100 gr. I - 2
£ Usate pane secco e friabile. Cibi impanati e gratinati
Panna montata 500 ml. I - 1/2/1 ß Tenete la panna da montare Guarniture, creme,
- sbattere in frigorifero fino al momento di miscele per gelato,
usarla. Usatene almeno 125 ml. pasticceria
Iniziate a velocità 1 e poi continuate a velocità 2. Quando vedete che la panna è quasi
pronta, tornate alla velocità 1.
Pasta per biscotti 3 uova Ingredienti a temperatura Torte, tartine varie e
- miscelare I - 2
^ ambiente. Sbattete le uova e lo pasticceria.
zucchero a velocità 2 sino a
quando sono spumosi.
Aggiungete a poco a poco la
farina setacciata. Continuate a
sbattere a velocità 1.
Page 24

24
Pasta per torte 200 gr. Ingredienti a temperatura Dolci vari.
- miscelare di farina I - 2
^ ambiente. Gli ingredienti
possono essere versati nel
contenitore tutti insieme.
Usate farina auto-lievitante
oppure farina mescolata
con lievito in polvere.
Tempo di miscelazione:
1 minuto circa.
Pastella 500 gr. Mettete prima il liquido nel Pancake, wafer,
di liquido I - 1/2
£ contenitore e aggiungete crêpes, frittelle.
successivamente gli ingredienti
asciutti.
Pasta per torte, 300 gr. M - 2
£ Usate burro/margarina freddi e Tartine alla frutta,
tartine, fagottini di farina acqua fredda. Mettete la farina fagottini alle mele, torte
nel contenitore e aggiungete due salate, quiche.
grossi pezzi di burro/margarina.
Mescolate a velocità 2 fino ad
ottenere un composto in briciole.
Sempre mescolando, aggiungete
l'acqua. Fermate l'apparecchio
non appena l'impasto forma una
palla (15 sec. circa). Lasciate
raffreddare l'impasto prima di
usarlo.
Pasta Mettete tutti gli ingredienti Pane, brioche,
da pane o pasta 500 gr. I - 2
^ asciutti nel contenitore e pizza, tartine.
con lievito di birra di farina mescolateli per 5 secondi poi,
(pane) sempre mescolando, aggiungete
l'acqua. Tempo massimo di
miscelazione: 1,5 minuti.
Potete terminare di impastare a
mano. Amalgamate l'eventuale
ripieno all'impasto lavorandolo
a mano.
Pasta per dolci 400 gr. I - 2
£ Usate burro o margarina freddi e Torta di mele, biscotti,
di farina tagliateli a pezzetti di 2 cm. flan alla frutta
Versate nel contenitore tutti gli
ingredienti insieme. Mescolate
finché l'impasto forma una palla
(dopo una trentina di secondi).
Lasciate raffreddare l'impasto
prima di usarlo.
Pomodori 1000 gr. I - 2
£ Tagliate i pomodori in 4. Salse, minestre.
- ridurre in purè
Porri Inserite i porri nell'apertura a Minestre, porri cotti.
- affettare M - 1/2
V testa in giù. Se i porri sono sottili,
utilizzate l'apertura più piccola
(avendo cura di staccare la guida
dal pestello).
Uova Le uova devono essere a tem- Budini, soufflé, meringhe,
- montare (albume) 4 uova I - 2 ß peratura ambiente. guarniture.
- sbattere 4 uova I - 2 ß Pulite con molta cura il conteni- Uova strapazzate, frittate.
(uovo intero) tore e la frusta.
Page 25

Verdure
(crude)
- tritare 500 gr. M - 2
£ Tagliate la verdura a pezzetti Insalate, crudité, minestre
- centrifugare 500 gr. I - 1/2
£ Creme di verdura,
(cotte) minestre.
- centrifugare 750 gr. I - 1/2
£ Tagliate la verdura a pezzetti. Minestre, salse.
Zucchine
- affettare M - 1/2
V Cibi al forno, minestre
25
Page 26

Descripción general (fig. 1)
A Unidad motora
B Recipiente
C Cubierta del recipiente
D Reborde de la tapa (cierra y abre el
incorporado cierre de seguridad)
E Cierre de seguridad
F Cuchilla metálica £
G Disco para rebanar § (doble cara)
I = Rebanado fino
[ = Rebanado grueso
H Disco rallador ¶ (doble cara)
I = Rallado extrafino
[ = Rallado fino
I Accesorio amasador ^
J Accesorio agitador ß
K Eje conductor
L Conducto de los alimentos
M Empujador
N Interruptores :
I = Paro/Marcha
M = Turbo (el motor se para cuando se
suelta)
YY
1 = Velocidad mínima
WW
2 = Velocidad máxima
O Almacenamiento del cable de red
Instrucciones gráficas
A la izquierda de los símbolos de la diferentes
aplicaciones, pueden ver el dibujo del accesorio a ser usado.
Sobre la línea superior esta indicado si lo mejor
es poner en marcha presionando ya sea M
(Turbo) o bien I (Continuo) en combinación con
el ajuste de velocidadYY1 (Velocidad mínima) o
WW
2 (Velocidad máxima). Consulten las tablas.
Posicionamiento del recipiente
- Posicionen el recipiente tal como se indica en la
fig. 2.
- Muevan el asa en la dirección de la flecha hasta
llegar a tope (fig. 3).
Español
Importante
• Antes de usar el Robot de Cocina, lean
las instrucciones observando, al mismo
tiempo, las ilustraciones.
Al leerlas, mantengan desplegada la
página 3.
• No permitan que el aparato funcione sin
vigilancia.
• No dejen que los niños utilicen el
aparato.
• Tengan mucho cuidado al manejar la
cuchilla metálica y el disco para rebanar,
ya que están muy afilados.
• Quiten la funda protectora de la cuchilla
metálica antes de usarla.
• Dejen que se paren completamente las
partes giratorias antes de abrir la tapa.
• No metan nunca los dedos o, por
ejemplo, una espátula en el conducto de
los alimentos mientras el Robot de
Cocina esté funcionando.
• Después del uso, desenchufen el aparato
de la red.
• Si el cable de red de este aparato es
dañado, solo puede ser reemplazado por
la Organización Philips o por un Taller de
Servicio Autorizado, ya que se requieren
herramientas y/o piezas especiales.
• Antes de usar el aparato por primera vez,
laven todas las piezas que hayan de
entrar en contacto con los alimentos.
• No sumerjan nunca la unidad motora en
agua ni en cualquier otro líquido. No la
enjuagen tampoco.
• Cuando mezclen o trituren líquidos, no
llenen el recipiente por encima de su
indicación de nivel máximo.
• No excedan las cantidades ni los tiempos
de proceso máximos prescritos en las
tablas.
• Coloquen de modo correcto la tapa sobre
el recipiente.
El incorporado cierre de seguridad queda
entonces desactivado y el aparato puede
ser puesto en funcionamiento.
• Conserven estas instrucciones para
futuras consultas.
26
2
3
Page 27

Posicionamiento de la cubierta
- Posicionen la cubierta tal como se indica en la
fig. 4.
- Muevan firmemente la cubierta (a tope y en la
dirección de la flecha) hasta que coincidan las
marcas sobre la cubierta y sobre el recipiente
(empuñadura) (fig. 5).
Incorporado cierre de seguridad
El incorporado cierre de seguridad se desbloquea
y el aparato puede ser puesto en funcionamiento
solo si la cubierta ha
sido colocada de
modo correcto sobre
el recipiente.
Después del uso
- Paren el aparato
(fig. 6).
- Quiten el recipiente del aparato (fig. 7).
- Desmonten la cubierta del recipiente (fig. 8).
Conducto de los
alimentos y
empujador
• Usen el empujador
para hacer avanzar
los ingredientes a
través del conducto
de los alimentos
(fig. 9).
• Pueden dejar el empujador en el conducto de
los alimentos para que sirva de tapón durante el
funcionamiento.
Ello evitará las salpicaduras y la creación de
polvo.
Cuchilla metálica £
¡ Tengan cuidado ya que los filos cortantes
están muy afilados !
• La cuchilla metálica sirve para picar, mezclar,
triturar, hacer puré y hacer pasta para
pastelería y panecillos.
- Posicionen el recipiente (fig. 10) y, entonces, la
cuchilla metálica (fig. 11).
- Pongan los ingredientes en el recipiente
(fig. 12).
- Coloquen la cubierta (fig. 13) y pongan el
empujador en el conducto de los alimentos
(fig. 14).
- Para poner en marcha, presionen el botón M y
los botones Y1 o W2 (fig. 15).
Consulten las tablas.
27
5
4
7
6
8
2
1
10
12
14
1
2
11
13
1
2
15
9
Page 28

Consejos :
• Corten previamente las piezas grandes en
trocitos cúbicos de unos 3 cm de lado.
• Eviten el pasarse en la elaboración como consecuencia de un exceso en el tiempo de marcha
del aparato (Incluso al usar la posición M).
• Cuando piquen queso (duro), tengan cuidado
de no mantener el motor funcionando
demasiado tiempo, ya que se corre el riesgo de
que el queso se caliente y forme masa.
• Si los alimentos se agarran a la cuchilla
metálica o partículas de los mismos quedan
pegadas en el interior del recipiente :
- Antes de nada, paren el aparato.
- Saquen la cubierta del recipiente
- Y quiten lo pegado a la cuchilla o al recipiente
utilizando una espátula.
• No trituren ingredientes muy duros, tales como
granos de café, nuez moscada o cubitos de
hielo, ya que podrían mellar la cuchilla metálica.
Disco para rebanar § y disco para rallar ¶
¡ Tengan cuidado ya que los bordes cortantes
del lado para rebanar están muy afilados !
En consecuencia, sostengan siempre el disco por
su soporte central de plástico.
- Posicionen el recipiente (fig. 16).
- Coloquen el disco con la cara que deseen utilizar hacia arriba (I para rebanado fino o rallado
fino y [ para rebanado grueso o rallado basto)
(fig. 17).
- Coloquen la cubierta (fig. 18).
- Para rallar : Presionen el botón I para poner
en marcha, y presionen el botón W2 (fig. 19).
- Para rebanar :
Presionen el botón M
para poner en marcha,
y presionen el botón
Y1 o W2 (fig. 20)
(Consulten también las
tablas).
- Introduzcan los ingredientes en el conducto de
los alimentos (fig. 21).
- Usando el empujador, presionen los
ingredientes hacia abajo (fig. 22). Apliquen una
presión constante y moderada.
Consejos
• Precorten las piezas grandes para facilitar su
introducción en el conducto.
• Llenen uniformemente el conducto de los
alimentos a fin de obtener los mejores
resultados.
• Cuando procesen grandes cantidades, vacíen
el recipiente de vez en cuando.
Accesorio amasador ^
• El accesorio amasador es adecuado para
amasar pasta para pan y mezclar pastas
culinarias.
- Coloquen el recipiente (fig. 23) y entonces el
accesorio amasador (fig. 24).
28
16
17
22
23
24
20
21
18
19
1
2
1
2
1
2
Page 29

- Pongan los ingredientes secos en el recipiente
(fig. 25) y coloquen la cubierta (fig. 26).
- Pongan en marcha seleccionando I en
combinación con W2 (fig. 27).
- Añadan el agua a través del conducto de los
alimentos (fig. 28).
Accesorio Agitador ß
• El accesorio agitador es adecuado para batir
huevos enteros, claras de huevo, acabados superiores para postres, pudines instantáneos y nata.
Nota : ¡ No usen el agitador para hacer pasta
culinaria !
- Coloquen primero el recipiente (fig. 29) y,
entonces, el accesorio agitador (fig. 30).
Después de ello, pongan los ingredientes en el
recipiente (fig. 31) y coloquen la cubierta
(fig. 32).
- Coloquen el empujador en el conducto de los
alimentos para impedir que puedan salir
(fig. 33).
- Pongan en marcha seleccionando I en
combinación con Y1 ó W2 (fig. 34).
(Consulten las tablas).
Limpieza
• Antes de limpiar la unidad motora, desenchufen
siempre el aparato de la red.
La unidad motora puede frotarse con un paño
húmedo.
No sumerjan nunca la unidad motora en agua ni
echen ésta sobre ella.
• Laven los elementos que hayan estado en
contacto con los alimentos con agua caliente
jabonosa inmediatamente después de haberlos
usado. No los limpien en un lavavajillas.
• ¡ Tengan cuidado al limpiar la cuchilla metálica
y el disco para rebanar, ya que sus bordes
cortantes están muy afilados !
• Asegúrense de que los bordes cortantes no
entren en contacto con objetos duros, ya que
podrían mellarse.
• No usen desengrasadores, abrasivos, etc.
• El engranaje del accesorio agitador puede ser
fácilmente desmontado para poder limpiarlo
completamente (figs. 35 y 36).
29
30
29
34
33
32
2
31
28
27
25
1
26
2
36
2
1
3
1
2
35
1
Page 30

30
Achicoria
- cortada
Alimentos
infantiles y
dietéticos
- purés
Batidos de
leche
Calabacín
- cortado
Carne,
pescado,
pollería
- picado (carne
magra)
- picado (carne
veteada)
Cebolla
- picada
- cortada
Col
- cortada
- rallada
Chocolate
- picado
Cremas
Fruta
- picada
- en puré
500g
500 ml
líquido
500 g
400 g
500 g
200 g
250 g
500 g
500 g
M 1/2
I 2
I 2
M 1/2
M
2
M 2
M 2
M 1/2
M 1/2
I 2
M - 2
I 2
M 2
I 1/2
V
£
£
V
£
£
£
V
V
¶
£
£
£
£
Pónganla en el conducto de alimentos
con las cabezas hacia abajo, llenando el
conducto por completo.
Grueso: añadir un poco de líquido.
Fino: si hace falta, agregar algo de
líquido extra para un resultado más fino.
Quiten antes huesos, ternillas, etc.,
incluso las espinas del pescado.
Corten en cubitos de unos 3 cm de lado.
Tiempo máximo de picado, 30 segundos.
Piquen en la posición M si quieren un
picado grueso.
Corten en cubitos de unos 3 cm de lado.
Piquen hasta conseguir la finura que
deseen.
Laven el recipiente inmediatamente
después de haberlo usado.
Precortada.
Usen chocolate duro y puro. Pártanlo en
cubitos de 2 cm de lado aprox.
Las primeras veces utilicen la posición
M y después la velocidad 2 para
conseguir un picado más fino. Tiempo
máximo de picado, 45 segundos.
Usen mantequilla suave para tener
resultados mejores.
Consejo: Utilicen un poco de zumo de
limón para impedir la decoloración.
Usen fruta dura y sin semillas.
Usen fruta cocida o madura.
Ensaladas.
Alimentos infantiles.
Alimentos para bebés.
Platos al horno,
sopas.
Filetes rusos, rellenos
para bocadillos,
hamburguesas.
Carne picada,
salchichas.
Ensaladas,
guarniciones, sopas.
Sopas, comidas
crudas, platos al
horno.
Vegetales cocidos,
ensalada de col.
Ensalada de
alimentos crudos.
Guarniciones, salsas,
pastas, mousse,
pudding.
Pastas, postres.
Ensaladas, jaleas,
tartas.
Salsas, jaleas,
pudding, alimentos
para bebés.
Conmutador y
control
velocidad
Ingredientes
Cantidad
máxima
Accesorio
Proceso Aplicaciones
Page 31

31
Hierbas
- picadas
Huevo
- batido (clara)
- batido (completo)
Legumbres
- en puré
Manzanas
- puré
- cortadas
- ralladas
Masa (bollería)
Masa (pan) o
con levadura
Masa (tarta,
pastelería)
Mayonesa
4 huevos
4 huevos
500 g
500 g
400 g
harina
500 g
harina
300 g
harina
3 huevos
M 2
I 2
I 2
I 2
I 2
M 1/2
I 2
I 2
I 2
M 2
I 2
£
ß
ß
£
£
V
¶
£
©
£
£
Laven y sequen las hierbas.
Usen huevos a la temperatura
ambiente.
Procuren que recipiente y batidores
estén libres de grasa.
Usen legumbres cocidas. Podrán añadir
un poco de líquido para mejorar la
consistencia.
Manzanas cocidas en puré (compota).
Manzanas crudas cortadas en cubitos
de 3 cm de lado.
Usen mantequilla o margarina frías.
Corten la mantequilla o margarina en
trozos de 2 cm. Echen en el recipiente
todos los ingredientes a la vez. Mezclen
hasta que la masa forme una bola (al
cabo de unos 30 segundos). Dejen que
se enfríe la masa antes de seguir el
proceso.
Poner todos los ingredientes secos en
el recipiente y mezclar durante 5
segundos. Añadir agua mientras se
mezcla. Máximo tiempo de amasado:
1,5 minutos. Puedan acabar
manualmente el amasado.
Amasen el relleno para el pan con la
pasta hecha a mano.
Usen mantequilla o margarina fría y
agua también fría. Echen la harina en el
recipiente, cubriéndola con 2 cm de
trozos grandes de mantequilla o margarina. Mezclen todo con la velocidad 2
hasta que la mezcla parezca pan
rallado. Agreguen después agua, a la
vez que siguen agitando. Paren en
cuanto la masa forme una bola (unos 15
segundos). Dejen que se enfríe la masa
antes de seguir el proceso.
Usen los ingredientes a la temperatura ambiente. Batan los huevos
(yemas) con vinagre o zumo de limón y,
si quieren, hierbas, durante 10 s.
Agreguen después 175 ml de aceite a
través de la tapa de la jarra. Dejen de
echar cuando el aceite esté completamente mezclado. Podrán controlar el
espesor ajustando la relación
huevo/aceite. Usen por lo menos una o
dos yemas.
Salsas, sopas,
guarniciones, mantequilla sazonada.
Pudding, soufflé, merengues, guarniciones.
Huevos revueltos,
tortillas.
Purés, sopas.
Alimentos infantiles y
de bebés.
Pastas, ensaladas.
Tarta de manzana,
bizcochos, flanes de
fruta.
Pan, brioche, pizza,
tartas.
Tartas de frutas,
budín de manzana,
tartas, quiche.
Para patatas fritas,
ensaladas, cocktails,
fondue y salsas de
barbacoa.
Page 32

32
Nata montada
- batida
Nueces
- picadas
Pan rallado
Papilla
(bizcocho)
- batida
Papilla
(bollería)
- batida
Papilla (suave)
- mezcla
Pepinillo
- cortado
- rallado
Puerro
- cortado
Queso
- picado
- rallado
Rábano
- rallado
Remolacha
- cortada
- rallada
Tomate
- en puré
500 ml
250 g
100 g
3 huevos
200 g
harina
500 g
lîquido
250 g
750 g
I -
1 / 2 / 1
M 2
I 2
I 2
I 2
I 1/2
M 1/2
I 2
M 1/2
M 2
I 2
I 2
M 1/2
I 2
I 2
ß
£
£
©
©
£
V
¶
V
£
¶
¶
V
¶
£
Usen nata enfriada previamente en el
frigorífico. Traten por lo menos 125 ml.
Empiecen con la velocidad 1 y pasen
después a la 2. Cuando la nata esté
casi lista, vuelvan a la 1.
Usen pan seco y duro.
Ingredientes a la temperatura ambiente.
Agiten la mezcla de huevos y azúcar
con la velocidad 2 hasta que quede una
pasta coherente. Añadan después la
harina y continúen agitando con cuidado
con la velocidad 1.
Ingredientes a la temperatura ambiente.
Pueden echarse en el recipiente todos a
la vez. Usen harina autocreciente o
normal con levadura. Tiempo de batido,
un minuto aprox.
Echen primero el líquido en la batidora y
añadan después los ingredientes secos.
Pónganlo en el conducto con la cabeza
hacia arriba. Cuando traten puerro fino,
usen el conducto menor (quiten la guía
del empujador).
Usen queso sin corteza (p. ej.,
parmesano), cortado en cubitos de unos
2 cm de lado. Elijan la posición M para
obtener picado grueso y la velocidad 2
si quieren polvo fino.
Aprieten con cuidado con el empujador.
Pongan primero la punta.
Corten los tomates en cuatro partes.
Guarniciones, nata,
mezclas para
helados, pastelería.
Ensaladas,
guarniciones, pan,
bollería, pudding.
Alimentos recubiertos
con pan rallado, platos
gratinados.
Bollería.
Rollos suizos.
Pastelería.
Bollería, etc.
Rosquillas, galletas,
crepes, fritos.
Ensaladas,
alimentos crudos.
Sopas, puerro cocido.
Guarniciones,
gratinados, sopas,
salsas, croquetas.
Salsas, fondue,
pizzas, platos
gratinados.
Guarniciones,
alimentos crudos,
ensaladas
Platos al horno.
Guarniciones,
alimentos crudos,
ensaladas.
Salsas, sopas.
Page 33

33
Vegetales
- picados
- en puré
Vegetales
cocidos
- hacer puré
Zanahoria
- cortada
- rallada
500 g
500 g
750 g
M 2
I 1/2
I 1/2
M 1/2
I 2
£
£
£
V
¶
Corten previamente.
Corten previamente.
Procesen las zanahorias crudas.
Pónganlas en el conducto de alimentos
con la punta hacia abajo. Cuando traten
zanahorias finas, usen el conducto de
alimentos menor. (Quiten la guía del
empujador.)
Ensaladas, alimentos
crudos, sopas.
Purés de verduras,
sopas.
Platos al horno.
Guarniciones,
alimentos crudos.
Page 34

Generell beskrivelse (fig. 1):
A Motorenhet
B Bolle
C Lokk til bolle
D Bolle kant (opererer sikkerhetsbryteren)
E Sikkerhetsbryter
F Kniv £
G Kutteskive § (dobbelsidig)
AA
= tynn
[ = tykk
H Raspeskive ¶ (dobbelsidig)
AA
= ekstra fin
[ = fin
I Elteutstyr ^
J Visp ß
K Drivaksel
L Stampehus (mateåpning)
M Stamper
N Brytere
I = På / Av
M = Puls (Slippes bryteren stopper
maskinen)
YY
1 = Lav hastighet
WW
2 = Høy hastighet
O Oppbevaringsrom for nettledning
Illustrasjoner
Til venstre for symbolene for de forskjellige
brukermåtene kan De se en tegning av det
utstyret som skal brukes.
I første linje anbefales det å slå på apparatet ved
å velge enten M ("Moment") eller I ("kontinuerlig
hastighet") i forbindelse med hastighetsinnstilling
Y1 ("minimum hastighet") eller W2
("maksimum hastighet").
Vennligst se også tabellene.
Plassering av bollen
- Plasser bollen som vist i fig. 2.
- Skyv håndtaket i pilens retning til det stopper
(fig. 3).
Norsk
Viktig
• Les bruksanvisningen sammen med
illustrasjonene før apparatet tas i bruk.
Hold side 3 oppslått når dette leses.
• Forlat ikke apparatet når det er i bruk.
• La ikke barn bruke apparatet.
• Vær forsiktig ved håndtering av kniven
og kutteskiven, da disse er meget skarpe.
• Fjern beskyttelsesdekslet fra kniven før
bruk.
• La de roterende delene stoppe helt før
lokket åpnes.
• Putt aldri fingrene eller slikkepotten inn i
mateåpningen når maskinen arbeider.
• Trekk støpselet ut av stikkontakten etter
bruk.
• Hvis nettledningen på dette apparatet
skulle bli skadet, må den kun byttes av
Philips eller Deres servicerepresentant
da spesielt verktøy og/eller deler er
nødvendig.
• Før første gangs bruk, skal alle delene
som kommer i kontakt med maten
vaskes.
• Dypp aldri motorenheten i vann eller
andre flytende væsker. Den skal heller
ikke skylles.
• Ved miksing eller blanding av flytende
væsker, skal det ikke fylles over
maksimumsmerket på bollen.
• Ikke overskrid maksimumsmengden og
bearbeidingstiden som er beskrevet i
tabellene.
• Plasser lokket på bollen på riktig måte.
Den innebygde sikkerhetsbryteren blir da
innkoblet og apparatet kan bli slått på.
• Behold bruksanvisningen for senere
bruk.
34
2
3
Page 35

Plassering av lokket
- Plasser lokket som vist i fig. 4.
- Skyv lokket godt på plass i pilens retning til det
stopper. Markeringene på lokket og bollen
(håndtaket) stemmer overens (fig. 5).
Innebygget sikkerhetsbryter
Bare hvis lokket er satt riktig på bollen vil
sikkerhetsbryteren frigjøres, slik at apparatet kan
slås på.
Etter bruk
- Slå av apparatet
(fig. 6).
- Fjern bollen fra
apparatet (fig. 7).
- Frigjør lokket fra
bollen (fig. 8).
Mateåpning og stamper
• Bruk stamperen til å
mate ingredienser
ned gjennom mateåpningen (fig. 9).
• De kan beholde stamperen i mateåpningen
under bruk. Dette vil hindre spruting og søling.
Kniven £
NB! Kniveggene er veldig skarpe!
• Kniven kan brukes til hakking, miksing,
blanding, lage pureer og lage deig til terter og
paier.
- Plasser bollen (fig. 10) og deretter kniven
(fig. 11).
- Legg ingrediensene i bollen (fig. 12).
- Sett lokket på plass (fig. 13) og putt stamperen
i mateåpningen (fig. 14).
- Trykk på bryter M i kombinasjon med bryter
YY
1 eller bryter WW2 (fig. 15) for å slå
apparatet på. Vennligst se tabellene.
Tips
• Kutt på forhånd ingrediensene i terninger på en
størrelse på ca. 3 cm (eller 1”).
• Unngå overbearbeiding på grunn av langvarig
behandling (også når bryter M brukes).
• Ved hakking av (hard) ost pass på å ikke kjøre
35
5
4
7
6
8
1
9
10
1
2
12
14
2
11
13
1
2
15
Page 36

motoren for lenge. Osten kan bli varm og
klumpe seg.
• Hvis maten setter seg fast rundt kniven eller på
innsiden av bollen:
- slå først av apparatet,
- ta av lokket
- og fjern maten fra kniven eller fra innsiden av
bollen ved hjelp av slikkepotten.
• Hakk ikke veldig harde ingredienser, f.eks.
kaffebønner, muskat og isbiter, da dette kan
gjøre kniven sløv.
Kutteskive § og raspeskive ¶
NB! Kutteskiven er veldig skarp!
Hold derfor alltid skiven i plaststykket på midten.
- Sett bollen på plass (fig. 16).
- Sett på skiven med den siden som skal brukes
oppover (I for tynne skiver eller fin rasping; [
for tykke skiver eller grov rasping) (fig. 17).
- Sett på lokket (fig. 18).
- For rasping trykk på bryter I i kombinasjon
med bryter W2
(fig. 19).
- For kutting trykk på
bryter M i kombinasjon med bryter Y1
eller W2 (fig. 20).
(Se også tabellene).
- Putt ingrediensene ned i mateåpningen
(fig. 21).
- Trykk ingrediensene nedover ved hjelp av
stamperen (fig. 22). Trykk jevnt og moderat.
Tips:
• Kutt på forhånd opp de store bitene slik at de
passer i mateåpningen.
• Fyll mateåpningen jevnt for å oppnå best
resultat.
• Tøm bollen med jevne mellomrom ved
behandling av større mengder.
Elteutstyr ^
• Elteutstyr kan brukes til elting av brøddeig og
blanding av rører.
- Sett bollen på plass (fig. 23) og sett deretter
elteutstyret ned i bollen (fig. 24).
- Hell de tørre ingrediensene ned i bollen
(fig. 25) og sett på lokket (fig. 26).
36
16
17
22
23
24
25
26
2
20
21
18
19
1
2
1
2
1
2
1
Page 37

- Trykk på bryter I i kombinasjon med bryter
W2 for å slå apparatet på (fig. 27).
- Tilsett væske via mateåpningen (fig. 28).
Visp ß
• Vispen er anvendelig til pisking av hele egg,
eggehvitter, pynt til desserter, puddinger og
krem. (Se også tabellene).
NB! Bruk ikke vispen til laging av rører.
- Sett bollen på plass (fig. 29) og sett deretter
vispen på plass (fig. 30).
Ha etter dette
ingrediensene i
bollen (fig. 31) og sett
på lokket (fig. 32).
- Sett stamperen i
mateåpningen for å
stenge denne
(fig. 33).
- Trykk på bryter I i
kombinasjon med
bryter Y1 eller W2
for å slå maskinen på
(fig. 34). Vennligst se
tabellene.
Rengjøring
• Trekk alltid støpselet ut av stikkontakten før
rengjøring av motorenheten. Motorenheten
rengjøres med en fuktig klut.
Dypp aldri motorenheten i vann. Hell aldri vann
over den.
• Vask delene som har vært i kontakt med maten
i varmt såpevann straks etter bruk. Bruk ikke
oppvaskmaskin.
• Vær forsiktig ved rengjøring av kniven og
kutteskiven: Skjæreeggene er meget skarpe.
• Forviss Dem om at skjæreeggen ikke kommer i
kontakt med harde gjenstander, da dette vil
gjøre den sløv.
• Bruk ikke skuremidler eller agressive
vaskemidler etc.
• Vispens gear kan lett tas fra hverandre for
grundig rengjøring (fig. 35, 36).
37
30
29
34
33
36
2
1
3
32
2
31
28
27
1
2
35
1
Page 38

38
Matvarer
Agurk
- skivet
- raspet
Barnemat-/
Spedbarnsdiett
- moset
Deig (kjeks)
- røring
Belgfrukter
- moset
Deig (kaker)
- røring
Deig (lett)
- miksing
Deig (terte,
pai, eplekake)
Deig
(brød, pizza)
eller gjærdeig
Deig
(småkaker)
Egg
- visping
(eggehvitte)
- visping
(hele egg)
Maks
Mengde
Bryter
Hastighetsvelger
Utstyr Fremgangsmåte Anvendelse
500 g
3 egg
500 g
200 g
mel
500 g
væske
300 g
mel
500 g
mel
(brød)
400 g
mel
4 egg
4 egg
M - 1/2
I 2
I 2
I 2
I 2
I 2
I 1 / 2
M 2
I 2
I 2
I 2
I 2
V
¶
£
©
£
©
£
£
©
£
ß
ß
Grov: Tilsett litt væske.
Fin: Hvis nødvendig tilsett ekstra
væske.
Ingrediensene skal ha rom-
temperatur. Rør egg og sukker på
hastighet 2 til det er stivt. Tilsett
siktet mel, fortsett røringen forsiktig
på hastighet 1.
Bruk kokte bønner eller erter. Det
bør kanskje tilsettes litt væske for å
få en bedre konsistens.
Ingrediensene skal ha romtemperatur. Ingrediensene kan
helles i bollen samtidig. Bruk
selvhevende mel eller vanlig mel og
bakepulver. Rør i ca. 1 minutt.
Ha først væsken i bollen. Tilsett de
tørre ingrediensene.
Bruk kaldt smør/margarin og kaldt
vann. Ha mel i bollen. Legg 2 cm
store biter med smør/margarin.
Bland på hastighet 2 til det ligner
brødsmuler. Tilsett vannet, stopp
straks deigen er formet til en ball
(etter ca. 15 sek.). Avkjøl deigen før
videre behandling.
Ha alle tørre ingredienser i bollen.
Bland i 5 sek. Tilsett vann under
miksing. Maks. eltetid: 1,5 min. De
kan avslutte eltingen manuelt. Elt
fyll til brøddeigen inn for hånd.
Bruk kaldt smør eller margarin.
Skjær i biter på 2 cm. Ha alle ingrediensene i bollen samtidig. Kna til
deigen samler seg (etter ca. 30 sek.).
Avkjøl deigen før videre bearbeiding.
Bruk egg med romtemperatur.
Forsikre Dem om at bollen og
vispen er fri for olje/fett.
Salater, råkost.
Spedbarnsmat.
Barnemat.
Kaker,
Rullader,
Butterdeig.
Pureer, supper.
Kaker etc.
Pannekaker, vafler,
epleskiver.
Fruktterte, eplekake,
paier.
Brød, brioche, pizza,
terte.
Eplepai, søte kjeks,
fruktterte.
Pudding, suffleer,
marengs, pynt.
Eggerøre, omelett.
Page 39

39
Epler
- mosing
- kutting
- rasping
Frukt
- hakket
- moset
Grønnsaker
(rå)
- hakket
- moset
(kokte)
- moset
Gulrot (rå)
- kuttet
- raspet
Kål
- kuttet
- raspet
Kjøtt, fisk,
fjærkre
- hakket
(magert)
- hakket
(ujevnt kjøtt)
Krem
Krydder
- hakket
Løk
- hakket
- skivet
Majones
Milkshake
Nøtter
- hakket
500 g
500 g
500 g
500 g
500 g
750 g
500 g
400 g
250 g
500 g
3 store
egg
500 ml
væske
250 g
I 2
M 1 / 2
I 2
M 2
I 1 / 2
M 2
I 1 / 2
I 1 / 2
M 1 / 2
I 2
M 1 / 2
I 2
M 2
M 2
I 2
M 2
M 2
M 1 / 2
I 2
I 2
M 2
£
V
¶
£
£
£
£
£
V
¶
V
¶
£
£
£
£
£
V
£
£
£
Mose kokte epler. Ukokte epler
kuttes i terninger (3cm 1").
Tips: Bruk litt sitronsaft for å unngå
misfarging.
Bruk rå, fast, stenfri frukt.
Brukt kokt eller bløt frukt.
Oppskåret.
Oppskåret.
Puttes inn med tuppen først. Ved
behandling av tynne gulrøtter fyll
åpningen helt.
Skjær i biter.
Fjern først sener, ben inkl. fiskeben.
Skjær i terninger på 3 cm.
Maks. hakketid = 30 sek.
Hakkes i pos. M for grovere resultat.
Bruk mykt smør for luftig resultat.
Vask og tørk krydderet.
Skjæres i biter på ca. 3 cm. Hakkes
til ønsket finhet er oppnådd. Vask
bollen straks etter bruk.
Ingrediensene skal ha romtemperatur. Bland eggene med
eddik, sitronjuice eller sennep og
hvis ønskelig urter i 10 sek. Tilsett
175 ml olje via hullet i stamperen.
Stopp når oljen er blandet helt inn.
Tykkelsen kan justeres med
egg/oljemengden.
Baby-spedbarnsmat.
Baking, salater.
Salater, syltetøy,
kaker.
Sauser, puddinger,
barnemat.
Salater, råkost,
sauser.
Supper, pureer.
Supper, sauser.
Ovnsretter, pynt,
råkost.
Kokte grønnsaker,
kålsalat.
Råkostsalat.
Biff, tartar,
smørbødfyll,
hamburgere, hakket
kjøtt, pølser.
Terter, desserter.
Sauser, supper,
pynt, kryddersmør.
Salater, sauser,
supper, råkost,
ovnsretter.
Pommes frites,
salater, coctails,
fondue- og
barbecue sauser.
Salater, pynt, brød,
kaker, pudding.
Page 40

40
Ost
- hakket
- raspet
Pisket krem
- pisket
Purre
- skivet
Rødbeter
- kuttet
- raspet
Reddiker
- raspet
Sikkori
- kutting
Sjokolade
- hakket
Strøkavring
Tomater
- moset
250 g
500 ml
200 g
100 g
750 g
M 2
I 2
I1/2/1
M 1 / 2
M 1 / 2
I 2
I 2
M 1 / 2
M 2
I 2
I 2
£
¶
ß
V
V
¶
¶
V
£
£
£
Bruk skorpefri ost (f.eks. Parmesan)
oppskåret i terninger på 2 cm. Velg
pos. M for grovt resultat og
hastighet 2 for fint resultat.
Press forsiktig med stamperen.
Bruk krem med kjøleskaptemperatur. Pisk minst 125 ml. Begynn
på hastighet 1. Gå så over til
hastighet 2. Når kremen er nesten
ferdig, gå tilbake til hastighet 1.
Plasseres i mateåpningen med
hodet oppover. Ved behandling av
tynn purre fyll åpningen helt.
Putt inn tuppen først.
Puttes inn med hodene opp. Fyll
materen helt.
Bruk hard, ren sjokolade. Brekk den
i biter på 2 cm. Begynn med pos. M.
Deretter hastighet 2 for finhakking.
Maks. hakketid = 45 sek.
Bruk tørt brød.
Del tomatene i 4 biter.
Pynt, supper,
sauser, kroketter.
Fondue, pizza.
Gratinerte retter.
Pynt, krem, iskremblandinger, terter.
Supper, kokt purre.
Ovnsretter.
Pynt, råkost, salater.
Garnering, råkost,
salater.
Salater, supper.
Pynt, sauser, terter,
mousseer,
puddinger.
Matsorter med
strøkavring,
gratinerte retter.
Sauser, supper.
Page 41

Läs först hela bruksanvisningen! Spara den!
Spara köpbevis och kvitto!
Beskrivning fig. 1
A Motorenhet.
B Skål.
C Lock till skål.
D Styrklack på locket, påverkar
säkerhetsbrytaren.
E Säkerhetsbrytare.
F Kniv £.
G Skiva, skivare §
A = tunna skivor.
[ = tjocka skivor.
H Finstrimlare ¶, dubbelsidig.
AA
= extra fin strimling
[ = finstrimling
I Degknådare ^.
J Visp ß.
K Drivaxel.
L Mataröppning.
M Påmatare.
N Start/stopp-knappar
I = Till / Från
M = Momentstart, motorn stannar när du
släpper ratten.
YY
1 = Lägsta hastighet.
WW
2 = Högsta hastighet.
O Förvaringsplats för nätsladden.
Symbolguiden
Till vänster om symbolerna för de olika
livsmedlen finns anvisat vilket tillbehör som
lämpligen kan användas.
På den övre raden anges om det är bäst att starta
på M (Momentstart) eller I (Kontinuerlig), i
kombination med hastighetsinställning Y1
(Lägsta hastighet) eller W2 (Högsta hastighet).
Se även tabellen.
Så här sätter du på skålen.
- Sätt skålen på maskinen som fig 2 visar.
- Vrid skålen med handtaget i pilens riktning så
långt det går, fig 3.
Svenska
VIKTIGT
• Läs bruksanvisningen och studera
illustrationerna innan du börjar använda
apparaten. Vik samtidigt ut sidan 3.
• Apparaten skall anslutas till 220 Volt
växelström, 50 Hz. Skulle på apparatens
typskylt stå andra uppgifter, vänd dig till
inköpsstället.
• Lämna inte maskinen utan uppsikt när
den är igång.
• Låt inte barn använda maskinen.
• Var försiktig när du hanterar tillbehören.
Särskilt skivaren och kniven är mycket
vassa. Du kan skära dig på dem!
• Avlägsna skyddet från kniven innan den
används.
• Ta inte av locket förrän maskinen stannat
helt.
• Det är farligt att stoppa ner fingrar eller
föremål i lockets mataröppning.
• Använd alltid påmataren för att mata ner
ingredienserna, aldrig verktyg såsom
gaffel, kniv, sked eller skrapa.
• Drag ut stickproppen ur vägguttaget efter
användning.
• Om sladden skadas måste den bytas av
Philips eller av deras serviceombud,
eftersom specialverktyg och/eller delar
krävs.
• Diska alla lösa delar innan du tar dem i
bruk första gången.
• Du får aldrig doppa motorenheten i
vatten eller spola den. Du kan torka av
den med en väl urvriden fuktig trasa.
• När du bearbetar flytande ingredienser
får du inte fylla i mer än upp till maxmarkeringen på skålen.
•Överskrid inte de rekommenderade
mängderna eller arbetstiden som anges i
tabellen.
• Säkerhetssystemet gör att maskinen kan
startas endast om skål och lock är
korrekt påsatta.
41
2
3
Page 42

Så här sätter du på locket.
- Sätt locket på skålen som fig 4 visar.
- Vrid locket i pilens riktning tills det stannar och
markeringarna på locket och skålens handtag
möts, fig 5.
Den inbyggda säkerhetsbrytaren.
Maskinen kan startas endast
- om skålen (B) och locket (C) är rätt påsatta.
När du är färdig
- Tryck på från
knappen, fig 6.
- Lossa skålen från
motorenheten, fig 7.
- Lossa locket från
skålen, fig 8.
Mataröppningen och påmataren
• Använd påmataren
för att försiktigt trycka
ner ingredienserna
genom
mataröppningen,
fig 9.
• Du kan ha kvar påmataren i mataröppningen
som lock när maskinen är igång så undviker du
att något skvätter ut eller att t ex mjöl dammar.
Så här sätter du i kniven. £
Var försiktig! Kniven är vass. Du kan skära dig
på den.
• Kniven använder du för att hacka, mosa,
blanda och för att göra pajdeg eller mördeg.
Överskrid inte rekommenderade
maximimängder.
- Sätt på skålen, fig 10.
- Tag försiktigt av skyddet på kniven och sätt
kniven över skålens mittpelare. Håll kniven i
handtaget upptill, fig 11.
- Lägg ingredienserna i skålen, fig 12.
- Sätt på locket, fig 13 och sätt i påmataren,
fig 14.
- Tryck på knapp M för att starta maskinen, och
på knapp Y1 alt. W2 fig 15.
För optimalt resultat se förslag på hastighet i
tabell.
42
5
4
10
1
11
6
7
8
1
9
2
12
14
2
13
1
2
15
Page 43

När du använder kniven
• Skär stora bitar av t ex kött och fisk i tärningar
3 x 3 x 3 cm jämnstora för bästa resultat.
Använd momentläget och kör “stötvis” annars
blir köttet trådigt.
• Undvik att överbearbeta det du kör, även när
momentläget M används.
• När du hackar hård ost, hacka inte för länge.
Då blir osten varm och smetar.
• Om mat fastnar på knivbladet eller på skålens
insida, stanna maskinen, tag av locket och
skrapa rent med den medföljande skrapan.
• Hacka lök så kort tid som möjligt. Den blir besk
annars. Använd momentläget, två till tre korta
tryckningar brukar räcka. Skölj skål, lock, kniv
och hållare i kallt vatten genast efter
lökhackningen.
• Mosa grönsaker med endast liten mängd
vätska. Sätt till resten i kastrullen. Ju längre du
hackar desto mer finhackat blir resultatet.
• En mördeg eller pajdeg kan du snabbt hacka
ihop med kniven. Arbeta den så kort tid som
möjligt så att den behåller sin spröda
konsistens.
• Hacka inte mycket hårda ingredienser som t ex
muskotnöt, kaffebönor eller istärningar. De kan
förstöra kniveggarna.
Skiva, skivare § och finstrimlare ¶
Så här sätter du i en skiva
Var försiktig! Särskilt skivaren är mycket
vass. Du kan skära dig på den.
Håll alltid skivorna i plasthandtaget i mitten.
- Sätt på skålen, fig 16.
- Sätt en skiva över skålens mittpelare med den
sida som du vill använda vänd uppåt (A = tunna
skivor eller extra fin strimling; [ = tjocka skivor
eller finstrimling), fig 17.
- Sätt på locket, fig 18.
- För strimling, tryck på
knapp I för att starta,
och på knapp W2,
fig 19.
- För skivning, tryck på
knappen M för att
starta, och på knapp
Y1 eller W2, fig 20.
Se även tabell.
- Lägg i ingredienserna i mataröppningen, fig 21.
- Tryck ner ingredienserna med påmataren,
fig 22. Tryck stadigt och inte alltför hårt.
Ju lösare du trycker desto finare blir resultatet.
När du använder skivorna
• Skär ingredienserna t ex vitkål eller äpplen i
bitar som passar i mataröppningen.
• Fyll mataröppningen innan du startar maskinen.
• Packa ingredienserna t ex morötter eller
purjolök, rakt i mataröppningen så blir skivorna
jämna och du undviker att något glider ner och
blir skivat på fel ledd.
• Töm skålen i tid! Blir den för full trycks skivan
upp mot locket och både skiva och lock kan
skadas.
• Grovleken kan regleras dels med den skiva du
väljer, dels genom att du trycker olika hårt på
påmataren. Ju lättare du trycker, desto tunnare
eller mer finstrimlat blir resultatet.
• Använd alltid påmataren. Använd aldrig fingrar,
gaffel eller andra redskap.
• Om i något recept står endast skivare eller
strimlare, välj då den sida av skivan, som du
tycker ger bäst resultat.
43
16
17
22
20
21
18
19
1
2
1
2
Page 44

Så här använder du degknådaren ^
• Degknådaren används för att knåda jäsdeg.
- Sätt på skålen, fig 23 och sedan degknådaren,
fig 24.
- Häll de torra ingredienserna i skålen, fig 25.
Smula i jästen eller strö i torrjästen och sätt på
locket, fig 26.
- Tryck på knapp I för att starta maskinen, och
på knapp W2, fig 27.
- Häll degvätskan genom mataröppningen
medan maskinen är igång, fig 28.
- Degen är färdig efter ca 1 - 1 1/2 minut. Den
skall formas till en boll som knådas mot
skålens kanter, locket och degknådaren. Om
degen inte formas som en boll utan endast
åker med runt, stanna maskinen och sätt till
ytterligare litet mjöl.
Så här använder du vispen ß
• Vispen används för vispning av grädde, äggvita
eller hela ägg. Se även tabellen.
OBS: Använd inte vispen för att göra smör.
- Sätt på skålen fig 29 och sedan vispen fig 30.
Häll sedan ingredienserna i skålen fig
31 och sätt på locket
fig 32.
- Sätt påmataren i
mataröppningen,
fig 33.
- Tryck på knappen I
för att starta
maskinen, och på
knapp Y1 eller
W2, fig 34.
Skötsel och diskning
• Drag ut stickproppen ur vägguttaget innan
du gör ren motorenheten.
Du får aldrig doppa motorenheten i vatten
eller spola den. Du kan torka av den med en
väl urvriden fuktig trasa.
• Alla övriga delar som varit i kontakt med
maten, bör diskas snarast i varmt vatten med
diskmedel. Diska plastdetaljerna för hand, ej
i diskmaskin.
44
30
29
34
33
32
2
31
28
27
23
24
25
26
2
1
2
1
2
1
1
Page 45

• Var särskilt försiktig när du diskar kniven och
skivaren eftersom de är mycket vassa.
• Var försiktig med eggarna på kniven och
skivaren. Låt dem inte komma i kontakt med
andra metallföremål så att de blir slöa.
• Använd aldrig skurpulver, hårda svampar,
stålull eller liknade och aldrig aceton, sprit eller
andra lösningsmedel eller vätskor.
• Kugghjulen på vispen kan lätt avlägsnas för att
underlätta rengöringen, fig 35 - 36.
Extra Tillbehör
• Följande detaljer kan du köpa som
ersättningsdelar eller för att utöka maskinens
möjligheter.
- Rivskiva för t ex potatis till Öländska
kroppkakor.
- Pommes frites-skiva. Enkelsidig. Även lämplig
till Janssons frestelse.
- Skivare för tunna, tjocka skivor. Dubbelsidig.
- Strimlare för medelgrov, grov strimling.
Dubbelsidig.
Symboler i tabellen
£ = Kniv (F)
≠ = Skivare - strimlare. Skiva (G)
¶ = Finstrimlare - extra fin finstrimling. Skiva (H)
^ = Degknådare (I)
ß = Visp (J)
45
36
2
1
3
35
Page 46

46
Ingredienser
Baljväxter,
kokta
- mosa
Barnmat
- mosa/puréa
Deg
Jäsdeg
Pajdeg
Kakdeg
Mjuka kakor
Fisk, rå eller
tillagad
- hacka
- mosa/puréa
Frukt
- hacka
Frukt och bär
- mosa
Grädde
- vispa
Grönsaker/
rotfrukter
Rödbetor,
Potatis,
Kål, Morötter.
- mosa
- hacka
- skiva
- strimla
Maximum
mängd
Inställning
hastighet
Tillbehör
Gör så här
500 g
500 g
500 g
mjöl
2 1/2 dl
degvätska
300 g
mjöl
3 ägg
500 g
350 g
500 g
500 g
5 dl
minst 1dl
500 g
500 g
I 2
I 2
I 2
M 2
I 2
M 2
M 2
M 2
I 1 / 2
I
1 / 2 / 1
I 1 / 2
M 2
M 1 / 2
M 2
£
£
^
£
£
£
£
£
£
ß
£
£
V
¶
Använd kokta bönor eller ärter.
Tillsätt 1/2 dl vätska för bra konsistens.
Grovmosat: Sätt till litet vätska.
Finmosat: Sätt till litet mer vätska och öka tiden.
Mät upp mjölet så exakt som möjligt och häll det i skålen
spara ca 1/2 dl till utbakningen. Lägg i de övriga
ingredienserna , t ex salt, socker och kryddor. Torrjäst ska
blandas i mjölet. Kör maskinen på hastighet 2 i 5
sekunder. Tillsätt degvätska och kör maskinen i max. 1,5
minut. Avsluta utbakningen för hand med att ev. tillsätta
1/2 dl mjöl.
Fyll mjölet i skålen. Skär kylskåpstempererat smör eller
margarin i 2 x 2 x 2 cm kuber. Lägg dem i mjölet
tillsammans med övriga ingredienser. Kör på hastighet 2
tills det blir en grynig massa. Tillsätt vatten. Stanna så
snart degen formats till en boll.
Lägg alla ingredienser i skålen. Smör eller margarin bör ha
rumstemperatur. Kör till en slät smet.
Tag bort alla ben. Skär i bitar 3 x 3 x 3 cm. Hacka till
önskat resultat. Max tid = 30 sekunder.
För fiskfärs, häll först vätska i bägaren.
Använd råa, fasta frukter. Ta bort hårda kärnor. Sätt till
citronsaft för att undvika missfärgning.
Använd kokt frukt eller mjuka frukter och bär. Ta bort
hårda kärnor. Använd momentläge M för grovt, läge I för
fint resultat.
Använd kylskåpskall grädde. Börja med hastighet 1. Öka
till hastighet 2. När grädden börjar bli färdigvispad,
minska till hastighet 1 igen.
Skär i bitar 3 x 3 x 3 cm. Mixa tillsammans med 1/2 - 1 dl
vätska.
Skär i bitar 3 x 3 x 3 cm. Momentläge M för grovt, läge I för
fint resultat.
Skär stora ingredienser i bitar, som passar i mataröppningen. Mata t ex smala morötter i påmatarens
öppning med uttagen insats. Tryck lätt med påmataren
(resp med insatsen).
Page 47

47
Kryddörter
t ex persilja
- hacka
Kött, Lever
- mört, magert
- mindre mört,
fett
Lök
- hacka
- skiva
Majonnäs
- Mixa
Mandel/
nötter
- hacka
Ost
- Hård ost:
hacka
- Mjukare ost:
strimla
Purjolök
- skiva
Smet till
exempelvis
pannkakor,
våfflor, crèps
Ströbröd
Vitlök
- hacka
Ägg, hela
eller äggvita
- vispa
Äpplen
- mosa
- skiva
- strimla
skålen
halvfylld
500 g
400 g
400 g
3 stora
ägg.
Dock
minst 1
helt ägg
eller
minst
2 äggulor
250 g
250 g
5 dl
vätska
100 g
4 ägg
500 g
M 2
M 2
M 2
M 2
M 1 / 2
I 2
M 2
M 2
I 2
M 1 / 2
I 2
I 2
M 2
I 2
I 2
M 1 / 2
I 2
£
£
£
£
V
£
£
£
¶
V
£
£
£
ß
£
V
¶
Skölj och torka örterna. Ta bort grova stjälkar.
Ta bort senor och ben. Skär i bitar 3 x 3 x 3 cm. Hacka inte
längre än 30 sekunder.
Dela i klyftor. Hacka till önskat resultat.
Skölj genast skålen och övriga delar i kallt vatten.
Alla ingredienser skall ha rumstemperatur!
Följ recept. Häll ägg/ äggulor och övriga ingredienser utom
oljan i mixerbägaren. Starta motorn och häll oljan i
doseringslocket så att oljan långsamt rinner ner. Fortsätt
mixningen några sekunder efter att all olja runnit ner.
Skålen skall vara torr före hackning. Använd momentläge
för grov hackning. För fin hackning kan du använda läge I.
Skär i bitar 3 x 3 x 3 cm. Hacka till önskat resultat. Om
osten fastnar på kniven är det bättre att strimla den.
Stick ner purjolöken med rotändan uppåt.
Fyll först i vätskan i mixerbägaren och tillsätt därefter
övriga ingredienser.
Använd skorpor eller torrt, poröst bröd.
Släpp ner klyftorna genom mataröppningen medan
maskinen är igång. Skölj genast skålen och övriga delar i
kallt vatten.
Äggen bör ha rumstemperatur. Det är viktigt att skålen
och övriga delar är absolut rena, väl sköljda och fria från
diskmedel.
Skär äpplena i bitar, som passar i mataröppningen. När du
mosar skall äpplena vara kokta.
Page 48

Laitteen osat (kuva 1)
A Runko
B Kulho
C Kulhon kansi
D Kannen kieleke (sulkee ja avaa
turvakytkimen)
E Turvakytkin
F Hienonnusterä £
G Viipalointiterä § (kaksipuolinen)
I = ohut
[ = paksu
H Raastinterä ¶ (kaksipuolinen)
AA
= erittäin hieno
[ = hieno
I Taikinakoukku ^
J Vispilä ß
K Akseli
L Syöttösuppilo
M Syöttöpainin
N Kytkimet
I = Kytkentä/Katkaisu
M = Pitoasento (vapauta = pysäytä)
Y1 = pieni nopeus
ÄW2 = suuri nopeus
O Johtopesä
Ohjaustaulu
Eri käyttötarkoitusten merkkien vasemmalla
puolella on kuva käytettävästä lisäosasta.
Ylärivillä on neuvottu käynnistämään laite
valitsemalla joko M (“Pitoasento”) tai I (“Jatkuva
käynti”) ja nopeusasetus Y1 (“pieni nopeus”) tai
W2 (“suuri nopeus”).
Katso myös ohjetaulukkoa.
Kulhon kiinnitys
- Aseta kulho paikalle kuvassa 2 näytetyllä
tavalla.
- Käännä kahvaa nuolen osoittamaan suuntaan
niin pitkälle kuin se menee (kuva 3).
Suomi
Tärkeää
• Lue käyttöohje ja katsele kuvat, ennen
kuin alat käyttää laitetta. Pidä sivu 3 auki
ohjetta lukiessasi.
•Älä jätä laitetta toimintaan ilman
valvontaa.
•Älä anna lasten käyttää laitetta.
• Käsittele kaikkia teriä varovasti, sillä ne
ovat erittäin teräviä.
• Poista hienonnusterän suojus ennen
käyttöä.
• Avaa kansi vasta, kun pyörivät osat ovat
täysin pysähtyneet.
•Älä työnnä syöttösuppiloon sormia tai
esim. kaavinta moottorin käydessä.
• Irrota pistotulppa pistorasiasta käytön
jälkeen.
• Tarkista liitosjohdon kunto
säännöllisesti. Jos tämän laitteen
verkkoliitosjohto vaurioituu, se on
korvattava erikoisjohdolla. Ota yhteys
lähimpään Philips-myyjään tai Philipshuoltoon.
• Pese kaikki ruoan kanssa kosketuksiin
joutuvat osat ennen käyttöönottoa.
• Laitteen runkoa ei saa kastaa veteen. Älä
myöskään huuhtele sitä.
• Nesteiden vatkaaminen ja sekoittaminen:
älä ylitä kulhoon merkittyä
enimmäismäärää osoittavaa viivaa.
•Älä ylitä taulukossa annettuja
enimmäismääriä ja aikoja.
• Aseta kulhon kansi paikalleen oikealla
tavalla. Tällöin sisäänrakennettu
turvakytkin avautuu ja laite voidaan
käynnistää.
• Säilytä tämä käyttöohje.
• Ennen kuin yhdistät laitteen pistorasiaan,
tarkista, että laitteen arvokilven jännite- ja
taajuusmerkintä vastaavat paikallista
verkkojännitettä ja -taajuutta.
• Tarkista, että laitteen toiminta on
katkaistu (kytkintä I painettu), silloin
kun yhdistät laitteen pistorasiaan.
• Jos laite on pudonnut veteen, irrota ensin
pistotulppa pistorasiasta, ennen kuin
nostat laitteen vedestä.
• Tarkistuta veteen pudonnut laite
huollossa ennen käyttöönottoa.
48
2
3
Page 49

Kannen kiinnitys
- Aseta kansi paikalle kuvassa 4 näytetyllä
tavalla.
- Kierrä kantta nuolen osoittamaan suuntaan,
kunnes se pysähtyy ja kannen ulokkeen ja
kulhon (kahvassa) merkit ovat vastakkain
(kuva 5).
Turvakytkin
Turvakytkin avautuu ja laite voidaan käynnistää
vain, kun kansi on asetettu oikein kulhon päälle.
Käytön jälkeen
- Katkaise toiminta
(kuva 6).
- Käännä ja nosta
kulho pois laitteesta
(kuva 7).
- Irrota kansi kulhon
päältä (kuva 8).
Syöttösuppilo ja
syöttöpainin
• Paina ruoka-aineita
syöttösuppiloon vain
syöttöpainimella
(kuva 9).
• Pidä syöttöpainin syöttösuppilossa käytön
aikana. Tämä vähentää roiskumista.
Hienonnusterä £
Varoitus: terän reunat ovat erittäin terävät!
• Tämä terä hienontaa, sekoittaa, soseuttaa ja
vatkaa.
- Aseta kulho paikalleen (kuva 10) ja sen jälkeen
hienonnusterä (kuva 11).
- Mittaa aineet kulhoon (kuva 12).
- Aseta kansi paikalleen (kuva 13) ja
syöttöpainin syöttösuppiloon (kuva 14).
- Käynnistä laite valitsemalla M ja nopeus Y1
tai W2 (kuva 15). Katso myös ohjetaulukkoa.
Käyttövihjeitä:
• Leikkaa aineet noin 3 cm:n suuruisiksi paloiksi.
• Varo hienontamasta aineita liikaa. (Myös
pitoasentoa M käytettäessä.)
• Älä hienonna juustoja kovin pitkään, etteivät ne
ehdi lämmetä ja siten paakkuuntua.
• Jos aineet takertuvat terän ympärille tai
tarttuvat kulhon reunoihin:
- katkaise ensin laitteen toiminta,
5
49
4
7
6
8
2
1
10
1
2
12
14
11
13
1
2
15
9
Page 50

- poista kansi kulhon päältä
- ja irrota aineet terän ympäriltä tai kulhon
reunoista kaapimella.
• Älä hienonna kovia aineksia, kuten
kahvipapuja, muskottipähkinöitä tai jääpaloja,
sillä nämä tylsyttävät terää.
Viipalointiterä § ja raastinterä ¶
Varoitus: leikkuureunat ovat hyvin terävät!
Tartu sen tähden terään aina muovisesta
pidikkeestä.
- Aseta kulho paikalleen (kuva 16).
- Aseta terä paikalleen käytettävä puoli ylöspäin.
(AAohuita viipaleita tai suikaleita varten; [ paksuja viipaleita tai suikaleita varten.) (kuva 17).
- Aseta kansi
paikalleen (kuva 18).
- Käynnistä suikalointi
valitsemalla I ja nopeus W2 (kuva 19).
- Käynnistä viipalointi
valitsemalla M ja
nopeusY1 tai W2
(kuva 20).
(Katso myös
ohjetaulukkoa.)
- Täytä syöttösuppilo (kuva 21).
- Paina aineita syöttösuppilossa alaspäin
syöttöpainimella (kuva 22) tasaisesti eikä liian
kovaa.
Käyttövihjeitä:
• Paloittele aineet, niin että ne mahtuvat
syöttösuppiloon.
• Täytä syöttösuppilo mahdollisimman tasaisesti.
• Tyhjennä kulho tarvittaessa välillä.
Taikinakoukku ^
• Taikinakoukulla vaivataan kaikki hiivataikinat ja
sekoitetaan muut taikinat.
- Aseta kulho (kuva 23) ja sen jälkeen
taikinakoukku (kuva 24).
- Mittaa sen jälkeen kuivat aineet kulhoon
(kuva 25) ja sulje kansi (kuva 26).
50
16
17
22
23
24
25
26
2
20
21
18
19
1
2
1
2
1
2
1
Page 51

- Käynnistä laite valitsemalla I ja nopeus W2
(kuva 27).
- Lisää neste syöttösuppilon kautta (kuva 28).
Vispilä ß
• Vispilää voi käyttää mm. munien,
munanvalkuaisten, kuorrutusten,
pikavanukkaiden ja kerman vaahdottamiseen
ja vatkaamiseen. Katso myös ohjetaulukkoa.
Huom. Älä käytä vispilää taikinoiden
tekemiseen!
- Aseta kulho (kuva 29) ja vispilä (kuva 30).
Mittaa sen jälkeen
aineet kulhoon
(kuva 31) ja aseta
kansi paikalleen
(kuva 32).
- Sulje syöttösuppilo
syöttöpainimella
(kuva 33).
- Käynnistä laite
valitsemalla I ja
nopeus Y1 tai W2.
Katso myös
ohjetaulukkoa.
Puhdistus
• Irrota pistotulppa pistorasiasta aina ennen
rungon puhdistusta.
Pyyhi runko puhtaaksi kostealla liinalla.
Älä kasta runkoa veteen. Älä kaada rungon
päälle vettä.
• Pese ruoan kanssa kosketuksissa olleet osat
lämpimällä pesuvedellä heti käytön jälkeen. Älä
pese astianpesukoneessa. Ole varovainen,
kun peset teriä: terien reunat ovat hyvin
terävät!
• Käsittele teriä huolellisesti, etteivät ne tylsy.
• Älä käytä naarmuttavia tai syövyttäviä
puhdistusvälineitä.
• Vispilän hammasrattaat voidaan helposti
irrottaa puhdistusta varten (kuvat 35, 36).
51
30
29
34
33
36
2
1
3
32
2
31
28
27
1
2
35
1
Page 52

Ruoka-aine Enim- Kytkimen- Lisäosa Käsittely Käyttö-
mäis- asento tarkoitus
määrä
52
Hedelmät
- hienonnettu
- sose
Hiivataikina
Juusto
- hienonnettu
- raaste
Kaali
- suikaleet
- raaste
Kerma
- vaahto
Kesäkurpitsa
- viipaleet
Korppujauhot
Kurkku
- viipaleet
- suikaleet
500 g
500 g
500 g
jauhoja
250 g
500 ml
100 g
M 2
I 1/2
I 2
M 2
I 2
M 1/2
I 2
I 1/2/1
M 1/2
I 2
M 1/2
I 2
£
£
^
£
¶
§
¶
ß
§
£
§
¶
Tummuminen estetään lisäämällä
muutama pisara sitruunamehua.
Käytä raakoja, kivettömiä
hedelmiä.
Käytä keitettyjä tai pehmeitä
hedelmiä.
Mittaa kuivat aineet kulhoon.
Sekoita 5 s. Lisää neste samalla
sekoittaen.
Vaivausaika enintään 1,5 minuuttia.
Voit jatkaa vaivaamista käsin.
Käytä kovaa juustoa. Leikkaa 2
cm:n paloiksi. Karkea tulos
asennolla M ja hieno tulos
nopeudella 2.
Paina varovasti syöttöpainimella.
Paloittele kaali.
Jäähdytä kulho, terä ja kerma
jääkaapissa. Vatkaa kerralla
vähintään 1,25 dl. Aloita
nopeudella 1. Vaihda nopeudelle
3. Kun vaahto on melkein valmis,
vaihda takaisin nopeudelle 1.
Käytä kuivaa leipää.
Salaatit, hillot,
kakut, jälkiruoat.
Keitot, hillot,
jälkiruokakastikkeet, vauvanruoka.
Sämpylät,
leivät, pullat,
pizzapohjat.
Kuorrutus,
keitot,
kastikkeet.
Kastikkeet,
fondue, pizzat.
Laatikot, keitot,
salaatit.
Koristelu,
jälkiruoat,
jäätelöseokset.
Uuniruoat,
keitot.
Jauheliharuoat,
kakkuvuokien
jauhotus.
Salaatit.
Page 53

53
Liha, kala,
linnut
- paisti
- muu raaka
liha
Majoneesi
Munat
- kokonaiset
- valkuaiset
Murokakku
Ohukaistaikina
Omenat
- sose
- viipaleet
- suikaleet
Paistostaikina
Palkokasvit
- sose
Pirtelö
Porkkana
- viipaleet
- raaste
Punajuuri
- viipaleet
- raaste
500 g
400 g
3 munaa
4 munaa
4 munaa
200 g
jauhoja
5 dl
500 g
400 g
jauhoja
500 g
5 dl
nestettä
M - 2
M - 2
I 2
I 2
I 2
I 2
I 1/2
I 2
M 1/2
I 2
I 2
I 2
I 2
M 1/2
I 2
M 1/2
I 2
£
£
£
ß
ß
^
£
£
§
¶
£
£
£
§
¶
§
¶
Poista kalvot, rustot, luut ja
ruodot.
Leikkaa n. 3 cm:n kuutioiksi.
Maksimi hienonnusaika = 30 s.
Aseta kuutiot tasaisesti kulhon
pohjalle.
Käytä aineet huoneenlämpöisinä. Sekoita munia,
viinietikkaa tai sitruunamehua ja
mausteita 10 sekuntia. Lisää öljy
(175 ml) syöttöpainimen aukon
kautta. Pysäytä kun öljy on täysin
sekoittunut. Majoneesin paksuus
riippuu öljyn ja munien määrästä.
Vatkaa munat huoneenlämpöisinä.
Kulho ja terä eivät saa olla
rasvaiset.
Mittaa kaikki aineet
huoneenlämpöisinä kulhoon.
Sekoita noin 1 minuutti.
Kaada kulhoon ensin neste ja sen
jälkeen kuivat aineet.
Käytä keitettyjä omenia.
Leikkaa raa'at omenat kuutioiksi
(3 cm).
Leikkaa kylmä voi 2 cm:n paloiksi.
Laita kaikki aineet kulhoon.
Sekoita, kunnes taikinasta
muodostuu pallo (n. 30 s).
Jäähdytä taikina ennen kaulimista.
Käytä keitettyjä herneitä tai
papuja. Lisää hieman nestettä.
Käytä raakoja porkkanoita. Syötä
kärki edellä. Jos porkkanat ovat
ohuita, täytä syöttösuppilo
kokonaan.
Jauhettu liha,
raakapihvit.
Jauhelihapivit.
Kastikkeet,
kuorrutukset.
Munakokkeli,
munakkaat.
Marenki.
Kakut.
Ohukaiset,
pannukakut,
vohvelit.
Vauvanruoka,
leivonnaiset ym.
Piirakat,
salaatit.
Piirakat,
paistokset.
Muhennokset,
keitot.
Laatikkoruoat,
keitot, lisäkkeet.
Raakaraaste,
koristelu.
Laatikot.
Salaatit, keitot.
Page 54

54
Purjosipuli
- viipaleet
Pähkinät,
Mantelit
- rouhitut
Retikka
- raaste
Sikurisalaatti
- viipaleet
Sipuli
- hienonnettu
- viipaleet
Sokerikakku
(kakkupohja)
Suklaa
- rouhittu
Tomaatti
- sose
Vauvanruoka
/dieettiruoka
- sose
Vihannekset
Raaka
- hienonnettu
- sose
Keitetty
- sose
Voikreemi
250 g
500 g
3 munaa
200 g
750 g
500 g
500 g
500 g
750 g
250 g
M 1/2
M 2
I 2
M 1/2
M 2
M 1/2
I 2
M 2
I 2
I 2
M 2
I 1/2
I 1/2
I 2
§
£
¶
§
£
§
^
£
£
£
£
£
£
£
Työnnä syöttösuppiloon päät
ylöspäin.
Lisää hieman öljyä tai muuta
nestettä
Paloittele syöttösuppiloon
sopivaksi. Syötä kärki edellä.
Työnnä lehdet nipussa
syöttösuppiloon päät ylöspäin.
Täytä syöttösuppilo kokonaan.
Leikkaa lohkoiksi. Hienonna
sopivaksi. Pese kulho heti käytön
jälkeen.
Aineet huoneenlämpöisinä.
Vatkaa munat ja sokeri vaahdoksi
nopeudella 2. Lisää jauhot siivilän
läpi nopeudella 1.
Käytä kovaa suklaata. Paloittele 2
cm:n paloiksi. Käytä ensin
muutaman kerran pitoasentoa M
ja sitten nopeutta 2.
Enimmäisaika = 45 s.
Paloittele tomaatit 4 osaan.
Karkea: lisää hieman nestettä.
Hieno: Lisää nestettä tarpeen
mukaan.
Paloittele.
Paloittele.
Käytä pehmeää voita.
Keitot, salaatit,
yms.
Salaatit,
leivonnaiset.
Leivonnaiset,
mantelimassa.
Salaatit,
raakaraasteet.
Salaatit.
Salaatit,
kastikkeet,
keitot,
murekeruoat.
Keitot, salaatit,
laatikot.
Täytekakut,
kääretortut.
Kuorrutus,
kastikkeet,
leivonnaiset,
vanukkaat.
Kastikkeet,
keitot,
pataruoat.
Vauvanruoka.
Dieettiruoka.
Salaatit, keitot.
Muhennokset,
keitot.
Keitot,
kastikkeet.
Leivokset,
jälkiruoat.
Page 55

55
Voitaikina
Yrttimausteet
- hienonnettu
300 g
jauhoja
M 2
M 2
£
£
Mittaa jauhot kulhoon. Lisää
paloiteltu (2 cm) kylmä voi.
Sekoita nopeudella 2, kunnes
taikina on ryynimäistä. Lisää
kylmä vesi ja jatka sekoittamista,
kunnes taikinasta tulee pallo (noin
15 sekuntia). Jäähdytä taikina
ennen kaulimista.
Pese ja kuivaa yrtit.
Piirakat, tortut.
Kastikkeet,
keitot,
maustevoit.
Page 56

Γενική περιγραφή (σχήµα 1)
A Μονάδα µοτέρ
B ∆οχείο
C Κάλυµµα δοχείου
D Προεξοχή ασφάλειασ καλύµµατοσ
(ασφαλίζει και απασφαλίζει τον
ενσωµατωµένο µηχανισµ ασφάλειασ)
E Ασφάλεια
F Μεταλλικσ κπτησ (λεπίδα) £
G ∆ίσκοσ για κοψιµο σε φέτεσ §
A = λεπτέσ φέτεσ
[ =χονδρέσ φέτεσ
H ∆ίσκοσ για τρίψιµο ¶ (δύο ψεων)
A = πολύ ψιλά κοµµάτια
[ = ψιλά κοµµάτια
I Ζυµωτήρι ^
J Κτυπητήρι ß
K Άξονασ κίνησησ
L Σωλήνασ εισδου συστατικών (τροφών)
M Εξάρτηµα ώθησησ συστατικών
N ∆ιακπτεσ
I = OFF (κλειστ),
M = MOMENT (απελευθέρωση = στοπ)
Y1 = ελάχιστη ταχύτητα
W2 = µέγιστη ταχύτητα
O Θάλαµοσ τοποθέτησησ καλωδίου
Γραφικέσ οδηγίεσ
Αριστερά απ τα σύµβολα των διάφορων
εφαρµογών µπορείτε να δείτε µια εικνα του
εξαρτήµατοσ που πρέπει να
χρησιµοποιήσετε.
Στην επάνω σειρά συνιστάται να επιλέξετε
ανάµεσα στισ θέσεισ Μ (“Στιγµιαία
λειτουργία”) ή II(Συνεχήσ λειτουργία) του
διακπτη, σε συνδυασµ µε τισ ρυθµίσεισ
ταχύτητασ Y1 (“ελάχιστη ταχύτητα”) ή W2
(“µέγιστη ταχύτητα”).
Εασ παρακαλούµε να συµβουλευθείτε και
τουσ πίνακεσ.
Ελληνικά
Σηµαντικ:
• Πριν χρησιµοποιήσετε τη συσκευή σασ,
διαβάστε τισ οδηγίεσ αναφερµενοι
στισ αντίστοιχεσ εικνεσ.
• Μην αφήνετε τη συσκευή σασ να
λειτουργεί αν δεν την παρακολουθείτε.
• Μην επιτρέπετε στα παιδιά να
λειτουργούν τη συσκευή σασ.
• Πρέπει να είστε πολύ προσεκτικοί ταν
χειρίζεστε το µεταλλικ κπτη και το
δίσκο για κψιµο σε φέτεσ επειδή είναι
πολύ κοφτεροί.
• Βγάλτε το προστατευτικ κάλυµµα απ
το µεταλλικ κπτη πριν το
χρησιµοποιήσετε.
• Αφήστε τα περιστρεφµενα µέρη να
σταµατήσουν τελείωσ πριν ανοίξετε το
κάλυµµα.
• Μη βάζετε ποτέ τα δάκτυλά σασ ή π.χ.
µια σπάτουλα στο στµιο εισαγωγήσ
συστατικών ενώ η συσκευή λειτουργεί.
• Βγάλτε το καλώδιο ρεύµατοσ απ την
πρίζα µετά τη χρήση τησ συσκευήσ σασ.
• Αν το καλώδιο ρεύµατοσ τησ συσκευήσ
σασ είναι χαλασµένο, πρέπει να
αντικατασταθεί απ το εξειδικευµένο
σέρβισ επειδή χρειάζονται ειδικά
εργαλεία και/ή ανταλλακτικά.
• Πριν χρησιµοποιήσετε για πρώτη φορά
τη συσκευή σασ, πλύντε λα τα
εξαρτήµατα που έρχονται σε επαφή µε
τα τρφιµα.
• Μη βυθίσετε ποτέ το µοτέρ στο νερ ή
σε άλλο υγρ, ούτε να το βρέξετε.
• ταν αναµιγνύετε ή ανακατεύετε υγρά,
µη γεµίζετε το δοχείο περισστερο απ
τη µέγιστη στάθµη.
• Μην ξεπερνάτε τισ µέγιστεσ ποστητεσ
και τουσ χρνουσ που αναφέρονται στα
δεξιά των πινάκων.
• Τοποθετείτε το καπάκι στο δοχείο
σωστά. Ο ενσωµατωµένοσ µηχανισµσ
ασφάλειασ απασφαλίζει και η συσκευή
είναι έτοιµη για να µπει σε λειτουργία.
• Φυλάξτε αυτέσ τισ οδηγίεσ για
µελλοντική αναφορά.
56
Page 57

Τοποθέτηση του δοχείου
- Τοποθετείστε το δοχείο πωσ φαίνεται στο
σχήµα 2.
- Μετακινείστε τη χειρολαβή προσ την
κατεύθυνση του βέλουσ µέχρι να
σταµατήσει (σχήµα 3).
Τοποθέτηση του καλύµµατοσ
- Τοποθετείστε το κάλυµµα πωσ φαίνεται
στο σχήµα 4.
- Μετακινείστε το κάλυµµα σταθερά προσ
την κατεύθυνση του βέλουσ µέχρι να
σταµατήσει και να ταιριάζουν τα ενδεικτικά
σηµάδια στο κάλυµµα και το δοχείο
(σχήµα 5).
Μηχανισµσ ασφάλειασ
Μνο ταν το κάλυµµα τοποθετηθεί σωστά
στο δοχείο, απελευθερώνεται ο µηχανισµσ
ασφάλειασ και µπορεί να τεθεί σε λειτουργία
η συσκευή.
Μετά τη χρήση
- Κλείστε τη
συσκευή σασ (OFF
- σχήµα 6).
- Βγάλτε το δοχείο απ τη συσκευή
(σχήµα 7).
- Απελευθερώστε το κάλυµµα απ το δοχείο
(σχήµα 8).
Σωλήνασ εισδου συστατικών (τροφών) και
εξάρτηµα ώθησησ
• Χρησιµοποιείστε
το εξάρτηµα
ώθησησ τροφών
για να σπρώξετε τα
διάφορα συστατικά
µέσω του σωλήνα
(σχήµα 9).
• Μπορείτε να
αφήσετε το
εξάρτηµα ώθησησ
µέσα στο σωλήνα
για να κρατά τισ τροφέσ κατά τη λειτουργία
τησ συσκευήσ Έτσι δεν “πιτσιλίζονται” τα
υγρά προσ τα έξω.
Μεταλλικσ κπτησ
Προσοχή: Τα άκρα κοπήσ είναι πολύ κοφτερά!
• Ο µεταλλικσ κπτησ είναι κατάλληλοσ για
κψιµο σε κοµµάτια, µίξη, για να κάνετε
πουρέ και ζύµη για γλυκά και κέικ.
- Τοποθετείστε το δοχείο (σχήµα 10) και
µετά το µεταλλικ κπτη (σχήµα 11).
57
7
8
2
4
3
5
2
1
9
6
10
1
2
11
Page 58

- Τοποθετείστε τα συστατικά στο δοχείο (12).
- Τοποθετείστε το κάλυµµα (σχήµα 13) και το
εξάρτηµα ώθησησ στο σωλήνα (σχήµα 14).
- Πιέστε είτε το πλήκτρο Μ είτε τα πλήκτρα
Y1 ή W2 για να τον ενεργοποιήσετε
(σχήµα 15).
Παρακαλούµε δείτε τουσ πίνακεσ.
Συµβουλέσ:
• Πρώτα, κψτε τα µεγάλα κοµµάτια σε
κύβουσ των 3 εκατ.
• Αποφεύγετε την υπερβολική επεξεργασία
τησ τροφήσ. (Ακµα και ταν
χρησιµοποιείτε τη θέση Μ).
• ταν κβετε (σκληρ) τυρί, φροντίστε να
µη λειτουργείτε το µοτέρ για µεγάλο
χρονικ διάστηµα, επειδή το τυρί µπορεί να
ζεσταθεί πολύ και να “λασπώσει”.
• Αν πιαστεί τροφή γύρω απ το µεταλλικ
κπτη, ή αν κολλήσουν µικρά κοµµάτια
τροφήσ στο εσωτερικ του δοχείου:
- κλείστε τη συσκευή (OFF),
- βγάλτε το κάλυµµα απ το δοχείο,
- και αφαιρέστε την τροφή απ το
µεταλλικ κπτη και απ το δοχείο µε τη
σπάτουλα.
• Μην κβετε σε κοµµάτια πολύ σκληρά
συστατικά, πωσ κκκουσ καφέ,
µοσχοκάρυδο, και παγάκια επειδή θα
χαλάσουν τη λεπίδα του κπτη.
∆ίσκοσ κοπήσ σε φέτεσ § και δίσκοσ για
τρίψιµο ¶
Προσοχή: Τα άκρα κοπήσ είναι πολύ κοφτερά!
Γι’ αυτ, να κρατάτε πάντα το δίσκο απ την
πλαστική λαβή.
- Τοποθετείστε το δοχείο (σχήµα 16).
- Τοποθετείστε το δίσκο µε την πλευρά που
θέλετε να χρησιµοποιήσετε προσ τα επάνω
(Ι για κψιµο σε λεπτέσ φέτεσ ή ψιλ
τρίψιµο - [ για κψιµο σε χοντρέσ φέτεσ ή
χοντρ τρίψιµο) (σχήµα 17).
- Τοποθετείστε το κάλυµµα (σχήµα 18).
- Για να τρίψετε, βάλτε µπροσ επιλέγοντασ I
σε συνδυασµ µε W2 (σχήµα 19).
- Για να τεµαχίσετε, βάλτε µπροσ
επιλέγοντασ Μ σε συνδυασµ µε Y1 ή
W2 (σχήµα 20).
(Αναφερθείτε και στουσ πίνακεσ).
- Βάλτε τα συστατικά
στο σωλήνα εισδου
(σχήµα 21).
- Σπρώξτε τα
συστατικά προσ τα
κάτω σταθερά και
µε µέτρια δύναµη
χρησιµοποιώντασ το
εξάρτηµα ώθησησ
(σχήµα 22).
58
12
13
1
2
14
15
16
1
2
18
1
2
21
17
19
20
22
Page 59

Συµβουλέσ:
• Κψτε πρώτα τα µεγάλα κοµµάτια για να
µπορούν να περάσουν απ το στµιο του
σωλήνα εισδου.
• Γεµίζετε το σωλήνα οµοιµορφα για να
έχετε καλύτερα αποτελέσµατα.
• Αδειάζετε το δοχείο τακτικά ταν έχετε
µεγάλεσ ποστητεσ τροφών.
Ζυµωτήρι
• Το ζυµωτήρι είναι κατάλληλο για να
ζυµώσετε ζύµη και να αναµίξετε
κουρκούτια.
- Τοποθετείστε το δοχείο (σχήµα 23) και
µετά το ζυµωτήρι (σχήµα 24).
- Τοποθετείστε τα στεγνά συστατικά µέσα
στο δοχείο (σχήµα 25) και τοποθετείστε το
κάλυµµα (26).
- Βάλτε µπροσ επιλέγοντασ IIσε συνδυασµ
µε W2 (σχήµα 27).
- Προσθέστε νερ µέσω του σωλήνα
(σχήµα 28).
Κτυπητήρι
• Το κτυπητήρι είναι κατάλληλο για κτύπηµα
αυγών, γαρνιτούρεσ για επιδρπια,
πουτίγκα και κρέµα. (Αναφερθείτε και
στουσ πίνακεσ).
Σηµείωση: Μη χρησιµοποιείτε το κτυπητήρι
για να κάνετε ζύµη!
- Τοποθετείστε το δοχείο (σχήµα 29) και
µετά το κτυπητήρι (σχήµα 30).
Μετά, τοποθετείστε τα συστατικά στο
δοχείο (σχήµα 31) και το κάλυµµα
(σχήµα 32).
- Τοποθετείστε το εξάρτηµα ώθησησ στο
σωλήνα εισδου για να το κλείσετε
(σχήµα 33).
- Βάλτε µπροσ επιλέγοντασ IIσε συνδυασµ
µε Y1 ή W2 (σχήµα 34).
Αναφερθείτε στουσ πίνακεσ.
59
23
24
25
26
2
28
27
30
29
33
32
2
31
34
1
2
1
1
2
1
Page 60

Καθαρισµσ
• Πριν καθαρίσετε τη µονάδα του µοτέρ,
βγάζετε πάντοτε το φισ του καλωδίου
ρεύµατοσ απ την πρίζα.
Μπορείτε να καθαρίσετε τη µονάδα του
µοτέρ µε ένα υγρ πανί.
Ποτέ µη βυθίσετε τη µονάδα του µοτέρ σε
νερ. Ποτέ µη χύσετε νερ επάνω στη
µονάδα του µοτέρ.
• Πλύντε τα εξαρτήµατα που ήρθαν σε
επαφή µε την τροφή µε ζεστ νερ και
σαπούνι αµέσωσ µετά τη χρήση τουσ. Μην
τα πλύνετε στο πλυντήριο πιάτων.
• Προσέχετε ταν καθαρίζετε τη µεταλλική
λεπίδα και το δίσκο τεµαχισµού: οι άκµέσ
κοπήσ είναι πολύ κοφτερέσ!
• Βεβαιωθείτε τι τα άκρα κοπήσ δεν
έρχονται σε επαφή µε σκληρά αντικείµενα
επειδή θα αµβλυνθούν.
• Μη χρησιµοποιείτε σύρµατα καθαρισµού,
κλπ.
• Τα γρανάζια του κτυπητηριού µπορούν να
αποσυναρµολογηθούν εύκολα για
καλύτερο καθαρισµ (σχήµατα 35 και 36).
60
36
2
1
3
35
Page 61

61
Συστατικά Μέγιστη Ενεργo- Εξάρ- ∆ιαδικασία Εφαρµογέσ
ποστητα ποίηση τηµα
& ταχύ-
τητα
Μήλα Κάντε πουρέ τα µαγειρεµένα Τροφή για µωρά/νήπια
- για πουρέ 500 γρ.
I 2 £ µήλα.
- για κψιµο
M 1/2 § Κψτε τα µαγειρεµένα µήλα Γλυκά, σαλάτεσ.
σε φέτεσ σε κύβουσ των 3 εκ.
- για τρίψιµο
I 2 ¶
Τροφή για Χονδρή: προσθέστε λίγο Τροφή για νήπια.
µωρά/νήπια 500 γρ.
I 2 £ υγρ.
- πουρέ Λεπτή: αν χρειάζεται, Τροφή για µωρά.
προσθέστε περισστερο
υγρ για να γίνει πιο µαλακή.
Ζύµη Συστατικά σε Κέικ, Ελβετικά
(µπισκτο) 3 αυγά
I 2 ^ θερµοκρασία δωµατίου. κουλούρια, γλυκά.
- ανακάτεµα Ανακατέψτε το µίγµα
αυγών και ζάχαρησ στην
ταχύτητα 2 µέχρι να πήξει.
Μετά, προσθέστε
κοσκινισµένο αλεύρι.
Συνεχίστε το ανακάτεµα
στην ταχύτητα 1.
Ζύµη (κέικ) Συστατικά σε Κέικ, κλπ.
- ανακάτεµα 200 γρ.
I 2 ^ θερµοκρασία δωµατίου.
αλεύρι Μπορείτε να βάλετε τα
συστατικά στο δοχείο
ταυτχρονα.
Χρησιµοποιείστε αλεύρι
που φουσκώνει µνο του
ή απλ αλεύρι µαζί µε
µπέκιν πάουντερ.
Ο χρνοσ ανακατέµατοσ
είναι 1 περίπου λεπτ.
Ζύµη Βάλτε πρώτα υγρ στο Τηγανίτεσ, κρέπεσ,
(αφράτη) 500 γρ.
I 1/2 £ δοχείο. Μετά, προσθέστε φρίτερσ.
- µίξη υγρ τα στεγνά συστατικά.
Παντζάρια
- κψιµο
M 1/2 § Φαγητά φούρνου.
σε φέτεσ Γαρνίρισµα,
- τρίψιµο
I 2 ¶ αµαγείρευτα, σαλάτεσ
Μαύρα
ραδίκια Βάλτε τισ άκρεσ πρώτα. Γαρνίρισµα,
- τρίψιµο
I 2 ¶ αµαγείρευτα, σαλάτεσ.
Τρίψιµο Χρησιµοποιείστε στεγν, Επίστρωση φαγητών,
ψωµιού 100 γρ.
I 2 £ τραγανιστ ψωµί. φαγητά γκρατέν.
Page 62

62
Λάχανο
- κψιµο
M 1/2 ¶ Κψτε το πρώτα. Μαγειρεµένα λαχανικά
σε φέτεσ Ωµή σαλάτα.
- τρίψιµο
I 2 ¶
Καρτα Βάλτε τισ άκρεσ πρώτα Φαγητά φούρνου
(αµαγείρευτα) µέσα στο σωλήνα εισδου. Γαρνίρισµα, ωµή
- κψιµο
M 1/2 § Στη συνέχεια, γεµίστε τροφή.
σε φέτεσ
I 2 ¶ το σωλήνα.
- τρίψιµο
Τυρί Χρησιµοποιείστε τυρί Γαρνίρισµα. γκρατέν,
- κψιµο 200 γρ.
M - 2 £ χωρίσ φλούδα (π.χ. σούπεσ, σάλτσεσ,
σε κοµµάτια παρµεζάνα). Πρώτα, κροκέτεσ.
- τρίψιµο
I 2 ¶ κψτε το σε κοµµάτια Σάλτσεσ, φοντί, πίτσα,
των 2 εκατ. Επιλέξτε τη γκρατέν.
θέση Μ για χονδρ κψιµο
και την ταχύτητα 2 για ψιλ.
Σπρώξτε το προσεκτικά µε
το εξάρτηµα ώθησησ.
Πικραλίδεσ Βάλτε τισ στο σωλήνα Σαλάτεσ, σούπεσ.
- κψιµο
M 1/2 § εισδου µε τα κεφάλια
σε φέτεσ προσ τα επάνω. Γεµίστε
το σωλήνα.
Σοκολάτα Χρησιµοποιείστε σκληρή, Γαρνίρισµα, σάλτσεσ
- κψιµο 200 γρ.
M - 2 £ αγνή σοκολάτα. Σπάστε γλυκισµάτων, µουσ
σε φέτεσ την σε κοµµάτια των 2 εκ. πουτίγκα.
Χρησιµοποιείστε πρώτα
τη θέση Μ. Μετά,
χρησιµοποιείστε την
ταχύτητα 2 για ψιλ
κψιµο. Ο µέγιστοσ
χρνοσ κοπήσ είναι
45 δευτερλεπτα.
Κολοκυθάκια
- κψιµο
M 1/2 § Φαγητ φούρνου,
σε φέτεσ σούπεσ.
Κρέµεσ 200 γρ.
I 2 £ Χρησιµοποιείστε µαλακ Γλυκίσµατα,
βούτυρο για αφράτη επιδρπια.
κρέµα.
Αγγούρι
- κψιµο
M 1/2 ¶ Σαλάτεσ, ωµή τροφή.
σε φέτεσ
- τρίψιµο
I 2 §
Page 63

63
Ζύµη (τάρτα, Χρησιµοποιείστε κρύο Τάρτεσ φρούτων,
πίτεσ,δίπλεσ, 300 γρ.
M 2 £ βούτυρο/µαργαρίνη και δίπλεσ µήλου, πίτεσ,
ζυµαρπιτα) αλεύρι κρύο νερ. Βάλτε το κουίσ.
αλεύρι στο δοχείο. Ρίξτε
επάνω του το βούτυρο/
µαργαρίνη σε κοµµάτια
των 2 εκατ. Αναµίξτε τα
στην ταχύτητα 2 µέχρι
το µίγµα να γίνει σαν
τριµένο ψωµί.
Προσθέστε νερ στην
ανάµιξη. Σταµατήστε
µλισ η ζύµη σχηµατίσει
µια µπάλλα (30
δευτερλεπτα περίπου).
Αφήστε την να κρυώσει
πριν την επεξεργαστείτε.
Ζύµη 500 γρ.
I 2 ^ Βάλτε λα τα στεγνά Ψωµί, πίτσα, τάρτεσ.
(ψωµί, αλεύρι ζύµη µε µαγιά συστατικά στο δοχείο.
πίτσα) (ψωµί) Αναµίξτε τα για 5
δευτερλεπτα. Μετά,
προσθέστε νερ κατά
την ανάµιξη. Ο µέγιστοσ
χρνοσ ζυµώµατοσ είναι
1,5 λεπτ. Μπορείτε να
τελειώσετε το ζύµωµα µε
το χέρι. Βάλτε το γέµισµα
µε το χέρι.
Ζύµη 400 γρ.
I 2 £ Χρησιµοποιείστε κρύο Μηλπιτα, γλυκά
(γλυκί- αλεύρι βούτυρο ή µαργαρίνη µπισκτα, φλαν.
σµατα) κοµµένα σε κοµµάτια των
2 εκατ. Βάλτε ταυτχρονα
λα τα συστατικά στο
δοχείο. Αναµίξτε τα µέχρι
η ζύµη να σχηµατίσει µια
µπάλλα (µετά απ 30
περίπου δευτερλεπτα).
Αφήστε τη ζύµη να
κρυώσει πριν την
επεξεργαστείτε.
Αβγά 4 αβγά
I 2 ß Χρησιµοποιείστε τα αβγά Πουτίγκα, σουφλέ,
- κτύπηµα σε θερµοκρασία δωµατίου µαρέγκα, γαρνίρισµα.
(ασπραδιού) Καθαρίστε καλά απ Κτυπητά αβγά,
- κτύπηµα 4 αβγά
I 2 ß τα λάδια το δοχείο οµελέτεσ.
(ολκληρου και το κτυπητήρι.
αβγού)
Φρούτα Συµβουλή: Σαλάτεσ, µαρµελάδα,
- κψιµο 500 γρ.
M 2 ^ χρησιµοποιείστε λίγο λεµνι κέικ.
σε κοµµάτια για να µη φύγει το χρώµα.
- - πουρέ 500 γρ.
I 1 / 2 ^ Χρησιµοποιείστε ωµά, σφιχτά Σάλτσεσ, µαρµελάδα,
φρούτα, χωρίσ κουκούτσια. πουτίγκα, τροφή
Χρησιµοποιείστε φρούτα µωρών.
µαγειρεµένα ή µαλακά.
Page 64

64
Βτανα/
Χρτα
- κψιµο
M 2 ^ Πλύντε και στραγγίξτε τα. Σάλτσεσ, σούπεσ,
σε κοµµάτια γαρνίρισµα, πικάντικο βούτυρο.
Πράσα
- κψιµο
M 1/2 § Βάλτε τα στο σωλήνα Σούπεσ,
σε κοµµάτια εισδου µε τα κεφάλια µαγειρεµένα πράσα.
προσ τα επάνω. Αν τα
πράσα είναι ψιλά,
γεµίστε ολκληρο το
σωλήνα εισδου.
Μαγιονέζα 3 µεγάλα
I 2 £ Χρησιµοποιείστε τα Τηγανιτέσ πατάτεσ,
αβγά συστατικά σε σαλάτεσ, κοκτέιλ,
θερµοκρασία δωµατίου. φοντί και σάλτσα
Αναµίξτε τα αβγά µε ξύδι, µπάρµπεκιου.
χυµ λεµονιού ή
µουστάρδα και, αν θέλετε,
µε χορταρικά για 10
δευτερλεπτα. Μετά,
προσθέστε 175 ml λάδι
απ το προστατευτικ
κάλυµµα. Σταµατήστε
ταν το λάδι αναµιχτεί
εντελώσ. Μπορείτε να
ελέγχετε την πυκντητα
κανονίζοντασ την
αναλογία αβγού/λαδιού.
Κρέασ, ψάρι, Βγάλτε πρώτα τα νεύρα, Μπιφτέκια ταρτάρ,
πουλερικά κκκαλα. Κψτε σε γέµισµα σάντουιτσ,
- κψιµο 500 γρ.
M 2 £ κοµµάτια των 3 εκατ. χάµπουργκερ
σε κοµµάτια Ο µέγιστοσ χρνοσ κοπήσ Kιµάσ, λουκάνικα.
(άπαχο βοδιν) είναι 30 δευτερλεπτα.
- κψιµο σε 400 γρ.
M 2 £ Χρησιµοποιείστε τη θέση
κοµµάτια Μ για πιο χονδρ κψιµο.
(κρέασ σε
λωρίδεσ)
Μιλκσέικ 500 γρ.
I 2 £
υγρ
Καρύδια Σαλάτεσ, γαρνίρισµα,
- κψιµο 250 γρ.
M 2 £ γλυκίσµατα, πουτίγκα.
σε κοµµάτια
Κρεµύδια Κψτε τα πρώτα σε Σαλάτεσ, σάλτσεσ,
- κψιµο σε 500 γρ.
M 2 £ κοµµάτια των 3 εκατ. σούπεσ.
κοµµάτια Κψτε τα σο λεπτά Σούπεσ, ωµή τροφή,
- κψιµο σε
M 1/2 § θέλετε. Πλύντε το φαγητά φούρνου.
φέτεσ δοχείο αµέσωσ µετά
τη χρήση.
Page 65

65
σπρια Χρησιµοποιείστε Πουρέ, σούπεσ.
- πουρέ 500 γρ.
I 2 £ µαγειρεµένα φασλια ή
µπιζέλια. Μπορείτε να
προσθέσετε λίγο υγρ
για µεγαλύτερη συνοχή.
Τοµάτεσ Κψτε πρώτα τισ τοµάτεσ Σάλτσεσ, σαλάτεσ.
- πουρέ 750 γρ.
I 2 £ σε 4 κοµµάτια.
Λαχανικά Κψτε τα πρώτα. Σαλάτεσ, ωµή τροφή,
(αµαγείρευτα) σούπεσ.
- κψιµο σε 500 γρ.
M - 2 £ Πουρέσ λαχανικών,
κοµµάτια σούπεσ.
- πουρέ 500 γρ.
I 1/2 £ Kψτε τα πρώτα. Σούπεσ, σάλτσεσ.
(µαγειρεµένα)
- πουρέ 750 γρ.
I 1/2 £
Κτυπητή
κρέµα
I - Χρησιµοποιείστε κρέµα Γαρνίρισµα, κρέµα,
- κτύπηµα 500 ml 1/2/1
ß που έχει κρυώσει σε µίγµατα παγωτού,
θερµοκρασία ψυγείου. γλυκίσµατα.
∆ουλέψτε τουλάχιστον
125 ml. Αρχίστε µε την
ταχύτητα 1. Αλλάξτε στην
ταχύτητα 2. ταν η κρέµα
είναι σχεδν έτοιµη,
επιστρέψτε στην ταχύτητα 1.
 Loading...