

Page 1

ENGLISH 4
DEUTSCH 13
NORSK 22
SVENSKA 30
SUOMI 38
DANSK 46
HQT788
3
Page 2
Important
◗ Check if the voltage indicated on the
appliance corresponds to the mains voltage in
your home before you connect the appliance.
◗ Make sure that the appliance does not get
wet.
◗ This appliance is only designed for trimming
the human beard.Do not use the appliance
for any other purpose.
◗ Keep the appliance out of the reach of
children.
◗ Charge and store the appliance at a
temperature between 15cC and 35cC.
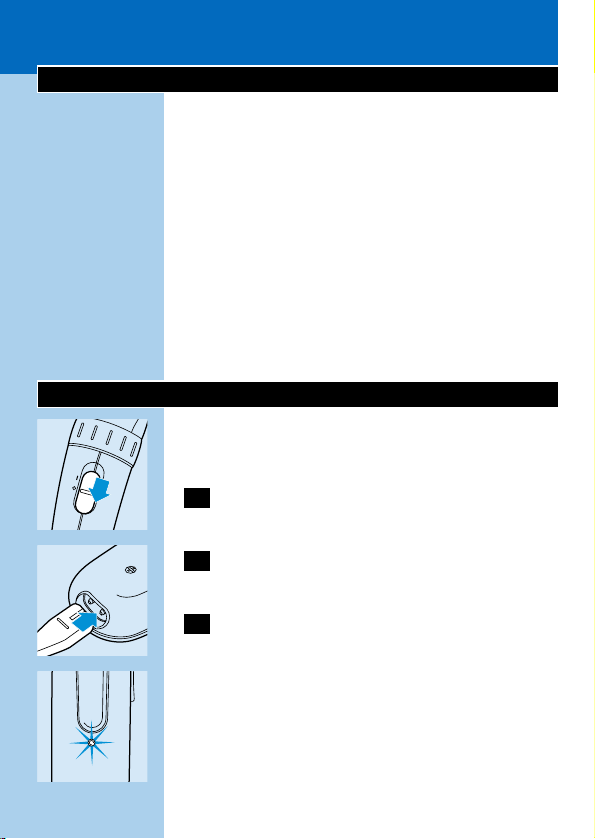
Charging
Charge the appliance fully before you start using
it for the first time.
C
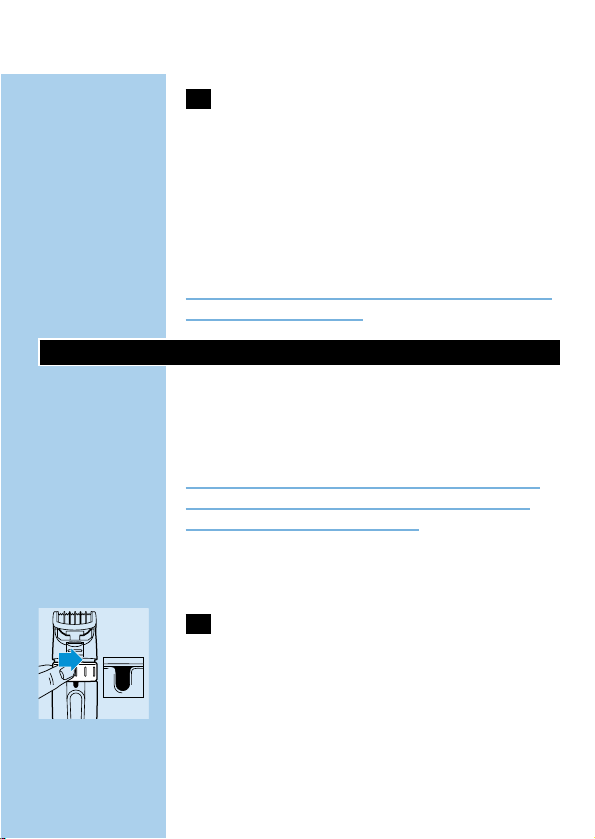
1 Make sure the appliance is switched off.
C
2 Insert the appliance plug into the
appliance.
3 Put the mains plug in the wall socket
(100-240 V AC).
C
◗ The green pilot light will go on to indicate
that the appliance is charging.
It will take approx.1 hour to fully charge the
battery.The pilot light will blink to indicate that
the battery has been fully charged.
ENGLISH4
CHARGE
Page 3

Do not charge the appliance for more than
24 hours.
A fully charged appliance has a cordless trimming
time of up to 50 minutes.
Optimise the lifetime of the rechargeable
battery
When the appliance has been charged for the
first time, we advise you to use it until the battery
is completely empty.
Do not recharge the appliance in between the
trimming sessions.
Continue using the appliance until the motor
almost stops running during a session.Then
recharge the battery.Follow this procedure at
least twice a year.
Corded trimming
◗ To trim with the appliance connected to the
mains:
1 Switch the trimmer off,connect it to the
mains and wait a few seconds before
switching it on.If the battery is completely
empty,wait one minute before switching
the appliance on,as the trimmer might not
start working right away.
Do not run the appliance from the mains when
the battery is fully charged.
ENGLISH 5
Page 4
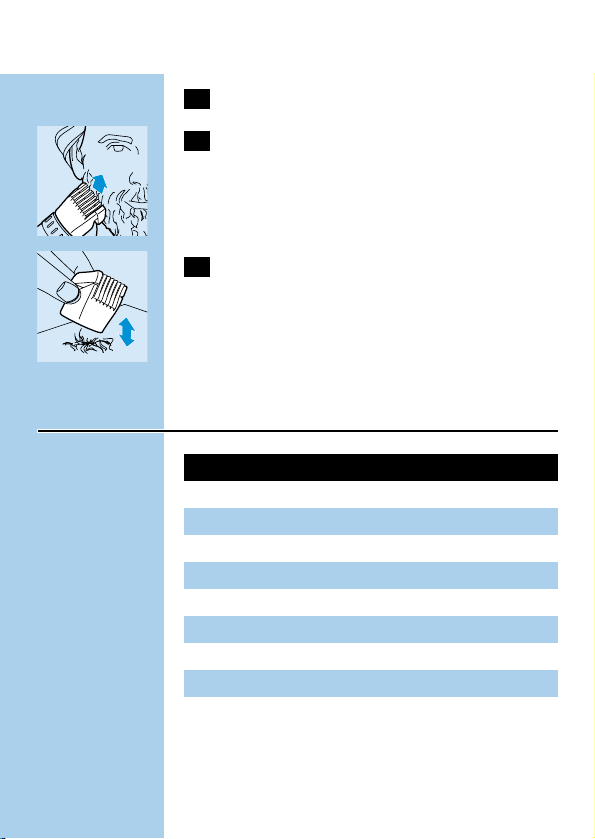
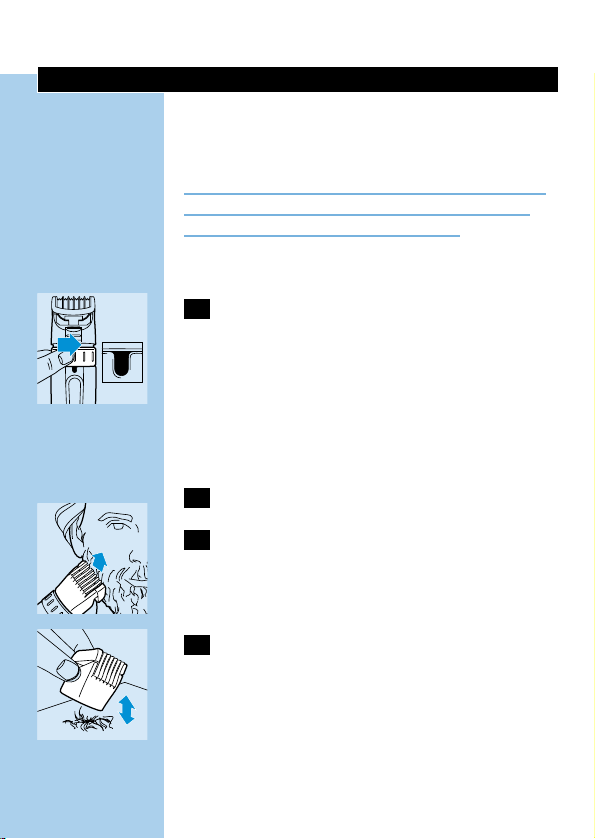
Trimming
Always comb the beard and/or moustache with a
fine comb before you start trimming.
If you are trimming for the first time, be careful
Do not move the trimmer too fast.Make smooth
and gentle movements.
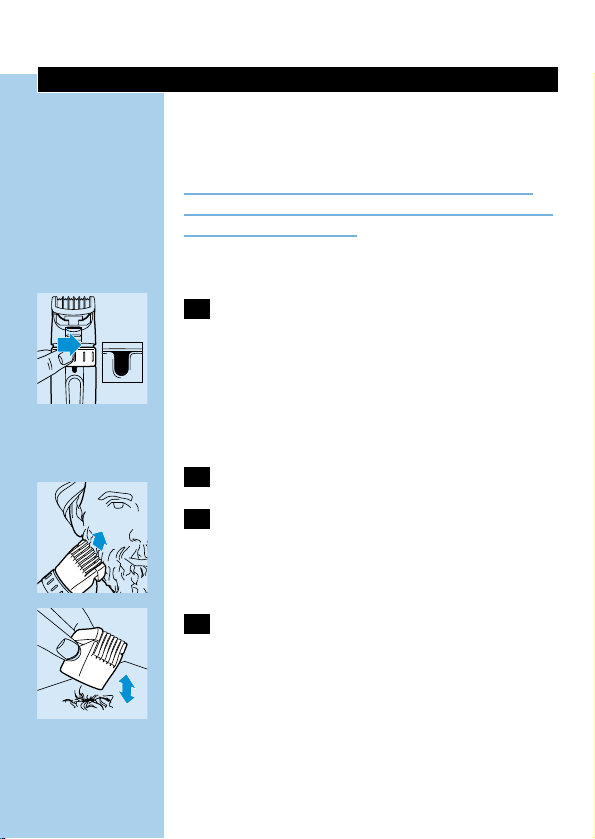
Trimming with comb attachment
C
1 Turn the Precision Zoom Lock` to the
desired trimming length setting (see table).
The setting will appear in the window below the
Precision Zoom Lock`.
B
If you are trimming for the first time, start by using
the maximum trimming length setting: setting 9.
2 Switch the appliance on.
C
3 To trim in the most effective way,move
the trimmer against the direction of hair
growth.Make sure the surface of the comb
always stays in contact with the skin.
C
4 If a lot of hair has accumulated in the
comb,remove the comb attachment and
blow and/or shake the hair out of the
comb.The selected trimming length setting
will not change when you do this.
ENGLISH6
9
9
Page 5
Trimming length settings table
Trimming with the unique 'stubble
look' setting
C
◗ Using setting 1 will result in a 'stubble look'.
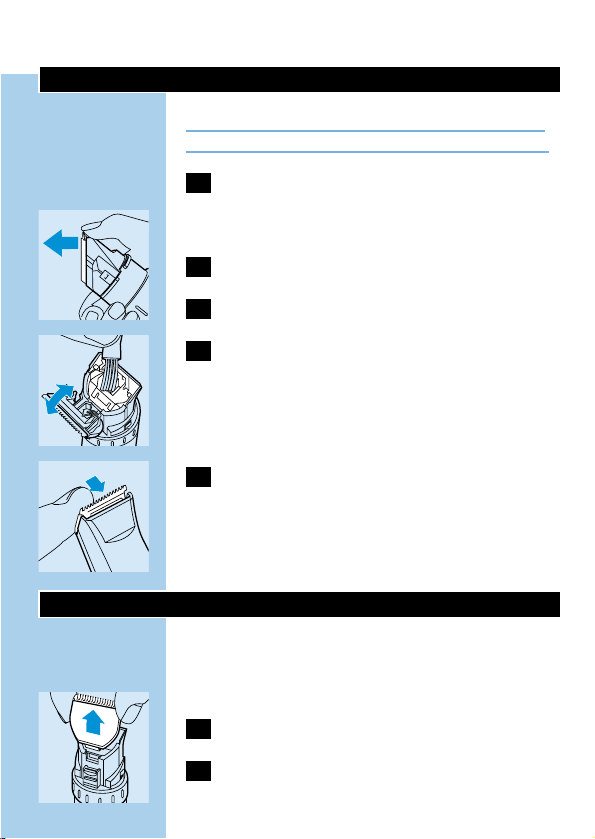
Trimming without comb attachment
Full beards and single hairs
C
1 Remove the comb attachment by pulling it
off the appliance.
Never pull at the flexible top of the comb
attachment.Always pull at the bottom part.
ENGLISH 7
resulting beard length
1.5 mm
2.5 mm
4.0 mm
5.5 mm
7.5 mm
9.5 mm
12.0 mm
15.0 mm
18.0 mm
setting
1
2
3
4
5
6
7
8
9
Page 6
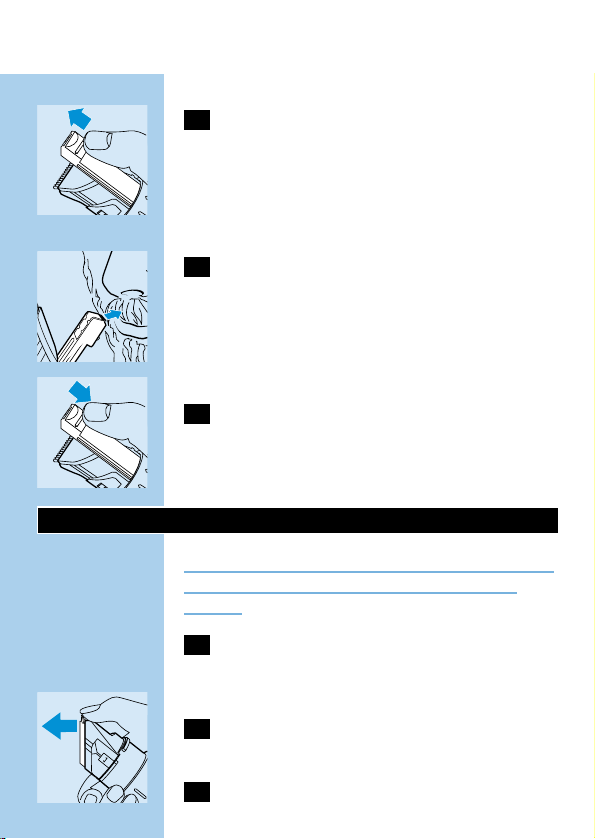
2 Switch the appliance on.
C
3 Make well-controlled movements.Touch
the hair lightly with the trimmer.
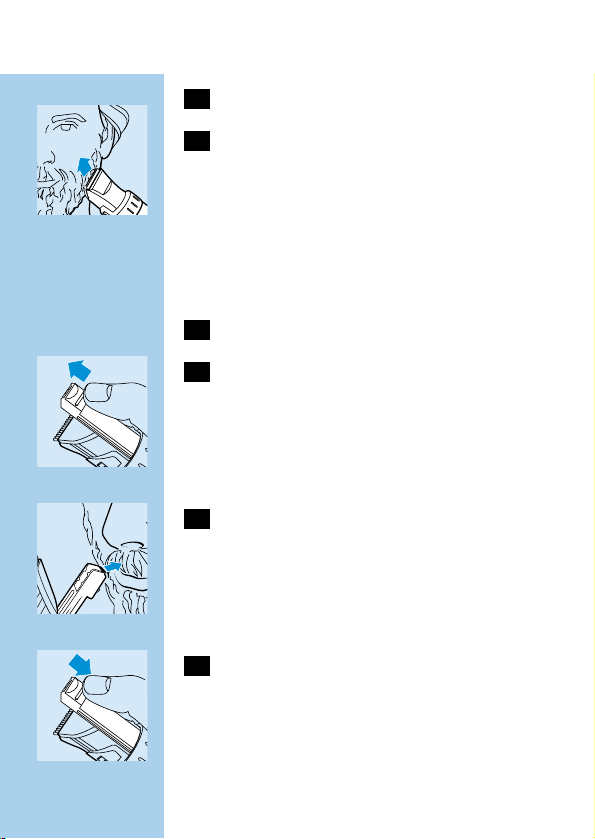
Trimming with the pop-up precision
trimmer
Moustaches,contours and single hairs
1 Remove the comb attachment.
C
2 Push the pop-up precision trimmer
upwards.If the appliance is switched on,
the pop-up precision trimmer will start to
work right away.
Note:the main cutting unit continues to work
when the pop-up precision trimmer is used.
C
3 Hold the appliance in vertical position and
make strokes.
The pop-up precision trimmer is also suitable for
outlining the edges of the beard in the neck and
on the cheeks.
C
4 When you have finished using the pop-up
precision trimmer,push it back into the
appliance.
You can now put the comb attachment back onto
the appliance.
ENGLISH8
Page 7
Cleaning
Do not use abrasives,scourers or liquids such as
alcohol,petrol or acetone to clean the appliance.
1 Make sure the appliance is switched off
and disconnected from the mains before
you start cleaning it.
2 Remove the comb attachment.
C
3 Open the cutting unit.
C
4 Clean the cutting unit and the inside of the
appliance with the brush supplied.
C
5 Close the cutting unit by pushing it back
onto the appliance until you hear a click.
The appliance does not need to be lubricated.
Replacing the cutting unit
A worn or damaged cutting unit should only be
replaced with an original Philishave cutting unit,
available from authorised Philips service centres.
1 Open the cutting unit.
C
2 Remove the old cutting unit by pulling it
upwards.
ENGLISH 9
Page 8

C
3 Place the two lugs of the new cutting unit
into the guiding slots.
4 Push the cutting unit back onto the
appliance until you hear a click.
Environment
To protect the environment,this appliance has
been equipped with a nickel-metal-hydride
battery which contains less than 0.01% cadmium.
Remove the rechargeable battery when you
discard the appliance.
Do not throw the battery away with the normal
household waste but hand it in at an official
collection point.
You can also take the appliance to a Philips
service centre, where the staff will be happy to
help you remove the battery and dispose of it in
an environmentally safe way.
1 Disconnect the appliance from the mains
and let the appliance run until the motor
stops.
C
2 Undo the screw in the housing of the
trimmer.
ENGLISH10
Page 9
C
3 Separate the 2 housing parts by means of a
screwdriver.
C
4 Insert the screwdriver into the small slot
in the printed circuit board marked with
an arrow. Push the screwdriver down until
parts of the printed circuit board break
off.
C
5 Press the hook and remove the printed
circuit board.
C
6 Separate the rechargeable battery from
the appliance by means of a screwdriver.
Do not connect the appliance to the mains again
after it has been opened!
ENGLISH 11
Page 10

Guarantee & service
If you need information or if you have a
problem,please visit the Philips Web site at
www.philips.com or contact the Philips Customer
Care Centre in your country (you will find its
phone number in the worldwide guarantee
leaflet).If there is no Customer Care Centre in
your country,turn to your local Philips dealer or
contact the Service Department of Philips
Domestic Appliances and Personal Care BV.
ENGLISH12
Page 11
Wichtig
◗ Prüfen Sie,bevor Sie das Gerät in Betrieb
nehmen,ob die Spannungsangabe am Gerät
mit der örtlichen Netzspannung
übereinstimmt.
◗ Achten Sie darauf,dass das Gerät nicht nass
wird.
◗ Das Gerät ist nur zum Schneiden von
menschlichen Bärten bestimmt.Benutzen Sie
es niemals für andere Zwecke.
◗ Halten Sie das Gerät außer Reichweite von
Kindern.
◗ Laden Sie das Gerät nur bei
Umgebungstemperaturen zwischen 15cC und
35cC.Bewahren Sie es auch bei Temperaturen
in diesem Bereich auf.
Den Akku aufladen
Laden Sie den Akku voll auf,bevor Sie das Gerät
zum ersten Mal benutzen.
C
1 Achten Sie darauf,dass das Gerät
ausgeschaltet ist.
C
2 Stecken Sie den Gerätestecker in das
Gerät.
3 Stecken Sie dann den Netzstecker in die
Steckdose (100 bis 240 V Wechselstrom).
Wenn das Netzkabel dieses Gerätes
beschädigt ist,verwenden Sie sich bitte an
Ihren Kundendienst.
DEUTSCH 13
Page 12
C
◗ Nach ca.einer Stunde ist der Akku aufgeladen.
Jetzt blinkt die Kontroll-Lampe und zeigt an,
dass der Akku voll aufgeladen ist.
Nach ca.einer Stunde ist der Akku aufgeladen.
Jetzt blinkt die Kontroll-Lampe und zeigt an,dass
der Akku voll aufgeladen ist.
Lassen Sie das Gerät nicht länger als 24 Stunden
am Netz.
Mit dem voll aufgeladenen Akku können Sie das
Gerät ca.50 Minuten kabelfrei benutzen.
Verlängern Sie die Nutzungsdauer Ihres
Akkus
Wir empfehlen Ihnen,das Gerät nach dem ersten
Laden des Akkus so lange zu benutzen, bis der
Akku völlig leer ist.
Laden Sie den Akku nicht zwischen den
verschiedenen Anwendungen nach..
Warten Sie immer solange bis der Motor bei
einer Anwendung anhält.Setzen Sie die
angefangene Arbeit mit dem Gerät am Netz fort,
und laden Sie den Akku erst dann wieder auf.Vgl.den folgenden Abschnitt.Lassen Sie das Gerät
mindestens zweimal jährlich laufen,bis der Akku
leer ist.
Das Gerät am Netz betreiben
◗ So schneiden Sie den Bart mit dem Kabel am
Netz:
DEUTSCH14
CHARGE
Page 13
1 Schalten Sie das Gerät aus.Stecken Sie den
Gerätestecker in das Gerät und das
Steckernetzgerät in die Steckdose.Warten
Sie einige Sekunden,bis Sie das Gerät
einschalten.Ist der Akku ganz leer,so
warten Sie einige Minuten bis zum
Einschalten,denn das Gerät ist dann nicht
sofort betriebsbereit..
Betreiben Sie das Gerät nicht am Netz,wenn der
Akku voll aufgeladen ist.
Den Bart schneiden
Kämmen Sie den Bart/den Schnurbart vor dem
Gebrauch des Geräts stets mit einem feinen
Kamm aus.
Seien Sie bei der ersten Anwendung besonders
vorsichtig. Gehen Sie langsam, mit ruhigen und
kontrollierten Bewegungen vor.
Bartschneiden mit dem ScherkammAufsatz
C
1 Stellen Sie zunächst den Precision Zoom
Lock` auf die Position,die der
gewünschten Bartlänge entspricht.- Vgl.die
Tabelle.
Die eingestellte Position können Sie im Fenster
unter dem Precision Zoom Lock` ablesen.
B
Beginnen Sie bei der ersten Anwendung des
Geräts mit der längsten Barthaarlänge: Position 9.
DEUTSCH 15
9
9
Page 14
2 Schalten Sie das Gerät ein.
C
3 Den besten Erfolg erzielen Sie,wenn Sie
das Gerät gegen die natürliche
Bartwuchsrichtung führen.Achten Sie
darauf,dass der Kamm stets Kontakt zur
Haut behält.
C
4 Hat sich viel Barthaar im Kamm
angesammelt,so ziehen Sie den
Scherkamm-Aufsatz vom Gerät,und blasen
oder schütteln Sie das Haar aus dem
Aufsatz.Die eingestellte Barthaarlänge
wird dabei nicht verändert.
Tabelle der Barthaarlängen
DEUTSCH16
Barthaarlänge
1,5 mm
2,5 mm
4,0 mm
5,5 mm
7,5 mm
9,5 mm
12,0 mm
15,0 mm
18,0 mm
Position
1
2
3
4
5
6
7
8
9
Page 15

3-Tage-Bart schneiden
C
◗ Die Anwendung bei Position 1 ergibt einen
3-Tage-Bart.
Verwendung ohne den ScherkammAufsatz
Vollbart konturieren und einzelne Haare
zurückschneiden
C
1 Ziehen Sie den Scherkamm-Aufsatz vom
Gerät.
Ziehen Sie niemals an dem biegsamen Oberteil
des Scherkamm-Aufsatzes. Ziehen Sie stets an
dem unteren Teil.
2 Schalten Sie das Gerät ein.
C
3 Gehen Sie mit ruhigen und gleichmäßigen
Bewegungen vor.Berühren Sie die
Barthaare nur leicht mit dem Gerät.
Anwendung des Präzisionsschneiders
Schnurbart,Konturen und einzelne Haare
1 Nehmen Sie den Scherkamm-Aufsatz vom
Gerät.
DEUTSCH 17
Page 16
C
2 Schieben Sie den Präzisionsschneider hoch.
Ist das Gerät eingeschaltet,so beginnt der
Präszisionsschneider sofort zu arbeiten.
Hinweis:Die zentrale Schneideeinheit arbeitet
mit,wenn der Präzisionsschneider eingeschaltet
ist.
C
3 Halten Sie das Gerät beim Gebrauch
aufrecht.
Der hochschiebbare Präzisionsschneider ist auch
geeignet,die Bartkanten an Hals und Schläfen
beizuschneiden.
C
4 Schieben Sie den Präzisionsschneider nach
Gebrauch wieder in das Gerät zurück.
Jetzt können Sie den Scherkamm-Aufsatz wieder
auf dem Gerät anbringen.
Reinigung
Verwenden Sie zum Reinigen keine Scheuermittel
oder Lösungsmittel wie Alkohol,Benzin oder
Azeton.
1 Achten Sie darauf,daß das Gerät
ausgeschaltet und nicht ans Netz
angeschlossen ist.
2 Nehmen Sie den Scherkamm-Aufsatz vom
Gerät ab.
C
3 Klappen Sie die Schneideeinheit auf.
DEUTSCH18
Page 17

C
4 Reinigen Sie die Schneideeinheit und das
Innere des Geräts mit der beiliegenden
Bürste.
C
5 Schließen Sie die Schneideeinheit,indem
Sie sie auf das Gerät zurück drücken,bis
Sie ein Geräusch ("Klick") hören.
Das Gerät braucht nicht geölt zu werden.
Ersatz der Schneideeinheit
Eine verbrauchte oder beschädigte
Schneideeinheit darf nur durch eine original
Philips Schneideeinheit ersetzt werden.Wenden
Sie sich an das Philips Service Center.
1 Klappen Sie die Schneideeinheit auf.
C
2 Ziehen Sie die alte Schneideeinheit vom
Gerät ab.
C
3 Setzen Sie die beiden Laschen der neuen
Schneideeinheit in die Führungsschlitze am
Gerät.
4 Drücken Sie die Schneideeinheit an,bis Sie
ein Geräusch ("Klick") hören.
DEUTSCH 19
Page 18

Umweltschutz
Zum Schutze der Umwelt ist dieses Gerät mit
einem NiMH- (Nickel-Metallhydrid-)Akku
ausgerüstet,der weniger als 0,01 % Cdamium
enthält.
Entfernen Sie die wiederaufladbaren Batterien
wenn Sie das Gerät wegwerfen.
Sie sind als Verbraucher gesetzlich dazu
verpflichtet,gebrauchte Batterien und Akkus der
Wiederverwertung zuzuführen. Geben Sie sie bei
einer öffentlichen Sammelstelle Ihrer Gemeinde
oder an einer Verkaufsstelle für entsprechende
Geräte bzw.für Batterien und Akkus ab.
Der Akku gehört nicht zum normalen Hausmüll!
Sie können das Gerät auch dem PhilipsService
Center zustellen.Wir kümmern uns dann um eine
ordnungsgemäße Entsorgung.
1 Wenn Sie den Akku selbst entnehmen
wollen,so gehen Sie wie folgt vor:Ziehen
Sie den Stecker aus der Steckdose,und
lassen Sie den Motor solange laufen,bis er
anhält.
C
2 Lösen Sie die Schraube am Gehäuse des
Geräts.
DEUTSCH20
Page 19

C
3 Trennen Sie die beiden Teile des Gehäuses
mit einem Schraubendeher.
C
4 Setzen Sie den Schraubendreher in den
kleinen Schlitz,der mit einem Pfeil
gekennzeichnet ist.Drücken Sie den
Schraubendreher hinab,bis ein Teil des
Bauteils wegbricht.
C
5 Drücken Sie auf den Haken und nehmen
Sie das Bauteil heraus.
C
6 Trennen Sie den Akku mit dem
Schraubendreher vom Gerät.
Wenn der Akku entfernt worden ist, darf das
Gerät nicht mehr benutzt werden!
Garantie und Service
Wenden Sie sich mit Ihren Fragen,Wünschen und
Problemen bitte an das Philips Service Center in
Ihrem Lande. Sollte sich in Ihrem Lande kein
solches Center befinden,so wenden Sie sich bitte
an das Service Department von Philips Domestic
Appliances and Personal Care BV. Entnehmen Sie
die Telefonnummer bitte der beigefügten
Garantieschrift. Besuchen Sie uns auch auf der
Homepage www.philips.com.
DEUTSCH 21
Page 20

Viktig
◗ Før apparatet kobles til strømnettet,
kontroller at spenningen på apparatet
stemmer overens med nettspenningen i Deres
hjem.
◗ Pass på at maskinen ikke blir våt.
◗ Denne maskinen er bare beregnet på å
trimme skjegg.Ikke bruk den til noe annet.
◗ Oppbevar maskinen utilgjengelig for barn.
◗ Lad og oppbevar maskinen ved en temperatur
på mellom 15cC og 35cC.
Lading
Lad maskinen helt opp før De bruker den for
første gang.
C
1 Se til at maskinen er slått av.
C
2 Sett maskinpluggen inn i maskinen.
3 Koble nettledningen i stikkontakten
(100-240 V AC).
C
◗ Det grønne lyset vil være tent når maskinen
lades.
Det vil ta ca.1 time å lade batteriet helt. Det
grønne lyset blinker når batteriet er fulladet.
Lad ikke maskinen i mer enn 24 timer.
NORSK22
CHARGE
Page 21

En fulladet maskin kan brukes uten ledning i opptil
50 minutter.
Slik optimerer De levetiden til det
oppladbare batteriet
Første gang maskinen er ladet, anbefaler vi at De
bruker den til batteriet er helt tomt før det lades
opp igjen.
Ikke lad maskinen hver gang etter bruk.
Fortsett å bruke maskinen til motoren nesten
stanser under bruk. Lad deretter batteriet opp
igjen.Følg denne fremgangsmåten minst to ganger
i året.
Bruk med ledning
◗ Slik bruker De maskinen med ledning:
1 Slå trimmeren av, koble den til
strømnettet,og vent noen sekunder før
De slår maskinen på igjen.Hvis batteriet er
helt tomt,bør De vente i ett minutt før
De slår maskinen på,ettersom den ellers
kanskje ikke vil starte umiddelbart.
Bruk ikke maskinen med strøm når batteriet er
fulladet.
Trimming
Gre alltid skjegget og/eller barten med en
fintannet kam før De begynner trimmingen.
NORSK 23
Page 22

Hvis det er første gang De bruker maskinen,bør
De være spesielt forsiktig. Ikke flytt trimmeren for
fort rundt. Bruk jevne og forsiktige bevegelser.
Trimming med kam
C
1 Still inn Precision Zoom Lock` til ønsket
trimmelengde (se tabellen).
Innstillingen vises i vinduet under Precision Zoom
Lock`.
B
Hvis det er første gang De bruker maskinen, bør
De starte med å bruke høyeste innstilling for
trimmelengde: innstilling 9.
2 Slå på maskinen.
C
3 Mest effektiv trimming oppnår De ved å
føre trimmeren mot hårenes vokseretning.
Pass på at kammen hele tiden er i kontakt
med huden.
C
4 Hvis det har samlet seg mye hår i kammen,
må De ta den av maskinen og blåse
og/eller riste håret ut av kammen.Den
valgte innstillingen for trimmelengde vil
ikke bli endret når De gjør dette.
NORSK24
9
9
Page 23

Tabell for innstilling av trimmelengde
Trimming med den unike "tredagers"innstillingen
C
◗ Med innstilling 1 får De "tredagersskjegg".
Trimming uten kam
Helskjegg og enkelthår
C
1 Dra av kammen fra maskinen.
Trekk aldri i den bøyelige,øverste delen av
kammen.Ta i stedet tak i den nederste delen.
2 Slå på maskinen.
C
3 Bruk kontrollerte bevegelser.Berør håret
lett med trimmeren.
NORSK 25
skjegglengde
1,5 mm
2,5 mm
4,0 mm
5,5 mm
7,5 mm
9,5 mm
12,0 mm
15,0 mm
18,0 mm
innstilling
1
2
3
4
5
6
7
8
9
Page 24

Trimming med presisjonstrimmeren
Bart,konturer og enkelthår
1 Fjern kammen fra maskinen.
C
2 Skyv presisjonstrimmeren opp.Hvis
maskinen er slått på,vil
presisjonstrimmeren starte med én gang.
NB:Hovedkutteenheten fortsetter å gå også når
presisjonstrimmeren brukes.
C
3 Hold maskinen loddrett,og før den rundt
etter behov.
Presisjonstrimmeren kan også brukes til å finstusse
kanten av skjegg på hals og kinn.
C
4 Når De er ferdig med å bruke
presisjonstrimmeren,skyver De den inn i
maskinen igjen.
De kan nå sette kammen tilbake på maskinen
igjen.
Rengjøring
Bruk ikke slipemidler,avfettingsmidler eller væsker
som alkohol,bensin eller aceton for å rengjøre
maskinen.
1 Forsikre Dem om at maskinen er slått av
og koblet fra stikkontakten før De
begynner å rengjøre den.
2 Fjern kammen fra maskinen.
NORSK26
Page 25

C
3 Åpne kutteenheten.
C
4 Rengjør kutteenheten og innsiden av
maskinen med den medfølgende børsten.
C
5 Lukk kutteenheten ved å skyve den tilbake
på maskinen til den settes fast med et
klikk.
Apparatet trenger ikke smøring.
Utskifting av kutteenheten
En slitt eller ødelagt kutteenhet må bare skiftes ut
med en original Philishave-kutteenhet,som kan
anskaffes hos autoriserte Philips servicesentre.
1 Åpne kutteenheten.
C
2 Ta av den gamle kutteenheten ved å dra
den oppover.
C
3 Sett de to tappene på den nye
kutteenheten inn i spaltene på maskinen.
4 Skyv kutteenheten på plass på maskinen til
den settes fast med et klikk.
NORSK 27
Page 26

Miljø
Denne maskinen er utstyrt med et miljøvennlig
nikkelhydridbatteri, som inneholder mindre enn
0,01 % kadmium.
Ta ut det oppladbare batteriet før maskinen
kastes.
Kast ikke batteriet i det vanlige
husholdningsavfallet,men lever det på et offentlig
innsamlingssted.
De kan også ta maskinen med til et Philips
servicesenter,der De kan få hjelp til å ta ut
batteriet og bli kvitt det på en miljøvennlig måte.
1 Koble maskinen fra strømnettet,og la den
gå til motoren stopper.
C
2 Skru ut skruen i trimmeren.
C
3 Skill de to delene fra hverandre ved hjelp
av et skrujern.
C
4 Stikk skrujernet inn i den lille spalten i
kretskortet som er merket med en pil.
Trykk skrujernet ned slik at deler av
kretskortet løsner.
NORSK28
Page 27

C
5 Trykk på festekroken,og ta ut kretskortet.
C
6 Løsne det oppladbare batteriet fra
maskinen ved hjelp av et skrujern.
Ikke koble maskinen til strømnettet igjen etter at
den er blitt åpnet!
Garanti og service
Hvis De trenger service eller informasjon,kan De
se Philips' Web-område på www.philips.com eller
kontakte Philips Kundetjeneste (se telefonnummer
i garantiheftet). Hvis det ikke er noe Philips
Kundetjeneste-senter i landet hvor De befinner
Dem,kan De kontakte Deres lokale Philipsforhandler eller serviceavdelingen ved Philips
Domestic Appliances and Personal Care BV.
NORSK 29
Page 28

Viktigt
◗ Innan du ansluter apparaten till elnätet måste
du kontrollera att den spänning som anges på
apparaten motsvarar nätspänningen i ditt hem.
◗ Trimmern får inte bli våt.
◗ Apparaten är endast avsedd för trimning av
skägg på människor.Använd inte apparaten för
något annat ändamål.
◗ Håll apparaten utom räckhåll för barn.
◗ Ladda och förvara apparaten vid en
temperatur mellan 15cC och 35cC.
Laddning
Ladda trimmern helt innan du använder den
första gången.
C
1 Se till att apparaten är avstängd.
C
2 Anslut sladdkontakten till trimmern.
3 Anslut stickproppen till vägguttaget
(100-240V AC).
C
◗ Den gröna signallampan tänds för att ange att
apparaten laddas.
Det tar ca en timma att ladda batteriet helt.
Signallampan blinkar för att ange att batteriet är
fulladdat.
Ladda inte apparaten längre än 24 timmar.
SVENSKA30
CHARGE
Page 29

En fulladdad apparat kan användas sladdlöst upp
till 50 minuter.
Förläng livstiden för det uppladdningsbara
batteriet
När apparaten har laddats första gången
rekommenderar vi att du använder apparaten
ända tills batteriet är helt tomt.
Ladda inte apparaten under pågående
skäggtrimningar.
Fortsätt att använda apparaten tills motorn nästan
slutar att gå.Ladda sen batteriet. Följ detta
tillvägagångssätt åtminstone två gånger om året.
Användning med sladd
◗ Så här använder du apparaten ansluten till ett
vägguttag:
1 Stäng av trimsaxen,anslut apparaten till
elnätet och vänta några sekunder innan du
kopplar till den.Om batteriet är helt tomt,
vänta en minut innan du startar apparaten,
eftersom trimsaxen annars kanske inte
startar på en gång.
Använd inte apparaten ansluten till vägguttaget
om batteriet är helt fulladdat.
Trimning
Kamma alltid skägget och/eller mustaschen med
en fin kam innan du börjar trimningen.
SVENSKA 31
Page 30

Var försiktig om du trimmar skägget för första
gången.Rör inte på trimsaxen för fort utan gör
jämna och varsamma rörelser.
Trimning med distanskam
C
1 Vrid på Precision Zoom Lock` för att få
önskad längdinställning för trimningen (se
översikt).
Inställningen syns i fönstret under Precision Zoom
Lock`.
B
Om du utför trimning för första gången, starta
med maximal trimningsinställning, läge 9.
2 Starta apparaten.
C
3 För att trimma på det effektivaste sättet,
för du trimsaxen mot skäggväxten.Se till
att distanskammen alltid håller kontakten
med huden.
C
4 Om det har samlats mycket hår i kammen,
tar du av distanskammen och blåser bort
och/eller skakar håret ur kammen.Den
längdinställning du valt,förändras inte när
du gör detta.
SVENSKA32
9
9
Page 31

Inställningsöversikt för trimningslängder
Trimning med den unika "3-dagarsstubb" inställningen
C
◗ Använder du inställning 1 får du "3-dagars-
stubb".
Trimning utan distanskam
Helskägg och enstaka hårstrån
C
1 Tag av distanskammen genom att dra den
av apparaten.
Dra aldrig i den flexibla toppen på
distanskammen.Dra alltid i bottendelen.
2 Starta apparaten.
C
3 Gör välkontrollerade rörelser. Rör vid
håret lätt med trimsaxen.
SVENSKA 33
återstående skägglängd
1.5 mm
2.5 mm
4.0 mm
5.5 mm
7.5 mm
9.5 mm
12.0 mm
15.0 mm
18.0 mm
Inställning
1
2
3
4
5
6
7
8
9
Page 32

Precisionstrimning med pop-up
trimsaxen
Mustasch,hårlinjer och enstaka hårstrån.
1 Tag av distanskammen.
C
2 Skjut pop-upp trimsaxen uppåt.Om
apparaten är tillkopplad,börjar pop-up
trimsaxen att gå med en gång.
Observera.Trimsaxen fortsätter att gå även när
pop-up trimsaxen används.
C
3 Håll apparaten i lodrätt läge och utför
trimningen.
Pop-up trimsaxen är lämplig för att trimma
kanterna på skägget, halsen och kinderna.
C
4 När du är klar med användning av pop-up
trimsaxen skjuter du den tillbaka i
apparaten.
Nu kan du sätta tillbaka distanskammen på
apparaten.
Rengöring
Använd inte nötande rengöringsmedel eller
vätskor som sprit, bensin eller aceton för att
rengöra trimmern.
1 Se till att apparaten är avstängd och inte
ansluten till elnätet innan du påbörjar
rengöringen.
SVENSKA34
Page 33

2 Ta av kamtillsatsen.
C
3 Fäll upp trimsaxen.
C
4 Rengör trimsaxen och apparatens insida
med den medlevererade borsten.
C
5 Stäng trimsaxen genom att fälla den
tillbaka på apparaten tills du hör ett klick.
Apparaten behöver inte smörjas.
Byte av trimsax
En sliten eller skadad trimsax ska endast bytas
mot Philishave original trimsax som finns hos
auktoriserade Philips servicombud.
1 Fäll upp trimsaxen.
C
2 Avlägsna den gamla trimsaxen genom att
dra den uppåt.
C
3 Placera de två tapparna på den nya
trimsaxen i ledskårorna.
SVENSKA 35
Page 34

4 Skjut trimsaxen tillbaka på apparaten tills
du hör ett klick.
Miljön
För att skydda miljön är den här apparaten
utrustad med ett nickel-metall-hydrid batteri som
innehåller mindre än 0,01 % kadmium.
Ta ut det uppladdningsbara batteriet när du en
dag kasserar apparaten.
Kasta inte bort batteriet med vanligt hushållsavfall
utan lämna över det till en av kommunen
godkänd uppsamlingsplats.
Du kan också ta med apparaten till Philips
serviceombud där man hjälper till att ta ut
batteriet och avyttrar det på ett för miljön säkert
sätt.
1 Koppla loss apparaten från elnätet och låt
den gå tills motorn stannar.
C
2 Lösgör skruven i höljet till apparaten.
C
3 Skilj på höljets två delar med hjälp av en
skruvmejsel.
SVENSKA36
Page 35

C
4 Stick in skruvmejseln i den lilla springan i
kretskortet som märkts med en pil.Skjut
ned skruvmejseln tills delarna i kretskortet
bryts loss.
C
5 Tryck på haken och ta ut kretskorten.
C
6 Skilj det uppladdningsbara batteriet från
apparaten med hjälp av en skruvmejsel.
Anslut inte apparaten till elnätet igen när den har
öppnats!
Garanti och service
Om du behöver service eller information eller
har något problem,sök upp Philips webbsida på
www.philips.com eller kontakta Philips kundtjänst
i ditt land (rätt telefonnummer finner du i
världsgarantibroschyren). Om det inte finns någon
kundtjänst i ditt land,vänd dig till din lokale
återförsäljare eller kontakta serviceavdelningen
på Philips Domestic Appliances and Personal
Care B.V.
SVENSKA 37
Page 36

Tärkeää
◗ Tarkasta,että laitteen jännitemerkintä vastaa
paikallista verkkojännitettä,ennen kuin
yhdistät laitteen pistorasiaan.
◗ Varo kastamasta laitetta.
◗ Älä käytä laitetta kylvyssä,suihkussa,suihkun
läheisyydessä tai ulkona sateessa.Jos laite on
pudonnut veteen,irrota ensin verkkolaite
pistorasiasta,ennen kuin nostat laitteen
vedestä.
◗ Tarkastuta veteen pudonnut laite huollossa
ennen käyttöönottoa.
◗ Älä käytä laitteen puhdistamiseen vettä.
◗ Tämä laite on tarkoitettu vain ihmisparran
käsittelyyn.Älä käytä laitetta mihinkään
muuhun tarkoitukseen.
◗ Pidä laite poissa lasten ulottuvilta.
◗ Lataa ja säilytä laite 15cC - 35cC:n
lämpötilassa.
Lataus
Lataa laite täyteen ennen ensimmäistä
käyttökertaa.
C
1 Varmista,että laitteesta on katkaistu virta.
C
2 Työnnä pieni pistoke laitteeseen.
3 Liitä pistotulppa pistorasiaan
(100-240 V AC).
SUOMI38
Page 37

C
◗ Vihreä merkkivalo syttyy ja palaa latauksen
ajan.
Akun täyteen lataaminen kestää noin 1 tunnin.
Merkkivalo alkaa vilkkua, kun akku on ladattu
täyteen.
Älä lataa laitetta yli 24 tuntia.
Täyteen ladatulla laitteella voi ajaa keskimäärin
50 minuuttia ilman johtoa.
Akun eliniän pidentäminen
Kun laite on ladattu täyteen ensimmäisen kerran,
sitä kannattaa käyttää niin kauan,kunnes akku on
aivan tyhjä.
Älä lataa laitetta uudelleen käyttökertojen välillä.
Jatka laitteen käyttöä siihen asti,kunnes moottori
melkein pysähtyy. Lataa sitten akku uudelleen.Tee
tällä tavalla vähintään kaksi kertaa vuodessa.
Käyttö johdon kanssa
◗ Laitteen käyttö sähköverkkoon liitettynä:
1 Katkaise laitteesta virta,liitä pistorasiaan ja
odota muutama sekunti ennen
käynnistämistä.Jos akku on aivan tyhjä,
odota yksi minuutti ennen käynnistämistä,
sillä laite ei ehkä heti käynnisty.
Älä käytä laitetta verkkovirralla silloin kun akku on
ladattu täyteen.
SUOMI 39
CHARGE
Page 38

Parran rajaus ja tasaus
Kampaa parta ja/tai viikset aina ennen tasausta
tiheällä kammalla.
Jos käytät laitetta ensimmäistä kertaa, ole
varovainen.Älä liikuta laitetta liian nopeasti. Liikuta
laitetta tasaisesti ja rauhallisesti.
Käyttö ohjauskamman kanssa
C
1 Kierrä Precision Zoom Lock`-rengasta
haluamasi parran pituuden kohdalle (katso
taulukosta).
Asetus näkyy Precision Zoom Lock`-renkaan
alapuolella olevasta ikkunasta.
B
Jos käytät laitetta ensimmäistä kertaa,aloita
suurimmasta pituudesta eli asennosta 9.
2 Käynnistä laite.
C
3 Parhaiten parran tasaaminen käy
liikuttamalla laitetta parran kasvusuuntaa
vastaan.Pidä huoli,että ohjauskamman
alapuoli koskettaa koko ajan ihoa.
C
4 Jos ohjauskampaan on kerääntynyt paljon
karvoja,irrota ohjauskampa ja puhalla ja/tai
ravista karvat pois.Asetettu pituussäätö ei
muutu.
SUOMI40
9
9
Page 39

Parranpituuden asetustaulukko
'Sänkiparran' tasaaminen
C
◗ 'Sänkiparta' saadaan käyttämällä asentoa 1.
Käyttö ilman ohjauskampaa
Täysparrat ja yksittäiset karvat
C
1 Vedä ohjauskampa irti laitteesta.
Älä vedä ohjauskampaa taipuisasta yläosasta.Vedä
aina ohjauskamman pohjasta.
2 Käynnistä laite.
SUOMI 41
parran pituus
1,5 mm
2,5 mm
4,0 mm
5,5 mm
7,5 mm
9,5 mm
12,0 mm
15,0 mm
18,0 mm
asento
1
2
3
4
5
6
7
8
9
Page 40

C
3 Toimi harkitusti ja hallitusti.Kosketa
partakarvaa kevyesti parranrajaimella.
Käyttö ylös nousevan rajaimen kanssa
Viikset,parran rajat ja yksittäiset partakarvat
1 Irrota ohjauskampa.
C
2 Työnnä rajain ylös. Jos virta on kytketty,
rajain alkaa heti toimia.
Huomaa:varsinainen terä jatkaa käymistä rajainta
käytettäessä.
C
3 Pidä laite pystyasennossa ja tee tasaisia
vetoja.
Rajaimella voidaan myös muotoilla parran rajat
kaulassa ja poskissa.
C
4 Kun lopetat rajaimen käyttämisen,paina se
takaisin laitteeseen.
Nyt voit taas yhdistää ohjauskamman laitteeseen.
Puhdistus
Älä käytä laitteen puhdistamiseen syövyttäviä
naarmuttavia tai alkoholia,bensiiniä,asetonia yms
sisältäviä puhdistusaineita.
SUOMI42
Page 41

1 Varmista että laitteen toiminta on katkaistu
ja irrota pistotulppa pistorasiasta,ennen
kuin aloitat puhdistamisen.
2 Irrota ohjauskampa.
C
3 Käännä terä auki.
C
4 Puhdista terä ja laitteen sisäpuoli mukana
olevalla harjalla.
C
5 Sulje terä painamalla se takaisin laitteeseen,
niin että kuulet napsahduksen.
Laitetta ei tarvitse öljytä.
Terän vaihto
Kuluneen tai rikkoutuneen terän tilalle saa vaihtaa
vain alkuperäisen Philishave-terän,jota on
saatavissa Philips Kodinkoneiden valtuuttamista
huoltoliikkeistä.
1 Käännä terä auki.
C
2 Vedä vanha terä pois ylöspäin.
SUOMI 43
Page 42

C
3 Aseta uuden terän kaksi tappia ohjausuriin.
4 Paina terä paikalleen laitteeseen,niin että
kuulet napsahduksen.
Ympäristöasiaa
Ympäristön suojelemiseksi tässä laitteessa on
nikkeli-metallihydridiakku,joka sisältää kadmiumia
alle 0,01 %.
Poista akku ennen laitteen hävittämistä.
Älä heitä pois akkua tavallisen talousjätteen
mukana,vaan toimita se asianmukaiseen
keräyspaikkaan.
Voit myös toimittaa laitteen Philips Kodinkoneiden
valtuuttamaan huoltoliikkeeseen,joka hoitaa akun
hävittämisen ympäristön kannalta turvallisesti.
1 Irrota laite sähköverkosta ja anna laitteen
käydä,kunnes moottori pysähtyy.
C
2 Kierrä auki kotelon ruuvi.
C
3 Irrota kotelon kaksi puolta toisistaan
ruuvitaltan avulla.
SUOMI44
Page 43

C
4 Työnnä ruuvitaltta piirikortissa nuolella
merkittyyn pieneen rakoon.Paina
ruuvitalttaa alaspäin,kunnes piirikortin osat
katkeavat.
C
5 Paina hakasta ja poista piirilevyt.
C
6 Irrota akku laitteesta ruuvitaltan avulla.
Älä yhdistä laitetta pistorasiaan enää sen jälkeen
kun se on avattu!
Takuu & huolto
Jos haluat lisää tietoa tai laitteen kanssa on
ongelmia,käy Philipsin Internet-sivuilla osoitteessa
www.philips.com tai ota yhteys Philipsin
asiakaspalveluun (puhelinnumero löytyy
takuulehtisestä).Voit myös ottaa yhteyden Philipsmyyjään tai Philips Kodinkoneiden valtuuttamaan
huoltoliikkeeseen tai suoraan Philips Domestic
Appliances and Personal Care BV:n huoltoosastoon.
SUOMI 45
Page 44

Vigtigt
◗ Før der sættes strøm til apparatet,
kontrolleres det,at spændingsangivelsen på
apparatet svarer til den lokale netspænding.
◗ Sørg for, at apparatet ikke bliver vådt.
◗ Apparatet er udelukkende beregnet til
trimning af menneskeskæg.Brug aldrig
apparatet til andre formål.
◗ Sørg for, at børn ikke kan få fat i apparatet.
◗ Apparatet skal oplades og opbevares ved
temperaturer mellem 15cC og 35cC.
Opladning
Apparatet skal oplades helt, inden det tages i brug
første gang.
C
1 Sørg for, at apparatet er slukket.
C
2 Sæt det lille stik ind i apparatet.
3 Sæt netstikket i en stikkontakt (100-240 V).
C
◗ Den grønne kontrollampe begynder at lyse,
hvilket indikerer, at apparatet er under
opladning.
En fuld opladning tager ca.1 time. Når
kontrollampen begynder at blinke,er apparatet
fuldt opladet.
DANSK46
CHARGE
Page 45

Lad ikke apparatet stå til opladning i mere end
24 timer.
En fuld opladning giver mulighed for op til 50
minutters ledningsfri brug af skægtrimmeren.
Sådan får det opladelige batteri længst mulig
levetid
Når batteriet er fuldt opladet første gang,
anbefales det at bruge apparatet til batteriet løber
helt tør for strøm.
Undlad at oplade apparatet mellem hver trimning.
Brug apparatet til motoren stopper af sig selv.
Oplad derefter batteriet. Følg denne procedure
mindst 2 gange årligt.
Brug med ledning
◗ Anvendelse af trimmeren ved tilslutning til
lysnettet:
1 Sluk trimmeren,sæt stikket i stikkontakten
(som tændes) og vent et par sekunder,
inden apparatet tændes. Hvis batteriet er
helt uden strøm,ventes 1 minut inden
apparatet tændes,da trimmeren måske
ikke starter med det samme.
Brug ikke apparatet via lysnettet, når batteriet er
fuldt opladet.
DANSK 47
Page 46
Trimning
Red altid skæg og/eller moustache igennem med
en fin kam,inden trimningen påbegyndes.
Vær ekstra påpasselig, hvis det er første gang, De
bruger en trimmer. Hav ikke for travlt og brug
kun langsomme og rolige bevægelser.
Trimning med påsat kam
C
1 Drej Precision Zoom Lock` til den
ønskede længdeindstilling (se tabellen).
Den valgte indstilling ses i ruden under Precision
Zoom Lock`.
B
Er det første gang De bruger trimmeren,
anbefales det at starte med maximal
skæglængde:Indstilling 9.
2 Tænd for apparatet.
C
3 Den bedste resultat opnås ved at bevæge
trimmeren mod skæggets vækstretning.
Sørg for, at kammens overflade hele tiden
er i kontakt med huden.
C
4 Hvis der har samlet sig for meget afklippet
skæg i kammen,tages den af.Kammen
renses ved at ryste den og/eller puste
hårene væk. Den indstillede skæglængde
bibeholdes.
DANSK48
9
9
Page 47

Indstillings-tabel
Trimning med den unikke indstilling
til det rå "skægstubbe-look"
C
◗ Brug indstilling 1 til det rå "skægstubbe-look".
Trimning uden kam
Til fuldskæg og lange hår
C
1 Fjern kammen ved at trækk e den af apparatet.
Træk aldrig i den øverste, flexible del af kammen
Træk kun i den nederste del.
DANSK 49
Skæglængde efter trimning
1,5 mm
2,5 mm
4,0 mm
5,5 mm
7,5 mm
9,5 mm
12,0 mm
15,0 mm
18,0 mm
Indstilling
1
2
3
4
5
6
7
8
9
Page 48

2 Tænd for apparatet.
C
3 Brug rolige og kontrollerede bevægelser.
Trimmeren skal kun berøre skægget
ganske let.
Trimning med pop-up præcisionstrimmeren
Til mostache, tilretning og enkelte hår
1 Tag kammen af.
C
2 Skyd pop-up trimmeren opad. Når
skægtrimmeren er tændt,starter pop-up
præcisions-trimmeren med det samme.
Bemærk: Skærhovedet kører samtidig med,at
pop-up præcisions-trimmeren bruges.
C
3 Hold apparatet lodret mod huden under
brug.
Pop-up præcisions-trimmeren er også velegnet til
tilretning af skægkanter på hals og kinder.
C
4 Efter brug skubbes pop-up trimmeren
tilbage i apparatet.
Herefter kan kammen sættes på igen.
Rengøring
Brug aldrig skrappe rengørings- og skuremidler
eller væsker som f.eks.sprit, benzin eller acetone
til rengøring af apparatet.
DANSK50
Page 49

1 Før rengøringen skal apparatet være
slukket og stikket taget ud af
stikkontakten.
2 Tag kammen af.
C
3 Vip skærhovedet op.
C
4 Rens skærhoved og apparatets inderside
med den medleverede børste.
C
5 Luk skærhovedet ved at vippe det tilbage i
apparatet,til der høres et "klik".
Det er ikke nødvendigt at smøre apparatet.
Udskiftning af skærhovedet
Et slidt eller beskadiget skærhoved må kun
udskiftes med et originalt Philishave skærhoved,
som fås eller bestilles hos Deres Philips forhandler.
1 Vip skærhovedet op.
C
2 Tag det gamle skærhoved af ved at trække
det opad.
DANSK 51
Page 50

C
3 De to indhak på det nye skærhoved
placeres i slidserne i apparatet.
4 Tryk skærhovedet ned på plads,til der
høres et "klik".
Miljøbeskyttelse
For at beskytte miljøet er dette apparat udstyret
med et miljøvenligt batteri,som indeholder
mindre end 0,01% cadmium.
Tag det opladelige batteri ud, når apparatet til sin
tid kasseres.
Smid ikke batteriet ud sammen med det normale
husholdningsaffald,men aflevér det på et officielt
sted for indsamling af brugte batterier.
Batteriet kan også afleveres til Philips,som gerne
hjælper Dem af med det på en miljømæssig sikker
og forsvarlig måde.
1 Tag stikket ud af stikkontakten og lad
apparatet køre,til det stopper af sig selv.
C
2 Skru skruen på apparatet ud.
C
3 Adskil de 2 dele ved hjælp skruetrækkeren.
DANSK52
Page 51

C
4 Sæt skruetrækkeren ned i den smalle slids i
printpladen,som er mærket med en pil.
Tryk ned på skruetrækkeren,så noget af
printpladen knækker af.
C
5 Bræk krogen og tag printpladen ud.
C
6 Frigør det opladelige batteri ved hjælp af
skruetrækkeren.
Slut aldrig strøm til apparatet igen, efter det har
været åbnet.
Garanti og service
For alle yderligere oplysninger eller ved eventuelle
problemer med apparatet henvises venligst til
Philips hjemmeside på adressen:www.philips.com
eller det lokale Philips Kundecenter (telefonnumre
findes i den verdensomspændende garantifolder).
Hvis der ikke findes et kundecenter i Deres land,
bedes De venligst kontakte Deres lokale Philips
forhandler eller Serviceafdelingen i Philips
Domestic Appliances and Personal Care BV.
Dette apparat opfylder de gældende EUdirektiver vedrørende sikkerhed og radiostøj.
DANSK 53
Page 52

4203 000 48813
 Loading...