

Page 1

ENGLISH 4
ESPAÑOL 18
FRANÇAIS 33
PORTUGUÊS
75
89
48
HQ6730, HQ6725, HQ6710, HQ6707
Page 2

4
ENGLISH
Introduction
The shaver comes with two different kinds of
NIVEA FOR MEN cartridges: Extra Fresh Shaving
Gel for a fresh sensation during and after shaving
and Moisturising Shaving Lotion for sensitive skin.
This gives you the opportunity to try them out and
discover which one suits your skin type best.
Extra Fresh Shaving Gel
,
NIVEA FOR MEN Extra Fresh Shaving Gel refreshes
the skin during shaving. It softens the beard hairs
and lets the shaver glide gently over the skin while
ensuring proper skin contact, resulting in a closer
shave. It leaves the skin feeling soft, supple and
revitalised.
The Extra Fresh Shaving Gel with advanced
moisturising agents helps protect the skin against
shaving burn, skin irritation and moisture loss. It
effectively improves the condition of the skin.
Moisturising Shaving Lotion
,
NIVEA FOR MEN Moisturising Shaving Lotion has
been specially formulated to meet the needs of
easily irritated and sensitive skin. It softens the beard
hairs and lets the shaver glide gently over the skin
while ensuring proper skin contact, resulting in a
closer and gentler shave. It leaves the skin feeling soft,
supple and healthy.
The Moisturising Shaving Lotion with advanced
moisturising agents helps protect sensitive skin
against shaving burn and moisture loss. It effectively
improves the condition of the skin by actively
moisturising the skin during shaving.
Important
Read these instructions for use carefully before using
the appliance and save them for future reference.
Page 3
ENGLISH 5
Only use the powerplug and the charging stand
,
supplied.
The powerplug transforms 100-240 volts to a
,
safe low voltage of less than 24 volts.
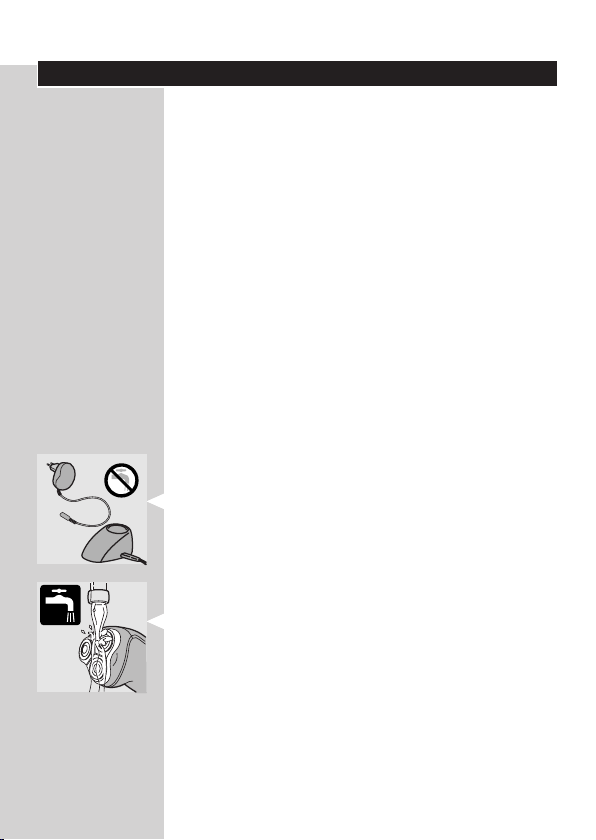
The powerplug contains a transformer. Do not
,
cut off the powerplug to replace it with another
plug, as this will cause a hazardous situation.
Do not use a damaged powerplug or charging
,
stand.
If the powerplug or charging stand is damaged,
,
always have it replaced by one of the original
type in order to avoid a hazard.
Charge, store and use the appliance at a
,
temperature between 5 cC and 35 cC.
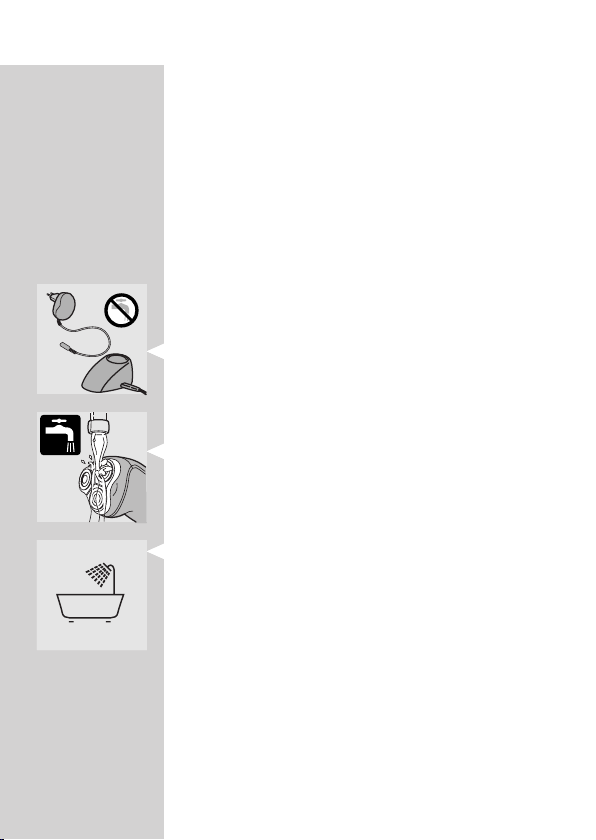
Make sure the powerplug does not get wet.
,
Never immerse the charging stand in water nor
,
rinse it under the tap.
Do not leave the shaver in the plugged-in
,
charging stand for more than 24 hours.
The appliance is watertight and can be cleaned
,
under the tap.
Be careful with hot water. Always check if the water
is not too hot, to prevent your hands from getting
burnt.
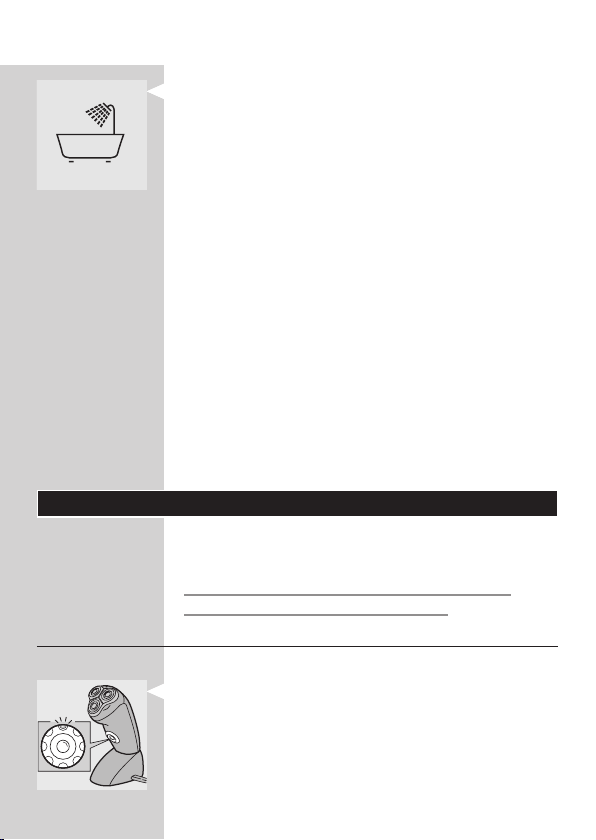
The appliance complies with the internationally
,
approved IEC safety regulations and can be safely
used in the bath or shower.
For the best shaving results, shaving gel/lotion
,
should be pumped up frequently.
Check if the gel and lotion supplied with the
,
appliance contain ingredients (see back of
cartridge) to which you are allergic before you
start using the appliance. Do not use the gel
and/or lotion if you are allergic to one or more
ingredients.
Page 4
ENGLISH6
Electromagnetic elds (EMF)
This Philips appliance complies with all standards
regarding electromagnetic elds (EMF). If handled
properly and in accordance with the instructions
in this user manual, the appliance is safe to use
according to scientic evidence available today.
Charging
Charging takes approx. 8 hours.
Do not leave the shaver in the plugged-in charging
stand for more than 24 hours.
Charge indications
Charging
As soon as you start charging the empty shaver,
,
the green pilot light goes on.
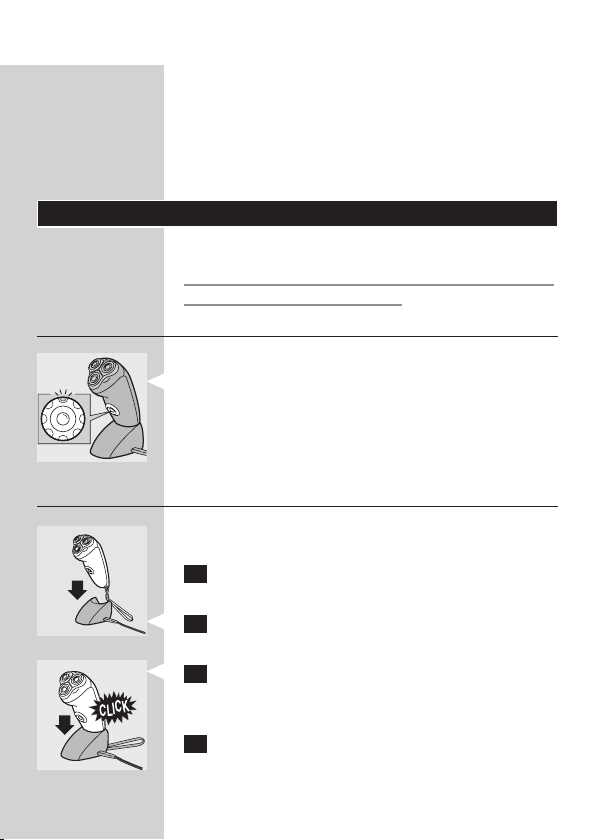
Charging the appliance
Charge the appliance when the motor stops or
starts running slower.
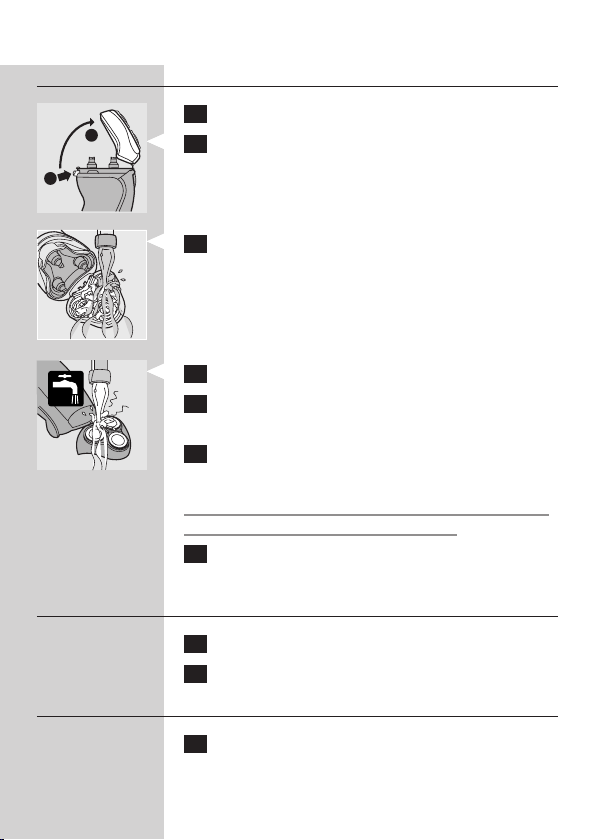
1 Insert the small plug into the charging stand
and put the powerplug in the wall socket.
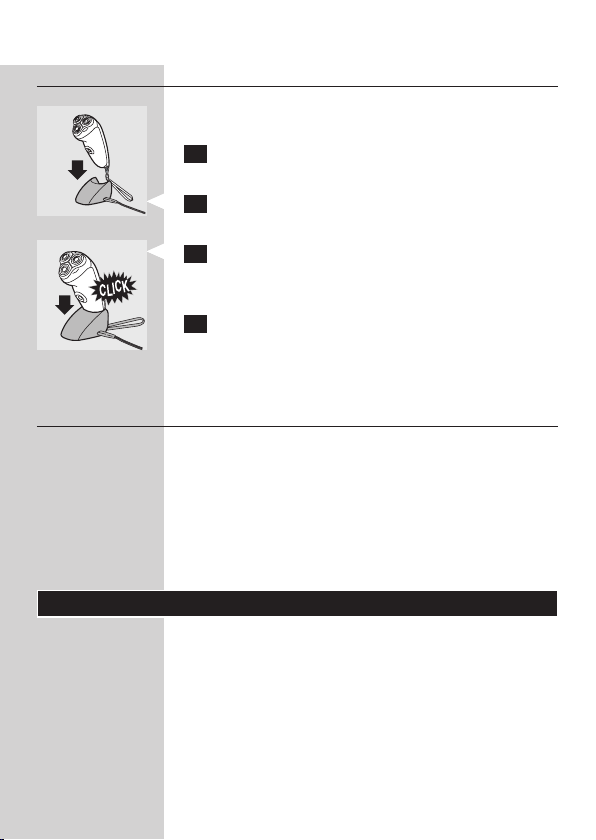
2 Place the shaver in the charging stand.
3 Press until you hear a click.
The shaver automatically switches off when it is
placed in the charging stand.
4 Remove the powerplug from the wall socket
and pull the small plug out of the charging
stand when the batteries have been fully
Page 5

ENGLISH 7
charged.You can then leave the appliance in the
charging stand.
Cordless shaving time
HQ6730 and HQ6710:
A fully charged shaver has a cordless shaving time of
up to 45 minutes.
HQ6725 and HQ6707:
A fully charged shaver has a cordless shaving time of
up to 40 minutes.
Cartridges
Cartridges with NIVEA FOR MEN shaving gel/lotion
are available in boxes containing ve cartridges and
one small plastic pump.
The NIVEA FOR MEN shaving gel/lotion in the
cartridges will keep for 32 months when stored at
temperatures between 0 cC and +40 cC.
Only use Philips NIVEA FOR MEN Cool Skin
(HQ170 and HQ171) cartridges.
One Philips NIVEA FOR MEN Cool Skin cartridge
contains enough gel/lotion for approx. 10 shaves.
Do not throw the pump away when you replace
an empty cartridge. You will need it for all ve
cartridges.
For hygienic reasons, we advise you to insert a
new pump when you start using a new set of ve
cartridges.
Remove the shaving gel/lotion cartridge from the
appliance when you are not going to use the shaver
for more than one week.
When you have run out of shaving gel/lotion
cartridges and you do not know where to buy them,
contact the Customer Care Centre in your country
(see ‘Guarantee & ser vice’).
Page 6
121
2
121
2
ENGLISH8
Inserting cartridges
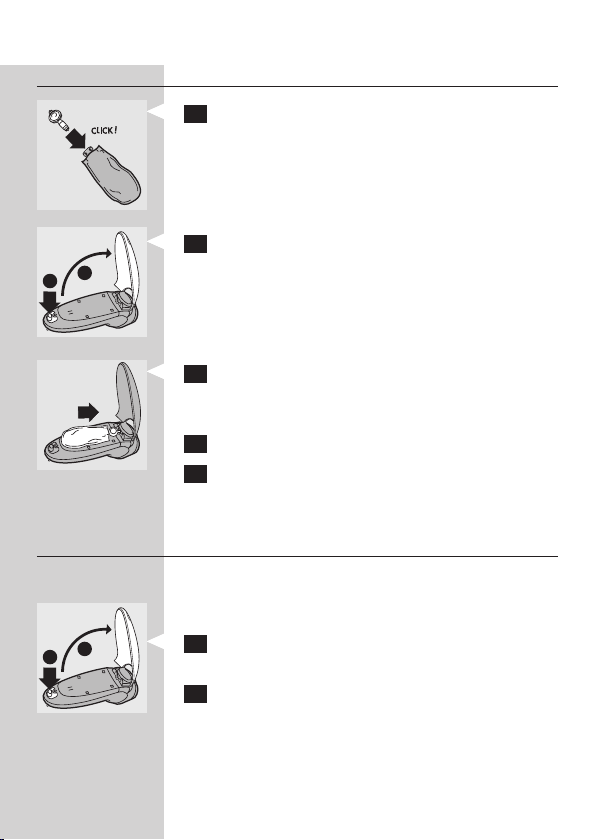
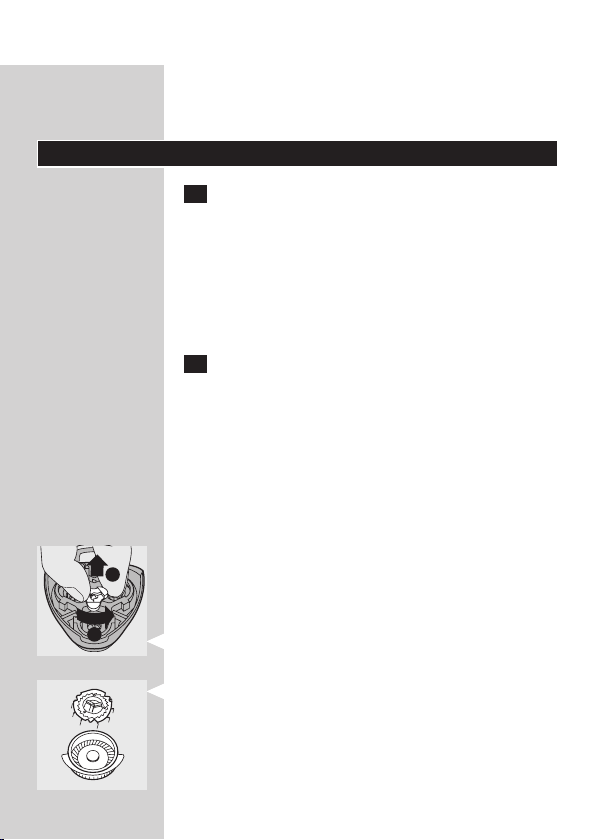
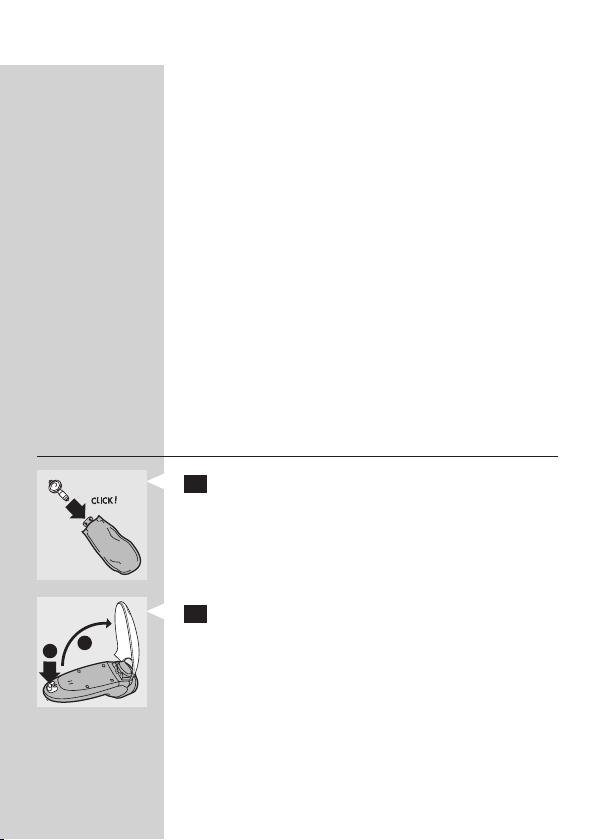
1 When you start using a new set of cartridges,
take the pump out of its bag and push it into
a cartridge until it locks into position with a
click.
2 Move the release slide downwards and open
the cover of the cartridge compartment.
3 Slide the cartridge with the pump into the
shaver. It only ts properly if the white side of
the pump is pointing upwards.
4 Close the cover (you will hear a click).
5 Press the yellow pump button a few times
until the NIVEA FOR MEN shaving gel/lotion
appears. The shaver is now ready for use.
Replacing cartridges
Do not throw the pump away when you replace
an empty cartridge. You will need it for the other
cartridges.
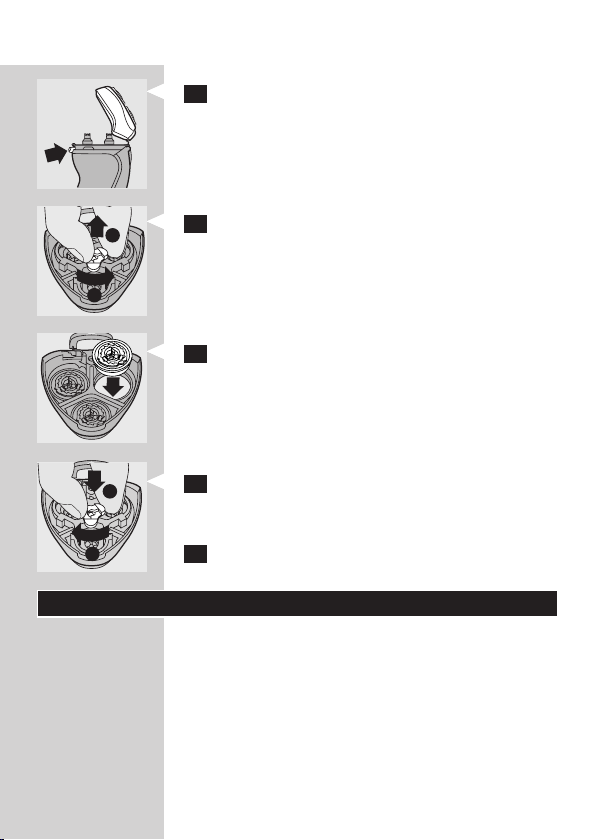
1 Move the release slide downwards and open
the cover of the cartridge compartment.
2 Remove the empty cartridge and pull out the
pump.
Page 7

ENGLISH 9
3 Push the pump into a new cartridge until it
locks into position with a click.
4 Slide the cartridge with the pump into the
shaver. It only ts properly if the white side of
the pump is pointing upwards. Close the cover.
Using the appliance
Shaving
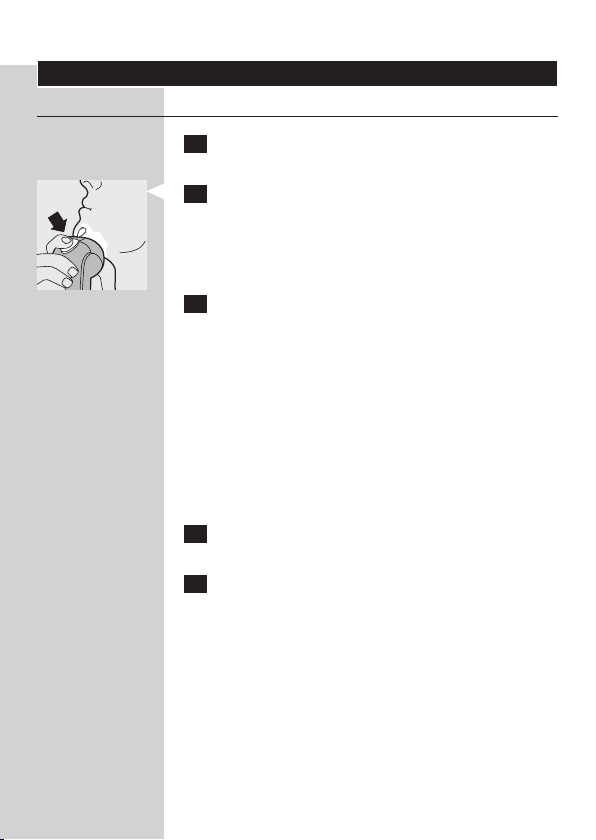
1 Switch the shaver on by pressing the on/off
button once.
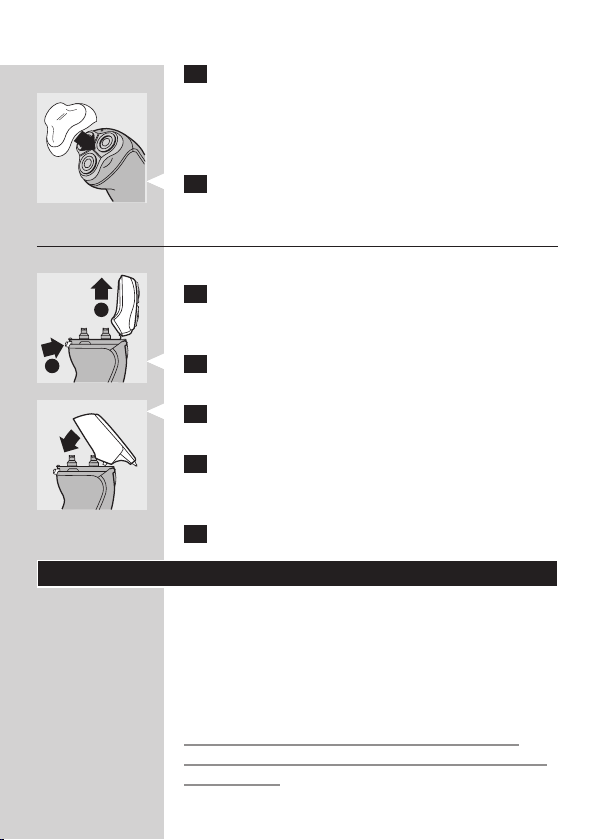
2 Press the yellow pump button to apply NIVEA
FOR MEN shaving gel/lotion to your skin. Move
the shaver over your skin, making both straight
and circular movements.
3 While shaving, press the pump button
frequently to apply more NIVEA FOR MEN
shaving gel/lotion so that the shaver keeps
gliding smoothly over your face.
When you have run out of shaving gel/lotion, you
,
can also use the shaver without it on a dry face.
Your skin may need 2 or 3 weeks to get
,
accustomed to the Philips shaving system.
4 Switch the shaver off by pressing the on/off
button once.
Page 8
212
1
ENGLISH10
5 Clean the shaver (see chapter ‘Cleaning and
maintenance’).
Rinse the shaver after each shave. Remove the
cartridge if you are not going to use the appliance
for more than one week.
6 Put the protection cap on the shaver every
time you have used it, to prevent damage.
Trimming (HQ6730 and HQ6725 only)
For grooming sideburns and moustache.
1 Switch the shaver off.
Clean the shaver before you attach the trimmer (see
chapter ‘Cleaning and maintenance’).
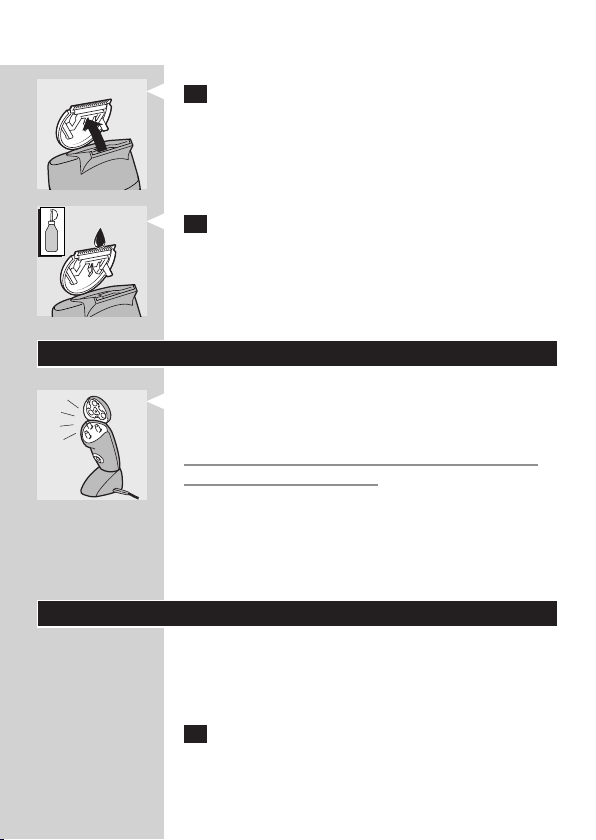
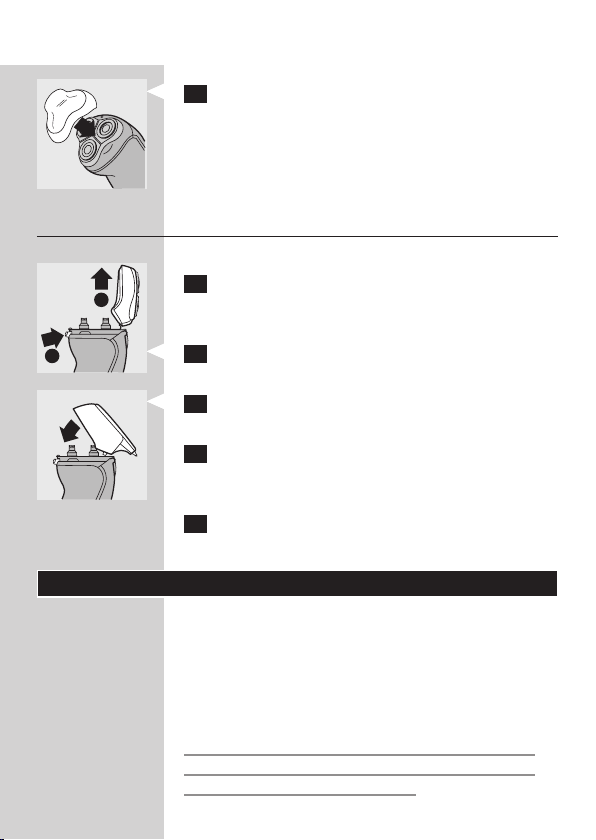
2 Press the release button (1) and pull the
shaving unit off the shaver (2).
3 Tilt the trimmer slightly backwards and t it
onto the shaver.
4 Remove the trimmer by pressing the release
button again and pulling the trimmer off the
shaver.
5 Put the shaving unit back onto the shaver.
Cleaning and maintenance
Regular cleaning guarantees better shaving
performance.
To maintain optimal shaving performance and to
keep the shaver clean, you have to thoroughly rinse
the shaving unit and hair chamber with hot water
after every shave.
Be careful with hot water. Always check if the
water is not too hot, to prevent your hands from
getting burnt.
Page 9
212
1
22
ENGLISH 11
Shaving unit and hair chamber
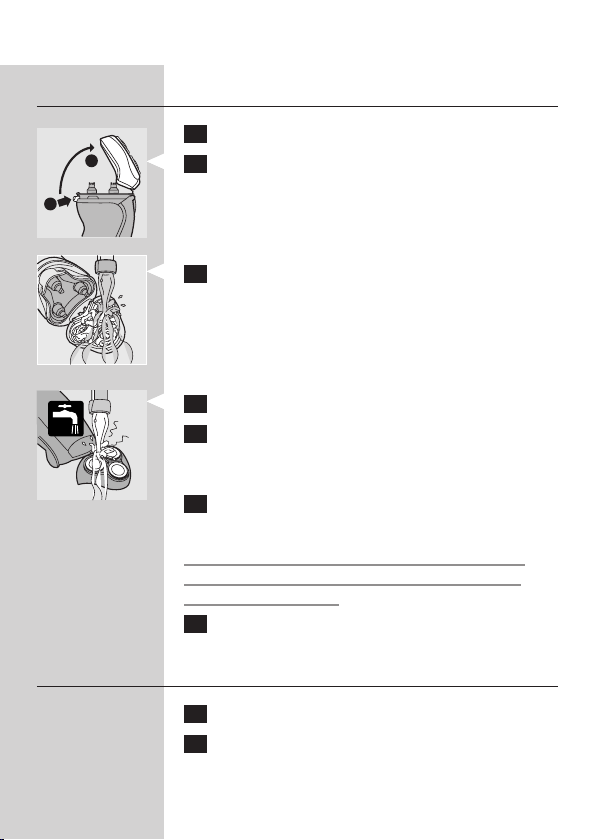
1 Switch the shaver off.
2 Press the release button (1) and open the
shaving unit (2).
3 Clean the shaving unit and the hair chamber by
rinsing them under a hot tap for some time.
4 Rinse the outside of the shaving unit.
5 Make sure the inside of the shaving unit and
the hair chamber have been cleaned properly.
6 Close the shaving unit and shake off excess
water.
Never dry the shaving unit with a towel or tissue,
as this may damage the shaving heads.
7 Open the shaving unit again and leave it open
to let the appliance dry completely.
Charging stand
1 Unplug the charging stand.
2 Clean the charging stand with a moist cloth.
Trimmer (HQ6730 and HQ6725 only)
1 Clean the outside of the trimmer with the
brush supplied after every use.
Page 10
OILOIL
ENGLISH12
2 Open the trimmer to clean it on the inside.
3 Lubricate the trimmer teeth with a drop of
sewing machine oil every six months.
Storage
There are three ways to store the shaver:
1 you can store the shaver in the charging stand,
even when it is wet.
Always unplug the charging stand before storing
the wet or dry shaver in it.
2 you can store the shaver in the pouch supplied.
3 you can store the shaver by hanging it from
the hanging cord, which can be attached to the
appliance by means of the clip. This is the best
way to let the appliance dry.
Replacement
Replace the shaving heads every two years for
optimal shaving results.
Replace damaged or worn shaving heads with
HQ167 Philips Cool Skin shaving heads only.
1 Switch the shaver off.
Page 11
1
1
2
1
1
2
111
1
ENGLISH 13
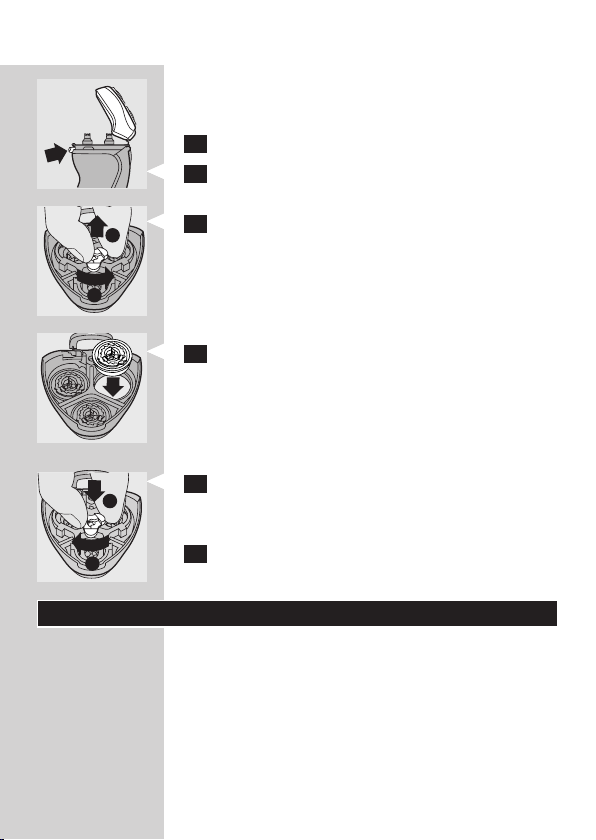
2 Press the release button (1) and open the
shaving unit (2).
3 Turn the wheel anticlockwise (1) and remove
the retaining frame (2).
4 Remove the shaving heads and place new ones
in the shaving unit.
5 Put the retaining frame back into the shaving
unit, press the wheel (1) and turn it clockwise
(2).
6 Put the shaving unit back onto the shaver.
Accessories
The following accessories are available:
HQ8000/800 powerplug.
-
HQ167 Philips Cool Skin shaving heads.
-
HQ170 NIVEA FOR MEN Cool Skin Moisturising
Shaving Lotion.
HQ171 NIVEA FOR MEN Cool Skin Extra Fresh
Shaving Gel.
Page 12
ENGLISH14
Environment
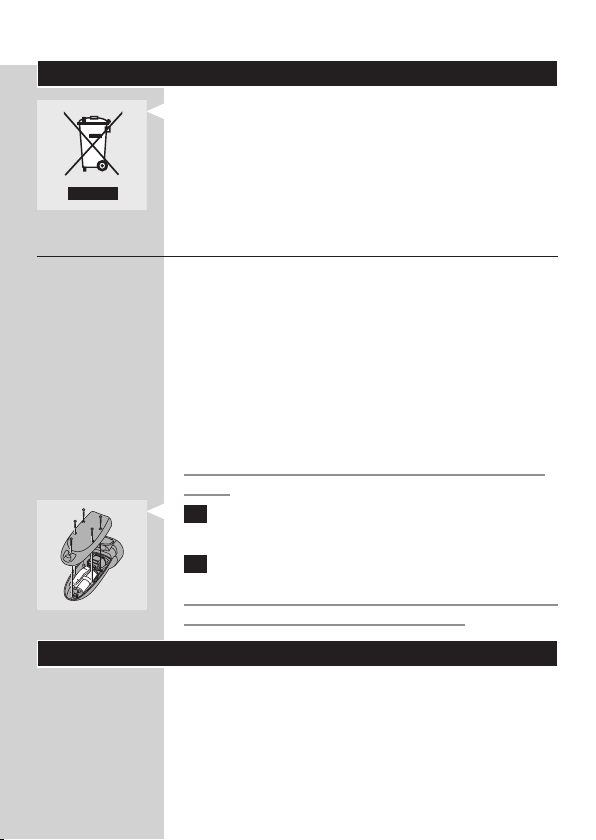
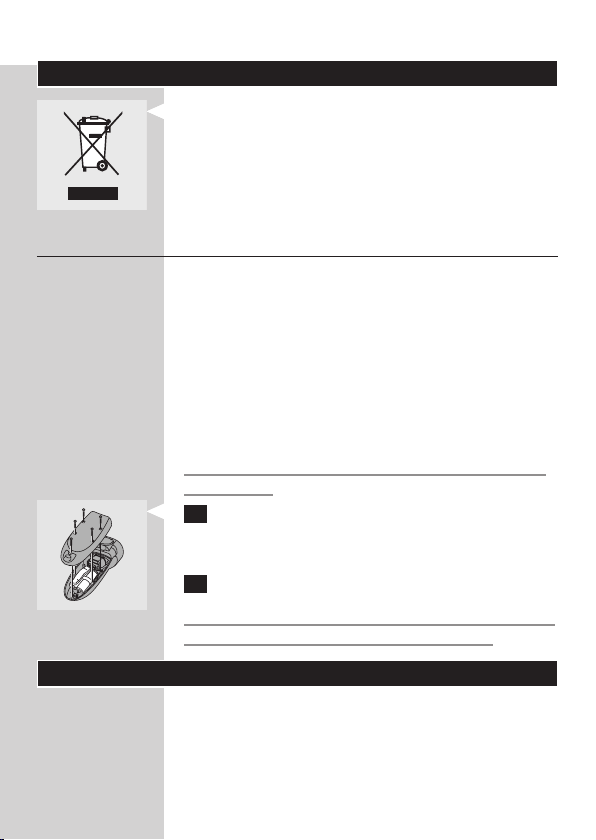
Do not throw the appliance away with the
,
normal household waste at the end of its life,
but hand it in at an ofcial collection point for
recycling. By doing this you will help to preserve
the environment.
Disposal of the batteries
The built-in rechargeable battery contains substances
that may pollute the environment. Always remove
the battery before discarding the appliance or
handing it in at an ofcial collection point. Dispose
of the battery at an ofcial collection point for
batteries. If you have trouble removing the battery,
you can also take the appliance to a Philips service
centre, which will remove the battery for you and
will dispose of it in an environmentally safe way.
Only remove the batteries if they are completely
empty.
1 Let the shaver run until it stops, undo the
screws and open the shaver.
2 Remove the batteries.
Do not put the shaver back into the charging stand
after the batteries have been removed.
Guarantee & service
If you need information or if you have a
problem, please visit the Philips website at
www.philips.com or contact the Philips Customer
Care Centre in your country (you will nd its phone
number in the worldwide guarantee leaet). If there
is no Customer Care Centre in your country, turn
Page 13
1
1
2
1
1
2
ENGLISH 15
to your local Philips dealer or contact the Service
Department of Philips Domestic Appliances and
Personal Care BV.
Troubleshooting
1
The shaving heads do not move smoothly over
the skin.
Cause: not enough shaving gel/lotion has been
,
applied.
Solution: press the pump button a few times
,
until sufcient NIVEA FOR MEN shaving
gel/lotion has been released to allow the shaving
heads to move smoothly over your face again.
2 Reduced shaving performance
Cause 1: the shaving heads are dirty. The shaver
,
has not been cleaned immediately after use
and/or has not been rinsed long enough and/or
the water used to rinse the shaver was not hot
enough
Solution 1: clean the shaver thoroughly before
,
you continue shaving. See chapter ‘Cleaning and
maintenance’.
Cause 2: long hairs are obstructing the shaving
,
heads.
Solution 2:
,
1 Press the release button and open the shaving
unit.
2 Turn the wheel anticlockwise (1) and remove
the retaining frame (2).
3 Clean the cutters and guards.
Do not clean more than one cutter and guard
at a time, since they are all matching sets. If you
accidentally mix up the cutters and guards, it
Page 14

ENGLISH16
may take several weeks before optimal shaving
performance is restored.
4 Remove the hairs with the brush supplied.
5 Put the shaving heads back into the shaving unit.
Put the retaining frame back into the shaving
unit, press the wheel and turn it clockwise.
6 To prevent long hairs from obstructing the
shaving heads, remove the shaving heads once a
month and clean them with the brush supplied.
Cause 3: the shaving heads are damaged or worn.
,
Solution 3: replace the shaving heads. See
,
chapter ‘Replacement’.
3 The shaver does not work when the on/off
button is pressed.
Cause 1: the batteries are empty
,
Solution 1: recharge the batteries. See chapter
,
‘Charging’.
Cause 2: dried-up shaving gel/lotion is blocking
,
the shaving heads.
Solution 2: clean the shaving heads thoroughly.
,
See chapter ‘Cleaning and maintenance’.
Cause 3: the shaving heads are damaged.
,
Solution 3: replace the shaving heads. See
,
chapter ‘Replacement’.
4 The cover of the cartridge compartment
cannot be closed
Cause 1: the cartridge has not been inserted
,
correctly.
Insert the cartridge correctly. It only ts
,
properly into the shaver if the white side of the
pump is pointing upwards.
Cause 2: the cartridge has not been pushed far
,
enough into the shaver.
Solution 2: press the cartridge until it locks into
,
position with a click.
Page 15

ENGLISH 17
5 The NIVEA FOR MEN shaving gel/lotion has
changed colour or has turned watery.
Cause: the NIVEA FOR MEN shaving gel/lotion
,
has not been stored at the right temperature.
,
Solution: Insert a new cartridge.
6 Skin irritation occurs
,
Cause 1: your skin has not yet become
accustomed to this shaving system.
,
Solution 1: allow 2-3 weeks for your skin to get
accustomed to this shaving system.
,
Cause 2: the shaving gel/lotion irritates your skin.
,
Solution 2A: try the other type of NIVEA FOR
MEN cartridge.
,
Solution 2B: Wet your face before shaving with
the shaving gel/lotion.
If the irritation does not disappear within 24 hours,
we advise you to stop using the shaving gel/lotion.
Page 16

18
ESPAÑOL
Introducción
La afeitadora se suministra con dos tipos diferentes
de cartuchos NIVEA FOR MEN: un gel extra
refrescante para el afeitado que da sensación de
frescor durante y después del afeitado y una loción
hidratante para el afeitado para pieles sensibles. De
este modo podrá probar ambos y descubrir cuál se
adapta mejor a su tipo de piel.
Gel extra refrescante para el afeitado
,
El gel extra refrescante para el afeitado NIVEA FOR
MEN refresca la piel durante el afeitado. Suaviza el
pelo de la barba y hace que la afeitadora se deslice
suavemente por la piel, garantizando un contacto
adecuado con la misma y proporcionando así un
afeitado más apurado. Deja la piel suave, exible y
revitalizada.
El gel extra refrescante con agentes hidratantes
avanzados protege la piel contra quemaduras,
irritación y pérdida de hidratación durante el
afeitado. Mejora ecazmente el estado de la piel.
Loción hidratante para el afeitado
,
La loción hidratante para el afeitado de NIVEA
FOR MEN está especialmente formulada para las
necesidades de las pieles sensibles y fácilmente
irritables. Suaviza el pelo de la barba y hace que
la afeitadora se deslice suavemente por la piel,
garantizando un contacto adecuado con la misma
y proporcionando así un afeitado más apurado
y menos agresivo. Deja la piel suave, exible y
saludable.
La loción hidratante para el afeitado con agentes
hidratantes avanzados protege las pieles sensibles
contra las quemaduras y la pérdida de hidratación
del afeitado. Mejora ecazmente el estado de la piel
hidratándola activamente durante el afeitado.
Page 17
ESPAÑOL 19
Importante
Antes de usar el aparato, lea atentamente estas
instrucciones de uso y consérvelas por si necesitara
consultarlas en el futuro.
Utilice sólo la clavija adaptadora y el soporte de
,
carga suministrados.
La clavija adaptadora transforma la corriente de
,
100 - 240 voltios a un bajo voltaje de seguridad
inferior a 24 voltios.
La clavija adaptadora tiene un transformador.
,
No corte la clavija adaptadora para sustituirla
por otra clavija, ya que ello podría provocar
situaciones de peligro.
No utilice una clavija adaptadora dañada o un
,
soporte de carga dañados.
Si la clavija adaptadora o el soporte de carga
,
están dañados, sustitúyalos siempre por otros
del modelo original para evitar situaciones de
peligro.
Cargue, guarde y utilice el aparato a una
,
temperatura entre 5cC y 35cC.
Asegúrese de que la clavija adaptadora no se
,
moje.
No sumerja nunca el soporte de carga en agua
,
ni lo enjuague bajo del grifo.
No deje la afeitadora en el soporte de carga
,
enchufado durante más de 24 horas.
El aparato es hermético y puede lavarse bajo el
,
grifo.
Tenga cuidado con el agua caliente. Compruebe
siempre que el agua no esté demasiado caliente para
evitar quemarse las manos.
Page 18
ESPAÑOL20
El aparato cumple las normas de seguridad
,
IEC aprobadas internacionalmente, y se puede
utilizar de manera segura en el baño o en la
ducha.
Para obtener los mejores resultados de afeitado,
,
bombee gel o loción frecuentemente.
Antes de comenzar a utilizar el aparato,
,
compruebe que ni el gel ni la loción que se
suministran con el aparato (consulte el dorso
del cartucho) contienen componentes a los que
es alérgico. No utilice el gel ni la loción si es
alérgico a uno o más de sus componentes.
Campos electromagnéticos (CEM)
Este aparato Philips cumple todos los estándares
sobre campos electromagnéticos (CEM). Si se utiliza
correctamente y de acuerdo con las instrucciones
de este manual, el aparato se puede usar de
forma segura según los conocimientos cientícos
disponibles hoy en día.
Carga
La afeitadora tarda aproximadamente 8 horas en
cargarse.
No deje la afeitadora en el soporte de carga
enchufado durante más de 24 horas.
Indicaciones de carga
Carga
En cuanto se empiece a cargar la afeitadora
,
descargada, el piloto verde se iluminará.
Page 19
ESPAÑOL 21
Carga del aparato
Cargue el aparato cuando el motor se pare o
empiece a funcionar más despacio.
1 Inserte la clavija pequeña en el soporte de
carga y enchufe la clavija adaptadora a la red.
2 Coloque la afeitadora en el soporte de carga.
3 Presione hasta que oiga un “clic”.
La afeitadora se apaga automáticamente cuando se
coloca en el soporte de carga.
4 Desenchufe la clavija adaptadora de la red y la
clavija pequeña del soporte de carga cuando la
batería esté completamente cargada. Después
puede dejar el aparato en el soporte de carga.
Tiempo de afeitado sin cable
Modelos HQ6730 y HQ6710:
Una afeitadora completamente cargada proporciona
un tiempo de afeitado sin cable de hasta 45 minutos.
Modelos HQ6725 y HQ6707:
Una afeitadora completamente cargada proporciona
un tiempo de afeitado sin cable de hasta 40 minutos.
Cartuchos
Los cartuchos con gel o loción para el afeitado
NIVEA FOR MEN están disponibles en cajas que
contienen cinco cartuchos y una pequeña bomba de
plástico.
El gel o loción para el afeitado NIVEA FOR MEN de
los cartuchos se conservará en buenas condiciones
durante 32 meses si se almacenan a temperaturas
entre 0cC y +40cC.
Page 20
121
2
ESPAÑOL22
Use sólo cartuchos Philips NIVEA FOR MEN Cool
Skin (HQ170 y HQ171).
Un cartucho Philips NIVEA FOR MEN Cool Skin
contiene gel o loción suciente para unos 10
afeitados.
No tire la bomba cuando sustituya un cartucho
vacío. La necesitará para los otros cinco cartuchos.
Por razones higiénicas, le aconsejamos que
introduzca una nueva bomba cuando empiece a usar
un nuevo conjunto de cinco cartuchos.
Cuando no vaya a usar la afeitadora durante más de
una semana, saque del aparato el car tucho de gel o
loción.
Cuando se acaben los cartuchos de gel o loción
para el afeitado y no sepa dónde adquirirlos,
póngase en contacto con el Servicio Philips de
Atención al Cliente de su país (consulte “Garantía y
servicio”).
Cómo insertar los cartuchos
1 Cuando comience a usar un paquete nuevo
de cartuchos, saque la bomba de la bolsa e
introdúzcala en el cartucho hasta que encaje en
su posición con un clic.
2 Deslice el botón de liberación hacia abajo
y abra la cubierta del compartimento del
cartucho.
Page 21

121
2
ESPAÑOL 23
3 Deslice el cartucho con la bomba en la
afeitadora. Sólo se acopla adecuadamente si el
lado blanco de la bomba está hacia arriba.
4 Cierre la cubierta (oirá un clic).
5 Presione el botón amarillo de la bomba unas
cuantas veces hasta que aparezca el gel o la
loción para el afeitado NIVEA FOR MEN. Ya
puede utilizar la afeitadora.
Cómo sustituir los cartuchos
No tire la bomba cuando sustituya un cartucho
vacío. La necesitará para los otros cartuchos.
1 Deslice el botón de liberación hacia abajo
y abra la cubierta del compartimento del
cartucho.
2 Saque el cartucho vacío y quite la bomba.
3 Coloque la bomba en un cartucho nuevo y
empújela hasta que encaje en su posición con
un clic.
4 Deslice el cartucho con la bomba en la
afeitadora. Sólo se acopla adecuadamente si
el lado blanco de la bomba está hacia arriba.
Cierre la cubierta.
Page 22
ESPAÑOL24
Uso del aparato
Afeitado
1 Encienda la afeitadora presionando una vez el
botón de encendido/apagado.
2 Presione el botón amarillo de la bomba para
aplicar gel o loción para el afeitado NIVEA
FOR MEN sobre la piel. Desplace la afeitadora
sobre la piel con movimientos rectos y
circulares.
3 Mientras se afeita, presione con frecuencia
el botón de la bomba para aplicar más gel o
loción para el afeitado NIVEA FOR MEN, de
modo que la afeitadora se deslice suavemente
sobre el rostro.
Si se acaba el gel o la loción para el afeitado,
,
también puede usar la afeitadora sobre la piel
seca.
Puede que su piel necesite de 2 a 3 semanas
,
para acostumbrarse al sistema de afeitado
Philips.
4 Apague la afeitadora presionando una vez el
botón de encendido/apagado.
5 Limpie la afeitadora (consulte el capítulo
“Limpieza y mantenimiento”).
Enjuague la afeitadora después de cada uso. Quite el
cartucho si no va a usar el aparato durante más de
una semana.
Page 23
212
1
ESPAÑOL 25
6 Después de usar la afeitadora, coloque siempre
la tapa protectora para evitar que se deteriore.
Recorte (sólo modelos HQ6730 y HQ6725)
Para arreglar las patillas y el bigote.
1 Apague la afeitadora.
Limpie la afeitadora antes de colocar el cortapatillas
(consulte el capítulo “Limpieza y mantenimiento”).
2 Presione el botón de liberación (1) y saque la
unidad de afeitado de la afeitadora (2).
3 Incline el cortapatillas ligeramente hacia atrás e
introdúzcalo en la afeitadora.
4 Para sacar el cortapatillas, presione el botón
de liberación de nuevo y tire del cortapatillas
fuera de la afeitadora.
5 Vuelva a colocar la unidad de afeitado en la
afeitadora.
Limpieza y mantenimiento
Una limpieza frecuente garantiza mejores resultados
en el afeitado.
Para mantener un rendimiento óptimo en el afeitado
y la afeitadora limpia, debe aclarar bien la unidad de
afeitado y la cámara de recogida del pelo con agua
caliente después de cada uso.
Tenga cuidado con el agua caliente. Compruebe
siempre que el agua no esté demasiado caliente
para evitar quemarse las manos.
Page 24
212
1
22
ESPAÑOL26
Unidad de afeitado y cámara de recogida del
pelo
1 Apague la afeitadora.
2 Pulse el botón de liberación (1) y abra la
unidad de afeitado (2).
3 Limpie la unidad de afeitado y la cámara de
recogida del pelo enjuagándolas durante un
rato con agua caliente del grifo.
4 Enjuague el exterior de la unidad de afeitado.
5 Asegúrese de que el interior de la unidad de
afeitado y la cámara de recogida del pelo se
han limpiado adecuadamente.
6 Cierre la unidad de afeitado y sacuda el exceso
de agua.
No seque nunca la unidad de afeitado con una
toalla o un paño, ya que esto podría dañar los
cabezales de afeitado.
7 Vuelva a abrir la unidad de afeitado y déjela
abierta para que se seque completamente.
Soporte de carga
1 Desenchufe el soporte de carga.
2 Limpie el soporte de carga con un paño
húmedo.
Page 25

OILOIL
ESPAÑOL 27
Cortapatillas (sólo modelos HQ6730 y HQ6725)
1 Después de cada uso, limpie el exterior del
cortapatillas con el cepillo que se suministra.
2 Abra el cortapatillas para limpiarlo por dentro.
3 Cada seis meses lubrique los dientes del
cortapatillas con una gota de aceite de máquina
de coser.
Almacenamiento
Hay tres modos de guardar la afeitadora:
1 Puede guardar la afeitadora en el soporte de
carga, incluso cuando esté mojada.
Desenchufe siempre el soporte de carga antes de
colocar la afeitadora, ya esté seca o húmeda.
2 Puede guardar la afeitadora en la funda que se
suministra.
3 Otra manera de guardar la afeitadora es colgarlo
del cordón para colgar que se suministra, que
se puede jar al aparato mediante la pinza. Es
la mejor manera para dejar que se seque el
aparato.
Sustitución
Para lograr un resultado óptimo de afeitado, cambie
los cabezales de afeitado cada dos años.
Page 26
1
1
2
1
1
2
111
1
ESPAÑOL28
Sustituya los cabezales de afeitado gastados o
deteriorados sólo por cabezales de afeitado Philips
HQ167 Cool Skin.
1 Apague la afeitadora.
2 Pulse el botón de liberación (1) y abra la
unidad de afeitado (2).
3 Gire la rueda en sentido contrario al de
las agujas del reloj (1) y quite el marco de
retención (2).
4 Quite los cabezales de afeitado y coloque unos
nuevos en la unidad de afeitado.
5 Coloque de nuevo el marco de retención en
la unidad de afeitado, presione la rueda (1) y
gírela en el sentido de las agujas del reloj (2).
6 Vuelva a colocar la unidad de afeitado en la
afeitadora.
Accesorios
Están disponibles los siguientes accesorios:
Clavija adaptadora HQ8000/800.
-
Cabezales de afeitado Philips HQ167 Cool Skin.
Loción hidratante para el afeitado Cool Skin de
-
NIVEA FOR MEN HQ170.
Gel extra refrescante para el afeitado Cool Skin
-
de NIVEA FOR MEN HQ171.
Page 27
ESPAÑOL 29
Medio ambiente
Al nal de su vida útil, no tire el aparato junto
,
con la basura normal del hogar. Llévelo a un
punto de recogida ocial para su reciclado.
De esta manera ayudará a conservar el medio
ambiente.
Cómo deshacerse de las baterías
La batería recargable incorporada contiene
sustancias que pueden contaminar el medio
ambiente. Extraiga siempre la batería antes de
deshacerse del aparato o de llevarlo a un punto de
recogida ocial. Deposite la batería en un lugar de
recogida ocial. Si no puede extraer la batería, puede
llevar el aparato a un servicio de asistencia técnica
de Philips, donde la extraerán y se desharán de ella
de forma no perjudicial para el medio ambiente.
Extraiga las baterías sólo si están completamente
descargadas.
1 Deje que la afeitadora funcione hasta que se
pare. A continuación, aoje los tornillos y abra
la afeitadora.
2 Quite las baterías.
Después de haber quitado las baterías, no vuelva a
poner la afeitadora en el soporte de carga.
Garantía y servicio
Si necesita información o tiene algún problema,
visite la página Web de Philips en www.philips.com,
o póngase en contacto con el Servicio de Atención
al Cliente de Philips en su país (hallará el número
de teléfono en el folleto de la garantía). Si no hay
Page 28

1
1
2
1
1
2
ESPAÑOL30
Servicio de Atención al Cliente de Philips en su
país, diríjase a su distribuidor local Philips o póngase
en contacto con el Service Depar tment de Philips
Domestic Appliances and Personal Care BV.
Guía de resolución de problemas
1
Los cabezales de afeitado no se desplazan
fácilmente por la piel.
Causa: no se ha aplicado suciente gel/loción
,
hidratante para el afeitado.
Solución: presione el botón de la bomba unas
,
cuantas veces hasta que haya suciente cantidad
de gel o loción para el afeitado NIVEA FOR
MEN para permitir que los cabezales de afeitado
se vuelvan a deslizar fácilmente por el rostro.
2 Menor rendimiento en el afeitado
Causa 1: los cabezales de afeitado están sucios.
,
La afeitadora no se ha limpiado inmediatamente
después de usarla, no se ha enjuagado durante
suciente tiempo o el agua usada para enjuagar
la afeitadora no estaba sucientemente caliente.
Solución 1: limpie bien el aparato antes de seguir
,
afeitándose. Consulte el capítulo “Limpieza y
mantenimiento”.
Causa 2: hay pelos largos que obstruyen los
,
cabezales de afeitado.
Solución 2:
,
1 Presione el botón de liberación y abra la unidad
de afeitado.
2 Gire la rueda en sentido contrario al de las
agujas del reloj (1) y quite el marco de retención
(2).
Page 29

ESPAÑOL 31
3 Limpie las cuchillas y los protectores.
No limpie más de una cuchilla y su protector al
mismo tiempo, ya que forman conjuntos entre
sí. Si mezcla accidentalmente las cuchillas y los
protectores, puede que tarde varias semanas en
volver a obtener el óptimo rendimiento en el
afeitado.
4 Quite los pelos con el cepillo que se suministra.
5 Coloque de nuevo el marco de retención en la
unidad de afeitado, presione la rueda y hágala
girar en el sentido de las agujas del reloj.
6 Para evitar que los pelos largos obstruyan los
cabezales de afeitado, sáquelos una vez al mes y
límpielos con el cepillo que se suministra.
Causa 3: los cabezales de afeitado están gastados
,
o deteriorados.
Solución 3: sustituya los cabezales de afeitado.
,
Consulte el capítulo “Sustitución”.
3 La afeitadora no funciona al pulsar el botón de
encendido/apagado.
Causa 1: las baterías están descargadas.
,
Solución 1: recargue las baterías. Consulte el
,
capítulo “Carga”.
Causa 2: hay loción o gel de afeitado seco y ha
,
bloqueado los cabezales de afeitado.
Solución 2: limpie a fondo los cabezales de
,
afeitado (consulte el capítulo “Limpieza y
mantenimiento”).
Causa 3: los cabezales de afeitado están dañados.
,
Solución 3: sustituya los cabezales de afeitado.
,
Consulte el capítulo “Sustitución”.
4 No se puede cerrar la tapa del compartimento
del cartucho.
Page 30

ESPAÑOL32
Causa 1: el cartucho no se ha insertado
,
correctamente.
Inserte correctamente el cartucho. Sólo se
,
acopla adecuadamente en la afeitadora si el lado
blanco de la bomba está hacia arriba.
Causa 2: el cartucho no se ha introducido lo
,
suciente en la afeitadora.
Solución 2: empuje el cartucho hasta que encaje
,
en su posición con un clic.
5 El gel o la loción para el afeitado NIVEA FOR
MEN ha cambiado de color o se ha vuelto
acuoso.
Causa: el gel o la loción para el afeitado NIVEA
,
FOR MEN no se ha guardado a la temperatura
correcta.
Solución: introduzca un cartucho nuevo.
,
6 La piel se irrita.
Causa 1: la piel no se ha acostumbrado todavía a
,
este sistema de afeitado.
Solución 1: su piel puede tardar de dos a tres
,
semanas en acostumbrarse a este sistema de
afeitado.
Causa 2: el gel o la loción para el afeitado irrita
,
su piel.
Solución 2A: utilice el otro tipo de cartucho de
,
NIVEA FOR MEN.
Solución 2B: mójese la cara antes de afeitarse
,
con el gel o la loción para el afeitado.
Si la irritación no desaparece en 24 horas, le
recomendamos que deje de utilizar el gel o la
loción para el afeitado.
Page 31

FRANÇAIS
Introduction
Votre rasoir est livré avec 2 types de cartouches
NIVEA FOR MEN différentes : un gel de rasage
extra rafraîchissant pour une sensation de fraîcheur
pendant et après le rasage et une lotion de rasage
hydratante pour peau sensible. Vous pouvez ainsi
essayer et choisir celui ou celle qui convient le mieux
à votre type de peau.
Gel de rasage extra rafraîchissant
,
Le gel de rasage extra rafraîchissant NIVEA FOR
MEN rafraîchit la peau pendant le rasage. Il adoucit
les poils et permet au rasoir de glisser doucement
sur la peau pour un rasage de près. La peau sera
douce, souple et revitalisée.
Le gel de rasage extra rafraîchissant aux agents
hydratants protège la peau contre le dessèchement,
l’irritation ou la déshydratation.
Lotion de rasage hydratante
,
La lotion de rasage hydratante NIVEA FOR MEN a
été spécialement conçue pour les peaux sensibles et
facilement irritées. Elle adoucit les poils de la barbe
et permet au rasoir de glisser doucement sur la peau
pour un rasage de très près. La peau sera douce,
souple et revitalisée.
La lotion de rasage hydratante aux agents hydratants
protège les peaux sensibles contre le dessèchement
et la déshydratation. Elle améliore efcacement l’état
de la peau en l’hydratant pendant le rasage.
33
Important
Avant d’utiliser l’appareil, lisez les instructions cidessous et conservez ce mode d’emploi pour un
usage ultérieur.
Utilisez exclusivement le cordon d’alimentation
,
et la base de recharge fournis.
Page 32

FRANÇAIS34
Le cordon d’alimentation transforme la tension
,
de 100-240 V en une tension de sécurité de
moins de 24 V.
Le cordon d’alimentation contient un
,
transformateur. N’essayez pas de remplacer la
che du cordon pour éviter tout accident.
N’utilisez pas le cordon d’alimentation ou la base
,
de recharge s’ils sont endommagés.
Dans le cas où ces derniers sont endommagés,
,
remplacez-les par un cordon ou une base
d’origine an d’éviter tout accident.
Chargez et conservez l’appareil à une
,
température comprise entre 5
Veillez à ce que le cordon d’alimentation ne soit
,
pas exposé à l’humidité.
Ne plongez jamais la base de recharge dans l’eau
,
et ne la rincez pas sous le robinet.
Ne laissez pas le rasoir sur la base de recharge
,
branchée pendant plus de 24 heures.
L’appareil est étanche et peut être nettoyé à
,
l’eau courante.
Veillez à ce que l’eau ne soit pas trop chaude pour
ne pas vous brûler.
Cet appareil est conforme aux normes
,
internationales de sécurité IEC et peut être
utilisé dans le bain ou sous la douche.
Pour de meilleurs résultats de rasage, le gel/la
,
lotion de rasage doit être pompée fréquemment.
Avant de commencer à utiliser l’appareil, vériez
,
que le gel ou la lotion fourni(e) ne contient pas
d’éléments auxquels vous êtes allergique (voir au
dos de la cartouche). N’utilisez pas le gel et/ou
la lotion si vous êtes allergique à un ou plusieurs
de ces composants.
cC et 35 cC.
Page 33

FRANÇAIS 35
Champs électromagnétiques
Cet appareil Philips est conforme à toutes les
normes relatives aux champs électromagnétiques
(CEM). Il répond aux règles de sécurité établies sur
la base des connaissances scientiques actuelles s’il
est manipulé correctement et conformément aux
instructions de ce mode d’emploi.
Charge
La charge dure environ 8 heures.
Ne laissez pas le rasoir sur la base de recharge
branchée pendant plus de 24 heures.
Informations relatives à la charge
Charge
,
Dès que vous commencez à charger le rasoir, le
voyant lumineux vert s’allume.
Charge de l’appareil
Chargez l’appareil lorsque le moteur s’arrête ou
ralentit.
1 Insérez la petite che dans la base de recharge
et branchez le cordon d’alimentation dans la
prise de courant.
2 Placez le rasoir dans la base de recharge.
Page 34

FRANÇAIS36
3 Appuyez dessus jusqu’à ce que vous entendiez
un clic.
Le rasoir s’éteint automatiquement lorsqu’il est placé
sur la base de recharge.
4 Retirez le cordon d’alimentation de la prise
de courant et déconnectez la petite che de
la base de recharge lorsque la batterie est
complètement chargée. Vous pouvez laisser
l’appareil dans la base.
Autonomie de rasage
HQ6730 et HQ6710 :
Un rasoir complètement chargé offre une
autonomie de rasage de 45 minutes environ.
HQ6725 et HQ6707 :
Un rasoir complètement chargé offre une
autonomie de rasage de 40 minutes environ.
Cartouches
Les cartouches de gel/lotion de rasage NIVEA FOR
MEN sont disponibles en jeux de cinq cartouches
avec une petite pompe en plastique.
Le gel/la lotion de rasage NIVEA FOR MEN des
cartouches peuvent être conservés pendant
32 mois, à une température comprise entre 0
+40
cC.
Utilisez uniquement les cartouches Philips
NIVEA FOR MEN Cool Skin (HQ170 et HQ171).
Une cartouche Philips NIVEA FOR MEN Cool Skin
contient du gel/de la lotion de rasage pour environ
10 utilisations.
cC et
Page 35

121
2
FRANÇAIS 37
Ne jetez pas la pompe quand vous remplacez une
cartouche vide. Vous en aurez besoin pour les cinq
cartouches.
Pour des raisons d’hygiène, il est conseillé de changer
la pompe à chaque nouveau jeu de cartouches.
Retirez la cartouche de l’appareil si vous ne vous en
servez pas pendant au moins une semaine.
Si vous êtes à court de car touches et que vous
ne savez pas où les acheter, contactez le Service
Consommateurs de votre pays (voir « Garantie et
service »).
Insérer les cartouches
1 Lorsque vous utilisez un nouveau jeu de
cartouches, retirez la pompe du sac et insérezla dans la cartouche jusqu’à ce que vous
entendiez un clic.
2 Déplacez le bouton de déverrouillage vers
bas et ouvrez le couvercle du compartiment à
cartouche.
3 Glissez la cartouche avec la pompe dans le
rasoir. Pour qu’elle soit correctement installée,
la partie blanche de la pompe doit être dirigée
vers le haut.
4 Fermez le couvercle (vous entendrez un clic).
5 Appuyez plusieurs fois sur le bouton jaune
de la pompe jusqu’à ce que le gel/la lotion de
rasage NIVEA FOR MEN apparaisse. Le rasoir
est alors prêt à l’emploi.
Page 36

121
2
FRANÇAIS38
Remplacer les cartouches
Ne jetez pas la pompe quand vous remplacez une
cartouche vide. Vous en aurez besoin pour les autres
cartouches.
1 Déplacez le bouton de déverrouillage vers
bas et ouvrez le couvercle du compartiment à
cartouche.
2 Retirez la cartouche vide et ôtez la pompe.
3 Insérez la pompe dans une nouvelle cartouche
jusqu’à ce que vous entendiez un clic.
4 Glissez la cartouche avec la pompe dans le
rasoir. Pour qu’elle soit correctement installée,
la partie blanche de la pompe doit être dirigée
vers le haut. Fermez le couvercle.
Utilisation de l’appareil
Rasoir
1 Mettez le rasoir en marche en appuyant sur le
bouton marche/arrêt.
2 Appuyez sur le bouton jaune de la pompe
pour appliquer le gel/la lotion de rasage NIVEA
FOR MEN. Déplacez le rasoir sur la peau
en effectuant des mouvements rectilignes et
circulaires.
3 Pour appliquer davantage de lotion/gel
NIVEA FOR MEN pendant le rasage, appuyez
Page 37

212
1
FRANÇAIS 39
fréquemment sur le bouton de la pompe ; le
rasoir glissera plus facilement sur votre visage.
Si vous n’avez plus de gel/lotion de rasage,
,
vous pouvez également utiliser le rasoir sans
gel/lotion sur un visage sec.
Votre peau pourrait avoir besoin de 2 ou
,
3 semaines pour s’habituer au système de rasage
Philips.
4 Arrêtez le rasoir en appuyant sur le bouton
marche/arrêt.
5 Nettoyez le rasoir (voir le chapitre
« Nettoyage et entretien »).
Rincez le rasoir après chaque emploi. Retirez la
cartouche si vous n’avez pas l’intention d’utiliser
l’appareil pendant plus d’une semaine.
6 Replacez le capot de protection sur le rasoir
après chaque utilisation pour éviter tout
dommage.
Tondre les favoris et la moustache (HQ6730 et HQ6725 uniquement)
Pour tailler les favoris et la moustache.
1 Arrêtez le rasoir.
Nettoyez le rasoir avant d’installer la tondeuse (voir
le chapitre « Nettoyage et entretien »).
2 Appuyez sur le bouton de déverrouillage (1) et
retirez l’unité de rasage (2) du rasoir.
3 Inclinez la tondeuse légèrement en arrière et
xez-la sur l’appareil.
4 Retirez la tondeuse en appuyant sur le bouton
de déverrouillage.
5 Remontez l’unité de rasage sur le rasoir.
Page 38

212
1
22
FRANÇAIS40
Nettoyage et entretien
Nettoyez régulièrement l’appareil pour obtenir des
résultats de rasage optimaux.
Pour obtenir des résultats de rasage optimaux et un
rasoir propre, rincez soigneusement l’unité de rasage
et le compartiment à poils à l’eau très chaude après
chaque utilisation.
Veillez à ce que l’eau ne soit pas trop chaude pour
ne pas vous brûler.
Unité de rasage et compartiment à poils
1 Arrêtez le rasoir.
2 Appuyez sur le bouton de déverrouillage (1) et
ouvrez l’unité de rasage (2).
3 Rincez l’unité de rasage et le compartiment à
poils à l’eau chaude.
4 Rincez l’extérieur de l’unité de rasage.
5 Assurez-vous d’avoir correctement nettoyé
l’intérieur de l’unité de rasage et du
compartiment à poils.
6 Fermez l’unité de rasage et secouez le rasoir
pour en retirer l’eau.
Ne séchez jamais l’unité de rasage à l’aide d’une
serviette au risque d’endommager les têtes de
rasage.
Page 39

OILOIL
FRANÇAIS 41
7 Ouvrez à nouveau l’unité de rasage et
laissez-la ouverte pour que le rasoir sèche
complètement.
Base de recharge
1 Débranchez la base de recharge.
2 Nettoyez-la à l’aide d’un chiffon humide.
Tondeuse (HQ6730 et HQ6725 uniquement)
1 Nettoyez l’extérieur de la tondeuse après
chaque utilisation, à l’aide de la brosse fournie.
2 Ouvrez la tondeuse pour la nettoyer à
l’intérieur.
3 Tous les six mois, appliquez une goutte d’huile
pour machine à coudre sur la tondeuse.
Rangement
Vous pouvez ranger le rasoir de trois façons :
1 Dans la base de recharge, même s’il est mouillé.
Débranchez toujours la base de recharge avant de
ranger le rasoir qu’il soit sec ou mouillé.
2 Dans la housse fournie.
3 Vous pouvez ranger le rasoir en le suspendant à
l’aide du cordon fourni à cet effet (utiliser le clip
pour l’attacher à l’appareil), an de le faire sécher.
Page 40

1
1
2
1
1
2
111
1
FRANÇAIS42
Remplacement
Pour obtenir un résultat de rasage optimal,
remplacez les têtes de rasage tous les deux ans.
Remplacez les têtes endommagées ou usées
uniquement par des têtes de rasage Philips
Cool Skin HQ167.
1 Arrêtez le rasoir.
2 Appuyez sur le bouton de déverrouillage (1) et
ouvrez l’unité de rasage (2).
3 Tournez la molette dans le sens inverse des
aiguilles d’une montre (1) et retirez-la (2).
4 Retirez les têtes de rasage usagées, puis insérez
les nouvelles.
5 Replacez le système de xation dans l’unité de
rasage, appuyez sur la molette (1) puis faites-la
tourner dans le sens des aiguilles d’une montre
(2).
6 Remontez l’unité de rasage sur le rasoir.
Accessoires
Les accessoires suivants sont disponibles :
Cordon d’alimentation HQ8000/800
-
Têtes de rasage Philips Cool Skin HQ167
Lotion de rasage hydratante NIVEA FOR MEN
-
Cool Skin HQ170
Page 41

FRANÇAIS 43
Gel de rasage rafraîchissant et hydratant NIVEA
-
FOR MEN Cool Skin HQ171
Environnement
Lorsqu’il ne fonctionnera plus, ne jetez pas
,
l’appareil avec les ordures ménagères mais
déposez-le à un endroit assigné à cet effet, où il
pourra être recyclé. Vous contribuerez ainsi à la
protection de l’environnement.
Mise au rebut de la batterie
La batterie rechargeable intégrée contient des
substances qui peuvent nuire à l’environnement.
Veillez à toujours retirer la batterie avant de mettre
l’appareil au rebut ou de le déposer à un endroit
assigné à cet effet. Déposez la batterie usagée à un
endroit assigné à cet effet. Si vous n’arrivez pas à
retirer la batterie, vous pouvez apporter l’appareil
dans un Centre Service Agréé Philips qui prendra
toute l’opération en charge.
Retirez la batterie lorsqu’elle est complètement
déchargée.
1 Laissez l’appareil fonctionner jusqu’à l’arrêt
complet du moteur, puis ôtez les vis et ouvrez
l’appareil.
2 Retirez la batterie.
Ne replacez pas le rasoir sur la base de recharge
après avoir retiré la batterie.
Garantie et service
Si vous souhaitez obtenir des informations
supplémentaires ou si vous rencontrez un problème,
Page 42

FRANÇAIS44
visitez le site Web de Philips à l’adresse
www.philips.com ou contactez le Service
Consommateurs Philips de votre pays (vous
trouverez le numéro de téléphone correspondant
sur le dépliant de garantie internationale). S’il n’existe
pas de Service Consommateurs Philips dans votre
pays, renseignez-vous auprès de votre revendeur
local ou contactez le « Service Depar tment of
Philips Domestic Appliances and Personal Care BV ».
Dépannage
1
Les têtes de rasage ne glissent pas facilement
sur la peau.
Cause : vous n’appliquez pas assez de gel/lotion.
,
Solution : appuyez plusieurs fois sur le bouton de
,
la pompe jusqu’à ce qu’une quantité sufsante de
gel/lotion NIVEA FOR MEN soit appliquée.
2 Les résultats de rasage ne sont pas satisfaisants.
Cause 1 : les têtes de rasage sont sales. Le rasoir
,
n’a pas été nettoyé immédiatement après le
rasage et/ou il n’a pas été sufsamment rincé, ou
l’eau n’était pas sufsamment chaude.
Solution 1 : nettoyez l’appareil en profondeur
,
avant de continuer à vous raser. Reportez-vous
au chapitre « Nettoyage et entretien ».
Cause 2 : des poils longs sont emmêlés dans les
,
têtes de rasage.
Solution 2 :
,
1 Appuyez sur le bouton de déverrouillage pour
ouvrir l’unité de rasage.
Page 43

1
1
2
1
1
2
FRANÇAIS 45
2 Tournez la molette dans le sens inverse des
aiguilles d’une montre (1) et retirez-la (2).
3 Nettoyez les lames et les grilles.
Ne nettoyez qu’une lame et une grille à la fois
car elles sont assemblées par paires. Si vous
intervertissez les lames et les grilles, il pourrait falloir
plusieurs semaines avant d’obtenir de nouveau un
rasage optimal.
4 Enlevez les poils à l’aide de la brosse fournie.
5 Remontez les têtes de rasage puis le système
de xation sur l’unité de rasage. Appuyez sur
la molette et faites-la tourner dans le sens des
aiguilles d’une montre.
6 Pour éviter que des poils longs soient emmêlés
dans les têtes de rasage, retirez ces dernières
une fois par mois et nettoyez-les avec la brosse
fournie.
Cause 3 : les têtes de rasage sont endommagées
,
ou usées.
Solution 3 : remplacez les têtes de rasage.
,
Reportez-vous au chapitre « Remplacement ».
3 Le rasoir ne fonctionne pas lorsque le bouton
marche/arrêt est enfoncé.
Cause 1 : la batterie est vide.
,
Solution 1 : rechargez la batterie. Reportez-vous
,
au chapitre « Charge ».
Cause 2 : du gel/une lotion de rasage secs
,
obstruent les têtes de rasage.
Page 44

FRANÇAIS46
Solution 2 : nettoyez les têtes de rasage
,
en profondeur. Reportez-vous au chapitre
« Nettoyage et entretien ».
Cause 3 : les têtes de rasage sont endommagées.
,
Solution 3 : remplacez les têtes de rasage.
,
Reportez-vous au chapitre « Remplacement ».
4 Le couvercle du compartiment à cartouche ne
se referme pas.
Cause 1 : la cartouche n’a pas été insérée
,
correctement.
Insérez la cartouche correctement ; la partie
,
blanche de la pompe doit être dirigée vers le
haut.
Cause 2 : la cartouche n’a pas sufsamment été
,
insérée dans le rasoir.
Solution 2 : appuyez sur cartouche jusqu’à ce
,
que vous entendiez un clic.
5 Le gel/la lotion de rasage NIVEA FOR
MEN a changé de couleur ou est devenu(e)
aqueux(se).
Cause : le gel/la lotion de rasage NIVEA FOR
,
MEN n’a pas été conservé(e) à la bonne
température.
Solution : insérez une autre cartouche.
,
6 Ma peau est irritée.
Cause 1 : votre peau n’est pas encore habituée à
,
ce nouveau système de rasage.
Solution 1 : 2 à 3 semaines peuvent être
,
nécessaires pour vous habituer à ce système de
rasage.
Cause 2 : le gel/la lotion de rasage irrite votre
,
peau.
Solution 2A : essayez l’autre type de cartouche
,
NIVEA FOR MEN.
Page 45

FRANÇAIS 47
Solution 2B : humidiez votre visage avant de
,
vous raser avec le gel/la lotion.
Si l’irritation ne disparaît pas sous 24 heures, il
est conseillé de ne plus utiliser le gel/la lotion de
rasage.
Page 46

48
PORTUGUÊS
Introdução
A máquina é fornecida com duas recargas diferentes
de NIVEA FOR MEN: Gel de Barbear Extra Fresco
para uma sensação de frescura durante e depois do
barbear e Loção Hidratante para a Barba especial
para peles sensíveis. Terá, assim, a oportunidade de
experimentar e descobrir qual a que melhor se
adequa ao seu tipo de pele.
Gel de Barbear Extra Fresco
,
O Gel de Barbear Extra Fresco NIVEA FOR MEN
refresca a pele enquanto se barbeia. Amacia os
pêlos da barba e permite que a máquina deslize
suavemente sobre a pele, assegurando um contacto
adequado com a pele para um barbear mais
apurado. Deixa a pele macia, suave e revitalizada.
O Gel de Barbear Extra Fresco com agentes
hidratantes avançados ajuda a proteger a pele contra
a abrasividade do barbear, a irritação da pele e a
desidratação. Melhora ecazmente o estado da pele.
Loção Hidratante para a Barba
,
A Loção Hidratante para a Barba NIVEA FOR
MEN foi especialmente concebida para satisfazer as
necessidades das peles mais facilmente irritáveis e
mais sensíveis. Amacia os pêlos da barba e permite
que a máquina deslize suavemente sobre a pele,
assegurando um contacto adequado com a pele
para um barbear mais apurado. Deixa a pele macia,
suave e saudável.
A Loção Hidratante para a Barba com agentes
hidratantes avançados ajuda a proteger a pele contra
a abrasividade do barbear e a desidratação. Melhora
ecazmente o estado da pele através de uma
hidratação activa durante o barbear.
Page 47

PORTUGUÊS 49
Importante
Leia estas instruções com atenção antes de utilizar
o aparelho e guarde-as para uma eventual consulta
futura.
Para carregar a máquina, use apenas a cha e a
,
base de carga fornecidos.
A cha transforma 100-240 volts numa tensão
,
segura e baixa inferior a 24 volts.
A cha de alimentação integra um
,
transformador. Não corte a cha para a
substituir por outra, porque isso poderá
conduzir a uma situação de perigo.
Não utilize a cha ou a base de carga se
,
estiverem danicadas.
Se a cha ou a base de carga se danicarem, só
,
deverão ser substituídas por peças de origem
para evitar situações de perigo.
Carregue, guarde e utilize o aparelho a uma
,
temperatura entre 5 cC e 35 cC.
Certique-se de que a cha de alimentação não
,
é molhada.
Nunca mergulhe a base de carga em água nem a
,
enxagúe à torneira.
Não deixe a máquina colocada sobre a base de
,
carga ligada durante mais de 24 horas.
A máquina é à prova de água e pode ser lavada
,
sob a torneira.
Tenha cuidado com a água quente. Verique sempre
se não está demasiado quente para evitar queimar
as mãos.
A máquina está em conformidade com as
,
regulamentações de segurança CEI aprovadas
internacionalmente e pode ser utilizada no
banho ou no duche.
Page 48

PORTUGUÊS50
Para obter sempre os melhores resultados, o
,
gel/loção para a barba deve ser bombeado(a)
com frequência.
Antes de utilizar a máquina, verique se o gel e
,
a loção que a acompanham contêm ingredientes
(veja o reverso da recarga) aos quais possa ser
alérgico. Não aplique o gel/loção se for alérgico a
um ou mais dos seus ingredientes.
Campos Electromagnéticos - EMF (Electro Magnetic Fields)
Este aparelho Philips cumpre todas as normas
relacionadas com campos electromagnéticos (EMF).
Se for manuseado correctamente e de acordo
com as instruções presentes neste manual, o
aparelho proporciona uma utilização segura, como
demonstrado pelas provas cientícas actualmente
disponíveis.
Carga
A carga demora aproximadamente 8 horas.
Não deixe a máquina colocada sobre a base de
carga ligada durante mais de 24 horas.
Indicações de carga
Carga
Logo que se começa a carregar a máquina
,
descarregada, a luz piloto verde acende-se.
Carga do aparelho
Carregue a máquina quando o motor parar ou
quando este começar a trabalhar mais devagar.
Page 49

PORTUGUÊS 51
1 Introduza a cha pequena no suporte de
carga e ligue a cha de alimentação na tomada
eléctrica.
2 Coloque a máquina sobre o suporte de carga.
3 Faça pressão até ouvir um clique.
A máquina desliga-se automaticamente quando é
colocada sobre o suporte de carga.
4 Retire a cha da tomada eléctrica e puxe a
cha pequena para fora do suporte de carga
quando as baterias tiverem sido totalmente
carregadas. Depois, se quiser, pode deixar a
máquina colocada na base de carga.
Autonomia sem o
HQ6730 e HQ6710:
Estando com carga total, a máquina de barbear tem
até 45 minutos de autonomia de barbear sem o.
HQ6725 e HQ6707:
Estando com carga total, a máquina de barbear tem
até 40 minutos de autonomia de barbear sem o.
Recargas
As recargas de gel/loção para a barba NIVEA FOR
MEN encontram-se à venda em embalagens com
cinco recargas e uma pequena bomba em plástico.
As recargas de gel/loção para a barba NIVEA FOR
MEN podem ser armazenadas durante 32 meses a
temperaturas entre 0 ºC e +40ºC.
Utilize apenas recargas Philips NIVEA FOR MEN
Cool Skin (HQ170 e HQ171).
Page 50

121
2
PORTUGUÊS52
Um cartucho Philips NIVEA FOR MEN Cool Skin
contém gel/loção suciente para cerca de 10 barbas.
Não deite a pequena bomba de plástico fora
quando for substituir uma recarga vazia. Irá precisar
dela para as cinco recargas.
Por razões de higiene, aconselha-se que introduza
uma bomba nova quando começar a utilizar um
novo conjunto de cinco recargas.
Retire a recarga de gel/loção para a barba da
máquina se não pretender usá-la durante mais de
uma semana.
Quando já não tiver recargas de gel/loção para a
barba e não souber onde comprá-las, contacte o
Centro de Informação ao Consumidor Philips do
seu país (consulte ‘Garantia e Assistência’).
Colocar as recargas
1 Quando começar a usar um novo conjunto
de recargas, retire a bomba da sua embalagem
e insira-a dentro da recarga até encaixar na
posição correcta com um clique.
2 Faça deslizar a tampa do compartimento das
recargas para baixo e abra-a.
4 Feche a tampa (irá ouvir um clique).
5 Prima o botão amarelo da máquina que
acciona a bomba algumas vezes, até aparecer
o gel/loção para a barba NIVEA FOR MEN. A
máquina está pronta a usar.
Page 51

121
2
PORTUGUÊS 53
Substituição das recargas
Não deite a bomba fora quando for substituir
uma recarga vazia. Irá precisar dela para as outras
recargas.
1 Faça deslizar a tampa do compartimento das
recargas para baixo e abra-a.
2 Retire a recarga vazia e puxe a bomba para
fora.
3 Empurre a bomba para dentro da nova recarga
até se xar na posição correcta com um clique.
4 Introduza a recarga com a bomba já colocada
na máquina. A recarga só entra bem se a parte
branca da bomba estiver virada para cima.
Feche a tampa.
Utilização do aparelho
Depilação de corte
1 Ligue a máquina de barbear premindo uma vez
o botão ligar/desligar.
2 Prima o botão amarelo da da máquina que
acciona a bomba para aplicar o gel/loção
para a barba NIVEA FOR MEN sobre a pele.
Movimente a máquina sobre a pele, efectuando
movimentos a direito e em círculo.
3 Enquanto se barbeia, prima frequentemente
o botão da bomba para aplicar mais gel/loção
NIVEA FOR MEN, de modo a que a máquina
Page 52

212
1
PORTUGUÊS54
possa deslizar sempre suavemente sobre o seu
rosto.
Se já não tiver gel/loção de barbear, também
,
pode usar a máquina sobre o rosto seco.
A sua pele poderá precisar de duas a três
,
semanas para se adaptar ao sistema de barbear
Philips.
4 Desligue a máquina de barbear premindo o
botão ligar/desligar uma vez.
5 Limpe a máquina de barbear (consulte o
capítulo ‘Limpeza e manutenção’).
Passe a máquina por água após cada utilização. Retire
a recarga se não pretender servir-se da máquina
durante mais de uma semana.
6 Sempre que se servir da máquina de barbear
coloque-lhe a tampa de protecção para evitar
qualquer dano.
Aparador (apenas HQ6730 e HQ6725)
Para aparar as patilhas e o bigode.
1 Desligue a máquina de barbear.
Antes de colocar o aparador limpe a máquina
(consulte o capítulo ‘Limpeza e manutenção’).
2 Prima o botão de libertação (1) e puxe a
unidade de corte para fora da máquina (2).
3 Incline ligeiramente o aparador para trás e
encaixe-o na máquina.
4 Retire o aparador premindo novamente o
botão de libertação e puxando o aparador para
fora da máquina.
5 Volte a colocar a unidade de corte na máquina
de barbear.
Page 53

212
1
22
PORTUGUÊS 55
Limpeza e manutenção
Uma limpeza regular garante melhores resultados
no corte.
Para manter sempre a máquina limpa e com um
óptimo desempenho de barbear, deverá enxaguar
muito bem a unidade de corte e a câmara de
recolha dos pêlos com água quente após cada
utilização.
Tenha cuidado com a água quente. Verique sempre
se não está demasiado quente para evitar queimar
as mãos.
Unidade de corte e câmara de recolha dos pêlos
1 Desligue a máquina de barbear.
2 Prima o botão de libertação (1) e abra a
unidade de corte (2).
3 Limpe a unidade de corte e a câmara de
recolha dos pêlos à torneira com água quente
durante algum tempo.
Page 54

OILOIL
PORTUGUÊS56
4 Enxagúe o exterior da unidade de corte.
5 Certique-se de que o interior da unidade de
corte e da câmara de recolha dos pêlos cam
bem limpos.
6 Feche a unidade de corte e sacuda o excesso
de água.
Nunca seque a unidade de corte com uma toalha
ou tecido, pois pode danicar as cabeças de corte.
7 Abra novamente a unidade de corte e deixe-a
aberta para permitir que o aparelho seque
completamente.
Suporte de carga
1 Desligue o suporte de carga da corrente.
2 Limpe o suporte de carga com um pano
húmido.
Aparador (apenas HQ6730 e HQ6725)
1 Após cada utilização, limpe a parte exterior do
aparador com a escova fornecida.
2 Abra o aparador para limpar o seu interior.
3 A cada seis meses, lubrique os dentes do
aparador com uma gota de óleo para máquinas
de costura.
Page 55

1
1
2
1
1
2
PORTUGUÊS 57
Arrumação
Existem três maneiras de guardar a máquina de
barbear:
1 pode guardar a máquina no suporte de carga,
mesmo quando esta estiver molhada.
Desligue sempre o suporte de carga da corrente
antes de colocar a máquina molhada ou seca no
mesmo.
2 O aparador pode ser guardado dentro da bolsa
fornecida.
3 A máquina também se pode pendurar através
do cordão de suspensão que lhe pode ser
acoplado usando a mola. É a melhor maneira de
secar a máquina.
Substituição
As cabeças de corte devem ser substituídas de dois
em dois anos para manter a ecácia da máquina de
barbear.
Substitua as cabeças danicadas ou gastas apenas
por cabeças de corte HQ167 Philips Cool Skin.
1 Desligue a máquina de barbear.
2 Prima o botão de libertação (1) e abra a
unidade de corte (2).
3 Rode o anel para a esquerda (1) e retire a
armação de xação (2).
Page 56

111
1
PORTUGUÊS58
4 Retire as cabeças de corte e coloque as
cabeças novas na unidade de corte.
5 Reponha a armação de xação na unidade de
corte, prima o anel (1) e rode-o para a direita
(2).
6 Volte a colocar a unidade de corte na máquina
de barbear.
Acessórios
Estão disponíveis os seguintes acessórios:
Ficha de alimentação HQ8000/800.
-
HQ167 Cabeças de corte Philips Cool Skin.
-
HQ170 Loção de Barbear Hidratante NIVEA
FOR MEN Cool Skin.
HQ171 Gel de Barbear Extra Fresco NIVEA FOR
MEN Cool Skin.
Ambiente
Não deite fora o aparelho junto com o lixo
,
doméstico normal no nal da sua vida útil,
entregue-o num ponto de recolha ocial para
reciclagem. Ao fazê-lo ajuda a preservar o
ambiente.
Eliminação das pilhas
A bateria incorporada recarregável contém
substâncias que podem poluir o ambiente. Retire
sempre a bateria antes de deitar fora o aparelho ou
Page 57

PORTUGUÊS 59
de o entregar num ponto de recolha ocial. Elimine
a bateria num ponto de recolha ocial para baterias.
Se tiver problemas na remoção da bateria, pode
também levar a máquina a um centro de assistência
Philips, que poderá remover a bateria por si e
eliminá-la de forma segura para o ambiente.
Retire as baterias apenas quando estiverem
totalmente vazias.
1 Deixe a máquina a trabalhar até parar,
desaperte os parafusos e abra a máquina de
barbear.
2 Retire as pilhas.
Não volte a colocar a máquina no suporte de carga
depois de ter retirado as pilhas.
Garantia e assistência
Se precisar de informações ou se tiver algum
problema, visite o site da Philips em
www.philips.pt ou contacte o Centro de
Atendimento ao Cliente Philips do seu país
(encontrará o número de telefone no folheto
da garantia mundial). Se não existir um Centro
de Atendimento ao Cliente no seu país, dirijase ao distribuidor Philips local ou contacte o
Departamento de Assistência da Philips Domestic
Appliances and Personal Care BV.
Resolução de problemas
1
As cabeças não deslizam suavemente sobre a
pele.
Causa: não foi aplicada uma quantidade suciente
,
de gel/loção para a barba.
Page 58

1
1
2
1
1
2
PORTUGUÊS60
Solução: prima o botão algumas vezes até
,
libertar gel/loção para a barba NIVEA FOR
MEN suciente para que as cabeças da máquina
voltem a deslizar suavemente sobre o seu rosto.
2 Desempenho de corte reduzido
,
Causa 1: as cabeças de corte estão sujas. A
máquina não foi bem limpa imediatamente
após a utilização e/ou não foi enxaguada tempo
suciente em água corrente e/ou a água da
torneira não estava sucientemente quente.
,
Solução 1: limpe a máquina de barbear
cuidadosamente antes de continuar a fazer
a barba. Consulte o capítulo ‘Limpeza e
manutenção’.
,
Causa 2: há pêlos compridos a obstruir as
cabeças de corte.
,
Solução 2:
1 prima o botão de libertação e abra a unidade de
corte.
2 Rode o anel para a esquerda (1) e retire a
armação de xação (2).
3 Limpe as lâminas e as guardas.
Não limpe mais do que um conjunto lâmina/guarda
de cada vez já que constituem pares. Se, por acaso,
alterar os conjuntos lâmina/guarda, a ecácia da
máquina diminuirá e só passadas algumas semanas
voltará ao normal.
4 Remova os pêlos com a escova fornecida.
5 Volte a colocar as cabeças na unidade de corte.
Volte a colocar a armação de xação na unidade
de corte, prima o anel e rode-o para a direita.
6 Para evitar que os pêlos compridos obstruam as
cabeças de corte, retire as cabeças uma vez por
mês e limpe-as com a escova fornecida.
,
Causa 3: as cabeças estão danicadas ou gastas.
Page 59

PORTUGUÊS 61
Solução 3: substitua as cabeças de corte.
,
Consulte o capítulo ‘Substituição’.
3 A máquina não funciona quando se prime o
botão ligar/desligar.
Causa 1: as pilhas estão vazias
,
Solução 1: recarregue as pilhas. Consulte o
,
capítulo ‘Carga’.
Causa 2: há gel/loção para a barba seco(a) a
,
obstruir as cabeças de corte.
Solução 2: limpe muito bem as cabeças de corte.
,
Consulte o capítulo ‘Limpeza e manutenção’.
Causa 3: as cabeças estão danicadas.
,
Solução 3: substitua as cabeças de corte.
,
Consulte o capítulo ‘Substituição’.
4 A tampa do compartimento das recargas não
se fecha
Causa 1: a recarga não está bem colocada.
,
Introduza a recarga correctamente. A recarga
,
está bem encaixada na máquina quando a parte
branca da bomba está virada para cima.
Causa 2: a recarga não foi bem empurrada para
,
dentro da máquina.
Solução 2: prima a recarga até encaixar bem na
,
posição correcta com um clique.
5 O gel/a loção para a barba NIVEA FOR MEN
mudou de cor ou cou aguada.
Causa: o gel/a loção para a barba NIVEA
,
FOR MEN não foi guardado(a) à temperatura
adequada.
Solução: introduza uma nova recarga.
,
6 A pele cou irritada
Causa 1: a sua pele ainda não se adaptou a este
,
sistema de barbear.
Page 60

PORTUGUÊS62
Solução 1: deixe passar 2 a 3 semanas para que a
,
sua pele se habitue a este sistema de barbear.
Causa 2: o gel/a loção para a barba irrita a sua
,
pele.
Solução 2A: experimente o outro tipo de
,
recarga NIVEA FOR MEN.
Solução 2B: molhe o rosto antes de se barbear
,
com o gel/loção.
Se a irritação não desaparecer no prazo de 24
horas, é aconselhável deixar de usar o gel/a loção
para a barba.
Page 61

63646566676869707172737475
Page 62

Page 63

Page 64

Page 65

Page 66

Page 67

Page 68

Page 69

Page 70

Page 71

Page 72

Page 73

Page 74

76
Page 75

77
Page 76

7879808182
Page 77

Page 78

Page 79

Page 80

Page 81

83
Page 82

84
Page 83

85
Page 84

86
Page 85

87
Page 86

88
Page 87

89
Page 88

90
4222.002.4546.4
 Loading...