

Philips HP6609/01, HP6609/10, HP6609 User Manual
HP6609
C
D
E
B
A
F
G
H
I
J
L
K
1
2
3 4
5
6
7
1312
11
10
98
22
2120
1918
17
16
15
14
2524
23

ENGLISH
Introduction
Congratulations on your purchase and welcome to
Philips! To fully benet from the support that Philips offers,
register your product at www.philips.com/welcome.
With your new epilator you can remove unwanted hair
quickly, easily and effectively. It is suitable for removing hair
from your legs, underarms and bikini line.
The rotating discs catch even the shortest hairs (down to
0.5mm) and pull them out by the root.
The hairs that grow back are soft and thin. Epilating with
this new appliance leaves your skin smooth and hair-free
for several weeks.
This epilator comes with the following attachments:
Hair-lifting attachment with massage
element
This attachment lifts at-lying hairs, even the shortest
ones. Its massage element minimises the pulling sensation
and soothes the skin after the hairs have been removed.
Opti-start cap with massage element
The opti-start cap with massage element allows you to
epilate with optimal efciency and gentleness. It ensures
ideal contact with the skin and optimal positioning of the
appliance, so that hairs are removed effectively in one
stroke. The massage element gives you a relaxing and
pleasant sensation during epilation.
Sensitive area cap
The sensitive area cap has been specially designed to
epilate sensitive areas, such as your underarms and bikini
line. It minimises the pulling sensation of epilation in
sensitive areas with long-lasting results.
Trimming head and comb
The trimming head has been designed for styling sensitive
areas, the bikini line in particular. With the trimming head
and comb you can trim hair to a length of 4mm, which is
also the ideal length for epilation. If you use the trimming
head without the comb, you can use it to style your bikini
line just the way you want. Contouring your bikini line has
never been easier.
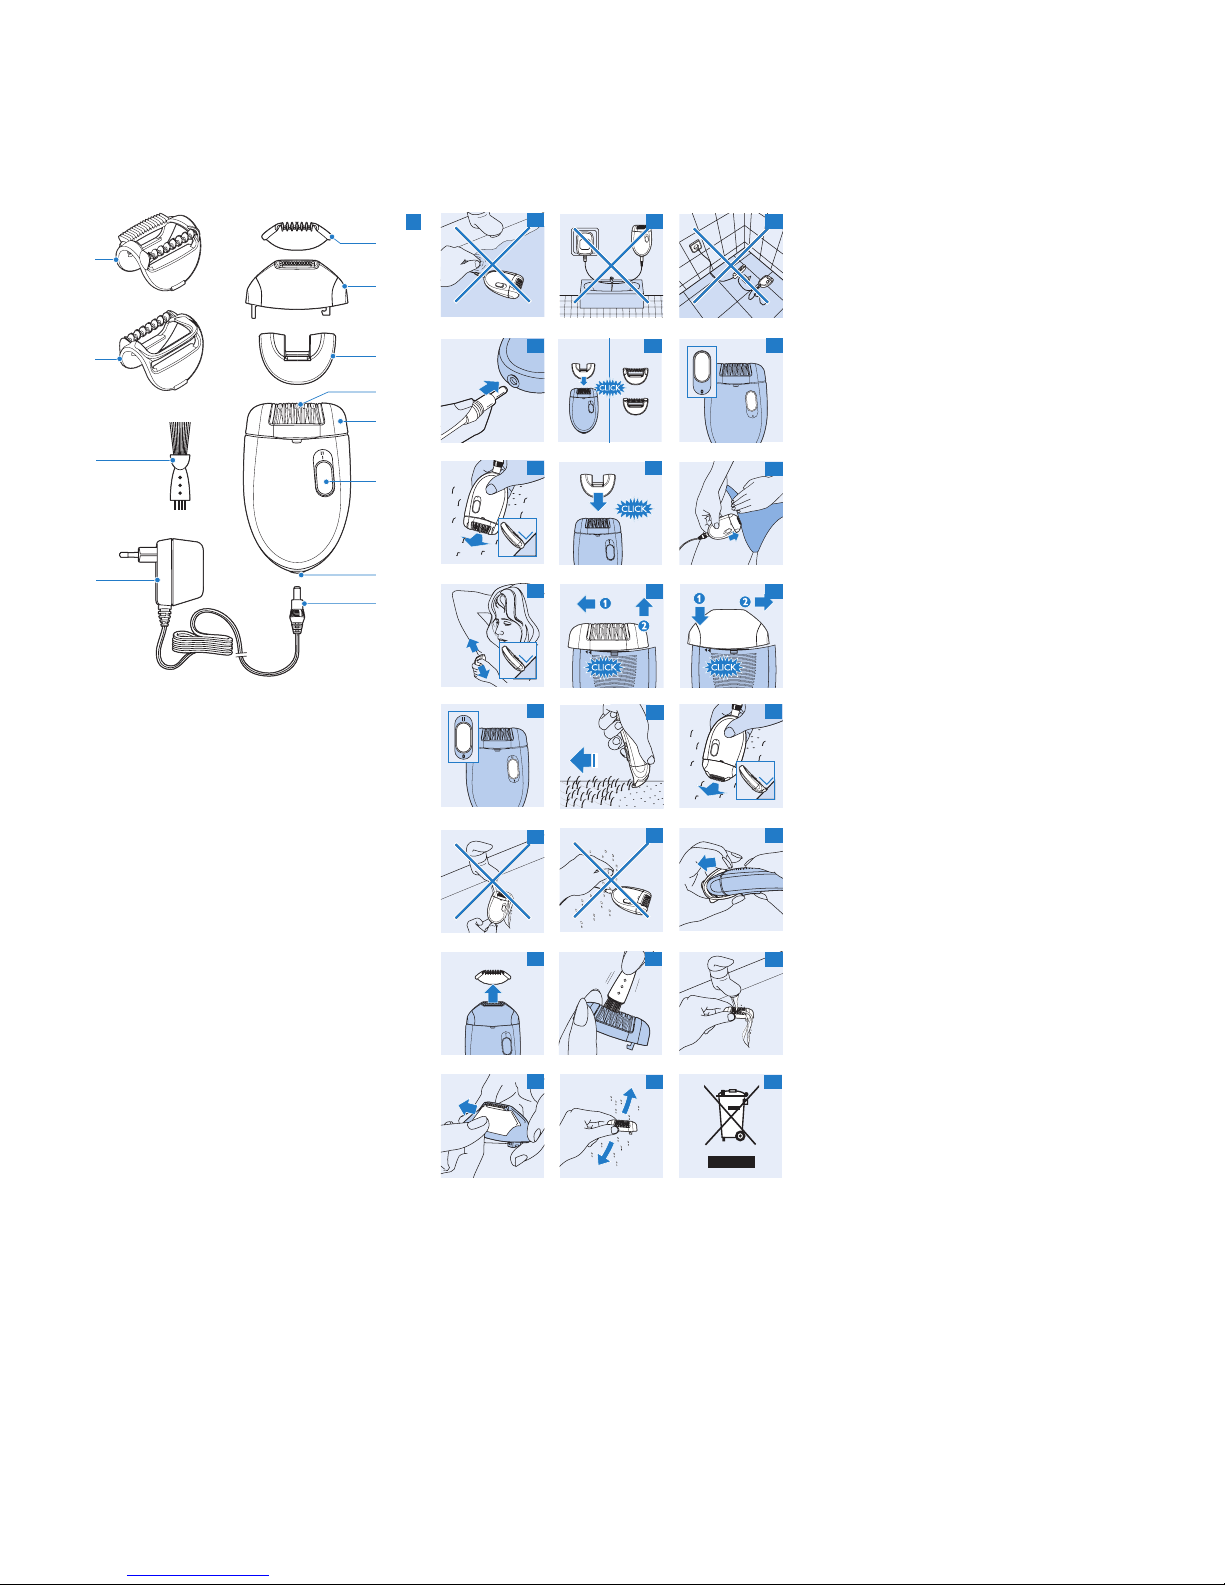
General description (Fig. 1)
A Hair-lifting attachment with massage element
B Opti-star t cap with massage element
C Trimming comb
D Trimming head
E Sensitive area cap
F Epilating discs
G Epilating head
H On/off slide
O = off
I = normal speed
II = high speed (only to be used for epilating head)
Note: Speed II does not work when the trimming head is
attached.
I Socket for appliance plug
J Small plug
K Adapter
L Cleaning brush
Important
Read this user manual carefully before you use the
appliance and save it for future reference.
Danger
Keep the appliance and the adapter dry.
Do not use the appliance near or over a washbasin
or bath lled with water (Fig. 2).
Do not use the appliance in the bath or in the
shower (Fig. 3).
If you use the appliance in the bathroom, do not use
an extension cord (Fig. 4).
Warning
Only use the appliance in combination with the
adapter supplied.
Do not use the appliance or the adapter if it is
damaged.
If the adapter is damaged, always have it replaced
with one of the original type in order to avoid a
hazard.
The adapter contains a transformer. Do not cut
off the adapter to replace it with another plug, as
this causes a hazardous situation.
This appliance is not intended for use by persons
(including children) with reduced physical, sensory
-
-
-
-
-
-
-
-
-
-
-
-
or mental capabilities, or lack of experience and
knowledge, unless they have been given supervision
or instruction concerning use of the appliance by a
person responsible for their safety.
Children should be supervised to ensure that they
do not play with the appliance.
Caution
Only epilate the underarms and bikini line with the
sensitive area cap attached.
This appliance is only intended for removing women’s
body hair on areas below the neck: underarms, bikini
area and legs. Do not use it for any other purpose.
To prevent damage and injuries, keep the running
appliance (with or without attachment) away
from scalp hair, eyebrows, eyelashes, clothes, threads,
cords, brushes etc.
Do not use the appliance on irritated skin or skin
with varicose veins, rashes, spots, moles (with hairs)
or wounds without consulting your doctor rst.
People with a reduced immune response or people
who suffer from diabetes mellitus, haemophilia or
immunodeciency should also consult their doctor
rst.
Your skin may become a little red and irritated the
rst few times you use the epilator. This phenomenon
is absolutely normal and quickly disappears. As
you use the appliance more often, your skin gets
used to epilation, skin irritation decreases and
regrowth becomes thinner and softer. If the irritation
has not disappeared within three days, we advise you
to consult a doctor.
Do not use the epilating head, trimming
head, attachments or comb if they are damaged or
broken, as this may cause injury.
Electromagnetic elds (EMF)
This Philips appliance complies with all standards
regarding electromagnetic elds (EMF). If handled
properly and according to the instructions in this user
manual, the appliance is safe to use based on scientic
evidence available today.
Using the appliance
Note: Clean the epilating head before rst use.
Epilation tips
When you use the appliance for the rst time, we
advise you to try it out on an area with only light hair
growth to get accustomed to the epilation process.
Epilation is easier just after taking a bath or shower.
Make sure your skin is completely dry when you
start epilating.
Make sure your skin is clean, entirely dry and free
from grease. Do not use any cream before you star t
epilating.
Epilation is easier and more comfortable when the
hair has the optimum length of 3–4 mm. If the hairs
are longer, we recommend that you either shave rst
and epilate the shorter regrowing hairs after 1 or 2
weeks, or that you use the trimming head with the
comb to pre-cut hairs to this ideal length.
When you epilate for the rst time, we advise you to
epilate in the evening, so that any reddening that
develops can disappear overnight.
While epilating stretch your skin with your free hand.
This lifts up the hairs and helps to minimise the
pulling sensation.
For optimal performance, place the appliance on
the skin at right angles (90°) with the on/off slide
pointing in the direction in which you are going to
move the appliance. Guide the appliance across the
skin against the direction of hair growth in a slow,
continuous movement without exerting any pressure.
On some areas, e.g. the underarms, hair may grow in
different directions. In this case, it may be helpful to
move the appliance in different directions to achieve
optimal results.
To relax the skin, we advise you to apply a
moisturising cream after epilation.
Fine hair that regrows might not grow up to the
skin surface. The regular use of an exfoliating sponge
or cream (e.g. during showering) helps to prevent
ingrowing hair as the gentle scrubbing action
removes the upper skin layer and ne hair can get
through to the skin surface.
When you use the hair-lifting attachment with
massage element or the opti-start cap with massage
element, make sure that the massage element or
-
-
-
-
-
-
-
-
-
-
-
-
-
-
-
-
-
-
the comb always stays in contact with the skin. The
massage element stimulates and relaxes the skin for a
gentler epilation.
Connecting the appliance
1 Insert the appliance plug into the appliance (Fig. 5).
2 Insert the adapter into the wall socket.
Epilating the legs
We advise you to star t epilating with the opti-start cap
with massage element. The opti-start cap with massage
element ensures maximum skin contact and allows you
to epilate your legs more quickly and efciently. After
a few sessions, you can use the epilating head with
the hair-lifting attachment with massage element. This
attachment ensures optimal hair lifting, relaxes the skin
and minimises the pulling sensation of epilation.
Only use the opti-start cap with massage element and
the hair-lifting attachment with massage element on
your legs.
1 Put the desired attachment (opti-start cap with
massage element or hair-lifting attachment with
massage element) on the epilating head (Fig. 6).
The procedure for placing the attachments onto the
appliance is the same for all attachments.
2 Select the desired speed to switch on the
appliance (Fig. 7).
Preferably use speed II. Switch to speed I for areas with
little hair growth, for hard-to-reach areas and for areas
where bones are located directly beneath the skin, such
as knees and ankles.
3 Stretch the skin with your free hand to make the
hairs stand upright.
4 Place the epilator perpendicularly onto the skin
with the on/off slide pointing in the direction in
which you are going to move the appliance (Fig. 8).
5 Move the appliance slowly over the skin, against the
direction of hair growth.
Press the appliance lightly onto the skin.
Epilating the underarms and bikini line
Your epilator comes with a sensitive area cap that
reduces the number of active epilating discs. This makes
the appliance ideal for epilating the sensitive areas of the
body, such as the underarms and bikini line. The rst few
times you use the appliance, these areas are particularly
sensitive to pain, but after repeated use the pain sensation
diminishes.
Note: You get the best results in the most comfortable
way when the hairs are not too long (approx. 4mm). If the
hairs are longer, you can trim them to this length with the
trimming head and comb (see section ‘Trimming sensitive
areas with the trimming head and comb’ in this chapter).
1 Thoroughly clean the area to be epilated to remove
any residues of deodorant, cream etc. Then dab the
area dry.
2 Put the sensitive area cap on the epilating
head (Fig. 9).
3 Switch on the appliance.
Preferably use speed II. Switch to speed I for areas with
little hair growth and for hard-to-reach areas.
4 Stretch the skin with your free hand. When epilating
the underarms, raise your arm to stretch the skin.
5 Place the appliance perpendicularly onto your skin,
with the on/off slide pointing in the direction in
which you are going to move the appliance.
6 Move the appliance slowly over the skin, against the
direction of the hair growth.
Epilate your bikini line as shown in the gure (Fig. 10).
Epilate your underarms as shown in the gure. Move
the appliance in different directions (Fig. 11).
Trimming sensitive areas with the trimming
head and comb
Use the trimming head to trim the hair on your
underarms and bikini line to a length of 4mm.
Note: The trimming head can only be used at speed setting I.
-
-
4203.000.4330.1
2/7

1 Push the epilating head in the direction of the
arrows on the back of the appliance (1) and remove
it from the appliance (2) (Fig. 12).
2 Put the trimming head on the appliance (1) and
push it against the direction of the arrows on the
back of the appliance (2) to x it (Fig. 13).
3 Put the comb on the trimming head.
4 Switch on the appliance (Fig. 14).
Note: Speed II does not work when the trimming head is
attached.
5 Stretch the skin with your free hand.
6 Move the appliance against the direction of hair
growth. Make sure the surface of the comb always
stays in contact with the skin (Fig. 15).
7 When you have nished trimming, switch off the
appliance and remove the comb.
Styling with the trimming head.
To style your bikini line, use the trimming head without
the comb. Styling without the comb results in a hair
length of approx. 0.5-1mm. You can be as creative as you
like when you style your bikini line. You can even draw
and cut out a template, e.g. a heart shape, which you can
use to create a personal style.
Note: The trimming head can only be used at speed setting I.
1 Push the epilating head in the direction of the
arrows on the back of the appliance (1) and remove
it from the appliance (2) (Fig. 12).
2 Put the trimming head on the appliance (1) and
push it against the direction of the arrows on the
back of the appliance (2) to x it (Fig. 13).
Note: We advise you not to put the comb on the trimming
head.
3 Switch on the appliance (Fig. 14).
Note: Speed II does not work when the trimming head is
attached.
4 Move the appliance towards the desired contour
of your bikini line, against the direction of hair
growth. Touch the skin lightly with the trimming
head (Fig. 16).
Cleaning and maintenance
Note: Make sure the appliance is switched off and
unplugged before you start to clean it.
Never use scouring pads, abrasive cleaning agents or
aggressive liquids such as petrol or acetone to clean the
appliance.
Never rinse the appliance or the adapter under the
tap (Fig. 17).
Keep the appliance and the adapter dry (Fig. 18).
Cleaning the attachments
1 Remove any attachment (sensitive area cap,
opti-start cap with massage element, hair-lifting
attachment with massage element) from the
epilating head (Fig. 19).
Remove the trimming comb by pulling it off the
trimming head (Fig. 20).
2 Remove loose hairs from the attachment with the
cleaning brush.
3 Rinse the attachment under the tap while turning it.
4 Dry the attachment before you use or store it.
Cleaning the epilating head/trimming head
1 Push the epilating head/trimming head in the
direction of the arrows on the back of the
appliance (1) and remove it (2) (Fig. 12).
2 Remove loose hairs with the cleaning
brush (Fig. 21).
3 Rinse the epilating head/trimming head under the
tap for 5-10 seconds while turning it (Fig. 22).
Pull the front cover off the trimming head to remove
any hair that has accumulated inside the trimming
head (Fig. 23).
-
-
-
-
4 Shake the epilating head/trimming
head rmly (Fig. 24).
Dry the epilating/trimming head thoroughly with a tea
towel.
Note: Make sure the epilating head/trimming head is
completely dry before you place it back onto the appliance.
Replacement
All parts of the appliance can be replaced. If you need to
replace one or more of the following parts, go to your
Philips dealer or an authorised Philips service centre:
appliance itself
epilating head
sensitive area cap
opti-start cap with massage element
hair-lifting attachment with massage element
trimming head
comb
cleaning brush
adapter
Environment
Do not throw away the appliance with the normal
household waste at the end of its life, but hand it in
at an ofcial collection point for recycling. By doing
this, you help to preserve the environment (Fig. 25).
Guarantee & service
If you need service or information or if you have a
problem, please visit the Philips website at www.philips.
com or contact the Philips Consumer Care Centre
in your country (you nd its phone number in the
worldwide guarantee leaet). If there is no Consumer
Care Centre in your country, go to your local Philips
dealer.
Troubleshooting
This chapter summarises the most common problems
you could encounter with the appliance. If you are unable
to solve the problem with the information below, contact
the Consumer Care Centre in your country.
-
-
-
-
-
-
-
-
-
-
Problem Cause Solution
Poor epilating results. You move the
appliance in the wrong
direction.
Move the appliance against the direction of hair growth, with
the on/off slide pointing in the direction in which you move the
appliance.
You place the epilating
head on the skin at the
wrong angle.
Make sure that you place the appliance on the skin at an angle
of 90° (see chapter ‘Using the appliance’).
You used a (depilatory)
cream prior to epilation.
Make sure your skin is clean, entirely dry and free from grease.
Do not use any cream before you start epilating.
The hairs are too short. Sometimes hairs are too short to be caught. The optimal length
for easy removal of the hairs is 3-4mm. The hairs that are not
caught during this session will be long enough to be removed
when you epilate the next time. You can also try to catch the
hairs by moving the appliance across the skin a few more times.
The sensitive area cap
is on the epilating head
when you epilate your
legs.
Do not use the sensitive area cap when you epilate your legs,
as the cap reduces the number of active epilating discs. NB:
Never use the epilator without the sensitive area cap when
you epilate your underarms or bikini line.
The appliance does
not work.
The socket to which the
appliance is connected is
not live.
Make sure the socket is live. If you have connected the epilator
to the socket in a bathroom cabinet, you may need to switch
on the bathroom light to activate the socket.
I cannot select speed
setting II.
The trimming head is
attached. The trimming
head can only be used at
speed setting I.
Select speed setting I when you use the trimming head.
I cannot remove the
trimming head/
epilating head from
the appliance.
You try to pull it straight
off.
Push the epilating head/trimming head in the direction of the
arrows on the back of the appliance before you pull it off the
appliance (see chapter ‘Cleaning and maintenance’).
4203.000.4330.1
3/7
 Loading...