How it Works
Log In / Sign Up
Buy Points
How it Works
FAQ
Contact Us
Questions and Suggestions
Users
Philips
Loading...
H
HP-1511
6
HP-3621
26
HP-3643
21
HP-4611
7
HP-4624
23
HP-4625
15
HP-4638
17
HP-4642
20
HP-4643
16
HP-4646
24
HP-4648
4
HP-4651
12
HP-4653
23
HP-4657
31
HP-4659
HP-4661
39
HP-4665
17
HP-4666
37
HP-4667
22
HP-4668
38
HP-4669
29
HP-4671
24
HP-4674
26
HP-4680
19
HP 4832
HP 4833
2
HP 4834D
HP 4837
HP 4838
HP 4842
HP 4846
2
HP 4852
2
HP 4853
2
HP 4862
2
HP 4863
HP 4864
HP 4898
2
HP 4949
HP 4950
HP 4960
38
HP 4997/00 Pro
HP 505
2
HP 5225
2
HP 555
HP 6306
18
HP 6307
2
HP 6308
HP 6315
HP 6317
22
HP 6319
15
HP 6321/20
HP 6322
11
HP 6335
14
HP 6341
18
HP 6345
23
HP 6350/0054
HP 6362
25
HP 6373
22
HP 6373-00
5
HP 6375
21
HP 6379
24
HP 6390
29
HP 6403
4
HP 6407
31
HP 6409
32
HP 6421
5
HP 6422
3
HP 6444
2
HP 6446
4
HP 6481
20
HP 6481/02
2
HP 6482
29
HP 6495
21
HP 6501
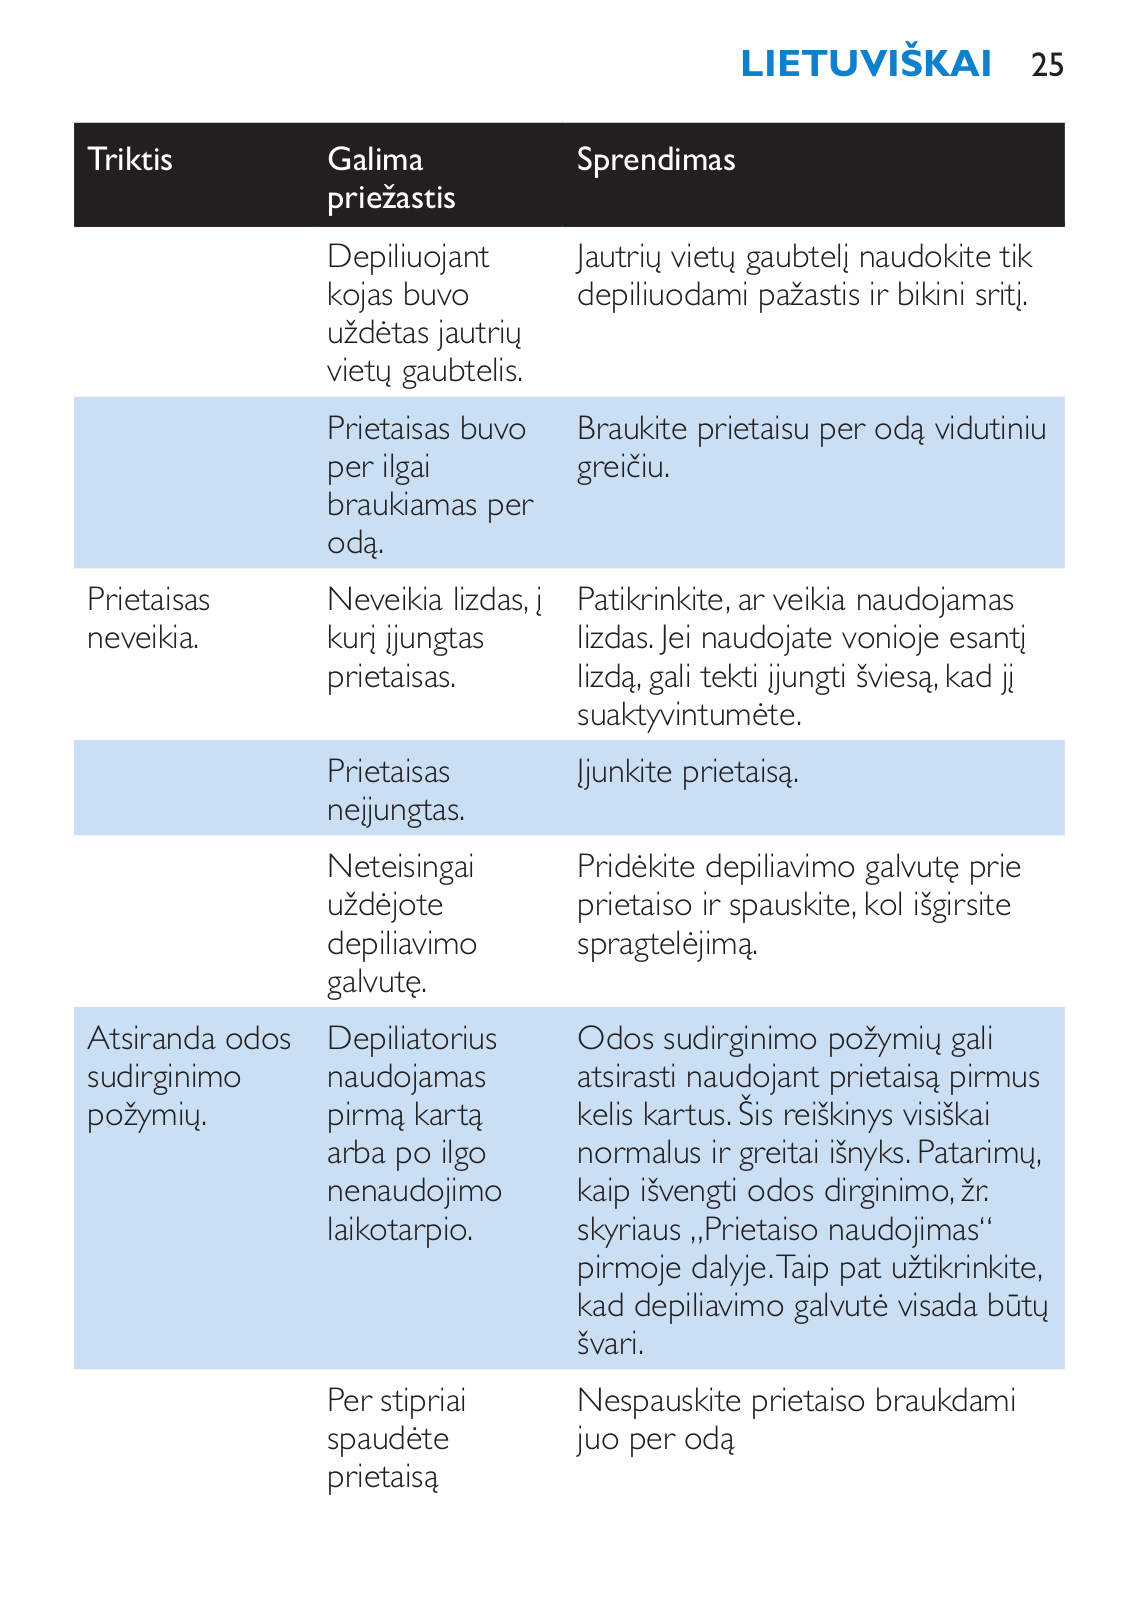
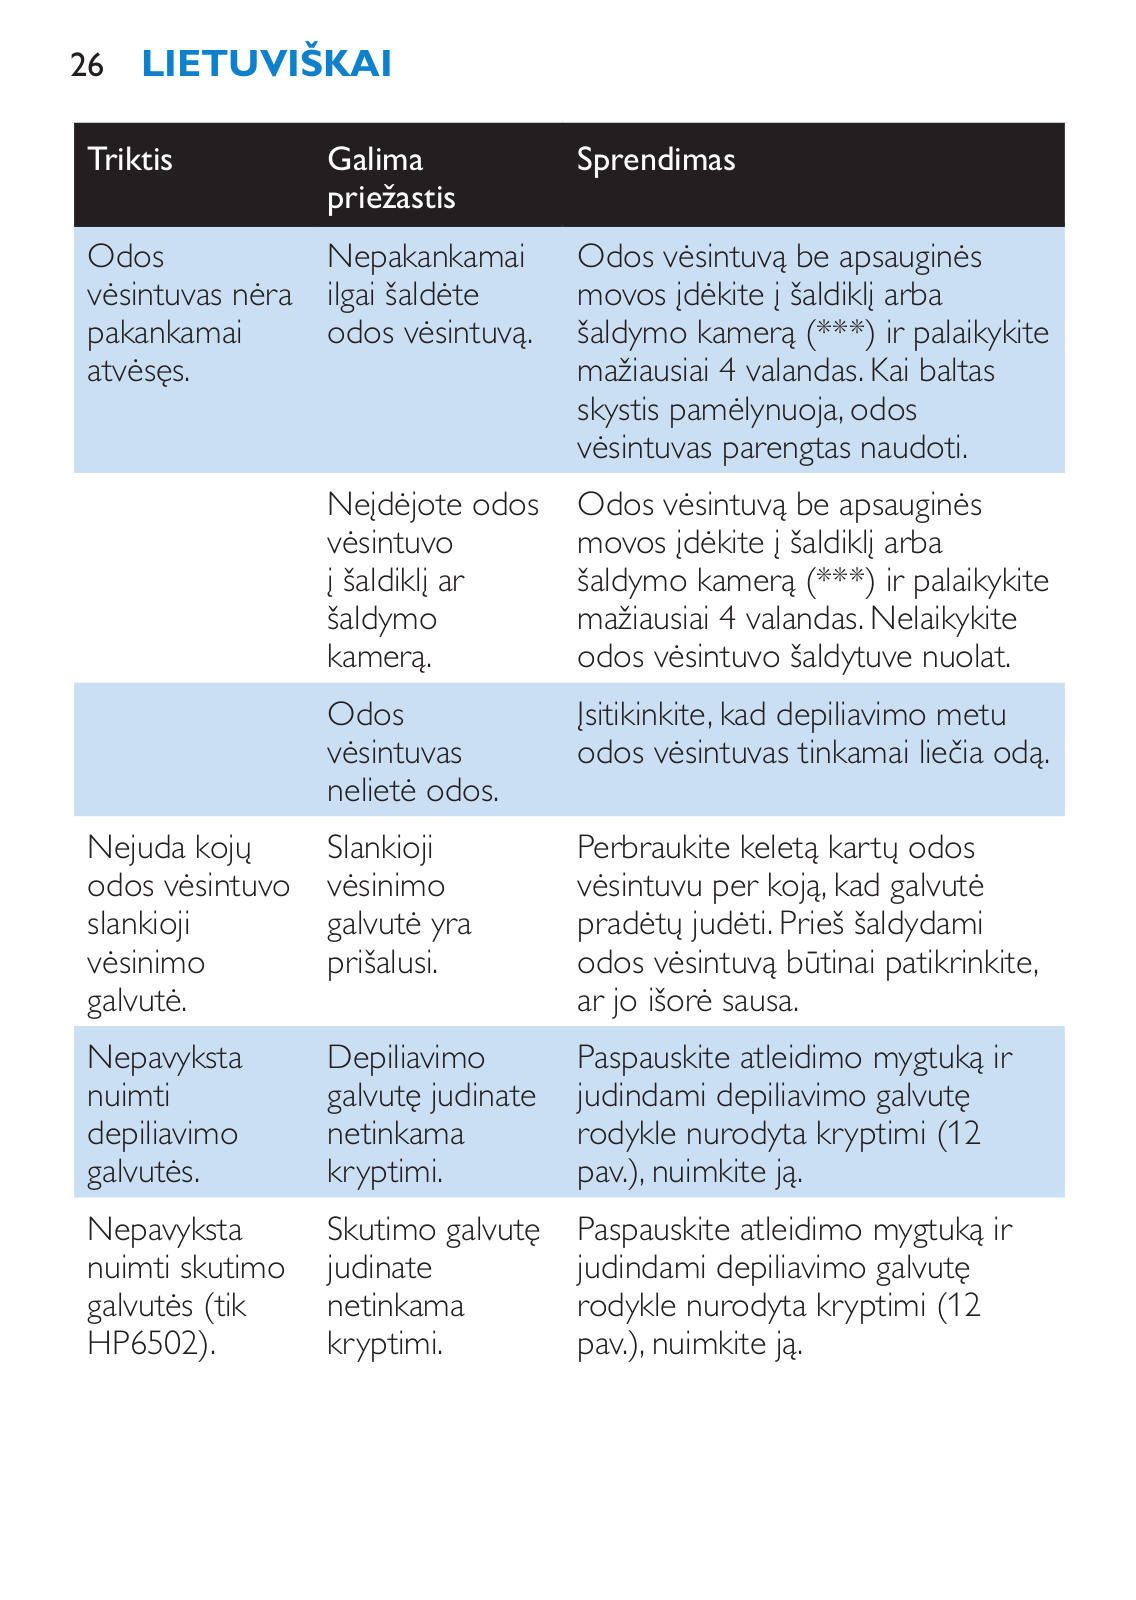
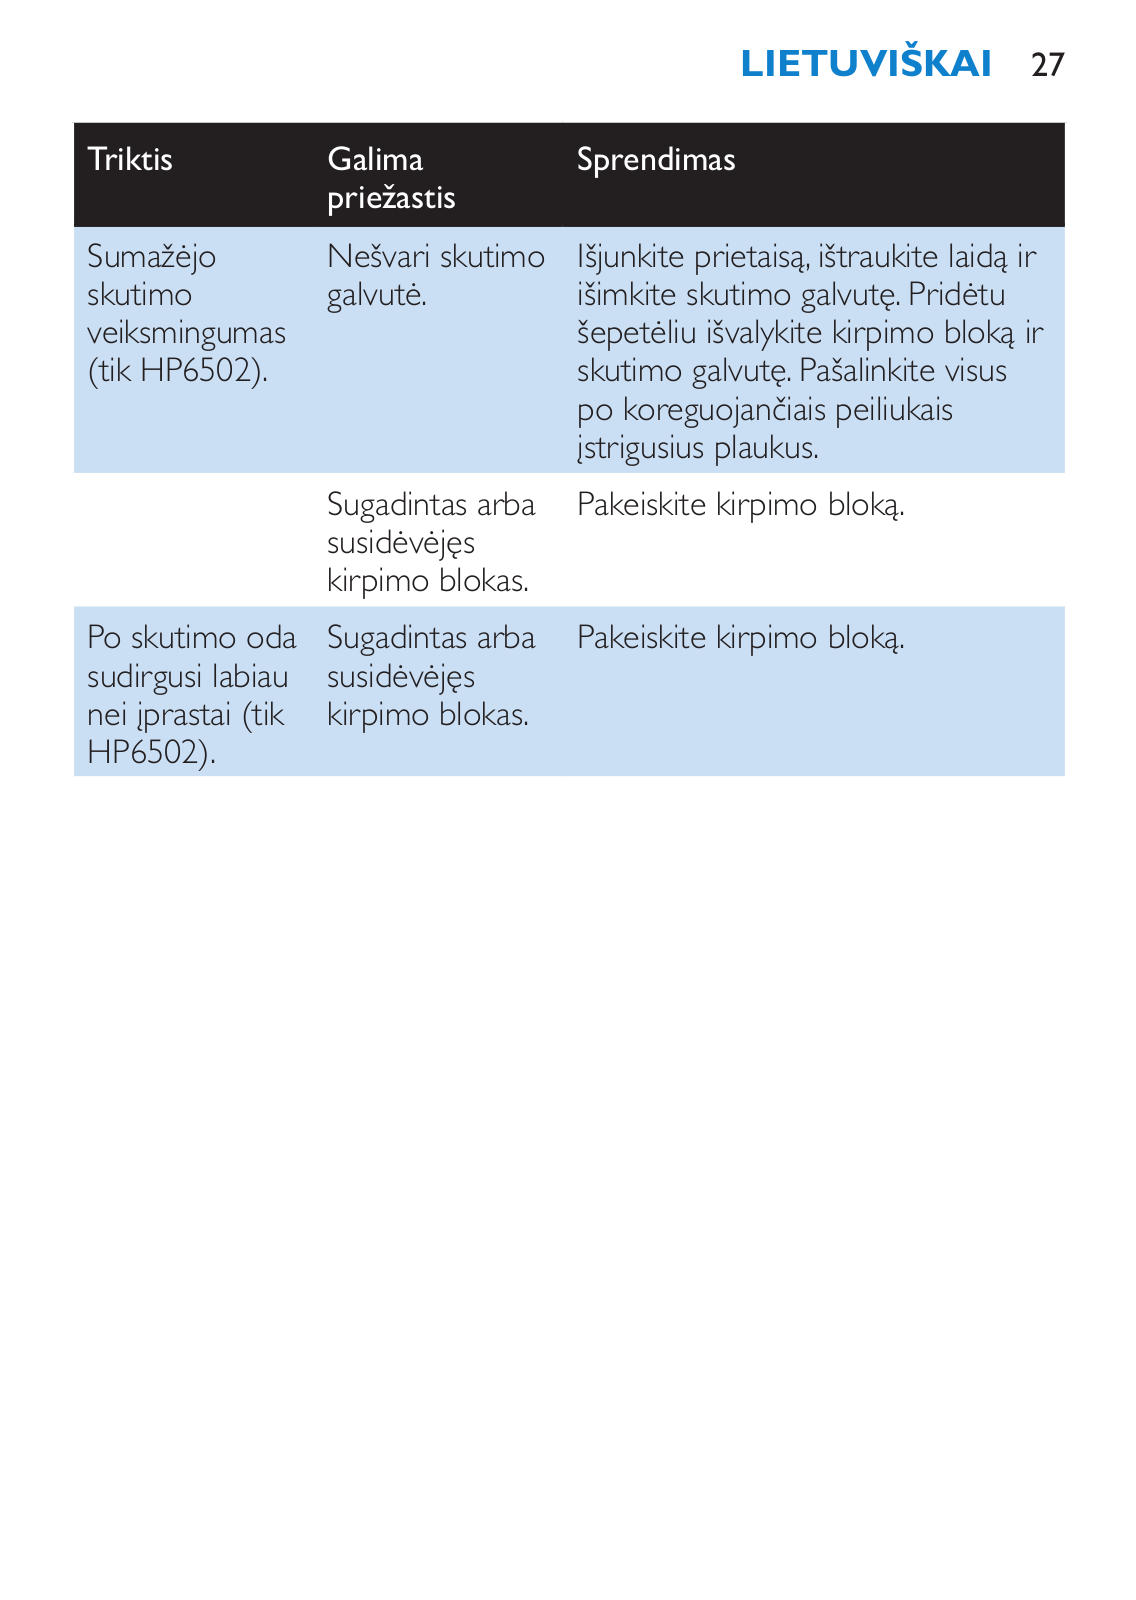
25
HP 6502
29
HP 6503
26
HP 6508
22
HP 6509
29
HP 6511
20
HP 6515
20
HP 6517
27
HP 6530
20
HP 6572
25
HP 6576
24
HP 8309
32
HP 8319
3
HP 8345
6
HP 8347
2
HP 8360
HP 8361
26
HP 8363
4
HP 8618
11
HP 8665
19
HP 8668
3
HP 8699
2
HP L1502
HP L1523
HP L1530R
HP L2035
HP P4795A
Loading...
Loading...
Nothing found
HP 6502
BROCHURE
2 pgs
271.04 Kb
0
BROCHURE
2 pgs
266.51 Kb
0
BROCHURE
2 pgs
276.07 Kb
0
BROCHURE
2 pgs
282.06 Kb
0
BROCHURE
2 pgs
274.2 Kb
0
BROCHURE
2 pgs
389.68 Kb
0
BROCHURE
2 pgs
387.61 Kb
0
BROCHURE
2 pgs
378.5 Kb
0
BROCHURE
2 pgs
276.01 Kb
0
BROCHURE
2 pgs
247.29 Kb
0
BROCHURE
2 pgs
269.66 Kb
0
BROCHURE
2 pgs
231.08 Kb
0
BROCHURE
2 pgs
388.84 Kb
0
BROCHURE [hr]
2 pgs
539.47 Kb
0
BROCHURE [hu]
2 pgs
387.28 Kb
0
BROCHURE [pl]
2 pgs
389.12 Kb
0
User Guide
88 pgs
7.08 Mb
0
User Manual
120 pgs
819.7 Kb
0
User Manual
2 pgs
392.02 Kb
0
User Manual
2 pgs
275.75 Kb
0
User Manual
2 pgs
396.13 Kb
0
User Manual
2 pgs
383.85 Kb
0
User Manual
2 pgs
367.55 Kb
0
User Manual
2 pgs
382.32 Kb
0
User Manual
88 pgs
7.22 Mb
0
User Manual
120 pgs
1.1 Mb
0
User Manual [fi]
128 pgs
885.17 Kb
0
User Manual [ja]
32 pgs
5.89 Mb
0
User Manual [lt]
116 pgs
890.35 Kb
0
Table of contents
Loading...
Philips HP6502, HP6501 User Manual [lt]
...
Philips User Manual [lt]
Download
Specifications and Main Features
Frequently Asked Questions
User Manual
Download
Loading...
+
hidden pages
Unhide
You need points to download manuals.
1 point = 1 manual.
You can buy points or you can get point for every manual you upload.
Buy points
Upload your manuals
 Loading...