

HP6368, HP6366
2
3
A
B
C
(
HP6368
D
F
G
)
E
H
I
J

4

ENGLISH 6
DEUTSCH 15
SUOMI 25
FRANÇAIS 33
NEDERLANDS 43
NORSK 53
SVENSKA 62
繁體中文 71
HP6368, HP6366

6
ENGLISH
Introduction
Congratulations on your purchase and welcome to Philips! To fully benet
from the support that Philips offers, register your product at www.philips.
com/welcome.
This innovative Ladyshave protects your skin while providing you with
beautifully smooth results. Its double-foil pivoting head makes light work
of even the toughest hairs, without fear of nicks and cuts.
With your new Philips Ladyshave, you can easily and comfortably shave
your legs, underarms and bikini zone. You can use the Ladyshave either
dry or wet. If you shave while taking a bath or shower, we advise you to
use soap or shaving foam for the most comfortable shave. After use, you
can clean the Ladyshave under the tap for extra hygiene. This ladyshave is
a cordless appliance equipped with rechargeable batteries that can be
recharged with the adapter.
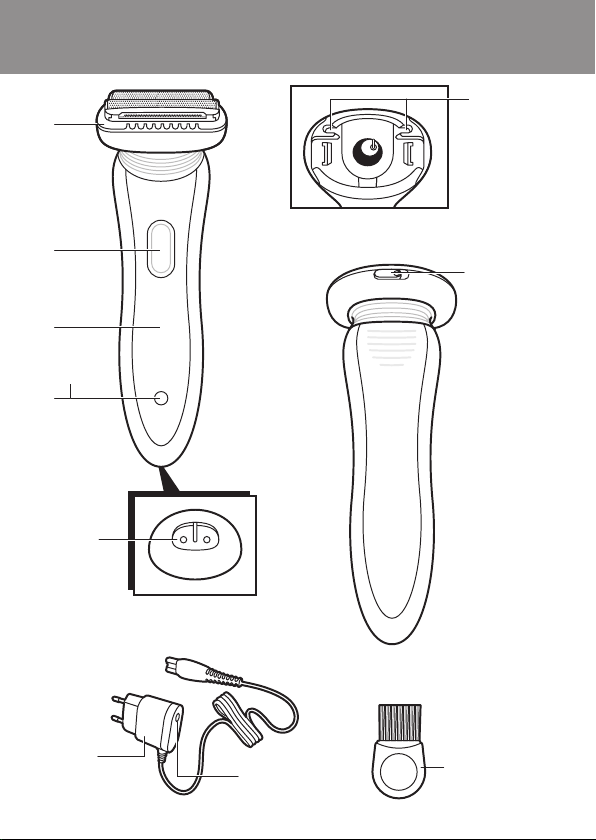
General description (Fig. 1)
A Shaving head with cutting unit (trimmer, aloe vera strip, gentle hair
lifter and double shaving foil)
B On/off button
C Handle
D Battery-low light (HP6368 only)
E Socket for appliance plug
F Guiding grooves
G Cutting unit release slide
H Adapter
I Charging light
J Cleaning brush
Important
Read this user manual carefully before you use the appliance and save it
for future reference.
Danger
- Keep the adapter dry.

ENGLISH 7
Warning
- Only use the Ladyshave with the adapter supplied.
- Do not use the appliance, an attachment or the adapter if it is
damaged or broken to avoid injuries.
- If the adapter is damaged, always have it replaced with one of the
original type in order to avoid a hazard.
- The adapter contains a transformer. Do not cut off the adapter to
replace it with another plug, as this causes a hazardous situation.
- This appliance is not intended for use by persons (including children)
with reduced physical, sensory or mental capabilities, or lack of
experience and knowledge, unless they have been given supervision
or instruction concerning use of the appliance by a person
responsible for their safety.
- Children should be supervised to ensure that they do not play with
the appliance.
- Do not insert metal-containing material into the socket for the
appliance plug to avoid short circuiting.
Caution
- Do not clean the Ladyshave with water that is hotter than shower
temperature (max. 40°C).
- Charge, use and store the appliance at a temperature between 10°C
and 40°C.
- This appliance is only intended to be used by women to shave their
body hair. It is not intended for shaving scalp hair or for any other
purpose.
- Only use the shaving head on the legs, the arms, the underarms
and the bikini area. Never use the shaving head on other body areas
(e.g. the face).
- Make sure the socket is live when you charge the appliance. The
electricity supply to sockets in mirror cabinets over washbasins or
shaver sockets in bathrooms may be cut off when the light is turned
off.

ENGLISH8
General
- The appliance complies with the internationally approved IEC safety
regulations and can be safely used in the bath or shower and cleaned
under the tap (Fig. 2).
- The appliance is equipped with an automatic voltage selector and is
suitable for mains voltages ranging from 100 to 240 volts.
Electromagnetic elds (EMF)
This Philips appliance complies with all standards regarding
electromagnetic elds (EMF). If handled properly and according to the
instructions in this user manual, the appliance is safe to use based on
scientic evidence available today.
Preparing for use
Charging
It takes approximately 10 hours to charge the batteries fully.
Make sure your hands and the appliance are dry when you prepare the
appliance for charging.
When the batteries are fully charged, the appliance has a cordless shaving
time of up to 40 minutes.
Always switch off the appliance before you connect it to the mains.
1 Make sure the appliance is switched off.
2 Insert the appliance plug into the appliance (1). Plug the adapter
into a wall socket (2) (Fig. 3).
, The charging light on the adapter goes on.
Note: The charging light on the adapter remains on after the appliance is
fully charged.
3 Unplug the appliance when the batteries are fully charged (i.e. after
approx. 10 hours).
Note: Do not leave the adapter plugged in for longer than 14 hours, as this
may affect the lifetime of the batteries.
ENGLISH 9
Rechargeable batteries low or empty (HP6368 only)
- When the battery-low light is on, the batteries are almost empty. In
this case, you can continue to shave for a few minutes (Fig. 4).
- If you switch off the appliance when the batteries are nearly empty,
the battery-low light ashes 4 times.
- When the batteries are empty, the battery-low light goes out and the
appliance stops operating.
- Switch off the appliance and charge the batteries.
Attaching/detaching attachments
Attaching/detaching the shaving head
1 To attach the shaving head, slide it into the guiding grooves on both
sides of the opening in the handle. Then press the shaving head
onto the appliance (‘click’) (Fig. 5).
2 To detach the shaving head, pull it off the appliance (Fig. 6).
Caution: Do not exert excessive pressure on the double shaving foil to
avoid damage.
Using the appliance
Make sure that the appliance is fully charged before you use it for the rst
time.
Note: You cannot use the Ladyshave while it is connected to the mains.
Shaving
Note: When you use the appliance for shaving, you can use it under both dry
and wet conditions.
1 Press the on/off button to switch on the appliance (Fig. 7).
2 Place the double shaving foil and the integrated trimmer gently on
the skin. Stretch the skin with your free hand while you shave your
bikini line. (Fig. 8)
Note: Do not press the appliance too rmly onto the skin.
ENGLISH10
Note: When you shave the underarms, raise your arm to stretch the skin.
3 Move the appliance slowly over the skin against the direction of
hair growth while you press it lightly. Make sure that the trimmer
and the double shaving foil are always in full contact with the
skin (Fig. 9).
Note: If you move the appliance over the skin too fast, you may not obtain a
smooth result.
Tip: To achieve the best result when you shave wet, lather your skin with soap
or shaving cream before you start to shave.
Caution: Never apply any creams or additives before you start to shave
under dry conditions.
Cleaning and maintenance
Always detach the appliance from the adapter before you clean the
appliance under the tap.
Never use scouring pads, abrasive cleaning agents or aggressive liquids
such as petrol or acetone to clean the appliance.
Never switch on the appliance while you clean it or while the cutting
unit is not attached.
Cleaning the handle and adapter
1 Clean the handle with the cleaning brush or under a running tap.
Note: Make sure that the handle is completely dry before you reassemble the
appliance.
2 If necessary, clean the adapter with the cleaning brush or a dry
cloth.
Always keep the adapter dry. Never rinse it under the tap or immerse
it in water.

ENGLISH 11
Cleaning the shaving head
1 Press the on/off button to switch off the appliance (Fig. 7).
2 Pull the shaving head off the appliance (Fig. 6).
Do not exert pressure on the double shaving foil to avoid damage.
3 Push the cutting unit release slide to the right (1) and remove the
cutting unit (2) (Fig. 10).
4 Clean the cutting unit and the inside of the shaving head with the
cleaning brush. Also brush away any hairs that have collected under
the trimmer (Fig. 11).
Caution: Do not brush the foil to avoid damage to the brush or the foil.
5 You can also rinse the cutting unit and the shaving head under the
tap (Fig. 12).
6 To dry the cutting unit and the shaving head, shake them
rmly (Fig. 13).
7 Place the cutting unit back onto the shaving head (‘click’) (Fig. 14).
Note: Make sure that the shaving head and the cutting unit are completely
dry before you reattach them onto the appliance.
Maintenance
1 Lubricate the cutting unit (double shaving foil and trimmer) with a
drop of sewing machine oil twice a year (Fig. 15).
2 After you have put the oil on the cutting unit, assemble it onto the
handle and let the appliance operate briey to spread the oil.
Replacement
The shaving head and the adapter of the appliance can be replaced. If you
need to replace one or more parts, go to your Philips dealer or an
authorised Philips service centre. If you use the Ladyshave two or more
times a week, we advise you to replace the shaving head after one or two
years or if it is damaged.
ENGLISH12
Storage
1 Store the appliance in a safe, dry place.
Environment
- Do not throw away the appliance with the normal household waste
at the end of its life, but hand it in at an ofcial collection point for
recycling. By doing this, you help to preserve the
environment (Fig. 16).
- The built-in rechargeable batteries contains substances that may
pollute the environment. Always remove the batteries before you
discard and hand in the appliance at an ofcial collection point.
Dispose of the batteries at an ofcial collection point for batteries. If
you have trouble removing the batteries, you can also take the
appliance to a Philips service centre. The staff of this centre will
remove the batteries for you and will dispose of them in an
environmentally safe way (Fig. 17).
Removing the rechargeable batteries
1 Disconnect the appliance from the adapter.
2 Let the motor run until the batteries are completely empty.
3 Remove the shaving head from the appliance.
4 Release the side panels on both sides of the appliance with a
screwdriver and remove them from the appliance (Fig. 18).
5 Remove the front panels of the appliance by pushing them upwards
with a screwdriver (Fig. 19).
6 Cut the wires at the end of the handle with a pair of household
scissors and pull out the inner part of the appliance (Fig. 20).
7 Remove the rechargeable batteries (Fig. 21).
Do not attempt to replace the rechargeable batteries.
Do not connect the appliance to the mains again after you have
removed the rechargeable batteries.

ENGLISH 13
Guarantee and service
If you need service or information or if you have a problem, please visit
the Philips website at www.philips.com or contact the Philips Consumer
Care Centre in your country (you nd its phone number in the
worldwide guarantee leaet). If there is no Consumer Care Centre in
your country, go to your local Philips dealer.
Troubleshooting
This chapter summarises the most common problems you could
encounter with the appliance. If you are unable to solve the problem with
the information below, contact the Consumer Care Centre in your
country.
Problem Solution
The appliance
does not shave
as well as it
should.
Make sure you move the shaving head against the
direction of hair growth.
Make sure that the batteries are charged sufciently.
Clean the shaving head after every use (see chapter
‘Cleaning and maintenance’). Also brush away any
hairs that have collected under the trimmer teeth.
Apply a drop of sewing machine oil onto the shaving
head.
If the above-mentioned solutions do not solve the
problem, you have to replace the shaving head. Go
to your dealer or an authorised Philips service centre
to obtain a new shaving head

ENGLISH14
Problem Solution
My skin is
irritated after
shaving.
Slight skin irritation like red skin or red dots may
occur. This is normal. To avoid irritated skin, make
sure the shaving head is always in full contact
with the skin and that you gently move the appliance
against the direction of hair growth (see chapter
‘Using the appliance’). Do not apply too much
pressure during shaving as this may cause skin
irritation.
Always stretch the skin with your free hand. When
you shave the underarms, raise your arm to stretch
the skin.
Make sure that you clean the appliance properly (see
chapter ‘Cleaning and maintenance’).
If you have very sensitive skin, a certain degree of
irritation is unavoidable. Do not apply deodorant or
cream on the irritated skin. If the irritation lasts
longer than 3 days, we advise you to consult a
doctor.
Check if the shaving head is broken. Only replace
damaged or broken parts with original Philips parts.

DEUTSCH
Einführung
Herzlichen Glückwunsch zu Ihrem Kauf und willkommen bei Philips! Um
die Unterstützung von Philips optimal nutzen zu können, registrieren Sie
Ihr Produkt bitte unter www.philips.com/welcome.
Dieser innovative Ladyshave schützt Ihre Haut und liefert schöne, glatte
Ergebnisse. Sein beweglicher Kopf mit doppelter Scherfolie beseitigt selbst
die schwierigsten Haare problemlos und ohne Gefahr von
Hautverletzungen.
Mit Ihrem neuen Philips Ladyshave können Sie Beine, Achselhöhlen und
Bikinizone leicht und komfortabel rasieren. Sie können den Ladyshave auf
trockener oder nasser Haut benutzen. Zur Rasur auf nasser Haut
(beispielsweise beim Duschen oder Baden) empehlt es sich, Seife oder
Rasierschaum zu verwenden. Spülen Sie den Ladyshave nach Gebrauch
einfach unter ießendem Wasser ab, für das Plus an Hygiene. Dieser
Ladyshave wird mit Akkus betrieben, die mit dem Adapter wieder
aufgeladen werden können.
Allgemeine Beschreibung (Abb. 1)
A Scherkopf mit Schneideeinheit (Trimmer, Aloe-Vera-Streifen, Aufsatz
für das sanfte Aufrichten der Haare und doppelte Scherfolie)
B Ein-/Ausschalter
C Griff
D Anzeige für geringen Ladestand (nur HP6368)
E Buchse für Gerätestecker
F Führungsrillen
G Entriegelungsschieber für Schneideeinheit
H Adapter
I Ladeanzeige
J Reinigungsbürste
15
Wichtig
Lesen Sie diese Bedienungsanleitung vor dem Gebrauch des Geräts
aufmerksam durch, und bewahren Sie sie für eine spätere Verwendung
auf.

DEUTSCH16
Gefahr
- Halten Sie den Adapter trocken.
Warnhinweis
- Verwenden Sie den Ladyshave nur mit dem mitgelieferten Adapter.
- Um Verletzungen zu vermeiden, verwenden Sie Gerät, Aufsätze und
Adapter nicht, wenn sie beschädigt sind.
- Wenn der Adapter defekt oder beschädigt ist, darf er nur durch ein
Original-Ersatzteil ausgetauscht werden, um Gefährdungen zu
vermeiden.
- Der Adapter enthält einen Transformator. Ersetzen Sie den Adapter
keinesfalls durch einen anderen Stecker, da dies möglicherweise den
Benutzer gefährden kann.
- Dieses Gerät ist für Benutzer (einschl. Kinder) mit eingeschränkten
physischen, sensorischen oder psychischen Fähigkeiten bzw. ohne
jegliche Erfahrung oder Vorwissen nur dann geeignet, wenn eine
angemessene Aufsicht oder ausführliche Anleitung zur Benutzung des
Geräts durch eine verantwortliche Person sichergestellt ist.
- Achten Sie darauf, dass Kinder nicht mit dem Gerät spielen.
- Zur Vermeidung eines Kurzschlusses stecken Sie kein metallhaltiges
Material in die Buchse für den Gerätestecker.
Achtung
- Bei der Reinigung des Ladyshave darf das Wasser nicht wärmer als
normales Duschwasser (max. 40 °C) sein.
- Laden, benutzen und verwahren Sie das Gerät bei Temperaturen
zwischen 10 °C und 40 °C.
- Dieses Gerät ist ausschließlich zum Rasieren von weiblichem
Köperhaar vorgesehen. Es ist nicht zum Rasieren von Kopfhaar oder
für andere Zwecke vorgesehen.
- Verwenden Sie den Scherkopf lediglich für die Beine, Arme,
Achselhöhlen und Bikinizone. Verwenden Sie den Scherkopf niemals
für andere Körperbereiche (z. B. im Gesicht).
- Prüfen Sie vor dem Auaden des Geräts, ob die Steckdose
kontinuierlich Strom führt. Steckdosen in Badezimmerschränken über
Waschbecken sowie Rasierer-Steckdosen werden häug zusammen
mit der Raumbeleuchtung ausgeschaltet.
DEUTSCH 17
Allgemeines
- Das Gerät erfüllt die internationalen IEC-Sicherheitsvorschriften und
kann ohne Bedenken unter der Dusche oder in der Badewanne
benutzt sowie unter ießendem Wasser gereinigt werden (Abb. 2).
- Das Gerät hat eine automatische Spannungsanpassung und eignet
sich für Netzspannungen von 100 bis 240 Volt.
Elektromagnetische Felder
Dieses Philips Gerät erfüllt sämtliche Normen bezüglich
elektromagnetischer Felder (EMF). Nach aktuellen wissenschaftlichen
Erkenntnissen ist das Gerät sicher im Gebrauch, sofern es ordnungsgemäß
und entsprechend den Anweisungen in dieser Bedienungsanleitung
gehandhabt wird.
Für den Gebrauch vorbereiten
Laden
Nach ca. 10 Stunden ist das Gerät vollständig aufgeladen.
Ihre Hände und das Gerät müssen trocken sein, wenn Sie mit dem
Auaden des Geräts beginnen.
Mit vollständig aufgeladenen Akkus können Sie sich bis zu 40 Minuten
kabellos rasieren.
Schalten Sie das Gerät immer aus, bevor Sie es an die Stromversorgung
anschließen.
1 Vergewissern Sie sich, dass das Gerät ausgeschaltet ist.
2 Stecken Sie den Gerätestecker in das Gerät (1). Schließen Sie den
Adapter an eine Steckdose an (2) (Abb. 3).
, Die Ladeanzeige am Adapter leuchtet auf.
Hinweis: Die Ladeanzeige am Adapter bleibt an, nachdem das Gerät
vollständig aufgeladen ist.
3 Ziehen Sie den Netzstecker aus der Steckdose, wenn die Akkus
vollständig aufgeladen sind (d. h. nach ungefähr 10 Stunden).

DEUTSCH18
Hinweis: Lassen Sie den Adapter nicht länger als 14 Stunden angeschlossen,
da dies die Lebensdauer der Akkus beeinträchtigen kann.
Akkus fast leer oder leer (nur HP6368)
- Wenn die Anzeige für geringen Ladestand aueuchtet, sind die Akkus
fast leer. In diesem Fall können Sie sich noch ein paar Minuten lang
rasieren (Abb. 4).
- Wenn die Akkus fast leer sind und Sie das Gerät ausschalten, blinkt
die Anzeige für geringen Ladestand viermal.
- Wenn die Akkus leer sind, erlischt die Anzeige für geringen Ladestand,
und das Gerät schaltet sich ab.
- Schalten Sie das Gerät aus, und laden Sie die Akkus auf.
Aufsätze befestigen und abnehmen
Den Scherkopf befestigen/abnehmen
1 Um den Scherkopf zu befestigen, schieben Sie ihn in die
Führungsrillen an beiden Seiten der Grifföffnung. Drücken Sie dann
den Scherkopf auf das Gerät, bis er hörbar einrastet (Abb. 5).
2 Um den Scherkopf abzunehmen, ziehen Sie ihn vom Gerät
ab (Abb. 6).
Achtung: Vermeiden Sie übermäßigen Druck auf die doppelte Scherfolie,
damit diese nicht beschädigt wird.
Das Gerät benutzen
Achten Sie darauf, dass das Gerät vor dem ersten Gebrauch vollständig
aufgeladen ist.
Hinweis: Solange der Ladyshave an das Stromnetz angeschlossen ist, kann er
nicht verwendet werden.
Rasieren
Hinweis: Beim Rasieren können Sie das Gerät sowohl für eine Trocken- als
auch für eine Nassrasur verwenden.

DEUTSCH 19
1 Drücken Sie den Ein-/Ausschalter, um das Gerät
einzuschalten (Abb. 7).
2 Setzen Sie die doppelte Scherfolie und den integrierten Trimmer
sanft auf der Haut auf. Straffen Sie Ihre Haut mit der freien Hand,
während Sie die Bikinizone rasieren. (Abb. 8)
Hinweis: Drücken Sie das Gerät nicht zu fest auf die Haut.
Hinweis: Heben Sie beim Rasieren der Achselhöhlen den Arm, um so die Haut
zu spannen.
3 Drücken Sie das Gerät leicht auf die Haut, und führen Sie es
langsam entgegen der Haarwuchsrichtung über die Haut. Achten Sie
darauf, dass der Trimmer und die doppelte Scherfolie stets vollen
Kontakt zur Haut haben (Abb. 9).
Hinweis: Wenn Sie das Gerät zu schnell über die Haut führen, erzielen Sie
möglicherweise kein glattes Ergebnis.
Tipp: Um das beste Ergebnis bei einer Nassrasur zu erzielen, seifen Sie Ihre
Haut vor der Rasur mit Seife oder Rasiercreme ein.
Achtung: Verwenden Sie bei einer Trockenrasur keinerlei Cremes oder
Zusätze.
Reinigung und Wartung
Trennen Sie das Gerät vom Adapter, bevor Sie es unter ießendem
Wasser reinigen.
Benutzen Sie zum Reinigen des Geräts keine Scheuerschwämme und mittel oder aggressive Flüssigkeiten wie Benzin oder Azeton.
Wenn Sie das Gerät reinigen oder keine Schneideeinheit aufgesetzt
haben, dürfen Sie es keinesfalls einschalten.
Den Griff und den Adapter reinigen
1 Reinigen Sie den Griff mit der Reinigungsbürste oder unter
ießendem Wasser.

DEUTSCH20
Hinweis: Achten Sie darauf, dass der Griff vollständig trocken ist, bevor Sie das
Gerät wieder zusammenbauen.
2 Wenn notwendig, reinigen Sie den Adapter mit der
Reinigungsbürste oder einem trockenen Tuch.
Achten Sie darauf, dass der Adapter immer trocken ist. Spülen Sie ihn
niemals unter ießendem Wasser ab, und tauchen Sie ihn auch nicht in
Wasser.
Den Ladyshave-Aufsatz reinigen
1 Drücken Sie den Ein-/Ausschalter, um das Gerät
auszuschalten (Abb. 7).
2 Ziehen Sie den Scherkopf vom Gerät (Abb. 6).
Üben Sie keinen Druck auf die doppelte Scherfolie aus, damit diese
nicht beschädigt wird.
3 Schieben Sie den Entriegelungsschieber der Schneideeinheit nach
rechts (1), und nehmen Sie die Schneideeinheit (2) vom
Gerät (Abb. 10).
4 Reinigen Sie die Schneideeinheit und das Innere des Scherkopfs mit
der Reinigungsbürste. Entfernen Sie auch die Härchen, die sich
möglicherweise unter dem Trimmer angesammelt haben (Abb. 11).
Achtung: Bürsten Sie die Folie nicht aus, um Beschädigungen an der
Bürste oder Folie zu vermeiden.
5 Sie können die Schneideeinheit und den Scherkopf auch unter
ießendem Wasser abspülen (Abb. 12).
6 Um die Schneideeinheit und den Scherkopf zu trocknen, schütteln
Sie sie kräftig (Abb. 13).
7 Setzen Sie die Schneideeinheit zurück auf den Scherkopf, bis sie
hörbar einrastet (Abb. 14).
Hinweis: Achten Sie darauf, dass der Scherkopf und die Schneideeinheit
vollständig trocken sind, bevor Sie sie wieder auf dem Gerät befestigen.

DEUTSCH 21
Wartung
1 Geben Sie zweimal jährlich einen Tropfen Nähmaschinenöl auf die
Schneideeinheit (doppelte Scherfolie und Trimmer) (Abb. 15).
2 Nachdem Sie die Schneideeinheit geölt haben, setzen Sie sie auf den
Griff, und schalten Sie das Gerät kurz ein, um das Öl zu verteilen.
Ersatz
Der Scherkopf und der Adapter des Geräts können ausgetauscht werden.
Wenn Sie Teile ersetzen müssen, wenden Sie sich an Ihren Philips Händler
oder ein autorisiertes Philips Service-Center. Wenn Sie Ihren Ladyshave
zweimal wöchentlich oder häuger verwenden, sollten Sie den Scherkopf
nach ein bis zwei Jahren – oder wenn er beschädigt ist – ersetzen.
Aufbewahrung
1 Bewahren Sie das Gerät an einem sicheren und trockenen Ort auf.
Umwelt
- Werfen Sie das Gerät am Ende der Lebensdauer nicht in den
normalen Hausmüll. Bringen Sie es zum Recycling zu einer ofziellen
Sammelstelle. Auf diese Weise helfen Sie, die Umwelt zu
schonen (Abb. 16).
- Die integrierten Akkus enthalten Substanzen, die die Umwelt
gefährden können. Entfernen Sie die Akkus, bevor Sie das Gerät an
einer ofziellen Recyclingstelle abgeben. Geben Sie die gebrauchten
Akkus bei einer Batteriesammelstelle ab. Falls Sie beim Entfernen der
Akkus Probleme haben, können Sie das Gerät auch an ein Philips
Service-Center geben. Dort werden die Akkus ausgebaut und
umweltgerecht entsorgt (Abb. 17).
Die Akkus entfernen
1 Trennen Sie das Gerät vom Adapter.
2 Lassen Sie den Motor laufen, bis die Akkus ganz leer sind.
3 Nehmen Sie den Scherkopf vom Gerät ab.
DEUTSCH22
4 Lösen Sie die beiden seitlichen Abdeckungen des Geräts mit einem
Schraubendreher, und nehmen Sie sie vom Gerät ab (Abb. 18).
5 Entfernen Sie die vorderen Abdeckungen des Geräts, indem Sie sie
mit einem Schraubendreher nach oben drücken (Abb. 19).
6 Durchtrennen Sie die Drähte am Griffende mit einer
Haushaltsschere, und ziehen Sie das Geräteinnere heraus (Abb. 20).
7 Nehmen Sie die Akkus heraus (Abb. 21).
Versuchen Sie nicht, die Akkus zu ersetzen.
Verbinden Sie das Gerät nicht mehr mit dem Stromnetz, nachdem Sie
die Akkus entnommen haben.
Garantie und Kundendienst
Benötigen Sie weitere Informationen oder treten Probleme auf, besuchen
Sie bitte die Philips Website (www.philips.com), oder setzen Sie sich mit
einem Philips Service-Center in Ihrem Land in Verbindung
(Telefonnummer siehe internationale Garantieschrift). Sollte es in Ihrem
Land kein Service-Center geben, wenden Sie sich bitte an Ihren Philips
Händler.
Fehlerbehebung
In diesem Kapitel sind die häugsten Probleme aufgeführt, die beim
Gebrauch Ihres Geräts auftreten können. Sollten Sie ein Problem mithilfe
der nachstehenden Informationen nicht beheben können, wenden Sie
sich bitte an das Philips Service-Center in Ihrem Land.
Problem Lösung
Die Ergebnisse
beim Rasieren
sind nicht so,
wie sie sein
sollten.
Achten sie darauf, dass Sie den Scherkopf gegen die
Haarwuchsrichtung führen.

Problem Lösung
Achten Sie darauf, dass die Akkus ausreichend
aufgeladen sind.
Reinigen Sie den Scherkopf nach jedem Gebrauch
(siehe Kapitel “Reinigung und Wartung”), und
entfernen Sie auch die Härchen, die sich
möglicherweise unter den Zähnen des Trimmers
angesammelt haben.
Geben Sie einen Tropfen Nähmaschinenöl auf den
Scherkopf.
Sollten die oben genannten Maßnahmen das
Problem nicht lösen, muss der Scherkopf ersetzt
werden. Wenden Sie sich an Ihren Händler oder ein
autorisiertes Philips Service Center, um einen neuen
Scherkopf zu erhalten.
Nach dem
Rasieren treten
bei mir
Hautirritationen
auf.
Es können leichte Hautirritationen, z. B. Rötungen,
auftreten. Dies ist normal. Achten Sie zur Vermeidung
von Hautirritationen darauf, dass der Scherkopf stets
vollen Kontakt zur Haut hat und dass Sie das Gerät
sanft entgegen der Haarwuchsrichtung über die Haut
führen (siehe Kapitel “Das Gerät benutzen”). Üben
Sie beim Rasieren nicht zu viel Druck aus, da dies zu
Hautirritationen führen kann.
Straffen Sie Ihre Haut stets mit der freien Hand.
Heben Sie beim Rasieren der Achselhöhlen den
Arm, um so die Haut zu spannen.
Achten Sie darauf, dass Sie das Gerät
ordnungsgemäß reinigen (siehe Kapitel “Reinigung
und Wartung”).
DEUTSCH 23

DEUTSCH24
Problem Lösung
Wenn Sie sehr empndliche Haut haben, sind
Hautirritationen bis zu einem gewissen Grad
unvermeidlich. Verwenden Sie auf der gereizten Haut
weder ein Deodorant noch eine Creme. Wenn die
Reizung länger als 3 Tage anhält, sollten Sie einen Arzt
aufsuchen.
Prüfen Sie, ob der Scherkopf beschädigt ist. Ersetzen
Sie beschädigte Teile nur mit Philips OriginalErsatzteilen.

SUOMI
Johdanto
Onnittelut ostoksestasi ja tervetuloa Philips-tuotteiden käyttäjäksi!
Hyödynnä Philipsin tuki ja rekisteröi tuotteesi osoitteessa www.philips.
com/welcome.
Tämä innovatiivinen ladyshave suojaa ihoa ja takaa samalla upean sileän
tuloksen. Sen kaksoisverkollinen kääntyvä pää leikkaa tehokkaasti
karkeimmatkin ihokarvat ilman naarmuja ja haavoja.
Uudella Philips-ladyshavella voit ajella sääret, kainalot ja bikinialueen
helposti ja mukavasti. Ladyshavea voi käyttää sekä kuiva- että märkäajoon.
Jos poistat ihokarvoja kylvyssä tai suihkussa, suosittelemme käyttämään
saippuaa tai ihokarvojenajogeeliä. Paranna hygieniaa puhdistamalla laite
käytön jälkeen juoksevalla vedellä. Tässä langattomassa ladyshavessa on
ladattavat akut, jotka voi ladata latauslaitteella.
Yleiskuvaus (Kuva 1)
A Ajopää, jossa leikkausyksikkö (rajainosa, aloe vera -liuska,
ihokarvannostin ja kaksoisteräverkko)
B Käynnistyspainike
C Kantokahva
D Lataus vähissä -merkkivalo (vain HP6368)
E Liitäntä pistokkeelle
F Ohjausurat
G Leikkausyksikön vapautuskytkin
H Latauslaite
I Latauksen merkkivalo
J Puhdistusharja
25
Tärkeää
Lue tämä käyttöopas huolellisesti ennen käyttöä ja säilytä se myöhempää
tarvetta varten.
Vaara
- Suojaa latauslaite kosteudelta.
Varoitus
- Käytä vain ladyshaven mukana toimitettua sovitinta.

SUOMI26
- Älä käytä rikkoutunutta tai viallista laitetta, lisäosaa tai verkkolaitetta
vahingonvaaran vuoksi.
- Jos latauslaite on vaurioitunut, vaihda vaaratilanteiden välttämiseksi
tilalle aina alkuperäisen tyyppinen latauslaite.
- Latauslaite sisältää jännitemuuntajan. Älä vaihda latauslaitteen tilalle
toisenlaista pistoketta, jotta et aiheuta vaaratilannetta.
- Laitetta ei ole tarkoitettu lasten tai sellaisten henkilöiden käyttöön,
joiden fyysinen tai henkinen toimintakyky on rajoittunut tai joilla ei ole
kokemusta tai tietoa laitteen käytöstä, muuten kuin heidän
turvallisuudestaan vastaavan henkilön valvonnassa ja ohjauksessa.
- Pienten lasten ei saa antaa leikkiä laitteella.
- Älä työnnä metallia sisältäviä materiaaleja pistokkeen liitäntään
oikosulun välttämiseksi.
Varoitus
- Käytä ladyshaven puhdistamiseen korkeintaan suihkulämmintä vettä
(enintään 40 °C).
- Lataa, käytä ja säilytä laitetta 10 - 40 °C:n lämpötilassa.
- Laite on tarkoitettu vain naisten ihokarvojen ajeluun. Se ei sovellu
hiusten leikkaamiseen eikä mihinkään muuhun tarkoitukseen.
- Käsittele ajopäällä ainoastaan sääriä, käsivarsia, kainaloita ja
bikinialuetta. Älä käsittele ajopäällä muita kehonosia (kuten kasvot).
- Varmista, että pistorasiaan tulee virtaa, kun lataat laitetta.
Kylpyhuoneiden peilikaappien tai parranajokoneille tarkoitettujen
pistorasioiden virta saattaa katketa, kun valo sammutetaan.
Yleistä
- Laite täyttää kansainvälisesti hyväksytyt IEC:n turvamääräykset, ja sitä
voidaan käyttää turvallisesti kylvyssä tai suihkussa ja sen voi puhdistaa
juoksevan veden alla (Kuva 2).
- Laitteessa on automaattinen jännitteenvalinta, joten laite soveltuu
100 - 240 voltin verkkojännitteelle.
Sähkömagneettiset kentät (EMF)
Tämä Philips-laite vastaa kaikkia, sähkömagneettisia kenttiä (EMF) koskevia
standardeja. Jos laitetta käytetään oikein ja tämän käyttöohjeen ohjeiden
mukaisesti, sen käyttäminen on turvallista tämänhetkisen tutkimustiedon
perusteella.
 Loading...