

Philips HP4696 User Manual
Geometricks 8 in 1
HP4696

234


ENGLISH 6
FRANÇAIS 14
ESPAÑOL 23
PORTUGUÊS 31
45
53
HP4696
á«Hô©dG
v<ñUã

Introduction
With the new Salon Geometricks 8-in-1 you can create a new look for
every occasion. The 8-in-1 offers unlimited versatility in hairstyling.
You can visit our website at www.philips.com for more information
about this product or any other Philips product.
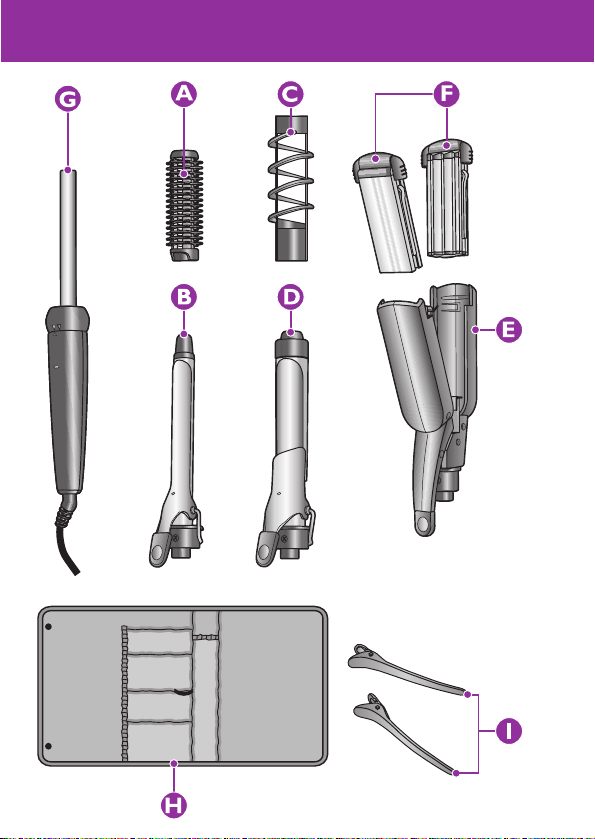
General description
A Brush
B Small curling attachment
C Spiral
D Large curling attachment
E Crimping/straightening attachment
F Crimping/straightening plates
G Handle
H Storage pouch
I Hair clips
Important
Read these instructions for use carefully before using the appliance and
save them for future reference.
◗ Check if the voltage indicated on the appliance corresponds to
the local mains voltage before you connect the appliance.
◗ Check the condition of the mains cord regularly. Do not use the
appliance if the plug, the cord or the appliance itself is damaged.
◗ If the mains cord is damaged, it must be replaced by Philips, a
service centre authorised by Philips or similarly qualified persons
in order to avoid a hazard.
◗ Keep this appliance away from water! Do not use this product
near or over water contained in baths, washbasins, sinks etc.
When used in a bathroom, unplug the appliance after use since
the proximity of water presents a risk.
◗ For additional protection, we advise you to install a residual
current device (RCD) with a rated residual operating current not
exceeding 30mA in the electrical circuit supplying the bathroom.
Ask your installer for advice.
ENGLISH6

◗ Do not connect the handle to the mains without attaching an
attachment first. Make sure the attachment is properly fixed to
the handle before you put the plug in the wall socket.
◗ Keep the attachments clean and free of dust, dirt, styling spray
and gel. Never use the appliance in combination with styling
mousse, styling spray, gel etc.
◗ The attachments have a ceramic coating. This coating will wear in
the course of time. When this happens, the appliance will still
function normally.
◗ The ceramic-coated parts of the attachments will become hot
during use. Prevent contact with the skin. Do not allow the
mains cord to touch any hot parts.
◗ Keep the appliance out of the reach of children.
◗ Only use the appliance on dry or damp hair.
◗ Always unplug the appliance after use.
◗ Wait until the appliance has cooled down before storing it.
◗ Do not wind the mains cord round the appliance.
Preparing for use
◗ Before you start styling, comb or brush the hair so that it is
untangled and smooth.
Connecting the attachments
1 Insert one of the attachments into the handle. Make sure that the
stand is pointing downwards (fig. 1).
2 Turn the locking ring on the handle to the right until the bold
arrow on the locking ring is in line with the arrow on the handle.
The attachment is now securely fixed to the handle (fig. 2).
◗ Follow this procedure for all attachments. To detach the
attachments, turn the locking ring to the left and pull the
attachment out of the handle.
Unplug the appliance when you remove an attachment after or
during styling. Avoid touching the metal and ceramic parts of the
attachment, as they are hot.
ENGLISH 7

Using the appliance
With the Salon Geometricks 8-in-1 you can create tight curls, large
curls, waves, ringlets, crimps and a sleek look.
1 After having connected the attachment to the handle, place the
appliance on the stand of the attachment and put the mains plug
in the wall socket. The pilot light goes on and the appliance starts
heating up (fig. 3).
2 Start styling when the ready dot on the attachment changes
colour (fig. 4).
3 When using one of the curling attachments or the brush
attachment, always make sure the end of the lock is wound in the
required direction.
4 How long you have to keep the styler in your hair depends on
the thickness of your hair. If you have fine hair, 5 seconds will be
long enough for a good result. Leave the styler in your hair
longer (max. 10 seconds) if your hair is thicker.
Large or tight curls
1 Connect the large or small curling attachment to the handle.
Make sure that the stand is pointing downwards.
2 Take a lock of hair, open the clip by pressing the lever and place
the lock between the barrel and the clip (fig. 5).
3 Release the lever and slide the barrel to the end of the lock.
Then wind the lock round the barrel.
Make sure that the end of the lock is wound in the required direction.
4 Open the clip after 5 to 10 seconds and remove the barrel from
the hair. Let the curls cool down before combing, brushing or
finger-combing the hair into its final style.
◗ You can comb the curls with your fingers to add volume.
ENGLISH8

Waves
Prevent the brush from getting tangled in the hair in the following
way:
- Do not put too much hair in one lock.
- Do not wind a lock of hair more than twice round the brush.
- When unwinding a lock of hair, make sure that you hold the brush
away from the underlying hair.
1 Connect the small curling attachment to the handle and slide the
brush onto the curling attachment.
2 Take a lock of hair and wind it round the brush (fig. 6).
3 Remove the brush from your hair after 5 to 10 seconds. Let the
waves cool down before combing, brushing or finger-combing
the hair into its final style.`
Ringlets
1 Connect the spiral attachment to the handle. Make sure that the
stand is pointing downwards.
2 Take a lock of hair, open the clip by pressing the lever and place
the lock between the barrel and the clip (fig. 7).
3 Release the lever and slide the barrel to the end of the lock.
Then wind the lock round the barrel following the spiral profile.
Make sure that the end of the lock is wound in the required
direction.
4 Open the clip after 5 to 10 seconds and remove the barrel from
the hair. Let the ringlets cool down before combing, brushing or
finger-combing the hair into its final style.
ENGLISH 9

Crimps
1 Connect the crimping/straightening attachment with crimping
plates to the handle (fig. 8).
2 Take a lock of hair (max. 5 to 6 cm wide), open the attachment
by pressing the lever and place the lock between the plates of the
crimping/straightening attachment. Start crimping at the roots
(fig. 9).
3 Keep the plates locked for 5 to 10 seconds.
4 Open the attachment by pressing the lever and place a lower
section of the same lock of hair between the plates. Make sure
there is an overlap. Repeat this process until you have reached
the end of the lock.
5 Let the crimps cool down. Do not brush or comb the crimps, as
this would ruin them.
The waves, curls and crimps will disappear if your hair gets wet (for
instance when you wash it). You can also use the straightening plates to
make them disappear.
Sleek look
1 Open the crimping/straightening attachment. Remove the plates
one by one by grabbing their cool tips and pulling them out of
the attachment (fig. 10).
2 Turn the plates round and slide them back into the attachment
(fig. 11).
Make sure that the edges of the plates are inserted properly into the
grooves.
3 You have now turned the crimping attachment into a
straightening attachment. Connect the attachment to the handle
and follow the same procedure as for creating crimps. You can
also straighten the hair by slowly sliding the straightening
attachment down the lock.
ENGLISH10

4 Let the sleek hair cool down before combing or brushing the
hair.
Cleaning
Always unplug the appliance before cleaning it.
Never rinse the appliance with water.
◗ Place the styler on the stand of the attachment in a safe place and
let it cool down.
◗ Clean the appliance and the attachments with a small brush or a
dry cloth.
Storage
Always unplug the appliance before storing it.
◗ Place the styler on the stand of the attachment in a safe place and
let it cool down.
◗ Do not wind the mains cord round the appliance.
Replacement
If the mains cord is damaged, it must be replaced by Philips, a service
centre authorised by Philips or similarly qualified persons in order to
avoid a hazard.
Always return the appliance to a service centre authorised by Philips for
examination or repair. Repair by unqualified people could cause an
extremely hazardous situation for the user.
Guarantee & service
If you need information or if you have a problem, please visit the Philips
website at www.philips.com or contact the Philips Customer Care
Centre in your country (you will find its phone number in the
worldwide guarantee leaflet). If there is no Customer Care Centre in
your country, turn to your local Philips dealer or contact the Service
Department of Philips Domestic Appliances and Personal Care BV.
ENGLISH 11

Solution
Perhaps there is a power failure or the
socket is not live.
Check if the power supply is working.
If it is, check whether the socket is live
by plugging in another appliance.
Perhaps the appliance overheated and
switched itself off.
Unplug the appliance and let it cool
down for a few minutes.
Make sure that the voltage indicated
on the appliance corresponds to the
local mains voltage.
Perhaps the mains cord of the
appliance is damaged.
The mains cord must be replaced by
Philips, a service centre authorised by
Philips or similarly qualified persons in
order to avoid a hazard.
Perhaps you didn't let the appliance
heat up long enough.
Let the appliance heat up until the
ready dot has changed colour.
Perhaps you wound too much hair
round the barrel or put too much hair
between the plates.
Problem
The appliance does not work at all.
The styling results are not what you
expected.
Troubleshooting
If problems should arise with your styler and you are unable to solve
them by means of the troubleshooting guide below, please contact a
Philips service centre or the Philips Customer Care Centre in your
country.
ENGLISH12

13
Solution
When using the curling attachments or
the slide-on brush, do not make the
locks too thick. The thinner the lock of
hair, the tighter the curl will be. When
using the crimping/straightening
attachment, make sure the locks are
no wider than 5 to 6 cm for a good
result.
Perhaps you didn't leave the styling
attachment in your hair long enough.
Keep the styler in your hair for 5 to
10 seconds, depending on the
thickness of your hair.
Problem
ENGLISH

Introduction
Avec le nouveau Salon Geometricks 8-en-1 vous pouvez créer un
nouveau look à chaque occasion. Le nouveau appareil 8-en-1 offre un
choix illimité de coiffures!
Pour plus d'informations sur ce produit ou sur tout autre produit
Philips, visitez notre site web à: www.philips.com.
Description générale
A Brosse
B Accessoire pour boucles serrées
C Spirale
D Accessoire pour boucles larges
E Accessoire à gaufrer/lisser
F Plaques à gaufrer/lisser
G Poignée
H Pochette de rangement
I Pinces
Important
Lisez les instructions du mode d'emploi avant d'utiliser l'appareil et
conservez-les pour un usage ultérieur.
◗ Avant de brancher l'appareil, vérifiez que la tension indiquée sur
l'appareil correspond bien à la tension de votre secteur.
◗ Vérifiez régulièrement le cordon d'alimentation. N'utilisez pas
l'appareil si la fiche, le cordon ou l'appareil lui-même est
endommagé.
◗ Si le cordon d'alimentation est endommagé, il ne doit être
remplacé que par Philips ou par un Centre Service Agréé pour
éviter tout accident.
◗ Evitez tout contact de l'appareil avec de l'eau! Ne l'utilisez pas
près d'une baignoire, d'un lavabo ou d'un évier. Si vous utilisez
l'appareil dans la salle de bain, débranchez-le après usage car la
proximité de l'eau peut présenter un danger pour l'utilisateur.
◗ Pour plus de protection, il est conseillé de brancher l'appareil sur
une prise de courant protégée par un disjoncteur différentiel de
FRANÇAIS14

15
30mA maxi si vous utilisez l'appareil dans la salle de bain.
Demandez conseil à votre électricien.
◗ Ne branchez pas la poignée sans avoir monté un accessoire au
préalable. Assurez-vous que l'accessoire a été correctement fixé
avant d'insérer la fiche dans la prise murale.
◗ Les accessoires doivent être toujours propres, sans traces de
poussières, mousse coiffante et gel. Avant d'utiliser l'appareil,
n'appliquez pas de mousse ou spray coiffant, gel, etc.
◗ Les accessoires ont un revêtement en céramique. Ce revêtement
peut s'user au cours du temps, mais l'appareil continuera à
fonctionner correctement.
◗ Les parties céramiques des accessoires chauffent pendant
l'utilisation. Evitez le contact avec la peau. Evitez le contact du
cordon d'alimentation avec les parties chaudes.
◗ Tenez l'appareil hors de portée des enfants.
◗ Utilisez l'appareil seulement sur cheveux secs ou légèrement
humides.
◗ Débranchez toujours l'appareil après utilisation.
◗ Attendez que l'appareil refroidisse avant de le ranger.
◗ Afin de ne pas vriller le cordon d'alimentation, ne l'enroulez pas
autour de l'appareil.
Préparation à l'emploi
◗ Avant de commencer le coiffage, démêlez vos cheveux à l'aide
d'un peigne ou d'une brosse.
Fixation des accessoires
1 Fixez un des accessoires sur la poignée. Assurez-vous que le
support est dirigé vers le bas (fig. 1).
2 Pour fixer correctement l'accessoire, tournez la bague de
blocage de la poignée vers la droite jusqu'à ce que la flèche de la
bague coïncide avec la flèche de la poignée (fig. 2).
FRANÇAIS

16
◗ Suivez la même procédure pour tous les accessoires. Pour
détacher les accessoires, tournez la bague de blocage vers la
gauche et retirez l'accessoire.
Débranchez l'appareil lorsque vous enlevez un accessoire après ou
durant la mise en forme. Evitez de toucher les parties métalliques ou
céramiques de l'accessoire car celles-ci sont très chaudes.
Mode d'emploi
Avec la brosse coiffante Salon Geometricks 8-en-1 vous pouvez créer
des boucles serrées ou larges, des vagues, spirales ou lisser vos
cheveux.
1 Après avoir fixé l'accessoire, positionnez l'appareil sur le support
de l'accessoire et branchez la brosse. Le témoin s'allume et
l'appareil commence à chauffer (fig. 3).
2 Vous pouvez commencer à vous coiffer lorsque le témoin sur
l'accessoire change de couleur (fig. 4).
3 Si vous utilisez un accessoire à boucler ou la brosse, assurez-
vous que l'extrémité de la mèche est enroulée dans la direction
souhaitée.
4 Le temps de mise en forme dépend de la texture du cheveu.
Si vous avez des cheveux fins, maintenez l'accessoire dans vos
cheveux pendant 5 secondes pour obtenir de bons résultats.
Si vous avez des cheveux plus épais, maintenez la brosse coiffante
plus longtemps (10 secondes au maximum).
Boucles larges ou serrées
1 Fixez l'accessoire pour boucles serrées ou larges sur la poignée,
avec le support orienté vers le bas.
2 Prenez une mèche et serrez-la entre la barre métallique et le
levier (fig. 5).
FRANÇAIS

17
3 Relâchez le levier et coulissez la barre métallique vers l'extrémité
de la mèche. Ensuite enroulez la mèche autour de la barre.
Assurez-vous que l'extrémité de la mèche est enroulée dans la
direction souhaitée.
4 Ouvrez le levier après 5-10 secondes et retirez la barre
métallique. Laissez refroidir les boucles avant de mettre la touche
finale à votre coiffure en brossant ou en peignant les cheveux ou
en arrangeant quelques mèches avec les doigts.
◗ Vous pouvez arranger quelques mèches avec les doigts pour
donner plus de volume.
Vagues
Pour éviter que les cheveux s'emmêlent dans la brosse, procédez
ainsi:
- Ne faites pas des mèches trop épaisses.
- N'enroulez pas une mèche autour de la brosse plus de deux fois.
- Quand vous retirez la brosse, tenez-la à distance des cheveux qui
sont au-dessous.
1 Connectez l'accessoire pour boucles serrées sur la poignée et
coulissez la brosse sur l'accessoire.
2 Prenez une mèche et enroulez-la autour de la brosse (fig. 6).
3 Retirez la brosse après 5-10 secondes. Laissez refroidir les
vagues avant de mettre la touche finale à votre coiffure en
brossant ou en peignant les cheveux ou en arrangeant quelques
mèches avec les doigts.
Spirales
1 Connectez la spirale sur la poignée. Assurez-vous que le support
est orienté vers le bas.
2 Prenez une mèche et serrez-la entre la barre métallique et le
levier (fig. 7).
FRANÇAIS
 Loading...