

Philips HeartStart FRx Trainer Instructions For Use Manual
HeartStart FRx Trainer
INSTRUCTIONS FOR USE
MODE D’EMPLOI
BEDIENUNGSANLEITUNG
861306
Edition 4

Intentionally blank.
Page intentionnellement laissée vide.
Diese Seite bleibt frei.
Philips Medical Systems

HeartStart FRx Trainer
861306
INSTRUCTIONS FOR USE ............................................... 1
MODE D’EMPLOI .......................................................... 19
BEDIENUNGSANLEITUNG .............................................. 39
Philips Medical Systems

About this edition
The information in this guide applies to the model 861306
HeartStart FRx Trainer. This information is subject to change.
Please contact Philips at www.medical.philips.com/heartstart or
your local Philips representative for information on revisions.
Edition history
Edition 4
Publication date: March 2007
Assembly #: 012904-0004
Printed in the U.S.A.
informatique sous une forme quelconque ou par un moyen
quelconque sans le consentement du détenteur des copyrights.
La copie non autorisée de cette publication peut non seulement
enfreindre les lois sur les copyrights mais peut également réduire la
capacité de Philips Medical Systems à fournir des informations
exactes et actualisées aux utilisateurs et aux opérateurs.
Fabricant
Le simulateur HeartStart FRx est fabriqué par Philips Medical
Systems, Seattle, WA, USA.
Copyright
© 2007 Philips Electronics North America Corp.
No part of this publication may be reproduced, transmitted,
transcribed, stored in a retrieval system or translated into any
human or computer language in any form by any means without the
consent of the copyright holder.
Unauthorized copying of this publication may not only infringe
copyright but also reduce the ability of Philips Medical Systems to
provide accurate and up-to-date information to users and
operators alike.
Manufacturer
The HeartStart FRx Trainer is manufactured by Philips Medical
Systems, Seattle, WA, USA.
À propos de cette édition
Les informations de ce guide s'appliquent au simulateur HeartStart
FRx, modèle 861306. Ces informations sont sujettes à modification.
Veuillez vous adresser à Philips à www.medical.philips.com/
heartstart ou composer le numéro de votre représentant
commercial Philips pour obtenir des informations sur les révisions.
Historique d'édition
Édition 4
Date de publication : Mars 2007
Numéro d'assemblage : 012904-0004
Imprimé aux États-Unis d'Amérique
Zu dieser Auflage
Die Informationen in dieser Anleitung gelten für den HeartStart
FRx Trainer, Modell 861306. Änderungen vorbehalten. Bitte
wenden Sie sich an Philips unter www.medical.philips.com/
heartstart oder an Ihren lokalen Vertreter von Philips, um
Informationen über Änderungen zu erhalten.
Bisherige Auflagen
Auflage 4
Veröffentlichungsdatum: März 2007
Fertigungsnummer: 012904-0004
Gedruckt in den USA
Copyright
© 2007 Philips Electronics North America Corp.
Kein Teil dieser Publikation darf ohne Zustimmung des CopyrightInhabers in irgendeiner Form oder auf irgendeine Weise
reproduziert, übertragen, kopiert, gespeichert oder in eine
menschliche oder Computersprache übersetzt werden.
Nicht autorisierte Kopien dieser Publikation verletzen nicht nur
urheberrechtliche Bestimmungen, sondern hindern überdies Philips
Medical Systems daran, Benutzern und Bedienern genaue und
aktuelle Informationen bereitzustellen.
Hersteller
Der HeartStart FRx Trainer wird hergestellt von Philips Medical
Systems, Seattle, Washington, USA.
Philips Medical Systems
Copyright
© 2007 Philips Electronics North America Corp.
Aucune partie de cette publication ne peut être reproduite,
transmise, transcrite, stockée dans un système de récupération
quelconque ni traduite dans une langue humaine ou un langage

HeartStart FRx Trainer 861306
Contents
Intended use of the FRx Trainer .............................................................................................. 1
Features of the FRx Trainer ........................................................................................................ 1
Overview of the FRx Trainer ....................................................................................................3
To set up the FRx Trainer ............................................................................................................. 6
To select a training scenario ....................................................................................................... 9
To run a training scenario ............................................................................................................ 9
Standard training scenarios ......................................................................................................... 10
FRx Trainer performance during use .................................................................................... 14
To change the FRx Trainer’s default configuration ........................................................ 14
To troubleshoot the FRx Trainer ............................................................................................. 16
Environmental Considerations .................................................................................................. 17
1
ENGLISH
Philips Medical Systems
Intended use of the FRx Trainer
The HeartStart FRx Trainer is designed to prepare emergency responders
to use the FRx automated external defibrillator (AED). The HeartStart FRx
Trainer cannot be used to deliver defibrillation treatment.
The Trainer provides a variety of simulations, or training scripts, to help
responders become familiar with the FRx defibrillator and allow them to
practice the basic skills necessary to use the defibrillator in an emergency.
The default Trainer configuration can be adjusted to meet local protocol
requirements.

2
Features of the FRx Trainer
• The HeartStart FRx Trainer provides simulated shock delivery. It has
no high-voltage capabilities, ensuring safety during training.
• The HeartStart FRx Trainer is designed for use with HeartStart
Training Pads II and training manikins when equipped with the External
Manikin Adapter M5089A provided with the Trainer. The FRx Trainer
and Training Pads II can also be used with Laerdal training manikins
when equipped with an Internal Manikin Adapter M5088A, available
separately from Philips.
• Reusable HeartStart Training Pads II are available in a kit
(REF: 989803139271). The kit contains one set of Training Pads II
in a reusable training pads case, an adult pads placement guide,
Instructions for Use of the training pads, and an illustrated guide.
Replacement training pads (REF: 989803139291) are available for
use with the Training Pads II case.
• The HeartStart FRx Trainer and Training Pads II can also be used with
an Infant/Child Pads Placement Guide and an Infant/Child Key, available
separately from Philips, for training in pediatric defibrillation.
• The HeartStart FRx Trainer has eight training scenarios that simulate
realistic sudden cardiac arrest episodes. See “Standard Training
Scenarios” for scenario descriptions. These scenarios are compatible
with training programs developed by nationally recognized responder
programs.
• The HeartStart FRx Trainer is powered by four standard AA alkaline
batteries.
Philips Medical Systems
WARNING: Do not store the Trainer with your defibrillator, or where it
could be confused with a defibrillator during an emergency.
FRx TRAINER 861306
3
back
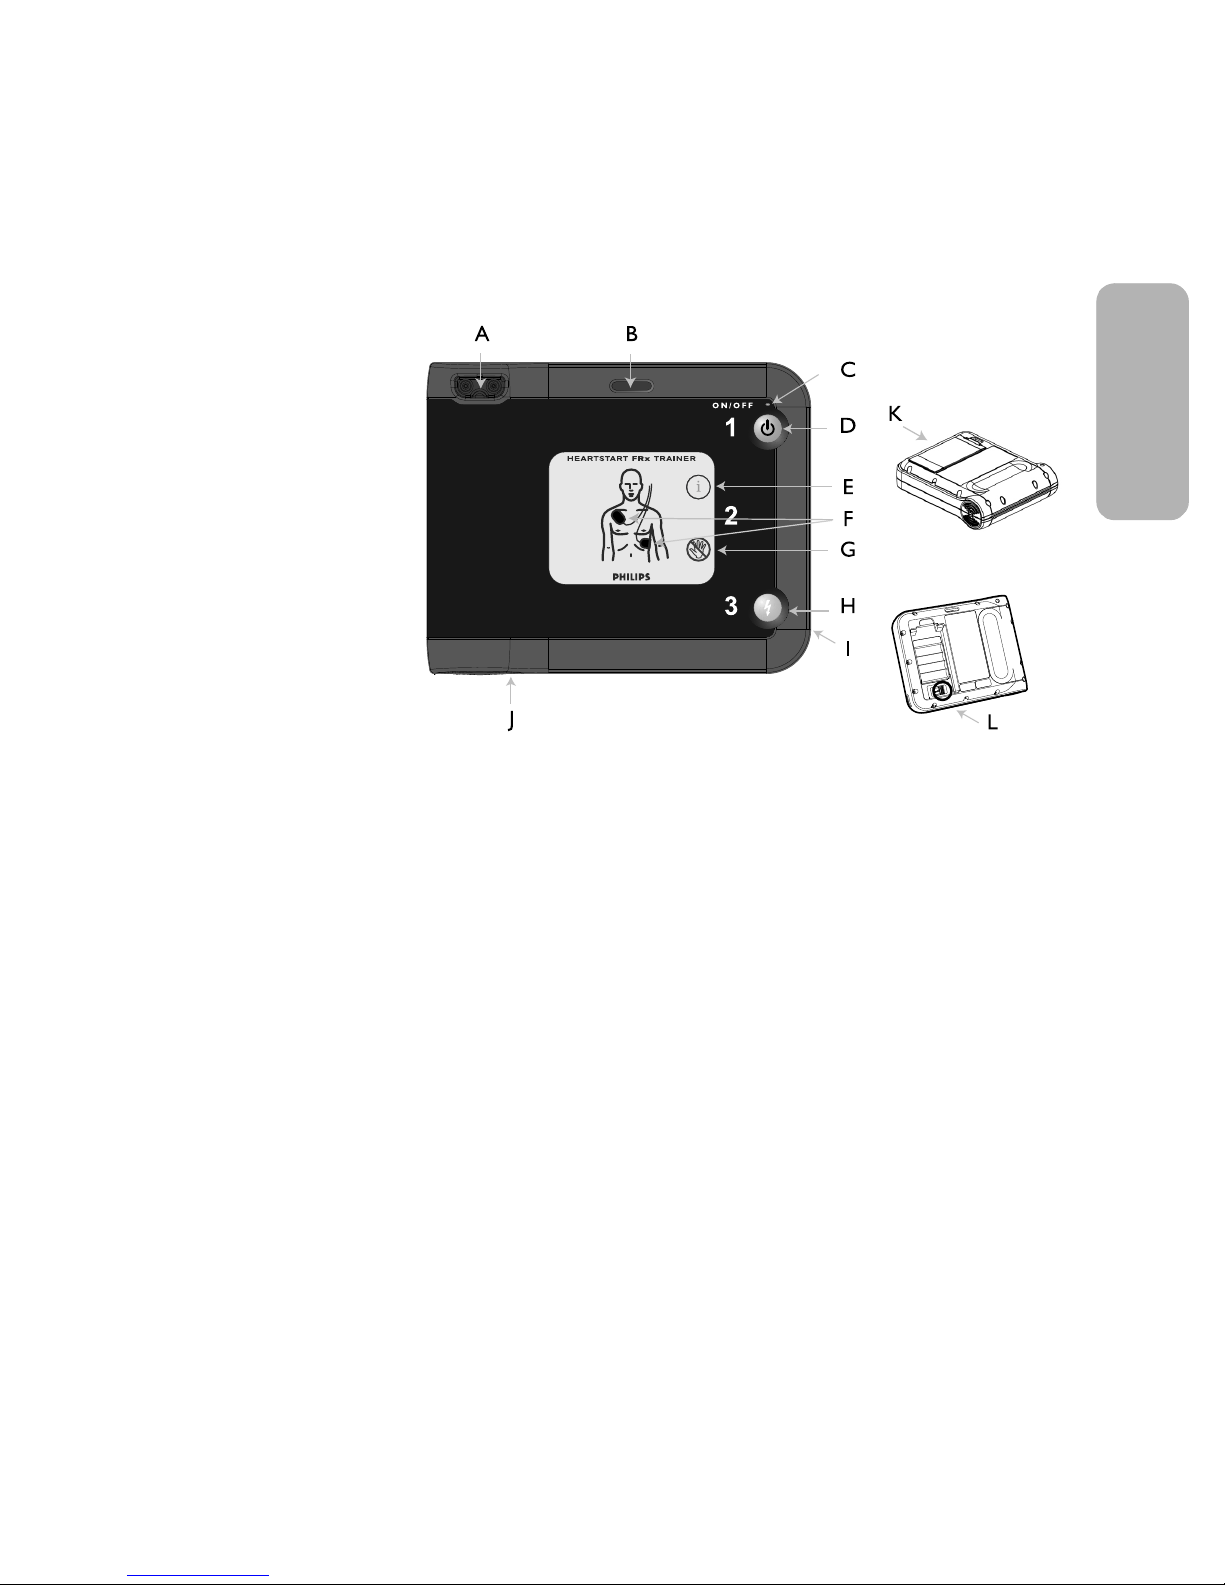
Overview of the FRx Trainer
ENGLISH
The HeartStart FRx Trainer is designed to look similar to the HeartStart
FRx Defibrillator. However, the yellow center label identifies it as a training
device. In addition, some of the FRx defibrillator’s features are either
Philips Medical Systems
inactive in the FRx Trainer or behave differently from their counterparts in
the Trainer. The FRx Trainer’s physical features are described below.
A TRAINING PADS CONNECTOR PORT. The Training Pads II
connector is inserted in this port.
B INFANT/CHILD KEY SLOT. The Infant/Child Key, available separately,
is inserted into this slot to simulate a defibrillation scenario for an
infant or child under 8 years old or 55 pounds.
C ON LIGHT. The FRx Trainer's green ON light is on solid when the
Trainer is on, and off otherwise. (In the FRx Defibrillator, the green
Ready light blinks when the defibrillator is in standby mode.)
D ON/OFF BUTTON. To turn on the FRx Trainer, press this green
button. To turn off the Trainer, press and hold the button down for one
(1) second.

4
E INFORMATION-BUTTON. In the FRx Trainer, this blue “i-button”
flashes when scenario selection is available and at the beginning of a
patient care pause when CPR Coaching is available.
F PADS ICONS. The pads icons flash as a guide to pads placement during
the training scenario. They turn off as soon as the pads are placed.
G CAUTION LIGHT. This light flashes during rhythm analysis and is on
solid when a shock is advised, as a reminder that no one should be
touching the patient.
H SHOCK BUTTON. This orange button flashes when the FRx Trainer
advises you to deliver a shock; press the Shock button to deliver the
simulated shock.
I INFRARED (IR) COMMUNICATIONS PORT. This feature is not active
in the FRx Trainer. (In the FRx Defibrillator, this feature is used for data
transfer.)
Philips Medical Systems
J SPEAKER. When the device is being used, its voice instructions come
from this speaker.
FRx TRAINER 861306
K BATTERY COMPARTMENT DOOR. This door is lifted off in order to
install or replace batteries. The Trainer is powered by four disposable
AA alkaline cells inserted in the recess on the back of the unit. (The
FRx Defibrillator is powered by a custom battery pack.)
L CONFIGURATION SWITCHES. Located inside the battery
compartment well, these switches allow you to alter certain Trainer
parameter settings. See “Configuring the FRx Trainer” for details. (The
FRx Defibrillator does not have these switches.)
The HeartStart Training Pads II are provided in a gray case with a yellow
label to distinguish them from the HeartStart SMART Pads II case, which
has a gray label. The Training Pads II wires also have a red “NOT FOR
CLINICAL USE” flag around the pad wires near the connector plug.
WARNING: Do not store your Training Pads II with your FRx
defibrillator, or where it could be confused with defibrillator pads
during an emergency. Do not put the training pads on a person.

HeartStart FRx Trainer Kit contents
5
The FRx Trainer 861306 includes one each of the following:
ENGLISH
• HeartStart FRx Trainer
• HeartStart Training Pads II
• HeartStart FRx Trainer carry case
• HeartStart FRx Defibrillator Quick Reference Guide
• HeartStart FRx Trainer Instructions for Use
• External Manikin Adapter
Check with your medical director or Emergency Medical Services provider
for additional training requirements, protocols, and materials.
Optional accessories
The following accessories are available from Philips separately:
• FRx Trainer Instructions for Use [REF: 989803139401]
• HeartStart Training Pads II (kit containing one set of Training Pads II in
training pads case, adult pads placement guide, Instructions for Use,
and illustrated guide) [REF: 989803139271]
Philips Medical Systems
• Replacement Training Pads II (pair of training pads on disposable liner
for use in training pads case provided with HeartStart Training Pads II)
[REF: 989803139291]
• Adult pads placement guide [REF: M5090A]
• Infant/Child pads placement guide [REF: 989803139281]
• Infant/Child Key [REF: 989803139311]
• HeartStart FRx Defibrillator Instructor's Training Toolkit (NTSC)
[REF: 989803139321]
• HeartStart FRx Defibrillator Instructor’s Training Toolkit (PAL)
[REF: 989803139331]
• HeartStart FRx Defibrillator Training DVD (NTSC)
[REF: 989803139341]
• HeartStart FRx Defibrillator Training DVD (PAL)
[REF: 989803139351]
• External Manikin Adapter, 5 pack [REF: M5089A]

6
• Internal Manikin Adapter [REF: M5088A]
• Replacement FRx Trainer carry case [REF: 989803139531]
To set up the FRx Trainer
To install or replace the batteries
The HeartStart Trainer is powered by four AA alkaline batteries (not
included). To install or replace the batteries, follow the steps below:
1. Press the latch on the battery compartment door on the back of the
FRx Trainer. Lift off the door and set it aside.
2. Remove the old batteries and recycle or dispose of in accordance with
your local regulations.
3. Insert four new AA alkaline batteries into the recess, oriented as
illustrated in the battery holder.
4. Replace the battery compartment door and press down to ensure the
latch holds it in place.
NOTE: It is recommended that you replace all four batteries at the
same time.
Philips Medical Systems
FRx TRAINER 861306
To connect or replace the Training Pads II
To connect the Training Pads II to the FRx Trainer, simply plug the Training
Pads II connector into the connector port of the FRx Trainer. Be sure the
connector clicks into place.
When the original training pads have reached the end of their service life,
you can order Replacement Training Pads for the training pads case.
To install replacement training pads in the reusable training pads case,
remove and discard the old pads from the case. Open the Replacement
Training Pads II package and remove each training pad from the disposable
liner. Repack the replacements pads in the reusable case according to the
following directions.
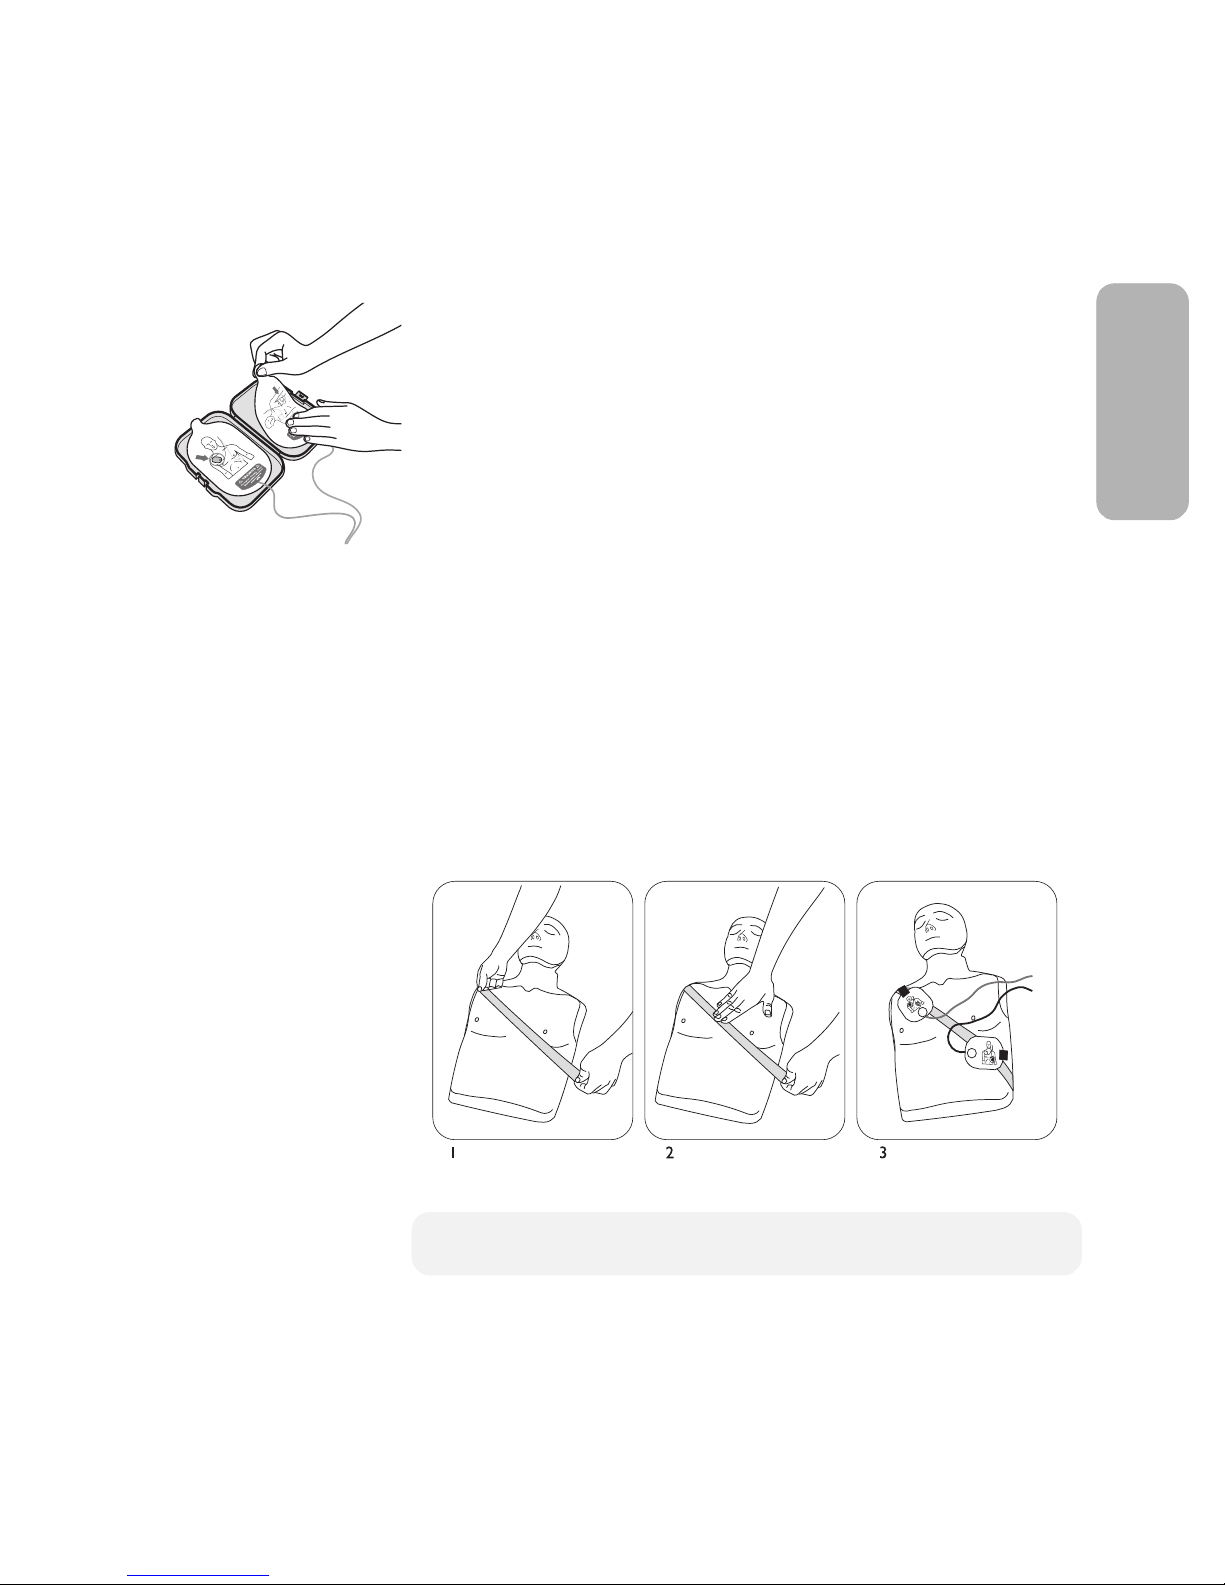
To repack the Training Pads II
Applying the External Manikin Adapter M5089A to an adult manikin.
7
1. Firmly press one pad into each side of the open training pads case.
ENGLISH
2. Untwist the pads wires if necessary.
3. Coil the pads wires inside the case with the connector plug exiting
through the hole in the pads case.
To use the FRx Trainer with Laerdal training manikins
To simulate the patient, use the Training Pads II on a CPR training manikin
equipped with a disposable External Manikin Adapter M5089A or an
Internal Manikin Adapter M5088A. Alternatively, you can use a Laerdal
Resusci Anne training manikin equipped with Laerdal Link technology and
an adapter available at most electronics stores. Contact Philips for
information.
To install the external manikin adapter
The M5089A External Manikin Adapter is provided with the FRx Trainer. It
can be applied to any training manikin as illustrated in steps 1 and 2 below.
(When the manikin is used in training, Training Pads II should be placed as
Philips Medical Systems
shown in step 3 below.)
NOTE: The M5089A External Manikin Adapter has a limited service life.
You can order replacement sets of five adapters.

8
Installing the Internal Manikin Adapter M5088A with the Laerdal Resusci Anne.
To install the internal manikin adapter
The Internal Manikin Adapter M5088A, sold separately, works with Laerdal
Little Anne CPR and Laerdal Resusci Anne CPR Manikins.
To install the Internal Manikin Adapter on a Laerdal Little Anne CPR or
Laerdal Resusci Anne CPR Manikin, follow the steps below:
1. Remove the skin from the manikin.
2. Peel off the liner from the adhesive backing of the Internal Manikin
Adapter.
3. Place the Internal Manikin Adapter sections in the appropriate
locations on the underside of the manikin’s skin. See the Instructions
for Use provided with the Internal Manikin Adapter for detailed
placement illustrations.
Philips Medical Systems
4. Replace the manikin skin.
5. Using the Trainer in a practice trial, check that the Internal Manikin
Adapter is located appropriately to teach proper pad placement.
FRx TRAINER 861306

To select a training scenario
9
1. Make sure the pads connector is plugged in and the FRx Trainer is
ENGLISH
turned off. (Press and hold the On/Off button if necessary to turn off
the Trainer.)
2. Press the flashing i-button once. The FRx Trainer will tell you how to
select a scenario.
3. Press the i-button again to have the FRx Trainer identify the current
training scenario. If you want to use this scenario, briefly press the
On/Off button to run the scenario immediately.
4. To select a different scenario, press the flashing blue i-button to scroll
through each of the eight scenarios in sequence. When you reach the
scenario number you want, briefly press the On/Off button to run the
scenario immediately. Or, to simply select the scenario without running
it, press and hold the On/Off button until the Trainer turns off, or wait
for 10 seconds and it will automatically turn off.
The FRx Trainer will run the selected scenario every time until the
batteries are replaced or until a different scenario is selected. The Trainer
Philips Medical Systems
defaults to Scenario 1 each time the batteries are installed.
To run a training scenario
To run the selected training scenario, treat the FRx Trainer exactly as you
would the FRx Defibrillator.
1. Press the green On/Off button to turn on the FRx Trainer.
2. To practice defibrillation of an infant or child under 8 years or 55
pounds (25 kg), insert the Infant/Child Key in the Trainer’s Infant/Child
Key slot.

10
NOTE: Inserting or removing the Infant/Child Key during a scenario will
restart the scenario.
3. Follow the FRx Trainer’s voice instructions.
4. If using a clothed manikin, remove the clothing as instructed.
5. Open the Training Pads II case and peel off one pad.
NOTE: Avoid touching the pad’s adhesive gel, because this may cause
the Trainer to begin analysis prematurely.
6. Place the pad on the manikin.
Press the pad down firmly. Then
peel and place the other pad.
7. Continue to follow the FRx
Trainer’s instructions for
remainder of scenario.
8. When the scenario has been
completed, or to stop a scenario in process, press and hold the On/Off
button until the FRx Trainer turns off.
Philips Medical Systems
FRx TRAINER 861306
9. To repeat the same scenario, repack the pads as described in
“To repack the Training Pads II.” Then begin again by pressing the green
On/Off button. To select a different scenario, press the i-button.
NOTE: If battery power is depleted, the FRx Trainer will say
BATTERY. The FRx Trainer will continue to operate for a short time.
REPLACE
Replace the batteries as soon as possible to ensure correct Trainer
behavior.
Standard training scenarios
The FRx Trainer provides eight training scenarios. When the Trainer
directs you to press the Shock button, the scenario will not advance unless
the button is pressed. When the Trainer detects a non-shockable rhythm,
it instructs you to provide CPR if needed.
In the Trainer scenarios, “conversion” means a change from a shockable to
a non-shockable rhythm.
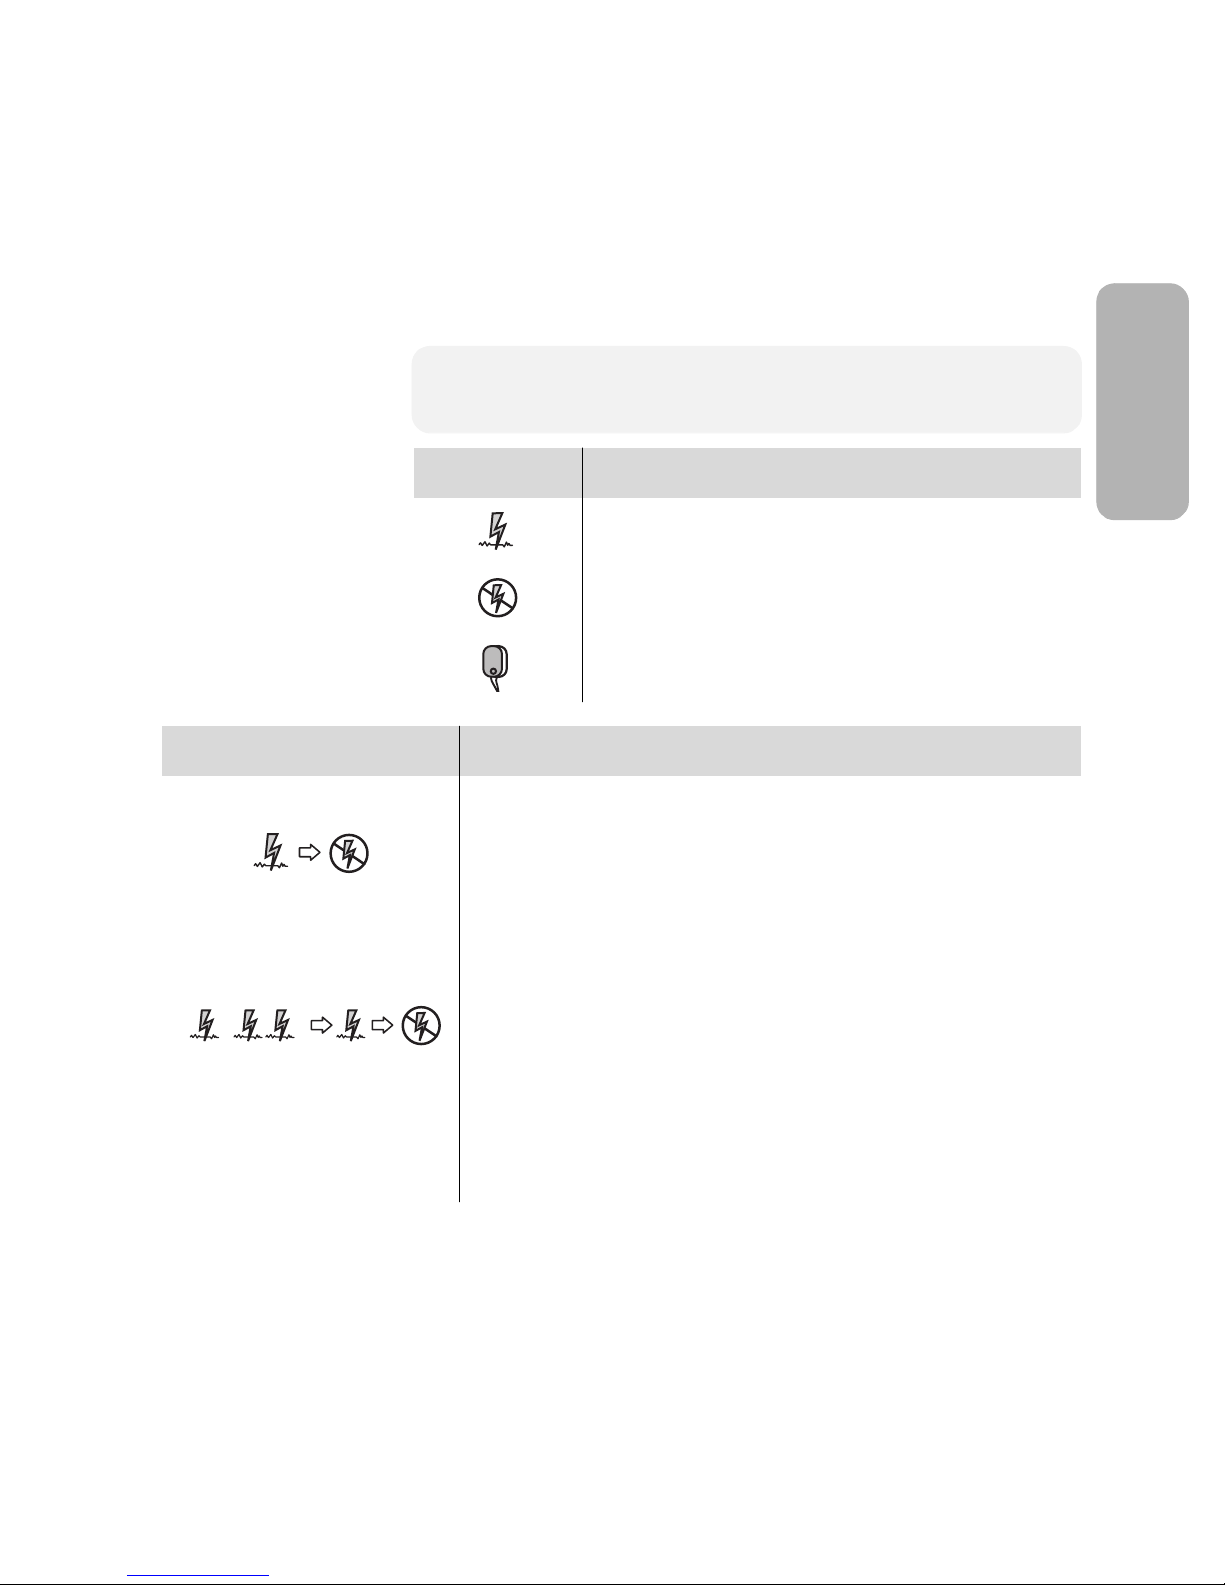
The legend below identifies the symbols used on the rear label of the FRx
Trainer and in the following scenario descriptions.
NOTE: The shock series can be configured to either one or three
shocks. If configured for the default one-shock series, the Trainer
provides a pause after each shoc
k.
symbol meaning
(Simulated) shockable rhythm detected by Trainer.
(Simulated) non-shockable rhythm detected by
Tr a i ne r.
(Simulated) pads problem detected by Trainer.
scenario number scenario description
11
ENGLISH
Scenario 1
Shockable rhythm detected, one shock needed for conversion
Details:
Philips Medical Systems
• Trainer detects a shockable rhythm, instructs user to deliver a
shock.
• Trainer detects a non-shockable rhythm.
Scenario 2
Shockable rhythm detected, multiple shocks needed for conversion
Details:
• Trainer detects a shockable rhythm, instructs user to deliver one
if configured for a one-shock series, or three shocks if
shock
configured for a three-shock series.
• Trainer detects a shockable rhythm, instructs user to deliver a
shock.
• Trainer detects a non-shockable rhythm.
12
scenario number scenario description
Scenario 3
Scenario 4
Scenario 5
Troubleshooting pads, one shock needed for conversion
Details:
• Trainer detects poor pad contact, repeats pads placement
instructions.
• After one pad is removed and reapplied, Trainer detects a
shockable rhythm, instructs user to deliver a shock.
•
Trainer detects a non-shockable rhythm.
Shockable rhythm detected, conversion, return to shockable
rhythm, conversion
Details:
• Trainer detects a shockable rhythm, instructs user to deliver a
shock.
• Trainer detects a non-shockable rhythm.
• Trainer detects refibrillation (return to a shockable rhythm),
instructs user to deliver a shock.
• Trainer detects a non-shockable rhythm.
Non-shockable rhythm detected
Details:
• Trainer detects a non-shockable rhythm throughout.
Philips Medical Systems
Scenario 6
FRx TRAINER 861306
Shockable rhythm detected, two shocks needed for conversion
Details:
• Trainer detects a shockable rhythm, instructs user to deliver a
shock.
• Trainer still detects a shockable rhythm, instructs user to deliver
another shock.
• Trainer detects a non-shockable rhythm.
scenario number scenario description
Scenario 7
Shockable rhythm detected, two shocks needed for conversion,
return to shockable rhythm detected, one shock needed for
conversion
Details:
• Trainer detects a shockable rhythm, instructs user to deliver a
shock.
• Trainer still detects a shockable rhythm, instructs user to deliver
another shock.
• Trainer detects a non-shockable rhythm.
• Trainer detects refibrillation (return to a shockable rhythm),
instructs user to deliver a shock.
• Trainer detects a non-shockable rhythm.
13
ENGLISH
Scenario 8
Troubleshooting pads, two shocks needed for conversion
Details:
• Trainer detects poor pad contact, repeats pads placement
instructions.
• After one pad is removed and reapplied, Trainer detects a
Philips Medical Systems
shockable rhythm, instructs user to deliver a shock.
• Trainer still detects a shockable rhythm, instructs user to deliver
another shock.
• Trainer detects a non-shockable rhythm.
Not all scenarios are appropriate for all user training. Training scenario
number 1 is the default scenario and is most commonly used when
teaching how to use the FRx to treat a victim of sudden cardiac arrest. If
the training scenarios are used as part of a formal training course, the
instructor may wish to:
• select only the scenarios appropriate for the training level goals,
• create case histories and patient details for the selected scenarios,
• highlight certain aspects of the defibrillator's performance,
• assure that users conform to local protocols,
• check pad placement, and
• evaluate user knowledge on topics such as CPR and assessing the
patient.

14
FRx Trainer performance during use
The Philips HeartStart FRx Trainer is designed for use in an automated
external defibrillator training class taught by a qualified instructor.
When a training scenario is running, the FRx Trainer mimics the behavior
of the FRx Defibrillator during actual emergency use. It provides voice
instructions, guides the user through one or more simulated shocks,
provides pauses for CPR, offers CPR Coaching, etc. If there is no user
interaction (no buttons are pressed) for ten minutes, the Trainer turns off.
IMPORTANT: Certain features of the actual HeartStart FRx
Defibrillator are not reproduced by the FRx Trainer.
• The FRx Trainer cannot be used with the (clinical) SMART Pads II. If
the SMART Pads II are installed, the FRx Trainer will repeatedly ask
you to install training pads.
• The FRx Trainer does not perform the battery insertion and periodic
self-tests.
• Inserting or removing the Infant/Child Key from the Trainer during a
scenario restarts the scenario.
• The FRx Trainer always uses a standard NSA pause.
Philips Medical Systems
FRx TRAINER 861306
To change the FRx Trainer’s default configuration
The HeartStart FRx Trainer comes with a factory default configuration
designed to meet the needs of most users. The settings for certain
parameters, listed in the table below, can be altered by the user.
To change configurable Trainer parameters, remove the battery
compartment door from the Trainer and locate the switches in the bottom
of the battery compartment. Using a small implement, adjust the ON and
OFF switch settings as described in the following table.
-
parameter switch # setting (default = OFF)
15
ENGLISH
volume 1
OFF: high
ON: low
NSA pause
(minutes)
*
2 & 3
switch #2 switch #3 setting
OFF OFF 2.0
ON OFF 1.0
OFF ON 1.5
ON ON 3.0
Philips Medical Systems
CPR Coaching
compressions/
ventilations
†
4
OFF: adult 30 compressions/2 ventilations
pediatric 30 compressions/2 ventilations
ON: adult 30 compressions/2 ventilations
pediatric 15 compressions/2 ventilations
CPR Coaching
ventilations
shock series 6
5
OFF: with ventilations
ON: without ventilations
OFF: 1
ON: 3
protocol pause
(minutes)
*
7 & 8
switch #7 switch #8 setting
OFF OFF 2.0
ON OFF 1.0
OFF ON 1.5
ON ON 3.0
* If the Trainer is configured for CPR Coaching with ventilations, and the user selects CPR Coaching by pressing the i-button,
the default pause and CPR Coaching settings (2 minutes pause, 30 compressions/2 ventilations) result in 5 cycles of CPR
Coaching. The number of cycles varies for other settings. For all settings, CPR Coaching begins and ends with compressions.
† The CPR Coaching compressions/ventilations selection (switch 4) is applicable only if the CPR Coaching ventilations
(switch 5) is set to OFF (with ventilations). Otherwise, the CPR Coaching compressions will be continuous, without breaks
for ventilations.

16
To troubleshoot the FRx Trainer
The following table provides troubleshooting tips.
behavior possible cause recommended action
Tr ai ne r s ay s
ANALYZING before
pads are applied to
manikin.
Tr ai ne r d oe s not say
ANALYZING when pads
are applied to the
manikin adapter.
Tr ai ne r’s vo ic e
instructions are
distorted.
• User touched the adhesive gel
on the pads and activated the
sensing circuitry of the Trainer.
• Pad wires are twisted.
• Pad wires are not separated.
• Pads are touching each other.
• Pads placement is incorrect.
• Pads are old, damaged, or use
discontinued blue gel.
• Manikin adapter is broken.
• In scenarios 3 and 8, pad has not
been removed and repositioned.
• Pad wires are twisted.
• One of the batteries is installed
backwards.
• Avoid touching the adhesive gel
on the pads.
• Untwist the pad wires.
• Separate the pad wires between
the pads and the red label.
• Separate pads.
• Check for proper pad and
manikin adapter placement.
Remove and reposition pads or
adapter if indicated.
• Replace training pads.
•Replace manikin adapter.
• Remove and reapply one pad.
• Untwist the pad wires.
• Reinstall batteries according to
the diagram in the battery
holder.
Philips Medical Systems
Battery depletes
• Trainer is stored so that On/Off
prematurely.
• One of the batteries is installed
FRx TRAINER 861306
button is inadvertently pressed.
backwards.
• Store the Trainer so as to
prevent inadvertent pressure on
the On/Off button.
• Reinstall batteries according to
the diagram in the battery
holder.
 Loading...