

Page 1
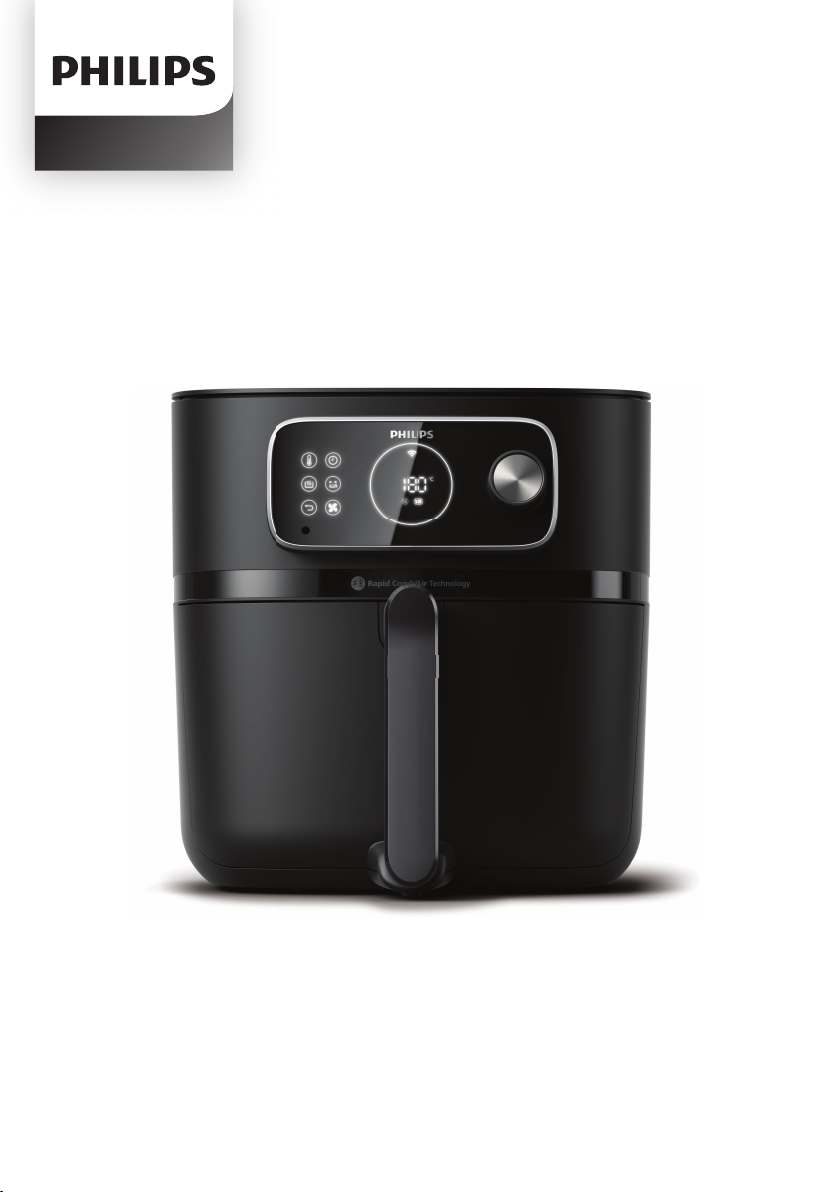
HD9875
Image pending
ImImImImIm
Im
agagagagag
e e e
pepepepepepepe
pe
pepepe
pe
pe
pe
pe
nd
ndndndndnd
nd
nd
nd
ininininininininin
g
g
Page 2

English 6
Türkçe 30
Page 3
6
English
Important
Danger
Warning
Read this important information carefully before you use the appliance and save
it for future reference.
-
Do not place the appliance on or near a hot gas stove or all kinds of electric
stove and electric cooking plates, or in a heated oven.
-
Never immerse the appliance in water nor rinse it under the tap.
-
Do not let any water or other liquid enter the appliance to prevent electric
shock.
-
Always put the ingredients to be fried in the basket, to prevent them from
coming into contact with the heating elements.
-
Do not cover the air inlet and the air outlet openings while the appliance is
operating.
-
Do not fill the pan with oil as this may cause a fire hazard.
-
Do not use the appliance, if the plug, the mains cord or the appliance itself is
damaged.
-
Never touch the inside of the appliance while it is operating.
-
Never put any amount of food that exceeds the maximum level indicated in
the basket.
-
Always make sure heater is free and no food stuck in heater.
-
If the supply cord is damaged, it must be replaced by Philips, its service agent
or similarly qualified persons in order to avoid a hazard.
-
Only connect the appliance to an earthed wall socket. Always make sure that
the plug is inserted into the wall socket properly.
-
This appliance is not intended to be operated by means of an external timer
or a separate remote-control system.
-
The accessible surfaces may become hot during use.
-
This appliance can be used by children aged from 8 years and above and
persons with reduced physical, sensory or mental capabilities or lack of
experience and knowledge if they have been given supervision or instruction
concerning use of the appliance in a safe way and understand the hazards
involved. Children shall not play with the appliance. Cleaning and user
maintenance shall not be made by children unless they are older than 8 and
supervised.
-
Keep the appliance and its cord out of the reach of children less than 8 years.
-
Do not place the appliance against a wall or against other appliances. Leave
at least 10 cm free space at the back, on both sides and above the appliance.
Do not place anything on top of the appliance.
-
During hot air frying, hot steam is released through the air outlet openings.
Keep your hands and face at a safe distance from the steam and from the air
outlet openings. Also, be careful of hot steam and air when you remove the
pan from the appliance.
-
Never use light ingredients or backing paper in the appliance.
-
Accessible surfaces may become hot during use.
Page 4

Caution
English
-
Storage of potatoes: The temperature shall be appropriate to the potato
variety stored and it shall be above 6 °C to minimize the risk of acrylamide
exposure in the prepared foodstuff.
-
Never fill the pan with oil.
-
This appliance is designed to be used at ambient temperatures between 5°C
and 40°C.
-
Check if the voltage indicated on the appliance corresponds to the local
mains voltage before you connect the appliance.
-
Keep the mains cord away from hot surfaces.
-
Do not place the appliance on or near combustible materials such as a
tablecloth or curtain.
-
Do not use the appliance for any other purpose than described in this manual
and use only original Philips-accessories.
-
Do not let the appliance operate unattended.
-
The pan, basket and accessories becomes hot during and after use of the
appliance, always handle carefully.
-
Thoroughly clean the parts that come into contact with food before you use
the appliance for the first time. Refer to the instructions in the manual.
-
If the supply cord is damaged, it must be replaced by Philips, its service agent
or similarly qualified persons in order to avoid a hazard.
-
Only connect the appliance to an earthed wall socket. Always make sure that
the plug is inserted into the wall socket properly.
-
This appliance is not intended to be operated by means of an external timer
or a separate remote-control system.
-
The accessible surfaces may become hot during use.
-
This appliance can be used by children aged from 8 years and above and
persons with reduced physical, sensory or mental capabilities or lack of
experience and knowledge if they have been given supervision or instruction
concerning use of the appliance in a safe way and understand the hazards
involved. Children shall not play with the appliance. Cleaning and user
maintenance shall not be made by children unless they are older than 8 and
supervised.
-
Keep the appliance and its cord out of the reach of children less than 8 years.
-
Do not place the appliance against a wall or against other appliances. Leave
at least 10 cm free space at the back, on both sides and above the appliance.
Do not place anything on top of the appliance.
-
During hot air frying, hot steam is released through the air outlet openings.
Keep your hands and face at a safe distance from the steam and from the air
outlet openings. Also, be careful of hot steam and air when you remove the
pan from the appliance.
-
Never use light ingredients or backing paper in the appliance.
-
Accessible surfaces may become hot during use.
-
Storage of potatoes: The temperature shall be appropriate to the potato
variety stored and it shall be above 6 °C to minimize the risk of acrylamide
exposure in the prepared foodstuff.
-
Never fill the pan with oil.
7
Page 5

8
English
-
This appliance is designed to be used at ambient temperatures between 5°C
and 40°C.
-
Check if the voltage indicated on the appliance corresponds to the local
mains voltage before you connect the appliance.
-
Keep the mains cord away from hot surfaces.
-
Do not place the appliance on or near combustible materials such as a
tablecloth or curtain.
-
Do not use the appliance for any other purpose than described in this manual
and use only original Philips-accessories.
-
Do not let the appliance operate unattended.
-
The pan, basket and accessories becomes hot during and after use of the
appliance, always handle carefully.
-
Thoroughly clean the parts that come into contact with food before you use
the appliance for the first time. Refer to the instructions in the manual.
Electromagnetic fields (EMF)
This appliance complies with the applicable standards and regulations regarding
exposure to electromagnetic fields.
Automatic Shut-Off
The Airfryer is equipped with an automatic shut-off function. When the
appliance is switched on but not in the cooking or keep warm mode, it will go to
standby mode after 10 minutes of no user interaction. To switch off the
appliance manually, long press the rotary button.
Recycling
-
This symbol means that electrical products shall not be disposed of with
normal household waste.
-
Follow your country's rules for the separate collection of electrical products.
Warranty and Support
Philips offers a two-year warranty after purchase on this product. This warranty is
not valid if a defect is due to incorrect use or poor maintenance. Our warranty
does not affect your rights under law as a consumer. For more information or for
invoking the warranty, please visit our website www.philips.com/support.
Declaration of Conformity
Hereby, DAP B.V. declares that the Airfryer HD9875 is in compliance with
Directive 2014/53/EU.
The full text of the EU declaration of conformity is available at the following
internet address: https://www.philips.com.
Page 6

The Airfryer HD9875 is equipped with a WiFi module, 2.4GHz 802.11 b/g/n with
a maximum output power of 92,9mW EIRP.
Software and firmware updates
Updating is essential to safeguard your privacy and the proper functioning of
your Airfryer and the app.
Please always update the app to the latest version.
The Airfryer is updating the appliance firmware automatically.
Note: To enable the Airfryer to update to the latest firmware version, make sure
your Airfryer is connected to your home WiFi.
Note: Always use the latest app and firmware.
Note: Updates are made available when there are software improvements.
Note: A firmware update is started automatically when the Airfryer is in stand-by
mode. This update takes a few minutes. During this time the Airfryer cannot be
used.
Device compatibility
For detailed information about the compatibility of the app, please refer to the
information in the app Store.
Factory reset
You can set your firmware back to its default settings by simultaneously pressing
the keep warm button and the rotary button for 10 seconds.
Your Airfryer is then no more connected to your home WiFi and not paired with
your smart device anymore.
English
9
Introduction
Congratulations on your purchase and welcome to Philips!
To fully benefit from the support that Philips offers, register your product at
www.philips.com/welcome.
Page 7
10
www.philips.com/parts-and-accessories
HD9958
a
g
h
j
b
d
c
e
f
i
k
English
Overview
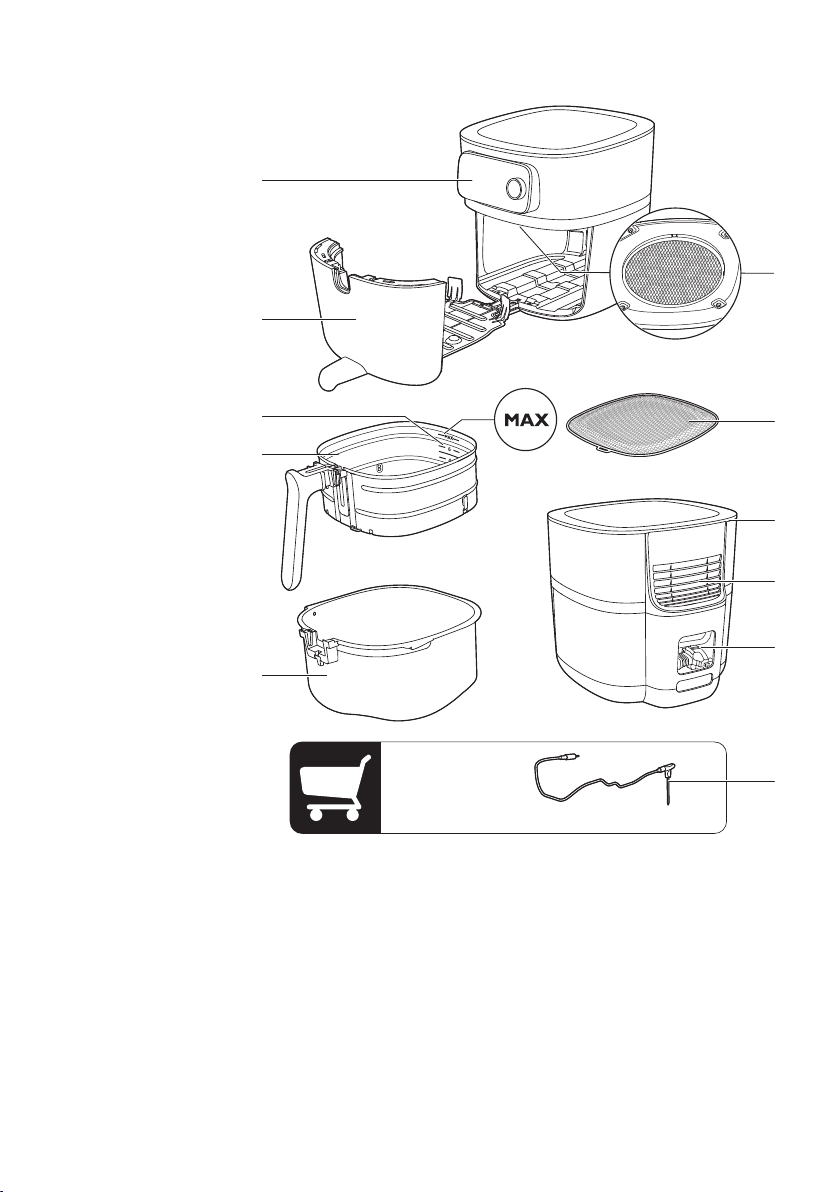
1 Control panel
2 Drawer
3 Filling level indication
4 Basket with removable mesh bottom
5 Pan
6 Food thermometer (HD9958, sold separately)
7 Cord storage compartment
8 Air outlets
9 Air inlet
10 Removable mesh bottom
11 Splatter shield
Page 8
Control panel overview
a
l
s r q p o
mn
f g h i j k g
b
c
d
e
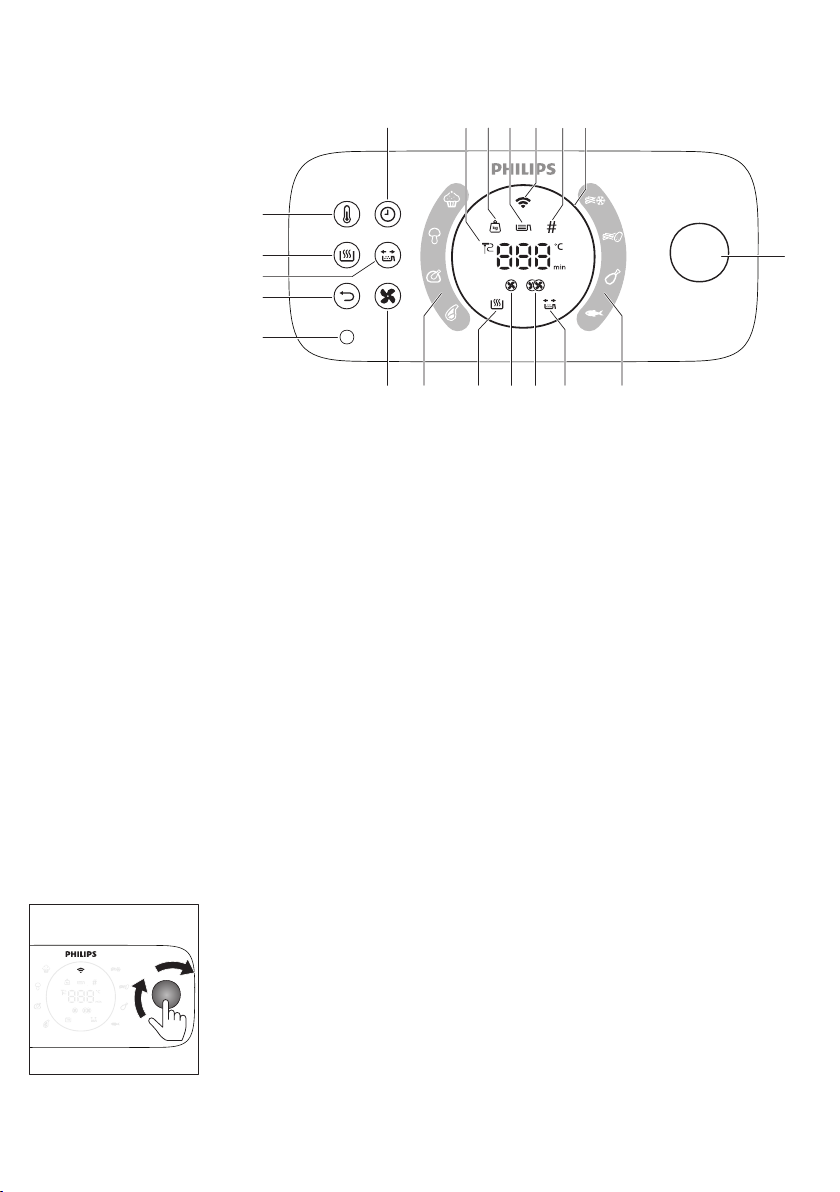
1 Temperature button
2 Keep warm button
3 Shaking reminder button
4 Back button
5 Food thermometer socket
6 Air speed button
7 Auto cook programs
8 Keep warm indicator
9 Low air speed indicator
10 High air speed indicator
11 Shaking reminder indicator
12 Rotary button
13 Light ring
14 Pieces indicator
15 Wifi indicator
16 Filling level indicator
17 Weight indicator
18 Food thermometer indicator
19 Time button
English
11
Description of functions
Rotary and back button
The rotary button is your central control. You can turn and press it to go through
different menu options and confirm an action.
-
Short press the rotary button: turn on the appliance.
-
Long press the rotaty button: turn off the appliance.
After the appliance is switched on:
-
Press the rotary button: confirm an action.
-
Turn the rotary button: go through different menu options or change the
cooking setting.
-
Press the back button: go back to the previous step.
Page 9
12
English
Auto-Cook programs
The Auto-Cook programs are one of the key features of your Airfryer, which
allows you to cook a variety of food items.
By selecting the desired food item and adjusting the filling level or specifying the
quantity of ingredients, the Airfryer will automatically set the appropriate
temperature and cooking time for your meal. Additionally, the Airfryer will alert
you if any interaction is required during cooking, such as shaking fries.
Important: The Airfryer comes with eight default auto-cook programs that can
be initiated directly from the appliance. However, for a wider selection of
options, you can access and download more auto-cook programs via the NutriU
app. Simply connect your Airfryer to your network and pair your smart device
with your appliance to begin exploring new culinary possibilities.
Food Thermometer (HD9958, sold separately)
The separately sold food thermometer can be used to cook your food to the
desired doneness level.
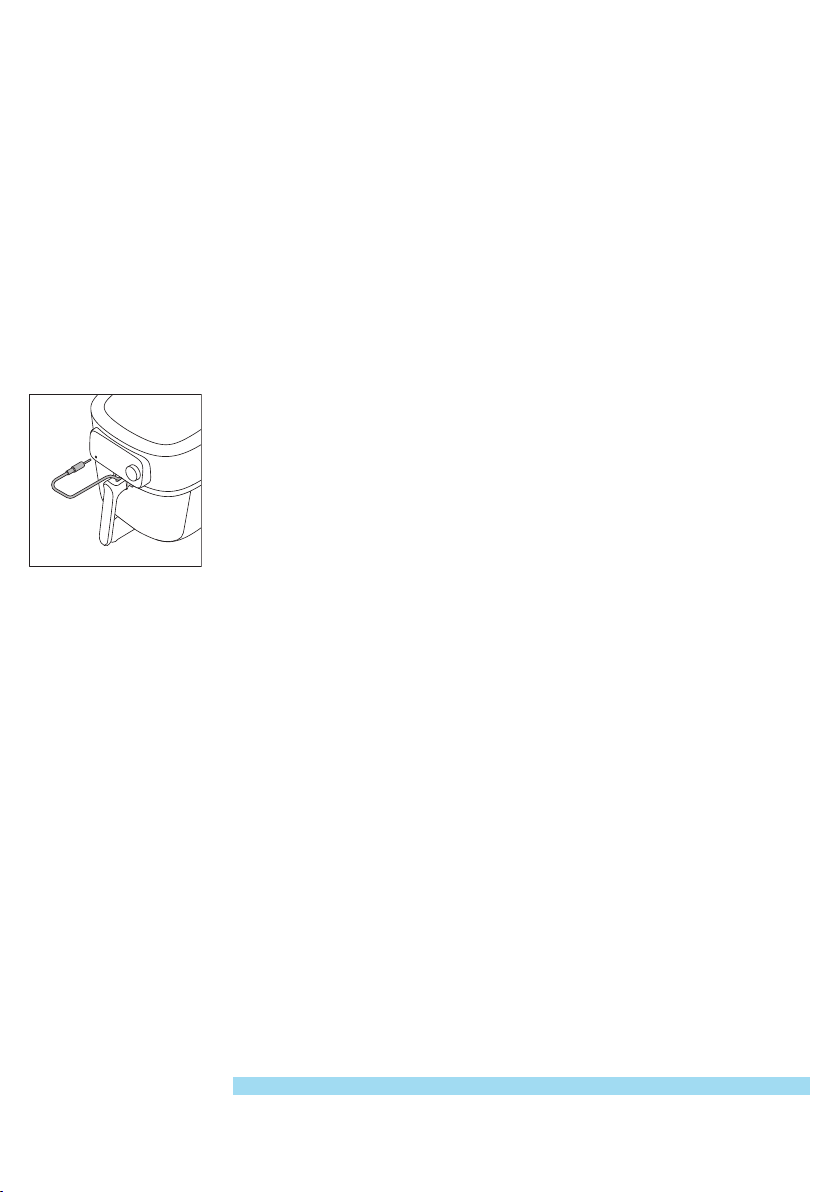
Put one end of the food thermometer to the food and the other end to the food
thermometer socket (see chapter “food thermometer”).
Cooking time
In cooking mode “Manual cooking”, you can set the cooking time from 1 minute
to 180 minutes.
In Auto-Cook programs, you do not need to set a cooking time as the Auto-Cook
program cooks your food based on your portion sizes or desired doneness level.
In cooking mode “Food thermometer”, you do not need to set a cooking time as
the cooking is automatically finished as soon the set core temperature of the
food thermometer is reached.
Cooking temperature
In cooking mode “Manual cooking” you can set the cooking temperature from
40°C to 200°C.
In cooking mode “Auto-Cook programs”, you do not need to set a cooking
temperature because the cooking temperature is set automatically.
Core temperature
In cooking mode “Food thermometer”, you can set the core temperature of the
food between 30°C and 99°C. The temperature at the center of the food will
reach the set core temperature at the end of the cooking process.
Note: The core temperature does not equal to the cooking temperature.
Page 10

High and low air speeds
Your Airfryer comes with two different air speed settings, a low Air Speed and a
high Air Speed.
In cooking mode “Auto-Cook programs”, the air speed is set automatically.
In cooking modes “Manual cooking” or “Food Thermometer”, you need to set
the air speed manually by pressing the air speed button.
For typical oven dishes, such as lasagna, roasts, cakes etc., and for a long cooking
time, use the low air speed. For typical Airfryer applications, such as fries, chicken
nuggets, fish fingers etc. and for a shorter cooking time, use the high air speed.
Keep warm function
Your Airfryer has a keep warm mode. To activate this mode, simply press the
"keep warm" button at any point during the cooking process - whether it's
before you begin cooking, in between stages, or at the end of a cooking session.
For more info see chapter “Keep warm”.
Shaking reminder
Your Airfryer comes with a shaking reminder feature that can be activated prior
to starting your cooking session. This feature sends a notification halfway
through the cooking time, reminding you to shake your food to ensure an evenly
cooked result. This feature is especially useful when cooking foods with multiple
pieces, such as various types of fries. Additionally, it can be utilized as a reminder
to turn foods like chicken drumsticks.
By default the shaking reminder is deactivated. You can activate it before or
during the cooking process by pressing the "shaking reminder" button.
English
13
Sound notifications
Sometimes you hear a sound, for example when the appliance has finished
cooking, or when there is an action required during cooking, e.g., shaking or
turning food.
Light ring
Your Airfryer comes with an animated light ring, which enhances the usability of
your Airfryer.
Spinning mode: The light ring is spinning around when an update is running.
Breathing mode: The light ring is blinking slowly if you have pressed the rotary
button during cooking. In this case the appliance is in the pause mode.
Blinking fast: Either if the drawer is open when the ring is blinking fast; or for
instance during the pairing process, the appliance is waiting for your action to
press the rotary button to confirm.
Focus mode: e.g if the appliance is asking for the filling level.
Preheating
Your Airfryer comes with a preheating function, which can be used to preheat
your Airfryer to your desired temperature.
Page 11
14
1
2
English
If you press the rotary button without setting a time, the preheat mode will be
activated and you will receive a sound notification when the desired
temperature is reached.
Before first use
1 Remove all packing material.
2 Remove any stickers or labels (if applicable) from the appliance.
3 Remove the protection foil from the display.
4 Thoroughly clean the appliance before first use (see chapter "cleaning").
Preparations before first use
Placing the removable mesh bottom
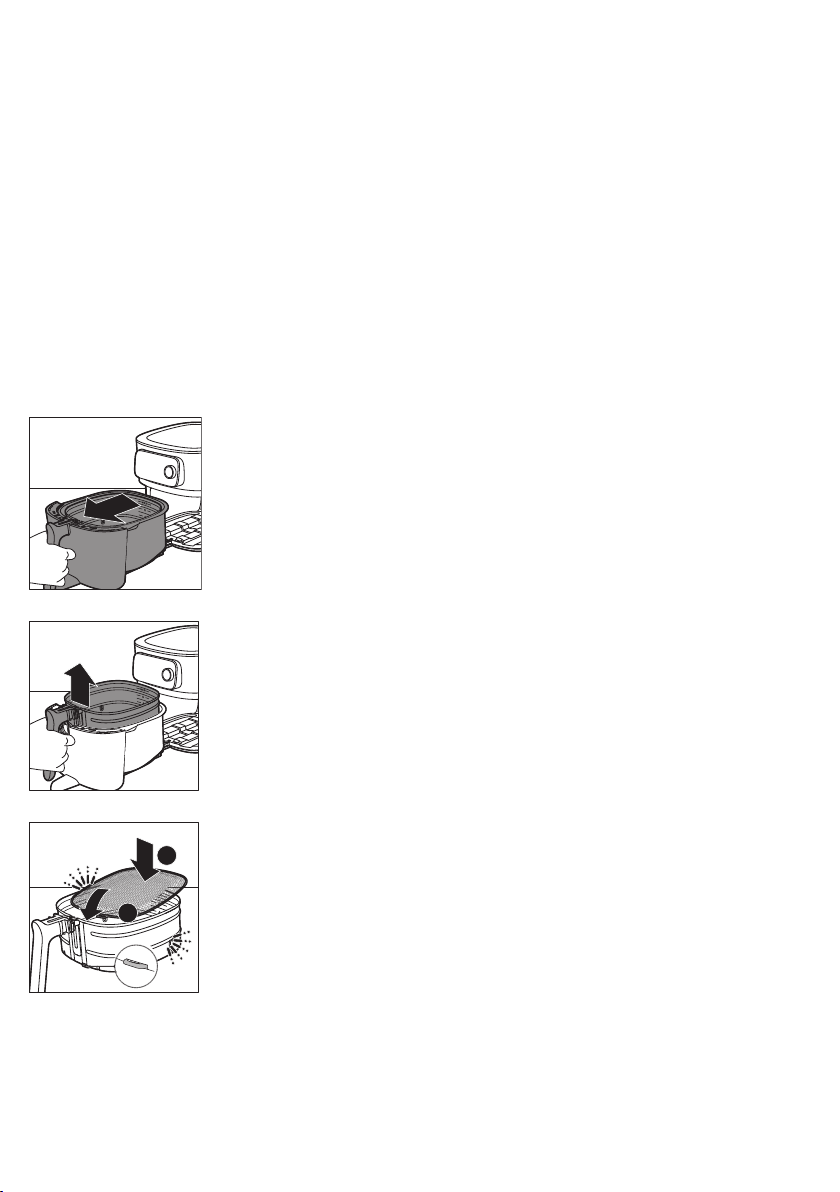
1 Open the drawer by pulling the handle.
2 Remove the basket by lifting the handle.
3 Insert the removable mesh bottom into the slot on the right bottom side of
the basket. Push the mesh bottom down until it locks into position (“click” on
both sides).
Page 12
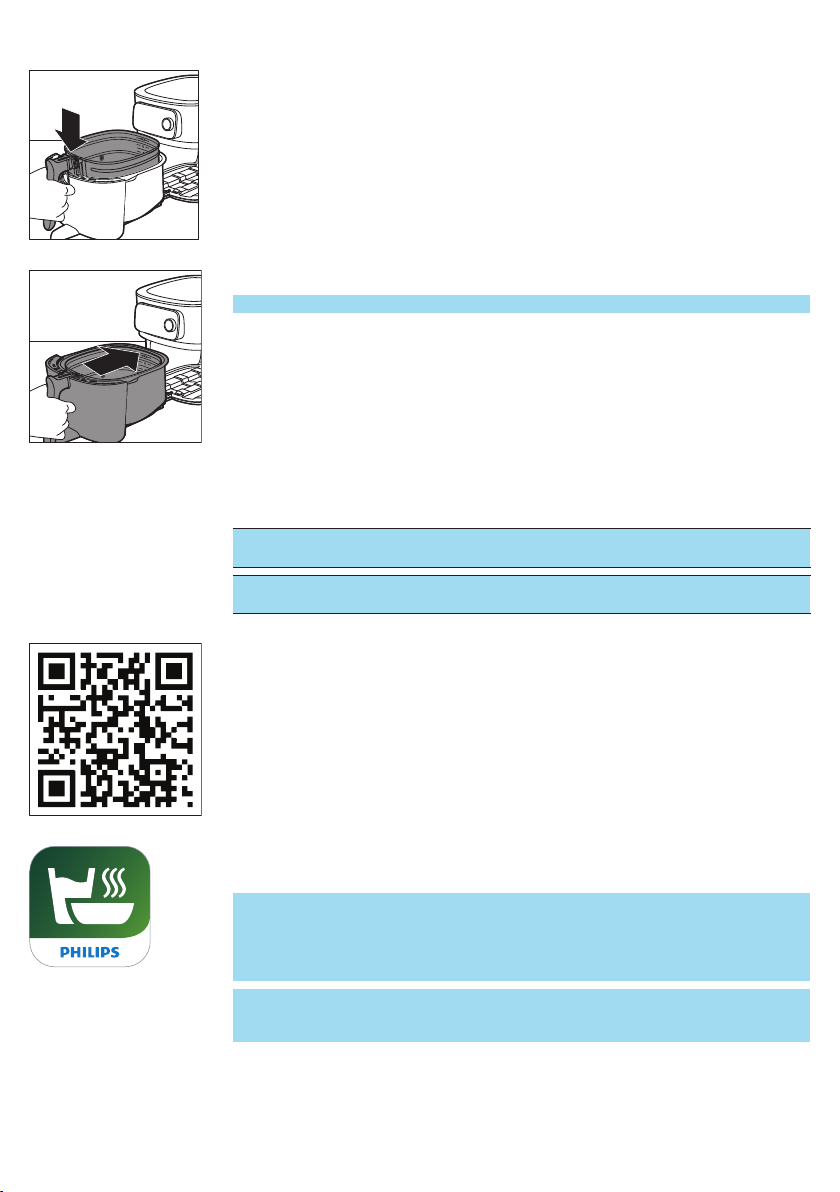
4 Put the basket in the pan.
NutriU
5 Slide the drawer back into the Airfryer by the handle.
Note: Never use the pan without the basket.
Connecting the Airfryer to the NutriU app
Important: Make sure that your smart phone is connected to your home
WiFi network before you start the WiFi set-up process.
Important: Make sure to connect your Airfryer to a 2.4 GHz 802.11 b/g/n
home WiFi network.
Pair your Airfryer with the NutriU app
1 Scan the QR code to download the NutriU app. You can also get the NutriU
app from the App Store or on the website www.philips.com/NutriU.
English
15
2 Start the Philips NutriU app on your smart phone.
3 Follow the onscreen instructions until you reach the "Set up appliance" page.
Note: We recommend downloading the NutriU app and add your Airfryer to
the app as soon as you set up your appliance for the first time. This enables
you to use the Airfryer to its full extent, for example, to enjoy remote cooking
(start recipes or Auto-Cook programs from the app, get notifications when
food is done, etc.) and to get the latest firmware updates.
Note: To make use of connectivity features, you need an account. During the
onboarding process, you need to register a new account or log in with an
existing one.
Page 13
16
English
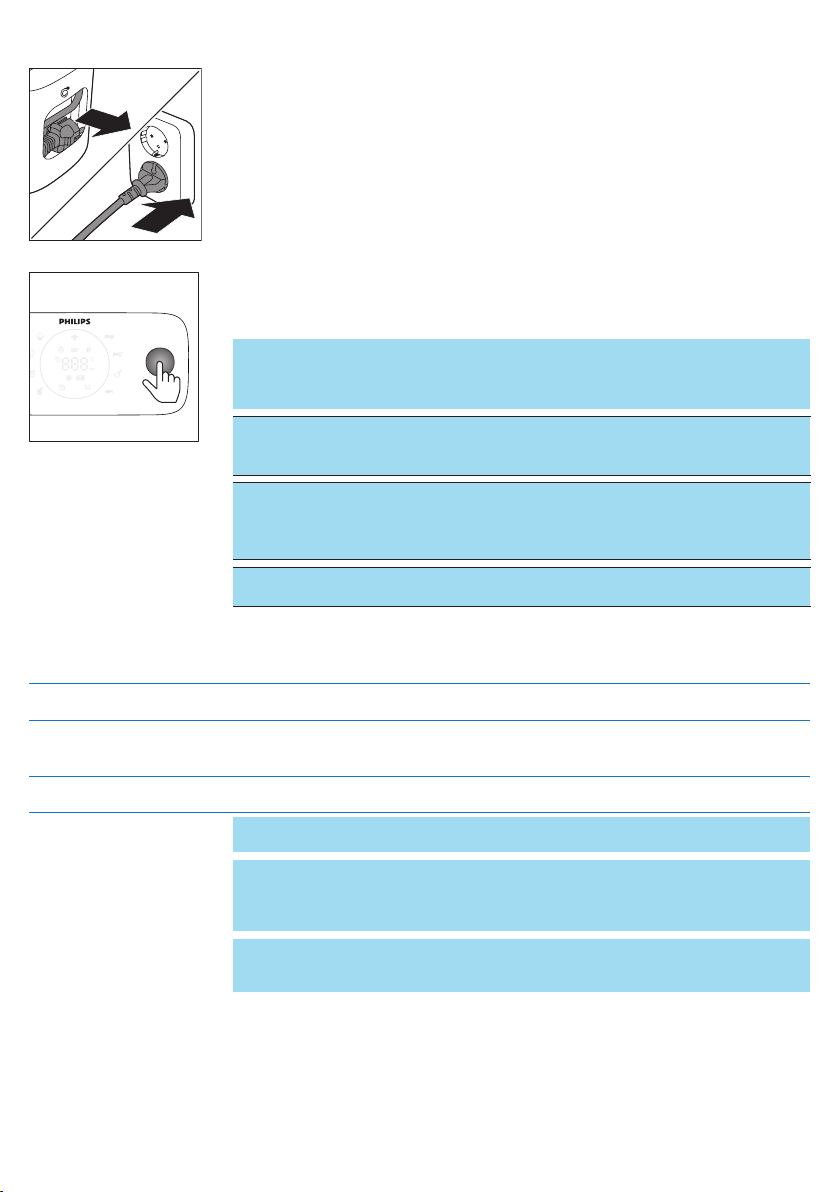
4 Plug in the appliance.
5 Press the rotary button to turn on the appliance.
6 Follow the steps in the app to connect your Airfryer to your WiFi and pair your
Airfryer with your smart phone.
Note: Along this process in the NutriU app, you will be asked at some point to
make an extra long press (4 seconds) on the appliance to initialize the setup
process. So make sure that you stay close to your Airfryer until your Airfryer is
connected.
Important: Remote control: you can remotely control your Airfryer through
the app (e.g. send a recipe, pause cooking, etc.) only if you have checked off
the “remote consent” in the NutriU app, to be found in your NutriU profile.
Important: Single user pairing: the Airfryer can be remotely controlled by
only one user at the same time. If a second user wants to control the
Airfryer and use the NutriU app, this user has to follow the pairing process.
Once paired, the first user will be unpaired automatically.
Important: The WiFi setup process can be cancelled via the app or by
unplugging the Airfryer.
WiFi indicator
The WiFi indicator is off. WiFi is disabled.
The WiFi indicator is on. WiFi is enabled and connected to the router.
The WiFi indicator is blinking slowly. WiFi connection is ongoing. The device is in the
pairing process or connecting to the router.
The WiFi indicator is blinking fast. WiFi connection error.
Note: You can start the paring process by long pressing the time button for 4
seconds.
Note: If you encounter any difficulties during the WiFi setup process - such as
pausing midway through and failing to complete the process, or experiencing
connectivity issues with your Wi-Fi network - you can restart the process by long
pressing the time button for 4 seconds.
Note: If you need to reset your firmware to its default settings, simply press and
hold the keep warm button and the rotary button simultaneously for 10
seconds.
Food table
The table below helps you select the basic settings for the types of food you
want to prepare.
Page 14

Note: Keep in mind that these settings are suggestions. As ingredients differ in
origin, size, shape as well as brand, we cannot guarantee the best setting for
your ingredients.
Note: When preparing larger amount of food (e.g. fries, prawns, drumsticks,
frozen snacks), shake, turn, or stir the ingredients in the basket 2 to 3 times in
order to achieve a consistent result.
Note: Most of the ingredients in this list can be found in the Automatic Cooking
programs in the NutriU app.
Ingredients Min. – Max.
amount
Time
(min)
Tem
pera
ture
Fan
speed
Note
English
17
Home-made fries
(10 x 10 mm/0.4 x 04
in)
Homemade potato
wedges
Frozen snacks
(chicken nuggets)
Frozen snacks
(small spring rolls
around 20 g/0.7 oz)
Chicken breast
Around 160 g/6 oz
Chicken fingers bread
crumbed homemade
Chicken wings
Around 100 g/3.5 oz
Meat chops without
bone
Around 150 g/5.3 oz
Filing level 1 - 6
(300g - 2000g)
Filing level 1 - 6
(300g - 2000g)
Filling level 1-6
(6 - 50 pieces)
100 - 600 g
(5 - 30 pieces)
1 - 6 pieces 20 - 25 180 °C High
3 - 18 pieces 15 - 20 180 °C High
2 - 25 pieces 15 - 40 200 °C High
1 - 5 chops 19 - 25 200 °C High
18 - 45 160 - 180°CHigh
speed
20 - 45 160 - 180°CHigh
speed
12 - 19 200 °C High
speed
14 - 16 180 °C High
speed
speed
speed
speed
speed
Soak 30 minutes in cold water or
3 minutes in luke warm water
(40°C/104°F), dry and then add
1 tbsp of oil per 500 g/18 oz.
Shake twice.
Soak 30 minutes in water, dry
and then add 1/4 to 1 tbsp of
oil. Shake, turn, or stir twice.
Ready when golden yellow and
crispy outside. Shake, turn, or stir
halfway.
Ready when golden yellow and
crispy outside. Shake, turn, or stir
halfway.
Add oil to the breadcrumbs.
Ready when golden yellow.
Shake, turn, or stir halfway.
Hamburger
Around 200 g
(diameter 10 cm/4 in)
Thick sausages
Around 100 g/3.5 oz
(diameter 4 cm/1.6
in)
1 - 4 patties 15 - 18 200 °C High
speed
1 - 12 pieces 12 - 20 200 °C High
speed
Page 15

18
English
Ingredients Min. – Max.
amount
Time
(min)
Tem
pera
Fan
speed
ture
Thin sausages
Around 70 g/2.5 oz
(diameter 2 cm/0.8
in)
Pork roast 800 - 2400 g 90 - 140 160 °C Low
Fish filets (Salmon)
Around 200 g
Fish filets (Cod,
shellfish)
Cake (butter cake)
using backing
accessory
Muffins
Around 50 g/1.8 oz
Pre-baked toast /
bread rolls
Fresh bread 500 - 1700 g 35 - 80 180 °C Low
1 - 12 pieces 10 - 18 200 °C High
1 - 5 pieces 18 - 22 200 °C High
1 - 4 pieces 7 - 14 200 °C High
Baking accessory
Filling level 1 - 2
600 - 1200 g
1 - 9 pieces 13 - 15 180 °C High
1 - 12 6 - 13 180 °C High
30 - 60 150 °C Low
speed
speed
speed
speed
speed
speed
speed
speed
Note
Let it rest for 5 minutes before
cutting.
In order to avoid sticking, place
the skin side to the bottom and
add some oil.
Use a baking accessory.
Use heat-proof silicone muffin
cups.
The shape should be as flat as
possible to avoid that the bread
touches the heating element
when rising.
Homemade rolls
Around 80 g/2.8 oz
Chestnuts Filling level 1 - 4 15 - 24 200 °C High
Mixed vegetable
(roughly chopped)
1 - 6 pieces 12-16 180 °C Low
speed
speed
Filling level 2 - 8 15 - 38 160 °C High
speed
Using the Airfryer
Caution: This is an Airfryer that works on hot air. Do not fill the pan with
oil, frying fat or any other liquid.
Caution: Do not touch hot surfaces. Use handles or knobs. Handle the hot
pan with oven-safe gloves.
Caution: This appliance is for household use only.
Caution: This appliance may produce some smoke when you use it for the
first time. This is normal.
1 Place the appliance on a stable, horizontal, level and heat-resistant surface.
Make sure the drawer can be opened completely.
Shake, turn, or stir halfway.
Shake, turn, or stir halfway.
Page 16
English
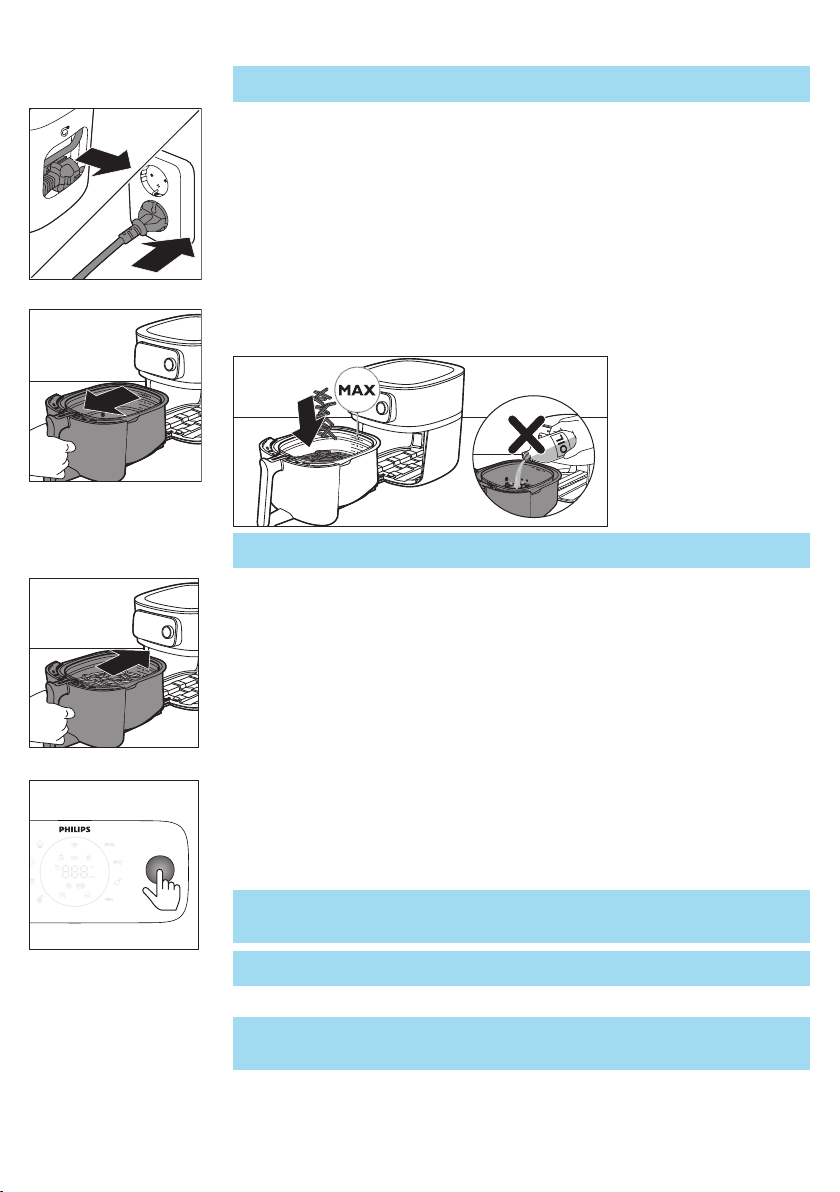
Note: Do not put anything on top or on the sides of the appliance. This could
disrupt the airflow and affect the frying result.
2 Pull the power cord out of the cord storage compartment at the back of the
appliance.
3 Put the plug in the wall outlet.
4 Open the drawer by pulling the handle.
5 Put the ingredients in the basket.
Note: Do not overfill the basket beyond the "MAX" indication as this could
affect the quality of the end result.
6 Slide the drawer back into the Airfryer.
19
7 Press the rotary button to turn on the appliance.
8 Select the cooking mode you would like to use (see chapter “Cooking
Modes”).
9 Decide whether you want to use the manual mode, choose an auto-cook
program or use the temperature probe to cook (see "Cooking Modes").
Caution: Never use the pan without the basket in it. If you heat up the
appliance without basket, use oven gloves to open the drawer. The
edges and inside of the drawer become very hot.
Caution: Do not touch the pan and basket during and for some time
after use, as they get very hot.
10 Press the rotary button to start cooking.
Note: You can press the rotary button to pause cooking process and turn it to
change the cooking settings. Press the rotary button again to resume
cooking.
11 When you hear the timer bell, it is time to shake your food or the cooking
time has elapsed.
Page 17
20
English
Note: Always make sure that your food is fully cooked before serving.
Note: Some Auto-Cook programs notify you when shaking or turning of your
food is required. The Airfryer will send out a sound signal when it is time to
shake or turn.
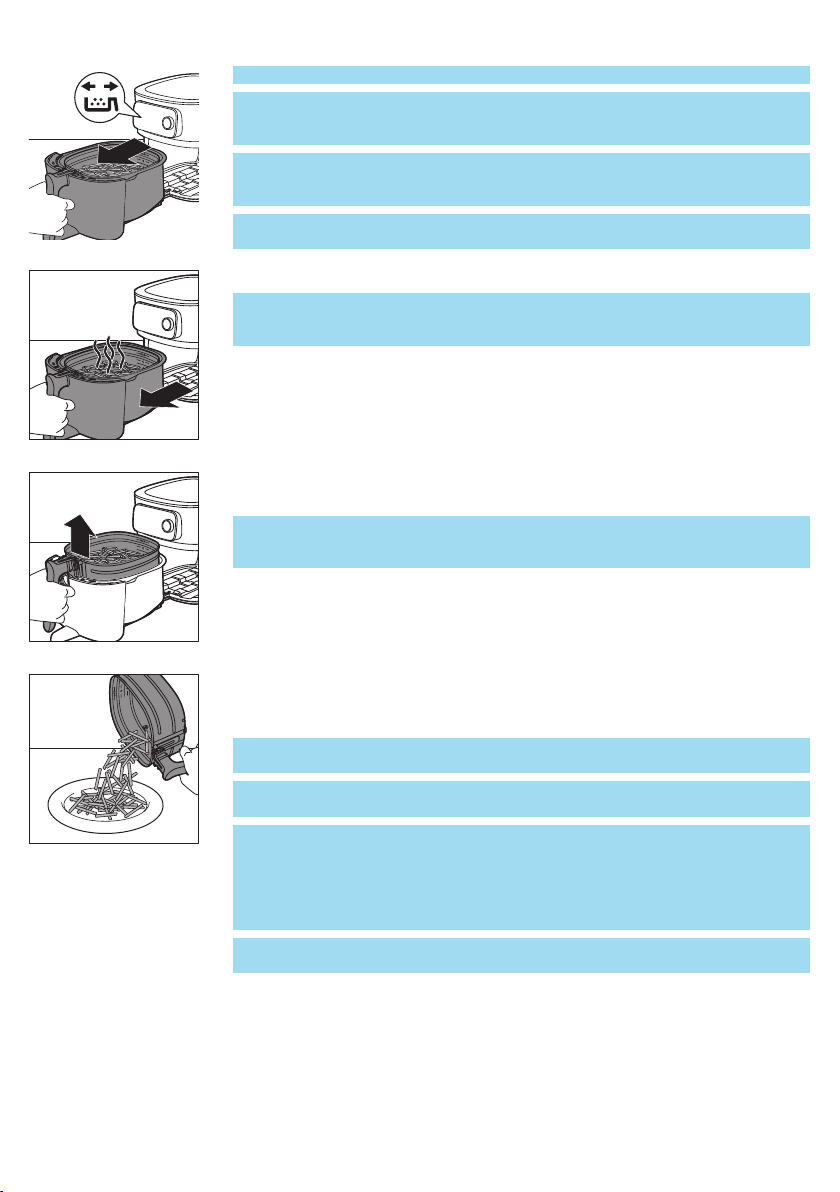
Note: The best way to shake is to open the drawer and lift the basket out of
the pan and shake it. Then slide the pan with the basket back into the
appliance. The appliance will automatically resume cooking.
Note: To cancel any ongoing process, go back to the main menu by pressing
the return button.
12 Open the drawer by pulling the handle and check if the ingredients are ready.
Note: If the food is not cooked to your desired doneness level, you can add
more time by pressing the time button and set a time. Press the rotary button
to start cooking for a few more minutes.
13 To remove small ingredients (e.g. fries), lift the basket out of the pan by the
handle.
Caution: After the cooking process is finished, the pan, the basket,
interior housing and the ingredients are hot. Depending on the type of
ingredients in the Airfryer, steam may escape from the pan.
14 Empty the basket contents into a bowl or onto a plate. Always remove the
basket from the pan to empty contents as hot oil may be at the bottom of the
pan.
Note: To remove large or fragile ingredients, use a pair of tongs to lift out
ingredients.
Note: Excess oil or rendered fat from the ingredients is collected on the
bottom of the pan.
Note: Depending on the type of ingredients cooked, you may want to
carefully pour off any excess oil or rendered fat from the pan after each batch
or before shaking or re-placing the basket in the pan. Place the basket on a
heat-resistant surface. Wearing oven-safe gloves, lift the pan off tracks and
place on heat- resistant surface. Pour off excess oil or rendered fat. Return the
pan to the drawer and the basket to the pan.
Note: When a batch of ingredients is ready, the Airfryer is instantly ready for
preparing another batch.
Page 18
Using the food thermometer (HD9958, sold separately)
Placing the food thermometer
The food thermometer can be used for steak, meat chops, chicken breast, fish
fillet, etc.
1 Clean the food thermometer before and after use - use warm and soapy
water.
2 Insert the thermometer into the center of the thickest part of the food.
Caution: The tip of the food thermometer is pointed.
Note: Make sure the tip of the thermometer is inserted straight into the
center of the thickest part of the food, not angled toward the bottom or top
of it.
Note: Make sure the thermometer is close to but not touching the bone and
away from any fat or gristle.
Note: The thickest part of the fillet may not be the center. It is important that
the end of the thermometer hits the thickest part so desired results are
achieved.
Note: When airfrying a whole chicken, make sure that the probe does not go
all the way through the breast into the cavity.
Note: Do not use the food thermometer if your food is less than 2cm thick.
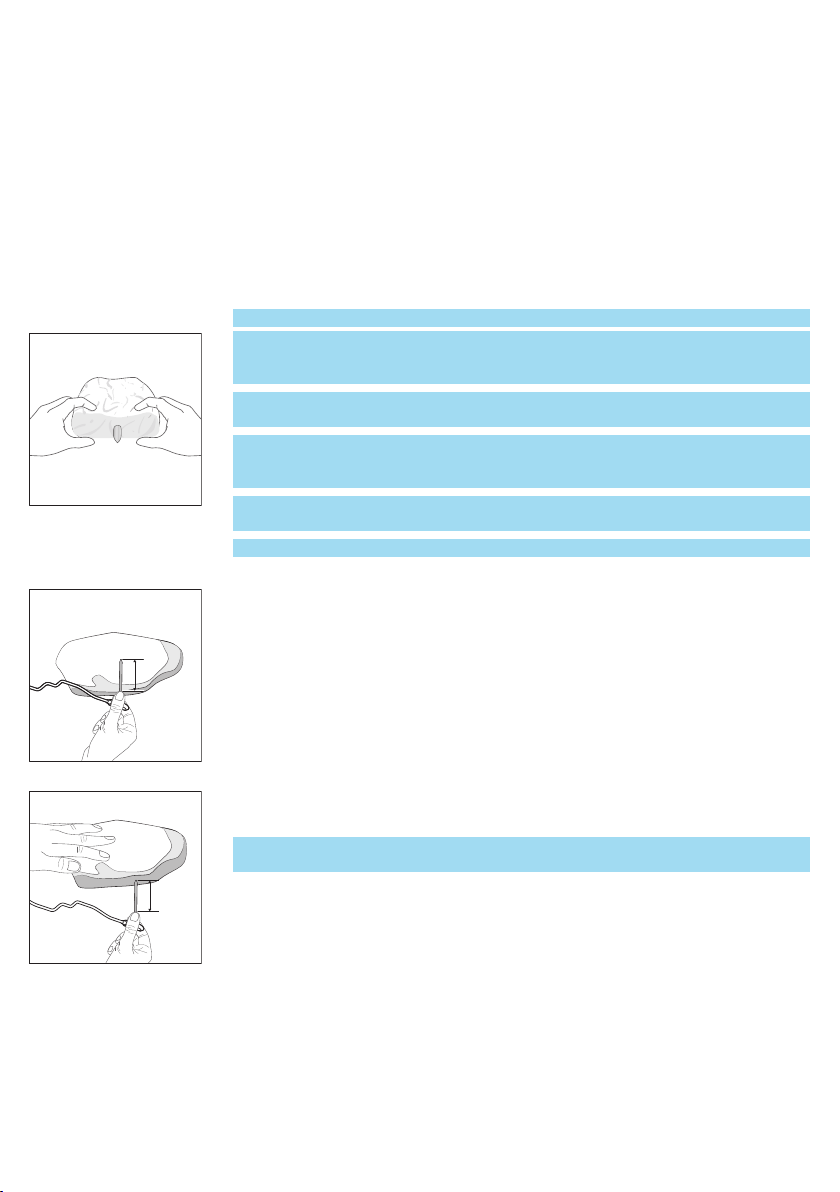
Follow the steps below to guide the probe to the center of the food.
1 Grab the metal stem of the thermometer and locate the tip to the center of
the food.
English
21
2 Keep your fingers on the same grab position and insert the probe to the
center of the thickest part of the food.
Note: Depending on the food item, it is not always necessary to insert the metal
stem of the food thermometer completely.
Page 19
22
English
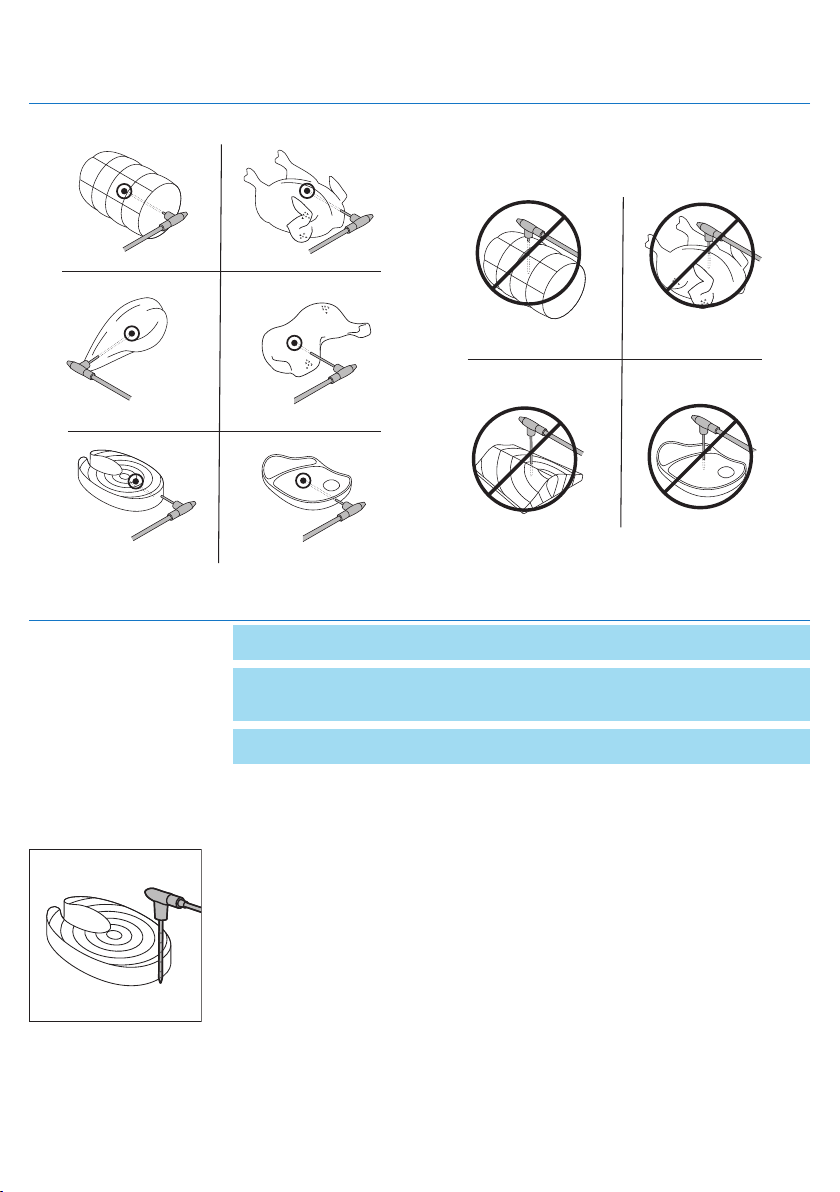
Dos Don'ts
Note: For a whole chicken ensure that the probe does not go all the way through
the breast into the cavity.
Note: You can also use the markings to determine first the center of the thickest
part of your food. Use your fingers to remember how deeply you need to insert
the food thermometer.
Note: Keeping your fingers marked on the food thermometer, insert the food
thermometer through the center of your food.
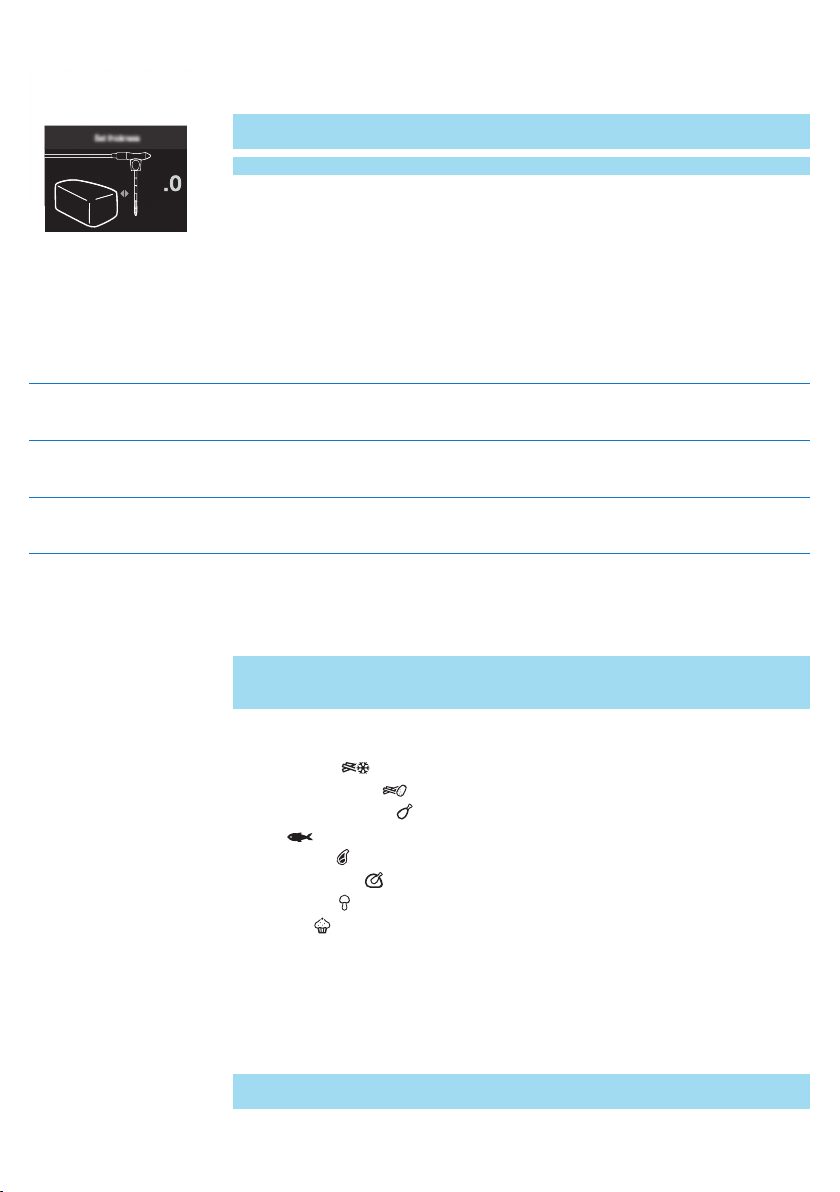
Measure the thickness of your food
You can use the food thermometer to measure the thickness of your food.
1 Place the food thermometer next to the food and check which marking
reaches the top of the food.
Page 20
English
3
2 Set the value 1 to 6 when you get asked about the thickness when cooking
with an Auto-Cook program in the NutriU app.
Note: This function is only available when you use the NutriU app and start the
Auto-Cook program from there.
Note: Do not use the food thermometer if your food is less than 2cm thick.
Cooking modes
Mode How to
Auto-Cook Programs Select the Auto-Cook program. Set filling level, number of
pieces or weight, then start cooking.
Manual cooking Set cooking time, temperature and air speed manually and
start cooking.
Food Thermometer Set core temperature, cooking temperature and air speed
manually and start cooking.
Auto-Cook Programs
1 When you switch on your Airfryer by pressing the rotary button, you are in
mode “Auto-Cook programs” by default.
Note: If you have already cooked something else before you want to cook
with an Auto-Cook program, you can enter mode “Auto-cook programs” by
clicking the back button.
2 You can choose among 8 Auto-Cook programs on your Airfryer. Turn the
rotary button to choose one program.
-
Frozen fries
-
Home-made fries
-
Chicken drumsticks
-
Fish
-
Meat chop
-
Whole chicken
-
Vegetables
-
Muffins
3 Turn the rotary button to choose the Auto-Cook program you need. Press the
rotary button to confirm.
4 Depending on the food, you may be asked to set the filling level, number of
pieces, or weight. Turn the rotary button to select the amount of food you
have put into the basket.
5 Push the rotary button to confirm.
Note: Use the markings indicated in the basket as a reference to set the
correct filling level.
23
Page 21

24
English
Note: Before you choose the filling level, make sure that you always distribute
the food evenly in the basket.
Note: When you use the "Whole chicken" Auto-Cook program, you need to
input the weight of the food item. Use a scale to determine the weight or you
might also find the weight on the pack of your food.
6 The Airfryer will display the temperature and time that it has automatically
calculated based on your selection. You can easily access this information on
your device as it alternates between the two. Additionally, the Airfryer will
indicate if low or high air speed has been selected.
Making home-made fries
To make great home-made fries in the Airfryer:
-
Choose a potato variety suitable for making fries, e.g. fresh, (slightly) floury
potatoes.
-
It is best to air fry the fries in portions of up to filling level 4 for an even result.
1 Peel the potatoes and cut into sticks. Larger fries tend to be less crispy than
smaller fries.
2 Soak the potato sticks in a bowl of water for at least 30minutes.
3 Empty the bowl and dry the potato sticks with a dish towel or paper towel.
4 Pour one tablespoon of cooking oil into the bowl, put the sticks in the bowl
and mix until the sticks are coated with oil.
5 Remove the sticks from the bowl with your fingers or a slotted kitchen utensil
so excess oil remains in the bowl.
Do not tilt the bowl to pour all the sticks in the basket at once to prevent
excess oil from going into the pan.
6 Put the sticks into the basket.
7 Start the Auto-Cook program of homemade fries and shake when notified.
Manual cooking
1 To enter manual cooking mode, simply press either the temperature or time
button.
2 If you have selected the temperature button, turn the rotary button to set
your desired temperature between 40°C and 200°C, then press the rotary
button to confirm.
3 Set the cooking time by turning the rotary button. You can choose a time
between 1 and 180 minutes.
Note: If you press the rotary button without setting a time, the pre-heat
mode will be activated and you'll receive a sound notification when the
desired temperature is reached.
4 Choose high or low air speed by pressing the air speed button and selecting
your preference.
5 Press the rotary button to confirm your selection and start cooking.
Note: To receive a shaking reminder after half of the cooking time, enable the
shaking reminder button.
Note: If you need to pause the cooking process to shake the food, add
ingredients, or adjust cooking parameters, simply press the rotary button. To
resume cooking, press the rotary button again.
Page 22

Food thermometer
Please note that in order to use the Food Thermometer feature, you'll need to
purchase the food thermometer (HD9959) separately. Once you have the
thermometer, follow these steps.
1 Place the food thermometer in your food as described in the "How to Place
the Food Thermometer" section of the manual.
Note: It is essential to place it correctly to achieve accurate results.
2 Put the food with the thermometer in the basket.
3 Use the groove in the pan to guide the cable into the correct position.
4 Plug the thermometer into the dedicated plug on the Airfryer.
5 Close the drawer and check that the cable is not being squeezed.
6 Turn the rotary button to set the desired core temperature, which will be
measured at the tip of the food thermometer. You can choose a temperature
from 30°C to 99°C.
7 Press the rotary button to confirm.
8 Adjust the cooking temperature by turning the rotary button. You can choose
a temperature between 40°C and 200°C.
9 Press the rotary button to confirm.
10 Choose the desired air speed by pressing the air speed button. You can select
between high and low air speed.
Note: During cooking, you can see the cooking temperature and core
temperature alternatively on the display screen.
11 The cooking process ends automatically when the core temperature has been
reached.
The table below gives you a guidance on which core temperature to set.
Food item Doneness level Core temperature
Poultry in general Done 80-85°C
English
25
Breast of poultry Juicy 70-74°C
Rare 45-50°C
Medium 55-60°CBeef, veal, lamb, venison
Well-Done 65-70°C
Pork in general Done 70-73°C
Pork loin Medium 58-63°C
Fish
Whole potato Done 92-95°C
Bread Done 90-95°C
Note: The suggested core temperature does not correspond necessarily to the
safe minimum internal temperature of the food.
Note: The internal temperature of the cooked food will continue to rise a few
degrees after the food is taken out of the appliance.
Translucent 50-55°C
Done 60-65°C
Page 23
26
English
Keep warm
Cleaning
The keep warm function of your Airfryer can be activated at any time - before
starting a cooking session, during cooking, or after the cooking process is
complete.
1 Press the keep warm button.
Note: To change the keep warm time, turn the rotary button to set a time
from 1 to 30 minutes. Press the rotary button to confirm the set keep warm
time.
2 Press the rotary button to start keep warm.
Note: You can pause keep warm by pressing the rotary button.
Note: Please note that using the keep warm function may affect the
doneness level of certain foods, such as steak, which require a specific level of
cooking.
Warning: Let the basket, pan and the inside of the appliance cool down
completely before you start cleaning.
Warning: The pan and basket of the appliance have a non-stick coating. Do
not use metal kitchen utensils or abrasive cleaning materials as this may
damage the non-stick coating.
Tip: Remove the pan and basket to let the Airfryer cool down faster.
1 Dispose of rendered fat or oil from the bottom of the pan.
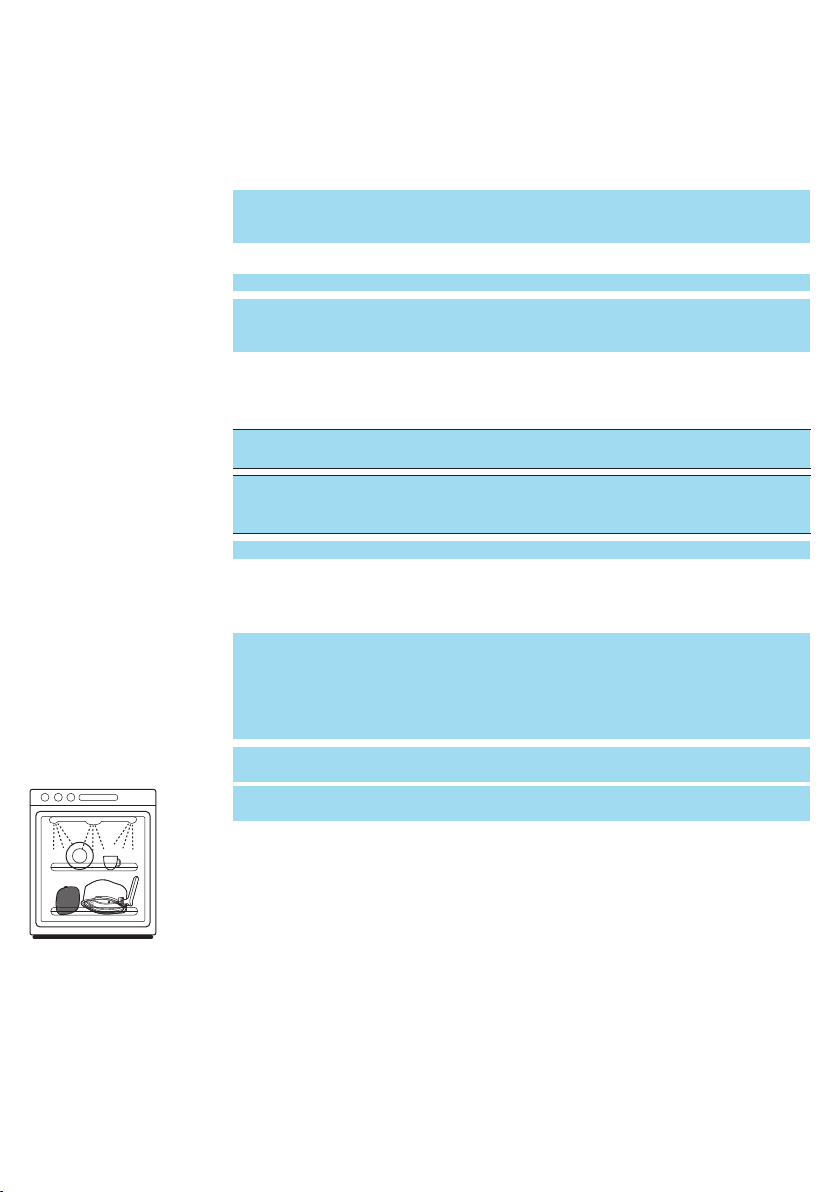
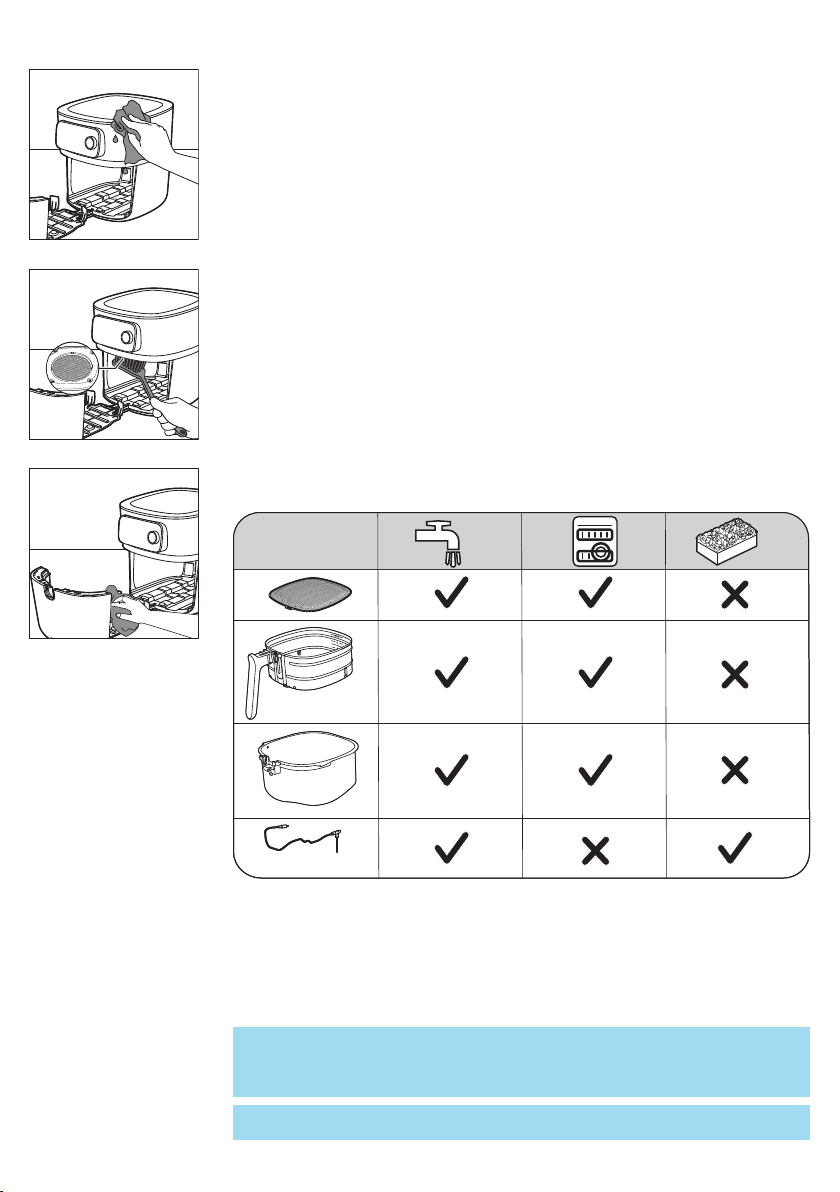
2 Clean the pan, basket in a dishwasher. You can also clean them with hot
water, dishwashing liquid and a non-abrasive sponge (see "cleaning table").
Tip: If food residues stuck to the pan or basket, you can soak them in hot
water and dishwashing liquid for 10–15 minutes. Soaking loosens the food
residues and makes it easier to remove. Make sure you use a dishwashing
liquid that can dissolve oil and grease. If there are grease stains on the pan or
basket and you have not been able to remove them with hot water and
dishwashing liquid, use a liquid degreaser.
Tip: If necessary, fat residues that stuck to the splatter shield, can be removed
with a sponge or a bristle brush.
Tip: Put the basket in the pan, and place them upside down when washing
them in the dishwasher to save space in the dishwasher.
Page 24
English
HD9958
3 Wipe the outside of the appliance with a moist cloth. Make sure no moisture
remains on the control panel. Dry the control panel with a cloth after you
have cleaned it.
4 Clean the splatter shield with a sponge or a cleaning brush to remove any fat
residues.
5 Clean the drawer and inside of the appliance with hot water and a non-
abrasive sponge.
27
Storage
1 Unplug the appliance and let it cool down.
2 Make sure all parts are clean and dry before storing.
3 Insert the cord into the cord storage compartment.
Note: Always hold the Airfryer horizontally when you carry it. Make sure that you
also hold the drawer on the front part of the appliance as it can slide out of the
appliance if accidentally tilted downwards. This can lead to damaging of the
drawer.
Note: Always make sure that the removable parts of the Airfryer e.g. removable
mesh bottom, etc. are fixed before you carry and/or store it.
Page 25

28
English
Troubleshooting
This chapter summarizes the most common problems you could encounter with
the appliance. If you are unable to solve the problem with the information
below, visit www.philips.com/support for a list of frequently asked questions
or contact the Consumer Care Centre in your country.
Problem Possible cause Solution
The outside of the appliance
becomes hot during use.
My home-made fries do not turn
out as I expected.
The heat inside radiates to the
outside walls.
You did not use the right potato
type.
The amount of ingredients in the
basket is too big.
This is normal. All handles and
knobs that you need to touch
during use stay cool enough to
touch.
The pan, the basket, and the inside
of the appliance always become
hot when the appliance is
switched on to ensure the food is
properly cooked. These parts are
always too hot to touch.
If you leave the appliance
switched on for a longer time,
some areas get too hot to touch.
These areas are marked on the
appliance with the following icon:
As long as you are aware of the
hot areas and avoid touching
them, the appliance is completely
safe to use.
To get the best results, use fresh
floury potatoes. If you need to
store the potatoes, do not store
them in a cold environment like in
a fridge. Choose potatoes whose
package states that they are
suitable for frying.
Do not overfill the basket or
exceed the maximum filling level
6.
Certain types of ingredients need
to be shaken halfway through the
cooking time.
The Airfryer does not switch on. The appliance is not plugged in. Check if the plug is inserted in the
Several appliances are connected
to one outlet.
The fuller the basket the more
frequent shaking is recommended.
wall outlet properly.
The Airfryer has a high wattage.
Try a different outlet and check
the fuses.
Page 26

Problem Possible cause Solution
English
29
I see some peeling off spots inside
my Airfryer.
White smoke comes out of the
appliance.
The WiFi LED on my Airfryer is not
shining anymore.
Some small spots can appear
inside the pan of the Airfryer due
to the incidental touching or
scratching of the coating (e.g.
during cleaning with harsh
cleaning tools and/or while
inserting the basket).
You are cooking fatty ingredients. Carefully pour off any excess oil or
The pan still contains greasy
residues from previous use.
Breading or coating did not
adhere properly to the food.
Marinade, liquid or meat juices are
splattering in the rendered fat or
grease.
- The Airfryer is not connected
to your home WiFi anymore.
- You have changed your home
WiFi network."
You can prevent damage by
lowering the basket into the pan
properly. If you insert the basket at
an angle, its side may knock
against the wall of the pan,
causing small pieces of coating to
chip off. If this occurs, please be
informed that this is not harmful
as all materials used are food-safe.
fat from the pan and then
continue cooking.
White smoke is caused by greasy
residues heating up in the pan.
Always clean the pan and the
basket thoroughly after every use.
Tiny pieces of airborne breading
can cause white smoke. Firmly
press breading or coating to food
to ensure it sticks.
Pat food dry before placing it in
the basket.
Start the WiFi set up process and
follow the instructions in the app.
The app shows that the pairing
process is not successful.
Another user has paired the
Airfryer with a different smart
device and is currently cooking.
Wait until the other user has
finished the current cooking
process and re-pair your smart
device with the Airfryer.
Page 27
30
Türkçe
Önemli
Tehlike
Uyarı
Cihazı kullanmadan önce bu önemli bilgileri dikkatle okuyun ve gelecekte
başvurmak üzere saklayın.
-
Cihazı sıcak gaz ocağının yakınına veya üzerine ya da elektrikli ocakların
üzerine veya sıcak fırının içine koymayın.
-
Cihazı kesinlikle suya batırmayın veya musluk altında durulamayın.
-
Elektrik çarpmasını önlemek için su veya diğer sıvıların cihaza girmesine izin
vermeyin.
-
Isıtma elemanlarıyla temas etmelerini önlemek için pişirilecek malzemeleri her
zaman sepete koyun.
-
Cihaz çalışırken hava giriş ve hava çıkış açıklıklarının üstünü kapatmayın.
-
Yangın tehlikesine neden olabileceğinden tavayı yağ ile doldurmayın.
-
Cihazın fişi, elektrik kablosu veya kendisi hasarlıysa kesinlikle kullanmayın.
-
Çalışırken cihazın içine kesinlikle dokunmayın.
-
Sepete yiyecek koyarken kesinlikle belirtilen maksimum seviyeyi aşmayın.
-
Isıtıcının boş olduğundan ve ısıtıcıya herhangi bir yiyecek sıkışmadığından
daima emin olun.
-
Besleme kablosu hasar görmüşse herhangi bir tehlikenin ortaya çıkmasını
önlemek için kablonun Philips, servis temsilcisi veya benzer şekilde
yetkilendirilmiş kişiler tarafından değiştirilmesi gerekir.
-
Cihazı sadece topraklı prize takın. Fişin prize, her zaman doğru şekilde takılı
olduğundan emin olun.
-
Bu cihaz, harici zamanlayıcı veya ayrı bir uzaktan kumanda sistemi ile birlikte
kullanılmamalıdır.
-
Kullanım sırasında açık yüzeyler ısınabilir.
-
Bu cihazın 8 yaşın üzerindeki çocuklar ve fiziksel, duyumsal ya da zihinsel
becerileri gelişmemiş veya bilgi ve tecrübe açısından eksik kişiler tarafından
kullanımı sadece bu kişilerin denetiminden sorumlu kişilerin bulunması veya
güvenli kullanım talimatlarının bu kişilere sağlanması ve olası tehlikelerin
anlatılması durumunda mümkündür. Çocuklar cihazla oynamamalıdır.
Temizlik ve kullanıcı bakımı, 8 yaşından büyük ve gözetim altında olmadıkları
sürece, çocuklar tarafından yapılmamalıdır.
-
Cihazı ve kablosunu 8 yaşından küçük çocukların erişemeyecekleri yerlerde
muhafaza edin.
-
Cihazı duvara veya diğer cihazlara dayanacak şekilde yerleştirmeyin. Cihazın
arkasında, yan kısımlarında ve üzerinde en az 10 cm boşluk bırakın. Cihazın
üzerine hiçbir şey koymayın.
-
Sıcak havayla pişirme sırasında hava çıkışı açıklıklarından sıcak buhar çıkar.
Ellerinizi ve yüzünüzü buhardan ve hava çıkışı açıklıklarından uzakta, güvenli
bir mesafede tutun. Ayrıca, tavayı cihazdan çıkarırken sıcak buhara ve havaya
karşı dikkatli olun.
-
Cihazda kesinlikle hafif malzemeler veya pişirme kağıdı kullanmayın.
-
Kullanım sırasında açık yüzeyler ısınabilir.
Page 28

Dikkat
Türkçe
-
Patateslerin saklanması: Sıcaklık, depolanan patates çeşidine uygun ve
hazırlanan gıda ürününün akrilamide maruz kalma riskini en aza indirmek için
6°C'nin üzerinde olmalıdır.
-
Tavayı kesinlikle yağ ile doldurmayın.
-
Bu cihaz 5ºC ile 40ºC arasındaki ortam sıcaklığında kullanılmak üzere
tasarlanmıştır.
-
Cihazı prize takmadan önce cihazın üstünde yazılı olan gerilimin evinizdeki
şebeke gerilimiyle aynı olup olmadığını kontrol edin.
-
Şebeke kablosunu sıcak yüzeylerden uzak tutun.
-
Cihazı masa örtüsü veya perde gibi yanabilen maddelerin üzerine veya
yakınına koymayın.
-
Cihazı, bu kılavuzda belirtilenin dışında, herhangi başka bir amaçla
kullanmayın ve yalnızca orijinal Philips aksesuarları kullanın.
-
Cihazı çalışır durumdayken gözetimsiz bırakmayın.
-
Tava, sepet ve aksesuarlar, cihaz kullanılırken ve kullanıldıktan sonra ısınır.
Bunları tutarken her zaman dikkatli olun.
-
Cihazı ilk kez kullanmadan önce yiyeceklerle temas eden parçalarını iyice
temizleyin. Kılavuzda verilen talimatlara başvurun.
-
Besleme kablosu hasar görmüşse herhangi bir tehlikenin ortaya çıkmasını
önlemek için kablonun Philips, servis temsilcisi veya benzer şekilde
yetkilendirilmiş kişiler tarafından değiştirilmesi gerekir.
-
Cihazı sadece topraklı prize takın. Fişin prize, her zaman doğru şekilde takılı
olduğundan emin olun.
-
Bu cihaz, harici zamanlayıcı veya ayrı bir uzaktan kumanda sistemi ile birlikte
kullanılmamalıdır.
-
Kullanım sırasında açık yüzeyler ısınabilir.
-
Bu cihazın 8 yaşın üzerindeki çocuklar ve fiziksel, duyumsal ya da zihinsel
becerileri gelişmemiş veya bilgi ve tecrübe açısından eksik kişiler tarafından
kullanımı sadece bu kişilerin denetiminden sorumlu kişilerin bulunması veya
güvenli kullanım talimatlarının bu kişilere sağlanması ve olası tehlikelerin
anlatılması durumunda mümkündür. Çocuklar cihazla oynamamalıdır.
Temizlik ve kullanıcı bakımı, 8 yaşından büyük ve gözetim altında olmadıkları
sürece, çocuklar tarafından yapılmamalıdır.
-
Cihazı ve kablosunu 8 yaşından küçük çocukların erişemeyecekleri yerlerde
muhafaza edin.
-
Cihazı duvara veya diğer cihazlara dayanacak şekilde yerleştirmeyin. Cihazın
arkasında, yan kısımlarında ve üzerinde en az 10 cm boşluk bırakın. Cihazın
üzerine hiçbir şey koymayın.
-
Sıcak havayla pişirme sırasında hava çıkışı açıklıklarından sıcak buhar çıkar.
Ellerinizi ve yüzünüzü buhardan ve hava çıkışı açıklıklarından uzakta, güvenli
bir mesafede tutun. Ayrıca, tavayı cihazdan çıkarırken sıcak buhara ve havaya
karşı dikkatli olun.
-
Cihazda kesinlikle hafif malzemeler veya pişirme kağıdı kullanmayın.
-
Kullanım sırasında açık yüzeyler ısınabilir.
-
Patateslerin saklanması: Sıcaklık, depolanan patates çeşidine uygun ve
hazırlanan gıda ürününün akrilamide maruz kalma riskini en aza indirmek için
6°C'nin üzerinde olmalıdır.
31
Page 29
32
Türkçe
-
Tavayı kesinlikle yağ ile doldurmayın.
-
Bu cihaz 5ºC ile 40ºC arasındaki ortam sıcaklığında kullanılmak üzere
tasarlanmıştır.
-
Cihazı prize takmadan önce cihazın üstünde yazılı olan gerilimin evinizdeki
şebeke gerilimiyle aynı olup olmadığını kontrol edin.
-
Şebeke kablosunu sıcak yüzeylerden uzak tutun.
-
Cihazı masa örtüsü veya perde gibi yanabilen maddelerin üzerine veya
yakınına koymayın.
-
Cihazı, bu kılavuzda belirtilenin dışında, herhangi başka bir amaçla
kullanmayın ve yalnızca orijinal Philips aksesuarları kullanın.
-
Cihazı çalışır durumdayken gözetimsiz bırakmayın.
-
Tava, sepet ve aksesuarlar, cihaz kullanılırken ve kullanıldıktan sonra ısınır.
Bunları tutarken her zaman dikkatli olun.
-
Cihazı ilk kez kullanmadan önce yiyeceklerle temas eden parçalarını iyice
temizleyin. Kılavuzda verilen talimatlara başvurun.
Elektromanyetik alanlar (EMF)
Bu cihaz, elektromanyetik alanlara maruz kalmaya ilişkin geçerli standartlara ve
düzenlemelere uygundur.
Otomatik Kapanma
Airfryer, otomatik kapanma işlevine sahiptir. Cihaz açıksa ancak pişirme veya
sıcak tutma modunda değilse 10 dakika boyunca herhangi bir kullanıcı etkileşimi
sağlanmadığında bekleme moduna geçer. Cihazı manuel olarak kapatmak için
döner düğmeyi basılı tutun.
Geri dönüşüm
-
Bu sembol, elektrikli ürünlerin normal evsel atıklarla birlikte atılmaması
gerektiği anlamına gelir.
-
Ülkenizin, elektrikli ürünlerin ayrı olarak toplanması ile ilgili kurallarına uyun.
Garanti ve Destek
Philips, bu ürün için satın aldıktan sonra iki yıllık garanti sunar. Bu garanti,
arızanın yanlış kullanım veya kötü bakım nedeniyle ortaya çıkması durumunda
geçerli değildir. Garantimiz, tüketici olarak kanunen haklarınızı etkilemez. Daha
fazla bilgi almak veya garantiye başvurmak için lütfen
www.philips.com/support adresindeki web sitemizi ziyaret edin.
Uygunluk Bildirimi
DAP B.V., Airfryer HD9875 cihazının 2014/53/AB sayılı Direktifine uygun
olduğunu beyan eder.
Page 30

AB uygunluk bildiriminin tam metni şu internet adresinde bulunabilir:
https://www.philips.com.
Airfryer HD9875, maksimum 92,9 mW EIRP çıkış gücüne sahip 2,4 GHz 802.11
b/g/n WiFi modülüyle donatılmıştır.
Yazılım ve ürün yazılımı güncellemeleri
Güncelleme işlemi, gizliliğinizi korumak ve Airfryer ile uygulamanın gerektiği gibi
çalışmasını sağlamak için önemlidir.
Lütfen uygulamayı her zaman en son sürüme güncelleyin.
Airfryer, ürün yazılımını otomatik olarak günceller.
Not: Airfryer'ı en son ürün yazılımı sürümüne güncellemek için Airfryer
cihazınızın evinizdeki WiFi ağına bağlı olduğundan emin olun.
Not: Her zaman en yeni sürüme sahip uygulamayı ve ürün yazılımını kullanın.
Not: Güncellemeler, yazılım iyileştirmeleri mevcut olduğunda kullanılabilir.
Not: Ürün yazılımı güncellemeleri, Airfryer hazırda bekleme modundayken
otomatik olarak başlatılır. Bu güncelleme birkaç dakika sürer. Bu işlem sırasında
Airfryer kullanılamaz.
Cihaz uyumluluğu
Uygulamanın uyumluluğu hakkında daha ayrıntılı bilgi edinmek için lütfen App
Store'daki bilgilere bakın.
Türkçe
33
Fabrika ayarlarına dönüş
Sıcak tutma düğmesine ve döner düğmeye aynı anda 10 saniye basarak ürün
yazılımınızı varsayılan ayarlarına geri döndürebilirsiniz.
Ardından Airfryer'ınızın evinizin WiFi ağıyla bağlantısı kesilir ve akıllı cihazınızla
eşleşmesi sona erer.
Giriş
Satın alma tercihiniz için teşekkür ederiz, Philips’e hoş geldiniz!
Philips'in sunduğu destekten tam olarak yararlanmak için ürününüzü
www.philips.com/welcome adresinde kaydettirin.
Page 31
34
www.philips.com/parts-and-accessories
HD9958
a
g
h
j
b
d
c
e
f
i
k
Türkçe
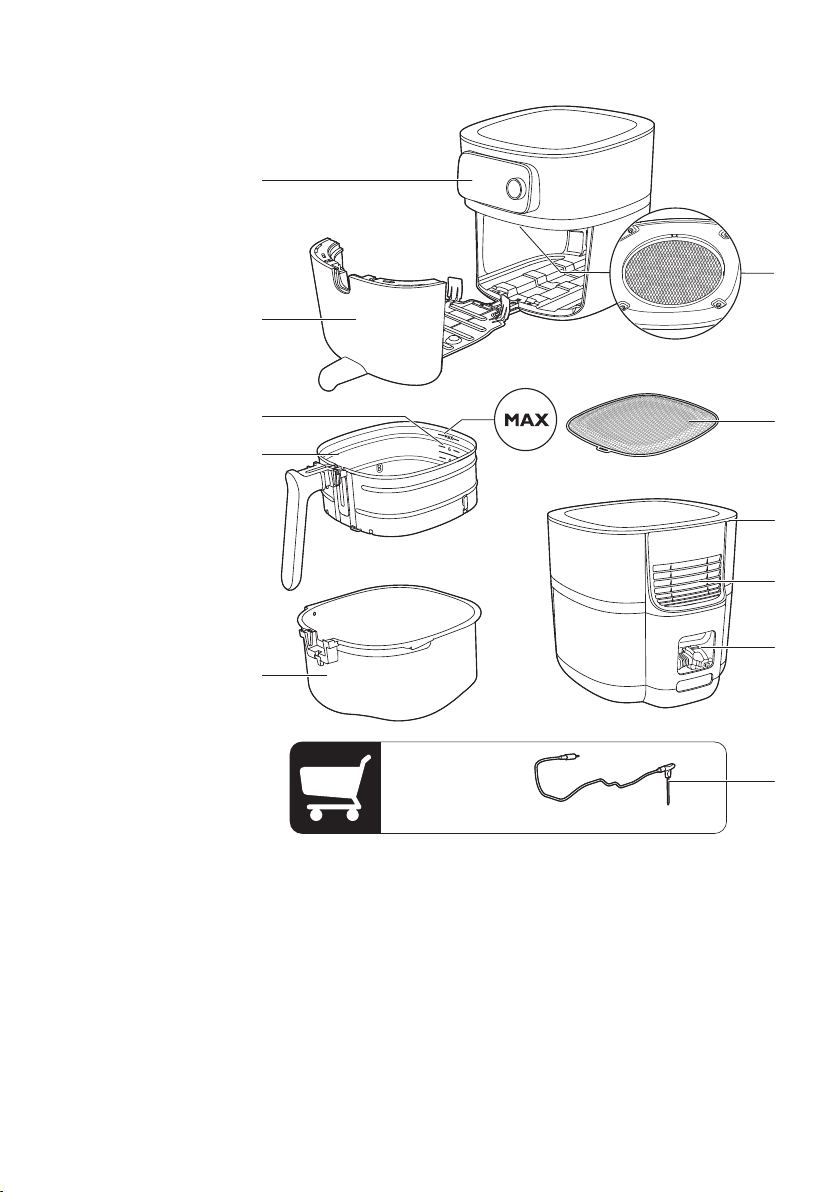
Genel Bakış
1 Kontrol paneli
2 Çekmece
3 Doldurma seviyesi göstergesi
4 Çıkarılabilir süzgeç altlıklı sepet
5 Tava
6 Gıda termometresi (HD9958, ayrı satılır)
7 Kablo saklama bölmesi
8 Hava çıkışları
9 Hava girişi
10 Çıkarılabilir süzgeç altlık
11 Sıçrama koruması
Page 32
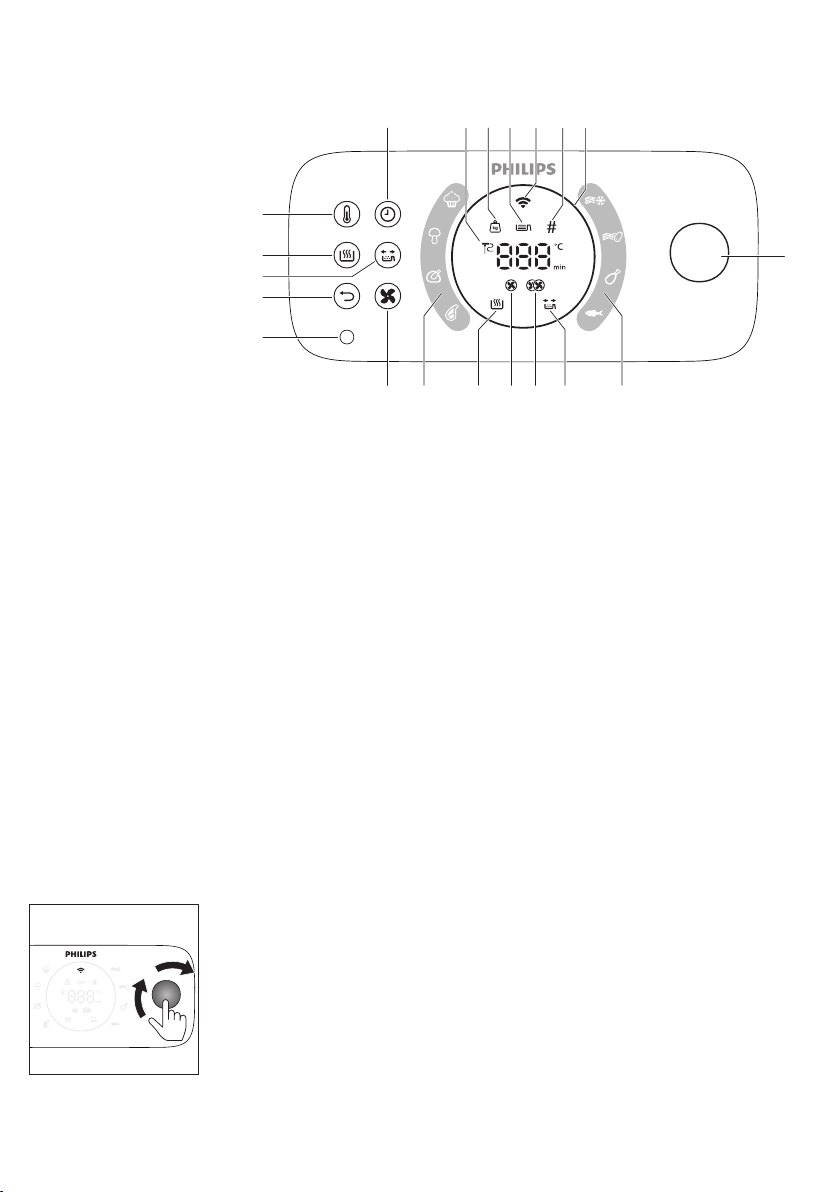
Kontrol paneline genel bakış
a
l
s r q p o
mn
f g h i j k g
b
c
d
e
1 Sıcaklık düğmesi
2 Sıcak tutma düğmesi
3 Sallama hatırlatıcısı düğmesi
4 Geri düğmesi
5 Gıda termometresi soketi
6 Hava hızı düğmesi
7 Otomatik pişirme programları
8 Sıcak tutma göstergesi
9 Düşük hava hızı göstergesi
10 Yüksek hava hızı göstergesi
11 Sallama hatırlatıcısı göstergesi
12 Döner düğme
13 Işıklı halka
14 Parça göstergesi
15 WiFi göstergesi
16 Doldurma seviyesi göstergesi
17 Ağırlık göstergesi
18 Gıda termometresi göstergesi
19 Süre düğmesi
Türkçe
35
İşlevlerin açıklaması
Döner düğme ve geri düğmesi
Döner düğme, merkezi kumandanızdır. Farklı menü seçenekleri arasında
gezinmek ve bir işlemi onaylamak için çevirebilir veya basabilirsiniz.
-
Döner düğmeye kısa basmak: Cihazı açar.
-
Döner düğmeyi basılı tutmak: Cihazı kapatır.
Cihaz açıldıktan sonra:
-
Döner düğmeye basmak: Bir işlemi onaylar.
-
Döner düğmeyi çevirmek: Farklı menü seçenekleri arasında gezinir veya
pişirme ayarını değiştirir.
-
Geri düğmesine basmak: Önceki adıma geri döner.
Page 33
36
Türkçe
Otomatik Pişirme programları
Otomatik pişirme programları, çeşitli yiyecekleri pişirmenizi sağlayan
Airfryer'ınızın temel özelliklerinden biridir.
İstediğiniz yiyeceği seçip doldurma seviyesini ayarladığınızda veya malzeme
miktarını belirlediğinizde Airfryer, yemeğiniz için uygun sıcaklığı ve pişirme
süresini otomatik olarak ayarlar. Ayrıca Airfryer, pişirme sırasında patatesleri
sallama gibi herhangi bir etkileşim gerektiğinde sizi uyarır.
Önemli: Airfryer, doğrudan cihazdan başlatılabilen sekiz varsayılan otomatik
pişirme programıyla birlikte sunulur. Ancak daha fazla seçenek için NutriU
uygulaması üzerinden daha fazla otomatik pişirme programına erişebilir ve
bunları indirebilirsiniz. Airfryer'ınızı ağınıza bağlayıp akıllı cihazınızı Airfryer ile
eşleştirerek yeni mutfak olanaklarını keşfetmeye başlayın.
Gıda Termometresi (HD9958, ayrı satılır)
Ayrı satılan gıda termometresi, yemeğinizi istenen pişme seviyesinde pişirmek
için kullanılabilir.
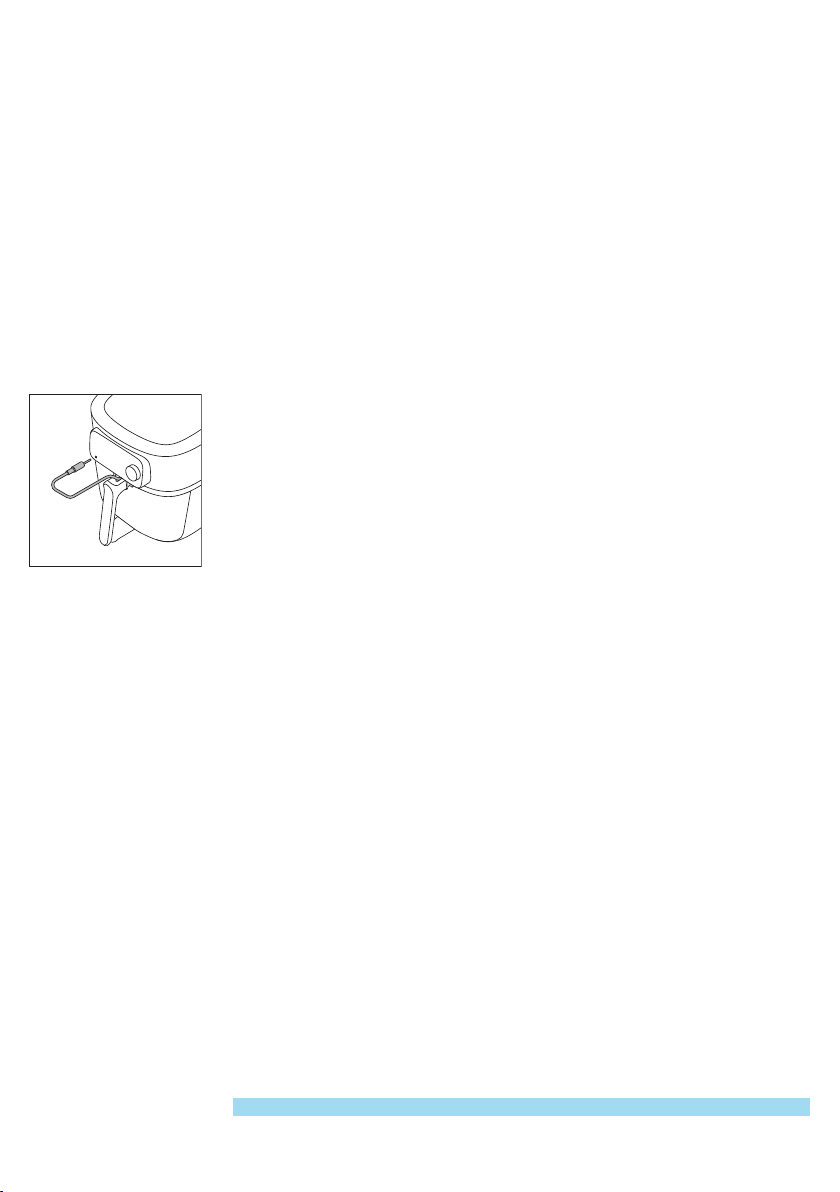
Gıda termometresinin bir ucunu yiyeceğe, diğer ucunu da gıda termometresi
yuvasına yerleştirin (bkz. "gıda termometresi" bölümü).
Pişirme süresi
Pişirme sıcaklığı
Merkez sıcaklığı
"Manuel pişirme" modunda, pişirme süresini 1 dakika ile 180 dakika arasında
ayarlayabilirsiniz.
Otomatik Pişirme programları yiyeceklerinizi porsiyon boyutlarınıza veya
istediğiniz pişme seviyesine göre pişireceğinden bir pişirme süresi ayarlamanıza
gerek yoktur.
"Gıda termometresi" pişirme modunda, gıda termometresinde ayarlanan merkez
sıcaklığına ulaşıldığında pişirme otomatik olarak sona ereceğinden bir pişirme
süresi ayarlamanıza gerek yoktur.
"Manuel pişirme" modunda, pişirme sıcaklığını 40°C ile 200°C arasında
ayarlayabilirsiniz.
"Otomatik Pişirme programları" pişirme modunda, pişirme sıcaklığı otomatik
olarak ayarlandığından pişirme sıcaklığını ayarlamanıza gerek yoktur.
"Gıda termometresi" pişirme modunda yiyeceğin merkez sıcaklığını 30°C ile 99°C
arasında ayarlayabilirsiniz. Yiyeceğin merkezindeki sıcaklık, pişirme işleminin
sonunda ayarlanan merkez sıcaklığına ulaşacaktır.
Not: Merkez sıcaklık, pişirme sıcaklığına eşit değildir.
Page 34

Yüksek ve düşük hava hızları
Airfryer'ınız iki farklı hava hızı ayarıyla gelir; düşük Hava Hızı ve yüksek Hava Hızı.
"Otomatik Pişirme programları" pişirme modunda, hava hızı otomatik olarak
ayarlanır.
"Manuel pişirme" veya "Gıda Termometresi" pişirme modlarında hava hızını hava
hızı düğmesine basarak manuel olarak ayarlamanız gerekir.
Lazanya, rosto, kek vb. tipik fırın yemekleri ve uzun pişirme süreleri için düşük
hava hızını kullanın. Kızartmalar, tavuk nugget, balık kroket vb. tipik Airfryer
uygulamaları ve daha kısa pişirme süreleri için yüksek hava hızını kullanın.
Sıcak tutma işlevi
Airfryer'ınız sıcak tutma moduna sahiptir. Bu modu etkinleştirmek için pişirme
işlemi sırasında herhangi bir noktada "sıcak tutma" düğmesine basmanız
yeterlidir. Pişirme işlemine başlamadan önce, aşamalar arasında veya pişirme
işleminin sonunda kullanabilirsiniz. Daha fazla bilgi için "Sıcak tutma" bölümüne
bakın.
Sallama hatırlatıcısı
Airfryer'ınız, pişirme işlemine başlamadan önce etkinleştirilebilecek bir sallama
hatırlatıcısı özelliğine sahiptir. Bu özellik, eşit pişirme elde etmeniz için pişirme
süresinin yarısında yiyeceğinizi sallamanızı hatırlatan bir bildirim gönderir. Bu
özellik, özellikle çeşitli kızartma türleri gibi birden fazla parçalı yiyecekleri
pişirirken kullanışlıdır. Ayrıca, baget tavuk gibi yiyecekleri çevirmek için hatırlatıcı
olarak da kullanılabilir.
Sallama hatırlatıcısı varsayılan olarak devre dışı bırakılmıştır. Pişirme işlemi
öncesinde veya sırasında "sallama hatırlatıcısı" düğmesine basarak özelliği
etkinleştirebilirsiniz.
Türkçe
37
Sesli bildirimler
Işıklı halka
Ön ısıtma
Bazen, örneğin cihaz pişirmeyi tamamladığında veya pişirme sırasında yiyeceği
sallamak veya çevirmek gibi bir işlem yapılması gerektiğinde bir ses duyarsınız.
Airfryer'ınız, kullanımı iyileştiren hareketli bir ışıklı halkaya sahiptir.
Dönme modu: Bir güncelleme çalışırken ışıklı halka döner.
Nefes alma modu: Pişirme sırasında döner düğmeye bastıysanız ışıklı halka
yavaşça yanıp söner. Bu durumda cihaz duraklatma modundadır.
Hızlı yanıp sönme: Halka hızlı yanıp sönerken çekmece açıksa veya örneğin,
eşleştirme işlemi sırasında cihaz, onaylamak için döner düğmeye basmanızı
bekliyor demektir.
Odaklanma modu: Örneğin, cihaz doldurma seviyesini istiyorsa.
Airfryer'ınız, cihazı istediğiniz sıcaklığa getirmek için kullanabileceğiniz bir ön
ısıtma işlevine sahiptir.
Page 35
38
1
2
Türkçe
Döner düğmeye bir süre ayarlamadan basarsanız ön ısıtma modu etkinleştirilir ve
istenen sıcaklığa ulaşıldığında sesli bir bildirim alırsınız.
İlk kullanımdan önce
1 Tüm ambalaj malzemelerini çıkarın.
2 Cihazdaki yapışkanları veya etiketleri (varsa) çıkarın.
3 Koruyucu folyoyu ekrandan çıkarın.
4 İlk kullanımdan önce cihazı iyice temizleyin (bkz. "Temizlik" bölümü).
İlk kullanımdan önce yapılacak hazırlıklar
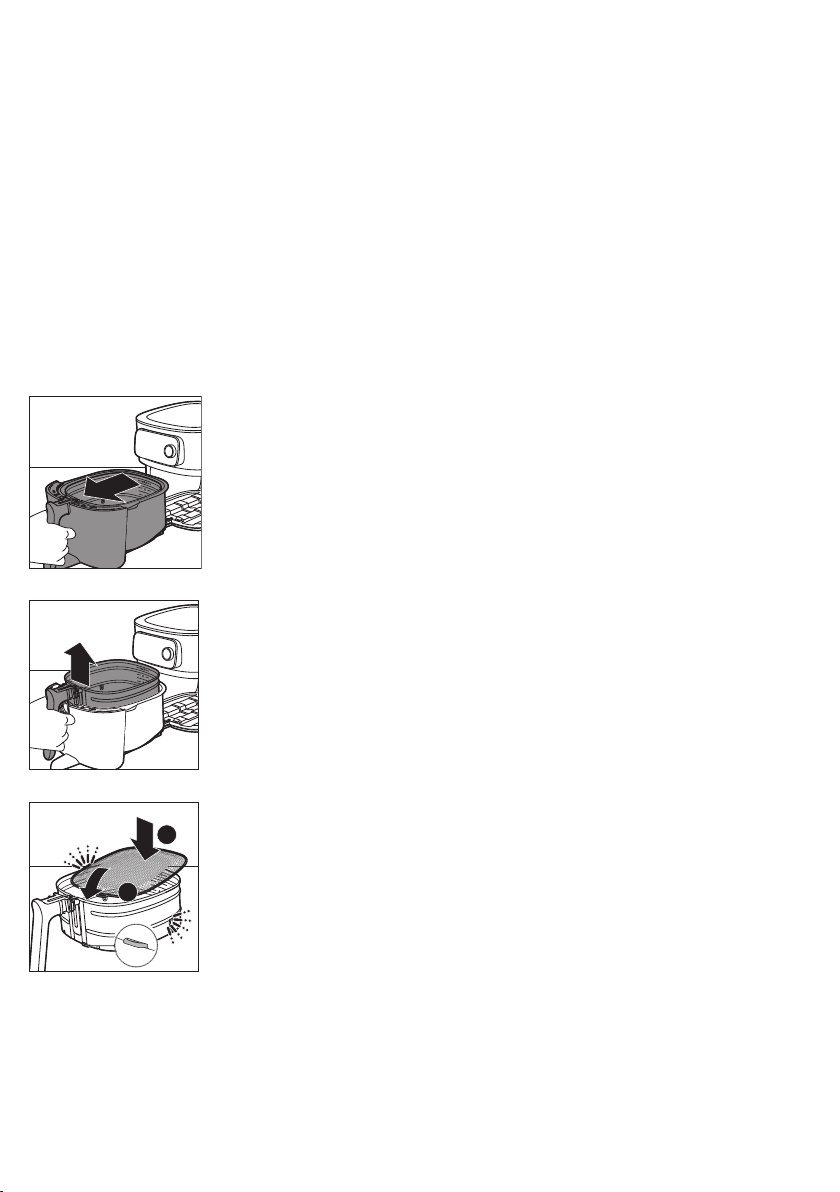
Çıkarılabilir süzgeç altlığını
1 Sapı çekerek çekmeceyi açın.
2 Sapı kaldırarak sepeti çıkarın.
3 Çıkarılabilir süzgeç altlığını, sepetin sağ alt tarafındaki yuvaya takın. Yerine
oturana kadar süzgeç altlığını aşağı doğru itin (her iki taraftan "klik" sesi gelir).
Page 36
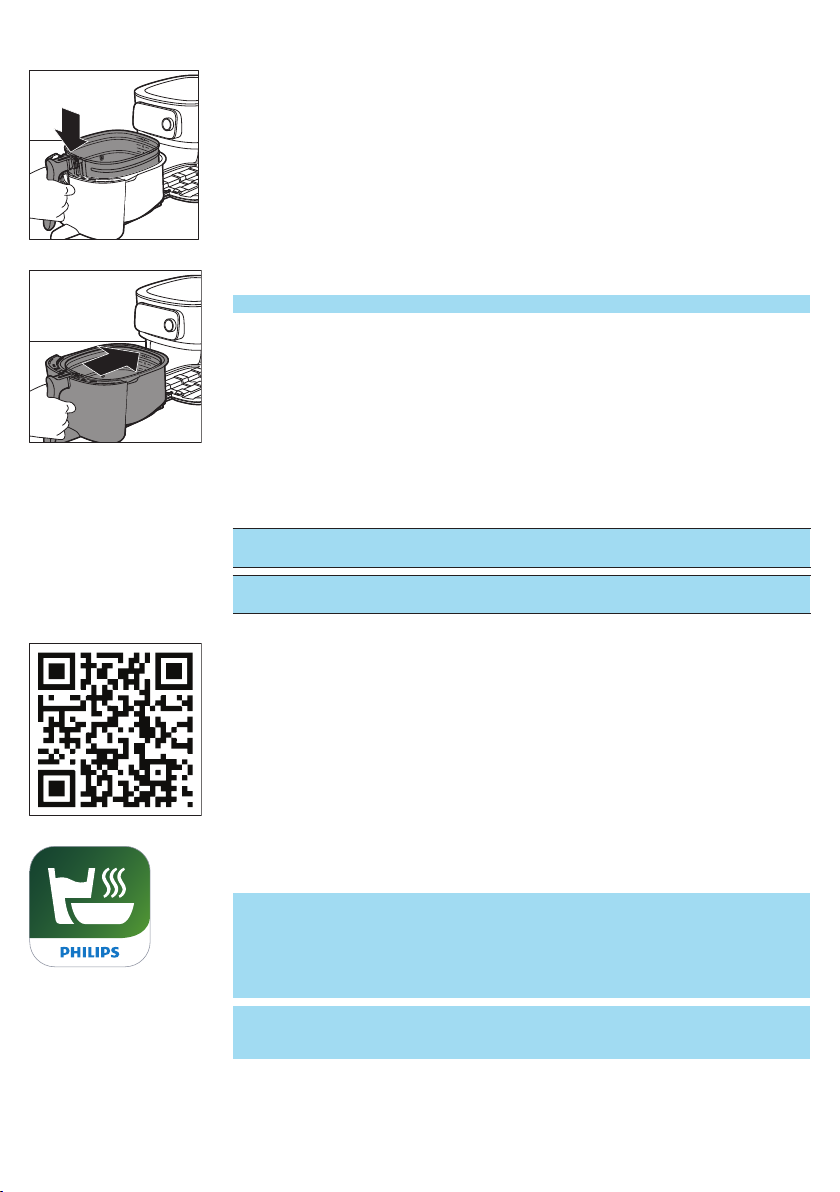
4 Sepeti tavaya koyun.
NutriU
5 Çekmeceyi sapından tutarak Airfryer'a geri takın.
Not: Tavayı asla sepetsiz kullanmayın.
Airfryer'ınızı NutriU Uygulamasına Bağlama
Önemli: WiFi kurulum işlemini başlatmadan önce akıllı telefonunuzun ev
WiFi ağınıza bağlı olduğundan emin olun.
Önemli: Airfryer'ınızı 2,4 GHz 802.11 b/g/n ev WiFi ağına bağladığınızdan
emin olun.
Airfryer'ınızı NutriU uygulamasıyla eşleştirme
1 NutriU uygulamasını indirmek için QR kodunu tarayın. NutriU uygulamasını
App Store'dan veya www.philips.com/NutriU web sitesinden de
indirebilirsiniz.
Türkçe
39
2 Akıllı telefonunuzda Philips NutriU uygulamasını başlatın.
3 "Cihaz Kurulumu" sayfasına ulaşana kadar ekrandaki talimatları izleyin.
Not: NutriU uygulamasını cihazınızı ilk kez kurduğunuzda hemen indirmenizi
ve Airfryer'ınızı uygulamaya eklemenizi öneririz. Bu sayede Airfryer'ı, örneğin
uzaktan yemek pişirmek (uygulamadan yemek tarifleri veya Otomatik Pişirme
programları başlatmak, pişirme tamamlandığında bildirim almak vb.) gibi
işlevlerle tam kapasite kullanabilir ve en son ürün yazılımı güncellemelerini
alabilirsiniz.
Not: Bağlantı özelliklerinden yararlanmak için bir hesabınızın olması gerekir.
İlk kullanım sırasında yeni bir hesap kaydetmeniz veya mevcut bir hesapla
oturum açmanız gerekir.
Page 37
40
Türkçe
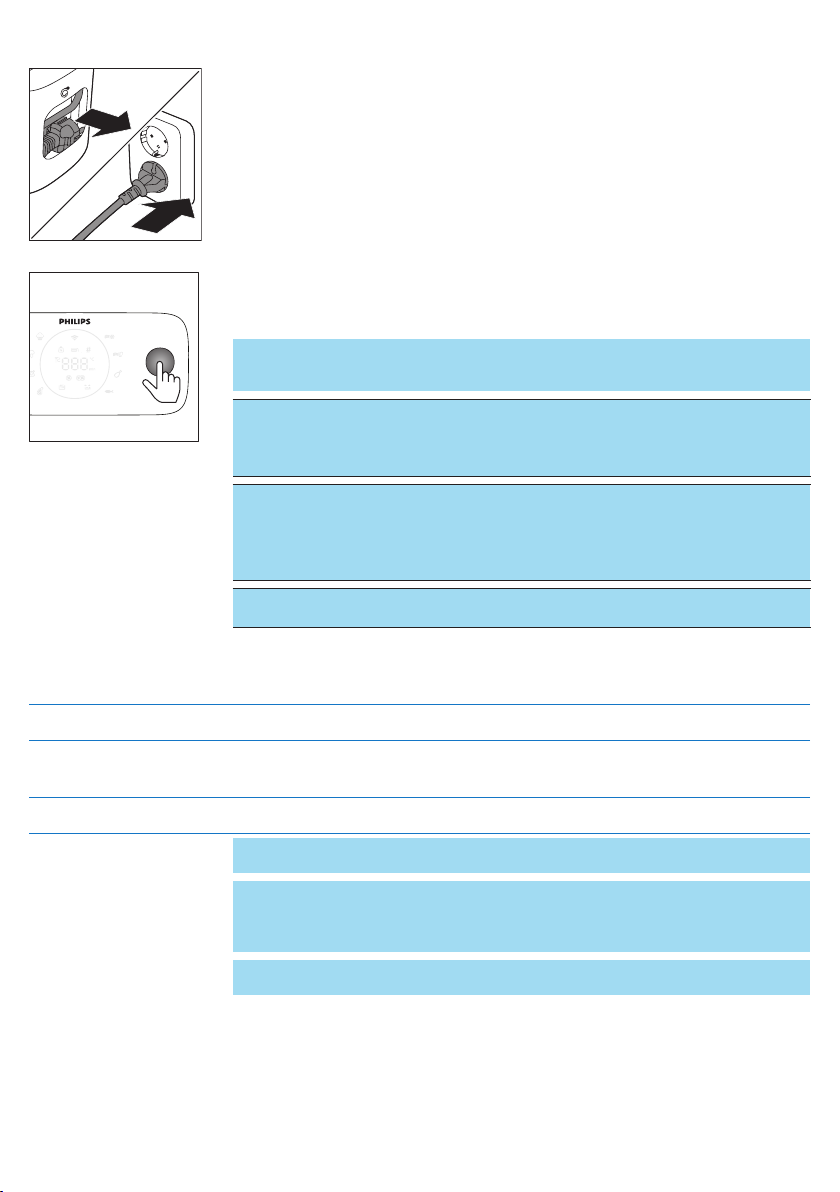
4 Cihazı prize takın.
5 Döner düğmeye basarak cihazı çalıştırın.
6 Airfryer'ınızı WiFi ağınıza bağlamak ve akıllı telefonunuzla eşleştirmek için
uygulamadaki adımları takip edin.
Not: NutriU uygulamasındaki bu işlemde bir noktada kurulum işlemini
başlatmak için cihazın düğmesine uzunca bir süre (4 saniye) basmanız istenir.
Bu nedenle Airfryer'ınız bağlanana kadar cihazın yakınında kalın.
Önemli: Uzaktan kumanda: Airfryer'ınızı, NutriU profilinizde bulunan
NutriU uygulamasında "uzaktan kumanda izni" seçeneğini işaretlediyseniz
uygulama aracılığıyla uzaktan kontrol edebilirsiniz (ör. yemek tarifi
gönderme, pişirmeyi duraklatma vb.).
Önemli: Tek kullanıcılı eşleştirme: Airfryer, aynı anda yalnızca bir kullanıcı
tarafından uzaktan kontrol edilebilir. İkinci bir kullanıcı Airfryer'ı kontrol
etmek ve NutriU uygulamasını kullanmak isterse eşleştirme işlemini
izlemesi gerekir. Eşleştirme tamamlandıktan sonra ilk kullanıcının
eşleştirmesi otomatik olarak kaldırılır.
Önemli: WiFi kurulum işlemi uygulama aracılığıyla veya Airfryer'ın fişini
çekerek iptal edilebilir.
WiFi göstergesi
WiFi göstergesi kapalı. WiFi devre dışı.
WiFi göstergesi açık. WiFi etkin ve yönlendiriciye bağlı.
WiFi göstergesi yavaşça yanıp sönüyor. WiFi bağlantısı devam ediyor. Cihaz eşleştirme işlemi
yapıyor veya yönlendiriciye bağlanıyor.
WiFi göstergesi hızla yanıp sönüyor. WiFi bağlantı hatası.
Not: Süre düğmesine 4 saniye boyunca basılı tutarak eşleştirme işlemini
başlatabilirsiniz.
Not: WiFi kurulum işlemi sırasında işlem ortasında duraklama ve işlemi
tamamlayamama ya da WiFi ağınızla bağlantı sorunları gibi herhangi bir sorunla
karşılaşırsanız süre düğmesine 4 saniye boyunca basılı tutarak işlemi yeniden
başlatabilirsiniz.
Not: Ürün yazılımınızı varsayılan ayarlarına sıfırlamanız gerekiyorsa sıcak tutma
düğmesini ve döner düğmeyi aynı anda 10 saniye basılı tutun.
Yiyecek tablosu
Aşağıdaki tablo hazırlamak istediğiniz yiyecek türleri için temel ayarları
seçmenize yardımcı olur.
Page 38

Not: Bu ayarların öneri niteliğinde olduğunu unutmayın. Malzemelerin menşe,
boyut, şekil ve marka özellikleri farklılık göstereceğinden bunlar için en iyi ayarı
sunacağımızı garanti edemeyiz.
Not: Büyük miktarlarda yiyecekler hazırlarken (ör. patates kızartması, karides,
tavuk baget, dondurulmuş atıştırmalıklar) tutarlı bir sonuç elde etmek için
sepetteki malzemeleri 2 ila 3 kez sallayın, çevirin veya karıştırın.
Not: Bu listedeki malzemelerin çoğu NutriU uygulamasındaki Otomatik Pişirme
programlarında bulunabilir.
Malzemeler Min. – Maks.
miktar
Süre
(dk)
Sıcaklık Fan
hızı
Not
Türkçe
41
Ev yapımı patates
kızartmaları
(10 x 10 mm/0,4 x 0,4
inç)
Ev yapımı patates
dilimleri
Dondurulmuş
atıştırmalık (tavuk
nugget)
Dondurulmuş
atıştırmalıklar
(yaklaşık 20 g/0,7 oz
küçük Çin böreği)
Tavuk göğsü
Yaklaşık 160 g/6 oz
Ev yapımı ekmek
kırıntısına bulanmış
tavuk kroket
Tavuk kanat
Yaklaşık 100 g/3,5 oz
Kemiksiz et pirzola
Yaklaşık 150 g/5,3 oz
Doldurma seviyesi
1 - 6
(300 g - 2000 g)
Doldurma seviyesi
1 - 6
(300 g - 2000 g)
Doldurma seviyesi
1-6
(6 - 50 parça)
100 - 600 g
(5 - 30 parça)
1 - 6 parça 20 - 25 180°C Yüksek
3 - 18 parça 15 - 20 180°C Yüksek
2 - 25 parça 15 - 40 200°C Yüksek
1 - 5 parça 19 - 25 200°C Yüksek
18 - 45 160 -
180°C
20 - 45 160 -
180°C
12 - 19 200°C Yüksek
14 - 16 180°C Yüksek
Yüksek
hız
Yüksek
hız
hız
hız
hız
hız
hız
hız
Soğuk suda 30 dakika veya ılık
suda (40°C/104°F) 3 dakika
bekletin, kurulayın ve her 500
g/18 oz için 1 yemek kaşığı yağ
ekleyin. İki kez sallayın.
30 dakika suda bekletin,
kurulayın ve 1/4 ila 1 yemek
kaşığı yağ ekleyin. İki kez
sallayın, çevirin veya karıştırın.
Dışı altın sarısı ve çıtır olduğunda
hazır demektir. Sürenin yarısında
sallayın, çevirin veya karıştırın.
Dışı altın sarısı ve çıtır olduğunda
hazır demektir. Sürenin yarısında
sallayın, çevirin veya karıştırın.
Ekmek kırıntılarına yağ ekleyin.
Altın sarısı olduğunda hazır
demektir.
Sürenin yarısında sallayın, çevirin
veya karıştırın.
Hamburger
Yaklaşık 200 g
(10 cm/4 inç çapında)
Kalın sosis
Yaklaşık 100 g/3,5 oz
(4 cm/1,6 inç
çapında)
1 - 4 köfte 15 - 18 200°C Yüksek
hız
1 - 12 parça 12 - 20 200°C Yüksek
hız
Page 39

42
Türkçe
Malzemeler Min. – Maks.
miktar
İnce sosis
Yaklaşık 70 g/2,5 oz
(2 cm/0,8 inç
çapında)
Domuz eti rosto 800 - 2400 g 90 - 140 160°C Düşük
Balık fileto (Somon)
Yaklaşık 200 g
Balık fileto (Morina,
kabuklu deniz
ürünleri)
Kek (tereyağlı kek)
pişirme aksesuarı
kullanarak
Muffin
Yaklaşık 50 g/1,8 oz
Önceden pişirilmiş
tost/sandviç ekmeği
Taze ekmek 500 - 1700 g 35 - 80 180°C Düşük
1 - 12 parça 10 - 18 200°C Yüksek
1 - 5 parça 18 - 22 200°C Yüksek
1 - 4 parça 7 - 14 200°C Yüksek
Pişirme aksesuarı
Dolum seviyesi 1 -
2
600 - 1200 g
1 - 9 parça 13 - 15 180°C Yüksek
1 - 12 6 - 13 180°C Yüksek
Süre
(dk)
30 - 60 150°C Düşük
Sıcaklık Fan
hızı
hız
hız
hız
hız
hız
hız
hız
hız
Not
Kesmeden önce 5 dakika
dinlendirin.
Yapışmayı önlemek için derili
tarafı alta gelecek şekilde
yerleştirin ve biraz yağ ekleyin.
Pişirme aksesuarı kullanın.
Isıya dayanıklı silikon muffin
kapları kullanın.
Ekmeğin kabarırken ısıtma
elemanına temasını önlemek
için şekli mümkün olduğunca
düz olmalıdır.
Ev yapımı küçük
yuvarlak ekmek
Yaklaşık 80 g/2,8 oz
Kestane Doldurma seviyesi
Karışık sebze
(büyükçe doğranmış)
1 - 6 parça 12 - 16 180°C Düşük
1 - 4
Doldurma seviyesi
2 - 8
Airfryer'ı kullanma
Dikkat: Bu, sıcak havayla çalışan bir Airfryer'dır. Tavayı yağ, kızartma yağı
veya başka bir sıvıyla doldurmayın.
Dikkat: Sıcak yüzeylere dokunmayın. Sapları veya düğmeleri kullanın. Sıcak
tavayı fırın eldiveniyle tutun.
Dikkat: Bu cihaz yalnızca evde kullanım için tasarlanmıştır.
Dikkat: İlk kullanımında cihaz bir miktar duman çıkarabilir. Bu normaldir.
hız
15 - 24 200°C Yüksek
hız
15 - 38 160°C Yüksek
hız
Sürenin yarısında sallayın, çevirin
veya karıştırın.
Sürenin yarısında sallayın, çevirin
veya karıştırın.
Page 40
Türkçe
1 Cihazı sabit, yatay, düz ve ısıya dayanıklı bir zemin üzerine yerleştirin.
Çekmecenin tamamen açılabildiğinden emin olun.
Not: Cihazın üzerine veya yanlarına hiçbir şey koymayın. Bu, hava akışını
bozabilir ve pişirme sonucunu etkileyebilir.
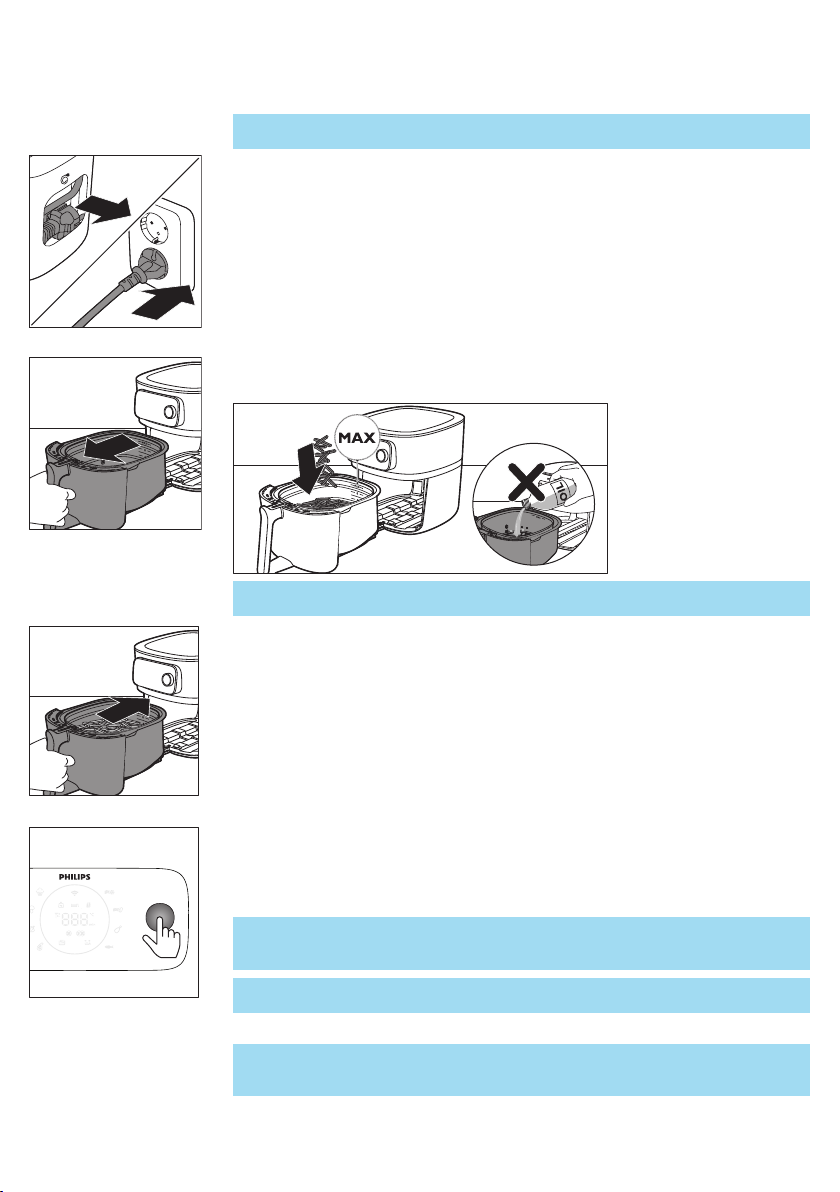
2 Elektrik kordonunu cihazın arka kısmında bulunan kablo saklama
bölmesinden çekip çıkarın.
3 Fişi prize takın.
4 Sapı çekerek çekmeceyi açın.
5 Yiyecekleri sepete koyun.
Not: Elde edilecek sonucun kalitesini etkileyebileceğinden, sepeti "MAX"
göstergesini aşacak şekilde doldurmayın.
6 Çekmeceyi Airfryer'a geri takın.
43
7 Döner düğmeye basarak cihazı çalıştırın.
8 Kullanmak istediğiniz pişirme modunu seçin (bkz. "Pişirme Modları" bölümü).
9 Pişirmek için manuel modu kullanabilir, bir otomatik pişirme programı
seçebilir veya sıcaklık probunu kullanabilirsiniz (bkz. "Pişirme Modları").
Dikkat: Tavayı asla içinde sepet olmadan kullanmayın. Cihazı sepet
olmadan ısıtırsanız çekmeceyi açmak için fırın eldivenleri kullanın.
Çekmecenin kenarları ve içi çok ısınır.
Dikkat: Tava ve sepet çok sıcak olacağından kullanım sırasında veya
kullanımdan sonra bir süre bu parçalara dokunmayın.
10 Pişirme işlemini başlatmak için döner düğmeye basın.
Not: Pişirme işlemini duraklatmak için döner düğmeye basabilir ve pişirme
ayarlarını değiştirmek için düğmeyi çevirebilirsiniz. Pişirmeye devam etmek
için döner düğmeye tekrar basın.
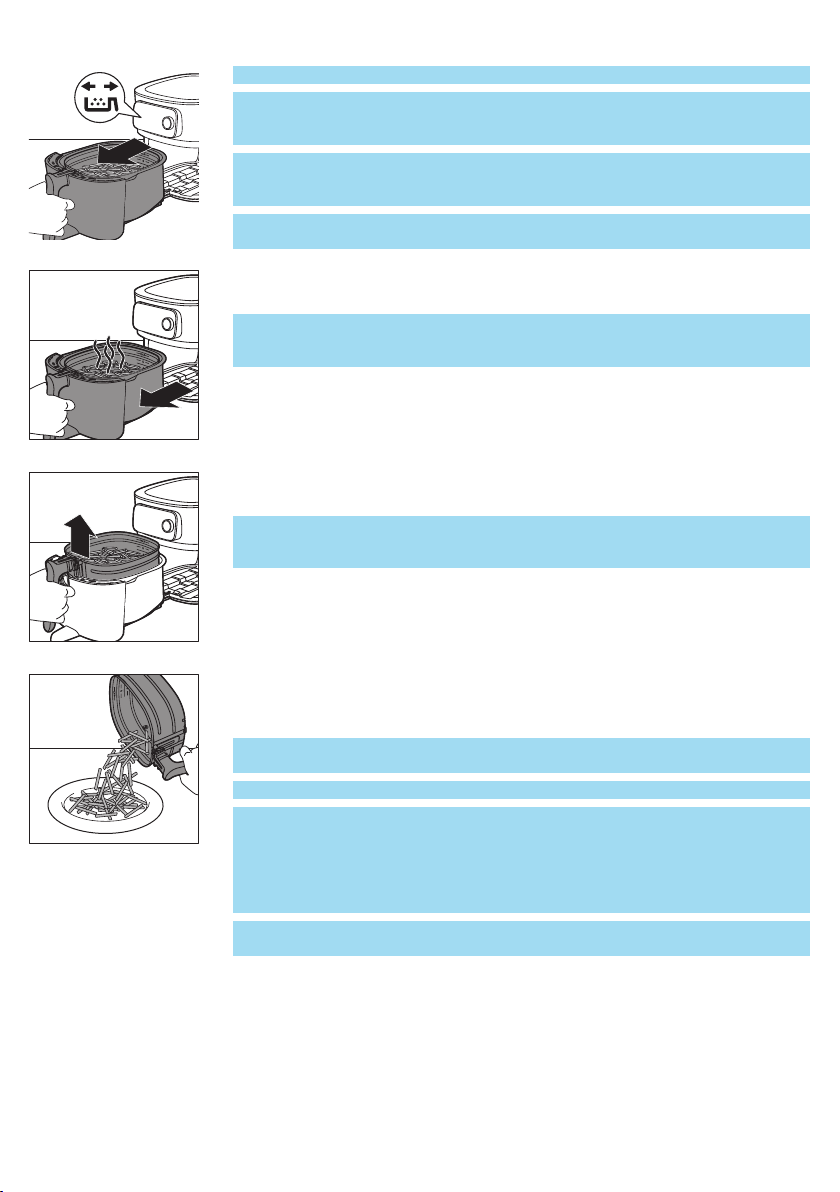
11 Zamanlayıcı uyarısını duyduğunuzda, yemeğinizi sallama zamanı gelmiştir
veya pişirme süresi tamamlanmıştır.
Page 41
44
Türkçe
Not: Servisten önce daima yemeğinizin piştiğinden tamamen emin olun.
Not: Bazı Otomatik Pişirme programları, yemeğinizi sallamak veya çevirmek
gerektiğinde sizi uyarır. Airfryer, sallama veya çevirme zamanı geldiğinde bir
ses sinyali gönderir.
Not: Sallamanın en iyi yolu çekmeceyi açıp sepeti tavadan çıkarıp sallamaktır.
Ardından tavayı sepetle birlikte cihazın içine yerleştirin. Cihaz otomatik olarak
pişirmeye devam eder.
Not: Devam eden işlemi iptal etmek için geri dön düğmesine basarak ana
menüye dönün.
12 Sapı çekerek çekmeceyi açın ve yiyeceklerin hazır olup olmadığını kontrol
edin.
Not: Yemeğiniz istediğiniz pişme seviyesinde pişirilmediyse süre düğmesine
basıp süre ayarlayarak süre ekleyebilirsiniz. Birkaç dakika daha pişirme işlemini
başlatmak için döner düğmeye basın.
13 Küçük yiyecekleri çıkarmak için (ör. patates kızartması), tavayı sapından
tutarak sepeti çıkarın.
Dikkat: Pişirme işlemi tamamlandıktan sonra tava, sepet, iç muhafaza ve
malzemeler sıcak olur. Airfryer'da bulunan malzemelere bağlı olarak
tavadan buhar çıkabilir.
14 Sepetteki malzemeleri bir kaseye veya tabağa boşaltın. Tavanın tabanında
sıcak yağ olabileceğinden yiyecekleri boşaltırken daima sepeti tavadan
çıkarın.
Not: Büyük veya yumuşak malzemeleri çıkarmak için malzemeleri maşa
kullanarak kaldırın.
Not: Malzemelerden çıkan fazla yağ süzülen yağ tavanın dibinde birikir.
Not: Pişirilen malzemelerin türüne bağlı olarak, her partiden sonra veya sepeti
sallamadan ya da yeniden tavaya yerleştirmeden önce tavadaki fazla veya
süzülmüş yağı dikkatli bir şekilde boşaltmanız gerekebilir. Sepeti ısıya
dayanıklı bir yüzeye yerleştirin. Fırın eldiveni kullanarak tavayı kaldırın ve ısıya
dayanıklı yüzeye yerleştirin. Fazla yağı veya süzülen yağı dökün. Tavayı
çekmeceye ve sepeti tavaya geri koyun.
Not: Yiyecekler hazır olduğunda, Airfryer bir sonraki pişirme işlemi için anında
kullanıma hazırdır.
Page 42
Gıda termometresini kullanma (HD9958, ayrı satılır)
Gıda termometresini yerleştirme
Gıda termometresi biftek, et pirzola, tavuk göğsü, balık filetosu vb. için
kullanılabilir.
1 Kullanmadan önce ve sonra gıda termometresini temizleyin. Ilık ve sabunlu su
kullanın.
2 Termometreyi yiyeceğin en kalın kısmının ortasına yerleştirin.
Dikkat: Gıda termometresinin ucu sivridir.
Not: Termometrenin ucunun, yiyeceğin altına veya üstüne doğru açılı değil,
yiyeceğin en kalın kısmının merkezine düz bir şekilde yerleştirildiğinden emin
olun.
Not: Termometrenin kemiğe yakın olduğundan ancak kemiğe temas
etmediğinden ve herhangi bir yağdan veya kıkırdaktan uzak olduğundan
emin olun.
Not: Filetonun merkezi, en kalın kısmı olmayabilir. İstenilen sonuçların elde
edilebilmesi için termometrenin ucunun en kalın kısma gelmesi önemlidir.
Not: Bütün bir tavuğu pişirirken, probun göğsün içinden tüm yolu geçip
boşlukta kalmadığından emin olun.
Not: Yiyeceklerinizin kalınlığı 2 cm'den azsa gıda termometresi kullanmayın.
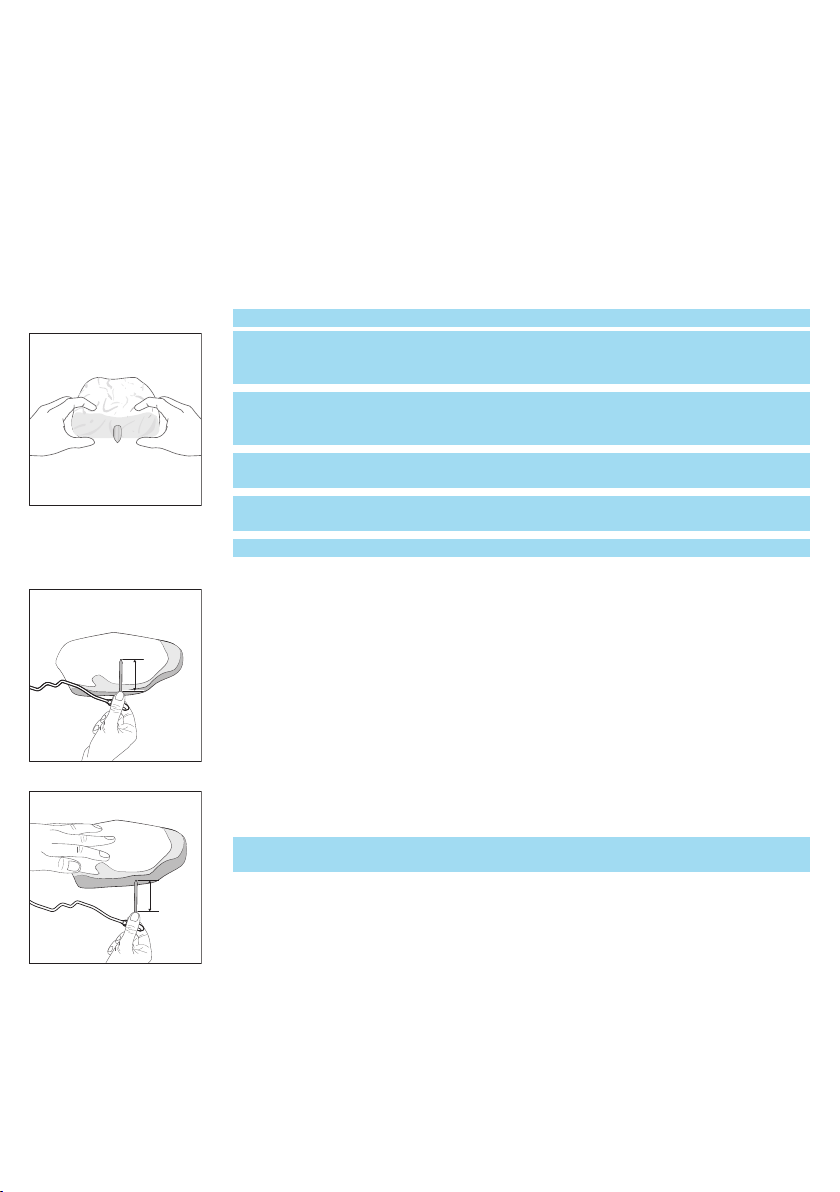
Probu yiyeceğin merkezine yönlendirmek için aşağıdaki adımları izleyin.
1 Termometrenin metal sapını tutun ve ucunu yiyeceğin ortasına yerleştirin.
Türkçe
45
2 Parmaklarınızı aynı pozisyonda tutun ve probu yiyeceğin en kalın kısmının
ortasına yerleştirin.
Not: Malzemeye bağlı olarak, gıda termometresinin metal gövdesini her zaman
tam olarak yerleştirmek gerekmez.
Page 43
46
Türkçe
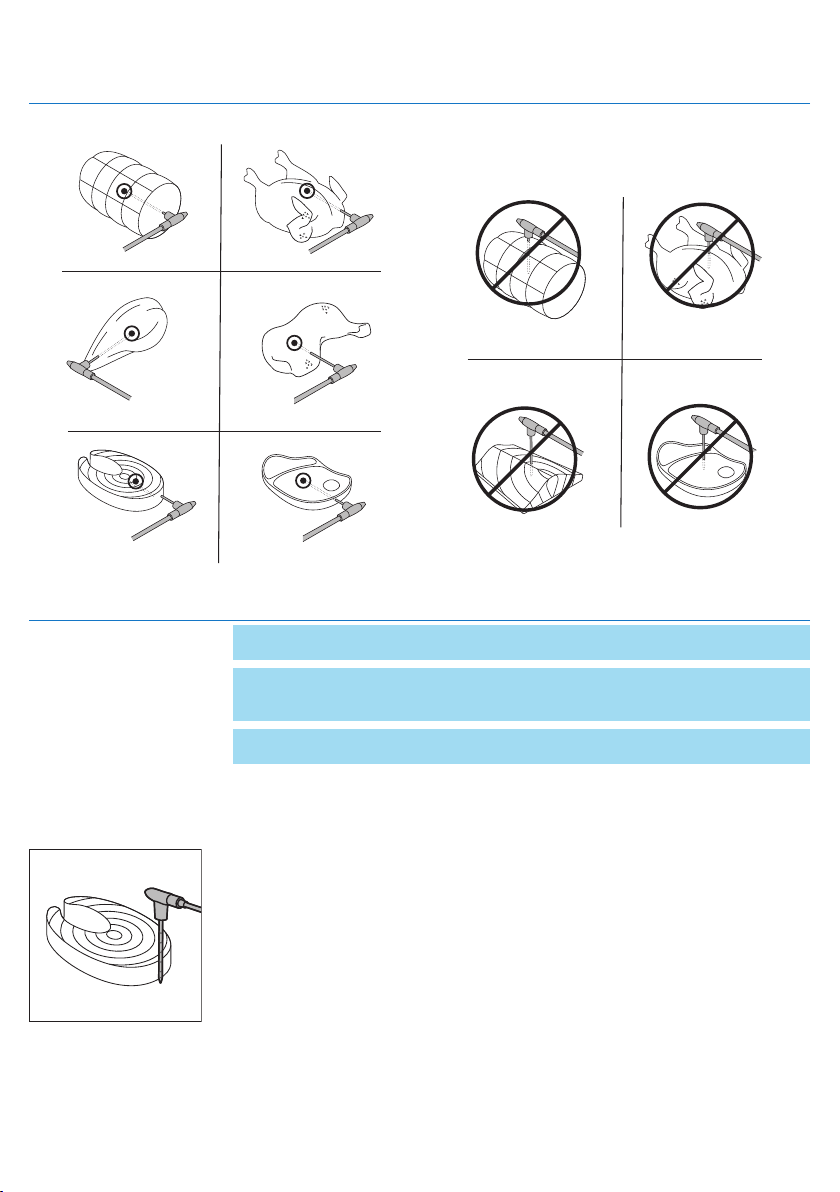
Yapılması gerekenler Yapılmaması gerekenler
Not: Bütün bir tavuk için probun göğsün içinden tüm yolu geçip boşlukta
kalmadığından emin olun.
Not: Önce yiyeceklerinizin en kalın kısmının merkezini belirlemek için işaretlerden
yararlanabilirsiniz. Gıda termometresini ne kadar derine yerleştirmeniz
gerektiğini hatırlamak için parmaklarınızı kullanın.
Not: Parmaklarınızı gıda termometresi üzerinde işaretli tutarak gıda
termometresini yiyeceklerinizin merkezine yerleştirin.
Yiyeceklerinizin kalınlığını ölçün
Yiyeceklerinizin kalınlığını ölçmek için gıda termometresini kullanabilirsiniz.
1 Gıda termometresini yiyeceğin yanına yerleştirin ve hangi işaretin yiyeceğin
üst kısmına geldiğini kontrol edin.
Page 44
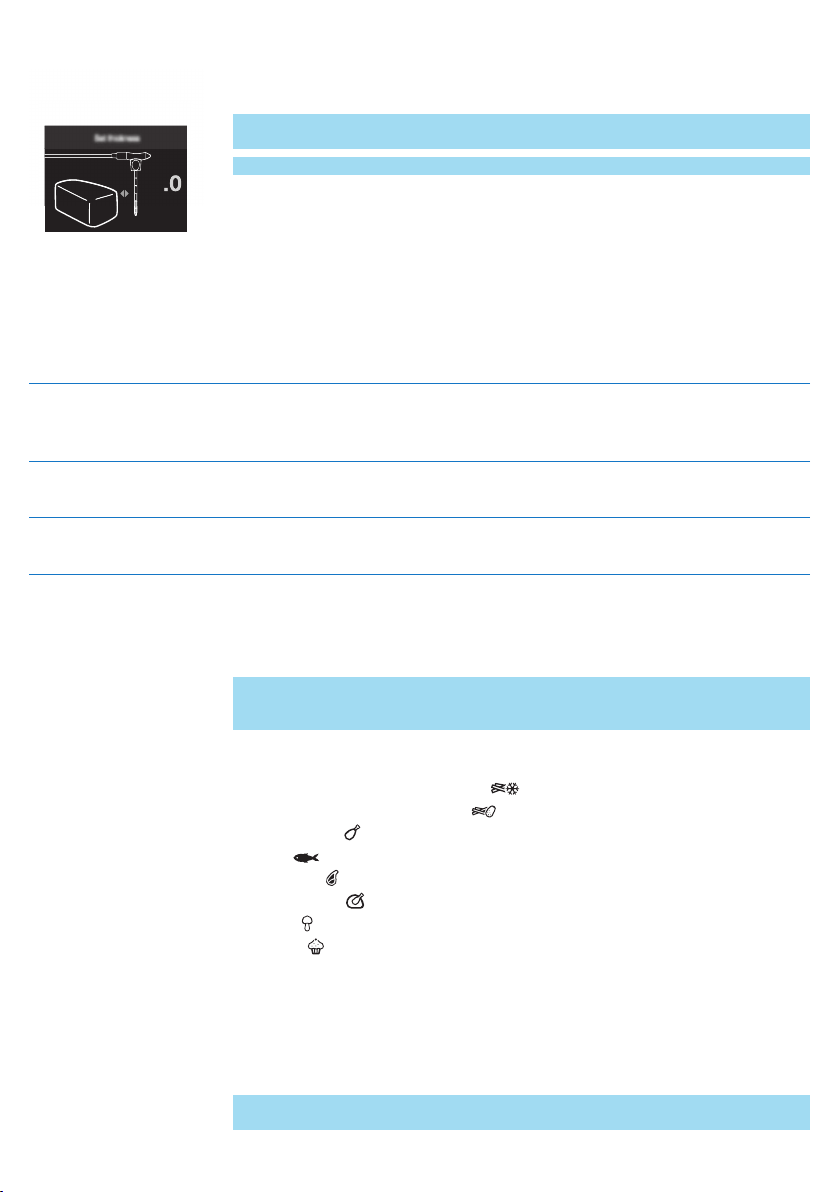
3
2 NutriU uygulamasındaki bir Otomatik Pişirme programıyla pişirirken kalınlık
sorulduğunda 1 ile 6 arasında bir değer ayarlayın.
Not: Bu işlev yalnızca NutriU uygulamasını kullandığınızda ve Otomatik Pişirme
programını buradan başlattığınızda kullanılabilir.
Not: Yiyeceklerinizin kalınlığı 2 cm'den azsa gıda termometresi kullanmayın.
Pişirme modları
Mod Yapılışı:
Türkçe
47
Otomatik Pişirme Programları
Manuel pişirme Pişirme süresini, sıcaklığı ve hava hızını manuel olarak
Gıda Termometresi Merkez sıcaklığını, pişirme sıcaklığını ve hava hızını manuel
Otomatik Pişirme programını seçin. Doldurma seviyesini,
parça sayısını veya ağırlığı ayarlayın, ardından pişirmeye
başlayın.
ayarlayın ve pişirmeye başlayın.
olarak ayarlayın ve pişirmeye başlayın.
Otomatik Pişirme Programları
1 Döner düğmeye basarak Airfryer'ınızı açtığınızda, varsayılan olarak "Otomatik
Pişirme programları" modunda olursunuz.
Not: Otomatik Pişirme programıyla yemek pişirmeden önce başka bir şey
pişirdiyseniz Geri düğmesine tıklayarak "Otomatik pişirme programları"
moduna girebilirsiniz.
2 Airfryer'ınızda 8 Otomatik Pişirme programı arasından seçim yapabilirsiniz. Bir
program seçmek için döner düğmeyi çevirin.
-
Dondurulmuş patates kızartması
-
Ev yapımı patates kızartmaları
-
Baget tavuk
-
Balık
-
Et pirzola
-
Bütün tavuk
-
Sebze
-
Muffin
3 İhtiyacınız olan Otomatik Pişirme programını seçmek için döner düğmeyi
çevirin. Onaylamak için döner düğmeye basın.
4 Yiyeceğin türüne bağlı olarak doldurma seviyesini, parça sayısını veya ağırlığı
ayarlamanız istenebilir. Döner düğmeyi çevirerek sepete koyduğunuz yiyecek
miktarını seçin.
5 Onaylamak için döner düğmeye basın.
Not: Doğru doldurma seviyesini ayarlamak için sepette belirtilen işaretleri
referans olarak kullanın.
Page 45

48
Türkçe
Not: Doldurma seviyesini seçmeden önce, yiyeceği sepet içinde her zaman eşit
şekilde dağıttığınızdan emin olun.
Not: "Bütün tavuk" Otomatik Pişirme programını kullandığınızda, malzemenin
ağırlığını girmeniz gerekir. Ağırlığı belirlemek için bir terazi kullanın. Ağırlığı
yiyeceğinizin ambalajı üzerinde de bulabilirsiniz.
6 Airfryer, seçiminize göre otomatik olarak hesaplanan sıcaklığı ve süreyi
görüntüler. İki bilgi arasında geçiş yapılırken bu bilgilere cihazınızdan kolayca
erişebilirsiniz. Ayrıca, Airfryer düşük veya yüksek hava hızı seçimini de gösterir.
Ev yapımı patates kızartması yapma
Airfryer'da ev yapımı harika patates kızartmaları yapmak için:
-
Kızartma yapmaya uygun patatesler seçin ör. taze, nispeten daha olgun
patatesler.
-
Eşit bir kızartma sonucu elde etmek için patatesleri doldurma seviyesi 4'e
kadar, porsiyonlar halinde havayla kızartın.
1 Patateslerin kabuklarını soyun ve çubuk şeklinde doğrayın. Daha büyük dilim
patatesler, küçük boyuttakilere göre daha az çıtır olur.
2 Patates dilimlerini en az 30dakika boyunca su dolu bir kasede bekletin.
3 Kaseyi boşaltın ve patates dilimlerini bir havlu veya kağıt havluyla kurulayın.
4 Kaseye bir yemek kaşığı yağ koyun, patates dilimlerini kaseye koyun ve tüm
dilimler yağla kaplanana kadar karıştırın.
5 Patatesleri kaseden parmaklarınızla veya delikli bir mutfak aletiyle çıkarın,
böylece fazla yağ kasede kalır.
Fazla yağın tavanın içine girmesini önlemek için tüm patatesleri sepete tek
seferde dökecek şekilde kaseyi eğmeyin.
6 Dilimleri sepete koyun.
7 Ev yapımı patates kızartmalarının Otomatik Pişirme programını başlatın ve
bildirildiğinde sallayın.
Manuel pişirme
1 Manuel pişirme moduna girmek için sıcaklık veya süre düğmesine basmanız
yeterlidir.
2 Sıcaklık düğmesini seçtiyseniz döner düğmeyi çevirerek 40°C ile 200°C
arasında istediğiniz dereceyi ayarlayın, ardından onaylamak için döner
düğmeye basın.
3 Döner düğmeyi çevirerek pişirme süresini ayarlayın. 1 ile 180 dakika arasında
bir süre seçebilirsiniz.
Not: Döner düğmeye bir süre ayarlamadan basarsanız ön ısıtma modu
etkinleştirilir ve istenen sıcaklığa ulaşıldığında sesli bir bildirim alırsınız.
4 Hava hızı düğmesine basıp tercihinizi seçerek yüksek veya düşük hava hızını
ayarlayın.
5 Seçiminizi onaylamak ve pişirmeye başlamak için döner düğmeye basın.
Not: Pişirme süresinin yarısından sonra sallama hatırlatıcısı almak için sallama
hatırlatıcısı düğmesini etkinleştirin.
Not: Yiyeceği sallamak, malzeme eklemek veya pişirme parametrelerini
ayarlamak için pişirme işlemini duraklatmanız gerekiyorsa döner düğmeye
basmanız yeterlidir. Pişirmeye devam etmek için döner düğmeye tekrar basın.
Page 46

Gıda termometresi
Gıda Termometresi özelliğini kullanmak için gıda termometresini (HD9959) ayrı
olarak satın almanız gerektiğini lütfen unutmayın. Termometreyi aldıktan sonra
aşağıdaki adımları izleyin.
1 Gıda termometresini, kılavuzun "Gıda Termometresini Yerleştirme"
bölümünde açıklandığı şekilde yiyeceğinize yerleştirin.
Not: Doğru sonuçlar elde etmek için doğru şekilde yerleştirmeniz önemlidir.
2 Yiyeceği termometreyle birlikte sepete koyun.
3 Kabloyu doğru konuma yönlendirmek için tava içindeki oluğu kullanın.
4 Termometreyi Airfryer'daki özel fişe takın.
5 Çekmeceyi kapatın ve kablonun sıkışmadığından emin olun.
6 Gıda termometresinin ucunda ölçülecek olan istenen merkez sıcaklığını
ayarlamak için döner düğmeyi çevirin. 30°C ile 99°C arasında bir sıcaklık
seçebilirsiniz.
7 Onaylamak için döner düğmeye basın.
8 Döner düğmeyi çevirerek pişirme sıcaklığını ayarlayın. 40°C ile 200°C arasında
bir sıcaklık seçebilirsiniz.
9 Onaylamak için döner düğmeye basın.
10 Hava hızı düğmesine basarak istenen hava hızını seçin. Yüksek ve düşük hava
hızları arasında seçim yapabilirsiniz.
Not: Pişirme sırasında pişirme sıcaklığını ve merkez sıcaklığını dönüşümlü
olarak ekranda görebilirsiniz.
11 Merkez sıcaklığına ulaşıldığında pişirme işlemi otomatik olarak sona erer.
Aşağıdaki tabloda hangi merkez sıcaklığının ayarlanacağı konusunda rehberlik
sunulmaktadır.
Yiyecek Pişme seviyesi Merkez sıcaklığı
Genel olarak beyaz et İyi pişmiş 80-85°C
Türkçe
49
Beyaz et göğsü Sulu 70-74°C
Az pişmiş 45-50°C
Orta 55-60°CSığır, dana, kuzu, geyik eti
Çok pişmiş 65-70°C
Genel olarak sığır eti İyi pişmiş 70-73°C
Sığır eti filetosu Orta 58-63°C
Balık
Tam patates İyi pişmiş 92-95°C
Ekmek İyi pişmiş 90-95°C
Not: Önerilen merkez sıcaklığı, yiyeceğin güvenli minimum merkez sıcaklığına
karşılık gelmeyebilir.
Not: Pişirilen yiyeceğin iç sıcaklığı, yiyecek cihazdan çıkarıldıktan sonra birkaç
derece artmaya devam eder.
Yarı saydam 50-55°C
İyi pişmiş 60-65°C
Page 47
50
Türkçe
Sıcak tutma
Temizlik
Airfryer'ınızın sıcak tutma işlevi, pişirme işlemine başlamadan önce, pişirme
sırasında veya pişirme işlemi tamamlandıktan sonra istediğiniz zaman
etkinleştirilebilir.
1 Sıcak tutma düğmesine basın.
Not: Sıcak tutma süresini değiştirmek için döner düğmeyi çevirerek 1 ile 30
dakika arasında bir süre ayarlayın. Ayarlanan sıcak tutma süresini onaylamak
için döner düğmeye basın.
2 Sıcak tutma işlemini başlatmak için düğmeye basın.
Not: Döner düğmeye basarak sıcak tutma işlemini duraklatabilirsiniz.
Not: Lütfen sıcak tutma işlevinin kullanımının, biftek gibi belirli bir pişirme
düzeyi gerektiren bazı yiyeceklerin pişme seviyesini etkileyebileceğini
unutmayın.
Uyarı: Temizlemeye başlamadan önce sepet, tava ve cihazın iç kısmının
soğumasını bekleyin.
Uyarı: Cihazın tavası ve sepeti yapışmaz malzemeyle kaplanmıştır.
Yapışmaz kaplamaya zarar verebileceğinden, metal mutfak aletleri veya
aşındırıcı temizlik malzemeleri kullanmayın.
İpucu: Airfryer'ın daha hızlı soğuması için tavayı ve sepeti çıkarın.
1 Tavanın tabanındaki süzülmüş yağı dökün.
2 Tavayı ve sepeti bir bulaşık makinesinde yıkayın. Bunları ayrıca sıcak su, bulaşık
deterjanı ve aşındırıcı olmayan süngerle temizleyebilirsiniz (bkz. "temizleme
tablosu").
İpucu: Tava veya sepete yemek kalıntıları yapışmışsa bu parçaları sıcak suda
veya bulaşık deterjanlı suda 10-15 dakika bekletebilirsiniz. Islattığınızda
yiyecek kalıntıları gevşer ve temizlemek kolaylaşır. Yağ ve yağ artıklarını
çözebilecek bir bulaşık deterjanı kullandığınızdan emin olun. Tava veya
sepetteki yağ lekelerini sıcak suda veya bulaşık deterjanlı suda bekleterek
temizleyemiyorsanız sıvı yağ çözücü kullanın.
İpucu: Gerekirse sıçrama korumasına yapışan yağ artıkları bir sünger veya kıl
fırça ile temizlenebilir.
İpucu: Sepeti tavaya koyun ve bulaşık makinesinde yıkarken daha az yer
kaplaması için ters çevirin.
Page 48
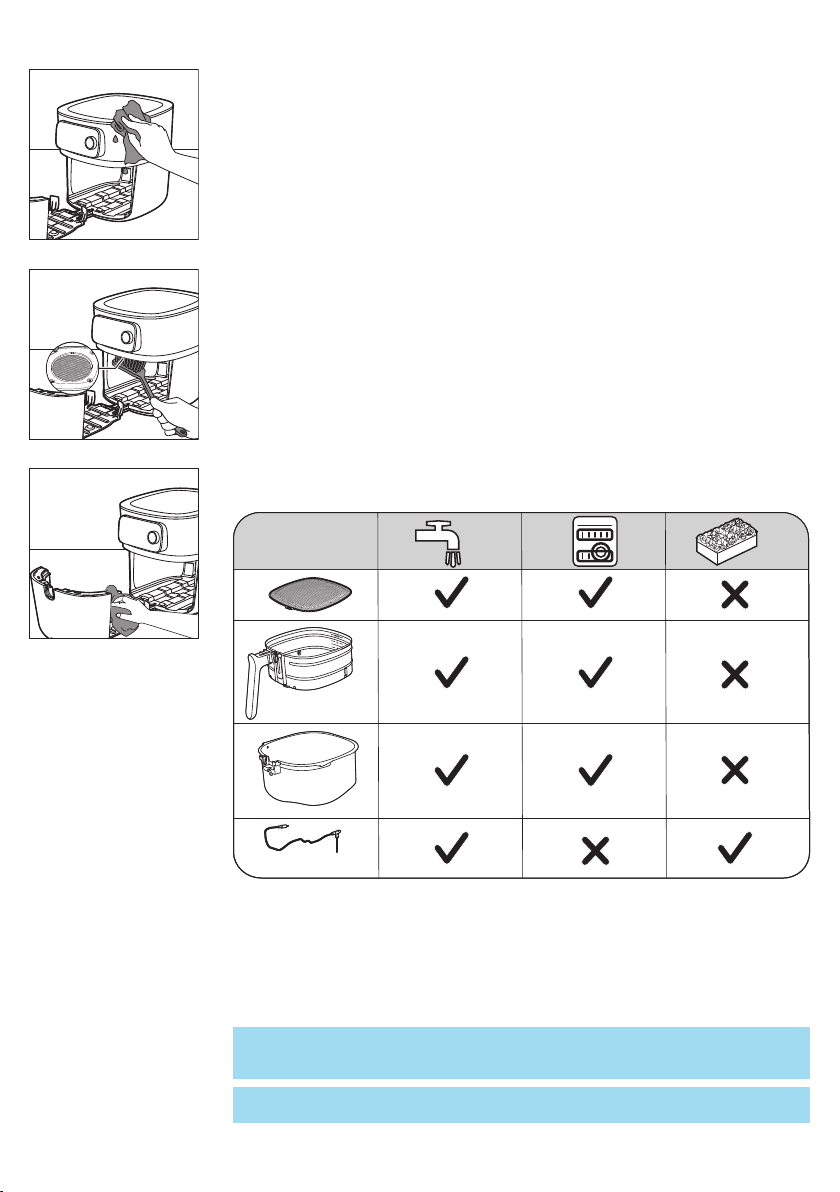
Türkçe
HD9958
3 Cihazın dış kısmını nemli bir bezle silin. Kontrol panelinde nem kalmadığından
emin olun. Kontrol panelini temizledikten sonra bir bezle kurulayın.
4 Yağ kalıntılarını gidermek için sıçrama korumasını bir sünger veya temizleme
fırçasıyla temizleyin.
5 Cihazın çekmecesini ve iç kısmını sıcak su ve aşındırıcı olmayan bir sünger ile
temizleyin.
51
Saklama
1 Cihazın fişini prizden çekin ve soğumasını bekleyin.
2 Saklamadan önce tüm parçaların temiz ve kuru olduğundan emin olun.
3 Kabloyu, kablo bölmesine yerleştirin.
Not: Airfryer'ı taşırken her zaman yatay tutun. Yanlışlıkla aşağı doğru eğilmesi
halinde çekmece cihazdan kayabileceğinden, cihazın ön kısmından çekmeceyi de
tutun. Aksi takdirde çekmece zarar görebilir.
Not: Airfryer'ın çıkarılabilir süzgeç altlık gibi çıkarılabilen parçalarının taşıma
sırasında ve/veya saklanırken yerlerinde sabit olduklarından emin olun.
Page 49

52
Türkçe
Sorun giderme
Bu bölümde cihaz ile ilgili en sık karşılaşılan sorunlar özetlenmiştir. Sorunu
aşağıdaki bilgilerle çözemiyorsanız sık sorulan sorular listesi için
www.philips.com/support adresini ziyaret edin veya ülkenizdeki Müşteri
Destek Merkezi ile iletişime geçin.
Sorun Olası Nedeni Çözüm
Cihazın dış kısmı kullanım sırasında
ısınıyor.
Ev yapımı patates kızartmaları
beklediğim gibi olmuyor.
İçerideki ısı dış duvarlara yayılır. Bu normaldir. Kullanım sırasında
Doğru patates türünü
kullanmamışsınızdır.
dokunmanız gereken tüm saplar
ve düğmeler dokunabileceğiniz
kadar soğuk kalır.
Cihaz açıldığında yiyeceklerin
düzgün bir şekilde pişirilmesi için
tava, sepet ve cihazın iç kısmı
daima sıcaktır. Bu parçalar her
zaman dokunulamayacak kadar
sıcaktır.
Cihazı daha uzun süre açık
bırakırsanız bazı alanlar
dokunulamayacak kadar ısınır. Bu
alanlar cihazın üzerinde aşağıdaki
simgeyle işaretlenmiştir:
Sıcak bölgelerin farkında
olduğunuz ve bunlara
dokunmaktan kaçındığınız sürece,
cihazın kullanımı tamamen
güvenlidir.
En iyi sonuçları elde etmek için
taze, olgun patatesler kullanın.
Patatesleri saklamanız gerekiyorsa
buzdolabı gibi soğuk bir ortamda
saklamayın. Paketinde kızartma
için uygun olduğu belirtilen
patatesleri seçin.
Sepetteki malzeme miktarı çok
fazladır.
Bazı malzemeler pişirme süresinin
yarısında sallanmalıdır.
Airfryer açılmıyor. Cihazın fişi prize takılmamıştır. Fişin prize düzgün bir şekilde
Tek bir prize birçok cihaz bağlıdır. Airfryer, yüksek bir watt değerine
Sepeti aşırı doldurmayın veya
maksimum doldurma seviyesi 6'yı
aşmayın.
Sepet ne kadar dolu ise o kadar sık
sallanması önerilir.
takılıp takılmadığını kontrol edin.
sahiptir. Farklı bir priz deneyin ve
sigortaları kontrol edin.
Page 50

Sorun Olası Nedeni Çözüm
Türkçe
53
Airfryer'ımın içindeki bazı
noktaların soyulduğunu
görüyorum.
Cihazdan beyaz duman çıkıyor. Yağlı malzemeler pişiriyorsunuz. Süzülen fazla yağı tavadan
Airfryer'ımın üzerindeki WiFi LED
ışığı artık yanmıyor.
Kaplamaya temas edilmesi veya
kaplamanın çizilmesi nedeniyle (ör.
sert temizlik araçlarıyla temizlik
yaparken ve/veya sepeti takarken)
Airfryer'ın tavasında bazı küçük
noktalar görülebilir.
Tavada önceki kullanımdan kalan
yağlı kalıntılar vardır.
Ekmek kırıntıları veya kaplama,
yiyeceğe düzgün şekilde
yapışmamıştır.
Marine sosu, sıvı veya et suyu
süzülen yağ veya yağ kalıntıları
içinde sıçrıyordur.
- Airfryer'ın ev WiFi ağınızla
bağlantısı kesilmiştir.
- Ev WiFi ağınız değiştirilmiştir.
Sepeti tepsiye doğru şekilde
indirip yerleştirerek hasarı
önleyebilirsiniz. Sepeti açılı olarak
yerleştirirseniz yan tarafı, tavanın
duvarına çarparak küçük kaplama
parçalarının dökülmesine neden
olabilir. Kullanılan tüm malzemeler
gıdaya uygun olduğundan böyle
bir durumun zararlı olmadığını
lütfen unutmayın.
dikkatlice boşaltıp pişirme işlemine
devam edin.
Beyaz duman, tavada ısınan yağlı
kalıntılardan kaynaklanır. Tava ve
sepeti her kullanımdan sonra
mutlaka iyice temizleyin.
Havaya karışan küçük ekmek
kırıntıları beyaz dumana neden
olabilir. Yapıştığından emin olmak
için ekmek kırıntılarını veya
kaplamayı yiyeceğe sıkıca bastırın.
Yiyeceği sepete yerleştirmeden
önce kurulayın.
WiFi kurulum işlemini başlatın ve
uygulamadaki talimatları izleyin.
Uygulama, eşleştirme işleminin
başarılı olmadığını gösteriyor.
Başka bir kullanıcı Airfryer'ı farklı
bir akıllı cihazla eşleştirmiş ve şu
anda pişirme yapıyor.
Diğer kullanıcı geçerli pişirme
işlemini tamamlayana kadar
bekleyin ve akıllı cihazınızı Airfryer
ile yeniden eşleştirin.
Page 51

2023 © Versuni Holding B.V.
PHILIPS and the Philips Shield Emblem are registered trademarks of Koninklijke Philips N.V. and are used
under license.
This product has been manufactured by and is sold under the responsibility of Versuni Holding B.V., and
Versuni Holding B.V. is the warrantor in relation to this product.
(04/2023)
>75 % recycled paper
>75 % papier recyclé
 Loading...