

Page 1

Register your product and get support at
www.philips.com/welcome
Type HD 8423 / HD 8425 / HD8427
ISTRUZIONI PER L'USO
OPERATING INSTRUCTIONS
BEDIENUNGSANLEITUNG
MODE D’EMPLOI
INSTRUCCIONES DE USO
INSTRUÇÕES DE USO
GEBRUIKSAANWIJZING
BRUKSANVISNING
BRUKSANVISNING
KÄYTTÖOHJEET
BRUGSANVISNING
ΟΔΗΓΙΕΣ ΧΡΗΣΗΣ
LEGGERE ATTENTAMENTE QUESTE ISTRUZIONI D'USO PRIMA DI UTILIZZARE LA MACCHINA.
READ THESE INSTRUCTIONS CAREFULLY BEFORE USING THE MACHINE.
VOR DEM GEBRAUCH DER MASCHINE IST DIE VORLIEGENDE BEDIENUNGSANLEITUNG AUFMERKSAM ZU LESEN.
LIRE ATTENTIVEMENT CE MODE D'EMPLOI AVANT D’UTILISER LA MACHINE.
LEER ATENTAMENTE ESTAS INSTRUCCIONES DE USO ANTES DE USAR LA MÁQUINA.
LEIA ATENTAMENTE ESTAS INSTRUÇÕES DE USO ANTES DE UTILIZAR A MÁQUINA.
LEES DEZE GEBRUIKSAANWIJZING AANDACHTIG ALVORENS DE MACHINE TE GEBRUIKEN.
LÄS NOGA IGENOM BRUKSANVISNINGEN INNAN DU BÖRJAR ANVÄNDA MASKINEN.
LES DENNE BRUKSANVISNINGEN NØYE FØR DU BRUKER MASKINEN.
LUE NÄMÄ KÄYTTÖOHJEET HUOLELLISESTI LÄPI ENNEN KEITTIMEN KÄYTTÖÖNOTTOA.
LÆS OMHYGGELIGT DISSE ANVISNINGER INDEN MASKINEN TAGES I BRUG.
ΠΡΙΝ ΧΡΗΣΙΜΟΠΟΙΗΣΕΤΕ ΤΗ ΜΗΧΑΝΗ, ΔΙΑΒΑΣΤΕ ΠΡΟΣΕΚΤΙΚΑ ΑΥΤΕΣ ΤΙΣ ΟΔΗΓΙΕΣ ΧΡΗΣΗΣ.
EnglishDeutschFrançaisEspañolPortuguêsNorskSuomiDanskΕλληνικά
Svenska Nederlands Italiano
FOR HOUSEHOLD USE ONLY
USAGE DOMESTIQUE SEULEMENT
Page 2
2 3
1
7 8 9 10
4 65
11
14
• 2 •
18
19
20
12
15
16
13
17
16 in
40 cm
20 cm
20 cm
8 in
20 cm
8 in
Fig. - Abb. - Afb. - R ys. - Kuva. - Εικ. (A)
20 cm
8 in
8 in
Fig. - Abb. - Af b. - Rys. -
Kuva. - Εικ. (B)
Page 3

Fig. - Abb. - Afb. - R ys. - Kuva. - Εικ. (1)
Fig. - Abb. - Afb. - R ys. - Kuva. - Εικ. (2)
Fig. - Abb. - Afb. - R ys. - Kuva. - Εικ. (3)
Fig. - Abb. - Afb. - R ys. - Kuva. - Εικ. (4)
Fig. - Abb. - Afb. - R ys. - Kuva. - Εικ. (7)
Fig. - Abb. - Afb. - R ys. - Kuva. - Εικ. (10)
Fig. - Abb. - Afb. - R ys. - Kuva. - Εικ. (5)
Fig. - Abb. - Afb. - R ys. - Kuva. - Εικ. (8)
Fig. - Abb. - Afb. - R ys. - Kuva. - Εικ. (11)
Fig. - Abb. - Afb. - R ys. - Kuva. - Εικ. (6)
Fig. - Abb. - Afb. - R ys. - Kuva. - Εικ. (9)
Fig. - Abb. - Afb. - R ys. - Kuva. - Εικ. (12)
• 3 •
Page 4

Fig. - Abb. - Afb. - R ys. - Kuva. - Εικ. (13)
Fig. - Abb. - Afb. - R ys. - Kuva. - Εικ. (14)
Fig. - Abb. - Afb. - R ys. - Kuva. - Εικ. (15)
Fig. - Abb. - Afb. - R ys. - Kuva. - Εικ. (16)
Fig. - Abb. - Afb. - R ys. - Kuva. - Εικ. (19)
Fig. - Abb. - Afb. - R ys. - Kuva. - Εικ. (22)
Fig. - Abb. - Afb. - R ys. - Kuva. - Εικ. (17)
Fig. - Abb. - Afb. - R ys. - Kuva. - Εικ. (20)
Fig. - Abb. - Afb. - R ys. - Kuva. - Εικ. (23)
Fig. - Abb. - Afb. - R ys. - Kuva. - Εικ. (18)
Fig. - Abb. - Afb. - R ys. - Kuva. - Εικ. (21)
Fig. - Abb. - Afb. - R ys. - Kuva. - Εικ. (24)
• 4 •
Page 5
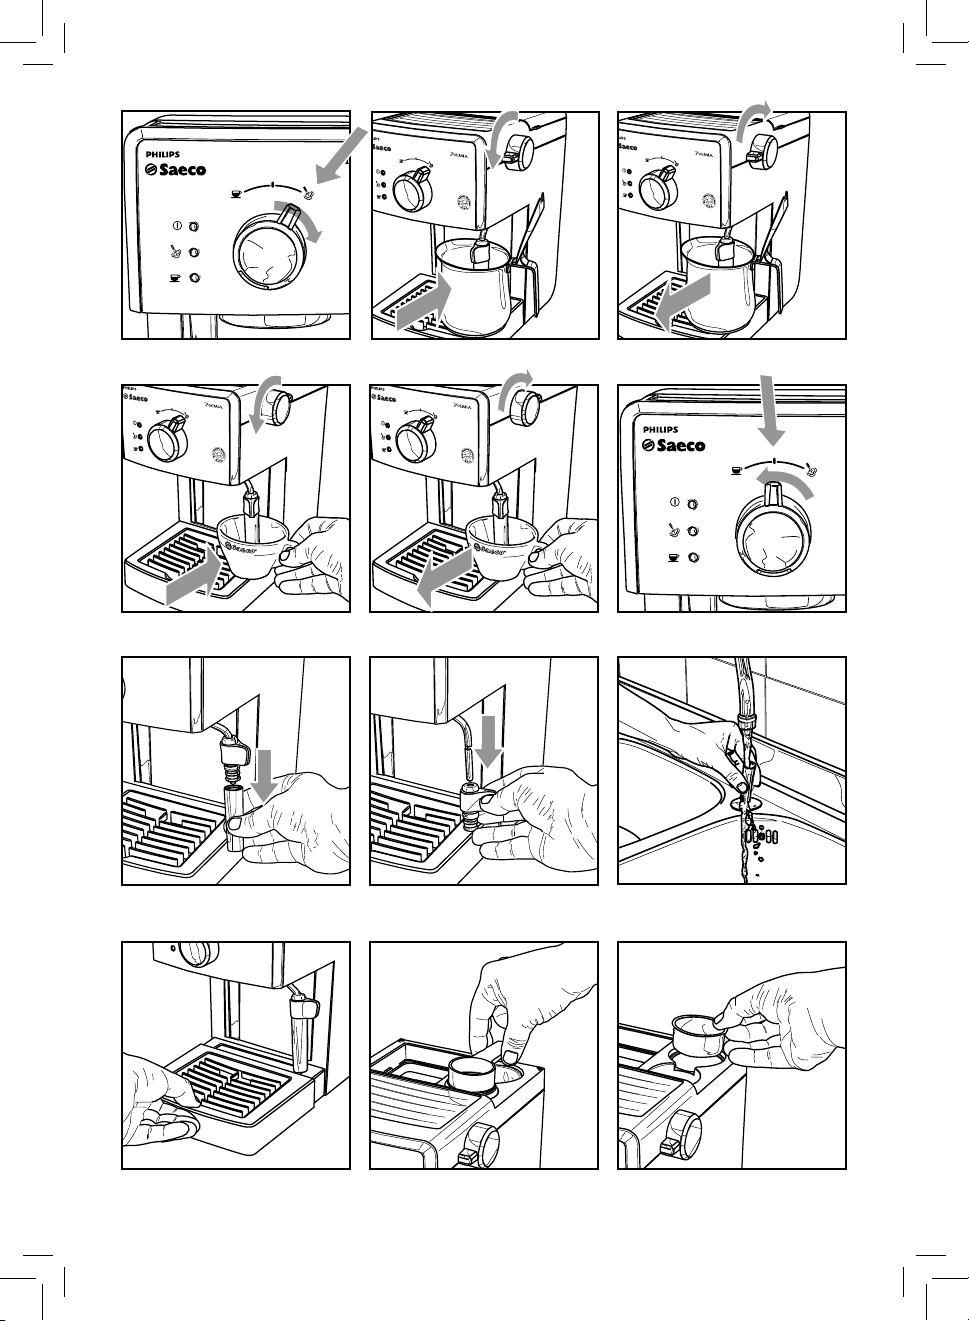
Fig. - Abb. - Afb. - R ys. - Kuva. - Εικ. (25)
Fig. - Abb. - Afb. - R ys. - Kuva. - Εικ. (26)
Fig. - Abb. - Afb. - R ys. - Kuva. - Εικ. (27)
Fig. - Abb. - Afb. - R ys. - Kuva. - Εικ. (28)
Fig. - Abb. - Afb. - R ys. - Kuva. - Εικ. (31)
Fig. - Abb. - Afb. - R ys. - Kuva. - Εικ. (34)
Fig. - Abb. - Afb. - R ys. - Kuva. - Εικ. (29)
Fig. - Abb. - Afb. - R ys. - Kuva. - Εικ. (32)
Fig. - Abb. - Afb. - R ys. - Kuva. - Εικ. (35)
Fig. - Abb. - Afb. - R ys. - Kuva. - Εικ. (30)
Fig. - Abb. - Afb. - R ys. - Kuva. - Εικ. (33)
Fig. - Abb. - Afb. - R ys. - Kuva. - Εικ. (36)
• 5 •
Page 6

1 GENERALITÀ
La macchina per ca è è indicata per la preparazione di 1 o 2
tazze di ca è espresso ed è dotata di un tubo orientabile per
l’erogazione del vapore e dell’acqua calda. I co man di sulla parte frontale del l’ap pa rec chio sono contrassegnati con simboli di
facile in ter pre ta zio ne.
La macchina è st ata progettata per us o domestico e non è indicata per un funzionamento continuo di tipo professionale.
Attenzione. Non si assumono re spon sa bi li tà per
eventuali danni in caso di:
• Impiego errato e non con for me agli scopi previsti;
• Riparazioni non ese gui te presso centri d’assistenza
autorizzati;
• Manomissione del cavo d'alimentazione;
• Manomissione di qual si a si com po nen te della macchina;
• Impie go di pezzi di ri cam bio e ac cessori non ori ginali;
• Mancata decalci cazione e stoccaggio in locali al di
sotto di 0°C.
In questi c asi viene a decadere la garanzia.
1.1 Per facilitare la lettura
Il triangolo d’avvertimento indica
tutte le istruzioni importanti per
la sicurezza del l’uten te. Attenersi
scrupo losamente a tali in dicazioni per evi tare ferimenti gra vi!
2 DATI TECNICI
Il costruttore si riserva il diritto di modi care le caratteristiche
tecniche del prodotto.
Tensione nominale - Potenza nominale - Alimentazione
Vedi targhetta posta sull’apparecchio
Materiale corpo
Plastica
Dimensioni (l x a x p) (mm)
210 x 300 x 280
Peso
3,9 kg
Lunghezza cavo
1,3 m
Pannello di comando
Sulla parte frontale
Porta ltro
Pressurizzato
Pannarello
Speciale per cappuccini
Serbatoio acqua
1,25 litri - Estraibile
Pressione pomp a
15 ba r
Caldaia
Inox
Dispositivi di sicurezza
Ter mof us ibi le
Il riferimen to ad illustrazioni, par ti dell’apparecchio o elementi
di co man do, ecc. è in di ca to da numeri o lettere; in questo caso
si rimanda all’illus trazione.
Questo simbolo evidenzia le in for ma zio ni da
tenere in maggiore con si de ra zio ne, per un mi-
gliore uti liz zo della mac chi na.
Le illustrazioni corrispondenti al te sto si trovano nelle
prime pagine del manuale. Consultare queste pagine
du ran te la let tura delle istru zio ni per l’uso.
1.2 Impiego di queste istruzioni per l’uso
Conservare queste ist ruzioni per l’uso in un luogo sicuro e allegarle alla mac chi na per ca è qualora un’altra persona dovesse
utilizzarla.
Per ulteriori informazioni o nel caso di problemi, rivolgetevi ai
centri assistenza autorizzati.
• 6 •
3 NORME DI SICUREZZA
Mai mettere a contatto del l’ac qua le parti sotto corrente: pe ri co lo di cortocircuito! Il vapore sur ri scal da to
e l’acqua calda possono pro vo ca re scottature! Mai dirigere il getto di va po re o dell’acqua calda ver so parti
del corpo, toccare con pre cau zio ne il beccuccio vapore /
ac qua calda: pe ri co lo di scottature!
Destinazione d’uso
La macchina per ca è è prevista esclu si va men te per l’impiego
do me sti co. È vietato apportare modi che tec ni che e ogni impiego illeci to, a causa dei rischi che es si com por ta no! L’apparecchio non è destinato ad essere utilizzato da persone (compresi
i bambini) con ridotte capacità siche, mentali o sensoriali o
con esperienza e/o competenze insu cienti, a meno che non
siano sotto la supervisione di una persona responsabile della
loro sicurezza o non vengano da essa istruite sull’uso dell’apparecchio.
Page 7

Alimentazione di corrente
Collegare la macchina per ca è soltanto ad una presa di corrente adeguata. La tensione deve corrispondere a quella indicata sulla targhetta dell’apparecchio.
Cavo d’alimentazione
Mai usare la macchina per ca è se il cavo d’alimentazione è di fet to so. Se il cavo d’alimentazione è danneggiato, deve essere
cambiato dal produttore o dal suo servizio assistenza clienti.
Non far passare il cavo d’ali men ta zio ne per angoli e su spigoli
vivi, sopra oggetti molto caldi e pro teg ger lo dall’olio.
Non portare o tirare la macchina per ca è tenendola per il
cavo. Non estr arre la spina tirandola per il cavo op pure toccarla
con le mani bagnate.
Evitare che il cavo d’ali men ta zio ne cada liberamente da tavoli
o sca ali.
Protezione d’altre persone
Tenere i bambini sotto supervisione, per evitare che giochino
con l’apparecchio.
I bambini non si rendono conto del per icolo connesso agli elettrodomestici. Non lasciare alla portata dei bam bi ni i ma te ria li
utilizzati per im bal la re la mac chi na.
Pericolo d’ustioni
Evitare di dirigere contro se stessi e/o altri il getto di vapore
sur ri scal da to e/o d’acqua calda. Usare sempre le apposite maniglie o ma no po le.
Non disinserir e (to glie re) mai il porta ltro pressur izzato durante l’erogazione del ca è. Durante la fase di riscaldamento dal
grup po erogazione ca è pos so no uscire gocce d’acqua calda.
Non erogare ca è quando la macchina è in sovratemperatura,
ossia quando i led “
” e “ ” sono accesi insieme.
Ubicazione
Sistemare la macchi na per ca è in un po sto si curo, dove nessuno può rovesciar la o venirne ferito.
Acqua calda o vapore sur ri scal da to po treb be ro fuoriuscire: pe-
ricolo di scottature!
Non tenere la macchina a tem peratura inferiore a 0°C; c'è il pe ricolo che il gelo possa danneggiare la macchina.
Non usare la macchina per ca è al l’aper to.
Non posare la macchina su su per ci mol to calde e nelle vicinanze di amme libere per evitare che la carcassa fonda o co mun que si danneggi.
Pulizia
Prima di pulire la macchina, è in di spensa bi le disinserire la
macchina con il pulsante ON/OFF tasti e poi staccare la spina
dalla presa di corrente. Inoltre, aspettare che la macchina si
ra red di. Mai immergere la mac chi na nel l’ac qua!
È severamente vietato cercare d’in ter ve ni re all’interno della
macchina.
Non utilizzare, per scopi alimentari, l’acqua rimasta nel serba-
toio per alcuni giorni, lavare il serbatoio e riempirlo con acqua
fresca potabile.
Spazio per l’uso e la ma nu ten zio ne
Per il corretto e buon funzionamento della macchina per ca è
si consiglia quanto segue:
• Scegliere un piano d’appoggio ben li vel la to;
• Scegli ere un ambiente su c i e n t e m e n t e i l l u m i n a t o , i g i e n i co e con presa di cor ren te facilmente accessibile;
• Prevedere una distanza minima dal le pa re ti della macchina come indicato in gu ra (Fig.A).
Custodia della macchina
Quando la macchina rimane inutilizzata per un pe ri o do prolungato, disinserire la mac chi na e staccare la spina dalla pre sa.
Custodirla in luogo asciutto e non ac ces si bi le ai bam bi ni. Proteggerla dalla polvere e dallo sporco.
Riparazioni / Manutenzione
Nel caso di guasti, difetti o sospetto di di fet to dopo una caduta, stac ca re subi to la spina dalla presa. Mai mettere in f unzione
una macchina di fet to sa. Soltanto i Centri di Assistenza Au to riz za ti possono e ettuare in ter ven ti e riparazioni. Nel caso di
interventi non eseguiti a regola d’arte, si declina ogni re spon sa bi li tà per eventuali danni.
Antincendio
In caso di incendio utilizzare estin to ri ad anidride carbonica
(CO
). Non utilizzare acqua o estintori a polvere.
2
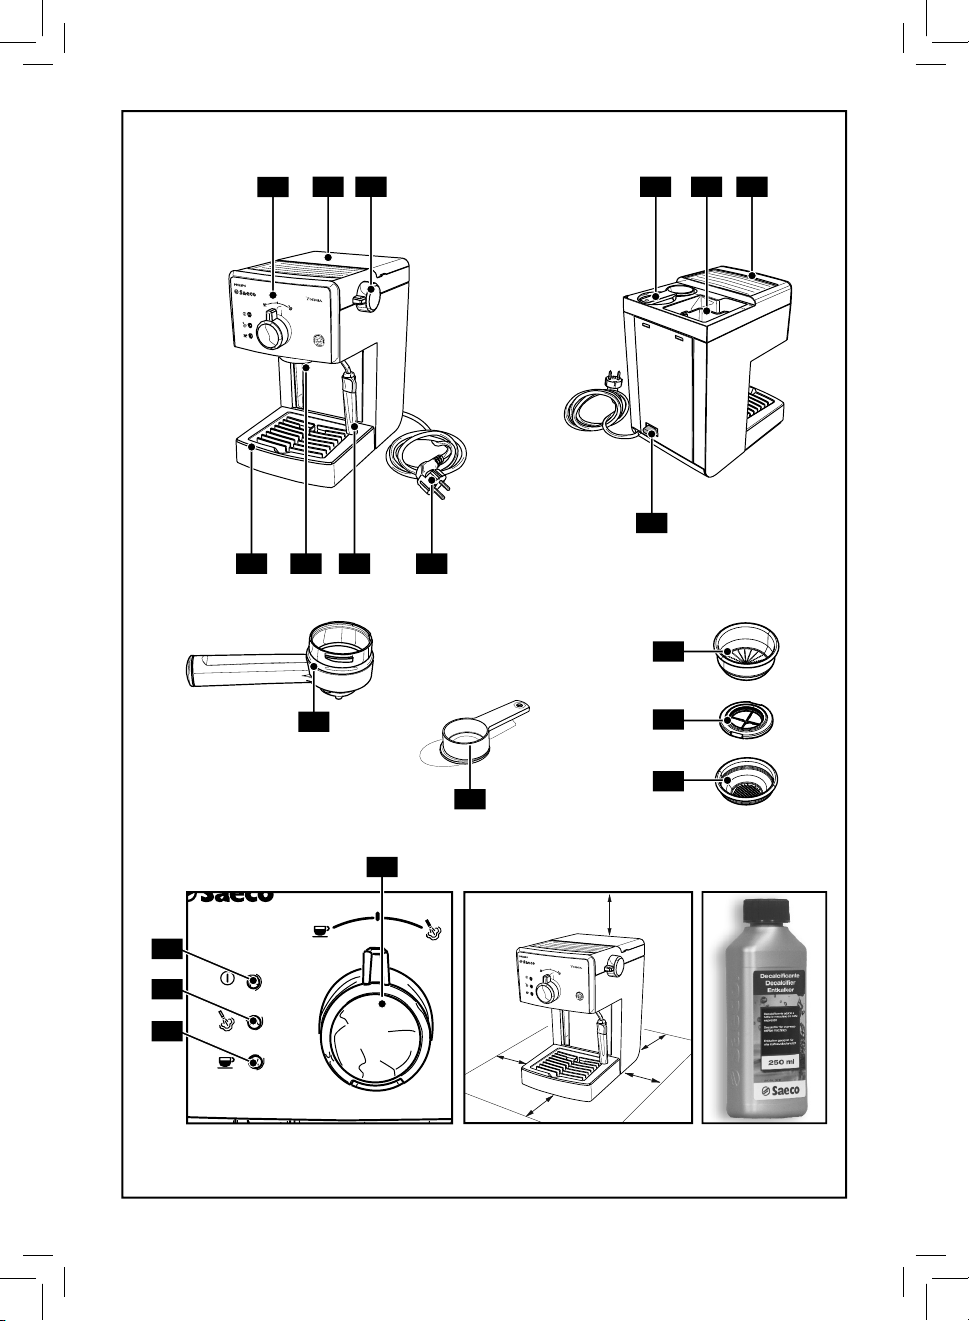
Legenda componenti macchina (Pag.2)
1 Pannello comandi
2 Coperchio serb atoio acqua
3 Pomello acqua calda / vapore
4 Sede per accessori
5 Serbatoio acqua
6 Supporto app oggia tazze
7 Vasca recupero acqua + griglia (se prevista)
8 Gruppo erogatore ca è
9 Tubo vapore (pannarello)
10 Cavo alimentazione
11 Pulsante ON/OFF
12 Porta ltro pressurizzato
13 Misurino per ca è macinato
14 Filtro per ca è macinato
(unico per l'erogazione di 1 o 2 ca è)
15 Adattatore per ltro ca è in cialde
16 Filtro per ca è in cialde
17 Pomello di selezione
18 Led "macchina accesa"
19 Led "Pronto vapore"
20 Led ca è / acqua - "Pronto macchina"
Italiano
• 7 •
Page 8

4 INSTALLAZIONE
Per la propria sicurezza e quella di ter zi at te ner si scrupolosamente alle “Nor me di si cu rez za” riportate nel
cap. 3.
4.1 Imballaggio
L’imballaggio originale è stato progettato e realizzato per
proteggere la macchina durante la spedizione. Si consiglia di
conservar lo per un eventuale trasporto f uturo.
4.2 Avvertenze d'installazione
Prima di installare la macchina, atten ersi alle seguenti prescr izioni di sicurez za:
• sistemare la macchina in un luogo si cu ro;
• accer tarsi che i bambini non a b bia no la possibilità di gio care con la mac chi na;
• evitare che la macchina venga col lo ca ta su super ci molto
calde o vicino a am me libere.
La macchina per ca è è ora pronta per es se re collegata alla
rete elettrica.
Nota: si consiglia di lavare i componenti prima
del loro primo utilizzo e/o dopo un periodo d'i-
nutilizzo.
4.3 Collegamento della macchina
La corrente elettrica può es se re pe ri co lo sa! Di
c o n s e g u e n z a , a t t e n e r s i s e m p r e s c r u p o l o s a m e n te alle n or m e di si c u r ez z a. Non usare mai cavi d i fe t t o si!
I cavi e le spi ne difettosi de vo no e s se re so st i tu i ti im me dia ta men te da Centri di Assistenza Autorizzati.
La tensione dell’apparecchio è stata impos tata in fabbrica. Veri care che la tensione della rete corrisponda alle indicazioni
riportate sulla targhetta d’identi cazione posta sul fondo
dell’apparecchio.
• Inseri re la spina in una presa di corrente a pare te di tensio-
ne adeguata.
4.4 Ser ba to io ac qua
• (Fig.1A) - Rimuovere il coperchio del serbatoio dell'acqua
(2) sollevandolo.
• (Fig.1B) - Estrarre il serbatoio del l’ac qua (5).
• (Fig.2) - Sciacquarl o e riempirlo con ac qua fre sca potabile;
non superare il livello (MAX) ripor tato sul serbatoio.
Immettere nel ser ba to io sem pre e sol tan to ac-
qua fre sca po ta bi le non gas sa ta. Ac qua cal da
non ché al tri liquidi possono dan neg gia re il ser ba to io.
Non mettere in fun zio ne la mac chi na sen za acqua: ac cer tar si che ve ne sia a su c i e n z a a l l ’ i n t e r n o d e l s e r batoio.
• (Fig. 3A) - Inserire il serbatoio assicurandosi di riposiziona-
lo corrett amente nella sua sede e riposizionare i l coperchio
(2).
Assicurarsi che il serbatoio sia ben inserito nel-
la macchina premendolo accuratamente no a
battuta (DEVE ESSERE COMPLETAMENTE VISIBILE IL RIFERIMENTO DELLA FIG.3B ) per evit are fuoriuscite d i acqua
dal fondo.
4.5 Caricamento del circuito
All'inizio, dopo aver erogato vapore o dopo aver terminato
l'acqua nel serbatoio, il circuito della macchina deve essere
ricaricato.
• Premere il pulsante ON/OFF (11); il led (18) si accende ad
indicare che la macc hina è accesa.
• (Fig.4) - Inse rire un co ntenitore sotto al t ubo vapor e (pan-
narello).
• Aprire il pomello (3) “ac qua cal da/va po re” ruotandolo in
sen so antiorario.
• (Fig.5) - Por tare il pomello di selez ione (17) nella posizione
"
".
• Attendere che dal tubo va po re (pannarello) fuoriesca un
get to regolare d'acqua.
• (Fig.5) - Portare il pomello di selezione (17) nella posizio-
ne "
".
• Chi udere il pomello (3) “ac qua calda/vap ore” ruotandolo in
sen so orario. Rimuovere il contenitore.
4.6 Primo utilizzo o dopo un periodo di
inutilizzo
Que sta s empl ice op eraz ione v i assi cura un'ero gazio ne ot tima le
e deve essere eseguita:
- al primo avvio;
- quando la macchina rimane inutilizzata per lungo tempo
(per più di 2 settimane).
L’acqua erogata deve essere vuotata in un ap-
posito scarico e non può essere utilizzata per
l’alimentazione. Se il contenitore si riempie, durante il
ciclo, fermare l’erogazione e vuotarlo prima di riprendere l’operazione.
• (Fig.2) - Risciacquare il serbatoio e riempirlo con acqua
• 8 •
Page 9

fresca potabile.
• (Fig.4) - Sistemare un contenitore sot to al tubo va po re
(pannarello). Aprire il rubinetto (3) ruotandolo in senso
antiorario.
(Fig.5) - Portare il pomello di selezione (17) nella posizio-
ne "
• Ero gare tutto il contenuto del s erbatoio dell’acqua dal tubo
• (Fig.2) - Riempire il serbatoio con acqua fresca potabile.
• (Fig.13-14) - Inserire dal basso il porta ltro nel gruppo
• (Fig.15) - Inserire un contenitore adeguato sotto al porta-
• (Fig.16) - Ruotare il pomello di selezione (17) nella posi-
(Fig.17) - Prima di terminare l'acqua completamente, fer-
• Riempire nuovamente il serbatoio ed attendere che il led
• (Fig.19) - Rimuovere il porta ltro dal gruppo ruotandolo
La macchina ora è pronta; per i dettagli di funzionamento per
l’erogazione del ca è e del va po re si rimanda ai ca pi to li relativi.
".
vapore/acqua calda (pannar ello); per terminare l'erogazio ne portar e il pomello di selezione (17) nella posizione "
chiudere il rubinetto (3) ruotandolo in senso orar io.
erogazione (8) e ruotarlo da sinistra verso destra no al
suo bloccaggio.
l t r o .
zione "
io.
mare l ’erog azione por tando il pom ello di sel ezione (17) ne lla
posizione "
di “pronto macchina” (20) si accenda.
da destra verso sinistra e sciacquarlo con acqua fresca potabile.
" ed erogare tut ta l’acqua presente nel serbato-
".
" e
5 EROGAZIONE DEL CAFFÈ
Attenzione! Durante l’erogazione del ca è è
vie ta to disinserire il porta ltro pressurizzato
ruotandolo ma nual men te in sen so ora rio. Pe ri co lo d’ustio ni.
• Durante questa operazione, il led (20) "pronto macchina"
può accendersi e spe gnersi; tale funzionamento deve es sere considerato normale e non un’anomalia.
• Assicurarsi, prima dell’uso, che il po mel lo (3) acqua calda/
va po re sia chiuso e che il ser ba to io acqua della macchina
con ten ga una quantità d'acqua su ciente.
• Premere il pulsante ON/OFF (11); il led (18) si accende ad
indicare che la macc hina è accesa.
• Attend ere che il led (20) "pronto macchina" si accenda, ora
la macchina è pronta per l’erogazione del ca è.
Gli accessori per l'erogazione del ca è sono riposti in una sede studiata appositamente per
rendere queste operazioni semplic i ed immediate.
Per il misu rino per il ca è mac inato e/o i ltri necess ari,
sollevare i l coperchio (2) e prelevare quanto deside rato
(Fig.35 e Fig.36)
Se dopo aver posizionato il pomello di selezione
(17) nella posizione "
tare il pomello di selezione (17) nella posizione "
consultare la tabella "Risoluzione problemi" prima di
rimuovere il porta ltro.
" NON esce ca è, por-
" e
5.1 Con ca è macinato
• (Fig.7) - Inserire il ltro (14) nel porta ltro pressurizzato
(12); al primo utiliz zo il ltro è già inserito.
• (Fig.13) - Inserire dal basso il por ta ltro nel gruppo eroga-
zione (8).
• (Fig.14) - Ruotare il por ta ltro da si ni stra verso de stra no
al suo bloccaggio. Lasciare la presa dal ma ni co del porta ltro pressurizzato. Un si ste ma automatico riporta ora
leg ger men te il manico verso sinistra.
Questo movimento garantisce il perfetto funzionamento
del porta ltro pressurizzato.
• (Fig.16) - Preriscaldare il porta ltro pressurizzato por-
tando il pomello di selezione (17) nella posizione "
l’acqua co min ce rà ad usci re dal porta ltro pressurizzato
(que sta operazione si rende ne ces sa ria solo per il primo
ca è).
• (Fig.17) -Dopo aver fatto scorrere 50cc di acqua, portare il
pomello di selezione (17) nella posizione "
l’erogazione.
• (Fig.19) - Togliere il porta ltro dalla macchina ruotandolo
da destra verso sinistra e vuotare l’acqua residua. Con lo
speciale ltro (14) di cui è dotata la mac chi na, non occorre
cambiare l tro per ottenere uno o due ca è.
• (Fig.35) - Prelevare il misurino dalla macchina.
• (Fig.8) - Versare 1-1,5 misurini per il ca è singolo o 2 mi-
surini rasi per il ca è doppio; pulire il bor do del porta ltro
dai re si dui di ca è.
• (Fig.13) - Inserire dal basso il porta ltro (12) nel gruppo
erogazione (8).
• (Fig.14) - Ruot are il p orta ltro d a si n i st ra vers o dest ra no
al suo bloccaggio.
• (Fig.15) - Prelevare 1 o 2 tazzine preriscaldate e po-
sizionarle sotto al porta ltro pressurizzato; veri care che
siano correttamente si s te ma te s otto ai fori di uscita ca è.
• (Fig.14) - Ruotare il pomello di selezione (17) nella posi-
zione "
• (Fig.17) - Quando è stata rag giun ta la quantità di ca è
de si de ra ta, ruotare il pomello di selezione (17) nella posizione "
dell’erogazione at ten de re qual che secondo; prelevare le
tazzine con il ca è (Fig.18).
".
" per fermare l’erogazione del ca è. Al termine
" per fer ma re
Italiano
";
• 9 •
Page 10

• (Fig.19) - Al termine dell’erogazione attendere qualche
secondo, estrarre il porta ltro pressurizzato e vuotarlo dai
fondi residui.
Nota: nel porta ltro rimane una piccola quantità di acq ua; questo è normal e ed è dovuto alle
caratteristiche del por ta ltro.
Nota importante: Il ltro (14) deve essere mantenuto pulito per garantire un perfetto risulta-
to. Lavare giornalmente a ne utilizzo.
• (Fig.17) - Quando è stata rag giun ta la quantità di ca è
de si de ra ta, ruotare il pomello di selezione (17) nella posizione "
" per fermare l’erogazione del ca è; prelevare la
tazzina con il ca è.
• (Fig.19) - Al termine dell’erogazione attendere qualche
secondo, estrarre il porta ltro e smaltire la cialda utilizzata.
Nota impor tante: I l ltro (16) e l'a datta tore (15)
devono essere mantenuti puliti per garantire
un perfetto risultato. Lavare giornalmente a ne utilizzo.
5.2 Con ca è in cialde
• (Fig.9) - Togliere, utilizzando un cucchiaino da ca è, il
ltro per ca è macinato (14) dal porta ltro pressurizzato
(12).
• (Fig.10) - Inserire, nel por ta ltro pressuriz zato (12), l'adat-
tatore per cialde (15), con la parte bombata rivolta verso il
basso.
• (Fig.11) - Dopo, inserire il ltro per cialde (16) nel porta l-
tro pressuriz zato (12).
• (Fig.13) - Inserire dal basso il porta ltro pressurizzato nel
gruppo erogazione (8).
• (Fig.14) - Ruotare il por ta ltro da si ni stra verso de stra no
al suo bloccaggio. Lasciare la presa dal ma ni co del porta ltro pressurizzato. Un si ste ma automatico riporta ora
leg ger men te il manico verso sinistra.
Questo movimento garantisce il perfetto funzionamento
del porta ltro pressurizzato.
• (Fig.16) - Preriscaldare il porta ltro pressurizzato por-
tando il pomello di selezione (17) nella posizione "
l’acqua co min ce rà ad usci re dal porta ltro pressurizzato
(que sta operazione si rende ne ces sa ria solo per il primo
ca è).
• (Fig.17) -Dopo aver fatto scorrere 50cc di acqua, portare il
pomello di selezione (17) nella posizione "
l’erogazione.
• (Fig.19) - Togliere il porta ltro pressurizzato dalla mac-
china ruotandolo da destra ver so sinistra e vuotare l’acqua
residua.
• (Fig.12) - Inserire la cialda nel por ta ltro; assicurarsi che la
carta della cialda non fuoriesca dal por ta ltro.
• (Fig.13) - Inserire dal basso il porta ltro pressurizzato nel
gruppo erogazione (8).
• (Fig.14) - Ruotare il por ta ltro da si ni stra verso de stra no
al suo bloccaggio.
• Prelevare 1 tazzina preriscaldata e posizionarla sotto al
porta ltro; veri care che sia correttamente sistemata sotto ai fori d'uscita ca è.
• (Fig.16) - Ruotare il pomello di selezione (17) nella posi-
zione "
".
" per fer ma re
6 SCELTA DEL TIPO DI CAF FÈ CON SI GLI
In linea di massima si possono uti liz za re tutti i tipi di ca è esistenti in commercio. Tuttavia, il ca è è un prodotto na tu ra le
ed il suo gusto cambia in funzione del l’ori gi ne e della mi sce la;
è preferibile quindi pro var ne vari tipi, al ne di trovare quello
che meglio si addice ai gusti personali.
Per migliori risult ati si consiglia co mun que di utiliz zare miscele
espres sa men te pre pa ra te per macchine espresso. Il ca è dovrebbe sempre fuo riu sci re re golar men te dal porta ltro pressurizzato senza goc cio la re.
La velocità di fuoriuscita del ca è può es se re modi cata cambiando leggermente la dose del ca è nel ltro e/o utilizzando
ca è con un grado di macinatura di erente.
Per un miglior risul tato in tazza e per facili tà di pulizia e preparazione, Saeco consiglia l'utilizzo di ca è in cialde monodose
contrassegnate dal marchio ESE.
";
PRIMA DI ESEGUIRE QUALSIASI OPERAZ IONE RELA-
TIVA ALL’EROGAZIONE DEL VAPORE O DELL’ACQUA
CALDA VERIFICARE CHE IL TUBO VAPORE (PANNARELLO)
SIA ORIENTATO SOPRA LA VASCA RECUPERO ACQUA.
7 AC QUA CALDA
Pericolo di scottature! All’inizio dell’erogazione
posso no ve ri car si brevi spruzzi di acqua calda.
Il tubo d’erogazione può rag giun ge re temperature elevate: evitare di toc car lo di ret ta men te con le mani.
• Durante questa operazione, il led (20) "pronto macchina"
può accendersi e spe gnersi; tale funzionamento deve es se-
• 10 •
Page 11

re considerato normale e non un'anomalia.
• Assicurarsi, prima dell'uso, che il pomello (3) acqua calda/
vapore sia chiuso e che il serbatoio acqua della macchina
contenga una quantità d'acqua su ciente.
• Preme re il pulsante ON/OFF (11); il led rosso (18) si accende
ad indicare che la macchina è accesa.
• Attend ere che il led (20) "pronto macchina" si accenda; ora
la macchina è pronta.
• (Fig.21) - Sistemare un contenitore o un bic chie re da tè
sot to al tubo va po re (pannarello).
• (Fig.21) - Aprire il po mel lo (3) ruotandolo in senso antiorario.
• (Fig. 22) - Portare il pomello di s elezione (17) nella posizione "
• (Fig.23) - Quando è stata prelevata la quan ti tà de si de ra ta
• (Fig.24) - Chiudere il po mel lo (3) ruotandolo in senso ora-
• Prelevare il contenitore con l'acqua calda.
".
di ac qua cal da, portare il pomello di selezione (17) nella
posizione "
rio.
".
8 VA PO RE / CAPPUCCINO
Pericolo di scottature! All’inizio dell’erogazione
pos so no ve ri car si brevi spruzzi di acqua calda.
Il tubo d’erogazione può rag giun ge re temperature elevate: evitare di toc car lo di ret ta men te con le mani.
chi na è pron ta per l ’erogazione del va po re.
• (Fig.26) - Inserire un contenitore sot to al tubo vapore.
• (Fig. 26) - Aprire il po mel lo (3) per qual che istante, in mo do
da far uscire l’ac qua residua dal tubo vapore (pannarello);
in breve tem po co min ce rà ad uscire solo vapore.
• (Fig.27) - Chiudere il pomello (3) e togliere il contenitore.
• Ri empire con latte freddo 1/3 del con te ni to re ch e si desidera uti liz za re per pre pa ra re il cappuccino.
Per garantire un miglior risultato utilizzare
latte freddo
• (Fig.28) - Immergere il tubo vapore nel latte e aprire il
pomello (3) ruotandolo in se nso antiorario; far ruotare le ntamente il recipiente contenente il latte, dal basso verso
l’alto per rendere uniforme il riscaldamento.
Si consigl ia un'erogazione mas sima di 60 secondi.
• Al ter mine, chiudere il pomello (3) ruotandolo in s enso orario; prelevare la tazza con il lat te montato.
• (Fig. 30) - Portare il pomello di s elezione (17) nella posizione "
".
Se entrambi i led "
una temperatur a troppo elevata per l'erogazi one del ca è.
• Procedere con il caricamento del cir cui to descritto nel
par.4.5 per rendere ope ra ti va la macchina.
" e " "sono accesi, la macchina ha
Italiano
Attenzio ne! Non erogare ca è quand o è selezionata la funzione vapore perchè la temperatura
è troppo alta e c’è il rischio di ustioni.
Attenzio ne! Durante l’erogazione del vapor e è
vietato disinserire il portafiltro (se inserito)
ruotandolo manualmente in senso orario. Pericolo di
ustioni! Il porta ltro può essere disinserito solo dopo
aver ripor tato il pomello di selezione (17) nella posizio ne "
" ed aver ra reddato la macchina con la procedura
descritta nel par.4.5.
• Durante questa operazione, il led (20) "pronto macchina"
può accendersi e spe gnersi; tale funzionamento deve es sere considerato normale e non un'anomalia.
• Assicurarsi, prima dell'uso, che il pomello (3) acqua calda/
vapore sia chiuso e che il serbatoio acqua della macchina
contenga una quantità d'acqua su ciente.
• Premere il pulsante ON/OFF (11); il led (18) si accende ad
indicare che la macc hina è accesa.
• Attendere che il led (20) "pronto macchina" si accenda.
• (Fig. 25) - Portare il pomello d i selezione (17) nella posizio-
ne "
• Attendere che il led (19) si accenda; a questo punto la mac-
"; il led (20) si spegne.
Nota: la macchina è operativa quando il led
"pronto macchina" è acces o in modo sso.
Nota bene: se non si riesce ad erogare un cap-
puccino come descritto, si deve ricaricare il
circuito come descritto nel par. 4.5 e successivamente
ripetere le operazioni.
Lo stesso sistema può essere uti lizza to per il
ri scal da men to di al tre be van de.
• Pulire, dopo questa operazione il tubo vapore con un pan-
no umido.
9 RISPARMIO ENERGIA
La macchina è progettata per il risparmio energetico. La macchina si spegne automaticamente dopo 9 minuti di inattività.
Per riavviare la macchina è su ciente premere il pulsante ON/
OFF (11); si accende il led (18) "macchina accesa".
Attendere che il led (20) "pronto macchina" si accenda.
• 11 •
Page 12

10 PULIZIA
La manutenzione e la pulizia possono essere e ettuate soltanto quando la macchina è fredda e scollegata dalla rete
elettrica.
• Non immergere la mac chi na nel l’ac qua e non inserire i
com po nen ti nella la va sto vi glie.
• Non utilizzare alcol etilico, solventi e/o agenti chimici aggressivi.
• Si consiglia di pulire quo ti dia na men te il serbatoio del l’ac qua e di riempirlo con acqua fresca.
• (Fig.31-33) - Giornalmente, dopo aver riscaldato il lat te,
smontare la parte esterna del pannarello e lavarla con acqua potabile f resca.
• (Fig.31-32-33) - Settimanalmente si deve pulire il tubo
vapore. Per ese guire questa operazione, si deve:
- rimuovere la parte e sterna del pannarello (per la re golare
pulizia);
- s lare la parte superior e del pannarello dal tubo vapore;
- lavare la parte superiore del pannarello con acqua fresca
potabile;
- lavare il tubo vapore con un panno umido e rimuovere
eventuali residui di lat te;
- riposizionare la parte superiore nel tubo vapore (assicurarsi che sia completamente inserita);
Rimontare la parte ester na del pannarello.
• (Fig.34) - Giornalmente vuotare e lavare la vasca raccogli
gocce.
• Per la puli zia dell’apparecchio utiliz zare un panno morbido
inumidito d'acqua.
• (Fig. 20) - Per la pulizia del porta ltro pressuriz zato pro ce de re come segue:
- (Fig.9) - estrarre il ltro, lavarlo con cura con acqua calda.
- estrarre l'adattatore (se presente), lavarlo con cura con
acqua calda.
- lavare l’interno del por ta ltro pressurizzato.
• Non as ciugare la macchina e/o i suoi componenti uti lizzando un forno a microonde e/o un forno convenzionale.
• (Fig.35-36) - Settimanalmen te pulire la sede per gli accessori con un panno um ido per rimuovere eventuali resid ui di
ca è o polvere in genere.
Nota: non lavare il porta ltro pressurizzato
nella lavastoviglie.
11 DE CAL CI FI CA ZIO NE
La formazione di calcare avviene con l’uso dell’apparecchio; la
decalci cazione è necessaria ogni 1-2 mesi di utilizzo della macchina e/o quando si osserva una riduzione della portata dell’acqua. Usare escl usivamente il prodotto de calci cante Saeco.
Quanto indicato nel manuale di uso e manu-
tenzione ha priorità rispetto alle indicazioni
riportate su accessori e/o materiali d’uso venduti separatamente, laddove sussista un con itto.
Usare il prodotto decalci cante Saeco (Fig.B).
E' stato formulato speci catamente per mantenere al meglio la performance e la funzionalità della
macchina per tutta la sua vita, nonchè per evitare, se
correttamente usato, ogni alterazione del prodotto
erogato. prima d’iniziare il ciclo di decalci cazione
assicurarsi che: SIA STATO RIMOSSO IL FILTRO ACQUA se
utilizzato.
Non bere la soluzione decalci cante e i prodotti
erogati no al compl etamento del ci clo. Non uti-
lizzar e in nessun caso l’aceto come decalci cante.
1 (Fig.13-14) - Inserire dal basso il porta ltro nel gruppo
erogazione (8) e ruotarlo da sinistra verso destra no al
suo bloccaggio.
2 (Fig.1B) - Rimuovere e svuotare il serbatoio dell’acqua.
3 (Fig.2) - Ver sare METÀ del contenuto della bottiglia di
decalci cante concentrato Saeco nel serbatoio dell’acqua
dell’apparecchio e riempire con acqua fresca potabile no
al livello MAX.
4 Accendere la macchina premendo il pulsante ON/OFF (11);
il led (18) si accende.
(Fig.21) - Prelevare (come descritto nel capitolo 7 del ma-
nuale), dal tubo vapore/acqua calda, 2 tazze (circa 150 ml.
ciascuna) di acqua; dopodichè spegnere la macchina tramite
il pulsante ON/OFF (11); il led (18) si spegne
5 Lasciare agire il decalci cante circa 15-20 minuti con la
macchina spenta.
6 Accendere la macchina premendo
(Fig.21) - Prelevar e (come descr itto nel capitolo 7 de l manua-
le) dal tubo vapore/acqua calda 2 t azze (circa 150 ml ciascuna)
di acqua. Successivamente spegnere la macchina tramite
pulsante ON/OFF (11)
7 Ripetere le operazioni descritte al punto 6 no al comple -
to svuotamento del serbatoio dell’acqua.
8 (Fig.2) - Risciacquare il serbatoio con acqua fresca potabi-
le e riempirlo completamente.
9 Inserire un contenitore sotto al porta ltro.
e lasciarla spent a per 3 minuti.
il pulsante ON/OFF (11)
.
il
• 12 •
Page 13

10 Accendere la macchina premendo il pulsante ON/OFF
(11); ruotare il pomello di selezione (17) nella posizione
"
" e tramite il por ta ltro, prelevare l’intero conte nuto
del serbatoio. Per fermare l’erogazione portare il pomello
di selezione (17) nella posizione "
11 (Fig. 2) - Riempire nuovamente il serbatoio con acqua f resca.
(Fig.21) - Posizionare un contenitore capiente sotto al
tubo vapore (pannarello). Aprire il rubinetto di erogazione
dell’acqua (3) ruotandolo in senso anti orario.
(Fig.22) - Ruotare il pomello di selezione (17) nella posi-
zione "
tramite il tubo vapore/acqua calda.
12 (Fig. 23) - Dopo av er nito il preli evo di acqua, p er fermare
l’erogazione por tare il pomello di selezione (17) nella posizione "
(Fig.24) - Chiudere il rubinetto erogazione acqua (3) ruo-
tando in senso orario.
13 Ripetere un’altra volta le operazioni dal punto (8) per un
totale di 4 serbatoi.
14 (Fig.19) - Rimuovere il porta ltro dal gruppo ruotandolo da
destra verso sinistra e sciacquarlo con acqua fresca potabile.
Il ciclo di decalci cazione è cosi concluso.
(Fig.2) - Riempire nuovamente il serbatoio con acqua fresca.
Se necessario e ettuare il caricamento del circuito come descrit to nel par. 4.5.
dalle norme vigenti nel Paese d’utilizzo.
" e prelevare l’intero contenuto del serbatoio
".
La soluzione decalci cante deve essere smalti-
ta secondo quanto previsto dal costruttore e/o
".
12 SMALTIMENTO
INFORMAZIONE AGLI UTENTI: ai sensi dell’art. 13 del Decreto
Legislativo 25 luglio 2005, n. 151"Attuazione delle Direttive
2002/95/CE, 2002/96/CE e 2003/108/CE, relative alla riduzione
dell'uso di sostanze pericolose nelle apparecchiature elettriche
ed elettroniche, nonché allo smaltimento dei ri uti"
Il simbolo del cassonet to barrato riportato sull’apparecchiatura o sulla sua confezione indica che il prodotto alla
ne della propria vi ta utile deve essere raccol to separatamente
dagli altri ri uti. L’utente dovrà, pertanto, conferire l’apparecchiatura giunta a ne vita agli idonei centri di raccolta di erenziata dei ri uti elettronici ed elettrotecnici, oppure riconsegnarla al rivenditore al momento dell’acquisto di una nuova
apparecchiatura di tipo equivalente, in ragione di uno a uno.
L’adeguata raccolta di erenziata per l’avvio successi vo dell’apparecchiatura dismessa al riciclaggio, al trattamento e allo
smaltimento ambientalmente compatibile contribuisce ad
evitare possibili e etti negativi sull’ambiente e sulla salute e
favorisce il reimpiego e/o riciclo dei materiali di cui è composta l’apparecchiatura. Lo smaltimento abusivo del prodotto
da parte dell’utente comporta l’applicazione delle sanzioni
amministrative previste dalla normativa vigente.
Italiano
• 13 •
Page 14

13 RISOLUZIONE PROBLEMI
Guasto Cause possibili Rimedio
La macchina non si ac cen de. Macchina non collegata alla rete elettrica. Collegare la macchina alla rete elettrica.
La pompa è molto ru mo ro s a. Man ca acqua nel ser ba to io Rabboccare co n acqua e ricaricare il circuito (p ar. 4.5)
Riportare il pomello di selezione (17) nella posizioNon esce ca è dopo aver posizionato il pomello di selezione
(17) nella posizione "
Il ca è é troppo freddo.
Non si forma la schiu ma del
lat te.
Non si riesce a preparare un
cappuccino.
Il ca è sgorga troppo ve lo ce men te, non si forma la crema.
Il ca è non sgorga o sgor ga
solo a gocce.
Il ca è sgorga dai bordi.
".
Porta ltro otturato.
Il led (20) "pronto macchina" era spen to
quan do è sta to portato il pomello di selezione (17) nella posizione "
Porta ltro non inserito per il preriscaldamento (cap. 5).
Tazzine fredde. Preriscadare le tazzine con acqua calda.
Latte non adatto: latte in polvere, latte
magro.
Pannarello sporco. Pulire il pannarello come descritto nel Cap.10.
Non è più presente vapore nella caldaia.
Troppo poco ca è nel porta ltro. Aggiungere il ca è (cap. 5).
Macinatura trop po grossa. Usare una miscela diversa (cap.6).
Ca è vecchio o non adatto. Usare una mi sce la diversa (cap.6).
Cialda vecchia o non adat ta. Cambiare la cialda utilizzata.
Manca un componente nel porta ltro.
Mancanza di acqua. Rabboccare con acqu a e ricaricare il circuito (par. 4.5)
Macinatura trop po ne. Usare una miscela diversa (cap.6).
Ca è premuto nel por ta ltro. Smuovere il ca è macinato.
Troppo ca è nel porta ltro. Ridurre la quantità di ca è nel porta ltro.
Pomello (3) aperto. Chiudere il pomello (3).
Macchina calci cata. Decalci care la macchina (cap.10).
Filtro nel porta ltro otturato. Pulire il ltro (cap.9).
Cialda non adatta. Cambiare il tipo di cialda.
Porta ltro inserito male nel grup po eroga-
zione ca è.
Bordo superiore del porta ltro sporco. Pulire il bordo del por ta lt ro.
Cialda inserita in modo errato.
Troppo ca è nel porta ltro. Ridurre la quantità di ca è uti liz zan do il misurino.
".
ne "
". Spegnere la macchina ed attendere che si
ra reddi (circa 1 ora). Successivamente rimuovere e
lavare bene il porta ltro. Se il problema si presenta
nuovamente contattare il centro assistenza.
Attendere che il led (20) si ac cen da.
Preriscaldare il porta ltro.
Utilizzare latte intero.
Ricar icare il circ uito (par. 4.5) e ri petere le ope razioni
descritte nel Cap.8.
Veri care che tut ti i componenti siano presenti e correttamente montati.
Inserire corre ttamente il porta ltro (cap.5).
Inserire correttamente la cialda facendo in modo che
non esca dal por ta ltro.
Per i guasti non con te m pla ti dalla suddetta ta bel la o in caso che i rimedi sug ge ri ti non li ri sol va no, rivolger si ad un
centro assistenza.
• 14 •
Page 15

Italiano
• 15 •
Page 16

IMPORTANT SAFEGUARDS
When using electrical appliances, basic safety precautions should always be
followed, including the following:
1. Read all instructions.
2. Do not touch hot surfaces. Use handles or knobs.
3. To protect against re, electric shock and injury to person do not immerse
cord, plugs, or machine in water or other liquid.
4. Close supervision is necessar y when the appliance is used by or near children.
5. Unplug from outlet when not in use and before cleaning. Allow to cool
before putting on or taking o parts, and before cleaning the appliance.
6. Do not operate any appliance with a damaged cord or plug or after the
appliance malfunctions, or has been damaged in any manner. Return
appliance to the nearest authorized service facility for examination, repair
or adjustment.
7. The use accessory attachments not recommended by the appliance
manufacturer may result in re, electric shock or injury to persons.
8. Do not use outdoors.
9. Do not let cords hang over edge of table or counter, or touch hot surfaces.
10. Do not place on or near a hot gas or electric burner, or in a heated oven.
11. Always attach plug to appliance rst, then plug cord into wall outlet. To
disconnect, turn any control to “o ”, then remove plug from wall outlet.
12. Do not use appliance for other than intended use.
13. Save these Instructions.
SAVE THESE INSTRUCTIONS
• 16 •
Page 17

INSTRUCTIONS FOR THE POWER
SUPPLY CORD
A. A short power-supply cord (or detachable power-supply cord) is to be
provided to reduce risks resulting from becoming entangled in or tripping
over a longer cord.
B. Longer detachable power-supply cords or extension cords are available and
may used if care is exercised in their use.
C. If a long detachable power-supply cord or extension cord is used,
1. The marked electrical rating of the detachable power-supply cord or
extension cord should be at least as great as the electrical rating of the
appliance
2. If the appliance is of the grounded type, the extension cord should be a
grounding-type 3-wire cord, and
3. The longer cord should be arranged so that it will not drape over the
counter top or table top where it can be pulled on by children or tripped
over.
English
• 17 •
Page 18

1 GENERAL INFORMATION
The co ee machine is suitable for preparing 1 or 2 cups of
espresso co ee and is provided with a swivel steam and hot
water wand. The controls on the front side of the machine are
labelled with easy-to-read symb ols.
The machine has been designed for domestic use and is not
suitable for professional, continuous use.
Warning. No liability is held for damage caused
by:
• Incorrect use not in accordance with the intended
purposes;
• Repairs not carried out in authorised service centres;
• Tampering with the power cord;
• Tampering with any part o f the machine;
• Use of non-original spare par ts and accessorie s;
• Failure to descale the machine and storage at temperatures below 0°C.
In these cases, the warranty is void.
1.1 To Simplify Manual Reading
The warning triangle indicates
all important instructions for the
instruc tions to avoid serious injur y!
References to illustrations, parts of the appliance or controls,
etc. are indicated by numbers or letters. Whenever possible,
refer to the illus tration.
This symbol is used to highlight information
that is particularly important to ensure opti-
mal use of the machine.
The illustrations corresponding to the text can be
found on the rst pages of the manual. Please refer to
these pages while re ading the operating instruc tions.
user’s safety. Carefully follow these
1.2 How to Use these Operating Instruc-
tions
Keep these operating instructions in a safe place and make
them available to anyone who may use the co ee machine.
For further information or in case of problems, please refer to
an authorised service centre.
2 TECHNICAL SPECIFICATIONS
The manufacturer reserves the right to make changes to the
technical speci cations of the produc t.
Nominal Voltage - Power Rating - Power Supply
See label on the appliance
Housing Material
Plastic
Size (w x h x d) (mm)
210 x 300 x 280
Weight
3.9 kg
Power Cord Length
1.3 m
Control Panel
Front side
Filter Holder
Pressurized type
Pannarello
Special for cappuccinos
Water Tank
1.25 litres - Removable type
Pump Pressure
15 ba r
Boiler
Stainless steel
Safety Devices
Thermal fuse
3 SAFETY REGULATIONS
Never allow water to come into contact with any of the
electrical parts of the machine: danger of shor t circuit!
Overheated steam and hot water may cause burning!
Never direct the steam or hot water jet towards body
parts. Handle the steam/hot water spout with care:
danger of scalding!
Intended Use
This co ee machine is intended for domestic use only. Do not
make any technical changes or use the machine for unauthorised purposes since this would create serious hazards! The appliance is not to be used by persons (including children) with
reduced physical, mental or sensory abilities or with scarce
experience and/or expertise, unless they are supervised by a
person responsible for their safety, or they are instructed by
this person on how to properly use the mac hine.
• 18 •
Page 19

Power Supply
Connect th e co ee machine only to a sui table socket. The voltage must correspond to that indicated on the appliance label.
Power Cord
Never use the co ee machine if the power cord is defective or
damaged. If the power cord is damaged, it must be replaced
by the manufac turer or by its author ised service centre. D o not
pass the power cord around corners, over sharp edges or over
hot objects and keep it away f rom oil.
Do not use the power cord to carry or pull the co ee machine.
Do not pull out the plug by the power cord or touch it with wet
hands.
Do not let the power cord hang freely f rom tables or shelves.
For the Safety of Others
Prevent children from playing with the machine.
Children are not aware of the risks related to electrical household appliances. D o not leave the machine packagi ng materials
within the reach of children.
Danger of Burns
Never direct jets of overheated steam and/or hot water towards yourself or others. Always use the handles or knobs
provided.
Do not disconnect (remove) the pressurized lter holder while
co ee is brewed. Hot water d rips may spill out of the brew unit
during the warm-up phase.
Do not brew co ee when the machine is overheated, namely
when both “
” and “ ” lights are on.
Location
Place the co ee machine in a s afe place, where there will be no
danger of overturning or injur y.
Hot water or overheated steam may spill out of the machine:
danger of scalding!
Do not keep the machine at a temperature below 0°C. Frost
may damage it.
Do not use the co ee machine outdoors.
In order to prevent its housing from melting or being damaged, do not place the machine on very hot surfaces and close
to open ames.
Cleaning
Before cleaning the machine, turn it o by pressing the ON/
OFF button, then pull out the plug from the socket. Wait also
for the machine to cool down. Never immerse the machine in
water!
It is strictly forbidden to tamper with the internal parts of the
machine.
Water left in the t ank for several days should not be con sumed.
Wash the tank and ll it with fresh drinking water.
Suitable Location for Operation and Maintenance
In order to ensure corre ct and e cient perf ormance of the coffee machine, we reco mmend following the instr uctions below:
• Choose a level surface;
• Choose a location that is su ciently well-lit, clean and
near an easily reachable socket;
• Allow for a minimum distance from the sides of the machine as shown in (Fig.A).
Storing the Machine
If the machine is to remain inactive for a long time, turn it o
and unplug it. Store th e machine in a dry place, out of the r each
of children. Keep it protected from dus t and dirt.
Repairs / Maintenance
In case of failure, problems or a suspected fault resulting from
the falling of the machine, immediately remove the plug from
the socket. Never attempt to operate a faulty machine. Servicing and repairs may only be carried out by Authorised Service
Centres. All liability for damages resulting from work not carried out by professionals is declined.
Fire Safety Precautions
In case of re, use carbon dioxide (CO2) extinguishers. Do not
use water or dry powder extinguishers.
Key to Machine Parts (Page 2)
1 Control panel
2 Water tank lid
3 Hot water/steam knob
4 Seat for accessories
5 Water tank
6 Cup holder res t
7 Water recovery tr ay + grill (if any)
8 Co ee brew unit
9 Steam wand (Pannarello)
10 Power cord
11 ON/OFF button
12 Pressurized lter holder
13 Ground co ee measuring scoop
14 Ground co ee lter
(single piece for 1 or 2 co ee(s))
15 Co ee pod lter adapter
16 Co ee pod lter
17 Selection knob
18 "Machine on" light
19 "Steam ready" light
20 Co ee/Water light - "Machine ready"
English
• 19 •
Page 20

4 INSTALLATION
For your own and other people safety, carefully follow
the "Safety Regulations" indicated in chapter 3.
4.1 Packaging
The original packaging has been designed and manufactured
to protect the machine during transport. We recommend
keeping the packaging material for possible future transport.
4.2 Installation Precautions
Before installing the machine, read the following safety precautions carefully:
• Place the machine in a safe place.
• Make sure children cannot play with the machine.
• Do not place the machine on hot surfaces or near open
a m e s .
The co ee machi ne is now ready to be connecte d to the electric
network.
Note: we recommend washing the components
before using them for the rst time and/or af-
ter they have not be en used for a cert ain period of time.
4.3 Machine Connection
Electric power may be very dangerous! It is
therefore necessary to strictly follow the safety
regulat ions. Do not use fau lty power cords . Faulty cords
and plugs m ust be replaced im mediately by Author ised
Service Centres.
The voltage of the appliance has been pre-set by the manufacturer. Check that the voltage matches the indication on the
data plate at the bottom of the appliance.
• Inser t the plug into a wall socket wit h suitable power volt-
age.
4.4 Water tank
• (Fig.1A) - Remove the lid f rom the water tank (2) by lifting
it.
• (Fig.1B) - Remove the water tank (5).
• (Fig.2) - Rinse it and ll it with fresh drinking water: do
not exceed the (MAX) level indicated in the water tank .
Fill the tank only with fresh, non-sparkling,
drinking water. Hot water or any other liquid
may damage the tank. Do not operate the machine
without water: make sure that there is enough water
in the tank.
• (Fig.3A) - Insert the water tank making sure that it has
been properly repositioned in its former seat and then
reposition the lid (2).
Make sure that the tank is fully inserted in the
machine by p ressing it gently up t o its limit stop
(THE REFERENCE MARK SHOWN IN FIG.3B SHOULD BE
COMPLETELY VISIBLE). This is to avoid water leaks from
its bottom.
4.5 Circuit Priming
At the beginning, after dispensing steam or when the water
tank is empty, the machine’s water circuit must be primed.
• Press the ON/OFF button (11); the light (18) will turn on to
indicate that the machine is on.
• (Fig.4) - Place a container under the steam wand (Pan-
narello).
• Open the “hot water/steam” knob (3) by turning it coun-
ter-clockwise.
• (Fig.5) - Set the selection knob (17) to the "
• Wait until a steady jet of water ows out of the steam
wand (Pannarello).
• (Fig.5) - Set the selection knob (17) to the "
• Close the "hot water/steam" knob (3) by turning it clock-
wise. Remove the container.
" position.
" position.
4.6 Using the Machine for the First Time
or After a Period of Inactivity
This simple operation ensures an optimum brewing and must
be performed:
- at rst start-up;
- when the machine remains inactive for a long time (more
than 2 weeks).
Dispensed water must be emptied into an ad-
equate drain. It is not suitable for food use. If
the container lls up during the cycle, stop dispensing
water and empty the container before resuming the
operation.
• (Fig.2) - Rinse th e tank and ll it again with fr esh drinking
water.
• (Fig.4) - Place a container under the steam wand (Pan-
narello). Open the knob (3) by turning it coun ter-clockwise.
(Fig.5) - Set the selec tion knob (17) to the "
• Dispense the whole water tank content from the steam/
hot water wand (Pannarello). To end the operation, s et the
selection knob (17) to the "
" position and close the knob
" position.
• 20 •
Page 21

(3) by turning it clockwise.
• (Fig.2) - Fill the water tank with fresh drinking water.
• (Fig.13-14) - Insert the lter holder into the brew unit (8)
from the bot tom and turn it from left to right until it locks
into place.
• (Fig.15) - Place a suitable container un der the lter holder.
• (Fig.16) - Turn the selection knob (17) to the "
tion and dispense all the water in the tank.
(Fig.17) - Before the tank is totally empty, stop dispensing
and switch the selection knob (17) to the "
• Fill the t ank again and wait until the "machine ready " light
(20) turns on.
• (Fig.19) - Rem ove t he lte r hol der f rom the u nit by tu rnin g
it from right to left and rinse it with fresh drinking water.
Now the machine is read y. Please see related c hapters for operating details on how to brew co ee and dispense steam.
" posi-
" position.
5 COFFEE BREWING
Warning! During the co ee brewing it is forbidden to remove the pressurized lter holder by
manually turning it clock wise. Danger of burns.
• During this operation, the "machine ready" light (20) may
ash; this is to be considered as a st andard and not a faulty
operating mode.
• Before using the machine, make sure that the hot water/
steam knob (3) is closed and that there is enough water in
the machine tank.
• Press the ON/OFF button (11); the light (18) will turn on to
indicate that the machine is on.
• Wait unt il the "machine ready" light (20) turns on. Th e machine is now ready f or co ee brewing.
Accessories for co ee brewing are placed in
a specially designed seat to make operations
easy and immediate.
If the ground co ee measuring scoop and/or the lters
are required, lift lid cover (2) and take what you need
(Fig.35 and Fig.36).
If co ee is NOT brewed after turning the selec-
tion knob (17) to the "
selection knob (17) to the "
"Troubleshooting" table before removing the lter
holder.
" position, turn the
" position and check the
5.1 Using Ground Co ee
• (Fig.7) - Inser t the lter (14) in the pressurized lter holder
(12); the lter is already inserted when using the machine
for the rst time.
• (Fig.13) - Insert the lter holder into the brew un it (8) from
the bottom.
• (Fig.14) - Turn the lter holder from left to right until it
locks into place. Release the grip from the pressurized
lter holder. The handle is automatically slightly turned
leftwards.
This movement guarantees proper pressurized lter hold-
er performance.
• (Fig.16) - Preheat the pressurized lter holder by switch-
ing the selection knob (17) to the "
some water spills out of it (this is to be done only for the
rst co ee brewing).
• (Fig.17) -When 50cc of water have owed out, set the se-
lection k nob (17) to the "
• (Fig.19) - Remove the lter holder from the machine by
turning it from right to left and pour out any water left.
As the machine is tted with the special lter (14), there
is no need to c hange the lter to prepare eit her one or two
co ees.
• (Fig. 35) - Remove the mea suring scoop from t he machine.
• (Fig.8) - Add 1-1.5 measuring scoop(s) for single co ee
and 2 measuring scoops for double co ee. Remove any
co ee residues from the rim of the lter holder.
• (Fig.13) - Insert the lter holder (12) into the brew unit (8)
from the bottom.
• (Fig.14) - Turn the lter holder from left to right until it
locks into place.
• (Fig.15) - Take 1 or 2 preheated cups and place them
under the pres surized lter holder. Make sure that they are
correctly placed under the co ee brewing nozzles.
• (Fig.14) - Switch the selec tion knob (17) to the "
tion.
• (Fig.17) - When the desired quantity of co ee has been
brewed, turn the selection knob (17) to the "
stop co ee brewing. Wait a few s econds after brewing has
stopped, then remove the cups of co ee (Fig.18).
• (Fig.19) - Wait a few seconds after brewing, then remove
the pressurized lter holder and empty the remaining coffee grounds.
Note: if a small qu antity of water rem ains in the
lter holder, this has to be considered as abso-
lutely normal and is due to the lter holder features.
" position to stop brewing.
" position until
" posi-
" position to
English
Important note: the lter (14) should be kept
clean to guarantee perfect results. Clean daily
after use.
• 21 •
Page 22

5.2 Using Co ee Pods
• (Fig.9) - Use a co ee spoon to remove the lter for ground
co ee (14) from the pressur ized lter holder (12).
• (Fig.10) - Insert the co ee pod adapter (15) - with the
convex part f acing down - into the pressurize d lte r holder
(12).
• (Fig.11) - Then, insert the pod lter (16) into the pressur-
ized lter holder (12).
• (Fig.13) - Insert the pressurized lter holder into the brew
unit (8) from the bot tom.
• (Fig.14) - Turn the lter holder from left to right until it
locks into place. Release the grip from the pressurized
lter holder. The handle is automatically slightly turned
leftwards.
This movement guarantees proper pressurized lter hold-
er performance.
• (Fig.16) - Preheat the pressurized lter holder by switch-
ing the selection knob (17) to the "
some water spills out of it (this is to be done only for the
rst co ee brewing).
• (Fig.17) -When 50cc of water have owed out, set the se-
lection k nob (17) to the "
• (Fig.19) - Remove the pressurized lter holder from the
machine by turning it from right to left and pour out any
water left.
• (Fig.12) - Insert the pod into the lter holder and make
sure the paper of the pod does not overhang the lter
holder.
• (Fig.13) - Insert the pressurized lter holder into the brew
unit (8) from the bot tom.
• (Fig.14) - Turn the lter holder from left to right until it
locks into place.
• Take 1 pr eheated cup and place it under the lter holder.
Check that it is placed correctly under the co ee brewing
nozzles.
• (Fig.16) - Switch the selec tion knob (17) to the "
tion.
• (Fig.17) - When the desired quantity of co ee has been
brewed, turn the selection knob (17) to the "
stop co ee brewing, and then remove the co ee cup.
• (Fig.19) - Wait a few seconds after brewing, then remove
the lter holder and dispose of the used pod.
Important note: the lter (16) and the adapter
(15) should be kept clean to guarantee perfect
results. Clean dail y after use.
" position to stop brewing.
" position until
" posi-
" position to
6 TIPS FOR CHOOSING COFFEE
As a general rule, any type of co ee available on the market
can be used. However, co ee is a natural product and its avour changes according to its origin and blend; it is therefore
a good idea to try di erent types of co ee in order to nd the
most suited to your personal tas te.
For optimal results, we recommend using espresso machine
blends. As a rule, co ee should always come out of the pressurized lter holder, without dripping.
The co ee brewing speed can be modi ed by slightly changing the amount of co ee in the lter and/or using a di erent
co ee grind.
Saeco recommends using ESE single-dose co ee pods for a
tasty co ee and easier cleaning and preparation.
BEFORE PERFORMING ANY OPERATIONS RELATED
TO HOT WATER/STEAM DISPENSING, MAKE SURE
THAT THE STEAM WAND (PANNARELLO) IS DIRECTED OVER
THE WATER RECOVERY TRAY.
7 HOT WATER
Danger of burns! Dispensing may be preceded
by small jets of hot water. The steam wand
may reach high temperatures: never touch it with bare
hands.
• During this operation, the "machine ready" light (20) may
ash; this is to be considered as a st andard and not a faulty
operating mode.
• Before using the machine, make sure that the hot water/
steam knob (3) is closed and that there is enough water in
the machine tank.
• Pres s the ON/OFF button (11); the red light (18) will turn on
to indicate that the machine is on.
• Wait unt il the "machine ready" light (20) turns on. Th e ma-
chine is now ready.
• (Fig.21) - Place a container or a tea glass under the steam
wand (Pannarello).
• (Fig.21) - Open the knob (3) by turning it counter-clock-
wise.
• (Fig. 22) - Set the selecti on knob (17) to the "
• (Fig.23) - When the desired quantity of hot water has
been dispensed, set the selection knob (17) to the "
sition.
" position.
" po-
• 22 •
Page 23

• (Fig.24) - Close the knob (3) by turning it clockwise.
• Remove the hot water container.
8 STEAM / CAPPUCCINO
Danger of burns! Dispensing may be preceded
by small jets of hot water. The steam wand may
reach high temperatures: never touch it with bare
hands.
Warning! Never brew coffee when the steam
function is on, as the temperature is too high
and there is a risk of burns.
Warning! During co ee br ew in g, d o no t r em ove
the filter holder (if inserted) by manually
turning it clockwise. Danger of burns! The lter holder
can only be disconnected after bringing the selection
knob (17) back to the "
machine down as desc ribed in section 4.5.
" position and cooling the
• Once nished, close the knob (3) by turning it clockwise
and remove the cup with frothed milk.
• (Fig.30) - Set the s election knob (17) to the "
If both "
the machine is too high for brewing co ee.
• Prime the circuit as described in section 4.5 to make the
machine ready for use.
explained in sec tion 4.5 and then repeat the steps.
• After this operation, clean the steam wand with a wet
cloth.
" and " " lights are on, the temperature of
Note: the machine is ready when the "machine ready" light is steady on.
Important note: if it is not possible to brew a
cappuccino as described, prime the circuit as
The same procedure can be used to heat other
beverages.
" position.
English
• During this operation, the "machine ready" light (20) may
ash; this is to be considered as a st andard and not a faulty
operating mode.
• Before using the machine, make sure that the hot water/
steam knob (3) is closed and that there is enough water in
the machine tank.
• Press the ON/OFF button (11); the light (18) will turn on to
indicate that the machine is on.
• Wait until the "machine ready" light (20) turns on.
• (Fig. 25) - Set the selectio n knob (17) to the "
The light (20) turns o .
• Wait unt il the light (19) turns on. The mac hine is now ready
for steam dispensing.
• (Fig.26) - Place a container under the steam wand.
• (Fig.26) - Open the knob (3) for a few seconds, so that remaining water ows out of the steam wand (Pannarello).
In a short time only steam will come out.
• (Fig.27) - Close the knob (3) and remove the container.
• Fill 1/3 of th e container - the one you wish to use to p repare
the cappuccino - with cold milk.
Use cold milk to get a better result.
• (Fig.28) - Immerse the steam wand in the milk and open
the knob (3) by turning it counter-clock wise. Turn the milk
container with slow upward movements so that it warms
up evenly.
It is recommended that the dispensing process
lasts max. 60 seconds.
" position.
9 ENERGY SAVING
The machine is designed for ener gy saving. The machine automatically turns o after 9 minutes of inactivity.
To restart the machine just press the ON/OFF button (11); the
"machine on" light (18) turns on.
Wait until the "machine ready" light (20) turns on.
10 CLEANING
Maintenance and cleaning can only be carried out when the
machine is cold and disconnected from the electric net work.
• Do not immerse the machine in water or place any of its
parts in a dishwasher.
• Do not use spirit, solvents and/or aggressive chemical
agents.
• We recommend cleaning the water tank and re lling it
with fresh water every day.
• (Fig.31-33) - Every day, after heating milk, remove t he external part of the Pannarello and wash it with fresh drinking water.
• (Fig. 31-32-33) - Clean the steam wand weekly. In order to
do this, perf orm the following operations:
- remove the external part of the Pannarello (for standard
cleaning);
- remove the upper part of the Pannarello from the steam
wand;
- wash the upper par t of the Pannarello with fr esh drinking
water;
• 23 •
Page 24

- wash the steam wand with a wet cloth and remove any
milk residue;
- re t the upper part in the steam wand (make sure it is
completely inserted).
Reassemble the e xternal part of the Pannarello.
• (Fig.34) - Empty and clean the drip tr ay every day.
• Use a sof t, dampened cloth to clean the appliance.
• (Fig.20) - Perform the following operations to clean the
pressurized lter holder:
- (Fig.9) - remove the lter and wash it tho roughly with hot
water.
- remove the adapter (if any) and wash it thoroughly with
hot water.
- wash the internal part of the pressurized lter holder.
• Do not dr y the machine and/or its par ts using a microwave
and/or standard oven.
• (Fig.35-36) - Clean the seat for accessories with a damp
cloth every we ek to remove any co ee or dust residues.
Note: do not wash the pressurized lter holder
in the dishwasher.
11 DESCALING
Limescale bu ilds up with the use of the appliance; t he machine
needs descaling every 1-2 months and/or whenever a reduction in water ow is noticed. Use the Saeco descaling product
only.
In case of con ict, priority must be given to
what is indicated in the operation and maintenance manual over the instructions provided on separately sold accessories and materials.
Use the Saeco descaling product (Fig. B). Its
formula has been designed to ensure better
machine performance and operation for its whole operating life. If correctly used, it also avoids alterations
in the brewed product. Before starting a descaling cycle make sur e that: THE WATER FILTER (if used) HAS BEEN
REMOVED.
Never drink the descaling solution or any prod-
ucts dispensed until the cycle has been carried
out to the end. Never use vinegar as a descaling solution.
1 (Fig.13-14) - Insert the lter holder into the brew unit (8)
from the bot tom and turn it from left to right until it locks
into place.
2 (Fig.1B) - Remove and empty the water tank.
3 (Fig.2) - Pour HALF the content of the Saeco concentrated
descaling solution into the water tank, then ll the tank
with fresh drinking water up to the MAX level.
4 Turn on the machine by pressing the ON/OFF button (11).
The indicator light (18) turns on.
(Fig.21) - Fill up (as described in chapter 7 of the manual)
2 cups of water (about 150ml each) from the steam / hot
water wand and turn o the machine by pressing the ON/
OFF button (11); the light (18) turns o
5 Let the descaling solution take e ect for approx. 15-20
minutes with the machine turned o .
6 Turn on the machine by pressing the
(Fig.21) - Fill up (as described in chapter 7 of the manual)
2 cups of water (about 150 ml each) from the steam / hot
water wand. Then turn the machine o by pressing
ON/OFF button (11)
7 Repeat the operations described in step 6 until the water
tank is completely empty.
8 (Fig.2) - Rinse the water tank with fresh drinking water
and ll it completely.
9 Place a container under the lter holder.
10 Switch on th e machine by pressing the ON/O FF button (11);
turn the selection knob (17) to the "
means of the lter holder, dispense the whole content of
the tank. Set the selection knob (17) to the "
stop dispensing.
11 (Fig.2) - Fill the tank again with fresh water.
(Fig.21) - Place a large enough container under the steam
wand (Pannarello). Open the water dispensing knob (3) by
turning it counter-clockwise.
(Fig.22) - Turn the selection knob (17) to the "
tion and dispense the whole content of the tank by means
of the steam / hot water wand.
12 (Fig.23) - After dispensing water, set the selection knob
(17) to the "
(Fig.24) - Close th e water dispensing knob (3) by turning it
clockwise.
13 Repeat the operat ions from step (8) once again, for a total
of 4 tanks.
14 (Fig.19) - Remove the lter holder from the unit by turning
it from right to left and rinse it with fresh drinking water.
The descaling cycle is now complete.
(Fig.2) - Fill the tank again with fresh water. If necessary,
prime the circuit as described in s ection 4.5.
The descaling solution is to be disposed of according to the manufacturer’s instructions
and/or the regulations in force in the country of use.
and leave it o for 3 minutes.
" position to stop dispensing.
ON/OFF button (11)
" position and, by
" position to
.
the
" posi-
• 24 •
Page 25

12 DISPOSAL
- The packing materials can be recycled.
- Appliance: unplug the appliance and cut the power cord.
- Deliver the appliance and power cord to a service center or
public waste disposal facilit y.
This produc t complies with eu directive 2002/96/EC.
English
The symbol
on the product or on its packaging indicates that this pr oduct may not be treated as hous ehold waste.
Instead it shall be handed over to the applicable collection
point for the re cycling of electric al and electronic equipment.
By ensuring this product is disposed of correctly, you will help
prevent potential negative consequences for the environment
and human health, which could otherwise be caused by inappropriate waste handling of this product. For more detailed information about recycling of this product, please contact your
local city o ce, your household waste disposal service or the
shop where you purchased the product.
• 25 •
Page 26

13 TROUBLESHOOTING
Problem Possible Causes Solution
The machine d oes not switch on.
The pump is ver y noisy. No water in the t ank.
Co ee is not spilling out after
turning the selection knob (17)
to the "
Co ee is too cold.
The milk does no t froth.
It is not possi ble to prepare a cap puccino.
Co ee is brewed too fast, crema
does not fo rm.
Co ee does not c ome out or drips
only.
Co ee ows out of the edges .
" position .
The machine is not connected to the electric
network.
Filter holder is clogged.
The "machine ready" light (20) was o while
switchin g the selection k nob (17) to the "
" position .
The lter holder is not inserted for preheating (chapter 5).
The cups are c old. Preheat the c ups with hot water.
The milk is not sui table: powdered milk, lowfat milk.
Dirt y Pannarello. Clean the Pannar ello as described in c hap.10.
There is no mo re steam in the boiler.
There is too li ttle co ee in the lter holder. Ad d co e e (chapter 5).
The grind is t oo coarse. Use a di erent blend (chapter 6).
Co ee is old or not sui table. Use a di erent blend (chapter 6).
The pod is old o r not suitable. Cha nge the pod.
Missing comp onent in the lter holder.
No water.
The grind is t oo ne. Use a di erent blend (chapter 6).
Co ee tamped in t he lte r holder. Shake t he ground co ee.
There is too mu ch co ee in the lter holder. Redu ce the quantity of co ee in the lter holder.
Knob (3) is open. Close the k nob (3).
The machine ha s limescale build-up. Descale t he machine (chapter 10).
The lt er in the lter holder is clogge d. Clean the lter (chapter 9).
Not suitab le pod. Change ty pe of pod.
The lter holder is not correctly inserted in
the brew uni t.
The upper r im of the lter holder is dirt y. Clean the rim of the lter holder.
Pod inserted incorrectly.
There is too mu ch co ee in the lter holder.
Connect t he machine to the elec tric network.
Fill the water t ank and prime the ci rcuit again (sec tion 4.5).
Turn the selection knob (17) back to the "
Turn the machine o and let it cool down (approx. 1
hour). Then remove and wash the lter holder thoroughly. If the problem persists, contact the service
centre.
Wait until the ligh t (20) turns on.
Preheat the lter holder.
Use whole milk.
Prime the circuit (section 4.5) and repeat the steps describe d in chapter 8.
Make sure that all the components are present and
properly installed.
Fill the water t ank and prime the ci rcuit again (sec tion 4.5).
Insert t he l ter holder correc tly (chapter 5).
Inser t the pod correc tly. Make sure it does not c ome out
of the l ter holder.
Reduce the quantity of co ee using the measuring
scoop.
" position.
Please cont act an authoris ed service centr e for any problems no t covered in the above tabl e or when the suggeste d
solutions do not solve the problem.
• 26 •
Page 27

1 ALLGEMEINES
Die Ka eemaschine eignet sich für die Zubereitung von 1
oder 2 Tassen Espresso und ist mit einer drehbaren Düse für
die Dampf- und die Heißwasserausgabe ausgestattet. Die Bedienelemente auf der Vorderseite des Geräts sind mit einfach
verständlichen Symbolen gekennzeichnet.
Die Maschine wurde für den Einsatz im Haushalt entwickelt
und eignet sich daher nicht für den Dauerbetrieb im gewerblichen Einsatz.
Achtung. In folgenden Fällen wird für eventuelle
Schäden ke ine Haftung übernommen:
• Falsche und n icht den vorgesehe nen Verwendungs-
zwecken entsprechende Ver wendung;
• Reparaturen, die nicht in autorisierten Kunden-
dienststellen durchgeführt wurden;
• Veränderungen am Netzkabel;
• Veränderungen an beliebigen Bestandteilen der
Maschine;
• Verwen dung von anderen a ls originalen Er satz- und
Zubehörteilen;
• Fehlende Entkalkung und Lagerung in Räumen bei
Temperaturen unter 0°C.
In diesen Fällen erlischt die Garantie.
1.1 Hinweise zur einfacheren Lektüre
Das Warndreieck weist auf alle
wichtig en Hinweise für d ie Sicherhe it
des Benutzers hin. Diese Hinweise
sind strikt zu beachten, um schwere Verletzungen zu
vermeiden!
Für weitere Informationen oder bei Problemen wenden Sie
sich bitte an die autorisierten Kundendienststellen.
2 TECHNISCHE DATEN
Der Hersteller behält sich das Recht vor, technische Änderungen am Produkt vorzunehmen.
Nennspannung - Nennleistung - Versorgung
Siehe Typenschild auf dem Gerät
Gehäusematerial
Kunsts to
Abmessungen (L x H x T) (mm)
210 x 300 x 280
Gewicht
3,9 kg
Kabellänge
1,3 m
Bedienfeld
Auf der Vorders eite
Filterhalter
Druckverdichtet
Pannarello
Spezialzubehör für Cappuccino
Wasse rtank
1,25 Liter - herausnehmb ar
Pumpendruck
15 ba r
Durchlauferhitzer
Rostfreier Edelstahl
Sicherheitsvorrichtungen
Thermosicherung
Deutsch
Der Bezug auf Abbildungen, Teile des Geräts oder Bedienelemente usw. erfolgt über Zahlen oder Buchstaben. In diesem
Falle wird auf die Abbildung verwiesen.
Mit diesem Symbol werden Informationen gekennzeichnet, auf die besonders geachtet wer-
den muss, um den Betri eb der Maschine zu optimier en.
Die dem Text entsprechenden Abbildungen be nden
sich auf den ersten Seiten des Handbuchs. Diese Seiten
sind beim Lesen der vorliegenden Bedienungsanleitung
zu berücksichtigen.
1.2 Gebrauch dieser Bedienungsanlei-
tung
Bewahren Sie diese Bedienungsanleitung an einem sicheren
Ort auf und legen Sie sie der Ka eemaschine immer bei, wenn
diese von anderen Personen benutzt wird.
3 SICHERHEITSVORSCHRIFTEN
Die unter Strom stehenden Teile dürfen keines falls mit
Wasser in Berührung kommen: Kurzschlussgefahr! Der
heiße Damp f und das heiße Wass er können Verbren nungen verur sachen! Nie den D ampf- oder Heißwa sserstrah l
auf Körper teile richten un d die Dampf-/Heißwass erdüse
immer vorsichtig anfassen: Verbrennungsgefahr!
Sachgemäßer Gebrauch
Die Ka eemaschine ist ausschließlich für den Gebrauch im
Haushalt bestimmt. Technische Änderungen und unsachgemäßer Gebrauch sind wegen der damit verbundenen Risiken
verboten! Die Ma schine ist nicht dazu bes timmt, von Personen
(einschließlich Kindern) mit eingeschränkten körperlichen
oder geistigen Fähigkeiten oder einer Beeinträchtigung der
• 27 •
Page 28

Sinnesorgane und/oder von Personen ohne ausreichende Erfahrung oder Kompetenz verwendet zu werden, es sei denn,
sie werden von einer Person über wacht, die für ihre Sicherheit
verantwortlich ist, oder sie werden im Gebrauch der Maschine
geschult.
Stromversorgung
Die Ka eemaschine darf ausschließlich an eine geeignete
Steckdose angeschlossen werden. Die Spannung muss mit
derjenigen übereinstimmen, die auf dem Typenschild des Geräts angegeben ist.
Netzkabel
Die Ka eemaschine darf keinesfalls mit defektem Netzkabel
betrieben werden. Bei Schäden am Netzkabel muss dieses
vom Hersteller oder von dessen Kundendienst ausgetauscht
werden. Das Net zkabel darf nicht in Ecke n, über scharfe Kanten
oder auf sehr heißen Gegenständen verlegt werden. Es sollte
vor Öl geschützt werden.
Die Ka eemaschine darf nicht am Kabel getragen oder gezogen werden. Der Stecker darf nicht durch Ziehen am Kabel
herausgezogen werden. Er sollte nicht mit nassen Händen
berührt werden.
Der freie Fall des Netzkabels von Tischen oder Regalen sollte
vermieden werden.
Schutz anderer Personen
Kinder beaufsichtigen, damit sie nicht mit dem Gerät spielen.
Kinder können die Gefahrensituationen, die durch Haushaltsgeräte entstehen können, nicht abschätzen. Die für die Verpackung der Maschine benutzten Materialien sollten nicht in
Reichweite von Kindern aufbewahrt werden.
Verbrühungsgefahr
Den Heißwasser- oder Dampfstrahl keinesfalls auf sich selbst
oder auf andere Personen richten. Stets die entsprechenden
Gri e oder Drehknöpfe benut zen.
Der Druck lterhalter darf keinesf alls während der Ausgabe des
Ka ees herausgenommen (abgenommen) werden. Während
der Aufheizphase der Brühgruppe besteht die Möglichkeit des
Austrit ts von Tropfen heißen Wassers.
Keinen Ka ee ausgeben, wenn sich die Maschine in Übertemperatur be ndet, d.h. wenn die LED “
tig au euchten.
” und “ ” gleichzei-
Standort
Die Ka eemaschine sollte an einem sicheren Ort aufgestellt
werden, an dem nicht die Gefahr des Umkippens oder der Verletzung von Personen b esteht.
Es besteht die Möglichkeit des Austritts von heißem Wasser
oder Dampf: Verbrennungsgefahr!
Die Maschine sollte Temperaturen von unter 0°C nicht ausgesetzt werden. Es besteht die Gefahr, dass die Maschine durch
gefrierendes Wasser beschädigt wird.
Die Ka eemaschine dar f nicht im Freien betrieben werden.
Die Maschine nicht auf heißen Flächen oder in der Nähe von
o enem Feuer aufstellen, da das Gehäuse schmelzen oder auf
andere Art beschädigt werden könnte.
Reinigung
Bevor die Maschine gereinigt wird, muss sie mit der Taste ON/
OFF ausgeschaltet und dann der Stecker von der Steckdose abgenommen werden. Da rüber hinaus abwarten, bis die Mas chine abgekühlt ist. Die Maschine keinesf alls in Wasser tauchen!
Der Versuch von Eingr i en i m Inneren der Maschine ist str engstens verboten.
Wasser, das einige Tage lang im Wassertank verblieben ist,
darf nicht für Lebensmittelzwecke genutzt oder getrunken
werden. Den Tank reinigen und mit frischem Trinkwasser füllen.
Raumbedarf für den Betrieb und die Wartung
Für einen korrekten und einwandfreien Betrieb der Ka eemaschine sollten folgende Empfehlungen berücksic htigt werden:
• Eine ebene Au age äche auswählen.
• Der Raum sollte ausreichend beleuchtet und hygienisch
unbedenklich sein und die Steckdose muss leicht zugänglich sein.
• Gemäß der Angaben in der Abbildung einen Mindestabstand von den Maschinenwänden berücksichtigen (Abb. A).
Aufbewahrung der Maschine
Die Maschine ausschalten, wenn sie längere Zeit nicht benutz t
wird, und den Stecker aus der Steckdose ziehen. An einem
trockenen und für Kinder unzugänglichen Ort aufbewahren.
Vor Staub und Schmutz schützen.
Reparaturen / Wartungsarbeiten
Die Maschine bei Störungen, Defekten oder dem Verdacht auf
Defekte nach einem Sturz nicht verwenden und unverzüglich
den Netzstecker ziehen. Eine defekte Maschine keinesfalls in
Betrieb setzen. Eingri e und Reparaturen dürfen ausschließlich von autorisierten Kundendienststellen vorgenommen
werden. Im Falle von nicht fachgerecht ausgeführten Eingriffen wird jede Haf tung für eventuelle Schäden abgelehnt.
Brandschutz
Im Fall eines Brands einen Kohlensäurelöscher (CO2) verwenden. Keinesfalls sind Wasser- oder Pulverlöscher einzusetzen.
• 28 •
Page 29

Legende der Maschinenbestandteile (S. 2)
1 Bedientafel
2 Deckel des Wassertank s
3 Drehknopf Heißwasser / Dampf
4 Aufnahme für das Zubehör
5 Wassertank
6 Halterung Tassenabstell äche
7 Wasserau angschale + Gitter (soweit vorgesehen)
8 Ka eebrühgruppe
9 Dampfdüse (Pannarello)
10 Netzkabel
11 Taste ON/OFF
12 Druck lterhalter
13 Messlö el für gemahlenen Ka ee
14 Filter für gemahlenen Ka ee
(ein Filter für die Ausgabe von 1 oder 2 Tassen Ka ee)
15 Filteradapter für Ka eepads
16 Filter für Ka eepads
17 Anwahlknopf
18 LED "Maschine ein"
19 LED "Dampf bereit"
20 LED Ka ee / Wasser - "Maschine bereit"
4 AUFSTELLUNG
Für Ihre eigene Sicherheit und die der anderen müssen
die “Sicherheitsvorsc hriften” im Kap. 3 s trikt eingehalten werden.
4.1 Verpackung
Die Original-Verpackung wurde für den Schutz der Maschine
während des Versandes entwickelt und hergestellt. Es wird
empfohlen, diese Verpackung für eventuelle zukünftige Transporte aufzubewahren.
4.2 Installationshinweise
Bevor die Maschine installiert wird, müssen die folgenden Sicherheitsvorschriften beachtet werden:
• die Maschine an einem sicheren Ort aufs tellen;
• sicherstellen, dass Kinder nicht mit der Maschine spielen
können;
• die Maschine nicht auf heißen Flächen oder in der Nähe
von o enem Feuer aufstellen.
Nun kann die Ka eemaschine an das Strom netz angeschlossen
werden.
Hinweis: Es wird empfohlen, die Bestandteile vor
deren Benutzung und/oder nach einer längeren
Nichtbenutzung zu reinigen.
4.3 Anschluss der Maschine
Elektrischer Strom kann gefährlich sein! Aus die-
sem Grunde müssen die Sicherheitsvorschriften
stets strikt beachtet werden. Defekte Kabel dürfen
keinesfalls benutzt werden! Beschädigte oder defekte
Kabel und Stecker müssen umgehend von einer autorisierten Kundendienststelle ersetzt werden.
Die Spannung des Geräts wurde werkseitig eingestellt. Überprüfen, ob die Netzspannung den auf dem Typenschild auf der
Unterseite der Maschine aufgeführten Angaben entspricht.
• Den Stecker in eine Wandsteckdose mit geeigneter Span-
nung einstecken.
4.4 Wassertank
• (Abb. 1A) - Den Deckel des Wassertanks (2) abnehmen,
indem er angehoben wird.
• (Abb. 1B) - Den Wassertank (5) herausnehmen.
• (Abb. 2) - Den Tank ausspülen und mit frischem Trinkwas-
ser füllen. Der Füllstand (MAX), der auf dem Tank markiert
ist, sollte nicht überschritten werden.
In den Tank stets ausschließlich frisches Trinkwas-
ser ohne Kohlensäure einfüllen. Heißes Wasser
oder andere Flüssigkeiten können den Tank beschädigen. Die Maschine niemals ohne Wasser betreiben:
sicherstellen, dass im Tank eine ausreichende Menge
Wasser vorhanden ist.
• (Abb. 3A) - Den Tank einset zen und sicherstellen, dass die -
ser korrekt in seine Aufnahme positioniert wird. Dann den
Deckel (2) wieder aufsetzen.
Sicherstellen, dass der Tank korrekt in die Ma-
schine eingesetzt ist, indem er sorgfältig bis zum
Anschlag gedrückt wird, um Wasseraustritte aus der
Unterseite zu vermeiden (DER IN ABB. 3B ANGEGEBENE
BEZUGSPUNKT MUSS VOLLSTÄNDIG SICHTBAR SEIN).
4.5 Entlüftung des Systems
Zu Beginn, nach der Dampfausgabe oder wenn kein Wasser
mehr im Tank vorhanden ist, muss das System der Maschine
entlüftet werden.
• Die Taste ON/OFF (11) drücken. Die LED (18) leuchtet auf
und zeigt an, dass die Maschine eingeschaltet ist.
• (Abb. 4) - Einen Behälter unter die Dampfdüse (Pannarel-
lo) stellen.
• Den Drehknopf (3) “Heißwasser/Dampf” ö nen, indem er
Deutsch
• 29 •
Page 30

im Gegenuhrzeigersinn gedreht wird.
• (Abb. 5) - Den Anwahlknopf (17) in die Position
"
" stellen.
• Abwarten, bis aus der Dampfdüse (Pannarello) ein regelmäßiger Wasserstrahl austritt.
• (Abb. 5) - Den Anwa hlknopf (17) in die Position "
• Den Drehknopf (3) “Heißwasser/Dampf ” schließen, indem
er im Uhrzeigers inn gedreht wird. Den Behälter ent fernen.
" stellen.
4.6 Erste Inbetriebnahme oder Benut-
zung nach längerer Nichtbenutzung
Dieser einfache Vorgang gewährleis tet eine optimale Ausgabe
und muss ausgef ührt werden:
- bei der ersten Inbetriebnahme;
- nach einem längeren Zeitraum der Nichtbenutzung der
Maschine (länger als 2 Wochen).
Das ausgegebene Wasser muss über einen ent-
sprechenden Ab uss entsorgt werden, und darf
nicht für L ebensmitte lzwecke ver wendet werden. S ollte
der Behälter während des Zyklus gefüllt werden, muss
die Ausgab e gestoppt und de r Behälter gelee rt werden,
bevor der Vorgang fortgesetzt wird.
links aus der Br ühgruppe herausnehmen und mit frischem
Tri nkwa sser au sspülen.
Die Maschine ist nun bereit. Für die Betriebseinzelheiten für
die Ausgabe von Ka ee und Dampf wird auf die entsprechenden Kapitel ver wiesen.
5 KAFFEEAUSGABE
Achtung! Die Herausnahme des Druckfilter-
halters durch Drehung im Uhrzeigersinn von
Hand während der Ausgabe des Ka ees ist verboten.
Verbrennungsgefahr.
• Während dieses Vorgangs kann sich die LED (20) "Maschi-
ne bereit" ein- und ausschalten. Dieser Betrieb ist völlig
normal und nicht als Störung zu betrachten.
• Vor dem Gebrauch sicherstellen, dass der Drehknopf (3)
Heißwasser/Dampf geschlossen ist und der Wassertank
der Maschine eine ausreichende Menge Wasser enthält.
• Die Taste ON/OFF (11) drücken. Die LED (18) leuchtet auf
und zeigt an, dass die Maschine eingeschaltet ist.
• Warten, bis die LED (20) "Maschine bereit" au euchtet.
Nun ist die Masc hine für die Ka eeausgabe bereit.
• (Abb. 2) - Den Tank ausspülen und mit frischem Trinkwas-
ser füllen.
• (Abb. 4) - Einen Behälter unter die Dampfdüse (Panna-
rello) stellen. Den Drehknopf (3) im Gegenuhrzeigersinn
drehen.
(Ab b. 5) - Den Anwahlknopf (17) in die Position "
len.
• Den gesamten Inhalt des Wassertanks über die Heißwasser-/Dampfdüse (Pannarello) ab ießen lassen. Um die
Ausgabe zu beenden, den Anwahlknopf (17) in die Position
"
" stellen und den Regler (3) schließen, indem er im Uhr-
zeigersinn gedreht wird.
• (Abb. 2) - Den Wassertank mit frischem Trinkwasser füllen.
• (Abb. 13-14) - Den Filterhalter von unten in die Brühgrup-
pe (8) einsetzen und von links nach rechts drehen, bis er
einrastet.
• (Abb. 15) - Einen geeigneten B ehälter unter den Filterhalter stellen.
• (Abb. 16) - Den Anwahlknopf (17) in die Position "
drehen und das gesamte im Tank verbliebene Wasser ablassen.
(Abb. 17) - Bevor das Wasser vollständig verbraucht ist, die
Ausgabe been den, indem der Anwahlknopf (17) auf Position
"
" gestellt wird.
• Den Tank erneut füllen und warten, bis die LED "Maschine
bereit" (20) au euchtet.
• (Abb. 19) - Den Filterhalter dur ch Drehung von rechts nach
" stel-
Das Zubehö r für die Ka eeausgabe be ndet sich
in einer entsprechenden Aufnahme, die diese
Vorgänge einfach und schnell macht.
Für die Entnah me des Messlö el s für gemahle nen Ka ee
und/oder die erforderlichen Filter muss lediglich der
Deckel (2) angehoben werden (Abb. 35 und Abb. 36).
Wird, nac hdem der Anwahl knopf (17) in die Positi-
on "
so ist der Anw ahlknopf (17) in die Position "
und auf die Tabel le "Problemlö sung" Bezug zu neh men,
bevor der Filterhalter entfernt wird.
" g es te llt wu rd e, K EI N Ka ee ausgegeben,
5.1 Betrieb mit gemahlenem Ka ee
• (Abb. 7) - Den Filter (14) in den Druck lterhalter (12)
einsetzen. Bei der ersten Benutzung ist der Filter bereits
eingesetzt.
• (Abb. 13) - Den Filterhalter von unten in die Brühgruppe
"
(8) ein setzen.
• (Abb. 14) - Den Filterhalter von links nach rechts drehen,
bis er blockiert. Den Gri des Druck lterhalters loslassen.
Ein automatisches System versetzt den Gri nun wieder
leicht nach links.
Diese Bewegung gewährleistet die korrekte Funktion des
Druck lterhalters.
• (Abb. 16) - Den Druck lterhalter vorwärmen, indem der
" zu stelle n
• 30 •
Page 31

Anwahlknopf (17) auf Position " " gestellt wird. Das
Wasser beginnt, aus dem Druck lterhalter auszuströmen
(dieser Vorgang ist lediglich für den ersten Ka ee erforderlich).
• (Abb. 17) - Nachdem 50 ml Wasser durchgelaufen sind,
wird der Anwahlknopf (17) auf Position "
die Ausgabe zu stoppen.
• (Abb. 19) - Den Filterhalter dur ch Drehung von rechts nach
links aus der Mas chine herausnehmen und das Rest wasser
ausschütten. Mit dem speziellen Filter (14), mit dem die
Maschine ausgestattet ist, muss der Filter für die Zubereitung von einer oder zwei Tassen Ka ee nicht gewechselt
werden.
• (Abb. 35) - Den Messlö el aus der Maschine entnehmen.
• (Abb. 18) - 1 oder 1,5 Messlö el für einen ei nzelnen Ka ee
oder 2 gestrichene Messlö el für einen doppelten Ka ee
in den Filter geben. Den Ka eesatz vom Rand des Filterhalters entfernen.
• (Abb. 13) - Den Filterhalter (12) von unten in die Brüh-
gruppe (8) einsetzen.
• (Abb.14) - Den Filterhalter von links nach rechts drehen,
bis er einrastet.
• (Abb. 15) - 1 oder 2 vorgewärmte Tassen entnehmen
und unter den Druck lterhalter stellen. Überprüfen, ob
diese korrek t unter den Ka eeausgabeö nungen stehen.
• (Abb. 14) - Den Anwahlknopf (17) in die Position "
stellen.
• (Abb. 17) - Nachdem die gewünschte Ka eemenge er-
reicht ist, wird der Anwahlknopf (17) auf Position "
gestellt, um die Ausgabe des Ka ees zu stoppen. Zum Abschluss der Ausgabe einige Sekunden abwarten, dann die
Tassen mit dem Ka ee entnehmen (Abb. 18).
• (Abb. 19) - Zum Abschluss der Ausgabe einige Sekunden
abwarten, dann den Druck lterhalter herausnehmen und
den Ka eesatz ent fernen.
Hinweis: Im Filterhalter verbleibt eine geringe
Menge Wasse r. Dies ist normal un d auf die Eigen-
schaften des Filterhalters zurückzuführen.
" gestellt, um
• (Abb. 11) - Danach den Filter für Ka eepads (16) in den
Druck lterhalter (12) einsetzen.
• (Abb. 13) - Den Druck lterhalter von unten in die Brüh-
gruppe (8) einsetzen.
• (Abb. 14) - Den Filterhalter von links nach rechts drehen,
bis er einrastet. Den Gri des Druck lterhalters loslassen.
Ein automatisches System versetzt den Gri nun wieder
leicht nach links.
Diese Bewegung gewährleistet die korrekte Funktion des
Druck lterhalters.
• (Abb. 16) - Den Druck lterhalter vorwärmen, indem der
Anwahlknopf (17) auf Position "
Wasser beginnt, aus dem Druck lterhalter auszuströmen
(dieser Vorgang ist lediglich für den ersten Ka ee erforderlich).
• (Abb. 17) - Nachdem 50 ml Wasser durchgelaufen sind,
wird der Anwahlknopf (17) auf Position "
die Ausgabe zu stoppen.
• (Abb. 19) - Den Druck lterhalter durch Drehung von
rechts nach link s aus der Maschine herausnehme n und das
Restwasser ausschütten.
• (Abb. 12) - Den Ka eepad in den Filterhalter einlegen. Si-
cherstellen, dass das Papier des Ka eepads nicht über den
Filterhalter übersteht.
• (Abb. 13) - Den Druck lterhalter von unten in die Brüh-
gruppe (8) einsetzen.
"
• (Abb. 14) - Den Filterhalter von links nach rechts drehen,
bis er einrastet.
• 1 vorgewärmte Tasse entnehmen und unter den Fil-
"
terhalter stellen. Überprüfen, ob diese korrekt unter den
Ka eeausgabeö nungen steht.
• (Abb. 16) - Den Anwahlknopf (17) in die Position "
stellen.
• (Abb. 17) - Nachdem die gewünschte Ka eemenge er-
reicht ist, wird der Anwahlknopf (17) auf Position "
stellt, um die Ausgabe des Ka ees zu stoppen. Die Tasse
mit dem Ka ee entnehmen.
• (Abb. 19) - Zum Abschluss der Ausgabe einige Sekunden
abwarten, dann den Filterhalter herausnehmen und den
verbrauchten Pad entfernen.
" gestellt wird. Das
" gestellt, um
Deutsch
"
" ge-
Wichtig er Hinweis: Der Filte r (14) muss stets s auber gehalte n werden, um ein op timales Ergeb nis
zu gewährleisten. Täglich nach Gebrauch reinigen.
5.2 Betrieb mit Ka eepads
• (Abb. 9) - Unter Verwen dung eines Ka eelö els den Filter
für gemahlenen Ka ee (14) aus dem Druck lterhalter (12)
herausnehmen.
• (Abb. 10) - Den Adapter für Ka eepads (15) mit der ge-
wölbten Seite nach unten in den Druck lterhalter (12)
einsetzen.
Wichtige r Hinweis: Der Filter (16) und der Adap ter
(15) müssen stets sauber gehalten werden, um
ein optimales Ergebnis zu gewährleisten. Täglich nach
Gebrauch reinige n.
• 31 •
Page 32

6 AUSWAHL DER KAFFEESORTE EMP
FEHLUNGEN
Im Allgemeinen können alle handelsüblichen Ka eesorten
verwendet werden. Dennoch handelt es sich bei Ka ee um ein
Naturprodukt und sein Geschmack ist je nach Ursprungsland
und Mischung unterschiedlich. Aus diesem Grunde sollten verschiedene Sorten probiert werden, um die Mischung zu ermitteln, die den persönlichen Vorlieben am besten gerecht wird.
Für optimale Ergebnisse empfehlen wir, nur ausdrücklich für
die Zubereitung in Espressomaschinen zusammengestellte
Mischungen zu verwenden. Der Ka ee sollte stets gleichmäßig
aus dem Druck lterhalter austreten und dabei keine Tropfen
bilden.
Die Geschwindigkeit des Austritts des Ka ees kann geändert
werden, indem der Umfang der Ka eeportion im Filter leicht
variiert und/oder ein Ka ee mit einem anderen Mahlgrad verwendet wird.
Um ein optimales Ergebnis in der Tasse zu gewährleisten und
um die Reinigung und die Zubereitung zu erleichtern, emp ehlt Saeco die Verwendung von Einzelportionen-Ka eepads
mit dem Markenzeichen ESE.
BEVOR DAMPF ODER HEISSES WASSER AUSGEGEBEN
WIRD, MUSS ÜBERPRÜFT WERDEN, OB DIE DAMPFDÜSE (PANNARELLO) AUF DIE WASSERAUFFANGSCHALE
GERICHTET IST.
• (Abb. 21) - Einen Behälter oder ein Teeglas unter die
Dampfdüse (Pannarello) stellen.
• (Abb. 21) - Den Drehknopf (3) ö nen, indem er im Gegen-
uhrzeiger sinn gedreht wird.
• (Abb. 22) - Den Anwahlknopf (17) in die Position "
stellen.
• (Abb. 23) - Nach der Entnahme der gewünschten Menge
heißen Wasser s den Anwahlknopf (17) in Position "
len.
• (Abb. 24) - Den Drehknopf (3) schließen, in dem er im Uhr-
zeigersinn gedreht wird.
• Den Behälter mit dem heißen Wasser entnehmen.
" stel-
8 DAMPF / CAPPUCCINO
Verbrennungsgefahr! Zu Beginn der Ausgabe
können Spritzer mit heißem Wasser auftreten.
Die Ausgabedüse kann hohe Temperaturen erreichen:
nicht dir ekt mit den Händen berühren.
Achtung! Keinen Kaffee ausgeben, wenn die
Damp unk tion angewä hlt ist, da die Tempe ratur
dann zu hoch ist und die Gefahr von Verbrennungen
besteht.
Achtung! Das Herausnehmen des Filterhalters
(wenn dieser eingesetzt ist) durch Drehung im
Uhrzeigersinn von Hand während der Ausgabe des Kaffees ist ver boten. Verbrenn ungsgefahr ! Der Filterhalte r
darf erst herausgenommen werden, wenn der Anwahlknopf (17) wieder in die Position "
Maschine gemäß der in Abschn. 4.5. beschriebenen
Vorgehensweise abgekühlt wurde.
" gestellt und die
"
7 HEISSWASSER
Verbrennungsgefahr! Zu Beginn der Ausgabe
können Spritzer mit heißem Wasser auftreten.
Die Ausgabedüse kann hohe Temperaturen erreichen:
nicht dir ekt mit den Händen berühren.
• Während dieses Vorgangs kann sich die LED (20) "Maschi-
ne bereit" ein- und ausschalten. Dieser Betrieb ist völlig
normal und nicht als Stör ung zu betrachten.
• Vor dem Gebrauch sicherstellen, dass der Drehknopf (3)
Heißwasser/Dampf geschlossen ist und der Wassertank
der Maschine eine ausreichende Menge Wasser enthält.
• Die Taste ON/OFF (11) drücken. Die rote LED (18) leuchtet
auf und zeigt an, dass die Maschine eingeschaltet ist.
• Warten, bis die LED (20) "Maschine bereit" leuchtet; die
Maschine ist nun bereit.
• 32 •
• Während dieses Vorgangs kann sich die LED (20) "Maschine bereit" ein- und ausschalten. Dieser Betrieb ist völlig
normal und nicht als Stör ung zu betrachten.
• Vor dem Gebrauch sicherstellen, dass der Drehknopf (3)
Heißwasser/Dampf geschlossen ist und der Wassertank
der Maschine eine ausreichende Menge Wasser enthält.
• Die Taste ON/OFF (11) drücken. Die LED (18) leuchtet auf
und zeigt an, dass die Maschine eingeschaltet ist.
• Warten, bis die LED (20) "Maschine bereit" au euchtet.
• (Abb. 25) - Den Anwahlknopf (17) in die Position "
stellen. Die LED (20) schaltet sich aus.
• Warten, bis die LED (19) au euchtet; nun ist die Maschine
für die Dampfausgabe bereit.
• (Abb. 26) - Einen Behälter unter die Dampfdüse stellen.
• (Abb. 26) - Den Drehknopf (3) kurz ö nen, um das Restwasser aus der Dampfdüse (Pannarello) aus ießen zu lassen; nach kurzer Zeit strömt nur mehr Dampf aus.
• (Abb. 27) - Den Drehknopf (3) schließen und den Behälter
entfernen.
"
Page 33

• Den Behälter, der für die Cappuccinozubereitung benutzt
werden soll, zu 1/3 mit kalter Milch füllen.
Für ein gutes Ergebnis kalte Milch ver wenden
• (Abb. 28) - Die Dampfdüse in die Milch tauchen und den
Drehknopf (3) ö nen, indem er im Gegenuhrzeigersinn
gedreht wird. Den Behälter mit der Milch langsam von unten nach oben drehen, u m ein gleichmäßiges Aufhei zen zu
gewährleisten.
Es wird em pfohlen, die Aus gabe auf maxi mal 60
Sekunden zu beschränken.
• Abschließend den Drehknopf (3) schließen, indem er
im Uhrzeigersinn gedreht wird. Die Tasse mit der aufgeschäumten Milch entnehmen.
• (Abb. 30) - Den Anwahlknopf (17) in die Position "
len.
Leuchten beide LED "
tur der Maschine zu hoch für die Ausgabe von K a ee.
• Die Vorgeh ensweise für die Entlüf tung des Systems, die im
Abschn. 4.5 be schrieben wird, aus führen, um die Maschi ne
betriebsbereit zu machen.
Hinweis: Die Maschine ist betriebsbereit,
wenn die LED
au euchtet.
Hinweis: Wenn es nicht gelingt, den Cappuccino
wie beschrieben zuzubereiten, muss das System
wie im Absc hn. 4.5. beschrie ben gefüllt un d der Vorgang
wiederholt werden.
Auf diese lbe Weise können au ch andere Ge tränke
erhitzt werden.
• Nach diesem Vorgang die Dampfdüse mit einem feuchten
Tuc h rei nige n.
" und " " auf, ist die Tempera-
"Maschine bereit" dauerhaft
" stel-
9 ENERGIESPARMODUS
Die Maschine wurde so entwickelt, dass Energie gespart werden kann. Die Maschine schaltet sich nach einer Nichtbenutzung von 9 Minuten automatisch aus.
10 REINIGUNG
Die Wartung und die Reinigung dürfen nur dann durchgeführt
werden, wenn die Maschine vom Stromnetz abgenommen
wurde und abgekühlt ist.
• Die Maschine darf nicht in Wasser getaucht werden. Teile
der Maschine dürfen nicht in der Spülmaschine gereinigt
werden.
• Für die Reinigung sollten kein Äthylalkohol, Lösungsmit tel
und/oder chemisch aggressive Produkte verwendet werden.
• Es wird empfohlen, den Wassertank täglich zu reinigen
und mit frischem Trinkwass er zu füllen.
• (Abb. 31-33) - Den äußeren Bereich des Pannar ello täglich
nach dem Erhitzen von Milch abnehmen und mit frischem
Trinkwasser waschen.
• (Abb. 31-32-33) - Die Dampfdüse muss wöch entlich gerei-
nigt werden. Dazu wie folgt vorgehen:
- Den äußeren Teil des Pannarello (fü r die regelmäßige Reinigung) entfernen;
- Den oberen Teil des Pannarello von de r Dampfdüse abziehen;
- Den oberen Bereich des Pannarello mit frischem Trinkwasser reinigen;
- Die Dampfdüse mit einem feuchten Tuch reinigen und
eventuelle Milchrückstände entfernen;
- Den oberen Teil der Dampfdüs e wieder anbringen (sicherstellen, dass dies e vollständig eingesetz t ist);
Den äußeren Teil des Pannarello wieder montieren.
• (Abb. 34) - Die Abtropfschale täglich entleeren und reini-
gen.
• Für d ie Reinigung des Gerät s ein weiches, leicht mit Wasse r
befeuchtetes Tuch verwenden.
• (Abb. 20) - Für die Rein igung des Druck lterhalters ist wie
folgt vorzugehen:
- (Abb. 9) - Den Filter herausnehmen und sorgfältig mit
warmem Wasser reinigen.
- Den Adapter (sofern vorhanden) herausnehmen und
sorgfältig mit warmem Wasser reinigen.
- Den Innenbereich des Druck lterhalters reinigen.
• Die Vorrichtung und/oder deren Bestandteile nicht unter
Verwendung einer Mikrowelle oder eines herkömmlichen
Backofens trocknen.
• (Abb. 35-36) - Die Aufnahme für das Zubehör sollte wöchentlich mit einem feuchten Lappen gereinigt werden,
um eventuelle Ka eerückstände oder Staub zu entfernen.
Deutsch
Um die Maschine erneut einzuschalten, muss lediglich die Taste ON/OFF (11) gedrückt werden. Die LED (18) "Maschine ein"
leuchtet auf.
Warten, bis die LED (20) "Maschine bereit" au euchtet.
Hinweis: Den Druckfilterhalter nicht in der
Spülmaschine reinigen.
• 33 •
Page 34

11 ENTK ALKUNG
Beim Gebrauch der Maschine bildet sich Kalk. Die Entkalkung
ist nach jeweils 1-2 Betriebsmonaten der Maschine und/oder
dann erforderlich, wenn eine Reduzierung der Wasserdurchlaufmenge festgestellt wird. Es sollte ausschließlich ein SaecoEntkalker verwendet werden.
Die Angabe n in der Bedienung s- und Wartungs-
anleitung haben gegenüber den Angaben auf
separat verkauftem Zubehör und/oder Verbrauchsmaterial Vorrang, soweit sich daraus Kon ikte ergeben.
Den Saeco-Entkalker verwenden (Abb. B).
Dieser wurde eigens dafür entwickelt, um die
Leistungen und den Betrieb der Maschine für deren
gesamtes Betriebsleben optimal zu erhalten, und,
soweit er korrekt verwendet wird, Beeinträchtigungen
des ausgegebenen Produktes zu vermeiden. Bevor
der Entkalkungszyklus gestartet wird, ist folgendes
sicherzustellen: DER WASSERFILTER (wenn verwendet)
WURDE ENTFERNT.
Die Entkalkerlösung und die bis zum Abschluss
des Zyklus ausgegebenen Produkte dürfen keinesfalls getrunken werden. Keinesfalls darf Essig als
Entkalker verwendet werden.
1 (Abb. 13-14) - Den Filterhalter von unten in die Brühgrup-
pe (8) einsetzen und von links nach rechts drehen, bis er
einrastet.
2 (Abb.1B) - Den Wassertank abnehmen und leeren.
3 (Abb.2) - Die HÄLFTE des Inhalts der Flasche mit konzen-
triertem Saeco-Entkalker in den Wassertank des Geräts
einfüllen und den Tank mit frischem Trinkwasser bis zum
Füllstand MAX au üllen.
4 Die Maschine einschalten, indem die Taste ON/OFF (11)
gedrück t wird. Die LED (18) leuchtet auf.
(Abb. 21) - Über die Heißwasser-/Dampfdü se 2 Tassen mit
jeweils ca. 150 ml Wasser entn ehmen (wie im Kapitel 7 des
Handbuchs beschrieben). Dann die Maschine über die Ta-
ste ON/OFF (11) ausschalten. Die LED (18) wird ausgeschaltet.
5 Den Entkalker für ca. 15-20 Minuten bei ausgeschalteter
Maschine einwirken lassen.
6 Die Masch ine durch Druck
(Abb. 21) - Über die Heißwasser-/Dampfdüse 2 Tassen mit
der Taste ON/OFF (11)
einschalten.
jeweils ca. 150 ml Wasser entnehmen (wie im Kapitel 7 des
Handbuchs beschrieben). Nachfolgend die Maschine über
die Taste ON/OFF (11)
ausschalten und für einen Zeitraum
von 3 Minuten ausgeschaltet lassen.
7 Die unter Punkt 6 beschriebenen Vorgänge bis zur voll-
ständigen Leerung des Wasser tanks wiederholen.
8 (Abb.2) - Den Tank mit frischem Trinkwasser ausspülen
und vollständig au üllen.
• 34 •
9 Einen Behälter unter den Filterhalter stellen.
10 Die Masch ine einschalten, indem die Taste ON/OFF (11) ge-
drückt wird. Den Anwahlknopf (17) in die Position "
drehen und über den Filterhalter den gesamten Inhalt des
Tanks entnehmen. Um die Ausgabe zu beenden, den Anwahlknopf (17) auf Position "
" stellen.
11 (Abb. 2) - Den Tank erneut mit frischem Wasser füllen.
(Abb. 21) - Einen Behälter mit ausreichendem Fassungs-
vermögen unter die Dampfdüse (Pannarello) stellen. Den
Regler für die Wasserausgabe (3) ö nen, indem er im Gegenuhrzeiger sinn gedreht wird.
(Abb. 22) - Den Anwahlknopf (17) in die Position "
drehen und den ge samten Inhalt des Wassertan ks über die
Heißwasser-/Dampfdüse ab ießen lassen.
12 (Abb. 23) - Nach Beendigung der Wasserentnahme wird
der Anwahlknopf (17) in die Position "
" gestellt, um die
Ausgabe zu beenden.
(Abb. 24) - Den Regler für die Wasserausgabe (3) schlie-
ßen, indem er im Uhr zeigersinn gedreht wird.
13 Die Vorgänge ab Punkt (8) für insge samt 4 Tankfüllungen
wiederholen.
14 (Abb. 19) - Den Filterhalter durch Drehung von rechts nach
links aus der Brühgruppe herausnehmen und mit frischem
Trinkwasser ausspülen.
Der Entkalkungsz yklus ist nun abgeschlossen.
(Abb. 2) - Den Tank erneut mit frischem Wasser füllen. Soweit erforderlich, das System entlüften, wie im Abschn. 4.5
beschrieben.
Die Entsorgung der Entkalkerlösung muss gemäß
den Vorgaben des Herstellers und/oder den im
Benutzerland geltenden Vorschriften erfolgen.
12 ENTSORGUNG
Dieses Produkt entspricht der EU-Richtlinie 2002/96/EG
Das Symbol
weist darauf hin, dass das Produkt nicht als normaler Haushaltsabfall zu behandeln ist, sondern an einem Sammelpunkt
für das Recycling von elektrischen und elektronischen Geräten
abgegeben werden muss.
Durch Ihren Beitrag zum korrekten Entsorgen dieses Produkts
schützen Sie die Umwelt und die Gesundheit Ihrer Mitmenschen.
Umwelt und Gesundheit werden durch falsches Entsorgen
gefährdet.
Weitere Informationen über das Recycling dieses Produkts
erhalten Sie von Ihrer Gemeinde, der Müllabfuhr oder dem
Geschäft, in dem Sie das Produk t gekauft haben.
auf dem Produkt oder seiner Verpackung
"
"
Page 35

13 PROBLEMLÖSUNG
Störung Mögliche Ursachen Abhilfe
Die Maschine schaltet sich nicht
ein.
Die Pumpe is t sehr laut. Wasser im Tank fehlt
Nachdem der Anwahlknopf (17)
auf Position "
de, wir d kein Ka ee aus gegeben.
Der Ka ee ist zu kalt.
Es bildet sich kein Schaum auf
der Milch.
Die Zubereit ung des Cappuccinos
gelingt nicht.
Der Ka ee sprudelt zu schnell
heraus, es bildet sich keine Crema.
Der Ka ee läuft nicht oder nur
tropfenweise heraus.
Der Ka ee läuft über die Rän der.
" gestellt wur-
Die Maschine ist nicht an das Stromnetz angeschlossen.
Der Filterhalter ist verstopft.
Die LED (20) "Maschine bereit" war ausgeschaltet, als der Anwahlknopf (17) in die
Position "
Filterhalter zum Vorheizen nicht eingesetzt
(Kap. 5).
Tassen kalt. Wärmen Sie die Tassen mit he ißem Wasser vor.
Nicht geeignete Milch: Milchp ulver, fettar me
Milch.
Pannarello verschmut zt.
Es ist kein Dam pf mehr im Durchlaufer hitzer.
Zu wenig Ka ee im Filterhalter. Füllen Sie mehr Ka e e ein (Kap. 5).
Der Mahlgra d ist zu grob. Eine ander e Ka eemischung verwen den (Kap. 6).
Der Ka ee ist alt oder nicht ge eignet. Verwe nden Sie eine andere Ka eemischung (Kap. 6).
Alter oder ung eeigneter Ka eepad. Wechseln Sie den ve rwendeten Ka eepad.
Im Filterhalter fehlt ein Bestandteil.
Wasse r fehlt.
Mahlgrad zu f ein. Ein e andere Ka eemischung ver wenden (Kap. 6).
Ka e e im Filterhalter zu fes t angedrückt. Den gemahle nen Ka ee lockern.
Zu viel Ka ee im Filterhalter. Reduzieren Si e die Ka eemenge im Filterhalte r.
Drehknopf (3) o en. Schließen Sie d en Drehknopf (3).
Maschine ver kalkt. Entkalken Sie die M aschine (Kap. 10).
Filter im Filterhalter verstopft. Reinigen Sie den Filter (Kap. 9).
Ka eepad nicht g eeignet. Wechseln Sie die K a e epadsorte.
Der Filterhalter wurde nicht korrekt in die
Brühgruppe eingesetzt.
Oberer Ran d des Filterhalters ver schmutzt. Reinigen Si e den Rand des Filterhalte rs.
Pad falsch eingelegt.
Zu viel Ka ee im Filterhalter. Reduzieren Si e die Ka eemenge mit einem Mes slö el.
" gestell t wurde.
Die Maschi ne an das Stromnetz an schließen.
Den Wassertank au üllen und das System entlüften
(Abschn. 4. 5)
Den Anwahlknopf (17) wieder in die Position "
len. Die Maschine ausschalten und abwarten, bis sie
abkühlt (ca. 1 Stunde). Anschließend den Filterhalter
abnehmen und sorgfältig reinigen. Sollte das Problem
erneut auftreten, die Kundendienststelle kontaktieren.
Warten, bis di e LED (20) au e uchtet.
Den Filterhalter vorwärmen.
Vollm ilch ve rwend en.
Reinigen Sie den Pannarello wie im Kap. 10 beschrieben.
Das System entlüften (Abschn. 4.5) und die im Kap. 8
beschriebenen Schritte wiederholen.
Überprüfen, ob alle Bestandteile vorhanden sind und
korrek t montiert wurde n.
Den Wassertank au üllen und das System entlüften
(Abschn. 4. 5)
Setzen Sie d en Filterhalter korre kt ein (Kap. 5).
Legen Sie den Ka eepad richtig ein und achten Sie darauf, dass er nicht über den Filterhalter hinausragt.
" stel-
Deutsch
Bei Störungen, die nicht in der oben aufgeführten Tabelle behandelt werden oder in Fällen, in denen die empfohlenen
Vorgehens weisen das Problem nicht beheben, wenden Sie sich bit te an eine Kundendienststelle.
• 35 •
Page 36

IMPORTANT
Lors de l’utilisation d’appareils électriques, il est indispensable de respecter
toujours les précautions de sécurité principales, y compris les suivantes :
1. Lire toutes les instructions.
2. Ne pas toucher de surfaces chaudes. Utiliser les poignées ou les boutons.
3. A n d’éviter tout incendie, choc électrique et blessure, ne pas plonger le
cordon, la che ou l’appareil dans l’eau ou dans n’importe quel liquide.
4. Il est nécessaire de contrôler attentivement lorsque l’appareil est utilisé par
des enfants ou à leur proximité.
5. Débrancher de la prise de courant lorsque l’appareil n’est pas en service et
avant son nettoyage. Laisser refroidir l’appareil aussi bien avant de retirer et
de mettre en place ses accessoires qu’avant de le nettoyer.
6. Ne pas utiliser l’appareil avec un cordon ou une che détériorés, après
un mauvais fonctionnement de l’appareil ou son endommagement de
n’importe quelle manière. Renvoyer l’appareil au centre d’assistance agréé le
plus proche pour tout contrôle, réparation et réglage.
7. L’utilisation d’accessoires non recommandés par le constructeur de l’appareil
pourrait engendrer des incendies, des chocs électriques et des blessures.
8. Ne pas utiliser à l’extérieur.
9. Ne pas laisser les cordons pendre des bords de la table ou du plan de travail,
ni toucher des surfaces chaudes.
10. Ne pas placer près du feu ou sur une cuisinière, électrique et à gaz, ou dans
un four chaud.
11. Toujours brancher le cordon d’alimentation à la machine d’abord et ensuite
à la prise de courant sur le mur. Pour débrancher, éteindre toute commande
en appuyant sur « OFF » et ensuite enlever la che de la prise de courant sur
le mur.
12. Ne pas utiliser l’appareil pour toute autre utilisation non prévue.
13. Garder ces instructions.
CONSERVER CES INSTRUCTIONS
• 36 •
Page 37

INSTRUCTIONS SUR LE CORDON
ELECTRIQUE
A. Votre appareil est muni d’un cordon électrique court ou d’un cordon
d’alimentation détachable, a n d’éviter de trébucher ou de s’emmêler avec
un câble plus long.
B. Des cordons détachables plus longs ou bien des rallonges sont disponibles
et ne peuvent être utilisés que si l’on prend toutes les précautions d’usage.
C. En cas d’utilisation d’un long cordon d‘alimentation détachable ou d’une
rallonge,
1. La tension électrique de fonctionnement marquée sur le cordon
d’alimentation détachable ou sur la rallonge doit être au moins égale à
celle de l’appareil.
2. Si la che de l’appareil a une connexion de terre, la rallonge devrait être
une rallonge de terre à 3 ls et
3. La rallonge ne devra pas encombrer le plan de travail ou le dessus de table,
a n d’éviter que les enfants la tirent ou trébuchent accidentellement.
Français
• 37 •
Page 38

1 INFORMATIONS GÉNÉRALES
Cette machi ne à café est indiquée po ur la préparation d’une ou
de deux tasses de café expresso. Elle est équipée d’une buse
orientable pour la distribution de la vapeur et de l’eau chaude.
Les commandes sur la façade de l’appareil sont marquées
par des symboles faciles à comprendre. Cette machine a été
conçue pour un usage domestique et n’est pas indiquée pour
un fonctionnement continu de type professionnel.
Attention. Nous déclinons toute responsabilité
pour les dommages éventuels se produisant en
cas de:
• Usage impropre et non conforme aux utilisations
prévues;
• Réparations non e ectuées auprès des centres
d'assistance agréés;
• Altération du câble d'alimentation;
• Altération de n’importe quel composant de la ma-
chine;
• Utilisation de pièces de rechange et d’accessoires
non d’origine;
• Défaut de détartrage et stockage dans un local où
la température est inférieure à 0°C.
Dans tous ces cas, la garantie n'est pas valable.
1.1 Pour faciliter la lecture
Le triangle d’avertissement indique
toutes les instructions à retenir
pour la sécurité de l’utilisateur. Se
conformer scrupuleusement à ces indications pour éviter tout risque de blessures graves!
2 DONNÉES TECHNIQUES
Le construc teur se réserve le dro it d'apporter des modi cations
aux caractéristiques techniques du produit.
Tension nominale - Puissance nominale - Alimentation
Voir la plaquette située sur l'appareil
Matériau du corps
Plastique
Dimensions (l x h x p) (mm)
210 x 300 x 280
Poids
3,9 kg
Longueur du câble
1,3 m
Bandeau de commande
En façade
Porte- ltre
Pressurisé
Pannarello
Spécial pour les c appuccinos
Réservoir à eau
1,25 litres - Amovible
Pression de la pomp e
15bars
Chaudière
Acier inoxydable
Dispositif s de sécurité
Coupe-circuit ther mique
3 CONSIGNES DE SÉCURITÉ
Les images, les parties de l’appareil, les éléments de commande, etc. sont marqués par des lettres ou des chi res. Dans
ce cas, consulter les images.
Ce symbole met en évidence les informations
à retenir pour une meilleure utilisation de la
machine.
Les images qui correspondent au texte se trouvent
dans les premières pages du manuel. Consulter ces
pages pendant la lec ture du mode d’emploi.
1.2 Utilisation de ce mode d’emploi
Conserver ce mode d'emploi dans un endroit sûr. Joindre le
mode d’emploi à la machine à café au cas où une autre personne devrait l ’utiliser.
Pour de plus amples informations ou en cas de problèmes,
s’adresser aux centres d ’assistance agréés.
• 38 •
Ne jamais mettre les p arties sous tension au contac t de
l’eau: danger de court-circuit! La vapeur surchau ée
et l’eau chaude peuvent provoquer des brûlures ! Ne
jamais diriger le jet de vapeur ou d’eau chaude vers
des parties du corps. Toucher la buse de vapeur / eau
chaude en faisant très attention: danger de brûlures!
Utilisation prévue
Cette machine à café est destinée uniquement à un usage
domestique. Toute modi cation technique de la machine,
ainsi que toute utilis ation impropre sont interdi tes puisqu'elles
engendrent des risques! L’appareil ne doit pas être utilisé par
des personnes (y compris les enfants) ayant de faibles capacités physiques, mentales ou sensorielles, sans expérience et/ou
aux compétences insu santes, à moins qu'elles ne s oient sous
la supervision d'une personne responsable de leur sécurité ou
formées par cette personne en ce qui concerne l’utilisation de
l’appareil.
Page 39

Alimentation du secteur
Ne brancher la machine à café que sur une prise de courant
appropriée. La tension doit correspondre à celle indiquée sur
la plaquette de l’appareil.
Câble d’alimentation
Ne jamais utiliser la machine à café si le câble d’alimentation
est défec tueux. Si le câble d'alimentation est abîmé, il doit être
remplacé par le fabricant ou par son service d'assistance aux
clients. Ne pa s faire passer le câble d’alimentat ion sur des arêtes
vives ou sur des objets très chauds. Le protéger contre l’huile.
Ne pas transpor ter ou tirer la machine à café par son câble. Ne
pas retirer la che en la tirant par le câble. Ne pas la toucher
avec les mains mouillées. Éviter que le câble d’alimentation ne
pende librement des tables ou des étagères.
Protection des autres personnes
Garder les enfants sous supervision, pour qu’ils ne jouent pas
avec l’appareil.
Les enfants ne se rendent pas compte des risques liés aux
électroménagers. Les matériaux utilisés pour l'emballage de
la machine doivent être gardés hors de la por tée des enfants.
Danger de brûlures
Ne pas diriger le jet d’eau chaude et/ou de vapeur surchau ée
vers soi et/ou vers d’autres personnes. Utiliser toujours les poignées ou les boutons prévus à cet e et.
Ne ja mais ôte r le por te- ltre pressu risé p endant l a dist ribut ion
du café. Pendant la phase de chau age, des gouttes d’eau
chaude peuvent sortir du groupe de distribution du café.
jamais distribuer de café lorsque la température de la machine
est trop élevée, c'est-à-dire lorsque les DEL «
sont allumées simultanément.
Ne
» et « »
Emplacement
Ranger la machine à café dans un endroit sûr pour éviter tout
risque de renversement ou de blessures.
Risque de fuite d’eau chaude ou de vapeur surchau ée: dan-
ger de brûlures!
Ne pas garder la machine à une température inférieure à 0°C:
le gel pourr ait l'endommager.
Ne pas utiliser la machine à café en plein air.
Ne pas poser la machine sur des surfaces très chaudes ou à
proximité d'une amme nue: le châssis pourrait fondre ou
s'abîmer.
Nettoyage
Avant de nettoyer la machine, il faut la déconnecter par la
touche ON/OFF et ôter la che de la prise de courant. Attendre
quelques instants pour que la machine se refroidisse. Ne
jamais plonger la machine dans l’eau!
Il est stric tement interdit d’essayer d’inter venir à l’intérieur de
la machine.
Ne pas utiliser l ’eau qui est restée pen dant plusieurs jours dans
le réservoir pour un usage alimentaire; laver le réservoir et le
remplir d’eau fraîche potable.
Espace pour l’utilisation et l’entretien
Pour un fonctionnement correct et e cace de la machine à
café, il est cons eillé de:
• choisir une surface d’appui plane et nivelée;
• choisir un endroit assez bien éclairé, propre et pourvu
d’une prise de courant f acilement accessible;
• prévoir une distance minimum des parois de la machine,
conformément à la gure (Fig. A).
Rangement de la machine
Si la machine reste inutilisée pendant longtemps, la mettre
hor s tension e t ôter la che de la p rise. Ra nger la mac hine dans
un lieu sec et hors de la portée des enfants. La protéger contre
la poussière et les saletés.
Réparations / Entretien
En cas de pannes, de dommages ou de défauts présumés à la
suite d’une chute, débrancher immédiatement la che de la
prise. Ne jamais mettre en marche une machine défectueuse.
Seuls les centres d'assistance agréés peuvent e ectuer des interventions et des réparations. Nous déclinons toute responsabilité en cas de dommages pour toute opération non e ectuée
dans les règles de l’art.
En cas d’incendie
En cas d’incendie, utiliser des extincteurs au dioxyde de carbone (CO
). N’utiliser ni d'eau ni d'extincteurs à poudre.
2
Légende des composants de la machine (page 2)
1 Bandeau de commande
2 Couvercle du réservoir à eau
3 Bouton eau-chaude/vapeur
4 Logement pour accessoires
5 Réservoir à eau
6 Plaque repose tasses
7 Bac de récupération de l'eau + grille (s'il est prévu)
8 Groupe de distribution du café
9 Buse de vapeur (Pannarello)
10 Câble d'alimentation
11 Touche ON/OFF
12 Porte- ltre pressurisé
13 Mesure à café moulu
14 Filtre à café moulu
(unique pour la distribution de 1 ou 2 cafés)
15 Adaptateur du ltre à dosettes de caf é
16 Filtre à dosettes de c afé
17 Bouton de sélection
18 DEL «Machine allumée»
19 DEL «Vapeur prête»
20 DEL café/eau - «Machine prête»
Français
• 39 •
Page 40

4 INSTALLATION
Pour votre sécurité et celle de tiers, s’en tenir scrupuleusement aux «Consignes de sécurité» indiquées au
chap.3.
Ne remplir le réservoir qu’avec de l'eau fraîche
potable non pétillante. L'eau chaude ou tout
autre liquide peuvent endommager le réservoir. Ne
jamais mettre la machine en marche sans eau: s’assurer que le réservoir est su samment plein.
4.1 Emballage
L’emballage original a été conçu et réalisé pour protéger la
machine lors de son expédition. Il est conseillé de le garder
pour d’éventuels transpor ts à venir.
4.2 Avertissements d'installation
Avant d’installer la machine, s’en tenir aux consignes de sécurité suivantes:
• placer la machine dans un endroit sûr;
• s’assurer que les enfants n’ont pas la possibilité de jouer
avec la machine;
• ne pas place r la machine sur des surfaces trè s chaudes ou à
proximité d’une amme nue.
La machine à café est en n prête pour être branchée sur le
réseau électrique.
Remarque: il est recommandé de laver les composants avant leur toute première utilisation
et/ou après des pério des d’inactivité.
4.3 Branchement de la machine
Le courant électrique peut être dangereux !
Par conséquent, s'en tenir toujours scrupuleusement aux consignes de sécurité. Ne jamais utiliser
de câbles défectueux ! Les câbles et les ches défectueux doivent être immédiatement remplacés par des
Centres d'Assistance Agréés.
La tension de l’appareil a été préréglée à l'usine. Véri er si la
tension du réseau correspond aux indications gurant sur la
plaquette d'identi cation qui se trouve sur le fond de l’appareil.
• Br ancher la che sur une prise d e courant murale ayant une
tension appropriée.
4.4 Réservoir à eau
• (Fig.1A) - Enlever le couvercle du réservoir à eau (2) en le
soulevant.
• (Fig.1B) - Retirer le réservoir à eau (5).
• (Fig.2) - Le rincer et le remplir avec de l’eau fraîche
potable; ne pas dépasser le niveau (MAX) indiqué sur le
réservoir.
• (Fig. 3A) - Insérer corr ectement le réservoir dans son loge-
ment et replacer le couvercle (2).
Véri er que le réservoir est bien inséré dans la
machine en le poussant soigneusement jusqu'à
la butée (LA RÉFÉRENCE DE LA FIG.3B DOIT ÊTRE COMPLÈTEMENT VISIBLE) a n d'éviter tout débordement d'eau
par le fond.
4.5 Amorçage du circuit
Au début, après avoir distribué de la vapeur ou après avoir
épuisé l'eau contenue dans le rés ervoir, le circuit de la machine
doit être réamorcé.
• Appuyer sur la touche ON/OFF (11); la DEL (18) s'allume: la
machine est allumée.
• (Fig.4) - Pla cer u n réc ipi ent s ous l a bus e de va peu r (Pan na-
rello).
• Ouvrir le bouton (3) «eau chaude/vapeur» en le tournant
dans le sens inverse des aiguilles d’une montre.
• (Fig.5) - Met tre le bouton de sélection (17) sur «
• Attendre jusqu’à ce que un jet d'eau régulier sorte de la
buse de vapeur (Pannarello).
• (Fig.5) - Met tre le bouton de sélection (17) sur «
• Ferme r le bouton (3) «eau chaude/vapeur» en le tournant
dans le sens des aiguilles d'une montre. Enlever le récipient.
».
».
4.6 Première utilisation ou après une
période d'inactivité
Cette simple op ération vous garantit une dist ribution optimale
et est à e ectuer:
- lors du premier démarrage;
- lorsque la machine reste inactive pendant une longue
période (pendant plus de 2 semaines).
L'eau distribuée doit être vidée dans un réci-
pient de vidange spécial et ne peut pas être
utilisée pour l'alimentation. Si le récipient se remplit,
pendant le cycle, arrêter la distribution et le vider
avant de recommencer l'opération.
• (Fig.2) - Rincer le réservoir et le remplir d’eau fraîche
potable.
• (Fig.4) - Placer un récipient sous la buse de vapeur (Pan-
narello). Ouvrir le robinet (3) en le tournant dans le sens
• 40 •
Page 41

inverse des aiguilles d’une montre.
(Fig.5) - Mettre le bouton de sélec tion (17) sur «
• Dis tribuer tout le contenu du réser voir à eau depuis la buse
eau chaude/vapeur (Pannarello); pour terminer la distribution, mettre le bouton de sélection (17) sur «
mer le robinet (3) en le tournant dans le sens des aiguilles
d'une montre.
• (Fig.2) - Remplir le réservoir avec de l’eau fraîche potable.
• (Fig.13-14) - Introduire le porte- ltre par le bas dans le
groupe de distribution (8) et le tourner de gauche à droite
jusqu'à ce qu'il se bloque.
• (Fig.15) - Placer un récipient approprié sous le porte- ltre.
• (Fig.16) - Tourner le bouton de sélection (17) sur «
pour faire sortir toute l'eau se trouvant dans le réser voir.
(Fig.17) - Avant que l'eau dans le réservoir soit complète-
ment terminée, arrêter la distribution en mettant le bouton
de sélection (17) sur «
• Rem plir à nouveau le réservoir e t attendre jusqu’à ce que la
DEL «Machine prête» (20) s'allume.
• (Fig.19) - Enlever le porte- ltre du groupe en le tournant
de droite à gauche et le rincer à l'eau fraîche potable.
La machine est prête; quant aux mécanismes de fonctionnement de la distribution du café et de la vapeur, consulter les
sections correspondantes.
».
».
» et fer-
»
5 DISTRIBUTION DU CAFÉ
Attention ! Pendant la distribution du café, il
est interdit d’ôter le porte- ltre pressurisé, en
le tournant manuellement dans le sens des aiguilles
d'une montr e. Danger de brûlures.
• Pendant cette opération, la DEL « Machine prête » (20)
peut s’allumer et s’éteindre. Ce fonctionnement doit être
considéré comme normal et ne constitue pas une anomalie.
• Avant d’utiliser la machine, véri er si le bouton « eau
chaude/vapeur» (3) est fermé et que le réservoir à eau de
la machine contient une quantité d’eau su sante.
• Appuyer sur la touche ON/OFF (11); la DEL (18) s'allume: la
machine est allumée.
• Attendre jusqu’à ce que la DEL « Machine prête » (20)
s'allume. La machine est p rête pour la distribution d u café.
Les accessoires pour la distribution du café
se trouvent dans un logement spécialement
conçu pour faciliter ces opérations.
Pour la mesure du café moulu et/ou les ltres nécessaires, soulever le couvercle (2) et prélever la quantité
souhaitée (Fig.35 et Fig.36)
Si après avoir mis le bouton de sélec tion (17) sur
«
ner le bouton de sélection (17) sur «
tableau «Dépannage» avant d'enlever le porte - ltre.
» la machine NE di stribue PAS de café, to ur-
» et consulter le
5.1 Avec du café moulu
• (Fig.7) - Insérer le ltre (14) dans le porte- ltre pressurisé
(12); lors d e la premiè re utilis ation, le ltre es t déjà insé ré.
• (Fig.13) - Introduire le porte- ltre par le bas dans le
groupe de distribution (8).
• (Fig.14) - Tourner le porte- ltre de gauche à droite jusqu’à
ce qu’il se bloque. Laisser la poignée du porte- ltre pressurisé. Grâce à un système automatique, la poignée se
déplace légèrement vers la gauche.
Ce mouvement garantit le parfait fonctionnement du
porte- ltre pressurisé.
• (Fig.16) - Préch au er le porte - ltre pr essurisé en mettant
le bouton de sélection (17) sur «
à sortir du porte- ltre pressurisé (cette opération n’est
nécessaire que pour le premier café).
• (Fig.17) -Après avoir distribué 50cc d'eau, mettre le bou-
ton de sélection (17) sur «
• (Fig.19) - Enlever le porte- ltre de la machine en le tour-
nant de droite à gauche et vider l’eau résiduelle. Grâce au
ltre spécial (14) dont la machine est pourvue, il n’est pas
nécessaire de changer de ltre pour obtenir une ou deux
doses de café.
• (Fig.35) - Prélever la mesure de la machine.
• (Fig.8) - Verser 1-1,5 mesures pour un café individuel ou 2
mesures pour un café double. Éliminer le café en excès se
trouvant sur le bord du porte- ltre.
• (Fig.13) - Introduire le porte- ltre (12) par le bas dans le
groupe de distribution (8).
• (Fig.14) - Tourner le porte- ltre de gauche à droite jusqu’à
ce qu’il se bloque.
• (Fig.15) - Prélever 1 ou 2 tasses préchau ées et les
placer sous le porte- ltre pressurisé. Véri er si elles sont
correctement placées sous les buses de distribution du
café.
• (Fig.14) - Tourner le bouton de sélection (17) sur «
• (Fig.17) - Lorsque la machine a distribué la quantité de
café souhaitée, tou rner le bouton de sélecti on (17) sur «
pour arrêter la distribution du café. La distribution terminée, attendre quelques secondes; retirer les tasses de café
(Fig.18).
• (Fig.19) - Une fois la distribution terminée, attendre
quelques secondes avant d'enlever le porte- ltre pressurisé et d’évacuer le marc du c afé.
Remarque : dans le porte- ltre il reste une
petite quantité d’eau; cela est normal et n'est
dû qu’aux caractéri stiques du porte - ltre.
» pour arrêter la distribution.
». L’eau commence
».
»
Français
• 41 •
Page 42

Remarque importante: a n de garantir de
bons résultats, le ltre (14) doit être gardé tou-
jours pr opre. Laver tous les jours après leur utilisation.
5.2 Avec du café en dosettes
• (Fig.9) - À l'aide d'une cui llère à café, enlever le ltre à café
moulu (14) du porte- ltre pressurisé (12).
• (Fig.10) - Insérer l'adaptateur pour dosettes (15) dans le
porte- ltre pressurisé (12), la partie bombée tournée vers
le bas.
• (Fig.11) - Ensuite, introduire le ltre pour dosettes (16)
dans le porte- ltre pressurisé (12).
• (Fig.13) - Introduire le porte- ltre pressurisé par le bas
dans le groupe de distribution (8).
• (Fig.14) - Tourner le porte- ltre de gauche à droite jusqu’à
ce qu’il se bloque. Laisser la poignée du porte- ltre pressurisé. Grâce à un système automatique, la poignée se
déplace légèrement vers la gauche.
Ce mouvement garantit le parfait fonctionnement du
porte- ltre pressurisé.
• (Fig.16) - Préch au er le porte - ltre pr essurisé en mettant
le bouton de sélection (17) sur «
à sortir du porte- ltre pressurisé (cette opération n’est
nécessaire que pour le premier café).
• (Fig.17) -Après avoir distribué 50cc d'eau, mettre le bou-
ton de sélection (17) sur «
• (Fig.19) - Enlever le porte- ltre pressurisé de la machine
en le tournant de droite à gauche et vider l’eau résiduelle.
• (Fig.12) - Introduire la dosette dans le porte- ltre et s’as-
surer que le papier d e la dosette ne sort p as du porte- ltre.
• (Fig.13) - Introduire le porte- ltre pressurisé par le bas
dans le groupe de distribution (8).
• (Fig.14) - Tourner le porte- ltre de gauche à droite jusqu’à
ce qu’il se bloque.
• Prélever 1 tasse préchau ée et la placer sous le porte-
ltre. Véri er si elle est correcte ment placée sous les buses
de distribution du café.
• (Fig.16) - Tourner le bouton de sélection (17) sur «
• (Fig.17) - Lorsque la machine a distribué la quantité de
café souhaitée, tou rner le bouton de sélecti on (17) sur «
pour arrêter la distribu tion du café. Retirer la tass e.
• (Fig.19) - La distribution terminée, attendre quelques
secondes; retirer le por te- ltre et jeter la dosette utilisée.
Remarque importante: a n de garantir de
bons résultats, le ltre (16) et l'adaptateur (15)
doivent être gardés toujours propres. Laver tous les
jours après leur utilisation.
» pour arrêter la distribution.
». L’eau commence
».
6 CHOIX DU TYPE DE CAFÉ CONSEILS
Généralement, tous les types de café disponibles dans le commerce peuvent être utilisés. Toutefois, le café est un produit
naturel et son goût change en fonction de l’origine et des mélanges réalisés. Il est donc conseillé d’essayer plusieurs types
de café, a n de trouver celui qui s’adapte le mieux à vos goût s.
Pour des résultats optimaux, il est conseillé d’utiliser des mélanges spécialement préparés pour les machines à café expresso. Le café devrai t toujours sortir réguliè rement du porte- l tre
pressurisé sans qu'il s'égoutte.
La vitesse de distribution du café peut être modi ée en modi ant lé gèremen t la dose d e café da ns le l tre et/o u en utili sant
un degré de mouture di érent.
Pour obtenir un meilleur résultat et pour faciliter le nettoyage
et la préparation, Saeco vous conseille d’utiliser des dosettes
unidose marquées ESE.
AVANT TOUTE OPÉRATION DE DISTRIBUTION DE
VAPEUR OU D’EAU CHAUDE, VÉRIFIER SI LA BUSE
DE VAPEUR (PANNARELLO) EST CORRECTEMENT ORIENTÉE
VERS LE BAC DE RÉCUPÉRATION D’EAU.
7 EAU CHAUDE
Danger de brûlures! Il peut y avoir quelques
éclaboussures d’eau chaude au début de la distribution. La buse de distribution peut atteindre des
températures élevées: éviter tout contact direct avec
les mains.
• Pendant cette opération, la DEL « Machine prête » (20)
peut s’allumer et s’éteindre. Ce fonctionnement doit être
considéré comme normal et ne constitue pas une anoma-
»
lie.
• Avant d’utiliser la machine, véri er si le bouton « eau
chaude/vapeur» (3) est fermé et que le réservoir à eau de
la machine contient une quantité d’eau su sante.
• Appuyer sur la touche ON/OFF (11); la DEL rouge (18) s'al-
lume: la machine est allumée.
• Attendre jusqu’à ce que la DEL « Machine prête » (20)
s'allume. La machine est prête.
• (Fig. 21) - Placer un récipient ou un ver re à thé sous la buse
de vapeur (Pannarello).
• (Fig.21) - Ouvrir le bouton (3) en le tournant dans le sens
inverse des aiguilles d’une montre.
• 42 •
Page 43

• (Fig.22) - Mettre le bouton de sélection (17) sur « ».
• (Fig.23) - Une fois la quantité d’eau chaude souhaitée dis-
tribuée, met tre le bouton de sélection (17) sur «
• (Fig.24) - Fermer le bouton (3) en le tournant dans le sens
des aiguilles d’une montre.
• Retirer le récipient contenant l’eau chaude.
».
Pour obtenir de meilleurs résultats, utiliser du
lait froid
• (Fig. 28) - Plonge r la bus e de vape ur dans l e lait e t ouvri r le
bouton (3) en le tournant dans le sens inverse des aiguilles
d’une montre. Tourner lentement le récipient du bas vers
le haut, a n d'obtenir un réchau age uniforme.
8 VAPEUR / CAPPUCCINO
Danger de brûlures! Il peut y avoir quelques
éclaboussures d’eau chaude au début de la distribution. La buse de distribution peut atteindre des
températures élevées: éviter tout contact direct avec
les mains.
Attention! Ne pas distribuer de café lorsque
la fonction vapeur est sélectionnée car la
température est trop élevée et le risque de brûlures
est possible.
Attentio n! Pendant la d istributio n du vapeur, il
est interdit d’ôter le porte- ltre (si celui-ci est
présent) en le tournant manuellement dans le sens des
aiguill es d'une montr e. Danger de brûl ures! Le porte- ltr e
peut être ôté uniquement après avoir reporté le bouton
de sélection (17) sur «
moyennant la procédure décrite dans la sect. 4.5.
• Pendant cette opération, la DEL « Machine prête » (20)
peut s’allumer et s’éteindre. Ce fonctionnement doit être
considéré comme normal et ne constitue pas une anomalie.
• Avant d’utiliser la machine, véri er si le bouton « eau
chaude/vapeur» (3) est fermé et que le réservoir à eau de
la machine contient une quantité d’eau su sante.
• Appuyer sur la touche ON/OFF (11); la DEL (18) s'allume: la
machine est allumée.
• Attendre jusqu’à ce que la DEL « Machine prête » (20)
s'allume.
• (Fig. 25) - Mettre le bouton de sél ection (17) sur «
DEL (20) s'éteint.
• Attendre jusqu’à ce que la DEL (19) s'allume. La machine
est prête pour la distribution de la vapeur.
• (Fig.26) - Placer un récipient sous la buse de vapeur.
• (Fig.26) - Ouvrir le bouton (3) pendant quelques instants
pour faire écouler l’eau résiduelle de la buse de vapeur
(Pa nnar ello) ; seu le de la va peur comm enc e à so rti r au b out
de quelques secondes.
• (Fig.27) - Fermer le bouton (3) et retirer le récipient.
• Remplir 1/3 du récipient servant à préparer le cappuccino
avec du lait froid.
» et avoir refroidi la machine
». La
Il est conseillé une distribution de 60 secondes
maximum.
• Une fois ce procédé terminé, fermer le bouton (3) en le
tournant dans le sens des aiguilles d'une montre. Prélever
la tasse avec le lait émulsionné.
• (Fig.30) - Mettre le bouton de sélection (17) sur «
Si les deux DEL «
a atteint une température trop élevée pour la distribution
du café.
• Pour mettre la machine en service, amorcer le circuit
comme indiqué à la section 4.5.
Remarque: la machine est prête lorsque la DEL
«Machine prête» est allumée xe.
Remarque: s’il n’est pas possible de distribuer
un cappuccino comme indiqué plus haut, réamorcer le circuit comme décrit dans la sec t. 4.5 et répéter ensuite les opérations.
Procéder de la même façon pour réchau er
d'autres boissons.
• Il faut ensuite nettoyer la buse de vapeur avec un chi on
humide.
» et « » sont allumées, la mac hine
».
9 ÉCONOMIE D'ÉNERGIE
La machine a été conçue pour l'économie d'énergie. La machine s'arrête automatiquement après 9 minutes d'inactivité.
Pour redémarrer la machine il su t d'appuyer sur la touche
ON/OFF (11); la DEL «Machine allumée» (18) s'allume.
Attendre jusqu’à ce que la DEL «Machine prête» (20) s'allume.
Français
• 43 •
Page 44

10 NETTOYAGE
L’entretien et le nettoyage ne peuvent être e ectués que si la
machine est f roide et débranchée du réseau électrique.
• Ne pas plonger la machine dans l’eau. Ne pas laver ses
composants au lave-vaisselle.
• Ne pas utiliser d’alcool éthylique, de solvants ni d’agents
chimiques agressifs.
• Il est recommandé de nettoyer quotidiennement le réservoir à eau et de le remplir ave c de l'eau fraîche.
• (Fig.31-33) - Une fois par jour, après avoir réchau é le
lait , démont er la par tie ex térieu re du Pann arello e t la laver
avec de l’eau fraîche potable.
• (Fig.31-32-33) - Une fois par semaine, nettoyer la buse de
vapeur. Pour ce faire, il f aut:
- enlever la partie extérieure du Pannarello (pour le nettoyage normal);
- retirer la partie supérieure du Pannarello de la buse de
vapeur;
- laver la partie supérieure du Pannarello avec de l'eau
fraîche potable;
- laver la buse de vapeur avec un chi on humide et enlever
tout éventuel résidu de lait;
- replacer la partie supérieure dans la buse de vapeur (véri er qu’elle est insérée complètement);
Monter à nouveau la par tie extérieure du Pannarello.
• (Fig.34) - Une fois par jour, vider et laver le bac d'égout te-
ment.
• Pour nettoyer l’appareil, utiliser un chi on doux légèrement imbibé d’eau.
• (Fig.20) - Pour nettoyer le porte- ltre pressurisé, procéder comme suit:
- (Fig.9) - enlever le ltre et le laver soigneusement à l’eau
chaude.
- retirer l’adaptateur (s’il e st présent) et le laver soigneusement à l’eau chaude.
- laver la partie intérieure du porte - ltre pressurisé.
• Ne pas faire sécher la machine et/ou ses composants dans
un four à micro -ondes et/ou dans un four traditionnel.
• (Fig.35-36) - Une fois par semaine, nettoyer le logement
des accessoires avec un chi on humide pour enlever tout
éventuel résidu de café ou de poussière.
Remarque: ne pas mettre le porte- ltre pressurisé au l ave-vaisselle.
11 DÉTARTRAGE
La formation de calcaire est liée à l’emploi de l’appareil. Le
cycle de détartrage est nécessaire tous les 1 ou 2 mois d’utilisation de la machine et/ou en cas de réduction de la quantité
d'eau débitée. Utiliser uniquement le produit détartrant Saeco.
En cas d'indications di érentes entre le conte-
nu du mode d'emploi et d'entretien et les indications fournies sur les accessoires et /ou les matériaux
d'usage vendus séparément, les indications données
par le mode d'emploi devront être considérées comme
prioritaires.
Utiliser le produit détartrant Saeco (Fig.B). Ce
produit a été spécialement conçu pour assurer,
si utilisé correctement, la meilleure performance et
fonctionnalité de l'appareil pendant toute sa vie opérationnelle et pour éviter toute altération du produit
distribué. Avant de commencer le cycle de détartrage,
véri er: QUE LE FILTRE À EAU, si utilisé, A ÉTÉ ENLEVÉ.
Ne pas boire la solution détartrante et les
produits distribués jusqu'à la conclusion du
cycle. Ne jamais utiliser de vinaigre pour détartrer la
machine.
1 (Fig.13-14) - Introduire le porte- ltre par le bas dans le
groupe de distribution (8) et le tourner de gauche à droite
jusqu'à ce qu'il se bloque.
2 (Fig.1B) - Enlever et vider le réser voir à eau.
3 (Fig.2) - Verser la MOITIÉ du contenu de la bouteille de
détartrant concentré Saeco dans le réser voir à eau de l'appareil et le remplir avec de l’eau fraîche potable jusqu'au
niveau MAX indiqué.
4 Allumer la machine en appuyant sur la touche ON/OFF
(11); la DEL (18) s'allume.
(Fig.21) - Prélever (comme indiqué à la sec tion 7 du mode
d'emploi) 2 tasses d'eau (à peu près 150 ml chacune) de la
buse de vapeur/eau chaude. Arrêter ensuite la machine en
appuyant sur la touche ON/OFF (11); la DEL (18) s'éteint
5 La machine arrêtée, attendre 15 à 20 minutes pour que le
détartrant ait son e et.
6 Me ttre e n marc he la mac hine, e n appu yant su r
OFF (11)
.
(Fig.21) - Prélever (comme indiqué à la section 7 du mode
d'emploi) 2 tasses d'eau (à peu près 150 ml chacune) de la
buse de vapeur/eau chaude. Arrêter ensuite la machine en
appuyant sur
dant 3 minutes.
7 Répéter les opérations décrites au point 6 jusqu'à vider
complètement le réservoir à eau.
8 (Fig.2) - Rincer l e réservoir avec de l’eau fraîche p otable et
le remplir complètement.
la touche ON/OFF (11)
la touche ON/
et la garder ainsi pen-
• 44 •
Page 45

9 Placer un récipient sous le porte- ltre.
10 Mettre en marche la machine en appuyant sur la touche
ON/OFF (11); tourner le bouton de sélection (17) sur
«
» et prélever tout le contenu du réservoir au moyen
du porte- ltre. Pour arrêter la distribution, mettre le bouton de sélection (17) sur «
».
11 (Fig.2) - Remplir à nouveau le réser voir avec de l'eau fraîche.
(Fig.21) - Placer un grand récipient sous la b use de vapeur
(Pannarello). Ouvrir le robinet de distribution de l'eau (3)
en le tournant dans le sens inverse des aiguilles d'une
montre.
(Fig.22) - Tourner le bouto n de sélection (17) sur «
» et
prélever tout le contenu du réservoir au moyen de la buse
de vapeur/eau chaude.
12 (Fig.23) - Une fois l'eau prélevée, pour arrêter la distribu-
tion, mettre le bouton de sélection (17) sur «
».
(Fig.24) - Fermer le robinet de distribution de l'eau (3) en
le tournant dans le sens des aiguilles d'une montre.
13 Répéter encore une fois les opérations du point (8) pour
un total de 4 réser voirs.
14 (Fig.19) - Enlever le porte- ltre du groupe en le tournant de
droite à gauche et le rincer à l'eau fraîche potable.
Le cycle de dét artrage est ainsi terminé.
(Fig.2) - Remplir à nouveau le réservoir avec de l'eau fraîche.
Le cas échéant, ré amorcer le circuit comme indiqué à la s ection
4.5.
La solution détartrante doit être éliminée
conformément à ce qui est prévu par le fabricant et/ou par les normes en vigueur dans le Pays où la
machine est utilisée.
12 ÉLIMINATION
L’ appareil est conçu et fabriqué pour faciliter sa valorisation,
son recyclage ou sa réutilisation conformément à la directive
européenne 2002/96/CEE relative aux appareils électriques et
électroniques usagés (waste electrical and electronic equipment - WEEE).
Le logo
ce produit ne peut pas être éliminé avec les déchets ménagers
non triés.
Lorsque vous aurez décidé de vous en séparer dé nitivement,
il convient de fair e procéder à la collecte sélective de cet appareil en vous conformant au mode de reprise mis en place dans
votre commune (collecte ponctuelle des encombrants, déchèterie), ou en faisant appel au service de reprise proposé par
votre distributeur, ou bien, en le con ant à des organisations
caritatives et des associations à but non luc ratif.
En vous assurant que ce produit est éliminé correctement,
vous favorisez la prévention des conséquences négatives pour
l’environnement et la santé humaine.
ci-contre apposé sur l’appareil indique que
Français
• 45 •
Page 46

13 DÉPANNAGE
Panne Causes possibles Solution
La machine ne se met pas en
marche.
La pompe est très bruyante. Manque d’eau dans le réser voir Remplir d'eau et réamorcer le circuit (Sect. 4.5)
Après avoir mis le bouton de
sélection (17) sur «
machine ne distribue pas de
café.
Le café est trop froid.
La mousse du lait ne se forme
pas.
Il n’est pas possible de préparer
du cappuccino.
Le café coule trop rapidement,
la crème ne se forme pas.
Le café ne coule pas ou bien il
coule goutte à goutte.
Le café coule des bords.
La machine n'est pas branchée sur le réseau électrique.
», la
Le porte- ltre est bouché.
La DEL «Machine prête» (20) était éteinte
lorsque le bouton de sélection (17) a été
mis sur «
Le porte- ltre n’est pas inséré pour le préchau age (chap. 5).
Les tasses sont froides. Préchau er les tasses avec de l'eau chaude.
Lait inapproprié : lait en poudre, lait
écrémé.
Pannarello sale. Nettoyer le Pannarello comme indiqué au chap. 10.
Il n’y a plus de vapeur dans la chaudière.
Pas assez de caf é dans le porte - ltre. Ajouter du café (chap. 5).
Mouture trop grossière. Changer de mélange (chap. 6).
Café non frais ou inapproprié. Changer de mélange (chap. 6).
La dosette est vieille ou inappropriée. Changer de dosette.
Un composant dans le porte- ltre fait
défaut.
Eau insu sante. Remplir d'eau et réamorcer le circuit (Sect. 4.5)
Mouture trop ne. Changer de mélange (chap. 6).
Café pressé dans le porte- ltre. Remuer le café moulu.
Trop de café dans le porte - ltre. Réduire la quantité de café dans le porte - ltre.
Bouton (3) ouvert. Fer mer le bouton (3).
Machine calci ée. Détartrer la machine (chap. 10).
Le ltre dans le porte- ltre est bouché. Net toyer le ltre (chap. 9).
La dosette est inappropriée. Changer de type de dosette.
Porte- ltre mal inséré dans le groupe de
distribu tion du café.
Bord supérieur du porte- ltre encrassé. Nettoyer le bord du porte- ltre.
Dosette introduite de manière incorrecte.
Trop de café dans le porte - ltre. Réduire la quantité de café à l’aide de la mesure.
».
Brancher la machine sur le réseau élec trique.
Remettre le bouton de sélection (17) sur «
Éteindre la machine et attendre qu'elle se refroidisse
(1 heure environ). Ensuite enlever et bien laver le
porte- ltre. Si le problème se représente contacter
le centre d'assistance.
Attendre jusqu’à ce que la DEL (20) s'allume.
Préchau er le porte- ltre.
Utiliser du lait entier.
Réamorcer le circuit (sec. 4.5) et répéter les opérations décrites au chap. 8.
Véri er si tous les co mposants s ont présent s et montés correctement.
Insérer correctement le por te- ltre (chap. 5).
Introduire correctement la dosette de manière
qu'elle ne sorte pas du porte- ltre.
».
Pour toute panne non détaillée dans le tableau ci-dessus ou en cas de solutions insu santes à résoudre le problème, s'adresser à un centre d'assistance agréé.
• 46 •
Page 47

1 INFORMACIÓN DE CARÁCTER GENERAL
Esta máquina de café está indicada para la preparación de 1 o
2 tazas de café exprés y dispone de un tubo orientable para el
suministro de vapor y de agua caliente. Los mandos situados
en la parte delantera del aparato llevan símbolos de fácil interpretación.
La máquina ha sido diseñada para uso doméstico y no está indicada para un funcionamiento continuo de tipo profesional.
Atención. Se declina toda responsabilidad por
posibles daños en caso de:
• Uso indebido o no confor me a los nes previstos;
• Reparaciones realizadas en centros de asistencia
técnica no autorizados;
• Alteración del cable de alimentación;
• Alteración de cualquier componente de la máquina;
• Utilizac ión de repuestos y accesorios no originales;
• Descalci cación de la máquina no realizada y alma-
cenamiento en locales con temperatura por debajo
de 0°C.
En dichos c asos la garantía pierde su validez.
1.1 Para facilitar la lectura
El triángulo de advertencia señala
todas aquellas instrucciones impor-
tantes para la seguridad del usuario.
¡Respetar escrupulosamente dichas indicaciones para
evitar heridas graves!
2 DATOS TÉCNICOS
El fabricante se reserva el derecho a modi car las características técnicas del produc to.
Tensión nominal - Potencia nominal - Alimentación
Véase placa en el aparato
Estruc tura exterior
Plástico
Dimensiones (l x a x p) (mm)
210 x 300 x 280
Peso
3,9 kg
Longitud del cable
1,3 m
Panel de mandos
En la parte delanter a
Porta ltro
Presurizado
Pannarello
Especial para capuchinos
Depósito de agua
1,25 litros - Extraíble
Presión de la bomba
15 ba r
Caldera
Acero inoxidable
Dispositivos de seguridad
Ter mof us ibl e
Español
La referenc ia a ilustraciones, parte s del aparato, elementos del
panel de mandos, etc. está indicada con números o letras; en
dichos casos, consultar la ilustración correspondiente.
Este símbolo señala la información que debe
considerarse más relevante para garantizar el
uso correcto de la máquina.
Las ilus traciones a las que s e hace referenci a en el texto
se encuentran en las primeras páginas del manual.
Consultar dichas páginas durante la lectura de las
instrucciones de u so.
1.2 Cómo utilizar estas instrucciones de
uso
Guardar estas instrucc iones de uso en un lugar seguro y adjuntarlas a la máquina de café en caso de que otra persona vaya
a utilizarla.
Para información más detallada o en caso de algún problema,
dirigirse a centros de asistencia autorizados.
3 NORMAS DE SEGURIDAD
No dejar nunca que las partes bajo tensión entren en
contacto con agua: ¡riesgo de cortocircuito! ¡El vapor
recalentado y el agua caliente pueden causar quemaduras! No dirigir nunca el chorro de vapor o de agua
caliente h acia partes de l cuerpo; manip ular con cuidad o
la b oqu ill a de s ali da d e va por/a gua cal ien te: ¡p eli gro de
quemaduras!
Uso previsto
Esta máquina de café ha sido diseñada exclusivamente para
uso doméstico. ¡Se prohíbe realizar modi caciones técnicas
y cualquier uso ilícito debido al riesgo que ello conlleva! Este
aparato no está destinado a ser utilizado por personas (niños
incluidos) con capacidades físicas, mentales o sensoriales reducidas o que no dispongan de una su ciente experiencia y/o
competencias, a menos que lo utilicen bajo la supervisión de
una persona r esponsable de su seguridad o q ue sean instruidas
por dicho responsable en cómo usarlo.
• 47 •
Page 48

Alimentación de corriente
Conectar la máquina de café s ólo a una toma de corriente adecuada. La tensión debe corresponderse con la indicada en la
placa del aparato.
Cable de alimentación
No usar nunca la máquina de café si el cable de alimentación
está defectuoso. Si el cable de alimentación está dañado, solici tar a l fab ric ante o al s erv ici o de a sis tenc ia al clie nte l a sus tit ución del mismo. Procurar que el cable de alimentación no pase
por esquinas o cantos agudos ni por encima de objetos muy
calientes. Prote gerlo del aceite.
No transpor tar ni tirar de la máquina de café so steniéndola por
el cable. No desenchufar la máquina tirando del cable ni tocar
el enchufe con las manos mojadas.
Procurar que el cable de alimentación no cuelgue libremente
de mesas o estanterías.
Protección de terceras personas
Mantener la máquina f uera del alcance de los niños par a evitar
que jueguen con ella.
Los niños no se dan cuenta de los peligros relacionados con el
uso indebido de un electrodoméstico. No dejar al alcance de los
niños los materiales usados para emb alar la máquina.
Riesgo de quemaduras
No dirigir contra uno mismo ni contra los demás el chorro de
vapor recalentado y/o de agua caliente. Usar siempre las empuñaduras o los mandos correspondientes.
No quitar nunca el porta ltro presurizado durante el suministro de café. Durante la fase de calentamiento, pueden salir
algunas gotas de agua c aliente por el grupo de café.
No suministrar c afé cuando la máquina esté sobrec alentada, es
decir, cuando los pilotos luminosos “
didos al mismo tiempo.
” y “ ” estén encen-
Colocación
Colocar la máquina de café en un lugar seguro, donde nadie
puede volcarla o resultar herido. Podría salir agua caliente o
vapor recalentado: ¡riesgo de quemaduras!
No colocar la máquina en un lugar con temperatura inferior a
0°C; las bajas temperaturas pueden dañar la máquina.
No usar la máquina de c afé al aire libre.
No poner la máquina sobre super cies muy calientes ni cerca
de llamas abiertas a n de evitar que su carrocería se derrita
o resulte dañada.
Limpieza
Antes de limpiar la máquina, apagarla mediante el botón ON/
OFF y, a continuación, descone ctar el enchufe de la toma de corriente. Es perar a que la máquina se enfr íe. ¡No sumergir nunca
la máquina en agua!
Se prohíbe terminantemente tratar de intervenir en el interior
de la máquina. No usar el agua que haya quedado en el depó-
sito durante unos día s para uso alimentario. Lavar el d epósito y
volver a llenarlo con agua fresca potable.
Área destinada al uso y el mantenimiento
Para un cor recto y buen fu ncionamiento de la má quina de café
se recomienda lo siguiente:
• Elegir una super cie de apoyo bien nivelada;
• Elegir un lugar su cientemente iluminado e higiénico. La
toma de corriente debe ser de fácil acceso;
• Dejar una distancia mínima entre la máquina y la p ared tal
como se muestra en la gura (Fig. A).
Almacenaje de la máquina
En caso de que la máqui na vaya a permanecer durante un largo
período sin utilizarse, apagarla y desconectar el enchufe de la
toma de corri ente. Gu ardar la m áquina e n un luga r seco y f uera
del alcance de los niños. Protegerla del polvo y de la suciedad.
Reparaciones / Mantenimiento
En caso de averías, desperfectos o sospecha de desperfectos
tras una caída, desconectar enseguida la máquina de la toma
de corriente. No poner nunca en funcionamiento la máquina
si está defectuosa. Sólo los Centros de Asistencia Autorizados
pueden realizar reparaciones a la máquina. En caso de reparaciones realizadas de forma incorrecta, se declina toda responsabilidad por posibles daños.
Antiincendio
En caso de incendio usar extintores de anhídrido carbónico
(CO
). No usar agua ni ex tintores de polvo.
2
Componentes de la máquina (pág. 2)
1 Panel de mandos
2 Tapa del depósito de agua
3 Mando de agua caliente/vapor
4 Alojamiento para accesorios
5 Depósito de agua
6 Super cie apoyatazas
7 Bandeja de goteo + rejilla (en su caso)
8 Grupo de café
9 Tubo de vapor (Pannarello)
10 Cable de alimentación
11 Botón ON/OFF
12 Porta ltro presurizado
13 Cuchara dosi cadora para café molido
14 Filtro para c afé molido
(el mismo para el suministro de 1 o 2 cafés)
15 Adaptador de ltro para pastillas de café
16 Filtro para p astillas de café
17 Mando de selección
18 Piloto luminoso "Máquina encendida"
19 Piloto luminoso "Vapor listo"
20 Piloto luminoso café/agua - "Máquina lista"
• 48 •
Page 49

4 INSTALACIÓN
Por su segur idad y la de los de más, atenerse e scrupulo samente a las "N ormas de segur idad" descr itas en el cap. 3.
4.1 Embalaje
El emb alaje or iginal ha sido dis eñado y re alizado para pro teger
la máquina durante el transporte. Se aconseja guardarlo para
posibles transpor tes futuros.
4.2 Advertencias para la instalación
Antes de instalar la máquina, atenerse a las siguientes normas
de seguridad:
• colocar la máquina en un lugar seguro;
• asegurarse de que los niños no tengan la posibilidad de
jugar con la máquina;
• no apoyar la máquina sobre super cies muy calientes ni
cerca de llamas abiertas.
Ya se puede conectar la máquina de café a la red eléc trica.
Nota: se aconseja lavar los componentes antes
de utiliz arlos por prim era vez y/o tras un período
sin utilizarlos.
4.3 Conexión de la máquina
¡La corriente eléctrica puede ser peligrosa! Por
consiguiente, respetar siempre escrupulosamente las normas de seguridad. ¡No usar nunca el cable si
está dañado! En caso de que el cable o el enchufe estén
defectuosos, contactar inmediatamente con un Centro
de Asistencia Autorizado para su sustitución.
Introducir siempre en el depósito sólo agua
potable fresca sin gas. El agua caliente y otros
líquidos pueden estropear el depósito. No poner en
funcionamiento la máquina sin agua: comprobar que
haya su ciente agua en el depósito.
• (Fig. 3A) - Introducir el depósito de agua asegurándose
de que quede correctamente colocado en su alojamiento
y volver a poner la tapa (2).
Asegurarse de que el depósito de agua esté
bien insertado en la máquina empujándolo con
cu ida do h ast a e l top e (L A RE FERE NCIA DE L A FIG . 3B DEBE
SER COMPLETAMENTE VISIBLE) para evita r que salga agua
por el fondo.
4.5 Carga del circuito
Al principio, tras haber suministrado vapor o una vez que el
agua del depósito se haya agotado, se debe volver a cargar el
circuito de la máquina.
• Pulsar el botón ON/OFF (11); el piloto luminoso (18) se en-
cenderá, lo que indica que la máquina es tá encendida.
• (Fig. 4) - Colocar un recipiente bajo el tubo de vapor (Pan-
narello).
• Abrir el mando (3) "agua caliente/vapor" girándolo en el
sentido contrario a las agujas del reloj.
• (Fig. 5) - Llevar el mando de selección (17) a la posición
"
".
• Esperar a que salga un chorro de agua regular por el tubo
de vapor (Pannarello).
• (Fig. 5) - Llevar el man do de selección (17) a la posición " ".
• Cerrar el mando (3) "agua caliente/vapor" girándolo en el
sentido de las agujas del reloj. Retirar el recipiente.
Español
La tensión del aparato ha sido determinada en fábrica. Comprobar que la tensión de red se corresponda con los valores indicados en la plac a de identi cación situada en la par te trasera
del aparato.
• Conectar el enchufe a una toma de corriente de pared de
tensión adecuada.
4.4 Depósito de agua
• (Fig. 1A) - Quitar la tapa del depósito de agua (2) levantándola.
• (Fig. 1B) - Extraer el depósito de agua (5).
• (Fig. 2) - Enjuagarlo y llenarlo con agua fresca potable sin
superar el nivel máximo (MAX) indicado en el depósito.
4.6 Al utilizar por primera vez o tras un
período sin utilizar
Esta sencilla operación garantiza un suministro óptimo y debe
realizarse:
- al poner en marcha la máquina por primera vez;
- cuando la máquin a haya permanecido un largo perío do sin
utilizars e (más de 2 semanas).
El agua suministrada debe verterse en un
desagüe apropiado y no puede utilizarse con
nes alimentarios. Si durante el ciclo el recipiente se
llena, detener el suministro y vaciarlo antes de seguir
con la operación.
• (Fig. 2) - Enjuagar el depósito y llenarlo con agua fresca
potable.
• 49 •
Page 50

• (Fig. 4) - Colocar un recipiente bajo el tubo de vapor (Pan-
narello). Abrir el mando (3) girándolo en el s entido contrario a las agujas del reloj.
(Fig. 5) - Llevar e l mando de selección (17) a la posición " ".
• Suministrar todo el contenido del depósito de agua a
través del tubo de vapor/agua caliente (Pannarello); para
terminar el suministro, llevar el mando de selección (17) a
la posición "
de las agujas del reloj.
• (Fig. 2) - Llenar el depósito con agua fresca potable.
• (Fig. 13-14) - Introducir el porta ltro en el grupo de café
(8) por la parte inferior y girarlo de izquierda a derecha
hasta que quede bloqueado.
• (Fig. 15) - Colocar un recipiente adecuado bajo el por ta l-
tro.
• (Fig. 16) - Girar el mando de selección (17) hasta la posición "
sito.
(Fig. 17) - Antes de que el agua se haya agotado por com-
pleto, detener el suministro llevando el mando de selección
(17) a la posición "
• Llenar nuevamente el depósito y esperar a que el piloto
luminoso de·"Máquina lista" (20) se encienda.
• (Fig. 19) - Extraer el porta ltro del grupo de café girándolo de derecha a izquierda y enjuagarlo con agua fresca
potable.
La m áquin a ya es tá li sta; p ara c onoce r los d etal les de func ionamiento del suministro de café y vapor, consultar los capítulos
correspondientes.
" y cerrar el mando (3) giránd olo en el sentido
" y suministrar toda el agua presente en el depó-
".
5 SUMINISTRO DE CAFÉ
¡Atención! Durante el suministro de café, no
quitar nun ca el porta ltro p resurizado gi rándolo
manualme nte en el sentid o de las agujas de l reloj. Riesgo
de quemaduras.
• Durante esta operación, el piloto luminoso (20) "Máquina
lista" se puede encender y apagar; dicho funcionamiento
debe ser considerado normal y no una anomalía.
• Antes de utilizar la máquina, asegurarse de que el mando
(3) agua caliente/vapor esté cerrado y que haya su ciente
agua en el depósito de la máquina.
• Pulsar el botón ON/OFF (11); el piloto luminoso (18) se en-
cenderá, lo que indica que la máquina es tá encendida.
• E sperar a que el piloto luminoso (20) "Máquina li sta" se en-
cienda; la máquina ya es tá lista para el suministro de c afé.
Los accesorios para el suministro de café están
depositados en un alojamiento especí camente
estudiado para simpli car y agilizar est as operaciones.
La cuchara dosi cadora para el café molido así como
los ltros necesarios se encuentran dentro; levantar la
tapa (2) y coger el accesorio deseado (Fig. 35 y Fig. 36).
Si tras haber posicionado el mando de selección
(17) en la posición "
mando de selección (17) a la posición "
la tabla "Resolución de problemas" antes de quitar el
porta ltro.
" NO sale café, llevar el
" y consultar
5.1 Con café molido
• (Fig. 7) - In troduci r el ltro (14) en el porta l tro pre suriza -
do (12); al utilizar la máquina por primera vez, el ltro ya
está introducido.
• (Fig. 13) - Introducir el porta ltro en el grupo de café (8)
por la parte inferior.
• (Fig. 14) - Girar el porta ltro de izquierda a derecha hasta
que quede bloqueado. Soltar el mango del porta ltro presurizado. A continuación, un sistema automático mueve el
mango levemente hacia la izquierda.
E ste movimiento garantiza el perfecto funcionamiento del
porta ltro presurizado.
• (Fig. 16) - Precalentar el porta ltro presurizado llevando
el mando de selección (17) a la posición "
a salir agua por el porta ltro presurizado (esta operación
sólo es neces aria para el primer café).
• (Fig. 17) -Tras haber dejado correr 50 cc de agua, llevar el
mando de selección (17) a la posición "
suministro.
• (Fig. 19) - Extraer el porta ltro de la máquina girándolo
de derecha a izquierda y vaciar el agua residual. Gracias al
ltro especial (14) de la máquina, no es necesario cambiar
de ltro para obtener uno o dos cafés.
• (Fig. 35) - Sacar la cuchara dosi c adora de la máquina.
• (Fig. 8) - Añad ir 1-1,5 cucharadas pa ra un café ind ividual o
2 cucharadas ra sas para un café doble; limpiar lo s restos de
café del borde del por ta ltro presur izado.
• (Fig. 13) - Introducir el porta ltro (12) en el grupo de café
(8) por la parte infer ior.
• (Fig. 14) - Girar el porta ltro de izquierda a derecha hasta
que quede bloqueado.
• (Fig. 15) - Toma r 1 o 2 tazas precalentadas y posicio-
narlas bajo el porta ltro presurizado; comprobar que estén correc tamente colocadas bajo los ori cios de salida del
café.
• (Fig. 14) - Llevar el mando de selección (17) a la posición " ".
• (Fig. 17) - Una vez alcanzada la cantidad de café deseada,
girar el mando de selección (17) a la posición "
ner el suministro de café. Al nalizar el suministro, esperar
unos segundos; retirar las tazas con el café (Fig. 18).
• (Fig. 19) - Al término del suministro, esperar unos segun-
dos; luego extraer el porta ltro presurizado y vaciar los
posos.
"; comenz ará
" para detener el
" para dete-
• 50 •
Page 51

Nota: en el portafiltro queda una pequeña
cantida d de agua; esto es norma l y se debe a las
características del porta ltro.
Nota importante: el ltro (16) y el adaptador
(15) deben mantenerse limpios para garantizar
un result ado perfecto. Lavar diariamente tras el uso.
No ta im por tan te: e l l tro ( 14) deb e ma nte ner se
limpio para garantizar un resultado perfecto.
Lavar diar iamente tras el uso.
5.2 Con pastillas de café
• (Fig. 9) - Utilizando una cucharilla de café, sacar el ltro
para café molido (14) del porta ltro presurizado (12).
• (Fig. 10) - Introducir en el porta ltro presurizado (12) el
adaptador para pastillas de café (15), con la parte convexa
orientada hacia abajo.
• (Fig. 11) - A continuación, introducir el ltro para pastillas
de café (16) en el porta ltro presurizado (12).
• (Fig. 13) - Introducir el porta ltro presurizado en el grupo
de café (8) por la parte inferior.
• (Fig. 14) - Girar el porta ltro de izquierda a derecha hasta
que quede bloqueado. Soltar el mango del porta ltro presurizado. A continuación, un sistema automático mueve el
mango levemente hacia la izquierda.
E ste movimiento garantiza el perfecto funcionamiento del
porta ltro presurizado.
• (Fig. 16) - Precalentar el porta ltro presurizado llevando
el mando de selección (17) a la posición "
a salir agua por el porta ltro presurizado (esta operación
sólo es neces aria para el primer café).
• (Fig. 17) -Tras haber dejado correr 50 cc de agua, llevar el
mando de selección (17) a la posición "
suministro.
• (Fig. 19) - Extrae r el porta ltro presuriz ado de la máquina
girándolo de derecha a izquierda y vaciar el agua residual.
• (Fig. 12) - Introducir la pastilla de café en el porta ltro;
asegurarse de que el papel de la pastilla de café no salga
del port a ltro.
• (Fig. 13) - Introducir el porta ltro presurizado en el grupo
de café (8) por la parte inferior.
• (Fig. 14) - Girar el porta ltro de izquierda a derecha hasta
que quede bloqueado.
• Tomar 1 taza precalentada y posicionarla bajo el porta l-
tro; comprobar que esté correctamente colocada bajo los
ori cios de salida del café.
• (Fig. 16) - Llevar el mando de selección (17) a la posición " ".
• (Fig. 17) - Una vez alcanzada la cantidad de café deseada,
girar el mando de selección (17) hasta la posición "
detener el suminis tro de café; retirar la taza con el café.
• (Fig. 19) - Al término del suministro, esperar unos segun-
dos; luego extraer el porta ltro y tirar la pastilla de café
usada.
"; comenz ará
" para detener el
" para
6 SELECCIÓN DEL TIPO DE CAFÉ CONSE
JOS
Por lo ge nera l, es posi ble u tili zar c ual quie r tip o de c afé e xis tente en el mercado. No ob stante, el café es un produc to natural y
su sabor cambia en función del origen y de la mezcla; por ello,
se aconseja probar varios tipos de café hasta encontrar la mezcla que mejor se adapte a su gusto personal.
En cualquier caso, para obtener unos mejores resultados se
aconseja utilizar mezclas expresamente preparadas para máquinas de café exprés. El café debería salir siempre de forma
regular, sin gotear, por el porta ltro presurizado.
Es posible modi car la velocidad de salida del café cambiando
levemente la cantidad de café en el ltro y/o usando un café
que tenga un grado de molido diferente.
Para asegurar un excelente resultado en taza y facilitar la limpieza y la prep aración, Saeco recomienda usar pastillas de café
monodosis de tipo ESE.
ANTES DE REALIZAR CUALQUIER OPERACIÓN DE
SUMINISTRO DE VAPOR O DE AGUA CALIENTE,
COMPROBAR QUE EL TUBO DE VAPOR (PANNARELLO) ESTÉ
ORIENTADO HACIA LA BANDEJA DE GOTEO.
7 AGUA CALIENTE
¡Riesgo de qu emaduras! Al pr incipio del sum inis-
tro se pueden producir pequeñas salpicaduras
de agua caliente. El tubo de suministro puede alcanzar
temperaturas elevadas: evitar el contacto directo con
las manos.
• Durante esta operación, el piloto luminoso (20) "Máquina
lista" se puede encender y apagar; dicho funcionamiento
debe ser considerado normal y no una anomalía.
• Antes de utilizar la máquina, asegurarse de que el mando
(3) agua caliente/vapor esté cerrado y que haya su ciente
agua en el depósito.
• Pulsar el botón ON/OFF (11); el piloto luminoso rojo (18) se
encenderá, lo que indica que la máquina está encendida.
• Esperar a que el piloto luminoso (20) "Máquina lista" se
encienda; la máquina ya es tá lista.
Español
• 51 •
Page 52

• (Fig. 21) - Colocar un recipiente o una taza de té bajo el
tubo de vapor (Pannarello).
• (Fig. 21) - Abrir el mando (3) girándolo en el sentido con-
trario a las agujas del reloj.
• (Fig. 22) - Llevar el mando de selección (17) a la posición " ".
• (Fig. 23) - Una vez obtenida la cantidad de agua caliente
des eada , llev ar el mand o de se lecc ión (17) a la p osic ión "
• (Fig. 24) - Cerrar el mando (3) girándolo en el sentido de
las agujas del reloj.
• Retirar el recipiente con el agua caliente.
8 VAPOR / CAPUCHINO
¡Riesgo de qu emaduras! Al pri ncipio del sum inis-
tro se pueden producir pequeñas salpicaduras
de agua caliente. El tubo de suministro puede alcanzar
temperaturas elevadas: evitar el contacto directo con
las manos.
¡A ten ci ón ! No su min is tr ar c af é c ua ndo es té s el ec-
cionada la función vapor ya que la temperatura es
demasiado alta y existe riego de quemaduras.
¡Atención! Durante el suministro de vapor, no
quitar nu nca el port a ltro (en su cas o) girándolo manualmente en el sentido de las agujas del reloj.
¡Riesgo de quemaduras! El porta ltro sólo puede quitarse tras haber llevado el mando de selección (17) a la
posición "
procedimiento descrito en el apdo. 4.5.
• Durante esta operación, el piloto luminoso (20) "Máquina
• Antes de utilizar la máquina, asegurarse de que el mando
• Pulsar el botón ON/OFF (11); el piloto luminoso (18) se en-
• Esperar a que el piloto luminoso (20) "Máquina lista" se
• (Fig. 25) - Llevar el mando de selecci ón (17) a la posición " ";
• Esperar a que el piloto luminoso (19) se encienda; la má-
• (Fig. 26) - Colocar un recipiente bajo el tubo de vapor.
• (Fig. 26) - Abrir el mando (3) durante unos instantes para
• (Fig. 27) - Cerrar el mando (3) y retirar el recipiente.
• Lle nar con leche fría 1/3 del recipi ente que se desee utiliz ar
" y haber enfriado la máquina mediante el
lista" se puede encender y apagar; dicho funcionamiento
debe ser considerado normal y no una anomalía.
(3) agua caliente/vapor esté cerrado y que haya su ciente
agua en el depósito.
cenderá, lo que indica que la máquina es tá encendida.
encienda.
el piloto luminoso (20) se apaga.
quina ya está lis ta para el suministro de vapor.
que salga el agua residual del tubo de vapor (Pannarello);
en poco tiempo, empezará a salir sólo vapor.
para preparar el capuchino.
Para garantizar un mejor resultado usar leche
fría.
• (Fig. 28) - Sumergir el tubo de vapor en la leche y abrir el
mando (3) girándolo en el sen tido contrario a las agujas de l
reloj; girar lentamente el recipiente que contiene la leche,
de abajo arriba, para que se caliente de forma uniforme.
".
Se recomienda un suministro máximo de 60
segundos.
• A continuac ión, cerrar el mando (3) girándolo en el sentid o
de las agujas del reloj; retirar la t aza con la leche montada.
• (Fig. 30) - Llevar el mando de se lección (17) a la posición " ".
Si los pilotos luminosos " " y " " están encendidos al
mismo tiempo, la máquina tiene una temperatura demasiado elevada para el suministro de caf é.
• Proceder a la carga del circuito tal como se indica en el
apdo. 4.5 para que la máquina vuelva a es tar operativa.
Nota: la máqu ina está oper ativa cuando e l piloto
luminoso
sin parpadear.
Nota importante: si no se consigue preparar un
capuchino como se describe, volver a cargar el
circuito tal como se indica en el apdo. 4.5 y, a continuación, repetir las operaciones.
Puede util izarse el mi smo sistema par a el calen-
tamiento de otras bebidas.
• Tras el uso, limpiar el tub o de vapor con un paño húmedo.
"Máquina lista" está encendido
9 AHORRO ENERGÉTICO
La máquina est á diseñada para ahorrar energía. La má quina se
apaga automáticamente tras 9 minutos sin ser utilizada.
Para reactivar la máquina, basta con pulsar el botón ON/OFF
(11); se encenderá el piloto luminoso (18) "Máquina encendida".
Esperar a que el piloto luminoso (20) "Máquina lista" se encienda.
• 52 •
Page 53

10 LIMPIEZA
El m ante nim ient o y la limp iez a se p ued en e fec tuar sól o cua ndo
la máquina está fría y desconectada de la red eléctrica.
• No sumergir la máquina en agua ni introducir sus componentes en el lavavajillas.
• No usar alcohol etílico, solventes y/o agentes químicos
agresivos.
• Se aconseja limpiar el depósito de agua diariamente y llenarlo con agua fresca.
• (Fig. 31-33) - Diariamente, después de haber calentado
leche, desmontar la parte exterior del Pannarello y lavarla
con agua fresca potable.
• (Fig. 31-32-33) - Limpiar el tubo de vapor una vez a la se-
mana. Para realizar esta operación se debe:
- desmontar la parte exterior del Pannarello (para la limpieza habitual);
- extrae r la parte superior del Pannare llo del tubo de vapor;
- lavar la parte superior del Pannarello con agua fresca potable;
- lavar el tubo de vapor con un paño húmedo y quitar los
posibles restos de leche;
- volver a colocar la par te superior en el tubo de vapor (ase gurarse de que quede completamente introducida);
Volver a montar la parte exterior del Pannarello.
• (Fig. 34) - Diariamente, vaciar y lavar la bandeja de gote o.
• Limpiar la máquina usando un paño suave humedecido
con agua.
• (Fig. 20) - Para limpiar el por ta ltro presuriza do realizar lo
siguiente:
- (Fig. 9) - extraer el ltro y lavarlo bien con agua caliente.
- extraer el adaptador (en su caso) y lavarlo bien con agua
caliente.
- lavar el interior del por ta ltro presur izado.
• No secar la máquina ni sus componentes usando un horno
de microondas y/o un horno convencional.
• (Fig. 35-36) - Una vez a la semana, limpiar el alojamiento
para los accesorios con un paño húmedo para quitar los
posibles pos os de café o polvo en general.
Nota: no lavar al porta ltro presurizado en el
lavavajillas.
11 DESCALCIFICACIÓN
La formación de cal se produce con el uso del aparato; la descalci cación debe efectuarse cada 1-2 meses de uso de la máquina y/o cuando se obser ve una reducción del caudal de agua.
Utilizar exclusivamente el producto desc alci cante Saeco.
En c aso d e con ict o, lo i ndic ado e n el m anua l de
uso y manten imiento tiene pr ioridad resp ecto a
las indicaciones dadas en los accesorios y/o materiales
de uso vendidos por separado.
Utilizar el producto descalci cante Saeco (Fig.
B). Ha sido formulado específicamente para
mantener al máximo el rendimiento y la funcionalidad
de la máquina durante toda su vida operativa así como
para evit ar, siempre qu e se utilice correc tamente, cualquier alter ación de los pro ductos sumi nistrados. Ante s de
iniciar el ciclo de descalci cación asegurarse de: HABER
EXTRAÍDO EL FILTRO DE AGUA, en su caso.
No beber la solución descalci cante ni los pro-
ductos suministrados hasta que el ciclo se haya
completado. No utilizar bajo ningún concepto vinagre
como producto descalci cante.
1 (Fig. 13-14) - Introducir el porta ltro en el grupo de café
(8) por la parte inferior y girarlo de izquierda a derecha
hasta que quede bloqueado.
2 (Fig. 1B) - Sacar y vaciar el depósito de agua.
3 (Fig. 2) - Verter la MITAD del contenido de la botella de
producto de scalci cante concentrado Saeco en el depósito
de agua del aparato y rellenarlo con agua fresca potable
hasta el nivel MA X.
4 Encender la máquina pulsando el botón ON/OFF (11); el
piloto luminoso (18) se encenderá.
(Fig. 21) - Suministrar (tal como se describe en el capítulo
7 del manual) 2 taza s de agua (150 ml aprox. cada una) por
el tubo de vapor/agua caliente. A continuación, apagar la
máquina mediante el botón ON/OFF (11); el piloto luminoso (18) se apagará.
5 Dejar que el producto descalci cante actúe durante unos
15-20 minutos con la máquina apagada.
6 Encender la máquina pulsando
(Fig. 21) - Suministrar (tal como se describe en el capítulo
7 del manual) 2 tazas de agua (150 ml aprox. cada una) por
el tubo de vapor/agua caliente. A continuación, apagar la
máquina mediante
durante 3 minutos.
7 Repetir las operaciones descritas en el punto 6 hasta que
el depósito de agua quede completamente vacío.
el botón ON/OFF (11)
el botón ON/OFF (11)
.
y dejarla apagada
Español
• 53 •
Page 54

8 (Fig. 2) - Enjuagar el depósito con agua fresca potable y
llenarlo completamente.
9 Coloc ar un recipiente bajo el por ta ltro.
10 Encender la máquina pulsando el botón ON/OFF (11);
girar el mando de selección (17) hasta la posición "
y suministrar todo el contenido del depósito a través del
porta ltro. Para detener el suministro, llevar el mando de
selección (17) a la posición "
11 (Fig. 2) - Llenar de nuevo el depósito con agua fresca.
(Fig. 21) - Colo car un re cipiente grande ba jo el tubo de va-
por (Pannarello). Abrir el mando de suministro de agua (3)
girándolo en el sentido contrario a las agujas del reloj.
(Fig. 22) - Girar el mando de selección (17) hasta la posi-
ción "
" y suministrar todo el contenido del depósito a
través del tubo de vapor/agua caliente.
12 (Fig. 23) - Una vez que el agua se haya agotado, para de-
tener el suministro, llevar el mando de selección (17) a la
posición "
(Fig. 24) - Cerrar el mando de suministro de agua (3) gi-
rándolo en el sentido de las agujas del reloj.
13 Repe tir de nuevo las operaciones des de el punto (8) hasta
un total de 4 depósitos.
14 (Fig. 19) - Extraer el porta ltro del grupo de café girándolo
de derecha a izqu ierda y enjuagarlo con agua fres ca potable.
El ciclo de descalci cación ha concluido.
(Fig. 2) - Volver a llenar el depósito con agua fresca. Si fuera
necesario, efectuar la carga del circuito tal como se describe
en el apdo. 4.5.
".
".
12 ELIMINACIÓN DEL APARATO
Este producto cumple con la Directiva EU 2002/96/EC.
"
El simbolo
que este producto no se puede tratar como desperdicios normales del hogar.
Este producto se debe entregar al punto de recogida de equipos eléctricos y electrónicos para reciclaje.
Al asegurarse de que este producto se deseche correctamente,
usted ayudará a evitar posibles consecuencias negativas para
el ambiente y la salud pública, lo cual podría ocurrir si este
producto no se manipula de forma adecuada. Para obtener
información más detallada sobre el reciclaje de este producto,
póngase en contac to con la administración de su ciu dad, con su
servicio de desechos del hogar o con la tienda donde compró
el producto.
en el producto o en su embalaje indica
La solución descalcificante se debe eliminar
según lo previsto por el fabricante y/o por las
nor mas vige ntes en el país don de se util ice la má quina.
• 54 •
Page 55

13 RESOLUCIÓN DE PROBLEMAS
Avería Causas posibles Solución
La máquina no se enciende. Máquina no conec tada a la red eléctrica. Conectar la máquina a la red eléc trica.
La bomba es muy ruidosa. Falta agua en el depó sito. Lle nar de agua y volver a cargar el circui to (apdo. 4.5)
Volver a llevar el mando de selección (17) a la posiNo sale café tras haber posicionado el mando de selección
(17) en la posición "
El café está demasiado frío.
No se forma la crema de la leche.
No es posible preparar el capuchino.
El café sale muy rápido y no se
forma crema.
El café no sale o s ale a gotas.
El café se sale por los bordes.
".
Porta ltro obstruido.
El piloto luminoso (20) "Máquina lista" estaba apagado cuando se ha llevado el mando de selección (17) a la posición "
Porta ltro no introducido para el precalentamiento (cap. 5).
Tazas frías. Precalentar las tazas con agua caliente.
Leche no adecuada: leche en polvo, leche
desnatada.
Pannarello sucio. Limpiar el Pannarello según lo descrito en el cap. 10.
Ya no hay vapor en la caldera.
Hay muy poco café en el porta ltro. Añadir café (cap. 5).
Molido demasiado gr ueso. Usar una mezcla diferente (cap. 6).
Café viejo o no adecuado. Usar una mezcla diferente (cap. 6).
Pastilla de café vieja o inadecuada. Cambiar la pastilla de café usada.
Falta un componente en el porta ltro.
Falta agua. Llenar de agua y volver a cargar e l circuito (apdo. 4.5)
Molido demasiado no. Usar una mezcla diferente (cap. 6).
Café comprimido en el porta ltro. Remover el café molido.
Hay demasiado café en el porta ltro. Reducir la cantidad de café en el por ta ltro.
Mando (3) abierto. Cerrar el mando (3).
Máquina con cal. Descalci car la máquina (cap. 10).
Filtro del porta ltro obstruido. Limpiar el ltro (cap. 9).
Pastilla de café inadecuada. Cambiar el tipo de pastilla de café.
Porta ltro colocado de forma incorrect a en
el grupo de café.
Borde superior del port a ltro sucio. Limpiar el borde del porta ltro.
Pastilla de café introducida de forma inco-
rrecta.
Hay demasiado café en el porta ltro.
ción "
". Apagar la máquina y esperar a que se enfríe
(1 hora aprox.). A continuación, sacar y lavar bien el
porta ltro. Si el problema vuelve a aparecer, contactar con el centro de asis tencia.
Esperar a que el piloto luminoso (20) se encienda.
".
Precalentar el porta ltro.
Utilizar leche entera.
Volver a cargar el circuito (apdo. 4.5) y repetir las
operaciones descrit as en el cap. 8.
Comprobar que todos los componentes se encuentren instalados y de forma correcta.
Colocar el por ta ltro de forma correct a (cap. 5).
Colocar la pastilla de café correctamente de manera
que no salga del porta ltro.
Reducir la cantidad de café utilizando la cuchara dosi cadora.
Español
Para las averías no mencionadas en la tabla o en caso de que las soluciones indicadas no las resuelvan, contactar
con un centro de asistencia.
• 55 •
Page 56

1 GENERALIDADES
A máquina de café é indicada para a preparação de 1 ou 2 chávenas de café expresso e está equipada com um tubo orientável para distribuição de vapor e de água quente. Os comandos
na parte frontal do aparelho são marcados com símbolos de
fácil interp retação.
A máquina foi projectada para uso doméstico e não está indicada para um funcionamento contínuo de tipo pro ssional.
Atenção. Não se assume qualquer tipo de responsabilidade por eventuais danos, no caso de:
• Utilização errada e não conformidade com os objectivos previstos;
• Reparações não realizadas em centros de assistência
autorizados;
• Alteração do cabo de alimentação;
• Altera ção de qualquer out ro componente da máq uina;
• Utilização de peças sobresselentes e acessórios não
originais;
• Falta de des calci cação e arm azenagem em lugar es
com temperatura infe rior a 0°C.
Nestes casos ocorre a anulação da garantia.
1.1 Para facilitar a leitura
O triângulo de advertência indica
todas as instruções importantes
Preste muita atenção a essas indicações para evitar
ferimentos graves!
A referência a imagens, partes do aparelho ou elementos de
comando, etc., está indicada através de números ou letras;
neste caso é realizada através da própria imagem.
Este símbolo evidencia as informações que se
devem ter em consideração, para uma melhor
utilização da máquina.
As ilustrações correspondentes ao texto encontram-se
nas primeiras páginas do manual. Consulte estas páginas
durante a leitura das instruções de utilização.
para a segurança do utilizador.
1.2 Aplicação destas instruções de utili-
zação
Guar de es tas ins truç ões de u tiliz ação e m lugar segur o e anex e-
-as à máquina de café caso uma outra pessoa tenha de a uti-
lizar.
Para mais informações ou em caso de problemas, contacte os
centros de assistência autorizados.
2 DADOS TÉCNICOS
O fabricante r eserva-se o direito de m odi car as caracterís ticas
técnicas do produto.
Tensão nominal - Potência nominal - Alimentação
Consulte a placa colocada no aparelho
Material do corpo
Plástico
Dimensões (c x a x p) (mm)
210 x 300 x 280
Peso
3,9 kg
Comprimento do cabo
1,3 m
Painel de comando
Na parte frontal
Porta- ltro
Pressurizado
Pannarello
Especial para cappuccinos
Reservatório de água
1,25 litros - Ex traível
Pressão da bomba
15 ba r
Caldeira
Inox
Dispositivos de segurança
Ter mof us íve l
3 NORMAS DE SEGURANÇA
Nunca col oque em contac to com água as peça s ligadas à
corrente: pe rigo de curto -circuito! O va por sobreaque cido e a água quen te podem provocar q ueimaduras! Nu nca
dir ija o j acto d e vapo r ou de á gua que nte pa ra qua lquer
parte do corpo, tome precauções quando tocar no tubo
de vapor/água quente: perigo de queimaduras!
Utilização prevista
A máquina de café é indicada exclusivamente para utilização
doméstica. É proibido efectuar modi cações técnicas e qualquer utilizaç ão ilícita, devido aos riscos que isso pode caus ar! O
aparelho não se destina a ser utilizado por pessoas (incluindo
crianças) com reduzidas capacidades físicas, mentais ou sensoriais ou com experiência e/ou competências insu cientes, a
não ser que estejam so b a supervisão de uma pesso a responsável pela sua segurança ou que sejam ensinadas por essa mesma pessoa a utilizar o aparelho.
• 56 •
Page 57

Alimentação de corrente
Ligue a máquina de café somente numa tomada de corrente
adequada. A tensão deve corresponder à indicada na placa do
aparelho.
Cabo de alimentação
Nunca utilize a máquina de café se o cabo de alimentação estiver defeituoso. Se o cabo de alimentação estiver dani cado,
deve ser substituído pelo fabricante ou pelo seu serviço de assistência a clien tes. Não passe o cabo de aliment ação por ângulos e sobre arestas vivas, por cima de objectos muito quentes
e proteja-o do óleo.
Não transportar a máquina de café ou puxar pelo cabo. Não
extraia a cha da tomada puxando-a pe lo cabo, nem lhe toque
com as mãos molhadas.
Evite que o cabo de alimentação caia livremente abaixo de
mesas ou estantes.
Protecção de outras pessoas
Mantenha as crianças sob supervisão, para evitar que brinquem com o aparelho.
As crianças não se apercebem do perigo associado aos electrodomésticos. Não deixe ao alcance das crianças os materiais
utilizados para embalar a máquina.
Perigo de queimaduras
Evite dirigir contra si mesmo e/ou outros o jacto de vapor sobreaquecido e/ou de água quente. Utilize sempre as pegas ou
os botões apropriados.
Nunca retire o porta- ltro pressurizado durante a distribuição
do café. Durante a fase de aquecimento podem sair gotas de
água quente do grupo de distribuição do café.
Não distribua café quando a máquina está em sobreaquecimento, ou seja, quando os indicadores luminosos “
estão acesos ao mesmo tempo.
” e “ ”
Localização
Coloque a máquina de café num local seguro, onde ninguém
possa virá-la ou ser ferido por ela.
Pode ser expelida água quente ou vapor sobreaquecido: peri-
go de queimaduras!
Não mantenha a máquina a temperaturas inferiores a 0 ºC; o
gelo poderia dani car a máquina.
Não utilize a máquina de café ao ar livre.
Não coloque a máquina em superfícies muito quentes e perto
de chamas livres, para evitar que a carcaça derreta ou que
dani cada.
Limpeza
Antes de limpar a máqu ina, é indispensável desligar a máqu ina
com a tecla ON/OFF e depois retirar a cha da tomada de corrente. Além diss o, deve esperar que a máquina arr efeça. Nunca
mergulhe a máquina em água!
É rigorosamente proibido tentar modi car de algum modo os
componentes internos da máquina.
Não utilize, para ns alimentares, a água restante no reservatório durante algun s dias, lave o reservatório e enc ha com água
fresca potável.
Espaço para a utilização e manutenção
Para o correcto e bom funcionamento da máquina de café
recomenda-se o seguinte:
• Seleccione uma super fície de apoio bem nivelada;
• Seleccione um ambiente su cientemente iluminado, higiénico e com uma tomada de corrente facilmente acessível;
• Pr eveja uma distância mínima das pared es à máquina como
indicado na gura (Fig.A).
Armazenamento da máquina
Quando a máquina permanecer inutilizada por um longo período de tempo, deverá desligá-la e retirar a cha da tomada.
Guarde-a num local seco e não acessível a crianças. Proteja-a
do pó e da sujidade.
Reparações / Manutenção
No caso de avarias, defeitos ou suspeita de defeito após uma
queda, retire imediatamente a cha da tomada. Nunca coloque em funcionamento uma máquina defeituosa. Somente os
Centros de Assistência Autorizados podem realizar intervenções e reparações. No caso de intervenções não realizadas segundo as normas, rejeita-se qualquer tipo de responsabilidade
por eventuais danos.
Medidas contra incêndio
Em caso de incêndio, utilize extintores de dióxido de carbono
(CO
). Não utilize água ou extintores de pó.
2
Legenda dos co mponentes da máquina (Pág.2)
1 Painel de comando
2 Tampa do reservatório de água
3 Botão de água quente / vapor
4 Sede para acessórios
5 Reservatório de água
6 Supor te de apoio para chávenas
7 Depósito de rec uperação da água + grelha (se for pre vista)
8 Grupo de distribuição de café
9 Tubo de vapor (Pannarello)
10 Cabo de alimentação
11 Tecla ON/OFF
12 Porta- ltro pressurizado
13 Medidor para café moído
14 Filtro para café moído
(único para a distribuição de 1 ou 2 cafés)
15 Adaptador para ltro de café em pastilhas
16 Filtro para café em pastilhas
17 Botão de selecção
18 Indicador luminoso de "máquina ligada"
Português
• 57 •
Page 58

19 Indicador luminoso de "Vapor pronto"
20 Indicador luminoso de café / água - "Máquina pronta"
• (Fig. 2) - Enxagúe-o e e ncha-o com água fresca po tável; não
ultrapasse o nível (MÁX) indicado no reser vatório.
4 INSTALAÇÃO
Para a sua segurança e a de te rceiros, siga escrupulosamente as “Normas de segurança” indicadas no cap. 3.
4.1 Embalagem
A embalagem original foi concebida e realizada para proteger
a máquina durante o transporte. Recomenda-se conservá-la
para uma possível necessidade de transporte no futuro.
4.2 Advertências de instalação
Antes de instalar a máquina, observe as seguintes indicações
de segurança:
• coloque a máquina num local seguro;
• certi que-se de que as crianças não têm a possibilidade de
brincar com a máquina;
• não coloque a máquina sobre superfícies muito quentes ou
perto de chamas livres.
A máquina de café está agora pronta para ser ligada à rede
eléctrica.
Obs.: aconselha-se lavar os componentes antes
da sua primeira utilização e/ou depois de um
período sem utiliz ação.
4.3 Ligação da máquina
A corrente e léctric a pode ser peri gosa! Por conse -
guinte, sig a sempre esc rupulosa mente as norma s
de segura nça. Nunca utili ze cabos defei tuosos! Os cabos
e as ch as defeituos os devem ser imed iatamente sub stituídos pelos Centros de Assistência Autorizados.
A tensão do aparelho foi programada na fábrica. Certi que-
-se de que a tensão de rede corresponde às indicações apresentadas na placa de identi cação posicionada no fundo do
aparelho.
• Introduza a cha numa tomada de parede de tensão ade-
quada.
Introduza no reservatório sempre e unicamente
água fresca potável sem gás. Água quente e
também outros líquidos podem dani car o reservatório. Não coloque a máquina em funcionamento sem
água: assegure-se que haja água su ciente dentro do
reservatório.
• (Fig.3A) - Introduza o reser vatório certi cando-se de que o
reposiciona correctamente na sua sede e coloque a tampa
(2).
Certi que- se de que o reser vatório est á bem inse-
rido na máquina, pressionando-o correctamente
até ao m (DEVE SER COMPLETAMENTE VISÍVEL A REFERÊNCIA DA FIG.3B) para evitar fugas de água do fundo.
4.5 Carregamento do circuito
No início, depois de ter distribuído vapor ou após a nalização
da água no reservatório, o circuito da máquina deve ser recarregado.
• Pressione a tecla ON/OFF (11); o indicador luminoso (18)
acende-se par a indicar que a máquina está ligada.
• (Fig.4) - Coloque um recipiente abaixo do tubo de vapor
(Pannarello).
• Abra o botão (3) “água quente/vapor” rodan do-o no sentido
oposto ao dos ponteiros do relógio.
• (Fig.5) - Coloque o botão de selecção (17) na posição
"
".
• Aguarde que saia um jacto regular de ág ua do tubo de vapor
(Pannarello).
• (Fig.5) - Coloque o botão de selecção (17) na posição "
• Fe che o botão (3) “água quente/vapor” rodando-o no senti -
do dos ponteiros do relógio. Remova o recipiente.
".
4.6 Primeira utilização ou após um perío-
do sem utilização
Esta simples operação assegura-lhe uma óptima distribuição
e deve ser realizada:
- na primeira utilização;
- quando a máquina permanecer sem ser utilizada por um
longo período de tempo (por mais de 2 semanas).
4.4 Reservatório de água
• (Fig.1A) - Remova a tampa do reservatório de água (2)
levantando-a.
• (Fig.1B) - Retire o reservatório de água (5).
• 58 •
A água dist ribuída deve ser e svaziada num lo cal
de desca rga apropria do e não pode ser util izada
para a alimentação. Se o recipiente se encher,durante o
ciclo, par e a distribuiç ão e esvazie- o antes de recomeç ar
a operação.
Page 59

• (Fig.2) - Enxagúe o reservatório e encha-o com água fresca
potável.
• (Fig.4) - Coloque um recipiente abaixo do tubo de vapor
(Pannarello). Abra a torneira (3) rodando-a no sentido contrário ao dos ponteiros do relógio.
(Fig.5) - Coloque o bot ão de selecção (17) na posição "
• Dis tri bua t odo o cont eúd o do r eser vat óri o de á gua p elo t ubo
de vapor/água quente (Pannarello); para nalizar a distribuição coloque o botão de selecção (17) na posição "
feche a torneira (3) virando-a no sentido dos ponteiros do
relógio.
• (Fig.2) - Encha o reservatório com água fresca potável.
• (Fig.13-14) - Introduza o porta- ltro abaixo do grupo de
distribuição (8), virando-o da esquerda para a direita até se
bloquear.
• (Fig.15) - Introduza um recipiente adequado abaixo do
porta- ltro.
• (Fig .16) - Rode o botão de sele cção (17) para a posição "
e distribua toda a água presente no reservatório.
(Fig.17) - Antes de a água terminar completamente, pare a
distribui ção e coloque o botão de selecç ão (17) na posição "
• Encha novamente o reservatório e aguarde que o indicador
luminoso de "máquina pronta" (20) se acenda.
• (Fig.19) - Remova o porta- ltro do grupo virando-o da di-
reita para a e squerda e enxagúe-o com á gua fresca potável.
Agora a máquina está pronta; os detalhes de funcionamento
para a distribuição de café e de vapor podem ser consultados
nos respec tivos capítulos.
" e
5 DISTRIBUIÇÃO DO CAFÉ
Atenção! Dur ante a distri buição do ca fé é proibido
desligar o porta- ltro pressurizado rodando-o
manualmente no sentido dos ponteiros do relógio.
Perigo de q ueimaduras.
• Durante esta operação o indicador luminoso (20) de "má-
quina pronta" poderá acender-se e apagar-se; este funcionamento deve ser consider ado normal e não uma anomalia.
• Antes de utilizar, certi que-se de que o botão (3) de água
quente/vapor es teja fechado e de que o reservatór io de água
da máquina contenha uma quantidade su ciente de água.
• Pressione a tecla ON/OFF (11); o indicador luminoso (18)
acende-se par a indicar que a máquina está ligada.
• Aguarde o indicador luminoso (20) de "máquina pronta" se
acender, agora a máquina es tá pronta para distr ibuir o café.
Os acessórios para a distribuição do café são
guardados numa sede estudada especi camente
para tornar estas operações simples e imediatas.
Em relação ao medido r para o café moído e/ou os ltros
necessá rios, levante a tampa (2) e ret ire o quanto desejado (Fig.35 e Fig.36)
Se, depois de colocar o botão de selecção (17) na
posição "
selecção (17) na posição "
lução de problemas" antes de remover o porta- ltro.
".
" NÃO sair café, coloque o botão de
" e consulte a tabela "Reso-
5.1 Com café moído
• (Fig.7) - Introduza o ltro (14) no porta- ltro pressurizado
(12); na primeira utilização o ltro já se encontra introduzido.
• (Fig.13) - Introduza o porta- ltro debaixo do grupo de dis-
tribuição (8).
• (Fig .14) - Rode o porta- ltro da esquerda para a direita até
se bloquear. Solte a pega do porta- ltro pressurizado. Um
sistema automático agora recolocará a pega ligeiramente
para a esquerda.
"
Este movimento garante o perfeito funcionamento do
porta- ltro pressurizado.
• (Fig.16) - Pré-aqueça o porta- ltro pressurizado colocando
".
o botão de selecç ão (17) na posição "
a sair do port a- lt ro pressurizado (esta operação é n ecessária apenas para o primeiro café).
• (Fig.17) -Depois de ter distribuído 50cc de água, coloque
o botão de selecção (17) na posição "
distribuição.
• (Fig.19) - Retire o porta- ltro da máquina, virando-o da
direita para a esquerda, e deite fora a água restante. Graças
ao ltro especial (14) fornecido com à máquina, não precisa
trocar o ltro para obter um ou dois cafés.
• (Fig.35) - Retire o medidor da máquina.
• (Fig. 8) - Deite 1-1,5 medidores para um único c afé ou 2 me-
didores cheios até à borda para o café duplo; limpe a borda
do porta- ltro dos resíduos de café.
• (Fig.13) - Introduza o porta- ltro (12) debaixo do grupo de
distribuição (8).
• (Fig.14) - Rode o porta- ltro da esquerda para a direita até
se bloquear.
• (Fig.15) - Pegue 1 ou 2 chávenas pequenas pré-aque-
cidas e coloque-as debaixo do porta- ltro pressurizado;
certi que-se de que estão colocadas correctamente debaixo dos furos de s aída do café.
• (Fig.14) - Rode o botão de selecç ão (17) para a posição " ".
• (Fig.17) - Depois de alcançada a quantidade de café dese-
jada, rode o botão de selecção (17) para a posição "
interromper a distribuição de café. Depois de terminada a
distribuição, aguarde alguns segundos; retire as chávenas
com o café (Fig.18).
• (Fig .19) - No m da distribuição aguarde uns segundos,
retire o por ta- ltro pressurizado e deite fora as borras.
Obs.: no porta- ltro permanece uma pequena
quantid ade de água; isto é norma l e é devido às
características do porta- ltro.
"; a água começará
" para interromper a
Português
" para
• 59 •
Page 60

Observação importante: O ltro (14) deve estar
sempre limpo para garantir um resultado per-
feito. Lave diariamente após a utilização.
5.2 Com café em pastilhas
• (Fig .9) - Tire, utilizando uma colher (chá), o ltro para café
moído (14) do porta- ltro pressurizado (12).
• (Fig.10) - Introduza no porta- ltro pressurizado (12), o
adaptador par a as pastilhas (15), com a parte convexa virada
para baixo.
• (Fig .11) - Depois, introduza o ltro para pastilhas (16) no
porta- ltro pressurizado (12).
• (Fig .13) - Introduza o porta- ltro pressurizado debaixo do
grupo de distribuição (8).
• (Fig .14) - Rode o porta- ltro da esquerda para a direita até
se bloquear. Solte a pega do porta- ltro pressurizado. Um
sistema automático agora recolocará a pega ligeiramente
para a esquerda.
Este movimento garante o perfeito funcionamento do
porta- ltro pressurizado.
• (Fig.16) - Pré-aqueça o porta- ltro pressurizado colocando
o botão de selecç ão (17) na posição "
a sair do port a- lt ro pressurizado (esta operação é n ecessária apenas para o primeiro café).
• (Fig.17) -Depois de ter distribuído 50cc de água, coloque
o botão de selecção (17) na posição "
distribuição.
• (Fig .19) - Tire o po rta- ltro pressuriza do da máquina viran-
do-o da direi ta para a esquerda, e deite f ora a água restante.
• (Fig .12) - Introduza a pastilha no porta- ltro; certi que-se
de que o papel da pas tilha não sai do porta- ltro.
• (Fig .13) - Introduza o porta- ltro pressurizado debaixo do
grupo de distribuição (8).
• (Fig .14) - Rode o porta- ltro da esquerda para a direita até
se bloquear.
• Pegue 1 chávena pequena pré-aquecida e posicione-a
debaixo do porta- ltro; certi que-se de que está colocada
correctamente debaixo dos furos de s aída do café.
• (Fig.16) - Rode o botão de selecç ão (17) para a posição " ".
• (Fig.17) - Depois de alcançada a quantidade de café dese-
jada, vire o botão de selecção (17) para a posição "
interromper a distribuição de café; retire a chávena com o
café.
• (Fig .19) - No m da distribuição aguarde uns segundos,
retire o por ta- ltro e deite fora a pastilha utilizada.
Observação importante: O ltro (16) e o adap-
tador (15) devem estar sempre limpos para
garantir um resultado perfeito. Lave diariamente após
a utilização.
"; a água começará
" para interromper a
" para
6 ESCOLHA DO TIPO DE CAFÉ SUGES
TÕES
Em linhas gerais é possível utilizar todos os tipos de café existentes à venda. Todavia, o café é um produto natural e o seu
gosto muda conforme a origem e a mistura; é preferível, portanto, experimentar vários tipos de café, para encontrar o que
satisfaz da melhor maneira os gostos pessoais.
Para um melhor resultado, aconselha-se utilizar misturas preparadas espe cialmente para máquinas de café e xpresso. O café
dev eria s air sem pre re gular mente do por ta- ltr o pres suriz ado,
sem gotejar.
A velocidade de saída do café pode ser modi cada mudando
leveme nte a dose de c afé no l tro e/ou util izando um c afé com
um grau de moagem diferente.
Para obter um melhor resultado na chávena e para facilitar a
limpeza e a preparação, a Saeco aconselha a utilizar café em
pastilhas mono dose da marca ESE.
ANTES DE REALIZAR QUALQUER OPERAÇÃO RELATIVA
À DISTRIBUIÇÃO DO VAPOR OU DA ÁGUA QUENTE,
CERTIFIQUE-SE DE QUE O TUBO DE VAPOR (PANNARELLO)
ESTEJA ORIENTADO SOBRE O DEPÓSITO DE RECUPERAÇÃO
DE ÁGUA.
7 ÁGUA QUENTE
Perigo de queimaduras! Durante o início da
distribuição podem veri car-se breves salpicos
de água quente. O tubo de distribuição pode alcançar
temperaturas elevadas: evite tocá-lo directamente
com as mãos.
• Durante esta operação o indicador luminoso (20) de "má-
quina pronta" poderá acender-se e apagar-se; este funcionamento deve ser consider ado normal e não uma anomalia.
• Antes do uso, certi que-se de que o botão (3) água quente/
vapor esteja fe chado e que o reservatório d e água da máquina contenha uma quantidade su ciente de água.
• Pressione a tecla ON/OFF (11); o indicador luminoso verme-
lho (18) acende-se para indicar que a máquina está ligada.
• Aguarde que o indicador luminoso (20) de "máquina pron-
ta" se acenda; agora a máquina está pronta.
• (Fig.21) - Coloque um recipiente ou um copo (chá) debaixo
do tubo de vapor (Pannarello).
• (Fig.21) - Abra o botão (3) virando-o no sentido contrário
• 60 •
Page 61

ao dos ponteiros do relógio.
• (Fi g.22) - Coloque o botão de s elecção (17) na posição " ".
• (Fig .23) - Depois de retirada a quantidade desejada de água
quente, coloque o botão de selecção (17) na posição "
• (Fig.24) - Feche o botão (3) virando-o no sentido dos pon-
teiros do relógio.
• Retire o recipiente com a água quente.
".
8 VA PO R / CAPPUCCINO
Perigo de queimaduras! Durante o início da
distribuição podem veri car-se breves salpicos
de água quente. O tubo de distribuição pode alcançar
temperaturas elevadas: evite tocá-lo directamente
com as mãos.
At enç ão ! N ão f aç a a d is tr ib ui çã o de ca fé q ua nd o a
função v apor estiver se leccionada po rque a temperatura é muito elevada e há o risco de queimaduras.
Atenção! Durante a distribuição do vapor é
proibido remover o porta- ltro (caso esteja inserido) rod ando-o manua lmente no sentido d os ponteiros do rel ógio. Perigo de queim aduras! O porta- ltro só
pode ser re movido após ter reco locado o botão de se lecção (17) na posição "
através do procedimento descrito no par.4.5.
• Durante esta operação o indicador luminoso (20) de "má-
quina pronta" poderá acender-se e apagar-se; este funcionamento deve ser consider ado normal e não uma anomalia.
• Antes do uso, certi que-se de que o botão (3) água quente/
vapor esteja fe chado e que o reservatório d e água da máquina contenha uma quantidade su ciente de água.
• Pressione a tecla ON/OFF (11); o indicador luminoso (18)
acende-se par a indicar que a máquina está ligada.
• Aguarde que o indicador luminoso (20) de "máquina pron-
ta" se acenda.
• (Fig .25) - Coloque o botão de s elecção (17) na posição "
o indicador luminoso (20) apaga-se.
• Aguarde que o indicador luminoso (19) se acenda; neste
ponto a máquina está pronta para distr ibuir o vapor.
• (Fi g.26) - Intro duza um re cipiente abaixo do t ubo de vap or.
• (Fig.26) - Abra o botão (3) durante alguns segundos, de
modo a fazer sair a água residual do tubo de vapor (Pannarello); em pouco tempo começará a sair apenas vapor.
• (Fig.27) - Feche o botão (3) e tire o recipiente.
• Encha com leite frio 1/3 do recipiente que deseja utilizar
para prepar ar o cappuccino.
" e de ter arrefecido a máquina
• (Fig.28) - Mergulhe o tubo de vapor no leite e abra o botão
(3) virando-o no sentido contrário ao dos ponteiros do relógio; vire lentamente o recipiente com o leite, de baixo para
cima para tornar o aquecimento uniforme.
Aconselha-se uma distribuição máxima de 60
segundos.
• Depois de terminada a distribuição, feche o botão (3) virando no sentido do s ponteiros do relógio; reti re a chávena com
o leite batido.
• (Fig.30) - Coloque o botão de selecção (17) na posição "
Se ambos os ind icadores luminosos "
acesos, a temperatura da máquina será demasiado elevada
para distribuir o café.
• Proceda ao carregamento do circuito descrito no par.4.5
para tornar a máquina operativa.
Obs.: a máquina estará operativa quanto o
indicador luminoso
estiver aceso de modo xo.
Note bem: se não conseguir fazer a distribuição
de um cappuccino como descrito, será preciso
recarregar o circuito como descrito no par. 4.5 e, de
seguida, repita as operações.
O mesmo sistema pode ser utilizado para o
aquecimento de outras bebidas.
• Limpe, após esta operação, o tubo de vapor com um pano
húmido.
" e " " estiver em
de "máquina pronta"
9 POUPANÇA DE ENERGIA
A máquina está projectada para a poupança de energia. A
máquina desliga-se automaticamente após 9 minutos de inactividade.
";
Para reiniciar a máquina, basta pressionar a tecla ON/OFF (11);
o indicador luminoso (18) de "máquina ligada" acende-se.
Aguarde que o indicador luminoso (20) de "máquina pronta"
se acenda.
".
Português
Para garantir um melhor resultado utilize leite
frio
• 61 •
Page 62

10 LIMPEZA
A manutenção e a limpeza só podem ser realizadas quando a
máquina estiver fria e desligada da corrente eléc trica.
• Não mergulhe a máquina em água e não introduza os componentes na máquina de lavar louça.
• Não utilize álcool etílico, solventes e/ou agentes químicos
agressivos.
• Aconselha-se a limpar quotidianamente o reservatório de
água e a enchê-lo com água fresca.
• (Fig.31-33) - Diariamente, depois de aquecido o leite, des-
monte a parte externa do Pannarello e lave-a com água
potável fresca.
• (Fig.31-32-33) - Semanalmente será preciso limpar o tubo
de vapor. Para realizar essa operação, deve-se:
- remover a parte externa do Pannarello (para a limpeza
regular);
- retirar a parte superior do Pannarello do tubo de vapor;
- lavar a parte superior do Pannarello com água fresca potável;
- lavar o tubo de vapor com um pano húmido e remover
eventuais resíduos de leite;
- reposici onar a parte superior no tub o de vapor (certi que-
-se de que est á completamente introduzida);
Monte novamente a parte externa do Pannarello.
• (Fig.34) - Esvazie e lave diariamente a bandeja de limpeza.
• Par a a limpeza do aparelho utilize um pano maci o humedecido com água.
• (Fig.20) - Para a limpeza do porta- ltro pressurizado proceda da seguinte forma:
- (Fig.9) - retire o ltro, lave-o cuidadosamente com água
quente.
- retire o adaptador (quando presente), lave-o cuidadosamente com água quente.
- lave o interior do porta - ltro pressurizado.
• Não seque a máquina e/ou os seus componentes utilizando
um forno de microondas e/ou um forno convencional.
• (Fig.35-36) - Semanalmente limpe a sede dos acessórios
com um pano húmido para remover eventuais resíduos de
café ou pó em geral.
Obs.: não lave o porta-filtro pressurizado na
máquina de lavar louça.
11 DESCALCIFICAÇÃO
A formação de calcário acontece com o uso do aparelho; é preciso realizar a descalci cação a cada 1-2 meses de utilização da
máquina e/ou quando houver uma redução da capacidade da
água. Utilize exclusivamente o produto descalci cante Saeco.
O indicad o no manual de uso e manutenç ão tem
prioridade em relação às indicações descritas
nos acessórios e/ou materiais de uso vendidos separadamente, on de exista um con ito.
Utilize o produto descalci cante Saeco (Fig.B).
Foi concebido especificamente para manter
da melhor forma o desempenho e a funcionalidade
da máquina durante toda a sua vida útil, assim como
para evitar, se for utilizado correctamente, qualquer
alteração d o produto distr ibuído. Antes de inic iar o ciclo
de descalci cação assegure-se que: O FILTRO DA ÁGUA
TENHA SIDO REMOVIDO, se utilizado.
Não beba a so lução descalc i ca nte e os produtos
distribuídos até à conclusão do ciclo. Nunca
utilize, em nenhuma circunstância, o vinagre como
descalci cante.
1 (Fig.13-14) - Introduza o porta- ltro abaixo do grupo de
distribuição (8), rode-o da esquerda para a direita até que
se bloqueie.
2 (Fig.1B) - Remova e esvazie o reservatório de água.
3 (Fig.2) - Deite METADE do conteúdo da garrafa de des-
calci cante concentrado Saeco no reservatório de água do
aparelho e encha-o com água fresca potável até alcançar o
nível MÁX.
4 Ligue a máquina pre ssionando a tecla ON/OFF (11); o indica-
dor luminoso (18) acende-se.
(Fig.21) - Retire (como descrito no capítulo 7 do manual)
pelo tubo de vapor/água quente 2 chávenas (aproximadamente 150 ml cada uma) de água; depois disso desligue a
máquina através da tecla ON/OFF (11); o indicador luminoso
(18) ap aga-se
5 D eixe o descalci cante actuar cerca de 15-20 minutos com a
máquina desligada.
6 Ligue a máquina pressionando
(Fig.21) - Retire (como descrito no capítulo 7 do manual)
pelo tubo de vapor/água quente 2 chávenas (aproximadamente 150 ml cada uma) de água. De seguida, desligue a
máquina através da tecla ON/OFF (11) e deixe-a desligada
durante 3 minutos.
7 Repita as operações descritas no ponto 6 até ao completo
esvaziamento do reservatório de água.
8 (Fig.2) - Enxagúe o reservatório com água fresca potável e
encha-o completamente.
a tecla ON/OFF (11)
.
• 62 •
Page 63

9 Int roduza um recipiente por baixo do porta- ltro.
10 Ligue a máquina pressionando a tecla ON/OFF (11); rode o
botão de selecção (17) para a posição "
porta- ltro, retire todo o conteúdo do reservatório. Para
interromper a distribuição coloque o botão de selecção (17)
na posição "
11 (Fig.2) - Encha novamente o reservatório com água fresca.
(Fig.21) - Posicione um recipiente grande abaixo do tubo
de vapor (Pannarello). Abra a torneira de distribuição de
água (3) rodando-a no sentido con trário ao dos ponteiros do
relógio.
(Fig.22) - Rod e o botão de selecção (17) para a posiçã o "
e retire todo o conteúdo do reservatório usando o tubo de
vapor/água quente.
12 (Fig.23) - Depois de nalizar a retirada de água, para inter-
romper a distribuição coloque o botão de selecção (17) na
posição "
(Fig.24) - Fec he a torneira de distrib uição de água (3) viran-
do-a no sentido dos ponteiros do relógio.
13 Repita mais uma vez as operações desde o ponto (8) num
total de 4 reser vatórios de água.
14 (Fig.19) - Remova o porta- ltro do grupo vir ando-o da direi-
ta para a esquerda e enxagúe-o com água fresca potável.
O ciclo de desc alci cação está concluído.
(Fig.2) - Encha novamente o reservatório com água fresca. Se
for necessário, realize o carregamento do circuito conforme
descrito no par. 4.5.
".
".
" e através do
12 ELIMINAÇÃO
Este produto está conforme a direc tiva EU 2002/96/EC.
O simbolo
lagem indica que este produto não se pode tratar como lixo
doméstico normal.
Este produto deve ser entregue num ponto de recolha de
equipamentos eléctricos e electrónicos para reciclagem. Ao
assegurar-se que este produto é eliminado correctamente, es-
"
tará a ajudar a evitar possiveis consequências negativas para o
ambiente e saúde pública que resultariam se este produto não
fosse manipulado de forma adquada. Para obter informações
mais detalhadas sobre a reciclagem deste produto, por favor
contacte o gabinete da câmara municipal da sua cidade ou a
loja onde comprou o produto.
impresso no produto ou na sua emba-
Português
A solução descalci cante deverá ser eliminada
de acordo com o previsto pelo fabricante e/ou
pelas nor mas vigentes no país de utilização.
• 63 •
Page 64

13 RESOLUÇÃO DE PROBLEMAS
Avaria Causas possíveis Solução
A máquina não liga. Máquina não ligada à rede eléctric a. Ligue a máquina à rede eléctrica.
A bomba é muito ruidosa. Falta água no reservatório.
Não sai café depois de posicionar o botão de selecção (17) na
posição "
O café está muito frio.
Não é possível obter a espuma
do leite.
Não é possível preparar um cappuccino.
O café sai demasiado rápido,
não se forma o creme.
O café não sai ou sai só às pingas.
O café jorra das bordas.
".
Porta- ltro obstruído.
O indicador luminoso (20) de "máquina
pronta" estava apa gado quando o botão de
selecção (17) foi colocado na posiç ão "
Porta- ltro não introduzido para o pré-
-aquecimento (Cap. 5).
Chávenas frias. Pré-aqueça as chávenas com água quente.
Leite não apropriado: leite em pó, leite
magro.
Pannarello sujo. Limpe o Pannarello como descrito no Cap.10.
Não há mais vapor na caldeira.
Pouco café no porta- ltro. Adicione o café (Cap. 5).
Moagem demasiado grossa. Utilize uma mistura diferente (Cap.6).
Café antigo ou inapropriado. Utilize uma mistura diferente (Cap.6).
Pastilha velha ou inapropriada. Troque a pastilha utilizada.
Falta um componente no porta- ltro.
Falta de água.
Moagem demasiado na. Utilize uma mistura diferente (Cap.6).
Café comprimido no porta- ltro. Me xa o café moído.
Demasiado café no porta- ltro. Diminua a quantidade de café no porta- ltro.
Botão (3) aberto. Feche o botão (3).
Máquina calci cada. Descalc i que a máquina (Cap.10).
Filtro entupido no porta- lt ro. Limpe o ltro (Cap.9).
Pastilha inapropriada. Mude o tipo de pastilha.
Porta- ltro mal introduzido no grupo de
distribuição de café.
Borda superior do porta- ltro suja. Limpe a borda do porta- ltro.
Pastilha introduzida de modo incorrecto.
Demasiado café no porta- ltro. Diminua a quantidade de café utilizando o medidor.
Reabasteça com água e recarregue o circuito (par.
4.5).
Volte a colocar o botão d e selecção (17) na posição " ".
Desligue a máqui na e aguarde que arrefeça (cerca de 1
hora). De seguida, rem ova e lave bem o porta- ltro. Se
o problema se repetir, contacte o centro de assistência.
Aguarde que o indicador luminoso (20) se acenda.
".
Pré-aqueç a o porta- ltro.
Utilize leite inteiro.
Recarregue o circuito (par. 4.5) e repita as operações
descritas no Cap.8.
Certi que-se de que todos os componentes estão
presentes e montados correctamente.
Reabasteça com água e recarregue o circuito (par.
4.5)
Introduza cor rectamente o porta- ltro (Cap.5).
Introduza correctamente a pastilha de modo a não
sair do por ta- ltro.
Para as avarias que não estão incluídas na tabela supracitada ou no caso das soluções sugeridas não resolverem o
problema, contac te um centro de assistência.
• 64 •
Page 65

1 ALGEMEEN
De ko emachine is geschikt voor het zetten van 1 of 2 kopjes
espresso en is voorzien van een zwenkbaar stoom- en heetwaterpijpje. De symbolen op de bedieningsknoppen aan de
voorkant van het apparaat zijn gemakkelijk te begr ijpen.
De machine is ontworpen vo or huishoudelijk gebruik en is niet
geschikt voor continu professioneel gebruik.
Let op. Men aanvaardt geen aansprakelijkheid
voor eventuele schade in geval van:
• Verkeerd gebruik dat niet in overeenstemming is
met de beoogde doelen;
• Reparaties die niet zijn uitgevoerd door erkende
servicecentra;
• Het onklaar maken van de voedingskabel;
• Onklaar gemaakte onderdelen van de mac hine;
• Gebruik van niet-originele reserveonderdelen en
accessoires;
• Wanneer het apparaat n iet is ontkalkt en bij opslag
in ruimten met temperaturen onder de 0°C.
In deze gevallen komt de garantie te vervallen.
1.1 Voor een gemakkelijke raadpleging
De waarschuwingsdriehoek geeft
alle belangrijke instructies aan die
van belang zijn voor de veiligheid
van de gebruiker. Houd u strikt aan deze aanwijzingen
om ernstig letsel te voorkomen!
2 TECHNISCHE GEGEVENS
De constructeur behoudt zich het recht voor om de technische
eigenschapp en van het product te wijzigen.
Nominale spanning - Nominaal vermogen - Voeding
Zie plaatje op het apparaat
Materiaal behuizing
Plastic
Afmetingen (l x h x d) (mm)
210 x 300 x 280
Gewicht
3,9 kg
Kabellengte
1,3 m
Bedieningspaneel
Op de voorkant
Filterhouder
Onder druk
Pannarello
Speciaal voor cappuccino's
Waterreservoir
1,25 liter - Uitneembaar
Pompdruk
15 ba r
Waterketel
Roestvrij staal
Veiligheidsinrichtingen
Thermozekering
Nederlands
Verwijzingen naar illustraties, delen van het apparaat of bedieningsonderdelen, etc. worden aangegeven met nummers
of letter s; in dit geval word t er verwezen naar een illustratie.
Dit symb ool geeft in formatie aan wa armee men
in het bijzonder rekening moet houden voor een
beter gebruik van de mac hine.
De illustraties die met de tekst overeenstemmen, bevinden zich op de eerste pagina’s van de handleiding.
Raadpleeg deze pagina’s tijdens het lezen van de
gebruiksaanwijzing.
1.2 Gebruik van deze handleiding
Bew aar de ze gebr uiks aanwi jzing op een v eilig e plaat s en ho ud
hem bij de ko emachine in geval van gebruik door anderen.
Neem voor nadere informatie of bij problemen contact op met
één van de erkende servicecentra.
3 VEILIGHEIDSVOORSCHRIFTEN
Breng de onder stroom staande delen nooit in contact
met water: kortsluitingsgevaar! De oververhitte stoom
en het hete water kunnen brandwonden veroorzaken!
Richt de hete stoom- of waterstraal nooit op lichaamsdelen. Wees voor zichtig bij h et aanraken van he t stoom-/
heetwaterpijpje: gevaar voor brandwonden!
Gebruiksbestemming
De ko emachine is uitsluitend bestemd voor huishoudelijk
gebruik. Het aanbrengen van technische wijzigingen en elk
ongeoorloofd gebruik is verboden, in verband met de risico’s
die dit met zich meebrengt! Het apparaat is niet bestemd om
gebruikt te worden door personen (inclusief kinderen) met
verminderde f ysieke, mentale of gevoelige ca paciteiten of met
onvoldoende er varing en/of bekwaamheid, tenz ij ze onder het
toezicht staan van een persoon die verantwoordelijk is voor
hun veiligheid en van wie ze instructies verkrijgen aangaande
het gebruik van het apparaat.
• 65 •
Page 66

Stroomvoorziening
Sluit de ko emachine alleen aan op een geschikt stopcontact.
De spanning moet overeenstemmen met de spanning die op
het plaatje van het apparaat staat vermeld.
Voed ingskabe l
Gebruik de ko emachine nooit als de voedingskabel defect
is. Indien de voedingskabel beschadigd is, moet deze door de
fabrikant of door de klantenservice vervangen worden. Laat
de voedingskabel niet over hoeken en scherpe randen of hete
voorwerp en lopen, en bescherm het tegen olie.
Draag de ko emachine niet aan de kabel en trek er niet aan.
Haal de stekker niet uit het stopcontact door aan de kabel te
trekken en raak he t niet met natte handen aan.
Voorkom dat de voedingskabel los van tafels of planken afhangt.
Bescherming van andere personen
Houd kinderen onder toezicht om te vermijden dat ze met het
apparaat spelen.
Kinderen realiseren zich de gevaren die aan elektrische apparaten verbonden zijn niet. Laat het verpakkingsmateriaal van
de machine niet binnen bereik van kinderen.
Gevaar voor brandwonden
Richt de hete sto om- en/of waterstraal nooit op uzelf of op anderen. Gebruik altijd de handgrepen of knoppen.
Verwijder de onder druk staande lterhouder nooit terwijl de
ko e uit het apparaat stroomt. Tijdens de opwarmfase kan
warm water uit de centrale ko e-unit druppelen.
Verstrek geen ko e wanneer de machine oververhit is, ofwel
wanneer de leds "
" en " " tegelijk branden.
Plaatsing
Zet de ko emachine op een veilige plek w aar niemand het kan
omstoten of zich eraan kan verwonden.
Er kan heet water of oververhitte stoom uit komen: gevaar
voor brandwonden!
Bewaar de machine niet bij een temperatuur van minder dan
0°C; het apparaat kan door bevriezing worden beschadigd.
Gebruik de ko emachine niet buiten.
Zet het apparaat niet op erg warme oppervlakken en in de
buurt van open vuur om te voorkomen dat de behuizing smelt
of anderszins beschadigd raakt.
Reiniging
Alvorens het apparaat te reinigen, moet het apparaat worden
uitgeschakeld met de ON/OFF toets en vervolgens moet de
stekker uit het stopcontact worden gehaald. Wacht dan tot
de machine is afgekoeld. Dompel het apparaat nooit onder in
water!
Pogingen tot reparaties aan de binnenkant van de machine
zijn ten strengste verboden.
Gebruik het water dat enkele dagen in het waterreservoir
heeft gestaan niet voor voedingsdoeleinden, was en vul het
reservoir met vers drinkwater.
Ruimte voor gebruik en onderhoud
Voor een correcte en goede werking van de ko emachine
wordt het volgende aanbevolen:
• Kies een steunopper vlak dat goed waterpas staat;
• Kies een voldoende verlichte, hygiënische omgeving met
een gemakkelijk toegankelijk stopcontact;
• Zorg er voor dat het apparaat op een mini mum afstand van
de wanden staat, zoals op de afbeelding is aangegeven
(Afb. A).
Opslag van de machine
Schakel de machine uit en haal de stekker uit het stopcontact,
wanneer de machine langere tijd niet wordt gebruikt. Bewaar
deze in een droge ruimte en buiten het bereik van kinderen.
Bescherm het tegen stof en v uil.
Reparaties / Onderhoud
Haal de stekker meteen uit het stopcontact bij storingen, defecten of vermoedelijke defecten na een val. Zet de machine
nooit in werking als deze defect is. Alleen de erkende servicecentra mogen werkzaamheden en reparaties uitvoeren. Bij
ondeskundig uitgevoerde werk zaamheden wordt iedere vorm
van aansprakelijkheid van de hand gewezen.
Brandbestrijding
Gebruik in geval van brand koolzuurblussers (CO2). Gebruik
geen water of poederblussers.
Legenda machineonderdelen (Pag.2)
1 Bedieningspaneel
2 Deksel waterreservoir
3 Heetwater-/stoomknop
4 Opbergruimte voor accessoires
5 Waterreservoir
6 Plaat voor kopjes
7 Wateropvangbakje + ro oster (indien voorzien)
8 Centrale ko e-unit
9 Stoompijpje (Pannarello)
10 Voedingskabel
11 ON/OFF toets
12 Onder druk staande lterhouder
13 Maatlepel voor gemalen ko e
14 Filter voor gemalen ko e
(dezelfde voor de afgifte van 1 of 2 kopjes ko e)
15 Adapter voor lter voor ko epads
16 Filter voor ko epads
17 Selectieknop
18 Led "machine aan"
19 Led "Stoom gereed"
20 Ko e / water led - "Klaar voor gebruik"
• 66 •
Page 67

4 INSTALLATIE
Houd u voor uw eigen veiligheid en die van anderen
strikt aan de “Veiligheidsvoorschr iften” in hst. 3.
4.1 Verpakking
De oorspronkelijke verpakking is ontworpen en vervaardigd
om de machine tijdens het transport te beschermen. Het is
raadzaam om de verpakking te bewaren voor eventueel transport in de toekomst.
4. 2 Waars chu win gen m .b.t . de i nst all atie
Houd u aan de volgende veiligheidsvoorschriften, voordat u
het apparaat installeert:
• zet het apparaat op een veilige plek;
• verzeker u ervan dat kinderen niet met het apparaat kunnen spelen;
• zet het apparaat niet op erg warme oppervlakken of in de
buurt van open vuur.
De ko emachine mag nu op het elektriciteitsnet worden aangesloten.
Opmerking: wij raden aan om de onderdelen te
wassen voor de eerste ingebruikname en/of na
een periode dat deze niet zijn gebruikt.
4.3 Aansluiting van de machine
Elektrische stroom kan gevaarlijk zijn! Houd
u daarom altijd strikt aan de veiligheidsvoorschrif ten. Gebruik nooit de fecte kabels! Defecte kabel s
en stekkers moeten onmiddellijk door erkende servicecentra worden vervangen.
De spanning van het apparaat is in de fabriek ingesteld. Controleer of de netspanning overeenstemt met de aanwijzingen
op het typeplaatje op de achterkant van het apparaat.
• Steek de stekker in een wandstopcontact met de juiste
spanning.
4.4 Waterreservoir
• (Afb.1A) - Verwijder de deksel van het waterreservoir (2)
door het op te tillen.
• (Afb.1B) - Verwijder het waterreservoir (5).
• (Afb.2) - Spoel het reservoir en vul het met vers drinkwa-
ter; overschrijd niet het (MAX) niveau aangegeven in het
reservoir.
Vul het reservoir altijd en alleen met vers drink-
water zonder koolzuur. Heet water of andere
vloeisto en kunnen het reservoir beschadigen. Zet de
machine ni et aan zonder water: ver zeker u ervan dat er
voldoende water in het reservoir zit.
• (Afb.3A) - Zet het reservoir erin en verzeker u ervan dat
deze op de juiste manier wordt geplaatst en plaats de deksel (2) er weer op.
Controleer of het reservoir goed in de machine
is geplaatst en druk het zorgvuldig aan tot het
ge he el a an sl uit (HE T TE KE NTJE VAN AFB .3B DIE NT G EHE EL
ZICHTBAAR TE ZIJN) om te voorkomen dat het water er
van onderen uit loopt.
4.5 Vullen van het circuit
Aan het begin, na stoom te hebben verstrekt of nadat het
water op is in het reservoir, dient het circuit van de machine
gevuld te worden.
• Druk op de ON/OFF toets (11); de led (18) gaat aan om aan
te geven dat de machine ingeschakeld is.
• (Afb.4) - Plaats een kannetje onder het stoompijpje (Pan-
narello).
• Draai de heetwater-/stoomknop (3) linksom open.
• (Afb.5) - Zet de selectieknop (17) in de stand "
• Wacht tot uit het stoompijpje (Pannarello) een gelijkma-
tige waterstraal stroomt.
• (Afb.5) - Zet de selectieknop (17) in de stand "
• Draai de heetwater-/stoomknop (3) rechtsom dicht. Haal
het kannetje weg.
".
".
4.6 Ingebruikname of gebruik na een pe-
riode van stilstand
Deze eenvoudig e handeling verzekert van e en optimale afgif te
en dient uitgevoerd te worden:
- bij de ingebruikname;
- wanneer de machine gedurende een lange tijd niet wordt
gebruikt (voor meer dan 2 weken).
Het water dat verstrekt wordt, dient geleegd
te worden in de daarvoor bestemde afvoer en
mag niet gebruikt worden voor consumptie. Indien het
reservoir vol raakt tijdens de cyclus, dient de afgifte
gestopt te worden en het reservoir geleegd alvorens
de handeling te voltooien.
• (Afb.2) - Spoel het reservoir en vul het met vers drinkwa-
ter.
• (Afb.4) - Plaats een kannetje onder het stoompijpje (Pan-
narello). Draai de kraan (3) linksom open.
Nederlands
• 67 •
Page 68

(Af b.5) - Zet de selectieknop (17) in de stand " ".
• Verstrek de gehele inhoud van het waterreservoir door
het stoom/heet waterpijpje (Pannarello); om de afgifte te
stoppen, zet de selectieknop (17) in de stand "
de kraan (3) rechtsom dic ht.
• (Afb.2) - Vul het reservoir met vers drinkwater.
• (Afb.13-14) - Plaats de lterhouder van onderen in de cen-
trale unit (8) en draai deze van link s naar rechts totdat deze
geblokkeerd is.
• (Afb.15) - Plaats een passend kopje onder de lter houder.
• (Afb.16) - Draai de selectieknop (17) in de stand "
schenk het resterende water uit het reservoir.
(Afb.17) - Voordat het water op is, dient men de afgifte te
stoppen door de selectieknop (17) in de stand "
• Vul opnieuw het reservoir en wacht tot de led "klaar voor
gebruik" (20) aangaat.
• (Afb.19) - Verwijder de lterhouder uit de centrale unit
door deze van rec hts naar links te draaien en spoel het m et
vers drinkwater.
De machine is nu gereed; zie de desbetre ende hoofdstukken
voor m eer infor matie over d e werking v an de afgif te van ko e
en stoom.
" en draai
" en
" te zetten.
5 KOFFIEAFGIFTE
Let op! Tijd ens de ko eafgifte mag de onder druk
staande filterhouder niet worden verwijderd
door hem met de hand rechtsom te draaien. Gevaar
voor brandwonden.
• Ti jdens deze handeling kan de led (20) "klaar voor g ebruik"
aan en uit gaan; dit is normaal en ge en storing.
• Controleer voor gebruik of de heetwater-/stoomknop (3)
dicht gedraaid is e n of het waterreservoir v an het apparaat
voldoende water bevat.
• Druk op de ON/OFF toets (11); de led (18) gaat aan om aan
te geven dat de machine ingeschakeld is.
• Wacht tot de le d (20) "klaar voor gebrui k" aangaat, nu is de
machine klaar voor de ko eafgifte.
De accessoires voor de ko eafgifte zijn in een
speciaal ontworpen ruimte opgeborgen om deze
handelingen eenvoudig en snel te maken.
Til de dek sel (2) op voor de maatlep el voor gemalen ko e
en/of de beno digde lter s en neem het benod igde eruit
(Afb.35 en Afb.36).
5.1 Met gemalen ko e
• (Afb.7) - Plaats de lter (14) in de onder druk staande
lterhouder (12); bij het eerste gebruik is de lter al geplaatst.
• (Afb.13) - Breng de lterhouder van onderen in de cen-
trale unit (8) aan.
• (Afb.14) - Draai de lterhouder van links naar rechts tot-
dat hij is geblokkeerd. Laat het handvat van de onder druk
staande lterhouder los. Een automatisch systeem brengt
het handvat nu iets naar links terug.
Deze beweging garandeert een perfecte werking van de
onder druk st aande lterhouder.
• (Afb.16) - Verwarm de onder druk staande lterhouder
voor door de selectieknop (17) in de stand "
het water zal beginnen uit de onder druk staande lterhouder te stromen (deze handeling is alleen noodzakelijk
voor het eer ste kopje ko e).
• (Afb.17) -Nadat men 50cc water uit het apparaat heeft
laten stromen, dient men de selectieknop (17) in de stand
"
" te zetten om de afgifte te stoppen.
• (Afb.19) - Haal de lterhouder uit het apparaat door hem
van rechts naar link s te draaien en gooi het rest water weg.
Met de speciale lter (14) waarmee de machine is uitgerust, hoeft het lter niet te worden verwisseld om één of
twee kopjes ko e te verkrijgen.
• (Afb.35) - Haal de maatlepel uit de machine.
• (Afb.8) - Doe 1-1,5 maatlepels voor één enkele ko e of 2
afgestreken maatlepels voor dubbele ko e erin; ontdoe
de rand van de lterhouder van de ko eresten.
• (Afb.13) - Breng de lterhouder (12) van onderen in de
centrale unit (8) aan.
• (Afb.14) - Draai de lterhouder van links naar rechts tot-
dat hij is geblokkeerd.
• (Afb.15) - Neem 1 of 2 voorverwarmde kopjes en zet
ze onder de onder druk staande lterhouder; controleer of
ze goed onder de gaten zijn geplaatst waar de ko e uitstroomt.
• (Afb.14) - Breng de selectieknop (17) in de stand "
• (Afb.17) - Wanneer de gewenste hoeveelheid ko e is
bereikt, draai de selectieknop (17) in de stand "
ko eafgifte te stoppen. Wacht na het beëindigen van de
afgif te enkele seconden; neem dan de kopjes me t de ko e
weg (Afb.18).
• (Afb. 19) - Wacht enkele seconden na het beëindigen van
de afgifte, neem de onder druk staande lterhouder weg
en gooi het ko edik weg.
" te zetten;
".
" om de
In di en n ad at men de se lec t iek no p (17 ) i n de st an d
"
men de sele ctie knop (17) in de st and " " te zetten en de
tabel "Oplossing van problemen" te raadplegen voordat
men de lterhouder eruit haalt.
" heeft gezet er GEEN ko e uitkomt, dient
• 68 •
Opmerking: in de lterhouder blijft er een kleine
hoeveelheid water over; dit is normaal en is te
wijten aan de eigensc happen van de lterhouder zelf.
Page 69

Belangrijke opmerking: De filter (14) dient
schoon gehouden te worden om een perfect re-
sultaat te ga randeren. Dag elijks wass en na het gebrui k.
5.2 Met ko epads
• (Afb.9) - Haal de lter voor gemalen ko e (14) uit de on-
der druk staande lterhouder (12) door gebruik te maken
van een ko elepeltje.
• (Afb.10) - Plaats de houder voor ko epads (15) in de on-
der druk staande lterhouder (12) met de bolle kant naar
beneden.
• (Afb.11) - Plaats vervolgens het lter voor ko epads (16)
in de onder druk s taande lterhouder (12).
• (Afb.13) - Breng de onder druk staande lterhouder van
onderen in de centrale unit (8) aan.
• (Afb.14) - Draai de lterhouder van links naar rechts tot-
dat hij is geblokkeerd. Laat het handvat van de onder druk
staande lterhouder los. Een automatisch systeem brengt
het handvat nu iets naar links terug.
Deze beweging garandeert een perfecte werking van de
onder druk st aande lterhouder.
• (Afb.16) - Verwarm de onder druk staande lterhouder
voor door de selectieknop (17) in de stand "
het water zal beginnen uit de onder druk staande lterhouder te stromen (deze handeling is alleen noodzakelijk
voor het eer ste kopje ko e).
• (Afb.17) -Nadat men 50cc water uit het apparaat heeft
laten stromen, dient men de selectieknop (17) in de stand
"
" te zetten om de afgifte te stoppen.
• (Afb.19) - Haal de onder druk staande lterhouder uit het
apparaat door hem v an rechts naar links te draaien en go oi
het restwater weg.
• (Afb.12) - Plaats de ko epad in de lterhouder; contro-
leer of het papier van de ko epad niet uit de lterhouder
steekt.
• (Afb.13) - Breng de onder druk staande lterhouder van
onderen in de centrale unit (8) aan.
• (Afb.14) - Draai de lterhouder van links naar rechts tot-
dat hij is geblokkeerd.
• Neem 1 voorverwarmd kopje en zet het onder de lter-
houder; controleer of het goed onder de gaten is geplaatst
waar de ko e uitstroomt.
• (Afb.16) - Breng de selectieknop (17) in de stand "
• (Afb.17) - Wanneer de gewenste hoeveelheid ko e is be-
reikt, draai de selectieknop (17) in de stand "
eafgifte te stoppen; neem het kopje met de ko e weg.
• (Afb.19) - Wacht na de afgifte enkele seconden, neem de
lterhouder weg en gooi de gebruik te ko epad weg.
Bel angri jke op merki ng: De lter (16) en de ho u-
der voor ko epads (15) dienen schoon gehouden
te worden om een perfect resultaat te garanderen.
Dagelijks wassen na het gebr uik.
" te zetten;
".
" om de kof-
6 KEUZE VAN DE SOORT KOFFIE ADVIEZEN
In principe kunne n alle in de handel verk rijgbare ko esoorten
worden gebruikt. Ko e is echter een natuurlijk product en de
smaak ervan verandert naar gelang de herkomst en de melange; het verdient dus de voorkeur om verschillende soorten
te proberen om het type ko e te vinden dat het meest naar
uw smaak is.
Voor de beste resultaten raden wij u echter aan speciaal voor
espressoapparaten bereide melanges te gebruiken. De ko e
moet gelijkmatig uit de onder druk staande lterhouder stromen zonder te druppelen.
De uitloop snelheid van de ko e kan worden gewijzigd do or de
ko ed osis in he t lter iets te verand eren en/of d oor ko e met
een andere maal jnheid te gebruiken.
Saeco raadt het gebruik van per stuk verpakte ESE ko epads
aan om een beter resultaat in het kopje te krijgen en om de
reiniging en de bereiding te vergemakkelijken.
CONTROLEER OF HET STOOMPIJPJE (PANNARELLO)
OP HET WATEROPVANGBAKJE IS GERICHT VOORDAT
U STOOM OF HEET WATER UIT HET APPARAAT LAAT KOMEN.
7 WARM WATER
Gevaar voor brandwonden! Aan het begin van
de afgifte kan er wat heet water vrijkomen.
Het uitlooppijpje kan erg heet worden: vermijd direct
contac t met de handen.
• Ti jdens deze handeling kan de led (20) "klaar voor g ebruik"
aan en uit gaan; dit is normaal en geen storing.
• Controleer voor gebruik of de heetwater-/stoomknop (3)
dicht gedraaid is e n of het waterreservoir v an het apparaat
voldoende water bevat.
• Druk op de ON/OFF toets (11); de rode led (18) gaat aan om
aan te geven dat de machine ingeschakeld is.
• Wacht tot de le d (20) "klaar voor gebrui k" aangaat, nu is de
machine klaar.
• (Afb.21) - Zet een kannetje of een theeglas onder het
stoompijpje (Pannarello).
• (Afb. 21) - Draai de knop (3) linksom open.
• (Afb.22) - Zet de selectieknop (17) in de stand "
• (Afb. 23) - Wanneer de gewenste hoeveelheid ko e is ge-
nomen, draai de sele ctieknop (17) in de stand "
• (Afb. 24) - Draai de knop (3) rechtsom dicht.
• Neem het kannetje met warm water weg.
".
".
Nederlands
• 69 •
Page 70

8 STOOM/CAPPUCCINO
Gevaar voor brandwonden! Aan het begin van
de afgifte kan er wat heet water vrijkomen.
Het uitlooppijpje kan erg heet worden: vermijd direct
contac t met de handen.
Let op! Geen ko e afgeven wanneer de stoom-
functie geselecteerd is, omdat de temperatuur
te hoog is en er een risico op brandwonden bestaat.
• Sluit de knop (3) na beëindiging door het rechtsom te
draaien; neem het kopje met opgeklopte melk weg.
• (Afb.30) - Breng de selectieknop (17) in de stand "
Indien beide leds "
raat een te hoge temp eratuur voor de afgif te van de ko e.
• Vul het circuit zoals in par. 4.5 is beschreven om de machine operatief te maken.
Opmerk ing: de machine i s operatief wa nneer de
led "
" en " " branden, heef t het appa-
" "klaar voor gebruik " continue aan is.
".
Let op! Tijdens de stoomafgifte mag de lter-
houder (indien geplaatst) niet worden verwijde rd doo r h em m et de h an d r ec hts om te d ra ai en. Ge va ar
voor brandwonden! De lterhouder mag er alleen uitgehaald worden nadat de selectieknop (17) in de stand
"
" is geplaatst en de machine is afgekoeld volgens de
procedure beschreven in par. 4.5.
• Ti jdens deze handeling kan de led (20) "klaar voor g ebruik"
aan en uit gaan; dit is normaal en geen storing.
• Controleer voor gebruik of de heetwater-/stoomknop (3)
dicht gedraaid is e n of het waterreservoir v an het apparaat
voldoende water bevat.
• Druk op de ON/OFF toets (11); de led (18) gaat aan om aan
te geven dat de machine ingeschakeld is.
• Wacht tot de led (20) "klaar voor gebruik" aangaat.
• (Afb. 25) - Breng de se lectiek nop (17) in de stan d "
led (20) gaat uit.
• Wacht tot het led (19) aangaat; op dit moment is de ma-
chine klaar voor de stoomafgifte.
• (Afb.26) - Plaats een kannetje onder het stoompijpje.
• (Afb.26) - Draai de knop (3) even open, zodat het restwa-
ter uit het stoo mpijpje (Pannarello) kan lopen; na korte tijd
komt er alleen stoom uit.
• (Afb.27) - Draai de knop (3) dicht en neem het
kannetje weg.
• Vul de beker die men voor de bereiding van de cappuccino
wil gebruiken voor 1/3 met koude melk.
"; de
Belangrijke opmerking: indien het niet lukt om
een cappuccino te bereiden zoals beschreven,
dient men het circuit weer te laden zoals beschreven
in par. 4.5 en vervolgens de handelingen te herhalen.
Hetzelfde systeem kan worden toegepast voor
het verwarmen van andere dranken.
• Reinig na deze handeling het stoompijpje met een voch-
tige doek.
9 ENERGIEBESPARING
De machine is ontworpen met het oog op energiebesparing.
De machine schakelt automatisch uit na 9 minuten van inactiviteit.
Om d e mach ine we er te s tar ten, i s het v oldo ende o m op d e ON/
OFF toets (11) te drukken; de led (18) "machine aan" gaat aan.
Wacht tot de led (20) "klaar voor gebruik" aangaat.
Gebruik koude melk om een beter resultaat te
verkrijgen
• (Afb.28) - Steek het stoompijpje in de melk en draai de
knop (3) open door deze linksom te draaien; laat het kannetje met de melk langzaam draaien en beweeg het van
onder naar boven om een gelijkmatige opwarming te verkrijgen.
Een afgifte van maximaal 60 seconden wordt
aangeraden.
• 70 •
Page 71

10 REINIGING
Het onderhoud en de reiniging mogen alleen worden uitgevoerd wanneer de machine koud is en van het elektriciteitsnet
afgekoppeld is.
• Dompel de machine niet onder in water en was de onderdelen niet in de vaatwasmachine.
• Gebruik geen ethylalcohol, oplosmiddelen en/of agressieve chemische s to en.
• Wij raden u aan om het waterreservoir dagelijks te reinigen en met vers water te vullen.
• (Afb.31-33) - Demonteer dagelijks, na de melk opge-
warmd te hebben, de buitenkant van de Pannarello en
was deze met vers drinkwater.
• (Afb.31-32-33) - Het stoompijpje dient wekelijks gerei-
nigd te worden. Om deze handeling uit te voeren, ga als
volgt te werk:
- verwijder de buitenkant van de Pannarello (voor een normale reiniging);
- schuif het bovenste gedeelte van de Pannarello van het
stoompijpje af;
- was het bovenste gedeelte van de Pannarello met vers
drinkwater;
- was het stoompijpje met een vochtige doek en verwijder
eventuele melkresten;
- plaats het bovens te gedeelte in het stoompijpj e (verzeker
u ervan dat deze er geheel ingeschoven is);
Plaats de buitenkant van de Pannarello terug.
• (Afb.34) - Maak het lekbakje dagelijks leeg en was het af.
• Gebruik voor de reiniging van het apparaat een zachte
doek die met water is bevochtigd.
• (Afb.20) - Ga als volgt te werk om de onder druk staande
lterhouder schoon te maken:
- (Afb.9) - verwijder de lter, was deze zorgvuldig met
warm water af.
- verwijder de houder voor ko epads (indien aanwezig),
was deze zorgvuldig met warm water.
- was de binnenkant van de onder druk staande lterhouder.
• Droog de machine en/of haar onderdelen niet in de magnetron en/of in een t raditionele oven.
• (Afb.35-36) - Reinig wekelijks met een vochtige doek de
opbergruimte voor accessoires om eventuele ko eresten
of stof te verwijderen.
Opmerk ing: reinig de ond er druk staand e lterhouder niet in de vaatwasmachine.
11 ONTK ALKING
Tijdens het gebruik van het apparaat wordt kalk gevormd; de
machine moet om de 1-2 maanden ontkalkt worden en/of als
er minder water uit de machine stroomt. Gebruik uitsluitend
het ontkalkingsproduct van Saeco.
In het geval er een verschil bestaat, heeft
hetgeen aangegeven is in de handleiding voor
gebruik en onderhoud prioriteit op de aanwijzingen die
zijn vermeld op de accessoires en/of gebruiksmaterialen
die apar t zijn verkocht.
Gebruik het ontkalkingsproduct van Saeco
(Afb.B). Dit is speciaal ontwikkeld om de performance en de functionering van de machine het best
te bewaren gedurende de gehele levensduur ervan,
evenals voor het voorkomen, indien juist gebruikt, va n
iedere aantasting van het verstrekte product. Controleer
voordat de o ntkalkingsc yclus wordt g estart het vo lgende: OF HET WATERFILTER VERWIJDERD IS indien g ebruikt.
Drink niet de ontkalkingsoplossing en de
verstrekte producten totdat de cyclus geheel
beëindigd is. Gebruik in geen geval azijn als ontkalkingsmiddel.
1 (Afb.13-14) - Plaats de lterhouder van onderen in de cen-
trale unit (8) en draai deze van link s naar rechts totdat deze
geblokkeerd is.
2 (Afb.1B) - Haal het waterreser voir eruit en leeg het.
3 (Afb.2) - Giet de HELFT van de inhoud van de es met ge-
concentreerd ontkalkingsmiddel van Saeco in het waterreservoir van het apparaat en vul het met vers drinkwater
tot het MAX niveau.
4 Zet de machine aan door op de ON/OFF toets (11) te druk-
ken; de led (18) zal aan gaan.
(Afb.21) - Neem (zoals beschreven in hoofdstuk 7 van de
handleiding) 2 kopje s water (circa 150 ml per kopje) uit het
stoom/heet waterpijpje; schakel vervolgens de machine
uit met de ON/OFF toets (11); de led (18) gaat uit.
5 Laat het ontkalkingsmiddel voor circa 15-20 minuten in-
werken terwijl de machine uitgeschakeld is.
6 Zet de machi ne aan door op
(Afb.21) - Neem (zoals beschreven in hoofdstuk 7 van de
handleiding) 2 kopjes water (circa 150 ml per kopje) uit het
stoom/he et waterpijpje. Schakel vervo lgens de machine uit
met
de ON/OFF toets (11)
uit.
7 Herhaal de handelingen beschreven bij punt 6 totdat het
waterreser voir geheel leeg is.
de O N/O FF to ets (11) te d ruk ken
en laat deze gedurend e 3 minuten
Nederlands
.
• 71 •
Page 72

8 (Afb.2) - Spoel het reservoir met vers drinkwater en vul
het weer opnieuw.
9 Plaats een kannetje onder de lterhouder.
10 Schakel de machine in door op de ON/OFF toets (11) te
drukken; draai de selectieknop (17) in de stand "
schenk de gehele inhoud van het reservoir door de lterhouder. Zet de selectieknop (17) in de stand "
afgifte te s toppen.
11 (Afb.2) - Vul het re servoir opnieuw met ver s water.
(Afb.21) - Plaats een rui m kannetje onder het stoompij pje
(Pannarello). Draai de kraan voor de afgifte van water (3)
open door deze link som te draaien.
(Af b.22) - Draai de selectieknop (17) in de stand "
schenk de gehele inhoud van het reservoir door het stoom/
heet waterpijpje.
12 (Afb.23) - Wanneer men klaar is met de afgifte van het
water, dient men de afgifte te stoppen door de selectieknop (17) in de stand "
(Af b.24) - Draai de kraan voor de afgifte van water (3)
rechtsom dicht.
13 Her haal opnieuw de handelingen vanaf punt (8) voor een
totaal van 4 reser voirs.
14 (Afb.19) - Verwijder de lterhouder uit de centrale unit door
deze van rechts naar links te draaien en spoel het met vers
drinkwater.
De ontkalkingscyclus is nu volto oid.
(Afb.2) - Vul het reservoir opnieuw met vers water. Vul indien
nodig het circuit volgens de aanwijzingen beschreven in de
par. 4.5.
" te zetten.
" en
" om de
" en
12 AFDANKEN VAN HET APPARAAT
Dit produc t voldoet aan de EU-richtlijn 2002/9 6/EG.
Het symbo ol
erop dat dit product niet als huishoudafval mag worden behandeld.
Het moet echter naar een plaats worden gebracht waar elektrische en elektronische apparatuur worden gerecycled.
Als u ervoor zorgt dat dit produc t op de correcte manier wordt
verwijderd, voorkomt u mogelijk voor het milieu negatieve
gevolgen die zich zouden kunnen voordoen in geval van verkeerde afvalbehandeling.
Voor meer details i n verband met he t recyclen van dit produ ct,
neemt u het best contact op met de gemeentelijke instanties,
het bedrijf of de dienst belast met de verwijdering van huishoudafval of de winkel waar u het produc t hebt gekocht.
op het pr oduct of op ve rpakking wijst
De ontkalkingsoplossing moet afgedankt wor-
den volgens de instructies van de constructeur
en/of de geld ende normen van he t land waar het wordt
gebruikt.
• 72 •
Page 73

13 OPLOSSING VAN PROBLEMEN
Storing Mogelijke oorzaken Oplossing
De machine kan niet worden
ingeschakeld.
De pomp maakt ve el lawaai. Geen water in het reser voir.
Er komt geen ko e uit de machine nadat de selectieknop
(17) in de stand "
De ko e is te koud.
Er komt geen schuim op de
melk.
Het lukt niet om een cappuccino te bereiden.
De ko e loopt te snel door, er
wordt geen schuim gevormd.
De ko e komt niet of slechts
druppelsgewijs naar buiten.
De ko e komt langs de rand
naar buiten.
" is gezet.
Machine niet aangesloten op het elektriciteitsnet.
Filterhouder is verstopt.
De led (20) "klaar voor gebrui k" was uit toen
de se lectie knop (17) in de s tand "
gezet.
Filterhouder niet geplaatst voor voorverwarming (hst. 5).
Koude kopjes. Warm de kopjes voor me t warm water.
Geen geschikte melk: poedermelk, magere
melk.
Pannarello is vuil. Reinig de Pannarello zoals beschreven in Hst.10.
Er is geen stoom meer in de waterketel.
Te weinig ko e in de lterhouder. Voeg ko e toe (hst. 5).
Te grove maling. Gebruik een andere melange (hs t.6).
Ko e oud of niet geschikt. Gebruik een andere melange (hst.6).
Ko epad oud of nie t geschikt. Vervang de gebruik te ko epad.
Er mist een onderdeel in de lterhouder.
Geen water.
Te jne maling. Gebruik een andere melange (hst.6).
Ko e aangedruk t in de lterhouder. Maak de gemalen ko e los.
Te veel ko e in lterhouder. Doe minder ko e in de lterhouder.
Knop (3) open. Draai de knop (3) dicht.
Kalkaanslag in machine. Ontkalk de machine (hst.10).
Filter in lter houder verstopt. Maak het lter schoon (hst.9).
Ko epad niet ges chikt. Gebruik een ander t ype ko epad.
Filt erhoud er verke erd in d e centr ale ko eunit aangebracht.
Bovenrand van lterhouder vuil. Maak de rand van de lterhouder schoon.
Ko epad onjuist aangebracht.
Te veel ko e in lterhouder.
Sluit de machine op het elektric iteitsnet aan.
Vul het waterreservoir en laat het circuit opnieuw
vollopen (par. 4.5)
Zet de selectieknop (17) in de stand "
chine uit en wacht tot het is afgekoeld (circa 1 uur).
Verwijder vervolgens de lterhouder en was het
goed af. Als het probleem zich opnieuw voordoet,
neem dan contact op met het ser vicecentrum.
" werd
Wacht tot de led (20) gaat branden.
Verwarm de lterhouder voor.
Gebruik volle melk.
Laad het circuit opnieuw (par. 4.5) en herhaal de
handelingen beschreven in Hst.8.
Controleer of alle onderdelen aanwezig en juist gemonteerd zijn.
Vul het waterreservoir en laat het circuit opnieuw
vollopen (par. 4.5)
Breng de lterhouder correct aan (hst.5).
Breng de ko epad juist aan en zorg ervoor dat deze
niet uit de lterhouder steekt.
Doe minder ko e in de lterhouder. Gebruik de
maatlepel.
". Zet de ma-
Nederlands
Voo r s tor in gen die ni et i n bo ven st aan de t ab el t e v ind en z ij n of als de g ea dvi se er de o plo ss ing en g ee n e ect hebben,
dient u cont act op te nemen met een servicecentrum.
• 73 •
Page 74

1 ALLMÄN INFORMATION
Ka emaskinen är avsedd för beredning av 1 eller 2 koppar espressoka e och ka emaskinen har ett vridbart rör för ut öde
av ånga och varmvatten. Kontrollerna på f ramsidan av apparaten är märkta me d symboler som är enkla att tolka.
Maskinen har tillverkats för användning i hemmet och inte för
professionell oavbruten användning.
Varning. Inget ansvar tas för eventuella skador
vid:
• Felaktig och oförutsedd användning;
• Repa rationer som inte har u tförts h os auktoriser ade
servicecenter;
• Manipulering av elkabeln;
• Manipulering av någon maskinko mponent;
• Använd ning av reservd elar och tillbe hör som inte är
original;
• Bri st på avkalkn ing och för varing i loka ler under 0°C.
I dessa fall kommer garantin att upphävas.
1.1 För att underlätta läsningen
Varningstriangeln gör dig uppmärks am på alla anvisning ar som är
Följ anvisningarna noggrant för att undvika allvarliga
skador!
Hänvisning till bilder, apparatens delar eller kontrolldelar, osv
anges med nummer eller bokstäver. I detta fall hänvisar man
till bilden.
Denna symbol framhäver den viktigaste
informationen, för en bättre användning av
maskinen.
Textens motsvarande bilder nns på manualens första
sidor. Hänvisa t ill dessa sidor un der läsningen av br uksanvisningen.
viktiga för användarens säkerhet.
1.2 Användning av denna bruksanvis-
ning
Förvara b ruksanvisningen på e tt säkert ställe o ch låt den medfölja ka emaskinen om du överlåter den till andra användare.
För ytterligare information eller om problem uppstår, vänd er
till ett auk toriserat servicecenter.
2 TEKNISKA DATA
Tillverkaren förbehåller sig rätten att ändra produktens tekniska egenskaper.
Nominell spänning - Nominell e ekt - Strömförsörjning
Se maskinens typskylt
Material stomme
Plast
Storlek (b x h x d) (mm)
210 x 300 x 280
Vikt
3,9 kg
Längd elkabel
1,3 m
Kontrollpanel
På framdel
Filterhållare
Try ck sat t
Pannarello
Specialdel för cappuccino
Vattenbehållare
1,25 liter - Uttagbar
Pumptryck
15 ba r
Kokare
I rostfritt stål
Säkerhetsanordningar
Ter mos äk rin g
3 SÄKERHETSBESTÄMMELSER
Låt aldrig strömförande delar komma i kontakt med
vatten p.g.a. kortslutningsfara! Den upphettade
ångan och det varma vattnet kan orsaka brännskador!
Rikta aldrig ång-/varmvattenstrålen mot en kroppsdel.
Hantera ång-/varmvattenpipen med varsamhet: risk för
brännskador!
Förutsedd användning
Ka emaskinen är endast avsedd för hushållsbruk. Tekniska
ändringar av maskinen och all otillåten användning är förbjudna på grund av riskerna som dessa kan medföra! Apparaten har inte förutsetts för användning av personer (inklusive
barn) med fysiska, mentala eller sensoriella funktionshinder
eller med otillräc klig erfarenhet och /eller kompetens, fö rutom
om de övervakas av en pers on som ansvarar för der as säkerhet
eller om de har fåt t instruktioner om hur apparaten används.
• 74 •
Page 75

Strömförsörjning
Koppla endast ka emaskinen till ett lämpligt eluttag. Spänningen skall motsvara den som anges p å apparatens typskylt.
Elkabel
Använd aldrig ka emaskinen om elkabeln är skadad. Om elkabeln är skadad ska den bytas ut av tillverkaren eller av kundservice. Vik inte elkabeln eller placera den på vassa kanter,
ovanför mycket var ma föremål och skydda den mot olja.
Bär eller dra inte i ka emaskinen genom att hålla i elkabeln.
Dra inte ut kontakten genom att dra i elkabeln. Rör inte kontakten med blöta händer.
Låt inte elkabeln hänga fritt från bord eller hyllor.
Skydd av andra personer
Håll barn under uppsyn för att undvika att de leker med apparaten.
Barn förstår inte faran med hushållsapparater. Håll maskinens
emballagematerial utom räckhåll för barn.
Risk för brännskador
Undvik att rikta ång- och/eller varmvattenstrålen direkt mot
dig själv och/eller andra personer. Använd alltid de särskilt
ämnade handtagen eller vridknapparna.
Avlägsna aldrig (ta bort) den trycksatta lterhållaren under
bryggningen. Under bryggruppens uppvärmningsfas kan det
uppstå st änk av hett vatten.
Brygg inte ka e när maskinen är överhettad, alltså när lysdioderna "
" och " " är tända samtidigt.
Placering
Ställ ka emaskinen på en s äker plats, där ingen kan slå omkull
den eller skadas av den.
Hett vatten eller upphettad ånga kan komma ut: risk för
brännskador!
Förvara in te ka emaskinen vid en tempe ratur som understig er
0°C efter som frost kan skada maskinen.
Använd inte ka emaskinen utomhus.
Ställ inte maskinen på mycket varma ytor eller i närheten av
öppna lågor för att undvika att maskinstommen smälter eller
skadas.
Rengöring
Före rengöring av maskinen måste maskinen stängas av med
knappen ON/OFF o ch kontakten måste dr as ur eluttaget. Vänt a
även tills maskinen har kallnat. Ställ aldrig maskinen under
vatten!
Det är absolut förbjudet att försöka utföra åtgärder inuti maskinen.
Använd inte vatten som har stått i vattenbehållaren under
era dagar för livsmedelsbruk. Rengör vattenbehållaren och
fyll på den med frisk t dricksvatten.
Plats för användning och underhåll
För att ka emaskinen ska fungera korrekt och väl rekommenderar vi att:
• Ställa maskinen på en plan och jämn yta;
• För vara ka emaskinen i en miljö som är la gom ljus och hygienisk, samt som är försedd med ett lättillgängligt eluttag;
• Placera ka emaskinen så att minim iavståndet från maskinens kanter är som på bilden (Fig. A).
Förvaring av maskinen
När maskinen har ståt t oanvänd under en längre period, stäng
av maskinen och dra ut stickkontakten från väggen. Förvara
maskinen på ett torrt ställe som är utom barns räckhåll. Skydda maskinen mot damm och smuts.
Reparationer / Underhåll
Vid skada, fel eller misstänkt fel efter ett fall, dra genast ut
kontakten från eluttaget. Sätt aldrig på en skadad maskin.
Endast auktoriserade servicecenter får utföra åtgärder och
reparation er. Om dessa åtgär der inte utförs ko rrekt avsäger sig
tillverkaren allt ansvar för eventuella skador.
Brandsläckning
Använd brandsläckare med koldioxid (CO2) ifall brand uppstår.
Använd inte vatten eller brandsläckningsmedel i pulver form.
Svenska
Maskinens huvudsakliga delar (Sid.2)
1 Kontrollpanel
2 Lock till vattenbehållare
3 Vridknapp för varmvatten / ånga
4 Plats för tillbehör
5 Vattenbehållare
6 Koppstöd
7 Vattenuppsamlare + bricka (om sådan nns)
8 Bryggrupp
9 Ångrör (Pannarello)
10 Elkabel
11 Knapp ON/OFF
12 Trycksatt lterhållare
13 Mått f ör malt ka e
14 Filter för malt ka e
(det enda för br yggning av 1 eller 2 koppar)
15 Adapter för ka epods
16 Filter för ka epods
17 Väljarratt
18 Lysdiod "maskin påslagen"
19 Lysdiod "ånga redo"
20 Lysdiod ka e / vatten - "maskin redo"
• 75 •
Page 76

4 INSTALLATION
För din egen och andras säkerhet bör de "Säkerhetsbestämmelser" som anges i kapitel 3 följas noggrant.
4.1 Emballage
Originalemballaget har skapats och tillverkats för att skydda
maskinen under transporten. Det är tillrådligt att spara förpackningen för eventuella framtida transporter.
övriga vätskor kan skada behållaren. Använd inte maskinen utan vatten: se till att det nns tillräckligt med
vatten i vattenbehållaren.
• (Fig.3A) - Sätt tillbaka vattenbehållaren på dess rätta
plats och sät t tillbaka locket (2).
Se till att behållaren är korrekt isat t i maskinen
genom att trycka ordentligt tills det tar stopp
(REFERENSMÄRKET I FIG.3B MÅSTE VARA HELT SYNLIGT)
för att undvika at t vatten läcker ut från botten.
4.2 Försiktighetsåtgärder vid installationen
Innan du installerar maskinen, håll dig till följande säkerhetsföreskrifter:
• ställ mask inen på en säker plats;
• försäkra dig om att inga barn har möjlighet att leka med
maskinen;
• undvik att placera maskinen på heta ytor eller i närheten
av öppna lågor.
Ka emaskinen är nu redo att anslutas till elnätet.
Obs: vi rekommenderar att rengöra komponenterna innan deras första användning och/eller
när de har stått oanvända under en längre period.
4.3 Anslutning av maskinen
Elektrisk ström kan vara farlig! På grund av det,
följ alltid säkerhetsföreskrifterna noggrant.
Använd aldrig skadade sladdar! Skadade sladdar och
kontakter måste ersättas omedelbart av ett Auktoriserat Servicecenter.
Apparatens spänning har ställts in i fabriken. Kontrollera att
nätets spänning motsvarar de anvisningar som står på identi kationsskylten i bot ten på apparaten.
• Sätt in kontakten i ett väggut tag med lämplig spänning.
4.4 Vattenbehållare
• (Fig.1A) - Ta bort locket på vat tenbehållaren (2) genom att
lyfta upp det.
• (Fig.1B) - Ta ut vattenbehållaren (5).
• (Fig.2) - Skölj av vattenbehållaren och fyll på den med
friskt vatten utan att överstiga den MAX-nivån som har
markerats på vattenbehållaren.
Häll alltid och endast i friskt dricksvatten utan
kolsyra i vattenbehållaren. Varmvatten samt
4.5 Laddning av kretsen
I början, efter att ånga har kommit ut eller efter att vattnet
har tagit slut i behållaren, måste maskinens krets laddas om.
• Tryck på ON/OFF-knappen (11). Lysdioden (18) tänds och
anger att maskinen är påslagen.
• (Fig.4) - Ställ en behållare under ångröret (Pannarellon).
• Öppna vridknappen (3) "varmvatten/ånga" genom att
vrida den moturs.
• (Fig.5) - Sät t väljarratten (17) i läget "
• Vänta tills ångröret (Pannarellon) släpper ut en jämn vattenstråle.
• (Fig.5) - Sät t väljarratten (17) i läget "
• Stäng vridknappen (3) "varmvatten/ånga" genom att
vrida den medurs. Ta bort behållaren.
".
".
4.6 Maskinen används för första gången
eller har stått oanvänd under en
längre period
Denna enkla åtgärd f örsäkrar en optimal bryggning och måste
utföras:
- när maskinen startas för första gången;
- när maskinen har stått oanvänd ett längre tag (mer än 2
veckor).
Vattnet so m kommer ut ska tömm as i en särski ld
slask och får inte användas för livsmedelsbruk.
Om behållaren fylls på under cykeln, stoppa bryggningen och töm den innan bryggningen åter upptas.
• (Fig.2) - Skölj vattenbehållaren och f yll på den med friskt
dricksvatten.
• (Fig.4) - Ställ en behållare under ångröret (Pannarellon).
Öppna kranen (3) genom att vrida den moturs.
(Fig.5) - Sätt väljarratten (17) i läget "
• Låt hela vattenbehållarens innehåll ut öda genom ång-/
varmvattenröret (Pannarellon). För att stoppa ut ödet
sätt väljarratten (17) i läget "
nom att vrida den medurs.
" och stäng kranen (3) ge-
".
• 76 •
Page 77

• (Fig.2) - Fyll på behållaren med frisk t dricksvatten.
• (Fig.13-14) - Sätt in lterhållaren underifrån i bryggrup-
pen (8) och vrid den fr ån vänster till höger tills den låse s på
plats.
• (Fig.15) - Ställ en lämplig behållare under lterhållaren.
• (Fig.16) - Vrid väljarratten (17) till läget "
vatten i behållaren ut öda.
(Fig.17) - Innan vattnet t ar slut helt, stoppa ut ödet genom
att föra väljarratten (17) till positionen " ".
• Fyll p å behållaren på nytt och v änta tills lysdioden "maskin
redo" (20) tänds.
• (Fig.19) - Ta bort lterhållaren från gruppen genom att
vrida den från höger till vänster och skölj den med friskt
dricksvatten.
Maskinen är nu red o. För detaljer o m hur bryggningen av ka e
och ut ödet av ånga fungerar hänvisar vi till respektive kapitel.
" och låt allt
5 BRYGGNING AV KAFFE
Varning! Under bryggningen av kaffe är det
förbjudet att ta bort den trycksatta lterhållaren genom att manuellt vrida den medurs. Risk för
brännskador.
• Under denna fas kan lysdioden (20) "maskin redo" tändas
och släckas. Detta är normalt och bör inte uppfattas som
avvikande.
• Försäkra dig, vid första användningstillfället, om att vrid-
knappen (3) för varmvat ten/ånga är stängd och att mask inens vattenbehållare innehåller tillräckligt med vatten.
• Tryck på ON/OFF-knappen (11). Lysdioden (18) tänds och
anger att maskinen är påslagen.
• Vänt a till lysdiod (20) "maskin redo" tänds. Nu är mask inen
redo för bryggning av ka e.
Tillbehören för bryggning av ka e placeras på
en lämplig plats som har utformats särskilt för
att göra dessa moment snabba och lätt a.
För måttet för det malda ka et och/eller nödvändiga
lter, lyft på locket (2) och ta vad du vill ha (Fig.35 och
Fig.36)
Om det, ef ter att du har place rat väljarrat ten (17)
i läget "
väljarratten (17) till läget "
ning" innan d u tar bort lterhållaren.
", INTE kommer ut något ka e, ytta
" och se tabellen "Felsök-
5.1 Med malt ka e
• (Fig.7) - Sätt in lter (14) i den trycksatta lterhållaren
(12). Vid första användningen är ltret redan isatt.
• (Fig.13) - Sätt in lterhållaren underifrån i bryggruppen
(8).
• (Fig.14) - Vrid lterhållaren från vänster t ill höger tills den
låses på plats. Släpp handtaget på den trycksatta lterhållaren. Ett automatiskt system för nu lätt handtaget till
vänster.
Denna rörelse garanterar att den trycksatta lterhållaren
fungerar perfekt.
• (Fig.16) - Förvärm den trycksatta lterhållaren genom
att vrida väljarratten (17) i läget "
att rinna ut ur den trycksatta lterhållaren (denna åtgärd
behövs bara för den första koppen ka e).
• (Fig.17) -Efter at t ha låtit 50ml vatten rinna ut, sät t väljar-
ratten (17) i läget "
• (Fig.19) - Ta bort lterhållaren från maskinen genom att
vrida den fr ån höger till vänster och töm vat tnet som nns
kvar. Med det särskilda ltret (14) som maskinen är utrustad med behöver m an inte byta lter för at t brygga en eller
två koppar ka e.
• (Fig.35) - Ta bort måttet från maskinen.
• (Fig.8) - Häll i 1-1,5 mått för att brygga en enkel ka e el-
ler 2 släta mått för en dubbel ka e. Rengör lterhållarens
kant från ka erester.
• (Fig.13) - Sätt in lterhållaren (12) i bryggruppen (8) un-
derifrån.
• (Fig.14) - Vrid lterhållaren från vänster till höger tills den
låses på plats.
• (Fig.15) - Ta fram 1 eller 2 förvärmda koppar och pla-
cera dem under den trycksatta lterhållaren. Kontrollera
att de är placerade precis under hålen som ka et kommer
ut genom.
• (Fig.14) - Vrid väljarratten (17) till läget "
• (Fig.17) - När önskad mängd ka e uppnåtts, vrid väljar-
ratten (17) till läget "
ka e. Vänta några sekunder ef ter det att bryggningen har
avslutats. Ta sedan ut kopparna med ka e (Fig.18).
• (Fig.19) - Vänta några sekunder efter bryggningen, ta ut
den tryck satta lterhållaren och töm den på ka erester.
Obs: i filterhållaren blir det kvar lite vatten.
Detta är normalt och beror på lterhållarens
egenskaper.
Viktigt: Filtret (14) måste hållas rent för att ett
perfekt resultat ska uppnås. Rengör dagligen
efter användning.
" för att stoppa bryggningen.
" för att stoppa bryggningen av
". Vattnet börjar nu
".
Svenska
• 77 •
Page 78

5.2 Med ka epods
• (Fig.9) - Ta bort ltret för malt ka e (14) från den tryck-
satta lterhållaren (12) med hjälp av en tesked.
• (Fig.10) - Sätt in adaptern för ka epods (15) i den tryck-
satta lterhållaren (12), med den rundade delen vänd
nedåt.
• (Fig.11) - Sätt därefter i ltret för ka epods (16) i den
trycksatta lterhållaren (12).
• (Fig.13) - Sätt in den trycksatta lterhållaren i bryggrup-
pen (8) underifrån.
• (Fig.14) - Vrid lterhållaren från vänster t ill höger tills den
låses på plats. Släpp handtaget på den trycksatta lterhållaren. Ett automatiskt system för nu lätt handtaget till
vänster.
Denna rörelse garanterar att den trycksatta lterhållaren
fungerar perfekt.
• (Fig.16) - Förvärm den tr ycksatta lterhållaren genom at t
vrida väljarra tten (17) till läget "
rinna ut ur den trycksatta lterhållaren (denna åtgärd behövs bara för den första koppen ka e).
• (Fig.17) -Efter at t ha låtit 50ml vatten rinna ut, sät t väljar-
ratten (17) i läget "
• (Fig.19) - Ta bort den trycksatta lterhållaren från maski-
nen genom att vrida den från höger till vänster och töm
vattnet s om nns k var.
• (Fig.12) - Sätt in ka epodsen i lterhållaren. Se till att
podsens papper inte sticker ut från lterhållaren.
• (Fig.13) - Sätt in den trycksatta lterhållaren i bryggrup-
pen (8) underifrån.
• (Fig.14) - Vrid lterhållaren från vänster t ill höger tills den
låses på plats.
• Ta 1 fö rvärmd kopp och placera d en under lterhållaren.
Kontrollera at t den är placerad precis und er hålen som kaffet kommer ut genom.
• (Fig.16) - Vrid väljarratten (17) till läget "
• (Fig.17) - När önskad mängd ka e har uppnåtts, vrid väl-
jarratten (17) till läget "
ka e. Ta ut ka ekoppen.
• (Fig.19) - Vid slutet av bryggningen, vänta några sekun-
der, ta bort lterhållaren och släng den använda podsen.
Viktig t: Filtret (16) och adaptern (15) måste hållas rena för att et t perfekt resultat ska uppnås.
Rengör dagligen efter användning.
" för att stoppa bryggningen.
". Vattnet börjar nu att
".
" för att stoppa bryggningen av
6 VAL AV KAFFE REKOMMENDATIONER
Generellt sätt kan man använda alla ka etyper som nns tillgängliga på marknaden. Men ka e är trots allt en naturprodukt och dess smak kan skilja sig åt beroende på ursprung och
blandning. Vi rekommenderar därför att testa olika typer, tills
du hittar den som du tycker bäst om.
För bästa resultat rekommenderas det att använda blandningar som är gjorda för espressomaskiner. Ka et ska alltid
ut öda med jämn stråle, utan att droppa, från den trycksatta
l t e r h å l l a r e n .
Hastigheten av ka eut ödet kan modi eras genom att f örsiktigt byta ka edosen i ltret och/eller använda ka e med en
annan malningsgrad.
För ett bättre resultat i koppen och för att underlätta rengöring och förberedning rekommenderar Saeco at t använda portionsförpackade ka epods av märket ESE.
INNAN DU UTFÖR NÅGON ÅTGÄRD SOM BERÖR
UTFLÖ DET AV ÅN GA ELLE R VARMVATT EN, KON TROLLERA ATT ÅNGRÖRET (PANNARELLON) ÄR RIKTAT ÖVER
VATTEN UPPSAML AREN.
7 VARMVATTEN
Risk för brännskador! I början av ut ödet kan
det uppstå små stänk av varmvatten. Ångröret
kan uppnå h öga temperature r: undvik att vi dröra röret
direkt med händerna.
• Under denna fas kan lysdioden (20) "maskin redo" tändas
och släckas. Detta är normalt och bör inte uppfattas som
avvikande.
• Försäkra dig, vid första användningstillfället, om att vrid-
knappen (3) för varmvat ten/ånga är stängd och att mask inens vattenbehållare är fylld med tillräckligt med vatten.
• Tryck på ON/OFF-knappen (11). Den röda lysdioden (18)
tänds och anger at t maskinen är påslagen.
• Vänta ti ll lysdioden (20) "maskin redo" tänds. Nu är maski -
nen redo.
• (Fig. 21) - Ställ en behållare eller en tekopp un der ångröret
(Pannarellon).
• (Fig.21) - Öppna vridknappen (3) genom att vrida den
moturs.
• (Fig.22) - Sätt väljarratten (17) i läget "
".
• 78 •
Page 79

• (Fig.23) - När du har fått ut önskad mängd varmvatten,
sätt väljarratten (17) i läget "
• (Fig.24) - Stäng vridknappen (3) genom att vrida den
medurs.
• Ta bort behållaren med varmvatten.
".
8 ÅNGA / CAPPUCCINO
Risk för brännskador! I början av ut ödet kan
det uppstå små stänk av varmvatten. Ångröret
kan uppnå h öga temperature r: undvik att vi dröra röret
direkt med händerna.
Varning! Brygg inte ka e när ång funktione n har
valts eftersom temperaturen är för hög och det
nns risk för brännskador.
Varning! Under ut ödet av ånga är det förbju-
det att ta bort lterhållaren genom att manuellt vrida den medurs. Risk för brännskador! Filterhållaren kan t as bort för st efter det at t väljarrat ten (17) har
satts i läget "
proceduren som beskrivs i avsnittet 4.5.
• Under denna fas kan lysdioden (20) "maskin redo" tändas
och släckas. Detta är normalt och bör inte uppfattas som
avvikande.
• Försäkra dig, vid första användningstillfället, om att vrid-
knappen (3) för varmvat ten/ånga är stängd och att mask inens vattenbehållare är fylld med tillräckligt med vatten.
• Tryck på ON/OFF-knappen (11). Lysdioden (18) tänds och
anger att maskinen är påslagen.
• Vänta tills lysdioden (20) "maskin redo" tänds.
• (Fig.25) - Sätt väljarratten (17) i läget "
(20) släc ks.
• Vänta tills lysdioden (19) tänds. Nu är maskinen redo för
ut öde av ånga.
• (Fig.26) - Ställ en behållare under ångröret.
• (Fig.267 - Öppna vridknappen (3) för ett ögonblick så att
det vatten som är kvar i ångröret (Pannarellon) rinner ut.
Efter en kor t stund kommer det ut ånga.
• (Fig.27) - Stäng vridknappen (3) och ta bort behållaren.
• Fyll på be hållaren som ska användas för beredni ng av cap-
puccino med kall mjölk till 1/3.
" och maskinen har kallnat med hjälp av
". Lysdioden
Det rekommenderas att inte låta ut ödet vara
mer än 60 sek under.
• När ut ödet är klart, stäng vridknappen (3) genom att
vrida den med urs. Ta ut koppen med d en skummade mjölken.
• (Fig.30) - Sätt väljarratten (17) i läget "
Om båda lysdioderna "
nens temperatur för hög för att kunna br ygga ka e.
• Fortsätt med laddning av kretsen såsom beskrivs i avsnitt
4.5 för att göra maskinen dri ftklar.
Obs: maskinen är driftklar när lysdioden
"maskin redo" lyser st adigt.
Obs: om man inte lyckas brygga en cappuccino
enligt be skrivninge n måste man ladda om k retsen såsom beskrivs i avsnitt 4.5 och därefter upprepa
åtgärderna.
Samma tillvägagångssätt kan användas vid
uppvärmning av övriga d rycker.
• Rengör ångröret med en fuktig trasa efter detta moment.
" och " " är tända är maski-
".
9 ENERGIBESPARING
Maskinen har utf ormats för att vara ener gisparande. Maskinen
stängs av automatisk t efter 9 minuters inaktivitet.
För att starta maskinen räcker det att trycka på ON/OFF-knappen (11). Lysdioden (18) "maskin redo" tänds.
Vänta tills lysdioden (20) "maskin redo" tänds.
Svenska
Använd kall mjölk för ett bättre resultat
• (Fig.28) - Sänk ner ångröret i mjölken och öppna vrid-
knappen (3) genom att vrida den moturs. Rotera mjölkbe hållaren långsamt, upp o ch ner, så att all mjölk vär ms upp.
• 79 •
Page 80

10 RENGÖRING
Underhåll och rengöring kan endast utföras när maskinen har
kallnat och kopplats ur elnätet.
• Ställ inte maskinen i vatten och rengör inte några av komponenterna i diskmaskin.
• Använd inte etanol, lösningsmedel och/eller aggressiva
kemiska medel.
• Vi rekommenderar en daglig rengöring av vattenbehållaren och att f ylla på den med friskt dricksvatten.
• (Fig.31-33) - Dagligen efter uppvärmning av mjölken:
avlägsna Pannarellons ytterdel och rengör den med friskt
dricksvatten.
• (Fig. 31-32-33) - Ångröret ska rengör as varje vecka. För att
utföra detta moment, gör följande:
- avlägsna Pannarellons yt terdel (för en god rengöring);
- dra av Pannarellons överdel från ångröret;
- rengör Pannarellons överdel med frisk t dricksvatten;
- rengör ångrö ret med en fuktig t rasa och avlägsna eventuella mjölkrester;
- sätt tillbaka ångrörets överdel (försäkra er om att den är
ordentligt insatt);
Sätt tillbaka Pannarellons ytterdel.
• (Fig.34) - Töm och rengör droppuppsamlaren dagligen.
• Använd en trasa som har fuktats med vatten för att rengöra apparaten.
• (Fig. 20) - För att rengöra den tr ycksatta lterhållaren, gör
som följer:
- (Fig.9) - ta bort ltret, rengör det noggrant med varmt
vatten.
- ta bort adaptern (om sådan nns), rengör den noggrant
med varmt vat ten.
- rengör den tryck satta lterhållaren invändigt.
• Torka inte maskinen och/eller dess komponenter i mikrovågsugn och/eller i vanlig ugn.
• (Fig.35-36) - Rengör platsen för tillbehören varje vecka
med en fuk tig trasa för att avlägsna eventuella ka erester
och damm.
Obs: rengör inte den trycksatta lterhållaren i
diskmaskin.
11 AVK ALKNING
Kalkbildning är normal vid användning av apparaten. Avkalkning måste utföras varje eller varannan månad under maskinens användning och/eller när en minskning av vatten ödet
uppmärksammas. Använd endast avkalkningsmedlet Saeco.
Om anvisningarna skiljer sig åt ska bruksan-
visningen tas i anspråk i första hand och anvisningar som berör tillbehör och/eller material som säljs
separat i andra hand.
Använd avkalkningsmedlet Saeco (Fig.B). Pro-
dukten har utarbetats för att hålla maskinens
prestanda och funktionalitet på en optimal nivå under
maskinens hela livslängd, samt, om den används på
rätt sät t, för att undv ika försämr ingar hos den br yggda
slutprodukten. Innan avkalkningscykeln inleds, se till
at t: VATT EN FILT RET HAR TAG ITS BOR T o m s åd ant an vän ds .
Drick inte av avkalkningsmedlet och bryggda
drycker innan cykeln har avslutats. Använd
absolut inte vinäger som avkalk ningsmedel.
1 (Fig.13-14) - Sätt in lterhållaren underifrån i bryggrup-
pen (8) och vrid den fr ån vänster till höger tills den låse s på
plats.
2 (Fig.1B) - Lyft u t vattenbehållar en och töm den på vatten.
3 (Fig.2) - Häll HALVA innehållet i askan med koncentr erat
Saeco avkalkningsmedel i maskinens vattenbehållare och
fyll på den med frisk t dricksvatten upp till MAX-nivån.
4 Sätt på maskinen genom att trycka på ON/OFF-knappen
(11). Lysdioden (18) tänds.
(Fig.21) - Låt 2 koppar vatten (cirka 150 ml vardera) rinna
ut från ång-/varmvattenröret (såsom anges i kapitel 7 i
bruksanv isningen). Stäng sedan av maskinen m ed hjälp av
ON/OFF-knappen (11). Lysdioden (18) släcks
5 Låt avkalkningsmedlet verka i 15-20 minuter med maski-
nen avstängd.
6 Sätt på maskinen genom att trycka på
(11)
.
(Fig.21) - Fyll 2 koppar (cirka 150 ml vardera) med vatten från ång-/varmvattenröret (såsom beskrivs i kapitel 7
i bruksanvisningen). Stäng sedan av maskinen genom att
trycka på
ON/OFF-knappen (11)
i 3 minuter.
7 Upprepa momenten i punkt 6 tills vattenbehållaren har
tömts helt.
8 (Fig.2) - Skölj vattenbehållaren med friskt dricksvatten
och fyll p å den helt.
9 Ställ en behållare under lterhållaren.
10 Sätt på maskinen genom att trycka på ON/OFF-knappen
(11). Vrid väljarratten (17) till läget "
behållarens innehåll rinna igenom lterhållaren. För att
ON/OFF-knappen
och låt den vara avstängd
" och låt hela
• 80 •
Page 81

stoppa ut ödet, sätt väljarratten (17) i läget " ".
11 (Fig.2) - Fyll på behållaren med friskt drick svatten igen.
(Fig.21) - Ställ en rymlig behållare under ångröret (Pan-
narellon). Öppna kranen för ut öde av vatten (3) genom
att vrida den moturs.
(Fig.22) - Vri d väljarra tten (17) till lä get "
" och låt hela
innehållet från behållaren rinna igenom ång-/varmvattenröret.
12 (Fig.23) - Efter ut ödet av vatten, sätt väljarratten (17) i
läget "
" för att stoppa ut ödet.
(Fig.24) - Stäng krane n för ut öde av vat ten (3) genom att
vrida den medurs.
13 Gör om momenten från punkt (8) med sammanlag t 4 be-
hållare.
14 (Fig.19) - Ta bort lterhållaren från gruppen genom att
vrida den från höger till vänster och skölj den med friskt
dricksvatten.
Avkalkningsc ykeln är nu klar.
(Fig.2) - Fyll på behållaren med friskt dricksvatten igen. Om
nödvändigt, utför laddning av kret sen såsom beskrivs i avsnitt
4.5.
Avkalkningsmedlet ska bortskaffas enligt
tillverkarens instruktioner och/eller gällande
normer i användarlandet.
12 BORTSKAFFANDE
• Sätt oanvända apparater ur funk tion
• Dra ur kontakten från elut taget och frånkoppla elkabeln.
• Ta apparaten till en lämp lig avfallssor tering när dess livslängd
löpt ut.
Produkten är f örenlig med Eu-direktivet 2002/96/EG.
Symbo len
ning indikerar att produkten inte får behandlas som hushållsav fa ll u tan ska läm nas in p å en läm pl ig av fa lls so rt eri ngs st ati on
för återv inning av elektrisk och e lektronisk utrus tning. Genom
att se till att produkten ska as bort på rätt sätt bidrar du till
att motverka möjliga negativa bie ekter på miljön och hälsan
som en oriktig avfallshantering av produkten kan orsaka. För
mer detaljerad information om återvinningen av denna produkt, var go d kontakta din kommun, din hu shållsavfallsser vice
eller a ären där du köpte produkten.
på produkten eller på produktens förpack-
Svenska
• 81 •
Page 82

13 FELSÖKNING
Skada Möjliga orsaker Åtgärd
Maskinen sät ts inte igång. Maskinen är inte kopplad till elnätet. Koppla maskinen till elnätet.
Pumpen är mycket högljudd. Vatten saknas i vat tenbehållaren Fyll på med vatten och ladda kret sen (avsnitt 4.5)
Det kommer inte ut något ka e
efter att väljarratten (17) har
satts i läget " ".
Ka et är för kallt.
Det bildas inget mjölkskum.
Det går inte bereda en cappuccino.
Ka et rinner ut för fort och
inget skum bildas.
Ka et rinner inte ut eller bara
droppar ut.
Ka et rinner ut längs kanterna.
Sätt tillbaka väljarratten (17) i läget "
Filterhållaren är tilltäppt.
Lysdioden (20) "maskin redo" var släck t när
väljarratten (17) sattes i läget "
Filterhållaren är inte isatt för förvärmningen (kap. 5).
Kalla koppar. Förvärm kopparna med varmt vatten.
Olämplig mjölk: pulvermjölk, lättmjölk. Använd helmjölk.
Pannarellon är smutsig. Rengör Pannarellon såsom beskrivs i kap.10.
Det nns ingen mer ånga i kokaren.
För lite ka e i lterhållaren. Tillsät t ka et (kap. 5).
Malningen är för grov. Använd en annan blandning (kap.6).
Gammalt eller inte lämpligt ka e. Använd en annan blandning (kap.6).
Gammal eller inte lämplig pod. Byt ut den använda podsen.
Det saknas en komponent i lterhållaren.
Vatten saknas. Fyll på med vatten och ladda kretsen (avsnit t 4.5)
Malningen är för n. Använd en annan blandning (kap.6).
Ka et är för pressat i lterhållaren. Ta bort det malda ka et.
För mycket ka e i lterhållaren. Minska på ka emängden i lterhållaren.
Vridknappen (3) är öppen. Stäng vridknappen (3).
Maskinen är förkalkad. Utför en avkalkning av maskinen (kap.10).
Filtret i lterhållaren är tilltäppt. Rengör ltret (kap.9).
Podsen är inte lämplig. Byt till en annan t yp av pod.
Filterhållaren är dåligt is att i bryggruppen. Sätt i lterhållaren korrekt (kap.5).
Övre kanten på lterhållaren är smutsig. Rengör kanten på lter hållaren.
Podsen har sat ts i på fel sätt.
För mycket ka e i lterhållaren. Minska på ka emängden med måt tet.
maskinen och vänta tills den har kallnat (ungefär 1
timme). Ta därefter bort lterhållaren och rengör
den noggrant. O m problemet uppstår i gen, kontakta
servicecenter.
Vänta tills lysdioden (20) tänds.
".
Förvärm lterhållaren.
Ladda om kretsen (avsnitt 4.5) och upprepa åtgärderna som beskrivs i Kap.8.
Kontrollera at t alla komponenter nns och är korrek t
monterade.
Sätt i pod sen korrekt och se till at t den inte sticker ut
från lterhållaren.
". Stäng av
Kontakta ett servicecenter för skador som inte nns med i tabellen ovan eller om åtgärderna som har föreslagits
inte löser problemen.
• 82 •
Page 83

1 GENERELL INFORMASJON
Denne ka emaskinen er egnet for tilberedning av 1 eller 2
kopper espr essoka e. Den er utst yrt med et regul erbart rør for
uttak av damp og varmt vann. Betjeningsknappene på apparatets framside er merket med symboler som er enkle å for stå.
Maskinen er designet for bruk i hjemmet og er ikke egnet til
noen form for profesjonell kontinuerlig bruk.
Advarsel. Produse nten påtar seg ikke ansvar for
eventuelle skader ved tilfeller av:
• Feilaktig bruk eller bruk som ikke er i tråd med det
maskinen er laget for
• Reparasjoner som ikke er utført av autoriserte
serviceverksteder
• Skader påført strømkabelen
• Skader på ført en hvilken som h elst del av maskine n
• Bruk av uoriginale reservedeler eller tilbehør
• Manglende avkalking og oppbevaring på steder med
temperatur under 0°C
I alle disse tilfellene bortfaller garantien.
1.1 For å forenkle avlesingen
Varseltrekanten indikerer alle
instruksjoner som er viktige for
kasjonene nøye for å unngå alvorlige skader!
Referansene til illustrasjoner av apparatets deler, betjeningselementer osv. er ind ikert med nummer eller b okstaver; i det te
tilfelle henvises det til illus trasjonen.
Dette symbolet fremhever den informasjonen
som skal tas spesielt hensyn til for at maskinen
skal fungere best mulig.
Illustrasjonene som er tilknyttet teksten nnes på de
første sidene i bruksanvisningen. Studer disse sidene
mens du leser bruksanvisningen.
brukerens sikkerhet. Følg disse indi-
1.2 Bruk av denne bruksanvisningen
Oppbevar den ne bruksanvisning en på et sikkert sted, o g husk å
legge den ved ka emaskinen hvis en annen person skal bruke
den.
For yt terligere informasj on eller i tilfelle av proble mer henviser
vi til autoriser te serviceverksteder.
2 TEKNISKE DATA
Produsenten f orbeholder seg ret ten til å endre produkte ts tekniske egenskaper.
Nominell spenning - nominell e ekt - strømforsyning
Se merkeplaten på apparatet
Materialet i hoveddelen
Plast
Mål (l x h x d) (mm)
210 x 300 x 280
Vekt
3,9 kg
Kabellengde
1,3 m
Betjeningspanel
På forsiden
Filterholder
Try kk sat t
Pannarello
Spesielt for cappuccinoer
Vannb eholder
1,25 liter - Kan trekkes ut
Pumpetrykk
15 ba r
Kokeenhet
Rustfritt stål
Sikkerhetsinnretninger
Ter mos ikr in g
Norsk
3 SIKKERHETSNORMER
La aldri noen av de strømførende delene komme i
kontak t med vann: Fare for kort slutning! Over opphetet
damp og varmt vann kan føre til forbrenni nger!
Rett aldri damp- eller vannspruten mot noen deler av
kroppen, og vær forsiktig når du tar på damp-/varmtvannstuten: Fare for forbrenning!
Bruksområde
Ka emaskinen er kun laget for bruk i hjemmet. Alle tekniske
endringer og all upassende bruk er ulovlig, da det vil kunne
medføre risiko! Apparatet er ikke beregnet for bruk av personer (barn inkludert) med reduserte fysiske, mentale eller
sansemessige evner, eller med utilstrekkelig erfaring og/eller
kompetanse, med mindre de overvåkes av en person som er
ansvarlig for deres sikkerhet, eller de får tilstrekkelig opplæring i bruken av app aratet.
• 83 •
Page 84

Strømforsyning
Koble ka emaskinen kun til et egne t strømuttak.
Nettspenningen må stemme overens med spenningen indikert
på apparatets merkeplate.
Strømkabel
Bruk aldri ka emaskinen hvis strømkabelen er skadet. Hvis
strømkabelen er skadet, må den skiftes ut av produsenten
eller av produsentens serviceverksted. Ikke la strømkabelen
ligge over hjørner eller skarpe kanter eller over svært varme
gjenstander og besky tte kabelen mot oljesprut.
Ikke bruk kabelen til å ytte eller dra i ka emaskinen. Ikke
trekk ut støpselet ved å dra i kabelen eller ta på kabelen med
våte hender.
Unngå at strømkabelen henger ned fra bord eller hyller.
Beskyttelse av andre personer
Hold barn und er oppsyn for å hindre at d e leker med apparatet.
Barn forstår ikke faren forbundet med elektriske husholdningsapparater. Hold alt emballasjemateriale utenfor barns
rekkevidde.
Fare for forbrenning
Unngå å vende den overopp hetede varmtvanns-/dampspru ten
mot deg selv elle r andre. Bruk alltid håndtakene ell er bryterne.
Løsne eller ern aldri den trykksatte lterholderen mens et
ka euttak pågår. Under ut taksenhetens oppvarmingsfase k an
det lekke ut noen dråper med varmt vann.
Ta ikke ut ka e når maskinen har for høy temperatur, dvs. når
ledene “
” og “ ” ly ser samtidig.
Plassering
Plasser ka emaskinen på et sikkert sted, hvor ingen vil kunne
velte den eller bli skadet av den.
Varmt vann eller damp kan lekke ut: Fare for fo rbrenning!
Oppbevar aldri maskinen ved temperaturer under 0°C, da det
er fare for at frost vil kunne skade maskinen.
Ikke bruk ka emaskinen utendørs.
Ikke plasser maskinen på svært varme over ater og/eller i
nærheten av åpen amme, dette for å unngå at kledningen
smelter eller på annen måte skades.
Rengjøring
Før du rengjør maskinen må du koble den fra ved hjelp av tasten ON/OFF, og deretter trekke støpselet ut av stikkontakten.
I tillegg må du vente til maskinen er avkjølt. Senk aldri maskinen ned i vann!
Det er strengt forbudt å forsøke å gjøre noe på innsiden av
maskinen.
Du må ikke bruke vannet som har blitt værende i beholderen
i noen dager til matlaging. Vask beholderen og fyll den med
friskt drikkevann.
Sted egnet til bruk og vedlikehold
For at ka emaskinen skal fungere korrek t anbefales følgende:
• Velg et underlag som er helt jevnt;
• Velg et sted som er tilstrekkelig opplyst, hygienisk og med
en stikkontakt let t tilgjengelig;
• La det være en minimumsavstand mellom veggene og
maskinen som angitt i guren (Fig. A).
Oppbevaring av maskinen
Når maskinen ikke er i bruk over lengre tid, skal den kobles fra
ved å ta støpselet ut av strømkontakten. Oppbevar på et tørt
sted, utenfor barns rekkevidde. Beskytt maskinen mot støv og
skitt.
Reparasjon/vedlikehold
Ta straks støpselet ut av kontakten ved skader, defekter eller
mistanke om defekter etter et fall. Bruk aldri maskinen hvis
den er skadet. Kun autoriserte serviceverksteder kan foreta
inngrep og reparasjoner. Produsenten fraskriver seg ethvert
ansvar i tilfeller av inngrep ut ført på feil måte.
Brannvern
I tilfelle brann, bruk brannslukningsapparater med karbondioksid (CO
). Ikke bruk vann eller pulverapparater.
2
Tegnforklaring for maskinens deler (S. 2)
1 Betjeningspanel
2 Lokk til vannbeholder
3 Velger til varmtvann / damp
4 Plass til tilbehør
5 Vannbeholder
6 Koppeplate
7 Dråpesamler + rist (hvis forutsatt)
8 Uttak senhet for ka e
9 Damprør (Pannarello)
10 Strømkabel
11 ON/OFF-tast
12 Trykksatt lterholder
13 Måleskje for malt ka e
14 Filter for malt ka e
(kun for uttak av 1 eller 2 ka er)
15 Adapter til ka e lter i kapsler
16 Filter for ka e i kapsler
17 Velger
18 Led-lys for "påslått maskin"
19 Led-lys for "klar for damput tak"
20 Led-lys for ka e/vann - "maskinen er klar"
• 84 •
Page 85

4 INSTALLASJON
For din egen og andres sikkerhet må du alltid ta hensyn
til instruksjonene i kapittel 3 som gjelder "Sikkerhetsnormer".
4.1 Emballasje
Originalemballasj en er utformet og laget fo r å beskytte maski nen under frakt. Vi anbefaler at du tar vare på emballasjen for
eventuell framtidig transport.
4.2 Forholdsregler for installasjon
Før du installerer ka emaskinen må du overholde følgende
sikkerhetsregler:
• Plasser mask inen på et sikkert sted
• Forsikre deg om at det ikke vil være mulig for barn å leke
med maskinen
• Unngå å plassere maskinen på svært varme over ater og/
eller i nærheten av åpne ammer
Ka emaskinen er nå klar for å bli koblet til strømnettet.
Merk: Det an befales å reng jøre delene f ør første
bruk og/elle r etter en perio de der maskinen ik ke
har vært i bruk.
4,3 Tilkobling av maskinen
Elektrisk strøm kan være farlig! Av denne grunn
er det ekstremt viktig å overholde sikkerhetsnormen e nøye. Bruk aldri s kadede ledning er! Skadede
ledninger og kontakter må skiftes ut med en gang av
autoriserte serviceverksteder.
Apparatets spenning er blitt innstilt av fabrikken. Kontroller at
strømnettets spenning stemmer overens med indikasjonene
på identi kasjonsplaten som nnes på undersiden av apparatet.
Vannbeholderen skal kun fylles med friskt
drikkevann uten kullsyre. Varmt vann og andre
væsker vil k unne skade beh olderen. Ikke s tart mask inen
uten vann: Kontroller at det er nok vann i beholderen.
• (Fig.3A) - Sett inn beholderen, forsikre deg om at den
plasseres korrekt, og sett på lokket (2).
Sørg for at vannbeholderen er godt innsatt
på maskinen ved å skyve den helt helt til man
hører den klikke på plass (REFERANSEPUNKTET I FIGUR
3B MÅ VÆRE HELT SYNLIG) for å unngå at vann kommer
ut nederst.
4.5 Oppfylling av kretsen
I begynnelsen, etter damputtaket, eller når det er tomt for
vann i beholderen, må maskinkretsen fylles opp.
• Trykk på tasten ON/OFF (11). Led-lyset (18) tennes for å
varsle om at maskinen er på.
• (Fig.4) - Plasser en beholder under damprøret (Panna-
rello).
• Åpne velgeren (3) "varmt vann/damp" ved å vri den mot
venstre.
• (Fig.5) - Flytt velgeren (17) til posisjonen "
• Vent til det kommer ut en jevn vannstråle fra damprøret
(Pannarello).
• (Fig.5) - Flytt velgeren (17) til posisjon "
• Steng velgeren (3) "varmt vann/damp" ved å vri den med
klokken. Fjern beholderen.
".
".
4.6 Første gangs bruk eller etter en peri-
ode der maskinen ikke har vært i bruk
Denne enkle operasjonen vil garantere deg et optimalt ka euttak og den må gjennomføres:
- Ved første gangs bruk
- Når maskinen har stått ubrukt over lengre tid (mer enn 2
uker)
Norsk
• Sett støpselet inn i en veggkontak t med egnet spenningsførsel.
4.4 Vannbeholder
• (Fig. 1A) - Fjern vannbeholderens lokk (2) ved å løfte det
av.
• (Fig. 1B) - Trekk ut vannbeholderen (5).
• (Fig.2) - Skyll den og fyll den med friskt drikkevann. Ikke
overstig nivået (MAX) indikert på beholderen.
Vannet som kommer ut må tømmes på et
egnet sted og ikke brukes til matlaging. Hvis
beholderen skulle bli full mens syklusen pågår, stopp
ka euttaket og tøm den før operasjonen fortsetter.
• (Fig.2) - Skyll beholderen grundig og fyll den med friskt
drikkevann.
• (Fig.4) - Plasser en beholder under damprøret (Panna-
rello). Åpne kranen (3) ved å vri den mot klokken.
(Fig.5) - Flytt velgeren (17) til posisjon "
• Før alt innholdet i vannbeholderen ut via damp-/varmt-
vannsrøret (Pannarello); for å avslutte ka euttaket, ytt
".
• 85 •
Page 86

velgeren (17) til posisjon " " og steng kranen (3) ved å vri
den med klokken.
• (Fig.2) - Fyll beholderen med f riskt drikkevann.
• (Fig.13-14) - Set t l terholderen inn i utt aksenheten (8) fra
undersiden, og vri den fra venstre mot høyre helt til den
blokkeres.
• (Fig.15) - Sett en passende beholder inn under lterholde-
ren.
• (Fig.16) - Flytt velgeren (17) til posisjon "
vannet ut fra vannbeholderen.
(Fig.17) - Før det er helt tomt for vann, skal ut taket stoppes
ved å ytte velgeren (17) til posisjon "
• Fyll o pp beholderen på nyt t og vent til led-lys et "maskinen
er klar" (20) tennes.
• (Fig.19) - Fjern lterholderen fra enheten ved å vri den fra
høyre mot vens tre og skyll den med friskt drikkevann.
Maskinen er nå klar til bruk; for funksjonsinformasjon som
gjelder ka e- og damputtak henvises det til de aktuelle kapitlene.
" og før alt
".
5 KAFFEUTTAK
Advarsel! Det er forbudt å trekke ut den trykksatte lterholderen ved å vri den manuelt mot
høyre mens et ka euttak pågår. Fare for for brenning.
• Når denne operasjonen pågår, kan led-lyset (20) "maskinen er klar" slå seg av og på; denne type funksjon skal
betraktes som normal og er ikke en uregelmessighet.
• Forsikre deg om at velgeren (3) for varmt vann/damp er
stengt og at maskinens vannbeholder inneholder tilstrekkelig vann før maskinen tas i bruk.
• Trykk på tasten ON/OFF (11). Led-lyset (18) tennes for å
varsle om at maskinen er på.
• Vent til led-lyset (20) "maskinen er klar" tennes. Maskinen
er nå klar til å ut føre et ka euttak.
Tilbehøret for ka euttak nnes på et sted som
har blitt designet spesielt for dette formål for
å gjøre disse operasjonene e nkle og raskt tilg jengelig.
For å nne måleskjeen for den malte ka en og/eller
nødvendige lter, løft opp lokket (2) og ta ut det du
ønsker (Fig. 35 og Fig. 36)
Hv is det , e tt er a t d u ha r p la sse rt ve lg ere n (17 ) i p o-
sisjonen "
(17) i posisjonen "
du erner lterholderen.
" IKKE kommer ut ka e, yt t velgeren
" og se tabellen "Problemløsning" før
5.1 Med malt ka e
• (Fig.7) - Sett lteret (14) inn i den trykksatte lterholde-
ren (12); ved første gangs bruk er lteret allerede satt inn.
• (Fig.13) - Sett lterholderen inn i uttaksenheten (8) fra
undersiden.
• (Fig.14) - Vri lterholderen fra venstre mot høyre helt til
den blokkeres. Slipp den trykksatte lterholderens håndtak. Et automatisk system vil nå føre håndtaket litt mot
venstre.
Denne bevegelsen garanterer at den trykksatte lterhol-
deren fungerer perfekt.
• (Fig.16) - Forvarm den trykksatte lterholderen ved å
ytte velgeren (17) til posisjon "
renne ut fra den trykksatte lterholderen (denne operasjonen er kun nød vendig for den første ka en).
• (Fig.17) -Ette r at 50 ml vann ha r rent ut, skal velgeren (17)
yttes til posisjonen "
• (Fig.19) - Ta lterholderen av maskinen ved å vri den fra
høyre mot venstre og tøm ut det gjenværende vannet.
Med maskinens spesielle lter (14), er det ikke nødvendig
å skifte lter for å få en eller to ka ekopper.
• (Fig. 35) - Ta måleskjeen ut av maskinen.
• (Fig.8) - Fyll i 1-1,5 måleskjeer for en enkelt ka e eller 2
fulle måleskjeer for en dobbel ka e; rengjør kanten på lterholderen for ka erester.
• (Fig.13) - Sett lterholderen (12) inn i uttaksenheten (8)
fra undersiden.
• (Fig.14) - Vri lterholderen fra venstre mot høyre helt til
den blokkeres.
• (Fig.15) - Ta ut 1 eller 2 forvarmede kopper og plasser
dem under den tr ykksatte lterholderen; kontrollere at de
er korrekt plasser t under hullene der ka en kommer ut.
• (Fig.14) - Vri velgeren (17) til posisjon "
• (Fig.17) - Når du har oppnådd ønsket ka emengde vrir du
velgeren (17) til posisjonen "
Vent noen sekunder etter at ut taket er avsluttet; ta ut kaffekoppene (Fig.18).
• (Fig.19) - Vent noen sekunder etter at ka euttaket er av-
sluttet, trekk ut trykksatte lterholderen og tøm den for
rester.
Merk: En liten mengde vann blir værende i
filterholderen; dette er normalt og skyldes
lterholderens egenskaper.
Viktig merknad: Filteret (14) må holdes rent
for å garantere et perfekt resultat. Vask dem
daglig etter bruk.
" for å stoppe uttaket.
"; vannet begynner å
".
" for å stanse ka euttaket.
• 86 •
Page 87

5.2 Med ka ekapsler
• (Fig.9) - Ta lteret for malt ka e (14) ut av den trykksatte
lterholderen (12) ved hjelp av en liten teskje.
• (Fig.10) - Sett adapteren for ka ekapsler (15) inn i den
trykksatte lterholderen (12), med den avrundede delen
vendt nedover.
• (Fig.11) - Deretter skal lteret for kapsler (16) settes inn i
den trykksatte lterholderen (12).
• (Fig.13) - Sett den trykksatte lterholderen inn i uttak-
senheten (8) fra under siden.
• (Fig.14) - Vri lterholderen fra venstre mot høyre helt til
den blokkeres. Slipp den trykksatte lterholderens håndtak. Et automatisk system vil nå føre håndtaket litt mot
venstre.
Denne bevegelsen garanterer at den trykksatte lterhol-
deren fungerer perfekt.
• (Fig.16) - Forvarm den trykksatte lterholderen ved å
ytte velgeren (17) til posisjon "
renne ut fra den trykksatte lterholderen (denne operasjonen er kun nød vendig for den første ka en).
• (Fig.17) -Ette r at 50 ml vann ha r rent ut, skal velgeren (17)
yttes til posisjonen "
• (Fig.19) - Ta den trykksatte lterholderen av maskinen
ved å vri den fra høyre mot venstre og tøm ut det gjenværende vannet.
• (Fig.12) - Sett kapselen inn i lterholderen; forsikre deg
om at kapselens papir ikke kommer ut fra lterholderen.
• (Fig.13) - Sett den trykksatte lterholderen inn i uttak-
senheten (8) fra under siden.
• (Fig.14) - Vri lterholderen fra venstre mot høyre helt til
den blokkeres.
• Hent ut 1 forvarmet kopp , og plasser den under lter-
holderen; kontroller at den er korrekt plassert under hullene der ka en kommer ut.
• (Fig.16) - Vri velgeren (17) til posisjon "
• (Fig.17) - Når ønsket ka emengde er oppnådd, skal velge-
ren (17) vris til posisjon "
ka ekoppen.
• (Fig.19) - Vent noen sekunder etter at ka euttaket er av-
sluttet, trekk ut lterholderen og kast den brukte kapselen.
" for å stoppe uttaket.
"; vannet begynner å
".
" for å stanse ka euttaket; ta ut
6 VALG AV KAFFETYPE NOEN RÅD
Generelt sett, kan man br uke alle typer ka e som nnes i handelen. Likevel er det slik at ka e er et naturprodukt og dens
smak endres alt et ter opprinnelse og blanding; man b ør derfor
prøve ut forskjellige typer for å nne den som passer best for
ens personlige smak.
For å forbedre resultatet anbefales det likevel å bruke blandinger som er spesielt laget for espressomaskiner. Ka en må
alltid strømme jevnt ut fra den trykksatte lterholderen, uten
å dryppe.
Hastigheten på ka en som strømmer ut kan endres ved å endre ka emengden i lteret og/eller ved å bruke en ka etype
som har en annen kverningsgrad.
For å få et bedre resultat i koppen og for å forenkle rengjøring
og reparasjon, anbefaler Saeco at man bruker ka ekapsler i
porsjonspakninger som er merket ESE.
FØR DU UTFØRER EN HVILKEN SOM HELST OPERA-
SJON SOM GJELDER UTTAK AV DAMP ELLER VARMT
VANN SKAL DU SJEKKE AT DAMPRØRET (PANNARELLO) ER
VENDT OVER VANNSAMLEREN.
Norsk
Viktig merknad: Filteret (16) og adapteren (15)
må holdes ren for å garantere et perfekt resul-
tat. Vask dem dag lig etter bruk.
• 87 •
Page 88

7 VARMT VANN
Fare for forbrenning! I starten av uttaket kan
det sprute litt varmt vann. Uttaksrøret kan
oppnå høye temperaturer: Unngå å ta direkte på det
med hendene.
• Når denne operasjonen pågår, kan led-lyset (20) "mas-
kinen er klar" slå seg av og på; denne type funksjon skal
betraktes som normal og er ikke en uregelmessighet.
• Forsikre deg om at velgeren (3) for varmt vann/damp er
stengt og at maskinens vannbeholder inneholder tilstrekkelig vann før maskinen tas i bruk.
• Trykk på tasten ON/OFF (11). Det røde led-lyset (18) tennes
for å varsle om at maskinen er på.
• Vent til led-lyset (20) "maskinen er klar" tennes. Maskinen
er nå klar.
• (Fig.21) - Plasser en beholder eller en tekopp under dam-
prøret (Pannarello).
• (Fig.21) - Åpne kranen (3) ved å vri den mot klokken.
• (Fig.22) - Flyt t velgeren (17) til posisjon "
• (Fig.23) - Når du har ført ut ønsket mengde varmt vann,
ytt velgeren (17) til posisjonen "
• (Fig.24) - Steng velgeren (3) ved å vri den med klokken.
• Ta ut beholderen med varmt vann.
".
".
8 DAMP/CAPPUCCINO
Fare for forbrenning! I starten av uttaket kan
det sprute litt varmt vann. Uttaksrøret kan
oppnå høye temperaturer: Unngå å ta direkte på det
med hendene.
Adva rsel! Ikk e ta ut ka e når duhar valgt damp-
funksjonen. Temperaturen er da for høy og man
risikerer forbrenning.
Advarse l! Det er forbudt å tre kke ut den trykk-
satte filterholderen ved å vri den manuelt i
klokker etningen (hv is den er sat t inn) mens et ka euttak
pågår. Fare for forbrenning! Filterholderen kan kun
erne s etter at du har yt tet velgeren (17) til posisjo nen
"
" og etter å ha av kjølt maski nen med fremg angsmåten
beskreve t i avsn. 4.5.
• (Fig.25) - Flytt velgeren (17) til posisjon " "; led-lyset
(20) slukkes.
• vent til led-lyset (19) tennes. Maskinen er nå klar til å føre
ut damp.
• (Fig.26) - Set t en beholder inn under damprøret.
• (Fig.26) - Åpne velgeren (3) et lite øyeblikk, slik at gjenværende vann i damprøret (Pannarello) renner ut; e tter en
kort stund vil kun damp komme u t.
• (Fig. 27) - Steng velgeren (3) og ta bort beholderen.
• Fyll beholderen opp 1/3 med kald melk hvis du skal tilberede cappuccino.
Bruk kald melk for å garantere et best mulig
resultat
• (Fig. 28) - Senk damprøret ned i melken og åpne velgeren
(3) ved å vri den mot venstre; vri beholderen med melk
langsomt nedenfra og opp for å fordele oppvarmingen
jevnt.
Det anbefales at et uttak ikke varer i mer enn
60 sekunder.
• Når utt aket er avsluttet, skal velgeren (3) stenges ved å vri
den med klokken; ta ut koppen med melkeskum.
• (Fig.30) - Flyt t velgeren (17) til posisjon "
Hvis begge led-lysene "
for høy temperatur for ka euttak.
• Fortsett med å fylle kretsen s om beskrevet i avsn. 4.5 for å
gjøre maskinen operativ.
Merk: Maskinen er operativ når led-lyset " "
"maskinen er klar" er tent med fast l ys .
NB! Hvis det ikke er mulig å utføre et uttak av
cappuccino som beskrevet, må kretsen fylles
som forklart i avsn. 4.5. Gjenta deretter operasjonene.
Det samme s ystemet kan br ukes til oppvarmi ng
av andre drikker.
• Rengj ør damprøret med en myk og fuk tig klut etter denne
operasjonen.
" og " "er tent har maskinen
".
• Når denne operasjonen pågår, kan led-lyset (20) "maskinen er klar" slå seg av og på; denne type funksjon skal
betraktes som normal og er ikke en uregelmessighet.
• Forsikre deg om at velgeren (3) for varmt vann/damp er
stengt og at maskinens vannbeholder inneholder tilstrekkelig vann før maskinen tas i bruk.
• Trykk på tasten ON/OFF (11). Led-lyset (18) tennes for å
varsle om at maskinen er på.
• Vent til led-lyset (20) "maskinen er k lar" tennes.
• 88 •
9 ENERGISPARING
Maskinen er laget for energisparing. Maskinen slukkes automatisk etter 9 minutters inaktivitet.
For å sette i gang maskinen igjen trykker du bare på ON/OFFtasten (11). Led-lyset (18) "påslått maskin" tennes.
Vent til led-lyset (20) "maskinen er klar" tennes.
Page 89

10 RENGJØRING
Vedlikehold og rengjøring skal kun utføres når maskinen er
avkjølt og koblet fra s trømnettet.
• Legg ikke maskinen i vann og sett ikke delene i oppvaskmaskinen.
• Bruk ikke etylalkohol, løsemidler og/eller aggressive kjemiske midler.
• Vi anbefaler at du rengjør vannbeholderen og fyller den
med frisk t vann daglig.
• (Fig. 31-33) - Etter å ha varmet opp melken bør du daglig
demontere den utvendige delen av Pannarello, og vaske
denne med friskt drikkevann.
• (Fig. 31-32-33) - Rengjør damprøret ukentlig. For å foreta
denne operasjonen, må du:
- erne den utvendige delen av Pannarello (for regelmessig rengjøring);
- trekke den øvre delen av Pannarello av damprøret;
- vaske den øvre delen av Pannarello med friskt drikkevann;
- vaske damprøret me d en fuktig klut og erne alle eventuelle melkerester;
- sette den øvr e delen på plass på damprøret igj en (pass på
at den er skikkelig festet).
Sett den utvendige delen av Pannarello på plass igjen.
• (Fig.34) - Tøm og vask dråpes amleren daglig.
• Br uk en myk klut fukte t med vann til rengjør ing av apparatet.
• (Fig. 20) - Gå frem som følger for å re ngjøre den trykk satte
lterholderen:
- (Fig.9) - trekk ut lteret, vask det nøye med varmt vann.
- trekk ut adapteren (hvis det nnes en slik på maskinen),
vask den nøye med varmt vann.
- vask den trykksatte lterholderen innvendig.
• Ikke bruk mikrobølgeovn og/eller vanlig ovn til å tørke
maskinen eller delene.
• (Fig.35-36) - Rengjør tilbehørets plass ukentlig med en
fuktig k lut for å erne eventuelle ka e- eller støvrester.
Merk: Ikke r engjør den tr ykksat te lterh olderen
i oppvaskmaskin.
11 AVK ALKING
Kalkdannelse oppstår ved bruk av apparatet; avkalking er
nødvendig hver 1.-2. måned hvis maskinen ha r vært i bruk, og/
eller når du legger merke til at det kommer mindre vann ut av
maskinen. Bruk kun avkalkingsmiddelet Saeco.
Opplysningene i br uks- og vedlikeholdsinstr uk-
sjonene ska l ha høyere prio ritet enn angive lsene
på tilbehør og/eller materialer som kjøpes separat ved
ev. kon ikter.
Bruk avkalkingsmiddelet Saeco (Fig.B). Det er
laget spesi kt for å opprettholde maskinens
yteevne og funksjon i hele dens levetid på beste måte,
og dessute n, hvis det brukes kor rekt, for å un ngå enhver
forringelse av produktet. Før du starter en avkalkingssyklus må du forsikre deg om følgende: AT VANNFILTERET
ER FJERNET hvis det har vær t i bruk.
Ikke drikk avkalkingsløsningen eller væsken
som kommer ut når syklusen er ferdig. Du må
ikke under noen omstendigheter bruke eddik som
avkalki ngsmiddel.
1 (Fig.13-14) - Sett lterholderen inn i ut taksenheten (8) fra
undersiden, og vri den fra venstre mot høyre helt til den
blokkeres.
2 (Fig.1B) - Ta ut og tøm vannbeholderen.
3 (Fig.2) - Hell HALVPARTEN av innholdet i asken med
konsentrert Saeco avkalkingsmiddel i apparatets vannbeholder og f yll opp med friskt dr ikkevann til MAX-nivået.
4 Slå på maskinen ved å trykke på ON/OFF-tasten (11). Led-
lyset (18) tennes.
(Fig.21) - Hent ut (som forklart i kapittel 7 i bruksanvis-
ningen) to kopper (ca. 150 ml hver) vann fra damp -/varmtvannsrøret; slå d eretter av maskinen ved hjelp av ON/OFF-
tasten (11). Led-lyset (18) slukkes
5 La avkalkingsmiddelet virke i cirka 15-20 minutter med
maskinen av.
6 Slå på maskinen ved å trykke på
(Fig.21) - Hent ut (som forklart i kapittel 7 i bruksanvis-
ningen) 2 kopper (ca. 150 ml hver) vann fra damp-/varmtvannsrøret. Slå deretter av maskinen ved hjelp av
tasten (11)
7 Gjenta operasjonene beskrevet i punkt 6 helt til vannbe-
holderen er helt tom.
8 (Fig. 2) - Skyll beholderen grundig med friskt drikkevann
og fyll den helt opp.
9Plasser en beholder under lterholderen.
10 Slå på maskinen ved å trykke på ON/OFF-tasten (11); vri
og la den være avslåt t i 3 minutter.
ON/OFF-tasten (11)
.
ON/OFF-
Norsk
• 89 •
Page 90

velgeren (17) til posisjon " " og før ut hele beholderens
innhold via lterholderen. For å stoppe uttaket, ytt velgeren (17) til posisjon "
".
11 (Fig.2) - Fyll beholderen med friskt drikkevann.
(Fig.21) - Plasser en stor beholder under damprøret
(Pannarello). Åpne kranen for uttak av vann (3) ved å vri
den mot klokken.
(Fig.22) - Vri velgeren (17) til posisjon "
" og før ut alt
innholdet fra beholderen via varmtvanns-/damprøret.
12 (Fig.23) - For å stoppe uttaket etter å ha tømt ut vannet,
ytt velgeren (17) til posisjon "
".
(Fig.24) - Steng kranen for uttak av vann (3) ved å vri den
med klokken.
13 Gjenta operasjonene en gang til fra punkt (8) for totalt 4
beholdere.
14 (Fig.19) - Fjern lterholderen fra enheten ved å vri den fra
høyre mot vens tre og skyll den med friskt drikkevann.
Avkalkingssyklusen er således avsluttet.
(Fig.2) - Fyll beholderen på nytt med friskt drikkevann. Om
nødvendig, ut før en fylling av kretsen som forklart i avsn. 4.5.
Avkalkingsløsningen må kasseres i henhold til
produsentens anvisninger og/eller gjeldende
normer i landet der produktet brukes.
12 AVHENDING
• Sett ubrukte apparater ut av drif t.
• Koble støp selet fra stikkont akten og kutt over str ømkabelen.
• Bring prod uktet til et egnet avf allshåndteringssted når det s
levetid er omme.
Dette produktet er i overensstemmelse med EU-direktivet
2002/96/EF.
Symbo let
at produktet ikke kan behandles som vanlig husholdningsavfall. I stedet m å det leveres inn til en miljøst asjon for resirkulering av elektrisk og elek tronisk utstyr.
Ved å sørge for at dette produktet kasseres på korrekt mate
bidrar du til å forebygge mulige negative konsekvenser for
miljø og menneskelig helse, som ellers vil kunne forekomme
ved feilaktig avfallshåndtering av dette produktet. For mer
detaljert informasjon om resirkulering av dette produktet ta
kontakt med lokale myndigheter, ditt lokale avfallshåndteringsselskap eller butikken der du kjøpte produktet.
på produktet eller på emballasjen indikerer
• 90 •
Page 91

13 PROBLEMLØSNING
Feil Mulige årsaker Løsning
Maskinen slår se g ikke på. Maskinen er ikke kob let til strømnettet. Koble maskinen til strømne ttet.
Pumpen er støyende. Det er ikke vann i beholderen . Fyll opp med vann og fyll opp kretsen (avsn. 4.5).
Det kommer ikke ut ka e etter
å ha plasser t velgeren (17) i posisjonen "
Ka en er altfor kald.
Det dannes ikke noe melkeskum.
Det er ikke mulig å tilberede en
cappuccino.
Ka en renner ut for fort, det
dannes ikke melkeskum.
Ka en kommer ikke ut, eller
den kommer kun ut dråpevis.
Ka en renner over kantene.
".
ytt velgeren (17) til posisjonen "
Filterholderen er tett.
Led-lyset (20) "maskinen er klar" var slukket
når velgeren (17) ble stilt til posisjon "
Filterholderen er ikke satt inn for forvarming (kap. 5).
Kalde kopper. Forvarme koppene med varmt vann.
Melken er ikke egnet: pulvermelk, skum-
metmelk.
Skitten Pannarello. Rengjør Pannarello slik det er beskrevet i Kap.10.
Det er ikke damp igjen i kokeenheten.
For lite ka e i lterholderen. Fyll på ka e (kap. 5).
Ka en er for grovmalt. Bruk en annen blanding (kap. 6).
Ka en er for gammel eller uegne t. Bruk en annen blanding (kap. 6).
Ka ekapselen er for gammel eller uegnet. Skif t ut den brukte ka ekapselen.
Det mangler en del til lter holderen.
Det er tomt for vann. Fyll opp med vann og f yll opp kretsen (avsn. 4.5)
Ka en er for nmalt. Bruk en annen blanding (kap. 6).
Ka e sammenpresset i lterholderen. Flytt den malte ka en.
For mye ka e i lterholderen. Reduser mengde ka e i lterholderen.
Åpen velger (3). Steng velgeren (3).
Forkalkninger i maskinen. Foreta avkalking på maskinen (kap. 10).
Filteret i lterholderen er tett. Rengjør lteret (kap. 9).
Uegnet ka ekapsel. Bytt type ka ekapsel.
Filterholderen er feil satt inn i uttaksen-
heten.
Filterholderens øvre kant er skitten. Rengjør kanten på lterholderen.
Ka ekapselen er feil satt inn.
For mye ka e i lterholderen. Bruk måleskjeen til å redusere ka emengden.
og vent til den avkjøles (cirka 1 time). Fjern deretter
lterholderen og vask den godt. Ta kontakt med serviceverkstedet hvis problemet vedvarer.
Vent til led-lyset (20) tennes.
".
Forvarme lterholderen.
Bruk helmelk.
Fyll opp kretsen (avsn. 4.5) og gjenta operasjonene
beskrevet i Kap. 8.
Kontrollere at alle delene nnes og at de er korrekt
montert.
Sett lterholderen korrek t inn (kap. 5).
Sett ka ekapselen korrekt inn slik at den ikke kommer ut av lterholderen.
". Slå av maskinen
Norsk
Ta kontakt med serviceverkstedet ved defekter som ikke er beskrevet i denne tabellen, eller hvis de foreslåtte
tiltakene ikke løser problemene.
• 91 •
Page 92

1 YLEISTÄ
Kahvinkeitin on tarkoitettu 1 tai 2 espressokupillisen valmistukseen ja siinä on höyryn sekä kuuman veden annosteluun
tarkoitettu suunnattava putki. Laitteen etuosassa olevat ohjaimet on merkit ty helposti tulkittavilla symboleilla.
Keitin on suunniteltu kotitalouskäyttöön eikä sitä ole tarkoitettu jatkuvaan ammattikäyttöön.
Varoitus. Ei vastata mahdollisista vahingoista,
jotka johtuvat:
• Väärästä tai käyttötarkoituksen vastaisesta käytöstä;
• Kor jaustoimen piteistä, joi ta ei ole suorit ettu valtuutetuissa huoltokeskuksiss a;
• Virtajohdon peukaloinnista;
• Minkä tahansa keittimeen kuuluvan osan peukaloinnista;
• Muiden kuin alkuperäisten varaosien ja varusteiden
käytöstä;
• Kalkinpoiston suorittamatta jättämisestä ja varastoinnista lämpötiloissa, jotka ovat alle 0°C.
Näissä tapauksissa tak uu raukeaa.
1.1 Lukemisen helpottamiseksi
Varoituskolmio osoittaa kaikki
käyttäjän turvallisuuden kannalta
tärkeät ohjeet. Noudata niitä huo-
lellisesti, jotta vältytään vakavilta loukkaantumisilta!
2 TEKNISET TIEDOT
Valmistaja pidättää oikeuden muuttaa tuotteen teknisiä ominaisuuksia.
Nimellisjännite - Nimellisteho - Virransyöt tö
Katso laitteeseen kiinnitetty kilpi
Rungon materiaali
Muovi
Keittimen mitat (l x k x s) (mm)
210 x 300 x 280
Paino
3,9 kg
Johdon pituus
1,3 m
Ohjauspaneeli
Etuosassa
Suodatinkahva
Paineen alainen
Pannarello
Erityisesti Cappuccinoa varten
Vesisäi liö
1,25 litraa - Irrotet tava
Pumpun paine
15 ba r
Kuumennussäiliö
Ruostumaton teräs
Turvalaitteet
Lämpösulake
Viittaukset kuviin, laitteen osiin tai ohjauslaitteisiin jne. osoitetaan numeroilla ja kirjaimilla; kyseisessä tapauksessa viitataan kuvaan.
Tämä symboli korostaa tietoja, jotka tulee
huomioida erityisen tarkasti keittimen käyttä-
miseksi parhaalla mahdollisella tavalla.
Tekstissä mainittavat kuvat löytyvät oppaan ensimmäisiltä sivuilta. Katso kyseisiä sivuja samalla, kun
luet käyttöohjeita.
1.2 Käyttöohjeiden säilyttäminen
Säilytä nämä käyttöohjeet turvallisessa paikassa ja yhdessä
keittimen kanssa siltä varalta, että toinen henkilö tarvitsee
niitä.
Lisätietoja var ten tai ongelmien tapauksessa ota yhteyt tä valtuutettuihin huoltokeskuksiin.
• 92 •
3 TURVAMÄÄRÄYKSET
Älä koskaan laita jännitteen alaisia osia kosketuksiin
veden kanssa: oikosulkuvaara! Kuumennettu höyry ja
kuuma vesi vo ivat aiheutt aa palovammoja! Äl ä koskaan
suuntaa höyryä tai kuumavesisuihketta kehon osia
kohti, käsittele höyry-/kuumavesisuutinta varovasti:
palovammojen vaara!
Käyttötarkoitus
Kahvinkeitin on tarkoitettu ainoastaan kotitalouskäyttöön.
Teknisten muutosten suorittaminen ja kaikenlainen väärä
käyttö on kielletty siitä aiheutuvien riskien takia! Laitetta ei
ole tarkoitettu fyysisesti, aistillisesti tai psyykkisesti rajoittuneiden (lapset mukaan lukien) tai kokemattomien ja/tai asiasta tietämättömien henkilöiden käytettäväksi, ellei heidän
turvallisuudesta vastaava henkilö valvo toimintaa tai anna
laitteen käyttöön liittyviä ohjeita.
Page 93

Virransyöttö
Kytke kahvinkeitin ainoastaan sopivaan pistorasiaan. Jännitteen tulee vastata keittimen kilvessä annettua ar voa.
Virtajohto
Älä koskaan käytä kahvinkeitintä, jos virtajohto on vioittunut.
Jos virtajohto on vaurioitunut, sen saa vaihtaa valmistaja tai
valmistajan asiakaspalvelu. Älä anna virtajohdon kulkea kulmien, terävien reunojen tai erit täin kuumien esineiden läheltä
ja suojaa sitä öljyltä.
Älä kuljeta tai vedä kahvinkeitintä johdosta kiinni pitämällä.
Älä irrota pistoketta pistorasiasta johdosta vetämällä äläkä
koske siihen märillä käsillä.
Älä anna virtajohdon roikkua vapaasti pöydiltä tai hyllyiltä.
Muilta henkilöiltä suojaaminen
Valvo lapsia etteivät he pääse leikkimään laitteella.
Lapset eivät ymmärrä sähkölaitteiden käyttöön liittyviä vaaroja. Älä jätä keittimen pakkauksessa käytettyjä materiaaleja
lasten ulottuville.
Palovammavaara
Älä suuntaa höyryä ja/tai kuuman veden suihketta itseäsi ja/
tai muita kohti. Käytä aina tarkoituksenmukaisia kahvoja tai
säätönuppeja.
Älä koskaan irrota (poista) paineenalaista suodatinkahvaa
kahvin annostelun kuluessa. Kahvin annosteluyksikön kuumennusvaiheen aikana saattaa vuotaa hieman kuumaa vettä.
Älä annostele kahvia kun keitin on ylikuumentunut, eli kun
led-valot “
” ja “ ” palavat samanaikaisesti.
Sijoituspaikka
Aseta kahvinkeitin turvalliseen paikkaan, jossa kukaan ei voi
kaataa sitä eikä se voi aiheuttaa loukkaantumisia.
Laitteesta voi tulla kuumaa vettä tai polttavaa höyryä: palo-
vammojen vaara!
Älä säilytä keitintä alle 0°C:n lämpötilassa; jäätyminen voi vahingoittaa keitintä.
Älä käytä kahvinkeitintä ulkoilmass a.
Älä aseta keitintä erittäin kuumille pinnoille tai lähelle avotulta, jotta es tetään rungon sulaminen tai sen v ahingoittuminen.
Puhdistus
Ennen keittimen puhdistamista, sammuta se ON/OFF -painiketta käyttämällä ja irrota pistoke sitten pistorasiasta. Lisäksi
tulee odottaa, että keitin jäähtyy. Älä koskaan upota keitintä
veteen!
Keittimen sisäisten korjaustoimenpiteiden suorittaminen on
ehdottomasti kielletty.
Älä käytä säiliöön muutamaksi päiväksi jäänyttä vettä elintarvikekäyttöön vaan pese säiliö ja täytä se raikkaalla juomavedellä.
Käyttöön ja huoltoon tarvittava tila
Kahvinkeittimen virheettömän ja hyvän toiminnan takaamiseksi suositellaan seuraavaa:
• Valitse vaakasuora ja vakaa taso;
• Valitse riittäväs ti valaistu ja hygieeninen tila, jossa on helposti saavutettava pistorasia;
• Huolehdi keittimen vähimmäisetäisyydestä seiniin kuvan
mukaisesti (Kuva A).
Keittimen säilytys
Kun keitintä ei aiota käyttää pitkään aikaan; kytke keitin pois
päältä ja irrota pistoke pistorasiasta. Säilytä sitä kuivassa paikassa lasten ulottumattomissa. Suojaa sitä pölyltä ja lialta.
Korjaukset / Huolto
Jos ilmenee vikoja, puutteita tai epäilyksiä puutteesta, irrota pistoke välittömästi pistorasiasta. Älä koskaan käynnistä
puutteellista keitintä. Ainoastaan valtuutetut huoltokeskukset voivat suorittaa toimenpiteitä ja korjauksia. Jos toimenpiteitä ei suoriteta oikein, valmistaja ei vastaa mahdollisista
vahingoista.
Palontorjunta
Tulipalon syttyessä käytä hiilidioksidisammuttimia (CO2). Älä
käytä vet tä tai jauhesammuttimia.
Keittimen osien selitykset (Sivu 2)
1 Ohjauspaneeli
2 Vesisäiliön kansi
3 Höyryn / kuuman veden nuppi
4 Varustelokero
5 Vesisäiliö
6 Kuppien asetustuki
7 Veden keräysallas + ritilä (jos kuuluu varustukseen)
8 Kahvin suutinyksikkö
9 Höyryputki (Pannarello)
10 Virtajohto
11 Painike ON/OFF
12 Paineenalainen suodatinkahva
13 Mittalusikka jauhetulle kahville
14 Suodatin jauhetulle kahville
(sopii 1 tai 2 kahvin annosteluun)
15 Suodattimen sovitinos a kahvikapseleille
16 Suodatin kahvikapseleille
17 Valintanuppi
18 Led-valo "keitin päällä"
19 Led-valo "Höyry valmis"
20 Led-valo kahvi / vesi - "Keitin valmis"
Suomi
• 93 •
Page 94

4 ASENNUS
Oman sekä kolmansien osapuolien turvallisuuden vuoksi
noudata h uolellises ti kappaleen 3 ko hdassa "Turvam ääräykset" annettuja ohjeita.
4.1 Pakkaus
Alkuperäinen pakkaus on suunniteltu ja valmistettu suojaamaan keitintä sen lähettämisen aikana. Suositellaan, että
säilytät sen mahdollista tulevaa kuljetusta varten.
4.2 Varoituksia asennusta varten
Ennen keittimen asentamista noudata seuraavia turvamääräyksiä:
• sijoita keitin turvallis een paikkaan;
• varmis ta, etteivät lapset voi leikk iä keittimellä;
• vältä keittimen sijoittamista hyvin kuumille pinnoille tai
lähelle avotulta.
Kahvinkeitin on nyt valmis liitettäväksi sähköverkkoon.
Huomautus: suositellaan, että kaikki osat pestään ennen niiden ensimmäistä käyttökertaa
ja/tai käyttämättömän jakson jälkeen.
4.3 Keittimen kytkeminen
Sähkövirta voi olla vaarallista! Sen vuoksi muista
noudattaa huolellisesti turvallisuusmääräyksiä.
Älä koskaan käytä vioittuneita johtoja! Vioittuneet
johdot ja pistokkeet tulee vaihdattaa välittömästi
valtuutetussa huoltokeskuksessa.
Laitteen jännite on asetettu tehtaalla. Tarkista, että sähköverkon jännite vastaa tietoja, jotka löytyvät laitteen pohjassa
olevasta tunnistuskilvestä.
• Laita pistoke seinäpistorasiaan, jonka jännite on sopiva.
4.4 Vesisäiliö
• (Kuva 1A) - Poista vesis äiliön kansi (2) nostamalla sitä.
• (Kuva 1B) - Poista vesisäiliö (5).
• (Kuva 2) - Huuhtele ja täytä se raikkaalla juomavedellä;
älä koskaan ylitä säiliöön merkit tyä (MAX) tasoa.
Kaada säiliöön aina ja yksinomaan raikasta
hiilihapotonta juomavettä. Kuuma vesi sekä
muut nest eet voivat vahin goittaa sä iliötä. Älä käy nnistä
keitintä ilman vettä: varmista, että säiliössä on riittävä
määrä vettä.
• (Kuva 3A) - Laita säiliö paikalleen varmistaen, et tä se ase-
tetaan takaisin oikein ja laita kansi (2) takaisin paikalleen.
Varmista, että säiliö on laitettu oikein keittimeen
ja paina se kunnolla ääriasentoon saakka (KUVAN
3B VIITTEEN TULEE OLLA KOKONAAN NÄKYVISSÄ ), jotta
vältetään veden vuotaminen pohjalta.
4.5 Järjestelmän lataaminen
Alussa höyryn annostelun jälkeen tai sen jälkeen, kun olet tyhjentänyt vesis äiliön, tulee ladata keittimen järjestelmä.
• Paina painiketta ON/OFF (11); led-valo (18) syttyy pala-
maan ja se osoit taa, että kone on päällä.
• (Kuva 4) - Laita astia höyryputken alle (Pannarello).
• Avaa “kuum an veden/höyryn” nuppi (3) kääntäen si tä vas-
tapäivään.
• (Kuva 5) - Vie valintanuppi (17) asentoon "
• Odot a, että höyryput kesta (Pannarello) tulee säännöllinen
vesisuihku.
• (Kuva 5) - Vie valintanuppi (17) asentoon "
• Sulje (3) “kuuman veden/höyryn” nuppi kääntäen sitä
myötäpäivään. Poista astia.
".
".
4.6 Käyttö ensimmäisen kerran tai käyt-
tämättömän jakson jälkeen
Tämä yksinkertainen toimenpide takaa parhaan mahdollisen
annostelun ja se tulee suorittaa:
- ensimmäisellä käynnistyskerralla;
- tai kun keitin on käytt ämättömänä pitkään (yli 2 viik koa).
Annosteltu vesi on tyhjennettävä tarkoituksen-
mukaisesti eikä sitä voi käyttää elintarvikekäyttöön. Jos säiliö täyttyy jakson aikana, keskeytä annostelu ja tyhjennä säiliö ennen toimenpiteen jatkamista.
• (Kuva 2) - Huuhtele säiliö ja täytä se raikkaalla juomave-
dellä.
• (Kuva 4) - Aseta astia höyr yputken alle (Pannarello). Avaa
hana (3) kääntämällä sitä vastapäivään.
(Kuva 5) - Vie valintanuppi (17) asentoon "
• Annostele koko vesisäiliön sisältö hyöry/kuumavesiput-
kesta (Pannarello); annostelun päättämiseksi vie valintanuppi (17) asentoon "
myötäpäivään.
• (Kuva 2) - Täytä s äiliö raikkaalla juomavedellä.
• (Kuvat 13-14) - Laita suodatinkahva alhaalta päin suu-
tinyksikköön (8) ja käännä sitä vasemmalta oikealle kunnes se lukkiutuu.
• (Kuva 15) - Laita asianmukainen astia suodatinkahvan
alle.
" ja sulje hana (3) kääntämällä sitä
".
• 94 •
Page 95

• (Kuva 16) - Käännä valintanuppi (17) asentoon " " ja
annostele kaikki säiliössä oleva vesi.
(Kuva17) - Ennen kuin vesi loppuu kokonaan, pysäytä an-
nostelu aset tamalla valintanuppi (17) asentoon "
• Täytä säiliö uudelleen ja odota, että led-valo “keitin valmis” (20) syttyy.
• (Kuva19) - Irrota suodatinkahva yksiköstä kääntäen sitä
oikealta vasemmalle ja huuhtele se raikkaalla juomavedellä.
Keitin on nyt valmis; kahvin ja höyryn annosteluun liittyviä
toiminnallisia yksityiskohtia varten viittaa vastaaviin lukuihin.
".
5 KAHVIN ANNOSTELU
Varoitus! Kahvin annostelun aikana on kielletty
irrottamasta paineenalaista suodatinkahvaa
kääntämällä sitä manuaalisesti myötäpäivään. Palovammavaara.
• Tämän toimenpiteen aikana led-valo (20) "keitin valmis"
voi syttyä ja sammua; kyseistä toimintaa tulee pitää normaalina eikä se ole toimint ahäiriö.
• Varmista ennen käy ttöä, että kuuman veden/höyr yn nup-
pi (3) on kiinni ja että keittimen vesisäiliössä on riittävä
määrä vettä.
• Paina painiketta ON/OFF (11); led-valo (18) syttyy pala-
maan ja se osoittaa, että keitin on päällä.
• Odota, että led-valo "keitin valmis" (20) syttyy; nyt keitin
on valmis kahvin annos telua varten.
Kahvin annosteluun liittyvät varusteet on
asetettu tarkoituksenmukaiseen paikkaan,
joka on suunniteltu näiden toimenpiteiden saamiseksi
yksinkertaiseksi ja välittömiksi.
Jauhetun kahvin mittalusikkaa ja/tai tarvittavia suodattimia varten nosta kantta (2) ja ota tarvitsemasi
varusteet (Kuva 35 ja Kuva 36)
Jos valintanupin (17) asettamisen jälkeen
asentoon "
lintanuppi (17) asentoon "
gelmien r atkaisu" ennen su odatinkahvan i rrottamis ta.
" kahvia EI valu ulos, käännä va-
" ja tutustu taulukkoon "On-
5.1 Jauhetun kahvin kanssa
• (Kuva 7) - Laita suodatin (14) paineenalaiseen suodatin-
kahvaan (12); ensimmäisellä käyttökerralla suodatin on jo
valmiina.
• (Kuva 13) - Laita suodatinkahva alhaalta suutinyksikköön
(8).
• (Kuva 14) - Käännä suodatinkahvaa vasemmalta oikealle,
kunnes se lukkiutuu. Irrota ote paineenalaisesta suodatinkahvasta. Automaattinen järjestelmä siirtää nyt kahvaosaa hiukan vasemmalle.
Tämä liike takaa paineenalaisen suodatinkahvan täydelli-
sen toiminnan.
• (Kuva 16) - Esilämmitä paineenalainen suodatinkahva
kääntäen valintanuppi (17) asentoon "
vuotaa paineenalaisesta suodatinkahvasta (tämä toimenpide tulee suorittaa ainoastaan ensimmäistä kahvia varten).
• (Kuva17) -Kun 50cc vettä on valutettu, vie valintanuppi
(17) asentoon "
• (Kuva 19) - Irrota suodatinkahva keittimestä kääntäen
sitä oikealta vasemmalle ja tyhjennä jäämävesi. Erityistä
suodatinta käyttämällä (14), joka kuuluu koneen varustukseen, suodatinta ei tarvitse vaihtaa yhden tai kahden
kahvikupillisen keittämiseksi.
• (Kuva 35) - Ota mit talusikka keittimestä.
• (Kuva 8) - Kaada 1-1,5 mittalusikallista kahvia yhtä tai 2
tasattua mittalusikallista kahta kahvia varten; puhdista
suodatinkahvan reunat kahvijäämistä.
• (Kuva 13) - Laita suodatinkahva (12) alhaalta suutinyksik-
köön (8).
• (Kuva 14) - Käännä suodatinkahvaa vasemmalta oikealle,
kunnes se lukkiutuu.
• (Kuva 15) - Ota 1 tai 2 esilämmitettyä kuppia ja aseta
ne paineenalaisen suodatinkahvan alle; tarkista, että asetat ne täsmälleen kahvin ulostuloaukkojen alle.
• (Kuva 14) - Käännä valintanuppi (17) asentoon "
• (Kuva 17) - Kun haluttu kahvimäärä on saavutettu, kään-
nä valintanuppi (17) asentoon "
pysäyttämiseksi. Annostelun päätyttyä odota muutama
sekunti ja ota k ahvikupit pois, joissa on kahvia (Kuva 18).
• (Kuva 19) - Annostelun lopuksi odota muutama sekunti,
poista paineenalainen suodatinkahva ja tyhjennä se sakkajäämistä.
" annostelun pysäyttämisek si.
"; vesi alkaa
".
" kahvin annostelun
Suomi
Huomautus: suodatinkahvaan jää hieman vettä;
tä mä on n or ma ali a j a se jo htu u s uod at in kah va n
ominaisuuksista.
Tärkeä huomautus: Suodatin (14) tulee pitää
puhtaan a, jotta taata an täydellinen tu los. Pese
päivittäin käytön jälkeen.
• 95 •
Page 96

5.2 Kahvikapselien kanssa
• (Kuva 9) - Poista pikkulusikalla jauhetun kahvin suodatin
(14) paineenalaisesta suodatinkahvasta (12).
• (Kuva 10) - Laita paineenalaiseen suodatinkahvaan (12)
kahvikapselien sovitinosa (15) pyöristetty puoli alaspäin.
• (Kuva 11) - Sen jälkeen laita kahvikapselien suodatin (16)
paineenalaiseen suodatinkahvaan (12).
• (Kuva 13) - Laita paineenalainen suodatinkahva alhaalta
suutinyksikköön (8).
• (Kuva 14) - Käännä suodatinkahvaa vasemmalta oikealle,
kunnes se lukkiutuu. Irrota ote paineenalaisesta suodatinkahvasta. Automaattinen järjestelmä siirtää nyt kahvaosaa hiukan vasemmalle.
Tämä liike takaa paineenalaisen suodatinkahvan täydelli-
sen toiminnan.
• (Kuva 16) - Esilämmitä paineenalainen suodatinkahva
kääntäen valintanuppi (17) asentoon "
vuotaa paineenalaisesta suodatinkahvasta (tämä toimenpide tulee suorittaa ainoastaan ensimmäistä kahvia varten).
• (Kuva17) -Kun 50cc vettä on valutettu, käännä valinta-
nuppi (17) asentoon "
• (Kuva 19) - Irrota paineenalainen suodatinkahva keit-
timestä kääntäen sitä oikealta vasemmalle ja tyhjennä
jäämävesi.
• (Kuva 12) - Laita kahvika pseli suodatinkahvaan; varmista,
että kahvikapselin paperi ei tule ulos suodatinkahvasta.
• (Kuva 13) - Laita paineenalainen suodatinkahva alhaalta
suutinyksikköön (8).
• (Kuva 14) - Käännä suodatinkahvaa vasemmalta oikealle,
kunnes se lukkiutuu.
• Ota 1 esilämmitetty kuppi ja laita se suodatinkahvan
alle; tarkista, että laitat sen täsmälleen kahvin ulostuloaukkojen alle.
• (Kuva 16) - Käännä valintanuppi (17) asentoon "
• (Kuva 17) - Kun haluttu kahvimäärä on saavutettu, kään-
nä valintanuppi (17) asentoon "
säytt ämiseksi; ota kahvia sisältävä kuppi.
• (Kuva 19) - Annostelun lopuksi odota muutama sekunti,
poista suodatinkahva ja hävitä käytetty kahvikapseli.
Tärkeä huomautus: Suodatin (16) ja sovitinosa
(15) tulee pitää puhtaa na, jotta taataa n täydel-
linen tulos. Pese päivittäin käytön jälkeen.
" annostelun pysäyttämisek si.
" kahvin annostelun py-
"; vesi alkaa
".
6 KAHVITYYPIN VALINTA SUOSITUKSIA
Käytännössä voidaan käyttää kaikkia kaupoissa myytäviä
kahvityyppejä. Tulee kuitenkin muistaa, että kahvi on luonnontuote ja sen maku muuttuu alkuperän ja sekoituksen mukaan; siten on hyvä koke illa useita eri ty yppejä, jotta löydet ään
omaa makua parhaiten vastaava.
Parhaita tuloksia varten suositellaan käyttämään seoksia, jotka on valmistettu erityisesti espressokeittimille. Kahvin tulisi
valua aina tasaisesti paineenalaisesta suodatinkahvasta ilman
tippumista.
Kahvin ulostulon nopeuteen voidaan vaikuttaa muuttamalla
kahvin annostelumäärää suodattimessa ja/tai käyttäen kahvia, jonka jauhatusaste on hieman erilainen.
Parhaan tuloksen saamiseksi sekä puhdistuksen ja valmistuksen helpottamiseksi, Saeco suosittelee käyttämään kahvikapseleita, joissa on merkintä ESE.
ENNEN MINKÄ TAHANSA HÖYRYN TAI KUUMAN
VEDEN ANNOSTELUUN LIITTYVÄN TOIMENPITEEN
SUORITTAMISTA, TARKISTA, ETTÄ HÖYRYPUTKI (PANNARELLO) ON SUUNNATTU VEDEN KERÄYSALLASTA KOHTI.
7 KUUMA VESI
Palovammojen vaara! Annostelun alussa voi
suihkuta pieniä määriä kuumaa vettä. Annosteluputki voi tulla erittäin kuumaksi: älä koske siihen
suoraan käsillä.
• Tämän toimenpiteen aikana led-valo (20) "keitin valmis"
voi syttyä ja sammua; kyseistä toimintaa tulee pitää normaalina eikä se ole toimintahäiriö.
• Varmista ennen käy ttöä, että kuuman veden/höyr yn nup-
pi (3) on kiinni ja että keittimen vesisäiliössä on riittävä
määrä vettä.
• Paina painiketta ON/OFF (11); punainen led-valo (18) syt-
tyy palamaan ja se osoittaa, että keitin on päällä.
• Odota, että led-valo (20) "keitin valmis" syttyy; nyt keitin
on valmis.
• (Kuva 21) - Aseta astia tai teekuppi höyryputken alle
(Pannarello).
• (Kuva 21) - Avaa nuppi (3) kääntämällä sitä vastapäivään.
• (Kuva 22) - Vie valintanuppi (17) asentoon "
• (Kuva 23) - Kun on otettu haluttu määrä kuumaa vettä,
käännä valintanuppi (17) asentoon "
".
".
• 96 •
Page 97

• (Kuva 24) - Sulje nuppi (3) kääntämällä sitä myötäpäi-
vään.
• Poista astia kuuman veden kanssa.
8 HÖYRY / CAPPUCCINO
Palovammojen vaara! Annostelun alussa voi
suihkuta pieniä määriä kuumaa vettä. Annosteluputki voi tulla erittäin kuumaksi: älä koske siihen
suoraan käsillä.
Varoitus! Älä annostele kahvia höyrytoiminto
valittuna, koska lämpötila on liian korkea ja on
olemassa palovammavaara.
Va roi tu s! H öy ry n a nno st el un a ik ana on kie ll et-
ty irrottamasta suodatinkahvaa (jos se on
asennettu) kääntämällä sitä manuaalisesti myötäpäivään. Palovammojen vaara! Suodatinkahva voidaan irrottaa vasta sitten kun valintanuppi (17) on käännetty
takaisin asentoon "
leessa 4.5 kuvatulla tavalla.
• Tämän toimenpiteen aikana led-valo (20) "keitin valmis"
voi syttyä ja sammua; kyseistä toimintaa tulee pitää normaalina eikä se ole toimintahäiriö.
• Varmista ennen käy ttöä, että kuuman veden/höyr yn nup-
pi (3) on kiinni ja että keittimen vesisäiliössä on riittävä
määrä vettä.
• Paina painiketta ON/OFF (11); led-valo (18) syttyy pala-
maan ja se osoit taa, että kone on päällä.
• Odota, e ttä led-valo (20) "keitin valmis" sy ttyy.
• (Kuva 25) - Käännä valintanuppi (17) asentoo n "
valo (20) sammuu.
• Odota, että led-valo (19) syttyy; nyt keitin on valmis höy-
ryn annostelua varten.
• (Kuva 26) - Laita astia höyr yputken alle.
• (Kuva 26) - Avaa nuppi (3) hetkeksi, tällä tavalla voidaan
poistaa jäämävesi h öyryputkesta (Pannare llo); lyhyen ajan
kuluttua tulee ulos ainoast aan höyryä.
• (Kuva 27) - Sulje nuppi (3) ja poista astia.
• Täytä 1/3 astiasta kylmällä maidolla, jota haluat käyttää
cappuccinon valmistamiseen.
" ja keitin on jäähdytetty kappa-
"; led-
Korkeintaan 60 sekuntia kestävää annostelua
suositellaan.
• Lop uksi sulje nuppi (3) kääntämällä sitä myötäpäiv ään; ota
kuppi vaahdotetun maidon kanssa.
• (Kuva 30) - Vie valintanuppi (17) asentoon "
Jos molemmat led-valot "
lämpötila on liian korkea kahvin annosteluun.
• Etene suorittaen kappaleessa 4.5 kuvattava järjestelmän
lataus, jotta saadaan keitin käy ttövalmiiksi.
Huomautus: keitin on käyttövalmis kun led-valo
"keitin valmis" palaa kiinteänä.
Tärkeä huomautus: jos et onnistu annostele-
maan capp uccinoa kuva uksen mukai sesti, lataa
järjeste lmä uudelleen kute n kuvataan kappale essa 4.5
ja sen jälkeen toista toimenpiteet.
Samaa järjestelmää voidaan käyttää muiden
juomien kuumentamiseen.
• Puhdista tämän toimenpiteen jälkeen höyryputki kosteal-
la rätillä.
" ja " " palavat, keittimen
".
9 ENERGIANSÄÄSTÖ
Keitin on suunniteltu energiansäästö huomioiden. Keitin sammuu automaattisesti 9 minuutin toimettoman jakson jälkeen.
Käynnistääksesi keittimen uudelleen riittää, että painat painiketta ON/OFF (11); led-valo (18) "keitin päällä" syttyy palamaan.
Odota, että led-valo (20) "keitin valmis" syt tyy.
Suomi
Parhaan tuloksen saamiseksi käytä kylmää
maitoa
• (Kuva 28) - Upota höyryputki maitoon ja avaa nuppi (3)
kääntäen sitä vastapäivään; kierrä maitoastiaa hitaasti
alhaalta ylöspäin, jot ta lämpiäminen tapahtuu tasaises ti.
• 97 •
Page 98

10 PUHDISTUS
Huolto ja puhdistus voidaan suorittaa vasta sitten, kun keitin
on jäähtynyt ja se on irrotet tu sähköverkosta.
• Älä koskaan upota keitintä veteen äläkä laita sen osia astianpesukoneeseen.
• Älä käytä etyylialkoholia, liuottimia ja/tai voimakkaita
kemiallisia aineita.
• Suositellaan, että puhdistat vesisäiliön päivittäin ja täytät
sen raikkaalla vedellä.
• (Kuvat 31-33) - Päivittäin, maidon kuumentamisen jälkeen, irrota Pannarellon ulkoinen osa ja pese se raikkaalla
juomavedellä.
• (Kuvat 31-32-33) - Puhdista höyryputki kerran viikossa.
Tämän toimenpiteen suorittamista varten:
- irrota Pannarellon ulkoinen osa (säännö llistä puhdistusta
varten);
- vedä Pannarellon yläosa pois höyryputkesta;
- pese Pannarellon yläosa raikkaalla juomavedellä;
- pese höyryputki kostealla rätillä ja poista mahdolliset
maitojäämät;
- aseta yläosa takaisin höyryputkeen (varmista, että se on
asetettu kunnolla paikalleen);
Asenna Pannarellon ulkoinen osa takaisin paikoilleen.
• (Kuva 34) - Päivittäin tyhjennä ja pese tippa-alus ta.
• Puhdist a laite veteen kostutetulla pehmeällä rätillä.
• (Kuva 20) - Paineenalaisen suodatinkahvan puhdistamis-
ta varten toimi seuraavasti:
- (Kuva 9) - poista suodatin ja pese se huolellisesti kuumalla vedellä.
- poista sovitinosa (jos kuuluu varustukseen) ja pese se
huolellisesti kuumalla vedellä.
- pese paineenalaisen suodatinkahvan sisäosa.
• Älä kuivaa keitintä ja/tai siihen kuuluvia osia mikroaaltouunissa ja/tai perinteisessä uunissa.
• (Kuvat 35-36) - Viikoittain puhdista varustelokero kostealla rätillä poistaaksesi mahdolliset kahvijäämät tai pölyt.
Huomautus: älä pese paineenalaista suodatinkahvaa astianpesukoneessa.
11 K ALKINPOISTO
Kalkin muodos tuminen on normaalia keittim en käytön aikana;
kalkinpoisto o n tarpeen 1-2 käyttökuukauden välein ja/ tai kun
huomioidaan, että veden virtaus vähenee. Käytä ainoastaan
Saecon kalkinpoistoainetta.
Käyttö- ja huolto-ohjeessa annetut ohjeet ovat
etusijalla erikseen myydyissä varusteissa ja/
tai käytetyissä materiaaleissa annettuihin ohjeisiin
nähden, mikäli ristiriitaisuuksia ilmenee.
Käytä S aeco-kalki npoistoain etta (Kuva B). Se on
valmistettu siten, että keittimen suorituskyky
ja toimin ta saadaan säil ymään parhaa lla mahdollis ella
tasolla koko sen eliniän sekä, oikein käytettäessä,
vältetään kaikki annostellun tuotteen häiriöt. Ennen
kalkinpoistojakson aloittamista varmista että: VESISUODATIN ON IRROTETTU, jos sitä on käy tetty.
Älä juo kal kinpoisto aineliuos ta äläkä anno steltuja tuotteita, kunnes jakso on saatu päätök seen.
Älä missä än tapauks essa käytä et ikkaa kalki npoistoon.
1 (Kuvat 13-14) - Laita suodatinkahva alhaalta päin suu-
tinyksikköön (8) ja käännä sitä vasemmalta oikealle kunnes se lukkiutuu.
2 (Kuva 1B) - Irrota ja tyhjennä vesisäiliö.
3 (Kuva 2) - Kaada PUOLI pulloa tiivistettyä Saeco-kalkin-
poistoainetta laitteen vesisäiliöön ja täytä raikkaalla juomavedellä MAX-tasoon saakka.
4 Käynnistä keitin painamalla painiketta ON/OFF (11); led-
valo (18) syttyy.
(Kuva 21) - Ota (kuten kuvataan oppaan kappaleessa 7)
höyry/kuumavesiputkesta 2 kuppia (noin 150 ml kukin)
vettä; sen jälkeen sammuta keitin painikkeen ON/OFF
kautta (11); led -valo (18) sammuu
5 Anna kalkinpoistoaineen vaikuttaa noin 15-20 minuuttia
keitin sammutettuna.
6 Käynnistä keitin painamalla
(Kuva 21) - Ota (kuten kuvataan oppaan kappaleessa 7)
höyry/kuumavesiputkseta 2 kuppia (noin 150 ml kukin)
vettä. Sammuta sitten keitin
anna sen olla sammutettuna 3 minuutin ajan.
7 Toista kohdan 6 toimenpiteet, kunnes vesisäiliö on tyh-
jennet ty kokonaan.
8 (Kuva 2) - Huuhtele vesisäiliö raikkaalla juomavedellä ja
täytä kokonaan.
9 Laita astia suodatinkahvan alle.
10 Käynnistä keitin painamalla painiketta ON/OFF (11); kään-
nä valintanuppi (17) asentoon "
käyttämällä, tyhjennä koko säiliön sisältö. Annostelun
pysäyttämiseksi, vie valintanuppi (17) asentoon "
11 (Kuva 2) - Täyt ä säiliö uudelleen raikkaalla juomavedellä.
painiketta ON/OFF (11)
painikkeella ON/OFF (11)
" ja suodatinkahvaa
.
ja
".
• 98 •
Page 99

(Kuva 21) - Aseta tilava astia höyryputken alle (Pannarel-
lo). Avaa veden annosteluhana (3) kääntämällä sitä vastapäivään.
(Kuva 22) - Käännä valintanuppi (17) asentoon "
" ja
ota säiliön koko sisältö höyr y/kuumavesiputken kaut ta.
12 (Kuva 23) - Kun vedenotto on päättynyt, annostelun py-
säyttämiseksi käännä valintanuppi (17) asentoon "
".
(Kuva 24) - Sulje veden annosteluhana (3) kääntämällä
myötäpäivään.
13 Toista toimenpiteet toisen kerran kohdasta (8) yhteensä
4 säiliön verran.
14 (Kuva 19) - Irrota suodatinkahva yksiköstä kääntäen sitä
oikealta vasemmalle ja huuhtele se raikkaalla juomavedellä.
Siten kalkinpoistojakso on suoritettu loppuun.
(Kuva 2) - Täytä säiliö uudelleen raikkaalla juomavedellä. Mikäli tarpeen suorita järjestelmän lataus kuten kuvataan käyttöohjeen kappaleessa 4.5.
Kalkinpoistoaineliuos on hävitettävä valmistajan ja/tai käyttömaassa voimassa olevien
määräysten mukaan.
12 HÄVITTÄMINEN
• Ota käyt tämättömät laitteet pois käytöstä.
• Kytke pistoke irti pistorasias ta ja katkaise virtajohto.
• Käy ttöiän lopussa vie laite s opivaan jätteenkeräysp isteeseen.
Tämä tuote täyttää EY-direktiivin 2002/96/EY asettamat vaatimukset.
Tämä
kintä ilmaisee, että tuotetta ei saa hävittää kotitalousjätteen
mukana. Tuote on toimitettava sen sijaan asianmukaiseen
sähkö- ja elektroniikkalaitteiden keräyspisteeseen kierrätystä
varten.
Varmistamalla tämän tuotteen oikean hävittämisen ehkäiset
ympäristölle ja ihmisille mahdollisesta epäasianmukaisesta
käsittelystä aiheutuvia haittoja. Lisätietoja tämän tuotteen
kierrätyksestä saat paikallisilta viranomaisilta, jätehuoltolaitoksesta tai tuotteen ostopaikasta.
tuotteeseen tai pakkaukseen kiinnitetty mer-
• 99 •
Suomi
Page 100

13 ONGELMIEN RATKAISU
Vika Mahdolliset syyt Korjaustoimenpide
Keitin ei ky tkeydy päälle. Keitintä ei ole ky tketty sähköverkkoon. Kytke keitin sähköver kkoon.
Pumppu pitää kovaa ääntä. Vesisäiliössä ei ole vettä. Täytä säiliö vedellä ja lataa järjestelmä (kpl. 4.5).
Kahvia ei tule ulos kun valintanuppi (17) on asetettu asentoon "
".
Kahvi on liian kylmää.
Maitoon ei muodostu vaahtoa.
Ei onnistuta valmistamaan cap puccinoa.
Kahvia valuu liian nopeasti, ei
muodostu vaahtoa.
Kahvi ei valu tai valuu tipoittain.
Kahvi valuu reunoilta.
Vie valintanuppi (17) asentoon "
Suodatinkahva on tukossa.
Led-valo (20) "keitin valmis" oli sammunut
kun valintanuppi (17) vietiin asentoon "
Suodatinkahvaa ei ole laitettu esilämmitystä varten (Kpl 5).
Kupit kylmiä. Esilämmitä kupit kuumalla vedellä.
Sopimaton maito: maitojauhe, rasvaton
maito.
Pannarello on likainen. Puhdista Pannarello kuten kuvataan Kpl. 10.
Kuumennussäiliössä ei ole vettä.
Liian vähän kahvia suodatinkahvassa. Lisää kahvia (Kpl. 5).
Jauhatus liian karkeaa. Käytä erilaista seosta (Kpl. 6).
Kahvi on vanhaa tai sopimatonta. Käytä erilaista seosta (Kpl. 6).
Kahvikapseli on vanha tai sopimaton. Vaihda käy tetty kahvikapseli.
Osa puuttuu suodatinkahvas ta.
Vesi puuttuu. Täytä säiliö vedellä ja lataa järjestelmä (kpl. 4.5)
Jauhatus liian hieno. Käytä erilaista seosta (Kpl. 6).
Kahvi painettu suodatinkahvaan. Kuohkeuta kahvijauhetta.
Liikaa kahvia suodatinkahvassa. Vähennä kahvimäärää suodatinkahvassa.
Nuppi (3) auki. Sulje nuppi (3).
Keittimessä kalkkikiveä. Suorita kalkinpoisto (Kpl.10).
Suodatinkahvan suodatin tukossa. Puhdista suodatin (Kpl.9).
Kahvikapseli on sopimaton. Vaihda käyttämääsi kahvikapselia.
Suodatinkahva on laitettu väärin kahvin
suutinyksikköön.
Suodatinkahvan yläreuna likainen. Puhdista suodatinkahvan reuna.
Kahvikapseli on asetettu väärin.
Liikaa kahvia suodatinkahvassa. Vähennä kahvimäärää mit talusikan avulla.
ja odota, että se jäähtyy (noin 1 tunti). Irrota sitten
suodatinkahva ja pes e se kunnolla. Jos ongelma toistuu, ota yhteyttä huoltokeskukseen.
Odota, et tä led-valo (20) sytt yy.
".
Esilämmitä suodatinkahva.
Käytä täysmaitoa.
Täytä järjestelmä (Kpl. 4.5) ja toista toimenpiteet
kuten kuvataan kappaleessa 8.
Tarkista, että kaikki osat on paikalla ja asennettu
oikein.
Laita suodatinkahva oikein (Kpl.5).
Aseta kahvikapseli oikein ja siten, että se ei tule ulos
suodatinkahvasta.
". Sammuta keitin
Jos vikaa ei löydy kyseisestä t aulukosta tai annetut ohjeet eivät ratkaise sitä, ota yhteyt tä huoltokeskuk seen.
• 100 •
 Loading...