

Page 1
Register your product and get support at
www.philips.com/welcome
ISTRUZIONI PER L'USO
OPERATING INSTRUCTIONS
BEDIENUNGSANLEITUNG
MODE D’EMPLOI
INSTRUCCIONES DE USO
INSTRUÇÕES DE USO
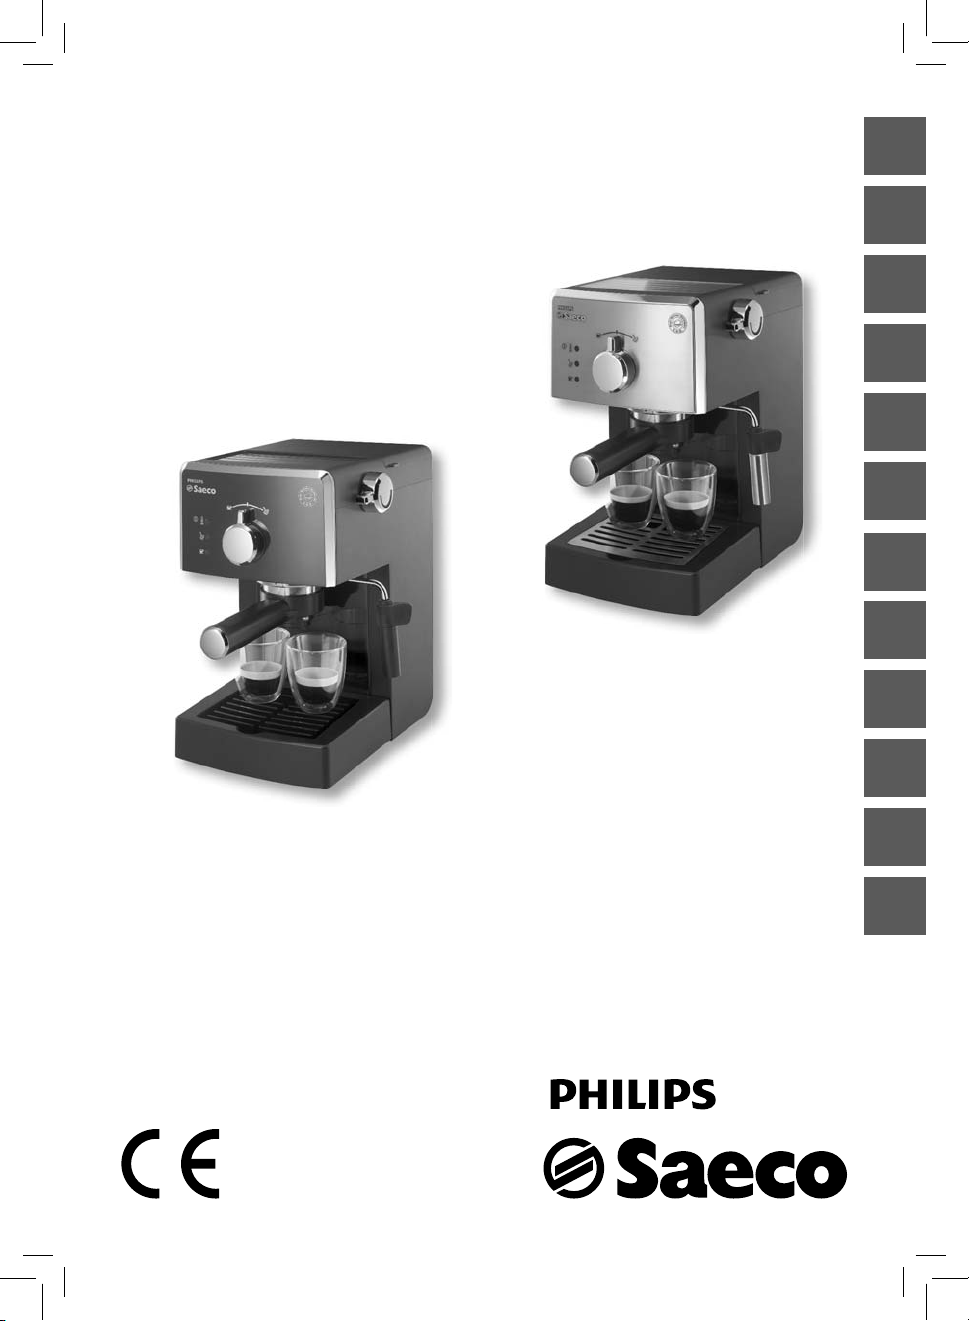
Type HD 8323 / HD 8325
EnglishDeutschFrançaisEspañolPortuguêsNorskSuomiDanskΕλληνικά
Svenska Nederlands Italiano
GEBRUIKSAANWIJZING
BRUKSANVISNING
BRUKSANVISNING
KÄYTTÖOHJEET
BRUGSANVISNING
ΟΔΗΓΙΕΣ ΧΡΗΣΗΣ
LEGGERE ATTENTAMENTE QUESTE ISTRUZIONI D'USO PRIMA DI UTILIZZARE LA MACCHINA.
VOR DEM GEBRAUCH DER MASCHINE IST DIE VORLIEGENDE BEDIENUNGSANLEITUNG AUFMERKSAM ZU LESEN.
READ THESE INSTRUCTIONS CAREFULLY BEFORE USING THE MACHINE.
LIRE ATTENTIVEMENT CE MODE D'EMPLOI AVANT D’UTILISER LA MACHINE.
LEER ATENTAMENTE ESTAS INSTRUCCIONES DE USO ANTES DE USAR LA MÁQUINA.
LEIA ATENTAMENTE ESTAS INSTRUÇÕES DE USO ANTES DE UTILIZAR A MÁQUINA.
LEES DEZE GEBRUIKSAANWIJZING AANDACHTIG ALVORENS DE MACHINE TE GEBRUIKEN.
LÄS NOGA IGENOM BRUKSANVISNINGEN INNAN DU BÖRJAR ANVÄNDA MASKINEN.
LES DENNE BRUKSANVISNINGEN NØYE FØR DU BRUKER MASKINEN.
LUE NÄMÄ KÄYTTÖOHJEET HUOLELLISESTI LÄPI ENNEN KEITTIMEN KÄYTTÖÖNOTTOA.
LÆS OMHYGGELIGT DISSE ANVISNINGER INDEN MASKINEN TAGES I BRUG.
ΠΡΙΝ ΧΡΗΣΙΜΟΠΟΙΗΣΕΤΕ ΤΗ ΜΗΧΑΝΗ, ΔΙΑΒΑΣΤΕ ΠΡΟΣΕΚΤΙΚΑ ΑΥΤΕΣ ΤΙΣ ΟΔΗΓΙΕΣ ΧΡΗΣΗΣ.
Page 2
2 3
1
7 8 9 10
4 65
11
14
• 2 •
18
19
20
12
15
16
13
17
16 in
40 cm
20 cm
20 cm
8 in
20 cm
8 in
Fig. - Abb. - Afb. - R ys. - Kuva. - Εικ. (A)
20 cm
8 in
8 in
Fig. - Abb. - Af b. - Rys. -
Kuva. - Εικ. (B)
Page 3
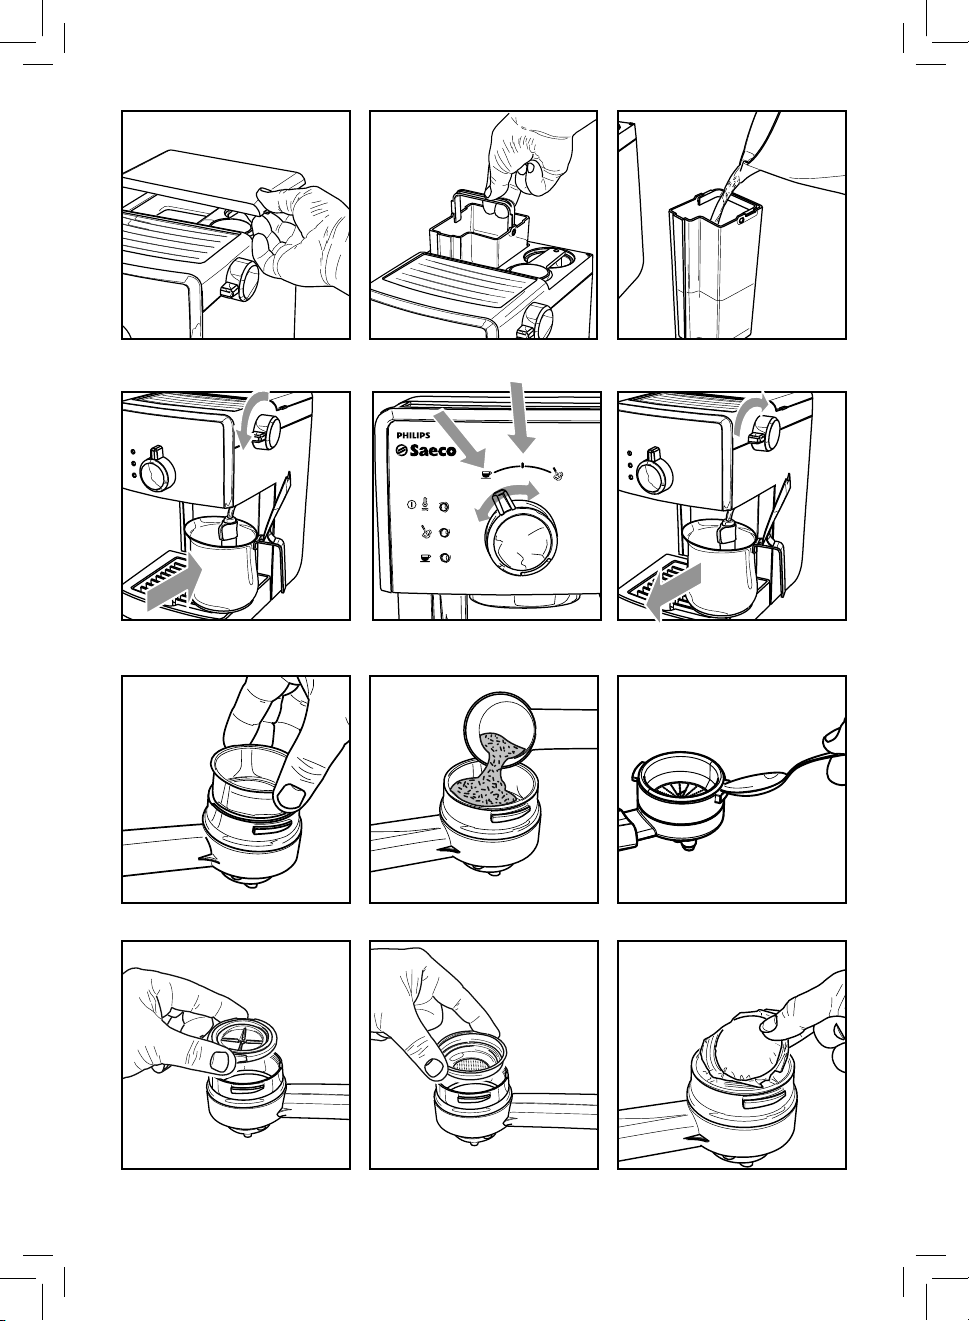
Fig. - Abb. - Afb. - R ys. - Kuva. - Εικ. (1)
Fig. - Abb. - Afb. - R ys. - Kuva. - Εικ. (2)
Fig. - Abb. - Afb. - R ys. - Kuva. - Εικ. (3)
Fig. - Abb. - Afb. - R ys. - Kuva. - Εικ. (4)
Fig. - Abb. - Afb. - R ys. - Kuva. - Εικ. (7)
Fig. - Abb. - Afb. - R ys. - Kuva. - Εικ. (10)
Fig. - Abb. - Afb. - R ys. - Kuva. - Εικ. (5)
Fig. - Abb. - Afb. - R ys. - Kuva. - Εικ. (8)
Fig. - Abb. - Afb. - R ys. - Kuva. - Εικ. (11)
Fig. - Abb. - Afb. - R ys. - Kuva. - Εικ. (6)
Fig. - Abb. - Afb. - R ys. - Kuva. - Εικ. (9)
Fig. - Abb. - Afb. - R ys. - Kuva. - Εικ. (12)
• 3 •
Page 4
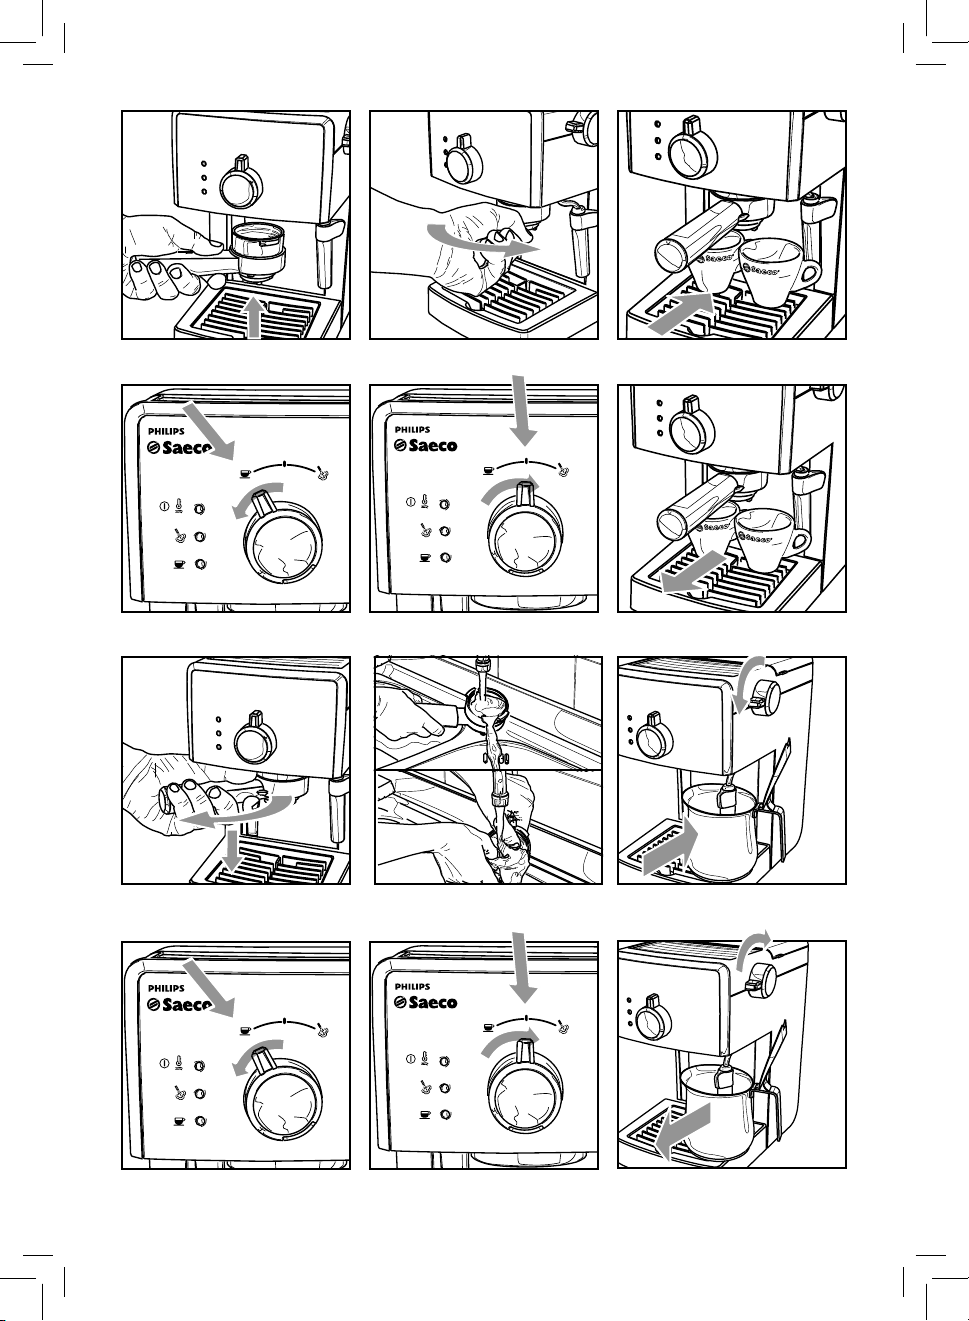
Fig. - Abb. - Afb. - R ys. - Kuva. - Εικ. (13)
Fig. - Abb. - Afb. - R ys. - Kuva. - Εικ. (14)
Fig. - Abb. - Afb. - R ys. - Kuva. - Εικ. (15)
Fig. - Abb. - Afb. - R ys. - Kuva. - Εικ. (16)
Fig. - Abb. - Afb. - R ys. - Kuva. - Εικ. (19)
Fig. - Abb. - Afb. - R ys. - Kuva. - Εικ. (22)
Fig. - Abb. - Afb. - R ys. - Kuva. - Εικ. (17)
Fig. - Abb. - Afb. - R ys. - Kuva. - Εικ. (20)
Fig. - Abb. - Afb. - R ys. - Kuva. - Εικ. (23)
Fig. - Abb. - Afb. - R ys. - Kuva. - Εικ. (18)
Fig. - Abb. - Afb. - R ys. - Kuva. - Εικ. (21)
Fig. - Abb. - Afb. - R ys. - Kuva. - Εικ. (24)
• 4 •
Page 5

Fig. - Abb. - Afb. - R ys. - Kuva. - Εικ. (25)
Fig. - Abb. - Afb. - R ys. - Kuva. - Εικ. (26)
Fig. - Abb. - Afb. - R ys. - Kuva. - Εικ. (27)
Fig. - Abb. - Afb. - R ys. - Kuva. - Εικ. (28)
Fig. - Abb. - Afb. - R ys. - Kuva. - Εικ. (31)
Fig. - Abb. - Afb. - R ys. - Kuva. - Εικ. (34)
Fig. - Abb. - Afb. - R ys. - Kuva. - Εικ. (29)
Fig. - Abb. - Afb. - R ys. - Kuva. - Εικ. (32)
Fig. - Abb. - Afb. - R ys. - Kuva. - Εικ. (35)
Fig. - Abb. - Afb. - R ys. - Kuva. - Εικ. (30)
Fig. - Abb. - Afb. - R ys. - Kuva. - Εικ. (33)
Fig. - Abb. - Afb. - R ys. - Kuva. - Εικ. (36)
• 5 •
Page 6

1 GENERALITÀ
La macchina per ca è è indicata per la preparazione di 1 o 2
tazze di ca è espresso ed è dotata di un tubo orientabile per
l’erogazione del vapore e dell’acqua calda. I co man di sulla parte frontale del l’ap pa rec chio sono cont rassegnati con simboli di
facile in ter pre ta zio ne.
La macchina è st ata progettata per u so domestico e non è indicata per un funzionamento continuo di tipo professionale.
Attenzione. Non si assumono re spon sa bi li tà per
eventuali danni in caso di:
• Impiego errato e non con for me agli scopi previsti;
• Riparazioni non ese gui te presso centri d’assistenza
autorizzati;
• Manomissione del cavo d'alimentazione;
• Manomissione di qual si a si com po nen te della macchina;
• Impie go di pezzi di ri cam bi o e accessori non or iginali;
• Mancata decalci cazione e stoccaggio in locali al di
sotto di 0°C.
In questi casi viene a decadere la garanzia.
1.1 Per facilitare la lettura
Il triangolo d’avvertimento indica
tutte le istruzioni importanti per
la sicurezza del l’uten te. Attenersi
scrupo losamente a tali in dicazioni per evi tare ferimenti gra vi!
2 DATI TECNICI
Il costruttore si riserva il diritto di modi care le carat teristiche
tecniche del prodotto.
Tensione nominale - Potenza nominale - Alimentazione
Vedi targhetta posta sull’apparecchio
Materiale corpo
Plastica
Dimensioni (l x a x p) (mm)
210 x 300 x 280
Peso
3,9 kg
Lunghezza cavo
1,3 m
Pannello di comando
Sulla parte frontale
Porta ltro
Pressurizzato
Pannarello
Speciale per cappuccini
Serbatoio acqua
1,25 litri - Estraibile
Pressione pomp a
15 ba r
Caldaia
Inox
Dispositivi di sicurezza
Ter mof us ibi le
Il riferimen to ad illustrazioni, par ti dell’apparecchio o elementi
di co man do, ecc. è in di ca to da numeri o lettere; in questo caso
si rimanda all’illus trazione.
Questo simbolo evidenzia le in for ma zio ni da
tenere in maggiore con si de ra zio ne, per un mi-
gliore uti liz zo della mac chi na.
Le illustrazioni corrispondenti al te sto si trovano nelle
prime pagine del manuale. Consultare queste pagine
du ran te la lettura delle istr u zio ni per l’uso.
1.2 Impiego di queste istruzioni per l’uso
Conservare queste ist ruzioni per l’uso in un luogo sicur o e allegarle alla mac chi na per ca è qualora un’altra persona dovesse
utilizzarla.
Per ulteriori informazioni o nel caso di problemi, rivolgetevi ai
centri assistenza autorizzati.
• 6 •
3 NORME DI SICUREZZA
Mai mettere a contatto del l’ac qua le parti sotto corrente: pe ri co lo di cortocircuito! Il vapore sur ri scal da to
e l’acqua calda possono pro vo ca re scottature! Mai dirigere il getto di va po re o dell’acqua calda ver so parti
del corpo, toccare con pre cau zio ne il beccuccio vapore /
ac qua calda: pe ri co lo di scottature!
Destinazione d’uso
La macchina per ca è è prevista esclu si va men te per l’impiego
do me sti co. È vietato apportare modi che tec ni che e ogni impiego illeci to, a causa dei rischi che essi co m por ta no! L’apparecchio non è destinato ad essere utilizzato da persone (compresi
i bambini) con ridotte capacità siche, mentali o sensoriali o
con esperienza e/o competenze insu cienti, a meno che non
siano sotto la supervisione di una persona responsabile della
loro sicurezza o non vengano da essa istruite sull’uso dell’apparecchio.
Page 7
Alimentazione di corrente
Collegare la macchina per ca è soltanto ad una presa di corrente adeguata. La tensione deve corrispondere a quella indicata sulla targhetta dell’apparecchio.
Cavo d’alimentazione
Mai usare la macchi na per ca è se il c avo d’alimentazio ne è di fet to so. Se il cavo d’alimentazione è danneggiato, deve essere
cambiato dal produttore o dal suo servizio assistenza clienti.
Non far passare il cavo d’ali men ta zio ne per angoli e su spigoli
vivi, sopra oggetti molto caldi e pro teg ger lo dall’olio.
Non portare o tirare la macchina per ca è tenendola per il
cavo. Non estr arre la spina tirandola per il cavo op pure toccarla
con le mani bagnate.
Evitare che il cavo d’ali men ta zio ne cada liberamente da tavoli
o sca ali.
Protezione d’altre persone
Tenere i bambini sotto supervisione, per evitare che giochino
con l’apparecchio.
I bambini non si rendono conto del per icolo connesso agli elettrodomestici. Non lasciare alla portata dei bam bi ni i ma te ria li
utilizzati per im bal la re la mac chi na.
Pericolo d’ustioni
Evitare di dirigere contro se stessi e/o altri il getto di vapore
sur ri scal da to e/o d’acqua calda. Usare sempre le apposite maniglie o ma no po le.
Non disinserire (to glie re) mai il por ta ltro pressurizz ato durante l’erogazione del ca è. Durante la fase di riscaldamento dal
grup po erogazione ca è pos so no uscire gocce d’acqua calda.
Non erogare ca è quando la macchina è in sovratemperatura,
ossia quando i led “
” e “ ” sono accesi insieme.
Ubicazione
Sistemare la macchi na per ca è in u n po sto sicuro, dove ne ssuno può rovesciar la o venirne ferito.
Acqua calda o vapore sur ri scal da to po treb be ro fuoriuscire: pe-
ricolo di scottature!
Non tenere la macchina a tem peratura inferiore a 0°C; c'è il pe ricolo che il gelo possa danneggiare la macchina.
Non usare la macchina per ca è al l’aper to.
Non posare la macchina su su per ci mol to calde e nelle vicinanze di amme libere per evitare che la carcassa fonda o co mun que si danneggi.
Pulizia
Prima di pulire la macch ina, è in di spensa bi le disinserire la macchina con il tas to ON/OFF tasti e poi stac care la spina dalla presa
di corrente. Inoltre, aspettare che la macchina si ra red di.
Mai immergere la mac chi na nel l’ac qua!
È severamente vietato cercare d’in ter ve ni re all’interno della
macchina.
Non utilizzare, per scopi alimentari, l’acqua rimasta nel serba-
toio per alcuni giorni, lavare il serbatoio e riempirlo con acqua
fresca potabile.
Spazio per l’uso e la ma nu ten zio ne
Per il corretto e buon funzionamento della macchina per ca è
si consiglia quanto segue:
• Scegliere un piano d’appoggio ben li vel la to;
• Scegli ere un ambiente su c i e n t e m e n t e i l l u m i n a t o , i g i e n i co e con presa di cor ren te facilmente accessibile;
• Prevedere una distanza minima dal le pa re ti della macchina come indicato in gu ra (Fig.A).
Custodia della macchina
Quando la macchina rimane inutilizzata per un pe ri o do prolungato, disinserire la mac chi na e staccare la spina dalla pre sa.
Custodirla in luogo asciutto e non ac ces si bi le ai bam bi ni. Proteggerla dalla polvere e dallo sporco.
Riparazioni / Manutenzione
Nel caso di guasti, difetti o sospetto di di fet to dopo una caduta, stac ca re subito la spina dalla presa. Mai met tere in funzione
una macchina di fet to sa. Soltanto i Centri di Assistenza Au to riz za ti possono e ettuare in ter ven ti e riparazioni. Nel caso di
interventi non eseguiti a regola d’arte, si declina ogni re spon sa bi li tà per eventuali danni.
Antincendio
In caso di incendio utilizzare estin to ri ad anidride carbonica
(CO
). Non utilizz are acqua o estintori a polvere.
2
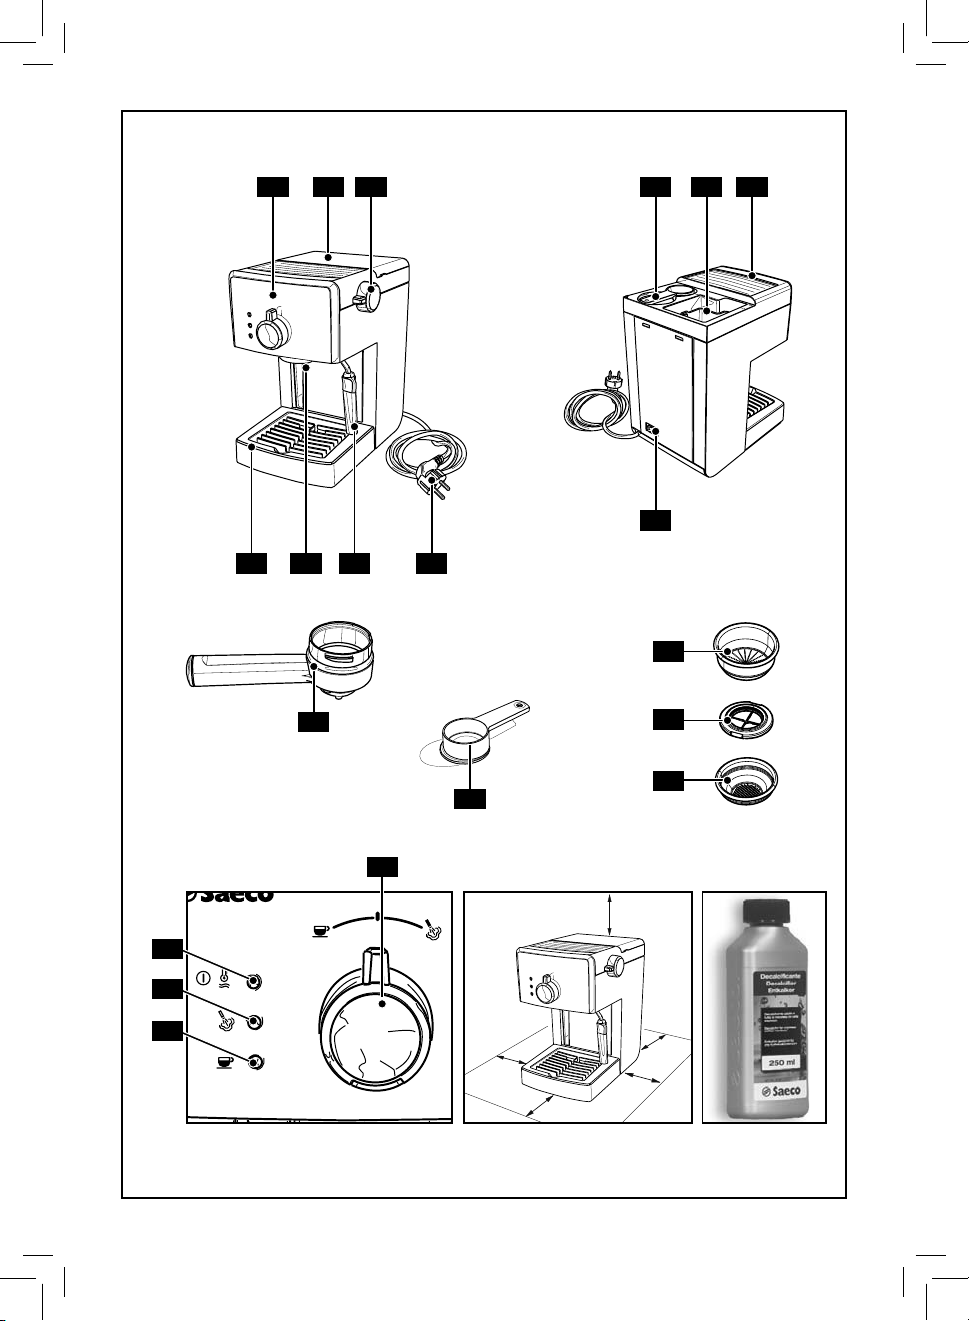
Legenda componenti macchina (Pag.2)
1 Pannello comandi
2 Coperchio serbatoio acqua
3 Pomello acqua calda / vapore
4 Sede per accessori
5 Serbatoio acqua
6 Supporto app oggia tazze
7 Vasca recupero acqua + griglia
8 Gruppo erogatore c a è
9 Tubo vapore (pannarello)
10 Cavo alimentazione
11 Interruttore ON/OFF
12 Porta ltro pressurizzato
13 Misurino per ca è macinato
14 Filtro per ca è macinato
(unico per l'erogazione di 1 o 2 ca è)
15 Adattatore per ltro ca è in cialde
16 Filtro per ca è in cialde
17 Pomello di selezione
18 Led "macchina accesa"
19 Led "Pronto vapore"
20 Led ca è / acqua - "Pronto macchina"
Italiano
• 7 •
Page 8

4 INSTALLAZIONE
Per la propria sicurezza e quella di ter zi at te ner si scrupolosamente alle “Nor me di si cu rez za” riportate nel
cap. 3.
4.1 Imballaggio
L’imballaggio originale è stato progettato e realizzato per
proteggere la macchina durante la spedizione. Si consiglia di
conservarlo per un eventuale trasporto f uturo.
4.2 Avvertenze d'installazione
Prima di inst allare la macchina, attenersi alle seguenti prescrizioni di sicurez za:
• sistemare la macchina in un luogo si cu ro;
• accer tarsi che i bambin i non ab bia no la possibilità di gioca re con la mac chi na;
• evitare che la macchina venga col lo ca ta su super ci molto
calde o vicino a am me libere.
La macchina per ca è è ora pronta per es se re collegata alla
rete elettrica.
Nota: si consiglia di lavare i componenti prima
del loro primo utilizzo e/o dopo un periodo
d'inutilizzo.
4.3 Collegamento della macchina
La corrente elettrica può es se re pe ri co lo sa! Di
c o n s e g u e n z a , a t te n e r s i s e m p r e s c r u p o l o s a m e n te al le nor me di si cu rez z a. Non usare mai cavi d i fet to si !
I cavi e le spi ne difettosi de vo no es s e re so sti tu i ti im me dia ta men te da Centri di Assistenza Autorizzati.
La tensione dell’apparecchio è stata impos tata in fabbrica. Veri care che la tensione della rete corrisponda alle indicazioni
riportate sulla targhetta d’identi cazione posta sul fondo
dell’apparecchio.
• Veri care che l ’interruttore ON/OFF (11) sia in posizione "0"
pri ma di collegare la macchina alla rete elet trica.
• Inseri re la spina in una presa di corrente a pare te di tensio-
ne adeguata.
4.4 Ser ba to io ac qua
• (Fig.1) - Rimuovere il coperchio del serbatoio dell'acqua
(2) sollevandolo.
• (Fig.2) - Estrarre il serbatoio del l’ac qua (5).
• (Fig.3) - Sciacquarlo e riempirlo con ac qua fre sca potabile
evitando di imme tterne una quantità eccessiva.
Immettere nel ser ba to io sem pre e sol tan to ac-
qua fre sca po ta bi le non gas sa ta. Ac qua cal da
non ché al tri liquidi possono dan neg gia re il ser ba to io.
Non mettere in fun zio ne la mac chi na sen za acqua: ac cer tar si che ve ne sia a su c i e n z a a l l ’ i n t e r n o d e l s e r batoio.
• (Fig.2) - Inserire il serbatoio assicurandosi di riposizionalo
correttamente nella sua sede e riposizionare il coperchio
(2).
4.5 Caricamento del circuito
All'inizio, dopo aver erogato vapore o dopo aver terminato
l'acqua nel serbatoio, il circuito della macchina deve essere
ricaricato.
• Premere l’interruttore ON/OFF (11) e portarlo in posizione
"I"; il Led (18) si accende ad indicare che la macchina è accesa.
• (Fig.4) - Inse rire un con tenitore s otto al tu bo vapore (pan-
narello).
• Aprire il pomello (3) “ac qua cal da/va po re” ruotandolo in
sen so antiorario.
• (Fig.5) - Por tare il pomello di selez ione (17) nella posizione
"
".
• Attendere che dal tubo va po re (pannarello) fuoriesca un
get to regolare d'acqua.
• (Fig.5) - Portare il pomello di selezione (17) nella posizio-
ne "
".
• Ch iudere il pomello (3) “ac qua c alda/vapore” ruo tandolo in
sen so orario. Rimuovere il contenitore.
4.6 Primo utilizzo o dopo un periodo di
inutilizzo
Questa semplice operazione vi assicura un'erogazione ottimale
e deve essere eseguita:
- al primo av vio;
- quando la macchina rimane inutilizzata per lungo tempo
(per più di 2 settimane).
L’acqua erogata deve essere vuotata in un ap-
posito scarico e non può essere utilizzata per
l’alimentazione. Se il contenitore si riempe, durante il
ciclo, fermare l’erogazione e vuotarlo prima di riprendere l’operazione.
• (Fig.3) - Risciacquare il serbatoio e riempirlo con acqua
fresca potabile.
• (Fig.4) - Sistemare un contenitore sot to al tubo va po re
(pannarello). Aprire il rubinetto (3) ruotandolo in senso
antiorario.
• 8 •
Page 9

(Fig.5) - Portare il pomello di selezione (17) nella posizio-
ne "
• Ero gare tutto il contenuto del s erbatoio dell’acqua dal tubo
• (Fig.3) - Riempire il serbatoio con acqua fresca potabile.
• (Fig.13-14) - Inserire dal basso il porta ltro nel gruppo
• (Fig.15) - Inserire un contenitore adeguato sotto al porta-
• (Fig.16) - Ruotare il pomello di selezione (17) nella posi-
(Fig.17) - Terminata l’acqua, fermare l’erogaz ione portan-
• Riempire nuovamente il serbatoio ed attendere che il led
• (Fig.19) - Rimuovere il porta ltro dal gruppo ruotandolo
La macchina ora è pronta; per i dettagli di funzionamento per
l’erogazione del ca è e del va po re si rimanda ai ca pi to li relativi.
".
vapore/acqua calda (p annarello); per terminare l'erogazione portar e il pomello di selezione (17) nella posizione "
chiudere il rubinetto (3) ruotandolo in senso orario.
erogazione (8) e ruotarlo da sinistra verso destra no al
suo bloccaggio.
l t r o .
zione "
io.
do il pomello di selezione (17) nella posizione "
di “pronto macchina” (20) si accenda.
da destra verso sinistra e sciacquarlo con acqua fresca potabile.
" ed erogare tutta l’acqua presente nel serbato-
" e
".
5 EROGAZIONE DEL CAFFÈ
Attenzione! Durante l’erogazione del ca è è
vie ta to disinserire il porta ltro pressurizzato
ruotandolo ma nual men te in sen so ora rio. Pe ri co lo
d’ustio ni.
• Durante questa operazione, il led (20) "pronto macchina"
può accendersi e spe gnersi; tale funzionamento deve e ssere considerato normale e non un’anomalia.
• Assicurarsi, prima dell’uso, che il po mel lo (3) acqua calda/
va po re sia chiuso e che il ser ba to io acqua della macchina
con ten ga una quantità d'acqua su ciente.
• (Fig.3) - Premere l’interruttore ON/OFF (11) e portarlo in
posizione "I".
• Attend ere che il led (20) "pronto macchina" si accenda, ora
la macchina è pronta per l’erogazione del ca è.
Gli accessori per l'erogazione del ca è sono ri-
posti in una sede studiata appositamente per
rendere queste operazioni semplici ed immediate.
Per il misu rino per il ca è macinato e /o i ltri ne cessari,
sollevare i l coperchio (2) e prelevare quanto desiderato
(Fig.35 e Fig.36)
5.1 Con caff è macinato
• (Fig.7) - Inserire il ltro (14) nel porta ltro pressurizzato
(12); al primo utiliz zo il ltro è già inserito.
• (Fig.13) - Inserire dal basso il por ta ltro nel gruppo er oga-
zione (8).
• (Fig.14) - Ruot are il p orta ltro da si ni stra v erso d estr a no
al suo bloccaggio. Lasciare la presa dal ma ni co del porta ltro pressurizzato, il manico ruota leg ger men te verso
sinistra. Questo movimento garantisce il perfetto funzionamento del por ta ltro.
• (Fig.16) - Preriscaldare il porta ltro pressurizzato por-
tando il pomello di selezione (17) nella posizione "
l’acqua co min ce rà ad usci re dal porta ltro pressurizzato
(que sta operazione si rende ne ces sa ria solo per il primo
ca è).
• (Fig.17) -Dopo aver fatto scorrere 150cc di acqua, portare
il pomello di selezione (17) nella posizione "
l’erogazione.
• (Fig.19) - Togliere il porta ltro dalla macchina ruotandolo
da destra verso sinistra e vuotare l’acqua residua. Con lo
speciale ltro (14) di cui è dotata la mac chi na, non occorre
cambiare l tro per ottenere uno o due ca è.
• (Fig.35) - Prelevare il misurino dalla macchina.
• (Fig.8) - Versare 1-1,5 misurini per il ca è singolo o 2 mi-
surini rasi per il ca è doppio; pulire il bor do del porta ltro
dai re si dui di ca è.
• (Fig.13) - Inserire dal basso il porta ltro (12) nel gruppo
erogazione (8).
• (Fig.14) - Ruot are il p orta ltro da si ni stra v erso d estr a no
al suo bloccaggio.
• (Fig.15) - Prelevare 1 o 2 tazzine preriscaldate e po-
sizionarle sotto al porta ltro pressurizzato; veri care che
siano correttamente si ste ma te sotto ai fori di uscita ca è.
• (Fig.14) - Ruotare il pomello di selezione (17) nella posi-
zione "
• Rag giun ta la quantità di ca è de si de ra ta, ruotare il pomello di selezione (17) nella posizione "
gazione del ca è. Al termine dell’erogazione at ten de re
qual che secondo; prelevare le tazzine con il ca è (Fig.18).
• (Fig.19) - Estrar re il porta ltro pressur izzato e vuotarlo dai
fondi residui.
caratteristic he del porta ltro.
to. Lavare giornalmente a ne utilizzo.
".
Nota: nel porta ltro rimane una piccola quantità d i acqua; que sto è norma le ed è dovuto alle
Nota importante: Il ltro (14) deve essere mantenuto pulito per garantire un perfetto risulta-
" per fer ma re
" per fermare l’ero-
Italiano
";
• 9 •
Page 10
5.2 Con caff è in cialde
• (Fig.9) - Togliere, utilizzando un cucchiaino da ca è, il
ltro per ca è macinato (14) dal porta ltro pressurizzato
(12).
• (Fig.10) - Inserire, nel por ta ltro pressuri zzato (12), l'adat-
tatore per cialde (15), con la parte bombata rivolta verso il
basso.
• (Fig.11) - Dopo, inserire il ltro per cialde (16) nel por ta l-
tro pressuriz zato (12).
• (Fig.13) - Inserire dal basso il porta ltro pressurizzato nel
gruppo erogazione (8).
• (Fig.14) - Ruotare il por ta ltro da si n i stra ver so destra no
al suo bloccaggio. Lasciare la presa dal ma ni co del porta ltro pressurizzato. Un si ste ma automatico riporta ora
leg ger men te il manico verso sinistr a.
Questo movimento garantisce il perfetto funzionamento
del porta ltro pressurizzato.
• (Fig.16) - Preriscaldare il porta ltro pressurizzato por-
tando il pomello di selezione (17) nella posizione "
l’acqua co min ce rà ad usci re dal porta ltro pressurizzato
(que sta operazione si rende ne ces sa ria solo per il primo
ca è).
• (Fig.17) -Dopo aver fatto scorrere 150cc di acqua, portare
il pomello di selezione (17) nella posizione "
l’erogazione.
• (Fig.19) - Togliere il porta ltro pressurizzato dalla mac-
china ruotandolo da destra verso sinistra e vuotare l’acqua
residua.
• (Fig.12) - Inserire la cialda nel por ta ltro; assicurar si che la
carta della cialda non fuoriesca dal por ta ltro.
• (Fig.13) - Inserire dal basso il porta ltro pressurizzato nel
gruppo erogazione (8).
• (Fig.14) - Ruotare il por ta ltro da si n i stra ver so destra no
al suo bloccaggio.
• Prelevare 1 tazzina preriscaldata e posizionarla sotto al
porta ltro; veri care che sia correttamente sistemata sotto ai fori d'uscita ca è.
• (Fig.16) - Ruotare il pomello di selezione (17) nella posi-
zione "
• (Fig.17) - Quando è stato rag giun ta la quantità di ca è
de si de ra ta, ruotare il pomello di selezione (17) nella posizione "
tazzina con il ca è.
• (Fig.19) - Al termine dell’erogazione attendere qualche
secondo, estrarre il porta ltro e smaltire la cialda utilizzata.
un perfetto risultato. Lavare giornalmente a ne utilizzo.
".
" per fermare l’erogazione del ca è; prelevare la
Not a impor tante: I l ltro (16) e l 'adatt atore (15)
devono essere mantenuti puliti per garantire
" per fer ma re
6 SCELTA DEL TIPO DI CAF FÈ CON SI GLI
In linea di massima si possono uti liz za re tutti i tipi di ca è esistenti in commercio. Tuttavia, il ca è è un prodotto na tu ra le
ed il suo gusto cambia in funzione del l’ori gi ne e della mi sce la;
è preferibile quindi pro var ne vari tipi, al ne di trovare quello
che meglio si addice ai gusti personali.
Per migliori risult ati si consiglia co mun que di utiliz zare miscele
espres sa men te pre pa ra te per macchine espresso. Il ca è dovrebbe sempre fuo riu sci re re golar men te dal porta ltro pressurizzato senza goc cio la re.
La velocità di fuoriuscita del ca è può es se re modi cata cambiando leggermente la dose del ca è nel ltro e/o utilizzando
ca è con un grado di macinatura di erente.
Per un miglior risul tato in tazza e per facili tà di pulizia e preparazione, Saeco consiglia l'utilizzo di ca è in cialde monodose
contrassegnate dal marchio ESE.
";
PRIMA DI ESEGUIRE QUALSIASI OPERA ZIONE RELA-
TIVA ALL’EROGAZIONE DEL VAPORE O DELL’ACQUA
CALDA VERIFICARE CHE IL TUBO VAPORE (PANNARELLO)
SIA ORIENTATO SOPRA LA VASCA RECUPERO ACQUA.
7 AC QUA CALDA
Pericolo di scottature! All’inizio dell’erogazione
posso no ve ri car si brevi spruzzi di acqua calda.
Il tubo d’erogazione può rag giun ge re temperature elevate: evitare di toc car lo di ret ta men te con le mani.
• Premere l’interruttore ON/OFF (11) e portarlo in posizione
"I".
• Attend ere che il led (20) "pronto macchina" si accenda; ora
la macchina è pronta.
• (Fig.21) - Sistemare un contenitore o un bic chie re da tè
sot to al tubo va po re (pannarello).
• (Fig.21) - Aprire il po mel lo (3) ruotandolo in senso antio-
rario.
• (Fig. 22) - Portare il pomello di s elezione (17) nella posizio-
ne "
• (Fig.23) - Quando è stata prelevata la quan ti tà de si de ra ta
• (Fig.24) - Chiudere il po mel lo (3) ruotandolo in senso ora-
• Prelevare il contenitore con l'acqua c alda.
".
di ac qua cal da, portare il pomello di selezione (17) nella
posizione "
rio.
".
• 10 •
Page 11
8 VA PO RE / CAPPUCCINO
Pericolo di scottature! All’inizio dell’erogazione
pos so no ve ri car si brevi spruzzi di acqua calda.
Il tubo d’erogazione può rag giun ge re temperature elevate: evitare di toc car lo di ret ta men te con le mani.
• Premere l’interruttore ON/OFF (11) e portarlo in posizione
"I".
• Attendere che il led (20) "pronto macchina" si accenda.
• (Fig. 25) - Portare il pomello d i selezione (17) nella posizio-
ne "
• Attendere che il led (19) si accenda; a questo pu nto la mac-
• (Fig.26) - Inserire un contenitore sot to al tubo vapore.
• (Fig. 26) - Aprire il po mel lo (3) per qual che istante, in m odo
• (Fig.27) - Chiudere il pomello (3) e togliere il contenitore.
• Ri empire con latte freddo 1/3 del con te ni to re che si deside-
• (Fig.28) - Immergere il tubo vapore nel latte e aprire il
• Al ter mine, chiudere il pomello (3) ruotan dolo in senso ora-
• (Fig. 30) - Portare il pomello di s elezione (17) nella posizio-
Se entrambi i led "
• Procedere con il caricamento del cir cui to descritto nel
circuito come descritto nel par. 4.5 e successivamente
ripetere le operazioni.
"; il led (20) si spegne.
chi na è pron ta per l’erogazione del va po re.
da far uscire l’ac qua residua dal tubo vapore (pannarello);
in breve tem po co min ce rà ad uscire solo vapore.
ra uti liz za re per pre pa ra re il cappuccino.
Per garantire un miglior risultato utilizzare
latte freddo
pomello (3) ruotandol o in senso antiorario; far ru otare lentamente il recipiente contenente il latte, dal basso verso
l’alto per rendere uniforme il riscaldamento.
Si consigl ia un'erogazione mas sima di 60 secondi.
rio; prelevare la ta zza con il latte montato.
ne "
".
una temperatur a troppo elevata per l'erogazi one del ca è.
par.4.5 per rendere ope ra ti va la macchina.
Nota: la macchina è operativa quando il led
"pronto macchina" è acceso in modo sso.
Nota bene: se non si riesce ad erogare un cappuccino come descritto, si deve ricaricare il
" e " "sono accesi, la macchina ha
9 PULIZIA
La manutenzione e la pulizia possono essere e ettuate soltanto quando la macchina è fredda e scollegata dalla rete
elettrica.
• Non immergere la mac chi na nel l’ac qua e non inserire i
com po nen ti nella la va sto vi glie.
• Non utilizzare alcol etilico, solventi e/o agenti chimici aggressivi.
• Si consiglia di pulire quo ti dia na men te il serbatoio del l’ac qua e di riempirlo con acqua fresca.
• (Fig.31-33) - Giornalmente, dopo aver riscaldato il lat te,
smontare la parte esterna del pannarello e lavarla con acqua potabile f resca.
• (Fig.31-32-33) - Settimanalmente si deve pulire il tubo
vapore. Per ese guire questa operazione, si deve:
- rimuovere la parte e sterna del pannarello (per la re golare
pulizia);
- s lare la parte super iore del pannarello dal tubo vapo re;
- lavare la parte superiore del pannarello con acqua fresca
potabile;
- lavare il tubo vapore con un panno umido e rimuovere
eventuali residui di lat te;
- riposizionare la parte superiore nel tubo vapore (assicurarsi che sia completamente inserita);
Rimontare la parte esterna del pannarello.
• (Fig.34) - Giornalmente vuotare e lavare la vasca raccogli
gocce.
• Per la puli zia dell’apparecchio utiliz zare un panno morbid o
inumidito d'acqua.
• (Fig. 20) - Per la pulizia del porta ltro pressuri zzato pro ce de re come segue:
- (Fig.9) - estrarre il ltro, lavarlo con cura con acqua cal-
da.
- estrarre l'adattatore (se presente), lavarlo con cura con
acqua calda.
- lavare l’interno del por ta ltro pressurizzato.
• Non as ciugare la macchina e/o i suoi componenti uti lizzando un forno a microonde e/o un forno convenzionale.
• (Fig.35-36) - Settimanal mente pulire la sede per gli accessori con un panno u mido per rimuovere eventuali re sidui di
ca è o polvere in genere.
Nota: non lavare il porta ltro pressurizzato
nella lavastoviglie.
Italiano
Lo stesso sistema può essere uti lizza to per il
r i s c a l d a m e n t o d i a l t r e b e v a n d e .
• Pulire, dopo questa operazione il tubo vapore con un panno umido.
• 11 •
Page 12
10 DE CAL CI FI CA ZIO NE
La formazione di calcare avviene con l’uso dell’apparecchio; la
decalci cazione è necessaria ogni 1-2 mesi di utiliz zo della macchina e/o quando si osserva una riduzione della portata dell’acqua. Usare esc lusivamente il prodotto d ecalci cante Saeco.
Quanto indicato nel manuale di uso e manu-
tenzione ha priorità rispetto alle indicazioni
riportate su accessori e/o materiali d’uso venduti separatamente, laddove sussista un con itto.
Usare il prodotto decalci cante Saeco (Fig.B).
E' stato formulato speci catamente per mantenere al meglio la performance e la funzionalità della
macchina per tutta la sua vita, nonchè per evitare, se
correttamente usato, ogni alterazione del prodotto
erogato. prima d’iniziare il ciclo di decalci cazione
assicurarsi che: SIA STATO RIMOSSO IL FILTRO ACQUA se
utilizzato.
Non bere la soluzione decalci cante e i prodotti
erogati no al com pletamento del c iclo. Non uti-
lizzar e in nessun caso l’aceto come decalci cante.
1 (Fig.13-14) - Inserire dal basso il porta ltro nel gruppo
erogazione (8) e ruotarlo da sinistra verso destra no al
suo bloccaggio.
2 (Fig.2) - Rimuovere e svuotare il ser batoio dell’acqua.
3 (Fig.3) - Ver sare METÀ del contenuto della bottiglia di
decalci cante concentrato Saeco nel serbatoio dell’acqua
dell’apparecchio e riempire con acqua fresca potabile no
al livello MAX.
4 Accendere la macchina premendo l’interruttore ON/OFF
(11) portandolo in posizione "I".
(Fig.21) - Prelevare (come descritto nel capitolo 7 del ma-
nuale), dal tubo vapore/acqua calda, 2 tazze (circa 150 ml.
ciascuna) di acqua; dopodichè spegnere la macchina tramite
l’interrut tore ON/OFF (11) portandolo in posi zione "0".
5 Lasciare agire il decalci cante circa 15-20 minuti con la
macchina spenta.
6 Accendere la macchina premendo l’inter ruttore ON/OFF (11).
(Fig. 21) - Prelevare (come des critto nel capito lo 7 del manua-
le) dal tubo vapore/acqua cal da 2 tazze (circa 150 ml ciascuna)
di acqua. Successivame nte spegnere la macchina tramite l’ interrutto re ON/OFF (11) e lasciarla spenta per 3 minuti.
7 Ripetere le operazioni descritte al punto 6 no al comple-
to svuotamento del serbatoio dell’acqua.
8 (Fig.3) - Risciacquare il s erbatoio con acqua fresca pot abile
e riempirlo completamente.
9 Inserire un contenitore sot to al porta ltro.
10 Accendere la macchina premendo l’interruttore ON/OFF
(11); ruotare il pomello di selezione (17) nella posizione
"
" e tramite il porta ltro, prelevare l’inte ro contenuto
del serbatoio. Per fermare l’erogazione portare il pomello
• 12 •
di selezione (17) nella posizione " ".
11 (Fig.3) - Riempire nuovamente il serbatoio con acqua fresca.
(Fig.21) - Posizionare un contenitore capiente sotto al
tubo vapore (pannarello). Aprire il rubinetto di erogazione
dell’acqua (3) ruotandolo in sens o anti orario.
(Fig.22) - Ruotare il pomello di selezione (17) nella posi-
zione "
tramite il tubo vapore/acqua calda.
12 (Fig.23) - Dopo ave r nito il prel ievo di acqua, per fermar e
l’erogazione por tare il pomello di selezione (17) nella posizione "
(Fig.24) - Chiudere il rubinetto erogazione acqua (3) ruo-
tando in senso orario.
13 Ripetere un’altra volta le operazioni dal punto (8) per un
totale di 4 serbatoi.
14 (Fig.19) - Rimuovere il porta ltro dal gruppo ruotandolo da
destra verso sinistra e sciacquarlo con acqua fresca potabile.
Il ciclo di decalci cazione è cosi concluso.
(Fig.3) - Riempire nuovamente il serbatoio con acqua fresca.
Se necessario e ettuare il caricamento del circuito come descritto nel par. 4.5.
dalle norme vigenti ne l Paese d’utilizzo.
" e prelevare l’intero contenuto del serbatoio
".
La soluzione decalci cante deve essere smaltita secondo quanto previsto dal costruttore e/o
11 SMALTIMENTO
INFORMAZIONE AGLI UTENTI: ai sensi dell’art. 13 del Decreto
Legislativo 25 luglio 2005, n. 151"Attuazione delle Direttive
2002/95/CE, 2002/96/CE e 2003/108/CE, relative alla riduzione
dell'uso di sostanze pericolose nelle apparecchiature elettriche
ed elettroniche, nonché allo smaltimento dei ri uti"
Il simbolo
parecchiatura o sulla sua confezione indica che il prodotto alla
ne della propria vita utile d eve essere raccolto separat amente
dagli altri ri uti. L’utente dovrà, pertanto, conferire l’apparecchiatura giunta a ne vita agli idonei centri di raccolta di erenziata dei ri uti elettronici ed elettrotecnici, oppure riconsegnarla al rivenditore al momento dell’acquisto di una nuova
apparecchiatura di tipo equivalente, in ragione di uno a uno.
L’adeguata raccolta di erenziata per l’avvio succe ssivo dell’apparecchiatura dismessa al riciclaggio, al trattamento e allo
smaltimento ambientalmente compatibile contribuisce ad
evitare possibili e etti negativi sull’ambiente e sulla salute e
favorisce il rei mpiego e/o riciclo dei materiali di c ui è composta
l’apparecchiatura.
Lo smaltimento abusivo del prodotto da parte dell’utente
comporta l’applicazione delle sanzioni amministrative previste dalla normativa vigente.
del cassonet to barrato riportato sull’ap-
Page 13
Guasto Cause possibili Rimedio
La macchina non si ac cen de.
La pompa è molto r u mo ro sa. Manca acqua nel ser ba to io Rabboccare con acqua.(par.4.4).
Il ca è é troppo freddo.
Non si forma la schiu ma del lat te.
Non si riesce a preparare un cappuccino.
Il ca è sgorga troppo ve lo ce men te, non si forma la crema.
Il ca è non sgorga o sgor ga solo
a gocce.
Il ca è sgorga dai bordi.
Macchina non collegata alla rete elettrica.
Il led (20) "pronto macchina" era spen to
quan do è sta to portato il pomello di selezione (17) nella posizione "
Porta ltro non inserito per il preriscaldamento (cap. 5).
Tazzine fredde. Preriscadare le tazzine con acqua calda.
Latte non adatto: latte in polvere, latte
magro.
Pannarello sporco. Pulire il pannarello come descritto nel Cap.9.
Non è più presente vapore nella caldaia.
Troppo poco ca è nel porta ltro. Aggiungere il c a è (cap. 5).
Macinatura trop po grossa. Usare una miscela diversa (cap.6).
Ca è vecchio o non adatto. Usare una mi sce la diver sa (cap.6).
Cialda vecchia o non adat ta. Cambiare la cialda utilizzata.
Manca un componente nel porta ltro.
Mancanza di acqua. Rabboccare con acqua (par.4.4).
Macinatura trop po ne. Usare una miscela diversa (cap.6).
Ca è premuto nel porta ltro. Smuovere il ca è macinato.
Troppo ca è nel porta ltro. Ridurre la quantità di ca è nel porta ltro.
Pomello (3) aperto. Chiudere il pomello (3).
Macchina calci cata. Decalci care la macchina (cap.10).
Filtro nel porta ltro otturato. Pulire il ltro (cap.9).
Cialda non adatta. Cambiare il tipo di cialda.
Porta ltro inserito male nel grup po ero-
gazione ca è.
Bordo superiore del porta ltro sporco. Pulire il bordo del port a ltro.
Cialda inserita in modo errato.
Troppo ca è nel porta ltro.
".
Collegare la macchina alla rete elet trica.
Attendere che il led (20) si ac cen da.
Preriscaldare il porta ltro.
Utilizzare latte intero.
Ricaricare il circuito (par. 4.5) e ripetere le operazioni desc ritte nel Cap.8.
Veri care che tutti i componenti siano presenti e
correttamente montati.
Inserire correttamente il porta ltro (cap.5).
Inserire correttamente la cialda facendo in modo
che non esca dal p orta ltro.
Ridurre la quantità di ca è uti liz zan do il misurino.
Italiano
Per i guasti non con tem pla ti dalla suddetta ta bel la o in c aso che i rimedi sug ge ri ti non li ri sol va no, rivolger si ad un
centro assistenza.
• 13 •
Page 14

DICHIARAZIONE DI CONFORMITA’ CE
ANNO 09
EC 2006/95, EC 2004/108.
Saeco International Group
Via Torretta , 240
40041 GAGGIO MONTANO (BO)
dichiariamo sotto la nostra responsabilità che il prodotto :
MACCHINA PER CAFFE' SINGOLA
TIPO : HD 8323 / HD 8325
al quale si riferisce questa dichiarazione è conforme alle seguenti norme :
• Sicurezza di elettrodomestici e apparecchi elettrici - Requisiti generali
EN 60335-1 (2002) + A1(2004) + A2(2006) + A11(2004) + A12 (2006) + A13(2008)
• Sicurezza di elettrodomestici e apparecchi elettrici - Parte 2-15
Requisiti speci ci per apparecchi per riscaldare liquidi
EN 60 335-2-15 (2002) + A1(2005) + A2(2008)
• Sicurezza apparecchi per uso domestico e similare. Campi elettromagnetici
Metodi per la valutazione e le misure -EN 62233 (2008).
• Limiti e metodi di misurazione dei disturbi radio caratteristici di apparecchi con motore
elettrico e termici per uso domestico e simili scopi, strumenti elettrici e simili
apparecchiature elettriche - EN 55014-1 (2006).
• Compatibilità elettromagnetica (EMC)
Parte 3^ Limiti - Sezione 2 : Limiti per le emissioni di corrente armonica (corrente in
ingresso dell’apparecchiatura ≤ 16A per fase) - EN 61000-3-2 (2006).
• Compatibilità elettromagnetica (EMC)
Parte 3^ Limiti - Sezione 3 : Limitazione delle uttuazioni e dei picchi di tensione nei
sistemi di alimentazione a bassa tensione per apparecchiature con corrente nominale ≤ 16A.
EN 61000-3-3 (1995) + corr.(1997) + A1(2001) + A2 (2005).
• Requisiti di immunità per elettrodomestici, strumenti e apparecchi similari.
Norma per famiglia di prodotti EN 55014-2 (1997) + A1 (2001).
secondo le disposizioni delle direttive : EC 2006/95 , EC 2004/108.
Gaggio Montano 28/04/2009
• 14 •
R & D Manager
Ing. Andrea Castellani
Page 15
1 GENERAL INFORMATION
The co ee machine is suitable for preparing 1 or 2 cups of
espresso co ee and is provided with a swivel steam and hot
water wand. The controls on the front side of the machine are
labelled with eas y-to-read symbols.
The machine has been designed for domestic use and is not
suitable for professional, continuous use.
Warning. No liability is held for damage caused
by:
• Incorrect use not in accordance with the intended
purposes;
• Repairs not carried out in authorised service
centres;
• Tampering with the power cor d;
• Tampering with any part of the machine;
• Use of non-genuine spare part s and accessories;
• Failure to descale the machine and storage at
temperatures below 0°C.
In these cases, the warranty is not valid.
1.1 To Simplify Manual Reading
The warning triangle indicates the
instructions that are important for
user’s safe ty. Please carefu lly follow
these instructions to avoid serious injury!
References to illustrations, parts of the appliance or controls,
etc. are indicated by numbers or letters. Whenever possible,
refer to the illus tration.
2 TECHNICAL SPECIFICATIONS
The manufacturer reserves the right to make changes to the
technical speci c ations of the product.
Nominal Voltage - Power Rating - Power Supply
See label on the appliance
Housing Material
Plastic
Size (w x h x d) (mm)
210 x 300 x 280
Weight
3.9 kg
Power Cord Length
1.3 m
Control Panel
Front side
Filter Holder
Pressurized type
Pannarello
Special for cappuccinos
Water Tank
1.25 litres – Removable type
Pump Pressure
15 ba r
Boiler
Stainless steel t ype
Safety Devices
Thermal fuse
English
This symbol is used to highlight information
th at i s p ar tic ul ar ly i mp or ta nt t o e nsu re opt im al
use of the machine.
The illus trations corr esponding to th e text can be fou nd
on the rst pages of the manual. Please refer to these
pages while reading the operating instructions.
1.2 How to use these Operating
Instructions
Keep these operating instructions in a safe place and make
them available to anyone who may use the co ee machine.
For further information or in case of problems, please refer to
an authorised service centre.
3 SAFETY REGULATIONS
Never allow water to come into contact with any of the
electrical par ts of the machine: Danger of short circuit!
Overheated steam and hot water may cause scalding!
Do not direct the steam or hot water jet towards body
parts. Handle the steam/hot water spout with care:
Danger of scalding!
Intended Use
The co ee machine is intended for domestic use only. Do
not make any technical changes or use the machine for
unauthorise d purposes since this would cr eate serious hazards!
The appliance is not to be used by persons (including children)
with reduced physical, mental or sensory abilities or with
scarce experience and/or expertise, unless they are supervised
by a person responsible for their safety, or they are instructed
by this person on how to properly use the machine.
• 15 •
Page 16

Power Supply
Only connect the co ee machine to a suitable socket. The
voltage must correspond to that indicated on the machine’s
label.
Power Cord
Never use the co ee machine if the power cord is defective or
damaged. If damaged, the power cord must be replaced by
the manufacturer or an authorised service centre. Do not pass
the power cord around corners, over sharp edges or over hot
object s and keep it away from oil.
Do not use the power cord to carry or pull the co ee machine.
Do not pull out the plug by the power cord o r touch it with wet
hands.
Do not let the power cord hang freely from tables or shelves.
For the Safety of Others
Prevent children from playing with the machine.
Children are not aw are of the risks related to ele ctric household
appliances. Do not leave the machine packaging materials
within the reach of children.
Danger of Burns
Never direc t jets of overheated stea m and/or hot water towards
yourself or others. Always use the handles or knobs provided.
Do not disconnect (remove) the pressurized lter holder during
co ee brewing. Hot water drips may spill out of the brew unit
during the warming phas e.
Do not brew co ee when the machine is overheated, namely
when both “
” and “ ” lights are on.
Machine Location
Place the co ee machine in a safe place, wh ere there will be no
danger of overturning or injur y.
Hot water or overheated steam may spill out of the machine:
Danger of scalding!
Do not keep the machine at a temperature below 0°C. Frost
may damage the machine.
Do not use the co ee machine outdoors.
In order to prevent it s housing from melt ing or being damaged,
do not place the machine on very hot surfaces and close to
open ames.
Cleaning
Bef ore c leani ng th e mach ine, t urn i t o by pre ssin g the O N/OFF
button, then pull out the plug from the socket. Wait for the
machine to cool down.
Never immerse the machine in water!
It is strictly forbidden to tamper with the internal parts of the
machine.
Water left in the tank for several days should not be used for
food purposes. Wash the tank and ll it with fresh drinking
water.
Suitable Location for Operation and
Maintenance
To ensure a correct and e cient performance of the co ee
machine, we recommend following the ins tructions below:
• Choose a level surface.
• Choose a location that is su ciently well-lit, clean and
near an easily reachable socket.
• Allow for a minimum distance from the sides of the
machine as shown in (Fig.A).
Storing the Machine
If the machine is to remain inactive for a long time, turn it
o and unplug it. Store it in a dry place, out of the reach of
children. Keep it protected from dus t and dirt.
Repairs / Maintenance
In case of failure, problems or a suspected fault resulting from
the falling of the machine, immediately remove the plug
from the socket. Never attempt to operate a faulty machine.
Servicing and repairs may only be carried out by Authorised
Service Centres. All liability for damages resulting from work
not carried out by professionals is declined.
Fire Safety Precautions
In case of re, use carbon dioxide (CO2) extinguishers. Do not
use water or dry powder extinguishers.
Key to Machine Components (Page 2)
1 Control panel
2 Water tank lid
3 Hot water/steam knob
4 Seat for accessor ies
5 Water tank
6 Cup holder res t
7 Water recovery tray + grill
8 Brew unit
9 Steam wand (Pannarello)
10 Power cord
11 ON/OFF button
12 Pressurized lter holder
13 Ground co ee measuring scoop
14 Ground co ee lter
(single piece for 1 or 2 co ee(s))
15 Pod lter adapter
16 Co ee pod lter
17 Selection knob
18 "Machine on" light
19 "Steam ready" light
20 Co ee/Water light - "Machine ready"
• 16 •
Page 17
4 INSTALLATION
For your own and other people safety, follow the
"Safet y Regulations" indicated in Section 3 carefully.
4.1 Packaging
The original packaging has been designed to protect the
machine during shipping. We recommend keeping the
packaging mater ial for possible future transport.
4.2 Installation Instructions
Before installing the machine, read the following safety
instructions carefully:
• Place the machine in a safe place;
• Make sure children cannot play with the machine;
• Do not place the machine on hot surfaces or near open
a m e s .
The co ee machine is now ready to be connected to the
electrical network.
Note: It is recommended to wash the
components before using them for the rst
time and/or after they have not been used f or a certain
period of time.
4.3 Machine Connection
Electric power may be very dangerous! It is
therefore necessary to strictly follow the safety
regulat ions. Do not use fau lty power cords! Fault y cords
and plugs must be replaced immediately in Authorised
Service Centres.
The voltage of the appliance has been pre-set by the
manufacturer. Check that the voltage matches the indication
on the data plate placed at the bottom of the appliance.
• Check that the ON/OFF button (11) is set on “0” before
connecting the machine to the electrical network.
• Insert the plug into a wall socket with suitable power
voltage.
Fill the tank only with fresh, non-sparkling,
drinking water. Hot water or any other liquid
may damage the tank. Do not operate the machine if
water is not present: Make sure there is enough water
in the tank.
• (Fig.2) - Inser t the water tank making sure that it has been
properly repositioned in its former seat and then reposition
the lid (2).
4.5 Circuit Priming
At the beginning, after dispensing steam or when the water
tank is empty, the machine’s water circuit must be prime d.
• Press the ON/OFF button (11) and switch it to the "I"
position. The light (18) will turn on to indicate that the
machine is on.
• (Fig.4) - Place a container under the steam wand
(Pannarello).
• Op en the "hot water/steam" knob (3) by turning it counter-
clockwise.
• (Fig.5) - Set the selection knob (17) to the
"
" position.
• Wait until a steady jet of water ows out of the steam
wand (Pannarello).
• (Fig.5) - Set the selection knob (17) to the "
• Close the "hot water/steam" knob (3) by turning it
clockwise. Remove the container.
" position.
4.6 Using the Machine for the First Time
or after a Period of Inactivity
This simple operation ensures optimum brewing and must be
performed:
- At r st start-up;
- When the machine remains inactive for a long time (more
than 2 weeks).
Dispensed water must be emptied into an
adequate drain. It is not suitable for food use. If
the container lls up during the cycle, stop dispensing
water and empty the container before resuming the
operation.
English
4.4 Water Tank
• (Fig.1) - Remove the lid from the water tank (2) by lifting
it.
• (Fig.2) - Remove the water tank (5).
• (Fig.3) - Rinse and ll it with fresh drinking water taking
care not to over ll.
• (Fig.3) - Rinse the t ank and ll it again with fresh drink ing
water.
• (Fig.4) - Place a container under the steam wand
(Pannarello). Open the knob (3) by turning it counterclockwise.
(Fig.5) - Set the selection knob (17) to the "
• Dispense the whole water tank content from the steam/
hot water wand (Pannare llo). To end the operation, set the
" position.
• 17 •
Page 18
selection knob (17) to the " " position and close the knob
(3) by turning it clockwise.
• (Fig.3) - Fill the tank with fresh drinking water.
• (Fig.13-14) - Insert the lter holder into the brew unit (8)
from the bot tom and turn it from lef t to right until it locks
into place.
• (Fig.15) - Place a suitable container under the lter
holder.
• (Fig.16) - Turn the selecti on knob (17) to the "
and dispense all the water in the tank.
(Fig.17) - Once the tank is empty, stop dispensing and
switch the selection k nob (17) to the "
• Fill th e tank again and wait until the "machin e ready" light
(20) turns on.
• (Fig.19) - Rem ove t he lte r hol der f rom the u nit b y tu rnin g
it from right to left and rinse it with fresh drinking water.
The machine is now ready; please see related sections for
operating details on how to brew co ee and dispense steam.
" position
" position.
5 COFFEE BREWING
Warning! During the co ee brewing it is
forbidden to remove the pressurized lter
holder by manually turning it clockwise. Danger of
burns.
• During this operation, the "machine ready" light (20) may
as h; this is to be considere d as a standard and not a faulty
operating mode.
• Before using the machine, make sure that the hot water/
steam knob (3) is closed and that there is enough water in
the tank.
• (Fig.3) - Press the ON/OFF button (11) and switch it to the
"I" position.
• Wait until the "machine ready" light (20) turns on. The
machine is now ready for co ee brewing.
Accessories for co ee brewing are placed in
a specially designed seat to make operations
easy and immediate.
If the ground co ee measuring scoop and/or the lters
are required, lift the cover (2) and take what you need
(Fig.35 e Fig.36).
5.1 Using Ground Coff ee
• (Fig.7) - Inser t the lter (14) in the pressuri zed lter holder
(12); the lter is already inserted when using the machine
for the rst time.
• (Fig.13) - Insert the lter holder into the br ew unit (8) from
the bottom.
• (Fig.14) - Turn the lter holder from left to right until it
locks into place. Release the pressurized lter holder grip.
The handle will slightly turn to the left. This movement
guarantees proper lter holder perfor mance.
• (Fig.16) - Preheat the pres surized lter holder by swi tching
the selection knob (17) to the "
water spills out of it. This is to be done only for the rst
co ee brewing.
• (Fig.17) -When 150 cc of water have owed out, set the
selection knob (17) to the "
• (Fig.19) - Remove the lter holder from the machine by
turning it f rom right to left and pour out any water lef t. As
the machine is tted with the special lter (14), there is no
need to change the lter to make one or two co ees.
• (Fig.35) - Remove the measuring scoop from the
machine.
• (Fig.8) - Add 1-1.5 measuring scoop(s) for single co ee
and 2 measuring scoops for double co ee. Remove any
co ee residues from the rim of the lter holder.
• (Fig.13) - Insert the lter holder (12) into the brew unit (8)
from the bottom.
• (Fig.14) - Turn the lter holder from left to right until it
locks into place.
• (Fig.15) - Take 1 or 2 preheated cups and place them
under the pres surized lter holder. Make sure that they are
correctly placed under the co ee brewing nozzles.
• (Fig.14) - Switch the selection knob (17) to the "
position.
• When the desired quantity of co ee has been obtained,
turn the selection knob (17) to the "
co ee brewing. Wait a few seconds after brewing has
stopped, then remove the cups of co ee (Fig.18).
• (Fig.19) - Remove the pressurized lter holder and empty
out the remaining co ee residues.
Note: If a small quantity of water remains
in the lter holder, this has to be considered
as absolutely normal and is due to the lter holder
features.
" position until some
" position to stop brewing.
" position to stop
"
• 18 •
Important Note: The lter (14) should be kept
clean to guarantee perfect results. Clean daily
after use.
Page 19
5.2 Using Coff ee Pods
• (Fig.9) - Use a co ee spoon to remove the lter for ground
co ee (14) from the pressurized lter holder (12).
• (Fig.10) - Insert the co ee pod adapter (15) - with the
convex part f acing down - into the pressurize d lter holder
(12).
• (Fig.11) - Then, insert the pod lter (16) into the pressurized
lter holder (12).
• (Fig.13) - Insert the pressurized lter holder into the brew
unit (8) from the bot tom.
• (Fig.14) - Turn the lter holder from left to right until it
locks into place. Release the grip from the pressurized
lter holder. The handle is automatically slightly turned
leftwards.
This movement guarantees proper pressurized lter holder
performance.
• (Fig.16) - Preheat the pres surized lter holder by swi tching
the selection knob (17) to the "
water spills out of it. This is to be done only for the rst
co ee brewing.
• (Fig.17) -When 150 cc of water have owed out, set the
selection knob (17) to the "
• (Fig.19) - Remove the pressurized lter holder from the
machine by turning it from right to left and pour out any
water left.
• (Fig.12) - Insert the pod into the lter holder and make
sure the paper of the pod does not overhang the lter
holder.
• (Fig.13) - Insert the pressurized lter holder into the brew
unit (8) from the bot tom.
• (Fig.14) - Turn the lter holder from left to right until it
locks into place.
• Take 1 pr eheated cup and place it und er the lter holder.
Check that it is correctly placed under the co ee brewing
nozzles.
• (Fig.16) - Switch the selection knob (17) to the "
position.
• (Fig.17) - When the desired quantity of co ee has been
obtained, turn the selection knob (17) to the "
to stop co ee brewing, and then remove the co ee cup.
• (Fig.19) - Wait a few seconds after brewing, then remove
the lter holder and dispose of the used pod.
Important Note: The lter (16) and the adapter
(15) should be kept clean to guarantee perfect
results. Clean daily after use.
" position until some
" position to stop brewing.
" position
6 TIPS FOR CHOOSING COFFEE
As a general ru le any type of co ee availabl e on the market can
be used. However, co ee is a natural product and its avour
changes accord ing to its origin and blend; it is t herefore a good
idea to try di erent types of co ee in order to nd the most
suited to your personal taste.
For optimal results, we recommend using espresso machine
blends. As a rule, co ee should always come out of the
pressurized lter holder, without dripping.
The co ee brewing speed can be modi ed by slightly changing
the amount of co ee in the lter and/or using a di erent co ee
grind.
Saeco recommends using ESE single-dose co ee pods for a
tasty co ee and easier cleaning and preparing.
BEFORE PERFORMING ANY OPERATIONS RELATED
TO HOT WATER/STEAM DISPENSING, MAKE SURE
THAT THE STEAM WAND (PANNARELLO) IS DIRECTED OVER
THE WATER RECOVERY TRAY.
7 HOT WATER
Danger of scalding! Dispensing may be preceded
by small jets of hot water. The wand can reach
high temperatures: Do not touch it directly with bare
hands.
• Press the ON/OFF button (11) and switch it to the "I"
"
position.
• Wait until the "machine ready" light (20) turns on. The
machine is now ready.
• (Fig.21) - Place a container or a tea glass under the steam
wand (Pannarello).
• (Fig.21) - Open the knob (3) by turning it counter-
clockwise.
• (Fig.22) - Set the selection knob (17) to the "
position.
• (Fig. 23) - When the desired quantit y of hot water has been
dispensed, set the selection knob (17) to the "
• (Fig.24) - Close the knob (3) by turning it clock wise.
• Remove the hot water container.
English
"
" position.
• 19 •
Page 20
8 STEAM / CAPPUCCINO
Danger of scalding! Dispensing may be preceded
by small jets of hot water. The wand can reach
high temperatures: Do not touch it directly with bare
hands.
• Press the ON/OFF button (11) and switch it to the "I"
position.
• Wait until the "machine ready" (20) light turns on.
• (Fig. 25) - Set the selectio n knob (17) to the "
The light (20) turns o .
• Wait unt il the light (19) turns on. The ma chine is now ready
for steam dispensing.
• (Fig.26) - Place a container under the steam wand.
• (Fig.26) - Open the knob (3) for a few seconds, so that
remaining water ows out of th e steam wand (Pannarello).
In a short time only steam will come out.
• (Fig.27) - Close the knob (3) and remove the container.
• Fill 1/3 of the container you wish to use to prepare
cappuccino with cold milk.
Use cold milk to get a better result.
• (Fig.28) - Immerse the steam wand in the milk and open
the knob (3) by turning it counter-clockwise. Turn the milk
container with slow upward movements so that it warms
up evenly.
A maximum dispensing of 60 seconds is
recommended.
• Once nished, close the knob (3) by turning it clockwise
and remove the cup w ith frothed milk.
• (Fig.30) - Set the selection knob (17) to the "
If both "
the machine is too high for brewing co ee.
• Prime the circuit as described in Section 4.5 to make the
machine ready for use.
" and " " lights are on, the temperature of
" position.
" position.
9 CLEANING
Maintenance and cleaning can only be carried out when the
machine is cold and disconnected from the ele ctrical network.
• Do not immerse the machine in water or place any of its
parts in a dishwasher.
• Do not use spirit, solvents and/or aggressive chemical
agents.
• We recommend cleaning the water tank and re lling it
with fresh water daily.
• (Fig.31-33) - Every day, after heating milk, remove the
external part of the Pannarello and wash it with fresh
drinking water.
• (Fig.31-32-33) - Clean the steam wand weekly. To do this,
the following operations have to be per formed:
- Remove the external part of the Pannarello (for standard
cleaning);
- Remove the upper part of the Pannarello from the steam
wand;
- Wash the upper par t of the Pannarello with f resh drinking
water;
- Wash the steam wand with a wet cloth and remove any
milk residues;
- Reposition the upper part in the steam wand (make sure
it is completely inserted).
Reassemble the external part of the Pannarello.
• (Fig.34) - Empty and clean the drip tray every day.
• Use a sof t, dampened cloth to clean the appliance.
• (Fig.20) - Perform the following operations to clean the
pressurized lter holder:
- (Fig.9) - Remove the lter and wash it thoroughly with
hot water.
- Remove the adapter (if tted) and wash it thoroughly
with hot water.
- Wash the internal part of the pressurized lter holder.
• Do not dry the machine and/or its components using a
microwave and/or standard oven.
• (Fig.35-36) - Clean the seat for accessories with a damp
cloth every we ek to remove any co ee or dust residues.
Note: The machine is ready when the "machine
ready" light
Important Note: If it is not possible to brew
cappuccino as described, prime the circuit as
explained in Sec tion 4.5 and then repeat the steps.
The same procedure can be performed to heat
other beverages.
• After this operation, clean the steam wand with a wet
cloth.
is permanently on.
• 20 •
Note: Do not wash the pressurized lter holder
in the dishwasher.
Page 21

10 DESCALING
Limescale b uilds up with the use of the app liance; the machine
needs desc aling every 1-2 months and/or whe never a reductio n
in water ow is noticed. Use the Saeco descaling solution only.
In case of con ict, priority must be given
to what is indicated in the operation and
maintenance manual over the instructions provided on
separately sold accessories and materials.
Use the Saeco descaling solution (Fig.B).
Its formula has been designed to ensure
better machine performance and operation for its
whole operating life. If correctly used, it also avoids
alterations in the brewed product. Before starting a
descaling cycle make sure that: THE WATER FILTER (if
used) HAS BEEN REMOVED.
Never drink the descaling solution or any
products dispensed until the cycle has been
carrie d out to the end. Never use vin egar as a descaling
solution.
1 (Fig.13-14) - Insert the lter holder into the brew unit (8)
from the bot tom and turn it from lef t to right until it locks
into place.
2 (Fig.2) - Remove and empty the water tank.
3 (Fig.3) - Pour HALF the content of the Saeco concentrated
descaling solution into the water tank, then ll the tank
with fresh drinking water up to the MAX level.
4 Switch on the machine by pressing the ON/OFF button (11)
and switch it to the "I" position.
(Fig.21) - Fill up (as described in Section 7 of the manual)
2 cups of water (about 150 ml each) from the steam / hot
water wand and turn o the machine by pressing and
switching the ON/OFF button (11) to the "0" position.
5 Let the d escaling solution sit for ab out 15-20 minutes with
the machine o .
6 Switch on the machine by pressing the ON/OFF button (11).
(Fig.21) - Fill up (as described in Section 7 of the manual)
two cups of water (about 150 ml each) from the steam /
hot water wand. Then turn the machine o by means of
the ON/OFF but ton (11) and leave it o for 3 minutes.
7 Repeat the operations described in step 6 until the water
tank is completely empty.
8 (Fig.3) - Rinse the tank and ll it completely with fresh
drinking water.
9 Place a container under the lter holder.
10 Switch on th e machine by pressing the ON/OFF b utton (11);
turn the selection knob (17) to the "
means of the lter holder, dispense the whole content of
the tank. Set the selection knob (17) to the "
stop dispensing.
" position and, by
" position to
11 (Fig. 3) - Fill the tank again with fresh water.
(Fig.21) - Place a large enough container under the s team
wand (Pannarello). Open the water dispensing knob (3) by
turning it counter-clockwise.
(Fig.22) - Turn the selection knob (17) to the "
position and dispense the whole content of the tank by
means of the steam / hot water wand.
12 (Fig.23) - After dispensing water, set the selection knob
(17) to the "
" position to stop dispensing.
(Fig.24) - Clos e the water dispensing knob (3) by turning it
clockwise.
13 Repeat the oper ations from point (8) once again for a total
of 4 tanks.
14 (Fig.19) - Remo ve th e lte r hol der f rom the u nit b y tur nin g
it from right to left and rinse it with fresh drinking water.
The descaling cycle is now comp lete.
(Fig.3) - Fill the tank again with fresh water. If necessary,
prime the circuit as desc ribed in Section 4.5.
The descaling solution must be disposed of
according to the manufacturer’s instructions
and/or regulations in force in the countr y of use.
11 DISPOSAL
- The packing materials can be rec ycled.
- Appliance: Unplug the appliance and cut the power cord.
- Deliver the appliance and power cord to a service center or
public waste disposal facilit y.
This product complies with eu directive 2002/96/EC.
The symbol
indicates that this product may not be treated as household
waste. Instead it shall be handed over to the applicable
collection point for the recycling of electrical and electronic
equipment.
By ensuring this product is disposed of correctly, you will help
prevent potential negative consequences for the environment
and human health, which could otherwise be caused by
inappropriate waste handling of this product. For more
detailed information about recycling of this product, please
contact your local city o ce, your household waste disposal
service or the shop where you purchased the product.
on the product or on its packaging
"
English
• 21 •
Page 22

Problem Possible Causes Solution
The machine does not turn on.
The pump is ver y noisy. No water in the tank . Re ll w ith water (Section 4.4).
The co ee is too cold.
The milk does not f roth.
It is not possible to prepare a
cappuccino.
The co ee is brewed too fast,
crema does not form.
Co ee is not brewed or brewed
in drips only.
Co ee ows out of the edges.
The machine is not connected to the
electrical network.
The "machine ready" light (20) was o
while switch ing the selection kn ob (17) to
the "
" position.
The lter holder is not inserted for
preheating (Section 5).
The cups are cold. Preheat the cups with hot water.
Not suitable milk: Powdered milk or low-
fat milk has been used.
Dirty Pannarello. Clean the Pannarello as described in Section 9.
No steam lef t in the boiler.
There is too little co ee in the lter
holder.
The grind is too coarse. Use a di erent blend (Section 6).
Co ee is old or not suitable. Use a di erent blend (Section 6).
Old or not suitable pod. Change the pod.
One component missing in the lter
holder.
No water. Re ll w ith water (Section 4.4).
The grind is too ne. Use a di erent blend (Sec tion 6).
Co ee pressed in the lter holder. Shake the ground co ee.
There is too much co ee in the lter
holder.
Knob (3) is open. Close knob (3).
The machine has lime scale build-up. Descale the machine (Sec tion 10).
The lter in the lter holder is clogged. Clean the lter (Section 9).
Not suitable pod. Change type of pod.
The lter holder is incorrectly inserted in
the brew unit.
The upper edge of the lter holder is
dirty.
The pod is inser ted incorrectly.
There is too much co ee in the lter
holder.
Connect the machine to the electrical network .
Wait until the "machine ready" light (20) turns
on.
Preheat the lter holder.
Use only cold, whole milk.
Prime the circuit (Section 4.5) and repeat the
steps desc ribed in Section 8.
Add co ee (Section 5).
Make sure that all components are present and
properly installed.
Reduce the quantity of co ee in the lter holder.
Insert the lter holder correc tly (Section 5).
Clean the rim of the lter holder.
Insert the pod correctly. Make sure it does not
come out of the lter holder.
Reduce the quanti ty of co ee usin g the measuring
scoop.
Please contact the customer service for any problems not covered in the above table or when the suggested
solutions do not solve the problem.
• 22 •
Page 23
EC DECLARATION OF CONFORMITY
YEAR 09
EC 2006/95 , EC 2004/108.
Saeco International Group
Via Torretta, 240
40041 GAGGIO MONTANO (BO) Italy
we declare under our sole responsibility that the following product:
SINGLE COFFEE MACHINE
TYPE: HD 8323 / HD 8325
to which this declaration relates is compliant with the following directives:
• Speci cation for safety of household and similar electrical appliances - General requirements
EN 60335-1 (2002) + A1(2004) + A2(2006) + A11(2004) + A12 (2006) + A13(2008)
• Speci cation for safety of household and similar electrical appliances - Part 2-15
Particular requirements for appliances for heating liquids
EN 60 335-2-15 (2002) + A1(2005) + A2(2008)
• Safety of household and similar appliances. Electromagnetic elds
Methods for evaluation and measurement - EN 62233 (2008).
• Limits and methods of measurement of radio interference characteristics of electric motor
operated and thermal household appliances, portable tools and similar
electrical apparatus - EN 55014-1 (2006).
• Electromagnetic compatibility (EMC)
Part 3 Limits - Section 2: Limits for harmonic current emissions (equipment input current
≤ 16A per phase) - EN 61000-3-2 (2006).
• Electromagnetic compatibility (EMC)
Part 3 Limits - Section 3: Limitation of voltage uctuations and icker in
low-voltage supply systems for equipment with rated current ≤ 16A.
EN 61000-3-3 (1995) + current (1997) + A1(2001) + A2 (2005).
• Immunity requirements for household appliances, tools and similar apparatus.
Product family standard EN 55014-2 (1997) + A1 (2001).
English
according to the provisions of the directives: EC 2006/95, EC 2004/108.
Gaggio Montano, 28/04/2009
R & D Manager
Eng. Andrea Castellani
• 23 •
Page 24
1 ALLGEMEINES
Die Ka eemaschine eignet sich für die Zubereitung von 1
oder 2 Tassen Espresso und ist mit einer drehbaren Düse für
die Dampf- und die Heißwasserausgabe ausgestattet. Die
Bedienelemente auf der Vorderseite des Geräts sind mit einfach verständlichen Symbolen gekennzeichnet. Die Maschine
wurde für den Einsatz im Haushalt entwickelt und eignet sich
daher nicht für den Dauerbetrieb im gewerblichen Einsat z.
Achtung. In folgenden Fällen wird für eventuelle Schäden keine Haftung übernommen:
• Falsche und n icht den vorgesehenen Verwendu ngszwecken entsprec hende Verwendung;
• Reparaturen, die nicht in autorisierten Kundendienststellen durchgeführt wurden;
• Veränderungen am Netzkabel;
• Veränderungen an beliebigen Bestandteilen der
Maschine;
• Verwen dung von anderen a ls originalen Er satz- und
Zubehörteilen;
• Fehlende Entkalkung und Lagerung in Räumen bei
Temperaturen unter 0°C.
In diesen Fällen erlisc ht die Garantie.
1.1 Hinweise zur einfacheren Lektüre
Das Warndr eieck weist auf a lle wichtigen Hinweise für die Sicherheit
des Benutzers hin. Diese Hinweise
sind strikt zu beachten, um schwere Verletzungen zu
vermeiden!
2 TECHNISCHE DATEN
Der Hersteller behält sich das Recht vor, technische Änderungen am Produk t vorzunehmen.
Nennspannung - Nennleistung - Stromversorgung
Siehe Typenschild auf dem Gerät
Material Gehäuse
Kunsts to
Abmessungen (L x H x T) (mm)
210 x 300 x 280
Gewicht
3,9 kg
Kabellänge
1,3 m
Bedienfeld
Auf der Vorderseite
Filterhalter
Druckverdichtet
Pannarello
Spezialzubehör für Cappuccinos
Wasse rtank
1,25 Liter - herausnehmbar
Pumpendruck
15 ba r
Durchlauferhitzer
Rostfreier Edelstahl
Sicherheitsvorrichtungen
Thermosicherung
Der Bezug auf Abbildungen, Teile des Geräts oder Bedienelemente usw. erfolgt über Zahlen oder Buchstaben. In diesem
Falle wird auf die Abbildung verwiesen.
Mit diesem Symbol werden Informationen
gekennzeichnet, auf die besonders geachtet
werden muss, um den Betrieb der Maschine zu optimieren.
Die dem Text entsprechenden Abbildungen be nden
sich auf den ersten Seiten des Handbuchs. Diese Seiten
sind beim Lesen der vorliegenden Bedienungsanleitung zu berücksichtigen.
1.2 Gebrauch dieser Bedienungsanlei-
tung
Bewahren Sie diese Bedienungsanleitung an einem sicheren
Ort auf und legen Sie sie der Maschine immer bei, wenn diese
von anderen Per sonen benutzt wird.
Für weitere Informationen oder bei Problemen wenden Sie
sich bitte an die autorisierten Kundendiensts tellen.
• 24 •
3 SICHERHEITSVORSCHRIFTEN
Die unter Strom stehenden Teile dürfen keinesf alls mit
Wasser in Berührung kommen: Kurzschlussgefahr! Der
heiße Dampf und das heiße Wasser können Verbrennungen verursachen! Den Dampf- oder Heißwasserstrahl keinesfalls auf Körperteile richten. Die Düse für
die Dampf-/Heißwasserausgabe vorsichtig berühren:
Verbrennungsgefahr!
Sachgemäßer Gebrauch
Die Ka eemaschine ist ausschließlich für den Betrieb in Haushalten vorgesehen. Technische Änderungen und unsachgemäßer Gebrauch sind wegen der damit verbundenen Risiken
verboten! Die Ma schine ist nicht dazu bes timmt, von Personen
(einschließlich Kindern) mit eingeschränkten körperlichen oder
geistigen Fähigkeiten oder einer Beeinträchtigung der Sinnesorgane bzw. von Personen ohne ausreichende Erfahrung oder
Kompetenz ver wendet zu werden, es sei denn, sie werden von
Page 25
einer Person überwacht, die für ihre Sicherheit verant wortlich
ist oder sie werden im Gebrauch der Maschine geschult.
Stromversorgung
Die Ka eemaschine darf ausschließlich an eine geeignete
Steckdose angeschlossen werden. Die Spannung muss mit
derjenigen übereinstimmen, die auf dem Typenschild des Geräts angegeben ist.
Netzkabel
Die Ka eemaschine darf keinesfalls mit defektem Netzkabel
betrieben werden. Bei Schäden am Netzkabel muss dieses
vom Hersteller oder von dessen Kundendienst ausgetauscht
werden. Das Net zkabel darf nicht in Ecke n, über scharfe Kante n
oder auf sehr heißen Gegenständen verlegt werden. Es sollte
vor Öl geschützt werden.
Die Ka eemaschine darf nicht am Kabel getragen oder gezogen werden. Der Stecker darf nicht durch Ziehen am Kabel
herausgezogen werden. Er sollte nicht mit nassen Händen
berührt werden.
Der freie Fall des Netzkabels von Tischen oder Regalen sollte
vermieden werden.
Schutz anderer Personen
Kinder beaufsichtigen, damit sie nicht mit dem Gerät spielen.
Kinder können die Gefahrensituationen, die durch Haushaltsgeräte entstehen können, nicht abschätzen. Die für die Verpackung der Maschine benutzten Materialien sollten nicht in
Reichweite von Kindern aufbewahrt werden.
Verbrennungsgefahr
Den Heißwasser- oder Dampfstrahl keinesfalls auf sich selbst
oder auf andere Personen richten. Stets die entsprechenden
Gri e oder Regler benutzen.
Der Druck lterhalter darf keine sfalls während der Ausgab e des
Ka ees herausgenommen (abgenommen) werden. Während
der Aufheizphase der Brühgruppe besteht die Möglichkeit des
Austrit ts von Tropfen heißen Wassers.
Keinen Ka ee ausgeben, wenn sich die Maschine in Übertemperatur be nden, d.h. wenn die LED “
tig au euchten.
” und “ ” gleichzei-
Standort
Die Ka eemaschine sollte an einem sicheren Ort aufgestellt
werden, an dem nicht die Gefahr des Umkippens oder der Verletzung von Personen besteht.
Es besteht die Möglichkeit des Austritts von heißem Wasser
oder Dampf: Verbrennungsgefahr!
Die Maschine sollte Temperaturen von unter 0°C nicht ausgesetzt werden. Es besteht die Gefahr, dass die Maschine durch
gefrierendes Wasser beschädigt wird.
Die Ka eemaschine darf nicht im Freien betrieben werden.
Die Maschine nicht auf heißen Flächen oder in der Nähe von
o enem Feuer aufstellen, da das Gehäuse schmelzen oder auf
andere Art beschädigt werden könnte.
Reinigung
Bevor die Maschine gereinigt wird, muss sie mit der Taste ON/
OFF ausgeschaltet und dann der Stecker von der Steckdose
abgenommen werden. Darüber hinaus abwarten, bis die Maschine abgekühlt ist.
Die Maschine keinesfalls in Wasser tauchen!
Der Versuch von Eingr i en im Inneren der Maschine ist s trengstens verboten.
Wasser, das einige Tage lang im Wassertank verblieben ist, darf
nicht für Leb ensmittelzwe cke genutzt od er getrunken werden.
Den Tank reinigen und mit f rischem Trinkwasser füllen.
Raumbedarf für den Betrieb und die Wartung
Für einen korrekten und einwandfreien Betrieb der Ka eemaschine sollten folgende Empfehlungen berücksichtigt werden:
• Eine ebene Au age äche auswählen.
• Der Raum sollte ausreichend beleuchtet und hygienisch
unbedenklich sein und die Steckdose muss leicht zugänglich sein.
• Gem äß den Angaben in der Abbildung (A bb. A) einen Mindestabstand von den Maschinenwänden berücksichtigen.
Aufbewahrung der Maschine
Wird die Maschine für längere Zeit nicht benutzt, so ist sie
auszuschalten und der Stecker ist aus der Steckdose zu ziehen.
An einem trockenen und für Kinder unzugänglichen Ort aufbewahren. Vor Staub und Schmutz schüt zen.
Reparaturen/ Wartungsarbeiten
Die Maschine bei Störungen, Defekten oder dem Verdacht auf
Defekte nach einem Sturz nicht verwenden und unverzüglich
den Netzstecker ziehen. Eine defekte Maschine keinesfalls in
Betrieb setzen. Eingri e und Reparaturen dürfen ausschließlich von autorisierten Kundendienststellen vorgenommen
werden. Im Falle von nicht fachgerecht ausgeführten Eingriffen wird jede Haf tung für eventuelle Schäden abgelehnt.
Brandschutz
Im Fall eines Brandes einen Kohlensäurelöscher (CO2) verwenden. Keinesfalls sind Wasser- oder Pulverlöscher einzuset zen.
Deutsch
• 25 •
Page 26

Legende der Maschinenbestandteile (S. 2)
1 Bedienfeld
2 Deckel Wassertank
3 Drehknopf Heißwasser/Dampf
4 Aufnahme für Zubehör
5 Wassertank
6 Halterung Tassenabstell äche
7 Wasserau angschale + Gitter
8 Ka eebrühgruppe
9 Dampfdüse (Pannarello)
10 Netzkabel
11 Schalter ON/OFF
12 Druck lterhalter
13 Messlö el für gemahlenen Ka ee
14 Filter für gemahlenen Ka ee
(ein Filter für die Ausgabe von 1 oder 2 Tassen Ka ee)
15 Filteradapter für Ka eepads
16 Filter für Ka eepads
17 Anwahlknopf
18 LED "Maschine ein"
19 LED "Dampf bereit"
20 LED Ka ee / Wasser - "Maschine bereit"
4 INSTALLATION
Für Ihre eigene Sicherheit und die der anderen müssen
die “Sicherheits vorschrif ten” im Kap. 3 strik t eingehalten werden.
4.1 Verpackung
Die Original-Verpackung wurde für den Schutz der Maschine
während des Versands entwickelt und hergestellt. Es wird
empfohlen, die se Verpackung für eventuelle z ukünftige Transporte aufzubewahren.
4.3 Anschluss der Maschine
Elekt rischer Str om kann gefäh rlich sein! A us die-
sem Grunde müssen die Sicherheitsvorschriften
stets strikt beachtet werden. Defekte Kabel dürfen
keinesfalls benutzt werden! Beschädigte oder defekte
Kabel und Stecker müssen umgehend von einer autorisierten Kundendienststelle ersetzt werden.
Die Spannung des Geräts wurde werkseitig eingestellt. Überprüfen, ob die Netzspannung den auf dem Typenschild auf der
Unterseite der Mas chine aufgeführten Angaben entspricht.
• Überprüfen, ob sich der Schalter ON/OFF (11) in Position
"0" be ndet, bevor die Maschine an das Stromnetz angeschlossen wird.
• Den Stecker in eine Wandsteckdose mit geeigneter Span-
nung einstecken.
4.4 Wassertank
• (Abb. 1) - Den Deckel des Wassertanks (2) abnehmen, in-
dem er angehoben wird.
• (Abb. 2) - Den Wasser tank (5) herausnehmen.
• (Abb. 3) - Den Wassertank ausspülen und mit frischem
Trinkwasser au üllen. Dabei sollte nicht zu viel Wasser
eingefüllt werden.
In den Tank stets ausschließlich frisches Trink-
wasser ohne Kohlensäure einfüllen. Heißes
Wasser oder andere Flüssigkeiten können den Tank beschädigen. Die Maschine darf ohne Wasser keinesfalls
in Betrieb gesetzt werden: sicherstellen, dass im Tank
eine ausreichende Menge Wasser vorhanden ist.
• (Abb. 2) - Den Tank einsetzen und sicherstellen, dass die-
ser korrekt in seine Aufnahme positioniert wird. Dann den
Deckel (2) wieder aufsetzen.
4.2 Installationshinweise
Bevor die Maschine installiert wird, müssen die folgenden Sicherheitsvorschriften beachtet werden:
• die Maschine an einem sicheren Ort aufstellen;
• sicherstellen, dass Kinder nicht mit der Maschine spielen
können;
• die Maschine nicht auf heißen Flächen oder in der Nähe
von o enem Feuer aufstellen.
Nun kann die Ka eemaschi ne an das Stromnetz angesc hlossen
werden.
Hinweis: es wird empfohlen, die Bestandteile
vor deren Benutzung und/oder nach einer län-
geren Nichtbenutzung zu reinigen.
• 26 •
4.5 Entlüftung des Systems
Zu Beginn, nach der Dampfausgabe oder wenn kein Wasser
mehr im Tank vorhanden ist, muss das System der Maschine
entlüftet werden.
• Den Schalter ON/OFF (11) drücken und in die Position "I"
stellen. Die LED (18) leuchtet auf und zeig t an, dass die Maschine eingeschaltet ist.
• (Abb. 4) - Einen Behälter unter die Dampfdüse (Pannarello) stellen.
• Den Drehknopf (3) “Heißwasser/Dampf” ö nen, indem er
im Gegenuhrzeigersinn gedreht wird.
• (Abb. 5) - Den Anwahlknopf (17) in die Position
"
" stellen.
Page 27

• Abwarten, bis aus der Dampfdüse (Pannarello) ein regelmäßiger Wasserstrahl austritt.
• (Abb. 5) - Den Anwahlknopf (17) in die Position "
len.
• Den Drehknopf (3) “Heißwasser/Dampf ” schließen, indem
er im Uhrzeigersinn gedreht wird. Den Behälter entfernen.
" stel-
links aus der Br ühgruppe herausnehmen und mit frischem
Tri nkwa sser au sspü len.
Die Maschine ist nun bereit. Für die Betriebseinzelheiten für
die Ausgabe von Ka ee und Dampf wird auf die entsprechenden Kapitel ver wiesen.
4.6 Erste Inbetriebnahme oder Benut-
zung nach längerer Nichtbenutzung
Dieser einfache Vorgang gewährleistet eine optimale Ausgabe
und muss ausgef ührt werden:
- bei der ersten Inbetriebnahme;
- nach einem längeren Zeitraum der Nichtbenutzung der
Maschine (länger als 2 Wochen).
Das ausgegebene Wasser muss über einen
entsprechenden Ab uss entsorgt werden, und
darf nicht für Lebensmittelzwecke verwendet werden.
Sollte der Behälter während des Zyklus voll werden,
muss die Ausgabe gestoppt und der Behälter geleert
werden, bevor der Vorgang fortgesetzt wir d.
• (Abb. 3) - Den Tank ausspülen und mi t frischem Trinkwas-
ser füllen.
• (Abb. 4) - Einen Behälter unter die Dampfdüse (Panna-
rello) stellen. Den Drehknopf (3) im Gegenuhrzeigersinn
drehen.
(Abb. 5) - Den Anwahlk nopf (17) in die Position "
len.
• Den gesamten Inhalt des Wassertanks über die Heißwas-
ser-/Dampfdüse (Pannarello) ab ießen lassen. Um die
Ausgabe zu be enden, den Anwahlknopf (17) in die Position
"
" stellen und den Regler (3) schließen, indem er im Uhr-
zeigersinn gedreht wird.
• (Abb. 3) - Den Wassertank mit frischem Trinkwasser fül-
len.
• (Abb. 13-14) - Den Filterhalter von unten in die Brühgrup-
pe (8) einsetzen und von links nach rechts drehen, bis er
einrastet.
• (Abb. 15) - Einen geeigneten B ehälter unter den Filterhal-
ter stellen.
• (Abb. 16) - Den Anwahlknopf (17) in die Position "
drehen und das gesamte im Tank verbliebene Wasser ablassen.
(Abb. 17) - Ist kein Wasser mehr vorhanden, die Ausgabe
beenden, inde m der Anwahlknopf (17) auf Position "
stellt wird.
• Den Tank erneut füllen und warten, bis die LED "Maschine
bereit" (20) au euchtet.
• (Abb. 19) - Den Filterhalter du rch Drehung von rechts nach
" stel-
" ge-
5 KAFFEEAUSGABE
Achtung! Die Herausnahme des Druck lterhal-
ters durch Drehung im Uhrzeigersinn von Hand
während der Ausgabe des Ka ees ist verboten. Verbrennungsgefahr.
• Während dieses Vorgangs kann sich die LED (20) "Maschi-
ne bereit" ein- und ausschalten. Dieser Betrieb ist völlig
normal und nicht als Störung zu betrachten.
• Vor dem Gebrauch sicherstellen, dass der Drehknopf (3)
“Heißwasser/Dampf" geschlossen ist und der Wassertank
der Maschine eine ausreichende Menge Wasser enthält.
• (Abb. 3) - Den Schalter ON/OFF (11) drücken und in Positi-
on "I" stellen.
• Warten, bis die LED (20) "Maschine bereit" au euchtet.
Nun ist die Masc hine für die Ka eeausgabe bereit.
Das Zubehör für die Ka eeausgabe be ndet
sich in einer entsprechenden Aufnahme, die
diese Vorgänge einfach und schnell macht.
Für die Entnahme des Messlö els für gemahlenen Kaffee und/oder die erforderlichen Filter muss lediglich
der Deckel (2) angehoben werden (Abb. 35 und Abb.
36).
5.1 Betrieb mit gemahlenem Kaff ee
• (Abb. 7) - Den Filter (14) in den Druck lterhalter (12)
einsetzen. Bei der ersten Benutzung ist der Filter bereits
eingesetzt.
• (Abb. 13) - Den Filterhalter von unten in die Brühgruppe
(8) einsetzen.
• (Abb. 14) - Den Filterhalter von links nach rechts drehen,
bis er blockiert. Den Gri des Druck lterhalters loslassen;
der Gri dreht sich leicht nach links. Diese Bewegung ge-
"
währleistet die ordnungsgemäße Funktion des Filterhalters.
• (Abb. 16) - Den Druck lterhalter vorwärmen, indem der
Anwahlknopf (17) auf Position "
Wasser beginnt, aus dem Druck lterhalter auszuströmen
(dieser Vorgang ist le diglich für den ers ten Ka ee er forderlich).
" gestellt wird. Das
Deutsch
• 27 •
Page 28
• (Abb. 17) -Nachdem 150 cm Wasser durchgelaufen sind,
wird der Anwahlknopf (17) auf Position "
die Ausgabe zu stoppen.
• (Abb. 19) - Den Filterhalter du rch Drehung von rechts nach
links aus der Maschine herausnehmen und das Restwasser ausschütten. Mit dem speziellen Filter (14), mit dem
die Maschine ausgestattet ist, muss der Filter für die Zubereitung von einem oder zwei Ka ees nicht gewechselt
werden.
• (Abb. 35) - Den Messlö el aus der Maschine entnehmen.
• (Abb. 8) - 1 oder 1,5 Messlö el für einen einzelnen Ka ee
oder 2 gestrichene Messlö el für einen doppelten Ka ee
in den Filter geben. Den Ka eesatz vom Rand des Filterhalters entfernen.
• (Abb. 13) - Den Filterhalter (12) von unten in die Brüh-
gruppe (8) einsetzen.
• (Abb. 14) - Den Filterhalter von links nach rechts drehen,
bis er blockiert.
• (Abb. 15) - 1 oder 2 vorgewärmte Tassen entnehmen
und unter den Druck lterhalter stellen. Überprüfen, ob
diese korrekt unter den Ka eeausgabeö nungen stehen.
• (Abb. 14) - Den Anwahlknopf (17) in die Position "
drehen.
• Nachdem die gewünschte Ka eemenge erreicht ist, wird
der Anwahlknopf (17) auf Position "
Ausgabe des Ka ees zu stoppen. Zum Abschluss der Ausgabe einige Sek unden abwarten, dann die Tassen mit dem
Ka ee entnehmen (Abb. 18).
• (Abb. 19) - Den Druck lterhalter herausnehmen und den
Ka eesatz entfernen.
Hinweis: im Filterhalter verbleibt eine geringe
Menge Wasser. Dies ist normal und auf die Ei-
genschaften des Filterhalters zurückzuführen.
Wichtiger Hinweis: Der Filter (14) muss stets
sauber gehalten werden, um ein optimales
Ergebnis zu gewährleisten. Täglich nach Gebrauch reinigen.
" gestellt, um
" gestellt, um die
5.2 Betrieb mit Kaff eepads
• (Abb. 9) - Unter Verwen dung eines Ka eelö els den Filter
für gemahlenen Ka ee (14) aus dem Druck lterhalter (12)
herausnehmen.
• (Abb. 10) - Den Adapter für Ka eepads (15) mit der ge-
wölbten Seite nach unten in den Druck lterhalter (12)
einsetzen.
• (Abb. 11) - Danach den Filter für Ka eepads (16) in den
Druck lterhalter (12) einsetzen.
• (Abb. 13) - Den Druck lterhalter von unten in die Brüh-
gruppe (8) einsetzen.
• (Abb. 14) - Den Filterhalter von links nach rechts drehen,
bis er blockiert. Den Gri des Druck lterhalters loslassen.
Ein automatisches System versetzt den Gri nun wieder
leicht nach links.
Diese Bewegung gewährleistet die korrekte Funktion des
Druck lterhalters.
• (Abb. 16) - Den Druck lterhalter vorwärmen, indem der
Anwahlknopf (17) auf Position "
Wasser beginnt, aus dem Druck lterhalter auszuströmen
(dieser Vorgang ist le diglich für den ers ten Ka ee er forder-
"
lich).
• (Abb. 17) -Nachdem 150 cm Wasser durchgelaufen sind,
wird der Anwahlknopf (17) auf Position "
die Ausgabe zu stoppen.
• (Abb. 19) - Den Druck lterhalter durch Drehung von
rechts nach link s aus der Maschine herausnehmen u nd das
Restwasser ausschütten.
• (Abb. 12) - Den Ka eepad in den Filterhalter einlegen. Si-
cherstellen, dass das Papier des Ka eepads nicht über den
Filterhalter übersteht.
• (Abb. 13) - Den Druck lterhalter von unten in die Brüh-
gruppe (8) einsetzen.
• (Abb. 14) - Den Filterhalter von links nach rechts drehen,
bis er blockiert.
• 1 vorgewärmte Tasse entnehmen und unter den Fil-
terhalter stellen. Überprüfen, ob diese korrekt unter den
Ka eeausgabeö nungen steht.
• (Abb. 16) - Den Anwahlknopf (17) in die Position "
drehen.
• (Abb. 17) - Nachdem die gewünschte Ka eemenge er-
reicht ist, wird der Anwahlknopf (17) auf Position "
stellt, um die Ausgabe des Ka ees zu stoppen. Die Tasse
mit dem Ka ee entnehmen.
• (Abb. 19) - Zum Abschluss der Ausgabe einige Sekunden
abwarten, dann den Filterhalter herausnehmen und den
verbrauchten Pad entfernen.
" gestellt wird. Das
" gestellt, um
"
" ge-
• 28 •
Wichtige r Hinweis: Der Filter (16) und der Adap-
ter (15) müssen stets sauber gehalten werden,
um ein optimales Ergebnis zu gewährleisten. Täglich
nach Gebrauch reinigen.
Page 29
6 AUSWAHL DER KAFFEESORTE EMPFEH
LUNGEN
Im Allgemeinen können alle handelsüblichen Ka eesorten
verwendet werden. Dennoch handelt es sich bei Ka ee um ein
Naturprodukt und sein Geschmack ist je nach Ursprungsland
und Mischung unterschiedlich. Aus diesem Grunde sollten verschiedene Sorten probiert werden, um die Mischung zu ermitteln, die den pers önlichen Vorlieben am besten gere cht wird.
Für optimale Ergebnisse empfehlen wir, nur ausdrücklich für
die Zubereitung in Espressomaschinen zusammengestellte
Mischungen zu verwenden. Der Ka ee sollte stets gleichmäßig
aus dem Druck lterhalter austreten und dabei keine Tropfen
bilden.
Die Geschwindigkeit des Austritts des Ka ees kann geändert
werden, indem der Umfang der Ka eeportion im Filter leicht
variiert und/oder ein Ka ee mit einem anderen Mahlgrad verwendet wird.
Um ein optimales Ergebnis in der Tasse zu gewährleisten und
um die Reinigung und die Zubereitung zu erleichtern, emp ehlt Saeco die Verwendung von Einzelportionen-Ka eepads
mit dem Markenzeichen ESE.
BEVOR DAMPF ODER HEISSES WASSER AUSGEGE-
BEN WIRD, MUSS ÜBERPRÜFT WERDEN, OB DIE
DAMPFDÜSE (PANNARELLO) AUF DIE AUFFANGSCHALE
GERICHTET IST.
7 HEISSWASSER
Verbrennungsgefahr! Zu Beginn der Ausgabe
können Spritzer mit heißem Wasser auftreten.
Das Ausgaberohr kann hohe Temperaturen erreichen:
direkte Berührung vermeiden.
• Den Schalter ON/OFF (11) drücken und in Position "I" stel-
len.
• Warten, bis die LED (20) "Maschine bereit" leuchtet; die
Maschine ist nun bereit.
• (Abb. 21) - Einen Behälter oder ein Teeglas unter die
Dampfdüse (Pannarello) stellen.
• (Abb. 21) - Den Drehknopf (3) ö nen, indem er im Gegen-
uhrzeiger sinn gedreht wird.
• (Abb. 22) - Den Anwahlknopf (17) in die Position "
stellen.
• (Abb. 23) - Nach der Entnahme der gewünschten Menge
heißen Wasser s den Anwahlknopf (17) in Position "
len.
• (Abb. 24) - Den Drehknopf (3) schließen, indem er im Uhr-
zeigersinn gedreht wird.
• Den Behälter mit dem heißen Wasser entnehmen.
" stel-
8 DAMPF / CAPPUCCINO
Verbrennungsgefahr! Zu Beginn der Ausgabe
können Spritzer mit heißem Wasser auftreten.
Das Ausgaberohr kann hohe Temperaturen erreichen:
direkte Berührung vermeiden.
• Den Schalter ON/OFF (11) drücken und in Position "I" stel-
len.
• Warten, bis die LED (20) "Maschine bereit" au euchtet.
• (Abb. 25) - Den Anwahlknopf (17) in die Position "
stellen. Die LED (20) schaltet sich aus.
• Warten, bis die LED (19) au euchtet; nun ist die Maschine
für die Dampfaus gabe bereit.
• (Abb. 26) - Einen Behälter unter die Dampfdüse stellen.
• (Abb. 26) - Den Drehknopf (3) kurz ö nen, um das Rest-
wasser aus der Dampfdüse (Pannarello) aus ießen zu lassen; nach kurzer Zeit s trömt nur mehr Dampf aus.
• (Abb. 27) - Den Drehknopf (3) schließen und den Behälter
entfernen.
• Den Behälter, der für die Cappuccinozubereitung benutzt
werden soll, zu 1/3 mit kalter Milch füllen.
Für ein gutes Ergebnis kalte Milch ver wenden
Deutsch
"
"
• (Abb. 28) - Die Dampfdüse in die Milch tauchen und den
Drehknopf (3) durch Drehen gegen den Uhrzeigersinn ö -
• 29 •
Page 30

nen. Den Behälter mit der Milch langsam von unten nach
oben drehen, um ei n gleichmäßiges Aufheize n zu gewährleisten.
Es wird empfohlen, die Ausgabe auf maximal
60 Sekunden zu beschränken.
• Abschließend den Drehknopf (3) schließen, indem er
im Uhrzeigersinn gedreht wird. Die Tasse mit der aufgeschäumten Milch entnehmen.
• (Abb. 30) - Den Anwahlknopf (17) in die Position "
len.
Leuchten beide LED "
tur der Maschine zu hoch für die Ausgabe von Ka ee.
• Die Vorgeh ensweise für die Entlüf tung des Systems, die im
Abschn. 4.5 be schrieben wird, aus führen, um die Maschin e
betriebsbereit zu machen.
Hinweis: die Maschine ist betriebsbereit, wenn
die LED
leuchtet.
Hinweis: wenn es nicht gelingt, den Cappuccino
wie beschrieben zuzubereiten, muss das System, wie im Abschnitt 4.5. beschrieben, entlüftet und
der Vorgang wiederholt werden.
" und " " auf, ist die Tempera-
"Maschine bereit" dauerhaft auf-
" stel-
- den oberen Bereich des Pannarellos von der Dampfdüse
abziehen;
- den oberen Bereich des Pannarellos mit frischem Trinkwasser waschen;
- die Dampfdüse mit einem feuchten Tuch reinigen und
eventuelle Milchreste entfernen;
- den oberen Bereich der Dampfdüse wieder anbringen
(sicherstellen, dass er vollständig eingesetzt ist);
Den äußeren Bereich des Pannarellos wieder montieren.
• (Abb. 34) - die Abtropfschale täglich entleeren und reini-
gen.
• Für d ie Reinigung des Gerät s ein weiches, leicht mit Wass er
befeuchtetes Tuch verwenden.
• (Abb. 20) - für die Reinigung des Dr uck lterhalters ist wie
folgt vorzugehen:
- (Abb.9) - den Filter herausnehmen und sorgfältig mit
warmem Wasser waschen.
- den Adapter (sof ern vorhanden) herausnehmen un d sorgfältig mit warmem Wasser waschen.
- den Innenbereich des Druc k lterhalters waschen.
• die Vorrichtung und deren Bestandteile nicht unter Verwendung einer Mikrowelle oder eines herkömmlichen
Backofens trocknen.
• (Abb. 35-36) - die Aufnahme für das Zubehör sollte wöchentlich mit einem feuchten Lappen gereinigt werden,
um eventuelle Ka eerückstände oder Staub zu entfernen.
Auf dieselbe Weise können auch andere Flüssigkeiten erhitzt werden.
• Nach diesem Vorgang die Dampfdüse mit einem feuchten
Tuc h rei nige n.
9 REINIGUNG
Die Wartung und die Reinigung dürfen nur dann durchgeführt
werden, wenn die Maschine vom Stromnetz abgenommen
wurde und abgekühlt ist.
• Die Maschine darf nicht in Wasser getaucht werden. Teile
der Maschine dürfen nicht in der Spülmaschine gereinigt
werden.
• Für die Reinigung sollten kein Äthylalkohol, Lösungsmit tel
und/oder chemisch aggressive Produkte verwendet werden.
• Es wird empfohlen, den Wassertank täglich zu reinigen
und mit frischem Trinkwasser zu füllen.
• (Abb. 31-33) - Den äußeren Bereich des Pannarellos täglich nach dem Erhitzen von Milch abnehmen und mit frischem Trinkwasser waschen.
• (Abb. 31-32-33) - Die Dampfdüse muss wöch entlich gerei-
nigt werden. Dazu wie folgt vorgehen:
- den äußeren Teil des Pannarellos (für die regelmäßige
Reinigung) entfernen;
• 30 •
Hinweis: Den Druck lterhalter nicht in der
Spülmaschine reinigen.
10 ENTKALKUNG
Beim Gebrauch der Maschine bildet sich Kalk. Die Entkalkung
ist nach jeweils 1-2 Betriebsmonaten der Maschine und/oder
dann erforderlich, wenn eine Reduzierung der Wasserdurchlaufmenge fes tgestellt wird. Es sollte ausschließlich ein S aecoEntkalker verwendet werden.
Die Angaben im Bedienungs- und Wartungs-
handbuch haben gegenüber den Angaben auf
separat verkauftem Zubehör und/oder Verbrauchsmaterial Vorrang, soweit sich daraus Kon ikte ergeben.
Den Saeco-Entkalker verwenden (Abb. B). Die-
ser wurde eigens dafür entwickelt, um die
Leistungen und den Betrieb der Maschine für deren
gesamtes Betriebsleben optimal zu erhalten, und, soweit er korrekt verwendet wird, Beeinträchtigungen
des ausgegebenen Produktes zu vermeiden. Bevor
der Entkalkungszyklus gestartet wird, ist folgendes
sicherzustellen: DER WASSERFILTER (wenn verwendet)
WURDE ENTFERNT.
Page 31

Die Entkalkerlösung und die bis zum Abschluss
des Zyklus ausgegebenen Produkte dürfen keinesfalls getrunken werden. Keinesfalls darf Essig als
Entkalker verwende t werden.
1 (Abb. 13-14) - Den Filterhalter von unten in die Br ühgrup-
pe (8) einsetzen und von links nach rechts drehen, bis er
einrastet.
2 (Abb. 2) - Den Wassertank abnehmen und leeren.
3 (Abb. 3) - Die HÄLFTE des Inhalts der Flasche mit konzen-
triertem Saeco-Entkalker in den Wassertank des Geräts
einfüllen und den Tank mit frischem Trinkwasser bis zum
Füllstand MAX au üllen.
4 Die Maschine durch Druck des Schalters ON/OFF (11) ein-
schalten, indem dieser in Position "I" gestellt wird.
(Abb. 21) - Über die Heißwasser-/Dampfdüse 2 Tassen mit
jeweils ca. 150 ml Wasser entnehmen (wie im Kapitel 7
des Handbuchs beschrieben). Dann die Maschine über den
Schalter ON/OFF (11) ausschalten, indem dieser in Position
"0" gestellt wird.
5 Den Entkalker für ca. 15-20 Minuten bei ausgeschalteter
Maschine einwirken lassen.
6 Die Maschine durch Druck des Schalters ON/OFF (11) ein-
schalten.
(Abb. 21) - Über die Heißwasser-/Dampfdüse 2 Tassen mit
jeweils ca. 150 ml Wasser entn ehmen (wie im Kapitel 7 des
Handbuchs beschrieben). Nachfolgend die Maschine über
den Schalter ON/OFF (11) ausschalten und für einen Zeitraum von 3 Minuten ausgeschaltet lassen.
7 Die unter Punkt 6 beschriebenen Vorgänge bis zur voll-
ständigen Leerung des Wasser tanks wiederholen.
8 (Abb. 3) - Den Tank mit frischen Trinkwasser ausspülen
und vollständig füllen.
9 Einen Behälter unter den Filterhalter stellen.
10 Die Maschine einschalten, indem der Schalter ON/OFF (11)
gedrück t wird. Den Anwahlknopf (17) in die Position "
drehen und über den Filterhalter den gesamten Inhalt des
Tanks entnehmen. Um die Ausgabe zu beenden, den Anwahlknopf (17) auf Position "
" stellen.
11 (Abb. 3) - Den Tank erneut mit frischem Wasser füllen.
(Abb. 21) - Einen Behälter mit ausreichendem Fassungs-
vermögen unter die Dampfdüse (Pannarello) stellen. Den
Regler für die Wasserausgabe (3) ö nen, indem er im Gegenuhrzeiger sinn gedreht wird.
(Abb. 22) - Den Anwahlknopf (17) in die Position "
drehen und den gesamten Inhalt des Wassert anks über die
Heißwasser-/Dampfdüse ab ießen lassen.
12 (Abb. 23) - Nach Beendigung der Wasserentnahme wird
der Anwahlknopf (17) in die Position "
" gestellt, um die
Ausgabe zu beenden.
(Abb. 24) - Den Regler für die Wasserausgabe (3) schlie-
ßen, indem er im Uhr zeigersinn gedreht wird.
13 Die Vorgänge a b Punkt (8) für insgesamt 4 Tankfüllungen
wiederholen.
14 (Abb. 19) - Den Filterhalter durc h Drehung von rechts nach
links aus der Br ühgruppe herausnehmen und mit frischem
Trinkwasser ausspülen.
Der Entkalkungszyklus ist nun abgeschlossen.
(Abb. 3) - Den Tank erneut mit frischem Wasser füllen. Soweit erforderlich, das System entlüften, wie im Abschn. 4.5
beschrieben.
Die Entsorgung der Entkalkerlösung muss gemäß den Vorgaben des Herstellers und/oder
den im Benut zerland geltenden Vorschriften er folgen.
11 ENTSORGUNG
Dieses Produkt entspricht der EU-Richtlinie 2002/96/EG
Das Symbol
weist darauf hin, dass das Produkt nicht als normaler Haushaltsabfall zu behandeln ist, sondern an einem Sammelpunkt
für das Recycling von elektrischen und elektronis chen Geräten
abgegeben werden muss.
Durch Ihren Beitrag zum korrekten Entsorgen dieses Produkts
schützen Sie die Umwelt und die Gesundheit Ihrer Mitmenschen.
Umwelt und Gesundheit werden durch falsches Entsorgen
gefährdet.
Weitere Informationen über das Recycling dieses Produkts
erhalten Sie von Ihrer Gemeinde, der Müllabfuhr oder dem
Geschäft, in dem Sie das Produk t gekauft haben.
"
"
auf dem Produkt oder seiner Verpackung
Deutsch
• 31 •
Page 32

Störung Mögliche Ursachen Abhilfe
Die Maschine schaltet sich nicht
ein.
Die Pumpe ist sehr laut. Wasser im Tank fehlt Füllen Sie Wasser nach (Absc hn. 4.4).
Der Ka ee ist zu kalt.
Es bildet sich kein Schaum auf
der Milch.
Die Zubereitu ng des Cappuccinos
gelingt nicht.
Der Ka ee sprudelt zu schnell
heraus, es bildet sich keine Crema.
Der Ka ee läuft nicht oder nur
tropfenweise heraus.
Der Ka ee läuft über die Ränder.
Die Maschine ist nicht an das Stromnetz
angeschlossen.
Die LED (20) "Maschine ber eit" war ausgeschaltet, als der Anwahlknopf (17) in die
Position "
Filterhalter zum Vorheizen nicht eingesetz t (Kap. 5).
Tassen kalt. Wärmen Sie die Tassen mit heißem Wasser vor.
Milch nicht geeignet: Milchpulver, fettar-
me Milch.
Pannarello verschmutzt.
Es ist kein Dampf mehr im Durchlauferhitzer.
Zu wenig Ka ee im Filterhalter. Mehr Ka ee einfüllen (Kap. 5).
Der Mahlgrad is t zu grob.
Der Ka ee ist alt oder nicht geeignet.
Alter oder ungeeigneter Ka eepad. Wechseln Sie den verwendeten Ka eepad.
Im Filterhalter fehlt ein Bestand teil.
Wasser fehlt. Füllen Sie Wasser nach (Abschn. 4.4).
Der Mahlgrad is t zu fein.
Ka ee im Filterhalter zu fest angedrückt. Lockern Sie den gemahlenen Ka ee.
Zu viel Ka ee im Filterhalter. Reduzieren Sie die Ka eemenge im Filterhalter.
Drehknopf (3) o en. Den Drehknopf (3) schließen.
Maschine verkalkt. Entkalken Sie die Maschine (Kap. 10).
Filter im Filterhalter verstopf t. Reinigen Sie den Filter (Kap. 9).
Ka eepad nicht ge eignet. Wechseln Sie die Ka eepadsorte.
Der Filterhalter wurde nicht korrekt in die
Brühgruppe eingesetzt.
Oberer Rand des Filterhalters ver-
schmutzt.
Ka eepad falsch eingelegt.
Zu viel Ka ee im Filterhalter.
" gestellt wurde.
Die Maschine an das Stromnetz anschließen.
Warten, bis die LED (20) au euchtet.
Wärmen Sie den Filter halter vor.
Verwenden Sie Vollmilch.
Reinigen Sie den Pannarello wie im Kap. 9 beschrieben.
Füllen Sie das System (Abschn. 4.5) und wiederholen Sie die im Kap. 8 beschrieb enen Schritte.
Verwenden Sie eine andere Ka eemischung
(Kap. 6).
Verwenden Sie eine andere Ka eemischung
(Kap. 6).
Überprüfen, ob alle Bestandteile vorhanden sind
und korrek t montiert wurden.
Verwenden Sie eine andere Ka eemischung
(Kap. 6).
Setzen Sie den Filterhalter korrekt ein (Kap. 5).
Reinigen Sie den Rand des Filterhalter s.
Legen Sie den Ka eepad richtig ein und achten
Sie darauf, dass er nicht über den Filterhalter
hinausragt.
Reduzieren Sie die Ka eemenge mit einem Messlö el.
Bei Störun gen, die nicht in der o ben aufgefüh rten Tabelle behan delt werden oder i n Fällen, in denen die em pfohlenen Vorgehensweisen das Problem nicht beheben, wenden Sie sich bit te an eine Kundendienststelle.
• 32 •
Page 33

EG KONFORMITÄTSERKLÄRUNG
JAHR 09
2006/95/EG, 2004/108/EG.
Saeco International Group
Via Torretta, 240
40041 GAGGIO MONTANO (BO) - ITALIEN
Wir erklären unter eigener Verantwortung, dass das Produkt:
EINFACHE KAFFEEMASCHINE
TYP: HD 8323 / HD 8325
auf welches sich diese Erklärung bezieht, folgenden Normen entspricht:
• Sicherheit elektrischer Geräte für den Hausgebrauch und ähnliche Zwecke - Allgemeine Anforderungen
EN 60335-1 (2002) + A1(2004) + A2(2006) + A11(2004) + A12 (2006) +A13 (2008)
• Sicherheit elektrischer Geräte für den Hausgebrauch und ähnliche Zwecke - Teil 2-15
Besondere Anforderungen für Geräte zur Flüssigkeitserhitzung
EN 60 335-2-15 (2002) + A1(2005) + A2(2008)
• Sicherheit Geräte für den Hausgebrauch und ähnliche Zwecke. Elektromagnetische Felder
Verfahren für die Bewertung und die Messungen -EN 62233 (2008).
• Grenzwerte und Messmethoden für charakteristische Funkstörungen bei Geräten mit
Elektro- und Wärmemotor für den Hausgebrauch und ähnliche Zwecke, Elektrowerkzeuge und ähnliche
Elektrogeräte - EN 55014-1 (2006).
• Elektromagnetische Verträglichkeit (EMV)
Teil 3 Grenzwerte - Hauptabschnitt 2: Grenzwerte für Oberschwingungsströme (Geräte-Eingangsstrom
≤ 16 A je Leiter) - EN 61000-3-2 (2006).
• Elektromagnetische Verträglichkeit (EMV)
Teil 3 Grenzwerte - Hauptabschnitt 3: Grenzwerte für Spannungsschwankungen und Spannungsspitzen in
in Niederspannungsnetzen für Geräte mit einem Eingangsstrom ≤ 16 A.
EN 61000-3-3 (1995) + Korr.(1997) + A1(2001) + A2 (2005).
• Störfestigkeit von Haushaltsgeräten, Elektrowerkzeugen und ähnlichen Geräten.
Produktfamiliennorm EN 55014-2 (1997) + A1 (2001).
gemäß den Bestimmungen der Richtlinien : 2006/95/EG, 2004/108/EG.
Gaggio Montano, 28/04/2009
Deutsch
R & D Manager
Ing. Andrea Castellani
• 33 •
Page 34

1 GÉNÉRALITÉS
Cette machi ne à café est indiquée pou r la préparation d’une ou
de deux tasses de café expresso. Elle est équipée d’une buse
orientable pour la distribution de la vapeur et de l’eau chaude.
Les commandes sur la façade de l’appareil sont marquées par
des symboles faciles à comprendre.
Cette machin e a été conçue pour un usage dome stique et n’est
pas indiquée pour un fonctionnement continu de type professionnel.
Attention. Nous déclinons toute responsabilité
pour les dommages éventuels se produisant en
cas de :
• Usage impropre et non conforme aux utilisations
prévues ;
• Répara tions non e ec tuées auprès des c entres d'as-
sistance agréés ;
• Altération du câble d'alimentation ;
• Altération de n’importe quel composant de la ma-
chine ;
• Utilisation de pièces de rechange et d’accessoires
non d’origine ;
• Défaut de détartrage et stockage au-dessous de
0°C.
Dans tous ces c as, la garantie cesse d ’exister.
1.1 Pour faciliter la lecture
Le triangle d’avertissement indique
toutes les instructions à retenir
pour la sécurité de l’utilisateur. Respecter attentivement ces indications a n d’éviter de
graves blessures !
2 DONNÉES TECHNIQUES
Le construc teur se réserve le dro it d'apporter des modi cations
aux caractéristiques techniques du produit.
Tension nominale - Puissance nominale - Alimentation
Voir la plaquette située sur l'appareil
Matériau du corps
Plastique
Dimensions (l x h x p) (mm)
210 x 300 x 280
Poids
3,9 kg
Longueur du câble
1,3 m
Bandeau de commande
En façade
Porte- ltre
Pressurisé
Pannarello
Spécial pour les cappuccinos
Réservoir à eau
1,25 litres - Amovible
Pression de la pompe
15 ba rs
Chaudière
Acier inoxydable
Dispositif s de sécurité
Coupe-circuit thermique
3 CONSIGNES DE SÉCURITÉ
Les images, les parties de l’appareil, les éléments de commande, etc. sont marqués par des lettres ou des chi res. Dans ce
cas, consulter les images.
Ce symbole met en évidence les informations
à retenir pour une meilleure utilisation de la
machine.
Les images qui correspondent au texte se trouvent
dans les premières pages du manuel. Consulter ces pages pendant la lecture du mode d ’emploi.
1.2 Utilisation de ce mode d’emploi
Conserver ce mode d'emploi dans un endroit sûr. Joindre le
mode d’emploi à la machine à café au cas où une autre personne devrait l’utiliser.
Pour de plus amples informations ou en cas de problèmes,
s’adresser aux centres d’assistance agréés.
• 34 •
Ne jamais mettre les pa rties sous tension au contact d e
l’eau : danger de court-circuit ! La vapeur surchau ée
et l’eau chaude peuvent provoquer des brûlures ! Ne
jamais diriger le jet de vapeur ou d’eau chaude vers
des parties du corps. Toucher la buse de vapeur / eau
chaude en faisant très attention : danger de br ûlures !
Utilisation prévue
Cette machine à café est destinée uniquement à un usage
domestique. Toute modi cation technique de la machine
ainsi que toute utilis ation impropre sont interdite s puisqu'elles
engendrent des risques ! L’appareil ne doit pas être utilisé par
des personnes (y compris les enfants) ayant de faibles capacités physiques, mentales ou sens orielles, sans expéri ence et/ou
aux compétences insu santes, à moins qu'elles ne soient sous
la supervision d’une personne responsable de leur sécurité ou
Page 35

formées par cette personne en ce qui concerne l’utilisation de
l’appareil.
Alimentation du secteur
Ne brancher la machine à café que sur une prise de courant
appropriée. La tension doit correspondre à celle indiquée sur
la plaquette de l’appareil.
Câble d’alimentation
Ne jamais utiliser la machine à café si le câble d’alimentation
est défectueux. Si le câble d’alimentation est abîmé, il doit
être remplacé par le fabricant ou par son service d’assistance
aux clients. Ne pas faire passer le câble d’alimentation sur des
arêtes vives ou sur des objets très chauds. Le protéger contre
l’huile.
Ne pas transporter ou tirer la machine à café par son câble. Ne
pas retirer la che en la tirant par le câble. Ne pas la toucher
avec les mains mouillées.
Éviter que le câble d’alimentation ne pende librement des tables ou des ét agères.
Protection des autres personnes
Garder les enfants sous supervision, a n d’éviter qu’ils ne
jouent avec l’appareil.
Les enfants ne se rendent pas compte des risques liés aux
électro ménagers. Les matériaux utili sés pour l'emballage de la
machine doivent ê tre gardés hors de la portée des enfants.
Danger de brûlures
Ne pas diriger le je t d’eau chaude ou de vapeur surchau ée vers
soi et/ou vers d ’autres pers onnes. Utiliser toujour s les poignées
ou les boutons prévus à cet e et.
Ne ja mais ôte r le por te- ltre press urisé p endant la dist ribut ion
du café. Pendant le chau age, des gouttes d’eau chaude peuvent sortir du groupe de dis tribution du café.
Ne jamais distribuer de café lorsque la température de la machine est trop élevée, c'est-à-dire lorsque les DEL «
«
» sont allumées simultanément.
» et
Emplacement
Ranger la machine à café dans un endroit sûr pour éviter tout
risque de renversement ou de blessures.
Risque de fuite d’eau chaude ou de vapeur surchau ée : dan-
ger de brûlures !
Ne pas garder la machine à une température inférieure à 0°C :
le gel pourr ait l'endommager.
Ne pas utiliser la machine à café en plein air.
Ne pas poser la machine sur des surfaces trop chaudes ou à
proximité d'une amme nue : le châssis pourrait fondre ou
s'abîmer.
Nettoyage
Avant de nettoyer la machine, il faut la déconnecter par la
touche ON/OFF et ôter la che de la prise de courant. Attendre
quelques ins tants pour que la machine refroidisse.
Ne jamais plonger la machine dans l’eau !
Il est stric tement interdit d’essayer d’inter venir à l’intérieur de
la machine.
Ne pas utilise r l’eau qui est rest ée pendant plusieurs jour s dans
le réservoir pour un usage alimentaire ; laver le réservoir et le
remplir d’eau fraîche potable.
Espace pour l’utilisation et l’entretien
Pour un fonctionnement correct et e cace de la machine à
café, il est cons eillé de :
• Choisir une surface d’appui plane et nivelée ;
• Choisir un endroit assez bien éclairé, propre et pourvu
d’une prise de courant facilement accessible ;
• Prévoir une distance minimale des parois de la machine,
comme indiqué sur la gure (Fig. A).
Rangement de la machine
Si la machine reste inutilisée pendant longtemps, la mettre
hor s tension e t ôter la che de l a prise. R anger la ma chine dan s
un lieu sec et hors de la portée des enfants. La protéger contre
la poussière et la s aleté.
Réparations / Entretien
En cas de pannes, de dommages ou de défauts présumés à la
suite d’une chute, débrancher immédiatement la che de la
prise. Ne jamais mettre en marche une machine défectueuse.
Seuls les Centres d'Assistance Agré és peuvent e ectuer des intervention s et des réparations. Nous déclinons toute responsabilité en cas de dommages pour toute opération non e ectuée
dans les règles de l ’art.
En cas d’incendie
En cas d'incendie, utiliser des extincteurs à anhydride carbonique (CO
). N’utiliser ni d’eau ni d’extinc teurs à poudre.
2
Français
• 35 •
Page 36

Légende des composants de la machine
(Page 2)
1 Bandeau de commande
2 Couvercle du réservoir à eau
3 Bouton eau chaude/vapeur
4 Logement pour accessoires
5 Réservoir à eau
6 Support égouttoir
7 Bac récupération d'eau + grille
8 Groupe de dis tribution du café
9 Buse de vapeur (Pannarello)
10 Câble d'alimentation
11 Interrupteur ON/OFF
12 Porte- ltre pressurisé
13 Mesure à café moulu
14 Filtre à café moulu
(unique pour la distribution de 1 ou 2 cafés)
15 Adaptateur du ltre à dosettes de c afé
16 Filtre à dosettes de café
17 Bouton de sélection
18 DEL « Machine allumée »
19 DEL « Vapeur prête »
20 DEL café/eau - « Machine prête »
4.3 Branchement de la machine
Le courant électrique peut être dangereux ! Par
conséquent, s'en tenir toujours scrupuleusement aux consignes de sécurité. Ne jamais utiliser de
câbles défectueux ! Les câbles et les ches défectueux
doivent être immédiatement remplacés par des Centres d'Assistance Agréés.
La tension de l’appareil a été con gurée à l’usine. Véri er si la
tension du réseau correspond aux indications gurant sur la
plaquette d'identi cation située sur le fond de l’appareil.
• Avant de brancher la machine sur le réseau électrique, vé-
ri er si l’interrupteur ON/OFF (11) se trouve sur « 0 ».
• Br ancher la che sur une pr ise de courant murale ayant u ne
tension appropriée.
4.4 Réservoir à eau
• (Fig.1) - Enlever le couvercle du réservoir à eau (2) en le
soulevant.
• (Fig.2) - Retirer le réservoir à eau (5).
• (Fig.3) - Le rincer et le r emplir d’eau fraîche potable ; é viter
d’en verser une quantité excessive.
4 MISE EN PLACE
Pour votre sécurité et celle des tiers, s’en tenir scrupuleusement aux « Consignes de sécurité » indiquées au
chap. 3.
4.1 Emballage
L’emballage d'origine a été conçu et réalisé pour protéger la
machine durant sa livraison. Il est conseillé de le conserver
pour tout éventuel transport à venir.
4.2 Avertissements de mise en place
Avant d’installer la machine, s’en tenir aux consignes de sécurité suivantes :
• placer la machine dans un endroit sûr ;
• s’assurer que les enfants n’ont pas la possibilité de jouer
avec la machine ;
• ne pas pla cer la machine sur des surfaces t rès chaudes ou à
proximité d’une amme nue.
La machine à café est en n prête pour être branchée sur le
réseau électrique.
Remarque : i l est recommandé de l aver les composants avant leur toute première utilisation
et/ou après des périodes d’inactivité.
Ne remplir le réservoir qu’avec de l'eau fraîche
potable non pétillante. L'eau chaude ou tout
autre liq uide peuvent endo mmager le réser voir. Ne pas
mettr e la machine en marc he s’il n’y a pas d’eau : s’assurer que le réservoir est su samment plein.
• (Fig.2) - Insérer correctement le réservoir dans son loge-
ment et replacer le cou vercle (2).
4.5 Amorçage du circuit
Au début, après avoir distribué de la vapeur ou après avoir
épuis é l'eau contenue dans le réser voir, le circ uit de la machi ne
doit être réamorcé.
• Appuyer sur l'interrupteur ON/OFF (11) et le mettre sur
« I ». La DEL (18) s'allume : la machine es t allumée.
• (Fig.4) - Pla cer u n réc ipie nt so us la buse de va peur (Pann a-
rello).
• Ouvrir le bouton (3) « eau chaude/vapeur » en le tournant
dans le sens inverse des aiguilles d’une montre.
• (Fig.5) - Mettre le bouton de sélection (17) sur
«
».
• Attendre jusqu’à ce que un jet d'eau régulier sorte de la
buse de vapeur (Pannarello).
• (Fig.5) - Met tre le bouton de sélection (17) sur «
• Fermer le bouton (3) « eau chaude/vap eur » en le tournant
dans le sens des aiguilles d'une montre. Enlever le récipient.
».
• 36 •
Page 37

4.6 Première utilisation ou après une période d'inactivité
Cet te si mple o péra tion v ous ga rant it une dist ribut ion o ptima le
et est à e ectuer :
- lors du premier démarrage ;
- lorsque la machine reste inactive pendant une longue pé-
riode (pendant plus de 2 semaines).
L'eau distribuée doit être vidée dans une vi-
dange spéciale et ne peut plus être destinée à
la consommation humaine. Si le récipient se remplit,
pendant le cycle, arrêter la distribution et le vider
avant de recommencer l'opération.
• (Fig.3) - Rincer le rés ervoir et le remplir d ’eau fraîche pot a-
ble.
• (Fig.4) - Placer un récipient sous la buse de vapeur (Pan-
narello). Ouvrir le robinet (3) en le tournant dans le sens
inverse des aiguilles d’une montre.
(Fig.5) - Mettre le bouton de sélection (17) sur «
• Dis tribuer tout le contenu du réser voir à eau depuis la buse
eau chaude/vapeur (Pannarello) ; pour terminer la distribution, mettre le bouton de sélection (17) sur «
mer le robinet (3) en le tournant dans le sens des aiguilles
d'une montre.
• (Fig.3) - Remplir le ré servoir avec de l’eau fraîche p otable.
• (Fig.13-14) - Introduire le porte- ltre par le bas dans le
groupe de distribution (8) et le tourner de gauche à droite
jusqu'à ce qu'il se bloque.
• (Fig.15) - Placer un récipient approprié sous le porte- l-
tre.
• (Fig.16) - Tourner le bouton de sélection (17) sur «
pour faire sortir toute l'eau se trouvant dans le réservoir.
(Fig.17) - Lorsqu'il n'y a plus d'eau dans le réservoir, pour
arrêter la distribution, mettre le bouton de sélection (17)
sur «
».
• Rem plir à nouveau le réservoi r et attendre jusqu’à ce que la
DEL « Machine prête » (20) s'allume.
• (Fig.19) - Enlever le porte- ltre du groupe en le tournant
de droite à gauche e t le rincer à l'eau fraîche potable.
La machine est prête ; quant aux mécanismes de fonctionnement de la distribution du café et de la vapeur, consulter les
chapitres correspondants.
».
» et fer-
»
5 DISTRIBUTION DU CAFÉ
Attention ! Pendant la distribution du café, il
est interdit d’ôter le porte- ltre pressurisé, en
le tournant manuellement dans le sens des aiguilles
d'une montr e. Danger de brûlures.
• Pendant cette opération, la DEL (20) « Machine prête »
peut s’allumer et s’éteindre. Ce fonctionnement doit être
considéré comme normal et ne constitue pas une anomalie.
• Avant d’utiliser la machine, véri er si le bouton « eau
chaude/vapeur » (3) est fermé et que le réservoir à eau de
la machine contienne une quantité d’eau su sante.
• (Fig.3) - Appuyer sur l'interrupteur ON/OFF (11) et le met-
tre sur « I ».
• Attendre jusqu’à ce que la DEL « Machine prête » (20) s'al-
lume. La machine est prête pour la distribution du café.
Les accessoires pour la distribution du café se
trouvent dans un logement spécialement conçu
pour faciliter ces opérations.
Pour la mesure du café moulu et/ou les ltres nécessaires, soulever le couvercle (2) et prélever la quantité
souhaitée (Fig.35 et Fig.36)
5.1 Avec du café moulu
• (Fig.7) - Insérer le ltre (14) dans le porte- ltre pressu-
risé (12) ; lors de la première utilisation, le ltre est déjà
inséré.
• (Fig.13) - Introduire le porte- ltre par le bas dans le grou-
pe de distribution (8).
• (Fig.14) - Tourner le porte- ltre de gauche à droite jusqu’à
ce qu’il se bloque. Laisser la poignée du porte- ltre pressurisé ; la poignée tourne légèrement vers la gauche. Ce
mouvement garantit le parfait fonctionnement du porte l t r e .
• (Fig.16) - Précha u er le porte- ltre press urisé en met tant
le bouton de sélection (17) sur «
sortir du porte- ltre pressurisé (cette opération n’est nécessaire que pour le premier café).
• (Fig.17) - Après avoir distribué 150 ml d'eau, mettre le
bouton de sélection (17) sur «
tion.
• (Fig.19) - Enlever le porte- ltre de la machine en le tour-
nant de droite à gauche et vider l’eau résiduelle. Grâce au
ltre spécial (14) dont la machine est pourvue, il n’est pas
nécessaire de changer de ltre pour obtenir un ou deux
cafés.
• (Fig.35) - Prélever la mesure de la machine.
». L’eau commence à
» pour arrêter la distribu-
Français
• 37 •
Page 38

• (Fig.8) - Verser 1-1,5 mesures pour un café individuel ou 2
mesures pour un café double. Éliminer le café en excès se
trouvant sur le bord du porte- ltre.
• (Fig.13) - Introduire le porte- ltre (12) par le bas dans le
groupe de distribution (8).
• (Fig.14) - Tourner le porte- ltre de gauche à droite jusqu’à
ce qu’il se bloque.
• (Fig.15) - Prélever 1 ou 2 tasses préchau ées et les
placer sous le porte- ltre pressurisé. Véri er si elles sont
correctement placées sous les buses de distribution du
café.
• (Fig.14) - Tourner le bouton de sélection (17) sur «
• Lorsque la machine a distribué la quantité de café souhaitée, tourner le bouton de sélection (17) sur «
arrêter la distribution. La distribution terminée, attendre
quelques secondes ; retirer les tasses de c afé (Fig. 18).
• (Fig.19) - Retirer le porte- ltre pressurisé et évacuer le
marc de café.
Remarque : dans le porte- ltre il reste une petite quantité d’eau ; cela est normal et n'est dû
qu’aux caractéristiques du porte- ltre.
».
» pour
en le tournant de droite à gauche et vider l’eau résiduelle.
• (Fig.12) - Introduire la dosette dans le porte- ltre et s’as-
surer que le papier de la dosette ne sort pas du porte- ltre.
• (Fig.13) - Introduire le porte- ltre pressurisé par le bas
dans le groupe de distribution (8).
• (Fig.14) - Tourner le porte- ltre de gauche à dro ite jusqu’à
ce qu’il se bloque.
• Prélever 1 tasse préchau ée et la placer sous le porte- l-
tre. Véri er si elle est correctement placée sous les buses
de distribution du café.
• (Fig.16) - Tourner le bouton de sélection (17) sur «
• (Fig.17) - Lorsque la machine a distribué la quantité de
café souhaitée, tou rner le bouton de sélectio n (17) sur «
pour arrêter la distribution du café. Retirer la tasse.
• (Fig.19) - La distribution terminée, attendre quelques se-
condes ; retirer le porte- ltre et jeter la doset te utilisée.
Remarque importante : a n de garantir de
bons résultats, le ltre (16) et l'adaptateur (15)
doivent être gardés toujours propres. Laver le ltre et
l'adaptateur tous les jour s après leur utilisation.
».
»
Re mar qu e im po rt ant e : a n de g ar ant ir d e bo ns
résultats, le ltre (14) doit être gardé toujours
propre. Laver le ltre tous les jours après l'utilisation.
5.2 Avec des dosettes de café
• (Fig. 9) - À l'aide d'une cui ller à café, enlever le l tre à café
moulu (14) du porte- ltre pressurisé (12).
• (Fig.10) - Insérer l'adaptateur pour dosettes (15) dans le
porte- ltre pressurisé (12), la partie bombée tournée vers
le bas.
• (Fig.11) - Ensuite, introduire le ltre pour dosettes (16)
dans le porte- ltre pressurisé (12).
• (Fig.13) - Introduire le porte- ltre pressurisé par le bas
dans le groupe de distribution (8).
• (Fig.14) - Tourner le porte- ltre de gauche à dro ite jusqu’à
ce qu’il se bloque. Laisser la poignée du porte- ltre pressurisé. Grâce à un système automatique, la poignée se déplace légèrement vers la gauche.
Ce mouvement garantit le parfait fonctionnement du por-
te- ltre pressurisé.
• (Fig.16) - Précha u er le porte- ltre press urisé en met tant
le bouton de sélection (17) sur «
sortir du porte- ltre pressurisé (cette opération n’est nécessaire que pour le premier café).
• (Fig.17) - Après avoir distribué 150 ml d'eau, mettre le
bouton de sélection (17) sur «
tion.
• (Fig.19) - Enlever le porte- ltre pressurisé de la machine
». L’eau commence à
» pour arrêter la distribu-
6 CHOIX DU TYPE DE CAFÉ CONSEILS
Généralement, tous les types de café disponibles dans le commerce peuvent être utilisés. Toutefois, le café est un produit
naturel et son goût change en fonction de l’origine et des mélanges réalisés. Il est donc conseillé d’essayer plusieurs types
de café, a n de trouver celui qui s’adapte le mieux à vos goûts.
Pour des résultats optimaux, il est conseillé d’utiliser des mélanges spécialement préparés pour les machines à café expresso. Le café devrai t toujours sortir réguliè rement du porte- ltre
pressurisé sans qu'il s'égoutte.
La vitesse de distribution du café peut être modi ée en modi ant légè rement la dose de c afé dans l e ltre et /ou en uti lisant
une mouture di érente.
Pour obtenir un meilleur résultat et pour faciliter le nettoyage
et la préparation, Saeco vous conseille d’utiliser des dosettes
unidose marquées ESE.
AVANT TOUTE OPÉRATION DE DISTRIBUTION DE
VAPEUR OU D’EAU CHAUDE, VÉRIFIER SI LA BUSE
DE VAPEUR (PANNARELLO) EST CORRECTEMENT ORIENTÉE
VERS LE BAC DE RÉCUPÉRATION D’EAU.
• 38 •
Page 39

7 EAU CHAUDE
Danger de brûlures ! Il peut y avoir quelques
éclaboussures d’eau chaude au début de la distribution. La buse de distribution peut atteindre des
températures élevées : éviter tout contact direct avec
les mains.
• Appuyer sur l'interrupteur ON/OFF (11) et le mettre sur « I ».
• Attendre jusqu’à ce que la DEL « Machine prête » (20) s'al-
lume. La machine est prête.
• (Fig. 21) - Placer un récipient ou u n verre à thé sous la buse
de vapeur (Pannarello).
• (Fig.21) - Ouvrir le bouton (3) en le tournant dans le sens
inverse des aiguilles d’une montre.
• (Fig.22) - Mettre le bouton de sélection (17) sur «
• (Fig.23) - Une fois la quantité d’eau chaude souhaitée dis-
tribuée, met tre le bouton de sélection (17) sur «
• (Fig.24) - Fermer le bouton (3) en le tournant dans le sens
des aiguilles d’une montre.
• Retirer le récipient contenant l’eau chaude.
».
».
le haut, a n d'obtenir un réchau age uniforme.
Il est conseillé une distribution de 60 secondes
maximum.
• Une fois ce procédé terminé, fermer le bouton (3) en le
tournant dans le sens des aiguilles d'une montre. Prélever
la tasse avec le lait émulsionné.
• (Fig.30) - Mettre le bouton de sélection (17) sur «
Si les deux DEL «
a atteint une température trop élevée pour la distribution
du café.
• Pour mettre la machine en service, amorcer le circuit
conformément à la section 4.5.
Remarque : la machine est prête lorsque la DEL
« Machine prête » est allumée xe.
Remarque : s’il n’est pas possible de distribuer
un cappuccino comme indiqué plus haut, réamorcer le circuit selon ce qui est prévu à la section 4.5
et répéter par la suite toutes les opérations.
» et « » sont allumées, la machine
».
Français
8 VAPEUR / CAPPUCCINO
Danger de brûlures ! Il peut y avoir quelques
éclaboussures d’eau chaude au début de la distribution. La buse de distribution peut atteindre des
températures élevées : éviter tout contact direct avec
les mains.
• Appuyer sur l'interrupteur ON/OFF (11) et le mettre sur « I ».
• Attendre jusqu’à ce que la DEL « Machine prête » (20) s'al-
lume.
• (Fig. 25) - Mettre le bouton de sélection (17) sur «
DEL (20) s'éteint.
• Attendre jusqu’à ce que la DEL (19) s'allume. La machine
est prête pour la distribution de la vapeur.
• (Fig.26) - Placer un réc ipient sous la buse de vapeur.
• (Fig.26) - Ouvrir le bouton (3) pendant quelques instants
pour faire écouler l’eau résiduelle de la buse de vapeur
(Pa nnar ello) ; seu le de la va peur comm enc e à so rti r au b out
de quelques secondes.
• (Fig.27) - Fermer le bouton (3) et retirer le récipient.
• Remplir 1/3 du récipient servant à préparer le cappuccino
avec du lait froid.
Pour obtenir de meilleurs résultats, utiliser du
lait froid.
• (Fig. 28) - Plonge r la buse de vape ur dans l e lait et ouvri r le
bouton (3) en le tournant dans le sens inverse des aiguilles
d’une montre. Tourner lentement le récipient du bas vers
». La
Procéder de la même façon pour réchau er
d'autres boissons.
• Il faut ensuite nettoyer la buse de vapeur avec un chi on
humide.
9 NETTOYAGE
L’entretien et le nettoyage ne peuvent être e ectués que si la
machine est f roide et débranchée du réseau élect rique.
• Ne pas plonger la machine dans l’eau. Ne pas laver ses
composants au lave-vaisselle.
• Ne pas utiliser d’alcool éthylique, de solvants ni d’agents
chimiques agressifs.
• Il est recommandé de nettoyer quotidiennement le réservoir à eau et de le remplir avec de l'eau fraîche.
• (Fig.31-33) - Une fois par jour, après avoir réchau é le
lait , démont er la par tie ex térieu re du Pann arello e t la laver
avec de l’eau fraîche potable.
• (Fig.31-32-33) - Une fois par semaine, nettoyer la buse de
vapeur. Pour ce faire, il f aut :
- enlever la partie extérieure du Pannarello (pour le nettoyage normal) ;
- retirer la partie supérieure du Pannarello de la buse de
vapeur ;
- laver la partie supérieure du Pannarello avec de l'eau fraîche potable ;
- laver la buse de vapeur avec un chi on humide et enlever
tout éventuel résidu de lait ;
- replacer la partie supérieure dans la buse de vapeur (véri-
• 39 •
Page 40

er si elle est insérée complètement) ;
Monter à nouveau la partie ex térieure du Pannarello.
• (Fig.34) - Une fois par jour, vider et laver le bac d'égoutte-
ment.
• Pour le nettoyage de l’appareil, utiliser un chi on doux
légèrement imbibé d’eau.
• (Fig.20) - Pour nettoyer le porte- ltre pressurisé, procéder comme suit :
- (Fig.9) - retirer le ltre, le laver soigneusement à l’eau
chaude.
- retirer l’adaptateur (si présent), le laver soigneusement à
l’eau chaude.
- laver la partie intérieure du porte- ltre pressurisé.
• Ne pas laisser sécher la machine et/ou ses composants
dans un four à micro-ondes et/ou un four traditionnel.
• (Fig.35-36) - Une fois par semaine, nettoyer le logement
des accessoires avec un chi on humide pour enlever tout
éventuel résidu de café ou de poussière.
Remarque : ne pas mettre le porte- ltre pressurisé au l ave-vaisselle.
10 DÉTARTRAGE
La formation d e calcaire est liée à l’emploi de l’appareil. Le c ycle
de détartrage est nécessaire tous les 1 ou 2 mois d’utilisation
de la machine et/ou en cas de réduction de la quantité d'eau
débitée. Utiliser uniquement le produit détartrant Saeco.
S’il y a du con it, le contenu du mode d’emploi
et d’entretien a l a priorité par rappo rt aux indications fournies sur les accessoires et/ou les matériaux
d’usage vendus séparément.
Utiliser le produit détartrant Saeco (Fig.B). Ce
produit a été spécialement conçu pour assurer,
si utilisé correctement, la meilleure performance et
fonctionnalité de l'appareil pendant toute sa vie opérationnelle et pour éviter toute altération du produit
distribué. Avant de commencer le cycle de détartrage,
véri er : SI LE FILTRE À EAU (si utilisé) A ÉTÉ ENLEVÉ.
Ne pas boire la solution détartrante et les pro-
duits distribués jusqu'à la conclusion du cycle.
Ne jamais utiliser de vinaigre pour détartrer la machine.
1 (Fig.13-14) - Introduire le porte- ltre par le bas dans le
groupe de distribution (8) et le tourner de gauche à droite
jusqu'à ce qu'il se bloque.
2 (Fig.2) - Enlever et vider le réser voir à eau.
3 (Fig.3) - Ver ser MOITIÉ du contenu de la bouteille de
détartrant concentré Saeco dans le réser voir à eau de l'ap-
pareil et le remplir avec de l’eau fraîche potable jusqu'au
niveau MAX indiqué.
4 Mettre en marche la machine : appuyer sur l'interrupteur
ON/OFF (11) et le mettre sur « I ».
(Fig.21) - Prélever (comme indiqué au chapitre 7 du mode
d'emploi) 2 tasses d'eau (à peu près 150 ml chacune) de
la buse de vapeur/eau chaude. Arr êter ensuite la machine :
appuyer sur l'interrupteur ON/OFF (11) et le mettre sur
« 0 ».
5 La machine arrêtée, attendre 15 à 20 minutes pour que le
détartrant ait son e et.
6 Mettre en marche la machine, en appuyant sur l'interrup-
teur ON/OFF (11).
(Fig.21) - Prélever (comme indiqué au chapitre 7 du mode
d'emploi) 2 tasses d'eau (à peu près 150 ml chacune) de la
buse de vapeur/eau chaude. Arrêter ensuite la machine en
appuyant sur l'interrupteur ON/OFF (11) et la garder ainsi
pendant 3 minutes.
7 Répéter les opérations décrites au point 6 jusqu'à vider
complètement le réservoir à eau.
8 (Fig.3) - Rincer le réservoir à l'eau fraîche potable et le
remplir complètement.
9 Placer un récipient sous le porte- ltre.
10 Mettre en marche la machine en appuyant sur l'interrup-
teur ON/OFF (11) ; tourner le bouton de sélection (17) sur «
» et prélever tout le contenu du réservo ir au moyen du
porte- ltre. Pour arrêter la distribution, mettre le bouton
de sélection (17) sur «
11 (Fig. 3) - Remplir à nouveau le réservoir avec de l'eau fraî-
che.
(Fig.21) - Placer un gr and récipient sous la buse de vapeur
(Pannarello). Ouvrir le robinet de distribution de l'eau (3)
en le tournant dans le sens inverse des aiguilles d'une
montre.
(Fig.22) - Tourner le b outon de sélection (17) sur «
prélever tout le contenu du réservoir au moyen de la buse
de vapeur/eau chaude.
12 (Fig.23) - Une fois l'eau prélevée, pour arrêter la distribu-
tion, mettre le bouton de sélection (17) sur «
(Fig.24) - Fermer le robinet de distribution de l'eau (3) en
le tournant dans le sens des aiguilles d'une montre.
13 Répéter encore une fois les opérations du point (8) pour
un total de 4 réser voirs.
14 (Fig.19) - Enlever le porte- ltre du groupe en le tournant
de droite à gauche et le rincer à l'eau fraîche potable.
Le cycle de dét artrage est ainsi terminé.
(Fig.3) - Remplir à nouveau le réservoir avec de l'eau fraîche.
Le cas échéant, r éamorcer le circuit comme indi qué à la section
4.5.
La solution détartrante doit être éliminée
conformément à ce qui est prévu par le produc-
».
» et
».
• 40 •
Page 41

teur et/ou par les normes en vigueur dans le Pays où la
machine est utilisée.
11 ÉLIMINATION
L’ appareil est conçu et fabriqué pour faciliter sa valorisation,
son recyclage ou sa réutilisation conformément à la directive
européenne 2002/96/CEE relative aux appareils électriques et
électroniques usagés (waste electrical and electronic equipment - WEEE).
Le logo
ci-contre apposé sur l’appareil indique que
ce produit ne peut pas être éliminé avec les déchets ménagers
non triés.
Lorsque vous aur ez décidé de vous en sépare r dé nitivement, il
convient de faire p rocéder à la collecte sélec tive de cet appareil
en v ous conf orm ant a u mo de de rep ris e mis en pl ace d ans v otr e
commune (collecte ponctuelle des encombrants, déchèterie),
ou en faisant appel au serv ice de reprise proposé par votre distributeur, ou bien, en le con ant à des organis ations caritative s
et des associations à but non lucratif.
En vous assurant que ce pr oduit est éliminé correc tement, vous
favorisez la prévention des conséquences négatives pour l’environnement et la santé humaine.
Français
• 41 •
Page 42

Panne Causes possibles Solution
La machine ne se met pas en
marche.
La pompe émet beaucoup de
bruit.
Le café est trop froid.
La mousse du lait ne se forme
pas.
Il n’est pas possible de préparer
de cappuccinos.
Le café coule trop rapidement, la
crème ne se forme pas.
La café ne coule pas ou bien il
coule goutte à goutte.
Le café coule des bords.
La machine n'est pas branchée sur le réseau électrique.
Manque d’eau dans le réser voir Remplir d’eau (sect. 4.4).
La DEL (20) « Machine prête » é tait éteinte
lorsque le bouton de sélection (17) était
sur «
».
Le p orte - ltre n ’est p as ins éré po ur le p réchau age (chap. 5).
Les tasses sont froides. Préchau er les tasses à l'eau chaude.
Lait inapproprié : lait en poudre, lait mai-
gre.
Pannarello sale.
Il n’y a plus de vapeur dans la chaudière.
Pas assez de café dans le porte - ltre. Ajouter du café (chap. 5).
Mouture trop grossière. Changer de mélange (chap. 6).
Café non frais ou inapproprié. Changer de mélange (chap. 6).
La dosette est vieille ou inappropriée. Changer de dosette.
Un composant dans le porte- ltre fait
défaut.
Eau insu sante. Remplir d’eau (sect. 4.4).
Mouture trop ne. Changer de mélange (chap. 6).
Café pressé dans le porte- ltre. Remuer le café moulu.
Trop de café dans le porte- ltre. Réduire la quantité de café dans le porte- ltre.
Bouton (3) ouvert. Fermer le bouton (3).
Machine calci ée. Détartrer la machine (chap. 10).
Le ltre contenu dans le porte- ltre est
bouché.
La dosette est inappropriée. Changer le type de dosette.
Porte- ltre mal inséré dans le groupe de
distribu tion du café.
Bord supérieur du porte- ltre encrassé. Net toyer le bord du porte- ltre.
Dosette mal insérée.
Trop de café dans le porte- ltre. Réduire la quantité de café à l ’aide de la mesure.
Brancher la machine sur le réseau élec trique.
Attendre jusqu’à ce que la DEL (20) s'allume.
Préchau er le porte- lt re.
Utiliser du lait entier.
Nettoyer le Pannarello comme indiqué au Chap.
9.
Réamorcer le circuit (sect. 4.5) et répéter le s opé-
rations décrites au Chap. 8.
Véri er si tous les composants sont présents et
montés correctement.
Nettoyer le ltre (chap. 9).
Insérer correctement le por te- ltre (chap. 5).
Introduire correctement la dosette de manière
qu'elle ne sorte pas du porte- ltre.
Pour toute pa nne non détaillée d ans le tableau ci- dessus ou en cas de re mèdes insu sants à résou dre le problème,
s'adresser à un centre d'assistance agréé.
• 42 •
Page 43

DÉCLARATION CE DE CONFORMITÉ
ANNÉE 09
2006/95/CE, 2004/108/CE.
Saeco International Group
Via Torretta, 240
40041 GAGGIO MONTANO (BO) - ITALIE
nous déclarons sous notre responsabilité que le produit :
MACHINE À CAFÉ SIMPLE
TYPE : HD 8323 / HD 8325
auquel se réfère cette déclaration est conforme aux réglementations suivantes :
• Sécurité des appareils électrodomestiques et analogues - Prescriptions générales
EN 60335-1 (2002) + A1(2004) + A2(2006) + A11(2004) + A12 (2006) + A13(2008)
• Sécurité des appareils électrodomestiques et analogues - Partie 2-15
Règles particulières pour les appareils de chau age des liquides
EN 60 335-2-15 (2002) + A1(2005) + A2 (2008)
• Sécurité des appareils électrodomestiques et analogues. Champs électro-magnétiques
Méthodes d'évaluation et de mesure - EN 62233 (2008).
• Limites et méthodes de mesure des perturbations radioélectriques produites par les appareils électrodomestiques ou analogues
comportant des moteurs
ou des dispositifs thermiques, par les outils électriques et par
les appareils électriques analogues - EN 55014-1 (2006).
• Compatibilité électromagnétique (EMC)
Partie 3, Limites - Section 2 : Limites pour les émissions de courant harmonique (courant
d'entrée des appareils ≤ 16 A par phase) - EN 61000-3-2 (2006).
• Compatibilité électromagnétique (EMC)
Partie 3, Limites - Section 3 : Limitation des uctuations et des pointes de tension dans les
systèmes d'alimentation à basse tension pour des appareils ayant un courant nominal ≤ 16A.
EN 61000-3-3 (1995) + corr.(1997) + A1(2001) + A2 (2005).
• Exigences d'immunité pour appareils électroménagers, outillages électriques et appareils analogues.
Norme pour famille de produits EN 55014-2 (1997) + A1 (2001).
Français
selon les dispositions des directives : 2006/95/CE, 2004/108/CE.
Fait à Gaggio Montano, le 28.04.2009
R & D Manager
M. Andrea Castellani
• 43 •
Page 44

1 INFORMACIÓN DE CARÁCTER GENERAL
La máquina de c afé prepara 1 ó 2 tazas d e café exprés y dispon e
de un tubo orientable para el suministro del vapor y del agua
caliente. Los mando s situados en la parte delanter a del aparato
llevan iconos de fácil interpret ación.
La máquina ha sido diseñada para uso doméstico y no s e aconseja un funcionamiento continuo de tipo profesional.
¡Atención! Se declina toda responsabilidad por
posibles daños en caso de:
• Uso indebido y no conforme a las instrucciones de
uso;
• Re parac ione s real izad as en ce ntro s de as isten cia no
autorizados;
• Alteración del cable de alimentac ión;
• Alteración de cualquier componente de la máquina;
• Utilizac ión de repuestos y accesorios no originales;
• Descalci cación de la máquina no realizada y almacenamiento en locales con temperatura por debajo
de 0°C.
En dichos c asos la garantía pierde su validez.
1.1 Para facilitar la lectura
El triángulo de advertencia señala
todas las instrucciones importan-
tes para la seguridad del usuario.
¡Observar atentamente dichas indic aciones para evitar
heridas g raves!
2 DATOS TÉCNICOS
El fabrican te se reserva el derec ho de modi car las caracterís ticas técnic as del producto.
Tensión nominal - Potencia nominal - Alimentación
Véase placa en el aparato
Estruc tura exterior
Plástico
Dimensiones (l x a x p) (mm)
210 x 300 x 280
Peso
3,9 kg
Longitud cable
1,3 m
Panel de mandos
En la parte delantera
Porta ltro
Presurizado
Pannarello
Especial para capuchinos
Depósito de agua
1,25 litros - Extraíble
Presión bomb a
15 ba r
Caldera
Acero inoxidable
Dispositivos de seguridad
Ter mof us ibl e
La referencia a guras, partes del aparato o elementos del panel de mandos, etc . está indicada con números o l etras; en este
caso, hacer referencia a las guras.
Este símbolo señala la información más importante para asegurar un mejor uso de la máqui-
na.
Las guras que remiten al texto se encuentran en las
primera s páginas del manua l. Consultar dichas p áginas
durante la lectura de las instrucciones de uso.
1.2 Cómo utilizar estas instrucciones de
uso
Guardar estas instrucci ones de uso en un lugar seguro y adjuntarlas a la máquina de café en caso de que otra persona vaya
a utilizarla.
Para información más detallada o en caso de algún problema,
dirigirse a centros de asistencia autorizados.
• 44 •
3 NORMAS DE SEGURIDAD
No dejar nunca que las partes bajo tensión entren en
contacto con el agua: ¡riesgo de cor tocircuito! ¡El vapor
sobrecalentado y el agua caliente pueden causar quemaduras! No d irigir nunca el c horro de vapor o del ag ua
caliente hacia partes del cuerpo; manipular con cuidado la boqui lla de salida de vapor / a gua caliente: ¡riesg o
de quemaduras!
Uso previsto
Esta máquina de café ha sido diseñada sólo para uso doméstico. ¡Se prohíbe toda modi cación técnica y cualquier uso
inadecuado por los riesgos que estos conllevan! El aparato no
está diseñado para que lo usen personas (incluidos los niños)
con reducidas capacidades físicas, mentales o sensoriales o
con experiencia y/o competencias insu cientes, a no ser que lo
utilicen bajo la supervisión de una persona responsable de su
seguridad o que ésta les enseñe a usarlo.
Page 45

Alimentación de corriente
Conectar la máquina de café sólo a una toma de corriente adecu ada. L a te nsió n deb e co rres pon der c on la indi cad a en la plac a
del aparato.
Cable de alimentación
Nunca usar la máquina de café si el cable de alimentación está
defectuoso. Si el cable de alimentación está dañado, solicitar
al fabricante o al servicio de asistencia clientes la sustitución
del mismo. Procurar que el cable de alimentación no pase por
esquinas o can tos agudos ni por encima de objeto s muy calientes. Proteger lo del aceite.
No llevar ni tirar de la máquina de café agarrándola por el cable. No desenchufar la máquina tirando del cable ni tocar el
enchufe con las manos mojadas.
Procurar que el cable de alimentación no cuelgue libremente
de mesas o estanterías.
Protección de otras personas
Mantener fuera del alcance de los niños para evitar que jueguen con el aparato.
Los niños no se dan cuenta de los peligros relacionados con el
uso indebido de un electrodoméstico. No dejar al alcance de los
niños los materiales usados para embalar la máquina.
Riesgo de quemaduras
No dirigir contra sí mismo ni contra los demás el chorro de vapor sobrec alentado o de agua caliente. Usa r siempre las empuñaduras o los mandos.
Nunca quitar el porta ltro presurizado durante el suministro
del café. Durante la fase de calentamiento del grupo de café
pueden salir unas gotas de agua caliente.
No suministrar café cuando la temperatura de la máquina es
elevada, es decir cuando los pilotos luminosos “
permanecen iluminados juntos.
” y “ ”
Colocación
Colocar la máquina de café en un lugar seguro, donde nadie
puede volcar la o quedar herido. Agua caliente o vap or sobrecalentado podrían salir de los tubos: ¡riesgo de q uemaduras!
No colocar la máquina e n un lugar con temperatu ra inferior a 0
°C; las bajas temperaturas pueden dañar la máquina.
No usar la máquina de café al aire libre.
No apoyar la máquina sobre super cies muy calientes ni cerca
de llamas abiertas a n de evitar que su carrocería se derrita o
que de cualquier manera se dañe.
Limpieza
Antes de limpiar la máquina, es necesario apagarla pulsando el
botón ON/OFF y, a continuación, desconectarla de la toma de
corriente. Esperar hasta que la máquina se enfríe.
¡Nunca sumergir la máquina en el agua!
Se prohíbe terminantemente tratar de intervenir en la estructura interna de la máquina.
No usar el agua que ha quedado en el depósito durante unos
días para uso alimentario. Lavar el depósito y volver a llenarlo
con agua potable f resca.
Espacio para el uso y mantenimiento
Para un cor recto y buen fu ncionamiento de la má quina de café
se aconseja lo siguiente:
• Elegir una super cie de apoyo bien nivelada;
• Elegir u n ambiente su cientemente iluminado e hig iénico.
La toma de corriente debe ser de fácil acceso;
• Prever una distancia mínima de la máquina con respecto a
la pared como mues tra la gura (Fig. A).
Almacenamiento de la máquina
Cuando la máquina permanece inactiva durante un largo perío do, apa garla y desco nec tar el e nchuf e de la t oma de corri ente. Guardar la máquina en un lugar seco y al que no puedan
acceder los niños. Protegerla del polvo y de la suciedad.
Reparaciones / Mantenimiento
En caso de averías, desperfectos o sospecha de desperfectos
tras una caída, se recomienda desconectar en seguida la máquina de la toma de corriente. No poner nunca en funcionamiento una máquina defectuosa. Sólo los Centros de Asistencia Autorizados pueden realizar reparaciones a la máquina. En
caso de reparaciones realizadas de forma incorrecta, se declina
toda responsabilidad por posibles daños.
Antiincendio
En caso de incendio usar extintores de anhídrido carbónico
(CO
). No usar agua ni ex tintores de polvo.
2
Componentes de la máquina (Pág. 2)
1 Panel de mandos
2 Tapa del depósito de agua
3 Mando de agua caliente / vapor
4 Alojamiento para accesorios
5 Depósito de agua
6 Super cie apoyatazas
7 Bandeja de goteo + rejilla
8 Grupo de café
9 Tubo de vapor (Pannarello)
10 Cable de alimentación
11 Interruptor ON/OFF
12 Porta ltro presurizado
13 Cuchara dosi cadora para café molido
14 Filtro para c afé molido
(único para el suministro de 1 ó 2 cafés)
15 Adaptador de ltro para pastillas de café
16 Filtro para p astillas de café
17 Mando de selección
18 Piloto luminoso "Máquina encendida"
19 Piloto luminoso “Vapor listo”
20 Piloto luminoso café / agua - "Máquina lista"
• 45 •
Español
Page 46

4 INSTALACIÓN
Para su seguridad y la seguridad de terceras personas
observar atentamente las “Normas de seguridad” descritas en el Cap. 3.
Introducir siempre en el depósito sólo agua po-
table fresca y sin gas. El agua caliente y otros
líquidos pueden dañar el depósito. No poner en funcionamiento l a máquina sin agua: ase gurarse de que haya
su ciente agua en el depósito.
4.1 Embalaje
El emb alaje or iginal h a sido dis eñado y re alizad o para pr oteger
la máquina durante el transporte. Se aconseja guardarlo para
transportes futuros.
4.2 Advertencias para la instalación
Antes de instalar la máquina, respetar las siguientes normas
de seguridad:
• colocar la máquina en un lugar seguro;
• asegurarse de que los niños no tengan la posibilidad de
jugar con la máquina;
• no apoyar la máquina sobre super cies muy calientes ni
cerca de llamas abier tas.
Ahora se puede conectar la máquina de café a la red eléctric a.
Nota: se aconseja lavar los componentes antes
de utiliz arlos por primer a vez y/o después de un
largo per íodo sin uso.
4.3 Conexión de la máquina
¡La corriente eléctrica puede ser peligrosa! Por
tanto, observar siempre atentamente las normas de seguridad. ¡Nunca usar cables defectuosos! Los
cables y l os enchufes defe ctuosos deben s er sustituidos
en seguida en los Centros de Asistencia Autorizados.
La tensión del aparato ha sido determinada en fábrica. Comprobar que la tensión de red corresponda a los valores indicados en la placa de identi cación situada en la parte de abajo
del aparato.
• Antes de co nectar la máquina a la red elé ctrica, comprobar
que el interruptor ON/OFF (11) esté en la posición "0".
• Conectar el enchufe a una toma de corriente de pared de
tensión adecuada.
• (Fig. 2) - Introducir el depósito de agua asegurándose de
que esté colocado correctamente en su alojamiento y volver a colocar la tapa (2).
4.5 Carga del circuito
Al principio, después de suministrar vapor o terminar el agua
en el depósito, se debe recargar el circuito de la máquina.
• Pulsar el interruptor ON/OFF (11) y posicionarlo en "I"; el
piloto luminoso (18) se enciende indicando que la máquina
está encendida.
• (Fig. 4) - Colocar un recipiente debajo del tubo de vapor
(Pannarello).
• Abrir el mando (3) “agua caliente/vapor” girándolo en el
sentido contrario a las agujas del reloj.
• (Fig. 5) - Llevar el mando de selección (17) a la posición
"
".
• Esperar a que desde el tubo de vapor (Pannarello) salga un
chorro de agua regular.
• (Fig. 5) - Llevar el mando de s elección (17) a la posición " ".
• Cerrar el mando (3) “agua caliente/vapor” girándolo en el
sentido de las agujas del reloj. Retirar el recipiente.
4.6 Primer uso o después de un período
de inactividad
Esta simple o peración asegura un sumini stro óptimo y debe ser
realizada:
- en la primera puesta en marcha;
- cuando la máquina permanece un largo período sin us arse
(más de 2 semanas).
Se debe vaciar el agua suministrada en un de-
sagüe apropiado y no se la puede utilizar para
la alimentación. Si durante el ciclo el recipiente se llena, detener el suministro y vaciarlo antes de reiniciar
la operación.
4.4 Depósito de agua
• (Fig. 1) - Abrir la tapa del depósito de agua (2), levantán-
dola.
• (Fig. 2) - Extraer el depósito de agua (5).
• (Fig. 3) - Aclarar y llenar con agua potable fresca evitando
llenar hasta el tope.
• 46 •
• (Fig. 3) - Enjuagar el depósito y llenarlo con agua potable
fresca.
• (Fig. 4) - Colocar un recipiente debajo del tubo de vapor
(Pannarello). Abrir el mando (3) girándolo en el sentido
contrario a las agujas del reloj.
(Fig. 5) - Llevar el mando de selección (17) a la posición
"
".
• Suministrar todo el contenido del depósito de agua a
través del tubo de vapor/agua caliente (Pannarello); para
Page 47

terminar el suministro, llevar el mando de selección (17) a
la posición "
de las agujas del reloj.
• (Fig. 3) - Llenar el depósito con agua potable fresca.
• (Fig. 13-14) - Fijar el porta ltro en el grupo de café (8) in-
troduciéndolo desde abajo del grupo y girarlo de izquierda
a derecha hasta que se bloquee.
• (Fig. 15) - Colocar un recipiente adecuado debajo del por-
ta ltro.
• (Fig. 16) - Girar el mando de selección (17) a la posición "
(Fig. 17) - Una vez terminada el agua, detener el suminis-
tro llevando el mando de selección (17) a la posición "
• Llenar nuevamente el depósito y esperar a que el piloto
luminoso de “Máquina lista” (20) se encienda.
• (Fig. 19) - Retirar el por ta ltro del grupo girándolo de derecha a izquier da y enjuagarlo con agua potable fresca.
Ahora la máquina es tá lista; para los detalles de f uncionamiento sobre el suministro de café y vapor, consultar los capítulos
correspondientes.
" y cerrar el mando (3) giránd olo en el sentido
" y suministrar toda el agua presente en el depósito.
".
5 SUMINISTRO DE CAFÉ
¡Atención! Nunca quitar el porta ltro presuriza-
do girándolo manualmente en el sentido de las
agujas del reloj durante el suministro del café. Riesgo
de quemaduras.
• Durante esta operación, el piloto luminoso (20) “Máquina
lista” se puede encender y apagar; dicho funcionamiento
debe ser consider ado normal y no una anomalía.
• Ase gurarse, antes de usar la máquina, de que el mando (3)
“agua caliente/vapor” esté cerrado y que haya su ciente
agua en el depósito.
• (Fig. 3) - Pulsar el interruptor ON/OFF (11) y posicionarlo
en "I".
• Esperar a que el piloto luminoso (20) “Máquina lista” se
encienda; a continuación, la máquina está lista para el suministro de café.
Los accesorios para suministrar café se guardan
en un alojamiento diseñado especialmente
para simpli car y agilizar estas operaciones.
Para la cuchara dosi cadora de café molido y/o los ltros necesarios, levantar la tapa (2) y retirar cuanto se
desee (Fig. 35 y Fig. 36)
5.1 Con café molido
• (Fig. 7) - Int roduci r el ltro (14) en el p orta ltr o presur iza-
do (12); al u tiliza rlo la pr imera v ez, el ltro y a está i ntrodu cido.
• (Fig. 13) - Fijar el porta ltro en el grupo de café (8) intro-
duciéndolo desde abajo del grupo.
• (Fig. 14) - Girar el porta ltro de izquierda a derecha hasta
que se bloquee. Soltar el mango del porta ltro presurizado, el mango gira levemente hacia la izquierda. Este movimiento garantiza el perfecto funcionamiento del porta ltro.
• (Fig. 16) - Precalentar el porta ltro presurizado llevando
el mando de selección (17) a la posición "
a salir agua del porta ltro presurizado (esta operación es
necesaria sólo para el primer café).
• (Fig. 17) -Después de haber dejado correr 150 cc de agua,
llevar el mando de selección (17) a la posición "
tener el suministro.
• (Fig. 19) - Retirar el porta ltro de la máquina girándolo
de derecha a izquierda y vaciar el agua restante. Gracias al
especial ltro (14) de la máquina, no es necesario cambiar
de ltro para obtener uno o dos cafés.
• (Fig. 35) - Quitar la cuchara dosi cadora de la máquina.
• (Fig. 8) - Añadir 1 -1,5 medidas para un café individual o
2 medidas rasas para un café doble; limpiar el borde del
porta ltro de los restos de café.
• (Fig. 13) - Fijar el po rta ltro (12) en el grupo d e café intro -
duciéndolo debajo del grupo (8).
• (Fig. 14) - Girar el porta ltro de izquierda a derecha hasta
que se bloquee.
• (Fig. 15) - Colocar 1 ó 2 taz as precalentadas debajo del
porta ltro presurizado; asegurarse de que las tazas estén
debajo de los ori cios de suministro de c afé.
• (Fig. 14) - Llevar el mando de selección (17) a la posición
"
".
• Una vez obtenida la cantidad de café deseada, girar el
mando de selección (17) a la posición "
suministro de café. Finalizado el suministro esperar unos
segundos, retirar las tazas con el café (Fig. 18).
• (Fig. 19) - Extraer el porta ltro presurizado y vaciarlo de
los posos.
Nota: en el porta ltro queda una pequeña cantidad de agua; esto es normal y se debe a las
características del porta ltro.
Not a imp ort ante: El ltr o (14) deb e man tene rse
limpio para poder garantizar un resultado per-
fecto. Lavar diariamente tras el uso.
"; empezará
" para de-
" para detener el
Español
• 47 •
Page 48

5.2 Con pastillas de café
• (Fig. 9) - Quitar, utilizando una cucharita de café, el ltro
para café molido (14) del porta ltro presurizado (12).
• (Fig. 10) - Introducir, en el porta ltro presurizado (12), el
adaptador para pastillas de café (15), con la parte convexa
orientada hacia abajo.
• (Fig. 11) - A continuación, introducir el ltro para pastillas
de café (16) en el porta ltro presurizado (12).
• (Fig. 13) - Fijar el porta ltro presurizado en el grupo de
café (8) introduciéndolo desde abajo del grupo.
• (Fig. 14) - Girar el porta ltro de izquierda a derecha hasta
que se bloquee. Soltar el mango del porta ltro presurizado. A continuación, un sistema automático mueve el mango levemente hacia la izquierda.
Este movimiento garantiza el perfecto funcionamiento de l
porta ltro presurizado.
• (Fig. 16) - Precalentar el porta ltro presurizado llevando
el mando de selección (17) a la posición "
a salir agua del porta ltro presurizado (esta operación es
necesaria sólo para el primer café).
• (Fig. 17) -Después de haber dejado correr 150 cc de agua,
llevar el mando de selección (17) a la posición "
tener el suministro.
• (Fig. 19) - Retirar el por ta ltro presurizado de la máquina
girándolo de derecha a izquierda y vaciar el agua restante.
• (Fig. 12) - Introducir la pastilla de café en el porta ltro;
asegurarse de que el papel de la pastilla de café no salga
del port a lt ro.
• (Fig. 13) - Fijar el porta ltro presurizado en el grupo de
café (8) introduciéndolo desde abajo del grupo.
• (Fig. 14) - Girar el porta ltro de izquierda a derecha hasta
que se bloquee.
• Colocar 1 taza precalentada debajo del porta ltro; ase-
gurarse de que las tazas estén debajo de los ori cios de
suministro de café.
• (Fig. 16) - Llevar el mando de selección (17) a la posición
"
".
• (Fig. 17) - Una vez obtenida la cantidad de café deseada,
girar el mando de selección (17) a la posición "
tener el suministro de café; retirar la taza con el café.
• (Fig. 19) - Finalizado el suminis tro esperar unos segundos,
luego ext raer el porta ltro y tirar la pas tilla de café usada.
Nota importante: El ltro (16) y el adaptador
(15) deben mantenerse limpios para poder garantizar un resultado perfecto. Lavar diariamente tras
el uso.
"; empezará
" para de-
" para de-
6 SELECCIÓN DEL TIPO DE CAFÉ CONSEJOS
En general es posible utilizar cualquier tipo de café que se encuentra en vent a. Sin embargo, el café es un produc to natural y
su sabor camb ia en función del origen y de la mezc la; por tanto
es aconsejable probar varios tipos hasta encontrar el café que
nos agrada más.
De todas formas, para obtener mejores resultados se aconseja
utilizar mezclas preparadas especialmente para las máquinas
de café exprés. La salida del café del porta ltro presurizado
deberá ser siempre regular y sin goteo.
Es posible modi car la velocidad de salida del café cambiando
levemente la c antidad de café del ltro y/o usando un caf é que
tenga un grado de molido diferente.
Para asegurar un excelente resultado en taza y facilitar la limpieza y la preparación, Saeco recomienda usar pastillas de café
monodosis marcadas ESE.
ANTES DE REALIZAR CUALQUIER OPERACIÓN DE
SUMINISTRO DE VAPOR O DE AGUA CALIENTE,
COMPROBAR QUE EL TUBO DE VAPOR (PANNARELLO) ESTÉ
ORIENTADO HACIA LA BANDEJA DE GOTEO.
7 AGUA CALIENTE
¡Riesgo de quemaduras! Al empezar el suminis-
tro se pueden producir pequeñas salpicaduras
de agua caliente. El tubo de suministro puede alcanzar
temperaturas elevadas: no tocarlo directamente con
las manos.
• Pulsar el interruptor ON/OFF (11) y posicionarlo en "I".
• Esperar a que el piloto luminoso (20) “Máquina lista” se
encienda; a continuación, la máquina está lista.
• (Fig. 21) - Colocar un recip iente o una taza de té debajo de l
tubo de vapor (Pannarello).
• (Fig. 21) - Abrir el mando (3) girándolo en el sentido con-
trario a las agujas del reloj.
• (Fig. 22) - Llevar el mando de selección (17) a la posición
"
".
• (Fig. 23) - Una vez obtenida la c antidad de agua caliente de-
seada, llevar el mand o de selección (17) a la posición "
• (Fig. 24) - Cerrar el mando (3) girándolo en el sentido de
las agujas del reloj.
• Retirar el recipiente con el agua caliente.
".
• 48 •
Page 49

8 VAPOR / CAPUCHINO
¡Riesgo de quemaduras! Al empezar el suminis-
tro se pueden producir pequeñas salpicaduras
de agua caliente. El tubo de suministro puede alcanzar
temperaturas elevadas: no tocarlo directamente con
las manos.
• Pulsar el interruptor ON/OFF (11) y posicionarlo en "I"..
• Esperar a que el piloto luminoso (20) “Máquina lista” se
encienda.
• (Fig. 25) - Llevar el mando de selección (17) a la posición
"
"; el piloto luminoso (20) se apaga.
• Esperar a que el piloto luminoso (19) se encienda; a conti-
nuación, la máquina está lista para el suministro de vapor.
• (Fig. 26) - Colocar un recipiente debajo del tubo de vapor.
• (Fig. 26) - Abrir el mando (3) durante algunos segundos
para que salga e l agua que ha quedado en el tubo de va por
(Pannarello); en poco tiempo, empez ará a salir sólo vapor.
• (Fig. 27) - Cerrar el mando (3) y retirar el recipiente.
• Llenar con leche fría 1/3 del recipiente que desee utilizar
para preparar el capuchino.
Para garantizar un mejor resultado usar leche
fría
• (Fig. 28) - Sumergir el tubo de vapor en la leche y abrir el
mando (3); girándolo en el sentido contrario a las agujas
del reloj; mover lentamente el recipiente que contiene la
leche de abajo hac ia arriba para que la operación de calentamiento sea uniforme.
Se recomienda un suministro máximo de 60
segundos.
• Al nal, cerrar el mando (3) girándolo en el sentido de las
agujas del reloj; retirar la taza con la le che montada.
• (Fig. 30) - Llevar el mando de selección (17) a la posición
"
".
Si ambos pilotos luminosos "
dos, la máquina tiene u na temperatura demasiado eleva da
para el suministro de café.
• Proceder con la operación de carga del circuito como se
indica en el apartado 4.5 para que la máquina sea operativa.
" y " " están encendi-
El mismo sistema puede ser utilizado para el
calentamiento de otras bebidas.
• Tras el uso, limpiar el tub o de vapor con un paño húmedo.
9 LIMPIEZA
El m ante nim ient o y la limp iez a se p ued en ef ec tuar sól o cua ndo
la máquina está fría y descone ctada de la red eléctr ica.
• No sumergir la máquina en el agua ni introducir sus componentes en el lavavajillas.
• No usar alcohol etílico, disolventes y/o productos químicos
agresivos.
• Es aconsejable limpiar el depósito de agua diariamente y
llenarlo con agua fresca.
• (Fig.31-33) - Diariamente, después de haber calentado la
leche, desmontar la parte exterior del Pannarello y lavarla
con agua potable f resca.
• (Fig.31-32-33) - Una vez a la semana se debe limpiar el
tubo de vapor. Para realizar esta operación se debe:
- desmontar la parte exterior del Pannarello (para la limpieza habitual);
- retirar la parte superior del Pannarello del tubo de vapor;
- lavar la parte superior del Pannarello con agua potable
fresca;
- lavar el tubo de vapor con un paño húmedo y quitar los
eventuales residuos de leche;
- volver a colocar la par te superior en el tubo de vapor (ase gurarse de que se haya introducido completamente);
Volver a montar la par te exterior del Pannarello.
• (Fig.34) - Vaciar y lavar la bandeja de goteo diariamente.
• Limpiar la máquina usando un paño suave humedecido
con agua.
• (Fig.20) - Para limpiar el porta ltro presurizado proceder
de la siguiente manera:
- (Fig.9) - extraer el ltro y lavarlo bien con agua caliente.
- extraer el adaptador (si está instalado) y lavarlo bien con
agua caliente.
- lavar el interior del por ta ltro presurizado.
• No secar la máquina ni sus componentes usando un horno
de microondas o un horno convencional.
• (Fig.35-36) - Una vez a la semana limpiar el alojamiento
de los accesorios con un paño húmedo para quitar eventuales restos de café o polvo en general.
Español
Nota: la máquina es operativa cuando el piloto
luminoso
j o .
Nota: si no se consigue preparar un capuchino
como se describe, se debe recargar el circuito
como se indica en el apartado 4.5 y luego repetir las
operaciones.
“Máquina lista” está encendido
Nota: no lavar el porta ltro presurizado en el
lavavajillas.
• 49 •
Page 50

10 DESCALCIFICACIÓN
La formaci ón de cal se produce con el uso d el aparato; el ciclo de
descalci cación debe efectuarse regularmente cada 1-2 meses
y/o cuando se observa una reducción del caudal de agua. Utilizar exclusivamente el producto desc alci cante Saeco.
En caso de con icto, las i nstrucciones pr esentes
en el manual de uso y mantenimiento tienen
priori dad respecto a las i ndicaciones re lativas a accesorios y/o materiales de uso vendidos por separado.
Utilizar el producto descalci cante Saeco (Fig.
B). Ha sido formulado especí camente para
mantener al máximo el rendimiento y la funcionalidad
de la máquina para toda su vida operativa, y también
para evitar, si utilizado co rrectamente, alteraciones de
los productos suministrados. Antes de iniciar el ciclo de
descalci cación asegurarse de que: SE HAYA EXTRAÍDO
EL FILTRO DE AGUA, si utilizado.
No beber la solución descalci cante y los pro-
ductos suministrados hasta completar el ciclo.
No utilizar bajo ningún concepto vinagre como producto descalci cante.
1 (Fig. 13-14) - Fijar el porta ltro en el grupo de café (8) in-
troduciéndolo desde abajo del grupo y girarlo de izquierda
a derecha hasta que se bloquee.
2 (Fig. 2) - Retirar y vaciar el depósito de agua.
3 (Fig. 3) - Ver ter la MITAD del contenido de la botella de lí-
quido descalci cante concentrado Saeco en el depósito de
agua del aparato y llenarlo con agua potable fresca hasta
el nivel MÁX.
4 Encender la máquina pulsando el interruptor ON/OFF (11)
posicionándolo en "I".
(Fig. 21) - Suministrar (como se describe en el capítulo 7
del manual), a través del tubo de vapor/agua caliente, 2
tazas de agua (aproximadamente 150 ml para cada una).
Luego, apagar la máquina mediante el interruptor ON/OFF
(11) posicionándolo en "0".
5 Dejar que el producto descalci cante actúe durante 15-20
minutos con la máquina apagada.
6 Encender la máquina pulsando el interruptor ON/OFF (11).
(Fig. 21) - Suministrar (como se describe en el capítulo 7
del manual), a través del tubo de vapor/agua caliente, 2
tazas de agua (aprox imadamente 150 ml para cada una). A
continuación, apagar la máquina mediante el interruptor
ON/OFF (11) y dejarla apagada durante 3 minutos.
7 Repetir las operaciones descritas en el punto 6 hasta que
el depósito de agua quede completamente vacío.
8 (Fig. 3) - Enjuagar el depósito y llenarlo completamente
con agua potable f resca.
9 Coloc ar un recipiente debajo del porta ltro.
10 Encender la máquina pulsando el interruptor ON/OFF
• 50 •
(11); girar el mando de selección (17) a la posición " "
y a través del por ta ltro, suministrar todo el contenido del
depósito. Para detener el suministro, llevar el mando de
selección (17) a la posición "
11 (Fig. 3) - Volver a llenar el depósito con agua fresca.
(Fig. 21) - Colocar un recipiente grande debajo del tubo de
vapor (Pannarello). Abrir el mando de suministro de agua
(3) girándolo en el sentido contrario a las agujas del reloj.
(Fig. 22) - Girar el mando de selección (17) a la posición
"
" y suministrar to do el contenido del depósito a través
del tubo de vapor/agua caliente.
12 (Fig. 23) - Una vez que el agua se haya agotado, para de-
tener el suministro, llevar el mando de selección (17) a la
posición "
(Fig. 24) - Cerrar el mando de suministro de agua (3) gi-
rándolo en el sentido de las agujas del reloj.
13 Repetir otra vez las operaciones desde el punto (8) por un
total de 4 depósitos.
14 (Fig. 19) - Retirar el porta ltro del grupo girándolo de de-
recha a izquier da y enjuagarlo con agua potable fresca.
De esta manera concluye el ciclo de descalci cación.
(Fig. 3) - Volver a llenar el depósito con agua fresca. Si fuera
necesario, cargar el circuito como se describe en el apar. 4.5.
por las normas vigentes en el país donde se usa.
".
La soluc ión descalc i c ante que se util ice se debe
eliminar según lo previsto por el fabricante y/o
".
11 ELIMINACIÓN DEL APARATO
Este producto cumple con la Directiva EU 2002/96/EC.
El simbolo
que este producto no se puede tratar como desperdicios normales del hogar.
Este producto se debe entregar al punto de recogida de equipos eléctricos y electrónicos para reciclaje.
Al asegurarse de que este producto se deseche correctamente,
usted ayudará a evitar posibles consecuencias negativas para
el ambiente y la salud pública, lo cual podria ocurrir si este
producto no se manipula de forma adecuada. Para obtener
información más detallada sobre el reciclaje de este producto,
póngase en contac to con la administración de su c iudad, con su
servicio de desechos del hogar o con la tienda donde compró
el producto.
en el producto o en su embalaje indica
Page 51

Avería Posibles causas Solución
La máquina no se enciende. Máquina no conectada a la red eléctrica. Conectar la máquina a la re d eléctrica.
La bomba es muy ruidosa. Falta agua en el depósito . Llenar con agua (apartado 4.4).
El piloto luminoso (20) "Máquina lista"
El café sale frío.
No se forma la crema de la leche.
No es posible preparar el capuchino.
El café sale muy rápido y no se
forma la crema.
El café no sale o bien sale en
gotas.
El café sale fuera de los bordes.
estaba apagado cuando se ha llevado
el mando de selección (17) a la posición
"
".
No se ha introducido el porta ltro para el
precalentamiento (Cap. 5).
Tazas frías. Precalentar las tazas con agua c aliente.
Leche no adecuada: leche en polvo, leche
desnatada.
Pann arell o suci o. Limpiar el Pannarello como se desc ribe en el Cap. 9.
No hay más vapor en la caldera.
Hay muy poco café en el porta ltro. Añadir café (Cap. 5).
Molido demasiado gr ueso. Usar una mezcla diferente (Cap. 6).
Café viejo o no adecuado. Usar una mezcla diferente (Cap. 6).
Pastilla de café vieja o inadecuada. Cambiar la pastilla de café usada.
Falta un componente en el porta ltro.
Falta agua. Llenar con agua (apartado 4.4).
Molido demasiado no. Usar una mezcla diferente (Cap. 6).
Café comprimido en el porta ltro. Mover el café molido.
Hay demasiado café en el porta ltro. Reducir la cantidad de café en el por ta ltro.
Mando (3) abierto. Cerrar el mando (3).
Máquina calci cada. Descalci car la máquina (Cap. 10).
Filtro del porta ltro obstruido. Limpiar el ltro (Cap. 9).
Pastilla de café inadecuada. Cambiar el tipo de pastilla de café.
Porta ltro colocado de forma incorrecta
en el grupo de café.
Borde superior del porta ltro sucio. Limpiar el borde del porta ltro.
Pastilla de café colocada de forma inco-
rrecta.
Hay demasiado café en el porta ltro.
Esperar a que el piloto luminoso (20) se encienda.
Precalentar el porta ltro.
Utilizar leche entera.
Cargar el circuito (apartado 4.5) y repetir las operaciones descritas en el Cap. 8.
Comprobar que todos los componentes estén
presentes e instalados correctamente.
Colocar el porta ltro de forma correcta (Cap. 5).
Colocar la pastilla de café correctamente de manera que no salga del porta ltro.
Reducir la cantidad de café utilizando la cuchara
dosi cadora.
Español
Para las averías no mencionadas en la tabla o en caso de que las soluciones indicadas no funcionen, contactar con
un centro de asistencia.
• 51 •
Page 52

DECLARACIÓN DE CONFORMIDAD CE
AÑO 09
2006/95/CE, 2004/108/CE.
Saeco International Group
Via Torretta , 240
40041 GAGGIO MONTANO (BO)
declaramos bajo nuestra responsabilidad que el producto:
MÁQUINA DE CAFÉ INDIVIDUAL
TIPO: HD 8323 / HD 8325
al cual se re ere esta declaración, cumple con las siguientes normas:
• Seguridad de electrodomésticos y aparatos eléctricos - Requisitos generales
EN 60335-1 (2002) + A1(2004) + A2(2006) + A11(2004) + A12 (2006) + A13(2008)
• Seguridad de electrodomésticos y aparatos eléctricos - Parte 2-15
Requisitos especí cos para aparatos para calentar líquidos
EN 60 335-2-15 (2002) + A1(2005) + A2(2008)
• Seguridad de aparatos para uso doméstico y análogos. Campos electromagnéticos
Métodos de evaluación y medición -EN 62233 (2008).
• Límites y métodos de medición de las interferencias de radio características de aparatos con motor
eléctrico y dispositivos térmicos para uso doméstico y objetivos análogos, instrumentos eléctricos y
equipos eléctricos análogos - EN 55014-1 (2006).
• Compatibilidad electromagnética (EMC)
Parte 3^ Límites - Sección 2: Límites para las emisiones de corriente armónica (equipos
con corriente de entrada ≤ 16A por fase) - EN 61000-3-2 (2006).
• Compatibilidad electromagnética (EMC)
Parte 3^ Límites - Sección 3: Limitación de las uctuaciones y de los picos de tensión en los
sistemas de alimentación de baja tensión para equipos con corriente nominal ≤ 16A.
EN 61000-3-3 (1995) + corr. (1997) + A1 (2001) + A2 (2005).
• Requisitos de inmunidad para electrodomésticos, instrumentos y equipos análogos.
Norma para familia de productos EN 55014-2 (1997) + A1 (2001).
de conformidad con las disposiciones de las directivas: 2006/95/CE, 2004/108/CE.
Gaggio Montano 28/04/2009
• 52 •
R & D Manager
Ing. Andrea Castellani
Page 53

1 GENERALIDADES
A máquina de café é indicada para a preparação de 1 ou 2 chávenas de café expresso e é equipada com um tubo orientável
para a distribuição de vapor e de água quente. Os comandos
na parte frontal do aparelho são marcados com símbolos de
fácil interpretação.
A máquina foi pro jectada para um uso d oméstico e não está in dicada para um funcionamento contínuo de tipo pro ssional.
Atenção. Não se assume qualquer tipo de res-
ponsabilidade por eventuais danos, no caso de:
• Utilização errada e não conforme com os objectivos
previstos;
• Reparações não realizadas em centros de assistên-
cia autorizados;
• Alteração do cabo de alimentação;
• Alteração de qualquer componente da máquina;
• Utilização de peças sobressalentes e acessórios não
originais;
• Falta de des calci cação e a rmazenagem em lug ares
com temperatura abaixo de 0°C.
Nestes casos pena a dec adência da garantia.
1.1 Para facilitar a leitura
O triângulo de advertência indica
todas as instruções importantes
para a segurança do utilizador.
Preste muita atenção a essas indicações para evitar
ferimentos graves!
2 DADOS TÉCNICOS
O fabricante reserva o direito de modi car as características
técnicas do produto.
Tensão nominal - Potência nominal - Alimentação
Veja placa posicionada no aparelho
Material do corpo
Plástico
Dimensões (l x a x p) (mm)
210 x 300 x 280
Peso
3,9 kg
Comprimento do cabo
1,3 m
Painel de comando
Na parte frontal
Porta- ltro
Pressurizado
Pannarello
Especial para cappuccinos
Reservatório de água
1,25 litros - Ex traível
Pressão da bomba
15 ba r
Caldeira
Inox
Dispositivos de segurança
Ter mof us íve l
Português
A referência a ilustrações, partes do aparelho ou elementos
de comando, etc., está indicada mediante números ou letras;
neste caso re ra-se à própria ilustração.
Este símbolo evidencia as informações que se
devem ter em consideração, para uma melhor
utilizaç ão da máquina.
As ilustrações correspondentes ao texto encontram-se
nas primeiras páginas do manual. Consulte essas páginas durante a leitura das instruções de utilização.
1.2 Aplicação destas instruções de utili-
zação
Gua rde es tas ins truç ões de u tiliz ação e m lugar segur o e anex eas à máquina de café se por acaso uma outra pessoa precisar
utilizá-la.
Para mais informações ou em caso de problemas, contacte os
centros de assistência autorizados.
3 NORMAS DE SEGURANÇA
Nunca coloque as peças que estão ligadas à corrente
em contacto com água: perigo de curto-circuito! O vapor sobreaquecido e a água quente podem provocar
queimaduras! Nunca dirija o jacto de vapor ou de água
quente para as partes do corpo, toque com cuidado no
tubo de vapor/água quente: perigo de queimaduras!
Utilização prevista
A máquina de café é indicada exclusivamente para a utilização doméstica. É proibido efectuar modi cações técnicas e
qualquer utilização ilícita, devido aos riscos que pode causar!
O aparelho não se de stina a ser utilizad o por pessoas (incluind o
crianças) com reduzidas capacidades físicas, mentais ou sensoriais ou com experiência e/ou competências insu cientes, a
não ser que estejam so b a supervisão de uma pess oa responsável pela sua segurança ou que sejam ensinados por essa mesma pessoa a ut ilizar o aparelho.
• 53 •
Page 54

Alimentação de corrente
Ligue a máquina de café somente numa tomada de corrente
adequada. A tensão deve corresponder à indicada na placa do
aparelho.
Cabo de alimentação
Nunca utilize a máquina de café se o cabo de alimentação estiver defeituoso. Se o cabo de alimentação estiver dani cado,
deve ser substi tuído pelo produtor ou pelo seu s erviço de assistência a clientes. Não passe o cabo de alimentação por ângulos
e sob arest as vivas e nem por cima de obje ctos muito quentes e
proteja-o do óle o. Não ande com a máquina de café nem a pu xe
pelo cabo. Não ex traia a cha puxando -a pelo cabo, nem toque
nela com as mãos molhadas. Evite que o cabo de alimentação
caia livremente de mesas ou est antes.
Protecção de outras pessoas
Mantenha as crianças sob supervisão, para evitar que brinquem com o aparelho.
As crianças não se apercebem do perigo associado aos electrodomésticos. Não deixe ao alcance das crianças os materiais
utilizados para embalar a máquina.
Perigo de queimaduras
Evite dirigir contra si mesmo e/ou outras pessoas o jacto de
vapor sobreaquecido e/ou água quente. Utilize sempre as adequadas pegas ou botões.
Nunca tire o por ta- ltro pressu rizado durante a distr ibuição do
café. Durante a f ase de aquecimento pode m sair gotas de água
quente do grupo de distribuição do café.
Não distribua café quando a máquina está em sobreaquecimento, ou seja, quando os indicadores luminosos “
estão acesos ao mesmo tempo.
” e “ ”
Local
Coloque a máquina de café num local seguro, onde ninguém
possa virá -la ou ser ferido por ela.
A água quente ou vapor sobreaquecido poderão sair: perigo
de queimaduras!
Não mantenha a máquina a temperaturas inferiores a 0ºC; o
gelo poderia dani car a máquina.
Não utilize a máquina de café ao ar livre.
Não pouse a máquina em superfícies muito quentes e perto
de chamas livres, para evitar que a carcaça se funda ou que
dani cada.
Limpeza
Antes de limpar a máqu ina, é indispensável desligar a máq uina
com a tecla ON/OFF e depois retirar a cha da tomada de corrente. Além disso, deve esperar que a máquina arref eça.
Nunca mergulhe a máquina em água!
É rigorosam ente proibido tentar intervi r no interior da máqui na.
Não utilize, para ns alimentares, a água restante no reservatório durante alg uns dias, lave o reservatório e e ncha com água
fresca potável.
• 54 •
Espaço para a utilização e manutenção
Para o correcto e bom funcionamento da máquina de café
recomenda-se o seguinte:
• Escolher uma superfície de apoio bem nivelada;
• Escolher um ambiente su cientemente iluminado, higiénico e com uma cha de corrente facilmente alcançável;
• Prever uma distância mínima das paredes da máquina
como indicado na gura (Fig.A).
Armazenagem da máquina
Quando a máquina permanecer inutilizada por um longo período de tempo, deverá desligá-la e retirar a cha da tomada.
Guarde-a num local seco e não acessível a crianças. Proteja-a
do pó e da sujidade.
Reparações / Manutenção
No caso de avarias, defeitos ou suspeita de defeito após uma
queda, retire imediatamente a cha da tomada. Nunca coloque em funcionamento uma máquina defeituosa. Somente os
Centros de Assistência Autorizados podem realizar intervenções e reparações. No caso de intervenções não realizadas segundo as normas, rejeita-se qualquer tipo de responsabilidade
por eventuais danos.
Anti-incêndio
No caso de incêndio, utilize extintores de dióxido de carbono
(CO
). Não utilize água ou ex tintores de pó.
2
Legenda dos componentes da máquina
(Pág.2)
1 Painel de comando
2 Tampa do reservatório de água
3 Botão água quente / vapor
4 Sede para acessórios
5 Reservatório de água
6 Suporte de ap oio para chávenas
7 Depósito de recuperação da água + grelha
8 Grupo de distribuição de café
9 Tubo de vapor (Pannarello)
10 Cabo de aliment ação
11 Interruptor ON/OFF
12 Porta- ltro pressurizado
13 Medidor p ara café moído
14 Filtro para café moído
(único para a distribuição de 1 ou 2 cafés)
15 Adaptador para ltro de café em pastilhas
16 Filtro para café em pastilhas
17 Botão de selecção
18 Indicador luminoso de "máquina ligada"
19 Indicador luminoso "Vapor pronto"
20 Indic ador luminoso café / água - "Máquina pronta"
Page 55

4 INSTALAÇÃO
Para a sua segurança e a de terceiros, siga escrupulosamente as “Normas de segurança” indicadas no cap. 3.
4.1 Embalagem
A embalagem original foi projectada e realizada para proteger
a máquina durante o transporte. Recomenda-se conservá-la
para uma eventual ne cessidade de transporte no futuro.
Introduza no reservatório sempre e unicamen-
te água fresca potável sem gás. Água quente e
também outros líquidos podem dani car o reservatório. Não coloque a máquina em funcionamento sem
água: assegure-se de que há água su ciente dentro do
reservatório.
• (Fig.2) - Introduza o reservatório certi cando-se de re-
posicioná-lo correctamente na sua sede e colocar a tampa
(2).
4.2 Advertências de instalação
Antes de instalar a máquina, observe as seguintes indicações
de segurança:
• coloque a máquina num lugar seguro;
• cer ti que-se de que as crianças nã o têm a possibilidade de
brincar com a máquina;
• não coloque a máquina acima de superfícies muito quentes ou perto de chamas livres.
A máquina de café agora está pronta para ser ligada à rede
eléctrica.
Obs.: aconselha-se lavar os componentes antes
da sua primeira utilização e/ou depois de um
período de inutiliz ação.
4.3 Ligar a máquina
A corrente eléctrica pode ser perigosa! Por con-
seguinte, siga escrupulosamente as normas de
segurança. Nunca utilize cabos defeituosos! Os cabos e
as chas defeituosos devem ser imediatamente su bstituídos pelos Centros de A ssistência Autorizados.
A tensão do aparelho foi programada na fábrica. Certi que-se
de que a tensão de rede corresponde às indicações apresentadas na placa de identi cação posicionada no fundo do aparelho.
• Certi que-se de que o interruptor ON/OFF (11) esteja na
posição "0" antes de ligar a máquina à rede eléc trica.
• Introduza a cha numa tomada de parede de tensão ade-
quada.
4.4 Reservatório de água
• (Fig.1) - Remova a tampa do reservatório de água (2)
levantando-a.
• (Fig.2) - Retire o reservatório de água (5).
• (Fig.3) - Enxagúe-o e encha-o com água fresca potável
evitando introduzir uma quantidade excessiva.
4.5 Carregamento do circuito
No início, depois de ter distribuído vapor ou após a nalização
da água no reservatório, o circuito da máquina deve ser recarregado.
• Pre ssione o interruptor ON/OFF (11) e coloque-o na posição
"I"; o indicador luminoso (18) se acende para indicar que a
máquina está ligada.
• (Fig.4) - Coloque um recipiente abaixo do tubo de vapor
(Pannarello).
• Abra o botão (3) “água quente/vapor” virando-o no sentido contrário ao dos ponteiros do relógio.
• (Fig.5) - Coloque o botão de selecção (17) na posição
"
".
• Aguarde que saía um jacto regular de água do tubo de vapor (Pannarello).
• (Fig.5) - Coloque o botão de selecç ão (17) na posição "
• Fe che o botão (3) “água quente/vapor” v irando-o no senti do dos ponteiros do relógio. Remova o recipiente.
".
4.6 Primeira utilização ou após um perío-
do de inutilização
Esta simples operação assegura-lhe uma óptima distribuição
e deve ser realizada:
- na primeira utilização;
- quando a máquina permanecer inutilizada por um longo
período de tempo (por mais de 2 semanas).
A água distribuída deve ser esvaziada em uma
apropriada descarga e não pode ser utilizada
para a alimentação. Se o recipiente se enche, durante
o ciclo, par e a distribuição e e svazie-o antes de re começar a operação.
• (Fig.3) - Enxagúe o reservatório e encha-o com água fres-
ca potável.
• (Fig.4) - Coloque um recipiente abaixo do tubo de vapor
(Pannarello). Abra a torneira (3) rodando-a no s entido contrário ao do s ponteiros do relógio.
Português
• 55 •
Page 56

(Fig.5) - Coloque o bot ão de selecção (17) na posição " ".
• Distribua todo o conteúdo do reservatório de água pelo
tubo de vapor/água quente (Pannarello); para nalizar a
distribuição coloque o botão de selecção (17) na posição
"
" e feche a torneira (3) virando-a no sentido dos pontei-
ros do relógio.
• (Fig.3) - Encha o reser vatório com água fresca potável.
• (Fig.13-14) - Introduza o porta- ltro abaixo do grupo de
distribui ção (8), virando-o da es querda à direita até se bloquear.
• (Fig.15) - Introduza um recipiente adequado abaixo do
porta- ltro.
• (Fig.16) - Vire o botão de selecção (17) na posição "
distribua toda a água presente no reservatório.
(Fig.17) - Depois de terminada a água, pare a distribuição
e coloque o botão de selecção (17) na posição "
• Encha n ovamente o reservatóri o e aguarde que o indicador
luminoso de "máquina pronta" (20) se acenda.
• (Fig.19) - Remova o porta- ltro do grupo virando-o da
direita à esquerda e enxagúe -o com água fresca potável.
Agora a máquina está pronta; os detalhes de funcionamento
para a distribuição de café e de vapor podem ser consultados
nos respec tivos capítulos.
" e
".
5 DISTRIBUIÇÃO DO CAFÉ
Atenção! Du rante a distribui ção do café é proib i-
do desligar o porta- ltro pressurizado virando-o
manualmente no sentido dos ponteiros do relógio. Perigo de queimaduras.
• Durante esta operação o indicador luminoso (20) de "má-
quina pronta" poderá acender-se e apagar-se; este func ionamento deve ser considerado normal e não uma anomalia.
• Antes do uso, certi que-se de que o botão (3) água quen-
te/vapor esteja fechado e que o reservatório da máquina
contenha uma quantidade su ciente de água.
• (Fig.3) - Pressione o interruptor ON/OFF (11) e coloque-o
na posição "I".
• Aguarde que o indicador luminoso (20) de "máquina pron-
ta" se acenda, então a máquina está pronta para distribuir
o café.
Os acessórios para a distribuição do café são
guardados numa sede estudada especi camente para tornar estas operações simples e imediatas.
Com relação ao medidor para o café moído e/ou os ltros necessários, levante a tampa (2) e retire o quanto
desejado (Fig.35 e Fig.36)
5.1 Com café moído
• (Fig.7) - Introduza o ltro (14) no porta- ltro pressurizado
(12); na prime ira u tiliz ação o lt ro já s e enco ntra i ntro duzi do.
• (Fig.13) - Introduza o por ta- ltro debaixo do grup o de dis-
tribuição (8).
• (Fig.14) - Vire o porta- ltro da esquerda para a direita
até se bloquear. Solte a pega do porta- ltro pressurizado,
a própria pega virará ligeiramente para a esquerda. Este
movimento garante o perfeito funcionamento do porta l t r o .
• (Fig.16) - Pré-aqueça o porta- ltro pressurizado colo-
cando o botão de selecção (17) na posição "
com eç ará a sai r do p or ta- l tro pre ssur iz ado (e sta ope raç ão
tornar-se-á necessária apenas para o primeiro café).
• (Fig.17) -Depois de ter distribuído 150cc de água, coloque
o botão de selecç ão (17) na posição "
distribuição.
• (Fig.19) - Tire o porta- ltro da máquina, virando-o da
direita à esquerda, e deite fora a água residual. Graças ao
ltro especial (14) fornecido com à máquina, não precisa
trocar o ltro para obter um ou dois cafés.
• (Fig.35) - Retire o medidor da máquina.
• (Fig.8) - Deite 1-1,5 medidores para um único café ou 2
medidores cheios até à borda para o café duplo; limpe a
borda do por ta- ltro dos resíduos de café.
• (Fig.13) - Introduza o por ta- ltro (12) debaixo do grupo de
distribuição (8).
• (Fig.14) - Vire o porta- ltro da esquerda para a direita até
se bloquear.
• (Fig.15) - Pegue 1 ou 2 chávenas pequenas pré-aque-
cidas e coloque-as debaixo do porta- ltro pressurizado;
certi que-se de que estão colocadas correctamente debaixo dos furos de saída do café.
• (Fig.14) - Vire o botão de selecç ão (17) para a posição " ".
• Depois de alcançada a quantidade de café desejada, vire o
botão de selecç ão (17) para a posição "
a distribuição de café. Depois de terminada a distribuição,
aguarde alguns segundos; retire as chávenas com o café
(Fig.18).
• (Fig.19) - Retire o port a- ltro pressurizado e e svazie-o das
borras residuais.
Obs.: no porta- ltro permanece uma pequena
quantid ade de água; isto é norma l e é devido às
características do porta- ltro.
Obs. importante: O ltro (14) deve estar sempre limpo para garantir um resultado perfeito.
Lave diariamente após a utilizaç ão.
" para interromper a
"; a água
" para interrom per
• 56 •
Page 57

5.2 Com café em pastilhas
• (Fig.9) - Tire, ut ilizando uma colher (chá), o ltro para café
moído (14) do porta- ltro pressurizado (12).
• (Fig.10) - Introduza no porta- ltro pressurizado (12), o
adaptador pa ra as pastilhas (15), com a parte convexa virada para baixo.
• (Fig.11) - Depois, introduza o ltro para pastilhas (16) no
porta- ltro pressurizado (12).
• (Fig.13) - Introduza o por ta- ltro pressurizado d ebaixo do
grupo de distribuição (8).
• (Fig.14) - Vire o porta- ltro da esquerda para a direita até
se bloquear. Solte a pega do porta- ltro pressurizado. Um
sistema automático agora recolocará ligeiramente a pega
para esquerda.
Este movimento garante o perfeito funcionamento do
porta- ltro pressurizado.
• (Fig.16) - Pré-aqueça o porta- ltro pressurizado colo-
cando o botão de selecção (17) na posição "
com eç ará a sai r do p or ta- l tro pre ssur iz ado (e sta ope raç ão
tornar-se-á necessária apenas para o primeiro café).
• (Fig.17) -Depois de ter distribuído 150cc de água, coloque
o botão de selecç ão (17) na posição "
distribuição.
• (Fig.19) - Tire o porta- ltro pressurizado da máquina
virando- o da direita à esquerda, e deite f ora a água residual.
• (Fig.12) - Introduza a pastilha no porta- ltro; certi que-
se de que o papel da pastilha não sai do porta- ltro.
• (Fig.13) - Introduza o por ta- ltro pressurizado d ebaixo do
grupo de distribuição (8).
• (Fig.14) - Vire o porta- ltro da esquerda para a direita até
se bloquear.
• Pegue 1 chávena pequena pré-aquecida e posicione-a
debaixo do porta- ltro; certi que-se de que está colocada
correctamente debaixo dos furos de saída do café.
• (Fig.16) - Vire o botão de selecção (17) para a posição " ".
• (Fig.17) - Depois de alcançada a quantidade de café de-
sejada, vire o botão de selecção (17) na posição "
interromper a distribuição de café; retire a chávena com o
café.
• (Fig.19) - No m da distribuição aguarde uns segundos,
retire o por ta- ltro e deite fora a pastilha utilizada.
Obs. importante: O ltro (16) e o adaptador (15)
devem estar sempre limpos para garantir um
resultado perfeito. Lave diar iamente após a utiliz ação.
" para interromper a
"; a água
" para
6 ESCOLHA DO TIPO DE CAFÉ SUGESTÕES
Em linhas gerais é possível utilizar todos os tipos de café existentes à venda. Todavia, o café é um produto natural e o seu
gosto muda conforme a origem e a mistura; é preferível portanto experimentar vários tipos de café, para encontrar o que
satisfaz da melhor maneira os gostos pessoais.
Para um melhor resultado, aconselha-se utilizar misturas preparadas espe cialmente para máquinas de caf é expresso. O café
deveria sair sempre regularmente do porta- ltro pressurizado,
sem gotejar.
A velocidade de saída do café pode ser modi cada mudando
leveme nte a dose de c afé no ltro e/ou ut ilizando um café com
um grau de moagem diferente.
Para obter um melhor resultado na chávena e para facilitar a
limpeza e a preparação, a Saeco aconselha a utilizar café em
pastilhas monodose da marca ESE.
ANTES DE REALIZAR QUALQUER OPERAÇÃO RE-
LATIVA À DISTRIBUIÇÃO DO VAPOR OU DA ÁGUA
QUENTE, CERTIFIQUE-SE DE QUE O TUBO DE VAPOR (PANNARELLO) ESTEJA ORIENTADO SOBRE O DEPÓSITO DE RECUPERAÇÃO DE ÁGUA.
7 ÁGUA QUENTE
Pe ri go de qu ei ma du ra s! No in íc io da di st ri bu iç ão
podem veri car-se breves jactos de água quente. O tubo de distribuição pode alcançar temperaturas
elevadas: evite tocá-lo directamente com as mãos.
• Pressione o interruptor O N/OFF (11) e coloque-o na posição "I".
• Aguarde que o indicador luminoso (20) de "máquina pron-
ta" se acenda; agora a máquina está pronta.
• (Fig. 21) - Coloque um reci piente ou um copo (chá) debaixo
do tubo de vapor (Pannarello).
• (Fig.21) - Abra o botão (3) virando-o no sentido contrário
ao dos ponteiros do relógio.
• (Fig.22) - Coloque o botão de selecção (17) na posição
"
".
• (Fig .23) - Depois de retirada a quantidade desejada de água
quente, coloque o bot ão de selecção (17) na posição "
• (Fig. 24) - Feche o bot ão (3) virando-o no sentido dos po n-
teiros do relógio.
• Retire o recipiente com a água quente.
".
Português
• 57 •
Page 58

8 VAPOR / CAPPUCCINO
Pe rig o de que im adu ras ! No iní ci o da d is tri bu içã o
podem veri car-se breves jactos de água quente. O tubo de distribuição pode alcançar temperaturas
elevadas: evite tocá-lo directamente com as mãos.
O mesmo sistema pode ser utilizado para o
aquecimento de outras bebidas.
• Limpe, após esta operação, o tubo de vapor com um pano
húmido.
• Pre ssione o interruptor ON/OFF (11) e coloque-o na posição
"I".
• Aguarde que o indicador luminoso (20) de "máquina pronta" se acenda.
• (Fig. 25) - Coloque o botão de selecç ão (17) na posição "
"; o indicador luminoso (20) se apaga.
• Aguarde que o indicador luminoso (19) se acenda; neste
ponto a máquina está pronta para distribuir o vapor.
• (Fig.26) - Introduza um recipiente abaixo do tubo do vapor.
• (Fig.26) - Abra o botão (3) durante alguns segundos, de
modo a fazer sa ir a água residual do tubo de vapor (Panna rello); em pouco tempo começará a sair apenas vapor.
• (Fig.27) - Feche o botão (3) e tire o recipiente.
• Encha com leite frio 1/3 do recipiente que deseja utilizar
para prepar ar o cappuccino.
Para garantir um melhor resultado utilize leite
frio
• (Fig.28) - Mergulhe o tubo de vapor no leite e abra o botão (3) virando-o no sentido contrário ao dos ponteiros do
relógio; vire lentamente o recipiente com o leite, de baixo
para cima para tornar o aquecimento uniforme.
Aconselha-se uma distribuição máxima de 60
segundos.
• Depois de terminada a distribuição, feche o botão (3) virando no sent ido dos ponteiros do relóg io; retire a chávena
com o leite batido.
• (Fig.30) - Coloque o botão de selecç ão (17) na posição " ".
Se ambos os indicadores luminosos " " e " " estive-
rem acesos, a temperatura da máquina será demasiado
elevada para distribuir o c afé.
• Providencie o carregamento do circuito descrito no par.4.5
para tornar a máquina operativa.
Obs.: a máquina estará operativa quando o
indicador luminoso
estiver aceso de modo xo.
" de "máquina pronta"
9 LIMPEZA
A manutenção e a limpeza só podem ser realizadas quando a
máquina estiver fria e desligada da corrente eléc trica.
• Não mergulhe a máquina na água e não introduza os componentes na máquina de lavar louça.
• Não utilize álcool etílico, solventes e/ou agentes químicos
agressivos.
• Aconselha-se limpar diariamente o reservatório de água e
enchê-lo com água fresca.
• (Fig.31-33) - Diariamente, depois de aquecido o leite,
desmonte a par te externa do Pannarello e lave -a com água
potável fresca.
• (Fig. 31-32-33) - Semanalmente será prec iso limpar o tubo
de vapor. Para realizar esta operação, deve-se:
- remover a parte externa do Pannarello (para a limpeza
regular);
- tirar a parte superior do Pannarello do tubo de vapor;
- lavar a parte superior do Pannarello com água fresca potável;
- lavar o tubo de vapor com um pano húmido e remover
eventuais resíduos de leite;
- reposicionar a parte superior no tubo de vapor (certi quese de que está completamente int roduzida).
Monte novamente a parte externa do Pannarello.
• (Fig.34) - Esvazie e lave diariamente a bandeja de limpe-
za.
• Para a limpeza do aparelho utilize um pano macio humedecido com água.
• (Fig.20) - Para a limpeza do porta- ltro pressurizado proceda da seguinte forma:
- (Fig.9) - retire o ltro, lave-o cuidadosamente com água
quente.
- retire o adaptador (se existente), lave-o cuidadosamente
com água quente.
- lave o interior do porta- ltro pressurizado.
• Não s eque a máquina e/ou os seus componente s utilizando
um microondas e/ou um forno convencional.
• (Fig.35-36) - Semanalmente limpe a sede dos acessórios
com um pano húmido para remover eventuais resíduos de
café ou pó em geral.
Note bem: se não conseguir distribuir um cap-
puccino como descrito anteriormente, será preciso recarregar o circuito como apresentado no par. 4.5
e sucessivamente repetir as operações.
• 58 •
Obs.: não lave o porta- ltro pressurizado na
máquina de lavar louça.
Page 59

10 DESCALCIFICAÇÃO
A formação de calcário acontece com o uso do aparelho; é preciso realiza r a descalci c ação a cada 1-2 meses de utilização da
máquina e/ou quando houver uma redução da capacidade da
água. Utilize exclusivamente o pro duto descalci cante Saeco.
O indicad o no manual de uso e manuten ção tem
prioridade com relação às indicações descritas
nos acessórios e/ou materiais de uso vendidos separadamente, on de exista um prob lema.
Utilize o produto descalci cante Saeco (Fig.B).
Foi concebido especi camente para manter da
melhor forma o desempenho e a funcionalidade da
máquina durante toda a sua vida útil, assim como para
evitar, se for utilizado cor rectamente, qualquer alteração do produto distribuído. Antes de iniciar o ciclo de
descalci cação assegure-se que: O FILTRO DA ÁGUA TENHA SIDO REMOVIDO, se utiliz ado.
Não beba a solução descalci cante e os produ-
tos distribuídos até a conclusão do ciclo. Nunca
utilize, baixo nenhuma circunstância, o vinagre como
descalci cante.
1 (Fig.13-14) - Introduza o porta- ltro abaixo do grupo de
distribui ção (8), virando-o da es querda à direita até se bloquear.
2 (Fig.2) - Remova e esvazie o reser vatório de água.
3 (Fig.3) - Deite METADE do conteúdo da garrafa de des-
calci cante concentrado Saeco no reservatório de água do
aparelho e encha-o com água fr esca potável até alcançar o
nível MÁX.
4 Ligue a máquina pressionando o interruptor ON/OFF (11)
colocando- o na posição "I".
(Fig.21) - Retire (como descrito no capítulo 7 do manual)
pelo tubo de vapor/água quente 2 chávenas (aproximadamente 150 ml cada uma) de água; depois disso desligue a
máquina pelo interruptor ON/OFF (11) colocando-o na posição "0".
5 De ixe o descalci cante actuar por a proximadamente 15-20
minutos com a máquina desligada.
6 Ligue a máquina pressionando o interruptor ON/OFF (11).
(Fig.21) - Retire (como descrito no capítulo 7 do manual)
pelo tubo de vapor/água quente 2 chávenas (aproximadamente 150 ml cada uma) de água. Sucessivamente
desligue a máquina pelo interruptor ON/OFF (11) e deixe-a
desligada durante 3 minutos.
7 Repita as operações descritas no ponto 6 até o completo
esvaziamento do reservatório de água.
8 (Fig.3) - Enxagúe o re servatório com água fres ca potável e
encha-o completamente com água.
9 Posicionar um recipiente debaixo do por ta- ltro.
10 Ligue a máquina pressionando o interruptor ON/OFF (11);
vire o botão de selecção (17) na posição "
ta- ltro retire todo o conteúdo do reservatório. Para interromper a distribuição coloque o botão de selecção (17) na
posição "
".
11 (Fig.3) - Encha novamente o res ervatório com água fresc a.
(Fig.21) - Posicione um recipiente grande abaixo do tubo
de vapor (Pannarello). Abra a torneira de distribuição de
água (3) virando-a no sentido contrário ao dos ponteiros
do relógio.
(Fig.22) - Vire o botão de selecção (17) na posição "
e retire todo o conteúdo do reservatório usando o tubo de
vapor/água quente.
12 (Fig.23) - Depois de nalizar a retirada de água, para in-
terromper a distribuição coloque o botão de selecção (17)
na posição "
(Fig.24) - Feche a torneira de distribuição de água (3)
virando-a no sentido dos p onteiros do relógio.
13 Repita mais uma vez as operações do ponto (8) num total
de 4 reservatórios de água.
14 (Fig.19) - Remova o porta- ltro do grupo virando-o da
direita à esquerda e enxagúe -o com água fresca potável.
O ciclo de desc alci cação está concluído.
(Fig.3) - Encha novamente o reservatório com água fresca.
Se for necessário realize o carregamento do circuito conforme
descrito no par. 4.5.
pelas nor mas vigentes no país de utilizaç ão.
".
A solução descalci cante deverá ser eliminada
de acordo com o previsto pelo fabricante e/ou
" e pelo por-
11 ELIMINAÇÃO
Este produto está confor me a directiva EU 2002/96/EC.
O simbolo
lagem indica que este produto não se pode tratar como lixo
doméstico normal.
Este produto deve ser entregue num ponto de recolha de
equipamentos eléctricos e electrónicos para reciclagem. Ao
assegurar-se que este produto é eliminado correc tamente, estará a ajudar a evitar possiveis consequências negativas para o
ambiente e saúde pública que resultariam se este produto não
fosse manipulado de forma adquada. Para obter informações
mais detalhadas sobre a reciclagem deste produto, por favor
contacte o gabinete da câmara municipal da sua cidade ou a
loja onde comprou o produto.
impresso no produto ou na sua emba-
"
Português
• 59 •
Page 60

Avaria Causas possíveis Solução
A máquina não liga. Máquina não ligada à rede eléctrica. Ligue a máquina à rede eléctric a.
A bomba é muito ruidosa. Falta água no reservatório. Reabasteç a com água. (par.4.4).
O indicador luminoso (20) de "máquina
O café é muito f rio.
Não é possível obter a espuma
do leite.
Não é possível preparar um cappuccino.
O café sai demasiado rápido, não
é possível obter o creme.
O café não sai ou sai só às pingas.
O café jorra das bordas.
pronta" estava apagado quando o botão
de selecção (17) foi colocado na posição "
".
Porta- ltro não introduzido para o préaquecimento (Cap. 5).
Chávenas frias. Pré-aqueça as chávenas com água quente.
Leite inapropriado: leite em pó, leite ma-
gro.
Pannarello sujo. Limpe o Pannarello como descrito no Cap.9.
Não há mais vapor na caldeira.
Pouco café no p orta- lt ro. Adicione o café (Cap. 5).
Moagem demasiado grossa. Utilize uma mis tura diferente (Cap.6).
Café velho ou inapropriado. Utilize uma mistura diferente (Cap.6).
Pastilha velha ou inapropriada. Troque a pastilha utiliz ada.
Falta um componente no porta- ltro.
Falta de água. Reabasteça com água (par.4.4).
Moagem demasiado na. Utilize uma mistura diferente (Cap.6).
Café comprimido no porta- ltro. Mexa o café moído.
Demasiado café no porta- ltro. Diminua a quantidade de café no porta- ltro.
Botão (3) aberto. Feche o botão (3).
Máquina calci cada. Descalci que a máquina (Cap.10).
Filtro entupido no porta- ltro. Limpe o ltro (Cap.9).
Pastilha inapropriada. Mude o tipo de pastilha.
Porta- ltro mal introduzido no grupo de
distribuição do café.
Borda superior do porta- ltro suja. Limpe a borda do porta- ltro.
Pastilha introduzida de modo incor recto.
Demasiado café no porta- ltro.
Aguarde que o indicador luminoso (20) se acenda.
Pré-aqueç a o porta- ltro.
Utilize leite inteiro.
Recarregue o circuito (par. 4.5) e repita as operações descr itas no Cap.8.
Certi que-se de que todos os co mponentes estão
presentes e montados correctamente.
Introduza cor rectamente o porta - ltro (Cap.5).
Introduza correctamente a pastilha de modo a
não sair do porta- ltro.
Diminua a quantidade de café utilizando o medidor.
Para as avarias que não estão incluídas na tabela supracitada ou no caso das soluções sugeridas não resolverem o
problema, contacte um centro de assistência.
• 60 •
Page 61

DECLARAÇÃO DE CONFORMIDADE CE
ANO 09
2006/95/CE, 2004/108/CE.
Saeco International Group
Via Torretta, 240
40041 GAGGIO MONTANO (BO) - Itália
declaramos sob a nossa responsabilidade que o produto:
MÁQUINA DE CAFÉ ÚNICA
TIPO: HD 8323 / HD 8325
ao qual se refere esta declaração, está em conformidade com as seguintes normas:
• Segurança de electrodomésticos e aparelhos eléctricos - Regras gerais
EN 60335-1 (2002) + A1(2004) + A2(2006) + A11(2004) + A12 (2006) + A13(2008)
• Segurança de electrodomésticos e aparelhos eléctricos - Parte 2-15
Requisitos especí cos para aparelhos de aquecimento de líquidos
EN 60 335-2-15 (2002) + A1(2005) + A2 (2008)
• Segurança de aparelhos para uso doméstico e análogos. Campos electromagnéticos
Métodos de avaliação e medição -EN 62233 (2008).
• Limites e métodos de medição das interferências de rádio características de aparelhos com motor
eléctrico e térmico para uso doméstico e utilizações similares, instrumentos eléctricos e aparelhos
eléctricos análogos - EN 55014-1 (2006).
• Compatibilidade electromagnética (CEM)
Parte 3 Limites - Secção 2: Limites para as emissões de corrente harmónica (corrente de
entrada do aparelho até ≤ 16A por fase) - EN 61000-3-2 (2006).
• Compatibilidade electromagnética (CEM)
Parte 3 Limites - Secção 3: Limitação das utuações e dos picos de tensão nos
sistemas de alimentação de baixa tensão para aparelhos de corrente nominal até ≤ 16A.
EN 61000-3-3 (1995) + corr.(1997) + A1 (2001) + A2 (2005).
• Requisitos de imunidade para electrodomésticos, instrumentos e aparelhos análogos.
Norma da família de produtos EN 55014-2 (1997) + A1 (2001).
Português
segundo as disposições das directivas: 2006/95/CE, 2004/108/CE.
Gaggio Montano 28/04/2009
R & D Manager
Eng. Andrea Castellani
• 61 •
Page 62

1 ALGEMEEN
De ko emachine is geschikt voor het zetten van 1 of 2 kopjes
espresso en is voorzien van een zwenkbaar stoom- en heetwaterpijpje. De symbolen op de bedieningsknoppen aan de
voorkant van het apparaat zijn gemakkelijk te begrijpen.
De machine is ont worpen voor huishoudelijk gebruik en is niet
geschikt voor continu professioneel gebruik.
Let op. Men aanvaardt geen aansprakelijkheid
voor eventuele schade in geval van:
• Verkeerd gebruik dat niet in overeenstemming is
met de beoogde doelen;
• Reparaties die niet zijn uitgevoerd door erkende
servicecentra;
• Onklaar gemaakte voedingskabel;
• Onklaar gemaakte componenten van de machine;
• Gebruik van niet-originele vervangingsonderdelen
en accessoires;
• Wanneer het apparaat n iet is ontkalkt en b ij opslag
in ruimten me t temperaturen onder de 0°C.
In deze gevallen komt de garantie te vervallen.
1.1 Voor een gemakkelijke raadpleging
De waarschuwingsdriehoek geeft
alle belangrijke instructies aan die
van belang zijn voor de veiligheid
van de gebruiker. Houd u strikt aan deze aanwijzingen
om ernstig letsel te voorkomen!
2 TECHNISCHE GEGEVENS
De constructeur behoudt zich het recht voor om de technische
eigenschappen van het product te wijzigen.
Nominale spanning - Nominaal vermogen - Voeding
Zie plaatje op het apparaat
Materiaal behuizing
Plastic
Afmetingen (l x h x d) (mm)
210 x 300 x 280
Gewicht
3,9 kg
Kabellengte
1,3 m
Bedieningspaneel
Op de voorkant
Filterhouder
Onder druk
Pannarello
Speciaal voor cappuccino’s
Waterrese rvoir
1,25 liter - Uitneembaar
Pompdruk
15 ba r
Waterketel
Roestvrij staal
Veiligheidsinrichtingen
Thermozekering
Verwijzingen naar illustraties, delen van het apparaat of bedieningsonderdelen, etc. worden aangegeven met nummers
of letters; in dit geval wordt er verwezen naar een illustratie.
Dit symbool geeft informatie aan waarmee
men in het bijzonder rekening moet houden
voor een beter gebruik van de machine.
De illustraties die met de tekst overeenstemmen, bevinden zich op de eerste pagina’s van de handleiding.
Raadpleeg deze pagina’s tijdens het lezen van de gebruiksaanwijzing.
1.2 Gebruik van deze gebruiksaanwij-
zing
Bew aar de ze gebr uiks aanwi jzing o p een v eilige plaat s en ho ud
hem bij de ko emachine in geval van gebruik door anderen.
Neem voor nadere informatie of bij problemen contact op met
één van de erkende service centra.
• 62 •
3 VEILIGHEIDSVOORSCHRIFTEN
Breng de onder stroom staande delen nooit in contact
met water: kortsluitingsgevaar! De oververhitte stoom
en het hete water kunnen brandwonden veroorzaken!
Richt de hete stoom- of waterstraal nooit op lichaamsdelen. Wees voorzichtig bij het aanraken van het
stoom-/heetwaterpijpje: gevaar voor brandwonden!
Gebruiksbestemming
De ko emachine is uitsluitend bestemd voor huishoudelijk
gebruik. Het aanbrengen van technische wijzigingen en elk
ongeoorloofd gebruik is verboden, in verband met de risico’s
die dit met zich meebrengt! Het apparaat is niet bestemd om
gebruikt te worden door personen (inclusief kinderen) met
verminderde fysieke, mentale of gevoelige capaciteiten of met
onvoldoende er varing en/of bekwaamheid, tenzij ze o nder het
toezicht staan van een persoon die verantwoordelijk is voor
hun veiligheid en van wie ze instructies verkrijgen aangaande
het gebruik van het apparaat.
Page 63

Stroomtoevoer
Sluit de ko emachine alle en aan op een geschikt stopcont act.
De spanning moet overeenstemmen met de spanning die op
het plaatje van het apparaat staat vermeld.
Voed ingskabe l
Gebruik de ko emachine nooit als de voedingskabel defect
is. Indien de voedingskabel beschadigd is, moet deze door de
fabrikant of door zijn klantenservice vervangen worden. Laat
de voedingskabel niet over hoeken en scherpe randen of hete
voorwerpen lopen, en bescherm het tegen olie.
Draag de ko emachine niet aan de kabel en trek er niet aan.
Haal de stekker niet uit het stopcontact door aan de kabel te
trekken en raak he t niet met natte handen aan.
Voorkom dat de voedingskabel los van tafels of planken afhangt.
Bescherming van andere personen
Houd kinderen onder toezicht om te vermijden dat ze met het
apparaat spelen.
Kinderen realiseren zich de gevaren die aan elektrische apparaten verbonden zijn niet. Laat het verpakkingsmateriaal van
de machine niet binnen bereik van kinderen.
Verb randingsgeva ar
Richt de hete sto om- en/of waterstraal nooit op uzelf of op anderen. Gebruik altijd de handgrepen of knoppen.
Verwijder de onder druk staande lterhouder nooit terwijl de
ko e uit het apparaat stroomt. Tijdens het opwarmen kan
warm water uit de centrale ko e-unit druppelen.
Verstrek geen ko e wanneer de machine oververhit is, ofwel
wanneer de leds "
" en " " tegelijk branden.
Plaatsing
Zet de ko emachine op een veilige pl ek waar niemand het kan
omstoten of zich eraan kan verwonden.
Er kan heet water of hete stoom uitkomen: gevaar voor
brandwonden!
Bewaar de machine niet bij een temperatuur van minder dan
0°C; het apparaat kan door bevriezing worden beschadigd.
Gebruik de ko emachine niet buiten.
Zet het apparaat niet op erg warme oppervlakken en in de
buurt van open vuur om te voorkomen dat de behuizing smelt
of anderszins beschadigd raakt.
Reiniging
Alvorens het apparaat te reinigen, moet het apparaat worden
uitgeschakeld met de ON/OFF toets en vervolgens moet de
stekker uit het stopcontact worden gehaald. Wacht dan tot de
machine is afgekoeld.
Dompel het app araat nooit onder in water!
Pogingen tot reparaties aan de binnenkant van de machine
zijn ten strengste verboden.
Gebruik het water dat enkele dagen in het waterreservoir
heeft gestaan niet voor voedingsdoeleinden, was en vul het
reservoir met vers drink water.
Ruimte voor gebruik en onderhoud
Voor een correcte en goede werking van de ko emachine
wordt het volgende aanbevolen:
• Kies een vlakke ondergrond;
• Kies een voldoende verlichte, hygiënische omgeving met
een gemakkelijk toegankelijk stopcont act;
• Zorg er voor dat het apparaat op een minimumaf stand van
de wanden staat, zoals op de afbeelding is aangegeven
(Afb. A).
Opslag van de machine
Schakel de machine uit en haal de stekker uit het stopcontact,
wanneer de machine langere tijd niet wordt gebruikt. Bewaar
deze in een droge ruimte en buiten het bereik van kinderen.
Bescherm het tegen stof en vuil.
Reparaties / Onderhoud
Haal de stekker meteen uit het stopcontact bij storingen, defecten of vermoedelijke defecten na een val. Zet de machine
nooit in werking als deze defect is. Alleen de erkende servicecentra mogen werkzaamheden en reparaties uitvoeren. Bij
ondeskundig uitgevoerde werk zaamheden wordt iedere vorm
van aansprakelijkheid van de hand gewezen.
Brandbestrijding
Gebruik in geval van brand koolzuurblussers (CO2). Gebruik
geen water of poederblussers.
Legenda machineonderdelen (Pag.2)
1 Bedieningspaneel
2 Deksel waterreservoir
3 Draaiknop voor heet water/stoom
4 Opbergruimte voor accessoires
5 Waterreservoir
6 Plaat voor kopjes
7 Wateropvangbakje + rooster
8 Centrale ko e-unit
9 Stoompijpje (Pannarello)
10 Voedingskabel
11 Schakelaar ON/OFF
12 Onder druk staande lterhouder
13 Maatlepel vo or gemalen ko e
14 Filter voor gemalen ko e
(dezelfde voor de afgifte van 1 of 2 kopjes ko e)
15 Adapter voor lter voor ko epads
16 Filter voor ko epads
17 Selectieknop
18 Led voor "machine aan"
19 Led "Stoom gereed"
20 Ko e / water led - "Klaar voor gebruik"
Nederlands
• 63 •
Page 64

4 INSTALLATIE
Houd u voor uw eigen veiligheid en die van anderen
strikt aan de “Veilig heidsvoorschriften” in hst. 3.
4.1 Verpakking
De oorspronkelijke verpakking is ontworpen en vervaardigd
om de machine tijdens het transport te beschermen. Het is
raadzaam om de verpakking te bewaren voor eventueel transport in de toekomst.
4.2 Waarschuwingen voor de installatie
Houd u aan de volgende veiligheidsvoorschriften, voordat u
het apparaat installeert:
• zet het apparaat op een veilige plek;
• verzeker u ervan dat kinderen niet met het apparaat kunnen spelen;
• zet het apparaat niet op erg warme oppervlakken of in de
buurt van open vuur.
De ko emachine mag nu op het elektriciteitsnet worden aangesloten.
Opmerking: wij raden aan om de onderdelen te
wassen voor de eerste ingebruikname en/of na
een periode dat deze niet zijn gebruikt.
Vul het reservoir altijd en alleen met vers drink-
water zonder koolzuur. Warm water of andere
vloeisto en kunnen het reservoir beschadigen. Zet de
machine ni et aan zonder water: ver zeker u ervan dat er
voldoende water in het res ervoir zit.
• (Afb.2) - Zet het reservoir erin en verzeker u ervan dat
deze o p de juiste m anier wordt geplaats t en plaats de deksel (2) er weer op.
4.5 Vullen van het circuit
Aan het begin, na stoom te hebben verstrekt of nadat het
water op is in het reservoir, dient het circuit van de machine
gevuld te worden.
• Druk op de schakelaar ON/OFF (11) zet het in de stand "I";
de led (18) gaat aan om aan te geven dat de machine ingeschakeld is.
• (Afb.4) - Plaats een kannetje onder het stoompijpje (Pan-
narello).
• Draai de hee twater-/stoomknop (3) linksom open.
• (Afb.5) - Breng de selectieknop (17) in de stand
"
".
• Wacht tot uit het stoompijpje (Pannarello) een gelijkma-
tige waterstraal stroomt.
• (Afb.5) - Breng de selec tieknop (17) in de stand "
• Draai de heetwater-/stoomknop (3) rechtsom dicht. Haal
het kannetje weg.
".
4.3 Aansluiting van de machine
Elektrische stroom kan gevaarlijk zijn! Houd
u daarom altijd strikt aan de veiligheidsvoorschrif ten. Gebruik nooit de fecte kabels! Defecte kabel s
en stekkers moeten onmiddellijk door erkende servicecentra worden vervangen.
De spanning van het apparaat is in de fabriek ingesteld. Controleer of de netspanning overeenstemt met de aanwijzingen
op het typeplaatje op de achterkant van het apparaat.
• Controleer of de schakelaar ON/OFF (11) niet in de stand
"0" staat voordat u het apparaat op het elektriciteitsnet
aansluit.
• Steek de stekker in een wandstopcontact met de juiste
spanning.
4.4 Waterreservoir
• (Afb.1) - Verwijder de deksel van het waterreservoir (2)
door het op te tillen.
• (Afb.2) - Verwijder het waterre servoir (5).
• (Afb.3) - Spoel het reservoir en vul het met vers drinkwa-
ter zonder het te vol te maken.
• 64 •
4.6 Ingebruikname of gebruik na een periode van stilstand
Deze eenvoudig e handeling verzekert va n een optimale afgif te
en dient uitgevoerd te worden:
- bij de ingebruikname;
- wanneer de machine gedurende een lange tijd niet wordt
gebruikt (voor meer dan 2 weken).
Het water dat verstrekt wordt, dient geleegd
te worden in de daarvoor bestemde afvoer en
mag niet gebruikt worden voor consumptie. Indien het
kannetje vol raakt tijdens de cyclus, dient de afgifte
gestopt te worden en het kannetje geleegd te worden
alvorens de handeling te voltooien.
• (Afb.3) - Spoel het reservoir en vul het met vers drinkwa-
ter.
• (Afb.4) - Plaats een kannetje onder het stoompijpje (Pan-
narello). Draai de kraan (3) open door deze linksom te
draaien.
(Afb.5) - Breng de selectieknop (17) in de stand "
• Verstrek de gehele inhoud van het waterreservoir door
".
Page 65

het stoom/heet waterpijpje (Pannarello); om de afgifte te
stoppen, zet de selectieknop (17) in de stand "
de kraan (3) rechtsom dicht.
• (Afb.3) - Vul het reservoir met vers drinkwater.
• (Afb.13-14) - Plaats de lterhouder van onderen in de cen-
trale unit (8) en draai deze van link s naar rechts totdat deze
geblokkeerd is.
• (Afb.15) - Plaats een passend kopje onder de lterhouder.
• (Afb.16) - Draai de selectieknop (17) in de stand "
schenk het resterende water uit het reser voir.
(Afb.17) - Wanneer het water op is, stop de af gifte door de
selectieknop (17) in de stand "
• Vul opnieuw het reservoir en wacht tot de led "klaar voor
gebruik" (20) aangaat.
• (Afb.19) - Verwijder de lterhouder uit de centrale unit
door deze van rec hts naar links te draaien en spoel het m et
vers drinkwater.
De machine is nu gereed; zie de desbetre ende hoofdstukken
voor m eer infor matie over de werking va n de afgif te van ko e
en stoom.
" te zetten.
" en draai
" en
5 KOFFIEAFGIFTE
Let op! Tijdens de ko eafgifte mag de onder
druk staande lterhouder niet worden verwijderd door hem met de hand rechtsom te draaien. Verbrandingsgevaar.
• Ti jdens deze handeling kan de led (20) "klaar voor g ebruik"
aan en uit gaan; dit is normaal en geen storing.
• Controleer voor gebruik of de heetwater-/stoomknop (3)
dicht gedraaid is e n of het waterreservoir va n het apparaat
voldoende water bevat.
• (Afb. 3) - Dr uk op de s chak ela ar ON /OFF (11) en z et h et in de
stand "I".
• Wacht tot de le d (20) "klaar voor gebruik " aangaat, nu is de
machine klaar voor de ko eafgifte.
De accessoires voor de ko eafgifte zijn in een
speciaal ontworpen ruimte opgeborgen om
deze handelingen eenvoudig en snel te maken.
Til de dek sel (2) op voor de maatlepel vo or gemalen kof e en/of de benodigde lters en neem het benodigde
eruit (Af b.35 en Afb.36).
5.1 Met gemalen koffi e
• (Afb.7) - Plaats de lter (14) in de onder druk staande
lterhouder (12); bij het eerste gebruik is de lter al geplaatst.
• (Afb.13) - Breng de lterhou der van onderen in de centrale
unit (8) aan.
• (Afb.14) - Draai de lterhouder van links naar rechts tot-
dat hij is geblokkeerd. Laat het handvat van de onder druk
staande lterhouder los, het handvat draait lichtjes naar
links. Deze beweging garandeert een perfecte werking
van de lterhouder.
• (Afb.16) - Verwarm de onder druk staande lterhouder
voor door de selectieknop (17) in de stand "
het water zal beginnen uit de onder druk staande lterhouder te stromen (deze handeling is alleen noodzakelijk
voor het eerste kopje ko e).
• (Afb.17) -Nadat men 150cc water uit het apparaat heeft
laten stromen, dient men de selectieknop (17) in de stand
"
" te zetten om de afgifte te stoppen.
• (Afb.19) - Haal de lterhouder uit het apparaat door hem
van rechts naar lin ks te draaien en gooi het rest water weg.
Met de speciale lter (14) waarmee de machine is uitgerust, hoeft het lter niet te worden verwisseld om één of
twee kopjes ko e te verkrijgen.
• (Afb.35) - Haal de maatlepel uit de machine.
• (Afb.8) - Doe 1-1,5 maatlepels voor één enkele ko e of 2
afgestreken maatlepels voor dubbele ko e erin; ontdoe
de rand van de lterhouder van de ko eresten.
• (Afb.13) - Breng de lterhouder (12) van onderen in de
centrale unit (8) aan.
• (Afb.14) - Draai de lterhouder van links naar rechts tot-
dat hij is geblokkeerd.
• (Afb.15) - Neem 1 of 2 voorverwarmde kopjes en zet
ze onder de onder druk staande lterhouder; controleer
of ze correct onder de gaten zijn geplaatst waar de ko e
uitstroomt.
• (Afb.14) - Breng de selectieknop (17) in de stand "
• Wanneer de gewenste hoeveelheid ko e is bereikt, draai
de selectieknop (17) in de stand “
te stoppen. Wacht na het beëindigen van de afgifte enkele seconden; neem dan de kopjes met de ko e weg
(Afb.18).
• (Afb.19) - Neem de onder druk staande lterhouder weg
en gooi het ko edik weg.
Opmerking: in de lterhouder blijft er een
kleine hoeveelheid water over; dit is normaal
en is te wijten aan de eigenschappen van de lterhouder zelf.
" te zetten;
".
” om de ko eafgifte
Nederlands
Belangrijke Opmerking: De lter (14) dient
schoon gehouden te worden om een perfect
resultaat te garanderen. Dagelijks wassen na het gebruik.
• 65 •
Page 66

5.2 Met koffi epads
• (Afb.9) - Haal de lter voor gemalen ko e (14) uit de on-
der druk staande lterhouder (12) door gebruik te maken
van een ko elepeltje.
• (Afb.10) - Plaats de houder voor ko epads (15) in de on-
der druk staande lterhouder (12) met de bolle kant naar
beneden.
• (Afb.11) - Plaats vervolgens het lter voor ko epads (16)
in de onder druk s taande lterhouder (12).
• (Afb.13) - Breng de onder druk staande lterhouder van
onderen in de centrale unit (8) aan.
• (Afb.14) - Draai de lterhouder van links naar rechts tot-
dat hij is geblokkeerd. Laat het handvat van de onder druk
staande lterhouder los. Een automatisch systeem brengt
het handvat nu iets naar links terug.
Deze beweging garandeert een perfecte werking van de
onder druk st aande lterhouder.
• (Afb.16) - Verwarm de onder druk staande lterhouder
voor door de selectieknop (17) in de stand "
het water zal beginnen uit de onder druk staande lterhouder te stromen (deze handeling is alleen noodzakelijk
voor het eerste kopje ko e).
• (Afb.17) -Nadat men 150cc water uit het apparaat heeft
laten stromen, dient men de selectieknop (17) in de stand
"
" te zetten om de afgifte te stoppen.
• (Afb.19) - Haal de onder druk staande lterhouder uit het
apparaat door hem v an rechts naar links te draaien en go oi
het restwater weg.
• (Afb.12) - Plaats de ko epad in de lterhouder; contro-
leer of het papier van de ko epad niet uit de lterhouder
steekt.
• (Afb.13) - Breng de onder druk staande lterhouder van
onderen in de centrale unit (8) aan.
• (Afb.14) - Draai de lterhouder van links naar rechts tot-
dat hij is geblokkeerd.
• Neem 1 voorverwarmd kopje en zet het onder de l-
terhouder; controleer of het correct onder de gaten is geplaatst waar de ko e uitstroomt.
• (Afb.16) - Breng de selectieknop (17) in de stand "
• (Afb.17) - Wanneer de gewenste hoeveelheid ko e is be-
reikt, draai de selectieknop (17) in de stand "
eaf gifte te stoppen; neem het kopje met de ko e weg.
• (Afb.19) - Wacht na de afgifte enkele seconden, neem de
lterhouder weg en gooi de gebruikte ko epad weg.
Bel ang rijk e Opm erki ng: D e lt er (16) e n de h ou-
der voor ko epads (15) dienen schoon gehouden te worden o m een perfect r esultaat te garand eren.
Dagelijks wassen na het gebruik.
" te zetten;
".
" om de kof-
6 KEUZE VAN DE KOFFIE ADVIEZEN
In princi pe kunnen alle in de han del verkrijgbar e ko esoorten
worden gebruikt. Ko e is echter een natuurlijk product en de
smaak ervan verandert naar gelang de herkomst en de melange; het verdient dus de voorkeur om verschillende soorten
te proberen om het type ko e te vinden dat het meest naar
uw smaak is.
Voor de beste resultaten raden wij u echter aan speciaal voor
espressoapparaten bereide melanges te gebruiken. De ko e
moet gelijkmatig uit de onder druk staande lterhouder stromen zonder te druppelen.
De uitloop snelheid van de ko e ka n worden gewijzigd door de
ko edosis in het lter iet s te veranderen en/of door ko e met
een andere maal jnheid te gebruiken.
Saeco raadt het gebruik van per stuk verpakte ESE ko epads
aan om een beter resultaat in het kopje te krijgen en om de
reiniging en de bereiding te vergemakkelijken.
CONTROLEER OF HET STOOMPIJPJE (PANNARELLO)
OP HET WATEROPVANGBAKJE IS GERICHT VOORDAT U STOOM OF HEET WATER UIT HET APPARAAT LAAT
KOMEN.
7 WARM WATER
Gevaar voor brandwonden! Aan het begin van
de afgif te kan er wat heet water vri jkomen. Het
uitlooppijpje kan erg heet worden: vermijd direct contact met de handen.
• Druk op de schakelaar ON/OFF (11) en zet het in de stand
"I".
• Wacht tot de le d (20) "klaar voor gebruik " aangaat, nu is de
machine klaar.
• (Afb.21) - Zet een kannetje of een theeglas onder het
stoompijpje (Pannarello).
• (Afb. 21) - Draai de knop (3) linksom open.
• (Afb.22) - Breng de selectieknop (17) in de stand "
• (Afb.23) - Wanneer de gewenste hoeve elheid ko e is ge-
nomen, draai de selectieknop (17) in de stand "
• (Afb. 24) - Draai de knop (3) rechtsom dicht.
• Neem het kannetje met war m water weg.
".
".
• 66 •
Page 67

8 STOOM / CAPPUCCINO
Gevaar voor brandwonden! Aan het begin van
de afgif te kan er wat heet water vrijkomen. Het
uitlooppijpje kan erg heet worden: vermijd direct contact met de handen.
• Druk op de schakelaar ON/OFF (11) en zet het in de stand
"I".
• Wacht tot de led (20) "klaar voor gebruik" aangaat.
• (Afb. 25) - Breng de se lectiek nop (17) in de stan d "
led (20) gaat uit.
• Wacht tot het led (19) aangaat; op dit moment is de ma-
chine klaar voor de s toomafgifte.
• (Afb.26) - Plaats een kannetje onder het stoompijpje.
• (Afb.26) - Draai de knop (3) even open, zodat het restwa-
ter uit het stoo mpijpje (Pannarello) kan lopen; na korte tijd
komt er alleen s toom uit.
• (Afb.27) - Draai de knop (3) dicht en neem het kannetje weg.
• Vul de b eker die u voor de bereiding v an de cappuccino wilt
gebruiken voor 1/3 met koude melk.
Gebruik koude melk om een beter resultaat te
verkrijgen
• (Afb.28) - Steek het stoompijpje in de melk en draai de
knop (3) open door deze linksom te draaien; laat de bak
met de melk langzaam draaien en beweeg het van onder
naar boven om gelijkmatige opwarming te verk rijgen.
Een afgifte van maximaal 60 seconden wordt
aangeraden.
• Sluit de knop (3) na beëindiging door het rechtsom te
draaien; neem het kopje met opgeklopte melk weg.
• (Afb.30) - Breng de selectieknop (17) in de stand "
Indien beide leds "
paraat een te hoge temperatuur voor de afgifte van de
ko e.
• Vul het circuit zoals in par. 4.5 is beschreven om de ma-
chine operatief te maken.
Opmerking: de machine is operatief wanneer
de led
" en " " branden, heeft het ap-
"klaar voor gebruik " continue aan is.
"; de
".
9 REINIGING
Het onderhoud en de reiniging mogen alleen worden uitgevoerd wanneer de machine koud is en van het elektriciteitsnet
afgekoppeld is.
• Dompel de machine niet onder in water en was de onderdelen niet in de vaat wasmachine.
• Gebruik geen ethylalcohol, oplosmiddelen en/of agressieve chemische s to en.
• Wij raden u aan om het waterreservoir dagelijks te reinigen en met vers water te vullen.
• (Afb.31-33) - Demonteer dagelijks, na de melk opge-
warmd te hebben, de buitenkant van de Pannarello en
was deze met vers drinkwater.
• (Afb.31-32-33) - Het stoompijpje dient wekelijks gerei-
nigd te worden. Om deze handeling uit te voeren, ga als
volgt te werk:
- verwijder de buitenkant van de Pannarello (voor een
juiste reiniging);
- schuif het bovenste gedeelte van de Pannarello van het
stoompijpje af;
- was het bovenste gedeelte van de Pannarello met vers
drinkwater;
- was het stoompijpje met een vochtige doek en verwijder
eventuele melkresten;
- plaats het bovenste g edeelte in het stoompijpje (ver zeker
u ervan dat deze er geheel ingeschoven is);
Plaats de buitenkant van de Pannarello terug.
• (Afb.34) - Maak het lekbakje dagelijks leeg en was het af.
• Gebruik voor de reiniging van het apparaat een zachte
doek die met water is bevochtigd.
• (Afb.20) - Ga als volgt te werk om de onder druk staande
lterhouder schoon te maken:
- (Afb.9) - verwijder de lter, was deze zorgvuldig met
warm water af.
- verwijder de adapter (indien aanwezig), was deze zorgvuldig met warm water.
- was de binnenkant van de onder druk staande lterhouder.
• Droog de machine en/of zijn onderdelen niet in de magnetron en/of in een traditionele oven.
• (Afb.35-36) - Reinig wekelijks met een vochtige doek de
opbergruimte voor accessoires om eventuele ko eresten
of stof te verwijderen.
Nederlands
Nota bene: indien het niet lukt om een cappuc-
cino te bereiden zoals beschreven, dient men
het circ uit weer te laden zoals be schreven in par. 4.5 en
vervolgens de handelingen te herhalen.
Hetzelfde systeem kan worden toegepast voor
het verwarmen van andere dranken.
• Reinig na deze handeling het stoompijpje met een voch-
tige doek.
Opmerking: reinig de onder druk staande lterhouder nie t in de vaatwasmachine.
• 67 •
Page 68

10 ONTKALKING
Tijdens het gebruik van het apparaat wordt kalk gevormd; de
machine moet om de 1-2 maanden ontkalkt worden en/of als
er minder water uit de machine stroomt. Gebruik uitsluitend
het ontkalkingsproduc t van Saeco.
In het geval er een verschil bestaat, heeft het-
geen aangegeven is in de handleiding voor gebruik en onderhoud prioriteit op de aanwijzingen die
zijn vermeld op de accessoires en/of gebruiksmaterialen die apart zijn verkocht.
Gebruik het ontkalkingsproduct van Saeco
(Afb.B). Dit is speciaal ontwikkeld om de performance en de functionering van de machine het best
te bewaren gedurende de gehele levensduur ervan,
evenals voor het voorkomen, indien juist gebruikt,
van iedere aantasting van het verstrekte product.
Zorg vóór het uitvoeren van de ontkalkingscyclus ervoor dat: HET WATERFILTER VERWIJDERD IS, indien deze
wordt gebruikt.
10 Schakel de machine in door op de schakelaar ON/OFF (11)
te drukken; draai de selectieknop (17) in de stand "
en schenk de gehele inhoud van het reservoir door de lterhouder. Zet de selectieknop (17) in de stand "
afgifte te s toppen.
11 (Af b.3) - Vul het reser voir opnieuw met vers water.
(Afb.21) - Plaats een r uim kannetje onder het stoompij pje
(Pannarello). Draai de kraan voor de afgifte van water (3)
open door deze link som te draaien.
(Afb.22) - Draai de selectieknop (17) in de stand "
schenk de gehele inhoud van het reservoir door het stoom/
heet waterpijpje.
12 (Fig.23) - Wanneer men klaar is met de af gifte van het wa-
ter, dient men de afgifte te stoppen door de selectieknop
(17) in de stand "
(Afb.24) - Draai de kraan voor de afgifte van water (3)
rechtsom dicht.
13 Herhaal opnieuw de handelingen vanaf punt (8) voor een
totaal van 4 reser voirs.
14 (Afb.19) - Verwijder de lterhouder uit de centrale unit
door deze van rec hts naar links te draaien en spoel het m et
vers drinkwater.
" te zetten.
" om de
" en
"
Drink niet de ontkalkingsoplossing en de verstrekte producten totdat de cyclus geheel beëindigd is.
Gebruik i n geen geval azijn al s ontkalkingsmi ddel.
1 (Afb.13-14) - Plaats de lterhouder van onderen in de cen-
trale unit (8) en draai deze van link s naar rechts totdat deze
geblokkeerd is.
2 (Afb. 2) - Haal het waterreservoir eruit en leeg het.
3 (Afb.3) - Giet de HELFT van de inhoud van de es met ge-
concentreerd ontkalkingsmiddel van Saeco in het waterreservoir van het apparaat en vul het met vers drinkwater
tot het MAX niveau.
4 Schakel de machine in door op de schakelaar ON/OFF (11)
te drukken en het in de stand "I" te zetten.
(Afb.21) - Neem (zoals beschreven in hoofdstuk 7 van de hand-
leiding) 2 kopjes water (circa 150 ml per kopje) uit het stoom/
heet waterpijpje; schakel vervolgens de machine uit met de
schakelaar ON/OFF (11) en het in de stand "0" te zette n.
5 Laat het ontkalkingsmiddel voor circa 15-20 minuten in-
werken terwijl de machine uitgeschakeld is.
6 Schakel de machine in door op de schakelaar ON/OFF (11)
te drukken.
(Afb.21) - Neem (zoals beschreven in hoofdstuk 7 van de
handleiding) 2 kopje s water (circa 150 ml per kopje) uit het
stoom/heet waterpijpje. Schakel vervolgens de machine
uit met de schakelaar ON/OFF (11) en laat deze gedurende
3 minuten uit.
7 Herhaal de handelingen beschreven bij punt 6 totdat het
waterreservoir geheel leeg is.
8 (Afb.3) - Spoel het reservoir en vul het geheel met vers
drinkwater.
9 Zet een b ak onder de lterhouder.
• 68 •
De ontkalkingscyclus is nu voltooid.
(Afb.3) - Vul het reservoir opnieuw met vers water. Vul indien
nodig het circuit volgens de aanwijzingen beschreven in de
par. 4.5.
De ontkalkingsoplossing moet afgedankt wor-
den volgens de instructies van de constructeur
en/of de geld ende normen van he t land waar het wordt
gebruikt.
11 AFDANKEN VAN HET APPARAAT
Dit produc t voldoet aan de EU-richtlijn 2002/9 6/EG.
Het symbo ol
erop dat dit product niet als huishoudafval mag worden behandeld.
Het moet echter naar een plaats worden gebracht waar elektrische en elektronische apparatuur worden gerecycled.
Als u ervoor zorgt dat dit product op de correcte manier wordt
verwijderd, voorkomt u mogelijk voor het milieu negatieve
gevolgen die zich zouden kunnen voordoen in geval van verkeerde afvalbehandeling.
Voor meer details in verband met het recycle n van dit product,
neemt u het best contact op met de gemeentelijke instanties,
het bedrijf of de dienst belast met de verwijdering van huishoudafval of de winkel waar u het product hebt gekocht.
op het product of op verpakking wijst
Page 69

Storing Mogelijke oorzaken Oplossing
De machine kan niet worden ingeschakeld.
De pomp maakt veel lawaai. Geen water in het reser voir Voeg water toe (par.4.4).
De ko e is te koud.
Er komt geen sc huim.
Het lukt niet om een cappuccino
te bereiden.
De ko e loopt te snel over, er
wordt geen schuim gevormd.
De ko e komt niet of slechts
druppelsgewijs naar buiten.
De ko e komt langs de rand
naar buiten.
Machine niet aangesloten op het elektriciteitsnet.
De led (20) “klaar voor gebruik” was uit
toen de selectieknop (17) in de stand
” werd gezet.
“
Filterhouder niet geplaatst voor voorver-
warming (hst. 5).
Koude kopjes. Warm de kopjes voor met warm water.
Geen geschikte melk: poedermelk, magere melk.
Pannarello is vuil. Reinig de Pannarello zoals beschreven in Hst.9.
Er is geen stoom meer in de waterketel.
Te weinig ko e in de lterhouder. Voeg ko e toe (hst. 5).
Te grove maling. Gebruik een andere melange (hst. 6).
Ko e oud of niet geschikt. Gebruik een andere melange (hst. 6).
Ko epad oud of niet geschikt. Vervang de gebruikte ko epad.
Er mist een onderdeel in de lterhouder.
Geen water. Voeg water toe (par.4.4).
Te jne maling. Gebruik een andere melange (hst. 6).
Ko e aangedrukt in de lterhouder. Maak de gemalen ko e los.
Te veel ko e in lterhouder. Doe minder ko e in de lterhouder.
Knop (3) open. Draai de knop (3) dicht.
Kalkaanslag in machine. Ontkalk de machine (hst.10).
Filter in lterhouder verstopt. Maak het lter schoon (hst.9).
Ko epad niet geschikt. Gebruik een ander type ko epad.
Filterhouder slecht in de centrale ko e-
unit aangebracht.
Bovenrand van lterhouder vuil. Maak de rand van de lterhouder schoon.
Ko epad onjuist aangebracht.
Te veel ko e in lterhouder.
Sluit de machine op het elektriciteitsnet aan.
Wacht tot de led (20) gaat branden.
Verwarm de lterhouder voor.
Gebruik volle melk.
Laad het circuit opnieuw (par. 4.5) en herhaal de
handelingen beschreven in Hst.8.
Controleer of alle onderdelen aanwezig zijn en
juist gemonteerd.
Breng de lterhouder correct aan (hst.5).
Breng de ko epad juist aan en zorg ervoor dat
deze niet uit de lterhouder steekt.
Doe minder ko e in de lterhouder. Gebruik de
maatlepel.
Nederlands
Voor storingen die niet in bovenstaande tabel te vinden zijn of als de geadviseerde oplossingen geen e ect hebben, dient u contact op te nemen met een servicecentrum.
• 69 •
Page 70

EG-VERKLARING VAN OVEREENSTEMMING
JAAR 09
2006/95/EG, 2004/108/EG.
Saeco International Group
Via Torretta, 240
40041 GAGGIO MONTANO (BO) - Italië
wij verklaren onder eigen verantwoordelijkheid dat het product:
ENKELE KOFFIEMACHINE
TYPE: HD 8323 / HD 8325
waarop deze verklaring betrekking heeft, in overeenstemming is met de volgende normen:
• Huishoudelijke en soortgelijke elektrische toestellen – Veiligheid – Algemene eisen
EN 60335-1 (2002) + A1(2004) + A2(2006) + A11(2004) + A12 (2006) +A13 (2008)
• Huishoudelijke en soortgelijke elektrische toestellen - Deel 2-15
Bijzondere eisen voor toestellen voor verwarming van vloeisto en
EN 60 335-2-15 (2002) + A1(2005) + A2 (2008)
• Huishoudelijke en soortgelijke toestellen. Elektromagnetische velden
Methoden voor de evaluatie en meting -EN 62233 (2008).
• Grenswaarden en meetmethoden van radiostoringskenmerken van elektrisch en thermisch
aangedreven motoren voor huishoudelijk gebruik en soortgelijke doeleinden,
elektrisch gereedschap en soortgelijke apparaten - EN 55014-1 (2006).
• Bestendigheid tegen elektromagnetische storingen (EMC)
Deel 3-2: Limietwaarden - Limietwaarden voor de emissie van harmonische stromen (ingangsstroom
van de toestellen ≤ 16A per fase) - EN 61000-3-2 (2006).
• Bestendigheid tegen elektromagnetische storingen (EMC)
Deel 3-3: Limietwaarden - Limietwaarden voor spanningswisselingen, spanningsschommelingen
en ikkering in openbare laagspanningsnetten voor apparatuur met een ingangsstroom ≤ 16A.
EN 61000-3-3 (1995) + corr.(1997) + A1(2001) + A2 (2005).
• Immuniteitseisen voor huishoudelijke toestellen, elektrisch gereedschap en soortgelijke apparaten.
Productgroepnorm EN 55014-2 (1997) + A1 (2001).
volgens de voorschriften van de richtlijnen: EG 2006/95, EG 2004/108.
Gaggio Montano 28/04/2009
• 70 •
R & D Manager
ir. Andrea Castellani
Page 71

1 ALLMÄN INFORMATION
Ka emaskinen är avsedd för tillredning av 1 eller 2 koppar
espresso och ka emaskinen har ett vridbart rör för ut öde av
ånga och varmt vatten. Kontrollerna på framsidan av apparaten är märkta med symboler som är enkla att tolka.
Maskinen har tillverkats för användning i hemmet och inte för
professionell oavbruten användning.
Varning. Inget ansvar tas för eventuella skador
vid fall av:
• Felaktig och oförutsedd användning;
• Reparationer som inte utförts hos auktoriserade
servicecentrum;
• Åverkan på elkabeln;
• Åverkan på vilken som helst maskinkomponent;
• Användn ing av icke origina la reservdel ar och tillbehör;
• Avsaknad avkalkning och förvaring i lokaler under
0°C.
I dessa fall kommer garantin att upphävas.
1.1 För att underlätta läsningen
Varningstriangeln gör dig uppmärks am på alla anvisning ar som är
Följ anvisningarna noggrant för att undvika allvarliga
skador på maskinen!
Hänvisning till bilder, apparatens delar eller kontrolldelar, osv.
är indikerade med nummer eller bokstäver; i detta fall hänvisar man till bilden.
Denna symbol framhäver den viktigaste informatione n, för ett bättr e användande av mask i-
nen.
Textens motsvarande bilder hittar man i manualens
först a sidor. Hänvisa till dess a sidor under läsningen av
bruksanvisningen.
viktiga för användarens säkerhet.
1.2 Användning av denna bruksanvis-
ning
Förvara b ruksanvisningen p å ett säkert st älle och låt den medfölja ka emaskinen om du överlåter den till andra användare.
För ytterligare information eller om problem uppstår, vänd er
till ett auktoriserat servicecentrum.
2 TEKNISKA DATA
Tillverkaren förbehåller sig rätten att ändra produktens tekniska egenskaper.
Nominell spänning - Nominell e ekt - Strömförsörjning
Se maskinens märkskylt
Material maskinkropp
Plast
Storlek (b x h x d) (mm)
210 x 300 x 280
Vikt
3,9 kg
Längd elkabel
1,3 m
Kontrollpanel
På framdel
Filterhållare
Try ck sat t
Pannarello
Specialdel för cappuccino
Vattenbehållare
1,25 liter - Uttagbar
Pumptryck
15 ba r
Kokare
I rostf ritt stål
Säkerhetsanordningar
Ter mos äk rin g
3 SÄKERHETSBESTÄMMELSER
Låt aldrig strömförda delar komma i kontakt med vatten: kortslutningsfara! Den upphettade ångan och det
varma vattnet kan orsaka brännskador! Rikta aldrig
ång-/varmvattenstrålen mot en kroppsdel. Hantera
ång-/varmvattenpipen med varsamhet: risk för brännskador!
Förutsedd användning
Ka emaskinen är endast avsedd för hemmabruk. Tekniska
ändringar av maskinen och samtliga otillåtna användningar är
förbjudna på grund av riskerna som dessa kan medföra! Apparaten har inte förutsetts för en användning av personer (inklusive barn) med fysiska, mentala eller sensoriella funktionshinder eller me d otillräcklig erf arenhet och/eller kompetens er,
förutom om de övervakas av en person som ansvarar för deras
säkerhet eller om de fått instruktioner om hur apparaten används.
Svenska
• 71 •
Page 72

Strömförsörjning
Koppla endast ka emaskinen till ett lämpligt strömuttag.
Spänningen skall motsvara den som anges på apparatens
märkskylt.
Elkabel
Använd aldrig ka emaskinen om elkabeln är skadad. Om elkabeln är skadad ska den bytas ut av tillverkaren eller av kundservice. Vik inte elkabeln eller placera den på vassa kanter,
ovanför mycket varma föremål och skydda den mot olja.
Bär eller dra inte i ka emaskinen genom elkabeln. Dra inte ut
kontakten genom att dra i elkabeln. Rör inte kontakten med
blöta händer.
Låt inte elkabeln hänga fritt från bord eller hyllor.
Skydd av andra personer
Håll barnen under uppsyn för at t undvika att de leker med apparaten.
Barnen förstår inte faran med elektriska hushållsapparater.
Håll maskinens emballagematerial utom räckhåll för barn.
Risk för brännskador
Undvik att rikta ång- och/eller varmvattenstrålen direkt mot
dig själv och/eller andra personer. Använd alltid de särskilt
ämnade handtagen eller vridknapparna.
Avlägsna aldrig (ta bort) den trycksatta lterhållaren under
bryggningen. Under bryggruppens uppvärmningsfas kan det
uppstå stänk av hett vatten.
Brygg inte ka e när maskinen är överhettad, alltså när lysdioderna “
” och “ ” är tända samtidigt.
Placering
Ställ ka emaskinen på en säker plat s, där ingen kan slå omkull
den eller skadas av den.
Hett vatten eller upphettad ånga kan komma ut: risk för
brännskador!
Förvara inte ka emaskinen i en temperatur som understiger
0°C efter som frost kan skada maskinen.
Använd inte ka emaskinen utomhus.
Ställ inte maskinen på mycket varma ytor eller i närheten av
öppna lågor för att undvika att maskinstommen smälter eller
skadas.
Rengöring
Före rengöring av maskinen ska maskinen stängas av med
knappen ON/OFF och kontakten ska dras ur eluttaget. Vänta
även tills maskinen har kallnat.
Ställ aldrig maskinen under vatten!
Det är absolut förbjudet att försöka utföra åtgärder inuti maskinen.
Drick och använd inte vatten som stått i vattenbehållaren under några dagar för matlagningsändamål. Rengör istället vattenbehållaren och fyll på den med friskt dricksvatten.
Plats för användning och underhåll
För ett korrekt och gott fungerande av ka emaskinen så rekommenderas följande:
• Ställ maskinen på en plan och jämn yta;
• Förvara ka emaskinen i en miljö som är lagom ljus och
hygienisk, samt är försedd med ett lät tåtkomligt eluttag;
• Placera ka emaskinen så at t minimiavståndet från maskinens kanter är som på bilden (Fig. A).
Förvaring av maskinen
När maskinen står oanvänd under en längre period, stäng av
maskinen och ta ur elkontakten från väggen. Förvara maskinen på ett torrt ställe som är utom barns räckhåll. Skydda maskinen mot damm och smut s.
Reparationer / Underhåll
Vid skada, fel eller misstänkt fel efter ett fall, dra genast ut
kontakten från eluttaget. Sätt aldrig på en skadad maskin.
Endast auktoriserade servicecentrer kan utföra åtgärder och
reparationer. Om åtgärder inte utförs korrekt avsäger sig tillverkaren allt ans var för eventuella skador.
Brandsläckning
Använd brandsläckare med koldioxid (CO2) ifall brand uppstår.
Använd inte vatten eller brandsläck ningsmedel i pulverform.
Maskinens huvudsakliga delar (Sid.2)
1 Kontrollpanel
2 Lock till vattenbehållaren
3 Ratt varmvatten / ånga
4 Plats för tillbehör
5 Vattenbehållare
6 Stöd för koppens placering
7 Vattenuppsamlare + bricka
8 Bryggrupp
9 Ångrör (pannarello)
10 Elkabel
11 ON/OFF-knapp
12 Trycksatt lterhållare
13 Mått för ka emalningen
14 Filter för ka emalningen
(det enda för br yggning av 1 eller 2 koppar)
15 Adapter för ka epod lter
16 Ka epod lter
17 Väljarratt
18 Lysdiod "påslagen maskin"
19 Lysdiod "Ånga redo"
20 Lysdiod k a e / vatten - "Maskinen redo"
• 72 •
Page 73

4 INSTALLATION
För er egen oc h utomståend es säkerhet bör “ Säkerhetsbestämmelser ” i kapitel 3 följas noggrant.
4.1 Emballage
Originalemballaget har skapats och tillverkats för att skydda
maskinen under tra nsporten. Det är tillrådligt at t spara emballaget för eventuella framtida transporter.
4.2 Försiktighetsåtgärder vid installationen
Innan du installerar maskinen, håll dig till följande säkerhetsföreskrifter:
• ställ maskinen på en säker plats;
• f örsäkra dig om att inga b arn har möjligheten att leka me d
maskinen;
• undvik att placera maskinen på heta ytor eller i närheten
av levande eld.
Ka emaskinen är nu redo at t anslutas till elnätet.
utan vatten: se till att det nns tillräckligt med vatten
i vattenbehållaren.
• (Fig.2) - Sätt tillbaka vattenbehållaren på dess rätta plats
och sätt tillbaka locket (2).
4.5 Laddning av kretsen
I början, efter att ånga har kommit ut eller efter att vattnet är
slut i behållaren, måste maskinens krets laddas om.
• Tryck p å ON/OFF-knappen (11) och sätt den i position en "I";
Lysdioden (18) tänds och anger att maskinen är påslagen.
• (Fig.4) - Ställ en behållare under ångröret (pannarellon).
• Öppna ratten (3) "varmvatten/ånga" genom att vrida den
moturs.
• (Fig.5) - Sätt väljarratten (17) i positionen
"
".
• Vänta tills ångröret (pannarellon) släpper ut en jämn vattenstråle.
• (Fig.5) - Sät t väljarratten (17) i läget "
• Stäng ratten (3) "varmvatten/ånga" genom att vrida den
medurs. Ta bort behållaren.
".
Obs: det rekommenderas att du rengör komponenterna innan deras första användning och/
eller ef ter en längre tids användning.
4.3 Maskinens anslutning
Elström kan vara farligt! På grund av det, håll
dig alltid noggrant till säkerhetsföreskrifterna.
Använd aldrig skadade sladdar! De skadade sladdarna
och kontakerna måste ersättas omedelbart av et t Auktoriserat Servicecentrum.
Apparatens spänning har ställts in i fabriken. Kontrollera att
nätets spänning motsvarar de anvisningar som står på identi kationsskylten i botten på apparaten.
• Kon trollera att ON/OFF-k nappen (11) är i position "0" innan
maskinen ansluts till elnätet.
• Sätt in kontakten i ett väggut tag med rätt spänning.
4.4 Vattenbehållare
• (Fig.1) - Ta bort locket till vattenbehållaren (2) genom att
lyfta upp det.
• (Fig.2) - Ta ut vattenbehållaren (5).
• (Fig.3) - Skölj den och fyll den med friskt dricksvatten,
utan att f ylla på med för mycket.
Häll alltid och endast friskt vatten utan kolsyra
i vattenbehållaren. Varmvatten samt övriga
vätskor kan skada behållaren. Sätt inte på maskinen
4.6 Maskinen används för första gången
eller har stått oanvänd under en
längre period
Denna enkla åtgärd försäkrar en god bryggning och måste
följas:
- när maskinen startas för första gången;
- när maskinen fått stå oanvänd ett längre tag (i över 2
veckor).
Vattnet som kommer ut ska tömmas i en sär-
skild slask och får inte drickas. Om behållaren
fylls på, under cykeln, stoppa bryggningen och töm
den innan br yggningen återupptas.
• (Fig.3) - Skölj vattenbehållaren och fyll den med friskt
dricksvatten.
• (Fig.4) - Ställ en behållare under ångröret (pannarellon).
Öppna kranen (3) genom att vrida den moturs.
(Fig.5) - Sätt väljarratten (17) i läget "
• Låt hela vattenbehållarens innehåll ut öda genom ång-/
varmvattensrör et (pannarello); för att st oppa ut ödet sätt
väljarratte n (17) i läget "
vrida den medurs.
• (Fig.3) - Fyll på behållaren med friskt dr icksvatten.
• (Fig.13-14) - Sätt in lterhållaren underifrån i bryggrup-
pen (8) och vrid den fr ån vänster till höger tills den lås es på
plats.
• (Fig.15) - Ställ en lämplig behållare under lterhållaren.
" och stäng k ranen (3) genom att
".
Svenska
• 73 •
Page 74

• (Fig.16) - Sätt väljarratten (17) i läget " " och låt allt
vatten i behållaren ut öda.
(Fig.17) - När vattnet är slut, avsluta ut ödet genom att
sätta väljarratten (17) i läget "
• Fyll på be hållaren på nytt och vänta t ills lysdioden "maskinen redo" (20) tänds.
• (Fig.19) - Ta bort lterhållaren från gruppen genom att
vrida den från höger till vänster och skölj den med friskt
dricksvatten.
Maskinen är nu klar; för detaljer om hur ka ebryggningen
och ut ödet av ånga fungerar, hänvisar vi till deras respektive
kapitel.
".
5 BRYGGNING AV KAFFE
Varning! Under bryggningen av ka et är det
förbjudet att ta bort den trycksatta lterhållaren genom att manuellt vrida den medurs. Risk för
brännskador.
• Under denna fas kan lysdioden (20) "maskinen redo" tän-
das och släckas; de tta skeende är normalt oc h ska inte räknas som en avvikelse.
• Försäkra dig om, vid första användningstillfället, att rat-
ten (3) varmvatten/ånga är stängd och att vattenbehållaren till maskinen är f ylld med tillräckligt med vatten.
• (Fig.3) - Tryck på ON/OFF- knappen (11) och sätt den i läge t
"I".
• Vänta ti ll lysdiod (20) "maskinen redo" tänds, nu är maski-
nen klar för ka ebryggning.
Ka ebryggningens tillbehör ligger på en lämp-
lig, avsedd plats för att göra dessa åtgärder
snabba och lätta.
För måttet för det malda ka et och/eller nödvändiga
lter, lyft på locket (2) och ta så mycket du önskar
(Fig.35 och Fig.36)
5.1 Med malet kaff e
• (Fig.7) - Sätt in lter (14) i den trycksatta lterhållaren
(12); vid första användningen är de t redan insatt.
• (Fig.13) - Sätt in lterhållaren underifrån i bryggruppen
(8).
• (Fig.14) - Rotera lterhållaren från vänster till höger tills
den nått låst läge. Släpp den trycksatta lterhållarens
handtag, handtaget roterar lätt åt vänster. Denna rörelse
garanterar ett perfek t fungerande av lter hållaren.
• (Fig.16) - Förvärm den trycksatta lterhållaren genom
att vrida väljarratten (17) i läget "
ut öda från den trycksatta lterhållaren (denna åtgärd
"; vattnet börjar att
behövs bara för den för sta koppen ka e).
• (Fig.17) -Efter att ha låtit 150ml vatten rinna, sätt väljar-
ratten (17) i läget "
• (Fig.19) - Ta bort lterhållaren från maskinen genom att
vrida den från höger till vänster och töm vattnet som är
kvar. Med det särskilda ltret (14) som är avsett för mask inen, behöver man inte by ta lter för att br ygga en eller två
koppar ka e.
• (Fig.35) - Ta måttet från maskinen.
• (Fig.8) - Häll på 1-1,5 mått för att brygga en enkel ka e
eller 2 släta mått f ör en dubbel; rengör lterhållarens kant
från ka erester.
• (Fig.13) - Sätt in lterhållaren (12) i bryggruppen (8) un-
derifrån.
• (Fig.14) - Rotera lterhållaren från vänster till höger tills
den nått låst läge.
• (Fig.15) - Ta 1 eller 2 förvärmda koppar och placera
dem under den tr ycksatta lterhållaren ; kontrol lera att de
är placerade precis under rören för ut öde av ka et.
• (Fig.14) - Vrid väljarratten (17) till läget "
• När önskad mängd ka e uppnåtts, vrid väljarratten (17)
till läget "
under efter det att bryggningen avslutats ; ta sedan kopparna med ka e (Fig.18).
• (Fig.19) - Ta ut den trycksatta lterhållaren och töm den
på sumprester.
Obs: i lterhållaren blir det kvar lite vatten;
detta är normalt och hör till lterhållarens
egenskaper.
Viktigt: Filtret (14) måste hållas rent för att ett
perfekt resultat ska uppnås. Rengör dagligen
efter användning.
" för att stoppa bryggningen.
".
" för att stoppa bryggningen. Vänta några sek-
5.2 Med kaff epods
• (Fig.9) - Ta bort ltret för malt ka e (14) från den trycksatta lterhållaren (12) genom att använda en tesked.
• (Fig.10) - Sätt in, i den trycksatta lterhållaren (12),
podsadaptern (15), med den rundade delen vänd neråt.
• (Fig.11) - Efteråt, sätt in pods ltret (16) i den trycksatta
l t e r h å l l a r e n (1 2 ) .
• (Fig.13) - Sätt in den trycksatta lterhållaren i bryggruppen (8) underifrån.
• (Fig.14) - Rotera lterhållaren från vänster till höger tills
den nått låst läge. Släpp handtaget till den trycksatta lterhållaren. Ett automatiskt system för nu lätt handtaget
till vänster.
Denna rörelse garanterar ett perfekt fungerande av den
trycksatta lterhållaren.
• 74 •
Page 75

• (Fig.16) - Förvärm den trycksatta lterhållaren genom
att vrida väljarratten (17) i läget "
ut öda från den trycksatta lterhållaren (denna åtgärd
behövs bara för den för sta koppen ka e).
• (Fig.17) -Efter att ha låtit 150ml vatten rinna, sätt väljar-
ratten (17) i läget "
• (Fig.19) - Ta bort den trycksatta lterhållaren från maski-
nen genom att vrida den från höger till vänster och töm
vattnet s om är kvar.
• (Fig.12) - Sätt in podsen i lterhållaren; se till att podsens
papper inte åker ut f rån lterhållaren.
• (Fig.13) - Sätt in den trycksatta lterhållaren i bryggrup-
pen (8) underifrån.
• (Fig.14) - Rotera lterhållaren från vänster till höger tills
den nått låst läge.
• Ta 1 fö rvärmd kopp och placer a den under lterhållaren;
kontrollera att den är placerad precis under rören för ut öde av ka e.
• (Fig.16) - Vrid väljarratten (17) till läget "
• (Fig.17) - När önskad mängd ka e uppnåtts, vrid väljar-
ratten (17) i läget "
ta ut ka ekoppen.
• (Fig.19) - Vid slutet av brygg ningen vänta några sekund er,
ta bort lterhållaren och släng den använda podsen.
Viktig t: Filtret (16) och adaptern (15) måste hållas rena för att ett perfekt resultat ska uppnås.
Rengör dagligen efter användning.
" för att stoppa bryggningen.
" för att s toppa bryggningen av ka et;
"; vattnet börjar att
".
6 VAL AV KAFFE REKOMMENDATIONER
Generellt sätt kan man använda alla ka etyper som nns
tillgängliga ute i handeln. Men ka e är trots allt en naturprodukt och dess smak kan skilja sig åt beroende på ursprung och
blandning; det är därför rekommenderat att testa olika typer,
tills man hitt ar den som man bäst tycker om.
För bästa resultat rekommenderas det att använda blandningar som är gjorda för espressomaskiner. Ka et ska alltid
ut öda med jämn stråle, utan att droppa, från den trycksatta
l t e r h å l l a r e n .
Hastigheten av ka eut ödet kan modi eras genom att för siktigt byta ka edosen i ltret och/eller använda ka e med en
annan malnings nhet.
För ett bättre resultat i koppen och för att underlätta rengöring och förberedning, rekommenderar Saeco att använda enkeldos ka epods av märket ESE.
INNAN MAN UTFÖR VILKEN SOM HELST ÅTGÄRD
SOM ÄR RELEVANT FÖR UTFLÖDET AV ÅNGAN ELLER VARMVATTNET, KONTROLLERA ATT ÅNGRÖRET (PANNARELLON) ÄR PLACERAT ÖVER UPPSAMLINGSK ARET FÖR
VATTEN .
7 VARMT VATTEN
Fara för brännskada! I början av ut ödet kan
det uppstå små stänk av varmvatten. Ångröret
kan uppnå höga temperaturer: undvik att röra röret
direkt med händerna.
• Tryck på ON/OFF-knappen (11) och sätt den i läget "I".
• Vänta ti ll lysdiod (20) "maskinen redo" tänds, nu är maski-
nen klar.
• (Fig. 21) - Ställ en behållare eller en te kopp under ångröret
(pannarellon).
• (Fig.21) - Öppna ratten (3) genom att vrida den moturs.
• (Fig.22) - Sätt väljarratten (17) i läget "
• (Fig.23) - När man tagit önskad mängd varmt vatten, sätt
väljarratten (17) i läget "
• (Fig.24) - Stäng ratten (3) genom att vrida den medurs.
• Fyll behållaren med varmt vatten.
".
".
8 ÅNGA / CAPPUCCINO
Fara för brän nskada! I börja n av ut ödet ka n det
uppstå små stänk av varmvatten. Ångröret kan
uppnå höga temperaturer: undvik att röra röret direkt
med händerna.
• Tryck på ON/OFF-knappen (11) och sätt den i läget "I".
• Vänta tills lysdioden (20) "maskinen redo" tänds.
• (Fig.25) - Sätt väljarratten (17) i läget "
(20) släcks.
• Vänta tills lysdiod (19) tänds, nu är maskinen redo för ut-
ödet av ånga.
• (Fig.26) - Ställ en behållare under ångröret.
• (Fig.26) - Öppna ratten (3) för ett ögonblick så att det
kvarstående vattnet i ångröret (pannarellon) rinner ut;
efter en stund kommer det endast ut ånga.
• (Fig.27) - Stäng kranen (3) och ta bor t behållaren.
• Fyll på be hållaren som ska användas för tillredn ing av cap-
puccinon med kall mjölk till 1/3.
Använd kall mjölk för ett bättre resultat
"; lysdioden
Svenska
• (Fig.28) - Sänk ner ångröret i mjölken och öppna ratten
(3) genom att vrida den moturs; rotera mjölkkannan långsamt, upp och ner, så att all mjölk värms upp.
• 75 •
Page 76

Det rekommenderas at t brygga under högst 60
sekunder.
• För att avsluta, stäng ratten (3) genom att vrida den medurs; ta koppen med den skummade mjölken.
• (Fig.30) - Sätt väljarratten (17) i läget "
Om båda lysdioderna "
nens temperatur f ör hög för att kunna brygga ka et.
• For tsätt med laddning en av kretsen så som st år beskrivet i
par.4.5 för att göra mask inen brukbar.
Obs: maskinen är brukbar när lysdioden
"maskinen redo" är rege lbundet tänd.
Obs: om man inte lyckas brygga en cappuccino
så som står beskrivet, måste man ladda om
kretsen som i par. 4.5 och därefter upprepa åtgärderna.
Samma tillvägagångssätt kan användas vid
uppvärmning av övriga drycker.
• Rengör maskinen och ångröret med en fuktig trasa efter
denna åtgärd.
" och " " är tända, är maski-
".
9 RENGÖRING
Underhåll och rengöring kan endast utföras när maskinen har
kallnat och kopplats ut ur elnätet.
• Doppa inte maskinen i vatten och tvätta inte några av
komponenterna i diskmaskin.
• Använd inte etanol, lösningsmedel och/eller aggressiva
kemiska medel.
• Vi rekommenderar en daglig rengöring av vattenbehålla-
ren och att f ylla den med friskt vat ten.
• (Fig.31-33) - Dagligen efter uppvärmning av mjölken: av-
lägsna pannarellon s yttersta del o ch rengör den med frisk t
dricksvatten.
• (Fig. 31-32-33) - Ångröret ska rengöra s varje vecka. För att
utföra detta moment, gör följande:
- avlägsna Pannarellons ytterdel (för en god rengöring);
- dra av Pannarellons överdel f rån ångröret;
- rengör Pannarellons överdel med frisk t dricksvatten;
- rengör ångr öret med en fukti g trasa och avlägsna event uella mjölkrester;
- sätt tillbaka ångrörets överdel (försäkra er om att den är
ordentligt isatt).
Sätt tillbaka Pannarellons ytterdel.
• (Fig.34) - Töm och rengör droppupps amlaren dagligen.
• Använd en trasa som fuktats med vatten för att rengöra
apparaten.
• (Fig. 20) - För att rengöra den tr ycksatta lterhållaren, gör
som följande:
- (Fig.9) - ta bort ltret, tvätta det noggrannt med varmt
vatten.
- ta bort adaptern (om be ntlig), tvätta den noggrannt
med varmt vat ten.
- tvätta den trycksatta lterhållarens insida.
• Torka inte maskinen och/eller dess delar i mikrovågsugn
och/eller i vanlig ugn.
• (Fig.35-36) - Tvätta tillbehörens plats varje vecka med en
fuktig t rasa för att avlägsna event uella rester av ka e eller
pulver och liknande.
Obs: tvätta inte den trycksatta lterhållaren i
diskmaskin.
10 AVKALKNING
Kalkbildningen är normal vid användning av apparaten. Avkalkningen måste göras var eller varannan månad under maskinens användnin g och/eller när en minskning av vat ten ödet
uppmärks ammas. Använd endast avkalkningsmedlet Saeco.
Om anvisningarna skiljer sig åt ska bruksanvis-
ningen tas i anspråk i första hand och instruktioner på tillbehör eller material som säljs separat i
andra hand.
Använd avkalkningsmedlet Saeco (Fig.B). Pro-
dukten har utarbetats för att hålla maskinens
prestanda och funktionalitet på en optimal nivå under
maskinens hela livslängd, samt, om rätt använd, för
att undv ika skiftningar i kval itet hos den bryggda slutprodukten. Innan avkalkningscykeln inleds, se till att:
VATTENFILTRET TAGITS BORT om det använts.
Drick inte av avkalkningsmedlet och bryggda
drycker innan cykeln avslutats. Använd absolut
inte vinäger som avkalkningsmedel.
1 (Fig.13-14) - Sätt in lterhållaren underifrån i bryggrup-
pen (8) och vrid den fr ån vänster till höger tills den lås es på
plats.
2 (Fig.2) - Lyf t ut vattenbehållaren och töm den på vatten.
3 (Fig.3) - Häll HALVA innehållet i a skan med koncentrerat
avkalkningsmedel Saeco i maskinens vattenbehållare och
fyll på den med frisk t dricksvatten till och med maxnivån.
4 Slå p å maskinen genom att tr ycka på ON/OFF-knappe n (11)
och sätta den i läget "I".
(Fig.21) - Låt 2 kopp ar vatten (cirka 150 ml vardera) till ö-
da från ång-/ varmvattenröret (såsom kapitel 7 i bruksanvisningen anger). Stäng sedan av maskinen med hjälp av
• 76 •
Page 77

strömbrytaren ON/OFF (11) genom att sätta denna i läget
"0".
5 Låt stå i ungefär 15-20 minuter med maskinen avslagen.
6 Sätt på maskinen genom att trycka på ON/OFF-knappen
(11).
(Fig.21) - Fyll 2 koppar (cirka 150 ml vardera) med vatten
från ång-/varmvattenröret (så som står beskrivet i kapitel
7 i manualen). Stäng sedan av maskinen genom att trycka
på ON/OFF-knappen (11) och låt den vara avstängd i 3 minuter.
7 Upprepa momenten i punkt 6 tills vattenbe hållaren tömts
helt.
8 (Fig.3) - Skölj vattenbehållaren med friskt dricksvatten
och fyll p å den helt.
9 Ställ en behållare under lterhållaren.
10 Slå på maskinen med ON/OFF-knappen (11); rotera väljar-
ratten (17) i läget "
" och låt ut öda hela behållarens
innehåll genom lterhållaren. För att stoppa ut ödet sätt
väljarratten (17) i läget "
".
11 (Fig. 3) - Fyll på behållaren med f riskt dricksvat ten igen.
(Fig.21) - Ställ en rymlig behållare under ångröret (pan-
narellon). Öppna kranen för ut öde av vatten (3) genom
att vrida den moturs.
(Fig.22) - Roter a väljarratten (17) i läget "
" och låt hela
innehållet från behållaren ut öda genom ång-/varmvattensröret.
12 (Fig.23) - Efter ut ödet av vatten, sätt väljarratten (17) i
läget "
". för att stoppa ut ödet.
(Fig.24) - Stän g kranen för ut öde av vatte n (3) genom att
vrida den medurs.
13 Gör om momenten i punkt (8) för sammanlagt 4 behål-
lare.
14 (Fig.19) - Ta bort lterhållaren från gruppen genom att
vrida den från höger till vänster och skölj den med friskt
dricksvatten.
11 BORTSKAFFANDE
• Sätt oanvända apparater ur f unktion
• Dra ur kontakten från eluttaget och frånkoppla elkabeln.
• Ta apparate n till en lämplig avfallss ortering när dess li vslängd
löpt ut.
Produkten är förenlig med Eu-direktivet 2002/96/EG.
Symbo len
ning indikerar att produkten inte får behandlas som hushållsav fa ll u tan ska läm na s in på e n lä mpl ig a vf all ss or ter ing ss tat io n
för återv inning av elektrisk och elektronisk utrustni ng. Genom
att se till att produkten ska as bort på rätt sätt bidrar du till
att motverka möjliga negativa bie ekter på miljön och hälsan
som en oriktig avfallshantering av produkten kan orsaka. För
mer detaljerad information om återvinningen av denna produkt, var go d kontakta din kommun, di n hushållsavfallsser vice
eller a ären där du köpte produkten.
på produkten eller på produktens förpack-
Svenska
Avkalkningscykeln är nu klar.
(Fig.3) - Fyll på behållaren med friskt dricksvatten igen. Om
nödvändigt, utför laddningen av kretsen så som beskrivet i
par. 4.5.
Avkalkningsmedlet skall bortska as enligt
tillverkarens instruktioner och/eller gällande
normer i användarlandet.
• 77 •
Page 78

Skada Möjliga orsaker Åtgärd
Maskinen sätts inte igång. Maskinen är inte kopplad till elnätet. Koppla maskinen till elnätet.
Pumpen är mycket högljudd. Vatten saknas i vattenbehållaren. Fyll på med vatten.(par.4.4).
Lysdioden (20) "maskinen redo" var av-
Ka et är för kallt.
stängd när väljarratten (17) sattes i läget
"
".
Filterhållaren är inte insatt för förvärmningen (kap. 5).
Kalla koppar. Förvärm kopp arna med varmt vatten.
Vänta tills lysdioden (20) tänds.
Förvärm lterhållaren.
Det bildas inget mjölkskum.
Det går inte förbereda en cappuccino.
Ka et rinner ut för fort oc h inget
skum bildas.
Ka et rinner inte ut eller bara
droppar ut.
Ka et rinner ut längs kanterna.
Olämplig mjölk: pulvermjölk, lättmjölk. Använd helmjölk.
Pannarellon är smut sig. Rengör pannarellon såsom står beskrivet i Kap.9.
Det nns inte längre ånga i kokaren.
För lite ka e i lterhållaren. Tillsätt ka et (kap. 5).
Malningen är för grov. Använd en annan blandning (kap.6).
Gammalt eller inte lämpligt ka e. Använd en annan blandning (kap.6).
Gammal eller inte lämplig pod. Byt ut den använda podsen.
Det saknas en komponent i lterhållaren.
Vatten saknas. Fyll på med vatten (par.4.4).
Malningen är för n. Använd en annan blandning (kap.6).
Ka e är pressat i lterhållaren. Ta bort ka emalningen.
För mycket ka e i lterhållaren. Minska på ka emängden i lter hållaren.
Ratt (3) öppen. Stäng ratten (3).
Maskinen är förkalkad. Utf ör en avkalkning av maskinen (kap.10).
Filtret i lterhållaren är tilltäppt. Rengör ltret (kap.9).
Podsen är inte lämplig. Byt till en annan typ av pod.
Filterhållaren är dåligt insatt i bryggrup-
pen.
Övre kanten på lterhållaren är smutsig. Rengör kanten på lterhållaren.
Podsen har sat ts i på fel sätt.
För mycket ka e i lterhållaren. Minska på ka emängden med måttet.
Ladda om kretsen (par. 4.5) och upprepa åtgärderna som beskrivs i Kap.8.
Kontroller a att alla komponenter nns och är korrekt monterade.
Sätt in lterhållaren korrekt (kap.5).
Sätt in podsen korrek t och se till att den inte åker
ut från lterhållaren.
För skador som inte nns med i tabellen ovan, eller om åtgär derna som föreslagits inte löser problemen, kontakta
ett servicecenter.
• 78 •
Page 79

EG-FÖRSÄKRAN OM ÖVERENSSTÄMMELSE
ÅR 09
2006/95/EG, 2004/108/EG.
Saeco International Group
Via Torretta 240
40041 GAGGIO MONTANO (BO)
vi försäkrar under eget ansvar att produkten:
ENKEL KAFFEMASKIN
TYP : HD 8323 / HD 8325
som denna försäkran avser överensstämmer med följande bestämmelser :
• Säkerhetsbestämmelser för hushållsapparater och elektriska apparater - Allmänna krav
EN 60335-1 (2002) + A1(2004) + A2(2006) + A11(2004) + A12 (2006) +A13 (2008)
• Säkerhetsbestämmelser för hushållsapparater och elektriska apparater - Del 2-15
Särskilda krav för apparater för vätskeuppvärmning
EN 60 335-2-15 (2002) + A1(2005) + A2 (2008)
• Säkerhetsbestämmelser för apparater för hushållsbruk och liknande. Elektromagnetiska fält
Tillvägagångssätt för bedömning och åtgärder -EN 62233 (2008).
• Tillåtna gränser och metoder för mätning av radiostörningar som kännetecknar apparater
med elektrisk eller termisk motor för hushållsbruk och liknande, elektriska instrument
och liknande elektriska apparater - EN 55014-1 (2006).
• Elektromagnetisk kompatibilitet (EMC)
Del 3^ Tillåtna gränser - Sektion 2 : Gränser för övertoner förorsakade av
apparater med matningsström högst 16 A per fas - EN 61000-3-2 (2006).
• Elektromagnetisk kompatibilitet (EMC)
Del 3^ Tillåtna gränser - Sektion 3 : Gränsvärden för spännings uktuationer och immer i
lågspänningsdistributionssystem förorsakade av apparater med märkström högst 16A.
EN 61000-3-3 (1995) + korr.(1997) + A1(2001) + A2 (2005).
• Immunitetsföreskrifter för hushållsapparater, instrument och liknande apparater.
Bestämmelser för produktklasserna EN 55014-2 (1997) + A1 (2001).
Svenska
i enlighet med bestämmelserna i direktiven: 2006/95/EG, 2004/108/EG.
Gaggio Montano 28/04/2009
R & D Manager
Ingenjör Andrea Castellani
• 79 •
Page 80

1 GENERELT
Denne ka emaskinen er egnet for tilbereding av 1 eller 2 kopper espressoka e. Den er utstyrt med et regulerbart rør for
uttak av damp og varmt vann. Betjeningsknappene på apparatets fremside er merket med symboler som er enkle å fors tå.
Maskinen er designet for bruk i hjemmet og er ikke egnet til
noen form for profesjonell kontinuerlig bruk.
Advarsel. Produsenten påtar seg intet ansvar
for eventuelle skader ved tilfelle r av:
• Feilaktig bruk eller bruk som ikke er i tråd med det
maskinen er laget for;
• Reparasjoner som ikke er utført av autoriserte serviceverksteder;
• Skader påført strømkabelen;
• Skader påført en hvilken som helst del av maskinen;
• Bruk av uoriginale reservedeler eller tilbehør;
• Manglende avkalking og oppbevaring på steder
med temperatur under 0°C.
I alle disse tilfellene bortfaller garantien.
1.1 For å forenkle avlesingen
Varseltrekanten indikerer alle instruksjoner som er viktige for bru-
sjonene nø ye for å unngå alvorlige skader!
Henvisninger til illustrasjoner av apparatets deler, betjeningselementer os v. er indikert m ed nummer eller boks taver; i dette
tilfelle henvises det til illus trasjonen.
Dette symbolet fremhever den informasjonen
som skal tas spesielt hensyn til for at maskinen
skal fungere best mulig.
Illustrasjonene som er tilknyttet teksten nnes på de
første sidene i bruksanvisningen. Studer disse sidene
mens du leser bruksanvisningen.
kerens sikkerhet. Følg disse indika-
1.2 Bruk av denne bruksanvisningen
Oppbevar den ne bruksanvisning en på et sikkert sted, o g husk å
legge den ved ka emaskinen hvis en annen person skal bruke
den.
For yt terligere informasj on eller i tilfelle av probl emer henviser
vi til autoriser te serviceverksteder.
2 TEKNISKE DATA
Produsenten f orbeholder seg ret ten til å endre produkte ts tekniske egenskaper.
Nominell spenning - nominell e ekt - strømforsyning
Se merkeplaten på apparatet
Materialet i hoveddelen
Plast
Mål (l x h x d) (mm)
210 x 300 x 280
Vekt
3,9 kg
Kabellengde
1,3 m
Betjeningspanel
På forsiden
Filterholder
Try kk sat t
Pannarello
Spesielt for cappuccinoer
Vannb eholder
1,25 liter - Kan trekkes ut
Pumpetrykk
15 ba r
Kokeenhet
Rustfritt stål
Sikkerhetsinnretninger
Ter mos ikr in g
3 SIKKERHETSNORMER
La aldri noen av de strømførende delene komme i
kontakt med vann: fare for kortslutning! Den overopphetede dampen og det varme vannet kan gi forbrenninger! Rett aldri damp- eller vannspruten mot noen
deler av kr oppen, og vær forsiktig når du tar på da mp-/
varmtvannstuten: fare for forbrenning!
Bruksområde
Denne ka emaskinen er kun bere gnet for bruk i hjemmet. Alle
tekniske endringer og all upassende bruk er ulovlig, da det vil
kunne medføre risiko! Apparatet er ikke beregnet for bruk av
personer (barn inkluder t) med reduserte fy siske, mentale eller
sansemessige evner, eller med utilstrekkelig erfaring og/eller
kompetanse, med mindre de overvåkes av en person som er
ansvarlig for deres sikkerhet, eller de får tilstrekkelig opplæring i bruken av apparatet.
• 80 •
Page 81

Strømforsyning
Koble ka emaskinen kun til et egnet strømuttak. Spenningen
i nettet må stemme overens med spenningen indikert på apparatets merkeplate.
Strømkabel
Bruk aldri ka emaskinen hvis strømkabelen er skadet. Hvis
strømkabelen er skadet, må den skiftes ut av produsenten eller av produsentens serviceverksted. Ikke la kabelen gå over
hjørner eller skarpe kanter eller over s vært varme gjenst ander,
og besky tte kabelen mot oljesprut.
Ikke bruk kabelen til å ytte eller dra i ka emaskinen. Ikke
trekk ut støpselet ved å dra i kabelen eller ta på kabelen med
våte hender.
Unngå at kabelen henger ned fra bord eller hyller.
Beskyttelse av andre personer
Hold barn under oppsyn for å hindre at de leker med apparatet.
Barn forstår ikke faren forbundet med elektriske husholdningsapparater. Oppbevar maskinens emballasje utilgjengelig
for barn.
Fare for forbrenning
Unngå å vende den overop phetede varmtvanns-/dampspr uten
mot deg selv eller andre. Bruk alltid de egne håndtakene eller
bryterne.
Løsne eller ern aldri den trykksatte lterholderen mens et
ka euttak pågår. Under uttaksenhetens oppvarmingsfase kan
det lekke ut dråper med varmt vann.
Ta ikke ut ka e når maskinen har for høy temperatur, dvs. når
led-lyset “
” og “ ” lyser samtidig.
Plassering
Plasser ka emaskinen på et sikkert sted, hvor ingen vil kunne
velte den eller bli skadet av den.
Overopphet et vann eller damp kan lekke ut: fare for forbren-
ning!
Oppbevar aldri maskinen ved temperaturer under 0°C, da det
er fare for at frost vil kunne skade maskinen.
Ikke bruk ka emaskinen utendør s.
Ikke plassere maskinen på svært varme over ater og/eller i
nærheten av åpne ammer, dette for å unngå at kledningen
smelter eller på annen måte skades.
Rengjøring
Før du rengjør maskinen må du koble den fra ved hjelp av ON/
OFF-tastene, og deretter trekke støpselet ut av stikkontakten.
Dessuten må du vente til maskinen er avk jølt.
Legg aldri maskinen i vann!
Det er strengt forbudt å forsøke å gjøre inngrep på innsiden
av maskinen.
Du må ikke bruke vannet som har blitt værende i beholderen
i noen dager til matlaging. Vask beholderen og fyll den med
friskt drikkevann.
Plass til bruk og vedlikehold
For at ka emaskinen skal fungere kor rekt anbefales følgende:
• Velg et underlag som er helt jev nt;
• Velg et sted som er tilstrekkelig opplyst, hygienisk og har
en stikkontakt let t tilgjengelig.
• La det være en minimumsavstand mellom veggene og
maskinen som angitt i guren (Fig.A).
Oppbevaring av maskinen
Når maskinen ikke er i bruk over lengre tid, skal den frakobles
ved å ta støpselet ut av strømkontakten. Oppbevar maskinen
tørt og utenfor barns rekkevidde. Beskytt maskinen mot støv
og skitt.
Reparasjon/vedlikehold
Ta straks støpselet ut av kontakten ved skader, defekter eller
mistanke om defekter etter et fall. Bruk aldri maskinen hvis
den er skadet. Kun autoriserte serviceverksteder kan foreta
inngrep og reparasjoner. Produsenten fraskriver seg ethvert
ansvar i tilfeller av inngrep utfør t på feil måte.
Brannvern
I tilfelle brann bruk slukningsapparater med karbondioksid
(CO
). Ikke bruk vann eller pulverapparater.
2
Tegnforklaring for maskinens deler (Pag. 2)
1 Betjeningspanel
2 Lokk til vannbeholder
3 Velger til varmtvann/damp
4 Plass til tilbehør
5 Vannbeholder
6 Støtte til koppholder
7 Vannsamler + rist
8 Uttak senhet for ka e
9 Damprør (Pannarello)
10 Strømkabel
11 ON/OFF-bryter
12 Trykksatt lterholder
13 Måleskje til den malte ka en
14 Filter til den malte ka en
(kun for uttak av 1 eller 2 ka er)
15 Adapter til ka e lter i kapsler
16 Filter til ka e i kapsler
17 Velger
18 Led-lys for "påslått maskin"
19 Led-lys for "klar for damput tak"
20 Led-lys for ka e/vann - "maskinen er klar"
Norsk
• 81 •
Page 82

4 INSTALLASJON
For egen og andres sikkerhet må du alltid ta hensyn til
instru ksjonene i kapit tel 3 som gjelde r "Sikkerhetsno rmer".
4.1 Emballasje
Originalemballasjen er designet og laget for å besk ytte maskinen under frakt. Vi anbefaler at du tar vare på emballasjen for
eventuell framtidig transpor t.
4.2 Forholdsregler for installasjon
Før du installerer ka emaskinen må du overholde følgende
sikkerhetsregler:
• plasser maskinen på et sikker t sted;
• forsikre deg om at det ikke vil være mulig for barn å leke
med maskinen;
• unngå å plassere maskinen på svært varme over ater og/
eller i nærheten av åpne ammer.
Ka emaskinen er nå klar for å bli tilkoble t strømnettet.
Merk: det anbefales å rengjøre delene før første bruk og /eller et ter en periode der mask inen
ikke har vært i bruk.
4.3 Tilkobling av maskinen
Elektrisk strøm kan være farlig! Derfor er det
ekstremt viktig å overholde sikkerhetsnormene
nøye. Bruk a ldri skadede ledn inger! Skadede le dninger
og kontakter skal bli skiftet ut øyeblikkelig av autoriserte serviceverksteder.
Apparatets spenning har blitt innstilt av fabrikken. Kontrollere at strømnettets spenning stemmer overens med indikasjonene på identi kasjonsplaten som nnes på undersiden av
apparatet.
• Kontrollere at ON/OFF-bryteren (11) er i stilling "0" før du
kobler maskinen til strømnettet.
• Sett støpselet inn i en veggkontakt med egnet spennings-
førsel.
4.4 Vannbeholder
• (Fig.1) - Fjern vannbeholderens lokk (2) ved å løfte det av.
• (Fig.2) - Trekk ut vannbeholderen (5).
• (Fig.3) - Skyll den o g fyll den med fr iskt drikkevann. Unn gå
å fylle på for mye vann.
Vannbeholderen skal kun fylles med friskt drik-
kevann uten kullsyre. Varmt vann og andre
væsker vil kunne skade beholderen. Ikke sett maskinen i gang uten vann: Pass alltid på at det er nok vann
i beholderen.
• (Fig.2) - Sett inn beholderen, forsikre deg om at den plas-
seres korrekt, og sett på lokket (2).
4.5 Oppfylling av kretsen
I begynnelsen, etter damputtaket, eller når det er tomt for
vann i beholderen, må maskinkret sen fylles opp.
• Trykk på ON/OFF-bryteren (11) og sett den i posisjon "I";
led-lyset (18) tennes for å indikere at maskinen er på.
• (Fig.4) - Plasser en beholder under damprøret (Pannarello).
• Åpne velgeren (3) "varmt vann/damp" ved å vri den mot
klokken.
• (Fig.5) - Flytt velgeren (17) til posisjon "
• Vent til det kommer ut en jevn vannstråle fra damprøret
(Pannarello).
• (Fig.5) - Flytt velgeren (17) til posisjon "
• Steng velgeren (3) "varmt vann/damp" ved å vri den med
klokken. Fjern beholderen.
".
".
4.6 Første gangs bruk eller etter en pe-
riode der maskinen ikke har vært i
bruk
Denne enkle operasjonen vil garantere deg et optimalt ka euttak og den må gjennomføres:
- ved første gangs bruk;
- når maskinen har stått ubrukt over lengre tid (mer enn 2
uker).
Vanne t som komm er ut må tø mmes på e t egnet
sted og ikke brukes til matlaging. Hvis beholder en bli r full mens s yklus en påg år, stop p ka euttaket
og tøm den før operasjonen fortsetter.
• (Fig.3) - Skyll beholderen grundig og fyll den med friskt
drikkevann.
• (Fig.4) - Plasser en beholder under damprøret (Panna-
rello). Åpne kranen (3) ved å vri den mot klokken.
(Fig.5) - Flytt velgeren (17) til posisjon "
• Før alt innholdet i vannbeholderen ut via damp-/varmt-
vannsrøret (Pannarello); for å avslutte ka euttaket, ytt
velgeren (17) til posisjon "
den med klokken.
• (Fig.3) - Fyll beholderen med friskt drikkevann.
• (Fig.13-14) - Sett lterholderen i nn i uttaksenhete n (8) fra
undersiden, og vri den fra venstre mot høyre helt til den
blokkeres.
" og steng kranen (3) ved å vri
".
• 82 •
Page 83

• (Fig.15) - Sett en passende beholder inn under lterholde-
ren.
• (Fig.16) - Flytt velgeren (17) til posisjon "
vannet ut fra vannbeholderen.
(Fig.17) - Når det er tomt for vann, skal uttaket stoppes
ved å y tte velgeren (17) til posisjon "
• Fyll op p beholderen på nyt t og vent til led-lyset "mas kinen
er klar" (20) tennes.
• (Fig.19) - Fjern lterholderen f ra enheten ved å vri den fra
høyre mot vens tre og skyll den med friskt drikkevann.
Maskinen er nå klar til bruk; for funksjonsinformasjon som
gjelder ka e- og damputtak henvises det til de aktuelle kapitlene.
" og før alt
".
5 KAFFEUTTAK
Advarsel! Det er forbudt å trekke ut den trykk-
satte lterholderen (ved å vri den manuelt med
klokken) mens et ka euttak pågår. Fare for forbrenning.
• Når denne operasjonen pågår, kan led-lyset (20) "mas-
kinen er klar" slå seg av og på; denne type funksjon skal
betraktes som normal og er ikke en uregelmessighet.
• Forsikre deg om at velgeren (3) for varmt vann/damp er
stengt og at maskinens vannbeholder inneholder tilstrekkelig vann før maskinen tas i bruk.
• (Fig.3) - Trykk på ON/O FF-bryteren (11) og still den til posi-
sjon "I".
• Vent til led-lyset (20) "maskinen e r klar" tennes. Maskinen
er nå klar til å ut føre et ka euttak.
Tilbehøret for ka euttak nnes på et sted som
har blit t designet spesie lt for dette form ål for å
gjøre disse operasjonene enk le og raskt tilgjengelig.
For å nne måleskjeen for den malte ka en og/eller
nødvendige lter, løft opp lokket (2) og ta ut det du
ønsker (Fig. 35 og Fig. 36)
5.1 Med malt kaff e
• (Fig.7) - Sett lteret (14) inn i den trykksatte lterholde-
ren (12); ved første gangs bruk er lteret allerede satt inn.
• (Fig.13) - Sett lterholderen inn i uttaksenheten (8) fra
undersiden.
• (Fig.14) - Vri lterholderen fra venstre mot høyre helt til
den blokkeres. Slipp den trykksatte lterholderens håndtak, håndtaket roterer let t mot venstre. Denne bevegelsen
garanterer at lterholderen fungerer perfekt.
• (Fig.16) - Forvarm den trykksatte lterholderen ved å
ytte velgeren (17) til posisjon "
renne ut fra den trykksatte lterholderen (denne opera-
"; vannet begynner å
sjonen er kun nødvendig for den første ka en).
• (Fig.17) -Etter at 150 ml vann har rennt ut, skal velgeren
(17) y ttes til posisjon "
• (Fig.19) - Ta lterholderen av maskinen ved å vri den fra
høyre mot venstre og tøm ut det gjenværende vannet.
Med maskinens spesielle lter (14), er det ikke nødvendig
å skifte lter for å få en eller to ka er.
• (Fig.35) - Ta måleskjeen ut av maskinen.
• (Fig.8) - Fyll i 1-1,5 måleskjeer for en enkelt ka e eller 2
fulle måleskjeer for en dobbel ka e; rengjør kanten på lterholderen for ka erester.
• (Fig.13) - Sett lterholderen (12) inn i uttaksenheten (8)
fra undersiden.
• (Fig.14) - Vri lterholderen fra venstre mot høyre helt til
den blokkeres.
• (Fig.15) - Ta ut 1 eller 2 forvarmede kopper og plasser
dem under den tr ykksatte lterholderen; kontrollere at de
er korrekt plasser t under hullene der ka en kommer ut.
• (Fig.14) - Vri velgeren (17) til posisjon "
• Når ønsket ka emengde er oppnådd, skal velgeren (17)
vris til posisjon "
sekunder etter at uttaket er avsluttet; ta ut ka ekoppene
(Fig.18).
• (Fig.19) - Ta ut den trykksatte lterholderen og tøm den
for resterende ka egrut.
Merk: en liten mengde vann blir værende i lterholderen; dette er normalt og skyldes lter-
holderens egenskaper.
Vikti g merknad: Filteret (14) må holdes rent for
å garanter e et perfekt resultat. Vas k det daglig
etter bruk.
" for å stoppe uttaket.
".
" for å stanse ka euttaket. Vent noen
5.2 Med kaff ekapsler
• (Fig.9) - Ta lteret for malt ka e (14) ut av den trykksatte
lterholderen (12) ved hjelp av en ka eskje.
• (Fig.10) - Sett adapteren for ka ekapsler (15) inn i den
trykksatte lterholderen (12), med den avrundede delen
vendt ned.
• (Fig.11) - Deretter skal lteret for kapsler (16) settes inn i
den trykksatte lterholderen (12).
• (Fig.13) - Sett den trykksatte lterholderen inn i uttaksenheten (8) fra undersiden.
• (Fig.14) - Vri lterholderen fra venstre mot høyre helt til
den blokkeres. Slipp den trykksatte lterholderens håndtak. Et automatisk system vil nå føre håndtaket lett mot
venstre.
Denne bevegelsen garanterer at den trykksatte lterhol-
deren fungerer perfekt.
• (Fig.16) - Forvarm den trykksatte lterholderen ved å
ytte velgeren (17) til posisjon "
renne ut fra den trykksatte lterholderen (denne opera-
"; vannet begynner å
Norsk
• 83 •
Page 84

sjonen er kun nødvendig for den første ka en).
• (Fig.17) -Etter at 150 ml vann har rent ut, skal velgeren
(17) y ttes til posisjon "
• (Fig.19) - Ta d en t ry kk sat te l ter ho lde ren av m ask ine n ve d
å vri den fr a høyre mot venstre og tøm u t det gjenværende
vannet.
• (Fig.12) - Sett kapselen inn i lterholderen; forsikre deg
om at kapselens papir ikke kommer ut fra lterholderen.
• (Fig.13) - Sett den trykksatte lterholderen inn i uttaks-
enheten (8) fra undersiden.
• (Fig.14) - Vri lterholderen fra venstre mot høyre helt til
den blokkeres.
• Hent ut 1 forvarmet kopp, og plasser den under lter-
holderen; kontroller at den er korrekt plassert under hullene der ka en kommer ut.
• (Fig.16) - Vri velgeren (17) til posisjon "
• (Fig.17) - Når ønsket ka emengde er oppnådd, skal velge-
ren (17) vris til posisjon "
ka ekoppen.
• (Fig.19) - Vent noen sekunder etter at ka euttaket er av-
sluttet, trekk ut lterholderen og kast den brukte kapselen.
Viktig merknad: Filteret (16) og adapteren (15)
må holdes ren for å garantere et perfekt resul-
tat. Vask dem dag lig etter bruk.
" for å stoppe uttaket.
".
" for å stanse ka euttaket; ta ut
6 VALG AV KAFFETYPE NOEN RÅD
Generelt se tt, kan man bruke alle typer ka e som nnes i handelen. Likevel er det slik at ka e er et naturprodukt og dens
smak endres alt etter opprinnelse og blanding; man bør der for
prøve ut forskjellige typer for å nne den som passer best for
ens personlige smak.
For å forbedre resultatet anbefales det likevel å bruke blandinger som er spesielt laget for espressomaskiner. Ka en skal
alltid strømme jevnt ut fra den trykksatte lterholderen, uten
å dryppe. Hastigheten på ka en som strømmer ut kan endres
ved å endre ka emengden i lteret og /eller ved å bruke en kaffetype som har en annen kverningsgrad.
For å få et bedre resultat i koppen og for å forenkle rengjøring
og reparasjon, anbefaler Saeco at man bruker ka ekapsler i
porsjonsp akninger som er merket ESE.
7 VARMT VANN
Fare for forbrenning! I starten av uttaket kan
det sprute litt varmt vann. Uttaksrøret kan
oppnå høye temperaturer: Unngå å ta direkte på det
med hendene.
• Trykk på ON/OFF-bry teren (11) og ytt den til posisjon "I".
• Vent til led-lyset (20) "maskinen e r klar" tennes. Maskinen
er nå klar.
• (Fig.21) - Plasser en beholder eller en tekopp under dam-
prøret (Pannarello).
• (Fig.21) - Åpne kranen (3) ved å vri den mot klokken.
• (Fig.22) - Flyt t velgeren (17) til posisjon "
• (Fig.23) - Når ønsket mengde varmt vann har blitt hentet
ut, skal velgeren (17) y ttes til posisjon "
• (Fig.24) - Steng velgeren (3) ved å vri den me d klokken.
• Ta ut beholderen med varmt vann.
".
".
8 DAMP/CAPPUCCINO
Fare for forbrenning! I starten av uttaket kan
det sprute litt varmt vann. Uttaksrøret kan
oppnå høye temperaturer: Unngå å ta direkte på det
med hendene.
• Trykk på ON/OFF-bry teren (11) og ytt den til posisjon "I".
• Vent til led-lyset (20) "maskinen er klar" tennes.
• (Fig.25) - Flytt velgeren (17) til posisjon "
(20) slukkes.
• Vent til led-lyset (19) tennes; maskinen er nå klar til å ut-
føre et damputtak.
• (Fig.26) - Set t en beholder inn under damprøret.
• (Fig.26) - Åpne velgeren (3) et lite øyeblikk, slik at gjen-
værende vann i damprøret (Pannarello) renner u t; etter en
kort stund vil kun damp komme ut.
• (Fig.27) - Steng velgeren (3) og ta bor t beholderen.
• Fyll 1/3 av beholderen opp med kald melk hvis du skal til-
berede cappuccino.
Bruk kald melk for å garantere et best mulig
resultat
• (Fig.28) - Senk damprøret ned i melken og åpne velgeren
(3) ved å fri den mot klokken; vri beholderen med melk
langsomt nedenfra og opp for å fordele oppvarmingen
jevnt.
"; led-lyset
FØR DU UTFØRER EN HVILKEN SOM HELST OPERA-
SJON SOM GJELDER UTTAK AV DAMP ELLER VARMT
VANN SKAL DU SJEKKE AT DAMPRØRET (PANNARELLO) ER
VENDT OVER VANNSAMLEREN.
• 84 •
Det anbefales at et uttak ikke varer i mer enn
60 sekunder.
• Når uttaket er avsluttet, skal velgeren (3) stenges ved å vri
den med klokken; ta ut koppen med melkeskum.
• (Fig.30) - Flyt t velgeren (17) til posisjon "
".
Page 85

Hvis begge led-lysene " " og " "er tent har maskinen
for høy temperatur for ka euttak.
• Fortsett med å fylle kretsen som beskrevet i avsn. 4.5 for å
gjøre maskinen operativ.
Merk: maskinen er operativ når led-lyset
"maskinen er klar" er tent med fast lys .
Merk: hvis det ikke er mulig å utføre et uttak
av cappuc cino som beskreve t, må kretsen f ylles
som forklart i avsn. 4.5. Gjenta deretter operasjonene.
Det samme s ystemet kan br ukes til oppvarmi ng
av andre drikker.
• Rengjør damprøret med en myk og fuk tig klut etter denne
operasjonen.
• (Fig.35-36) - Rengjør tilbehørets plass ukentlig med en
fuktig klut for å erne eventuelle ka e- eller støvres ter.
Merk: rengjør ikke den trykksatte lterholderen i oppvaskmaskin.
10 AVKALKING
Kalkdannelse oppstår ved bruk av apparatet; avkalking er
nødvendig hver 1.-2. måned hvis maskinen ha r vært i bruk, og/
eller når du legger merke til at det kommer mindre vann ut av
maskinen. Bruk kun avkalkingsmiddelet Saeco.
Opplysningene i bruks- og vedlikeholdsinstruk-
sjonene skal ha høyere prioritet enn angivelsene på tilbehør og/eller materialer som kjøpes separat
ved ev. kon ikter.
9 RENGJØRING
Vedlikehold og rengjøring skal kun utføres når maskinen er
avkjølt og koblet fra strømnet tet.
• Legg ikke maskinen i vann og sett ikke delene i oppvaskmaskinen.
• Bruk ikke etylalkohol, løsemidler og/eller aggressive kjemiske midler.
• Vi anbefaler at du rengjør vannbeholderen og fyller den
med frisk t vann daglig.
• (Fig.31-33) - Etter å ha varmet opp melken bør du daglig
demontere den utvendige delen av Pannarello, og vaske
denne med friskt drikkevann.
• (Fig.31-32-33) - Rengjør damprøret ukentlig. For å foreta
denne operasjonen, må du:
- erne den utvendige delen av Pannarello (for regelmessig rengjøring);
- trekke den øvre delen av Pannarello av damprøret;
- vaske den øvre delen av Pannarello med friskt drikkevann;
- va ske dam prøre t med en fukt ig klu t og ern e alle e ventu elle melkerester;
- sette den øvr e delen på plass på damprøret igj en (pass på
at den er skikkelig fe stet);
Sett den utvendige delen av Pannarello på plass igjen.
• (Fig.34) - Tøm og vask dråpesamleren daglig.
• Br uk en myk klut fukte t med vann til rengjør ing av apparatet.
• (Fig. 20) - Gå frem som følger for å ren gjøre den trykk satte
lterholderen:
- (Fig.9) - trekk ut lteret, vask det nøye med var mt vann.
- trekk ut adapteren (hvis det nnes en slik på maskinen),
vask den nøye med varmt vann.
- vask den trykk satte lterholderen innvendig.
• Ikke bruk mikrobølgeovn og/eller vanlig ovn til å tørke
maskinen eller delene.
Bruk avkalkingsmiddelet Saeco (Fig.B). Det er
laget spesi kt for å opprettholde maskinens
yteevne og funksjon i hele dens levetid på beste måte,
og dessuten, hvis det brukes korrekt, for å unngå enhver forringelse av produktet. Før du starter en avkalkingssyklus må du forsikre deg om følgende: AT VANNFILTERET ER FJERNET hvis det har vært i bruk.
Ikke drikk avkalkingsløsningen eller produk-
tene som føres ut ved fullføring av syklusen. Du
må ikke under noen omstendigheter bruke eddik som
avkalkingsmiddel.
1 (Fig.13-14) - Sett lterholderen i nn i uttaksenhete n (8) fra
undersiden, og vri den fra venstre mot høyre helt til den
blokkeres.
2 (Fig.2) - Ta ut og tøm vannb eholderen.
3 (Fig.3) - Hell HALVPARTEN av innholdet i asken med
konsentrert Saeco avkalkingsmiddel i apparatets vannbeholder og f yll opp med friskt dr ikkevann til MAX-nivået.
4 Slå på mask inen ved å trykke på ON/OFF-bry teren (11) sett
den i posisjon "I".
(Fig.21) - Hent ut (som forklart i kapittel 7 i bruksanvis-
ningen) to kopper (ca. 150 ml hver) vann fra damp -/varmtvannsrøret; slå deretter av mask inen ved hjelp av bryteren
ON/OFF (11) og y tt den til posisjon "0".
5 La avkalkingsmiddelet virke i cirka 15-20 minutter med
maskinen av.
6 Slå på maskinen ved å trykke på bry teren ON/OFF (11).
(Fig.21) - Hent ut (som forklart i kapittel 7 i bruksanvis-
ningen) 2 kopper (ca. 150 ml hver) vann fra damp-/varmtvannsrøret. Slå de retter av maskinen ved hjelp av br yteren
ON/OFF (11) og la den være avslåt t i 3 minutter.
7 Gjenta operasjonene beskrevet i punkt 6 helt til vannbe-
holderen er helt tom.
Norsk
• 85 •
Page 86

8 (Fig.3) - Skyll beholderen grundig med friskt drikkevann
og fyll den helt opp.
9 Plasser en beholder under lterholderen.
10 Slå på maskinen ved å trykke på bryteren ON/OFF (11); vri
velgeren (17) til posisjon "
" og før ut hele beholderens
innhold via lterholderen. For å stoppe uttaket, ytt velgeren (17) til posisjon "
".
11 (Fig. 3) - Fyll beholderen med frisk t drikkevann.
(Fig.21) - Plasser en stor beholder under damprøret
(Pannarello). Åpne kranen for uttak av vann (3) ved å vri
den mot klokken.
(Fig.22) - Vri velgeren (17) til posisjon "
" og før ut alt
innholdet fra beholderen via varmtvanns-/damprøret.
12 (Fig.23) - For å stoppe uttaket etter å ha tømt ut vannet,
y tt velgeren (17) til posisjon "
".
(Fig.24) - Steng kranen for uttak av vann (3) ved å vri den
med klokken.
13 Gjenta operasjonene en gang til fra punkt (8) for totalt 4
beholdere.
14 (Fig.19) - Fjern lterholderen fr a enheten ved å vri den fra
høyre mot vens tre og skyll den med friskt drikkevann.
Avkalkingssyklusen er således avsluttet.
(Fig.3) - Fyll beholderen med friskt drikkevann. Om nødvendig, utfør en fylling av kretsen som forklart i avsn. 4.5.
Avkalkingsmiddelet må avhendes i henhold til
produsentens anvisninger og/eller gjeldende
lovgivning i landet der produkte t brukes.
kontakt med lokale myndigheter, ditt lokale avfallshåndteringsselskap eller butikken der du kjøpte produk tet.
11 AVHENDING
• Sett ubrukte apparater ut av drif t.
• Koble s tøpselet fra stik kontakten og kutt over s trømkabelen.
• Bring pr oduktet til et egnet av fallshåndteringsste d når dets
levetid er omme.
Dette produktet er i overensstemmelse med EU-direktivet
2002/96/EF.
Symbo let
på produktet eller på emballasjen indikerer
at produktet ikke kan behandles som vanlig husholdningsavfall. I stedet m å det leveres inn til en miljøst asjon for resirkulering av elektrisk og elek tronisk utstyr.
Ved å sørge for at dette produktet kasseres på korrekt mate
bidrar du til å forebygge mulige negative konsekvenser for
miljø og menneskelig helse, som ellers vil kunne forekomme
ved feilaktig avfallshåndtering av dette produktet. For mer
detaljert informasjon om resirkulering av dette produktet ta
• 86 •
Page 87

Feil Mulige årsaker Løsning
Maskinen slår se g ikke på. Maskinen er ikke koblet til strømnettet. Koble maskinen til s trømnettet.
Pumpen er støyende. Det er ikke vann i beholderen Påfylling av vann.(avsn. 4.4).
Led-lyse t (20) "maskinen er klar" va r sluk-
Ka en er altfor kald.
Det dannes ikke no e melkeskum.
Det er ikke mulig å tilberede en
cappuccino.
Ka en renner ut for fort, det
danner seg ikke melkeskum.
Ka en kommer ikke ut, eller den
kommer kun dråpevis.
Ka en renner over kantene.
ket når velgeren (17) ble stilt til posisjon
"
".
Filterholderen er ikke satt inn for forvarming (kap. 5).
Kalde kopper. For varme koppene med var mt vann.
Uegnet melketype: pulvermelk, mager
melk.
Skitten Pannarello. Rengjør Pannarello slik det er beskrevet i Kap. 9.
Det er ikke damp ig jen i kokeenheten.
For lite ka e i lterholderen. Fyll på ka e (kap. 5).
Ka en er for grovmalt. Br uk en annen blanding (kap. 6).
Ka en er for gammel eller uegnet. Bruk en annen blanding (kap. 6).
Ka ekapselen er for gammel eller ueg-
net.
Det mangler en del til lterholderen.
Det er tomt for vann. Fyll opp med vann (avsn. 4.4).
Ka en er for nmalt. Bruk en annen blanding (kap. 6).
Ka e sammenpresset i lterholderen. Flytt den malte ka een.
For mye ka e i lterholderen. Reduser mengde ka e i lterholderen.
Åpen velger (3). Steng velgeren (3).
Forkalkninger i maskinen. Foreta avkalking på maskinen (kap. 10).
Filteret i lterholderen er tett. Rengjør lteret (kap. 9).
Uegnet ka ekapsel. By tt type ka ekapsel.
Filterholderen er feil satt inn i uttaksen-
heten.
Filterholderens øvre kant er skitten. Rengjør kanten på lterholderen.
Ka ekapselen er feil satt inn.
For mye ka e i lterholderen. Bruk måleskjeen til å redusere ka emengden.
Vent til led-lyset (20) tennes.
Forvarme lterholderen.
Bruk helmelk.
Fyll opp kretsen (avsn. 4.5) og gjenta operasjonene beskrevet i Kap. 8.
Skift ut den brukte ka ekapselen.
Kontrollere at alle delene nnes og at de er korrekt montert.
Sett lterholderen korrekt inn (kap. 5).
Sett ka ekapselen korrekt inn slik at den ikke
kommer ut av lterholderen.
Norsk
Ta kontakt med serviceverkstedet for defekter som ikke er beskrevet i denne tabellen, eller hvis de foreslåtte tiltakene ikke løser problemene.
• 87 •
Page 88

EF-SAMSVARSERKLÆRING
ÅR 09
EF 2006/95 , EF 2004/108.
Saeco International Group
Via Torretta, 240
40041 GAGGIO MONTANO (BO)
erklærer på eget ansvar at produktet:
ENKELTSTÅENDE KAFFEMASKIN
TYPE: HD 8323 / HD 8325
som denne erklæringen dreier seg om, er i overensstemmelse med følgende normer:
• Husholdnings- og tilsvarende elektriske apparater - Generelle krav
EN 60335-1 (2002) + A1(2004) + A2(2006) + A11(2004) + A12 (2006) +A13 (2008)
• Husholdnings- og tilsvarende elektriske apparater - Sikkerhet - Del 2-15
Spesielle sikkerhetskrav til apparater for oppvarming av væsker
EN 60 335-2-15 (2002) + A1(2005) + A2 (2008)
• Husholdnings- og tilsvarende elektriske apparater. Elektromagnetiske felter
Metoder for bestemmelse og måling -EN 62233 (2008).
• Grenser og målemetoder for radioforstyrrelser fra apparater med motor
som husholdningsapparater, elektrisk verktøy og lignende elektriske apparater
elektriske apparater - EN 55014-1 (2006).
• Elektromagnetisk kompatibilitet (EMC)
Del 3^ Grenser - Avsnitt 2: Grenseverdier for utsendelse av harmoniske strømmer (inngangsstrøm
til utstyret ≤ 16A per fase) - EN 61000-3-2 (2006).
• Elektromagnetisk kompatibilitet (EMC)
Del 3^ Grenser - Avsnitt 3: Grenser for svingninger og topper i
lavspenningssystemer for apparater med nominell spenning ≤ 16A.
EN 61000-3-3 (1995) + korr.(1997) + A1(2001) + A2 (2005).
• Immunitetskrav for husholdningsapparater, verktøy og lignende apparater.
Produktfamiliestandard EN 55014-2 (1997) + A1 (2001).
i henhold til kravene i direktivene: EF 2006/95 , EF 2004/108.
Gaggio Montano 28/04/2009
• 88 •
R & D Manager
Ing. Andrea Castellani
Page 89

1 YLEISTÄ
Kahvinkeitin on tarkoitettu 1 tai 2 espressokahvikupillisen
valmistamiseen ja se on varustettu suunnattavalla putkella
höyryn ja kuuman veden annostelua varten. Laitteen edessä
olevat ohjaimet on merkitty helposti ymmärrettävillä symboleilla.
Laite on tarkoitettu kotitalouskäyttöön, sitä ei ole tarkoitettu
jatkuvaan ammatti käyttöön.
Varoitus. Valmistaja ei vastaa mahdollisista vahingoista, jotka jo htuvat:
• väärästä tai käyttötarkoituksen vastaisesta käy-
töstä
• korjaustoimenpiteistä, joita ei ole suoritettu val-
tuutetuissa huoltokeskuksissa
• virtajohdon peukaloinnista
• minkä tahansa keittimeen kuuluvan osan peuka-
loinnista
• muiden kuin alkuperäisten varaosien ja varustei-
den käytöstä
• varastoinnista alle 0 °C lämpötiloissa.
Näissä tapauksissa takuu raukeaa.
1.1 Lukemisen helpottamiseksi
Varoituskolmio osoittaa kaikki
käyttäjän turvallisuuden kannalta
tärkeät ohjeet. Noudata niitä tark-
kaan, jotta välty ttäisiin vakavilta loukkaantumisilta!
2 TEKNISET TIEDOT
Valmistaja pidättää itsellään oikeuden muuttaa tuotteen teknisiä ominaisuuksia.
Nimellisjännite - Nimellis teho - Virransyöttö
Katso laitteeseen kiinnitetty kilpi
Rungon materiaali
Muovi
Keittimen mitat (l x k x s) (mm)
210 x 300 x 280
Paino
3,9 kg
Virtajohdon pituus
1,3 m
Ohjauspaneeli
Etuosassa
Suodatinpidike
Paineistettu
Pannarello
Erityisesti cappuccinoille
Vesi säiliö
1,25 litraa - Irrotet tava
Pumpun paine
15 ba r
Säiliö
Ruostumaton teräs
Turvalaitteet
Lämpösulake
Kuvien viitteet, laitteen osat tai ohjaimet, jne. on merkitty numeroin tai kirjaimin. Tekstissä annetaan viitte et kuviin.
Tämä symb oli korostaa keit timen optimaal isen
käytön kannalta tärkeimpiä tietoja.
Tekstiin viittaavat kuvat löytyvät käyttöohjeiden
ensimmäisiltä sivuilta. Pidä kyseisiä sivuja viitteenä
käyttöohjeita lukiessa.
1.2 Käyttöohjeiden käyttö
Säilytä näitä käyttöohjeita turvallisessa paikassa ja pidä niitä
keittimen m ukana siltä varalta, ett ä toinen henkilö tulee käyttämään sitä.
Lisätietoja varten tai ongelmien syntyessä käänny valtuutettujen huoltokeskusten puoleen.
3 TURVAMÄÄRÄYKSET
Suomi
Älä koskaan päästä jännitteisiä osia kosketuksiin
veden kanssa: oikosulkuvaara! Kuuma höyry ja vesi
voivat aiheuttaa palovammoja! Älä koskaan suuntaa
höyry- tai kuuman veden suihketta kehon osia kohti;
kosketa höyry-/kuumavesisuutinta varovaisesti: palovammojen vaara!
Käyttötarkoitus
Kahvinkeitin on tarkoitettu ainoastaan kotitalouskäyttöön.
Teknisten muutosten suorittaminen ja kaikenlainen väärä
käyttö on kielletty siitä aiheutuvien riskien takia! Laitetta ei
ole tarkoitettu fyysisesti, aistillisesti tai psyykkisesti rajoittuneiden (lapset mukaan lukien) tai kokemattomien ja/tai asiasta tietämättömien henkilöiden käytettäväksi, ellei henkilö,
joka vastaa heidän turvallisuudesta valvo toimintaa tai anna
laitteen käyttöön liittyviä ohjeita.
• 89 •
Page 90

Virransyöttö
Liitä kahvinkeitin ainoastaan sopivaan pistorasiaan. Verkkovirran on vastattava keit timen kilvessä annet tua arvoa.
Virtajohto
Älä koskaan käytä kahvinkeitintä jos virtajohto on vioittunut.
Jos virtajohto on vioittunut, sen saa vaihtaa valmistaja tai
valmistajan asiakaspalvelu. Älä anna johdon kulkea kulmien,
terävien reunojen ja erittäin kuumien esineiden päältä ja suojaa sitä öljyltä.
Älä kuljeta tai vedä kahvinkeitintä johtoa käyttämällä. Älä
irrota pistoketta pistorasiasta johdosta vetämällä äläkä koske
siihen märillä käsillä.
Älä anna virtajohdon roikkua vapaasti pöydiltä tai hyllyiltä.
Muilta henkilöiltä suojaaminen
Valvo lapsia etteivät he pääse leikkimään laitteella.
Lapset eivät ymmärrä sähkölaitteiden käyttöön liittyviä vaaroja. Älä jätä keittimen pakkauksessa käytettyjä materiaaleja
lasten ulottuville.
Palovammavaara
Älä suuntaa kuumaa höyry- ja/tai vesisuihketta itseäsi ja/tai
muita kohti. Käytä aina tarkoituksenmukaisia kahvoja tai säätönuppeja.
Älä koskaan ky tke paineistettua su odatinpidikettä po is (irrota)
kahvin annostelun aikana. Kahvin annosteluyksikön lämmitysvaiheen aikana laittees ta voi tulla kuumia vesipisaroita.
Kahvia ei saa annostella silloin, kun keitin on ylikuumentunut,
ts. kun merkkivalot “
” ja “ ” palavat samanaikaisesti.
Käyttöpaikka
Aseta kahvinkeitin turvalliseen paikkaan, jossa se ei pääse kaatumaan eikä aiheuta loukkaantumisia.
Laitteesta voi tulla kuumaa vettä tai höyryä: palovammojen
vaara!
Älä säilytä keitintä alle 0 °C lämpötilassa; jäätyminen voi vahingoittaa keitintä.
Älä käytä kei tintä ulkoilmassa.
Älä aseta keitintä erittäin kuumille pinnoille tai lähelle avotulta estääk sesi rungon sulamista tai sen vahingoittumista.
Puhdistus
Ennen keittimen puhdistamista kytke se ON/OFF-näppäintä
käyttämällä pois päältä ja irrota pistoke sitten pistorasiasta.
Odota lisäk si, että keitin viilenee.
Älä koskaan upota kei tintä veteen!
Keittimen sisäisten korjaustoimenpiteiden suorittaminen on
ehdottomasti kielletty.
Älä käytä säiliöön muutamak si päiväksi jäänyttä vet tä elintarvikekäyttöön vaan pese säiliö ja täytä se raikkaalla juomavedellä.
Käyttöön ja huoltoon tarvittava tila
Kahvinkeittimen virheettömän ja optimaalisen toiminnan
kannalta on suositeltavaa:
• valita tasainen työt aso
• valita riittävästi valaistu, hygieeninen ja pistorasialla varustettu tila, johon päästään helposti käsiksi
• varata keittimen ja sitä ympäröivien seinien välille minimietäisyys kuvassa (kuva A) osoitet tuun tapaan.
Keittimen säilytys
Kun keitintä ei käytetä pitkään aikaan, kytke se pois toiminnasta ja irrota pistoke pistorasiasta. Säilytä sitä kuivassa paikassa lapsien ulottumattomissa. Suojaa sitä pölyltä ja lialta.
Korjaukset / Huolto
Jos rikkoutumisia, vikoja tai epäilyksiä viasta ilmenee, kytke
pistoke välittömästi irti pistorasiasta. Älä koskaan käynnistä
viallista keitintä. Ainoastaan valtuutetut huoltokeskukset
voivat suorittaa toimenpiteitä ja korjauksia. Jos toimenpiteitä ei ole suoritettu oikein, valmistaja ei vastaa mahdollisista
vahingoista.
Palontorjunta
Tulipalon syntyessä käytä hiilidioksidisammuttimia (CO2). Älä
koskaan käytä palon sammuttamiseen vettä tai jauhesammuttimia.
Keittimen osien selitykset (sivu 2)
1 Ohjauspaneeli
2 Vesisäiliön kansi
3 Höyryn/kuuman veden säätönuppi
4 Lisävarustekotelo
5 Vesisäiliö
6 Kuppiteline
7 Tippa-alusta + ritilä
8 Kahvin annosteluyksikkö
9 Höyryputki (Pannarello)
10 Virtajohto
11 ON/OFF-kytkin
12 Paineistettu suodatinpidike
13 Kahvijauheen mittalusikka
14 Kahvijauheen suodatin
(yksi 1 tai 2 kahvin annosteluun)
15 Kahvikapselien suodattimen sovitin
16 Kahvikapselien suodatin
17 Valintanuppi
18 Merkkivalo "keitin toiminnassa"
19 Merkkivalo "Höyry valmis"
20 Merk kivalo kahvi/vesi - "Keitin valmis"
• 90 •
Page 91

4 ASENNUS
Oman sekä kolmansien osapuolien turvallisuuden kannalta noudata tarkkaan luvussa 3 "Turvamääräykset"
annettuja ohjeita.
4.1 Pakkaus
Alkuperäinen pakkaus on suunniteltu ja valmistettu suojaamaan keitintä sen lähettämisen aikana. Säilytä sitä mahdollista tulevaa kuljetusta varten.
4.2 Asennukseen liittyviä varoituksia
Noudata seuraavia turvallisuusohjeita ennen keittimen asentamista:
• sijoita keitin turvalliseen paikkaan
• varmis ta, etteivät lapset pääse leikkimään keit timellä
• älä aseta keitintä kuumille alustoille tai avoimien tulien
lähelle.
Kahvinkeitin on valmis sähköverkkoon kytkettäväksi.
Huomaa: laitteen osat on suositeltavaa pestä
ennen niiden ensimmäistä käyttökertaa ja/tai
käyttämättömän jakson jälkeen.
4.3 Keittimen liittäminen sähköverk-
koon
Sähkövirta voi olla vaarallista! Noudata aina
turvallisuusohjeita tarkoin. Älä koskaan käytä
vaurioituneita sähköjohtoja! Vialliset johdot ja pistokkeet tulee vaihdattaa välittömästi valtuutetuissa
huoltokeskuksissa.
Laitteen jännite on asetettu tehtaalla. Tarkista, että sähköverkon jännite vastaa laitteen pohjassa olevan tunnuslaatan
merkintöjä.
• Tarkista, että ON/OFF-kytkin (11) on asennossa "0" ennen
keittimen liittämistä sähköverkkoon.
• Aseta pistoke pistorasiaan, jonka jännite on keittimeen
sopiva.
4.4 Vesisäiliö
• (kuva 1) - Irrota vesisäiliön kansi (2) nostamalla sitä.
• (kuva 2) - Irrota vesisäiliö (5).
• (kuva 3) - Huuhtele säiliö ja täytä se puhtaalla juomave-
dellä, vältä säiliön liiallista täyt tämistä.
Kaada säiliöön aina ja yksinomaan raikasta hii-
lihapotonta juomavettä. Kuuma vesi sekä muut
nesteet vo ivat vahingoitt aa säiliötä. Älä käy nnistä kei-
tintä ilman vettä: varmista, että sitä on riittävä määrä
säiliössä.
• (kuva 2) - Aseta säiliö takaisin paikoilleen ja varmista sen
virheetön kiinnittyminen, kiinnitä kansi (2) takaisin paikoilleen.
4.5 Järjestelmän lataaminen
Kun höyryä on aluksi annosteltu tai kun säiliön vesi on loppunut, keittimen järjestelmä on ladat tava uudelleen.
• Paina ON/OFF-kytkintä (11) ja käännä se asentoon "I".
Merkkivalo (18) syttyy ja ilmoittaa keittimen olevan toiminnassa.
• (kuva 4) - Aseta astia höyryputken alle (Pannarello).
• Avaa nuppi (3) “kuuma vesi/höyry” kääntämällä sitä vastapäivään.
• (kuva 5) - Vie valintanuppi (17) asentoon "
• Odota, että höyryputkesta (Pannarello) tulee vettä tasaisesti.
• (kuva 5) - Vie valintanuppi (17) asentoon "
• Sulje nuppi (3) “kuuma vesi/höyry” kääntämällä sitä myötäpäivään. Poista astia.
".
".
4.6 Keittimen käyttö ensimmäistä ker-
taa tai jos se on ollut pitkään pois
käytöstä
Seuraava yksinkertainen toimenpide on suoritettava ja se takaa optimaalisen annostelun:
- ensimmäisen käynnistyksen yhteydessä
- kun keitintä ei käytetä pitkään aikaan (yli kahteen viikkoon).
Annosteltu vesi on tyhjennettävä tarkoituk-
senmukaisesti eikä sitä voi käyttää elintarvikekäyttöön. Jos astia täyttyy toimenpiteen aikana,
keskeytä annostelu ja tyhjennä astia ennen toimenpiteen jatkamista.
• (kuva 3) - Huuhtele säiliö ja täytä se raikkaalla juomave-
dellä.
• (kuva 4) - Aseta astia höyryputken alle (Pannarello). Avaa
hana (3) kääntämällä sitä vastapäivään.
(kuva 5) - Vie valintanuppi (17) asentoon "
• Annostele koko vesisäiliön sisältö höyryn/kuuman veden
putkesta (Pannarello); lopeta annostelu viemällä valintanuppi (17) asentoon "
myötäpäivään.
• (kuva 3) - Täytä vesisäiliö raik kaalla juomavedellä.
• (kuva 13-14) - Aseta suodatinpidike annosteluyksikköön
(8) alhaalta päin ja käännä sitä vasemmalta oikealle, kunnes se lukittuu paikoilleen.
" ja sulje hana (3) kääntämällä sitä
".
Suomi
• 91 •
Page 92

• (kuva 15) - Aseta sopiva astia suodatinpidikkeen alle.
• (kuva 16) - Käännä valintanuppi (17) asentoon "
annostele kaikki säiliön vesi.
(kuva 17) - Kun vesi loppuu, lopeta annostelu viemällä
valintanuppi (17) asentoon "
• Täytä säiliö uudelleen ja odota, että merkkivalo “keitin
valmis” (20) syttyy.
• (kuva19) - Poista suodatinpidike annosteluyksiköstä
kääntämällä sitä oikealta vasemmalle ja huuhtele se raikkaalla juomavedellä.
Keitin on valmis käy ttöä varten; kats o kahvin ja höyryn annosteluohjeet vastaavista luvuista.
".
" ja
5 KAHVIN ANNOSTELU
Varoitus! Kahvin annostelun aikana paineistettua suodatinpidikettä ei saa irrottaa kääntä-
mällä sitä käsin myötäp äivään. Palovammavaara.
• Kyseisen toimenpiteen aikana merkkivalo (20) "keitin
valmis" voi syttyä ja sammua; se on täysin normaalia eikä
kyse ole häiriöstä.
• Varmista ennen käyttöä, että kuuman veden/höyr yn nuppi (3) on suljettu ja että keittimen vesisäiliössä on riittävä
määrä vettä.
• (kuva 3) - Paina kytkintä ON/OFF (11) ja käännä se asentoon "I".
• Odota, että merkkivalo (20) "keitin valmis" syttyy; keitin
on nyt valmis kahvin annostelua varten.
Kahvin annosteluun liittyvät lisävarusteet si-
jaitsevat niille tarkoitetussa kotelossa, jotta
toimenpiteiden suorittaminen onnistuisi helposti ja
välittömästi.
Kahvijauheen mittalusikka ja/tai vaaditut suodattimet ovat käytettävissä, kun nostat kannen (2) ja valitset tar vitsemasi lisävarusteen (kuva 35 ja kuva 36).
• (kuv a 16) - Esikuumenna paineistettu suodatinpidike vie-
mällä valintanuppi (17) asentoon "
maan paineenalaisesta suodatinpidikkeestä (toimenpide
on suoritettava ainoastaan ensimmäisen kahvin kohdalla).
• (kuva 17) -Kun vettä on valunut 150 cc, vie valintanuppi
(17) asentoon "
• (kuv a 19) - Poista suoda tinpidike keitt imestä kääntä mällä
sitä oikealta vasemmalle ja poista jäljelle jäänyt vesi. Keittimen varusteena olevan erityissuodattimen (14) ansiosta
suodattimen vaihto ei ole tarpeen yhtä tai kahta kahvia
valmistaessa.
• (kuva 35) - Poista mitt alusikka keittimestä.
• (kuva 8) - Lisää 1-1,5 mittalusikallista kahvia yhdelle
kahville tai 2 täyttä mittalusikallista kahdelle kahville;
puhdista suodatinpidikkeen reunat kahvista.
• (kuva 13) - Aseta suodatinpidike (12) annosteluyksikköön
(8) alhaalta päin.
• (kuv a 14) - Käännä suodatinpidiket tä vasemmalta oikeal-
le, kunnes se lukit tuu paikoilleen.
• (kuva 15) - Aseta 1 tai 2 esilämmitettyä kuppia pai-
neistetun suodatinpidikkeen alapuolelle. Tarkista, että ne
sijaitsevat oikein kahvin annosteluauk kojen alapuolella.
• (kuva 14) - Vie valintanuppi (17) asentoon "
• Kun kuppiin on annosteltu riittävä määrä kahvia, vie valintanuppi (17) asentoon "
miseksi. Odota annostelun päättymisen jälkeen muutama
sekunti ja poista kahvikupit (kuva 18).
• (kuva 19) - Poista kahvijäämät paineistetusta suodatinpidikkeestä.
Huomaa: suodatinpidikkeeseen jää pieni määrä vettä, se on normaalia ja johtuu suodatinpi-
dikkeen ominaisuuksista.
Tärkeä huomautus: Suodatin (14) tulee pitää
puhtaana täydellisen tuloksen takaamiseksi.
Pese päivittäin käytön jälkeen.
" annostelun pysäyttämiseksi.
" kahvin annostelun lopetta-
"; vettä alkaa tule-
".
5.1 Kahvijauhetta käytettäessä
• (kuva 7) - Aseta suodatin (14) paineistettuun suodatinpi-
dikkeeseen (12); ensimmäisellä käyttökerralla suodatin on
jo paikoillaan.
• (kuva 13) - Aseta suodatinpidike annosteluyksikköön (8)
alhaalta päin.
• (kuv a 14) - Käännä suodatinpidiket tä vasemmalta oikeal-
le, kunnes se lukittuu paikoilleen. Päästä irti paineistetun
suodatinpidikkeen varresta, varsi kääntyy hiukan vasemmalle päin. Tämä takaa suodatinpidikkeen täydellisen
toiminnan.
• 92 •
5.2 Kahvikapseleja käyttämällä
• (kuva 9) - Poista kahvijauheen suodatin (14) teelusikkaa
käyttäen paineistetusta suodatinpidikkeestä (12).
• (kuva 10) - Aseta paineistettuun suodatinpidikkeeseen
(12) kahvikapselien sovitin (15) niin, että pyöreän muotoinen puoli osoittaa alaspäin.
• (kuv a 11) - Aseta sen jälkeen kahvikaps elien suodatin (16)
paineistettuun suodatinpidikkeeseen (12).
• (kuva 13) - Aseta paineistettu suodatinpidike annosteluyksikköön (8) alhaalta päin.
• (kuv a 14) - Käännä suodatinpidiket tä vasemmalta oikeal-
Page 93

le, kunnes se lukittuu paikoilleen. Päästä irti paineistetun
suodatinpidikkeen varresta. Automaattinen järjestelmä
siirtää var tta hiukan vasemmalle.
Kyseinen liike takaa paineistetun suodatinpidikkeen täy-
dellisen toiminnan.
• (kuv a 16) - Esikuumenna paineistettu suodatinpidike vie-
mällä valintanuppi (17) asentoon "
maan paineenalaisesta suodatinpidikkeestä (toimenpide
on suoritettava ainoastaan ensimmäisen kahvin kohdalla).
• (kuva 17) -Kun vettä on valunut 150 cc, vie valintanuppi
(17) asentoon "
• (kuv a 19) - Poista painei stettu suodat inpidike keittim estä
kääntämällä sitä oikealta vasemmalle ja poista jäljelle jäänyt vesi.
• (kuva 12) - Aseta kahvikapseli suodatinpidikkeeseen ja
varmista, ettei kahvikapselin paperi tulo ulos suodatinpidikkeestä.
• (kuva 13) - Aseta paineistettu suodatinpidike annostelu-
yksikköön (8) alhaalta päin.
• (kuv a 14) - Käännä suodatinpidiket tä vasemmalta oikeal-
le, kunnes se lukit tuu paikoilleen.
• Aseta 1 esilämmitetty kuppi suodatinpidikkeen ala-
puolelle ja varmista, että se sijaitsee oikein kahvin annosteluaukkojen alapuolella.
• (kuva 16) - Vie valintanuppi (17) asentoon "
• (kuva 17) - Kun haluttu kahvimäärä on annosteltu, kään-
nä valintanuppi (17) asentoon "
pettamiseksi. Poista kahvikuppi.
• (kuva 19) - Odota annostelun päät yttyä muut ama sekun-
ti, poista suodatinpidike ja hävitä käytett y kahvikapseli.
Tärkeä huomautus: Suodatin (16) ja sovitin (15)
on pidettävä puhtaina täydellisen tuloksen ta-
kaamiseksi. Pese päivittäin käytön jälkeen.
" annostelun pysäyttämiseksi.
"; vettä alkaa tule-
".
" kahvin annostelun lo-
6 KAHVITYYPIN VALITSEMINEN NEUVO
JA
Yleisesti ottaen kahvinkeittimessä voidaan käyttää kaikenlaisia kaupallises ti saatavilla olevia kahvilaatuja. K ahvi on kuitenkin luonnollinen tuote ja sen maku vaihtelee sen alkuperän ja
sekoituk sen mukaan. Eri kahvilaatuja kannattaa kokeilla, jotta
löytäisit niistä itsellesi parhaimman.
Parhaiden tuloksien saavuttamiseksi on suositeltavaa käyttää erityisesti espressokeittimille tarkoitettuja kahvijauheita.
Kahvin tulee aina valua tasaisesti paineistetusta suodatinpidikkeestä ilman, että sitä tippuisi tippoina.
Kahvin valumisnopeutta voidaan säätää muuttamalla hiukan
kahvin määrää suodattimessa ja/tai käyttämällä erilaisen
koostumuk sen omaavaa kahvijauhetta.
Parhaan tuloksen saavuttamiseksi sekä puhdistuksen ja val-
mistuksen helpottamiseksi Saeco suosittelee ESE-merkillä
merkittyjen yksittäisten kahvikapselien käyttämistä.
ENNEN HÖYRYN TAI KUUMAN VEDEN ANNOSTELUA
ON TARKISTETTAVA, ETTÄ HÖYRYPUTKI (PANNA-
RELLO) ON SUUNNATTU TIPPA-ALUSTAN PÄÄLLE.
7 KUUMA VESI
Palovammojen vaara! Annostelun alussa put-
kesta voi suihkuta pieni määrä kuumaa vettä.
Annosteluputki voi tulla erittäin kuumaksi: älä koske
siihen suoraan käsilläsi.
• Paina ky tkintä ON/OFF (11) ja käännä se asentoon "I".
• Odota, että merkkivalo (20) "keitin valmis" syttyy; keitin
on nyt valmis kahvin annostelua varten.
• (kuva 21) - Aseta astia tai teekuppi höyryputken alle
(Pannarello).
• (kuva 21) - Avaa nuppi (3) kääntämällä sitä vas tapäivään.
• (kuva 22) - Vie valintanuppi (17) asentoon "
• (kuva 23) - Kun olet annostellut haluamasi määrän kuu-
maa vettä, käännä valintanuppi (17) asentoon "
• (kuva 24) - Sulje nuppi (3) kääntämällä sitä myötäpäi-
vään.
• Poista kuumavesiastia.
".
".
8 HÖYRY / CAPPUCCINO
Palovammojen vaara! Annostelun alussa put-
kesta voi suihkuta pieni määrä kuumaa vettä.
Annosteluputki voi tulla erittäin kuumaksi: älä koske
siihen suoraan käsilläsi.
• Paina ky tkintä ON/OFF (11) ja käännä se asentoon "I".
• Odota, e ttä merkkivalo (20) "keitin valmis" sytt yy.
• (kuva 25) - Vie valintanuppi (17) asentoon "
valo (20) sammuu.
• Odota, että merkkivalo (19) syttyy; keitin on nyt valmis
höyryn annostelua varten.
• (kuva 26) - Aseta astia höyryputken alle.
• (kuva 26) - Avaa nuppi (3) hetkeksi niin, että höyryput-
kesta (Pannarello) tulee ulos kaikki jäljelle jäänyt vesi.
Hetken päästä putkesta tulee ainoastaan höyryä.
• (kuva 27) - Sulje nuppi (3) ja poista astia.
• Täytä 1/3 astiasta kylmällä maidolla, jota haluat käyttää
cappuccinon valmistamiseen.
". Merkki-
Suomi
• 93 •
Page 94

Käytä k ylmää maitoa p arhaan tulok sen saavuttamiseksi
• (kuva 28) - Upota höyryputki maitoon ja avaa nuppi (3)
kääntämällä sitä vastapäivään. Käännä hitaasti maitoastiaa alhaalta ylöspäin, jotta se kuumentuisi tasaisesti.
Höyryä on suositeltavaa annostella korkeintaan 60 sekunnin ajan.
• Sulje nuppi (3) annostelun jälkeen kääntämällä sitä myötäpäivään. Poista kuppi, joss a on maitovaahtoa.
• (kuva 30) - Vie valintanuppi (17) asentoon "
Jos molemmat merkkivalot "
men lämpötila on liian korkea kahvin annosteluun.
• Lataa järjestelmä kappaleen 4.5 ohjeiden mukaan keittimen käyttämiseksi.
" ja " " palavat, keitti-
".
- aseta yläosa takaisin höyryputken päälle (varmista, että
se on kytkeytynyt täysin paikoilleen).
Asenna Pannarellon ulkoinen osa takaisin paikoilleen.
• (kuva 34) - Tyhjennä ja pese tippa-alusta päivittäin.
• Puhdista keitin veteen kos tutetulla pehmeällä rätillä.
• (kuva 20) - Puhdista paineistettu suodatinpidike seuraa-
vasti:
- (kuva 9) - Poista suodatin, puhdista se huolellisesti lämpimällä vedellä.
- Poista sovitin (jos olemassa), pese se huolellisesti lämpimällä vedellä.
- Pese paineistetun suodatinpidikkeen sisäosa.
• Älä kuivaa keitintä ja/tai siihen kuuluvia osia mikroaaltouunissa ja/tai tavallisessa uunissa.
• (kuva 35-36) - Puhdista lisävarustekotelo kerran viikossa kostealla liinalla mahdollisten kahvijäämien tai pölyn
poistamiseksi.
Huomaa: keitintä voidaan käyttää, kun merkkivalo
Huomaa: jos cappuccinon valmistus ei onnistu
ohjeiden mukaan, järjestelmä on ladattava
kappaleen 4.5 mukaisesti, jonka jälkeen valmistustoimenpiteet on toistettava.
Samaa järjestelmää voidaan käyttää muiden
juomien kuumentamiseen.
• Puhdista höyryputki toimenpite en jälkeen kostealla liinal-
la.
"keitin valmis" palaa pysyvästi.
9 PUHDISTUS
Huolto- ja puhdistustoimenpiteet voidaan suorittaa vasta sitten, kun keitin on k ylmä ja kytkett y irti verkkovirrasta.
• Älä upota keitintä veteen, älä myöskään aseta keittimen
osia astianpesukoneeseen.
• Älä käy tä etyylialkoholia, li uotusaineita ja/tai voima kkaita
kemiallisia aineita.
• Vesisäiliö on suositeltavaa puhdistaa ja täyttää puhtaalla
vedellä päivit täin.
• (kuv a 31-33) - Irrota Pannarellon ulko-osa (jos kuuluu va-
rustukseen) päivittäin maidon kuumentamisen jälkeen, ja
pese se raikkaalla juomavedellä.
• (kuva 31-32-33) - Puhdista höyryputki kerran viikossa.
Tämän toimenpiteen suorittamista varten:
- irrota Pannarellon u lkoinen osa (säännöllistä puhdistusta
varten)
- vedä Pannarellon yläosa pois höyry putkesta
- pese Pannarellon yläosa raikkaalla juomavedellä
- pese höyryputki kostealla rätillä ja poista mahdolliset
maitojäämät
Huomaa: älä pese paineistettua suodatinpidikettä astianpesukoneessa.
10 KALKINPOISTO
Kalkkia muodostuu keittimen käytön aikana; kalkinpoisto on
tarpeen keittimen 1-2 käyttök uukauden välein ja/tai kun huomataan, että veden virtaus vähenee. Käytä ainoastaan Saecokalkinpoistoainetta.
Käyttö- ja huolto -ohjeessa annetut ohjeet ov at
etusijalla erikseen myydyissä varusteissa ja/tai
käytetyissä materiaaleissa annettuihin ohjeisiin nähden, mikäli ristiriitaisuuksia ilmenee.
Käytä S aeco-kalk inpoisto ainetta (k uva B). Se on
valmistettu siten, että keittimen suorituskyky
ja toimint a saadaan säil ymään parhaal la mahdollise lla
tasolla koko sen eliniän sekä välttää, jos sitä käytetään
oikein, annostellussa tuotteessa syntyvät muutokset.
Ennen kalkinpoistoa on varmistettava, että: VESISUODATIN ON IRROTETTU, jos sitä on käytetty.
Älä juo kalkinpoistoaineseosta äläkä annostel-
tuja tuotteita, kunnes jakso on saatu päätökseen. Älä missään tapauksessa käytä etikkaa kalkinpoistoon.
1 (kuva 13-14) - Aseta suodatinpidike annosteluyksikköön
(8) alhaalta päin ja käännä sitä vasemmalta oikealle, kunnes se lukittuu paikoilleen.
2 (kuva 2) - Irrota ja tyhjennä vesisäiliö.
3 (kuva 3) - Kaada PUOLET tiivistetystä Saeco-kalkinpois-
toainepullosta vesisäiliöön ja täytä se raikkaalla juomavedellä MAX-tasoon asti.
• 94 •
Page 95

4 Käynnistä keitin painamalla kytkintä ON/OFF (11) ja kään-
tämällä se asentoon "I".
(kuva 21) - Poista (käy ttöohjeiden kapp aleen 7 mukaan) 2
kupillista (noin 150 ml kuppia kohti) vettä höyry-/kuumavesiputkesta. Sammuta keitin sen jälkeen kytkimellä ON/
OFF (11) viemällä se asentoon "0".
5 Anna kalkinpoistoaineen vaikuttaa noin 15-20 minuutin
ajan keittimen ollessa sammu tettuna.
6 Käynnistä keitin p ainamalla kytkint ä ON/OFF (11).
(kuva 21) - Poista (käy ttöohjeiden kapp aleen 7 mukaan) 2
kupillista (noin 150 ml kuppia kohti) vettä höyry-/kuumavesiputkesta. Sammuta sitten keitin kytkimestä ON/OFF
(11) ja anna sen olla sammutettuna 3 minuutin ajan.
7 Toista kohdan 6 toimenpiteet, kunnes vesisäiliö on tyh-
jennet ty kokonaan.
8 (kuva 3) - Huuhtele säili ö raikkaalla juomavedellä ja täyt ä
se kokonaan.
9 Aseta astia suodatinpidikkeen alle.
10 Käynnistä keitin painamalla kytkintä ON/OFF (11). Käännä
valintanuppi (17) asentoon "
" ja tyhjennä koko säiliö
suodatinpidikkeen avulla. Pysäytä annostelu viemällä valintanuppi (17) asentoon "
".
11 (kuva 3) - Täytä vesisäiliö uudelleen r aikkaalla vedellä.
(kuva 21) - Aseta tilava astia höyryputken (Pannarello)
alle. Avaa veden annosteluhana (3) kääntämällä sitä vastapäivään.
(kuva 22) - Käännä valintanuppi (17) asentoon "
" ja
tyhjennä koko säiliö höyry-/kuumavesiputken avulla.
12 (kuva 23) - Kun vesi on po istettu, pysäy tä annostelu kään-
tämällä valintanuppi (17) asentoon "
".
(kuva 24) - Sulje veden annosteluhana (3) kääntämällä
sitä myötäpäivään.
13 Toista toimenpiteet kohdasta (8) yhteensä 4 säiliön ver-
ran.
14 (kuva19) - Poista suodatinpidike annosteluyksiköstä
kääntämällä sitä oikealta vasemmalle ja huuhtele se raikkaalla juomavedellä.
11 HÄVITTÄMINEN
• Ota käyttämättömät laitteet pois käytöstä.
• Kytke pistoke ir ti pistorasiasta ja katkaise virtajohto.
• Käyttöiän lopussa vie laite sopivaan jätteenkeräyspisteeseen.
Tämä tuote täyttää EY-direktiivin 2002/96/EY asettamat vaatimukset.
Tämä
kintä ilmaisee, että tuotetta ei saa hävittää kotitalousjätteen
mukana. Tuote on toimitettava sen sijaan asianmukaiseen
sähkö- ja elektroniikkalaitteiden keräyspisteeseen kierrätystä
varten.
Varmistamalla tämän tuotteen oikean hävittämisen ehkäiset
ympäristölle ja ihmisille mahdollisesta epäasianmukaisesta
käsittelystä aiheutuvia haittoja. Lisätietoja tämän tuotteen
kierrätyksestä saat paikallisilta viranomaisilta, jätehuoltolaitoksesta tai tuotteen ostopaikasta.
tuotteeseen tai pakkaukseen kiinnitetty mer-
Suomi
Kalkinpoistojak so on suotitettu tällöin loppuun.
(kuva 3) - Täytä vesisäiliö uudelleen raikkaalla vedellä. Suorita tarvittaessa järjestelmän lataus kuten kuvattu kappaleessa
4.5.
Kalkinpoistoaine on hävitettävä valmistajan
ja/tai käyttömaassa voimassa olevien määrä-
ysten mukaan.
• 95 •
Page 96

Vika Mahdolliset syyt Korjaustoimenpide
Keitin ei käynnisty. Keitintä ei ole k ytketty sähköverkkoon. Kytke keitin sähköverkkoon.
Pumppu pitää kovaa ääntä. Vesisäiliössä ei ole vettä. Täytä säiliö vedellä (kappale 4.4).
Merkkival o (20) "keitin valmis" ei palanu t,
Kahvi on liian kylmää.
Maitoon ei muodostu vaahtoa.
Cappuccinon valmistaminen ei
onnistu.
Kahvi valuu liian nopeasti, vaahtoa ei muodostu.
Kahvi ei valu tai valuu vain tipoittain.
Kahvia vuotaa reunoilta.
kun valintanuppi (17) asetettiin asentoon
"
".
Suodatinpidikettä ei ole astettu esikuumennusta varten (luku 5).
Kahvikupit ovat k ylmiä. Esilämmitä kupit kuumalla vedellä.
Maito ei ole sopivaa: maitojauhetta, vä-
härasvaista maitoa.
Likainen Pannarello. Puhdista Pannarello luvun 9 mukaisesti.
Säiliössä ei ole enää höyryä.
Suodatinpidikkeessä on liian vähän kahvia.
Jauhe liian suurikokoista. Käytä toista kahvijauhetta (luku 6).
Kahvi vanhaa tai sopimatonta. Käy tä toista kahvijauhetta (luku 6).
Kahvikapseli vanha tai sopimaton. Vaihda kahvikapselia.
Suodatinpidikkee stä puuttuu jokin osa.
Vettä liian vähän. Täytä s äiliö vedellä (kappale 4.4).
Jauhe liian pienikokoista. Käy tä toista kahvijauhetta (luku 6).
Kahvi on painettu suodatinpidikkeeseen. Sekoita kahvijauhetta.
Suodatinpidikkeessä on liian paljon kah-
via.
Nuppi (3) auki. Sulje nuppi (3).
Keitin on kalkkiutunut. Suorita kalkinpoisto (luku 10).
Suodatinpidikkeen suodatin on tukkiu-
tunut.
Sopimaton kahvikapseli. Vaihda kahvikapselit yyppiä.
Suodatinpidike on asetettu virheellisesti
kahvin annosteluyksikköön.
Suodatinpidikkeen yläreuna on likainen. Puhdista suodatinpidikkeen reuna.
Kahvikapseli on asetettu väärin.
Suodatinpidikkeessä on liian paljon kahvia.
Odota, et tä merkkivalo (20) syt tyy.
Esikuumenna suodatinpidike.
Käytä täysmaitoa.
Täytä järjestelmä uudelleen (kappale 4.5) ja toista luvussa 8 kuvatut toimenpiteet.
Lisää kahvia (luku 5).
Tarkista, että kaikki osat ovat paikoillaan ja oikein
asennettuja.
Vähennä suodatinpidikkeessä olevaa kahvimäärää.
Puhdista suodatin (luku 9).
Aseta suodatinpidike oikein paikoilleen (luku 5).
Aseta kahvikapseli oikein, jotta se ei tulisi ulos
suodatinpidikkeestä.
Vähennä kahvimäärää käyttäen mittalusikkaa.
Jos vikaa ei löydy edellä annetusta taulukosta tai annetut ohjeet eivät ratkaise niitä, ota yhteyttä huoltokeskukseen.
• 96 •
Page 97

EY-VAATIMUSTENMUKAISUUSVAKUUTUS
VUOSI 09
EY 2006/95, EY 2004/108.
Saeco International Group
Via Torretta, 240
40041 GAGGIO MONTANO (BO)
vakuuttaa omalla vastuullaan, että tuote:
YHDEN KUPIN KAHVINKEITIN
TYYPPI: HD 8323 / HD 8325
johon tämä vakuutus viittaa, on seuraavien standardien mukainen:
• Kotitaloussähkölaitteiden ja vastaavien turvallisuus - Yleiset vaatimukset
EN 60335-1 (2002) + A1(2004) + A2(2006) + A11(2004) + A12 (2006) +A13 (2008)
• Kotitaloussähkölaitteiden ja vastaavien turvallisuus - Osa 2-15
Erityisvaatimukset nesteiden lämmittämiseen
EN 60 335-2-15 (2002) + A1(2005) + A2(2008)
• Sähkökäyttöiset kotitalous- ja vastaavaan käyttöön tarkoitetut laitteet. Sähkömagneettiset kentät
Testausmenetelmät ja -vaatimukset -EN 62233 (2008).
• Sähkö- ja lämpömoottorilla varustetuille kotitalous- ja vastaavaan käyttöön tarkoitetuille laitteille, sähkölaitteille ja vastaaville
elektronisille laitteille
ominaisten radiohäiriön rajoitukset ja mittaustavat
- EN 55014-1 (2006).
• Sähkömagneettinen yhteensopivuus (EMC)
Osa 3^ Rajoitukset - Osio 2: Yliaaltosisällön rajoitukset (laitteen
tulovirta ≤ 16 A vaihetta kohti) - EN 61000-3-2 (2006).
• Sähkömagneettinen yhteensopivuus (EMC)
Osa 3^ Rajoitukset - Osio 3: Vaihtelu- ja huippujännitteen rajoitukset pienjännitteisissä
syöttöjärjestelmissä laitteissa, joiden nimellisvirta on ≤ 16 A.
EN 61000-3-3 (1995) + korj.(1997) + A1(2001) + A2 (2005).
• Häiriönsieto kodinkoneille, sähkötyökaluille ja vastaaville laitteille.
Tuoteperhestandardi EN 55014-2 (1997) + A1 (2001).
Suomi
seuraavien direktiivien vaatimusten mukaisesti: EY 2006/95, EY 2004/108.
Gaggio Montano 28.04.2009
R & D Manager
Ins. Andrea Castellani
• 97 •
Page 98

1 GENERELT
Ka emaskinen er beregnet til tilberedning af 1 eller 2 kopper
espressoka e og er udstyret med et indstilleligt rør til udløb
af damp og varmt vand. Betjeningsknapperne på maskinens
frontpanel er mærket med let fortolkelige symboler.
Maskinen er bere gnet til brug i hjemmet og ik ke til vedvarende
professionel brug.
Vær opmærksom. Der påtages intet ansvar for
eventuelle skader som følge af:
• Forkert brug og brug til andet formål end angivet.
• Reparationer udført hos ikke-autoriserede servicecentre.
• Ændring af strømforsyningskab let.
• Ændring af maskinkomponenter.
• Anvendelse af ikke-originale reservedele eller tilbehør.
• Manglen de afkalkning o g opbevaring i rum med en
temperatur på under 0°C.
Ovennævnte punkter medfører bor tfald af garantien.
1.1 Vejledning i læsning af vejledningen
Advarselstrekanten angiver alle de
vigtige anvisninger for brugerens
sikkerhed. Overhold nøje disse an-
visninger for at undgå alvorlige personskader!
Reference til illustrationer, dele af maskinen eller betjeningsknapper osv. er angivet med tal eller bogstaver. Der henvises
således til den pågældende illustration.
2 TEKNISKE DATA
Fabrikanten forb eholder sig retten til at ændr e produktets tekniske karakteristika.
Normal spænding - Nominel spænding - Strømforsyning
Se typeskiltet på maskinen
Maskinlegemets materiale
Plastik
Dimensioner (l x h x d) (mm)
210 x 300 x 280
Vægt
3,9 kg
Kabellængde
1,3 m
Betjeningspanel
På maskinens front
Filterholder
Try kmo nte ret
Pannarello
Specialudst yr til cappuccino
Vandb eholder
1,25 liter - Kan tages ud
Pumpetryk
15 ba r
Kedel
Rustfrit stål
Sikkerhedsanordninger
Ter mos ikr in g
Dette symbol angiver oplysninger, der skal tages højde for, med henblik på optimal brug af
maskinen.
De tilsvarende illustrationer til teksten ndes på de
første sider i manualen. Konsulter disse sider under
læsning af brugsanvisningen.
1.2 Anvendelse af brugsanvisningen
Opbevar denne brugsanvisning på et sikkert sted, og lad den
følge med maskinen, hvis den skal anvendes af en anden person.
For yderligere oplysninger, eller i tilfælde af problemer, skal
man kontakte de autoriserede servicecentre.
• 98 •
3 SIKKERHEDSREGLER
Dele under spænding må aldrig komme i kontakt med
vand. Fare for kortslutning! Den overophedede damp
og det varme vand kan medføre forbrændinger! Ret
aldrig s trålen med damp ell er varmt vand mod di g selv.
Udvis for sigtighed ved ber øring af dysen ti l varmt vand
/ damp. Fare for forbrænding!
Tilsigtet brug
Ka emaskinen er udelukkende beregnet til brug i hjemmet.
Det er forbudt at foretage tekniske ændringer på maskinen
og anvende den til andre formål, da dette kan medføre fare!
Maskinen er ikke beregnet til brug af personer (herunder
børn), der ikke har de fornødne fysiske, mentale eller sensoriske evner eller som ikke har den tilstrækkelige erfaring og/
eller kompetence, medmindre de overvåges af en person, der
er ansvarlig for deres sikkerhed eller instrueres i, hvordan maskinen anvendes.
Page 99

Strømforsyning
Tilslut kun maskinen til en egnet stikkontakt. Spændingen
skal stemme overens med værdien angivet på maskinens typeskilt.
Strømforsyningskabel
Tag ikke ka emaskinen i brug, hvis s trømkablet er defek t. Hvis
strømkablet er defekt, skal det udskiftes af fabrikanten eller
hos et af de autoriserede servicecentre. Lad ikke kablet løbe
langs hjørner eller skarpe punkter eller over varme genstande
og besky t det imod olie.
Bær eller yt ikke ka emaskinen ved at trække i kablet. Træk
ikke stikke t ud ved at trække i kablet o g rør ikke ved kablet me d
våde hænder.
Undgå, at strømkablet falder frit ned over borde eller skabe.
Personsikkerhed
Hold altid børn under opsyn for at undgå, at de leger med maskinen.
Børn er ikke klar over den fare, der er forbundet med husholdningsapparater. Lad heller ikke børn lege med maskinens emballagemateriale.
Fare for forbrænding
Undgå at rette strålen med overophedet damp og/eller varmt
vand mod dig selv og/eller andre personer. Brug altid de dertil
indrettede håndtag eller greb.
Den trykmonterede lterholder må aldrig ernes, mens ka en
er ved at løbe ud. Under opvarmningsfasen af ka eudløbsenheden kan der lø be dråber af varmt vand ud.
Lad der ikke løbe ka e ud, når maskinen er for varm, dvs. når
kontrollamperne “
” og “ ” lyser samtidig.
Placering
Anbring maskinen på et sikkert sted, hvor den ikke kan vælte
eller skade nogen.
Der kan løbe overophedet damp eller varmt vand ud. Fare for
forbrænding!
Opbe var ikke mas kinen på s teder med e n tempera tur på unde r
0°C. Frost kan beskadige maskinen.
Anvend ikke ka emaskinen udendø rs.
Anbring ikke maskinen på meget varme over ader eller i nærheden af åben ild, s å legemet ikke smelter eller beskadiges.
Rengøring
Inden maskinen rengøres skal man frakoble den på ON/OFFtasterne og herefter trække stikket ud af stikkontakten. Vent,
til maskinen er kølet ned.
Sænk aldrig mask inen ned i vand!
Det er strengt forbudt at foretage ændringer på maskinens
indvendige dele.
Brug ikke vand, der har ligget i beholderen i nogle dage. Vask
beholderen og fyld den med frisk drikkevand.
Plads til brug og vedligeholdelse
For korrekt og god funktion af ka emaskinen tilrådes følgende:
• Vælg en plan støtte ade.
• Stede t, hvor maskinen placeres, skal vær e godt oplyst, rent
og have en stikkontakt i nærhe den.
• Der skal være en minimumsafstand mellem maskinen og
væggene, som vist i guren (Fig.A).
Opbevaring af maskinen
Når maskinen ikke skal anvendes i længere tid, skal man
frakoble den og trække stikket ud af stikkontakten. Opbevar
maskinen et tø rt sted, der ikke er tilgæ ngeligt for børn. Besk yt
maskinen mod støv og snavs.
Reparationer / Vedligeholdelse
I tilfælde af fejl, defek ter eller mistanke om defekter, hvis man
har tabt maskinen, skal man straks trække stikket ud af stikkontakten. Tag aldrig en defekt maskine i brug. Det er udelukkende autoriserede servicecentre, der må udføre reparationer
på maskinen. I tilfælde af ikke-autoriserede indgreb på maskinen, fralægger fabrikanten sig ethvert ansvar for eventuelle
skader.
Brandforebyggelse
I tilfælde af brand skal man bruge brandslukkere med kulsyre
(CO
). Brug ikke vand eller pulverslukkere.
2
Oversigt over maskinkomponenter (Side 2)
1 Betjeningspanel
2 Låg til vandbeholder
3 Knap til varmt vand/damp
4 Tilslutning af tilbehør
5 Vandbeholder
6 Kopbakke
7 Drypbakke + rist
8 Ka eudløbsenhed
9 Damprør (Pannarello)
10 Strømkabel
11 ON/OFF-knap
12 Trykmonteret lterholder
13 Måleske til k værnet ka e
14 Filter til k værnet ka e
(fælles for br ygning af 1 eller 2 kopper ka e)
15 Adapter til lter til ka epods
16 Filter til ka epods
17 Vælgerknap
18 Kontrollampe for "tændt maskine"
19 Kontrollampe for "damp klar til brug"
20 Kontr ollampe for ka e / vand - "Maskine klar"
Dansk
• 99 •
Page 100

4 INSTALLATION
For din egen og andres sikkerheds skyld skal alle anvisninger i kapitel 3 “Sikkerhedsregler” overholdes nøje.
4.1 Emballage
Originalemballagen er udviklet og konstrueret til at beskytte
maskinen under tr ansport. Det anbefal es, at man gemmer emballagen for eventuel fremtidig transport.
4.2 Advarsler vedrørende installation
Inden maskinen installeres skal man nøje følge nedenstående
sikkerhedsforskrifter:
• Anbring maskinen et sikker t sted.
• Sørg for, at børn ikke har mulighed for at lege med maskinen.
• Undgå, at maskinen placeres på meget varme over ader
eller i nærheden af åben ild.
Ka emaskinen kan nu tilsluttes strømforsyningen.
Bemærk: Det anbefales at vaske komponenterne inden første brug og/eller efter længere
tid, hvor maskinen ikke har været i brug.
4.3 Tilslutning af maskinen
Elektrisk strø m kan være farlig! O verhold derfo r
altid sikkerhedsreglerne omhyggeligt. Brug aldrig defekte kabler! Defekte kabler og stik skal straks
udskif tes hos de autoriserede servicecentre.
Maskinens spænding er forudindstillet fra fabrikken. Kontroller, at netspændingen svarer til anvisningerne på typeskiltet i
bunden af maskinen.
• Kontroller, at ON/OFF-knappen (11) er i position "0", inden
maskinen tilsluttes strømforsyningen.
• Sæt stikket i en vægs tikkontakt med pass ende spænding.
4.4 Vandbeholder
• (Fig.1) - Løft låget af vandbeholderen (2).
• (Fig.2) - Tag vandbeholderen (5) af.
• (Fig.3) - Skyl den og fyld den med frisk drikkevand, og
undgå, at fylde den for mege t.
Vandbeholderen skal altid og kun fyldes med
frisk drikkevand uden brus. Varmt vand og andre væsker kan beska dige beholdere n. Sæt ikke maskinen i funk tion uden vand. Kon troller, at der er tils trækkeligt med vand i beholderen.
• (Fig.2) - Sæt vandbeholderen på, og sørg for at placere
den korrek t, og sæt låget (2) på.
4.5 Fyldning af vandkredsløbet
I starten - efter dampudløb eller når vandbeholderen er tom skal maskinens vandkredsløb fyldes.
• Tryk ON/OFF-knappen (11) i position "I". Kontrollampen
(18) tænder og angiver, at maskinen er tændt.
• (Fig.4) - Sæt en beholder under damprøre t (Pannarello).
• Åbn knappen (3) “varmt vand/damp” ved at dreje den
imod urets retning.
• (Fig.5) - Drej vælgerknappen (17) i position
"
".
• Vent, indtil der kommer en regelmæssig vandstråle ud af
damprøret (Pannarello).
• (Fig.5) - Drej vælgerknappen (17) i position "
• Luk knappen (3) “varmt vand/damp” ved at dreje den i
urets retning. Fjern beholderen.
".
4.6 Når maskinen tages i brug for første
gang eller har ikke været i brug i længere tid
Denne enkle handling sikrer dig en optimal brygning og skal
udføres:
- første gang maskinen tages i brug
- hvis mask inen ikke har været i brug i læng ere tid (mere end
2 uger).
Det vand, der løber ud, skal hældes ud i et pas-
sende a øb og må ikke drikkes. Hvis beholderen bliver f yldt under cyklussen, skal man stoppe udløbet og tømme den, inden udløbet genoptages.
• (Fig.3) - Skyl beholderen og fyld den med frisk drikke-
vand.
• (Fig.4) - Sæt en beholder under damprøret (Pannarello).
Åbn hanen (3) ved at dreje den imod urets retning.
(Fig.5) - Drej vælgerknappen (17) i position "
• Lad alt indholdet i vandbeholderen løbe ud af damp-/
varmtvandsrøret (Pannarello). For at stoppe udløbet drejes vælgerknappen (17) i position "
ved at dreje den i uret s retning.
• (Fig.3) - Fyld beholderen med frisk drikkevand.
• (Fig.13-14) - Sæt lterholderen på udløbsenheden (8) ne-
defra og drej den fra venstre mod højre, indtil den sidder
fast.
• (Fig.15) - Sæt en egnet beholder under lterholderen.
• (Fig.16) - Drej vælgerknappen (17) i position "
alt vandet i beholderen løbe ud.
(Fig.17) - Når vandet er løbet ud, stoppes udløbet ved at
" og hanen (3) lukkes
".
" og lad
• 100 •
 Loading...