

Page 1
HD7858, HD7857,
HD7856, HD7855
User manual
Benutzerhandbuch
Mode d’emploi
Gebruiksaanwijzing
Page 2
Page 3

Table of contents
1 Introduction
1 Introduction 3
1.1 SENSEO
®
coffee system 3
2 General description 4
3 Important 4
3.1 Compliance with standards 5
4 Flushing the machine before
rst use 5
5 Brewing black SENSEO
®
coffee 7
6 Brewing a coffee speciality with
fresh milk 8
7 Adjusting the coffee volume 11
7.1 Adjusting the coffee volume to your
personal taste 11
8 Cleaning 11
8.1 Cleaning the milk spout 12
8.2 Cleaning the coffee spout and
the machine 14
9 Descaling 15
9.1 Descaling procedure 15
10 Ordering accessories 17
11 Environment 17
Congratulations on your purchase and welcome
to Philips! To fully benet from the support that
Philips offers, register your product at
www.philips.com/welcome.
1.1 SENSEO® coffee system
Make your coffee moments truly special with
SENSEO
easy-to-use Philips SENSEO
with the specially developed D.E Master Blenders
SENSEO
coffee with a delicious foam layer.
D.E Master Blenders coffee in convenient
SENSEO
SENSEO
to ensure that the best taste and aroma are
extracted from the coffee. Discover all SENSEO
coffee blends at www.senseo.com.
To ensure a smooth and full coffee taste, you
should keep the following things in mind:
Fresh coffee pods
Use the SENSEO
specially developed by D.E Master Blenders for
your SENSEO
taste. D.E Master Blenders SENSEO
pods stay fresh longer if you store them in an
airtight storage container.
Fresh water
Use fresh water every day. If you have not used
the coffee machine for one day, you have to ush
it with fresh water before you use it again.
®
. This unique system combines the
®
coffee pods, giving you a full, smooth
®
coffee pods and Philips’ unique new
®
brewing system are perfectly matched
®
coffee pods that have been
®
coffee machine for a full, round
®
coffee machine
®
coffee
ENGLISH
®
12 Guarantee and support 17
13 Troubleshooting 18
13.1 SENSEO
®
coffee machine 18
3
Page 4

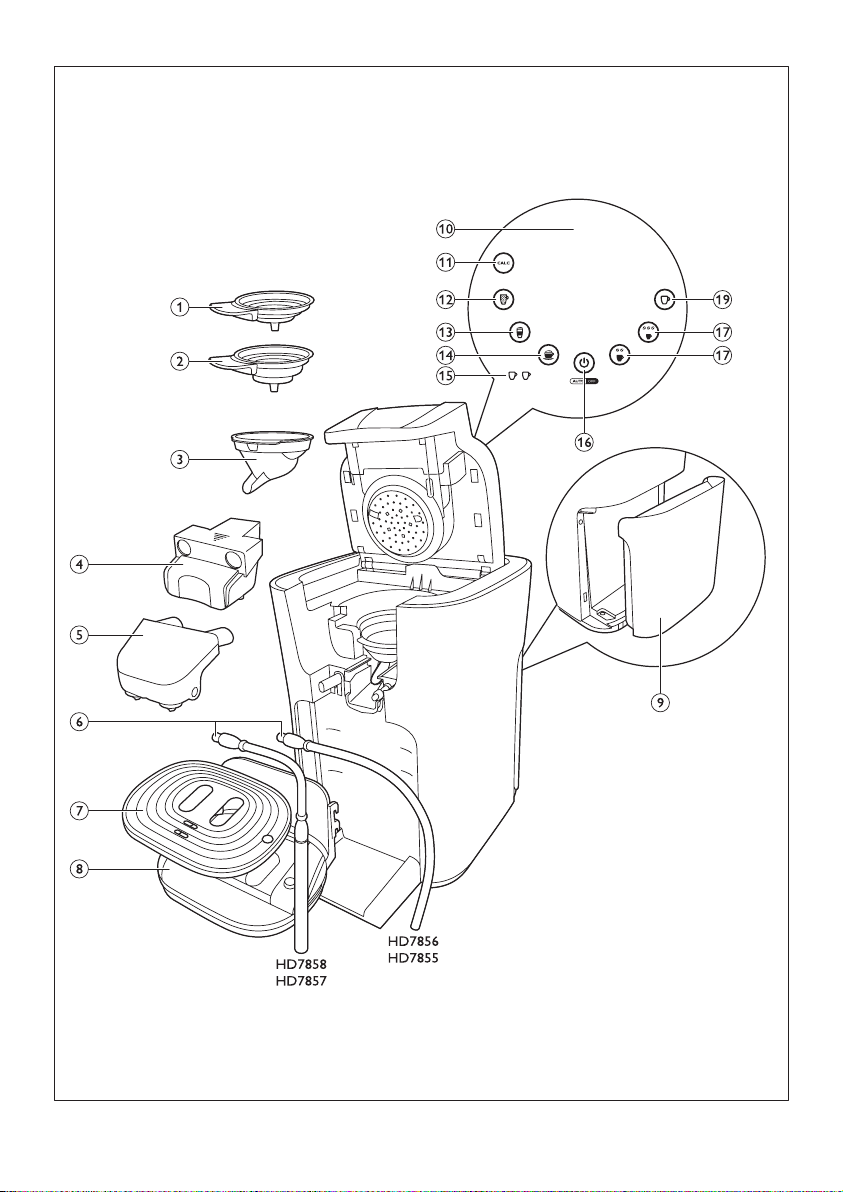
2 General description
1 1-cup pod holder q
2 2-cup pod holder qq
3 Coffee collector
4 Coffee spout
5 Milk spout
6 Milk tube
7 Cup tray
8 Removable drip tray
9 Water reservoir
10 Touch panel with recipe buttons
11 CALC button
12 Café Latte button
13 Latte Macchiato button
14 Cappuccino button
15 Cup indicators
16 On/off button
17 Regular coffee button
18 Strong coffee button
19 Milk only button
3 Important
Read this user manual carefully before
you use the machine and save it for
future reference.
Danger
• Never immerse the machine in
water or any other liquid.
Warning
• Check if the voltage indicated
on the bottom of the machine
corresponds to the local mains
voltage before you connect the
machine.
• This machine can be used by
children aged from 8 years and
above and by persons with
reduced physical, sensory or
mental capabilities or lack of
experience and knowledge if they
have been given supervision or
instruction concerning use of the
machine in a safe way and if they
understand the hazards involved.
• Cleaning and user maintenance
shall not be made by children
unless they are older than
8 and supervised.
• Keep the machine and its cord out
of the reach of children aged less
than 8 years.
• Children should be supervised to
ensure that they do not play with
the machine.
• Do not use the machine if the
plug, the mains cord or the
machine itself is damaged.
• If the mains cord is damaged, you
must have it replaced by Philips,
a service centre authorised
by Philips or similarly qualied
persons in order to avoid a hazard.
Caution
• Always return the machine to
a service centre authorised by
Philips for examination or repair.
Do not attempt to repair the
machine yourself, otherwise your
guarantee becomes invalid.
• Do not use the machine in
combination with a transformer,
as this could cause hazardous
situations.
4
Page 5
• Always put the machine on a
at and stable surface. Keep it
in upright position, also during
transport.
• Do not place the machine on a
hotplate, directly next to a hot
oven or similar source of heat.
• Do not keep the machine at
temperatures below 0°. Water left
in the heating system may freeze
and cause damage.
• Never pour milk, coffee, hot water
or carbonated water into the
water reservoir.
• Never put normal ground coffee
or use torn pods in the machine,
as this causes it to become
blocked.
• Never ush the machine or let it
brew coffee when the spout is not
in place.
• This machine is intended for
normal household use only.
It is not intended for use in
environments such as staff
kitchens of shops, ofces, farms
or other work environments.
Nor is it intended to be used by
clients in hotels, motels, bed and
breakfasts and other residential
environments.
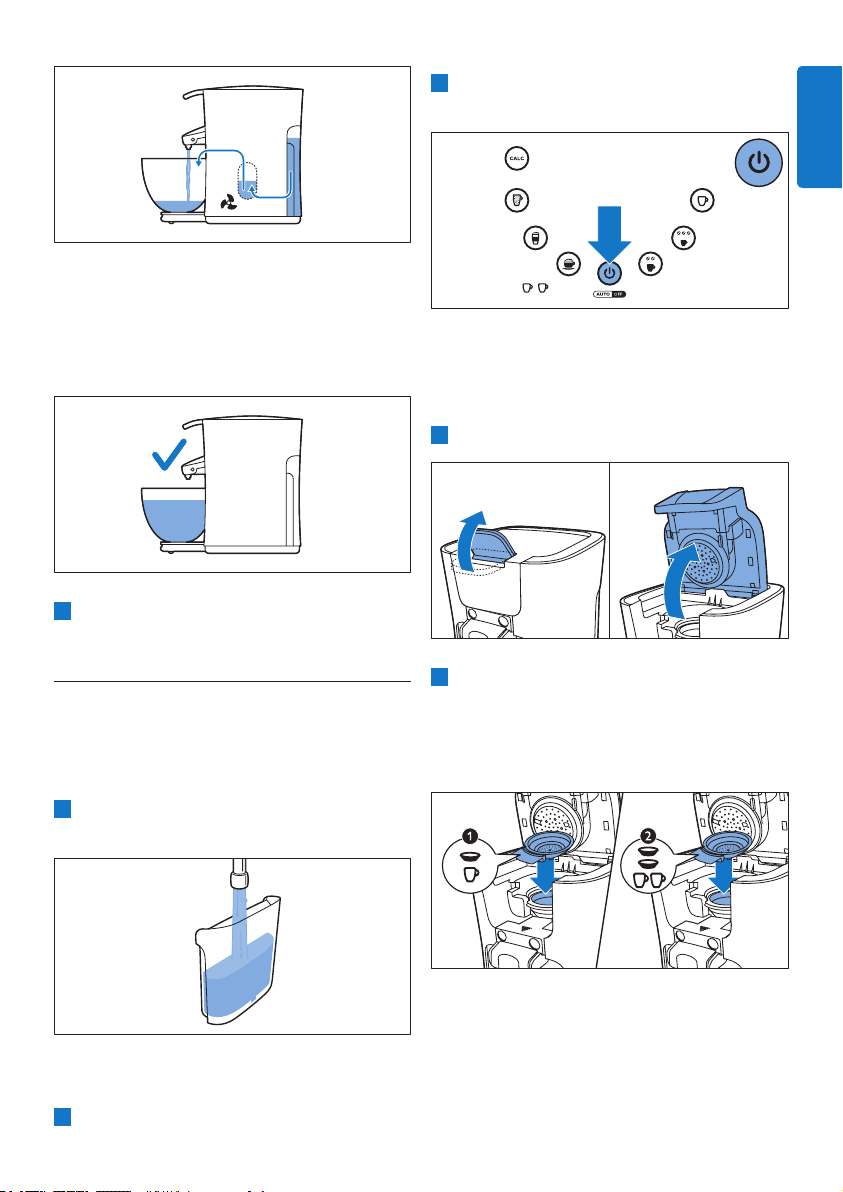
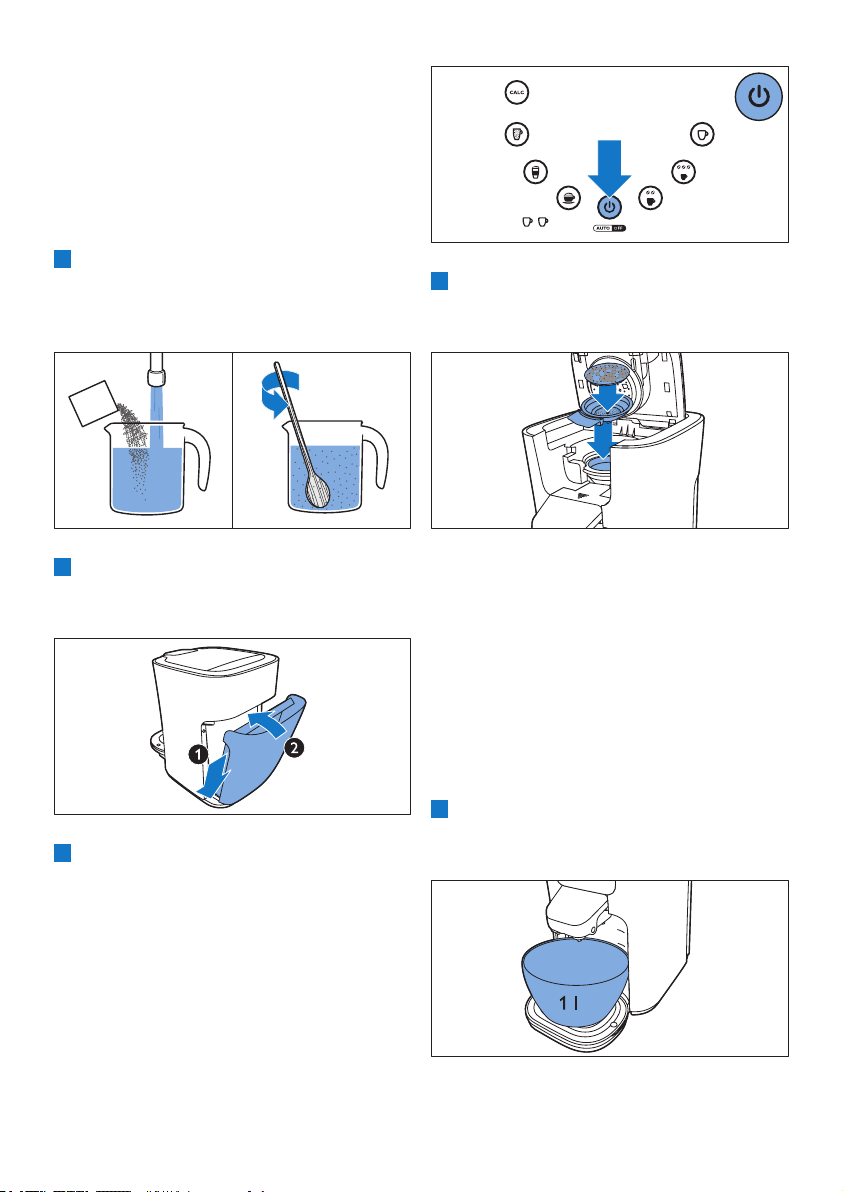
4 Flushing the
machine before rst
use
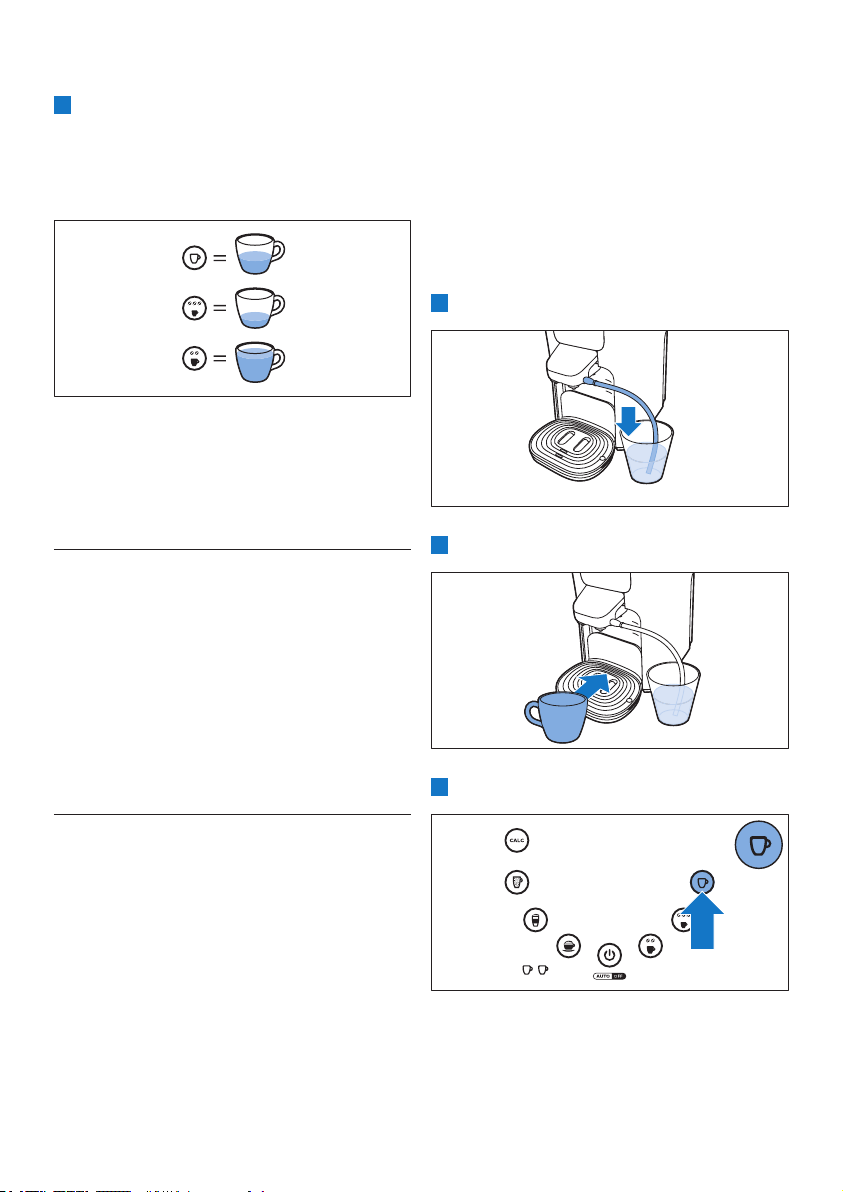
It is important that you ush your SENSEO® coffee
machine before rst use. After the ushing cycle,
the machine is ready for brewing SENSEO
C
Caution:
Never interrupt the ushing cycle halfway. If you
do, the boiler does not ll itself properly.
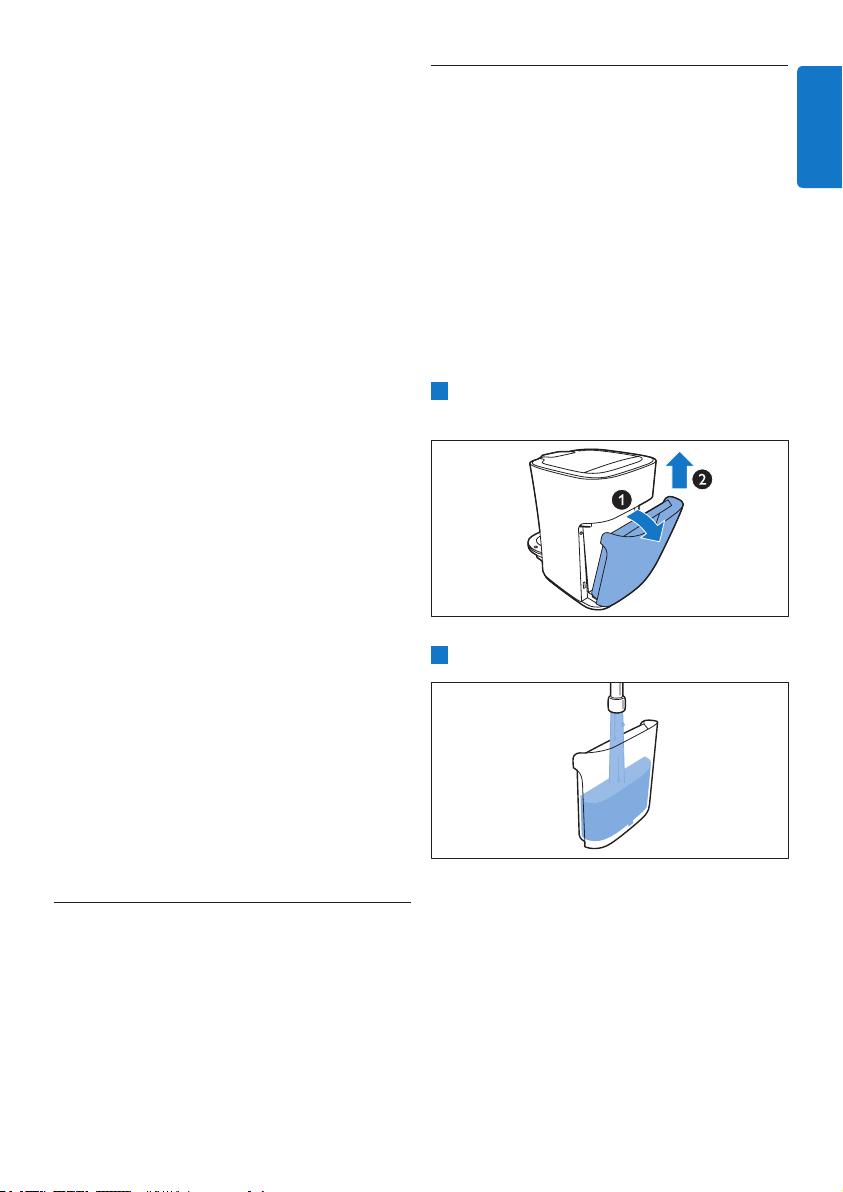
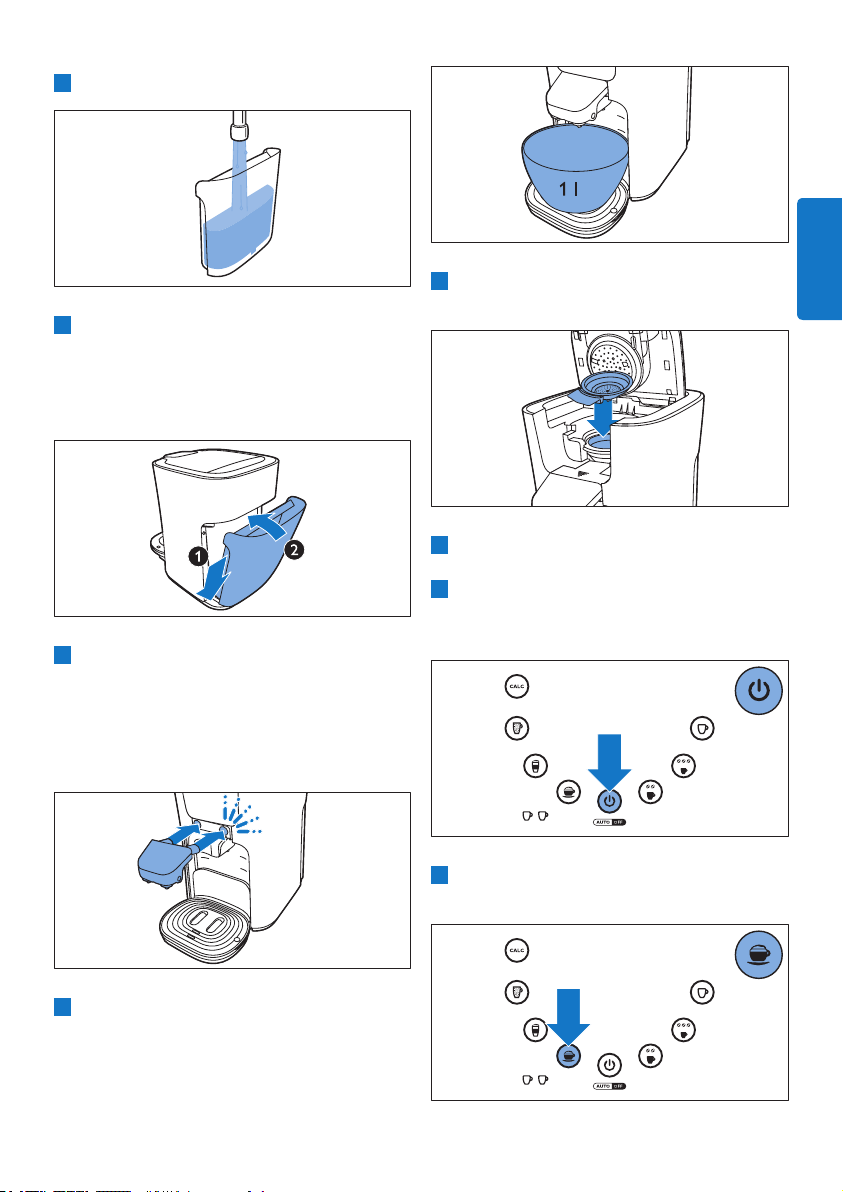
1 Tilt the water reser voir backwards (1) and lift
the water reservoir off the machine (2).
2 Fill the water reser voir.
®
coffee.
ENGLISH
3.1 Compliance with standards
This Philips machine complies with all applicable
standards and regulations regarding exposure to
electromagnetic elds.
The energy consumption of this machine in
off mode is less than 0,5 watt. This means that
this machine complies with European Directive
2009/125/EC, which sets the ecological design
requirements for energy-using products.
5
Page 6
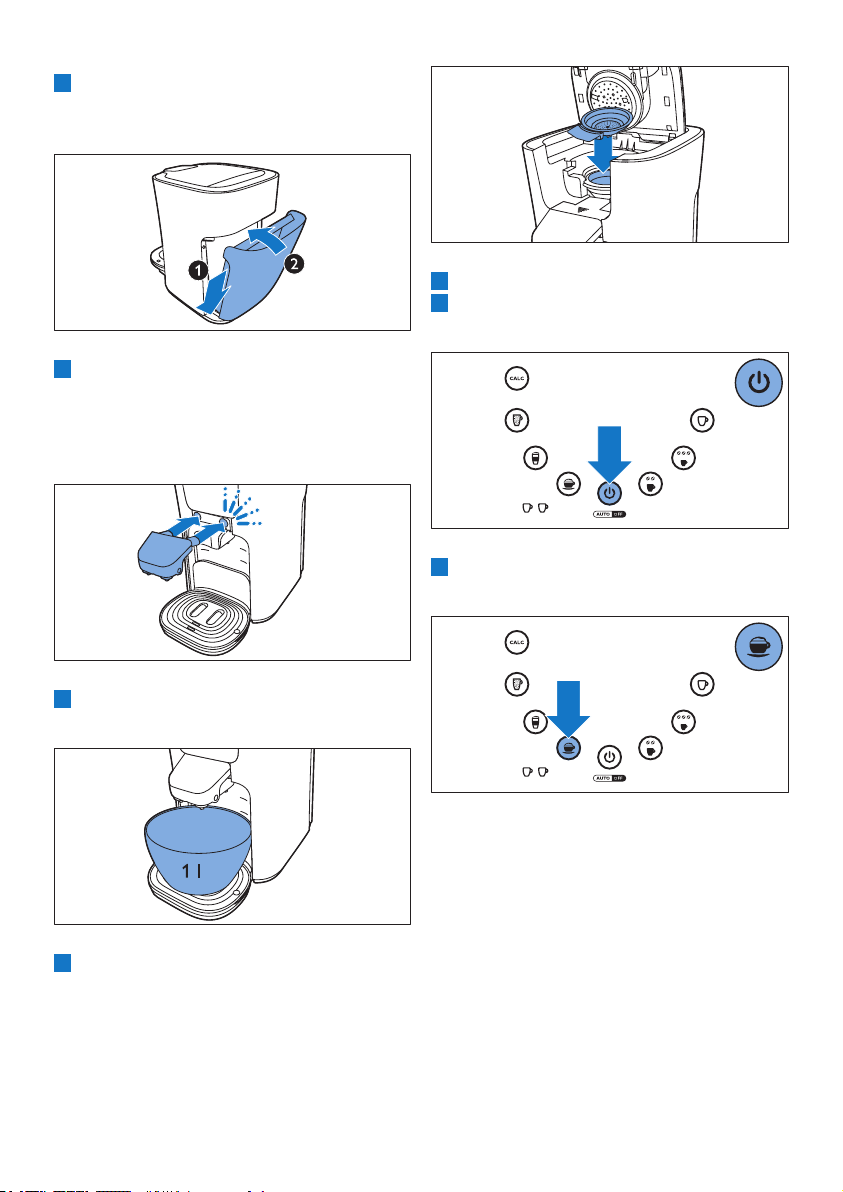
3 Tilt the water reservoir and place the bottom
back onto the machine (1). Then press the top
of the water reservoir towards the machine (2).
4 Slide the milk spout onto the machine. Make
sure you attach the milk spout by sliding it
over the guiding rails on the coffee spout. You
hear a click sound when the spout is attached
properly.
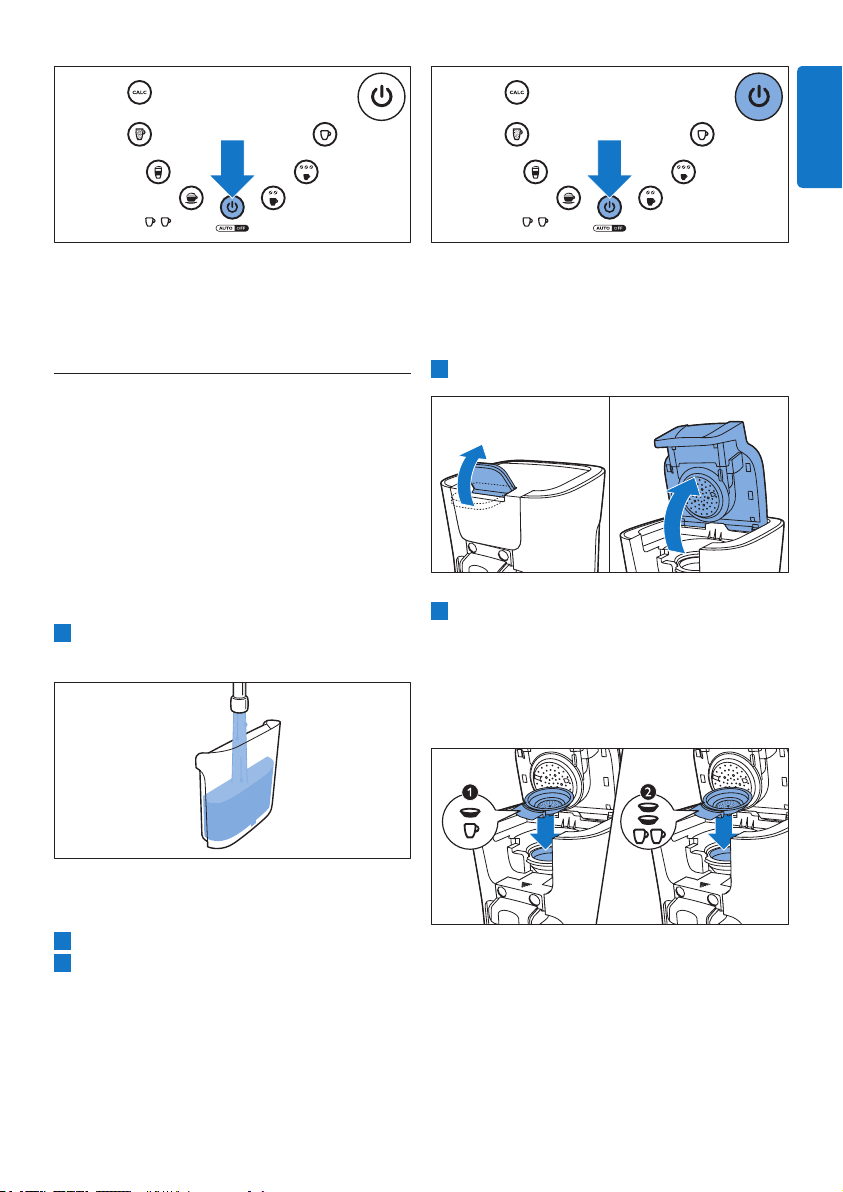
7 Put the plug in an ear thed wall socket.
8 Press the on/off button. The button lights up
to indicate that you have to ush the machine.
9 To start ushing, press any of the recipe
buttons.
5 Place a bowl with a capacity of at least 1 litre
under the coffee spout.
6 Make sure a pod holder, without pod or pods,
is in place.
6
• During the ushing cycle, the boiler lls itself
with water from the water reservoir and
cold water comes out of the coffee spout.
During the ushing cycle, the machine
produces more noise than during a regular
brewing cycle.
Page 7
• When all the water in the water reservoir
has been used up, the ushing cycle is
nished and the machine switches off. You
may notice some steam coming from the
machine, this is normal.
10 Fill the water reser voir with fresh tap water
and place it back onto the machine.
3 Press the on/off button. The on/off button
ashes slowly while the water heats up.
D
Note:
If the on/off button ashes rapidly, the water
reservoir does not contain enough water for
brewing one cup of coffee.
4 Pull the lid lever upwards to open the lid.
ENGLISH
5 Brewing black
SENSEO® coffee
1 Make sure that the water reser voir is lled
with fresh cold tap water.
E
Tip:
Use fresh water every day.
2 Put the plug in an ear thed wall socket.
5 If you want to make one cup of SENSEO
coffee, place the 1-cup pod holder q in the
machine (1). If you want to make two cups,
put the 2-cup pod holder qq in the machine
(2). Make sure the pod holder is clean.
®
7
Page 8

6 Place 1 coffee pod in the 1-cup pod holder
q (1) or place 2 coffee pods in the 2-cup
pod holder qq (2). Place the pod or pods
properly in the centre of the pod holder, with
the convex side pointing downwards. Press
the pod or pods lightly into the pod holder.
D
Note:
Make sure the coffee in the pod or pods is
evenly distributed.
C
Caution:
Never put normal ground coffee or use torn
pods in the SENSEO
®
machine, as this causes
it to become blocked.
7 Close the lid and lock the lever.
D Note:
You can adjust the height of the drip tray
or remove the drip tray to be able to place
higher cups.
D
Note
The cups you use should have a capacity of at
least 150ml when you brew regular coffee or
100ml when you brew strong coffee. Do not
use cups that are too large, as they cause the
coffee to get cold more quickly.
9 Press the button with two coffee beans for a
regular cup of coffee. Press the button with
three coffee beans for a strong cup of coffee.
10 Press the recipe button once for one cup of
coffee or twice for two cups of coffee.
11 When the water has heated up and the on/
off button lights up continuously, the machine
automatically starts brewing coffee.
8 Place one cup or two cups under the spout
openings. Use the markings on the drip tray to
place the cup or cups.
8
D
Note:
Do not remove the water reservoir during a
brewing cycle.
12 When the coffee is ready, remove the used
coffee pod or pods. Simply lift the pod holder
out of the machine and empty it.
C
Caution:
There may still be some hot water/coffee on
the coffee pod or pods.
13 After use, press the on/off button to switch
off the machine.
Page 9
ENGLISH
D Note:
If you do not use the machine, it switches off
automatically after 15 minutes to save energy.
6 Brewing a coffee
speciality with fresh
milk
With the SENSEO® coffee machine you can easily
create the perfect cappuccino, café latte, latte
macchiato or warm milk only with two cups at the
same time.
1 Make sure that the water reser voir is lled
with fresh cold tap water.
D Note:
If the on/off button ashes rapidly, the water
reservoir does not contain enough water for
brewing one cup of coffee.
4 Pull the lid lever upwards to open the lid.
5 If you want to make one cup of cappuccino,
café latte or latte macchiato, place the 1-cup
pod holder q in the machine (1). If you want
to make two cups, put the 2-cup pod holder
qq in the machine (2). Make sure the pod
holder is clean.
E
Tip:
Use fresh water every day.
2 Put the plug in an ear thed wall socket.
3 Press the on/off button. The on/off button
ashes slowly while the water heats up.
D
Note:
For warm milk only, you do not have to place
a pod holder in the machine. Proceed with
step 7.
9
Page 10
6 Place 1 coffee pod in the 1-cup pod holder
q (1) or place 2 coffee pods in the 2-cup
pod holder qq (2). Place the pod or pods
properly in the centre of the pod holder, with
the convex side pointing downwards. Press
the pod or pods lightly into the pod holder.
D
Note:
Make sure the coffee in the pod or pods is
evenly distributed.
C
Caution:
Never put normal ground coffee or use torn
pods in the SENSEO
®
machine, as this causes
it to become blocked.
7 Close the lid and lock the lever.
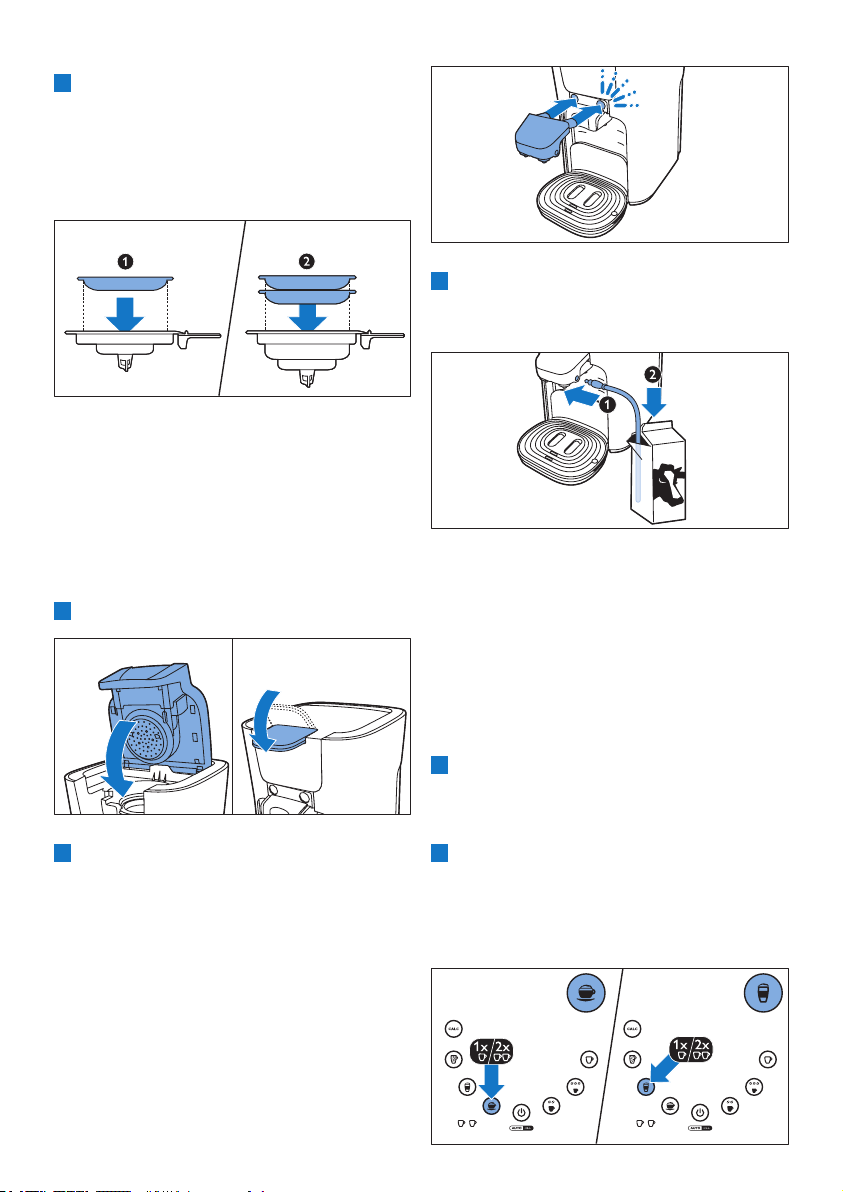
9 Inser t the connector of the milk tube into the
milk spout (1). Place the other end of the milk
tube in a milk carton or jar (2).
E
Tip:
Use fresh chilled milk. We recommend semi
skimmed fresh cow’s milk to get the best milk
froth.
8 Slide the milk spout onto the machine. Make
sure you attach the milk spout by sliding it
over the guiding rails on the coffee spout. You
hear a click sound when the spout is attached
properly.
10
D
Note:
To prevent steam from coming out of the milk
spout, make sure there is enough milk in the
carton or jar.
10 Place one cup or two cups under the spout
openings. You can adjust the drip tray or
remove the drip tray to be able to place
higher cups.
11 Press the recipe button of your choice to select
the desired coffee speciality. You can choose
between cappuccino, café latte, latte macchiato
or warm milk only. Press the recipe button
once for one cup or twice for two cups.
Page 11
12 When the water has heated up and the on/
off button lights up continuously, the machine
starts to create the selected coffee speciality
with milk.
D
Note:
The machine rst brews milk and then adds
the coffee. In case of café latte, the machine
rst adds coffee and then brews milk.
13 When the coffee is ready, remove the used
coffee pod or pods. Simply lift the pod holder
out of the machine and empty it.
C
Caution:
There may still be some hot water/coffee on
the coffee pod or pods.
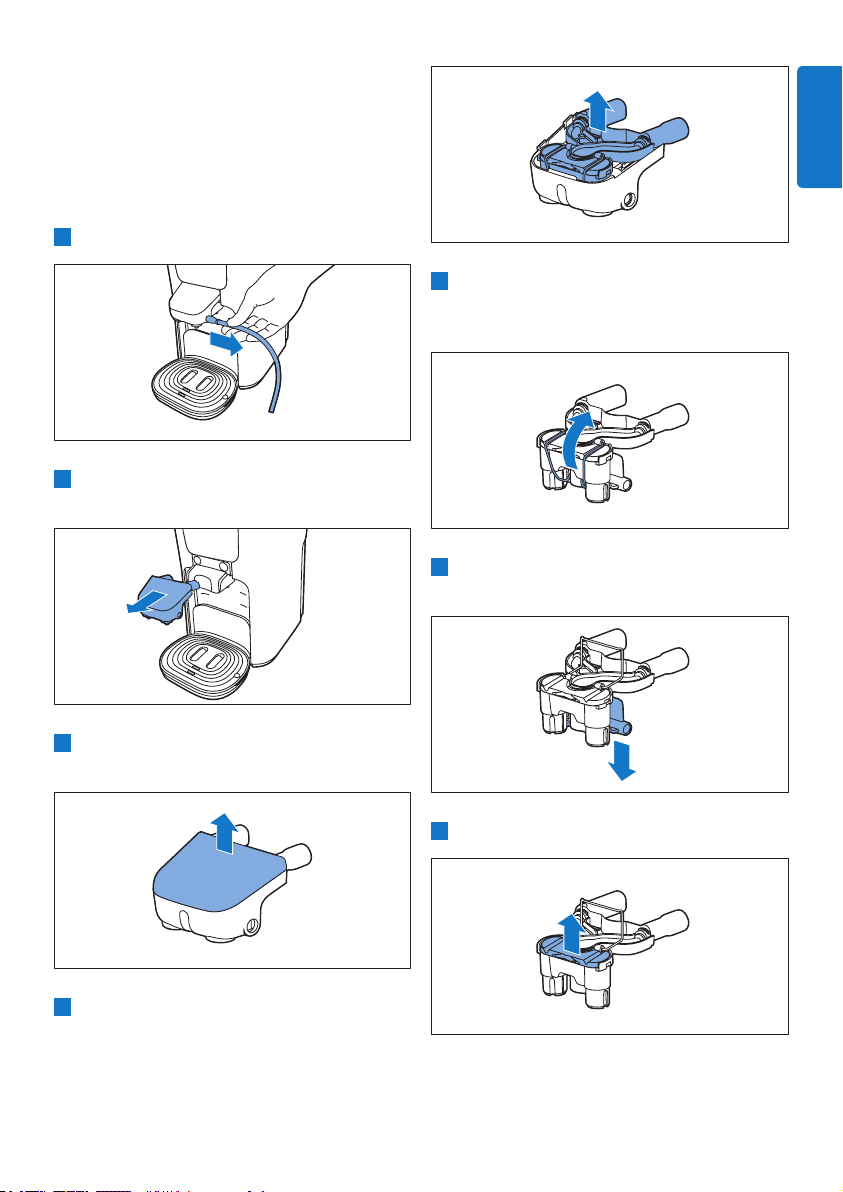
14 Remove the milk spout and tube from
the machine and clean them (see chapter
‘Cleaning the milk spout’).
15 After use, press the on/off button to switch
off the machine.
D Note:
If you do not use the machine, it switches off
automatically after 15 minutes to save energy.
ENGLISH
7 Adjusting the coffee
volume
Note: this function is only available for type
number HD7858, HD7857.
7.1 Adjusting the coffee volume
to your personal taste
You can adjust the volume of each recipe to your
own personal taste by programming the different
recipes.
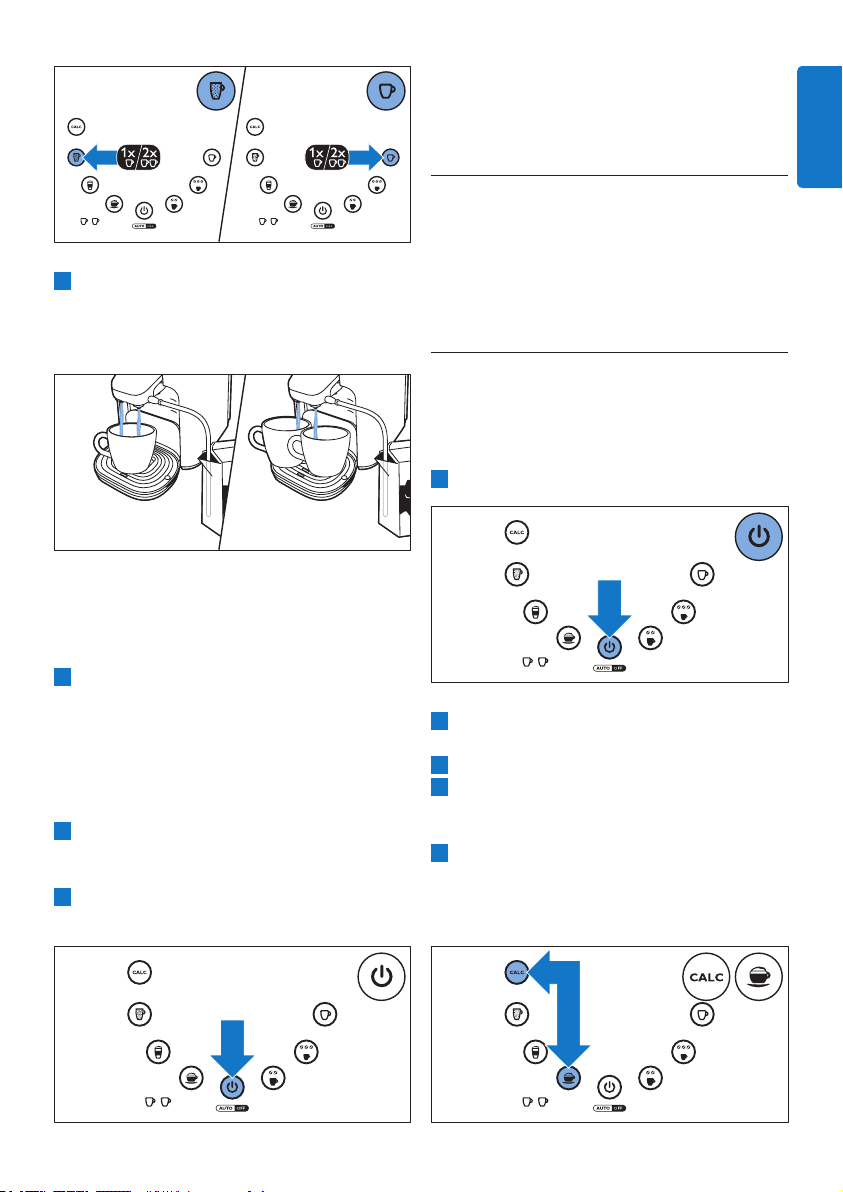
1 Switch on the appliance.
2 Fill the water reser voir with cold water up to
the MAX indication.
3 Put a coffee pod in the pod holder.
4 If you want to prepare a coffee speciality with
milk, put the tube of the milk spout into a
carton or jar of milk.
5 Press the CALC button and the button for
the recipe you want to adjust simultaneously.
Release the buttons when the appliance
beeps twice after approximately two seconds.
11
Page 12
• The 1-cup symbol starts to ash.
6 Press one of the following buttons to change
the coffee volume: the regular coffee button
for a larger cup, the milk only button for a
medium cup (default setting) or the strong
coffee button for a smaller cup.
• The appliance beeps three times to conrm
and starts to brew a coffee recipe according
to the new setting.
The appliance saves the setting automatically.
8 Cleaning
D Note:
If you do not plan to froth milk again straight
away, rinse the milk spout and milk tube within 30
minutes after use.
D
Note:
After the last use of the day, clean the milk spout
and milk tube thoroughly.
8.1.1 Rinsing after every use
1 Put the milk tube in a cup of clean water.
2 Place an empty cup under the spout.
Regular cleaning of your SENSEO® is important
to ensure that the SENSEO
®
coffee always tastes
optimally and to optimise the lifetime of the
coffee machine.
B
Warning:
Never immerse the SENSEO® coffee machine in
water.
8.1 Cleaning the milk spout
For a reliable performance of the milk spout
and consistently good frothing results, it is
important to clean the milk spout and milk tube
regularly and thoroughly. The milk spout can be
disassembled completely, which allows you to
remove all milk residues from it.
12
3 Press the milk only button.
The machine rinses all milk residues from the
milk spout and milk tube with clean hot water.
Page 13
8.1.2 After the last use of the day
Clean the milk tube and the milk spout in the
dishwasher or in hot water with some washing-up
liquid.
D
Note:
Cleaning in the dishwasher is recommended.
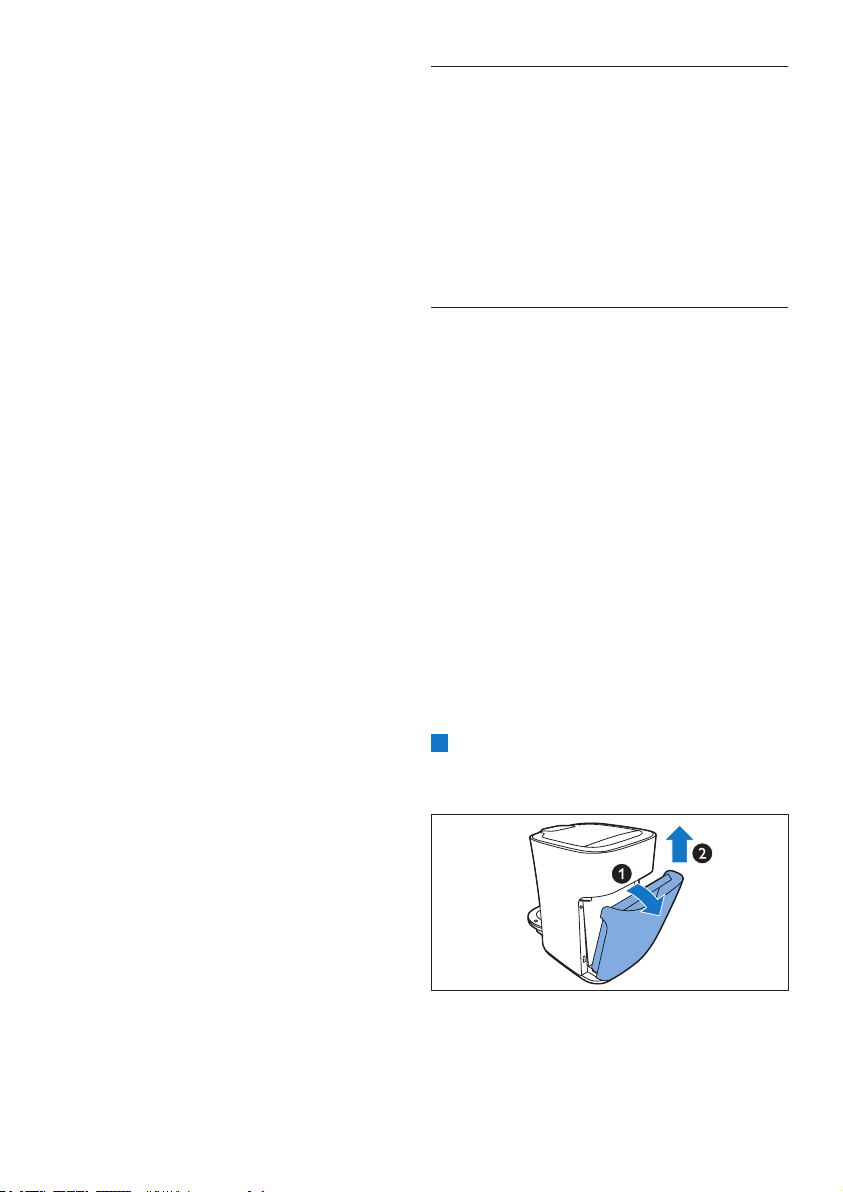
1 Pull the milk tube out of the milk spout.
2 To remove the milk spout from the machine,
pull it towards you.
ENGLISH
5 The frothing system can be separated into
two parts. Open the spring to separate the
parts.
6 Remove the inside part of the frothing system
by pulling it downwards.
3 Remove the top part of the milk spout from
the bottom part by pulling it rmly.
4 Take out the frothing system.
7 Remove the small lid by pulling it upwards.
13
Page 14
8 Clean all par ts in the dishwasher or with hot
water and some washing-up liquid.
4 Place the frothing system in the bottom par t
of the milk spout.
8.1.3 Reassembling the milk spout
1 Place the small lid back on the frothing system.
2 Place the inside par t back into the frothing
system.
3 Close the spring to lock the two parts
together.
5 Place the top par t of the milk spout back
onto the bottom part.
8.2 Cleaning the coffee spout
and the machine
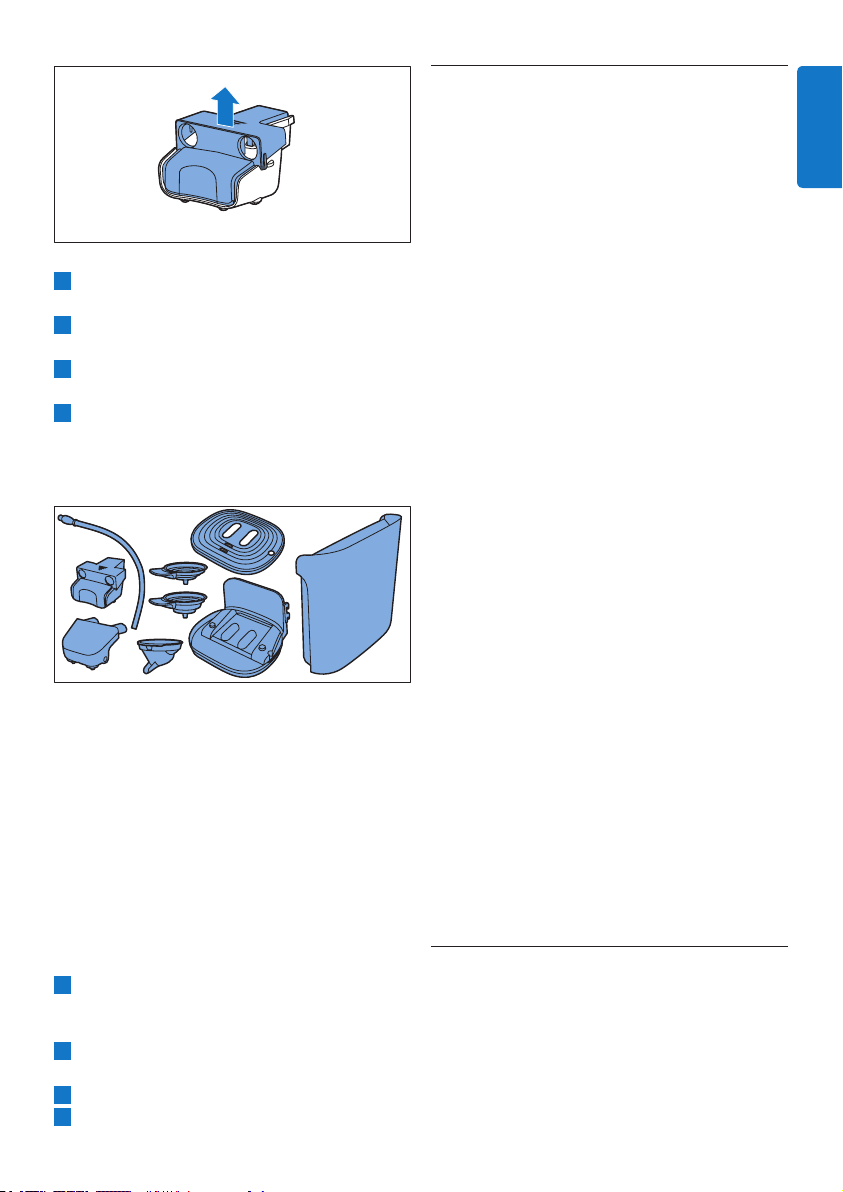
1 Always unplug the machine before you clean it.
2 To remove the coffee spout from the
machine, pull it towards you.
3 Remove the top part of the coffee spout from
the bottom part by pulling it rmly.
14
Page 15
9 Descaling
4 Clean the outside of the machine with a moist
cloth.
5 Clean the water distribution disc and the
rubber sealing ring with a moist cloth.
6 Clean the water inlet on the machine with a
moist cloth.
7 Clean the water reser voir, the coffee spout,
the coffee collector, the drip tray, the cup tray,
the milk tube, the milk spout and the pod
holders in hot water or in the dishwasher.
C
Caution:
Be careful not to damage the valve in the
bottom of the water reservoir if you use
a washing-up brush to clean the water
reservoir.
D
Note:
Check if the sieve in the centre of the pod
holder is clogged. If this is the case, unclog the
sieve by rinsing the pod holder under the tap.
If necessary, use a washing-up brush to clean
the sieve.
8 When you are nished with cleaning, place
the top part of the coffee spout back onto
the bottom part.
9 Place the water reser voir, the coffee collector
and the drip tray back into the machine.
10 Slide the coffee spout into the machine.
11 Put the plug the back in the wall socket.
Scale builds up inside the machine during use. It is
essential to descale the SENSEO
®
coffee machine
when the CALC light goes on.
When to descale
• Descale the SENSEO
®
coffee machine as
described below when the CALC button
lights up (after you have brewed approx. 400
cups of SENSEO
®
coffee).
Why to descale
Your reasons to descale:
• It prolongs the life of your SENSEO
®
coffee
machine
• It ensures maximum cup volume
• It ensures maximum coffee temperature
• The machine produces less sound during
brewing
• It prevents malfunctioning
If the descaling procedure is not performed
correctly, scale residue remains behind in the
machine. This causes scale to build up more
quickly and may cause permanent and irreparable
damage to the machine.
Use the correct descaling agent
Use SENSEO
®
Descaler (HD7012, HD7011) only.
It has been developed to ensure better machine
performance and operation. Each descaling
mixture can be used only once. For more
information about this descaler, visit our website
www.philips.com.
B
Warning:
Never use a descaling agent based on mineral
acids such as sulphuric acid, hydrochloric acid,
sulphamic acid and acetic acid (e.g. vinegar).
These descaling agents may damage your
SENSEO
®
coffee machine.
9.1 Descaling procedure
The CALC button lights up to indicate you
have to descale your machine. The descaling
procedure consists of a descaling cycle and 3
ushing cycles. Do not interrupt the descaling
cycle and do not switch off the machine before
you have performed the ushing cycles. The whole
procedure takes approximately 60 minutes.
15
ENGLISH
Page 16
B Warning:
Make sure you place the milk spout for proper
descaling.
D
Note:
You can always descale your machine before the
appliance indicates it is necessary, follow the steps
below.
1 Mix the descaler with 1 litre of water in
a measuring jug. Stir until the powder has
dissolved. Fill the water reservoir with the
descaling solution.
2 Tilt the water reser voir and place the bottom
back onto the machine (1). Then press the top
of the water reservoir towards the machine (2).
4 Place the 1-cup pod holder q with a used
coffee pod in it in the machine. Close the lid
and make sure it is properly locked.
D
Note:
Always put a used coffee pod in the pod
holder when you descale the machine. This
pod serves as a ‘lter’ to prevent the sieve or
hole in the pod holder from getting clogged
with scale residue.
3 Press the on/off button. The on/off button
ashes slowly while the water heats up. The
machine is ready for descaling when the on/
off button lights up continuously.
16
B
Warning:
Make sure the lid is closed properly and the
lid lever is locked before you start descaling
the machine.
5 Put a bowl with a capacity of at least 1 litre
under the spout to collect the descaling
solution.
Page 17
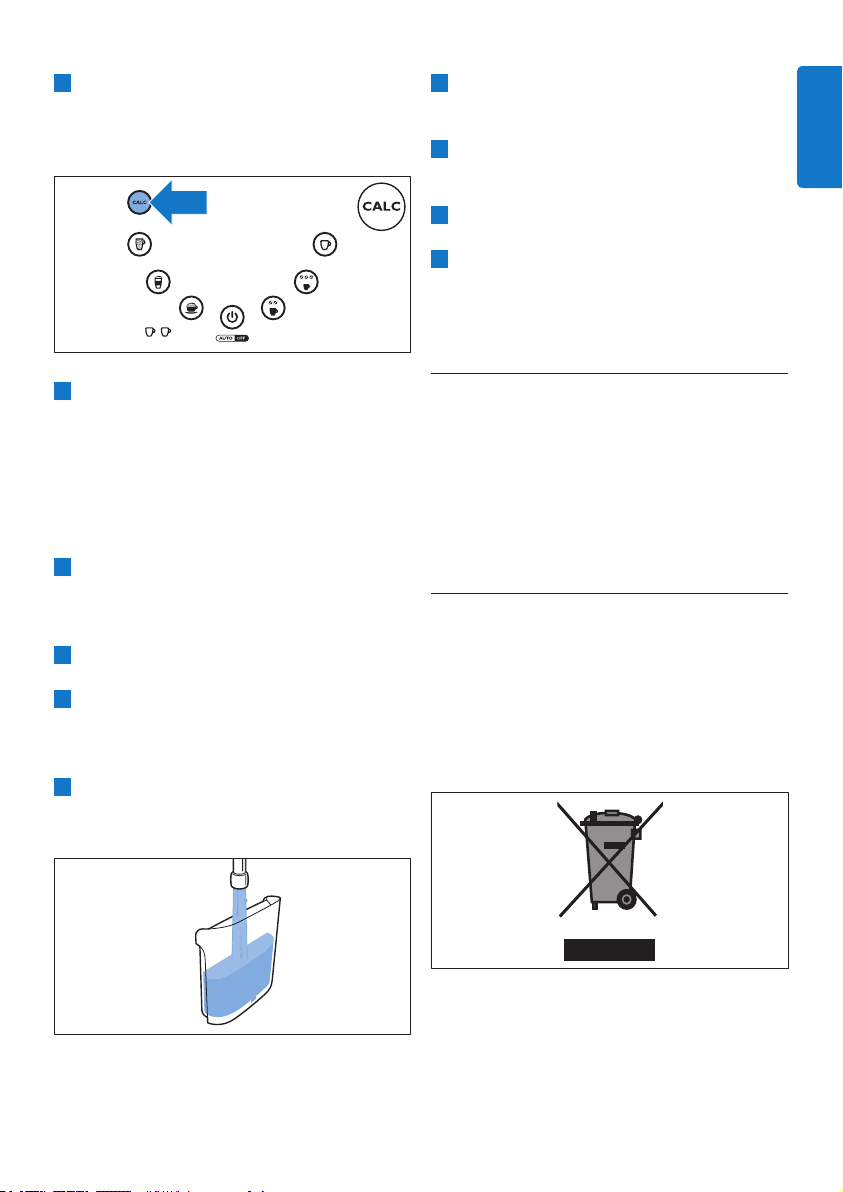
6 The machine is ready for descaling when
the on/off button and CALC button light up
continuously. Press the CALC button until the
machine beeps twice to start the descaling cycle.
7 The descaling cycle is in progress. During the
descaling cycle, the descaling solution comes
out of the machine in intervals. During the
last 5 minutes the descaling solution ows
continuously.
B
Warning:
Do not interrupt the descaling cycle.
8 When all the descaling solution in the water
reservoir has been used up after approximately
50 minutes, the on/off button ashes quickly
and CALC button ashes slowly.
9 Empty the bowl and place it back under the
spout.
10 Remove the used coffee pod from the pod
holder.
9.1.1 Flushing cycles:
1 Rinse and ll the water reser voir with fresh
water until the MAX indication. Place it back
onto the machine.
2 Press the CALC button to start the ushing
cycle. The water ows continuously for
approximately 5 minutes.
3 Wait until the machine has completed the
ushing cycle. The on/off button ashes quickly
and the CALC button ashes slowly.
4 Empty the bowl and place it back under the
spout.
5 Repeat steps 1 to 4 twice to complete the
ushing procedure. When the last ushing
cycle is complete, the machine switches off
automatically.
10 Ordering accessories
To buy accessories or spare parts, visit
www.shop.philips.com/service or go to your
Philips dealer. You can also contact the Philips
Consumer Care Centre in your country (see the
worldwide guarantee leaet for contact details).
11 Environment
• Do not throw away the machine with the
normal household waste at the end of its life,
but hand it in at an ofcial collection point for
recycling. By doing this, you help to preserve
the environment.
ENGLISH
17
Page 18

12 Guarantee and
support
If you need information or support, please
visit www.philips.com/support or read the
separate worldwide guarantee leaet.
The purchase of the Philips SENSEO
machine does not exhaust any of the rights of D.E.
Master Blenders 1753 or Philips under any of their
patents nor does it confer upon the purchaser a
licence under these patents.
Always return the machine to a service centre
authorised by Philips for examination or repair.
Do not attempt to repair the machine yourself,
otherwise your guarantee becomes invalid.
®
coffee
13 Troubleshooting
The on/off light ashes quickly.
• There is not enough water in the water reservoir.
Fill the water reservoir and make sure you
place the reservoir properly into the machine.
• The oat in the water reservoir might be stuck.
Empty the water reservoir and shake it a few
times to release the oat. Clean the water
reservoir with hot water and some washing-up
liquid or in the dishwasher.
• You are using the machine at an ambient
temperature below 10*C.
Only use the machine at an ambient
temperature above 10*C.
• If these solutions do not solve the problem,
contact the Philips Consumer Care Centre in
your country.
The CALC light is on continuously.
• You need to descale the machine.
• Perform the descaling procedure as described
in chapter ‘Descaling’. Do not switch off the
machine during descaling.
13.1 SENSEO® coffee machine
This chapter summarises the most common
problems you could encounter with the machine.
If you are unable to solve the problem with the
information below, visit www.philips.com/
support for a list of frequently asked questions or
contact the Consumer Care Centre in your country.
The on/off light is on continuously.
• You need to ush the machine before rst use.
Flush the machine before rst use, see chapter
‘Flushing the machine before rst use’.
• The machine is ready to brew.
The on/off light ashes slowly.
• The machine is heating up.
• If this takes longer than two minutes, contact the
Philips Consumer Care Centre in your country.
18
The CALC light is on continuously after descaling.
• The descaling procedure has not been completed.
• Perform the descaling procedure as described
in chapter ‘Descaling’. Do not switch off the
machine during descaling.
The CALC light ashes.
• The descaling procedure is in progress.
• Let the machine complete the descaling
procedure. See chapter ‘Descaling’.
The on/off lights ashes quickly and the CALC
light ashes slowly.
• The water reservoir is empty.
• Rinse and ll the water reservoir and make
sure you place the reservoir properly into the
machine. Press the CALC button to continue
the descaling procedure as described in
chapter ‘Descaling’.
Page 19

One cup indicator lights up.
• You pressed the recipe button once to brew
one cup of coffee.
• Press the recipe button once more if you
want to brew two cups of coffee. In this case,
both cup indicators light up.
Two cup indicators light up.
• You pressed the recipe button twice for two
cups of coffee.
• If you want to brew just one cup of coffee,
press the recipe button once more. In this
case, only one cup indicator lights up.
The coffee is not hot enough.
• The machine has been used for a longer
period of time without descaling.
Perform the descaling procedure as described
in chapter ‘Descaling’.
• The coffee temperature quickly decreases in
the cup.
• Do not use cups that are too large.
• Use thin-walled cups. Thin-walled cups absorb
less heat from the coffee than thick-walled cups.
• You can preheat the coffee machine and cup
by brewing a cup of hot water rst without
placing a coffee pod in the pod holder.
• The coffee speciality with fresh milk is not hot
enough.
• This is normal. A milk-based coffee recipe
is less hot than a cup of black coffee. Milk is
heated to a lower temperature to ensure
high-quality milk froth.
The touch panel with recipe buttons does not work.
• There may be water on the touch panel.
• Make sure your hands and the touch panel
are dry when you choose a coffee recipe.
• Make sure that the voltage indicated on the
coffeemaker corresponds to the local mains
voltage.
The SENSEO® machine does not produce good
or enough frothed milk.
• There is not enough milk in the milk carton or jar.
• Make sure the milk carton or jug contains
enough milk.
• Make sure the milk tube is properly
connected into the milk spout and the tube is
properly placed in the milk carton or jar.
• The milk is not cold enough.
Make sure you use cold milk straight from the
refrigerator (5°C-8°C).
• You did not use cow’s milk.
To achieve the best frothing results we advise
you to use semi-skimmed cow’s milk at
refrigerator temperature (5°C-8°C).
• The milk froth quality decreases over time.
The milk spout and milk tube may be dirty.
Disassemble all the parts of the milk spout and
milk tube. Clean them thoroughly with a brush
and some washing-up liquid or put them in the
dishwasher. See chapter ‘Cleaning the milk spout’.
• The coffee machine is clogged by scale and
needs to be descaled.
Perform the descaling procedure as described
in chapter ‘Descaling’.
The milk froth continues to ow from the milk spout.
• The milk continues to ow more than a few
seconds.
• Make sure you place the milk carton or jar on
the same level as the coffee machine.
• I cannot open the lid.
• Overpressure may have temporarily formed
under the lid.
• Switch of the coffee machine. Pull up the lever
and wait 24 hours before you open the lid.
You may need to use some force.
• Always make sure the pod holders are clean
and the centre of the sieve is not clogged to
prevent over pressure.
ENGLISH
19
Page 20

DEUTSCH
Inhaltsangabe
1 Einführung 20
1.1 SENSEO
2 Allgemeine Beschreibung 21
3 Wichtig 21
3.1 Normerfüllung 22
4 Die Maschine vor dem ersten
Gebrauch durchspülen 22
5 Schwarzen SENSEO
zubereiten 24
6 Eine Kaffeespezialität mit frischer
Milch zubereiten 26
7 Die Kaffeemenge einstellen 29
7.1 Die Kaffeemenge nach Ihrem
persönlichen Geschmack einstellen 29
8 Pege 30
8.1 Den Milchausgießer reinigen 30
8.2 Den Kaffeeauslauf und die Maschine
reinigen 32
9 Entkalken 33
9.1 Entkalkungsvorgang 34
10 Zubehör bestellen 36
11 Umwelt 36
12 Garantie und Support 36
13 Fehlerbehebung 36
13.1 SENSEO
®
Kaffeesystem 20
®
Kaffee
®
Kaffeepadmaschine 36
1 Einführung
Herzlichen Glückwunsch zu Ihrem Kauf und
willkommen bei Philips! Um die Unterstützung
von Philips optimal nutzen zu können, registrieren
Sie Ihr Produkt bitte unter www.philips.com/
welcome.
1.1 SENSEO® Kaffeesystem
Mit SENSEO® erleben Sie einen sensationellen
Kaffeegenuss. Dieses einzigartige System
kombiniert die einfach zu bedienende Philips
SENSEO
von D.E Master Blenders SENSEO
Kaffeepads: Das Ergebnis ist eine perfekte Tasse
Kaffee mit einem weichen, vollen Aroma und einer
köstlichen Crema.
Kaffee von D.E Master Blenders in praktischen
SENSEO
SENSEO
aufeinander abgestimmt, sodass sich das volle
Aroma des Kaffees entfalten kann. Unter
www.senseo.com nden Sie alle SENSEO
Kaffeesorten.
Beachten Sie folgende Tipps, um stets den vollen
und aromatischen Kaffeegeschmack zu erhalten:
Frische Kaffeepads
Verwenden Sie die speziell von D.E Master
Blenders für Ihre SENSEO
entwickelten SENSEO
weiches, volles Aroma. Die D.E Master Blenders
SENSEO
Sie sie in einem luftdichten Behälter aufbewahren.
Frisches Wasser
Verwenden Sie täglich frisches Wasser. Wenn
die Kaffeepadmaschine einen Tag lang nicht in
Gebrauch war, lassen Sie vor dem nächsten
Aufbrühen frisches Wasser durchlaufen.
®
Kaffeepadmaschine mit den speziell
®
Kaffeepads und das einzigartige
®
Brühsystem von Philips sind perfekt
®
Kaffeepads für ein
®
Kaffeepads bleiben länger frisch, wenn
®
entwickelten
®
Kaffeepadmaschine
®
20
Page 21

2 Allgemeine
Beschreibung
1 Padhalter für 1 Tasseq
2 Padhalter für 2 Tassenqq
3 Kaffeesammelkammer
4 Kaffeeauslauf
5 Milchausgießer
6 Milchschlauch
7 Tassentablett
8 Herausnehmbare Abtropfschale
9 Wasserbehälter
10 Touchpanel mit Rezepttasten
11 CALC-Taste
12 Taste für Café Latte
13 Taste für Latte Macchiato
14 Taste für Cappuccino
15 Tassenanzeigen
16 Ein-/Ausschalter
17 Taste für normalen Kaffee
18 Taste für starken Kaffee
19 Taste für reine Milch
3 Wichtig
Lesen Sie diese Bedienungsanleitung
vor dem Gebrauch der Maschine
aufmerksam durch, und bewahren Sie
sie für eine spätere Verwendung auf.
Gefahr
• Tauchen Sie die Maschine
niemals in Wasser oder andere
Flüssigkeiten.
Warnhinweis
• Prüfen sie, bevor Sie das
Gerät anschließen, ob die
Spannungsangabe am Boden
des Geräts mit der örtlichen
Netzspannung übereinstimmt.
• Dieses Gerät kann von Kindern
ab 8 Jahren und Personen
mit verringerten physischen,
sensorischen oder psychischen
Fähigkeiten oder Mangel an
Erfahrung und Kenntnis verwendet
werden, wenn sie beim Gebrauch
des Geräts beaufsichtigt werden
oder Anweisung zum sicheren
Gebrauch des Geräts erhalten und
die Gefahren verstanden haben.
• Reinigung und Pege des
Geräts darf nicht von Kindern
durchgeführt werden, außer
Sie sind älter als 8 Jahre und
beaufsichtigt.
• Bewahren Sie das Gerät und das
Kabel außerhalb der Reichweite
von Kindern unter 8 Jahren auf.
• Achten Sie darauf, dass Kinder
nicht mit dem Gerät spielen.
• Verwenden Sie die Maschine
nicht, wenn der Netzstecker, das
Netzkabel oder die Maschine
selbst defekt oder beschädigt ist.
• Um Gefährdungen zu vermeiden,
darf ein defektes Netzkabel nur
von einem Philips Service-Center,
einer von Philips autorisierten
Werkstatt oder einer ähnlich
qualizierten Person durch ein
Original-Ersatzkabel ersetzt
werden.
Achtung
• Geben Sie die Maschine zur
Überprüfung bzw. Reparatur stets
an ein Philips Service-Center.
Versuchen Sie nicht, die Maschine
selbst zu reparieren, da andernfalls
Ihre Garantie erlischt.
DEUTSCH
21
Page 22
• Aus Sicherheitsgründen darf
das Gerät nicht mit einem
Transformator betrieben werden.
• Stellen Sie die Maschine immer auf
eine ache und stabile Oberäche.
Halten Sie sie senkrecht, auch
während des Transpor ts.
• Stellen Sie das Gerät nicht auf eine
Warmhalteplatte, direkt neben
einen heißen Ofen oder eine
ähnliche Hitzequelle.
• Bewahren Sie das Gerät nicht
bei Temperaturen unter 0°
auf. Wasser im Heizsystem
kann einfrieren und Schäden
verursachen.
• Füllen Sie niemals Milch, Kaffee,
heißes oder kohlensäurehaltiges
Wasser in den Wasserbehälter!
• Verwenden Sie keinesfalls
normalen gemahlenen Kaffee
oder beschädigte Pads in Ihrer
Kaffeepadmaschine, da dies das
Gerät verstopfen würde.
• Spülen Sie die Maschine nicht
durch, und bereiten Sie keinen
Kaffee zu, solange der Kaffeeauslauf
nicht eingesetzt ist.
• Dieses Gerät ist nur für den
Gebrauch im Haushalt bestimmt.
Es ist nicht für die Verwendung
in Umgebungen wie z. B.
Personalküchen in Geschäften,
Büros, landwirtschaftlichen
Betrieben oder anderen
Arbeitsumgebungen vorgesehen.
Weiterhin ist es nicht für den
Gebrauch in Hotels, Motels,
Pensionen oder anderen
Gastgewerben bestimmt.
3.1 Normerfüllung
Dieses Philips Gerät erfüllt sämtliche Normen
und Vorschriften bezüglich der Exposition in
elektromagnetischen Feldern.
Wenn diese Maschine ausgeschaltet ist, beträgt
ihr Energieverbrauch weniger als 0,5 Watt. Dies
entspricht der EU-Richtlinie 2009/125/EC, die
die ökologischen Designanforderungen für
energieverbrauchende Produkte regelt.
4 Die Maschine
vor dem ersten
Gebrauch
durchspülen
Es ist wichtig, dass Sie Ihre SENSEO®
Kaffeepadmaschine vor dem ersten Gebrauch
durchspülen. Nach dem Durchspülvorgang ist die
Maschine zur Zubereitung von SENSEO
betriebsbereit.
C
Achtung:
Unterbrechen Sie keinesfalls den bereits
begonnenen Durchspülvorgang, da der Boiler
andernfalls nicht richtig gefüllt wird.
1 Kippen Sie den Wasserbehälter nach hinten
(1), und nehmen Sie den Wasserbehälter von
der Maschine (2).
®
Kaffee
22
Page 23
2 Befüllen Sie den Wasserbehälter.
3 Kippen Sie den Wasserbehälter, und setzen Sie
den unteren Teil des Behälters in die Maschine
ein (1). Drücken Sie anschließend den oberen
Teil des Wasserbehälters in Richtung der
Maschine (2).
4 Schieben Sie den Milchausgießer auf das
Gerät. Vergewissern Sie sich, dass Sie
den Milchausgießer durch Schieben über
die Führungsschienen des Kaffeeauslaufs
befestigen. Sie hören ein Klicken, wenn der
Ausgießer ordnungsgemäß befestigt wurde.
6 Vergewissern Sie sich, dass sich ein Padhalter
ohne Pads in der Maschine bendet.
7 Stecken Sie den Netzstecker in eine geerdete
Steckdose.
8 Drücken Sie den Ein-/Ausschalter. Die Taste
leuchtet auf, um anzuzeigen, dass Sie die
Maschine durchspülen müssen.
DEUTSCH
5 Stellen Sie ein Gefäß mit einem
Fassungsvermögen von mindestens 1 Liter
unter den Kaffeeauslauf.
9 Um den Durchspülvorgang zu beginnen,
drücken Sie eine der Rezepttasten.
23
Page 24

• Während des Durchspülvorgangs füllt
sicher der Boiler mit Wasser aus dem
Wasserbehälter, und aus dem Kaffeeauslauf
tritt kaltes Wasser aus. Während des
Durchspülvorgangs erzeugt die Maschine
lautere Geräusche als während des
normalen Brühvorgangs.
• Wenn das gesamte Wasser im
Wasserbehälter aufgebraucht worden ist,
ist der Durchspülvorgang beendet, und die
Maschine schaltet sich aus. Möglicherweise
tritt etwas Dampf aus der Maschine aus;
dies ist normal.
5 Schwarzen
SENSEO® Kaffee
zubereiten
1 Vergewissern Sie sich, dass der Wasserbehälter
mit frischem kaltem Leitungswasser gefüllt ist.
E
Tipp:
Verwenden Sie täglich frisches Wasser.
2 Stecken Sie den Netzstecker in eine geerdete
Steckdose.
3 Drücken Sie den Ein-/Ausschalter. Während
das Wasser erhitzt wird, blinkt der Ein-/
Ausschalter langsam.
10 Füllen Sie den Wasserbehälter mit frischem
Leitungswasser, und setzen Sie ihn wieder in
die Maschine ein.
24
D
Hinweis:
Wenn der Ein-/Ausschalter schnell blinkt,
reicht das Wasser im Wasserbehälter nicht
mehr für eine Tasse Kaffee.
Page 25

4 Öffnen Sie den Deckel durch Ziehen des
Verschlusshebels nach oben.
D Hinweis:
Achten Sie darauf, dass der Kaffee im Pad bzw.
in den Pads gleichmäßig verteilt ist.
C
Achtung:
Verwenden Sie keinesfalls normalen
gemahlenen Kaffee oder beschädigte Pads in
Ihrer SENSEO
®
Kaffeepadmaschine, da dies
das Gerät blockieren würde.
7 Schließen Sie den Deckel und den
Verschlusshebel.
DEUTSCH
5 Setzen Sie für die Zubereitung einer Tasse
SENSEO
®
Kaffee den Padhalter für 1 Tasse q
in die Maschine ein (1). Wenn Sie zwei Tassen
SENSEO
®
Kaffee zubereiten möchten, setzen
Sie den Padhalter für 2 Tassen qq in die
Maschine ein (2). Achten Sie darauf, dass der
Padhalter sauber ist.
6 Legen Sie 1 Kaffeepad in den Padhalter
für 1 Tasse q (1) bzw. 2 Kaffeepads in den
Padhalter für 2 Tassen qq (2). Legen Sie
das Kaffeepad bzw. die Kaffeepads mit der
gewölbten Seite nach unten in die Mitte des
Padhalters. Drücken Sie das Pad bzw. die Pads
im Padhalter leicht an.
8 Stellen Sie eine Tasse oder zwei Tassen
unter die Ausgießeröffnung. Beachten Sie
die Markierungen auf der Auffangschale zur
Positionierung der Tasse/der Tassen.
D
Hinweis:
Sie können die Höhe der Auffangschale
einstellen oder die Auffangschale
herausnehmen, wenn Sie höhere Tassen
verwenden möchten.
D
Hinweis
Verwenden Sie Tassen mit einem
Fassungsvermögen von mindestens 100 ml,
wenn Sie starken Kaffee zubereiten, bzw.
150 ml, wenn Sie normalen Kaffee zubereiten.
Die Tassen sollten nicht zu groß sein, da der
Kaffee darin schneller kalt wird.
25
Page 26

9 Drücken Sie die Taste mit den zwei
Kaffeebohnen für eine Tasse normalen
Kaffees. Drücken Sie die Taste mit den drei
Kaffeebohnen für eine Tasse starken Kaffees.
10 Drücken Sie die Rezepttaste einmal für eine
Tasse Kaffee oder zweimal für zwei Tassen
Kaffee.
11 Wenn das Wasser heiß ist und die Anzeige im
Ein-/Ausschalter konstant leuchtet, beginnt das
Gerät automatisch mit dem Brühvorgang.
D
Hinweis:
Während des Brühvorgangs dürfen Sie den
Wasserbehälter nicht entfernen.
12 Entfernen Sie die gebrauchten Kaffeepads,
wenn der Kaffee fertig ist. Nehmen Sie einfach
den Padhalter aus dem Gerät, und entsorgen
Sie das/die die Kaffeepad(s).
C
Achtung:
Es könnte sich noch Wasser oder Kaffee auf
dem (den) Kaffeepad(s) benden.
13 Drücken Sie nach Gebrauch den Ein-/
Ausschalter, um das Gerät auszuschalten.
6 Eine
Kaffeespezialität
mit frischer Milch
zubereiten
Mit der SENSEO® Kaffeepadmaschine können
Sie mühelos perfekten Cappuccino, Café Latte,
Latte Macchiato oder warme Milch für zwei Tassen
gleichzeitig zubereiten.
1 Vergewissern Sie sich, dass der Wasserbehälter
mit frischem kaltem Leitungswasser gefüllt ist.
E
Tipp:
Verwenden Sie täglich frisches Wasser.
2 Stecken Sie den Netzstecker in eine geerdete
Steckdose.
3 Drücken Sie den Ein-/Ausschalter. Während
das Wasser erhitzt wird, blinkt der Ein-/
Ausschalter langsam.
D
Hinweis:
Wenn die Kaffeemaschine nicht benutzt wird,
schaltet sie sich nach 15 Minuten automatisch
aus, um Energie zu sparen.
26
D
Hinweis:
Wenn der Ein-/Ausschalter schnell blinkt,
reicht das Wasser im Wasserbehälter nicht
mehr für eine Tasse Kaffee.
Page 27

4 Öffnen Sie den Deckel durch Ziehen des
Verschlusshebels nach oben.
5 Setzen Sie für die Zubereitung einer Tasse
Cappuccino, Café Latte oder Latte Macchiato
den Padhalter für 1 Tasse q in die Maschine
ein (1). Wenn Sie zwei Tassen zubereiten
möchten, setzen Sie den Padhalter für 2 Tassen
qq in die Maschine ein (2). Achten Sie
darauf, dass der Padhalter sauber ist.
D Hinweis:
Achten Sie darauf, dass der Kaffee im Pad bzw.
in den Pads gleichmäßig verteilt ist.
C
Achtung:
Verwenden Sie keinesfalls normalen
gemahlenen Kaffee oder beschädigte Pads in
Ihrer SENSEO
®
Kaffeepadmaschine, da dies
das Gerät blockieren würde.
7 Schließen Sie den Deckel und den
Verschlusshebel.
8 Schieben Sie den Milchausgießer auf das
Gerät. Vergewissern Sie sich, dass Sie
den Milchausgießer durch Schieben über
die Führungsschienen des Kaffeeauslaufs
befestigen. Sie hören ein Klicken, wenn der
Ausgießer ordnungsgemäß befestigt wurde.
DEUTSCH
D
Hinweis:
Für warme Milch müssen Sie keinen Padhalter
in das Gerät einsetzen. Fahren Sie mit Schritt
7 fort.
6 Legen Sie 1 Kaffeepad in den Padhalter
für 1 Tasse q (1) bzw. 2 Kaffeepads in den
Padhalter für 2 Tassen qq (2). Legen Sie
das Kaffeepad bzw. die Kaffeepads mit der
gewölbten Seite nach unten in die Mitte des
Padhalters. Drücken Sie das Pad bzw. die Pads
im Padhalter leicht an.
27
Page 28

9 Setzen Sie den Anschluss des Milchschlauches
in den Milchausgießer (1) ein. Positionieren Sie
das andere Ende des Milchschlauches in einer
Milchtüte oder einem Becher (2).
E
Tipp:
Verwenden Sie frisch gekühlte Milch. Wir
empfehlen fettarme Kuhmilch für den besten
Milchschaum.
D
Hinweis:
Um zu verhindern, dass Dampf aus dem
Milchausgießer austritt, stellen Sie sicher, dass
genug Milch im Karton oder Becher ist.
10 Stellen Sie eine oder zwei Tassen unter die
Ausgießer. Sie können die Auffangschale
anpassen oder herausnehmen, wenn Sie
höhere Tassen verwenden möchten.
11 Drücken Sie die Rezepttaste Ihrer Wahl, um
die gewünschte Kaffeespezialität auszuwählen.
Sie können zwischen Cappuccino, Café Latte,
Latte Macchiato oder warmer Milch wählen.
Drücken Sie die Rezepttaste einmal für eine
Tasse oder zweimal für zwei Tassen.
12 Wenn das Wasser heiß ist und der Ein-/
Ausschalter konstant leuchtet, beginnt das
Gerät mit der Zubereitung Ihrer gewünschten
Kaffee-Spezialität mit Milch.
D
Hinweis:
Die Maschine wärmt erst die Milch auf und
fügt dann den Kaffee hinzu. Bei Café Latte
brüht die Maschine zuerst den Kaffee und fügt
dann warme Milch hinzu.
13 Entfernen Sie die gebrauchten Kaffeepads,
wenn der Kaffee fertig ist. Nehmen Sie einfach
den Padhalter aus dem Gerät, und entsorgen
Sie das/die die Kaffeepad(s).
C
Achtung:
Es könnte sich noch Wasser oder Kaffee auf
dem (den) Kaffeepad(s) benden.
14 Nehmen Sie den Milchausgießer und den
Schlauch von der Maschine ab, und reinigen
Sie sie (siehe Kapitel “Den Milchausgießer
reinigen”).
28
Page 29

15 Drücken Sie nach Gebrauch den Ein-/
Ausschalter, um das Gerät auszuschalten.
D
Hinweis:
Wenn die Kaffeemaschine nicht benutzt wird,
schaltet sie sich nach 15 Minuten automatisch
aus, um Energie zu sparen.
7 Die Kaffeemenge
einstellen
Hinweis: Diese funktion ist nur verfüghbar
für Typenummer HD7858, HD7857.
7.1 Die Kaffeemenge nach
Ihrem persönlichen
Geschmack einstellen
Sie können die Kaffeemenge für jedes Rezept
an Ihre persönlichen Vorlieben anpassen.
Programmieren Sie hierzu die verschiedenen
Rezepte.
1 Schalten Sie das Gerät ein.
3 Legen Sie ein Kaffeepad in den Padhalter ein.
4 Wenn Sie eine Kaffeespezialität mit Milch
zubereiten möchten, positionieren Sie den
Schlauch des Milchausgießers in eine Tüte
oder ein Glas Milch.
5 Drücken Sie gleichzeitig die CALC-Taste
und die Taste für das Rezept, das Sie ändern
möchten. Lassen Sie die Tasten los, wenn das
Gerät zweimal nach ungefähr zwei Sekunden
einen Piepton ausgegeben hat.
• Das Symbol für eine Tasse beginnt zu
blinken.
6 Drücken Sie eine der folgenden Tasten, um
die Kaffeemenge zu ändern: Die Taste für
normalen Kaffee für eine größere Tasse,
die Milch-Taste für eine mittelgroße Tasse
(Standardeinstellung) oder die Taste für
starken Kaffee für eine kleinere Tasse.
DEUTSCH
2 Füllen Sie den Wasserbehälter bis zur
Markierung MAX mit kaltem Wasser.
• Das Gerät gibt zur Bestätigung einen
dreimaligen Signalton aus und beginnt den
Brühvorgang des Kaffeerezepts mit den
neuen Einstellungen.
Das Gerät speichert die Einstellung automatisch.
29
Page 30

8 Pege
Ein regelmäßiges Reinigen Ihrer SENSEO®
Kaffeepadmaschine ist wichtig, um sicherzustellen,
dass der SENSEO
schmeckt, und um die Nutzungsdauer der
Kaffeepadmaschine zu verlängern.
B
Warnhinweis:
Tauchen Sie die SENSEO® Kaffeepadmaschine
niemals in Wasser.
8.1 Den Milchausgießer
reinigen
Für eine zuverlässige Leistung des Milchausgießers
und gleichmäßig guten Milchschaumergebnissen
ist es wichtig, den Milchausgießer und den
Milchschlauch regelmäßig und gründlich zu
reinigen. Der Milchausgießer kann vollständig
auseinander genommen werden, sodass Sie alle
Milchrückstände entfernen können.
®
Kaffee immer hervorragend
2 Stellen Sie eine leere Tasse unter den
Ausgießer.
3 Drücken Sie die Taste für Milch.
D
Hinweis:
Wenn Sie nicht sofort wieder Milch aufschäumen
möchten, spülen Sie den Milchausgießer und den
Milchschlauch innerhalb von 30 Minuten nach
Gebrauch.
D
Hinweis:
Reinigen Sie nach dem letzten Gebrauch des
Tages den Milchausgießer und den Milchschlauch
gründlich.
8.1.1 Spülen nach jedem Gebrauch
1 Stellen Sie den Milchschlauch in eine Tasse mit
sauberem Wasser.
30
Die Maschine spült alle Milchrückstände vom
Milchausgießer und dem Milchschlauch mit
sauberem heißem Wasser.
8.1.2 Nach dem letzten Gebrauch des Tages
reinigen
Reinigen Sie den Milchschlauch und den
Milchausgießer in der Geschirrspülmaschine oder
in heißem Wasser mit etwas Spülmittel.
D
Hinweis:
Wir empfehlen die Reinigung im Geschirrspüler.
1 Ziehen Sie den Milchschlauch aus dem
Milchausgießer.
Page 31

2 Um den Milchausgießer von der Maschine zu
nehmen, ziehen Sie ihn in Ihre Richtung.
3 Nehmen Sie den oberen Teil des
Milchausgießers vom unteren Teil ab, indem
Sie fest daran ziehen.
4 Nehmen Sie das Aufschäumsystem heraus.
6 Nehmen Sie den inneren Teil des
Aufschäumsystems durch Ziehen nach unten
ab.
DEUTSCH
7 Ziehen Sie den kleinen Deckel nach oben ab.
8 Reinigen Sie alle Teile im Geschirrspüler oder
in heißem Wasser mit etwas Spülmittel.
5 Das Aufschäumsystem besteht aus zwei
Einzelteilen. Öffnen Sie die Feder, um die Teile
voneinander zu trennen.
31
Page 32

8.1.3 Den Milchausgießer wieder
zusammensetzen
1 Positionieren Sie den kleinen Deckel wieder
auf dem Aufschäumsystem.
2 Setzen Sie den Innenteil wieder in das
Aufschäumsystem.
3 Schließen Sie die Feder, um die zwei Teile
miteinander zu verbinden.
4 Setzen Sie das Aufschäumsystem in den
unteren Teil des Milchausgießers.
5 Setzen Sie den oberen Teil des
Milchausgießers wieder auf den unteren Teil.
8.2 Den Kaffeeauslauf und die
Maschine reinigen
1 Ziehen Sie vor dem Reinigen des Geräts stets
den Netzstecker aus der Steckdose.
2 Um den Kaffeeauslauf von dem Gerät zu
nehmen, ziehen Sie ihn in Ihre Richtung.
32
Page 33

3 Nehmen Sie den oberen Teil des
Kaffeeauslaufs vom unteren Teil ab, indem Sie
fest daran ziehen.
4 Reinigen Sie die Außenwände des Geräts mit
einem feuchten Tuch.
5 Reinigen Sie den Sprühkopf und den
Gummidichtungsring mit einem feuchten Tuch.
6 Reinigen Sie die Wassereinfüllöffnung der
Maschine mit einem feuchten Tuch.
7 Reinigen Sie den Wasserbehälter, den
Kaffeeauslauf, die Kaffeesammelkammer,
die Auffangschale, das Tassentablett, den
Milchschlauch, den Milchausgießer und
die Padhalter in heißem Wasser oder im
Geschirrspüler.
C
Achtung:
Achten Sie darauf, dass das Ventil unten
im Wasserbehälter nicht beschädigt wird,
wenn Sie eine Spülbürste zum Reinigen des
Wasserbehälters verwenden.
D
Hinweis:
Prüfen Sie, ob das Sieb in der Mitte des
Padhalters verstopft ist. Wenn dies der Fall ist,
spülen Sie den Padhalter unter ießendem
Wasser ab. Bei Bedarf können Sie eine
Spülbürste verwenden, um das Sieb zu säubern.
8 Wenn Sie die Reinigung abgeschlossen haben,
setzen Sie den oberen Teil des Kaffeeauslaufs
wieder auf den unteren.
9 Setzen Sie den Wasserbehälter, die
Kaffeesammelkammer und die Auffangschale
wieder in die Maschine ein.
10 Schieben Sie den Kaffeeauslauf in das Gerät.
11 Stecken Sie den Stecker wieder in die
Steckdose.
9 Entkalken
Im Laufe der Zeit lagert sich Kalk im Gerät ab. Daher
muss die SENSEO
werden, sobald die CALC-Anzeige aueuchtet.
Wann entkalken?
• Entkalken Sie die SENSEO
wie nachstehend erläutert, wenn die
CALC-Anzeige leuchtet (nach ca. 400 Tassen
SENSEO
Warum entkalken?
Die folgenden Gründe sprechen für das Entkalken:
• Es verlängert die Nutzungsdauer Ihrer
SENSEO
• Es stellt die maximale Füllmenge pro Tasse sicher.
• Es stellt die maximale Kaffeetemperatur sicher.
• Die Maschine verursacht während des
Brühens weniger Geräusche.
• Es verhindert Fehlfunktionen.
Wenn die Entkalkung nicht korrekt durchgeführ t
wird, verbleiben Kalkrückstände in der Maschine.
Dies führt dazu, dass sich schneller Kalkablagerungen
bilden, die dauerhafte und irreparable Schäden der
Kaffeemaschine verursachen können.
Den richtigen Entkalker verwenden
Verwenden Sie nur SENSEO
HD7011). Er wurde speziell dafür entwickelt, eine
bessere Maschinenleistung und einen besseren
Betrieb zu gewährleisten. Jede Entkalkermischung
darf nur einmal verwendet werden. Weitere
Informationen zu diesem Entkalker nden Sie auf
unserer Website unter www.philips.com.
®
Kaffeepadmaschine entkalkt
®
Kaffeemaschine,
®
Kaffee).
®
Kaffeepadmaschine.
®
Entkalker (HD7012,
DEUTSCH
33
Page 34

B Warnhinweis:
Verwenden Sie keine Entkalker auf Basis
von Mineralsäuren, beispielsweise Schwefel-,
Salz-, Sulfamin- oder Essigsäure (z. B. Essig).
Diese Entkalker können Ihre SENSEO
®
Kaffeepadmaschine beschädigen.
9.1 Entkalkungsvorgang
Die CALC-Taste leuchtet, um anzuzeigen,
dass Sie Ihre Maschine entkalken müssen.
Der Entkalkungsvorgang besteht aus einem
Entkalkungszyklus und drei Spülzyklen.
Unterbrechen Sie den Entkalkungszyklus nicht,
und schalten Sie die Maschine nicht aus, bevor Sie
die Spülzyklen abgeschlossen haben. Der gesamte
Entkalkungsvorgang dauert ungefähr 60 Minuten.
B
Warnhinweis:
Vergewissern Sie sich, dass Sie den
Milchausgießer zum Entkalken ordnungsgemäß
positioniert haben.
D
Hinweis:
Sie können Ihre Maschine jederzeit entkalken,
bevor das Gerät anzeigt, dass es notwendig ist.
Folgen Sie dann den Schritten unten.
1 Mischen Sie in einem Messbecher den
Entkalker mit 1 Liter Wasser. Rühren Sie die
Flüssigkeit um, bis sich das Pulver aufgelöst
hat. Füllen Sie die Entkalkerlösung in den
Wasserbehälter.
2 Kippen Sie den Wasserbehälter, und setzen Sie
den unteren Teil des Behälters in die Maschine
ein (1). Drücken Sie anschließend den oberen
Teil des Wasserbehälters in Richtung der
Maschine (2).
3 Drücken Sie den Ein-/Ausschalter. Während das
Wasser erhitzt wird, blinkt der Ein-/Ausschalter
langsam. Das Gerät ist bereit zum Entkalken,
wenn der Ein-/Ausschalter konstant leuchtet.
4 Setzen Sie den Padhalter für 1 Tasse q mit
einem gebrauchten Kaffeepad in die Maschine
ein. Schließen Sie den Deckel, und überprüfen
Sie, ob er richtig eingerastet ist.
34
Page 35

D Hinweis:
Legen Sie beim Entkalken des Geräts immer
ein gebrauchtes Kaffeepad in den Padhalter.
Dieses Pad dient als Filter und verhindert,
dass Kalkrückstände das Sieb bzw. Loch im
Padhalter verstopfen.
B
Warnhinweis:
Vergewissern Sie sich vor dem Entkalken
der Maschine, dass der Deckel richtig
geschlossen und der Verschlusshebel des
Deckels fest verschlossen ist.
5 Stellen Sie ein Gefäß mit einem
Fassungsvermögen von mindestens
1 Liter unter den Kaffeeauslauf, um die
Entkalkerlösung aufzufangen.
6 Die Maschine ist bereit zum Entkalken, wenn
der Ein-/Ausschalter und die CALC-Taste
ununterbrochen aueuchten. Drücken Sie die
CALC-Taste, bis die Maschine zwei Signaltöne
ausgibt, um den Entkalkungsvorgang zu starten.
B Warnhinweis:
Unterbrechen Sie nicht den
Entkalkungsvorgang.
8 Wenn nach ca. 50 Minuten die gesamte
Entkalkungslösung im Wasserbehälter
aufgebraucht ist, blinkt der Ein-/Ausschalter
schnell, und die CALC-Taste blinkt langsam.
9 Leeren Sie das Gefäß, und setzen Sie es
erneut unter den Auslauf.
10 Nehmen Sie das gebrauchte Kaffeepad aus
dem Padhalter.
9.1.1 Spülzyklen:
1 Waschen Sie den Wasserbehälter aus,
füllen Sie ihn mit frischem Wasser bis zur
Markierung MAX, und setzen Sie ihn wieder
in die Maschine ein.
2 Drücken Sie die CALC-Taste, um den
Spülzyklus zu starten. Das Wasser ießt
ungefähr 5 Minuten lang ununterbrochen durch.
3 Warten Sie, bis die Maschine den Spülzyklus
beendet hat. Der Ein-/Ausschalter blinkt
schnell, und die CALC-Taste blinkt langsam.
4 Leeren Sie das Gefäß, und setzen Sie es
erneut unter den Auslauf.
5 Wiederholen Sie Schritt 1 bis 4 zweimal, um
den Spülvorgang abzuschließen. Wenn der
letzte Spülzyklus beendet wurde, schaltet sich
die Maschine automatisch ab.
DEUTSCH
7 Der Entkalkungsvorgang läuft. Während
des Entkalkungsvorgangs tritt die
Entkalkungslösung in Intervallen aus der
Maschine aus. Während der letzten 5 Minuten
wird die Entkalkungslösung ununterbrochen
ausgegeben.
35
Page 36

10 Zubehör bestellen
12 Garantie und
Um Zubehörteile oder Ersatzteile zu kaufen,
besuchen Sie www.shop.philips.com/service,
oder gehen Sie zu Ihrem Philips Händler. Sie
können auch das Philips Service-Center in Ihrem
Land kontaktieren (die Kontaktdetails nden Sie in
der internationalen Garantieschrift).
11 Umwelt
• Werfen Sie das Gerät am Ende der
Lebensdauer nicht in den normalen Hausmüll.
Bringen Sie es zum Recycling zu einer
ofziellen Sammelstelle. Auf diese Weise
tragen Sie zum Umweltschutz bei.
Support
Für Unterstützung und weitere Informationen
besuchen Sie die Philips Website unter
www.philips.com/support, oder lesen Sie die
internationale Garantieschrift.
Der Kauf der Philips SENSEO
beeinusst in keiner Weise die Rechte von D.E.
Master Blenders 1753 oder Philips hinsichtlich
deren Patente. Dem Käufer wird auch keine Lizenz
im Rahmen dieser Patente übertragen.
Geben Sie die Maschine zur Überprüfung bzw.
Reparatur stets an ein Philips Service-Center.
Versuchen Sie nicht, die Maschine selbst zu
reparieren, da andernfalls Ihre Garantie erlischt.
®
Kaffeepadmaschine
13 Fehlerbehebung
13.1 SENSEO®
Kaffeepadmaschine
In diesem Abschnitt sind die häugsten Probleme
zusammengestellt, die mit Ihrem Gerät auftreten
können. Sollten Sie ein Problem mithilfe der
nachstehenden Informationen nicht beheben
können, besuchen Sie unsere Website unter:
www.philips.com/support für eine Liste mit
häug gestellten Fragen, oder wenden Sie sich an
den Kundendienst in Ihrem Land.
Der Ein-/Ausschalter leuchtet ununterbrochen.
• Sie müssen die Maschine vor dem ersten
Gebrauch einmal durchspülen.
Spülen Sie das Gerät vor dem ersten
Gebrauch durch. Siehe Kapitel “Die Maschine
vor dem ersten Gebrauch durchspülen”.
• Die Maschine ist bereit für die Zubereitung.
36
Page 37

Der Ein-/Ausschalter blinkt langsam.
• Die Maschine heizt sich auf.
• Wenn dies mehr als zwei Minuten in
Anspruch nimmt, kontaktieren Sie das Philips
Service-Center in Ihrem Land.
Der Ein-/Ausschalter blinkt schnell.
• Es bendet sich nicht genug Wasser im
Wasserbehälter. Füllen Sie den Wasserbehälter,
und vergewissern Sie sich, dass Sie den Behälter
ordnungsgemäß in die Maschine einsetzen.
• Der Schwimmer im Wasserbehälter ist
möglicherweise eingeklemmt.
Entleeren Sie den Wasserbehälter und
schütteln Sie ihn ein paar Mal, um den
Schwimmer zu lösen. Reinigen Sie den
Wasserbehälter mit heißem Wasser und
etwas Spülmittel oder im Geschirrspüler.
• Sie verwenden das Gerät bei einer
Umgebungstemperatur von unter 10 °C.
Verwenden Sie das Gerät nur bei
Umgebungstemperaturen von über 10 °C.
• Wenn diese Lösungen das Problem nicht
beheben, kontaktieren Sie das Philips
Service-Center in Ihrem Land.
Die CALC-Anzeige leuchtet ununterbrochen.
• Sie müssen die Maschine entkalken.
• Führen Sie den Entkalkungsvorgang wie im Kapitel
“Entkalken” beschrieben durch. Schalten Sie die
Maschine während des Entkalkens nicht aus.
Die CALC-Anzeige leuchtet nach dem Entkalken
ununterbrochen.
• Der Entkalkungsvorgang wurde nicht beendet.
• Führen Sie den Entkalkungsvorgang wie im Kapitel
“Entkalken” beschrieben durch. Schalten Sie die
Maschine während des Entkalkens nicht aus.
Die CALC-Anzeige blinkt.
• Der Entkalkungsvorgang läuft.
• Warten Sie, bist das Gerät den Entkalkungsvor-
gang beendet hat. Siehe Kapitel “Entkalken”.
Der Ein-/Ausschalter blinkt schnell, und die CALCAnzeige blinkt langsam.
• Der Wasserbehälter ist leer.
• Spülen Sie den Wasserbehälter aus, füllen Sie
ihn mit Wasser, und vergewissern Sie sich,
dass Sie den Behälter ordnungsgemäß in die
Maschine einsetzen. Drücken Sie die CALCTaste, um den Entkalkungsvorgang fortzusetzen,
wie im Kapitel “Entkalken” beschrieben.
Die Anzeige für eine Tasse leuchtet auf.
• Sie haben die Rezepttaste einmal gedrückt, um
eine Tasse Kaffee zuzubereiten.
• Drücken Sie die Rezepttaste noch einmal, wenn
Sie zwei Tassen Kaffee zubereiten möchten. In
diesem Fall leuchten beide Tassen-Anzeigen auf.
Die Anzeigen für zwei Tassen leuchten auf.
• Sie haben die Rezepttaste zweimal gedrückt,
um zwei Tassen Kaffee zuzubereiten.
• Wenn Sie nur eine Tasse Kaffee zubereiten möch-
ten, drücken Sie die Rezepttaste noch einmal. In
diesem Fall leuchtet nur eine Tassen-Anzeige auf.
Der Kaffee ist nicht heiß genug.
• Die Maschine wurde längere Zeit verwendet,
ohne entkalkt worden zu sein.
Führen Sie den Entkalkungsvorgang wie im
Kapitel “Entkalken” beschrieben durch.
• Die Kaffeetemperatur geht in der Tasse schnell
zurück.
• Verwenden Sie keine Tassen, die zu groß sind.
• Verwenden Sie dünnwandige Tassen, da diese
dem Kaffee weniger Wärme entziehen als
dickwandige Tassen.
• Sie können die Kaffeemaschine und die
Tasse durch vorheriges Zubereiten einer
Tasse heißen Wassers vorwärmen, ohne ein
Kaffeepad in den Padhalter einzusetzen.
• Die Kaffeespezialität mit frischer Milch ist nicht
heiß genug.
• Dies ist normal. Ein mit Milch zubereitetes
Kaffeerezept ist weniger heiß als eine
Tasse schwarzen Kaffees. Milch wird auf
eine niedrigere Temperatur erhitzt, um
Milchschaum von hoher Qualität zuzubereiten.
DEUTSCH
37
Page 38

Das Touchpanel mit den Rezepttasten funktioniert
nicht.
• Möglicherweise bendet sich Wasser auf dem
Touchpanel.
• Vergewissern Sie sich, dass Ihre Hände und
das Touchpanel trocken sind, wenn Sie ein
Kaffeerezept wählen.
• Prüfen Sie, ob die Spannungsangabe auf
der Kaffeemaschine mit der örtlichen
Netzspannung übereinstimmt.
Die SENSEO
®
Kaffeepadmaschine macht keinen
guten oder nicht genug Milchschaum.
• Es bendet sich nicht genug Milch in der
Milchtüte oder im Becher.
• Vergewissern Sie sich, dass die Milchtüte oder
die Kanne genug Milch enthält.
• Vergewissern Sie sich, dass der Milchschlauch
ordnungsgemäß mit dem Milchausgießer
verbunden ist und der Schlauch
ordnungsgemäß in die Milchtüte oder den
Becher eingesetzt ist.
• Die Milch ist nicht kalt genug.
Achten Sie darauf, dass Sie kalte Milch direkt aus
dem Kühlschrank (5 °C bis 8 °C) verwenden.
• Sie haben keine Kuhmilch verwendet.
Um besten Milchschaum zu erhalten,
empfehlen wir die Verwendung von fettarmer
Kuhmilch bei Kühlschranktemperatur
(5 °C bis 8 °C).
Die Milchschaumqualität wird mit der Zeit
schlechter.
• Der Milchausgießer und der Milchschlauch
können schmutzig sein. Nehmen Sie alle Teile
des Milchausgießers und des Milchschlauches
ab. Reinigen Sie sie gründlich mit einer Bürste
und etwas Spülmittel, oder stellen Sie sie
in den Geschirrspüler. Siehe Kapitel “Den
Milchausgießer reinigen”.
• Die Kaffeemaschine wird von Kalk verstopft
und muss entkalkt werden.
Führen Sie den Entkalkungsvorgang wie im
Kapitel “Entkalken” beschrieben durch.
Der Milchschaum ießt weiter aus dem
Milchausgießer.
• Die Milch ießt noch einige Sekunden weiter.
• Vergewissern Sie sich, dass Sie die Milchtüte
oder den Becher auf der gleichen Höhe wie
die Kaffeemaschine positionieren.
• Der Deckel lässt sich nicht öffnen.
• Möglicherweise hat sich kurzfristig unter dem
Deckel Überdruck gebildet.
• Schalten Sie die Kaffeemaschine aus. Ziehen
Sie den Hebel nach oben, und warten Sie 24
Stunden, bevor Sie den Deckel öffnen. Dies
kann etwas Kraft erfordern.
• Vergewissern Sie sich immer, dass die
Padhalter sauber sind und die Mitte des
Siebs nicht verstopft ist, um Überdruck zu
verhindern.
38
Page 39

Table des matières
1 Introduction 39
1.1 Système à café SENSEO
2 Description générale 40
®
39
1 Introduction
Félicitations pour votre achat et bienvenue dans
l’univers Philips ! Pour proter pleinement de
l’assistance Philips, enregistrez votre produit sur
le site à l’adresse suivante : www.philips.com/
welcome.
3 Important 40
3.1 Conforme aux normes 41
4 Rinçage de la machine avant la
première utilisation 41
5 Préparation de café noir
SENSEO
®
43
6 Préparation d’une spécialité de
café avec du lait frais 45
7 Réglage du volume de café 48
7.1 Réglage du volume de café selon
vos goûts 48
8 Nettoyage 49
8.1 Nettoyage du diffuseur 49
8.2 Nettoyage de l’unité d’écoulement
du café et de la machine 51
9 Détartrage 52
9.1 Procédure de détartrage 52
10 Commande d’accessoires 54
11 Environnement 54
12 Garantie et assistance 54
1.1 Système à café SENSEO
®
Savourez vos pauses café avec SENSEO®. Ce
système unique qui associe la machine à café
SENSEO
®
de Philips aux dosettes SENSEO®
de D.E Master Blenders vous offrira en toute
simplicité un café intense et rafné avec sa
délicieuse couche de mousse.
Le système innovateur de préparation du
café SENSEO
SENSEO
®
de Philips et les dosettes
®
de D.E Master Blenders sont
parfaitement associés an d’extraire du café
le meilleur goût, le meilleur arôme. Découvrez
toutes les variétés de café SENSEO
®
sur
www.senseo.com.
Pour obtenir un goût intense et rafné, vous devez
respecter les recommandations suivantes :
Dosettes
Utilisez les dosettes SENSEO
®
spécialement
conçues par D.E Master Blenders pour votre
machine à café SENSEO
®
an d’obtenir un
café tout en goût et en rondeur. Les dosettes
SENSEO
®
de D.E Master Blenders restent
fraîches plus longtemps si vous les rangez dans un
récipient hermétique.
Eau fraîche
Utilisez de l’eau fraîche chaque jour. Si vous n’avez
pas utilisé la machine à café pendant une journée,
rincez-la à l’eau claire avant de la réutiliser.
FRANÇAIS
13 Dépannage 55
13.1 Machine à café SENSEO
®
55
39
Page 40

FRANÇAIS
2 Description générale
1 Porte-dosette pour une tasse q
2 Porte-dosette pour deux tasses qq
3 Récepteur de café
4 Unité d’écoulement du café
5 Diffuseur de lait
6 Tube d’aspiration du lait
7 Repose-tasses
8 Plateau égouttoir amovible
9 Réservoir d’eau
10 Écran tactile avec boutons de recette
11 Bouton CALC
12 Bouton pour Café Latte
13 Bouton pour Latte Macchiato
14 Bouton pour Cappuccino
15 Indicateurs de tasse
16 Bouton marche/arrêt
17 Bouton pour café normal
18 Bouton pour café fort
19 Bouton pour lait uniquement
3 Important
Lisez attentivement ce manuel avant
d’utiliser l’appareil et conservez-le
pour un usage ultérieur.
Danger
• Ne plongez jamais l’appareil dans
l’eau ou dans tout autre liquide.
Avertissement
• Avant de brancher votre appareil,
vériez que la tension indiquée
au fond de la machine à café
correspond bien à la tension
secteur locale.
• Cette machine peut être utilisée
par des enfants âgés de 8 ans
ou plus, des personnes dont les
capacités physiques, sensorielles ou
intellectuelles sont réduites ou des
personnes manquant d’expérience
et de connaissances, à condition
que ces enfants ou personnes
soient sous surveillance ou qu’ils
aient reçu des instructions quant à
l’utilisation sécurisée de la machine
et qu’ils aient pris connaissance
des dangers encourus.
• Le nettoyage et l’entretien ne
doivent pas être réalisés par des
enfants sauf s’ils sont âgés de plus
de 8 ans et sous surveillance.
• Tenez la machine et son cordon
hors de portée des enfants de
moins de 8 ans.
• Veillez à ce que les enfants ne
jouent pas avec l’appareil.
• N’utilisez jamais l’appareil si la
che, le cordon d’alimentation
ou l’appareil lui-même est
endommagé.
• Si le cordon d’alimentation est
endommagé, il doit être remplacé
par Philips, par un Centre Service
Agréé Philips ou par un technicien
qualié an d’éviter tout accident.
Attention
• Conez toujours l’appareil à un
Centre Service Agréé Philips
pour réparation ou vérication.
N’essayez jamais de réparer
l’appareil vous-même ; toute
intervention par des personnes
non qualiées entraîne l’annulation
de la garantie.
40
Page 41

• N’utilisez pas la machine à café
avec un transformateur pour
éviter tout accident.
• Placez toujours la machine sur une
surface stable et plane. Maintenezla en position verticale, également
pendant le transport.
• Ne placez pas la machine sur une
plaque chauffante, directement
à côté d’un four chaud ou d’une
source similaire de chaleur.
• Ne conservez pas la machine à
des températures inférieures à 0°.
L’eau restant dans le système de
chauffe peut geler et causer des
dommages.
• Ne versez jamais de lait, de café,
d’eau chaude ou d’eau gazeuse
dans le réservoir d’eau.
• N’utilisez jamais de café moulu
ordinaire ou des dosettes
déchirées avec la machine à café :
elle risquerait de se boucher.
• Ne rincez jamais la machine et ne
la faites jamais fonctionner lorsque
le bec verseur n’est pas en place.
• Cette machine à café est
uniquement destinée à un usage
domestique normal. Elle n’est
pas destinée à être utilisée dans
des environnements tels que des
cuisines destinées aux employés
dans les entreprises, magasins et
autres environnements de travail.
Elle n’est pas non plus destinée à
être utilisée par des clients dans
des hôtels, motels, chambres
d’hôtes et autres environnements
résidentiels.
3.1 Conforme aux normes
Cette machine Philips est conforme à toutes les
normes et à tous les règlements applicables relatifs
à l’exposition aux champs électromagnétiques.
La consommation énergétique de cet appareil
à l’arrêt est inférieure à 0,5 watt. Cela signie
que cet appareil est conforme à la directive
européenne 2009/125/CE, qui établit un
cadre pour la xation d’exigences en matière
d’écoconception applicables aux produits
consommateurs d’énergie.
4 Rinçage de la
machine avant la
première utilisation
Il est important de rincer votre machine à café
SENSEO
cycle de rinçage, la machine à café SENSEO
prête à l’emploi.
C
N’interrompez jamais le cycle de rinçage car
vous empêcheriez la chaudière de se remplir
correctement.
1 Inclinez le réser voir d’eau vers l’arrière (1) et
®
avant la première utilisation. Après le
Attention :
soulevez le réservoir d’eau pour le retirer de
la machine (2).
®
est
FRANÇAIS
41
Page 42

2 Remplissez le réser voir d’eau.
3 Inclinez le réser voir d’eau et replacez la partie
inférieure dans la machine (1). Appuyez
ensuite le sommet du réservoir d’eau vers la
machine (2).
4 Insérez le diffuseur de lait dans la machine.
Veillez à xer le diffuseur de lait en le faisant
glisser sur les rainures du bec verseur de café.
Vous entendez un clic lorsque le bec verseur
est correctement xé.
6 Assurez-vous qu’un porte-dosette vide est
installé.
7 Branchez la che sur une prise murale avec
mise à la terre.
8 Appuyez sur le bouton marche/arrêt. Le
bouton s’allume pour indiquer que vous devez
rincer la machine.
5 Placez un bol d’une contenance d’au moins
1 litre sous le bec verseur de café.
42
9 Pour commencer le rinçage, appuyez sur l’un
des boutons de recette.
Page 43

• Durant le cycle de rinçage, la chaudière
se remplit avec l’eau du réservoir et de
l’eau froide sort de l’unité d’écoulement du
café. L’appareil est plus bruyant pendant le
cycle de rinçage que pendant le cycle de
préparation du café.
5 Préparation de café
noir SENSEO®
1 Assurez-vous que le réservoir d’eau est rempli
avec de l’eau fraîche du robinet.
• Lorsque toute l’eau du réservoir a été
écoulée, le cycle de rinçage est terminé et
la machine s’éteint. Il est possible que de la
vapeur s’échappe de la machine. Ceci est
normal.
10 Remplissez le réser voir d’eau avec de l’eau
fraîche du robinet et remettez-le en place
dans la machine à café.
E
Conseil :
Utilisez de l’eau fraîche chaque jour.
2 Branchez la che sur une prise murale avec
mise à la terre.
3 Appuyez sur le bouton marche/arrêt. Le
bouton marche/arrêt clignote lentement
pendant que l’eau chauffe.
D
Remarque :
Si le bouton marche/arrêt clignote
rapidement, cela signie que le réservoir ne
contient pas assez d’eau pour préparer une
tasse de café.
FRANÇAIS
43
Page 44

4 Ouvrez le couvercle en tirant le levier vers le
haut.
D Remarque :
Vériez que le café est uniformément réparti
dans la ou les dosette(s).
C
Attention :
N’utilisez jamais de café moulu ordinaire
ou des dosettes déchirées dans la machine
à café SENSEO
®
car elle risquerait de se
boucher.
7 Refermez le couvercle et verrouillez le levier.
5 Si vous voulez préparer une tasse de café
SENSEO
®
, placez le porte-dosette pour
une tasse q dans la machine (1). Si vous
voulez préparer deux tasses, placez le
porte-dosette pour deux tasses qq dans
la machine (2). Assurez-vous que le portedosette est propre.
6 Placez une dosette dans le por te-dosette
pour une tasse q (1) ou placez 2 dosettes
dans le porte-dosette pour deux tasses qq
(2). Placez la ou les dosette(s) correctement
au centre du porte-dosette, avec la partie
bombée vers le bas. Appuyez légèrement sur
la ou les dosette(s) pour la/les caler dans le
porte-dosette.
8 Placez une ou deux tasses sous le bec verseur.
Utilisez les marquages sur le plateau égouttoir
pour placer la ou les tasses.
D
Remarque :
Vous pouvez régler la hauteur du plateau
égouttoir ou enlever le plateau égouttoir pour
pouvoir placer de plus grandes tasses.
D
Remarque
Les tasses que vous utilisez doivent avoir une
capacité d’au moins 150 ml lorsque vous faites
du café normal et 100 ml pour du café court.
N’utilisez pas de tasses trop grandes car le
café refroidirait plus rapidement.
44
Page 45

9 Appuyez sur le bouton avec deux grains de
café pour une tasse de café normal. Appuyez
sur le bouton avec trois grains de café pour
une tasse de café fort.
10 Appuyez sur le bouton de recette à
une reprise pour une tasse de café ou à
deux reprises pour deux tasses de café.
11 Une fois que l’eau a chauffé et que le bouton
marche/arrêt s’allume en continu, la machine
commence automatiquement à préparer le café.
D
Remarque :
Ne retirez pas le réservoir d’eau pendant la
préparation du café.
12 Lorsque le café est prêt, retirez la ou les
dosette(s) usagée(s). Ôtez simplement le
porte-dosette de la machine et videz-le.
C
Attention :
La ou les dosette(s) peut/peuvent encore
contenir un peu d’eau chaude ou de café.
13 Après utilisation, appuyez sur le bouton
marche/arrêt pour éteindre la machine à café.
6 Préparation d’une
spécialité de café
avec du lait frais
Avec la machine à café SENSEO®, vous pouvez
créer facilement le cappuccino, le café latte, le latte
macchiato ou le lait chaud parfait avec deux tasses
en même temps.
1 Assurez-vous que le réservoir d’eau est rempli
avec de l’eau fraîche du robinet.
E
Conseil :
Utilisez de l’eau fraîche chaque jour.
2 Branchez la che sur une prise murale avec
mise à la terre.
3 Appuyez sur le bouton marche/arrêt. Le
bouton marche/arrêt clignote lentement
pendant que l’eau chauffe.
FRANÇAIS
D
Remarque :
Si vous n’utilisez pas la machine à café,
elle s’éteint automatiquement au bout de
15 minutes an d’économiser de l’énergie.
D
Remarque :
Si le bouton marche/arrêt clignote
rapidement, cela signie que le réservoir ne
contient pas assez d’eau pour préparer une
tasse de café.
45
Page 46

4 Ouvrez le couvercle en tirant le levier vers le
haut.
5 Si vous voulez préparer une tasse de
cappuccino, café latte ou latte macchiato,
placez le porte-dosette pour une tasse q
dans la machine (1). Si vous voulez préparer
deux tasses, placez le porte-dosette pour
deux tasses qq dans la machine (2). Assurezvous que le porte-dosette est propre.
D Remarque :
Vériez que le café est uniformément réparti
dans la ou les dosette(s).
C
Attention :
N’utilisez jamais de café moulu ordinaire ou
des dosettes déchirées dans la machine à
café SENSEO
7 Refermez le couvercle et verrouillez le levier.
®
car elle risquerait de se boucher.
D
Remarque :
Pour du lait chaud uniquement, vous ne devez
pas placer de porte-dosette dans la machine.
Passez à l’étape 7.
6 Placez une dosette dans le por te-dosette
pour une tasse q (1) ou placez 2 dosettes
dans le porte-dosette pour deux tasses qq
(2). Placez la ou les dosette(s) correctement
au centre du porte-dosette, avec la partie
bombée vers le bas. Appuyez légèrement sur
la ou les dosette(s) pour la/les caler dans le
porte-dosette.
46
8 Insérez le diffuseur de lait dans la machine.
Veillez à xer le diffuseur de lait en le faisant
glisser sur les rainures du bec verseur de café.
Vous entendez un clic lorsque le bec verseur
est correctement xé.
Page 47

9 Insérez le tube d’aspiration du lait dans le
diffuseur de lait (1). Placez l’autre extrémité du
tube d’aspiration du lait dans un récipient ou
une brique de lait (2).
E
Conseil :
Utilisez du lait bien frais. Nous recommandons
du lait de vache frais demi-écrémé pour
obtenir la meilleure mousse de lait.
D
Remarque :
Pour éviter que de la vapeur s’échappe du
diffuseur de lait, assurez-vous qu’il y a assez de
lait dans la brique ou la bouteille de lait.
10 Placez une ou deux tasses sous le bec verseur.
Vous pouvez régler ou enlever le plateau
égouttoir pour pouvoir placer de plus grandes
tasses.
11 Appuyez sur le bouton de recette de votre
choix pour sélectionner la spécialité de
café souhaitée. Vous pouvez choisir entre
cappuccino, café latte, latte macchiato ou lait
chaud uniquement. Appuyez sur le bouton
de recette à une reprise pour une tasse ou à
deux reprises pour deux tasses.
12 Une fois que l’eau a chauffé et que le bouton
marche/arrêt s’allume en continu, la machine
commence à préparer la spécialité de café à
base de lait sélectionnée.
D
Remarque :
La machine commence par préparer le lait,
puis ajoute le café. Pour un café latte, la
machine commence par ajouter le café, puis
prépare le lait.
13 Lorsque le café est prêt, retirez la ou les
dosette(s) usagée(s). Ôtez simplement le
porte-dosette de la machine et videz-le.
C
Attention :
La ou les dosette(s) peut/peuvent encore
contenir un peu d’eau chaude ou de café.
14 Enlevez le diffuseur de lait et le tube
d’aspiration du lait de la machine et
nettoyez-les (voir le chapitre « Nettoyage du
diffuseur »).
FRANÇAIS
47
Page 48

15 Après utilisation, appuyez sur le bouton
marche/arrêt pour éteindre la machine à café.
D
Remarque :
Si vous n’utilisez pas la machine à café,
elle s’éteint automatiquement au bout de
15 minutes an d’économiser de l’énergie.
7 Réglage du volume
de café
Remarque: cette function est disponible
uniqement pour le modèle HD7858, HD7857.
7.1 Réglage du volume de café
selon vos goûts
Vous pouvez régler le volume de chaque recette
selon vos goûts en programmant les différentes
recettes.
1 Allumez l’appareil.
4 Si vous voulez préparer une spécialité de café
à base de lait, mettez le tube d’aspiration dans
un récipient ou une brique de lait.
5 Appuyez simultanément sur le bouton
CALC et le bouton de la recette que vous
voulez adapter. Relâchez les boutons lorsque
l’appareil émet deux signaux sonores après
deux secondes environ.
• Le symbole d’1 tasse commence à clignoter.
6 Appuyez sur un des boutons suivants pour
modier le volume de café : le bouton pour
café normal pour une tasse plus grande, le
bouton pour lait uniquement pour une tasse
moyenne (réglage par défaut) ou le bouton
pour café fort pour une plus petite tasse.
2 Remplissez le réser voir avec de l’eau froide,
jusqu’au niveau maximal (MAX).
3 Mettez une dosette dans le por te-dosette.
48
• L’appareil émet trois signaux sonores pour
conrmer et commence à préparer une
recette de café selon le nouveau réglage.
L’appareil enregistre le réglage automatiquement.
Page 49

8 Nettoyage
2 Placez une tasse vide sous le bec verseur.
Le nettoyage régulier de votre SENSEO® est
important pour que votre café SENSEO
®
soit
toujours aussi bon et pour optimiser la durée de
vie de la machine à café.
B
Avertissement :
Ne plongez jamais la machine à café SENSEO®
dans l’eau.
8.1 Nettoyage du diffuseur
Pour un fonctionnement able du diffuseur et une
bonne production de mousse, il est important
de nettoyer régulièrement et soigneusement le
diffuseur de lait ainsi que le tube d’aspiration du
lait. Le diffuseur peut être entièrement démonté,
ce qui vous permet d’en enlever tous les résidus
de lait.
D
Remarque :
Si vous n’envisagez pas de préparer de la mousse
de lait dans les instants qui suivent, rincez le
diffuseur de lait et le tube d’aspiration du lait
dans les 30 minutes qui suivent l’utilisation de la
machine.
D
Remarque :
Après la dernière utilisation du jour, nettoyez
soigneusement le diffuseur et le tube d’aspiration
du lait.
8.1.1 Rinçage après chaque utilisation
1 Mettez le tube d’aspiration du lait dans une
tasse d’eau propre.
3 Appuyez sur le bouton de lait uniquement.
La machine rince tous les résidus de lait du
diffuseur de lait et du tube d’aspiration du lait
à l’eau chaude claire.
8.1.2 Après la dernière utilisation de la
journée
Nettoyez le tube d’aspiration du lait et le
diffuseur de lait au lave-vaisselle ou à l’eau chaude
légèrement savonneuse.
D
Remarque :
Le nettoyage au lave-vaisselle est recommandé.
1 Retirez le tube d’aspiration du lait du diffuseur
de lait.
FRANÇAIS
49
Page 50

2 Pour retirer le diffuseur de lait de la machine,
tirez-le vers vous.
6 Enlevez la partie intérieure du système de
production de mousse en la tirant vers le haut.
3 Enlevez la partie supérieure du diffuseur
de lait de la partie inférieure en la tirant
fermement.
4 Retirez le système de production de mousse.
5 Le système de production de mousse peut
être séparé en deux parties. Ouvrez le ressort
pour séparer les parties.
7 Retirez le petit couvercle en le soulevant.
8 Nettoyez toutes les parties au lave-vaisselle
ou à l’eau chaude savonneuse.
8.1.3 Réassemblage du diffuseur de lait
1 Replacez le petit couvercle sur le système de
production de mousse.
50
Page 51

2 Replacez la par tie intérieure dans le système
de production de mousse.
3 Fermez le ressort pour verrouiller les
deux parties ensemble.
4 Placez le système de production de mousse
dans la partie inférieure du diffuseur.
8.2 Nettoyage de l’unité
d’écoulement du café et de
la machine
1 Débranchez toujours l’appareil avant de le
nettoyer.
2 Pour retirer le bec verseur de café de la
machine, tirez-le vers vous.
FRANÇAIS
3 Enlevez la partie supérieure du bec verseur
de café de la partie inférieure en la tirant
fermement.
5 Replacez la par tie supérieure du diffuseur de
lait sur la partie inférieure.
4 Nettoyez l’extérieur de la machine à café à
l’aide d’un chiffon humide.
5 Nettoyez le disque de distribution d’eau et
la bague d’étanchéité en caoutchouc avec un
chiffon humide.
6 Nettoyez l’orice de remplissage de la
machine à l’aide d’un chiffon humide.
51
Page 52

7 Nettoyez le réservoir d’eau, le bec verseur de
café, le récepteur de café, le plateau égouttoir,
le repose-tasses, le tube d’aspiration du lait, le
diffuseur de lait et les porte-dosettes à l’eau
chaude ou au lave-vaisselle.
C
Attention :
Veillez à ne pas endommager la soupape au
fond du réservoir d’eau si vous utilisez une
brosse à vaisselle pour nettoyer le réservoir
d’eau.
D
Remarque :
Vériez si le tamis au centre du porte-dosette
n’est pas bouché. Le cas échéant, débouchez
le tamis en rinçant le porte-dosette sous le
robinet. Si nécessaire, utilisez une brosse à
vaisselle pour nettoyer le tamis.
8 Lorsque vous avez terminé le nettoyage,
replacez la partie supérieure du bec verseur
de café sur la partie inférieure.
9 Replacez le réser voir d’eau, le récepteur de
café et le plateau égouttoir dans la machine.
10 Insérez le bec verseur de café dans la
machine.
11 Rebranchez la che sur la prise murale.
Fréquence de détartrage
• Détartrez la machine à café SENSEO
®
comme indiqué ci-dessous lorsque le bouton
CALC s’allume (après la préparation d’environ
400 tasses de café SENSEO
®
).
Nécessité du détartrage
En voici les raisons :
• Cela prolonge la durée de vie de votre
machine à café SENSEO
®
.
• Il garantit un volume de tasse maximal.
• Il assure une température de café optimale.
• Il réduit le bruit de la machine lors de la
préparation du café.
• Il prévient les dysfonctionnements.
Si vous ne respectez pas la procédure de
détartrage, les résidus de calcaire restent bloqués
dans l’appareil et le calcaire se forme alors plus
rapidement. À terme, cela peut endommager
dénitivement la machine.
Utilisez un agent de détartrage approprié.
Utilisez uniquement le détartrant spécial
SENSEO
®
(HD7012, HD7011). Il a été développé
pour garantir les meilleures performances
pour votre machine à café. Chaque solution de
détartrage est à usage unique. Pour en savoir plus
sur ce détartrant, rendez-vous sur notre site Web
www.philips.com.
B
Avertissement :
N’utilisez jamais un agent de détartrage à base
d’acides minéraux tel que l’acide sulfurique,
l’acide chlorhydrique, l’acide sulfamique ou
l’acide acétique (le vinaigre, par ex.). Ces agents
détartrants risquent d’endommager votre
machine à café SENSEO
®
.
9 Détartrage
Des résidus de calcaire se forment lors de
l’utilisation de la machine. Il est essentiel de
détartrer la machine à café SENSEO
voyant CALC s’allume.
52
®
lorsque le
9.1 Procédure de détartrage
Le bouton CALC s’allume pour vous indiquer
que vous devez détartrer votre machine.
La procédure de détartrage est constituée
d’un cycle de détartrage et de 3 cycles de rinçage.
N’interrompez pas le cycle de détartrage et
n’éteignez pas la machine avant la n des cycles
de rinçage. Toute la procédure prend environ
60 minutes.
B
Avertissement :
Veillez à placer le diffuseur de lait pour un
détartrage correct.
Page 53

D Remarque :
Vous pouvez toujours détartrer votre machine
avant que l’appareil n’indique que c’est nécessaire.
Pour ce faire, suivez les étapes ci-dessous.
1 Dans un verre gradué, mélangez le détartrant
avec 1 litre d’eau. Remuez jusqu’à dissolution
de la poudre. Versez la solution de détartrage
dans le réservoir d’eau.
2 Inclinez le réser voir d’eau et replacez la partie
inférieure dans la machine (1). Appuyez
ensuite le sommet du réservoir d’eau vers la
machine (2).
4 Mettez une dosette usagée dans le por te-
dosette pour une tasse q, puis placez le
porte-dosette dans la machine. Fermez
le couvercle et assurez-vous qu’il est
correctement verrouillé.
D
Remarque :
Utilisez toujours une dosette usagée lors du
détartrage de la machine. Celle-ci ltre les
résidus de calcaire pour éviter que le tamis ou
l’orice du porte-dosette ne se bouche.
B
Avertissement :
Assurez-vous que le couvercle est
correctement fermé et le levier
correctement verrouillé avant de
commencer à détartrer l’appareil.
5 Placez un bol d’une capacité minimale d’1 litre
sous le bec verseur pour recueillir la solution
de détartrage.
FRANÇAIS
3 Appuyez sur le bouton marche/arrêt. Le
bouton marche/arrêt clignote lentement
pendant que l’eau chauffe. La machine est
prête pour le détartrage lorsque le bouton
marche/arrêt est allumé en continu.
6 La machine est prête pour le détar trage
lorsque le bouton marche/arrêt et le bouton
CALC sont allumés en continu. Appuyez sur
le bouton CALC jusqu’à ce que la machine
émette deux signaux sonores pour démarrer
le cycle de détartrage.
53
Page 54

7 Le cycle de détar trage est en cours. Durant le
cycle de détartrage, la solution de détartrage
s’écoule de la machine par intermittence.
Pendant les 5 dernières minutes, la solution de
détartrage s’écoule en continu.
3 Attendez que la machine ait terminé le cycle
de rinçage. Le bouton marche/arrêt clignote
rapidement et le bouton CALC clignote
lentement.
4 Videz le bol et remettez-le en place sous
l’unité d’écoulement.
5 Répétez les étapes 1 à 4 à deux reprises pour
compléter la procédure de rinçage. Lorsque
le dernier cycle de rinçage est terminé, la
machine s’éteint automatiquement.
10 Commande
B
Avertissement :
N’interrompez pas le cycle de détartrage.
8 Lorsque toute la solution de détartrage
du réservoir d’eau a été écoulée (après
50 minutes environ), le bouton marche/arrêt
clignote rapidement et le bouton CALC
clignote lentement.
9 Videz le bol et remettez-le en place sous
l’unité d’écoulement.
10 Retirez la dosette usagée du por te-dosette.
9.1.1 Cycles de rinçage :
1 Rincez et remplissez le réser voir d’eau avec
de l’eau fraîche jusqu’à l’indication MAX.
Remettez-le en place dans la machine.
2 Appuyez sur le bouton CALC pour démarrer
le cycle de rinçage. L’eau s’écoule en continu
pendant environ 5 minutes.
d’accessoires
Pour acheter des accessoires ou des pièces de
rechange, visitez le site Web
www.shop.philips.com/service ou rendezvous chez votre revendeur Philips. Vous pouvez
également contacter le Service Consommateurs
Philips de votre pays (voir le dépliant de garantie
internationale pour les coordonnées).
11 Environnement
• Lorsqu’il ne fonctionnera plus, ne jetez pas
l’appareil avec les ordures ménagères, mais
déposez-le à un endroit assigné à cet effet, où
il pourra être recyclé. Vous contribuerez ainsi à
la protection de l’environnement.
54
Page 55

12 Garantie et
assistance
Si vous avez besoin d’une assistance ou
d’informations supplémentaires, consultez le site
Web www.philips.com/support ou lisez le
dépliant séparé sur la garantie internationale.
L’achat de la machine à café SENSEO
n’annule aucun droit de D.E Master Blenders 1753
ou Philips relatif aux brevets et ne confère en
aucun cas à l’acheteur une licence ou un droit
relatif à ces brevets.
Conez toujours l’appareil à un
Centre Service Agréé Philips pour réparation
ou vérication. N’essayez jamais de réparer
l’appareil vous-même ; toute intervention par des
personnes non qualiées entraîne l’annulation de
la garantie.
®
de Philips
Le voyant marche/arrêt clignote rapidement.
• Il n’y a pas assez d’eau dans le réservoir d’eau.
Remplissez le réservoir d’eau et veillez à le
placer correctement dans la machine.
• Le otteur dans le réservoir d’eau est
peut-être coincé. Videz le réservoir d’eau
et secouez-le quelques fois pour libérer le
otteur. Nettoyez le réservoir d’eau avec de
l’eau chaude savonneuse ou au lave-vaisselle.
• Vous utilisez la machine à une température
ambiante inférieure à 10 *C.
Utilisez la machine uniquement à une
température ambiante supérieure à 10 *C.
• Si ces solutions ne permettent pas de
résoudre le problème, contactez le Service
Consommateurs Philips de votre pays.
Le voyant CALC est allumé en continu.
• Vous devez détartrer la machine.
• Effectuez la procédure de détartrage comme
décrit au chapitre « Détartrage ». N’éteignez
pas la machine pendant le détartrage.
FRANÇAIS
13 Dépannage
13.1 Machine à café SENSEO
Ce chapitre présente les problèmes les plus courants
que vous pouvez rencontrer avec votre machine.
Si vous ne parvenez pas à résoudre le problème à
l’aide des informations ci-dessous, visitez le site Web
www.philips.com/support pour consulter une
liste de questions fréquemment posées ou contactez
le Service Consommateurs Philips de votre pays.
Le voyant marche/arrêt est allumé en continu.
• Vous devez rincer la machine avant la
première utilisation.
Rincez la machine avant la première utilisation
(voir le chapitre « Rinçage de la machine avant
la première utilisation »).
• La machine est prête à fonctionner.
Le voyant marche/arrêt clignote lentement.
• La machine chauffe.
• Si ceci prend plus de deux minutes, contactez
le Service Consommateurs Philips de votre pays.
®
Le voyant CALC est allumé en continu après le
détartrage.
• La procédure de détartrage n’est pas terminée.
• Effectuez la procédure de détartrage comme
décrit au chapitre « Détartrage ». N’éteignez
pas la machine pendant le détartrage.
Le voyant CALC clignote.
• La procédure de détartrage est en cours.
• Laissez la machine terminer la procédure de
détartrage. Consultez le chapitre « Détartrage ».
Le voyant marche/arrêt clignote rapidement et le
voyant CALC clignote lentement.
• Le réservoir d’eau est vide.
• Rincez et remplissez le réservoir d’eau et
veillez à le placer correctement dans la
machine. Appuyez sur le bouton CALC
pour poursuivre la procédure de détartrage
comme décrit au chapitre « Détartrage ».
55
Page 56

Un indicateur de tasse s’allume.
• Vous avez appuyé sur le bouton de recette à
une reprise pour préparer une tasse de café.
• Appuyez une seconde fois sur le bouton de
recette si vous voulez préparer deux tasses de
café. Dans ce cas, les deux indicateurs de tasse
s’allument.
Deux indicateurs de tasse s’allument.
• Vous avez appuyé sur le bouton de recette à
deux reprises pour préparer deux tasses de café.
• Si vous ne voulez préparer qu’une tasse de
café, appuyez une nouvelle fois sur le bouton
de recette. Dans ce cas, seul un indicateur de
tasse s’allume.
Le café n’est pas assez chaud.
• La machine a été utilisée pendant une longue
période sans détartrage.
Effectuez la procédure de détartrage comme
décrit au chapitre « Détartrage ».
• La température du café diminue rapidement
dans la tasse.
• N’utilisez pas de tasses trop grandes.
• Utilisez des tasses à parois nes car celles-ci
absorbent moins de chaleur que les tasses à
parois épaisses.
• Vous pouvez préchauffer la machine à café
et la tasse en commençant par préparer une
tasse d’eau sans placer de dosette dans le
porte-dosette.
• La spécialité de café à base de lait frais n’est
pas assez chaude.
• Ceci est normal. Une recette de café à base de
lait est moins chaude qu’une tasse de café noir. Le
lait est chauffé à une température plus basse pour
garantir une mousse de lait de haute qualité.
L’écran tactile avec boutons de recette ne
fonctionne pas.
• Il y a peut-être de l’eau sur l’écran tactile.
• Assurez-vous que vos mains et l’écran tactile
sont secs lorsque vous sélectionnez une
recette de café.
• Assurez-vous que la tension indiquée sur la
machine à café correspond bien à la tension
secteur locale.
La machine à café SENSEO® produit une mousse de
lait de mauvaise qualité ou en quantité insufsante.
• Il n’y a pas assez de lait dans le récipient ou la
brique de lait.
• Assurez-vous que le récipient ou la brique de
lait contient assez de lait.
• Assurez-vous que le tube d’aspiration du lait
est correctement xé dans le diffuseur de lait
et que le tube est correctement placé dans le
récipient ou la brique de lait.
• Le lait n’est pas assez froid. N’utilisez que du
lait froid sortant du réfrigérateur (5-8 °C).
• Vous n’avez pas utilisé de lait de vache.
Pour obtenir les meilleurs résultats de
production de mousse, nous vous conseillons
d’utiliser du lait de vache demi-écrémé à
température réfrigérée (5-8 °C).
• La qualité de la mousse de lait diminue au l du
temps. Le diffuseur de lait et le tube d’aspiration
du lait sont peut-être sales. Désassemblez toutes
les parties du diffuseur et du tube d’aspiration
du lait. Nettoyez-les soigneusement à l’aide
d’une brosse et d’un peu de liquide vaisselle ou
mettez-les au lave-vaisselle. Consultez le chapitre
« Nettoyage du diffuseur de lait ».
• La machine à café est obstruée par des
résidus de calcaire et doit être détartrée.
Effectuez la procédure de détartrage comme
décrit au chapitre « Détartrage ».
La mousse de lait continue de s’écouler du diffuseur.
• Le lait continue de s’écouler pendant plus de
quelques secondes.
• Assurez-vous que vous avez placé le récipient
ou la brique de lait au même niveau que la
machine à café.
• Je ne parviens pas à ouvrir le couvercle. Une
surpression s’est formée en dessous du couvercle.
• Éteignez la machine à café. Levez le levier
et patientez 24 heures avant d’ouvrir le
couvercle. Cela nécessite une certaine force.
• Assurez-vous toujours que les porte-dosettes
sont propres et que le centre du tamis n’est
pas obstrué an d’éviter toute surpression.
56
Page 57

Inhoudsopgave
1 Introductie 57
1.1 SENSEO
2 Algemene beschrijving 58
3 Belangrijk 58
3.1 Naleving van richtlijnen 59
4 De machine doorspoelen vóór het
eerste gebruik 59
5 Zwarte SENSEO
6 Een kofespecialiteit met verse
melk zetten 63
7 De kofehoeveelheid aanpassen 65
7.1 Pas de kofehoeveelheid aan uw
persoonlijke smaak aan 65
8 Schoonmaken 66
8.1 De melktuit schoonmaken 66
8.2 De kofetuit en de machine
schoonmaken 68
9 Ontkalken 69
9.1 Ontkalkingsprocedure 70
10 Accessoires bestellen 72
11 Milieu 72
®
kofemachine 57
®
kofe zetten 61
1 Introductie
Gefeliciteerd met uw aankoop en welkom bij
Philips! Als u volledig wilt proteren van de
ondersteuning die Philips biedt, registreer uw
product dan op www.philips.com/welcome.
1.1 SENSEO® kofemachine
Maak uw kofemomenten echt speciaal met
SENSEO
de gebruiksvriendelijke Philips SENSEO
kofemachine met de speciaal ontwikkelde D.E
Master Blenders SENSEO
met een volle, ronde kofesmaak en een heerlijk
schuimlaagje.
De D.E-kofe in de handige SENSEO
en het unieke SENSEO
zijn perfect op elkaar afgestemd voor de beste
smaak en het beste aroma. Ontdek alle SENSEO
kofevarianten op www.senseo.com.
Om zeker te zijn van een volle, ronde kofesmaak,
dient u aan het volgende te denken:
Verse kofepads
Gebruik de SENSEO
door D.E Master Blenders voor uw SENSEO
kofemachine zijn ontwikkeld om die volle,
ronde smaak te krijgen. De D.E Master Blenders
SENSEO
in een hermetisch afsluitbaar opbergblik bewaart.
Vers water
Gebruik elke dag vers water. Wanneer u de
kofemachine één dag niet hebt gebruikt, moet u
de machine voor gebruik doorspoelen met vers
water.
®
. Dit unieke systeem combineert
®
kofepads, voor kofe
®
zetsysteem van Philips
®
kofepads die speciaal
®
kofepads blijven langer vers als u deze
®
®
kofepads
®
®
NEDERLANDS
12 Garantie en ondersteuning 72
13 Problemen oplossen 72
13.1 SENSEO
®
kofemachine 72
57
Page 58

NEDERLANDS
2 Algemene
beschrijving
1 1-kops padhouder q
2 2-kops padhouder qq
3 Kofecollector
4 Kofetuit
5 Melktuit
6 Melkslang
7 Plateau
8 Afneembare lekbak
9 Waterreservoir
10 Aanraakpaneel met receptknoppen
11 CALC-knop
12 Café latte-knop
13 Latte macchiato-knop
14 Cappuccino-knop
15 Kopsaanduidingen
16 Aan/uit-schakelaar
17 Knop voor normale kofe
18 Knop voor sterke kofe
19 Knop voor alleen melk
3 Belangrijk
Lees deze gebruiksaanwijzing
zorgvuldig door voordat u de
machine gaat gebruiken. Bewaar de
gebruiksaanwijzing om deze indien
nodig te kunnen raadplegen.
Gevaar
• Dompel de machine nooit in
water of een andere vloeistof.
Waarschuwing
• Controleer of het voltage
aangegeven op de onderkant van
de machine overeenkomt met de
plaatselijke netspanning voordat u
de machine aansluit.
• Deze machine kan worden
gebruikt door kinderen vanaf
8 jaar en door personen met
verminderde lichamelijke,
zintuiglijke of geestelijke
capaciteiten of weinig ervaring
en kennis, mits zij toezicht of
instructie hebben ontvangen
aangaande veilig gebruik van de
machine, en zij de gevaren van het
gebruik begrijpen.
• Reiniging en onderhoud mogen
alleen door kinderen worden
uitgevoerd die ouder zijn dan 8 en
alleen onder toezicht.
• Houd de machine en het snoer
buiten het bereik van kinderen die
jonger zijn dan 8 jaar oud.
• Houd toezicht op kinderen om
te voorkomen dat ze met de
machine gaan spelen.
• Gebruik de machine niet indien
de stekker, het netsnoer of de
machine zelf beschadigd is.
• Indien het netsnoer beschadigd
is, moet u het laten vervangen
door Philips, een door Philips
geautoriseerd servicecentrum
of personen met vergelijkbare
kwalicaties om gevaar te
voorkomen.
Let op
• Breng de machine altijd naar
een door Philips geautoriseerd
servicecentrum voor onderzoek
of reparatie. Probeer niet zelf
de machine te repareren, omdat
uw garantie hierdoor komt te
vervallen.
58
Page 59

• De machine mag niet worden
gebruikt in combinatie met een
transformator, aangezien dit tot
onveilige situaties kan leiden.
• Plaats de machine altijd op een
vlakke en stabiele ondergrond.
Houd de machine rechtop, ook
tijdens transport.
• Plaats de machine niet op een
warmhoudplaat of naast een hete
oven of vergelijkbare warmtebron.
• Bewaar de machine niet bij een
temperatuur onder 0 °C. Water
in het verwarmingssysteem kan
bevriezen en schade veroorzaken.
• Giet nooit melk, kofe, heet water
of koolzuurhoudend water in het
waterreservoir.
• Gebruik nooit gewone gemalen
kofe of gescheurde pads in de
machine, omdat de machine
hierdoor verstopt raakt.
• Zorg ervoor dat de tuit goed is
geplaatst voordat u de machine
doorspoelt of kofe zet.
• Deze machine is uitsluitend
bedoeld voor normaal
huishoudelijk gebruik. De
machine is niet bedoeld voor
gebruik in personeelskeukens van
bijvoorbeeld winkels, kantoren,
boerderijen of vergelijkbare
werkomgevingen en ook niet
voor gebruik door gasten van
hotels, motels, bed & breakfasts en
andere verblijfsaccommodaties.
3.1 Naleving van richtlijnen
Deze Philips-machine voldoet aan alle toepasbare
richtlijnen en voorschriften met betrekking tot
blootstelling aan elektromagnetische velden.
Het energieverbruik van deze machine
bedraagt, wanneer deze is uitgeschakeld,
minder dan 0,5 watt. Dit betekent dat deze
machine aan EU-richtlijn 2009/125/EG voldoet,
waarin de ecologische ontwerpvereisten voor
energiegebruikende producten zijn vastgelegd.
4 De machine
doorspoelen vóór
het eerste gebruik
U moet uw SENSEO® kofemachine vóór het
eerste gebruik doorspoelen. Na het doorspoelen
is de machine klaar voor gebruik en kunt u
SENSEO
C
Onderbreek het doorspoelen nooit. Anders
wordt de boiler niet correct gevuld.
1 Kantel het waterreservoir naar achteren (1) en
®
kofe zetten.
Let op:
neem het waterreservoir van de machine (2).
NEDERLANDS
59
Page 60

2 Vul het waterreservoir.
3 Kantel het waterreservoir en plaats de
onderkant terug op de machine (1).
Duw vervolgens de bovenkant van het
waterreservoir naar de machine (2).
4 Schuif de melktuit op de machine. Zorg
ervoor dat u de melktuit bevestigt door
deze over de geleiderrails op de kofetuit te
schuiven. U hoort een klikgeluid wanneer de
tuit goed is bevestigd.
5 Plaats een kom met een minimumcapaciteit
van 1 liter onder de kofetuit.
6 Zorg ervoor dat een padhouder zonder
pad(s) is geplaatst.
7 Steek de stekker in een geaard stopcontact.
8 Druk op de aan/uitknop. De knop gaat
branden om aan te geven dat u de machine
moet doorspoelen.
9 Druk op een van de receptknoppen om het
doorspoelen te starten.
60
Page 61

• Tijdens de doorspoelcyclus vult de boiler
zich met water uit het waterreservoir en
komt er koud water uit de kofetuit. Tijdens
het doorspoelen maakt de machine meer
geluid dan tijdens gewoon kofezetten.
• Wanneer al het water in het waterreservoir
is opgebruikt, is de doorspoelcyclus voltooid
en schakelt de machine automatisch uit.
Er kan een beetje stoom uit de machine
komen. Dit is normaal.
5 Zwarte SENSEO®
kofe zetten
1 Zorg ervoor dat het waterreservoir is gevuld
met vers, koud kraanwater.
E
Tip:
Gebruik elke dag vers water.
2 Steek de stekker in een geaard stopcontact.
3
Druk op de aan/uitknop. De aan/uitknop knippert
langzaam terwijl het water wordt opgewarmd.
NEDERLANDS
10 Vul het waterreservoir met vers kraanwater
en plaats het terug op de machine.
D Opmerking:
Als de aan/uitknop snel knippert, bevat het
waterreservoir niet genoeg water voor één
kop kofe.
4 Trek aan de hendel van het deksel om het te
openen.
61
Page 62

5 Als u één kop SENSEO
®
kofe wilt zetten,
plaatst u de 1-kops padhouder q in de machine
(1). Als u twee koppen wilt zetten, plaatst u de
2-kops padhouder qq in de machine (2). Zorg
ervoor dat de padhouder schoon is.
6 Plaats 1 kofepad in de 1-kops padhouder
q (1) of plaats 2 kofepads in de 2-kops
padhouder qq (2). Plaats de pad of pads
goed in het midden van de padhouder met de
bolle zijde naar beneden. Druk de pad of pads
licht in de padhouder.
7 Sluit het deksel en vergrendel de hendel.
8 Plaats een of twee koppen onder de
openingen van de kofetuit. Gebruik de
markeringen op de lekbak om de kop of
koppen te plaatsen.
D
Opmerking:
U kunt de hoogte van de lekbak aanpassen of
de lekbak verwijderen om hogere koppen te
kunnen plaatsen.
D
Opmerking:
Zorg ervoor dat de kofe in de pad of pads
gelijkmatig is verdeeld.
C
Let op:
Gebruik nooit gewone gemalen kofe of
gescheurde pads in de SENSEO
®
machine,
aangezien hierdoor de machine verstopt raakt.
62
D
Opmerking
De koppen die u gebruikt, moeten een inhoud
van ten minste 150 ml hebben voor normale
kofe of ten minste 100 ml voor sterke kofe.
Gebruik geen koppen die te groot zijn, anders
wordt de kofe snel koud.
9 Druk op de knop met twee kofebonen voor
een kop normale kofe. Druk op de knop met
drie kofebonen voor een kop sterke kofe.
Page 63

10 Druk eenmaal op de receptknop voor één
kop kofe of tweemaal voor twee koppen
kofe.
11 Wanneer het water is opgewarmd en de
aan/uitknop ononderbroken brandt, zet de
machine automatisch kofe.
D
Opmerking:
Verwijder het waterreservoir niet tijdens het
kofezetten.
12 Verwijder de gebruikte kofepads wanneer
de kofe klaar is. Neem de padhouder uit de
machine en haal de kofepads eruit.
C
Let op:
Er kan zich nog wat heet water of hete
kofe op de kofepads bevinden.
13 Druk na gebruik op de aan/uitknop om de
machine uit te schakelen.
1 Zorg ervoor dat het waterreservoir is gevuld
met vers, koud kraanwater.
E
Tip:
Gebruik elke dag vers water.
2 Steek de stekker in een geaard stopcontact.
3 Druk op de aan/uitknop. De aan/uitknop
knippert langzaam terwijl het water wordt
opgewarmd.
NEDERLANDS
D
Opmerking:
Als u de machine niet gebruikt, schakelt deze
automatisch na 15 minuten uit om energie te
besparen.
6 Een kofespecialiteit
met verse melk
zetten
Met de SENSEO® kofemachine kunt u
gemakkelijk tegelijkertijd twee koppen perfecte
cappuccino, café latte, latte macchiato of warme
melk maken.
D
Opmerking:
Als de aan/uitknop snel knippert, bevat het
waterreservoir niet genoeg water voor één
kop kofe.
4 Trek aan de hendel van het deksel om het te
openen.
63
Page 64

5 Als u één kop cappuccino, café latte of latte
macchiato wilt zetten, plaatst u de 1-kops
padhouder q in de machine (1). Als u twee
koppen wilt zetten, plaatst u de 2-kops
padhouder qq in de machine (2). Zorg
ervoor dat de padhouder schoon is.
D
Opmerking:
Voor alleen warme melk hoeft u geen
padhouder in de machine te plaatsen. Ga
door met stap 7.
6 Plaats 1 kofepad in de 1-kops padhouder
q (1) of plaats 2 kofepads in de 2-kops
padhouder qq (2). Plaats de pad of pads
goed in het midden van de padhouder met de
bolle zijde naar beneden. Druk de pad of pads
licht in de padhouder.
7 Sluit het deksel en vergrendel de hendel.
8 Schuif de melktuit op de machine. Zorg
ervoor dat u de melktuit bevestigt door
deze over de geleiderrails op de kofetuit te
schuiven. U hoort een klikgeluid wanneer de
tuit goed is bevestigd.
9 Plaats de koppeling van de melkslang in de
melktuit (1). Doe het andere uiteinde van de
melkslang in een melkpak of melkkan (2).
D
Opmerking:
Zorg ervoor dat de kofe in de pad of pads
gelijkmatig is verdeeld.
C
Let op:
Gebruik nooit gewone gemalen kofe of
gescheurde pads in de SENSEO
®
machine,
aangezien hierdoor de machine verstopt
raakt.
64
E
Tip:
Gebruik verse gekoelde melk. We raden
verse halfvolle koemelk aan voor het beste
melkschuim.
D
Opmerking:
Zorg dat er genoeg melk in het melkpak of de
melkkan zit om te voorkomen dat er stoom
uit de melktuit komt.
Page 65

10 Plaats een of twee koppen onder de
tuitopeningen. U kunt de lekbak verstellen of
de lekbak verwijderen om hogere koppen te
kunnen plaatsen.
11 Druk op de receptknop van uw keuze om
de gewenste kofespecialiteit te kiezen. U
kunt kiezen tussen cappuccino, café latte,
latte macchiato of alleen warme melk. Druk
eenmaal op de receptknop voor één kop of
tweemaal voor twee koppen.
D Opmerking:
De machine bereidt eerst de melk en voegt
dan de kofe toe. Voor café latte voegt de
machine eerst kofe toe, waarna de melk
wordt bereid.
13 Verwijder de gebruikte kofepads wanneer
de kofe klaar is. Neem de padhouder uit de
machine en haal de kofepads eruit.
C
Let op:
Er kan zich nog wat heet water of hete
kofe op de kofepads bevinden.
14 Verwijder de melktuit en melkslang van de
machine en maak ze schoon (zie hoofdstuk
‘De melktuit schoonmaken’).
15 Druk na gebruik op de aan/uitknop om de
machine uit te schakelen.
NEDERLANDS
12 Wanneer het water is opgewarmd en de aan/
uitknop ononderbroken brandt, begint de
machine de geselecteerde kofespecialiteit
met melk te maken.
D
Opmerking:
Als u de machine niet gebruikt, schakelt deze
automatisch na 15 minuten uit om energie te
besparen.
7 De kofehoeveelheid
aanpassen
Opmerking: deze functie is alleen beschikbaar
voor typenummer HD7858, HD7857.
7.1 Pas de kofehoeveelheid
aan uw persoonlijke smaak
aan
U kunt de hoeveelheid van elk recept aan
uw persoonlijke smaak aanpassen door de
verschillende recepten te programmeren.
65
Page 66

1 Schakel het apparaat in.
• Het apparaat piept drie keer om uw keuze
te bevestigen en begint een koferecept te
zetten met de nieuwe instellingen.
Het apparaat slaat de instellingen automatisch op.
8 Schoonmaken
2 Vul het waterreservoir tot aan de MAX-
aanduiding met koud water.
3 Plaats een kofepad in de padhouder.
4 Als u een kofespecialiteit met melk wilt
bereiden, doet u de slang van de melktuit in
een melkpak of -kan.
5 Druk tegelijkertijd op de CALC-knop en de
knop voor het recept dat u wilt aanpassen.
Laat de knoppen los wanneer het apparaat na
ongeveer twee seconden tweemaal piept.
• Het 1-koppictogram begint te knipperen.
6 Druk op een van de volgende knoppen om
de hoeveelheid kofe te veranderen: de knop
voor normale kofe voor een grotere kop, de
knop voor alleen melk voor een middelgrote
kop (standaardstand) of de knop voor sterke
kofe voor een kleinere kop.
Het is belangrijk dat u uw SENSEO® regelmatig
schoonmaakt, zodat uw SENSEO
®
kofe altijd
optimaal smaakt en uw kofemachine zo lang
mogelijk meegaat.
B
Waarschuwing:
Dompel de SENSEO® kofemachine nooit in
water.
8.1 De melktuit schoonmaken
Voor een goede werking van de melktuit en
consistent goede schuimresultaten is het belangrijk
dat u de melktuit en melkslang regelmatig en
grondig schoonmaakt. De melktuit kan volledig uit
elkaar worden gehaald, zodat u alle melkresten
kunt verwijderen.
D
Opmerking:
Als u niet van plan bent onmiddellijk opnieuw
melk op te schuimen, spoel de melktuit en
melkslang dan binnen 30 minuten na gebruik
schoon.
D
Opmerking:
Maak de melktuit en melkslang na het laatste
gebruik van de dag grondig schoon.
8.1.1 Spoelen na ieder gebruik
1 Zet de melkslang in een kop schoon water.
66
Page 67

2 Plaats een lege kop onder de tuit.
3 Druk op de knop voor alleen warme melk.
2 Om de melktuit van de machine te
verwijderen, trekt u deze naar u toe.
3 Trek het bovenste deel van de melktuit van
het onderste deel.
De machine spoelt met schoon warm water
alle melkresten uit de melktuit en melkslang.
8.1.2 Na het laatste gebruik van de dag
Maak de melkslang en de melktuit schoon in de
vaatwasmachine of in warm water met een beetje
afwasmiddel.
D
Opmerking:
Reinigen in de vaatwasmachine wordt aanbevolen.
1 Trek de melkslang uit de melktuit.
NEDERLANDS
4 Verwijder het opschuimsysteem.
5 Het opschuimsysteem kan in twee delen
worden gescheiden. Open de veer om de
delen te scheiden.
67
Page 68

6 Verwijder het binnenste deel van het
opschuimsysteem door het omlaag te trekken.
7 Verwijder het kleine deksel door het naar
boven te trekken.
8 Maak alle onderdelen schoon in de
vaatwasmachine of in warm water met wat
afwasmiddel.
8.1.3 De melktuit in elkaar zetten
1 Plaats het kleine deksel terug op het
opschuimsysteem.
2 Plaats het binnenste deel terug in het
opschuimsysteem.
3 Sluit de veer om de twee delen aan elkaar te
vergrendelen.
4 Plaats het opschuimsysteem in het onderste
deel van de melktuit.
68
Page 69

5 Plaats het bovenste deel van de melktuit terug
op het onderste deel.
8.2 De kofetuit en de machine
schoonmaken
1 Haal altijd de stekker uit het stopcontact
voordat u de machine schoonmaakt.
2 Om de kofetuit van de machine te
verwijderen, trekt u deze naar u toe.
3 Trek het bovenste deel van de kofetuit van
het onderste deel.
7 Maak het waterreservoir, de kofetuit, de
kofecollector, de lekbak, het plateau, de
melkslang, de melktuit en de padhouders
schoon in warm water of in de
vaatwasmachine.
C
Let op:
Zorg ervoor dat u het ventiel in de
onderkant van het waterreservoir niet
beschadigt als u een afwasborstel gebruikt
om het waterreservoir schoon te maken.
D
Opmerking:
Controleer of het zeefje in het midden van de
padhouder verstopt is. Als dit het geval is, kunt
u het zeefje ontstoppen door de padhouder
onder de kraan af te spoelen. Gebruik indien
nodig een afwasborstel om het zeefje te
schoon te maken.
8 Wanneer u klaar bent met schoonmaken,
plaatst u het bovenste deel van de kofetuit
terug op het onderste deel.
9 Plaats het waterreservoir, de kofecollector en
de lekbak terug in de machine.
10 Schuif de kofetuit in de machine.
11 Steek de stekker weer in het stopcontact.
NEDERLANDS
4 Maak de buitenkant van de machine schoon
met een vochtige doek.
5 Maak de water verdeelschijf en de rubberen
afdichtring schoon met een vochtige doek.
6 Maak de waterinlaat op de machine schoon
met een vochtige doek.
69
Page 70

9 Ontkalken
Tijdens gebruik ontwikkelt zich kalk in de
machine. Het is zeer belangrijk dat de SENSEO
kofemachine wordt ontkalkt wanneer het CALC-
lampje gaat branden.
Wanneer ontkalken
• Ontkalk de SENSEO
®
kofemachine zoals
hieronder beschreven wanneer het CALClampje gaat branden (nadat u circa 400
koppen SENSEO
®
kofe hebt gezet).
Waarom ontkalken
Waarom u de kofemachine zou moeten
ontkalken:
• Het verlengt de levensduur van uw SENSEO
kofemachine
• Het zorgt ervoor dat uw kop volledig wordt
gevuld
• Het zorgt ervoor dat de kofe zo warm
mogelijk is
• De machine maakt tijdens het kofezetten
minder geluid
• Het voorkomt storingen
Als de ontkalkingsprocedure niet juist wordt
uitgevoerd, blijven er kalkresten achter in de
machine. Hierdoor ontwikkelt de kalk zich sneller
en kan de machine permanent en onherstelbaar
worden beschadigd.
Gebruik de juiste ontkalker
Gebruik alleen de ontkalker voor SENSEO
(HD7012, HD7011). Deze is ontwikkeld voor
betere machinale prestaties en bediening. Elk
ontkalkingsmengsel kan slechts eenmaal worden
gebruikt. Bezoek onze website www.philips.com
voor meer informatie over deze ontkalker.
®
®
9.1 Ontkalkingsprocedure
De CALC-knop gaat branden om aan te
geven dat u uw machine moet ontkalken.
De ontkalkingsprocedure bestaat uit een
ontkalkingscyclus en drie doorspoelcycli.
Onderbreek de ontkalkingscyclus niet en schakel
de machine niet uit voordat u de doorspoelcycli
hebt voltooid. De volledige procedure neemt circa
60 minuten in beslag.
B
Waarschuwing:
Zorg ervoor dat de melktuit is geplaatst voor
een goede ontkalking.
D
Opmerking:
®
U kunt de machine altijd ontkalken voordat de
machine aangeeft dat dit nodig is. Volg daartoe de
onderstaande stappen.
1 Meng de ontkalker in een maatbeker
met 1 liter water. Roer het mengsel totdat
het poeder volledig is opgelost. Vul het
waterreservoir met de ontkalkoplossing.
2 Kantel het waterreservoir en plaats de
onderkant terug op de machine (1).
Duw vervolgens de bovenkant van het
waterreservoir naar de machine (2).
B
Waarschuwing:
Gebruik nooit een ontkalker op basis van een
anorganisch zuur, zoals zwavelzuur, zoutzuur,
sulfaminezuur en azijnzuur (bijv. azijn). Deze
ontkalkers kunnen uw SENSEO
®
kofemachine
beschadigen.
70
Page 71

3 Druk op de aan/uitknop. De aan/uitknop
knippert langzaam terwijl het water wordt
opgewarmd. De machine kan worden ontkalkt
wanneer de aan/uitknop ononderbroken
brandt.
4 Plaats de 1-kops padhouder q met een
gebruikte kofepad in de machine. Sluit
het deksel en zorg ervoor dat het goed
vergrendeld is.
5 Zet een kom met een inhoud van minstens
1 liter onder de tuit om de ontkalkoplossing
op te vangen.
6 De machine kan worden ontkalkt wanneer
de aan/uitknop en de CALC-knop
ononderbroken branden. Druk op de CALCknop tot de machine tweemaal piept om de
ontkalkingscyclus te starten.
NEDERLANDS
D
Opmerking:
Plaats tijdens het ontkalken altijd een
gebruikte kofepad in de padhouder. Deze
pad dient als ‘lter’ om te voorkomen dat de
zeef of de opening in de padhouder tijdens
het ontkalken verstopt raakt met kalkresten.
B
Waarschuwing:
Zorg dat het deksel goed gesloten is en
dat de hendel van het deksel is vergrendeld
voordat u begint met ontkalken.
7 De ontkalkingscyclus wordt uitgevoerd. Tijdens
de ontkalkingscyclus komt er met tussenpozen
ontkalkoplossing uit de machine. Tijdens de
laatste 5 minuten blijft de ontkalkoplossing
ononderbroken stromen.
B
Waarschuwing:
Onderbreek de ontkalkingscyclus niet.
8 Wanneer alle ontkalkoplossing in het
waterreservoir na ongeveer 50 minuten is
opgebruikt, knippert de aan/uitknop snel en
knippert de CALC-knop langzaam.
9 Leeg de kom en plaats deze terug onder de
tuit.
10 Verwijder de gebruikte kofepad van de
padhouder.
71
Page 72

9.1.1 Doorspoelcycli:
1 Spoel en vul het waterreservoir met vers
water tot de MAX-aanduiding. Plaats het
terug op de machine.
2 Druk op de CALC-knop om de
doorspoelcyclus te starten. Het water blijft
ongeveer 5 minuten ononderbroken stromen.
3 Wacht tot de machine de doorspoelcyclus
heeft voltooid. De aan/uitknop knippert snel
en de CALC-knop knippert langzaam.
4 Leeg de kom en plaats deze terug onder de
tuit.
5 Herhaal stap 1 t/m 4 tweemaal om de
doorspoelprocedure te voltooien. Wanneer
de laatste doorspoelcyclus is voltooid, wordt
de machine automatisch uitgeschakeld.
10 Accessoires
bestellen
Ga naar www.shop.philips.com/service om
accessoires en reserveonderdelen te kopen of
ga naar uw Philips-dealer. U kunt ook contact
opnemen met het Philips Consumer Care Centre
in uw land (zie het ‘worldwide guarantee’vouwblad voor contactgegevens).
11 Milieu
• Gooi de machine aan het einde van zijn
levensduur niet weg met het normale huisvuil,
maar lever deze in op een door de overheid
aangewezen inzamelpunt om hem te laten
recyclen. Op die manier levert u een bijdrage
aan een schonere leefomgeving.
12 Garantie en
ondersteuning
Als u informatie of ondersteuning nodig hebt,
bezoek dan www.philips.com/support of lees
het ‘worldwide guarantee’-vouwblad.
De aankoop van de Philips SENSEO
kofemachine put geen enkel recht uit dat D.E
Master Blenders 1753 of Philips hebben op grond
van hun patenten. Ook verstrekt het de koper
geen licentie onder deze patenten.
Breng de machine altijd naar een door Philips
geautoriseerd servicecentrum voor onderzoek
of reparatie. Probeer niet zelf de machine te
repareren, omdat uw garantie hierdoor komt te
vervallen.
®
72
Page 73

13 Problemen oplossen
13.1 SENSEO® kofemachine
Dit hoofdstuk behandelt in het kort de problemen
die u kunt tegenkomen tijdens het gebruik van de
machine. Als u het probleem niet kunt oplossen
met de informatie hieronder, ga dan naar
www.philips.com/support voor een lijst met
veelgestelde vragen of neem contact op met het
Consumer Care Centre in uw land.
Het CALC-lampje brandt ononderbroken.
• U moet de machine ontkalken.
• Voer de ontkalkingsprocedure uit zoals
beschreven in hoofdstuk ‘Ontkalken’. Schakel
de machine niet uit tijdens het ontkalken.
Het CALC-lampje brandt ononderbroken na het
ontkalken.
• De ontkalkingsprocedure is niet voltooid.
• Voer de ontkalkingsprocedure uit zoals
beschreven in hoofdstuk ‘Ontkalken’. Schakel
de machine niet uit tijdens het ontkalken.
Het aan/uitlampje brandt ononderbroken.
• Voor het eerste gebruik dient u de machine
door te spoelen.
Spoel de machine voor het eerste gebruik
door, zie hoofdstuk ‘De machine doorspoelen
vóór het eerste gebruik’.
• De machine is klaar om kofe te zetten.
Het aan/uitlampje knippert langzaam.
• De machine warmt op.
• Als dit langer dan twee minuten duurt, neem
dan contact op met het Philips Consumer
Care Centre in uw land.
Het aan/uitlampje knippert snel.
• Er zit niet genoeg water in het waterreservoir.
Vul het waterreservoir en zorg ervoor dat u
het reservoir goed in de machine plaatst.
• De vlotter in het waterreservoir zit mogelijk vast.
Leeg het waterreservoir en schud het enkele
keren om de vlotter los te krijgen. Maak het
waterreservoir schoon met warm water en
wat afwasmiddel of in de vaatwasmachine.
• U gebruikt de machine bij een
omgevingstemperatuur onder 10*C.
Gebruik de machine alleen bij een
omgevingstemperatuur boven 10*C.
• Als deze oplossingen het probleem niet
oplossen, neem dan contact op met het
Philips Consumer Care Centre in uw land.
Het CALC-lampje knippert.
• De ontkalkingsprocedure wordt uitgevoerd.
• Laat de machine de ontkalkingsprocedure
voltooien. Zie hoofdstuk ‘Ontkalken’.
Het aan/uitlampje knippert snel en het CALClampje knippert langzaam.
• Het waterreservoir is leeg.
• Spoel en vul het waterreservoir en zorg
ervoor dat u het reservoir goed in de
machine plaatst. Druk op de CALC-knop om
verder te gaan met de ontkalkingsprocedure,
zoals beschreven in hoofdstuk ‘Ontkalken’.
Er brandt één kopsaanduiding.
• U hebt eenmaal op de receptknop gedrukt
om één kop kofe te zetten.
• Druk nog eens op de receptknop als u twee
koppen kofe wilt zetten. In dat geval gaan
beide kopsaanduidingen branden.
Er branden twee kopsaanduidingen.
• U hebt tweemaal op de receptknop gedrukt
om twee koppen kofe te zetten.
• Als u slechts één kop kofe wilt zetten, drukt
u nog eens op de receptknop. In dat geval
gaat er één kopsaanduiding branden.
NEDERLANDS
73
Page 74

De kofe is niet heet genoeg.
• De machine is langere tijd gebruikt zonder te
worden ontkalkt.
Voer de ontkalkingsprocedure uit zoals
beschreven in hoofdstuk ‘Ontkalken’.
• De kofetemperatuur neemt snel af in de kop.
• Gebruik geen koppen die te groot zijn.
• Gebruik dunwandige koppen omdat deze de
hitte van de kofe minder absorberen dan
dikwandige koppen.
• U kunt de kofemachine en de kop
voorverwarmen door eerst een kop warm
water te zetten zonder een kofepad in de
padhouder te plaatsen.
• De kofespecialiteit met verse melk is niet
warm genoeg.
• Dit is normaal. Een koferecept met melk is
minder warm dan een kop zwarte kofe. Melk
wordt op een lagere temperatuur verwarmd
voor een goede kwaliteit melkschuim.
Het aanraakpaneel met receptknoppen werkt niet.
• Mogelijk ligt er water op het aanraakpaneel.
• Zorg ervoor dat uw handen en het
aanraakpaneel droog zijn wanneer u een
koferecept kiest.
• Controleer of het voltage dat is aangegeven
op de kofezetter overeenkomt met de
plaatselijke netspanning.
• De melkschuimkwaliteit neemt langzaam af.
De melktuit en melkslang kunnen vuil zijn.
Demonteer alle delen van de melktuit en
melkslang. Maak ze grondig schoon met
een borstel en wat afwasmiddel of in de
vaatwasmachine. Zie hoofdstuk ‘De melktuit
schoonmaken’.
• De kofemachine is verstopt geraakt door
kalkaanslag en moet worden ontkalkt.
Voer de ontkalkingsprocedure uit zoals
beschreven in hoofdstuk ‘Ontkalken’.
Er blijft melkschuim uit de melktuit komen.
• De melk blijft langer dan een paar seconden
stromen.
• Zorg ervoor dat u het melkpak of de melkkan
op dezelfde hoogte als de kofemachine
plaatst.
• Ik kan het deksel niet openen.
• Mogelijk is er tijdelijk te veel druk onder het
deksel ontstaan.
• Schakel de kofemachine uit. Trek de hendel
omhoog en wacht 24 uur voordat u het
deksel opent. Mogelijk moet u hiervoor enige
kracht uitoefenen.
• Zorg er altijd voor dat de padhouders schoon
zijn en het midden van de zeef niet verstopt
zit om een teveel aan druk te voorkomen.
De SENSEO
®
machine maakt geen goed
melkschuim, of te weinig melkschuim.
• Er zit niet genoeg melk in het melkpak of de
melkkan.
• Zorg ervoor dat het melkpak of de melkkan
genoeg melk bevat.
• Zorg ervoor dat de melkslang goed in de
melktuit is geplaatst en dat de slang goed in
het melkpak of de melkkan is geplaatst.
• De melk is niet koud genoeg.
Gebruik koude melk die direct uit de koelkast
komt (5 - 8 °C).
• U hebt geen koemelk gebruikt.
Voor de beste opschuimresultaten
raden wij u aan om halfvolle koemelk op
koelkasttemperatuur (5 - 8 °C) te gebruiken.
74
Page 75

Page 76

© 2013 Koninklijke Philips Electronics N.V.
All rights reserved.
Document order number: 4222.200.0653.3
 Loading...