

Page 1
HD6180
Page 2

2
Page 3
3
1
Page 4

4
Page 5

ENGLISH 6
한국어 15
繁體中文 24
简体中文 32
HD6180
Page 6

6
ENGLISH
Introduction
Congratulations on your purchase and welcome to Philips! To fully benet from the support that
Philips offers, register your product at www.philips.com/welcome.
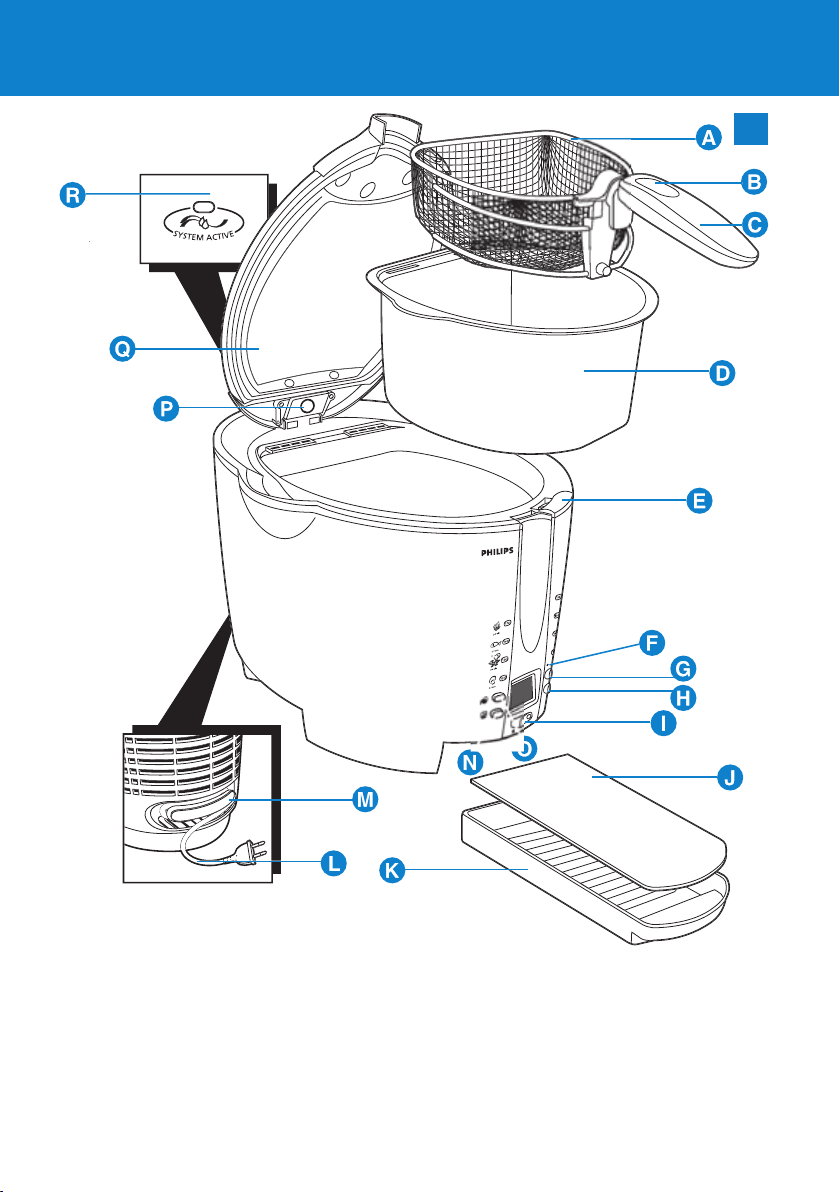
General description (Fig. 1)
A Frying basket
B Release button
C Basket handle
D Removable inner bowl
E Lid release lever
F Reset button
G Temperature button
H Timer button
I On/off switch with power-on light
J Water reservoir lid
K Water reservoir
L Mains cord
M Cord storage compartment
N PreClean button
O ReFresh button
P Release button to remove lid
Q Removable glass lid
R System Active indication light
Important
Read this user manual carefully before you use the appliance and save it for future reference.
Danger
Never immerse the housing, which contains electrical components and the heating element, in
water nor rinse it under the tap.
Warning
Check if the voltage indicated on the appliance corresponds to the local mains voltage before
you connect the appliance.
Do not use the appliance if the plug, the mains cord or the appliance itself is damaged.
If the mains cord is damaged, you must have it replaced by Philips, a service centre authorised by
-
Philips or similarly qualied persons in order to avoid a hazard.
This appliance is not intended for use by persons (including children) with reduced physical,
sensory or mental capabilities, or lack of experience and knowledge, unless they have been given
supervision or instruction concerning use of the appliance by a person responsible for their
safety.
Children should be supervised to ensure that they do not play with the appliance.
Keep the mains cord out of the reach of children. Do not let the mains cord hang over the edge
of the table or worktop on which the appliance stands.
Only connect the appliance to an earthed wall socket.
Be careful of the hot steam when you open the lid.
-
Caution
Always return the appliance to a service centre authorised by Philips for examination or repair.
Do not attempt to repair the appliance yourself, otherwise the guarantee becomes invalid.
Place the appliance on a horizontal, even and stable surface.
Do not touch the glass part of the lid when the appliance is operating, as it becomes hot.
-
Page 7

ENGLISH 7
Fry food golden-yellow instead of dark or brown and remove burnt remnants. Do not fry
starchy foods, especially potato and cereal products, at a temperature above 175°C (to minimise
the production of acrylamide).
Do not fry Asian rice cakes (or similar types of food) in this appliance. This might cause heavy
spattering or violent bubbling of the oil or fat.
Make sure the fryer is always lled with oil or fat to a level between the ‘MIN’ and ‘MAX’
-
indications on the inside of the inner bowl to prevent either overowing or overheating.
Do not switch on the appliance before you have lled it with oil or fat, as this can damage the
appliance.
This appliance is intended for household use only. If the appliance is used improperly or for
professional or semi-professional purposes or if it is not used according to the instructions in
the user manual, the guarantee becomes invalid and Philips refuses any liability for damage
caused.
Electromagnetic elds (EMF)
This Philips appliance complies with all standards regarding electromagnetic elds (EMF). If handled
properly and according to the instructions in this user manual, the appliance is safe to use based on
scientic evidence available today.
Safety
Thermal safety cut-out
This appliance is equipped with a thermal safety cut-out that switches off the appliance if it
overheats.
This may happen if there is not enough oil or fat in the fryer or if blocks of solid fat are melted in
the fryer, which prevents the heating element from being able to give off its heat.
Take the following measures if the fryer does not work anymore:
1 Unplug the appliance.
2 Let the oil or fat cool down.
3 Carefully press the reset button at the front of the fryer, above the top right-hand corner of
the display, with a very small screwdriver (Fig. 2).
Now the appliance is ready for use again.
Note: If the appliance still does not work after you have reset it, go to your Philips dealer or a service
centre authorised by Philips.
Preparing for use
Put the appliance on a horizontal, even and stable surface out of the reach of children.
1
2 Take the entire cord from the cord storage compartment (Fig. 3).
3 Fill the fryer with oil, liquid fat or melted solid fat up to the top indication mark on the inside
of the inner bowl (see section ‘Oil and fat’ for instructions on how to use solid fat) (Fig. 4).
Do not switch on the appliance before you have lled it with oil or fat.
Oil and fat
Never mix different types of oil or fat and never add fresh oil or fat to used oil or fat.
We advise you to use fr ying oil or liquid frying fat, preferably vegetable oil or fat that is rich in
unsaturated fats (e.g. linoleic acid), such as soy oil, peanut oil, maize oil or sunower oil.
Only use types of oil or fat that are suitable for deep frying and that contain an antifoam agent. You
can nd this information on the package or label of the oil or fat.
Page 8

ENGLISH8
Solid fat
It is also possible to use solid frying fat, but in that case extra precautions are necessary to prevent
the fat from spattering and the heating element from overheating:
1 If you want to use new blocks of fat, melt them slowly over a low heat in a normal pan.
2 Pour the melted fat carefully into the fryer.
3 Store the fryer with the resolidied fat still in it at room temperature.
4 If the fat gets very cold, it may start spattering when melted. Punch some holes into the
resolidied fat with a fork to prevent this. (Fig. 5)
Be careful not to damage the coating of the inner bowl while you do this.
Using the appliance
Frying
1 Put the plug in the wall socket.
Make sure the cord does not come into contact with hot parts of the appliance.
2 Set the on/off switch to ‘I’ to switch on the fryer. (Fig. 6)
The power-on light in the on/off switch goes on and you hear an audible signal.
This appliance is equipped with electronic temperature control. The set temperature appears on the
display of the appliance.
3 Press the temperature button one or more times to set the required frying temperature
(150-190°C). The display shows the selected temperature. (Fig. 7)
For the required temperature, see the package of the food to be fried or the food table at the end
of this booklet.
If you do not set a temperature, the oil or fat is heated to 150°C.
You can leave the basket in the fryer while the oil or fat heats up.
The oil or fat is heated to the selected temperature in 10 to 15 minutes.
,
While the fryer heats up, the thermometer symbol on the display lls and empties
,
continuously. When the entire thermometer symbol, including the top segment, has turned
black, the oil or fat has reached the selected temperature. You hear an audible signal to
indicate that the fryer is ready for frying the rst batch.
Note: If you want to fry a number of batches in a row, wait until the thermometer symbol has turned
completely black again before you start frying the next batch. In this case you do NOT hear an audible
signal.
4 Lift the handle to raise the basket to its highest position (Fig. 8).
5 Pull the lid release lever to open the lid (Fig. 9).
The lid opens automatically.
,
6 Remove the basket from the fryer and put the food to be fried in the basket (Fig. 10).
For the best frying results, we advise you not to exceed the quantities mentioned in the table below
and in the food table at the end of this booklet. Exceeding the recommended quantity reduces the
effectiveness of the Active Air Control system and may cause some water to end up under the fryer.
Recommended quantities
HD6180 Home-made French fries Frozen French fries
Max. quantity 800g 800g
Page 9

ENGLISH 9
HD6180 Home-made French fries Frozen French fries
Recommended max. quantity for best
end result
Do not fry Asian rice cakes (or similar types of food) in this appliance as this might cause heavy
spattering or violent bubbling of the oil or fat.
7 Carefully insert the basket into the fryer. Do not lower it into the oil or fat.
8 Close the lid. (Fig. 11)
Make sure the lid is properly closed to prevent that hot steam escapes during frying and to
guarantee that the Active Air Control ` system functions optimally.
9 Set the required frying time (see section ‘Timer’ in this chapter). You can also use the fryer
without setting the timer.
10 Press the release button of the basket handle and carefully lower the basket to its lowest
position (Fig. 12).
Stick to the preparation time indicated on the package of the food to be fried or mentioned in
the food table at the end of this booklet.
Active Air Control `
1 This appliance is equipped with Active Air Control ` , a closed system based on the principle
of condensation that offers a reduction of frying odours by up to 100%. (Fig. 13)
The system condenses the steam produced by frying into water in a continuous process. The
condensed water is collected in a water reservoir in the bottom of the fryer housing.
The condensed water reservoir has a capacity of 750ml, which is enough to hold the quantity of
-
condensed water resulting from frying 1.6kg frozen French fries.
The level indicator at the front of the reservoir tells you how much water has already been
collected in the water reservoir and the maximum amount it can contain.
Once you have set the”on/off switch to ‘I’, the Active Air Control
,
and the fan in the rear part of the fryer starts running, to cool down and condense the frying
steam that develops inside the fryer.
The blue System Active light indicates that the Active Air Control
,
Timer
This appliance is equipped with an electronic timer on the display.
The timer indicates the end of the frying time, but does NOT switch off the fryer.
500g 500g
` system starts working
` system works. (Fig. 14)
1 Press the timer button to set the frying time in minutes. The set time becomes visible on the
display (Fig. 15).
2 Keep the timer button pressed to put the minutes forward quickly. Release the button once
the required frying time has been reached.
The maximum time that can be set is 99 minutes.
Note: If the preset time is not correct, press the timer button for 2 seconds at the moment the timer
starts counting down (i.e. when the time starts to ash) to erase it. Keep the button pressed until ‘00’
appears on the display. You can now set the correct frying time.
A few seconds after you have set the frying time, the timer starts to count down.
,
While the timer is counting down, the remaining frying time ashes on the display. The last
,
minute is displayed in seconds.
Page 10

ENGLISH10
When the preset time has elapsed, you hear an audible signal. After 10 seconds the audible
,
signal is repeated.
3 Press the timer button to stop the audible signal.
ReFresh indication
For better, tastier and healthier frying results, this appliance is equipped with a ReFresh function,
which advises you when to change the oil or fat. After 6 hours of frying, the ReFresh symbol appears
on the display and starts ashing, advising you to change the oil or fat (see chapter ‘Cleaning’, section
‘Changing the oil or fat’).
1 After you have changed the oil or fat, press the ReFresh button for at least 2 seconds to
reset the frying session counter (Fig. 16).
The ReFresh function does not interfere with the frying process, which means that you can always
continue frying without changing oil or fat.
After frying
1 Lift the handle to raise the basket to its highest position, i.e. the draining position. (Fig. 10)
2 Pull the lid release lever to open the lid. (Fig. 9)
The lid opens automatically.
,
3 Carefully remove the basket from the fryer. If necessary, shake the basket over the fryer to
remove excess oil or fat (Fig. 10).
Put the fried food in a bowl or colander containing grease-absorbing paper, e.g. kitchen paper.
4 Set the on/off switch to ‘O’ to switch off the fryer. Unplug the appliance after use (Fig. 17).
The power-on light in the on/off switch goes out.
,
5 Unplug the appliance.
Do not move the fryer until the oil or fat has cooled down sufciently.
6 Remove the water reservoir.
Always remove and empty the water reservoir after frying.
The water reservoir and the water in it can be hot! Let the water reservoir cool down
sufciently before you remove it from the fryer.
7 Empty the water reservoir in the sink (Fig. 18).
The lid of the water reservoir is detachable. The reservoir and its lid can be cleaned in the
dishwasher or in hot water with some washing-up liquid.
Note: If you do not use the fryer regularly, we advise you to remove the oil or liquid fat and to store it in
well-closed containers, preferably in the refrigerator or in a cool place. Fill the containers by pouring the
oil or fat through a ne sieve to remove food particles. Remove the frying basket before you empty the
inner bowl.
Quantities, temperatures and frying times
In the food table (Fig. xx) at the end of this booklet you nd an overview of the quantities, frying
temperatures and frying times for various types of food. Always stick to the information in this table
or on the package of the food to be fried.
Cleaning
Wait until the oil or fat has cooled down sufciently.
Never immerse the housing, which contains electrical components and the heating element, in
water nor rinse it under the tap.
Page 11

ENGLISH 11
Do not use caustic or abrasive (liquid) cleaning agents or materials such as washing soda,
scouring liquid or powder or scouring pads to clean the fryer.
1 Press the release button on the hinge to unlock the lid. (Fig. 19)
2 Lift the lid out of the hinge (Fig. 20).
Note: When you put the lid back onto the appliance, make sure that you insert it properly into the hinge.
3 Remove the frying basket from the fryer.
4 Lift the inner bowl out of the appliance and pour out the oil or fat (Fig. 21).
PreClean function
This appliance is equipped with a PreClean function, which enables you to soak the inner bowl with
hot water to allow easier cleaning.
1 Fill the inner bowl with cold water up to three quarters of its capacity and add some
washing-up liquid (Fig. 22).
2 Set the on/off switch to ‘I’ to switch on the appliance. Within 30 seconds, press the PreClean
button for at least 2 seconds to activate the PreClean function. (Fig. 23)
The water is heated to 80°C for 30 minutes to soak the inner bowl. This makes it easier for
,
you to clean the bowl. (Fig. 24)
3 When 30 minutes have passed, you hear an audible signal to indicate that the heating element
is turned off. You can now lift the inner bowl out of the fryer, empty it and clean it with hot
water and some washing-up liquid.
Dishwasher-proof parts
All parts, except the housing with electrical components and the heating element, can be cleaned in
the dishwasher or in hot water with some washing-up liquid.
Clean the housing with a moist cloth (with some washing-up liquid) and/or kitchen paper.
Dry all par ts thoroughly after cleaning.
-
Cleaning the glass lid
This appliance is equipped with a glass lid with a permanent sealing ring. Do not remove the
sealing ring to guarantee optimal functioning (Fig. 25).
Clean the glass lid in the dishwasher or in hot water with some washing-up liquid every time
you have used the appliance.
Changing the oil or fat
Because oil and fat lose their favourable properties rather quickly, you have to change the oil or fat
regularly. The ReFresh symbol advises you when to change the oil or fat (see chapter ‘Using the
appliance’, section ‘ReFresh indication’).
If you use the fryer to prepare food that is rich in proteins (such as meat or sh), you should
change the oil or fat more often.
Never use the same oil or fat longer than 6 months and always follow the instructions on the
package.
Never add fresh oil or fat to used oil or fat.
Never mix different types of oil or fat.
Always change the oil or fat if it starts foaming when it is heated, if it has a strong smell or taste
or if it turns dark and/or syrupy.
Disposing of used oil or fat
Pour used oil or liquid fat back into its original (resealable) plastic bottle. You can dispose of used fat
by letting it solidify in the fryer (without the basket in it) and subsequently scooping it out of the
Page 12
ENGLISH12
fryer with a spatula and wrapping it in a newspaper. If applicable, you can put the bottle or
newspaper in the bin for non-compostable waste (not in the compostable waste bin) or dispose of
it in accordance with the regulations in your country.
Storage
Put all parts back onto/into the fryer and close the lid.
1
When you put the lid back onto the appliance, make sure that the holder has been moved
backwards and that you insert the lid properly into the hinge.
2 Wind up the cord and push it back into the storage compartment (Fig. 26).
3 Lift the fryer by its handles (Fig. 27).
4 If the fryer contains solid fat, let the fat solidify in the fryer and store the fryer with the fat in
it (see chapter ‘Preparing for use’).
Frying tips
For information about which quantities and settings to select, see the food table at the end of
this booklet.
Carefully shake off as much ice and water as possible and dab the food to be fried until it is
properly dry.
Do not fry large quantities at one time. Do not exceed the quantities mentioned in the food
table at the end of this booklet.
Getting rid of unwanted avours
Certain types of food, par ticularly sh, can give the oil or fat an unpleasant avour. To neutralise the
taste of the oil or fat:
1 Heat the oil or fat to a temperature of 160°C.
2 Put two thin slices of bread or a few sprigs of parsley in the oil.
3 Wait until no more bubbles appear and then scoop the bread or the parsley out of the fryer
with a spatula.
The oil or fat now has a neutral taste again.
Home-made French fries
You make the tastiest and crispiest French fries in the following way:
1 Use rm potatoes and cut them into sticks. Rinse the sticks with cold water.
This prevents them from sticking to each other during frying.
Note: Dry the sticks thoroughly.
2 Fry the French fries twice: the rst time for 4-6 minutes at a temperature of 160°C, the
second time for 5-8 minutes at a temperature of 175°C. Let the French fries cool down
before you fry them for the second time.
3 Put the home-made French fries in a bowl and shake them.
Environment
Do not throw away the appliance away with the normal household waste at the end of its life,
-
but hand it in at an ofcial collection point for recycling. By doing this, you help to preserve the
environment (Fig. 28).
Page 13

ENGLISH 13
Guarantee & service
If you need information or if you have a problem, please visit the Philips website at www.philips.com
or contact the Philips Customer Care Centre in your country (you nd its phone number in the
worldwide guarantee leaet). If there is no Customer Care Centre in your country, go to your local
Philips dealer or contact the Service Depar tment of Philips Domestic Appliances and Personal Care
BV.
Troubleshooting
This chapter summarises the most common problems you could encounter with the appliance. If
you are unable to solve the problem with the information below, contact the Customer Care
Centre in your country.
Problem Possible cause Solution
The fried food
does not have a
golden brown
colour and/or is
not crispy.
The fryer gives
off a strong
unpleasant smell.
A lot of steam
escapes from the
fryer.
The water
reservoir leaks.
The oil or fat is not clean
anymore.
There is too much food in
the basket.
The Active Air Control
system does not work
properly.
The type of oil or fat used
is not suitable for deep
frying food.
The lid has not been
closed properly.
The Active Air Control
system does not work
properly.
The sealing ring around
the inside of the lid is dirty
or worn.
There is too much water
in the reservoir.
Change the oil or fat. Remember to reset the
ReFresh button after that. See chapter ‘Using the
appliance’, section ‘ReFresh indication’.
Do not fry more food at one time than
the quantities mentioned in the food table at the
end of this booklet.
The thermal safety cut-out has switched off the
appliance. Let the oil or fat cool down and
carefully press the reset button at the front of
the fryer (see chapter ‘Safety’).
The fan does not work. Go to your Philips
dealer or a service centre authorised by Philips.
Use frying oil or liquid fr ying fat of good quality.
Never mix different types of oil or fat.
Check whether the lid has been closed properly.
The fan does not work. Go to your Philips
dealer or a service centre authorised by Philips.
If the ring is dirty, clean the lid in hot water with
some washing-up liquid or in the dishwasher. If
the lid is worn, go to your Philips dealer or a
service centre authorised by Philips to have the
sealing ring replaced.
Always empty the water reservoir after you
have used the fryer. If you are frying large
quantities, empty the water reser voir after frying
1.6kg of frozen French fries or when the
maximum water level has been reached.
Page 14

ENGLISH14
Problem Possible cause Solution
The PreClean
function cannot
be activated.
Oil or fat spills
over the edge of
the fryer during
frying.
The oil or fat
foams strongly
during frying.
The fryer does
not work.
The fryer makes
plopping sounds
that are louder
than usual (it is
normal for the
fryer to make
soft plopping
sounds).
The water reservoir has
not been inserted
properly.
More than 30 seconds
elapsed between the
moment you switched on
the appliance and the
moment you pressed the
PreClean button. In this
case, the PreClean
function is not activated.
There is too much oil or
fat in the fryer.
The food contains too
much moisture.
There is too much food in
the frying basket.
The food contains too
much moisture.
The type of oil or fat used
is unsuitable for deep
frying food.
The inner bowl has not
been placed properly in
the fryer.
The thermal safety cut-out
has switched off the
appliance.
The food contains too
much moisture.
Check whether the water reservoir has been
inserted properly (you hear a click).
Set the on/off switch to ‘I’ to switch on the
appliance. Then press the PreClean button
within 30 seconds.
Make sure the oil or fat in the fryer does not
exceed the maximum level.
Dry the food thoroughly before you fry it. Then
fry the food according to the instructions in this
user manual.
Do not fry more food at one time than the
quantities mentioned in the food table at the
end of this booklet.
Dry the food thoroughly before you fry it.
Never mix different types of oil or fat and use
oil or liquid fat that contains an antifoam agent.
Move the inner bowl slightly to and fro in the
appliance to ensure that it is in the correct
position.
Let the oil or fat cool down. Carefully press the
reset button at the front of the fryer (see
chapter ‘Safety’).
If the fryer still does not work, go to your Philips
dealer or a service centre authorised by Philips.
Dry the food thoroughly before you fry it.
Page 15

한국어
제품 소개
필립스 제품을 구입해 주셔서 감사합니다! 필립스가 드리는 지원 혜택을 받으실 수 있도
록 www.philips.com/welcome에서 제품을 등록하십시오.
각 부의 명칭 (그림 1)
A 튀김 바구니
B 열림 버튼
C 바구니 손잡이
D 분리형 내부 용기
E 뚜껑 열림 레버
F Reset(리셋) 버튼
G 온도 버튼
H 타이머 버튼
I 전원 표시등이 있는 전원 스위치
J 급수통 뚜껑
K 급수통
L 전원 코드
M 코드 보관함
N PreClean 버튼
O ReFresh 버튼
P 뚜껑 분리용 열림 버튼
Q 분리형 유리 뚜껑
R 시스템 활성 표시등
중요사항
본 제품을 사용하기 전에 이 사용 설명서를 주의 깊게 읽고 나중에 참조할 수 있도록 잘
보관하십시오.
위험
전기 부품과 가열 장치가 들어 있으므로 본체를 절대로 물에 담그거나 헹구지 마십시
-
오.
경고
제품에 전원을 연결하기 전에, 제품에 표시된 전압과 사용 지역의 전압이 일치하는지
-
확인하십시오.
만약 플러그나 전원 코드 또는 제품이 손상되었을 경우에는 제품을 사용하지 마십시
-
오.
전원 코드가 손상된 경우, 안전을 위해 필립스 서비스 센터 또는 필립스 서비스 지정
-
점에 의뢰하여 교체하십시오.
신체적인 감각 및 정신적인 능력이 떨어지거나 경험과 지식이 풍부하지 않은 사용자
-
(어린이 포함)는 혼자 제품을 사용하지 말고 제품 사용과 관련하여 안전에 책임 질 수
있도록 지시사항을 충분히 숙지한 사람의 도움을 받으십시오.
어린이가 제품을 가지고 놀지 못하도록 지도해 주십시오.
-
전원 코드는 어린이의 손이 닿지 않는 곳에 보관하십시오. 제품이 올려져 있는 식탁
-
이나 조리대의 가장자리로 전원 코드가 흘러내리지 않도록 하십시오.
제품은 반드시 접지된 벽면 콘센트에 연결하십시오.
-
뚜껑을 열 때 뜨거운 증기를 조심하십시오.
-
주의
검사 또는 수리가 필요한 경우에는 항상 필립스 지정 서비스 센터로 문의하십시오.
-
품질 보증이 무효화되므로, 제품을 직접 수리하지 마십시오.
제품은 평평하고 안정적인 곳에 놓으십시오.
-
제품이 작동 중일 때에는 뚜껑의 유리 부분이 뜨거워지므로 만지지 마십시오.
-
15
Page 16

한국어16
재료가 검은색이나 짙은 갈색이 될 때까지 튀기지 말고 황금빛 도는 노란색이 되도록
-
튀기고, 타버린 찌꺼기는 제거하십시오. 감자나 곡물 제품처럼 녹말 성분이 많은 음
식은 175°C 이상의 온도에서 튀기지 마십시오(아크릴아미드 생성 최소화).
떡과 같은 쌀 가공 식품은 이 제품을 이용해 튀기지 마십시오. 식용유나 패트가 매우
-
심하게 튀거나 거품이 강하게 끓어올라 위험합니다.
식용유 또는 패트가 넘치거나 과열되지 않도록 항상 내부 용기의 ‘MIN’과
-
‘MAX’ 표시 이내로 채우십시오.
제품이 손상될 수 있으므로, 식용유나 패트를 채우지 않은 상태에서 제품의 전원을
-
켜지 마십시오.
본 제품은 가정용입니다. 제품을 부적절하게 사용하거나 사업장이나 준사업장에서
-
사용하는 경우, 또는 사용 설명서에 따라 이용하지 않는 경우, 보증 서비스를 받을 수
없으며 필립스는 이로 인해 발생한 피해에 대해 책임을 지지 않습니다.
EMF(전자기장)
이 필립스 제품은 EMF(전자기장)와 관련된 모든 기준을 준수합니다. 이 사용 설명서의
지침에 따라 적절하게 취급할 경우 이 제품은 안전하게 사용할 수 있으며 이는 현재까지
의 과학적 증거에 근거하고 있습니다.
안전
안전 열 차단
본 제품에는 안전 열 차단 기능이 내장되어 있으므로 제품이 과열되면 꺼집니다.
튀김기에 식용유나 패트가 부족하거나 고형 패트 덩어리가 튀김기에서 녹아 가열 장치가
열을 발산할 수 없으면 이러한 문제가 발생할 수 있습니다.
튀김기가 작동하지 않을 경우 다음 단계를 따르십시오.
1 제품의 전원 코드를 뽑으십시오.
2 식용유나 패트를 식히십시오.
3 튀김기 앞 표시창의 우측 상단 모서리 위에 있는 Reset(리셋) 버튼을 매우 작은 드라
이버로 조심스럽게 누르십시오 (그림 2).
이제 제품을 다시 사용할 수 있습니다.
참고: 제품을 리셋한 이후에도 작동하지 않으면 필립스 대리점이나 지정된 필립스 서비
스 센터에 방문하십시오.
사용 전 준비
제품은 어린이의 손이 닿지 않는, 평평하고 안정적인 수평 장소에 놓으십시오.
1
2 코드 보관함에서 코드를 모두 꺼내십시오 (그림 3).
3 식용유, 액상 패트, 녹인 고형 패트를 튀김기의 내부 용기에 있는 최대 표시선까지 채
우십시오(고형 패트 사용 방법은 ‘식용유 및 패트’란 참조) (그림 4).
식용유나 패트를 채우지 않은 상태에서 제품을 켜지 마십시오.
식용유 및 패트
절대 다른 종류의 식용유와 패트를 섞거나, 사용한 식용유 또는 패트에 신선한 식용유 또
는 패트를 첨가하지 마십시오.
튀김용 식용유나 튀김용 액상 패트를 사용하는 것이 좋습니다. 특히 콩기름, 땅콩기름,
옥수수기름 또는 해바라기씨 기름과 같이 불포화 지방(리놀렌산)이 풍부하게 함유된 식
물성 식용유 또는 패트를 사용할 것을 권장합니다.
튀김 요리에 적합하고 소포제를 포함한 식용유나 패트의 유형만 사용하십시오. 이 정보
는 식용유나 패트의 포장 또는 레이블에서 찾을 수 있습니다.
Page 17

한국어 17
고형 패트
고형 패트도 사용할 수 있습니다. 이런 경우, 패트가 튀거나 가열 장치가 과열되는 것을
방지하려면 특별한 주의가 필요합니다.
1 새로운 패트 덩어리를 사용할 경우에는 일반 프라이팬에서 낮은 온도로 서서히 녹이
십시오.
2 녹은 패트를 튀김기에 천천히 부으십시오.
3 다시 고체가 된 패트가 들어 있는 튀김기는 실내 온도에서 보관하십시오.
4 매우 차가운 패트는 녹을 때 튈 수 있습니다. 튐 현상을 방지하려면 고체가 된 패트에
포크나 젓가락으로 구멍을 몇 개 뚫어 주십시오. (그림 5)
이렇게 할 때, 내부 용기의 코팅이 손상되지 않도록 주의하십시오.
제품 사용
튀김
1 플러그를 벽면 콘센트에 꽂으십시오.
코드가 제품의 뜨거운 부분과 닿지 않도록 주의하십시오.
2 튀김기의 전원 스위치를 ‘I’로 설정하여 제품을 켜십시오. (그림 6)
스위치의 전원 표시등이 켜지고 신호음이 나옵니다.
본 제품은 온도 조절기 기능이 탑재되어 있습니다. 설정된 온도는 제품의 표시창에 나타
납니다.
3 온도 조절 버튼을 한 번 이상 눌러서 원하는 튀김 온도(150-190°C)를 설정하십시
오. 표시창에 선택된 온도가 나타납니다. (그림 7)
필요한 온도는 튀김할 재료의 포장 또는 본 책자 마지막 부분의 음식 표를 참조하십시오.
온도를 설정하지 않으면 식용유나 패트가 150°C로 가열됩니다.
식용유나 패트가 가열되는 동안 튀김기에 바구니를 넣어 두셔도 됩니다.
식용유나 패트는 10 - 15분 내에 선택된 온도로 가열됩니다.
,
튀김기가 가열되는 동안 표시창의 온도계 표시가 계속 채워졌다가 비워집니다. 위쪽
,
구분을 비롯한 전체 온도계 표시가 검은색으로 변하고 식용유나 패트는 선택된 온도
에 도달합니다. 튀김기에서 처음으로 튀길 수 있음을 알려주는 신호음이 들립니다.
참고: 연속해서 여러 번을 튀기려면, 다음 튀김을 시작하기 전에 온도계 표시가 다시 완
전히 검은색으로 변할 때까지 기다리십시오. 이 경우에는 신호음이 들리지 않습니다.
4 손잡이를 펴서 바구니를 가장 높은 위치로 올리십시오 (그림 8).
5 뚜껑 열림 레버를 당겨 뚜껑을 여십시오 (그림 9).
뚜껑이 자동으로 열립니다.
,
6 튀김기에서 바구니를 꺼낸 다음, 튀김 재료를 바구니에 넣으십시오 (그림 10).
최상의 결과를 위해 아래 표와 본 책자 마지막 부분의 음식 표에 나와있는 용량을 초과하
지 않는 것이 좋습니다. 권장 용량을 초과하면 Active Air Control 시스템의 효율성이 줄
어들고 튀김기 아래 물이 남을 수 있습니다.
권장량
HD6180 프렌치 프라이(감자 튀김)
만들기
최대 용량 800g 800g
냉동 프렌치 프라이(감자
튀김)
Page 18

한국어18
HD6180 프렌치 프라이(감자 튀김)
만들기
가장 맛있게 만들 수 있는
최대 권장량
떡과 같은 쌀 가공 식품은 이 제품을 이용해 튀기지 마십시오. 식용유나 패트가 매우 심
하게 튀거나 거품이 강하게 끓어올라 위험합니다.
7 조심해서 바구니를 튀김기에 넣으십시오. 식용유나 패트에 담그지 마십시오.
8 뚜껑을 닫으십시오. (그림 11)
튀기는 도중 뜨거운 증기가 새어나가지 않고 Active Air Control ` 시스템이 최적으로
기능하도록 뚜껑을 확실히 닫으십시오.
9 원하는 튀김 온도를 설정하십시오(이 장의 ‘타이머’란 참조). 타이머를 설정하지
않고 튀김기를 사용할 수도 있습니다.
10 바구니 손잡이의 버튼을 누르고 조심스럽게 바구니를 가장 낮은 위치로 내리십시
오 (그림 12).
튀김 재료 포장이나 본 책자 마지막 부분의 음식 표에 나와있는 준비 시간을 따르십시오.
Active Air Control `
1 본 제품은 응축 원리를 바탕으로 불쾌한 기름 냄새를 말끔히 없애주는 밀폐형 시스템
인 Active Air Control `을 탑재하고 있습니다. (그림 13)
본 시스템은 튀기면서 나오는 증기를 계속적으로 물로 응축합니다. 응축된 물은 튀김
-
기 본체의 바닥에 있는 급수통에 모아집니다.
응축된 물의 급수통은 용량이 750ml로 1.6kg의 냉동 프렌치 프라이(감자 튀김)를 튀
-
기고 나오는 응축된 물을 담을 만큼의 양입니다.
급수통 앞의 수위 표시기는 급수통에 이미 모아진 물의 양과 통에 담을 수 있는 최대
-
용량을 알려줍니다.
전원 스위치를 ‘I’로 맞추면 Active Air Control ` 시스템이 작동하기 시작하고 후
,
면부의 팬이 작동하기 시작하여 열을 식히고 튀김기 내에서 발생되는 튀김 증기를 응
축합니다.
파란색 System Active 표시등은 Active Air Control ` 시스템이 작동 중임을 표시합
,
니다. (그림 14)
타이머
본 제품은 표시창에 전자식 타이머가 장착되어 있습니다.
타이머는 튀김 시간이 끝났음을 알려주지만, 튀김기의 전원이 꺼지지는 않습니다.
500g 500g
냉동 프렌치 프라이(감자
튀김)
1 타이머 버튼을 눌러서 튀김 시간을 분으로 설정합니다. 설정된 시간이 표시창에 나타
납니다 (그림 15).
2 타이머 버튼을 계속 누르고 있으면 분 표시가 빠르게 지나갑니다. 원하는 튀김 시간
이 되면 버튼을 놓으십시오.
최대 99분까지 시간을 설정할 수 있습니다.
참고: 사전 설정 시간이 정확하지 않으면 타이머가 카운트 다운을 시작할 때(예를 들어,
깜박이기 시작할 때) 타이머 버튼을 2초 동안 눌러 설정을 지우십시오. 표시창에
‘00’이 나타날 때까지 버튼을 계속 누르고 계십시오. 이제 정확한 튀김 시간을 설정할
수 있습니다.
튀김 시간을 설정하고 몇 초 정도 지나면 타이머가 카운트 다운을 시작합니다.
,
Page 19

한국어 19
타이머가 카운트 다운을 하는 동안 남은 튀김 시간이 표시창에 깜박이며 나타납니다.
,
마지막 1분은 초 단위로 나타납니다.
설정한 시간이 경과될 때 신호음이 들립니다. 이 신호음은 10초마다 반복됩니다.
,
3 신호음을 멈추려면 타이머 버튼을 누르십시오.
ReFresh 표시
본 제품은 보기 좋고 맛도 좋고 위생적인 튀김 음식을 만들기 위해 식용유나 패트의 교체
시기를 알려주는 ReFresh 기능을 장착하였습니다. 6시간 동안 튀긴 후에는 표시창에
ReFresh 표시가 나타나고 깜박이기 시작하여 식용유나 패트의 교체를 권장합니다(‘청
소’장의 ‘식용유나 패트 교체’란 참조).
1 식용유나 패트를 교체한 후, ReFresh 버튼을 2초 이상 눌러서 튀김 세션 조리대를
리셋하십시오 (그림 16).
ReFresh 기능은 튀김 조리 과정을 방해하지 않으므로 조리 과정 중에는 식용유나 패트
를 교체하지 않고 계속 튀길 수 있습니다.
튀김 요리 후
1 손잡이를 펴서 바구니를 기름이 빠지는 가장 높은 위치로 들어 올리십시오. (그
림 10)
2 뚜껑 열림 레버를 당겨 뚜껑을 여십시오. (그림 9)
뚜껑이 자동으로 열립니다.
,
3 튀김기에서 바구니를 조심스럽게 꺼내십시오. 필요한 경우 바구니를 튀김기 위에서
흔들어 남은 식용유나 패트를 제거하십시오 (그림 10).
키친 타올처럼 기름기를 흡수하는 종이를 깐 그릇에 튀김 요리를 담으십시오.
4 전원 스위치를 ‘O’로 맞추어 튀김기의 전원을 끄십시오. 사용 후 전원 코드를 뽑
으십시오 (그림 17).
전원 스위치의 전원 표시등이 꺼집니다.
,
5 제품의 전원 코드를 뽑으십시오.
식용유나 패트가 충분히 식을 때까지 튀김기를 옮기지 마십시오.
6 급수통을 꺼내십시오.
튀긴 후에는 항상 급수통을 비워 버리십시오.
급수통과 내부의 물은 뜨거울 수 있습니다! 튀김기에서 물을 버리기 전에 급수통의 열을
충분히 식히십시오.
7 급수통은 싱크대에서 비우십시오 (그림 18).
급수통의 뚜껑은 분리할 수 있습니다. 급수통과 뚜껑은 식기세척기나 소량의 세제를 푼
뜨거운 물로 세척할 수 있습니다.
참고: 튀김기를 정기적으로 사용하지 않을 경우 식용유나 패트를 따라내어 밀봉된 용기
에 담아 냉장고나 시원한 장소에 두는 것이 좋습니다. 촘촘한 거름망으로 음식 찌꺼기를
제거한 식용유나 패트를 부어 용기를 채우십시오 내부 용기를 비우기 전에 튀김 바구니
를 꺼내십시오.
용량, 온도 및 튀김 시간
본 책자 마지막 부분의 음식 표(그림. xx)에는 다양한 재료에 따른 용량, 튀김 온도 및 튀
김 시간이 간략하게 표시되어 있습니다. 반드시 이 표 또는 튀김 재료 포장에 나와있는
정보를 따르십시오.
Page 20

한국어20
청소
식용유나 패트가 충분히 식을 때까지 기다리십시오.
전기 부품과 가열 장치가 들어 있으므로 본체를 절대로 물에 담그거나 헹구지 마십시오.
세탁용 소다, 연마 액체 또는 가루와 같은 부식성 또는 연마성(액체) 세제 또는 수세미와
같은 물질을 사용하여 튀김기를 닦지 마십시오.
1 경첩의 열림 버튼을 눌러 뚜껑을 여십시오. (그림 19)
2 경첩에서 뚜껑을 들어 올리십시오 (그림 20).
참고: 제품 뚜껑을 다시 닫을 때, 경첩으로 정확하게 삽입했는지 확인하십시오.
3 튀김기에서 바구니를 꺼내십시오.
4 내부 용기를 제품에서 꺼내어 식용유 또는 패트를 따르십시오 (그림 21).
PreClean 기능
본 제품은 PreClean 기능을 장착하여 내부 용기를 뜨거운 물에 헹구어 쉽게 세척할 수
있습니다.
1 차가운 물을 내부 용기 용량의 최대 3/4까지 채우고 소량의 세제를 넣으십시오 (그
림 22).
2 전원 스위치를 ‘I’로 설정하여 제품을 켜십시오. 30초 이내에 PreCelan 버튼을
2초 이상 눌러 PreClean 기능을 활성화하십시오. (그림 23)
80°C로 가열된 물이 내부 용기를 30분 동안 헹굽니다. 이 기능을 사용하면 용기를
,
편리하게 세척할 수 있습니다. (그림 24)
3 30분이 지나면 가열 장치가 꺼짐을 알리는 신호음이 나옵니다. 튀김기의 내부 용기
를 들어올려 내용물을 비우고 뜨거운 물과 세제로 세척하여 주십시오
식기세척기 사용가능 부품
전기 부품과 가열 장치가 있는 본체를 제외한 모든 부품은 식기 세척기나 소량의 세제를
푼 뜨거운 물로 세척할 수 있습니다.
소량의 세제를 묻힌 천이나 키친 타올로 외장을 닦으십시오.
-
세척 후에는 모든 부품을 완전히 말리십시오.
-
유리 뚜껑 청소
본 제품은 영구 봉합 링이 있는 유리 뚜껑이 장착되어 있습니다. 최적의 기능을 보증
-
하는 봉합 링을 제거하지 마십시오 (그림 25).
제품을 사용한 후에는 항상 유리 뚜껑을 식기 세척기나 소량의 세제를 푼 뜨거운 물
-
로 세척해 주십시오
식용유나 패트 교체
식용유와 패트의 좋은 성분은 다소 빨리 사라지기 때문에, 정기적으로 식용유 또는 패트
를 교체해야 합니다. ReFresh 표시가 식용유나 패트의 권장 교체 시기를 나타냅니다
(‘제품 사용’장의 ‘ReFresh 표시’란 참조).
튀김기를 사용하여 단백질이 풍부한 음식(고기 또는 생선)을 준비하는 경우, 식용유
-
나 패트를 보다 자주 교체해야 합니다.
동일한 식용유나 패트를 6개월 이상 사용하지 마시고 항상 포장의 지침을 따르십시
-
오.
사용한 식용유 또는 패트에 신선한 식용유 또는 패트를 첨가하지 마십시오.
-
다른 종류의 식용유와 패트를 섞지 마십시오.
-
가열할 때 거품이 생기거나, 냄새 또는 맛이 강하게 나거나, 색이 진해지거나, 시럽처
-
럼 끈끈해지면 반드시 식용유 또는 패트를 교체하십시오.
Page 21

한국어 21
사용한 식용유나 패트 폐기
사용한 식용유나 패트를 원래(밀봉 가능) 플라스틱 병에 따르십시오. 사용한 패트는 바구
니를 제거한 상태로 튀김기에서 굳히고 이후에 주걱으로 떠서 신문지에 싸서 폐기할 수
있습니다. 해당되는 경우 이 병 또는 신문지를 비료용 이외의 쓰레기통에 버리거나 해당
국가의 규정에 따라 폐기할 수 있습니다.
보관
모든 부품을 튀김기에 다시 넣고 뚜껑을 닫으십시오.
1
제품 뚜껑을 다시 닫을 때 거치대가 뒤로 옮겨졌는지 확인하고 뚜껑을 경첩에 제대로 삽
입했는지 확인하십시오.
2 전원 코드를 감아서 코드 보관함에 넣어두십시오 (그림 26).
3 손잡이 부분을 잡고 튀김기를 들어올리십시오 (그림 27).
4 튀김기에 고형 패트가 들어있는 경우, 패트를 튀김기에서 굳히고 패트가 들어있는 채
로 보관하십시오(‘사용 전 준비’장 참조).
튀김 도움말
용량 및 설정 선택에 대한 정보는 본 책자 마지막의 음식 표를 참조하십시오.
-
튀김 재료에서 얼음과 물을 최대한 털어내고 두드려 물기를 제거하십시오.
-
동시에 너무 많은 양을 튀김기에 넣지 마십시오. 본 책자 마지막의 음식 표에 나와있
-
는 용량을 초과하지 마십시오.
불쾌한 냄새 제거
생선과 같은 음식 재료는 식용유나 패트에 불쾌한 냄새를 남깁니다. 다음과 같이 식용유
나 패트의 맛을 중화시키십시오.
1 식용유나 패트를 160°C까지 가열하십시오.
2 얇은 식빵 두 쪽 또는 파슬리 몇 줄기를 식용유에 넣으십시오.
3 거품이 더 이상 올라오지 않을 때까지 기다린 다음 주걱으로 식빵이나 파슬리를 튀김
기에서 건져 내십시오.
식용유 또는 유지의 맛이 다시 정상으로 돌아옵니다.
프렌치 프라이(감자 튀김) 만들기
다음 방법을 따라 맛있고 바삭한 프렌치 프라이를 만들어 보십시오.
1 단단한 감자를 골라 길쭉하게 썬 다음 찬 물로 씻으십시오.
이렇게 하면 튀기는 도중 서로 달라붙지 않습니다.
참고: 감자를 완전히 말리십시오.
2 감자를 두 번 튀기십시오. 처음 튀길 때는 160°C에서 4-6분간, 두 번째 튀길 때는
175°C에서 5-8분간 튀깁니다. 두 번째 튀기기 전에 감자 튀김을 충분히 식히십시
오.
3 완성된 프렌치 프라이(감자 튀김)를 그릇에 담고 흔드십시오.
환경
수명이 다 된 제품은 일반 가정용 쓰레기와 함께 버리지 마시고 지정된 재활용 수거
-
장소에 버리십시오. 이런 방법으로 환경 보호에 동참하실 수 있습니다 (그림 28).
Page 22

한국어22
품질 보증 및 서비스
보다 자세한 정보가 필요하시거나, 사용상의 문제가 있을 경우에는 필립스전자 홈페이지
(www.philips.co.kr)를 방문하시거나 필립스 고객 상담실로 문의하십시오. 전국 서비스
센터 안내는 제품 보증서를 참조하십시오. *(주)필립스전자: (02)709-1200 *고객 상담
실: (080)600-6600(수신자부담)
문제 해결
이 란은 제품을 사용하면서 가장 일반적으로 경험하게 되는 문제와 그 해결 방법을 제시
합니다. 발생한 문제를 아래 정보로 해결할 수 없는 경우에는 필립스 고객 상담실로 문의
하십시오.
문제점 예상 원인 해결책
튀김 요리가 황
금빛 갈색이 되
지 않고 바삭하
지 않습니다.
튀김기에서 불
쾌한 냄새가 강
하게 납니다.
튀김기에서 증
기가 너무 많이
나옵니다.
급수통에서 물
이 샙니다.
식용유나 패트가 더 이
상 신선하지 않습니다.
바구니에 재료를 너무
많이 넣었습니다.
Active Air Control 시
스템이 제대로 작동하
지 않습니다.
사용하는 식용유 또는
패트가 튀김 요리에 적
합하지 않습니다.
뚜껑이 제대로 닫혀있
지 않습니다.
Active Air Control 시
스템이 제대로 작동하
지 않습니다.
뚜껑 내부 주변 봉합 링
이 더러워졌거나 마모
되었습니다.
급수통에 물을 너무 많
이 넣었습니다.
급수통을 제대로 넣지
않았습니다.
식용유나 패트를 교체하십시오. 교체 이후
에는 ReFresh 버튼으로 리셋해야 합니다.
‘제품 사용’장의 ‘ReFresh 표시’란을
참조하십시오.
본 책자 마지막의 음식 표에 나와있는 용량
보다 많은 양을 튀김기에 동시에 넣지 마십
시오.
열 안전 차단으로 제품의 전원이 꺼졌습니
다. 식용유나 패트를 식히고 튀김기 앞의
Reset 버튼을 조심스럽게 누르십시오(‘안
전’장 참조).
팬이 작동하지 않습니다. 필립스 대리점이
나 필립스 지정 서비스 센터를 방문하십시
오.
좋은 품질의 튀김용 식용유 또는 액상 패트
를 사용하십시오. 다른 종류의 식용유나 패
트를 섞지 마십시오.
뚜껑이 제대로 닫혀 있는지 확인하십시오.
팬이 작동하지 않습니다. 필립스 대리점이
나 필립스 지정 서비스 센터를 방문하십시
오.
링이 더러워지면 소량의 세제를 푼 뜨거운
물 또는 식기 세척기를 이용해 세척하십시
오. 링이 마모되면 필립스 대리점이나 필립
스 지정 서비스 센터를 방문하여 봉합 링을
교체하십시오.
튀김기 사용 후에는 항상 급수통을 비우십
시오. 많은 양을 튀기는 경우 1.6kg의 냉동
프렌치 프라이(감자 튀김)를 튀긴 후 또는
최대 수위에 도달했을 때 비우십시오.
급수통을 제대로 넣었는지 확인하십시오
(딸깍 소리가 남).
Page 23

문제점 예상 원인 해결책
PreClean 기능
이 활성화되지
않았습니다.
튀김 요리 도중
튀김기에서 식
용유나 패트가
넘칩니다.
튀김 요리 도중
식용유나 패트에
서 거품이 너무
많이 발생합니다.
튀김기가 작동
하지 않습니다.
튀김기에서 평
상 시보다 부글
거리는 소리가
크게 나옵니다
(튀김기가 부드
러운 부글거리
는 소리를 내는
것은 정상).
제품의 전원을 켠 시점
에서 PreClean 버튼을
누른 시점까지 30초가
경과되었습니다. 이 경
우 PreClean 기능이 활
성화되지 않았습니다.
튀김기에 식용유나 패
트를 너무 많이 넣었습
니다.
재료에 수분이 너무 많
이 포함되어 있습니다.
튀김 바구니에 재료를
너무 많이 넣었습니다.
재료에 수분이 너무 많
이 포함되어 있습니다.
사용하는 식용유 또는
패트가 튀김 요리에 적
합하지 않습니다.
내부 용기가 튀김기에
제대로 설치되지 않았
습니다.
열 안전 차단으로 제품
의 전원이 꺼져 있습니
다.
재료에 수분이 너무 많
이 포함되어 있습니다.
전원 스위치를 ‘I’로 설정하여 제품을 켜
십시오. 그런 다음 30초 내에 PreClean 버
튼을 누릅니다.
튀김기의 최대 표시선을 넘지 않도록 식용
유나 패트를 넣으십시오.
튀기기 전에 재료를 완전히 말리십시오. 그
런 다음 이 사용 설명서의 지침을 따르십시
오.
본 책자 마지막의 음식 표에 나와있는 용량
보다 많은 양을 튀김기에 동시에 넣지 마십
시오.
튀기기 전에 재료를 완전히 말리십시오.
다른 종류의 식용유나 패트를 섞지 마시고
소포제가 들어있는 액상 패트를 사용하십
시오
제품에서 내부 용기를 앞 뒤로 가볍게 움직
여서 정확한 위치에 들어있는지 확인하십
시오.
식용유나 패트를 식히십시오. 튀김기 앞에
있는 Reset 버튼을 조심스럽게 누르십시오
(‘안전’장 참조).
튀김기가 작동하지 않으면 필립스 대리점
이나 필립스 지정 서비스 센터를 방문하십
시오.
튀기기 전에 재료를 완전히 말리십시오.
한국어 23
Page 24

24
繁體中文
簡介
恭喜您購買本產品並歡迎加入飛利浦!請於 www.philips.com/welcome 註冊您的產品,
來善用飛利浦提供的支援。
一般說明(圖1)
A 油炸網籃
B 鬆蓋鈕
C 網籃把手
D 可拆式內鍋
E 開蓋控制桿
F 重設按鈕
G 溫度設定鈕
H 定時按鈕
I 開啟/關閉 (On/off) 開關附電源指示燈
J 集水槽蓋
K 集水槽
L 電線
M 收線槽
N PreClean (清潔浸泡) 按鈕
O ReFresh (換油) 按鈕
P 鍋蓋釋放鈕
Q 可拆式玻璃蓋
R 系統啟動指示燈
重要事項
在使用本產品前,請先仔細閱讀本使用手冊,並保留說明以供日後參考。
危險
炸鍋外殼有電子元件及加熱裝置,不可浸泡在水中,或在水龍頭下沖洗。
-
注意
在您連接電源之前,請檢查本地的電源電壓是否與產品所標示的電源電壓相符。
-
當插頭、電線或產品本身受損時,請勿使用產品。
-
如果電線損壞,必須交由飛利浦、飛利浦授權之服務中心,或是具備相同資格的技師
-
更換,以免發生危險。
本產品不適合供下列人士 (包括小孩) 使用:身體官能或心智能力退化者,或是經驗與
-
使用知識缺乏者。他們需要有負責其安全的人員在旁監督,或指示產品的使用方法,
方可使用。
請勿讓孩童將本產品當成玩具。
-
請勿讓兒童接觸電源線。請勿讓電源線懸掛在產品放置的餐桌或流理台邊緣。
-
只將產品連接到有接地的牆壁插座。
-
打開鍋蓋時請小心高溫蒸氣。
-
注意
務必將產品交由飛利浦授權之服務中心檢查或修理。請勿嘗試自己動手修理;否則產
-
品保固將無效。
請將產品置於平穩的表面上。
-
本產品操作時請勿碰觸鍋蓋玻璃部分,以免燙手。
-
將食物炸成金黃色而非黑色或褐色,去除過焦的部份。當油炸澱粉類食物時,尤其是
-
馬鈴薯和穀類產品,請將油溫控制在 175°C 以下 (如此可將儘量降低丙烯醯胺的產
生)。
請勿使用本產品油炸米糕類製品 (或類似食物)。這可能造成炸油嚴重噴濺或劇烈沸
-
騰。
Page 25

繁體中文 25
請確定油炸鍋內的油脂位於內鍋的 MIN (最低) 與 MAX (最高) 標示之間,以避免溢出
-
或是產生過度加熱的情形。
請勿在倒入炸油前打開電源,這會損害本產品。
-
本電器用品僅供家用。如果不當使用本產品、作為 (半) 專業用途,或未依照使用手冊
-
操作,保固將無效,且飛利浦將不擔負任何損壞賠償責任。
電磁場(EMF)
本飛利浦產品符合電磁場 (electromagnetic fields,EMF) 所有相關標準。若正確處理及依
照本使用手冊之說明進行操作,根據現有之科學文獻來看,使用本產品並無安全顧慮。
安全
防過熱安全裝置
本電器裝有防過熱安全裝置,過熱時會自動關閉。
這種狀況可能發生在油炸鍋的油不夠,或是大塊固態脂肪在鍋內融化時,導致加熱裝置無
法散熱。
如果油炸鍋無法運作,請採取下列步驟:
1 將本產品的插頭拔掉。
2 讓炸油冷卻。
3 小心按下炸鍋正面的重設按鈕。顯示幕右上角會出現小小的螺絲起子圖樣。 (圖 2)
現在油炸鍋可以再次使用。
注意: 如果重設後,本產品仍無法使用,請聯絡您的飛利浦經銷商,或是飛利浦授權的服
務中心。
使用前準備
請將產品至於兒童無法碰觸的平穩均勻表面。
1
2 將整條電線從收線槽取出。 (圖 3)
3 將液態食用油脂或融化的固態食用脂肪倒入鍋內,高度以內鍋最高標示線為限 (請參閱
「炸油」章節,了解如何使用固態脂肪)。 (圖 4)
未倒入炸油前,請勿開啟電源開關。
炸油
請勿將不同種類的油脂混合使用,或將新油加入舊油中。
建議您使用專用炸油或是液態油炸脂肪,最好是含有豐富不飽和脂肪 (例如亞麻油酸) 的植
物油或是植物脂肪,例如大豆油、花生油、玉米油或是葵花油。
只用適合油炸又含有消泡劑的的食用油或脂肪。您可在食用油或脂肪的外包裝或標籤上找
到這項資訊。
固態食用脂肪
您也可以使用固態脂肪油炸。這時需要額外的預防措施,避免油脂噴濺,或是加熱設備過
熱。
1 若您要使用全新的塊狀食用脂肪,請先在一般的平底鍋中以低溫將其融化。
2 將融化過後的食用脂肪小心地倒入油炸鍋內。
3 將凝固的炸油連同炸鍋一起在室溫下收藏。
4 若炸油變得太冷,融化時可能會噴濺。請用叉子在凝結的油脂上戳幾個洞,以防此情
況發生。 (圖 5)
Page 26

繁體中文26
這麼做時請小心不要損壞內鍋表層。
使用本產品
油炸
1 將插頭插入插座。
確定電線不會觸及高溫部分。
2 將電源開關撥到「I」,啟動炸鍋。 (圖 6)
電源指示燈會亮,同時響起訊號聲。
本產品有電子控溫裝置。螢幕會顯示設定溫度。
3 按壓溫度鈕一次或多次,設定需要的油炸溫度 (150-190°C)。螢幕會顯示選定溫
度。 (圖 7)
油炸所需溫度,請參閱油炸食品包裝說明,或是使用手冊最後的食物對照表。
如果沒有設定溫度,炸油會加溫到 150°C。
炸油加熱時,您可以將油炸網籃留在鍋內。
炸油會在 10 到 15 分鐘內加熱到選定溫度。
,
炸鍋加熱時,螢幕的溫度計圖樣會持續顯示由空變滿。等溫度計圖樣連頂端部分整個
,
變暗時,表示炸油已達選定溫度。您會聽到訊號聲,表示炸鍋已經可以油炸第一批食
物。
注意: 連續油炸多批食物時,請等溫度計圖樣再次完全變暗,再放入下一批食物。這時您
不會聽到訊號聲。
4 提起把手,將油炸網籃往上移到最高的位置。 (圖 8)
5 拉起開蓋控制桿,打開鍋蓋。 (圖 9)
鍋蓋會自動打開。
,
6 將油炸網籃由鍋內取出,然後將所要油炸的食物置於油炸網籃內。 (圖 10)
要達到最佳油炸效果,建議您油炸食物份量不要超過下表,或是使用手冊最後的食物對照
表。超過建議份量會降低自動油煙控制系統的效果,還可能造成鍋底積水。
建議份量
HD6180 自製薯條 冷凍薯條
最大份量 800g 800g
油炸效果最佳的建議最大份量 500 克 500 克
請勿使用本產品油炸米糕類製品 (或類似食物),以防炸油嚴重噴濺或劇烈沸騰。
7 小心將油炸網籃放入炸鍋。先不要泡進炸油中。
8 關上上蓋。 (圖 11)
確定鍋蓋蓋緊,高溫蒸氣不會在油炸時外洩,以確保自動油煙控制系統`發揮最佳效果。
9 設定所需油炸時間 (請參閱本單元的「定時功能」)。您也可以不用定時器,直接使用
炸鍋。
10 請按下網籃把手上的釋放鈕,小心將網籃放至最底。 (圖 12)
油炸時間請遵照油炸食物的包裝說明,或是本使用手冊最後的食物對照表建議。
Page 27

繁體中文 27
自動油煙控制`
1 本產品裝有自動油煙控制`這個密閉系統應用凝結原理,油煙氣味消除率最高可達
100%。 (圖 13)
本系統將油炸產生的蒸氣不斷凝結成水,流到炸鍋外殼下方的集水槽。
-
集水槽容量有 750 毫升,足可容納油炸 1.6 公斤冷凍薯條所產生的凝結水氣。
-
集水槽正面的水位顯示,可讓您知道積水多高,及其最大容量。
-
打開炸鍋開關,自動油煙控制系統就會開始運轉,炸鍋後方風扇開始轉動,冷卻並凝
,
結炸鍋內的油炸蒸氣。
藍色的系統啟動指示燈亮起,表示自動油煙控制系統正在運轉。 (圖 14)
,
定時功能
本產品有電子定時裝置。
定時器會顯示油炸時間結束,但不會關閉油炸鍋電源。
1 按下定時器按鈕,設定油炸時間 (分鐘)。螢幕將顯示設定時間。 (圖 15)
2 按住按鈕不放,即可快速增加時間。達到所需油炸時間後,鬆開按鈕。
最久可設定為 99 分鐘。
注意: 如果預設時間不正確,在定時器開始倒數時 (也就是時間開始閃爍時),按住定時器
按鈕 2 秒以消除定時。一直按著按鈕,直到螢幕顯示「00」。現在您可以設定正確油炸時
間。
設定油炸時間幾秒後,定時器就會開始倒數。
,
定時器倒數時,剩餘的油炸時間會在顯示螢幕上閃爍。剩最後一分鐘時會以秒數顯
,
示。
預設時間歸零時,會響起訊號聲。10 秒後訊號聲會重複。
,
3 按下定時器按鈕即可停止訊號聲。
ReFresh(換油)指示
為達到更理想、可口和健康的油炸效果,本產品設有 ReFresh (換油) 指示功能,建議您何
時更換炸油。油炸 6 小時後,ReFresh (換油) 圖示會出現在螢幕上,不斷閃爍,建議您更
換炸油 (請參閱「清潔」單元的「更換炸油」)。
1 更換炸油後,按下 ReFresh (換油) 鈕至少 2 秒鐘,重新設定油炸次數計算器。 (圖 16)
ReFresh (換油) 功能不會影響油炸過程,所以您即使不換油還是能繼續油炸。
油炸後
1 請提起把手,將油炸網籃往上移到最高的位置 (亦稱瀝油位置)。 (圖 10)
2 拉起開蓋控制桿,打開鍋蓋。 (圖 9)
鍋蓋會自動打開。
,
3 小心將油炸網籃從鍋內取出。如有需要,在炸鍋上方抖一抖網籃,甩除多餘炸
油。 (圖 10)
將炸好的食物放在鋪有吸油紙 (如廚房紙巾) 的碗或濾鍋中。
4 將炸鍋開關撥到「O」,關閉電源。使用完畢請拔掉插頭。 (圖 17)
開啟/關閉 (on/off) 開關上的電源指示燈即會熄滅。
,
5 將本產品的插頭拔掉。
炸油未充分冷卻前,請勿移動炸鍋。
6 取出集水槽。
油炸後一定要將集水槽倒空。
Page 28

繁體中文28
集水槽和裡頭的水可能會很燙!讓集水槽充分冷卻,再從油炸鍋取出集水槽。
7 將集水槽的水倒入廚房水槽。 (圖 18)
集水槽蓋可以卸下。集水槽和蓋子可用洗碗機,或是熱水和些許清潔劑清洗。
注意: 如果不常使用油炸鍋,建議您倒出炸油,保存在密閉容器內,最好放入冷藏庫或是
陰涼處。將油倒入容器時,以細篩過濾食物殘渣。倒空內鍋時,請先取出油炸網籃。
份量、溫度以及油炸時間
本使用手冊最後的食物對照表 (圖 xx),提供多種食物的份量、油炸溫度和時間概要。請遵
照表上資訊,或是所要油炸食物的包裝說明。
清潔
請等炸油充分冷卻。
炸鍋外殼有電子元件及加熱裝置,不可浸泡在水中,或在水龍頭下沖洗。
請勿使用強烈或研磨性 (液態) 清潔劑或物品清潔炸鍋,例如洗滌用蘇打粉、去污劑、去污
粉或是菜瓜布。
1 按下鉸鏈上的鬆蓋鈕鬆開鍋蓋。 (圖 19)
2 將鍋蓋從鉸鏈取出。 (圖 20)
注意: 將鍋蓋裝回去時,要確定正確插入鉸鏈中。
3 將油炸網籃從鍋內取出。
4 取出內鍋,倒掉炸油。 (圖 21)
PreClean(清潔浸泡)功能
本產品設有 PreClean (清潔浸泡) 功能,讓您能用熱水浸泡內鍋,清洗時更輕鬆。
1 將冷水倒入內鍋直到水線高達容量的 3/4,加入少許清潔劑。 (圖 22)
2 打開油炸鍋的開關。在 30 秒內,按下 PreClean (清潔浸泡) 鈕至少 2 秒,啟動
PreClean (清潔浸泡) 功能。 (圖 23)
水會加熱到 80°C,為時 30 分鐘,浸泡內鍋。這讓您清潔內鍋更輕鬆。 (圖 24)
,
3 30 分鐘後會響起訊號聲,表示加熱裝置已經關閉。這時您可以取出內鍋倒空,以熱水
和少許清潔劑清洗。
可用洗碗機清洗的組件
除了裝置電子元件和加熱設備的外殼外,所有組件都可以用洗碗機,或是熱水和少許清潔
劑清洗。
請用濕布 (沾點洗潔精) 及 (或) 廚房紙巾,清潔本產品外殼。
-
清洗後,請徹底風乾所有組件。
-
清洗玻璃蓋
-
本產品的玻璃蓋密封環為固定式。請勿拆開密封環,以確保最佳效果。 (圖 25)
每次使用炸鍋後,請用洗碗機或熱水及少許清潔劑,清洗玻璃蓋。
-
更換炸油
因為炸油很快就會失去風味,您應該經常更換炸油。ReFresh (換油) 圖示會建議您何時更
換炸油 (請參閱「使用本產品」單元的「 ReFresh (換油) 顯示」小節)。
如果您用炸鍋烹調蛋白質含量高的食材 (如肉或魚),換油次數應該更頻繁。
-
同一鍋炸油請勿使用超過 6 個月,而且一定要遵照食物的包裝說明。
-
Page 29

繁體中文 29
請勿將新油加入舊油中混合使用。
-
請勿將不同種類的油脂混合使用。
-
當炸油加熱後開始冒泡、有強烈異味或味道變質、或是顏色變暗及 (或) 呈糖漿狀時,
-
請務必更換。
丟棄用過的炸油
將用過的液態炸油倒回原來 (可密封) 的塑膠罐。您可以讓用過的脂肪在炸鍋內凝固後 (炸
籃不要放在裡面),用鍋鏟將脂肪從鍋中刮出,用報紙包住丟棄。如果可以,您可以將油罐
或報紙放在非堆肥類廚餘的垃圾箱中 (不是堆肥類廚餘),或遵照您當地的垃圾處理條例丟
棄。
收藏
將所有組件裝回油炸鍋內,然後蓋上蓋子。
1
把蓋子放回炸鍋時,確定固定座向後,而且蓋子正確插入鉸鏈中。
2 捲繞電源線,放回收線槽中。 (圖 26)
3 從把手拿起炸鍋。 (圖 27)
4 如果炸鍋內有固態炸油,讓油脂在鍋內凝結,連油脂帶鍋子一起收藏 (請參閱「使用前
準備」單元)。
油炸小秘訣
如需得到選用份量和設定,請參考本使用手冊最後的食物對照表。
-
小心地盡量甩除食物上的冰粒和水分,然後輕拍,直到食物適度瀝乾。
-
一次油炸份量請勿過多。請勿超過本使用手冊最後的食物對照表的建議份量。
-
去除異味
某些食物,特別是魚類,會讓炸油發出異味。如要中和炸油味道:
1 請將炸油加熱到 160°C。
2 將兩小片麵包或是些許的荷蘭芹枝葉丟入油裡。
3 等到泡泡消失,用鍋鏟將麵包或是荷蘭芹從油炸鍋內取出。
現在炸油又會回復原本風味。
自製薯條
依照以下步驟,您可以炸出最可口香脆的薯條:
1 使用結實的馬鈴薯,切成條狀。接著用冷水清洗削好的馬鈴薯。
這樣可預防在油炸過程中,薯條黏在一起。
注意: 將薯條水分完全瀝乾。
2 將薯條炸兩次:第一次以 160°C 炸 4-6 分鐘,第二次以 175°C 炸 5-8 分鐘。炸第
二次之前,要讓薯條冷卻。
3 將自製薯條放入碗裡晃動。
環境保護
本產品壽命結束時請勿當成一般家用廢棄物丟棄。請將該產品送至政府指定的回收
-
站,這麼做能為環保盡一份心力。 (圖 28)
Page 30

繁體中文30
保固與服務
若您需要相關資訊或有任何問題,請造訪飛利浦網站 www.philips.com,或連絡您當地的
飛利浦客戶服務中心 (您可以在全球保證書上找到連絡電話)。如果您當地沒有客戶服務中
心,請洽詢當地飛利浦經銷商,或與飛利浦小家電及個人護理用品部門聯繫。
故障排除
本單元概述您使用本產品時最常遇到的問題。如果您無法利用以下資訊解決您遇到的問
題,請聯絡您所在國家/地區的顧客服務中心。
問題 可能原因 解決方法
薯條沒有呈現出金
黃色澤,而且 (或)
並不酥脆。
油炸鍋發出強烈的
惡臭。
炸鍋冒出大量蒸氣。蓋子沒蓋緊。 檢查蓋子是否蓋緊。
炸油已經不乾淨。 更換炸油。記得換油後重新設定「 ReFresh
(換油) 」鈕。請參閱「使用本產品」單元的
「 ReFresh (換油) 指示」。
油炸網籃內放了太多
食物。
自動油煙控制系統運
轉不當。
您用的食用油脂不適
合油炸食物。
一次油炸份量請勿超過本使用手冊最後的食
物對照表的建議份量。
防過熱安全裝置已經切斷電源。讓炸油冷
卻,小心按下炸鍋正面的重設鈕 (請參閱「
安全」單元)。
風扇沒有運轉。請聯絡您的飛利浦經銷商,
或是飛利浦授權的服務中心。
請用優質專用炸油。請勿將不同種類的油脂
混合使用。
自動油煙控制系統運
轉不當。
蓋子內的密封環骯髒
或是破損。
集水槽漏水。 集水槽水太多。 每次用完炸鍋一定要倒空集水槽。大量油炸
集水槽沒有正確裝
入。
無法使用
PreClean (清潔浸
泡) 功能。
油炸過程中,炸油
溢出炸鍋。
打開炸鍋開關到按下
「 PreClean (清潔浸
泡) 」鈕之間,超過
30 秒。這時
PreClean (清潔浸泡)
清潔浸泡功能不會啟
動。
油炸鍋內倒入太多炸油。請確定炸鍋內的炸油沒有超過最高刻度。
風扇沒有運轉。請聯絡您的飛利浦經銷商,
或是飛利浦授權的服務中心。
如果密封環骯髒,請用熱水和少許清潔劑,
或是洗碗機來清洗蓋子。如果密封環破損,
請聯絡飛利浦經銷商或飛利浦授權的服務中
心,更換密封環。
時,每炸 1.6 公斤薯條,或是到達滿水位線
時,就要倒空集水槽。
檢查集水槽是否正確裝入 (會有喀的一聲)。
打開炸鍋開關,然後在 30 秒內按下
PreClean (清潔浸泡) 鈕。
Page 31

繁體中文 31
問題 可能原因 解決方法
食物水分過多。 油炸前請徹底瀝乾食物,並依照使用手冊指
示油炸食物。
油炸網籃裡放入過多
的食物。
油炸過程中,炸油
大量起泡。
油炸鍋無法運作。 內鍋沒有正確放入。 輕輕來回移動內鍋,確定內鍋位置正確。
炸鍋的噗通聲比平
常大 (炸鍋發出輕
微噗通聲是正常現
象)。
食物中含有過多的水分。請在油炸之前,將食物完全瀝乾。
您用的油脂不適合油
炸食物。
防過熱安全裝置關閉
炸鍋。
食物中含有過多的水分。油炸前請將食物徹底瀝乾。
一次油炸份量請勿超過使用手冊最後的食材
參考表建議的份量。
請勿將不同種類油脂混合使用,並使用含有
消泡劑的油脂。
讓炸油冷卻。小心按下炸鍋正面的重設鈕
(請參閱「安全」單元)。
如果炸鍋仍無法使用,請聯絡飛利浦經銷
商,或是飛利浦授權服務中心。
Page 32

32
简体中文
产品简介
感谢您的惠顾,欢迎光临飞利浦!为了您能充分享受飞利浦提供的支持,请注册您的产
品,网址为 www.philips.com/welcome。
一般说明(图1)
A 炸篮
B 刀头释放按钮
C 炸篮手柄
D 分离式内锅
E 盖子释放杆
F 重置按钮
G 温度按钮
H 预约按钮
I 带有通电指示灯的 On/off 开关
J 蓄水槽盖
K 蓄水槽
L 电源线
M 电线储藏格
N PreClean 按钮
O ReFresh 按钮
P 取下锅盖的释放按钮
Q 可分离式玻璃盖
R 系统活动指示灯
注意事项
使用产品之前,请仔细阅读本使用说明书,并妥善保管以备日后参考。
危险
切勿将外壳浸入水中或在龙头下冲洗,因为外壳中有电子元件和
-
加热元件。
警告
在将产品连接电源之前,请先检查产品所标电压与当地的供电电
-
压是否相符。
如果插头、电源线或产品本身受损,请勿使用本产品。
-
如果电源软线损坏,为避免危险,必须由制造厂或其维修部或类
-
似的专职人员来更换。
本产品不打算由肢体不健全、感觉或精神上有障碍或缺乏相关经
-
验和知识的人(包括儿童)使用,除非有负责他们安全的人对他
们使用本产品进行监督或指导。
应照看好儿童,确保他们不玩耍这些产品。
-
不要让儿童接触到电源线。切勿将电源线悬挂在放置本产品的桌
-
子或工作台的边上。
产品只能使用带接地线的插座。
-
打开盖子时,小心高温蒸气。
-
Page 33

简体中文 33
注意
产品只能送到由飞利浦授权的维修中心检修。不要自己修理产
-
品,否则产品维修保证书将会无效。
将产品放在一个水平、平滑、稳固的表面上。
-
使用炸锅时不要触摸锅盖的玻璃部分,因为它的温度很高。
-
将食物炸成金黄色而非黑色或褐色,去除过焦的部分。当油炸淀
-
粉类食物时,尤其是土豆和谷类食物,请不要用超过 175°C 的
温度(为了最大程度地减少丙烯酰胺的产生)。
请勿使用本产品炸制亚洲年糕(或类似食品)。这样可能导致油
-
或油脂大量飞溅或产生大量泡沫。
确保电炸锅内油或油脂的份量始终在电炸锅内锅内侧的 MIN(最
-
小)和 MAX(最大)刻度之间,以防止溢出或过热。
在放入油或油脂前,切勿打开电源开关,否则会损坏本产品。
-
本产品仅限于家用。如果本产品使用不当、用于专业或半专业用
-
途或未按用户手册中的说明进行操作,则本产品的保修将会失
效,并且对于因此而造成的损失,飞利浦拒绝承担任何责任。
电磁场(EMF)
这款飞利浦产品符合关于电磁场 (EMF) 的所有相关标准。据目前的科学证明,如果正确使
用并按照本用户手册中的说明进行操作,本产品是安全的。
安全
过热保护装置
本产品配有过热保护装置,它在产品过热时会切断产品电源。
电炸锅中没有足够的油或油脂,或者大块的固体油脂融化时,会阻碍加热元件释放热量,
从而导致产品过热。
如果电炸锅不能继续工作,请采取以下措施:
1 拔掉产品插头。
2 让油或油脂冷却后再重新启动。
3 用极细小的螺丝刀小心地按复位按钮。其位置在油炸锅的前面,显示器的右上
角。 (图 2)
这样产品就可以继续使用了。
注: 如果复位后产品仍不能使用,请将产品送往飞利浦经销商或经飞利浦授权的服务中
心。
使用准备
1 将电炸锅置于水平、平滑、稳固且儿童接触不到的台面上。
2 将整条电源线从电源线收藏格内取出。 (图 3)
3 向油炸锅中倒油、液态脂或熔化的固体脂,到达内锅内侧的最高标志线为止(参
阅“油和脂”一节,了解如何使用固体油脂)。 (图 4)
在放入油或油脂前,切勿打开电源开关。
Page 34

简体中文34
油和油脂
切勿混合不同类型的油或油脂,切勿将新鲜的油或油脂加入用过的
油或油脂中。
建议您使用适用于油炸的油或液体油脂,最好是植物油或含丰富不饱和脂肪(如亚油酸)
的油脂,例如豆油、花生油、玉米油或葵花油。
仅使用适合油炸且含有消泡剂的油或油脂。在油和油脂的包装或商标上可以找到相关信
息。
固体油脂
也可以使用固体煎炸油脂,但是要采取特别的安全措施防止油脂飞溅,并防止加热元件过
热:
1 如果想使用新的油脂块,应先将其放在普通煎锅内用低温慢慢融化。
2 将融化后的油脂小心地倒入电炸锅中。
3 可在室温下存放装有重新凝固的油脂的电炸锅。
4 如果固体脂太凉,则当其熔化时会产生飞溅。可以用叉子在凝固的油脂上打一些孔,
以防飞溅。 (图 5)
注意打孔时不要损坏内锅的涂层。
使用本产品
炸制食物
1 将插头插入插座。
确保电源线未与产品的发热部分接触。
2 将开关调到“I”的位置以打开电炸锅。 (图 6)
开关上的电源指示灯亮起,您将听到声音信号。
本产品配有电子控温装置。设定温度会显示在产品的显示屏上。
3 按一次或多次温度按钮设定所需的油炸温度 (150-190°C)。显示屏将显示选定的温
度。 (图 7)
对于所需温度,请查看待炸食品的包装或本说明书末尾的食物表格。
如果不设定温度,油或油脂会加热到 150C。
加热油或油脂时,可以将炸篮留在电炸锅中。
油或油脂会在 10 到 15 分钟内被加热到预定温度。
,
电炸锅加热时,显示屏上的温度计符号会不断地填满和变空。当整个温度计符号(包
,
括最顶端的部分)都变为黑色时,说明油和油脂已达到选定温度。您将听到一声声音
信号,表示电炸锅已做好炸第一批食物的准备。
注: 如果想要连续炸制多批食物,则一定要等到温度计符号重新完全变黑时再炸下一批食
物。此时不会听到声音信号。
4 提起炸篮手柄将炸篮提到最高位置。 (图 8)
5 拉锅盖释放杆,打开锅盖。 (图 9)
锅盖将自动打开。
,
6 从炸锅中取出炸篮,将要煎炸的食物放入炸篮。 (图 10)
为取得最佳的油炸效果,建议不要超过下表以及本说明书末尾食物表格中列出的最大量。
超过建议数量会降低灵敏空气控制系统的效用,并且可能在炸锅中留下水分。
Page 35

简体中文 35
建议份量
HD6180 自制炸薯条 冷冻炸薯条
最大份量 800 克 800 克
建议获得最佳效果的最大份量 500 克 500 克
请勿使用本产品炸制亚洲年糕(或类似食品),因为这样可能导致
油或油脂大量飞溅或产生大量泡沫。
7 小心地将炸篮放入电炸锅内。不要将炸篮下放到油或油脂中。
8 合上盖子。 (图 11)
确保盖好盖子,以防油炸时蒸气逃逸,并保证灵敏空气控制 ` 系统发挥最佳效用。
9 设定所需的油炸时间(请参阅本章的“计时器”)。使用电炸锅时也可以不设定计时
器。
10 按下炸篮手柄上的释放按钮,并小心地将炸篮降到最低位置。 (图 12)
应遵循待炸食品包装或本说明书末尾食物表格中标明的准备时间。
灵敏空气控制
1 本产品配有灵敏空气控制 ` ,这是一种基于冷凝原理的封闭系统,可完全消除油炸的
气味。 (图 13)
该系统不断将油炸产生的蒸汽凝结为水。凝结的水存入油炸锅外壳底部的蓄水槽中。
-
蓄水槽容量为 750 毫升,足够盛放炸制 1.6 千克冰冻油炸薯条时产生的冷凝水。
-
蓄水槽前端的水平指示器会标明水箱中已经盛放的水量以及最多可以盛放的水量。
-
将开关调到“I”的位置后,灵敏空气控制 ` 系统开始工作,电炸锅后端的风扇开始运
,
转,以使电炸锅内侧形成的油炸蒸汽冷却和凝结。
蓝色的系统活动指示灯指示灵敏空气控制 ` 系统是否工作正常。 (图 14)
,
`
计时器
本产品的显示屏上配有电子计时器。
计时器会指示设置的炸制时间已到,但不会关闭电炸锅的电源。
1 按下计时器按钮设定炸制分钟数。该设定时间会显示在显示屏上。 (图 15)
2 按住计时器按钮可迅速增加分钟数。达到所需油炸时间后请立刻松开按钮。
最长时间可设置为 99 分钟。
注: 如果预设时间不正确,则在计时器开始倒计时的时候(即时间开始闪烁时)按住计时
器按钮 2 秒钟可以消除错误时间。按住该按钮直至显示屏出现“00”,则可以开始设置正
确的油炸时间。
设定煎炸时间几秒钟之后,计时器开始倒计时。
,
计时器进行倒计时的过程中,显示屏会闪烁显示剩余煎炸时间。最后一分钟以秒为单
,
位显示。
当预设时间已过期时,您将听到声音信号。10 秒钟过后,声音信号将重复。
,
3 按下计时器按钮可停止声音信号。
更新指示器
为了让油炸效果更好,味道更香,更健康,本产品设置了 ReFresh 功能。ReFresh 功能会
提醒您何时应更换油脂。油炸六小时后,显示屏上会出现 ReFresh 符号并且闪烁,提醒您
更换油脂(见“清洁”一章中的“更换油脂”一节)。
Page 36

简体中文36
1 更换油或油脂后,按住 ReFresh 按钮至少 2 秒钟以重新设置油炸阶段计时器。 (图 16)
ReFresh 功能不会干扰油炸过程,也就是说您可以不更换油脂来继续油炸食物。
煎炸结束后
1 提起炸篮手柄将炸篮提到最高位置,即滴净位置。 (图 10)
2 拉锅盖释放杆,打开锅盖。 (图 9)
锅盖将自动打开。
,
3 小心地从电炸锅中取出炸篮。有必要的话,请在电炸锅上方摇动炸篮以去除多余的油
或油脂。 (图 10)
将炸好的食物放在垫有能吸收油脂的纸(如厨房手纸等)的碗或滤器内。
4 将开关调到“O”的位置以关闭电炸锅。使用后拔下产品电源。 (图 17)
电源开关上的通电指示灯熄灭。
,
5 拔掉产品插头。
请等待油或油脂充分冷却后再移动电炸锅。
6 取下蓄水槽。
油炸完毕后务必取出蓄水槽并倒空其中的水。
蓄水槽及其中的水可能很烫!从电炸锅中取出蓄水槽之前一定要让
其充分冷却。
7 倒空蓄水槽中的水。 (图 18)
蓄水槽盖可以拆卸。蓄水槽和盖子可以用洗碗机清洁,也可以在含有洗涤液的热水中洗
涤。
注: 如果不经常使用电炸锅,建议您倒出油或液体油脂,将它存放在密封良好的容器里,
而且最好保存在冰箱或凉爽的地方。透过细密的滤网向容器注入油或油脂,这样可以去除
食物残渣。先取出炸篮再倒空内锅。
份量、温度和油炸时间
您可以在本说明书末尾的食物表格(图 xx)中找到各种食物的份量、油炸温度和油炸时间
概览。请务必遵循该表格中或待炸食品包装上提供的信息。
清洁
必须让油或油脂充分冷却后才可进行清洗。
切勿将外壳浸入水中或在龙头下冲洗,因为外壳中有电子元件和加
热元件。
切勿使用腐蚀性或研磨性的(液体)清洗剂或原料,如洗涤碱、擦
洗液/粉末或钢丝绒等来清洁电炸锅。
1 按下栓轴上的释放钮使锅盖解锁。 (图 19)
2 将锅盖从栓轴上移开。 (图 20)
注: 将锅盖放回产品时,确保将盖子适当地插进栓轴。
3 从电炸锅中取出炸篮。
4 从产品中取出内锅并倒出油或油脂。 (图 21)
Page 37

简体中文 37
预清洁功能
本产品具有预清洁功能,您可以用热水浸泡内锅,以方便清洁。
1 将内锅装入四分之三的冷水和一些洗涤剂。 (图 22)
2 将开关调到“I”的位置以打开产品电源。在 30 秒内,按住 PreClean 按钮至少 2 秒钟
可激活预清洁功能。 (图 23)
水将被加热到 80°C 并持续 30 分钟,以便泡透内锅。这会让您清洗内锅时容易
,
些。 (图 24)
3 30 分钟结束后,您将听到声音信号,表示加热元件已经断电。这时可将内锅从电炸锅
中取出。将内锅倒空,并用热水和洗涤剂清洗。
可用洗碗机清洗的部件
除带电子部件和加热元件的外壳外,所有部件都可用洗碗机或含洗涤剂的热水清洁。
用湿布(蘸上少许洗涤剂)和/或厨房用纸巾清洗外壳。
-
清洗过后,将所有部件彻底擦干。
-
清洗玻璃盖
本产品配有带永久密封圈的玻璃盖。为确保最佳效果,请勿取下密封圈。 (图 25)
-
每次用完产品后,请在洗碗机或加入洗涤液的热水中清洗玻璃盖子。
-
更换油脂
因为油脂的有效成分消失得很快,所以必须定期更换油脂。ReFresh 符号会提醒您何时更
换油脂(见“使用产品”一章中的“ReFresh 指示”一节)。
如果您用电炸锅炸制富含蛋白质的食物(如鱼或肉),则需要更频繁地更换油或油
-
脂。
切勿使用相同的油或油脂超过 6 个月,请遵循包装上的说明。
-
切勿在已用过的油或油脂里加入新油或新油脂。
-
切勿将不同种类的油或油脂混合使用。
-
如果油或油脂在加热时开始冒泡、或有很浓的气味或味道、或者变黑和/或像糖浆一
-
样,请更换油或油脂。
废油或废油脂的处理
将用过的油或液体油脂倒回原来的(可再密封)塑料瓶。在处理时,应先让固体油脂在电
炸锅中(在没有放入炸篮的情况下)固化,然后用刮铲刮出,用报纸包好。如果可能,将
瓶子或包好的报纸放入不可堆肥垃圾桶(不要放入可堆肥垃圾桶)或按照您所在国家的规
定进行处理。
存放
1 将所有部件装回电炸锅内,并盖好盖子。
将盖子盖回产品上时,请确保已将支架向后移动,以便正确将盖子
插入栓轴。
2 卷起电线,将其放回存储格中。 (图 26)
3 用双手握住电炸锅底部的手柄,将电炸锅提起。 (图 27)
4 如果电炸锅中有固体油脂,则应让其在锅中固化,将电炸锅连同固化的油脂一起存放
(见“准备使用”一章)。
煎炸技巧
有关选择份量和设置的信息,请参阅本说明书末尾的食物表格。
-
Page 38

简体中文38
仔细并尽可能抖掉冷冻食品上的冰和水,然后轻拍食物使其变干。
-
不要一次炸制大量食物。不要超过本说明书末尾的食物表格中标明的份量。
-
去除异味
某些食物(尤其是鱼)会给油或油脂带来怪味。以下是给油或油脂除异味的方法:
1 将油或油脂加热至 160 摄氏度。
2 放两片薄面包或一些西洋芹菜到油中。
3 等到再没有泡沫冒出时,用锅铲将面包或西洋芹菜从电炸锅里铲出。
此时的油或油脂就没有异味了。
自制炸薯条
按照下面的方法您便可以炸出美味松脆的炸薯条:
1 选用坚实的马铃薯,切条并用冷水冲洗。
这样可防止薯条在炸制时,互相粘在一起。
注: 将薯条彻底弄干。
2 将薯条炸两次:第一次在 160°C 的温度下炸 4-6 分钟,第二次在 175°C 的温度下
炸 5-8 分钟。应在薯条冷却后再炸第二次。
3 将自制薯条放入碗中摇动。
环保
弃置产品时,请不要将其与一般生活垃圾堆放在一起;应将其交给官方指定的回收中
-
心。这样做有利于环保。 (图 28)
保修与服务
如果您需要了解详细信息或有任何问题,请浏览飞利浦网站,网址为 www.philips.com。
您也可以与您所在的国家/地区的飞利浦客户服务中心联系(您可以从全球保修卡中找到电
话号码)。如果您所在的国家/地区没有飞利浦客户服务中心,请与当地的飞利浦经销商或
与飞利浦家庭小电器的维修中心联系。
故障排除
本章归纳了本产品在使用时最常遇到的问题。如果您无法用下面的信息解决问题,请与贵
国(地区)的飞利浦客户服务中心联系。
问题 可能的原因 解决方法
炸出的食物不是
金黄色和/或不松
脆。
电炸锅发出一股
很浓的异味。
油或油脂不干净。 更换油或油脂。记住换油之后,将 ReFresh
按钮复位。见“使用产品”一章中
的“ReFresh 指示”一节。
炸篮里的食物太多。 一次不要炸制超过本使用说明书末尾附表中
标明的份量。
过热保护装置已将产品断电。待油或油脂冷
却后,小心地按下电炸锅前面的复位按钮(
见“安全”一章)。
灵敏空气控制系统不
能正常工作。
风扇停止转动。请与飞利浦经销商或飞利浦
授权的服务中心联系。
Page 39

简体中文 39
问题 可能的原因 解决方法
使用的油或油脂不适
合油炸食物。
煎锅中溢出大量
蒸汽。
蓄水槽漏水。 蓄水槽中水太多。 使用电炸锅后,必须将蓄水槽中的水倒空。
无法激活预清洁
功能。
炸制过程中油或
油脂从电炸锅的
边缘溢出。
炸制过程中油或
油脂剧烈冒泡。
不能启动电炸
锅。
油炸锅的扑通声
比平时大(油炸
锅温和的扑通声
是正常的)。
锅盖没有盖好。 检查锅盖是否盖好。
灵敏空气控制系统不
能正常工作。
锅盖内侧的密封圈变
脏或已磨损。
没有正确插入蓄水槽。检查蓄水槽是否已正确插入(可听到咔嗒一
打开产品电源后超过
30 秒钟才按下
PreClean 按钮。此
情况下不能激活
PreClean 功能。
电炸锅里的油或油脂
太多。
食物中的水分太多。 炸食物前先彻底晾干食物,并按照本用户手
炸篮里食物太多。 一次不要炸制超过本使用说明书末尾附表中
食物中的水分太多。 炸食物前先彻底晾干食物。
使用的油或油脂不适
合用于油炸食物。
没有将内锅正确放入
电炸锅中。
过热保护装置已将产
品断电。
食物中的水分太多。 炸制食物前应先彻底晾干食物。
请使用优质煎炸油或液体煎炸油脂。切勿将
不同种类的油或油脂混合使用。
风扇停止转动。请与飞利浦经销商或飞利浦
授权的服务中心联系。
如果圈太脏,可用热水加洗涤液清洗,或用
洗碗机洗。如果锅盖受损,请去本地的飞利
浦经销商或由飞利浦授权的服务中心更换。
如果炸制大量食物,则每炸 1.6 千克冷冻薯
条或每当达到最高水位,就应将蓄水槽倒空
一次。
声)。
将开关调到“I”的位置以打开产品电源。然
后在 30 秒内按下 PreClean 按钮。
确保电炸锅里的油或油脂份量不超过电炸锅
内锅内侧的上容量刻度线。
册中的说明炸制食物。
标明的份量。
切勿将不同种类的油或油脂混合使用。使用
含消泡剂的油或液体油脂。
将内锅在产品中轻轻地前后移动,以便确保
内锅放在正确位置。
让油或油脂冷却。小心地按下电炸锅前面的
复位按钮(见“安全”一章)。
如果风扇仍不转动,请与飞利浦经销商或飞
利浦授权的服务中心联系。
Page 40

40
Page 41

41
Page 42

2 3 4 5
6 7 8 9
10 11 12 13
42
14
18
15 16 17
19
20
21
Page 43

43
22 23 24 25
26 27 28
Page 44

4222.002.2844.4
 Loading...