

Page 1
Cucina HD6153, HD6152
Book 1
Page 2

2
Page 3

ENGLISH 4
POLSKI 15
РУССКИЙ 26
EESTI 39
LATVISKI 49
LIETUVIŠKAI 59
HD6153, HD6152
3
Page 4

Important
◗ Read the instructions for use and look at the illustrations before
you start using the appliance.
◗ This appliance is intended for household use only. If the appliance
is used improperly or for (semi) professional purposes or if it is
used in a way that is not in accordance with the instructions for
use, the guarantee will become invalid and Philips will not accept
liability for any damage caused.
◗ Do not fry rice cakes (or comparable types of food) in this
appliance as this might cause heavy spattering/explosions of oil.
◗ Make sure that frozen ingredients are (almost) defrosted before
frying.
◗ Dab the food to be fried until it is properly dry and carefully shake
the ice off frozen food before you start frying.
◗ Check if the voltage indicated on the appliance corresponds to the
mains voltage in your home before you connect the appliance.
◗ Only connect the appliance to an earthed wall socket.
◗ Clean the separate parts of the fryer thoroughly before you use
the appliance for the first time (see 'Cleaning').
◗ Never immerse the housing, which contains electrical components
and the heating element, in water nor rinse this part under the tap.
◗ Make sure all parts are completely dry before you fill the fryer
with oil or liquid fat.
◗ We advise you to use frying oil or liquid fat. It is possible to use
solid frying fat, but in that case extra precautions are necessary to
prevent the fat from spattering (see 'Using solid fat' and 'Tips').
◗ Only use types of oil or fat that are suitable for deep-frying and
that contain an antifoam agent.You can find this information on the
package or label of the oil or fat.
◗ Do not switch the appliance on before you have filled it with oil or
fat.
◗ Make sure the fryer is always filled to a level between the two
indication marks on the inside of the inner pot.
◗ A thermal safety cut-out will switch the appliance off if it overheats
(see 'Safety').
◗ In these instructions for use you will find the maximum and
recommended amounts of food to be fried at one time. For the
best frying results we advise you to not exceed the recommended
amounts (see 'Table').
◗ During frying, hot steam is released through the filter. Keep your
hands and face at a safe distance from the steam.You should also
be careful of the hot steam when you open the lid.
◗ Keep the appliance out of the reach of children when you use it.
Do not let the mains cord hang over the edge of the table or
worktop on which the appliance is standing.
◗ After you have used the appliance, set the temperature control to
the lowest setting (turn it completely to the left). Remove the plug
from the wall socket and let the oil or fat cool down.Do not move
the fryer until it has cooled down sufficiently.
ENGLISH4
Page 5
◗ If the mains cord or other parts of this appliance are damaged,
they must only be replaced by Philips or a service centre
authorised by Philips, since repair requires special tools and/or
parts.
◗ Save these instructions for use for future reference.
Safety
Thermal safety cut-out
The appliance has been equipped with a thermal safety cut-out that
switches the appliance off if it overheats.
This may happen if there is no oil or fat or not enough oil or fat in the
fryer or if blocks of solid fat are being melted in the fryer, which will
prevent the heating element from being able to give off the heat
produced quickly enough.
◗ Take the following measures when the thermal safety cut-out has
switched the appliance off:
1 Let the oil or fat cool down.
2 Turn to your Philips dealer or a service centre authorised by
Philips.
Using solid fat
We advise you to use frying oil or liquid fat. It is possible to use solid
frying fat, but in that case extra precautions are necessary to prevent
the fat from spattering.
1 If you want to use new blocks of fat, melt them slowly over a
low heat in a normal pan.
2 Pour the melted fat carefully into the fryer.
3 Put the plug in the wall socket and switch the fryer on (see
'Frying').
C
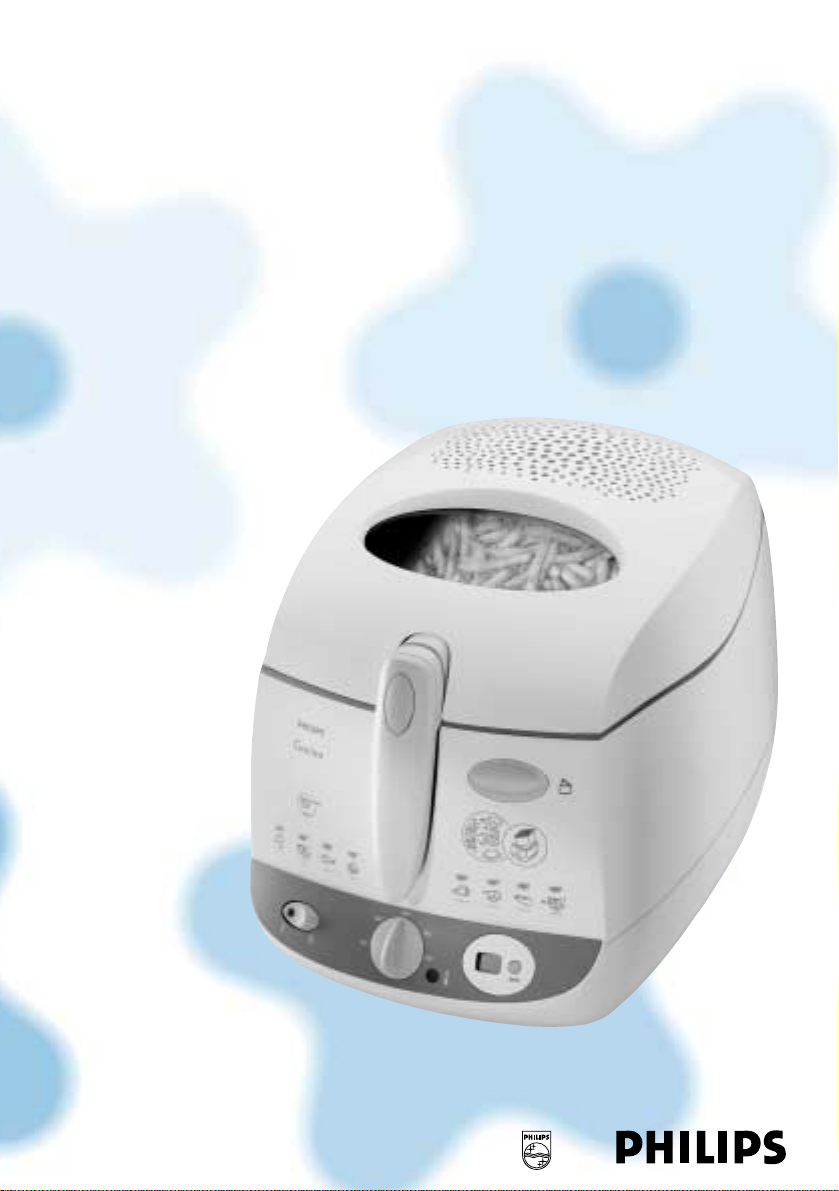
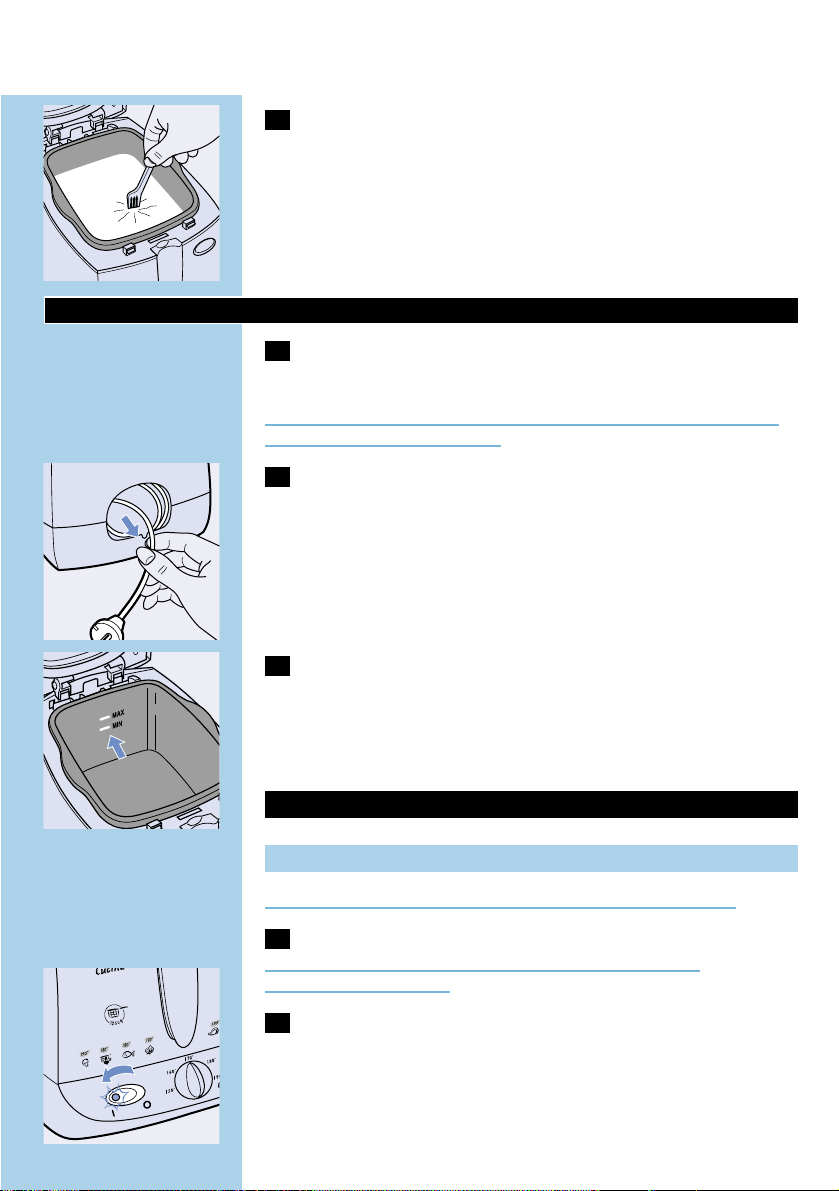
4 Store the fryer with the resolidified fat still in it at room
temperature. If the fat gets very cold, it may start spattering
when melted. Punch some holes into the resolidified fat with a
fork to prevent this.Be careful not to damage the non-stick
coating of the inner pot while doing this.
ENGLISH 5
Page 6
Frying
1 Put the appliance on a horizontal, even and stable surface out
of the reach of children.
If you want to place the fryer on top of the cooker, underneath the
extractor hood, make sure the rings of the cooker have been turned
off.
C
2 Take the entire cord from the cord storage compartment.
C
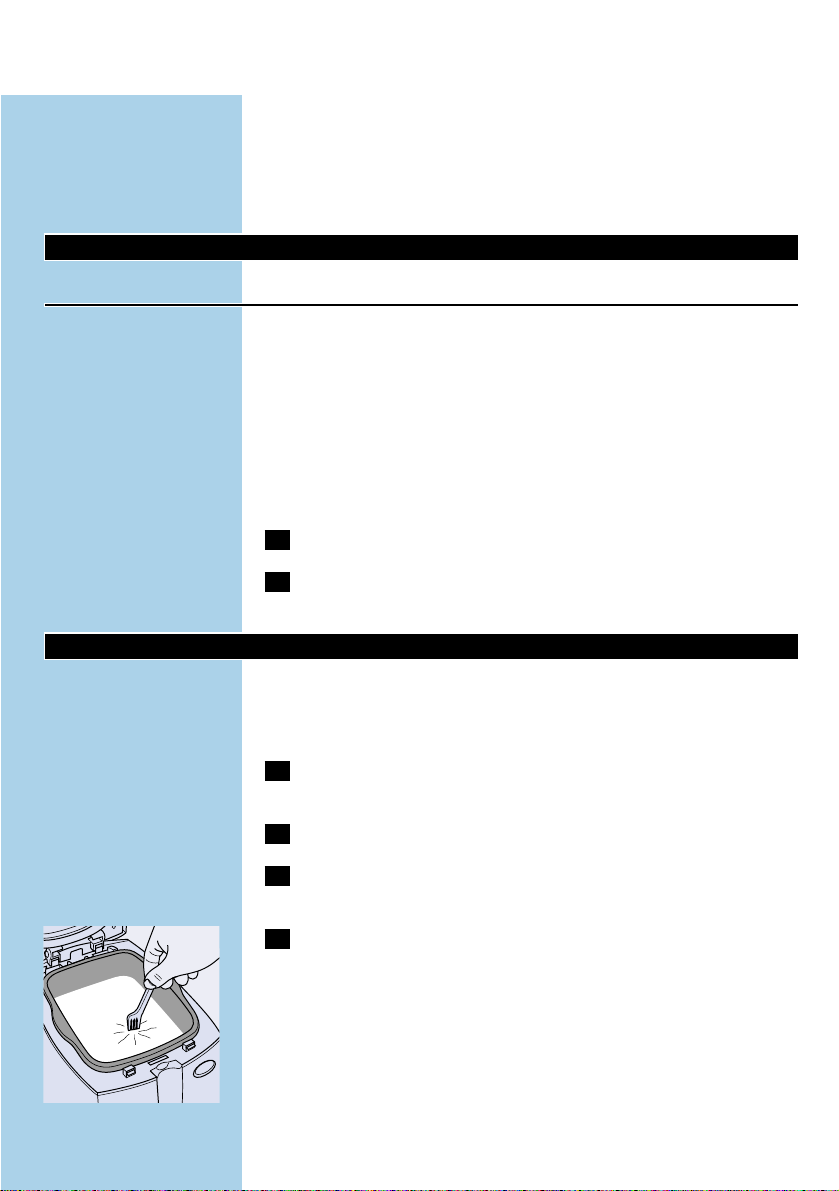
3 Fill the dry fryer with oil, liquid fat or melted solid fat up to the
top indication mark on the inner pot.
Read the 'Using solid fat' section on how to fill the fryer when using
solid fat.
Never mix two different kinds of oil or fat!
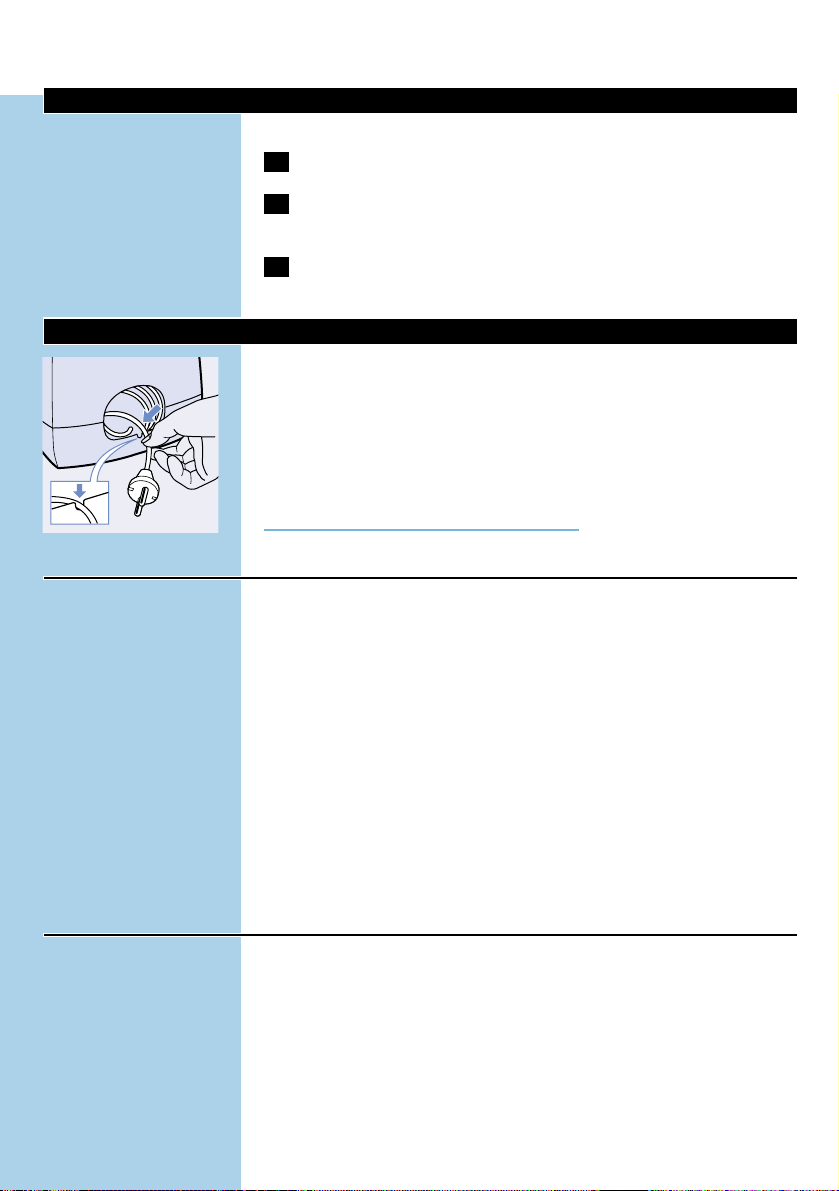
4 Put the plug in the wall socket.
Make sure the cord does not come into contact with hot parts of the
appliance.
C
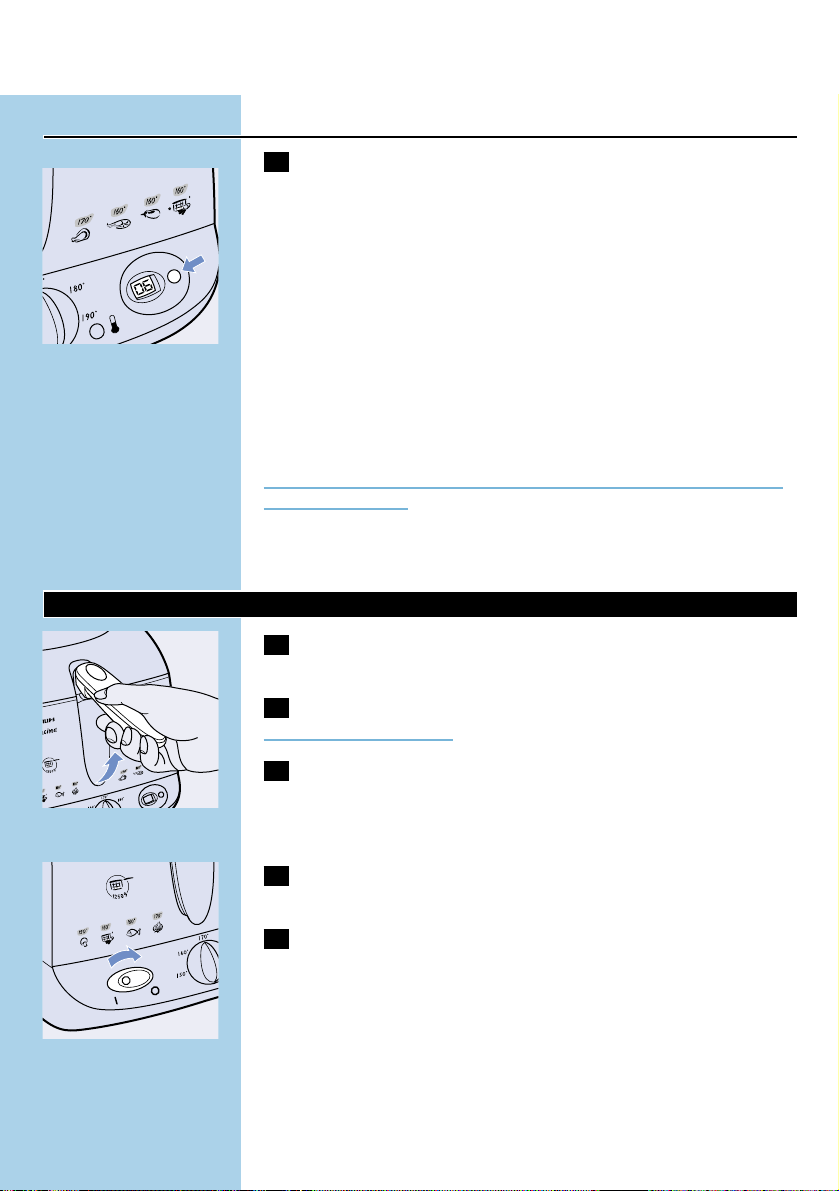
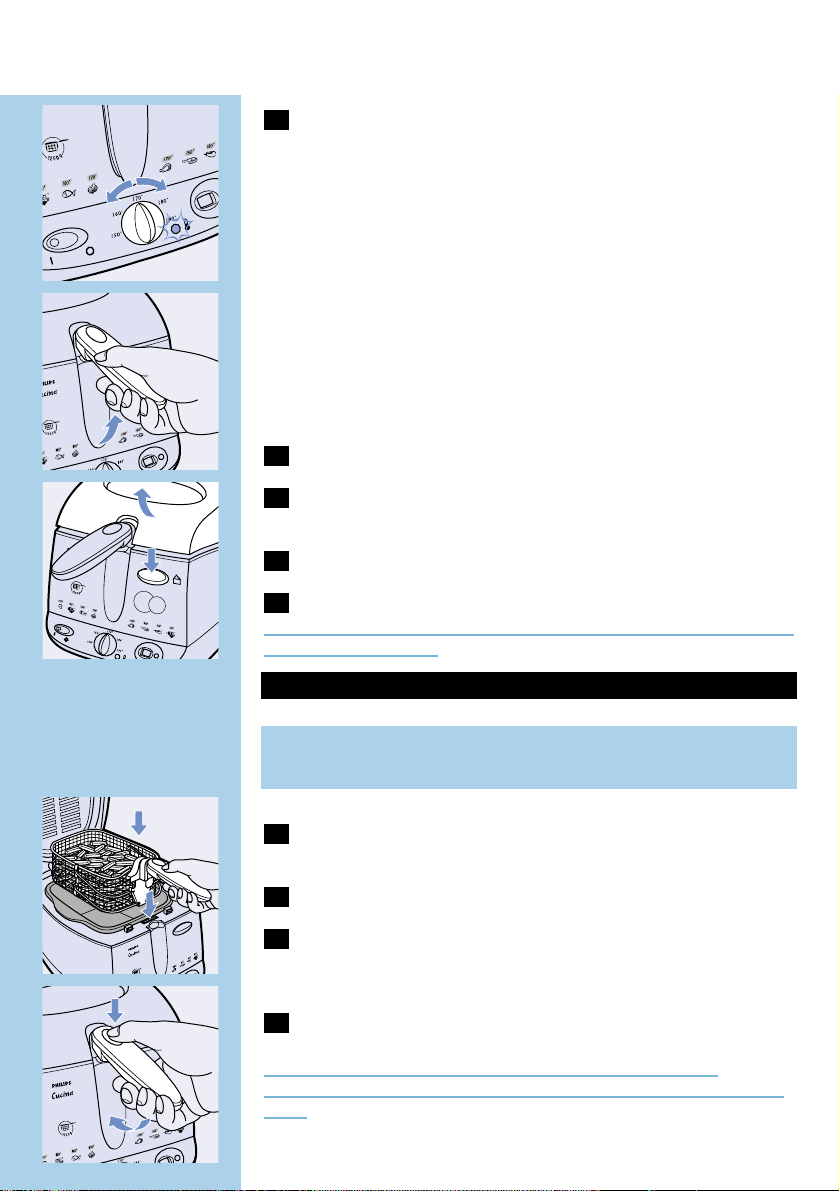
5 Switch the fryer on by means of the on/off switch.The pilot
light in the switch and the temperature light will go on.
C
6 Set the temperature control to the correct temperature.
For information about which temperature to select, check the package
of the food to be fried or the table in these instructions for use.
The oil or fat will be heated to the right temperature in 10 to 15
minutes.
While the fryer is heating up, the temperature light will go out and on
a number of times.When it stays out for some time, the oil or fat has
reached the preset temperature.
The same procedure applies if you want to fry a number of batches in
a row. So wait until the pilot light has been out for some time before
you start fr ying the next batch.
◗ You can leave the basket in the fryer while the fryer is heating up.
ENGLISH6
solid fat
1925 g
2200 g
oil
2.2 litre
2.5 litre
types HD6152 and HD 6153
min.
max.
Page 7
C
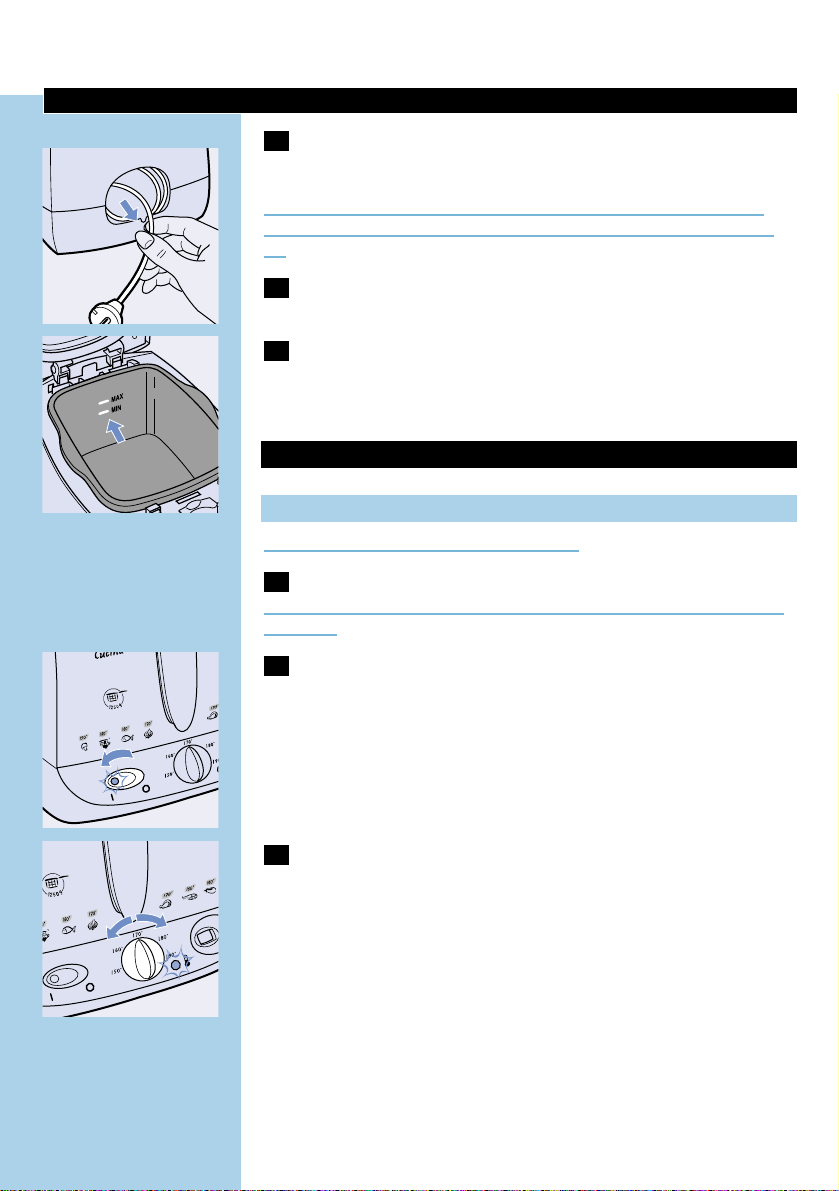
7 Lift the handle to raise the basket to its highest position.
C
8 Open the lid by pressing the release button.The lid will open
automatically.
9 Remove the basket from the fryer.
10 Put the food to be fried in the basket.
For the best frying results, we advise you to use the recommended
quantities of food as indicated in the table.
C
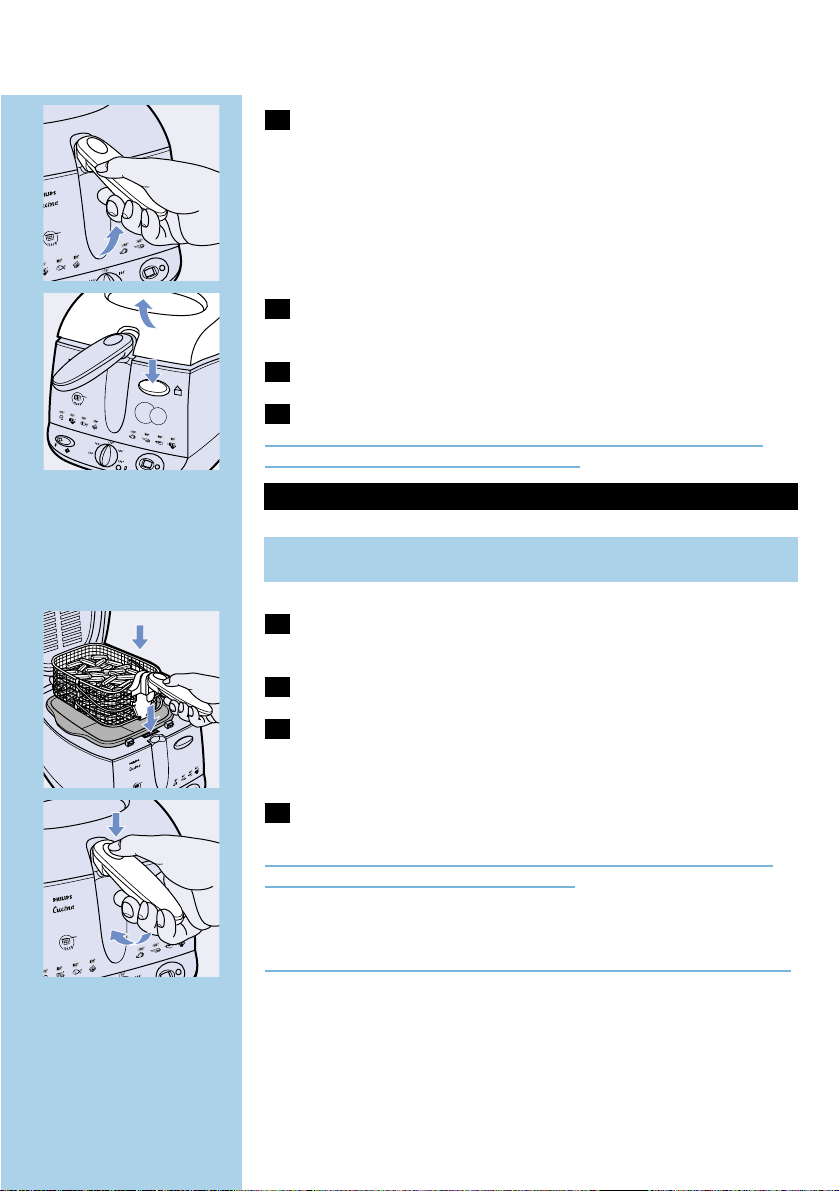
11 Carefully put the basket in the fryer. Make sure the basket has
been properly inserted.
12 Close the lid.
13 Type HD6153 only: Set the required frying time (see 'Timer').
You can also use the fryer without setting the timer.
C
14 Press the release button of the basket handle and carefully
lower the basket to its lowest position.
Stick to the preparation time indicated on the package or follow the
preparation times mentioned in the table.
◗ For a uniform golden frying result, lift the basket out of the oil or
fat a few times during frying and gently shake the contents.
Be careful: hot steam will emerge from the filter in the lid during frying.
ENGLISH 7
Frozen French fries
1000 g
500 g
Home-made French fries
1300 g
650 g
Types HD6152 and HD6153
Max. quantity
Recommended max. quantity
for best end result
1
2
Page 8
Timer (type HD6153 only)
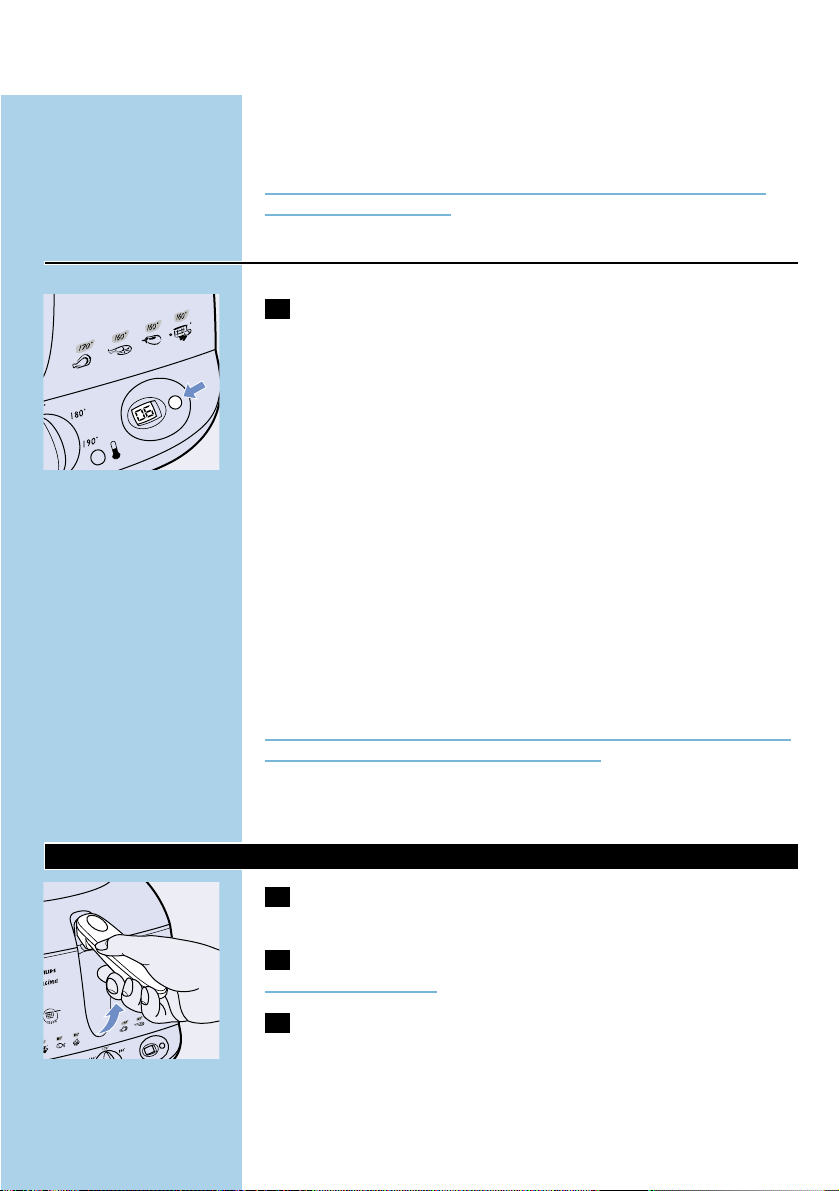
C
1 Press the timer button to set the frying time in minutes.
◗ Keep the button pressed in and the minutes go forward quickly.
The maximum time that can be set is 99 minutes.
A few seconds after you have set the timer it will star t counting down
time.
While the timer is active, the remaining time will blink on the display.
The last minute is displayed in seconds.
If the preset time is not correct, you can erase the set time by pressing
the button once again at the moment the timer starts counting down
(i.e. when the time starts to blink) and keeping the button pressed in
until '00' appears on the display.You can now set the correct time.
When the preset time has elapsed, you will hear an audible signal (a
few beeps). After 20 seconds the audible signal will be repeated.You
can stop the audible signal by pressing the button again.
Caution: the timer indicates the end of the cooking time but does not
switch the fryer off.
◗ To replace the battery of the timer, please contact the Philips
Service Centre.
After frying
C
1 Lift the handle to raise the basket to its highest position, the
'drip-out position'.
2 Open the lid.
Beware of the hot steam.
3 Carefully remove the basket from the fryer.
If necessary, shake the basket over the fryer to remove excess oil or fat.
Put the fried food in a bowl or colander containing grease-absorbing
paper, e.g. kitchen paper.
C
4 Switch the fryer off by means of the on/off switch.The pilot
light in the on/off switch will go out.
5 Unplug the appliance after use.
◗ If you do not use the fryer regularly,we advise you to store the oil
or liquid fat in well-closed bottles, preferably in the refrigerator or
in a cool place, after it has cooled down. Fill the bottles by pouring
the oil or fat through a fine sieve to remove food particles.To take
out the inner pot and empty it, first remove the frying basket and
the lid. Lift the inner pot out of the appliance and pour out the oil
or fat (see 'Cleaning').
◗ If the fryer contains solid fat, let the fat solidify in the fryer and
store the fryer with the fat still in it (see 'Using solid fat').
ENGLISH8
Page 9
Cleaning
This fryer is almost completely dishwasher proof or can also be
cleaned with hot soapy water.
Wait until the oil or fat has cooled down sufficiently.
Disassemblance of the fryer:
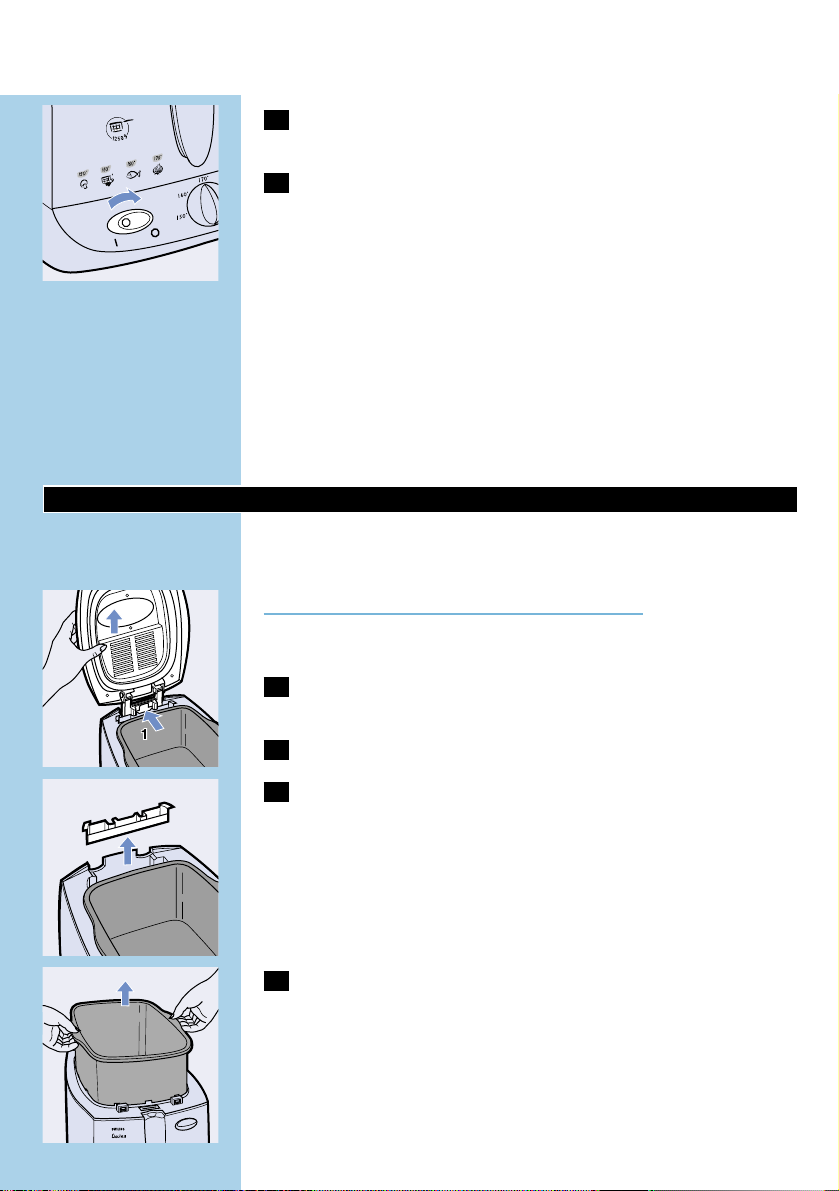
C
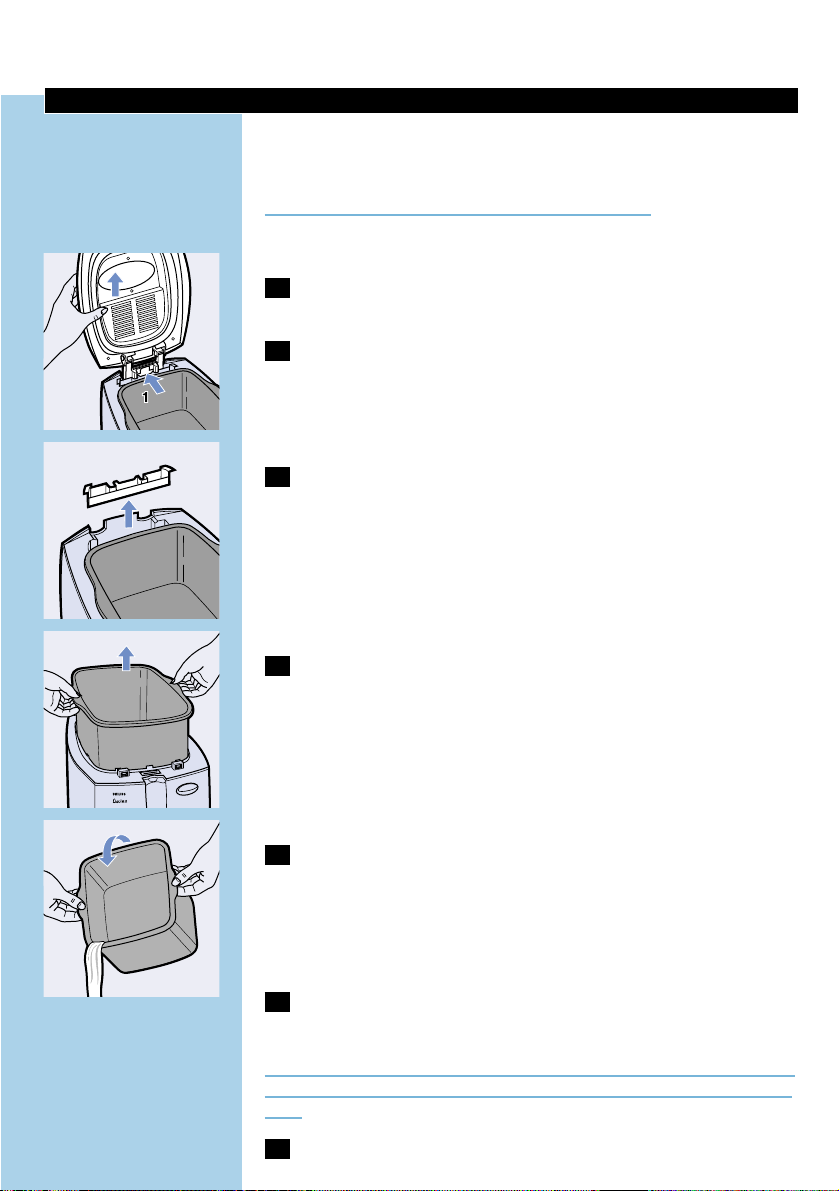
1 Remove the lid by pressing the lid release tab to unlock the lid.
Then lift the lid out of the appliance.
2 Remove the basket from the fryer.
C
3 Remove the water tray.
C
4 Lift the non-stick coated inner pot out of the appliance.
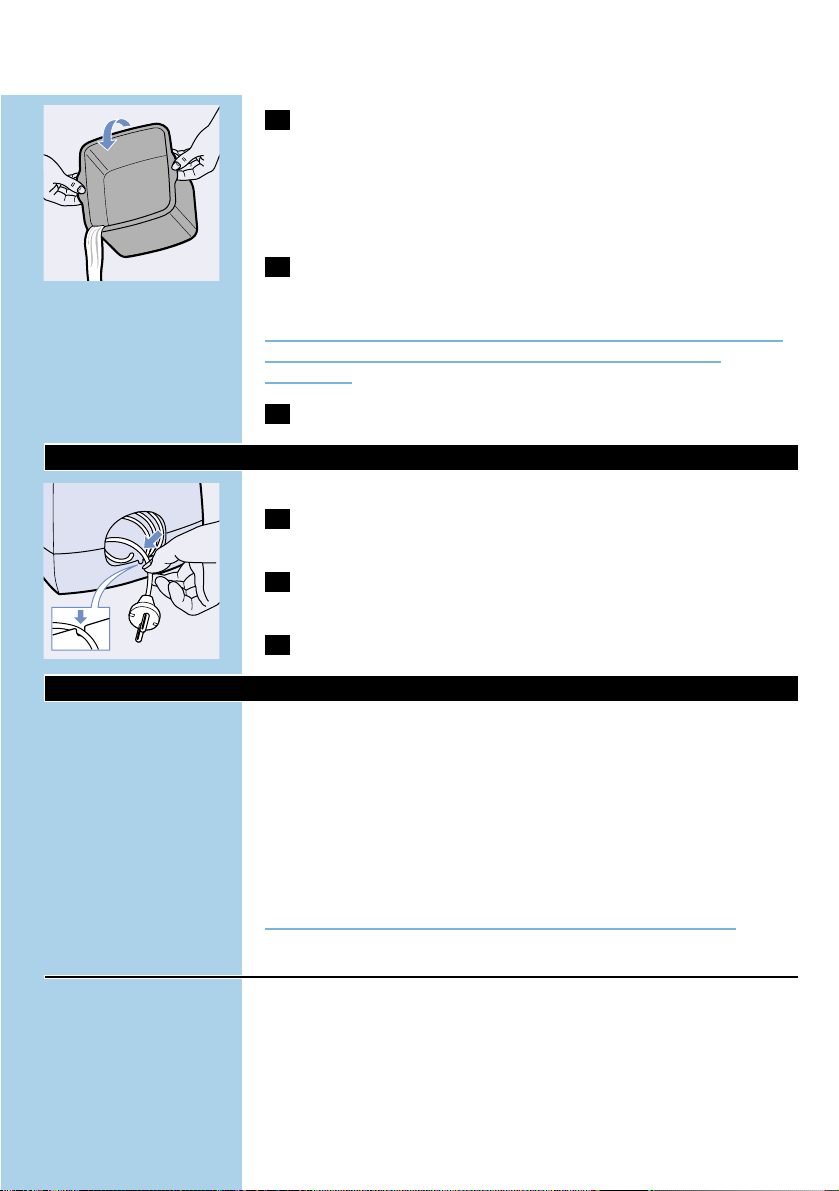
C
5 Remove the oil or fat and eventually dispose of it (see 'Oil and
fat').
◗ All parts except the housing with electrical components and the
heating element can be cleaned in the diswasher or in hot soapy
water.
6 Clean the housing with a moist cloth (with some washing-up
liquid) and/or kitchen paper.
Do not use caustic or abrasive (liquid) cleaning agents or materials (e.g.
washing soda, scouring liquid or powder or scouring pads) to clean the
fryer.
7 Dry all parts thoroughly after cleaning.
ENGLISH 9
2
Page 10
Storing the appliance
1 Put all parts back onto/into the fryer and close the lid.
C
2 Wind up the cord, push it back into the storage compartment
and put the plug in the plug fixing facility.
3 Lift the fryer by its handles.
Oil and fat
We advise you to use frying oil or liquid frying fat, preferably vegetable
oil or fat that is rich in unsaturated fats (e.g. linoleic acid).You can also
use solid frying fat, but in that case you should melt it in a pan over low
heat before use to prevent spattering or overheating of the fat.
Only use types of oil or fat that are suitable for deep-frying and that
contain an antifoam agent.You can find this information on the package
or label of the oil or fat.
Never mix two different kinds of oil or fat!
Changing the oil or fat
As the oil or fat loses its favourable properties rather quickly, you
should change the oil or fat regularly.To do so, follow the instructions
below:
- If you mainly use the fryer to prepare French fries and if you sieve
the oil or fat after each use, you can re-use the oil or fat 10 to 12
times before it needs to be changed.
- If you use the fryer to prepare food that is rich in proteins (such as
meat or fish), you should change the oil or fat more often.
- Never use the same oil longer than 6 months and always follow the
instructions on the package.
- Never add fresh oil or fat to used oil or fat.
- Always change the oil if it starts foaming when it is heated, when it
has a strong smell or taste or when it turns dark and/or syrupy.
Disposing of used oil or fat
Pour used oil or liquid fat back into its original (resealable) plastic
bottle.You can dispose of used solid fat by letting it solidify in the fryer
(without the basket in it) and subsequently scooping it out of the fryer
by means of a spatula and wrapping it in a newspaper.You can put the
bottle or newspaper in the bin for non-compostable waste (not in the
compostable waste bin) or dispose of them in accordance with the
regulations in your country.
ENGLISH10
Page 11

Frying tips
For preparation times and temperature settings, see the table at the
end of this booklet.
Home-made French fries
You will make the tastiest and crispiest French fries in the following
way:
Use firm potatoes and cut them into sticks. Rinse the sticks with cold
water.This will prevent them from sticking to each other during frying.
Dry the sticks thoroughly.
Fry the French fries twice: the first time for 4-6 minutes at a
temperature of 160cC, the second time for 2-4 minutes at a
temperature of 190cC.
For an uniform golden result, lift the basket out of the fr yer a few times
during the second frying period and shake the basket a few times.
When you fry the maximum quantity, do not shake the basket. Before
you start the second fr ying cycle, throw the home-made French fries in
a bowl and shake it.
When you want to fry the maximum amount, insert the basket slowly
in the fryer to prevent overcooking.
Frozen food
Frozen fries have already been precooked, so you will only have to fry
them once in accordance with the instructions on the package.
Food from the freezer (-16 to -18cC) will cool the oil or fat
considerably when it is immersed in it. Because it does not sear right
away, the food may also absorb too much oil or fat.Take the following
measures to prevent this:
Do not fry ver y large quantities at one time (see the table with
preparation times and temperature settings).
Heat the oil or fat for at least 15 minutes before you lower a batch of
food into it.
Set the temperature control to the setting indicated in the tables in
these instructions or on the package of the food to be fried. If there
are no instructions, select a temperature of 190cC.
Preferably allow frozen food to partly defrost at room temperature
and shake off as much ice and water as possible.
Lower the food into the oil or fat very gently, since frozen food may
cause the hot oil or fat to start bubbling violently.
ENGLISH 11
Page 12

Environment (type HD6153 only)
Disposing the battery
Remove the battery of the timer before you discard the appliance.
C
1 Use a small flat-blade screwdriver to remove the timer panel.
2 Take out the battery. Do not throw it away with the normal
household waste, but hand it in at an official collection point.
Guarantee & service
If you need information or if you have a problem, please visit the Philips
Web site at www.philips.com or contact the Philips Customer Care
Centre in your country (you will find its phone number in the
worldwide guarantee leaflet). If there is no Customer Care Centre in
your country, turn to your local Philips dealer or contact the Service
Department of Philips Domestic Appliances and Personal Care BV.
Problems that may occur during frying
If your fryer does not function properly or if the fr ying quality is
insufficient, consult the table below. If you are unable to solve the
problem by means of this troubleshooting guide, see 'Guarantee and
service'.
ENGLISH12
Page 13

Solution
Check on the package of the food or in the
table in these instructions for use whether the
temperature and/or preparation time you have
selected is/are correct. Set the temperature
control to the correct temperature.
Do not fry more food at one time than the
recommended quantities indicated in these
instructions for use.
The fuse of temperature control may have
blown.Turn to your Philips dealer or a ser vice
centre authorised by Philips.
Remove the lid and clean the lid and filter in
hot soapy water or in the dishwasher.
Change the oil or fat. Regularly sieve the oil or
fat to keep it fresh longer.
Use frying oil or liquid fr ying fat of good
quality. Never mix two different types of oil or
fat.
Check whether the lid has been closed
properly.
Remove the lid and clean the lid and filter in
hot soapy water or in the dishwasher.
If the ring is dirty, clean the lid in hot soapy
water or in the dishwasher. If the lid is worn,
turn to your Philips dealer or a service centre
authorised by Philips to have the sealing ring
replaced.
Make sure the oil or fat in the fryer does not
exceed the maximum level.
Dry the food thoroughly before you start
frying it and fr y the food in accordance with
these instructions for use.
Do not fry more food at one time than the
recommended quantities indicated in these
instructions for use.
Dry the food thoroughly before frying it.
Never mix two different types of oil or fat and
use oil or liquid fat that contains an antifoam
agent.
Clean the inner pot as described in these
instructions for use.
Turn to your Philips dealer or a service centre
authorised by Philips.
Possible cause
The selected temperature is too
low and/or the food has not been
fried long enough.
There is too much food in the
basket.
The oil or fat does not get hot
enough.
The permanent anti-grease filter is
saturated.
The oil or fat isn't clean anymore.
The type of oil or fat used is not
suitable for deep-frying food.
The lid has not been closed
properly.
The permanent anti-grease filter is
saturated.
The sealing ring around the metal
inside of the lid is dirty or worn.
There is too much oil or fat in the
fryer.
The food contains too much
liquid.
There is too much food in the
frying basket.
The food contains too much
liquid.
The type of oil or fat used is
unsuitable for deep-frying food.
The inner pot has not been
cleaned properly.
The fuse of temperature control
may have blown.
Problem
The fried food does not have a
golden brown colour and/or is not
crispy.
The fryer gives off a strong
unpleasant smell.
Steam escapes from other places
than the filter.
During frying, the oil or fat spills
over the edge of the fryer.
The oil or fat foams too much
during frying.
Fryer does not work
ENGLISH 13
Page 14

Preparation times and temperature settings
If the instructions on the package of the food to be prepared differ
from those in the table, always follow the instructions on the package.
ENGLISH14
Frying time
(minutes)
2-3
4-6
5-7
12-15
2-3
6-7
3-4
3-4
3-4
3-4
3-4
3-4
3-4
3-4
3-4
4-5
Max. quantity
1300 g
1300 g
Recommended
quantity for best end
result
6-8 pieces
650 g
450 g
3-5 pieces
8-10 pieces
2-3 pieces
8-10 pieces
8-10 pieces
8-10 pieces
8-10 pieces
8-10 pieces
5 pieces
650 g
600 g
600 g
5 pieces
Type of food
Mushrooms
Home-made French fries*) 1st frying
cycle
Fresh fish
Chicken (drumsticks)
Vegetable fritters (i.e. cauliflower)
Chinese spring rolls
Chicken nuggets
Mini snacks
Squid rings in batter
Fish (pieces) in batter
Prawns
Apple fritters
Home-made French fries*) 2nd frying
cycle
Crips (very thin potato slices)
Aubergine (slices)
Meat\fish croquettes
Temp.
150cC
160cC
170cC
180cC
190cC
FRESH OR DEFROSTED FOOD
Frying time
(minutes)
15-20
3-4
10-12
4-5
4-5
4-5
4-5
4-5
5-6/7-8
6-7
Max. quantity
1000 g
Recommended
quantity for best end
result
3-4 pieces
4 pieces
2-3 pieces
8 pieces
6 pieces
8 pieces
8 pieces
8 pieces
500 g
4 pieces
Type of food
Chicken (drumsticks)
Mini potato pancakes
Chinese spring rolls
Chicken nuggets
Mini snacks
Squid rings in batter
Fish (pieces) in batter
Prawns
Frozen French fries
Meat/fish croquettes
Temp.
170cC
180cC
190cC
FROZEN FOOD
Page 15

Ważne
◗ Przed pierwszym użyciem urządzenia prosimy zapoznać się z
tekstem niniejszej instrukcji oraz zawartymi w niej ilustracjami.
◗ Niniejsze urządzenie przeznaczone jest wyłącznie do użytku
domowego.Jeśli urządzenie wykorzystywane jest w sposób
niewłaściwy lub do celów profesjonalnych,lub też w sposób
niezgodny z instrukcją obsługi, gwarancja traci ważność, a firma
Philips nie bierze odpowiedzialności za wszelkie wynikłe z tego
szkody.
◗ W urządzeniu tym nie należy smażyć ciastek ryżowych (ani innych
podobnych rodzajów żywności),gdyż może to powodować silne
rozpryskiwanie oleju.
◗ Sprawdź przed smażeniem, czy mrożone składniki są dostatecznie
rozmrożone.
◗ Przed smażeniem osusz przeznaczoną do smażenia żywność i
ostrożnie strząśnij z niej lód.
◗ Przed podłączeniem urządzenia do sieci należy sprawdzić, czy
napięcie wskazane na urządzeniu odpowiada napięciu miejscowej
sieci zasilającej.
◗ Wetknij wtyczkę przewodu zasilającego do uziemionego gniazdka.
◗ Przed pierwszym użyciem urządzenia oczyść dokładnie oddzielne
części frytkownicy (patrz: "Czyszczenie").
◗ Nie wolno zanurzać w wodzie obudowy, zawierającej elementy
elektryczne i grzałkę ani płukać jej w bieżącej wodzie pod kranem.
◗ Przed napełnieniem frytkownicy olejem lub płynnym tłuszczem
sprawdź, czy wszystkie jej części są zupełnie suche.
◗ Zalecane jest używanie oleju do smażenia lub płynnego tłuszczu.
Można używać tłuszczu stałego,lecz wówczas należy zachować
szczególną ostrożność (patrz: "Używanie tłuszczu stałego" oraz
"Wskazówki").
◗ Używaj tylko olejów lub tłuszczu, wskazanych do głębokiego
smażenia i zawierających środek zapobiegający powstawaniu piany.
Informację taką znajdziesz na opakowaniu lub etykiecie
opakowania oleju lub tłuszczu.
◗ Nie włączaj urządzenia przed napełnieniem go olejem lub
tłuszczem.
◗ Upewnij się, że frytkownica wypełniona jest zawsze do poziomu
pomiędzy dwoma znakami umieszczonymi w środku
wewnętrznego pojemnika.
◗ Wyłącznik bezpieczeństwa reagujący na temperaturę odłączy
urządzenie w przypadku jego przegrzania (patrz:
"Bezpieczeństwo").
◗ W niniejszej instrukcji obsługi znajdziesz maksymalne i zalecane
ilości żywności, którą można smażyć za jednym razem.Aby
uzyskiwać najlepsze rezultaty smażenia, zaleca się nieprzekraczanie
zalecanych w instrukcji ilości (patrz: "'Tabela").
◗ Podczas smażenia przez filtr wydobywa się gorąca para. Pamiętaj,
aby twarz i ręce znajdowały się w bezpiecznej odległości od
wydobywającej się pary.Powinieneś na nią uważać również
podczas otwierania pokrywy.
POLSKI 15
Page 16

◗ Podczas korzystania z urządzenia ustaw je w miejscu niedostępnym
dla dzieci. Pamiętaj, aby przewód zasilający nie zwisał nad krawędzią
stołu lub blatu kuchennego,na którym ustawiono urządzenie.
◗ Po zakończeniu korzystania z urządzenia ustaw regulator
temperatury w najniższym położeniu (obróć go maksymalnie w
lewo).Wyjmij wtyczkę z gniazdka ściennego i odczekaj, aż olej lub
tłuszcz zupełnie wystygną. Nie przesuwaj frytkownicy,zanim się
zupełnie nie schłodzi.
◗ Jeśli uszkodzone są przewód zasilający lub inne części urządzenia,
ich wymiany może dokonać jedynie punkt serwisowy
autoryzowany przez firmę Philips, ponieważ wymagane są do tego
specjalne narzędzia i części.
◗ Niniejsza instrukcja obsługi może okazać się przydatna w
przyszłości.
Bezpieczeństwo
Termiczny wyłącznik bezpieczeństwa
Niniejsze urządzenie wyposażone zostało w termiczny wyłącznik
bezpieczeństwa, wyłączający je w przypadku przegrzania urządzenia.
Może to mieć miejsce, gdy we frytkownicy nie ma w ogóle lub nie ma
wystarczająco dużo oleju lub tłuszczu, lub gdy roztapiają się we
frytkownicy kostki tłuszczu; zapobiega to zbyt szybkiemu wydzielaniu
ciepła przez grzałkę.
◗ Gdy termiczny wyłącznik bezpieczeństwa wyłączył urządzenie,
postępuj w sposób następujący:
1 Odczekaj, aż olej lub tłuszcz wystygną.
2 Zwróć się do sklepu lub upoważnionego punktu serwisowego
firmy Philips.
Używanie tłuszczu stałego
Zalecane jest używanie oleju do smażenia lub płynnego tłuszczu. Można
używać tłuszczu stałego, ale należy wówczas zachować szczególną
ostrożność, aby nie dopuścić do rozpryskiwania gorącego tłuszczu.
1 Jeśli chcesz użyć nowej kostki tłuszczu, roztop ją powoli na
małym ogniu, w zwykłej patelni.
2 Wlej ostrożnie roztopiony tłuszcz do frytkownicy.
3 Wetknij wtyczkę przewodu zasilającego do gniazdka ściennego
i włącz frytkownicę (patrz: "Smażenie").
POLSKI16
Page 17
C
4 Przechowuj frytkownicę wraz z zastygłym wewnątrz niej
tłuszczem w temperaturze pokojowej.Zbyt oziębiony tłuszcz
podczas smażenia może rozpryskiwać się.Aby temu zapobiec,
zrób widelcem kilka otworów w warstwie zastygłego tłuszczu.
Uważaj przy tym, by nie uszkodzić warstwy zapobiegającej
przywieraniu potraw, która pokrywa powierzchnię
wewnętrznego pojemnika.
Smażenie
1 Należy ustawić urządzenie na chłodnej, płaskiej i stabilnej
powierzchni, w miejscu niedostępnym dla dzieci.
Jeśli chcesz ustawić urządzenie na kuchence, pod wyciągiem, sprawdź,
czy zostały wyłączone jej palniki.
C
2 Wysuń cały przewód zasilający ze schowka.
C
3 Napełnij suchą frytkownicę olejem, płynnym tłuszczem lub
roztopionym tłuszczem stałym - do poziomu oznaczonego na
wewnętrznym pojemniku.
Zapoznaj się ze wskazówkami dotyczącymi napełniania frytkownicy
stałym tłuszczem, zamieszczonymi w rozdziale "Używanie stałego
tłuszczu".
Nie wolno mieszać dwóch różnych rodzajów oleju lub tłuszczu!
4 Włóż wtyczkę do gniazdka ściennego.
Upewnij się, że przewód zasilający nie styka się z rozgrzaną
powierzchnią urządzenia.
C
5 Włącz urządzenie za pomocą przełącznika ON/OFF. Zapali się
lampka kontrolna w przełączniku,a także lampka kontrolna
temperatury.
POLSKI 17
tłuszcz stały
1925 g
2200 g
olej
2,2 litra
2,5 litra
Typy HD6152 i HD6153
minimum
maksimum
Page 18
C
6 Ustaw regulator temperatury na odpowiedniej wartości.
Informację o zalecanej temperaturze znajdziesz na opakowaniu
przeznaczonej do smażenia żywności lub w tabeli zamieszczonej w
instrukcji obsługi.
W ciągu 10-15 minut olej lub tłuszcz zostaną rozgrzane do właściwej
temperatury.
Podczas rozgrzewania frytkownicy lampka kontrolna temperatury
będzie wielokrotnie zapalać się i gasnąć. Zgaśnięcie lampki na dłuższą
chwilę będzie oznaczać, że olej (lub tłuszcz) osiągnął żądaną
temperaturę.
Ta sama procedura odnosi się do sytuacji, gdy chcesz smażyć kolejno
kilka porcji. Przed rozpoczęciem smażenia kolejnej porcji odczekaj, aż
zgaśnie lampka kontrolna.
◗ Podczas rozgrzewania frytkownicy możesz pozostawić w niej kosz.
C
7 Unieś uchwyt, unosząc kosz do najwyższego położenia.
C
8 Otwórz pokrywę, zwalniając przycisk blokujący. Pokrywa
otworzy się automatycznie.
9 Wyjmij kosz z urządzenia.
10 Ułóż w koszu żywność przeznaczoną do smażenia.
Aby uzyskać najlepsze rezultaty smażenia, zaleca się używanie podanych
w tabeli ilości żywności.
C
11 Ostrożnie umieść kosz w urządzeniu.Upewnij się, że kosz
umieszczony został poprawnie.
12 Zamknij pokrywę.
13 Wyłącznie dla typu HD6153: Ustaw żądany czas smażenia
(patrz: "Wyłącznik czasowy"). Możesz również używać
frytkownicy bez korzystania z wyłącznika czasowego.
C
14 Wciśnij znajdujący się w uchwycie kosza przycisk blokujący i
ostrożnie opuść kosz do najniższego położenia.
Przestrzegaj czasów przygotowywania potraw wskazanych na
opakowaniu lub bierz pod uwagę czasy przygotowywania wskazane w
tabeli.
POLSKI18
Mrożone frytki
1000 g
500 g
Domowe frytki
1300 g
650 g
Typy HD6152 i HD6153
Maksymalna. ilość
Zalecana maksymalna ilość w
celu uzyskania najlepszego
wyniku końcowego
1
2
Page 19
◗ Aby żywność usmażyła się równomiernie na złocisty kolor, w
trakcie smażenia wyjmij kilkakrotnie kosz z oleju lub tłuszczu i
delikatnie potrząśnij jego zawartością.
Zachowaj ostrożność: podczas smażenia gorąca para wydobywa się
poprzez filtr w pokrywie.
Wyłącznik czasowy (tylko dla typu HD6153)
C
1 Aby ustawić w minutach czas smażenia,wciśnij przycisk
wyłącznika czasowego.
◗ Przytrzymaj wciśnięty przycisk - na wyświetlaczu będą szybko
przewijały się kolejne minuty.
Maksymalna długość czasu, który można ustawić, wynosi 99 minut.
Po upływie kilku sekund od ustawienia wyłącznika czasowego zacznie
się odliczanie czasu.
Podczas działania wyłącznika czasowego na wyświetlaczu migocze
wartość oznaczająca czas pozostały do zakończenia smażenia. Ostatnia
minuta smażenia wskazywana jest w sekundach.
Jeśli ustalona wcześniej wartość czasu nie jest prawidłowa, możesz ją
skasować, wciskając ponownie przycisk w chwili, w której wyłącznik
czasowy rozpoczyna odliczanie(tzn. w chwili, w której wartość na
wyświetlaczu zaczyna migotać) oraz przytrzymując wciśnięty przycisk
do momentu, gdy na wyświetlaczu pojawi się wartość "00". Możesz
teraz ustawić właściwy czas.
Po upływie ustalonego okresu czasu usłyszysz sygnał dźwiękowy
(kilkakrotnie). Po 20 sekundach sygnał dźwiękowy powtórzy się. Możesz
przerwać sygnał dźwiękowy, ponownie wciskając przycisk.
Uwaga: wyłącznik czasowy informuje jedynie o upływie czasu smażenia,
frytkownica pozostaje jednak nadal włączona.
◗ Aby wymienić baterię w wyłączniku czasowym, skontaktuj się z
punktem serwisowym firmy Philips.
Po zakończeniu smażenia
C
1 Korzystając z uchwytu unieś kosz do najwyższego położenia -
"położenia skapywania".
2 Otwórz pokrywę.
Uważaj na gorącą parę.
3 Ostrożnie wyjmij kosz z urządzenia.
W razie potrzeby potrząśnij koszem nad frytkownicą, w celu usunięcia
nadmiaru oleju lub tłuszczu.
Umieść usmażoną żywność w misce lub cedzaku, wyłożonych bibułą
pochłaniającą tłuszcz, może to być papierowy ręcznik kuchenny.
POLSKI 19
Page 20
C
4 Wyłącz urządzenie za pomocą przełącznika ON/OFF. Zgaśnie
lampka kontrolna w przełączniku.
5 Po zakończeniu korzystania z urządzenia wyjmij wtyczkę z
gniazdka ściennego.
◗ Jeśli nie korzystasz regularnie z frytkownicy, wówczas olej lub
płynny tłuszcz przechowuj, po wystygnięciu, w szczelnie
zamkniętych butelkach, najlepiej w lodówce lub innym chłodnym
miejscu. Napełnij butelki wlewając do nich olej lub tłuszcz przez
drobne sitko, zatrzymujące cząstki żywności.Aby wyjąć
wewnętrzny pojemnik w celu opróżnienia go, najpierw wyjmij kosz
do smażenia oraz pokrywę. Unieś wewnętrzny pojemnik z
urządzenia i wylej olej lub tłuszcz (patrz: "Czyszczenie").
◗ Jeśli we frytkownicy znajduje się stały tłuszcz, pozwól, aby się
zestalił i przechowuj frytkownicę wraz z tym pozostałym w niej
tłuszczem (patrz: "Używanie stałego tłuszczu").
Czyszczenie
Niemal wszystkie części frytkownicy można myć w zmywarce, można
też czyścić ją w gorącej wodzie z dodatkiem środka do mycia naczyń.
Odczekaj, aż olej lub tłuszcz dostatecznie wystygną.
Demontaż frytkownicy.
C
1 Zdejmij pokrywę wciskając przycisk blokady.Następnie zdejmij
pokrywę z urządzenia.
2 Wyjmij kosz z frytkownicy.
C
3 Wyjmij tacę na wodę.
C
4 Wyjmij z urządzenia wewnętrzny pojemnik pokryty warstwą
zapobiegającą przywieraniu potraw.
POLSKI20
2
Page 21
C
5 Usuń olej lub tłuszcz i ewentualnie pozbądź się ich (patrz: "Olej
i tłuszcz").
◗ Wszystkie części, za wyjątkiem obudowy zawierającej układy
elektryczne oraz grzałkę, można umyć w zmywarce lub w gorącej
wodzie z dodatkiem środka do mycia naczyń.
6 Obudowę oczyść wilgotną szmatką (zwilżoną płynem do mycia
naczyń) i/lub ręcznikami kuchennymi.
Do czyszczenia frytkownicy nie używaj środków żrących lub ściernych
(płynnych) (np sody, płynu lub proszku do szorowania, czy też
druciaków).
7 Po umyciu dokładnie osusz wszystkie części urządzenia.
Przechowywanie urządzenia
1 Umieść ponownie wszystkie części na lub we frytkownicy i
zamknij pokrywę.
C
2 Zwiń przewód zasilający, wepchnij go ponownie do schowka i
załóż wtyczkę do przeznaczonego na nią uchwytu.
3 Unieś frytkownicę za uchwyty.
Olej i tłuszcz
Zaleca się używanie oleju lub płynnego tłuszczu do smażenia, najlepiej
oleju roślinnego lub tłuszczu bogatego w tłuszcze nienasycone (np kwas
linolowy). Możesz również używać do smażenia tłuszczu stałego, ale
należy go przed użyciem roztopić na patelni, na wolnym ogniu, w celu
zapobieżenia rozpryskiwaniu lub przegrzaniu tłuszczu.
Używaj tylko olejów lub tłuszczu, przeznaczonych do głębokiego
smażenia i zawierających środek zapobiegający powstawaniu piany.
Informację tę znajdziesz na opakowaniu lub etykiecie opakowania oleju
lub tłuszczu.
Nie wolno mieszać dwóch różnych rodzajów oleju lub tłuszczu!
Zmiana oleju lub tłuszczu
Ponieważ olej lub tłuszcz dosyć szybko tracą swoje korzystne cechy,
powinno się regularnie je zmieniać.W tym celu należy postępować w
następujący sposób:
- Jeśli używasz frytkownicy przede wszystkim do przygotowywania
ziemniaków smażonych na sposób francuski i jeśli po użyciu
przecedzasz olej lub tłuszcz przez sitko,możesz wykorzystać ten sam
olej 10-12 razy,zanim wymienisz go na nowy.
POLSKI 21
Page 22

- Jeśli frytkownicy używa się do przygotowywania potraw bogatych w
proteiny (takich jak mięso lub ryby), olej lub tłuszcz należy zmieniać
częściej.
- Nigdy nie korzystaj z tego samego oleju lub tłuszczu przez okres
dłuższy niż 6 miesięcy i zawsze stosuj się do instrukcji podanych na
opakowaniu.
- Do starego oleju lub tłuszczu nigdy nie dodawaj nowego.
- Zawsze zmieniaj olej, gdy zaczyna pienić się przy podgrzewaniu, gdy
ma intensywny zapach lub smak, albo staje się ciemny i/lub o
konsystencji syropu.
Pozbywanie się zużytego oleju lub tłuszczu.
Wlej zużyty olej lub tłuszcz do oryginalnej (szczelnej) butelki z
tworzywa. Zużytego stałego tłuszczu możesz pozbyć się pozwalając na
jego zastygnięcie we frytkownicy (bez kosza wewnątrz) i następnie
zbierając go ze ścianek frytkownicy łopatka oraz zawijając go w gazetę.
Butelkę lub stały tłuszcz zawinięty w gazetę możesz umieścić w
odpadach nie podlegających kompostowaniu (tzn. w pojemniku nie
przeznaczonym na odpady kompostowane) lub pozbyć się ich w inny
sposób, zgodny z przepisami obowiązującymi w danym kraju.
Wskazówki przydatne podczas smażenia
Zalecane czasy i temperatury smażenia zamieszczone są w tabeli na
końcu niniejszej broszury.
Domowe frytki
Frytki będą smaczniejsze i bardziej kruche, jeśli będziesz postępować w
następujący sposób:
Wybierz twarde ziemniaki i pokrój je na kostki. Opłucz kostki
ziemniaków w zimnej wodzie. Zapobiegnie to sklejaniu się ich podczas
smażenia.
Osusz dokładnie kostki ziemniaków.
Frytki smażone są w dwóch etapach: po raz pierwszy przez 4-6 minut
w temperaturze 160cC, po raz drugi przez 2-4 minuty w temperaturze
190cC.
Aby żywność usmażyła się równomiernie na złocisty kolor, kilkakrotnie
w trakcie drugiego smażenia wyjmij kosz z oleju lub tłuszczu i
kilkakrotnie potrząśnij jego zawartością.
Podczas smażenia ilości maksymalnej nie należy potrząsać koszem.
Przed rozpoczęciem drugiego smażenia wrzuć frytki do misy i
potrząśnij nią.
Jeśli chcesz usmażyć maksymalną ilość, powoli wkładaj kosz do
frytkownicy, aby zapobiec nadmiernemu usmażeniu.
POLSKI22
Page 23

Żywność mrożona
Mrożone frytki są już wstępnie smażone, dlatego też wystarczy je
usmażyć tylko raz, zgodnie z instrukcją podaną na opakowaniu.
Żywność wyjęta z zamrażarki (-16 to -18cC) wyraźnie ostudzi olej lub
tłuszcz po zanurzeniu jej w nim. Ponieważ tłuszcz nie podgrzewa się od
razu, żywność może również wchłonąć go zbyt dużo. Aby temu
zapobiec, podejmij następujące kroki:
Nie smaż jednocześnie bardzo dużych ilości (patrz: tabela zawierająca
czasy przygotowania potraw i ustawienia temperatury).
Zanim zanurzysz porcję żywności w oleju lub tłuszczu, podgrzewaj ją
przez 15 minut.
Ustaw regulator temperatury na wartości wskazanej w zamieszczonych
w tej instrukcji tabelach lub na wartości wskazanej na opakowaniu
żywności przeznaczonej do smażenia.W przypadku braku takiej
instrukcji wybierz temperaturę o war tości 190cC.
Najlepiej będzie, jeśli odczekasz,aż żywność rozmrozi się w
temperaturze pokojowej i strząśniesz z niej możliwie najwięcej lodu i
wody.
Delikatnie zanurzaj żywność w oleju lub tłuszczu, gdyż mrożona
żywność może powodować gwałtowne tworzenie się pęcherzy na
powierzchni gorącego oleju lub tłuszczu.
Ochrona środowiska (tylko dla typu HD6153)
Pozbywanie się baterii
Przed wyrzuceniem wyeksploatowanego urządzenia wyjmij z niego
baterię zasilającą wyłącznik czasowy.
C
1 Do wyjęcia płytki z baterią użyj małego płaskiego wkrętaka.
2 Wyjmij baterię. Nie wyrzucaj baterii z odpadami gospodarstwa
domowego,ale oddaj ją do oficjalnego punktu skupu.
Gwarancja i serwis
Jeśli chcesz skorzystać z serwisu lub natknąłeś się na jakiś problem,
skontaktuj się z Biurem Obsługi Klienta lub najbliższym punktem
serwisowym, autoryzowanym przez dział AGD firmy Philips (numery
telefonów znajdziesz w karcie gwarancyjnej).
Problemy, na jakie można natrafić podczas smażenia
Jeśli frytkownica nie działa poprawnie lub jakość smażenia nie jest
zadowalająca, zapoznaj się z poniższą tabelą. Jeśli poradnik ten nie jest
wystarczający do rozwiązania problemu, patrz: "Gwarancja i serwis".
POLSKI 23
Page 24

24
Rozwiązanie
Sprawdź na opakowaniu lub w tabeli
zamieszczonej w niniejszej instrukcji, czy
prawidłowo zostały wybrane temperatura i/lub
czas przygotowania potrawy. Ustaw regulator
temperatury na odpowiedniej wartości.
Nie smaż żywności więcej, niż ilość zalecana w
niniejszej instrukcji obsługi.
Może być przepalony bezpiecznik układu
regulacji temperatury. Zwróć się do sklepu lub
upoważnionego punktu serwisowego firmy
Philips.
Zdejmij pokrywę i umyj pokrywę oraz filtr w
gorącej wodzie z dodatkiem środka do mycia
naczyń.
Zmień olej lub tłuszcz. Regularnie przesączaj go
przez sito, co pozwoli dłużej utrzymać jego
świeżość.
Zawsze używaj oleju lub płynnego tłuszczu
dobrej jakości. Nie wolno mieszać dwóch
różnych rodzajów oleju lub tłuszczu.
Sprawdź, czy prawidłowo została zamknięta
pokrywa.
Zdejmij pokrywę i umyj pokrywę oraz filtr w
gorącej wodzie z dodatkiem środka do mycia
naczyń.
Jeśli pierścień jest zabrudzony,umyj pokrywę w
gorącej wodzie z dodatkiem płynu do mycia
naczyń lub w zmywarce. Jeśli pokrywa jest
zużyta, zwróć się do sklepu lub upoważnionego
punktu serwisowego firmy Philips, w celu
wymiany pierścienia uszczelniającego.
Sprawdź, czy ilość oleju lub tłuszczu nie
przekracza dopuszczalnego poziomu.
Osusz dokładnie żywność, zanim rozpoczniesz
smażenie jej i smaż ją zgodnie z instrukcją
obsługi.
Nie smaż żywności więcej, niż ilość zalecana w
niniejszej instrukcji obsługi.
Osusz dokładnie żywność przed smażeniem jej.
Nie wolno mieszać dwóch różnych rodzajów
oleju lub tłuszczu. Używaj tylko olejów lub
tłuszczu zawierających środek zapobiegający
powstawaniu piany.
Oczyść wewnętrzny pojemnik zgodnie z
zaleceniami niniejszej instrukcji obsługi.
Zwróć się do sklepu lub upoważnionego
punktu serwisowego firmy Philips.
Możliwa przyczyna
Wybrano zbyt niską temperaturę
i/lub żywność poddawana była
smażeniu zbyt długo.
W koszu znajduje się zbyt dużo
żywności.
Olej lub tłuszcz nie rozgrzewają się
wystarczająco.
Stały filtr olejowy uległ zapchaniu.
Zanieczyszczony jest już olej lub
tłuszcz.
Rodzaj używanego oleju lub
tłuszczu nie jest odpowiedni do
głębokiego smażenia.
Nie została poprawnie zamknięta
pokrywa.
Stały filtr olejowy uległ zapchaniu.
Pierścień uszczelniający wokół
części metalowej wewnątrz
pokrywy jest zabrudzony lub
zużyty.
We frytkownicy znajduje się zbyt
dużo oleju lub tłuszczu.
Żywność zawiera zbyt dużo
wilgoci.
W koszu do smażenia znajduje się
zbyt dużo żywności.
Żywność zawiera zbyt dużo
wilgoci.
Rodzaj używanego oleju lub
tłuszczu nie jest odpowiedni do
głębokiego smażenia.
Nie został prawidłowo
oczyszczony wewnętrzny
pojemnik.
Przepalić się mógł bezpiecznik
układu regulacji temperatury.
Problem
Usmażone potrawy nie mają
złocistego koloru i/lub nie są
kruche.
Z frytkownicy wydziela się silny
nieprzyjemny zapach.
Para wydostaje się w innych
miejscach niż filtr.
Podczas smażenia olej (lub tłuszcz)
pryska poza frytkownicę.
Olej lub tłuszcz zbytnio pienią się
podczas smażenia.
Frytkownica nie działa.
POLSKI
Page 25

25
Czas smażenia
(w minutach)
2-3
4-6
5-7
12-15
2-3
6-7
3-4
3-4
3-4
3-4
3-4
3-4
3-4
3-4
3-4
4-5
Maksymalna ilość
1300 g
1300 g
Zalecana ilość w celu
uzyskania najlepszego
wyniku końcowego
6-8 sztuk
650 g
450 g
3-5 sztuk
8-10 sztuk
2-3 sztuki
8-10 sztuk
8-10 sztuk
8-10 sztuk
8-10 sztuk
8-10 sztuk
5 sztuk
650 g
600 g
600 g
5 sztuk
Rodzaj żywności
Grzyby
Domowe frytki*) Pierwszy cykl smażenia
Świeże ryby
Kurczak (udka)
Smażone warzywa (np kalafior)
Chińskie sajgonki
Medaliony z kurczaka
Mini-przekąski
Pierścienie z kałamarnicy panierowane
Ryby w kawałkach panierowane
Krewetki
Smażone jabłka
Domowe frytki*) Drugi cykl smażenia
Krążki (bardzo cienkie plasterki
ziemniaków)
Bakłażan (plastry)
Krokiety z mięsem
Temp.
150cC
160cC
170cC
180cC
190cC
ŚWIEŻA LUB ROZMROŻONA ŻYWNOŚĆ
Czasy przygotowania potraw i ustawienia temperatury.
Jeśli instrukcje umieszczone na opakowaniu żywności różnią się od
wskazówek zamieszczonych w tabeli, zawsze stosuj się do instrukcji
podanych na opakowaniu.
POLSKI
Czas smażenia
(w minutach)
15-20
3-4
10-12
4-5
4-5
4-5
4-5
4-5
5-6/7-8
6-7
Maksymalna ilość
1000 g
Zalecana ilość w celu
uzyskania najlepszego
wyniku końcowego
3-4 sztuki
4 sztuki
2-3 sztuki
8 sztuk
6 sztuk
8 sztuk
8 sztuk
8 sztuk
500 g
4 sztuki
Rodzaj żywności
Kurczak (udka)
Placuszki ziemniaczane
Chińskie sajgonki
Medaliony z kurczaka
Mini-przekąski
Pierścienie z kałamarnicy panierowane
Ryby w kawałkach panierowane
Krewetki
Mrożone frytki
Krokiety z mięsem/rybą
Temp.
170cC
180cC
190cC
ŻYWNOŚĆ MROŻONA
Page 26

Внимание
◗ Прежде чем пользоваться фритюрницей, внимательно
прочитайте настоящее руководство и ознакомьтесь с
иллюстрациями.
◗ Электроприбор предназначен для эксплуатации только в
домашних условиях. В случае использования прибора
ненадлежащим образом, в (полу)профессиональных условиях
или не в соответствии с данным руководством, вы утрачиваете
право на гарантию, и компания «Филипс» не несет
ответственности за нанесенный ущерб.
◗ Не жарьте пироги с рисом (или подобные продукты) в этом
приборе, поскольку это может стать причиной сильного
разбрызгивания/взрыва масла.
◗ Перед началом приготовления убедитесь,что замороженные
ингредиенты (почти полностью) разморожены.
◗ Перед обжариванием обсушите поверхность продуктов,
приготовленных для обжаривания, и тщательно стряхните лед
с замороженных продуктов.
◗ Перед подключением фритюрницы убедитесь, что
напряжение, указанное на приборе, соответствует напряжению
сети у вас дома.
◗ Подключайте электроприбор только к заземленной розетке.
◗ Перед первым применением фритюрницы тщательно
промойте отдельные детали (см. раздел «Очистка»).
◗ Запрещается погружать в воду части, содержащие
нагревательные элементы, а также промывать их под струей
водопроводной воды.
◗ Перед заполнением фритюрницы растительным маслом или
жидким жиром убедитесь, что все детали абсолютно сухие.
◗ Мы рекомендуем вам пользоваться маслом для жарения или
жидким жиром. Вы можете пользоваться также твердым
жиром для жарения, но в этом случае необходимо принять
дополнительные меры предосторожности, чтобы не допустить
разбрызгивания жира (см. раздел «Использование твердого
жира» и «Полезные советы»).
◗ Пользуйтесь только такими видами масла и жира, которые
пригодны для обжаривания во фритюрнице и содержат
пеногаситель. Информацию об этом вы найдете на упаковке
или этикетке масла или жира.
◗ Не включайте фритюрницу, пока вы не заполните ее маслом
или жиром.
◗ Проверьте, чтобы фритюрница всегда была заполнена до
уровня между двумя отметками на внутренней поверхности
внутренней чаши.
◗ В случае перегрева автоматический аварийный
термовыключатель отключает электроприбор (см. раздел
"Вопросы безопасности").
◗ В данном руководстве по эксплуатации указаны максимально
допустимые и рекомендованные количества продуктов,
которые
26 РУССКИЙ
Page 27

27
можно обжаривать за один прием. Для получения лучших
результатов обжаривания мы рекомендуем вам не превышать эти
значения (см. таблицу).
◗ Обжаривание сопровождается выходом пара через фильтр.
Следите за тем, чтобы ваши руки и лицо были на безопасном
расстоянии от пара. Вам следует также остерегаться горячего
пара, когда вы открываете крышку.
◗ Во время использования установите фритюрницу в месте,
недоступном для детей. Следите за тем,чтобы сетевой шнур
не свисал с края стола или рабочей поверхности, на которой
установлен электроприбор.
◗ После окончания работы установите терморегулятор в
положение, соответствующее минимальной температуре
(повернув его до упора влево). Выньте вилку сетевого шнура из
розетки электросети и дайте маслу или жиру остыть. Не
перемещайте фритюрницу, пока она не остынет.
◗ В случае повреждения сетевого шнура или других деталей
электроприбора, их следует заменять только в компании
«Филипс» или ее уполномоченном сервисном центре,
поскольку для ремонта могут потребоваться специальные
инструменты и/или детали.
◗ Сохраните настоящее руководство по эксплуатации в качестве
справочного материала.
Вопросы безопасности
Аварийный термовыключатель
Прибор оснащен аварийным термовыключателем, который
отключает его в случае перегрева.
Это может произойти при отсутствии масла или жира во
фритюрнице, в случае если их недостаточное количество, либо в
процессе растапливания кубиков твердого жира во фритюрнице,
препятствующего достаточно быстрому выделению тепла
нагревательным элементом.
◗ При срабатывании аварийного выключателя и отключении
прибора выполните следующее:
1 Дайте маслу или жиру остыть.
2 Обратитесь в вашу местную торговую организацию
компании «Филипс» или сервисное отделение компании
«Филипс».
РУССКИЙ
Page 28

Использование твердого жира
Мы рекомендуем вам пользоваться маслом для жарения или
жидким жиром. Вы можете пользоваться также твердым жиром
для жарения, но в этом случае необходимо принять
дополнительные меры предосторожности, чтобы не допустить
разбрызгивания жира.
1 Если вы хотите использовать новые кубики жира,
расплавьте их на обычной сковороде на медленном огне.
2 Осторожно перелейте расплавленный жир во фритюрницу.
3 Вставьте вилку сетевого шнура в розетку электросети и
включите фритюрницу (см. раздел «Обжаривание»).
C
4 Храните фритюрницу с застывшим в ней жиром при
комнатной температуре. Если жир застынет очень сильно,
то при расплавлении он может начать разбрызгиваться.
Чтобы избежать разбрызгивания, проделайте в застывшем
жире несколько отверстий вилкой. Делайте это осторожно,
чтобы не повредить нагревательный элемент.
Обжаривание
1 Установите фритюрницу в месте, недоступном для детей,
на горизонтальную, ровную и устойчивую поверхность.
Если вы хотите поставить фритюрницу на плиту, под вытяжной
колпак, убедитесь в том, что конфорки плиты выключены.
C
2 Извлеките весь шнур целиком из отсека для хранения
шнура.
C
3 Заполните фритюрницу маслом, жидким жиром или
расплавленным твердым жиром до верхней отметки уровня
на внутренней емкости.
Ознакомьтесь с правилами заполнения фритюрницы при
использовании твердого жира в разделе «Использование твердого
жира».
28 РУССКИЙ
твердый жир
1925 г
2200 г
масло
2,2 л
2,5 л
модели HD6152 и HD 6153
мин.
макс.
Page 29

29
Никогда не смешивайте различные виды масла или жира!
4 Вставьте вилку сетевого шнура в розетку электросети.
Убедитесь, что сетевой шнур не касается горячих деталей
электроприбора.
C
5 Включите фритюрницу, нажав на выключатель питания. При
этом загорятся индикатор внутри выключателя питания и
индикатор нагрева.
C
6 Установите терморегулятор в положение, соответствующее
правильной температуре.
Чтобы узнать, какую температуру вам следует выбрать, посмотрите
на упаковку с продуктом, который вы будете обжаривать, или в
таблицу, имеющуюся в данном Руководстве по эксплуатации.
Масло или жир будут нагреваться до нужной температуры в
течение 10-15 минут.
В процессе нагревания фритюрницы индикатор нагрева будет
неоднократно выключаться и включаться снова. Температура масла
или жира достигнет заданного уровня, когда этот индикатор в
течение некоторого времени будет оставаться выключенным.
Эта же процедура применима, если вы хотите обжарить несколько
загружаемых порций продукта одну за другой. Но перед тем как
приступить к обжариванию следующей порции, подождите, пока
индикатор в течение некоторого времени останется выключенным.
◗ Во время нагревания фритюрницы корзина может находиться
внутри.
C
7 Поднимите рычаг, чтобы поднять корзину в самое высокое
положение.
C
8 Для того чтобы открыть крышку, нажмите на кнопку
разблокировки. Крышка откроется автоматически.
9 Выньте корзину из фритюрницы.
10 Положите в корзину продукты, предназначенные для
обжаривания.
Для получения наилучших результатов мы советуем вам загружать
во фритюрницу продукты, в количествах указанных в таблице.
РУССКИЙ
Замороженный
картофель-фри
1000 г
500 г
Домашний
картофель-фри
1300 г
650 г
Модели HD6152 и HD6153
Максимальное количество
Рекомендуемое
максимальное количество
для получения наилучших
результатов
Page 30

30
C
11 Осторожно поставьте корзину во фритюрницу. Убедитесь,
что корзина установлена правильно.
12 Закройте крышку.
13 Только для модели HD6153:Установите требуемое время
обжаривания (см. раздел «Таймер»). Вы можете также
пользоваться фритюрницей, не устанавливая время на
таймере.
C
14 Нажмите на кнопку разблокировки и осторожно опустите
корзину в самое нижнее положение.
Придерживайтесь времени приготовления, указанного на упаковке
продукта, или следуйте инструкциям о времени приготовления,
которые вы найдете в таблице.
◗ Чтобы получить ровную золотистую корочку, время от времени
вынимайте корзину из масла или жира во время обжаривания и
осторожно встряхивайте ее содержимое.
Будьте осторожны: обжаривание сопровождается выходом
горячего пара из фильтра, расположенного в крышке.
Таймер (только модель HD6153)
C
1 Нажмите на кнопку таймера, чтобы установить время
обжаривания (в минутах).
◗ Удерживайте кнопку в нажатом состоянии, и значение
времени в минутах будет быстро возрастать.
Максимальное время, которое вы можете установить, составляет
99 минут.
Через несколько секунд после установки таймера начнется
обратный отсчет времени.
Когда таймер включен, на его экране мелькают значения,
указывающие на оставшееся время. Отсчет последней минуты
ведется в секундах.
Если время на таймере установлено неправильно, вы можете сбросить
заданное время, нажав на кнопку повторно в тот момент, когда
таймер начнет обратный отсчет времени (т.е. когда цифры начнут
мелькать), и удерживая ее до тех пор, пока на экране не появятся
цифры «00». Теперь вы можете установить правильное время.
По истечении заданного времени вы услышите звуковой сигнал
(несколько гудков). Через 20 секунд звуковой сигнал прозвучит
повторно. Вы можете прервать звуковой сигнал, нажав на кнопку
повторно.
Внимание: таймер сигнализирует об окончании процесса
приготовления продуктов, но не отключает фритюрницу.
◗ Для замены батареи таймера обращайтесь в Сервисный центр
компании «Филипс»
РУССКИЙ
1
2
Page 31

31
После завершения обжаривания
C
1 Поднимите ручку, чтобы установить корзину в самое
высокое положение, положение «для стекания масла»).
2 Откройте крышку.
Осторожно: горячий пар.
3 Осторожно выньте корзину из фритюрницы.
При необходимости встряхните корзину над фритюрницей, чтобы
удалить излишки жира или масла.
Переложите обжаренный продукт в миску или дуршлаг, выстланные
жиропоглощающей бумагой, например, кулинарной бумагой.
C
4 Выключите фритюрницу с помощью выключателя питания.
При этом индикатор,расположенный внутри выключателя
питания, погаснет.
5 После завершения работы выключите электроприбор из
розетки электросети.
◗ Если вы пользуетесь фритюрницей нерегулярно, мы
рекомендуем хранить масло или жидкий жир в плотно
закрытых бутылках, желательно, после остывания, в
холодильнике или холодном месте.Для заполнения бутылок
сливайте масло или жир через мелкоячеистое сито,
удерживающие частички пищи. Для того чтобы вынуть
внутреннюю емкость и опорожнить ее, сначала выньте корзину
для обжаривания и крышку. Выньте из фритюрницы
внутреннюю емкость и слейте жир или масло (см. раздел
«Очистка»).
◗ Если во фритюрнице остался твердый жир, дайте ему застыть и
храните фритюрницу вместе с жиром (см. раздел
«Использование твердого жира»).
Очистка
Почти все детали фритюрницы можно мыть в посудомоечной
машине или же просто водой с добавлением моющего средства.
Подождите до остывания жира или масла.
Разберите фритюрницу:
C
1 Снимите крышку, нажимая рифленую пластину, чтобы
отсоединить крышку. После этого выньте крышку.
2 Выньте корзину из фритюрницы.
РУССКИЙ
2
Page 32

32
C
3 Выньте поддон для воды.
C
4 Выньте из фритюрницы внутреннюю емкость с
антипригарным покрытием.
C
5 Слейте жир или масло для дальнейшего использования (см.
раздел «Масло и жир»).
◗ Все детали фритюрницы, за исключением частей с
нагревательными элементами, можно мыть в посудомоечной
машине или горячей мыльной водой.
6 Очистите части фритюрницы влажной тканью (с
небольшим количеством моющей жидкости) и/или
кулинарной бумагой.
Не пользуйтесь для очистки фритюрницы едкими или абразивными
(жидкими) чистящими средствами (например, стиральной содой,
абразивными жидкостями или порошками или жесткими губками).
7 После очистки тщательно высушите все детали.
Хранение электроприбора
1 Установите все детали на фритюрницу и внутрь
фритюрницы и закройте крышку.
C
2 Смотайте сетевой шнур, протолкните его в отсек для
хранения и зафиксируйте вилку с помощью специального
устройства.
3 Поднимайте фритюрницу, удерживая ее за ручки.
РУССКИЙ
Page 33

33
Поднимайте фритюрницу, удерживая ее за ручки.
Мы рекомендуем вам пользоваться маслом для жарения или
жидким жиром для жарения, желательно растительным маслом или
жиром с высоким содержанием ненасыщенных жиров (например,
линолевой кислоты). Вы можете также использовать твердый жир
для жарения, но в этом случае вам потребуется предварительно
расплавить его на сковороде при слабом нагревании, чтобы не
допустить разбрызгивания или перегревания жира.
Пользуйтесь только такими видами масла и жира, которые
пригодны для обжаривания во фритюрнице и содержат
пеногаситель. Эту информацию вы найдете на упаковке или
этикетке масла или жира.
Никогда не смешивайте различные виды масла или жира!
Замена масла или жира
Поскольку масло и жир довольно быстро теряют свои полезные
свойства, их следует регулярно менять. Следуйте описанным ниже
инструкциям:
- Если вы пользуетесь фритюрницей главным образом для
приготовления картофеля-фри или если вы фильтруете масло или
жир через сито после каждого использования, то вы можете
воспользоваться маслом или жиром 10-12 раз, прежде чем его
потребуется заменить.
- Если вы пользуетесь фритюрницей для приготовления пищи с
высоким содержанием белка (например, мяса или рыбы), вам
потребуется менять масло или жир чаще.
- Никогда не пользуйтесь одной и той же порцией масла дольше
6 месяцев и всегда следуйте инструкциям на упаковке масла.
- Никогда не добавляйте свежее масло или жир к уже
использованным маслу или жиру.
- Вам необходимо сменить масло, если оно пенится при
нагревании, либо приобрело сильный запах или привкус, либо
становится темным и/или липким.
Утилизация использованного масла или жира
Слейте использованное масло или жидкий жир обратно в
пластиковую бутылку (с герметично закрывающейся крышкой).
Твердый жир можно оставить во фритюрнице (после извлечения
из нее корзины) до застывания и впоследствии собрать его
лопаткой и завернуть в газету. Бутылку или газету с жиром можно
выбросить в мусоросборный бачок для отходов, не поддающихся
биохимическому распаду (но не в бачок для сбора пищевых
отходов), либо утилизовать их в соответствии с правилами,
действующими в вашей стране.
РУССКИЙ
Page 34

34
Советы по приготовлению блюд во фритюрнице
Время приготовления и температура обжаривания указаны в
таблице в конце данной брошюры.
Домашний картофель-фри
Для приготовления самого вкусного и самого хрустящего
картофеля-фри выполните следующее:
Выберите твердый картофель и нарежьте его ломтиками. Вымойте
ломтики холодной водой. Благодаря этому они не будут слипаться
при обжаривании.
Тщательно обсушите ломтики.
Обжарьте ломтики картофеля-фри дважды: сначала в течение 4-6
минут при температуре 160cC, во второй раз в течение 2-4 минут
при температуре 190cC.
Для получения ровной золотистой корочки во время второго
обжаривания несколько раз приподнимайте корзину из
фритюрницы и встряхивайте ее.
При обжаривании максимального количества картофеля корзину
встряхивать не следует. Прежде чем начать второй цикл
обжаривания, перенесите домашний картофель-фри в миску и
встряхните ее.
Если вы хотите обжарить максимальное количество картофеля,
опускайте корзину во фритюрницу медленно, чтобы избежать
выкипания масла.
Замороженные продукты
Замороженные продукты уже прошли предварительную
кулинарную обработку, поэтому вам нужно обжарить их лишь
однократно, в соответствии с инструкцией на упаковке.
При погружении во фритюрницу продуктов из морозильника (с
температурой от -16 до -18cC) температура масла или жира
значительно снизится. Поскольку продукты не смогут обжариться
немедленно, они могут впитать слишком много масла или жира.
Чтобы не допустить этого, примите следующие меры:
Не обжаривайте слишком большое количество замороженных
продуктов за один прием (см. время приготовления и температуру
обжаривания в таблице).
Прежде чем опустить порцию продуктов во фритюрницу,
нагревайте масло или жир в течение не менее 15 минут.
Установите терморегулятор в положение, указанное в таблицах,
которые имеются в данном руководстве, или на упаковке с
продуктами. В случае отсутствия указаний установите регулятор
температуры на 190cC.
Желательно дать замороженным продуктам частично оттаять при
комнатной температуре и стряхнуть с них как можно большее
количество льда и воды.
РУССКИЙ
Page 35

35
Опускайте продукты в масло или жир очень осторожно, поскольку
замороженные продукты при попадании в горячее масло или жир
могут вызвать бурное кипение масла или жира.
Защита окружающей среды (только модель HD6153)
Утилизация батареи
Прежде чем выбросить прибор, выньте батарею из таймера.
C
1 Снимите панель таймера с помощью небольшой отвертки с
плоским шлицом.
2 Выньте батарею. Не выбрасывайте батарею вместе с
бытовым мусором, а сдайте ее в официальный пункт приема.
Гарантия и обслуживание
По поводу дополнительной информации или в случае
возникновения каких-либо проблем обращайтесь на Web-сайт
компании «Филипс» по адресу www. philips.com или в центр
компании «Филипс» по обслуживанию потребителей в вашей
стране (вы найдете его номер телефона на международном
гарантийном талоне). Если подобный центр в вашей стране
отсутствует, обратитесь в вашу местную торговую организацию
компании «Филипс» или сервисное отделение компании Philips
Domestic Appliances and Personal Care BV.
Трудности,с которыми вы можете столкнуться при обжаривании
Если ваша фритюрница плохо работает или качество обжаривания
недостаточно высокое, обратитесь к таблице, представленной
ниже. Если вы не сможете устранить неисправности с помощью
данного руководства по устранению неисправностей, см. раздел
«Гарантия и обслуживание».
РУССКИЙ
Page 36

Решение
Проверьте на упаковке продуктов или в
таблице, приведенной в данном
руководстве, правильно ли вы выбрали
температуру и/или продолжительность
приготовления. Установите терморегулятор
в правильное положение.
Не обжаривайте за один раз больше
продуктов, чем количеств, указанных в
руководстве по эксплуатации.
Возможно, перегорел плавкий
предохранитель терморегулятора.
Обратитесь в вашу местную торговую
организацию компании «Филипс» или
сервисное отделение компании «Филипс».
Снимите крышку и вымойте крышку и
фильтр горячей мыльной водой или в
посудомоечной машине.
Замените жир или масло. Регулярно
фильтруйте масло или жир через сито,
чтобы они дольше сохранялись свежими.
Пользуйтесь высококачественным маслом
или жиром. Никогда не смешивайте
различные виды масла или жира.
Проверьте, правильно ли закрыта крышка.
Снимите крышку и вымойте крышку и
фильтр горячей мыльной водой или в
посудомоечной машине.
В случае загрязнения кольца вымойте
крышку в посудомоечной машине или
вручную горячей мыльной водой. В случае
износа обратитесь в вашу местную
торговую организацию компании «Филипс»
или сервисное отделение компании
«Филипс» для замены уплотнительного
кольца.
Убедитесь в том, что фритюрница
заполнена маслом или жиром не выше
отметки максимального уровня.
Тщательно обсушите поверхность
продуктов перед обжариванием и
обжаривайте их в соответствии с
содержащимися в данном руководстве
инструкциями.
Не обжаривайте за один раз больше
продуктов, чем количеств, указанных в
руководстве по эксплуатации.
Тщательно обсушите продукты перед их
обжариванием во фритюрнице.
Возможная причина
Выбрана недостаточно высокая
температура и/или пища
обжаривалась недостаточно
долго.
Корзина заполнена больше, чем
нужно.
Масло или жир недостаточно
горячие.
Произошло насыщение
постоянного фильтражиропоглотителя.
Произошло загрязнение масла
или жира.
Масло или жир данного вида
непригодны для обжаривания
пищи во фритюре.
Плохо закрыта крышка.
Произошло насыщение
постоянного фильтражиропоглотителя.
Уплотнительное кольцо,
окружающее металлическую
часть крышки с внутренней
стороны, загрязнено или
износилось.
Во фритюрнице слишком много
жира или масла.
В продуктах слишком много
жидкости.
Корзина заполнена больше, чем
нужно.
В продуктах слишком много
жидкости.
Проблема
Обжаренные продукты не
имеют золотисто-коричневого
цвета и/или хрустящей корочки.
Фритюрница распространяет
сильный, неприятный запах.
Пар выходит не из фильтра, а из
других мест.
Во время обжаривания масло
или жир выплескиваются из
фритюрницы.
Во время обжаривания
образуется слишком много
пены.
РУССКИЙ36
Page 37

Решение
Никогда не смешивайте различные виды
масла или жира и пользуйтесь маслом или
жиром, содержащим пеногаситель.
Очистите внутреннюю емкость, как описано
в данном руководстве.
Обратитесь в вашу местную торговую
организацию компании «Филипс» или
сервисное отделение компании «Филипс».
Возможная причина
Масло или жир данного вида
непригодны для обжаривания
пищи во фритюрнмце.
Внутренняя емкость
недостаточно чистая.
Возможно, перегорел плавкий
предохранитель
терморегулятора.
Проблема
Фритюрница не включается
РУССКИЙ 37
Время приготовления и установка температуры
Если инструкции на упаковке продукта, который вы будете
обжаривать, не совпадают с рекомендациями, приведенными в
таблице, всегда следуйте рекомендациям, указанным на упаковке.
Время
обжаривания
(минуты)
2-3
4-6
5-7
12-15
2-3
6-7
3-4
3-4
3-4
3-4
3-4
3-4
3-4
3-4
3-4
4-5
Максимальное
количество
1300 г
1300 г
Рекомендуемое
количество для
получения
наилучшего
результата
6-8 штук
650 г
450 г
3-5 штуки
8-10 штук
2-3 штуки
8-10 штук
8-10 штук
8-10 штук
8-10 штук
8-10 штук
5 штук
650 г
600 г
600 г
5 штук
Тип продуктов
Грибы
Домашний картофель-фри*) 1-ый цикл
обжаривания
Свежая рыба
Цыпленок (куриные ножки)
Овощные оладьи (например, из
цветной капусты)
Китайские фаршированные блинчики
Нугаты из цыпленка
Мини-снэк (закуска)
Нарезанный кольцами кальмар в кляре
Кусочки рыбы в кляре
Креветки
Яблочные оладьи
Домашний картофель-фри*) 2-ой цикл
обжаривания
Хрустящий картофель (очень тонко
нарезанные ломтики картофеля)
Баклажаны (ломтики)
Мясные крокеты
Температ
ура
150cC
160cC
170cC
180cC
190cC
СВЕЖИЕ ИЛИ РАЗМОРОЖЕННЫЕ ПРОДУКТЫ
Page 38

РУССКИЙ38
Время
обжаривания
(минуты)
15-20
3-4
10-12
4-5
4-5
4-5
4-5
4-5
5-6/7-8
6-7
Максимальное
количество
1000 г
Рекомендуемое
количество для
получения
наилучшего
результата
3-4 штуки
4 штуки
2-3 штуки
8 штук
6 штук
8 штук
8 штук
8 штук
500 г
4 штуки
Тип продуктов
Цыпленок (куриные ножки)
Картофельные миниоладьи
Китайские фаршированные блинчики
Нугаты из цыпленка
Мини-снэк (закуска)
Нарезанный кольцами кальмар в кляре
Кусочки рыбы в кляре
Креветки
Замороженный картофель-фри
Мясные/рыбные крокеты
Температ
ура
170cC
180cC
190cC
ЗАМОРОЖЕННЫЕ ПРОДУКТЫ
Page 39

Tähtis
◗ Enne seadme kasutuselevõttu tutvuge juhendi ja joonistega.
◗ Seade on mõeldud kasutamiseks ainult majapidamises. Kui seadet
kasutatakse lohakalt, ebaprofessionaalselt või mitte kooskõlas
kasutusjuhendiga, siis ei ole garantii kehtiv ja Philips ei vastuta
tekkinud kahjustuste eest.
◗ Ärge küpsetage riisikooki (või sellesarnaseid toite), sest selles
seadmes võib õli hakata pritsima/on plahvatusohtlik.
◗ Enne praadimist sulatage külmutatud toiduained (peaaegu)
◗ Kuivatage toiduained, mida tahate töödelda, kuivaks ja eemaldage
jäätükid enne frittimist.
◗ Kontrollige, et kohalik voolutugevus vastaks seadme
voolutugevusele enne seadme sisselülitamist.
◗ Ühendage seade ainult maandatud pistikupessa.
◗ Puhastage fritteri osad enne seadme esmakasutamist (vt
'Puhastamine').
◗ Ärge kunagi kastke korpust, mis sisaldab elektri- ja kütteelemente,
vette või loputage voolava vee all.
◗ Veenduge, et seade on täiesti kuiv, enne kui täidate selle õli või
rasvaga.
◗ Soovitame kasutada frittimisõli või vedelat frittimisrasva.Võite
kasutada tahket frittimisrasva, kuid olge ettevaatlik, et rasv ei
pritsiks (vt. 'Tahke rasva kasutamine' ja 'Soovitused').
◗ Kasutage ainult frittimisõli või -rasva, mis on ette nähtud
frittimiseks ja sisaldab vahuvastast ainet. Need andmed leiate
pakendilt.
◗ Ärge lülitage seadet sisse enne,kui sellesse pole õli või rasva
pandud.
◗ Jälgige,et frittimisõli või -rasva tase frittimisnõus oleks
tasemetähiste vahel.
◗ Ülekuumenemiskaitse lülitab seadme välja ülekuumenemise korral
(vt 'Ohutusnõuanded').
◗ Selles juhendis leiate korraga frititavate toiduainete maksimum- ja
soovitava koguse.Soovitame mitte ületada soovitavaid koguseid (vt.
'Tabel').
◗ Valmistamise ajal tuleb kaanes asuvast filtrist kuuma auru. Hoidke
käed ja nägu kuumast aurust eemal. Olge ettevaatlik ka fritteri
kaane avamisel, fritterist eraldub kuuma auru.
◗ Hoidke seade laste käeulatusest eemal, eriti seadme töötamise ajal
ning ärge jätke toitejuhet üle lauaserva või tööpinna rippuma.
◗ Pärast frittimist seadke temperatuurivalits madalaimale
temeperatuurile (keerake vastupäeva lõpuni). Eemaldage pistik
pistikupsesast ja laske õlil või rasval maha jahtuda. Ärge liigutage
fritterit enne, kui see on piisavalt jahtunud.
◗ Kui toitejuhe või seadme teised osad on rikkis, vahetage need
Philipsi's või Philips'i poolt volitatud hooldekeskuses,sest ainult neil
on vastavad tööriistad ja/või osad.
◗ Hoidke kasutusjuhend alles.
39EESTI
Page 40

Ohutusnõuanded
Ülekuumenemiskaitse
Sellel seadmel on ülekuumenemiskaitse, mis lülitab seadme
ülekuumenemise korral välja.
Seda võib juhtuda, kui fritteris ei ole üldse või on liiga vähe rasva või õli,
või kui sulatate tahkeid rasva tükke ning soojus ei saa kiiresti
kuumenevast kütteelemendist piisavalt kiiresti edasi levida.
◗ Kui ülekuumenemiskaitse on fritteri välja lülitanud:
1 Laske õlil või rasval maha jahtuda.
2 Pöörduge Philipsi toodetemüüja või Philips'i poolt volitatud
hoolduskeskuse poole.
Tahke rasva kasutamine
Soovitame kasutada küpsetamisõli või vedelat rasva.Võite kasutada
tahket frittimisrasva, selle kasutamisel olge ettevaatlik ning vältige rasva
pritsimist.
1 Kui tahate kasutada tahket rasva, sulatage seda eelnevalt pannil
madalal temperatuuril.
2 Kallake sulatatud rasv ettevaatlikult fritterisse.
3 Pange pistik seinapistikusse ja lülitage fritter sisse (vt
'Frittimine').
C
4 Hoidke sulatatud rasvaga täidetud fritterit toatemperatuuril.
Kui rasv muutub väga jahedaks,võib see ülessulatamise ajal
hakata pritsima. Pritsimise vältimiseks tehke kahvliga hangunud
rasva sisse mõned augud. Olge ettevaatlik, et seejuures mitte
rikkuda külgevõtmatut pinda.
Frittimine
1 Paigutage seade horisontaalsele ühtlasele ja stabiilse pinnale,
lastele kättesaamatusse kohta.
Kui soovite paigutada fritteri keedupinnale, õhupuhasti alla, kontrollige,
kas keeduväljad on välja lülitatud.
C
2 Võtke kogu toitejuhe juhtmehoidikust välja.
40 EESTI
Page 41

41
C
3 Pange tühja ja kuiva fritterisse õli, vedelat või sulatatud tahket
rasva frittimisnõu ülemise tasemetähiseni.
Vt pt 'Tahke frittimisrasva kasutamine', kuidas kasutada tahket rasva.
Ärge kasutage koos erinevaid õlisid ega rasvu!
4 Pange pistik pistikupessa.
Kontrollige, et toitejuhe ei puutuks vastu seadme kuumi osi.
C
5 Lülitage fritter sisse/väljalülitist sisse. Lüliti ja termostaadi
märgutuled süttivad.
C
6 Keerake temperatuurivalits soovitud temperatuurile.
Infot erinevate toiduainete frittimistemperatuuride kohta saate
toiduaine pakendilt või kasutusjuhendi tabelist.
Õli või rasv kuumeneb soovitud temperatuurini 10-15 minutiga.
Seadme kuumenemisel lülitub termostaadi märgutuli mitmed korrad
sisse ja välja. Kui tuli on mõnda aega kustunud, on õli või rasv
saavutanud seatud temperatuuri.
Samuti peab toimima ka siis, kui soovite fritterit kasutada mitu korda
järjest. Enne uue toidukoguse frittimist oodake veidi pärast märgutule
kustumist, enne kui panete fritterisse uue toidukoguse.
◗ Võite jätta frittimiskorvi fritteri kuumenemise ajaks frittimisnõusse.
C
7 Tõstke frittimiskorvi käepidemest ja fikseerige see ülemisse
asendisse.
C
8 Avage kaas vajutades kaanevabastusnupule. Kaas avaneb
automaatselt.
9 Eemaldage korv fritterist.
10 Pange frititavad toiduained frittimiskorvi.
Parima tulemuse saavutamiseks ärge ületage tabelis soovitatud
koguseid.
EESTI
tahke rasv
1925 g
2200 g
õli
2,2 liitrit
2,5 liitrit
mudel HD6152 ja HD6153
min.
maksimum
Külmutatud friikartulid
1000 g
500 g
Friikartulid
1300 g
650 g
Mudel HD6152 ja HD6153
Maksimumkogus
Soovitatud maksimumkogus parima
lõpptulemuse saavutamiseks
Page 42

42
C
11 Pange korv ettevaatlikult fritterisse. Kontrollige, kas korv on
õigesti fritteris.
12 Sulgege kaas.
13 Ainult mudel HD6153. Seadistage frittimisaeg (vt 'Taimer'). On
võimalik kasutada fritterit ka ilma taimeri seadistamiseta.
C
14 Vajutage korvi vabastusnuppu käepidemel ja laske see
ettevaatlikult madalaimasse asendisse.
Pidage kinni pakendil märgitud või tabelis olevast valmistamisajast.
◗ Toit pruunistub ühtlaselt, kui tõstate korvi õlist või rasvast välja ja
raputate seda kergelt paar korda frittimise ajal.
Olge ettevaatlik: Fritteri kaane avamisel tuleb filtri kaudu fritterist kuuma
auru.
Taimer (ainult HD6153)
C
1 Vajutage tamerinuppu,et seadistada frittmisaeg minutites.
◗ Jätke nupp sissevajutatuks ja minutid hakkavad liikuma kiiresti
edasi.
Maksimumaeg, mida on võimalik seadistada, on 99 minutit.
Pärast taimeri seadistamist mõne sekundi pärast algab aja loendamine
Kui taimer on aktiveeritud, vilgub järelejäänud aeg displeil.Viimane minut
kuvatakse sekundites.
Kui eelseadistatud aeg ei ole õige, saab seda tühistada vajutades nuppu
veelkord sel hetkel, kui taimer hakkab aega loendama (näit kui aeg
hakkab vilkuma), hoides nuppu allvajutatuna, kuni displeile ilmub '00'.
Nüüd saate seadistada õige aja.
Kui seadistatud aeg on läbi, kuulete helisignaali (mõned piibitused).
Helisignaali väljalülitamiseks tuleb nuppu veelkord vajutada.
Hoiatus: taimer näitab, et frittimisaeg on lõppenud, kuid ei lülita fritterit
välja.
◗ Võtke ühendus Philips'i hoolduskeskusega, kui tekib vajadus taimeri
patareid vahetada.
Pärast frittimist
C
1 Tõstke korv käepidemest ülaasendisse, 'nõrgumisasendisse'.
2 Avage kaas.
Hoiduge kuuma auru eest.
3 Eemaldage ettevaatlikult korv fritterist.
Vajaduse korral raputage korvi fritteri kohal, et liigne rasv või õli ära
nõrguks.
EESTI
1
2
Page 43

43
Pange frititud toit majapidamispaberiga vooderdatud sõelale või nõusse
nõrguma.
C
4 Lülitage fritter lülitist välja. Lüliti märgutuli kustub.
5 Tõmmake pistik pistikupesast.
◗ Kui te fritterit pidevalt ei kasuta, soovitame frittimiseks kasutatavat
õli või rasva hoida pärast mahajahutamist külmkapis või jahedas
kohas tihedalt suletavas nõus.Õli või rasv valage nõusse läbi
peensõela, et eemaldada väikesed toiduosakesed. Fritteri
tühjendamiseks eemaldage esmalt korv ja kaas.Tõstke frittmisnõu
seadmest välja ja kallake õli või rasv välja (vt 'Puhastamine').
◗ Kui fritteris on tahke rasv, laske rasval ära hanguda ja hoidke seda
fritteris (vt 'Tahke frittimisrasva kasutamine').
Puhastamine
Seda fritterit võib pesta nõudepesumasinas või kuuma
pesuvahendilahusega.
Oodake, kuni õli või rasv on piisavalt jahtunud.
Fritteri lahtitegemine
C
1 Eemaldage kaas vajutades vabastusnuppu. Seejärel tõstke kaas
seadmest välja.
2 Eemaldage korv fritterist.
C
3 Eemaldage veekandik.
C
4 Tõstke külgevõtmatu pinnaga nõu seadmest välja.
EESTI
2
Page 44

44
C
5 Eemaldage õli või rasv ja lõpuks valage see välja (vt 'Õli ja rasv').
◗ Kõiki osi k.a. väliskesta elektriosade ja kütteelemendiga võib pesta
nõudepesumasinas või kuumas nõudepesuvahendi lahuses.
6 Puhastage väliskesta niiske lapiga (pesuvahendilahusega) ja/või
majapidamispaberiga.
Ärge kasutage sööbivaid ega abrasiivseid pesemisvahendeid (vedelikke)
ega aineid (näit pesusooda, küürimisvedelik,-pulber või -käsn) fritteri
puhastamiseks.
7 Kuivata kõiki osi pärast pesemist.
Seadme hoidmine
1 Pange kõik osad tagasi fritterisse ja sulgege kaas.
C
2 Kerige toitjuhe kokku, lükake hoiukambrisse ja pange pistik
fikseeritud asendisse.
3 Tõstke fritterit ainult käepidemest.
Õli ja rasv
Soovitame teil kasutada frittimisõli või vedelat frittimisrasva,
küllastumata rasvhappeid sisaldavat taimset õli või rasva (näit
linoolhape).Võite kasutada ka tahket rasva,kuid seda tuleb aeglasel tulel
eelnevalt panni peal soojendada, et välltida rasva pritsimist või
ülekuumenemist.
Kasutage ainult õli- või rasvasorte, mis on frittimiseks ette nähtud ja
sisaldavad vahuvastaseid aineid. Leiate vastava info õli või rasva
pakendilt või sildilt.
Ärge kunagi kasutage koos erinevaid õlisid ega rasvu!
Õli või rasva vahetamine
Kuna õli või rasv kaotab kiiresti oma kasulikud omadused, tuleb õli või
rasva tihti vahetada. Selleks vt. allpool olevat kasutusjuhendit:
- Kui kasutate fritterit peamiselt friikartulite valmistamiseks ning
filtreerite õli või rasva läbi pärast iga kasutust, võite sama õli või rasva
tarvitada 10-12 korda.
- Kui fritite valgurikkaid toiduaineid (liha või kala), vahetage õli vüi rasva
tihemini.
- Ärge kasutage sama õli kauem kui 6 kuud ning alati järgige juhiseid õli
või rasva pakendil.
- Ärge lisage kasutatud õlile või rasvale uut juurde.
- Õli tuleb välja vahetada, kui see hakkab kuumutamisel vahutama, sel
on kirbe lõhn või maitse või kui see muutub tumedaks ja/või paksuks.
EESTI
Page 45

45
Kasutatud õlist või rasvast vabanemine
Valage kasutatud õli või vedel rasv selle originaalplastpudelisse
(suletavasse).Tahke rasv jätke fritterisse jahtuma (ilma frittimiskorvita) ja
pärast tõstke see kaabitsaga fritterist välja ja pakkige ajalehepaberisse.
Pudel või ajaleht tahkunud rasvaga pange mitte komposteeritavate
jäätmete hulka või hävitage vastavalt teie maal kehtivatele määrustele.
Nõuanded frittimiseks
Valmistamiskogust ning temperatuuri vt tabelist, voldiku lõpust.
Kodused friikartulid
Et friikartulid tuleksid maitsvad ja krõbedad:
Ärge kasutage varajasi kartuleid, lõigake kartulid kangideks. Loputage
kartulikange külma veega. Siis ei kleepu need frittides omavahel kokku.
Kuivatage kartulikange hoolikalt.
Kartuleid tuleks frittida kaks korda: esmalt 4-6 minutit temperatuuril
160cC, teine kord 2-4 minutit temperatuuril 190cC.
Teise frittimise ajal tõstke frittimiskorvi mõned korrad õlist välja ning
raputage, nii pruunistuvad kartulid ühtlasemalt.
Kui fritite maksumumkogust, ärge korvi raputage. Enne teist
frittimiskorda pange friikartulid kaussi ja raputage seda.
Kui soovite frittida maksimumkogust, laske korv fritterisse aeglaselt, et
vältida ülepraadimist.
Külmutatud toiduained
Külmutatud toit on eelnevalt valmis tehtud, seetõttu peate neid frittima
ainult ühe korra, vastavalt pakendil olevale kirjeldusele.
Sügavkülmutatud toit (-16 kuni -18cC) jahutab õli või rasva tunduvalt.
Kuna sügavkülmutatud toiduainetele ei teki kohe koorikut peale, võib
toit imeda endasse liiga palju õli või rasva. Selle välitmiseks toimige
järgnevalt:
Ärge frittige korraga liiga suuri toidukoguseid (vt tabelist valmistamise
kestust ja temperatuuriseadeid).
Kuumutage õli vähemalt 15 minutit, enne kui panete toiduained fritterisse.
Keerake temperatuurivalits tabelis või toiduaine pakendil soovitatud
temperatuurile. Kui frititava toiduaine valmistamistemperatuur ei ole
antud, seadke temperatuurivalits 190cC.
Enne frittimist on soovitatav sügavkülmutatud toit toatemperatuuril
osaliselt üles sulatada ja võimalikult palju jääd ja vett ära raputada.
Laske toiduained õli või rasva sisse aeglaselt, kuna sügavkülmutatud
toiduained võivad põhjustada kuuma õli või rasva pritsimist.
EESTI
Page 46

46
Keskkond (ainult mudel HD6153)
Patarei hävitamine
Eemaldage patarei taimerist enne kui te seadme minema viskate.
C
1 Kasutage väikest kruvikeerajat,et taimeri paneeli eemaldada.
2 Võtke patarei välja.Ärge visake seda tavalise olmeprügi hulka
vaid viige vastavasse kogumiskohta.
Garantii&teenindus
Kui Te vajate informatsiooni või on Teil probleemid tekkinud, külastage
Philips Web lehekülge www.philips.com või võtke ühendus teie maa
Philipsi hoolduskeskusega (lisainfot ja telefoninumbrid leiate
garantiitalongilt). Kui Teie maal ei ole Philipsi hoolduskeskust, pöörduge
Philipsi toodete müüja poole või võtke ühendus Philipsi
koduhooldusseadmete ja isikliku hoolduse BV teenindusosakonnaga.
EESTI
Page 47

47
Lahendus
Vt toidu pakendilt või selle kasutusjuhendi
tabelist, milliseid temperatuure ja/või
valmistamisaegu tuleb kasutada.Vali vastav
temperatuur valitsiga.
Ärge frittige korraga enam toitu,kui
kasutusjuhendis soovitatud.
Temperatuurivalitsi kaitse võib olla läbi
põlenud. Pöörduge Philips'i toodetemüüja või
Philipsi poolt volitatud hooldekeskuse poole.
Eemaldage kaas ja peske filter kuumas
pesuvahendilahuses või nõudepesumasinas
puhtaks.
Vahetage õli või rasv.Filtreerige korrapäraselt
õli või rasva, siis säilib see kauem värskena.
Kasutage õli või rasva, mis on kvaliteetne. Ärge
kunagi kasutage koos erinevaid õlisid ega
rasvu.
Kontrollige, kas kaas on korralikult suletud.
Eemaldage kaas ja peske see kuumas
pesuvahendilahuses või nõudepesumasinas
puhtaks.
Tihendvõru on määrdunud, peske seda
kuumas pesuvahendilahuses või
nõudepesumasinas. Kui tihend on kulunud,
pöörduge Philipsi toodetemüüja või Philips'i
poolt volitatud hoolduskeskuse poole, et see
uuega asendada.
Kontrollige, kas õli või rasv ei ületa
maksimumtaset.
Kuivatage toit enne frittimist ja valmistage
toitu vastavalt kasutusjuhendi näidustustele.
Ärge frittige korraga enam toitu,kui on
soovitatud selles kasutusjuhendis.
Enne frittimist kuivatage toitu.
Ärge kasutage koos erinevaid õlisid ega rasvu
ja kasutage õli või vedelat rasva, mis sisaldab
vahuvastast ainet.
Puhastage nõu sisepind kooskõlas antud
kasutusjuhendiga.
Pöörduge Philips'i toodetemüüja või Philips'i
poolt volitatud hooldekeskuse poole.
Võimalik põhjus
Valitud temperatuur on liiga madal
ja/või toitu ei ole piisavalt kaua
frititud.
Korvis on liiga palju toitu.
Õli või rasv ei lähe enam
kuumaks.
Püsifilter on satureeritud.
Õli või rasv ei ole puhas.
See õli- või rasvasort ei ole
ettenähtud frittimiseks.
Kaas ei ole korralikult suletud.
Püsifilter on satureeritud.
Tihendvõru, mis on ümber kaane
metallist sisepinna, on määrdunud
või kulunud.
Fritteris on liiga palju õli või rasva.
Toit sisaldab liiga palju vedelikku.
Korvis on liiga palju toitu.
Toit sisaldab liiga palju vedelikku.
See õli- või rasvasort ei ole
ettenähtud frittimiseks.
Nõu sisemus ei ole korralikult
puhas.
Temperatuurivalitsi kaitse on läbi
põlenud.
Probleem
Frititud toit ei ole piisavalt
pruunistatud ja/või ei ole krõbe.
Fritterist tuleb tugevat
ebameeldivat lõhna.
Auru tuleb mujalt, mitte filtrist.
Frittimise ajal tilgub fritteri nurgast
õli või rasva.
Õli või rasv vahutab liiga tugevasti
frittmise ajal.
Fritter ei tööta.
EESTI
Probleemid, mis võivad tekkida frittimise käigus
Kui fritter ei tööta korralikult või on frititud toidu kvaliteet ebarahuldav,
vt allolevat tabelit. Kui probleemi lahendamine ei õnnestu, tutvuge pt
'Garantii ja teenindus'.
Page 48

Toidu valmistamise ajad ja temperatuuri seaded
Juhul, kui toidupakendil antud valmistamisjuhised erinevad
kasutusjuhendi tabelis olevatest andmetest, siis järgige pakendi juhiseid.
EESTI48
Frittimisaeg
(minutites)
15-20
3-4
10-12
4-5
4-5
4-5
4-5
4-5
5-6/7-8
6-7
Maksimumkogus
1000 g
Soovitatud
temperatuur parima
lõpptulemuse
saavutamiseks
3-4 tk
4 tk
2-3 tk
8 tk
6 tk
8 tk
8 tk
8 tk
500 g
4 tk
Toit
Kanakoivad
Väikesed kartulipannkoogid
Hiina kevadised rullid
Kanalihatükid
Minisuupisted
Kalmaarirõngad tainas
Kala (tükid) tainas
Krevetid
Külmutatud friikartulid
Liha-/kalakroketid
Temperat
uur
170cC
180cC
190cC
KÜLMUTATUD TOIT
Frittimisaeg
2-3
4-6
5-7
12-15
2-3
6-7
3-4
3-4
3-4
3-4
3-4
3-4
3-4
3-4
3-4
4-5
Maks. toidukogus
1300 g
1300 g
Soovitatud
toidukogus parima
lõpptulemuse
saavutamiseks
6-8 tk
650 g
450 g
3-5 tk
8-10 tk
2-3 tk
8-10 tk
8-10 tk
8-10 tk
8-10 tk
8-10 tk
5 tk
650 g
600 g
600 g
5 tk
Toit
Seened
Friikartulid*) 1 frittimine
Värske kala
Kanakoivad
Köögiviljad (näit lillkapsas)
Hiina kevadised rullid
Kanapallid
Minisuupisted
Kalmaarirõngad tainas
Kala (tükid) tainas
Krevetid
Frititud õunad
Friikartulid *) 2 frittimist
Krõpsud (väga õhukesed kartuliviilud)
Baklazaan (viilud)
Kala-/lihakroketid
Temperat
uur
150cC\pa
r
160cC\pa
r
170cC
180cC
190cC
VÄRSKE VÕI SULATATUD TOIT
Page 49

Svarīgi
◗ Pirms sākat lietot ierīci, izlasiet lietošanas pamācību un apskatiet
zīmējumus.
◗ Ierīce ir paredzēta lietošanai mājturībā. Ja ierīce tiek lietota nepareizi,
profesionāliem nolūkiem vai neievērojot lietošanas pamācībā
sniegtos norādījumus, garantija kļūst nederīga un Philips neuzņemas
atbildību par bojājumiem, kas radušies šādas rīcības rezultātā.
◗ Negatavojiet rīsu kūkas (vai līdzīgus ēdienus) šajā ierīcē, jo tas var
izraisīt eļļas izšļakstīšanos.
◗ Pārliecinieties, ka saldētie produkti pirms gatavošanas ir (gandrīz)
atkusuši.
◗ Pirms gatavošanas nosusiniet vai apžāvējiet produktus un uzmanīgi
nokratiet ledu no sasaldētās pārtikas.
◗ Pirms pievienojat ierīci elektrotīklam, pārliecinieties, vai uz ierīces
norādītais spriegums atbilst elektrotīkla spriegumam jūsu mājās.
◗ Pievienojiet ierīci tikai iezemētai elektrotīkla kontaktrozetei.
◗ Pirms lietojat ierīci pirmo reizi, rūpīgi notīriet taukvāres katla daļas
(sk. nodaļu 'Tīrīšana').
◗ Nekādā gadījumā neiegremdējiet ūdenī un neskalojiet tekošā ūdenī
ierīces apvalku, kurā ir elektrodetaļas un sildelements.
◗ Pārliecinieties, ka visas detaļas ir pilnīgi sausas, pirms piepildāt
taukvāres katlu ar eļļu vai kausētiem taukiem.
◗ Iesakām lietot cepamo eļļu vai kausētos taukus.Varat lietot arī
cietos taukus, bet tādā gadījumā jāveic papildu piesardzības
pasākumi, lai tauki neizšļakstītos (sk. nodaļas 'Cieto tauku lietošana'
un 'Padomi').
◗ Lietojiet tikai tādu eļļu vai taukus, kas piemēroti vārīšanai un satur
pretputošanas līdzekli. Šī informācija ir atrodama uz eļļas vai tauku
iesaiņojuma vai etiķetes.
◗ Neieslēdziet ierīci, pirms tajā nav iepildīta eļļa vai tauki.
◗ Raugieties, lai produktu līmenis taukvāres katlā vienmēr ir starp
abām līmeņa iezīmēm katla iekšpusē.
◗ Termiskais drošības slēdzis izslēdz ierīci, lai tā nepārkarstu (sk.
nodaļu 'Drošība').
◗ Šajās lietošanas pamācībās ir norādīts maksimālais produktu
daudzums, ko var gatavot vienlaikus.Lai nevainojami pagatavotu
ēdienu, iesakām nepārsniegt šo daudzumu (sk. nodaļu 'Tabula').
◗ Ēdiena gatavošanas laikā caur filtru izdalās karsts tvaiks. Raugieties,
lai seja un rokas ir pienācīgā attālumā no tvaika. No tā jāpiesargās
arī atverot vāku.
◗ Novietojiet ierīci bērniem nepieejamā vietā. Raugieties,lai
elektrovads nenokarājas pāri galda vai darba virsmas malai.
◗ Pēc ierīces lietošanas uzstādiet temperatūras regulatoru uz zemāko
iedaļu (pagrieziet to līdz galam pa kreisi). Izvelciet kontaktspraudni
no elektrotīkla sienas kontaktrozetes un ļaujiet eļļai vai taukiem
atdzist. Neaiztieciet taukvāres katlu, kamēr tas nav pietiekami atdzisis.
◗ Bojāts elektrovads vai citas detaļas ir jānomaina pie Philips
produkcijas izplatītāja vai Philips pilnvarotā remontdarbnīcā, jo tam
nepieciešami īpaši darbarīki un/vai detaļas.
◗ Saglabājiet šīs pamācības turpmākām uzziņām.
LATVISKI 49
Page 50

Drošība
Termiskais drošības slēdzis
Ierīce ir aprīkota ar termisko drošības slēdzi, kas izslēdz ierīci, neļaujot
tai pārkarst.
Tas notiek gadījumā, ja taukvāres katlā vairs nav eļļas vai tauku vai arī tie
ir nepietiekamā daudzumā, kā arī, ja cieto tauku gabali kūst ierīcē, kas
kavē sildelementu pietiekami ātri atbrīvoties no radītā siltuma.
◗ Ja termiskais drošības slēdzis ir izslēdzis ierīci, rīkojieties šādi:
1 Ļaujiet eļļai vai taukiem atdzist.
2 Vērsieties pie Philips produkcijas izplatītāja vai Philips pilnvarotā
remontdarbnīcā.
Cieto tauku lietošana
Iesakām lietot cepamo eļļu vai šķidros taukus.Var lietot arī cietos taukus,
bet tādā gadījumā nepieciešami piesardzības pasākumi, kas novērš tauku
izšļakstīšanos.
1 Ja vēlaties lietot tauku gabalus, vispirms izkausējiet tos uz lēnas
uguns parastajā pannā.
2 Uzmanīgi ielejiet izkausētos taukus taukvāres katlā.
3 Iespraudiet kontaktspraudni elektrotīkla sienas kontaktrozetē
un ieslēdziet taukvāres katlu (sk. nodaļu 'Ēdiena gatavošana').
C
4 Glabājiet taukvāres katlu ar izkausētajiem taukiem istabas
temperatūrā. Ja tauki ir ļoti atdzisuši, kūstot tie var sprakšķēt.
Lai to novērstu, sadurstiet taukus ar dakšiņu.To darot,
uzmanieties, lai nesabojātu katla nepiedegošo pārklājumu.
Ēdiena gatavošana
1 Novietojiet ierīci uz horizontālas, līdzenas un stabilas virsmas
bērniem nepieejamā vietā.
Ja vēlaties novietot taukvāres katlu uz elektriskās plīts zem tvaika
savācēja, pārliecinieties,ka plīts riņķi ir izslēgti.
C
2 Izvelciet visu elektrovadu no tā glabāšanas nodalījuma.
LATVISKI50
Page 51

C
3 Piepildiet sauso taukvāres katlu ar eļļu, šķidrajiem taukiem vai
izkausētajiem cietajiem taukiem līdz katla augšējai iezīmei.
Izlasiet nodaļu 'Cieto tauku lietošana', lai uzzinātu, kā piepildīt taukvāres
katlu, lietojot cietos taukus.
Nekad nejauciet kopā divu dažādu veidu eļļu vai taukus!
4 Iespraudiet kontaktspraudni elektrotīkla sienas kontaktrozetē.
Raugieties, lai elektrovads nepieskaras ierīces karstajām detaļām.
C
5 Piespiežot slēdzi, ieslēdziet taukvāres katlu. Iedegas
signāllampiņa uz slēdža un temperatūras regulatora
signāllampiņa.
C
6 Uzstādiet temperatūras regulatoru uz vajadzīgo temperatūras
iezīmi.
Lai uzzinātu, kādu temperatūru izvēlēties, meklējiet to uz gatavošanai
paredzēto produktu iesaiņojuma vai šīs lietošanas pamācības tabulā.
Eļļa vai tauki uzkarst līdz nepieciešamajai temperatūrai 10 līdz 15 minūšu
laikā.
Kamēr taukvāres katls uzkarst, temperatūras regulatora signāllampiņa
pārmaiņus iedegas un nodziest vairākas reizes. Ja tā ir nodzisusi ilgāku
laiku, eļļa vai tauki ir uzkarsēti līdz nepieciešamajai temperatūrai.
Tāpat jārīkojas, ja vēlaties gatavot daudz ēdiena porciju pēc kārtas.
Nogaidiet, līdz signāllampiņa ir kādu laiku nodzisusi, pirms gatavojat
nākamo porciju.
◗ Taukvāres katla uzkaršanas laikā grozu varat atstāt ierīcē.
C
7 Paceliet rokturi, lai saslietu grozu tā augstākajā pozīcijā.
C
8 Atveriet vāku, piespiežot atbrīvošanas taustiņu.Vāks automātiski
atveras.
9 Izņemiet grozu no taukvāres katla.
10 Ievietojiet gatavošanai paredzēto ēdienu grozā.
Lai nevainojami pagatavotu ēdienu, iesakām gatavot tabulā norādīto
ēdiena daudzumu.
LATVISKI 51
cietie tauki
1925 g
2200 g
eļļa
2,2 litri
2,5 litri
modeļiem HD6152 un HD 6153
min.
maks.
Saldēti smalki sagriezti
kartupeļi
1000 g
500 g
Mājās gatavoti smalki
sagriezti kartupeļi
1300 g
650 g
Modeļiem HD6152 un
HD6153
Maksimālais daudzums
Ieteicamais maksimālais
daudzums labākam rezultātam
Page 52

C
11 Uzmanīgi ievietojiet grozu taukvāres katlā.Pārliecinieties, ka
grozs ir pareizi ievietots.
12 Aizveriet vāku.
13 Tikai modelim HD6153: uzstādiet vajadzīgo ēdiena gatavošanas
ilgumu (sk. nodaļu 'Taimers').Taukvāres katlu varat lietot, arī
neuzstādot taimeru.
C
14 Piespiediet atbrīvošanas taustiņu, kas atrodas uz groza roktura,
un uzmanīgi nolaidiet grozu tā viszemākajā pozīcijā.
Ievērojiet uz produktu iesaiņojuma vai tabulā norādīto gatavošanas
ilgumu.
◗ Lai produkti iegūtu vienmērīgi zeltainu garoziņu, cepšanas laikā
dažas reizes izņemiet grozu no eļļas vai taukiem un nedaudz
sakratiet.
Uzmanieties: gatavošanas laikā caur vākā esošo filtru izdalās karsts tvaiks.
Taimers (tikai modelim HD6153)
C
1 Piespiediet taimera taustiņu, lai uzstādītu gatavošanas ilgumu
minūtēs.
◗ Turot taustiņu piespiestu, cipari ātri mainās.
Maksimālais uzstādāmais laiks ir 99 minūtes.
Pāris sekundes pēc taimera uzstādīšanas sākas uzstādītā laika skaitīšana.
Kamēr taimers darbojas, ekrānā mirgo atlikušais laiks. Pēdējā minūte tiek
skaitīta sekundēs.
Ja nav uzstādīts pareizais ilgums, to varat izdzēst, vēlreiz piespiežot
taustiņu tad, kad sākas uzstādītā laika skaitīšana (t. i., kad cipari sāk
mirgot), un turot to iespiestu, līdz ekrānā parādās '00'.Tagad varat
uzstādīt pareizo ilgumu.
Kad uzstādītais laiks ir pagājis, dzirdams skaņas signāls (daži pīkstieni). Ik
pēc 20 sekundēm skaņas signāls atskanēs vēlreiz. Skaņas signālu var
izslēgt, piespiežot taustiņu.
Brīdinājums: taimers norāda gatavošanas laika beigas, bet neizslēdz
taukvāres katlu.
◗ Lai nomainītu taimera bateriju, sazinieties ar Philips pakalpojumu
centru.
LATVISKI52
1
2
Page 53

LATVISKI 53
Pēc ēdiena gatavošanas
C
1 Paceliet rokturi, lai saslietu grozu tā augstākajā pozīcijā un
notecētu eļļa vai tauki.
2 Atveriet vāku.
Uzmanieties no karstā tvaika.
3 Uzmanīgi izņemiet grozu no taukvāres katla.
Ja nepieciešams, turot grozu virs taukvāres katla, sakratiet to, lai
atbrīvotos no pārpalikušās eļļas vai taukiem.
Ievietojiet pagatavoto ēdienu bļodā vai caurdurī, kas izklāts ar taukus
uzsūcošu papīru, piemēram, virtuves dvieli.
C
4 Piespiežot slēdzi, izslēdziet taukvāres katlu. Nodziest uz slēdža
esošā signāllampiņa.
5 Pēc lietošanas atvienojiet ierīci no elektrotīkla.
◗ Ja nelietojat taukvāres katlu regulāri, iesakām eļļu vai šķidros taukus
pēc atdzišanas glabāt cieši aizvērtās pudelēs ledusskapī vai citā vēsā
vietā. Iepildiet eļļu vai taukus pudelē, lejot cauri smalkam sietam,lai
atbrīvotos no produktu daļiņām.Lai izņemtu un iztukšotu katlu,
vispirms izņemiet grozu un vāku. Izceliet katlu no apvalka un izlejiet
eļļu vai taukus (sk. nodaļu 'Tīrīšana').
◗ Ja taukvāres katlā ir cietie tauki, ļaujiet tiem sacietēt un glabājiet tos
katlā (sk. nodaļu 'Cieto tauku lietošana').
Tīrīšana
Gandrīz visas šā taukvāres katla detaļas var mazgāt trauku mazgājamajā
mašīnā vai karstā ziepjūdenī.
Nogaidiet, līdz eļļa vai tauki ir pietiekami atdzisuši.
Taukvāres katla izjaukšana:
C
1 Noņemiet vāku, piespiežot vāka atbrīvošanas āķīti, lai atvienotu
vāku. Pēc tam izceliet vāku no ierīces.
2 Izņemiet grozu no taukvāres katla.
C
3 Noņemiet ūdens tekni.
2
Page 54

C
4 Izņemiet nepiedegošā pārklājuma katlu no ierīces.
C
5 Izņemiet eļļu vai taukus un atbrīvojieties no tiem (sk. nodaļu
'Eļļa un tauki').
◗ Visas detaļas, izņemot apvalku,kurā ir elektrodetaļas un
sildelements, var mazgāt trauku mazgājamajā mašīnā vai karstā
ziepjūdenī.
6 Ierīces apvalku tīriet ar mitru drānu (ar kādu tīrīšanas līdzekli)
un/vai virtuves dvieli.
Nelietojiet kodīgus vai abrazīvus mazgāšanas līdzekļus vai materiālus
(piemēram, sodu, ķīmisku mazgāšanas līdzekli, pulveri vai skrāpi)
taukvāres katla tīrīšanai.
7 Pēc mazgāšanas pilnīgi nosusiniet visas detaļas.
PIerīces glabāšana
1 Novietojiet visas detaļas taukvāres katlā vai uz tā un aizveriet
vāku.
C
2 Satiniet elektrovadu, iebīdiet to glabāšanas nodalījumā un
ievietojiet kontaktspraudni tā stiprinājuma spraugā.
3 Celiet taukvāres katlu aiz rokturiem.
Eļļa un tauki
Iesakām lietot cepamo eļļu vai šķidros taukus, īpaši augu eļļu vai taukus,
kas satur nepiesātinātās taukskābes (piemēram, linolēnskābi).Varat lietot
arī cietos taukus, bet šajā gadījumā pirms lietošanas tie jāizkausē uz
pannas, lai novērstu tauku sprakšķēšanu vai pārkaršanu.
Lietojiet tikai tādu eļļu vai taukus, kas ir piemēroti vārīšanai un satur
pretputošanas līdzekli. Šī informācija atrodama uz eļļas vai tauku
iesaiņojuma vai uzlīmes.
Nekad nejauciet kopā divu dažādu veidu eļļu vai taukus!
LATVISKI54
Page 55

Eļļas vai tauku nomaiņa
Tā kā eļļa vai tauki samērā drīz zaudē garšu, tie regulāri jāmaina. Lai to
izdarītu, rīkojieties šādi:
- Ja taukvāres katlu galvenokārt lietojat smalki sagrieztu kartupeļu
gatavošanai un ja filtrējat eļļu vai taukus pēc katras gatavošanas reizes,
to pašu eļļu vai taukus varat lietot 10 līdz 12 reizes pirms
nepieciešama to nomaiņa.
- Ja taukvāres katlu lietojat olbaltumvielām bagātu ēdienu gatavošanai
(piemēram, gaļa vai zivis), eļļa vai tauki ir jāmaina biežāk.
- Nekādā gadījumā nelietojiet to pašu eļļu ilgāk par 6 mēnešiem un
vienmēr ievērojiet uz iesaiņojuma sniegtās pamācības.
- Nekādā gadījumā vecajai eļļai vai taukiem nepievienojiet jaunu eļļu vai
taukus.
- Vienmēr nomainiet eļļu, ja tā pēc uzkarsēšanas sāk putot, ja tai ir stipri
izteikta nepatīkama smaka vai garša, ja tā kļūst tumša un/vai sīrupaina.
Atbrīvošanās no eļļas vai taukiem
Salejiet lietoto eļļu vai izkusušos taukus to sākotnējā (vairākkārt
aizveramajā) plastmasas pudelē. No lietotajiem cietajiem taukiem var
atbrīvoties, ļaujot tiem sacietēt taukvāres katlā (no kura ir izņemts
grozs), pēc tam pakāpeniski izņemot tos ar lāpstiņu no taukvāres katla
un ietinot avīzē.Varat izmest pudeli vai avīzi nepārstrādājamo atkritumu
tvertnē (nevis parastajā atkritumu tvertnē) vai atbrīvoties no tiem
saskaņā ar noteikumiem savā valstī.
Padomi ēdiena gatavošanai
Gatavošanas ilgums un temperatūra ir norādīta tabulā šīs pamācības
beigās.
Mājās gatavoti smalki sagriezti kartupeļi
Visgaršīgākos un kraukšķīgākos smalki sagrieztos kartupeļus gatavo šādi:
Ņemiet cietus kartupeļus un sagrieziet nūjiņās. Noskalojiet tās aukstā
ūdenī.Tas novērš nūjiņu salipšanu gatavošanas laikā.
Nūjiņas pilnīgi nosusiniet.
Vāriet smalki sagrieztos kartupeļus divas reizes: pirmo reizi 4-6 minūtes
160&@5,099 C temperatūrā, otro reizi 2-4 minūtes 190&@5,099 C
temperatūrā.
Lai iegūtu vienmērīgi zeltainus kartupeļus, gatavošanas laikā dažas reizes
izņemiet grozu no taukvāres katla un mazliet sakratiet.
Gatavojot maksimālo kartupeļu daudzumu, nekratiet grozu. Pirms otrās
vārīšanas reizes izberiet smalki sagrieztos kartupeļus bļodā un sakratiet.
Ja vēlaties gatavot maksimālo kartupeļu daudzumu, lēni ievietojiet grozu
taukvāres katlā, lai novērstu piedegšanu.
LATVISKI 55
Page 56

Saldēta pārtika
Saldēta pārtika jau ir sagatavota lietošanai, tāpēc tā jāvāra tikai vienu
reizi, ievērojot norādījumus uz iesaiņojuma.
Ievietojot ēdienu no saldētavas (-16 līdz -18cC) grozā, tas ievērojami
atdzesē eļļu vai taukus.Tā kā ēdiens uzreiz neatkūst, tajā uzsūcas pārāk
daudz taukvielu. Lai to novērstu, rīkojieties šādi:
Negatavojiet vienā reizē lielu ēdiena daudzumu (sk. gatavošanas ilguma
un temperatūras tabulu).
Karsējiet eļļu vai taukus vismaz 15 minūtes, pirms tajos ieliekat ēdiena
porciju.
Uzstādiet temperatūras regulatoru uz temperatūras iedaļu, kas norādīta
tabulā vai uz iesaiņojuma. Ja nav norādījumu, uzstādiet 190cC
temperatūru.
Ieteicams ļaut saldētajam ēdienam daļēji atkust istabas temperatūrā un
pēc tam no tā nokratīt pēc iespējas vairāk ledus un ūdens.
Lēni iegremdējiet ēdienu eļļā vai taukos, jo saldētie produkti var izraisīt
eļļas vai tauku kūsāšanu.
Vides aizsardzība (tikai modelim HD6153)
Atbrīvošanās no baterijas
Izņemiet taimera bateriju, pirms atbrīvojaties no ierīces.
C
1 Ar mazu plakano skrūvgriezi noņemiet taimera plātni.
2 Izņemiet bateriju. Neizmetiet to kopā ar parastajiem
saimniecības atkritumiem, bet gan tam paredzētā vietā.
Garantija un apkalpošana
Ja nepieciešama palīdzība vai informācija, lūdzu,izmantojiet Philips mājas
lapu Internetā www.philips.com vai sazinieties ar Philips pakalpojumu
centru savā valstī (tā tālruņa numurs atrodams garantijas talonā). Ja jūsu
valstī nav Philips pakalpojumu centra, lūdziet palīdzību Philips
produkcijas izplatītājiem vai Philips Mājturības un personīgās higiēnas
ierīču nodaļas pakalpojumu dienestam.
Iespējamās problēmas ēdiena gatavošanas laikā
Ja taukvāres katls nedarbojas pareizi vai gatavā ēdiena kvalitāte ir
nepietiekama, meklējiet atbildi šajā tabulā. Ja padomi nepalīdz atrisināt
problēmu, sk. nodaļu 'Garantija un apkalpošana'.
LATVISKI56
Page 57

57
Risinājums
Pārbaudiet uz ēdiena iesaiņojuma vai šīs
lietošanas pamācības tabulā, vai pareizi izvēlēta
temperatūra un gatavošanas ilgums. Uzstādiet
temperatūras regulatoru uz pareizo
temperatūras iezīmi.
Vienlaikus nedrīkst gatavot lielāku produktu
daudzumu par tabulā norādīto.
Iespējams, ir izdedzis temperatūras regulatora
drošinātājs.Vērsieties pie Philips produkcijas
izplatītāja vai Philips pilnvarotā remontdarbnīcā.
Noņemiet vāku, nomazgājiet to un filtru karstā
ziepjūdenī vai trauku mazgājamajā mašīnā.
Nomainiet eļļu vai taukus. Regulāri izkāsiet eļļu
vai taukus, lai tie ilgāk saglabātos svaigi.
Lietojiet kvalitatīvu eļļu vai šķidros taukus.
Nekad nejauciet kopā divu dažādu veidu eļļu
vai taukus.
Pārbaudiet, vai vāks ir pilnīgi aizvērts.
Noņemiet vāku, nomazgājiet to un filtru karstā
ziepjūdenī vai trauku mazgājamajā mašīnā.
Ja gredzens ir netīrs, nomazgājiet vāku karstā
ziepjūdenī vai trauku mazgājamajā mašīnā. Ja
vāks ir nolietojies, vērsieties pie Philips
produkcijas izplatītāja vai Philips pilnvarotā
remontdarbnīcā, lai noslēggredzenu nomainītu.
Raugieties, lai eļļa vai tauki taukvāres katlā
nepārsniedz maksimālā līmeņa iezīmi.
Pilnīgi nosusiniet produktus pirms gatavošanas
un vāriet tos, kā norādīts šajā lietošanas
pamācībā.
Vienā reizē negatavojiet lielāku porciju nekā
norādīts tabulā.
Pirms gatavošanas pilnīgi nosusiniet produktus.
Nekad nejauciet kopā divu dažādu veidu eļļu
vai taukus un lietojiet eļļu vai šķidros taukus, kas
satur pretputošanas līdzekli.
Mazgājiet katlu, kā norādīts šajā lietošanas
pamācībā.
Vērsieties pie Philips produkcijas izplatītāja vai
Philips pilnvarotā remontdarbnīcā.
Iespējamais iemesls
Izvēlētā temperatūra ir pārāk zema
un/vai ēdiena gatavošanas laiks ir
pārāk īss.
Grozā ir pārāk daudz produktu.
Eļļa vai tauki pietiekami neuzkarst.
Pastāvīgais taukus uzsūcošais filtrs
ir piesātināts.
Eļļa vai tauki vairs nav tīri.
Eļļa vai tauki nav paredzēti ēdiena
vārīšanai.
Vāks nav pilnīgi aizvērts.
Pastāvīgais taukus uzsūcošais filtrs
ir piesātināts.
Noslēggredzens vāka iekšpusē ir
netīrs vai nolietojies.
Taukvāres katlā ir pārāk daudz eļļas
vai tauku.
Produkti satur pārāk daudz
šķidruma.
Grozā ir pārāk daudz produktu.
Produkti satur pārāk daudz
šķidruma.
Eļļa vai tauki nav paredzēti
vārīšanai.
Katls nav pilnīgi iztīrīts.
Iespējams, ir izdedzis temperatūras
regulatora drošinātājs.
Problēma
Ēdiens nav zeltaini brūns un/vai nav
kraukšķīgs.
No taukvāres katla izdalās
nepatīkama smaka.
Tvaiks izdalās ne tikai no filtra.
Gatavošanas laikā eļļa vai tauki
izšļakstās pāri taukvāres katla malai.
Gatavošanas laikā eļļa vai tauki
pārāk stipri puto.
Taukvāres katls nedarbojas
LATVISKI
Page 58

58
Gatavošanas
ilgums
(minūtēs)
2-3
4-6
5-7
12-15
2-3
6-7
3-4
3-4
3-4
3-4
3-4
3-4
3-4
3-4
3-4
4-5
Maksimālais
daudzums
1300 g
1300 g
Ieteicamais daudzums
labākam rezultātam
6-8 gabali
650 g
450 g
3-5 gabaliņi
8-10 gabaliņi
2-3 gabaliņi
8-10 gabaliņi
8-10 gabaliņi
8-10 gabaliņi
8-10 gabaliņi
8-10 gabaliņi
5 gabali
650 g
600 g
600 g
5 gabali
Pārtikas veids
Sēnes
Smalki sagriezti kartupeļi*) pirmā
vārīšanas reize
Svaiga zivs
Vista (stilbiņi)
Dārzeņu gabaliņi (t. i. ziedkāposti)
Virtuļi ķīniešu gaumē
Vistas gabaliņi
Mini uzkožamie
Kalmāra riņķīši mīklā
Zivju gabaliņi mīklā
Garneles
Ābolu pankūkas
Mājās gatavoti smalki sagriezti
kartupeļi*) otrā vārīšanas reize
Čipši (ļoti plānas kartupeļu šķēles)
Baklažāns (šķēles)
Gaļas/zivju bumbiņas
Temperat
ūra
150c C
160cC
170c C
180c C
190c C
SVAIGA VAI ATKAUSĒTA PĀRTIKA
LATVISKI
Gatavošanas
ilgums
(minūtēs)
15-20
3-4
10-12
4-5
4-5
4-5
4-5
4-5
5-6/7-8
6-7
Maksimālais
daudzums
1000 g
Ieteicamais daudzums
labākam rezultātam
3-4 gabaliņi
4 gabali
2-3 gabaliņi
8 gabaliņi
6 gabaliņi
8 gabaliņi
8 gabaliņi
8 gabaliņi
500 g
4 gabaliņi
Pārtikas veids
Vista (stilbiņi)
Mazas kartupeļu pankūkas
Virtuļi ķīniešu gaumē
Vistas gabaliņi
Mini uzkožamie
Kalmāra riņķīši mīklā
Zivs (gabaliņi) mīklā
Garneles
Saldēti smalki sagriezti kartupeļi
Gaļas/zivju bumbiņas
Temperat
ūra
170c C
180c C
190c C
SALDĒTA PĀRTIKA
Gatavošanas ilgums un temperatūra
Ja pamācības uz ēdiena iesaiņojuma atšķiras no pamācībām tabulā,
vienmēr ņemiet vērā uz iesaiņojuma sniegtās pamācības.
Page 59

Svarbu žinoti
◗ Pirmiausiai perskaitykite instrukcijas ir peržiūrėkite iliustracijas, tik
tada naudokite aparatą.
◗ Šis aparatas skirtas tik buitiniam naudojimui.Jei aparatas naudojams
netinkamai ar (pusiau) profesionalioms reikmėms arba naudojamas
ne pagal instrukciją, garantija nebegalios ir Philips neprisiims
atsakomybės už padarytą žalą.
◗ Neskrudinkite ryžių paplotėlių (ar panašaus maisto) šiame aparate,
kadangi aliejus gali smarkiai taškytis ar sproginėti.
◗ Prieš skrudinimą įsitikinkite,kas šaldyti produktai yra (beveik) atšilę.
◗ Prieš pradėdami skrudinti, maistą, kurį skrudinsite, nusausinkite,o
nuo šaldyto maisto atidžiai nuvalykite ledą.
◗ Prieš įjungdami aparatą patikrinkite,ar įtampa, nurodyta ant
aparato,sutampa su įtampa jūsų namuose.
◗ Aparatą įjunkite tik į įžemintą rozetę.
◗ Prieš pirmą kartą naudojant aparatą,kruopščiai išvalykite atskiras
skrudintuvės dalis (žr. skyrelį "Valymas").
◗ Niekada neįmerkite į vandenį ir neskalaukite po tekančiu vandeniu
aparato korpuso,kuriame yra elektrinės detalės ir kaitinimo
elementas.
◗ Prieš užpildydami skrudintuvę aliejumi ar skystais riebalais
įsitikinkite, ar visos dalys yra visiškai sausos.
◗ Mes patariame naudoti kepimo aliejų ar skystus riebalus. Galima
naudoti ir kietus kepimo riebalus, bet šiuo atveju imkitės
papildomų atsargumo priemonių, kad neapsitaškytumėte (žr.
skyrelius "Kietų riebalų naudojimas" ir "Patarimai").
◗ Naudokite tik tas aliejaus ir riebalų rūšis, kurios yra tinkamos
kepimui skrudintuvėje ir neputoja.Šią informaciją rasite ant aliejaus
ar riebalų pakuotės ar etiketės.
◗ Neįjunkite aparato, kol neužpildėte jo aliejumi ar riebalais.
◗ Įsitikinkite,ar skrudintuvė visada užpildyta iki lygmens tarp dviejų
atžymų ant vidinės vidinio indo sienelės.
◗ Šiluminis apsaugos išjungėjas išjungs aparatą, jei jis perkais (žr.
skyrelį "Saugumas").
◗ Šiose naudojimo instrukcijose rasite didžiausią vienu metu galimo
skrudinti maisto kiekį. Kad geriausiai paskrudintumėte, patariame
neviršyti rekomenduojamų kiekių (žr."Lentelė").
◗ Skrudinant per filtrą išleidžiamas karštas garas. Nekiškite prie garų
rankų ir veido.Karštų garų turite saugotis ir nukeldami dangtį.
◗ Neleiskite įjungto aparato imti vaikams. Laidas negali kaboti
nusviręs nuo stalo ar darbinio paviršiaus,ant kurio padėtas
aparatas, krašto.
◗ Po panaudojimo temperatūros reguliatorių nustatykite į žemiausią
padėtį (iki galo atsukite kairėn). Ištraukite kyštuką iš rozetės ir
palaukite, kol aliejus ar riebalai atvės. Nejudinkite skrudintuvės,kol
ji pakankamai neatvėso.
◗ Jei yra pažeistas maitinimo laidas arba kitos aparato dalys, jos turi
būti pakeistos tik Philips aptarnavimo centre, kadangi reikalingi
specialūs įrankiai ir/arba dalys.
◗ Pasilikite šią instrukciją toliemesniam naudojimui.
59LIETUVIŠKAI
Page 60

60
Saugumas
Šiluminis apsauginis išjungėjas
Šiame aparate yra šiluminis apsaugos išjungėjas, kuris išjungia aparatą, jei
jis perkaista.
Tai gali atsitikti, jei skrudintuvėje nėra arba yra nepakankamai aliejaus ar
riebalų, skrudintuvė užsikemša ištirpdytais kietais riebalais, kurie neleidžia
kaitinimo elementui pakankamai kaisti?
◗ Ką daryti, kai šiluminis apsauginis išjungėjas išjungia aparatą :
1 Palaukite, kol aliejus ar riebalai atvės.
2 Kreipkitės į Philips pardavėją arba į autorizuotą Philips
aptarnavimo centrą.
Kietų taukų naudojimas
Mes patariame jums naudoti kepimo aliejų arba skystus taukus. Jei galite
naudokite kietus kepimo taukus, bet šiuo atveju reikalingos papildomos
atsargumo priemonės, nes taukai taškosi.
1 Jei naudojate naują taukų pokelį,ištirpinkite juos ant lėtos
ugnies.
2 Atsargiai pilkite atšildytus taukus į skrudintuvę.
3 Įkiškite kištuką į elektros lizdą ir įjunkite skrudintuvę (žr.
"Kepimas").
C
4 Skrudintuvę su sustingusiais riebalais laikykite tik kambario
temperatūroje. Jei riebalais labai sušals, tirpdami jie gali taškytis.
Šakute riebaluose padarykite kelias skylutes, kad mažiau
taškytusi. Badydami šakute, būkite atsargūs, kad nepažeistumėte
vidinio indo paviršiaus.
Skrudinimas
1 Pastatykite aparatą ant horizontalaus, lygaus ir stabilaus
paviršiaus, kad nepasiektų vaikai.
Jei norite skrudintuvę padėti ant viryklės viršaus po garų surinkėju,
įsitikinkite, kad viryklė yra išjungta.
C
2 Iš laido saugojimo skyrelio išimkite visą laidą.
LIETUVIŠKAI
Page 61

61
C
3 Pripildykite sausą skrudintuvę aliejumi, skystais riebalais arba
ištirpintais kietais riebalais iki viršutinio žymens ant vidinio indo
sienelės.
Perskaitykite skyrelyje "Kietų riebalų naudojimas" kaip pripildyti
skrudintuvę, jei naudojate kietus riebalus.
Niekada nemaišykite dviejų skirtingų rūšių aliejaus ar riebalų!
4 Įkiškite kištuką į elektros lizdą.
Įsitikinkite, ar laidas nesiliečia su karštomis aparato dalimis.
C
5 Įjunkite skrudintuvę įjungimo/išjungimo mygtuku. Užsidegs
signalinė lemputė ir skrudintuvė ims kaisti.
C
6 Temperatūros reguliatorių nustatykite ties reikiama
temperatūra.
Informaciją, kokią temperatūrą pasirinkti, rasite ant skruidinamo maisto
pakuotės arba atitinkamoje lentelėje šioje instrukcijoje.
Aliejus ir riebalai iki reikiamos temperatūros įkais per 10-15 minučių.
Kol skrudintuvė kaista, signalinė lemputė keletą kartų užges ir vėl
užsidegs.Kai ji kuriam laikui užgęsta, aliejus ar riebalai pasiekia nustatytą
temperatūrą.
Norėdami skrudinti kelias maisto porcijas iš eilės, kartokite tą pačią
procedūrą.Todėl kurį laiką palaukite,kol užges signalinė lemputė, prieš
pradėdami skrudinti sekančią porciją.
◗ Galite palikti krepšelį skrudintuvėje, kol skrudintuvė kaista.
C
7 Pakelkite rankeną,norėdami iškelti krepšelį į aukščiausią padėtį.
C
8 Dangtį pakelkite spausdami nuėmimo mygtuką. Dangtis
atsidarys automatiškai.
9 Išimkite krepšelį iš skrudintuvės.
10 Norimą skrudinti maistą sudėkite į krepšelį.
Kad geriausiai iškeptumėte, mes patariame naudoti rekomenduojamus
lentelėje maisto kiekius.
LIETUVIŠKAI
kieti riebalai
1925 g
2200 g
aliejus
2.2 litro
2.5 litro
modeliai HD6152 ir HD 6153
min.
maks.
Page 62

62
C
11 Atsargiai įleiskite krepšelį į skrudintuvę. Įsitikinkite, kad
krepšelis yra tinkamai įstatytas.
12 Nuleiskite dangtį.
13 Tik HD6153 modeliui: nustatykite norimą skrudinimo laiką (žr.
skyrelį "Laikmatis"). Skrudintuvę galite naudoti ir neįjungdami
laikmačio.
C
14 Paspauskite krepšelio rankenos nuėmimo mygtuką ir atsargiai
nuleiskite krepšelį į žemiausią padėtį.
Laikykitės paruošimo laiko, nurodyto ant pakuotės arba nurodyto
atitinkamoje šios instrukcijos lentelėje.
◗ Maistas apskrus tolygiai ir bus aukso spalvos, jei skrudindami keletą
kartų iškelsite krepšelį iš aliejaus ar riebalų ir švelniai pakratysite
krepšelio turinį.
Būkite atsargūs: skrudinant iš filtro išeina karštas garas.
Laikmatis (tik HD6153 modeliui)
C
1 Paspauskite laikmačio mygtuką, norėdami nustatyti kepimo laiką
minutėmis.
◗ Laikykite nuspaustą mygtuką, jei norite nustatyti laiką greičiau.
Didžiausias nustatomas skrudinimo laikas yra 99 minutės.
Praėjus kelioms sekundėms po laiko nustatymo laikmatis pradės
skaičiuoti nustatytą laiką.
Kol laikmatis yra įjungtas, likęs laiką blyksi ekrane. Paskutinė minutė
skaičiuojama sekundėmis.
Jei nustatytas laikas netinka, jūs galite jį ištrinti,vėl spausdami mygtuką
tuo metu, kai laikmatis pradeda skaičiuoti laiką (t.y. kai skaičiai ekrane
ima mirkčioti) ir laikydami mygtuką, kol ekrane atsiranda skaičiai "00".
Dabar galite nustatyti reikalingą laiką.
Kai nustatytas laikas baigiasi, išgirsite garsinį signalą (keletą pyptelėjimų).
Po 20 sekundžių pypsėjimas pasikartos. Pypsėjimą galite išjungti,vėl
paspausdami laikmačio mygtuką.
Įspėjimas: laikmatis rodo skrudinimo pabaigą, bet neišjungia
skrudintuvės.
◗ Norėdami pakeisti laikmačio baterijas, prašome kreiptis į Philips
aptarnavimo centrą.
LIETUVIŠKAI
Šaldytos bulvytės
1000 g
500 g
Naminės bulvytės
1300 g
650 g
HD6152 ir HD6153 modeliams
Didžaiusias kiekis
Didžiausias rekomenduojamas kiekis
1
2
Page 63

63
Po skrudinimo
C
1 Pakelkite rankeną,norėdami iškelti krepšelį į aukščiausią
"nuvarvėjimo" padėtį.
2 Nukelkite dangtį.
Saugokitės karšto garo.
3 Atsargiai iškelkite krepšelį iš skrudintuvės.
Jei yra būtina, pakratykite krepšelį virš skrudintuvės, kad nutekėtų aliejus
ar riebalai.
Sudėkite paskrudintą maistą į indą ar koštuvą, išklotą sugeriamu
popieriumi.
C
4 Skrudintuvą išjunkite, paspausdami įjungimo/iųšjungimo
mygtuką. Užges įjungimo/išjungimo lemputė.
5 Po naudojimo išjunkite aparatą.
◗ Jei reguliariai nenaudojate skrudintuvės, mes patariame atvėsusį
aliejų ar skystus riebalus laikyti gerai uždarytuose buteliuose, geriau
šaldytuve ar šaltoje vietoje. Į butelius aliejų ar riebalus pilkite pro
smulkų sietelį, kad neliktų maisto dalelių. Išimkite ir ištuštinkite
vidinį indą, pirmiausia nuimdami kepimo krepšelį ir dangtį.
Nukelkite vidinį indą nuo aparato ir išpilkite aliejų ar riebalus
(žiūrėkite "Valymas").
◗ Jei skrudinate su kietais riebalais, palaukite kol jie skrudintuvėje
sukietės ir palikite juos ten (žiūrėkite skyrelį "Kietų riebalų
naudojimas").
Valymas
Šią skrudintuvę galima plauti indaplovėje arba ją galite valyti karštu
muiluotu vandeniu.
Palaukite, kol aliejus ar riebali pakankamai atvės.
Skrudintuvės išardymas:
C
1 Dangtį nuimkite, paspausdami nuėmimo mygtuką, atrakinantį
dangtį.Tada nukelkite dangtį nuo aparato.
2 Išimkite krepšelį iš skrudintuvo.
C
3 Nuimkite vandens lovelį.
LIETUVIŠKAI
2
Page 64

64
C
4 Išimkite iš aparato vidinį indą.
C
5 Išpilkite aliejų ar riebalus ir išmeskite juos (žr. "Aliejus ir riebalai").
◗ Visos dalys, išskyrus korpusą su elektros komponentais, gali būti
plaunamos indų plovimo mašinoje ar karštame muiluotame vandenyje.
6 Korpusą valykite drėgna skepetaite (su trupučiu indų plovimo
valiklio) ir/ar virtuviniu popieriumi.
Valydami skrudintuvę nenaudokite ėsdinančių ar šlifuojančių (skystų)
valiklių ar medžiagų (t.y. sodos, šveičiančių skysčių, miltelių ar šveičiančių
skepetėlių).
7 Po valymo visas dalis kruopščiai nusausinkite.
Aparato saugojimas
1 Sudėkite visas dalis į skrudintuvę ir uždenkite dangtį.
C
2 Įstumkite laidą į saugojimo skyrelį, o kištuką įstatykite į kištuko
pritvirtinimo įpjovą.
3 Skrudintuvą pakelkite už rankenų.
Aliejus ir riebalai
Patariame naudoti kepimo aliejų ar skystus kepimo riebalus, geriausiai
augalinį aliejų ar riebalus, kuriuose yra daug nesočių rūgščių (pvz.,
linoleinė rūgštis).Taip pat galite naudoti kietus kepimo riebalus, tačiau
šiuo atveju prieš naudojimą, vengiant išsitaškymo ar riebalų
perkaitinimo, riebalus pirmiausiai reikia ištirpinti ant nedidelės ugnies.
Naudokite tik tą neputojantį aliejų ar riebalus, kurie tinka skrudinimui.
Šią informaciją rasite ant aliejaus ar riebalų etiketės.
Niekada nemaišykite dviejų skirtingų aliejaus ar riebalų rūšių!
LIETUVIŠKAI
Page 65

65
Aliejaus ar taukų pakeitimas
Kadangi aliejus ir riebalai gana greitai praranda savo geras savybes, aliejų
ar riebalus keiskite reguliariai. Apie pakeitimą aiškinama žemiau
esančiame skyrelyje:
- Jei skrudintuvę dažniausiai naudojate skrudintų bulvyčių ruošimui ir jei
aliejų ar riebalus nukošiate po kiekvieno panaudojimo, aliejų ar
riebalus prieš pakeisdami galite naudoti 10-12 kartų.
- Jei skrudintuvę naudojate baltymais turtingo maisto (mėsos ar žuvies)
ruošimui, aliejų ar riebalus reikia keisti dažniau.
- Niekada nenaudokite to paties aliejaus ilgiau nei 6 mėnesius ir
laikykitės nurodymų ant pakuotės.
- Niekada nepilkite šviežio aliejaus ar riebalų į naudotus riebalus ar
aliejų.
- Visada keiskite aliejų, kai jis kaisdamas ima putoti, įgauna stiprų kvapą
ar skonį arba kai patamsėja ir/ar sutirštėja.
Naudoto aliejaus ir taukų išmetimas
Sunaudotą aliejų ar riebalus supilkite į originalius plasmasinius butelius.
Panaudotus kietus riebalus galite išmesti, pirmiausiai sustingdę juos
skrudintuvėje (išėmę krepšelį) po to mentele išgrandykite juos iš
skrudintuvės ir suvyniokite į laikraštį. Butelį ar laikraštį galite išmesti į
neperdirbamų atliekų konteinerį (ne į perdirbamų atliekų konteinerį)
arba atsikratyti jais, remiantis jūsų šalyje galiojančiais įstatymais.
Skrudinimo patarimai
Ruošimo laikas ir temperatūra nurodyti lentelėse, esančiose šio
lankstinuko pabaigoje.
Naminės skrudintos bulvytės
Skaniausias ir traškiausias skrudintas bulvytes pagaminsite taip:
Naudokite kietas bulves ir supjaustykite jas lazdelėmis. Nuplaukite
lazdeles šaltu vandeniu, tada skrudinant jos nekibs viena prie kitos.
Lazdeles gerai nusausinkite.
Bulvytes skrudinkite du kartus: pirmą kar tą 4-6 minutes temperatūroje
160cC, antrą kartą 2-4 minutes temperatūroje 190cC.
Bulvytės apkeps tolygiai ir įgaus auksinį atspalvį, jei antro skrudinimo
metu keletą kartų iškelsite krepšelį iš skrudintuvės ir pakratysite.
Kai skrudinate maksimalų kiekį, nekratykite krepšelio. Prieš pradedant
antrą skrudinimo ciklą, sudėkite namines bulvytes į dubenį ir pakratykite.
Kai skrudinante didžiausią kiekį, krepšelį į skrudintuvę įleiskite lėtai, kad
maistas nesudegtų.
LIETUVIŠKAI
Page 66

Šaldytas maistas
Šaldytos bulvytės jau būna apvirtos, todėl jas tereikia paskrudinti vieną
kartą, remiantis ant pakuotės esančia instrukcija.
Maistas iš šaldiklio (nuo -16 iki -18cC) aliejų ar riebalus gerokai atvėsina.
Kadangi maistas iškart nepradeda kepti, į jį gali prisigerti perdaug aliejaus
ar riebalų. Jei norite to išvengti:
Vienu metu neskrudinkite perdaug šaldyto maisto (žr.lentelę su
nurodytu šaldyto maisto paruošimo laiku ir temperatūra).
Prieš įdėdami maistą į aliejų ar riebalus, pakaitinkite juos bent 15
minučių.
Temperatūros reguliatorių nustatykite taip, kaip parodyta šaldyto maisto
paruošimo lentelėje šioje instrukcijoje arba ant skrudinamo maisto
pakuotės. Jei tokių instrukcijų nėra, nustatykite 190cC temparatūrą.
Geriausiai maistą dalinai atšildyti kambario temperatūroje ir nukratyti
nuo jo kiek įmanoma daugiau ledo ir vandens.
Švelniai įleiskite maistą į aliejų ar riebalus, kadangi dėl šaldyto maisto
aliejus ar riebalai gali stipriai burbuliuoti.
Aplinka (tik HD6153 modelis)
Baterijų išmetimas
Prieš išmesdami aparatą, išimkite laikmačio bateriją.
C
1 Laikmačio panelę nuimkite plokščio atsuktuvo pagalba.
2 Išimkite bateriją. Nemeskite jos į įprastą šiukšlių dėžę, bet
pristatykite į oficialų surinkimo punktą.
Garantija ir aptarnavimas
Jei jums reikalinga informacija arba jei turite problemą, prašome
aplankyti Philips tinklapį, kurio adresas yra www.philips.com arba kreiptis
į Philips atstovybę Lietuvoje (telefono numerį rasite visame pasaulyje
galiojančios garantijos lankstinuke) ar į vietinį Philips platintoją.
Problemos, galinčios atsirasti skrudinimo metu
Jei jūsų skrudintuvė neveikia tinkamai ar kepimo kokybė yra nepatenkinama,
žiūrėkite į toliau esančią lentelę. Jei negalite išspręsti problemų, naudojantis
problemų sprendimų lentele, žiūrėkite skyrelį "Garantija ir aptarnavimas".
66 LIETUVIŠKAI
Page 67

67LIETUVIŠKAI
Sprendimas
Ar apsirinktas paruošimo laiko ir/ar
temperatūra yra teisinga, patikrinkite ant
maisto pakuotės arba lentelėje šiose
naudojimosi instrukcijoje .Temperatūros
reguliatorių nustatykite reikalingai
temperatūrai.
Niekada negaminkite didesnių nei
rekomenduojama šiose naudojimosi
instrukcijose maisto kiekių.
Gali perdegti temperatūros reguliavimo
saugiklis. Kreipkitės į autorizuotą Philips
aptarnavimo centrą.
Nuimkite ir išplaukite dangtį bei filtrą karštame
muiluotame vandenyje arba indų plovimo
mašinoje.
Pakeiskite aliejų ar riebalus. Reguliariai
prafiltruokite aliejų ar riebalus, kad jie išliktų
ilgiau švieži.
Naudokite geros kokybės kepimo aliejų ar
kepimo riebalus. Niekada nemaišykite dviejų
skirtingų aliejaus ar riebalų rūšių.
Patikrinkite, ar tinkamai uždarytas dangtis.
Nuimkite ir išplaukite dangtį bei filtrą karštame
muiluotame vandenyje arba indų plovimo
mašinoje.
Jei žiedas yra nešvarus, išplaukite dangtį
karštame muiluotame vandenyje arba indų
plovimo mašinoje. Jei dangtis yra susidėvėjęs,
kreipkitės į autorizuotą Philips aptarnavimo
centrą, kur sandarinimo žiedą pakeis.
Patikrinkite, ar aliejaus arba riebalų kiekis
neviršija didžiausio kiekio.
Prieš pradedant kepti, kruopščiai nusausinkite
maistą ir kepkite, laikantis šių naudojimosi
instrukcijų.
Nekepkite didesnio maisto kiekio, negu
rekomenduojama šiose naudojimosi
instrukcijose.
Prieš kepdami maistą, kruopščiai nusausinkite
maistą.
Niekada nemaišykite dviejų skirtingų rūšių
aliejaus ar riebalų bei skystų riebalų, kurie
putoja.
Vidinį puodą valykite kaip aprašyta šiose
naudojimosi instrukcijose.
Kreipkitės į Philips atstovą ar į Philips
aptarnavimo centrą.
Galima priežastis
Pasirinkta temperatūra yra per
žema ir/ar maistas yra dar
neiškepęs.
Krepšelyje yra per daug maisto.
Aliejus ar riebalai nepakankamai
įkaito.
Ilgalaikis antiriebalinis filtras yra
užsikimšęs.
Aliejus ar riebalai nėra švarūs.
Naudojamas aliejus ar riebalai
nėra skirti kepimui skrudintuvėje.
Dangtis nėra tinkamai uždarytas.
Ilgalaikis antiriebalinis filtras yra
užsiteršęs.
Sandarinimo žiedas, esantis
dangčio viduje yra purvinas arba
susidėvėjęs.
Skrudintuvėje yra per daug
aliejaus ar riebalų.
Maiste yra per daug vandens.
Kepimo krepšelyje yra per daug
maisto.
Maiste yra per daug vandens.
Ši aliejaus ar riebalų rūšis yra
netinkama kepimui skrudintuvėje.
Vidinis puodas turi būti tinkamai
išvalytas.
Gali būti perdegęs temperatūros
reguliavimo saugiklis.
Problema
Iškeptas maistas nėra auksiniai
rudos spalvos ir/ar nėra traškus.
Skrudintuvė skleidžia nemalonų
kvapą.
Garas eina ne tik per filtrą.
Kepimo metu aliejus ar riebalai
liejasi per skrudintuvės kraštus.
Aliejus ar riebalai kepimo metu
per daug putoja.
Skrudintuvė neveikia
Page 68

Skrudinimo
laikas
(nminutėmis)
2-3
4-6
5-7
12-15
2-3
6-7
3-4
3-4
3-4
3-4
3-4
3-4
3-4
3-4
3-4
4-5
Didžiausias kiekis
1300 g
1300 g
Rekomenduojamas
kiekis
6-8 gabaliukai
650 g
450 g
3-5 gabalėliai
8-10 gabalėlių
2-3 gabaliukai
8-10 gabalėlių
8-10 gabalėlių
8-10 gabalėliai
8-10 gabalėliai
8-10 gabalėliai
5 gabalėliai
650 g
600 g
600 g
5 gabalėliai
Maisto rūšis
Grybai
Naminės bulvytės*) 1 skrudinimo ciklas
Šviežios bulvės
Vištiena (kulšelės)
Daržovių gabalėliai tešloje (t.y. kalafiorai)
Kinietiški ?
Vištienos gabalėliai
Maži užkandžiai
Kalmarų žiedai tešloje
Žuvis (gabalėliai) tešloje
Krevetės
Obuolių gabalėliai tešloje
Naminės bulvytės *) 2-ras skrudinimo
ciklas
Traškučiai (labai ploni bulvių griežinėliai)
Baklažanas (skiltelės)
Mėsos kukuliai
Temperat
ūra
150cC
160cC
150cC
180cC
190c C
ŠVIEŽIAS ARBA ATŠILDYTAS MAISTAS
Paruošimo laikas ir temperatūros nustatymai
Jei šioje lentelėje ruošiamo maisto kiekis skiriasi nuo kiekio, nurodyto
ant maisto pakuotės, visada laikykitės nurodymų ant maisto pakuotės.
LIETUVIŠKAI68
Skrudinimo
laikas
(minutėmis)
15-20
3-4
10-12
4-5
4-5
4-5
4-5
4-5
5-6/7-8
6-7
Didžiausias kiekis
1000 g
Rekomenduojamas
kiekis
3-4 gabalėliai
4 gabalėliai
2-3 gabalėliai
8 gabalėliai
6 gabalėliai
8 gabalėliai
8 gabalėliai
8 gabalėliai
500 g
4 gabalėliai
Maisto rūšis
Vištiena (kulšelės)
Maži bulviniai blynai
Kinietiškos ?
Vištienos gabalėliai
Maži kasneliai
Kalmarų žiedai tešloje
Žuvis (gabalėliai) tešloje
Krevetės
Šaldytos bulvytės
Mėsos/žuvies kroketai
Temperat
ūra
170cC
180cC
190cC
ŠALDYTAS MAISTAS
Page 69

697071
Page 70

Page 71

Page 72

www.philips.com
4222 001 95882
u
 Loading...