

Page 1
Cucina
HD6144, HD6142, HD6140
Page 2

2
Page 3
3
1
2 3 4
5 6 7 8
9 10 11
12
13 14 15 16
17 18 19 20
CLICK
1
2
Page 4

4
Page 5

ENGLISH 6
ESPAÑOL 16
PORTUGUÊS 27
SVENSKA 39
SUOMI 49
TÜRKÇE 59
HD6144, HD6142, HD6140
Page 6

Important
Read these instructions for use carefully before using the appliance and save them for future
reference.
◗ Check if the voltage indicated on the appliance corresponds to the local mains voltage before
you connect the appliance.
◗ Only connect the appliance to an earthed wall socket.
◗ If the mains cord is damaged, it must be replaced by Philips, a service centre authorised by
Philips or similarly qualified persons in order to avoid a hazard.
◗ Always return the appliance to a service centre authorised by Philips for examination or
repair. Do not attempt to repair the appliance yourself, otherwise your guarantee will
become invalid.
◗ Clean the separate parts of the fryer thoroughly before using the appliance for the first time
(see chapter 'Cleaning'). Make sure all parts are completely dry before you fill the fryer with
oil or liquid fat.
◗ Never immerse the control panel with the heating element attached to it in water nor rinse
it under the tap.
◗ Always unplug the appliance after use. Do not move the fryer until it has cooled down
sufficiently.
◗ Do not switch the appliance on before you have filled it with oil or fat. Make sure the fryer is
always filled to a level between the two indication marks on the inside of the inner bowl.
◗ During frying, hot steam is released through the filter. Keep your hands and face at a safe
distance from the steam.You should also be careful of the hot steam when you open the lid.
◗ Keep the appliance out of the reach of children. Do not let the mains cord hang over the
edge of the table or worktop on which the appliance is standing.
◗ This appliance is intended for household use only. If the appliance is used improperly or for
(semi-)professional purposes or if it is used in a way that is not in accordance with the
instructions for use, the guarantee will become invalid and Philips will not accept liability for
any damage caused.
◗ Fry food golden-yellow instead of dark or brown and remove burnt remnants! Do not fry
starchy foods,especially potato and cereal products, at a temperature above 175cC (to
minimise the production of acrylamide).
Safety features
Safety cut-out
This appliance is equipped with a safety cut-out that switches the appliance off if it overheats.This
may happen if there is not enough oil or fat in the fryer or if blocks of solid fat are being melted in
the fryer, which will prevent the heating element from being able to give off its heat.
Take the following measures if the fryer doesn't work anymore:
1 Let the oil or fat cool down.This will take approx. 60 minutes.
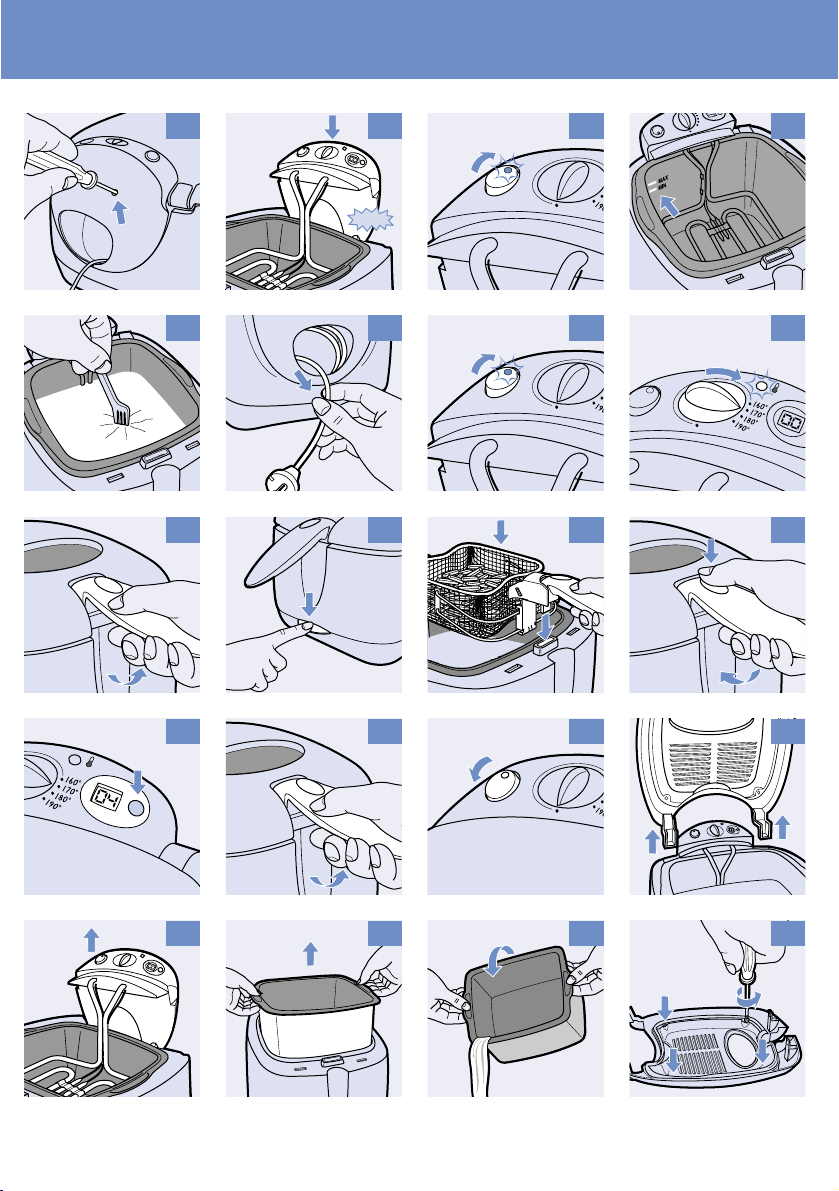
2 Carefully press the reset button at the back of the control panel with a small screwdriver
(fig. 1).
Now the appliance is ready for use again.
Safety switch
The safety switch in the control panel ensures that the heating element can only be switched on if
the control panel has been assembled correctly.
◗ Always make sure the control panel is in the right position ('click') (fig. 2).
ENGLISH6
Page 7

Auto shut-off (type HD6144 only)
The fryer will switch off automatically after 2 hours.When this happens, the power-on light in the
on/off switch will go out.
◗ To switch the appliance back on,press the on/off switch again (fig. 3).
Cool zone
During frying, loose food particles collect on the bottom of the inner bowl. As the heating element
has been placed some distance above the bottom of the inner bowl and primarily heats the oil or
fat above it, the oil or fat between the bottom of the inner bowl and the heating element remains
relatively cool (cool zone).This prevents the food particles that end up in this zone from burning,
increasing the number of times you can re-use the oil or fat.
Preparing for use
1 Put the appliance on a horizontal, even and stable surface out of the reach of children.
If you want to place the fryer on top of the cooker, make sure the rings of the cooker have been
turned off and are cold.
2 Fill the dry fryer with oil, liquid fat or melted solid fat up to the top indication mark on the
inside of the inner bowl (see section 'Oil and fat' for instructions on how to use solid fat)
(fig. 4).
Oil and fat
Never mix different types of oil or fat!
We advise you to use frying oil or liquid frying fat, preferably vegetable oil or fat that is rich in
unsaturated fats (e.g. linoleic acid).
It is possible to use solid frying fat, but in that case extra precautions are necessary to prevent the
fat from spattering and the heating element from overheating or becoming damaged.
1 If you want to use new blocks of fat, melt them slowly over a low heat in a normal pan.
2 Pour the melted fat carefully into the fryer.
3 Store the fryer with the resolidified fat still in it at room temperature.
4 If the fat gets very cold, it may start spattering when melted. Punch some holes into the
resolidified fat with a fork to prevent this (fig. 5).
Be careful not to damage the inner bowl with the fork.
Using the appliance
Frying
Be careful: hot steam will escape from the filter in the lid during frying.
1 Take the entire cord from the cord storage compartment and put the plug in the wall socket
(fig. 6).
Make sure the cord does not come into contact with hot parts of the appliance.
ENGLISH 7
Solid fat
2800 g
3050 g
Oil/liquid fat
3.2 l
3.5 l
HD6142 and
HD6144
Min.
Max.
Solid fat
1925 g
2200 g
Oil/liquid fat
2.2 l
2.5 l
HD6140
Min.
Max.
Page 8

2 Switch the fryer on by means of the on/off switch (fig. 7).
The power-on light in the on/off switch and the temperature light go on.
3 Set the temperature control to the required temperature (160-190cC) (fig. 8).
- For information about which temperature to select, check the package of the food to be fried
or the tables at the end of these instructions for use.
- The oil or fat will be heated to the selected temperature in 10 to 15 minutes.
- While the fryer is heating up, the temperature light goes out and on a number of times.When it
stays out for some time, the oil or fat has reached the preset temperature.
- After a batch has been fried, the temperature light also goes on.Wait until it stays out for some
time before frying the next batch.
B
You can leave the basket in the fryer while the oil or fat is heating up.
4 Lift the handle to raise the basket to its highest position ('click') (fig. 9).
5 Open the lid by pressing the release button.The lid will open automatically (fig. 10).
6 Remove the basket from the fryer.
7 Put the food to be fried in the basket.
B
For the best frying results, we advise you not to exceed the maximum quantities mentioned below.
Do not fry Asian rice cakes (or similar types of food) in this appliance as this might cause heavy
spattering or violent bubbling of the oil or fat.
8 Carefully put the basket in the fryer (fig. 11).
Make sure the basket has been properly inserted.
9 Close the lid.
10 HD6144 only - Set the required frying time (see section 'Timer' in this chapter).
You can also use the fryer without setting the timer.
11 Press the release button of the basket handle and carefully lower the basket to its lowest
position (fig. 12).
B
For a good end result, stick to the preparation time indicated on the package of the food to be fried
or the preparation time mentioned in the tables at the end of these instructions for use.
B
For a uniform golden frying result, lift the basket out of the oil or fat a few times during frying and
gently shake the contents.
Timer (HD6144 only)
B
The timer indicates the end of the frying time, but does NOT switch the fryer off.
1 Press the timer button to set the frying time in minutes (fig. 13).
The set time will become visible on the display.
2 Keep the button pressed to put the minutes forward quickly.Release the button once the
required frying time has been reached.
- The maximum time that can be set is 99 minutes.
ENGLISH8
Frozen
French fries
700 g
400 g
Home-made
French fries
1000 g
450 g
HD6140
Max. quantity
Recommended
quantity for best
result
Frozen
French fries
900 g
500 g
Home-made
French fries
1250 g
650 g
HD6142
and HD6144
Max. quantity
Recommended
quantity for best
result
Page 9
- A few seconds after you have set the frying time, the timer will start counting down.
- While the timer is counting down, the remaining frying time blinks on the display.The last minute
is displayed in seconds.
3 If the preset time is not correct, you can erase it by pressing the timer button for 2 seconds
at the moment the timer starts counting down (i.e. when the time starts to blink).Keep the
button pressed until '00' appears on the display.You can now set the correct frying time.
4 When the preset time has elapsed you will hear an audible signal.After 20 seconds the
audible signal will be repeated.You can stop the audible signal by pressing the timer button.
After frying
1 Lift the handle to raise the basket to its highest position, i.e. the draining position (fig. 14).
2 Open the lid.
Beware of the hot steam and possible spattering of the oil.
3 Carefully remove the basket from the fryer.
If necessary, shake the basket over the fryer to remove excess oil or fat. Put the fried food in a bowl
or colander containing grease-absorbing paper, e.g. kitchen paper.
4 Switch the fryer off by means of the on/off switch (fig. 15).
The power-on light in the on/off switch goes out.
5 Unplug the appliance after use.
B
If you do not use the fryer regularly, we advise you to remove the oil or liquid fat and to store it in
well-closed containers, preferably in the refrigerator or in a cool place. Fill the containers by pouring
the oil or fat through a fine sieve to remove food particles. Remove the frying basket before emptying
the inner bowl.
B
If the fryer contains solid fat, let the fat solidify in the fryer and store the fryer with the fat still in it
(see chapter 'Preparing for use', section 'Oil and fat').
Cleaning
Wait until the oil or fat has cooled down sufficiently.
Do not use any abrasive (liquid) cleaning agents or materials (e.g. scouring pads) to clean the
appliance.
1 Remove the lid (fig. 16).
2 Remove the basket from the fryer.
3 Remove the control panel with the heating element and put it in a safe and dry place (fig. 17).
4 Lift the inner bowl out of the appliance (fig. 18).
5 Remove the oil or fat and dispose of it, if necessary (fig. 19).
6 Dry all parts thoroughly after cleaning.
Cleaning the permanent anti-grease filter
This appliance is equipped with a permanent filter.To guarantee optimal functioning, the metal filter
should be cleaned regularly.
◗ Clean the lid of the fryer in hot water with some washing-up liquid or in the dishwasher
every time you have used the appliance.
ENGLISH 9
Page 10

For thorough cleaning:
1 Undo the screws on the inside of the lid (fig. 20).
2 Remove the filter and clean it in hot water with some washing-up liquid. Let the filter dry
thoroughly before you put it back into the lid and before you start using the appliance again.
3 Put the filter back into the lid and redo the screws on the inside of the lid.
Changing oil or fat
Because oil and fat lose their favourable properties rather quickly, you should change the oil or fat
regularly.To do so, follow the instructions below.
If you mainly use the fryer to prepare French fries and if you sieve the oil or fat after each use, you
can re-use the oil or fat 10 to 12 times before it needs to be changed. If you use the fryer to
prepare food that is rich in proteins (such as meat or fish), you should change the oil or fat more
often.
◗ Never use the same oil or fat longer than 6 months and always follow the instructions on the
package.
◗ Never add fresh oil or fat to used oil or fat.
◗ Never mix different types of oil or fat.
◗ Always change the oil or fat if it starts foaming when it is heated, if it has a strong smell or
taste or if it turns dark and/or syrupy.
Disposing of used oil or fat
Pour used oil or liquid fat back into its original (resealable) plastic bottle.You can dispose of used fat
by letting it solidify in the fryer (without the basket in it) and subsequently scooping it out of the
fryer by means of a spatula and wrapping it in a newspaper. If applicable, you can put the bottle or
newspaper in the bin for non-compostable waste (not in the compostable waste bin) or dispose of
it in accordance with the regulations in your country.
Storage
1 Put all parts back onto/into the fryer and close the lid.
2 Wind up the cord, put it in the cord storage compartment and insert the plug into the plug
fixing facility (fig. 21).
3 Lift the fryer by its handles.
Frying tips
For an overview of preparation times and temperature settings, see the tables at the end of these
instructions for use.
Home-made French fries
You will make the tastiest and crispiest French fries in the following way:
1 Use firm potatoes and cut them into sticks. Rinse the sticks with cold water.
This will prevent them from sticking to each other during frying.
B
Dry the sticks thoroughly.
2 Fry the French fries twice: the first time for 4-6 minutes at a temperature of 160cC, the
second time for 5-8 minutes at a temperature of 175cC.
ENGLISH10
Page 11

3 Put the home-made French fries in a bowl and shake them.Let the fries cool down before
frying them for the second time.
Frozen food
Frozen fries have already been precooked, so you will only have to fry them once in accordance
with the instructions on the package.
Food from the freezer (-16 to -18cC) will cause the oil or fat to cool down considerably when it is
immersed in it. Because the food does not sear right away, it may also absorb too much oil or fat.
Take the following measures to prevent this:
- Preferably allow frozen food to defrost at room temperature before frying, unless stated
otherwise on the package of the food to be fried.
- Carefully shake off as much ice and water as possible and dab the food to be fried until it is
properly dry.
- Do not fry very large quantities at one time (consult the relevant table in these instructions for
use).
- Select the frying temperature mentioned in the relevant table at the end of these instructions
for use or on the package of the food to be fried. If there are no instructions, select a
temperature of 190cC.
- Lower the food into the oil or fat very gently, since frozen food may cause the hot oil or fat to
start bubbling violently.
Getting rid of unwanted flavours
Certain types of food, particularly fish, can give the oil or fat an unpleasant flavour.To neutralise the
taste of the oil or fat:
1 Heat the oil or fat to a temperature of 160cC.
2 Put two thin slices of bread or a few sprigs of parsley in the oil.
3 Wait until no more bubbles appear and then scoop the bread or the parsley out of the fryer
with a spatula.
The oil or fat will now have a neutral taste again.
Environment
◗ Do not throw the appliance away with the normal household waste at the end of its life, but
hand it in at an official collection point for recycling. By doing this you will help to preserve
the environment (fig. 22).
Remove the battery of the timer (HD6144 only) before you discard the appliance.
1 Use a small flat-blade screwdriver to remove the timer panel (fig. 23).
2 Remove the battery.Do not throw the battery away with the normal household waste, but
hand it in at an official collection point.
Guarantee & service
If you need information or if you have a problem, please visit the Philips website at
www.philips.com
or contact the Philips Customer Care Centre in your country (you will find its phone number in
the worldwide guarantee leaflet). If there is no Customer Care Centre in your country,turn to
your local Philips dealer or contact the Service Department of Philips Domestic Appliances and
Personal Care BV.
ENGLISH 11
Page 12

Solution
Check on the package of the food or in the tables in
these instructions for use whether the temperature
and/or preparation time you have selected is/are
correct. Set the temperature control to the correct
temperature.
Never fry more food at one time than the quantity
mentioned in the relevant table in these instructions
for use.
The fuse of temperature control may have blown,
causing the safety cut-out to switch the appliance off
(see chapter 'Safety features').
Remove the lid and clean the lid and filter in hot water
with some washing-up liquid or in the dishwasher.
Change the oil or fat. Regularly sieve the oil or fat to
keep it fresh longer.
Use frying oil or liquid frying fat of good quality. Never
mix different types of oil or fat.
Check whether the lid has been closed properly.
Remove the lid and clean the lid and filter in hot water
with some washing-up liquid or in the dishwasher.
If the ring is dirty,clean the lid in hot water with some
washing-up liquid or in the dishwasher. If the ring is
worn, turn to your Philips dealer or a service centre
authorised by Philips to have the sealing ring replaced.
Make sure the oil or fat in the fryer does not exceed
the maximum level.
Dry the food thoroughly before you start frying it and
fry the food in accordance with these instructions for
use.
Never fry more food at one time than the quantity
mentioned in the relevant table in these instructions
for use.
Dry the food thoroughly before frying it.
Never mix different types of oil or fat and use oil or
liquid fat that contains an antifoam agent.
Clean the inner bowl as described in these instructions
for use.
Make sure the control panel is in the right position
('click').
Press the reset button (see chapter 'Safety features').
Possible cause
The selected temperature is too
low and/or the food has not
been fried long enough.
There is too much food in the
basket.
The oil or fat does not get hot
enough.
The permanent anti-grease filter
is saturated.
The oil or fat is no longer clean.
The type of oil or fat used is not
suitable for deep-frying food.
The lid has not been closed
properly.
The permanent anti-grease filter
is saturated.
The sealing ring on the inside of
the lid is dirty or worn.
There is too much oil or fat in
the fryer.
The food contains too much
moisture.
There is too much food in the
frying basket.
The food contains too much
moisture.
The type of oil or fat used is
unsuitable for deep-frying food.
The inner bowl has not been
cleaned properly.
The control panel has not been
properly inserted.
The fuse of the temperature
control may have blown, causing
the safety cut-out to switch the
appliance off.
Problem
The fried food does
not have a golden
brown colour and/or
is not crispy.
The fryer gives off a
strong unpleasant
smell.
Steam escapes from
other places than
the filter.
During frying, the oil
or fat spills over the
edge of the fryer.
The oil or fat foams
too much during
frying.
The fryer does not
work.
Troubleshooting
ENGLISH12
Page 13

ENGLISH 13
Frying time
(minutes)
2-3
4-6 (go to
175cC in this
table for
instructions
about the 2nd
cycle)
5-7
12-15
2-3
5-8
3-4
6-7
3-4
3-4
3-4
3-4
3-4
3-4
3-4
4-5
Max. quantity
1000 g
1000 g
Recommended
quantity for best
result
6-8 pieces
450 g
300 g
2-4 pieces
8-10 pieces
450 g
400 g
2 pieces
6-8 pieces
6-8 pieces
6-8 pieces
6-8 pieces
6-8 pieces
4 pieces
400 g
4 pieces
Type of food
Mushrooms
Home-made French fries*) 1st frying
cycle
Fresh fish
Chicken (drumsticks)
Vegetable fritters (i.e. cauliflower)
Home-made French fries*) 2nd frying
cycle
Crisps (very thin potato slices)
Chinese spring rolls
Chicken nuggets
Mini snacks
Squid rings in batter
Fish (pieces) in batter
Prawns
Apple fritters
Aubergine (slices)
Meat/fish croquettes
Temper
ature
150cC
160cC
170cC
175cC
180cC
190cC
HD6140 FRESH OR DEFROSTED FOOD
Preparation times and temperature settings
The tables below indicate how much of a particular type of food you can prepare at one time and
which temperature and preparation time you should select.
If the instructions on the package of the food to be fried differ from those in the tables, always
follow the instructions on the package.
*) See 'Frying tips' for the preparation of home-made French fries.
Page 14

Frying time
(minutes)
2-3
4-6 (go to
175cC in this
table for
instructions
about the 2nd
cycle)
5-7
12-15
2-3
5-8
3-4
6-7
3-4
3-4
3-4
3-4
3-4
3-4
3-4
4-5
Max. quantity
1250 g
1250 g
Recommended
quantity for best
result
6-8 pieces
650 g
450 g
3-5 pieces
8-10 pieces
650 g
600 g
2-3 pieces
8-10 pieces
8-10 pieces
8-10 pieces
8-10 pieces
8-10 pieces
5 pieces
600 g
5 pieces
Type of food
Mushrooms
Home-made French fries*) 1st frying
cycle
Fresh fish
Chicken (drumsticks)
Vegetable fritters (i.e. cauliflower)
Home-made French fries*) 2nd frying
cycle
Crips (very thin potato slices)
Chinese spring rolls
Chicken nuggets
Mini snacks
Squid rings in batter
Fish (pieces) in batter
Prawns
Apple fritters
Aubergine (slices)
Meat/fish croquettes
Temper
ature
150cC
160cC
170cC
175cC
180cC
190cC
HD6144, HD6142 FRESH OR DEFROSTED FOOD
Frying time
(minutes)
15-20
3-4
3-4/7-8
10-12
4-5
4-5
4-5
4-5
4-5
6-7
Max. quantity
700 g
Recommended
quantity for best
result
2-3 pieces
3 pieces
400 g
2 pieces
6 pieces
6 pieces
6 pieces
6 pieces
6 pieces
3 pieces
Type of food
Chicken (drumsticks)
Mini potato pancakes
Frozen French fries
Chinese spring rolls
Chicken nuggets
Minisnacks
Squid rings in batter
Fish (pieces) in batter
Prawns
Meat/fish croquettes
Temper
ature
170cC
175cC
180cC
190cC
HD6140 FROZEN FOOD
ENGLISH14
Page 15

15
Frying time
(minutes)
15-20
3-4
3-4/7-8
10-12
4-5
4-5
4-5
4-5
4-5
6-7
Max. quantity
700 g
Recommended
quantity for best
result
3-4 pieces
4 pieces
400 g
2-3 pieces
8 pieces
6 pieces
8 pieces
8 pieces
8 pieces
4 pieces
Type of food
Chicken (drumsticks)
Mini potato pancakes
Frozen French fries
Chinese spring rolls
Chicken nuggets
Mini snacks
Squid rings in batter
Fish (pieces) in batter
Prawns
Meat/fish croquettes
Temper
ature
170cC
175cC
180cC
190cC
HD6144, HD6142 FROZEN FOOD
ENGLISH
Page 16

Importante
Antes de usar el aparato, lea atentamente estas instrucciones y consérvelas por si necesitara
consultarlas en el futuro.
◗ Antes de conectar el aparato, compruebe si el voltaje indicado en el aparato se corresponde
con el voltaje local.
◗ Conecte el aparato sólo a un enchufe con toma de tierra.
◗ Si el cable de red está dañado,debe ser sustituido por Philips, un centro de servicio
autorizado por Philips o personal cualificado para evitar situaciones de peligro.
◗ Lleve siempre el aparato a un centro de servicio autorizado por Philips para que lo examinen
o lo reparen. No intente repararlo usted mismo; de lo contrario, la garantía quedará anulada.
◗ Limpie bien todas las piezas de la freidora antes de usarla por primera vez (consulte el
capítulo 'Limpieza').Asegúrese de que todas las piezas estén completamente secas antes de
llenar la freidora con aceite o grasa líquida.
◗ No sumerja nunca en agua el panel de control con el elemento de calor conectado a él ni lo
lave bajo el grifo.
◗ Desenchufe siempre el aparato después de usarlo.No mueva la freidora hasta que se haya
enfriado lo suficiente.
◗ No conecte el aparato hasta que no esté lleno de aceite o grasa.Asegúrese de que la freidora
está siempre llena entre las dos marcas indicadoras que se encuentran en el interior de la
cubeta.
◗ Durante el proceso de fritura, saldrá vapor caliente a través del filtro. Mantenga las manos y
el rostro a una mínima distancia de seguridad del vapor. Cuando abra la tapa, tenga cuidado
con el vapor caliente.
◗ Cuando la use, mantenga la freidora fuera del alcance de los niños y no deje que el cable de
red cuelgue del borde de la mesa o del lugar donde esté colocado el aparato.
◗ Este aparato está diseñado únicamente para uso doméstico. Si se utiliza el aparato de forma
incorrecta, para fines (semi)profesionales o de un modo que no se adecue a las instrucciones
de uso, la garantía quedará anulada y Philips no aceptará ninguna responsabilidad en caso de
daños.
◗ Dore la comida en vez de freírla demasiado y quite los restos quemados. No fría comida a
base de féculas, especialmente patatas y productos con cereales, a una temperatura superior
a 175cC (para minimizar la producción de acrilamida).
Características de seguridad
Disyuntor de seguridad
Este aparato está equipado con un disyuntor de seguridad que desconecta el aparato si éste se
calienta en exceso. Esto podría ocurrir si no hay suficiente aceite o grasa en la freidora o si se están
derritiendo bloques de grasa sólida, lo que impedirá que el elemento de calor desprenda su calor.
Tome las siguientes medidas si la freidora deja de funcionar:
1 Deje que el aceite o la grasa se enfríe.Tardará unos 60 minutos.
2 Pulse con cuidado el botón de reinicio que se encuentra en la parte trasera del panel de
control con un destornillador pequeño (fig. 1).
Ahora el aparato ya está listo para usarlo de nuevo.
Interruptor de seguridad
El interruptor de seguridad que hay en el panel de control garantiza que el elemento de calor sólo
se conecta si el panel de control se ha montado correctamente.
◗ Compruebe siempre si el panel de control está en la posición correcta (clic) (fig.2).
ESPAÑOL16
Page 17

17
Desconexión automática (sólo modelo HD6144)
La freidora se desconectará automáticamente transcurridas 2 horas. Cuando esto ocurra, el piloto
de conexión del interruptor de marcha/parada (on/off) se apagará.
◗ Para volver a conectar el aparato, pulse de nuevo el interruptor de marcha/parada (on/off)
(fig. 3).
Zona fría
Mientras se fríe, se acumulan partículas de alimentos en el fondo de la cubeta interna. Puesto que el
elemento de calor está situado a cierta distancia por encima del fondo de la cubeta y calienta
primero el aceite o la grasa que está por encima, el aceite o la grasa que quedan entre el fondo de
la cubeta y el elemento de calor permanecen relativamente fríos (zona fría). Esto evita que se
quemen las partículas de alimentos que acaban en el fondo de la cubeta y aumenta así el número
de veces que puede volver a usar el aceite o la grasa.
Cómo preparar el aparato
1 Coloque el aparato en una superficie horizontal, uniforme y estable, fuera del alcance de los
niños.
Si desea colocar la freidora sobre los quemadores del fogón,asegúrese de que los quemadores
del fogón están desconectados y se han enfriado.
2 Llene la freidora seca con aceite, grasa líquida o grasa sólida derretida hasta la indicación de
máximo del interior de la cubeta (consulte las instrucciones de la sección 'Aceite y grasa'
sobre cómo utilizar la grasa sólida) (fig. 4).
Aceite y grasa
No mezcle nunca tipos diferentes de aceite o grasa.
Le aconsejamos que utilice aceite o grasa líquida para freír, preferiblemente aceite vegetal o grasa
rica en grasas no saturadas (por ejemplo, el ácido linoleico).
Se puede utilizar grasa sólida, pero en ese caso deberá tomar precauciones adicionales para evitar
que salpique la grasa y que el elemento de calor se sobrecaliente o sufra daños.
1 Si quiere utilizar bloques de grasa nuevos,derrítalos despacio y a fuego lento en una sartén
convencional.
2 Vierta con cuidado la grasa derretida en la freidora.
3 Guarde la freidora con la grasa resolidificada a temperatura ambiente.
4 Si la grasa se enfría mucho, puede salpicar al derretirla. Haga con un tenedor unos agujeros
en la grasa resolidificada para evitarlo (fig. 5).
Tenga cuidado de no dañar la cubeta interna con el tenedor.
ESPAÑOL
Grasa sólida
1.925 g
2.200 g
Aceite/grasa
líquida
2,2 l
2,5 l
HD6140
Mín.
Máx.
Grasa sólida
2.800 g
3.050 g
Aceite/grasa
líquida
3,2 l
3,5 l
HD6142 y
HD6144
Mín.
Máx.
Page 18

18
Cómo usar el aparato
Cómo freír
Tenga cuidado: al freír saldrá vapor caliente del filtro situado en la tapa.
1 Saque todo el cable del compartimento de recogida del cable y enchúfelo a la red (fig. 6).
Asegúrese de que el cable no entra en contacto con las piezas calientes del aparato.
2 Conecte la freidora presionando el interruptor de marcha/parada (fig.7).
El piloto de conexión del botón de marcha/parada y el piloto de temperatura se iluminarán.
3 Coloque el control de la temperatura en la temperatura deseada (160-190cC) (fig. 8).
- Para obtener información sobre qué temperatura debe seleccionar, consulte el envase del
alimento que va a freír o la tabla que aparece al final de estas instrucciones de uso.
- El aceite o la grasa se calentarán a la temperatura seleccionada en 10 ó 15 minutos.
- Mientras la freidora se está calentando, el piloto se enciende y apaga unas cuantas veces.
Cuando se apague durante un tiempo, querrá decir que el aceite o la grasa ha alcanzado la
temperatura seleccionada.
- Una vez frito un lote, el símbolo del termómetro se iluminará también. Espere, de nuevo, hasta
que permanezca apagado antes de freír el siguiente lote.
B
Puede dejar la cesta dentro de la freidora mientras se está calentando el aceite o la grasa.
4 Suba el asa para levantar la cesta hasta su posición más alta ('clic') (fig. 9).
5 Abra la tapa presionando el botón de liberación. La tapa se abrirá automáticamente (fig. 10).
6 Saque la cesta de la freidora.
7 Coloque la comida que desea freír en la cesta.
B
Para obtener un mejor resultado,le aconsejamos que no supere las cantidades máximas
mencionadas a continuación.
No fría tortas de arroz (o alimentos similares) en este aparato,ya que podría salpicar mucho o
hacer que salte el aceite o la grasa.
8 Introduzca con cuidado la cesta en la freidora (fig. 11).
Asegúrese de que ha colocado correctamente la cesta.
9 Cierre la tapa.
10 Sólo modelo HD6144 - Programe el tiempo de fritura necesario (consulte la sección
'Temporizador' de este apartado).
También puede usar la freidora sin programar el temporizador.
11 Pulse el botón de liberación del mango de la cesta y baje con cuidado la cesta hasta su
posición más baja (fig. 12).
B
Para obtener un buen resultado, respete el tiempo de preparación indicado en el envase del alimento
que va a freír o los tiempos de preparación mencionados en la tabla que aparece al final de estas
instrucciones de uso.
ESPAÑOL
Patatas fritas
congeladas
900 g
500 g
Patatas
fritas caseras
1.250 g
650 g
HD6142 y
HD6144
Cantidad máx.
Cantidad
recomendada
para conseguir
los mejores
resultados
Patatas fritas
congeladas
700 g
400 g
Patatas
fritas caseras
1.000 g
450 g
HD6140
Cantidad máx.
Cantidad
recomendada
para conseguir los
mejores
resultados
Page 19

19
B
Para que los alimentos queden dorados y uniformes, saque la cesta del aceite o la grasa unas
cuantas veces mientras se está friendo y sacuda suavemente el contenido.
Temporizador (sólo modelo HD6144)
B
El temporizador indica el final del tiempo de fritura, pero NO desconecta la freidora.
1 Pulse el botón del temporizador para ajustar el tiempo de fritura en minutos (fig. 13).
El tiempo seleccionado aparecerá en la pantalla.
2 Mantenga el botón pulsado, para pasar los minutos más rápidamente. Suelte el botón cuando
llegue al tiempo de fritura deseado.
- El tiempo máximo que se puede programar es de 99 minutos.
- Unos segundos después de haber ajustado el tiempo de fritura empezará la cuenta atrás.
- A medida que se va descontando el tiempo, en la pantalla parpadea el tiempo restante.
El último minuto se muestra en segundos.
3 Si el tiempo seleccionado no es el correcto,puede borrarlo pulsando durante dos segundos
el botón del temporizador justo cuando éste comience la cuenta atrás (es decir, cuando el
tiempo comienza a parpadear). Mantenga el botón pulsado hasta que en la pantalla aparezca
'00'.Ahora puede establecer el tiempo correcto de fritura.
4 Cuando se alcance el tiempo seleccionado, oirá una señal sonora.A los veinte segundos, la
señal se repetirá. Puede parar la señal sonora pulsando el botón del temporizador.
Después de freír
1 Levante el mango para elevar la cesta hasta su posición más elevada, es decir, la posición de
escurrido (fig. 14).
2 Abra la tapa.
Tenga cuidado con el vapor y el aceite que pueda saltar.
3 Saque con cuidado la cesta de la freidora.
Si fuera necesario, sacuda la cesta sobre la freidora para eliminar el exceso de aceite o de grasa.
Ponga los alimentos fritos en un recipiente o colador con papel que absorba la grasa, como papel
de cocina.
4 Desconecte la freidora presionando el interruptor de marcha/parada (on/off) (fig.15).
El piloto de conexión del interruptor de marcha/parada se apagará.
5 Desenchufe el aparato después de utilizarlo.
B
Si no utiliza la freidora regularmente, le aconsejamos que saque el aceite o la grasa y lo guarde en
recipientes bien cerrados, preferiblemente en el frigorífico o en un lugar fresco.Al llenar los recipientes,
pase el aceite o la grasa por un colador fino para retirar las partículas de alimentos. Saque la cesta
antes de vaciar la cubeta.
B
Si la freidora contiene grasa sólida, deje que la grasa se solidifique en la freidora y guarde el aparato
con la grasa dentro (consulte el capítulo 'Cómo preparar el aparato',sección 'Aceite y grasa').
Limpieza
Espere hasta que el aceite o la grasa se hayan enfriado lo suficiente.
No utilice detergentes (líquidos) o materiales de limpieza abrasivos (como estropajos) para
limpiar el aparato.
1 Quite la tapadera (fig. 16).
2 Quite la cesta de la freidora.
ESPAÑOL
Page 20

20
3 Quite el panel de control con el elemento calefactor y colóquelo en un sitio seguro y seco
(fig. 17).
4 Saque la cubeta interna del aparato (fig. 18).
5 Saque el aceite y la grasa, y utilícelo, si lo necesita (fig. 19).
6 Seque bien todas las piezas después de limpiarlas.
Cómo limpiar el filtro permanente anti-grasa
Este aparato está equipado con un filtro permanente anti-grasa. Para garantizar un funcionamiento
óptimo, debe limpiar el filtro metálico con frecuencia.
◗ Limpie la tapa de la freidora con agua caliente y un poco de detergente líquido o métala en el
lavavajillas cada vez que utilice el aparato.
Para una limpieza en profundidad:
1 Desenrosque los tornillos del interior de la tapa (fig. 20).
2 Quite el filtro y límpielo con agua caliente y un poco de detergente líquido. Deje secar bien
el filtro antes de volver a colocarlo en la tapa y antes de volver a utilizar el aparato.
3 Vuelva a colocar el filtro en la tapa y vuelva a enroscar los tornillos del interior de la tapa.
Cambio del aceite o la grasa
Puesto que el aceite y la grasa pierden sus propiedades con rapidez, debe cambiarlos con
regularidad. Para hacerlo, siga las siguientes instrucciones.
Si utiliza la freidora principalmente para hacer patatas fritas y si cuela el aceite o la grasa después de
cada uso, puede volver a utilizar el aceite o la grasa 10 ó 12 veces antes de que sea necesario
cambiarlo. Si utiliza la freidora para freír alimentos ricos en proteínas (como carne o pescado),
deberá cambiar el aceite o la grasa con mayor frecuencia.
◗ No utilice el mismo aceite o grasa durante más de 6 meses y siga siempre las instrucciones
del paquete.
◗ No añada nunca aceite nuevo al aceite ya usado. Lo mismo se aplica a la grasa.
◗ No mezcle nunca tipos diferentes de aceite o grasa.
◗ Cambie siempre el aceite o la grasa si hace espuma cuando se calienta, si tiene un olor o un
sabor muy fuerte o si se pone oscuro y/o espeso.
Cómo tirar el aceite o grasa usados.
Vierta el aceite o la grasa líquida en su recipiente de plástico original (si se puede volver a sellar).
Puede deshacerse de la grasa usada si la deja solidificar en la freidora (sin la cesta en el interior) y
después la saca con una espátula y la envuelve en un papel de periódico. En su caso, puede echar el
recipiente o el periódico en un cubo para desechos inorgánicos (no para desechos orgánicos) o
deshacerse del mismo según la normativa de su país.
Cómo guardar el aparato
1 Vuelva a colocar todas las piezas en la freidora y cierre la tapa.
2 Enrolle el cable, guárdelo en el compartimento de recogida del cable e introduzca la clavija en
la cavidad para fijar la clavija (fig.21).
3 Levante la freidora por las asas.
ESPAÑOL
Page 21

21
Consejos para freír
Para consultar los tiempos de preparación y las posiciones de temperatura, diríjase a la tabla que
aparece al final de estas instrucciones.
Patatas fritas caseras
Podrá preparar las patatas fritas más crujientes y sabrosas de la siguiente manera:
1 Utilice patatas nuevas y córtelas en tiras. Lávelas con agua fría.
Esto evitará que se peguen unas a otras mientras se fríen.
B
Seque bien las patatas.
2 Fría las patatas dos veces: la primera vez durante 4-6 minutos a una temperatura de 160cC,y
la segunda durante 5-8 minutos a una temperatura de 175cC.
3 Ponga las patatas en un recipiente y agítelas.Antes de comenzar a freír las patatas por
segunda vez, déjelas que se enfríen.
Alimentos congelados
Los alimentos congelados ya están precocinados, así que sólo tendrá que freírlos una vez siguiendo
las instrucciones del paquete.
Al introducir los alimentos congelados (-16 a -18cC) en la freidora, el aceite o la grasa se enfriarán
considerablemente. Puesto que los alimentos no se secan enseguida, pueden absorber demasiado
aceite o grasa.
Para evitarlo tome las siguientes medidas:
- Deje preferiblemente que los alimentos congelados se descongelen a temperatura ambiente
antes de freírlos, a menos que se indique lo contrario en el paquete del alimento que va a freír.
- Retire con cuidado tanto hielo y agua como sea posible y escurra los alimentos hasta que estén
bien secos.
- No fría cantidades muy grandes de una sola vez (consulte la tabla pertinente que aparece en
estas instrucciones de uso).
- Seleccione la temperatura que se indica en la tabla de este manual de instrucciones o en el
paquete de los alimentos que va a freír. Si no hay instrucciones, seleccione una temperatura de
190cC.
- Sumerja los alimentos en el aceite o grasa con mucho cuidado, ya que la comida congelada
puede hacer que el aceite comience a saltar de manera violenta.
Cómo eliminar los malos sabores
Determinados tipos de alimentos, especialmente el pescado, pueden dar al aceite o a la grasa un
sabor desagradable. Para neutralizar el sabor del aceite o de la grasa:
1 Caliente el aceite o la grasa a una temperatura de 160cC.
2 Ponga dos rebanadas finas de pan o unas ramitas de perejil en el aceite.
3 Espere hasta que dejen de aparecer burbujas y luego saque el pan o el perejil de la freidora
con una espátula.
El aceite o la grasa volverán a tener un sabor neutro.
ESPAÑOL
Page 22

22
Medio ambiente
◗ Cuando vaya a deshacerse de este aparato, no lo tire con la basura normal del hogar;
deposítelo en un punto de recogida oficial para su reciclado.Al hacerlo, contribuirá a
preservar el medio ambiente (fig. 22).
Quite la batería del temporizador (sólo modelo HD6144) antes de tirar el aparato.
1 Utilice un destornillador de punta plana para quitar el panel del temporizador (fig. 23).
2 Saque la pila. No la tire con el resto de la basura doméstica normal, deposítela en un punto
de recogida oficial.
Garantía y servicio
Si necesita información o si tiene algún problema, visite la página web de Philips en
www.philips.com
o póngase en contacto con el Servicio Philips de Atención al Cliente de su país (hallará el número
de teléfono en el folleto de la Garantía Mundial). Si en su país no hay Servicio Philips de Atención al
Cliente, diríjase a su distribuidor local Philips o póngase en contacto con el Service Department of
Philips Domestic Appliances and Personal Care BV.
ESPAÑOL
Page 23

23
Solución
Compruebe en el paquete o en la tabla de estas
instrucciones si la temperatura y/o el tiempo de
preparación elegidos son los correctos. Coloque el
control de la temperatura en la temperatura correcta.
No fría al mismo tiempo más cantidad de alimentos
que la recomendada en la tabla de estas instrucciones.
Puede que se haya fundido el fusible del control de la
temperatura, provocando que el disyuntor de
seguridad desconecte el aparato (consulte el capítulo
'Características de seguridad').
Quite la tapa y límpiela junto con el filtro con agua
caliente y un poco de detergente líquido o métalos en
el lavavajillas.
Cambie el aceite o la grasa. Filtre regularmente el
aceite o la grasa para mantenerlos frescos durante más
tiempo.
Utilice aceite o grasa líquida para freír de buena
calidad. Nunca mezcle distintos tipos de aceite o grasa.
Compruebe si se ha cerrado bien la tapadera.
Quite la tapa y límpiela junto con el filtro con agua
caliente y un poco de detergente líquido o métalos en
el lavavajillas.
Si el precinto está sucio, lave la tapa con agua caliente
y un poco de detergente líquido o en el lavavajillas. Si
el precinto está gastado, diríjase a su distribuidor de
Philips o a un centro de servicio autorizado por Philips
para que sustituyan el precinto.
Asegúrese de que el aceite o la grasa que hay en la
freidora no sobrepasa el nivel máximo.
Seque bien los alimentos antes de comenzar a freírlos
y fríalos siguiendo estas instrucciones.
No fría nunca al mismo tiempo más cantidad de
alimentos que la que se menciona en la tabla
pertinente de estas instrucciones.
Seque bien los alimentos antes de freírlos.
No mezcle nunca distintos tipos de aceite o grasa y
utilice aceite o grasa líquida que contenga un agente
antiespumante.
Limpie la cubeta tal y como se indica en estas
instrucciones.
Posible causa
La temperatura seleccionada es
demasiado baja y/o los
alimentos no se han frito
durante suficiente tiempo.
Hay demasiada cantidad de
alimentos en la cesta.
El aceite o la grasa no se
calientan lo suficiente.
El filtro anti-grasa permanente
está saturado.
El aceite o la grasa ya no están
limpios.
El tipo de aceite o grasa que
utiliza no es apropiado para
freír.
No se ha cerrado bien la
tapadera.
El filtro anti-grasa permanente
está saturado.
El precinto del interior de la
tapa está sucio o gastado.
Hay demasiado aceite o grasa
en la freidora.
Los alimentos están demasiado
húmedos.
Hay demasiados alimentos en la
cesta.
Los alimentos están demasiado
húmedos.
El tipo de aceite o grasa que
utiliza no es apropiado para
freír.
No se ha limpiado bien la
cubeta.
Problema
Los alimentos fritos
no están dorados
y/o no están
crujientes.
La freidora
desprende un olor
muy fuerte y
desagradable.
Sale vapor de más
sitios, además de por
el filtro.
Al freír, el aceite o la
grasa se sale por el
borde de la freidora.
Al freír, el aceite o la
grasa hace mucha
espuma.
ESPAÑOL
Guía de resolución de problemas
Page 24

24
Tiempos de preparación y temperaturas
Las siguientes tablas indican la cantidad de un tipo concreto de alimento que se puede preparar de
una sola vez, así como la temperatura y el tiempo que debe seleccionar.
Si las instrucciones del paquete de los alimentos que se van a freír difieren de las que se dan en las
tablas, siga siempre las instrucciones del paquete.
Solución
Asegúrese de que el panel de control está bien
colocado (clic).
Pulse el botón de reinicio (consulte el capítulo
'Características de seguridad').
Posible causa
El panel de control no se ha
colocado correctamente.
Puede que se haya fundido el
fusible del control de la
temperatura, provocando que el
disyuntor de seguridad
desconectara el aparato.
Problema
La freidora no
funciona
ESPAÑOL
Tiempo de
fritura
(minutos)
2-3
4-6 (vaya a
175cC en esta
tabla para ver
las
instrucciones
sobre el
segundo ciclo)
5-7
12-15
2-3
5-8
3-4
6-7
3-4
3-4
3-4
3-4
3-4
3-4
3-4
4-5
Cantidad máx.
1.000 g
1.000 g
Cantidad
recomendada
para conseguir
los mejores
resultados
6-8 piezas
450 g
300 g
2-4 piezas
8-10 piezas
450 g
400 g
2 piezas
6-8 piezas
6-8 piezas
6-8 piezas
6-8 piezas
6-8 piezas
4 piezas
400 g
4 piezas
Tipo de alimento
Champiñones
Patatas fritas caseras*) Primer ciclo
de fritura
Pescado fresco
Pollo (muslos)
Verdura rebozada (p.ej.coliflor)
Patatas fritas caseras*) Segundo ciclo
de fritura
Patatas (láminas muy finas de patata)
Rollitos de primavera chinos
Nuggets de pollo
Aperitivos pequeños
Calamares a la romana
Pescado rebozado (en trozos)
Gambas
Buñuelos de manzana
Berenjena (rodajas)
Croquetas de carne o pescado
Temper
atura
150cC
160cC
170cC
175cC
180cC
190cC
HD6140 ALIMENTOS DESCONGELADOS O FRESCOS
*) Consulte "Consejos para freír" para saber cómo preparar patatas fritas caseras.
Page 25

ESPAÑOL 25
Tiempo de
fritura
(minutos)
2-3
4-6 (vaya a 175cC
en esta tabla para
ver las
instrucciones
sobre el segundo
ciclo)
5-7
12-15
2-3
5-8
3-4
6-7
3-4
3-4
3-4
3-4
3-4
3-4
3-4
4-5
Cantidad máx.
1.250 g
1.250 g
Cantidad
recomendada
para conseguir
los mejores
resultados
6-8 piezas
650 g
450 g
3-5 piezas
8-10 piezas
650 g
600 g
2-3 piezas
8-10 piezas
8-10 piezas
8-10 piezas
8-10 piezas
8-10 piezas
5 piezas
600 g
5 piezas
Tipo de alimento
Champiñones
Patatas fritas caseras*) Primer ciclo
de fritura
Pescado fresco
Pollo (muslos)
Verdura rebozada (p.ej.coliflor)
Patatas fritas caseras*) Segundo ciclo
de fritura
Patatas (láminas muy finas de patata)
Rollitos de primavera chinos
Nuggets de pollo
Aperitivos pequeños
Calamares a la romana
Pescado rebozado (en trozos)
Gambas
Buñuelos de manzana
Berenjena (rodajas)
Croquetas de carne o pescado
Temper
atura
150cC
160cC
170cC
175cC
180cC
190cC
HD6144, HD6142 ALIMENTOS FRESCOS O DESCONGELADOS
Page 26

Tiempo de
fritura
(minutos)
15-20
3-4
3-4/7-8
10-12
4-5
4-5
4-5
4-5
4-5
6-7
Cantidad máx.
700 g
Cantidad
recomendada
para conseguir
los mejores
resultados
2-3 piezas
3 piezas
400 g
2 piezas
6 piezas
6 piezas
6 piezas
6 piezas
6 piezas
3 piezas
Tipo de alimento
Pollo (muslos)
Tortitas de patata
Patatas fritas congeladas
Rollitos de primavera chinos
Nuggets de pollo
Aperitivos pequeños
Calamares a la romana
Pescado rebozado (en trozos)
Gambas
Croquetas de carne o pescado
Temper
atura
170cC
175cC
180cC
190cC
HD6140 ALIMENTOS CONGELADOS
ESPAÑOL26
Tiempo de
fritura
(minutos)
15-20
3-4
3-4/7-8
10-12
4-5
4-5
4-5
4-5
4-5
6-7
Cantidad máx.
700 g
Cantidad
recomendada
para conseguir
los mejores
resultados
3-4 piezas
4 piezas
400 g
2-3 piezas
8 piezas
6 piezas
8 piezas
8 piezas
8 piezas
4 piezas
Tipo de alimento
Pollo (muslos)
Tortitas de patata
Patatas fritas congeladas
Rollitos de primavera chinos
Nuggets de pollo
Aperitivos pequeños
Calamares a la romana
Pescado rebozado (en trozos)
Gambas
Croquetas de carne o pescado
Temper
atura
170cC
175cC
180cC
190cC
HD6144, HD6142 ALIMENTOS CONGELADOS
Page 27

Importante
Antes de se servir da fritadeira, leia atentamente estas instruções e guarde-as para uma eventual
consulta futura.
◗ Antes de ligar à corrente, verifique se a voltagem indicada no aparelho corresponde à
voltagem do local onde for utilizá-lo.
◗ Ligue sempre a uma tomada com terra.
◗ Se o fio estiver estragado,só deverá ser substituído pela Philips, por um concessionário
autorizado pela Philips ou pessoal igualmente qualificado para se evitarem situações de
perigo para o utilizador.
◗ Para verificações e reparações, dirija-se sempre a um concessionário autorizado pela Philips.
Não tente reparar a fritadeira, caso contrário a garantia será considerada nula.
◗ Antes de se servir da fritadeira pela primeira vez, deverá lavar cuidadosamente todas as
peças desmontáveis (vidé capítulo 'Limpeza'). Certifique-se que todas as peças estão
completamente secas antes de encher a fritadeira com óleo ou com gordura líquida.
◗ Nunca mergulhe o painel de controlo com a resistência acoplada dentro de água nem o
enxague à torneira.
◗ Desligue a fritadeira da corrente após cada utilização.Não desloque a fritadeira sem que
tenha primeiro arrefecido o suficiente.
◗ Não ligue a fritadeira antes de a encher com o óleo ou a gordura. Certifique-se que a
fritadeira está sempre cheia até um nível entre as duas marcas existentes no interior da cuba.
◗ Durante a fritura, poderá sair algum vapor quente através do filtro. Mantenha o rosto e as
mãos a uma distância segura desse vapor. Deverá também ter cuidado com o vapor quente
quando abrir a tampa da fritadeira.
◗ Mantenha sempre a fritadeira fora do alcance das crianças, Não deixe o cabo de alimentação
pendurado para fora da mesa de trabalho ou da bancada da cozinha onde ela estiver
colocada.
◗ Este aparelho destina-se apenas a uma utilização doméstica. Se for usado indevidamente ou
para fins (semi-)profissionais ou se for utilizado de uma forma que não esteja de acordo com
o modo de emprego,a garantia tornar-se-á nula e a Philips não aceitará qualquer
responsabilidade por algum dano causado.
◗ Frite os alimentos de modo a ficarem com um tom dourado e não escuro e remova todos os
resíduos queimados! Não frite alimentos com amido,especialmente batatas e cereais, numa
temperatura superior a 175cC (para minimizar a formação de acrilamide).
Características de segurança
Corte de segurança
Este aparelho está equipado com um dispositivo que o desliga automaticamente em caso de
sobreaquecimento. Isso pode acontecer se não houver óleo ou gordura suficientes na fritadeira ou
se pedaços de gordura sólida estiverem a ser derretidos na fritadeira, o que impedirá a resistência
de libertar o calor.
Tome as seguintes medidas se a fritadeira já não funcionar mais:
1 Deixe o óleo ou a gordura arrefecer.Isso levará cerca de 60 minutos.
2 Com cuidado, prima o botão 'reset' na parte de trás do painel de controlo com uma pequena
chave de parafusos (fig.1).
Agora, o aparelho está novamente pronto a usar.
PORTUGUÊS 27
Page 28

Comutador de segurança
O botão de segurança do painel de controlo assegura que a resistência só poderá ser ligada se o
painel de controlo estiver montado correctamente.
◗ Certifique-se sempre que o painel de controlo está na posição correcta ('clique!') (fig.2).
Desligar automático (apenas mod. HD6144)
A fritadeira desliga-se automaticamente passadas 2 horas. Quando isso acontece, a lâmpada piloto
do interruptor apaga-se.
◗ Para voltar a ligar a fritadeira, prima de novo o interruptor (fig.3).
Zona fria
Durante a fritura, há partículas soltas de comida que se juntam no fundo da cuba interior. Uma vez
que a resistência está colocada a alguma distância acima da base da cuba interior e aquece primeiro o
óleo ou a gordura de cima, o óleo ou a gordura na zona entre o fundo da cuba interior e a resistência
fica relativamente frio (zona fria). Deste modo, evita-se que as partículas de comida que estiverem
nessa zona se queimem e aumenta-se o número de vezes de reutilização do óleo ou da gordura.
Preparação
1 Coloque a fritadeira sobre uma superfície horizontal, plana e estável, fora do alcance das
crianças.
Se quiser colocar a fritadeira sobre o fogão,verifique sempre se as bocas do fogão estão
desligadas e frias.
2 Encha a fritadeira com óleo, gordura líquida ou gordura sólida derretida até à indicação
máxima do interior da cuba (vidé secção 'Óleo e gordura' para mais instruções sobre o uso
de gordura sólida) (fig. 4).
Óleo e gordura
Nunca misture tipos diferentes de óleo ou de gordura!
Recomenda-se a utilização de óleo ou de gordura líquida para fritar, de preferência óleo ou gordura
vegetal rica em gorduras não saturadas (por ex. ácido linoleico).
É possível usar gordura sólida mas, neste caso, são necessárias precauções extra para se evitar que a
gordura salpique e a resistência entre em sobreaquecimento ou se estrague.
1 Se quiser usar cubos de gordura novos, derreta-os lentamente em lume brando numa
frigideira normal.
2 Deite cuidadosamente a gordura já derretida para a fritadeira.
3 Guarde a fritadeira com a gordura novamente solidificada à temperatura ambiente.
4 Se a gordura ficar muito fria, poderá começar a salpicar quando derreter. Para o evitar, pique
a gordura solidificada com um garfo (fig. 5).
Tenha cuidado para não estragar a cuba interior com os dentes do garfo.
PORTUGUÊS28
Gordura
sólida
1,925 kg
2.2 kg
Óleo/gordura
líquida
2,2 l
2,5 l
HD6140
Mín.
Máx.
Gordura
sólida
2,8 kg
3,050 kg
Óleo/gordura
líquida
3,2 l
3,5 l
HD6142 e
HD6144
Mín.
Máx.
Page 29

Utilização
Fritura
Tenha cuidado: durante a fritura pode escapar-se algum vapor quente através do filtro da tampa.
1 Puxe todo o fio para fora do compartimento de arrumação e ligue a ficha à tomada eléctrica
(fig. 6).
Certifique-se que o fio não fica em contacto com as partes quentes do aparelho.
2 Ligue a fritadeira no interruptor (fig. 7).
A lâmpada piloto do interruptor e a lâmpada piloto da temperatura acendem-se.
3 Regule o controlo da temperatura para a temperatura pretendida (160-190cC) (fig. 8).
- Para informações sobre qual a temperatura a seleccionar, consulte a embalagem dos alimentos a
fritar ou as tabelas no final deste manual de instruções.
- O óleo ou gordura aquecerá durante 10 a 15 minutos até atingir a temperatura seleccionada.
- Enquanto a fritadeira estiver a aquecer, a lâmpada da temperatura apaga-se e acende-se várias
vezes. Quando permanecer acesa durante algum tempo, o óleo ou a gordura terá atingido a
temperatura seleccionada.
- Após uma série, a lâmpada da temperatura acende-se. Aguarde que se mantenha apagada
durante algum tempo antes de prosseguir com outra série.
B
Pode deixar o cesto dentro da fritadeira enquanto o óleo ou a gordura estiver a aquecer.
4 Levante a pega para erguer o cesto até à posição mais elevada ('clique!') (fig. 9).
5 Abra a tampa pressionando o botão.A tampa abre-se automaticamente (fig. 10).
6 Retire o cesto para fora da fritadeira.
7 Coloque os alimentos a fritar dentro do cesto.
B
Para obter sempre os melhores resultados, não deverá exceder as quantidades máximas
mencionadas abaixo.
Não frite bolos de arroz asiáticos (ou alimentos similares) nesta fritadeira porque isso poderá
provocar muitos salpicos ou um borbulhar muito forte do óleo ou da gordura.
8 Coloque o cesto na fritadeira com cuidado (fig. 11).
Certifique-se que o cesto está correctamente colocado.
9 Feche a tampa.
10 Apenas HD6144 - Programe o tempo de fritura adequado (vidé secção 'Temporizador' neste
capítulo).
Também pode usar a fritadeira sem programar o tempo.
11 Prima o botão para soltar a pega do cesto e baixe-o cuidadosamente até à posição mais
baixa (fig. 12).
PORTUGUÊS 29
Batatas fritas
congeladas
700 gr
400 gr
Batatas fritas
caseiras
1 kg
450 gr
HD6140
Quantidade
máx.
Quantidade
recomendada
para melhores
resultados
Batatas fritas
congeladas
900 gr
500 g
Batatas fritas
caseiras
1,250 kg
650 gr
HD6142 e
HD6144
Quantidade
máx.
Quantidade
recomendada
para melhores
resultados
Page 30

B
Para obter um bom resultado final,siga o tempo de preparação indicado na embalagem dos
alimentos a fritar ou o tempo de preparação mencionado nas tabelas no final deste manual de
instruções.
B
Para que os alimentos fiquem dourados e uniformemente fritos, levante o cesto para fora do óleo ou
da gordura umas quantas vezes durante a fritura e agite-o cuidadosamente.
Temporizador (apenas mod.HD6144)
B
O temporizador indica o fim do tempo de fritura, mas NÃO desliga a fritadeira.
1 Prima o botão do temporizador para ajustar o tempo em minutos (fig. 13).
O tempo programado fica indicado no visor.
2 Mantenha o botão premido para avançar rapidamente nos minutos.Solte o botão logo que
atinja o tempo de fritura pretendido.
- O tempo máximo permitido é de 99 minutos.
- Alguns segundos após a programação do tempo de fritura, o temporizador inicia a contagem
decrescente.
- Enquanto o temporizador estiver a fazer a contagem decrescente, o tempo de fritura que resta
aparece a piscar no visor. O último minuto é apresentado em segundos.
3 Se o tempo programado não estiver certo, pode apagá-lo pressionando novamente o botão
do temporizador durante 2 segundos quando o temporizador iniciar a contagem
decrescente (isto é, quando o tempo começar a piscar no mostrador). Mantenha o botão
premido até aparecer '00' no visor. Nessa altura poderá corrigir o tempo programado.
4 Quando o tempo programado chegar ao fim, ouvir-se-á um sinal sonoro. Passados
20 segundos, o sinal sonoro repete-se. Se quiser parar o sinal sonoro,prima o botão do
temporizador.
Após a fritura
1 Levante a pega para erguer o cesto até à posição mais elevada, isto é, até à posição de
escorrer (fig. 14).
2 Abra a tampa.
Tenha atenção ao vapor quente e à possibilidade de o óleo salpicar.
3 Retire o cesto para fora da fritadeira com cuidado.
Se for necessário, agite o cesto sobre a fritaderia para remover o excesso de óleo ou gordura.
Coloque os alimentos numa tigela ou num escorredor com papel absorvente (rolo de cozinha).
4 Desligue a fritadeira no interruptor (fig. 15).
A lâmpada piloto do interruptor apaga-se.
5 Desligue da corrente após cada utilização.
B
Se não se servir da fritadeira com regularidade, é aconselhável retirar o óleo ou a gordura líquida e
guardar em recipientes bem fechados, de preferência no frigorífico ou em local fresco. Encha os
recipientes, deitando primeiro o óleo ou a gordura para um passador de rede fina de modo a retirarlhe todas as partículas de comida. Antes de esvaziar a cuba, retire o cesto.
B
Se a fritadeira contiver gordura sólida, deixe a gordura dentro da fritadeira e guarde-a com a gordura
dentro (vidé capítulo 'Preparação', secção 'Óleo e gordura').
Limpeza
Aguarde primeiro que o óleo ou gordura arrefeça o suficiente.
Não use qualquer produto de limpeza (líquido) abrasivo ou esfregões para limpar o aparelho.
PORTUGUÊS30
Page 31

1 Retire a tampa (fig. 16).
2 Retire o cesto para fora da fritadeira.
3 Retire o painel de controlo com a resistência acoplada e coloque-o em local seguro e seco
(fig. 17).
4 Levante a cuba para fora da fritadeira (fig. 18).
5 Remova o óleo ou a gordura e, se for necessário, deite fora (fig. 19).
6 Depois de as lavar, seque bem todas as peças.
Limpeza do filtro permanente anti-gordura
Este aparelho está equipado com um filtro permanente. Para garantir o seu óptimo funcionamento,
o filtro metálico deve ser limpo regularmente.
◗ Sempre que se servir da fritadeira, lave a tampa com água quente e um pouco de detergente
líquido ou na máquina da loiça.
Para uma limpeza mais profunda:
1 Desaperte os parafusos do interior da tampa (fig. 20).
2 Retire o filtro e lave-o com água quente e um pouco de detergente líquido. Deixe o filtro
secar muito bem antes de voltar a colocá-lo na tampa e antes de se servir novamente da
fritadeira.
3 Volte a colocar o filtro na tampa e aperte os parafusos do interior da tampa.
Mudar o óleo ou gordura
Dado que o óleo e a gordura perdem as suas propriedades muito rapidamente, deverá proceder à
sua mudança com regularidade. Para isso, siga as instruções abaixo.
Se utiliza a fritadeira sobretudo para preparar batatas fritas em palitos e se passa o óleo ou a
gordura por um coador de rede após cada utilização, poderá reutilizar o óleo ou a gordura 10 a
12 vezes antes de proceder à sua mudança. Se utilizar a fritadeira para fritar alimentos ricos em
proteínas (como a carne ou o peixe), terá de mudar o óleo ou a gordura mais vezes.
◗ Nunca use o mesmo óleo ou gordura durante mais de 6 meses e siga sempre as instruções
da embalagem do produto.
◗ Nunca misture óleo ou gordura frescos com os usados.
◗ Nunca misture diferentes tipos de óleo ou gordura.
◗ Se o óleo ou gordura começar a fazer espuma quando estiver em aquecimento,se tiver um
cheiro ou um sabor forte ou se ficar escuro e/ou axaropado deverá mudá-lo de imediato.
Como desfazer-se do óleo ou gordura usados
Deite o óleo ou a gordura usados na embalagem (reutilizável) original. Pode desfazer-se da gordura
usada deixando-a primeiro solidificar dentro da fritadeira (sem o cesto) e, em seguida, retirá-la com
uma colher ou com uma espátula (de madeira) e embrulhando-a em papel de jornal. Se for
possível, pode deitar a embalagem ou o papel de jornal num contentor próprio para lixo degradável
(e não junto com o lixo normal) ou seguir os procedimentos legais do seu país.
Arrumação
1 Volte a colocar todas as peças na fritadeira e feche a tampa.
PORTUGUÊS 31
Page 32

2 Enrole o fio, arrume-o no compartimento respectivo e introduza a ficha no encaixe próprio
para esse fim (fig. 21).
3 Levante a fritadeira pelas pegas.
Sugestões
Para ter uma perspectiva sobre os tempos de preparação e as temperaturas, consulte as tabelas no
final deste manual de instruções.
Batatas fritas caseiras
As suas batatas fritas em palitos ficarão mais saborosas e estaladiças se as preparar da seguinte maneira:
1 Use batatas de boa qualidade e corte-as em palitos. Passe os palitos por água fria.
Assim os palitos não se colam uns aos outros durante a fritura.
B
Seque-os bem.
2 Frite as batatas em palitos por duas vezes: na 1ª vez durante 4-6 minutos numa temperatura
de 160cC, na 2ª vez durante 5-8 minutos numa temperatura de 175cC.
3 Coloque as batatas fritas em palitos numa tigela e sacuda-as bem. Deixe-as arrefecer antes de
as fritar pela segunda vez.
Alimentos congelados
As batatas congeladas já têm uma fritura prévia, por isso basta fritá-las uma vez, seguindo as
instruções da embalagem.
Alimentos retirados directamente do congelador (-16 a -18cC) poderão provocar o arrefecimento
súbito e considerável do óleo ou da gordura quando se mergulha o cesto na cuba. Uma vez que os
alimentos não começam logo a ferver, irão absorver muito óleo ou gordura.
Para o evitar, tome as seguintes precauções:
- De preferência, deixe os alimentos descongelarem primeiro à temperatura ambiente antes de
os fritar,a não ser que as instruções da embalagem indiquem um outro procedimento.
- Retire cuidadosamente o máximo de gelo e de água possível e seque os alimentos que for fritar.
- Não frite grandes quantidades de cada vez (consulte a tabela deste modo de emprego).
- Seleccione a temperatura mencionada na tabela correspondente no final deste manual de
instruções ou a embalagem dos alimentos a fritar. Se não tiver instruções, seleccione uma
temperatura de 190cC.
- Mergulhe os alimentos com cuidado no óleo ou gordura porque a comida congelada pode
provocar o borbulhar violento do óleo ou gordura.
Como evitar sabores desagradáveis
Certos tipos de alimentos, sobretudo o peixe, podem conferir um sabor desagradável ao óleo ou à
gordura. Para neutralizar o sabor do óleo ou da gordura:
1 Aqueça o óleo ou a gordura numa temperatura de 160cC.
2 Coloque duas fatias finas de pão ou algumas folhas de salsa no óleo.
3 Aguarde até não aparecerem mais bolhas e depois retire o pão ou a salsa para fora com a
ajuda duma espátula.
O óleo ou a gordura terão readquirido o seu sabor neutro.
PORTUGUÊS32
Page 33

Meio ambiente
◗ Quando chegar a altura de se desfazer do aparelho,não o deite fora juntamente com o seu
lixo doméstico normal. Deverá colocá-lo num ponto de recolha oficial para efeitos de
reciclagem.Ao fazê-lo, estará a contribuir para a preservação do meio ambiente (fig. 22).
Antes de se desfazer da fritadeira, retire a pilha do temporizador (apenas mod. HD6144).
1 Sirva-se de uma chave de parafusos pequena para remover o painel do temporizador (fig.23).
2 Retire a pilha. Não deite a pilha fora junto com o restante lixo doméstico.Coloque-a nos
ecopontos próprios.
Garantia e assistência
Se necessitar de informações ou se tiver algum problema, por favor visite a página da Philips em
www.philips.pt ou contacte o Centro de Informação ao Consumidor Philips do seu país
(encontrará os números de telefone no folheto da garantia mundial). Se não existir um Centro de
Informação ao Consumidor Philips no seu país, por favor dirija-se ao seu agente Philips local ou
contacte o Departamento de Service da Philips Domestic Appliances and Personal Care BV.
PORTUGUÊS 33
Page 34

Solução
Consulte a embalagem dos alimentos ou as tabelas
deste manual de instruções para saber se a
temperatura e/ou o tempo de preparação
seleccionada(o) está correcta(o). Regule o controlo da
temperatura para a temperatura correcta.
Nunca frite de uma só vez mais quantidade de
alimentos do que a mencionada na tabela
correspondente deste manual de instruções.
O fusível do controlo da temperatura pode ter
disparado e provocado o corte de segurança da
fritadeira (vidé capítulo 'Características de segurança').
Retire a tampa. Lave a tampa e o filtro com água
quente e um pouco de detergente líquido ou na
máquina da loiça.
Mude o óleo ou a gordura. Passe o óleo ou a gordura
regularmente por um coador para conservar a sua
frescura durante mais tempo.
Use óleo ou gordura líquida próprios e de boa
qualidade. Nunca misture tipos diferentes de óleo ou
gordura.
Verifique se a tampa está bem fechada.
Retire a tampa. Lave a tampa e o filtro com água
quente e um pouco de detergente líquido ou na
máquina da loiça.
Se o anel vedante estiver sujo, lave a tampa com água
quente e um pouco de detergente líquido ou na
máquina. Se o anel vedante estiver gasto, dirija-se ao
seu agente Philips ou a um concessionário autorizado
pela Philips para que se proceda à sua substituição por
um novo.
O óleo ou gordura não devem exceder o nível
máximo.
Seque bem os alimentos antes de os começar a fritar
e frite-os de acordo com o indicado neste modo de
emprego.
Nunca frite de uma só vez mais quantidade de
alimentos do que a mencionada na tabela
correspondente deste manual de instruções.
Seque bem os alimentos antes de os fritar.
Nunca misture tipos diferentes de óleo ou gordura e
use óleo ou gordura líquida que contenha um agente
anti-espuma.
Causa provável
A temperatura seleccionada é
muito baixa e/ou os alimentos
não fritaram o tempo suficiente.
O cesto está demasiado cheio.
O óleo ou a gordura não
aquece o suficiente.
O filtro permanente antigordura está saturado.
O óleo ou a gordura já não está
limpo/a.
O tipo de óleo ou gordura
usado/a não é próprio/a para
frituras a alta temperatura.
A tampa não está bem fechada.
O filtro permanente antigordura está saturado.
O anel vedante no interior da
tampa pode estar sujo ou gasto.
A fritadeira tem demasiado
óleo ou gordura.
Os alimentos têm demasiada
humidade.
O cesto tem demasiada
quantidade.
Os alimentos têm demasiada
humidade.
O tipo de óleo ou gordura não
é adequado(a) para fritura em
temperaturas elevadas.
Problema
Os alimentos não
ficam dourados e/ou
não ficam
estaladiços.
A fritadeira liberta
um cheiro forte e
desagradável.
Sai vapor doutros
sítios sem ser do
filtro.
Durante a fritura, o
óleo ou a gordura
sai pelo rebordo da
fritadeira.
O óleo ou a gordura
formam muita
espuma durante a
fritura.
PORTUGUÊS34
Resolução de problemas
Page 35

Solução
Limpe a cuba interior conforme se descreve neste
modo de emprego.
Certifique-se que o painel está na posição certa
('clique!').
Prima o botão 'reset' (vidé capítulo 'Características de
segurança').
Causa provável
A cuba interior não foi
convenientemente limpa.
O painel de controlo não está
introduzido correctamente.
O fusível de controlo da
temperatura pode ter disparado
provocando o corte de
segurança e desligando a
fritadeira.
Problema
A fritadeira não
funciona.
PORTUGUÊS 35
Page 36

Tempo de
fritura
(minutos)
2-3
4-6 (avançar
para 175cC
desta tabela
para se
informar sobre
o 2º ciclo)
5-7
12-15
2-3
5-8
3-4
6-7
3-4
3-4
3-4
3-4
3-4
3-4
3-4
4-5
Quantidade máx.
1 kg
1 kg
Quantidade
recomendada
para melhores
resultados
6-8 peças
450 gr
300 gr
2-4 peças
8-10 peças
450 gr
400 gr
2 peças
6-8 peças
6-8 peças
6-8 peças
6-8 peças
6-8 peças
4 peças
400 gr
4 peças
Tipo de alimento
Cogumelos
Batatas fritas caseiras *) 1º ciclo de
fritura
Peixe fresco
Frango (pedaços)
Legumes (couve-flôr, etc.)
Batatas fritas caseiras *) 2º ciclo de
fritura
Batata às rodelas (muito finas)
Crepes chineses
Douradinhos de frango
Mini-snacks
Lulas à sevilhana
Filetes de peixe
Gambas
Maçã em polme
Beringela (rodelas)
Croquetes de carne/peixe
Temper
atura
150cC
160cC
170cC
175cC
180cC
190cC
Tempos de preparação e temperaturas
As tabelas abaixo indicam a quantidade de um determinado tipo de alimento que se pode preparar
de uma só vez e o tempo de preparação que deverá ser seleccionado.
Se as instruções da embalagem dos alimentos diferirem das tabelas, siga sempre as instruções da
embalagem dos alimentos.
PORTUGUÊS36
*) Vidé 'Sugestões de fritura' para a preparação de batatas fritas em palitos.
Page 37

37
Tempo de
fritura
(minutos)
15-20
3-4
3-4/7-8
10-12
4-5
4-5
4-5
4-5
4-5
6-7
Quantidade máx.
700 gr
Quantidade
recomendada
para melhores
resultados
2-3 peças
3 peças
400 gr
2 peças
6 peças
6 peças
6 peças
6 peças
6 peças
3 peças
Tipo de alimento
Frango (pedaços)
Mini-panquecas de batata
Batatas fritas congeladas
Crepes chineses
Douradinhos de frango
Mini Snacks
Lulas à sevilhana
Filetes de peixe
Gambas
Croquetes de carne/peixe
Temper
atura
170cC
175cC
180cC
190cC
HD6140 ALIMENTOS CONGELADOS
PORTUGUÊS
Tempo de
fritura
(minutos)
2-3
4-6 (avançar
para 175cC
desta tabela
para se
informar sobre
o 2º ciclo)
5-7
12-15
2-3
5-8
3-4
6-7
3-4
3-4
3-4
3-4
3-4
3-4
3-4
4-5
Quantidade máx.
1,250 kg
1,250 kg
Quantidade
recomendada
para melhores
resultados
6-8 peças
650 gr
450 gr
3-5 peças
8-10 peças
650 gr
600 gr
2-3 peças
8-10 peças
8-10 peças
8-10 peças
8-10 peças
8-10 peças
5 peças
600 gr
5 peças
Tipo de alimento
Cogumelos
Batatas fritas caseiras *) 1º ciclo de
fritura
Peixe fresco
Frango (pedaços)
Legumes (couve-flôr, etc.)
Batatas fritas caseiras *) 2º ciclo de
fritura
Batatas fritas às rodelas finas
Crepes chineses
Douradinhos de frango
Mini-snacks
Lulas à sevilhana
Filetes de peixe
Gambas
Maçã em polme
Beringela (rodelas)
Croquetes de carne/peixe
Temper
atura
150cC
160cC
170cC
175cC
180cC
190cC
HD6144, HD6142 ALIMENTOS FRESCOS OU DESCONGELADOS
Page 38

Tempo de
fritura
(minutos)
15-20
3-4
3-4/7-8
10-12
4-5
4-5
4-5
4-5
4-5
6-7
Quantidade máx.
700 gr
Quantidade
recomendada
para melhores
resultados
3-4 peças
4 peças
400 gr
2-3 peças
8 peças
6 peças
8 peças
8 peças
8 peças
4 peças
Tipo de alimento
Frango (pedaços)
Mini-panquecas de batata
Batatas fritas congeladas
Crepes chineses
Douradinhos de frango
Mini-snacks
Lulas à sevilhana
Filetes de peixe
Gambas
Croquetes de carne/peixe
Temper
atura
170cC
175cC
180cC
190cC
HD6144, HD6142 ALIMENTOS CONGELADOS
PORTUGUÊS38
Page 39

Viktigt
Läs bruksanvisningen och titta på bilderna innan du använder fritösen.
◗ Kontrollera att den spänning som anges på fritösen överensstämmer med den lokala
nätspänningen innan du ansluter apparaten.
◗ Fritösen får endast anslutas till ett jordat vägguttag.
◗ Om nätsladden är skadad måste den bytas ut av Philips,en av Philips auktoriserad verkstad
eller liknande kvalificerade personer för att undvika faror.
◗ Lämna alltid in apparaten till ett av Philips auktoriserat servicecenter för undersökning eller
reparation. Försök inte reparera apparaten själv. Om du gör det upphör garantin att gälla.
◗ Diska noga fritösens olika delar innan du använder den första gången (se kapitel 'Rengöring').
Se till att alla delar är helt torra innan du fyller fritösen med olja eller flytande matfett.
◗ Sänk aldrig ned kontrollpanelen då värmeelementet är fäst vid den i vatten och skölj den inte
heller under kranen.
◗ Dra alltid ur kontakten efter användning.Flytta inte fritösen förrän den har svalnat tillräckligt.
◗ Sätt inte på fritösen innan du har fyllt den med olja/matfett. Se till att fritösen alltid är fylld så
att nivån ligger mellan de två indikeringsmärkena på insidan av innerskålen.
◗ Under friteringen strömmar det ut ånga. Se upp så att du inte bränner dig på händerna eller i
ansiktet.Tänk på att het ånga kan strömma ut när du öppnar locket.
◗ Håll apparaten utom räckhåll för barn. Låt inte nätsladden hänga ner över bordskanten eller
arbetsytan på vilken fritösen står.
◗ Fritösen är endast avsedd för användning i normalt hushåll.Om den används fel, i
professionella sammanhang eller om bruksanvisningen inte följs,upphör garantin att gälla och
Philips ansvarar inte för de skador som kan uppkomma.
◗ Fritera maten gyllengul istället för mörk eller brun och ta bort brända rester! Fritera inte
stärkelsehaltig mat, speciellt potatis och spannmålsprodukter,vid en temperatur över 175cC
(för att minska produktionen av akrylamid).
Säkerhetsfunktioner
Säkerhetsfunktion
Den här apparaten är försedd med en säkerhetsfunktion som stänger av apparaten om den blir
överhettad. Detta kan inträffa om det inte finns tillräckligt med olja eller om hela bitar fast fett smälts
i fritösen, vilket hindrar fritösens värmeelement från att avge all sin värme.
Gör följande om fritösen inte längre fungerar:
1 Låt oljan eller matfettet svalna. Det tar cirka 60 minuter.
2 Tryck försiktigt på återställningsknappen på baksidan av kontrollpanelen med hjälp av en liten
skruvmejsel (fig. 1).
Nu kan fritösen användas igen.
Säkerhetsomkopplare
Säkerhetsomkopplaren på kontrollpanelen ser till så att värmeelementet endast kan slås på om
kontrollpanelen har satts ihop på rätt sätt.
◗ Se alltid till så att kontrollpanelen är i rätt läge ('klick') (fig.2).
Automatisk avstängning (endast typ HD6144)
Fritösen stängs automatiskt av efter 2 timmar. När detta händer släcks på/av-knappens lampa.
◗ Tryck på på/av-knappen igen för att sätta på apparaten igen (fig. 3).
SVENSKA 39
Page 40

Lågtemperaturzon
Medan du friterar samlas matrester på botten av innerskålen. Eftersom värmeelementet sitter en bit
ovanför innerskålens botten och främst värmer oljan/matfettet som är ovanför det, kommer
oljan/matfettet mellan innerskålens botten och värmeelementet att förbli vid relativt låg temperatur
(lågtemperaturzon). Detta förhindrar att matrester som fastnar i denna zon bränns och ökar
samtidigt antalet gånger som du kan återanvända oljan/matfettet.
Före användning
1 Ställ fritösen på en plan, jämn och stadig yta utom räckhåll för barn.
Om du vill ställa fritösen ovanpå spisen ska du kontrollera att spisplattorna har stängts av och är
kalla.
2 Fyll den torra fritösen med olja, flytande matfett eller smält fast matfett upp till markeringen
på insidan av innerskålen (se avsnitt 'Olja och matfett' för att få instruktioner om hur du
använder fast matfett) (fig. 4).
Olja och matfett
Blanda aldrig oljor eller matfetter av olika sorter!
Vi rekommenderar att du använder friteringsolja eller flytande friteringsmatfett, helst vegetabiliskt
som innehåller omättat fett (t.ex. linolsyra).
Det går att använda fast friteringsmatfett men var i så fall extra försiktig för att förhindra att
matfettet stänker och att värmeelementet överhettas eller skadas.
1 Om du vill använda ett nytt block matfett ska du smälta det långsamt på låg värme i en
kastrull.
2 Häll försiktigt ned matfettet i fritösen.
3 Förvara fritösen med det stelnade matfettet fortfarande kvar vid rumstemperatur.
4 Om matfettet blir väldigt kallt kan det börja stänka när det smälter. Stick några hål i det
stelnade matfettet med en gaffel för att förhindra detta (fig. 5).
Var försiktig så att du inte skadar innerskålen med gaffeln.
Använda apparaten
Fritering
Var försiktig:det kommer het ånga genom filtret i locket under friteringen.
1 Ta ut hela sladden från sladdförvaringsfacket och sätt kontakten i vägguttaget (fig. 6).
Se till att sladden inte kommer i kontakt med varma ytor.
2 Slå på fritösen med av/på-knappen (fig. 7).
Indikatorlampan på av/på-knappen och temperaturlampan tänds.
3 Ställ in temperaturkontrollen på den temperatur som krävs (160-190cC) (fig.8).
- Om du önskar information om vilken temperatur du ska välja, läs på förpackningen till den mat
som ska friteras eller i tabellerna i slutet av denna bruksanvisning.
SVENSKA40
Fast matfett
1925 g
2200 gram
Olja/flytande
matfett
2,2 l
2,5 l
HD6140
Minst
Högst
Fast matfett
2800 g
3050 g
Olja/flytande
matfett
3,2 l
3,5 l
HD6142 och
HD6144
Minst
Högst
Page 41

- Oljan/matfettet värms upp till den valda temperaturen på 10 till 15 minuter.
- Medan fritösen värms upp släcks och tänds temperaturlampan några gånger. När den förblir
släckt ett tag har oljan eller matfettet nått den förinställda temperaturen.
- När en omgång har friterats tänds också temperaturlampan.Vänta tills den förblir släckt ett tag
innan du friterar nästa omgång.
B
Du kan lämna kvar korgen i fritösen när oljan/matfettet värms upp.
4 Lyft handtaget för att höja korgen till dess högsta läge ('klick') (fig.9).
5 Öppna locket genom att trycka på öppningsknappen. Locket öppnas automatiskt (fig. 10).
6 Ta ut korgen ur fritösen.
7 Lägg maten som ska friteras i korgen.
B
För bästa friteringsresultat bör du inte låta mängden mat överskrida de maxgränser som anges
nedan.
Fritera inte asiatiska riskakor (eller liknande typer av mat) i den här apparaten eftersom det kan
orsaka kraftiga stänk eller våldsamt bubblande olja eller fett.
8 Sätt försiktigt korgen i fritösen (fig. 11).
Se till att korgen har satts i ordentligt.
9 Stäng locket.
10 Endast HD6144 - Ställ in den friteringstid som krävs (se avsnitt 'Timer' i detta kapitel).
Du kan också använda fritösen utan att ställa in timern.
11 Tryck på frigöringsknappen på korgens handtag och sänk försiktigt ned korgen till det
understa läget (fig. 12).
B
Följ instruktionerna på förpackningen om tillagningstiden för den mat som ska friteras eller den
tillagningstid som anges i tabellerna i slutet av denna bruksanvisning för att du ska få ett gott
slutresultat.
B
För att uppnå en jämn gyllene fritering bör du lyfta korgen ur oljan eller fettet några gånger och
försiktigt skaka runt innehållet.
Timer (endast HD6144)
B
Timern indikerar att friteringstiden har löpt ut, men fritösen stängs INTE av.
1 Tryck på timer-knappen för att ställa in friteringstiden i minuter (fig.13).
Den inställda tiden visas på displayen.
2 Håll knappen intryckt för att snabbt stega fram minuterna. Släpp upp knappen när den
önskade friteringstiden har nåtts.
- Längsta tid som kan ställas in är 99 minuter.
- Ett par sekunder efter det att du har ställt in tiden börjar timern räkna ned.
- Samtidigt som timern räknar ned blinkar den återstående tiden i displayen. Den sista minuten
visas i sekunder.
SVENSKA 41
Fryst
pommes
frites
700 g
400 g
Hemgjord
pommes frites
1000 g
450 gram
HD6140
Maximal mängd
Rekommendera
d mängd för att
få bäst resultat
Fryst
pommes f
rites
900 g
500 gram
Hemgjord
pommes
frites
1250 g
650 g
HD6142 och
HD6144
Maximal mängd
Rekommendera
d mängd för att
få bäst resultat
Page 42

3 Om den förinställda tiden är felaktig kan du lätt ändra den genom att trycka in timerknappen
i två sekunder när timern börjar räkna ned (dvs. när tiden börjar blinka). Håll knappen
intryckt tills siffrorna "00" visas på displayen.Ställ sedan in den rätta tiden.
4 När den inställda tiden har runnit ut hör du en signal. Efter 20 sekunder upprepas den
hörbara signalen. Du kan avbryta den hörbara signalen genom att trycka på timerknappen.
Efter fritering
1 Lyft handtaget för att lyfta korgen till dess högsta läge, det vill säga tömningsläget (fig. 14).
2 Öppna locket.
Se upp för den heta ångan och stänket som kan komma från oljan.
3 Lyft försiktigt korgen ur fritösen.
Skaka korgen försiktigt för att bli av med överflödigt fett om så behövs. Lägg den friterade maten i
en skål eller ett durkslag på något fettabsorberande material, till exempel hushållspapper.
4 Stäng av fritösen med på/av-knappen (fig.15).
Indikatorlampan på av/på-knappen släcks.
5 Koppla ur apparaten när du är klar.
B
Om du inte använder fritösen regelbundet bör du flytta oljan eller matfettet till en väl försluten
behållare, och helst förvara det i kylen eller på någon annat sval plats. Häll oljan eller matfettet i
behållaren genom en fin sil för att bli av med eventuella matrester.Ta ur friteringskorgen innan du
tömmer innerskålen.
B
Om fritösen innehåller fast matfett ska du låta matfettet stelna i fritösen och sedan förvara fritösen
med matfettet i (se kapitel 'Före användning', avsnitt 'Olja och matfett').
Rengöring
Vänta tills oljan/matfettet har svalnat ordentligt.
Använd inte frätande rengöringsmedel eller repande tvättsvampar för att rengöra apparaten.
1 Ta av locket (fig.16).
2 Ta ut korgen ur fritösen.
3 Avägsna kontrollpanelen med värmeelementet och lägg den på en säker och torr plats (fig. 17).
4 Lyft ut innerskålen ur apparaten (fig. 18).
5 Avlägsna oljan eller matfettet och släng den/det om det behövs (fig. 19).
6 Torka alla delar noggrant efter rengöringen.
Rengöra det permanenta flottfiltret
Apparaten är utrustad med ett permanent filter. Metallfiltret bör rengöras regelbundet för att
säkerställa att apparaten fungerar optimalt.
◗ Rengör locket till fritösen i varmt vatten med lite diskmedel eller i diskmaskinen varje du har
använt apparaten.
Så här rengör du grundligt:
1 Lossa skruvarna på lockets insida (fig. 20).
2 Avlägsna filtret och rengör det i varmt vatten med lite diskmedel.Låt filtret torka ordentligt
innan du sätter tillbaka det i locket och innan du börjar använda apparaten igen.
SVENSKA42
Page 43

3 Sätt tillbaka filtret i locket och sätt tillbaka skruvarna på insidan av locket.
Byta olja eller matfett
Eftersom olja och matfett förlorar sina goda egenskaper ganska snabbt bör du byta olja eller matfett
regelbundet. För att göra det ska du följa instruktionerna nedan.
Om du huvudsakligen använder fritösen för att laga pommes frites och om du silar oljan/matfettet
efter varje gång kan du återanvända oljan/matfettet 10 till 12 gånger innan den/det måste bytas. Om
du använder fritösen för att laga proteinrik mat (såsom kött eller fisk) bör du byta oljan/matfettet
oftare.
◗ Använd aldrig olja eller matfett i mer än 6 månader och följ alltid instruktionerna på
matförpackningen.
◗ Tillsätt aldrig ny olja eller matfett till använd olja/använt matfett.
◗ Blanda aldrig olika sorters olja eller fett.
◗ Byt alltid olja/matfett om det börjar skumma vid uppvärmning, om det luktar eller smakar
starkt eller om det mörknar och/eller blir simmigt.
Ta hand om använd frityr
Häll tillbaka använd olja eller flytande fett i dess ursprungliga (förslutningsbara) plastflaska. Du kan
göra dig av med använt fett genom att låta det stelna i fritösen (utan att korgen är inuti den) och
sedan skopa ut det ur fritösen med hjälp av en stekspade och svepa in det i tidningspapper. Om det
går kan du lägga flaskan eller tidningspapperet i soptunnan för ej komposterbart avfall (inte i
soptunnan för komposterbart avfall) eller slänga det i enlighet med föreskrifterna i ditt land.
Förvaring
1 Lägg tillbaka alla delar i fritösen och stäng locket.
2 Linda nätsladden, lägg den i sladdförvaringen och för in stickkontakten i kontakthållaren (fig.21).
3 Lyft fritösen i handtagen.
Friteringstips
Läs tabellerna i slutet av bruksanvisningen för att få en översikt över tillagningstider och
temperaturinställningar.
Hemgjord pommes frites
Godast och knaprigast pommes frites får du så här:
1 Ta fast potatis och skär dem i stavar. Skölj stavarna med kallt vatten.
Detta hindrar dem från att klibba ihop under friteringen.
B
Torka stavarna noga.
2 Fritera pommes frites två gånger: första gången i 4-6 minuter vid en temperatur på 160cC,
andra gången i 5-8 minuter vid en temperatur på 175cC.
3 Lägg dina hemgjorda pommes frites i en skål och skaka dem. Låt dina pommes frites svalna
innan du friterar dem den andra gången.
Djupfryst mat
Fryst pommes frites är förkokt och behöver bara friteras en gång enligt anvisningarna på
förpackningen.
SVENSKA 43
Page 44

Djupfryst mat (-16 to -18cC) kan orsaka att oljan/matfettet svalnar avsevärt när den sänks ned i
den/det. Eftersom maten inte bryns direkt kan den även absorbera för mycket olja eller matfett.
Så här undviker du ovanstående problem:
- Låt helst djupfryst mat tina i rumstemperatur innan fritering såvida det inte står annorlunda på
matförpackningen.
- Skaka försiktigt bort så mycket is och vatten som möjligt och torka av maten tills den är
ordentligt torr.
- Fritera inte stora mängder på en gång (se i respektive tabell i dessa anvisningar).
- Välj den friteringstemperatur som anges i relevant tabell i slutet av denna instruktionsbok eller
på förpackningen till den mat som ska friteras. Om det inte finns några instruktioner, välj
temperaturen 190cC.
- Sänk ned maten i oljan/matfettet mycket försiktigt, eftersom fryst mat kan göra att
oljan/matfettet börjar bubbla våldsamt.
Om oljan/matfettet har fått bismak
En del matvaror, särskilt fisk, kan ge oljan/matfettet en obehaglig smak. Gör så här för att få bort
smaken:
1 Hetta upp frityren till 160cC.
2 Lägg ner två tunna skivor bröd eller några persiljekvistar i frityren.
3 Vänta tills du inte ser några bubblor längre och lyft sedan ut brödet eller persiljan ur fritösen
med en stekspade.
Nu har frityren en neutral smak igen.
Miljön
◗ När apparatens livslängd är slut ska du inte slänga den med de vanliga hushållssoporna utan
lämna in den på en offentlig återvinningsstation. Om du gör det hjälper du till att skydda
miljön (fig. 22).
Ta ut batteriet ur timern (endast HD6144) innan du kasserar apparaten.
1 Använd en liten spårskruvmejsel för att avlägsna timerpanelen (fig. 23).
2 Ta ut batteriet. Kasta inte batteriet i de vanliga hushållssoporna utan lämna in det på ett
offentligt insamlingsställe.
Garanti och service
Om du behöver information eller har något problem kan du söka upp Philips webbsida på adressen
www.philips.com eller kontakta Philips kundtjänst i ditt land (rätt telefonnummer finner du i
världsgarantibroschyren). Om det inte finns någon kundtjänst i ditt land ska du vända dig till din
lokala återförsäljare, eller kontakta serviceavdelningen på Philips Domestic Appliances and Personal
Care BV.
SVENSKA44
Page 45

Felsökning
SVENSKA 45
Lösning
Läs på matförpackningen eller i tabellerna i denna
bruksanvisning om den temperatur och/eller
tillagningstid du har valt är korrekt. Ställ in
temperaturkontrollen på rätt temperatur.
Fritera aldrig mer mat åt gången än den mängd som
anges i relevant tabell i denna bruksanvisning.
Säkringen till temperaturkontrollen kan har utlösts och
orsakat att säkerhetsfunktionen stängt av apparaten
(se kapitlet 'Säkerhetsfunktioner').
Ta av locket och rengör filtret i diskmaskinen eller i
hett vatten med lite rengöringsmedel.
Byt olja eller matfett. Sila regelbundet frityren för att
hålla den fräsch längre.
Använd friteringsolja eller flytande friteringsmatfett av
god kvalitet. Blanda aldrig olika sorters olja eller
matfett.
Kontrollera att locket är ordentligt stängt.
Ta av locket och rengör filtret i diskmaskinen eller i
hett vatten med lite rengöringsmedel.
Rengör locket i varmt vatten med lite diskmedel eller i
diskmaskinen om ringen är smutsig. Kontakta din
Philips-återförsäljare eller ett av Philips auktoriserat
servicecenter för att få tätningsringen utbytt om den
är sliten.
Se till att oljan/matfettet inte överskrider maximinivån.
Torka maten ordentligt innan du börjar fritera den, och
fritera enligt den här bruksanvisningen.
Fritera aldrig mer mat åt gången än den mängd som
anges i relevant tabell i denna bruksanvisning.
Torka maten ordentligt innan du friterar den.
Blanda aldrig olika sorters oljor/matfetter och använd
olja/flytande matfett som innehåller ett medel som
motverkar skumbildning.
Diska innerskålen enligt beskrivningen i den här
bruksanvisningen.
Se till att kontrollpanelen sitter i rätt läge (klick').
Möjlig orsak
Friteringstemperaturen är för
låg och/eller maten har inte
friterats tillräckligt länge.
Det är för mycket mat i korgen.
Oljan eller matfettet blir inte
tillräckligt varm/varmt.
Det permanenta flottfiltret är
igentäppt.
Oljan eller matfettet är inte
längre ren/rent.
Oljan eller matfettet som
används som frityr är inte
lämplig för fritering.
Locket är inte ordentligt stängt.
Det permanenta flottfiltret är
igentäppt.
Tätningsringen på lockets insida
är smutsig eller sliten.
Det är för mycket olja/matfett i
fritösen.
Maten har för hög fukthalt.
Det är för mycket mat i
friteringskorgen.
Maten har för hög fukthalt.
Oljan eller matfettet som
används som frityr är inte
lämplig för fritering.
Innerskålen är inte ordentligt
diskad.
Kontrollpanelen har inte satts i
ordentligt.
Problem
Den friterade maten
får inte en
gyllenbrun färg
och/eller är inte
krispig.
Det luktar starkt och
otrevligt från
fritösen.
Det kommer ånga
ur andra ställen än
filtret.
Oljan eller matfettet
rinner över kanten
på fritösen under
fritering.
Oljan eller matfettet
skummar för mycket
under fritering.
Fritösen fungerar
inte
Page 46

Friteringstider och temperaturinställningar
Tabellerna nedan anger hur mycket av en speciell sorts mat du kan tillaga åt gången och vilken
temperatur och tillagningstid du bör välja.
Om instruktionerna på förpackningen till maten som ska tillagas skiljer sig från dem i tabellerna ska
du alltid följa instruktionerna på förpackningen.
Lösning
Tryck på återställningsknappen (se kapitlet
'Säkerhetsfunktioner').
Möjlig orsak
Säkringen till
temperaturkontrollen kan ha
utlösts och orsakat att
säkerhetsfunktionen har stängt
av apparaten.
Problem
SVENSKA46
Friteringstid
(minuter)
2-3
4-6 (se sedan
175cC i denna
tabell för
instruktioner
för andra
omgången)
5-7
12-15
2-3
5-8
3-4
6-7
3-4
3-4
3-4
3-4
3-4
3-4
3-4
4-5
Maximal mängd
1000 g
1000 g
Rekommenderad
mängd för att få
bäst resultat
6-8 stycken
450 gram
300 g
2-4 stycken
8-10 stycken
450 gram
400 g
2 stycken
6-8 stycken
6-8 stycken
6-8 stycken
6-8 stycken
6-8 stycken
4 stycken
400 g
4 stycken
Maträtt
Svamp
Hemgjord pommes frites*) första
friteringen
Färsk fisk
Kyckling (lårklubba)
Vegetabiliska munsbitar (t.ex. blomkål)
Hemgjord pommes frites*) andra
omgången
Chips (väldigt tunna potatisskivor)
Kinesiska vårrullar
Kycklingbitar
Minisnacks
Panerade bläckfiskringar
Panerade fiskpinnar
Räkor
Äppelbitar
Auberginer (skivor)
Kött/fiskkroketter
Temper
atur
150cC
160cC
170cC
175cC
180cC
190cC
HD6140 FÄRSK ELLER TINAD MAT
*) Se 'Friteringstips' för att tillaga hemlagade pommes frites.
Page 47

48
Friteringstid
(minuter)
15-20
3-4
3-4/7-8
10-12
4-5
4-5
4-5
4-5
4-5
6-7
Maximal mängd
700 g
Rekommenderad
mängd för bäst
resultat
2-3 stycken
3 stycken
400 g
2 stycken
6 stycken
6 stycken
6 stycken
6 stycken
6 stycken
3 stycken
Maträtt
Kyckling (lårklubba)
Små potatiskakor
Fryst pommes frites
Kinesiska vårrullar
Kycklingbitar
Minisnacks
Panerade bläckfiskringar
Panerade fiskpinnar
Räkor
Kött/fiskkroketter
Temper
atur
170cC
175cC
180cC
190cC
HD6140 FRUSEN MAT
SVENSKA
Friteringstid
(minuter)
2-3
4-6 (se sedan
175cC i denna
tabell för
instruktioner
för andra
omgången)
5-7
12-15
2-3
5-8
3-4
6-7
3-4
3-4
3-4
3-4
3-4
3-4
3-4
4-5
Maximal mängd
1000 g
1000 g
Rekommenderad
mängd för att få
bäst resultat
6-8 stycken
450 gram
300 g
2-4 stycken
8-10 stycken
450 gram
400 g
2 stycken
6-8 stycken
6-8 stycken
6-8 stycken
6-8 stycken
6-8 stycken
4 stycken
400 g
4 stycken
Maträtt
Svamp
Hemgjord pommes frites*) första
friteringen
Färsk fisk
Kyckling (lårklubba)
Vegetabiliska munsbitar (t.ex. blomkål)
Hemgjord pommes frites*) andra
omgången
Chips (väldigt tunna potatisskivor)
Kinesiska vårrullar
Kycklingbitar
Minisnacks
Panerade bläckfiskringar
Panerade fiskpinnar
Räkor
Äppelbitar
Auberginer (skivor)
Kött/fiskkroketter
Temper
atur
150cC
160cC
170cC
175cC
180cC
190cC
HD6140 FÄRSK ELLER TINAD MAT
*) Se 'Friteringstips' för att tillaga hemlagade pommes frites.
Page 48

Friteringstid
(minuter)
15-20
3-4
3-4/7-8
10-12
4-5
4-5
4-5
4-5
4-5
6-7
Maximal mängd
700 g
Rekommenderad
mängd för att få
bäst resultat
3-4 stycken
4 stycken
400 g
2-3 stycken
8 stycken
6 stycken
8 stycken
8 stycken
8 stycken
4 stycken
Maträtt
Kyckling (lårklubba)
Små potatiskakor
Fryst pommes frites
Kinesiska vårrullar
Kycklingbitar
Minisnacks
Panerade bläckfiskringar
Panerade fiskpinnar
Räkor
Kött/fiskkroketter
Temper
atur
170cC
175cC
180cC
190cC
HD6144, HD6142 FRUSEN MAT
SVENSKA48
Page 49

Tärkeää
Lue tämä käyttöohje huolellisesti, ennen kuin alat käyttää laitetta. Säilytä ohje vastaisen varalle.
◗ Tarkasta, että laitteen jännitemerkintä vastaa paikallista verkkojännitettä, ennen kuin liität
laitteen pistorasiaan.
◗ Yhdistä laite vain maadoitettuun pistorasiaan.
◗ Jos laitteen liitosjohto on vahingoittunut, se on turvallisinta vaihdattaa Philips Kodinkoneiden
valtuuttamassa huoltoliikkeessä tai muuten ammattitaitoisella korjaajalla.
◗ Palauta laite aina Philipsin valtuuttamaan huoltoliikkeeseen tutkimusta tai korjausta varten.Älä
yritä korjata laitetta itse, koska se mitätöi takuun.
◗ Puhdista irto-osat ennen friteerauskeittimen käyttöönottoa (katso kohtaa Puhdistus).
Varmista,että kaikki osat ovat täysin kuivat, ennen kuin laitat friteerauskeittimeen öljyä tai
juoksevaa rasvaa.
◗ Älä upota ohjaustaulua ja siinä kiinni olevaa lämmitysvastusta veteen äläkä huuhtele niitä
juoksevalla vedellä.
◗ Irrota pistotulppa pistorasiasta aina käytön jälkeen.Älä siirrä friteerauskeitintä, ennen kuin se
on jäähtynyt riittävästi.
◗ Älä käynnistä keitintä, ennen kuin siinä on öljyä tai sulatettua rasvaa.Tarkasta aina ennen
friteerauksen aloittamista, että keittimessä on jäljellä tarpeeksi öljyä tai rasvaa. Öljyn tai
rasvan pinnan tulee olla friteerausastian sisäpuolella olevan kahden merkkiviivan välissä.
◗ Varo laitteen kuumia pintoja ja laitteesta purkautuvaa kuumaa ilmaa tai höyryä. Kypsennyksen
aikana kannessa olevan suodattimen kautta tulee kuumaa höyryä. Suojaa kädet ja kasvot tältä
höyryltä.Varo kuumaa höyryä, kun avaat kannen.
◗ Älä jätä laitetta lasten ulottuville. Älä jätä liitosjohtoa roikkumaan pöydän tai tiskipöydän
reunan yli.
◗ Tämä laite on tarkoitettu vain kotikäyttöön.Jos laitetta on käytetty väärin tai (puoli-
)ammatillisessa tarkoituksessa tai jos sitä on käytetty käyttöohjeen vastaisesti, takuu lakkaa
olemasta voimassa eikä Philips vastaa mahdollisista vahingoista.
◗ Kypsennä ruoka kullankeltaiseksi, älä ruskista sitä. Poista palaneet tähteet. Älä kypsennä
tärkkelyspitoisia ruokia, erityisesti peruna- ja viljatuotteita, yli 175 cC:n lämpötilassa
(akrylamidin muodostumisen välttämiseksi).
Turvallisuus
Ylikuumenemissuoja
Tässä laitteessa on ylikuumenemissuoja, joka katkaisee laitteen toiminnan, jos se kuumenee liikaa.
Näin voi tapahtua, jos öljyä tai rasvaa ei ole riittävästi tai jos yritetään sulattaa uutta rasvaa paloina
friteerauskeittimessä, jolloin lämpö ei pääse leviämään lämmityselementistä.
Jos friteerauskeitin ei enää toimi, tee seuraavat toimet:
1 Anna öljyn tai rasvan jäähtyä.Tämä kestää noin tunnin.
2 Paina ohjaustaulun takana olevaa palautuspainiketta varovasti pienellä ruuvitaltalla (kuva 1).
Nyt laite on taas valmiina käyttöön.
Turvakytkin
Ohjaustaulussa oleva turvakytkin varmistaa, että lämmitysvastukseen kytkeytyy virta vain, jos
ohjaustaulu on asennettu oikein.
◗ Tarkista aina, että ohjaustaulu napsahtaa paikalleen (kuva 2).
SUOMI 49
Page 50

Automaattinen virrankatkaisu (vain HD6144)
Friteerauskeittimen toiminta katkeaa automaattisesti 2 tunnin kuluttua. Kun tämä tapahtuu,
virtakytkimen merkkivalo sammuu.
◗ Laitteen toiminta palautetaan painamalla uudelleen virtakytkintä (kuva 3).
Kylmä alue
Ruuan kypsennyksen kuluessa irronneet palat kerääntyvät friteerausastian pohjalle. Koska lämmitysvastus
on jonkin verran friteerausastian pohjaa ylempänä ja koska se ensisijaisesti kuumentaa yläpuolella olevan
öljyn tai rasvan, pysyy lämmitysvastuksen alla oleva öljy viileämpänä (kylmä alue).Tämä estää tälle alueelle
joutuvien ruuanpalojen palamisen ja siten öljy tai rasva pysyy pidempään hyvänä.
Käyttöönotto
1 Aseta laite vaakasuoralle, tasaiselle ja vakaalle alustalle pois lasten ulottuvilta.
Jos asetat friteerauskeittimen liedelle, varmista, että keittolevyistä on katkaistu virta ja ne ovat
kylmiä.
2 Täytä kuiva friteerauskeitin öljyllä, juoksevalla rasvalla tai sulatetulla kiinteällä rasvalla
friteerausastian sisäpinnan ylempään merkkiviivaan asti (tietoja kiinteän rasvan käytöstä on
kohdassa Öljy ja rasva) (kuva 4).
Öljy ja rasva
Älä koskaan sekoita keskenään erilaisia öljyjä tai rasvoja!
Suosittelemme käytettäväksi uppopaistamiseen tarkoitettua öljyä tai juoksevaa rasvaa, mieluiten
kasviöljyä tai -rasvaa, joka sisältää runsaasti tyydyttymättömiä rasvoja (esim. linoleenihappoa).
Myös kiinteää uppopaistorasvaa voidaan käyttää, mutta sen sulattamisessa on oltava erityisen
varovainen, ettei rasva ala roiskua ja lämmitysvastus kuumene liikaa tai vahingoitu.
1 Jos haluat käyttää uutta kiinteää rasvaa, sulata paloiteltu kiinteä rasva erillisessä astiassa
miedolla lämmöllä.
2 Kaada sulanut rasva varovasti keittimeen.
3 Säilytä jähmettynyttä rasvaa sisältävä friteerauskeitin huoneenlämmössä.
4 Kylmässä säilytetty rasva saattaa roiskua sulatettaessa.Voit estää tämän pistelemällä haarukalla
reikiä jähmettyneeseen rasvaan (kuva 5).
Varo vahingoittamasta haarukalla friteerausastiaa.
Käyttö
Kypsentäminen rasvassa
Ole varovainen: kuumaa höyryä tulee kannen suodattimesta kypsentämisen aikana.
1 Vedä liitosjohto kokonaan esiin johtopesästä ja liitä pistotulppa pistorasiaan (kuva 6).
Pidä huoli, ettei liitosjohto kosketa laitteen kuumia osia.
SUOMI50
Kiinteä
rasva
1925 g
2200 g
Öljy / juokseva
rasva
2,2 l
2,5 l
HD6140
Vähintään
Enintään
Kiinteä
rasva
2 800 g
3 050 g
Öljy / juokseva
rasva
3,2 l
3,5 l
HD6142 ja
HD6144
Vähintään
Enintään
Page 51

2 Käynnistä friteerauskeitin käynnistyskytkimestä (kuva 7).
Käynnistyskytkimessä oleva virran merkkivalo ja lämpötilan merkkivalo syttyvät.
3 Aseta lämpötilan säätimen avulla sopiva lämpötila (160-190 cC:n) (kuva 8).
- Tietoja sopivasta lämpötilasta on ruokapakkauksessa tai tämän käyttöohjeen lopussa olevissa
taulukoissa.
- Öljy tai rasva kuumenee halutun lämpöiseksi 10-15 minuutissa.
- Kun friteerauskeitin lämpenee, lämpötilan merkkivalo syttyy ja sammuu useita kertoja. Kun se
pysyy sammuneena jonkin aikaa, öljy tai rasva on saavuttanut asetetun lämpötilan.
- Kun ruokaerä on kypsennetty, lämpötilan merkkivalo syttyy uudelleen. Odota, että merkkivalo
pysyy sammuneena jonkin aikaa, ennen kuin kypsennät seuraavan ruokaerän.
B
Korin voi antaa olla friteerauskeittimessä öljyn tai rasvan kuumennuksen aikana.
4 Nosta kädensijaa, kunnes kori napsahtaa paikalleen yläasentoon (kuva 9).
5 Avaa kansi painamalla avauspainiketta.Kansi avautuu automaattisesti (kuva 10).
6 Poista kori friteerauskeittimestä.
7 Laita kypsennettävä ruoka koriin.
B
Älä laita koriin kerralla enempää ruokaa kuin mitä on neuvottu alla.
Älä kypsennä aasialaisia riisikakkuja (tai vastaavanlaista ruokaa) tässä laitteessa, sillä ne voivat
aiheuttaa öljyn tai rasvan voimakasta roiskumista tai kuplimista.
8 Laske kori varovasti friteerauskeittimeen (kuva 11).
Tarkista, että kori on asetettu paikalleen oikein.
9 Sulje kansi.
10 Vain HD6144 - Aseta sopiva kypsennysaika (katso tämän luvun kohtaa Aikakytkin).
Voit käyttää friteerauskeitintä myös asettamatta aikakytkintä.
11 Paina kahvan vapautuspainiketta ja laske kori varovasti ala-asentoon (kuva 12).
B
Hyvä lopputulos saadaan noudattamalla ruokapakkauksessa tai tämän käyttöohjeen lopussa olevissa
taulukoissa annettua kypsennysaikaa.
B
Tasainen ruskistus saadaan, kun kori nostetaan ylös ja sitä ravistellaan varovasti pari kertaa
kypsennyksen aikana.
Aikakytkin (vain HD6144)
B
Aikakytkin ilmoittaa kypsennysajan kuluneen, mutta EI katkaise laitteesta virtaa.
1 Aseta kypsennysaika minuutteina painamalla aikakytkintä (kuva 13).
Asetettu aika tulee näkyviin näyttöön.
2 Minuutit vaihtuvat nopeammin, jos painat kytkintä jatkuvasti.Vapauta kytkin, kun haluttu
kypsennysaika on näkyvissä.
- Pisin asetettava kypsennysaika on 99 minuuttia.
- Asetettuasi kypsennysajan aikakytkin alkaa muutaman sekunnin kuluttua vähentää aikaa.
SUOMI 51
Pakastetut
ranskanperun
at
900 g
500 g
Kotitekoiset
ranskanperunat
1 250 g
650 g
HD6142 ja
HD6144
Enimmäismäärä
Suositusmäärä
parasta
lopputulosta
varten
Pakastetut
ranskanperunat
700 g
400 g
Kotitekoiset
ranskanperunat
1000 g
450 g
HD6140
Enimmäismäärä
Suositusmäärä
parasta
lopputulosta
varten
Page 52

- Aikakytkimen vähentäessä aikaa jäljellä oleva aika vilkkuu näytössä.Viimeinen minuutti näytetään
sekunteina.
3 Jos asetat väärän ajan, voit poistaa sen painamalla aikakytkintä 2 sekuntia samalla hetkellä, kun
aikakytkin alkaa vähentää aikaa (eli kun aika alkaa vilkkua). Jatka painamista niin kauan, kunnes
näyttöön ilmestyy 00. Sen jälkeen voit asettaa oikean ajan.
4 Kun asetettu aika on kulunut,laite antaa äänimerkin. 20 sekunnin kuluttua äänimerkki toistuu.
Voit lopettaa äänimerkin painamalla aikakytkimen painiketta.
Kypsentämisen jälkeen
1 Nosta kori kahvasta yläasentoon eli valumisasentoon (kuva 14).
2 Avaa kansi.
Varo kuumaa höyryä ja öljyn mahdollista roiskumista.
3 Nosta kori varovasti pois keittimestä.
Ravistele tarvittaessa keittimen päällä liika öljy tai rasva pois. Laita ruoka valumaan kulhoon tai
siivilään, jonka pohjalla on rasvaa imevää paperia, esim. talouspaperia.
4 Katkaise friteerauskeittimen toiminta virtakytkimellä (kuva 15).
Virtakytkimessä oleva virran merkkivalo sammuu.
5 Irrota pistotulppa pistorasiasta käytön jälkeen.
B
Ellet käytä friteerauskeitintä säännöllisesti, säilytä öljy tai juokseva rasva hyvin suljetuissa pulloissa ja
mielellään jääkaapissa. Kaada öljy tai rasva pulloon tiheän siivilän läpi, niin ruuanpalat erottuvat pois.
Poista kori ennen friteerausastian tyhjentämistä.
B
Jos käytät kiinteää rasvaa, anna sen jähmettyä keittimessä ja säilytä keitin rasvoineen
huoneenlämmössä (katso kohdasta Käyttöönotto osa Öljy ja rasva).
Puhdistus
Odota, kunnes öljy tai rasva on jäähtynyt riittävästi.
Älä käytä naarmuttavia tai syövyttäviä puhdistusaineita tai -välineitä laitteen puhdistamiseen.
1 Poista kansi (kuva 16).
2 Poista kori friteerauskeittimestä.
3 Poista ohjaustaulu sekä lämmitysvastus ja aseta ne turvalliseen, kuivaan paikkaan (kuva 17).
4 Nosta friteerausastia pois laitteesta (kuva 18).
5 Poista öljy tai rasva ja hävitä se tarvittaessa (kuva 19).
6 Kuivaa kaikki osat hyvin puhdistuksen jälkeen.
Rasvan- ja kärynsuodattimen puhdistus
Laitteessa on kestosuodatin. Häiriöttömän toiminnan takaamiseksi metallinen suodatin on
puhdistettava säännöllisesti.
◗ Puhdista friteerauskeittimen kansi kuumalla vedellä ja astianpesuaineella tai
astianpesukoneessa aina laitteen käytön jälkeen.
Perusteellinen puhdistus:
1 Avaa kannen sisäpuolella olevat ruuvit (kuva 20).
2 Poista suodatin ja puhdista se kuumalla vedellä ja astianpesuaineella.Anna suodattimen kuivua
kokonaan,ennen kuin se asetetaan takaisin kanteen ja laitetta käytetään uudelleen.
SUOMI52
Page 53

3 Aseta suodatin takaisin kanteen ja kiinnitä kannen sisäpuolelle tulevat ruuvit.
Öljyn tai rasvan vaihtaminen
Koska öljy ja rasva menettävät hyvät ominaisuutensa melko nopeasti, on öljy tai rasva vaihdettava
säännöllisesti. Noudata alla olevia ohjeita.
Jos friteerauskeitintä käytetään pääasiassa ranskaperunoiden valmistamiseen ja jos öljy tai rasva
siivilöidään aina käytön jälkeen, voi samaa öljyä tai rasvaa käyttää 10-12 kertaa, ennen kuin se on
vaihdettava. Jos friteerauskeittimessä kypsennetään runsasproteiinista ruokaa (kuten lihaa tai kalaa),
öljy tai rasva on vaihdettava useammin.
◗ Älä käytä samaa öljyä tai rasvaa yli 6 kuukautta ja noudata aina pakkauksen ohjeita.
◗ Älä lisää uutta öljyä tai rasvaa jo käytetyn joukkoon.
◗ Älä sekoita keskenään erityyppisiä öljyjä tai rasvoja.
◗ Vaihda öljy tai rasva,kun se alkaa kuohuta kuumennettaessa, kun siinä on voimakas haju tai
maku tai kun se on tummunut ja/tai muuttunut siirappimaiseksi.
Käytetyn öljyn tai rasvan hävittäminen
Kaada käytetty öljy tai juokseva rasva takaisin alkuperäiseen suljettavaan muovipulloon. Kiinteän
rasvan voi hävittää antamalla sen ensin jähmettyä keittimessä ilman koria, minkä jälkeen se voidaan
nostaa lastalla pois ja kääriä sanomalehteen.Voit heittää pullon tai sanomalehden talousjätteisiin,ei
kuitenkaan kompostoitavien jätteiden joukkoon, tai hävittää paikallisia ohjeita noudattaen.
Säilytys
1 Laita kaikki irto-osat takaisin friteerauskeittimeen ja sulje kansi.
2 Kelaa johto,aseta se johtokoteloon ja kiinnitä pistotulppa sille tarkoitettuun kiinnikkeeseen
(kuva 21).
3 Nosta friteerauskeitin kahvoista.
Vinkkejä
Tämän käyttöohjeen lopussa olevissa taulukoissa on kypsennysaikojen ja -lämpötilojen tiivistelmä.
Kotitekoiset ranskanperunat
Näin teet herkullisia ja rapeita ranskanperunoita:
1 Käytä kiinteitä perunoita, ja leikkaa ne suikaleiksi. Huuhtele suikaleet siivilässä kylmällä vedellä.
Sen jälkeen suikaleet eivät tartu kiinni toisiinsa kypsennettäessä.
B
Kuivaa suikaleet esim. talouspaperilla.
2 Kypsennä ranskanperunat kahdesti:ensin 4-6 minuuttia 160 cC:n lämpötilassa ja toisen
kerran 5-8 minuuttia 175 cC:n lämpötilassa.
3 Laita kotitekoiset ranskanperunat kulhoon ja ravistele niitä.Anna ranskanperunoiden jäähtyä
ennen toista kypsennystä.
Pakasteruuat
Pakastetut ranskanperunat on esikypsennetty ja niitä kypsennetään vain kerran pakkauksessa olevan
ohjeen mukaisesti.
SUOMI 53
Page 54

Pakastimesta (-16 ... -18 cC:n) otettu ruoka jäähdyttää öljyä tai rasvaa huomattavasti, kun se
lasketaan keittimeen. Koska ruoka ei ala paistua heti, se saattaa imeä liikaa öljyä tai rasvaa.
Tämä voidaan estää seuraavalla tavalla:
- Anna pakasteruuan sulaa ainakin osittain huoneenlämmössä ennen kypsentämistä, ellei
ruokapakkauksessa neuvota toisin.
- Ravistele pois mahdollisimman paljon jäätä ja vettä ja taputtele kypsennettävä ruoka
talouspaperilla kuivaksi.
- Älä kypsennä kerralla kovin suuria määriä (katso tässä käyttäohjeessa olevaa taulukkoa).
- Valitse kypsennyslämpötila tämän käyttöohjeen lopussa olevista taulukoista tai käytä
ruokapakkauksessa mainittua lämpötilaa. Jos ohjeita ei ole, käytä 190 cC:n lämpötilaa.
- Laske ruoka varovasti öljyyn tai rasvaan, sillä pakasteruoka saattaa aiheuttaa kuuman öljyn tai
rasvan voimakasta kuplimista.
Vieraan maun poistaminen
Tietyistä ruuista, varsinkin kalasta, lähtee nestettä rasvassa kypsennettäessä, mikä saattaa antaa makua
öljyyn. Jos haluat estää maun tarttumisen seuraavaan ruokaan:
1 Kuumenna öljy tai rasva 160 cC:n.
2 Laita keittimeen kaksi ohutta leipäviipaletta.
3 Odota kunnes kaikki ilmakuplat ovat hävinneet ja nosta leivät pois keittimestä lastalla.
Nyt öljyssä tai rasvassa ei enää ole vierasta makua.
Ympäristöasiaa
◗ Älä hävitä loppuun käytettyä laitetta tavallisen kotitalousjätteen mukana, vaan toimita se
asianmukaiseen keräyspisteeseen. Näin autat suojelemaan ympäristöä (kuva 22).
Poista aikakytkimen paristo (vain HD6144) ennen laitteen hävittämistä.
1 Irrota ohjauspaneeli pienen ruuvitaltan avulla (kuva 23).
2 Poista paristo. Älä hävitä paristoa tavallisen kotitalousjätteen mukana, vaan toimita se
asianmukaiseen keräyspisteeseen.
Takuu & huolto
Jos haluat lisätietoja tai jos laitteen kanssa tulee ongelmia, katso Philipsin www-sivuja osoitteesta
www.philips.com tai ota yhteys Philipsin asiakaspalveluun (puhelinnumero löytyy takuulehtisestä).
Voit myös kääntyä lähimmän Philips-kauppiaan puoleen tai ottaa suoraan yhteyden Hollantiin Philips
Domestic Appliances and Personal Care BV:n Service-osastoon.
SUOMI54
Page 55

Tarkistusluettelo
SUOMI 55
Ratkaisu
Tarkista ruokapakkauksesta tai tämän käyttöohjeen
taulukoista, onko lämpötila ja kypsennysaika valittu
oikein.Aseta oikea lämpötila lämpötilan säätimen avulla.
Älä kypsennä kerralla enempää ruokaa kuin tämän
käyttöohjeen asianmukaisessa taulukossa on ilmoitettu.
Lämpötilan säätimen sulake on saattanut palaa, jolloin
turvakytkin on katkaissut laitteesta virran (katso luku
Turvallisuus).
Poista kansi ja pese kansi ja suodatin kuumalla
astianpesuvedellä tai astianpesukoneessa.
Vaihda öljy tai rasva. Siivilöi öljy tai rasva säännöllisesti,
niin se pysyy pidempään hyvänä.
Käytä hyvälaatuista uppopaistamiseen tarkoitettua öljyä
tai juoksevaa rasvaa. Älä sekoita erilaisia öljyjä tai
rasvoja keskenään.
Tarkista, onko kansi suljettu kunnolla.
Poista kansi ja pese kansi ja suodatin kuumalla
astianpesuvedellä tai astianpesukoneessa.
Jos rengas on likainen, puhdista kansi kuumalla vedellä
ja astianpesuaineella tai astianpesukoneessa. Jos rengas
on kulunut, ota yhteys Philipsin jälleenmyyjään tai
Philipsin valtuuttamaan huoltoliikkeeseen ja vaihdata
tiivisterengas.
Pidä huoli, että keittimessä olevan öljyn tai rasvan
määrä ei ylitä enimmäistasoa.
Kuivaa ruoka ennen valmistuksen aloittamista ja
kypsennä ruoka tämän käyttöohjeen neuvoja
noudattaen.
Älä kypsennä kerralla enempää ruokaa kuin tämän
käyttöohjeen asianmukaisessa taulukossa on ilmoitettu.
Kuivaa ruoka hyvin ennen kypsentämistä.
Älä koskaan sekoita keskenään erilaisia öljyjä tai rasvoja,
ja käytä vain uppopaistamiseen tarkoitettua öljyä tai
rasvaa.
Puhdista friteerausastia tässä käyttöohjeessa neuvotulla
tavalla.
Varmista, että ohjaustaulu on asetettu siten, että se on
napsahtanut paikalleen.
Paina palautuspainiketta (katso luku Turvallisuus).
Mahdollinen syy
On valittu liian matala lämpötila
ja/tai ruokaa ei ole kypsennetty
riittävän kauan.
Korissa on liikaa ruokaa.
Öljy tai rasva ei kuumene
riittävästi.
Käryn- ja rasvansuodatin on
likainen.
Öljy tai rasva ei ole enää hyvää.
Käytetty öljy tai rasva ei sovi
uppopaistamiseen.
Kantta ei ole suljettu kunnolla.
Käryn- ja rasvansuodatin on
likainen.
Kannen sisäpuolella oleva
tiivisterengas on likainen tai
kulunut.
Keittimessä on liikaa öljyä tai
rasvaa.
Ruuassa on liikaa kosteutta.
Korissa on liikaa ruokaa.
Ruuassa on liikaa kosteutta.
Käytetty öljy tai rasva ei sovi
uppopaistamiseen.
Friteerausastiaa ei ole
puhdistettu kunnolla.
Ohjaustaulu ei ole
asianmukaisesti paikallaan.
Lämpötilan säätimen sulake on
saattanut palaa, jolloin turvakytkin
on katkaissut laitteesta virran.
Ongelma
Ruoka ei ole kauniin
kullanruskeaa eikä
rapeaa.
Friteerauskeittimestä
lähtee voimakas,
epämiellyttävä haju.
Höyryä tulee ulos
muualta kuin
suodattimesta.
Öljyä tai rasvaa
roiskuu valmistuksen
aikana keittimen
reunan yli.
Öljy tai rasva
vaahtoaa liikaa
valmistuksen aikana.
Friteerauskeitin ei
toimi
Page 56

Kypsennysajat ja lämpötila-asetukset
Seuraavissa taulukoissa on tietoja siitä, kuinka paljon tiettyä ruokaa voi kypsentää kerralla ja mikä on
kullekin ruoalle sopiva kypsennyslämpötila ja -aika.
Jos ruokapakkauksessa olevat ohjeet poikkeavat näissä taulukoissa ilmoitetuista, noudata aina
pakkauksessa olevia ohjeita.
SUOMI56
Kypsennysai
ka
(minuuttia)
2-3
4-6 (katso
toinen
kypsennysvaihe
kohdasta
175cC)
5-7
12-15
2-3
5-8
3-4
6-7
3-4
3-4
3-4
3-4
3-4
3-4
3-4
4-
Enimmäismäärä
1000 g
1000 g
Suositusmäärä
parasta
lopputulosta
varten
6-8 kpl
450 g
300 g
2-4 kpl
8-10 kpl
450 g
400 g
2 kpl
6-8 kpl
6-8 kpl
6-8 kpl
6-8 kpl
6-8 kpl
4 kpl
400 g
4 kp
Ruokalaji
Herkkusienet
Kotitekoiset ranskanperunat *)
esikypsennysvaihe
Tuore kala
Broileri (koivet, fileet)
Friteeratut kasvikset (mm. kukkakaali)
Kotitekoiset ranskanperunat *) toinen
kypsennys
Perunalastut
Kiinalaiset kevätkääryleet
Kananugetit
Pikku välipalat
Mustekalarenkaat (taikinakuoressa)
Kalapalat (taikinakuoressa)
Katkaravut
Friteeratut omenat
Munakoiso (viipaleet)
Liha-/kalakuoruka
Lämpöt
ila
150 cC:n
160 cC:n
170 cC:n
175 cC:n
180 cC:n
190 cC:n
HD6140 TUORE TAI SULATETTU RUOKA
*) Katso kotitekoisten ranskanperunoiden ohje kohdasta 'Vinkit'.
Page 57

Kypsennysai
ka
(minuuttia)
15-20
3-4
3-4/7-8
10-12
4-5
4-5
4-5
4-5
4-5
6-7
Enimmäismäärä
700 g
Suositusmäärä
parasta
lopputulosta
varten
2-3 kpl
3 kpl
400 g
2 kpl
6 kpl
6 kpl
6 kpl
6 kpl
6 kpl
3 kpl
Ruokalaji
Broileri (koivet, fileet)
Pienet perunaletut
Pakastetut ranskanperunat
Kiinalaiset kevätkääryleet
Kananugetit
Pikku välipalat
Mustekalarenkaat (taikinakuoressa)
Kalapalat (taikinakuoressa)
Katkaravut
Liha-/kalakuorukat
Lämpöt
ila
170 cC:n
175 cC:n
180 cC:n
190 cC:n
HD6140 PAKASTERUOKA
SUOMI 57
Kypsennysai
ka
(minuuttia)
2-3
4-6 (katso
toinen
kypsennysvaihe
kohdasta
175cC)
5-7
12-15
2-3
5-8
3-4
6-7
3-4
3-4
3-4
3-4
3-4
3-4
3-4
4-5
Enimmäismäärä
1 250 g
1 250 g
Suositusmäärä
parasta
lopputulosta
varten
6-8 kpl
650 g
450 g
3-5 kpl
8-10 kpl
650 g
600 g
2-3 kpl
8-10 kpl
8-10 kpl
8-10 kpl
8-10 kpl
8-10 kpl
5 kpl
600 g
5 kpl
Ruokalaji
Herkkusienet
Kotitekoiset ranskanperunat *)
esikypsennysvaihe
Tuore kala
Broileri (koivet, fileet)
Friteeratut kasvikset (mm. kukkakaali)
Kotitekoiset ranskanperunat *) toinen
kypsennys
Perunalastut
Kiinalaiset kevätkääryleet
Kananugetit
Pikku välipalat
Mustekalarenkaat (taikinakuoressa)
Kalapalat (taikinakuoressa)
Katkaravut
Friteeratut omenat
Munakoiso (viipaleet)
Liha-/kalakuorukat
Lämpöt
ila
150 cC:n
160 cC:n
170 cC:n
175 cC:n
180 cC:n
190 cC:n
HD6144, HD6142 TUORE TAI SULATETTU RUOKA
Page 58

58
Kypsennysai
ka
(minuuttia)
15-20
3-4
3-4/7-8
10-12
4-5
4-5
4-5
4-5
4-5
6-7
Enimmäismäärä
700 g
Suositusmäärä
parasta
lopputulosta
varten
3-4 kpl
4 kpl
400 g
2-3 kpl
8 kpl
6 kpl
8 kpl
8 kpl
8 kpl
4 kpl
Ruokalaji
Broileri (koivet, fileet)
Pienet perunaletut
Pakastetut ranskanperunat
Kiinalaiset kevätkääryleet
Kananugetit
Pikku välipalat
Mustekalarenkaat (taikinakuoressa)
Kalapalat (taikinakuoressa)
Katkaravut
Liha-/kalakuorukat
Lämpöt
ila
170 cC:n
175 cC:n
180 cC:n
190 cC:n
HD6144, HD6142 PAKASTERUOKA
SUOMI
Page 59

Önemli
Bu cihazı kullanmaya başlamadan önce aşağıda yazılı talimatları okuyun ve saklayın.
◗ Cihazınızı fişe takmadan önce üzerinde belirtilen voltajın ülkenizdeki voltajla uygunluğunu
kontrol edin.
◗ Bu cihazı sadece toprak hatlı bir prize takılı kullanın.
◗ Cihazın elektrik kordonu hasar görürse, tamir özel aletler ve parçalar gerektireceğinden,
Philips veya Philips tarafından yetkilendirilmiş servis merkezi tarafından değiştirilmelidir.
◗ Cihazı tamir veya bakım için mutlaka yetkili Philips servisine götürün. Kendiniz evde tamir
etmeyin.Aksi halde garanti kapsamı dışında kalacaktır.
◗ İlk kullanımdan önce, fritözün ayrılabilen parçalarını iyice temizleyin (bkz. 'Temizleme'). Fritözü
yağ ile doldurmadan önce, her parçanın tamamen kuru olduğundan emin olun.
◗ Elektrik parçalarını ve ısıtma elemanlarını içeren, ana gövdeyi asla suya sokmayın veya
musluğun altına tutmayın.
◗ Cihazın fişini her kullanımdan sonra prizden çekin. Fritözü iyice soğumadan yerinden
oynatmayın.
◗ Cihazı bitkisel veya katı yağ ile doldurmadan açık konuma getirmeyin. Fritözün her zaman iç
kabın içindeki iki gösterge işareti arasında bir seviyede doldurulmasına dikkat edin.
◗ Kızartma sırasında, filtreden sıcak buhar çıkar. Ellerinizi ve yüzünüzü bu buhardan uzakta
tutunuz.Ayrıca kapağı açtığınızda da sıcak buhardan kendinizi korumaya dikkat ediniz.
◗ Cihazı çocuklardan uzak tutun ve elektrik kordonunu cihazın bulunduğu masanın veya
tezgahın kenarından sarkıtmayın.
◗ Bu cihaz sadece ev kullanımı amaçlıdır. Eğer cihaz düzgün şekilde kullanılmazsa veya
(yarı)profesyonel amaçlarla veya kullanım talimatlarına uygunsuz şekilde kullanılırsa, garanti
geçersiz sayılacak ve Philips ortaya çıkabilecek herhangi bir hasarla ilgili sorumluluk
almayacaktır.
◗ Kızarttığınız gıdaların açık altın sarısı bir renk almasını sağlamak için yağı düzenli olarak
temizleyin. Özellikle patates ve tahıl hububat gibi nişasta içeren gıdaları 175cC nin üzerinde
sıcaklıkta kızartmayın. ( acrylamid oluşumunu en aza indirmek için).
Güvenlik özellikleri
Güvenli kapanma
Bu cihaz ısı güvenlik sistemi ile donatılmıştır. Bu sistem, fazla ısındığında cihazı otomatik olarak kapatır.
Bu durum fritözde yeterince yağ olmadığında veya katı yağlar fritöz içinde eritildiklerinde, kısacası
ısıtıcı parçaların ısılarını dışa veremedikleri durumlarda gerçekleşebilir.
Fritöz çalışmıyorsa yapmanız gerekenler:
1 Yağın soğumasını bekleyin. Bu yaklaşık 60 dakika sürer.
2 Küçük bir tornavida ile kontrol panelinin arkasında bulunan reset düğmesine dikkatlice basınız
(şek. 1).
Cihazı tekrar çalıştırabilirsiniz.
Güvenlik düğmesi
Kontrol panelinde bulunan güvenlik düğmesi, ısıtma biriminin ancak kontrol paneli yerine doğru
takıldığında çalışmasını sağlar.
◗ Kontrol panelinin doğru yerleştirildiğinden emin olun ('klik') (şek. 2).
TÜRKÇE 59
Page 60

60
Otomatik kapanma (model HD6144 için)
Fritöz 2 saat sonra otomatik olarak kapanacaktır. Bu durumda, açma/kapama düğmesinin pilot ışık
sönecektir.
◗ Cihazı tekrar çalıştırmak için, açma/kapama düğmesine basın (şek. 3).
Soğuk bölge
kızartma sırasında, yiyecek parçaları iç haznenin tabanında birikirler. Isıtma birimide iç haznenin
tabanından biraz yukarıda bulunduğundan ve öncelikle üst kısımda bulunan yağı ısıttığından, iç hazne
ile ısıtma elementi arasındaki yağ serin kalır.(Soğuk bölge) Bu sayede yiyecek kalıntıları yanmayarak,
yağın tadının değişmesine ve daha çok süreler kullanımına imkan verir.
Kullanıma hazırlama
1 Cihazı yatay, düz ve sabit bir yüzey üzerine, çocukların erişemeyecekleri yere yerleştirin.
Eğer fritözü ocağın üzerine yerleştirecekseniz, ocak düğmelerinin kapalı konumda olduklarını
kontrol edin.
2 Kuru fritözü yağ, sıvı hayvani yağ veya eritilmiş katı yağ ile, iç kabın içindeki en üst gösterge
işaretine kadar doldurun (katı yağ kullanımı talimatları için, bkz. 'Kullanıma hazırlama', 'Bitkisel
ve hayvani yağlar' bölümü) (şek.4).
Bitkisel ve donmuş yağlar
Asla farklı tiplerdeki yağları karıştırmayın.
Size, fritözünüzde sıvı kızartma yağı kullanmanızı öneririz.Tercihen bitkisel yağlar veya doymamış yağ
(örn. linoleik asit) oranı yüksek hayvani yağları kullanın.
Katı kızartma yağlarını da kullanabilirsiniz, fakat bu durumda yağın sıçramasını ve ısıtıcı unsurların fazla
ısınmalarını engellemek için ekstra önlemler almalısınız:
1 Yeni katı yağ blokları kullanmak isterseniz, bunları düşük ısıda normal bir tavada yavaşça eritin.
2 Erittiğiniz yağı fritöze dikkatlice boşaltın.
3 Fritözü, erittiğiniz yağ halen oda sıcaklığındayken saklayabilirsiniz.
4 Eğer yağ çok soğursa, eridiğinde sıçrama yapabilir. Bunu engellemek için,donan yağa bir çatal
yardımı ile delikler açın (şek. 5).
Bunu yaparken, iç tasın kaplamasına zarar vermemeye özen gösterin.
Cihazın kullanımı
Kızartma
Dikkali olun: kızartma esnasında kapak içerisindeki filtreden sıcak buhar çıkacaktır.
1 Kordon muhafaza bölmesindeki tüm kordonu çıkartın. Fişi prize takın (şek. 6).
Kordonun cihazın sıcak kısımlarıyla temas etmemesine özen gösterin.
2 Açma/kapama düğmesini kullanarak cihazı çalıştırın (şek. 7).
Açma/kapama düğmesinin ve sıcaklık gösterge ışığı yanar.
TÜRKÇE
Katı yağ
2800 gr
3050 gr
Sıvı yağ
3.2 l
351
HD6142 ve HD6144
Min.
Maks.
Katı yağ
1925 gr
2200 gr
Sıvı yağ
2.2 l
2.2 l
HD6140
Min.
Maks.
Page 61

61
3 Sıcaklık kontrol ayarını istenilen dereceye getirin. (160-190cC) (şek. 8).
- Uygun sıcaklığı seçmek için, kullanacağınız gıdanın paketi üzerinde bulunan pişirme talimatları
tablosunu kontrol edin.
- Yağ seçilen ısıya, 10 ila 15 dakika içinde erişecektir.
- Fritöz ısınırken, sıcaklık gösterge ışığı birkaç sefer yanıp sönebilir. Işık söndüğünde ve sönük
kaldığında, fritözün içindeki yağ istenilen sıcaklığa ulaşmıştır.
- Bir grup yiyecek kızartıldıktan sonra, sıcaklık gösterge ışığı da yanar. Bir sonraki yiyecek grubunu
kızartmadan önce, bir süre ışık sönene kadar bekleyin.
B
Yağ ısınırken sepeti fritözün içinde bırakabilirsiniz.
4 Sepeti en üst konuma getirmek için, sapı kaldırın.('klik') (şek. 9).
5 Kapak açma düğmesine basarak kapağı açın. Kapak otomatik olarak açılacaktır (şek. 10).
6 Sepeti fritözden çıkartın.
7 Kızartılacak yiyeceği sepetin içine atın.
B
En iyi kızartma sonuçları için, aşağıdaki tabloda belirtilen maksimum miktarları aşmamanızı öneririz.
Lütfen bu cihazda Asya tipi pirinç pastaları (veya benzer tipte yiyecekler) kızartmayın,bu çok fazla
yağ sıçramasına ve yağın tehlikeli derecede köpürmesine sebep olabilir.
8 Kızartma sepetini dikkatlice fritöze yerleştirin (şek. 11).
Sepeti doğru olarak yerleştirdiğinizden emin olun.
9 Kapağı kapatın.
10 HD6144 için - İstenilen zamanı ayarlayın.( bkz.'Zamanlayıcı' bölümü)
Fritözü, zaman ayarı olmadan da kullanabilirsiniz.
11 Sepet sapının indirme düğmesine basın ve sepeti en düşük seviyesine kadar indirin (şek.12).
B
En iyi kızartma sonuçları için, yiyecek paketinde belirtilen maksimum miktarlarını veya kullanma
kılavuzundaki tabloda bulunan hazırlanma sürelerini ve sıcaklıkları aşmamanızı öneririz.
B
Altın renginde sabit bir kızartma sonucu için, kızartma esnasında sepeti birkaç kez yağdan çıkartın ve
malzemeleri hafifçe sallayın.
Zamanlayıcı (sadece HD6144 için)
B
Zamanlayıcı kızartma süresinin bittiğini belirtir, fakat fritözü KAPATMAZ.
1 Kızartma süresini dakika olarak ayarlamak için zamanlama düğmesine basın (şek. 13).
Ayarladığınız süre, ekranda görünecektir.
2 Dakikaları hızla ileri almak isterseniz düğmeyi basılı tutmanız gerekir. Gerekli olan kızartma
süresine ulaşıldığında elinizi düğmeden çekin.
- Ayarlanabilen en uzun süre 99 dakikadır.
- Kızartma süresini ayarlamanızdan birkaç saniye sonra, zamanlayıcı geri saymaya başlayacaktır.
- Zamanlayıcı geri sayarken, geri kalan kızartma süresi ekranda yanıp söner. Son dakika saniyelerle
gösterilir.
TÜRKÇE
Dondurulmuş
Patates
kızartması
900 gr
500 gr
Ev yapımı
patates
kızartması
1250 gr
650 gr
HD6142 ve
HD6144
Maks. miktar
En iyi sonuç
için önerilen
miktar
Dondurulmuş
Patates
kızartması
700gr
400 gr
Ev yapımı
patates
kızartması
1000 gr
450 gr
HD6140
Maks. miktar
En iyi sonuç
için önerilen
miktar
Page 62

62
3 Eğer önceden ayarlanan zaman doğru değilse, zamanlayıcı geri saymaya başladığında (örn.
zaman yanıp sönmeye başladığında) zamanlayıcı düğmesine 2 saniye süreyle basarak bunu
silebilirsiniz. Ekranda '00' görünene kadar düğmeyi basılı tutun. Şimdi doğru kızartma süresini
ayarlayabilirsiniz.
4 Önceden ayarlı zaman geçildiğinde, sesli bir sinyal duyacaksınız. 20 saniye sonra sesli sinyal
tekrarlanacaktır. Sesli sinyali durdurmak için, zamanlayıcı düğmesine basabilirsiniz.
Kızartma sonrasında
1 Sapı tutarak, sepeti en yüksek konumuna getirin, örn. süzülme pozisyonuna (şek.14).
2 Kapağı açın.
Sıcak buhara ve kızgın yağa dikkat edin.
3 Dikkatlice sepeti fritözden çıkartın.
Gerekirse, fazla yağı süzmek için sepeti fritözün üzerinde sallayın. Kızarmış yiyeceği içinde yağ emici
kağıt, örn. mutfak kağıdı bulunan bir kaba veya süzgece yerleştirin.
4 Açma/kapama düğmesiyle fritözü kapatın (şek. 15).
Açma/kapama düğmesinin güç ışığı söner.
5 Kullanım sonrasında cihazı prizden çıkartın.
B
Eğer fritözü düzenli olarak kullanmıyorsanız, içindeki yağı almanızı ve iyice kapatılmış şişelerde,
tercihen buzdolabı veya serin bir yerde saklamanızı öneririz. Şişeleri doldururken besin parçacıklarını
süzebilmek için iyi bir süzgeç kullanın. İç kabı boşaltmadan önce, kızartma sepetini çıkartın.
B
Fritözde katı yağ varsa, katılaşmasını bekleyin ve fritözün içinde saklayın.(Bkz. Kullanıma Hazırlama"
Sıvı ve katı yağ bölümü)
Temizlik
Yağın yeterince soğumasını bekleyin.
Cihazı temizlemek için aşındırıcı (sıvı) temizlik maddeleri veya materyalleri (örn. ovalayıcı
maddeler) kullanmayın.
1 Kapağı kaldırın (şek. 16).
2 Sepeti fritözden çıkarın.
3 Kontrol panelini ısıtma birimi ile birlikte çıkararak kuru bir yerde saklayın (şek. 17).
4 İç hazneyi cihazdan çıkarın (şek. 18).
5 Gereği varsa sıvı/katı yağı çıkararak, dökün (şek. 19).
6 Temizleme sonrasında tüm kısımları iyice kurutun.
Yağ tutmayan filtrenin temizlenmesi
Cihazda sabit filtre bulunmaktadır. Cihazın performansını artırmak için filtreyi düzenli olarak
temizlemek gerekir.
◗ Cihazı her kullandığınızda kapağı sıcak sabunlu su veya bulaşık makinesinde yıkayın.
Derinlemesine temizlik:
1 Kapağın iç kısımlarında bulunan vidaları sökün (şek. 20).
2 Filtreyi çıkararak sıcak sabunlu suda yıkayın.Filtreyi tekrar kapağa yerleştirmeden ve cihazı
kullanmadan önce iyice kurumasını bekleyin.
TÜRKÇE
Page 63

63
3 Filtreyi tekrar kapağa yerleştirin vidalarını kapağın içinden geri takın.
Yağ değiştirme
Yağların özelliklerini kolayca kaybetmelerinden ötürü, yağı sıkça değiştirmelisiniz. Değiştirme sembolü
yağı değiştireceğiniz zamanı belirtir (bkz. 'Değiştirme göstergesi').
Sadece patates kızartıyorsanız ve yağı her kullanımdan sonra süzüyorsanız, 10-12 kez aynı yağı
kızartma için kullanabilirsiniz. Eğer protein bakımından zengin balık veya et kızartıyorsanız, yağı daha
çok sıklıkla değiştirmeniz gereklidir.
◗ Hiçbir zaman yağı 6 aydan daha uzun bir süre kullanmayın ve her zaman paket üzerindeki
talimatları takip edin.
◗ Kullanılmış yağın üzerine asla taze yağ eklemeyin.
◗ Farklı türlerdeki sıvı veya katı yağları asla karıştırmayın.
◗ Isıtıldığında köpürmeye başlayan, ağır bir kokusu olan veya rengi koyulaşıp şurup kıvamına
gelen bir yağı hemen değiştirin.
Kullanılmış yağın çöpe atılması
Kullanılmış yağı, kendi orijinal (kapanabilen) plastik şişesine dökün. Kullanılmış yağı, fritöz içinde
katılaştırıp (içinde sepet olmadan), ardından spatula ile alıp gazete kağıdına koyarak da çöpe
atabilirsiniz. Mümkünse, şişeyi ve gazete kağıdını geri dönüşümsüz bir çöpe (geri dönüşümü olmayan)
atın veya ülkenizdeki kurallara göre çöpe atın.
Saklama
1 Tüm parçaları fritözün üzerine/içine koyun ve kapağı kapatın.
2 Elektrik kordonunu sararak kordon saklama bölümüne sarın ve fişi yerine yerleştirerek
sabitleyin (şek. 21).
3 Fritözü tutacak yerlerinden kaldırın.
Kızartma ipuçları
Hazırlanma sürelerini ve sıcaklık ayarlarını öğrenmek için, kullanma kılavuzunun en sonundaki tabloyu
inceleyin.
Ev yapımı patates kızartması
En lezzetli ve kıtır patates kızartmasını şu şekilde yapabilirsiniz:
1 Sert patates kullanın. Patatesleri çubuklar halinde doğrayın. Soğuk su ile yıkayın.
Bu sayede patatesler kızartma anında birbirlerine yapışmayacaktır.
B
Çubukları iyice kurulayın.
2 Patatesleri iki defa kızartın: ilkinde 4-6 dakika 160cC, ikincide 5-8 dakika 175cC.
3 İkinci kızartma seansına başlamadan önce, ev yapımı patates kızartmalarını bir kaba koyun ve
sallayın. Patatesleri ikinci kez kızartmadan önce biraz soğumasını bekleyerek kızartın.
Donmuş yiyecekler
Donmuş patatesler zaten önceden pişirilmişlerdir, bu nedenle paketlerinin üzerindeki talimatlar
doğrultusunda sadece bir kere kızartmanız yetecektir.
Donmuş gıdaların (-16 to -18cC) kızartma yağına atılması yağı soğutacaktır.Yiyecek derhal
kızarmayacağından biraz yağ çekecektir.
TÜRKÇE
Page 64

64
Bunu engellemek için aşağıdaki önlemleri alın:
- Tercihen eğer paket üzerinde belirtilmemişse donmuş olarak kızartılmaları, donmuş gıdaları oda
sıcaklığında çözülmelerini bekleyerek kızartın.
- Yiyecekleri sallayarak üzerlerindeki suyu ve buzu azaltın, ardından iyice kuruyana kadar bekleyin.
- Bir seferde çok fazla miktarda kızartma yapmayın (hazırlama süreleri ve kızartma ısıları ile ilgili
tabloya başvurun).
- Kullanma kılavuzunda bulunan tabloda belirtilen kızartma sıcaklıklarına veya kızartacağınız gıdanın
paketi üzerindeki sıcaklık talimatlarına uyun. Eğer herhangi bir talimat verilmemişse, 190cC sıcaklık
ayarını seçin.
- Dondurulmuş yiyeceklerin sıcak yağın aniden köpürmesine neden olabileceğinden, yiyeceği yağın
içine yavaşça indirin.
İstenmeyen tatlardan kurtulmak için
Bazı yiyecekler balık gibi kızartıldıklarında yağa istenmeyen tatlar bırakırlar, bu istenmeyen tatları
kullanılan yağdan arındırmak için;
1 Yağı 160cC ısıya ısıtın.
2 Yağın içine 2 ince dilim ekmek veya birkaç tutam maydonoz atın.
3 Köpükler kayboluncaya kadar bekleyin ve ardından ekmeği veya maydonozu bir spatula
yardımıyla fritözden alın.
Yağ tekrar eski tadına kavuşacaktır.
Çevre
◗ Cihazı hurdaya ayırırken, çevreye zarar vermemek amacı ile normal ev çöpüne kesinlikle
atmayın. Özel toplama noktalarına teslim edin (şek. 22).
Cihazı çöpe atmadan önce, zamanlayıcının pilini (sadece HD6144 için)çıkartın.
1 Arka kısmı çıkartmak için küçük bir yassı-uçlu bir tornavida kullanın (şek. 23).
2 Pili çıkartın. Pili normal ev çöpüne atmayın, özel pil toplama noktalarına teslim edin.
Garanti ve Servis
Eğer daha fazla bilgiye ihtiyaç duyarsanız veya bir problem yaşarsanız, lütfen
www.philips.com.tr
adresinden Philips Web Sitesini ziyaret edin veya ülkenizde bulunan Philips Müşteri Danışma Merkezi
ile iletişime geçin (dünya genelindeki telefon numaralarını verilen garanti belgeleri içerisinde
bulabilirsiniz). Eğer ülkenizde Müşteri Danışma Merkezi yoksa, yerel Philips yetkilinize başvurun veya
Philips Ev Aletleri ve Kişisel Bakım BV Servis Departmanı ile iletişime geçin. 0 800 261 33 02
TÜRKÇE
Page 65

65
Sorun giderme
TÜRKÇE
Çözümü
Seçtiğiniz ısının ve/veya hazırlama süresinin doğru olup
olmadığını anlamak için, yiyecek ambalajını veya
kullanma talimatları içerisindeki tabloyu kontrol edin.
Bir anda, kullanma kılavuzunda bulunan ilgili tabloda
belirtilen miktarlardan fazla miktarda yiyecek
kızartmayın.
Sıcaklık kontrol sigortası atmış olabilir. Bu ısı güvenlik
sisteminin cihazı kapatmasına sebep olmuş olabilir
(bkz.'güvenlik özellikleri' bölümü)
Kapağı kaldırarak kapak ve filtreyi biraz bulaşık deterjanı
katılmış sıcak suyun içinde veya bulaşık makinesinde
yıkayın.
Yağı değiştirin.Yağı daha uzun süre taze tutabilmek için
yağı düzenli olarak süzün.
İyi kalite kızartma yağı veya kullanın. Asla farklı
tiplerdeki sıvı ve katı yağları karıştırmayın.
Kapağın düzgün şekilde kapatılıp kapatılmadığını kontrol
edin.
Kapağı kaldırarak kapak ve filtreyi biraz bulaşık deterjanı
katılmış sıcak suyun içinde veya bulaşık makinesinde
yıkayın.
Conta kirli ise, sıcak sabunlu suda veya bulaşık
makinesinde yıkayın.Yıpranmışsa, değiştirmek için yetkili
Philips servisine veya bayisine başvurun.
Fritözdeki yağın, maksimum seviyeyi aşmamasına dikkat
edin.
Kızartmadan önce yiyecekleri iyice kurutun ve verilen
bu talimatlara uygun olarak yiyecekleri kızartın.
Bir anda, kullanma kılavuzunda ilgili tabloda belirtilen
miktarlardan fazla miktarda yiyecek kızartmayın.
Kızartmadan önce yiyecekleri iyice kurutun.
Hiçbir zaman farklı tiplerde yağ kullanmayın ve
köpürme önleyici madde içeren yağ kullanın.
Bu kullanım talimatlarında tarif edildiği şekilde iç kabı
temizleyin.
Kontrol panelinin doğru takılıp takılmadığını kontrol
edin ('klik').
Reset düğmesine basın (bkz.'güvenlik özellikler'
bölümü).
Olası nedeni
Seçilen ısı oldukça düşük
ve/veya yiyecek yeterince uzun
kızartılmamış olabilir.
Sepette çok fazla yiyecek var.
Yağ yeterli derecede ısınmıyor.
Yağ tutmayan filtre dolmuş
olabilir.
Sıvı veya katı yağ kirli.
Kullandığınız yağ, yiyecekleri
fritözde kızartmaya uygun
olmayabilir.
Kapak düzgün şekilde
kapatılmamış.
Yağ tutmayan filtre dolmuş
olabilir.
Kapağın contası çok kirli veya
yıpranmış.
Fritözde çok fazla yağ var.
Yiyecekler fazla nemli.
Kızartma sepetinde çok fazla
yiyecek var.
Yiyecekler fazla nemli.
Kullandığınız yağ, yiyecekleri
fritözde kızartmaya uygun değil.
İç kap düzgün şekilde
temizlenmemiş.
Kontrol paneli doğru
takılmamıştır.
Sıcaklık kontrol sigortası atmış
olabilir. Bu ısı güvenlik sisteminin
cihazı kapatmasına sebep olmuş
olabilir.
Problem
Kızarmış yiyeceğin
rengi koyu altın
renginde değil
ve/veya yiyecek kıtır
değil.
Fritözden kötü
kokular çıkıyor.
Buhar filtreden değil,
başka kısımlardan
çıkıyor.
Kızartma sırasında
fritözden dışarıya yağ
sıçrıyor.
Kızartma sırasında
yağ oldukça fazla
köpürüyor.
Fritöz çalışmıyor.
Page 66

Kızartma
süresi
(dakika)
2-3
4-6 (175cC,
2nci evre için
tablodaki
talimatlara
bakın)
5-7
12-15
2-3
5-8
3-4
6-7
3-4
3-4
3-4
3-4
3-4
3-4
3-4
4-5
Maks. miktar
1000 gr
1000 gr
En iyi sonuç için
önerilen miktar
6-8 adet
450 gr
300 gr
2-4 adet
8-10 adet
450 gr
400 gr
2 adet
6-8 adet
6-8 adet
6-8 adet
6-8 adet
6-8 adet
4 adet
400 gr
4 adet
Yiyecek tipi
Mantar
Ev yapımı patates kızartması*) 1.
kızartma evresi
Taze balık
Tavuk (kanat)
Sebze kızartma (örn. karnabahar)
Ev yapımı Patates kızartması*) 2.
evresi
Cips (çok ince patates dilimleri)
Çin börekleri
Tavuk nugget
Minik çerezler
Kalamar halkaları
Balık (parça)
Pavurya
Elma kızartma
Patlıcan (dilim)
Et/balık kroket
Isı
150cC
160cC
170cC
175cC
180cC
190cC
TAZE VEYA BUZU ÇÖZÜLMÜŞ YİYECEKLER
Hazırlama süreleri ve ısı ayarları
Aşağıdaki tabloda, bir seferde ne kadar miktarda belirli bir tür yiyeceği hazırlayabileceğiniz ve
seçmeniz gereken kızartma ısıları ve hazırlama süreleri belirtilmektedir.
Eğer yiyecek ambalajı üzerindeki talimatlar tabloda verilenlerden farklı ise, her zaman ambalaj
üzerindeki talimatları takip edin.
TÜRKÇE66
*) Ev yapımı kızarmış patates için bkz.'Kızartma ipuçları'
Page 67

67
Kızartma
süresi
(dakika)
15-20
3-4
3-4/7-8
10-12
4-5
4-5
4-5
4-5
4-5
6-7
Maks. miktar
700 gr
Tavsiye edilen
miktar
2-3 adet
3 parça
400 gr
2 adet
6 adet
6 adet
6 adet
6 adet
6 adet
3 parça
Yiyecek tipi
Tavuk (kanat)
Ufak patates kurabiyeleri
Dondurulmuş Patates kızartması
Çin börekleri
Tavuk nugget
Minik çerezler
Kalamar halkaları
Balık (parça)
Pavurya
Et/balık kroket
Sıcaklık
170cC
175cC
180cC
190cC
HD6140 DONMUŞ GIDA
Kızartma
süresi
(dakika)
2-3
4-6 (175cC,
2nci evre için
tablodaki
talimatlara
bakın)
5-7
12-15
2-3
5-8
3-4
6-7
3-4
3-4
3-4
3-4
3-4
3-4
3-4
4-5
Maks. miktar
1250 gr
1250 gr
En iyi sonuç için
önerilen miktar
6-8 adet
650 gr
450 gr
3-5 adet
8-10 adet
650 gr
600 gr
2-3 adet
8-10 adet
8-10 adet
8-10 adet
8-10 adet
8-10 adet
5 adet
600 gr
5 adet
Yiyecek tipi
Mantar
Ev yapımı patates kızartması*) 1.
kızartma evresi
Taze balık
Tavuk (kanat)
Sebze kızartma (örn. karnabahar)
Ev yapımı Patates kızartması*) 2.
evresi
Cips (çok ince patates dilimleri)
Çin börekleri
Tavuk nugget
Minik çerezler
Kalamar halkaları
Balık (parça)
Pavurya
Elma kızartma
Patlıcan (dilim)
Et/balık kroket
Isı
150cC
160cC
170cC
175cC
180cC
190cC
HD6144, HD6142 TAZE VEYA BUZU ÇÖZÜLMÜŞ GIDALAR
TÜRKÇE
Page 68

Kızartma
süresi
(dakika)
15-20
3-4
3-4/7-8
10-12
4-5
4-5
4-5
4-5
4-5
6-7
Maks. miktar
700 gr
En iyi sonuç için
önerilen miktar
3-4 adet
4 adet
400 gr
2-3 adet
8 adet
6 adet
8 adet
8 adet
8 adet
4 adet
Yiyecek tipi
Tavuk (kanat)
Ufak patates kurabiyeleri
Dondurulmuş Patates kızartması
Çin börekleri
Tavuk nugget
Minik çerezler
Kalamar halkaları
Balık (parça)
Pavurya
Et/balık kroket
Isı
170cC
175cC
180cC
190cC
HD6144, HD6142 DONMUŞ GIDA
TÜRKÇE68
Page 69

69
Page 70

70
21 22 23
Page 71

71
Page 72

u
4222 001 94314
www.philips.com
 Loading...