

Page 1
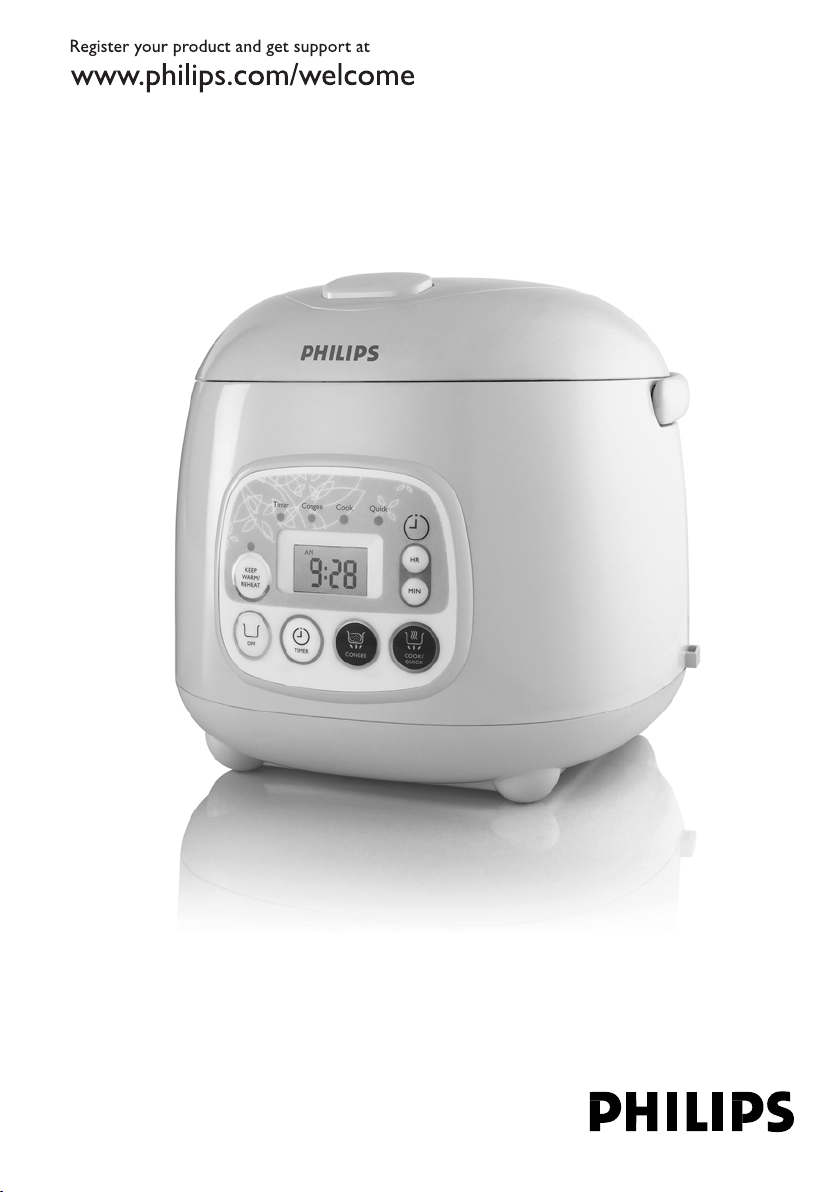
HD4740
Page 2

2
Page 3
3
1
Page 4

4
Page 5

ENGLISH 6
BAHASA MELAYU 13
繁體中文 20
简体中文 26
HD4740
Page 6

6
ENGLISH
Introduction
Congratulations on your purchase and welcome to Philips! To fully benet from the support that
Philips offers, register your product at www.philips.com/welcome.
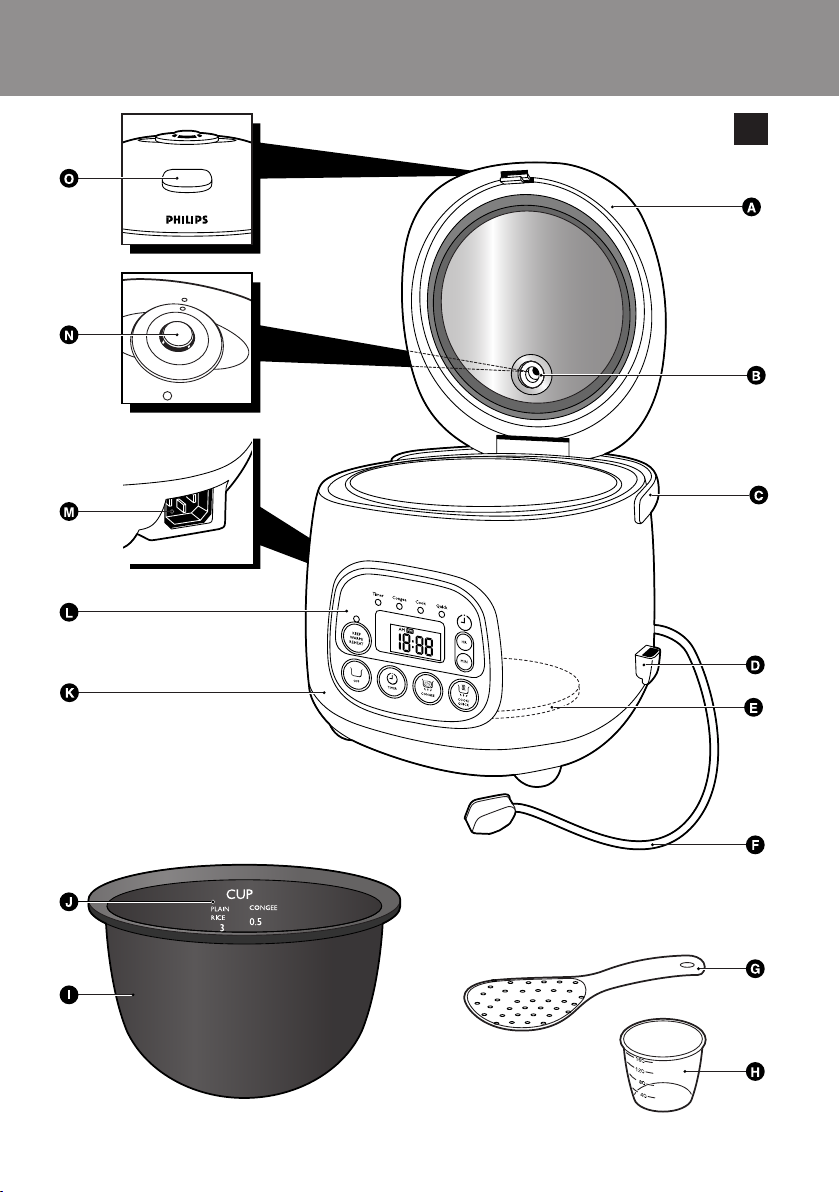
General description (Fig. 1)
A Lid
B Steam vent
C Rice cooker handle
D Scoop holder
E Heating element
F Mains cord
G Rice scoop
H Measuring cup
I Inner pot
J Water level indication
K Main body
L Control panel
M Mains cord connection
N Detachable steam vent cap
O Release lever
Important
Read these instructions for use carefully before using the appliance and save them for future
reference.
Check if the voltage indicated on the appliance corresponds to the local mains voltage before
,
you connect the appliance.
Only connect the appliance to an earthed wall socket. Always ensure the plug is inserted
,
rmly into the wall socket.
If the mains cord is damaged, it must be replaced by Philips, a service centre authorised by
,
Philips or similarly qualied persons in order to avoid a hazard.
Never use any accessories or parts from other manufacturers or which have not been
,
specically advised by Philips. Your guarantee will become invalid if such accessories or parts
have been used.
Only use the rice scoop provided. Avoid using sharp utensils.
,
Never immerse the housing of the rice cooker in water, nor rinse it under the tap.
,
Do not expose the rice cooker to high temperatures, nor place it onto a working or still hot
,
stove or cooker.
Make sure the heating element, the magnetic switch and the outside of the inner pot are
,
clean and dry before switching the rice cooker on.
Always press the OFF button before you unplug the rice cooker.
,
Always unplug the rice cooker and let it cool down before cleaning it.
,
Do not place the inner pot directly over an open re to cook rice.
,
Do not cover the steam vent while the rice cooker is operating.
,
Do not let the mains cord hang over the edge of the table or worktop on which the
,
appliance is standing.
This appliance is not intended for use by persons (including children) with reduced physical,
,
sensory or mental capabilities, or lack of experience and knowledge, unless they have been
given supervision or instruction concerning use of the appliance by a person responsible for
their safety.
Children should be supervised to ensure that they do not play with the appliance.
,
Page 7

ENGLISH 7
This appliance is intended for household use only. If the appliance is used improperly or for
,
professional or semiprofessional purposes or if it is used in a way that is not in accordance
with the instructions for use, the guarantee will become invalid and Philips will not accept
liability for any damage caused.
Place the rice cooker on a stable, horizontal and level surface.
,
The accessible surfaces may become hot when the appliance is operating.
,
Do not plug the appliance in or switch on the mains with wet hands.
,
Beware of hot steam coming out of the steam vent during cooking or out of the rice cooker
,
when you open the lid.
Do not lift and move the rice cooker by its handle while it is operating.
,
Electromagnetic elds (EMF)
This Philips appliance complies with all standards regarding electromagnetic elds (EMF). If handled
properly and according to the instructions in this user manual, the appliance is safe to use based on
scientic evidence available today.
Before rst use
Remove the sheet between the inner pot and the heating element.
1 Clean the parts of the rice cooker thoroughly before using the appliance for the rst time
(see chapter ‘Cleaning’). Make sure all parts are completely dry before you start using the
appliance.
2 Attach the scoop holder to the body of the rice cooker (Fig. 2).
Using the appliance
Cooking rice
1 Measure the rice using the measuring cup provided.
Each cup of uncooked rice normally gives 2 bowls of cooked rice. Do not exceed the quantities
indicated on the inside of the inner pot. 1 cup of rice is approx. 180ml.
HD4740: 1-3 cups of rice
-
Menu Quantity of rice (cups)
Regular rice cooking 1-3
Congee cooking 0.25-0.50
2 Wash the rice thoroughly.
Use a separate container to wash the rice to avoid damaging the non-stick coating of the inner pot.
3 Put the pre-washed rice in the inner pot.
4 Add water to the level indicated on the scale inside the inner pot that corresponds to the
number of cups of rice used. Then smooth the rice surface. (Fig. 3)
For instance, if you cook 2 cups of rice, add water up to the 2-cup level indicated on the scale.
Note: The level marked inside the inner pot is just an indication; you can always adjust the water level and
your own preference.
5 Press the release lever to open the lid.
6 Put the inner pot in the rice cooker. Check if the inner pot is in proper contact with the
heating element (Fig. 4).
Make sure that the outside of the inner pot is dry and clean and that there is no foreign residue on
the heating element or the magnetic switch.
Page 8

ENGLISH8
The rice cooker will not operate without the inner pot or when the pot is not properly in contact
with the heating element.
7 Close the lid of the rice cooker, put the plug in the wall socket and switch on the mains.
You will hear a beep.
8 Press the COOK/QUICK button (Fig. 5).
The cook light goes on and the cooking process starts.
,
You can switch to quick cooking within the rst 5 minutes of the cooking process by pressing
,
the COOK/QUICK button twice.
The display counts down in minutes (10, 9, 8 etc.) during the last 10 minutes of the cooking
,
process.
When the cooking process is nished, you will hear a beep. The cook or quick light goes out
,
and the keep-warm/reheat light starts to burn continuously to indicate that the rice cooker
has automatically switched to the keep-warm mode (Fig. 6).
The table below shows the approximate cooking time of each function. The actual cooking time may
vary depending on voltage, room temperature, humidity and amount of water used.
Function Approximate cooking time
(minutes)
Regular 30-40 10
Quick 20-30 10
Congee 30-240 not applicable
Reheat 23 23
9 Open the lid and stir the rice to loosen it (Fig. 7).
For the best results, do this just after the rice cooker has switched to keep-warm mode. Then close
the lid rmly. Stirring the rice allows excess steam to escape. This will give ufer rice.
10 Press the OFF button to cancel the cooking process, the preset setting or the keep-warm
mode. The cook light will start to blink (Fig. 8).
The rice cooker has a backup memory that retains the last selected mode, function and settings in
case of a power failure. If the power supply is restored within 2 hours, the interrupted cooking
process will continue or the timer function will be reactivated.
Always press the OFF button before unplugging the appliance, as otherwise the last selected
function and settings will resume when the rice cooker is plugged in again.
11 Unplug the rice cooker to switch it off.
Cooking congee
1 Follow steps 1 to 7 in ‘Cooking rice’.
Do not exceed the volume indicated in the table for congee cooking, as this may cause the rice
cooker to overow.
2 Press the CONGEE button (Fig. 9).
The congee light goes on.
The default cooking time of 1 hour blinks on the display.
Press the HR and/or MIN buttons to set the desired time. You can set any time between 30
,
minutes and 4 hours (Fig. 10).
If you fail to set a cooking time, the default cooking time of 1 hour will apply.
,
The congee cooking process automatically starts within 5 seconds of setting the cooking
,
time.
Approximate time until ready
(minutes)
Page 9

ENGLISH 9
When the cooking process starts, the display switches from preset time to current time.
To view the preset cooking time, press the HR or MIN button once.
When the cooking process is nished, you will hear a beep. The congee light goes out and the
,
keep-warm/reheat light starts to burn continuously to indicate that the rice cooker has
automatically switched to the keep-warm mode.
3 Press the OFF button to cancel the cooking process, the preset setting or the keep-warm
mode. The cook light will start to blink.
4 Unplug the rice cooker to switch it off.
Reheating
You can use the reheating mode to warm up rice that has cooled down. Fill the inner pot to not
more than half its capacity to ensure that the rice is heated up properly.
1 Loosen the cooled rice and evenly distribute it in the inner pot.
2 Pour some water onto the rice to prevent it from becoming too dry. The amount of water to
be added depends on the amount of rice being reheated.
If the rice starts scorching, add more water.
3 Press the KEEP-WARM/REHEAT button twice to start the reheating process.
The keep-warm/reheat light starts to blink and the reheating process starts.
,
The reheat time is displayed and the countdown starts.
,
The default reheat time is 23 minutes.
,
When the reheating process is nished, you will hear a beep. The keep-warm/reheat light
,
starts to burn continuously to indicate that the rice cooker has automatically switched to
keep-warm mode.
Mix the rice thoroughly before serving.
,
Cooled rice should not be reheated more than once.
,
Keeping warm
This function allows you to keep your rice warm for a longer period of time.
Press the KEEP-WARM/REHEAT button once to start the keep-warm function.
Note: The keep-warm/reheat light starts to burn continuously.
We advise you to keep rice warm for not more than 12 hours so as to preserve its taste.
During the keep-warm process, the display shows the time in hours from 0 to 11 (0HR, 1HR
...11HR). After 12 hours, the display will switch to the current time.
After 12 hours, the keep-warm mode will end and the cook light will blink.
Press the OFF button and remove the plug from the wall socket to switch the rice cooker off.
Timer
You can use the timer for rice cooking and congee cooking.
Press the TIMER button to set the time when you want the food to be ready to eat.
You can set a time from 0 minutes up to 23 hours.
Setting the ready time of rice:
1 To set the rice ready time, press the TIMER button once and then use the HR and/or MIN
buttons to set the time.
You can for example use the TIMER button to set the rice ready time at 6:30 PM (Fig. 11).
,
2 Press the COOK/QUICK button to start the timer and the cooking process. (Fig. 12)
The cook light blinks and the timer light burns continuously. The display shows the current time. To
view the preset time, press the HR or MIN button once.
Page 10

ENGLISH10
If the preset time is shorter than the required total cooking time, the rice cooker will star t the
cooking process immediately.
Setting the ready time of congee:
1 To set the congee ready time, press the TIMER button once and then use the HR and or MIN
buttons to set the time. (Fig. 13)
You can for example use the TIMER button to set the congee ready time at 6:30 PM.
,
2 Press the CONGEE button then follow step 2 in the section ‘Cooking congee’.
The congee light blinks and the timer light burns continuously. The display shows the current time. To
view the preset time, press the HR or MIN button once.
If the preset time is shorter than the required total cooking time, the rice cooker will star t the
cooking process immediately.
Clock
To set the current time:
1 Plug in the rice cooker.
2 Press the Ö button once and then use the HR and MIN buttons to set the time.
The time on the display starts to blink.
,
You can put the time forward quickly by holding down the HR or MIN button.
,
The time cannot be adjusted during the cooking or the keep-warm process.
,
3 To conrm the time, do not press any key for 5 seconds after setting the time. The time has
been conrmed when the time indicated on the display stops blinking.
Cleaning
Unplug the rice cooker before starting to clean it.
Wait until the rice cooker has cooled down sufciently before cleaning it.
To protect the non-stick coating of the inner pot, do not:
use the inner pot for washing dishes;
put vinegar into the pot.
-
1 Take the inner pot out of the body of the appliance.
2 Detach the steam vent cap from the lid by pulling it upwards (Fig. 14).
To take the steam vent cap apart, gently pull the two halves apart (Fig. 15).
,
To reassemble the steam vent cap, align the dots on the top and bottom half and then push
,
the two halves together (‘click’).
To put the steam vent cap back into the vent hole of the lid, insert it into the hole and push
,
it down rmly (Fig. 16).
3 Clean the inner pot, rice scoop and steam vent cap with a sponge or a cloth in hot water
with some washing-up liquid.
Do not use abrasive cleaning agents, scourers or metal utensils to clean the inner pot as these
will damage the non-stick coating.
4 Use only a damp cloth to wipe the outside and inside of the body and the lid of the rice
cooker.
Never immerse the body of the rice cooker in water, nor rinse it under the tap. Wipe the heating
element with a dry cloth.
Page 11

ENGLISH 11
Environment
Do not throw the appliance away with the normal household waste at the end of its life, but
,
hand it in at an ofcial collection point for recycling. By doing this you will help to preserve
the environment (Fig. 17).
Guarantee & service
If you need information or if you have a problem, please visit the Philips website at www.philips.com
or contact the Philips Customer Care Centre in your country (you will nd its phone number in the
worldwide guarantee leaet). If there is no Customer Care Centre in your country, turn to your
local Philips dealer or contact the Service Depar tment of Philips Domestic Appliances and Personal
Care BV.
Troubleshooting
If your rice cooker does not function properly or if the cooking quality is insufcient, consult the
table below. If you are unable to solve the problem, please contact the Philips Customer Care
Centre in your country.
Problem Cause Solution
The cook light or
congee light does not
go on.
The keep-warm/reheat
light does not go on
when the cooking
process is nished.
LCD shows
E0,E1,E2,E3,E4
LCD shows E5 Press OFF button once. The appliance will
The display is off when
the rice cooker is
unplugged.
The rice is not cooked. Not enough water has
There is a connection
problem.
The light is defective. Take the appliance to your Philips dealer or a
The light is defective. Take the appliance to your Philips dealer or a
Electronic parts
malfunction.
The battery runs out. Take the appliance to your Philips dealer or a
been added.
The cooking process
has not started.
The inner pot is not
properly in contact with
the heating element.
The heating element is
damaged.
Check if the rice cooker is connected to the
mains and if the plug is inserted rmly into
the wall socket.
service centre authorised by Philips.
service centre authorised by Philips.
Take the appliance to your Philips dealer or a
service centre authorised by Philips.
resume normal.
service centre authorised by Philips.
Add water according to the scale on the
inside of the inner pot (see chapter ‘Using the
appliance’).
You have failed to press the COOK or
CONGEE button.
Make sure that there is no foreign residue on
the heating element.
Take the appliance to your Philips dealer or a
service centre authorised by Philips.
Page 12

ENGLISH12
Problem Cause Solution
The timer light does
not go on when the
timer is set.
The rice is too hard or
too soft.
The rice is scorched. The rice has not been
The rice cooker does
not automatically
switch to keep-warm
mode.
The light is defective. Take the appliance to your Philips dealer or a
service centre authorised by Philips.
Not enough or too
much water has been
added.
The wrong button was
pressed.
rinsed well.
The temperature
control is defective.
Add water according to the scale on the
inside of the inner pot (see chapter ‘Using the
appliance’).
See chapter ‘Using the appliance’.
Rinse the rice until water runs clear.
Take the appliance to your Philips dealer or a
service centre authorised by Philips.
Page 13

BAHASA MELAYU
Pengenalan
Tahniah atas pembelian anda dan selamat datang ke Philips! Untuk mendapat manfaat sepenuhnya
daripada sokongan yang ditawarkan oleh Philips, daftarkan produk anda di www.philips.com/
welcome.
Perihalan umum (Gamb. 1)
A Tudung
B Bolong stim
C Pemegang pemasak nasi
D Pemegang senduk
E Elemen pemanasan
F Kord sesalur kuasa
G Senduk nasi
H Cawan penyukat
I Perikut dalam
J Penunjuk paras air
K Jasad utama
L Panel kawalan
M Sambungan kord utama
N Tukup bolong stim boleh tanggal
O Tuil pelepas
Penting
Baca arahan ini dengan teliti sebelum menggunakan perkakas dan simpan arahan ini untuk rujukan
pada masa depan.
Periksa sama ada voltan yang ditunjukkan pada perkakas sepadan dengan voltan sesalur kuasa
,
setempat sebelum anda menyambungkan perkakas.
Sambungkan perkakas hanya dengan soket dinding terbumi. Sentiasa pastikan plag dimasukkan
,
dengan rapi ke dalam soket.
Jika sesalur kuasa rosak, ia mesti digantikan oleh Philips, pusat servis yang dibenarkan oleh
,
Philips atau pihak-pihak yang telah diluluskan bagi mengelakkan bahaya.
Jangan guna sebarang aksesori atau alat ganti dari pembuat lain yang tidak dinasihati khas oleh
,
Philips. Jaminan anda akan menjadi tidak sah jika aksesori atau alat ganti sedemikian telah pun
digunakan.
Gunakan hanya senduk nasi yang disediakan. Elakkan menggunakan perkakas yang tajam.
,
Jangan tenggelamkan perumah pemasak nasi di dalam air atau membilasnya di bawah pili air.
,
Jangan dedahkan pemasak nasi pada suhu yang tinggi, atau letakkannya di atas pemanas atau
,
dapur yang sedang berfungsi atau masih panas.
Pastikan plat pemanas, suis magnet dan bahagian luar periuk dalam bersih dan kering sebelum
,
menghidupkan periuk pemasak nasi.
Sentiasa tekan butang MATI sebelum anda mencabut plag periuk pemasak nasi.
,
Cabutkan plag periuk pemasak nasi dan biarkan sehingga sejuk setiap kali sebelum
,
membersihkannya.
Jangan letakkan periuk dalam terus di atas api terbuka untuk memasak nasi.
,
Jangan tutup bolong stim semasa periuk pemasak nasi sedang beroperasi.
,
Jangan biarkan kord sesalur tergantung dari tepi meja atau permukaan ruang kerja tempat
,
perkakas itu terletak.
Perkakas ini bukan dimaksudkan untuk digunakan oleh orang (termasuk kanak-kanak) yang
,
kurang upaya dari segi zikal, deria atau mental, atau kurang berpengalaman dan pengetahuan,
kecuali mereka diawasi atau diberi arahan berkenaan penggunaan perkakas ini oleh orang
yang bertanggungjawab atas keselamatan mereka.
13
Page 14

BAHASA MELAYU14
Kanak-kanak kecil harus diawasi untuk memastikan mereka tidak bermain dengan perkakas
,
itu.
Perkakas ini hanya untuk kegunaan rumah sahaja. Jika perkakas digunakan dengan tidak betul
,
atau bagi tujuan profesional atau (separa) profesional atau penggunaannya tidak selaras
dengan arahan penggunaan, jaminan akan terbatal dan Philips tidak akan menerima
tanggungjawab terhadap apa-apa kerosakan yang menjadi akibat.
Letakkan periuk pemasak nasi pada permukaan yang stabil, mendatar dan rata.
,
Permukaan yang dapat dicapai mungkin menjadi panas apabila perkakas beroperasi.
,
Jangan pasang plag perkakas atau hidupkan sesalur kuasa dengan tangan yang basah.
,
Berhati-hati dengan stim panas yang keluar dari bolong stim semasa memasak atau yang
,
keluar dari periuk pemasak nasi semasa anda membuka tudungnya.
Jangan angkat dan pindahkan periuk pemasak nasi dengan tangkainya semasa ia sedang
,
beroperasi.
Medan Elektro Magnet (EMF)
Perkakas Philips ini mematuhi semua piawai yang berhubung dengan medan elektromagnet (EMF).
Jika dikendalikan dengan betul dan mematuhi arahan dalam manual pengguna ini, perkakas selamat
untuk digunakan menurut bukti saintik yang boleh didapati pada masa ini.
Sebelum penggunaan pertama
Keluarkan alas di antara periuk dalam dan plat pemanas.
1 Bersihkan bahagian berasingan periuk pemasak nasi dengan sempurna sebelum menggunakan
perkakas pada kali pertama (lihat bab ‘Membersihkan’). Pastikan semua bahagiannya betulbetul kering sebelum anda mula menggunakan perkakas.
2 Pasangkan pemegang senduk pada jasad utama periuk pemasak nasi (Gamb. 2).
Menggunakan perkakas
Memasak nasi
1 Ukur beras menggunakan cawan penyukat yang disediakan.
Setiap cawan beras biasanya memberikan 2 mangkuk nasi. Jangan lebihi kuantiti yang ditunjukkan
pada permukaan dalam periuk dalam. 1cawan nasi adalah kira-kira 180ml.
HD4740: 1-3 cawan beras
-
Menu Kuantiti beras (cawan)
Memasak nasi biasa 1-3
Pemasakan bubur 0.25-0.50
2 Basuh beras dengan sempurna.
Gunakan bekas lain untuk membasuh beras supaya salutan tidak lekat pada periuk dalam tidak rosak.
3 Tuangkan beras yang sudah dibasuh ke dalam periuk dalam.
4 Tambahkan air sehingga aras yang ditunjukkan pada skala di dalam periuk, yang sepadan
dengan bilangan cawan beras yang digunakan. Kemudian ratakan permukaan beras. (Gamb. 3)
Contohnya, jika anda memasak 2 cawan beras, tambahkan air sehingga aras 2 cawan yang
ditunjukkan pada skala.
Nota: Aras yang ditandakan di dalam periuk dalam hanyalah panduan; anda boleh melaraskan aras air
dan kegemaran anda sendiri.
5 Tekan butang pelepas untuk membuka tudungnya.
Page 15

BAHASA MELAYU 15
6 Masukkan periuk dalam ke dalam periuk pemasak nasi. Periksa sama ada periuk dalam dan
plat pemanas besentuhan dengan baik pada satu sama lain (Gamb. 4).
Pastikan bahagian luar periuk kering dan bersih, dan tiada sisa asing pada plat pemanas atau suis
magnet.
Pemasak masi tidak akan beroperasi tanpa periuk dalam atau apabila periuk tidak bersentuhan
dengan elemen pemanasan dengan betul.
7 Tutup tudung periuk pemasak nasi, pasangkan plag di dalam soket dinding dan hidupkan
sesalur kuasa.
Anda akan terdengar bunyi klik.
8 Tekan butang COOK/QUICK (Gamb. 5).
Lampu masak menyala dan proses masak bermula.
,
Anda boleh beralih kepada masakan cepat dalam masa 5 minit yang pertama daripada proses
,
memasak dengan menekan butang COOK/QUICK dua kali.
Paparan mengira detik dalam minit (10, 9, 8 dsb.) semasa 10 minit terakhir proses memasak.
,
Apabila proses memasak telah selesai, anda akan mendengar bip. Lampu masak atau lampu
,
cepat akan padam dan lampu simpan panas/panas semula akan menyala untuk menunjukkan
bahawa periuk pemasak nasi telah beralih ke mod simpan panas secara automatik (Gamb. 6).
Jadual di bawah menunjukkan anggaran masa memasak bagi setiap fungsi. Masa memasak sebenar
berbeza-beza bergantung pada voltan, suhu bilik, kelembapan dan jumlah air yang digunakan.
Fungsi Anggaran masa memasak
(minit)
Biasa 30-40 10
Cepat 20-30 10
Bubur nasi 30-240 tidak berkaitan
Panaskan semula 23 23
9 Buka tudung dan kacau nasi agar rata (Gamb. 7).
Untuk hasil terbaik, lakukan sebaik saja periuk pemasak nasi beralih ke mod simpan panas. Kemudian
tutup tudung dengan rapi. Mengacau nasi membolehkan stim keluar. Ini akan menjadikan nasi lebih
lembut.
10 Tekan butang OFF untuk membatalkan proses memasak, tetapan pratetap atau mod simpan
panas. Lampu masak akan mula berkelip (Gamb. 8).
Periuk pemasak nasi mempunyai memori sandaran yang menyimpan mod, fungsi dan tetapan yang
terakhir dipilih jika berlaku gangguan bekalan kuasa. Jika bekalan kuasa dipulihkan dalam masa 2 jam,
proses memasak yang telah diganggu akan diteruskan atau fungsi pemasa akan diaktifkan semula.
Sentiasa tekan butang OFF sebelum anda mencabut plag perkakas, jika tidak mod, fungsi dan tetapan
yang terakhir dipilih akan disambung semula apabila plag periuk pemasak nasi dipasang semula.
11 Cabut plag periuk pemasak nasi untuk mematikkannya.
Memasak bubur nasi
1 Ikut langkah 1 hingga 7 dalam bahagian ‘Memasak nasi’.
Jangan lebihi isipadu yang ditunjukkan dalam jadual untuk memasak bubur nasi, kerana ini boleh
menyebabkan periuk pemasak nasi membuak.
2 Tekan butang CONGEE (Gamb. 9).
Lampu bubur nasi menyala.
Masa memasak lalai selama 1 jam berkelip pada paparan.
Anggaran masa sehingga siap
(minit)
Page 16

BAHASA MELAYU16
Tekan butang HR dan/atau MIN untuk menetapkan masa yang dikehendaki. Anda boleh
,
menetapkan sebarang masa antara 30 minit dan 4 jam (Gamb. 10).
Jika anda gagal untuk menetapkan masa memasak, masa memasak lalai selama 1 jam akan
,
digunakan.
Proses memasak bubur bermula secara automatik dalam masa 5 saat setelah menetapkan
,
masa memasak.
Apabila proses memasak bermula, paparan akan menukar masa yang dipratetap kepada masa
semasa.
Untuk melihat masa memasak pratetap, tekan butang HR atau MIN sekali.
Apabila proses memasak telah selesai, anda akan mendengar bip. Lampu bubur akan padam
,
dan lampu simpan panas/panas semula akan menyala untuk menunjukkan bahawa periuk
pemasak nasi telah beralih ke mod simpan panas secara automatik.
3 Tekan butang OFF untuk membatalkan proses memasak, tetapan pratetap atau mod simpan
panas. Lampu masak akan mula berkelip.
4 Cabut plag periuk pemasak nasi untuk mematikkannya.
Panas semula
Anda boleh mengunakan mod panas semula untuk menghangatkan nasi yang telah sejuk. Isi periuk
dalam tidak lebih daripada separuh kapasitinya untuk memastikan nasi dipanaskan dengan betul.
1 Kacau nasi sejuk dan ratakannya di dalam periuk dalam.
2 Tuang sedikit air pada nasi untuk mengelakkannya daripada terlalu kering. Jumlah air untuk
ditambah bergantung pada jumlah nai yang sedang dipanaskan.
Jika nasi mula menjadi panas, tambahkan sedikit lagi air.
3 Tekan butang KEEP-WARM/REHEAT dua kali untuk memulakan proses memanaskan semula.
Lampu keep-warm/reheat mula berkelip dan proses memanaskan semula bermula.
,
Masa pemanasan semula dipaparkan dan pengiraan detik bermula.
,
Masa memanaskan lalai adalah 23 minit.
,
Apabila proses memanaskan semula telah selesai, anda akan mendengar bip. Lampu simpan
,
panas/panas semula akan mula menyala untuk menunjukkan bahawa periuk pemasak nasi telah
beralih ke mod simpan panas secara automatik.
Ratakan nasi sebelum dihidangkan.
,
Nasi yang sejuk tidak seharusnya dipanaskan lebih daripada sekali.
,
Menyimpan panas
Fungsi ini membolehkan anda menyimpan panas nasi anda untuk tempoh yang lebih panjang.
Tekan butang KEEP-WARM/REHEAT sekali untuk memulakan fungsi simpan panas.
Nota: Lampu simpan panas/panas semula menyala berterusan.
Anda dinasihati agar untuk menghangatkan nasi untuk tidak lebih daripada 12 jam untuk
mengekalkan rasanya.
Semasa proses simpan panas, paparan menunjukkan masa dalam jam daripada 0 hingga 11 (0HR,
1HR ...11HR). Selepas 12 jam, paparan akan bertukar ke masa semasa.
Selepas 12 jam, mod simpan panas akan tamat dan lampu masak akan berkelip.
Tekan butang OFF dan tanggalkan plag dari soket dinding untuk mematikan periuk pemasak nasi.
Pemasa
Anda boleh menggunakan pemasa untuk memasak nasi dan memasak bubur.
Tekan butang PEMASA untuk menetapkan masa yang anda hendak makanan itu siap untuk dimakan.
Anda boleh menetapkan masa daripada 0 minit sehingga 23 jam.
Page 17

BAHASA MELAYU 17
Menetapkan masa siap nasi:
1 Untuk menetapkan masa siap nasi, tekan butang PEMASA sekali dan kemudian guanakan
butang HR dan/atau MIN untuk menetapkan masanya.
Anda boleh, contohnya, menggunakan butang TIMER untuk menetapkan masa siap nasi pada
,
pukul 6:30 PM (Gamb. 11).
2 Tekan butang COOK/QUICK untuk memulakan pemasa dan proses memasak. (Gamb. 12)
Lampu masak berkelip dan lampu pemasa menyala berterusan. Paparan menunjukkan masa sekarang.
Untuk melihat masa yang dipratetapkan, tekan butang HR atau MIN sekali.
Jika masa pratetap lebih singkat daripada jumlah masa memasak yang diperlukan, periuk pemasak
nasi akan memulakan proses memasak dengan segera.
Menetapkan masa siap bubur:
1 Untuk menetapkan masa siap bubur, tekan butang TIMER sekali dan kemudian gunakan butang
HR dan atau MIN untuk menetapkan masa. (Gamb. 13)
Anda boleh, contohnya, menggunakan butang TIMER untuk menetapkan masa siap bubur pada
,
pukul 6:30 PM.
2 Tekan butang CONGEE kemudian ikut langkah 2 dalam bahagian ‘Memasak bubur’.
Lampu bubur berkelip dan lampu pemasa menyala berterusan. Paparan menunjukkan masa sekarang.
Untuk melihat masa yang dipratetapkan, tekan butang HR atau MIN sekali.
Jika masa pratetap lebih singkat daripada jumlah masa memasak yang diperlukan, periuk pemasak
nasi akan memulakan proses memasak dengan segera.
Jam
Untuk menetapkan masa semasa:
1 Pasang plag ke dalam periuk pemasak nasi.
2 Tekan Ö butang sekali dan kemudian gunakan butang HR dan MIN untuk menetapkan masa.
Masa pada paparan mula berkelip.
,
Anda boleh mempercepatkan masa dengan menekan dan menahan butang HR atau MIN.
,
Masa tidak boleh dilaraskan semasa proses memasak atau menyimpan panas.
,
3 Untuk mengesahkan masa, jangan tekan sebarang kekunci selama 5 saat selepas menetapkan
masa. Masa telah disahkan apabila masa yang ditunjukkan pada paparan berhenti berkelip.
Pembersihan
Cabutkan plag perkakas setiap kali sebelum anda mula membersihkannya.
Tunggu sehingga periuk pemasak nasi telah sejuk secukupnya sebelum membersihkannya.
Untuk melindungi salutan tidak lekat pada periuk, jangan:
atau membasuh pinggan;
tuangkan cuka ke dalam periuk.
-
1 Keluarkan periuk dalam daripada jasad perkakas.
2 Tanggalkan tukup bolong stim daripada tudung dengan menariknya ke atas (Gamb. 14).
Untuk membuka tukup bolong stim, tarik kedua-dua bahagian dengan perlahan-
,
lahan (Gamb. 15).
Untuk memasang semula tukup bolong stim, jajarkan titik pada bahagian atas dan bawah dan
,
kemudian tolak kedua-dua bahagian sekali (‘klik’).
Untuk mengembalikan tukup bolong stim ke dalam lubang bolong pada tudung, masukkannya
,
ke dalam lubang dan tekannya ke bawah dengan kukuh (Gamb. 16).
Page 18

BAHASA MELAYU18
3 Bersihkan periuk dalam, senduk nasi dan tukup bolong stim dengan span atau kain di dalam
air panas dengan sedikit cecair pencuci.
Jangan gunakan agen pembersih yang melelas, kain penyental atau alatan logam untuk
membersihkan periuk dalam kerana ini akan merosakkan salutan tidak lekat.
4 Gunakan hanya kain yang lembap untuk mengesat permukaan luar dan dalam jasad dan
tudung periuk pemasak nasi.
Jangan sekali-kali tenggelamkan jasad periuk pemasak nasi di dalam air, atau membilasnya di bawah
pili air. Kesat plat pemanas dengan kain kering.
Alam sekitar
Jangan buang perkakas bersama sampah rumah pada akhir hayatnya, tetapi bawanya ke pusat
,
pungutan rasmi untuk dikitar semula. Dengan melakukan sedemikian anda akan membentu
memelihara alam sekitar (Gamb. 17).
Jaminan dan servis
Jika anda memerlukan maklumat atau menghadapi masalah, sila kunjungi laman web Philips di
www.philips.com atau hubungi Pusat Layanan Pelanggan Philips di negara anda (anda boleh
mendapatkan nombor telefonnya di dalam risalah jaminan sedunia). Jika tiada Pusat Layanan
Pelanggan di negara anda, hubungi wakil pengedar Philips tempatan atau Jabatan Servis Syarikat
Perkakas Domestik dan Penjagaan Diri Philips.
Menyelesaikan masalah
Jika periuk pemasak nasi tidak berfungsi dengan betul atau jika mutu masakan tidak baik, rujuk jadual
di bawah. Jika anda tidak dapat menyelesaikan masalahnya, sila hubungi Pusat Penjagaan Pelanggan
Philips di negara anda.
Masalah Penyebab Penyelesaian
Lampu masak atau lampu
bubur tidak menyala.
Lampu simpan panas/
panas semula tidak
menyala apabila proses
memasak selesai.
LCD menunjukkan
E0,E1,E2,E3,E4
LCD menunjukkan E5 Tekan butang OFF sekali. Perkakas akan
Paparan akan padam
apabila periuk pemasak
nasi dicabut plagnya.
Terdapat masalah
sambungan.
Lampu rosak. Bawa perkakas ke penjual Philips anda atau
Lampu rosak. Bawa perkakas ke penjual Philips anda atau
Malfungsi bahagianbahagian elekronik.
Bateri kehabisan kuasa. Bawa perkakas ke penjual Philips anda atau
Periksa sama ada periuk pemasak nasi
bersambung dengan sesalur dan sama ada
plag dimasukkan dengan rapi ke dalam soket
dinding.
pusat servis yang disahkan oleh Philips.
pusat servis yang disahkan oleh Philips.
Bawa perkakas ke penjual Philips anda atau
pusat servis yang disahkan oleh Philips.
menyambung semula seperti biasa.
pusat servis yang disahkan oleh Philips.
Page 19

Masalah Penyebab Penyelesaian
Nasi masih mentah. Air yang dimasukkan
tidak mencukupi.
Proses memasak
belum lagi bermula.
Periuk dalam dan plat
pemanas tidak
bersentuhan dengan
baik pada satu sama
lain.
Plat pemanas rosak. Bawa perkakas ke penjual Philips anda atau
Lampu pemasa tidak
padam apabila pemasa
ditetapkan.
Nasi terlalu keras atau
terlalu lembut.
Nasinya hangus. Beras tidak dibasuh
Periuk pemasak nasi tidak
secara automatik beralih
ke mod simpan panas..
Lampu rosak. Bawa perkakas ke penjual Philips anda atau
Tidak cukup atau
terlebih air telah
dimasukkan.
Butang yang salah
telah ditekan.
dengan betul.
Kawalan suhu rosak. Bawa perkakas ke penjual Philips anda atau
Tambahkan air mengikut skala di dalam
periuk dalam (lihat bab ‘Menggunakan
perkakas’).
Anda tidak menekan butang COOK atau
CONGEE.
Pastikan tiada sisa asing pada plat pemanas.
pusat servis yang disahkan oleh Philips.
pusat servis yang disahkan oleh Philips.
Tambahkan air mengikut skala di dalam
periuk dalam (lihat bab ‘Menggunakan
perkakas’).
Lihat bab ‘Menggunakan perkakas’.
Basuh beras sehingga air yang mengalir
bersih.
pusat servis yang disahkan oleh Philips.
BAHASA MELAYU 19
Page 20

20
繁體中文
簡介
恭喜您購買本產品並歡迎加入飛利浦!請於 www.philips.com/welcome 註冊您的產品,
來善用飛利浦提供的支援。
一般說明(圖1)
A 蓋子
B 蒸氣通氣孔
C 電子鍋握柄
D 飯匙固定座
E 加熱板
F 電線
G 飯勺
H 量杯
I 內鍋
J 水位刻度
K 主機體
L 控制面板
M 電線連接處
N 拆卸式蒸氣通氣孔蓋
O 釋放控制桿
重要事項
在使用本產品前,請先仔細閱讀說明並保留說明書,以供日後參考。
在您連接電源之前,請檢查本地的電源電壓是否與產品所標示的電源電壓相符。
,
僅能將本產品連接到有接地的電源插座上。請務必確定將插頭確實插入插座中。
,
如果電線損壞,必須交由飛利浦、飛利浦授權之服務中心,或是具備相同資格的技師
,
更換,以免發生危險。
切勿使用其他廠商供應或未經飛利浦認可的附件或配件,否則,將無法享有本公司所
,
提供的保固服務。
請僅使用隨附的飯匙。請勿使用尖銳的器具。
,
不可將電子鍋浸泡在水中或者在水龍頭下沖洗。
,
請勿將電子鍋暴露在高溫下,也不要將它放在正在使用 (或有餘溫) 的爐子或廚具上。
,
請確定加熱板、磁簧開關與內鍋外側是否乾燥、清潔,再開啟電子鍋電源。
,
拔除電子鍋的電源插頭之前,請務必先按下關閉 (OFF) 按鈕。
,
在進行清潔之前,請務必先拔除電子鍋的電源插頭並讓它冷卻下來。
,
請勿直接將內鍋置於爐火上炊飯。
,
使用電子鍋時,請勿擋住蒸氣通氣孔。
,
請勿讓電源線懸吊在置放本產品的餐桌或工作檯邊緣。
,
本產品不適合供下列人士 (包括小孩) 使用:身體官能或心智能力退化者,或是經驗與
,
使用知識缺乏者。他們需要有負責其安全的人員在旁監督,或指示產品的使用方法,
方可使用。
請勿讓孩童將本產品當成玩具。
,
本電器裝置僅適合家用。如果不當使用本電器裝置、作為 (半) 專業用途,或未依照說
,
明使用,保固將無效,且飛利浦將不擔負任何造成損壞的責任。
請將電子鍋放置在平穩的水平面上。
,
本產品使用時,暴露在外的表面可能會變熱。
,
為電器插上或開啟電源時,請確保雙手未潮濕。
,
在炊飯過程中,熱氣可能會從蒸氣通氣孔冒出;若您掀開鍋蓋,熱氣可能會從電子鍋
,
冒出。
請勿在使用電子鍋時,以握柄舉起或移動電子鍋。
,
Page 21

繁體中文 21
電磁場(EMF)
本飛利浦產品符合電磁場 (electromagnetic fields,EMF) 所有相關標準。若正確處理及依
照本使用手冊之說明進行操作,根據現有之科學文獻來看,使用本產品並無安全顧慮。
第一次使用前
請移除內鍋和加熱板中間的紙張。
1 在首次使用本電器前,請徹底清洗電子鍋的各個組件(請參「清潔」章節)。在您開始使
用本電器之前,請確定所有零件都完全乾燥。
2 請將飯匙固定座吸附在電子鍋的主機體上。 (圖 2)
使用此電器
炊飯
1 使用所附的量杯來量米。
一杯生米通常可煮成 2 碗白飯。請不要超過內鍋內側所標示的量線。1 杯米約 180 毫升。
HD4740:1-3 杯米
-
功能選擇 生米數量 (杯)
烹煮一般米飯 1-3
稀飯 0.25-0.50
2 將米徹底洗淨。
請使用另一個容器來洗米以免損壞內鍋的不沾鍋塗層。
3 將事先洗過的米倒入內鍋中。
4 在內鍋中加水直到水位刻度相當於所使用的米杯數。然後撫平米粒的表面。 (圖 3)
例如,如果您要煮 2 杯米,請將水加到 2 杯的水位刻度。
注意: 內鍋內側所標示的水位僅供參考;您可以隨時針對您自己的偏好來調整水量。
5 按下釋放控制桿,打開鍋蓋。
6 將內鍋放入電子鍋中。檢查內鍋是否與加熱板正確接觸。 (圖 4)
請確定內鍋外側是否乾燥、清潔,且沒有異物殘留在加熱板或磁簧開關上。
沒有裝入內鍋之前,或是當內鍋與加熱板接觸不良時,電子鍋均無法啟動。
7 關上電子鍋鍋蓋,將插頭插入牆面的插座,再開啟電源。
您會聽到一次嗶聲。
8 按烹調/快速 (COOK/QUICK) 按鈕。 (圖 5)
烹調指示燈亮起,表示烹調程序開始。
,
您可以按兩下烹調/快速 (COOK/QUICK) 按鈕,在烹調程序開始後的 5 分鐘內切換至
,
快速烹調模式。
烹調程序的最後 10 分鐘,螢幕會以分鐘為單位,進行倒數計時 (10、9、8 等等)。
,
當烹調程序結束時,您會聽到一次嗶聲。烹調或快速指示燈會熄滅,保溫/再加熱指示
,
燈開始持續亮著,表示電子鍋已自動切換為保溫模式。 (圖 6)
下表所示為各功能的大約烹調時間。實際烹調時間可能按照電壓、室溫、溼度和所用水量
而不同。
Page 22

繁體中文22
功能 約略烹調時間 (分鐘) 約略完成時間 (分鐘)
一般 30-40 10
快速 20-30 10
稀飯 30-240 不適用
再加熱 23 23
9 開啟鍋蓋,略微攪動,使米飯鬆開。 (圖 7)
為了達到最佳烹調效果,請在電子鍋切換為保溫模式後立即進行此動作。然後關緊鍋蓋。
攪動米飯放出更多蒸氣,讓米飯更為鬆軟。
10 按下關閉 (OFF) 按鈕可取消烹調程序、預設設定或保溫模式。烹調指示燈會開始閃
爍。 (圖 8)
本電子鍋設置有備用記憶功能,萬一遇到停電,可保留最後選取的模式、功能與設定。若
電力在 2 小時內恢復供電,中斷的烹調程序將會繼續,或是重新啟動定時功能。
拔除電子鍋的電源插頭之前,請務必先按下關閉 (OFF) 按鈕,否則當電子鍋再度插上電源
時,會恢復上次選取的功能及設定。
11 這時請拔下電子鍋電源插頭,加以關閉。
煮稀飯
1 請依照「煮飯」章節的第 1 步到第 7 步操作。
請勿烹調超過稀飯表格中指示的量,以免米飯溢出電子鍋。
2 按稀飯 (CONGEE) 按鈕。 (圖 9)
稀飯指示燈會點亮。
顯示螢幕上的預設烹調時間 1 小時會開始閃爍。
按下小時 (HR) 及/或分鐘 (MIN) 按鈕,以設定理想的時間。您可隨意設定 30 分鐘至 4
,
小時之間的任何時間。 (圖 10)
如果沒有設定烹調時間,本電器會採取預設的烹調時間,即 1 小時。
,
設定好烹調時間之後,稀飯烹調程序會在 5 秒內自動啟動。
,
當烹調程序開始時,螢幕會從原本顯示的預設時間改為顯示目前時間。
若要檢視預設的烹調時間,按一下小時 (HR) 或分鐘 (MIN) 按鈕。
當烹調程序結束時,您會聽到一次嗶聲。稀飯指示燈會熄滅,保溫/再加熱指示燈開始
,
持續亮著,表示電子鍋已自動切換為保溫模式。
3 按下關閉 (OFF) 按鈕可取消烹調程序、預設設定或保溫模式。烹調指示燈會開始閃
爍。
4 這時請拔下電子鍋電源插頭,加以關閉。
再加熱
您可以利用再加熱模式,溫熱已經放涼的米飯。在內鍋中放置的飯以一半為限,以確保米
飯完全溫熱。
1 將已經放涼的米飯翻鬆,均勻地鋪在內鍋中。
2 倒些許的水在飯上,防止加熱之後變得太乾。添加的水量依照所要再加熱的飯量而
定。
如果米飯開始燒焦,再加進更多水。
3 按下烹調/再加熱 (KEEP-WARM/REHEAT) 按鈕兩次,開始再加熱程序。
保溫/再加熱指示燈開始閃爍,開始再加熱程序。
,
螢幕會顯示再加熱時間,並啟動倒數計時。
,
Page 23

繁體中文 23
預設的加熱時間是 23 分鐘。
,
當再加熱程序結束時,您會聽到一次嗶聲。保溫/再加熱指示燈開始持續亮著,表示電
,
子鍋已自動切換為保溫模式。
上桌之前,先將米飯拌勻。
,
放涼的米飯不可多次加熱。
,
保溫
此功能讓您可以將米飯長時間保溫。
按一下保溫/再加熱 (KEEP-WARM/REHEAT) 按鈕,啟動保溫功能。
注意: 保溫/再加熱指示燈會開始持續亮著。
建議您不要讓米飯保溫時間超過 12 小時,以保持米飯風味。
保溫過程中,螢幕會以小時為單位,顯示 0 到 11 的時間 (0HR、1HR ...11HR)。經過 12
個小時之後,螢幕會切換為目前的時間。
經過 12 個小時之後,保溫模式就會結束,烹調指示燈開始閃爍。
按下關閉 (OFF) 按鈕,將牆上插座中的電源插頭拔除,關閉電子鍋的電源。
定時功能
您可以在煮飯和稀飯模式中使用定時功能。
按下定時 (TIMER) 按鈕,以設定您希望食物完成的時間。
設定的時間從 0 分鐘到 23 小時皆可。
設定米飯的完成時間:
1 若要設定米飯煮好的時間,按一下定時 (TIMER) 按鈕,再以小時 (HR) 及/或分鐘
(MIN) 按鈕設定時間。
例如,可利用定時 (TIMER) 按鈕設定米飯在 6:30 PM 時烹調完成。 (圖 11)
,
2 按下烹調/快速 (COOK/QUICK) 按鈕,啟動定時和烹調程序。 (圖 12)
烹調指示燈開始閃爍,定時指示燈持續亮著。螢幕中顯示的是目前時間。若要檢視預設的
時間,按一下小時 (HR) 或分鐘 (MIN) 按鈕。
如果預設的時間比所需的總烹調時間來得短,電子鍋會立即開始烹調程序。
設定稀飯的完成時間:
1 若要設定稀飯煮好的時間,按一下定時 (TIMER) 按鈕,再以小時 (HR) 及/或分鐘
(MIN) 按鈕設定時間。 (圖 13)
例如,可利用定時 (TIMER) 按鈕設定稀飯在 6:30 PM 時烹調完成。
,
2 按稀飯 (CONGEE) 按鈕,然後按照「煮稀飯」單元中的第 2 步驟操作。
稀飯指示燈開始閃爍,定時指示燈持續亮著。螢幕中顯示的是目前時間。若要檢視預設的
時間,按一下小時 (HR) 或分鐘 (MIN) 按鈕。
如果預設的時間比所需的總烹調時間來得短,電子鍋會立即開始烹調程序。
時鐘
若要設定目前的時間:
1 插好電子鍋的電源。
2 按一下 Ö 按鈕,然後使用小時 (HR) 及分鐘 (MIN) 按鈕,以設定時間。
螢幕中的時間就會開始閃爍。
,
將小時 (HR) 或分鐘 (MIN) 按鈕按住不動,可將時間往前迅速調整。
,
烹調或保溫過程中無法調整時間。
,
3 若要確認時間,設定時間之後的 5 秒鐘內完全不要按任何按鈕。顯示畫面中的時間停
止閃爍時,表示時間已經確認完畢。
Page 24

繁體中文24
清潔
開始清潔電子鍋前,請先拔除插頭。
在進行清潔之前,請稍加等待,確定電子鍋已充分冷卻。
為了保護不沾鍋塗層,請勿採取下列動作:
使用內鍋洗碗盤;
-
在鍋中倒入醋。
-
1 將內鍋從電子鍋中取出。
2 將蒸氣通氣孔蓋往上拉,即可從鍋蓋拆卸下來。 (圖 14)
若要拆卸蒸氣通氣孔蓋,輕輕拉開兩片外殼。 (圖 15)
,
若要將蒸氣通氣孔蓋重新裝回,請將上下方的點對準,然後將兩片外殼壓緊 (要聽到「
,
喀搭聲」)。
若要將蒸氣通氣孔蓋裝回鍋蓋的通氣孔中,將它插入洞孔中,再用力向下壓。 (圖 16)
,
3 若要清潔內鍋、飯匙和蒸氣通氣孔蓋,請用海棉或軟布,以熱水加上少許清潔劑來清
洗。
不要使用磨蝕性或腐蝕性的清潔劑、菜瓜布、或金屬器具來清潔內鍋,因為這些物質會損
壞不沾鍋塗層。
4 電子鍋主機體的外部、內側及電子鍋鍋蓋只能使用濕布擦拭。
不可將電子鍋浸泡在水中或者在水龍頭下沖洗。請以乾布擦拭加熱板。
環境保護
電器壽命結束時請勿與一般家庭廢棄物一併丟棄。請將該產品放置於政府指定的回收
,
站,此舉能為環保盡一份心力。 (圖 17)
保固與服務
若您需要相關資訊或有任何問題,請瀏覽飛利浦網站 www.philips.com,或連絡您當地的
飛利浦客戶服務中心 (您可以在全球保證書上找到連絡電話)。如果您當地沒有客戶服務中
心,請洽詢當地飛利浦經銷商,或與飛利浦小家電服務部門聯繫。
故障排除
如果您的電子鍋運作不正常,或烹調品質不佳,請參考下面的表格。如果您無法解決問
題,請連絡您當地的飛利浦客戶服務中心。
問題 原因 解決方法
烹調指示燈/稀飯指示燈
沒有點亮。
保溫/再加熱指示燈沒有
在煮飯程序結束時點
亮。
CD 顯示 E0、E1、E2、
E3、E4
電源連接有問題。 請檢查電子鍋是否連接電源及插頭是否
確實插入牆面插座中。
指示燈故障。 請將電器送至飛利浦經銷商或飛利浦授
權的服務中心。
指示燈故障。 請將電器送至飛利浦經銷商或飛利浦授
權的服務中心。
電子零件故障。 請將電器送至飛利浦經銷商或飛利浦授
權的服務中心。
Page 25

繁體中文 25
問題 原因 解決方法
LCD 顯示 E5 按一下開關 (on/off) 按鈕。電器將恢復
到正常運作。
電子鍋的電源插頭拔除
後,顯示螢幕也跟著關
閉
米飯沒有煮透。 加入的水量不足。 請根據內鍋內側所標示的刻度來加水
設定定時功能之後,定
時指示燈沒有點亮。
米飯太硬或太軟。 加入的水量不足或
米飯煮焦了。 生米未徹底清洗。 請清洗生米,直到水流清澈。
電子鍋沒有自動切換至
保溫模式。
電池的電力已經耗盡。請將電器送至飛利浦經銷商或飛利浦授
權的服務中心。
(請參閱「使用此電器」單元)。
烹調程序沒有開始。您沒有按下烹調 (COOK) 或 稀飯
(CONGEE) 按鈕。
內鍋沒有與加熱板
良好接觸。
加熱元件損壞。 請將電器送至飛利浦經銷商或飛利浦授
指示燈故障。 請將電器送至飛利浦經銷商或飛利浦授
太多。
按錯鈕。 請參閱「使用此電器」單元。
溫度控制功能故障。請將電器送至飛利浦經銷商或飛利浦授
確認加熱板上沒有異物殘留。
權的服務中心。
權的服務中心。
請根據內鍋內側所標示的刻度來加水
(請參閱「使用此電器」單元)。
權的服務中心。
Page 26

26
简体中文
产品简介
感谢您的惠顾,欢迎光临飞利浦!为了您能充分享受飞利浦提供的支持,请注册您的产
品,网址为 www.philips.com/welcome。
一般说明(图1)
A 盖子
B 蒸汽孔
C 电饭煲把手
D 饭勺支架
E 加热元件
F 电源线
G 饭勺
H 量杯
I 内胆
J 水位标记
K 煲身
L 控制面板
M 电源线连接
N 可分离式蒸汽孔帽
O 释放杆
注意事项
使用本产品前,请仔细阅读本使用说明书,并妥善保管以备日后参考。
在将产品连接电源之前,请先检查产品所标电压与当地的供电电压是否相符。
,
产品必须插入有接地的插座,且务必确保其已稳固插入。
,
如果电源软线损坏,为避免危险,必须由制造厂或其维修部或厂方认可的专职人员来
,
更换。
切勿使用其它制造商生产的或未经飞利浦特别推荐的零件或附件。如果使用了此类附
,
件或部件,本产品的保修将会失效。
仅使用附送的饭勺。不要使用尖锐的器具。
,
切勿将电饭煲主体浸入水中,也不能在自来水龙头下冲洗。
,
切勿将电饭煲暴露在高温之下,也不要将电饭煲放在正在工作或仍然发热的炉具或炊
,
具上。
接通电饭煲电源之前,确保加热元件、限温器和内锅外侧是洁净、干燥的。
,
在拔下电饭煲电源插座之前,请务必按 OFF(关闭)按钮。
,
清洁电饭煲之前,必须先将插头拔掉,并待其冷却。
,
不要将内锅直接放在火上煮饭。
,
电饭煲正在工作时,不要盖住其蒸汽孔。
,
不要将电源线悬挂在放置产品的桌子或工作台的边缘上。
,
本产品不打算由肢体不健全、感觉或精神上有障碍或缺乏相关经验和知识的人(包括
,
儿童)使用,除非有负责他们安全的人对他们使用本产品进行监督或指导。
应照看好儿童,确保他们不玩耍这些产品。
,
本产品仅限于家用。如果本产品使用不当、用于专业或半专业用途或未按本使用说明
,
书进行操作,则本产品的保修将会失效,并且对于因此而造成的损失,飞利浦将不承
担任何责任。
将电饭煲放在稳固、平整且水平的表面上。
,
产品在使用时,表面会变得很热。
,
切勿使用潮湿的手插入产品插头或打开产品电源。
,
小心煮饭期间从蒸汽孔排出的热蒸汽或在打开盖子时从电饭煲中冒出的热蒸汽。
,
煮饭期间,切勿提起及移动电饭煲。
,
Page 27

简体中文 27
电磁场(EMF)
这款飞利浦产品符合关于电磁场 (EMF) 的所有相关标准。据目前的科学证明,如果正确使
用并按照本用户手册中的说明进行操作,本产品是安全的。
初次使用之前
取出内锅和加热元件之间的隔板。
1 首次使用本产品之前,请彻底清洁电饭煲的所有部件(见“清洁”一章)。使用本产
品之前,确保所有部件都已完全干燥。
2 将附带的饭勺支架固定在电饭煲机身上。 (图 2)
使用本产品
煮饭
1 使用附带的量杯量米。
每杯生米大约相当于煮熟后的 2 碗米饭。不要超过内锅里指定的量。1 杯米大约为 180 毫
升。
HD4740:1-3 杯米
-
菜单 用米量(杯)
普通米煮饭 1-3
煮粥 0.25-0.50
2 将米彻底淘洗干净。
为避免损伤内锅的不粘涂层,应使用另外的容器淘米,
3 将淘好的米倒入内锅。
4 按所倒入白米杯数,依照刻在内锅上的相应水位标记加入适量的水,然后将米抚
平。 (图 3)
例如,如果煮 2 杯米,就应将水加至水位标记上 2 杯的位置。
注: 内锅的水位标记只是一个参考;您始终可以根据个人喜好调整水位。
5 按释放杆,打开盖子。
6 将内锅放入电饭煲。检查内锅是否已经正确接触加热元件。 (图 4)
请确保内锅的外表面是洁净且干燥的,并且没有其他杂物黏附在加热元件及限温器上。
如果没有内锅或者内锅与加热元件接触不当,电饭煲将无法工作。
7 合上电饭煲的盖子,将插头插入插座并打开电源。
您将听到一声哔声。
8 按下 COOK/QUICK 按钮。 (图 5)
烹饪指示灯亮起,烹饪过程开始。
,
您可以在烹饪过程开始后的 5 分钟内按两次 COOK/QUICK 按钮切换到快速烹饪模
,
式。
在烹饪过程的最后 10 分钟,显示屏以分钟为单位进行倒计时(10、9、8 等)。
,
当烹饪过程结束时,您将听到一声哔声。烹饪或快速烹饪指示灯将熄灭,保温/再加热
,
指示灯开始持续亮起,指示电饭煲已自动切换到保温模式。 (图 6)
下文中的表格列出了各种功能的大概烹饪时间。实际烹饪时间视电压、室温、湿度和用水
量而定。
Page 28

简体中文28
功能 近似烹饪时间(分钟) 就绪剩余时间(分钟)
普通 30-40 10
快速 20-30 10
粥 30-240 不适用
再加热 23 23
9 打开盖子,翻松米饭。 (图 7)
为获得最佳效果,在电饭煲切换到保温模式后翻动米饭。然后将盖子盖牢。翻动米饭会使
过多的蒸汽散失,这将使米饭更加蓬松。
10 按 OFF 按钮取消烹饪过程、预定设置或保温模式。烹饪指示灯将开始闪烁。 (图 8)
电饭煲具有备用记忆时功能,能够在出现电源故障时保留上次选定的模式、功能和设置。
如果电源在 2 个小时内恢复正常,中断的烹饪过程将会继续,或者定时功能将被重新激
活。
在断开电饭煲电源之前,请务必按 OFF 按钮,否则电饭煲在重新通电后将恢复上次选择
的功能和设置。
11 拔下电饭煲电源插头,切断电源。
煮粥
1 遵循“煮饭”中的步骤 1 至 7。
不要超过表中针对煮粥时所示的量,否则可能导致电饭煲溢出。
2 按下 CONGEE 按钮。 (图 9)
粥指示灯亮起。
默认的 1 小时烹饪时间将在显示屏上闪烁。
按 HR(小时)和/或 MIN(分钟)按钮,设置需要的时间。您可以设置 30 分钟至 4
,
小时内的任意时间。 (图 10)
如果设置烹饪时间失败,则采用默认的烹饪时间 1 小时。
,
煮粥过程将在设定好烹饪时间后的 5 秒钟内自动开始。
,
烹饪过程开始后,显示屏上的预设时间便会切换成当前时间。
要查看预设的烹饪时间,请按一次 HR 或 MIN 按钮。
当烹饪过程结束时,您将听到一声哔声。煮粥指示灯将熄灭,保温/再加热指示灯开始
,
持续亮起,指示电饭煲已自动切换到保温模式。
3 按 OFF 按钮取消烹饪过程、预定设置或保温模式。烹饪指示灯将开始闪烁。
4 拔下电饭煲电源插头,切断电源。
再加热
您可以用再加热模式来加热冷饭。加入内锅的量不能超过其容量的一半,以确保米饭能得
到适当加热。
1 翻松冷饭并将其均匀地分布在内锅中。
2 在饭中倒入一些水以避免饭太干。添加的水量视要再加热的米饭量而定。
如果米饭开始变焦,则多添加一些水。
3 按两次 KEEP-WARM/REHEAT 按钮开始再加热过程。
保温/再加热指示灯开始闪烁,再加热过程开始。
,
再加热时间显示,倒计时开始。
,
默认再加热时间为 23 分钟。
,
Page 29

简体中文 29
当再加热过程结束时,您将听到一声哔声。保温/再加热指示灯开始持续亮起,指示电
,
饭煲已自动切换到保温模式。
在食用前彻底搅拌米饭。
,
冷饭再加热的次数不能超过一次。
,
保温
此功能使您可以在较长的时间内保持米饭的热度。
按一次 KEEP-WARM/REHEAT 按钮启动保温功能。
注: 保温/再加热指示灯开始持续亮起。
建议不要让米饭的保温时间超过 12 个小时以保持其口感。
在保温期间,显示屏以小时为单位显示 0 至 11 小时内的时间(0HR、1HR ...11HR)。
12 小时后,显示屏将切换到当前时间。
12 小时后,保温模式将结束,烹饪指示灯将闪烁。
按下 OFF(关闭)按钮,从插座拔下插头,切断电饭煲电源。
计时器
您可以使用定时器以方便煮饭和煮粥。
按 TIMER(定时器)按钮设置食品可以食用的时间。
可以将时间设置为 0 分钟至 23 小时。
设置煮好米饭的时间:
1 要设置米饭煮好时间,请按一次 TIMER(定时器)按钮,然后用 HR(小时)和/或
MIN(分钟)按钮设置时间。
例如,您可以用 TIMER 按钮将煮好米饭的时间设置在下午 6:30。 (图 11)
,
2 按 COOK/QUICK 按钮启动定时器并开始烹饪过程。 (图 12)
烹饪指示灯闪烁,且定时器指示灯持续亮起。显示屏显示当前时间。要查看预设时间,请
按一次 HR 或 MIN 按钮。
如果预设的时间比需要的总烹饪时间短,电饭煲将立即开始烹饪过程。
设置煮好粥的时间:
1 要设置煮好粥的时间,请按一次 TIMER 按钮,然后用 HR 和/或 MIN 按钮设置时
间。 (图 13)
例如,您可以用 TIMER 按钮将煮好粥的时间设置在下午 6:30。
,
2 按 CONGEE 按钮,然后执行“煮粥”一节中的步骤 2。
煮粥指示灯闪烁,且定时器指示灯持续亮起。显示屏显示当前时间。要查看预设时间,请
按一次 HR 或 MIN 按钮。
如果预设的时间比需要的总烹饪时间短,电饭煲将立即开始烹饪过程。
时钟
要设置当前时间:
1 接通电饭煲的电源。
2 按一次 Ö 按钮,然后用 HR 和 MIN 按钮设置时间。
显示屏上的时间开始闪烁。
,
按住 HR(小时)或 MIN(分钟)按钮即可快速增加时间。
,
在烹饪或保温过程中不能调整时间。
,
3 要确认时间,在设置时间后 5 秒钟内不按任何键即可。当显示屏上显示的时间停止闪
烁时,即表示已经确认时间。
Page 30

简体中文30
清洁
在开始清洗电饭煲之前,请拔掉电饭煲的电源线。
等到电饭煲完全冷却后再开始清洗。
要保护内锅的不粘涂层,请勿:
用内锅洗盘子;
-
将醋倒入内锅。
-
1 将内锅提出电饭煲的煲身。
2 向上拉蒸汽孔帽,从煲盖上拆下蒸汽孔帽。 (图 14)
要分开蒸汽孔帽,可将两半部分轻轻拉开。 (图 15)
,
要重新装回蒸汽孔帽,请将上面的圆点与下面部分对准,然后将两半部分同时推入(
,
可听到嗒哒声)。
要将蒸汽孔帽装回煲盖的蒸汽孔,请将蒸汽孔帽插入蒸汽孔并向下按紧。 (图 16)
,
3 在热水中加入清洁剂,用海绵或布清洁内锅、饭勺和蒸汽孔帽。
不要用任何研磨性清洗剂,材料或金属网绒清洁内锅,以免损坏不粘涂层。
4 只能用湿布擦拭电饭煲煲身内外和煲盖。
不可将电饭煲主机身浸入水中,也不能在水龙头下冲洗。用干布擦拭加热元件。
环保
弃置产品时,请不要将其与一般生活垃圾堆放在一起;应将其交给官方指定的回收中
,
心。这样做有利于环保。 (图 17)
保修与服务
如果您需要详细信息或有任何问题,请浏览飞利浦网站,地址为 www.philips.com。您也
可以与贵国的飞利浦顾客服务中心联系(您可以从全球保修卡中找到电话号码)。如果贵
国没有飞利浦顾客服务中心,请与当地的飞利浦经销商或与飞利浦家庭小电器的维修中心
联系。
故障排除
如果您的电饭煲工作不正常,或烹饪质量有缺陷,请查询以下表格。如果仍不能解决问
题,则请联系您所在国家的飞利浦客户服务中心。
问题 原因 解决方法
烹饪指示灯或煮粥指示
灯不亮。
烹饪过程结束后,保温/
再加热指示灯不亮。
LCD 显示屏显示 E0、
E1、E2、E3、E4
LCD 显示屏显示 E5 按一次 OFF 按钮。产品将恢复正常。
拔下电饭煲插头时,显
示屏关闭。
接触不良。 检查电饭煲是否与电源连接,插头是否插
牢。
指示灯有故障。 请将本产品送往当地的飞利浦经销商,或
经飞利浦授权的客户服务中心。
指示灯有故障。 请将本产品送往当地的飞利浦经销商,或
经飞利浦授权的客户服务中心。
电子部件故障。 请将本产品送往当地的飞利浦经销商,或
经飞利浦授权的客户服务中心。
电池电量不足。 请将本产品送往当地的飞利浦经销商,或
经飞利浦授权的客户服务中心。
Page 31

简体中文 31
问题 原因 解决方法
饭没煮好。 加水不足。 将水加到内锅的相应水位标志(见“使用
本产品”一章)。
煮饭过程未启
动。
内锅与加热元件
接触不良。
加热元件已损
坏。
在设置了定时器的情况
下,定时器指示灯不
亮。
米饭太硬或太软。 加水不足或太
饭煮焦了。 米没有洗干净。 将米洗干净。
电饭煲没有自动切换到
保温模式。
指示灯有故障。 请将本产品送往当地的飞利浦经销商,或
多。
按下了错误的按钮。见“使用产品”一章。
温度控制有故
障。
未正确按下 COOK 或 CONGEE 按钮。
确保加热元件上没有黏附其他杂物。
请将本产品送往当地的飞利浦经销商,或
经飞利浦授权的客户服务中心。
经飞利浦授权的客户服务中心。
将水加到内锅的相应水位标志(见“使用
本产品”一章)。
请将本产品送往当地的飞利浦经销商,或
经飞利浦授权的客户服务中心。
Page 32

32
Page 33

33
Page 34

2 3 4 5
6 7 8 9
10 11 12 13
34
14
15 16 17
Page 35

35
Page 36

4222.001.9889.5
 Loading...