

HD3802

213
6
7
8
9
12
5
2
1
3
4
18
19
17
16
13
11
10
22
21
20
14
15
A
D
B C

4

ENGLISH 6
繁體中文 18
HD3802

6
ENGLISH
Introduction
Congratulations on your purchase and welcome to Philips! To fully benet
from the support that Philips offers, register your product at www.philips.
com/welcome.
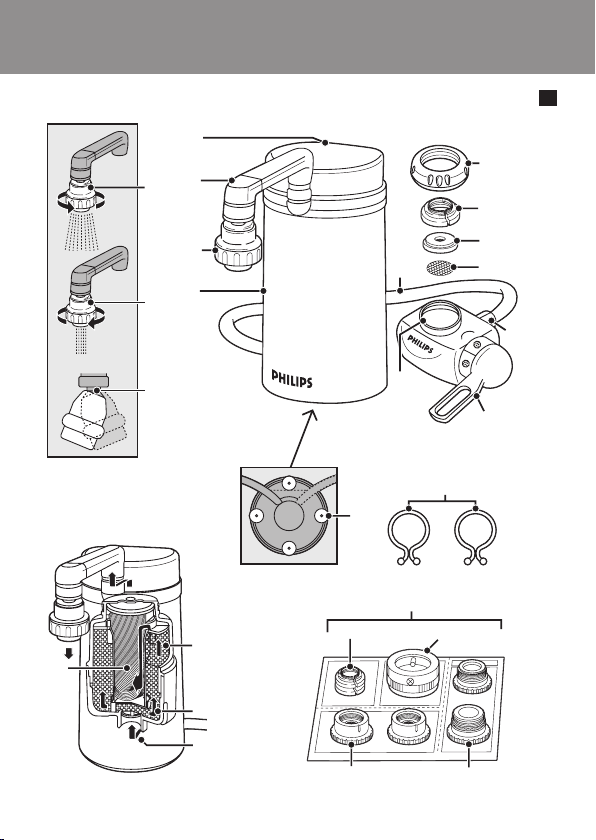
General description (Fig. 1)
1 Filter housing
2 Filtered water outlet
3 Swivel arm
4 Filter cover
5 Hose
6 Attachment nut
7 Tap adapter (A-type 16mm)
8 Rubber washer
9 Stainless steel screen
10 Hose joint
11 Water selection lever
12 Water selection unit
13 Suction cups on bottom
14 Fasteners
15 Tap adapters
A A-type
B B-type
C C-type
D D-type
16 Unltered water inlet
17 Granular activated coral
18 Granular activated carbon
19 Hollow bre
20 Swivel nozzle
21 Filtered stream (turn nozzle clockwise)
22 Filtered spray (turn nozzle anticlockwise)

ENGLISH 7
Important
Read this user manual carefully before you use the water purier and
save it for future reference.
Warning
-
This water purier is not intended for use by persons (including
children) with reduced physical, sensor y or mental capabilities, or lack
of experience and knowledge, unless they have been given
supervision or instruction concerning use of the appliance by a
person responsible for their safety.
Children should be supervised to ensure that they do not play with
-
the water purier.
Do not let water hotter than 50°C run through the water purier, as
-
this may damage the water purier.
Do not let the water purier freeze.
-
Before daily use
To prevent quick clogging of the lter cartridge, let the water run at
-
the unltered setting for around 5 seconds before every use.
If the water is highly coloured or turbid due to work on your water
-
network, do not let the water run at the ltered setting until the
water is clear.
Cautions:
-
1 Let the water run at the ltered setting for 10 seconds before use
each day.
2 Let the water run at the ltered setting for 60 seconds before use if
you have not used the water purier for more than two days.
3 If you have not used the water purier for more than two weeks, let
the water run at the ltered setting for 2-3 minutes before use. If the
lter cartridge emits an unpleasant smell, replace it with a new one.
During use
-
Only use the water purier to lter water that meets drinking water
standards.
Do not block the ltered water outlet or connect other devices to it.
-

ENGLISH8
If the water pressure is very high, reduce the water ow of the tap to
prevent damage to the cartridge.
Keep the water purier away from heat to avoid distortion or
breakage.
Do not tamper with the water purier.
-
Do not remove the lter cartridge while you use the water purier
-
Do not use the water purier without a lter cartridge.
-
Do not place the water purier near a window where it is exposed
to direct sunlight.
This water purier does not soften water.
-
Do not use ltered water in aquariums. Tap water, ltered or
-
unltered, can be harmful to sh.
Do not store puried water to avoid contamination. Air contact
-
contaminates puried water quickly. If you want to store puried
water, use a clean container and keep it in the refrigerator. Do not
keep it in the refrigerator longer than 1 day to avoid contamination.
Features
Philips’ multi-ltration system consists of a primary lter, a secondary
-
lter, a high-tech hollow-bre membrane lter, a granular activated
carbon lter and a granular activated coral lter.
The hollow bre membrane contains more than 1200 billion
micropores that are small enough to remove particles down to
0.1µm. It eliminates 99.99%* of bacteria, rust and other particles
larger than the micropore size from your tap water without removing
calcium, magnesium and other minerals that are vital to your body. (*
tested according to Japanese Water Purier Association (JWPA)
standard).
The granular activated carbon removes unpleasant chlorine smell, bad
taste and odours from your tap water.
The granular activated coral enriches your ltered water with natural
minerals to improve the taste and to make it healthier.
The 360° swivel arm and the swivel nozzle provide ultimate control
-
of the ltered water ow.

ENGLISH 9
Preparing for use
Mounting the water selection unit
When you exchange the adapter, beware the screw thread of the tap is
sharp.
Before you install the water purier, make sure all tap adapters you
require are present.
The tap must have a diameter of 13mm-25mm.
Determine what type of tap you have and select the appropriate
tap adapter.
The tap adapters supplied make the water purier suitable for almost
-
any kitchen tap. However, the water purier may not t some
uncommon types of taps.
The tap water pressure has to be between 0.7kgf/cm² and 3.5kgf/cm².
-
If you use the water purier at a water pressure below this range, the
ltered water ow is either extremely low or there is no ow at all.
On the other hand, if the water pressure exceeds this range, the
water purier gets damaged.
Installation A-type adapter
For taps with a round spout with a diameter of 16mm, 17.5mm or
19mm (Fig. 2).
1 Remove the attachment nut and the adapter from the water
selection unit (Fig. 3).
2 Pass the attachment nut over the tap spout (Fig. 4).
3 Place the matching adapter (A-type) over the tip of the spout. The
16mm adapter is attached to the water selection unit when you
unpack it. Replace this adapter with the 17.5mm adapter or 19mm
adapter to t the diameter of your tap (Fig. 5).
4 Tighten the attachment nut rmly onto the water
selection unit (Fig. 6).
Installation B-type adapter
For taps with an aerator (threaded on the outside) (Fig. 7).
-

ENGLISH10
1 Remove the attachment nut and the adapter from the water
selection unit (Fig. 3).
2 Remove the aerator cap from the tap and pass the attachment nut
over the spout. Take out the original adapter and screw the
matching adapter (B-type) onto the tap (Fig. 8).
3 Tighten the adapter further with a coin (Fig. 9).
4 Tighten the attachment nut rmly onto the water selection
unit (Fig. 10).
Installation C-type adapter
For taps with an aerator (threaded on the inside) (Fig. 11).
-
1 Remove the attachment nut and the adapter from the water
selection unit (Fig. 3).
2 Remove the aerator cap from the tap. Take out the original adapter
and screw the matching adapter (C-type) onto the tap through the
attachment nut. (Fig. 12)
3 Tighten the adapter further with a coin (Fig. 13).
4 Tighten the attachment nut rmly onto the water selection
unit (Fig. 14).
Installation D-type adapter
For taps other than A, B or C. (Fig. 15)
-
1 Remove the attachment nut and the adapter from the water
selection unit (Fig. 3).
2 Screw the D-type adapter about halfway onto the water selection
unit. Make sure to leave enough room in order to tighten the tting
at a later step. (Fig. 16)
3 Push the water selection unit rmly onto the tap from below and
tighten the 4 screws evenly. Make sure that you keep the tap in the
center of the screw fastener. At the same time maintain pressure
on the water purier housing from below. (Fig. 17)

ENGLISH 11
4 Tighten the attachment nut rmly onto the water selection
unit (Fig. 18).
Make sure the rubber washer is rmly pushed against the tap to prevent
water leakage.
Connecting the hose to the water selection unit
1 Make sure the tap is closed.
2 Set the water selection lever to the unltered stream
position (Fig. 19).
3 Cut the hose to the required length (Fig. 20).
4 Remove the hose joint from the water selection unit (Fig. 21).
5 Push the hose through the hose joint (1). Push the hose onto the
connection point until it does not go any further (2) (Fig. 22).
6 Tighten the hose joint (Fig. 23).
7 Use the nylon fasteners to fasten the hose along the tap (Fig. 24).
Using the water purier
The water selection unit has 4 settings: ltered spray, ltered stream,
unltered spray and unltered stream.
The unltered spray and stream come out of the water selection unit.
-
The ltered water comes out of the swivel nozzle. The swivel nozzle
-
has two settings: ltered spray and ltered stream.
Do not let water hotter than 50°C run through the water purier, as
this may damage the water purier.
Filtered water (spray or stream)
Select this setting for drinking, washing vegetables or fruits and
for cooking.
1 Turn the swivel arm to the desired position.
2 Turn the water selection lever on the water selection unit until the
ltered water symbol is aligned with the indicator (Fig. 25).

ENGLISH12
3 Set the swivel nozzle to spray or stream.
To select the ltered spray, turn nozzle anti-clockwise.
-
To select the ltered stream, turn nozzle clockwise.
-
4 Move the swivel nozzle until it is in the desired position
5 Open the tap.
Filtered spray or stream comes out of the swivel nozzle.
,
If you lter water between 35°C and 50°C, the water may have an
unpleasant smell. The lter cartridge has absorbed this smell during
ltering, but releases it again if you lter water hotter than 35°C.
Unltered water (spray or stream)
Spray
Select this setting for washing dishes and other jobs that require a gentle
water ow.
1 Turn the water selection lever on the water selection unit until the
unltered spray symbol is aligned with the indicator (Fig. 26).
2 Open the tap.
Unltered spray comes out of the water selection unit.
,
Unltered stream
Select this setting for a strong water ow.
1 Turn the water selection lever on the water selection unit until the
unltered stream symbol is aligned with the indicator (Fig. 19).
2 Open the tap.
Unltered stream comes out of the water selection unit.
,
Cleaning
Never use scouring pads, abrasive cleaning agents or aggressive liquids
such as petrol or acetone to clean the water purier. These substances
may cause cracking, discolouration or distortion.
1 Wipe the water selection unit and the lter housing with a damp
cloth.

ENGLISH 13
2 Clean the ltered water outlet with a clean soft brush and wipe off
any contamination with a clean cloth.
Note: Do not use a used toothbrush, as it may transfer bacteria to the water
outlet.
3 Regularly clean the stainless steel screen under a running tap with a
clean and soft brush.
Replacement
New lter cartridges are available under type number HD3902.
Replace the lter cartridge if it is clogged to prevent damage to the
water purier.
No part of the lter cartridge can be reused. Discard the used
cartridge and replace it with a new one.
When to replace lter cartridge
The actual lifetime of the lter cartridge depends on the quality of the
local water and the water pressure.
For optimal performance of the water purier, replace the lter cartridge
if one of the following situations occurs:
A You have used the lter cartridge for twelve months.
B The volume of puried water decreases substantially.
C The ltered water still has an unpleasant smell or is still turbid
after purication.
Reduced lter cartridge life
The lter cartridge has a shorter life and should be replaced more
frequently in the following situations:
The water pressure is very low.
The pipes and water tank are worn.
The tap water is contaminated due to plumbing activities or cleaning
of the water tank.
When you use cloudy water immediately after heavy rain.
-

ENGLISH14
How to replace the lter cartridge
1 Close the tap and set the water selection lever to the unltered
stream position (Fig. 19).
2 Turn the cover anticlockwise to remove it from the lter
housing (Fig. 27).
3 Remove the cover with the lter attached from the lter
housing (Fig. 28).
4 Turn the lter cartridge clockwise to remove it (Fig. 29).
5 Screw the new lter cartridge anticlockwise into the cover of the
lter housing (Fig. 30).
6 Insert the cover with the cartridge attached into the lter
housing (Fig. 31).
7 Turn the cover clockwise to tighten it (Fig. 32).
Make sure the cover is tightened rmly.
Environment
Do not throw away the water purier with the normal household
-
waste at the end of its life, but hand it in at an ofcial collection point
for recycling. By doing this, you help to preserve the
environment (Fig. 33).
Guarantee & service
If you need service or information or if you have a problem, please visit
the Philips website at www.philips.com or contact the Philips Consumer
Care Centre in your country (you nd its phone number in the
worldwide guarantee leaet). If there is no Consumer Care Centre in
your country, go to your local Philips dealer.

ENGLISH 15
Troubleshooting
This chapter summarises the most common problems you could
encounter with the water purier. If you are unable to solve the problem
with the information below, contact the Consumer Care Centre in your
country.
Problem Solution
Water leaks from
the attachment nut.
Water leaks from the
bottom of the lter
housing unit.
The water ow is
weak at the unltered
setting.
The water ow is
weak at the ltered
setting.
Perhaps you have not installed the water
purier properly. Reinstall the water
purier according to the instructions in this
user manual.
Perhaps the attachment nut or the tap adapter
is damaged. Contact an authorised Philips
service centre.
Perhaps the tap water pressure is higher than
specied.
You may need to wind some Teon
tape around the thread of the tap adapter.
Perhaps the lter cartridge is not properly
installed. Reinstall the lter car tridge. See
chapter ‘Preparing for use’, section ‘Installing the
lter cartridge’.
Perhaps the stainless steel screen under the
rubber washer inside the water selection unit is
clogged. Clean it with a soft brush and rinse it.
Perhaps the lter cartridge is clogged. Replace
the lter cartridge. See chapter ‘Replacement’,
section ‘How to replace the lter cartridge’.
Perhaps the tap water pressure is lower than
specied.

ENGLISH16
Problem Solution
The water ows from
the safety valve when
ltered water is
selected.
Technical specications
The specications below are according to Japanese Industrial Standards
(JIS) s 3201.
The water pressure is too high. Reduce the
water volume.
Product specications
Product name and type
number
Major lter
components
Initial water ow rate 4ltrs/min. (water pressure at 1kgf/cm2, water
Chlorine reduction
capacity
Turbidity reduction
capacity
Filter lifetime Approximately 1 year at 20ltrs a day (the
Replacement lter
cartridge
Countertop water purier HD3802
Polysulphone hollow-bre membrane,
granular activated carbon and granular
activated coral
temperature at 20°C)
8,000ltrs (water density at 2ppm)
4,000ltrs (water turbidity at 10NTU)
actual lifetime depends on the quality of the
local water and the water pressure)
HD3902

Product specications
ENGLISH 17
Minimum water
pressure
Maximum water
pressure
Accessories HD3902 lter cartridge, 8 tap-mounting
Appliance dimensions Height: 240mm; diameter: 116mm
Packaging dimensions 250mm x 192mm x 140mm (H x W x D)
Weight Approximately 1.3kg
Country of origin Japan
0.7kgf/cm² (7 metres of water column/70kPa)
3.5kgf/cm² (35 metres of water column/
350kPa)
adapters

18
繁體中文
簡介
恭喜您購買本產品並歡迎加入飛利浦!請於 www.philips.com/
welcome 註冊您的產品,來善用飛利浦提供的支援。
一般說明(圖1)
1 濾芯外殼
2 過濾水出水口
3 旋轉式懸臂
4 濾網護蓋
5 軟管
6 連接螺帽
7 自來水轉接頭 (A 型 16 公釐)
8 橡膠墊圈
9 不鏽鋼網
10 軟管接頭
11 選水調整鈕
12 水流切換組件
13 底部吸盤
14 扣件
15 自來水轉接頭
A A 型
B B 型
C C 型
D D 型
16 未過濾水注水口
17 顆粒狀活性珊瑚
18 顆粒狀活性碳
19 中空絲膜
20 旋轉式噴嘴
21 已過濾水直流式 (順時鐘方向旋轉噴嘴)
22 已過濾淋灑式 (逆時鐘方向旋轉噴嘴)
重要事項
使用淨水器前,請先仔細閱讀使用手冊,並保留說明以供日後參
考。

繁體中文 19
警示
本淨水器不適合供下列人士 (包括小孩) 使用:身體官能或心智
-
能力退化者,或是經驗與使用知識缺乏者。他們需要有負責其
安全的人員在旁看護,或指示產品的使用方法,方可使用。
請看管孩童,避免他們將淨水器當成玩具。
-
通過淨水器的水請勿高於 50°C,否則可能會損壞淨水器。
-
請勿讓淨水器結冰。
-
每日使用前
為防止濾芯快速阻塞,每回使用之前,請先在未過濾的設定下
-
讓水流出約 5 秒時間。
若水管由於施工而造成水的顏色很深或者混濁,請先等待水清
-
澈之後,再開始設定過濾水源。
警告:
-
1 每日使用之前,請先讓水從過濾的設定下流出 10 秒。
2 淨水器若有兩天以上不曾使用,請先讓水從過濾的設定下流出
60 秒。
3 淨水器若有兩週以上不曾使用,請先讓水從過濾的設定下流出
2-3 分鐘之後再使用。如果濾芯發出異味,請更換新濾芯。
使用期間
本淨水器限於用來過濾符合飲用水標準的水。
-
請勿堵住過濾水出水口,或連接其它裝置。
-
如果水壓非常高,請減少水龍頭的水流量,以免損壞濾芯。
-
淨水器請保持遠離熱源,以免變形或損壞。
-
請勿改裝淨水器。
-
使用淨水器時請勿取出濾芯
-
尚未安裝濾芯前,請勿使用淨水器。
-
請勿將淨水器置於窗戶附近,使其直接曝曬在陽光下。
-
本淨水器無法軟化水質。
-
請勿將過濾後的水用於水族箱。自來水無論過濾與否,對魚類
-
都可能有害。
請勿儲存濾淨後的水,以免水質遭受污染。空氣的接觸會快速
-
污染濾淨後的水,若您想儲存濾淨後的水,請使用乾淨的容器
然後將其放入冰箱內。在冰箱中,請勿放置超過 1 天以上,以
免遭受污染。

繁體中文20
功能
飛利浦的多重過濾系統共計有主要過濾層、輔助過濾層、高科
-
技的中空絲膜過濾層、顆粒狀活性碳過濾層,和顆粒狀活性珊
瑚過濾層。
中空絲膜含有超過 1.2 兆個微孔,小到足以去除小至 0.1 微米
-
的顆粒。能去掉自來水中 99.99%* 的細菌、鐵銹與大於微孔尺
寸的其它微粒,並留下人體所需的鈣、鎂等等礦物質 (* 依照日
本淨水器協會 (JWPA) 標準測試通過)。
顆粒狀活性碳能將自來水中氯所造成的不好氣味與味道去除。
-
顆粒狀活性珊瑚可以在過濾後的水質中加入自然礦物質,不僅
-
可以增添風味,也能夠增進健康。
360 度旋轉式懸臂與旋轉式噴嘴可以讓您完全操控過濾後的水
-
流。
使用前準備
安裝選水調整組件
在更換轉接頭時,請小心水龍頭的螺紋非常銳利。
在您安裝本淨水器之前,請先確定所需的自來水轉接頭都已備
-
齊。
水龍頭的直徑必須為 13 - 25 公釐。
-
請判斷您的水龍頭屬於哪種類型,再選取適當的自來水轉接
-
頭。
隨附的自來水轉接頭讓本淨水器幾乎適用於所有廚房水龍頭。
-
然而,本淨水器可能無法適合某些少見類型的水龍頭。
自來水水壓必須在 0.7kgf/cm² 到 3.5kgf/cm² 之間。若您以低
-
於此範圍的水壓使用本淨水器,則過濾後的水流可能極小,或
者沒有水流跑出來。另一方面,若水壓超過此範圍,本淨水器
則會受損。
安裝A型轉接頭
適合直徑為 16 公釐、17.5 公釐或 19 公釐的圓口水龍
-
頭。 (圖 2)
1 將連接螺帽與轉接頭從選水調整組件上取下。 (圖 3)
2 將連接螺帽穿過水龍頭的口。 (圖 4)

繁體中文 21
3 在水龍頭的口端放置相符的轉接頭 (A 型)。打開包裝時,16 公
釐的轉接頭已經連接在選水調整組件上。請依照水龍頭的直
徑,更換為適合的 17.5 公釐轉接頭或 19 公釐轉接頭。 (圖 5)
4 將連接螺帽牢固地鎖到選水調整組件上。 (圖 6)
安裝B型轉接頭
-
適合裝有濾水網罩的水龍頭 (螺紋在外)。 (圖 7)
1 將連接螺帽與轉接頭從選水調整組件上取下。 (圖 3)
2 將濾水網罩的外蓋從水龍頭取下,再將連接螺帽穿過水龍頭的
口。取出原有的轉接頭,將相符的轉接頭 (B 型) 鎖到水龍頭
上。 (圖 8)
3 用硬幣將轉接頭鎖得更緊。 (圖 9)
4 將連接螺帽牢固地鎖到選水調整組件上。 (圖 10)
安裝C型轉接頭
-
適合裝有濾水網罩的水龍頭 (螺紋在外)。 (圖 11)
1 將連接螺帽與轉接頭從選水調整組件上取下。 (圖 3)
2 將濾水網罩的外蓋從水龍頭取下。取出原有的轉接頭,利用連
接螺帽將相符的轉接頭 (C 型) 鎖到水龍頭上。 (圖 12)
3 用硬幣將轉接頭鎖得更緊。 (圖 13)
4 將連接螺帽牢固地鎖到選水調整組件上。 (圖 14)
安裝D型轉接頭
-
適合 A、B 或 C 型以外的水龍頭。 (圖 15)
1 將連接螺帽與轉接頭從選水調整組件上取下。 (圖 3)
2 將 D 型轉接頭鎖到選水調整組件上。請鎖到一半就好,確保預
留足夠的空間,能夠在稍後的步驟中調整鬆緊。 (圖 16)
3 將選水調整組件從下方緊緊地推到水龍頭上,再將 4 枚螺旋釘
平均地鎖緊。請確保水龍頭位於螺旋扣件中間,同時請由下往
上持續壓住淨水器外殼。 (圖 17)
4 將連接螺帽牢固地鎖到選水調整組件上。 (圖 18)

繁體中文22
請務必將橡膠墊圈牢固地推壓至水龍頭上,以防止漏水。
將軟管連接到選水調整組件上
1 請確定水龍頭有關緊。
2 將選水調整鈕調到未過濾水流的位置。 (圖 19)
3 將軟管裁切到所需的長度。 (圖 20)
4 從水流切換組件中移除軟管接頭。 (圖 21)
5 將軟管推入軟管接頭 (1)。將軟管推到連接點,直到無法再往
前推入為止 (2)。 (圖 22)
6 拴緊軟管接頭。 (圖 23)
7 使用尼龍扣件將軟管拴在水龍頭上。 (圖 24)
使用淨水器
水流切換組件共有 4 種設定:已過濾淋灑式、已過濾直流式、未
過濾淋灑式以及未過濾直流式。
未過濾的淋灑式與直流式會從水流切換組件中流出來。
-
過濾後的水則是從旋轉式噴嘴中流出來。此旋轉式噴嘴共有兩
-
種設定:已過濾淋灑式與已過濾直流式。
通過淨水器的水請勿高於 50°C,否則可能會損壞淨水器。
過濾水(淋灑式與直流式)
此項設定適合用來飲用、清洗蔬果或烹調。
1 將旋轉式懸臂轉到所要的位置。
2 旋轉水流切換組件上的水流切換桿,直到過濾水的符號對齊指
針。 (圖 25)
3 將旋轉式噴嘴設定為淋灑式與直流式。
若要選擇已過濾淋灑式,請逆時鐘轉動噴嘴。
-
若要選擇已過濾直流式,請順時鐘轉動噴嘴。
-
4 移動旋轉式噴嘴,直到轉到所需的位置
5 打開水龍頭。

繁體中文 23
已過濾淋灑式或直流式即會從旋轉式噴嘴中流出來。
,
如果過濾的水溫介於 35°C 到 50°C 之間,水可能會發出不好的
氣味。原本濾芯在過濾過程中會將此氣味吸收,但若過濾的水溫
超過 35°C,則又會重新釋放出來。
未過濾水(淋灑式與直流式)
噴水
此項設定適合用來清洗碗盤或需要輕柔水流的其它工作。
1 旋轉水流切換組件上的水流切換桿,直到未過濾淋灑的符號對
齊指針。 (圖 26)
2 打開水龍頭。
未過濾淋灑就會從水流切換組件中流出來。
,
未過濾水流
此項設定適合需要強大水流的情形。
1 旋轉水流切換組件上的水流切換桿,直到未過濾直流水的符號
對齊指針。 (圖 19)
2 打開水龍頭。
未過濾直流水就會從水流切換組件中流出來。
,
清潔
絕對不可使用鋼絲絨、磨蝕性的清潔劑或侵蝕性的液體 (例如汽油
或丙酮) 清潔本淨水器。這類物質可能會造成龜裂、褪色或變形。
1 請用濕布擦拭水流切換組件與濾芯外殼。
2 請使用乾淨的軟刷清潔過濾水出水口,然後再以乾淨的布擦拭
污垢。
注意: 請勿使用已用過的牙刷,以防牙刷上的細菌傳到出水口。
3 請定期使用乾淨的軟刷在水龍頭下清潔不鏽鋼網。
更換
添購新濾芯時請指明型號 HD3902。

繁體中文24
濾芯若已阻塞請立即更換,以免傷害淨水器。
濾芯無法重複使用,請丟棄使用過的濾芯,並且換上新的濾芯。
何時需要更換濾芯
濾芯實際使用壽命會受到所在地區自來水品質與水質相當大的影
響。
為使淨水器發揮最佳效果,若有下列情形,請更換濾芯:
A 濾芯已使用 12 個月。
B 淨化後的水量大幅減少。
C 過濾後的水仍有不好的氣味,或淨化後依然混濁。
濾芯使用壽命減短
下列情況會導致濾芯壽命減短並且需要更常更換濾芯:
水壓非常低。
-
水管和水塔損壞。
-
抽水或清潔水塔時,自來水遭受污染。
-
大雨過後立即使用混濁的水。
-
如何更換濾芯
1 請關閉水龍頭,將水流切換組件桿調到未過濾直流水的位
置。 (圖 19)
2 逆時鐘轉動外蓋,將其從濾芯外殼上移除。 (圖 27)
3 請將外蓋連著濾芯一起從濾芯外殼上移除。 (圖 28)
4 順時鐘轉動以移除濾芯。 (圖 29)
5 以逆時鐘方向將新的濾芯旋入濾芯外殼的外蓋。 (圖 30)
6 將外蓋連著濾芯一起插入濾芯外殼。 (圖 31)
7 順時鐘轉動以鎖緊外蓋。 (圖 32)
請確定外蓋有鎖緊。
環境保護
本淨水器使用壽命結束時請勿與一般家庭廢棄物一併丟棄。請
-
將該產品放置於政府指定的回收站,此舉能為環保盡一份心
力。 (圖 33)

繁體中文 25
保固與服務
若您需要相關服務或資訊,或是有任何問題,請瀏覽飛利浦網
站,網址為 www.philips.com,或連絡您當地的飛利浦顧客服務中
心 (您可以在全球保證書上找到連絡電話)。若您當地沒有顧客服務
中心,請洽詢當地的飛利浦經銷商。
故障排除
本單元概述您使用本淨水器時最常遇到的問題。如果您無法利用
以下資訊解決您遇到的問題,請聯絡您所在國家/地區的顧客服務
中心。
問題 解決方法
水從連接螺帽漏出。可能是您的淨水器並未安裝正確。請依照
本使用手冊的指示,重新安裝淨水器。
可能是連接螺帽或自來水轉接頭已經損壞。
請洽飛利浦授權之服務中心。
可能是自來水壓高過指定值。
您可能需要在自來水轉接頭的螺紋四周纏
繞一些鐵弗龍膠帶。
濾芯外殼底座漏水。可能是因為沒有妥善安裝好濾芯。請重新
安裝濾芯。請參閱「使用前準備」單元的
「安裝濾芯」部分。
未過濾的設定下水
流很弱。
過濾的設定下水流
很弱。
可能是因為在選水調整組件內部、橡膠墊
圈下方的不鏽鋼網阻塞所致。請以軟刷清
潔後再用水沖洗乾淨。
可能是因為濾芯已阻塞。請更換濾芯。請
參閱「更換」單元的「如何更換濾芯」部
分。
可能是自來水壓低於指定值。

繁體中文26
問題 解決方法
選擇過濾後的水
時,水從安全閘中
流出來。
技術規格
* 以下規格係根據日本工業標準 (JIS) s 3201。
產品名稱與機型編號 流理台淨水器 HD3802
主要過濾零件 聚硫樹脂中空絲膜、顆粒狀活性碳與
初期水流速 每分鐘 4 公升 (水壓 1kgf/cm2,水溫
氯成分降低容量 8,000 公升 (水密度 2ppm)
濁度降低容量 4,000 公升 (水濁度 10NTU)
濾芯使用壽命 每日 20 公升,使用壽命約 1 年 (實際
替換用濾芯 HD3902
最低水壓 0.7kgf/cm² (7 公尺水柱/70kPa)
最高水壓 3.5kgf/cm² (35 公尺水柱/350kPa)
配件 HD3902 濾芯、8 個安裝於水龍頭使用
產品尺寸 高度: 240 公釐;直徑:116 公釐
包裝尺寸 250 公釐 x 192 公釐 x 140 公釐 (高 x
水壓過高。請減少水量。
產品規格
顆粒狀活性珊瑚
20°C)
壽命依照當地水質與水壓不同)
的轉接頭
寬 x 深)

產品規格
重量 約 1.3 公斤
產地 日本
繁體中文 27

28

29

30
A-type
16mm
adapter
2
6
3 4 5
7 8 9
10 11 12 13
14 15 16 17
18 19 20 21

22 23 24 25
31
26
30 31 32 33
27 28 29

www.philips.com
u
4222.002.7091.1
 Loading...