

Page 1
HD37 20
HD3610
2
© 2018 Koninklijke Philips N.V.
All rights reserved.
4222 001 93399
User manual
Benutzerhandbuch
Manual del usuario
Mode d’emploi
Manuale utente
Gebruiksaanwijzing
Page 2

3 4
HD3720
1
Page 3
ENGLISH 6
DEUTSCH 28
ESPAÑOL 52
FRANÇAIS BELGIQUE 76
ITALIANO 99
NEDERLANDS 123
HD3720, HD3610
Page 4
6 ENGLISH
Introduction
Congratulations on purchasing this new PerfectDraft. From
now on you can enjoy the perfect taste of fresh, cold draft
beer. The system keeps your beer fresh and at exactly the
right temperature so that you can pour a cold beer whenever
you feel like it. Several beer brands are available for this of
the PerfectDraft system (also see chapter ‘Keg suppliers’
at the end of user manual). You can visit our website at
www.perfectdraft.de for more information.
This user manual tells you how to use the PerfectDraft.
Because the name of this appliance is PerfectDraft, we use
‘draft beer’ instead of ‘draught beer’ in this user manual.
General description (Fig. 1)
A Right door
B Release button
C Cooling plate
D Cord storage facility
E LCD display: beer temperature, beer level & freshness
indication (HD3720 only)
F Keg sensor
G Temperature sensor
H Left door
I Locking levers
J LED indicator lights to indicate the status of the appliance
(HD3610 only)
K Drip tray cover (HD3610, HD3720)
L Drip tray (HD3610, HD3720)
Tube unit (supplied with keg)
M Tube connector
N Tube
Tap unit
O Medallion
P Tap handle
Q Tap body
R Spout
S Release buttons
T Tube release button
Keg
U Connection top
V Protection cap
W Chimes
X Cleaning brush (HD3720)
Pass through the slot on rear housing to clean (remove the
dust) on the heat sink
Page 5
ENGLISH 7
Important
Read this user manual carefully before you
use the appliance and save it for future
reference.
The appliance
Warning
- If the mains cord is damaged, you must
have it replaced by Philips, a service centre
authorised by Philips or similarly qualied
persons in order to avoid a hazard.
- Check if the voltage indicated on the
bottom of the appliance corresponds
to the local mains voltage before you
connect the appliance.
- Do not use the appliance if the plug, the
cord or the appliance itself is damaged.
- This appliance can be used by persons
with reduced physical, sensory or mental
capabilities or lack of experience and
knowledge if they have been given
supervision or instruction concerning use
of the appliance in a safe way and if they
understand the hazards involved.
- This appliance shall not be used by
children. Keep the appliance and its cord
out of reach of children.
- Children should be supervised to ensure
that they do not play with the appliance.
- Do not cover the appliance (e.g. with a
towel) to prevent it from overheating.
- This appliance is only intended for indoor
use. Do not use it outdoors.
Page 6
ENGLISH8
- The appliance is not suitable for
installation in an area where a water jet
could be used.
Caution
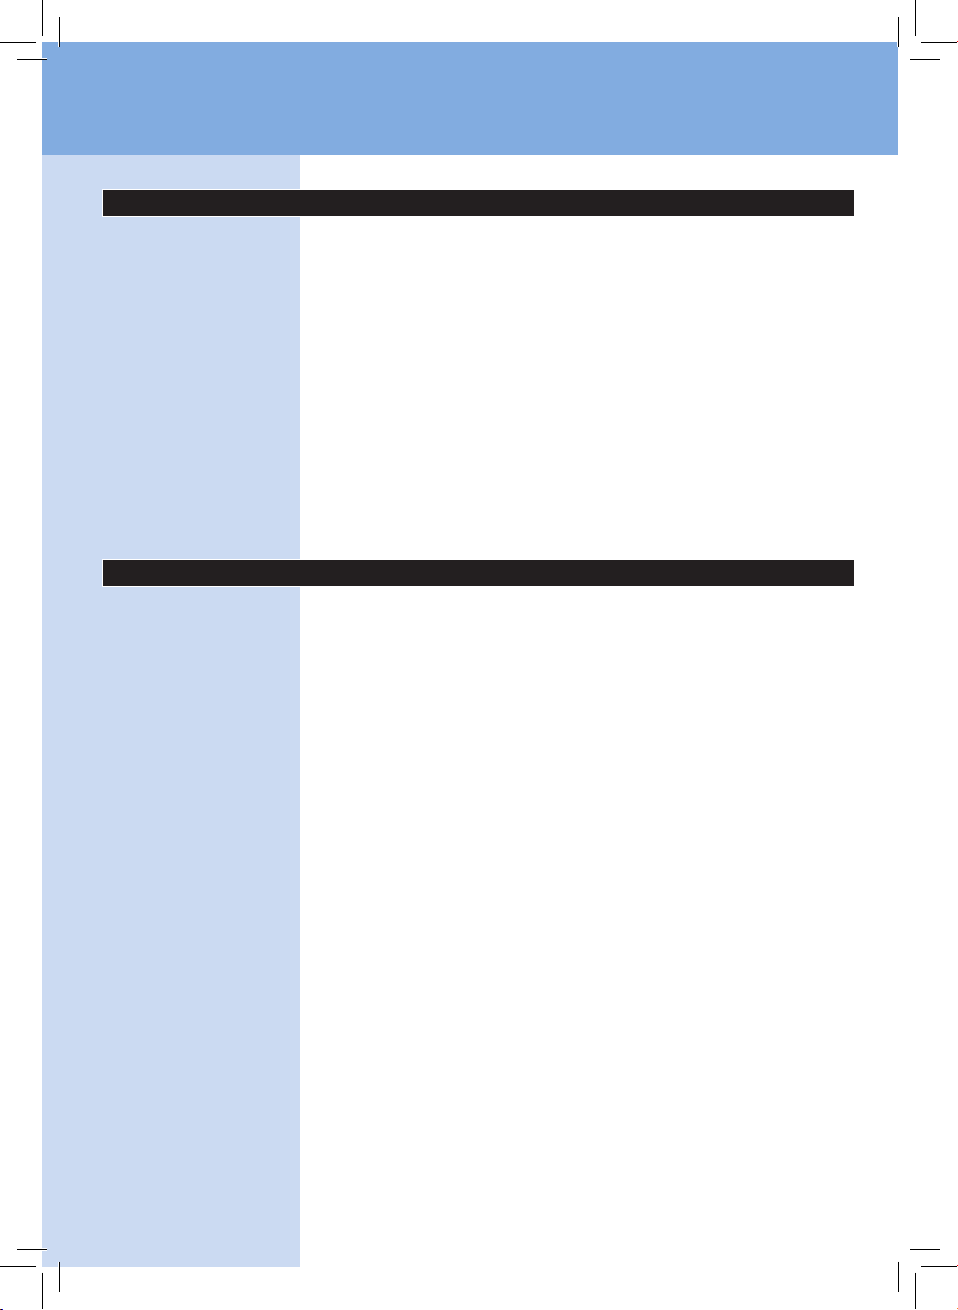
- Keep the appliance out of the reach of
children. The handle can be removed for
extra safety.
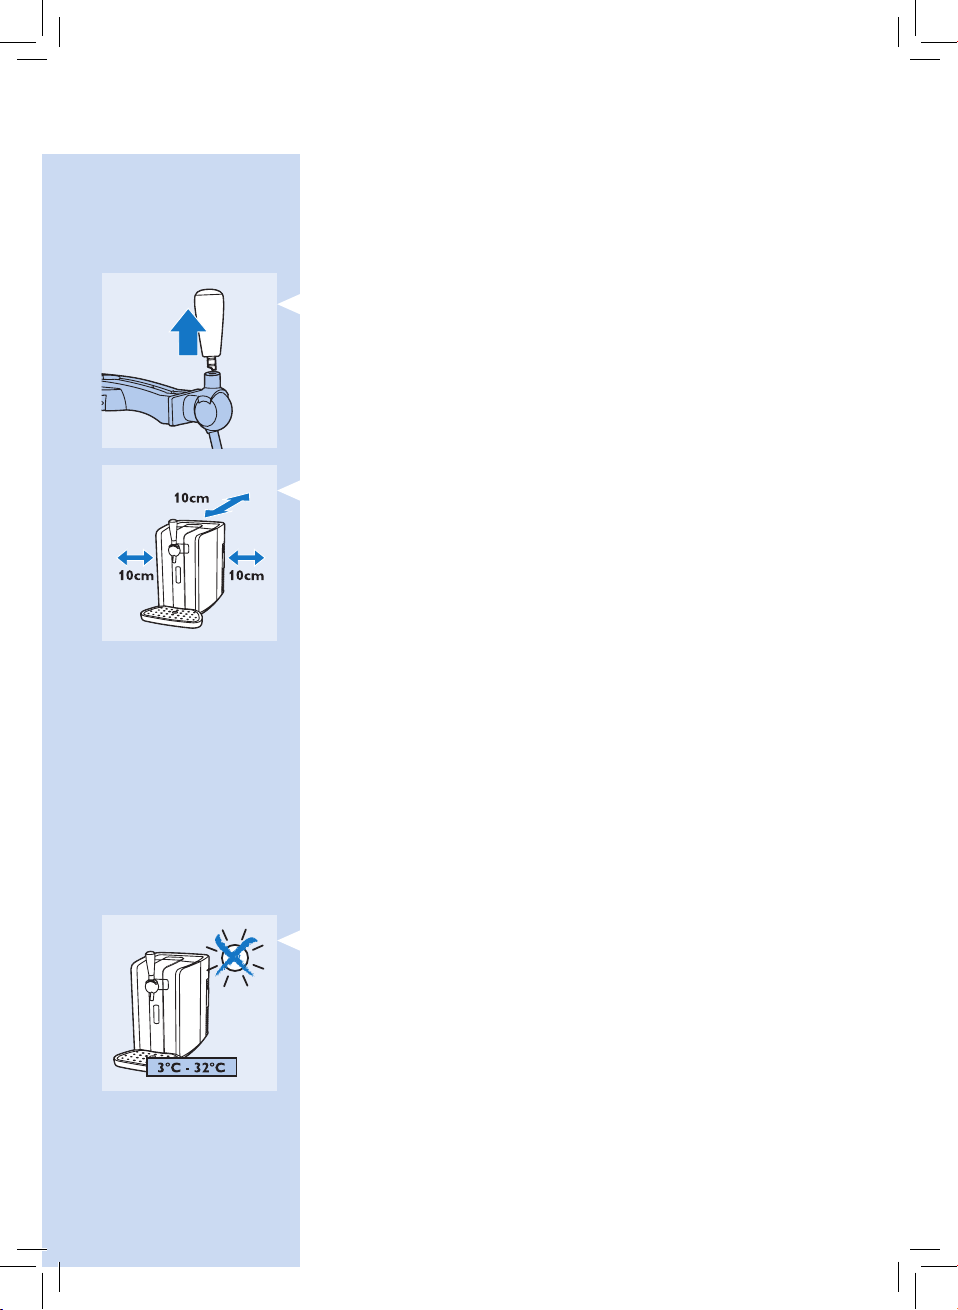
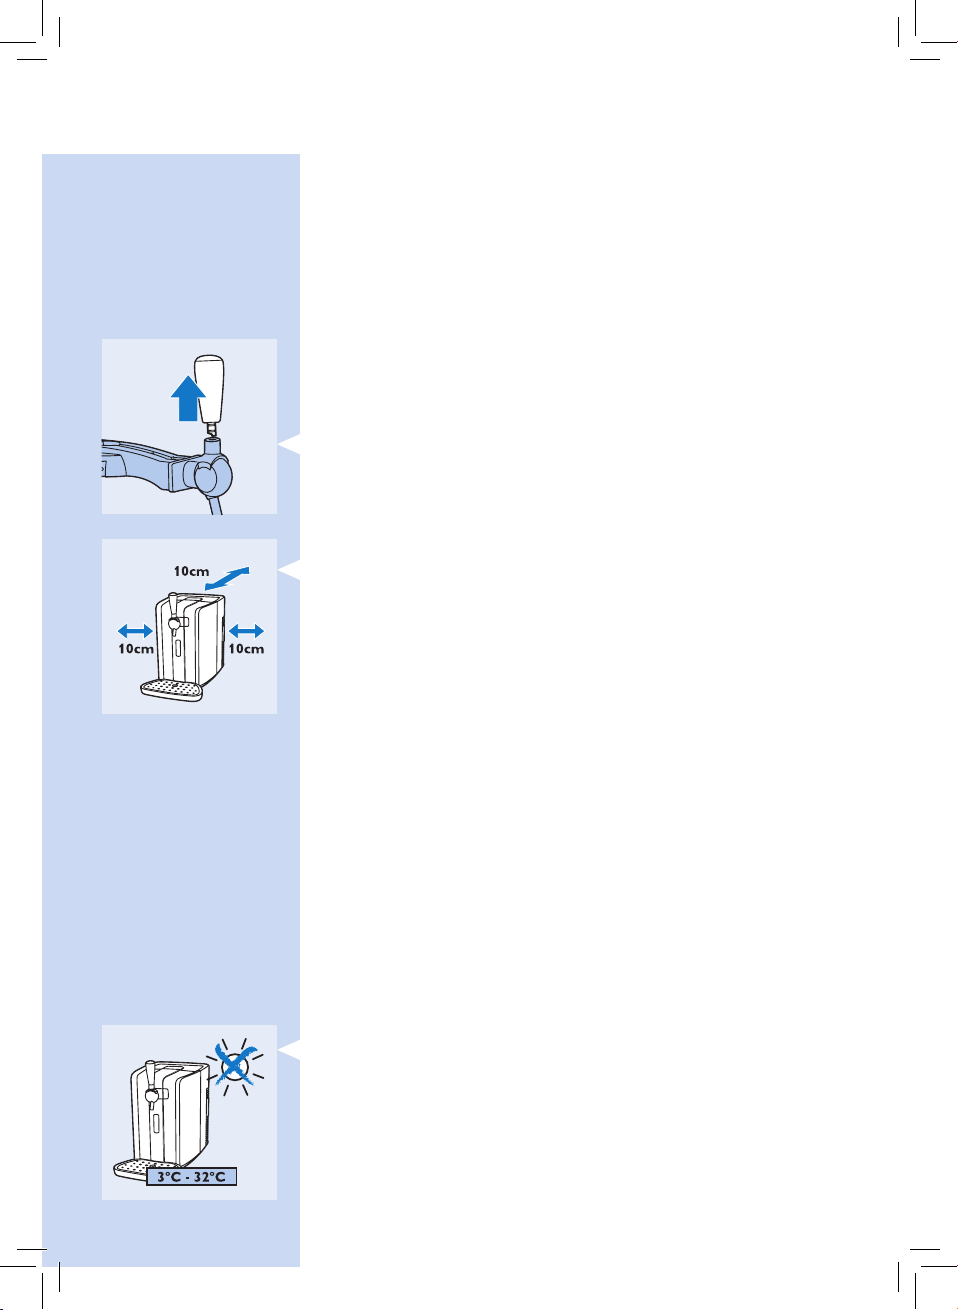
- Put the appliance on a horizontal, even
and stable surface. Leave at least 10 cm
free space around the appliance for the
best performance.
- In an environment with an ambient
temperature of 23 °C, it takes
approximately 12 to 15 hours to chill
an uncooled keg to the ideal drinking
temperature of 3 °C. At higher ambient
temperatures, chilling the keg takes longer.
- When you use the appliance above 32 °C
(HD3720) or 30 °C (HD3610), the beer
temperature may rise above 3 °C. When
the temperature decreases to below 32 °C,
the beer temperature drops to 3 °C again.
- Do not expose the appliance to direct
sunlight.
- Always clean the appliance before you
store it for a longer period. Make sure you
rinse the tap unit thoroughly. Beer residues
Page 7
ENGLISH 9
may cause problems when you install the
tap unit on the keg.
- Do not lift the appliance by the tap handle.
The keg
Warning
- Never store the keg in the freezer! Freezing
may cause serious damage to the keg.
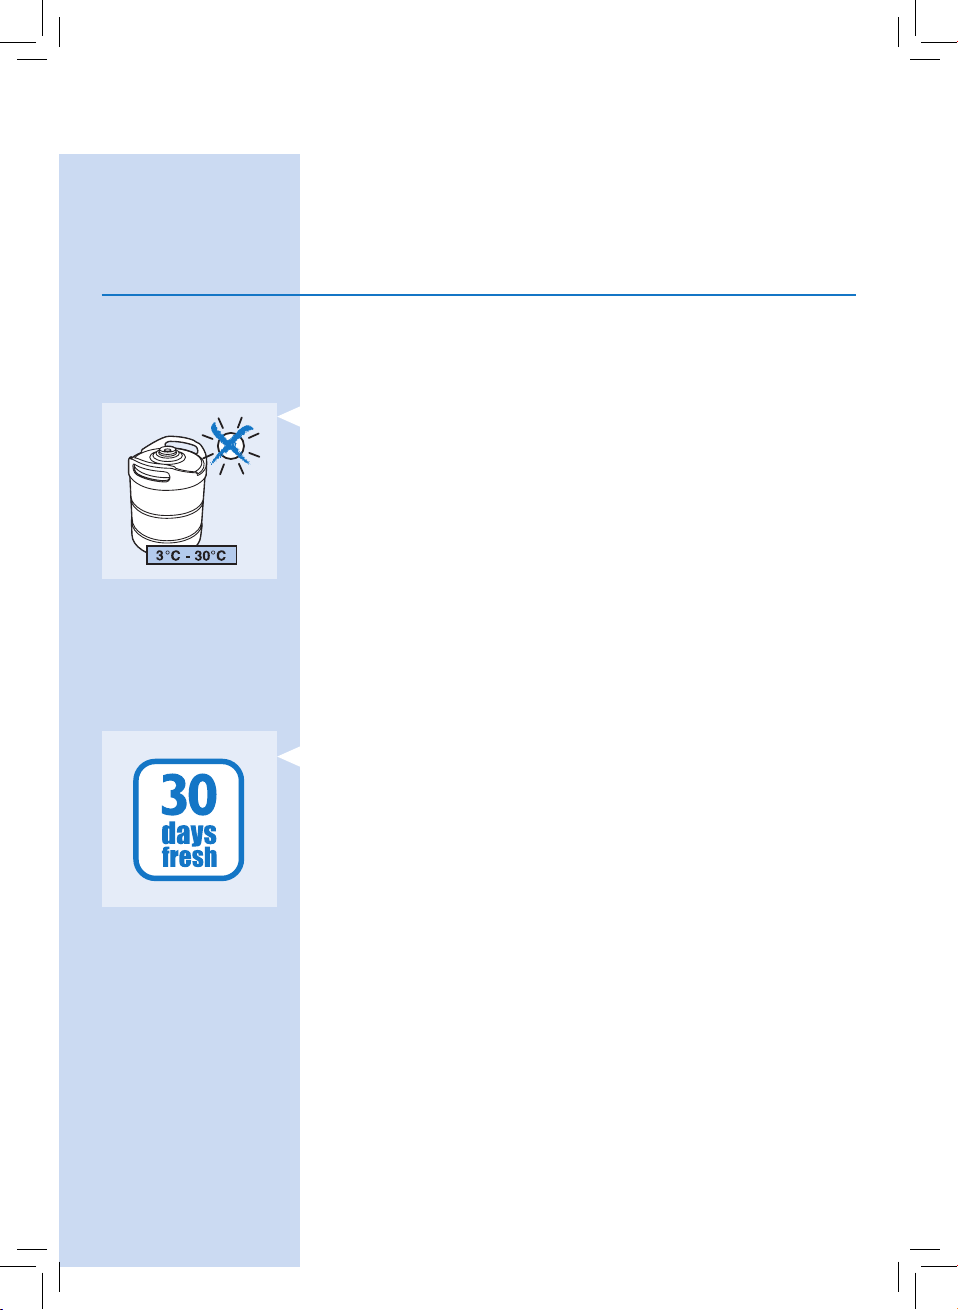
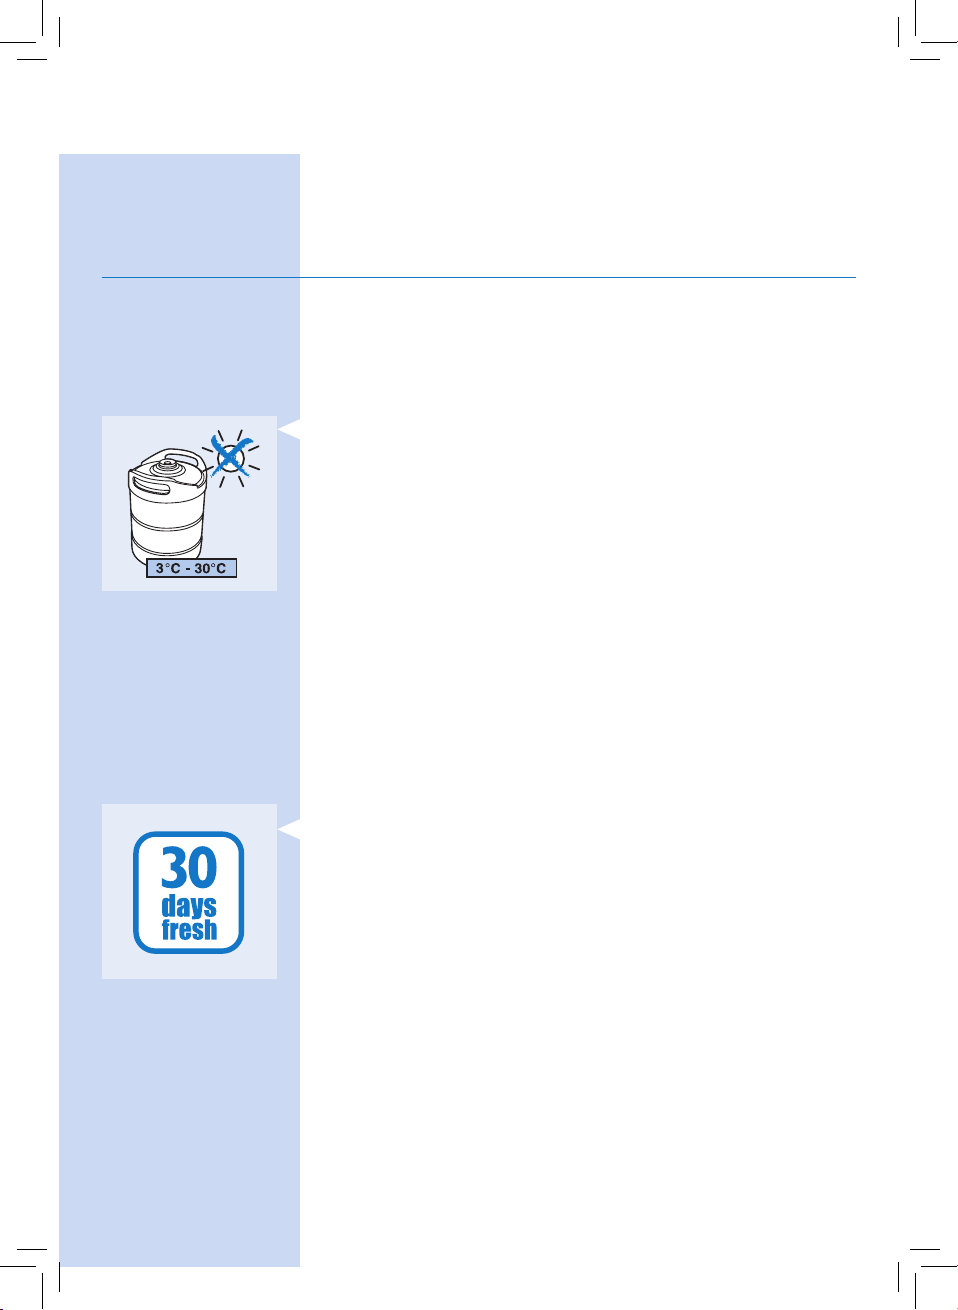
- To avoid the risk of explosion, do not
expose the keg to direct sunlight or
temperatures higher than 30 °C.
- The keg is under pressure. Do not remove
the connection top or pierce the keg with a
sharp object.
Caution
- Always read and follow the instructions
and safety warnings on the keg before you
install it in the appliance.
- Do not shake the keg.
- Store an open keg at the right temperature
by leaving it in the appliance. Make sure
the appliance is switched on. If you switch
o the appliance because you are not
going to use it for a longer period (e.g. a
holiday), always remove the open keg from
the appliance and put it in the fridge. Once
a keg has been opened, the beer stays
fresh for 30 days.
- Always check the expiry date on the keg
when you buy it and before you install it.
- Do not use the keg if the connection
top is damaged. If the connection top is
damaged, the tap unit does not t onto it.
Page 8
ENGLISH10
- Unopened kegs keep best when you store
them at a stable temperature. The cooler
you store the keg, the better.
- Maximum working pressure: 1.5 bar.
- Use the keg only for the HD3720/HD3610/
HD3600 PerfectDraft. Do not connect
other equipment to the keg.
- Do not use kegs from other suppliers than
the ones mentioned in this user manual
(see chapter ‘Keg suppliers’).
- Do not use damaged kegs in this appliance,
as this could harm the appliance. Return
a damaged keg immediately to the shop
where you bought it.
- The kegs are not stackable.
- Noise level: Lc < 70 dB(A).
Electromagnetic elds (EMF)
This Philips appliance complies with all standards regarding
electromagnetic elds (EMF). If handled properly and
according to the instructions in this user manual, the appliance
is safe to use based on scientic evidence available today.
Before rst use
Installing the appliance
1 Put the appliance on a horizontal, even and stable
surface. Leave at least 10cm free space around the
appliance for the best performance.
Note: Do not put the appliance in a place where it is exposed
to direct sunlight or to high temperatures (e.g. close to a
cooker or an oven).
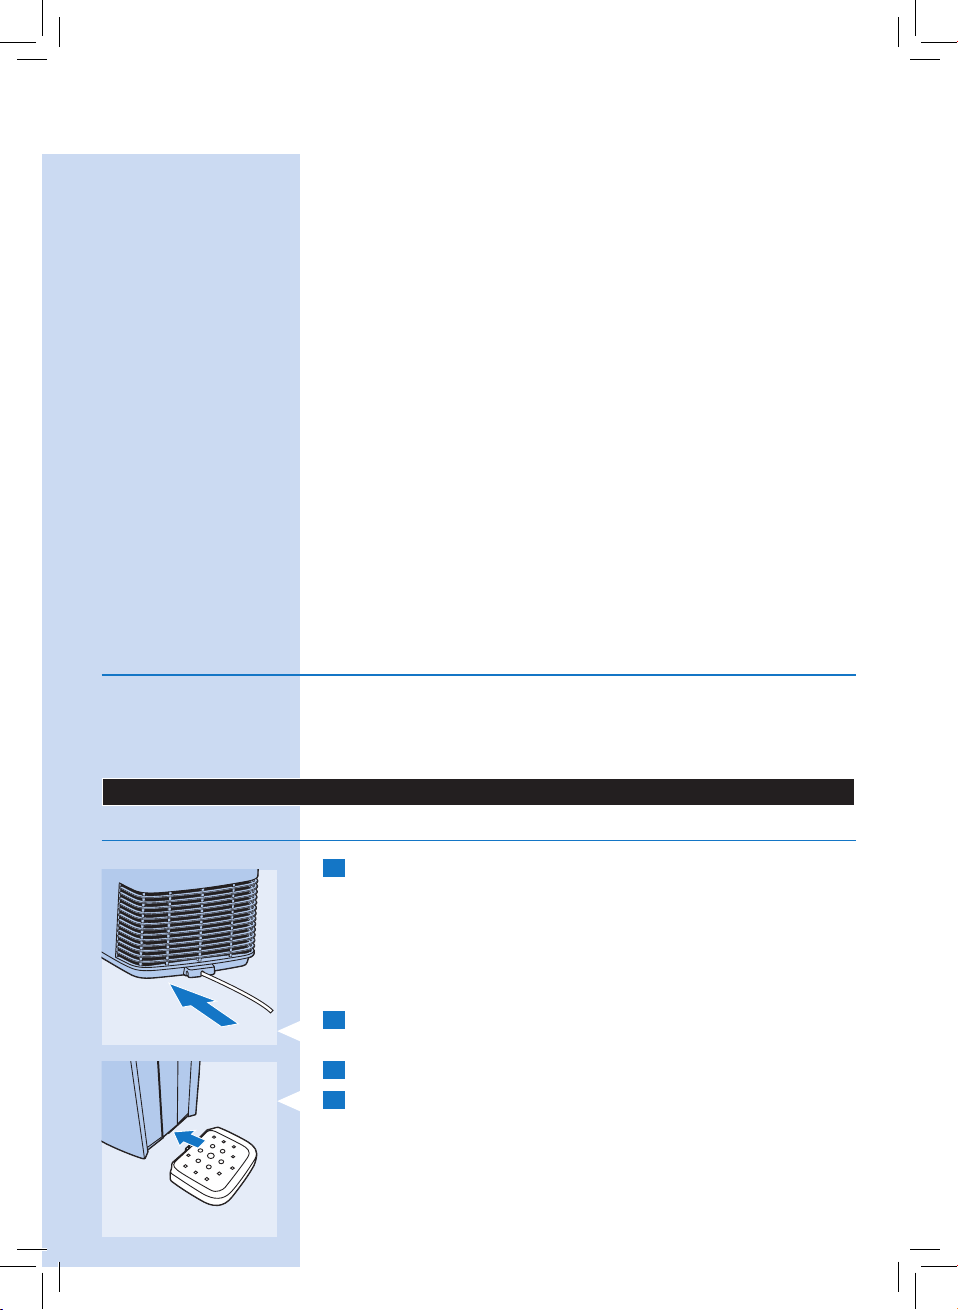
2 To store excess cord, push it into the storage compartment
at the back of the appliance.
3 Insert the plug into the wall socket.
4 HD3720: install the drip tray.
Page 9
ENGLISH 11
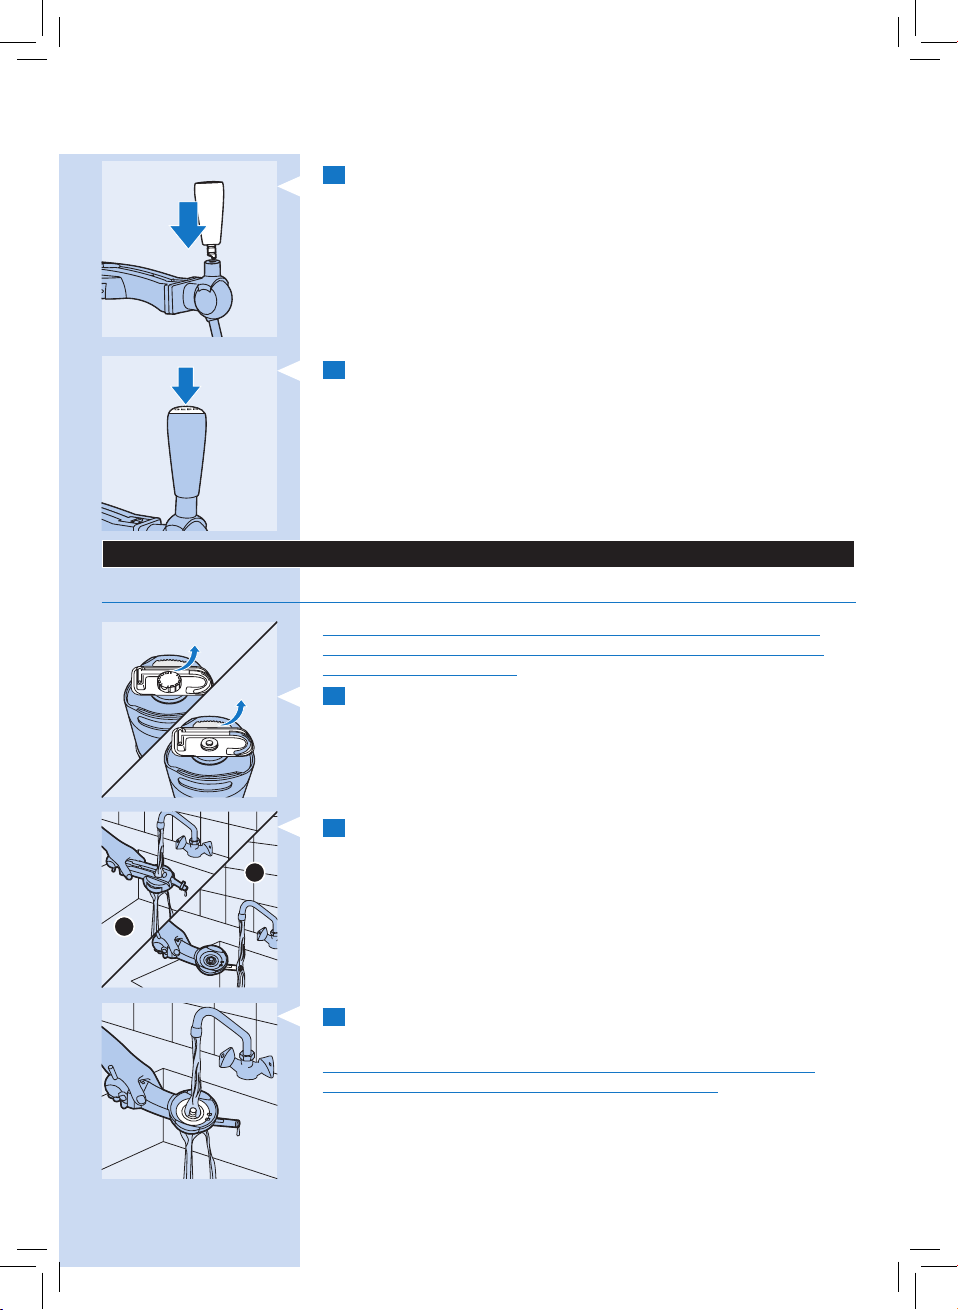
5 Attach the tap handle.
6 Place the preferred medallion on top of the handle.
Preparing for use
Placing the tap unit onto the keg
Always clean the tap unit with water and, if necessary, with
some washing-up liquid before you place it on the keg and
insert the tube. Table 1:
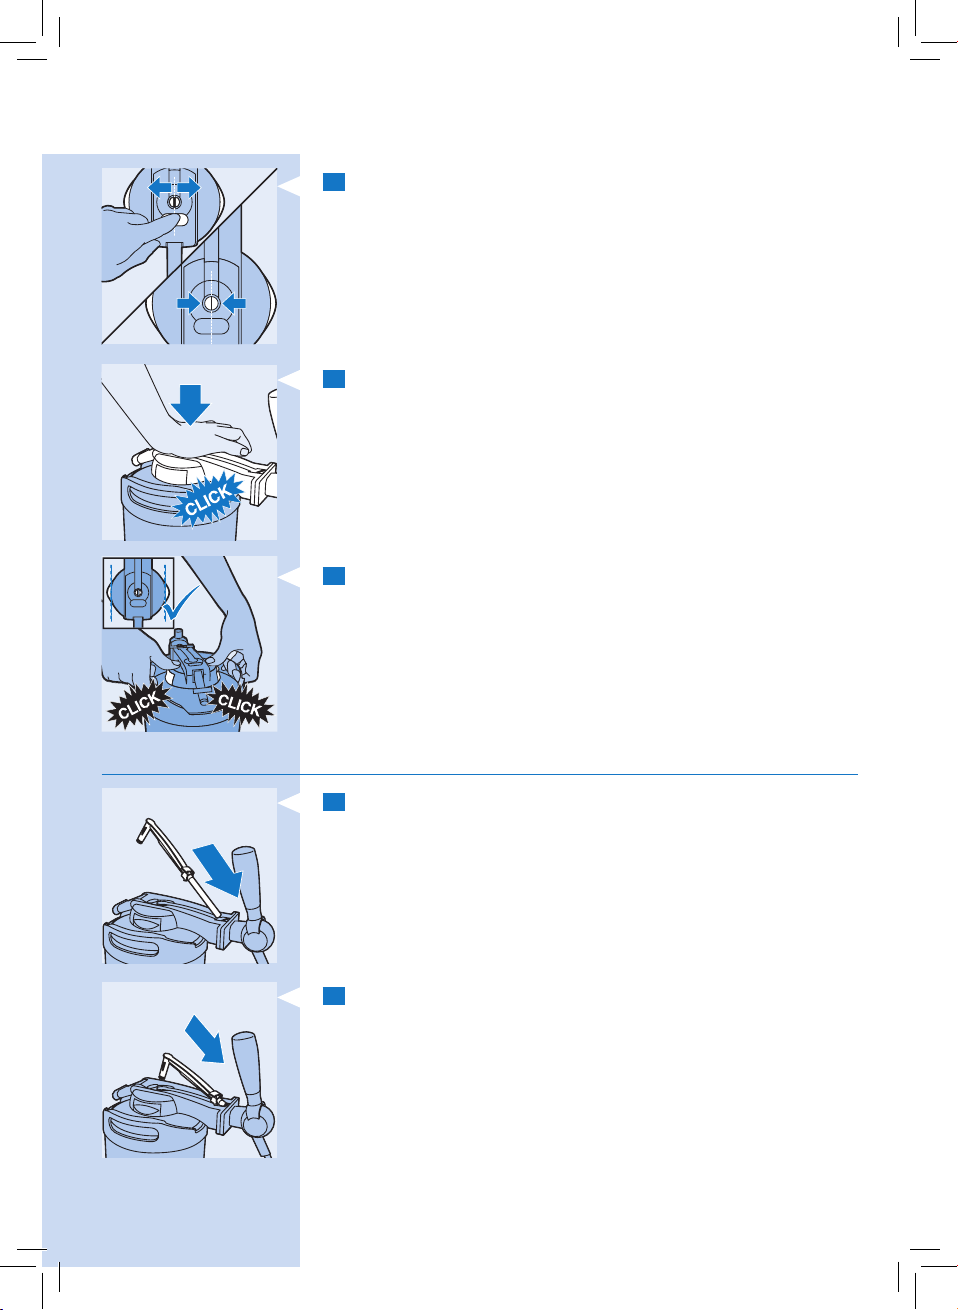
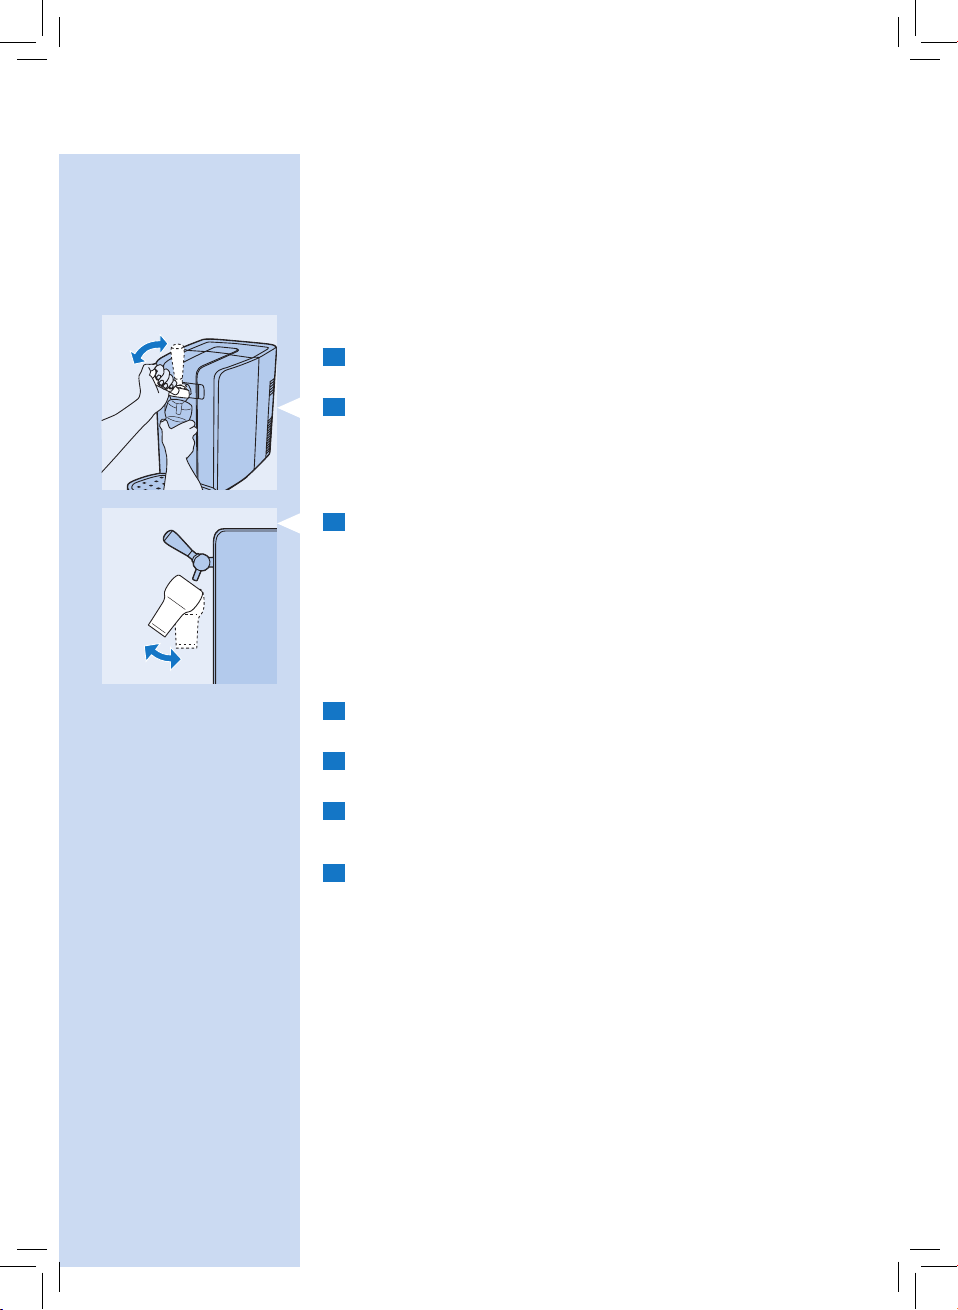
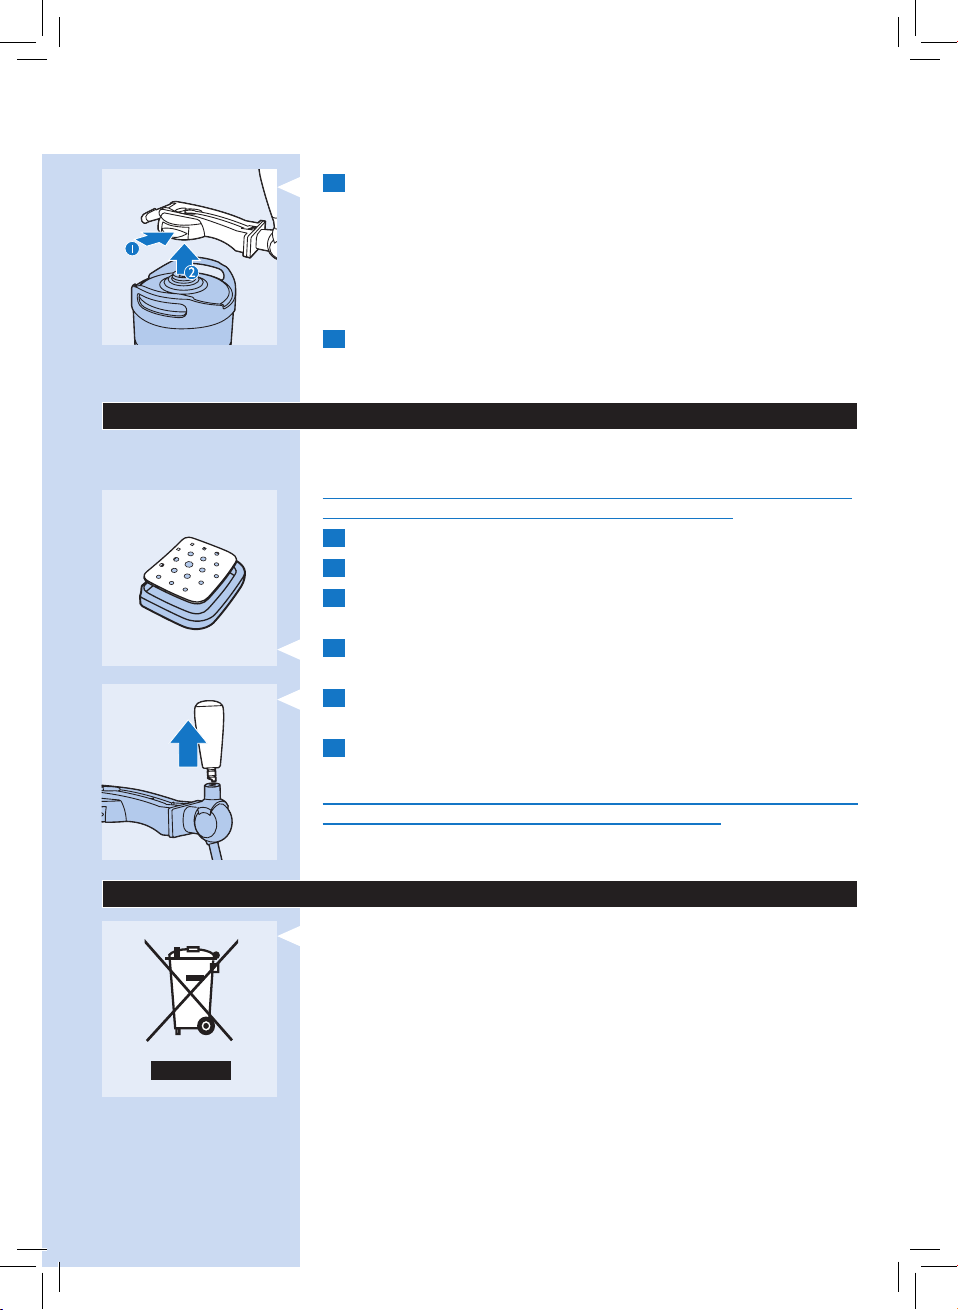
1 Remove the protection cap and the tube from the keg.
2 If present, remove the tube connector and the tube from
the tap unit. Hold the tap unit under a running tap and
2
1
rinse the tubeconnection hole (1) and the connection
to the body of the appliance (2). If necessary, use some
washing-up liquid.
3 Then turn the tap unit upside down and rinse the keg
connection in the bottom of the tap unit.
It is essential that all rubber parts of the tap unit are moist
before you assemble the tap unit onto the keg.
Page 10
ENGLISH12
4 Check if the tube release button works properly. When you
press the blue tube release button, the two clamps in the
opening have to move.
Note: If the clamps fail to move when you press the blue
tube release button, rinse the tube-connection hole under a
running tap again.
5 Put the tap unit onto the connection top of the keg by
pushing it down rmly (‘click’).
When you assemble the tap unit properly, you hear two clicks
in quick succession.
Tip: If you can move the arm of the connection top freely up
and down, the tap unit is placed properly on the keg.
6 Make sure the release buttons on either side of the tap
unit stick out equally far on both sides. If this is not the
case, press the release buttons on both sides with your
thumbs until you hear one click or two clicks in quick
succession.
Placing the tube into the tap unit
1 Insert the exible tube into the tap body.
2 Slide the projections of the tube connector under the hinge
points.
Page 11
ENGLISH 13
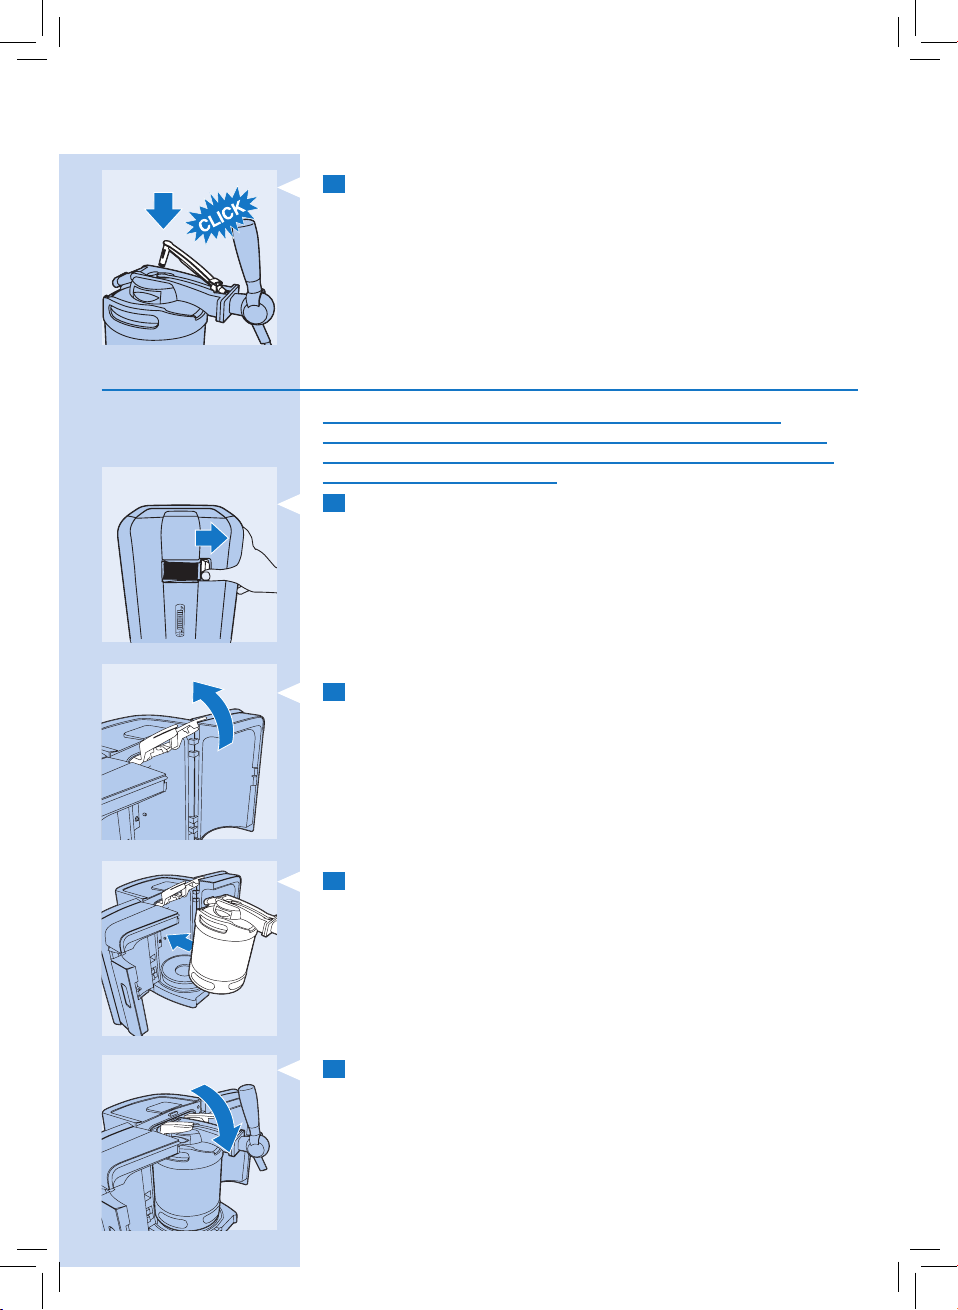
3 Push the tube connector into the opening in the tap unit
(‘click’).
Placing the keg into the appliance
Never place the keg into the appliance if you have not
assembled the tap unit and the tube properly. See sections
‘Placing the tap unit onto the keg’ and ‘Placing the tube into
the tap unit’ in this chapter.
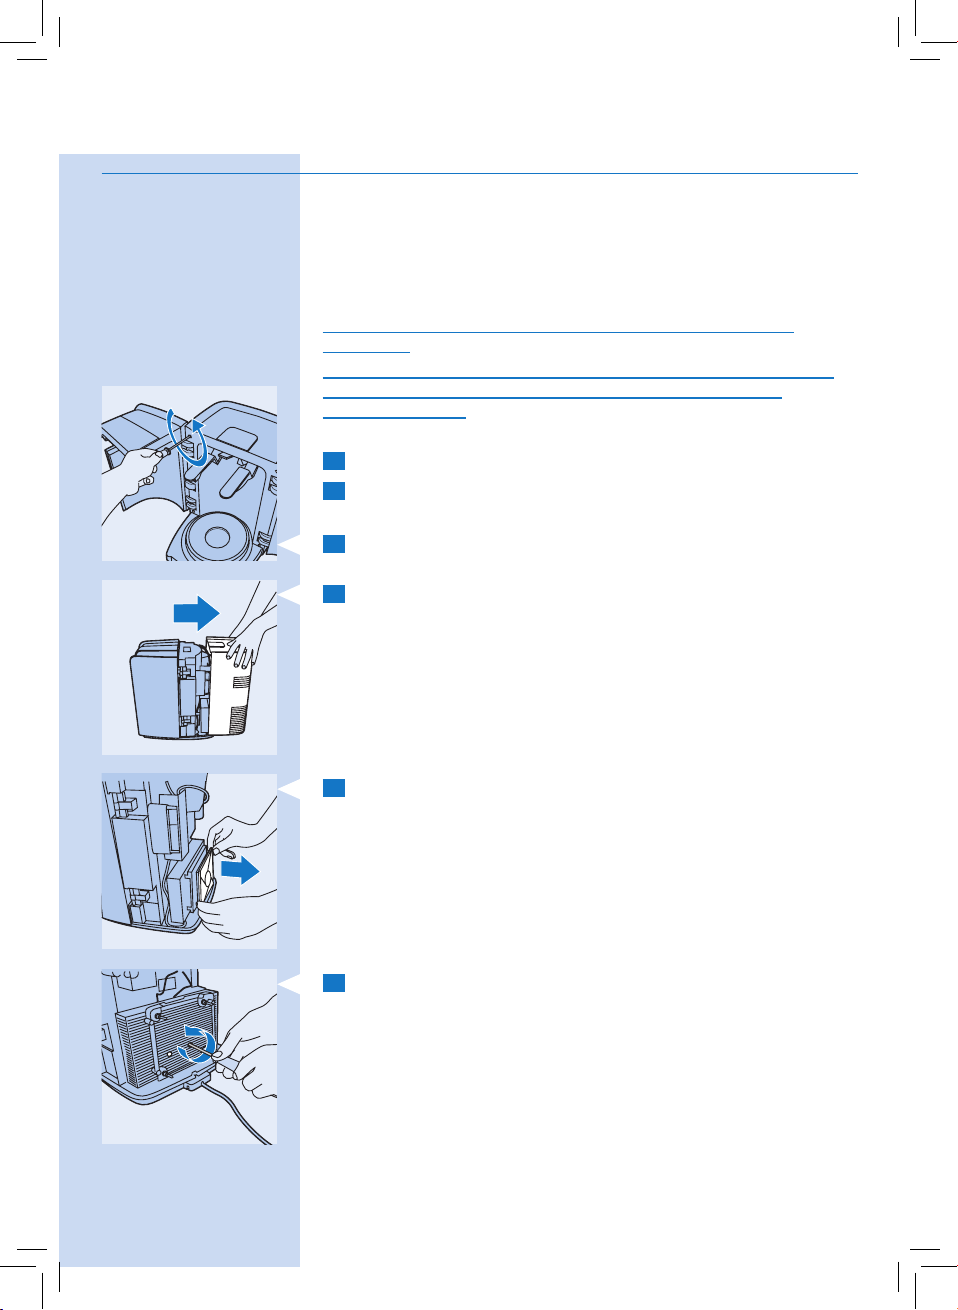
1 Slide the release button to the right to open the doors.
2 Lift the two blue locking levers completely.
3 Tilt the keg with the assembled tap unit slightly forward
and put it into the appliance.
- First put the keg on the cooling plate of the appliance.
- Then put the keg upright by sliding the tap unit between the
blue locking levers.
4 Push down the blue locking levers until they are in
horizontal position.
If you are unable to put the locking levers in horizontal position,
you have not put the keg into the appliance in the right
position. Take out the keg and follow steps 1 to 3 again.
, After you have installed the keg (even the rst time), the
pump runs for a few seconds.
Page 12
ENGLISH14
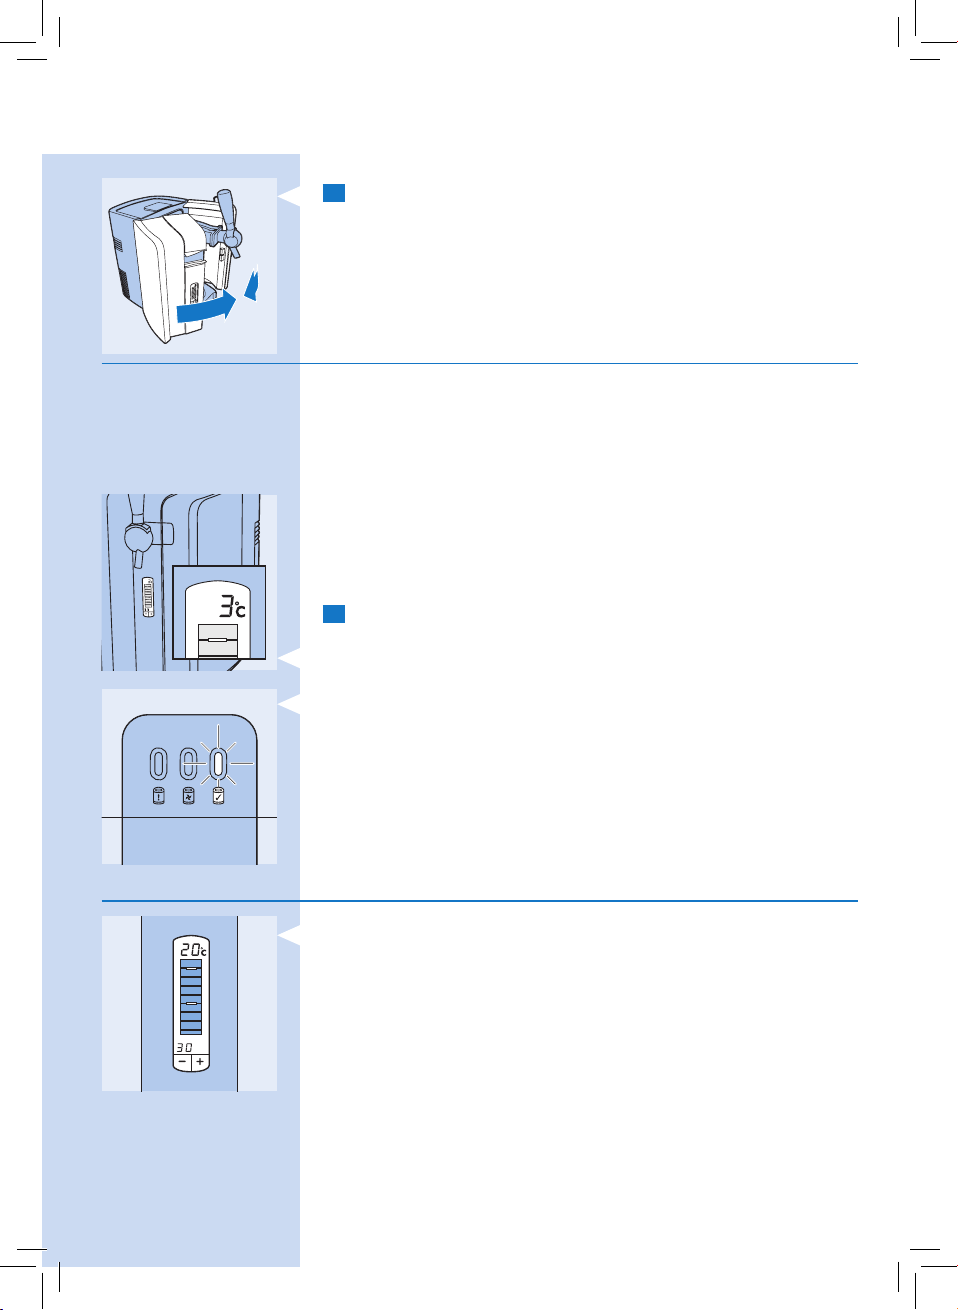
5 Close the doors.
Note: If the pump goes on frequently when you are not
pouring beer, reinstall the keg or repeat the instructions in
section ‘Placing the tap unit onto the keg’ in this chapter.
Cooling
After you have installed the keg, the appliance automatically
starts to cool the keg.
Note: At an ambient temperature of 23 °C, chilling an
uncooled keg takes 12-15 hours.
Tip: If you want to pour beer shortly after placing the keg in
the appliance, prechill the keg in upright position in the fridge
for a while before you install it. For more tips, see chapter
‘Troubleshooting’.
1 Wait until the beer has reached the right drinking
temperature.
, HD3720: The temperature is shown on the display in green
(see section ‘LCD display’ in this chapter).
, HD3610: The temperature light lights up green (see section
‘LED indicator lights’ in this chapter).
LCD display (HD3720 only)
, The display shows the temperature of the beer, the beer
level inside the keg and the freshness of the beer.
Temperature indication
Wait until the temperature of the keg has dropped below 4 °C
before you start to pour beer. The ideal drinking temperature
is 3 °C. The colour of the temperature displayed tells you if the
beer has reached the right drinking temperature.
- Red = the beer temperature is not yet ideal for consumption
(above 4 °C). The beer head may be too large.
- Green = the beer has reached the right temperature
(4 °C or below) for consumption.
Page 13
ENGLISH 15
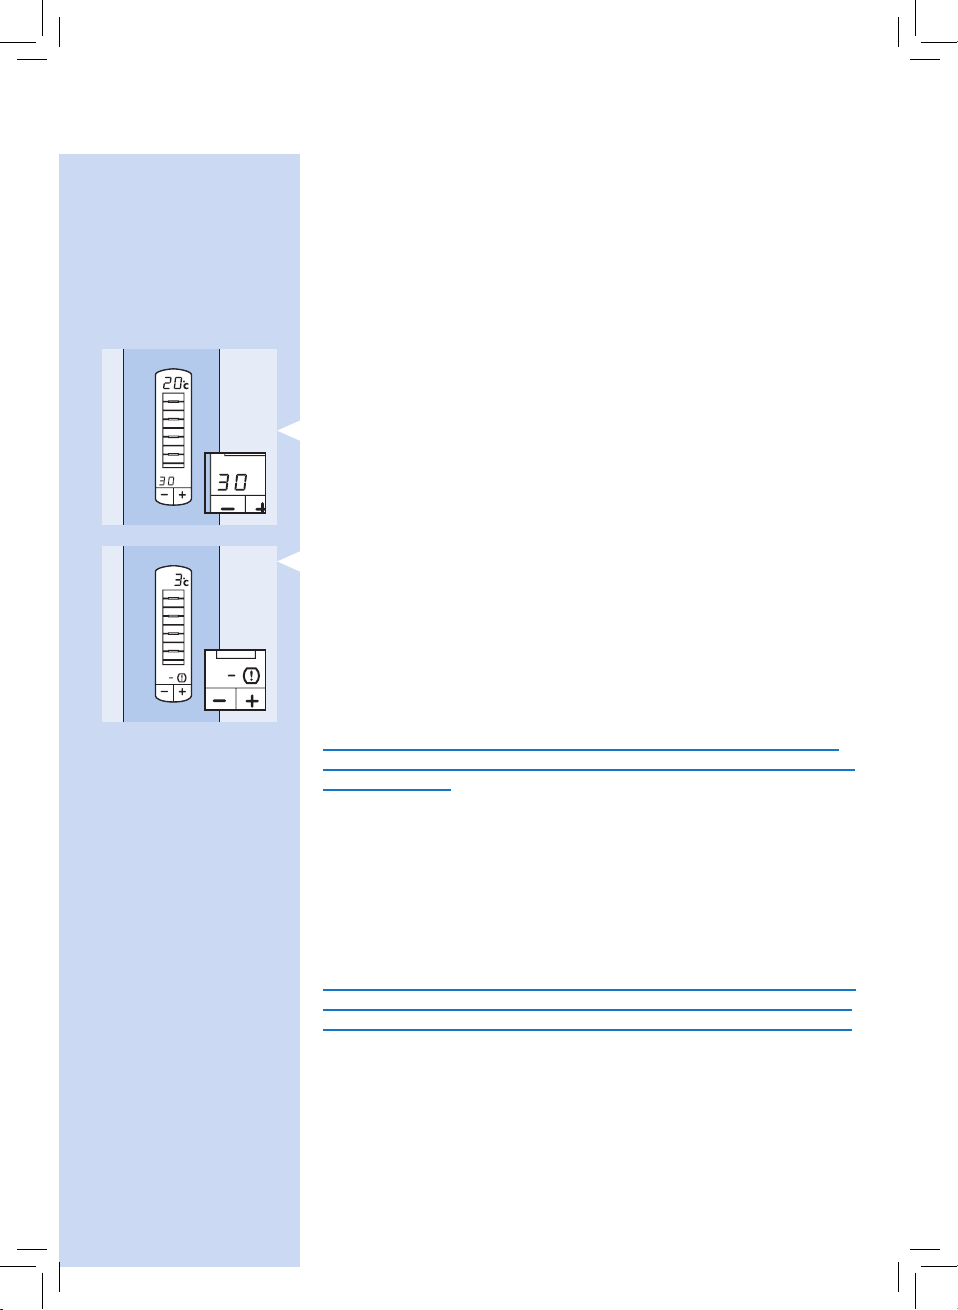
Level indication
The yellow-orange level indication on the display shows the
amount of beer left in the keg in eight steps.
Note: If you use 20cl glasses, you can pour approx. 30 glasses
of beer from one keg. If you use 33cl glasses, you can pour
approx. 18 glasses.
Freshness indication
The freshness indication tells you how long the beer is still
fresh.
- When you place a new keg in the appliance, the freshness
indication shows that the beer in the keg stays fresh for
30 days. The indication counts down from 30 to 0 days.
- Once the keg has been opened, the beer stays fresh for
30 days if the keg is stored in the appliance.
Make sure the appliance is switched on all the time.
- When 30 days have passed, the display shows that the keg
needs to be replaced. A dash and an exclamation mark
appear on the display.
Adapting the freshness indication
- If you want to switch o the appliance for a longer period
(e.g. a holiday), store the opened keg in the fridge.
Disconnect the tap unit, rinse the top of the keg, rinse the
tube and store the tube with the keg in the fridge.
Always write down the date and the number of days that the
beer inside the keg is still fresh on the keg (see number of days
on the display).
- When you reinstall the opened keg, you can set the
freshness indicator to the correct number of days with the –
and + buttons.
Tip: To calculate the correct number of days: compare the
date with the one you have written on the keg and subtract
the number of days the keg lay in the fridge from the number
you wrote on the keg when you stored it.
Before you reinstall the opened keg, clean the tap unit and the
tube again. Also check if dirty deposits have developed on top
of the keg. If so, do not use the opened keg but use a new one.
Other indications
Besides the beer level and temperature, the display gives the
following information:
- Green dash with no level indication visible = the tap unit is
not present on the keg.
- Red dash with no level indication visible = no keg is
installed.
Page 14
ENGLISH16
- Red or green dash with ashing yellow-orange background
light = the tap unit and/or tube are not properly placed.
Remove the keg and check if the tap unit and the tube are
properly placed. See chapter ‘Preparing for use’, sections
‘Placing the tap unit onto the keg’ and ‘Placing the tube into
the tap unit’. If this does not help, try another keg with a new
tube.
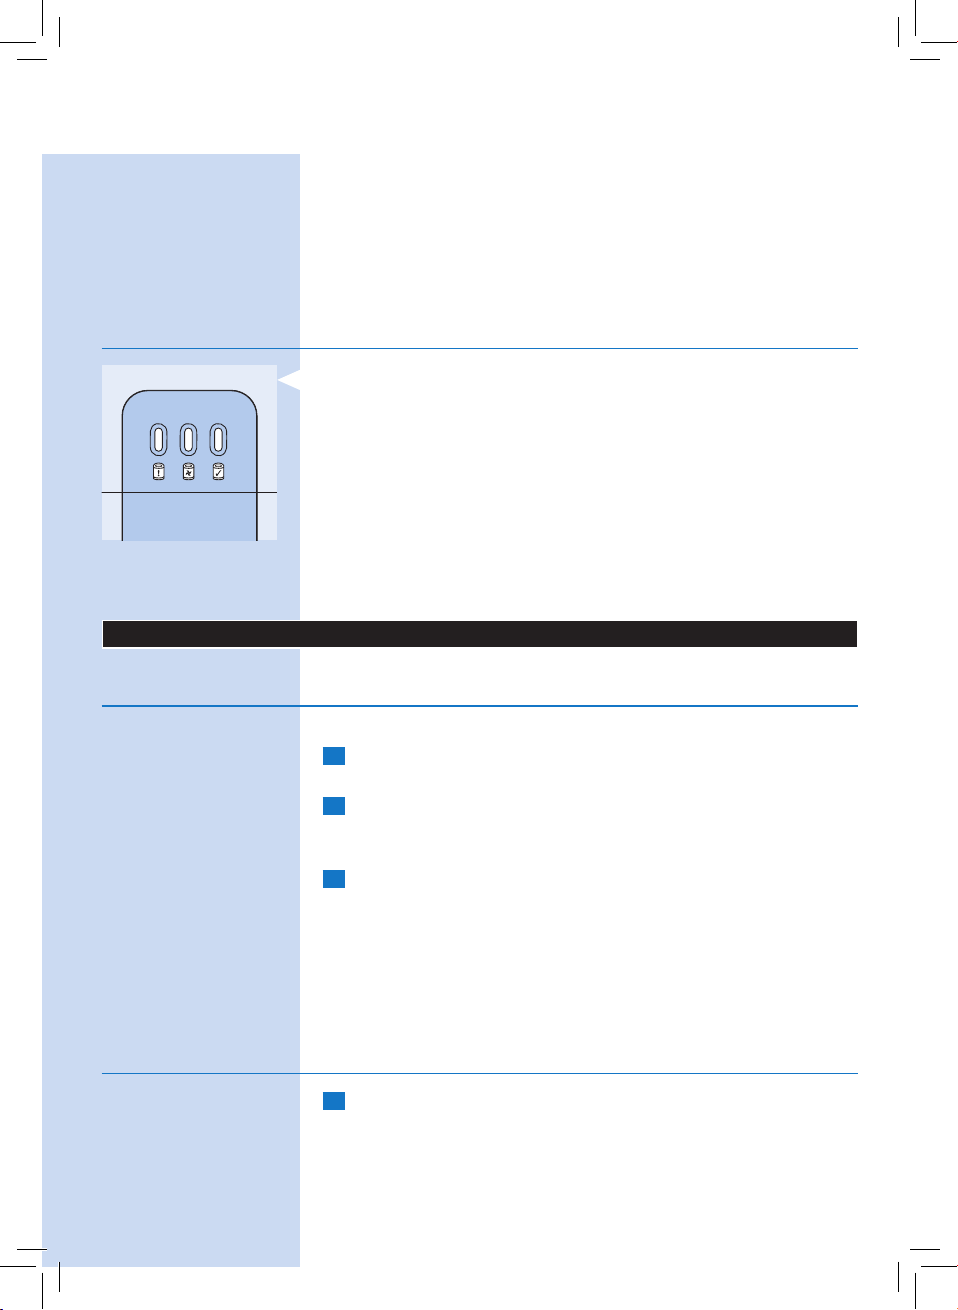
LED indicator lights (HD3610 only)
- There are three indicator lights on top of the appliance that
show the status of the appliance.
- Red indicator light = the appliance is switched on and you
have to install a keg.
- Orange indicator light = the appliance is cooling the keg and
the keg has not yet reached the right drinking temperature.
- Green indicator light = the beer has reached the right
drinking temperature and is ready to be poured.
Other indications
- Red indicator light ashes = the tap unit and/or tube are not
properly placed.
How to pour a perfect beer
Follow the instructions below to pour a perfect beer.
Cleaning beer glasses
Always use clean beer glasses when you tap beer.
1 Clean the glasses carefully in hot water with some
washing-up liquid.
2 Rinse the glasses thoroughly with cold tap water.
In this way you remove all grease and soap residues, which
allows you to pour a beer with a good head.
3 Hold the glasses upside down to the light to check if they
are free of grease and soap residues.
The glasses are clean when the water runs down the surface
evenly, without revealing any stains.
Tip: If you clean beer glasses in the dishwasher, do not use a
rinse agent. Rinse agent residues may break down the foam
head of the beer.
Pouring beer
1 You get the best results if you pour the beer in a cool, clean
and wet glass!
Note: A cool glass ensures a more stable beer head. It also
keeps freshly poured beer fresh longer and helps to retain its
sparkling quality.
Page 15
ENGLISH 17
Note: For the best quality draft beer, always clean and rinse
used glasses before you use them again. This prevents foam
residues of previously poured beer from causing too much
foam in freshly poured beer.
Note: When you have not poured beer for more than a week,
it is recommended to let beer ow into the glass for 1 second.
Then rinse the glass with cold water before you ll it with
fresh beer.
2 Hold the glass by the bottom or in the middle to make sure
it stays clean.
3 Open the tap in one quick, smooth movement.
The beer only ows properly into the glass if the tap is
completely open. If the tap is only half open, the beer is forced
through the tap, causing it to foam more strongly.
Let the beer to ow down the inside of the glass.
4 To vary the size of the beer head, vary the angle at which
you hold the glass under the spout and vary the distance
between the glass and the spout.
The more upright and the closer to the spout you hold the
glass, the more foam you obtain.
Note: Do not let the end of the spout touch the beer glass, the
beer or the beer head. Any beer residues present on the spout
aect the forming of the beer head.
5 Slowly move the glass to vertical position while you pour
your beer.
6 Fill the glass until the foam almost ows over the rim of
the glass.
7 Insert the exible tube into the tap body.
Note: The pump may go on.
8 Europe (except Germany and the UK): For the best end
result, remove excess foam from the glass by moving a
skimmer over the rim of the glass at an angle of 45° in one
smooth movement.
Note: Never leave the skimmer lying on the worktop, but
put it in a clean glass with fresh, cold water or rinse it right
away. Only pass the skimmer over the glass once, as further
skimming has a negative eect on the quality of the beer
head.
, You now have a perfect draft beer.
Page 16
ENGLISH18
Serving a freshly poured beer
1 Dry the bottom of the glass by passing it over a cloth.
2 Use a clean beer mat for your guest.
3 Pick up the glass in the middle and serve the beer on the
beer mat. Make sure the beer brand logo (if present on the
glass) faces your guest.
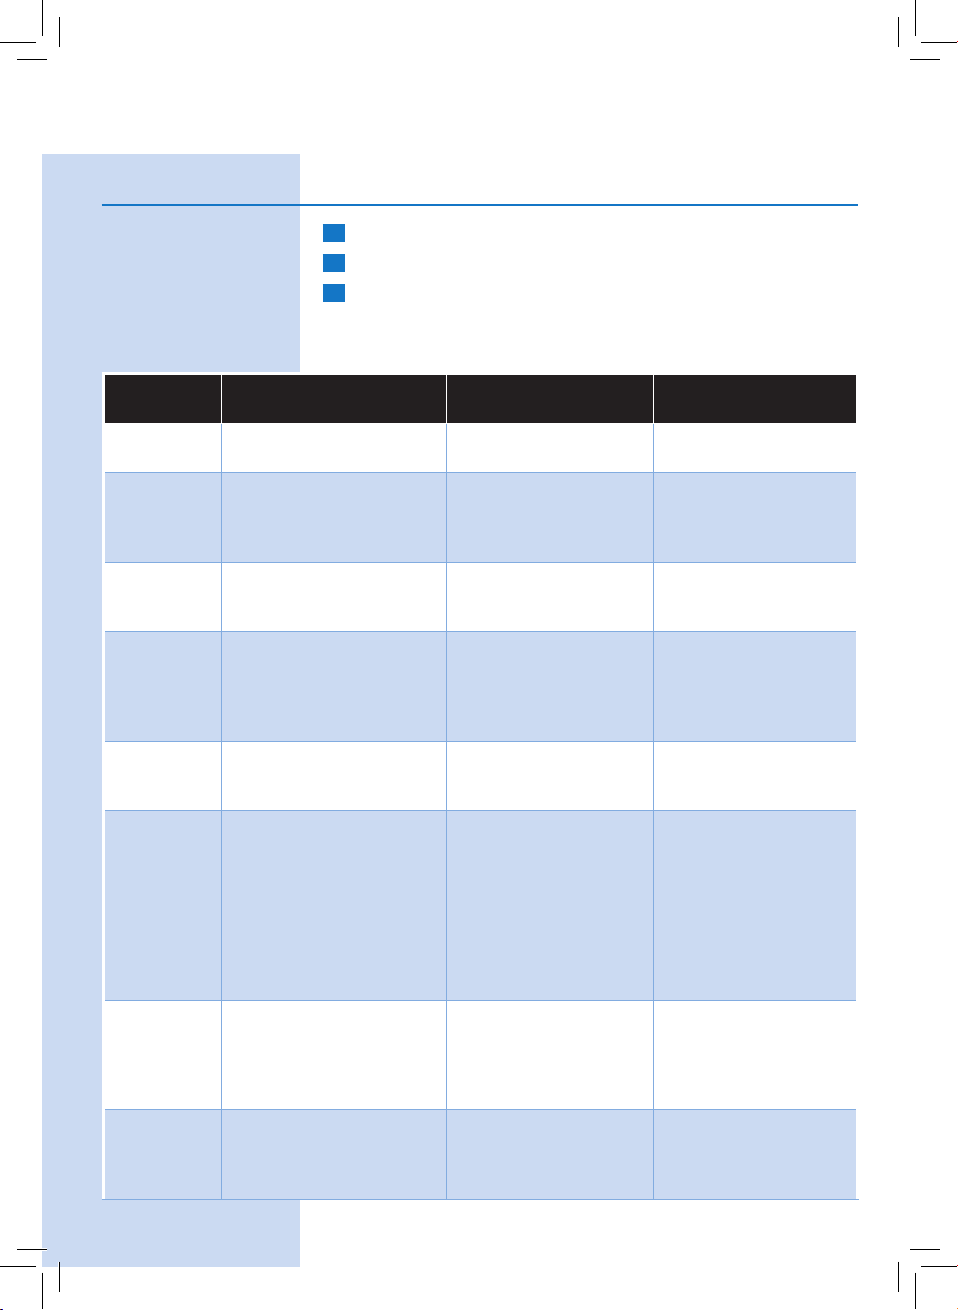
3 dierent beer pouring traditions
Step European (except
Germany and UK)
1 Rinse a glass and let it
drain.
2 Hold the glass next
to the opening of the
spout.
3 Open the tap fully in
one smooth movement.
4 Move the glass under
the spout at an angle
of approx. 45 °C and let
the beer ow down the
inside of the glass.
5 Do not let the spout
touch theglass, the beer
or the foam.
6 The angle at which you
hold the glass while you
pour beer determines
the ultimate size of the
foam head. The more
upright you hold the
glass, the higher the
foam head becomes.
7 Fill the glass until the
beer almost ows over
the rim of the glass.
German British
Rinse a glass and let
it drain.
Hold the glass under
the opening of the
spout at an angle of
approx. 45 °C.
Open the tap fully
in one smooth
movement.
Let the beer ow
down the inside of the
glass.
Do not let the spout
touch the glass, the
beer or the foam.
The angle at which
you hold the glass
while you pour beer
determines the
ultimate size of the
foam head. The more
upright you hold the
glass, the higher the
foam head becomes.
a. Let beer ow into
the glass until it
contains twothirds
beer and one-third
foam.
b. Close the tap and
put the glass down for
1 minute to allow the
foam to settle.
Rinse a glass and let
it drain.
Hold the glass under
the opening of the
spout at an angle of
approx. 45 °C.
Open the tap fully
in one smooth
movement.
Let the beer ow
down the inside of
the glass.
Do not let the spout
touch the glass, the
beer or the foam.
The angle at which
you hold the glass
while you pour beer
determines the
ultimate size of the
foam head. The more
upright you hold the
glass, the higher the
foam head becomes.
Fill the glass until the
beer almost ows
over the rim of the
glass.
Page 17
ENGLISH 19
Step European (except
Germany and UK)
8 Close the tap in one
smooth movement.
9 a. Move the glass away
from the spout to
prevent drops of beer
from falling onto the
foam head.
b. Remove the foam that
rises beyond the rim of the
glass by passing a skimmer
over the rim of the glass at
an angle of 45°.
10 Your beer is now ready to
be served.
Replacing the keg
The keg is empty when only foam comes out of the spout and
no beer. HD3720 only: the display also indicates that the keg is
empty.
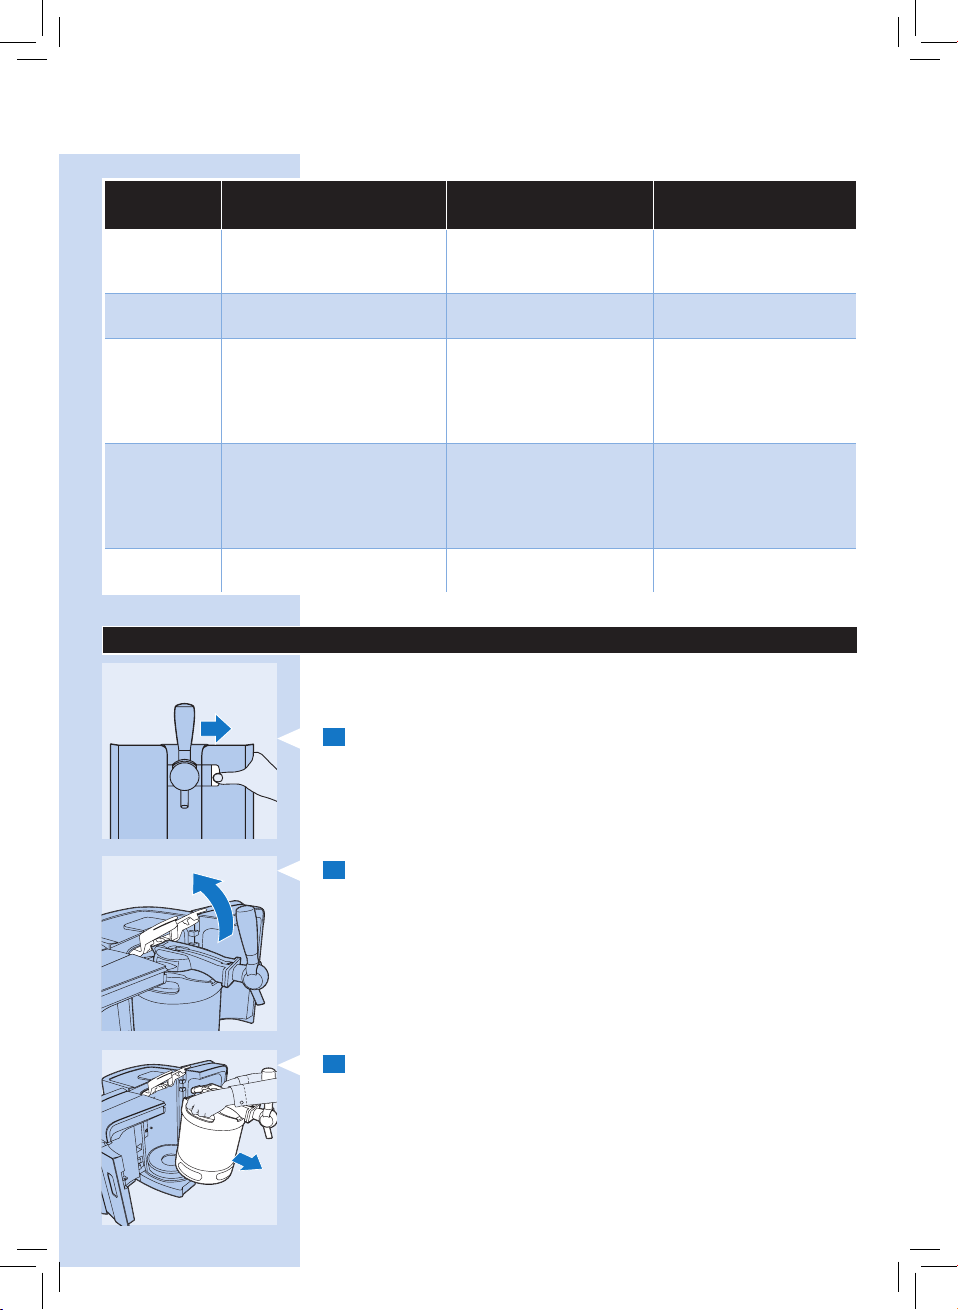
1 Press the release button to the right to open the doors.
Make sure you open the doors fully.
German British
c. Repeat steps 2 to 6
and ll the glass up to
the rim.
Close the tap in one
smooth movement.
Move the glass away
from the spout to
prevent drops of beer
from falling onto the
foam head.
Your beer is now ready
to be served.
Close the tap in one
smooth movement.
Move the glass away
from the spout to
prevent drops of beer
from falling onto the
foam head.
Your beer is now ready
to beserved.
2 Lift the blue locking levers completely.
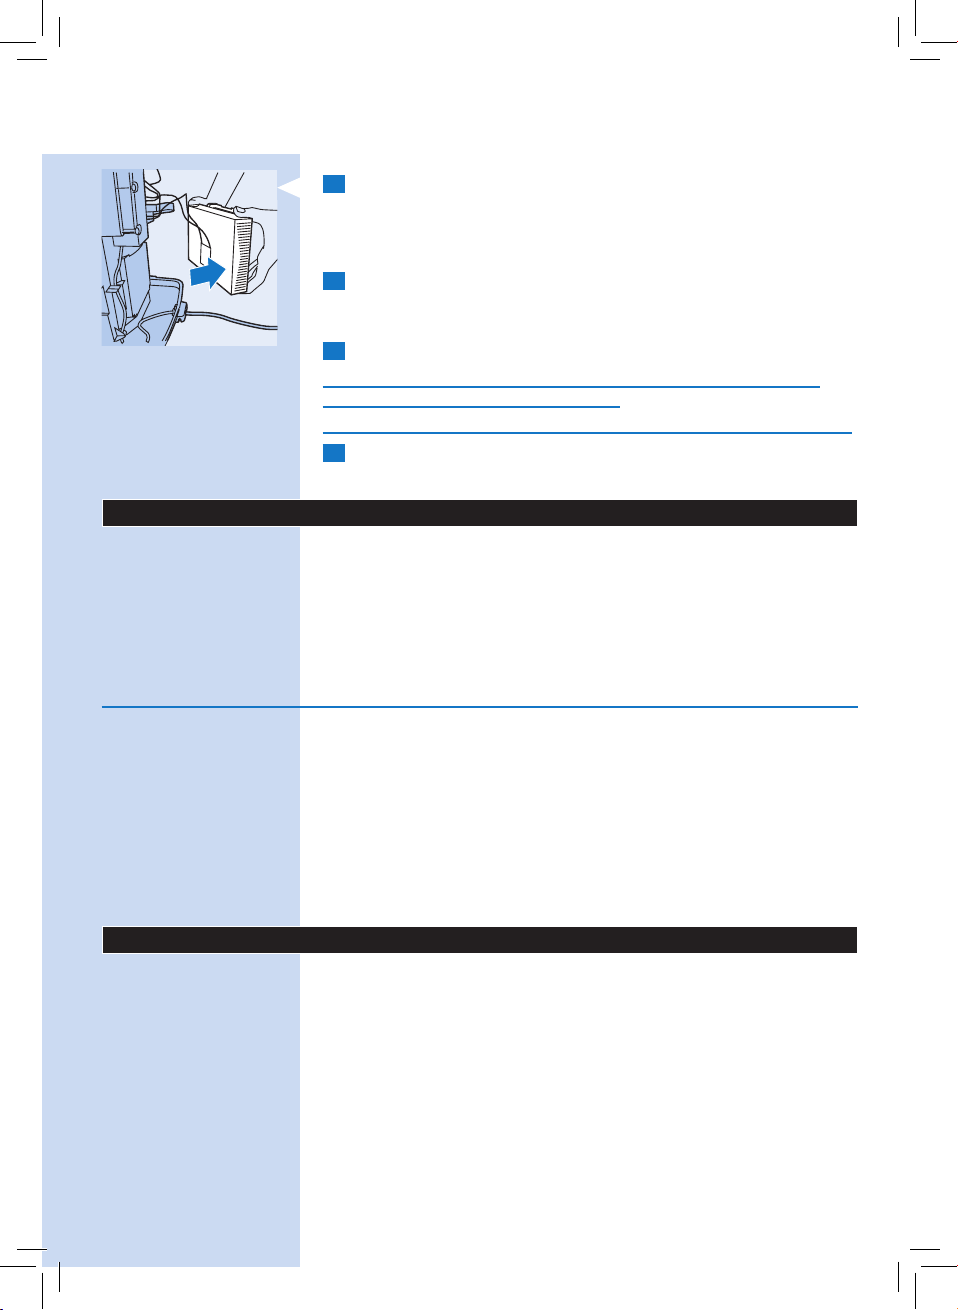
3 Tilt the keg with the assembled tap unit towards you and
take it out of the appliance.
Page 18
ENGLISH20
4 Press on the release buttons on both sides of the tap unit
(1). The tap unit is released from the keg with a click and
you can remove it (2).
You have to remove the tap unit from the keg before you can
replace the tube.
Always replace the tube when you install a new keg. Never use
a tube for more than 30 days.
5 See chapter ‘Preparing for use’ for instructions on how to
place the tap unit on the keg and how to place the keg into
the appliance.
Cleaning
Clean the appliance when you replace the keg or when you
store the appliance for a longer period.
Never use scouring pads, scouring agents or aggressive liquids
such as petrol or acetone to clean the appliance.
1 Always unplug the appliance before you clean it.
2 Clean the outside of the appliance with a damp cloth.
3 Always clean the tap unit as described in chapter
‘Replacing the keg’ to avoid sticky beer residues.
4 Remove and disassemble the drip tray and the drip tray
cover.
5 You can remove the tap handle by pulling it out of the tap
body.
6 Clean the tap unit, the drip tray and the drip tray cover
with hot water and, if necessary, some washing-up liquid.
Hot water may cause burns. Always check if the water is not too
hot before you clean these parts under the tap.
Only the drip tray, the drip tray cover and the spout are
dishwasher-proof.
Recycling
- This symbol means that this product shall not be disposed
of with normal household waste (2012/19/EU).
- Follow your country’s rules for the separate collection of
electrical and electronic products. Correct disposal helps
prevent negative consequences for the environment and
human health.
Page 19
ENGLISH 21
Removing the cooling element
The cooling element inside the appliance contains a substance
that may pollute the environment. Therefore you must remove
the cooling element before you discard the appliance.
You can also take or send the appliance to a Philips service
centre. The sta of this centre will remove the cooling element
for you and will dispose of it in an environmentally safe way.
Only remove the cooling element when you discard the
appliance.
Be careful of the paste on the cooling element and adjacent
parts. If this paste ends up on your clothes, it causes a
permanent stain.
Remove the cooling element in the following way:
1 Unplug the appliance.
2 Slide the release button to the right to open the doors.
There are two holes near the hinges of the doors on either side.
3 Remove the four screws located in these holes with a
screwdriver.
4 Remove the back cover from the appliance.
5 Pull the cooling fan out of the appliance.
, Now you see an aluminium plate with ns on it and with
two screw holes.
6 Undo the screws with a screwdriver.
Page 20
ENGLISH22
7 Remove the aluminium plate.
, After you have removed the aluminium plate, you see a
white plate of approx. 4 x 4cm. This is the actual cooling
element.
8 Place the shaft of a screwdriver against one side of the
cooling element and push the cooling element o the back
of the aluminium plate.
9 Cut the wires attached to the cooling element.
Do not connect the appliance to the mains again after you
have removed the cooling element.
Never reassemble the cooling element once you have removed it.
10 Hand in the cooling element at an ocial collection point
for chemical waste.
Guarantee & service
If you need information or if you have a problem, contact us
online at www.philips.com or call the PerfectDraft call centre.
Their phone number is 078-250159 (Belgium), 040 80 80 10 980
(Germany) or 0900-2224222 (Netherlands).
When you take the appliance to your dealer or a Philips service
centre for determination of the cause of the problem, also bring
the tube and the keg.
Guarantee restrictions
Your guarantee becomes invalid if:
- you do not use the appliance according to the instructions
in this user manual.
- you use damaged kegs in this appliance.
- you do not install the kegs according to the instructions in
this user manual.
- you use kegs from other suppliers than the ones mentioned
in this user manual.
, The kegs and tubes are not covered by this guarantee.
Troubleshooting
If you are unable to solve the problem with the information
below, contact us online at www.philips.com or call the
PerfectDraft call centre at 078-250159 (Belgium), 040 80 80 10
980 (Germany) or 0900-2224222 (Netherlands).
Page 21
Problem Solution
Appliance general
It is not possible to
close the doors.
There is frost on
the keg or on the
appliance.
Beer leaks out of the
appliance.
The appliance makes a
sound.
The pump goes on
frequently when I am
not pouring beer.
Make sure you push down the blue locking levers until they
are in horizontal position before you close the doors.
Make sure the tube is placed correctly in the tap unit and the
tap handle is in upright position. See chapter ‘Preparing for
use’, section ‘Placing the tube into the tap unit’.
Make sure the tap unit is placed correctly on the keg.
Unplug the appliance and let the keg or appliance defrost.
Dry the appliance or keg with a cloth.
Make sure that the doors are properly closed. For instructions
on how to close the doors, see the chapter ‘Preparing for use’,
section ‘Placing the keg into the appliance’. It is normal for
some frost to be present on the back of the keg.
Make sure that the tap unit and the tube are placed correctly
(see chapter ‘Preparing for use’, sections ‘Placing the tap unit
onto the keg’ and ‘Placing the tube into the tap unit’).
Remove the tap unit and tube and reinstall them. If the
problem continues to occur, contact the PerfectDraft call
centre in your country to obtain a new tube.
Because the appliance chills constantly, the fan works
continuously.
The pump may go on while you pour beer to maintain the
right pressure. When you are not pouring beer, the pump also
goes on every now and then to keep the appliance at the
right pressure.
If the appliance makes a hissing sound, the tap unit may not
be properly connected to the keg. Make sure you rinse the
tap unit thoroughly. It is essential that all rubber parts of the
tap unit are moist before you assemble the tap unit onto the
keg.
Reinstall the tap unit and the keg by following the instructions
in sections ‘Placing the tap unit onto the keg’ and ‘Placing the
keg into the appliance’ in chapter ‘Preparing for use’. If this
does not help, try another keg together with a new tube. If
the problem continues to occur, contact the PerfectDraft call
centre in your country.
ENGLISH 23
Page 22
ENGLISH24
Problem Solution
Tap unit
It is dicult to place the
tap unit onto the keg.
It is dicult to press
the release buttons to
remove the tap unit.
It is not possible to
place the keg with the
assembled tap unit in
the appliance.
The tube cannot be
removed from the tap
unit.
It is dicult to place the
tube into the tap unit.
LCD display/LED indicator lights
The red indicator light
ashes (HD3610).
There is a green dash
on the display and the
appliance does not
work (HD3720).
There is a green or red
dash on the display
and the background
light ashes (HD3720).
Make sure no old beer is left in the tap unit. Clean the entire
tap unit with hot water and, if necessary, some washing-up
liquid.
First remove the keg from of the appliance. Then press the
release buttons to remove the tap unit from the keg.
Beer residues may cause the tap unit to stick to the keg.
Clean the tap unit with hot water and, if necessary, some
washing-up liquid to dissolve beer residues. Then remove the
tap unit from the keg.
Make sure the tap unit is placed correctly on the keg. Push
the tap unit down rmly when you place it onto the keg. See
chapter ‘Preparing for use’, section ‘Placing the tap unit onto
the keg’.
Check if you have lifted the blue locking levers properly and
push them down after you have installed the keg.
Remove the tap unit rst before you remove the tube. Rinse
the tap unit with hot water. Press the tube release button and
pull the tube out of the spout.
Make sure the tube is placed correctly (see chapter ‘Preparing
for use’, section ‘Placing the tube into the tap unit’).
Make sure you clean the tap unit with hot water before you
insert a new tube.
The tube may be broken. Contact the PerfectDraft call centre
in your country to obtain a new tube.
Remove the tap unit, clean it and reinstall the tap unit. If this
does not help, try another keg with a new tube.
If the problem continues to occur, please contact the
PerfectDraft call centre in your country.
Make sure that the tap unit is placed correctly (see chapter
‘Preparing for use’, section ‘Placing the tap unit onto the keg’).
Remove the tap unit, clean it and reinstall the tap unit. If this
does not help try another keg with a new tube.
If the problem continues to occur, please contact the
PerfectDraft call centre in your country.
Page 23
Problem Solution
The display shows
the wrong volume
(HD3720).
Pouring beer
No beer comes out
when I pull the tap
handle.
Too much foam comes
out of the appliance.
The foam head is too
high.
The beer that comes
out of the appliance is
at.
For proper functioning of the volume indication, it is crucial
that you open the tap handle completely (see chapter ‘How
to pour a perfect beer’).
In case of a power failure or if the appliance has been
disconnected from the mains, the level indication will be
accurate again after you have poured a few glasses of beer.
Perhaps the keg is empty. Put a new keg into the appliance.
Make sure the tube is tted correctly in the tap unit (see
chapter ‘Preparing for use’, section ‘Placing the tube into the
tap unit’).
Make sure that the tap unit is placed correctly on the keg (see
chapter ‘Preparing for use’, section ‘Placing the tap unit onto
the keg’).
Make sure you open the tap completely when you pour beer
(see chapter ‘How to pour a perfect beer’).
The beer is too warm. Wait until the beer is cold enough to
be poured, i.e. when temperature on the display is green
(HD3720 only) or when the green indicator light goes on
(HD3610).
The keg has been shaken too much. Wait half an hour for the
beer to settle.
The rst glass can contain more foam than usual. Try pouring
a second glass.
The tube may not function properly. Contact the PerfectDraft
call centre in your country to obtain a new tube.
See chapter ‘How to pour a perfect beer’.
Check if the keg has been open for over 30 days and check if
the expiry date of the keg has passed.
Perhaps the glasses you used were not clean enough. Rinse
the glasses with water and some washing-up liquid. Rinse
them thoroughly with cold water to remove all grease and
soap residues
Pour beer as described on the keg and in this user manual
(see chapter ‘How to pour a perfect beer’).
ENGLISH 25
Page 24
ENGLISH26
Problem Solution
The foam head
collapses very quickly.
The keg fell, can I still
use it?
The beer tastes bad. Make sure you keep the appliance plugged in all the time.
Cooling
The temperature on
the display goes up
(HD3720).
The appliance does
not chill the beer
suciently.
Perhaps the glasses you used were not clean enough. Rinse
the glasses with water and some washing-up liquid. Rinse
them thoroughly with cold water to remove all grease and
soap residues.
Make sure the beer is cold enough to be poured, i.e. when
temperature on the display is green (HD3720) or when the
green indicator light goes on (HD3610).
When it is an unopened keg and it does not have any visual
damage, you can try to use it. When the keg is already open,
you cannot use the keg anymore and have to install a new
keg.
Once the keg has been opened and is kept cool, the beer
stays fresh for 30 days. Check the expiry date on the keg
before you install a new keg.
Always clean the tap unit and place a new tube into it when
you install a new keg.
Make sure you use clean glasses.
Make sure that the doors are properly closed (see chapter
‘Preparing for use’, section ‘Placing the keg into the
appliance’).
During hot days, put the appliance in a cooler place.
Place the appliance in an environment with an ambient
temperature between 3 °C and 32 °C. Leave at least 10cm free
space around the appliance. Do not expose the appliance to
direct sunlight.
Check if the fan outlet at the back of the appliance is free
from dust and/ or other particles.
At an ambient temperature of 23 °C, chilling the keg takes
approximately 12-15 hours.
At higher ambient temperatures, chilling the keg takes longer.
When you use the appliance above 32 °C (HD3720) or
30 °C (HD3610), the beer temperature may rise above 3 °C.
When the temperature decreases to below 32 °C, the beer
temperature drops to 3 °C again.
You can prechill the keg in upright position in the fridge for a
while before you install the keg.
Page 25
ENGLISH 27
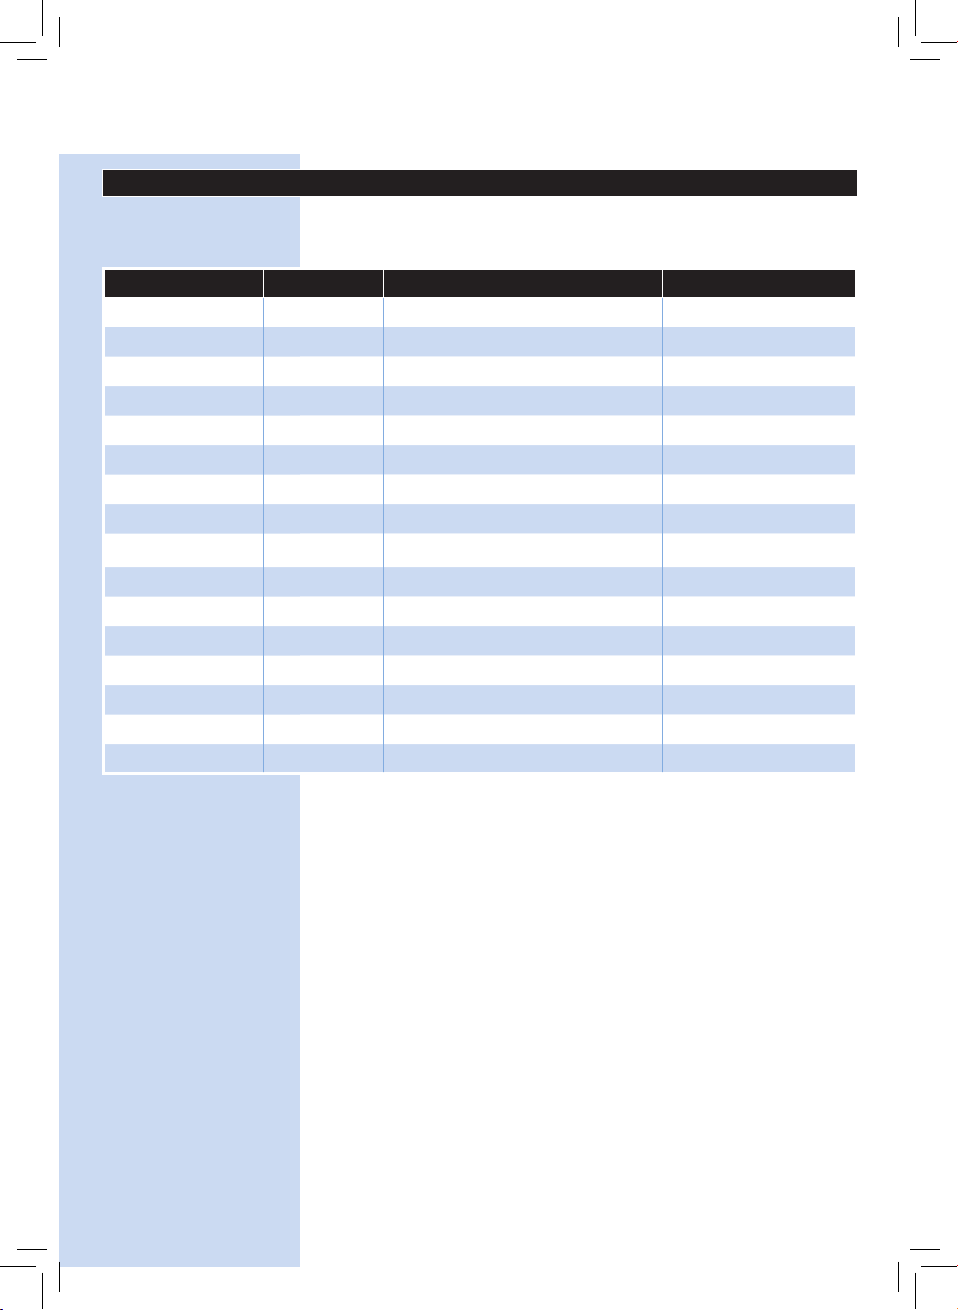
Keg suppliers
If you need information about the keg or if you have a problem
with your keg, you can contact the supplier of the keg in your
country. You will nd the phone numbers in the table below.
Country Brand Phone number Web address
The Netherlands Dommelsch 0800-0230367 www.dommelsch.nl
Hertog Jan 0800-0230375 www.hertogjan.nl
Jupiler 0800-0230945 www.jupiler.nl
Grolsch 0800-1591 www.grolsch.nl
Bavaria 0900-2282742 (Eur 0,10 p/m) www.bavaria.nl
Belgium Stella Artois 070-222918 www.stella-artois.be
Jupiler 070-222912 www.jupiler.be
Lee 078 250 159 www.perfectdraft.de
Luxembourgh
Germany Beck’s Pils 040 80 80 10 980 (local tari) www.perfectdraft.de
Diekirch
Jupiler 0032 70-222912 www.jupiler.be
Lee 0032 78 250 159 www.perfectdraft.de
Beck’s Gold 040 80 80 10 980 (local tari) www.perfectdraft.de
Diebels Alt 040 80 80 10 980 (local tari) www.perfectdraft.de
Diebels Pils 040 80 80 10 980 (local tari) www.perfectdraft.de
Hasseröder 040 80 80 10 980 (local tari) www.perfectdraft.de
0035-2802131999 -
Page 26
28 DEUTSCH
Einführung
Wir gratulieren Ihnen zum Kauf dieses neuen PerfectDraft
Zapfsystems. Ab jetzt können Sie jederzeit den wunderbaren
Geschmack von frisch gezapftem Fassbier genießen. Das Gerät
hält Ihr Bier frisch und perfekt temperiert, sodass Sie sich ein
kühles Bier genehmigen können, wann immer Sie Lust darauf
haben. PerfectDraft ist für verschiedene Biersorten geeignet.
Welche davon in Ihrem Land verkauft werden, können Sie auf
dem Verpackungskarton sehen (siehe dazu auch das Kapitel
“Fasshersteller” am Ende der Bedienungsanleitung). Weitere
Informationen nden Sie im Internet auf unserer Website unter
www.perfectdraft.de.
Diese Bedienungsanleitung beschreibt die Handhabung von
PerfectDraft.
Da dieses System PerfectDraft heißt, schreiben wir in dieser
Bedienungsanleitung “draft beer” anstelle des üblichen
“draught beer” (= Fassbier).
Allgemeine Beschreibung (Abb. 1)
A Rechte Klappe
B Entriegelungstaste
C Kühlplatte
D Kabelaufwicklung
E LCD-Anzeige: Biertemperatur, Füllstands- und
Frischeanzeige (nur HD3720)
F Fass-Sensor
G Temperatursensor
H Linke Klappe
I Verriegelungshebel
J LEDs für die Statusanzeige des Geräts (nur HD3610)
K Abdeckung für Auangschale (HD3610, HD3720)
L Auangschale (HD3610, HD3720)
Schlaucheinheit (im Lieferumfang des Fasses enthalten)
M Schlauchanschluss
N Rohr
Zapfeinheit
O Plakette
P Zapfhahn
Q Mittelstück der Zapfeinheit
R Ausgießer
S Entriegelungstasten
T Rohrentriegelungstaste
Bierfass
U Oberseite
V Schutzkappe
W Ränder
X Reinigungsbürste (HD3720)
Reinigen (entstauben) Sie den Wärmeableiter durch den
Schlitz am hinteren Gehäuse
Page 27

DEUTSCH 29
Wichtig!
Lesen Sie diese Bedienungsanleitung vor
dem Gebrauch des Geräts aufmerksam
durch, und bewahren Sie sie für eine spätere
Verwendung auf.
Das Gerät
Achtung
- Um Gefährdungen zu vermeiden, darf
ein defektes Netzkabel nur von einem
Philips Service-Center, einer von Philips
autorisierten Werkstatt oder einer ähnlich
qualizierten Person durch ein OriginalErsatzkabel ersetzt werden.
- Prüfen Sie vor Inbetriebnahme, ob die
Spannungsangabe auf der Unterseite des
Geräts mit der örtlichen Netzspannung
übereinstimmt.
- Verwenden Sie das Gerät nicht, wenn der
Netzstecker, das Netzkabel oder das Gerät
selbst defekt oder beschädigt ist.
- Dieses Gerät kann von Personen mit
verringerten physischen, sensorischen
oder psychischen Fähigkeiten oder Mangel
an Erfahrung und Kenntnis verwendet
werden, wenn sie bei der Verwendung
beaufsichtigt wurden oder Anweisung zum
sicheren Gebrauch des Geräts erhalten
und die Gefahren verstanden haben.
- Dieses Gerät sollte nicht von Kindern
verwendet werden. Halten Sie das
Gerät und das Netzkabel außerhalb der
Reichweite von Kindern.
- Achten Sie darauf, dass Kinder nicht mit
dem Gerät spielen.
Page 28
DEUTSCH30
- Zur Vermeidung von Überhitzung sollten
Sie das Gerät nicht abdecken (z. B. mit
einem Handtuch).
- Dieses Gerät ist nur für den Gebrauch in
Innenräumen vorgesehen. Verwenden Sie
das Gerät nicht im Freien.
- Das Gerät ist nicht für Wasseranschlüsse
mit Hochdruck geeignet.
Achtung
- Halten Sie das Gerät außerhalb
der Reichweite von Kindern. Der
Zapfhahn lässt sich als zusätzliche
Sicherheitsmaßnahme abnehmen.
- Stellen Sie das Gerät auf eine waagerechte,
ebene und stabile Unterlage. Für eine
optimale Leistung sollte um das Gerät
herum mindestens 10 cm Platz frei bleiben.
- Bei einer Umgebungstemperatur von
23 °C dauert es etwa 12 bis 15 Stunden,
bis ein ungekühltes Bierfass auf die ideale
Trinktemperatur von 3 °C gekühlt ist. Bei
höheren Umgebungstemperaturen dauert
die Kühlung des Fasses entsprechend länger.
- Wenn Sie das Gerät bei Temperaturen von
über 32 °C (HD3720) oder 30 °C (HD3720)
benutzen, steigt die Biertemperatur unter
Umständen auf über 3 °C an. Geht die
Umgebungstemperatur unter 32 °C zurück,
fällt auch die Biertemperatur wieder auf 3 °C.
- Setzen Sie das Gerät nicht direktem
Sonnenlicht aus.
- Reinigen Sie das Gerät, bevor Sie es für
einen längeren Zeitraum wegstellen.
Spülen Sie die Zapfeinheit gründlich aus.
Bierrückstände können beim Anbringen
Page 29
DEUTSCH 31
der Zapfeinheit am Bierfass Probleme
verursachen.
- Heben Sie das Gerät nicht am Zapfhahn an.
Das Bierfass
Warnhinweis
- Bewahren Sie das Fass niemals im
Tiefkühlfach auf! Das Einfrieren würde dem
Fass erheblichen Schaden zufügen.
- Um das Risiko einer Explosion zu
vermeiden, sollten Sie das Bierfass weder
direktem Sonnenlicht noch Temperaturen
über 30 °C aussetzen.
- Das Bierfass steht unter Druck. Entfernen
Sie die Oberseite nicht; stechen Sie auch
kein Loch mit einem spitzen Gegenstand
in das Fass.
Achtung
- Lesen und beachten Sie die Anweisungen
und Sicherheitshinweise auf dem Bierfass,
bevor Sie es in das Gerät einsetzen.
- Schütteln Sie das Fass nicht.
- Lassen Sie das geönete Fass im
eingeschalteten Gerät, damit es die
richtige Temperatur behält. Überprüfen Sie,
ob das Gerät tatsächlich ausgeschaltet
ist. Wenn Sie das Gerät ausschalten, weil
Sie beabsichtigen, es über einen längeren
Zeitraum (z. B. während des Urlaubs) nicht
zu benutzen, sollten Sie das Bierfass
herausnehmen und im Kühlschrank
aufbewahren. Ein geönetes Bierfass ist
30 Tage lang haltbar.
- Achten Sie beim Kauf und vor
dem Einsetzen des Bierfasses
Page 30
DEUTSCH32
immer auf das darauf abgedruckte
Mindesthaltbarkeitsdatum.
- Benutzen Sie das Fass nicht, wenn die
Oberseite defekt ist. Bei beschädigter
Oberseite lässt sich die Zapfeinheit nicht
montieren.
- Ungeönete Bierfässer halten am
längsten, wenn sie bei gleichbleibender
Temperatur gelagert werden. Je kühler Sie
das Fass aufbewahren, umso besser.
- Maximaler Betriebsdruck: 1,5 bar.
- Verwenden Sie das Fass ausschließlich
für die PerfectDraft Modelle HD3720/
HD3610/HD3600. Setzen Sie das Fass in
kein anderes Gerät.
- Verwenden Sie ausschließlich Fässer der
in dieser Bedienungsanleitung genannten
Hersteller (siehe Kapitel "Fasshersteller").
- Verwenden Sie keine defekten Bierfässer,
um Schäden am Gerät zu vermeiden.
Geben Sie ein beschädigtes Bierfass gleich
in dem Geschäft zurück, in dem Sie es
gekauft haben.
- Die Fässer lassen sich nicht stapeln.
- Geräuschpegel: Lc < 70 dB(A).
Elektromagnetische Felder
Dieses Philips Gerät erfüllt sämtliche Normen bezüglich
elektromagnetischer Felder. Nach aktuellen wissenschaftlichen
Erkenntnissen ist das Gerät sicher im Gebrauch, sofern es
ordnungsgemäß und entsprechend den Anweisungen in dieser
Bedienungsanleitung gehandhabt wird.
Page 31

DEUTSCH 33
Vor dem ersten Gebrauch
Das Gerät in Betrieb nehmen
1 Stellen Sie das Gerät auf eine waagerechte, ebene und
stabile Unterlage. Für eine optimale Leistung sollte um das
Gerät herum mindestens 10 cm Platz frei bleiben.
Hinweis: Stellen Sie das Gerät nicht an einen Ort, an dem es
direktem Sonnenlicht oder hohen Temperaturen ausgesetzt
ist (z. B. in der Nähe eines Herdes oder Backofens).
2 Überschüssiges Kabel können Sie in das Kabelfach an der
Rückseite des Geräts schieben.
3 Stecken Sie den Netzstecker in die Steckdose.
4 HD3720: Setzen Sie die Auangschale ein.
5 Befestigen Sie den Zapfhahn.
6 Befestigen Sie die gewünschte Plakette oben auf dem
Zapfhahn.
Page 32

DEUTSCH34
Zum Gebrauch vorbereiten
Die Zapfeinheit am Fass anbringen
Reinigen Sie die Zapfeinheit immer mit heißem Wasser, bei
Bedarf mit etwas Spülmittel, bevor Sie sie auf das Bierfass
setzen und den Schlauch einführen. Tabelle 1:
1 Nehmen Sie die Schutzkappe und den Schlauch vom
Bierfass.
2 Ziehen Sie den Schlauchanschluss und den Schlauch
aus der Zapfeinheit. Halten Sie die Zapfeinheit unter
2
1
ießendes Wasser, und spülen Sie die Önung am
Schlauchanschluss (1) und den Anschluss am Gerät (2) ab.
Verwenden Sie bei Bedarf etwas Spülmittel
3 Drehen Sie die Zapfeinheit um, und spülen Sie den
Fassanschluss auf der Unterseite der Zapfeinheit ab.
Alle Gummiteile der Zapfeinheit müssen feucht sein, bevor Sie
die Zapfeinheit auf das Bierfass setzen.
4 Stellen Sie sicher, dass die Entriegelungstaste
ordnungsgemäß funktioniert. Wenn Sie die blaue
Entriegelungstaste drücken, müssen sich die beiden
Klemmen in der Önung verschieben.
Hinweis: Wenn sich die Klemmen durch Drücken der blauen
Entriegelungstaste nicht bewegen, spülen Sie die Önung
am Schlauchanschluss erneut unter ießendem Wasser ab.
5 Drücken Sie die Zapfeinheit fest auf die Oberseite des
Fasses, bis sie mit einem “Klick” hörbar einrastet.
Wenn die Zapfeinheit richtig auf dem Fass sitzt, hören Sie
zweimal kurz hintereinander ein “Klick”.
Tipp: Die Zapfeinheit sitzt richtig auf dem Fass, wenn Sie den
Arm der Oberseite frei auf- und abwärts bewegen können.
Page 33

DEUTSCH 35
6 Die Entriegelungstasten an beiden Seiten der Zapfanlage
müssen gleich weit herausragen. Ist dies nicht der
Fall, drücken Sie sie mit dem Daumen herunter, bis Sie
entweder einmal oder zweimal kurz hintereinander ein
“Klick” hören.
Den Schlauch in die Zapfeinheit einführen
1 Schieben Sie den biegsamen Schlauch in das Mittelstück
der Zapfeinheit.
2 Schieben Sie die Vorsprünge des Schlauchanschlusses
unter das Scharnier.
3 Schieben Sie den Schlauchanschluss in die Önung der
Zapfeinheit, bis er mit einem “Klick” hörbar einrastet.
Das Fass in das Gerät setzen
Stellen Sie das Fass keinesfalls in das Gerät, bevor Sie nicht
die Zapfeinheit und den Schlauch korrekt zusammengesteckt
haben. Siehe hierzu die Abschnitte “Die Zapfeinheit am Fass
anbringen” und “Den Schlauch in die Zapfeinheit einführen” in
diesem Kapitel.
Page 34

DEUTSCH36
1 Schieben Sie die Entriegelungstaste nach rechts, um die
Klappen zu önen.
2 Heben Sie die beiden blauen Verschlusshebel bis zum
Anschlag an.
3 Kippen Sie das Fass mit der darauf montierten Zapfeinheit
leicht nach vorne und stellen Sie es in das Gerät.
- Stellen Sie das Fass zuerst auf die Kühlplatte des Geräts.
- Richten Sie dann das Fass auf, indem Sie die Zapfeinheit
zwischen die blauen Verschlusshebel schieben.
4 Push down the blue locking levers until they are in
horizontal position.
Wenn es nicht möglich ist, die Verschlusshebel waagerecht zu
stellen, haben Sie das Fass nicht richtig in das Gerät gestellt.
Nehmen Sie es heraus und folgen Sie anschließend erneut den
Schritten 1 bis 3.
, Nachdem Sie das Fass eingesetzt haben (auch beim ersten
Mal), läuft die Pumpe einige Sekunden lang.
5 Schließen Sie die Klappen des Geräts.
Hinweis: Wenn sich die Pumpe häug einschaltet, obwohl Sie
kein Bier zapfen, setzen Sie das Fass erneut ein, oder führen
Sie die Anweisungen im Abschnitt “Die Zapfeinheit am Fass
anbringen” dieses Kapitels noch einmal aus.
Page 35

DEUTSCH 37
Die Kühlung
Sobald Sie das Fass eingesetzt haben, beginnt das Gerät mit
dem Kühlen.
Hinweis: Bei einer Umgebungstemperatur von 23 °C dauert es
12 bis 15 Stunden, bis ein ungekühltes Fass gekühlt ist.
Tipp: Wenn Sie schon kurz nach dem Einsetzen des Fasses
in das Gerät Bier zapfen möchten, kühlen Sie das Fass
in aufrechter Position eine Weile im Kühlschrank, bevor
Sie es in das Gerät stellen. Weitere Tipps siehe Kapitel
“Fehlerbehebung”.
1 Warten Sie, bis das Bier die richtige Trinktemperatur
erreicht hat.
, HD3720: Die Temperatur wird im Display grün angezeigt
(siehe Abschnitt “LCD-Display” in diesem Kapitel).
, HD3610: Die Temperaturanzeige leuchtet grün auf (siehe
Abschnitt “LED-Anzeigen” in diesem Kapitel).
LCD-Display (nur HD3720)
, Im Display werden die Biertemperatur, der Füllstand im
Fass und der Frischegrad des Biers angezeigt.
Temperaturanzeige
Warten Sie mit dem Zapfen, bis das Bier kälter als 4 °C ist. Die
ideale Trinktemperatur liegt bei 3 °C. Die Farbe der angezeigten
Temperatur gibt Auskunft darüber, ob das Bier die richtige
Temperatur erreicht hat.
- Rot = Die Biertemperatur ist noch nicht ideal zum Trinken
(über 4 °C). Das Bier schäumt unter Umständen noch zu stark.
- Grün = Das Bier hat die richtige Temperatur (4 °C oder
weniger) zum Trinken erreicht.
Füllstandsanzeige
Die gelb-orange Füllstandsanzeige im Display zeigt die im Fass
verbliebene Biermenge in achtfacher Unterteilung an.
Hinweis: Wenn Sie Gläser mit einem Fassungsvermögen von
20 cl benutzen, können Sie ca. 30 Gläser Bier aus einem Fass
zapfen. 33 cl Gläsern reicht ein Fass für ca. 18 Gläser Bier. Bei
33 cl Gläsern reicht ein Fass für ca. 18 Gläser Bier.
Page 36

DEUTSCH38
Frischeanzeige
Anhand der Frischeanzeige sehen Sie, wie lange das Bier noch
frisch bleibt.
- Wenn Sie ein neues Fass in das Gerät gestellt haben, gibt
Ihnen die Anzeige an, dass das Bier im Fass noch 30 Tage
lang frisch bleibt. Danach zählt die Anzeige von 30 auf
0 Tage zurück.
- Nach dem Önen des Fasses bleibt das Bier 30 Tage lang
frisch, sofern das Fass im Gerät aufbewahrt wird.
Das Gerät muss die ganze Zeit über eingeschaltet bleiben.
- Nach 30 Tagen zeigt die Anzeige an, dass das Fass
ausgewechselt werden muss. Auf der Anzeige sind ein
Gedankenstrich und ein Ausrufezeichen zu sehen.
Die Frischeanzeige einstellen
- Wenn Sie das Gerät für einen längeren Zeitraum
ausschalten möchten, z. B. während Sie im Urlaub sind,
sollten Sie das geönete Fass im Kühlschrank aufbewahren.
Nehmen Sie die Zapfeinheit ab, spülen Sie das Fass oben
ab, spülen Sie den Schlauch durch und bewahren Sie ihn
mit dem Fass im Kühlschrank auf.
Vermerken Sie auf dem Fass immer das Datum und die Anzahl
Tage, die das Bier im Fass noch frisch bleibt (= Anzahl Tage auf
der Anzeige).
- Wenn Sie dann das geönete Fass wieder in das Gerät
stellen, können Sie die Frischeanzeige über die Tasten - und
+ auf die richtige Anzahl von Tagen einstellen.
Tipp: So berechnen Sie die verbleibenden Tage richtig:
Vergleichen Sie das aktuelle Datum mit dem, das Sie auf
das Fass geschrieben haben, als Sie es in den Kühlschrank
stellten, und ziehen Sie davon die Tage ab, die das Fass im
Kühlschrank gestanden hat.
Reinigen Sie die Zapfeinheit und den Schlauch erneut,
bevor Sie das geönete Fass wieder in das Gerät einsetzen.
Überprüfen Sie außerdem, ob sich auf der Fassoberseite
Schmutzrückstände gebildet haben. Wenn dies der Fall ist,
verwenden Sie ein neues Fass.
Weitere Anzeigen
Neben Füllstand und Temperatur sind über das Display
folgende Informationen ersichtlich:
- Grüner Gedankenstrich ohne erkennbare Füllstandsanzeige
= Keine Zapfeinheit auf dem Fass montiert.
- Roter Gedankenstrich ohne erkennbare Füllstandsanzeige
= Kein Fass im Gerät.
Page 37

DEUTSCH 39
- Roter oder grüner Gedankenstrich bei blinkendem
gelborangefarbenem Hintergrund = Zapfeinheit und/
oder Schlauch sind nicht richtig aufgesetzt. Nehmen Sie
das Fass heraus und überprüfen Sie den richtigen Sitz der
Zapfeinheit und des Schlauchs. Siehe hierzu die Abschnitte
“Die Zapfeinheit am Fass anbringen” und “Den Schlauch
in die Zapfeinheit einführen” im Kapitel “Für den Gebrauch
vorbereiten”. Wenn dies nicht hilft, versuchen Sie es mit
einem anderen Fass und einem neuen Schlauch.
LED-Anzeigen (nur HD3610)
- Oben auf dem Gerät benden sich drei Anzeigeleuchten,
aus denen der Gerätestatus ersichtlich ist.
- Rote Betriebsanzeige = Das Gerät ist eingeschaltet, und Sie
müssen nun ein Fass hineinstellen.
- Orange Kühlungsanzeige = Das Gerät kühlt, aber das Fass
hat die richtige Trinktemperatur noch nicht erreicht.
- Grüne Bereitschaftsanzeige = Das Bier hat die richtige
Trinktemperatur erreicht und kann gezapft werden.
Weitere Anzeigen
- Rot blinkende Betriebsanzeige = Die Zapfeinheit und/oder
der Schlauch sind nicht richtig aufgesetzt.
Bier perfekt zapfen
Wenn Sie ein perfekt gezapftes Bier ausschenken möchten,
befolgen Sie die nachstehenden Anweisungen.
Die Biergläser reinigen
Verwenden Sie stets saubere Gläser, wenn Sie Bier zapfen.
1 Reinigen Sie die Gläser sorgfältig mit heißem Wasser und
etwas Spülmittel.
2 Spülen Sie die Gläser gründlich mit klarem, kaltem
Leitungswasser nach.
Auf diese Weise entfernen Sie alle Fett- und
Spülmittelrückstände; das ist wichtig, damit das Bier beim
Einschenken den gewünschten Schaum bildet.
3 Halten Sie die Gläser nach unten gegen das Licht. So sehen
Sie, ob sie völlig frei von Fett- und Spülmittelrückständen
sind.
Die Gläser sind sauber, wenn das Wasser gleichmäßig abtropft,
ohne Flecken am Glas zu hinterlassen.
Tipp: Wenn Sie Biergläser im Geschirrspüler reinigen, sollten
Sie keinen Klarspüler verwenden. Durch Klarspülerrückstände
kann die Schaumkrone in sich zusammenfallen.
Page 38

DEUTSCH40
Bier ausschenken
1 Die besten Ergebnisse erzielen Sie, wenn Sie das Bier in ein
kühles, sauberes und nasses Glas einschenken!
Hinweis: In einem kühlen Glas hält die Schaumkrone länger.
Zudem bleibt frisch gezapftes Bier auch länger frisch und
spritzig.
Hinweis: Fassbier lässt sich am besten zapfen, wenn Sie die
gebrauchten Gläser vor dem erneuten Gebrauch reinigen
und ausspülen. Dadurch wird verhindert, dass sich beim neu
gezapften Bier zuviel Schaum durch Schaumrückstände im
Glas bildet.
Hinweis: Wenn Sie länger als eine Woche kein Bier gezapft
haben, empfehlen wir, das Bier 1 Sekunde lang in ein
Glas ießen zu lassen und das Glas anschließend kalt
auszuspülen, bevor Sie es frisch füllen.
2 Fassen Sie das Glas unten oder in der Mitte an, damit es
sauber bleibt.
3 Önen Sie den Zapfhahn mit einer zügigen Bewegung.
Das Bier läuft nur richtig in das Glas, wenn der Zapfhahn ganz
geönet ist. Ist der Hahn nur halb oen, wird das Bier durch den
Zapfhahn gepresst und entwickelt zu viel Schaum.
Lassen Sie das Bier an der Innenwand des Glases hinab ießen.
4 Die Schaumkrone können Sie durch den Winkel
beeinussen, mit dem Sie das Glas unter den Auslauf
halten, zudem durch den Abstand zwischen Glas und
Bierauslauf.
Je senkrechter und je näher am Auslauf Sie das Glas halten,
desto mehr Schaum erhalten Sie.
Hinweis: Achten Sie darauf, dass die Spitze des Bierauslaufs
weder das Glas noch den Bierschaum oder das Bier berührt,
da Bierrückstände am Auslauf die Bildung der Schaumkrone
beeinträchtigen.
5 Richten Sie das Glas während des Zapfvorgangs
langsam auf.
6 Füllen Sie das Glas, bis der Schaum fast über den Glasrand
läuft.
7 Schieben Sie den biegsamen Schlauch in das Mittelstück
der Zapfeinheit.
Hinweis: Es kann sein, dass sich dabei die Pumpe einschaltet.
Page 39

8 Europa (außer Deutschland und Großbritannien): Die
besten Ergebnisse erzielen Sie, wenn Sie überschüssigen
Schaum zügig mit einem Abstreifer in einem Winkel von
45 ° vom Glasrand streichen.
Hinweis: Lassen Sie den Abstreifer nicht auf der Arbeitsäche
liegen, sondern tauchen Sie ihn in ein Glas mit frischem
kaltem Wasser oder spülen Sie ihn sofort ab. Führen Sie
den Abstreifer nur einmal über das Glas, denn weiteres
Abschöpfen würde die Qualität der Schaumkrone
beeinträchtigen.
, Sie haben jetzt ein perfekt eingeschenktes Fassbier.
So servieren Sie ein frisch gezapftes Bier
1 Trocknen Sie den Glasboden, indem Sie ihn über ein Tuch
streifen.
2 Nehmen Sie einen neuen Bierdeckel für Ihren Gast.
3 Heben Sie das Glas in der Mitte an und servieren Sie das
Bier auf dem Bierdeckel, wobei das Logo der Biermarke
(sofern auf dem Glas vorhanden) in Richtung des Gastes
zeigt.
3 unterschiedliche Zapfmethoden
Schritt Europäische Tradition
(außer Deutschland
und Großbritannien)
1 Spülen Sie ein Glas
aus und lassen Sie es
ablaufen.
2 Halten Sie das
Glas dicht an die
Auslaufönung.
3 Önen Sie den
Zapfhahn komplett
mit einer zügigen
Bewegung.
4 Halten Sie das Glas in
einem Winkel von ca.
45° unter den Auslauf
und lassen Sie das
Bier innen am Glas
hinunter laufen.
5 Der Auslauf sollte
weder das Glas
noch das Bier oder
die Schaumkrone
berühren.
DEUTSCH 41
Deutsche Tradition Britische Tradition
Spülen Sie ein Glas
aus und lassen Sie es
ablaufen.
Halten Sie das Glas in
einem Winkel von ca. 45°
unter den Auslauf. 45 °C.
Önen Sie den Zapfhahn
komplett mit einer
zügigen Bewegung.
Lassen Sie das Bier
innen am Glas hinunter
laufen.
Der Auslauf sollte weder
das Glas noch das Bier
oder die Schaumkrone
berühren.
Spülen Sie ein Glas
aus und lassen Sie es
ablaufen.
Halten Sie das Glas in
einem Winkel von ca.
45° unter den Auslauf.
45 °C.
Önen Sie den
Zapfhahn komplett
mit einer zügigen
Bewegung.
Lassen Sie das
Bier innen am Glas
hinunter laufen.
Der Auslauf sollte
weder das Glas
noch das Bier oder
die Schaumkrone
berühren.
Page 40

DEUTSCH42
Schritt Europäische Tradition
(außer Deutschland
und Großbritannien)
6 Der Winkel, in dem
Sie das Glas beim
Zapfen halten, ist
ausschlaggebend
für das Volumen der
Schaumkrone. Je
gerader Sie das Glas
halten, desto höher
wird diese.
7 Füllen Sie das Glas,
bis das Bier fast über
den Rand läuft.
8 Schließen Sie den
Zapfhahn mit einer
zügigen Bewegung.
9 a. Lassen Sie das
Glas nicht unter
dem Zapfhahn
stehen, damit keine
Biertropfen auf die
Schaumkrone fallen
können.
b. b. Entfernen Sie
überschüssigen
Schaum, indem Sie
einen Abstreifer in
einem Winkel von 45°
über den Glasrand
führen.
10 Jetzt können Sie Ihr
Bier servieren.
Deutsche Tradition Britische Tradition
Der Winkel, in dem
Sie das Glas beim
Zapfen halten, ist
ausschlaggebend
für das Volumen der
Schaumkrone. Je
gerader Sie das Glas
halten, desto höher wird
diese.
a. a. Lassen Sie das Bier
in das Glas laufen, bis
dieses zwei Drittel Bier
und ein Drittel Schaum
enthält.
b. b. Schließen Sie den
Zapfhahn und stellen
Sie das Glas eine Minute
lang ab, damit sich der
Schaum setzen kann.
c. c. Wiederholen Sie
Schritte 2 bis 6 und
füllen Sie das Glas bis
zum Rand.
Schließen Sie den
Zapfhahn mit einer
zügigen Bewegung.
Lassen Sie das Glas
nicht unter dem
Zapfhahn stehen, damit
keine Biertropfen auf
die Schaumkrone fallen
können.
Jetzt können Sie Ihr Bier
servieren.
Der Winkel, in dem
Sie das Glas beim
Zapfen halten, ist
ausschlaggebend
für das Volumen der
Schaumkrone. Je
gerader Sie das Glas
halten, desto höher
wird diese.
Füllen Sie das Glas,
bis das Bier fast über
den Rand läuft.
Schließen Sie den
Zapfhahn mit einer
zügigen Bewegung.
Lassen Sie das
Glas nicht unter
dem Zapfhahn
stehen, damit keine
Biertropfen auf die
Schaumkrone fallen
können.
Jetzt können Sie Ihr
Bier servieren.
Page 41

DEUTSCH 43
Das Fass austauschen
Das Fass ist leer, wenn nur noch Schaum und kein Bier mehr
aus dem Auslauf kommt. Nur HD3720: Das Display gibt zudem
an, dass das Fass leer ist.
1 Drücken Sie die Entriegelungstaste nach rechts, um die
Klappen zu önen.
Önen Sie die Klappen vollständig.
2 Schieben Sie die blauen Verschlusshebel bis zum Anschlag
hoch.
3 Kippen Sie das Fass mit der angebrachten Zapfeinheit
nach vorn, und nehmen Sie es aus dem Gerät.
4 Drücken Sie auf die Entriegelungstasten links und rechts
von der Zapfeinheit (1). Die Einheit löst sich mit einem Klick
vom Fass, sodass Sie sie abnehmen können (2).
Um den Schlauch auszuwechseln, müssen Sie die Zapfeinheit
vom Fass nehmen.
Nehmen Sie immer einen neuen Schlauch, wenn Sie ein neues
Fass anzapfen. Verwenden Sie denselben Schlauch höchstens
30 Tage lang.
5 Im Kapitel "Für den Gebrauch vorbereiten" nden Sie
Anleitungen zum Anbringen der Zapfeinheit am Fass und
zum Einsetzen des Fasses in das Gerät.
Reinigen
Reinigen Sie das Gerät, wenn Sie das Fass austauschen oder
das Gerät längere Zeit wegstellen.
Benutzen Sie zum Reinigen des Geräts keine
Scheuerschwämme und -mittel oder aggressive Flüssigkeiten
wie Benzin oder Azeton.
1 Ziehen Sie vor dem Reinigen des Geräts stets den
Netzstecker aus der Steckdose.
Page 42

DEUTSCH44
2 Reinigen Sie das Gerät von außen mit einem feuchten Tuch.
3 Reinigen Sie die Zapfeinheit stets wie im Kapitel “Das
Fass austauschen” beschrieben, um festklebende
Bierrückstände zu vermeiden.
4 Nehmen Sie die Abtropfschale mit der Abdeckung heraus.
5 Der Zapfhahn lässt sich aus dem Mittelstück der
Zapfeinheit ziehen.
6 Reinigen Sie die Zapfeinheit, die Abtropfschale und die
Abdeckung mit heißem Wasser und bei Bedarf mit etwas
Spülmittel.
Heißes Wasser kann Verbrühungen verursachen. Achten Sie
darauf, dass das Wasser nicht zu heiß ist, bevor Sie mit dem
Spülen beginnen.
Nur die Auangschale und ihre Abdeckung sowie der Auslauf
sind spülmaschinengeeignet.
Recycling
Dieses Symbol bedeutet, dass das Produkt nicht mit dem
normalen Hausmüll entsorgt werden kann (2012/19/EU).
1. Altgeräte können kostenlos an geeigneten
Rücknahmestellen abgegeben werden.
2. Diese werden dort fachgerecht gesammelt oder zur
Wiederverwendung vorbereitet. Altgeräte können
Schadstoe enthalten, die der Umwelt und der
menschlichen Gesundheit schaden können. Enthaltene
Rohstoe können durch ihre Wiederverwertung einen
Beitrag zum Umweltschutz leisten.
3. Die Löschung personenbezogener Daten auf den
zu entsorgenden Altgeräten muss vom Endnutzer
eigenverantwortlich vorgenommen werden.
4. Hinweise für Verbraucher in Deutschland: Die in Punkt
1 genannte Rückgabe ist gesetzlich vorgeschrieben.
Sammel- und Rücknahmestellen in Deutschland:
https://www.stiftung-ear.de/
Ausbauen des Kühlelements
Das im Gerät bendliche Kühlelement enthält eine unter
Umständen umweltschädliche Substanz und muss deshalb vor
der Entsorgung des Geräts ausgebaut werden.
Sie können das Gerät auch zu einem Philips Service-Center
bringen oder dorthin einsenden. Dort wird das Kühlelement für
Sie ausgebaut und umweltgerecht entsorgt.
Nehmen Sie das Kühlelement nur heraus, wenn Sie das Gerät
entsorgen.
Page 43

DEUTSCH 45
Vorsicht! Die auf dem Kühlelement und den angrenzenden
Geräteteilen aufgebrachte Paste verursacht auf Kleidung
Flecken, die sich nicht entfernen lassen.
Bauen Sie das Kühlelement wie folgt aus:
1 Ziehen Sie den Netzstecker aus der Steckdose.
2 Schieben Sie die Entriegelungstaste nach rechts, um die
Klappen zu önen.
Neben den Klappenscharnieren benden sich auf beiden
Seiten zwei Vertiefungen.
3 Lösen Sie die darin bendlichen vier Schrauben mit einem
Schraubendreher.
4 Nehmen Sie die Rückwand vom Gerät ab.
5 Ziehen Sie den Ventilator aus dem Gerät heraus.
, Jetzt wird eine gerippte Aluminiumplatte mit zwei
Schraubenvertiefungen sichtbar.
6 Lösen Sie die Schrauben mit einem Schraubendreher.
Page 44

DEUTSCH46
7 Nehmen Sie die Aluminiumplatte heraus.
, Nun sehen Sie eine weiße, ca. 4 x 4 cm große Platte. Dies
ist das eigentliche Kühlelement.
8 Halten Sie die Klinge eines Schraubenziehers gegen
eine Seite des Kühlelements, und entfernen Sie das
Kühlelement, indem Sie es von der Rückseite der
Aluminiumplatte weg drücken.
9 Durchtrennen Sie dann die Drähte am Kühlelement.
Stecken Sie den Stecker des Geräts nach dem Ausbau des
Kühlelements nicht mehr in die Steckdose.
Versuchen Sie auf keinen Fall, das entnommene Kühlelement
wieder einzubauen!
10 Geben Sie das Kühlelement an einer oziellen
Sammelstelle für chemischen Sondermüll ab.
Garantie und Kundendienst
Wenn Sie Informationen benötigen oder ein Problem haben,
können Sie sich online im Internet mit uns unter www.philips.com
in Verbindung setzen oder das PerfectDraft Call Center anrufen.
Die Nummer lautet 078-250159 (Belgien), 040 80 80 10 980
(Deutschland) bzw. 0900-2224222 (Niederlande).
Wenn Sie das Gerät zwecks Überprüfung zu Ihrem Händler
oder einem Philips Service-Center bringen, sollten Sie auch
den Schlauch und das Bierfass mitnehmen.
Garantieeinschränkungen
Die Garantie erlischt, wenn Sie:
- das Gerät nicht so benutzen, wie in dieser
Bedienungsanleitung beschrieben.
- beschädigte Bierfässer in diesem Gerät verwenden.
- die Fässer nicht so einsetzen, wie in dieser
Bedienungsanleitung beschrieben.
- Fässer anderer Hersteller als der in dieser
Bedienungsanleitung genannten verwenden.
, Die Bedingungen der internationalen Garantie gelten nicht
für Bierfässer und Schläuche.
Fehlerbehebung
Wenn sich das Problem anhand der nachstehenden Hinweise
nicht beheben lässt, können Sie sich online im Internet
mit uns unter www.philips.com in Verbindung setzen oder
das PerfectDraft Call Center anrufen. Die Nummer lautet
078-250159 (Belgien), 040 80 80 10 980 (Deutschland) bzw.
0900-2224222 (Niederlande).
Page 45

Problem Lösung
Das Gerät im Allgemeinen
Die Klappen des
Geräts lassen sich nicht
schließen.
Das Fass bzw. das Gerät
ist beschlagen.
Es tritt Bier aus dem
Gerät aus.
Das Gerät macht ein
Geräusch.
Die Pumpe schaltet sich
häug ein, wenn ich kein
Bier zapfe.
Drücken Sie die blauen Verriegelungshebel nach unten, bis
sie waagerecht stehen, bevor Sie die Klappen schließen.
Achten Sie darauf, dass der Schlauch richtig in die Zapfeinheit
eingesetzt ist und der Zapfhahn sich in aufrechter Stellung
bendet. Siehe dazu Kapitel “Für den Gebrauch vorbereiten”,
Abschnitt “Den Schlauch in die Zapfeinheit einsetzen”.
Prüfen Sie, ob die Zapfeinheit richtig auf dem Fass angebracht ist.
Ziehen Sie den Gerätestecker aus der Steckdose, und lassen
Sie das Fass bzw. Gerät abtauen. Trocknen Sie das Gerät bzw.
Fass mit einem Tuch ab.
Prüfen Sie, ob die Klappen richtig geschlossen sind. Hinweise
zum Schließen der Klappen nden Sie im Kapitel „Für den
Gebrauch vorbereiten“, Abschnitt „Das Fass in das Gerät
setzen“. Es ist ganz normal, dass die Rückseite des Fasses
etwas beschlägt.
Achten Sie darauf, dass Zapfeinheit und Schlauch richtig
auf- bzw. eingesetzt sind (siehe Kapitel “Für den Gebrauch
vorbereiten”, Abschnitte “Die Zapfeinheit auf das Fass
aufsetzen” und “Den Schlauch in die Zapfeinheit einsetzen”).
Nehmen Sie die Zapfeinheit und den Schlauch ab und
setzen Sie beides wieder auf bzw. ein. Bleibt das Problem
bestehen, bestellen Sie über das PerfectDraft Call Center in
Ihrem Land einen neuen Schlauch.
Da da Gerät konstant kühlt, läuft auch der Ventilator ständig.
Während Sie gerade ein Bier zapfen, schaltet sich
möglicherweise die Pumpe ein, um den erforderlichen Druck
im Fass aufrecht zu erhalten. Die Pumpe geht zu diesem
Zweck gelegentlich an und aus.
Wenn das Gerät ein zischendes Geräusch von sich gibt, ist
die Zapfeinheit möglicherweise nicht richtig mit dem Fass
verbunden. Spülen Sie die Zapfeinheit gründlich aus. Alle
Gummiteile der Zapfeinheit müssen feucht sein, bevor Sie
die Zapfeinheit auf das Bierfass setzen.
Setzen Sie die Zapfeinheit und das Fass gemäß der Anleitung
in den Abschnitten “Die Zapfeinheit am Fass anbringen” und
“Das Fass in das Gerät setzen” des Kapitels “Für den Gebrauch
vorbereiten” erneut ein. Wenn dies keine Abhilfe bringt,
versuchen Sie es mit einem anderen Fass und einem neuen
Schlauch. Bleibt das Problem bestehen, wenden Sie sich an
das PerfectDraft Call Center in Ihrem Land.
DEUTSCH 47
Page 46

DEUTSCH48
Problem Lösung
Zapfeinheit
Es ist schwierig, die
Zapfeinheit auf das
Bierfass zu setzen.
Die Entriegelungstasten
zum Abnehmen der
Zapfeinheit lassen sich
nur schwer drücken.
Es gelingt mir nicht, das
Fass mit der montierten
Zapfeinheit in das Gerät
zu setzen.
Der Schlauch lässt sich
nicht aus der Zapfeinheit
ziehen.
Es bereitet
Schwierigkeiten,
den Schlauch in die
Zapfeinheit einzuführen.
LCD-Display/LED-Anzeigen
Die rote Anzeige blinkt
(HD3610).
Prüfen Sie, ob sich noch altes Bier in der Zapfeinheit
bendet. Reinigen Sie die komplette Zapfeinheit unter
heißem Wasser, dem Sie bei Bedarf etwas Spülmittel
zufügen können.
Nehmen Sie zunächst das Fass aus dem Gerät. Drücken Sie
anschließend die Entriegelungstasten, um die Zapfeinheit
vom Fass zu nehmen.
Möglicherweise klebt die Zapfeinheit durch Bierrückstände
am Fass. Reinigen Sie sie mit heißem Wasser und bei Bedarf
etwas Spülmittel, um diese Rückstände zu entfernen.
Nehmen Sie dann die Zapfeinheit vom Fass.
Prüfen Sie, ob die Zapfeinheit richtig auf dem Fass
angebracht ist. Drücken Sie die Zapfeinheit fest auf das Fass.
Siehe Kapitel “Für den Gebrauch vorbereiten”, Abschnitt “Die
Zapfeinheit auf das Bierfass setzen”).
Prüfen Sie, ob Sie die blauen Verriegelungshebel richtig
hochgehoben haben und schieben Sie sie nach unten, wenn
Sie das Fass in das Gerät gestellt haben.
Nehmen Sie zunächst die Zapfeinheit ab, bevor
Sie den Schlauch herausziehen. Spülen Sie die
Zapfeinheit mit heißem Wasser ab. Drücken Sie die
Schlauchentriegelungstaste und ziehen Sie den Schlauch
aus dem Auslauf.
Vergewissern Sie sich, dass der Schlauch richtig sitzt (siehe
dazu Kapitel “Für den Gebrauch vorbereiten”, Abschnitt “Den
Schlauch in die Zapfeinheit einführen”).
Reinigen Sie die Zapfeinheit mit heißem Wasser, bevor Sie
einen neuen Schlauch einführen.
Unter Umständen ist der Schlauch kaputt. Bestellen Sie
über das PerfectDraft Call Center in Ihrem Land einen neuen
Schlauch.
Nehmen Sie die Zapfeinheit ab, reinigen Sie sie und setzen
Sie sie wieder ein. Wenn dies nicht hilft, versuchen Sie es mit
einem anderen Fass und einem neuen Schlauch.
Tritt das Problem weiterhin auf, wenden Sie sich bitte an das
PerfectDraft Call Center in Ihrem Land.
Page 47

Problem Lösung
Auf dem Display
steht ein grüner
Gedankenstrich, und
das Gerät läuft nicht
(HD3720).
Auf dem Display steht
ein grüner oder roter
Gedankenstrich, und die
Hintergrundbeleuchtung
blinkt (HD3720).
Das Display zeigt die
falsche Biermenge an
(HD3720).
Bier zapfen
Wenn ich den Zapfhahn
öne, kommt kein Bier
heraus.
Es tritt zu viel Schaum
aus dem Gerät aus.
Achten Sie darauf, dass die Zapfeinheit richtig aufgesetzt ist
(siehe Kapitel "Für den Gebrauch vorbereiten", Abschnitt "Die
Zapfeinheit auf das Bierfass setzen").
Nehmen Sie die Zapfeinheit ab, reinigen Sie sie und setzen
Sie sie wieder ein. Wenn dies keine Abhilfe bringt, versuchen
Sie es mit einem anderen Fass und einem neuen Schlauch.
Tritt das Problem weiterhin auf, wenden Sie sich bitte an das
PerfectDraft Call Center in Ihrem Land.
Damit die Mengenanzeige richtig funktioniert, müssen Sie
unbedingt den Zapfhahn vollständig önen (siehe Kapitel
“Bier perfekt zapfen”).
Nach einem Stromausfall oder wenn das Gerät vom
Stromnetz getrennt wurde, reagiert die Füllstandanzeige
wieder einwandfrei, nachdem Sie einige Gläser Bier gezapft
haben.
Möglicherweise ist das Fass leer. Setzen Sie ein neues Fass
in das Gerät.
Achten Sie darauf, dass der Schlauch richtig in der
Zapfeinheit sitzt (siehe Kapitel “Für den Gebrauch
vorbereiten”, Abschnitt “Den Schlauch in die Zapfeinheit
einführen”).
Achten Sie darauf, dass die Zapfeinheit richtig auf dem Fass
sitzt (siehe Kapitel “Für den Gebrauch vorbereiten”, Abschnitt
“Die Zapfeinheit auf das Bierfass setzen”).
Achten Sie darauf, dass Sie den Zapfhahn zum Bierzapfen
vollständig önen (siehe Kapitel "Bier perfekt zapfen").
Das Bier ist zu warm. Warten Sie, bis das Bier auf eine
Temperatur gekühlt ist, bei der es gezapft werden kann, also
bis die Temperaturanzeige auf dem Display grün leuchtet
(nur HD3720), oder wenn die grüne Anzeige aueuchtet
(HD3610).
Das Bierfass wurde zu stark geschüttelt. Warten Sie eine
halbe Stunde, bis sich das Bier wieder gesetzt hat.
Das erste Glas kann mehr Schaum enthalten als gewöhnlich.
Zapfen Sie ein weiteres Glas.
DEUTSCH 49
Page 48

DEUTSCH50
Problem Lösung
Möglicherweise funktioniert der Schlauch nicht richtig.
Bestellen Sie über das PerfectDraft Call Center in Ihrem Land
einen neuen Schlauch.
Die Schaumkrone ist zu
hoch.
Das Bier aus dem Gerät
schmeckt schal.
Der Schaum fällt
sehr schnell in sich
zusammen.
Das Fass ist
heruntergefallen. Kann
ich es noch benutzen?
Das Bier schmeckt nicht. Lassen Sie das Gerät ständig am Stromnetz. In einem
Die Kühlung
Die Temperatur auf
dem Display steigt an
(HD3720).
Siehe Kapitel „Bier perfekt zapfen“.
Prüfen Sie, ob das Fass bereits länger als 30 Tage geönet
ist. Überprüfen Sie auch das Mindesthaltbarkeitsdatum auf
dem Fass.
Möglicherweise waren die Gläser nicht sauber genug.
Reinigen Sie die Pfanne mit Wasser und etwas Spülmittel.
Spülen Sie sie gründlich mit kaltem Wasser nach, um alle
Fett- und Spülmittelrückstände zu entfernen.
Zapfen Sie das Bier so, wie auf dem Fass und in dieser
Bedienungsanleitung beschrieben (siehe Kapitel "Bier
perfekt zapfen").
Möglicherweise waren die Gläser nicht sauber genug.
Reinigen Sie die Pfanne mit Wasser und etwas Spülmittel.
Spülen Sie sie gründlich mit kaltem Wasser nach, um alle
Fett- und Spülmittelrückstände zu entfernen.
Achten Sie darauf, dass das Bier kalt genug ist, um gezapft
zu werden. Das ist der Fall, wenn die Temperaturanzeige
auf dem Display grün leuchtet (nur HD3720), oder wenn die
grüne Anzeige aueuchtet (HD3610).
Wenn es sich um ein ungeönetes Fass handelt und
es keine sichtbaren Schäden aufweist, können Sie es
versuchen. Ist das Fass bereits geönet, können Sie es nicht
mehr benutzen und müssen ein neues einsetzen.
geöneten, kühl gehaltenen Fass bleibt das Bier 30 Tage
lang frisch. Achten Sie beim Einsetzen eines neuen Fasses
auf das Mindesthaltbarkeitsdatum.
Reinigen Sie die Zapfeinheit und verwenden Sie bei einem
neuen Fass auch immer einen neuen Schlauch.
Nehmen Sie immer saubere Gläser.
Vergewissern Sie sich, dass die Klappen richtig geschlossen
sind (siehe Kapitel "Für den Gebrauch vorbereiten", Abschnitt
"Das Fass in das Gerät setzen").
Stellen Sie das Gerät an heißen Tagen an einen kühleren
Platz.
Page 49

DEUTSCH 51
Problem Lösung
Stellen Sie das Gerät dort auf, wo die Umgebungstemperatur
zwischen 3° C und 32° C liegt. Lassen Sie um das Gerät
herum mindestens 10 cm Platz. Setzen Sie das Gerät nicht
direktem Sonnenlicht aus.
Prüfen Sie, ob die Ventilatorönung hinten am Gerät frei von
Staub und Schmutz ist.
Das Gerät kühlt das Bier
nicht genügend
Bei einer Umgebungstemperatur von 23 °C dauert es etwa
12 - 15 Stunden, bis das Fass gekühlt ist.
Bei höheren Umgebungstemperaturen dauert es länger, das
Fass zu kühlen. Wenn Sie das Gerät bei Temperaturen von
über 32 °C (HD3720) oder 30 °C (HD3720) benutzen, steigt
die Biertemperatur unter Umständen auf über 3 °C an. Geht
die Umgebungstemperatur unter 32 °C zurück, fällt auch die
Biertemperatur wieder auf 3 °C.
Sie können das Fass in aufrechter Stellung im Kühlschrank
vorkühlen, bevor Sie es in das Gerät einsetzen.
Hersteller von Bierfässern
Wenn Sie weitere Informationen zum Bierfass benötigen oder
Probleme mit dem Fass haben, wenden Sie sich bitte an den
Fasshersteller in Ihrem Land. Die Telefonnummer nden Sie in der
Tabelle unten.
Land Marke Telefonnummer Internet-Adresse
Niederlande Dommelsch 0800-0230367 www.dommelsch.nl
Hertog Jan 0800-0230375 www.hertogjan.nl
Jupiler 0800-0230945 www.jupiler.nl
Grolsch 0800-1591 www.grolsch.nl
Bavaria 0900-2282742 (Eur 0,10/Min.) www.bavaria.nl
Belgien Stella Artois 070-222918 www.stella-artois.be
Jupiler 070-222912 www.jupiler.be
Lee 078 250 159 www.perfectdraft.de
Luxemburg
Deutschland Beck's Pils 040 80 80 10 980 (Ortstarif) www.perfectdraft.de
Diekirch
Jupiler 0032 70-222912 www.jupiler.be
Lee 0032 78 250 159 www.perfectdraft.de
Beck's Gold 040 80 80 10 980 (Ortstarif) www.perfectdraft.de
Diebels Alt 040 80 80 10 980 (Ortstarif) www.perfectdraft.de
Diebels Pils 040 80 80 10 980 (Ortstarif) www.perfectdraft.de
Hasseröder 040 80 80 10 980 (Ortstarif) www.perfectdraft.de
0035-2802131999 -
Page 50

52 ESPAÑOL
Introducción
Enhorabuena por adquirir su nuevo PerfectDraft. De ahora en
adelante puede disfrutar del sabor perfecto de cerveza de barril
recién servida y fría. El sistema mantiene la cerveza fresca y
exactamente a la temperatura correcta para que pueda servirse
una cerveza fría siempre que le apetezca. Existen varias marcas
de cerveza disponibles para este sistema PerfectDraft (también
puede consultar el capítulo "Proveedores de barriles" al nal
del manual de usuario). Puede visitar nuestro sitio Web en
www.perfectdraft.de para obtener más información.
Este manual de usuario le ofrece las instrucciones para utilizar
el sistema PerfectDraft.
Debido a que el nombre de este aparato es PerfectDraft,
utilizamos "cerveza de barril" en lugar de "cerveza de barril" de
este manual de usuario.
Descripción general (g. 1)
A Puerta derecha
B Botón de liberación
C Placa de refrigeración
D Recogecable
E Pantalla LCD: indicación de temperatura, nivel y estado
óptimo de la cerveza (sólo modelo HD3720)
F Sensor de barril
G Sensor de temperatura
H Puerta izquierda
I Palancas de bloqueo
J Pilotos indicadores LED para indicar el estado del aparato
(sólo modelo HD3610)
K Cubierta de la bandeja de goteo (HD3610, HD3720)
L Bandeja de goteo (HD3610, HD3720)
Unidad del tubo (se suministra con el barril)
M Conector del tubo
N Tubo
Unidad del grifo
O Medallón
P Palanca del grifo
Q Grifo
R Boquilla
S Botones de libración
T Botón de liberación del tubo
Barril
U Pieza superior de conexión
V Tapa protectora
W Asas
X Cepillo de limpieza (HD3720)
Se pasa a través de la ranura de la carcasa trasera para
limpiar (quitar el polvo) del disipador de calor
Page 51

ESPAÑOL 53
Importante
Antes de usar el aparato, lea atentamente
este manual de usuario y consérvelo por si
necesitara consultarlo en el futuro.
El aparato
Advertencia
- Si el cable de alimentación está dañado,
debe ser sustituido por Philips o por un
centro de servicio autorizado por Philips,
con el n de evitar situaciones de peligro.
- Antes de enchufar el aparato, compruebe
si el voltaje indicado en la parte inferior del
mismo se corresponde con el voltaje de
red local.
- No utilice el aparato si la clavija, el cable o
el propio aparato están dañados.
- Este aparato puede ser usado por
personas con su capacidad física, psíquica
o sensorial reducida y por quienes no
tengan los conocimientos y la experiencia
necesarios, si han sido supervisados o
instruidos acerca del uso del aparato de
forma segura y siempre que sepan los
riesgos que conlleva su uso.
- Los niños no deben utilizar este aparato.
Mantenga el aparato y el cable fuera del
alcance de los niños.
- Vigile a los niños para asegurarse de que
no jueguen con el aparato.
- No cubra el aparato (por ejemplo, con una
toalla) para evitar que se sobrecaliente.
- Este aparato está diseñado únicamente
para usar en interiores. No lo utilice al aire
libre.
Page 52

ESPAÑOL54
- No es conveniente que instale el aparato
en una zona donde se pueda utilizar agua
a presión.
Precaución
- Mantenga el aparato fuera del alcance de
los niños. Puede quitar el asa para una
mayor seguridad.
- Coloque el aparato en una supercie
horizontal, uniforme y estable. Deje por lo
menos 10 cm de espacio libre alrededor
del aparato para obtener un mejor
rendimiento.
- En un entorno con una temperatura
ambiente de 23 °C, un barril sin enfriar
tardará entre 12 y 15 horas en enfriarse a
la temperatura ideal para beber (3 °C). En
lugares con una temperatura ambiente
más alta, el barril tardará más en enfriarse.
- Cuando utilice el aparato en lugares por
encima de 32 °C (modelo HD3720) o 30 °C
(modelo HD3610), la temperatura de la
cerveza puede sobrepasar los 3 °C. Cuando
la temperatura disminuya por debajo de
32 °C, la temperatura de la cerveza volverá
a descender hasta llegar a 3 °C.
- No exponga el aparato a la luz solar directa.
- Limpie siempre el aparato antes de
guardarlo durante un largo periodo de
tiempo. Asegúrese de enjuagar la unidad
del grifo a fondo. Los restos de cerveza
pueden causar problemas al instalar la
unidad del grifo en el barril.
Page 53

ESPAÑOL 55
- No levante el aparato mediante la palanca
del grifo.
El barril
Advertencia
- Nunca guarde el barril en el congelador. La
congelación puede dañar seriamente el
barril.
- Para evitar el riesgo de explosión, no
exponga el barril a la luz solar directa ni a
temperaturas superiores a 30 °C.
- El barril está a presión. No quite la pieza
superior de conexión ni perfore el barril
con un objeto alado.
Precaución
- Lea siempre y siga las instrucciones y
advertencias de seguridad del barril antes
de instalarlo en el aparato.
- No sacuda el barril.
- Si el barril está abierto, guárdelo a la
temperatura adecuada dejándolo dentro
del aparato. Asegúrese de que el aparato
está encendido. Si apaga el aparato
porque no va a utilizarlo durante un
largo periodo de tiempo (por ejemplo,
unas vacaciones), extraiga siempre el
barril abierto del aparato y guárdelo en
la nevera. Una vez que un barril ha sido
abierto, la cerveza permanecerá en buen
estado durante 30 días.
- Compruebe siempre la fecha de
caducidad del barril cuando lo compre y
antes de instalarlo.
Page 54

ESPAÑOL56
- No utilice el barril si la pieza superior de
conexión está dañada. En ese caso, la
unidad del grifo no encajará en ella.
- Los barriles sin abrir se mantienen mejor
si se guardan a una temperatura estable.
Cuanto más frío sea el lugar donde
almacena el barril, mejor.
- Presión máxima de funcionamiento:
1,5 bares.
- Utilice el barril sólo con los modelos
HD3720/HD3610/HD3600 de PerfectDraft.
No conecte otros equipos al barril.
- No utilice barriles de aquellos proveedores
que no sean mencionados en este
manual de usuario (consulte el capítulo
“Proveedores de barriles”).
- No utilice barriles dañados en este
aparato, ya que podría dañarlo. Si el barril
está dañado, llévelo inmediatamente a la
tienda donde lo compró.
- Los barriles no se pueden apilar.
- Nivel de ruido: Lc < 70 dB (A).
Campos electromagnéticos (CEM)
Este aparato Philips cumple todos los estándares sobre
campos electromagnéticos (CEM). Si se utiliza correctamente
y de acuerdo con las instrucciones de este manual, el aparato
se puede usar de forma segura según los conocimientos
cientícos disponibles hoy en día.
Antes de utilizarlo por primera vez
Instalación del aparato
1 Coloque el aparato en una supercie horizontal, uniforme
y estable. Deje por lo menos 10 cm de espacio libre
alrededor del aparato para obtener un mejor rendimiento.
Page 55

ESPAÑOL 57
No coloque el aparato en un lugar donde quede expuesto
a la luz solar directa o a altas temperaturas (por ejemplo,
cerca de una cocina o de un horno).
2 Para guardar el cable sobrante, colóquelo en el
compartimento de almacenamiento que se encuentra en
la parte posterior del aparato.
3 Enchufe el aparato a la red.
4 HD3720: Instale la bandeja de goteo.
5 Conecte la palanca del grifo.
6 Coloque el medallón que desee en la parte superior de la
palanca.
Preparación para su uso
Cómo acoplar la unidad del grifo en el barril
Antes de colocar la unidad del grifo en el barril e insertar el
tubo, límpiela siempre con agua y, si fuera necesario, con un
poco de detergente líquido. Tabla 1:
1 Quite la tapa protectora y el tubo del barril.
Page 56

ESPAÑOL58
2 Si procede, quite el conector del tubo y el tubo de la
unidad del grifo. Enjuague con agua la unidad del grifo,
2
1
el oricio de conexión del tubo (1) y la conexión al cuerpo
del aparato (2). Si fuera necesario, utilice un poco de
detergente líquido.
3 A continuación, ponga la unidad del grifo al revés y
enjuague la conexión del barril situada en el fondo de la
unidad del grifo.
Es esencial que todas las piezas de goma de la unidad del grifo
estén húmedas antes de colocar la unidad del grifo en el barril.
4 Compruebe si el botón de liberación del tubo funciona
correctamente. Cuando pulse el botón azul de liberación
del tubo, los dos cierres de sujeción situados en la
abertura se tienen que mover.
Si los cierres de sujeción no se mueven al pulsar el botón
azul de liberación del tubo, vuelva a enjuagar bajo el grifo el
oricio de conexión del tubo.
5 Coloque la unidad del grifo en la pieza superior de
conexión del barril empujándolo hacia abajo rmemente
(“clic”).
Cuando haya montado la unidad del grifo correctamente, oirá
dos clics de forma sucesiva.
Si puede mover el brazo de la pieza superior de conexión
libremente hacia arriba y hacia abajo, signica que la unidad
del grifo está colocada correctamente en el barril.
6 Asegúrese de que los botones de liberación situados a
ambos lados de la unidad del grifo sobresalen al mismo
nivel en ambos lados. De lo contrario, pulse los botones de
liberación de ambos lados con los pulgares hasta que oiga
uno o dos clics de forma sucesiva.
Page 57

ESPAÑOL 59
Cómo colocar el tubo en la unidad del grifo
1 Inserte el tubo exible en el grifo.
2 Deslice los salientes del conector del tubo por debajo de
los puntos de bisagras.
3 Empuje el conector del tubo hacia la abertura de la unidad
del grifo (“clic”).
Cómo colocar el barril en el aparato
Nunca coloque el barril en el aparato si no ha montado
la unidad del grifo y el tubo correctamente. Consulte las
secciones "Cómo acoplar la unidad del grifo en el barril" y
"Cómo colocar el tubo en la unidad del grifo" en este capítulo.
1 Deslice el botón de liberación hacia la derecha para abrir
las puertas.
2 Levante por completo las dos palancas azules de bloqueo.
Page 58

ESPAÑOL60
3 Incline ligeramente hacia delante el barril con la unidad del
grifo colocada y póngalo en el aparato.
- Coloque primero el barril en la placa de refrigeración del
aparato.
- A continuación coloque el barril en posición vertical
deslizando la unidad del grifo entre las palancas azules de
bloqueo.
4 Empuje hacia abajo las palancas azules de bloqueo hasta
que estén en posición horizontal.
Si no puede colocar las palancas de bloqueo en posición
horizontal, signica que no ha colocado el barril en el aparato
en la posición correcta. Quite el barril y vuelva a seguir los
pasos 1-3.
, Después de instalar el barril (incluso la primera vez), la
bomba se pone en marcha durante unos pocos segundos.
5 Cierre las puertas.
Si la bomba se pone en marcha con frecuencia cuando no
está sirviendo cerveza, vuelva a instalar el barril o repita las
instrucciones de la sección "Cómo acoplar la unidad del grifo
en el barril" en este capítulo.
Enfriamiento
Después de instalar el barril, el aparato comienza
automáticamente a enfriarlo.
A una temperatura ambiente de 23 °C, un barril sin enfriar
tarda entre 12 y 15 horas en enfriarse.
Si desea servir cerveza poco después de colocar el barril en
el aparato, enfríelo previamente en la nevera en posición
vertical durante un rato antes de instalarlo. Para obtener
más consejos, consulte el capítulo "Solución de problemas".
1 Espere hasta que la cerveza haya alcanzado la
temperatura correcta para beber.
, HD3720: La temperatura se muestra en la pantalla en color
verde (consulte la sección "Pantalla LCD" en este capítulo).
Page 59

ESPAÑOL 61
, HD3610: El piloto de temperatura se ilumina en color verde
(consulte la sección "Pilotos indicadores LED" en este
capítulo).
pantalla LCD (sólo modelo HD3720)
, La pantalla muestra la temperatura, el nivel y el estado
óptimo de la cerveza.
Indicación de temperatura
Espere hasta que la temperatura del barril haya descendido
por debajo de 4 °C antes de empezar a servir la cerveza.
La temperatura ideal para beber es 3 °C. El color de la
temperatura mostrado le indica si la cerveza ha alcanzado la
temperatura correcta para beber.
- Rojo = la temperatura de la cerveza todavía no es ideal
para el consumo (por encima de 4 °C). Puede producirse
demasiada espuma de cerveza.
- Verde = la cerveza ha alcanzado la temperatura correcta
para el consumo (4 °C o menos).
Indicación de nivel
La indicación de nivel amarilla-naranja en la pantalla indica en
ocho pasos la cantidad de cerveza que queda en el barril.
Nota: Si utiliza vasos de 20 cl, podrá servir aproximadamente
30 vasos de cerveza con un solo barril. Si utiliza vasos de 33
cl, podrá servir aproximadamente 18 vasos.
Indicador de estado óptimo
El indicador de estado óptimo le indica durante cuánto tiempo
permanecerá la cerveza en buen estado.
- Cuando coloca un nuevo barril en el aparato, el indicador
de estado óptimo muestra que la cerveza del barril
permanecerá en buen estado durante 30 días. El indicador
realiza una cuenta atrás desde 30 a 0 días.
- Una vez que el barril ha sido abierto, la cerveza
permanecerá en buen estado durante 30 días, siempre que
el barril se deje guardado en el aparato.
Asegúrese de que el aparato esté encendido todo el tiempo.
- Después de 30 días, la pantalla indicará que el barril debe
ser reemplazado. En la pantalla aparecerán un guión y un
signo de exclamación.
Page 60

ESPAÑOL62
Adaptación del indicador de estado óptimo
- Si desea apagar el aparato durante un largo período de
tiempo (por ejemplo, unas vacaciones), guarde el barril
abierto en el frigoríco. Desconecte la unidad del grifo,
enjuague la parte superior del barril y el tubo y guarde el
tubo junto con el barril en el frigoríco.
Anote siempre la fecha y el número de días que la cerveza del
barril seguirá estando en estado óptimo en el barril (consulte el
número de días en la pantalla).
- Cuando vuelva a instalar el barril abierto, puede poner el
indicador de estado óptimo en el número correcto de días
con los botones – y +.
Para calcular el número correcto de días, compare la fecha
actual con la fecha escrita en el barril y reste el número de
días durante los que el barril ha estado en el frigoríco al
número que escribió en el barril cuando lo guardó.
Antes de volver a instalar el barril abierto, limpie la unidad del
grifo y el tubo otra vez. Compruebe también si se han formado
depósitos de suciedad en la parte superior del barril. En ese
caso, no utilice el barril abierto, utilice uno nuevo.
Otras indicaciones
Aparte del nivel de cerveza y de la temperatura, la pantalla le
ofrece la siguiente información:
- Guión verde sin ninguna indicación de nivel visible = la
unidad del grifo no está colocada en el barril.
- Guión rojo sin ninguna indicación de nivel visible = no hay
ningún barril instalado.
- Guión rojo o verde con luz intermitente de fondo amarillanaranja = la unidad del grifo y/o el tubo no están colocados
correctamente. Quite el barril y compruebe si la unidad del
grifo y el tubo están colocados correctamente. Consulte las
secciones "Cómo acoplar la unidad del grifo en el barril" y
"Cómo colocar el tubo en la unidad del grifo" en el capítulo
"Preparación para su uso". Si esto no funciona, pruebe con
otro barril y con un nuevo tubo.
Pilotos indicadores LED (sólo modelo HD3610)
- Hay tres pilotos indicadores en la parte superior del aparato
que muestran el estado del aparato.
- Piloto indicador rojo = el aparato está encendido y se tiene
que instalar un barril.
- Piloto indicador naranja = el aparato está enfriando el barril
y éste todavía no ha alcanzado la temperatura correcta
para beber.
Page 61

ESPAÑOL 63
- Piloto indicador verde = la cerveza ha alcanzado la
temperatura correcta para beber y está lista para ser
servida.
Otras indicaciones
- Piloto indicador rojo parpadeando = la unidad del grifo y/o
el tubo no están colocados correctamente.
Cómo servir una cerveza perfecta
Siga las instrucciones siguientes para servir una cerveza
perfecta.
Cómo limpiar los vasos de cerveza
Utilice siempre vasos de cerveza limpios cuando vaya a servir
cerveza.
1 Lave los vasos con cuidado con agua caliente y un poco de
detergente líquido.
2 Enjuague los vasos a fondo con agua fría del grifo.
De esta manera, eliminará todos los restos de grasa y jabón, lo
que le permitirá servir una cerveza con una cantidad óptima de
espuma.
3 Sujete los vasos boca abajo a la luz para comprobar que
no tengan restos de grasa ni de jabón.
Los vasos estarán limpios cuando el agua corra por su
supercie de manera uniforme, sin que aparezca cualquier
mancha.
Consejo: Si limpia los vasos de cerveza en el lavavajillas, no
utilice un producto de aclarado. Los restos de productos de
aclarado pueden romper la espuma de la cerveza.
Cómo verter cerveza
1 Conseguirá los mejores resultados si vierte la cerveza en
un vaso frío, limpio y húmedo.
Nota: Si el vaso está frío, la espuma de la cerveza será más
estable. También mantendrá la cerveza recién servida en
buen estado durante más tiempo y ayudará a conservar el
gas.
Nota: Para obtener la mejor cerveza de barril, limpie y
enjuague siempre los vasos usados antes de volver a
utilizarlos. Esto evitará que los restos de espuma de la
cerveza anteriormente servida originen demasiada espuma
en la cerveza recién servida.
Nota: Si no ha servido cerveza durante más de una semana,
se recomienda dejar que uya la cerveza en un vaso durante
1 segundo. Después, enjuague el vaso con agua fría antes de
llenarlo con cerveza reciente.
Page 62

ESPAÑOL64
2 Sujete el vaso por la parte inferior o por el centro para
asegurarse de que permanece limpio.
3 Abra el grifo con un movimiento rápido y suave.
La cerveza sólo uye correctamente en el vaso si el grifo está
completamente abierto. Si el grifo sólo está abierto hasta
la mitad, la cerveza saldrá por el mismo de forma forzada
haciendo que se origine más espuma.
Deje que la cerveza uya hacia el interior del vaso.
4 Para variar el tamaño de la espuma de cerveza, varíe el
ángulo con el que sujeta el vaso bajo la boquilla y varíe la
distancia entre el vaso y la boquilla.
Cuanto más vertical y más cerca de la boquilla sujete el vaso,
más espuma obtendrá.
Nota: No permita que el extremo de la boquilla toque el
vaso de cerveza, la cerveza ni la espuma. Cualquier resto de
cerveza presente en la boquilla afectará a la formación de
espuma de cerveza.
5 Mueva lentamente el vaso hasta la posición vertical
mientras vierte la cerveza.
6 Llene el vaso hasta que la espuma casi se derrame sobre el
borde del mismo.
7 Inserte el tubo exible en el grifo.
La bomba puede ponerse en marcha.
8 Europa (menos Alemania y Reino Unido): para obtener
un mejor resultado, elimine el exceso de espuma del
vaso pasando una paleta sobre el borde del mismo en un
ángulo de 45° con un movimiento suave.
Nota: Nunca deje la paleta sobre la encimera, colóquela en
un vaso limpio con agua fría o enjuáguela enseguida. Pase la
paleta sobre el vaso sólo una vez, de lo contrario empeorará
la calidad de la espuma de cerveza.
, Ahora ya tiene una cerveza de barril perfecta.
Cómo servir una cerveza recién vertida
1 Seque el fondo del vaso pasándolo sobre un paño.
2 Utilice un posavasos de cerveza limpio para su invitado.
3 Sujete el vaso por el centro y coloque la cerveza sobre el
posavasos. Asegúrese de que el logotipo de la marca de
cerveza (si está presente en el vaso) quede mirando hacia
su invitado.
3 tradiciones diferentes para verter cerveza
Page 63

ESPAÑOL 65
Paso Estilo europeo (excepto
Alemania y Reino
Unido)
1 Enjuague un vaso y deje
que escurra.
2 Sujete el vaso junto a la
abertura de la boquilla.
3 Abra el grifo
completamente con un
movimiento suave.
4 Mueva el vaso por
debajo de la boquilla
en un ángulo de
aproximadamente 45 °C
y deje que la cerveza
uya hacia el interior del
vaso.
5 No permita que la
boquilla toque el vaso,
la cerveza ni la espuma.
6 El ángulo en que usted
sujeta el vaso mientras
vierte cerveza determina
el tamaño nal de la
espuma. Cuanto más
vertical sujete el vaso,
más alta será la espuma.
7 Llene el vaso hasta
que la cerveza casi se
derrame sobre el borde
del mismo.
Alemana Británica
Enjuague un vaso y
deje que escurra.
Sujete el vaso debajo
de la abertura de la
boquilla en un ángulo
de aproximadamente
45 °C.
Abra el grifo
completamente con
un movimiento suave.
Deje que la cerveza
uya hacia el interior
del vaso.
No permita que la
boquilla toque el
vaso, la cerveza ni la
espuma.
El ángulo en que
usted sujeta el vaso
mientras vierte
cerveza determina
el tamaño nal de
la espuma. Cuanto
más vertical sujete el
vaso, más alta será la
espuma.
a. Deje que la cerveza
uya en el vaso hasta
que contenga dos
tercios de cerveza y
un tercio de espuma.
b. Cierre el grifo y
baje el vaso durante
1 minuto para permitir
que la espuma se
asiente.
c. Repita los pasos 2 a
6 y llene el vaso hasta
el borde.
Enjuague un vaso y
deje que escurra.
Sujete el vaso debajo
de la abertura de la
boquilla en un ángulo
de aproximadamente
45 °C.
Abra el grifo
completamente con
un movimiento suave.
Deje que la cerveza
uya hacia el interior
del vaso.
No permita que la
boquilla toque el
vaso, la cerveza ni la
espuma.
El ángulo en que
usted sujeta el vaso
mientras vierte
cerveza determina
el tamaño nal de
la espuma. Cuanto
más vertical sujete el
vaso, más alta será la
espuma.
Llene el vaso hasta
que la cerveza casi
se derrame sobre el
borde del mismo.
Page 64

ESPAÑOL66
Paso Estilo europeo (excepto
Alemania y Reino
Unido)
8 Cierre el grifo con un
movimiento suave.
9 a. Separe el vaso de la
boquilla para evitar que
caigan gotas de cerveza
en la espuma.
b. Retire la espuma que
sobrepase el borde
del vaso pasando una
paleta sobre el borde
del mismo en un ángulo
de 45°.
10 Ahora la cerveza está
lista para ser servida.
Cómo reemplazar el barril
Sabrá que el barril está vacío cuando sólo salga espuma por la
boquilla y nada de cerveza. Sólo modelo HD3720: la pantalla
también indica que el barril está vacío
1 Pulse el botón de liberación hacia la derecha para abrir las
puertas.
Asegúrese de abrir las puertas completamente.
Alemana Británica
Cierre el grifo con un
movimiento suave.
Separe el vaso de la
boquilla para evitar
que caigan gotas de
cerveza en la espuma.
Ahora la cerveza está
lista para ser servida.
Cierre el grifo con un
movimiento suave.
Separe el vaso de la
boquilla para evitar
que caigan gotas de
cerveza en la espuma.
Ahora la cerveza está
lista para ser servida.
2 Levante las palancas de bloqueo azules completamente.
3 Incline el barril hacia usted con la unidad del grifo montada
y sáquelo del aparato.
Page 65

ESPAÑOL 67
4 Pulse los botones de liberación situados a ambos lados
de la unidad del grifo (1). La unidad del grifo se suelta del
barril con un clic y la puede extraer (2).
Tiene que quitar la unidad del grifo del barril antes de
reemplazar el tubo.
Siempre que instale un nuevo barril, reemplace el tubo. Nunca
utilice el mismo tubo durante más de 30 días.
5 Consulte el capítulo "Preparación para su uso" para
obtener instrucciones sobre cómo colocar la unidad del
grifo en el barril y cómo colocar el barril en el aparato.
Limpieza
Limpie el aparato cuando reemplace el barril o cuando vaya a
guardarlo durante un largo periodo de tiempo.
No utilice estropajos, agentes abrasivos ni líquidos agresivos,
como gasolina o acetona, para limpiar el aparato.
1 Desenchufe siempre el aparato antes de limpiarlo.
2 Limpie el exterior del aparato con un paño húmedo.
3 Limpie siempre la unidad del grifo tal como se describe en
el capítulo "Cómo reemplazar el barril" para evitar que se
formen restos de cerveza pegajosos.
4 Quite y desmonte la bandeja de goteo y la cubierta de la
bandeja de goteo.
5 Para quitar la palanca del grifo, tire de ella para sacarla del
grifo.
6 Limpie la unidad del grifo, la bandeja de goteo y la cubierta
de la bandeja de goteo con agua caliente y, si fuera
necesario, con un poco de detergente líquido.
El agua caliente puede causar quemaduras. Compruebe
siempre que el agua no esté demasiado caliente antes de
limpiar estas piezas debajo del grifo.
Sólo la bandeja de goteo, la cubierta de la bandeja de goteo y
la boquilla son resistentes al lavavajillas.
Reciclaje
- Este símbolo signica que este producto no debe
desecharse con la basura normal del hogar (2012/19/UE).
- Siga la normativa de su país con respecto a la recogida de
productos eléctricos y electrónicos. El correcto desecho de
los productos ayuda a evitar consecuencias negativas para
el medioambiente y la salud humana.
Page 66

ESPAÑOL68
Cómo retirar el elemento de refrigeración
El elemento de refrigeración situado en el interior del
aparato contiene una sustancia que puede contaminar el
medio ambiente. Por lo tanto, debe retirar el elemento de
refrigeración antes de desechar el aparato.
También puede llevar o enviar el aparato a un centro de
servicio de Philips. El personal del mismo extraerá el elemento
de refrigeración y se deshará de él de forma no perjudicial para
el medio ambiente.
Retire el elemento de refrigeración únicamente cuando vaya a
desechar el aparato.
Tenga cuidado con la pasta del elemento de refrigeración y con
las piezas adyacentes. Si esta pasta entra en contacto con su
ropa, dejará manchas permanentes.
Retire el elemento de refrigeración tal como se indica a
continuación:
1 Desenchufe el aparato.
2 Deslice el botón de liberación hacia la derecha para abrir
las puertas.
Hay dos oricios cerca de las bisagras de las puertas que hay a
ambos lados.
3 Quite los cuatro tornillos que hay en estos oricios con un
destornillador.
4 Quite la cubierta posterior del aparato.
5 Extraiga el ventilador del aparato.
, Ahora verá una placa de aluminio con aletas y con dos
oricios para tornillos.
6 Desenrosque los tornillos con un destornillador.
Page 67

ESPAÑOL 69
7 Retire la placa de aluminio.
, Después de retirar la placa de aluminio, verá una placa
blanca de aproximadamente 4 X 4 cm. Se trata del
elemento de refrigeración en sí.
8 Coloque el extremo del destornillador contra uno de los
lados del elemento de refrigeración y empuje el elemento
de refrigeración para extraerlo de la parte posterior de la
placa de aluminio.
9 Corte los cables conectados al elemento de refrigeración.
No conecte el aparato a la red eléctrica una vez extraído el
elemento de refrigeración.
Nunca vuelva a montar el elemento de refrigeración una vez que
lo haya extraído.
10 Entregue el elemento de refrigeración en un punto de
recogida ocial para residuos químicos.
Garantía y servicio
Si necesita información o si tiene algún problema, póngase
en contacto con nosotros en línea (www.philips.com) o llame
al centro de atención al cliente de PerfectDraft. Su número de
teléfono es 078-250159 (Bélgica), 040 80 80 10 980 (Alemania) o
0900-2224222 (Países Bajos).
Cuando lleve el aparato a su distribuidor o a un centro
de servicio Philips para la determinación de la causa del
problema, lleve también el tubo y el barril.
Restricciones de la garantía
Su garantía quedará anulada si:
- no utiliza el aparato según las instrucciones de este manual
de usuario.
- utiliza barriles dañados en este aparato.
- no instala los barriles según las instrucciones de este
manual de usuario.
- utiliza barriles de proveedores distintos a los que se
mencionan en este manual de usuario.
, Los barriles y los tubos no están cubiertos por esta
garantía.
Page 68

ESPAÑOL70
Solución de problemas
Si no puede resolver su problema con la información que le
facilitamos más abajo, póngase en contacto con nosotros en
línea (www.philips.com) o llame al centro de atención al cliente
de PerfectDraft, cuyos números de teléfono son: 078-250159
(Bélgica), 040 80 80 10 980 (Alemania) o 0900-2224222
(Países Bajos).
Problema Solución
El aparato en general
No se pueden cerrar las
puertas.
Hay escarcha en el
barril o en el aparato.
El aparato gotea
cerveza.
El aparato emite un
sonido.
Antes de cerrar las puertas, asegúrese de empujar hacia
abajo las palancas azules de bloqueo que están en posición
horizontal.
Asegúrese de que el tubo está colocado correctamente en la
unidad del grifo y de que la palanca del grifo está en posición
vertical. Consulte la sección "Cómo colocar el tubo en la
unidad del grifo" en el capítulo "Preparación para su uso".
Asegúrese de que la unidad del grifo está colocada
correctamente en el barril.
Desenchufe el aparato y deje que el barril o el aparato se
descongelen. Seque el aparato o el barril con un paño.
Asegúrese de que las puertas están cerradas correctamente.
Para obtener instrucciones sobre cómo cerrar las puertas,
consulte la sección "Cómo colocar el barril en el aparato" en
el capítulo "Preparación para su uso". Es normal que haya un
poco de escarcha en la parte posterior del barril.
Asegúrese de que la unidad del grifo y el tubo están
colocados correctamente (consulte las secciones "Cómo
colocar el barril en el aparato" y "Cómo colocar el tubo en la
unidad del grifo" en el capítulo "Preparación para su uso").
Retire la unidad del grifo y el tubo y vuelva a instalarlos. Si
el problema persiste, póngase en contacto con el centro de
atención al cliente de PerfectDraft de su país para obtener un
nuevo tubo.
Debido a que el aparato enfría constantemente, el ventilador
funciona continuamente.
La bomba puede ponerse en marcha mientras vierte cerveza
para mantener la presión correcta. Cuando no esté vertiendo
cerveza, la bomba también se pondrá en marcha de vez en
cuando para mantener el aparato a la presión correcta.
Page 69

Problema Solución
Si el aparato emite un silbido, puede que la unidad del grifo
no esté conectada correctamente al barril. Asegúrese de
enjuagar la unidad del grifo a fondo. Es esencial que todas
las piezas de goma de la unidad del grifo estén húmedas
antes de colocar la unidad del grifo en el barril.
La bomba se pone en
marcha con frecuencia
cuando no estoy
vertiendo cerveza.
Unidad del grifo
Resulta difícil colocar
la unidad del grifo en el
barril.
Resulta difícil pulsar los
botones de liberación
para retirar la unidad
del grifo.
No se puede colocar
el barril junto con la
unidad del grifo en el
aparato.
El tubo no se puede
quitar de la unidad del
grifo.
Resulta difícil colocar el
tubo en la unidad del
grifo.
Vuelva a instalar la unidad del grifo y el barril siguiendo las
instrucciones de las secciones "Cómo acoplar la unidad del
grifo en el barril" y "Cómo colocar el barril en el aparato" en
el capítulo "Preparación para su uso". Si esto no funciona,
pruebe otro barril junto con un nuevo tubo. Si el problema
persiste, póngase en contacto con el centro de atención al
cliente de PerfectDraft de su país.
Asegúrese de que no haya restos de cerveza en la unidad del
grifo. Limpie toda la unidad del grifo con agua caliente y, si
fuera necesario, con un poco de detergente líquido.
Primero quite el barril del aparato. A continuación, pulse
los botones de liberación para retirar la unidad del grifo del
barril.
Los restos de cerveza pueden hacer que la unidad del grifo
quede adherida al barril. Limpie la unidad del grifo con agua
caliente y, si fuera necesario, con un poco de detergente
líquido para disolver los restos de cerveza. A continuación
retire la unidad del grifo del barril.
Asegúrese de que la unidad del grifo está colocada
correctamente en el barril. Empuje la unidad del grifo
rmemente hacia abajo cuando la coloque en el barril.
Consulte la sección "Cómo acoplar la unidad del grifo en el
barril" en el capítulo "Preparación para su uso".
Compruebe si ha levantado correctamente las palancas
azules de bloqueo y empújelas hacia abajo después de
instalar el barril.
Retire la unidad del grifo antes de quitar el tubo. Enjuague
la unidad del grifo con agua caliente. Pulse el botón de
liberación del tubo y tire de él para sacarlo de la boquilla.
Asegúrese de que el tubo está colocado correctamente
(consulte la sección "Cómo colocar el tubo en la unidad del
grifo" en el capítulo "Preparación para su uso").
Asegúrese de limpiar la unidad del grifo con agua caliente
antes de insertar un nuevo tubo.
ESPAÑOL 71
Page 70

ESPAÑOL72
Problema Solución
Puede que el tubo esté roto. Póngase en contacto con el
centro de atención al cliente de PerfectDraft de su país para
obtener un nuevo tubo.
Pantalla LCD/Pilotos indicadores LED
El piloto indicador rojo
parpadea (HD3610).
Hay un guión verde en
la pantalla y el aparato
no funciona (HD3720).
Hay un guión verde o
rojo en la pantalla y la
luz de fondo parpadea
(HD3720).
La pantalla muestra el
volumen equivocado
(HD3720).
Cómo verter cerveza
No sale cerveza cuando
tiro de la palanca del
grifo.
Sale demasiada
espuma del aparato.
Retire la unidad del grifo, límpiela y vuelva a instalarla. Si esto
no funciona, pruebe con otro barril y con un nuevo tubo.
Si el problema persiste, póngase en contacto con el centro de
atención al cliente de PerfectDraft de su país.
Asegúrese de que la unidad del grifo está colocada
correctamente (consulte la sección "Cómo acoplar la unidad
del grifo en el barril" en el capítulo "Preparación para su uso").
Retire la unidad del grifo, límpiela y vuelva a instalarla. Si esto
no funciona, pruebe otro barril junto con un nuevo tubo.
Si el problema persiste, póngase en contacto con el centro de
atención al cliente de PerfectDraft de su país.
Para que la indicación de volumen funcione correctamente,
es crucial que abra la palanca del grifo completamente
(consulte capítulo "Cómo servir una cerveza perfecta").
Si se produce un corte en el suministro eléctrico o si
el aparato ha sido desconectado de la red eléctrica, la
indicación de nivel volverá a ser precisa después de verter
varios vasos de cerveza.
Puede que el barril esté vacío. Coloque un nuevo barril en el
aparato.
Asegúrese de que el tubo está colocado correctamente en la
unidad del grifo (consulte la sección "Cómo colocar el tubo en
la unidad del grifo" en el capítulo "Preparación para su uso").
Asegúrese de que la unidad del grifo está colocada
correctamente en el barril (consulte la sección "Cómo acoplar
la unidad del grifo en el barril" en el capítulo "Preparación
para su uso").
Asegúrese de abrir el grifo completamente cuando vaya a
servir cerveza (consulte el capítulo "Cómo servir una cerveza
perfecta").
Page 71

Problema Solución
La cerveza está demasiado tibia. Espere hasta que la cerveza
esté lo sucientemente fría para ser servida, es decir, cuando
el indicador de temperatura de la pantalla esté de color verde
(sólo modelo HD3720) o cuando el piloto indicador verde se
ilumine (HD3610).
El barril se ha agitado demasiado. Espere media hora para
que la cerveza se asiente.
El primer vaso puede contener más espuma de lo normal.
Pruebe a llenar un segundo vaso.
Puede que el tubo no funcione correctamente. Póngase en
contacto con el centro de atención al cliente de PerfectDraft
de su país para obtener un nuevo tubo.
La espuma es
demasiado alta.
La cerveza que sale
del aparato no tiene
espuma.
La espuma desaparece
muy rápido.
Se me ha caído el
barril. ¿Puedo utilizarlo
aun así?
La cerveza tiene mal
sabor.
Consulte el capítulo "Cómo servir una cerveza perfecta".
Compruebe si el barril ha estado abierto durante más de
30 días y si el barril está caducado.
Puede que los vasos utilizados no estuvieran lo
sucientemente limpios. Lave los vasos con agua y un poco
de detergente líquido. Enjuáguelos bien con agua caliente
para eliminar todos los restos de grasa y jabón.
Vierta la cerveza tal como se describe en el barril y en este
manual de usuario (consulte el capítulo "Cómo servir una
cerveza perfecta").
Puede que los vasos utilizados no estuvieran lo
sucientemente limpios. Lave los vasos con agua y un poco
de detergente líquido. Enjuáguelos bien con agua caliente
para eliminar todos los restos de grasa y jabón.
Asegúrese de que la cerveza esté lo sucientemente fría para
ser servida, es decir, cuando el indicador de temperatura de
la pantalla esté de color verde (HD3720) o cuando el piloto
indicador verde se ilumine (HD3610).
Si se trata de un barril sin abrir y no se observa ningún daño
a simple vista, puede intentar utilizarlo. Si el barril ya estaba
abierto, ya no podrá utilizarlo y tendrá que instalar uno
nuevo.
Asegúrese de mantener el aparato enchufado todo el
tiempo. Una vez que el barril ha sido abierto y se mantiene
frío, la cerveza permanece en buen estado durante 30 días.
Compruebe la fecha de caducidad del barril antes de instalar
uno nuevo.
ESPAÑOL 73
Page 72

ESPAÑOL74
Problema Solución
Limpie siempre la unidad del grifo y coloque un nuevo tubo
en ella cuando instale un nuevo barril.
Asegúrese de utilizar vasos limpios.
Enfriamiento
La temperatura de
la pantalla sube
(HD3720).
El aparato no enfría la
cerveza lo suciente.
Asegúrese de que las puertas están cerradas correctamente
(consulte la sección "Cómo colocar el barril en el aparato" en
el capítulo "Preparación para su uso").
Durante los días calurosos, coloque el aparato en un lugar
más frío.
Coloque el aparato en un lugar con una temperatura
ambiente de entre 3 °C y 32 °C. Deje al menos 10 cm de
espacio libre alrededor del aparato. No exponga el aparato a
la luz solar directa.
Compruebe que la salida del ventilador situada en la parte
posterior del aparato no tenga polvo y/o otras partículas.
A una temperatura ambiente de 23 °C, un barril sin enfriar
tarda aproximadamente entre 12 y 15 horas en enfriarse.
En lugares con una temperatura ambiente más alta, el barril
tardará más en enfriarse. Cuando utilice el aparato en lugares
por encima de 32 °C (modelo HD3720) o 30 °C (modelo
HD3610), la temperatura de la cerveza puede sobrepasar los
3 °C. Cuando la temperatura disminuya por debajo de 32 °C,
la temperatura de la cerveza volverá a descender hasta llegar
a 3 °C.
Antes de instalar el barril, puede enfriarlo en la nevera en
posición vertical durante un rato.
Page 73

ESPAÑOL 75
Proveedores de barriles
Si necesita información sobre el barril o si tiene un problema con
el mismo, puede ponerse en contacto con el proveedor del barril
en su país. Encontrará los números teléfono en la siguiente tabla.
País Marca Número de teléfono Dirección web
Países Bajos Dommelsch 0800-0230367 www.dommelsch.nl
Jan de
Hertog
Jupiler 0800-0230945 www.jupiler.nl
Grolsch 0800-1591 www.grolsch.nl
Bavaria 0900-2282742 (0,10 € por
Bélgica Stella Artois 070-222918 www.stella-artois.be
Jupiler 070-222912 www.jupiler.be
Lee 078 250 159 www.perfectdraft.de
Luxemburgo
Alemania Beck’s Pils 040 80 80 10 980 (tarifa local) www.perfectdraft.de
Diekirch
Jupiler 0032 70-222912 www.jupiler.be
Lee 0032 78 250 159 www.perfectdraft.de
Beck’s Gold 040 80 80 10 980 (tarifa local) www.perfectdraft.de
Diebels Alt 040 80 80 10 980 (tarifa local) www.perfectdraft.de
Diebels Pils 040 80 80 10 980 (tarifa local) www.perfectdraft.de
Hasseröder 040 80 80 10 980 (tarifa local) www.perfectdraft.de
0800-0230375 www.hertogjan.nl
www.bavaria.nl
min.)
0035-2802131999 -
Page 74

76 FRANÇAIS
Introduction
Félicitations pour l’achat de ce système PerfectDraft ! Protez
dorénavant du plaisir inégalable d’une bière pression bien
fraîche, chez vous. Le système maintient le fût à température
idéale an que vous puissiez savourer un demi bien frais
quand l’envie vous en prend. Plusieurs marques de bière sont
disponibles dans votre pays ; elles gurent sur l'emballage
du système PerfectDraft (consultez également le chapitre
« Fournisseurs de fûts de bière » à la n de ce mode d'emploi).
Pour plus d'information, rendez-vous sur notre site Web à
l’adresse www.tireuse à bière.de.
Ce mode d'emploi vous indique comment utiliser le PerfectDraft.
Parce que le nom de l'appareil est PerfectDraft, nous utilisons
le terme « bière pression » dans ce mode d'emploi.
Description générale (g. 1
A Porte droite
B Bouton de déverrouillage
C Plaque réfrigérante
D Rangement du cordon
E Acheur LCD : indique la température, le niveau de bière et
sa durée de conservation (HD3720 uniquement)
F Détecteur de fût
G Capteur de température
H Porte gauche
I Leviers de verrouillage
J Voyant DEL indiquant l'état de l'appareil (HD3610
uniquement)
K Grille du plateau égouttoir (HD3610, HD3720)
l Plateau égouttoir (HD3610, HD3720)
Élément tuyau (fourni avec le fût)
M Connecteur tuyau
N Tube
Robinet
O Médaillon
P Poignée de pompe
Q Corps de robinet
R Bec de tirage
S Boutons de déverrouillage
T Bouton de déverrouillage du tuyau
Fût
U Tête de connexion
V Capot de protection
W Peignes
X Brosse de nettoyage (HD3720)
Passez à travers la fente au dos du boîtier pour nettoyer
(enlever la poussière sur) le dissipateur de chaleur
Page 75

FRANÇAIS 77
Important
Lisez attentivement ce mode d'emploi avant
d'utiliser l'appareil et conservez-le pour un
usage ultérieur.
L'appareil
Avertissement
- Si le cordon d'alimentation est
endommagé, il doit être remplacé par
Philips, par un Centre Service Agréé Philips
ou par un technicien qualié an d'éviter
tout accident.
- Avant de brancher l'appareil, vériez que la
tension indiquée sur la base correspond à
la tension secteur locale.
- N'utilisez jamais l'appareil si la che, le
cordon d'alimentation ou l'appareil luimême est endommagé.
- Cet appareil peut être utilisé par des
personnes dont les capacités physiques,
sensorielles ou intellectuelles sont réduites
ou des personnes manquant d’expérience
et de connaissances, à condition que
ces personnes soient sous surveillance
ou qu’elles aient reçu des instructions
quant à l’utilisation sécurisée de l’appareil
et qu’elles aient pris connaissance des
dangers encourus.
- Cet appareil ne doit pas être utilisé par des
enfants. Tenez l’appareil et le cordon hors
de portée des enfants.
- Veillez à ce que les enfants ne puissent
pas jouer avec l'appareil.
Page 76

FRANÇAIS78
- Ne couvrez pas l'appareil (par exemple,
avec une serviette), cela pourrait
provoquer une surchaue.
- Cet appareil est uniquement destiné à
un usage en intérieur Ne l'utilisez pas à
l'extérieur.
- Il est déconseillé d’installer l’appareil dans
un endroit où un jet d’eau peut être utilisé.
Attention
- Tenez l'appareil hors de portée des
enfants. Vous pouvez ôter la poignée pour
plus de sécurité.
- Placez l’appareil sur une surface plate et
stable. Laissez un espace libre d’au moins
10 cm derrière et sur les côtés.
- Lorsque la température ambiante est
de 23 °C, 12 à 15 heures sont nécessaires
pour que la bière refroidisse dans le fût et
atteigne la température de consommation
idéale de 3 °C. La durée de refroidissement
augmente proportionnellement à la
température ambiante.
- Si vous utilisez l’appareil dans un endroit
où il fait plus de 32 °C (HD3720) ou 30 °C
(HD3610), la température de la bière peut
excéder 3 °C. Elle redescendra à 3 °C
lorsque la température ambiante sera
revenue sous les 32 °C.
- N'exposez pas l'appareil directement aux
rayons du soleil.
- Nettoyez toujours l'appareil avant de
le ranger pour une période prolongée.
N’oubliez pas de rincer abondamment le
Page 77

FRANÇAIS 79
robinet. La présence de résidus de bière
peut entraîner des problèmes lors de
l’installation du robinet sur le fût.
- N'essayez pas de soulever l'appareil par la
poignée.
Le fût
Avertissement
- Ne placez jamais le fût au congélateur ! Le
gel peut gravement l'endommager.
- Pour éviter tout risque d'explosion,
n'exposez pas le fût directement aux
rayons du soleil ou à une température
supérieure à 30 °C.
- Le fût est sous pression. Ne retirez pas la
tête de connexion et ne percez pas le fût.
Attention
- Lisez et suivez toujours les instructions et
les avertissements de sécurité mentionnés
sur le fût avant de l'installer à l'intérieur de
l'appareil.
- Ne secouez pas le fût.
- Pour conserver un fût entamé à bonne
température, laissez-le dans l’appareil.
Assurez-vous que l'appareil est allumé.
Si vous arrêtez l’appareil sachant que vous
n’allez pas l’utiliser pendant une période
plus longue (par exemple, lorsque vous
partez en vacances), retirez toujours le
fût entamé de l’appareil et placez-le au
réfrigérateur. La bière d'un fût entamé se
conserve 30 jours.
- Vériez toujours la date limite de vente du
fût lorsque vous l'achetez ou l'installez.
Page 78

FRANÇAIS80
- N'utilisez pas un fût dont la tête de
connexion est endommagée. Le robinet de
tirage ne pourra pas être xé sur une tête
de connexion endommagée.
- Les fûts non entamés se conservent mieux
à température constante. Il est conseillé de
les conserver à une température basse.
- Pression maximale: 1,5 bar.
- Utilisez le fût uniquement pour les
systèmes PerfectDraft HD3720/HD3610/
HD3600. Ne connectez pas d'autres
accessoires au fût.
- Utilisez uniquement les fûts des
fournisseurs mentionnés dans ce
mode d’emploi (consultez le chapitre
« Fournisseurs de fûts de bière »).
- N'utilisez pas de fûts détériorés, car
vous pourriez endommager l'appareil.
Retournez immédiatement le fût détérioré
au magasin où vous l'avez acheté.
- Les fûts ne peuvent pas être superposés.
- Niveau sonore : < 70 dB(A).
Champs électromagnétiques (CEM)
Cet appareil Philips est conforme à toutes les normes relatives
aux champs électromagnétiques (CEM). Il répond aux règles de
sécurité établies sur la base des connaissances scientiques
actuelles s'il est manipulé correctement et conformément aux
instructions de ce mode d'emploi.
Avant la première utilisation
Installation de l'appareil
1 Placez l’appareil sur une surface plate et stable. Laissez un
espace libre d’au moins 10 cm derrière et sur les côtés.
Ne placez pas l’appareil dans un endroit où il sera exposé
directement aux rayons du soleil ou à une température
élevée (près d’une cuisinière ou d’un four, par exemple).
2 Placez l’excédent de cordon dans le compartiment de
rangement à l’arrière de l’appareil.
Page 79

FRANÇAIS 81
3 Insérez la che dans la prise secteur.
4 HD3720 : installez le plateau égouttoir.
5 Fixez la poignée de la pompe.
6 Placez le médaillon de votre bière préférée sur la poignée.
Avant utilisation
Fixation du robinet sur le fût.
Nettoyez toujours le robinet avec de l’eau, savonneuse si
nécessaire, avant de le placer sur le fût et d’insérer le tuyau.
Tableau 1 :
1 Retirez le capot de protection et le tuyau du fût.
2 Le cas échéant, retirez le connecteur tuyau et le tuyau
du robinet. Placez le robinet sous l’eau, rincez le trou du
2
1
connecteur tuyau (1) ainsi que l’élément de connexion
à l’appareil (2). Si nécessaire, utilisez un peu de produit
vaisselle.
Page 80

FRANÇAIS82
3 Retournez ensuite le robinet et rincez l’élément de
connexion au fût situé dans la partie basse du robinet.
Toutes les parties en caoutchouc doivent être humides avant la
xation du robinet sur le fût.
4 Vériez que le bouton de déverrouillage du tuyau
fonctionne correctement. Lorsque vous appuyez sur le
bouton bleu de déverrouillage du tuyau, les deux brides
dans l’ouverture doivent bouger.
Remarque : si les brides restent immobiles lorsque vous
appuyez sur le bouton bleu de déverrouillage du tuyau,
rincez à nouveau le trou du connecteur tuyau.
5 Placez le robinet sur la tête de connexion du fût en
poussant fermement. Vous entendrez un clic.
Une fois que vous avez correctement xé le robinet, vous
entendez deux clics successifs.
Conseil : si vous pouvez lever et abaisser librement le
bras de la tête de connexion, le robinet est alors installé
correctement sur le fût.
6 Assurez-vous que les boutons de déverrouillage, situés de
chaque côté du robinet, dépassent de manière identique.
Dans le cas contraire, appuyez sur les boutons de
déverrouillage à l’aide de vos pouces jusqu’à ce que vous
entendiez un ou deux clics successifs.
Insertion du tuyau dans le robinet
1 Insérez le tuyau souple dans le corps du robinet.
Page 81

FRANÇAIS 83
2 Poussez le tuyau à fond jusque sous l’articulation.
3 Poussez la partie rigide du tuyau dans l’ouverture du
robinet (« clic »).
Mise en place du fût à l'intérieur de l'appareil
Ne placez jamais le fût dans l’appareil si le robinet et le tuyau
ne sont pas correctement installés. Consultez les sections
« Fixation du robinet sur le fût » et « Insertion du tuyau dans le
robinet » de ce chapitre.
1 Ouvrez les portes en appuyant sur les boutons
déverrouillage.
2 Levez les deux leviers de verrouillage bleus au maximum.
3 Inclinez légèrement le fût avec son robinet vers l’avant et
poussez-le à l’intérieur de l’appareil.
- Placez d'abord le fût sur la plaque réfrigérante de l'appareil.
- Ensuite, redressez le fût verticalement, le robinet devant
venir se loger entre les leviers bleus de verrouillage.
Page 82

FRANÇAIS84
4 Abaissez les leviers de verrouillage bleus jusqu’en position
horizontale.
Si vous ne pouvez pas abaisser les leviers en position
horizontale, cela signie que le fût n’a pas été correctement
introduit dans l’appareil. Sortez le fût et recommencez les
étapes 1 à 3.
, Une fois le fût installé (même la première fois), la pompe
commencera à fonctionner immédiatement pendant
quelques secondes.
5 Fermez les portes.
Remarque : si la pompe se met fréquemment en marche alors
que vous ne vous servez pas de l’appareil, réinstallez le fût ou
répétez les instructions de la section « Fixation du robinet sur
le fût » dans ce chapitre.
Refroidissement
L'appareil commence immédiatement à refroidir le fût installé.
Remarque : à une température ambiante de 23 °C, 12 à
15 heures sont nécessaires pour refroidir un fût.
Conseil : si vous souhaitez utiliser l’appareil rapidement
après son installation, placez au préalable le fût en position
verticale dans le réfrigérateur pour le refroidir. Vous trouverez
d'autres conseils dans le chapitre « Dépannage ».
1 Patientez jusqu’à ce que la bière ait atteint la température
de consommation correcte.
, HD3720 : la température s’ache en vert sur l’écran
(consultez la section « Acheur LCD » de ce chapitre).
, HD3610 : le voyant de température devient vert (consultez
la section « Voyants DEL » de ce chapitre).
Page 83

FRANÇAIS 85
Acheur LCD (HD3720 uniquement)
, L'écran indique la température de la bière, le niveau de
bière dans le fût et sa durée de conservation.
Indication de la température
Attendez que la température du fût soit passée en dessous
de 4 °C avant de commencer à la servir. La température de
consommation idéale est de 3 °C. La couleur de la valeur
achée vous indique si la bière a atteint la température
correcte.
- Rouge = la température idéale de la bière n'est pas atteinte
(au-dessus de 4 °C). Le col de mousse risque d'être excessif.
- Vert = la bière a atteint la température de consommation
idéale (4 °C ou moins).
Indication du niveau
La jauge jaune-orange de l'achage indique la quantité de
bière restant dans le fût sur une échelle à 8 niveaux.
Remarque : un fût a une capacité de 30 verres de 20 cl, ou
18 verres de 33 cl.
Indication de durée de conservation
L’indication de durée de conservation vous informe sur le
temps qu’il vous reste pour consommer la bière.
- Lorsque vous placez un nouveau fût dans l’appareil, la
durée de conservation est de 30 jours. Cette durée se
décompte de 30 jusqu’à 0 jours.
- Une fois le fût entamé, la bière se conserve pendant
30 jours si vous laissez le fût dans l’appareil et que celui-ci
reste constamment allumé.
- Une fois la période de 30 jours écoulée, un tiret et un point
d’exclamation sur l’achage indiquent que le fût doit être
remplacé.
Réglage de l'indication de durée de conservation
- Si vous souhaitez arrêter l’appareil pendant un certain
temps, par exemple, lorsque vous partez en vacances,
placez le fût ouvert dans le réfrigérateur. Pour cela,
débranchez le robinet, rincez la partie supérieure du
fût, rincez le tuyau et placez le tuyau avec le fût dans le
réfrigérateur.
Notez toujours la date et le nombre de jours restants pour
consommer la bière sur le fût (nombre de jours indiqué sur
l'acheur).
- Lorsque vous réinstallerez le fût ouvert, vous pourrez régler
l'indicateur de fraîcheur sur le nombre de jours appropriés
avec les touches – et +.
Page 84

FRANÇAIS86
Conseil : pour calculer le nombre de jours, comparez la date à
celle que vous avez inscrite sur le fût et soustrayez le nombre
de jours pendant lesquels le fût est resté au réfrigérateur
au chire que vous avez écrit sur le fût lorsque vous l’y avez
placé.
Avant de réinstaller le fût ouvert, nettoyez à nouveau le robinet
et le tuyau. Vériez également qu’aucune saleté ne s’est
déposée sur le haut du fût. Si c’est le cas, remplacez le fût.
Autres indications
Outre le niveau et la température de la bière, l'achage peut
indiquer les informations suivantes :
- Trait vert sans indication de niveau = pas de robinet sur le
fût.
- Trait rouge sans indication de niveau = pas de fût dans
l'appareil.
- Trait rouge ou vert sur fond lumineux jaune-orange
clignotant = robinet et/ou tuyau mal installé(s). Sortez le
fût et vériez si le robinet ou le tuyau sont correctement
installés. Consultez les sections « Fixation du robinet sur le
fût » et « Insertion du tuyau dans le robinet » du chapitre
« Avant utilisation ». Si cela ne résout pas le problème,
essayez un autre fût avec un tuyau neuf.
Voyants DEL (HD3610 uniquement)
- Trois voyants au-dessus de l'appareil vous indiquent l'état
de celui-ci.
- Voyant rouge = l'appareil est allumé ; vous devez installer
un fût.
- Voyant orange = l'appareil refroidit le fût ; la bière n'a pas
encore atteint la température de consommation correcte.
- Voyant vert = la bière a atteint la température de
consommation correcte ; elle est peut être servie.
Autres indications
- Voyant rouge clignotant = le robinet ou le tuyau n'ont pas
été installés correctement.
Servir une bière parfaite
Les instructions ci-dessous vous aideront à servir une bière
parfaite.
Nettoyage des verres à bière
Utilisez toujours des verres à bière parfaitement propres.
1 Nettoyez soigneusement les verres à l’eau chaude avec un
peu de liquide vaisselle.
2 Rincez-les soigneusement à l’eau froide.
Le verre est ainsi parfaitement dégraissé. Vous pourrez ainsi
servir une bière avec un col de mousse parfait.
Page 85

FRANÇAIS 87
3 Pour vérier si les verres sont débarrassés de toute trace
de graisse ou de savon, examinez-les à l’envers à la
lumière.
Les verres sont propres lorsque l'eau s'écoule de manière égale
sur les rebords sans révéler de traces.
Conseil : si vous lavez vos verres au lave-vaisselle, n’utilisez
pas de produit de rinçage. Les résidus des produits de
rinçage peuvent casser la mousse.
Servir la bière
1 Pour obtenir une bière parfaite, servez-la dans un verre
propre, rincé à l’eau froide et non essuyé !
Remarque : le col de mousse dure plus longtemps lorsque le
verre est froid. Un verre froid préserve aussi la fraîcheur et le
pétillant de la bière.
Remarque : lavez et rincez toujours les verres que vous
réutilisez. Les résidus de la mousse du verre précédent
peuvent produire une mousse excessive dans la nouvelle
bière fraîchement tirée.
Remarque : si vous n’avez pas utilisé votre pompe à bière
depuis plus d’une semaine, il est conseillé de laisser couler la
bière dans le verre pendant une seconde. Rincez ensuite le
verre à l’eau froide et servez une nouvelle bière.
2 Manipulez les verres par le pied ou le milieu plutôt que par
le rebord.
3 Actionnez la pompe d’un geste franc et précis.
La bière ne s’écoulera correctement dans le verre que si la
pompe est complètement ouverte. Si la pompe est ouverte à
moitié, la pression de la bière sera trop forte et produira un col
de mousse trop important.
Laissez la bière couler le long du verre.
4 Vous pouvez agir sur la quantité de mousse en faisant
varier l’angle d’inclinaison du verre sous le bec de tirage et
la distance entre le verre et le bec de tirage.
Plus le verre est droit et proche du bec de tirage, plus le col de
mousse est généreux.
Remarque : le bec de tirage ne doit toucher ni le verre ni la
bière ni la mousse, car les résidus de bière présents sur le bec
de tirage aecteront la formation de la mousse.
5 Redressez le verre doucement pendant le tirage.
6 Remplissez le verre jusqu’à ce que la mousse atteigne le
bord du verre.
Page 86

FRANÇAIS88
7 Fermez la pompe d’un geste franc et précis.
Remarque : la pompe peut continuer à fonctionner pendant
quelques secondes.
8 Europe (sauf Allemagne et Royaume-Uni) : pour un
meilleur résultat, utilisez un coupe-mousse que vous faites
glisser d’un geste franc à un angle de 45° sur le bord du
verre.
Remarque : ne laissez jamais le coupe-mousse sur le plan de
travail. Placez-le dans un verre propre rempli d’eau fraîche ou
rincez-le immédiatement. N’enlevez la mousse qu’une seule
fois pour ne pas aecter la qualité du col de mousse.
, Vous pouvez désormais savourez une bière pression
parfaite.
Servir une bière pression bien fraîche
1 Essuyez le verre à l’aide d’un torchon.
2 Prenez un sous-verre.
3 Prenez le verre par le milieu et posez-le sur le sous-verre,
en orientant le logo du brasseur (s’il gure sur le verre) face
à votre invité.
3 traditions pour servir la bière
Étape Européenne (sauf
Allemagne et RoyaumeUni)
1 Rincez le verre et le
laisser sécher.
2 Tenez le verre près du
bec de tirage.
3 Ouvrez la pompe
complètement d'un
mouvement précis.
4 Amenez le verre sous le
bec de tirage à un angle
d'environ 45 °C et laissez
la bière s'écouler le long
des rebords du verre.
5 Évitez le contact du bec
de tirage avec le verre, la
bière ou la mousse.
Allemand britannique
Rincez le verre et le
laisser sécher.
Présentez le verre
sous le bec de tirage
à un angle d'environ
45 °C.
Ouvrez la pompe
complètement d'un
mouvement précis.
Laissez la bière
s'écouler le long des
rebords du verre.
Évitez le contact du
bec de tirage avec le
verre, la bière ou la
mousse.
Rincez le verre et le
laisser sécher.
Présentez le verre
sous le bec de tirage
à un angle d'environ
45 °C.
Ouvrez la pompe
complètement d'un
mouvement précis.
Laissez la bière
s'écouler le long des
rebords du verre.
Évitez le contact du
bec de tirage avec le
verre, la bière ou la
mousse.
Page 87

FRANÇAIS 89
Étape Européenne (sauf
Allemagne et RoyaumeUni)
6 L'angle d'inclinaison
du verre lors du tirage
détermine la quantité
nale de mousse. Plus
le verre est droit, plus
le col de mousse est
important.
7 Remplissez le verre
jusqu'à ce que la
mousse atteigne le bord
du verre.
8 Fermez la pompe d'un
geste franc et précis.
9 a. Écartez le verre
du bec de tirage an
d'éviter que des gouttes
de bière ne tombent
dans le col de mousse.
b. Enlevez le surplus
de mousse à l'aide
d'un coupe-mousse
positionné à un angle
de 45°.
10 Vous pouvez
maintenant servir votre
bière
Allemand britannique
L'angle d'inclinaison
du verre lors du tirage
détermine la quantité
nale de mousse. Plus
le verre est droit, plus
le col de mousse est
important.
a. Laissez la bière
s'écouler le long du
verre jusqu'à ce que
celui-ci soit rempli aux
deux-tiers de bière et
à un tiers de mousse.
b. Fermez la pompe
et laissez reposer
la mousse pendant
1 minute.
c. Remplissez le verre
jusqu'au rebord en
répétant les étapes 2
à 6.
Fermez la pompe d'un
geste franc et précis.
Écartez le verre du
bec de tirage an
d'éviter que des
gouttes de bière ne
tombent dans le col
de mousse.
Vous pouvez
maintenant servir
votre bière
L'angle d'inclinaison
du verre lors du tirage
détermine la quantité
nale de mousse.
Plus le verre est droit,
plus le col de mousse
est important.
Remplissez le verre
jusqu'à ce que la
mousse atteigne le
bord du verre.
Fermez la pompe
d'un geste franc et
précis.
Écartez le verre du
bec de tirage an
d'éviter que des
gouttes de bière ne
tombent dans le col
de mousse.
Vous pouvez
maintenant servir
votre bière
Page 88

FRANÇAIS90
Remplacement du fût
Le fût est vide lorsque le bec de tirage ne produit plus que de
la mousse, sans bière. HD3720 uniquement : l’acheur indique
également que le fût est vide.
1 Ouvrez les portes en poussant sur les boutons de
déverrouillage vers la droite.
Ouvrez les portes au maximum.
2 Levez les leviers de verrouillage bleus au maximum.
3 Inclinez vers vous le fût et son robinet et retirez-le de
l’appareil.
4 Appuyez sur les boutons de déverrouillage sur les deux
côtés du robinet (1). Le robinet est libéré (clic). Vous pouvez
maintenant le retirer (2).
Vous devez ôter le robinet du fût avant de remplacer le tuyau.
Vous devez toujours remplacer le tuyau lorsque vous installez
un nouveau fût. N'utilisez jamais le même tuyau plus de
30 jours.
5 Consultez les instructions du chapitre « Avant utilisation »
relatives à la xation du robinet sur le fût et à la mise en
place du fût à l’intérieur de l’appareil.
Page 89

FRANÇAIS 91
Nettoyage
Nettoyez l'appareil lorsque vous remplacez le fût où si vous
n'allez pas l'utiliser pour une longue période.
N'utilisez jamais d'éponges à récurer, de produits abrasifs ou
de liquides agressifs tels que de l'essence ou de l'acétone pour
nettoyer l'appareil.
1 Débranchez toujours l’appareil avant de le nettoyer.
2 Nettoyez l’extérieur de l’appareil à l’aide d’un chion
humide.
3 An d’éviter les résidus de bière collants, nettoyez toujours
le robinet comme décrit au chapitre « Remplacement du
fût ».
4 Retirez et démontez le plateau égouttoir et sa grille.
5 Retirez la poignée du robinet.
6 Nettoyez le robinet, le plateau égouttoir et la grille du
plateau égouttoir à l’eau chaude, savonneuse si nécessaire.
L'eau chaude peut causer des brûlures. Faites attention que
l’eau ne soit pas trop chaude pour ne pas vous brûler.
Seuls le bec de tirage, le plateau égouttoir et sa grille sont
prévus pour le lave-vaisselle.
Recyclage
- Ce symbole signie que ce produit ne doit pas être mis au
rebut avec les ordures ménagères (2012/19/EU).
- Respectez les règles en vigueur dans votre pays pour la
mise au rebut des produits électriques et électroniques.
Une mise au rebut correcte contribue à préserver
l'environnement et la santé.
Retrait du composant réfrigérant
Le composant réfrigérant à l’intérieur de l’appareil contient une
substance polluante. Vous devez donc enlever le composant
réfrigérant de l’appareil avant de jeter ce dernier.
Vous pouvez également apporter l’appareil dans un Centre
Service Agréé Philips. Le composant réfrigérant y sera traité
dans le respect de l’environnement.
Retirez le composant réfrigérant uniquement lors de la mise au
rebut de l'appareil.
Attention à la pâte présente sur le composant réfrigérant et les
pièces voisines. Elle peut provoquer des taches indélébiles sur
les vêtements.
Page 90

FRANÇAIS92
Retirez le composant réfrigérant de la manière suivante:
1 Débranchez l'appareil.
2 Ouvrez les portes en appuyant sur les boutons de
déverrouillage.
Vous constaterez deux orices sur les deux côtés au niveau des
charnières de la porte.
3 Dévissez les quatre vis à l’aide d’un tournevis.
4 Enlevez la plaque de protection derrière l’appareil.
5 Retirez le ventilateur de l’appareil.
, Vous verrez une plaque en aluminium, avec des
protubérances et deux trous de vis.
6 Dévissez les vis à l’aide d’un tournevis.
7 Retirez la plaque en aluminium.
, Une fois la plaque en aluminium retirée, vous pourrez
voir une plaque blanche d’environ 4 X 4 cm. Il s'agit du
composant réfrigérant.
8 Insérez la tige d’un tournevis sur l’un des côtés du
composant réfrigérant de manière à détacher le
composant réfrigérant de la plaque en aluminium.
9 Coupez les ls du composant réfrigérant.
Ne branchez pas l'appareil sur le secteur après en avoir retiré le
composant réfrigérant.
Page 91

FRANÇAIS 93
N'essayez pas de remonter le composant réfrigérant après l'avoir
retiré !
10 Portez le composant réfrigérant à un endroit prévu pour les
déchets chimiques.
Garantie et service
Si vous avez besoin d’informations supplémentaires ou
si vous rencontrez un problème, consultez le site Web de
Philips à l’adresse www.philips.com ou contactez le Service
Consommateurs PerfectDraft aux numéros suivants 078-250159
(Belgique), 040 80 80 10 980 (Allemagne) ou 0900-2224222
(Pays-Bas).
Lorsque vous reportez l'appareil chez votre fournisseur ou
à un centre service agréé Philips pour diagnostic en cas de
problème, apportez également le tuyau et le fût.
Limites de la garantie
Votre garantie s'annule dans les cas suivants :
- vous n'utilisez pas l'appareil selon les instructions de ce
mode d'emploi.
- vous utilisez des fûts défectueux dans l'appareil.
- vous n'installez pas les fûts conformément aux instructions
de ce mode d'emploi.
- vous utilisez des fûts d'autres fournisseurs que ceux
mentionnés dans ce mode d'emploi.
, Les fûts et les tuyaux ne sont pas couverts par la garantie.
Dépannage
Si vous ne pouvez pas résoudre le problème à l’aide des
informations ci-dessous, consultez le site Web de Philips
à l’adresse www.philips.com ou contactez le Service
Consommateurs PerfectDraft aux numéros suivants
078-250159 (Belgique), 040 80 80 10 980 (Allemagne) ou
0900-2224222 (Pays-Bas).
Problème Solution
Général
Impossible de fermer
les portes.
Il y a du givre sur le fût
ou sur l'appareil.
Abaissez les leviers bleus de verrouillage en position
horizontale avant de fermer les portes.
Vériez que le tuyau est inséré correctement dans le robinet
et que la poignée est en position verticale. Consultez le
chapitre « Avant utilisation », section « Insertion du tuyau
dans le robinet ».
Vériez que le robinet est correctement installé sur le fût.
Débranchez l’appareil et laissez dégivrer le fût ou l’appareil.
Essuyez l'appareil ou le fût.
Page 92

FRANÇAIS94
Problème Solution
Vériez que les portes sont bien fermées. Pour plus
d'informations, consultez le chapitre « Avant utilisation »,
section « Mise en place du fût à l'intérieur de l'appareil ». La
présence d'un peu de givre sur le fût est tout à fait normale.
De la bière fuit de
l'appareil.
L'appareil émet un
bruit.
La pompe se met
fréquemment en
marche alors que je
ne me sers pas de
l'appareil.
Robinet
L'installation du robinet
sur le fût s'avère
dicile.
Les boutons de
déverrouillage du
robinet sont diciles à
actionner.
Vériez que le robinet et le tuyau sont correctement installés
(consultez le chapitre « Avant utilisation », sections « Fixation
du robinet sur le fût » et « Insertion du tuyau dans le
robinet »).
Démontez le robinet et le tuyau et remettez-les en place. Si
le problème persiste, contactez le Service Consommateurs
PerfectDraft de votre pays et demandez un nouveau tuyau.
La réfrigération continue fait fonctionner le ventilateur en
permanence.
La pompe peut se mettre en marche pour maintenir la
pression lorsque
vous servez de la bière. Même si ce n’est pas le cas, elle peut
se mettre en marche occasionnellement pour maintenir la
pression dans l’appareil.
Si l’appareil émet un siement, il se peut que le robinet ne
soit pas correctement connecté au fût. N’oubliez pas de rincer
abondamment le robinet. Toutes les parties en caoutchouc
doivent être humides avant la xation
du robinet sur le fût.
Réinstallez le robinet et le fût en suivant les instructions
des sections « Fixation du robinet sur le fût » et « Mise en
place du fût à l’intérieur de l’appareil » du chapitre « Avant
installation ». Si cela ne résout pas le problème, remplacez le
fût et le tuyau. Si le problème persiste, contactez le Service
Consommateurs PerfectDraft de votre pays.
Assurez-vous que le robinet est propre. Nettoyez-le à l’eau
chaude, savonneuse si nécessaire.
Commencez par retirer le fût de l’appareil. Appuyez ensuite
sur les boutons de déverrouillage an de retirer le robinet du
fût.
Des résidus de bière peuvent coller le robinet au fût. Nettoyez
le robinet à l’eau chaude, savonneuse si nécessaire, an de
dissoudre ces résidus. Ensuite, retirez le robinet du fût.
Page 93

Problème Solution
Impossible de placer
le fût et son robinet à
l'intérieur de l'appareil.
Impossible de retirer le
tuyau du robinet.
L'insertion du tuyau
dans le robinet est
dicile.
Achage LCD /voyants DEL
Le voyant rouge
clignote (HD3610).
Un trait vert apparaît
sur l'achage et
l'appareil ne fonctionne
pas (HD3720).
Un trait vert ou rouge
apparaît sur l’achage
et le fond lumineux
clignote (HD3720).
L’achage n’indique
pas la quantité correcte
(HD3720).
Servir la bière
Vériez que le robinet est correctement installé sur le fût.
Poussez fermement vers le bas lorsque vous le xez sur le fût.
Consultez le chapitre « Avant utilisation », section « Fixation
du robinet sur le fût ».
Vériez que les leviers de verrouillage bleus sont levés
au maximum et n'oubliez pas de les rabattre en position
horizontale une fois le fût installé.
Démontez le robinet avant de retirer le tuyau. Rincez
le robinet à l’eau chaude. Appuyez sur le bouton de
déverrouillage du tuyau et retirez le tuyau du bec de tirage.
Vériez que le tuyau est correctement installé (consultez le
chapitre « Avant utilisation », section « Insertion du tuyau
dans le robinet »).
N'oubliez pas de nettoyer le robinet à l'eau chaude avant
d'insérer un nouveau tuyau.
Le tuyau est peut-être cassé. Contactez le Service
Consommateurs PerfectDraft de votre pays et demandez un
nouveau tuyau.
Démontez le robinet, nettoyez-le et remettez-le en place. Si
cela ne résout pas le problème, essayez un autre fût avec un
tuyau neuf.
Si le problème persiste, contactez le Service Consommateurs
PerfectDraft de votre pays.
Vériez que le robinet est correctement installé (consultez le
chapitre « Avant utilisation », section « Fixation du robinet sur
le fût »).
Démontez le robinet, nettoyez-le et remettez-le en place. Si
cela ne résout pas le problème, remplacez le fût et le tuyau.
Si le problème persiste, contactez le Service Consommateurs
PerfectDraft de votre pays.
Pour que l’indication du volume soit exacte, vous devez ouvrir
complètement la pompe (consultez le chapitre « Servir une
bière parfaite »).
En cas de panne de courant ou si vous avez débranché
l'appareil, l'indicateur de niveau achera de nouveau la
quantité correcte lorsque vous aurez servi quelques verres.
FRANÇAIS 95
Page 94

FRANÇAIS96
Problème Solution
La bière ne s'écoule
pas lorsque j'actionne
la poignée.
L'appareil produit trop
de mousse.
Le col de mousse est
excessif.
La bière servie est
plate.
Le col de mousse
diminue rapidement.
Le fût est peut-être vide. Placez un fût neuf dans l'appareil.
Vériez que le tuyau est correctement inséré dans le robinet
(consultez le chapitre « Avant utilisation », section « Insertion
du tuyau dans le robinet »).
Vériez que le robinet est monté correctement sur le fût
(consultez le
chapitre « Avant utilisation », section « Fixation du robinet sur
le fût »).
Ouvrez la pompe complètement lorsque vous servez une
bière (consultez le chapitre « Servir une bière parfaite »).
La bière est chaude. Laissez le temps à la bière de refroidir
avant de la servir. La température doit être indiquée en vert
sur l’achage (HD3720 uniquement) ou le voyant vert doit
s’allumer (HD3610).
Le fût a été secoué trop fortement. Laissez reposer la bière
une demi-heure.
Le premier verre contient plus de mousse que d'habitude.
Essayez de servir un autre verre.
Il se peut que le tuyau ne fonctionne pas correctement.
Contactez le Service Consommateurs PerfectDraft de votre
pays et demandez un nouveau tuyau.
Consultez le chapitre « Servir une bière parfaite ».
Vériez si le fût n'est pas entamé depuis plus de 30 jours ou
si la date limite de conservation n'est pas dépassée.
Vos verres ne sont peut-être pas susamment propres. Lavez
les verres à l’eau savonneuse. Rincez-les bien à l’eau froide
pour les débarrasser de toute trace de graisse et de savon.
Servez la bière en suivant les instructions du fût et de ce
mode d’emploi (consultez le chapitre « Servir une bière
parfaite »).
Vos verres ne sont peut-être pas susamment propres. Lavez
les verres à l’eau savonneuse. Rincez-les bien à l’eau froide
pour les débarrasser de toute trace de graisse et de savon.
Page 95

Problème Solution
Attendez que la bière soit susamment froide pour être
servie. La température doit être indiquée en vert sur
l’achage (HD3720) ou le voyant vert doit s’allumer (HD3610).
Le fût est tombé, puisje encore l'utiliser ?
La bière a mauvais
goût.
Refroidissement
La température achée
augmente (HD3720).
L'appareil ne refroidit
pas susamment la
bière.
Si le fût n’était pas entamé et qu’aucun dommage visuel n’est
apparent, vous pouvez essayer de l’utiliser. S’il était déjà
ouvert, vous ne pouvez plus l’utiliser et devez installer un
nouveau fût.
L'appareil doit rester branché en permanence. Dans un fût
entamé maintenu au frais, la bière se conserve 30 jours.
Vériez la date limite de consommation avant d'installer un
nouveau fût.
Nettoyez toujours le robinet et insérez un nouveau tuyau
chaque fois que vous remplacez le fût.
Assurez-vous que les verres sont propres.
Vériez que les portes sont bien fermées (consultez le
chapitre « Avant utilisation », section « Mise en place du fût à
l’intérieur de l’appareil »).
Les jours de forte chaleur, placez l'appareil dans un endroit
plus frais.
L’appareil doit fonctionner à une température ambiante
comprise entre 3 °C et 32 °C. Laissez un espace libre d'au
moins 10 cm autour de l'appareil. N'exposez pas l'appareil
directement aux rayons du soleil.
Vériez que la sortie du ventilateur à l'arrière de l'appareil est
bien dégagée (poussières ou autres particules).
À une température ambiante de 23 °C, 12 à 15 heures sont
nécessaires pour refroidir un fût.
La durée de refroidissement augmente proportionnellement
à la température ambiante. Si vous utilisez l’appareil dans un
endroit où il fait plus de 32 °C
(HD3720) ou 30 °C (HD3610), la température de la bière peut
excéder 3 °C. Elle redescendra à 3 °C lorsque la température
ambiante sera revenue sous les 32 °C.
Pour refroidir le fût avant son utilisation, placez-le en position
verticale dans le réfrigérateur.
FRANÇAIS 97
Page 96

FRANÇAIS98
Fournisseurs de fûts de bière
Pour plus d’informations sur un fût ou si vous rencontrez des
problèmes, vous pouvez contacter votre fournisseur local. Vous
trouverez les numéros de téléphone dans le tableau ci-dessous.
Pays Marque Numéro de téléphone Site Internet
Pays-Bas Dommelsch 0800-0230367 www.dommelsch.nl
Hertog Jan 0800-0230375 www.hertogjan.nl
Jupiler 0800-0230945 www.jupiler.nl
Grolsch 0800-1591 www.grolsch.nl
Bavaria 0900-2282742 (0,10 €/m) www.bavaria.nl
Belgique Stella Artois 070-222918 www.stella-artois.be
Jupiler 070-222912 www.jupiler.be
Lee 078 250 159 www.perfectdraft.de
Luxembourg
Allemagne Beck’s Pils 040 80 80 10 980 (tarif local) www.perfectdraft.de
Diekirch
Jupiler 0032 70-222912 www.jupiler.be
Lee 0032 78 250 159 www.perfectdraft.de
Beck’s Gold 040 80 80 10 980 (tarif local) www.perfectdraft.de
Diebels Alt 040 80 80 10 980 (tarif local) www.perfectdraft.de
Diebels Pils 040 80 80 10 980 (tarif local) www.perfectdraft.de
Hasseröder 040 80 80 10 980 (tarif local) www.perfectdraft.de
0035-2802131999 -
Page 97

99ITALIANO
Introduzione
Congratulazioni per l'acquisto del nuovo PerfectDraft. Da oggi
potrete provare il gusto di una birra fresca e perfetta appena
spillata. Il sistema consente di mantenere la birra fresca e alla
giusta temperatura in moda da poter spillare un boccale quando
volete. Questo consente l'utilizzo di diverse marche di birra di
PerfectDraft (vedere anche il capitolo "Fornitori di barili di birra"
alla ne del manuale dell'utente). È possibile visitare il sito Web all'
indirizzo www.philips.de PerfectDraft.de per ulteriori informazioni.
Il presente manuale dell'utente vi fornirà informazioni relative
all'utilizzo di PerfectDraft.
Si noti che il nome dell'apparecchio è PerfectDraft e che nel
presente manuale verrà utilizzata la dicitura "birra alla spina".
Descrizione generale (g. 1)
A Sportello destro
B Pulsante di sgancio
C Piatto di rareddamento
D Supporto per cavo
E Display LCD: consente di visualizzare le informazioni relative
alla temperatura, il livello e la freschezza della birra (solo
per il modello HD3720)
F Sensore del barile
G Sensore temperatura
H Sportello di sinistra
I Leve di bloccaggio
J Le spie a LED indicano lo stato dell'apparecchio (solo per il
modello HD3610)
K Coperchio del vassoio antigoccia (HD3610, HD3720)
L Vassoio antigoccia (HD3610, HD3720)
Unità tubo (fornita insieme al barile)
M Connettore del tubo
N Tubo
Rubinetto
O Etichetta
P Leva del rubinetto
Q Corpo del rubinetto
R Beccuccio
S Pulsanti di sgancio
T Pulsante di rilascio del tubo
Barile
U Parte superiore di collegamento
V Cappuccio di protezione
w Impugnature
X Spazzolina per la pulizia (HD3720)
Passare attraverso il foro presente sul rivestimento posteriore
per pulire il dissipatore di calore (rimozione della polvere)
Page 98

ITALIANO100
Importante
Prima di utilizzare l'apparecchio, leggete
attentamente il presente manuale e
conservatelo per eventuali riferimenti futuri.
L'apparecchio
Avviso
- Nel caso in cui il cavo di alimentazione
fosse danneggiato, dovrà essere sostituito
presso i centri autorizzati Philips, i
rivenditori specializzati oppure da
personale debitamente qualicato, per
evitare situazioni pericolose.
- Prima di collegare l'apparecchio,
controllate che la tensione indicata
sulla parte inferiore dell'apparecchio
corrisponda a quella locale.
- Non utilizzate l'apparecchio se la spina,
il cavo o l'apparecchio stesso sono
danneggiati.
- Questo apparecchio può essere usato
da persone con capacità mentali, siche
o sensoriali ridotte, prive di esperienza o
conoscenze adatte a condizione che tali
persone abbiano ricevuto assistenza o
formazione per utilizzare l’apparecchio in
maniera sicura e capiscano i potenziali
pericoli associati a tale uso.
- Questo apparecchio non deve essere
usato dai bambini. Tenere l’apparecchio e
il cavo di alimentazione fuori dalla portata
dei bambini.
- Adottate le dovute precauzioni per evitare
che i bambini giochino con l'apparecchio.
Page 99

ITALIANO 101
- Non coprite l'apparecchio (ad esempio
con un asciugamano) per evitare che si
surriscaldi.
- Questo apparecchio deve essere utilizzato
esclusivamente all'interno. Non utilizzatelo
all'esterno.
- L'apparecchio non è adatto per
l'installazione in luoghi dove è presente un
sistema di erogazione dell'acqua a getto.
Attenzione
- Tenete l'apparecchio fuori dalla portata
dei bambini. Per una maggiore sicurezza è
possibile staccare la leva.
- Posizionate l'apparecchio su una
supercie orizzontale, uniforme e stabile.
Lasciate almeno 10 cm di spazio libero
intorno all'apparecchio per consentire
prestazioni ottimali.
- In un ambiente con una temperatura
esterna di 23°C, sono necessarie dalle
12 alle 15 ore per rareddare un barile
non refrigerato alla temperatura ideale
di consumazione di 3°C. Temperature
ambiente più alte richiedono un tempo
superiore.
- Se l’apparecchio viene utilizzato con
temperature esterne superiori ai 32°C
(HD3720) o 30°C (HD3610), la temperatura
di consumazione della birra può essere
superiore a 3°C. Quando la temperatura
scende sotto i 32°C, quella della birra torna
nuovamente sotto i 3°C.
Page 100

ITALIANO102
- Non esponete l'apparecchio ai raggi diretti
del sole.
- Prima di riporre l'apparecchio per un lungo
periodo di tempo, pulitelo. Assicuratevi di
pulire accuratamente il rubinetto. I residui
di birra possono causare problemi durante
l’installazione del rubinetto sul barile.
- Non alzate l'apparecchio aerrandolo per
la leva del rubinetto.
Il barile
Avviso
- Non conservate mai il barile in freezer,
poiché potrebbe danneggiarsi gravemente
dal processo di congelamento.
- Per evitare il rischio di esplosioni, non
esponete il barile alla luce diretta del sole
o a temperature superiori ai 30°C.
- Il barile è un contenitore a pressione.
Non rimuovete mai la parte superiore di
collegamento e non forate il barile con
oggetti appuntiti.
Attenzione
- Leggete e seguite sempre le istruzioni
e le avvertenze di sicurezza riportate
sul barile prima di inserirlo all'interno
dell'apparecchio.
- Non scuotete il barile.
- Un barile aperto deve essere conservato
alla giusta temperatura all’interno
dell’apparecchio. Assicuratevi che
quest’ultimo sia acceso; se l’apparecchio
viene spento perché inutilizzato per un
lungo periodo di tempo (ad esempio
 Loading...