


HD37 20
HD3610
2
© 2018 Koninklijke Philips N.V.
All rights reserved.
4222 001 93399
User manual
Benutzerhandbuch
Manual del usuario
Mode d’emploi
Manuale utente
Gebruiksaanwijzing

3 4
HD3720
1

ENGLISH 6
DEUTSCH 28
ESPAÑOL 52
FRANÇAIS BELGIQUE 76
ITALIANO 99
NEDERLANDS 123
HD3720, HD3610

6 ENGLISH
Introduction
Congratulations on purchasing this new PerfectDraft. From
now on you can enjoy the perfect taste of fresh, cold draft
beer. The system keeps your beer fresh and at exactly the
right temperature so that you can pour a cold beer whenever
you feel like it. Several beer brands are available for this of
the PerfectDraft system (also see chapter ‘Keg suppliers’
at the end of user manual). You can visit our website at
www.perfectdraft.de for more information.
This user manual tells you how to use the PerfectDraft.
Because the name of this appliance is PerfectDraft, we use
‘draft beer’ instead of ‘draught beer’ in this user manual.
General description (Fig. 1)
A Right door
B Release button
C Cooling plate
D Cord storage facility
E LCD display: beer temperature, beer level & freshness
indication (HD3720 only)
F Keg sensor
G Temperature sensor
H Left door
I Locking levers
J LED indicator lights to indicate the status of the appliance
(HD3610 only)
K Drip tray cover (HD3610, HD3720)
L Drip tray (HD3610, HD3720)
Tube unit (supplied with keg)
M Tube connector
N Tube
Tap unit
O Medallion
P Tap handle
Q Tap body
R Spout
S Release buttons
T Tube release button
Keg
U Connection top
V Protection cap
W Chimes
X Cleaning brush (HD3720)
Pass through the slot on rear housing to clean (remove the
dust) on the heat sink

ENGLISH 7
Important
Read this user manual carefully before you
use the appliance and save it for future
reference.
The appliance
Warning
- If the mains cord is damaged, you must
have it replaced by Philips, a service centre
authorised by Philips or similarly qualied
persons in order to avoid a hazard.
- Check if the voltage indicated on the
bottom of the appliance corresponds
to the local mains voltage before you
connect the appliance.
- Do not use the appliance if the plug, the
cord or the appliance itself is damaged.
- This appliance can be used by persons
with reduced physical, sensory or mental
capabilities or lack of experience and
knowledge if they have been given
supervision or instruction concerning use
of the appliance in a safe way and if they
understand the hazards involved.
- This appliance shall not be used by
children. Keep the appliance and its cord
out of reach of children.
- Children should be supervised to ensure
that they do not play with the appliance.
- Do not cover the appliance (e.g. with a
towel) to prevent it from overheating.
- This appliance is only intended for indoor
use. Do not use it outdoors.

ENGLISH8
- The appliance is not suitable for
installation in an area where a water jet
could be used.
Caution
- Keep the appliance out of the reach of
children. The handle can be removed for
extra safety.
- Put the appliance on a horizontal, even
and stable surface. Leave at least 10 cm
free space around the appliance for the
best performance.
- In an environment with an ambient
temperature of 23 °C, it takes
approximately 12 to 15 hours to chill
an uncooled keg to the ideal drinking
temperature of 3 °C. At higher ambient
temperatures, chilling the keg takes longer.
- When you use the appliance above 32 °C
(HD3720) or 30 °C (HD3610), the beer
temperature may rise above 3 °C. When
the temperature decreases to below 32 °C,
the beer temperature drops to 3 °C again.
- Do not expose the appliance to direct
sunlight.
- Always clean the appliance before you
store it for a longer period. Make sure you
rinse the tap unit thoroughly. Beer residues

ENGLISH 9
may cause problems when you install the
tap unit on the keg.
- Do not lift the appliance by the tap handle.
The keg
Warning
- Never store the keg in the freezer! Freezing
may cause serious damage to the keg.
- To avoid the risk of explosion, do not
expose the keg to direct sunlight or
temperatures higher than 30 °C.
- The keg is under pressure. Do not remove
the connection top or pierce the keg with a
sharp object.
Caution
- Always read and follow the instructions
and safety warnings on the keg before you
install it in the appliance.
- Do not shake the keg.
- Store an open keg at the right temperature
by leaving it in the appliance. Make sure
the appliance is switched on. If you switch
o the appliance because you are not
going to use it for a longer period (e.g. a
holiday), always remove the open keg from
the appliance and put it in the fridge. Once
a keg has been opened, the beer stays
fresh for 30 days.
- Always check the expiry date on the keg
when you buy it and before you install it.
- Do not use the keg if the connection
top is damaged. If the connection top is
damaged, the tap unit does not t onto it.

ENGLISH10
- Unopened kegs keep best when you store
them at a stable temperature. The cooler
you store the keg, the better.
- Maximum working pressure: 1.5 bar.
- Use the keg only for the HD3720/HD3610/
HD3600 PerfectDraft. Do not connect
other equipment to the keg.
- Do not use kegs from other suppliers than
the ones mentioned in this user manual
(see chapter ‘Keg suppliers’).
- Do not use damaged kegs in this appliance,
as this could harm the appliance. Return
a damaged keg immediately to the shop
where you bought it.
- The kegs are not stackable.
- Noise level: Lc < 70 dB(A).
Electromagnetic elds (EMF)
This Philips appliance complies with all standards regarding
electromagnetic elds (EMF). If handled properly and
according to the instructions in this user manual, the appliance
is safe to use based on scientic evidence available today.
Before rst use
Installing the appliance
1 Put the appliance on a horizontal, even and stable
surface. Leave at least 10cm free space around the
appliance for the best performance.
Note: Do not put the appliance in a place where it is exposed
to direct sunlight or to high temperatures (e.g. close to a
cooker or an oven).
2 To store excess cord, push it into the storage compartment
at the back of the appliance.
3 Insert the plug into the wall socket.
4 HD3720: install the drip tray.

ENGLISH 11
5 Attach the tap handle.
6 Place the preferred medallion on top of the handle.
Preparing for use
Placing the tap unit onto the keg
Always clean the tap unit with water and, if necessary, with
some washing-up liquid before you place it on the keg and
insert the tube. Table 1:
1 Remove the protection cap and the tube from the keg.
2 If present, remove the tube connector and the tube from
the tap unit. Hold the tap unit under a running tap and
2
1
rinse the tubeconnection hole (1) and the connection
to the body of the appliance (2). If necessary, use some
washing-up liquid.
3 Then turn the tap unit upside down and rinse the keg
connection in the bottom of the tap unit.
It is essential that all rubber parts of the tap unit are moist
before you assemble the tap unit onto the keg.

ENGLISH12
4 Check if the tube release button works properly. When you
press the blue tube release button, the two clamps in the
opening have to move.
Note: If the clamps fail to move when you press the blue
tube release button, rinse the tube-connection hole under a
running tap again.
5 Put the tap unit onto the connection top of the keg by
pushing it down rmly (‘click’).
When you assemble the tap unit properly, you hear two clicks
in quick succession.
Tip: If you can move the arm of the connection top freely up
and down, the tap unit is placed properly on the keg.
6 Make sure the release buttons on either side of the tap
unit stick out equally far on both sides. If this is not the
case, press the release buttons on both sides with your
thumbs until you hear one click or two clicks in quick
succession.
Placing the tube into the tap unit
1 Insert the exible tube into the tap body.
2 Slide the projections of the tube connector under the hinge
points.

ENGLISH 13
3 Push the tube connector into the opening in the tap unit
(‘click’).
Placing the keg into the appliance
Never place the keg into the appliance if you have not
assembled the tap unit and the tube properly. See sections
‘Placing the tap unit onto the keg’ and ‘Placing the tube into
the tap unit’ in this chapter.
1 Slide the release button to the right to open the doors.
2 Lift the two blue locking levers completely.
3 Tilt the keg with the assembled tap unit slightly forward
and put it into the appliance.
- First put the keg on the cooling plate of the appliance.
- Then put the keg upright by sliding the tap unit between the
blue locking levers.
4 Push down the blue locking levers until they are in
horizontal position.
If you are unable to put the locking levers in horizontal position,
you have not put the keg into the appliance in the right
position. Take out the keg and follow steps 1 to 3 again.
, After you have installed the keg (even the rst time), the
pump runs for a few seconds.

ENGLISH14
5 Close the doors.
Note: If the pump goes on frequently when you are not
pouring beer, reinstall the keg or repeat the instructions in
section ‘Placing the tap unit onto the keg’ in this chapter.
Cooling
After you have installed the keg, the appliance automatically
starts to cool the keg.
Note: At an ambient temperature of 23 °C, chilling an
uncooled keg takes 12-15 hours.
Tip: If you want to pour beer shortly after placing the keg in
the appliance, prechill the keg in upright position in the fridge
for a while before you install it. For more tips, see chapter
‘Troubleshooting’.
1 Wait until the beer has reached the right drinking
temperature.
, HD3720: The temperature is shown on the display in green
(see section ‘LCD display’ in this chapter).
, HD3610: The temperature light lights up green (see section
‘LED indicator lights’ in this chapter).
LCD display (HD3720 only)
, The display shows the temperature of the beer, the beer
level inside the keg and the freshness of the beer.
Temperature indication
Wait until the temperature of the keg has dropped below 4 °C
before you start to pour beer. The ideal drinking temperature
is 3 °C. The colour of the temperature displayed tells you if the
beer has reached the right drinking temperature.
- Red = the beer temperature is not yet ideal for consumption
(above 4 °C). The beer head may be too large.
- Green = the beer has reached the right temperature
(4 °C or below) for consumption.
ENGLISH 15
Level indication
The yellow-orange level indication on the display shows the
amount of beer left in the keg in eight steps.
Note: If you use 20cl glasses, you can pour approx. 30 glasses
of beer from one keg. If you use 33cl glasses, you can pour
approx. 18 glasses.
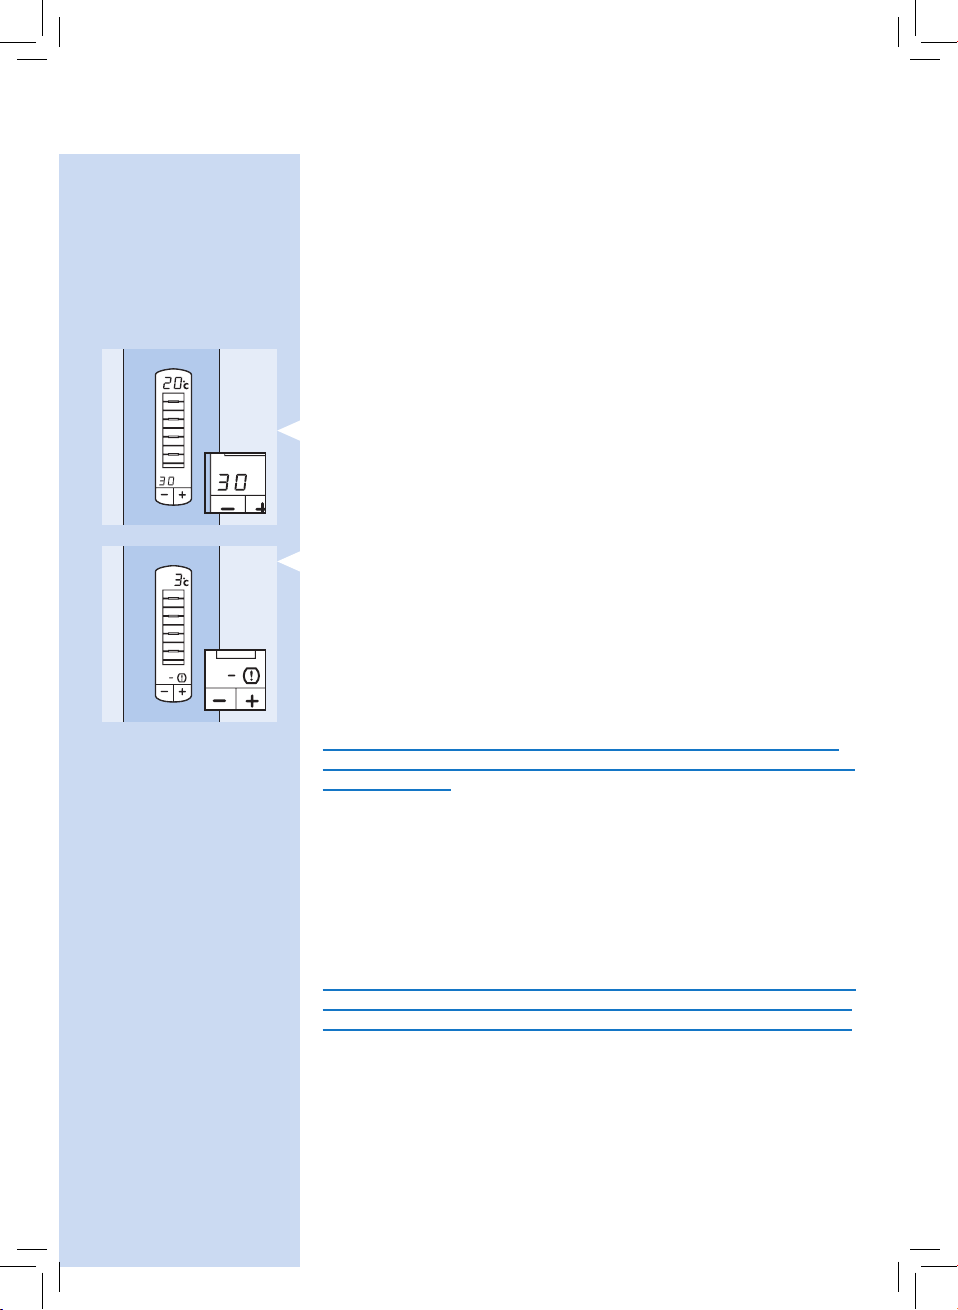
Freshness indication
The freshness indication tells you how long the beer is still
fresh.
- When you place a new keg in the appliance, the freshness
indication shows that the beer in the keg stays fresh for
30 days. The indication counts down from 30 to 0 days.
- Once the keg has been opened, the beer stays fresh for
30 days if the keg is stored in the appliance.
Make sure the appliance is switched on all the time.
- When 30 days have passed, the display shows that the keg
needs to be replaced. A dash and an exclamation mark
appear on the display.
Adapting the freshness indication
- If you want to switch o the appliance for a longer period
(e.g. a holiday), store the opened keg in the fridge.
Disconnect the tap unit, rinse the top of the keg, rinse the
tube and store the tube with the keg in the fridge.
Always write down the date and the number of days that the
beer inside the keg is still fresh on the keg (see number of days
on the display).
- When you reinstall the opened keg, you can set the
freshness indicator to the correct number of days with the –
and + buttons.
Tip: To calculate the correct number of days: compare the
date with the one you have written on the keg and subtract
the number of days the keg lay in the fridge from the number
you wrote on the keg when you stored it.
Before you reinstall the opened keg, clean the tap unit and the
tube again. Also check if dirty deposits have developed on top
of the keg. If so, do not use the opened keg but use a new one.
Other indications
Besides the beer level and temperature, the display gives the
following information:
- Green dash with no level indication visible = the tap unit is
not present on the keg.
- Red dash with no level indication visible = no keg is
installed.

ENGLISH16
- Red or green dash with ashing yellow-orange background
light = the tap unit and/or tube are not properly placed.
Remove the keg and check if the tap unit and the tube are
properly placed. See chapter ‘Preparing for use’, sections
‘Placing the tap unit onto the keg’ and ‘Placing the tube into
the tap unit’. If this does not help, try another keg with a new
tube.
LED indicator lights (HD3610 only)
- There are three indicator lights on top of the appliance that
show the status of the appliance.
- Red indicator light = the appliance is switched on and you
have to install a keg.
- Orange indicator light = the appliance is cooling the keg and
the keg has not yet reached the right drinking temperature.
- Green indicator light = the beer has reached the right
drinking temperature and is ready to be poured.
Other indications
- Red indicator light ashes = the tap unit and/or tube are not
properly placed.
How to pour a perfect beer
Follow the instructions below to pour a perfect beer.
Cleaning beer glasses
Always use clean beer glasses when you tap beer.
1 Clean the glasses carefully in hot water with some
washing-up liquid.
2 Rinse the glasses thoroughly with cold tap water.
In this way you remove all grease and soap residues, which
allows you to pour a beer with a good head.
3 Hold the glasses upside down to the light to check if they
are free of grease and soap residues.
The glasses are clean when the water runs down the surface
evenly, without revealing any stains.
Tip: If you clean beer glasses in the dishwasher, do not use a
rinse agent. Rinse agent residues may break down the foam
head of the beer.
Pouring beer
1 You get the best results if you pour the beer in a cool, clean
and wet glass!
Note: A cool glass ensures a more stable beer head. It also
keeps freshly poured beer fresh longer and helps to retain its
sparkling quality.

ENGLISH 17
Note: For the best quality draft beer, always clean and rinse
used glasses before you use them again. This prevents foam
residues of previously poured beer from causing too much
foam in freshly poured beer.
Note: When you have not poured beer for more than a week,
it is recommended to let beer ow into the glass for 1 second.
Then rinse the glass with cold water before you ll it with
fresh beer.
2 Hold the glass by the bottom or in the middle to make sure
it stays clean.
3 Open the tap in one quick, smooth movement.
The beer only ows properly into the glass if the tap is
completely open. If the tap is only half open, the beer is forced
through the tap, causing it to foam more strongly.
Let the beer to ow down the inside of the glass.
4 To vary the size of the beer head, vary the angle at which
you hold the glass under the spout and vary the distance
between the glass and the spout.
The more upright and the closer to the spout you hold the
glass, the more foam you obtain.
Note: Do not let the end of the spout touch the beer glass, the
beer or the beer head. Any beer residues present on the spout
aect the forming of the beer head.
5 Slowly move the glass to vertical position while you pour
your beer.
6 Fill the glass until the foam almost ows over the rim of
the glass.
7 Insert the exible tube into the tap body.
Note: The pump may go on.
8 Europe (except Germany and the UK): For the best end
result, remove excess foam from the glass by moving a
skimmer over the rim of the glass at an angle of 45° in one
smooth movement.
Note: Never leave the skimmer lying on the worktop, but
put it in a clean glass with fresh, cold water or rinse it right
away. Only pass the skimmer over the glass once, as further
skimming has a negative eect on the quality of the beer
head.
, You now have a perfect draft beer.

ENGLISH18
Serving a freshly poured beer
1 Dry the bottom of the glass by passing it over a cloth.
2 Use a clean beer mat for your guest.
3 Pick up the glass in the middle and serve the beer on the
beer mat. Make sure the beer brand logo (if present on the
glass) faces your guest.
3 dierent beer pouring traditions
Step European (except
Germany and UK)
1 Rinse a glass and let it
drain.
2 Hold the glass next
to the opening of the
spout.
3 Open the tap fully in
one smooth movement.
4 Move the glass under
the spout at an angle
of approx. 45 °C and let
the beer ow down the
inside of the glass.
5 Do not let the spout
touch theglass, the beer
or the foam.
6 The angle at which you
hold the glass while you
pour beer determines
the ultimate size of the
foam head. The more
upright you hold the
glass, the higher the
foam head becomes.
7 Fill the glass until the
beer almost ows over
the rim of the glass.
German British
Rinse a glass and let
it drain.
Hold the glass under
the opening of the
spout at an angle of
approx. 45 °C.
Open the tap fully
in one smooth
movement.
Let the beer ow
down the inside of the
glass.
Do not let the spout
touch the glass, the
beer or the foam.
The angle at which
you hold the glass
while you pour beer
determines the
ultimate size of the
foam head. The more
upright you hold the
glass, the higher the
foam head becomes.
a. Let beer ow into
the glass until it
contains twothirds
beer and one-third
foam.
b. Close the tap and
put the glass down for
1 minute to allow the
foam to settle.
Rinse a glass and let
it drain.
Hold the glass under
the opening of the
spout at an angle of
approx. 45 °C.
Open the tap fully
in one smooth
movement.
Let the beer ow
down the inside of
the glass.
Do not let the spout
touch the glass, the
beer or the foam.
The angle at which
you hold the glass
while you pour beer
determines the
ultimate size of the
foam head. The more
upright you hold the
glass, the higher the
foam head becomes.
Fill the glass until the
beer almost ows
over the rim of the
glass.

ENGLISH 19
Step European (except
Germany and UK)
8 Close the tap in one
smooth movement.
9 a. Move the glass away
from the spout to
prevent drops of beer
from falling onto the
foam head.
b. Remove the foam that
rises beyond the rim of the
glass by passing a skimmer
over the rim of the glass at
an angle of 45°.
10 Your beer is now ready to
be served.
Replacing the keg
The keg is empty when only foam comes out of the spout and
no beer. HD3720 only: the display also indicates that the keg is
empty.
1 Press the release button to the right to open the doors.
Make sure you open the doors fully.
German British
c. Repeat steps 2 to 6
and ll the glass up to
the rim.
Close the tap in one
smooth movement.
Move the glass away
from the spout to
prevent drops of beer
from falling onto the
foam head.
Your beer is now ready
to be served.
Close the tap in one
smooth movement.
Move the glass away
from the spout to
prevent drops of beer
from falling onto the
foam head.
Your beer is now ready
to beserved.
2 Lift the blue locking levers completely.
3 Tilt the keg with the assembled tap unit towards you and
take it out of the appliance.

ENGLISH20
4 Press on the release buttons on both sides of the tap unit
(1). The tap unit is released from the keg with a click and
you can remove it (2).
You have to remove the tap unit from the keg before you can
replace the tube.
Always replace the tube when you install a new keg. Never use
a tube for more than 30 days.
5 See chapter ‘Preparing for use’ for instructions on how to
place the tap unit on the keg and how to place the keg into
the appliance.
Cleaning
Clean the appliance when you replace the keg or when you
store the appliance for a longer period.
Never use scouring pads, scouring agents or aggressive liquids
such as petrol or acetone to clean the appliance.
1 Always unplug the appliance before you clean it.
2 Clean the outside of the appliance with a damp cloth.
3 Always clean the tap unit as described in chapter
‘Replacing the keg’ to avoid sticky beer residues.
4 Remove and disassemble the drip tray and the drip tray
cover.
5 You can remove the tap handle by pulling it out of the tap
body.
6 Clean the tap unit, the drip tray and the drip tray cover
with hot water and, if necessary, some washing-up liquid.
Hot water may cause burns. Always check if the water is not too
hot before you clean these parts under the tap.
Only the drip tray, the drip tray cover and the spout are
dishwasher-proof.
Recycling
- This symbol means that this product shall not be disposed
of with normal household waste (2012/19/EU).
- Follow your country’s rules for the separate collection of
electrical and electronic products. Correct disposal helps
prevent negative consequences for the environment and
human health.

ENGLISH 21
Removing the cooling element
The cooling element inside the appliance contains a substance
that may pollute the environment. Therefore you must remove
the cooling element before you discard the appliance.
You can also take or send the appliance to a Philips service
centre. The sta of this centre will remove the cooling element
for you and will dispose of it in an environmentally safe way.
Only remove the cooling element when you discard the
appliance.
Be careful of the paste on the cooling element and adjacent
parts. If this paste ends up on your clothes, it causes a
permanent stain.
Remove the cooling element in the following way:
1 Unplug the appliance.
2 Slide the release button to the right to open the doors.
There are two holes near the hinges of the doors on either side.
3 Remove the four screws located in these holes with a
screwdriver.
4 Remove the back cover from the appliance.
5 Pull the cooling fan out of the appliance.
, Now you see an aluminium plate with ns on it and with
two screw holes.
6 Undo the screws with a screwdriver.

ENGLISH22
7 Remove the aluminium plate.
, After you have removed the aluminium plate, you see a
white plate of approx. 4 x 4cm. This is the actual cooling
element.
8 Place the shaft of a screwdriver against one side of the
cooling element and push the cooling element o the back
of the aluminium plate.
9 Cut the wires attached to the cooling element.
Do not connect the appliance to the mains again after you
have removed the cooling element.
Never reassemble the cooling element once you have removed it.
10 Hand in the cooling element at an ocial collection point
for chemical waste.
Guarantee & service
If you need information or if you have a problem, contact us
online at www.philips.com or call the PerfectDraft call centre.
Their phone number is 078-250159 (Belgium), 040 80 80 10 980
(Germany) or 0900-2224222 (Netherlands).
When you take the appliance to your dealer or a Philips service
centre for determination of the cause of the problem, also bring
the tube and the keg.
Guarantee restrictions
Your guarantee becomes invalid if:
- you do not use the appliance according to the instructions
in this user manual.
- you use damaged kegs in this appliance.
- you do not install the kegs according to the instructions in
this user manual.
- you use kegs from other suppliers than the ones mentioned
in this user manual.
, The kegs and tubes are not covered by this guarantee.
Troubleshooting
If you are unable to solve the problem with the information
below, contact us online at www.philips.com or call the
PerfectDraft call centre at 078-250159 (Belgium), 040 80 80 10
980 (Germany) or 0900-2224222 (Netherlands).

Problem Solution
Appliance general
It is not possible to
close the doors.
There is frost on
the keg or on the
appliance.
Beer leaks out of the
appliance.
The appliance makes a
sound.
The pump goes on
frequently when I am
not pouring beer.
Make sure you push down the blue locking levers until they
are in horizontal position before you close the doors.
Make sure the tube is placed correctly in the tap unit and the
tap handle is in upright position. See chapter ‘Preparing for
use’, section ‘Placing the tube into the tap unit’.
Make sure the tap unit is placed correctly on the keg.
Unplug the appliance and let the keg or appliance defrost.
Dry the appliance or keg with a cloth.
Make sure that the doors are properly closed. For instructions
on how to close the doors, see the chapter ‘Preparing for use’,
section ‘Placing the keg into the appliance’. It is normal for
some frost to be present on the back of the keg.
Make sure that the tap unit and the tube are placed correctly
(see chapter ‘Preparing for use’, sections ‘Placing the tap unit
onto the keg’ and ‘Placing the tube into the tap unit’).
Remove the tap unit and tube and reinstall them. If the
problem continues to occur, contact the PerfectDraft call
centre in your country to obtain a new tube.
Because the appliance chills constantly, the fan works
continuously.
The pump may go on while you pour beer to maintain the
right pressure. When you are not pouring beer, the pump also
goes on every now and then to keep the appliance at the
right pressure.
If the appliance makes a hissing sound, the tap unit may not
be properly connected to the keg. Make sure you rinse the
tap unit thoroughly. It is essential that all rubber parts of the
tap unit are moist before you assemble the tap unit onto the
keg.
Reinstall the tap unit and the keg by following the instructions
in sections ‘Placing the tap unit onto the keg’ and ‘Placing the
keg into the appliance’ in chapter ‘Preparing for use’. If this
does not help, try another keg together with a new tube. If
the problem continues to occur, contact the PerfectDraft call
centre in your country.
ENGLISH 23

ENGLISH24
Problem Solution
Tap unit
It is dicult to place the
tap unit onto the keg.
It is dicult to press
the release buttons to
remove the tap unit.
It is not possible to
place the keg with the
assembled tap unit in
the appliance.
The tube cannot be
removed from the tap
unit.
It is dicult to place the
tube into the tap unit.
LCD display/LED indicator lights
The red indicator light
ashes (HD3610).
There is a green dash
on the display and the
appliance does not
work (HD3720).
There is a green or red
dash on the display
and the background
light ashes (HD3720).
Make sure no old beer is left in the tap unit. Clean the entire
tap unit with hot water and, if necessary, some washing-up
liquid.
First remove the keg from of the appliance. Then press the
release buttons to remove the tap unit from the keg.
Beer residues may cause the tap unit to stick to the keg.
Clean the tap unit with hot water and, if necessary, some
washing-up liquid to dissolve beer residues. Then remove the
tap unit from the keg.
Make sure the tap unit is placed correctly on the keg. Push
the tap unit down rmly when you place it onto the keg. See
chapter ‘Preparing for use’, section ‘Placing the tap unit onto
the keg’.
Check if you have lifted the blue locking levers properly and
push them down after you have installed the keg.
Remove the tap unit rst before you remove the tube. Rinse
the tap unit with hot water. Press the tube release button and
pull the tube out of the spout.
Make sure the tube is placed correctly (see chapter ‘Preparing
for use’, section ‘Placing the tube into the tap unit’).
Make sure you clean the tap unit with hot water before you
insert a new tube.
The tube may be broken. Contact the PerfectDraft call centre
in your country to obtain a new tube.
Remove the tap unit, clean it and reinstall the tap unit. If this
does not help, try another keg with a new tube.
If the problem continues to occur, please contact the
PerfectDraft call centre in your country.
Make sure that the tap unit is placed correctly (see chapter
‘Preparing for use’, section ‘Placing the tap unit onto the keg’).
Remove the tap unit, clean it and reinstall the tap unit. If this
does not help try another keg with a new tube.
If the problem continues to occur, please contact the
PerfectDraft call centre in your country.

Problem Solution
The display shows
the wrong volume
(HD3720).
Pouring beer
No beer comes out
when I pull the tap
handle.
Too much foam comes
out of the appliance.
The foam head is too
high.
The beer that comes
out of the appliance is
at.
For proper functioning of the volume indication, it is crucial
that you open the tap handle completely (see chapter ‘How
to pour a perfect beer’).
In case of a power failure or if the appliance has been
disconnected from the mains, the level indication will be
accurate again after you have poured a few glasses of beer.
Perhaps the keg is empty. Put a new keg into the appliance.
Make sure the tube is tted correctly in the tap unit (see
chapter ‘Preparing for use’, section ‘Placing the tube into the
tap unit’).
Make sure that the tap unit is placed correctly on the keg (see
chapter ‘Preparing for use’, section ‘Placing the tap unit onto
the keg’).
Make sure you open the tap completely when you pour beer
(see chapter ‘How to pour a perfect beer’).
The beer is too warm. Wait until the beer is cold enough to
be poured, i.e. when temperature on the display is green
(HD3720 only) or when the green indicator light goes on
(HD3610).
The keg has been shaken too much. Wait half an hour for the
beer to settle.
The rst glass can contain more foam than usual. Try pouring
a second glass.
The tube may not function properly. Contact the PerfectDraft
call centre in your country to obtain a new tube.
See chapter ‘How to pour a perfect beer’.
Check if the keg has been open for over 30 days and check if
the expiry date of the keg has passed.
Perhaps the glasses you used were not clean enough. Rinse
the glasses with water and some washing-up liquid. Rinse
them thoroughly with cold water to remove all grease and
soap residues
Pour beer as described on the keg and in this user manual
(see chapter ‘How to pour a perfect beer’).
ENGLISH 25

ENGLISH26
Problem Solution
The foam head
collapses very quickly.
The keg fell, can I still
use it?
The beer tastes bad. Make sure you keep the appliance plugged in all the time.
Cooling
The temperature on
the display goes up
(HD3720).
The appliance does
not chill the beer
suciently.
Perhaps the glasses you used were not clean enough. Rinse
the glasses with water and some washing-up liquid. Rinse
them thoroughly with cold water to remove all grease and
soap residues.
Make sure the beer is cold enough to be poured, i.e. when
temperature on the display is green (HD3720) or when the
green indicator light goes on (HD3610).
When it is an unopened keg and it does not have any visual
damage, you can try to use it. When the keg is already open,
you cannot use the keg anymore and have to install a new
keg.
Once the keg has been opened and is kept cool, the beer
stays fresh for 30 days. Check the expiry date on the keg
before you install a new keg.
Always clean the tap unit and place a new tube into it when
you install a new keg.
Make sure you use clean glasses.
Make sure that the doors are properly closed (see chapter
‘Preparing for use’, section ‘Placing the keg into the
appliance’).
During hot days, put the appliance in a cooler place.
Place the appliance in an environment with an ambient
temperature between 3 °C and 32 °C. Leave at least 10cm free
space around the appliance. Do not expose the appliance to
direct sunlight.
Check if the fan outlet at the back of the appliance is free
from dust and/ or other particles.
At an ambient temperature of 23 °C, chilling the keg takes
approximately 12-15 hours.
At higher ambient temperatures, chilling the keg takes longer.
When you use the appliance above 32 °C (HD3720) or
30 °C (HD3610), the beer temperature may rise above 3 °C.
When the temperature decreases to below 32 °C, the beer
temperature drops to 3 °C again.
You can prechill the keg in upright position in the fridge for a
while before you install the keg.

ENGLISH 27
Keg suppliers
If you need information about the keg or if you have a problem
with your keg, you can contact the supplier of the keg in your
country. You will nd the phone numbers in the table below.
Country Brand Phone number Web address
The Netherlands Dommelsch 0800-0230367 www.dommelsch.nl
Hertog Jan 0800-0230375 www.hertogjan.nl
Jupiler 0800-0230945 www.jupiler.nl
Grolsch 0800-1591 www.grolsch.nl
Bavaria 0900-2282742 (Eur 0,10 p/m) www.bavaria.nl
Belgium Stella Artois 070-222918 www.stella-artois.be
Jupiler 070-222912 www.jupiler.be
Lee 078 250 159 www.perfectdraft.de
Luxembourgh
Germany Beck’s Pils 040 80 80 10 980 (local tari) www.perfectdraft.de
Diekirch
Jupiler 0032 70-222912 www.jupiler.be
Lee 0032 78 250 159 www.perfectdraft.de
Beck’s Gold 040 80 80 10 980 (local tari) www.perfectdraft.de
Diebels Alt 040 80 80 10 980 (local tari) www.perfectdraft.de
Diebels Pils 040 80 80 10 980 (local tari) www.perfectdraft.de
Hasseröder 040 80 80 10 980 (local tari) www.perfectdraft.de
0035-2802131999 -

28 DEUTSCH
Einführung
Wir gratulieren Ihnen zum Kauf dieses neuen PerfectDraft
Zapfsystems. Ab jetzt können Sie jederzeit den wunderbaren
Geschmack von frisch gezapftem Fassbier genießen. Das Gerät
hält Ihr Bier frisch und perfekt temperiert, sodass Sie sich ein
kühles Bier genehmigen können, wann immer Sie Lust darauf
haben. PerfectDraft ist für verschiedene Biersorten geeignet.
Welche davon in Ihrem Land verkauft werden, können Sie auf
dem Verpackungskarton sehen (siehe dazu auch das Kapitel
“Fasshersteller” am Ende der Bedienungsanleitung). Weitere
Informationen nden Sie im Internet auf unserer Website unter
www.perfectdraft.de.
Diese Bedienungsanleitung beschreibt die Handhabung von
PerfectDraft.
Da dieses System PerfectDraft heißt, schreiben wir in dieser
Bedienungsanleitung “draft beer” anstelle des üblichen
“draught beer” (= Fassbier).
Allgemeine Beschreibung (Abb. 1)
A Rechte Klappe
B Entriegelungstaste
C Kühlplatte
D Kabelaufwicklung
E LCD-Anzeige: Biertemperatur, Füllstands- und
Frischeanzeige (nur HD3720)
F Fass-Sensor
G Temperatursensor
H Linke Klappe
I Verriegelungshebel
J LEDs für die Statusanzeige des Geräts (nur HD3610)
K Abdeckung für Auangschale (HD3610, HD3720)
L Auangschale (HD3610, HD3720)
Schlaucheinheit (im Lieferumfang des Fasses enthalten)
M Schlauchanschluss
N Rohr
Zapfeinheit
O Plakette
P Zapfhahn
Q Mittelstück der Zapfeinheit
R Ausgießer
S Entriegelungstasten
T Rohrentriegelungstaste
Bierfass
U Oberseite
V Schutzkappe
W Ränder
X Reinigungsbürste (HD3720)
Reinigen (entstauben) Sie den Wärmeableiter durch den
Schlitz am hinteren Gehäuse

DEUTSCH 29
Wichtig!
Lesen Sie diese Bedienungsanleitung vor
dem Gebrauch des Geräts aufmerksam
durch, und bewahren Sie sie für eine spätere
Verwendung auf.
Das Gerät
Achtung
- Um Gefährdungen zu vermeiden, darf
ein defektes Netzkabel nur von einem
Philips Service-Center, einer von Philips
autorisierten Werkstatt oder einer ähnlich
qualizierten Person durch ein OriginalErsatzkabel ersetzt werden.
- Prüfen Sie vor Inbetriebnahme, ob die
Spannungsangabe auf der Unterseite des
Geräts mit der örtlichen Netzspannung
übereinstimmt.
- Verwenden Sie das Gerät nicht, wenn der
Netzstecker, das Netzkabel oder das Gerät
selbst defekt oder beschädigt ist.
- Dieses Gerät kann von Personen mit
verringerten physischen, sensorischen
oder psychischen Fähigkeiten oder Mangel
an Erfahrung und Kenntnis verwendet
werden, wenn sie bei der Verwendung
beaufsichtigt wurden oder Anweisung zum
sicheren Gebrauch des Geräts erhalten
und die Gefahren verstanden haben.
- Dieses Gerät sollte nicht von Kindern
verwendet werden. Halten Sie das
Gerät und das Netzkabel außerhalb der
Reichweite von Kindern.
- Achten Sie darauf, dass Kinder nicht mit
dem Gerät spielen.

DEUTSCH30
- Zur Vermeidung von Überhitzung sollten
Sie das Gerät nicht abdecken (z. B. mit
einem Handtuch).
- Dieses Gerät ist nur für den Gebrauch in
Innenräumen vorgesehen. Verwenden Sie
das Gerät nicht im Freien.
- Das Gerät ist nicht für Wasseranschlüsse
mit Hochdruck geeignet.
Achtung
- Halten Sie das Gerät außerhalb
der Reichweite von Kindern. Der
Zapfhahn lässt sich als zusätzliche
Sicherheitsmaßnahme abnehmen.
- Stellen Sie das Gerät auf eine waagerechte,
ebene und stabile Unterlage. Für eine
optimale Leistung sollte um das Gerät
herum mindestens 10 cm Platz frei bleiben.
- Bei einer Umgebungstemperatur von
23 °C dauert es etwa 12 bis 15 Stunden,
bis ein ungekühltes Bierfass auf die ideale
Trinktemperatur von 3 °C gekühlt ist. Bei
höheren Umgebungstemperaturen dauert
die Kühlung des Fasses entsprechend länger.
- Wenn Sie das Gerät bei Temperaturen von
über 32 °C (HD3720) oder 30 °C (HD3720)
benutzen, steigt die Biertemperatur unter
Umständen auf über 3 °C an. Geht die
Umgebungstemperatur unter 32 °C zurück,
fällt auch die Biertemperatur wieder auf 3 °C.
- Setzen Sie das Gerät nicht direktem
Sonnenlicht aus.
- Reinigen Sie das Gerät, bevor Sie es für
einen längeren Zeitraum wegstellen.
Spülen Sie die Zapfeinheit gründlich aus.
Bierrückstände können beim Anbringen

DEUTSCH 31
der Zapfeinheit am Bierfass Probleme
verursachen.
- Heben Sie das Gerät nicht am Zapfhahn an.
Das Bierfass
Warnhinweis
- Bewahren Sie das Fass niemals im
Tiefkühlfach auf! Das Einfrieren würde dem
Fass erheblichen Schaden zufügen.
- Um das Risiko einer Explosion zu
vermeiden, sollten Sie das Bierfass weder
direktem Sonnenlicht noch Temperaturen
über 30 °C aussetzen.
- Das Bierfass steht unter Druck. Entfernen
Sie die Oberseite nicht; stechen Sie auch
kein Loch mit einem spitzen Gegenstand
in das Fass.
Achtung
- Lesen und beachten Sie die Anweisungen
und Sicherheitshinweise auf dem Bierfass,
bevor Sie es in das Gerät einsetzen.
- Schütteln Sie das Fass nicht.
- Lassen Sie das geönete Fass im
eingeschalteten Gerät, damit es die
richtige Temperatur behält. Überprüfen Sie,
ob das Gerät tatsächlich ausgeschaltet
ist. Wenn Sie das Gerät ausschalten, weil
Sie beabsichtigen, es über einen längeren
Zeitraum (z. B. während des Urlaubs) nicht
zu benutzen, sollten Sie das Bierfass
herausnehmen und im Kühlschrank
aufbewahren. Ein geönetes Bierfass ist
30 Tage lang haltbar.
- Achten Sie beim Kauf und vor
dem Einsetzen des Bierfasses

DEUTSCH32
immer auf das darauf abgedruckte
Mindesthaltbarkeitsdatum.
- Benutzen Sie das Fass nicht, wenn die
Oberseite defekt ist. Bei beschädigter
Oberseite lässt sich die Zapfeinheit nicht
montieren.
- Ungeönete Bierfässer halten am
längsten, wenn sie bei gleichbleibender
Temperatur gelagert werden. Je kühler Sie
das Fass aufbewahren, umso besser.
- Maximaler Betriebsdruck: 1,5 bar.
- Verwenden Sie das Fass ausschließlich
für die PerfectDraft Modelle HD3720/
HD3610/HD3600. Setzen Sie das Fass in
kein anderes Gerät.
- Verwenden Sie ausschließlich Fässer der
in dieser Bedienungsanleitung genannten
Hersteller (siehe Kapitel "Fasshersteller").
- Verwenden Sie keine defekten Bierfässer,
um Schäden am Gerät zu vermeiden.
Geben Sie ein beschädigtes Bierfass gleich
in dem Geschäft zurück, in dem Sie es
gekauft haben.
- Die Fässer lassen sich nicht stapeln.
- Geräuschpegel: Lc < 70 dB(A).
Elektromagnetische Felder
Dieses Philips Gerät erfüllt sämtliche Normen bezüglich
elektromagnetischer Felder. Nach aktuellen wissenschaftlichen
Erkenntnissen ist das Gerät sicher im Gebrauch, sofern es
ordnungsgemäß und entsprechend den Anweisungen in dieser
Bedienungsanleitung gehandhabt wird.
 Loading...