

Page 1

HD3600
Page 2

234
Page 3
Page 4

Page 5

ENGLISH 6
DEUTSCH 25
FRANÇAIS 45
NEDERLANDS 64
HD3600
Page 6

Introduction
Congratulations on acquiring this new PerfectDraft. From now on you
can enjoy the perfect taste of a draft beer at home.The system will
keep your beer fresh and at exactly the right temperature so that you
can always enjoy nice and cool draft beer. Once the PerfectDraft has
been installed, you can pour beer at home by just pulling the tap
handle. Several beer brands are available for this system.You can find
the beer brands available in your country on the box of the
PerfectDraft system (also see chapter 'Keg suppliers' at the end of
these instructions for use).You can visit our website at
www.perfectdraft.com for more information.
The PerfectDraft system is meant for home use only. It is not suitable
for professional use.
These instructions for use tell you how to use the PerfectDraft.
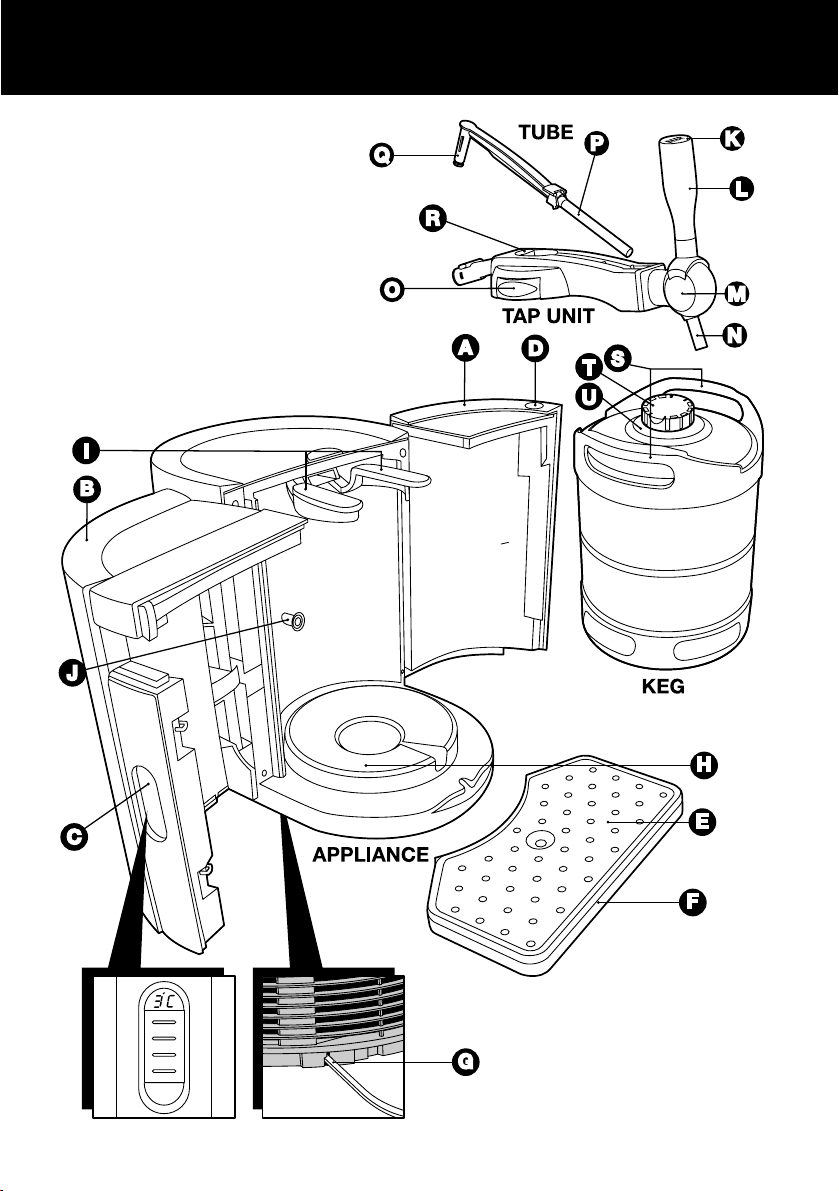
B
Because the name of this appliance is PerfectDraft, we use 'draft beer'
instead of 'draught beer' in these instructions for use.
General description
Appliance
A Right door
B Left door
C Display: indicates beer temperature & beer level
D Release button
E Drip tray cover
F Drip tray
G Cord storage facility
H Cooling plate
I Locking levers
J Keg sensor
Tap unit
K Medaillon
L Tap handle
M Tap body
N Spout
O Release buttons
P Tube
Q Tube connector
R Tube release button
Keg
S Chimes
T Protection cap
U Connection top
ENGLISH6
Page 7
Important
Read these instructions for use carefully before using the appliance and
save them for future reference.
The appliance
◗ If the mains cord is damaged, it must be replaced by Philips,a
service centre authorised by Philips or similarly qualified persons
in order to avoid a hazard.
◗ Check if the voltage indicated on the bottom of the appliance
corresponds to the local mains voltage before you connect the
appliance.
◗ Do not use the appliance when the mains cord, the plug or the
appliance itself is damaged.
C
◗ Keep the appliance out of the reach of children.The handle can be
removed for extra safety.
◗ Put the appliance on a horizontal, even and stable surface, leaving
at least 10 cm free space behind and on both sides of the
appliance for the best performance.
◗ We advise you to put the appliance in an environment with an
ambient temperature between 3 and 25cC.
◗ When you use the appliance at an ambient temperature above
25cC, the beer temperature indicated on the display may rise to
above 3cC.When the ambient temperature decreases to below
25cC, the beer temperature will drop to 3cC again.At higher
ambient temperatures chilling the keg will also take longer.
C
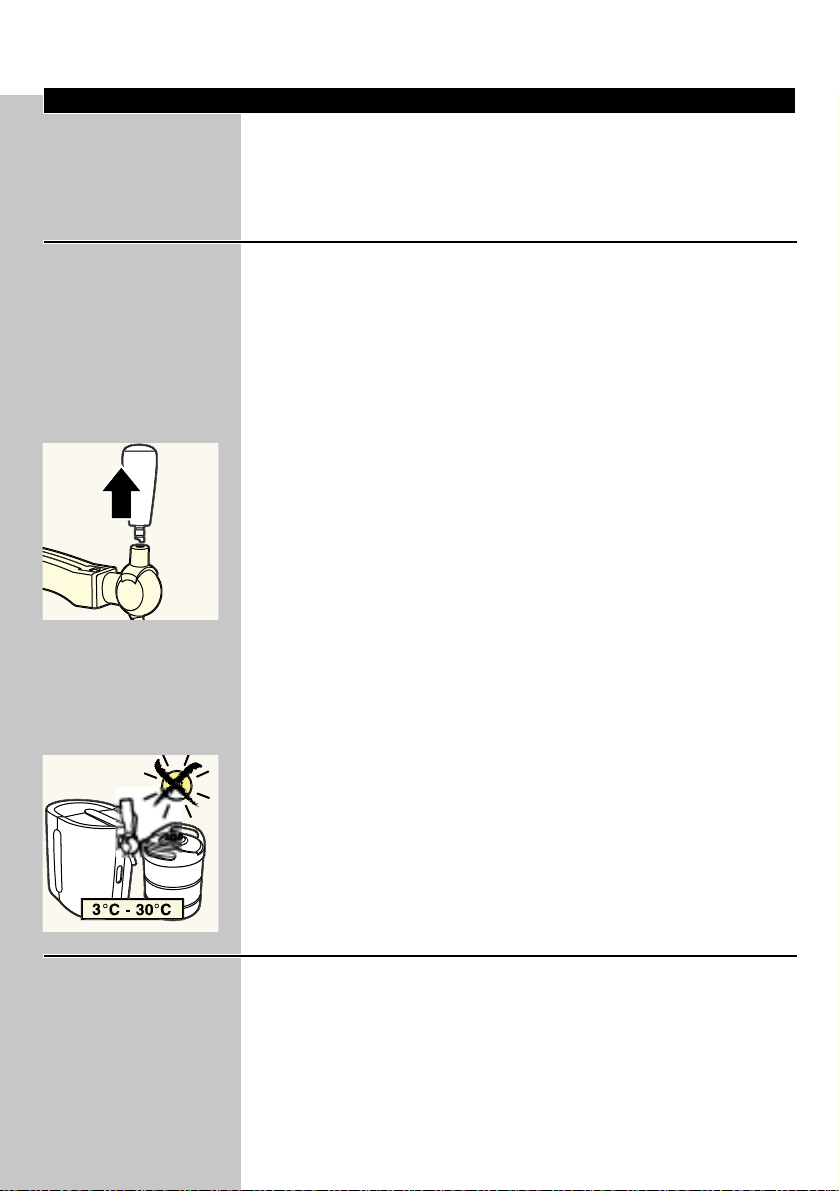
◗ Do not expose the appliance and the keg to direct sunlight or to
temperatures higher than 30cC.
◗ Always clean the appliance before you store it for a longer period.
◗ Do not lift the appliance by means of the tap handle.
◗ Do not cover the appliance (e.g. with a towel) to prevent it from
overheating.
The keg
◗ Always read and follow the instructions and safety warnings on
the keg before installing it in the appliance.
◗ Do not shake the keg.
◗ Store an open keg at the right temperature by leaving it in the
appliance. Make sure the appliance is switched on.If you switch
the appliance off because you are not going to use it for a longer
period (e.g. a holiday), always remove the open keg from the
appliance and put it in the fridge. Once a keg has been opened, the
beer stays fresh for 28 days.
◗ Never store the keg in the freezer! Freezing may cause serious
damage to the keg.
◗ To avoid the risk of explosion,do not expose the keg to direct
sunlight or temperatures higher than 30cC.
ENGLISH 7
Page 8
◗ Always check the sell-by date on the keg at purchase before
installing it.
◗ Do not use the keg if the connection top is damaged. If the
connection top is damaged, the tap unit will not fit onto it.
◗ Unopened kegs will keep best when stored at a stable
temperature.The cooler you store the keg, the better.
◗ The keg is under pressure.Do not remove the connection top or
pierce the keg with a sharp object.
◗ Maximum working pressure:1.5 bar.
◗ Use the keg only for the HD3600 PerfectDraft. Do not connect
other equipment to the keg.
◗ Do not use kegs from other suppliers than the ones mentioned in
these instructions for use (see chapter 'Keg suppliers' at the end
of these instructions for use).
◗ Do not use damaged kegs in this appliance, as this could harm the
appliance.A damaged keg should be immediately returned to the
shop where it was bought.
◗ The kegs are not stackable.
Preparing for use
Step 1: installing the appliance
1 Put the appliance on a horizontal, even and stable surface,
leaving at least 10 cm free space behind and on both sides of
the appliance for the best performance.
B
Do not put the appliance in a place where it will be exposed to direct
sunlight or to high temperatures (e.g. close to a cooker or an oven).
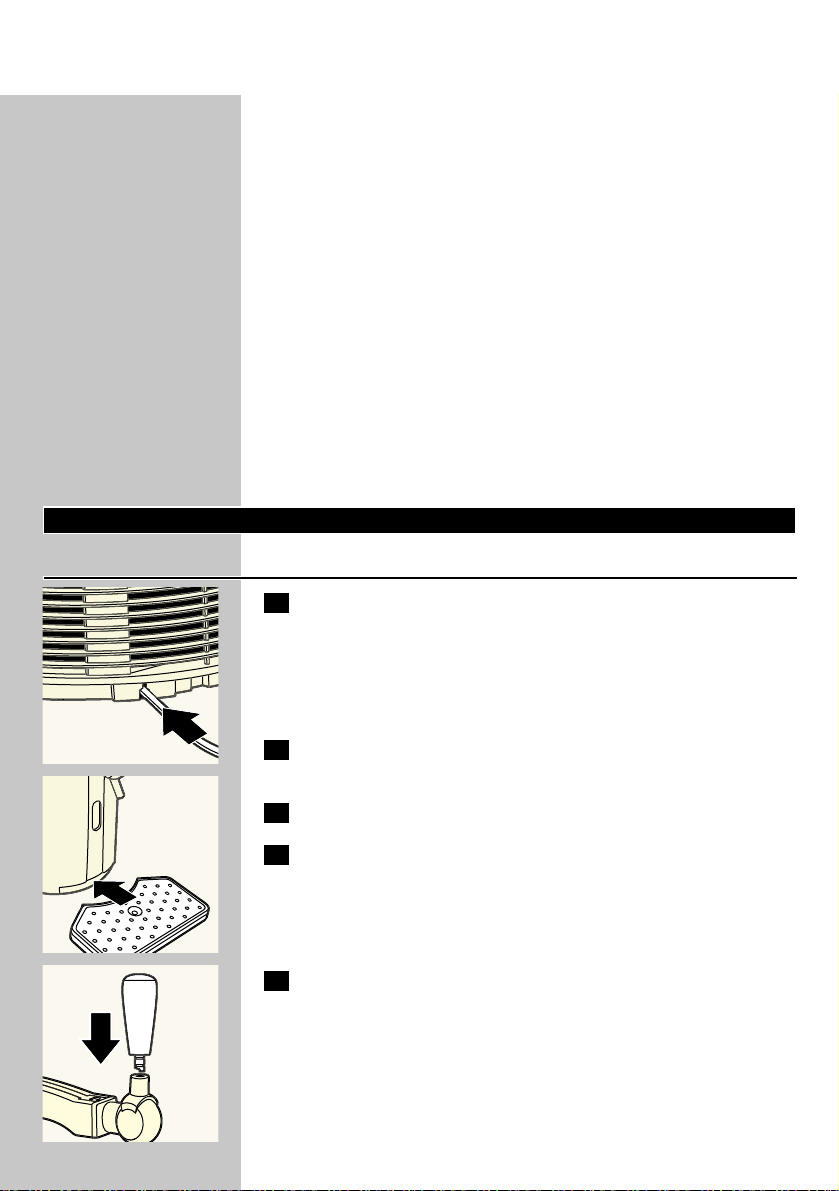
C
2 You can store excess cord by pushing it into the storage
compartment at the back of the appliance.
3 Insert the plug into the wall socket.
C
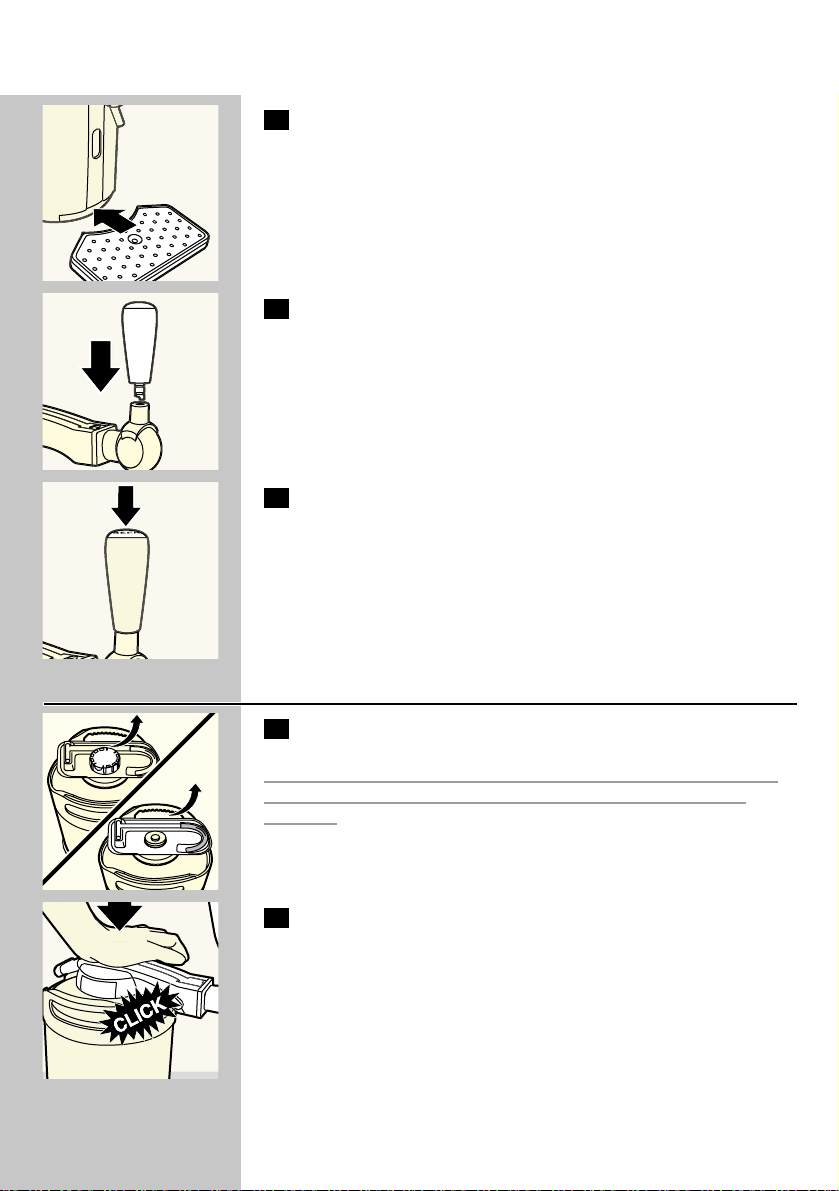
4 Install the drip tray.
C
5 Attach the tap handle.
ENGLISH8
Page 9
C
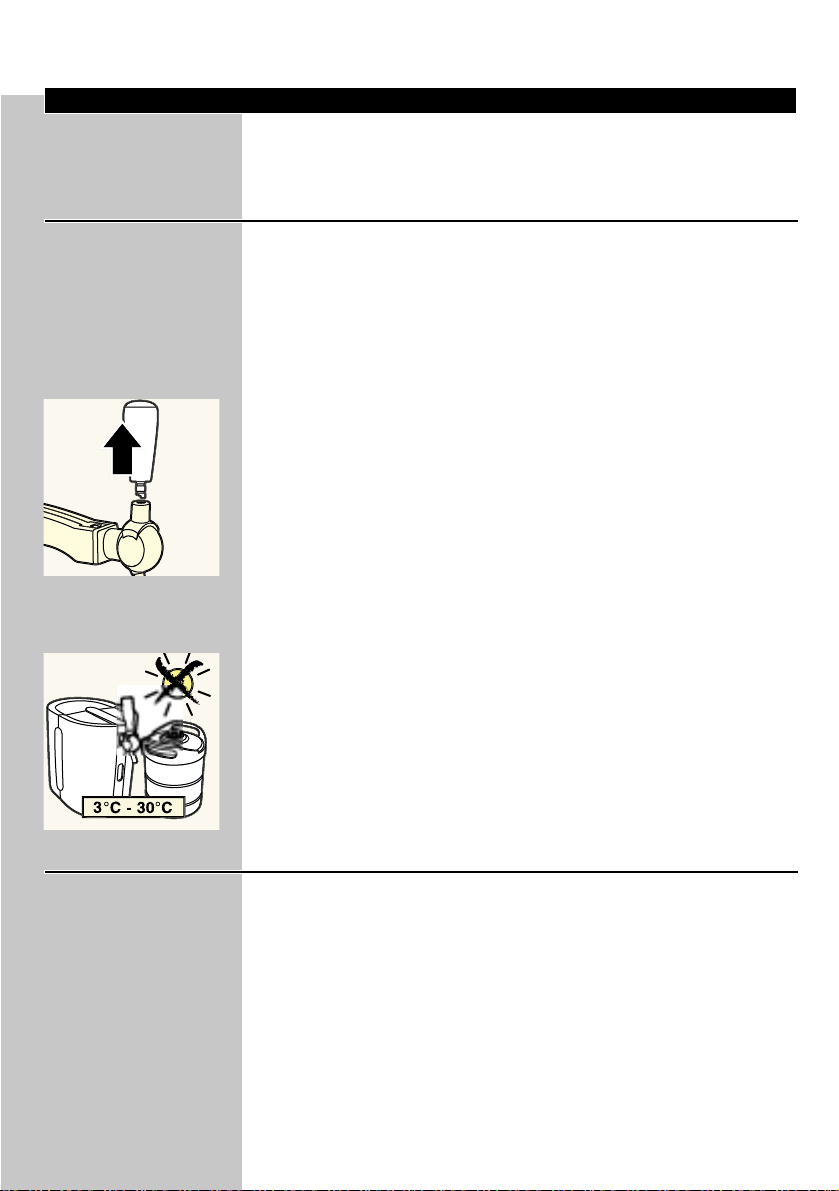
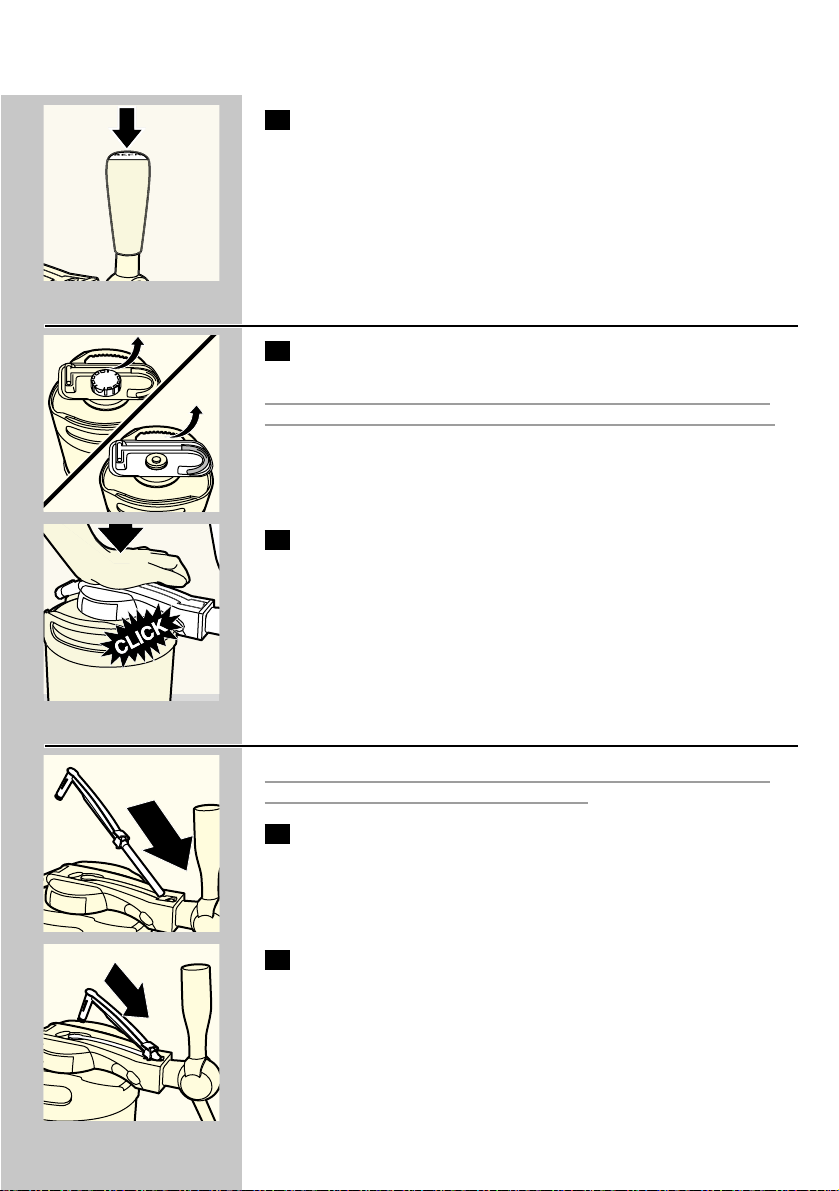
6 Place the preferred medallion on top of the handle.
Step 2: placing the tap unit onto the keg
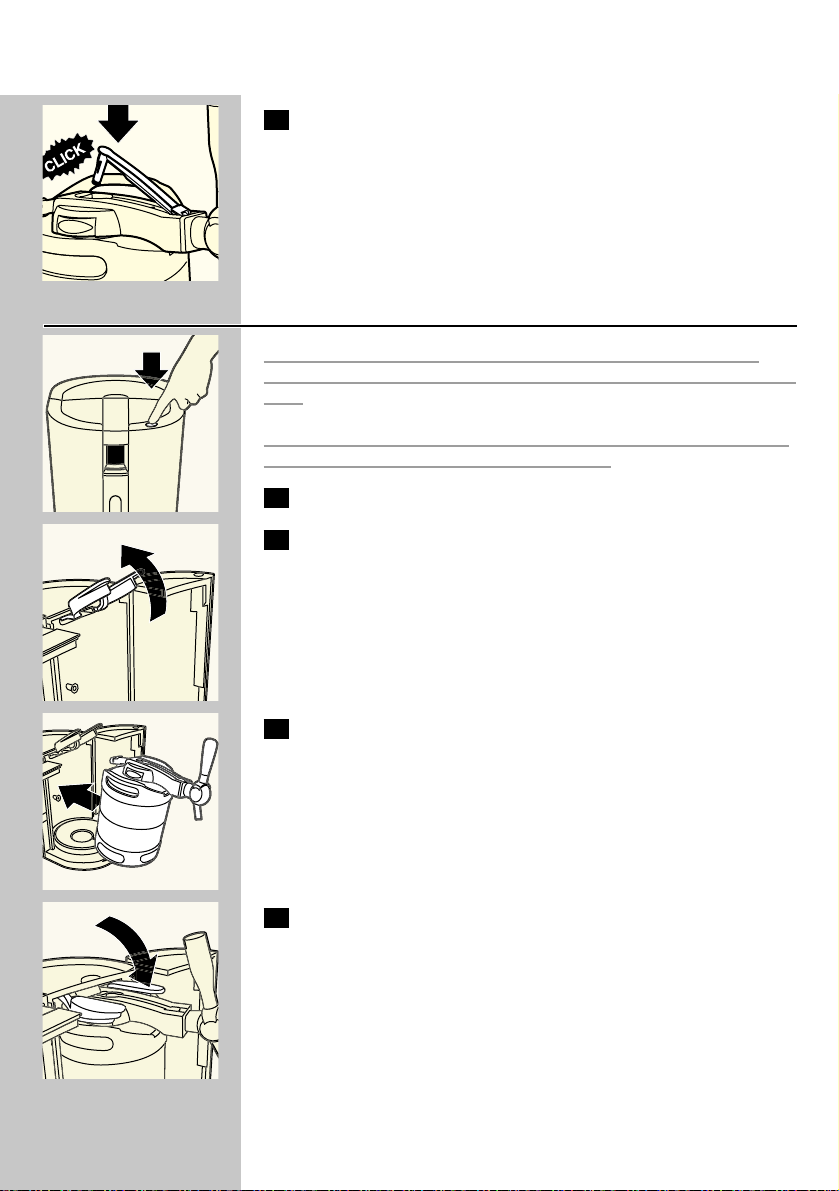
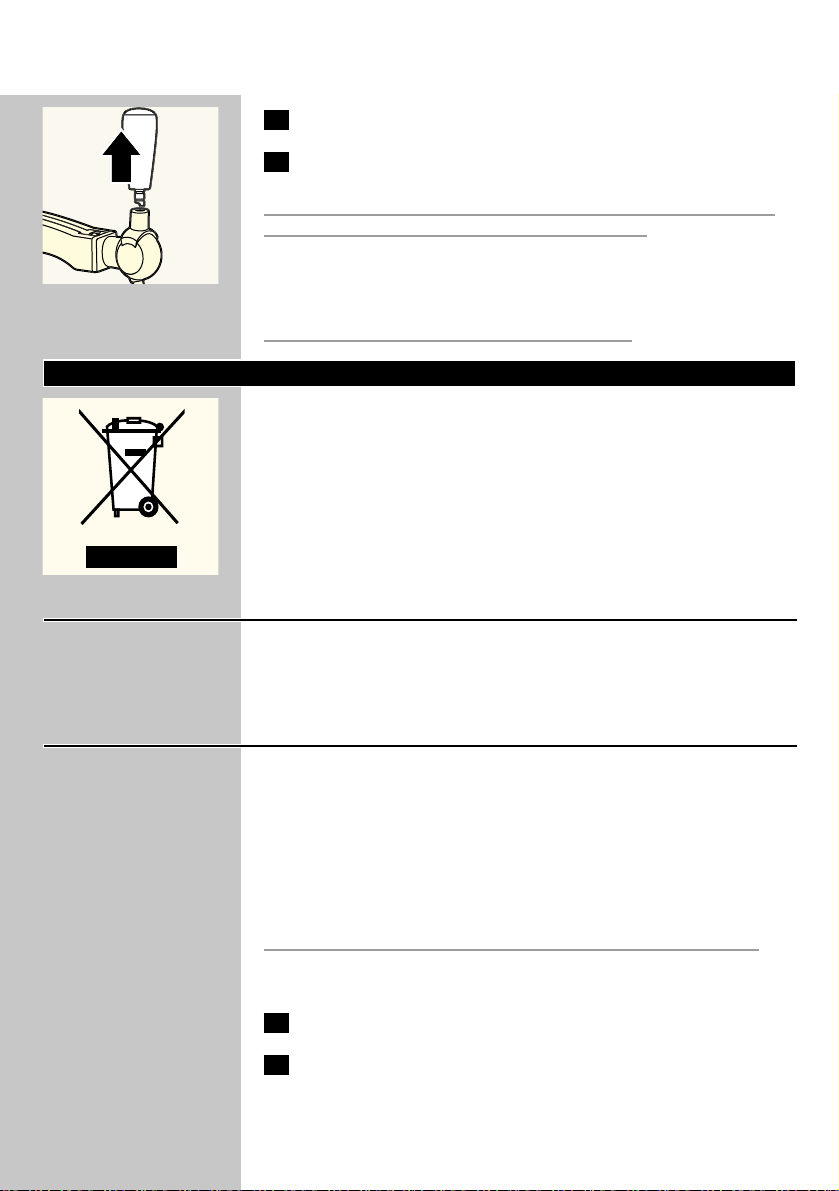
C
1 Remove the protection cap and the tube from the keg.
Always clean the tap unit with hot water and, if necesary, with some
washing-up liquid before placing it on the keg and inserting the tube.
C
2 Put the tap unit onto the connection top of the keg by pushing
it down firmly.You will hear a click.
If you snap the tap unit onto the keg correctly, it will fit nicely between
the two chimes of the keg.
Step 3: placing the tube into the tap unit
Always clean the tap unit with hot water and, if necesary, with some
washing-up liquid before inserting the tube.
C
1 Insert the flexible tube into the tap body.
C
2 Slide the projections of the tube connector under the hinge
points.
ENGLISH 9
Page 10
C
3 Push the tube connector into the opening in the tap unit.You
will hear a click.
Step 4: placing the keg into the appliance
Never place the keg into the appliance if the tap unit has not been
placed properly onto the keg. (see 'Step 2:placing the tap unit onto the
keg').
Always make sure there is a tube in the tap unit before placing the keg
with the assembled tap unit into the appliance.
C
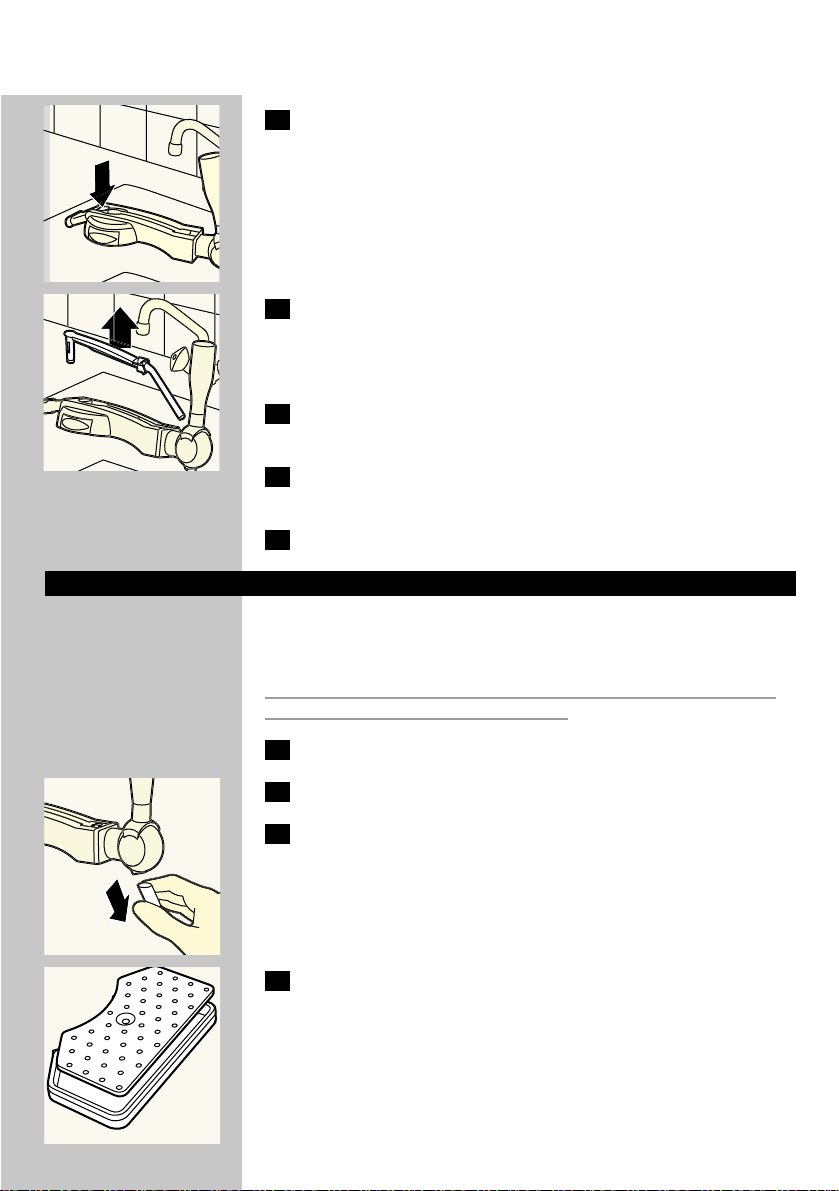
1 Open the doors by pressing the release button.
C
2 Lift the two blue locking levers completely.
C
3 Place the keg with the assembled tap unit into the appliance by
tilting it slightly forward.
- First put the keg on the cooling plate of the appliance.
- Then put the keg upright by sliding the tap unit between the blue
locking levers.
◗ After you have installed the keg (even the first time),the pump
will run for a few seconds.
C
4 Push down the blue locking levers until they are in horizontal
position.
◗ Note: if you are unable to put the locking levers in horizontal
position, the keg has not been put into the appliance in the right
position.Take the keg out and follow steps 1 to 3 again.
◗ The pump and the cooling system will start to work soon after
you have installed the keg.
ENGLISH10
Page 11
C
5 Close the doors.
The best way to close the doors is first closing the left door and then
the right door.
◗ The beer temperature & level display starts to work.
C
6 Wait until the keg has reached a temperature of 4cC or below.
When this is the case, the temperature is displayed in green.
The ideal temperature is 3cC.
If you start using the appliance when the beer is still above 4cC (i.e
when the temperature is displayed in red), the beer head will become
too large.
◗ If the temperature of the keg is approx. 23cC when you put it
into the appliance, wait approx. 15 hours before pouring beer.We
advise you to wait until the whole keg is chilled.
◗ For the best cooling performance, place the appliance in an
environment with an ambient temperature between 3cC and
25cC and leave at least 10 cm free space behind and on both
sides of the appliance.
Do not expose the appliance to direct sunlight.When using the
appliance at an ambient temperature above 25ºC, the beer
temperature indicated on the display may rise to above 3ºC.When the
ambient temperature decreases to below 25ºC, the beer temperature
will drop to 3ºC again.At higher ambient temperatures chilling the keg
will also take longer.
◗ Pre-chilling the keg in the fridge allows you to pour beer more
quickly.
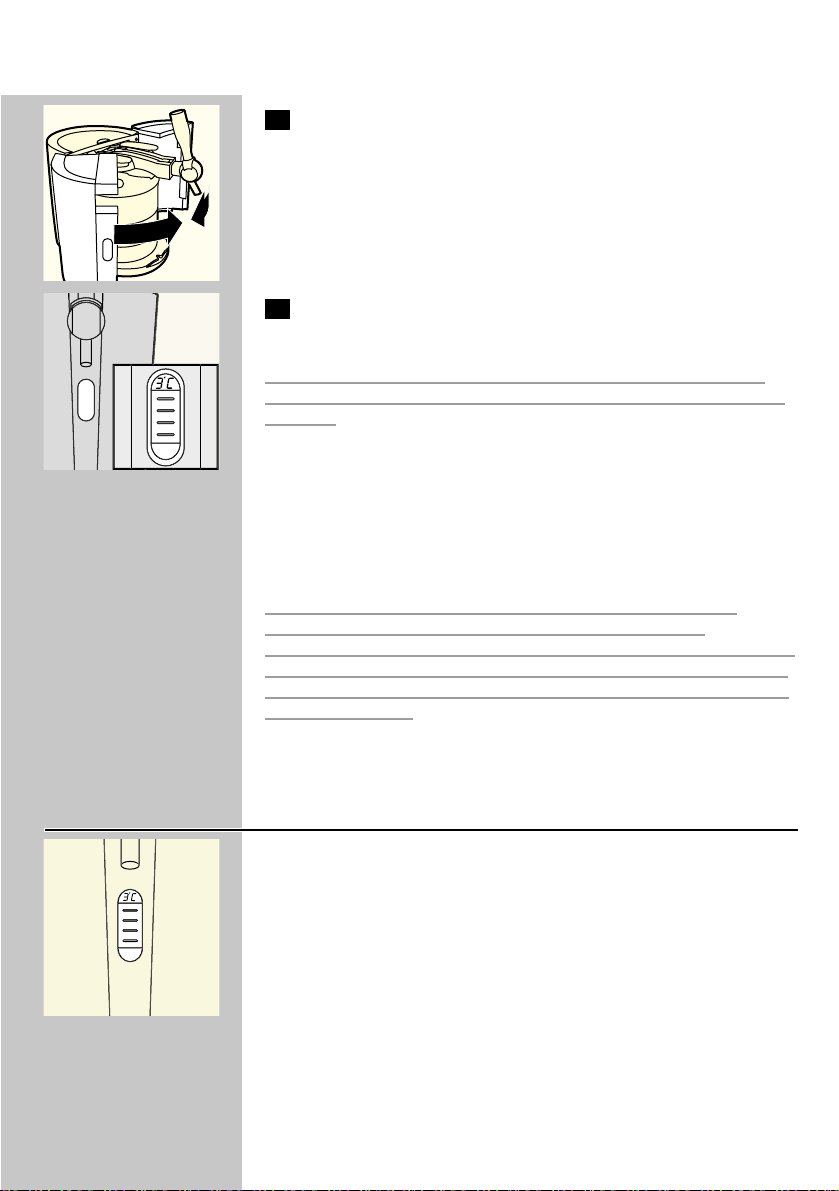
The display
C
◗ The display shows the temperature of the beer and the beer level
inside the keg.
Temperature indication
Wait until the temperature of the keg has dropped below 4cC before
you start pouring beer.The ideal drinking temperature is 3cC.
The colour of the temperature displayed tells you if the ideal drinking
temperature has been reached.
ENGLISH 11
Page 12

- Red = to indicate that the beer temperature is not yet ideal for
consumption (above 4cC).The beer head may be too large.
- Green = to indicate that the beer has reached the ideal temperature
(4cC or below) for consumption.
Level indication
The yellow-orange level indication in the display shows the amount of
beer left in the keg in eight steps.
B
If you use 25cl glasses, you can pour approx. 24 glasses of beer from
one keg. If you use 33cl glasses, you can pour approx. 18 glasses.
Other indications
Besides the beer level and temperature, the display can give the
following information:
- Green segment but no level indication visible = tap unit not present
on keg.
- Red segment but no level indication visible = no keg installed.
- Red or green segment with blinking yellow-orange background light
= tap unit and/or tube not properly placed. Remove the keg and
check if the tap unit and the tube are properly placed (see chapter
'Preparing for use', steps 2 and 3).
Tips and recommendations
◗ If you want to start pouring beer shortly after placing the keg in
the appliance, pre-chill the keg in the fridge for a while before
installing it.
C
◗ Once the keg has been opened, the beer will stay fresh for 28
days if the keg is stored in the appliance.
Make sure the appliance is switched on all the time.
◗ If you want to switch the appliance off for a longer period,e.g. a
holiday, store the opened keg in the fridge. Disconnect the tap
unit, rinse the top of the keg, rinse the tube and store the tube
with the keg in the fridge.
◗ Always replace the tube when you start using a new keg. Never
use a tube for more than 28 days.
◗ When beer has not been poured for more than a week 's time,it
is recommended to let the beer flow into the glass for a period of
1 second, then to rinse the glass with cold water before filling it
with fresh beer.
ENGLISH12
Page 13
How to pour a perfect beer
Follow the instructions below to pour a perfect beer.
Cleaning beer glasses
Always use clean beer glasses when tapping beer.
1 Clean the glasses carefully in hot water with some washing-up
liquid.
2 Rinse the glasses thoroughly with cold tap water.
In this way you will remove all grease and soap residues,which will
allow you to pour a beer with a good head.
3 Check if the glasses are free of grease and soap residues by
holding them upside down to the light.
The glasses are clean when the water runs down the surface evenly,
without revealing any stains.
B
Tip: if you clean the beer glasses in the dishwasher, you should not use a
rinse agent. Rinse agent residues may break down the foam head of the
beer.
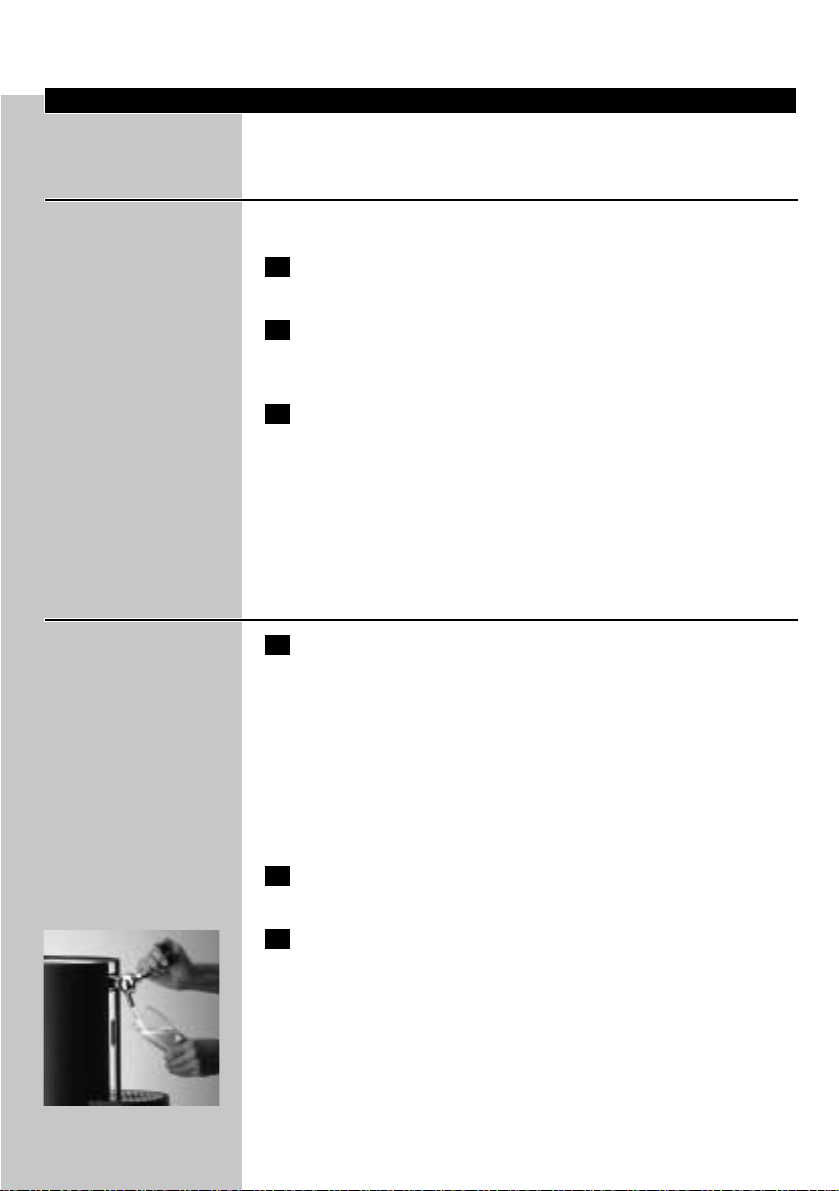
Pouring beer
1 You will get the best results if you pour the beer in a cool,
clean and wet glass!
B
A cool glass ensures a more stable beer head.
B
A cool glass will also keep freshly poured beer fresh longer and helps to
retain its sparkling quality.
◗ NB: For the best quality draft beer, used glasses should always be
cleaned and rinsed before they are used again to prevent foam
residues of previously poured beer from causing too much foam
in freshly poured beer.
2 Hold the glass by the bottom or in the middle to make sure it
stays clean.
C
3 Open the tap in one quick, smooth movement.
The beer will only flow properly into the glass if the tap is completely
open. If the tap is only half open, the beer will be forced through the
tap, causing it to foam more strongly.
Allow the beer to flow down the inside of the glass.
ENGLISH 13
Page 14

C
4 You can vary the size of the beer head by varying the angle at
which you hold the glass under the spout and by varying the
distance between the glass and the spout.
The more upright and the closer to the spout you hold the glass, the
more foam you will obtain.
◗ NB: Do not let the end of the spout touch the beer glass, the
beer or the beer head, as any beer residues present on the spout
will affect the forming of the beer head.
5 Slowly move the glass to vertical position while tapping your
beer.
6 Fill the glass until the foam almost flows over the rim of the
glass.
7 Close the tap in one smooth movement.
Note: the pump may go on.
8 Europe (excl. Germany and U.K.):For the best end result,
remove excess foam from the glass by moving a skimmer over
the rim of the glass at an angle of 45c in one smooth
movement.
B
Never leave the skimmer lying on the worktop, but put it in a clean glass
with fresh, cold water or rinse it right away. Only pass the skimmer over
the glass once, as further skimming will have a negative effect on the
quality of the beer head.
◗ You now have a perfect draft beer.
Serving a freshly poured beer
1 Dry the bottom of the glass by passing it over a cloth.
2 Use a clean beer mat for your guest.
3 Pick up the glass in the middle and serve the beer on the beer
mat with the beer brand logo (if present on the glass) facing
your guest.
ENGLISH14
Page 15

ENGLISH 15
British
Rinse a glass and allow it to drain.
Hold the glass under the opening
of the spout at an angle of
approx. 45c.
Open the tap fully in one smooth
movement.
Let the beer flow down the inside
of the glass.
Do not let the spout touch the
glass, the beer or the foam.
The angle at which you hold the
glass while pouring beer
determines the ultimate size of
the foam head.The more upright
you hold the glass, the higher the
foam head will be.
Fill the glass until the beer almost
flows over the rim of the glass.
Close the tap in one smooth
movement.
Move the glass away from the
spout to prevent drops of beer
from falling onto the foam head.
Your beer is now ready to be
served.
German
Rinse a glass and allow it to drain.
Hold the glass under the opening
of the spout at an angle of
approx. 45c.
Open the tap fully in one smooth
movement.
Let the beer flow down the inside
of the glass.
Do not let the spout touch the
glass, the beer or the foam.
The angle at which you hold the
glass while pouring beer
determines the ultimate size of
the foam head.The more upright
you hold the glass, the higher the
foam head will be.
a. Let beer flow into the glass until
it contains two-thirds beer and
one-third foam.
b. Close the tap and put the glass
down for 1 minute to allow the
foam to settle.
c. Repeat steps 2 to 6 and fill the
glass up to the rim.
Close the tap in one smooth
movement.
Move the glass away from the
spout to prevent drops of beer
from falling onto the foam head.
Your beer is now ready to be
served.
European (excl. Germany and
UK)
Rinse a glass and allow it to drain.
Hold the glass next to the
opening of the spout.
Open the tap fully in one smooth
movement.
Move the glass under the spout at
an angle of approx. 45c and let
the beer flow down the inside of
the glass.
Do not let the spout touch the
glass, the beer or the foam.
The angle at which you hold the
glass while pouring beer
determines the ultimate size of
the foam head.The more upright
you hold the glass, the higher the
foam head will be.
Fill the glass until the beer almost
flows over the rim of the glass.
Close the tap in one smooth
movement.
a. Move the glass away from the
spout to prevent drops of beer
from falling onto the foam head.
b. Remove the foam that rises
beyond the rim of the glass by
passing a skimmer over the rim
of the glass at an angle of 45c.
Your beer is now ready to be
served.
Step
1.
2.
3.
4.
5.
6.
7.
8.
9.
10.
3 different beer pouring traditions
The way beer is poured differs from country to country.This table tells you how to pour a perfect
beer in three local traditions in 10 steps.
Page 16
16
Replacing the keg
When the keg is empty, only foam will come out of the spout and no
beer.The display will indicate that the keg is empty.This means that you
have to replace the keg.
C
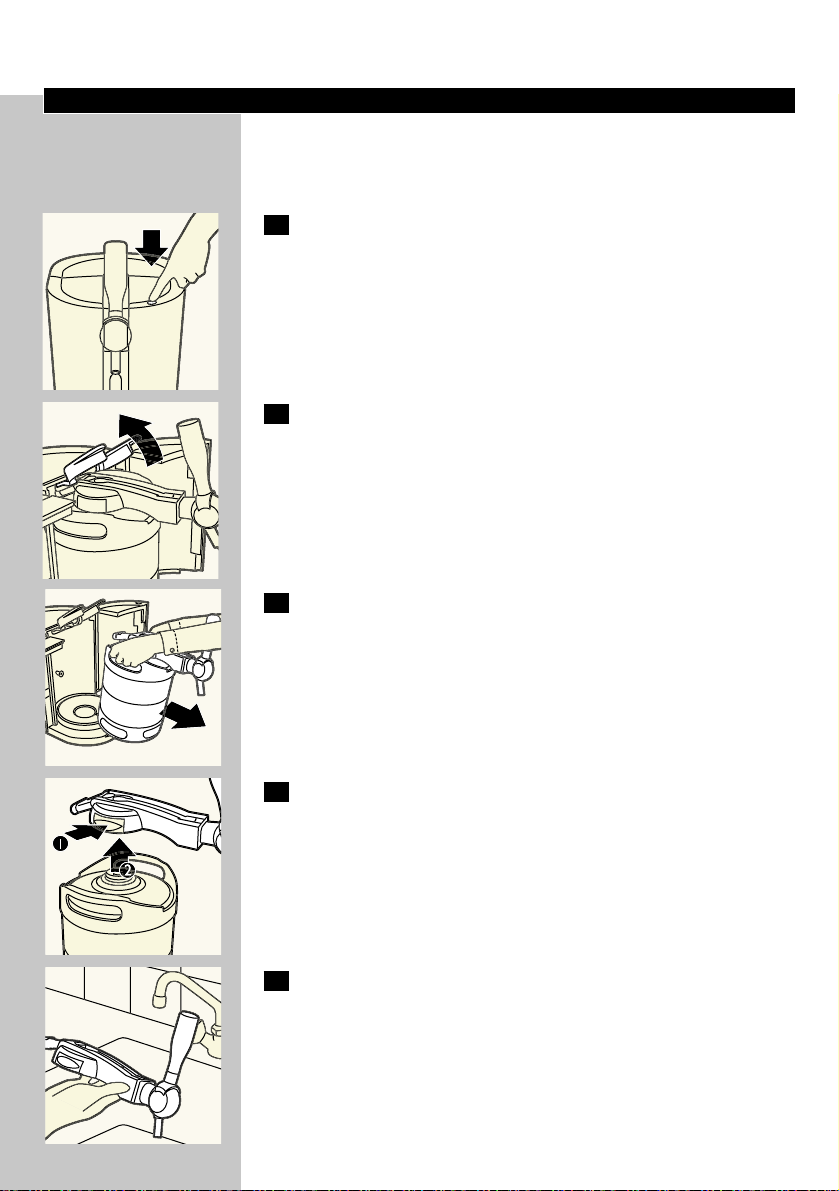
1 Open the doors by pressing the release button.
Make sure you open the doors fully.
C
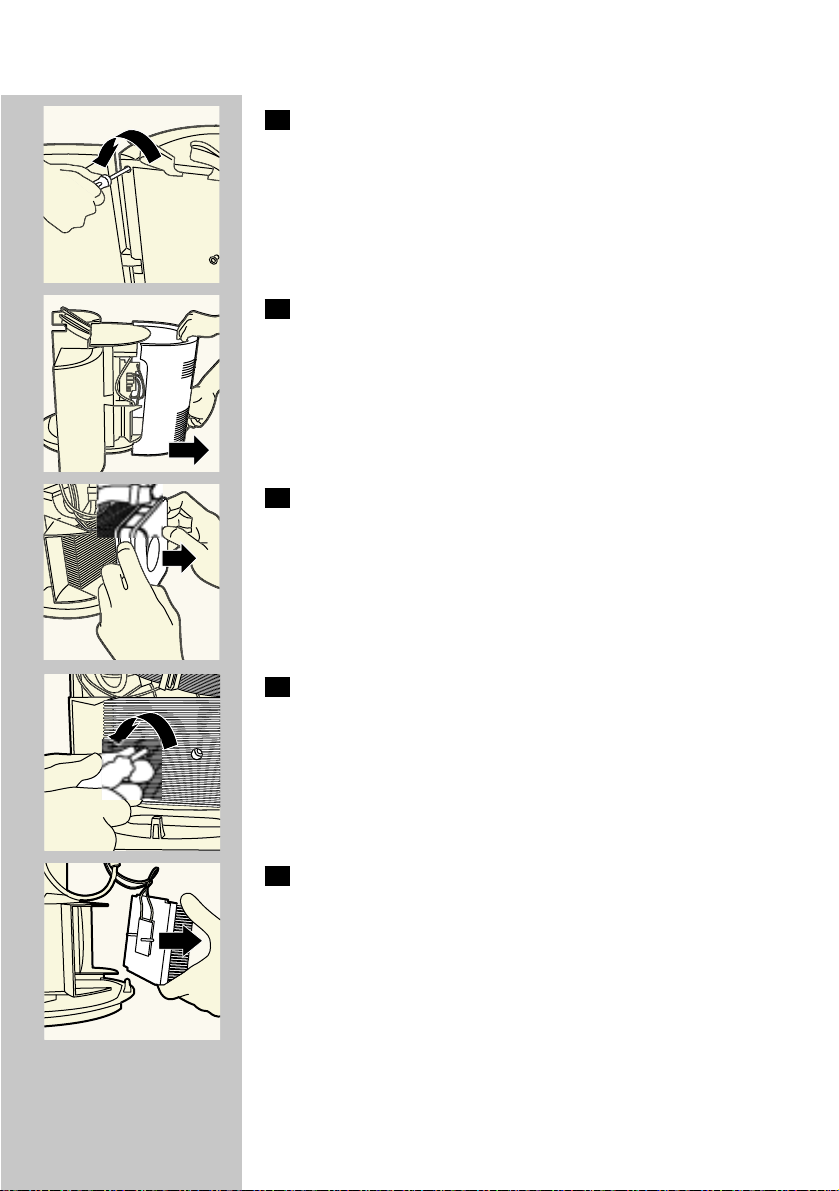
2 Lift the blue locking levers completely.
C
3 Tilt the keg with the assembled tap unit towards you and take
it out of the appliance.
C
4 Remove the tap unit from the keg by pressing the release
buttons on both sides of the tap unit (1).The tap unit will be
released from the keg with a click and you can remove it (2).
You have to remove the tap unit from the keg before you can replace
the tube.The release button for releasing the tube will not work when
the tap unit is placed on the keg.
C
5 Hold the tap unit over a sink.
ENGLISH
Page 17
17
C
6 Press the blue release button to release the tube.
C
7 Pull the tube connector out of the tap unit and remove the
flexible tube out of the tap body.
Note: always clean the tap unit with hot water and, if necessary, some
washing-up liquid before inserting a new tube.
8 Assemble the tap unit onto the keg (see chapter 'Preparing for
use', 'Step 2: placing the tap unit onto the keg').
9 Insert a new tube into the tap unit (see chapter 'Preparing for
use', 'Step 3: placing the tube into the tap unit').
10 Place the new keg into the appliance (see chapter 'Preparing
for use', 'Step 4: placing the keg into the appliance').Cleaning
Clean the appliance when you replace the keg or when you are going
to store the appliance for a longer period.
Never use scouring pads and abrasive liquids such as scouring agents
petrol or acetone to clean the appliance.
1 Always unplug the appliance before cleaning it.
2 Clean the outside of the appliance with a damp cloth.
C
3 Remove the spout.
C
4 Remove and disassemble the drip tray and the drip tray cover.
ENGLISH
Page 18
C
5 You can remove the tap handle by pulling it out of the tap body.
6 Clean the tap unit, the drip tray and the drip tray cover with
hot water and, if necessary,some washing-up liquid.
Hot water may cause burns.Always check if the water is not too hot
before you start cleaning these parts under the tap.
◗ Only the drip tray, the drip tray cover and the spout are
dishwasher-proof.
THE TAP UNIT IS NOT DISHWASHER-PROOF!
Environment
C
◗ Do not throw the appliance away with the normal household
waste at the end of its life, but hand it in at an official collection
point for recycling. By doing this you will help to preserve the
environment.
To protect our environment, make sure that empty kegs are disposed
of according to the instructions below.
Disposal of the keg
First check whether the keg is returnable or not by reading the sticker
on the keg. If the keg is not returnable, read the instructions on how to
dispose of the keg on the sticker.
Disposal of the cooling element
◗ The cooling element inside the appliance contains a substance
that may pollute the environment.Therefore the cooling element
needs to be removed from the appliance before the appliance is
discarded.
You may also take or send the appliance to a Philips service centre,
which will remove the cooling element for you and will dispose of it in
an environmentally safe way.
Only remove the cooling element when you discard the appliance!
Remove the cooling element in the following way:
1 Unplug the appliance.
2 Open the doors by pressing the release button.
◗ Near the hinges of the doors there are two holes on either side.
18 ENGLISH
Page 19
19
C
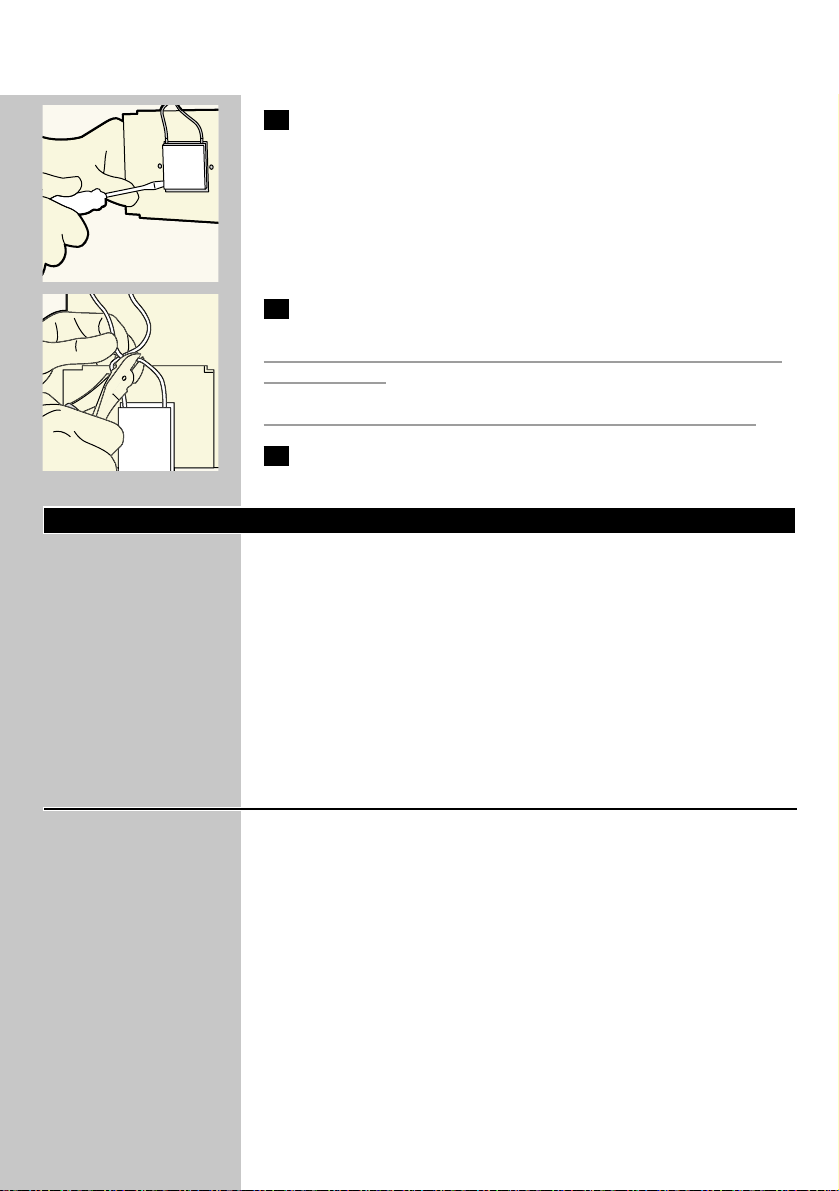
3 Remove the four screws located in these holes by means of a
screwdriver.
C
4 Remove the back cover from the appliance.
C
5 Remove the cooling fan by pulling it out.
◗ Now you will see an aluminium plate with fins on it and with two
screw holes.
C
6 Undo the screws by means of a screwdriver.
C
7 Remove the aluminium plate.
◗ After having removed the aluminium plate, you will see a white
plate of approx.4 x 4 cm.This is the actual cooling element.
ENGLISH
Page 20
20
C
8 Place the flat blade of a screwdriver behind the cooling
element and pry the cooling element off the back of the
aluminium plate by twisting the screwdriver.
C
9 Then cut the wires attached to the cooling element.
Do not connect the appliance to the mains again after removal of the
cooling element.
Never reassemble the cooling element once you have removed it!
10 Hand the cooling element in at an official collection point for
chemical waste.
Guarantee & service
If you need information or if you have a problem, please visit the Philips
website at www.philips.com or contact the Philips Customer Care
Centre in your country (you will find its phone number in the
worldwide guarantee leaflet). If there is no Customer Care Centre in
your country, turn to your local Philips dealer or contact the Service
Department of Philips Domestic Appliances and Personal Care BV.
When you bring the appliance back to your dealer or a Philips service
centre for determination of the cause of the problem, also bring the
tube and the keg.
Guarantee restrictions
Your guarantee becomes invalid if:
- you do not use the appliance in accordance with these instructions
for use.
- you use damaged kegs in this appliance.
- you do not install the kegs in accordance with the instructions.
- you use kegs from other suppliers than the ones mentioned in these
instructions for use.
◗ The kegs and tubes are not covered by this guarantee.
ENGLISH
Page 21

Solution
Make sure no old beer is left in the tap unit. Clean the
entire tap unit with hot water and some washing-up liquid,
if necessary.
Make sure no old beer is left in the tap unit. Clean the
entire tap unit with hot water and some washing-up liquid,
if necessary.
Make sure you remove the keg with the tap unit on top of
it from the appliance before removing the tap unit from
the keg by pressing the release buttons.
Make sure the tap unit has been placed properly on the
keg. Push the tap unit down firmly when placing it onto the
keg. See chapter 'Preparing for use', 'Step 3:placing the tap
unit onto the keg'.
Check if the locking levers have been lifted properly and
push them down firmly.
Make sure you push down the blue locking levers until they
are in horizontal position before closing the doors.
Make sure the tube is placed correctly in the tap unit and
the handle is in upright position.
If the problem continues to occur, please contact the
Philips Customer Care Centre in your country.
Make sure you have removed the tap unit from the keg.
Release the tube from the keg unit by pressing the release
button.
Make sure the tap unit does not contain any beer residues
by rinsing the tap unit with hot water.
Check if the locking levers have been lifted properly and
push them down firmly.
Make sure that the doors have been closed properly.For
instructions on how to close the doors, see the chapter
'Preparing for use', 'Step 4:placing the keg into the
appliance'. It is normal for some frost to be present on the
back of the keg.
Make sure that the tap unit has been placed onto the keg
in the right way (see chapter 'Preparing for use', 'Step 2:
placing the tap unit onto the keg').
Make sure the tube has been fitted in the tap unit in the
right way (see chapter 'Preparing for use', 'Step 3: placing
the tube into the tap unit').
If there is no beer left in the keg, put a new keg in the
appliance. Check the display for the beer level.
Problem
It is difficult to place the tap unit onto the keg.
It is difficult to press the release buttons to remove the tap
unit.
It is not possible to place the keg with the assembled tap
unit in the appliance.
It is not possible to close the doors.
Beer already starts running when the tube is placed in the
tap unit.
The display blinks.
Follow the instructions in 'Other indications' in the chapter
'Preparing for use'.
The tube cannot be removed from the tap unit.
There is frost on the keg or the appliance.
No beer comes out when I pull the handle.
Troubleshooting
If you are unable to solve the problem by means of this troubleshooting guide, contact the Customer
Care Centre in your country (see chapter 'Guarantee & service') or the PerfectDraft call centre:
078-250159 in Belgium, 01801-324000 in Germany or 0900-2224222 in the Netherlands.
ENGLISH 21
Page 22

Solution
The beer is too warm.Wait until the appliance has cooled
the beer to a temperature of 4cC or below. Check the
display for the temperature of the beer.The appliance
should not be exposed to direct sunlight and should be
placed in an environment with an ambient temperature
between 3c and 25c.
The keg has been shaken too much.Wait half an hour for
the beer to settle.
Make sure that the tap is completely open while tapping.
The first glass can contain more foam than usual.Try
pouring a second or third glass.
The tube may not function properly.Contact the Philips
Customer Care Centre in your country.
The keg is empty. Place a new keg into the appliance (see
chapter 'Replacing the keg').
Check if the keg has been open for over 28 days and check
if the sell-by date of the keg has expired.
The glasses used were not clean enough. Rinse the glasses
with water and some washing-up liquid. Rinse them
thoroughly with cold water to remove all grease and soap
residues.
The appliance should be plugged in all the time to keep
the beer in the opened keg cool.The temperature shown
on the display should be 4cC or below.
Pour beer as described on the keg and in these instructions
for use.
Do not let the spout touch the glass, the beer or the beer
head.
The glasses used were not clean. Rinse the glasses with
water and some washing-up liquid. Rinse them thoroughly
with cold water to remove all grease and soap residues.
Make sure the beer is cold and the display shows a
temperature of 4cC or below.
Place the appliance in an environment with an ambient
temperature between 3cC and 25cC and leave at least
10 cm free space behind and on both sides of the
appliance. Do not expose the appliance to direct sunlight.
When it is an unopened keg and it does not have any
visual damage, you can try to use it.When the keg has
already been opened, you cannot use the keg anymore.
Make sure you clean the tap unit with hot water before
inserting a new tube.
Pour a glass of beer from the opened keg at least every
7 days.
Always clean the tap unit and place a new tube into it
when you install a new keg.
Make sure you use clean glasses.
Problem
Too much foam comes out of the appliance.
The beer that comes out of the appliance is flat.
The foam head collapses very quickly.
The temperature on the display goes up.
The keg fell, can I still use it?
It is difficult to place the tube into the tap unit.
The beer tastes bad.
ENGLISH22
Page 23

Solution
Make sure you keep the appliance plugged in all the time.
Once the keg has been opened and is kept cool, the beer
stays fresh for 28 days. Check the sell-by date on the keg
before installing a new keg.
In case of a power failure or if the appliance has been
disconnected from the mains, the level indication will be
accurate again after you have poured 1 or 2 glasses of beer.
Remove the plug from the wall socket, wait 5 seconds and
then reinsert it.
Pour 1 glass of beer (of at least 250ml) while opening the
tap handle quickly and completely (to prevent the
development of foam).
Make sure the temperature inside the appliance is 4cC or
below by placing the appliance in an environment with an
ambient temperature between 3cC and 30cC and leaving
at least 10 cm free space behind and on both sides of the
appliance.
Make sure that there is at least 10 cm free space behind
and on both sides of the appliance for the best
performance.
Make sure that the appliance is used at an ambient
temperature between 3cC and 25cC. Do not expose the
appliance to direct sunlight.
Make sure the keg does not have a temperature of more
than 23cC when you place it into the appliance. If the keg
has a temperature of more than 23cC, a longer chilling
time will be required.
Check if the fan outlet at the back of the appliance is free
from dust and/or other particles.
The pump may go on while you are pouring beer in order
to maintain the right pressure.The pump also goes on
every now and then to keep the appliance at the right
pressure.
Problem
The display shows the wrong volume.
The appliance doesn't chill the beer sufficiently.
The appliance makes a sound.
ENGLISH 23
Page 24

Web address
www.perfectdraft.nl
www.perfectdraft.nl
www.perfectdraft.nl
www.perfectdraft.nl
www.stella-artois.be
www.jupiler.be
-
Phone number
0900-2224222 EUR 0.05
p/m
0900-2224222 EUR 0.05
p/m
0900-2224222 EUR 0.05
p/m
0900-2224222 EUR 0.05
p/m
070-222918
070-222912
0035-2802131999
Brand
Dommelsch
Hertog Jan
Jupiler
Bavaria
Stella Artois
Jupiler
Diekirch
Country
The Netherlands
Belgium
Luxembourgh
Keg suppliers
If you need information about the keg or if you have a problem with your keg, you can contact the
supplier of the keg in your country.You will find the phone numbers in the table below.
ENGLISH24
Page 25
Introduction
Wir gratulieren Ihnen zu Ihrem neuen PerfectDraft. Jetzt können Sie
den unvergleichlichen Geschmack eines frisch gezapften Bieres in Ihrer
häuslichen Umgebung genießen. Dieses Zapfsystem hält Ihr Bier frisch
und wohltemperiert: Ihr frisch gezapftes Bier ist stets erfrischend kühl.
Sobald Ihr PerfectDraft installiert ist, können Sie zu Hause Bier
ausschenken, indem Sie einfach den Zapfhahn betätigen.Verschiedene
Biersorten sind für dieses System erhältlich. Die in Ihrem Land
erhältlichen Marken sind auf der Verpackung von PerfectDraft
aufgelistet (siehe auch das Kapitel "Fassbierlieferanten" am Ende dieser
Bedienungsanleitung).Weitere Informationen finden Sie auf unserer
Website (www.perfectdraft.com).
Das PerfectDraft Zapfsystem ist nur für den häuslichen Gebrauch
vorgesehen. Das Gerät ist nicht geeignet für gewerbliche Nutzung.
Diese Bedienungsanleitung gibt Ihnen detaillierte Informationen zur
Benutzung von PerfectDraft.
Allgemeine Beschreibung
Das Gerät
A Rechte Klappe
B Linke Klappe
C Display:Temperatur- und Füllstandanzeige des Bieres
D Entriegelungsknopf
E Abtropftablett
F Auffangschale
G Kabelfach
H Kühlplatte
I Verschlusshebel
J Fass-Sensor
Die Zapfeinheit
K Plakette
L Zapfhahn
M Mittelstück
N Ausguss
O Entriegelungstasten
P Schlauch
Q Schlauchverbindung
R Schlauchentriegelung
Das Bierfass
S Ränder
T Schutzkappe
U Verbindungsdeckel
DEUTSCH 25
Page 26
Wichtig
Lesen Sie diese Bedienungsanleitung vor dem ersten Gebrauch des
Geräts sorgfältig durch und bewahren Sie sie zur späteren
Einsichtnahme auf.
Das Gerät
◗ Wenn das Netzkabel defekt oder beschädigt ist, darf es nur von
einem Philips Service-Center oder einer von Philips autorisierten
Werkstatt durch ein Original-Ersatzkabel ausgetauscht werden,
um Gefährdungen zu vermeiden.
◗ Prüfen Sie vor dem Anschließen des Gerätes, ob die
Spannungsangabe auf der Unterseite des Gerätes mit der
örtlichen Netzspannung übereinstimmt.
◗ Benutzen Sie das Gerät nicht, wenn das Netzkabel, der
Netzstecker oder das Gerät selbst beschädigt ist.
C
◗ Halten Sie das Gerät fern von Kindern. Der Zapfhahngriff lässt
sich zur zusätzlichen Sicherheit abnehmen.
◗ Stellen Sie das Gerät auf eine waagerechte, ebene und stabile
Oberfläche. Hinter dem Gerät und an den Seiten sollte jeweils
mindestens 10 cm Platz frei bleiben, damit das Gerät optimal
arbeiten kann.
◗ Es empfiehlt sich, das Gerät an einem Ort mit einer
Umgebungstemperatur zwischen 3 und 25c C aufzustellen.
◗ Wenn Sie das Gerät bei einer Umgebungstemperatur von über
25c C betreiben, kann die auf dem Display angezeigte
Biertemperatur auf über 3c C steigen.Wenn die
Umgebungstemperatur auf unter 25c C sinkt, geht die
Biertemperatur wieder auf 3c C zurück. Bei höheren
Umgebungstemperaturen dauert auch das Kühlen des Bierfasses
länger.
C
◗ Setzen Sie das Gerät und das Bierfass keinem direkten
Sonnenlicht oder Temperaturen über 30c C aus.
◗ Reinigen Sie das Gerät, bevor Sie es für einen längeren Zeitraum
wegstellen.
◗ Heben Sie das Gerät nicht am Zapfhahn an.
◗ Bedecken Sie das Gerät nicht (z. B. mit einem Handtuch), um eine
Überhitzung zu vermeiden.
Das Bierfass
◗ Lesen und beachten Sie die Anweisungen und Sicherheitshinweise
auf dem Bierfass, bevor Sie es in das Gerät einsetzen.
◗ Schütteln Sie das Fass nicht.
◗ Lassen Sie das geöffnete Fass im eingeschalteten Gerät, damit es
die richtige Temperatur behält.Wenn Sie das Gerät ausschalten,
weil Sie beabsichtigen, es über einen längeren Zeitraum (z. B.
während des Urlaubs) nicht zu benutzen, sollten Sie das Bierfass
26 DEUTSCH
Page 27

27
herausnehmen und im Kühlschrank aufbewahren. Ein geöffnetes
Bierfass ist 28 Tage lang haltbar.
◗ Bewahren Sie das Fass niemals im Tiefkühlfach auf! Das Einfrieren
würde dem Fass erheblichen Schaden zufügen.
◗ Um das Risiko einer Explosion zu vermeiden,sollten Sie das
Bierfass weder direktem Sonnenlicht noch Temperaturen über
30c C aussetzen.
◗ Prüfen Sie beim Kauf stets das Mindesthaltbarkeitsdatum auf dem
Fass.
◗ Benutzen Sie das Fass nicht, wenn die Oberseite defekt ist. Ist die
Oberseite beschädigt, lässt sich die Zapfeinheit nicht montieren.
◗ Neue ungeöffnete Fässer halten am besten, wenn sie bei einer
gleichmäßigen, möglichst kühlen,Temperatur gelagert werden
(3c C bis 8c C).
◗ Das Bierfass steht unter Druck. Entfernen Sie die Oberseite nicht;
stechen Sie auch kein Loch mit einem scharfen Gegenstand in das
Fass.
◗ Maximaler Druck beim Betrieb: 1,5 bar.
◗ Verwenden Sie das Fass ausschließlich für PerfectDraft HD3600.
Setzen Sie das Fass in kein anderes Gerät.
◗ Benutzen Sie nur Fässer der in dieser Bedienungsanleitung
aufgelisteten Lieferanten (siehe Kapitel "Fassbierlieferanten" am
Ende dieser Bedienungsanleitung).
◗ Setzen Sie keine defekten Fässer in das Gerät; sie könnten
Schäden am Gerät verursachen. Geben Sie ein defektes Bierfass
unverzüglich an das Geschäft zurück, in dem Sie es erworben
haben.
◗ Die Fässer lassen sich nicht stapeln.
Vorbereitung zum Gebrauch
1. Schritt: Das Gerät installieren
1 Stellen Sie das Gerät auf eine waagerechte, ebene und stabile
Oberfläche. Hinter dem Gerät und an den Seiten sollte jeweils
mindestens 10 cm Platz frei bleiben, damit das Gerät optimal
arbeiten kann.
B
Stellen Sie das Gerät nicht an einen Ort, an dem es direktem Sonnenlicht
oder hohen Temperaturen ausgesetzt ist (z. B. in der Nähe eines Herdes).
C
2 Überschüssiges Kabel lässt sich in das Kabelfach hinten am
Gerät schieben.
3 Stecken Sie den Netzstecker in die Steckdose.
DEUTSCH
Page 28
28
C
4 Setzen Sie die Abtropfschale ein.
C
5 Befestigen Sie den Zapfhahngriff.
C
6 Setzen Sie die von Ihnen bevorzugte Plakette auf das Ende des
Zapfhahns.
2. Schritt: Die Zapfeinheit auf das Bierfass setzen
C
1 Nehmen Sie die Schutzkappe und den Schlauch vom Bierfass.
Reinigen Sie die Zapfeinheit mit heißem Wasser, bei Bedarf mit etwas
Spülmittel, bevor Sie sie auf das Bierfass setzen und den Schlauch
einführen.
C
2 Drücken Sie die Zapfeinheit fest auf den Verbindungsdeckel des
Fasses. Sie hören ein Klicken.
Wenn die Zapfeinheit richtig auf dem Fass eingerastet ist, passt sie
genau zwischen die beiden Ränder des Fasses.
DEUTSCH
Page 29

29
3. Schritt: Den Schlauch in die Zapfeinheit einführen
Reinigen Sie die Zapfeinheit mit heißem Wasser, bei Bedarf mit etwas
Spülmittel, bevor Sie den Schlauch einführen.
C
1 Schieben Sie den biegsamen Schlauch in das Mittelstück der
Zapfeinheit.
C
2 Schieben Sie die Vorsprünge der Schlauchverbindung unter das
Scharnier.
C
3 Drücken Sie die Schlauchverbindung in die Öffnung der
Zapfeinheit. Sie hören ein Klicken.
4. Schritt: Das Fass in das Gerät setzen
Das Fass lässt sich nur in das Gerät setzen, wenn die Zapfeinheit richtig
auf dem Fass sitzt (siehe "2. Schritt: Die Zapfeinheit auf das Bierfass
setzen")
Achten Sie darauf, dass sich ein Schlauch in der Zapfeinheit befindet
bevor Sie das Fass mit der montierten Zapfeinheit in das Gerät setzen.
C
1 Drücken Sie den Entriegelungsknopf zum Öffnen der Klappen.
DEUTSCH
Page 30

C
2 Heben Sie die beiden blauen Verschlusshebel bis zum Anschlag
an.
C
3 Stellen Sie das Fass mit der montierten Zapfeinheit in das
Gerät. Kippen Sie dabei das Fass leicht nach vorn.
- Stellen Sie das Fass zuerst auf die Kühlplatte des Gerätes.
- Richten Sie das Fass dann auf, indem Sie die Zapfeinheit zwischen die
blauen Verschlusshebel schieben.
◗ Nachdem Sie das Fass installiert haben (auch beim ersten Mal),
läuft die Pumpe einige Sekunden lang.
C
4 Drücken Sie die blauen Verschlusshebel nach unten, bis beide
waagerecht stehen.
◗ Hinweis: Sollte es Ihnen nicht gelingen, die Verschlusshebel
waagerecht zu stellen, sitzt das Fass nicht richtig im Gerät.
Nehmen Sie das Fass heraus und wiederholen Sie die Schritte
1 bis 3.
◗ Die Pumpe und das Kühlsystem beginnen nach Einsetzen des
Fasses zu laufen.
C
5 Schließen Sie die Klappen des Gerätes.
Schließen Sie zuerst die linke und dann die rechte Klappe.
◗ Die Temperatur- und Füllstandsanzeige schalten sich ein.
C
6 Warten Sie, bis das Bierfass eine Temperatur von 4c C oder
darunter erreicht hat. Die Temperaturanzeige leuchtet grün.
Die ideale Temperatur beträgt 3c C.
Wenn Sie das Gerät benutzen, solange das Bier noch eine Temperatur
von über 4º C hat - also noch rot angezeigt wird - bildet sich zu viel
Schaum.
◗ Wenn die Temperatur des Fasses beim Einsetzen in das Gerät ca.
23c C beträgt, sollten Sie mit dem Zapfen der ersten Gläser Bier
ca. 15 Stunden warten. Es empfiehlt sich zu warten, bis der
gesamte Fassinhalt gekühlt ist.
◗ Die optimale Kühlleistung wird erzielt, wenn Sie das Gerät an
einem Ort mit einer Umgebungstemperatur zwischen 3c C und
DEUTSCH30
Page 31

31
25c C aufstellen und mindestens 10 cm Platz hinter dem Gerät
und an beiden Seiten frei halten.
Setzen Sie das Gerät keinem direkten Sonnenlicht aus.Wenn Sie das
Gerät bei einer Umgebungstemperatur von über 25c C betreiben
kann die auf dem Display angezeigte Biertemperatur auf über 3c C
steigen.Wenn die Umgebungstemperatur auf unter 25c C sinkt, geht
die Biertemperatur wieder auf 3c C zurück. Bei höheren
Umgebungstemperaturen dauert auch das Kühlen des Bierfasses länger.
◗ Das Vorkühlen des Fasses im Kühlschrank ermöglicht eine
schnellere Betriebsbereitschaft.
Das Display
C
◗ Das Display zeigt die Temperatur des Bieres sowie den Füllstand
im Fass an.
Temperaturanzeige
Warten sie mit dem Zapfen von Bier, bis die Fasstemperatur auf unter
4c C gesunken ist. Die ideale Temperatur zum Trinken liegt bei 3c C.
Die Farbe der angezeigten Temperatur signalisiert, ob die ideale
Temperatur zum Trinken des Bieres erreicht ist.
- Rot = Die Biertemperatur ist noch nicht ideal zum Verzehr (über
4c C). Es bildet sich zu viel Bierschaum.
- Grün = Das Bier hat die ideale Temperatur (4cC oder darunter)
zum Tr inken erreicht.
Füllstandsanzeige
Die gelb-orange Füllstandsanzeige im Display zeigt die im Fass
verbliebene Biermenge in acht Schritten an.
B
Wenn Sie Gläser mit einem Fassungsvermögen von 25 cl benutzen,
können Sie ca. 24 Gläser Bier aus einem Fass zapfen. Bei 33 cl Gläsern
reicht ein Fass für ca. 18 Gläser Bier.
Weitere Anzeigen
Neben Füllstand und Temperatur gibt das Display die folgenden
Informationen:
- Grüner Bereich, ohne sichtbare Füllstandanzeige = Keine Zapfeinheit
auf dem Bierfass.
- Roter Bereich, ohne sichtbare Füllstandanzeige = Kein Bierfass im
Gerät.
DEUTSCH
Page 32

32
- Roter oder grüner Bereich mit gelb-oranger Hintergrundbeleuchtung
= Zapfeinheit und/oder Schlauch nicht richtig montiert. Nehmen Sie
das Fass heraus und prüfen Sie, ob Zapfeinheit und Schlauch richtig
angebracht sind (siehe "Vorbereitung zum Gebrauch", 2. und 3. Schritt).
Tipps für ein perfektes Fassbier
◗ Wenn Sie möglichst bald nach Einsetzen des Fasses in das Gerät
Bier ausschenken möchten, sollten Sie das Bierfass eine längere
Zeit im Kühlschrank vorkühlen.
C
◗ Nach Öffnen des Fasses bleibt das Bier 28 Tage lang haltbar,
vorausgesetzt das Fass wird im Gerät aufbewahrt.
Das Gerät muss die ganze Zeit über eingeschaltet sein.
◗ Wenn Sie das Gerät für einen längeren Zeitraum ausschalten
möchten, z. B. während des Urlaubs, sollten Sie das geöffnete Fass
im Kühlschrank aufbewahren. Nehmen Sie die Zapfeinheit ab,
spülen Sie das Fass oben ab, spülen Sie den Schlauch ab und
bewahren Sie ihn mit dem Fass max. 28 Tage im Kühlschrank auf.
◗ Nehmen Sie immer einen neuen Schlauch, wenn Sie ein neues Fass
anzapfen.Verwenden Sie denselben Schlauch höchstens 28 Tage
lang.
◗ Wenn Sie über eine Woche lang kein Bier gezapft haben, empfiehlt
es sich, einige Sekunden lang Bier in ein Glas laufen zu lassen und
das Glas dann mit kaltem Wasser auszuspülen, bevor Sie es mit
frischem Bier füllen.
Ein perfekt gezapftes Bier ausschenken
Befolgen Sie die nachstehenden Anleitungen zum Ausschenken eines
perfekten Bieres.
Biergläser reinigen
Verwenden Sie stets saubere Gläser, wenn Sie Bier zapfen.
1 Reinigen Sie die Gläser sorgfältig mit heißem Wasser und etwas
Spülmittel.
2 Spülen Sie die Gläser gründlich mit klarem, kaltem
Leitungswasser nach.
Auf diese Weise entfernen Sie alle Fett- und Spülmittelrückstände; das
ist wichtig, damit das Bier beim Einschenken den gewünschten Schaum
bildet.
DEUTSCH
Page 33

33
3 Halten Sie die Gläser umgekehrt gegen das Licht, um zu prüfen,
ob Fett- und Spülmittelspuren vollständig beseitigt sind.
Die Gläser sind sauber, wenn das Wasser gleichmäßig abtropft, ohne
Flecken am Glas zu hinterlassen.
B
Hinweis:Wenn Sie Biergläser im Geschirrspüler reinigen, sollten Sie
keinen Klarspüler verwenden. Rückstände von Klarspüler können die
Bildung von Bierschaum verhindern.
Bier ausschenken
1 Die besten Ergebnisse erzielen Sie, wenn Sie das Bier in ein
kühles, sauberes und nasses Glas einschenken!
B
Ein kühles Glas gewährleistet, dass der Bierschaum länger hält.
B
In einem kühlen Glas bleibt das gezapfte Bier länger frisch.
◗ Hinweis: Das beste Fassbier erhalten Sie, wenn Sie benutzte
Gläser vor jedem Gebrauch reinigen und spülen. So verhindern
Sie, dass noch verbliebene Schaumrückstände zu übermäßigem
Schäumen beim Zapfen führen.
2 Fassen Sie das Glas unten oder in der Mitte an, damit es sauber
bleibt.
C
3 Öffnen sie den Zapfhahn mit einer zügigen Bewegung.
Das Bier läuft nur richtig in das Glas, wenn der Zapfhahn ganz geöffnet
ist. Ist der Hahn nur halb offen, wird das Bier durch den Zapfhahn
gepresst und entwickelt zu viel Schaum.
Lassen Sie das Bier an der Innenwand des Glases hinab fließen.
C
4 Die Schaummenge können Sie durch den Winkel beeinflussen,
mit dem Sie das Glas unter den Auslauf halten, sowie durch den
Abstand zwischen Glas und Bierauslauf.
Je senkrechter und je näher am Auslauf Sie das Glas halten,desto mehr
Schaum erhalten Sie.
◗ Hinweis: Lassen Sie die Spitze des Bierauslaufs nicht das Glas, den
Bierschaum oder das Bier berühren, da Bierrückstände am Auslauf
die Bildung des Bierschaums beeinträchtigen.
DEUTSCH
Page 34

34
5 Richten Sie das Glas während des Bierzapfens langsam
senkrecht auf.
6 Füllen Sie das Glas, bis der Schaum fast über den Glasrand läuft.
7 Schließen Sie den Zapfhahn mit einer zügigen Bewegung.
Hinweis: Möglicherweise schaltet sich die Pumpe ein.
8 Europa (exklusiv Deutschland und Großbritannien):Die besten
Ergebnisse erzielen Sie, wenn Sie überschüssigen Schaum mit
einem Abstreifer in einem Winkel von 45c vom Glasrand
streichen.
B
Lassen Sie den Abstreifer nicht auf der Arbeitsfläche liegen, sondern
tauchen Sie ihn in ein Glas mit frischem kaltem Wasser oder spülen Sie
ihn sofort ab. Führen Sie den Abstreifer nur einmal über das Glas, denn
weiteres Abschöpfen würde die Qualität des Bierschaums
beeinträchtigen.
◗ Sie haben jetzt ein perfekt eingeschenktes Fassbier.
Ein frisch gezapftes Bier servieren
1 Trocknen Sie das Glas von unten, indem Sie es über ein Tuch
streifen.
2 Nehmen Sie einen neuen Bierdeckel für Ihren Gast.
3 Heben Sie das Glas in der Mitte an und servieren Sie das Bier
auf dem Bierdeckel,wobei das Logo der Biermarke (sofern auf
dem Glas vorhanden) in Richtung des Gastes zeigt.
DEUTSCH
Page 35

35DEUTSCH
Britische Tradition
Spülen Sie ein Glas und lassen Sie
es abtropfen.
Halten Sie das Glas in einem
Winkel von ca. 45c unter den
Zapfhahn.
Öffnen Sie den Zapfhahn komplett
mit einer zügigen Bewegung.
Lassen Sie das Bier innen am Glas
hinunter laufen.
Der Ausguss sollte weder das
Glas noch das Bier oder den
Bierschaum berühren.
Der Winkel, indem Sie beim
Zapfen das Glas halten, ist
ausschlaggebend für das Volumen
des Bierschaums. Je gerader Sie
das Glas halten, desto höher wird
der Schaum.
Füllen Sie das Glas, bis das Bier
fast über den Rand läuft.
Schließen Sie den Zapfhahn mit
einer zügigen Bewegung.
Stellen Sie das Glas nicht unter
den Zapfhahn, damit keine
Biertropfen auf den Bierschaum
fallen können.
Jetzt können Sie Ihr Bier servieren.
Deutsche Tradition
Spülen Sie ein Glas und lassen Sie
es abtropfen.
Halten Sie das Glas in einem
Winkel von ca. 45c unter den
Zapfhahn.
Öffnen Sie den Zapfhahn komplett
mit einer zügigen Bewegung.
Lassen Sie das Bier innen am Glas
hinunter laufen.
Der Ausguss sollte weder das
Glas noch das Bier oder den
Bierschaum berühren.
Der Winkel, indem Sie beim
Zapfen das Glas halten, ist
ausschlaggebend für das Volumen
des Bierschaums. Je gerader Sie
das Glas halten, desto höher wird
der Schaum.
a. Lassen Sie das Bier in das Glas
laufen, bis es zwei Drittel Bier und
ein Drittel Schaum enthält.
b. Schließen Sie den Zapfhahn und
stellen Sie das Glas eine Minute
lang ab, damit sich der Schaum
verdichten kann.
c.Wiederholen Sie Schritte 2 bis
6 und füllen Sie das Glas bis
zum Füllstrich.
Schließen Sie den Zapfhahn mit
einer zügigen Bewegung.
Stellen Sie das Glas nicht unter
den Zapfhahn, damit keine
Biertropfen auf den Bierschaum
fallen können.
Jetzt können Sie Ihr Bier servieren.
Europäische Tradition (außer
Deutschland und Großbritannien)
Spülen Sie ein Glas und lassen Sie
es abtropfen.
Halten Sie das Glas dicht an die
Ausgussöffnung.
Öffnen Sie den Zapfhahn komplett
mit einer zügigen Bewegung.
Halten Sie das Glas in einem
Winkel von ca. 45c unter den
Ausguss und lassen Sie das Bier
innen am Glas hinunter laufen.
Der Ausguss sollte weder das Glas
noch das Bier oder den Bierschaum
berühren.
Der Winkel, indem Sie beim Zapfen
das Glas halten, ist ausschlaggebend
für das Volumen des Bierschaums.
Je gerader Sie das Glas halten,
desto höher wird der Schaum.
Füllen Sie das Glas, bis das Bier fast
über den Rand läuft.
Schließen Sie den Zapfhahn mit
einer zügigen Bewegung.
a. Stellen Sie das Glas nicht unter
den Zapfhahn, damit keine
Biertropfen auf den Bierschaum
fallen können.
b. Entfernen Sie überschüssigen
Schaum, indem Sie einen
Abstreifer in einem 45c Winkel
über den Glasrand führen.
Jetzt können Sie Ihr Bier servieren.
Schritt
1.
2.
3.
4.
5.
6.
7.
8.
9.
10.
3 unterschiedliche Zapfmethoden
Das Zapfen von Bier unterscheidet sich von Land zu Land. Dieser Tabelle können Sie entnehmen,
nach welcher Methode in drei Regionen in jeweils 10 Schritten ein perfektes Bier gezapft wird.
Page 36

36
Das Fass austauschen
Wenn das Fass leer ist,tritt nur Schaum aus dem Auslauf, aber kein Bier.
Das Display zeigt an, dass das Fass leer ist und ausgetauscht werden
muss.
C
1 Drücken Sie den Entriegelungsknopf zum Öffnen der Klappen.
Öffnen Sie die Klappen so weit wie möglich.
C
2 Schieben Sie die blauen Verschlusshebel bis zum Anschlag hoch.
C
3 Kippen Sie das Fass mit der angebrachten Zapfeinheit zu Ihnen
und nehmen Sie es heraus.
C
4 Drücken Sie die Entriegelungstasten an beiden Seiten der
Zapfeinheit (1) und nehmen Sie die Zapfeinheit vom Fass.Die
Zapfeinheit löst sich mit einem Klicken vom Fass und kann
abgenommen werden (2).
Sie müssen die Zapfeinheit vom Fass nehmen, um den Schlauch
austauschen zu können. Die Taste zur Entriegelung des Schlauches
reagiert nicht, solange die Zapfeinheit auf dem Fass sitzt.
C
5 Halten Sie die Zapfeinheit über ein Spülbecken.
DEUTSCH
Page 37

C
6 Drücken Sie die blaue Entriegelungstaste, um den Schlauch zu
lösen.
C
7 Ziehen Sie die Schlauchverbindung aus der Zapfeinheit und den
biegsamen Schlauch aus dem Mittelstück.
Hinweis: Reinigen Sie die Zapfeinheit mit heißem Wasser - bei Bedarf
mit etwas Spülmittel - bevor Sie einen neuen Schlauch einsetzen.
8 Setzen Sie die Zapfeinheit auf das Fass (siehe "Vorbereitung
zum Gebrauch", "2. Schritt: Die Zapfeinheit auf das Bierfass
setzen").
9 Führen Sie einen neuen Schlauch in die Zapfeinheit ein (siehe
"Vorbereitung zum Gebrauch", "3.Schritt: Den Schlauch in die
Zapfeinheit einführen").
10 Setzen Sie das neue Fass in das Gerät (siehe "Vorbereitung zum
Gebrauch", "4. Schritt: Das Fass in das Gerät setzen").
Reinigung
Reinigen Sie das Gerät, wenn Sie ein Fass austauschen oder das Gerät
für einen längeren Zeitraum wegstellen.
Benutzen Sie zum Reinigen des Gerätes keine Scheuerschwämme oder
aggressive Scheuermittel, Azeton oder Benzin.
1 Ziehen Sie vor dem Reinigen stets den Netzstecker aus der
Steckdose.
2 Reinigen Sie das Gehäuse mit einem feuchten Tuch.
C
3 Nehmen Sie den Auslauf ab.
C
4 Nehmen Sie die Auffangschale mit Abtropftablett heraus.
DEUTSCH 37
Page 38

C
5 Der Zapfhahngriff lässt sich aus dem Mittelstück der
Zapfeinheit ziehen.
6 Reinigen Sie die Zapfeinheit, die Auffangschale und das
Abtropftablett mit heißem Wasser - bei Bedarf mit etwas
Spülmittel.
Heißes Wasser kann Verbrennungen verursachen. Achten Sie darauf
dass das Wasser nicht zu heiß ist, bevor Sie mit dem Spülen beginnen.
◗ Nur die Auffangschale, das Abtropftablett und der Auslauf sind
spülmaschinengeeignet.
DIE ZAPFEINHEIT IST NICHT SPÜLMASCHINENGEEIGNET!
Umweltschutz
C
◗ Geben Sie das Gerät am Ende der Lebensdauer nicht in den
normalen Hausmüll. Bringen Sie es zum Recycling zu einer
offiziellen Sammelstelle.Auf diese Weise helfen Sie die Umwelt zu
schonen.
Sorgen Sie zum Schutz der Umwelt dafür, dass leere Bierfässer gemäß
nachstehenden Anweisungen entsorgt werden.
Bierfässer entsorgen
Prüfen Sie anhand des Etiketts auf dem Fass zuerst, ob es
zurückgegeben werden kann. Ist dies nicht der Fall, befolgen Sie bitte
die Anleitungen auf dem Etikett in Bezug auf die Entsorgung.
Das Kühlelement entsorgen
◗ Das Kühlelement in diesem Gerät enthält Substanzen, welche die
Umwelt gefährden können. Das Kühlelement muss deshalb vor
Entsorgung des Geräts entnommen werden.
Sie können das Gerät auch an ein Philips Service Center geben bzw.
schicken. Dort wird das Kühlelement entnommen und umweltgerecht
entsorgt.
Nehmen Sie das Kühlelement nur heraus, wenn Sie das Gerät
entsorgen!
Entnehmen Sie das Kühlelement wie folgt:
1 Ziehen Sie den Netzstecker aus der Steckdose.
2 Drücken Sie den Entriegelungsknopf zum Öffnen der Klappen.
DEUTSCH38
Page 39

◗ Neben den Scharnieren der Klappen befinden sich jeweils zwei
Vertiefungen.
C
3 Lösen Sie die vier Schrauben in diesen Vertiefungen mit einem
Schraubendreher.
C
4 Nehmen Sie die Hinterwand vom Gerät.
C
5 Ziehen Sie den Ventilator heraus.
◗ Jetzt wird eine gerippte Aluminiumplatte mit zwei
Schraubenvertiefungen sichtbar.
C
6 Lösen Sie die Schrauben mit einem Schraubendreher.
C
7 Nehmen Sie die Aluminiumplatte heraus.
◗ Nach Entnahme der Aluminiumplatte sehen Sie eine weiße
ca. 4 x 4 cm große Platte. Dies ist das Kühlelement.
DEUTSCH 39
Page 40

C
8 Führen Sie die Flachseite des Schraubendrehers hinter das
Kühlelement und drehen Sie den Schraubendreher, bis sich das
Kühlelement von der Rückseite der Aluminiumplatte gelöst hat.
C
9 Durchtrennen Sie dann die Drähte am Kühlelement.
Nach Entnahme des Kühlelements darf das Gerät nicht mehr an das
Stromnetz angeschlossen werden.
Versuchen Sie auf keinen Fall, das entnommene Kühlelement wieder zu
montieren!
10 Geben Sie das Kühlelement an einer offiziellen Sammelstelle für
Sondermüll ab.
Garantie und Kundendienst
Benötigen Sie weitere Informationen oder treten Probleme auf,
wenden Sie sich bitte an Ihren Philips-Händler oder setzen Sie sich mit
einem Philips Service-Center in Ihrem Land in Verbindung
(Tel. Nr. 0180/5356767).Besuchen Sie auch die Philips Website
www.philips.com
Wenn Sie das Gerät zwecks Überprüfung zu Ihrem Händler oder
einem Philips Service Center bringen, sollten Sie auch den Schlauch
und das Bierfass mitnehmen.
Einschränkungen zur Garantie
Die Garantie erlischt, wenn Sie
- das Gerät nicht gemäß dieser Bedienungsanleitung benutzen;
- beschädigte Bierfässer in diesem Gerät verwenden;
- die Bierfässer nicht gemäß dieser Anleitung in das Gerät einsetzen;
- Bierfässer von Lieferanten verwenden, die nicht in dieser
Bedienungsanleitung aufgelistet sind.
◗ Die Bedingungen der internationalen Garantie gelten nicht für
Bierfässer und Schläuche.
DEUTSCH40
Page 41

Lösungsvorschlag
Prüfen Sie, ob sich noch altes Bier in der Zapfeinheit
befindet. Reinigen Sie die komplette Zapfeinheit unter
heißem Wasser, dem Sie bei Bedarf etwas Spülmittel
zufügen können.
Prüfen Sie, ob sich noch altes Bier in der Zapfeinheit
befindet. Reinigen Sie die komplette Zapfeinheit unter
heißem Wasser, dem Sie bei Bedarf etwas Spülmittel
zufügen können.
Nehmen Sie das Bierfass mit der darauf montierten
Zapfeinheit aus dem Gerät, bevor Sie die Zapfeinheit unter
Betätigung der Entriegelungstasten vom Fass nehmen.
Prüfen Sie, ob die Zapfeinheit richtig auf dem Fass
angebracht ist. Drücken Sie die Zapfeinheit fest auf das
Fass, bis sie einrastet (siehe "Vorbereitung zum Gebrauch",
"2. Schritt: Die Zapfeinheit auf dem Bierfass anbringen").
Prüfen Sie, ob die Verschlusshebel ganz hoch geschoben
sind, und drücken Sie sie kräftig nach unten.
Drücken Sie die blauen Verschlussriegel nach unten, bis sie
waagerecht stehen. Schließen Sie dann die Klappen.
Vergewissern Sie sich, dass der Schlauch richtig in der
Zapfeinheit steckt und der Zapfhahngriff aufrecht steht.
Tritt das Problem weiterhin auf, wenden Sie sich bitte an
das Philips Service Center in Ihrem Land.
Sie müssen erst die Zapfeinheit vom Fass nehmen. Lösen
Sie dann den Schlauch, indem Sie die Entriegelungstaste
drücken.
Spülen Sie die Zapfeinheit mit heißem Wasser aus, um alle
Bierrückstände gründlich zu beseitigen.
Prüfen Sie, ob die Verschlusshebel ganz hoch geschoben
sind, und drücken Sie sie kräftig nach unten.
Prüfen Sie, ob die Klappen richtig geschlossen sind.
Anleitungen zum Schließen der Klappen finden Sie im
Abschnitt "Vorbereitung zum Gebrauch", "4. Schritt: Das
Fass in das Gerät setzen". Es ist ganz normal, dass die
Rückseite des Fasses etwas beschlägt.
Prüfen Sie, ob die Zapfeinheit richtig auf dem Fass
angebracht ist (siehe "Vorbereitung zum Gebrauch",
"2. Schritt: "Die Zapfeinheit auf dem Bierfass anbringen").
Prüfen Sie, ob der Schlauch richtig in der Zapfeinheit sitzt
(siehe "Vorbereitung zum Gebrauch, "3. Schritt: Den
Schlauch in die Zapfeinheit einführen").
Problem
Es bereitet Schwierigkeiten, die Zapfeinheit auf das Bierfass
zu setzen.
Es bereitet Schwierigkeiten, die Entriegelungstasten zur
Entnahme der Zapfeinheit zu drücken.
Es gelingt mir nicht, das Fass mit der montierten
Zapfeinheit in das Gerät zu setzen.
Die seitlichen Klappen des Gerätes lassen sich nicht
schließen.
Es läuft bereits Bier aus, sobald der Schlauch in die
Zapfeinheit eingeführt ist.
Das Display blinkt.
Befolgen Sie die Anleitungen unter "Weitere Anzeigen" im
Kapitel "Vorbereitung zum Gebrauch".
Der Schlauch lässt sich nicht aus der Zapfeinheit ziehen.
Das Fass bzw. das Gerät ist beschlagen.
Wenn ich den Zapfhahn öffne, kommt kein Bier heraus.
Problembehebung
Lässt sich das Problem mit Hilfe der nachstehenden Lösungsvorschläge nicht beheben, so wenden Sie
sich bitte an ein Philips Service-Center in Ihrem Land (s. Kapitel "Garantie und Kundendienst") oder
an das PerfectDraft Call Centre: 078-250159 in Belgien, 01801-324000 in Deutschland oder
0900-2224222 in den Niederlanden.
DEUTSCH 41
Page 42

Lösungsvorschlag
Wenn sich kein Bier mehr im Fass befindet, setzen Sie ein
neues Fass in das Gerät. Das Display zeigt Ihnen den
Füllstand an.
Das Bier ist zu warm.Warten Sie, bis das Gerät das Bier
auf eine Temperatur von 4c C oder darunter gekühlt hat.
Überprüfen Sie die Biertemperatur auf dem Display.Das
Gerät sollte keinem direkten Sonnenlicht ausgesetzt sein
und an einem Ort mit einer Umgebungstemperatur
zwischen 3c und 25c C stehen.
Das Bierfass ist zu stark geschüttelt worden.Warten Sie
eine halbe Stunde, bis sich das Bier wieder gesetzt hat.
Achten Sie darauf, dass der Zapfhahn während des
Ausschenkens ganz geöffnet ist.
Das erste Glas kann mehr Schaum enthalten als
gewöhnlich. Zapfen Sie ein zweites oder drittes Glas.
Möglicherweise funktioniert der Schlauch nicht einwandfrei.
Wenden Sie sich bitte an das Philips Service Center in
Ihrem Land.
Das Fass ist leer. Setzen Sie ein neues Fass in das Gerät
(siehe "Das Bierfass austauschen").
Prüfen sie, ob das Fass bereits vor mehr als 28 Tagen
geöffnet wurde. Überprüfen Sie auch das
Mindesthaltbarkeitsdatum auf dem Fass.
Die Gläser waren nicht sauber genug. Reinigen Sie die
Gläser mit Wasser und etwas Spülmittel. Spülen Sie sie
gründlich mit kaltem Wasser nach, um alle Fett- und
Spülmittelrückstände zu entfernen.
Das Gerät sollte ständig eingeschaltet sein, um das Bier im
geöffneten Fass kühl zu halten. Die auf dem Display
angezeigte Temperatur sollte 4c C oder darunter betragen.
Zapfen Sie das Bier so, wie auf dem Fass und in dieser
Bedienungsanleitung beschrieben.
Achten Sie darauf, dass der Auslauf weder das Glas, das
Bier noch den Bierschaum berührt.
Die Gläser waren nicht sauber genug. Reinigen Sie die
Gläser mit Wasser und etwas Spülmittel. Spülen Sie sie
gründlich mit kaltem Wasser nach, um alle Fett- und
Spülmittelrückstände zu entfernen.
Prüfen Sie, ob das Bier kalt ist und die Temperatur auf dem
Display 4c C oder darunter beträgt.
Stellen Sie das Gerät an einen Ort mit einer
Umgebungstemperatur zwischen 3c C und 25c C und
halten Sie mindestens 10 cm Platz hinter dem Gerät und
an beiden Seiten frei. Setzen Sie das Gerät keinem direkten
Sonnenlicht aus.
Sofern das Fass ungeöffnet ist und keine sichtbaren
Schäden aufweist, können Sie es benutzen.War das Fass
bereits geöffnet, darf es nicht mehr benutzt werden.
Problem
Es tritt zu viel Schaum aus dem Gerät.
Das Bier aus dem Gerät schmeckt schal.
Der Schaum fällt sehr schnell in sich zusammen.
Die Temperatur auf dem Display steigt an.
Das Fass ist herunter gefallen. Kann ich es noch benutzen?
DEUTSCH42
Page 43

Lösungsvorschlag
Reinigen Sie die Zapfeinheit mit heißem Wasser,bevor Sie
einen neuen Schlauch einführen.
Zapfen Sie mindestens einmal pro Woche ein Glas Bier
vom geöffneten Fass.
Reinigen Sie die Zapfeinheit und verwenden Sie immer
einen neuen Schlauch, wenn Sie ein neues Fass in das
Gerät setzen.
Nehmen Sie immer saubere Gläser.
Lassen Sie das Gerät ständig am Stromnetz. In einem
geöffneten, kühl gehaltenen Fass bleibt das Bier 28 Tage
lang frisch. Prüfen Sie das Mindesthaltbarkeitsdatum, wenn
Sie ein neues Bierfass einsetzen.
Nach einem Stromausfall oder wenn das Gerät vom
Stromnetz getrennt wurde, reagiert die Füllstandanzeige
wieder einwandfrei, nachdem Sie 1 bis 2 Gläser Bier
gezapft haben.
Ziehen Sie den Netzstecker aus der Steckdose, warten Sie
5 Sekunden, und stecken Sie ihn dann wieder in die
Steckdose.
Zapfen Sie ein Glas Bier (mindestens 250 ml), indem Sie
den Zapfhahn kurz vollständig öffnen (um die
Schaumentwicklung zu verhindern).
Sorgen Sie dafür,dass die Temperatur im Gerät bei 4c C
oder darunter liegt, indem Sie das Gerät an einen Ort mit
einer Umgebungstemperatur zwischen 3c C und 30c C
stellen und hinter dem Gerät sowie an beiden Seiten
mindestens 10 cm Platz frei lassen.
Achten Sie darauf, dass hinter dem Gerät und an beiden
Seiten mindestens 10 cm freier Platz bleibt, damit das
Gerät optimal kühlen kann.
Betreiben Sie das Gerät bei einer Umgebungstemperatur
zwischen 3c C und 25c C. Setzen Sie das Gerät keinem
direkten Sonnenlicht aus.
Das Fass darf höchstens eine Temperatur von 23c C haben,
wenn Sie es in das Gerät setzen. Bei einer Temperatur von
über 23c C braucht es länger zum Abkühlen.
Prüfen Sie, ob die Ventilatoröffnung hinten am Gerät frei
von Staub und Schmutz ist.
Während Sie gerade ein Bier zapfen, schaltet sich
möglicherweise die Pumpe ein, um den erforderlichen
Druck im Fass aufrecht zu erhalten. Die Pumpe geht zu
diesem Zweck gelegentlich an und aus.
Problem
Es bereitet Schwierigkeiten, den Schlauch in die Zapfeinheit
einzuführen.
Das Bier schmeckt mir nicht.
Das Display zeigt die falsche Biermenge an.
Das Gerät kühlt das Bier nicht ausreichend.
Das Gerät macht ein Geräusch.
DEUTSCH 43
Page 44

Internet-Adresse
www.perfectdraft.nl
www.perfectdraft.nl
www.perfectdraft.nl
www.perfectdraft.nl
www.stella-artois.be
www.jupiler.be
-
Telefonnummer
0900-2224222 - 5 Cent/Min.
0900-2224222 - 5 Cent/Min.
0900-2224222 - 5 Cent/Min.
0900-2224222 - 5 Cent/Min.
070-222918
070-222912
0035-2802131999
Marke
Dommelsch
Hertog Jan
Jupiler
Bavaria
Stella Artois
Jupiler
Diekirch
Land
Niederlande
Belgien
Luxemburg
Lieferanten von Bierfässern
Wenn Sie weitere Informationen zum Bierfass benötigen oder Probleme mit dem Fass haben,
wenden Sie sich bitte an den Fasslieferanten in Ihrem Land. Die Telefonnummer finden Sie in der
nachstehenden Tabelle.
DEUTSCH44
Page 45

Introduction
Félicitations pour l'achat de votre nouveau PerfectDraft. Dorénavant
vous pouvez déguster tout le plaisir d'une bière au fût chez vous, grâce
au système qui maintient votre bière fraîche et à bonne température.
Après avoir installé le PerfectDraft, vous pouvez savourer une bière
fraîche en tirant tout simplement la manette du robinet. Plusieurs
marques de bière sont disponibles pour l'utilisation de ce système.Vous
pouvez trouver les marques de bière disponibles dans votre pays sur
l'emballage du système PerfectDraft (voir chapitre "Fournisseurs fûts" à
la fin de ce mode d'emploi). Pour plus d'informations, veuillez visiter
notre site Web à www.perfectdraft.com.
Le système PerfectDraft est destiné à un usage domestique
uniquement. Le système PerfectDraft n'est pas destiné à un usage
professionnel.
Ce mode d'emploi vous indique comment utiliser le PerfectDraft.
Description générale
Appareil
A Porte droite
B Porte gauche
C Affichage: indique la température et le niveau de bière
D Bouton de ouverture des por tes
E Couvercle plateau égouttoir
F Ramasse-gouttes
G Rangement cordon
H Plaque de refroidissement
I Leviers de verrouillage du fût
J Détecteur de pression
Robinet de soutirage
K Médallion
L Poignée de la pompe
M Corps du robinet
N Brise-jet
O Boutons de déclenchement du robinet de soutirage
P Tu y a u
Q Connecteur tuyau
R Bouton de déclenchement du tuyau
Fût
S Peignes
T Capot de protection
U Tête de connexion
45FRANÇAIS
Page 46

Important
Lisez soigneusement ce mode d'emploi avant d'utiliser l'appareil et
conservez-le pour une consultation ultérieure.
L'appareil
◗ Si le cordon d'alimentation est endommagé, il doit être remplacé
par Philips ou par un Centre Service Agréé, pour éviter tout
accident.
◗ Avant de brancher votre appareil, vérifiez que la tension indiquée
sur le fond de l'appareil correspond bien à la tension de votre
secteur.
◗ N'utilisez pas l'appareil si la fiche, le cordon d'alimentation ou
l'appareil lui-même sont endommagés.
C
◗ Tenez l'appareil hors de portée des enfants.Vous pouvez ôter la
poignée pour plus de sécurité.
◗ Placez l'appareil sur une surface plate et stable et laissez un
espace d'au moins 10 cm derrière et sur les côtés de l'appareil.
◗ Pour un refroidissement efficace,placez l'appareil dans un lieu avec
une température ambiante entre 3cC et 25cC et laissez au moins
10 cm derrière et aux côtés de l'appareil.
◗ N'exposez pas l'appareil au soleil. Lorsque vous utilisez l'appareil à
une température ambiante au-dessus 25cC, la température de la
bière affichée sur l'écran peut dépasser 3cC. Lorsque la
température ambiante diminue au-dessous 25cC, la bière
atteindra de nouveau 3cC.A une température élevée le
refroidissement du fût dure plus longtemps.
C
◗ N'exposez pas l'appareil et le fût directement aux rayons du soleil
ou à une température supérieure à 30cC.
◗ Nettoyez toujours l'appareil avant de le ranger.
◗ N'essayez pas de soulever l'appareil à l'aide de la poignée du
robinet.
◗ Ne couvrez pas l'appareil (par ex.avec une serviette) pour éviter
la surchauffe.
Le fût
◗ Lisez et suivez toujours les instructions et les avertissements de
sécurité mentionnés sur le fût avant de l'installer dans l'appareil.
◗ Ne secouez pas le fût.
◗ Après avoir entamé le fût,laissez-le dans l'appareil, à la
température correcte.Assurez-vous que l'appareil est mis en
marche. Si vous arrêtez l'appareil et vous n'allez pas l'utiliser
pendant une période plus longue (par ex. lorsque vous partez en
vacances), retirez toujours le fût entamé de l'appareil et mettez-le
dans le réfrigérateur. La bière d'un fût entamé reste fraîche
pendant 28 jours.
◗ Ne rangez jamais le fût dans le congélateur! Vous pouvez le
détériorer.
46 FRANÇAIS
Page 47

47
◗ Pour éviter tout risque d'explosion, n'exposez pas le fût
directement aux rayons du soleil ou à une température
supérieure à 30cC.
◗ Vérifiez toujours la date limite de vente avant d'installer le fût.
◗ N'utilisez pas le fût lorsque l'embout de connexion est détérioré.
Si la tête de connexion est détériorée, le robinet de soutirage ne
peut pas être fixé.
◗ Les fûts non entamés se conservent mieux si vous les rangez à
une température constante. Il est conseillé de les conserver à une
température basse.
◗ Le fût est sous pression. Ne retirez pas la tête de connexion et ne
percez pas le fût.
◗ Pression maximale: 1,5 bar.
◗ Utilisez le fût uniquement pour le PerfectDraft HD3600.
Ne connectez pas d'autres accessoires au fût.
◗ Utilisez uniquement les fûts mentionnés dans ce mode d'emploi
(voir chapitre "Fournisseurs fûts " à la fin de ce mode d'emploi).
◗ N'utilisez pas de fûts détériorés, car vous pouvez endommager
l'appareil. Retournez le fût détérioré au magasin où vous l'avez
acheté.
◗ Les fûts ne sont pas superposables.
Préparation à l'emploi
1ère étape: installer l'appareil
1 Placez l'appareil sur une surface plate et stable et laissez un
espace d'au moins 10 cm derrière et sur les côtés de l'appareil.
B
Ne placez pas l'appareil dans un endroit où il est exposé directement
aux rayons du soleil ou à une température élevée (par ex. près d'une
cuisinière ou d'un four) .
C
2 Pour ajuster la longueur du cordon, rentrez-le dans le
compartiment de rangement derrière l'appareil.
3 Insérez la fiche dans la prise murale.
C
4 Installez le plateau égouttoir.
FRANÇAIS
Page 48

48
C
5 Attachez la poignée de la pompe.
C
6 Placez le médaillon préféré sur la poignée.
2ème étape: fixer le robinet sur le fût
C
1 Retirez le capot de protection et le tuyau du fût.
Nettoyez toujours le robinet à l'eau chaude savonneuse avant de
placer le fût et d'insérer le tuyau.
C
2 Placez le robinet sur la tête de connexion du fût en le poussant
fermement.Vous entendrez un clic.
Lorsque le robinet est correctement monté, il reste bien fixé entre les
deux poignées du fût.
3ème étape: insérer le tuyau dans le robinet
Nettoyez toujours le robinet à l'eau chaude savonneuse avant d'insérer
le tuyau.
C
1 Insérez le tuyau flexible dans le corps du robinet.
FRANÇAIS
Page 49

49
C
2 Poussez le tuyau à fond jusqu'à ce que la partie rigide
s'encastre dans le robinet.
C
3 Poussez la partie rigide du tuyau dans l'ouverture du robinet
(clic).
4ème étape: placer le fût dans l'appareil
Ne placez jamais le fût dans l'appareil lorsque le robinet n'a pas été
correctement monté (voir "2ème étape: fixer le robinet sur le fût").
Assurez-vous toujours qu'il y a un tuyau dans le robinet de soutirage.
C
1 Ouvrez les portes en appuyant sur le bouton d'ouverture des
portes.
C
2 Levez les deux leviers de verrouillage bleus au maximum.
C
3 Mettez le fût avec le robinet assemblé dans l'appareil en
l'inclinant légèrement en avant.
- Placez le fût sur la plaque de refroidissement de l'appareil.
- Ensuite redressez le fût verticalement en faisant glisser le robinet
entre les leviers bleus de verrouillage.
◗ Après avoir installé le fût (même pour la première fois), la pompe
fonctionnera quelques secondes.
FRANÇAIS
Page 50

50
C
4 Abaissez les leviers de verrouillage bleus jusqu'à ce qu'ils soient
en position horizontale.
◗ Note: Si vous ne pouvez pas abaisser les leviers en position
horizontale, cela signifie que vous n'avez pas monté correctement
le fût. Otez le fût et suivez les étapes 1 à 3 de nouveau.
◗ La pompe et le système de refroidissement commenceront à
fonctionner immédiatement après avoir installé le fût.
C
5 Fermez les portes.
Il est conseillé de fermer d'abord la porte gauche, puis la porte droite.
◗ La température et le niveau de la bière seront affichés.
C
6 Attendez que la bière atteigne une température au-dessous de
4cC. Les températures au-dessous de cette valeur seront
affichées en vert. La température idéale à la consommation est
de 3cC.
Si vous utilisez l'appareil lorsque la température de la bière est au
dessus de 4cC (affichée en rouge), la mousse sera trop abondante.
◗ Si la température du fût est de 23cC environ lorsque vous le
mettez dans l'appareil, attendez au moins 15 heures avant de
servir la bière. Il est conseillé d'attendre jusqu'à ce que le fût
entier soit refroidi.
◗ Pour un refroidissement efficace,placez l'appareil dans un lieu avec
une température ambiante entre 3cC et 25cC et laissez au moins
10 cm derrière et aux côtés de l'appareil.
N'exposez pas l'appareil au soleil. Lorsque vous utilisez l'appareil à une
température ambiante au-dessus 25cC, la température de la bière
affichée sur l'écran peut dépasser 3cC. Lorsque la température
ambiante diminue au-dessous 25cC, la bière atteindra de nouveau
3cC. A une température élevée le refroidissement du fût dure plus
longtemps.
◗ Vous pouvez utiliser le PerfectDraft plus rapidement en
refroidissant le fût au préalable dans le réfrigérateur.
FRANÇAIS
Page 51

51
L'affichage
C
◗ L'affichage indique la température et le niveau de la bière à
l'intérieur du fût.
Indication de la température
Attendez que la température du fût soit au-dessous 4cC avant de
commencer à verser de la bière. La température idéale est de 3cC.
La couleur de la valeur affichée vous indique si la bière a atteint la
température correcte.
- Rouge = pour indiquer que la température correcte n'a pas été
atteinte (au-dessus 4cC). La couronne de mousse peut être
trop grande.
- Vert = pour indiquer que la température correcte a été atteinte
(4cC ou moins)
Indicateur de niveau
L'indicateur jaune de niveau sur l'affichage indique la quantité de bière
restante dans le fût (8 niveax).
B
Si vous utilisez des verres de 25 cl, le fût a une capacité de 24 verres.
Si vous utilisez des verres de 33 cl, vous pouvez remplir 18 verres
environ.
Autres indications
A part le niveau et la température de la bière, l'affichage peut indiquer
les informations suivantes:
- Segment vert et aucun indicateur de niveau visible = le robinet n'a
pas été installé
- Segment rouge et aucun indicateur de niveau visible = le fût n'a pas
été installé
- Segment vert ou rouge et avertisseur lumineux jaune-orange
clignotant = le robinet et/ou le tuyau n'ont pas été correctement
montés. Retirez le fût et vérifiez si le robinet et le tuyau sont
correctement montés (voir chapitre "Préparation à l'emploi", 2ème
et 3ème étapes).
Suggestions et recommandations
◗ Si vous voulez vous servir de la bière immédiatement après avoir
placé le fût dans l'appareil, refroidissez le fût au préalable dans le
réfrigérateur.
FRANÇAIS
Page 52

52
C
◗ Après avoir entamé le fût,la bière garde sa fraîcheur pendant
28 jours si vous le laissez dans l'appareil.
Assurez-vous que l'appareil reste en marche continuellement.
◗ Si vous voulez arrêter l'appareil pendant un certain temps, par ex.
lorsque vous allez en vacances, rangez le fût entamé dans le
réfrigérateur: déconnectez le robinet, rincez la partie supérieure
du fût, rincez le tuyau et rangez le tuyau avec le fût dans le
réfrigérateur.
◗ Remplacez toujours le tuyau lorsque vous utilisez un nouveau fût.
N'utilisez jamais un tuyau pendant plus de 28 jours.
◗ Si vous n'avez pas versé de la bière depuis une semaine, il est
recommandé de la laisser couler dans le verre quelques secondes.
Ensuite rincez le verre à l'eau froide avant de le remplir de bière.
Verser une bière parfaite
Suivez les instructions ci-dessous.
Nettoyer les verres de bière
Utilisez toujours des verres propres pour un col de mousse parfait.
1 Nettoyez bien les verres à l'eau chaude savonneuse.
2 Rincez-les ensuite à l'eau froide.
Ainsi le verre est propre et ne porte plus aucun résidu de savon, vous
permettant de servir une bière avec un col de mousse appétissant.
3 Pour vérifier si les verres sont propres, tenez-les à l'envers en
pleine lumière.
Les verres sont propres lorsque l'eau s'écoule sur les parois sans
révéler de traces de graisse.
B
Suggestion: si vous nettoyez les verres au lave-vaisselle, n'utilisez pas de
produit de rinçage. Les résidus des produits de rinçage peuvent entraîner
un piètre col de mousse.
Servir la bière
1 Pour obtenir un meilleur résultat, servez la bière dans un verre
propre et rincé à l'eau froide!
B
Le col de mousse dure plus longtemps lorsque le verre est froid.
B
Un verre froid conserve plus longtemps la fraîcheur et la couche de
mousse de la bière fraîchement tirée.
FRANÇAIS
Page 53

53
◗ NB: Pour une délicieuse bière au fût, rincez toujours le verre
utilisé avant de vous servir une autre bière.Cela évite les bulles
dans la bière.
2 Manipulez les verres par le pied plutôt que par le rebord.
C
3 Ouvrez la pompe d'un mouvement rapide et précis.
La bière sera débitée correctement seulement si la pompe est
complètement ouverte. Si la pompe est à moitié ouverte, la pression
de la bière sera trop forte occasionnant un col de mousse trop
important.
Faites couler la bière le long de la paroi du verre.
C
4 La quantité de mousse peut varier en fonction de l'angle
d'inclinaison du verre et de la distance entre le verre et le
brise-jet.
Pour obtenir une belle mousse, n'inclinez pas trop le verre et tenez-le
tout près du brise-jet.
◗ NB: Le brise-jet ne doit toucher ni le verre, ni la bière, ni la
mousse, car les résidus de bière présents sur le brise-jet
affecteront la montée de la mousse.
5 Redressez le verre doucement pendant le tirage.
6 Remplissez le verre jusqu'à ce que la mousse touche le bord.
7 Fermez la pompe d'un mouvement précis.
Note: la pompe se peut mettre en marche de temps en temps.
8 Europe (excl. Allemagne et Royaume-Uni): Pour un meilleur
résultat en cas de surmoussage, utilisez un coupe-mousse en le
glissant à un angle de 45c au-dessus du sommet du verre.
B
Ne laissez jamais le coupe-mousse sur le plan de travail. Mettez-le dans
un verre propre rempli d'eau fraîche ou rincez-le immédiatement, pour
ne pas affecter la qualité de la bière.
◗ Maintenant vous pouvez savourer une excellente bière au fût.
Servir une bière au fût bien fraîche
1 Essuyez bien le verre à l'aide d'un essuie.
2 Utilisez un sous-verre de la marque de votre bière.
3 Prenez le verre par le milieu et posez-le sur le sous-verre.
Vérifiez que le logo sur le verre soit bien orienté vers la
personne qui va déguster la bière
FRANÇAIS
Page 54

54 FRANÇAIS
Britannique
Rincez un verre à l'eau froide.
Tenez le verre au-dessous du
brise-jet à un angle d'environ 45c.
Ouvrez la pompe complètement
d'un mouvement précis.
Faites couler la bière le long de la
paroi du verre.
Evitez le contact du brise-jet avec
le verre, la bière ou la mousse.
L'angle d'inclinaison du verre lors
du service détermine la quantité
finale de mousse. Plus le verre est
incliné, plus le col de mousse est
réduit.
Remplissez le verre jusqu'à ce que
la mousse parvienne au bord du
verre.
Fermez la pompe d'un
mouvement précis.
Ecartez le verre du brise-jet afin
d'éviter que des gouttes de bière
ne tombent dans le col de
mousse.
Vous pouvez maintenant servir
votre bière.
Allemande
Rincez un verre à l'eau froide.
Tenez le verre au-dessous du
brise-jet à un angle d'environ 45c.
Ouvrez la pompe complètement
d'un mouvement précis.
Faites couler la bière le long de la
paroi du verre.
Evitez le contact du brise-jet avec
le verre, la bière ou la mousse.
L'angle d'inclinaison du verre lors
du service détermine la quantité
finale de mousse. Plus le verre est
incliné, plus le col de mousse est
réduit.
a. Faites couler la bière le long de
la paroi jusqu'à ce que le verre
soit rempli aux deux tiers de
bière et à un tiers de mousse.
b. Fermez la pompe et mettez le
verre sur la table pendant
1 minute pour laisser reposer la
mousse.
c. Répétez les étapes 2 à 6 et
remplissez le verre jusqu'au
rebord.
Fermez la pompe d'un
mouvement précis.
Ecartez le verre du brise-jet afin
d'éviter que des gouttes de bière
ne tombent dans le col de
mousse.
Vous pouvez maintenant servir
votre bière.
Européenne (sauf l'Allemagne et
le Royaume-Uni)
Rincez un verre à l'eau froide.
Tenez le verre près du brise-jet.
Ouvrez la pompe complètement
d'un mouvement précis.
Déplacez le verre au-dessous du
brise-jet à un angle d'environ 45c
et faites couler la bière le long de
la paroi du verre.
Evitez le contact du brise-jet avec
le verre, la bière ou la mousse.
L'angle d'inclinaison du verre lors
du service détermine la quantité
finale de mousse. Plus le verre est
incliné, plus le col de mousse est
réduit.
Remplissez le verre jusqu'à ce que
la mousse parvienne au bord du
verre.
Fermez la pompe d'un
mouvement précis.
Ecartez le verre du brise-jet afin
d'éviter que des gouttes de bière
ne tombent dans le col de
mousse.
b. Pour enlever le surplus de
mousse, utilisez un coupemousse en le tenant à un angle
de 45c.
Vous pouvez maintenant servir
votre bière.
Etapes
1.
2.
3.
4.
5.
6.
7.
8.
9.
10.
3 traditions pour le service de la bière
La manière de servir une bière au fût diffère d'un pays à l'autre. Dans le tableau ci-dessous vous
trouverez les règles de service d'une bière parfaite selon trois traditions locales en 10 étapes.
Page 55

Remplacer le fût
Lorsque le fût est vide, seule de la mousse sortira par le brise-jet.
L'affichage vous indiquera que le fût est vide. Remplacez le fût.
C
1 Ouvrez les portes en appuyant sur le bouton d'ouverture des
portes.
Ouvrez les portes au maximum.
C
2 Levez les leviers de verrouillage bleus au maximum.
C
3 Inclinez vers vous le fût avec le robinet monté et retirez-le.
C
4 Enlevez le robinet en appuyant sur les boutons de
déclenchement sur les deux côtés du robinet (1). Le robinet
sera relâché (clic); retirez-le (2).
Vous devez ôter le robinet du fût avant de remplacer le tuyau. Le
bouton de déclenchement pour relâcher le tuyau ne fonctionnera pas
si le robinet est fixé sur le fût.
C
5 Tenez le robinet au-dessus d'un évier.
55FRANÇAIS
Page 56

56
C
6 Appuyez sur le bouton de déclenchement bleu pour relâcher le
tuyau.
C
7 Tirez le connecteur du tuyau hors du robinet et enlevez le
tuyau flexible.
Note: Nettoyez toujours le robinet à l'eau chaude (savonneuse) avant
d'insérer un nouveau tuyau.
8 Montez le robinet sur le fût (voir chapitre "Préparation à
l'emploi", "2ème étape: fixer le robinet sur le fût").
9 Insérez un nouveau tuyau dans le robinet (voir chapitre
"Préparation à l'emploi", "3ème étape: insérer le tuyau dans le
robinet").
10 Placez le nouveau fût dans l'appareil (voir chapitre "Préparation
à l'emploi", "4ème étape: placer le fût dans l'appareil").
Nettoyage
Nettoyez l'appareil lorsque vous remplacez le fût où si vous allez le
ranger pendant une longue période.
N'utilisez jamais de tampons à récurer et des produits abrasifs tels que
les poudres à récurer, l'essence ou l'acétone pour nettoyer l'appareil.
1 Débranchez toujours l'appareil avant de le nettoyer.
2 Nettoyez l'extérieur de l'appareil avec un chiffon humide.
C
3 Enlevez le brise-jet.
C
4 Retirez et démontez le plateau égouttoir et son couvercle.
FRANÇAIS
Page 57

57
C
5 Retirez la poignée du robinet.
6 Nettoyez le robinet,le plateau égouttoir et le couvercle du
plateau égouttoir à l'eau chaude savonneuse.
Faites attention que l'eau ne soit pas trop chaude pour ne pas vous
brûler.
◗ Uniquement le brise-jet, le plateau égouttoir et son couvercle
sont prévus pour le lave-vaisselle.
LE ROBINET N'EST PAS PRÉVU POUR LE LAVE-VAISSELLE!
Environnement
C
◗ Ne jetez pas l'appareil en fin de vie avec les ordures ménagères,
mais déposez-le à un endroit prévu à cet effet par les pouvoirs
publics pour son recyclage.Vous aiderez, ainsi,à protéger
l'environnement.
Pour protéger notre environnement,débarrassez-vous des fûts vides
selon les instructions ci-dessous.
Elimination du fût
Lisez l'étiquette du fût pour vérifier s'il est consigné ou pas. Si le fût est
non consigné, lisez les instructions sur la façon de vous en débarrasser.
Elimination de l'élément de refroidissement
◗ L'élément de refroidissement à l'intérieur de l'appareil contient
des substances qui peuvent polluer l'environnement.Il faut donc
l'ôter avant de jeter l'appareil.
Vous pouvez également porter ou envoyer l'appareil dans un Centre
Service Agréé Philips. L'élément de refroidissement y sera traité dans le
respect de l'environnement.
Retirez l'élément de refroidissement uniquement si vous vous
débarrassez de l'appareil!
Retirez l'élément de refroidissement de la manière suivante:
1 Débranchez l'appareil.
2 Ouvrez les portes en appuyant sur le bouton d'ouverture des
portes.
◗ Près des charnières des portes il y a deux orifices sur les deux
côtés.
FRANÇAIS
Page 58

58
C
3 Dévissez les quatre vis à l'aide d'un tournevis.
C
4 Enlevez la plaque de protection derrière l'appareil.
C
5 Tirez le ventilateur hors de l'appareil.
◗ Vous verrez une plaque en aluminium, avec des protubérances et
deux trous de vis.
C
6 Défaites les vis à l'aide d'un tournevis.
C
7 Retirez la plaque en aluminium.
◗ Après avoir retiré la plaque en aluminium, vous verrez une plaque
blanche d'environ 4 x 4 cm. C'est l'élément de refroidissement.
FRANÇAIS
Page 59
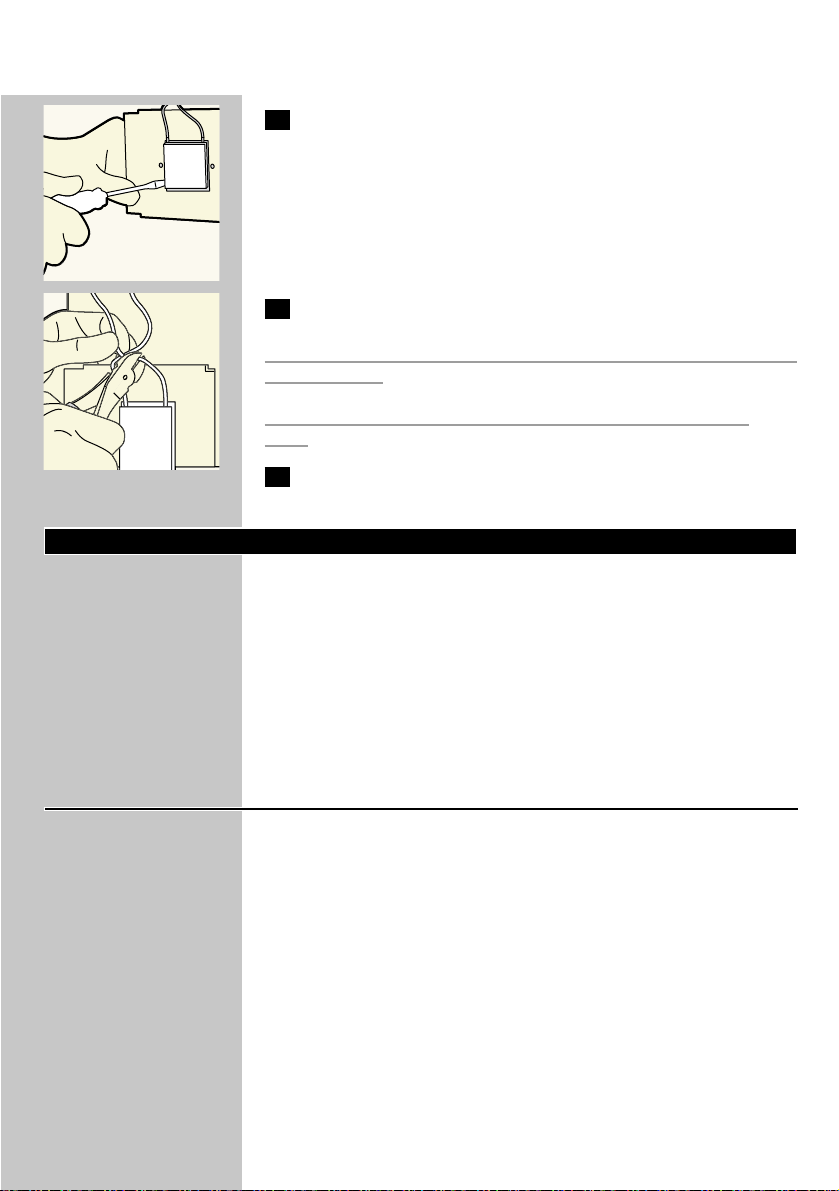
59
C
8 Insérez un tournevis à tête plate au-dessous de l'élément de
refroidissement et forcez-le pour l'ôter.
C
9 Rompez les connexions de l'élément de refroidissement.
Ne branchez pas l'appareil sur le secteur après avoir retiré l'élément de
refroidissement.
N'essayez pas de remonter l'élément de refroidissement une fois
retiré!
10 Portez l'élément de refroidissement à un endroit prévu pour
les déchets chimiques.
Garantie et service
Pour plus d'informations, visitez notre site Internet : www.philips.com
ou veuillez contacter le Service Consommateurs Philips de votre pays
(vous trouverez le numéro de téléphone dans le dépliant sur la
garantie internationale). S'il n'y a aucun Service Consommateurs Philips
dans votre pays, contactez votre distributeur ou le Service Depar tment
of Philips Domestic Appliances and Personal Care BV.
Lorsque vous reportez l'appareil chez votre fournisseur ou à un centre
service agréé Philips pour vérification, apportez aussi le tuyau et le fût.
Restrictions de garantie
Votre garantie s'annule dans les cas suivants:
- vous n'utilisez pas l'appareil selon les instructions de ce mode
d'emploi.
- vous utilisez des fûts défectueux dans l'appareil.
- vous n'installez pas les fûts selon les instructions.
- vous utilisez des fûts d'autres fabricants que ceux mentionnés dans le
mode d'emploi.
◗ Les fûts et les tuyaux ne sont pas couverts par la garantie.
FRANÇAIS
Page 60

60
Solution
Assurez-vous que le robinet est propre. Nettoyez-le à l'eau
chaude savonneuse, si nécessaire.
Assurez-vous que le robinet est propre. Nettoyez-le à l'eau
chaude savonneuse, si nécessaire.
Retirez d'abord le fût avec le robinet attaché de l'appareil
et ensuite enlevez le robinet du fût en appuyant sur les
boutons de déclenchement.
Assurez-vous d'avoir correctement fixé le robinet. Poussezle fermement lorsque vous le fixer.Voir chapitre
"Préparation à l'emploi", "3ème étape: fixer le robinet sur le
fût".
Vérifiez que les leviers de verrouillage ont été
correctement relevés et inclinez le fût vers l'avant.
Abaissez les leviers bleus de verrouillage en position
horizontale avant de fermer les portes.
Assurez-vous d'avoir monté correctement le tuyau dans le
robinet et que la poignée soit en position verticale.
Si le problème n'est pas résolu, veuillez contacter le Service
Consommateurs Philips de votre pays.
D'abord retirez le robinet du fût. Pour enlever le tuyau,
appuyez sur le bouton de déclenchement.
Rincez le robinet à l'eau chaude pour enlever tout résidu
de bière.
Vérifiez que les leviers de verrouillage ont été
correctement relevés et inclinez le fût vers l'avant.
Assurez-vous d'avoir correctement fermé les portes. Pour
plus d'informations, voir chapitre "Préparation à l'emploi",
section "4ème étape: placer le fût dans l'appareil".La
présence d'un peu de givre sur le fût est tout à fait
normale.
Assurez-vous que le robinet a été correctement placé sur
le fût (voir chapitre "Préparation à l'emploi", section "2ème
étape: fixer le robinet sur le fût").
Assurez-vous que le tuyau a été fixé correctement dans le
robinet (voir chapitre "Préparation à l'emploi", "3ème
étape: insérer le tuyau dans le robinet").
Remplacez le fût s'il est vide.Vérifiez le niveau de la bière
affiché à l'écran.
Problème
Il est difficile de monter le robinet sur le fût.
Il est difficile d'appuyer sur les boutons de déclenchement
pour retirer le robinet.
Je ne peux pas placer le fût avec le robinet attaché sur
l'appareil.
Je ne peux pas fermer les portes.
Lorsque je mets le tuyau dans le robinet, de la bière
commence à s'écouler du tuyau.
L'affichage clignote.
Suivez les instructions dans "Autres indications" du chapitre
"Préparation à l'emploi".
Je ne peux pas retirer le tuyau du robinet.
Il y a du givre sur le fût ou sur l'appareil.
Lorsque je tire la poignée, la bière ne sort pas.
Dépannage
Si vous ne réussissez pas à résoudre le problème à l'aide de ce guide, veuillez contacter le Service
Consommateurs Philips de votre pays (voir chapitre "Garantie et service") ou le centre d'appels
PerfectDraft: 078-250159 en Belgique, 01801-324000 en Allemagne ou 0900-2224222 aux Pays-Bas.
FRANÇAIS
Page 61

61
Solution
La bière est trop chaude. Attendez que l'appareil
refroidisse la bière à une température au-dessous 4cC.
Vérifiez la température sur l'affichage. N'exposez pas
l'appareil au soleil et placez-le dans un lieu avec une
température ambiante entre 3c et 25c.
Le fût a été secoué trop fortement. Attendez une demi
heure.
Assurez-vous que le robinet est complètement ouvert lors
du soutirage.
Le premier verre contient plus de mousse que d'habitude.
Essayez de verser un autre verre.
Le tuyau ne fonctionne probablement pas correctement.
Contactez le Service Consommateurs Philips de votre
pays.
Le fût est vide. Remplacez-le (voir chapitre "Remplacer le
fût").
Vérifiez si le fût a été ouvert pendant plus de 28 jours et
vérifiez si la date de péremption n'a pas expiré.
Les verres ne sont pas suffisamment propres. Lavez les
verres à l'eau savonneuse. Rincez-les bien à l'eau froide
pour enlever tout résidu de savon.
L'appareil doit rester brancher continuellement pour
conserver la bière du fût entamé à la température
correcte. La température affichée doit être de 4cC ou audessous de cette valeur.
Pour tirer de la bière, lisez les instructions sur le fût et dans
ce mode d'emploi.
Evitez le contact du brise-jet avec le verre, la bière ou la
mousse.
Les verres ne sont pas propres. Lavez les verres à l'eau
savonneuse. Rincez-les bien à l'eau froide pour enlever tout
résidu de savon.
Assurez-vous que la bière est froide et que l'affichage
indique une température au-dessous de 4cC.
Placez l'appareil dans un lieu avec une température
ambiante entre 3cC et 25cC et laissez au moins 10 cm
derrière et aux côtés de l'appareil. N'exposez pas l'appareil
au soleil.
Si le fût n'est pas entamé et n'a aucun dommage visible,
vous pouvez essayer à l'utiliser. Si le fût a été déjà entamé,
vous ne pouvez plus l'utiliser.
Nettoyez le robinet à l'eau chaude avant d'insérer un
nouveau tuyau.
Versez un verre de bière d'un fût entamé au moins une
fois tous les 7 jours.
Nettoyez toujours le robinet et insérez un nouveau tuyau
chaque fois que vous remplacez le fût.
Problème
De l'appareil sort trop de mousse.
La bière servie est plate.
La couche de mousse disparaît rapidement.
La température affichée augmente.
Le fût est tombé, puis-je l'utiliser encore?
Il est difficile d'insérer le tuyau dans le robinet.
La bière a un goût déplaisant.
FRANÇAIS
Page 62

62
Solution
Assurez-vous que les verres sont propres.
Laissez l'appareil branché continuellement. Après avoir
entamé le fût, la bière garde sa fraîcheur pendant 28 jours
si vous le rangez dans l'appareil.Vérifiez la date de
péremption avant d'installer un nouveau fût.
En cas de panne de courant ou si vous avez débranché
l'appareil, l'indicateur de niveau affichera la quantité
correcte après avoir rempli 1 ou 2 verres de bière.
Débranchez l'appareil, attendez 5 secondes et ensuite
réinsérez la fiche dans la prise.
Pour verser la bière, utilisez un verre d'au moins 250 ml.
La bière sera tirée correctement seulement si le robinet
est complètement ouvert (pour éviter de former une
couronne de mousse trop importante).
Assurez-vous que la température à l'intérieur de l'appareil
est au-dessous de 4cC en utilisant l'appareil à une
température ambiante comprise entre 3cC et 30cC.
Laissez un espace d'au moins 10 cm derrière et sur les
côtés de l'appareil.
Assurez-vous qu'il y a un espace d'au moins 10 cm
derrière et sur les côtés de l'appareil, pour obtenir les
meilleurs résultats.
Assurez-vous que l'appareil est utilisé à une température
ambiante entre 3cC et 25cC. N'exposez pas l'appareil au
soleil.
Assurez-vous que le fût n'a pas une température
supérieure à 23cC lorsque vous le placez dans l'appareil.
Si la température est supérieure à 23cC la durée de
refroidissement sera plus longue.
Vérifiez si la sortie du ventilateur à l'arrière de l'appareil est
propre.
Occasionnellement, la pompe se met en marche pour
maintenir la pression correcte, même lorsque vous tirez
une bière.
Problème
L'affichage n'indique pas la quantité correcte.
L'appareil ne refroidit pas la bière suffisamment.
L'appareil est bruyant.
FRANÇAIS
Page 63

63
Adresse Internet
www.perfectdraft.nl
www.perfectdraft.nl
www.perfectdraft.nl
www.perfectdraft.nl
www.stella-artois.be
www.jupiler.be
-
Numéro de téléphone
0900-2224222 EUR 0.05
p/m
0900-2224222 EUR 0.05
p/m
0900-2224222 EUR 0.05
p/m
0900-2224222 EUR 0.05
p/m
070-222918
070-222912
0035-2802131999
Marque
Dommelsch
Hertog Jan
Jupiler
Bavaria
Stella Artois
Jupiler
Diekirch
Pays
Les Pays-Bas
Belgium
Luxembourg
Fournisseurs fûts
Pour plus d'informations sur les marques de bière, veuillez contacter un fournisseur local.Vous
trouverez les numéros de téléphone dans le tableau ci-dessous.
FRANÇAIS
Page 64

Inleiding
Gefeliciteerd met uw aankoop van deze nieuwe PerfectDraft.Vanaf nu
kunt u thuis genieten van de perfecte smaak van getapt bier. Het
systeem houdt uw bier vers en op exact de juiste temperatuur zodat u
op ieder moment van een heerlijk koel getapt biertje kunt genieten.
Nadat u de PerfectDraft geïnstalleerd heeft, kunt u thuis bier tappen
door simpelweg de tapkraan te openen.Voor dit systeem zijn
verscheidene biermerken beschikbaar. De biermerken die beschikbaar
zijn in uw land staan vermeld op de doos van de PerfectDraft (zie ook
hoofdstuk 'Biervatleveranciers' aan het eind van deze
gebruiksaanwijzing). Bezoek onze website (www.perfectdraft.com)
voor meer informatie.
Het PerfectDraft systeem is alleen bedoeld voor thuisgebruik.
Dit apparaat is niet geschikt voor professioneel gebruik.
Deze gebruiksaanwijzing vertelt u hoe u de PerfectDraft moet
gebruiken.
Algemene beschrijving
Apparaat
A Rechterdeur
B Linkerdeur
C Display: toont biertemperatuur en bierniveau
D Ontgrendelknop
E Lekplaat
F Lekbak
G Snoeropbergvak
H Koelplaat
I Vergrendelarmen
J Vatsensor
Tapunit
K Medaillon
L Hendel van tapkraan
M Kraanhuis
N Tuit
O Ontgrendelknoppen
P Slangetje
Q Koppelstuk voor slangetje
R Ontgrendelknop voor slangetje
Biervat
S Handvatten van biervat
T Beschermdop
U Aansluitpunt
NEDERLANDS64
Page 65

Belangrijk
Lees deze gebruiksaanwijzing zorgvuldig door voordat u het apparaat
gaat gebruiken. Bewaar de gebruiksaanwijzing om deze indien nodig te
kunnen raadplegen.
Het apparaat
◗ Indien het netsnoer beschadigd is, moet het vervangen worden
door Philips, een door Philips geautoriseerd servicecentrum of
personen met vergelijkbare kwalificaties om gevaar te voorkomen.
◗ Controleer of het voltage aangegeven op de onderkant van het
apparaat overeenkomt met de plaatselijke netspanning voordat u
het apparaat aansluit.
◗ Gebruik het apparaat niet indien het netsnoer, de stekker of het
apparaat zelf beschadigd is.
C
◗ Houd het apparaat buiten het bereik van kinderen.U kunt de
hendel van de tapkraan verwijderen voor extra veiligheid.
◗ Plaats het apparaat op een horizontale, vlakke en stabiele
ondergrond en laat daarbij ten minste 10 cm vrij achter en aan
beide zijden van het apparaat om het goed te laten functioneren.
◗ We raden u aan het apparaat in een omgeving te plaatsen waar de
omgevingstemperatuur tussen 3 en 25cC graden ligt.
◗ Wanneer u het apparaat bij een omgevingstemperatuur van meer
dan 25cC gebruikt, kan de op het display aangegeven
biertemperatuur stijgen tot boven 3cC.Wanneer de
omgevingstemperatuur onder 25cC zakt, zal de biertemperatuur
ook weer naar 3cC zakken.Bij hogere omgevingstemperaturen
duurt het koelen van biervat ook langer.
C
◗ Stel het apparaat en het biervat niet bloot aan direct zonlicht of
aan temperaturen boven 30cC.
◗ Maak het apparaat altijd schoon voordat u het voor langere tijd
opbergt.
◗ Til het apparaat niet op aan de hendel van de tapkraan.
◗ Bedek het apparaat niet (met bijv.een handdoek) om
oververhitting te voorkomen.
Het biervat
◗ Lees en volg altijd de instructies en waarschuwingen op het
biervat voordat u het vat in het apparaat plaatst.
◗ Schud het biervat niet.
◗ Bewaar een geopend biervat op de juiste temperatuur door het in
het apparaat te laten zitten. Zorg ervoor dat het apparaat
ingeschakeld is.Als u het apparaat uitschakelt omdat u het langere
tijd niet gaat gebruiken (bijvoorbeeld omdat u op vakantie gaat),
haal dan altijd het geopende vat uit het apparaat en plaats het in
de koelkast. Na opening van het vat blijft het bier 28 dagen
houdbaar.
NEDERLANDS 65
Page 66

◗ Bewaar het biervat nooit in de diepvries! Bevriezing kan ernstige
schade veroorzaken aan het biervat.
◗ Stel het biervat nooit bloot aan direct zonlicht of aan
temperaturen boven 30cC om explosiegevaar te vermijden.
◗ Controleer altijd of de houdbaarheidsdatum van het biervat nog
niet verstreken is bij aankoop en voordat u het biervat installeert.
◗ Gebruik het biervat niet als het aansluitpunt bovenop het biervat
beschadigd is.Als het aansluitpunt beschadigd is, zal de tapunit niet
op het biervat passen.
◗ Ongeopende biervaten blijven het langst goed wanneer ze bij een
constante temperatuur bewaard worden.Hoe koeler u het
biervat bewaart, hoe beter.
◗ Het biervat staat onder druk.Verwijder nooit het aansluitpunt en
doorboor het biervat nooit met een scherp voorwerp.
◗ Maximale werkdruk: 1,5 bar.
◗ Gebruik het biervat alleen voor de HD3600 PerfectDraft. Sluit
geen andere apparaten op het biervat aan.
◗ Gebruik geen biervaten van andere leveranciers dan degenen die
vermeld staan in deze gebruiksaanwijzing (zie hoofdstuk
'Biervatleveranciers' aan het eind van deze gebruiksaanwijzing).
◗ Gebruik geen beschadigde biervaten in het apparaat, aangezien dit
tot schade aan het apparaat kan leiden. Breng een beschadigd
biervat altijd terug naar de winkel waar u het gekocht heeft.
◗ De biervaten zijn niet stapelbaar.
Klaarmaken voor gebruik
Stap 1: het apparaat installeren
1 Plaats het apparaat op een horizontale, vlakke en stabiele
ondergrond en laat daarbij ten minste 10 cm vrij achter en aan
beide zijden van het apparaat om het goed te laten
functioneren.
B
Plaats het apparaat niet op een plek waar het blootgesteld is aan direct
zonlicht of hoge temperaturen (bijv. nabij een kooktoestel of oven).
C
2 Overtollig snoer kunt u opbergen door het in het
snoeropbergvak aan de achterzijde van het apparaat te duwen.
3 Steek de stekker in het stopcontact.
NEDERLANDS66
Page 67

C
4 Plaats de lekbak.
C
5 Bevestig de hendel aan het kraanhuis van de tapkraan.
C
6 Plaats het gewenste medaillon op de hendel.
Stap 2: de tapunit op het biervat bevestigen
C
1 Verwijder de beschermdop en het slangetje van het biervat.
Reinig de tapunit altijd met warm water en indien nodig een beetje
afwasmiddel, voordat u hem op het biervat plaatst en het slangetje
bevestigt.
C
2 Plaats de tapunit op het aansluitpunt bovenop het biervat en
druk de tapunit stevig aan totdat u hem hoort vastklikken.
Als u de tapunit goed geplaatst heeft, past hij precies tussen de twee
opstaande randen van het biervat.
NEDERLANDS 67
Page 68

Stap 3: bevestigen van het slangetje in de tapunit
Reinig de tapunit altijd met warm water en indien nodig een beetje
afwasmiddel, voordat u hem op het biervat plaatst en het slangetje
bevestigt.
C
1 Steek het bierslangetje in het tapkraanhuis.
C
2 Schuif de nokken van het koppelstuk onder de
scharnierpunten.
C
3 Duw het koppelstuk van het slangetje in de opening van de
tapunit tot u hem hoort vastklikken.
Stap 4: het biervat in het apparaat plaatsen
Plaats het biervat nooit in het apparaat als de tapunit niet goed op het
biervat is bevestigd (zie 'Stap 2: de tapunit op het biervat plaatsen').
Zorg er altijd voor dat er een bierslangetje in de tapunit zit voordat u
het biervat, met de tapunit daarop bevestigd, in het apparaat plaatst.
C
1 Open de deuren door op de ontgrendelknop te drukken.
NEDERLANDS68
Page 69

C
2 Til de twee blauwe vergrendelarmen helemaal omhoog.
C
3 Plaats het biervat, met de tapunit daarop bevestigd,in het
apparaat door het biervat enigszins naar voren te kantelen.
- Plaats eerst het biervat op de koelplaat van het apparaat.
- Zet het biervat daarna rechtop door de tapunit tussen de blauwe
vergrendelarmen te schuiven.
◗ Nadat u het biervat in het apparaat geplaatst heeft (zelfs de eerste
keer), gaat de pomp enkele seconden lopen.
C
4 Duw de blauwe vergrendelarmen omlaag tot ze in horizontale
stand staan.
◗ NB:Als het niet mogelijk is de vergrendelarmen in horizontale
stand te brengen, dan is het biervat niet in de juiste stand in het
apparaat geplaatst. Neem het vat uit en volg normaals stappen
1 t/m 3.
◗ De pomp en het koelsysteem beginnen te werken zodra u het
biervat in het apparaat heeft geplaatst.
C
5 Sluit de deuren.
De beste manier om de deuren te sluiten is eerst de linkerdeur dicht
te doen en dan de rechterdeur.
◗ De biertemperatuur- en bierniveau-aanduiding beginnen te
werken.
C
6 Wacht tot het biervat een temperatuur van 4cC of lager heeft
bereikt.Wanneer dit het geval is, wordt de temperatuur in het
groen weergegeven. De ideale temperatuur is 3cC.
Als u het apparaat gaat gebruiken wanneer de temperatuur van het
bier nog boven 4cC is (en wordt weergegeven in rood), zal de
schuimkraag te hoog worden.
◗ Als de temperatuur van het biervat ongeveer 23cC is wanneer u
het vat in het apparaat plaatst, wacht dan ongeveer 15 uur
voordat u bier gaat tappen.We raden u aan te wachten tot het
hele vat goed gekoeld is.
NEDERLANDS 69
Page 70

70
◗ Plaats het apparaat in een omgeving met een
omgevingstemperatuur tussen 3cC en 25cC voor de beste
koeling en laat achter het apparaat en aan beide zijden een ruimte
van ten minste 10 cm vrij.
Stel het apparaat niet bloot aan direct zonlicht.Wanneer u het
apparaat bij een omgevingstemperatuur van meer dan 25cC gebruikt
kan de op het display aangegeven biertemperatuur stijgen tot boven
3cC. Wanneer de omgevingstemperatuur onder 25cC zakt, zal de
biertemperatuur ook weer naar 3cC zakken. Bij hogere
omgevingstemperaturen duurt het koelen van biervat ook langer.
◗ Als u het biervat voorkoelt in de koelkast,kunt u eerder bier
tappen.
Het display
C
◗ Het display toont de temperatuur van het bier en het bierniveau
in het biervat.
Temperatuuraanduiding
Wacht tot de temperatuur van het biervat tot onder 4cC is gezakt
voordat u bier begint te tappen. De ideale drinktemperatuur is 3cC.
De kleur van de aangegeven temperatuur laat u weten wanneer de
ideale drinktemperatuur bereikt is.
- Rood = om aan te geven dat de biertemperatuur nog niet ideaal is
voor consumptie (boven 4cC). De schuimkraag kan te hoog
zijn.
- Groen = om aan te geven dat het bier de ideale temperatuur voor
consumptie (4cC of lager) heeft bereikt.
Niveau-aanduiding
De geel-oranje niveau-aanduiding op het display laat zien hoeveel bier
er nog in het biervat zit in acht stappen.
B
Als u glazen van 25 cl gebruikt, kunt u ongeveer 24 glazen bier uit één
biervat tappen.Als u glazen van 33 cl gebruikt, kunt u ongeveer
18 glazen tappen.
Andere aanduidingen
Behalve het bierniveau en de temperatuur van het bier kan het display
ook de volgende informatie geven:
- Groen segment, maar niveau-indicatie niet zichtbaar = tapunit niet
geplaatst op biervat.
NEDERLANDS
Page 71

71
- Rood segment, maar niveau-indicatie niet zichtbaar = geen biervat
geïnstalleerd.
- Rood of groen segment met knipperend geel-oranje
achtergrondlicht = tapunit en/of slangetje niet goed geplaatst.
Verwijder het biervat en controleer of de tapunit en het slangetje
goed geplaatst zijn (zie hoofdstuk 'Klaarmaken voor gebruik', stappen
2 en 3).
Tips en aanbevelingen
◗ Als u snel bier wilt gaan tappen nadat u het biervat in het apparaat
heeft geplaatst, koel het biervat dan enige tijd in de koelkast
voordat u het in het apparaat plaatst.
C
◗ Nadat het biervat geopend is, blijft het bier nog 28 dagen
houdbaar indien het biervat in het apparaat bewaard wordt.
Zorg ervoor dat het apparaat altijd aanstaat wanneer er een biervat in
zit.
◗ Als u het apparaat wilt uitschakelen omdat u het langere tijd niet
gaat gebruiken (bijvoorbeeld omdat u op vakantie gaat),bewaar
het geopende biervat dan in de koelkast. Let op de houdbaarheid
van 28 dagen.Verwijder de tapunit van het biervat, spoel de
bovenzijde van het biervat schoon, spoel het bierslangetje schoon
en berg het bierslangetje samen met het biervat op in de koelkast.
◗ Vervang altijd het bierslangetje wanneer u een nieuw biervat gaat
gebruiken. Gebruik een bierslangetje nooit langer dan 28 dagen.
◗ Indien u gedurende 1 week geen bier heeft getapt,adviseren wij u
om gedurende 1 seconde het bier in een glas te laten stromen,
het glas schoon te spoelen met koud water voordat u een vers
biertje tapt.
Een perfect biertje tappen
Volg de onderstaande instructies om een perfect biertje te tappen.
Schone bierglazen
Gebruik altijd schone bierglazen wanneer u bier gaat tappen.
1 Reinig de glazen grondig in warm water met een beetje
afwasmiddel.
NEDERLANDS
Page 72

72
2 Spoel de glazen daarna grondig af met koud stromend
kraanwater.
Op deze manier verwijdert u alle vet- en zeepresten, waardoor u een
biertje met een goede schuimkraag kunt tappen.
3 Controleer of het glas vet- en zeepvrij is door het glas
ondersteboven tegen het licht te houden.
Het glas is schoon wanneer het water gelijkmatig langs het glas naar
beneden loopt, zonder vlekken zichtbaar te maken.
B
Tip: als u de bierglazen in de vaatwasmachine reinigt, gebruik dan geen
glansmiddel. Als er glansmiddel in de glazen blijft zitten, zal de
schuimkraag van het bier afgebroken worden.
Bier tappen
1 U bereikt het beste resultaat als u het bier in een gekoeld,
schoon en nat glas tapt!
B
Een koel glas garandeert een stabielere schuimkraag.
B
Een koel glas zorgt er ook voor dat het net getapte bier langer vers blijft
en zijn sprankelende eigenschap behoudt.
◗ NB: maak gebruikte glazen altijd schoon en spoel ze af voordat u
ze gebruikt voor het volgende biertje om te voorkomen dat
schuimresten van een vorige biertje een te grote
schuimontwikkeling in het nieuwe biertje veroorzaken.
2 Pak het glas altijd onderaan of in het midden vast om er zeker
van te zijn dat het schoon blijft.
C
3 Open de tapkraan in één snelle, vloeiende beweging.
Het bier stroomt alleen goed in het glas als de tapkraan volledig
geopend is.Als de tapkraan slechts half geopend is, wordt het bier door
de kraan heen geperst, waardoor het sterker gaat schuimen.
Laat het bier langs de binnenzijde van het glas stromen.
C
4 U kunt de hoogte van de schuimkraag variëren door de hoek
waaronder u het glas onder de tuit houdt en de afstand tussen
het glas en de tuit te variëren.
Hoe meer recht op en hoe dichterbij de tuit u het glas houdt, hoe
meer schuimvorming er optreedt.
◗ NB: voorkom dat het uiteinde van de tuit in aanraking komt met
het bierglas, het bier of de schuimkraag, omdat bierresten op de
tuit een nadelige invloed kunnen hebben op de schuimvorming
van het biertje.
NEDERLANDS
Page 73

73
5 Breng het glas langzaam in verticale stand terwijl u het biertje
tapt.
6 Vul het glas totdat het schuim bijna over de rand van het glas
loopt.
7 Sluit de tapkraan in één vloeiende beweging.
NB: de pomp kan aanslaan.
8 Europa (excl. Duitsland en Groot-Brittanië):Voor het beste
eindresultaat verwijdert u overtollig schuim van het glas door
na het tappen een afschuimer onder een hoek van 45c in één
vloeiende beweging over de rand van het glas te bewegen.
B
Laat de afschuimer nooit op het werkblad liggen, maar zet hem in een
schoon glas met vers koud water of spoel hem gelijk na gebruik af. Haal
de afschuimer slechts één keer over het glas, omdat vaker afschuimen
een negatieve invloed op de schuimkraag heeft.
◗ U heeft nu een perfect getapt biertje.
Een vers getapt biertje serveren
1 Droog de onderzijde van het glas door het over een doekje te
halen.
2 Leg een schoon bierviltje neer.
3 Pak het glas in het midden vast en zet het op het bierviltje met
het bierbeeldmerk (indien op het glas aanwezig) naar de
bierdrinker gericht.
NEDERLANDS
Page 74

74 NEDERLANDS
Brits
Spoel een glas om en laat het
uitlekken.
Houd het glas schuin, onder een
hoek van ongeveer 45c, onder
het uiteinde van de tuit.
Zet de tapkraan in één vloeiende
beweging volledig open.
Laat het bier langs de binnenzijde
van het glas stromen.
Laat de tuit niet in aanraking
komen met het glas, het bier of
het schuim.
De hoek waaronder u het glas
houdt bepaalt de uiteindelijke
hoogte van de schuimkraag. Hoe
meer u het glas rechtop houdt,
hoe hoger de schuimkraag zal zijn.
Vul het glas totdat het bier bijna
over de rand van het glas loopt.
Sluit de tapkraan in één vloeiende
beweging.
Haal het glas onder de tuit
vandaan, zodat er geen druppels
bier uit de tapkraan op de
schuimkraag kunnen vallen.
Uw biertje is nu klaar om
geserveerd te worden.
Duits
Spoel een glas om en laat het
uitlekken.
Houd het glas schuin, onder een
hoek van ongeveer 45c, onder
het uiteinde van de tuit.
Zet de tapkraan in één vloeiende
beweging volledig open.
Laat het bier langs de binnenzijde
van het glas stromen.
Laat de tuit niet in aanraking
komen met het glas, het bier of
het schuim.
De hoek waaronder u het glas
houdt bepaalt de uiteindelijke
hoogte van de schuimkraag. Hoe
meer u het glas rechtop houdt,
hoe hoger de schuimkraag zal zijn.
a. Laat bier in het glas lopen
totdat het voor tweederde met
bier en voor eenderde met
schuim is gevuld.
b. Sluit de tapkraan en laat het glas
1 minuut staan om de
schuimkraag tot rust te laten
komen.
c. Herhaal stappen 2 t/m 6 en tap
het glas tot de rand vol.
Sluit de tapkraan in één vloeiende
beweging.
Haal het glas onder de tuit
vandaan, zodat er geen druppels
bier uit de tapkraan op de
schuimkraag kunnen vallen.
Uw biertje is nu klaar om
geserveerd te worden.
Europees (m.u.v. Duitsland en
Groot-Brittannië)
Spoel een glas om en laat het
uitlekken.
Houd het glas naast het uiteinde
van de tuit.
Zet de tapkraan in één vloeiende
beweging volledig open.
Breng het glas schuin, in een hoek
van ongeveer 45c, onder de tuit
en laat het bier langs de
binnenzijde van het glas stromen.
Laat de tuit niet in aanraking
komen met het glas, het bier of
het schuim.
De hoek waaronder u het glas
houdt bepaalt de uiteindelijke
hoogte van de schuimkraag. Hoe
meer u het glas rechtop houdt,
hoe hoger de schuimkraag zal zijn.
Vul het glas totdat het bier bijna
over de rand van het glas loopt.
Sluit de tapkraan in één vloeiende
beweging.
a. Haal het glas onder de tuit
vandaan, zodat er geen druppels
bier uit de tapkraan op de
schuimkraag kunnen vallen.
b.Verwijder het schuim dat boven
de rand van het glas uitstijgt
door een afschuimer onder een
hoek van 45c over de rand van
het glas te halen.
Uw biertje is nu klaar om
geserveerd te worden.
Stap
1.
2.
3.
4.
5.
6.
7.
8.
9.
10.
3 verschillende taptradities
De manier waarop bier getapt wordt verschilt van land tot land. In deze tabel wordt in 10 stappen
uitgelegd hoe u een perfect biertje kunt tappen volgens 3 nationale tradities.
Page 75

75
Het biervat vervangen
Wanneer het biervat leeg is, komt er alleen nog schuim uit de tuit en
geen bier. Het display geeft aan dat het biervat leeg is. Dit betekent dat
u het biervat moet vervangen.
C
1 Open de deuren door op de ontgrendelknop te drukken.
Zorg ervoor dat u de deuren volledig opent.
C
2 Til de blauwe vergrendelarmen helemaal omhoog.
C
3 Kantel het biervat, met de tapunit daarop bevestigd,naar u toe
en neem het uit het apparaat.
C
4 Verwijder de tapunit van het biervat door op de
ontgrendelknoppen aan beide zijden van de tapunit te drukken
(1). De tapunit klikt hierdoor los van het biervat, waarna u de
tapunit kunt verwijderen (2).
U moet de tapunit van het biervat verwijderen voordat u het slangetje
kunt vervangen. De ontgrendelknop voor het ontgrendelen van het
slangetje werkt niet wanneer de tapunit op het biervat bevestigd is.
C
5 Houd de tapunit boven de gootsteen.
NEDERLANDS
Page 76

76
C
6 Druk op de blauwe ontgrendelknop om het bierslangetje te
verwijderen.
C
7 Trek het koppelstuk uit de tapunit en verwijder het
bierslangetje uit het tapkraanhuis.
NB: Maak de tapunit altijd schoon met warm water en indien nodig
een beetje afwasmiddel, voordat u een nieuw slangetje bevestigt.
8 Bevestig de tapunit op het biervat (zie hoofdstuk 'Klaarmaken
voor gebruik', 'Stap 2: de tapunit op het biervat plaatsen').
9 Plaats een nieuw slangetje in de tapunit (zie hoofdstuk
'Klaarmaken voor gebruik','Stap 3: bevestigen van het slangetje
in de tapunit').
10 Plaats het nieuwe biervat in het apparaat (zie hoofdstuk
'Klaarmaken voor gebruik','Stap 4: het biervat in het apparaat
plaatsen').
Schoonmaken
Maak het apparaat schoon wanneer u het biervat vervangt of wanneer
u het apparaat voor langere tijd opbergt.
Gebruik nooit schuursponzen of agressieve vloeistoffen zoals
schuurmiddelen, benzine of aceton om het apparaat schoon te maken.
1 Haal altijd de stekker uit het stopcontact voordat u het
apparaat schoon gaat maken.
2 Reinig de buitenkant van het apparaat met een vochtige doek.
C
3 Verwijder de tuit.
C
4 Verwijder de lekbak en neem de lekplaat eraf.
NEDERLANDS
Page 77

77
C
5 Verwijder de hendel van de tapkraan door deze uit het
tapkraanhuis te trekken.
6 Reinig de tapunit, de lekbak en de lekplaat met warm water en
indien nodig een beetje afwasmiddel.
Heet water kan brandwonden veroorzaken. Controleer altijd of het
water niet te heet is voordat u deze onderdelen onder de kraan
schoonspoelt.
◗ Alleen de lekbak, de lekplaat en de tuit van de tapkraan zijn
vaatwasmachinebestendig.
DE TAPUNIT IS NIET VAATWASMACHINEBESTENDIG!
Milieu
C
◗ Gooi het apparaat aan het einde van zijn levensduur niet weg met
het normale huisvuil, maar lever het in op een officieel
verzamelpunt om het te laten recyclen. Op deze wijze helpt u om
het milieu te beschermen.
Zorg ervoor dat u lege biervaten afvoert volgens de onderstaande
instructies om het milieu te beschermen.
Wat te doen met een leeg biervat
Controleer eerst of er statiegeld op het biervat zit of niet. Als er geen
statiegeld op het biervat zit, lees dan de instructies op de sticker op het
biervat.
Wat te doen met het koelelement
◗ Het koelelement binnenin het apparaat bevat een stof die
schadelijk kan zijn voor het milieu. Daarom moet u het
koelelement verwijderen voordat u het apparaat afdankt.
U kunt het apparaat ook naar een Philips servicecentrum brengen of
sturen, waar men het koelelement voor u zal verwijderen en ervoor zal
zorgen dat het op milieuvriendelijke wijze wordt verwerkt.
Verwijder het koelelement alleen wanneer u het apparaat afdankt!
Verwijder het koelelement op de volgende wijze:
1 Haal de stekker uit het stopcontact.
2 Open de deuren door op de ontgrendelknop te drukken.
◗ In de buurt van de scharnieren van de deuren bevinden zich aan
beide kanten twee gaten.
NEDERLANDS
Page 78

78
C
3 Verwijder met een schroevendraaier de vier schroeven in deze
gaten.
C
4 Verwijder de achterzijde van het apparaat.
C
5 Verwijder de ventilator door deze uit het apparaat te trekken.
◗ U ziet nu een aluminiumplaat met ribben en met twee
schroefgaten.
C
6 Draai de schroeven los met een schroevendraaier.
C
7 Verwijder de aluminiumplaat.
◗ Nadat u de aluminiumplaat verwijderd heeft, ziet u een witte plaat
van ongeveer 4 x 4 cm. Dit is het eigenlijke koelelement.
NEDERLANDS
Page 79

79
C
8 Plaats de platte kant van een schroevendraaier achter het
koelelement en wrik het koelelement los van de
aluminiumplaat door de schroevendraaier heen en weer te
bewegen.
C
9 Knip hierna de draden die aan het koelelement vastzitten door.
Sluit het apparaat niet meer aan op netspanning nadat u het
koelelement verwijderd heeft.
Monteer het koelelement nooit meer opnieuw in het apparaat nadat u
het verwijderd heeft!
10 Lever het koelelement in op een officieel verzamelpunt voor
chemisch afval.
Garantie & service
Als u informatie nodig heeft of als u een probleem heeft, bezoek dan
de Philips website (www.philips.com), of neem contact op met het
Philips Customer Care Centre in uw land (u vindt het telefoonnummer
in het 'worldwide guarantee' vouwblad). Als er geen Customer Care
Centre in uw land is, ga dan naar uw Philips dealer of neem contact op
met de afdeling Service van Philips Domestic Appliances and Personal
Care BV.
Wanneer u het apparaat naar uw dealer of een Philip servicecentrum
brengt om de oorzaak van een probleem te laten vaststellen, breng dan
ook het biervat en het slangetje mee.
Garantiebeperkingen
Uw garantie vervalt indien:
- u het apparaat niet volgens de instructies in deze gebruiksaanwijzing
gebruikt;
- u beschadigde biervaten in het apparaat gebruikt;
- u de biervaten niet volgens de instructies in het apparaat plaatst;
- u biervaten van andere leveranciers dan die vermeld staan in deze
gebruiksaanwijzing gebruikt.
◗ De biervaten en bierslangetjes vallen niet onder de garantie van
het apparaat.
NEDERLANDS
Page 80

80
Oplossing
Zorg ervoor dat er geen oud bier meer in de tapunit zit.
Maak de hele tapunit schoon met warm water en gebruik
indien nodig een beetje afwasmiddel.
Zorg ervoor dat er geen oud bier meer in de tapunit zit.
Maak de hele tapunit schoon met warm water en gebruik
indien nodig een beetje afwasmiddel.
Zorg ervoor dat u het biervat met de tapunit erop uit het
apparaat neemt voordat u de tapunit van het biervat
afneemt door op de ontgrendelknoppen te drukken.
Zorg ervoor dat de tapunit goed op het biervat bevestigd
is. Duw stevig op de tapunit wanneer u hem op het biervat
plaatst. Zie hoofdstuk 'Klaarmaken voor gebruik',
'Stap 2: de tapunit op het biervat bevestigen'.
Controleer of u de blauwe vergrendelarmen goed opgetild
heeft en druk ze stevig naar beneden.
Zorg ervoor dat u de blauwe vergrendelarmen omlaag
duwt tot ze horizontaal staan voordat u de deuren sluit.
Zorg ervoor dat het slangetje op de juiste manier in de
tapunit is geplaatst en de hendel rechtop staat.
Als dit probleem blijft optreden, neem dan contact op met
het Philips Customer Care Centre in uw land.
Haal eerst de tapunit van het biervat. Ontgrendel het
slangetje van de tapunit door op de ontgrendelknop te
drukken.
Zorg ervoor dat er geen bierresten meer in de tapunit
zitten door hem met warm water af te spoelen.
Controleer of u de blauwe vergrendelarmen goed opgetild
heeft en druk ze stevig naar beneden.
Zorg ervoor dat de deuren goed dicht zitten.Voor
instructies ten aanzien van het sluiten van de deuren zie
hoofdstuk 'Klaarmaken voor gebruik', 'Stap 4: het biervat in
het apparaat plaatsen'. Het is normaal dat er wat rijp zit op
de achterzijde van het biervat.
Zorg ervoor dat de tapunit op de juiste manier op het
biervat is geplaatst (zie hoofdstuk 'Klaarmaken voor
gebruik', 'Stap 2: de tapunit op het biervat bevestigen').
Zorg ervoor dat het slangetje op de juiste manier in de
tapunit is bevestigd (zie hoofdstuk 'Klaarmaken voor
gebruik', 'Stap 3: bevestigen van het slangetje in de
tapunit').
Probleem
Het is moeilijk om de tapunit op het biervat te bevestigen
Het is moeilijk om de ontgrendelknoppen op de tapunit in
te drukken.
Het is niet mogelijk het biervat met de tapunit erop in het
apparaat te plaatsen.
De deuren kunnen niet gesloten worden.
Het bier begint al te stromen wanneer het bierslangetje in
de tapunit wordt geplaatst.
Het display knippert.
Volg de instructies in 'Andere aanduidingen' in het
hoofdstuk 'Klaarmaken voor gebruik'.
Het slangetje kan niet uit de tapunit worden verwijderd.
Er zit rijp op het biervat of op het apparaat.
Er komt geen bier uit de tapkraan wanneer ik aan de
hendel trek.
Problemen oplossen
Als u het probleem niet kunt oplossen met behulp van de onderstaande informatie, neem dan
contact op met het Customer Care Centre in uw land (zie hoofdstuk 'Garantie & service') of met
het PerfectDraft call centre: 078-250159 in België, 01801-324000 in Duitsland of 0900-2224222 in
Nederland.
NEDERLANDS
Page 81

81
Oplossing
Als er geen bier meer in het biervat zit, plaats dan een
nieuw biervat in het apparaat. Kijk op het display om te
zien of er nog bier in het biervat zit.
Het bier is te warm.Wacht tot het apparaat het bier heeft
gekoeld tot een temperatuur van 4cC of lager.Let op de
biertemperatuur die aangegeven staat op het display. Het
apparaat moet niet worden blootgesteld aan direct zonlicht
en moet geplaatst worden in een omgeving met een
omgevingstemperatuur tussen 3c and 25c.
Het biervat is te veel geschud. Wacht een half uur om het
bier tot rust te laten komen.
Zorg ervoor dat de tapkraan volledig geopend is wanneer
u bier tapt.
Het eerste glas kan meer schuim bevatten dan gewoonlijk.
Probeer een tweede of derde glas te tappen.
Het slangetje werkt waarschijnlijk niet naar behoren. Neem
contact op met het Philips Customer Care Centre in uw
land.
Het biervat is leeg. Plaats een nieuw biervat in het apparaat
(zie hoofdstuk 'Het biervat vervangen').
Controleer of het vat meer dan 28 dagen open is en
controleer of de houdbaarheidsdatum van het vat
verlopen is.
De gebruikte glazen waren niet schoon genoeg. Reinig de
glazen met water en een beetje afwasmiddel. Spoel ze
daarna grondig af met koud water om alle zeep- en
vetresten te verwijderen.
Het apparaat moet voortdurend op het net aangesloten
blijven om het bier in een geopend vat koel te houden.
De aangegeven temperatuur op het display moet 4cC of
lager zijn.
Tap bier op de op het vat aangegeven wijze of zoals
aangegeven in deze gebruiksaanwijzing.
Laat de tuit niet in contact komen met het glas, het bier of
de schuimkraag.
De gebruikte glazen waren niet schoon genoeg. Reinig de
glazen met water en een beetje afwasmiddel. Spoel ze
daarna grondig af met koud water om alle zeep- en
vetresten te verwijderen.
Zorg dat het bier koud is en het display een temperatuur
van 4cC of lager aangeeft.
Plaats het apparaat in een omgeving met een
omgevingstemperatuur tussen 3cC and 25cC en laat een
ruimte van ten minste 10 cm vrij achter en aan beide
zijden van het apparaat. Stel het apparaat niet bloot aan
direct zonlicht.
Als het vat ongeopend is en u geen zichtbare schade ziet,
kunt u het vat proberen te gebruiken.Wanneer het vat al
open was, kunt u het niet meer gebruiken.
Probleem
Er komt te veel schuim uit het apparaat.
Het bier dat uit het apparaat komt is dood.
De schuimkraag zakt heel snel in.
De temperatuur op de display gaat omhoog.
Het biervat is gevallen. Kan ik het nog steeds gebruiken?
NEDERLANDS
Page 82

82
Oplossing
Zorg ervoor dat u de tapunit met warm water reinigt
voordat u er een nieuw slangetje in plaatst.
Tap ten minste eenmaal per week een glas bier uit een
geopend vat.
Reinig altijd de tapunit en plaats een nieuw slangetje
wanneer u een nieuw biervat gaat installeren.
Zorg dat u schone glazen gebruikt.
Zorg ervoor dat het apparaat steeds op netstroom
aangesloten blijft.Wanneer een biervat open is en gekoeld
wordt, blijft het bier 28 dagen vers. Controleer de
houdbaarheidsdatum voordat u een nieuw biervat
installeert.
Wanneer er een stroomstoring is geweest of de stekker
van het apparaat uit het stopcontact is geweest, zal de
niveau-indicatie weer de juiste waarde aangeven nadat u 1
of 2 glazen bier heeft getapt.
Haal de stekker uit het stopcontact, wacht 5 seconden en
steek de stekker dan weer in het stopcontact.
Tap 1 glas bier (van ten minste 250 ml) door de hendel
van de kraan snel en volledig te openen (om
schuimontwikkeling te voorkomen).
Zorg ervoor dat de temperatuur in het apparaat 4cC of
lager is door het apparaat te plaatsen op een plek waar de
omgevingstemperatuur tussen 3cC en 30cC ligt en zorg
dat er achter en aan beide zijden van het apparaat ten
minste 10 cm vrije ruimte is.
Zorg dat er achter en aan beide zijden van het apparaat
ten minste 10 cm vrije ruimte is om het apparaat goed te
laten functioneren.
Zorg ervoor dat het apparaat gebruikt wordt bij een
omgevingstemperatuur tussen 3cC en 25cC. Stel het
apparaat niet bloot aan direct zonlicht.
Zorg ervoor dat het biervat niet warmer is dan 23cC
wanneer u het in het apparaat plaatst. Als het biervat
warmer is dan 23cC; zal een langere koeltijd nodig zijn.
Controleer of de luchtuitlaat van de ventilator aan de
achterzijde van het apparaat vrij is van stof en/of andere
deeltjes.
De pomp kan aangaan wanneer u een glas bier aan het
tappen bent om het vat op druk te houden. De pomp kan
ook zo nu en dan aangaan om het apparaat op druk te
houden.
Probleem
Het is moeilijk het slangetje in de tapunit te plaatsen.
Het bier smaakt slecht.
Het display toont niet de juiste hoeveelheid.
Het apparaat koelt het bier onvoldoende.
Het apparaat maakt een geluid.
NEDERLANDS
Page 83

NEDERLANDS 83
Internetadres
www.perfectdraft.nl
www.perfectdraft.nl
www.perfectdraft.nl
www.perfectdraft.nl
www.stella-artois.be
www.jupiler.be
-
Telefoonnummer
0900-2224222 EUR 0.05
p/m
0900-2224222 EUR 0.05
p/m
0900-2224222 EUR 0.05
p/m
0900-2224222 EUR 0.05
p/m
070-222918
070-222912
0035-2802131999
Merk
Dommelsch
Hertog Jan
Jupiler
Bavaria
Stella Artois
Jupiler
Diekirch
Land
Nederland
België
Luxemburg
Biervatleveranciers
Als u informatie over het biervat wilt of als u een probleem heeft met het biervat, neem dan contact
op met de leverancier van het biervat in uw land. U vindt het telefoonnummer in de onderstaande
tabel.
Page 84

84
Page 85

85
Page 86

u
4222 001 96407
www.philips.com
 Loading...