

Page 1
Always there to help you
Register your product and get support at
www.philips.com/welcome
Question?
Contact
Philips
HD3134
Мультиварка
Мультипісіргіш
Мультиварка
1
a
k
j
i
2
3
6
9
EN User manual
RU Руководство пользователя
UK Посібник користувача
b
c
d
l
m
n
www.philips.com/welcome
User manual
www.philips.com/welcome
Safety leaflet
www.philips.com/welcome
Warranty
www.philips.com/welcome
Recipe
s
r
q
h
g
f
e
4
5
7
8
10
3 sec
Изготовитель:
“Филипс Консьюмер Лайфстайл Б.В.”, Туссендиепен 4, 9206
АД, Драхтен, Нидерланды
Импортер на территорию России и Таможенного Союза:
ООО "ФИЛИПС", Российская Федерация, 123022 г.
Москва, ул. Сергея Макеева, д.13, тел. +7 495 961-1111
Сделано в Китае
Дата производства указана в серийном номере
устройства. Например, “XP1A1347000001” означает, что
изделие было произведено на 47-ой неделе 2013 года.
Specifications are subject to change without notice
© 2014 Koninklijke Philips N.V.
All rights reserved.
HD3134_UM_RU_V2.0_141125
English
1 Your multi-cooker
Congratulations on your purchase, and welcome to Philips!
To fully benet from the suppor t that Philips offers, register your
product at www.Philips.com/welcome.
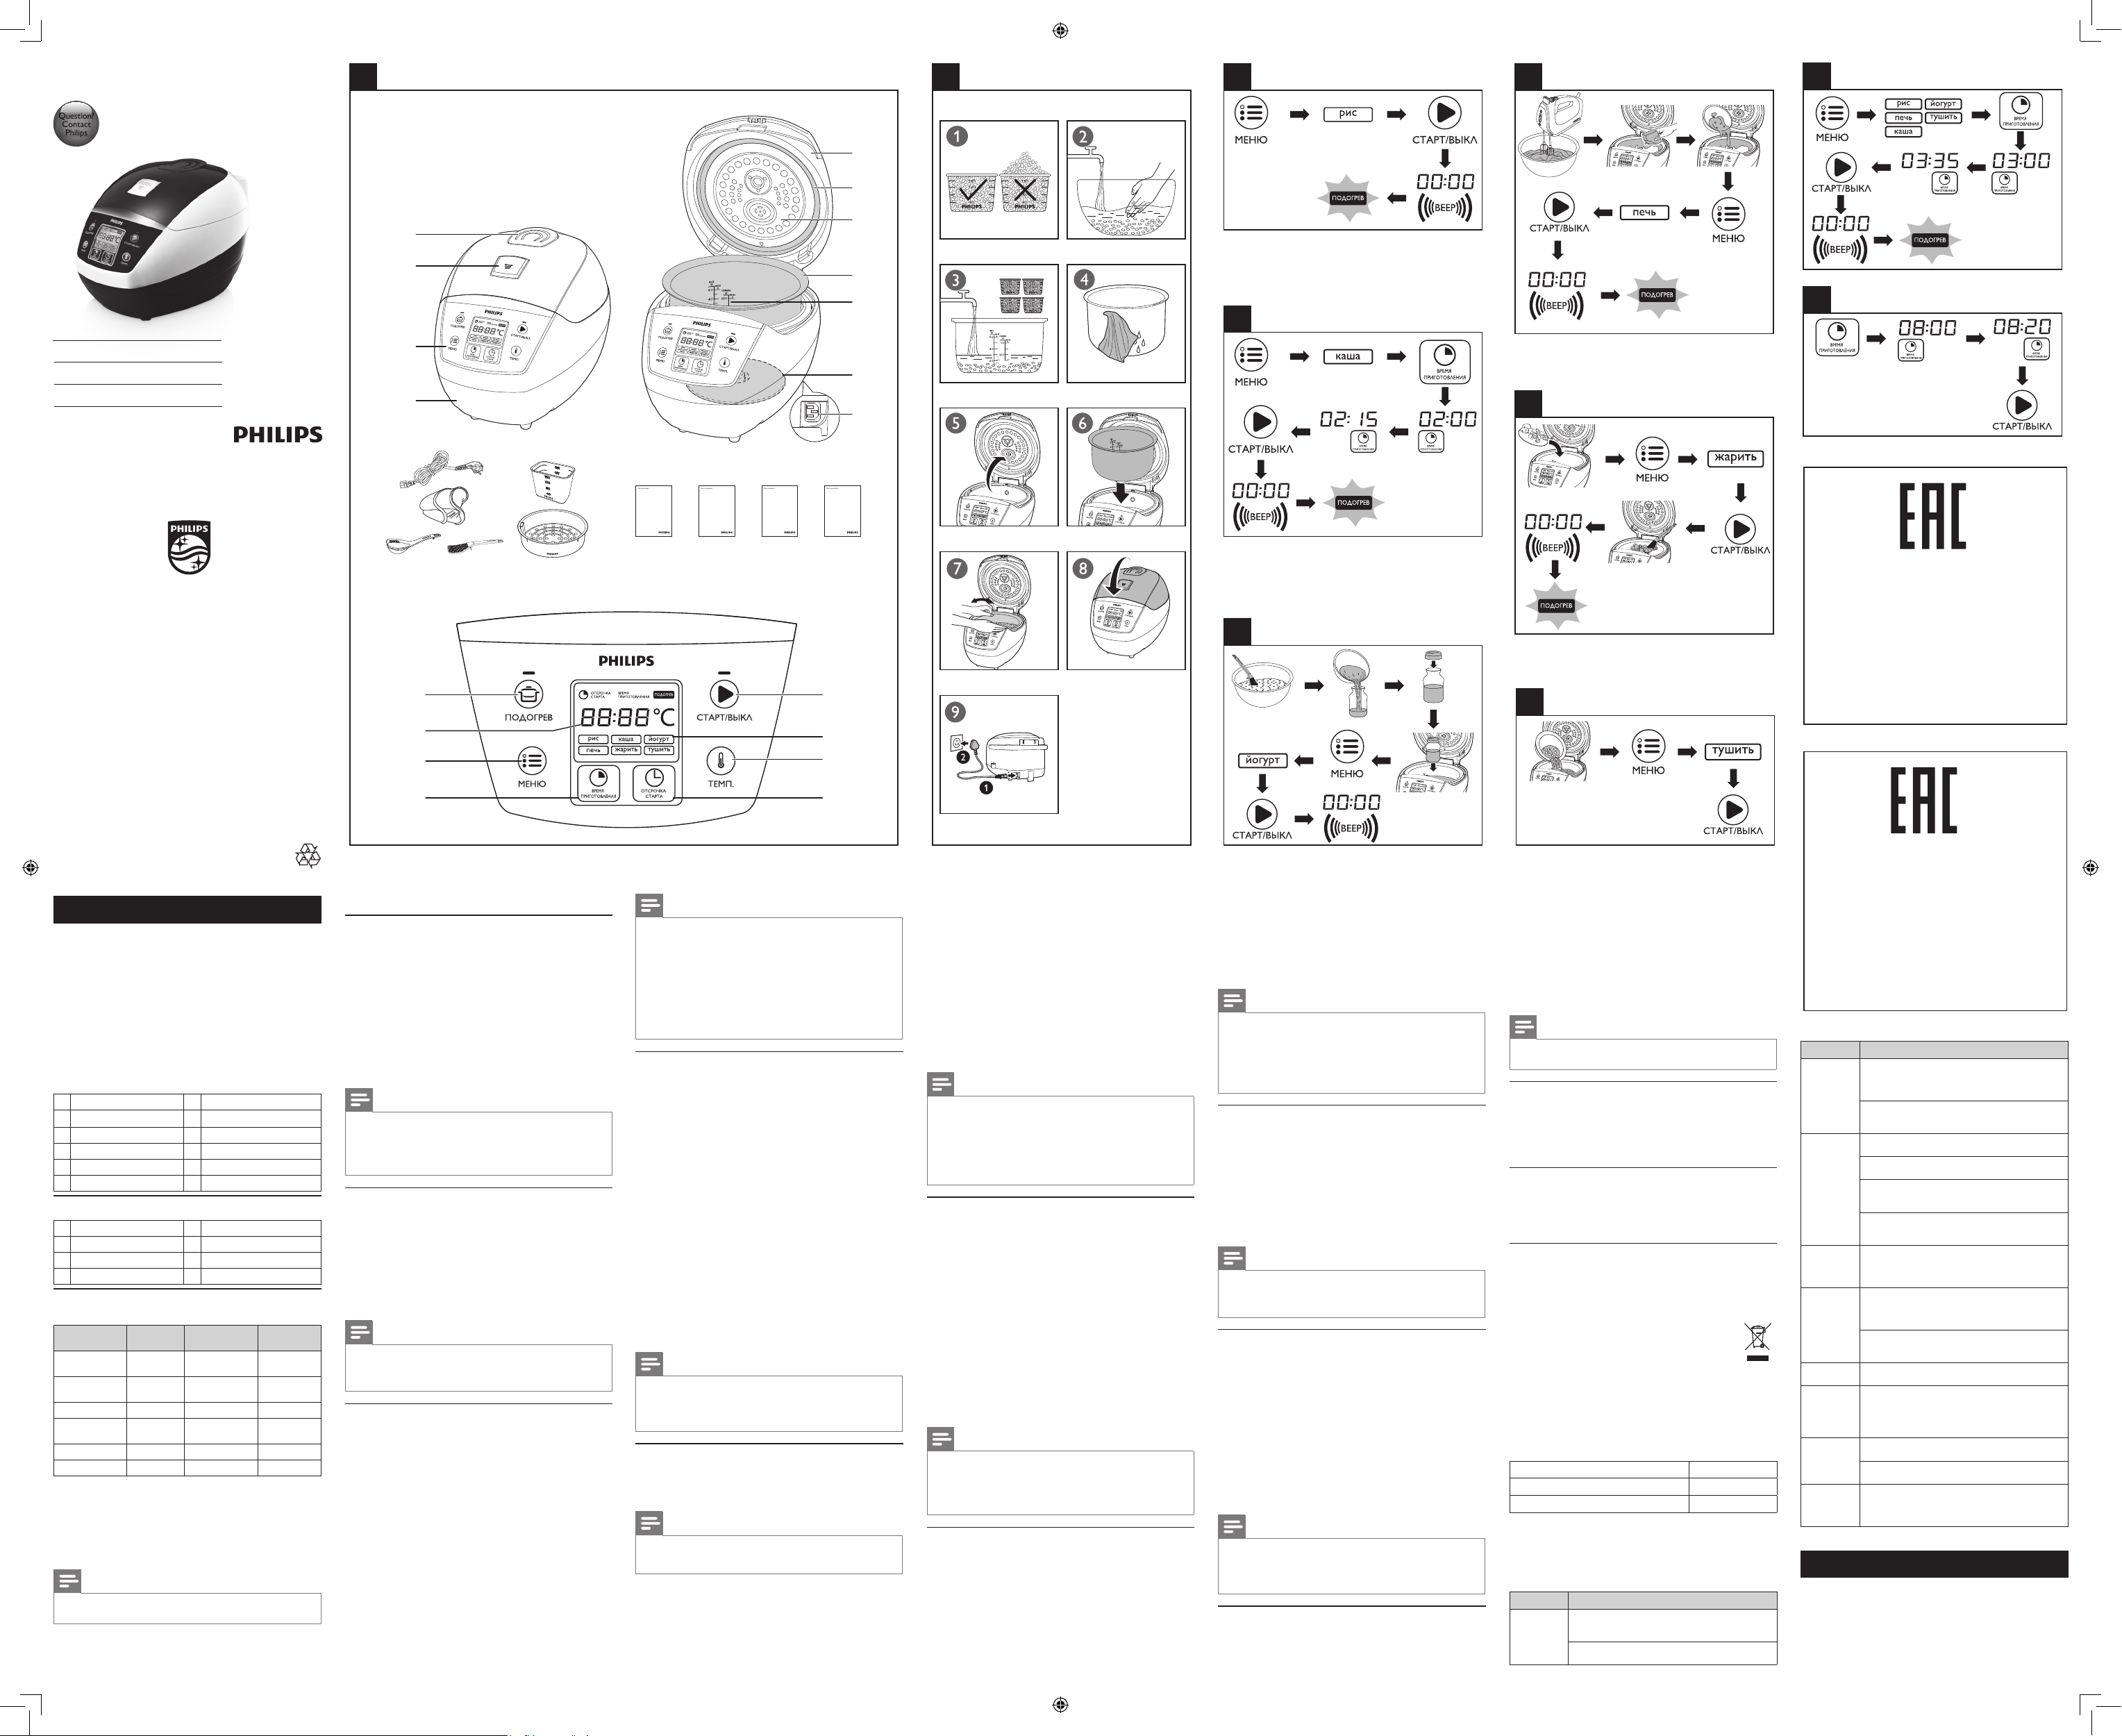
2 What’s in the box (fig.1)
Multi-cooker main unit Steamer
Rice scoop Soup ladle
Silicon gloves Measuring cup
User manual Safety leaet
Recipe Warranty card
3 Overview
a
Detachable steam vent capgWater level indications
b
Lid release button
c
Control panel
d
Main body
e
Power socket
f
Heating element
Controls overview
l
Keep-warm button
m
Display
n
Menu button
o
Cooking time button
Functions overview
Functions Default
Rice (рис) 30 - 40
Congee (каша)
Fry (жарить) 15 Minutes 5 - 60 minutes /
Stew (тушить)
Bake (печь) 45 Minutes 20 - 120 minutes 1 - 24 hours
Yogur t (йогурт) 8 hours 6 - 12 hours 1 - 24 hours
cooking time
Minutes
10 Minutes
1 hour
4 Before first use
1 Take out all the accessories from the inner pot. Remove the
packaging material of the inner pot.
2 Clean the parts of the multi-cooker thoroughly before using it for
the rst time (see chapter ‘Cleaning and Maintenance’).
Note
•
Make sure all parts are completely dr y before you start using the multicooker.
h
Inner pot
i
Detachable inner lid
j
Sealing ring
k
Top lid
p
Preset button
q
Temperature button
r
Cooking functions
s
Start/Off button
Adjustable
cooking time
/ 1 - 24 Hours
5 minutes - 2
hours
20 minutes - 10
hours
Preset time
1 - 24 Hours
1 - 24 Hours
o
5 Using the multi-cooker
Preparations before cooking (g.2)
Before using the multi-cooker, you need to follow below preparations:
1 Measure the rice using the measuring cup provided.
2 Wash the rice thoroughly.
3 Put the pre-washed rice in the inner pot.
4 Add water to the level indicated on the scale inside the inner pot
that corresponds to the number of cups of rice used. Then smooth
the rice surface.
5 Press the lid release button to open the lid.
6 Wipe the outside of the inner pot dry, then put the inner pot in
the multi-cooker. Check if the inner pot is in proper contact with
the heating element.
7 Close the lid of the multi-cooker, and put the plug in the power
socket.
Note
•
Each cup of uncooked rice normally gives 2 bowls of cooked rice. 1 cup of
rice is approximately 180ml.
• The level marked inside the inner pot is just an indication. You can always
adjust the water level for different types of rice and your own preference.
• Make sure that the outside of the inner pot is clean and dry, and that
there is no foreign residue on the heating element or the magnetic switch.
Rice cooking (g.3)
1 Follow the steps in “Preparations before cooking”.
2 Press the menu button (МЕНЮ) until the rice cooking function
(Рис) is selected.
» The default cooking time starts ashing on the display.
3 Press the start button (СТАРТ/ВЫКЛ) to star t cooking.
4 When the cooking is nished, you will hear a few beeps and the
selected cooking function light will be off.
5 The multi-cooker will be in keep-warm mode automatically.
» Keep-warm (ПОДОГРЕВ) is indicated on the display.
Note
•
After the cooking has started, you can press the start/off button (СТАРТ/
ВЫКЛ) to deactivate the cooking process, and the multi-cooker will be in
standby mode.
• The default cooking time is 30 to 40 minutes, and is not adjustable.
Cooking congee (g.4)
1 Follow the steps in “Preparations before cooking”.
2 Press the menu button (МЕНЮ) until the congee function (каша)
is selected.
» The default cooking time starts ashing on the display.
3 To set a different cooking time, press the cooking time button
(ВРЕМЯ ПРИГОТОВЛЕНИЯ), and the hour unit starts ashing
on the display.
4 Press the cooking time button (ВРЕМЯ ПРИГОТОВЛЕНИЯ)
repeatedly to set the hour unit.
5 Once the hour unit is set, wait for a few seconds before the multi-
cooker automatically conrms the hour unit, and the minute unit
starts ashing on the display.
6 Press the cooking time button (ВРЕМЯ ПРИГОТОВЛЕНИЯ)
repeatedly to set the minute unit.
7 After the cooking time is set, press the start button (СТАРТ/
ВЫКЛ) to start cooking.
8 When the cooking is nished, you will hear a few beeps and the
selected cooking function light will be off.
9 The multi-cooker will be in keep-warm mode automatically.
» Keep-warm (ПОДОГРЕВ) is indicated on the display.
p
Note
•
Do not exceed the volume indicated nor exceed the maximum water level
indicated in the inner pot, as this may cause the multi-cooker to overow.
• It is normal to nd the congee stickier if it is left in keep-warm mode for
too long.
• If the voltage is unstable at the area you live, it is possible that the multi-
cooker overows.
• After the cooking has star ted, you can press the start/off button (СТАРТ/
ВЫКЛ) to deactivate the cooking process, and the multi-cooker will be in
standby mode.
• In congee mode, the cooking time only starts counting down when the
water starts boiling.
• The default cooking time is 10 minutes. You can select the cooking time
between 5 minutes to 2 hours.
Making yogurt (g.5)
1 Whisk the ingredients for the yogurt well and put them in a glass
container.
2 Put the glass container in the inner pot. Make sure that the
container is sealed.
3 Pour some water in the inner pot. Make sure that half of the
container is immersed in water.
4 Follow steps 6 and 7 in “Preparations before cooking”.
5 Press the menu button (МЕНЮ) until the yogurt function
(йогурт) is selected.
» The default cooking time starts ashing on the display.
6 To set a different cooking time, press the cooking time button
(ВРЕМЯ ПРИГОТОВЛЕНИЯ), and the hour unit starts ashing
on the display.
7 Press the cooking time button (ВРЕМЯ ПРИГОТОВЛЕНИЯ)
repeatedly to set the hour unit.
8 Once the hour unit is set, wait for a few seconds before the multi-
cooker automatically conrms the hour unit, and the minute unit
starts ashing on the display.
9 Press the cooking time button (ВРЕМЯ ПРИГОТОВЛЕНИЯ)
repeatedly to set the minute unit.
10 After the cooking time is set, press the star t button (СТАРТ/
ВЫКЛ) to start cooking.
11 When the cooking is nished, you will hear a few beeps and the
selected cooking function light will be off.
12 The multi-cooker will be in standby mode automatically.
Note
•
After the cooking has started, you can press the start/off button (СТАРТ/
ВЫКЛ) to deactivate the cooking process, and the multi-cooker will be in
standby mode.
• The default cooking time is 8 hours. You can select the cooking time
between 6 to 12 hours.
Baking (g.6)
1 Put the food and ingredients in the inner pot.
2 Follow step 6 in “Preparations before cooking”.
3 Put the plug in the power socket.
Note
•
When baking cake, keep the lid closed during cooking. Baking cake at
130°C and by 45 minutes usually delivers best cooking result.
• When baking food other than cake, the lid must be opened during cooking.
4 Press the menu button (МЕНЮ) until the baking function (печь)
is selected.
» The default cooking time starts ashing on the display.
5 To set a different cooking temperature, press the temperature
button (ТЕМП.), and the default cooking temperature starts
ashing on the display.
6 Press the temperature button (ТЕМП.) repeatedly to select the
cooking temperature.
7 To set a different cooking time, press the cooking time button
(ВРЕМЯ ПРИГОТОВЛЕНИЯ), and the hour unit starts ashing
on the display.
8 Press the cooking time button (ВРЕМЯ ПРИГОТОВЛЕНИЯ)
repeatedly to set the hour unit.
9 Once the hour unit is set, wait for a few seconds before the multi-
cooker automatically conrms the hour unit, and the minute unit
starts ashing on the display.
10 Press the cooking time button (ВРЕМЯ ПРИГОТОВЛЕНИЯ)
repeatedly to set the minute unit.
11 After the cooking time is set, press the star t button (СТАРТ/
ВЫКЛ) to start cooking.
12 When the baking is nished, you will hear a few beeps and the
selected function light will be off.
13 The multi-cooker will be in keep-warm mode automatically.
» Keep-warm (ПОДОГРЕВ) is indicated on the display.
Note
•
When removing the inner pot from the multi-cooker, use a kitchen glove
or a cloth, as the inner pot will be very hot.
• After the cooking has star ted, you can press the start/off button (СТАРТ/
ВЫКЛ) to deactivate the cooking process, and the multi-cooker will be in
standby mode.
• The default cooking time is 45 minutes. You can select the cooking time
from 20 minutes to 2 hours.
• The default cooking temperature is 100°C . You can select the temperature
between 40°C to 160°C.
Frying (g.7)
1 Put food and ingredients into the inner pot.
2 Follow step 6 in “Preparations before cooking”.
3 Put the plug in the power socket.
4 Press the menu button (МЕНЮ) until the frying function (жарить)
is selected.
» The default cooking time starts ashing on the display.
5 To set a different cooking time, press the cooking time button
(ВРЕМЯ ПРИГОТОВЛЕНИЯ), and the minute unit starts ashing
on the display.
6 Press the cooking time button (ВРЕМЯ ПРИГОТОВЛЕНИЯ)
repeatedly to set the minute unit.
7 After the cooking time is set, press the start button (СТАРТ/
ВЫКЛ) to start cooking.
8 During cooking, stir the food constantly using a spatula.
9 When the cooking is nished, you will hear a few beeps and the
selected cooking function light will be off.
10 The multi-cooker will be in keep-warm mode automatically.
» Keep-warm (ПОДОГРЕВ) is indicated on the display.
Note
•
Do not close the top lid when cooking in the fry mode.
• After the cooking has star ted, you can press the start/off button (СТАРТ/
ВЫКЛ) to deactivate the cooking process, and the multi-cooker will be in
standby mode.
• The default cooking time is 15 minutes. You can select the cooking time
between 5 to 60 minutes.
Stewing (g.8)
1 Follow steps 6 and 7 in “Preparations before cooking”.
2 Press the menu button (МЕНЮ) until the stewing function
(тушить) is selected.
» The default cooking time starts ashing on the display.
3 To set a different cooking time, press the cooking time button
(ВРЕМЯ ПРИГОТОВЛЕНИЯ), and the hour unit starts ashing
on the display.
4 Press the cooking time button (ВРЕМЯ ПРИГОТОВЛЕНИЯ)
repeatedly to set the hour unit.
5 Once the hour unit is set, wait for a few seconds before the multi-
cooker automatically conrms the hour unit, and the minute unit
starts ashing on the display.
6 Press the cooking time button (ВРЕМЯ ПРИГОТОВЛЕНИЯ)
repeatedly to set the minute unit.
7 After the cooking time is set, press the start button (СТАРТ/
ВЫКЛ) to start cooking.
8 When the cooking is nished, you will hear a few beeps and the
selected cooking function light will be off.
9 The multi-cooker will be in keep-warm mode automatically.
» Keep-warm (ПОДОГРЕВ) is indicated on the display.
Note
•
Do not exceed the volume indicated nor exceed the maximum water
level indicated in the inner pot, as this may cause the multi-cooker to
overow.
• After the cooking has star ted, you can press the start/off button (СТАРТ/
ВЫКЛ) to deactivate the cooking process, and the multi-cooker will be in
standby mode.
• The default cooking time is 1 hour. You can select the cooking time
between 20 minutes to 10 hours.
Keep-warm mode
The multi-cooker provides you with easy control over the keep-warm
mode.
• After you have selected the cooking function using the menu
button (МЕНЮ), if you press the start button (СТАРТ/ВЫКЛ)
directly, the keep-warm indicator will light up. After the cooking is
nished, the multi-cooker will switch to keep-warm mode directly.
• After you have selected the cooking function using the menu
button (МЕНЮ), if you press the keep-warm button rst, and
then the start button (СТАРТ/ВЫКЛ), the keep-warm indicator
will be off. After the cooking is nished, the multi-cooker will be in
standby mode.
Note
•
In standby mode, you can press the keep-warm button (ПОДОГРЕВ) to
enter keep-warm mode.
• In keep-warm mode, you can press the keep-warm button (ПОДОГРЕВ)
to enter standby mode.
Preset time for delayed cooking (g.9)
You can preset the delayed cooking time for different cooking modes.
1 Follow steps 6 and 7 in “Preparations before cooking”.
2 Press the menu button (МЕНЮ) to select a cooking function.
3 Press the preset button (ОТСРОЧКА).
» The default preset time starts ashing on the display.
4 Press the preset button (ОТСРОЧКА) repeatedly to select the
desired preset time.
5 After the preset time is set, press the start button (СТАРТ/
ВЫКЛ) to start cooking.
6 The cooking process will be nished when the preset time has
elapsed. You will hear a few beeps and the selected cooking
function light will be off.
7 The multi-cooker will be in keep-warm mode automatically.
» The keep- warm (ПОДОГРЕВ) indicator lights up.
Note
•
The preset function is not available in fry mode (жарить).
• The preset button is not responsive in standby mode.
• Before setting the preset time, you may set the cooking time rst.
• The default preset time is 4 hours. You can select the preset time between
1 to 24 hours.
Setting up the clock (g.10)
You can set up the clock on your multi-cooker when it is in standby
mode.
1 Press and hold the cooking time button (ВРЕМЯ
ПРИГОТОВЛЕНИЯ) for 3 seconds, and the hour unit starts
ashing on the display.
2 Press the cooking time button (ВРЕМЯ ПРИГОТОВЛЕНИЯ)
repeatedly to set the hour unit.
3 Once the hour unit is set, wait for a few seconds before the multi-
cooker automatically conrms the hour unit, and the minute unit
starts ashing on the display.
4 Press the cooking time button (ВРЕМЯ ПРИГОТОВЛЕНИЯ)
repeatedly to set the minute unit.
5 After the minute unit is set, press the start button (СТАРТ/ВЫКЛ)
to conrm the clock.
6 Cleaning and Maintenance
Note
•
Unplug the multi-cooker before starting to clean it.
• Wait until the multi-cooker has cooled down sufciently before cleaning it.
Interior
Inside of the top lid and the main body:
• Wipe with wrung out and damp cloth.
• Make sure to remove all the food residues stuck to the multi-cooker.
Heating element:
• Wipe with wrung out and damp cloth.
• Remove food residues with wrung out and damp cloth.
Exterior
Surface of the top lid and outside of the main body:
• Wipe with a cloth damped with soap water.
• Only use soft and dr y cloth to wipe the control panel.
• Make sure to remove all the food residues around the control
panel.
Accessories
Rice scoop, soup ladle, inner pot, steamer, and steam vent cap:
• Soak in hot water and clean with sponge.
7 Environment
Do not throw away the appliance with normal household
waste at the end of its life, but hand it in at an ofcial
collection point for recycling. By doing this, you can help to
preserve the environment.
8 Guarantee and service
If you need service or information, or if you have a problem, visit the
Philips website at www.philips.com or contact the Philips Customer
Care Center in your country. You can nd its phone number in the
worldwide guarantee leaet. If there is no Customer Care Center in
your country, go to your local Philips dealer.
9 Specifications
Model Number HD3134
Rated power output 650W
Rated capacity 3.0L
10 Troubleshooting
If you encounter problems when using this multi-cooker, check the
following points before requesting service. If you cannot solve the
problem, contact the Philips Consumer Care Center in your country.
Problem Solution
The light on
the button
does not
go on.
There is a connection problem. Check if the power
cord is connected to the multi-cooker properly and if
the plug is inserted rmly into the power outlet.
The light is defective. Take the appliance to your Philips
dealer or a service center authorized by Philips.
Өндіруші:
“Филипс Консьюмер Лайфстайл Б.В.”, Туссендиепен 4, 9206
АД, Драхтен, Нидерланды
Ресей және Кедендік Одақ территориясына импорттаушы:
"ФИЛИПС" ЖШҚ, Ресей Федерациясы, 123022 Мәскеу
қаласы, Сергей Макеев көшесі, 13-үй, тел. +7 495 961-1111
Қытайда жасап шығарылған
Өнімнің сериялық нөмірінен өндірілген күнін табуға болады.
Мысалы, «XP1A1347000001» өнімнің 2013 жылдың 47-ші
аптасында шығарылғанын білдіреді.
Problem Solution
The display
does not
function.
The rice is
not cooked.
The rice is
too dry and
not well
cooked.
The multicooker does
not switch
to the keepwarm mode
automatically.
The rice is
scorched.
Water spills
out of the
multi-cooker
during
cooking.
Rice smells
bad after
cooking
Error message
(E1, E2, E3, or
E4) appears
on the display.
The multi-cooker is not connected to the power
supply. If there is no power supply, the power failure
backup function does not work and the display does
not function.
The battery for the display runs out of power. Take the
appliance to your Philips dealer or a service center
authorized by Philips to have the battery replaced.
You didn't press the star t button (СТАРТ/ВЫКЛ)
after the cooking function is selected.
There is not enough water. Add water according to
the scale on the inside of the inner pot.
Make sure that there is no foreign residue on the
heating element and the outside of the inner pot
before switching the multi-cooker on.
The heating element is damaged, or the inner pot
is deformed. Take the multi-cooker to your Philips
dealer or a service center authorized by Philips.
Add more water to the rice, and cook for a bit
longer.
You might have pressed the keep-warm button
(ПОДОГРЕВ) before pressing the start button
(СТАРТ/ВЫКЛ). In this case the multi-cooker will be
in standby mode after the cooking is nished.
The temperature control is defective. Take the
appliance to your Philips dealer or a service center
authorized by Philips.
You have not rinse the rice proper ly. Rinse the rice
until the water runs clear.
Make sure that you add water to the level indicated
on the scale inside the inner pot that corresponds to
the number of cups of rice used.
Clean the inner pot with some washing detergent
and warm water.
After cooking, make sure the steam vent cap, inner lid
and inner pot is cleaned thoroughly.
There has been a power failure during cooking. Take
the appliance to your Philips dealer or a service
center authorized by Philips.
Русский
1 Мультиварка
Поздравляем с покупкой, и добро пожаловать в клуб Philips!
Чтобы воспользоваться всеми преимуществами поддержки Philips,
зарегистрируйте приобретенное устройство на сайте www.
philips.com/welcome.
Page 2

2 Комплект поставки (рис. 1)
Мультиварка Пароварка
Ложка для риса Половник для супа
Силиконовые перчатки Мерный стакан
Руководство пользователя Инструкции по безопасности
Рецепт Гарантийная карточка
3 Описание
a
Съемная крышка
отверстия выхода пара
b
Кнопка открывания
крышки
c
Панель управления
d
Основной корпус
e
Разъем питания
f
Нагревательный элемент
Описание элементов управления
l
Кнопка режима поддержания
температуры
m
Дисплей
n
Кнопка меню
o
Кнопка выбора времени
приготовления
Обзор функций
Функции Время при-
Рис (рис) 30—40 минут / 1 — 24 часа
Каша (каша)
Обжаривание
(жарить)
Тушение
(тушить)
Выпечка (печь) 45 минут 20 — 120 минут 1 — 24 часа
Йогурт (йо-
гурт)
готовления,
установленное
по умолчанию
10 минут
15 минут 5 — 60 минут /
1 час
8 часов 6—12 часов 1 — 24 часа
g
Индикация уровня воды
h
Внутренняя емкость
i
Съемная внутренняя крышка
j
Уплотнительное кольцо
k
Верхняя крышка
p
Кнопка отсрочки
старта
q
Кнопка нагрева
r
Функции приготовления
s
Кнопка включения/
выключения
Регулируемое
время приготовления
5 минут —
2 часа
20 минут —
10 часов
Время
отсрочки
старта
1 — 24 часа
1 — 24 часа
4 Перед первым использованием
1 Извлеките все принадлежности из внутренней емкости.
Снимите с внутренней емкости упаковочные материалы.
2 Тщательно очистите все детали мультиварки перед первым
использованием (см. главу «Очистка и уход»).
Примечание
•
Перед использованием мультиварки убедитесь, что все части
являются абсолютно сухими.
5 Использование мультиварки
Подготовка к работе (рис. 2)
Перед использованием мультиварки выполните следующие
действия.
1 Измерьте количество риса с помощью прилагаемого мерного
стакана.
2 Тщательно промойте рис.
3 Поместите предварительно промытый рис во внутреннюю
емкость.
4 Добавьте воду до уровня, указанного на шкале во внутренней
емкости, в соответствии с количеством используемых чашек
риса. Разгладьте поверхность риса.
5 Откройте крышку, нажав кнопку открывания крышки.
6 Протрите внешнюю поверхность внутренней емкости,
установите емкость в мультиварку. Убедитесь, что внутренняя
емкость касается нагревательного элемента должным
образом.
7 Закройте крышку мультиварки, вставьте сетевую витку в
розетку сети.
Примечание
•
В результате приготовления одной чашки сырого риса обычно
получается 2 чаши готового риса. Емкость 1 чашки риса составляет
примерно 180 мл.
• Уровень, отмеченный во внутренней емкости, является
рекомендованным. Вы всегда можете изменить его в соответствии с
видом риса и собственными предпочтениями.
• Убедитесь, что внешняя поверхность внутренней емкости является
сухой и чистой, а на нагревательном элементе и магнитном
переключателе отсутствуют загрязнения.
Приготовление риса (рис. 3)
1 Следуйте инструкциям в главе «Подготовка к работе».
2 С помощью кнопки меню (МЕНЮ) выберите функцию
приготовления риса (Рис).
» На дисплее начнет мигать время приготовления,
установленное по умолчанию.
3 Для запуска процесса приготовления нажмите кнопку
включения (СТАРТ/ВЫКЛ).
4 По окончании приготовления прозвучит несколько звуковых
сигналов, индикатор выбранной функции погаснет.
5 Мультиварка автоматически перейдет в режим поддержания
температуры.
» На дисплее появится индикация режима поддержания
температуры (ПОДОГРЕВ).
Примечание
•
После запуска процесса приготовления для отключения программы
нажмите кнопку включения/выключения (СТАРТ/ВЫКЛ). Мультиварка
перейдет в режим ожидания.
• Время приготовления по умолчанию составляет 30—40 минут,
изменить его нельзя.
Приготовление каши конджи (рис. 4)
1 Следуйте инструкциям в главе «Подготовка к работе».
2 С помощью кнопки меню (МЕНЮ) выберите функцию
приготовления каши (каша).
» На дисплее начнет мигать время приготовления,
установленное по умолчанию.
3 Чтобы выбрать другое время приготовления, нажмите кнопку
выбора времени приготовления (ВРЕМЯ ПРИГОТОВЛЕНИЯ).
На дисплее начнет мигать значение часа.
4 Последовательно нажимайте кнопку выбора времени
приготовления (ВРЕМЯ ПРИГОТОВЛЕНИЯ), чтобы
установить значение часа.
5 После установки значения часа дождитесь подтверждения
настроек. Это займет несколько секунд. На дисплее начнет
мигать значение минут.
6 Последовательно нажимайте кнопку выбора времени
приготовления (ВРЕМЯ ПРИГОТОВЛЕНИЯ), чтобы
установить значение минут.
7 После установки времени приготовления нажмите кнопку
включения (СТАРТ/ВЫКЛ), чтобы запустить процесс
приготовления.
8 По окончании приготовления прозвучит несколько звуковых
сигналов, индикатор выбранной функции погаснет.
9 Мультиварка автоматически перейдет в режим поддержания
температуры.
» На дисплее появится индикация режима поддержания
температуры (ПОДОГРЕВ).
Примечание
•
Во избежание переполнения мультиварки не превышайте
рекомендованный объем и максимальный уровень воды, указанный на
внутренней емкости.
• Если каша долго находилась в режиме поддержания температуры,
она может загустеть.
• Если в вашем регионе в сети наблюдаются перепады напряжения,
емкость мультиварки может переполниться.
• После запуска процесса приготовления для отключения программы
нажмите кнопку включения/выключения (СТАРТ/ВЫКЛ). Мультиварка
перейдет в режим ожидания.
• В режиме приготовления каши конджи: отсчет времени
приготовления начинается только после закипания воды.
• Время приготовления по умолчанию составляет 10 минут. Можно
выбрать время приготовления от 5 минут до 2 часов.
Приготовление йогурта (рис. 5)
1 Хорошо перемешайте ингредиенты для йогурта и положите
их в стеклянный контейнер.
2 Стеклянный контейнер поставьте во внутреннюю емкость.
Контейнер должен быть плотно закрыт.
3 Налейте воду во внутреннюю емкость. Контейнер должен
быть погружен в воду наполовину.
4 Следуйте шагам 6 и 7 в главе «Подготовка к работе».
5 С помощью кнопки меню (МЕНЮ) выберите функцию
приготовления йогурта (йогурт).
» На дисплее начнет мигать время приготовления,
установленное по умолчанию.
6 Чтобы выбрать другое время приготовления, нажмите кнопку
выбора времени приготовления (ВРЕМЯ ПРИГОТОВЛЕНИЯ).
На дисплее начнет мигать значение часа.
7 Последовательно нажимайте кнопку выбора времени
приготовления (ВРЕМЯ ПРИГОТОВЛЕНИЯ), чтобы
установить значение часа.
8 После установки значения часа дождитесь подтверждения
настроек. Это займет несколько секунд. На дисплее начнет
мигать значение минут.
9 Последовательно нажимайте кнопку выбора времени
приготовления (ВРЕМЯ ПРИГОТОВЛЕНИЯ), чтобы
установить значение минут.
10 После установки времени приготовления нажмите кнопку
включения (СТАРТ/ВЫКЛ), чтобы запустить процесс
приготовления.
11 По окончании приготовления прозвучит несколько звуковых
сигналов, индикатор выбранной функции погаснет.
12 Мультиварка автоматически перейдет в режим ожидания.
Примечание
•
После запуска процесса приготовления для отключения программы
нажмите кнопку включения/выключения (СТАРТ/ВЫКЛ). Мультиварка
перейдет в режим ожидания.
• Время приготовления по умолчанию — 8 часов. Можно выбрать
время приготовления от 6 до 12 часов.
Выпекание (рис. 6)
1 Положите ингредиенты во внутреннюю емкость.
2 Следуйте инструкциям в шаге 6 главы «Подготовка к работе».
3 Подключите сетевую вилку к электророзетке.
Примечание
•
При выпечке тортов крышка должна быть закрыта. Оптимальной
для выпечки считается температура 130 °C и время приготовления
45 минут.
• При выпечке других изделий крышка должна быть открыта.
4 С помощью кнопки меню (МЕНЮ) выберите функцию
выпечки (печь).
» На дисплее начнет мигать время приготовления,
установленное по умолчанию.
5 Чтобы установить другую температуру приготовления,
нажмите кнопку нагрева (ТЕМП.), на дисплее начнет мигать
значение температуры, установленное по умолчанию.
6 Последовательно нажимайте кнопку нагрева (ТЕМП.), чтобы
выбрать нужную температуру приготовления.
7 Чтобы выбрать другое время приготовления, нажмите кнопку
выбора времени приготовления (ВРЕМЯ ПРИГОТОВЛЕНИЯ).
На дисплее начнет мигать значение часа.
8 Последовательно нажимайте кнопку выбора времени
приготовления (ВРЕМЯ ПРИГОТОВЛЕНИЯ), чтобы
установить значение часа.
9 После установки значения часа дождитесь подтверждения
настроек. Это займет несколько секунд. На дисплее начнет
мигать значение минут.
10 Последовательно нажимайте кнопку выбора времени
приготовления (ВРЕМЯ ПРИГОТОВЛЕНИЯ), чтобы
установить значение минут.
11 После установки времени приготовления нажмите кнопку
включения (СТАРТ/ВЫКЛ), чтобы запустить процесс
приготовления.
12 По окончании выпечки прозвучит несколько звуковых
сигналов, индикатор выбранной функции погаснет.
13 Мультиварка автоматически перейдет в режим поддержания
температуры.
» На дисплее появится индикация режима поддержания
температуры (ПОДОГРЕВ).
Примечание
•
Извлекая внутреннюю емкость из мультиварки, пользуйтесь
кухонными рукавицами или прихватками — емкость сильно
нагревается.
• После запуска процесса приготовления для отключения программы
нажмите кнопку включения/выключения (СТАРТ/ВЫКЛ). Мультиварка
перейдет в режим ожидания.
• Время приготовления по умолчанию — 45 минут. Можно выбрать
время приготовления от 20 минут до 2 часов.
• Температура приготовления по умолчанию — 100 °C. Можно
выбрать температуру приготовления от 40 °C до 160 °C.
Жарка (рис. 7)
1 Положите ингредиенты во внутреннюю емкость.
2 Следуйте инструкциям в шаге 6 главы «Подготовка к работе».
3 Подключите сетевую вилку к электророзетке.
4 С помощью кнопки меню (МЕНЮ) выберите функцию жарки
(жарить).
» На дисплее начнет мигать время приготовления,
установленное по умолчанию.
5 Чтобы выбрать другое время приготовления, нажмите кнопку
выбора времени приготовления (ВРЕМЯ ПРИГОТОВЛЕНИЯ),
на дисплее начнет мигать значение минут.
6 Последовательно нажимайте кнопку выбора времени
приготовления (ВРЕМЯ ПРИГОТОВЛЕНИЯ), чтобы
установить значение минут.
7 После установки времени приготовления нажмите кнопку
включения (СТАРТ/ВЫКЛ), чтобы запустить процесс
приготовления.
8 Во время приготовления часто помешивайте ингредиенты
лопаткой.
9 По окончании приготовления прозвучит несколько звуковых
сигналов, индикатор выбранной функции погаснет.
10 Мультиварка автоматически перейдет в режим поддержания
температуры.
» На дисплее появится индикация режима поддержания
температуры (ПОДОГРЕВ).
Примечание
•
В режиме обжаривания не накрывайте прибор верхней крышкой.
• После запуска процесса приготовления для отключения программы
нажмите кнопку включения/выключения (СТАРТ/ВЫКЛ). Мультиварка
перейдет в режим ожидания.
• Время приготовления по умолчанию — 15 минут. Можно установить
время приготовления от 5 до 60 минут.
Тушение (рис. 8)
1 Следуйте шагам 6 и 7 в главе «Подготовка к работе».
2 С помощью кнопки меню (МЕНЮ) выберите функцию
тушения (тушить).
» На дисплее начнет мигать время приготовления,
установленное по умолчанию.
3 Чтобы выбрать другое время приготовления, нажмите кнопку
выбора времени приготовления (ВРЕМЯ ПРИГОТОВЛЕНИЯ).
На дисплее начнет мигать значение часа.
4 Последовательно нажимайте кнопку выбора времени
приготовления (ВРЕМЯ ПРИГОТОВЛЕНИЯ), чтобы
установить значение часа.
5 После установки значения часа дождитесь подтверждения
настроек. Это займет несколько секунд. На дисплее начнет
мигать значение минут.
6 Последовательно нажимайте кнопку выбора времени
приготовления (ВРЕМЯ ПРИГОТОВЛЕНИЯ), чтобы
установить значение минут.
7 После установки времени приготовления нажмите кнопку
включения (СТАРТ/ВЫКЛ), чтобы запустить процесс
приготовления.
8 По окончании приготовления прозвучит несколько звуковых
сигналов, индикатор выбранной функции погаснет.
9 Мультиварка автоматически перейдет в режим поддержания
температуры.
» На дисплее появится индикация режима поддержания
температуры (ПОДОГРЕВ).
Примечание
•
Во избежание переполнения мультиварки не превышайте
рекомендованный объем и максимальный уровень воды, указанный на
внутренней емкости.
• После запуска процесса приготовления для отключения программы
нажмите кнопку включения/выключения (СТАРТ/ВЫКЛ). Мультиварка
перейдет в режим ожидания.
• Время приготовления по умолчанию — 1 час. Можно выбрать время
приготовления от 20 минут до 10 часов.
Режим поддержания температуры
В мультиварке предусмотрена функция простого управления
режимом поддержания температуры.
• Если после выбора функции приготовления с помощью кнопки
меню (МЕНЮ) нажать кнопку включения (СТАРТ/ВЫКЛ),
загорится индикатор режима поддержания температуры.
После окончания приготовления мультиварка автоматически
перейдет в режим поддержания температуры.
• Если после выбора функции приготовления с помощью кнопки
меню (МЕНЮ) сначала нажать кнопку режима поддержания
температуры, а затем кнопку включения (СТАРТ/ВЫКЛ),
индикатор режима поддержания температуры не загорится.
По окончании приготовления мультиварка перейдет в режим
ожидания.
Примечание
•
Для перехода в режим поддержания температуры в режиме
ожидания нажмите кнопку режима поддержания температуры
(ПОДОГРЕВ).
• Для перехода в режим ожидания в режиме поддержания
температуры нажмите кнопку режима поддержания температуры
(ПОДОГРЕВ).
Функция отсрочки старта (рис. 9)
Функцию отсрочки старта можно выбрать для различных
режимов приготовления.
1 Следуйте шагам 6 и 7 в главе «Подготовка к работе».
2 Чтобы выбрать функцию приготовления используйте кнопку
меню (МЕНЮ).
3 Нажмите кнопку отсрочки старта (ОТСРОЧКА).
» На дисплее начнет мигать время отложенного старта,
установленное по умолчанию.
4 Для выбора времени отложенного старта используйте кнопку
отсрочки старта (ОТСРОЧКА).
5 После установки таймера отсрочки старта нажмите кнопку
включения (СТАРТ/ВЫКЛ), чтобы запустить процесс
приготовления.
6 По истечении установленного времени приготовление будет
завершено. Прозвучит несколько звуковых сигналов, индикатор
выбранной функции погаснет.
7 Мультиварка автоматически перейдет в режим поддержания
температуры.
» Загорится индикатор режима поддержания температуры
(ПОДОГРЕВ).
Примечание
•
Отсрочка старта недоступна для режима обжаривания (жарить).
• Кнопка отсрочки старта не работает в режиме ожидания.
• Возможно, время приготовления было выбрано перед установкой
таймера отсрочки старта.
• Время отсрочки старта, установленное по умолчанию — 4 часа.
Можно выбрать время отсрочки старта от 1 до 24 часов.
Установка часов (рис. 10)
Вы можете настроить время, когда мультиварка находится в
режиме ожидания.
1 Нажмите и удерживайте в течение 3 секунд кнопку выбора
времени приготовления (ВРЕМЯ ПРИГОТОВЛЕНИЯ), на
дисплее начнет мигать значение часа.
2 Последовательно нажимайте кнопку выбора времени
приготовления (ВРЕМЯ ПРИГОТОВЛЕНИЯ), чтобы
установить значение часа.
3 После установки значения часа дождитесь подтверждения
настроек. Это займет несколько секунд. На дисплее начнет
мигать значение минут.
4 Последовательно нажимайте кнопку выбора времени
приготовления (ВРЕМЯ ПРИГОТОВЛЕНИЯ), чтобы
установить значение минут.
5 После установки значения минут нажмите кнопку включения
(СТАРТ/ВЫКЛ), чтобы подтвердить установленное время.
6 Очистка и уход
Примечание
•
Перед тем как приступать к очистке, отключите мультиварку от сети.
• Перед началом очистки дождитесь, пока мультиварка достаточно
остынет.
Внутренняя поверхность
Внутренняя поверхность верхней крышки и корпуса.
• Протрите слегка влажной тканью.
• Полностью удалите приставшие к мультиварке остатки пищи.
Нагревательный элемент.
• Протрите слегка влажной тканью.
• Удалите остатки пищи слегка влажной тканью.
Внешняя поверхность
Поверхность верхней крышки и внешняя поверхность корпуса.
• Протрите тканью, смоченной мыльной водой.
• Для очистки панели управления используйте только мягкую
сухую ткань.
• Тщательно удаляйте остатки пищи вокруг кнопок управления.
Дополнительные принадлежности
Ложка для риса, половник для супа, внутренняя емкость,
пароварка, крышка отверстия выхода пара.
• Замочите в горячей воде и очистите губкой.
7 Защита окружающей среды
После окончания срока службы не выбрасывайте
прибор вместе с бытовыми отходами. Передайте его в
специализированный пункт для дальнейшей утилизации.
Таким образом вы поможете защитить окружающую
среду.
8 Гарантия и обслуживание
Если вам требуется обслуживание прибора или дополнительная
информация, а также в случае возникновения проблем
посетите веб-сайт Philips, расположенный по адресу www.
philips.com, или обратитесь в центр поддержки потребителей
Philips в вашей стране. Ее телефонный номер можно найти в
гарантийном буклете. Если в вашей стране нет центра поддержки
потребителей Philips, обратитесь по месту приобретения изделия.
9 Характеристики
Номер модели HD3134
Номинальная выходная мощность 650 Вт
Номинальная емкость 3,0 л
10 Поиск и устранение
неисправностей
Если в процессе использования мультиварки возникли проблемы,
перед обращением в сервисную службу ознакомьтесь с
приведенной ниже информацией. Если устранить неполадку не
удается, обратитесь в центр поддержки потребителей Philips в
вашей стране.
Проблема Возможные решения
Не загорается
индикатор
кнопки.
Не работает
дисплей.
Рис не готов. После выбора функции приготовления не
Рис пересушен и
недоварен.
Мультиварка не
переключается
в режим
поддержания
температуры
автоматически.
Рис пригорел. Рис плохо промыт. Промывайте рис, пока
Во время
приготовления
из мультиварки
пролилась вода.
Приготовленный
рис неприятно
пахнет
На дисплее
появляется
сообщение об
ошибке (E1, E2, E3
или E4).
Неправильное подключение. Убедитесь,
что сетевой шнур правильно подключен
к мультиварке, а сетевая вилка плотно
вставлена в розетку сети.
Индикатор неисправен. Для проверки
прибора обратитесь в торговую организацию
или авторизованный сервисный центр Philips.
Мультиварка не подключена к источнику
питания. При отсутствии электропитания не
срабатывает функция возобновления работы,
не работает дисплей.
Элемент питания дисплея разряжен. Для
замены элемента питания обратитесь
в торговую организацию Philips или
авторизованный сервисный центр Philips.
была нажата кнопка включения (СТАРТ/
ВЫКЛ).
Добавлено недостаточно воды. Добавьте
воды в соответствии с метками на
внутренней поверхности внутренней
емкости.
Перед включением мультиварки убедитесь,
что на нагревательном элементе и внешней
поверхности внутренней емкости нет
загрязнений.
Поврежден нагревательный элемент или
деформирована внутренняя емкость.
Для проверки мультиварки обратитесь в
торговую организацию или авторизованный
сервисный центр Philips.
Добавьте больше воды, увеличьте время
приготовления.
Возможно, кнопка режима поддержания
температуры (ПОДОГРЕВ) была нажата
до кнопки включения (СТАРТ/ВЫКЛ). В
этом случае по окончании приготовления
мультиварка переходит в режим ожидания.
Неисправен регулятор температуры. Для
проверки прибора обратитесь в торговую
организацию или авторизованный сервисный
центр Philips.
вода не станет прозрачной.
Убедитесь, что вода добавлена до уровня,
указанного в шкале во внутренней емкости,
в соответствии с количеством используемых
чашек риса.
Очистите внутреннюю емкость в теплой
воде с помощью средства для мытья посуды.
После приготовления тщательно очистите
крышку отверстия выхода пара, внутреннюю
крышку и внутреннюю емкость.
Во время процесса приготовления произошел
сбой подачи питания. Для проверки прибора
обратитесь в торговую организацию или
авторизованный сервисный центр Philips.
Українська
1 Мультиварка
Вітаємо вас із покупкою та ласкаво просимо до клубу Philips!
Щоб у повній мірі скористатися підтримкою, яку пропонує
компанія Philips, зареєструйте свій виріб на веб-сайті
www.Philips.com/welcome.
2 Комплектація упаковки (мал. 1)
Мультиварка Пароварка
Ложка для рису Ополоник
Силіконові рукавиці Мірна чашка
Посібник користувача Брошура з інструкціями з безпеки
Рецепт Гарантійний талон
3 Огляд
a
Знімна кришка парового
отвору
b
Кнопка розблокування
кришки
c
Панель керування
d
Основний корпус
e
Роз’єм для кабелю
живлення
f
Нагрівальний елемент
Огляд елементів керування
l
Кнопка збереження теплаpКнопка попереднього
m
Дисплей
n
Кнопка меню
o
Кнопка часу приготуванняsКнопка запуску/вимкнення
Огляд функцій
Функції Стандартний
Рис (рис) 30–40 хвилин / 1–24 години
Каша
(каша)
Смажити
(жарить)
Тушкувати
(тушить)
Пекти
(печь)
Йогурт
(йогурт)
час
приготування
10 хвилин
15 хвилин 5–60 хвилин /
1 година
45 хвилин 20–120 хвилин 1–24 години
8 годин 6–12 годин 1–24 години
g
Індикатори рівня води
h
Внутрішня каструля
i
Знімна внутрішня кришка
j
Ущільнююче кільце
k
Верхня кришка
налаштування
q
Кнопка налаштування
температури
r
Функції приготування
Регульований
час
приготування
5 хвилин –
2 години
20 хвилин –
10 годин
Попередньо
встановлений час
1–24 години
1–24 години
4 Перед першим використанням
1 Вийміть усі аксесуари з внутрішньої каструлі. Зніміть із
внутрішньої каструлі пакувальний матеріал.
2 Перед першим використанням добре почистіть частини
мультиварки (див. розділ «Чищення та догляд»).
Примітка
•
Перед тим як використовувати мультиварку, перевірте, чи всі частини
сухі.
5 Використання мультиварки
Підготовка до роботи (мал. 2)
Перед використанням мультиварки потрібно виконати подані
нижче дії.
1 Виміряйте кількість рису за допомогою мірної чашки, що
додається.
2 Добре промийте рис.
3 Покладіть попередньо промитий рис у внутрішню каструлю.
4 Налийте води до рівня, вказаного на шкалі всередині
внутрішньої каструлі, що відповідає кількості використаних
чашок рису. Потім розрівняйте поверхню рису.
5 Щоб відкрити кришку, натисніть кнопку розблокування кришки.
6 Витріть зовнішню частину внутрішньої каструлі насухо, після
чого вставте її у мультиварку. Перевірте, чи внутрішня каструля
належний контактує з нагрівальним елементом.
7 Закрийте кришку мультиварки та вставте штекер у розетку.
Примітка
•
Зазвичай з одної чашки сирого рису можна отримати 2 чаші вареного
рису. Ємність 1 чашки рису становить приблизно 180 мл.
• Рівень, вказаний всередині внутрішньої каструлі, є лише орієнтовним.
Можна завжди змінити рівень води відповідно до типу рису та
власних уподобань.
• Перевірте, чи зовнішня частина внутрішньої каструлі чиста та суха, а на
нагрівальному елементі або магнітному перемикачі немає залишків їжі.
Приготування рису (мал. 3)
1 Виконайте кроки в розділі «Підготовка до роботи».
2 Натискайте кнопку меню (МЕНЮ), поки не буде вибрано
функцію приготування рису (Рис).
» На дисплеї почне блимати стандартний час приготування.
3 Натисніть кнопку запуску (СТАРТ/ВЫКЛ), щоб почати
приготування.
4 Після завершення приготування пролунає кілька звукових
сигналів і згасне індикатор вибраної функції приготування.
5 Мультиварка автоматично перейде в режим збереження тепла.
» На дисплеї з’явиться індикація режиму збереження тепла
(ПОДОГРЕВ).
Примітка
•
Після початку приготування можна натиснути кнопку запуску/
вимкнення (СТАРТ/ВЫКЛ), щоб зупинити приготування; мультиварка
перейде в режим очікування.
• Стандартний час приготування становить 30–40 хвилин; змінити його
неможливо.
Приготування каші (мал. 4)
1 Виконайте кроки в розділі «Підготовка до роботи».
2 Натискайте кнопку меню (МЕНЮ), поки не буде вибрано
функцію приготування каші (каша).
» На дисплеї почне блимати стандартний час приготування.
3 Щоб встановити інший час приготування, натисніть кнопку часу
приготування (ВРЕМЯ ПРИГОТОВЛЕНИЯ); на дисплеї почне
блимати значення годин.
4 Кілька разів натисніть кнопку часу приготування (ВРЕМЯ
ПРИГОТОВЛЕНИЯ), щоб встановити значення годин.
5 Встановивши значення годин, зачекайте кілька секунд, поки
мультиварка автоматично не підтвердить його; на дисплеї
почне блимати значення хвилин.
6 Кілька разів натисніть кнопку часу приготування (ВРЕМЯ
ПРИГОТОВЛЕНИЯ), щоб встановити значення хвилин.
7 Після встановлення часу приготування натисніть кнопку
запуску (СТАРТ/ВЫКЛ), щоб почати приготування.
8 Після завершення приготування пролунає кілька звукових
сигналів і згасне індикатор вибраної функції приготування.
9 Мультиварка автоматично перейде в режим збереження тепла.
» На дисплеї з’явиться індикація режиму збереження тепла
(ПОДОГРЕВ).
Примітка
•
Не перевищуйте вказаний об’єм та максимальний рівень води,
вказаний у внутрішній каструлі, оскільки це може спричинити
переповнення мультиварки.
• Якщо залишити кашу в режимі збереження тепла на надто довгий
період часу, вона стане в’язкішою.
• Якщо у Вашому регіоні спостерігаються перепади напруги, можливе
переповнення мультиварки.
• Після початку приготування можна натиснути кнопку запуску/
вимкнення (СТАРТ/ВЫКЛ), щоб зупинити приготування; мультиварка
перейде в режим очікування.
• У режимі приготування каші відлік часу приготування починається
лише після закипання води.
• Стандартний час приготування становить 10 хвилин. Можна вибрати
час приготування від 5 хвилин до 2 годин.
Приготування йогурту (мал. 5)
1 Добре перемішайте продукти для йогурту та покладіть їх у
скляну ємність.
2 Поставте скляну ємність у внутрішню каструлю. Ємність має
бути щільно закрито.
3 Налийте воду у внутрішню каструлю. Ємність має бути
занурена у воду наполовину.
4 Виконайте кроки 6 та 7 у розділі «Підготовка до роботи».
5 Натискайте кнопку меню (МЕНЮ), поки не буде вибрано
функцію приготування йогурту (йогурт).
» На дисплеї почне блимати стандартний час приготування.
6 Щоб встановити інший час приготування, натисніть кнопку часу
приготування (ВРЕМЯ ПРИГОТОВЛЕНИЯ); на дисплеї почне
блимати значення годин.
7 Кілька разів натисніть кнопку часу приготування (ВРЕМЯ
ПРИГОТОВЛЕНИЯ), щоб встановити значення годин.
8 Встановивши значення годин, зачекайте кілька секунд, поки
мультиварка автоматично не підтвердить його; на дисплеї
почне блимати значення хвилин.
9 Кілька разів натисніть кнопку часу приготування (ВРЕМЯ
ПРИГОТОВЛЕНИЯ), щоб встановити значення хвилин.
10 Після встановлення часу приготування натисніть кнопку
запуску (СТАРТ/ВЫКЛ), щоб почати приготування.
11 Після завершення приготування пролунає кілька звукових
сигналів і згасне індикатор вибраної функції приготування.
12 Мультиварка автоматично перейде в режим очікування.
Примітка
•
Після початку приготування можна натиснути кнопку запуску/
вимкнення (СТАРТ/ВЫКЛ), щоб зупинити приготування; мультиварка
перейде в режим очікування.
• Стандартний час приготування становить 8 годин. Можна вибрати
час приготування від 6 до 12 годин.
Випікання (мал. 6)
1 Покладіть продукти у внутрішню каструлю.
2 Виконайте крок 6 у розділі «Підготовка до роботи».
3 Вставте штекер у розетку.
Примітка
•
Під час випікання тортів кришка має бути закрита. Найкращою для
випікання тортів є температура 130 °C і час приготування 45 хвилин.
• Під час випікання інших страв, ніж торти, кришка має бути відкрита.
4 Натискайте кнопку меню (МЕНЮ), поки не буде вибрано
функцію випікання (печь).
» На дисплеї почне блимати стандартний час приготування.
5 Щоб встановити іншу температуру приготування, натисніть
кнопку налаштування температури (ТЕМП.); на дисплеї почне
блимати стандартна температура приготування.
6 Кілька разів натисніть кнопку налаштування температури
(ТЕМП.), щоб вибрати температуру приготування.
7 Щоб встановити інший час приготування, натисніть кнопку часу
приготування (ВРЕМЯ ПРИГОТОВЛЕНИЯ); на дисплеї почне
блимати значення годин.
8 Кілька разів натисніть кнопку часу приготування (ВРЕМЯ
ПРИГОТОВЛЕНИЯ), щоб встановити значення годин.
9 Встановивши значення годин, зачекайте кілька секунд, поки
мультиварка автоматично не підтвердить його; на дисплеї
почне блимати значення хвилин.
10 Кілька разів натисніть кнопку часу приготування (ВРЕМЯ
ПРИГОТОВЛЕНИЯ), щоб встановити значення хвилин.
11 Після встановлення часу приготування натисніть кнопку
запуску (СТАРТ/ВЫКЛ), щоб почати приготування.
12 Після завершення випікання пролунає кілька звукових сигналів і
згасне індикатор вибраної функції.
13 Мультиварка автоматично перейде в режим збереження тепла.
» На дисплеї з’явиться індикація режиму збереження тепла
(ПОДОГРЕВ).
Примітка
•
Виймаючи внутрішню каструлю з мультиварки, користуйтеся
кухонними рукавицями або ганчіркою, оскільки вона буде дуже гаряча.
• Після початку приготування можна натиснути кнопку запуску/
вимкнення (СТАРТ/ВЫКЛ), щоб зупинити приготування; мультиварка
перейде в режим очікування.
• Стандартний час приготування становить 45 хвилин. Можна вибрати
час приготування від 20 хвилин до 2 годин.
• Стандартна температура приготування становить 100 °C. Можна
вибрати температуру від 40 °C до 160 °C.
Смаження (мал. 7)
1 Покладіть продукти у внутрішню каструлю.
2 Виконайте крок 6 у розділі «Підготовка до роботи».
3 Вставте штекер у розетку.
4 Натискайте кнопку меню (МЕНЮ), поки не буде вибрано
функцію смаження (жарить).
» На дисплеї почне блимати стандартний час приготування.
5 Щоб встановити інший час приготування, натисніть кнопку часу
приготування (ВРЕМЯ ПРИГОТОВЛЕНИЯ); на дисплеї почне
блимати значення хвилин.
6 Кілька разів натисніть кнопку часу приготування (ВРЕМЯ
ПРИГОТОВЛЕНИЯ), щоб встановити значення хвилин.
7 Після встановлення часу приготування натисніть кнопку
запуску (СТАРТ/ВЫКЛ), щоб почати приготування.
8 Під час приготування постійно перемішуйте їжу лопаткою.
9 Після завершення приготування пролунає кілька звукових
сигналів і згасне індикатор вибраної функції приготування.
10 Мультиварка автоматично перейде в режим збереження тепла.
» На дисплеї з’явиться індикація режиму збереження тепла
(ПОДОГРЕВ).
Примітка
•
Під час приготування у режимі смаження не накривайте пристрій
верхньою кришкою.
• Після початку приготування можна натиснути кнопку запуску/
вимкнення (СТАРТ/ВЫКЛ), щоб зупинити приготування; мультиварка
перейде в режим очікування.
• Стандартний час приготування становить 15 хвилин. Можна вибрати
час приготування від 5 до 60 хвилин.
Тушкування (мал. 8)
1 Виконайте кроки 6 та 7 у розділі «Підготовка до роботи».
2 Натискайте кнопку меню (МЕНЮ), поки не буде вибрано
функцію тушкування (тушить).
» На дисплеї почне блимати стандартний час приготування.
3 Щоб встановити інший час приготування, натисніть кнопку часу
приготування (ВРЕМЯ ПРИГОТОВЛЕНИЯ); на дисплеї почне
блимати значення годин.
4 Кілька разів натисніть кнопку часу приготування (ВРЕМЯ
ПРИГОТОВЛЕНИЯ), щоб встановити значення годин.
5 Встановивши значення годин, зачекайте кілька секунд, поки
мультиварка автоматично не підтвердить його; на дисплеї
почне блимати значення хвилин.
6 Кілька разів натисніть кнопку часу приготування (ВРЕМЯ
ПРИГОТОВЛЕНИЯ), щоб встановити значення хвилин.
7 Після встановлення часу приготування натисніть кнопку
запуску (СТАРТ/ВЫКЛ), щоб почати приготування.
8 Після завершення приготування пролунає кілька звукових
сигналів і згасне індикатор вибраної функції приготування.
9 Мультиварка автоматично перейде в режим збереження тепла.
» На дисплеї з’явиться індикація режиму збереження тепла
(ПОДОГРЕВ).
Примітка
•
Не перевищуйте вказаний об’єм та максимальний рівень води,
вказаний у внутрішній каструлі, оскільки це може спричинити
переповнення мультиварки.
• Після початку приготування можна натиснути кнопку запуску/
вимкнення (СТАРТ/ВЫКЛ), щоб зупинити приготування; мультиварка
перейде в режим очікування.
• Стандартний час приготування становить 1 годину. Можна вибрати
час приготування від 20 хвилин до 10 годин.
Режим збереження тепла
Мультиварка дозволяє легко керувати режимом збереження
тепла.
• Якщо після вибору функції приготування за допомогою кнопки
меню (МЕНЮ) натиснути й утримувати кнопку запуску
(СТАРТ/ВЫКЛ), засвітиться індикатор режиму збереження
тепла. Після завершення приготування мультиварка перейде в
режим збереження тепла.
• Якщо після вибору функції приготування за допомогою кнопки
меню (МЕНЮ) спочатку натиснути кнопку збереження тепла,
а потім кнопку запуску (СТАРТ/ВЫКЛ) та утримувати її,
індикатор режиму збереження тепла згасне. Після завершення
приготування мультиварка перейде в режим очікування.
Примітка
•
Для переходу в режим збереження тепла в режимі очікування можна
натиснути кнопку збереження тепла (ПОДОГРЕВ).
• Для переходу в режим очікування у режимі збереження тепла можна
натиснути кнопку збереження тепла (ПОДОГРЕВ).
Попередньо встановлений час для
відкладеного приготування (мал. 9)
Можна попередньо встановити час для відкладеного
приготування у різних режимах.
1 Виконайте кроки 6 та 7 у розділі «Підготовка до роботи».
2 Натисніть кнопку меню (МЕНЮ), щоб вибрати функцію
приготування.
3 Натисніть кнопку попереднього налаштування (ОТСРОЧКА).
» На дисплеї почне блимати стандартний попередньо
встановлений час приготування.
4 Кілька разів натисніть кнопку попереднього налаштування
(ОТСРОЧКА), щоб вибрати потрібний попередньо
встановлений час.
5 Після налаштування попередньо встановленого часу
приготування натисніть кнопку запуску (СТАРТ/ВЫКЛ), щоб
почати приготування.
6 Приготування буде завершено тоді, коли мине попередньо
встановлений час. Пролунає кілька звукових сигналів і згасне
індикатор вибраної функції приготування.
7 Мультиварка автоматично перейде в режим збереження тепла.
» Засвітиться індикатор режиму збереження тепла (ПОДОГРЕВ).
Примітка
•
Функція попереднього налаштування недоступна в режимі смаження
(жарить).
• Кнопка попереднього налаштування не працює у режимі очікування.
• Перед налаштуванням попередньо встановленого часу можна
налаштувати час приготування.
• Стандартний попередньо встановлений час – 4 години. Можна
вибрати попередньо встановлений час від 1 до 24 годин.
Налаштування годинника (мал. 10)
Коли мультиварка перебуває у режимі очікування, на ній можна
налаштувати годинник.
1 Натисніть та утримуйте кнопку часу приготування (ВРЕМЯ
ПРИГОТОВЛЕНИЯ) протягом 3 секунд; на дисплеї почне
блимати значення годин.
2 Кілька разів натисніть кнопку часу приготування (ВРЕМЯ
ПРИГОТОВЛЕНИЯ), щоб встановити значення годин.
3 Встановивши значення годин, зачекайте кілька секунд, поки
мультиварка автоматично не підтвердить його; на дисплеї
почне блимати значення хвилин.
4 Кілька разів натисніть кнопку часу приготування (ВРЕМЯ
ПРИГОТОВЛЕНИЯ), щоб встановити значення хвилин.
5 Після встановлення значення хвилин натисніть кнопку запуску
(СТАРТ/ВЫКЛ), щоб підтвердити налаштування годинника.
6 Чищення та догляд
Примітка
Перед чищенням від’єднайте мультиварку від електромережі.
•
• Перед чищенням зачекайте, поки мультиварка достатньо не охолоне.
Внутрішня частина
Внутрішня частина верхньої кришки та основного корпусу:
• витріть викрученою і вологою ганчіркою;
• видаліть усі залишки продуктів, які прилипли до мультиварки.
Нагрівальний елемент:
• витріть викрученою і вологою ганчіркою;
• видаліть залишки продуктів викрученою і вологою ганчіркою.
Зовнішня частина
Поверхня верхньої кришки та зовнішня частина основного
корпусу:
• витріть ганчіркою, змоченою у воді з милом;
• витирайте панель керування лише м’якою і сухою ганчіркою;
• видаліть усі залишки продуктів навколо панелі керування.
Аксесуари
Ложка для рису, ополоник, внутрішня каструля, пароварка та
кришка парового отвору:
• замочіть у гарячій воді та помийте губкою.
7 Навколишнє середовище
Не викидайте пристрій разом із звичайними побутовими
відходами, а здавайте його в офіційний пункт прийому
для повторної переробки. Таким чином Ви допоможете
захистити довкілля.
8 Гарантія та обслуговування
Якщо Вам необхідне обслуговування чи інформація або ж виникла
проблема, відвідайте веб-сайт компанії Philips www.philips.com
чи зверніться до Центру обслуговування клієнтів компанії Philips
у своїй країні. Номер телефону можна знайти у гарантійному
талоні. Якщо у Вашій країні немає Центру обслуговування клієнтів,
зверніться до місцевого дилера Philips.
9 Технічні характеристики
Номер моделі HD3134
Номінальна вихідна потужність 650 Вт
Номінальна ємність 3 л
10 Усунення несправностей
Якщо під час використання цієї мультиварки виникають певні
проблеми, перш ніж звертатися до центру обслуговування,
скористайтеся наведеними нижче порадами. Якщо не вдається
вирішити проблему, зверніться до Центру обслуговування клієнтів
Philips у своїй країні.
Проблема Вирішення
Не
засвічується
підсвітка
кнопки.
Не працює
дисплей.
Рис не
готовий.
Рис надто
сухий та
недоварений.
Мультиварка
не
переходить
у режим
збереження
тепла
автоматично.
Рис пригорів. Ви не промили рис належним чином. Промийте
Під час
приготування
із мультиварки
виливається
вода.
Після
приготування
рис
неприємно
пахне.
На дисплеї
з’являється
повідомлення
про помилку
(E1, E2, E3 або
E4).
Проблема з підключенням. Перевірте, чи кабель
живлення під’єднано до мультиварки належним
чином, а штекер надійно зафіксовано в розетці.
Підсвітка несправна. Віднесіть пристрій
до дилера Philips або сервісного центру,
уповноваженого Philips.
Мультиварку не під’єднано до електромережі.
За відсутності живлення не працює функція
збереження налаштувань у разі збою в
електропостачанні, і не працює дисплей.
Батарея дисплея розряджається. Для заміни
батареї віднесіть пристрій до дилера Philips або
сервісного центру, уповноваженого Philips.
Ви не натиснули кнопку запуску (СТАРТ/ВЫКЛ)
після вибору функції приготування.
Недостатньо води. Налийте води відповідно до
шкали всередині внутрішньої каструлі.
Перед тим як вмикати мультиварку, перевірте, чи
на нагрівальному елементі та зовнішній частині
внутрішньої каструлі немає залишків їжі.
Пошкоджено нагрівальний елемент або
деформувалася внутрішня каструля. Віднесіть
мультиварку до дилера Philips або сервісного
центру, уповноваженого Philips.
Налийте до рису більше води та готуйте його
трохи довше.
Можливо, кнопку збереження тепла
(ПОДОГРЕВ) було натиснуто до натиснення
кнопки запуску (СТАРТ/ВЫКЛ). У такому разі
після завершення приготування мультиварка
перейде в режим очікування.
Несправний регулятор температури. Віднесіть
пристрій до дилера Philips або сервісного центру,
уповноваженого Philips.
рис, поки вода не стане прозорою.
Потрібно налити води до рівня, вказаного
на шкалі всередині внутрішньої каструлі, що
відповідає кількості використаних чашок рису.
Помийте внутрішню каструлю у теплій воді з
миючим засобом.
Після приготування добре почистіть кришку
парового отвору, внутрішню кришку та
внутрішню каструлю.
Під час приготування стався збій в
електропостачанні. Віднесіть пристрій до дилера
Philips або сервісного центру, уповноваженого
Philips.
 Loading...