

Philips HD2237 Quick Start Manual

All-in-One Cooker
HD2237 recipe book
Tasty dishes
made easy


Get ready to really cook,
bake and more
Congratulations! As a new owner of a Philips All-in-One Cooker you can take your
cooking to the next level, and it will make your life easier too.
Impress family and friends with many mouth-watering meals, even on hectic days
when you’re short on time. Now you can actually make your cooking t your schedule,
instead of planning your time around a recipe, thanks to your new All-in-One Cooker.
Become a sauté sensation
You’ll be amazed at how much better your dishes taste. Use the sauté function to enhance the taste of comfort food
from rich stews, yummy soups and avoursome rice to delicious risottos.
Slow cook for tender meat dishes
On colder days, nothing is better than sitting down for dinner and enjoying hearty and heavenly food. You can use the slow
cooker function to tenderise even the toughest cuts of stewing or braising meat that melts in your mouth.
Pressure cook to save time
Our lives are busy. That’s why it’s great to save time without sacricing taste. Pressure cooking can quickly tenderise
tough cuts of meat while transforming sealed evaporation into sauces that are rich and full of avour.
Bake better and more
You’ll also love how easy it is to bake sweet cakes and desserts, steam food or even make creamy yoghurts.
We hope you enjoy your new Philips culinary adventure. Explore the recipes in this book to enjoy all the meals, dishes
and more any time with your Philips All-in-One Cooker.
Want more recipes, reviews and maintenance tips? Go to:
Australia www.philips.com.au/allinone
New Zealand www.philips.co.nz/allinone
Have a question or need more help? Our Customer Care is here to support
www.philips.com.au/support
www.philips.co.nz/support
Australia 1300 363 391
New Zealand 0800 658 224
Share your creations
If you’ve created your own recipe, share it on social media for others to enjoy using
#philipsallinonecooker
Facebook All-In-One community
You can also share your creations and ask questions in the Philips All-In-One Community on Facebook
(independent from Philips).
Search “Philips All-In-One-Cooker Community (All pots welcome)” or visit:
https://www.facebook.com/groups/1987277694826676/

Philips All-in-One Cooker Recipe Book
Cooking tips
• The Philips All-in-One Cooker is a great addition to your kitchen.
You can follow recipes in this book, or experiment with your own.
• Keep notes to refer to in future.
• Cold ingredients and liquids will take longer to heat up compared to room
temperature or warm ingredients/liquids.
• Pressure building time will vary based on the volume in the pot. Large volumes
will take longer to maintain pressure compared to small volumes.
• Sauté ingredients in batches for eective browning – this maintains a high heat
in the pot.
• If you double a recipe, don’t double the cooking time. Ensure you do not exceed
the MAX lines.
• When using a stainless steel pot in your All-in-One Cooker, it may take a couple
of minutes before you are able to open the lid. This is caused by a stronger
suction between the smooth surface of the stainless steel and the sealing ring.
• If your meal has more liquid than you require, you can reduce the liquid using
the ‘Sauté’ function, or alternatively add corn our. When using corn our, mix
with water in a separate bowl to form a paste then add to the pot to avoid
clumping.
• To reduce the cooking time, cut ingredients into smaller sizes.

Contents
5
Breakfast and snacks
Shakshuka eggs 15
Farmhouse granola 17
Dairy-free coconut yoghurt 19
Basic vanilla yoghurt 20
Natural Greek yoghurt 21
Smoothie bowl 23
Spiced chickpeas and almonds 25
Soups and broths
Roasted tomato and pesto soup 29
Chicken, turmeric and vegetable soup 31
Chicken, dhal, corn and coconut soup 33
Low-calorie vegetable soup 35
Noodle and vegetable hot pot 37
Beef bone broth 39
Light bone broth 40
Main dishes
30 minute miracles
Mexican pulled pork tacos 43
Spiced lamb ribs with sticky glaze 45
Beef with coee rub and pineapple salsa 47
Spiced pork and veal meatballs with tomato sauce 49
Beef burgers with barbecue onion sauce 51
Boston baked beans 53
Creamy garlic prawns and salmon 55
Harissa-spiced chicken 57
Soy and sesame pork ribs with ginger 59
Asian delights
Beef pho 61
Japanese edamame, prawn and calamari salad 63
Fish in Malaysian-style coconut sauce 65
Chicken laksa with fresh herbs 67
Tandoori chicken with coriander, orange and 69
cucumber salad
Thai red curry with beef and pumpkin 71
Chinese beef with broccoli 73
Family favourites
Chicken cacciatore 75
Coq au vin 77
Mushroom and chicken risotto 79
Middle Eastern lamb shanks with pearl couscous 81
Spiced pot roast with orange and pomegranate 83
Slow-cooked lamb with lemony potato salad 85
Beef and red wine casserole 87
Italian sausage bolognese 89
Slow-cooked beef with mushrooms and beans 91
Sweet potato frittata 93
Bourbon-basted beef ribs 95
All in one chicken and broccoli hotpot 97
Salads that satisfy
Harissa lamb with beetroot salad and hummus 99
Salad of baked sweet potato, chorizo and 101
chickpeas with couscous
Warm chicken salad with dukkah 103
Nutty quinoa and snowpea salad 105
Gado gado salad 107
Side dishes
Creamy polenta 111
Creamy garlic mashed potato 113
Zesty lemon couscous 115
Sweet potato wedges and guacamole 117
Baked goodies
Baked vanilla cheesecake 121
Self-saucing sticky date pudding 123
Flourless chocolate cake 125
Carrot and pineapple cake 127
Mixed berry upside-down cake 129
Blueberry and coconut shortcake 131
Chocolate fudge 133
Pizza scrolls 135
Parmesan and bacon beer bread 137
Feta and jalapeño cornbread 139
Preserves and condiments
Tomato and chilli relish 143
Mixed berry and pomegranate jam 145
Orange barbecue sauce with rosemary 147
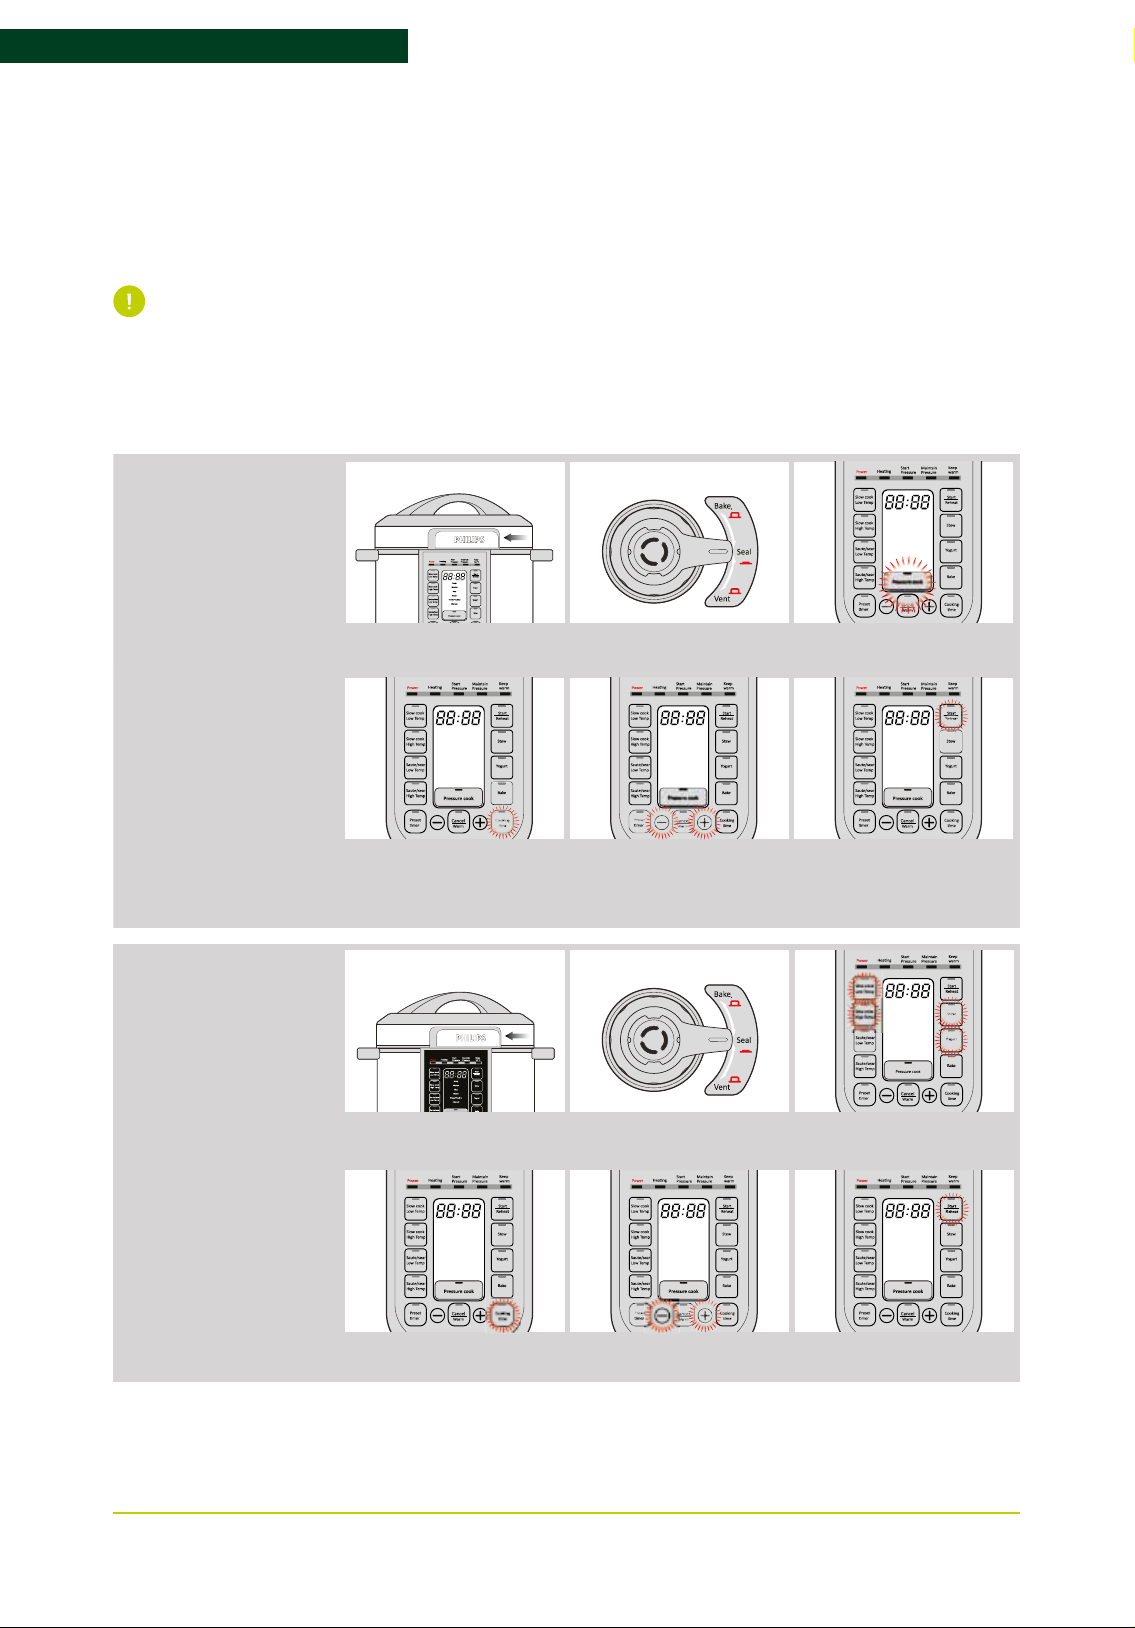
Secure and lock lid in a clockwise
direction by aligning arrows.
Set the valve to seal. Select menu by pressing
PRESSURE COOK button.
Secure and lock lid in a clockwise
direction by aligning arrows.
Set the valve to SEAL.
Press SLOW COOK LOW TEMP,
SLOW COOK HIGH TEMP, STEW
or YOGHURT button.
Philips All-in-One Cooker Recipe Book
Quick start guide
Ensure utensils used are suitable for ceramic coating of the inner pot.
Wooden, plastic or silicone are recommended.
For more information, refer to your user manual.
1 2 3
A
How to
pressure
cook
Secure and lock lid in a clockwise
direction by aligning arrows.
Set the valve to seal. Select menu by pressing
PRESSURE COOK button.
B
How to
slow cook/
stew/yoghurt
4 5 6
To set a dierent pressure cooking
time, press COOKING TIME button.
Press once for adjusting hours,
press twice for adjusting minutes.
Note: cooking time starts once pressure has been maintained. This can vary from 10-25 minutes, depending on how much is in the pot.
1
Secure and lock lid in a clockwise
direction by aligning arrows.
4
Press + or - to set the
pressure cooking time.
2
Set the valve to SEAL.
5
Press START/REHEAT for 1 second
to start the cooking process.
3
Press SLOW COOK LOW TEMP,
SLOW COOK HIGH TEMP, STEW
or YOGHURT button.
6
To set a dierent pressure cooking time, press
COOKING TIME button. Press once for adjusting
hours, press twice for adjusting minutes.
Press + or - to set the
pressure cooking time.
Press START/REHEAT for 1 second
to start the cooking process.
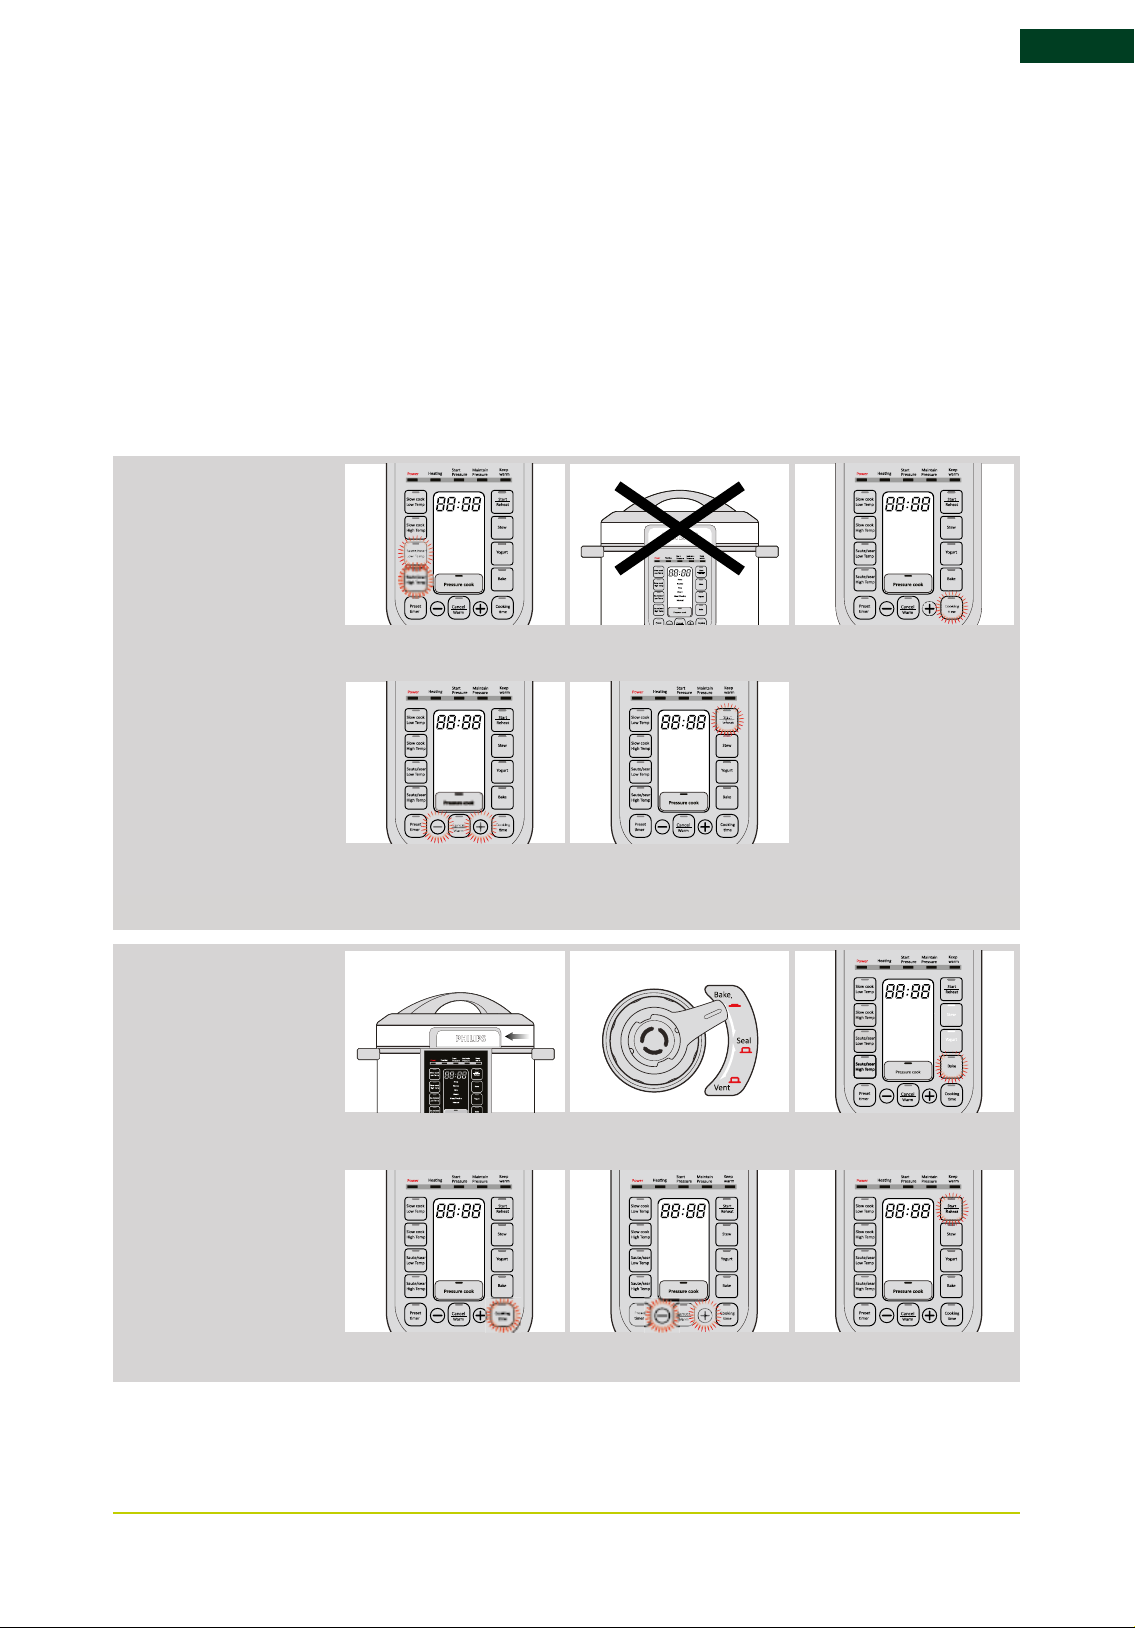
Secure and lock lid in a clockwise
direction by aligning arrows.
Set the valve to SEAL.
Press SLOW COOK LOW TEMP,
SLOW COOK HIGH TEMP, STEW
or YOGHURT button.
To set a dierent pressure cooking time, press
COOKING TIME button. Press once for adjusting
hours, press twice for adjusting minutes.
Press + or - to set the
pressure cooking time.
Press START/REHEAT for 1 second
to start the cooking process.
Press either SAUTÉ/SEAR HIGH
TEMP or SAUTÉ/SEAR LOW
TEMP button.
Do not close the lid.
To set a dierent SAUTÉ/SEAR time,
press COOKING TIME button.
7
C
How to
sauté/sear
D
How to bake
1 2
Press either SAUTÉ/SEAR HIGH
TEMP or SAUTÉ/SEAR LOW
TEMP button.
Do not close the lid.
4 5
Press + or - to set the cooking time.
Press START/REHEAT for 1 second
to start the cooking process.
1 2 3
3
To set a dierent SAUTÉ/SEAR time,
press COOKING TIME button.
Secure and lock lid in a clockwise
direction by aligning arrows.
4 5
To set a dierent pressure cooking
time, press COOKING TIME button.
Set the valve to BAKE. Press the BAKE button.
6
Press + or - to set the
pressure cooking time.
Press START/REHEAT for 1 second
to start the cooking process.

Philips All-in-One Cooker Recipe Book
Table with programs and temperatures
Function
Non
pressure
cook
Cooking
temp and
pressure
Slow cook
low temp
Slow cook
high temp
Sauté / sear
low temp
Sauté / sear
high temp
Yoghurt 40°C±3°C 8 hours 6–12 hours
Stew 90°C±10°C 1 hour
Bake 140°C±10°C 45 mins 10–59 mins
Reheat 85°C±10°C 10 mins 8–15 mins
Warm 75°C±10°C 12 hours Keep warm time cannot be adjusted
75°C±10°C 8 hours 2–12 hours
90°C±10°C 6 hours 2–12 hours
130°C±10°C 2 mins 1 - 20 mins
150°C±10°C 2 mins 1 - 20 mins
Default
cooking
time
Operating
time
adjustable
20 mins –
10 hours
24 hours
preset
Automatically
keep warm
after cooking
completed
1. Automatically keep warm for 12 hours
after cooking completed, then return to
standby mode.
2. Before cooking completed, temperature
climbs to 95~100°C for 10 mins.
1. Automatically keep warm for 12 hours
after cooking completed, then return to
standby mode.
2. Before cooking completed, temperature
climbs to 95~100°C for 10 mins.
Must operate with lid open. Timer will start
counting down once temperature has been
reached.
Must operate with lid open. Timer will start
counting down once temperature has been
reached.
1. Automatically keep warm for 12 hours
after cooking completed, then return to
standby mode.
2. Before cooking completed, temperature
dimbs to 95~100°C for 10 mins.
1. Automatically keep warm for 12 hours
after cooking completed, then return to
standby mode.
1. Automatically keep warm for 12 hours
after cooking completed, then return to
standby mode.
Remarks
Pressure
cook
Soup
Risotto
Rice
Steam
Meat/
poultry
Manual
Cooking time starts once pressure has been maintained. This can take 10-25 minutes depending on how much is in the pot. Larger volumes of
ingredients/liquids will take longer to heat up and maintain pressure. Cold ingredients/liquids will slow heat up time compared to warm or hot
ingredients/liquids.
50 kPa±
15 kPa
50 kPa±
15 kPa
50 kPa±
15 kPa
50 kPa±
15 kPa
50 kPa±
15 kPa
50 kPa±
15 kPa
20 mins 20–59 mins
14 mins –
14 mins –
10 mins 5–59 mins
15 mins 12–59 mins
2 mins 2–59 mins
1. Automatically keep warm for 12 hours
after cooking completed, then return to
standby mode.
1. Automatically keep warm for 12 hours
after cooking completed, then return to
standby mode.
2. Risotto cooking time cannot be
adjusted.
1. Automatically keep warm for 12 hours
after cooking completed, then return to
standby mode.
2. Rice cooking time cannot be adjusted.
1. Automatically keep warm for 12 hours
after cooking completed, then return to
standby mode.
1. Automatically keep warm for 12 hours
after cooking completed, then return to
standby mode. mode.
1. Automatically keep warm for 12 hours
after cooking completed, then return
to standby mode. after cooking
completed, then return to standby
mode. hours after cooking completed,
then return to standby mode.

Cleaning and maintenance
Clean all parts after every use – Keep the pressure control valve and floater
unblocked.
Note
• Unplug the All-In-One Cooker before starting to clean it.
• Wait until the All-In-One Cooker has cooled down suciently before cleaning it.
Interior
Inside of the top lid and the main body
• Wipe with damp cloth.
• Make sure to remove all the food residues stuck to the All-In-One Cooker.
9
Exterior
Heating element
• Wipe with damp cloth.
• Remove food residues with wrung out and damp cloth.
Sealing ring
• Soak in warm water and clean with sponge.
• Never put the sealing ring in a dishwasher.
• If sealing ring becomes damaged or worn out, please contact Customer Care for
replacement details.
Inner lid
• Remove the detachable inner lid by pulling the knob in the middle of the inner lid.
• Soak it in warm water and clean with sponge.
Surface of the top lid and outside of the main body
• Wipe with a damp cloth and soapy water.
• Only use soft and dry cloth to wipe the control panel.
• Use a toothpick to remove all the food residues around the pressure regulator
valve and oater.
Pressure regulator valve and oating valve
• If required, disassemble the pressure regulator, soak it in warm water, and clean
with sponge.

Philips All-in-One Cooker Recipe Book
Troubleshooting
Problem Cause Solution
I have diculties opening the lid after
cooking
I have diculties closing the top lid
Leaking from under lid
Leaking from oater
Need to release the pressure
Set the pressure control valve to ‘Vent.’
Wait until the oater has dropped.
Floater stuck in up position
The sealing ring is not well assembled
Floater stuck in up position
Sealing ring missing
Food debris under sealing ring Remove sealing ring, clean and replace.
Lid not correctly closed
Sealing ring broken Replace sealing ring.
Food or debris under sealing ring Remove sealing ring, clean and replace.
Set the pressure control valve to ‘Vent.’
Wait until the oater has dropped.
Make sure the sealing ring is well assembled
around the inner lid.
The oater blocks the locking pin. Push
down the oater so that it does not block
the locking pin.
Put sealing ring in place correctly on inner lid.
Open and reclose lid, checking for correct
closing.
Food & water are below minimum level
Not pressurising / oater does not
rise up after the appliance starts
pressurising
E3 is displayed on the screen
E1, E2 or E4 is displayed on the screen The All-In-One cooker has malfunctioned
Leaking from lid or pressure control valve
The temperature inside the inner
pot is too high
Add food/water. Make sure there is enough
food and water in the inner pot.
Verify if sealing ring and inner lid are
inserted correctly.
Verify oating valve is present.
Verify there is not food stuck inside the
control valve.
Wait until it falls down to room temperature.
Take the appliance to Philips service centre.
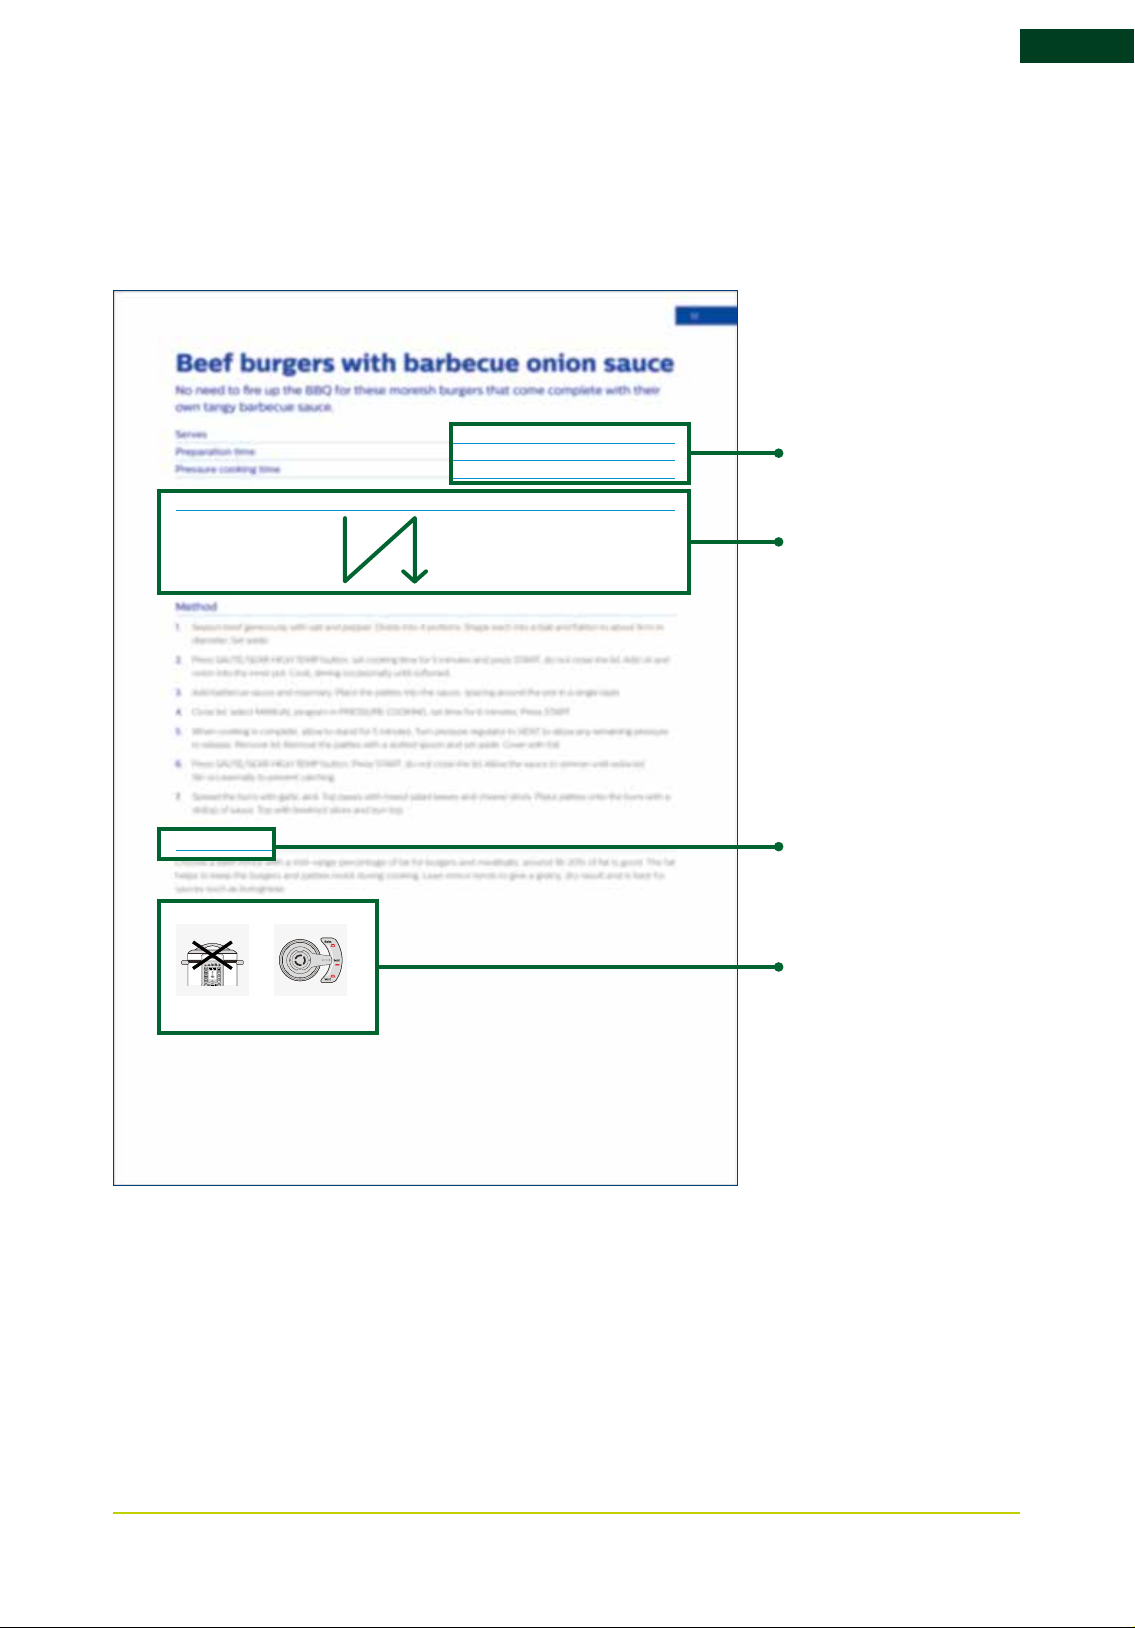
Tips for reading these recipes
Beef burgers with barbecue onion sauce
No need to re up the BBQ for these moreish burgers that come complete with their
own tangy barbecue sauce.
Serves 4
Preparation time 15 minutes
Pressure cooking time 6 minutes (excluding pressure building time)
51
51
Beef burgers with barbecue onion sauce
No need to re up the BBQ for these moreish burgers that come complete with their
own tangy barbecue sauce.
Serves 4
Preparation time 15 minutes
Pressure cooking time 6 minutes (excluding pressure building time)
Ingredients
650g beef mince, see Cook’s note
2 tsp olive oil
2 medium brown onions, thickly sliced
1 cup barbecue sauce
2 tsp chopped fresh rosemary leaves
4 sourdough buns, split, toasted
½ cup garlic aioli
Mixed salad leaves, beetroot slices, cheese slices and
Kettle-style chips, to serve
Method
1. Season beef generously with salt and pepper. Divide into 4 portions. Shape each into a ball and atten to about 9cm in
diameter. Set aside.
2. Press SAUTÉ/SEAR HIGH TEMP button, set cooking time for 5 minutes and press START, do not close the lid. Add oil and
onion into the inner pot. Cook, stirring occasionally until softened.
3. Add barbecue sauce and rosemary. Place the patties into the sauce, spacing around the pot in a single layer.
4. Close lid, select MANUAL program in PRESSURE COOKING, set time for 6 minutes. Press STAR T.
5. When cooking is complete, allow to stand for 5 minutes. Turn pressure regulator to VENT to allow any remaining pressure
to release. Remove lid. Remove the patties with a slotted spoon and set aside. Cover with foil.
6. Press SAUTÉ/SEAR HIGH TEMP button. Press START, do not close the lid. Allow the sauce to simmer until reduced.
Stir occasionally to prevent catching.
7. Spread the buns with garlic aioli. Top bases with mixed salad leaves and cheese slices. Place patties onto the buns with a
dollop of sauce. Top with beetroot slices and bun top.
Cook’s note
Choose a beef mince with a mid-range percentage of fat for burgers and meatballs, around 18-20% of fat is good. The fat
helps to keep the burgers and patties moist during cooking. Lean mince tends to give a grainy, dry result and is best for
sauces such as bolognese.
51
Beef burgers with barbecue onion sauce
No need to re up the BBQ for these moreish burgers that come complete with their
own tangy barbecue sauce.
Serves 4
Preparation time 15 minutes
Pressure cooking time 6 minutes (excluding pressure building time)
Ingredients
650g beef mince, see Cook’s note
2 tsp olive oil
2 medium brown onions, thickly sliced
1 cup barbecue sauce
2 tsp chopped fresh rosemary leaves
4 sourdough buns, split, toasted
½ cup garlic aioli
Mixed salad leaves, beetroot slices, cheese slices and
Kettle-style chips, to serve
Method
1. Season beef generously with salt and pepper. Divide into 4 portions. Shape each into a ball and atten to about 9cm in
diameter. Set aside.
2. Press SAUTÉ/SEAR HIGH TEMP button, set cooking time for 5 minutes and press START, do not close the lid. Add oil and
onion into the inner pot. Cook, stirring occasionally until softened.
3. Add barbecue sauce and rosemary. Place the patties into the sauce, spacing around the pot in a single layer.
4. Close lid, select MANUAL program in PRESSURE COOKING, set time for 6 minutes. Press STAR T.
5. When cooking is complete, allow to stand for 5 minutes. Turn pressure regulator to VENT to allow any remaining pressure
to release. Remove lid. Remove the patties with a slotted spoon and set aside. Cover with foil.
6. Press SAUTÉ/SEAR HIGH TEMP button. Press START, do not close the lid. Allow the sauce to simmer until reduced.
Stir occasionally to prevent catching.
7. Spread the buns with garlic aioli. Top bases with mixed salad leaves and cheese slices. Place patties onto the buns with a
dollop of sauce. Top with beetroot slices and bun top.
51
4
15 minutes
Ingredients
650g beef mince, see Cook’s note
2 tsp olive oil
2 medium brown onions, thickly sliced
1 cup barbecue sauce
6 minutes (excluding pressure building time)
2 tsp chopped fresh rosemary leaves
4 sourdough buns, split, toasted
½ cup garlic aioli
Mixed salad leaves, beetroot slices, cheese slices and
Kettle-style chips, to serve
11
Preparation time includes
general prep and sauté times.
Heating time for sauté may vary.
Cooking time excludes the
pressure building time
Ingredients are listed in order
of use
Cook’s note
Sauté
Pressure Cook
Do not close the
lid during sauté.
Set valve to “Seal”
position.
Extra tips and tricks for
the recipe
Reminders for valve setting for
each required function within
the recipe


Breakfast
and snacks
Shakshuka eggs 15
Farmhouse granola 17
Dairy-free coconut yoghurt 19
Basic vanilla yoghurt 20
Natural Greek yoghurt 21
Smoothie bowl 23
Spiced chickpeas and almonds 25
Philips All-in-One Cooker Recipe Book

Shakshuka eggs
There’s no need to deal with Sunday morning brunch crowds when it’s this easy to
make café-style Middle Eastern eggs at home with this simple recipe and your
All-in-One Cooker.
Serves 4
Preparation time 10 minutes
Cooking time 20 minutes
Ingredients
15
2 red capsicums, seeded, chopped
3 garlic cloves, crushed
1 tbsp mild Moroccan seasoning
2 x 400g cans diced tomatoes
4 eggs
Buttered thick toast, crumbled feta and chopped fresh
parsley, to serve
Method
1. Combine the capsicum, garlic, Moroccan seasoning and tomatoes in the inner pot. Stir to combine.
2. Close lid, select STEW program, set time for 20 minutes and press START. When cooking time is complete, turn pressure
regulator to VENT to allow the pressure to release. Remove lid.
3. Stir the mixture with a wooden spoon and make 4 hollows in the sauce mixture. Crack an egg into each hollow.
Season with black pepper.
4. Press SAUTÉ/SEAR LOW TEMP button, set cooking time for 5 minutes and press START, do not close the lid. Allow to
simmer until eggs are cooked to your preference.
5. Spoon into individual bowls, serve with buttered toast and crumbled feta. Garnish with chopped fresh parsley.
Cook’s note
Stew Sauté
Set valve to “Seal”
position.
Do not close the
lid during sauté.
Philips All-in-One Cooker Recipe BookPhilips All-in-One Cooker Recipe Book
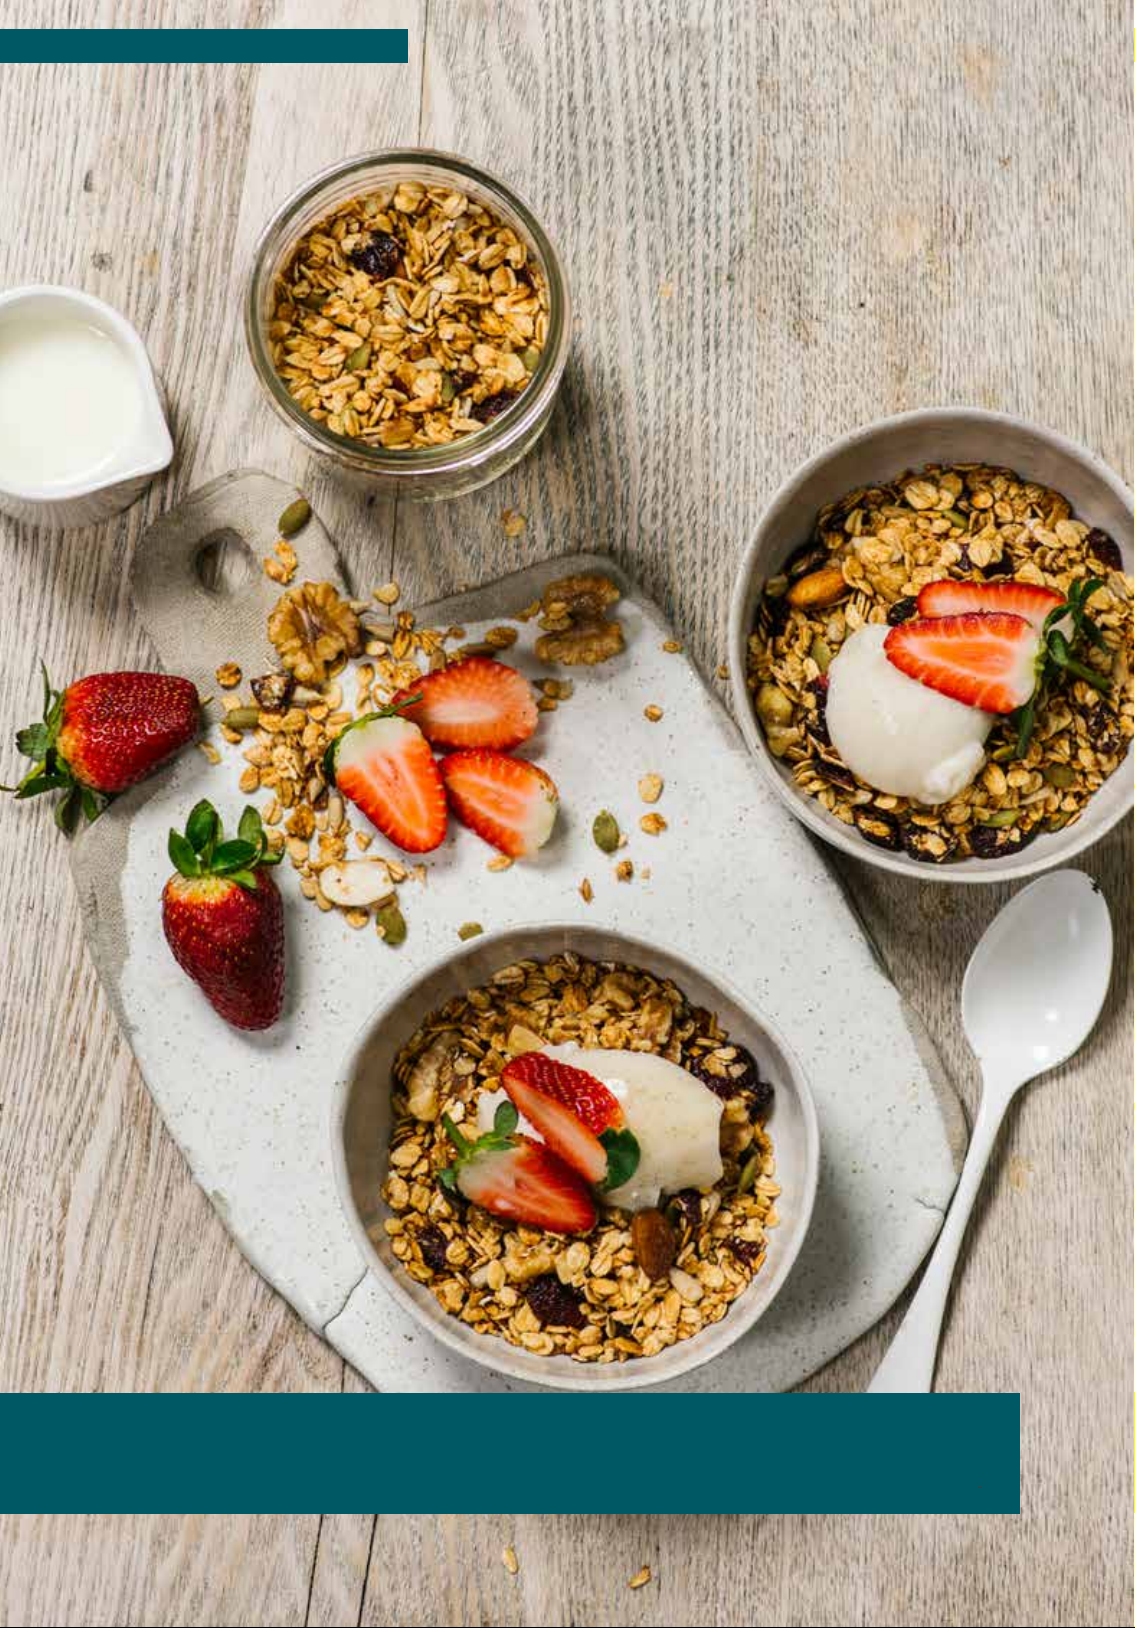
Tip
Serve granola layered into glasses with sliced fresh strawberries and coconut yoghurt, see page 19.

Farmhouse granola
If you like to know exactly what’s in your breakfast cereal, whip up a batch of this
simple granola. Feel free to add extras like spices, additional dried fruit or coconut
akes and get your day o to a great start. This granola can also double as a delicious
topping for stewed fruit.
Makes About 4 cups
Preparation time 5 minutes
Cooking time 10 minutes
Ingredients
17
17
2 cups (200g) rolled oats
⅓ cup (50g) whole natural almonds
½ cup (50g) walnut or pecan pieces
⅓ cup (40g) mixed seeds, like sunower seeds and
pepitas
2 tbsp linseeds, optional
⅓ cup honey
1 tsp vanilla bean paste
1 tsp ground cinnamon
½ cup (80g) dried cranberries
Method
1. Spray inner pot with canola oil. Place all ingredients into the pot and stir with a wooden spoon to combine.
2. Press SAUTÉ/SEAR HIGH TEMP button, set cooking time for 10 minutes. Press START. Do not close the lid.
Stir occasionally throughout cooking with a wooden spoon.
3. When cooking is complete, spread mix onto a baking tray and allow to cool. Keep refrigerated in an airtight container
and use within 10 days.
Cook’s note
Sauté
Do not close the
lid during sauté.

Philips All-in-One Cooker Recipe Book
Coconut
Greek
Natural
Tip
For a softer texture, or drinking yoghurt, reduce the vegetarian gelling powder to 1 sachet
(2 ½ teaspoons).
For a creamy, richer texture chill a 400g can coconut cream, open the can and scoop the solid
coconut cream from the top and add to the yoghurt base in step 3, then process as described.

Dairy-free coconut yoghurt
If you’re not a fan of dairy but still love yoghurt this coconut version is for you.
Makes About 2L
Preparation time 10 minutes
Cooking time 12 hours
Refrigeration time 6 hours or overnight
Ingredients
19
2L unsweetened coconut milk
2 sachets (5 tsp) vegetarian gelling powder
2 tbsp raw sugar
2 tsp vanilla bean extract
1 cup (250ml) store-bought, lactose-free yoghurt, with
live cultures (see Cook’s note)
Method
1. Press SAUTÉ/SEAR LOW TEMP button, press START, do not close the lid. Pour 2 cups (500ml) coconut milk into the
inner pot.
2. Sprinkle the gelling powder over the coconut milk, whisk until combined. Bring to the boil, simmer for 1 minute. Add sugar
and vanilla bean extract.
3. Cancel any remaining time. Add remaining coconut milk. Stir until combined. Add yoghurt.
4. Close the lid and select YOGHURT mode. Set cooking time for 12 hours and press START.
5. Once cooking is complete, transfer to suitable containers and chill yoghurt for 6-8 hours or overnight. Chill until required.
Yoghurt is best eaten within 5 days.
Flavour variations
Chocolate coconut yoghurt
For each serve, whisk 2 tbsp organic dark drinking chocolate with raw dark chocolate shavings, into 1 cup of Dairy-free
coconut yoghurt. Chill until required.
Berry bonanza
For each serve, purée
a few blueberries and then ll the glass with Dairy-free coconut yoghurt. Swirl fruit through the yoghurt. Top with
chopped aked almonds or pistachios. Chill until required.
½ cup raspberries, adding a little honey to taste if desired. Spoon into the base of a glass. Top with
Mango and maple syrup yoghurt
To serve 2, peel, chop and purée one large, ripe mango (or thaw and use 1 cup chopped frozen mango) with 2
tablespoons maple syrup. Swirl through 2 cups Dairy-free coconut yoghurt.
Cook’s note
Sauté
For a creamy dairy-free Greek-style yoghurt, omit raw sugar and
Do not close the
lid during sauté.
Yoghurt
Set valve to “Seal”
position.
Once you get into a yoghurt-making routine, save 1 cup of your own
yoghurt and use instead of purchased yoghurt in the next batch.
vanilla. Once setting is complete, remove the lid. Place a layer of damp
cheesecloth into a large colander and place over a larger bowl. Pour
the yoghurt into the cheesecloth, gather the excess cheesecloth over
the top and secure with a rubber band or kitchen string. Refrigerate for
10 hours. Check to ensure yoghurt is not sitting in the liquid as it drains.
Discard liquid and transfer yoghurt to suitable containers. Chill until
required. Yoghurt is best eaten within 5 days.

Philips All-in-One Cooker Recipe Book
Basic vanilla yoghurt
A tub of plain yoghurt is a healthy refrigerator staple – eat it on its own, with
fruit or granola or use it for frozen treats, baking, salad dressings or marinades.
The possibilities are almost endless.
Makes About 2.5L
Preparation time 5 minutes
Cooking time 10 hours
Refrigeration time 6 hours or overnight
Ingredients
2L whole milk, at room temperature
2 tbsp caster sugar, optional
500g tub plain yoghurt, with Iive cultures (see Cook’s
note)
2 tsp vanilla bean extract
Method
1. Pour milk, caster sugar, yoghurt and vanilla bean extract into the inner pot. Stir to combine.
2. Close the lid and select YOGHURT mode. Set cooking time for 10 hours and press START.
3. Once cooking is complete, transfer to suitable containers and chill yoghurt for 6-8 hours or overnight. Chill until required.
Yoghurt is best eaten within 5 days.
Flavour variations
Cumin and turmeric
For each serve, combine 1 cup basic vanilla yoghurt with ½ teaspoon ground cumin, 1 teaspoon ground turmeric, pinch of
cayenne pepper and a pinch of salt. Stir to combine. Chill until required. This makes a lovely creamy salad dressing or dip.
Honey and vanilla
For each serve, combine 1 cup basic vanilla yoghurt with 1 teaspoon strong-avoured honey and
extract. Stir to combine. Chill until required.
Pomegranate and raspberry
For each serve, mash
dissolves. Simmer for 1 minute and allow to cool. Stir in ¾ cup basic vanilla yoghurt and 2 tbsp pomegranate seeds. Stir to
combine. Chill until required.
½ cup raspberries and place into a small pan. Add 2 tsp sugar. Stir over a low heat until sugar
½ tsp vanilla bean
Cook’s note
Once cooking is nished the yoghurt may have some liquid remaining, chilling the yoghurt
Yoghurt
will make it thicker.
Once you get into a yoghurt-making routine, save 500g of your own yoghurt and use instead
of purchased yoghurt in the next batch.
Set valve to “Seal”
position.
Tip
For a rmer texture, cook yoghurt for 12 hours.
Yoghurt can be used as a base for desserts, salad dressings and smoothies. It is also ideal frozen
into ice-block treats.

Natural Greek yoghurt
Makes About 1L
Preparation time 5 minutes
Cooking time 10 hours
Refrigeration time 6 hours or overnight
Ingredients
2L whole milk, at room temperature 500g tub plain yoghurt, with Iive cultures (see Cook’s
note)
Method
1. Pour milk into the inner pot.
2. Add yoghurt. Stir to combine.
3. Close the lid and select YOGHURT mode. Set cooking time for 10 hours and press START.
4. Once setting is complete, remove the lid. Place a layer of damp cheesecloth into a large colander and place over a larger
bowl. Pour the yoghurt into the cheesecloth, gather the excess cheesecloth over the top and secure with a rubber band or
kitchen string. Refrigerate for 6 hours. Check to ensure yoghurt is not sitting in the liquid as it drains.
21
5. Discard liquid and transfer yoghurt to suitable containers, add a pinch of salt if desired. Chill until required. Yoghurt is best
eaten within 5 days.
Cook’s note
Once cooking is nished the yoghurt may have some liquid remaining, chilling the yoghurt will make it thicker.
Once you get into a yoghurt-making routine, save 500g of your own yoghurt and use instead of purchased yoghurt in the
next batch
Yoghurt
Set valve to “Seal”
position.
Tip
To make labneh (yoghurt cheese), continue to drain yoghurt for 24 hours. Place the drained yoghurt
(now labneh) into a bowl and add salt and white pepper to taste. Shape into balls the size of a
walnut. Roll in dried oregano, place into a jar or bowl. Add some fresh herbs and peppercorns and
cover with olive oil. Serve with crackers.
Philips All-in-One Cooker Recipe Book
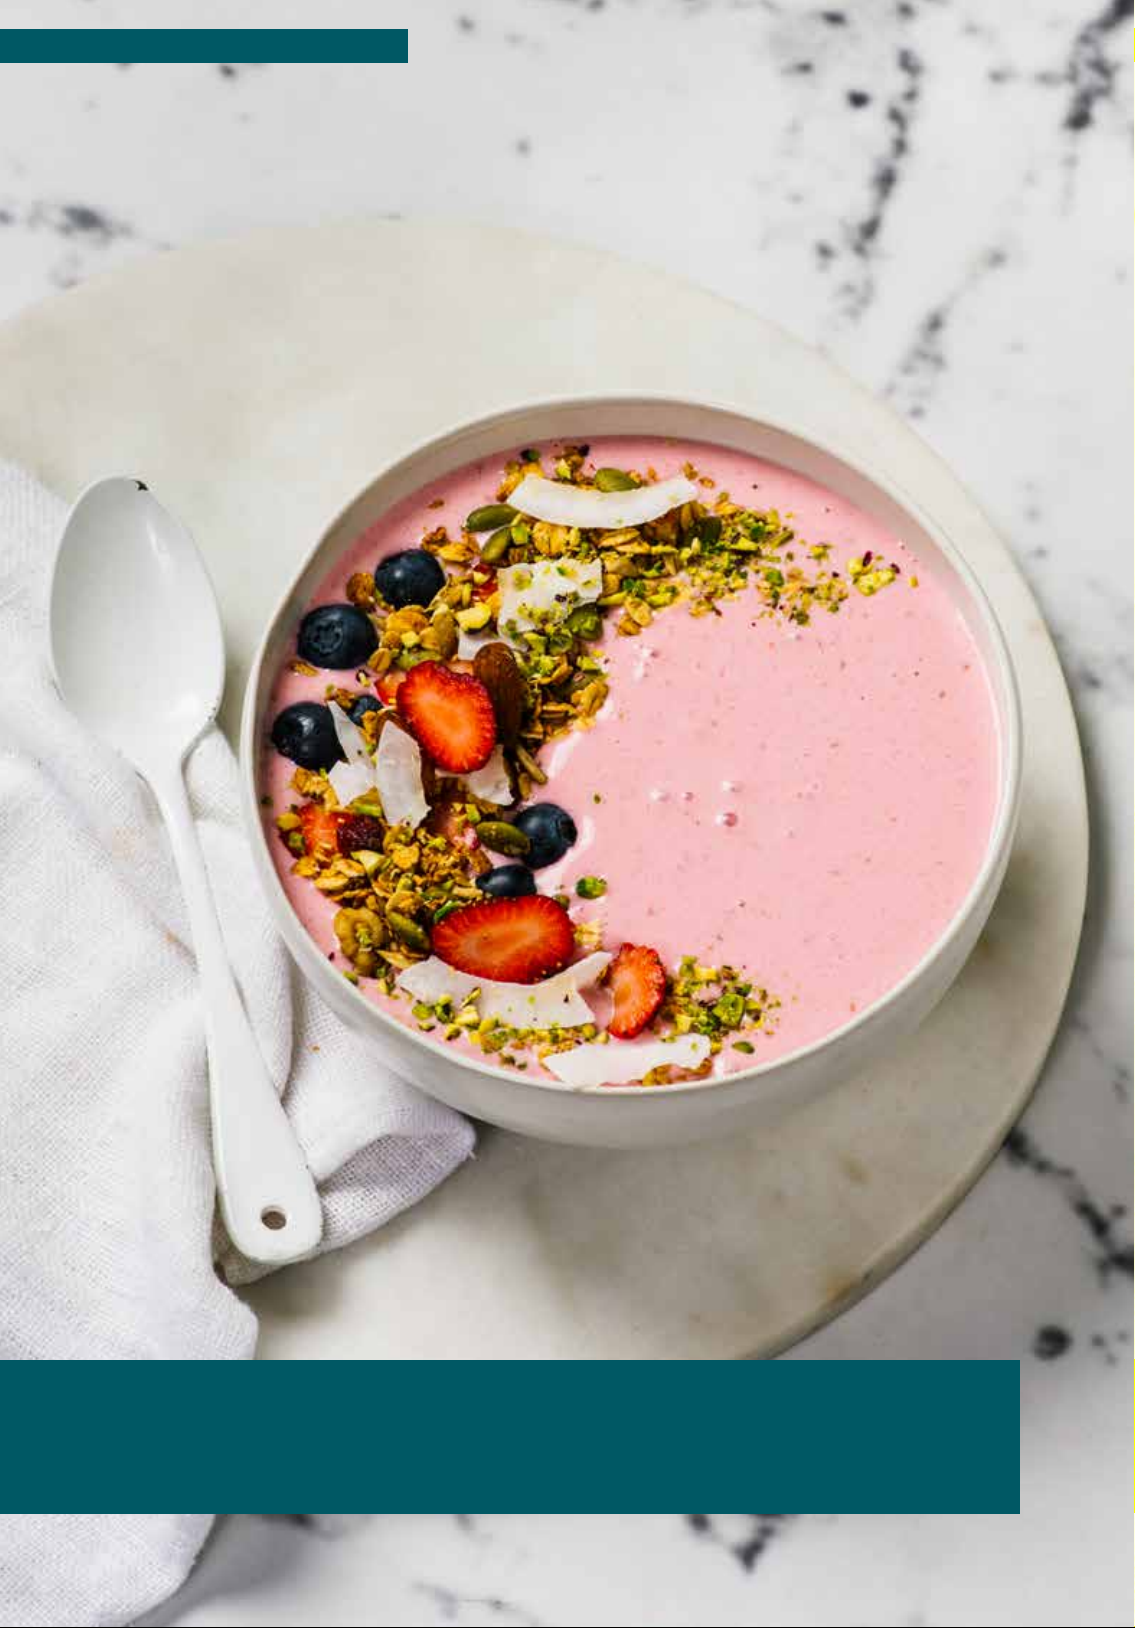
Tip
Yoghurt recipes, see pages 19–21.
Farmhouse granola, see page 17 is the perfect addition to this smoothie bowl.

Smoothie bowl
You don’t need to be Instagram famous to make a beautiful smoothie bowl. Just grab
your homemade yoghurt and follow our simple recipe. Whether you photograph it
before you eat it is entirely up to you!
Serves 2
Preparation time 5 minutes
Additional equipment Stick or jug blender
Ingredients
23
2 cups Basic vanilla or Dairy-free coconut yoghurt, see
TIP
⅓ cup pure coconut water
3 bananas, peeled, chopped
1 cup fresh or thawed frozen raspberries
6 fresh strawberries, hulled, sliced
1 cup (130g) granola, see TIP
2 tsp grated dark chocolate
Method
1. Place 1 ½ cups yoghurt, all the coconut water, 2 bananas and half the raspberries into a blender. Blend until smooth.
2. Pour the smoothie evenly between two bowls. Add remaining yoghurt and swirl through with the back of a spoon.
3. Top smoothie with remaining banana, raspberries, strawberries, granola and grated chocolate. Serve immediately.
Philips All-in-One Cooker Recipe Book

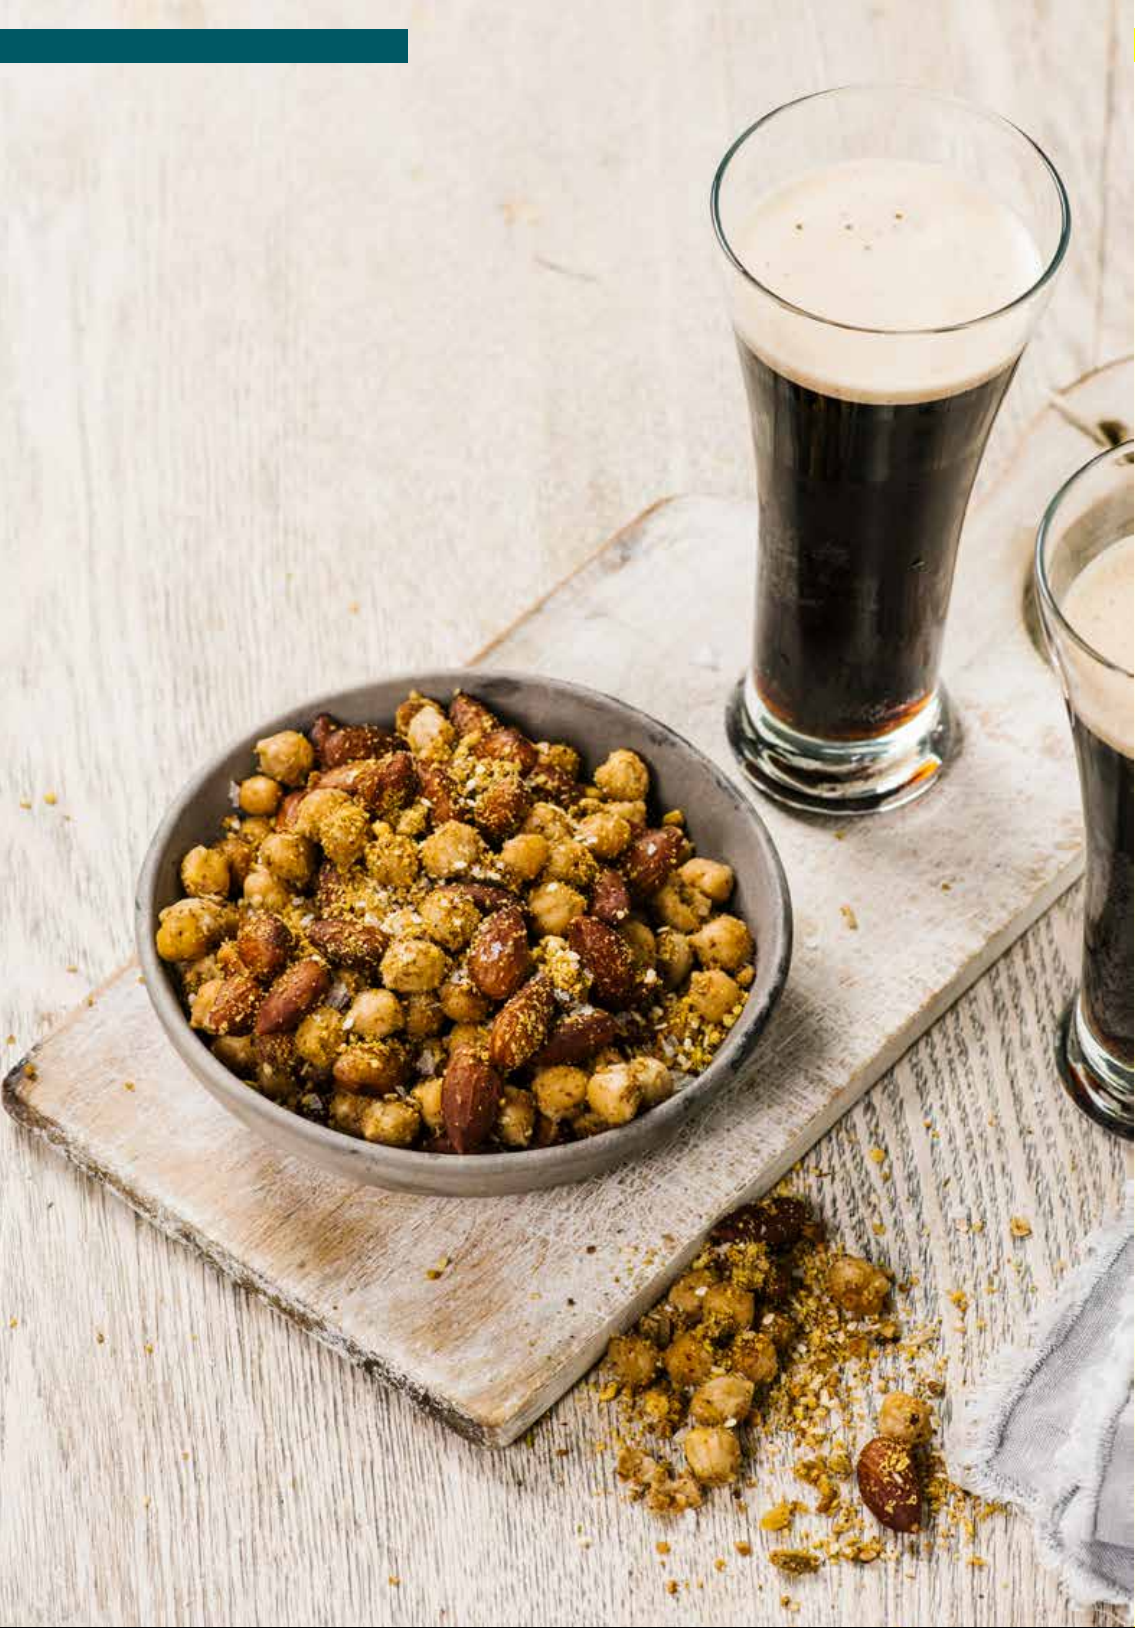
Spiced chickpeas and almonds
Rev up your nibbles game with this snack mix that’s baked in your All-in-One Cooker.
Makes About 4 cups
Preparation time 10 minutes
Bake time 30 minutes
Ingredients
25
2 tbsp (30g) coconut oil
¼ cup dukkah mix, see Cook’s note
2 x 400g can chickpeas, rinsed, drained on paper towel
1 cup whole natural almonds
Optional, 2 kale leaves, trimmed, shredded
Method
1. Press SAUTÉ/SEAR HIGH TEMP button, set time to 2 minutes, press START, do not close the lid. Place coconut oil into the
inner pot, allow to melt, add the dukkah and the chickpeas. Stir until dukkah is fragrant.
2. Stir in the almonds and place the kale on top, if using.
3. Close lid, select BAKE program, set time for 30 minutes and press START.
4. When cooking is complete, remove lid. Spread mix onto a baking tray and allow to cool. Keep refrigerated in an airtight
container and use within 3 days.
Cook’s note
Dukkah is a avourful, Middle Eastern mix of nuts, seeds and spices and can be purchased from supermarkets.
Store unused portion in an airtight container.
BakeSauté
Do not close the
lid during sauté.
Set valve to
“Bake” position.


Soups and
broths
Roasted tomato and pesto soup 29
Chicken, turmeric and vegetable soup 31
Chicken, dhal, corn and coconut soup 33
Low-calorie vegetable soup 35
Noodle and vegetable hot pot 37
Beef bone broth 39
Light bone broth 40
Philips All-in-One Cooker Recipe Book
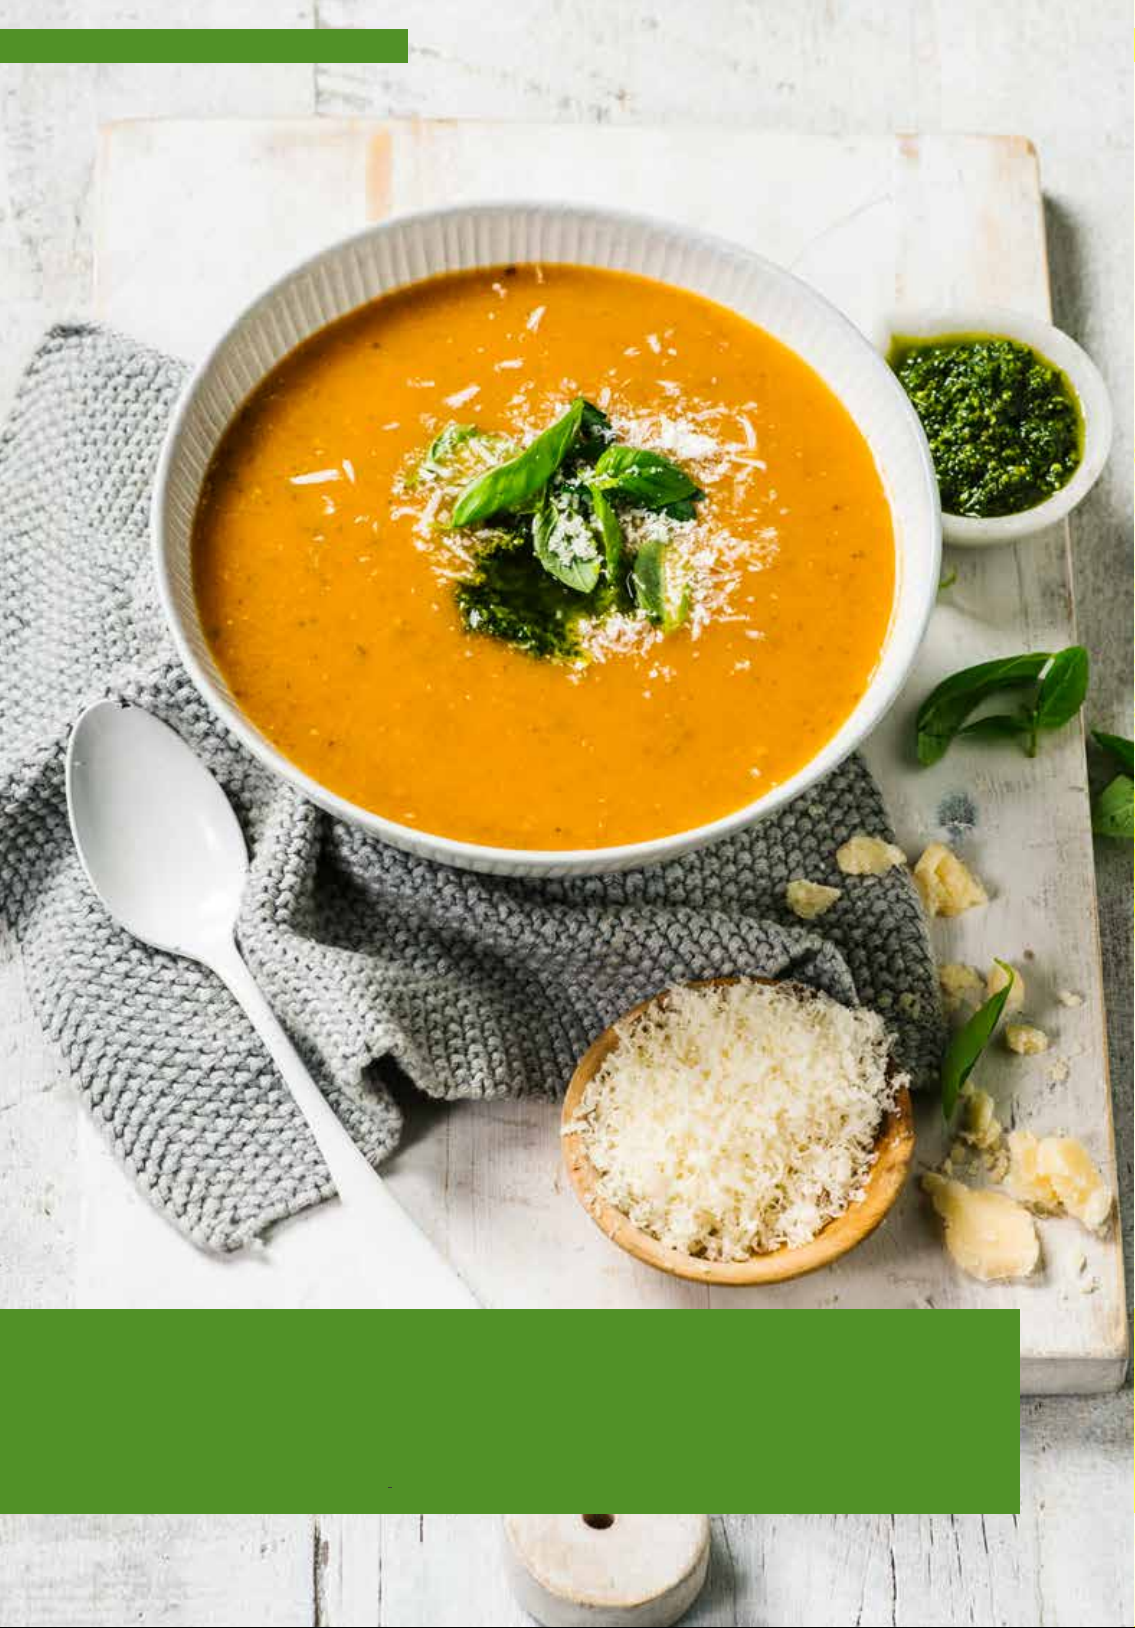
Tip |
Place 2 cups fresh basil leaves into a small blender or food processor, add ½ cup extra virgin olive
oil, ⅓ cup toasted pine nuts and 3 cloves chopped garlic. Blend until smooth. Add ½ cup freshly
grated parmesan and pulse until combined. Store unused pesto in a screw-top jar with a little oil
over the surface. Use within 14 days.
To make your own pesto

Roasted tomato and pesto soup
What is it that makes simple soup so satisfying and soul-restoring? In this case it’s the
fact that you’re roasting the tomatoes (yes, in your All-in-One Cooker!) to bring out
their avour and sweetness before turning them into a soup that will have you wishing
every night was soup night.
Serves 6
Preparation time 15 minutes
Pressure cooking time 10 minutes (excluding pressure building time)
Ingredients
29
1.2kg ripe tomatoes, peeled, quartered, see Cook’s note
1 red onion, chopped
2 tbsp olive oil
4-6 fresh thyme sprigs
3 cloves garlic
3 tsp brown sugar
1L vegetable stock, salt-reduced
⅓ cup basil pesto
Extra pesto, freshly grated parmesan and basil leaves,
to serve
Method
1. Place tomatoes and onion into the inner pot. Drizzle with olive oil, add thyme sprigs and garlic. Close the lid.
2. Press the BAKE button, set cooking time for 10 minutes and press START.
3. Remove the lid. Add the brown sugar, vegetable stock and pesto. Close the lid.
4. Select the MANUAL program in PRESSURE COOKING. Set time for 10 minutes. Press START.
5. When cooking is complete turn pressure regulator to VENT to allow the pressure to release. Remove lid. Remove the
thyme. Using a stick blender, blend soup until smooth. Season to taste with salt and pepper. Ladle soup into bowls, top
with extra pesto, freshly grated parmesan and basil leaves.
Cook’s note
To peel tomatoes, cut a cross at the bottom of the tomatoes, using a sharp knife. Place into a large bowl, cover with
boiling water and let stand for 5 minutes, or until the skin begins to peel o. Drain, cool for a few minutes, then using your
ngers or a knife, peel back the sections of skin.
Bake
Set valve to
“Bake” position.
Pressure Cook
Set valve to “Seal”
position.
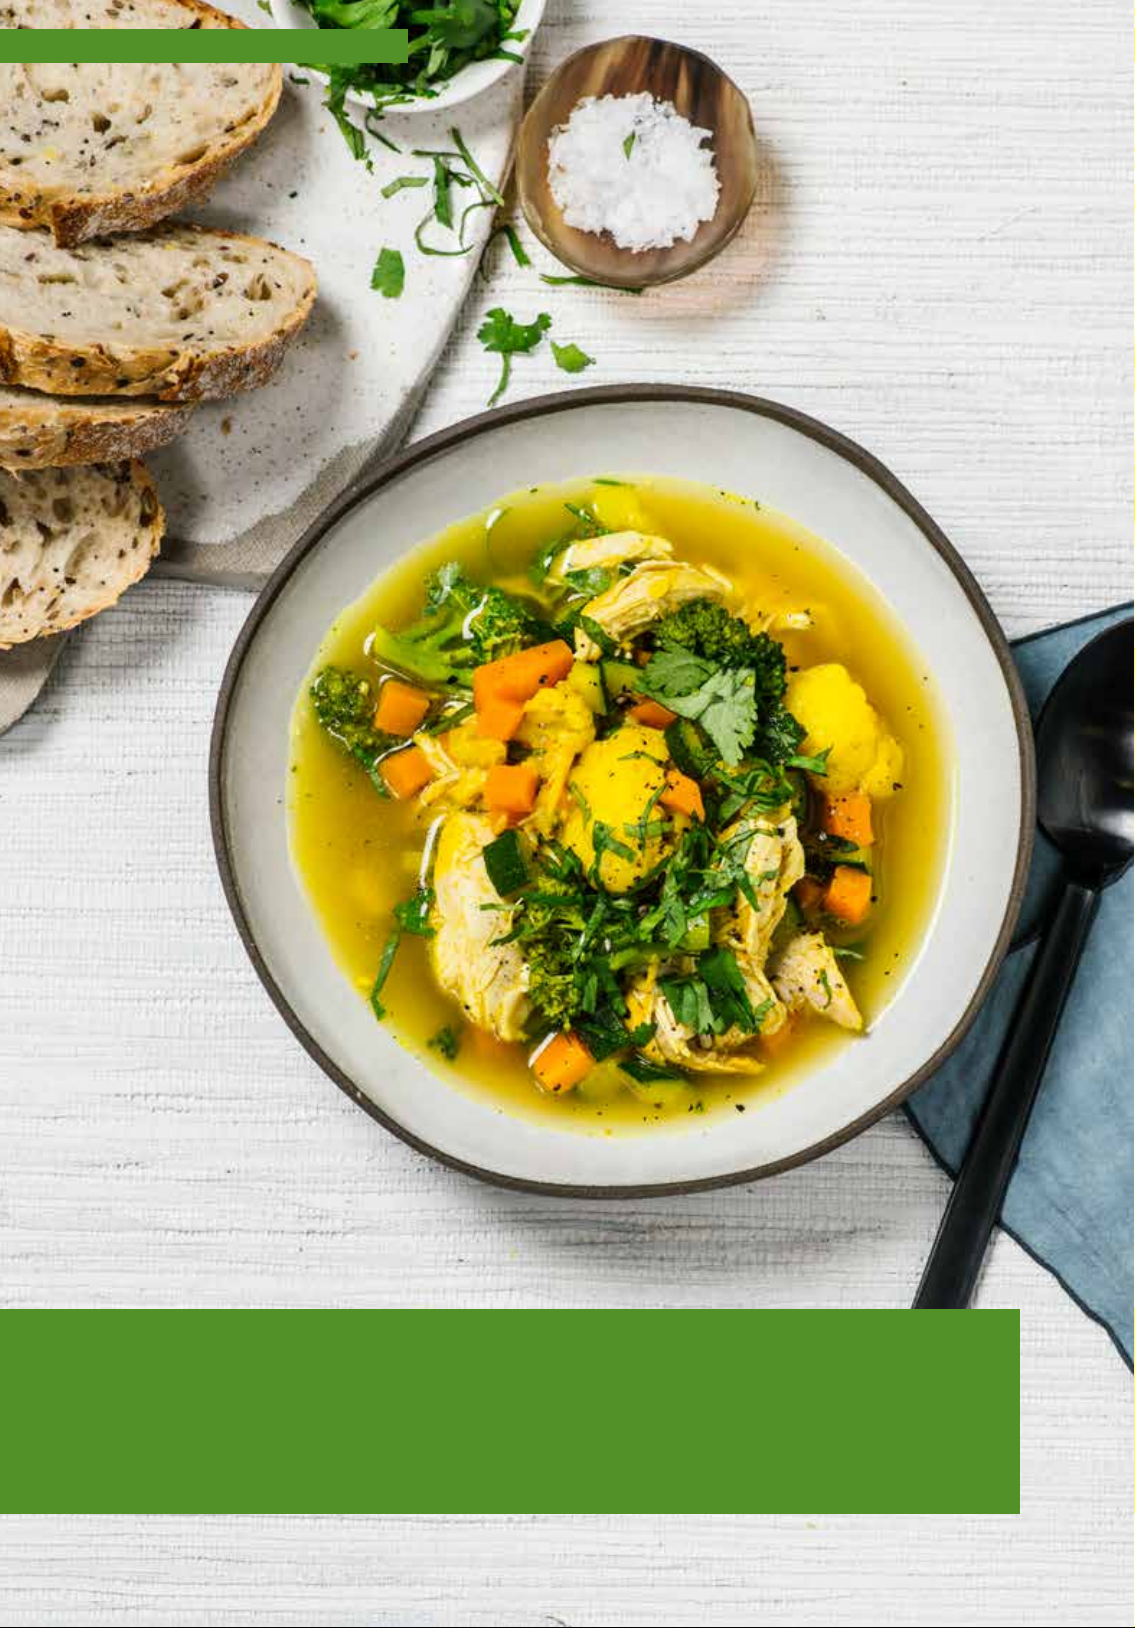
Philips All-in-One Cooker Recipe Book
Tip
Soup can be frozen: cool soup for 30 minutes, then chill until completely cold. Divide soup into
single-serve portions (about 1 ½ cups) and place in airtight containers or ziplock bags. Label with
contents and date. Freeze for up to 4 weeks. Defrost overnight in the refrigerator and reheat
until piping hot before serving.
 Loading...