

Philips HD2132 User Manual
Specifications are subject to change without notice
© 2016 Koninklijke Philips N.V.
All rights reserved.
HD2132_UM_Malay_v2.0
HD2132
Register your product and get support at
www.philips.com/welcome
Always there to help you
Question?
Contact
Philips
English
1 Your electric pressure
cooker
Congratulations on your purchase, and welcome
to Philips!
To fully benefit from the support that Philips
offers, register your product at www.philips.com/
welcome.
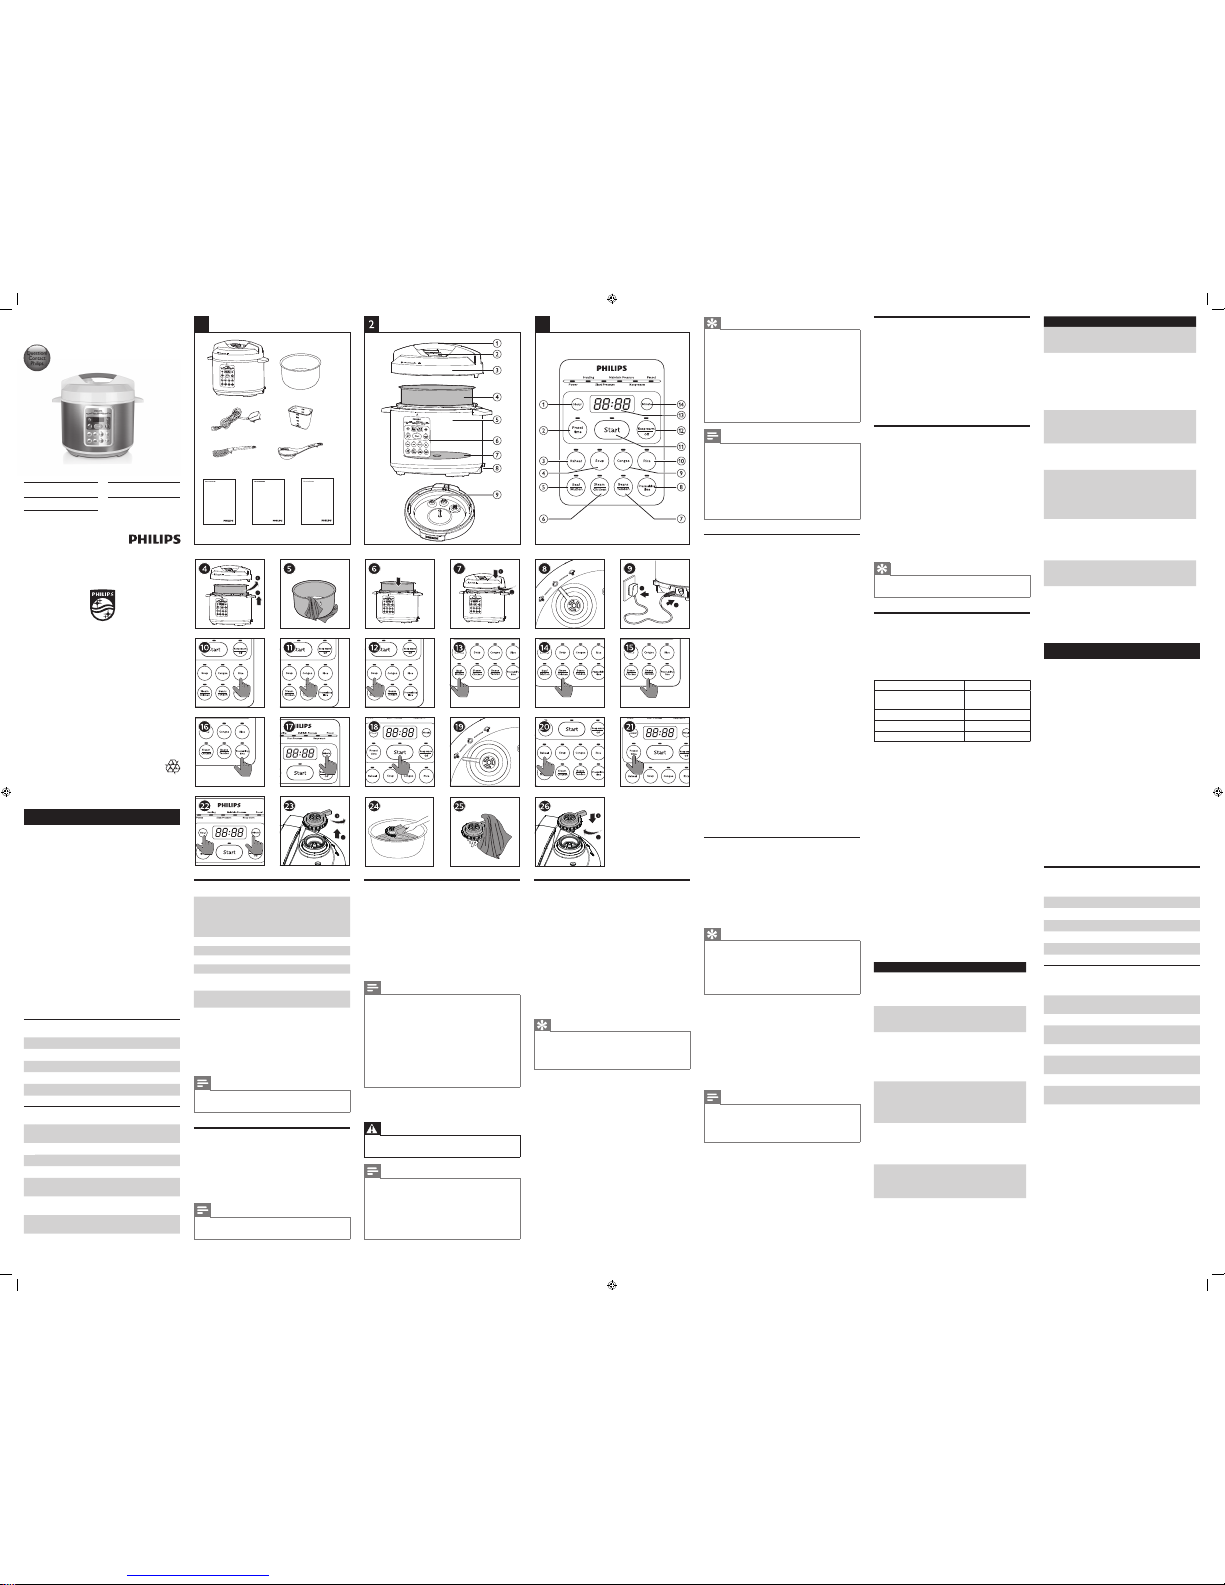
2 What’s in the box (fig. 1)
Main unit Inner pot
Power cord Soup ladle
Rice spoon Measuring cup
User manual Important information leaflet
Warranty card
3 Overview
Product overview (fig. 2)
a
Lid handle
f
Control Panel
b
Pressure regulatorgHeating element
c
Top lid
h
Power socket
d
Inner pot
i
Safety valve
e
Main body
Controls overview (fig. 3)
a
Hour button
h
Pressurizing time
button
b
Preset buttoniCongee button
c
Reheat buttonjRice button
d
Soup buttonkStart button
e
Beef/Mutton button
l
Keep warm/Off
button
f
Steam/Chicken
button
m
Display screen
g
Beans/Tendon
button
n
Minute button
Functions overview
Cooking
function
Default
pressure
keeping
time
(minute)
Pressure
keeping time
regulating
range
(minute)
Preset
time
(hour)
Rice 14 Not adjustable 24
Congee 13 1-59 24
Soup 20 20-59 24
Reheat 25 20-50 24
Beef/
Mutton
30 30-59 24
Steam/
Chicken
20 20-59 24
Beans/
Tendon
30 25-59 24
4 Using the electric
pressure cooker
Note
• Always unplug the appliance if not used for a
longer period.
Before first use
1 Remove all packaging materials from the
appliance.
2 Take out all the accessories from the inner pot.
3 Clean the parts of the electric pressure cooker
thoroughly before using it for the first time (see
chapter ‘Cleaning and Maintenance’).
Note
• Make sure all parts are completely dry before
using the electric pressure cooker.
Preparations before cooking
Before using the electric pressure cooker to cook
food, follow below preparation steps.
1 Hold the lid handle and turn it
counterclockwise to take the lid off the main
unit, and then take the inner pot out (fig. 4).
2 Put the pre-washed food in the inner pot,
wipe the outside of the inner pot dry (fig. 5),
and then put it back into the electric pressure
cooker (fig. 6).
Note
• Do not fill the inner pot with less than 1/3 or
more than 2/3 full of food.
• For food that expands during cooking, do
not fill the inner pot with more than 1/2 full of
food.
• For rice cooking, follow the water level
indications on the inside of the inner pot. You
can adjust the water level for different types of
rice and according to your own preference. Do
not exceed the maximum quantities indicated
on the inside of the inner pot.
3 Place the top lid onto the electric pressure
cooker and turn it clockwise to lock the top lid
properly (fig. 7).
Warning
• Make sure the pressure regulator valve and
floating valve are clean and not blocked.
Note
• Make sure the sealing ring is properly
assembled around the inner side of the top lid.
• Make sure the outside of the inner pot is dry
and clean, and that there is no foreign residue
on the heating element.
• Make sure the inner pot is in proper contact
with the heating element.
Tip
• To release pressure quickly, turn the pressure
regulator to the vent position after the electric
pressure cooker turns into keep warm mode.
Beware of hot steam coming out of the steam
vent to avoid scald burns.
• You can adjust the pressure keeping time for
different types of food. The pressure keeping
time is fixed when you use the rice cooking
function.
• To cancel the ongoing cooking process, press
the keep warm/off button.
Note
• When cooking soup or viscous liquid, do
not release pressure by turning the pressure
regulator to vent, otherwise liquid might spurt
from the pressure regulator. Wait until the
pressure is naturally released and the floater
has dropped down to open the top lid.
• After the cooking is finished, unplug the
electric pressure cooker if you are not using it
continously.
Reheating
1 Loosen the food and evenly distribute it in the
inner pot.
2 Pour some water onto the food to prevent it
from becoming too dry. The quantity of the
water depends on the amount of food.
3 Place the top lid onto the electric pressure
cooker and turn it clockwise to lock the top lid
properly (fig. 7).
4 Turn the pressure regulator to the sealing
position (fig. 8).
5 Put the plug in the power socket (fig. 9).
6 Press the reheating button (fig. 20)
» The default reheating time displays on
the screen.
7 To set a different reheating time, press the
pressurizing time button (fig. 16).
8 Press the minute button to set the reheating
time (fig. 17).
9 Press the start button to start the reheating
process (fig. 18).
» The remaining reheating time starts
counting down.
10 When the reheating time has elapsed,
the electric pressure cooker automatically
switches to keep warm mode.
11 After the pressure has been released
sufficiently, turn the pressure regulator to the
vent position (fig. 19), and then turn the top lid
counterclockwise to take it off the main unit
(fig. 4).
» The floater drops down when the
pressure is released sufficiently.
Preset time for delayed cooking
You can preset the delayed cooking time for
different cooking functions. The preset timer is
available up to 24 hours.
1 Choose one of the cooking functions, and
then press the preset button (fig. 21).
2 Press the hour button to set the hours, and
press the minute button to set the minutes
(fig. 22).
Tip
• Press the hour button once to set the hour
unit by the increment of one hour; press the
minute button once to set the minute unit by
the increment of ten minutes. Press and hold
the minute or hour button to fast forward in
setting the minute or hour unit.
3 Press the start button to confirm the preset
time (fig. 18).
4 When the preset time has elapsed, the electric
pressure cooker starts the cooking process
automatically.
5 Cleaning and
Maintenance
Note
• Unplug the electric pressure cooker before
cleaning.
• Wait until the electric pressure cooker has
cooled down sufficiently before cleaning.
Cooking food
1 Follow the steps in “Preparations before
cooking”.
2 Turn the pressure regulator to the sealing
position (fig. 8).
3 Put the plug in the power socket (fig. 9).
4 Press one of the cooking buttons (fig. 10 to
fig. 15)
» The default pressure keeping time
displays on the screen.
5 To set a different pressure keeping time, press
the pressurizing time button (fig. 16).
6 Press the minute button to set the pressure
keeping time (fig. 17).
Tip
• Press the minute button once to set the
minute unit by the increment of one minutes.
Press and hold the minute button to fast
forward in setting the minute unit.
7 Press the start button to start the cooking
process (fig. 18).
8 When the electric pressure cooker reaches
the working pressure, the remaining pressure
keeping time starts counting down.
9 When the pressure keeping time has elapsed,
the electric pressure cooker automatically
switches to keep warm mode.
10 After the pressure has been released
sufficiently, turn the pressure regulator to the
vent position (fig. 19), and then turn the top lid
counterclockwise to take it off the main unit
(fig. 4).
» The floater drops down when the
pressure is released sufficiently.
1 3
http://www.philips.com/welcome
User manual
http://www.philips.com/welcome
Warranty
http://www.philips.com/welcome
Important information leaet
Interior
Inside of the top lid and the main body:
• Wipe with wrung out and damp cloth.
• Make sure to remove all the food residues
stuck to the electric pressure cooker.
Heating element:
• Wipe with wrung out and damp cloth.
• Remove food residues with wrung out and
damp cloth.
Sealing ring:
• Soak in warm water and clean with sponge.
Exterior
Surface of the top lid and outside of the main
body:
• Wipe with a cloth damped with soap water.
• Only use soft and dry cloth to wipe the control
panel.
• Make sure to remove all the food residues
around the pressure regulator and floating
valve.
Pressure regulator:
• Disassemble the pressure regulator, soak it in
warm water, and clean with sponge (fig. 23 to
fig. 26).
• Remove food residues in the pressure
regulator and floating valve.
Tip
• To remove the pressure regulator, turn it
counterclockwise and then pull it up (fig. 23).
Accessories
Detachable top lid, measuring cup, rice spoon,
soup ladle, and inner pot:
• Soak in hot water and clean with sponge.
6 Specifications
Model Number HD2132
Rated voltage 220-240V~
50-60 Hz
Rated power output 830-980W
Rated capacity 5.0L
Warm keeping temperature 60-80°C
7 Recycling
Do not throw away the appliance with normal
household waste at the end of its life, but hand it in
at an official collection point for recycling. By doing
this, you can help to preserve the environment.
8 Guarantee and service
If you need service or information, or if you have a
problem, visit the Philips website at www.philips.
com or contact the Philips Customer Care Center
in your country. You can find its phone number
in the worldwide guarantee leaflet. If there is no
Customer Care Center in your country, go to your
local Philips dealer.
9 Troubleshooting
If your electric pressure cooker does not function
properly or if the cooking quality is insufficient,
consult the table below. If you are unable to solve
the problem, contact a Philips service center or the
Consumer Care Center in your country.
Problem Solution
I have
diculties
closing the
top lid.
The sealing ring is not well
assembled. Make sure the
sealing ring is well assembled
around the inside of the top lid.
The oater blocks the locking pin.
Push down the oater so that it
does not block the locking pin.
I have
diculties
opening the
top lid after
the pressure
is released.
The oater has not dropped.
Push the oater down.
The food
is not well
cooked.
Make sure that there is no foreign
residue on the heating element
and the outside of the inner pot
before switching the electric
pressure cooker on.
The heating element is damaged,
or the inner pot is deformed. Take
the cooker to your Philips dealer
or a service center authorized by
Philips.
Air or steam
leaks from
under the lid.
The sealing ring is not well
assembled. Make sure the
sealing ring is well assembled
around the inside of the top lid.
There is food residue in the
sealing ring. Make sure the
sealing ring is clean.
Problem Solution
The top lid is not properly closed.
Make sure the top lid is properly
closed.
The pressure level inside of
the appliance is abnormal, in
this case the safety valve will
be releasing steam. Take the
appliance to your Philips dealer
or a service center authorized by
Philips.
Air or steam
leaks from
the oating
valve.
There is food residue in the
rubber ring of the oating valve.
Clean the rubber ring of the
oating valve.
The rubber ring of the oating
valve is broken. Replace the
rubber ring.
The oater
does not
rise after the
appliance
starts
pressurizing.
Make sure there is enough food
and water in the inner pot.
The top lid or the pressure
regulator valve has malfunction.
Take the appliance to your
Philips dealer or a service center
authorized by Philips.
E3 displays
on the
screen.
The temperature inside the inner
pot is too high. Wait until it falls
down to room temperature.
E1, E2, or E4
displays on
the screen.
The electric pressure cooker has
malfunction. Take the appliance
to a Philips dealer or a service
center authorised by Philips.
Bahasa Melayu
1 Periuk tekanan elektrik
anda
Tahniah atas pembelian anda dan selamat
menggunakan Philips!
Untuk mendapat manfaat sepenuhnya daripada
sokongan yang ditawarkan oleh Philips, daftarkan
produk anda di www.philips.com/welcome.
2 Isi kandungan kotak
(rajah 1)
Unit utama Periuk dalam
Kord kuasa Senduk sup
Sudu nasi Cawan penyukat
Manual pengguna Risalah maklumat penting
Kad waranti
3 Gambaran keseluruhan
Gambaran keseluruhan produk
(rajah 2)
a
Pemegang penutupfPanel Kawalan
b
Pengatur tekanangElemen pemanasan
c
Penutup atashSoket kuasa
d
Periuk dalamiInjap keselamatan
e
Jasad utama
Gambaran keseluruhan kawalan
(rajah 3)
a
Butang jam
h
Butang masa
penekanan
b
Butang prasetiButang bubur
c
Butang pemanasan
semula
j
Butang nasi
d
Butang sup
k
Butang mula
e
Butang daging
lembu/kambing
l
Butang simpan
panas/mati
f
Butang stim/ayammSkrin paparan
g
Butang kacang/
tendon
n
Butang minit
User manual
Manual pengguna
用户手册

Gambaran keseluruhan fungsi
Fungsi
memasak
Masa
menyimpan
tekanan
lalai (minit)
Julat kawalan
masa
menyimpan
tekanan
(minit)
Masa
praset
(jam)
Beras
14
Tidak dapat
dilaraskan
24
Bubur 13 1-59 24
Sup 20 20-59 24
Panas
semula
25 20-50 24
Daging
lembu/
kambing
30 30-59 24
Stim/
Ayam
20 20-59 24
Kacang/
Tendon
30 25-59 24
4 Menggunakan periuk
tekanan elektrik
Nota
• Buka plag perkakas jika ia tidak akan
digunakan untuk tempoh masa yang lama.
Sebelum penggunaan pertama
1 Tanggalkan semua bahan bungkusan dari
perkakas.
2 Keluarkan semua aksesori dari periuk dalam.
3 Bersihkan bahagian periuk tekanan elektrik
dengan teliti sebelum menggunakannya buat
pertama kali (lihat bab 'Pembersihan dan
Penyelenggaraan').
Nota
• Pastikan semua bahagian telah kering
sepenuhnya sebelum menggunakan periuk
tekanan elektrik.
Persediaan sebelum memasak
Sebelum menggunakan periuk tekanan elektrik
untuk memasak, ikuti langkah persediaan di
bawah.
1 Pegang pemegang penutup dan putarkannya
lawan arah jam untuk mengeluarkan
pemegang daripada unit utama kemudian
keluarkan periuk dalam (rajah 4).
2 Letakkan makanan yang belum dicuci ke
dalam periuk dalam, lap bahagian luar periuk
dalam sehingga kering (rajah 5), kemudian
letakkannya kembali ke dalam periuk tekanan
elektrik (rajah 6).
Nota
• Jangan isi periuk dalam dengan kurang
daripada 1/3 atau lebih daripada 2/3
makanan.
• Untuk makanan yang mengembang sewaktu
dimasak, jangan isi periuk dalam dengan lebih
daripada 1/2 makanan.
• Untuk memasak nasi, ikut penunjuk paras air
di bahagian dalam periuk dalam. Anda boleh
melaraskan aras air untuk jenis beras yang
berlainan dan mengikut keutamaan anda.
Jangan melebihi kuantiti maksimum yang
ditunjukkan di bahagian dalam periuk dalam.
3 Letakkan penutup atas pada periuk tekanan
elektrik dan putarkannya mengikut arah
jam untuk mengunci penutup dengan betul
(rajah. 7).
Amaran
• Pastikan injap pengatur tekanan dan injap
terapung bersih dan tidak tersekat.
Nota
• Pastikan gegelang kedap dipasangkan dengan
betul mengelilingi bahagian dalam penutup
atas.
• Pastikan bahagian luar periuk dalam kering
dan bersih serta tiada sisa asing pada elemen
pemanasan.
• Pastikan periuk dalam bersentuhan dengan
betul dengan elemen pemanasan.
Memasak makanan
1 Ikuti langkah dalam "Persediaan sebelum
memasak".
2 Putarkan pengatur tekanan kepada
kedudukan kedap (rajah 8).
3 Pasangkan plag ke soket kuasa (rajah 9).
4 Tekan salah satu butang memasak (rajah 10
hingga rajah 15)
» Masa menyimpan tekanan lalai
dipaparkan pada skrin.
5 Untuk menetapkan masa menyimpan tekanan
yang berbeza, tekan butang masa penekanan
(rajah. 16).
6 Tekan butang minit untuk menetapkan masa
menyimpan tekanan (rajah 17).
Petua
• Tekan butang minit sekali untuk menetapkan
unit minit dengan tokokan seminit. Tekan dan
tahan butang minit untuk mara laju dalam
melaraskan unit minit.
7 Tekan butang mula untuk memulakan proses
memasak (rajah 18).
8 Apabila periuk tekanan elektrik mencapai
tekanan yang sesuai, baki masa menyimpan
tekanan akan mula membilang turun.
9 Apabila masa menyimpan tekanan tamat,
periuk tekanan elektrik bertukar ke mod
simpan panas secara automatik.
10 Selepas tekanan dilepaskan dengan
secukupnya, putarkan pengatur tekanan
kepada kedudukan bolong (rajah 19),
kemudian putarkan penutup atas melawan
arah jam untuk mengeluarkan pemegang
daripada unit utama (rajah 4).
» Pengapung akan jatuh apabila tekanan
dilepaskan dengan secukupnya.
Petua
• Untuk melepaskan tekanan dengan
pantas, putarkan pengatur tekanan kepada
kedudukan bolong selepas periuk tekanan
elektrik bertukar kepada mod menyimpan
panas. Berhati-hati dengan stim panas yang
keluar dari bolong stim untuk mengelakkan
luka terbakar atau melecur.
• Anda boleh melaraskan masa menyimpan
tekanan bagi jenis makanan yang berlainan.
Masa menyimpan tekanan adalah tetap
apabila anda menggunakan fungsi memasak
nasi.
• Untuk membatalkan proses memasak, tekan
butang simpan panas/mati.
Nota
• Apabila memasak sup atau cecair likat,
jangan keluarkan tekanan dengan memutar
pengatur tekanan ke bolong, jika tidak, cecair
mungkin memancut dari pengatur tekanan.
Tunggu sehingga tekanan dilepaskan dengan
sendirinya dan pengapung telah jatuh untuk
membuka penutup atas.
• Apabila selesai memasak, cabut plag
periuk tekanan elektrik jika anda tidak
menggunakannya secara berterusan.
Panas semula
1 Kacau makanan dan ratakannya di dalam
periuk dalam.
2 Tuangkan sedikit air ke dalam makanan agar
makanan tidak menjadi terlalu kering. Jumlah
air bergantung pada jumlah makanan.
3 Letakkan penutup atas pada periuk tekanan
elektrik dan putarkannya mengikut arah
jam untuk mengunci penutup dengan betul
(rajah. 7).
4 Putarkan pengatur tekanan kepada
kedudukan kedap (rajah 8).
5 Pasangkan plag ke soket kuasa (rajah 9).
6 Tekan butang pemanasan semula (rajah 20)
» Masa pemanasan semula lalai akan
dipaparkan pada skrin.
7 Untuk menetapkan masa pemanasan semula
yang berbeza, tekan butang masa penekanan
(rajah. 16).
8 Tekan butang minit untuk menetapkan masa
pemanasan semula (rajah 17).
9 Tekan butang mula untuk memulakan proses
pemanasan semula (rajah 18).
» Masa pemanasan semula akan bermula
membilang turun.
10 Apabila masa pemanasan semula tamat,
periuk tekanan elektrik akan bertukar kepada
mod simpan panas secara automatik.
11 Selepas tekanan dilepaskan dengan
secukupnya, putarkan pengatur tekanan
kepada kedudukan bolong (rajah 19),
kemudian putarkan penutup atas melawan
arah jam untuk mengeluarkan pemegang
daripada unit utama (rajah 4).
» Pengapung akan jatuh apabila tekanan
dilepaskan dengan secukupnya.
Praset masa untuk pemasakan
tertunda
Anda boleh praset masa memasak tertangguh bagi
fungsi memasak yang berlainan. Pemasa boleh
dipraset sehingga 24 jam.
1 Pilih salah satu fungsi memasak kemudian
tekan butang praset (rajah 21).
2 Tekan butang jam untuk menetapkan unit jam
dan butang minit untuk menetapkan unit minit
(rajah 22).
Petua
• Tekan butang jam sekali untuk menetapkan
unit jam dengan penambahan satu jam, tekan
butang minit untuk menetapkan unit minit
dengan penambahan sepuluh minit. Tekan
dan tahan butang minit atau jam untuk mara
laju penetapan unit minit atau jam.
3 Tekan butang mula untuk mengesahkan masa
praset (rajah 18).
4 Setelah masa praset tamat, periuk tekanan
elektrik akan memulakan proses memasak
secara automatik.
5 Pembersihan dan
Penyelenggaraan
Nota
• Cabut plag periuk tekanan elektrik sebelum
membersihkannya.
• Tunggu sehingga periuk tekanan elektrik sejuk
secukupnya sebelum membersihkannya.
Dalaman
Di bahagian dalam tudung atas dan badan utama:
• Lap dengan kain lembap yang telah diperah.
• Pastikan semua sisa makanan yang melekat
pada periuk tekanan elektrik dibuang.
Elemen pemanas:
• Lap dengan kain lembap yang telah diperah.
• Buang sisa makanan dengan kain lembap
yang telah diperah.
Gegelang kedap:
• Rendam di dalam air suam dan bersihkan
dengan span.
Luaran
Permukaan tudung atas dan bahagian luar badan
utama:
• Lap dengan kain yang dilembapkan dengan
air sabun.
• Hanya gunakan kain lembut dan kering untuk
mengelap panel kawalan.
• Pastikan anda membuang semua sisa
makanan di sekeliling pengatur tekanan dan
injap terapung.
Pengatur tekanan:
• Tanggalkan pengatur tekanan, rendam dalam
air suam dan bersihkan dengan span (rajah. 23
hingga rajah 26).
• Keluarkan sisa makanan pada pengatur
tekanan dan injap terapung.
Petua
• Untuk mengeluarkan pengatur tekanan,
putarkannya melawan arah jam kemudian
tariknya ke atas (rajah 23).
Aksesori
Penutup atas boleh tanggal, cawan penyukat,
sudu nasi, senduk sup dan periuk dalam:
• Rendam di dalam air panas dan bersihkan
dengan span.
6 Spesifikasi
Nombor Model HD2132
Voltan berkadar 220-240V~
50-60 Hz
Output kuasa yang
ditarafkan
830-980W
Kapasiti yang ditarafkan 5.0L
Suhu simpan panas 60-80°C
7 Kitar Semula
Jangan buang perkakas ini dengan sampah
rumah biasa di akhir hayatnya, sebaliknya
bawa ia ke pusat pungutan rasmi untuk dikitar
semula. Dengan melakukan ini, anda membantu
memelihara alam sekitar.
简体中文
1
您的电压力煲
感谢您的惠顾,欢迎光临飞利浦!
为了您能充分享受飞利浦提供的支持,请在
www.philips.com/welcome
上注册您的产品。
2
包装盒内物品(图
1
)
电压力煲 内胆
电源线 汤勺
饭勺
量杯
用户手册 重要信息单页
保修卡
3
概述
产品概述(图
2
)
a
锅盖把手
f
控制面板
b
限压阀
g
加热元件
c
上盖
h
电源插座
d
内胆
i
安全阀
e
煲身
控件概述(图
3
)
a
小时键
h
保压时间键
b
预设键
i
煮粥键
c
再加热键
j
米饭键
d
煲汤键
k
开始键
e
牛肉/羊肉键
l
保温/关闭键
f
蒸煮/鸡肉键
m
显示屏
g
豆类/蹄筋键
n
分钟键
功能概述
烹饪功能 默认保压时
间(分钟)
保压时间调整
范围(分钟)
预设时间
(小时)
米饭
14
不可调
24
粥
13 1-59 24
汤
20 20-59 24
再加热
功能
25 20-50 24
牛肉/羊肉
30 30-59 24
蒸煮/鸡肉
20 20-59 24
豆类/蹄筋
30 25-59 24
4
使用电压力煲
注意
•
如果长时间不用,务必拔掉产品插头。
首次使用之前
1 除去产品的所有包装材料。
2 从内锅中取出所有附件。
3 首次使用前彻底清洁电压力煲的部件(参阅
“清洁和保养”一章)。
注意
•
使用之前,确保所有电压力煲部件均已完全
干燥。
烹饪前准备
使用电压力煲烹饪食物之前,按照下面的准备步骤
操作。
1 按住上盖手柄并逆时针转动盖子以从主装置上取
下盖子,然后取出内胆(图 4)。
2 将预先洗好的食物放入内胆,并将内胆外部擦干
(图 5),然后将内胆放回电压力煲(图 6)。
注意
•
内胆中所装食物不得少于
1/3
或超过
2/3
锅体。
•
对于烹饪过程中会膨胀的食物,内胆中所装食物不
得超过
1/2
锅体。
•
对于煮饭,请按照内锅内侧的水位指示放水。您可
以根据米的品种及个人喜好调整水位。不要超过内
胆中标注的最大量。
3 将上盖放回电压力煲并顺时针转动以正确锁定上
盖(图 7)。
警告
•
确保限压阀和浮子阀保持洁净且未被堵塞。
8 Jaminan dan servis
Jika anda memerlukan servis atau maklumat, atau
jika anda mengalami masalah, lawati laman web
Philips di www.philips.com atau hubungi Pusat
Layanan Pelanggan Philips di negara anda. Anda
boleh mendapatkan nombor telefonnya dalam
risalah jaminan seluruh dunia. Jika tiada Pusat
Layanan Pelanggan di negara anda, pergi ke
penjual Philips tempatan anda.
9 Menyelesaikan Masalah
Jika periuk tekanan elektrik anda tidak berfungsi
dengan betul atau jika kualiti masakan tidak
mencukupi, rujuk jadual di bawah. Jika anda tidak
dapat menyelesaikan masalah tersebut, hubungi
pusat perkhidmatan Philips atau Pusat Layanan
Pelanggan di negara anda.
Masalah Penyelesaian
Saya
mengalami
kesukaran
menutup
penutup
atas.
Gegelang kedap tidak
dipasangkan dengan betul.
Pastikan gegelang kedap
dipasangkan dengan betul
di sekeliling bahagian dalam
penutup atas.
Pengapung menyekat pin
pengunci. Tekan pengapung ke
bawah supaya ia tidak menyekat
pin pengunci.
Saya
mengalami
kesukaran
membuka
penutup
atas selepas
tekanan
dilepaskan.
Pengapung masih belum jatuh.
Tekan pengapung ke bawah.
Makanan
tidak cukup
masak.
Pastikan tidak terdapat sisa asing
pada elemen pemanasan dan
di bahagian luar periuk dalam
sebelum menghidupkan periuk
tekanan elektrik.
Elemen pemanasan rosak,
atau periuk dalam cacat. Bawa
pemasak nasi kepada wakil
penjual Philips anda atau pusat
servis yang diluluskan oleh
Philips.
Udara atau
stim keluar
dari bawah
penutup.
Gegelang kedap tidak
dipasangkan dengan betul.
Pastikan gegelang kedap
dipasangkan dengan betul
di sekeliling bahagian dalam
penutup atas.
Terdapat sisa makanan pada
gegelang kedap. Pastikan
gegelang kedap bersih.
Penutup atas tidak ditutup
dengan betul. Pastikan penutup
atas ditutup dengan betul.
Tahap tekanan di dalam
perkakasan tidak normal, dalam
kes ini injap keselamatan akan
melepaskan stim. Bawa perkakas
ke penjual Philips anda atau
pusat servis yang disahkan oleh
Philips.
Udara atau
stim keluar
dari injap
terapung.
Terdapat sisa makanan di dalam
gegelang getah injap terapung.
Bersihkan gegelang getah injap
terapung.
Gegelang getah injap terapung
rosak. Gantikan gegelang getah.
Pengapung
tidak naik
selepas
perkakas
mula
mengumpul
tekanan.
Pastikan terdapat makanan dan
air yang cukup di dalam periuk
dalam.
Penutup atas atau injap pengatur
tekanan gagal berfungsi. Bawa
perkakas ke penjual Philips anda
atau pusat servis yang disahkan
oleh Philips.
E3
dipaparkan
pada skrin.
Suhu di dalam periuk dalam
terlalu tinggi. Tunggu sehingga ia
turun ke suhu bilik.
E1, E2,
atau E4
dipaparkan
pada skrin.
Periuk tekanan elektrik gagal
berfungsi. Bawa perkakas ke
wakil penjual Philips atau ke
pusat servis yang disahkan oleh
Philips.
注意
•
确保密封圈已正确安装在上盖内侧周围。
•
请确保内胆的外表面洁净且干燥,并且没有其他
杂物黏附在加热元件上。
•
确保内锅已正确接触加热元件。
烹饪食物
1 请遵循“烹饪前准备”中的步骤。
2 将限压阀转至密封位置(图
8
)。
3 将电源插头接入插座(图
9
)。
4 按下其中一个烹饪键(图
10 至图 15
)。
» 屏幕上会显示默认保压时间。
5 要设置其他保压时间,按保压时间键(图
16
)
6 按分钟键设置保压时间(图
17
)。
提示
•
每按一次分钟键分钟单位就会增加一分钟。按住
分钟键可以快进方式调整时间。
7 按开始键可开始烹饪过程(图
18
)。
8 当电压力煲达到工作压力后,开始倒计时剩余的
保压时间。
9 保压时间结束后,电压力煲会自动切换至保温
模式。
10 等到压力完全释放后,将限压阀转至排气位置
(图
19
),然后逆时针转动上盖以将其从主装置
上卸下(图 4)。
» 压力充分释放后,浮子阀会降下。
提示
•
要快速释放压力,在电压力锅进入保温模式之后
将限压阀转至排气位置。当心蒸汽孔排出的热蒸
汽以避免烫伤。
•
您可以根据食物的品种调整保压时间。使用煮饭
功能时,保压时间是固定的。
•
要取消正在进行的烹饪过程,按保温/关闭键。
注意
•
煮汤或粘稠液体时,请勿通过将限压阀旋转至排
气位置来释放压力,否则液体可能会从限压阀中
喷射出来。等到压力自然释放,浮子阀降下,再
打开上盖。
•
烹饪完成后,如果不继续使用,请拔掉电压力煲
的插头。
再加热
1 翻松食物并将其均匀地分布在内胆中。
2 在食物中倒入一些水以避免食物太干。水量取决
于食物量。
3 将上盖放回电压力煲并顺时针转动以正确锁定
上盖(图 7)。
4 将限压阀转至密封位置(图
8
)。
5 将电源插头接入插座(图
9
)。
6 按再加热键(图
20
)。
» 屏幕上会显示默认的再加热时间。
7 要设置其他再加热时间,按保压时间键
(图
16
)。
8 按分钟键设置再加热时间(图
17
)。
9 按开始键开始再加热过程(图
18
)。
» 开始倒计时剩余的再加热时间。
10 再加热时间结束后,电压力煲会自动切换至保温
模式。
11 等到压力完全释放后,将限压阀转至排气位置
(图
19
),然后逆时针转动上盖以将其从主装置
上卸下(图 4)。
» 压力充分释放后,浮子阀会降下。
延长烹饪的预设时间
您可以为不同的烹饪功能预设延迟烹饪时间。预设计时
器最长可达
24
小时。
1 选择其中一种烹饪功能,然后按预设键
(图
21
)。
2 按小时键可设置小时单位,按分钟键可设置分钟
单位(图
22
)。
提示
•
每按一次小时键小时单位就会增加一小时;
每按一次分钟键分钟单位就会增加十分钟。
按住分钟或小时键可以快进方式调整时间。
3 按开始键确认预设时间(图
18
)。
4 达到预设的时间后,电压力煲会自动启动烹饪
过程。
5
清洁和保养
注意
•
清洗之前拔出电压力煲插头。
•
等到电压力煲充分冷却后再开始清洗。
内部
上盖内部及煲身内侧:
• 用拧干的湿布进行擦拭。
• 确保清理掉黏在电压力煲上的所有食物残渣。
加热元件:
• 用拧干的湿布进行擦拭。
• 用拧干的湿布清理食物残渣。
密封圈:
• 浸泡到温水中并用海绵清洁。
外部
上盖表面和煲身外侧:
• 用蘸有肥皂水的布进行擦拭。
• 只能使用柔软的干布擦拭控制面板。
• 确保清理掉限压阀和浮子阀周围的所有食物残渣。
限压阀:
• 拆下限压阀,将其浸泡在温水中并使用海绵清洁
(图
23 至图 26
)。
• 清理掉限压阀和浮子阀里的食物残渣。
提示
•
要卸下限压阀,逆时针转动限压阀,然后向上
拉起(图
23
)。
附件
可拆卸的上盖、量杯、米勺、汤勺和内胆:
• 浸泡到热水中并用海绵清洁。
6
规格
型号
HD2132
电压 约
220-240
伏
50-60
赫兹
额定输出功率
830-980
瓦
额定容量
5.0
升
保温温度
60-80°C
7
回收
弃置产品时,请不要将其与一般生活垃圾堆放在一起,
应将其交给官方指定的回收中心。这样做有利于环保。
8
保修与服务
如果需要服务或信息,或有任何疑问,请访问飞利浦
网站:
www.philips.com
,或联系您所在国家/地区的
飞利浦客户服务中心。可在全球保修卡中找到其电话
号码。如果您所在的国家/地区没有飞利浦客户服务
中心,请向当地的飞利浦经销商求助。
9
故障种类和处理方法
如果电压力煲工作不正常,或烹饪质量有缺陷,请查询
下表。如果无法解决问题,则请联系您所在国家/地区
的飞利浦服务中心或客户服务中心。
问题 解决方法
无法合上
上盖。
密封圈未装好。确保密封圈已正确安
装在上盖内侧周围。
浮子阀阻塞了推杆。向下压浮子阀,
使其无法阻塞推杆。
压力释放后
无法打开上
盖。
浮子阀未落下。向下压浮子阀。
食物未完全
熟透。
确保加热元件以及内锅外部没有
杂物黏附,再打开电压力煲。
加热元件损坏或内锅变形。请将电饭
煲送往当地的飞利浦经销商,或经飞
利浦授权的客户服务中心。
盖子下面有
空气或蒸汽
漏出。
密封圈未装好。确保密封圈已正确安
装在上盖内侧周围。
密封圈中有食物残留物。确保密封圈
保持洁净。
上盖未盖好。确保盖好上盖。
装置内的压力异常,在这种情况下,
安全阀将释放压力。请将本产品送往
当地的飞利浦经销商,或经飞利浦授
权的客户服务中心。
浮子阀中有空
气或蒸汽漏
出。
浮子阀的橡胶圈中有食物残留物。
清洁浮子阀的橡胶圈。
浮子阀的橡胶圈已损坏。
更换橡胶圈。
产品开始
加压后浮子阀
未升起。
确保在内锅中放入足量的食物
和水。
上盖或限压阀阀出现故障。请将本产
品送往当地的飞利浦经销商,或经飞
利浦授权的客户服务中心。
屏幕上显示
E3
。
内锅温度太高。等待其降至室温。
屏幕上显示
E1、E2 或
E4
。
电压力煲出现故障。请将产品送往飞
利浦经销商或经飞利浦授权的
服务中心。
 Loading...