

Page 1
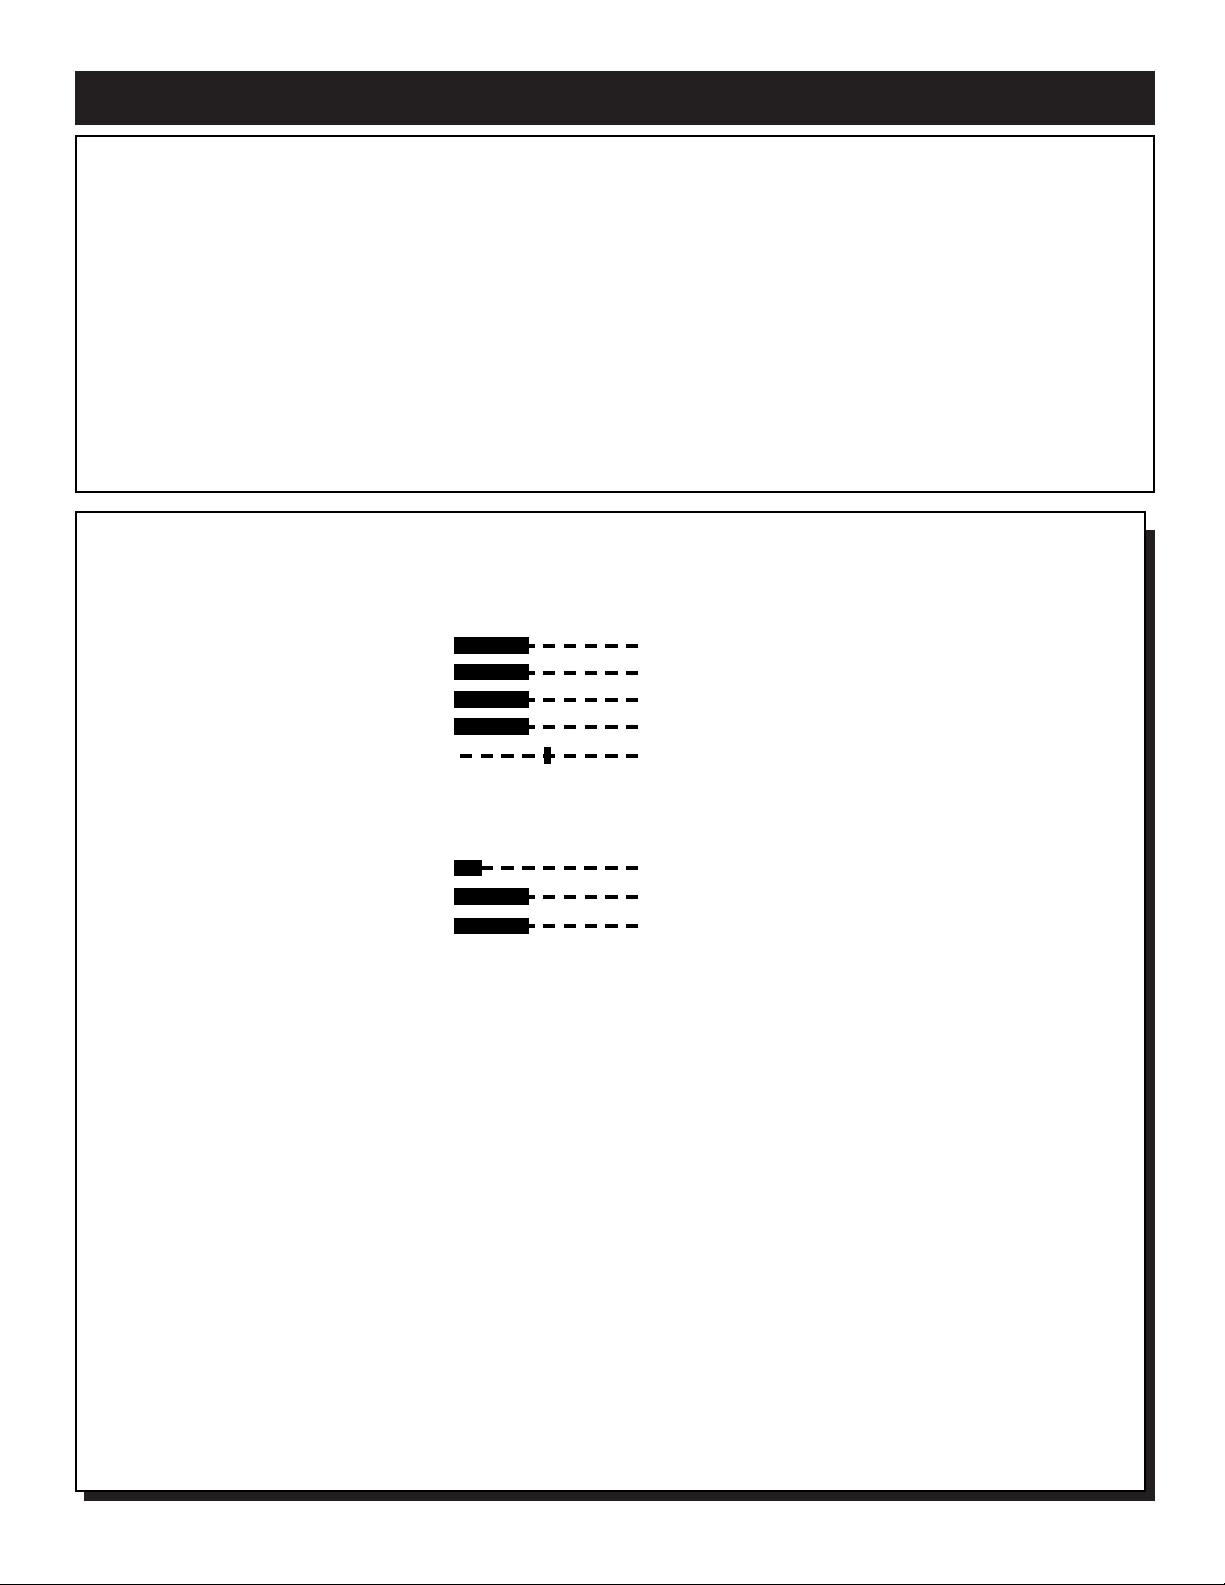
HEALTH CARE (HC) MAIN ON-SCREEN MENU CONTROLS
LANGUAGE ENGLISH/ESPANOL/FRANÇAIS
CHANNEL INSTALL ©
CABLE TUNING ON/OFF
CURRENT RING 1/2/3/4
BRIGHTNESS 27
COLOR 27
CONTRAST 27
SHARPNESS 27
TINT 2
NOISE REDUCTION ON/OFF
AVL ON/OFF
VOLUME BAR ON/OFF
MIN VOLUME 3
MAX VOLUME 40
SWITCH ON VOLUME 25/STANDARD
SWITCH ON CHANNEL TV Channels 1-125/STANDARD
POWER ON STANDARD/FORCED
CHANNEL DISPLAY NUMBER/LABEL/ALL/NONE
KEYBOARD LOCK ON/OFF
ESP 1-99/OFF
AUDIO/VIDEO MUTE OFF/BLACK/BLUE
WELCOME MESSAGE ©
CHANNEL GUIDE POWER ON/OFF/ON
REMINDER ON/OFF
3 DIGIT ENTRY ON/OFF
A/CH ON/OFF
CC OFF/CC-1/CC-2/CC ON MUTE
SAVE CC ON/OFF
V-CHIP MENU ITEM ON/OFF
SAVE V-CHIP ON/OFF
V-CHIP SETUP ©
SLEEPTIMER OFF/15/30/45/60/90/120/180/240
SECURITY STANDARD/HIGH
EXIT ©
I
nstaller: This product is not provided with a pendant control; however, it is expected that this institution (or hospital) will
provide one for attachment to the appropriate receptacle on the product. As part of the installation, examine the pendant
control to determine whether a marking similar to the one below appears on it:
“CAUTION - Risk of fire if used in oxygen-enriched atmosphere - return to hook or holder after use.”
If the above notice is not provided on the pendant control, remove the label provided with these instructions and attach it to
the pendant control.” A separate adhesive-backed label stating “CAUTION” “Risk of fire if pendant control is used in
oxygen-enriched atmosphere. Keep pendant control away from oxygen equipment,” can be affixed by the installer to the
pendant control if necessary.
Note: Depending on the model and its features, some or all of the displays and features described below will be available.
To perform setup operations for the TV Commercial mode, a RG4172BK remote with its TV Setup, Guest, and Data
Communication mode capabilities can be used. Press TV SETUP, then press RECALL, to determine whether the TV is in
Commercial mode. If the TV is in Consumer mode, press TV SETUP, 02, 49, 95, then M(enu), then use the +/– buttons to
select Commercial mode. (See RG4172BK Remote Control Instructions, part number IB7166E002, for details.)
3135 015 160411
Page 2
CHANNEL INSTALLATION
CHANNEL TV 1-125
CHANNEL RING CHANNEL RING 1/CHANNEL RING 2
/CHANNEL RING 3/CHANNEL RING 4
LABEL (- - - - - - - -) Example; CHAN 004
VIDEO BLANK ON/OFF
AUDIO BLANK ON/OFF
AUTO PROGRAM ©
EXIT ©
O
N-SCREEN SUB-MENU CONTROLS
WELCOME MESSAGE
MESSAGE ON/OFF
LINE 1 (- - - - - - - - - - - -)
LINE 2 (- - - - - - - - - - - -)
CLEAR ©
EXIT ©
V CHIP SETUP
MASTER DISABLE ON/OFF
TV RATINGS ©
MOVIE RATINGS ©
EXIT ©
MOVIE RATINGS
G VIEW/BLOCKED
PG VIEW/BLOCKED
PG-13 VIEW/BLOCKED
R VIEW/BLOCKED
NC-17 VIEW/BLOCKED
X VIEW/BLOCKED
NR VIEW/BLOCKED
EXIT ©
TV RATINGS
TV RATINGS ALL V S L D
TV-Y [__]
TV-Y7 [__] [__]
TV-G [__]
TV-PG [__] [__][__][__][__]
TV-14 [__] [__][__][__][__]
TV-MA [__] [__][__][__]
EXIT ©
TO SELECTA FEATURE IN THE ON-SCREEN MENU
Press the POWER button on the remote control. Next, press the TV SETUP button. Then, press the M(enu) button. The TV’s on-screen
menu will appear. Now, use the ▲ / ▼ buttons to scroll to and highlight the feature you want to adjust. Finally, use the § or © buttons to
make the changes. Remember, the TVmust be in Commercial mode.
2
Page 3

LANGUAGE - Highlight LANGUAGE, then press the § or © button to
select ENGLISH, ESPANOL, or FRANÇAIS. The Menu and some onscreen displays will now appear in English, Spanish, or French. The language of the Labels and the Channel Guide will not change.
CHANNEL
INSTALL - Highlight to display the CHANNEL INSTAL-
LATION MENU. This menu contains the following adjustable items: Auto
Program, Channel, Channel Ring, Channel Program, Label, Video Blank,
Audio Blank and Exit. Refer to CHANNEL INSTALLATION Sub-Menu
descriptions.
CABLE
TUNING - Highlight CABLE TUNING, then press the § or ©
button to select ON or OFF. When ON is selected the TV will be set to
receive Cable TV signals. When OFF is selected the TV is set to receive
normal Antenna TVsignals.
CURRENT
RING - Highlight CURRENT RING, then press the § or ©
button to select 1 through 4. There are four custom CHANNEL RINGS
that can be setup within the CHANNEL INSTALL feature.
BRIGHTNESS, COLOR, CONTRAST
, SHARPNESS, TINT -
(Picture Controls) - Highlight the Picture Control you want to adjust, then
press the § or © button to adjust the picture control to the desired level.
NOISE
REDUCTION - Highlight NOISE REDUCTION and press the
© button to turn the control ON or OFF. Noise Reduction will help to
eliminate signal noise (speckle, snow, etc.) from the TV’s picture.
A
VL - Highlight AVL, then press the © button to turn the control ON or
OFF. When ON, AVL will level out the sound being heard, for more consistent listening by reducing the peaks and valleys that occur during program changes or commercial breaks.
V
OLUME BAR - Highlight VOLUME BAR, then press the © button to
select ON. When you press the VOL(ume) ▲/ ▼ buttons, a bar appears
on the screen, showing the change in sound. (DISPLAYS must be set to
ALL.) Or, press the § button to select OFF. The bar will not appear when
you adjust the volume.
MIN
VOLUME (Minimum Volume) - Highlight MIN VOLUME, then
press the § or © button to set the minimum allowable volume.
MAX
VOLUME (Maximum Volume) - Highlight MAX VOLUME, then
press the § or © button to set the maximum allowable volume.
SWITCH
ON VOLUME - Highlight SWITCH ON VOLUME, then
press the § or © button to select a volume level. The volume will be at
this level every time you turn on the TV. If STANDARD is selected, the
last volume level setting will be used.
SWITCH
ON CHANNEL - Use this feature to have the TV tune to the
same channel every time you turn on the TV. Highlight SWITCH ON
CHANNEL, then press the § or © button to select any channel, 1 - 125.
(Or, use the Number buttons to select a channel between 1 and 99. Enter a
zero before single-digit numbers.) Every time you turn on the TV, the TV
will tune to the channel you selected. When in STANDARD the TV will
tune to the channel it was on when it turned off.
POWER ON
- Highlight POWER ON, then press the © button to select
FORCED. This disables the POWER button on the front of the TV. The
TV is now activated when the AC power cord is plugged into an outlet.
The SLEEP TIMER feature is disabled on both the remote control and the
TV’s front panel. With a consumer remote, the TV will not turn off or on.
Or, press the § button to select STANDARD. The TVwill return to normal operation. (Make sure KEYBOARD is set to ON.)
CHANNEL
DISPLAY - Highlight CHANNEL DISPLAY, then press the
© button to select NONE. This disables any on-screen displays, except
SLEEP TIMER and MUTE. Or, press the § button to select ALL. All onscreen displays (such as the Channel Number, Channel Label, or Channel
Guide) will reappear. Press the © button again to select NUMBER or
LABEL. With NUMBERselected, only the channel number will be displayed. With LABELselected the display will appear as set in the LABEL
control under the CHANNEL INSTALLATION menu.
KEYBOARD LOCK
- Highlight KEYBOARD LOCK, then press the ©
button to select ON or OFF. ON disables all the buttons on the front panel
of the TV. OFF re-enables the buttons on the front panel of the TV.
ESP
- This feature allows you to select a time when the TV will automatically turn off. The TVmust remain on continuously during the amount of
time you select. If the power is switched off, the ESP timer will be reinitialized. Highlight ESP, then press the § or © button to select the number
of hours (1 - 99) before the TV turns off. (You also may use the Number
buttons to enter the number of hours. For example, press 0, then 6, for six
hours. Enter a zero before single-digit numbers.) Or, press the § button to
select OFF (or press 0, 0). The TV will not shut off automatically.
AUDIO/VIDEO MUTE
- Highlight AUDIO/VIDEO MUTE, then press
the § or © buttons to select OFF, BLACK, or BLUE. If BLACK or
BLUE is selected, the screen will be solid black or blue when the TV is on
a channel that is not receiving a signal. The sound will be muted on that
channel. Press the § button to select OFF. The normal background static
will appear when the TV is on a channel that is not receiving a signal.
WELCOME
MESSAGE - Highlight WELCOME MESSAGE, then
press the © button to display the Welcome Message Sub-Menu. Within
this Sub-Menu the WELCOME MESSAGE can be turned ON or OFF.
Two lines (LINE1 and LINE2) on information can be set to be displayed
on the screen when the TV is powered ON. Use the cursor ▲ ▼ buttons to
scroll characters for the message lines. Clear will eliminate any message
written.
CHANNEL
GUIDE - Highlight CHANNEL GUIDE, then press the §
or © button to select OFF, ON, or POWER ON. If you select POWER
ON or ON, the Channel Guide (a list of channels that are labeled) will
appear when you turn on the TV. The Channel Guide will appear also
when you press the CH GDE (Channel Guide) button. If you select ON,
the Channel Guide will appear only when you press the CH GDE button.
(Also, if you select POWER ON or ON, make sure CHANNEL DISPLAY
is set to ALL.) If you select OFF, the Channel Guide will not appear when
you press the CH GDE button. Remember, only the programmed channels
that are labeled (within the CHANNEL INSTALLATION MENU) will
appear in the Channel Guide.
REMINDER
- Highlight REMINDER, then press the © button to select
ON. The current channel number (and Label, if assigned) will appear onscreen at all times. (Make sure CHANNEL DISPLAY is set to ALL and
Closed Captioning is set to OFF.) Or, press the § button to select OFF.
The channel number will appear briefly when the channel is selected, then
disappear.
3 DIGIT
ENTRY- Highlight 3 DIGIT ENTRY, then press the § or ©
button to select ON or OFF. With ONselected the 3 digits can be entered
to select channels above 99.
A/CH-A/V
SWITCH - When highlighted, press the § or © button to
select ON or OFF. When ON is selected, pressing the A/CH button will
toggle between the currently viewed channel and the last viewed channel.
CC
- Highlight CC, then press the © button to select the Closed Caption
Mode. The choices are OFF, CC-1, CC-2, or CC on MUTE. CC-1 is the
most common choice for broadcasters. The CC on MUTE will display the
Closed Captioning material when ever the Mute button is pressed.
SA
VE CC (Save Closed Captioning) - Highlight SAVE CC, then press the
© button to select YES. The Closed Captioning mode you selected will be
saved, even if you turn off the TV power. Or, press the § button to select
NO. Closed Captioning will be turned OFF when you turn off the TV
power.
V
-CHIP MENUITEM (Censoring Control) - Highlight V-CHIP MENU
ITEM, then press the © button to select ON or OFF. When ON, the VCHIP menu options for the user controls will be shown. When OFF is
selected, the user controls will not display the V-CHIP blocking options.
SA
VE V-CHIP(Censoring Control) - Highlight SAVE V-CHIP, then press
the © button to select ON or OFF. ON will save the current V-CHIPsettings within the TV’s memory.
V
-CHIP SETUP (Censoring Control) - Highlight V-CHIP SETUP, then
press the © button to display the V-CHIP SETUP Sub-Menu. Within this
Sub-Menu, certain types of programming maybe set to VIEW or BLOCK.
See the V-CHIP SETUP Sub-Menu Descriptions for more details.
SLEEPTIMER
- Highlight the SLEEPTIMER, then press the § or ©
button to scroll and select a preset time for the TV to turn itself off. The
options are OFF, 15, 30, 45, 60, 90, 120, 180 or 240 minutes.
SECURITY
- Highlight SECURITY, then press the § or © button to
select STANDARD or HIGH. With STANDARD selected, an IR sequence
(31, 97, 53, MUTE) will access the SETUP MENU. If HIGH is selected,
access to SETUP is only allowed with a Setup Remote.
EXIT
- Highlight EXIT, then press the © button to remove the on-screen
menu from the TV’s screen.
D
ESCRIPTION OF MAIN ON-SCREEN MENU CONTROLS
3
Page 4

CHANNEL INSTALLATION Sub-Menu
CHANNEL
- When highlighted, enter the desired channel number
using the NUMBERED buttons you wish to edit. The following controls within the CHANNEL INSTALLATION menu will effect the
channel chosen.
CHANNEL
RING - When highlighted, press the § or © buttons to
choose CHANNEL RING 1, CHANNEL RING 2, CHANNEL RING 3,
or CHANNEL RING 4. Four separate Channel Rings can be setup, then
accessed through the main on-screen menu.
LABEL
- When LABEL is highlighted, press the © button to highlight
the first digit area. Then, press the ▲ or ▼ buttons to scroll a list of
characters (A-Z, 0-9). Press the © button to highlight the next digit and
repeat until the desired label has been entered. When channel changes
occur the label chosen will be displayed.
VIDEO
BLANK - When highlighted, press the § or © buttons to turn
the VIDEO BLANK control ON or OFF. When ON, NO VIDEO will
be shown when this specific channel is tuned. When OFF is selected,
normal viewing will take place.
AUDIO
BLANK - When highlighted, press the § or © buttons to turn
the AUDIO BLANK control ON or OFF. When ON, NO SOUND will
be heard when the channel is tuned. When OFF is selected, the channels
sound will be normal.
AUT
O PROGRAM - Highlight CHANNEL INSTALL, then press the
© button to display the CHANNEL INSTALLATION Sub-Menu.
Highlight AUTOPROGRAM, then press the © button. The TV will
automatically search the signal being received for all available channels. Any channels found will be held in the TV’s memory and can be
accessed using the Channel ▲ or ▼ buttons.
EXIT
- Highlight EXIT, then press the © button to return to the main
menu screen.
WELCOME MESSAGE Sub-Menu
MESSAGE
- Highlight MESSAGE, then press the § or © button to
toggle the Message control ON or OFF. When ON and a message line
has been entered, the Message will be displayed whenever the TV is
powered on. The Message will not time out. A press of any button on
the remote will remove the Message from the screen.
LINE
1 - When highlighted, press the © button to highlight the first
digit of the line. Use the s or t buttons to scroll a list of available characters (A-Z, 0-9). Press the © button to highlight the next character and
repeat the scrolling process until the message has been entered.
LINE
2 - Use to add a second message or extend the first message. Use
the same process as described in LINE 1.
CLEAR
- When highlighted, press the © button to clear or delete any
messages that might be entered in the TV’s memory.
EXIT
- Highlight EXIT, then press the © button to return to the main
menu screen.
V CHIP SETUP Sub-Menu
MASTER
DISABLE - When highlighted, press the § or © buttons to
turn the MASTER DISABLE control ON or OFF. When ON, any
blocked programming will be viewable making the V-CHIP censoring
inoperable.
TV
RATINGS - When highlighted, press the © button to display
another sub-menu with the TV RATING Options. Press the § or ©
buttons to set each rating to VIEW or BLOCKED.
TV-Y - (All children-- This program is designed to be appropriate for all children.)
Designed for a very young audience, including children ages 2-6. This type of programming is not expected to frighten younger children.
TV-Y7 - (Directed to OlderChildren -- This program is designed for children age 7
and above.) It may be more appropriate for children who have acquired the develop-
ment skills needed to distinguish between make-believe and reality. This programming may include mild fantasy and comic violence (FV).
TV-G - (General Audience -- Most parents would find this program suitable for all
ages.) This type of programming contains little or no violence, no strong language,
and little or no sexual dialogue or situations.
TV-PG - (Parental Guidance Suggested -- This program contains material that parents may find unsuitable for younger children.) This type of programming contains
one or more of the following: Moderate violence (V), some sexual situations (S),
infrequent coarse language (L), or some suggestive dialogue (D).
TV-14 - (Parents Strongly Cautioned -- This program contains some material that
many parents would find unsuitable for children under 14 years of age.) This type of
programming contains one or more of the following: intense violence (V), intense
sexual situations (S), strong coarse language (L), or intensely suggestive dialogue (D).
TV-MA - (Mature Audience Only -- This program is specifically designed to be
viewed by adults and therefore may be unsuitable for children under 17.) This type of
programming contains one or more of the following: graphic violence (V), explicit
sexual situations (S), or crude indecent language (L).
MOVIE RATINGS - When highlighted, press the © button to display
another sub-menu with the MOVIE RATING Options. Press the § or
© buttons to set each rating to VIEW or BLOCKED.
G: General Audience - All ages admitted. Most parents would find this program
suitable for all ages. This type of programming contains little or no violence, no
strong language, and little or no sexual dialogue or situations.
PG: Parental Guidance Suggested - This programming contains material that par-
ents may find unsuitable for younger children. It may contain one or more of the following: Moderate violence, some sexual situations, infrequent coarse language, or
some suggestive dialogue.
PG-13: Parents Strongly Cautioned - This programming contains material that par-
ents may find unsuitable for children under the age of 13. It contains one or more of
the following: violence, sexual situations, coarse language, or suggestive dialogue.
R: Restricted -This programming is specifically designed for adults. Anyone under
the age of 17 should only view this programming with an accompanying parent or
adult guardian. It contains one or more of the following: intense violence, intense
sexual situations, strong coarse language, or intensely suggestive dialogue.
NC-17: No one under the age of 17 will be admitted. - This type of programming
should be viewed by adults only. It contains graphic violence, explicit sex, or crude
indecent language.
X: Adults Only - This type of programming contains one or more of the following:
very graphic violence, very graphic and explicit or indecent sexual acts, very coarse
and intensely suggestive language.
NR: Not Rated - This is programming without rating encoding. This could be such
programming as commercials, etc.
EXIT - Highlight EXIT, then press the © button to return to the main
menu screen.
D
ESCRIPTION OF ON-SCREEN SUB-MENU CONTROLS
4
 Loading...