

Page 1

Philips hearing capsule HC8900
Microlux
®
User manual
Page 2

2
Page 3
314
Page 4

Page 5

ENGLISH 6
DEUTSCH 14
NEDERLANDS 22
HC8900
Page 6

6
ENGLISH
Introduction
Congratulations on purchasing your new Philips Microlux. Due to its
patented construction it is the most invisible hearing enhancer on the
market. The Microlux is not only completely invisible when you wear it,
but it also produces a much better sound. This is thanks to your own
auricle which, after all, works as a reector. Half of the amplifying effect of
your ear can be attributed to the auricle. You owe the other half to the
cavity just in front of the entrance to the auditory canal. With the Philips
Microlux, this cavity is not lled up, as is still the case with today’s in-the-
ear hearing aids. Consequently the (directional) quality of the sound is
retained and you hear your own voice without resonance.
The irksome squeaking and whistling you hear when, for example, you
make a telephone call or move your lower jaw (talking, chewing) are
things of the past; you have far less trouble with wind in your ears and
you can participate in spor ts. Greater amplication is possible as the
Microlux is positioned deeper in the ear and earwax is no longer a
problem because of the characteristic construction of the Microlux. The
Microlux does not cause interference to mobile telephones or vice versa.
The Philips Microlux will give you many years of uninterrupted pleasure!
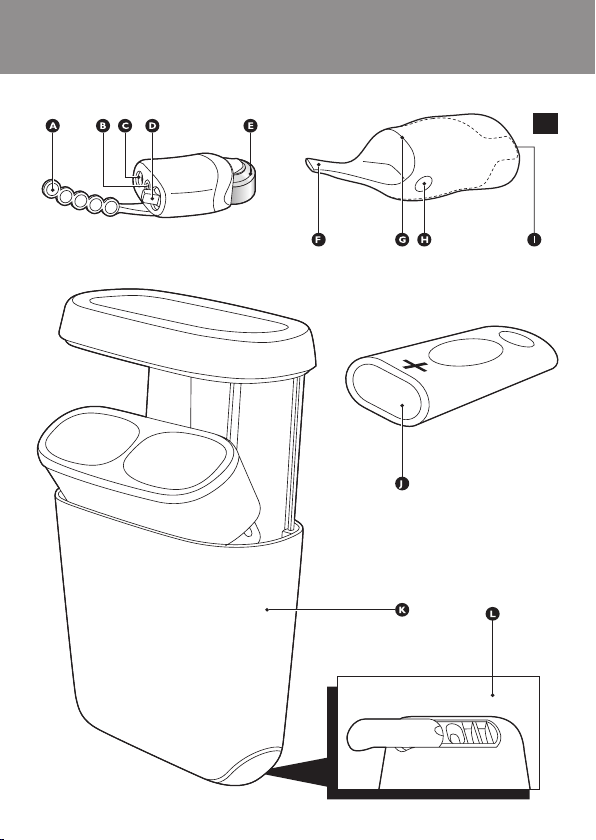
General description (Fig. 1)
Hearing capsule
A Pull tab
B Microphone opening
C Programming output
D On/off switch
E Battery
Customized sleeve
F Pull tab
G Sleeve edge
H Left/right identication dot
I Sound output
Page 7

ENGLISH 7
Accessories
J Battery inser tion aid
K Storage box
L Battery inser tion aid of storage box
Important
Read these instructions for use carefully before using the Microlux and
save them for future reference.
If you have two Microlux hearing capsules, make sure you do not
,
switch them because the programming for the left ear is often
different from that for the right ear.
Never leave the hearing capsule, customized sleeve and battery
,
unattended. If these items are swallowed by children or pats, they
may cause suffocation.
Regularly clean the hearing capsule and the customised sleeve, to
,
avoid skin irritation or inammation (see chapter ‘Cleaning’).
Regularly check if the sound output is not blocked, because this will
,
deaden the sound.
Never let anyone else use your Microlux because this can cause
,
injury or damage to the other person’s hearing and ear.
Keep the Microlux dry.
,
Do not wear your Microlux during swimming, showering and when
,
blow-drying your hair or in combination with other heat sources
close to the ear.
This appliance meets the requirements of MDD 93/42/EEC for
,
medical appliances.
Preparing for use
Putting the hearing capsule in the customised sleeve
Always place the hearing capsule and customised sleeve on a clean
surface.
1 Slide the hearing capsule (battery rst) into the customised sleeve
and press it as far as it will go. (Fig. 2)
Page 8

ENGLISH8
Make sure that the pull tab of the hearing capsule is positioned on
,
top of the pull tab of the customised sleeve.
2 Switch on the Microlux by setting the on/off switch to the ‘on’
position. (Fig. 3)
You can check whether the Microlux is working by holding it in the
closed palm of your hand. You will hear a whistling sound if the
Microlux is functioning. If it does not whistle, check the sound output
and the position of the battery.
Using the Microlux
Inserting the Microlux in your ear
If you have two Microlux hearing capsules, make sure you do not
switch them, because the programming for the left ear is often different
from that for the right ear.
1 Grip the assembled Microlux by both pull tabs and insert it loosely
into the auditory canal. (Fig. 4)
The Microlux with the red identication dot is for your right ear,
,
the Microlux with the blue identication dot is for your left ear.
The identication dot must point upwards when the Microlux is in
,
your ear.
2 Place your forenger or thumb behind both pull tabs at the
location of the programming contact and press the Microlux
further into your ear.
You may have to guide the Microlux upwards and backwards when
,
doing so, depending on the shape of the auditory canal.
If necessary, stretch the auditory canal with your other hand by
,
pulling your auricle upwards and backwards.
It may help to open your mouth wide when inserting the Microlux.
,
If necessary, massage the Microlux with the point of your forenger
,
to ease it further into the ear.
Note: It is not possible to insert the Microlux too deeply into the auditory
canal.
Page 9

ENGLISH 9
Removing the Microlux from your ear
1 Slowly pull at both pull tabs to remove the Microlux from the
auditory canal.
2 Switch off the Microlux and check if it is off by holding it in the
closed palm of your hand.
The Microlux does not whistle if it has been switched off.
Adjusting the sound
The hearing capsule has a high sound quality and many possibilities for
adjusting the amplication. The sound is adjusted by your audiologist using
a computer program.
You cannot adjust the sound of the Microlux yourself. Consult your
audiologist if you have complaints about the sound.
Earwax
Earwax protects your ears from detrimental effects from outside,
including dirt and infections. When there is something (e.g. a hearing aid)
in your ear, more wax is produced than normally as a reaction to the
foreign body. This is not a problem with the Philips Microlux hearing
enhancer, because it takes some earwax with it every time you remove it
from your ear. This slows down the buildup of an earwax plug.
An earwax plug can lead to squeaking in your Microlux hearing
,
enhancer or you may suddenly hear less well, even though there is
still enough energy in the battery. Have your ears examined by your
audiologist to determine if you have an earwax plug. If so, have it
removed by a medical professional.
Do not try to clean your ears yourself with, for example cotton swabs.
Cleaning
If you have two Microlux hearing capsules, always clean them one at a
time to prevent switching them.
Page 10

ENGLISH10
Tip: Clean the Microlux hearing capsule daily to prevent dirt or moisture from
collecting between the hearing capsule and the customised sleeve.
1 Firmly grip the pull tab of the hearing capsule (not the pull tab of
the customised sleeve).
2 Place the thumbnail of your other hand against the edge of the
customised sleeve and pull the hearing capsule out of the sleeve.
3 Clean the hearing capsule by rubbing it with a dry cloth or tissue.
Keep the hearing capsule dry.
4 Check if the sound output and microphone opening are still clean
and open. If they are not, ask your audiologist to clean them.
Never clean the capsule housing with cleaning agents yourself.
5 Thoroughly clean and disinfect the customised sleeve by using the
cleaning agent provided by your audiologist.
Do not use any other cleaning agent than the one provided by your
audiologist.
6 Let the customised sleeve dry before you reinsert the hearing
capsule.
Replacing the battery
Tip: If you have two Microlux hearing capsules, do not to take both of them
apart at the same time to prevent switching the hearing capsules and
sleeves.
Tip: Always work above a table or similar at surface.
Note: The correct position is very important when placing the battery.
The + of the battery should be on the same side as the pull tab.
Note: Always use the battery insertion aid provided to insert the battery. If, for
any reason, you have to insert the battery with your ngers, place the
battery horizontally between the battery contacts to prevent shortcircuiting.
Page 11

ENGLISH 11
1 Remove the hearing capsule from the customised sleeve (see
chapter ‘Cleaning’).
2 Remove the battery by placing your ngernail between the hearing
capsule and the round part of the battery. (Fig. 5)
3 Remove the sticker from the new battery.
Only use type 10 batteries (yellow sticker).
Do not remove the sticker before you are going to use the battery.
Replacing the battery with the battery insertion aid in the storage box
1 Slide the lid of the storage box completely open and place the new
battery in the battery cavity. (Fig. 6)
2 Press the hearing capsule into the storage box over the battery.
(Fig. 7)
Make sure the pull tab is at the same side as the + side of the battery.
Replacing the battery with the loose battery insertion aid
1 Place the battery in the battery cavity of the battery insertion aid.
(Fig. 8)
2 Press the hearing capsule into the battery insertion aid. (Fig. 9)
Make sure the pull tab is at the same side as the + side of the battery.
Storage
Store the Microlux in the storage box provided.
,
Environment
Batteries contain substances that may pollute the environment. Do
,
not throw empty batteries away with the normal household waste,
but hand them in at an ofcial collection point. Always remove the
battery before discarding the Microlux and handing it in at an
ofcial collection point.
Page 12

ENGLISH12
Do not throw the Microlux away with the normal household waste
,
at the end of its life, but hand it in at an ofcial collection point for
recycling. By doing this you will help to preserve the environment.
(Fig. 10)
Guarantee and service
If you need information or if you have a problem, please visit or contact
your audiologist.
Page 13

ENGLISH 13
Frequently asked questions
This chapter lists the questions most frequently asked about the Philips
Microlux hearing enhancer. If you can’t nd the answer to your question,
please contact your audiologist.
Question Answer
Why doesn’t
the Microlux
hearing
enhancer work?
How can I
adjust the
sound of the
Microlux
hearing
enhancer?
The battery may be empty. Replace the batter y (see
chapter ‘Replacing the battery’).
The Microlux may not be on. Switch on the Microlux
by setting the on/off switch to the ‘on’ position (see
chapter ‘Preparing for use’).
The sound output and/or microphone opening may
be blocked. Check if they are and, if so, ask your
audiologist to clean them.
Dirt and/or moisture may have collected between
the customised sleeve and the hearing capsule.
Remove the hearing capsule from the customised
sleeve and clean both parts (see chapter ‘Cleaning’).
You cannot adjust the sound yourself. Consult your
audiologist if you have any complaints about the
sound.
Page 14

14
DEUTSCH
Einführung
Herzlichen Glückwunsch zu Ihrem neuen Philips Microlux! Sein
patentiertes Design macht es zum unsichtbarsten Hörgerät auf dem
Markt. Das Microlux ist nicht nur vollkommen unsichtbar beim Tragen,
sondern liefert auch eine viel bessere Hörleistung, wobei die eigene
Ohrmuschel als Reektor fungiert. 50 % der Hörleistung kommt von der
Ohrmuschel, die anderen 50 % vom Hohlraum direkt vor dem
Gehörgang. Im Gegensatz zu den gängigen Im-Ohr-Geräten blockiert das
Philips Microlux diesen Hohlraum nicht. So wird das Richtungshören
wieder möglich, und die eigene Stimme wird verzerrungsfrei
wahrgenommen.
Störende Quietsch- und Pfeifgeräusche, die etwa beim Telefonieren oder
Bewegen des Unterkiefers (beim Sprechen oder Kauen) entstehen
können, gehören ebenso der Vergangenheit an, wie Windrauschen, das Sie
bisher bei sportlichen Aktivitäten behindert hat. Die Hörleistung wird
verbessert, da das Microlux tiefer im Ohr platziert wird. Auch
Ohrenschmalz ist dank des speziellen Designs des Microlux nicht länger
ein Problem. Das Microlux verursacht zudem keine Rückkopplungen beim
Telefonieren mit dem Handy.
Mit dem Philips Microlux erhalten Sie über viele Jahre eine optimale
Unterstützung beim Hören.
Allgemeine Beschreibung (Abb. 1)
Hörkapsel
A Ausziehlasche
B Mikrofonöffnung
C Programmier-Anschluss
D Ein-/Ausschalter
E Batterie
Individuell geformte Manschette
F Ausziehlasche
G Manschettenkante
H Markierung für linkes/rechtes Ohr
Page 15

DEUTSCH 15
I Tonausgang
Zubehör
J Batterieeinsatzhilfe
K Aufbewahrungsbox
L Batterieeinsatzhilfe der Aufbewahrungsbox
Wichtig
Lesen Sie diese Bedienungsanleitung vor dem ersten Gebrauch des
Microlux sorgfältig durch, und bewahren Sie sie zur späteren
Einsichtnahme auf.
Falls Sie zwei Microlux-Hörkapseln verwenden, dürfen Sie diese
,
nicht verwechseln, da sich die Einstellungen für das linke Ohr häug
von denen für das rechte Ohr unterscheiden.
Lassen Sie die Hörkapsel, Ihre individuell geformte Manschette und
,
die Batterie niemals unbeaufsichtigt. Wenn Kinder oder Hausetiere
diese Teile verschlucken, besteht Erstickungsgefahr.
Reinigen Sie die Hörkapsel und die Manschette in regelmäßigen
,
Abständen, um Hautreizungen und Entzündungen zu vermeiden
(siehe “Reinigung”).
Überprüfen Sie regelmäßig den Tonausgang, da bei Blockierungen
,
die Hörleistung nachlässt.
Überlassen Sie Ihr Microlux niemals einer anderen Person, da dies
,
zu Verletzungen oder Beschädigungen am Ohr bzw. zu
Einschränkungen des Hörvermögens der anderen Personen führen
kann.
Halten Sie das Microlux stets trocken.
,
Tragen Sie Ihr Microlux nicht beim Schwimmen, Duschen,
,
Haartrocknen oder bei Verwendung anderer Wärmequellen in
Ohrnähe.
Dieses Gerät entspricht den Anforderungen der Europäischen
,
Richtlinie 93/42/EWG über Medizinprodukte (MDD).
Page 16

DEUTSCH16
Für den Gebrauch vorbereiten
Die Hörkapsel in die individuell geformte Manschette einsetzen
Legen Sie die Hörkapsel und die Manschette immer auf eine saubere
Unterlage.
1 Schieben Sie die Hörkapsel (Batterie zuerst) so weit wie möglich in
die Manschette. (Abb. 2)
Achten Sie darauf, dass sich die Ausziehlasche der Hörkapsel über
,
der Ausziehlasche der Manschette bendet.
2 Schalten Sie das Microlux ein, indem Sie den Ein-/Ausschalter auf
Position ‘Ein’ stellen. (Abb. 3)
Sie können die korrekte Funktionsweise des Microlux überprüfen,
indem Sie es auf Ihre Hand legen und mit der Hand umschließen. Wenn
das Microlux funktioniert, hören Sie ein Pfeifgeräusch. Hören Sie kein
Pfeifen, überprüfen Sie den Tonausgang und die Position der Batterie.
Das Microlux verwenden
Das Microlux in das Ohr einsetzen
Falls Sie zwei Microlux-Hörkapseln verwenden, dürfen Sie diese nicht
verwechseln, da sich die Einstellungen für das linke Ohr häug von
denen für das rechte Ohr unterscheiden.
1 Fassen Sie das zusammengesetzte Microlux an beiden
Ausziehlaschen an, und setzen Sie es locker in den Gehörgang.
(Abb. 4)
Das Microlux mit dem roten Punkt ist für Ihr rechtes Ohr, das
,
Microlux mit dem blauen Punkt ist für Ihr linkes Ohr bestimmt.
Der farbige Punkt muss nach oben zeigen, wenn sich das Microlux
,
in Ihrem Ohr bendet.
Page 17

DEUTSCH 17
2 Setzen Sie Ihren Zeigenger oder Daumen hinter beide
Ausziehlaschen am Programmier-Anschluss, und drücken Sie das
Microlux weiter in Ihr Ohr.
Entsprechend Ihrem Gehörgang müssen Sie dabei das Microlux ggf.
,
nach oben und hinten führen.
Falls erforderlich, dehnen Sie den Gehörgang mit der anderen
,
Hand, indem Sie die Ohrmuschel nach oben und hinten ziehen.
Das Einsetzen des Microlux kann durch Öffnen des Mundes
,
erleichtert werden.
Massieren Sie das Microlux ggf. mit der Spitze Ihres Zeigenders,
,
um das tiefere Einsetzen in das Ohr zu vereinfachen.
Hinweis: Es ist nicht möglich, das Microlux zu tief in den Gehörgang
einzuführen.
Das Microlux aus dem Ohr entfernen
1 Ziehen Sie langsam an beiden Ausziehlaschen, um das Microlux aus
dem Gehörgang zu entfernen.
2 Schalten Sie das Microlux aus, und überprüfen Sie dies anschließend,
indem Sie es in Ihrer geschlossenen Hand halten.
Wenn das Microlux ausgeschaltet ist, erzeugt es keine Pfeifgeräusche.
Den Ton einstellen
Die Hörkapsel liefert eine hochwertige Tonqualität und bietet umfassende
Möglichkeiten zum Anpassen der Hörleistung. Der Ton wird von Ihrem
Audiologen mithilfe eines speziellen Computerprogramms eingestellt.
Sie können den Ton Ihres Microlux nicht selbst einstellen. Wenden Sie
sich bei Tonproblemen an Ihren Audiologen.
Ohrenschmalz
Ohrenschmalz schützt Ihre Ohren vor schädlichen äußeren Einüssen, wie
z. B. Schmutz und Infektionen. Wenn sich ein Gegenstand (z. B. ein
Hörgerät) im Ohr bendet, wird als Reaktion auf den Fremdkörper
zusätzlich Ohrenschmalz produziert. Dieses Problem tritt bei der
Benutzung des Philips Microlux-Hörgeräts nicht auf, da bei jedem
Page 18

DEUTSCH18
Herausnehmen etwas Ohrenschmalz aus dem Ohr entfernt wird. Der
Verstopfung durch Ohrenschmalz wird so entgegengewirkt.
Eine Verstopfung durch Ohrenschmalz kann zu Quietschgeräuschen
,
in Ihrem Microlux-Hörgerät oder plötzlichen Schwankungen der
Hörleistung führen, obwohl die Batterieleistung nicht zu schwach
ist. Lassen Sie Ihre Ohren von Ihrem Audiologen auf Verstopfungen
durch Ohrenschmalz untersuchen. Nehmen Sie bei einer
Verstopfung medizinische Hilfe in Anspruch, um diese zu entfernen.
Versuchen Sie nicht, Ihre Ohren mit Wattestäbchen selbst zu reinigen.
Reinigung
Falls Sie zwei Microlux-Hörkapseln verwenden, reinigen Sie sie nicht
gleichzeitig, um Verwechslungen zu vermeiden.
Tipp: Reinigen Sie die Microlux-Hörkapsel täglich, um das Ansammeln von
Schmutz oder Feuchtigkeit zwischen der Hörkapsel und der
Manschette zu vermeiden.
1 Halten Sie die Ausziehlasche der Hörkapsel (nicht die Ausziehlasche
der Manschette) fest.
2 Setzen Sie den Daumennagel der anderen Hand an die
Manschettenkante, und ziehen Sie die Hörkapsel aus der
Manschette.
3 Reinigen Sie die Hörkapsel mit einem trockenen Tuch.
Halten Sie die Hörkapsel stets trocken.
4 Überprüfen Sie, ob der Tonausgang und die Mikrofonöffnung sauber
und nicht blockiert sind. Lassen Sie diese ggf. von Ihrem Audiologen
reinigen.
Reinigen Sie das Gehäuse der Kapsel niemals selbst mit
Reinigungsmitteln.
Page 19

DEUTSCH 19
5 Reinigen und desinzieren Sie die individuell geformte Manschette
gründlich mit dem Reinigungsmittel, das Sie von Ihrem Audiologen
erhalten.
Verwenden Sie ausschließlich das Reinigungsmittel, das Sie von Ihrem
Audiologen erhalten haben.
6 Setzen Sie die Hörkapsel erst wieder ein, nachdem die Manschette
vollständig getrocknet ist.
Die Batterie auswechseln
Tipp: Falls Sie zwei Microlux-Hörkapseln verwenden, nehmen Sie sie nicht
gleichzeitig auseinander, um Verwechslungen bei den Hörkapseln und
Manschetten zu vermeiden.
Tipp: Arbeiten Sie stets über einem Tisch oder einer anderen achen
Oberäche.
Hinweis: Die korrekte Polung ist beim Einsetzen der Batterie sehr wichtig. Die
Markierung “+” der Batterie muss sich auf derselben Seite wie die
Ausziehlasche benden.
Hinweis: Verwenden Sie beim Einsetzen der Batterie immer die
Batterieeinsatzhilfe. Müssen Sie aus irgendeinem Grund die Batterie
mit den Fingern einsetzen, legen Sie die Batterie horizontal zwischen
die Batteriekontakte, um einen Kurzschluss zu vermeiden.
1 Nehmen Sie die Hörkapsel aus der Manschette (siehe “Reinigung”).
2 Entfernen Sie die Batterie, indem Sie Ihren Fingernagel zwischen die
Hörkapsel und den runden Teil der Batterie setzen. (Abb. 5)
3 Entfernen Sie den Aufkleber von der neuen Batterie.
Verwenden Sie ausschließlich Batterien vom Typ 10 (gelber Aufkleber).
Entfernen Sie den Aufkleber erst, wenn Sie die Batterie in Gebrauch
nehmen.
Page 20

DEUTSCH20
Die Batterie mit der Batterieeinsatzhilfe in der Aufbewahrungsbox auswechseln
1 Schieben Sie den Deckel der Aufbewahrungsbox ganz auf, und
setzen Sie die neue Batterie in das Batteriefach. (Abb. 6)
2 Drücken Sie die Hörkapsel in die Aufbewahrungsbox über die
Batterie. (Abb. 7)
Achten Sie darauf, dass sich die Ausziehlasche und die Markierung + der
Batterie auf der gleichen Seite benden.
Die Batterie mit der separaten Batterieeinsatzhilfe auswechseln
1 Legen Sie die Batterie in das Batteriefach der Batterieeinsatzhilfe.
(Abb. 8)
2 Drücken Sie die Hörkapsel in die Batterieeinsatzhilfe. (Abb. 9)
Achten Sie darauf, dass sich die Ausziehlasche und die Markierung + der
Batterie auf der gleichen Seite benden.
Aufbewahrung
Bewahren Sie das Microlux in der mitgelieferten Aufbewahrungsbox
,
auf.
Umweltschutz
Batterien enthalten Substanzen, die die Umwelt gefährden können.
,
Entsorgen Sie Batterien nicht über den gewöhnlichen Hausmüll,
sondern geben Sie sie an einer der ofziellen Sammelstellen ab.
Entnehmen Sie die Batterie, bevor Sie das Microlux entsorgen und
an einer ofziellen Sammelstelle abgeben.
Werfen Sie das Microlux am Ende der Lebensdauer nicht in den
,
normalen Hausmüll. Bringen Sie es zum Recycling zu einer
ofziellen Sammelstelle. Auf diese Weise helfen Sie, die Umwelt zu
schonen. (Abb. 10)
Page 21

DEUTSCH 21
Garantie und Kundendienst
Wenn Sie weitere Informationen benötigen oder Probleme haben,
wenden Sie sich bitte an Ihren Audiologen.
Häug gestellte Fragen
Dieses Kapitel enthält die am häugsten zum Philips Microlux-Hörgerät
gestellten Fragen. Sollten Sie hier keine Antwort auf Ihre Frage nden,
wenden Sie sich bitte an Ihren Audiologen.
Frage Antwort
Warum
funktioniert das
MicroluxHörgerät nicht?
Wie kann ich
den Ton des
MicroluxHörgeräts
anpassen?
Die Batterie ist möglicherweise leer. Tauschen Sie die
Batterie aus (siehe “Die Batterie auswechseln”).
Das Microlux ist möglicherweise nicht eingeschaltet.
Schalten Sie das Microlux ein, indem Sie den Ein-/
Ausschalter auf Position ‘Ein’ stellen (siehe “Für den
Gebrauch vorbereiten”).
Der Tonausgang und/oder die Mikrofonöffnung sind
möglicherweise blockiert. Überprüfen Sie sie, und
lassen Sie sie ggf. von Ihrem Audiologen reinigen.
Zwischen der Manschette und der Hörkapsel hat
sich Schmutz und/oder Feuchtigkeit angesammelt.
Nehmen Sie die Hörkapsel aus der Manschette, und
reinigen Sie beide Teile (siehe “Reinigung”).
Sie können den Ton nicht selbst einstellen. Wenden
Sie sich bei Problemen mit der Tonqualität an Ihren
Audiologen.
Page 22

22
NEDERLANDS
Inleiding
Gefeliciteerd met de aanschaf van uw nieuwe Philips Microlux. Dankzij de
gepatenteerde constructie is dit het minst zichtbare hoortoestel dat
verkrijgbaar is. De Microlux is niet alleen volledig onzichtbaar tijdens het
dragen, maar produceert ook een veel beter geluid. Dit is mogelijk dankzij
uw eigen oorschelp, die in feite het geluid weerkaatst. De oorschelp is
voor de helft verantwoordelijk voor het versterkende effect. De andere
helft is toe te schrijven aan de holte vlak voor de ingang van de
gehoorgang. De Philips Microlux vult deze holte niet, zoals nog steeds wel
het geval is bij de huidige in-het-oor-hoortoestellen. Het voordeel is dat u
de richting waaruit het geluid komt nog steeds goed kunt bepalen en dat
u uw eigen stem zonder echo hoort.
Het hinderlijke piepen en uiten dat u hoort wanneer u bijvoorbeeld een
telefoongesprek voert of uw onderkaak beweegt (praten, kauwen)
behoren tot het verleden. U hebt veel minder last van wind in uw oren
en u kunt sporten. Het geluid wordt nog meer versterkt wanneer de
Microlux dieper in het oor wordt geplaatst. Oorsmeer is geen probleem
meer vanwege de karakteristieke constructie van de Microlux. De
Microlux veroorzaakt geen storing in mobiele telefoons en omgekeerd.
U zult vele jaren plezier hebben van de Philips Microlux!
Algemene beschrijving (g. 1)
Hoorcapsule
A Treklipje
B Microfoonopening
C Programmeeruitgang
D Aan/uitschakelaar
E Batterij
Aangemeten hoes
F Treklipje
G Rand van de hoes
H Kleurmarkeringsstip voor links/rechts
I Geluidsuitgang
Page 23

NEDERLANDS 23
Accessoires
J Batterijplaatshulpje
K Opbergdoos
L Batterijplaatshulpje in de opbergdoos
Belangrijk
Lees deze gebruiksaanwijzing zorgvuldig door voordat u de Microlux gaat
gebruiken en bewaar de gebruiksaanwijzing om deze indien nodig te
kunnen raadplegen.
Houd uw Microlux-hoorcapsules goed gescheiden als u er twee
,
hebt, want de programmering voor beide oren is vaak verschillend.
Laat de hoorcapsule, de aangemeten hoes en de batterij nooit
,
onbeheerd achter. Kinderen of huisdieren kunnen deze kleine
onderdelen inslikken en hierin stikken.
Maak de hoorcapsule en de aangemeten hoes regelmatig schoon
,
om huidirritatie of ontsteking te voorkomen (zie hoofdstuk
‘Schoonmaken’).
Controleer regelmatig of de geluidsuitgang niet is geblokkeerd,
,
omdat hierdoor het geluid wordt gedempt.
Laat nooit iemand anders uw Microlux gebruiken, omdat dit
,
verwondingen of schade kan toebrengen aan het gehoor en het oor
van de ander.
Houd de Microlux droog.
,
Draag uw Microlux niet tijdens het zwemmen of het douchen, en
,
ook niet tijdens het gebruik van een haardroger of dichtbij een
andere warmtebron.
Dit apparaat voldoet aan de eisen van de Richtlijn Medische
,
Hulpmiddelen MDD 93/42/EEG.
Klaarmaken voor gebruik
De hoorcapsule in de aangemeten hoes plaatsen
Leg de hoorcapsule en de aangemeten hoes altijd op een schoon
oppervlak.
Page 24

NEDERLANDS24
1 Schuif de hoorcapsule (batterij eerst) in de aangemeten hoes en
duw de capsule naar binnen tot deze niet verder kan. (g. 2)
Zorg ervoor dat het treklipje van de hoorcapsule op het treklipje
,
van de aangemeten hoes ligt.
2 Schakel de Microlux in door de aan/uitknop in de ‘aan’-stand te
zetten. (g. 3)
U kunt controleren of de Microlux werkt door deze met uw hand te
omsluiten. U hoort een uittoon als de Microlux werkt. Als u geen
uittoon hoort, controleer dan de geluidsuitgang en de plaatsing van de
batterij.
De Microlux gebruiken
De Microlux in uw oor plaatsen
Verwissel de Microlux-hoorcapsules niet als u er twee hebt, omdat de
programmering voor beide oren vaak verschillend is.
1 Pak de geassembleerde Microlux bij beide treklipjes en plaats het
toestel losjes in de gehoorgang. (g. 4)
De Microlux met de rode kleurmarkeringsstip is voor uw
,
rechteroor en die met de blauwe kleurmarkeringsstip is voor uw
linkeroor.
De kleurmarkeringsstip moet naar boven zijn gericht als de
,
Microlux zich in uw oor bevindt.
2 Plaats uw wijsvinger of duim achter beide treklipjes bij de
programmeringsuitgang en duw de Microlux verder in uw oor.
Het is mogelijk dat u de Microlux iets omhoog en naar achteren
,
moet geleiden. Dit hangt af van de vorm van de gehoorgang.
Indien nodig kunt u de gehoorgang strekken door uw oorschelp
,
met uw andere hand omhoog en naar achteren te trekken.
Het kan ook helpen uw mond te openen tijdens het plaatsen van
,
de Microlux.
Indien nodig kunt u het topje van uw wijsvinger over de Microlux
,
heen en weer bewegen om deze verder naar binnen te werken.
Page 25

NEDERLANDS 25
Opmerking: Het is onmogelijk dat u de Microlux te diep in de gehoorgang
plaatst.
De Microlux uit uw oor verwijderen
1 Trek langzaam aan beide treklipjes om de Microlux uit de
gehoorgang te verwijderen.
2 Schakel de Microlux uit en controleer dit door het toestel in uw
gesloten hand te houden.
De Microlux uit niet als deze is uitgeschakeld.
Het geluid afstellen
De hoorcapsule heeft een zeer goede geluidskwaliteit en veel
mogelijkheden om de geluidsversterking af te stellen. Dit wordt gedaan
door uw audicien met behulp van een computerprogramma.
U kunt het geluid van de Microlux niet zelf afstellen. Neem contact op
met uw audicien als u klachten hebt over het geluid.
Oorsmeer
Oorsmeer beschermt uw oren tegen schadelijke invloeden van buitenaf,
waaronder vuil en infecties. Als zich iets in uw oor bevindt (bijv. een
hoortoestel), dan wordt als reactie op het lichaamsvreemde voorwerp
meer oorsmeer aangemaakt dan gewoonlijk. Dit is geen probleem met
het Philips Microlux-hoortoestel, omdat de Microlux wat oorsmeer mee
naar buiten neemt telkens als u deze uit uw oor verwijdert. Hierdoor
wordt de vorming van oorproppen vertraagd.
Een oorprop kan een pieptoon veroorzaken in uw Microlux-
,
hoortoestel of uw gehoor ineens verminderen, ook als de batterij
nog voldoende energie heeft. Laat uw oren door uw audicien
nakijken om vast te stellen of u oorproppen hebt. Als dat het geval
is, kunt u deze laten verwijderen door een medische
beroepsbeoefenaar.
Probeer uw oren niet zelf schoon te maken met bijvoorbeeld een
wattenstaafje.
Page 26

NEDERLANDS26
Schoonmaken
Als u twee Microlux-hoorcapsules hebt, maak deze dan een voor een
schoon, om te voorkomen dat u de capsules verwisselt.
Tip: Maak de Microlux-hoorcapsule dagelijks schoon om te voorkomen dat er
vuil en vocht tussen de hoorcapsule en de aangemeten hoes gaat zitten.
1 Pak het treklipje van de hoorcapsule (niet het treklipje van de
aangemeten hoes) goed vast.
2 Plaats de duimnagel van uw andere hand tegen de rand van de
aangemeten hoes en trek de hoorcapsule eruit.
3 Maak de hoorcapsule schoon door deze met een droge doek of
tissue schoon te wrijven.
Houd de hoorcapsule droog.
4 Controleer of de geluidsuitgang en de microfoonopening nog
schoon en open zijn. Vraag of uw audicien deze onderdelen wil
schoonmaken als dat niet het geval is.
Maak de behuizing van de capsule nooit zelf schoon met
schoonmaakmiddelen.
5 Maak de aangemeten hoes grondig schoon en desinfecteer deze
met het schoonmaakmiddel dat u van de audicien hebt
meegekregen.
Gebruik geen andere schoonmaakmiddelen dan het product dat u hebt
gekregen van uw audicien.
6 Laat de aangemeten hoes drogen voordat u de hoorcapsule er
weer in plaatst.
De batterij vervangen
Tip: Als u twee Microlux-hoorcapsules hebt, haal deze dan niet tegelijkertijd
uit elkaar om te voorkomen dat de hoorcapsules en hoezen worden
verwisseld.
Tip: Werk altijd boven een tafel of soortgelijke vlakke ondergrond.
Page 27

NEDERLANDS 27
Opmerking: De juiste plaatsing van de batterij is zeer belangrijk. De +-zijde
van de batterij moet zich aan dezelfde kant bevinden als het
treklipje.
Opmerking: Gebruik altijd het batterijplaatshulpje voor het plaatsen van de
1 Verwijder de hoorcapsule uit de aangemeten hoes (zie hoofdstuk
2 Verwijder de batterij door uw vingernagel tussen de hoorcapsule
3 Verwijder de sticker van de nieuwe batterij.
Gebruik uitsluitend batterijen van type 10 (gele sticker).
Verwijder de sticker niet voordat u de batterij gaat gebruiken.
1 Schuif het deksel van de opbergdoos helemaal open en plaats de
2 Druk de hoorcapsule over de batterij in de opbergdoos. (g. 7)
Het treklipje moet zich aan dezelfde kant bevinden als de +-zijde van de
batterij.
batterij. Als u, om welke reden ook, de batterij met uw vingers
moet plaatsen, dient u de batterij horizontaal tussen de
contactpunten te plaatsen om kortsluiting te voorkomen.
‘Schoonmaken’).
en het ronde gedeelte van de batterij te plaatsen. (g. 5)
De batterij vervangen met het batterijplaatshulpje in de opbergdoos
nieuwe batterij in de batterijholte. (g. 6)
De batterij verwisselen met het afzonderlijke batterijplaatshulpje
1 Plaats de batterij in de batterijholte van het batterijplaatshulpje.
(g. 8)
2 Druk de hoorcapsule in het batterijplaatshulpje. (g. 9)
Het treklipje moet zich aan dezelfde kant bevinden als de +-zijde van de
batterij.
Page 28

NEDERLANDS28
Opbergen
Berg de Microlux op in de bijgeleverde opbergdoos.
,
Milieu
Batterijen bevatten stoffen die schadelijk kunnen zijn voor het
,
milieu. Gooi lege batterijen niet weg met het gewone huisvuil, maar
lever deze in bij een ofcieel aangewezen inzamelpunt. Verwijder
altijd de batterij voordat u de Microlux afdankt en inlevert op een
ofcieel inzamelpunt.
Gooi de Microlux aan het einde van zijn levensduur niet weg met
,
het normale huisvuil, maar lever deze in op een door de overheid
aangewezen inzamelpunt om het apparaat te laten recyclen. Op die
manier levert u een bijdrage aan een schonere leefomgeving.
(g. 10)
Garantie en service
Als u informatie nodig hebt of als u een probleem hebt, neem dan
contact op met uw audicien.
Page 29

NEDERLANDS 29
Veelgestelde vragen
In dit hoofdstuk vindt u de meestgestelde vragen over het Philips
Microlux-hoortoestel. Als u het antwoord op uw vraag niet kunt vinden,
neem dan contact op met uw audicien.
Vraag Antwoord
Waarom werkt
het Microlux-
hoortoestel
niet?
Hoe kan ik het
geluid van het
Microlux-
hoortoestel
afstellen?
De batterij is mogelijk leeg. Vervang de batterij (zie
hoofdstuk ‘De batterij vervangen’).
De Microlux is mogelijk niet ingeschakeld. Schakel de
Microlux in door de aan/uitknop in de ‘aan’-stand te
zetten (zie hoofdstuk ‘Klaarmaken voor gebruik’).
De geluidsuitgang en/of microfoonopening kunnen
zijn geblokkeerd. Controleer of dit het geval is en laat
deze indien nodig schoonmaken door uw audicien.
Er kan vuil en/of vocht tussen de aangemeten hoes
en de hoorcapsule zijn gekomen. Verwijder de
hoorcapsule uit de hoes en maak beide onderdelen
schoon (zie hoofdstuk ‘Schoonmaken’).
U kunt het geluid niet zelf afstellen. Raadpleeg uw
audicien als u klachten hebt over het geluid.
Page 30

2 3 4 5
6 7 8 9
10
30
Page 31

31
Page 32

PHILIPS DAP B.V.
Drachten (NL)
Fax: +31(0)512594316
www.philips.com
u
4203.000.5503.1
 Loading...