

Page 1
1
GC9600
PerfectCare Elite Plus
1918
17
16
15
14
13
1
2
12
3
11
4
5
6 7 20
10
4239 001 0829 4
User Manual
Қолданушының нұсқасы
8
9
Инструкция по эксплуатации
Kullanım Kılavuzu
Page 2

2
3
4
5
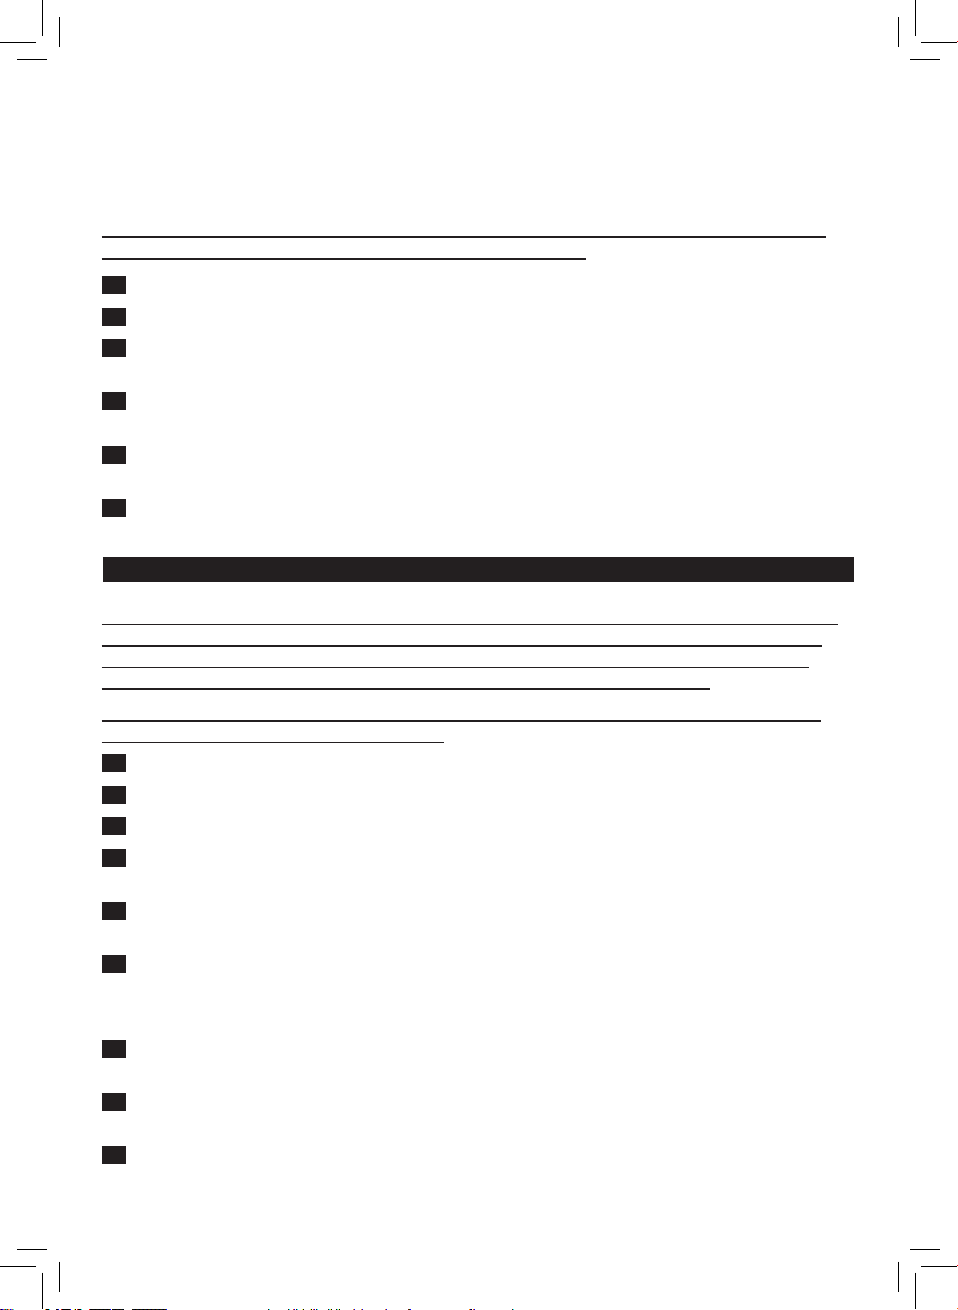
EN IMPORTANT: Perform descaling regularly for great steam
and prolonged life.
6
10
14
11
15
KK МАҢЫЗДЫ: Күшті булау және қызмет мерзімін ұзарту үшін
қақтан тазалау әрекетін мерзімді түрде орындаңыз.
RU ВАЖНАЯ ИНФОРМАЦИЯ. Для продления срока
7
2 sec.
8
12
16
9
TR ÖNEMLİ: Mükemmel buhar ve uzun süreli kullanım ömrü
2x
13
17
службы и сохранения мощности подачи пара
регулярно проводите очистку от накипи.
için kireç temizleme işlemini düzenli olarak gerçekleştirin.
DE
CALC
18
19
20
Page 3
ENGLISH 6
ҚАЗАҚ 12
РУССКИЙ 18
TÜRKÇE 26
GC9600 PerfectCare Elite Plus
Page 4
6 ENGLISH
Introduction
This iron has been approved by The Woolmark Company Pty Ltd for the ironing of wool
only products provided that the garments are ironed according to the instructions on the
garment label and those issued by the manufacturer of this iron. R1703. The Woolmark
symbol is a certication mark in many countries.
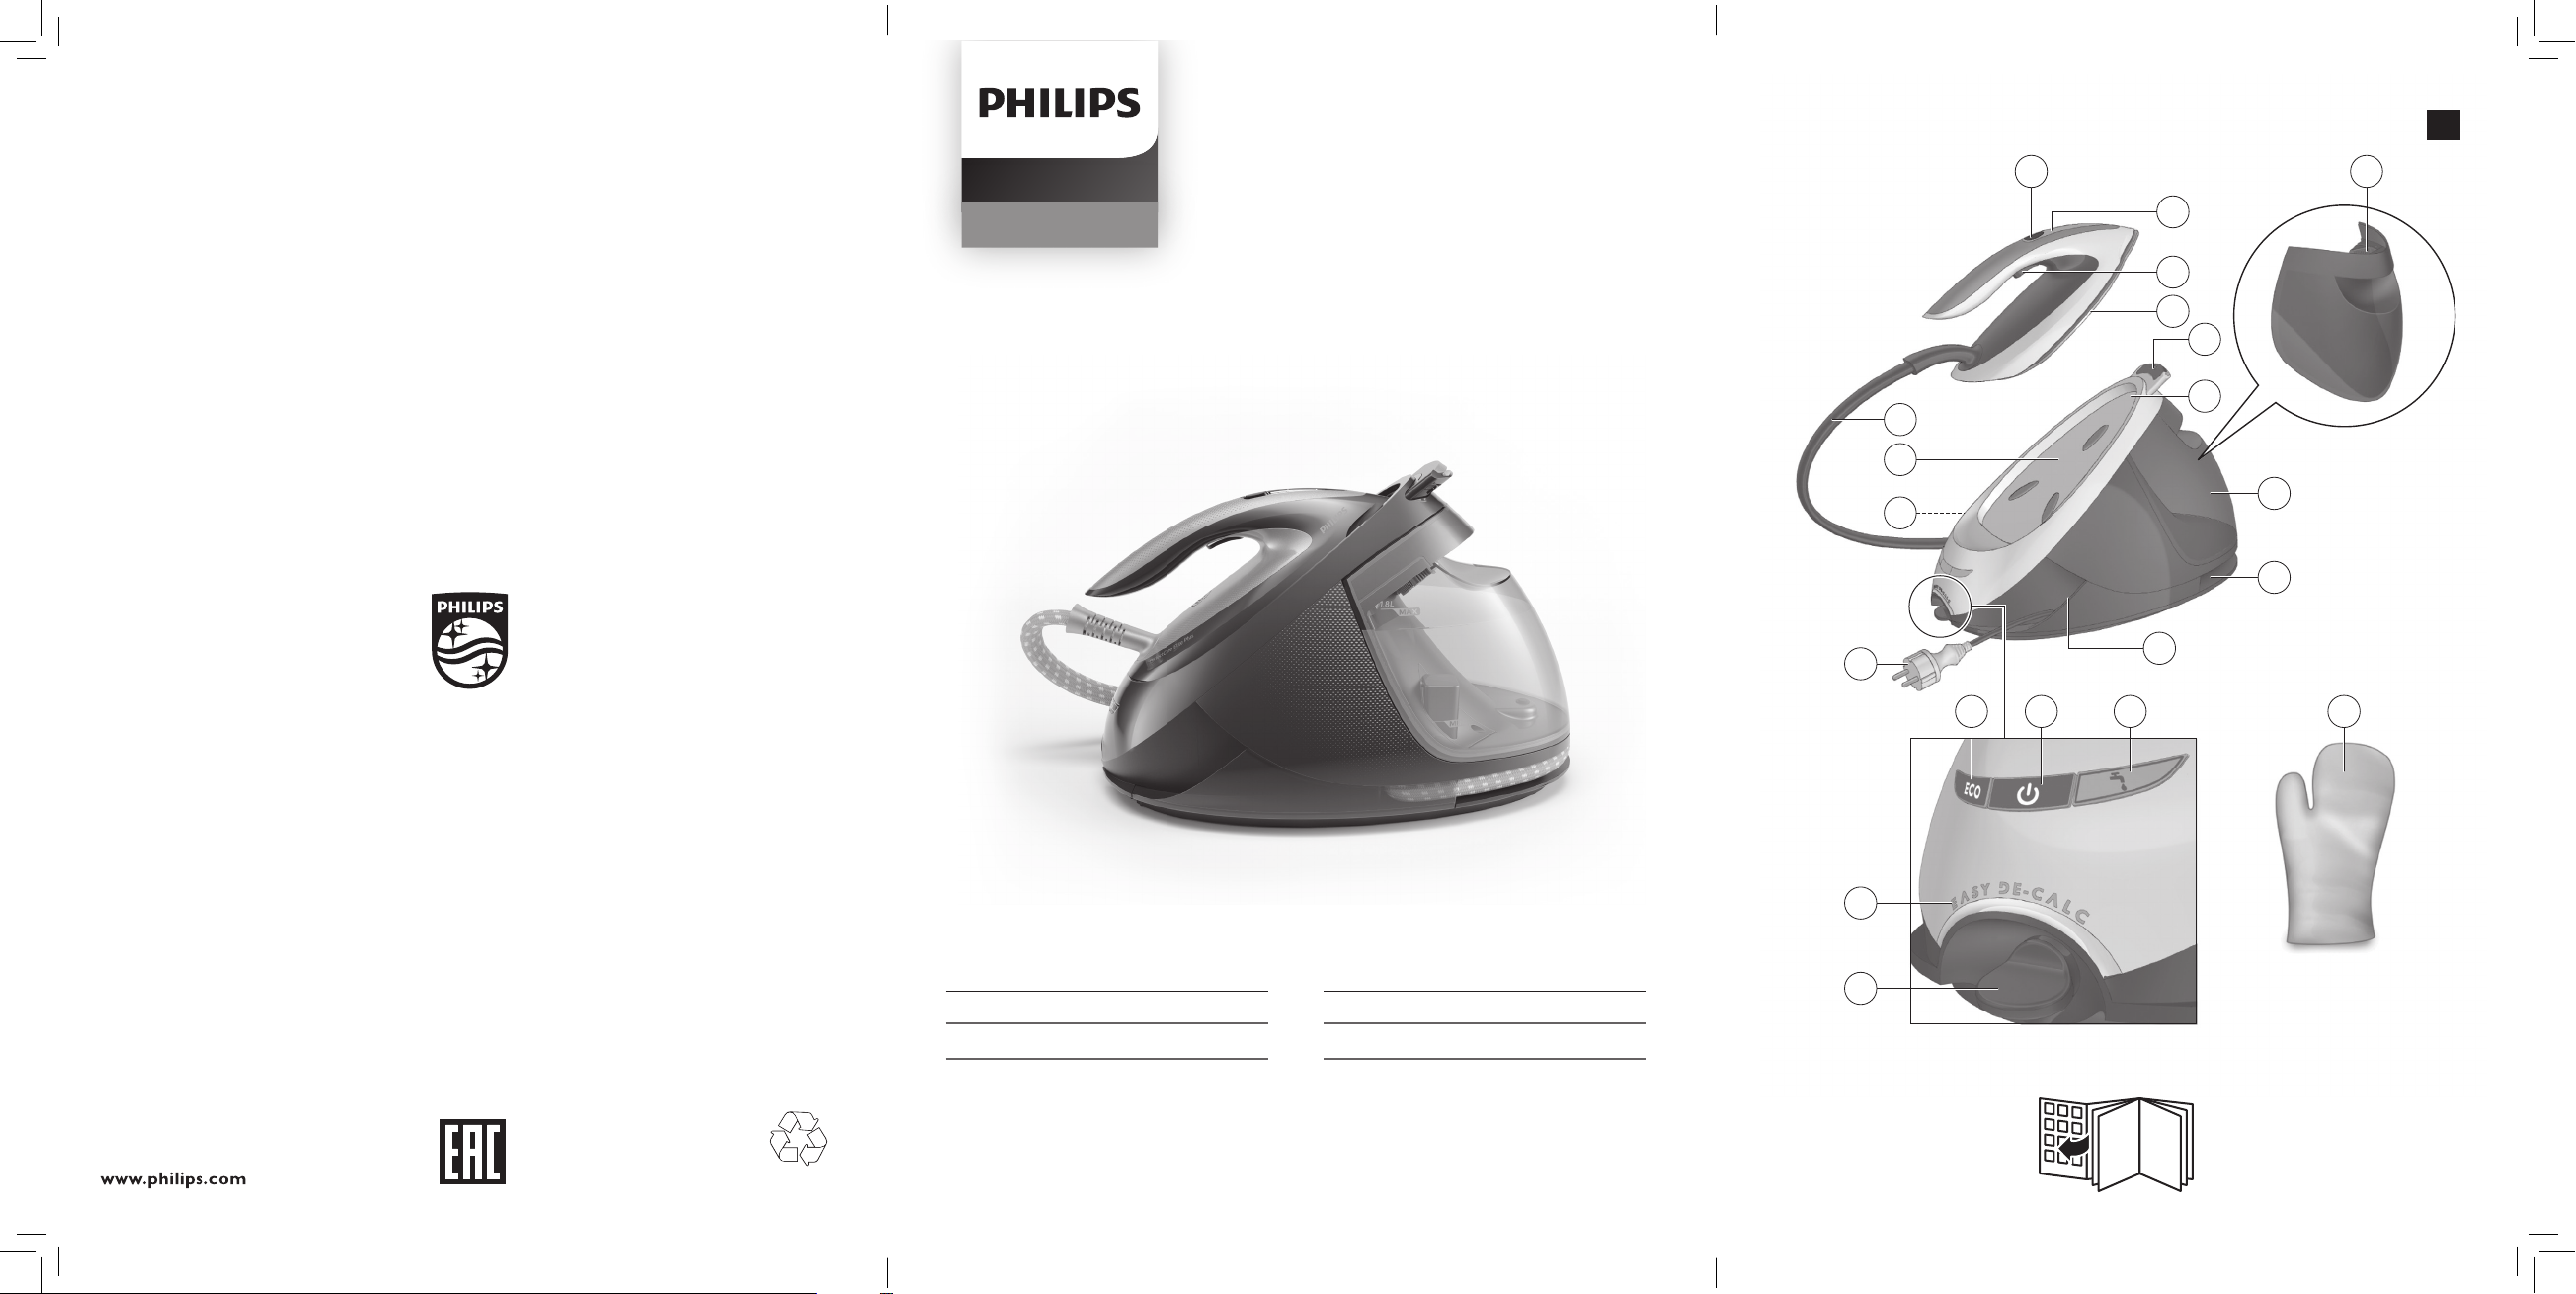
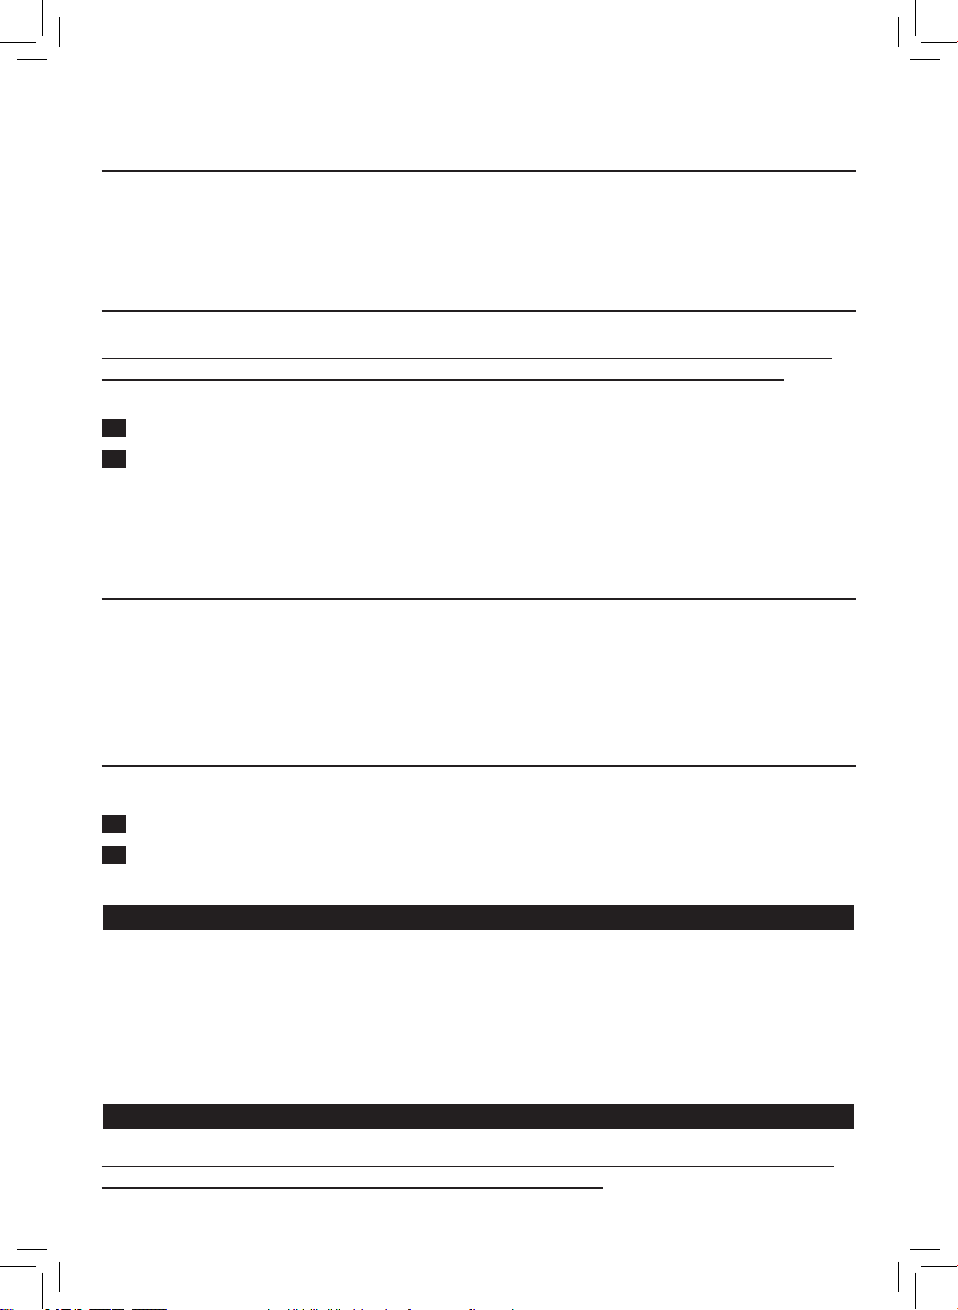
Product overview (Fig. 1)
1 Steam supply hose
2 Iron platform
3 First supply hose storage compartment
4 Mains cord with plug
5 ECO button with light
6 On/o button with light and MAX setting
7 ‘Water tank empty’ light
8 EASY DE-CALC light
9 EASY DE-CALC knob
10 Cord storage compartment
11 Second supply hose storage compartment
12 Detachable water tank
13 Carry lock
14 Carry lock release button
15 Soleplate
16 Steam trigger
17 ‘Iron ready’ light
18 Intelligent automatic steam button with light
19 Filling hole
20 Protective glove for vertical ironing
Important
Read the separate important information leaet and the user manual carefully before
you use the appliance. Save both documents for future reference.
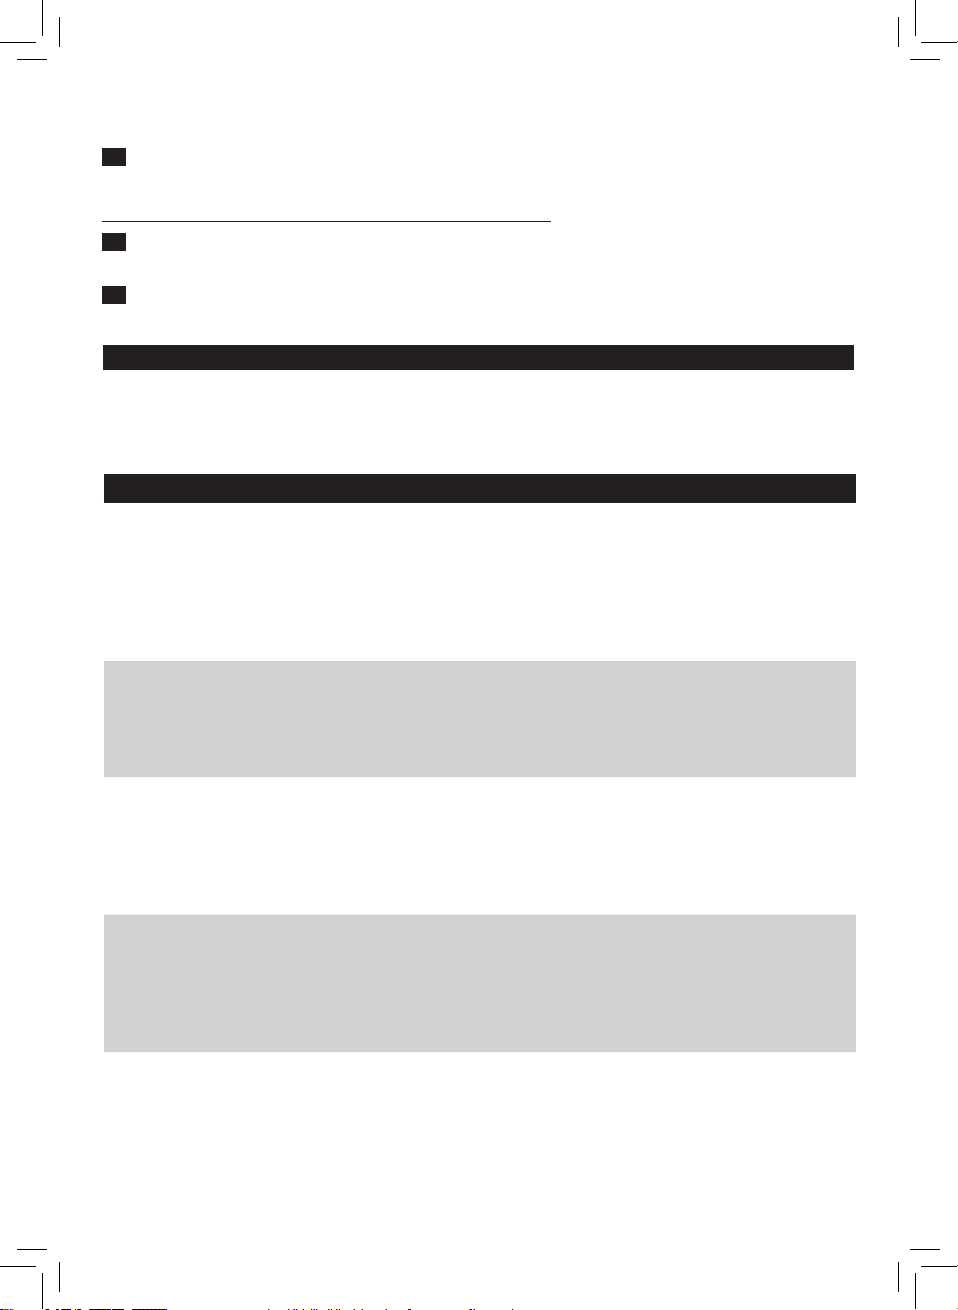
Using your appliance
OptimalTEMP technology
The OptimalTEMP technology enables you to iron all types of ironable fabrics, in any
order, without adjusting the iron temperature setting.
Fabrics with these symbols are ironable, for example linen, cotton, polyester, silk, wool,
viscose and rayon (Fig. 2).
Page 5
7
ENGLISH
Fabrics with this symbol are not ironable. These fabrics include synthetic fabrics such as
Spandex or elastane, Spandex-mixed fabrics and polyolens (e.g. polypropylene), but
also prints on garments (Fig. 3).
During ironing, you can place the iron either on the iron platform or horizontally on the
ironing board. Thanks to the OptimalTEMP technology, the soleplate will not damage the
ironing board cover (Fig. 4).
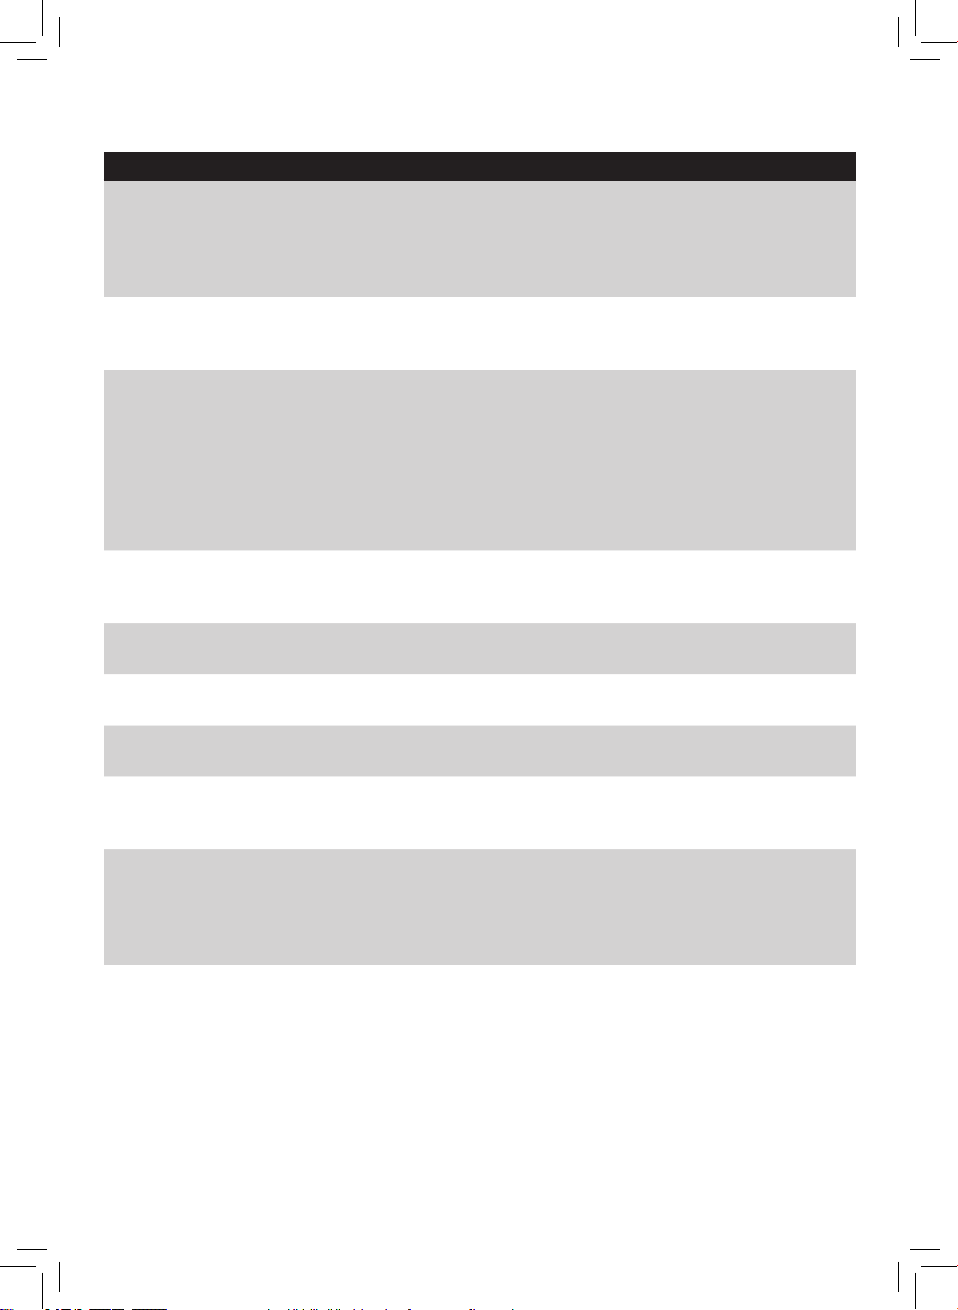
Ironing
Read this user manual, the important information leaet, and the quick start guide
carefully before you use the appliance. Save them for future reference.
1 Press and hold the steam trigger to start ironing (Fig. 5).
Never direct steam at people.
Note: For best result on tough fabrics such as cotton, linen and jeans, keep the steam
trigger pressed continuously when you move the iron over the fabric. Then move the
iron over the same area a few more times without steam to dry the fabric.
Note: For the best results on silk and shiny synthetic fabrics, it is recommended to keep
the steam trigger pressed continuously while ironing.
sensor and intelligent automatic steam mode
The intelligent sensor inside your iron knows exactly when and how your iron is
moving. When you activate intelligent automatic steam mode, the sensor will
start recognizing the movements of your iron and will enable your iron to release the right
amount of steam automatically without you having to press the steam trigger. This will
help you to get great results faster and easier.
- To activate the intelligent automatic steam mode, press the intelligent automatic
steam button on top of the iron handle. The intelligent automatic steam light turns on
(Fig. 6).
- The ‘iron ready’ light moves back and forth when the iron is moving.
Note: in intelligent automatic steam mode, steam comes out automatically when you
move the iron and stops when you stop moving the iron (Fig. 7). You can still press the
steam trigger in this mode to activate the steam when the iron is not moving.
- You can use the intelligent automatic steam mode in all steam settings, including ECO
and MAX.
Note: for your safety, in intelligent automatic steam mode, the steam stops when the
soleplate is tilted.
- To exit the intelligent automatic steam mode, press the intelligent automatic steam
button. The intelligent automatic steam light turns o. You need to press the steam
trigger to continue your ironing.
Page 6
8
ENGLISH
Steam boost function
The steam boost function is designed to help tackle dicult creases.
- Press the steam trigger twice quickly to activate the steam boost function. The
appliance releases 3 powerful shots of steam (Fig. 8).
Vertical ironing
Hot steam is emitted from the iron. Never attempt to remove creases from a garment
that someone is wearing. Do not apply steam near your or someone else’s hand.
You can use the iron in vertical position to remove wrinkles from hanging fabrics.
1 Put on the glove.
2 Hold the iron in vertical position, press the steam trigger and touch the garment
slightly with the soleplate (Fig. 9).
Note: for your safety, the intelligent automatic steam mode is not available for vertical
ironing.
ECO setting
By using the ECO setting (reduced amount of steam), you can save energy without
compromising on the ironing result.
- Press the ECO button. The green ECO light turns on (Fig. 10).
- To deactivate ECO setting, press then ECO button again. The green ECO light goes o.
MAX setting
For faster ironing and a higher amount of steam, you can use MAX setting.
1 Press and hold the on/o button for 2 seconds until the light turns white (Fig. 11).
2 To deactivate MAX setting, press and hold the on/o button again for 2 seconds
until the white light turns blue
Auto shut-o
- The appliances enters the standby mode if it has not been used for 10 minutes. The
light in the on/ o button starts to ash (Fig. 12).
- To activate the appliance again, press the on/o button. The appliance starts to heat
up again.
- The appliance switches o automatically if it has not been used for another 10
minutes after it enters the standby mode. The light in the on/o button goes o.
IMPORTANT - EASY DE-CALC
It is very important to use the EASY DE-CALC function as soon as the EASY DE-CALC
light starts to ash and the appliance beeps continuously.
Page 7
9
ENGLISH
The EASY DE-CALC light ashes and the appliance beeps continuously after about
a month or 10 ironing sessions to indicate that the appliance needs to be descaled.
Perform the following EASY DE-CALC procedure before you continue ironing.
To avoid the risk of burns, unplug the appliance and let it cool down for at least two
hours before you perform the EASY DE-CALC procedure.
1 Remove the plug from the wall socket (Fig. 13).
2 Place the appliance on the edge of the tabletop.
3 Hold a cup (with a capacity of at least 350ml) under the EASY DE-CALC knob and
turn the knob anticlockwise (Fig. 14).
4 Remove the EASY DE-CALC knob and let the water with scale particles ow into the
cup (Fig. 15).
5 When no more water comes out of the appliance, reinsert the EASY DE-CALC knob
and turn it clockwise to fasten it (Fig. 16).
6 You can continue using your iron immediately after completing the EASY DE-CALC
procedure.
IMPORTANT – Descaling the soleplate
If you do not use the EASY DE-CALC function regularly, scale particles may build up in
the soleplate and brown stains may come out of the soleplate during ironing. In this
situation, you need to descale the soleplate by following the procedure below. We
advice you to repeat the procedure twice to better clean the soleplate.
To avoid the risk of burns, unplug the appliance and let it cool down for at least two
hours before you descale the soleplate.
1 Remove the plug from the wall socket (Fig. 13).
2 Place the appliance on the edge of the tabletop.
3 Make sure that the water tank is empty.
4 Hold a cup (with a capacity of at least 350ml) under the EASY DE-CALC knob and
turn the knob anticlockwise (Fig. 14).
5 Remove the EASY DE-CALC knob and let the water with scale particles ow into the
cup (Fig. 15).
6 Hold the appliance in the position that EASY DE-CALC opening is facing up and pour
900ml distilled water into the opening (Fig. 17).
Note: Be mindful on the heavy weight of the appliance when you tilt it.
7 Keep the EASY DE-CALC opening facing up, reinsert the EASY DE-CALC knob and
turn it clockwise to fasten it (Fig. 18).
8 Put the appliance back on a stable and even surface. Plug in the appliance and
switch it on (Fig. 19).
9 Wait for 5 minutes for the appliance to heat up.
Page 8
10
ENGLISH
10 Keep the steam trigger pressed continuously while you move the iron on a piece of
thick cloth for 3 minutes (Fig. 20).
Warning: hot, dirty water comes out of the soleplate.
11 Stop moving the iron when no more water comes out or when steam starts coming
out.
12 You can continue to use the appliance immediately. Otherwise unplug the appliance
after the descaling is completed.
Troubleshooting
This chapter summarises the most common problems you could encounter with the
appliance. If you are unable to solve the problem with the information below, visit
www.philips.com/support for a list of frequently asked questions or contact the
Consumer Care Centre in your country.
Problem Possible cause Solution
The ironing board
cover becomes
wet or there are
water droplets
on the garment
during ironing.
Water droplets
come out of the
soleplate.
Steam and/or
water come out
from under the
EASY DE-CALC
knob.
Steam has condensed on
the ironing board cover after
a long ironing session.
You have an ironing board
cover that is not designed
to cope with the high steam
rate of the appliance.
The steam that was
still present in the hose
has cooled down and
condensed into water. This
causes water droplets to
come out of the soleplate.
The EASY DE-CALC knob is
not tightened properly.
The rubber sealing ring of
the EASY DE-CALC knob is
worn.
Replace the ironing board cover if
the foam material has worn out. You
can also add an extra layer of felt
material under the ironing board
cover to prevent condensation on
the ironing board. You can buy felt in
a fabric shop.
Put an extra layer of felt material
under the ironing board cover to
prevent condensation on the ironing
board. You can buy felt in a fabric
shop.
Steam away from the garment for a
few seconds.
Switch o the appliance and let the
appliance cool down for 2 hours.
Unscrew the EASY DE-CALC knob
and screw it back onto the appliance
properly. Note: Some water may
escape when you remove the knob.
Contact an authorised Philips service
centre for a new EASY DE-CALC
knob.
Page 9
11
ENGLISH
Problem Possible cause Solution
Dirty water
and impurities
come out of the
soleplate or the
soleplate is dirty.
The iron leaves
a shine or an
imprint on the
garment.
The appliance
does not produce
any steam.
The appliance
has switched o.
The light in the
on/o button
ashes.
The appliance
produces a
pumping sound.
Impurities or chemicals
present in the water have
deposited in the steam
vents and/or on the
soleplate.
Too much scale and
minerals have accumulated
inside the appliance.
The surface to be ironed
was uneven, for instance
because you were ironing
over a seam or a fold in the
garment.
There is not enough water
in the water tank (the ‘water
tank empty’ light ashes).
The appliance is not hot
enough to produce steam.
You did not press the steam
trigger.
The water tank is not placed
in the appliance properly.
The appliance is not
switched on.
The auto-o function is
activated automatically
when the appliance has not
been used for more than 10
minutes.
Water is pumped into the
boiler inside the appliance.
This is normal.
Clean the soleplate with a damp
cloth.
Descale the appliance regularly (see
chapter ‘Important - DESCALING’).
PerfectCare is safe on all garments.
The shine or imprint is not
permanent and will come o if you
wash the garment. Avoid ironing
over seams or folds or you can place
a cotton cloth over the area to be
ironed to avoid imprints at seams
and folds.
Fill the water tank (see chapter ‘Using
your appliance’, section ‘Filling the
water tank’).
Wait until the ‘iron ready’ light on the
iron lights up continuously.
Press the steam trigger and keep it
pressed while you iron.
Slide the water tank back into the
appliance rmly (‘click’).
Insert the plug in the wall socket and
press the on/o button to switch on
the appliance.
Press the power on/o button to
switch on the appliance again.
If the pumping sound continues
nonstop, switch o the appliance
and remove the plug from the wall
socket. Contact an authorised Philips
service centre.
Page 10
12 ҚАЗАҚ
Кіріспе
Киім жапсырмасындағы және осы үтіктің өндірушісі берген нұсқауларға сай үтіктелген жағдайда,
бұл үтікті тек жүннен жасалған өнімдерді үтіктеу үшін Woolmark Company Pty Ltd компаниясы
мақұлдаған. R1703. Woolmark нышаны көптеген елдерде сертификаттау белгісі болып табылады.
Өнімге шолу (1- сурет)
1 Бу жеткізу шлангысы
2 Үтіктің түпқоймасы
3 Бірінші бу жеткізу шлангысын сақтау орны
4 Штепсельдік ұшы бар қуат сымы
5 Жарығы бар ECO түймесі
6 Шамы мен MAX (Макс) параметрі бар қосу/өшіру түймесі
7 «Су ыдысы бос» шамы
8 EASY DE-CALC жарығы
9 EASY DE-CALC тұтқасы
10 Қуат сымын сақтау бөлімі
11 Екінші бу жеткізу шлангысын сақтау орны
12 Алынатын су сыйымдылығы
13 Алып жүру құлпы
14 Тасымалдау бекітпесін босату түймесі
15 Астыңғы табан
16 Бу шығарушы ілмек
17 «Үтік дайын» шамы
18 Шамы бар интеллектуалды автоматты бу түймесі
19 Толтыру тесігі
20 Тік үтіктеуге арналған қорғағыш қолғап
Маңызды
Құрылғыны пайдалану алдында бөлек маңызды ақпарат парақшасын және осы пайдаланушы
нұсқаулығын мұқият оқып шығыңыз. Құжаттардың екеуін де болашақта анықтама алу үшін сақтап
қойыңыз.
Құрылғыны пайдалану
OptimalTEMP технологиясы
OptimalTEMP технологиясы үтіктеуге болатын бүкіл мата түрлерін үтік температурасы параметрін
реттеместен кез келген ретте үтіктеуге мүмкіндік береді.
Мына белгілері бар маталарды, мысалы, зығыр, мақта-мата, полиэстер, жібек, жүн, вискоза және
жасанды жібекті үтіктеуге болады (2- сурет).
Page 11

13
ҚАЗАҚ
Мына белгісі бар маталарды үтіктеуге болмайды. Бұл маталардың құрамында спандекс немесе
эластан, спандекс аралас талшықтар және полиолефиндер (мысалы, полипропилен) сияқты
синтетикалық талшықтар бар, сондай-ақ басылған суреті бар маталарды да үтіктеуге болмайды
(3- сурет).
Үтіктеу барысында үтікті түпқоймаға немесе көлденеңінен үтіктеу тақтасына қоюға болады.
OptimalTEMP технологиясының арқасында үтіктің табаны үтіктеу тақтасының жабынын бүлдірмейді
(4- сурет).
Үтіктеу
Құралды пайдаланбастан бұрын, осы пайдаланушы нұсқаулығын, маңызды ақпарат парақшасын және
жылдам бастау нұсқаулығын мұқият оқып шығыңыз. Келешекте қарау үшін оларды сақтап қойыңыз.
1 Үтіктейбастауүшінбушығарғышынбасыңыз(5-сурет).
Будыадамдарғабағыттаушыболмаңыз.
Ескертпе: мақта сияқты қатты маталарды үтіктеудің жақсы нәтижелеріне қол жеткізу үшін,
матада үтікті жылжытқанда бу шығару түймесін үздіксіз басып тұрыңыз. Одан кейін матаны
құрғату үшін, үтікті бір аймаққа бірнеше рет бусыз жылжытыңыз.
Ескертпе: жібек және жылтыр синтетикалық маталарда үздік нәтижелерге қол жеткізу үшін,
үтіктеу кезінде бу триггерін үздіксіз басулы ұстау ұсынылады.
қадағасы және интеллектуалды бу режимі
Үтік ішіндегі интеллектуалды қадағасы үтіктің жылжу уақыты мен жолын біледі.
Интеллектуалды автоматты бу режимі белсендірілсе, қадағасы үтік қозғалыстарын
анықтауды бастап, бу триггерін басусыз будың дұрыс мөлшерін автоматты түрде шығаруға жол
береді. Бұл жақсы нәтижелерге тезірек және оңайырақ жетуге көмектеседі.
- Интеллектуалды автоматты бу режимін белсендіру үшін, үтік тұтасының үстіндегі автоматты бу
түймесін басыңыз. Интеллектуалды автоматты бу шамы қосылады (6- сурет).
- Үтік жылжыған кезде «Үтік дайын» шамы артқа және алға жылжиды.
Ескертпе: интеллектуалды автоматты бу режимінде үтікті жылжытқан кезде бу автоматты
түрде шығады және үтікті тоқтатқан кезде бу да тоқтайды (7- сурет). Үтік қозғалмайтын кезде
буды белсендіру үшін, триггерді осы режимде ұзақ басуға болады.
- Интеллектуалды автоматты бу режимін барлық бу параметрлерінде пайдалана аласыз, оның
ішінде ECO (Эко) және MAX (Макс).
Ескертпе: қауіпсіздік үшін интеллектуалды автоматты бу режимінде үтіктеу тақтасы еңкейтілген
кезде бу тоқтайды.
- Интеллектуалды автоматты режимнен шығу үшін, интеллектуалды автоматты бу түймесін
басыңыз. Интеллектуалды автоматты бу шамы өшеді. Үтіктеуді жалғастыру үшін, бу триггерін басу
керек.
Page 12

14
ҚАЗАҚ
Буды күшейту функциясы
Буды күшейту функциясы қатты бүктеліп қалған жерлерді түзету үшін жасалған.
- Бу күшейту функциясын белсендіру үшін, бу триггерін екі рет жылдам басыңыз. Құрылғы будың 3
қуатты ағынын шығарады ( 8-сурет).
Тігінен үтіктеу
Үтіктеныстықбушығады.Киімдібіреугекигізіптұрыпүтіктеушіболмаңыз.Үтіктіңжанында
өзіңіздіңнемесебасқабіреудіңқолытұрса,будышығармаңыз.
Ілулі тұрған матаның қыртысын кетіру үшін үтікті тігінен пайдалануға болады.
1 Қолғапкиіңіз.
2 Үтіктітіккүйдеұстап,бушығарутүймесінбасыңызжәнекиімгеүтіктіңтабанынжайлап
тигізіңіз(9-сурет).
Ескертпе: қауіпсіздік үшін интеллектуалды автоматты бу режимі тік үтіктеуге қолжетімсіз.
ECO параметрі
ECO (Эко) параметрін пайдалану арқасында (будың шығуын азайтады) үтіктеу нәтижесіне әсер
етпестен энергияны үнемдеуге болады.
- ECO түймесін басыңыз. Жасыл ECO (Эко) шамы қосылады (10- сурет).
- ECO (Эко) параметрін өшіру үшін, ECO (Эко) түймесін қайта басыңыз. Жасыл ECO (Эко) шамы
өшеді.
MAX (Макс) параметрі
Жылдам үтіктеу және будың көп мөлшерін шығару үшін MAX күйін пайдалануға болады.
1 Шамақболыпжанғаншақосу/өшірутүймесін2секундбойыбасыптұрыңыз(11-сурет).
2 MAX(Макс)күйінөшіруүшіншамкөктүспенжанғандақосу/өшірутүймесінқайтадан2
секундбойыбасыптұрыңыз.
Автоматты түрде өшу
- Құрылғы 10 минут бойы қолданылмаса, күту режиміне өтеді. Қосу/өшіру түймесіндегі жарық
жыпылықтай бастайды (12- сурет).
- Құрылғыны қайта белсендіру үшін, қосу/өшіру түймесін басыңыз. Құрылғы қайта жылына бастайды.
- Егер құрылғы күту режиміне өткеннен кейін 10 минут пайдаланылмаса, ол автоматты түрде
өшеді. Қосу/өшіру түймесіндегі жарық өшеді.
МАҢЫЗДЫ - EASY DE-CALC
EASY DE-CALC шамы жыпылықтай бастағаннан және құрылғы дыбыс сигналын
үздіксіз шығарғаннан EASY DE-CALC функциясын пайдалану керек.
Page 13

15
ҚАЗАҚ
EASY DE-CALC шамы шамамен бір айдан кейін немесе 10 үтіктеу сеансынан кейін құрылғының
қақтан тазалануы керектігін көрсету үшін жыпылықтайды және құрылғы дыбыстық сигналды үздіксіз
шығарады. Үтіктеуді жалғастырмас бұрын, келесі EASY DE-CALC процедурасын орындаңыз.
Күйік қаупін болдырмау үшін құрылғыны ажыратып, EASY DE-CALC процедурасын
орындау алдында кемінде екі сағат суытыңыз.
1 Тығындырозеткаданажыратыңыз(13-сурет).
2 Құрылғыныүстелжиегінеқойыңыз.
3 Тостағанды(көлемікемінде350мл)EASYDE-CALCтұтқасыныңастынаұстап,тұтқанысағат
тілінеқарсыбұраңыз(14-сурет).
4 EASYDE-CALCтұтқасыналып,қақбөлшектерібарсудытостағанғаағызыңыз(15-сурет).
5 ҚұрылғыдансудыңағуытоқтағандаEASYDE-SCALEтұтқасынқайтасалып,сағаттілі
бағытыменбұрапбекітіңіз(16-сурет).
6 EASYDE-CALCпроцедурасынаяқтағаннанкейінүтіктібірденпайдаланудыжалғастыра
беругеболады.
МАҢЫЗДЫ – Үтіктің табанының қағын кетіру
ЕгерEASYDE-CALCфункциясыжүйелітүрдепайдаланылмаса,үтіктіңтабанынақақбөлшектері
жиналып,үтіктеубарысындақоңырдақтаршығуымүмкін.Бұндайжағдайдаүтіктіңтабанын
төмендегіпроцедураныорындаументазалаукерек.Үтіктіңтабанындұрыстазалауүшін,
процедураныекіретқайталауұсынылады.
Күйікқаупінболдырмауүшінқұрылғыныажыратып,үтіктіңтабанықағынкетіруалдындакемінде
екісағатсуытыңыз.
1 Тығындырозеткаданажыратыңыз(13-сурет).
2 Құрылғыныүстелжиегінеқойыңыз.
3 Суыдысыбосекендігінтексеріңіз.
4 Тостағанды(көлемікемінде350мл)EASYDE-CALCтұтқасыныңастынаұстап,тұтқанысағат
тілінеқарсыбұраңыз(14-сурет).
5 EASYDE-CALCтұтқасыналып,қақбөлшектерібарсудытостағанғаағызыңыз(15-сурет).
6 ҚұрылғыныEASYDE-CALCсаңылауыжоғарықаратылатындайетіпұстап,900мл
дистилденгенсудысаңылауғақұйыңыз(17-сурет).
Ескертпе: құрылғыны еңкейткен кезде ауыр салмағын ескеріңіз.
7 EASYDE-CALCсаңылауынжоғарықаратып,EASYDE-CALCтұтқасынқайтасалып,бекіту
үшінсағаттілібағытыменбұраңыз(18-сурет).
8 Құрылғынытұрақтыжәнетегісбеткекерісалыңыз.Құрылғынытығыпқосыңыз(19-сурет).
9 Құрылғыныңқызуын5минуткүтіңіз.
10 Үтіктіқалыңматабөлігіне3минутқажылжытқанкездебутриггерінүздіксізбасулыұстаңыз
(20-сурет).
Ескерту:үтіктіңтабанынаныстық,лассуағыптұр.
Page 14

16
ҚАЗАҚ
11 Ешбірсушықпағанкезденемесебушығабастағандаүтіктіжылжытпаңыз.
12 Құрылғыныбірденпайдаланудытоқтатыңыз.Болмаса,қақкетіруаяқталғаннанкейін
құрылғыныажыратыңыз.
Ақаулықтарды шешу
Бұл тарауда құрылғыда ең көп кездесуі мүмкін ақаулықтар жинақталған. Егер төмендегі ақпараттың
көмегімен мәселені шеше алмасаңыз, www.philips.com/support торабына кіріп, жиі қойылатын
сұрақтар тізімін қараңыз немесе еліңіздегі тұтынушыларды қолдау орталығына хабарласыңыз.
Ақаулық Мүмкінсебептер Шешімі
Үтіктеу кезінде
үтік үстелінің қабы
дымқыл болады
немесе киімде су
іздері болады.
Астыңғы табаннан
су тамшылары
шығып жатыр.
Бу және/немесе
су EASY DE-CALC
тұтқасынан шығады.
Үтіктің табанынан
лас су мен қоспалар
шығып жатыр
немесе үтіктің
табаны кір.
Ұзақ үтіктеу сеансынан
кейін бу үтіктеу тақтасының
жапқышында суға айналған.
Үтіктеу тақтасының қаптамасы
құрылғының буды тез шығару
жылдамдығына арналмаған.
Шлангіде болған бу салқындаған
және суға айналған. Осы
себептен үтіктің табанынан су
тамшылайды.
EASY DE-CALC тұтқасы дұрыс
бекітілмеген.
EASY DE-CALC тұтқасының
резеңке төсеме сақинасы
тозған.
Су құрамында бар химикаттар
мен қалдықтар бу тесікшелеріне
және/немесе астыңғы табанға
шыққан болар.
Құрылғыда тым көп қақ және
басқа қалдықтар жиналып
қалған болуы мүмкін.
Егер пенопласт тозса, үтіктеу тақтасы
жапқышын ауыстырыңыз. Сонымен қатар,
үтіктеу тақтасында конденсаттың пайда
болуын болдырмау үшін үтіктеу тақтасы
қаптамасының астына киізден жасалған
қосымша қабат қосуға болады. Киізді мата
дүкенінен сатып алуға болады.
Үтіктеу тақтасында конденсаттың пайда
болуын болдырмау үшін үтіктеу тақтасы
қаптамасының астына киізден жасалған
қосымша қабат қойыңыз. Киізді мата
дүкенінен сатып алуға болады.
Бірнеше секунд бойы киімнен басқа
жерге бу шығарыңыз.
Құрылғыны өшіріп, оны 2 сағатқа
суытыңыз. EASY DE-CALC тұтқасын ашып,
оны құрылғыға тиісті түрде қайта бекітіңіз.
Ескертпе: тұтқаны алғанда су ағуы мүмкін.
Жаңа EASY DE-CALC тұтқасын алу үшін
рұқсат етілген Philips қызмет көрсету
орталығына хабарласыңыз.
Құралды дымқыл шүберекпен тазалаңыз.
Құрылғыдағы қақты жүйелі түрде түсіріп
тұрыңыз («Маңызды - ҚАҚ ТҮСІРУ»
тарауын қараңыз).
Page 15

17
ҚАЗАҚ
Ақаулық Мүмкінсебептер Шешімі
Үтік киімде жылтыр
із немесе белгі
қалдырады.
Құрылғы еш бу
шығармайды.
Құрылғы өшті.
Қосу/өшіру
түймесіндегі жарық
жыпылықтайды.
Құрал сору
дыбысын шығарады.
Үтіктелетін бет тегіс емес,
мысалы, қатты бумен үтіктеп
жатқандықтан немесе киімде
бүктелген жер болғандықтан.
Су ыдысындағы су көлемі
жеткіліксіз («су ыдысы бос»
шамы жыпылықтап тұр).
Құрылғы бу шығару үшін
жетерліктей ыстық емес.
Бу шығару түймесін баспағансыз. Үтіктеген кезде, бу шығару түймесін
Су ыдысы құрылғыға дұрыс
қойылмаған.
Құрылғы қосылмаған. Штепсельдік ұшты розеткаға жалғаңыз
Құрылғы 10 минут бойы іссіз
тұрғанда, автоматты өшіру
функциясы автоматты түрде
қосылады.
Су құрылғының ішіндегі
қайнатқышқа сорылып тұр. Бұл
әдеттегі нәрсе.
Perfect Care үтігін кез келген киімге
қауіпсіз пайдалануға болады. Жылтыр
із немесе белгі тұрақты қалмайды,
олар киімді жуғанда кетеді. Қатты
бумен немесе бүктеп үтіктемеңіз, не
болмаса будан және бүктеуден болатын
белгілердің алдын алу үшін үтіктелетін
аймаққа мақта мата қоюға болады.
Су ыдысын толтырыңыз («Құралды
қолдану» тарауындағы «Су ыдысын
толтыру» бөлімін қараңыз).
«Үтік дайын» жарығының тұрақты жануын
күтіңіз.
басып тұрыңыз.
Су ыдысын қайтадан құрылғысына
сырғытып мықтап орнатыңыз («сырт» ете
түседі).
да, қосу/өшіру түймесін басып құрылғыны
қосыңыз.
Құрылғыны қайта қосу үшін қуатты қосу/
өшіру түймесін басыңыз.
Сорғылау дыбысы тоқтамаса, құрылғыны
өшіріп, штепсельдік ұшты розеткадан
ажыратыңыз. Өкілетті Philips қызмет
көрсету орталығына хабарласыңыз. Philips
әкімшілік берген қызмет орталығымен
хабарласыңыз.
Буменүтіктеужүйесі
Өндіруші: “Филипс Консьюмер Лайфстайл Б.В.”, Туссендиепен 4, 9206 АД, Драхтен, Нидерланды.
Ресей және Кедендік Одақ территориясына импорттаушы: “ФИЛИПС” ЖШҚ, Ресей Федерациясы,
123022 Мәскеу қаласы, Сергей Макеев көшесі, 13-үй, тел. +7 495 961-1111.
GC9682, GC9690: 2250-2700Вт, 220-240В, 50-60Гц
Тұрмыстық қажеттіліктерге арналған
Электр тогымен зақымданудан қорғау класы: Класс I
Индонезияда жасалған
Сақтаушарттары,пайдалану
Температура +0°C - +35°C
Салыстырмалы ылғалдылық 20% - 95%
Атмосфералық қысым 85 - 109 kPa
Page 16

18 РУССКИЙ
Введение
Глажение изделий из натуральной шерсти с помощью данного утюга
одобрено компанией The Woolmark Company Pty Ltd при условии, что глажение
осуществляется в соответствии с указаниями на этикетке изделия и инструкциями
производителя утюга. R1703. Символ Woolmark является сертификационным знаком
во многих странах.
Описание изделия (рис. 1)
1 Шланг подачи пара
2 Подставка утюга
3 Первое отделение для хранения шланга подачи пара
4 Сетевой шнур с вилкой
5 Кнопка ECO с индикатором
6 Кнопка включения/выключения с подсветкой и индикатором режима MAX
7 Индикатор "Пустой резервуар для воды"
8 Индикатор EASY DE-CALC
9 Клапан EASY DE-CALC
10 Отделение для хранения шнура
11 Второе отделение для хранения шланга подачи пара
12 Съемный резервуар для воды
13 Фиксатор Carry-Lock
14 Клавиша фиксатора
15 Подошва
16 Кнопка подачи пара
17 Индикатор готовности
18 Кнопка интеллектуальной автоматической подачи пара с индикатором
19 Отверстие для наливания воды
20 Защитная рукавица для вертикального отпаривания
Важно
Перед использованием прибора внимательно ознакомьтесь с буклетом с важной
информацией и данной инструкцией по эксплуатации. Сохраните эти документы
для дальнейшего использования в качестве справочного материала.
Использование прибора
Технология OptimalTEMP
Технология OptimalTEMP позволяет гладить все типы тканей, допускающих
глажение, в любом порядке и без необходимости регулировки температуры.
Page 17

19
РУССКИЙ
Ткани, на которых имеются эти обозначения, можно гладить (например, лен, хлопок,
полиэстер, шелк, шерсть, вискоза, искусственный шелк) (рис. 2).
Ткани, на которых имеется такое обозначение, гладить нельзя. Сюда относятся
синтетические ткани, такие как спандекс, эластан, ткани с содержанием спандекса
или ткани из полиолефиновых волокон (например, полипропиленовая ткань), а
также ткани с принтами (рис. 3).
Во время глажения утюг можно ставить на подставку или помещать подошвой
вниз на гладильную доску. Благодаря технологии OptimalTEMP подошва утюга не
повредит чехол гладильной доски (рис. 4).
Глажение
Перед использованием прибора ознакомьтесь со сведениями, содержащимися
в данном руководстве пользователя, информационной листовке и кратком
руководстве. Сохраните эти документы для дальнейшего использования в качестве
справочного материала.
1 Чтобы начать глажение, нажмите кнопку подачи пара и удерживайте ее (рис. 5).
Запрещается направлять струю пара на людей.
Примечание. Для получения качественных результатов при глажении жестких
тканей, например хлопка, льна и джинсовой ткани, удерживайте кнопку подачи
пара нажатой, перемещая утюг. Несколько раз проведите утюгом по одному
участку без подачи пара, чтобы просушить ткань.
Примечание. Для получения оптимальных результатов при глажении шелка и
блестящих синтетических тканей рекомендуется постоянно удерживать кнопку
подачи пара во время глажения.
Датчик и режим интеллектуальной автоматической подачи
пара
Интеллектуальный датчик точно определяет движения утюга. При
включении интеллектуального режима датчик отслеживает движения
утюга для автоматической подачи оптимального количества пара — вам не нужно
будет нажимать кнопку подачи пара. Таким образом вы сможете быстрее и проще
добиться качественного результата.
- Для включения режима интеллектуальной автоматической подачи пара
нажмите кнопку интеллектуальной автоматической подачи пара сверху на ручке
утюга. Загорится индикатор интеллектуальной автоматической подачи пара
(рис. 6).
- Индикатор готовности движется вперед и назад при перемещении утюга.
Примечание. В режиме интеллектуальной автоматической подачи пар поступает
автоматически при перемещении утюга; подача прекращается, когда вы не
используете утюг (рис. 7). В этом режиме вы можете нажать кнопку подачи
пара — тогда пар будет поступать даже в том случае, если утюг не перемещается.
Page 18

20
РУССКИЙ
- Режим интеллектуальной автоматической подачи пара можно использовать в
сочетании с любыми режимами подачи пара, в том числе с режимами ECO и
MAX.
Примечание. В целях безопасности в интеллектуальном режиме подача пара
прекращается, если подошва наклонена.
- Чтобы выйти из режима интеллектуальной автоматической подачи пара,
нажмите кнопку интеллектуальной автоматической подачи пара. Индикатор
интеллектуальной автоматической подачи пара погаснет. Чтобы продолжить
глажение, нажмите кнопку подачи пара.
Функция "Паровой удар"
Функция "Паровой удар" предназначена для разглаживания самых жестких
складок.
- Чтобы включить функцию парового удара, два раза быстро нажмите кнопку
подачи пара. Прибор выпустит 3 мощных потока пара (рис. 8).
Вертикальное глажение
Утюг генерирует горячий пар. Запрещается гладить одежду прямо на человеке.
Не направляйте пар на себя или на руки других людей.
Утюг можно использовать для глажения одежды, висящей на плечиках.
1 Наденьте рукавицу.
2 Удерживая утюг в вертикальном положении, нажмите кнопку подачи пара и
поднесите подошву к ткани (рис. 9).
Примечание. В целях безопасности вертикальное отпаривание невозможно в
режиме интеллектуальной автоматической подачи пара.
Экорежим
Благодаря режиму ECO (уменьшенная мощность подачи пара) можно экономить
электроэнергию и по-прежнему получать отличные результаты глажения.
- Нажмите кнопку ECO. Загорится зеленый индикатор режима ECO (рис. 10).
- Для отключения режима ECO снова нажмите кнопку ECO. Зеленый индикатор
режима ECO погаснет.
Режим MAX
Для более быстрого глажения и интенсивной подачи пара можно использовать
режим MAX.
1 Нажмите и удерживайте кнопку включения/выключения в течение 2 секунд,
пока индикатор не загорится белым светом (рис. 11).
Page 19

21
РУССКИЙ
2 Чтобы отключить режим MAX, снова нажмите и удерживайте кнопку
включения/выключения в течение 2 секунд, пока белый индикатор не
загорится синим светом.
Автоотключение
- Прибор перейдет в режим ожидания, если его не использовать в течение
10 минут. Индикатор кнопки включения/выключения будет мигать (рис. 12).
- Чтобы снова включить прибор, нажмите кнопку включения/выключения.
Прибор начнет нагреваться.
- Прибор автоматически выключится, если его не использовать в течение
10 минут после перехода в режим ожидания. Индикатор кнопки включения/
выключения погаснет.
ВАЖНАЯ ИНФОРМАЦИЯ: EASY DE-CALC
Необходимо выполнить процедуру EASY DE-CALC, как только начнет мигать
индикатор EASY DE-CALC и прибор начнет издавать продолжительный звуковой
сигнал.
Индикатор EASY DE-CALC начинает мигать, а прибор — издавать продолжительный
звуковой сигнал примерно через месяц или после 10 сеансов глажения, указывая
на то, что необходимо выполнить очистку от накипи. Выполните следующую
процедуру EASY DE-CALC, прежде чем продолжить глажение.
Во избежание ожогов перед выполнением процедуры EASY DE-CALC отключите
прибор от сети питания и дайте ему остыть в течение не менее двух часов.
1 Отключите вилку от розетки электросети (рис. 13).
2 Поставьте прибор на край стола.
3 Под клапаном EASY DE-CALC поставьте чашку (емкостью не менее 350 мл) и
поверните клапан против часовой стрелки (рис. 14).
4 Снимите клапан EASY DE-CALC и слейте воду с частицами накипи в чашку
(рис. 15).
5 Когда из прибора перестанет поступать вода, установите клапан EASY DE-CALC
на место и поверните его по часовой стрелке для фиксации (рис. 16).
6 Вы можете продолжать использование утюга сразу после завершения
процедуры EASY DE-CALC.
ВАЖНАЯ ИНФОРМАЦИЯ: очистка подошвы от накипи
Если функция EASY DE-CALC не используется регулярно, частицы накипи
скапливаются в подошве и она может оставлять коричневые пятна во время
глажения. В такой ситуации необходимо выполнить очистку подошвы от накипи,
как описано ниже. Рекомендуется выполнять процедуру два раза подряд для
оптимального результата очистки подошвы.
Во избежание ожогов перед очисткой подошвы от накипи отключите прибор от
сети питания и дайте ему остыть в течение не менее двух часов.
Page 20

22
РУССКИЙ
1 Отключите вилку от розетки электросети (рис. 13).
2 Поставьте прибор на край стола.
3 Убедитесь, что резервуар для воды пуст.
4 Под клапаном EASY DE-CALC поставьте чашку (емкостью не менее 350 мл) и
поверните клапан против часовой стрелки (рис. 14).
5 Снимите клапан EASY DE-CALC и слейте воду с частицами накипи в чашку
(рис. 15).
6 Удерживая прибор таким образом, чтобы отверстие EASY DE-CALC было
направлено вверх, налейте 900 мл дистиллированной воды через отверстие
(рис. 17).
Примечание. Наклоняя прибор, помните, что он тяжелый.
7 Следите, чтобы отверстие EASY DE-CALC было направлено вверх. Установите
клапан EASY DE-CALC на место и поверните его по часовой стрелке для
фиксации (рис. 18).
8 Установите прибор на ровную и устойчивую поверхность. Подключите прибор к
электросети и включите его (рис. 19).
9 Подождите 5 минут, чтобы прибор нагрелся.
10 Нажмите и удерживайте кнопку подачи пара; перемещайте утюг по плотной
ткани в течение 3 минут (рис. 20).
Предупреждение. Из подошвы будет вытекать грязная горячая вода.
11 Когда вода перестанет поступать или начнется подача пара, можно больше не
перемещать утюг.
12 Вы можете сразу же приступать к использованию прибора. В противном случае
отключите прибор от сети, после того как очистка от накипи будет выполнена.
Поиск и устранение неисправностей
Данная глава посвящена наиболее распространенным проблемам, возникающим
при эксплуатации прибора. Если самостоятельно справиться с возникшими
проблемами не удается, см. список часто задаваемых вопросов на веб-странице
www.philips.com/support или обратитесь в центр поддержки потребителей в вашей
стране.
Page 21

23
РУССКИЙ
Проблема Возможная причина Способы решения
Во время
глажения
гладильная
доска
становится
влажной/
на одежде
появляются
капли воды.
На подошве
появляются
капли воды.
Через клапан
EASY DE-CALC
поступает пар
и/или вода.
Из отверстий
подошвы
поступает
грязная вода,
или подошва
загрязнилась.
Причиной может служить
пар, скапливающийся
на покрытии
гладильной доски при
продолжительном
глажении.
Покрытие вашей
гладильной доски не
предназначено для столь
сильного потока пара из
прибора.
Внутри шланга остается
пар, который остывает
и конденсируется,
превращаясь в воду.
Из-за этого на подошве
появляются капли воды.
Клапан EASY DE-CALC
плохо закрыт.
Износилось резиновое
уплотняющее кольцо
клапана EASY DE-CALC.
На подошве и/или
отверстиях выхода пара
осаждаются загрязнения
или химические вещества,
присутствующие в воде.
В приборе накопилось
слишком много накипи и
минеральных веществ.
Замените чехол гладильной
доски, если вспененный материал
износился. Можно также
поместить под чехол гладильной
доски дополнительный слой
войлока — это предотвратит
появление конденсата. Войлок
можно приобрести в магазине
тканей.
Поместите под покрытие
гладильной доски дополнительный
слой войлока, это предотвратит
появление конденсата. Войлок
можно приобрести в магазине
тканей.
Не направляйте пар на одежду в
течение нескольких секунд.
Отключите прибор и дайте ему
остыть в течение 2 часов. Откройте
клапан EASY DE-CALC и еще раз
плотно установите его на место.
Примечание. При извлечении
клапана может поступать
небольшое количество воды.
Обратитесь в авторизованный
сервисный центр Philips для
получения нового клапана EASY
DE-CALC.
Очистите утюг с помощью
влажной ткани.
Регулярно очищайте прибор
от накипи (см. главу "Важная
информация — ОЧИСТКА ОТ
НАКИПИ").
Page 22

24
РУССКИЙ
Проблема Возможная причина Способы решения
После
использования
утюга на ткани
остается блеск
или след от
глажения.
Прибор не
вырабатывает
пар.
Прибор
выключился.
На кнопке
питания мигает
индикатор.
Прибор
издает звук
работающего
насоса.
Разглаживаемая
поверхность была
неровной, например,
глажение выполнялось
поверх шва или складки
на одежде.
В резервуаре
недостаточно воды
(мигает индикатор пустого
резервуара для воды).
Прибор недостаточно
нагрелся для подачи пара.
Не нажата кнопка подачи
пара.
Резервуар для воды
неправильно вставлен в
прибор.
Прибор не включен. Чтобы включить прибор, вставьте
Функция автовыключения
активируется
автоматически, если
прибор не используется
более 10 минут.
Вода закачивается в
бойлер прибора. Это
нормально.
PerfectCare безопасен для
всех тканей. Блеск или следы
исчезнут после стирки. Не
выполняйте глажение поверх
швов или складок на одежде или
накрывайте эти участки хлопковой
тканью, чтобы на швах и складках
не оставалось следов.
Наполните резервуар для воды
(см. главу "Использование
прибора", раздел "Заполнение
резервуара для воды").
Подождите, пока индикатор
готовности на утюге не загорится
ровным светом.
Нажмите и удерживайте кнопку
подачи пара во время глажения.
Вставьте резервуар для воды
обратно в прибор (должен
прозвучать щелчок).
вилку сетевого шнура в розетку
электросети и нажмите кнопку
включения/выключения.
Нажмите кнопку включения/
выключения, чтобы снова
включить прибор.
Если звук работающего насоса
не прекращается, выключите
прибор и отключите его от
розетки электросети. Обратитесь в
авторизованный сервисный центр
Philips.
Page 23

25
РУССКИЙ
Парогенератор
Изготовитель: “Филипс Консьюмер Лайфстайл Б.В.”, Туссендиепен 4, 9206 АД,
Драхтен, Нидерланды
Импортер на территорию России и Таможенного Союза:
ООО “ФИЛИПС”, Российская Федерация, 123022 г. Москва, ул. Сергея Макеева, д.13,
тел. +7 495 961-1111.
GC9682, GC9690: 2250-2700Вт, 220-240В, 50-60Гц
Для бытовых нужд
Класс защиты от поражения электрическим током: Класс I
Сделано в Индонезии
Условия хранения, эксплуатации
Температура +0°C - +35°C
Относительная влажность 20% - 95%
Атмосферное давление 85 - 109 kPa
Page 24

26 TÜRKÇE
Giriş
Giysilerin, etiketlerinde belirtilen ve bu ütünün üreticisi tarafından verilen talimatlara
uygun şekilde ütülenmesi şartıyla, bu ütünün tamamen yünlü ürünlerde kullanılabileceği
The Woolmark Company Pty Ltd tarafından onaylanmıştır. R1703. Woolmark simgesi,
birçok ülkede sertika markasıdır.
Ürüne genel bakış (Şek. 1)
1 Buhar besleme hortumu
2 Ütü platformu
3 Birinci besleme hortumu saklama bölmesi
4 Fişli elektrik kablosu
5 Işıklı ECO düğmesi
6 Işıklı ve MAX ayarlı açma/kapama düğmesi
7 "Su haznesi boş" ışığı
8 EASY DE-CALC ışığı
9 EASY DE-CALC düğmesi
10 Kablo saklama bölmesi
11 İkinci besleme hortumu saklama bölmesi
12 Çıkarılabilir su haznesi
13 Taşıma kilidi
14 Taşıma kilidi açma düğmesi
15 Taban
16 Buhar tetiği
17 "Ütü hazır" ışığı
18 Işıklı akıllı otomatik buhar düğmesi
19 Doldurma deliği
20 Dikey ütüleme için koruyucu eldiven
Önemli
Cihazı kullanmadan önce ayrı olarak sunulan önemli bilgiler kitapçığını ve kullanım
kılavuzunu dikkatli bir şekilde okuyun. İki belgeyi de ileride başvurmak üzere saklayın.
Cihazın kullanımı
Akıllı Çip teknolojisi
OptimalTEMP teknolojisi, sıcaklık ayarını değiştirmenize gerek kalmadan ütülenebilir her
tür kumaşı istediğiniz sırayla ütüleyebilmenizi sağlar.
Page 25

27
TÜRKÇE
Bu simgeleri taşıyan kumaşlar ütülenebilir. Örneğin; keten, pamuk, polyester, ipek, yün,
viskoz ve suni ipek (Şek. 2).
Bu simgeleri taşıyan kumaşlar ütülenmez. Bu kumaşlara Spandeks veya elastan,
Spandeks karışımlı kumaşlar ve poliolenler (ör. polipropilen) ve kumaşların üzerindeki
baskılar dahildir (Şek. 3).
Ütüleme sırasında ütüyü ütü platformuna veya yatay biçimde ütü masasına
yerleştirebilirsiniz. OptimalTEMP teknolojisi sayesinde taban, ütü masasının örtüsüne
zarar vermez (Şek. 4).
Ütüleme
Cihazı kullanmadan önce bu kullanım kılavuzunu, önemli bilgiler broşürünü ve hızlı
başlangıç kılavuzunu dikkatle okuyun. Bunları gelecekte başvurmak üzere saklayın.
1 Ütülemeye başlamak için buhar tetiğini basılı tutun (Şek. 5).
Buharı asla insanlara yöneltmeyin.
Not: Pamuklu, keten ve kot gibi sert kumaşlarda en iyi sonuçlar için ütüyü kumaşın
üzerinde gezdirirken buhar tetiğini sürekli olarak basılı tutun. Ardından buharın kumaşı
kurutmasına izin vermeksizin ütüyü aynı alan üzerinde birkaç kez daha gezdirin.
Not: İpek ve parlak sentetik kumaşlarda en iyi sonuçlar için ütüleme sırasında buhar
tetiğini sürekli olarak basılı tutmanız önerilir.
sensör ve akıllı otomatik buhar modu
Ütünüzün içinde bulunan akıllı sensör, ütünüzün ne zaman ve nasıl hareket
ettiğini tam olarak bilir. Akıllı otomatik buhar modunu etkinleştirdiğinizde
sensör, ütünüzün hareketlerini tanımaya başlayarak buhar tetiğine basmanız
gerekmeksizin ütünüzün otomatik olarak doğru miktarda buhar vermesini sağlar. Bu
özellik, daha hızlı ve kolayca mükemmel sonuçlar elde etmenize yardımcı olur.
- Akıllı otomatik buhar modunu etkinleştirmek için ütünün tutma yerinin üzerindeki akıllı
otomatik buhar düğmesine basın. Akıllı otomatik buhar ışığı yanar (Şek. 6).
- Ütü hareket ederken "ütü hazır" ışığı da ileri ve geri hareket eder.
Not: Akıllı otomatik buhar modunda ütüyü hareket ettirdiğinizde otomatik olarak
buhar çıkar ve ütüyü hareket ettirmeyi bıraktığınızda durur (Şek. 7). Bu modda
ütü hareket etmezken buharı etkinleştirmek için buhar tetiğine basmaya devam
edebilirsiniz.
- Akıllı otomatik buhar modunu, ECO ve MAX dahil olmak üzere tüm buhar ayarlarında
kullanabilirsiniz.
Not: Güvenliğiniz için akıllı otomatik buhar modunda taban eğildiğinde buhar durur.
- Akıllı otomatik buhar modundan çıkmak için akıllı otomatik buhar düğmesine basın.
Akıllı otomatik buhar ışığı söner. Ütülemeye devam etmek için buhar tetiğine basmanız
gerekir.
Page 26

28
TÜRKÇE
Buhar püskürtme fonksiyonu
Buhar püskürtme fonksiyonu inatçı kırışıklıkların giderilmesine yardımcı olmak için
tasarlanmıştır.
- Buhar püskürtme işlevini etkinleştirmek için buhar tetiğine iki kez hızlıca basın. Cihaz 3
kez güçlü şok buhar verir (Şek. 8).
Dikey ütüleme
Ütü, sıcak buhar verir. Bir kumaşın kırışıklıklarını birisinin üzerindeyken gidermeyi asla
denemeyin. Buharın kendi elinize veya başkasının eline gelmesini önleyin.
Ütüyü, asılı giysilerinizdeki kırışıklıkları gidermek için dikey konumda kullanabilirsiniz.
1 Eldiven takın.
2 Ütüyü dik pozisyonda tutun, buhar tetiğine basın ve tabanı kumaşa hafçe değdirin
(Şek. 9).
Not: Güvenliğiniz için akıllı otomatik buhar modu, dikey ütüleme için kullanılamaz.
ECO ayarı
ECO ayarını (düşük miktarda buhar) kullanarak ütüleme sonuçlarından ödün vermeksizin
enerjiden tasarruf edebilirsiniz.
- ECO düğmesine basın. Yeşil ECO ışığı yanar (Şek. 10).
- ECO ayarını devre dışı bırakmak için ECO düğmesine tekrar basın. Yeşil ECO ışığı söner.
MAX ayarı
Daha hızlı ütüleme ve daha yüksek miktarda buhar için MAX ayarını kullanabilirsiniz.
1 Işık beyaza dönene kadar açma/kapama düğmesini 2 saniye boyunca basılı tutun
(Şek. 11).
2 MAX ayarını devre dışı bırakmak için beyaz ışık maviye dönene kadar açma/kapama
düğmesini 2 saniye boyunca basılı tutun
Otomatik kapanma
- Cihazlar 10 dakika boyunca kullanılmadığında bekleme moduna girer. Açma/kapama
düğmesinin üzerindeki ışık yanıp sönmeye başlar (Şek. 12).
- Cihazı tekrar çalıştırmak için açma/kapama düğmesine basın. Cihaz tekrar ısınmaya
başlar.
- Cihaz bekleme moduna girdikten sonra bir 10 dakika daha kullanılmadığında otomatik
olarak kapanır. Açma/kapama düğmesinin üzerindeki ışık söner.
ÖNEMLİ - EASY DE-CALC
EASY DE-CALC işlevini, EASY DE-CALC ışığı yanıp sönmeye ve cihaz sürekli sesli uyarı
vermeye başlar başlamaz kullanmanız çok önemlidir.
Page 27

29
TÜRKÇE
Yaklaşık bir ay veya 10 ütüleme işlemi sonrasında EASY DE-CALC ışığı yanıp söner ve
cihaz sürekli olarak sesli uyarı vererek cihazın kireçten arındırılması gerektiğini belirtir.
Ütüleme işlemine devam etmeden önce aşağıdaki EASY DE-CALC prosedürünü
uygulayın.
Yanık riskini önlemek için EASY DE-CALC prosedürünü uygulamadan en az iki saat önce
cihazın şini çekin ve soğumaya bırakın.
1 Fişi prizden çıkarın (Şek. 13).
2 Cihazı masanın kenarına yerleştirin.
3 EASY DE-CALC düğmesinin altına bir kap (en az 350 ml) yerleştirin ve düğmeyi saat
yönünün tersine çevirin (Şek. 14).
4 EASY DE-CALC düğmesini çıkarın ve suyun, kireç parçacıklarıyla birlikte kaba
akmasını sağlayın (Şek. 15).
5 Cihazdan suyun boşalması kesildiğinde, EASY DE-CALC düğmesini tekrar takıp saat
yönünde çevirerek sıkın (Şek. 16).
6 EASY DE-CALC prosedürünü tamamladıktan hemen sonra ütünüzü kullanmaya
devam edebilirsiniz.
ÖNEMLİ – Tabandaki kireci temizleme
EASY DE-CALC işlevini düzenli olarak kullanmıyorsanız tabanda kireç parçacıkları
birikebilir ve ütüleme sırasında tabandan kahverengi leke çıkabilir. Bu durumda
aşağıdaki prosedürü uygulayarak tabandaki kireci temizlemeniz gerekir. Tabanı daha iyi
temizlemek için prosedürü iki kez tekrarlamanızı öneririz.
Yanık riskini önlemek için tabandaki kireci temizlemeden en az iki saat önce cihazın
şini çekin ve cihazı soğumaya bırakın.
1 Fişi prizden çıkarın (Şek. 13).
2 Cihazı masanın kenarına yerleştirin.
3 Su haznesinin boş olduğundan emin olun.
4 EASY DE-CALC düğmesinin altına bir kap (en az 350 ml) yerleştirin ve düğmeyi saat
yönünün tersine çevirin (Şek. 14).
5 EASY DE-CALC düğmesini çıkarın ve suyun, kireç parçacıklarıyla birlikte kaba
akmasını sağlayın (Şek. 15).
6 Cihazı EASY DE-CALC bölmesi yukarı bakacak şekilde tutun ve bölmeye 900 ml saf
su dökün (Şek. 17).
Not: Cihazı eğerken ağırlığına dikkat edin.
7 EASY DE-CALC bölmesini yukarı bakacak şekilde tutun, EASY DE-CALC düğmesini
tekrar takıp saat yönünde çevirerek sıkın (Şek. 18).
8 Cihazı tekrar sabit ve düz bir zemine yerleştirin. Cihazın şini takıp çalıştırın (Şek. 19).
9 Cihazın ısınması için 5 dakika bekleyin.
Page 28

30
TÜRKÇE
10 Buhar tetiğini sürekli basılı tutarak ütüyü 3 dakika boyunca kalın bir parça bez
üzerinde gezdirin (Şek. 20).
Uyarı: Ütünün tabanından sıcak, kirli su çıkar.
11 Daha fazla su çıkmadığında veya buhar çıkmaya başladığında ütüyü hareket
ettirmeyi bırakın.
12 Cihazı hemen kullanmaya devam edebilirsiniz. Kullanmayacaksanız kireç temizleme
işlemi tamamlandıktan sonra cihazın şini çekin.
Sorun giderme
Bu bölümde cihaz ile ilgili en sık karşılaşılan sorunlar özetlenmiştir. Sorunu aşağıdaki
bilgilerle çözemiyorsanız sık sorulan sorular listesi için www.philips.com/support adresini
ziyaret edin veya ülkenizdeki Müşteri Destek Merkezi ile iletişime geçin.
Sorun Nedeni Çözüm
Ütü masası
örtüsü ıslanıyor
veya ütüleme
sırasında kumaş
üzerinde su
damlacıkları
oluyor.
Ütü tabanından
su damlıyor.
EASY DE-CALC
düğmesinin
altından buhar
ve/veya su akıyor.
Ütünün altından
kirli su ve
partiküller geliyor
veya ütü tabanı
kirli.
Uzun süre ütü yaptıktan
sonra ütü masası
örtüsü üzerinde buhar
yoğunlaşmıştır.
Ütü masası örtünüz cihazın
ürettiği yüksek miktardaki
buhara dayanıklı olmayabilir.
Hortumda kalan buhar
soğuyor ve yoğunlaşarak su
haline geliyor. Bu durum,
tabandan su damlacıklarının
gelmesine neden oluyor.
EASY DE-CALC düğmesi
iyice sıkılmamıştır.
EASY DE-CALC düğmesinin
lastik contası aşınmıştır.
Suda bulunan kireç veya
kimyasal maddeler buhar
deliklerinde ve/veya ütü
tabanında birikiyor.
Köpük malzemesi eskidiyse ütü
masası örtüsünü değiştirin. Ütü
masası üzerinde yoğunlaşmayı
önlemek için ütü masası örtüsünün
altına ekstra bir katman keçe
yerleştirebilirsiniz. Kumaş satan
mağazalardan keçe alabilirsiniz.
Ütü masası üzerindeki yoğunlaşmayı
önlemek için ütü masası
örtüsünün altına ekstra bir katman
keçe yerleştirin. Kumaş satan
mağazalardan keçe alabilirsiniz.
Giysi dışında bir yere birkaç saniye
buhar verin.
Cihazı kapatıp 2 saat boyunca
soğumaya bırakın. EASY DE-CALC
düğmesini çıkarıp cihaza tekrar
düzgün bir şekilde takın. Not:
Düğmeyi çıkarırken biraz su gelebilir.
Yeni bir EASY DE-CALC düğmesi
almak için yetkili Philips servis
merkezine başvurun.
Tabanı nemli bir bezle silin.
Page 29

31
TÜRKÇE
Sorun Nedeni Çözüm
Ütü, kumaş
üzerinde parlaklık
veya iz bırakıyor.
Cihaz buhar
üretmiyor.
Cihaz kapandı.
Açma/kapatma
düğmesinin ışığı
yanıp sönüyor.
Cihazdan
pompalama
sesleri geliyor.
Cihazın içinde çok miktarda
kireç ve mineral birikmiştir.
Örneğin dikişleri veya kumaş
katını ütülediğiniz için,
ütülenen yüzey düz değildir.
Su haznesinde yeterince su
yoktur ("su haznesi boş" ışığı
yanıp söner).
Cihaz buhar üretmek için
yeterli sıcaklıkta değildir.
Buhar tetiğine basmayın. Buhar tetiğine basın ve ütüleme
Su haznesi cihaza düzgün
şekilde yerleştirilmemiştir.
Cihaz açık değildir. Cihazın şini prize takın ve
Cihaz 10 dakikadan uzun
bir süre kullanılmadığı
takdirde, otomatik kapanma
fonksiyonu otomatik olarak
devreye girer.
Cihazın içindeki kazana
su pompalanır. Bu durum
normaldir.
Cihazın kirecini düzenli olarak
temizleyin ("Önemli - KİREÇ
TEMİZLEME" bölümüne bakın).
PerfectCare tüm kumaşlarda
güvenlidir. Kumaş üzerindeki
parlaklık veya iz geçicidir ve kumaş
yıkandığında kaybolur. Dikişleri veya
katları ütülemeyin ya da dikişler
ve katlarda iz oluşmasını önlemek
için ütülenecek bölümün üzerine
pamuklu bir bez yerleştirin.
Su haznesini doldurun ("Cihazınızı
kullanma" bölümünün "Su haznesinin
doldurulması" kısmına bakın).
Ütünün üzerindeki "Ütü hazır" ışığı
sürekli yanana kadar bekleyin.
sırasında basılı tutun.
Su haznesinin cihaza tam olarak
oturmasını sağlayın ("klik" sesi
duyulur).
cihazı açmak için açma/kapama
düğmesine basın.
Cihazı yeniden çalıştırmak için açma/
kapama düğmesine basın.
Pompalama sesi durmaksızın devam
ederse cihazı kapatın ve şi prizden
çekin. Yetkili Philips servis merkezine
başvurun.
Page 30

Page 31

UPOZORNENIE: Horúci povrch (obr. 1)
Počas používania sa povrchy budú
zohrievať na vysokú teplotu (pre žehličky so
symbolom vysokej teploty vyznačeným na
spotrebiči).
Upozornenie
- Zariadenie pripojte jedine do uzemnenej
zásuvky.
- Zariadenie sa smie používať iba na rovnom
povrchu odolnom voči vysokým teplotám
a klásť iba na takýto povrch. Keď žehličku
postavíte na podstavec, uistite sa, že povrch,
na ktorý ju kladiete, je stabilný. Podstavec je
päta žehličky alebo časť, na ktorú žehličku
položíte pri jej nepoužívaní.
- Kvôli možnému poškodeniu pravidelne
kontrolujte sieťový kábel a prívodnú hadicu.
- Zástrčka sa musí pripojiť len do zásuvky so
zhodnými technickými parametrami.
- Skôr než zapojíte sieťový kábel do
elektrickej zásuvky, úplne ho rozviňte.
- Podstavec žehličky a žehliaca plocha
žehličky môžu byť veľmi horúce a pri dotyku
môžu spôsobiť popáleniny. Ak chcete
presunúť naparovací žehliaci systém,
nedotýkajte sa podstavca žehličky.
- Po skončení žehlenia, pri čistení zariadenia,
keď plníte alebo vyprázdňujete generátor
pary a keď čo len na chvíľu prestanete
žehličku používať, postavte ju späť na
podstavec, vypnite zariadenie a odpojte ho
zo siete.
- Zariadenie odpojte zo siete a nechajte ho
aspoň 2 hodiny vychladnúť, aby ste predišli
riziku popálenia. Odstraňujte vodný kameň
z naparovacieho žehliaceho systému alebo
ho odstraňujte pomocou funkcie CalcClean podľa pokynov uvedených v kapitole
„Čistenie a údržba“.
- Nedolievajte vodu obsahujúcu parfém,
vodu zo sušičky bielizne, ocot, škrob,
prostriedky na odstránenie vodného
kameňa, prostriedky na uľahčenie žehlenia,
chemicky zmäkčenú vodu ani žiadne iné
chemické látky, pretože môžu spôsobiť únik
vody, hnedé sfarbenie alebo poškodenie
zariadenia.
- Toto zariadenie je určené len na domáce
použitie.
Elektromagnetické polia (EMF)
Tento spotrebič značky Philips vyhovuje všetkým
príslušným normám a smerniciam týkajúcim sa vystavenia
elektromagnetickým poliam.
Recyklácia
- Tento symbol (obr. 2) znamená, že tento výrobok sa nesmie
likvidovať s bežným komunálnym odpadom (smernica
2012/19/EÚ).
- Postupujte podľa predpisov platných vo vašej krajine pre
separovaný zber elektrických a elektronických výrobkov.
Správna likvidácia pomáha zabrániť negatívnym dopadom
na životné prostredie a ľudské zdravie.
Záruka a podpora
Ak potrebujete informácie alebo podporu, navštívte webovú
stránku www.philips.com/support alebo si preštudujte
informácie v priloženom celosvetovo platnom záručnom liste.
Slovenščina
Uvod
Čestitamo vam za nakup in dobrodošli pri Philipsu! Da bi
izkoristili vse prednosti Philipsove podpore, izdelek registrirajte
na www.philips.com/welcome.
Pomembno
Pred uporabo aparata preberite letak s
pomembnimi informacijami in uporabniški
priročnik. Oba dokumenta shranite za
poznejšo uporabo.
Ta aparat je namenjen samo za domačo
uporabo. Proizvajalec v primeru komercialne
uporabe, neprimerne uporabe ali
neupoštevanja navodil ne prevzema nikakršne
odgovornosti in garancija v takšnem primeru
ne velja.
Nevarnost
- Likalnika ali sistemskega likalnika ne
potapljajte v vodo.
Opozorilo
- Pred priključitvijo aparata preverite, ali na
omrežnem vtiču označena napetost ustreza
napetosti lokalnega električnega omrežja.
- Aparata ne uporabljajte, če so vtič, kabel,
cev za dovod pare ali sam aparat vidno
poškodovani, če vam je aparat padel na tla
ali če pušča.
- Poškodovani omrežni kabel ali cev za dovod
pare sme zamenjati le podjetje Philips;
Philipsov pooblaščeni servis ali ustrezno
usposobljeno osebje.
- Na električno omrežje priklopljenega
aparata nikoli ne puščajte brez nadzora.
- Ta aparat lahko uporabljajo otroci od 8.
leta starosti naprej in osebe z zmanjšanimi
zičnimi ali psihičnimi sposobnostmi ali s
pomanjkljivimi izkušnjami in znanjem, če
so prejele navodila glede varne uporabe
aparata oziroma jih pri uporabi nadzoruje
odgovorna oseba, ki jih opozori na
morebitne nevarnosti.
- Ne dovolite, da bi se z aparatom igrali otroci.
- Ko je likalnik vklopljen ali se ohlaja, aparat
in omrežni kabel hranite izven dosega otrok
pod 8. letom starosti.
- Otroci lahko aparat čistijo in vodni kamen
odstranjujejo samo pod nadzorom.
- Omrežni kabel in cev za dovod pare ne
smeta priti v stik z vročo likalno ploščo.
- Pred čiščenjem ali odstranjevanjem
vodnega kamna aparat izključite iz
električnega omrežja in počakajte najmanj 2
uri, da se ohladi, da ne pride do opeklin.
- Gumba EASY DE-CALC med uporabo ne
odpirajte in odstranjujte s sistemskega
likalnika, ko je ta še vroč ali pod pritiskom.
- Če para ali kapljice vroče vode uhajajo izpod
gumba EASY DE-CALC, ko je aparat segret,
aparat izklopite in počakajte najmanj 2 uri,
da se ohladi. Privijte gumb EASY DE-CALC.
Če para še naprej uhaja, izklopite aparat in
se obrnite na pooblaščenega Philipsovega
servisnega zastopnika.
- Za pokrovček generatorja pare uporabljajte
samo gumb EASY DE-CALC, ki je priložen
aparatu.
- Med likanjem s paro se s prsti ali rokami ne
dotikajte likalne plošče, da se med likanjem
ne opečete.
- Pare nikoli ne usmerite proti ljudem ali
živalim.
- Velja samo za izdelke Perfect Care Elite Plus
in Perfect Care 9000: ne vrtite ali premikajte
likalnika naprej in nazaj v zraku, ko je
vklopljen samodejni način nastavitve pare,
in se tako izognite opeklinam s paro.
POZOR: vroča površina (slika 1)
Površine se med uporabo segrejejo (za
likalnike, ki imajo simbol za vroče).
Pozor
- Aparat priključite le na ozemljeno vtičnico.
- Aparat postavite in uporabljajte na ravni
površini, ki je odporna na vročino. Ko likalnik
odložite na stojalo, ga morate odložiti na
stabilno površino. Stojalo je ploščati zadnji
del likalnika ali del, na katerem likalnik stoji,
ko ni v uporabi.
- Redno preverjajte, da omrežni kabel in
dovodna cev nista poškodovana.
- Vtič se lahko priključi samo v vtičnico, ki ima
enake tehnične lastnosti kot vtič.
- Preden omrežni kabel vključite v stensko
vtičnico, ga popolnoma odvijte.
- Podstavna plošča za likalnik in likalna
plošča se lahko zelo segrejeta in ob
dotiku povzročita opekline. Pri premikanju
sistemskega likalnika se ne dotikajte plošče
za likalnik.
- Po končanem likanju, med čiščenjem
aparata, polnjenjem ali praznjenjem
sistemskega likalnika ali če likalnik za kratko
pustite brez nadzora: likalnik postavite na
ploščo za likalnik, izklopite aparat in omrežni
vtič izvlecite iz stenske vtičnice.
- Aparat izključite iz električnega omrežja in
počakajte najmanj 2 uri, da se ohladi, da ne
pride do opeklin. Iz sistemskega likalnika
odstranjujte vodni kamen v skladu z navodili
v poglavju »Čiščenje in vzdrževanje«.
- Ne dodajajte odišavljene vode, vode
iz sušilnika, kisa, škroba, sredstev za
odstranjevanje vodnega kamna, dodatkov
za likanje, kemično omehčane vode ali
drugih kemikalij, saj lahko to povzroči
uhajanje vode, pojav rjavih madežev ali
poškodovanje aparata.
- Aparat je namenjen izključno uporabi v
gospodinjstvu.
Elektromagnetna polja (EMF)
Ta Philipsov aparat ustreza vsem veljavnim standardom in
predpisom glede izpostavljenosti elektromagnetnim poljem.
Recikliranje
- Ta simbol (slika 2) označuje, da izdelka ne smete odlagati
med običajne gospodinjske odpadke (2012/19/EU).
- Upoštevajte državne predpise za ločeno zbiranje električnih
in elektronskih izdelkov. S pravilnim odlaganjem pripomorete
k preprečevanju negativnih vplivov na okolje in zdravje ljudi.
Garancija in podpora
Če potrebujete informacije ali podporo, obiščite
www.philips.com/support ali preberite ločeni mednarodni
garancijski list.
Shqip
Hyrje
Urime për blerjen dhe mirë se vini pranë Philips! Për të përtuar
plotësisht nga mbështetja që ofron Philips, regjistrojeni
produktin në faqen www.philips.com/welcome.
E rëndësishme
Lexojeni me kujdes fletëpalosjen e
informacionit të rëndësishëm përpara se ta
vini në punë pajisjen. Ruajini të dy dokumentet
për referencë në të ardhmen.
Kjo pajisje është krijuar vetëm për përdorim
shtëpiak. Për çfarëdo përdorimi komercial,
të papërshtatshëm apo mospajtimi me
udhëzimet, prodhuesi nuk merr përsipër asnjë
përgjegjësi dhe garancia nuk vlen për raste të
tilla.
Rrezik
- Mos i zhysni kurrë në ujë hekurin apo
avulloren.
Paralajmërim
- Kontrolloni nëse voltazhi i përcaktuar në
pllakën e specikimeve përkon me voltazhin
e linjës lokale përpara se ta vini në punë
pajisjen.
- Mos e përdorni pajisjen nëse spina, kordoni
elektrik, zorra e avullit apo pajisja vetë
paraqet dëmtime të dukshme, apo nëse
pajisja është rrëzuar apo pikon.
- Nëse kordoni elektrik apo zorra e avullit janë
të dëmtuara, duhet t'i ndërroni nga Philips;
një pikë servisi e autorizuar nga Philips ose
nga persona me kualikim të ngjashëm, në
mënyrë që të shmangni rreziqet.
- Mos e lini kurrë pa mbikëqyrje pajisjen kur
është e lidhur në rrjetin elektrik.
- Kjo pajisje mund të përdoret nga fëmijë
të moshës 8 vjeç e lart dhe persona me
aftësi të reduktuara zike, shqisore apo
mendore, apo që kanë mungesë përvoje
dhe njohurish vetëm nëse u kushtohet
mbikëqyrja e duhur apo u jepen udhëzime
në lidhje me përdorimin e sigurt të pajisjes,
si dhe nëse kuptojnë rreziqet e përfshira.
- Mos i lini fëmijët të luajnë me pajisjen.
- Mbajeni hekurin dhe kordonin elektrik të tij
në vende ku nuk arrihen dot nga fëmijët e
moshës 8 vjeç e poshtë kur pajisja është e
ndezur apo duke u ftohur.
- Fëmijëve u lejohet ta pastrojnë pajisjen
dhe të kryejnë procedurën e heqjes së
skories apo Calc-Clean vetëm nëse janë të
mbikëqyrur.
- Mos e lini kordonin elektrik dhe zorrën
e avullit të bien në kontakt me pllakën
fundore të hekurit.
- Përpara se të kryeni heqjen e skories apo
Calc-Clean, shkëputeni pajisjen dhe lëreni të
ftohet për të paktën 2 orë, për të shmangur
rrezikun e djegies.
- Mos e hapni dhe hiqni rrotullën EASY
DE-CALC nga gjeneratori i avullit gjatë
përdorimit apo kur gjeneratori i avullit është
ende i nxehtë apo nën presion.
- Nëse nga poshtë rrotullës EASY DE-
CALC del avull apo pika uji, keni pajisjen
dhe lëreni të ftohet për të paktën 2 orë.
Shtrëngojeni rrotullën EASY DE-CALC. Nëse
vazhdon të dalë avull, keni pajisjen dhe
kontaktoni me një pikë servisi të autorizuar
nga Philips.
- Mos përdorni kapakë të tjetër mbi
gjeneratorin e avullit përveç rrotullës EASY
DE-CALC që vjen me pajisjen.
- Kur aktivizohet avulli mbajini gishtat apo
dorën larg pllakës fundore të hekurit që të
shmangni djegien gjatë hekurosjes.
- Mos e drejtoni kurrë avullin nga njerëzit apo
kafshët.
- Vlen për produktet e serive Perfect Care
Elite Plus dhe Perfect Care 9000: Mos e
tundni dhe lëvizni hekurin para-mbrapa në
ajër kur është aktiv modaliteti inteligjent i
avullit automatik, për të shmangur djegien
nga avulli.
KUJDES: Sipërfaqe e nxehtë (Fig. 1)
Sipërfaqet mund të nxehen gjatë përdorimit
(për hekurat me simbol nxehtësie të
shënuar mbi pajisje).
Kujdes
- Pajisjen lidheni vetëm me priza të
tokëzuara.
- Pajisja duhet të përdoret dhe të vendoset
mbi një sipërfaqe të rrafshët dhe
nxehtësiduruese. Kur e vendosni hekurin
jashtë mbajtëses së vet, sigurohuni që
sipërfaqja mbi të cilën e vendosni të jetë
e qëndrueshme. Mbajtësja është thembra
e hekurit ose pjesa ku vendoset hekur kur
qëndron pa punë.
- Kordonin elektrik dhe zorrën e avullit
kontrollojini rregullisht për dëmtime të
mundshme.
- Spina duhet të futet vetëm në priza me të
njëjtat karakteristika teknike si të vetat.
- Çmbështilleni kordonin elektrik përpara se
ta fusni në prizë.
- Platforma e hekurit dhe pllaka fundore e
hekurit mund të nxehen së tepërmi dhe
mund të shkaktojnë djegie nëse preken.
Nëse dëshironi ta hiqni gjeneratorin e
avullit, mos e prekni platformën e hekurit.
- Pasi të keni përfunduar hekurosjen, kur e
pastroni pajisjen, kur mbushni apo zbrazni
gjeneratorin e avullit dhe kur e lini hekurin,
qoftë edhe për pak: vendoseni hekurin
sërish në platformën e vet, keni pajisjen
dhe hiqjani spinën nga priza.
- Hiqeni pajisjen nga priza dhe lëreni të
ftohet për të paktën 2 orë, për të shmangur
rrezikun e djegieve. Hiqjani skorien apo
kryeni procesin Calc-Clean te gjeneratori i
avullit në përputhje me udhëzimet në kreun
"Pastrimi dhe mirëmbajtja".
- Mos shtoni ujë të parfumosur, ujë nga
centrifuga, uthull, solucione antiskorie,
solucione hekurosjeje, ujë të deskorjezuar
me procese kimike, pasi këto mund të
shkaktojnë pikimin e ujit, njollosjen apo
dëmtimin e pajisjes suaj.
- Kjo pajisje synohet vetëm për përdorim
shtëpiak.
Fushat elektromagnetike (EMF)
Pajisja Philips është në përputhje me të gjitha standardet
dhe rregulloret në fuqi për ekspozimin ndaj fushave
elektromagnetike.
Riciklimi
- Ky simbol (Fig. 2) do të thotë që produkti nuk duhet të hidhet
me mbeturinat normale shtëpiake (2012/19/BE).
- Ndiqni rregullat shtetërore për hedhjen e veçuar të
produkteve elektrike dhe elektronike. Hedhja e duhur
ndihmon në parandalimin e pasojave negative ndaj mjedisit
dhe shëndetit të njeriut.
Garancia dhe mbështetja
Nëse ju duhen informacione ose mbështetje teknike, vizitoni
www.philips.com/support ose lexoni etëpalosjen e posaçme të
garancisë botërore.
Srpski
Uvod
Čestitamo na kupovini i dobro došli u Philips! Da biste na najbolji
način iskoristili podršku koju nudi kompanija Philips, registrujte
svoj proizvod na www.philips.com/welcome.
Važno
Pre korišćenja aparata pažljivo pročitajte
brošuru sa važnim informacijama i korisnički
priručnik. Oba dokumenta sačuvajte za
buduće potrebe.
Ovaj aparat namenjen je isključivo za kućnu
upotrebu. U slučaju bilo kakve komercijalne
upotrebe, neodgovarajuće upotrebe ili
nepoštovanja uputstava, proizvođač ne
prihvata nikakvu odgovornost i garancija se
neće primenjivati.
Opasnost
- Peglu i posudu za paru nikada ne uranjajte
u vodu.
Upozorenje
- Pre nego što uključite aparat, proverite da li
napon naveden na tipskoj pločici odgovara
naponu lokalne električne mreže.
- Aparat nemojte da koristite ako na utikaču,
kablu, crevu za dovod pare ili samom
aparatu primetite vidljiva oštećenja,
odnosno ako vam je aparat pao ili iz njega
curi voda.
- Da bi se izbegla opasnost, crevo za
dovod pare i kabl za napajanje u slučaju
oštećenja treba da zameni kompanija
Philips, tj. servisni centar ovlašćen od
strane kompanije Philips ili osoba sa
odgovarajućim kvalikacijama.
- Aparat nikada ne ostavljajte bez nadzora
dok je priključen na električnu mrežu.
- Ovaj aparat mogu da koriste deca starija
od 8 godina i osobe sa smanjenim zičkim,
senzornim ili mentalnim sposobnostima
ili nedostatkom iskustva i znanja, pod
uslovom da su dobile uputstva za bezbednu
upotrebu aparata ili pod nadzorom kako
bi se omogućila bezbedna upotreba,
kao i ukoliko su obaveštene o mogućim
opasnostima.
- Nemojte da dozvolite da se deca igraju
aparatom.
- Peglu (dok je uključena ili dok se hladi) i
kabl za napajanje držite van domašaja dece
mlađe od 8 godina.
- Deci je dozvoljeno samo da čiste aparat i
da obavljaju proceduru čišćenja kamenca ili
Calc-Clean pod nadzorom.
- Pazite da kabl za napajanje i crevo za dovod
pare ne dođu u dodir sa vrelom grejnom
pločom pegle.
- Pre nego što obavite čišćenje kamenca
ili Calc-Clean, isključite aparat iz struje i
ostavite ga da se hladi bar 2 sata da biste
izbegli rizik od opekotina.
- Nemojte da otvarate niti da skidate
regulator EASY DE-CALC sa posude za paru
tokom upotrebe, dok je ona vruća ili pod
pritiskom.
- Ako para ili kapljice vruće vode izlaze ispod
regulatora EASY DE-CALC dok se aparat
zagreva, isključite aparat i ostavite ga da
se hladi bar 2 sata. Pritegnite regulator
EASY DE-CALC. Ako para nastavi da izlazi,
isključite aparat i obratite se ovlašćenom
servisnom centru kompanije Philips.
- Na posudu za paru stavljajte isključivo
regulator EASY DE-CALC koji ste dobili u
kompletu sa aparatom.
- Držite prste ili ruku dalje od ploče dok je
para aktivirana da biste izbegli opekotine
tokom peglanja.
- Nikada nemojte da usmeravate paru prema
osobama ili životinjama.
- Odnosi se na proizvode iz serija Perfect
Care Elite Plus i Perfect Care 9000: Nemojte
da mašete peglom niti da je pomerate
napred-nazad u vazduhu kada je aktiviran
inteligentni automatski režim pare kako
biste izbegli rizik od opekotina parom.
OPREZ: Vruća površine (sl. 1)
Površine se zagrevaju tokom korišćenja (kod
pegli koje na kućištu imaju simbol toplote).
Opomena
- Aparat priključujte samo u uzemljenu zidnu
utičnicu.
- Aparat morate da koristite i da ga
postavljate na ravnu površinu otpornu na
toplotu. Kada peglu postavljate na postolje,
proverite da li je površina na koju ste je
stavili stabilna. Postolje je zadnji kraj pegle
ili deo na koji se pegla stavlja kada nije u
upotrebi.
- Redovno proveravajte da li na kablu i crevu
za dovod ima oštećenja.
- Utikač mora da bude priključen u utičnicu
odgovarajućih tehničkih karakteristika.
- Odmotajte do kraja kabl za napajanje pre
uključivanja u zidnu utičnicu.
- Postolje za peglu i grejna ploča mogu
izuzetno da se zagreju, pa može da dođe
do pojave opekotina ako ih dodirnete.
Ako želite da premestite posudu za paru,
nemojte da dodirujete postolje za peglu.
- Kada završite peglanje, prilikom čišćenja
aparata, kada punite ili praznite posudu
za paru i kada peglu ostavljate makar i na
kratko: peglu postavite na postolje, isključite
je i izvucite utikač iz zidne utičnice.
- Isključite aparat iz struje i ostavite ga da
se hladi bar 2 sata da biste izbegli rizik
od opekotina. Posudu za paru čistite od
naslaga kamenca ili primenite Calc-Clean u
skladu sa uputstvima u poglavlju „Čišćenje i
održavanje“.
- Nemojte da dodajete namirisanu vodu,
vodu iz mašine za sušenje veša, sirće, štirak,
sredstva za uklanjanje kamenca, aditive
za peglanje, vodu čiji je sadržaj kamenca
smanjen hemijskim putem niti druge
hemikalije, zato što to može da dovede
do curenja vode, pojave braon eka ili
oštećenja aparata.
- Aparat je namenjen isključivo upotrebi u
domaćinstvu.
Elektromagnetna polja (EMF)
Ovaj Philips aparat usklađen je sa svim primenjivim standardima
i propisima u vezi sa elektromagnetnim poljima.
Recikliranje
- Ovaj simbol (sl. 2) ukazuje na to da ovaj proizvod ne sme da
se odlaže sa običnim kućnim otpadom (2012/19/EU).
- Pratite propise svoje zemlje za zasebno prikupljanje otpadnih
električnih i elektronskih proizvoda. Pravilno odlaganje
doprinosi sprečavanju negativnih posledica po životnu
sredinu i zdravlje ljudi.
Garancija i podrška
Ako vam trebaju informacije ili podrška, posetite
www.philips.com/support ili pročitajte međunarodni garantni
list.
Türkçe
Giriş
Satın alma tercihiniz için teşekkür ederiz, Philips’e hoş geldiniz!
Philips’in sunduğu destekten tam olarak yararlanmak için
ürününüzü www.philips.com/welcome adresinde kaydettirin.
Önemli
Cihazı kullanmadan önce ayrı olarak sunulan
önemli bilgiler kitapçığını ve kullanım
kılavuzunu dikkatli bir şekilde okuyun. İki
belgeyi de ileride başvurmak üzere saklayın.
Bu cihaz, sadece evde kullanıma yönelik olarak
tasarlanmıştır. Her türlü ticari ve uygunsuz
kullanım veya talimatlara uyulmaması
durumunda üretici hiçbir sorumluluk kabul
etmez ve garanti geçerliliğini yitirir.
Tehlike
- Ütü veya buhar üreticiyi kesinlikle suya
sokmayın.
Uyarı
- Cihazı prize takmadan önce, tip plakasında
yazılı olan gerilimin, evinizdeki şebeke
gerilimiyle aynı olup olmadığını kontrol edin.
- Fiş, elektrik kablosu, buhar hortumu veya
cihazın kendisinde gözle görülür bir hasar
varsa ya da cihaz düşürülmüşse veya sızıntı
yapıyorsa cihazı kullanmayın.
- Elektrik kablosu veya buhar hortumu hasar
gördüyse tehlike oluşmasını önlemek
için mutlaka Philips, Philips’in yetki
verdiği bir servis merkezi veya benzer
şekilde yetkilendirilmiş kişiler tarafından
değiştirilmesini sağlayın.
- Cihaz elektriğe bağlıyken asla gözetimsiz
bırakmayın.
- Bu cihaz, güvenliklerinden sorumlu kişi
tarafından cihazların güvenli kullanımı
ile ilgili talimat verilerek veya bu kişinin
nezaretinde ve eğer cihazın neden
olabileceği tehlikelerden haberdar
edilmişlerse, 8 yaş ve üzeri çocuklar ve
ziksel, motor ya da zihinsel becerileri
gelişmemiş veya tecrübe ve bilgi eksikliği
olan kişiler tarafından kullanılabilir.
- Çocukların cihazla oynamalarına izin
vermeyin.
- Cihaz çalışırken veya soğurken, ütüyü ve
kablosunu 8 yaşında veya daha küçük
çocukların ulaşabilecekleri yerlerden uzak
tutun.
- Çocukların yalnızca yetişkin denetimi altında
kireç temizleme ve Calc Clean işlemlerini
gerçekleştirmesine izin verilir.
- Elektrik kablosu ve buhar hortumunun sıcak
ütü tabanına temas etmesine izin vermeyin.
- Kireç temizleme veya Calc Clean işlemini
gerçekleştirmeden önce yanık riskini
önlemek için cihazın şini prizden çekin ve
en az 2 saat soğumasını bekleyin.
- Kullanım sırasında ve/veya buhar kazanlı
ütü sıcakken ya da basınç altındayken EASY
DE-CALC düğmesini açmayın veya cihazdan
çıkarmayın.
- Cihaz ısındığında EASY DE-CALC
düğmesinin altından buhar veya sıcak su
damlacıkları geliyorsa cihazı kapatın ve en
az 2 saat soğumasını bekleyin. EASY DECALC düğmesini sıkın. Buhar çıkmaya devam
ediyorsa cihazı kapatın ve Philips tarafından
yetkilendirilmiş bir servis merkezi ile iletişime
geçin.
- Buhar kazanlı ütüye, cihazla birlikte
verilen dışında bir EASY DE-CALC düğmesi
takmayın.
- Ütüleme sırasında yanık oluşumundan
kaçınmak için buhar etkinken parmaklarınızı
veya elinizi tabandan uzak tutun.
- Buharı asla insanlara veya hayvanlara
yöneltmeyin.
- Perfect Care Elite Plus ve Perfect Care
9000 serisi ürünler için geçerlidir: Buhardan
kaynaklı yanık oluşumundan kaçınmak için
akıllı otomatik buhar modu etkinken ütüyü
havada öne arkaya sallamayın veya hareket
ettirmeyin.
DİKKAT: Sıcak yüzey (Şek. 1)
Yüzeyler kullanım sırasında ısınabilir (cihaz
üzerinde sıcak sembolü bulunan ütülerde).
Dikkat
- Cihazı sadece topraklı prize takın.
- Cihaz düz ve ısıya dayanıklı bir yüzeyde
kullanılmalı ve bu tür yüzeylere
yerleştirilmelidir. Ütüyü standına
oturttuğunuzda yerleştirdiğiniz yüzeyin
sabit olduğundan emin olun. Stand,
ütünün tabanı veya ütü kullanılmadığında
yerleştirilen kısımdır.
- Olası hasarlara karşı kabloyu ve besleme
hortumunu düzenli olarak kontrol edin.
- Fiş yalnızca şle aynı teknik özelliklere sahip
bir prize takılmalıdır.
- Prize takmadan önce elektrik kordonunu
tamamen açın.
- Ütü platformu ve ütünün tabanı aşırı
ısınabilir ve dokunulduğunda yanıklara yol
açabilir. Kazanlı ütüyü hareket ettirmek
isterseniz ütü platformuna dokunmayın.
- Ütüleme işlemini bitirdikten sonra,
cihazı temizlerken, buhar kazanlı ütüyü
doldururken veya boşaltırken ve ütülemeye
kısa bir süre için bile olsa ara verdiğinizde
ütüyü ütü standına geri koyun, cihazı
kapatın ve elektrik şini prizden çekin.
- Yanık riskini önlemek için cihazın şini
prizden çekin ve en az 2 saat soğumasını
bekleyin. Buhar kazanlı ütünün kireç
temizleme veya Calc Clean işlemini “Temizlik
ve bakım” bölümündeki talimatlara göre
gerçekleştirin.
- Suyun sızmasına veya kahverengi lekelere
sebep olabileceğinden ve cihazınıza zarar
verebileceğinden parfümlü su, kurutma
makinesinde biriken su, sirke, kola, kireç
çözücü maddeler, ütülemeye yardımcı
ürünler, kimyasal olarak kireçten arındırılmış
su veya başka kimyasallar eklemeyin.
- Bu cihaz sadece evde kullanım için
tasarlanmıştır.
Elektromanyetik alanlar (EMF)
Bu Philips cihazı, elektromanyetik alanlara maruz kalmaya ilişkin
geçerli tüm standartlara ve düzenlemelere uygundur.
Geri dönüşüm
- Bu simge (Şek. 2) ürünün normal evsel atıklarla birlikte
atılmaması gerektiği anlamına gelir (2012/19/EU).
- Elektrikli ve elektronik ürünlerin ayrı olarak toplanması ile
ilgili ülkenizin kurallarına uyun. Eski ürünlerin doğru şekilde
atılması, çevre ve insan sağlığı üzerindeki olumsuz etkileri
önlemeye yardımcı olur.
Garanti ve destek
Bilgi veya desteğe ihtiyaç duymanız durumunda lütfen
www.philips.com/support adresini ziyaret edin veya ayrı olarak
sunulan, dünya çapında garanti kitapçığını okuyun.
Українська
Вступ
Вітаємо з придбанням виробу Philips! Щоб у повній
мірі скористатися підтримкою, яку пропонує
компанія Philips, зареєструйте свій виріб на веб-сайті
www.philips.com/welcome.
Важлива інформація
Перед тим як користуватися пристроєм,
уважно прочитайте окремий буклет
із важливою інформацією і посібник
користувача. Збережіть обидва документи
для довідки в майбутньому.
Цей пристрій призначено лише
для побутового використання. У
разі комерційного використання,
невідповідного використання чи
недотримання інструкцій виробник не бере
на себе відповідальності, а гарантія втрачає
чинність.
Небезпечно
- Ніколи не занурюйте праску або
парогенератор у воду.
Попередження
- Перед тим, як приєднувати пристрій до
мережі, перевірте, чи збігається напруга,
вказана на таблиці з даними, із напругою
у мережі.
- Не використовуйте пристрій, якщо на
штекері, шнурі живлення, шлангу подачі
пари або самому пристрої помітні
пошкодження, або якщо пристрій упав
або протікає.
- Якщо шнур живлення або шланг подачі
пари пошкоджено, для запобігання
небезпеки обов’язково замініть їх
оригінальними компонентами Philips
у сервісному центрі, уповноваженому
Philips, або звернувшись до
кваліфікованих осіб.
- Ніколи не залишайте пристрій без
нагляду, коли він під’єднаний до мережі.
- Цим пристроєм можуть користуватися
діти віком від 8 років або більше чи особи
із послабленими фізичними відчуттями
або розумовими здібностями, чи без
належного досвіду та знань, за умови,
що їм було проведено інструктаж щодо
безпечного користування пристроєм,
якщо користування відбувається під
наглядом або якщо їх було повідомлено
про можливі ризики.
- Не дозволяйте дітям бавитися пристроєм.
- Тримайте праску і шнур живлення подалі
від дітей, яким ще не виповнилося
8 років, коли пристрій увімкнено або він
охолоджується.
- Дітям можна лише під наглядом
проводити чищення пристрою та
виконувати очищення від накипу чи
процедуру Calc-Clean.
- Слідкуйте, щоб шнур живлення та
шланг подачі пари не торкалися гарячої
підошви праски.
- Перш ніж виконувати очищення від
накипу або Calc-Clean, від’єднайте
пристрій від мережі і дайте йому
охолонути протягом щонайменше
2 годин для запобігання опікам.
- Ніколи не відкривайте і не знімайте
регулятор EASY DE-CALC із
парогенератора під час використання,
коли він ще гарячий або знаходиться під
тиском.
- Якщо під час нагрівання пристрою з-під
регулятора EASY DE-CALC виходять
пара або краплі гарячої води, вимкніть
пристрій і дайте йому охолонути
протягом щонайменше 2 годин. Щільно
закрутіть регулятор EASY DE-CALC. Якщо
пара продовжує виходити, вимкніть
пристрій і зверніться до сервісного
центру, уповноваженого Philips.
- Не використовуйте іншої кришки для
парогенератора, крім регулятора EASY
DE-CALC, що входить у комплект.
- Коли активується подача пари, тримайте
пальці чи руку подалі від підошви для
запобігання опікам.
- Ніколи не спрямовуйте пару на людей
або тварин.
- Стосується пристроїв Perfect Care
Elite Plus та Perfect Care серії 9000:
не розмахуйте і не ведіть праскою
вперед-назад у повітрі, коли активовано
режим інтелектуальної автоматичної
подачі пари, щоб уникнути небезпеки
отримання опіків від пари.
УВАГА! Гаряча поверхня (мал. 1)
Під час використання поверхні можуть
нагріватися (для прасок із символом
нагрівання).
1
©2019 Koninklijke Philips N.V.
All rights reserved.
4239 001 10603
2
Увага!
- Підключайте пристрій лише до
заземленої розетки.
- Пристрій потрібно використовувати і
ставити на рівну, жаростійку поверхню.
Коли ставите праску на підставку,
перевіряйте, чи поверхня є стійкою.
Підставка – це п’ята праски або частина,
на яку ставиться праска під час перерви у
прасуванні.
- Регулярно перевіряйте, чи не
пошкоджені шнур живлення та шланг
подачі пари.
- Штекер потрібно під’єднанувати до
розетки з такими самими технічними
характеристиками.
- Повністю розмотайте шнур живлення
перед тим, як вставляти штекер у розетку.
- Платформа та підошва праски можуть
стати дуже гарячими та спричинити опіки,
якщо їх торкнутися. Коли Ви переміщаєте
парогенератор, не торкайтеся до
платформи праски.
- Після прасування, під час чищення
пристрою, наповнення або спорожнення
парогенератора, а також якщо Ви
навіть ненадовго залишаєте праску,
кладіть праску на підставку, вимикайте і
витягайте штепсель із розетки.
- Від’єднуйте пристрій від мережі і
дайте йому охолонути протягом
щонайменше 2 годин для запобігання
опікам. Регулярно виконуйте процедуру
Calc-Clean чи видаляйте накип із
парогенератора, дотримуючись
інструкцій із розділу «Чищення та догляд».
- Не додавайте в резервуар парфумовану
воду, воду із сушильної машини,
оцет, крохмаль, засоби проти накипу,
засоби для прасування, воду після
хімічного видалення накипу чи інші
хімічні речовини, оскільки вони можуть
спричинити витікання води, появу
коричневих плям чи пошкодження
пристрою.
- Цей пристрій призначений виключно для
побутового використання.
Електромагнітні поля (ЕМП)
Цей пристрій Philips відповідає усім чинним стандартам та
правовим нормам, що стосуються впливу електромагнітних
полів.
Утилізація
- Цей символ (мал. 2) означає, що цей виріб не підлягає
утилізації зі звичайними побутовими відходами
(2012/19/EU).
- Дотримуйтесь правил розділеного збору електричних та
електронних пристроїв у Вашій країні. Належна утилізація
допоможе запобігти негативному впливу на навколишнє
середовище та здоров’я людей.
Гарантія та підтримка
Якщо Вам необхідна інформація чи підтримка, відвідайте
веб-сайт www.philips.com/support або прочитайте окремий
гарантійний талон.
Page 32

English
Introduction
Congratulations on your purchase and welcome to Philips!
To fully benet from the support that Philips oers, register your
product at www.philips.com/welcome.
Important
Read the separate important information
leaflet and the user manual carefully before
you use the appliance. Save both documents
for future reference.
This appliance has been designed for
domestic use only. Any commercial use,
inappropriate use or failure to comply with
the instructions, the manufacturer accepts no
responsibility and the guarantee will not apply.
Danger
- Never immerse the iron or the steam
generator in water.
Warning
- Check if the voltage indicated on the type
plate corresponds to the local mains voltage
before you connect the appliance.
- Do not use the appliance if the plug, the
mains cord, the steam supply hose or the
appliance itself shows visible damage, or if
the appliance has been dropped or leaked.
- If the mains cord or the steam supply hose
is damaged, you must have it replaced
by Philips; a service centre authorized by
Philips or similarly qualied persons in order
to avoid a hazard.
- Never leave the appliance unattended when
it is connected to the mains.
- This appliance can be used by children aged
8 or above and by persons with reduced
physical, sensory or mental capabilities or
lack of experience and knowledge if they
have been given instructions in safe use of
the appliance or supervision to establish
safe use and if they have been made aware
of the hazards involved.
- Do not allow children to play with the
appliance.
- Keep the iron and its mains cord out of the
reach of children aged 8 or under when the
appliance is switched on or cooling down.
- Children are only allowed to clean the
appliance and perform descale or CalcClean procedure under supervision.
- Do not let the mains cord and steam
supply hose come into contact with the hot
soleplate of the iron.
- Before performing descale or calc-clean,
unplug the appliance and cool it down for at
least 2 hours to avoid risk of burns.
- Do not open and remove the EASY DE-
CALC knob from the steam generator during
use and or when the steam generator is still
hot or under pressure.
- If steam or hot water droplets escape from
under the EASY DE-CALC knob when the
appliance heats up, switch o the appliance
and cool it down for at least 2 hours. Tighten
the EASY DE-CALC knob. If steam continues
to escape, switch o the appliance and
contact the service center authorized by
Philips.
- Do not use any other cap on the steam
generator than the EASY DE-CALC knob
that has been supplied with the appliance.
- Keep your ngers or hand away from the
soleplate when steam is activated to avoid
burns during ironing.
- Never direct the steam towards persons or
animals.
- Applicable for Perfect Care Elite Plus and
Perfect Care 9000 series products: Do not
swing or move the iron back and forth in the
air when the intelligent auto steam mode is
activated to avoid burns from steam.
CAUTION: Hot surface (Fig. 1)
Surfaces are liable to get hot during use
(for irons with hot symbol marked on the
appliance).
Caution
- Only connect the appliance to an earthed
wall socket.
- The appliance must be used and placed
on a at, heat-resistant surface. When you
place the iron on its stand, make sure that
the surface on which you place it is stable.
Stand is the heel of the iron or the part,
which the iron is placed when at rest.
- Check the mains cord and the supply hose
regularly for possible damage.
- The plug must only be connected
to a socket with the same technical
characteristics as plug.
- Fully unwind the mains cord before you plug
it in the wall socket.
- The iron platform and the soleplate of the
iron can become extremely hot and may
cause burns if touched. If you want to move
the steam generator, do not touch the iron
platform.
- When you have nished ironing, when you
clean the appliance, when you ll or empty
the steam generator and when you leave
the iron even for a short while: put the iron
back on the iron platform, switch o the
appliance and remove the mains plug from
the wall socket.
- Unplug the appliance and cool it down for at
least 2 hours to avoid risk of burns. Descale
or calc clean the steam generator according
to the instructions in chapter ‘Cleaning and
maintenance’.
- Do not add perfumed water, water from
the tumble dryer, vinegar, starch, descaling
agents, ironing aids, chemically descaled
water or other chemicals, as they may cause
water leakage, brown staining or damage to
your appliance.
- This appliance is intended for household
use only.
Electromagnetic elds (EMF)
This Philips appliance complies with all applicable standards and
regulations regarding exposure to electromagnetic elds.
Recycling
- This symbol (Fig. 2) means that this product shall not be
disposed of with normal household waste (2012/19/EU).
- Follow your country’s rules for the separate collection of
electrical and electronic products. Correct disposal helps
prevent negative consequences for the environment and
human health.
Guarantee and support
If you need information or support, please visit
www.philips.com/support or read the separate worldwide
guarantee leaet.
Ελληνικά
Εισαγωγή
Συγχαρητήρια για την αγορά σας και καλώς ήρθατε στη Philips! Για να
επωφεληθείτε πλήρως από την υποστήριξη που προσφέρει η Philips,
δηλώστε το προϊόν σας στη διεύθυνση www.philips.com/welcome.
Σημαντικό!
Διαβάστε το ξεχωριστό φυλλάδιο σημαντικών
οδηγιών και το εγχειρίδιο χρήσης προσεκτικά
προτού χρησιμοποιήσετε τη συσκευή. Φυλάξτε και
τα δύο έγγραφα για μελλοντική αναφορά.
Αυτή η συσκευή έχει σχεδιαστεί μόνο για
οικιακή χρήση. Σε περίπτωση εμπορικής χρήσης,
ακατάλληλης χρήσης ή αδυναμίας τήρησης των
οδηγιών, ο κατασκευαστής δεν φέρει καμία ευθύνη
και η εγγύηση δεν ισχύει.
Κίνδυνος
- Μην βυθίζετε ποτέ το σίδερο ή τη γεννήτρια
ατμού σε νερό.
Προειδοποίηση
- Ελέγξτε εάν η τάση που αναγράφεται στο
πινακίδιο στοιχείων του προϊόντος αντιστοιχεί
στην τοπική τάση ρεύματος πριν συνδέσετε τη
συσκευή.
- Μην χρησιμοποιείτε τη συσκευή εάν το φις, το
καλώδιο, ο σωλήνας παροχής ατμού ή η ίδια η
συσκευή παρουσιάζουν ορατή φθορά ή εάν η
συσκευή έχει πέσει κάτω ή είχε διαρροή.
- Εάν το καλώδιο ή ο σωλήνας παροχής
ατμού έχουν υποστεί φθορά, θα πρέπει να
αντικατασταθούν από τη Philips, ένα κέντρο σέρβις
εξουσιοδοτημένο από τη Philips ή από εξίσου
εξειδικευμένα άτομα προς αποφυγή κινδύνου.
- Μην αφήνετε ποτέ τη συσκευή χωρίς επίβλεψη
όταν είναι συνδεδεμένη στο ρεύμα.
- Αυτή η συσκευή μπορεί να χρησιμοποιηθεί
από παιδιά 8 ετών και άνω και από άτομα με
μειωμένες σωματικές, αισθητήριες ή διανοητικές
ικανότητες ή άτομα χωρίς σχετική εμπειρία και
γνώση, εφόσον έχουν λάβει οδηγίες για ασφαλή
χρήση της συσκευής ή τη χρησιμοποιούν υπό
επιτήρηση και έχουν επίγνωση των κινδύνων που
ενέχονται.
- Μην αφήνετε τα παιδιά να παίζουν με τη συσκευή.
- Κρατήστε το σίδερο και το καλώδιό του μακριά
από παιδιά 8 ετών και κάτω, όταν η συσκευή είναι
ενεργοποιημένη ή την έχετε αφήσει να κρυώσει.
- Τα παιδιά επιτρέπεται να καθαρίζουν τη
συσκευή και να πραγματοποιούν τις διαδικασίες
αφαλάτωσης ή καθαρισμού αλάτων μόνο υπό
επίβλεψη.
- Μην αφήνετε το καλώδιο και το σωλήνα παροχής
ατμού να έρθουν σε επαφή με τη ζεστή πλάκα του
σίδερου.
- Πριν εκτελέσετε αφαλάτωση ή καθαρισμό αλάτων,
αποσυνδέστε τη συσκευή από την πρίζα και
αφήστε την να κρυώσει για 2 ώρες τουλάχιστον,
για να αποφύγετε τον κίνδυνο εγκαυμάτων.
- Μην ανοίγετε και μην αφαιρείτε την τάπα EASY
DE-CALC από τη γεννήτρια ατμού κατά τη χρήση
ή όταν η γεννήτρια ατμού είναι ακόμα ζεστή ή
υπό πίεση.
- Αν βγαίνει ατμός ή σταγόνες ζεστού νερού
από την τάπα EASY DECALC ενώ η συσκευή
θερμαίνεται, απενεργοποιήστε τη συσκευή και
αφήστε την να κρυώσει για τουλάχιστον 2 ώρες.
Σφίξτε την τάπα EASY DE-CALC. Εάν συνεχίσει
να διαφεύγει ατμός, απενεργοποιήστε τη συσκευή
και επικοινωνήστε με το εξουσιοδοτημένο κέντρο
σέρβις της Philips.
- Μην χρησιμοποιείτε κανένα άλλο κάλυμμα στη
γεννήτρια ατμού εκτός από την τάπα EASY DECALC που παρέχεται με τη συσκευή.
- Κρατήστε τα δάχτυλά σας μακριά από την πλάκα
όταν είναι ενεργοποιημένος ο ατμός, ώστε να
αποφύγετε εγκαύματα όταν σιδερώνετε.
- Μην κατευθύνετε ποτέ τον ατμό προς ανθρώπους
ή ζώα.
- Ισχύει μόνο για τη σειρά προϊόντων Perfect Care
Elite Plus και Perfect Care 9000: Μην περιστρέφετε
και μην κινείτε το σίδερο πίσω-μπρος στον
αέρα όταν είναι ενεργοποιημένη η λειτουργία
αυτόματου ατμού, για να αποφύγετε τα εγκαύματα
από τον ατμό.
ΠΡΟΣΟΧΗ: Καυτή επιφάνεια (εικ. 1)
Κατά τη διάρκεια της χρήσης, οι επιφάνειες
θερμαίνονται πολύ (ισχύει για τα σίδερα που
φέρουν το σύμβολο του θερμού στοιχείου).
Προσοχή
- Συνδέετε τη συσκευή μόνο σε πρίζα με γείωση.
- Η συσκευή πρέπει να χρησιμοποιείται και να
τοποθετείται σε επίπεδη επιφάνεια που αντέχει
στις υψηλές θερμοκρασίες. Όταν τοποθετείτε το
σίδερο στη βάση του, βεβαιωθείτε ότι η επιφάνεια
όπου το τοποθετείτε είναι σταθερή. Βάση είναι το
πίσω μέρος του σίδερου ή η πλευρά στην οποία
στηρίζεται το σίδερο όταν δεν χρησιμοποιείται.
- Ελέγχετε τακτικά το καλώδιο και το σωλήνα
τροφοδοσίας για πιθανή φθορά.
- Το βύσμα θα πρέπει να συνδεθεί σε μια πρίζα με
τα ίδια τεχνικά χαρακτηριστικά.
- Ξετυλίξτε εντελώς το καλώδιο προτού συνδέσετε
το φις στην πρίζα.
- Η βάση του σίδερου και η πλάκα θερμαίνονται
πάρα πολύ και μπορεί να προκαλέσουν
εγκαύματα αν τις αγγίξετε. Αν θέλετε να
μετακινήσετε τη γεννήτρια ατμού, μην αγγίξετε τη
βάση του σίδερου.
- Όταν τελειώνετε το σιδέρωμα, όταν καθαρίζετε τη
συσκευή, όταν γεμίζετε ή αδειάζετε τη γεννήτρια
ατμού και επίσης όταν αφήνετε το σίδερο έστω
και για λίγο: τοποθετήστε το σίδερο στη βάση του,
απενεργοποιήστε τη συσκευή και αποσυνδέστε το
φις από την πρίζα.
- Αποσυνδέστε τη συσκευή από την πρίζα και
αφήστε την να κρυώσει για 2 ώρες τουλάχιστον,
για να αποφύγετε τον κίνδυνο εγκαυμάτων.
Να αφαιρείτε ή να καθαρίζετε τα άλατα από
τη γεννήτρια ατμού, σύμφωνα με τις οδηγίες
του κεφαλαίου «Καθαρισμός και συντήρηση».
- Μην προσθέτετε νερό με άρωμα, το νερό από
το στεγνωτήριο, ξύδι, κόλλα κολλαρίσματος,
ουσίες αφαλάτωσης, υγρά σιδερώματος, χημικά
αφαλατωμένο νερό ή άλλα χημικά, καθώς οι
ουσίες αυτές ενδέχεται να προκαλέσουν διαρροή
νερού, καφέ κηλίδες ή βλάβη στη συσκευή.
- Αυτή η συσκευή προορίζεται για οικιακή χρήση
μόνο.
Ηλεκτρομαγνητικά πεδία (EMF)
Η συγκεκριμένη συσκευή της Philips συμμορφώνεται με όλα τα
ισχύοντα πρότυπα και τους κανονισμούς σχετικά με την έκθεση σε
ηλεκτρομαγνητικά πεδία.
Ανακύκλωση
- Αυτό το σύμβολο (εικ. 2) σημαίνει ότι αυτό το προϊόν δεν πρέπει να
απορρίπτεται μαζί με τα συνηθισμένα οικιακά απορρίμματα (2012/19/
ΕΕ).
- Ακολουθήστε τους κανονισμούς της χώρας σας για την ξεχωριστή
συλλογή των ηλεκτρικών και ηλεκτρονικών προϊόντων. Η σωστή
απόρριψη συμβάλλει στην αποφυγή αρνητικών επιπτώσεων για το
περιβάλλον και την ανθρώπινη υγεία.
Εγγύηση και υποστήριξη
Αν χρειάζεστε πληροφορίες ή υποστήριξη, επισκεφτείτε τη διεύθυνση
www.philips.com/support ή διαβάστε το ξεχωριστό φυλλάδιο της
διεθνούς εγγύησης.
Қазақша
Кіріспе
Осы затты сатып алуыңызбен құттықтаймыз және Philips компаниясына
қош келдіңіз! Philips ұсынатын қолдауды толық пайдалану үшін өнімді
www.philips.com/welcome веб-сайтында тіркеңіз.
Маңызды ақпарат
Қосымша пайдалану құжаттамасын
Құрылғыны пайдалану алдында бөлек маңызды
ақпарат парақшасын және осы пайдаланушы
нұсқаулығын мұқият оқып шығыңыз. Құжаттардың
екеуін де болашақта анықтама алу үшін сақтап
қойыңыз.
Бұл құрылғы тек үйде пайдалануға арналған. Кез
келген коммерциялық қолданыс, дұрыс пайдаланбау
немесе нұсқауларды орындамау жағдайында
өндіруші ешқандай жауапкершілікті қабылдамайды
және кепілдік қолданылмайды.
Қауіпті жағдайлар
- Ешқашан үтікті немесе бу шығарушыны суға
батырмаңыз.
Ескерту
- Құралды қосар алдында, құралда көрсетілген
вольтаж, жергілікті қамтамасыз етілетін вольтажға
сәйкес келетіндігін тексеріп алыңыз.
- Егер құралдың шанышқысы, сымы, буы қосыла
берілетін шлангы немесе құралдың өзі көзге
көрінетін зақым алған болса, немесе құралды
түсіріп алған болсаңыз, құралмен қолданбаңыз.
- Егер сым немесе буы қосыла берілетін шланг
сынған болса, қауіпті жағдай туғызбас үшін, оны
тек Philips немесе Philips әкімшілігі берген қызмет
орталығында немесе сондай деңгейі бар маман
ғана оларды алмастыруы тиіс.
- Құрал токқа қосылып тұрғанда, оны бақылаусыз
қалдыруға болмайды.
- Құралды қауіпсіз түрде пайдалану жөнінде нұсқау
алған, біреудің қадағалауымен қауіпсіз пайдаланған
жағдайда және құралды пайдалануға қатысты
қауіп-қатерлер түсіндірілген жағдайда, осы
құралды 8 жасқа толған және одан үлкен балалар,
сондай-ақ мүмкіндігі мен ойлау қабілеті шектеулі,
білімі мен тәжірибесі аз адамдар пайдалана алады.
- Балалардың құралмен ойнауына жол бермеңіз.
- Қосылып тұрғанда немесе суып жатқанда, құрал
мен қуат сымын жасы сегізде немесе сегізге
толмаған балалардың қолы жетпейтін жерге қою
керек.
- Балаларға ересек адамның қадағалауымен ғана
құралды тазартуға, қақтан тазалауға немесе CalcClean рәсімін орындауға рұқсат етіледі.
- Тоқ сымын және буы қосыла берілетін шлангты
үтіктің астыңғы табаны ысып тұрғанда тигізуге
болмайды.
- Қақтан тазалау және Calc-Clean рәсімін орындау
алдында құралды электр желісінен ажыратыңыз
да, күйік шалмас үшін кемінде екі сағат бойы
суытыңыз.
- Бу генераторы әлі ыстық немесе қысым астында
болса, EASY DE-CALC тұтқасын қолданып
жатқан уақытта ашпаңыз және бу генераторынан
шешпеңіз.
- Құрылғыны қыздырған кезде EASY DE-CALC
тұтқасынан ыстық судың буы немесе тамшылары
шығып жатса, құрылғыны сөндіріңіз де және
кемінде екі сағат бойы суытыңыз. EASY DE-CALC
тұтқасын тартыңыз. Бу шыға берсе, құрылғыны
сөндіріп, Philips әкімшілігі берген қызмет
орталығына барыңыз.
- Бу генераторына құралмен бірге берілген EASY
DE-CALC тұтқасынан басқа қақпақты орнатпаңыз.
- Үтіктеу кезінде күйік шалмас үшін бу атқарымын
іске қосқан кезде саусағыңызды және
қолдарыңызды табаннан алшақ ұстаңыз.
- Буды адамдарға немесе жануарларға қарай
бағыттауға тыйым салынады.
- Perfect Care Elite Plus және Perfect Care 9000
сериялы құрылғыларға қатысты: будан күйік
шалмауы үшін, зияткерлік автоматты бу режимі
қосылып тұрған кезде үтікті ауада теңселтпеңіз
және жан-жаққа сілтемеңіз.
АБАЙ БОЛЫҢЫЗ! Жабыны ыстық
(1-сурет).
Қолдану кезінде беттері ысуға бейім келеді
(құрылғыда «ыстық» белгісі бар үтіктер үшін).
Ескерту
- Құралды тек жерге тұйықталған қабырға
розеткасына ғана қосуға болады.
- Құрылғы тегіс, ыстыққа төзімді бетте
пайдаланылуы және қойылуы тиіс. Үтікті тірегіне
қойғанда ол қойылған беттің тұрақты екенін
тексеріңіз. Тірек – бұл үтік сөндірілген күйінде
қойылатын үтіктің өкшесі немесе бөлігі.
- Әрдайым сымды және қосыла берілген шлангты
зақымдары жоқтығын тексеріп отырыңыз.
- Тығын тек техникалық сипаттамалары ұқсас
розеткаға қосылуы керек.
- Розеткаға жалғамас бұрын, қуат сымын толығымен
тарқатып алыңыз.
- Үтіктің түпқоймасы және астыңғы табаны өте
ыстық болуы мүмкін, сондықтан оны қолмен
ұстағанда, күйдіруі мүмкін. Егер бу генераторын
жылжыту керек болса, түпқойманы ұстамаңыз.
- Үтіктеп болғанда, үтікті тазалағанда, бу
генераторын толтырып немесе босатып жатқанда,
сондай-ақ үтікті тіпті қысқа уақытқа болса да
қараусыз қалдырғанда, үтікті түпқоймасына
қойыңыз, өшіріңіз және қуат сымын қабырғадағы
розеткадан ажыратыңыз.
- Құрылғыны электр желісінен ажыратыңыз да, күйік
шалмас үшін кемінде екі сағат бойы суытыңыз.
«Тазалау және техникалық қызмет көрсету»
тарауындағы нұсқауларға сәйкес бу генераторын
қақтан тазалап немесе Calc-Clean рәсімін тұрыңыз.
- Хош иісті суды, кептіргіштен алынған суды, сірке
суын, крахмалды, қақ түсіру заттарын, үтіктеу
заттарын, химиялық түрде қағы түсірілген суды
немесе басқа химикаттарды пайдаланбаңыз,
өйткені олар судың шашырауына, қоңыр дақтарға
әкелуі не құрылғыны зақымдауы мүмкін.
- Бұл құрал тек үйде қолдануға жасалған.
Электромагниттік өрістер (ЭМӨ)
Осы Philips құрылғысы электромагниттік өрістерге қатысты барлық
қолданыстағы стандарттар мен ережелерге сәйкес келеді.
Өңдеу
- Бұл таңба ( 2-сурет) осы өнімнің қалыпты тұрмыстық қоқыспен бірге
утилизацияланбауы қажет екенін білдіреді (2012/19/EU).
- Электр және электрондық өнімдердің қалдықтарын бөлек жинау
жөніндегі еліңіздің ережелерін сақтаңыз. Қоқысқа дұрыс тастау
қоршаған ортаға және адам денсаулығына тиетін зиянды әсердің
алдын алуға көмектеседі.
Кепілдік және қолдау
Егер сізге ақпарат немесе қолдау қажет болса, www.philips.com/support
сайтына кіріңіз немесе бөлек дүниежүзілік кепілдік парақшасын оқыңыз.
Македонски
Вовед
Ви честитаме за купувањето и добре дојдовте во
Philips! За да целосно ја искористите поддршката која
ја нуди Philips, регистрирајте го вашиот производ на
www.philips.com/welcome.
Важно
Пред да го користите апаратот внимателно
прочитајте ја брошурата со важни
информации и упатството за користење.
Зачувајте ги двата документа за во иднина.
Овој апарат е наменет само за домашна
употреба. Во случај на каква било
комерцијална употреба, несоодветна
употреба или непридржување до
упатствата, производителот не прифаќа
никаква одговорност и гаранцијата нема да
важи.
Опасност
- Не ја потопувајте пеглата или садот за
пареа во вода.
Предупредување
- Пред да го вклучите апаратот, проверете
дали напонот наведен на плочката
одговара на напонот на електричната
мрежа.
- Немојте да го користите апаратот ако на
приклучокот, кабелот, цревото за довод
на пареа или на самиот апарат има
видливи оштетувања, или ако апаратот
ви паднал или од него тече вода.
- За да се избегне опасност, кабелот за
напојување или цревото за довод на
пареа во случај на оштетување треба да
ги замени компанијата Philips, односно
сервисен центар овластен од Philips или
лица со соодветни квалификации.
- Никогаш не го оставајте апаратот без
надзор кога е приклучен на електричната
мрежа.
- Овој апарат може да го користат
деца постари од 8 години и лица со
ограничени физички, сензорни или
ментални способности или лица со
недостаток на искуство и знаење, под
услов да добиле упатства за безбедно
користење на апаратот или да се под
надзор за да се овозможи безбедно
користење и да се информирани за
можните опасности.
- Не дозволувајте децата да си играат со
апаратот.
- Пеглата и кабелот за напојување држете
ги подалеку од дофат на деца помлади од
8 години додека апаратот е вклучен или
додека се лади.
- На децата им е дозволено само да
го чистат апаратот и да ја вршат
процедурата за чистење бигор или да
ја активираат функцијата Calc-Clean под
надзор.
- Внимавајте кабелот за напојување и
цревото за довод на пареа да не дојдат
во допир со жешката грејна плоча на
пеглата.
- Пред да извршите чистење на бигор
или да ја активирате функцијата CalcClean, исклучете го апаратот од штекер и
оставете го да се лади најмалку 2 часа за
да избегнете ризик од изгореници.
- Немојте да го отворате и отстранувате
регулаторот EASY DE-CALC од садот за
пареа додека го користите и кога садот
за пареа е жежок или под притисок.
- Доколку пареа или капки жешка вода
излегуваат под регулаторот EASY DECALC додека апаратот се загрева,
исклучете го апаратот и оставете го да
се лади најмалку 2 часа. Прицврстете
го регулаторот EASY DE-CALC. Ако и
понатаму излегува пареа, исклучете го
апаратот и контактирајте со сервисниот
центар овластен од Philips.
- На садот за пареа ставајте го само
регулаторот EASY DE-CALC кој се
испорачува со апаратот.
- Држете ги прстите и дланките подалеку
од грејната плоча кога е активирана
пареата за да избегнете изгореници при
пеглањето.
- Никогаш не ја насочувајте пареата кон
луѓе или животни.
- Важи за сериите на производи Perfect
Care Elite Plus и Perfect Care 9000: немојте
да ја нишате или движите пеглата
напред-назад во воздух кога е активиран
интелигентниот режим за автоматска
пареа за да избегнете изгореници од
пареата.
ВНИМАНИЕ: жешка површина (сл. 1)
Површините се загреваат при
користењето (кај пегли кои на куќиштето
имаат симбол за топлина).
Внимание
- Апаратот приклучувајте го само во
заземјен ѕиден штекер.
- Апаратот мора да го користите и да го
поставувате на рамна површина која е
отпорна на топлина. Кога ја поставувате
пеглата на држачот, проверете дали
површината на која ја поставувате е
стабилна. Држачот е долниот дел на
пеглата или делот на кој се поставува
пеглата кога не се користи.
- Редовно проверувајте дали на кабелот и
на цревото за довод има оштетувања.
- Приклучокот мора да се приклучи во
штекер со исти технички карактеристики.
- Одмотајте го кабелот за напојување до
крај пред да го приклучите во ѕидниот
штекер.
- Држачот на пеглата и грејната плоча
можат значително да се загреат и можат
да предизвикаат изгореници ако ги
допрете. Доколку сакате да го преместите
садот за пареа, немојте да го допирате
држачот на пеглата.
- Кога ќе завршите со пеглање, кога
го чистите апаратот, кога го полните
или празните садот за пареа и кога
ја оставате пеглата дури и на кратко:
поставете ја пеглата на држачот,
исклучете ја и извлечете го приклучокот
од ѕидниот штекер.
- Исклучете го апаратот од штекер и
оставете го да се лади најмалку 2 часа
за да избегнете ризик од изгореници.
Редовно чистете го бигорот или
активирајте ја функцијата Calc-Clean
на садот за пареа во согласност со
упатствата во поглавјето „Чистење и
одржување“.
- Не додавајте парфимирана вода, вода
од машина за сушење алишта, оцет,
штирак, средства за отстранување бигор,
адитиви за пеглање, вода чија содржина
на бигор е намалена на хемиски начин
или други хемикалии, затоа што можат
да предизвикаат течење на вода, појава
на кафени дамки или оштетување на
апаратот.
- Овој апарат е наменет само за употреба
во домаќинства.
Електромагнетни полиња (EMF)
Овој уред од Philips е во согласност со сите важечки
стандардни и одредби во однос на изложеноста на
електромагнетни полиња.
Рециклирање
- Овој симбол (сл. 2) укажува на тоа дека производот не
смее да се фрла со обичниот отпад од домаќинствата
(2012/19/EU).
- Придржувајте се до законите во вашата земја за
посебно собирање на електричните и електронските
производи. Правилното фрлање помага во спречувањето
на негативните последици по животната средина и
човековото здравје.
Гаранција и поддршка
Доколку ви се потребни информации или поддршка,
посетете ја страницата www.philips.com/support или
прочитајте го посебниот леток за светска гаранција.
Русский
Введение
Поздравляем с покупкой и приветствуем в клубе
Philips! Чтобы воспользоваться всеми преимуществами
поддержки Philips, зарегистрируйте продукт на сайте
www.philips.com/welcome.
Важная информация
Дополнение к эксплуатационной
документации
Перед использованием прибора
внимательно ознакомьтесь с буклетом
с важной информацией и данной
инструкцией по эксплуатации. Сохраните
эти документы для дальнейшего
использования в качестве справочного
материала.
Этот прибор предназначен только для
домашнего использования. Использование
в коммерческих целях, ненадлежащее
использование или несоблюдение
инструкций освобождает производителя
от любой ответственности и отменяет
действие гарантии.
Опасно!
- Запрещается погружать утюг или
парогенератор в воду.
Внимание!
- Перед подключением прибора
убедитесь, что номинальное напряжение,
указанное на заводской бирке,
соответствует напряжению местной
электросети.
- Запрещается использовать прибор,
если вилка, сетевой шнур, шланг подачи
пара или сам прибор имеют видимые
повреждения, а также если прибор
роняли или он протекает.
- В случае повреждения сетевого шнура
или шланга подачи пара их необходимо
заменить. В целях безопасности замена
должна производиться в торговой
организации Philips, в авторизованном
сервисном центре Philips или в
сервисном центре с персоналом
аналогичной квалификации.
- Не оставляйте включенный в сеть прибор
без присмотра.
- Данный прибор может использоваться
детьми старше 8 лет, а также людьми
с ограниченными возможностями
сенсорной системы, ограниченными
физическими или интеллектуальными
возможностями, лицами с
недостаточным опытом и знаниями при
условии ознакомления с правилами
безопасности и рисками, связанными
с эксплуатацией прибора, или под
наблюдением лиц, ответственных за
обеспечение безопасности.
- Не разрешайте детям играть с прибором.
- Оберегайте детей младше 8 лет от
контакта с устройством и сетевым
шнуром во время работы устройства или
в процессе охлаждения.
- Дети могут проводить очистку прибора
и выполнять удаление накипи или
процедуру Calc-Clean только под
присмотром взрослых.
- Сетевой шнур и шланг подачи пара не
должны касаться горячей подошвы
утюга.
- Во избежание ожогов перед удалением
накипи или процедуры Calc-Clean
отключите прибор от сети и дайте ему
остыть в течение не менее 2 часов.
- Не открывайте клапан EASY DE-CALC и
не извлекайте его из парогенератора,
если парогенератор все еще нагрет,
используется или находится под
давлением.
- Если во время нагрева прибора из-под
клапана EASY DE-CALC выходит пар
или капает горячая вода, выключите
прибор и дайте ему остыть в течение
не менее 2 часов. Затяните клапан EASY
DE-CALC. Если пар продолжит выходить,
выключите прибор и обратитесь в
авторизованный сервисный центр Philips.
- Используйте с парогенератором только
клапан EASY DE-CALC, входящий в
комплект прибора.
- При подаче пара не трогайте подошву
руками; в противном случае вы можете
получить ожоги.
- Никогда не направляйте струю пара на
людей или животных.
- Применимо к продуктам Perfect
Care Elite Plus и Perfect Care 9000: во
избежание получения ожогов от пара не
переворачивайте утюг и не встряхивайте
его, если активирован режим
интеллектуальной автоматической
подачи пара.
ОСТОРОЖНО! Поверхность горячая
(рис. 1)
Во время использования поверхности
нагреваются (применимо к утюгам с
обозначением «горячо»).
Предупреждение.
- Подключайте прибор только к
заземленной розетке.
- Прибор необходимо использовать и
размещать на плоской и термостойкой
поверхности. Прежде чем поставить утюг
на подставку, убедитесь в устойчивости
поверхности. Подставкой служит задняя
часть утюга или часть, на которой утюг
стоит, когда не используется.
- Регулярно проверяйте, не поврежден ли
сетевой шнур или шланг подачи пара.
- Напряжение в сети должно
соответствовать напряжению,
указанному на приборе.
- Полностью размотайте сетевой шнур
перед тем, как вставить вилку в розетку
электросети.
- Подставка и подошва утюга могут сильно
нагреваться, поэтому прикосновение
к ним может привести к ожогам. Если
необходимо передвинуть парогенератор,
не прикасайтесь к подставке утюга.
- По окончании глажения, при очистке
прибора, во время заполнения или
опустошения парогенератора, а также
оставляя утюг без присмотра даже
на короткое время, ставьте утюг на
подставку, выключайте его и отключайте
от электросети.
- Во избежание ожогов отключите прибор
от сети и дайте ему остыть в течение не
менее 2 часов. Очищайте парогенератор
от накипи или выполняйте процедуру
Calc-Clean в соответствии с инструкцией,
приведенной в главе «Очистка и уход».
- Во избежание появления протечек,
коричневых пятен или повреждения
прибора не используйте душистую
воду, воду из сушильной машины, уксус,
крахмал, средства очистки от накипи,
добавки для глажения, химические
вещества и воду, подвергшуюся очистке
от накипи с использованием химических
средств.
- Прибор предназначен только для
домашнего использования.
Электромагнитные поля (ЭМП)
Этот прибор Philips соответствует всем применимым
стандартам и нормам по воздействию электромагнитных
полей.
Утилизация
- Этот символ (рис. 2) означает, что изделие не может быть
утилизировано вместе с бытовыми отходами (2012/19/EU).
- Выполняйте раздельную утилизацию электрических
и электронных изделий в соответствии с правилами,
принятыми в вашей стране. Правильная утилизация
помогает предотвратить негативное воздействие на
окружающую среду и здоровье человека.
Гарантия и поддержка
Для получения поддержки или информации посетите
веб-сайт www.philips.com/support или ознакомьтесь с
информацией на гарантийном талоне.
Slovensky
Úvod
Blahoželáme vám ku kúpe a vítame vás medzi používateľmi
produktov spoločnosti Philips. Ak chcete naplno využiť podporu
ponúkanú spoločnosťou Philips, zaregistrujte svoj produkt na
lokalite www.philips.com/welcome.
Dôležité
Pred použitím zariadenia si pozorne prečítajte
priložený leták s dôležitými informáciami
a návod na používanie. Oba tieto dokumenty
si uschovajte na neskoršie použitie.
Toto zariadenie je určené iba na domáce
používanie. Výrobca nenesie žiadnu
zodpovednosť za poruchy spôsobené
komerčným alebo nesprávnym používaním,
prípadne nedodržaním pokynov a na takéto
poruchy sa nevzťahuje záruka.
Nebezpečenstvo
- Žehličku ani naparovací žehliaci systém
nikdy neponárajte do vody.
Varovanie
- Skôr, ako zariadenie pripojíte do siete,
skontrolujte, či sa napätie uvedené na štítku
s označením modelu zhoduje s napätím v
sieti.
- Zariadenie nepoužívajte, ak zásuvka, sieťový
kábel, prívodná hadica pary alebo samotné
zariadenie vykazujú viditeľné známky
poškodenia, prípadne vtedy, ak zariadenie
spadlo alebo z neho uniká kvapalina.
- Ak je poškodený sieťový kábel alebo
prívodná hadica pary, výmenu musí
vykonať kvalikovaný personál spoločnosti
Philips, servisné centrum autorizované
spoločnosťou Philips alebo iné kvalikované
osoby, aby sa predišlo nebezpečným
situáciám.
- Pokiaľ je zariadenie pripojené k sieti,
nesmiete ho nikdy nechať bez dozoru.
- Zariadenie môžu používať aj deti
staršie ako 8 rokov a osoby, ktoré majú
obmedzené telesné, zmyslové alebo
mentálne schopnosti alebo nemajú
dostatok skúseností a znalostí, pokiaľ sú
pod dozorom alebo im bolo vysvetlené
bezpečné používanie tohto zariadenia a
za predpokladu, že boli oboznámené s
príslušnými rizikami.
- Nedovoľte, aby sa so zariadením hrali deti.
- Keď je zariadenie zapnuté alebo chladne,
udržujte ho a jeho sieťový kábel mimo
dosahu detí mladších ako 8 rokov.
- Deti smú zariadenie čistiť a odstraňovať
vodný kameň či odstraňovať ho pomocou
funkcie Calc-Clean iba pod dozorom.
- Nedovoľte, aby sa sieťový kábel a prívodná
hadica pary dostali do kontaktu s horúcou
žehliacou plochou žehličky.
- Pred vykonaním odstraňovania vodného
kameňa alebo jeho odstraňovania pomocou
funkcie Calc-Clean odpojte zariadenie
zo siete a nechajte ho aspoň 2 hodiny
vychladnúť, aby ste predišli riziku popálenia.
- Neotvárajte a nevyberajte vypúšťaciu zátku
EASY DE-CALC systému, kým sa naparovací
žehliaci systém používa, prípadne je horúci
alebo pod tlakom.
- Ak spod vypúšťacej zátky EASY DE-CALC
uniká po zahriatí zariadenia para alebo
kvapky vody, zariadenie vypnite a nechajte
ho aspoň 2 hodiny vychladnúť. Dotiahnite
vypúšťaciu zátku EASY DE-CALC. Ak
para naďalej uniká, vypnite zariadenie
a kontaktujte servisné centrum autorizované
spoločnosťou Philips.
- Nepoužívajte žiaden iný uzáver
naparovacieho žehliaceho systému než
vypúšťaciu zátku EASY DE-CALC, ktorá sa
dodáva spolu so zariadením.
- Udržujte prsty či ruky mimo žehliacej plochy
pri aktivovanej pare, aby ste tak počas
žehlenia predišli popáleninám.
- Nikdy ňou nemierte na osoby alebo zvieratá.
- Platí iba na produkty Perfect Care Elite Plus
a Perfect Care série 9000: ak je aktivovaný
režim inteligentného automatického
naparovania, žehličkou nemávajte vo
vzduchu dopredu – dozadu. Vyhnete sa tak
popáleniu parou.
 Loading...