

Page 1
Register your product and get support at
www.philips.com/welcome
GC5000 series
Page 2
Page 3
1
Page 4

Page 5

ENGLISH 6
FRANÇAIS 17
38
48
GC5000 series
Page 6

6
ENGLISH
Table of contents
Important 6
Introduction 7
Product overview 8
Before rst use 8
Using the appliance 9
Checking the water hardness 9
Filling the water tank 10
Heating up 10
Temperature and steam setting 11
Ironing 11
Putting down the iron during ironing 12
ECO mode (specic types only) 13
Ironing tips 13
Safety Auto-off 13
Cleaning and maintenance 13
Storage 14
Troubleshooting 14
Overview of models 16
Important
Read this user manual carefully before you use the appliance and save it for
future reference.
Danger
- Never immerse the appliance in water.
Warning
- Check if the voltage indicated on the type plate corresponds to the
local mains voltage before you connect the appliance.
- Check to make sure the wall socket has the correct rating (16A)
before you connect the appliance.
- Do not use the appliance if the plug, the mains cord or the appliance
itself shows visible damage, or if the appliance has been dropped
or leaks.
- If the mains cord is damaged, you must have it replaced by Philips, a
service centre authorised by Philips or similarly qualied persons in
order to avoid a hazard.
- Never leave the appliance unattended when it is connected to
the mains.
- This appliance can be used by children aged 8 or above and by
persons with reduced physical, sensory or mental capabilities or lack
of experience and knowledge if they have been given instructions in
safe use of the appliance or supervision to establish safe use and if they
have been made aware of the hazards involved.
- Do not allow children to play with the appliance.
- Keep the appliance and its mains cord out of the reach of children
aged 8 or under when the appliance is switched on or cooling down.
- Children are not allowed to clean the appliance without supervision.
- Do not let the mains cord come into contact with the hot soleplate
of the iron.
Page 7
ENGLISH 7
Caution
- Only connect the appliance to an earthed wall socket.
- Always place and use the appliance on a stable, level and horizontal
surface. If you prefer to place the iron on its heel, make sure that you
place it on a stable surface.
- Check the mains cord regularly for possible damage.
- Fully unwind the mains cord before you plug it in the wall socket.
- The soleplate of the iron can become extremely hot and may cause
burns if touched.
- When you have nished ironing, when you clean the appliance, when
you leave the iron even for a short while and also during water lling:
put the iron in horizontal position or on its heel on a stable surface and
remove the mains plug from the wall socket.
- Do not put perfume, vinegar, starch, descaling agents, ironing aids or
other chemicals in the water tank.
- This appliance is intended for indoor household use only.
Electromagnetic elds (EMF)
This Philips appliance complies with all standards regarding electromagnetic
elds (EMF). If handled properly and according to the instructions in this
user manual, the appliance is safe to use based on scientic evidence
available today.
Disposal
- Do not throw away the appliance with the normal household waste
at the end of its life, but hand it in at an ofcial collection point for
recycling. By doing this, you help to preserve the environment.
- To make recycling possible, the plastic parts used for this appliance
have been coded. The cardboard packaging is made of 90% recycled
material and is fully recyclable.
Introduction
Thank you for buying this Philips appliance.
- The new Philips PerfectCare Xpress steam iron offers you an innovative
way to iron your garments. We all know the fuss with traditional irons:
choosing the right temperature for your tough and delicate fabrics,
waiting for the iron to warm up and cool down to avoid the risk of
damaging clothes with a too hot iron. Those hassles are things of the
past with the new Philips PerfectCare Xpress steam iron.
- In principle, wrinkle removal is done by transferring heat to
fabric. Historically, this was done with a very hot soleplate. Then
steam was added to enhance heat transfer, thus making ironing much
faster. Our research conrmed that the best way to remove wrinkles
effectively is a perfect combination of intense steam and optimal
soleplate temperature. The key to effective wrinkle removal is the
steam, not the soleplate temperature. The soleplate temperature needs
to be just above the steam temperature to remove any moisture. This
is the optimal temperature.
Page 8
ENGLISH8
- In the past, a high amount of steam at this optimal temperature would
have led to water leakage. We developed a unique steam chamber that
generates a consistent output of moisture-rich steam that penetrates
deep into the fabric for fast ironing with no risk of water leakage.
- Ironing is now truly simple - no temperature adjustment, no scorching,
no waiting for heating up and cooling down. Ironing takes less time, no
matter who does the ironing. With this OptimalTemp technology, every
single garment can be ironed effectively and safely.
- This iron has been approved by The Woolmark Company Pty Ltd for
the ironing of wool-only products, provided that the garments are
ironed according to the instructions on the garment label and those
issued by the manufacturer of this iron. R1201. In the United Kingdom,
Eire, Hong Kong and India, the Woolmark trademark is a certication
trademark.
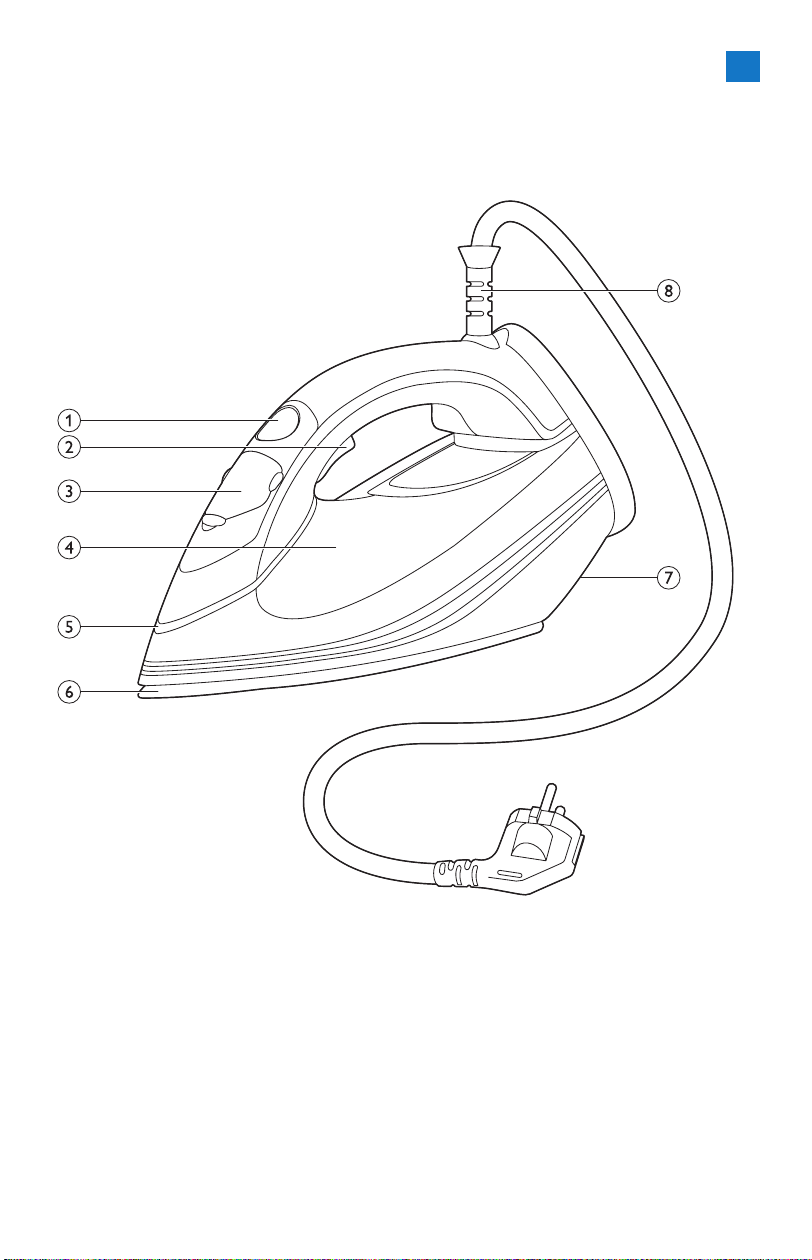
Product overview (Fig. 4)
1 ECO button (specic types only)
2 Steam trigger for vertical steaming and Steam Boost
3 Cap of lling opening
4 Water tank with water level indication
5 Smart light
6 Soleplate
7 Type plate
8 Mains cord with plug
Before rst use
This appliance is intended for ironing and refreshing fabrics only.
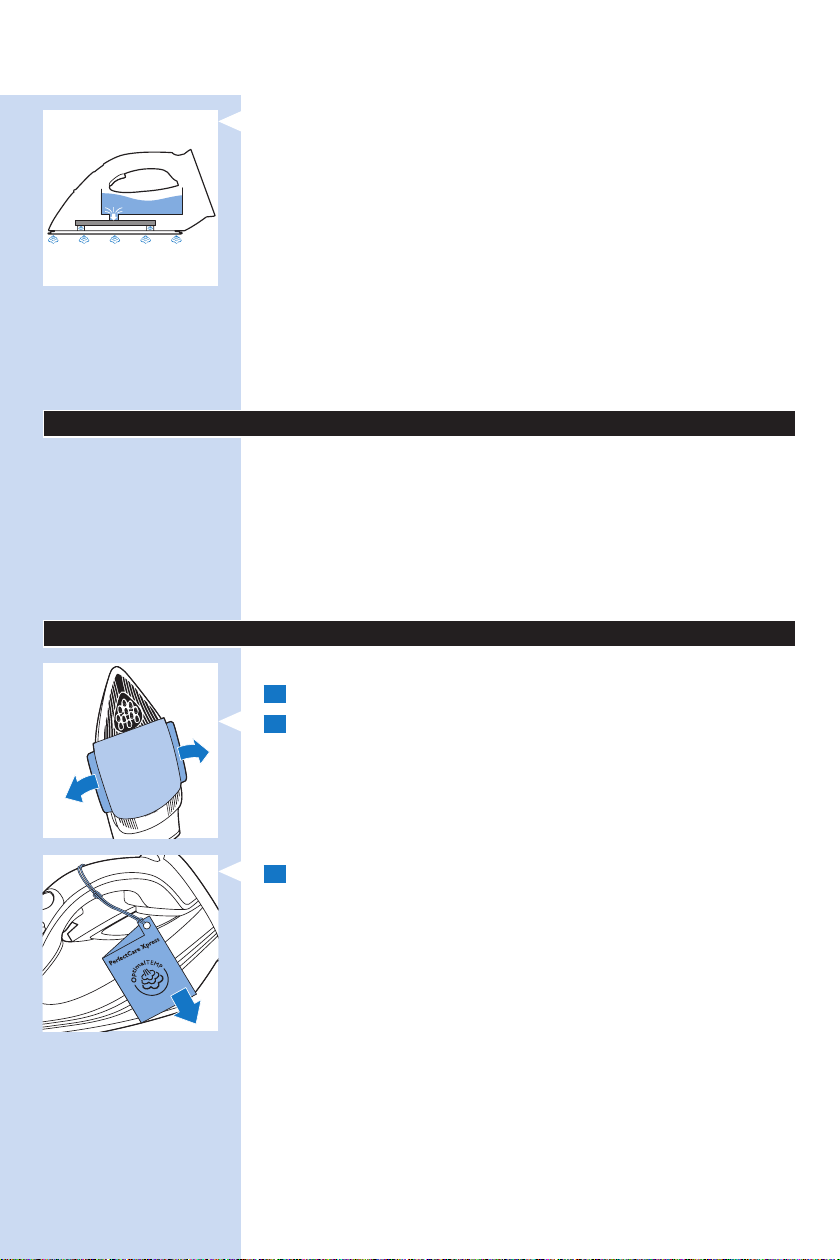
1 Remove all packaging material and stickers.
2 Remove the protective cover from the soleplate before you use the
appliance.
3 Remove the hangtag from the iron.
Page 9
60 sec.
ENGLISH 9
Using the appliance
Checking the water hardness
Your appliance has been designed to be used with tap water. If you live in
an area with very hard water, fast scale build-up will occur. It is therefore
recommended to check the water hardness rst with the test strips
provided.
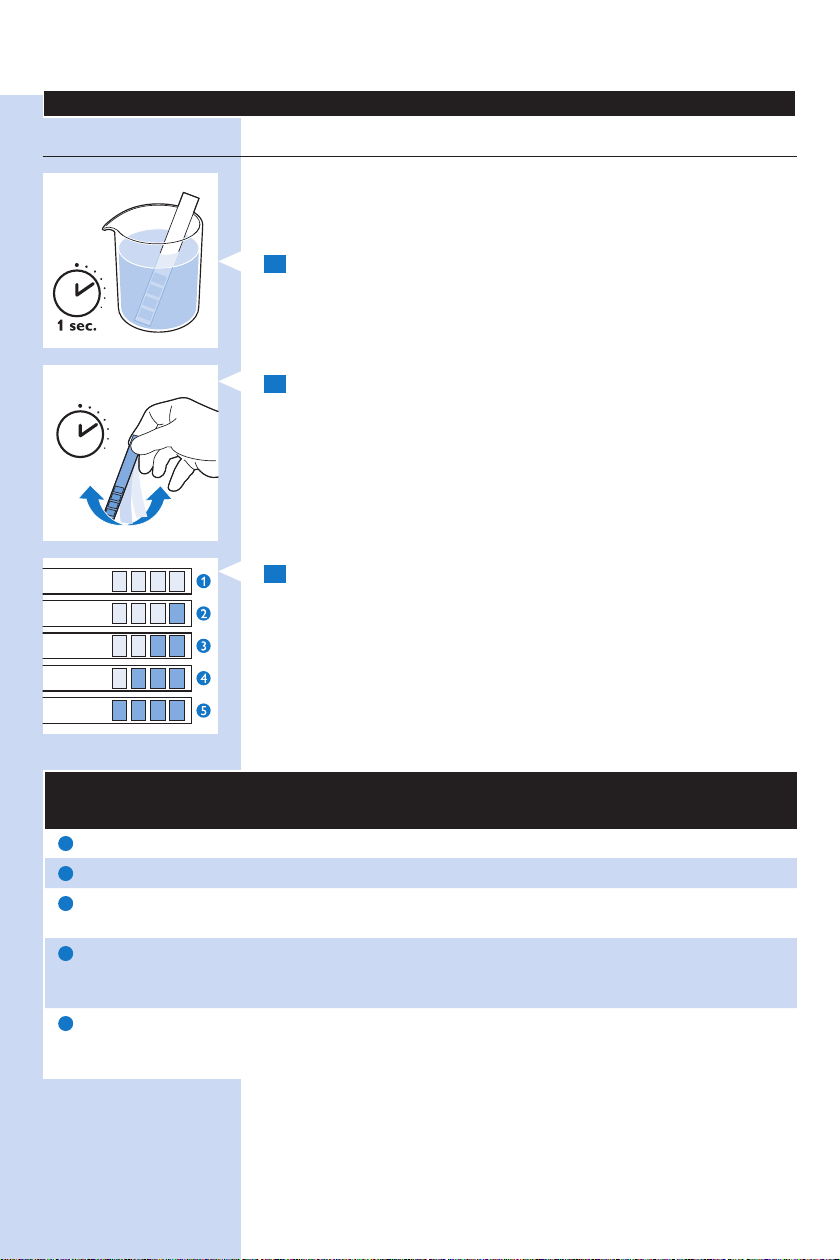
1 Dip the test strip in tap water for 1 second.
2 Shake the strip for 60 seconds.
3 Check how many squares on the test strip have changed colour and
compare with the details in the water hardness table below.
Water hardness table
Squares with colour
Water hardness Advice
change
1
None Very soft water Use tap water
2
One Soft water Use tap water
3
Tw o Medium hard water Use mixture of 50% tap water and 50% distilled
water*
4
Three Hard water Use mixture of 50% tap water and 50% distilled
water or ltered water from IronCare water descale
lter.
5
Four Very hard water Use mixture of 30% tap water and 70% distilled
water or ltered water from IronCare water descale
lter.
* For your convenience, we recommend that you use ltered water from
IronCare water descale lter.
Page 10
ENGLISH10
Note: Please visit www.philips.com/IronCare for more information on the
IronCare water descale lter. You can buy an IronCare water descale lter in
the online webshop at www.shop.philips.com/service. You can also contact the
Philips Consumer Care Centre.
Filling the water tank
Caution: Do not put perfume, vinegar, starch, descaling agents, ironing
aids or other chemicals in the water tank, as your appliance is not
designed to work with these chemicals.
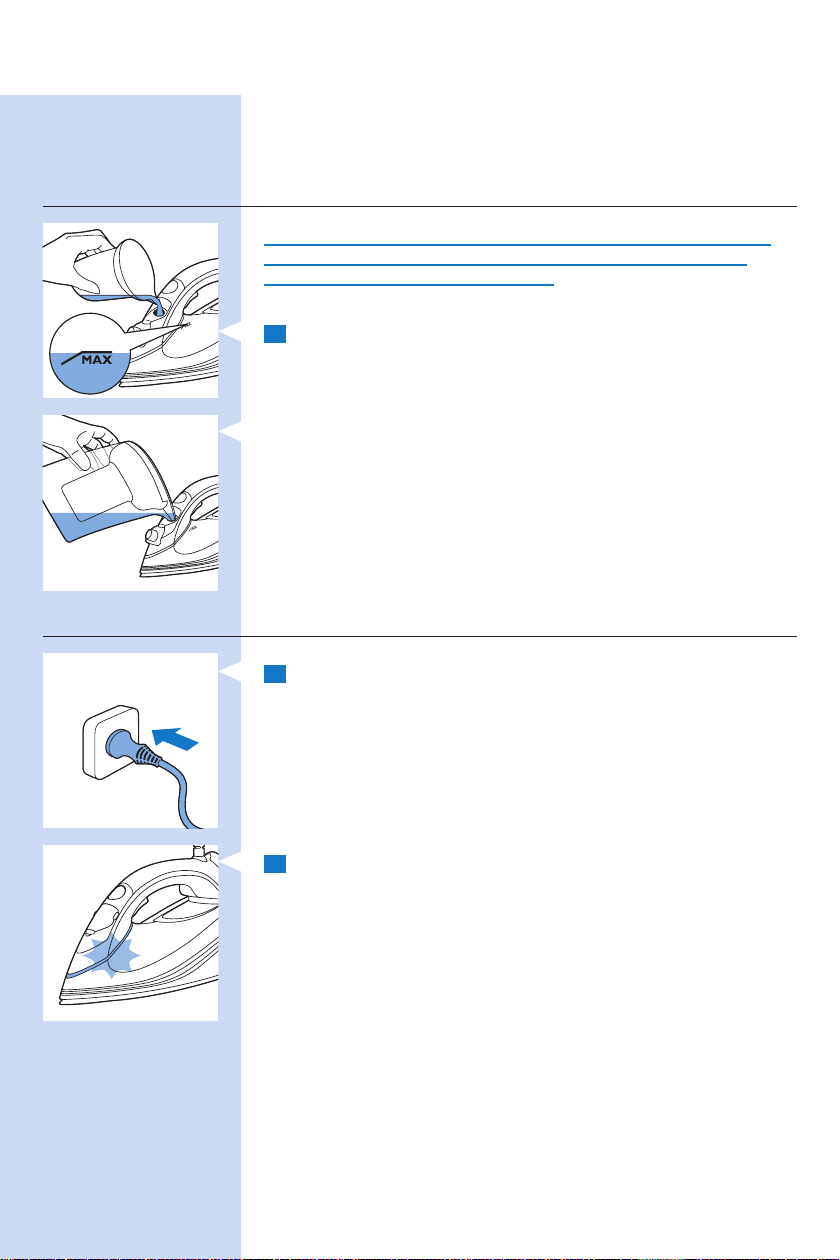
1 FillthewatertankuptotheMAXindicationwiththellingcup
supplied if your tap water is soft.
Note: If you use the IronCare water descale lter, you can ll the water tank
with ltered water straight from this lter.
Heating up
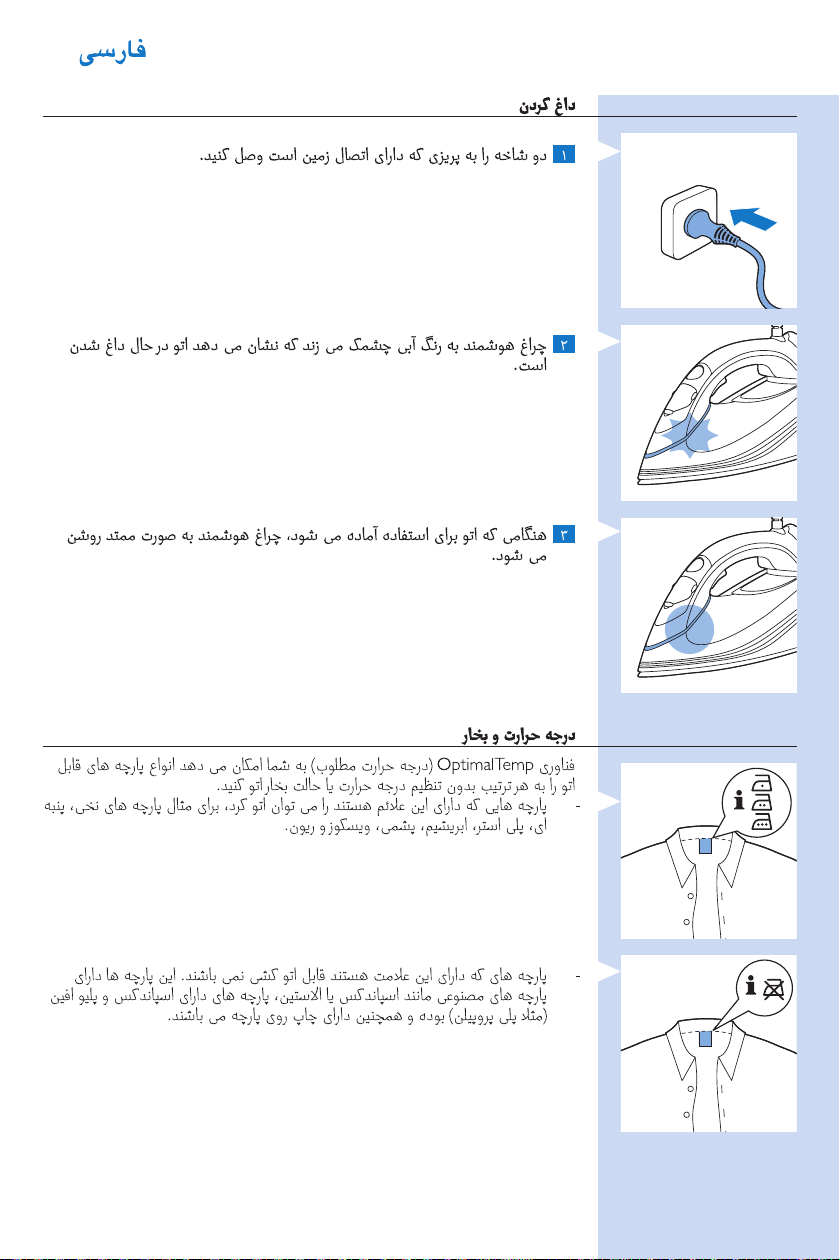
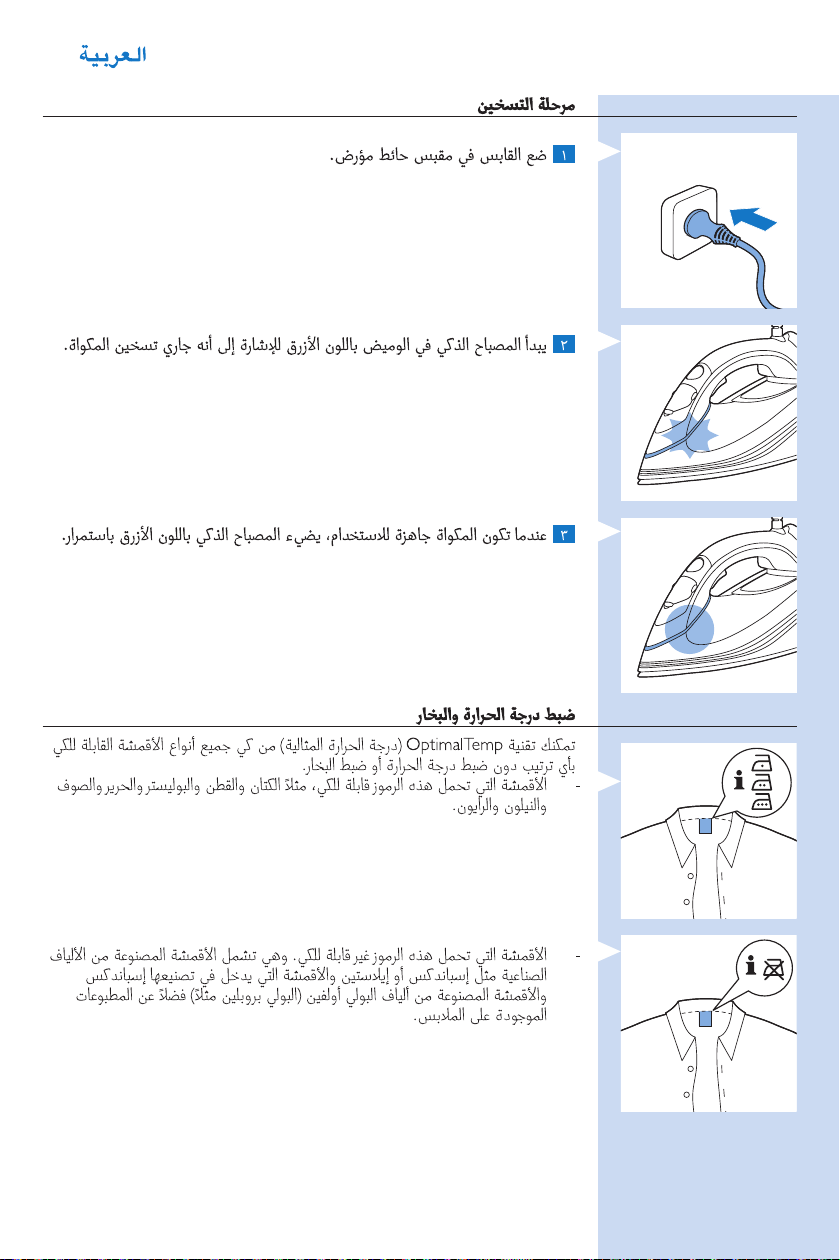
1 Put the plug in an earthed wall socket.
2 TheSmartlightstartsashingbluetoindicatethattheironis
heating up.
Page 11
ENGLISH 11
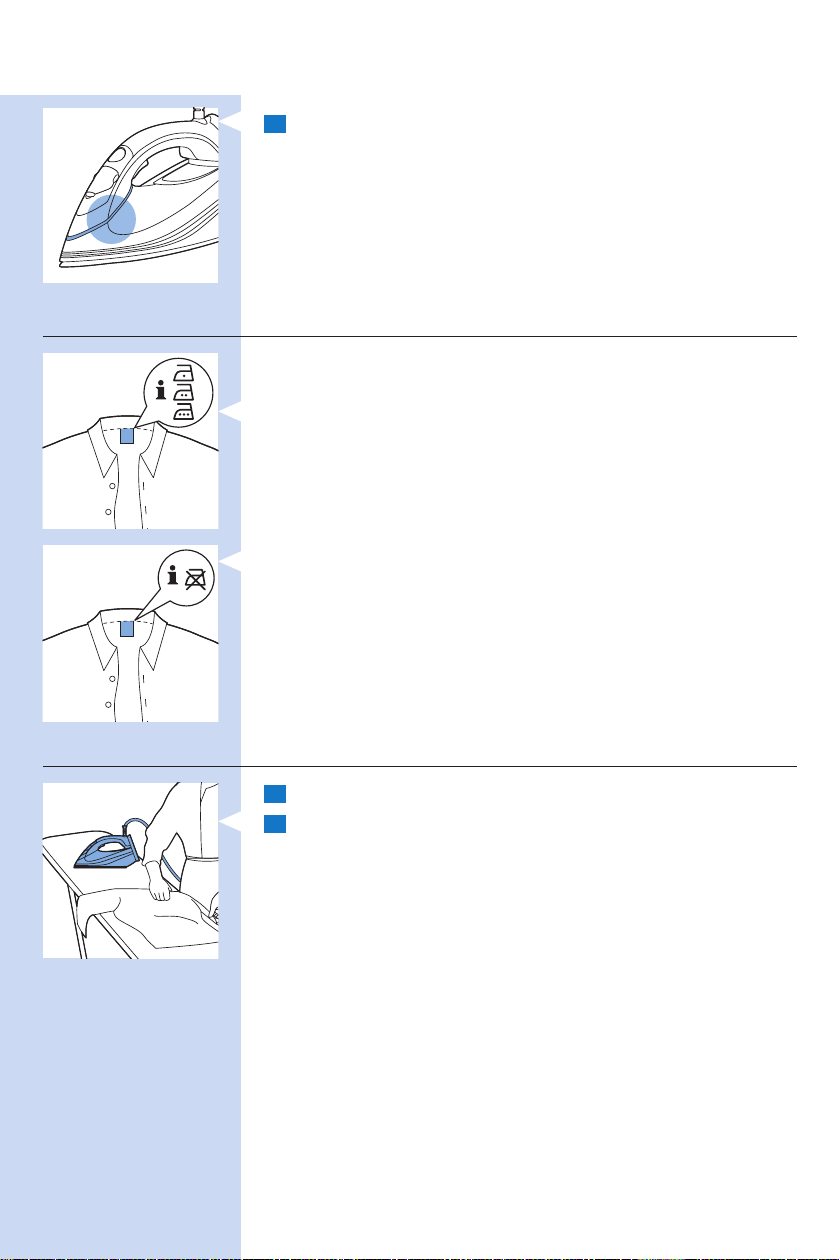
3 When the iron is ready for use, the Smart light lights up blue
continuously.
Temperature and steam setting
The OptimalTemp technology enables you to iron all types of ironable
fabrics, in any order, without adjusting the iron temperature or steam
setting.
- Fabrics with these symbols are ironable, for example linen, cotton,
polyester, silk, wool, viscose, rayon.
- Fabrics with this symbol are not ironable. These fabrics include synthetic
fabrics such as Spandex or elastane, Spandex-mixed fabrics and
polyolens (e.g. polypropylene), but also prints on garments.
Ironing
1 Unfold your ironing board and set it to the appropriate height.
2 Place the garment you want to steam iron on the ironing board.
Note: With the OptimalTemp technology, every single garment can be ironed
effectively and safely, even delicate fabrics like silk.
Page 12
ENGLISH12
3 YoucanstartironingwhentheSmartlightstopsashingandlights
up continuously.
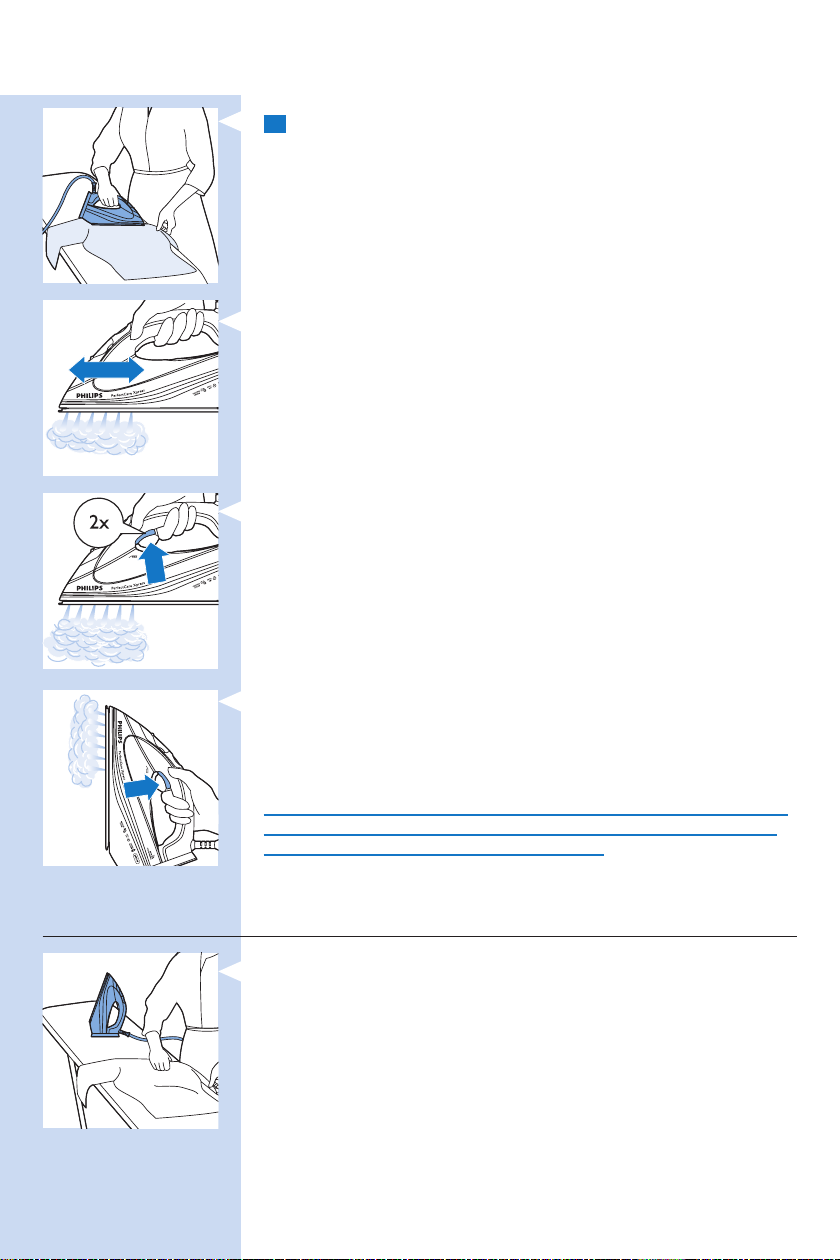
- Thanks to the Auto Steam Sensor technology, the iron starts steaming
automatically when it is moved.
Steam Boost function (specic types only)
- Press the steam trigger twice. The iron delivers one single shot of high
steam output to remove stubborn wrinkles.
- During delivery of the Steam Boost, the Smart light ashes quickly.
Vertical steam ironing
- Hold the iron in vertical position. Then press and hold the steam trigger
to steam the garment vertically.
Tip: Pull the garment with one hand to stretch it for more effective wrinkle
removal.
Hot steam is emitted from the iron. Never attempt to remove wrinkles
from a garment while someone is wearing it. Do not apply steam near
your or someone else’s body to prevent burns.
Note: Water is regularly pumped into the steam chamber, which causes the
iron to produce a pumping sound. This is normal.
Putting down the iron during ironing
- Place the iron on its heel on the ironing board.
Page 13
ENGLISH 13
ECO mode (specic types only)
During ironing, you can use the ECO mode to save energy but still have
sufcient steam to iron all your garments.
Note: For the best results, we advise you to use the ‘OptimalTemp’ mode.
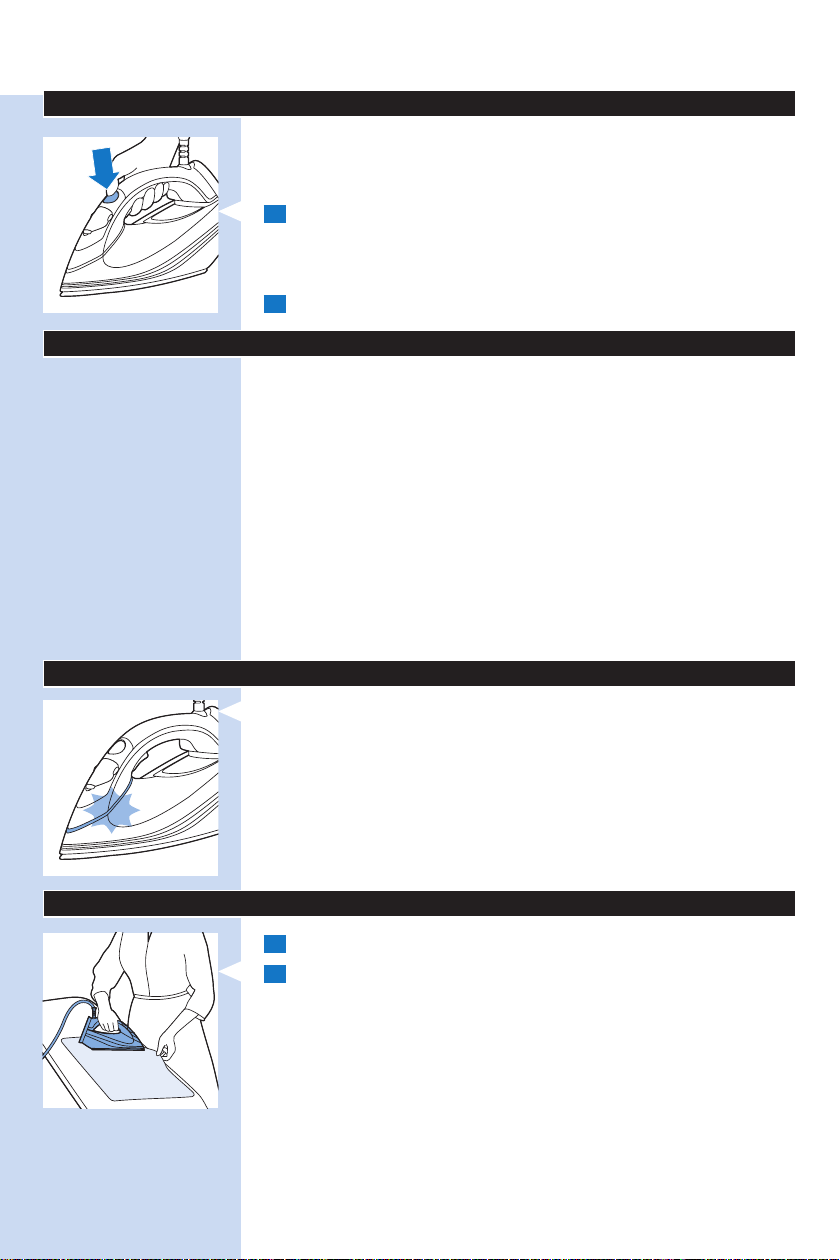
1 Press the ECO button when the appliance is switched on. The Smart
lightstartsashinggreen.WhentheironhasreachedtheECOmode
andisreadyforuse,theSmartlightstopsashingandlightsupgreen
continuously.
2 To go back to the ‘OptimalTemp’ mode, press the ECO button again.
Ironing tips
Minimising wrinkles while drying
Start wrinkle removal early in the drying process by spreading out your
laundry properly after washing and by putting garments on hangers to
make them dry naturally with fewer wrinkles.
Best practice shirt ironing
Start with the time-consuming parts like collar, cuff links and sleeves. Next,
iron the bigger parts like front and back to prevent wrinkling the bigger
parts when you are busy ironing the time-consuming parts.
Collar: When you iron a collar, start on its underside and work from the
outside (the pointy end) inwards. Turn over and repeat. Fold down the
collar and press the edge for a more crisp nish.
Buttons: Iron on the reverse side of the buttons for more effective and
faster ironing.
Safety Auto-off
- To save energy, the appliance switches off automatically when it has not
been moved for 3 minutes in horizontal position, or 8 minutes when
left standing on its heel. The Smart light star ts ashing slowly.
- To reactivate the iron, press the steam trigger. The iron starts heating
up again.
Note: The steam iron is not switched off completely when it is in Safety Auto-off
mode. Unplug the iron to switch it off.
Cleaning and maintenance
1 Clean the appliance with a moist cloth after every use.
2 To easily and effectively remove stains, let the appliance heat up and
move the soleplate over a moist cloth.
Tip: Clean the soleplate regularly to ensure smooth gliding.
Page 14
ENGLISH14
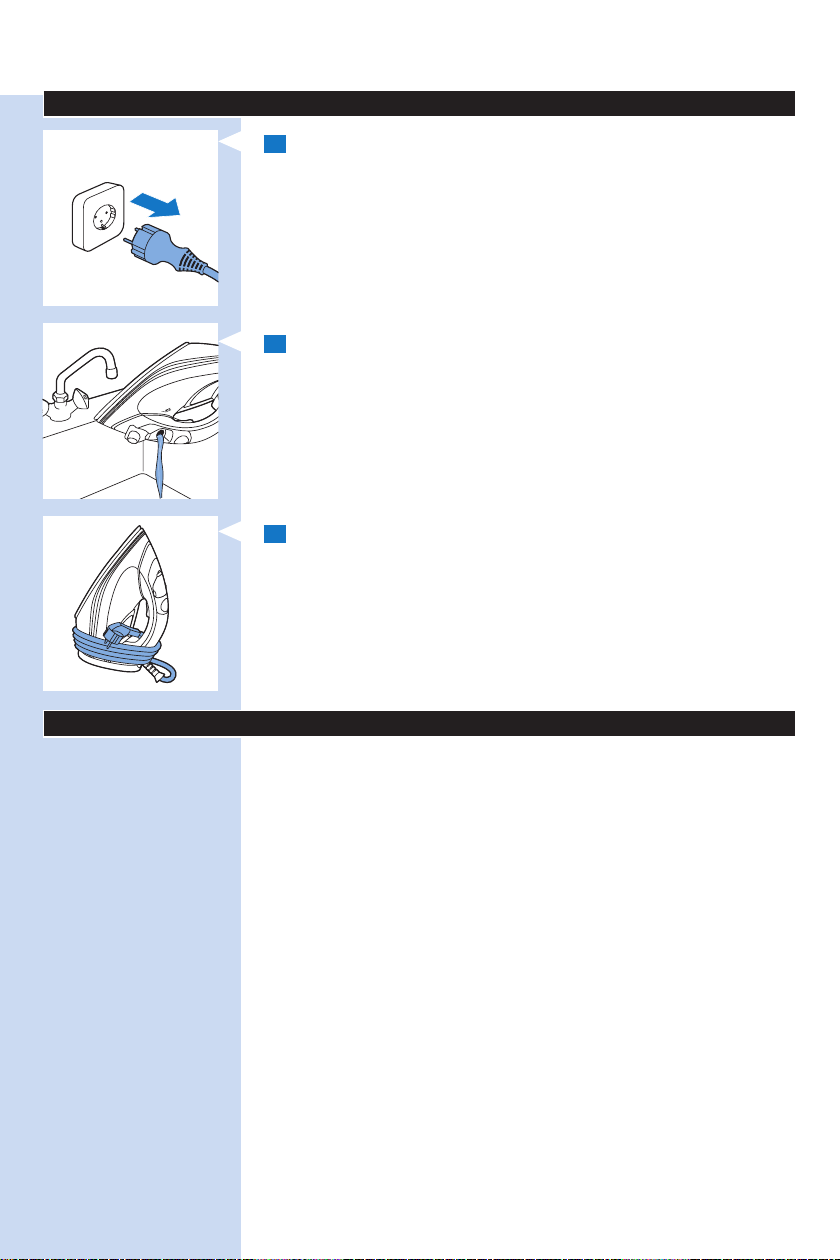
Storage
1 Remove the plug from the wall socket.
2 Empty the water tank and let the iron cool down in a safe place.
3 Windthemainscordroundtheheeloftheapplianceandxitwith
the cord clip. Store the iron on its heel in a safe and dry place.
Troubleshooting
This chapter summarises the most common problems you could
encounter with the appliance. If you are unable to solve the problem with
the information below, visit www.philips.com/support for a list of
frequently asked questions or contact the Consumer Care Centre in
your country.
Page 15

Problem Possible cause Solution
ENGLISH 15
The iron is plugged
in, but the soleplate
is cold.
The iron does not
produce any steam.
The iron does not
produce any steam
when moved.
The iron continues to
steam when it is not
moved.
The iron does not
produce Steam Boost.
Water droplets drip
onto the fabric during
ironing.
The Smart light ashes
slowly.
Dirty water and
impurities come out
of the soleplate or the
soleplate is dirty.
There is a connection problem. Check the mains cord, the plug and the
There is not enough water in the
water tank.
The iron is not hot enough to
produce steam.
You did not move the iron. This iron is equipped with a motion
The iron is not plugged in. Plug in the iron to switch it on.
Although the Auto Steam Sensor
technology covers a large number
of ironing movements, there may
still be some movements that do
not activate the sensor.
Because of the Auto Steam Sensor
Technology, steam may continue
to be produced for 1-4 seconds
to ensure good wrinkle removal at
the end of the ironing stroke. This is
normal.
You have used the Steam Boost
function too often within a very
short period.
The iron is not hot enough. Wait until the Smart light has stopped
You have not closed the cap of the
lling opening properly.
You have put a chemical in the
water tank.
The Safety Auto-off mode is active.
The iron has been switched to
standby mode(see chapter ‘Safety
Auto-off’).
Impurities or chemicals present in
the water have deposited in the
steam vents or on the soleplate.
wall socket.
Fill the water tank (see chapter ‘Using
the appliance’, section ‘Filling the water
tank’).
Wait until the Smart light has stopped
ashing and lights up continuously.
sensor and starts producing steam as
soon as it is moved.
Press the steam trigger to start
steaming.
If you want to avoid this, place the iron
on its heel.
Continue ironing in horizontal position
and wait a while before you use the
Steam Boost function again.
ashing and lights up continuously.
Press the cap until you hear a click.
Rinse the water tank and do not put any
perfume or any chemical in the water
tank.
To reactivate the iron, press the steam
trigger. The iron starts heating up again.
Clean the soleplate with a damp cloth.
Page 16

ENGLISH16
Problem Possible cause Solution
The iron leaves a shine
or an imprint on the
garment.
The iron produces a
pumping sound.
The iron produces a
loud pumping noise.
The iron steams
continuously when
placed horizontally on
the ironing board for
20-30 seconds.
Feature GC5060 GC5057 GC5055 GC5050
OptimalTemp technology 3 3 3 3
Compact, powerful steam
generation technology
Blue Smart light 3 3 3 3
Constant steam output 65g/min 65g/min 65g/min 50g/min
Auto Steam Sensor 3 3 3 3
Soleplate SteamGlide SteamGlide SteamGlide anodilium
ECO button 3 - - -
Steam Boost 3 3 3 -
Constant vertical steam 3 3 3 3
Soft-grip handle 3 3 3 3
Water tank capacity (ml) 320 320 320 320
Anti-drip system 3 3 3 3
Safety Auto-off mode 3 3 3 3
360° swivel cord 3 3 3 3
Cord length (m) 2.5 2.5 2.5 2.5
The surface to be ironed was
uneven, for instance because you
ironed over a seam or a fold in the
garment.
Water is being pumped into the
steam chamber. This is normal.
There is no water in the water tank. Fill the water tank (see chapter ‘Using
The ironing board did not provide a
good at support and this activated
the Auto Steam Sensor in the iron.
Overview of models
3 3 3 3
The iron is safe to use on all garments.
The shine or imprint is not permanent
and disappears when you wash the
garment. Avoid ironing over seams or
folds. You can also place a cotton cloth
over the area to be ironed to avoid
imprints.
If the pumping sound continues nonstop,
unplug the iron and contact the
Consumer Care Centre.
the appliance’, section ‘Filling the water
tank’).
Place the iron on its heel when you are
not ironing to prevent this problem.
Page 17

FRANÇAIS
Table des matières
Important 17
Introduction 18
Présentation du produit 19
Avant la première utilisation 19
Utilisation de l’appareil 20
Vérication de la dureté de l’eau 20
Remplissage du réservoir 21
Temps de chauffe 21
Température et réglage de la vapeur 22
Repassage 22
Mettre le fer sur son talon pendant le repassage 23
Mode ECO (certains modèles uniquement) 23
Conseils pour le repassage 24
Arrêt automatique 24
Nettoyage et entretien 24
Rangement 24
Dépannage 25
Aperçu des modèles 27
Important
Lisez attentivement ce mode d’emploi avant d’utiliser l’appareil et
conservez-le pour un usage ultérieur.
Danger
- Ne plongez jamais l’appareil dans l’eau.
Avertissement
- Avant de brancher l’appareil, vériez que la tension indiquée sur la
plaque signalétique correspond à la tension secteur locale.
- Vériez que le niveau de puissance de la prise secteur est adapté
(16 A) avant de brancher l’appareil.
- N’utilisez pas l’appareil si la che, le cordon d’alimentation ou l’appareil
lui-même est endommagé ou s’il est tombé et/ou si de l’eau s’en
écoule.
- Si le cordon d’alimentation est endommagé, il doit être remplacé
par Philips, par un Centre Service Agréé Philips ou par un technicien
qualié an d’éviter tout accident.
- Ne laissez jamais l’appareil sans surveillance pendant qu’il est branché.
- Cet appareil peut être utilisé par les enfants à partir de 8 ans et par
des personnes aux capacités physiques, sensorielles ou mentales
réduites ou qui ont un manque d’expérience et de connaissances s’ils
ont reçu des instructions quant à l’utilisation sécurisée de l’appareil
ou qu’ils sont supervisés pour une utilisation sécurisée et s’ils ont pris
connaissance des dangers encourus.
- Ne laissez pas les enfants jouer avec l’appareil.
- Gardez l’appareil et son cordon d’alimentation hors de portée des
enfants de moins de 8 ans lorsque l’appareil est allumé ou qu’il refroidit.
- Les enfants ne sont pas autorisés à nettoyer l’appareil sans surveillance.
- Évitez tout contact entre le cordon d’alimentation et la semelle du fer à
repasser lorsqu’elle est chaude.
17
Page 18
FRANÇAIS18
Attention
- Branchez l’appareil uniquement sur une prise secteur mise à la terre.
- Placez et utilisez toujours l’appareil sur une surface stable, plane et
horizontale. Si vous préférez placer le fer sur son talon, veillez à le
positionner sur une surface stable.
- Vériez régulièrement l’état du cordon d’alimentation.
- Déroulez complètement le cordon d’alimentation avant de le brancher
sur la prise secteur.
- La semelle du fer à repasser peut devenir très chaude et peut par
conséquent provoquer des brûlures si vous la touchez.
- Lorsque vous avez ni le repassage, que vous nettoyez l’appareil,
que vous vous absentez même pour une courte durée et que vous
remplissez le réservoir d’eau : placez le fer en position horizontale
ou sur son talon sur une surface stable et débranchez le cordon
d’alimentation de la prise secteur.
- Ne mettez pas de parfum, de vinaigre, d’amidon, de détartrants, de
produits d’aide au repassage ou autres agents chimiques dans le
réservoir d’eau.
- Cet appareil est uniquement destiné à un usage domestique intérieur.
Champs électromagnétiques (CEM)
Cet appareil Philips est conforme à toutes les normes relatives aux champs
électromagnétiques (CEM). Il répond aux règles de sécurité établies
sur la base des connaissances scientiques actuelles s’il est manipulé
correctement et conformément aux instructions de ce mode d’emploi.
Mise au rebut
- Lorsqu’il ne fonctionnera plus, ne jetez pas l’appareil avec les ordures
ménagères, mais déposez-le à un endroit assigné à cet effet, où
il pourra être recyclé. Vous contribuerez ainsi à la protection de
l’environnement.
- Pour permettre le recyclage de l’appareil, les éléments en plastique
utilisés pour cet appareil ont été codés. L’emballage en carton est
réalisé à partir de 90 % de matériaux recyclés et est entièrement
recyclable.
Introduction
Vous avez acheté un appareil Philips. Nous vous en remercions.
- Le nouveau fer vapeur PerfectCare Xpress de Philips vous propose une
façon innovante de repasser vos vêtements. Nous connaissons tous
les tracas liés aux fers traditionnels : choisir la température adéquate
pour vos tissus les plus difciles et les plus délicats, attendre que le fer
chauffe ou refroidisse pour éviter d’abîmer vos vêtements à cause d’un
fer trop chaud. Ces problèmes appartiennent désormais au passé grâce
au nouveau fer vapeur PerfectCare Xpress de Philips.
- En principe, l’élimination des plis se fait par le transfert de la chaleur au
tissu. Dans le passé, le repassage était effectué avec une semelle très
chaude. Alors la vapeur a été ajoutée pour améliorer le transfert de
chaleur, optimisant ainsi les temps de repassage. Nos recherches ont
conrmé que la meilleure façon d’enlever les plis efcacement était la
combinaison de vapeur abondante et d’une température de semelle
optimale. En effet, c’est la vapeur qui permet d’ôter les plis, et non
la température de la semelle. Il suft que la semelle soit légèrement
au-dessus de la température de vapeur pour éliminer toute humidité.
Il s’agit de la température optimale.
Page 19

FRANÇAIS 19
- Dans le passé, une grande quantité de vapeur avec cette température
optimale aurait entraîné des fuites d’eau. Nous avons développé une
chambre à vapeur unique, qui produit un débit régulier de vapeur
humide pénétrant en profondeur dans le tissu pour un repassage
rapide sans aucun risque de fuites.
- Le repassage est maintenant véritablement simple - aucun réglage
de température n’est nécessaire, plus besoin d’attendre que le fer
chauffe ou refroidisse. C’est plus rapide, quelle que soit la personne qui
repasse. Grâce à la technologie OptimalTemp, tous vos vêtements sont
parfaitement repassés et en toute sécurité.
- Ce fer a été approuvé par The Woolmark Company Pty Ltd pour
le repassage de vêtements en laine à condition que ceux-ci soient
repassés selon les instructions indiquées sur l’étiquette du vêtement
et celles fournies par le fabricant du fer. R1201. Au Royaume-Uni, en
République d’Irlande, à Hong-Kong et en Inde, la marque commerciale
Woolmark est une marque de certication.
Présentation du produit (g. 4)
1 Bouton ECO (certains modèles uniquement)
2 Gâchette vapeur pour défroissage vertical et Effet pressing
3 Bouchon de l’orice de remplissage
4 Réservoir d’eau avec indication de niveau
5 Voyant intelligent
6 Semelle
7 Plaque signalétique
8 Cordon d’alimentation avec prise secteur
Avant la première utilisation
Cet appareil est uniquement destiné au repassage et au défroissage des
vêtements.
1 Retirezlesmatériauxd’emballageetlesautocollants.
2 Enlevez le couvercle de protection de la semelle avant d’utiliser
l’appareil.
3 Enlevez l’étiquette volante du fer.
Page 20

FRANÇAIS20
60 sec.
Utilisation de l’appareil
Vérication de la dureté de l’eau
Votre appareil a été conçu pour être utilisé avec l’eau du robinet. Si vous
habitez dans une région où l’eau est très calcaire, des dépôts se formeront
rapidement. Il est dès lors recommandé de commencer par vérier la
dureté de l’eau au moyen des bandelettes de test fournies.
1 Plongez la bandelette de test dans l’eau du robinet pendant
1 seconde.
2 Secouez la bandelette pendant 60 secondes.
3 Vériezlenombredecarréssurlabandeletteayantchangéde
couleuretcomparezcerésultatauxdonnéesindiquéesdansle
tableau de dureté de l’eau ci-dessous.
Tableau de dureté de l’eau
Carrés ayant
Dureté de l’eau Conseil
changé de couleur
1
Aucun Eau très douce Utilisez l’eau du robinet
2
Un Eau douce Utilisez l’eau du robinet
3
Deux Eau peu calcaire Utilisez un mélange de 50 % d’eau du robinet et 50 %
d’eau distillée*
4
Trois Eau calcaire Utilisez un mélange de 50 % d’eau du robinet et 50 %
d’eau distillée ou de l’eau ltrée à l’aide du ltre de
détartrage d’eau IronCare.
5
Quatre Eau très calcaire Utilisez un mélange de 30 % d’eau du robinet et 70 %
d’eau distillée ou de l’eau ltrée à l’aide du ltre de
détartrage d’eau IronCare.
* Pour plus de confort, nous vous recommandons d’utiliser de l’eau ltrée
au moyen du ltre de détartrage d’eau IronCare.
Remarque : Consultez le site Web www.philips.com/IronCare pour en savoir
plus sur le ltre de détartrage d’eau IronCare. Vous pouvez acheter un ltre de
détartrage d’eau IronCare dans la boutique en ligne sur www.shop.philips.com/
service. Vous pouvez également contacter le Service Consommateurs Philips.
Page 21

FRANÇAIS 21
Remplissage du réservoir
Attention : Ne mettez pas de parfum, de vinaigre, d’amidon, de
détartrants, de produits d’aide au repassage ou autres agents chimiques
dans le réservoir d’eau, car votre appareil n’est pas conçu pour
fonctionner avec ces produits chimiques.
1 Remplissez le réservoir d’eau jusqu’au niveau MAX à l’aide du
gobelet de remplissage fourni si votre eau du robinet est douce.
Remarque : Si vous utilisez la carafe anti-calcaire IronCare, vous pouvez remplir
le réservoir d’eau avec l’eau ltrée directement depuis cette carafe.
Temps de chauffe
1 Branchezlachesuruneprisemuraleavecmiseàlaterre.
2 Le voyant Smart commence à clignoter en bleu pour indiquer que le
fer chauffe.
3 Lorsque le fer est prêt à être utilisé, le voyant Smart s’allume en bleu
de manière continue.
Page 22

FRANÇAIS22
Température et réglage de la vapeur
La technologie OptimalTemp vous permet de repasser tous les types de
tissus repassables, dans l’ordre que vous souhaitez, sans avoir à régler la
température du fer ou la vapeur.
- Les tissus avec les symboles suivants sont repassables. Par exemple, le
lin, le coton, le polyester, la soie, la laine, la viscose et la rayonne (soie
articielle).
- Les tissus avec les symboles suivants ne sont pas repassables. Parmi ces
tissus : les tissus synthétiques tels que l’élasthanne, les tissus comprenant
de l’élasthanne et des polyolénes (par exemple du polypropylène),
mais également les impressions sur les vêtements.
Repassage
1 Dépliez votre planche à repasser et placez-la à la hauteur appropriée.
2 Placez le vêtement que vous voulez repasser sur la planche à
repasser.
Remarque : Grâce à la technologie OptimalTemp, tous vos vêtements sont
parfaitement repassés et en toute sécurité, mêmes les tissus délicats comme
la soie.
3 Vous pouvez commencer le repassage lorsque le voyant Smart cesse
de clignoter et qu’il s’allume de manière continue.
- Grâce à la technologie Auto Steam Sensor, le fer commence
automatiquement à dégager de la vapeur lorsqu’il est déplacé.
Page 23

FRANÇAIS 23
Fonction Effet pressing (certains modèles uniquement)
- Appuyez à deux reprises sur la gâchette vapeur. Le fer libère un seul jet
de vapeur au débit élevé pour enlever les faux plis les plus tenaces.
- Le voyant Smart clignote rapidement lorsque l’Effet pressing est activé.
Défroissage vertical
- Tenez le fer en position verticale. Maintenez ensuite la gâchette vapeur
activée pour repasser le vêtement verticalement.
Conseil : Tirez le vêtement avec une main an de l’étirer et obtenir ainsi une
meilleure élimination des plis.
Le fer émet de la vapeur chaude. N’essayez jamais d’enlever les plis d’un
vêtement directement sur la personne qui le porte. N’appliquez pas de
vapeur près de vos mains ou de celles de quelqu’un d’autre, pour éviter
toute brûlure.
Remarque : L’eau est régulièrement pompée dans la chambre à vapeur, ce qui
provoque un léger bruit de pompe. Ce phénomène est normal.
Mettre le fer sur son talon pendant le repassage
- Placez le fer sur son talon sur la table à repasser.
Mode ECO (certains modèles uniquement)
Pendant le repassage, vous pouvez utiliser le mode ECO pour économiser
l’énergie tout en protant d’une vapeur sufsante pour repasser tous vos
vêtements.
Remarque : Pour de meilleurs résultats, nous vous conseillons d’utiliser le mode
« OptimalTemp ».
1 Appuyez sur le bouton ECO lorsque l’appareil est allumé. Le voyant
Smart commence à clignoter en vert. Lorsque le fer a atteint la
température ECO et est prêt à être utilisé, le voyant Smart cesse de
clignoter et s’allume en vert de manière continue.
2 Pour retourner au mode « OptimalTemp », appuyez à nouveau sur le
bouton ECO.
Page 24

FRANÇAIS24
Conseils pour le repassage
Réduire les plis pendant le séchage
Commencez par éliminer les plis dès le séchage de vos vêtements en
les étendant correctement et en les plaçant sur des cintres pour les faire
sécher naturellement et éviter la formation de plis.
Meilleure pratique en matière de repassage de chemise
Commencez par les parties prenant le plus de temps, notamment le col,
les boutons de manchette et les manches. Puis, repassez les plus grandes
parties comme les parties avant et arrière de la chemise pour éviter de les
plisser lorsque vous repassez les parties les plus contraignantes.
Col : Lorsque vous repassez un col, commencez par le dessous du col et
allez de l’extérieur (l’extrémité pointue) vers l’intérieur. Retournez le col et
renouvelez l’opération. Repliez le col et appuyez sur le bord pour obtenir
un résultat plus net.
Boutons : Repassez sur l’envers des boutons pour obtenir de meilleurs
résultats de repassage.
Arrêt automatique
- Pour économiser de l’énergie, l’appareil s’éteint automatiquement
lorsqu’il n’a pas été déplacé pendant 3 minutes en position horizontale
ou 8 minutes sur son talon. Le voyant Smart commence à clignoter
lentement.
- Pour réactiver le fer, appuyez sur la gâchette vapeur. Le fer
recommence à chauffer.
Remarque : Le fer vapeur n’est pas complètement éteint lorsqu’il est en mode
d’arrêt automatique. Débranchez le fer pour l’éteindre.
Nettoyage et entretien
1 Nettoyez l’appareil avec un chiffon humide après chaque utilisation.
2 Pourenleverfacilementetefcacementdestâches,faiteschauffer
l’appareil et passez la semelle sur un chiffon humide.
Conseil : Nettoyez la semelle régulièrement pour garantir une glisse optimale.
Rangement
1 Débranchez l’appareil.
Page 25

FRANÇAIS 25
2 Videz le réservoir d’eau et laissez refroidir le fer en lieu sûr.
3 Enroulez le cordon d’alimentation autour du talon de l’appareil
etxez-leàl’aidedelabride.Rangezlefersursontalondansun
endroit sûr et sec.
Dépannage
Cette rubrique présente les problèmes les plus courants que vous
pouvez rencontrer avec votre appareil. Si vous ne parvenez pas à
résoudre le problème à l’aide des informations ci-dessous, rendez-vous sur
www.philips.com/support pour consulter les questions fréquemment
posées, ou contactez le Service Consommateurs de votre pays.
Problème Cause possible Solution
Le fer à repasser
est branché, mais la
semelle est froide.
L’appareil ne produit
pas de vapeur.
L’appareil ne produit
pas de vapeur
lorsqu’il a été déplacé.
Il s’agit d’un problème de
branchement.
Il n’y a pas assez d’eau dans le
réservoir d’eau.
Le fer n’a pas sufsamment chauffé
pour produire de la vapeur.
Vous n’avez pas déplacé le fer. Ce fer est équipé d’un capteur de
Le fer n’est pas branché. Branchez le fer pour l’allumer.
Bien que la technologie Auto Steam
Sensor englobe bon nombre de
mouvements de repassage, il se peut
toujours que certains mouvements
n’activent pas le capteur.
Vériez le cordon d’alimentation, la
che et la prise secteur.
Remplissez le réservoir d’eau (voir le
chapitre « Utilisation de l’appareil »,
section « Remplissage du réservoir »).
Patientez jusqu’à ce que le voyant
Smart cesse de clignoter et s’allume de
manière continue.
mouvement et il commence à générer
de la vapeur dès qu’il est déplacé.
Appuyez sur la gâchette vapeur pour
commencer à produire de la vapeur.
Page 26

FRANÇAIS26
Problème Cause possible Solution
Le fer continue à
produire de la vapeur
lorsqu’il est immobile.
Le fer ne produit pas
de jet de vapeur Effet
pressing.
Des gouttes d’eau
tombent sur le tissu
lors du repassage.
Le voyant Smart
clignote lentement.
De l’eau sale et
des impuretés
s’échappent de la
semelle ou la semelle
est sale.
Le fer laisse un voile
ou une marque sur l
e vêtement.
Le fer produit un
bruit de pompe.
Le fer produit un fort
bruit de pompe.
Le fer produit de la
vapeur en continu
lorsqu’il est posé
horizontalement sur
la table à repasser
pendant 2030 secondes.
Grâce à la technologie Auto Steam
Sensor, le fer peut continuer à
produire de la vapeur pendant 1
à 4 secondes an d’éliminer les
derniers plis en n de repassage. Ce
phénomène est normal.
Vous avez utilisé la fonction Effet
pressing trop souvent pendant une
courte période.
Le fer n’est pas sufsamment chaud. Patientez jusqu’à ce que le voyant
Vous n’avez pas correctement
fermé le bouchon de l’orice de
remplissage.
Vous avez ajouté un produit
chimique dans le réservoir d’eau.
Le mode d’arrêt automatique est
actif. Le fer a basculé en mode veille
(voir le chapitre « Mode d’arrêt
automatique »).
Des impuretés ou dépôts de calcaire
se sont formés sur les trous de la
semelle ou à l’intérieur de celle-ci.
La surface à repasser était non
plane, par exemple parce que vous
repassiez sur une couture ou un pli
dans le vêtement.
L’eau est pompée dans la chambre à
vapeur. Ce phénomène est normal.
Il n’y a pas d’eau dans le réservoir
d’eau.
La table à repasser ne fournit pas
une bonne surface plane et cela a
activé le capteur de mouvement
Auto Steam Sensor du fer.
Pour éviter la production de vapeur,
placez le fer sur son talon.
Continuez à utiliser le fer en position
horizontale et patientez quelques
instants avant d’utiliser de nouveau la
fonction Effet pressing.
Smart cesse de clignoter et s’allume de
manière continue.
Appuyez sur le bouchon jusqu’à ce que
vous entendiez un clic.
Rincez le réservoir d’eau et ne mettez
aucun parfum ni produit chimique dans
le réservoir d’eau.
Pour réactiver le fer, appuyez sur la
gâchette vapeur. Le fer recommence à
chauffer.
Nettoyez le fer avec un chiffon humide.
Le fer peut être utilisé en toute sécurité
sur tous les vêtements. Le voile ou
la marque n’est pas permanent(e) et
partira si vous lavez le vêtement. Évitez
de repasser sur les coutures ou plis.
Vous pouvez aussi placer un chiffon
en coton sur la zone à repasser an
d’éviter des marques.
Si le bruit de pompe continue sans
arrêt, débranchez le fer et contactez le
Service Consommateurs Philips.
Remplissez le réservoir d’eau (voir le
chapitre « Utilisation de l’appareil »,
section « Remplissage du réservoir »).
Placez le fer sur son talon lorsque
vous ne repassez pas pour éviter ce
problème.
Page 27

FRANÇAIS 27
Aperçu des modèles
Fonction GC5060 GC5057 GC5055 GC5050
Technologie OptimalTemp 3 3 3 3
Technologie de générateur de
vapeur compacte et puissante
Voyant Smart bleu 3 3 3 3
Débit de vapeur constant 65 g/min 65 g/min 65 g/min 50 g/min
Détecteur de vapeur auto. 3 3 3 3
Semelle SteamGlide SteamGlide SteamGlide anodilium
Bouton ECO 3 - - -
Effet pressing 3 3 3 -
Défroissage vertical continu 3 3 3 3
Poignée ergonomique 3 3 3 3
Capacité du réservoir d’eau
(ml)
Système anti-goutte 3 3 3 3
Mode d’arrêt automatique 3 3 3 3
Cordon rotatif à 360° 3 3 3 3
Longueur du cordon (m) 2,5 2,5 2,5 2,5
3 3 3 3
320 320 320 320
Page 28

Page 29

29303132333435
Page 30

Page 31

Page 32

Page 33

Page 34
Page 35

۳
۱
۲
۳
۴
۵
IronCare
IronCare
IronCare
www.philips.com/IronCare
IronCare IronCare
www.shop.philips.com/serice
hilips
۱
۱
۲
۳
۴
۵
IronCare
Page 36

36
Page 37

3738394041424344454647
Page 38

Page 39

Page 40

Page 41

Page 42

Page 43

Page 44
Page 45

Page 46

Page 47

Page 48
48
Page 49

Page 50

4239.000.8081.1
 Loading...