


Azur
GC4243, GC4238, GC4233, GC4223, GC4218

2

GC4243, GC4238, GC4233, GC4223, GC4218
3
ENGLISH 4
18
25
»``Hô``Y

Important
Read these instructions for use carefully before using the appliance and
save them for future reference.
- Never leave the iron unattended when it is connected to the mains.
- This appliance is not intended for use by children.
- Infirm persons should not be allowed to use the appliance without
supervision. Keep an eye on children to make sure that they do not
play with the appliance.
- The soleplate of the iron can become extremely hot and may cause
burns if touched.
- Never use the appliance if it is damaged in any way.
- When you have finished ironing, when you clean the appliance, when
you fill or empty the water tank and also when you leave the iron
even for a short while: set the steam control to position O, put the
iron on its heel and remove the plug from the wall socket.
- If the mains cord of this appliance is damaged, it may only be
replaced by a service centre authorised by Philips in order to avoid
hazardous situations.
Before first use
1 Check if the voltage indicated on the appliance corresponds to
the local mains voltage before you connect the appliance.
C
2 Remove the protective heat cover from the soleplate (type
GC4243 only). Remove any sticker or protective foil from the
soleplate.
3 Let the iron heat up to maximum temperature and pass the
iron over a piece of damp cloth for several minutes to remove
any residues from the soleplate.
B
The iron may give off some smoke when you use it for the first time.This
will cease after a short while.
Preparing for use
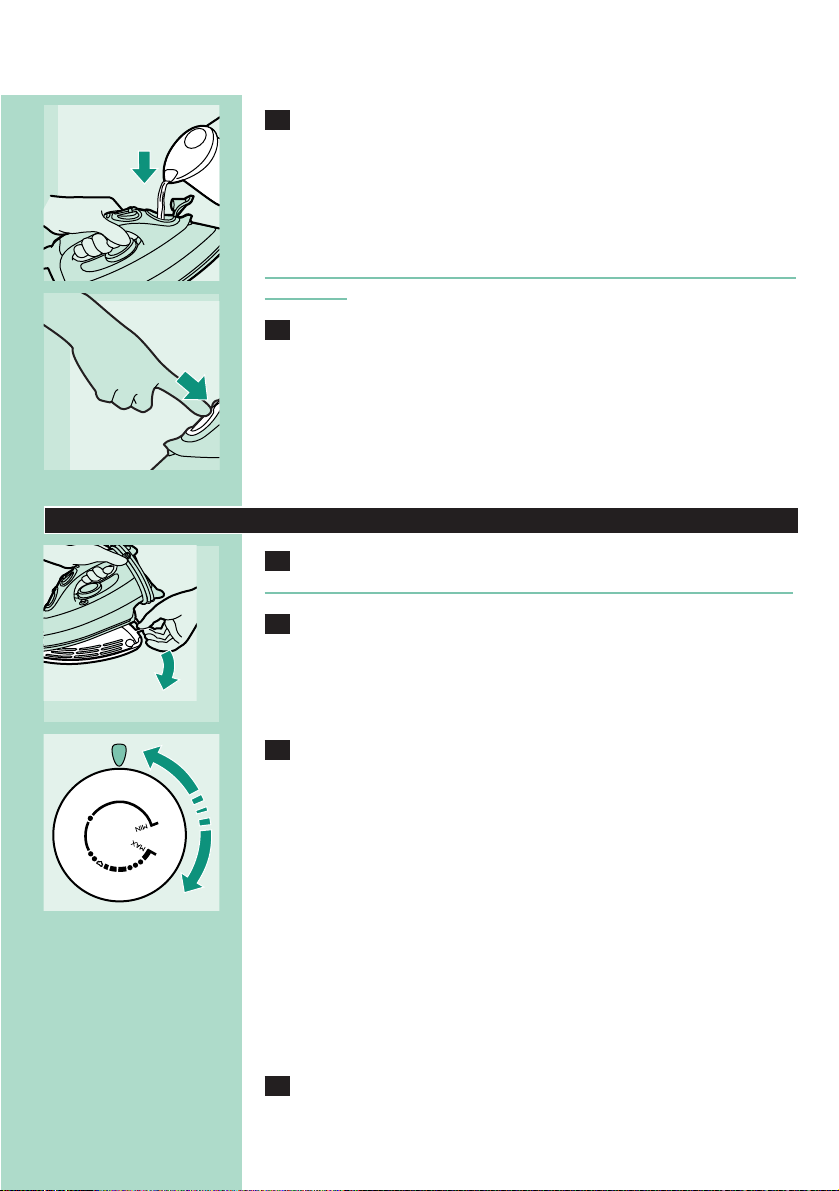
Filling the water tank
Never immerse the iron in water.
1 Remove the mains plug from the wall socket.
C
2 Set the steam control to position O (= no steam).
3 Open the cap of the filling opening.
4 Tilt the iron backwards.
ENGLISH4
C
5 Fill the water tank with tap water up to the maximum level by
means of the filling cup.
Do not fill the tank beyond the MAX indication.
◗ If the tap water in your area is very hard, we advise you to mix it
with an equal amount of distilled water or to use distilled water
only.
Do not put additives, vinegar, starch or chemically descaled water in the
water tank.
C
6 Close the cap of the filling opening.You will hear a click.
Setting the temperature
C
1 Types GC4243 only: remove the protective heat cover.
Do not leave the protective heat cover on the soleplate during ironing.
2 Put the iron on its heel.
C
3 Set the temperature dial to the required ironing temperature
by turning it to the appropriate position.
- Check the garment label for the required ironing temperature.
- 1 Synthetic fabrics (e.g. acrylic, nylon, polyamide, polyester)
- 1 Silk
- 2 Wool
- 3 Cotton, linen
- If you do not know what kind(s) of fabric(s) an article is made of,
determine the right ironing temperature by ironing a part that will
not be visible when you wear or use the article.
- Silk, woollen and synthetic materials: iron the reverse side of the
fabric to prevent shiny patches. Avoid using the spray function to
prevent stains.
- Start ironing the articles that require the lowest ironing temperature,
such as those made of synthetic fibres.
4 Put the mains plug in an earthed wall socket.
ENGLISH 5
N
Y
L
O
N
N
Y
L
O
N
S
S
I
O
L
K
I
E
L
A
W
I
N
O
E
O
L
N
N
I
E
L
N
I
L
N
O
T
O
N
C
O
T
T
O
C

C
5 When the amber temperature pilot light has gone out, wait a
while before you start ironing.
The amber pilot light will go on from time to time during ironing.
Using the appliance
Steam ironing
1 Make sure that there is enough water in the water tank.
C
2 Select the appropriate steam setting. Make sure that the steam
setting you select is suitable for the ironing temperature
selected:
- 1 - 3 for moderate steam (temperature settings 2 to 3)
- 4 - 6 for maximum steam (temperature settings 3 to MAX)
See 'Setting the temperature'.
B
The iron will start producing steam as soon as the set temperature has
been reached.
Ironing without steam
C
1 Set the steam control to position O (= no steam).
2 Select the recommended ironing temperature.
See 'Setting the temperature'.
Features
Spraying
You can use the spray function to remove stubborn creases at any
temperature.
Make sure that there is enough water in the water tank.
C
1 Press the spray button several times to moisten the article to
be ironed.
ENGLISH6
Shot of steam
A powerful 'shot' of steam helps remove stubborn creases.
The shot-of-steam function can only be used at temperature settings
between 2 and MAX.
C
1 Press and release the shot-of-steam button.
Drip stop
This iron is equipped with a drip-stop function: the iron automatically
stops producing steam when the temperature is too low to prevent
water from dripping out of the soleplate. When this happens you may
hear a sound.
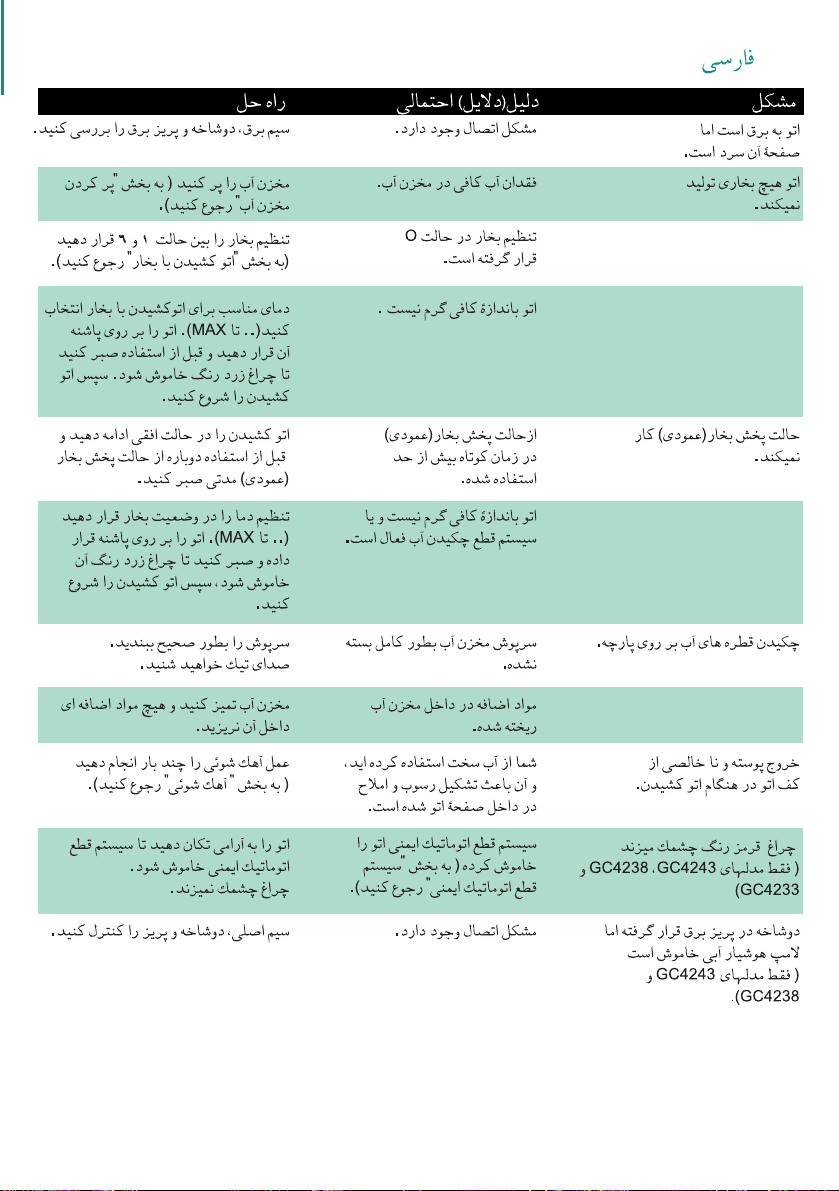
Vertical shot of steam
C
1 The shot-of-steam function can also be used when you hold
the iron in vertical position.
Never direct the steam at people.
Automatic anti-calc function
C
1 The built-in anti-calc system reduces the build-up of scale and
guarantees a longer life for the iron.
ENGLISH 7

Electronic safety shut-off function (types GC4243, GC4238
and GC4233 only)
C
1 The electronic safety shut-off function automatically switches
off the iron if it has not been moved for a while.
◗ The red auto-off pilot light starts blinking to indicate that the iron
has been switched off by the safety shut-off function.
To let the iron heat up again:
- Pick up the iron or move it slightly.
- The red auto-off pilot light goes out. If the temperature of the
soleplate has dropped below the set ironing temperature, the amber
temperature pilot light goes on.
- If the amber pilot light goes on after you have moved the iron, wait
for it to go out before you start ironing.
- If the amber pilot light does not go on after you move the iron, the
soleplate still has the right temperature and the iron is ready for use.
Alert light
C
◗ Types GC4243 and GC4238 only:
- The iron is equipped with a blue alert pilot light.
- The blue alert light burns as long as the iron is plugged in, even if the
iron has been switched off by the safety shut-off function.
Cleaning and maintenance
Using the calc-clean function
You can use the calc-clean function to remove scale and impurities.
◗ Use the calc-clean function once every two weeks. If the water in
your area is very hard (i.e. when flakes come out from the
soleplate during ironing), the calc-clean function should be used
more frequently.
1 Set the steam control to position O.
2 Fill the water tank to the maximum level.
Do not put vinegar or other descaling agents in the water tank.
ENGLISH8

ENGLISH 9
C
3 Select the maximum ironing temperature.
4 Put the plug in the wall socket.
5 Unplug the iron when the amber temperature pilot light has
gone out.
C
6 Hold the iron over the sink, press and hold the calc-clean
button and gently shake the iron to and fro.
B
Steam and boiling water will come out of the soleplate. Impurities and
flakes (if any) will be flushed out.
7 Release the calc-clean button as soon as all the water in the
tank has been used up.
Repeat the calc-clean process if the iron still contains a lot of impurities.
After the calc-clean process
- Put the plug in the wall socket and let the iron heat up to allow the
soleplate to dry.
- Unplug the iron when it has reached the set ironing temperature.
- Move the hot iron gently over a piece of used cloth to remove any
water stains that may have formed on the soleplate.
- Let the iron cool down before you store it.
After ironing
1 Remove the mains plug from the wall socket and let the iron
cool down.
2 Wipe flakes and any other deposits off the soleplate with a
damp cloth and a non-abrasive (liquid) cleaning agent.
3 Clean the upper part of the iron with a damp cloth.
C
4 Regularly rinse the water tank with water. Empty the water
tank after cleaning.
E
N
N
I
L
N
I
L
N
O
T
N
T
O
T
O
O
C
C
L
E
O
N
I
O
N
N
Y
L
Y
O
L
O
N
N
A
L
W
E
I
O
S
K
L
I
S

Storage
1 Remove the mains plug from the wall socket and set the steam
control to position O.
2 Empty the water tank.
C
3 a) Let the iron cool down.Wind the mains cord around the
cord storage facility and fix it with the cord clip.
b)Always store the emptied iron horizontally on a stable surface and
use a cloth to protect the soleplate.
C
4 Protective heat cover (type GC4243 only).
a) Put the iron on the protective heat cover.
Do not use the protective heat cover during ironing.
b)Wind the mains cord around the cord storage facility.
c) Store the iron with the protective heat cover horizontally on a stable
surface.
Guarantee & service
If you need information or if you have a problem, please visit the Philips
Web site at www.philips.com or contact the Philips Customer Care
Centre in your country (you will find its phone number in the
worldwide guarantee leaflet). If there is no Customer Care Centre in
your country, turn to your local Philips dealer or contact the Service
Department of Philips Domestic Appliances and Personal Care BV.
Troubleshooting
This chapter summarises the most common problems you could
encounter with your iron. Please read the different sections for more
details. If you are unable to solve the problem, please contact the
Customer Care Centre in your country.
ENGLISH10

Solution
Check the mains cord, the plug and
the wall socket.
Fill the water tank (see 'Filling the
water tank').
Set the steam control to a position
between 1 and 6 (see 'Steam
ironing').
Select an ironing temperature that is
suitable for steam ironing (2 to
MAX). Put the iron on its heel and
wait until the amber pilot light has
gone out before you start ironing.
Continue ironing in horizontal position
and wait for a while before using the
(vertical) shot-of-steam function again.
Select an ironing temperature that is
suitable for steam ironing (2 to
MAX). Put the iron on its heel and
wait until the amber pilot light has
gone out before you start ironing.
Close the cap properly.You will hear a
click.
Rinse the water tank and do not put
any additive in the water tank.
Use the calc-clean function a few
times (see 'Using the calc-clean
function').
Move the iron slightly to deactivate
the safety shut-off function.The pilot
light stops blinking.
Check the mains cord, the plug and
the wall socket.
Possible cause(s)
There is a connection problem.
There is not enough water in the
water tank.
The steam control has been set to
position O.
The iron is not hot enough.
The (vertical) shot-of-steam function
has been used too often within a very
short period.
The iron is not hot enough and/or the
drip-stop function has been activated.
The cap of the filling opening has not
been closed properly.
An additive has been poured into the
water tank.
You have been using hard water, which
has caused scale flakes to develop
inside the soleplate.
The safety shut-off function has
switched the iron off (see 'Safety shutoff function')
There is a connection problem.
Problem
The iron is plugged in but the soleplate
is cold.
The iron does not produce any steam.
The (vertical) shot-of-steam function
does not work.
Water droplets drip onto the fabric.
Flakes and impurities come out of the
soleplate during ironing.
The red pilot light blinks (types
GC4243, GC4238 and GC4233 only).
The iron is plugged in but the blue alert
light is out (types GC4243 and
GC4238 only).
ENGLISH 11

d∂GTºdG dì d»dO
øº O»Rºdd IadJñºdG ºGSbGdG IAGQb AGêQdG .∂JGƒ∂º Yº G√J√êGƒº dºJìºdG d∂GTºdG UñdJ IQbadG √P√
.∂OdH »a øÅGHRdG IºOñd SH»dG»a R∂QºH dGUJGdG AGêQdG ,Id∂TºdG dì øº »ø∂ºJJ ºd GPG .d»UGaJdG
12
Id∂TºdG
.IOQÉH IOYGbdG ø∂dƒ AGHQ√∂dG »a IdƒUƒº IGƒ∂ºdG
.QGñH »CG IGƒ∂ºdG QOUJ Gd
.dºYJ Gd »OƒºYdG »QGñHdG YaOdG Ia»Xƒ øG
.TGºbdG idY HQSJJ AGº JGQWb
dGdñ IGƒ∂ºdG IOYGb øº IKƒdº OGƒº ƒ JGbGbQ QOUJ
.»∂dG I»dºY
JGd»Oƒº Wba) V»ºƒdGH QºìCGdG QTDhºdG ºƒb»
GC4243 ,GC4238 ,GC4233.(
bQRCGdG QTDhºdG AƒVdG ø∂dƒ AGHQ√∂dGH IdƒUƒº IGƒ∂ºdG øG
JGd»Oƒº Wba) AiaWøº √HøºdGGC4243ƒ
GC4238.(
dºJìºdG HHSdG
.d»UƒJdG »a Id∂Tº ∂Gø√
.AGºdG øGRñ »a aG∂ AGº Oꃻ Gd
YVƒ idG QGñHdGH º∂ìJdG ìGJaº WHV ºJO.
.I»Ga∂dG √»a GºH IøñGS JS»d IGƒ∂ºdG
IOY »OƒºYdG »QGñHdG YaOdG Ia»Xƒ ºGOñJSG ºJ Obd
.IQ»Ub IQJa dGdñ JGQº
d»ZTJ ºJ ƒCG/ƒ I»Ga∂dG √»a GºH IøñGS JS»d IGƒ∂ºdG
.AGºdG JGQWb HQSJ Yøº Ia»Xƒ
.ºG∂ìGH √bGdZG ºJ» ºd IÅHYJdG IìJa AGWZ øG
.AGºdG øGRñ dñGO »aGVG dÅGS H∂S ºJ Obd
ø»ƒ∂J »a JHHS »JdG I»SGb √G»º ø»ºOñJSJ ∂øG
.IGƒ∂ºdG IOYGb dñGO Sd∂dG øº JGbGbQ
IGƒ∂ºdG JabƒCG Ob IºGdSdd »ÅGbdJdG abƒJdG Ia»Xƒ øG
»ÅGbdJdG abƒJdG Ia»Xƒ" IQba idG »QXøG) dºYdG øY
.("IºGdSdd
.d»UƒJdG »a Id∂Tº ∂Gø√
dìdG
SHGbƒ AGHQ√∂dG SHbºƒ »ÅGHQ√∂dG ∂dSdG »UìaG
.WÅGìdG
øGRñ IÅHYJ" IQba idG »QXøG) AGºdG øGRñ »CGdºG
.("AGºdG
6 ƒ 1 ø»H YVƒ idG QGñHdGH º∂ìJdG ìGJaº »WHVG
.("QGñHdGH »∂dG" IQba idG »QXøG)
øº) QGñHdGH »∂dd IºÅGdº IQGQì IêQO »QGJñG2
idGMAX»QXJøG ƒ G√dìG∂ idY IGƒ∂ºdG »YV .(
AOHdG dHb QaUCGdG QTDhºdG AƒVdG AiaWø» øCG idG
.»∂dG I»dºYH
IQJad »QXJøG ƒ »baCG YVƒH »∂dG I»dºY »YHGJ
»OƒºYdG »QGñHdG YaOdG Ia»Xƒ ºGOñJSG dHb IQ»Ub
.GOOêº
øº) QGñHdGH »∂dd IºÅGdº IQGQì IêQO »QGJñG2
idGMAX»QXJøG ƒ G√dìG∂ idY IGƒ∂ºdG »YV .(
AOHdG dHb QaUCGdG QTDhºdG AƒVdG AiaWø» øCG idG
.»∂dG I»dºYH
.∂»d∂ JƒU ø»YºSJS .ºG∂ìGH AGWZdG »bdZCG
dñGO »aGVG dÅGS »CG »YVJ Gd ƒ AGºdG øGRñ »aWTG
.AGºdG øGRñ
JGQº IYVH º∂GQJºdG Sd∂dG a»XøJ Ia»Xƒ »ºOñJSG
Sd∂dG a»XøJ Ia»Xƒ ºGOñJSG" IQba idG »QXøG)
.("º∂GQJºdG
»ÅGbdJdG abƒJdG Ia»Xƒ aGb»Gd Gd»db IGƒ∂ºdG »∂Qì
.V»ºƒdG øY QTDhºdG AƒVdG abƒJ»S .IºGdSdd
SHGbƒ AGHQ√∂dG SHbºƒ »ÅGHQ√∂dG ∂dSdG »UìaG
.WÅGìdG
»``Hô``Y

13
OGƒºdG øº Q»K∂dG idY »ƒJìJ dGRJ Gd IGƒ∂ºdG JøG∂ GPG º∂GQJºdG Sd∂dG a»XøJ Ia»Xƒ I»dºY »QQ∂
.IKƒdºdG
º∂GQJºdG Sd∂dG a»XøJ I»dºY OYH
-.aêJ øCG IOYGbdd »ìºSJd øñSJ IGƒ∂ºdG »YOƒ WGìdG SHGb »a AGHQ√∂dG SHbº »dUƒCG
-.IQGJñºdG IQGQìdG IêQO idG dUJ GºOøY AGHQ√∂dG øY IGƒ∂ºdG »dUaG
-idY Jøƒ∂J Ob øƒ∂J AGº YbH »CG IdGRGd IdºYJSº TGºb IYWb bƒa aWdH IøñGSdG IGƒ∂ºdG »∂Qì
.IGƒ∂ºdG IOYGb
-.G√ø»RñJ dHb Gd»db OQHJ IGƒ∂ºdG »YO
»∂dG I»dºY OYH
1.OQHJ IGƒ∂ºdG »YOƒ WÅGìdG SHGb øº AGHQ√∂dG SHbº »YRøG
2.WTG∂ Q»Z a»XøJ dÅGSƒ IddHº TGºb IYWb IWSGƒH IGƒ∂ºdG IOYGb idY IbdGY OGƒº »CG »ìSºG
3.IddHº TGºb IYWb IWSGƒH IGƒ∂ºdG øº idYCGdG ARêdG »aXø
B
4.a»XøJdG I»dºY OYH AGºdG øGRñ »ZQaCG .AGºdGH AGºdG øGRñ ºGXJøGH »aWTG
ø»RñJdG
1YVƒ idG QGñHdGH º∂ìJdG ìGJaº »WHVG ƒ WÅGìdG SHGb øº AGHQ√∂dG SHbº »dUaGO.
2.AGºdG øGRñ »ZQaCG
B
3√»JHK ƒ √ø»RñJd UUñºdG øG∂ºdG dƒì »ÅGHQ√∂dG ∂dSdG »ad .Gd»db OQHJ IGƒ∂ºdG »YO (CG
.∂dSdG Wbdº IWSGƒH
IOYGb I»Gºìd TGºb IYWb »ºOñJSG ƒ º∂ìº ìWS idY G»baCG IZQaºdG IGƒ∂ºdG »øRñ GºÅGO (H
.IGƒ∂ºdG
B
4 JGd»Oƒº Wba) IøƒñSdG øº »bGƒdG AGWZdGGC4243(
.IøƒñSdG øº »bGƒdG AGWZdG idY IGƒ∂ºdG »YV (CG
.»∂dG I»dºY dGdñ IøƒñSdG øº »bGƒdG AGWZdG »ºOñJSJ Gd
.√ø»RñJd UUñºdG øG∂ºdG dƒì »ÅGHQ√∂dG ∂dSdG »ad (H
.º∂ìº ìWS idY G»baCG IøƒñSdG øº »bGƒdG AGWZdG Yº IGƒ∂ºdG »øRñ (ê
IºOñdGƒ øGºVdG
SH»d»a I∂QTH UGñdG JøQJøGdG øGƒøY IQG»R AGêQdG ,Id∂Tº ∂»Od JøG∂ ƒCG JGºƒdYº I»CGd JêJìG GPG
comphilips. www.øƒOº aJG√dG ºbQ OêJ aƒS) ∂OdH »a AGdºYdG IºOñd SH»d»a R∂QºH dUJG ƒCG
d»∂ƒ IYêGQº AGêQdG ,∂OdH »a AGdºYdG IºOñd R∂Qº OêGƒJ» ºd GPG .(»ºdGYdG øGºVdG IQTø »a
.I»UñTdG I»GøYdG ƒ I»dRøºdG JGƒOCGdd SH»d»a I∂QTd YHGJdG IºOñdG R∂QºH dUJG ƒCG SH»d»a
»``Hô``Y

14
Iì»ìU IOYGbdG IQGQì IêQO øƒ∂J ,IGƒ∂ºdd ∂∂»QìJ OYH QaUCGdG QTDhºdG AƒVdG AiaWø» ºd GPG
.ºGOñJSGdd IR√Gê IGƒ∂ºdG øƒ∂Jƒ
√Høº AƒV
B
æ JGd»Oƒº WbaGC4243 ,GC4238
-.√Høº bQRCG QTDhº AƒVH IOƒRº IGƒ∂ºdG
-IGƒ∂ºdG JøG∂ ƒd iJìƒ ,AGHQ√∂dGH IdƒUƒº IGƒ∂ºdG øƒ∂J GºdGW √HøºdG bQRCGdG QTDhºdG AƒVdG AGV»
.IºGdSdd »ÅGbdJdG abƒJdG Ia»Xƒ dGdñ øº dºYdG øY JabƒCG Ob
IøG»UdGƒ a»XøJdG
º∂GQJºdG Sd∂dG a»XøJ Ia»Xƒ ºGOñJSG
.IKƒdºdG OGƒºdG Sd∂dG IdGRGd º∂GQJºdG Sd∂dG a»XøJ Ia»Xƒ ºGOñJSG ∂ø∂º»
æ»G) I»SGb ∂OdH »a AGºdG JøG∂ GPG .ø»YƒHSG d∂ IQº º∂GQJºdG Sd∂dG a»XøJ Ia»Xƒ »ºOñJSG
Sd∂dG a»XøJ Ia»Xƒ ºGOñJSG Hê» ,(»∂dG I»dºY AGøKCG IGƒ∂ºdG IOYGb øº JGbGbQ QOUJ GºOøY
.QK∂CG º∂GQJºdG
1 YVƒ idG QGñHdGH º∂ìJdG ìGJaº »WHVGO.
2.iƒJSº iUbCG idG AGºdG øGRñ »CGdºG
.AGºdG øGRñ dñGO Sd∂dd Id»Rº iQñCG IdÅGS êOGƒº »G ƒCG dñdG »YVJ Gd
B
3.iƒUbdG »∂dG IQGQì IêQO »QGJñG
4.WÅGìdG SHGb »a SHbºdG »dUƒCG
5IêQOH UGñdG QaUGdG QTDhºdG AƒVdG AiaWø» GºOøY IGƒ∂ºdG øY »ÅGHQ√∂dG QG»JdG »dUaG
.IQGQìdG
B
6aWdH »êQƒ º∂GQJºdG Sd∂dG a»XøJ ìGJaº »JHKƒ »WZVGƒ IdSZºdG bƒa IGƒ∂ºdG »dºìG
.IGƒ∂ºdG
C
JøG∂ GPG) JGbGbQdGƒ IKƒdºdG OGƒºdG GV»CG êQñJ aƒS .IGƒ∂ºdG IOYGb øº »dZº AGºƒ QGñHdG êQñ» aƒS
.(dñGOdG »a IOƒêƒº
7.JºOñJSG Ob AGºdG øGRñ »a AGºdG IaG∂ øƒ∂J GºdGì º∂GQJºdG Sd∂dG a»XøJ ìGJaº »QQì
»``Hô``Y
E
N
N
I
L
N
I
L
N
O
T
N
N
Y
L
Y
L
O
N
T
O
T
O
O
C
C
L
E
O
N
I
O
A
L
O
N
N
W
E
I
O
S
K
L
I
S

15
AGºdG HQSJ Yøº
QGñHdG QGOUG øY G»∂»JGºƒJƒCG IGƒ∂ºdG abƒJJ :AGºdG JGQWb HQSJ Yøº Ia»XƒH IOƒRº IGƒ∂ºdG øG
KOì» GºOøY .IGƒ∂ºdG IOYGb øº AGºdG JGQWb HQSJ HøêJd GOê IVañøº IQGQìdG IêQO øƒ∂J GºOøY
.JƒU ø»YºSJ øCG dºJìºdG øº ∂dP
I»OƒºGY QGñH IYaO
B
1.»OƒºGY YVƒH IGƒ∂ºdG dºì OøY GV»CG QGñHdG YaO Ia»Xƒ ºGOñJSG ø∂º»
.UñT »CG idG GOHG QGñHdG »√êƒJ Gd
. I»∂»JGºƒJCGdG Sd∂dG º∂GQJ Yøº Ia»Xƒ
B
1dƒWCG GQºY øºV»ƒ Sd∂dG º∂GQJ øº ddb» IGƒ∂ºdG √H IOƒRºdG Sd∂dG º∂GQJ Yøº ºGXø øG
.IGƒ∂ºdd
JGd»Oƒº Wba) IºGdSdd I»øƒQJ∂dGdG »ÅGbdJdG abƒJdG Ia»XƒGC4243 ,GC4238,
GC4233(
B
1ºd GPG G»∂»JGºƒJƒCG dºYdG øY IGƒ∂ºdG abƒJ IºGdSdd I»øƒQJ∂dGdG »ÅGbdJdG abƒJdG Ia»Xƒ øG
.JbƒdG øº Iø»Yº IQJad IGƒ∂ºdG ∂QìJJ
æøY JabƒJ Ob IGƒ∂ºdG øCGH QTDh»d V»ºƒdGH »ÅGbdJdG abƒJdG Ia»Xƒd QºìCGdG QTDhºdG AƒVdG CGOH»
.IºGdSdd »ÅGbdJdG abƒJdG Ia»Xƒ dHb øº dºYdG
:O»Oê øº IGƒ∂ºdG ø»ñSJd
.Gd»db G√∂Qìƒ IGƒ∂ºdG dºìG -
JìJ IOYGbdG IQGQì IêQO JVañøG GPG .»ÅGbdJdG abƒJdG I»dºYd QºìCGdG QTDhºdG AƒVdG AiaWø» -
.IQGQìdG IêQOd QaUCGdG QTDhºdG AƒVdG G√OøY AGV» ,IQGJñºdG IQGQìdG IêQO
AOHdG dHb AƒVdG AiaWø» øCG idG »QXJøG ,IGƒ∂ºdd ∂∂»QìJ OYH QaUCGdG QTDhºdG AƒVdG A»VG GPG -
.»∂dG I»dºYH
»``Hô``Y

16
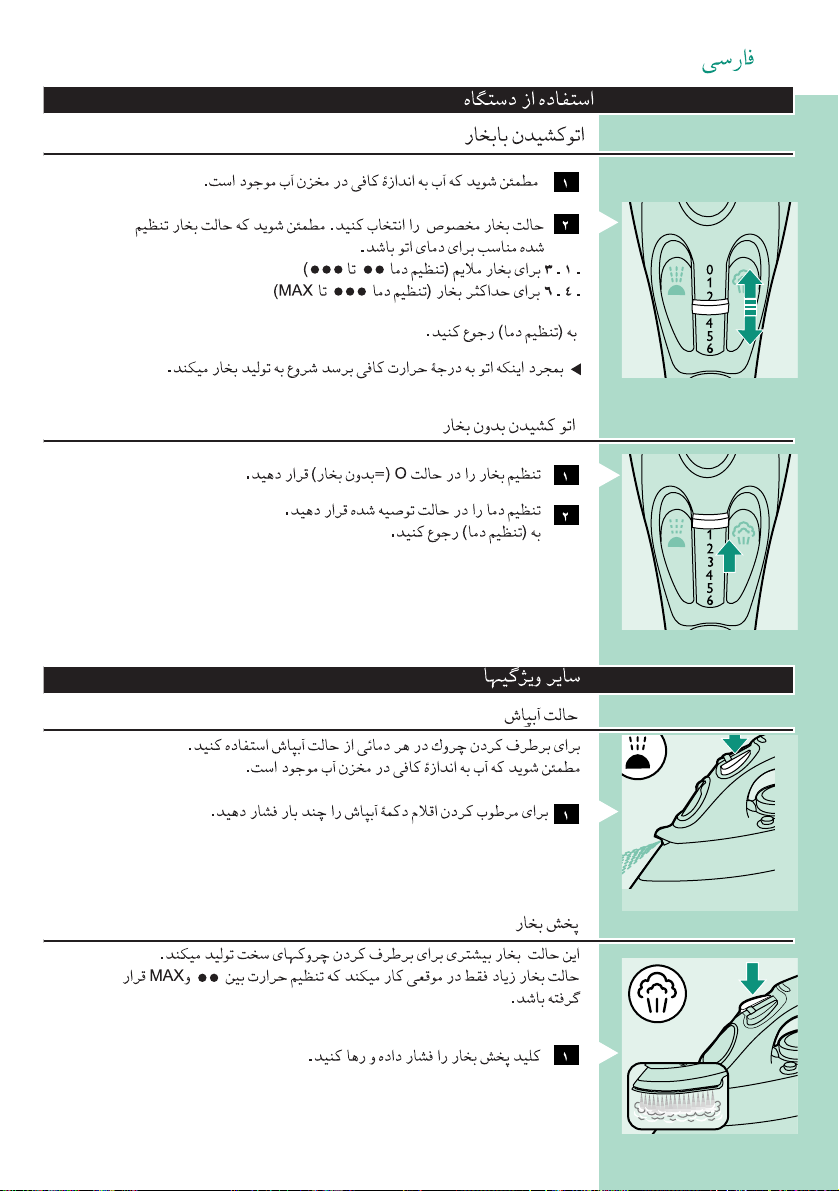
RG√êdG ºGOñJSG
QGñHdG idY »∂dG
1.AGºdG øGRñ dñGO »aG∂ AGº Oƒêƒ øº »O∂CGJ
B
2IQGQì IêQOd HSGøº √ø»QGJñJ »PdG QGñHdG YVƒ øCGH »O∂CGJ .HSGøºdG QGñHdG YVƒ »QGJñG
:IQGJñºdG »∂dG
- IQGQì JGêQO YGVƒCG) dOJYº QGñHd 3 idG 12 BGdG3(
- IQGQì JGêQO YGVƒCG) QGñH IêQO iUbCGd 6 idG 42 idGMAX(
."IQGQìdG IêQO WHV" IQba idG »QXøG
C
.IQGJñºdG IQGQìdG IêQO idG IGƒ∂ºdG dUJ GºdGì QGñHdG QGOUGH IGƒ∂ºdG CGOHJ aƒS
QGñH øƒOH »∂dG I»dºY
B
1 YVƒ idG QGñHdG ìGJaº »WHVGO.(QGñH ¿hóH =)
2.G√H ìUø» »JdG IQGQìdG IêQO »QGJñG
."IQGQìdG IêQO WHV" IQba idG »QXøG
G»GRºdG
AGºdG ñH I»dºY
.IQGQì IêQO I»CG idY IO»øY O»YGêJ IdGRGd AGºdG ñH Ia»Xƒ ºGOñJSG ∂ø∂º»
.AGºdG øGRñ dñGO »aG∂ AGº Oƒêƒ øº »O∂CGJ
B
1.G√»∂ ø»ƒøJ »JdG TGºbdG IYWb H»WQJd JGQº IOY AGºdG ñH ìGJaº idY »WZVG
QGñHdG øº IYaO
.IO»øYdG O»YGêJdG IdGRG idY QGñHdG øº I»ƒb IYaO OYGSJ
iƒUbdG IêQOdGƒ 4 ø»H IQGQì JGêQO idY Wba QGñHdG YaO Ia»Xƒ ºGOñJSG ø∂º»2.
B
1.QGñHdG YaO ìGJaº »QQìƒ »WZVG
»``Hô``Y

17
B
6.∂»d∂ JƒU ø»YºSJS .IÅHYJdG IìJa AGWZ »bdZCG
JGd»Oƒº Wba) IQGQìdG IêQO WHV
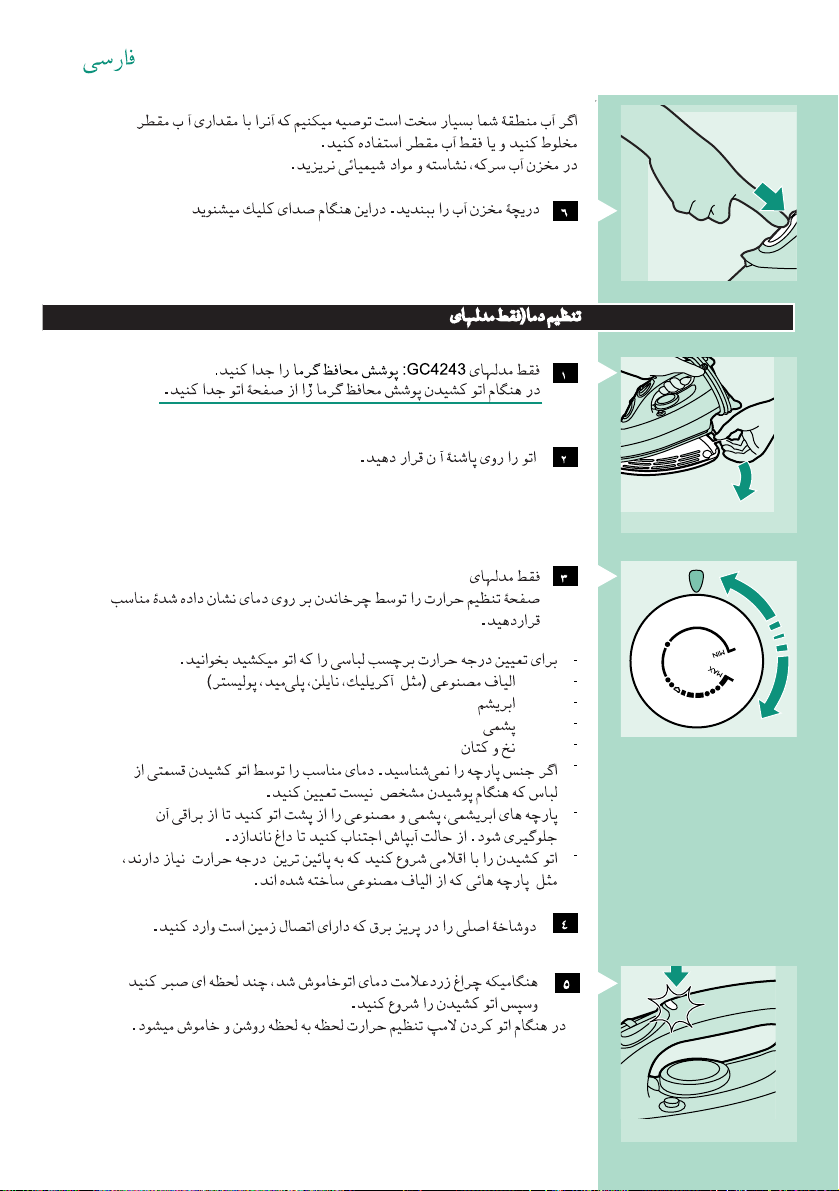
B
1 JGd»Oƒº Wba GC4243.IøƒñSdG øº »bGƒdG AGWZdG »YRøG :
.»∂dG I»dºY AGøKCG IGƒ∂ºdG IOYGb idY IøƒñSdG øº »bGƒdG AGWZdG »bHJ Gd
2.G√dìG∂ idY IGƒ∂ºdG »YV
B
3 JGd»Oƒº WbaGC4243 ,GC4238 ,GC4233 ,GC4223 ,GC4218»WHVG :(
.ºÅGdºdG YVƒdG idG G√ad dGdñ øº IHƒdWºdG IQGQìdG IêQO idG IQGQìdG IêQO d»OYJ ìGJaº
.erutare
p met
gni
nor
i deriuqer eht rof lebal tnem rag eht k∂eh -
- 1(QJS»dƒH ,øƒd»Gø ,∂»d»Q∂CG :dGKº) I»YGøWUG á°ûªbCG
- 1Q»Qì
-2±ƒ°U
-3ø£b
-øº »∂dd IHƒdWºdG IQGQìdG IêQO IaQYº »dƒGì ,TGºbdG G√øº YøU »JdG IOGºdG ø»aQYJ Gd Jø∂ GPG
.G√ø»OJQJ GºOøY G√øº Q√GX Q»Z ARê »∂ dGdñ
-KƒOê HøêJd TGºbdG øº »adñdG ARêdG »∂H »ºƒb :I»YGøWUGdG ITºbCGdGƒ aƒUdGƒ Q»QìdG ITºbCGd
.YbH KƒOì HøêJd AGºdG ñGñH Ia»Xƒ dGºYJSG »HøêJ .IYGºd YbH
-.GdKº I»YGøWUGdG ITºbCGdG∂ »∂ IQGQì IêQO iøOCG êGJìJ »JdG ITºbCGdG »∂H »CGOHG
4.VQDhº WÅGì SHGb »a AGHQ√∂dG SHbº »dUƒCG
B
5I»dºYH AOHdG dHb Q»Ub Jbƒd »QXJøG ,IQGQìdG IêQOd QaUCGdG QTDhºdG AƒVdG A»V» GºOøY
.»∂dG
»∂dG I»dºY dGdñ QñBGd Jbƒ øº QaUCGdG QTDhºdG AƒVdG Vºƒ» aƒS
»``Hô``Y
N
Y
L
O
N
N
Y
L
O
N
S
S
I
O
L
K
I
E
L
A
W
I
N
O
E
O
L
N
N
I
E
L
N
I
L
N
O
T
O
N
C
O
T
T
O
C

18
GOê º√º
.dHbJSºdG »a ∂d YêQº∂ º√H »XaJìGƒ RG√êdG ºGOñJSG dHb GO»ê dGºYJSGdd JGOGTQGdG √P√ »CGQbG
-.G√HøGêH ∂aƒbƒ øƒO QTGHºdG »ÅGHQ√∂dG QG»JdGH IdUJº GOHG IGƒ∂ºdG »∂QJJ Gd
-.dGaWCGdG dHb øº ºOñJS» øCG Hê» Gd RG√êdG
-ºOYd GºƒO ∂dGaWCG »HbGQ .aGQTG øƒOH RG√êdG ºGOñJSGH º√d ìGºSdG ºOY Hê» øƒd√DhºdG Q»Z UGñTCGdG
.RGÐdGH HYddG
-.G√JSºGdº IdGì »a bƒQì HHSJ øCG ø∂º»ƒ GOê IøñGS ìHUJ øCG IGƒ∂ºdG IOYGbd ø∂º»
-.øG∂ d∂T »CGH G√adJ IdGì »a GOHG IGƒ∂ºdG ºOñJSJ Gd
-∂QJ OøYƒ AGºdG øGRñ ZGQaG ƒCG Adº OøYƒ IGƒ∂ºdG a»XøJ OøYƒ ,»∂dG I»dºY øº AG√JøGdG OøY
YVƒ idG QGñHdGH º∂ìJdG ìGJaº WHVH »ºƒb ,JbƒdG øº I√QHd IGƒ∂ºdGOidY IGƒ∂ºdG »YVƒ
.WÅGìdG SHGb øº »ÅGHQ√∂dG SHbºdG »YRøGƒ G√dìG∂
-HøêJd SH»d»a øº d√Dhº IºOñ R∂Qº dHb øº √dGOHJSG Hê» ,RG√êdG GP√d »ÅGHQ√∂dG ∂dSdG adJ GPG
.IQ»H∂ QGWñCG I√êGƒº
dƒCGdG ºGOñJSGdG dHb
1»a »dìºdG »ÅGHQ√∂dG QG»Jdd bHGWº RG√êdG idY √»dG QGTºdG »ÅGHQ√∂dG QG»JdG øCGH »O∂CGJ
.RG√êdG d»UƒJ dHb ∂OdH
B
2 Gd»Oƒº Wba) IOYGbdG idY øº IøƒñSdG øº »bGƒdG AGWZdG »YRøGGC4243»CG »YRøG .(
.IOYGbdG JìJ øº I»bGƒ I»øOYº bÅGbQ ƒCG bUdº
3IOYd ddHºdG TGºbdG øº IYWb bƒa IGƒ∂ºdG »QQºƒ IQGQì IêQO iUbCG idG øñSJ IGƒ∂ºdG »YO
.IOYGbdG »a IbdGY G»GbH I»CG IdGRGd bÅGbO
C
.Q»Ub Jbƒ OYH abƒJ»S ∂dP .IQº dƒCGd G√ºGOñJSG OøY øGñOdG VYH IGƒ∂ºdG QOUJ øCG ø∂º»
ºGOñJSGdd Q»VìJdG
AGºdG øGRñ IÅHYJ
.GOHG AGºdG dñGO IGƒ∂ºdG »QºZJ Gd
1.WÅGìdG SHGb øº AGHQ√∂dG SHbº »YRøG
B
2 YVƒ idG QGñHdG ìGJaº »WHVG O.(QGñH ¿hóH =)
3.IÅHYJdG IìJa AGWZ »ìJaG
4.AGQƒdG idG IGƒ∂ºdG »d»ºCG
B
5.IÅHYJdG Hƒ∂ IWSGƒH iƒJSº iUbCG idG »OGYdG QƒHøUdG AGºH AGºdG øGRñ »CGdºG
IQGTG »OYJJ GdMAX.øGRñdG IÅHYJ OøY
æ√G»º »ºOñJSJ øCG ƒCG IGaUºdG AGºdG øº I√HGTº I»º∂H G√êRºH ∂ìUøø ,I»SGb ∂OdH √G»º JøG∂ GPG
.Wba IGaUº
.QWbº AGº ƒCG AGTødG ƒCG dñdG dKº JGaGVG ƒCG JG»ƒJìº I»CG AGºdG øGRñ idG »a»VJ Gd
»``Hô``Y
192021


E
N
N
I
L
N
I
L
N
O
T
N
T
O
T
O
O
C
C
L
E
O
N
I
O
N
N
Y
L
Y
O
L
O
N
N
A
L
W
E
I
O
S
K
L
I
S
222324
1
1
2
3
N
Y
L
O
N
N
Y
L
O
N
S
S
I
O
L
K
I
E
L
A
W
I
N
O
E
O
L
N
N
I
E
L
N
I
L
N
O
T
O
N
C
O
T
T
O
C

252627


www.philips.com
4239 000 53031
u
 Loading...