

Page 1
Azur
GC4043,GC4040,GC4038,GC4035,GC4033,GC4030,GC4028,
GC4025,GC4023,GC4020,GC4018,GC4015,GC4013,GC4010,
GC4005
Page 2

Page 3

ENGLISH 4
DEUTSCH 11
FRANÇAIS 18
NEDERLANDS 25
ESPAÑOL 33
ITALIANO 40
PORTUGUÊS 47
TÜRKÇE 54
GC4043,GC4040,GC4038,GC4035, GC4033,GC4030, GC4028,
GC4025,GC4023, GC4020,GC4018, GC4015,GC4013, GC4010,
GC4005
3
Page 4
Important
For optimal safety,first read these instructions before you are going to
use the iron:
- The user must not leave the iron unattended while it is connected to
the supply.
- This appliance is not intended for use by young children without
supervision.
- Young children should be supervised to ensure that they do not play
with the appliance.
- The soleplate of the iron can become extremely hot and may cause
burns if touched.
- Never use the appliance if it is damaged in any way.
- After finished ironing,during filling or emptying the water tank or
even when you leave the iron for a while, unplug from the wall
socket,set the steam control to position 0 and put the iron on its
heel.
- f the supply cord is damaged,it must be replaced by Philips or its
service agent or a similarly qualified person in order to avoid a
hazard.
Before first use
1 Check if the voltage rating on the typeplate corresponds to the
mains supply in your home.
C
2 Remove any sticker,protective foil or storage cover (Type
GC4043,GC4040, GC4028,GC4025 only) from the soleplate.
3 Heat up the iron to maximum temperature and iron over a
piece of damp cloth for several minutes to remove any residue
on the soleplate.
The iron may give out some smoke when using it for the first time.
After a short while this will cease.
Filling the water tank
Do not immerse the iron in water.
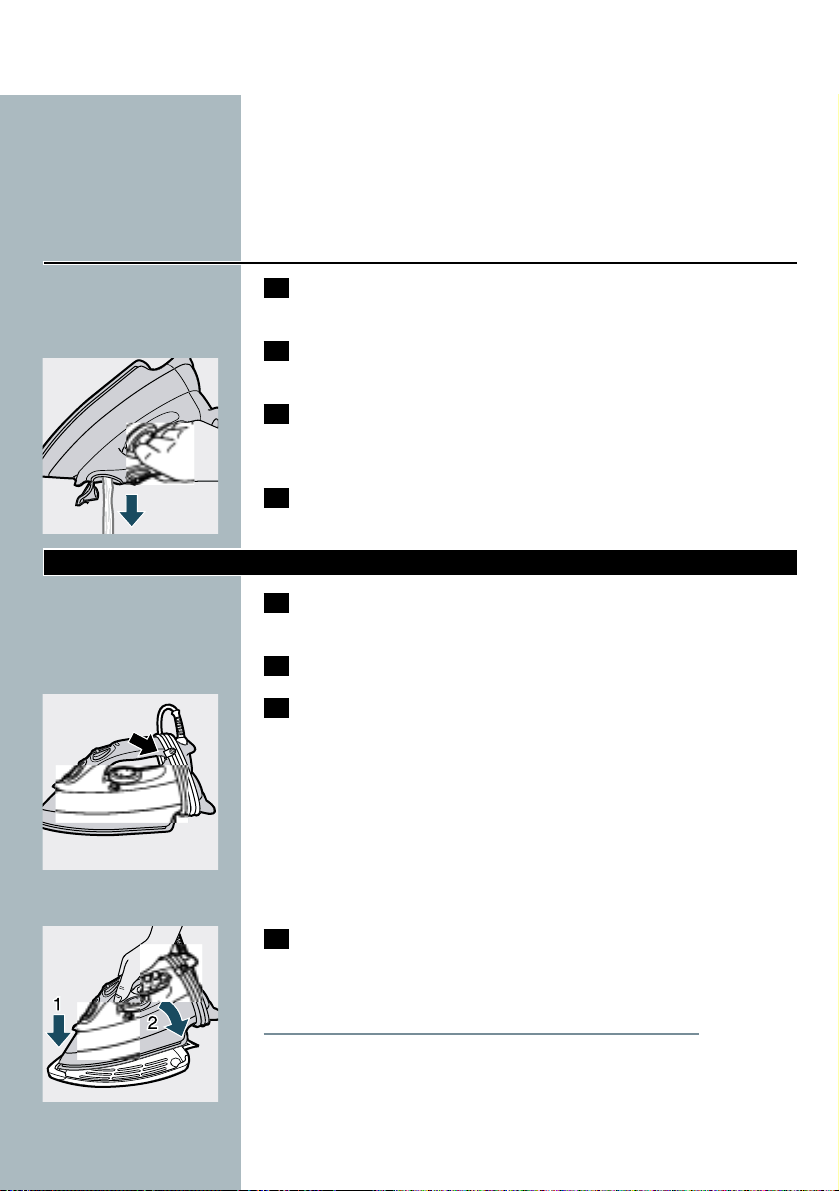
1 Remove the mains plug from the wall socket.
C
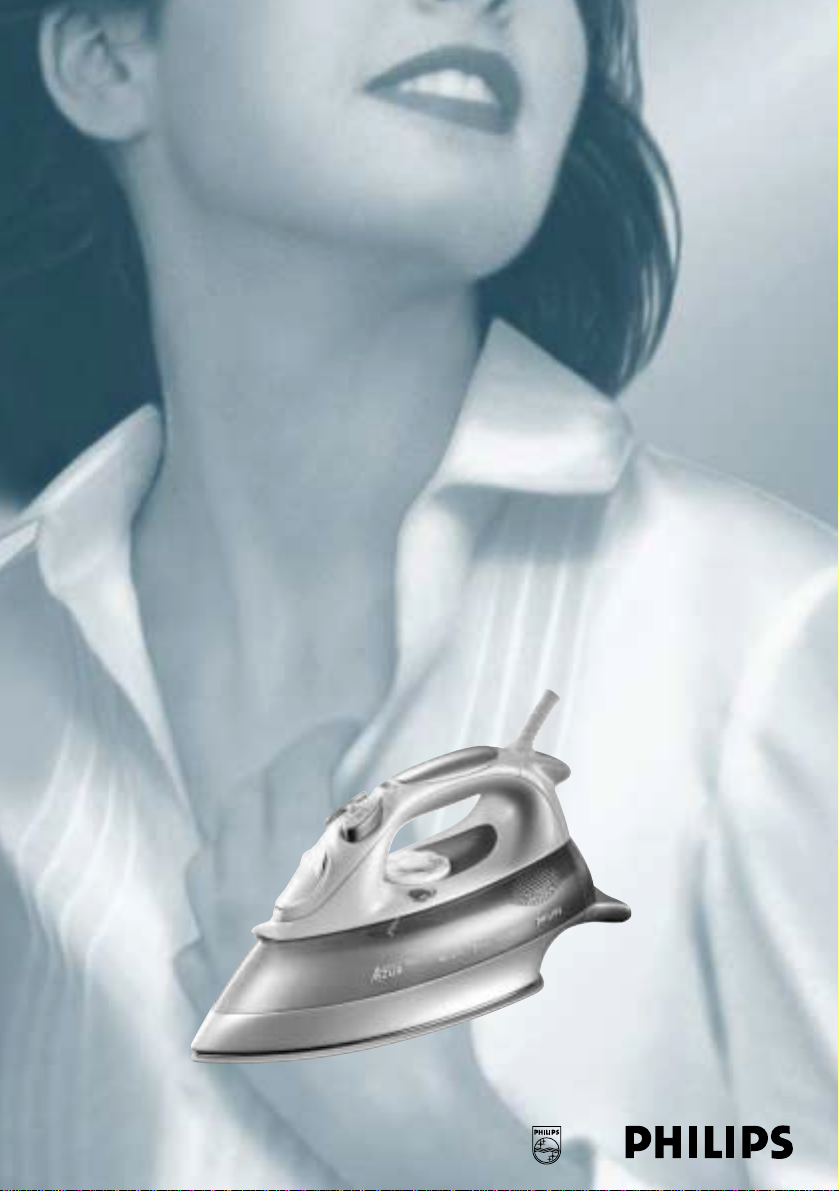
2 Set the steam control to position O (= no steam).
3 Open the filling cap.
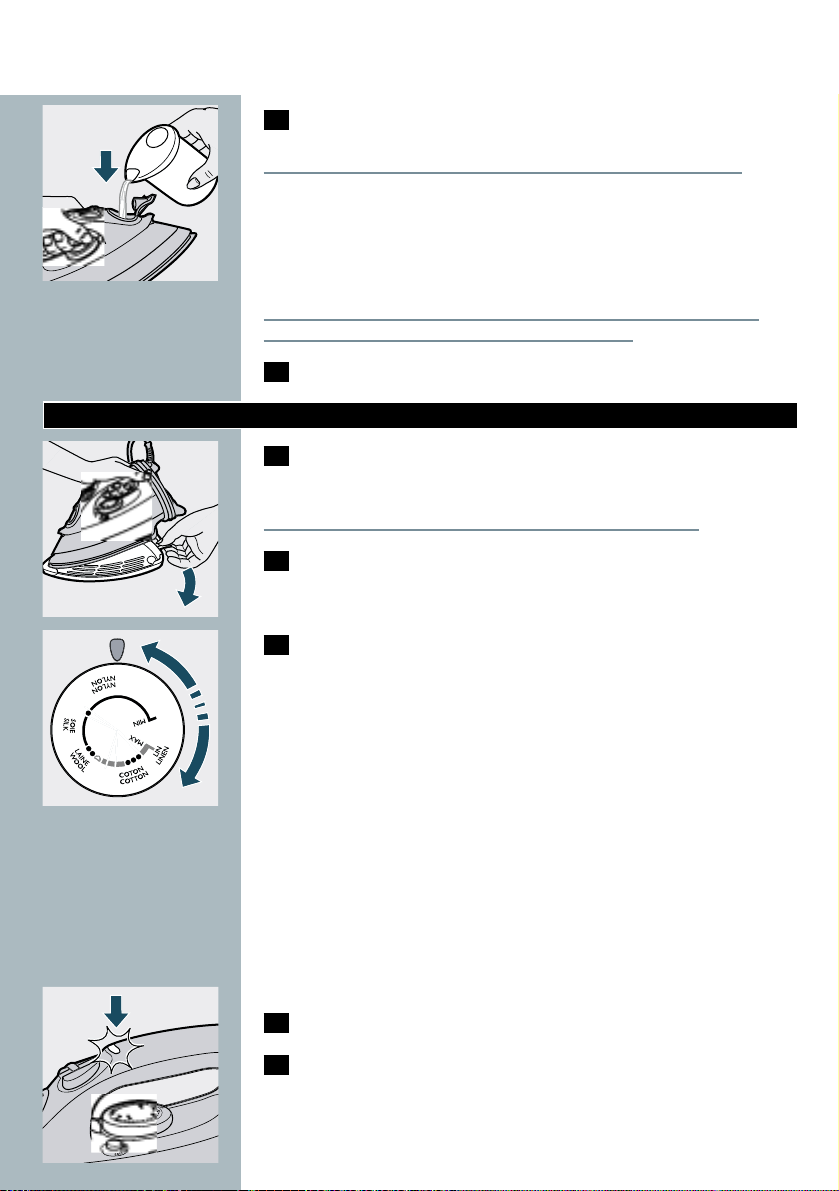
4 Hold the iron in a tilted position.
ENGLISH4
Page 5
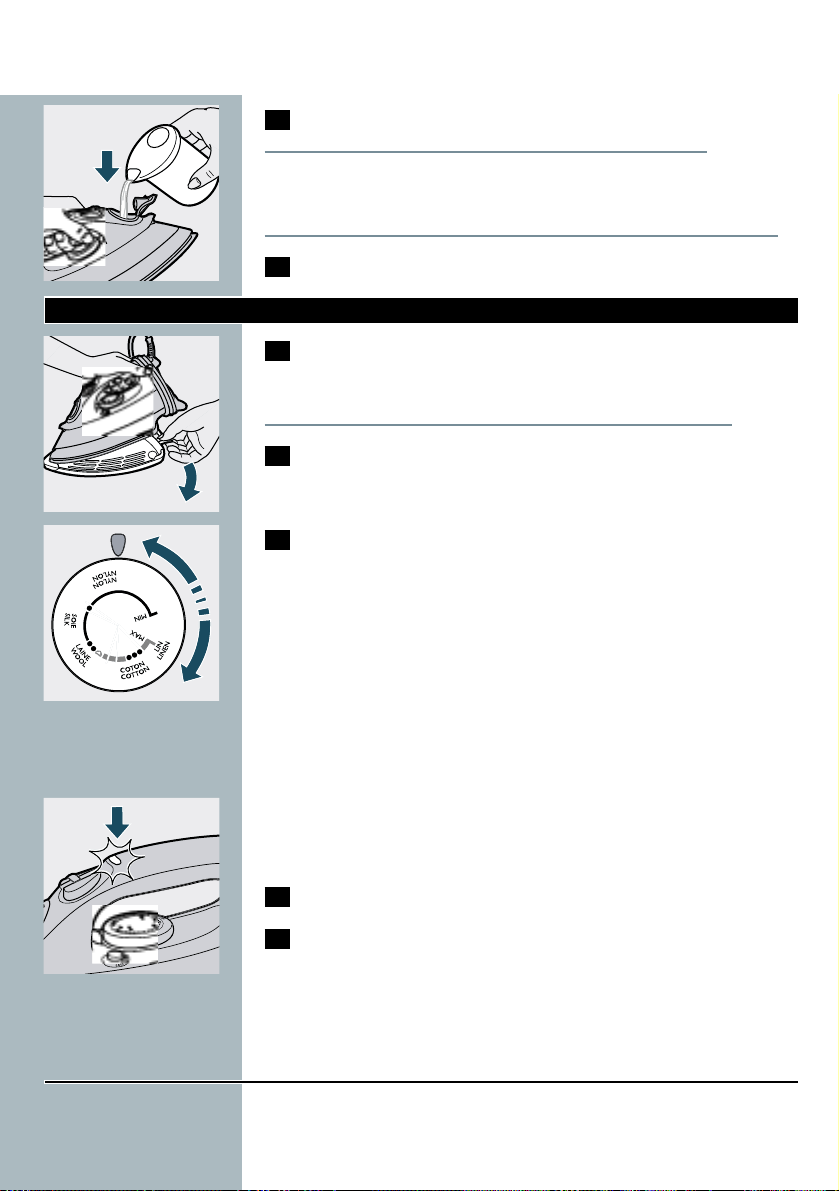
C
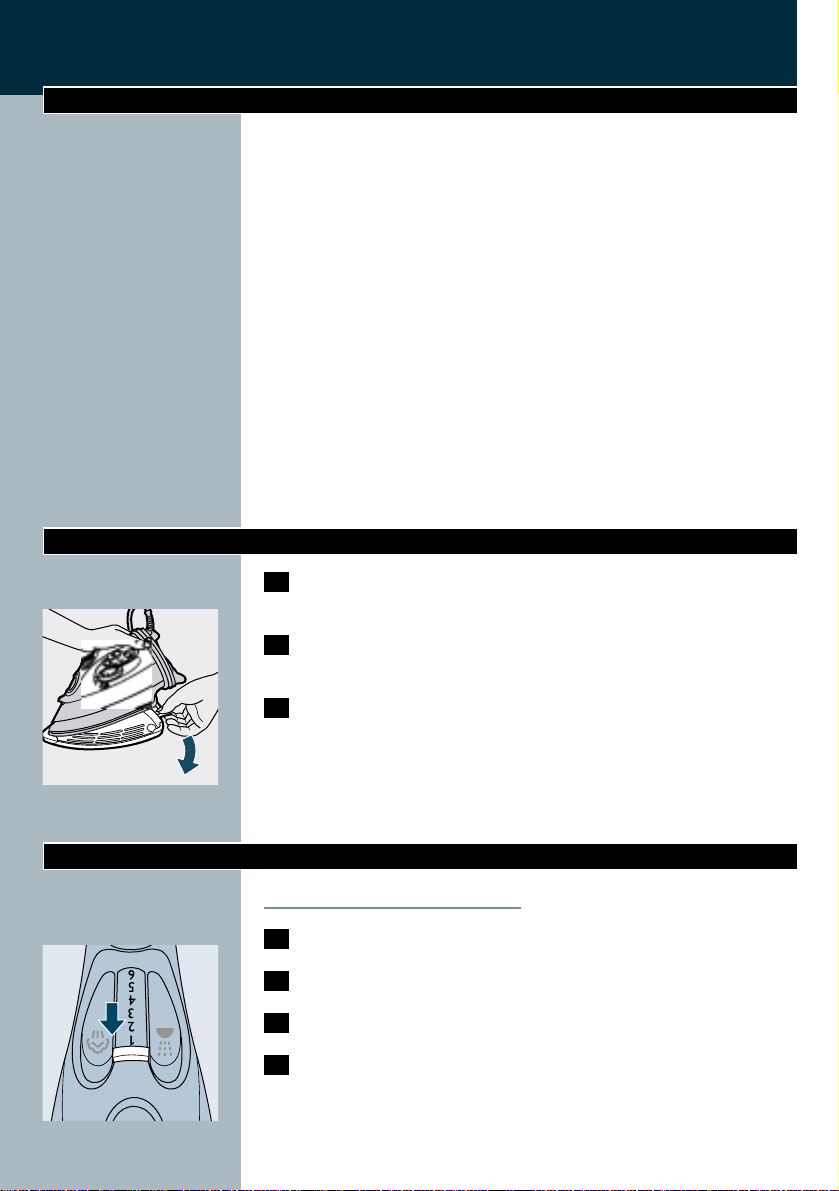
5 Pour tap water from the filling jug into the water tank up to
the maximum level.
Do not fill the tank beyond the MAX indication.
If the tap water in your area is very hard, we advise you to mix it with
an equal portion of distilled water,or to use distilled water only.
Do not use vinegar, starch or chemically descaled water.
6 Press to close the filling cap (click!).
Setting the temperature
C
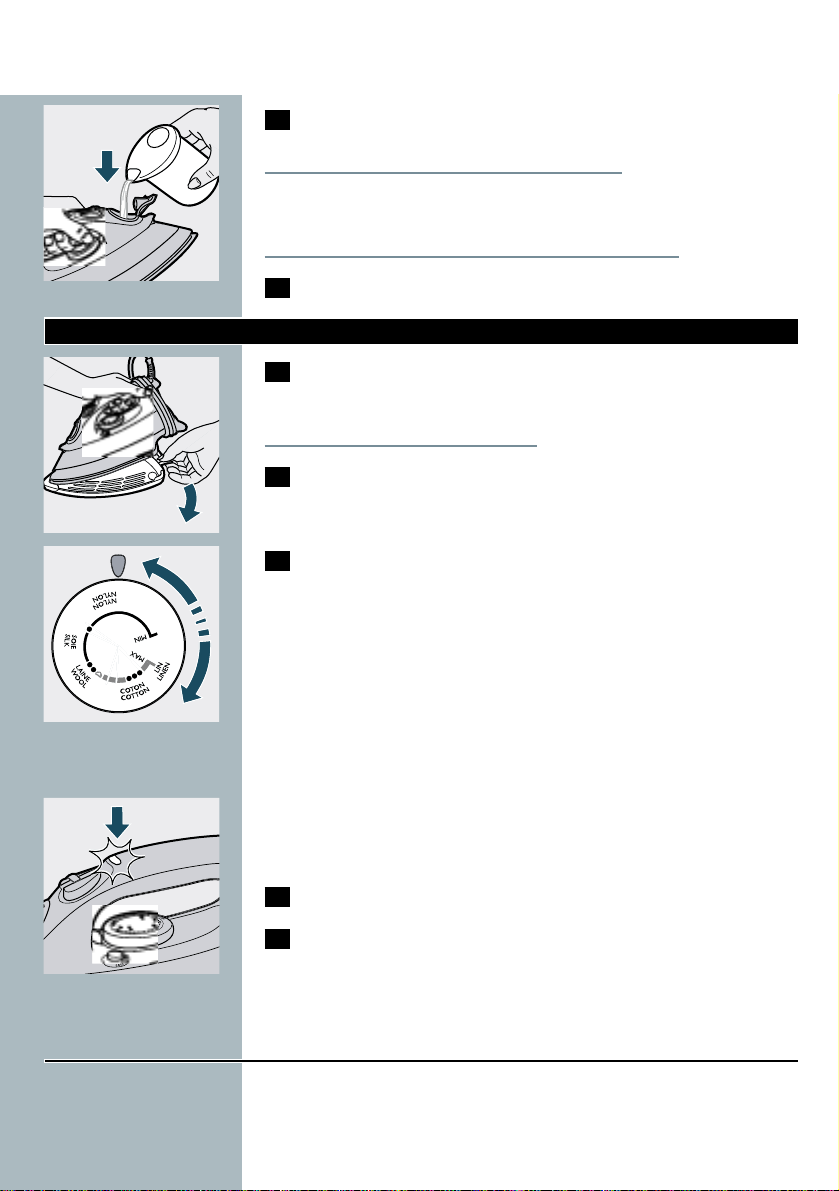
1 (Type GC4043,GC4040, GC4028,GC4025 only).Remove the
protective storage cover.
Do not use the cover during ironing.
2 Put the iron on its heel.
C
3 Set the temperature control to the required ironing
temperature by turning it to the position of the temperature
indicator.
- Check the garment label for the required ironing temperature.
- 1 Synthetic fabrics (e.g. acrylic, viscose, polyamide, polyester)
- 1 Silk
- 2 Wool
- 3 Cotton,linen
- When you do not know what kind of fabric(s) the article is made of,
try to iron on a spot which will be invisible when you wear it.
- Silk,woolen and synthetic materials:iron the reverse side of the
fabric to prevent shiny spots.To prevent stains, avoid using the spray
function.
- Start ironing the articles that require the lowest ironing temperature,
such as those made of synthetic fibers.
4 Put the mains plug in an earthed wall socket.
C
5 When the amber temperature pilot light has first gone out,
wait for a while before start ironing.
B
The amber pilot light will come on from time to time during ironing.
For Auto-shut-off versions (Type GC4043,GC4040,GC4038,
GC4035,GC4033,GC4030)
If the Auto-shut-off is activated (red pilot light blinks), move the iron
slightly to deactivate it (blinking stops).
ENGLISH 5
Page 6
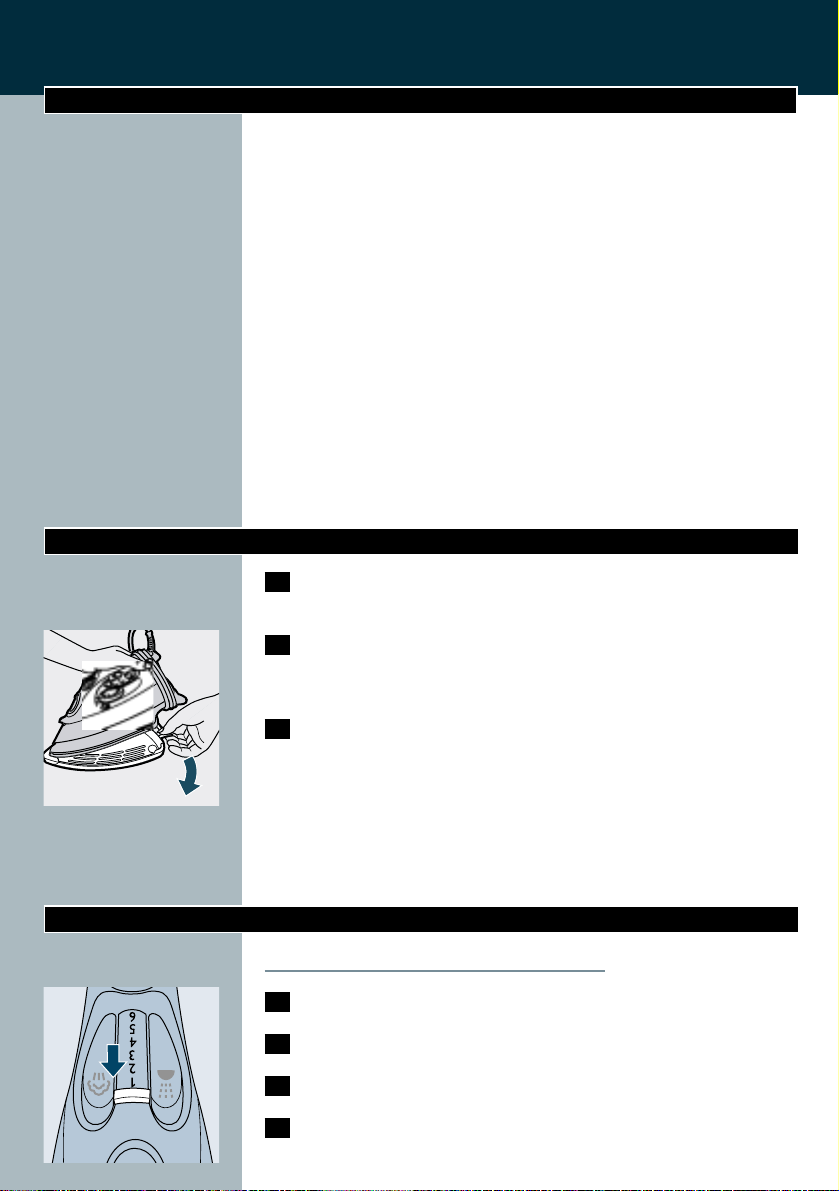
Steam-ironing
Make sure that there is enough water in the water tank.
1 Set the temperature control to the recommended position.
See section 'Setting the temperature'.
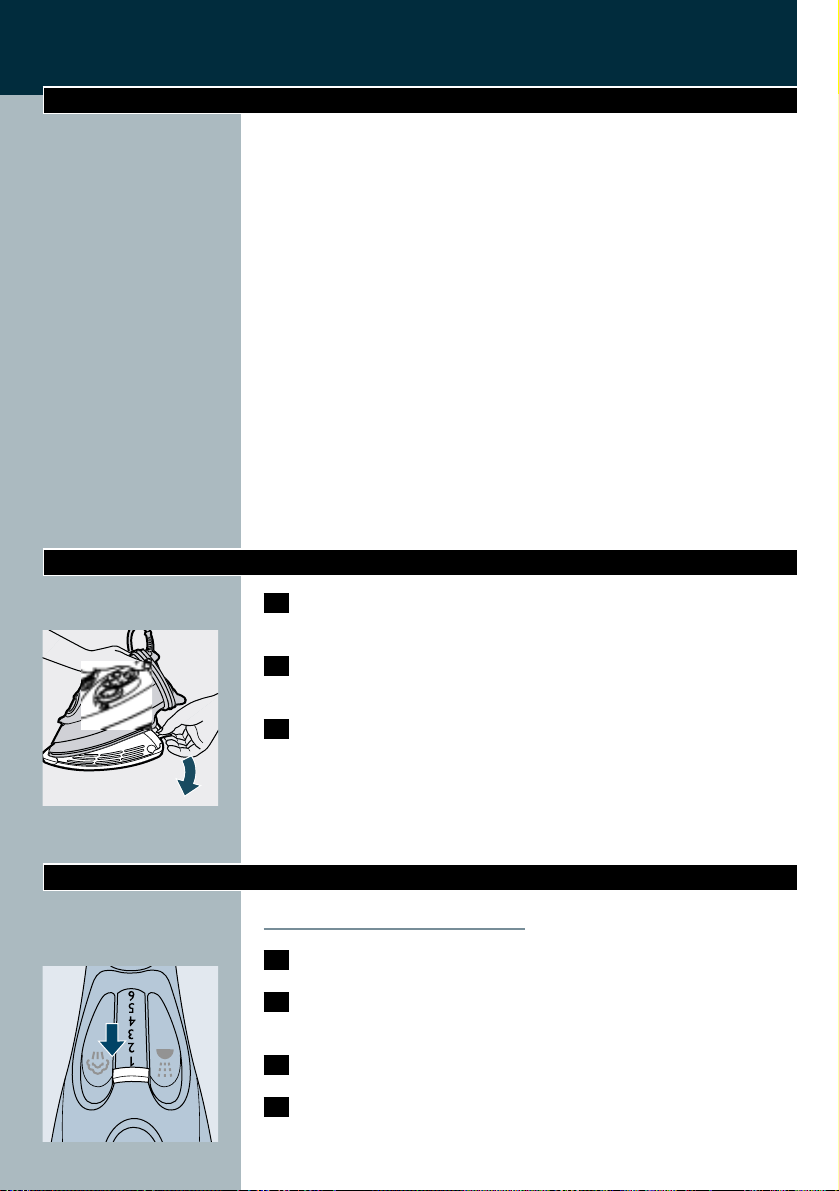
C
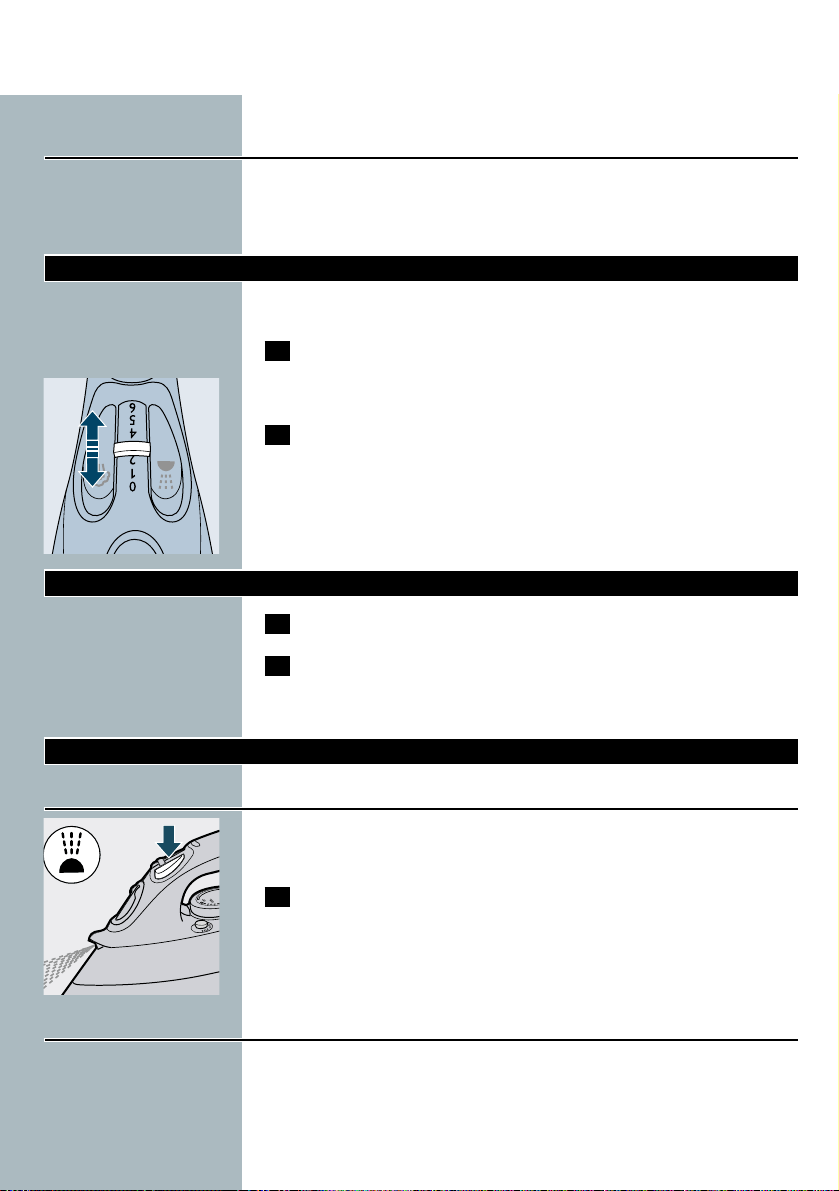
2 Set the steam control to the appropriate steam position.
- 1 - 3 for moderate steam (temperature settings 2 to 3)
- 4 - 6 for maximum steam (temperature settings 3 to MAX)
B
Steaming will start as soon as the set temperature has been reached.
Ironing without steam
1 Set the steam control to position O (= no steam).
2 Set the temperature control to the recommended position.
See section 'Setting the temperature'.
Other features
Spraying
To remove stubborn creases at any temperature.
Make sure that there is enough water in the water tank.
C
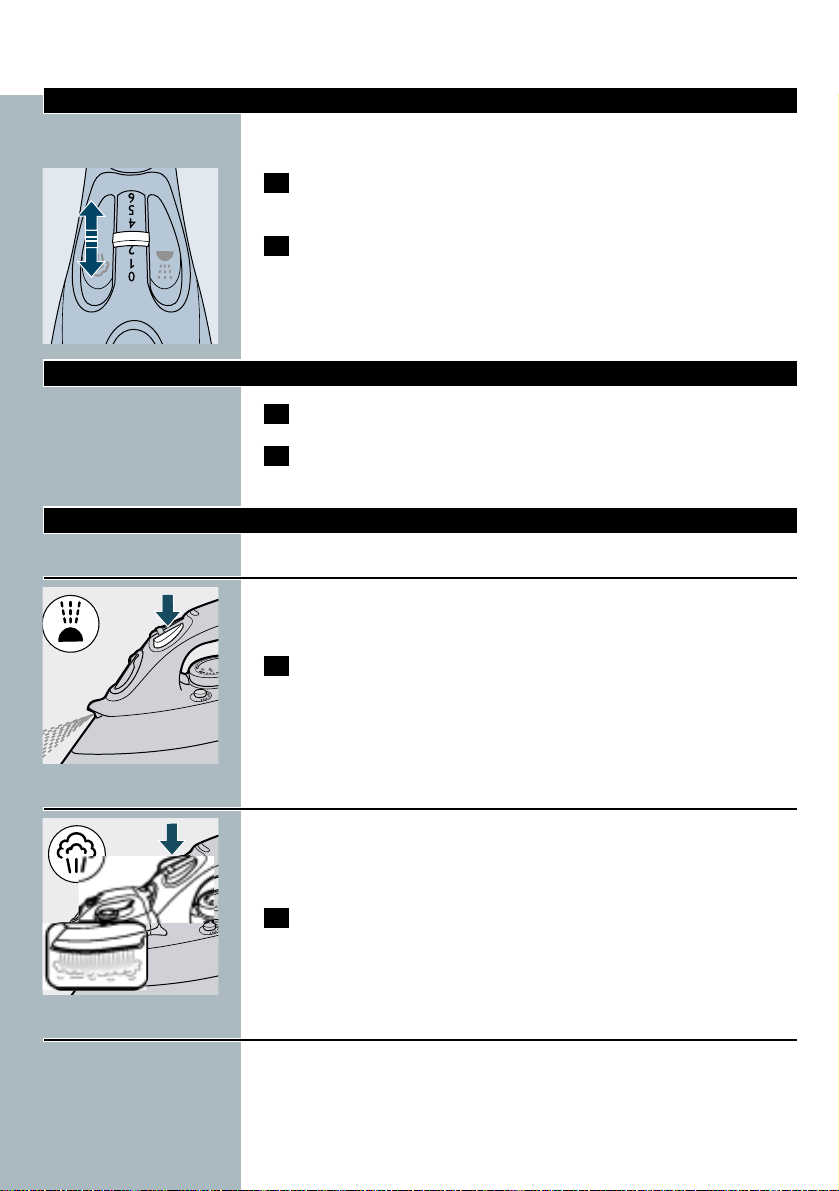
1 Press the spray button a couple of times to moisten the
laundry.
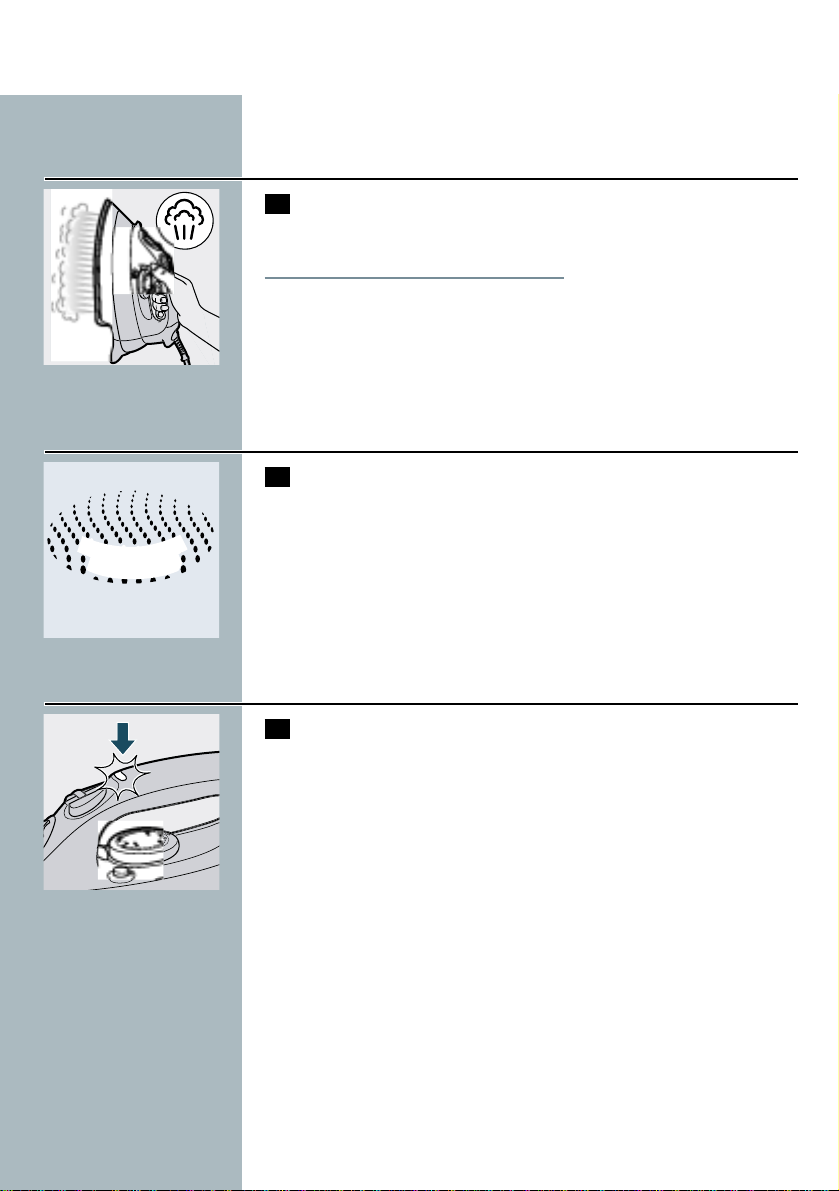
Shot of Steam
A powerful "shot" of steam helps remove stubborn creases.
The Shot-of-Steam function can only be used at temperature settings
between 2 and MAX.
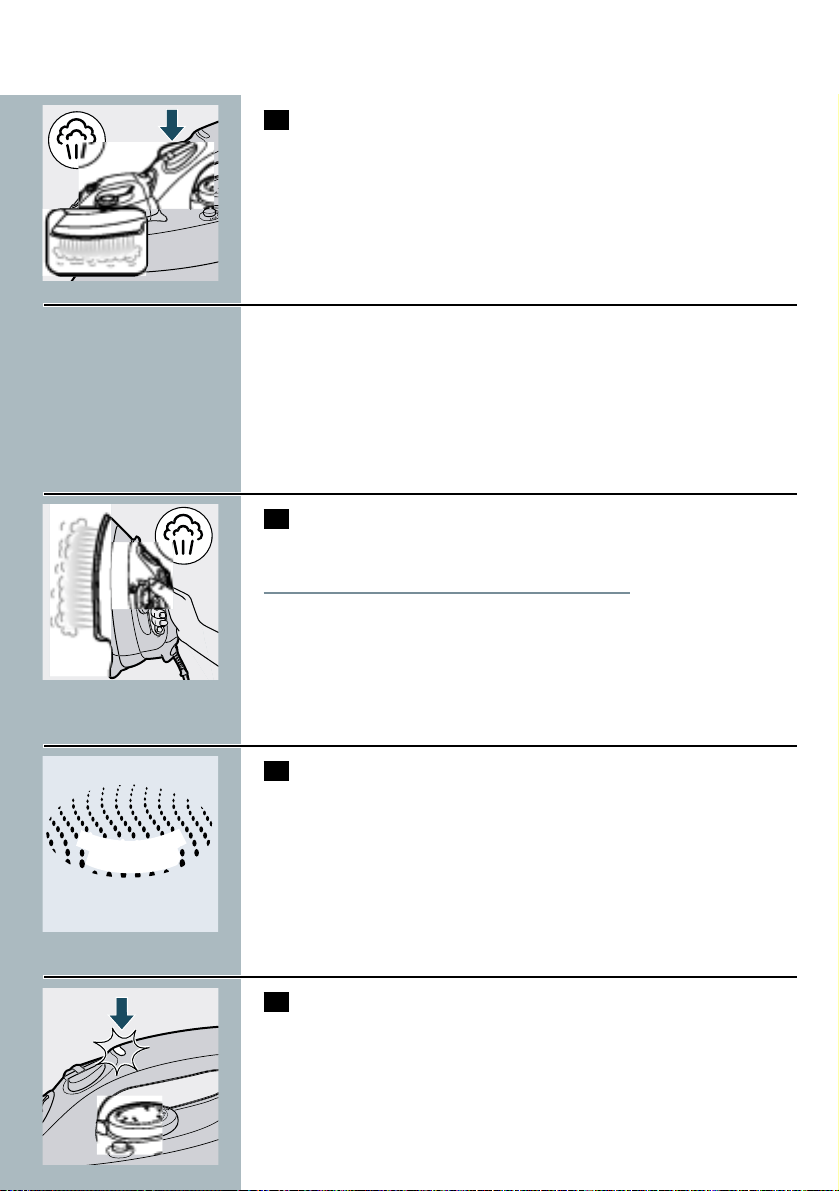
C
1 Press and release the Shot-of-Steam button.
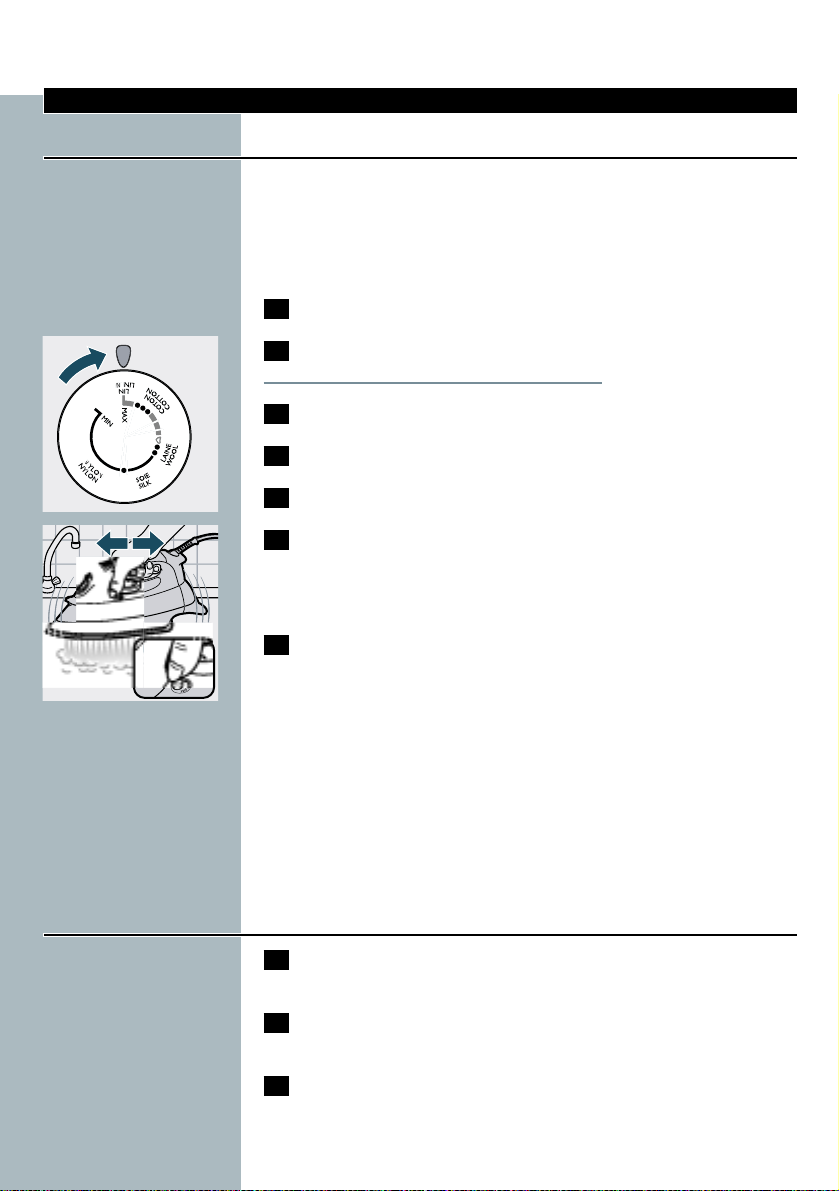
Drip Stop
This iron features a "Drip Stop" steam shut-off facility:the iron
automatically stops steaming at too low temperatures to prevent water
from dripping out of the soleplate.When this happens you may hear a
sound.
ENGLISH6
Page 7
Vertical Shot of Steam (Type GC4043,GC4040,GC4038,
GC4035,GC4033,GC4030, GC4028, GC4025,GC4023,
GC4020,GC4018,GC4015, GC4013, GC4010)
C
1 The Shot of Steam function can also be used when you hold
the iron in vertical position.
Never direct the steam towards people.
Automatic Anti-Calc system (Type GC4043,GC4040,
GC4038,GC4035,GC4033, GC4030, GC4028,GC4025,
GC4023,GC4020,GC4018, GC4015)
C
1 The built-in Anti-Calc system automatically reduces deposit of
scale and ensures a longer life of the iron.
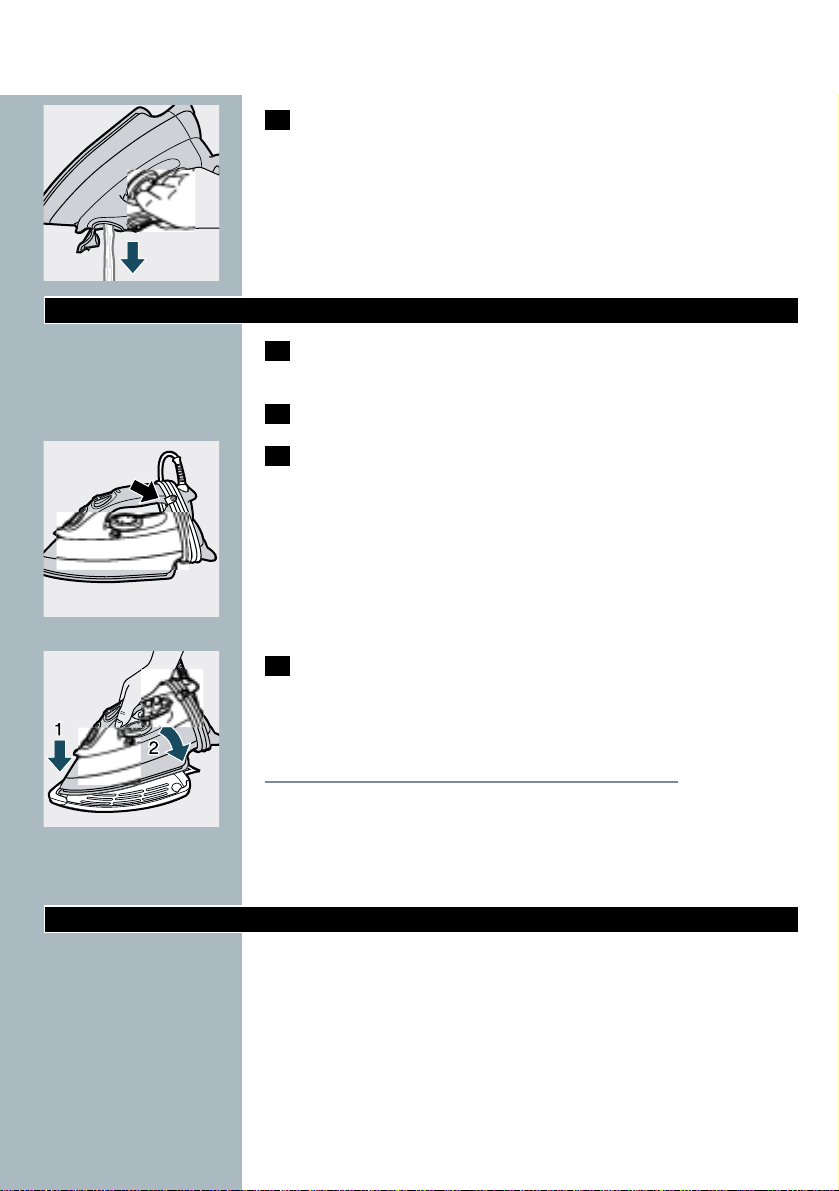
Auto-shut-off (Type GC4043,GC4040, GC4038, GC4035,
GC4033,GC4030)
C
1 An electronic safety device will automatically switch off the
iron if it has not been moved for a while.
◗ To indicate that the iron has been switched off,the red auto-off
pilot light will start blinking.
To heat up the iron again:
- Pick up the iron or move it slightly.
- The red auto-off pilot light will go out.The amber temperature pilot
light may come on,depending on the soleplate temperature.
- If the amber pilot light comes on after the iron is moved,wait for it
to go out before start ironing.
- If the amber pilot light does not come on after the iron is moved,the
iron is ready for use.
ENGLISH 7
A
U
T
A
N
T
C
I
T
A
O
M
C
L
A
I
C
-
Page 8
Cleaning and maintenance
Calc-Clean
This is a Calc-Cleaning function which removes scale and impurities.
Use the Calc-Clean function once every two weeks. If the water in
your area is very hard (when flakes coming out from the soleplate
during ironing), the Calc-Clean function should be used more
frequently.
1 Set the steam control to position O.
2 Fill the water tank to the maximum level.
Do not use vinegar or other descaling agents.
C
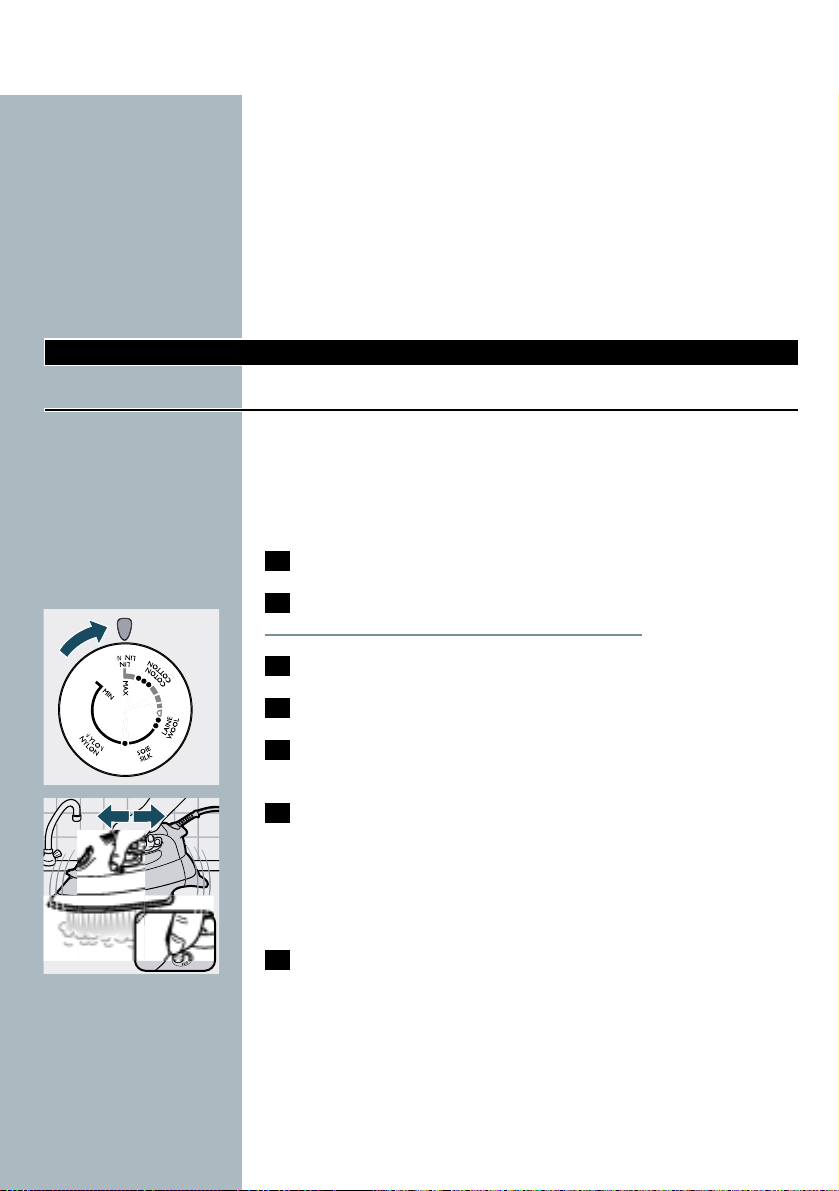
3 Set the temperature control to MAX.
4 Put the plug in the wall socket.
5 Unplug the iron when the amber pilot light has gone out.
C
6 Hold the iron over the sink,press and hold the calc-clean
button and gently shake the iron.
B
Steam and boiling water will come out of the soleplate.Impurities and
flakes (if any) will be flushed out.
7 Release the Calc-Clean button as soon as all the water in the
tank has been used up.
Repeat the calc-cleaning process if the iron still contains a lot of
impurities.
After calc-cleaning
- Plug in the iron to let the soleplate dry up.
- Unplug the iron when the amber pilot light has gone out.
- Move the hot iron gently over a piece of used cloth to remove any
water stains that may have formed on the soleplate.
- Let the iron cool down before you store it.
After ironing
1 Remove the mains plug from the wall socket and let the iron
cool down.
2 Wipe flakes and any other deposits off the soleplate with a
damp cloth and a non-abrasive (liquid) cleaner.
3 Clean the upper part of the iron with a damp cloth.
ENGLISH8
N
N
E
N
Page 9
C
4 Regularly rinse the water tank with water.Empty the water
tank after cleaning.
Storage
1 Remove the mains plug from the wall socket and set the steam
control to position 0.
2 Empty the water tank.
C
3 Type GC4038,GC4035, GC4033,GC4030,GC4023, GC4020,
GC4018,GC4015, GC4013,GC4010,GC4005.
a) Let the iron cool down.Wind the mains cord around the cord
storage facility and fix it with the cord clip.Type GC4040 comes with
a 3m cord.
b) Always store the emptied iron horizontally on a stable surface and
use a cloth to protect the soleplate.
C
4 Protective storage cover ( Type GC4043,GC4040,GC4028,
GC4025).
a) Put the protective storage cover on the iron.
Do not use the protective storage cover during ironing.
b) Wind the mains cord around the cord storage facility.
c) Store the iron with the protective storage cover horizontally on a
stable surface.
Guarantee & service
If you need information or if you have a problem, please visit the Philips
Web site at www.philips.com or contact the Philips Customer Care
Centre in your country (you will find its phone number in the
worldwide guarantee leaflet). If there is no Customer Care Centre in
your country,turn to your local Philips dealer or contact the Service
Department of Philips Domestic Appliances and Personal Care BV.
ENGLISH 9
Page 10

Trouble shooting guide
This chapter summarizes the most common problems you could
encounter with your iron.Please read the different sections for more
details.If you are unable to solve the problem, please contact the
nearest Philips Service Centre or one of its representatives. See the
worldwide guarantee leaflet for telephone numbers of the Philips
Helpdesk or visit our website at www.philipsonline.com.
ENGLISH10
Solution
Check the mains cord,the plug and
the wall socket.
Fill the water tank (see Filling the
water tank).
Set to steam position between 1-6
(see Steam ironing).
Set the temperature control to the
steam area (2 to MAX).Put the
iron on its heel and wait until the
amber pilot light has gone out before
you start ironing.
Put the iron in horizontal position and
wait for a while before using the
(Vertical) Shot of Steam function
again.
Set the temperature control to the
steam area (2 to MAX).Put the
iron on its heel and wait until the
amber pilot light has gone out before
you start ironing.
Press to close the filling cap tightly
until you hear a click.
Apply Calc-Clean a few times (see
Calc-Clean).
Shake the iron slightly to deactivate
the Auto-shut-off,the lamp will stop
blinking.
Possible cause(s)
Connection problem.
Not enough water in the water tank.
The steam control has been set to
position O.
The iron is not hot enough and/or
Drip Stop is activated.
The (Vertical) Shot of Steam function
has been used too often within a very
short period.
The iron is not hot enough and/or
Drip Stop is activated.
The filling cap is not closed properly.
Hard water form flakes inside the
soleplate.
Auto-shut-off is activated.See "Autoshut-off" section.
Problem
The iron is plugged in but the
soleplate is cold.
No steam
No Shot of Steam or No Vertical
Shot of Steam (Type GC4043,
GC4040,GC4038, GC4035,GC4033,
GC4030,GC4028, GC4025,GC4023,
GC4020,GC4018, GC4015,GC4013,
GC4010)
Water droplets on fabric
Flakes and impurities coming out
from soleplate during ironing.
Red pilot light blinks (Type GC4043,
GC4040,GC4038, GC4035,GC4033,
GC4030).
Page 11
Wichtig
Lesen Sie zu Ihrer Sicherheit zuerst diese Gebrauchsanweisung durch,
bevor Sie das Gerät in Gebrauch nehmen.
- Lassen Sie das eingeschaltete Gerät niemals unbeaufsichtigt.
- Dieses Gerät darf durch kleine Kinder nicht ohne Aufsicht verwendet
werden.
- Achten Sie darauf, daß Kinder nicht mit dem Gerät hantieren.
- Achten Sie beim Bügeln darauf, daß Sie die heiße Bügelsohle nicht
berühren.
- Verwenden Sie das Gerät nicht, wenn es in irgendeiner Hinsicht
defekt oder beschädigt ist.
- Wenn Sie das Bügeln beenden,aber auch bevor Sie den
Wasserbehälter nachfüllen bzw. leeren,stellen Sie den Dampfregler
auf Position 0,ziehen Sie den Stecker aus der Steckdose, und stellen
Sie das Bügeleisen auf seine Rückseite.
- Wenn das Netzkabel defekt oder beschädigt ist, muss es zu Ihrer
eigenen Sicherheit von einer durch Philips autorisierten Werkstatt
ersetzt werden.Wenden Sie sich an Ihren Philips Händler oder das
Philips Service Center in Ihrem Lande.
Vor dem ersten Gebrauch
1 Prüfen Sie,ob die örtliche Netzspannung mit der
Spannungsangabe auf dem Typenschild übereinstimmt.
C
2 Entfernen Sie vor dem ersten Gebrauch von der Bügelsohle
alle Aufkleber und die Schutzfolie bzw.(Nur Typen GC4043,
GC4040,GC4028, GC4025) Abdeckung.
3 Lassen Sie die Bügelsohle auf die maximale Temperatur
aufheizen und führen Sie das Bügeleisen einige Minuten über
ein feuchtes Tuch, damit sich alle Reste von der Bügelsohle
lösen.
Einige Teile des Bügeleisens sind leicht eingefettet und können beim
ersten Gebrauch etwas Rauch abgeben. Das geht nach kurzer Zeit
vorüber.
Den Wasserbehälter füllen
Tauchen Sie das Bügeleisen niemals in Wasser.
1 Ziehen Sie vor dem Füllen den Netzstecker aus der Steckdose.
C
2 Stellen Sie den Dampfregler auf Position 0 (= kein Dampf).
3 Öffnen Sie den Verschluß des Wasserbehälters.
4 Halten Sie das Eisen schräg.
DEUTSCH 11
Page 12
C
5 Füllen Sie mit Hilfe des Bechers den Wasserbehälter bis zur
Markierung mit Leitungswasser.
Füllen Sie niemals mehr Wasser ein als bis zur Markierung MAX.
Sie können Leistungswasser verwenden.Ist das Wasser in Ihrer Gegend
allerdings hart (Härtegrad 3 oder 4),so ist zu empfehlen, es zur Hälfte
mit destilliertem Wasser zu mischen oder mit reinem destilliertem
Wasser zu füllen.- Ihre Wasserwerke geben Ihnen Auskunft über die
Härte Ihres Wassers.
Verwenden Sie in diesem Gerät kein chemisch enthärtetes Wasser
keinen Essig und keine Wäschestärke oder -steife.
6 Drücken Sie den Deckel des Wasserbehälters fest auf ("Klick").
Einstellen der Bügeltemperatur
C
1 (Nur Typen GC4043, GC4040,GC4028,GC4025) Nehmen Sie
die Abdeckung ab.
Verwenden Sie während des Bügelns die Abdeckung nicht.
2 Stellen Sie das Bügeleisen auf den Rücken.
C
3 Stellen Sie den Temperaturregler auf die zum Bügeln
erforderliche Temperatur. Sie ist auf der Skala des Reglers
ablesbar.
- Prüfen Sie die Bügelvorschrift auf dem Wäsche-/Kleidungsstück,
bevor Sie mit dem Bügeln beginnen.
- 1 Synthetics,z.B.Acetat,Acryl,Viskose,Polyamid, Polyester
- 1 Seide
- 2 Wolle
- 3 Baumwolle, Leinen
- Wenn Ihnen die Art des Materials nicht bekannt ist,so prüfen Sie die
Bügeltemperatur an einer Stelle, die bei normaler Verwendung nicht
sichtbar wird.
- Bügeln Sie Wolle,Seide und Sythetics stets von links, um glänzende
Stellen zu vermeiden.Verwenden Sie kein Bügelspray;es könnte
Flecken verursachen.
- Beginnen Sie stets mit den Textilien,welche die niedrigste
Bügeltemperatur erfordern, z. B. mit Synthetics.
4 Stecken Sie den Netzstecker in eine Schuko-Steckdose.
C
5 Warten Sie,wenn die gelbe Kontroll-Lampe ausgegangen ist,
noch eine Weile, bevor Sie mit dem Bügeln beginnen.
B
Die gelbe Kontrollampe schaltet sich von Zeit zu Zeit an und wieder
aus.
DEUTSCH12
Page 13
Automatische Ausschaltung (Nur Typen GC4043, GC4040,
GC4038,GC4035,GC4033, GC4030)
Hat die Automatik das Gerät ausgeschaltet,so blinkt die rote KontrollLampe.Wenn Sie das Bügeleisen leicht hin und her bewegen,schaltet
es sich wieder ein und die rote Kontroll-Lampe blinkt nicht mehr.
Dampfbügeln
Achten Sie darauf, daß genügend Wasser im Wasserbehälter ist.
1 Stellen Sie den Temperaturregler auf die erforderliche
Temperatur.
Vgl.den Abschnitt "Die Temperatur einstellen."
C
2 Stellen Sie den Dampfregler auf die erforderliche Position.
- 1 bis 3:mäßiger Dampf - Temperatur-Einstellung 2 bis 3.
- 4 bis 6:starker Dampf - Temperatur-Einstellung 3 bis MAX.
B
Sobald die eingestellte Temperatur erreicht ist,können Sie mit dem
Dampfbügeln beginnen.
Trockenbügeln
1 Stellen Sie den Dampfregler auf Position 0 (= kein Dampf).
2 Stellen Sie den Temperaturregler auf die erforderliche
Temperatur.
Vgl.den Abschnitt "Die Temperatur einstellen."
Andere Anwendungen
Bügelgut einsprühen
Hiermit lassen sich bei jeder Temperatur hartnäckige Falten ausbügeln.
Achten Sie darauf, dass genügend Wasser im Wasserbehälter ist.
C
1 Drücken Sie einige Male die Sprühtaste,um die Wäsche
anzufeuchten.
Dampfstoß
Ein kräftiger Dampfstoß beseitigt selbst hartnäckige Falten aus den
Textilien.
Der Dampfstoß kann nur bei Temperatureinstellungen von 2 und
MAX angewandt werden.
DEUTSCH 13
Page 14
C
1 Drücken Sie die Dampfstoßtaste,und lassen Sie sie wieder los.
Tropf-Stop
Ihr Bügeleisen ist mit einem "Tropf-Stop" ausgerüstet, der verhindert,
daß bei zu geringer Temperatur der Bügelsohle Wasser aus dem
Bügeleisen tropft.Wenn er sich einschaltet, wird ein Geräusch hörbar
("Klick").
(Nur T ypen GC4043, GC4040,GC4038,GC4035,GC4033,
GC4030,GC4028,GC4025, GC4023, GC4020,GC4018,
GC4015,GC4013,GC4010)
C
1 Der Dampfstoß kann auch bei senkrecht gehaltenem
Bügeleisen angewandt werden.
Richten Sie den Dampstoß niemals auf Personen!
Automatisches Anti-Kalk System (Nur Typen GC4043,
GC4040,GC4038,GC4035, GC4033, GC4030,GC4028,
GC4025,GC4023,GC4020, GC4018, GC4015)
C
1 Das integrierte Anti-Kalk-System reduziert automatisch die
Kalkablagerung und verlängert somit die Nutzungsdauer Ihres
Bügeleisens.
Automatische Ausschaltung (Nur Typen GC4043, GC4040,
GC4038,GC4035,GC4033, GC4030)
C
1 Ist das Bügeleisen eine Weile lang nicht bewegt worden,wird
das Heizelement automatisch ausgeschaltet.
◗ Die rote Kontroll-Lampe beginnt dann zu blinken.
DEUTSCH14
A
U
T
A
N
T
C
I
T
A
O
M
C
L
A
I
C
-
Page 15
Die Bügelsohle wird wie folgt wieder beheizt:
- Nehmen Sie das Bügeleisen auf,und bewegen Sie es etwas.
- Die rote Kontroll-Lampe erlischt. Die gelbe Kontroll-Lampe leuchtet
bei entsprechender Temperatur der Bügelsohle auf.
- Wenn die gelbe Kontroll-Lampe aufleuchtet,nachdem das Bügeleisen
bewegt wurde, so warten Sie bis sie erlischt,ehe Sie mit dem Büglen
fortfahren.
- Ist die gelbe Kontroll-Lampe nicht angegangen,nachdem Sie das
Bügeleisen bewegt haben,so können Sie sofort mit dem Bügeln
beginnen.
Reinigung und Wartung
Calc-Clean
Mit Hilfe von Calc-Clean können Sie Kalk und Verunreinigungen aus
dem Gerät entfernen.
Verwenden Sie Calc-Clean einmal alle 14 Tage. Ist das Wasser in Ihrer
Gegend besonders hart - wenn Kalkpartikel beim Bügeln aus der
Bügelsohle austreten - sollten Sie Calc-Clean häufiger einsetzen.
1 Stellen Sie den Dampfregler auf Position O (= kein Dampf).
2 Füllen Sie den Wasserbehälter bis zur Markierung MAX.
Verwenden Sie keinen Essig oder andere Entkalker.
C
3 Stellen Sie den Temperaturregler auf Position MAX.
4 Stecken Sie den Netzstecker in die Steckdose.
5 Ziehen Sie den Netzstecker aus der Steckdose,sobald die
gelbe Kontrollampe erloschen ist.
C
6 Halten Sie das Bügelseisen über das Spülbecken,drücken Sie
die Calc-Clean-Taste,halten Sie sie gedrückt,und schütteln Sie
das Bügeleisen leicht hin und her.
B
Dabei tritt Dampf und kochendes Wasser aus der Bügelsohle aus.
Verunreinigungen und Kalkpartikel werden,sofern vorhanden,dabei
herausgepült.
7 Lassen Sie die Calc-Clean-Taste los,sobald das Wasser im
Wasserbehälter aufgebraucht ist.
Sollten noch viele Verunreinigungen im Wasserbehälter zurück
geblieben sein,so wiederholen Sie den Vorgang.
Nach der Reinigung mit Calc-Clean
- Stecken Sie den Netzstecker in die Steckdose,damit die Bügelsohle
trocknet.
DEUTSCH 15
N
N
E
N
Page 16
- Ziehen Sie den Netzstecker aus der Steckdose, sobald die gelbe
Kontrollampe erloschen ist.
- Führen Sie die Bügelsohle einige Male über ein altes,aber sauberes
Tuch hin und her.
- Lassen Sie das Bügeleisen abkühlen,bevor Sie es zur Seite stellen.
Nach dem Bügeln
1 Ziehen Sie den Netzstecker aus der Steckdose,und lassen Sie
das Bügeleisen abkühlen.
2 Wischen Sie die Bügelsohle mit einem feuchten Tuch ab, auf das
Sie bei Bedarf etwas Spülmittel auftragen können.
3 Der obere Teil des Bügeleisens lässt sich mit einem feuchten
Tuch abwischen, auf das Sie bei Bedarf ein wenig Spülmittel
auftragen können.
C
4 Füllen Sie den Wasserbehälter von Zeit zu Zeit mit klarem
Wasser. Gießen Sie das Wasser anschließend aus.
Aufbewahrung
1 Ziehen Sie den Netzstecker aus der Steckdose,und stellen Sie
den Dampfregler auf Position 0.
2 Leeren Sie den Wasserbehälter.
C
3 (Nur T ypen GC4038,GC4035,GC4033, GC4030,GC4023,
GC4020,GC4018, GC4015,GC4013,GC4010, GC4005)
a) Lassen Sie das Eisen abkühlen.Wickeln Sie das Netzkabel um die
Kabelwicklung und fixieren Sie es mit der Klammer.Die Type
GC4040 wird mit einem 3 Meter langen Kabel geliefert.
b) Bewahren Sie das Bügeleisen stets waagerecht auf einer festen
Oberfläche stehend auf.Schützen Sie die Bügelsohle mit einem
weichen T uch.
C
4 (Nur T ypen GC4043,GC4040,GC4028, GC4025) Abdeckung
a) Schützen Sie das Bügeleisen mit Hilfe der Abdeckung.
Verwenden Sie die Abdeckung nicht während des Bügelns.
b) Wickeln Sie das Netzkabel um die Kabelaufwicklung.
c) Bewahren Sie das Bügeleisen stets waagerecht auf einer festen
Oberfläche stehend und durch die Abdeckung geschützt auf.
DEUTSCH16
Page 17

Garantie und Service
Wenden Sie sich mit Ihren Fragen,Wünschen und Problemen bitte an
das Philips Service Center in Ihrem Lande.Sollte sich in Ihrem Lande
kein solches Center befinden,so wenden Sie sich bitte an das Service
Department von Philips Domestic Appliances and Personal Care BV.
Entnehmen Sie die Telefonnummern bitte der beigefügten
Garantieschrift. Besuchen Sie uns auch auf unserer Homepage
www.philips.com.
Das Gerät arbeitet nicht wie gewünscht?
In diesem Kapitel finden Sie Hinweise zur Lösung von Problemen,die
am häufigsten beim Gebrauch dieses Bügeleisens auftreten.Können Sie
Ihr Problem anhand dieser Aufstellung nicht lösen, so wenden Sie sich
bitte an das Philips Service Center in Ihrem Lande.Die Telefonnummer
finden Sie in der beliegenden Garantieschrift.
DEUTSCH 17
Abhilfe
Prüfen Sie das Netzkabel,den
Netzstecker und die Steckdose.
Füllen Sie den Wasserbehälter.
Stellen Sie den Dampfschalter auf eine
Position zwischen 1 und 6.Vgl.den
Abschnitt "Dampfbügeln".
Stellen Sie den Temperaturregler auf
den Dampfbereich (2 bis MAX).
Stellen Sie dann das Bügeleisen auf
seine Rückseite, und warten Sie, bis
die gelbe Kontroll-Lampe erlischt. Nun
können Sie mit dem Bügeln beginnen.
Stellen Sie das Bügeleisen waagerecht
und warten Sie eine Weile, bevor Sie
den (vertikalen) Dampfstoß weider
ausführern.
Stellen Sie den Temperaturregler auf
den Dampfbereich (2 bis MAX).
Stellen Sie dann das Bügeleisen auf
seine Rückseite, und warten Sie, bis
die gelbe Kontroll-Lampe erlischt. Nun
können Sie mit dem Bügeln beginnen.
Drücken Sie den Deckel des
Wasserbehälters fest auf ("Klick").
Wenden Sie einige Male Calc-Clean
an.Vgl. den Abschnitt "Calc-Clean".
Schütteln Sie leicht das Bügeleisen.Die
automatische Ausschaltung wird
deaktiviert, und die rote KontrollLampeblinkt nicht mehr.
Vermutliche Ursache
Keine Stromzufuhr
Nicht genügend Wasser im Tank.
Der Dampfregler steht auf Position 0
(= kein Dampf).
Die Bügelsohle ist noch nicht heiß
genug und/oder der Tropf-Stop ist
aktiviert.
Der (vertikale) Dampfstoß ist in
kurzem Zeitraum zu oft angewandt
worden.
Die Bügelsohle ist noch nicht heiß
genug und/oder der Tropf-Stop ist
aktiviert.
Der Deckel des Wasserbehälters ist
nicht fest geschlossen.
Hartes Wasser setzt in der Bügelsohle
Kalkpartikel ab.
Die automatische Ausschaltung ist
aktiviert.Vgl.den Abschnitt
"Automatische Ausschaltung".
Problem
Der Netzstecker steckt in der
Steckdose, aber die Bügelsohle bleibt
kalt.
Kein Dampf
(Nur T ypen GC4043, GC4040,
GC4038,GC4035, GC4033,GC4030,
GC4028,GC4025, GC4023,GC4020,
GC4018,GC4015, GC4013,GC4010)
Kein Dampfstoß verfügbar
Wasser tröpfelt auf das Bügelgut
Verunreinigungen und Kalkpartikel
treten beim Bügeln aus der
Bügelsohle aus.
(Nur T ypen GC4043, GC4040,
GC4038,GC4035, GC4033,GC4030)
Die rote Kontroll-Lampe blinkt
Page 18
Important
Avant d' utiliser l'appareil,lisez soigneusement ces instructions pour
une sécurité optimale.
- Ne laissez jamais le fer à repasser sans surveillance pendant qu'il est
branché.
- Attention aux risques de brûlure.Faites attention que les enfants ne
puissent pas toucher ou utiliser le fer quand il est chaud.
- Faites bien attention à ce que les enfants ne puissent pas jouer avec
le fer.
- La semelle du fer à repasser peut devenir très chaude et donc peut
causer des brûlures si vous la touchez.
- N'utilisez jamais le fer à repasser s'il est endommagé d'une façon
quelconque.
- Lorsque vous avez fini de repasser,pendant que vous remplissez ou
videz le réservoir d'eau, et même si vous laissez le fer pour un bref
instant,réglez la commande de vapeur sur la position 0 et placez le
fer à repasser sur le talon.
- Si le cordon d'alimentation est endommagé il ne doit être remplacé
que par Philips ou un Centre Service Agréé afin d'éviter tout
accident.
Avant la première utilisation
1 Vérifiez que la tension indiquée sous l'appareil correspond bien
à la tension de votre secteur.
C
2 Retirez tout auto-collant ou film de protection qui se trouve
sur la semelle (Types:GC4043, GC4040,GC4028,GC4025).
3 Faite chauffer le fer à la température maximum et repassez une
pièce de tissus en coton afin de retirer tous les residus qui
auraient pu se déposer sur la semelle.
Le fer peut fumer légèrement quand on le branche pour la première
fois.Cela cessera après un bref instant.
Remplissage du réservoir
Ne plongez jamais le fer dans l'eau.
1 Débranchez la fiche de la prise de courant.
C
2 Réglez la commande de vapeur sur la position 0 (pas de
vapeur).
3 Soulevez le couvercle de l'orifice de remplissage.
4 Tenez le fer en position verticale.
FRANÇAIS18
Page 19
C
5 Remplissez le reservoir du fer jusqu'au MAX.
Ne remplissez pas le réservoir au-delà de l'indication MAX.
Si l'eau du robinet dans votre region est très calcaire, il est conseillé de
la mélanger avec de l'eau déminéralisée.
N'utilisez pas de vinaigre, amidon ou de l'eau adoucie chimiquement.
6 Fermez l'obturateur (clic!)
Réglage de la température
C
1 (Type GC4043,GC4040, GC4028,GC4025 uniquement)
Retirez le couvercle de rangement.
N'utilisez pas le couvercle de rangement pendant le repassage.
2 Posez le fer à repasser sur son talon.
C
3 Choisissez la température de repassage souhaitée à l'aide du
bouton de réglage.
- Vérifiez toujours les instructions et températures de repassage
figurant sur l'étiquette des vêtements.
- 1 Fibres synthétiques (e.g. acrylique,viscose,polyamide,
polyester)
- 1 Soie
- 2 Laine
- 3 Coton,lin
- Si vous ne connaissez pas la composition des tissus,repassez en
commençant par la température la plus basse sur une partie interne
du vêtement et invisible de l'extérieur.
- La soie, la laine et autres fibres synthétiques doivent être repassés sur
l'envers pour éviter les taches surtout si vous repasser à la vapeur.
- Commencez toujours le repassage des articles nécessitant la
température la plus basse.
4 Branchez la fiche dans la prise de courant.
C
5 Attendez que le témoin lumineux s'éteigne avant de
commencer à repasser.
B
Le témoin lumineux s'allume et s'éteint de temps en temps pendant le
repassage.
Pour les versions à coupure automatique (Types:GC4043,
GC4040,GC4038,GC4035, GC4033, GC4030 uniquement)
Si la coupure automatique est activé (témoin lumineux rouge allumé),
remuez le fer (le témoin rouge s'éteint),le fer chauffe de nouveau.
FRANÇAIS 19
Page 20

Repassage à la vapeur
Assurez-vous qu'il y a suffisamment d'eau dans le réservoir.
1 Mettez le bouton de réglage de température sur la position
conseillée.
Voir le chapitre "Réglage de la température".
C
2 Réglez la commande de vapeur sur la position appropriée.
- 1 - 3 vapeur modérée (réglage température: 2 à 3)
- 4 - 6 vapeur maximum (réglage température:3 à MAX)
B
La vapeur commence à se dégager une fois que la température réglée a
été atteinte.
Repassage sans vapeur
1 Réglez la commande de vapeur sur la position 0 (pas de
vapeur).
2 Mettez le bouton de réglage de température sur la position
conseillée.
Voir le chapitre "Réglage de la température".
Autres caractéristiques
Le spray
Pour enlever les faux plis difficiles à éliminer.
Assurez-vous qu'il y a suffisamment d'eau dans le réservoir.
C
1 Appuyez à plusieurs reprises sur le bouton du spray pour
humidifier l'article à repasser.
Jet de Vapeur
Un puissant jet de vapeur est utile pour enlever les faux plis difficiles à
éliminer.
Le jet de vapeur ne peut être utilisé qu'à des températures comprises
entre 2 et MAX.
C
1 Appuyez et relâchez le bouton jet de vapeur.
FRANÇAIS20
Page 21

Anti-goutte
Ce fer à repasser est doté d'un système anti-goutte :lorsque la
température de semelle est trop basse , la production de vapeur est
interrompue afin d'empêcher que la semelle ne goutte.Vous entendrez
un léger bruit (clic) si cela ce produit.
Repassage vertical Types:GC4043,GC4040,GC4038,GC4035,
GC4033,GC4030,GC4028, GC4025, GC4023,GC4020,
GC4018,GC4015,GC4013, GC4010 uniquement)
C
1 Le jet de vapeur peut être aussi utilisé pour le repassage
vertical.
Ne dirigez jamais le jet de vapeur vers des personnes.
Système anti-calcaire automatique (Types: GC4043,GC4040,
GC4038,GC4035,GC4033, GC4030, GC4028,GC4025,
GC4023,GC4020,GC4018, GC4015 uniquement)
C
1 Le système anti-calcaire automatique incorporé permet de
réduire le dépot de calcaire à l'intérieur de la semelle et assure
un plus grande longévité de votre fer.
Arrêt automatique (type GC4043,GC4040,GC4038,
GC4035,GC4033,GC4030 uniquement)
C
1 Une sécurité électronique arrêtera automatiquement le fer s'il
reste inutilisé pendant un certain temps.
◗ Pour indiquer que le fer est arrêté,le témoin lumineux rouge
Arrêt-automatique se met à clignoter.
Pour faire chauffer le fer à nouveau:
- Prenez le fer en main et bougez-le.
- Le témoin rouge s'éteint.Le témoin orange s'allume et vous indique
que la semelle est en cours de chauffe.
- Si le témoin orange s'allume juste après avoir repris le fer, attendez
que celui-ci s'éteigne avant de commencer à repasser.
- Si le témoin reste éteint vous pouvez commencer le repassage.
FRANÇAIS 21
A
U
T
A
N
T
C
I
T
A
O
M
C
L
A
I
C
-
Page 22

Nettoyage et entretien
Auto-nettoyage
La fonction auto-nettoyage permet de retirer les particules de calcaire
qui auraient pu se déposer ainsi que d'éventuelles impuretés.
Utilisez la fonction auto-nettoyage toutes les deux semaines.Si l'eau de
votre région est très calcaire (par ex:lorsque des particules de calcaire
sortent par la semelle) vous devez utiliser cette fonction plus souvent.
1 Réglez la commande de vapeur sur la position 0.
2 Remplissez le réservoir d'eau jusqu'au niveau maximum.
N'utilisez pas de vinaigre ou d'autres agents détartrants.
C
3 Mettez le bouton de réglage de la température sur MAX.
4 Branchez l'appareil.
5 Quand le témoin lumineux orange s'éteint,débranchez
l'appareil.
C
6 Tenez le fer au dessus d'un récipient, pressez le bouton Auto-
nettoyage en bougeant le fer d'avant en arrière.
B
De la vapeur et de l'eau bouillante sortent ainsi par les trous de la
semelle en entrainant avec elles les impuretés.
7 Relachez le bouton Auto-nettoyage dés que le réservoir est
vide.
Répétez cette opération aussi souvent que nécessaire.
Après l'auto-nettoyage
- Branchez l'appareil et laissez-le chauffer jusqu'à ce que la semelle soit
sèche.
- Quand le témoin lumineux orange s'éteint, débranchez l'appareil.
- Repassez un vieux morceau de tissu pour vous assurer que la
semelle est bien sèche.
- Avant de ranger l'appareil laissez-le refroidir.
Après le repassage
1 Débranchez l'appareil et laissez-le refroidir.
2 Les taches et autres salissures peuvent être retirées de la
semelle avec un chiffon humide.N'utilisez pas d'abrassif.
FRANÇAIS22
N
N
E
N
Page 23

3 Nettoyez la partie supérieure du fer à repasser avec un chiffon
humide.
C
4 Rincez régulièrement le réservoir avec de l'eau.Videz le
réservoir après le nettoyage.
Rangement
1 Retirez la fiche de la prise de courant et positionnez le bouton
vapeur sur 0.
2 Videz le réservoir.
C
3 Types:GC4038, GC4035,GC4033,GC4030, GC4023,GC4020,
GC4018,GC4015, GC4013,GC4010,GC4005 uniquement.
a) Laissez le fer refroidir complètement.Enroulez le cordon
d'alimentation sur le talon et fixez l'extémité à l'aide du clip.Type
GC4040 est équipé avec 3m de cordon.
b) Rangez le fer à plat sur une surface stable et sur un chiffon pour
protéger la semelle.
C
4 Couvercle de rangement (Types: GC4043,GC4040, GC4028,
GC4025 uniquement)
a) Placez le couvercle pour ranger l'appareil.
N'utilisez jamais le couvercle pendant l'utilisation.
b) Enroulez le cordon d'alimentation sur le talon.
Rangez le fer à plat sur une surface stable.
Garantie et service
Pour plus d'informations,visitez notre Philips Web site :
www.philips.com ou veuillez contacter le Service Consommateurs
Philips de votre pays (vous trouverez le numéro de téléphone dans le
dépliant sur la garantie internationale). S'il n'y a aucun Service
Consommateurs Philips dans votre pays,contactez votre distributeur
ou le Service Department of Philips Domestic Appliances and Personal
Care BV.
FRANÇAIS 23
Page 24

En cas de problèmes
Ce paragraphe résume les problème d'utilisation les plus courants. Si
vous ne pouvez pas resoudre le problème à l'aide des explications
suivantes,addressez-vous à un Centre Service Agréé,au Service
Consommateurs Philips de votre pays ou contactez-nous en ligne à
www.philips.com.
FRANÇAIS24
Solution
Vérifiez que la prise de courant est
bien allimentée (à l'aide d'un autre
appareil par exemple).
Remplissez le réservoir d'eau.
Réglez la commande vapeur entre
1 et 6.
Mettez le bouton de réglage de
température sur la plage vapeur (2
au MAX).Posez le fer sur son talon,
attendez que le témoin lumineux
orange s'éteigne avant de commencer
le repassage.
Placez le fer sur le talon et attendez
quelqes instants avant de l'utiliser à
nouveau.
Mettez le bouton de réglage de
température sur la plage vapeur (2
au MAX).Posez le fer sur son talon,
attendez que le témoin lumineux
orange s'éteigne avant de commencer
le repassage.
Pressez le couvercle fermement (clic!).
Utilisez l'Auto-nettoyage plus souvent.
Remuez le fer ;le témoin rouge
s'éteint.
Cause(s) possible(s)
Problème de connexion.
Il n'y a pas assez d'eau dans le
réservoir.
La commande de vapeur a été réglée
sur la position 0.
Le fer à repasser n'est pas suffisament
chaud et/ou la fonction anti-goutte est
activée.
Le jet de vapeur a été utilisé trop
souvent et la semelle n'a pas eu le
temps de reprendre la température
initiale.
Le fer à repasser n'est pas suffisament
chaud et/ou la fonction anti-goutte est
activée.
Le couvercle du reservoir n'est pas
fermé correctement.
L'eau est trop dure et entartre
l'intérieur de la semelle.
L'arrêt automatique est activé.Voir
paragraphe "Arrêt automatique".
Problème
Le fer à repasser est branché mais la
semelle est froide.
Pas de vapeur
Pas de jet de vapeur ou pas de
vapeur en position verticale (Types:
GC4043,GC4040, GC4038,GC4035,
GC4033,GC4030, GC4028,GC4025,
GC4023,GC4020, GC4018,GC4015,
GC4013,GC4010)
Goutelettes d'eau sur le linge
Des particules de calcaire et des
impuretés sortent par la semelle.
Le témoin lumineux rouge clignote
(types:GC4043, GC4040,GC4038,
GC4035,GC4033, GC4030
uniquement).
Page 25

Waarschuwing
Voor optimale veiligheid: lees deze instructies voordat u het strijkijzer
gaat gebruiken.
- Laat het apparaat nooit onbeheerd achter terwijl het op netspanning
is aangesloten.
- Dit apparaat mag nooit zonder toezicht gebruikt worden door jonge
kinderen.
- Houd toezicht op jonge kinderen om te voorkomen dat ze met het
apparaat gaan spelen.
- De zoolplaat van het strijkijzer kan zeer heet worden en bij aanraking
brandwonden veroorzaken.
- Gebruik het apparaat nooit als het op de een of andere manier
beschadigd is.
- Als u klaar bent met strijken, als u bij het strijkijzer wegloopt en
tijdens het vullen of leegmaken van het waterreservoir,haal altijd de
stekker uit het stopcontact,zet de stoomregelaar op O en zet het
strijkijzer op zijn achterkant.
- Indien het snoer van dit apparaat beschadigd is, dient het uitsluitend
te worden vervangen door Philips of een door Philips daartoe
aangewezen reparateur of een ander ter zake deskundig persoon
om een gevaarlijke situatie te voorkomen.
Voor het eerste gebruik
1 Controleer of de voltageaanduiding op het typeplaatje van uw
apparaat overeenkomt met de netspanning in uw woning.
C
2 Verwijder stickers,beschermfolie of de zoolplaathoes (alleen bij
type GC4043,GC4040, GC4028,GC4025) van de zoolplaat.
3 Warm het strijkijzer op tot de maximumtemperatuur en
beweeg het strijkijzer vervolgens gedurende een paar minuten
over een vochtige doek om lijmresten en andere
verontreinigingen van de zoolplaat te verwijderen.
Wanneer u het strijkijzer voor de eerste keer gebruikt, kan er wat rook
vrijkomen. Na een tijdje houdt dit op.
Het waterreservoir vullen
Dompel het strijkijzer nooit in water.
1 Haal de stekker uit het stopcontact.
C
2 Zet de stoomregelknop op stand 0 (=geen stoom).
3 Open de vuldop.
4 Houd het strijkijzer schuin.
NEDERLANDS 25
Page 26

C
5 Vul het waterreservoir met kraanwater tot aan het
maximumniveau met behulp van het vulkannetje.
Vul het reservoir nooit verder dan het MAX-teken.
Als het kraanwater in uw woongebied erg hard is, raden wij u aan het
water te mengen met een gelijke hoeveelheid gedistilleerd water,of
alleen gedistilleerd water te gebruiken.
Gebruik geen azijn, stijfsel, of chemisch ontkalkt water.
6 Druk op de vuldop om hem te sluiten (klik!).
Temperatuur instellen
C
1 Verwijder de zoolplaathoes van de zoolplaat (alleen bij type
GC4043,GC4040, GC4028,GC4025).
Gebruik de zoolplaathoes niet tijdens het strijken.
2 Zet het strijkijzer op zijn achterkant.
C
3 Stel de gewenste temperatuur in door de temperatuurregelaar
naar de juiste temperatuurindicatie te draaien.
- Controleer het label in uw kledingstuk voor de gewenste
strijktemperatuur.
- 1 Synthetische stoffen (bijv.acryl,viscose,polyamide,polyester)
- 1 Zijde
- 2 Wol
- 3 Katoen,linnen
- Als u niet zeker weet van welk materiaal uw kledingstuk is gemaakt,
probeer het dan eerst uit op een plek die niet zichtbaar is tijdens het
dragen.
- Zijde, wol en synthetische materialen: strijk de binnenkant van de
stoffen om glimmende plekken te voorkomen.Gebruik de
sproeifunctie niet om vlekken te voorkomen.
- Strijk eerst de kledingstukken die op de laagste temperatuur
gestreken moeten worden,zoals kleding gemaakt van synthetische
stoffen.
4 Steek de stekker in een geaard stopcontact.
C
5 Als het temperatuurcontrolelampje uit is gegaan,wacht dan
even voordat u begint te strijken.
B
Het controlelampje gaat tijdens het strijken af en toe aan en uit.
NEDERLANDS26
Page 27

Voor types met een automatische uitschakelfunctie (alleen
type GC4043,GC4040,GC4038, GC4035, GC4033,GC4030).
Als de automatische uitschakelfunctie geactiveerd is (het rode lampje
knippert),beweeg het strijkijzer dan even om deze functie weer uit te
schakelen (het lampje stopt met knipperen).
Stoomstrijken
Controleer of er genoeg water in het waterreservoir zit.
1 Zet de temperatuurregelaar op de gewenste stand.
Zie 'Temperatuur instellen'.
C
2 Zet de stoomregelaar op de juiste stand.
- 1 - 3 voor weinig stoom (temperatuurstand van 2 tot 3)
- 4 - 6 voor veel stoom (temperatuurstand van 3 tot MAX)
B
Het apparaat begint te stomen zodra het de ingestelde temperatuur
heeft bereikt
Strijken zonder stoom
1 Zet de stoomregelknop op stand O (=geen stoom).
2 Zet de temperatuurregelaar op de gewenste stand.
Zie 'Temperatuur instellen'.
Overige functies
Sproeien
Voor het verwijderen van hardnekkige kreuken op elke temperatuur.
Controleer of er genoeg water in het waterreservoir zit.
C
1 Druk een paar keer op de sproeiknop om de stof vochtig te
maken.
Stoomstoot
Deze krachtige stoomstoot helpt hardnekkige kreuken te verwijderen.
De stoomstoot kan alleen worden toegepast bij een temperatuurstand
tussen 2 en MAX.
NEDERLANDS 27
Page 28

C
1 Druk de stoomstootknop in.
Druppelstop
Dit strijkijzer is uitgerust met een druppelstopsysteem:het strijkijzer
stopt automatisch met stomen bij te lage temperaturen, zodat er geen
water uit de zoolplaat druppelt.Als dit systeem wordt ingeschakeld
kunt u een geluidje horen.
Verticale stoomstoot (alleen bij type GC4043,GC4040,
GC4038,GC4035,GC4033, GC4030, GC4028,GC4025,
GC4023,GC4020,GC4018, GC4015, GC4013,GC4010)
C
1 De stoomstoot kan ook gebruikt worden als u het strijkijzer
verticaal houdt.
Richt de stoom nooit op mensen.
Automatisch anti-kalksysteem (alleen bij type GC4043,
GC4040,GC4038,GC4035, GC4033, GC4030,GC4028,
GC4025,GC4023,GC4020, GC4018, GC4015)
C
1 Het ingebouwde anti-kalksysteem vermindert automatisch de
afzetting van kalk en garandeert een langere levensduur voor uw
strijkijzer.
NEDERLANDS28
A
U
T
A
N
T
C
I
T
A
O
M
C
L
A
I
C
-
Page 29

Automatische uitschakelfunctie allen bij type GC4043,
GC4040,GC4038,GC4035, GC4033, GC4030)
C
1 Een elektronisch beveiligingssysteem zorgt ervoor dat het
strijkijzer automatisch wordt uitgeschakeld als het een tijdje
heeft stilgestaan.
◗ Het rode waarschuwingslampje zal gaan knipperen als teken dat de
automatische uitschakelfunctie het apparaat heeft uitgeschakeld.
Om het strijkijzer weer te laten opwarmen:
- Til het strijkijzer op of beweeg het even heen en weer
- Het rode waarschuwingslampje gaat dan uit. Het oranje
temperatuurcontrolelampje kan gaan branden, afhankelijk van de
temperatuur van de zoolplaat.
- Als het oranje controlelampje gaat branden nadat u het strijkijzer
heen en weer bewogen heeft,wacht dan totdat het uit is gegaan
voordat u begint te strijken.
- Als het oranje controlelampje niet gaat branden nadat u het
strijkijzer heen en weer bewogen heeft,dan is het strijkijzer klaar
voor gebruik.
Schoonmaken en onderhoud
Calc-Clean
Dit is een ontkalkingsfunctie die kalksteen en andere verontreinigingen
verwijdert. Gebruik de "Calc-Clean"-functie om de twee weken.Als het
water in uw regio erg hard is (d.w.z.wanneer er tijdens het strijken
schilfertjes uit de zoolplaat komen), moet u de "Calc-Clean"-functie
vaker gebruiken.
1 Zet de stoomregelaar op stand 0.
2 Vul het waterreservoir tot aan het maximumniveau.
Gebruik geen azijn of andere ontkalkingsmiddelen.
C
3 Stel de temperatuur in op MAX.
4 Steek de stekker in het stopcontact.
5 Haal,nadat het oranje controlelampje is uitgegaan, de stekker
uit het stopcontact.
C
6 Houd het strijkijzer boven de gootsteen,houd de "Calc-Clean"-
knop ingedrukt en schud het strijkijzer voorzichtig heen en
weer.
NEDERLANDS 29
N
N
E
N
Page 30

B
Er zal stoom en kokend water uit de zoolplaat komen.Schilfertjes en
verontreinigingen,voor zover aanwezig,zullen uit het strijkijzer worden
weggespoeld.
7 Laat de "Calc-Clean"-knop los zodra al het water in het
reservoir is opgebruikt.
Herhaal dit ontkalkingsproces als het strijkijzer nog steeds veel
verontreinigingen bevat.
Na het ontkalken.
- Steek de stekker in het stopcontact om de zoolplaat te laten drogen.
- Haal,nadat het oranje controlelampje is uitgegaan,de stekker uit het
stopcontact.
- Beweeg het hete strijkijzer voorzichtig over een schone oude lap om
eventuele watervlekken van de zoolplaat te verwijderen.
- Laat het strijkijzer afkoelen voordat u het opbergt.
Na het strijken
1 Haal de stekker uit het stopcontact en laat het strijkijzer
afkoelen.
2 Veeg schilfertjes en andere verontreinigingen van de zoolplaat
met een vochtige doek en een niet-schurend
schoonmaakmiddel.
3 Maak de bovenkant van het strijkijzer schoon met een vochtige
doek.
C
4 Spoel het waterreservoir regelmatig schoon met water. Leeg
het waterreservoir na het schoonmaken.
Opbergen
1 Haal de stekker uit het stopcontact en zet de stoomregelaar
op stand O.
2 Leeg het waterreservoir.
C
3 Alleen voor type GC4038,GC4035, GC4033,GC4030,
GC4023,GC4020, GC4018,GC4015,GC4013, GC4010,
GC4005.
a) Laat het strijkijzer afkoelen.Wikkel het snoer om de
snoeropwindhaspel en maak het vast met de clip.Type GC4040
heeft een snoer van 3 meter.
NEDERLANDS30
Page 31

b) Berg het strijkijzer,nadat u het reservoir heeft geleegd,altijd op door
het horizontaal op een stevig oppervlak te plaatsen.Bescherm de
zoolplaat door het strijkijzer op een doek te plaatsen.
C
4 Zoolplaathoes (alleen bij type GC4043,GC4040, GC4028,
GC4025)
a) Bevestig de zoolplaathoes.
Verwijder de zoolplaathoes voordat u gaat strijken.
b) Wind het snoer rond de snoerhaspel.
c) Berg het strijkijzer met de zoolplaathoes op door het apparaat
horizontaal op een stevig oppervlak te plaatsen.
Informatie & service
Als u informatie nodig heeft of als u een probleem heeft,bezoek dan
onze Website (www.philips.com),of neem contact op met het Philips
Customer Care Centre in uw land (u vindt het telefoonnummer in het
'worldwide guarantee' vouwblad).Als er geen Customer Care Centre
in uw land is,ga dan naar uw Philips dealer of neem contact op met de
afdeling Service van Philips Domestic Appliances and Personal Care BV.
NEDERLANDS 31
Page 32

Hulp bij het oplossen van problemen
Dit hoofdstuk behandelt in het kort de problemen die u tegen kunt
komen tijdens het gebruik van uw strijkijzer.Lees de betreffende
hoofdstukken voor verdere details.Als u er niet in slaagt het probleem
op te lossen,neem dan contact op met het Philips Customer Care
Centre in uw land (het telefoonnummer vindt u in het 'worldwide
guarantee' vouwblad).Als er geen Customer Care Centre in uw land is,
ga dan naar uw Philips dealer of het dichtsbijzijnde Philips
servicecentrum.
NEDERLANDS32
Oplossing
Controleer het snoer, de stekker en
het stopcontact.
Vul het waterreservoir (zie 'Het
waterreservoir vullen'),
Zet de stoomregelaar op een stand
tussen 1 en 6 (zie Stoomstrijken).
Zet de temperatuurregelaar op
stomen (2 tot MAX).Zet het
strijkijzer op zijn achterkant en wacht
totdat het controlelampje is uitgegaan
voordat u begin met strijken.
Zet het strijkijzer horizontaal en wacht
even voordat u de (verticale)
stoomstootfunctie opnieuw gaat
gebruiken.
Zet de temperatuurregelaar op
stomen (2 tot MAX).Zet het
strijkijzer op zijn achterkant en wacht
totdat het controlelampje is uitgegaan
voordat u begin met strijken.
Druk de vuldop stevig dicht totdat u
een klik hoort.
Gebruik de "Calc-Clean"-functie een
paar keer (zie Calc-Clean).
Schud het strijkijzer voorzichtig heen
en weer om de automatische
uitschakelfunctie uit te schakelen.Het
controlelampje stopt met knipperen.
Mogelijke oorza(a)k(en)
Aansluitproblemen.
Onvoldoende water in het
waterreservoir.
De stoomregelaar staat op stand O.
Het strijkijzer is niet heet genoeg en/of
de druppelstop is in werking getreden.
De (verticale) stoomstootfunctie is te
vaak achter elkaar gebruikt in korte
tijd.
Het strijkijzer is niet heet genoeg en/of
de druppelstop is in werking getreden.
De vuldop is niet goed gesloten.
Hard water vormt schilfertjes binnen
in de zoolplaat.
De automatische uitschakelfunctie is
geactiveerd (zie Automatische
uitschakelfunctie).
Probleem
De stekker zit in het stopcontact,
maar de zoolplaat is koud.
Geen stoom
Geen stoomstoot of verticale
stoomstoot (alleen bij type GC4043,
GC4040,GC4038, GC4035,GC4033,
GC4030,GC4028, GC4025,GC4023,
GC4020,GC4018, GC4015,GC4013,
GC4010).
Water druppeltjes op de stof
Tijdens het strijken komen schilfertjes
en verontreinigingen uit de zoolplaat.
Rode controlelampje knippert (alleen
bij type GC4043,GC4040, GC4038,
GC4035,GC4033, GC4030).
Page 33

Importante
Para una seguridad óptima, antes de empezar a usar la Plancha lean
primero estas instrucciones.
- El usuario no debe dejar la Plancha sin vigilancia mientras esté
enchufada a la red.
- Este aparato no está destinado a ser usado por chiquillos sin
vigilancia.
- Los niños pequeños deben ser vigilados para asegurarse de que no
juegan con este aparato
- La suela de la Plancha puede llegar a calentarse extremadamente y,si
se toca, puede causar quemaduras.
- No usen nunca el aparato si tiene cualquier tipo de deterioro.
- Después de acabar el planchado,cuando llenen o vacíen el depósito
del agua o incluso cuando dejen la Plancha durante algún tiempo,
desenchúfenla de la red,pongan el control del vapor en la posición
O y colóquenla sobre su talonera.
- Si el cable de red se deteriora, debe ser sustituido por un cable de
red o por un conjunto especial disponible en Philips o en los
Servicios de Asistencia Técnica de Philips.
Antes del primer uso
1 Comprueben si la gama de voltajes de la placa de
características se corresponde con la de la red eléctrica de su
hogar.
C
2 Quiten de la suela cualquier etiqueta,lámina protectora o tapa
para guardar (Solo modelos GC4043,GC4040, GC4028,
GC4025).
3 Para eliminar cualquier residuo de la suela.calienten la Plancha
a la temperatura máxima y planchen un trozo de paño húmedo
durante varios minutos
La Plancha puede producir un poco de humo cuando la usen por vez
primera. Después de un corto periodo,esto cesará.
Cómo llenar el depósito del agua
No sumerjan la Plancha en agua.
1 Desenchufen el aparato de la red.
C
2 Coloquen el control del vapor en la posición O (Sin vapor).
3 Abran la tapa de llenado.
4 Sostengan la Plancha en una posición inclinada.
ESPAÑOL 33
Page 34

C
5 Viertan agua de la jarra de llenado en el depósito del agua
hasta el nivel máximo.
No llenen el depósito por encima de la indicación "MAX".
Si el agua del grifo de su zona es muy dura,les aconsejamos mezclarla,
a partes iguales,con agua destilada o usar sólo agua destilada.
No usen vinagre, almidón o agua químicamente descalcificada.
6 Presionen para cerrar la tapa de llenado ("Click")
Cómo ajustar la temperatura
C
1 (Solo modelos GC4043,GC4040, GC4028,GC4025) Quiten la
cubierta protectora de almacenaje.
No usen la cubierta durante el planchado
2 Pongan la Plancha sobre su talonera.
C
3 Girándolo a la posición del indicador de temperatura,ajusten el
control de la temperatura a la requerida temperatura de
planchado.
- Para la temperatura necedaria,comprueben la etiqueta de la prenda.
- 1 Fibras sintéticas (Por ejemplo,acrílicas, viscosa, poliamida,
poliester.
- 1 Seda
- 2 Lana
- 3 Algodón,lino
- Cuando no sepan de que tipo de tejido(s) está hecha la prenda,
traten de planchar en un punto que no se vea cuando la usen.
- Seda,lana y materiales sintéticos :Para evitar puntos brillantes,
planchen por el reverso del tejido.Para evitar manchas,no usen la
función de pulverizadora (Spray).
- Empiecen planchando los artículos que requieran la más baja
temperatura de planchado, tales como los fabricados con fibras
sintéticas.
4 Enchufen el aparato a la red en un enchufe con toma de tierra.
C
5 Cuando la lámpara piloto ambar se haya apagado, esperen a
que se encienda de nuevo para empezar a planchar.
B
La lámpara piloto ambar se encenderá,de vez en cuando, durante el
planchado.
Para versiones con desconexión automática (Sólo modelos
GC4043,GC4040,GC4038, GC4035, GC4033,GC4030)
Si la desconexión automática se activa,(Lámpara piloto roja parpadea),
muevan la Plancha ligeramente para desactivarla (El parpadeo cesará)
ESPAÑOL34
Page 35

Cómo planchar con vapor
Asegúrense de que haya suficiente agua en el depósito del agua.
1 Ajusten el control de la temperatura a la posición
recomendada.
Consulten la sección "Cómo ajustar la temperatura".
C
2 Ajusten el control del vapor a la apropiada posición de vapor.
- 1 - 3 para vapor moderado (Posiciones de temperatura de 2 a
3)
- 4 - 6 para vapor máximo (Posiciones de temperatura de 3 a
MAX)
B
El vaporizado empezará tan pronto como se haya alcanzado la
temperatura seleccionada.
Cómo planchar sin vapor
1 Coloquen el control del vapor en la posición O (Sin vapor).
2 Ajusten el control de la temperatura a la posición
recomendada.
Consulten la sección "Cómo ajustar la temperatura".
Otras funciones
Pulverizador
Para eliminar arrugas rebeldes a cualquier temperatura.
Asegúrense de que haya suficiente agua en el depósito del agua.
C
1 Para humedecer la ropa,presionen un par de veces el botón
del pulverizador.
Chorro de vapor
Un poderoso "Chorro" de vapor les ayudará a eliminar las arrugas
rebeldes.
La función Chorro de vapor solo puede usarse en posiciones de
temperatura entre 2 y MAX.
C
1 Presionen y suelten el botón del Chorro de Vapor.
ESPAÑOL 35
Page 36

Antigoteo
Esta Plancha incorpora un dispositivo antigoteo del vapor ("Drip
Stop").Para evitar que el agua gotee por la suela,la Plancha cesa
automáticamente de vaporizar a temperaturas demasiado bajas.
Cuando esto suceda,podrán oir un sonido.
Chorro de Vapor V ertical (Solo en modelos GC4043,GC4040,
GC4038,GC4035,GC4033, GC4030, GC4028,GC4025,
GC4023,GC4020,GC4018, GC4015, GC4013,GC4010)
C
1 La función Chorro de Vapor también puede utilizarse cuando
sostengan la Plancha en posición vertical.
No dirijan nunca el vapor hacia las personas.
Automático Sistema Antical (Solo modelos GC4043,GC4040,
GC4038,GC4035,GC4033, GC4030, GC4028,GC4025,
GC4023,GC4020,GC4018, GC4015)
C
1 El Sistema Antical incorporado reduce automáticamente el
depósito de incrustaciones y asegura una más larga vida útil de la
plancha.
Desconexión automática (Solo modelos GC4043,GC4040,
GC4038,GC4035,GC4033, GC4030)
C
1 Un dispositivo electrónico de seguridad desconectará
automáticamente la Plancha si no ha sido movida durante algún
tiempo.
◗ Para indicar que la Plancha ha sido desconectada,la lámpara piloto
roja de desconexión automática ("Auto-off") empezará a
parpadear.
Para volver a calentar la Plancha :
- Cojan la Plancha o muévanla ligeramente
- La lámpara piloto roja de la desconexión se apagará. La lámpara
piloto ambar de la temperatura puede encenderse,dependiendo de
la temperatura de la suela.
ESPAÑOL36
A
U
T
A
N
T
C
I
T
A
O
M
C
L
A
I
C
-
Page 37

- Si la lámpara piloto ambar se enciende después de mover la Plancha,
esperen a que se apague antes de empezar a planchar.
- Si la lámpara piloto ambar no se enciende después de mover la
Plancha,la Plancha está lista para el uso.
Limpieza y mantenimiento
Función Calc-Cleaning
(Limpieza de la Cal)
Hay una función Calc-Cleaning que elimina las incrustaciones y las
impurezas.
Usen la función Calc-Cleaning una vez cada dos semanas.Si el agua de
su zona es muy dura (Cuando salgan escamas de la suela durante el
planchado),la función Calc-Cleaning debe ser usada más a menudo.
1 Ajusten el control del vapor a la posición O.
2 Llenen el depósito del agua hasta el nivel máximo.
No usen vinagre u otros agentes desincrustantes.
C
3 Ajusten el control de la temperatura a la posición MAX.
4 Enchufen el aparato a la red.
5 Desenchufen la Plancha tan pronto como se haya apagado la
lámpara piloto ambar.
C
6 Sostengan la Plancha sobre el fregadero,presionen y mantengan
presionado el botón Calc-Clean y agiten suavemente la Plancha
B
Vapor y agua hirviendo saldrán de la suela . Las impurezas y las
escamas (si hay) saldrán al mismo tiempo.
7 Suelten el botón Calc-Clean tan pronto como haya salido toda
el agua del depósito.
Si la Plancha tiene muchas impurezas,repitan el proceso Calc-Cleaning.
Después del Calc-Clening
- Enchufen el aparato a la red y dejen que la suela se caliente.
- Desenchufen la Plancha tan pronto como se haya apagado la
lámpara piloto ambar.
- Para eliminar cualquier mancha de agua que pueda haberse formado
en la suela,pasen suavemente la Plancha caliente sobre un trozo de
ropa usada.
- Dejen que la Plancha se enfríe antes de guardarla.
ESPAÑOL 37
N
N
E
N
Page 38

Después del planchado
1 Desenchufen el aparato de la red y dejen que se enfríe.
2 Limpien las escamas y cualquier otro deposito de la suela con
un paño húmedo y con un limpiador no abrasivo (Líquido)
3 Limpien la parte superior de la Plancha con un paño húmedo.
C
4 Periódicamente,enjuaguen el depósito del agua con agua.
Vacíen el depósito del agua después de limpiarlo.
Cómo guardar la Plancha
1 Desenchufen el aparato y lleven el control del vapor a la
posición "0"
2 Vacíen el depósito del agua.
C
3 Solo modelos GC4038,GC4035, GC4033,GC4030,GC4023,
GC4020,GC4018, GC4015,GC4013,GC4010, GC4005.
a) Dejen que la Plancha se enfríe. Enrollen el cable de red alrededor
del área para guardar el cable y fíjenlo con la brida del cable. El
modelo GC 4040 se suministra con un cable de red de 3 metros.
b) Guarden siempre la Plancha vacía y horizontalmente sobre una
superficie estable.Usen un paño para protejer la suela.
C
4 Cubierta protectora para guardar (Solo modelos GC4043,
GC4040,GC4028, GC4025)
a) Pongan en la Plancha la cubierta protectora para guardar
Durante el planchado,no usen la cubierta protectora para guardar
b) Enrollen el cable de red alrededor del área para guardar el cable
c) Guarden la Plancha horizontalmente con la cubierta protectora y
sobre una superficie estable.
Garantía y Servicio
Si necesitan información o si tienen algún problema,visiten la página
Web de Philips en www.philips.com o contacten con el Servicio Philips
de Atención al Cliente de su país (Hallarán el número de teléfono en el
folleto de la Garantía Mundial). Si en su país no hay Servicio Philips de
Atención al Cliente, diríjanse a su distribuidor local Philips o contacten
ESPAÑOL38
Page 39

con el Service Department of Philips Domestic Appliances and
Personal Care BV.
Guía de la resolución de problemas
Este capítulo reune los problemas más comunes que se les pueden
presentar con su Plancha.Para más detalles,lean las diferentes
secciones.Si no pueden solucionar el problema,contacte con el más
cercano Servicio de Asistencia Técnica de Philips o con uno de sus
representantes.Para hallar el número de teléfono del Servicio Philips
de Atención al Cliente consulte el folleto de la Garantía Mundial o
visite nuestra página Web en www.philipsonline.com.
ESPAÑOL 39
Solución
Comprueben el cable de red, la clavija
y el enchufe
Llenen el depósito del agua
(Consulten "Cómo llenar el depósito
del agua")
Ajusten a una posición de vapor entre
1 - 6 (Consulten "Cómo planchar con
vapor")
Ajusten el control de la temperatura
al área de vapor (De 2 a MAX).
Pongan la Plancha sobre su talonera y,
antes de empezar a planchar, esperen
hasta que la lámpara piloto ambar se
haya apagado.
Pongan la Plancha en posición
horizontal y esperen un poco antes de
volver a usar la función Chorro de
Vapor (Vertical).
Ajusten el control de la temperatura
al área de vapor (De 2 a MAX).
Pongan la Plancha sobre su talonera y,
antes de empezar a planchar, esperen
hasta que la lámpara piloto ambar se
haya apagado.
Para cerrar la tapa de llenado,
presionen firmemente hasta que oigan
un "click"
Apliquen la función Calc-Clean unas
pocas veces (Consulten "Calc-Clean)
Agiten ligeramente la Plancha para
desactivar la desconexión automática.
La lámpara piloto dejará de parpadear.
Causa(s) posible(s)
Problema de conexión
No hay suficiente agua en el depósito
del agua
El control de vapor ha sido ajustado a
la posición O.
La Plancha no está suficientemente
caliente y/o el antigoteo (Drip-Stop)
está activado.
El Chorro de Vapor (Vertical) ha sido
usado demasiado a menudo en un
muy corto espacio de tiempo.
La Plancha no está suficientemente
caliente y/o el antigoteo (Drip-Stop)
está activado.
La tapa de llenado no está
adecuadamente cerrada
El agua dura forma escamas dentro de
la suela
La desconexión automática está
activada.Consulten la sección
"Desconexión automática".
Problema
La Plancha está enchufada pero la
suela está fría
No produce vapor
No produce Chorro de Vapor o no
produce Chorro de Vapor en
posición vertical (Solo modelos
GC4043,GC4040, GC4038,GC4035,
GC4033,GC4030, GC4028,GC4025,
GC4023,GC4020, GC4018,GC4015,
GC4013,GC4010
Gotitas de agua sobre el tejido
Salen escamas e impurezas de la suela
durante el planchado
La lámpara piloto roja parpadea (Solo
modelos GC4043,GC4040, GC4038,
GC4035,GC4033, GC4030)
Page 40

Importante
Per maggior sicurezza,leggete attentamente le istruzioni prima di usare
il ferro da stiro.
- Non lasciate mai il ferro incustodito mentre è collegato alla presa di
corrente.
- L'apparecchio non deve essere usato da bambini senza il controllo di
un adulto.
- Fate in modo che i bambini non possano giocare con l'apparecchio.
- La piastra del ferro diventa bollente durante l'uso.
- Non usate l'apparecchio nel caso risultasse danneggiato.
- Quando avete finito di stirare,mentre riempite o svuotate il ferro o
quando dovete allontanarvi anche solo per un attimo, togliete la
spina dalla presa,mettete il regolatore di vapore sulla posizione 0 e il
ferro in posizione verticale.
- Nel caso il cavo di alimentazione fosse danneggiato,dovrà essere
sosituito esclusivamente da Philips,da un rivenditore autorizzato o
comunque da personale qualificato,per evitare eventuali danni o
incidenti.
Prima dell'uso
1 Controllate che la tensione indicata sulla targhetta corrisponda
a quella della rete locale.
C
2 Togliete eventuali adesivi,pellicole protettive o foderine (solo
modello GC4043,GC4040, GC4028,GC4025) dalla piastra.
3 Fate riscaldare il ferro alla temperatura massima e passatelo su
uno straccio per alcuni minuti per eliminare qualsiasi residuo di
colla o altre sostanze dalla piastra.
Il ferro potrebbe emettere un po' di fumo durante la prima
accensione. Il fenomeno è del tutto normale e scomparirà nel giro di
poco tempo.
Come riempire il serbatoio
Non immergete il ferro nell'acqua.
1 Togliete la spina dalla presa di corrente.
C
2 Mettete il regolatore di vapore sulla posizione O (=Vapore
escluso).
3 Aprite l'apertura di riempimento.
4 Tenete il ferro in posizione inclinata.
ITALIANO40
Page 41

C
5 Riempite il serbatoio fino al livello max.utilizzando acqua
corrente.
Non superate l'indicazione MAX.
Nel caso l'acqua della vostra zona fosse particolarmente dura,vi
consigliamo di mischiarla con la stessa quantità di acqua distillata o di
usare solo acqua distillata.
Non usate aceto,amido o acqua decalcificata chimicamente.
6 Premete per chiudere l'apertura di riempimento.
Come impostare la temperatura
C
1 (Solo mod.GC4043, GC4040,GC4028,GC4025).Togliere la
fodera di protezione.
Non usate la fodera durante la stiratura.
2 Mettete il ferro in posizione verticale.
C
3 Impostate la temperatura richiesta ruotando il termostato nella
posizione corretta.
- Leggete l'etichetta apposta sui vestiti per conoscere l'esatta
temperatura di stiratura.
- 1 Fibre sintetiche (es.acrilico,viscosa,poliammide,poliestere).
- 1 Seta
- 2 Lana
- 3 Cotone, lino
- Se non conoscete la composizione del tessuto,per stabilire la
temperatura giusta, fate una prova su un angolo del capo non visibile
quando indossato.
- Seta,lana e materiali sintetici:stirate il capo al rovescio per evitare
tracce di lucido.Per evitare di macchiare il tessuto, non usate la
funzione spray.
- Iniziate a stirare i capi che richiedono una temperatura più bassa,
come ad esempio quelli in fibra sintetica.
4 Inserite la spina in una presa dotata di messa a terra.
C
5 Non appena la spia arancione si spegnerà,aspettate qualche
minuto prima di iniziare a stirare.
B
La spia arancione sparirà di tanto in tanto durante la stiratura.
ITALIANO 41
Page 42

Per i modelli con spegnimento automatico (solo mod.
GC4043,GC4040,GC4038, GC4035, GC4033,GC4030)
Se è stata attivata la funzione di spegnimento automatico (la spia rossa
lampeggia),muovete leggermente il ferro per disattivarla (la spia cessa
di lampeggiare).
Stiratura a vapore
Controllate che ci sia una quantità d'acqua sufficiente nel serbatoio.
1 Mettete il termostato nella posizione desiderata.
Vedere la sezione "Come impostare la temperatura".
C
2 Mettete il regolatore di vapore nella posizione prescelta.
- 1-3 per un vapore moderato (temperatura fra 2 e 3)
- 4-6 per un vapore molto vapore (temperatura fra 3 e MAX)
B
Il vapore inizierà a fuoriuscire non appena verrà raggiunta la
temperatura impostata.
Stiratura senza vapore.
1 Mettete il regolatore di vapore sulla posizione O (=Vapore
escluso).
2 Mettete il termostato nella posizione consigliata.
Vedere la sezione "Come impostare la temperatura".
Altre caratteristiche
Spray
Per eliminare le pieghe più ostinate.
Controllate che ci sia una quantità d'acqua sufficiente nel serbatoio.
C
1 Premete un paio di volte il pulsante spray per inumidire il
bucato.
Colpo di vapore
Il potente colpo di vapore è utilissimo per eliminare le pighe più
ostinate.
Il colpo di vapore può essere utilizzato soltanto con le alte
temperature (da 2 a MAX).
ITALIANO42
Page 43

C
1 Premete e rilasciate il pulsante Colpo di Vapore.
Dispositivo antisgocciolamento
Il ferro è provvisto di uno speciale dispositivo antisgocciolamento che
blocca automaticamente il vapore nel caso vengano utilizzate
temperature troppo basse, per evitare che l'acqua fuoriesca dalla
piastra. In questo caso,sentirete un segnale.
Getto di vapore verticale (solo mod.GC4043, GC4040,
GC4038,GC4035,GC4033, GC4030, GC4028,GC4025,
GC4023,GC4020,GC4018, GC4015, GC4013,GC4010)
C
1 Il getto di vapore può essere usato anche tenendo il ferro in
posizoine verticale.
Non puntate mai il getto di vapore verso cose o persone.
Sistema Anti Calcare automatico (solo mod.GC4043,
GC4040,GC4038,GC4035, GC4033, GC4030,GC4028,
GC4025,GC4023,GC4020, GC4018, GC4015)
C
1 Il Sistema Anti Calcare automatico incorporato riduce il deposito
di calcare ed assicura al vostro ferro una vita piu' lunga.
Spegnimento automatico(solo mod.GC4043,GC4040,
GC4038,GC4035,GC4033, GC4030)
C
1 Uno speciale dispositivo elettronico spegne automaticamente il
ferro nel caso venga lasciato inutilizzato per un po'.
◗ La spia rossa "Autospegnimento" inizierà a lampeggiare per
indicare che il ferro si è pento.
ITALIANO 43
A
U
T
A
N
T
C
I
T
A
O
M
C
L
A
I
C
-
Page 44

Per riscaldare nuovamente il ferro:
- Sollevate il ferro o muovetelo leggermente
- La spia rossa si spegnerà.Potrebbe accendersi la spia arancione, in
base alla temperatura della piastra.
- Nel caso la spia arancione si accenda dopo aver mosso il ferro,
aspettate che si spenga prima di iniziare a stirare.
- Se dopo aver mosso il ferro non si accende la spia arancione, significa
che il ferro è pronto per l'uso.
Pulizia e manutenzione
Eliminazione calcare
Questa funzione serve per eliminare il calcare e le altre impurità.
Usate la funzione "Eliminazione calcare" una volta ogni quindici giorni.
Nel caso di acqua particolarmente dura (durante la stiratura
fuoriescono pezzetti di calcare dalla piastra), la funzione "Eliminazione
calcare" dovrà essere attivata con maggiore frequenza.
1 Mettete il regolatore di vapore in posizione O.
2 Riempite il serbatoio fino al livello MAX.
Non usate aceto o altri prodotti disincrostanti.
C
3 Mettete il termostato in posizione MAX.
4 Inserite la spina nella presa di corrente.
5 Togliete la spina non appena la spia arancione si sarà spenta.
C
6 Tenendo il ferro sopra il lavandino,tenete premuto il pulsante
"Eliminazione calcare" e scuotete delicatamente il ferro.
B
Dalla piastra usciranno acqua bollente e vapore,che trascineranno con
sé gli (eventuali) impurità e il calcare.
7 Rilasciate il pulsante "Eliminazione calcare" non appena l'acqua
contenuta nel serbatoio sarà esaurita.
Ripetete l'operazione nel caso in cui il ferro contenga una grande
quantità di impurità.
Dopo l'operazione di eliminazione del calcare
- Inserite la spina nella presa per riscaldare il ferro.
- Togliete la spina non appena la spia arancione si sarà spenta.
- Passate il ferro sopra uno straccio per eliminare eventuali macchie
che si fossero formate sulla piastra.
- Lasciate raffreddare il ferro prima di riporlo.
ITALIANO44
N
N
E
N
Page 45

Al termine della stiratura
1 Togliete la spina dalla presa e lasciate raffreddare il ferro.
2 Togliete i residui di calcare dalla piastra usando un panno
umido e un detergente (liquido) non abrasivo.
3 La parte superiore del ferro può essere pulita con un panno
umido.
C
4 Risciacquate regolarmente l'interno del serbatoio.Svuotate il
serbatoio dopo la pulizia.
Come riporre il ferro
1 Togliete la spina dalla presa di corrente e mettete il termostato
in posizione 0.
2 Svuotate il serbatoio.
C
3 Solo mod.GC4038, GC4035,GC4033,GC4030, GC4023,
GC4020,GC4018, GC4015,GC4013,GC4010, GC4005.
a) Lasciate raffreddare il ferro.Avvolgete il cavo attorno all'apposito
supporto e fissatelo con il gancio.Il mod. GC4040 viene fornito con
un cavo lungo 3 m.
b) Riponete sempre il ferro in posizione orizzontale su una superficie
stabile e usate uno straccio per proteggere la piastra.
C
4 Fodera di protezione (solo mod.GC4043,GC4040,GC4028,
GC4025).
a) Coprite il ferro con la fodera di protezione.
Non usate la fodera di protezione durante la stiratura.
b) Avvolgete il cavo attorno all'apposito supporto.
c) Riponete il ferro con la fodera di protezione in posizione
orizzontale, su una superficie piana+.
Garanzia e assistenza
Se avete bisogno di assistenza o di ulteriori informazioni, vi preghiamo
di visitare il nostro sito web:www.Philips.com oppure di contattare il
Centro Assistenza Clienti Philips del vostro Paese (per conoscere il
numero di telefono,vedere l'opuscolo della garanzia). Qualora nel
ITALIANO 45
Page 46

vostro Paese non ci fosse un Centro Assistenza Clienti,rivolgetevi al
rivenditore autorizzato Philips oppure contattate il Service
Departmente of Philips Domestic Appliances and Personal Care BV.
Localizzazione guasti
In questo capitolo vengono riportati i problemi più ricorrenti legati
all'uso del ferro.Per ulteriori dettagli,vi preghiamo di leggere le diverse
sezioni.Nel caso non riusciste a risolvere un problema,vi preghiamo di
contattare il Centro Assistenza Philips più vicino oppure un rivenditore
autorizzato.Per conoscere il numero di telefono,vedere l'opuscolo
della garanzia, oppure visitate il nostro sito web:www.Philips.com.
ITALIANO46
Soluzione
Controllate il cavo,la spina e la presa
di corrente.
Riempite il serbatoio (Vedere "Come
riempire il serbatoio").
Impostate il getto di vapore fra 1 e 6
(Vedere "Come stirare a vapore").
Impostate il regolatore di vapore (da
2 a MX).Mettete il ferro in
posizione verticale e aspettate fino a
quando la spia arancione si sarà
spenta prima di iniziare a stirare.
Mettete il ferro in posizione
orizzontale e aspettate qualche
minuto prima di usare nuovamente la
funzione Getto di Vapore (Verticale).
Impostate il regolatore di vapore (da
2 a MX).Mettete il ferro in
posizione verticale e aspettate fino a
quando la spia arancione si sarà
spenta prima di iniziare a stirare.
Premete per chiudere il tappo di
riempimento,fino a quando non
sentirete un click.
Attivate alcune volte il dispositivo
Eliminazione Calcare (Vedere
"Eliminazione Calcare").
Muovete leggermente il ferro per
disattivare la funzione Spegnimento
automatico:la spia cesserà di
lampeggiare.
Possibile causa
Problemi di collegamento
Quantità d'acqua insufficiente nel
serbatoio
Il regolatore di vapore è in posizione
O.
Il ferro non è sufficientemente caldo
ed è attivato il dispositivo
Antisgocciolamento.
Il Getto di Vapore (Verticale) è stato
usato troppo spesso in un lasso di
tempo molto corto.
Il ferro non è sufficientemente caldo
ed è attivato il dispositivo
Antisgocciolamento.
Il tappo del serbatoio non è ben
chiuso.
Hard water form flakes inside the
soleplate.
Auto-shut-off is activated.See "Autoshut-off" section.
Problema
Il ferro è collegato alla presa di
corrente ma la piastra è fredda.
Mancanza di vapore
Non fuoriesce nessun Getto di
Vapore o Getto di Vapore Verticale
(solo mod.GC4043, GC4040,
GC4038,GC4035, GC4033,GC4030,
GC4028,GC4025, GC4023,GC4020,
GC4018,GC4015, GC4013,
GC4010).
Gocce d'acqua sul tessuto
Durante la stiratura, dalla piastra
fuoriescono impurità e residui di
calcare.
La spia rossa lampeggia (solo mod.
GC4043,GC4040, GC4038,GC4035,
GC4033,GC4030).
Page 47

Importante
Para maior segurança, leia atentamente as instruções que se seguem
antes de utilizar o ferro pela primeira vez:
- O ferro não deve ficar ligado à corrente sem estar alguém por
perto.
- Este aparelho não deve ser utilizado por crianças sem a supervisão
de um adulto.
- As crianças devem ser vigiadas para evitar que usem o ferro nas suas
brincadeiras.
- A base do ferro pode ficar muito quente e causar queimaduras
sérias se for tocada inadvertidamente.
- Nunca deve servir-se do ferro se ele tiver alguma deficiência.
- Quando terminar o trabalho, durante o enchimento ou o
esvaziamento do reservatório da água ou mesmo se deixar o ferro
sozinho durante algum tempo,desligue sempre a ficha da corrente,
rode o controlo do vapor para a posição 0 e coloque o ferro em
posição de descanso.
- Se o cabo de alimentação se estragar,deverá ser substituído pela
Philips ou por um seu concessionário autorizado ou por alguém
qualificado para evitar problemas sérios.
Antes de usar
1 Verifique se a voltagem indicada na placa de tipo do ferro
corresponde à da corrente eléctrica local.
C
2 Retire qualquer autocolante,película de protecção ou
cobertura (apenas nos modelos GC4043,GC4040,GC4028,
GC4025) da base do ferro.
3 Aqueça o ferro até à temperatura máxima e passe-o sobre um
pedaço de pano húmido durante alguns minutos para retirar
qualquer resíduo da base do ferro.
O ferro poderá produzir algum vapor quando se liga pela primeira vez.
O vapor cessará passado pouco tempo.
Enchimento do reservatório
Não mergulhe o ferro em água.
1 Retire a ficha da tomada de corrente.
C
2 Rode o controlo do vapor para a posição 0 (= sem vapor).
3 Abra o bocal de enchimento.
4 Mantenha o ferro ligeiramente inclinado.
PORTUGUÊS 47
Page 48

C
5 Deite água da torneira no jarro de enchimento e encha o
interior do reservatório até atingir o nível máximo.
Não ultrapasse a indicação MAX.
Se a água da torneira da sua área de residência for muito dura, é
aconselhável usar uma mistura em partes iguais de água corrente e
água destilada ou,então,usar apenas água destilada.
Não utilize vinagre, lixívia ou água descalcificada quimicamente.
6 Faça pressão para fechar a tampa de enchimento (clique!).
Selecção da temperatura
C
1 (Apenas nos modelos GC4043,GC4040, GC4028,GC4025).
Retire a cobertura de protecção.
Não use a cobertura quando estiver a engomar.
2 Coloque o ferro em posição de descanso.
C
3 Seleccione o grau de temperatura desejada,rodando o botão
da temperatura para a posição correspondente no indicador.
- Verifique a etiqueta da peça para saber qual a temperatura indicada:
- 1 Tecidos sintéticos (p.ex.:acrílicos, viscoses, poliamide e
poliester)
- 1 Seda
- 2 Lã
- 3 Algodão,linho
- Se não conhecer o tipo de tecido do artigo que for passar a ferro,
experimente primeiro numa pontinha que não fique à vista.
- Tecidos de seda,lã e sintéticos:passe o tecido pelo avesso para
evitar a formação de brilho. Para prevenir manchas,evite usar o
borrifador.
- Comece por passar as peças que requeiram uma temperatura mais
baixa,como é o caso das fibras sintéticas.
4 Ligue a ficha numa tomada com terra.
C
5 Depois de a lâmpada piloto âmbar se apagar pela primeira vez,
aguarde um pouco antes de começar a engomar.
B
A luz âmbar acende-se de vez em quando durante o trabalho.
Para as versões com Desligar Automático (apenas os modelos
GC4043,GC4040,GC4038, GC4035, GC4033,GC4030)
Se a função Desligar Automático for activada (a luz encarnada pisca),
movimente o ferro ligeiramente para a desactivar (a luz pára de piscar).
PORTUGUÊS48
Page 49

Passar com vapor
Verifique se existe água suficiente no reservatório.
1 Rode o controlo da temperatura para a posição recomendada.
Consulte o capítulo 'Selecção da temperatura'.
C
2 Coloque o controlo do vapor na posição adequada.
- 1 - 3 para vapor moderado (temperaturas 2 a 3)
- 4 - 6 para vapor máximo (temperaturas 3 a MAX)
B
O vapor começa a sair logo que a água atinge a temperatura
seleccionada.
Passar sem vapor
1 Rode o controlo do vapor para a posição 0 (= sem vapor).
2 Rode o selector da temperatura para a posição recomendada.
Consulte o capítulo 'Selecção da temperatura'.
Outras características
Borrifador
Para remover vincos mais difíceis em qualquer temperatura.
Verifique se existe água suficiente no reservatório.
C
1 Prima o botão do borrifador um par de vezes para humedecer
a roupa.
Jacto de vapor
Um forte jacto de vapor ajuda a remover vincos mais difíceis.
A função Jacto de Vapor só pode ser aplicada com temperaturas entre
2 e MAX.
C
1 Prima e solte o botão do Jacto de Vapor.
Sistema anti-pingos
Este ferro apresenta a função "Drip Stop" (anti-pingos) que corta a
saída de vapor:o ferro pára automaticamente de produzir vapor se a
temperatura for muito baixa para evitar que a água pingue pela base.
Quando isso acontece, poderá ouvir-se um som.
PORTUGUÊS 49
Page 50

Jacto de Vapor Vertical (apenas nos modelos GC4043,
GC4040,GC4038,GC4035, GC4033, GC4030,GC4028,
GC4025,GC4023,GC4020, GC4018, GC4015,GC4013,
GC4010)
C
1 O Jacto de Vapor também pode ser usado quando se mantém
o ferro na posição vertical.
Nunca vire o jacto de vapor na direcção de alguém.
Sistema Automatico Anti-Calcário (apenas nos modelos
GC4043,GC4040,GC4038, GC4035, GC4033,GC4030,
GC4028,GC4025,GC4023, GC4020, GC4018,GC4015)
C
1 O sistema Anti-Calcário incorporado reduz automaticamente os
resíduos de calcário e assegura um maior tempo de vida ao seu
ferro.
Desligar automático (apenas nos modelos GC4043,GC4040,
GC4038,GC4035,GC4033, GC4030)
C
1 Um dispositivo electrónico de segurança que desliga o ferro
automaticamente se ele estiver parado durante algum tempo.
◗ Para indicar que o ferro foi desligado,a lâmpada piloto encarnada
ficará a piscar.
Para voltar a aquecer o ferro:
- Segure no ferro ou movimente-o ligeiramente.
- A luz encarnada indicadora do desligar automático apaga-se.A
lâmpada âmbar indicadora da temperatura pode acender-se,
dependendo da temperatura da base do ferro.
- Se a lâmpada âmbar da temperatura se acender depois de ter
movimentado o ferro,espere que ela se apague antes de começar a
passar.
- Se a lâmpada âmbar não se acender depois de ter movimentado o
ferro,então pode começar a passar de imediato.
PORTUGUÊS50
A
U
T
A
N
T
C
I
T
A
O
M
C
L
A
I
C
-
Page 51

Limpeza e manutenção
Limpeza do Calcário
Trata-se duma função que remove o calcário e as impurezas.
Use a função Limpeza do Calcário pelo menos de 2 em 2 semanas. Se
a água da sua área for muito dura (quando saiem resíduos da base do
ferro quando se está a passar),a função de limpeza do calcário deve
ser usada com mais frequência.
1 Rode o controlo do vapor para a posição O.
2 Encha o reservatório com água até ao nível máximo.
Não utilize vinagre ou outros produtos descalcificantes.
C
3 Coloque o selector de temperatura na posição MAX.
4 Ligue a ficha à corrente.
5 Desligue o ferro quando a luz âmbar se apagar.
C
6 Mantenha o ferro sobre o lava-loiça,prima e mantenha
premido o botão da limpeza anti-calcário e sacuda o ferro
suavemente.
B
O vapor e a água a ferver sairão pela base do ferro.As impurezas e os
resíduos de calcário (se os houver) também serão expelidos.
7 Solte o botão da limpeza anti-calcário logo que tiver saído toda
a água do reservatório.
Repita este procedimento de limpeza do calcário se o ferro continuar
a ter impurezas.
Após a limpeza do calcário
- Ligue o ferro e deixe a base secar.
- Desligue o ferro quando a luz âmbar se apagar.
- Movimente o ferro suavemente sobre um pedaço de pano velho
para remover qualquer mancha de água que se tenha formado na
base.
- Deixe arrefecer o ferro antes de o arrumar.
Quando terminar
1 Retire a ficha da tomada de corrente e deixe o ferro a
arrefecer.
2 Limpe os resíduos e outras impurezas da base do ferro com
um pano húmido e um pouco de detergente líquido não
abrasivo.
PORTUGUÊS 51
N
N
E
N
Page 52

3 Limpe a parte de cima do ferro com um pano húmido.
C
4 Regularmente,enxague o reservatório com água limpa.Após a
limpeza,esvazie o reservatório.
Arrumação
1 Retire a ficha da corrente e rode o controlo do vapor para a
posição 0.
2 Esvazie o reservatório da água.
C
3 Apenas nos modelos GC4038,GC4035, GC4033,GC4030,
GC4023,GC4020, GC4018,GC4015,GC4013, GC4010,
GC4005.
a) Deixe o ferro arrefecer. Enrole o fio no compartimento próprio e
prenda-o com a mola.O modelo GC4040 é fornecido com um fio
de 3 metros.
b) Arrume sempre o ferro vazio na posição horizontal e sobre uma
superfície estável.Proteja a base do ferro com a cobertura.
C
4 Cobertura de protecção (apenas nos modelos GC4043,
GC4040,GC4028, GC4025).
a) Coloque a cobertura de protecção no ferro.
Não use a cobertura de protecção quando estiver a engomar.
b) Enrole o fio no compartimento próprio.
c) Arrume o ferro com a cobertura de protecção na posição
horizontal e sobre uma superfície estável.
Garantia e assistência
Se necessitar de informações ou se tiver qualquer problema,por favor
visite a página Philips na Internet em www.philips.com ou contacte o
Centro de Informação ao Consumidor Philips do seu país (o número
de telefone encontra-se no folheto da garantia mundial). Se não existir
um Centro de Informação ao Consumidor no seu país, dirija-se a um
agente Philips local ou ao Departamento de Service da Philips
Domestic Appliances and Personal Care BV.
PORTUGUÊS52
Page 53

Como solucionar eventuais problemas
Este capítulo resume os problemas mais comuns que poderá encontrar
com o seu ferro.Por favor, leia as várias secções para obter mais
informação.Se não conseguir resolver o problema,queira contactar o
Concessionário Philips mais próximo ou um dos seus representantes.
Consulte o folheto da garantia mundial para obter os números de
telefone da Linha de Ajuda Philips ou visite o nosso site em
www.philipsonline.com.
PORTUGUÊS 53
Solução
Verifique o cabo de alimentação, a
ficha e a tomada de corrente.
Encha o reservatório (vidé
'Enchimento do reservatório').
Coloque o controlo do vapor entre 1
e 6 (vidé 'Passar com vapor').
Rode o selector da temperatura para
a zona de vapor (2 até MAX).
Coloque o ferro em posição de
descanso e aguarde até a luz âmbar se
apagar antes de começar a passar.
Coloque o ferro na posição horizontal
e aguarde um pouco antes de usar
novamente o Jacto (Vertical) de Vapor.
Rode o selector da temperatura para
a zona de vapor (2 até MAX).
Coloque o ferro em posição de
descanso e aguarde até a luz âmbar se
apagar antes de começar a passar.
Empurre a tampa do bocal de
enchimento até ouvir um clique.
Aplique a função de Limpeza do
Calcário algumas vezes (vidé 'Limpeza
do Calcário').
Sacuda o ferro ligeiramente para
desactivar a função de desligar
automático.A luz começará a piscar.
Causa(s) provável(eis)
Problema na ligação.
O reservatório não tem água
suficiente.
O controlo do vapor está na posição
0.
O ferro não está suficientemente
quente e/ou o sistema anti-pingos está
a funcionar.
O Jacto (Vertical) de Vapor foi usado
muitas vezes num curto período de
tempo.
O ferro não está suficientemente
quente e/ou o sistema anti-pingos está
a funcionar.
O bocal de enchimento não está bem
fechado.
Se a água for muito dura,formam-se
partículas no interior da base.
A função de Desligar Automático foi
activada.Vidé capítulo 'Desligar
Automático').
Problema
O ferro está ligado mas a base
continua fria.
Não sai vapor
Não sai Jacto de Vapor nem Jacto de
Vapor Vertical (apenas nos modelos
GC4043,GC4040, GC4038,GC4035,
GC4033,GC4030, GC4028,GC4025,
GC4023,GC4020, GC4018,GC4015,
GC4013,GC4010)
Caiem pingos de água no tecido
Saiem restos de calcário e de
impurezas da base do ferro quando
se está a engomar.
A luz encarnada pisca (apenas nos
modelos GC4043,GC4040, GC4038,
GC4035,GC4033, GC4030).
Page 54

Önemli
Güvenliğiniz açısından, lütfen cihazınızı kullanmaya başlamadan önce
kullanma kılavuzunu dikkatlice okuyunuz.
- Ütüyü asla fişi elektrik prizine bağlı ve sıcak iken yalnız bırakmayınız.
- Cihaz yaşları küçük çocuklar tarafından, yanlarında yetişkin bir kişi
bulunmayınca kullandırılmamalıdır.
- Çocukların ütü sıcakken cihaza dokunmamalarına ve cihaz ile yalnız
başlarına bırakılmamalarına dikkat ediniz.
- Ütünün tabanı sıcak olduğundan, yanmamanız için dikkat ediniz.
- Cihaz herhangi bir şekilde hasarlı ise asla kullanmayınız.
- Ütülemeyi bitirdiğinizde veya kısa bir süre için ara verdiğinizde,
ütünüzü su ile doldururken veya suyunu boşaltırken fişin prize takılı
olmamasına dikkat ediniz. Buhar ayar düğmesini 0 pozisyonuna getirip,
ütüyü dik olarak arka kısmının üzerine oturtunuz.
- Eğer cihazın elektrik kordonu zarar görürse, değiştirme işlemi için
yalnız Philips yetkili servislerinde orjinal kordonu ile değiştirilmelidir.
İlk kullanımdan önce
1 Tip numarası etiketi üstünde yazılı olan voltajın evinizin şebeke
voltajı ile aynı olmasına dikkat ediniz.
C
2 Ütülemeye başlamadan önce, tabanın altına yapıştırılmış
herhangi bir etiket, vs. varsa bunları çıkartınız ve yumuşak bir
bezle ütünün altını siliniz.(Sadece model GC4043,GC4040,
GC4028,GC4025 içindir)
3 Ütüyü en sıcak ayarda ısıtarak nemli bir bez üzerinde birkaç
dakika gezdirerek ütü tabanını temizleyiniz.
Cihazı ilk kullanışınızda bir miktar duman çıkması normaldir.Bu durum
kısa bir süre sonra geçecektir.
Su tankının doldurulması
Ütüyü hiçbir zaman suya batırmayınız.
1 Cihazın fişini prizden çekiniz.
C
2 Buhar ayar düğmesini 0 pozisyonuna getiriniz.(=buharsız
ütüleme)
3 Doldurma deliğinin kapağını açınız.
4 Ütüyü eğik pozisyonda tutunuz.
TÜRKÇE54
Page 55

C
5 Maksimum göstergesine kadar su doldurma deliğinden su
tankına su doldurunuz.
Doldurduğunuz suyun maksimum seviyesini geçmemesi için özen
gösteriniz.
Eğer kullandığınız su çok sert ise, musluk suyunu arıtılmış su ile
karıştırarak kullanabilirsiniz.Veya arıtılmış su kullanınız.
Su tankının içine sirke veya herhangi bir kireç sökücü madde
koymayınız.
6 Doldurma deliğinin kapağını bastırarak kapatınız.(klik! sesi
duyacaksınız)
Sıcaklık ayarı
C
1 Koruyucu saklama kılıfını çıkartınız.(Sadece model GC4043,
GC4040,GC4028, GC4025 için geçerlidir)
Ütüleme sırasında koruyucu kılıfı çıkartınız.
2 Ütünüzü arka kısmı üzerine oturtunuz.
C
3 Sıcaklık ayar düğmesini istenilen sıcaklığa getiriniz.
- Kumaşın etiketinin üzerinde belirtilen sıcaklık derecesini kontrol
ediniz.
- Sentetik kumaşlar (Örn:Viscont, polyester, akrilik)
- İpekli
- Yünlü
- Pamuklu ve Ketenli
- Eğer ütü yaptığınız kumaşın ne cins bir kumaş olduğundan emin
değilseniz, ütülemeye önce giydiğiniz zaman görülemeyecek
bölümden başlayınız.
- İpekli, yünlü ve sentetik materyaller: Bu cins kumaşları ütülerken,
kumaşın parlamasını önlemek için ters kısmından ütüleyiniz. Bu tür
kumaşları ütülerken leke olabileceğinden spreyleme yapmayınız.
- Ütü yapmaya örneğin sentetik az sıcaklık isteyen kumaşlarla başlayınız.
4 Cihazın fişini topraklı prize takınız.
C
5 Pilot ışık ilk kez söndüğünde, tekrar ütülemeye başlamak için
biraz bekleyiniz.
B
Ütüleme esnasında pilot ışık zaman zaman yanıp sönecektir.
TÜRKÇE 55
Page 56

Otomatik Kapanma özelliği bulunan modeller için. (Sadece
GC4043,GC4040,GC4038, GC4035, GC4033,GC4030
içindir)
Eğer otomatik kapanma özelliği çalışmaya başlarsa (kırmızı pilot ışık
yanıp sönmeye başlayınca), ütüyü hafifçe kıpırtatarak ütüyü aktif
pozisyona sokabilirsiniz.(yanıp, sönme duracaktır)
Buharlı Ütüleme
Su tankında yeterli suyun olduğundan emin olunuz.
1 Sıcaklık ayarını istenilen pozisyona getiriniz.
Sıcaklık ayar bölümüne bakınız.
C
2 Buhar ayarını istenilen buhar pozisyonuna getiriniz.
- 1-3 az buhar (ısı ayarı 2 den 3 e kadar)
- 4-6 fazla buhar (ısı ayarı 3 den Maksimum'a kadar)
B
Ütü istenilen sıcaklığa erişince istenilen buharı verebilirsiniz.
Buharsız Ütüleme
1 Buhar ayar düğmesini 0 pozisyonuna getiriniz.(=buharsız
ütüleme)
2 Sıcaklık ayar düğmesini istenilen pozisyona getiriniz.
Sıcaklık ayar bölümüne bakınız.
Diğer Özellikler
Spreyleme
Her ısı derecesinde çok kırışmış kumaşları ütüleme.
Su tankında yeterli suyun olduğundan emin olunuz.
C
1 Sprey düğmesine bir kaç kez basmanız ütüleyeceğiniz kumaşı
nemli hale getirecektir.
Şok Buhar
Şok buhar özelliği çok fazla kırışmış kumaşlar için idealdir.
Şok buhar özelliği sadece (ve Maksimum) yüksek sıcaklık derecesinde
kullanılır.
TÜRKÇE56
Page 57

C
1 Şok buhar düğmesine basınız ve serbest bırakınız.
"Drip Stop" Damlamayı Önleme Özelliği
Bu ütü "Drip Stop", yani su damlamasını önleyici sisteme sahiptir. Bu da
uygun ısı derecesi tekrar elde edilene kadar ütünün buhar vermeyi
kesmesine neden olur.
Dikey buharlama.(Sadece model GC4043,GC4040, GC4038,
GC4035,GC4033,GC4030, GC4028, GC4025,GC4023,
GC4020,GC4018,GC4015, GC4013, GC4010 için geçerlidir)
C
1 Cihazın şok buhar fonksiyonu, ütüyü dik olarak kullandığınız
zaman da kullanılabilir.
Buharı direkt olarak insanlara doğru tutmayınız.
Otomatik Anti- kireç sökücü sistem (Sadece model GC4043,
GC4040,GC4038,GC4035, GC4033, GC4030,GC4028,
GC4025,GC4023,GC4020, GC4018, GC4015 için geçerlidir)
C
1 Ütüye entegre edilmiº kireç çözücü sistem otomatik olarak kireçi
azaltarak, Cihazın kullanım ömrünü arttıracaktır.
Otomatik Kapanma.(Model GC4043,GC4040,GC4038,
GC4035,GC4033,GC4030 içindir)
C
1 Ütünüzün elektronik güvenlik sistemi sayesinde, hareketsiz
bırakılan ütünüzün ısıtma işlevi otomatik olarak devreden çıkar.
◗ Ütünün devreden çıktığını gösteren "Auto-off" otomatik kapanma
kırmızı pilot ışık yanıp sönecektir.
TÜRKÇE 57
A
U
T
A
N
T
C
I
T
A
O
M
C
L
A
I
C
-
Page 58

Ütünün tekrar ısınması için;
- Ütüyü yavaşça kaldırınız veya kıpırdatınız.
- Otomatik kapanma kırmızı pilot ışığı sönüp, ütü tabanının sıcaklık
seviyesine göre turuncu sıcaklık pilot ışığı yanmaya başlayacaktır.
- Eğer ütü hareket ettikten sonra turuncu pilot ışık yanarsa, ütülemeye
başlamadan önce sönmesini bekleyiniz.
- Eğer ütü hareket ettikten sonra turuncu pilot ışık yanmıyorsa, ütü
kullanıma hazırdır.
Temizlik ve Bakım
"Calc clean" Kireç temizleme
Kireç temizleme- Calc Clean özelliği sayesinde buhar ünitesinde oluşan
kum, kir gibi küçük zerrecikler temizlenir.
İki haftada bir "Calc clean-kireç temizleme uygulanmalıdır. Eğer
kullandığınız musluk suyu çok sertse (ütü yaparken tabandan kireç
zerrecikleri geliyorsa) kireç temizleme özelliği daha sık kullanılmalıdır.
1 Buhar kontrol düğmesini 0 pozisyonuna getiriniz.
2 Su tankını maksimum seviyede doldurunuz.
Sirke veya diğer kireç çözücü kimyevi maddeler kullanmayınız.
C
3 Sıcaklık ayarını maksimum sıcaklığa getiriniz.
4 Cihazın fişini prize takınız.
5 Pilot ışık sönünce ütüyü prizden çekiniz.
C
6 Ütüyü yatay olarak lavabonun üzerine tutunuz."Calc clean" -
Kireç temizleme düğmesine basınız ve basılı tutunuz.Bu arada
yavaşça ütüyü ileri geri sallayınız.
B
Kaynar su ve buhar, kireç ve diğer tortularla birlikte tabandaki deliklerden
aşağı doğru akacaktır.(Eğer varsa)
7 Su tankı boşaldığında Calc-Clean düğmesini bırakınız.
"Calc Clean" - Kireç temizleme işlemini, ütünün içerisinde hala kireç ve
tortular varsa tekrarlayınız.
"Calc Clean" - Kireç Temizleme işleminden sonra
- Ütüyü prize takarak tabanının kurumasını sağlayınız.
- Pilot ışık sönünce ütüyü prizden çekiniz.
- Ütünüzü yavaşça eski bir bez üzerinde gezdiriniz. Kalan su lekeleri
tabandan çıkacaktır.
- Ütüyü saklamadan önce soğumasını bekleyiniz.
TÜRKÇE58
N
N
E
N
Page 59

Ütülemeden sonra
1 Fişi prizden çekiniz ve ütünün soğumasını bekleyiniz.
2 Ütünüzün altında biriken maddeleri (kireç,vs.) nemli yumuşak
bir bez veya çizmeyen (sıvı) bir temizleme maddesi kullanarak
temizleyiniz.
3 Ütünün üst kısmını nemli, yumuşak bir bezle silebilirsiniz.
C
4 Zaman zaman su tankını temizlemek için, tankı su ile doldurup
sallayınız ve daha sonra suyu boşaltınız.
Saklama
1 Fişi prizden çekiniz. Ütünün soğumasını bekleyiniz. Buhar ayar
düğmesini "0" pozisyonuna getiriniz.
2 Su tankını boşaltınız.
C
3 Sadece model GC4038,GC4035, GC4033,GC4030,GC4023,
GC4020,GC4018, GC4015,GC4013,GC4010, GC4005 içindir.
a) Ütünün soğumasını bekleyiniz. Kordonunu kordon saklama bölümüne
sarıp kordonun klipsini kullanarak sabitleyiniz. Model GC4040 elektrik
kordonu 3m 'dir.
b) Daima su tankı boş olan ütüyü yatay bir şekilde tabanını çizilmeye
karşılık düz ve yumuşak bir zemin üzerinde muhafaza ediniz.
C
4 koruyucu saklama kılıfı.(Model GC4043,GC4040,GC4028,
GC4025 içindir)
a) Koruyucu saklama kılıfını ütüye geçiriniz.
Ütü yaparken kılıfı çıkartınız.
b) Kordon saklama bölümünün etrafına kordonu sarınız.
c) Ütüyü koruyucu saklam kılıfı ile düz bir zeminde yatay pozisyonda
saklayınız.
Garanti ve Servis
Servise, ek bilgilere ihtiyacınız veya bir probleminiz olduğunda Tüketici
danışma hattını arayabilirsiniz. Numaralarını garanti belgelerinde
bulabilirsiniz.Veya web Sitemizi ziyaret edebilirsiniz. www.philips.com.tr
TÜRKÇE 59
Page 60

Sorunlar ve Çözümler
Bu bölümde ütüyü kullanırken karşınıza çıkabilecek en muhtemel
sorunları özetleyecektir. Daha fazla ayrıntı için değişik bölümleri
okuyunuz. Eğer karşılaştığınız sorunları çözemeyecek durumdaysanız size
en yakın yetkili Philips servislerinden yardım isteyebilirsiniz. Philips
tüketici Danışma Hattının telefonlarını garanti belgelerinin içinden
bulabilirsiniz.
TÜRKÇE60
Yapılması gereken
Cihazın fişini, elektrik kordonunu ve
prizi kontrol ediniz.
Su tankını doldurunuz.(Su tankını
doldurma bölümüne bakınız.)
Buhar ayarını 1 ile 6 arasında bir ayara
getiriniz. (Buharla ütülemeye bakınız)
Sıcaklık ayar düğmesini buhar
konumuna getiriniz.( yada Max) Ütüyü
dik olarak arka kısmı üzerine
oturtunuz.Ve ütülemeye başlamadan
önce pilot ışık sönene kadar bekleyiniz.
Tekrar şok buharlam veya dikey
buharlama kullanmadan önce ütüyü
yatay pozisyonda biraz bekletiniz.
Sıcaklık ayar düğmesini buhar
konumuna getiriniz.( yada Max) Ütüyü
dik olarak arka kısmı üzerine
oturtunuz.Ve ütülemeye başlamadan
önce pilot ışık sönene kadar bekleyiniz.
Kapağı "klik" sesi duyuncaya kadar
iterek kapağı düzgün olarak kapatınız.
"Calc-Clean " kireç temizleme işlemini
birkaç kez uygulayınız.(kireç temizleme
bölümüne bakınız.)
Ütüyü hafifçe hareket etirerek
otomatik kapanma özelliğini devre dışı
bırakınız. Işık yanıp sönmeyecektir.
Nedenleri
Bağlantı sorunu
Su tankında yeterli su bulunmaması
Buhar kontrol düğmesi 0 pozisyonuna
getirilmiştir.
Ütü yeterli derecede sıcak değil
ve/veya Damlama kesme özelliği
çalışıyor durumda olabilir.
Kısa bir zaman süresi içerisinde Şok
buharlama veya Dikey buharlama sık
kullanılmıştır.
Ütü yeterli derecede sıcak değil
ve/veya Damlama kesme özelliği
çalışıyor durumda olabilir.
Doldurma deliğinin kapağı düzgün
olarak kapanmamıştır.
Suyun sertliği taban içinde tortular
oluşturur.
Otomatik kapanma çalışmaktadır.
"Otomatik kapanma" özelliği
bölümüne bakınız.
Problem
Ütünün fişi prize bağlı olduğu halde,
tabanının ısınmaması.
Ütünün buhar vermemesi
Şok buharlama ve Dikey buharlama
çalışmıyor (Sadece model GC4043,
GC4040,GC4038, GC4035,GC4033,
GC4030,GC4028, GC4025,GC4023,
GC4020,GC4018, GC4015,GC4013,
GC4010 içindir.)
Su akıtıyorsa
Ütünün tabanından tortular ve kireç
zerrecikleri çıkıyor.
Kırmızı pilot ışık yanıp söner(sadece
model GC4043,GC4040, GC4038,
GC4035,GC4033, GC4030 içindir.)
Page 61

616263
Page 62

Page 63

 Loading...