

G96SVC Replacement Rkmotk Control
hank you for buying the latest in
remote control technology. Your
T
remote control has programs
installed in the factory to operate
your TV and a majority of VCRs and
Cable Converters.
This new remote probably looks dif
ferent from your old one. That’s
okay. It still operates all of the fea
tures of your old remote, and may
also operate other features that your
old remote didn't. Of course your
TV, VCR or Cable Converter must
have these features.
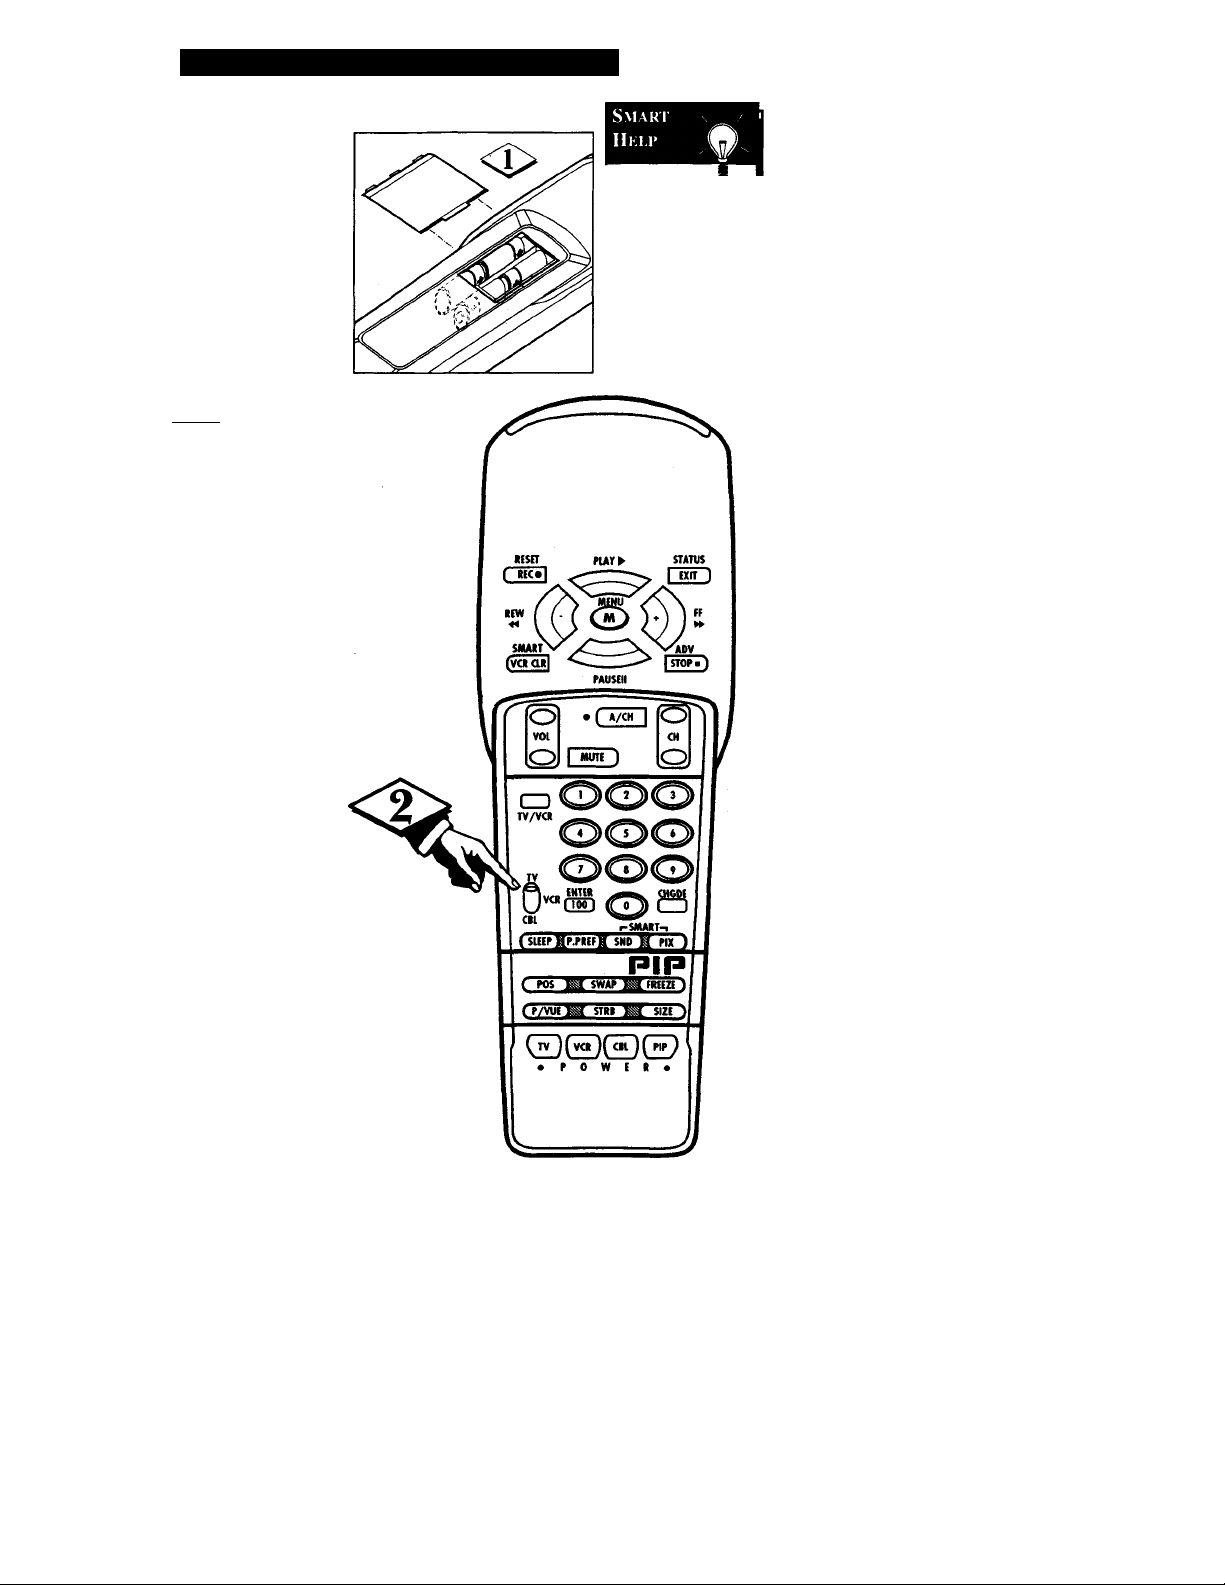
i BBOINJ
Installing the batteries is the
4>
first step. Use 4 type AAA
Alkaiine cells. NOTE: The easy
way to open the battery door is with
a penny or a dime inserted in to the
shortest of two slots. Press down on
the coin. Move the top of the coin
away from the long slot. The door
will pop open. Take care to insert
the batteries as the drawing inside
the door indicates. Reinstall the
door by pressing in place until there
is a click.
If the distance
that the remote will
operate the TV (or
VCR-Cable Box)
becomes shorter the
batteries need
replacing. Replace
with 4 AAA
Alkaline cells.
<|> YOUR REMOTE IS NOW
"AWAKE":
Your new remote control is set up to
operate Philips, Magnavox,
Sylvania, or Philco TV as well as
Crosley, Curtis Mathes and Bell &
Howell TVs manufactured by
Philips. Try it, switch to the TV
position, point it at your TV and try
it.
When your remote "wakes up" it
is ready to operate TVs listed above
that were manufactured after 1987.
it can be programmed to operate
TVs of some of those brands as far
back as 1981. The following pages
will instruct you in programming for
older TVs and for VCRs and Cable
Converters.

PR0(;RAMVtINCi FOR Ol.DER TELEVISIONS
our remote “wakes up” ready to
work Philips, Magnavox,
y
Sylvania, or Philco TVs as well as
Crosley, Curtis Mathes and Bell &
Howell TVs manufactured by Philips
since 1987. If you have tried the
remote as suggested on page I and
there is no response, there is a one
time set up to operate your TV.
C BEGIN]
Press the POWER button on
I your TV to turn it on.
Place the switch on the remote in
I the TV position.
Stand at least 6 feet away from
the TV. Point the remote toward the
TV. Hold down the A/CH button and
the TV POWER button at the same
time. Keep holding then down.
Watch the channel indicator on
the TV. The channel numbers will
change when the TV has been identi
fied. This may take as long as one
minute.
Smart Mhi.p
Remember, a minute may
seem like a long time but the
code will be located in that minute.
Don’t let the TV change more than 5
channels. If you do the remote will
pass on the right identification for the
TV and another one minute search
cycle will have to be done.
If no channel change happens in one
minute take the following steps:
1. Remove and reinsert the batteries,
taking care that they are inserted as
the picture inside the battery com
partment shows.
2. Repeat steps 1 to 4.
3. Have this remote and your old
remote in hand along with the
Model Number of your TV set and
call 1-423-475-8869.
On rare occasions the failure to
respond to a remote may be in the TV
set. In this case a Service Technician
will be required.
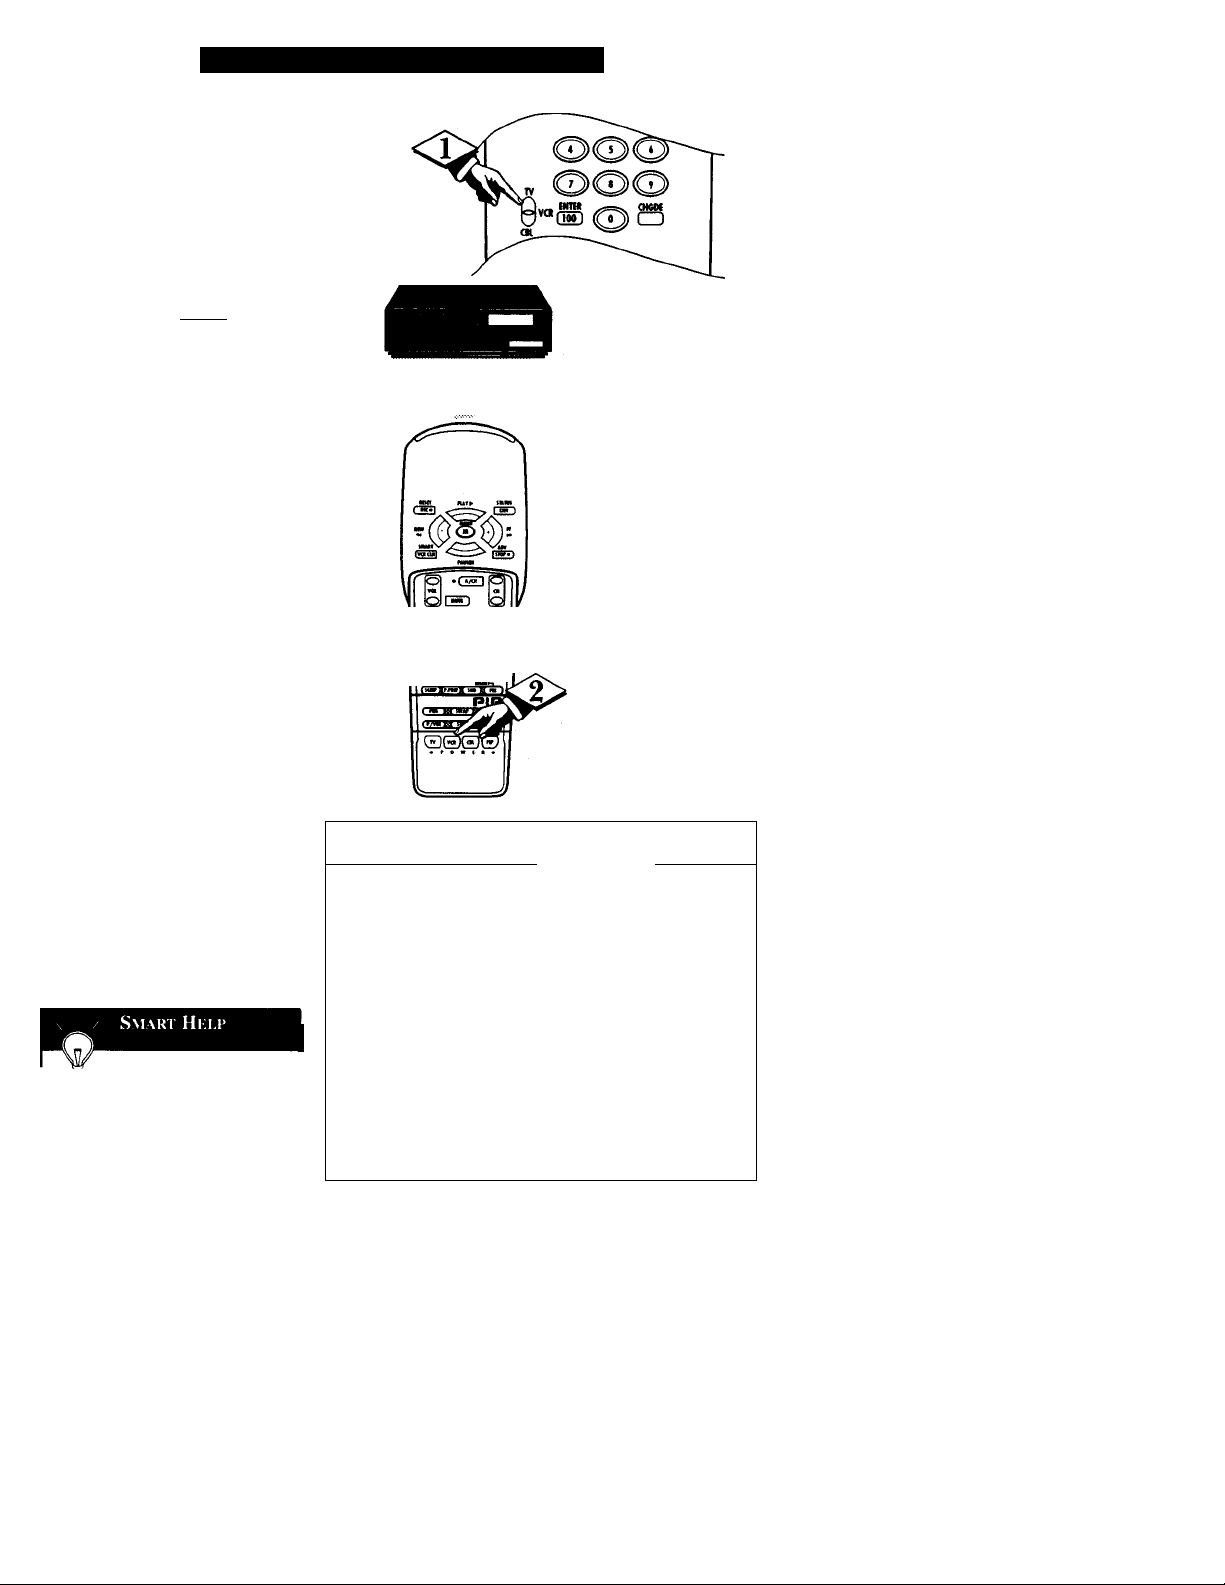
Skttinc; the Remote to Work VCRs
our remote control is set to
work your TV and many
y
infrared remote (IR) control VCRs.
However, an easy one-time step
may be necessary before the remote
will work your VCR.
Try this initial check to see if going
on to the following section is neces
sary.
[ BEQINi
Slide the switch on the remote
to VCR.
Point the remote toward the
<l>
VCR and press the VCR POWER
button.
Does the remote turn on the
VCR? If YES, ^ and try the other
VCR buttons on the remote, if they
also work the VCR, then the remote
is ready and no further steps are
needed.
If NO, continue...
oOOO
"^OOO
ooo
“®OS
First look up a TWODIGIT remote code
number for your brand
VCR before going through the
simple "1,2,3" steps (on the fol
lowing page).
continue to next page
_ Remember, if more than
• one number is listed, you may
have to try more than the first twodigit code given in order to locate
your VCR's remote code.
VCR REMOTE
BRANP
Akai 24, 25, 36
Capehart 33
Conoid 13
Curtis Mathes 42
Daewoo 33 Samsung 22, 30
Emerson
Fisher
Goldstar 23
Go Video 45,46 Sharp
Hitachi 03,51
JVC 14,47,48 Sony 09, 10,41
Magnavox
Matsushita 01,02
Mitsubishi 16, 17, 38, 39, 50
Multi tech
NEC
CODE NO.
20,31,34,40
00, 05
VCR REMOTE
BRAND
Panasonic 01,02, 52
Philips 00,05
Philips Video CD 37
RCA 04, 32, 42, 43,44
Sansui
06,07
Sanyo
Sears
Shin tom
Teknika
Toshiba
Video Concepts
Zenith 15
27,28
21
CQPENQ.
11, 12
18, 19
49
13
08
35
26
29

Si:ttin(; thk Rkmoti; to Work VCRs Continlkd
A 7ow that you have looked up the
L V two-digit Remote Code
Number for your brand of VCR (on
previous page), you are ready to
follow the four simple steps below.
Please read through steps 1-4
before beginning.
cpBoiiu
Press and release the REC
(RECORD) button.
.2^ Within thirty seconds after
releasing the REC button, press
and release the VCR Power but
ton.
Within thirty seconds after
<l>
releasing the VCR Power button,
ENTER THE TWO DIGIT
CODE NUMBER for the desired
VCR. The remote is now ready to
send commands to the VCR.
Point the remote at the VCR.
Press the VCR Power button on the
remote to turn the VCR ON.
L
Smart Help
Try it out. The Channel
and VCR buttons on the
i
remote should now operate the
VCR.
Remember, if this doesn't work the
first time, repeat steps using the same
remote code number.
If after a second ffy the remote does
not operate your VCR, and there are
more code numbers listed for your
brand VCR, use the next listed code
number.
If after repeated attempts the code
number method does not work your
VCR, try the "VCR SEARCH"
method on page 7.
VCR

Skttinìì thk Rkmoti; to Work Cabli; TV Conv lrti.rs
’our remote control is set to work
your TV and many infrared
y
remote (IR) control Cable
Converters. However, an easy one
time step may be necessary before
the remote will work your Converter.
Try this initial check to see if going
on to the following section is neces
sary.
Slide the switch on the remote to
CBL.
Point remote toward Cable
Converter and press the CBL Power
button.
Does the remote turn the
Converter ON?
IF YES, ® and try the CH A ▼
and CH number buttons on the
remote. If they also work the
Converter then the remote is ready
and no further steps are needed.
If NO, continue...
fBEiogrn
Cable
Converter
CSD Iq)
t=.<S><S><S>
"~ooo
ooo
Q”®oo
mi
First look up a TWODIGIT remote code
number for your brand
Converter before going through the
simple "1,2,3" steps (on the fol
lowing page).
continue to next page
Smart Hki.p
Remember, if more
than one number is list-
”ed, you may have to try
more than the first two-digit code
given in order to locate your
Converter's remote code.
CONVERTER REMOTE
BRAND
Archer 28
Diamond
Drake
Gemini
Hamlin 14, 15 Starcom 30
Hitachi
Jerrold 00,01,02,03,04,05,46,55 Texscan 48
Macom 29,38 Tocom
Magnavox
NSC 49 Uniden Satellite
Oak
Panasonic
Philips
Pioneer 09, 32
Regency
CODE NO.
06, 27, 39
19, 20, 21, 24, 26
10, 11
CONVERTER REMOTE
BRAND
Rembrant 33
23
Salora 52
37
Scientific Atlanta
45 Sheritech 34
25
Sylvania
17,31
Toshiba
Unika
18, 35
United Satellite
Universal
Video Tech
Video Way
Zenith 07,41,42
CODE NO.
08, 22, 47
12,13, 53
51
16
43
44
50
54
36
40

Si iTiNf; rm. Rkmoti to Work Caiu.i; TV Convkrikrs Com im i d
A Jow that you have looked up the
1 V two-digit Remote Code Number
for your brand of Cable Converter
(on previous page), you are ready to
follow the four simple steps below.
Please read through steps 1-4
before beginning.
Press and release the REC
I (RECORD) button.
Within thirty seconds after
releasing the REC button, press and
release the CBL Power button.
Within thirty seconds after releas
ing the CBL Power button, ENTER
THE TWO DIGIT CODE NUM
BER for the desired Converter. The
remote is now ready to send com
mands to the Converter.
<P
Point the remote at the Converter.
Press the CBL POWER button on
the remote to turn the Converter ON.
Smart Help
Try it out. The Channel
g and POWER buttons on the
remote should now operate the
Converter.
Remember, if this doesn't work the
first time, repeat steps using the same
remote code number.
If after a second try the remote does
not operate your Converter, and there
are more code numbers listed for
your brand Converter, use the next
listed code number.
If after repeated attempts the code
number method does not work your
Converter, try the "CONVERTER
SEARCH" method on the next page.

Sktting Your Rkmotk To Work VCRs, Convkrtkrs - Skarch
our TV remote can be set to work
your VCR or Cable Converter by
y
what is called the SEARCH method.
If the "REMOTE CODE" number
method shown in the previous section
did not set your remote to work your
VCR or Converter, then follow the easy
steps listed below.
Please read through steps 1-4 before
beginning.
I VCR or Converter to turn the unit ON.
on the remote in the desired position
(VCRorCBL).
<l>
front of the VCR or Converter.
Point the remote toward the unit.
HOLD DOWN the A/CH and
desired POWER (VCR or CBL
Converter) buttons at the same time.
KEEP HOLDING BUTTONS DOWN.
<l>
the unit.
Channel Numbers will SCAN UP
when the unit has been identified. This
may take up to two minutes.
<l>
(VCR or CBL) buttons as soon as
channel numbers start to scan up. The
code has been identified and the
remote is ready to operate the VCR or
Converter.
______________
( BEQIW)
Press the POWER button on the
<|> Place the TVA'CR/CBL switch
Stand at least six feet away from the
Watch the Channel Indicator on
Release the A/CH and POWER
Don't let the VCR or Converter
scan up more than five channels
(in Search mode).
Smart Hki.p
Remember, a minute or
two can seem very long, but
*the code should be located
within two minutes.
Don't let the VCR scan up more than
five channels. If you do the remote
may pass up the right code and anoth
er two minute search cycle will have
to be repeated.
If no channel change happens within
two minutes, repeat steps 1-4. Should
a channel change still not occur, the
remote will not work with the desired
unit.

G96SVC LiMiTKi) Warranty
90 Days Over the Counter Exchange
This warranty gives you specific legal rights, and you may also have other
rights which vary from state to state.
During the First 90 Days
For the first Ninety (90) days from the date of purchase, your Accessory will be
replaced with a new or renewed product (at Philips’ option) if it becomes defective
or inoperative. This is done without charge to you. Replacement products are war
ranted for the balance of the warranty period.
Who is Protected... Where?
This warranty is extended to the original purchaser for products purchased and used
in the U.S.A., Puerto Rico and the Virgin Islands. .(For Canada see below.)
What the Purchaser Must Do (in Canada ONLY)
If you require an exchange during the warranty period, you must take your
Accessory to the dealer from whom it was purchased with proof of the purchase
receipt. You are responsible for all shipping costs.
What the Purchaser Must Do (except in Canada)
If you require an exchange during the warranty period, you must take your accesso
ry to the dealer from whom it was purchased, or carefully pack the product and ship
it by prepaid transportation with proof of the purchase date to the Small Products
Service Center, address listed below.
ALL IMPLIED WARRANTIES INCLUDING IMPLIED GUARANTIES OF
MERCHANTABILITY AND FITNESS FOR A PARTICULAR PURPOSE, ARE
LIMITED IN DURATION TO THE DURATION OF THIS EXPRESS WARRAN
TY. Some states do not allow limitations on how long an implied warranty lasts, so
the above limitation may not apply to you.
Philips CEC - Credit Receiving
Small Products Service Center
1001 Snapp Ferry Road
Greeneville, TN 37745
(423) 475-8869
Copyright © 1996 Philips Consumer Electronics Company. All rights reserved.
8
IB7646E00I
3121-245-3002.1
 Loading...