

Page 1
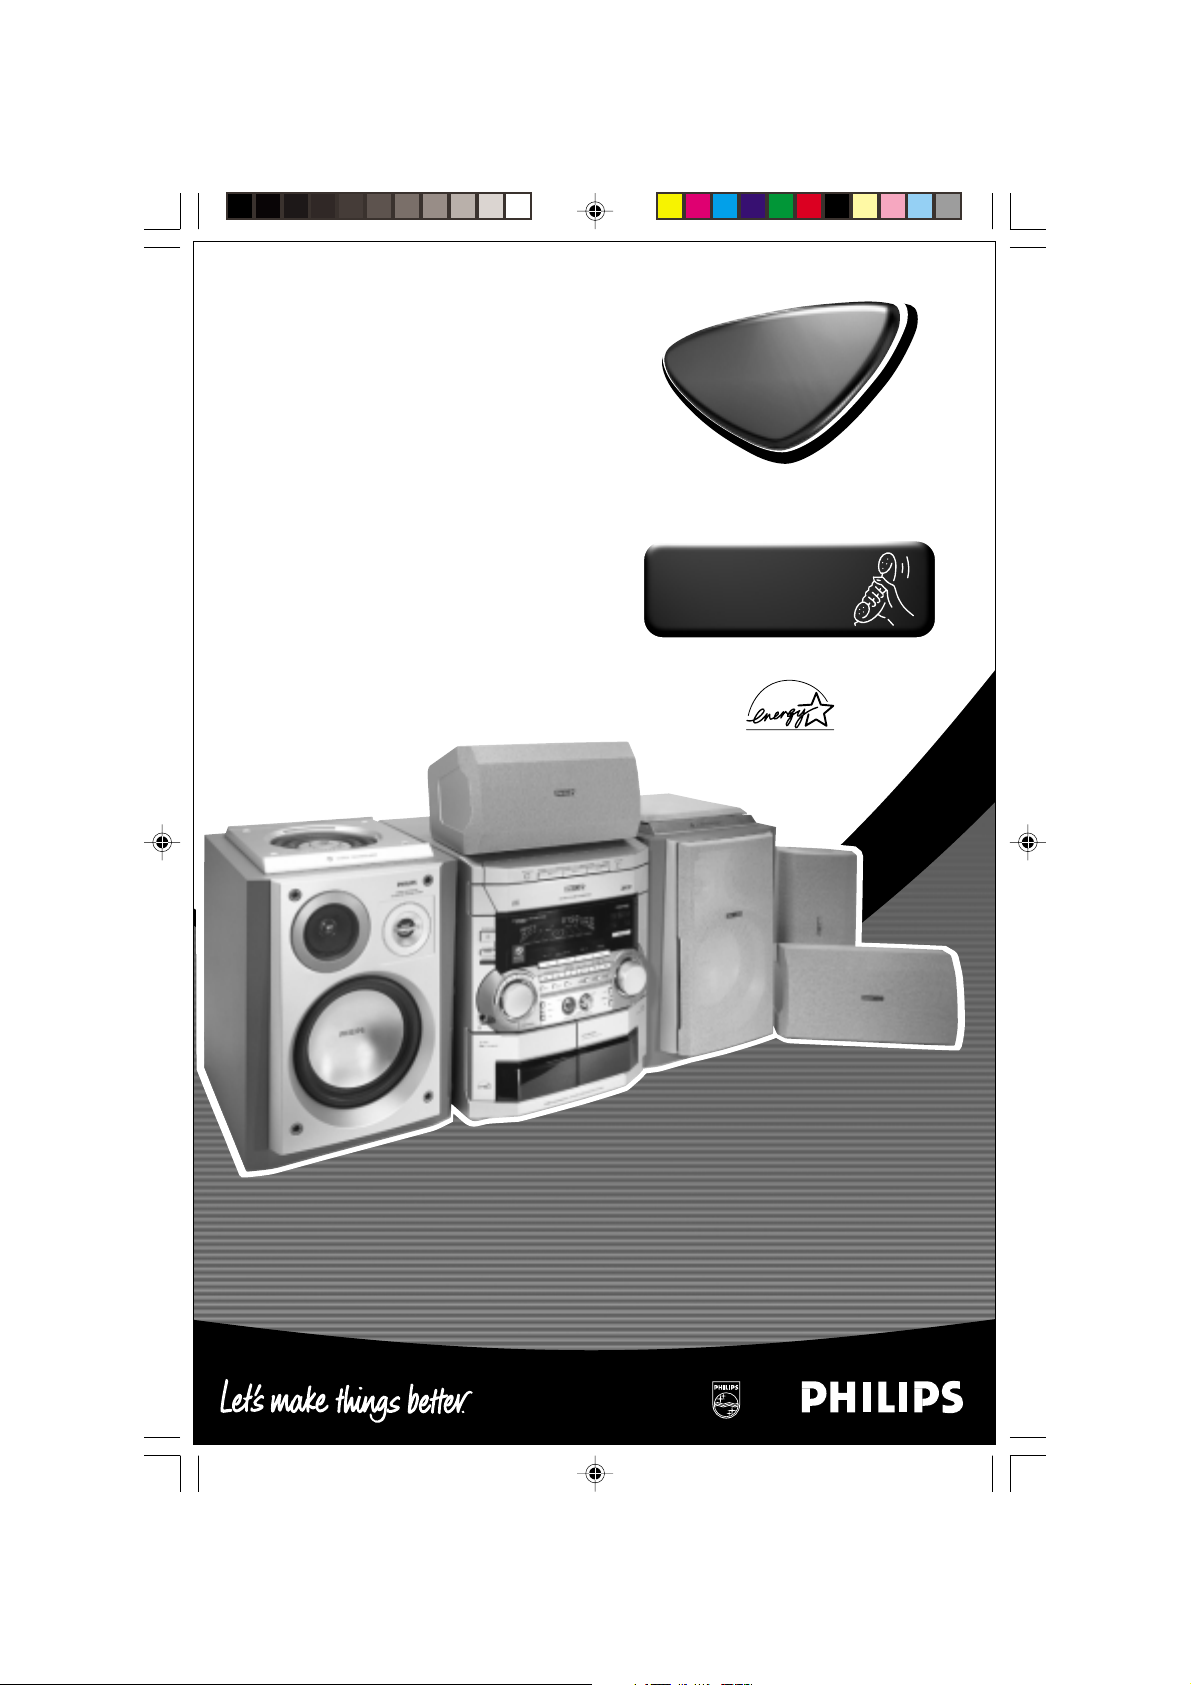
Mini Hi-Fi System
FW-P880
FW-P880
Toll Free Help Line
Ligne d'assistance en service libre
Linea de ayuda telefónica sin cargo
800-531-0039
pg 001-032/P880/37-Eng 12/8/00, 1:53 PM1
1
3139 115 20421
Page 2
Return your Warranty Registration card today to
ensure you receive all the benefits you’re entitled to.
• Once your Philips purchase is registered, you’re eligible to
receive all the privileges of owning a Philips product.
• So complete and return the Warranty Registration Card
enclosed with your purchase at once. And take advantage
of these important benefits.
Warranty
Verification
Registering your product within
10 days confirms your right to
maximum protection under the
terms and conditions of your Philips
warranty.
Owner
Confirmation
Your completed Warranty Registration
Card serves as verification of ownership
in the event of product theft or loss.
T
I
A
R
T
S
I
G
E
R
•
S
Y
Hurry!
A
D
0
1
I
N
Congratulations on your purchase,
and welcome to the “family!”
Dear Philips product owner:
Thank you for your confidence in Philips .You’ve selected one of the best-built,
best-backed products available today.And we’ll do everything in our power to
keep you happy with your purchase for many years to come.
As a member of the Philips
most comprehensive warranties and outstanding service networks in the
industry.
What’s more, your purchase guarantees you’ll receive all the information and
special offers for which you qualify, plus easy access to accessories from our
convenient home shopping network.
And most importantly you can count on our uncompromising commitment to
your total satisfaction.
All of this is our way of saying welcome–and thanks for investing in a Philips
product.
Sincerely,
Robert Minkhorst
President and Chief Executive Officer
P.S. Remember, to get the most from your Philips product, you must
return your Warranty Registration Card within 10 days. So please
mail it to us right now!
C5097
MA
“family,” you’re entitled to protection by one of the
Model
Registration
Returning your Warranty Registration
Card right away guarantees you’ll
receive all the information and special
offers which you qualify for as the
owner of your model.
O
N
N
Know these
E
E
D
E
D
W
I
T
H
safety symbols
CAUTION
RISK OF ELECTRIC SHOCK
CAUTION: TO REDUCE THE RISK OF ELECTRIC SHOCK, DO NOT
REMOVE COVER (OR BACK). NO USER-SERVICEABLE PARTS
INSIDE. REFER SERVICING TO QUALIFIED SERVICE PERSONNEL.
household, please do not remove product
covering.
s
maintenance problems.
WARNING:
FIRE OR SHOCK HAZARD, DO NOT
EXPOSE THIS EQUIPMENT TO RAIN OR
MOISTURE.
CAUTION:
electric shock, match wide blade of
plug to wide slot, and fully insert.
For Customer Use
Enter below the Serial No. which is located
on the rear of the cabinet. Retain this
information for future reference .
Model No. ___________________________
Serial No. ____________________________
DO NOT OPEN
This "bolt of lighting" indicates
uninsulated material within your
unit may cause an electrical shock.
For the safety of everyone in your
The "exclamation point" calls
attention features for which you
should read the enclosed literature
closely to prevent operating and
TO PREVENT
To prevent
2
pg 001-032/P880/37-Eng 12/8/00, 1:53 PM2
Visit our World Wide Web Site at http://www.philipsusa.com
3139 115 20421
Page 3
#
@
!
0
1
2
3
4
5
6
7
8
9
™
STANDBY ON
ECO POWER
IR SENSOR
OPEN
DISC CHANGE
DISC 1 DISC 2 DISC 3
OPEN•CLOSE
$
%
DC
3
CHANGER
MINI HIFI SYSTEM
LEFT CENTER RIGHT
LEFT CENTER RIGHT
SURR
SURR
SURR
SURR
PRO LOGIC
PRO LOGIC
CD 1•2•3
B
A
S
S
C
E
/
T
V
R
E
B
L
C
S
D
L
A
N
O
S
R
E
P
E
JOG CONTROL
CD
SEARCH•TUNING
PROG
BASS
FM•AM
BANDC1 • 2 • 3
TUNER
DEMO STOP
STOP•CLEAR
CLOCK/
TIMER
ON•OFF
DYNAMIC AMPLIFICATION CONTROL
TAPE 1•2
CDR/DVD
CDR
AUX
TAP E
▲
PRESET
▲
PREV NEXTSIDE
PLAY PAUSE
DUB
AUTO
DIM
REVERSE
wOOx
LEVEL
RECORD
(HSD)
TREBLE
U
M
L
O
E
V
OPEN
^
&
*
(
)
¡
™
£
≤
§
3
pg 001-032/P880/37-Eng 12/8/00, 1:53 PM3
∞
3
3139 115 20421
Page 4
4
pg 001-032/P880/37-Eng 12/8/00, 1:53 PM4
3139 115 20421
Page 5
Canada
English:
This digital apparatus does not exceed
the Class B limits for radio noise
emissions from digital apparatus as set
out in the Radio Interference
Regulations of the Canadian
Department of Communications.
Français:
Cet appareil numérique n'emet pas de
bruits radioélectriques dépassant les
limites applicables aux appareils
numériques de Class B prescrites dans
le Règlement sur le Brouillage
Radioélectrique édicté par le Ministère
des Communications du Canada.
This warning label is located on the rearside
and inside this laser product.
INVISIBLE
:
CAUTION
LASER RADIATION
WHEN OPEN. DO NOT STARE INTO BEAM.
INVISIBLE LASER RADIATION WHEN OPEN.
:
DANGER
AVOID DIRECT EXPOSURE TO BEAM.
AVATTAESSA JA SUOJALUKITUS OHITETTAESSA OLET
VARO !
ALTTIINANAKYMATTOMAALLE LASERSATEILYLLE.ALA
KATSO SATEESEEN.
OSYNLIG LASERSTRÅLNING NÄR DENNA DEL ÄR ÖPPNAD.
VARNING!
OCH SPARREN AR URKOPPLAD.BETRAKTA EJ STRÅLEN.
or
DANGER - Invisible laser radiation when open.
AVOID DIRECT EXPOSURE TO BEAM.
Index
English ------------------------------------------------ 7
English
Français -------------------------------------------- 35
Français
Español --------------------------------------------- 63
Español
CAUTION
Use of controls or adjustments or
performance of procedures other
than herein may result in hazardous
radiation exposure or other unsafe
operation.
ATTENTION
L'utilisation des commandes ou
réglages ou le non-respect des
procédures ci-incluses peuvent se
traduire par une exposition
dangereuse à l'irradiation.
ATENCIÓN
El uso de mando o ajustes o la
ejecucción de métodos que no sean
los aquí descritos puede ocasionar
peligro de exposición a radiación.
pg 001-032/P880/37-Eng 12/8/00, 1:53 PM5
5
3139 115 20421
Page 6
6
pg 001-032/P880/37-Eng 12/8/00, 1:53 PM6
3139 115 20421
Page 7
Contents
General Information
Environmental Information ................................ 8
Acknowledgement ............................................... 8
Supplied Accessories ........................................... 8
Safety Information ................................................ 8
Preparations
Rear Connections .......................................... 9–10
Optional Connections ...................................... 10
Inserting batteries into the remote
control .................................................................. 10
Dolby Pro Logic
Setting up the Dolby Pro Logic system ......... 11
Test Tone ....................................................... 11–12
Switching the Dolby Pro Logic ........................ 12
Controls
Controls on the system and remote
control ........................................................... 13–14
Basic Functions
Demonstration mode ........................................ 15
Easy Set ................................................................. 15
Switching the system on ................................... 16
Switching the system to Standby mode ........ 16
Switching the system to Eco Power
Standby mode ..................................................... 16
Power Saving Automatic Standby .................... 16
Dim mode ............................................................ 16
Volume Control .................................................. 17
Interactive Sound Control ........................ 17–18
External Sources
Listening to External Sources .......................... 23
Tape Operation/Recording
Tape Playback ............................................... 24–25
General Information on Recording ................ 25
Preparation for Recording ........................ 25–26
One Touch Recording ........................................ 26
CD Synchro Recording ..................................... 26
Dubbing Tapes ..................................................... 26
Digital Recording via Digital Out .................... 26
Clock/Timer
View Clock .......................................................... 27
Clock Setting ....................................................... 27
Timer Setting ................................................ 27–28
Sleep Timer Setting ............................................ 28
Specifications ........................................... 29
Maintenance.............................................. 30
Troubleshooting ............................. 30–31
English
CD Operation
Discs for Playback .............................................. 19
Loading Discs ...................................................... 19
Disc Playback....................................................... 20
Programming the disc tracks .................... 20–21
Repeat ................................................................... 21
Shuffle .................................................................... 21
Radio Reception
Storing Preset Radio Stations .................... 22-23
Tuning to Preset Radio Stations ...................... 23
pg 001-032/P880/37-Eng 12/8/00, 1:53 PM7
7
3139 115 20421
Page 8
General Information
English
This system complies with the FCC rules,
Part 15 and with 21 CFR 1040.10.
Operation is subject to the following two
conditions:
– This device may not cause harmful
interference, and
– This device must accept any interference
received, including interference that may
cause undesired operation.
Environmental Information
All unnecessary packaging has been omitted. We
have tried to make the packaging easy to
separate into three materials: cardboard (box),
polystyrene foam (buffer) and polyethylene (bags,
protective foam sheet).
Your system consists of materials which can be
recycled and reused if disassembled by a
specialized company. Please observe the local
regulations regarding the disposal of packaging
materials, exhausted batteries and old
equipment.
Acknowledgement
Energy Star
As an ENERGY STAR
Partner, Philips has
determined that this product
meets the ENERGY STAR
guidelines for energy efficiency.
Dolby
Manufactured
under license
from Dolby Laboratories. “PRO-LOGIC” and the
double-D symbol d are trademarks of Dolby
Laboratories. Confidential unpublished works.
C 1992-1997 Dolby Laboratories. All rights
reserved.
R
R
Supplied accessories
– Remote control
– Batteries (two AA size) for remote control
– AM loop antenna
– FM wire antenna
– AC power cord
– CS-900 speaker package (includes one pair of
surround speakers and one center speaker)
Safety Information
● Before operating the system, check that the
operating voltage indicated on the typeplate (or
the voltage indication beside the voltage
selector) of your system is identical with the
voltage of your local power supply. If not, please
consult your dealer.
● Place the system on a flat, hard and stable
surface.
● Place the system in a location with adequate
ventilation to prevent internal heat build-up in
your system. Allow at least 10 cm (4 inches)
clearance from the rear and the top of the unit
and 5 cm (2 inches) from each side.
● Do not expose the system, batteries or discs to
excessive moisture, rain, sand or heat sources
caused by heating equipment or direct sunlight.
● If the system is brought directly from a cold to a
warm location, or is placed in a very damp room,
moisture may condense on the lens of the disc
unit inside the system. Should this occur, the CD
player would not operate normally. Leave the
power on for about one hour with no disc in the
system until normal playback is possible.
● The mechanical par ts of the set contain selflubricating bearings and must not be oiled or
lubricated.
● When the system is switched to Standby
mode, it is still consuming some power.
To disconnect the system from the
power supply completely, remove the AC
power plug from the wall socket.
8
pg 001-032/P880/37-Eng 12/8/00, 1:53 PM8
3139 115 20421
Page 9
2
right
surround
AM loop antenna
center speaker
Preparations
FM wire antenna
English
left
surround
speaker
(right)
AC
MAINS
~
A
AC power cord
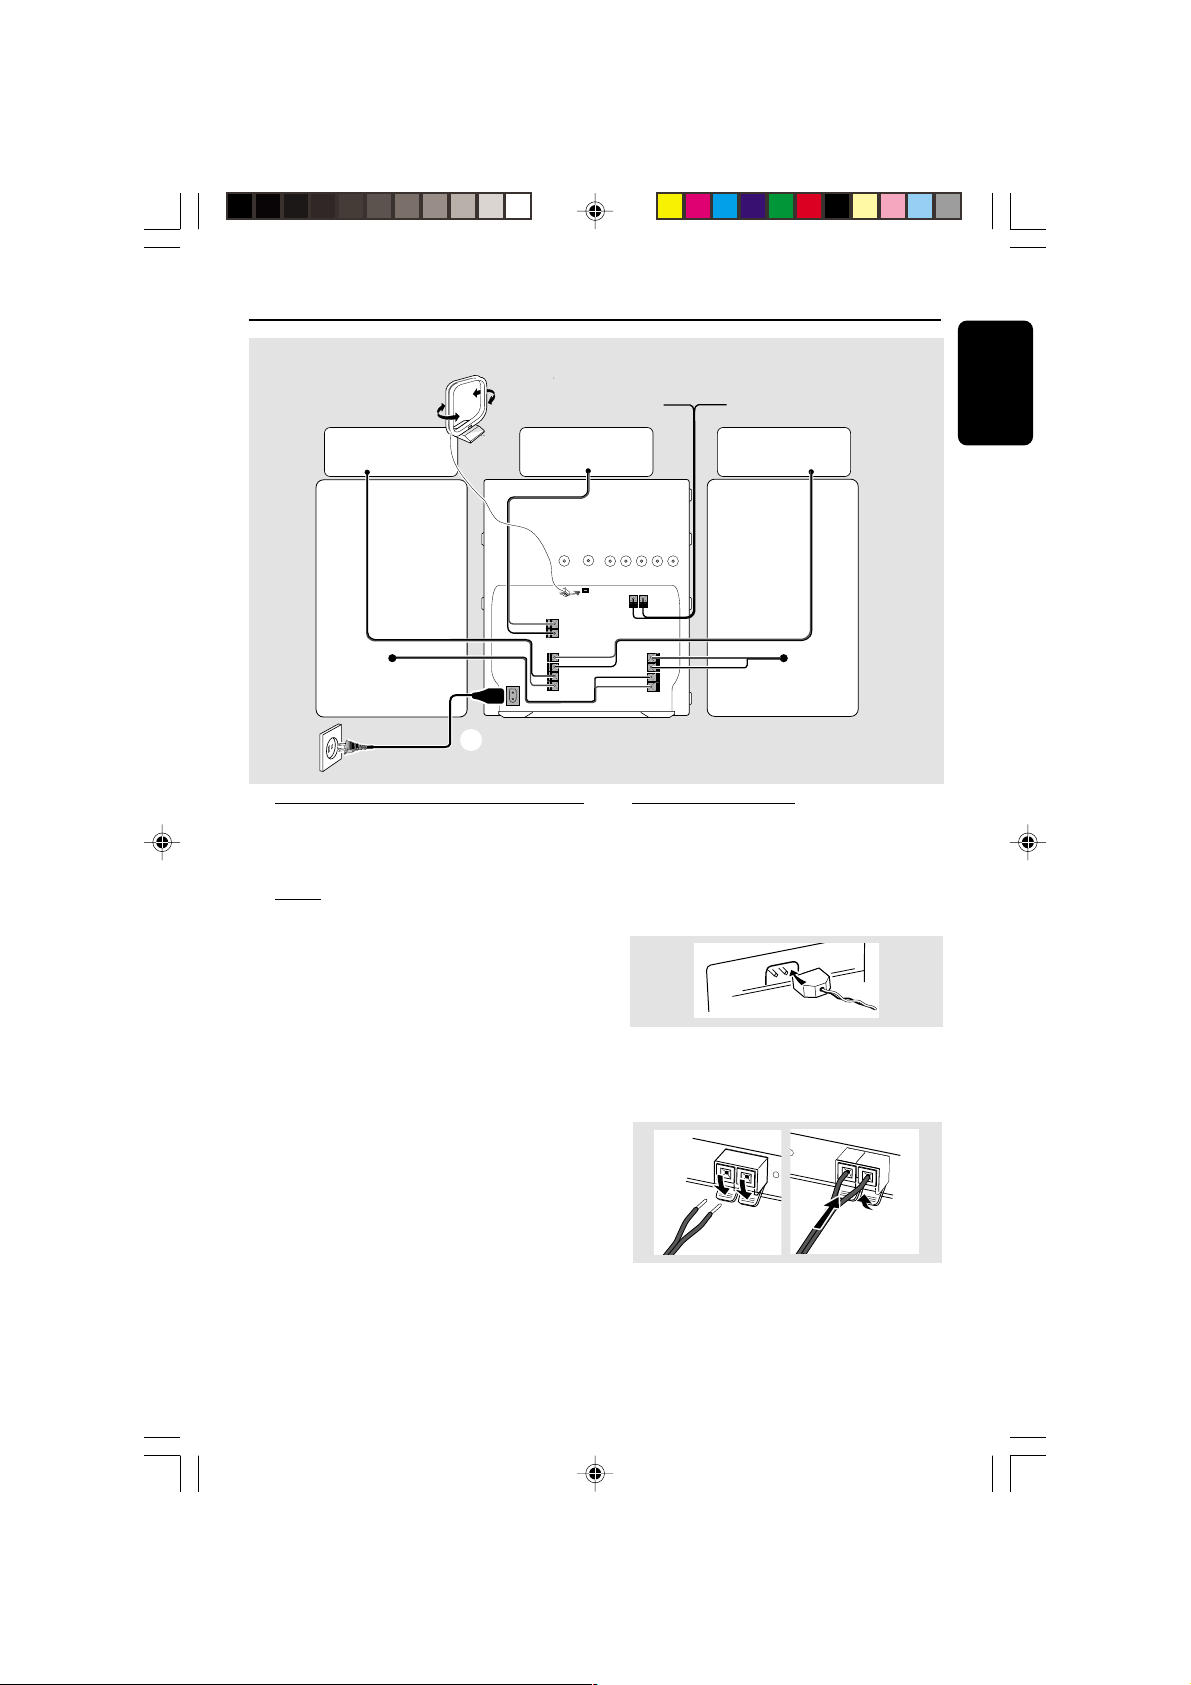
Rear Connections
The type plate is located at the rear of the
system.
A Powe r
Before connecting the AC power cord to the
wall outlet, ensure that all other connections
have been made.
WARNING!
– For optimal performance, use only the
original power cable.
– Never make or change any connections
with the power switched on.
To avoid overheating of the system, a safety
circuit has been built in. Therefore, your
system may switch to Standby mode
automatically under extreme conditions. If
this happens, let the system cool down
before reusing it (not available for all versions).
C
E
N
REAR
SURROUND
L
R
OUT
T
E
R
+
–
+
–
–
+
AM ANTENNA
C
OUT
B
AUX/CDR IN
FM ANTENNA 300Ω
FRONT
LINE OUT
+
L
–
–
R
+
LRLR
SURROUND
SUB-
DIGITAL
WOOFER
OUT
speaker
(left)
B Antennas Connection
Connect the supplied AM loop antenna and FM
antenna to the respective terminals. Adjust the
position of the antenna for optimal reception.
AM Antenna
● Position the antenna as far as possible from a TV,
VCR or other radiation source.
FM Antenna
1
pg 001-032/P880/37-Eng 12/8/00, 1:53 PM9
● For better FM stereo reception, connect an
outdoor FM antenna to the FM ANTENNA
terminal.
9
3139 115 20421
Page 10
Preparations
English
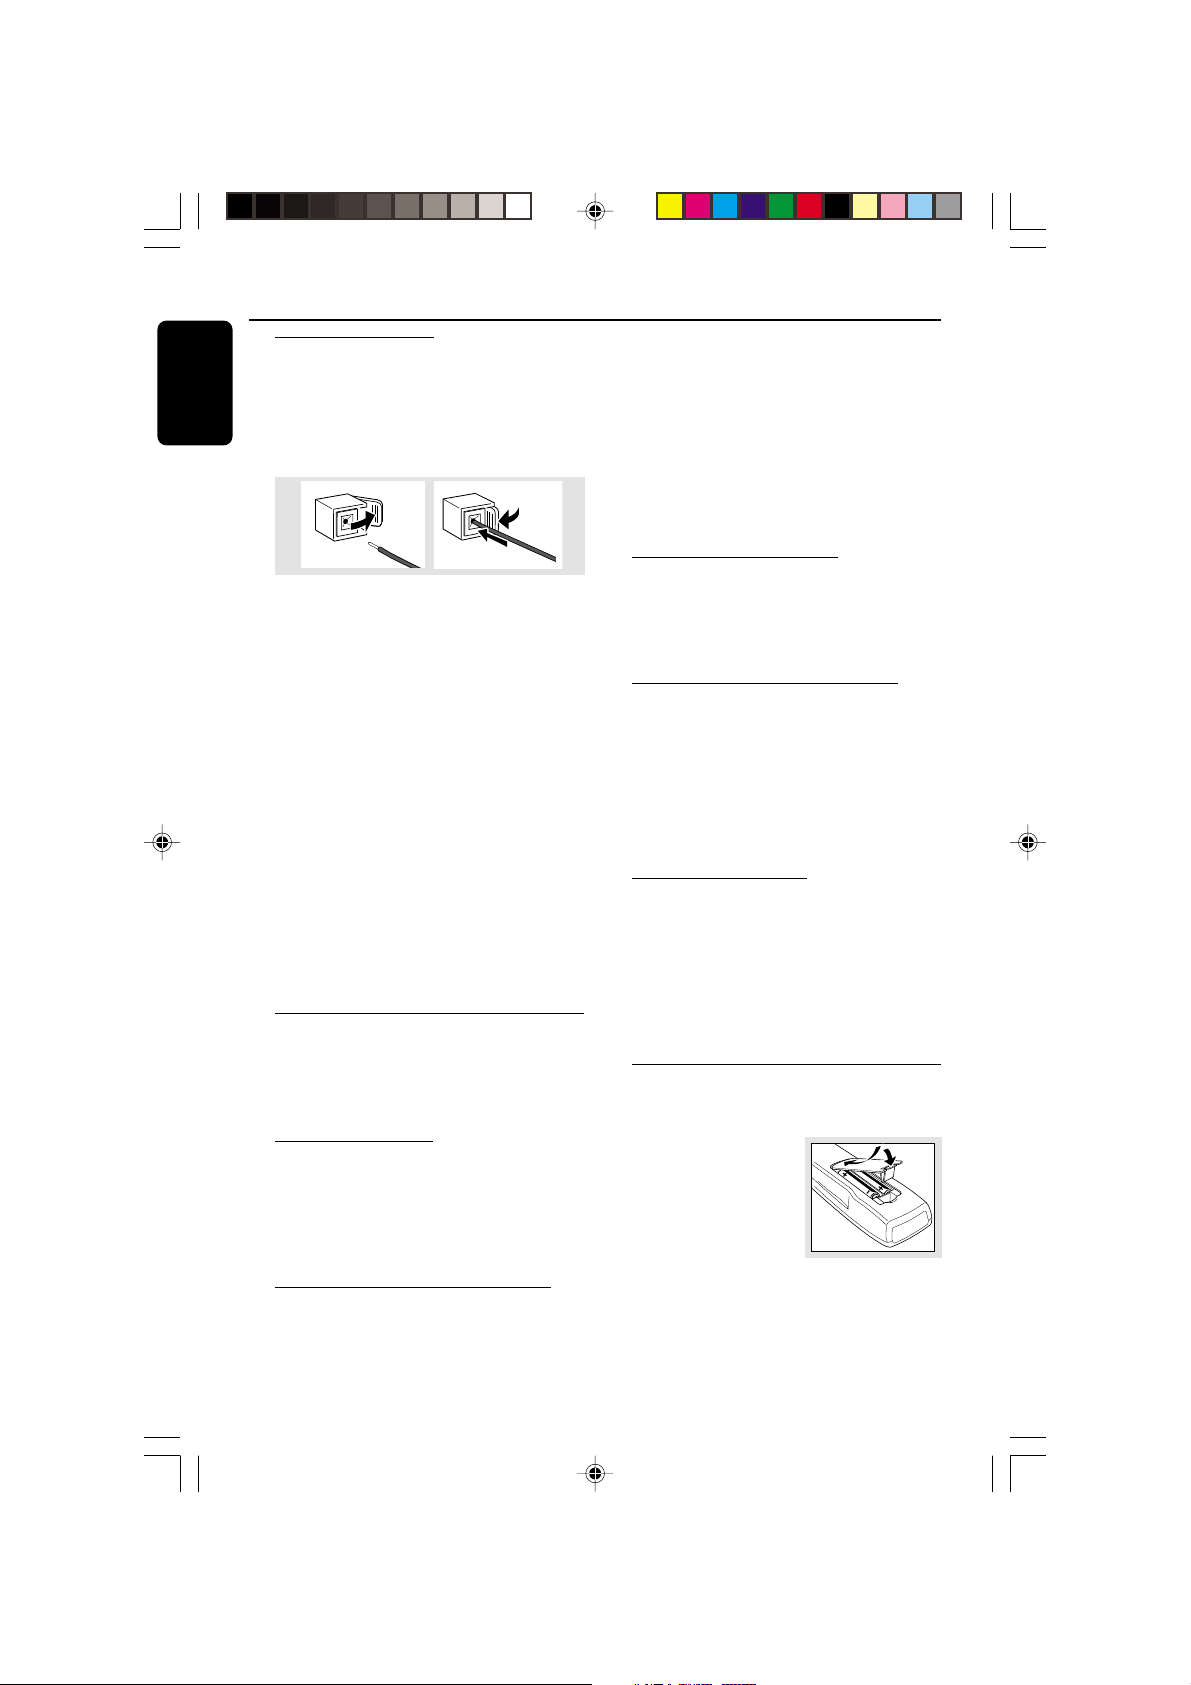
C Speakers Connection
Front Speakers
Connect the speaker wires to the SPEAKERS
(FRONT) terminals, right speaker to "R" and left
speaker to "L", colored (marked) wire to "+"
and black (unmarked) wire to "-".
1
● Clip the stripped portion of the speaker wire as
shown.
Rear Surround Speakers
Connect the speaker wires to the REAR
SURROUND terminals, right speaker to "R" and
left speaker to "L", colored (marked) wire to
"+" and black (unmarked) wire to "-".
Center Speaker
Connect the speaker wires to the CENTER
terminal, colored (marked) wire to "+" and
black (unmarked) wire to "-".
Notes:
– For optimal sound performance, use the
supplied speakers.
– Do not connect more than one speaker to any
one pair of +/- speaker terminals.
– Do not connect speakers with an impedance
lower than the speakers supplied. Please refer to
the SPECIFICATIONS section of this manual.
2
Optional Connections
The optional equipment and connecting cords
are not supplied. Refer to the operating
instructions of the connected equipment for
details.
Line Out Connection
Connect this output to any analog audio
equipment for playback or recording (CD recorder,
tape recorder or amplifier for example). Use a
cinch cable to connect the LINE OUT terminals
to the analog audio in terminals of the equipment.
Connecting other equipment to your
system
Connect the audio left and right OUT terminals
of a TV, VCR, Laser Disc player, DVD player or
CD Recorder to the AUX/CDR IN terminals.
10
Notes:
– Do not connect equipment to both the LINE
OUT and AUX/CDR IN terminals at the same time.
Otherwise, noise will be generated and malfunction
might occur.
– If you are connecting equipment with a mono
output (a single audio out terminal), connect it to
the AUX/CDR IN left terminal. Alternatively, you
can use a “single to double” cinch cable (still be
mono sound).
Subwoofer Out Connection
Connect the subwoofer to the SUBWOOFER
OUT terminal. The subwoofer reproduces just
the low bass sound effect (explosions or the
rumble of spaceships, for example).
Wireless Surround Out Connection
Connect the transmitter unit of wireless rear
speakers to the SURROUND OUT terminal.
Note:
– The availability of a wireless transmitter and its
peripherals are subjected to the approval of local
authorities. Please check with your respective local
safety or approving authority.
Digital Out Connection
Connect this digital output when recording on
any audio equipment with digital input (CD
Recorder, Digital Audio Tape [DAT] deck, Digital
to Analog Converter and Digital Signal Processor,
for example). Use a cinch cable to connect the
DIGITAL OUT terminal to the digital input
terminal of the equipment.
Inserting batteries into the
Remote Control
Insert two batteries (Type R06 or AA) into the
remote control with the
correct polarity as
indicated by the + and
- symbols inside the
battery compar tment.
CAUTION!
– Remove batteries if they are exhausted
or not to be used for a long time.
– Do not use old and new or different
types of batteries in combination.
– Batteries contain chemical substances, so
dispose of them properly.
pg 001-032/P880/37-Eng 12/8/00, 1:54 PM10
3139 115 20421
Page 11
Dolby Pro Logic
A
R
S
REPEAT
Dolby ProLogic Surround Sound provides the
current industry standard for home cinema
sound from VCR and TV broadcasts. The front
left and right speakers deliver detailed, directional
sound as the center speaker "steers" dialogue/
vocal sound and center screen action toward the
TV screen. Both surround speakers add a
greater sense of depth with special effects.
Audio and video tapes and discs with the
Dolby Surround mark are
encoded for multi channel Dolby Surround
sound. The DOLBY PRO LOGIC sound setting
allows you to listen to audio tracks as they were
recorded through the left, right, center, and rear
channels.
IMPORTANT!
– Dolby Pro Logic Surround sound can only
be reproduced if the program is broadcast
in Dolby Surround Sound.
– For the best Dolby Pro Logic sound,
switch on DPL with DSC set to “Classic”
and with VEC off.
– Dolby Pro Logic mode will automatically
switch to normal Stereo mode when
headphones is connected.
– When recording, switch to normal stereo
mode.
Setting up the Dolby Pro Logic
system
You must set up the system properly in order to
experience and enjoy a Home Cinema sound
ambience.
Connecting the Speakers
5-Speakers Connection (refer to
“Preparations - Rear Connections”)
● Front speakers: Connect the front speakers.
● Center speaker: Connect the center speaker.
● Rear (surround) speakers: Connect either the
wired rear surround speakers or a pair of
wireless rear speakers (not supplied) to the
SURROUND OUT terminals.
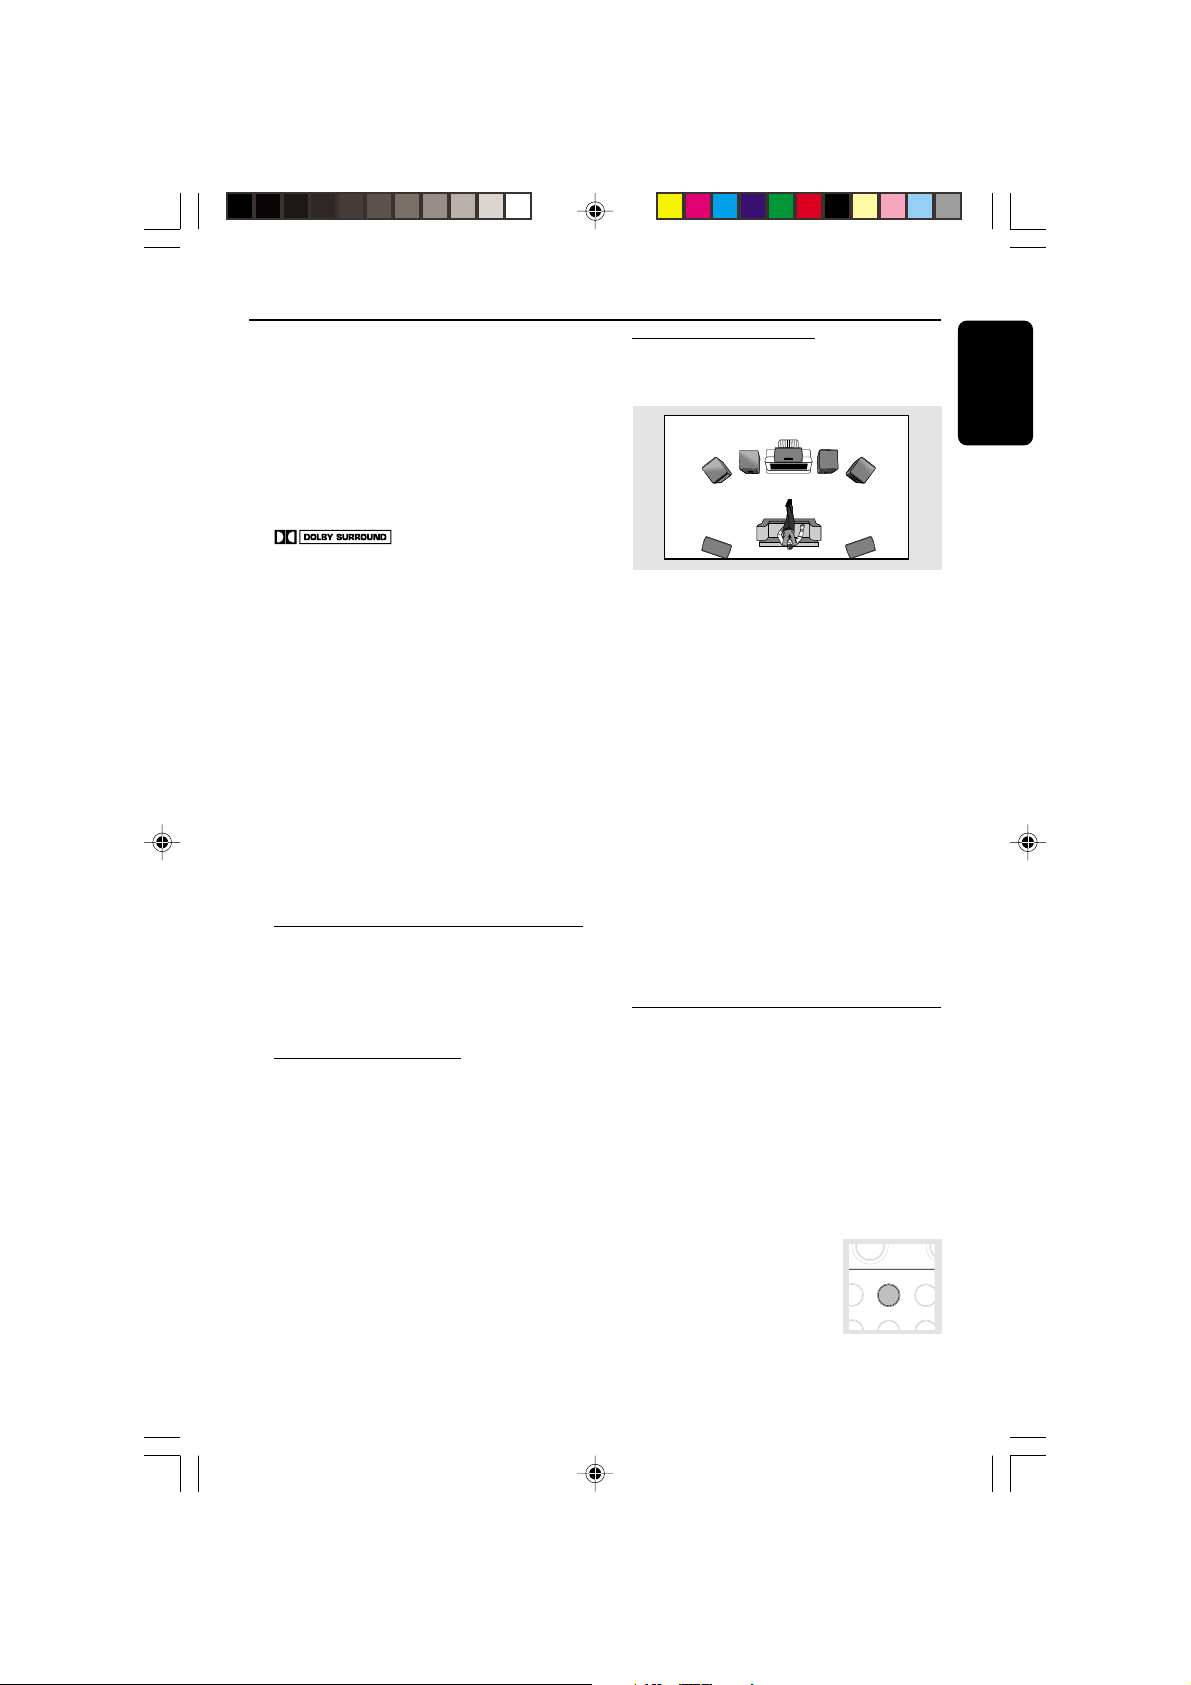
Positioning the Speakers
To get the best surround sound effect, place the
speakers as follows.
CENTER
SPEAKER
MINI HIFI
SYSTEM
FRONT
RIGHT
TV
SURROUND
RIGHT
SURROUND
LEFT
FRONT
SUB-
WOOFER
LEFT
Front Left and Right Speakers
For the best sound, place the left and right
speakers at an angle of approximately 45
degrees to the listener.
Note:
– To avoid magnetic interference with the picture
on your TV, do not position the front speakers too
close to the TV.
Rear (surround) Speakers
The surround speakers should be placed at
normal listening ear level or mounted on the
wall at the back of the room. Most importantly,
experiment when placing the surround speakers
to obtain the best sound.
Center Speaker
For the best sound, place the center speaker at
the same height as the left and right speakers.
Place the center speaker directly above or
beneath the television.
Test Tone
This feature enables you to adjust the Front Left,
Front Right, Center and Surround Sound levels
of the respective speakers in Dolby Pro Logic
mode.
You must sit at the ideal sitting position and
use the remote control to perform this
operation.
1 Press CD, TUNER, TAPE or AUX to switch
on the system.
2 Press TEST TONE on the
remote control.
➜ A test signal is generated; it
will move through the Left,
Center, Right, and Surround
speakers.
PL TEST TONE
CENTER
English
B
L
11
pg 001-032/P880/37-Eng 12/8/00, 1:54 PM11
3139 115 20421
Page 12
Dolby Pro Logic
T
English
➜ "TEST TONE" followed by "ADAPT
BALANCE, CENTER AND REAR LEVEL" will
be displayed.
➜ The test signal will last for about 90 seconds.
Adjust the sound level
DPL TEST TONE
CENTER
-
BALANCE
R
L
REAR
+
+
-
Front speakers
● Press BALANCE L on the remote control for
left speaker and press BALANCE R on the
remote control for right speaker.
➜ "BAL L +XX" or "BAL R +XX" will be
displayed.
Center speaker
● Press CENTER + or - on the remote
control.
➜ "CENT +XX" or "CENT-XX" will be displayed.
Surround speakers
● Press REAR + or - on the remote control.
➜ "REAR +XX" or "REAR -XX" will be
displayed.
To switch off the TEST TONE
● Press TEST TONE.
Notes:
– It is advisable to set the speakers’ level at
normal listening level.
– "XX" denotes the sound level.
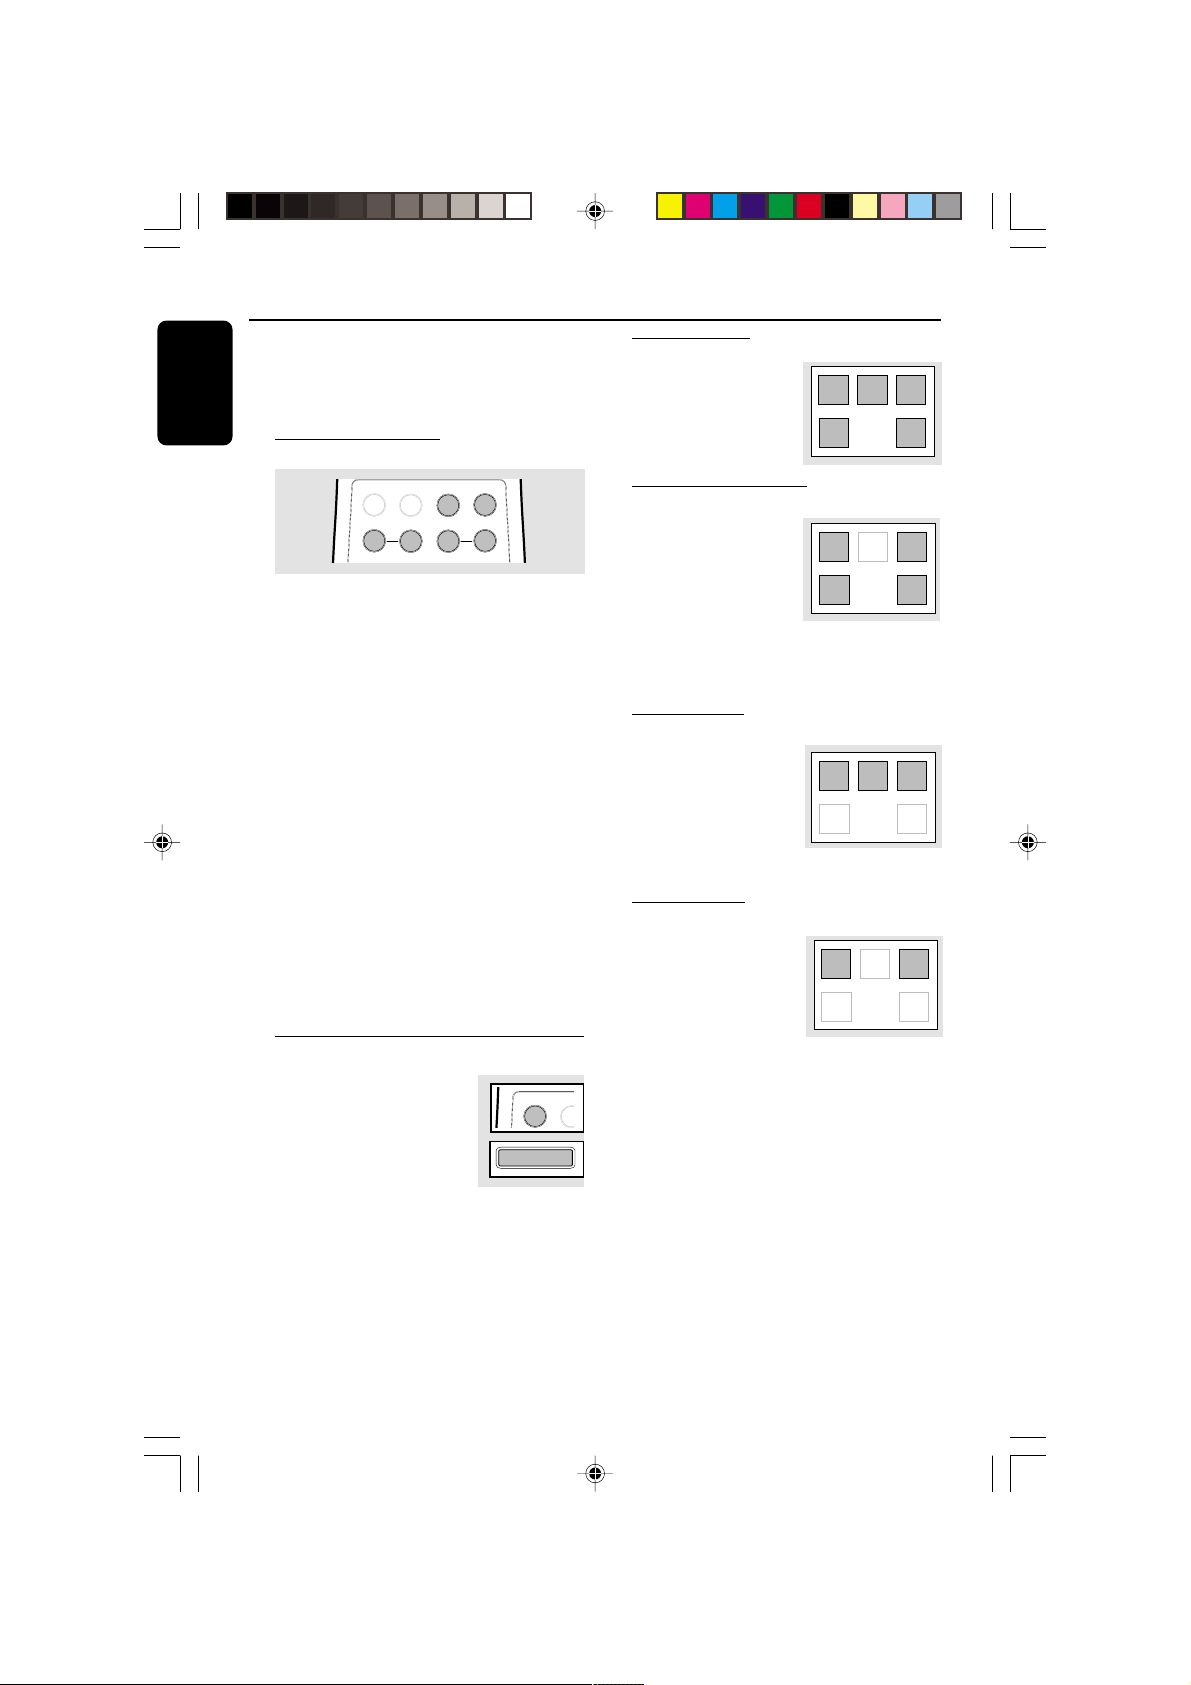
Switching the Dolby Pro Logic
● Press DPL (PRO LOGIC)
repeatedly to select and cycle
through the various sound
modes.
➜ The Dolby Pro Logic display
panel will light up with the
selection.
Dolby Surround ➜ Dolby Center Phantom
➜ Dolby 3 Stereo ➜ Stereo ➜ Dolby
Surround …
DPL TEST
PRO LOGIC
Dolby Surround
This setting is for a full
Dolby Surround Pro Logic
LEFT CENTER RIGHT
mode.
➜ “DOLBY SURROUND”
SURR
will be displayed.
Dolby Center Phantom
This setting is for use
without the center speaker.
LEFT CENTER RIGHT
It redistributes the center
speaker sound to the left
and right speakers,
SURR
providing conventional
stereo across the front.
➜ “DOLBY CENTER PHANTOM” will be
displayed.
Dolby 3 Stereo
Use this setting when full
surround is not required,
but a wide stereo sound is
desired. It requires only the
left, right and center
LEFT CENTER RIGHT
SURR
speakers.
➜ “DOLBY 3 STEREO” will be displayed.
Normal Stereo
This setting is for normal
stereo sound without
LEFT CENTER RIGHT
Dolby Pro Logic. It requires
only the left and right
speakers.
SURR
➜ “STEREO” will be
displayed.
SURR
SURR
SURR
SURR
12
pg 001-032/P880/37-Eng 12/8/00, 1:54 PM12
3139 115 20421
Page 13
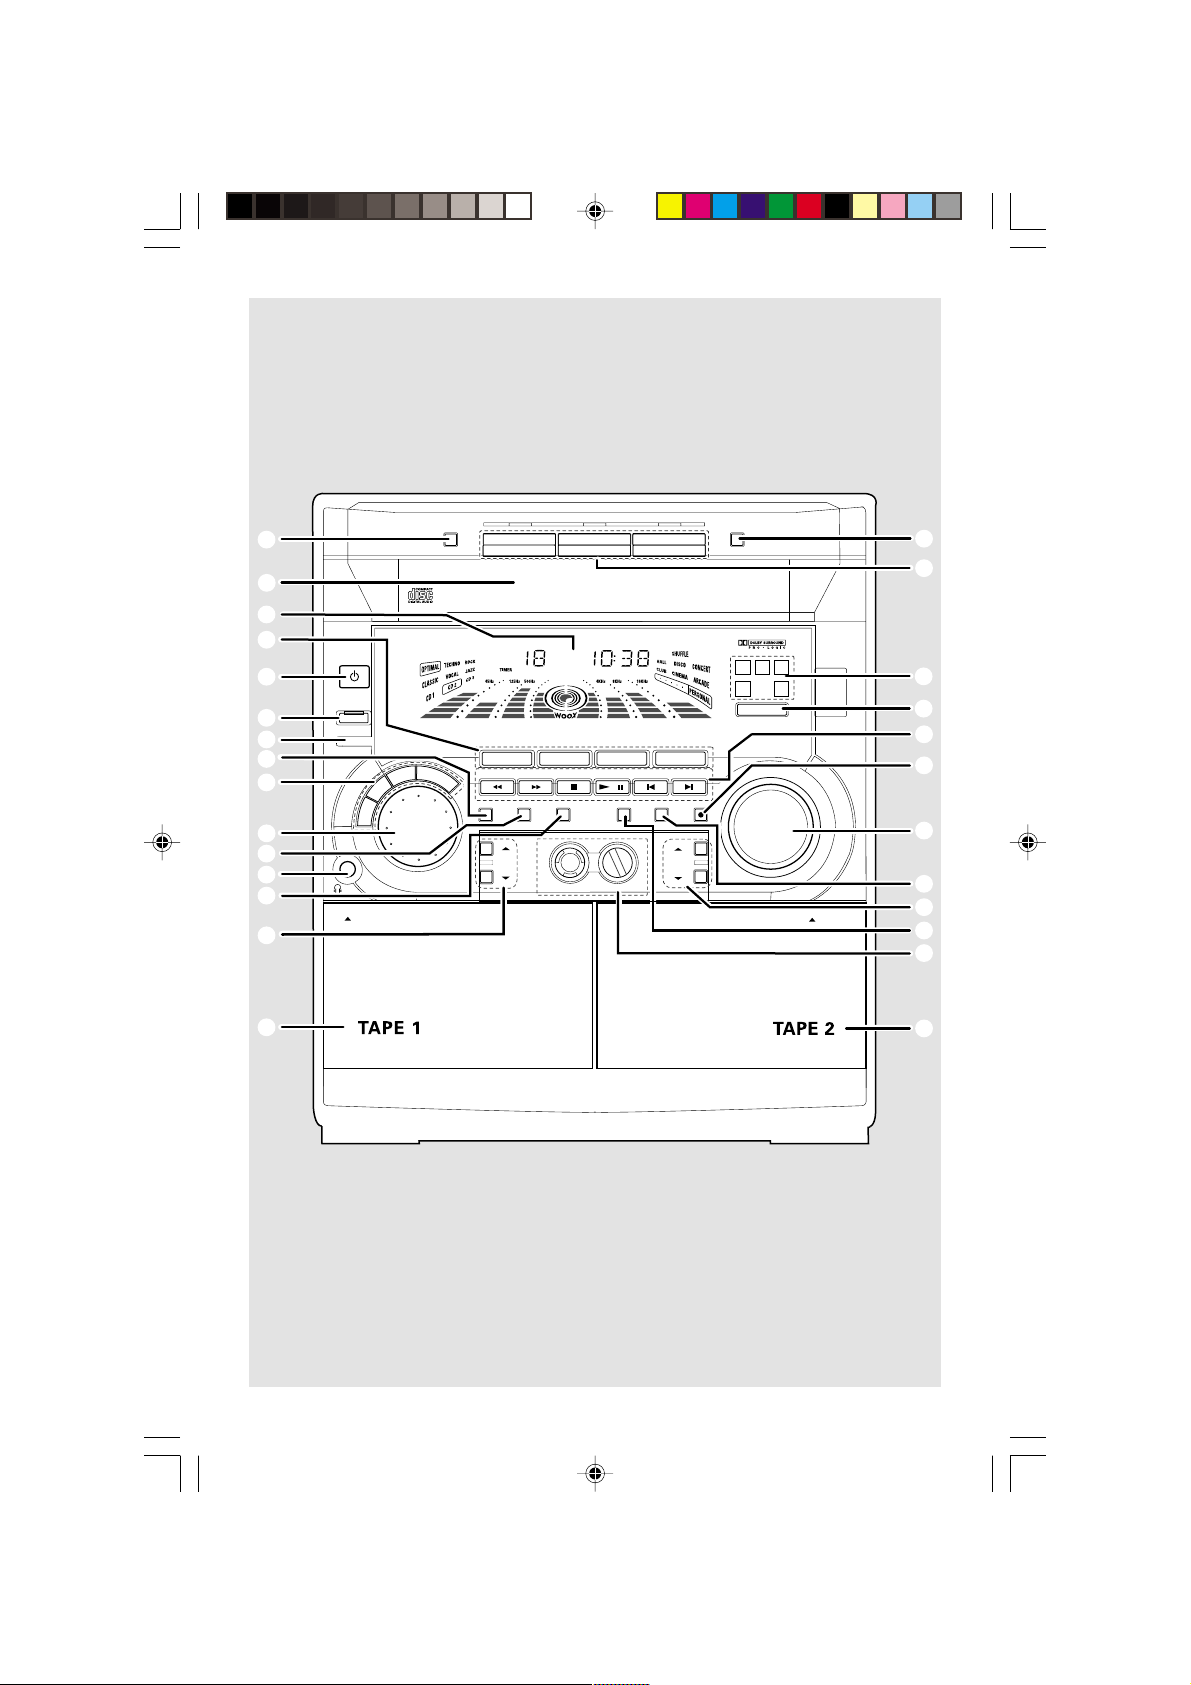
Controls (main system’s illustration on page 3)
Controls on the system and
remote control
1 STANDBY ON y
– to switch the system on or to Standby mode.
– to star t EASY SET operation.
2 ECO POWER
– to activate or deactivate Eco Power Standby
mode.
3 iR SENSOR
– infrared sensor for remote control.
4 PROG (PROGRAM)
for CD .................to program disc tracks.
for TUNER ........ to program preset radio stations.
for CLOCK .......(on the system only) to select 12-
or 24-hour clock mode.
5 INTERACTIVE SOUND CONTROLS
– to select the desired sound feature : PERSONAL
(PER.), DSC, VEC or BASS/TREBLE (BTC).
6 JOG CONTROL
– to select the desired sound effect for the
selected sound feature.
PERSONAL ..... PERSONAL 1-6, six personal
preferred Spectrum Analyzer
settings.
DSC ..................OPTIMAL, CLASSIC, TECHNO,
VOCAL, ROCK or JAZZ.
VEC .................. HALL, CLUB, DISCO, CINEMA,
CONCERT or ARCADE.
7 CLOCK/TIMER
– to view the clock, set the clock or set the timer.
8 n
– to connect headphones.
9 DIM
– to select brightness of the display screen :
DIM 1, DIM 2, DIM 3 or DIM OFF.
0 SOURCE – to select the following:
CD / (CD 1•2•3)
– to select disc tray 1, 2 or 3.
TUNER / (FM•AM)
– to select waveband : FM or AM.
TAPE / (TAPE 1• 2)
– to select tape deck 1 or 2.
AUX / (CDR/DVD)
– to select a connected external source :
CDR/DVD or AUX (auxiliary) mode.
TV/AV (on the remote control only)
– to select TV or Video mode.
! DISPLAY SCREEN
– to view the current status of the system.
@ DISC TRAY
# DISC CHANGE
– to change disc(s).
$ OPEN•CLOSE
– to open or close the disc tray.
% DISC 1 / DISC 2 / DISC 3 (CD DIRECT)
– to select a disc tray for playback.
^ DPL DISPLAY PANEL
– to view the selected Dolby Pro Logic setting.
& DOLBY PRO LOGIC (DPL)
– to select Dolby Surround, Dolby Center
Phantom, Dolby 3 Stereo or Stereo mode.
* Mode Selection
SEARCH• TUNING à á
for CD .................to search backward/forward.
for TUNER ......... to tune to a lower or higher radio
frequency.
for TAPE.............. to rewind or fast forward.
for CLOCK .......(on the system only) to set the
hour.
for TV VOL. .......to adjust the TV volume (if the
remote operates your TV).
STOP•CLEAR Ç (DEMO STOP)
for CD .................to stop playback or to clear a
program.
for TUNER ........ to stop programming.
for TAPE.............. to stop playback or recording.
for DEMO .........(on the system only) to activate/
deactivate the demonstration.
PLAY PAUSE ÉÅ
for CD .................to start or interrupt playback.
for TAPE.............. to start playback.
í PREV / SIDE / NEXT ë
(PRESET 4 3 )
for CD .................to skip to the beginning of the
current, previous, or next track.
for TUNER ........ to select a preset radio station.
for TAPE.............. to select tape side (back or
front) in tape deck 2 only.
for CLOCK .......(on the system only) to set the
minute.
( RECORD
– to star t recording on tape deck 2.
) VOLUME
– to increase or decrease the volume.
¡ DUB (HSD) (HIGH SPEED DUBBING)
– to dub a tape in normal or fast speed.
English
pg 001-032/P880/37-Eng 12/8/00, 1:54 PM13
13
3139 115 20421
Page 14
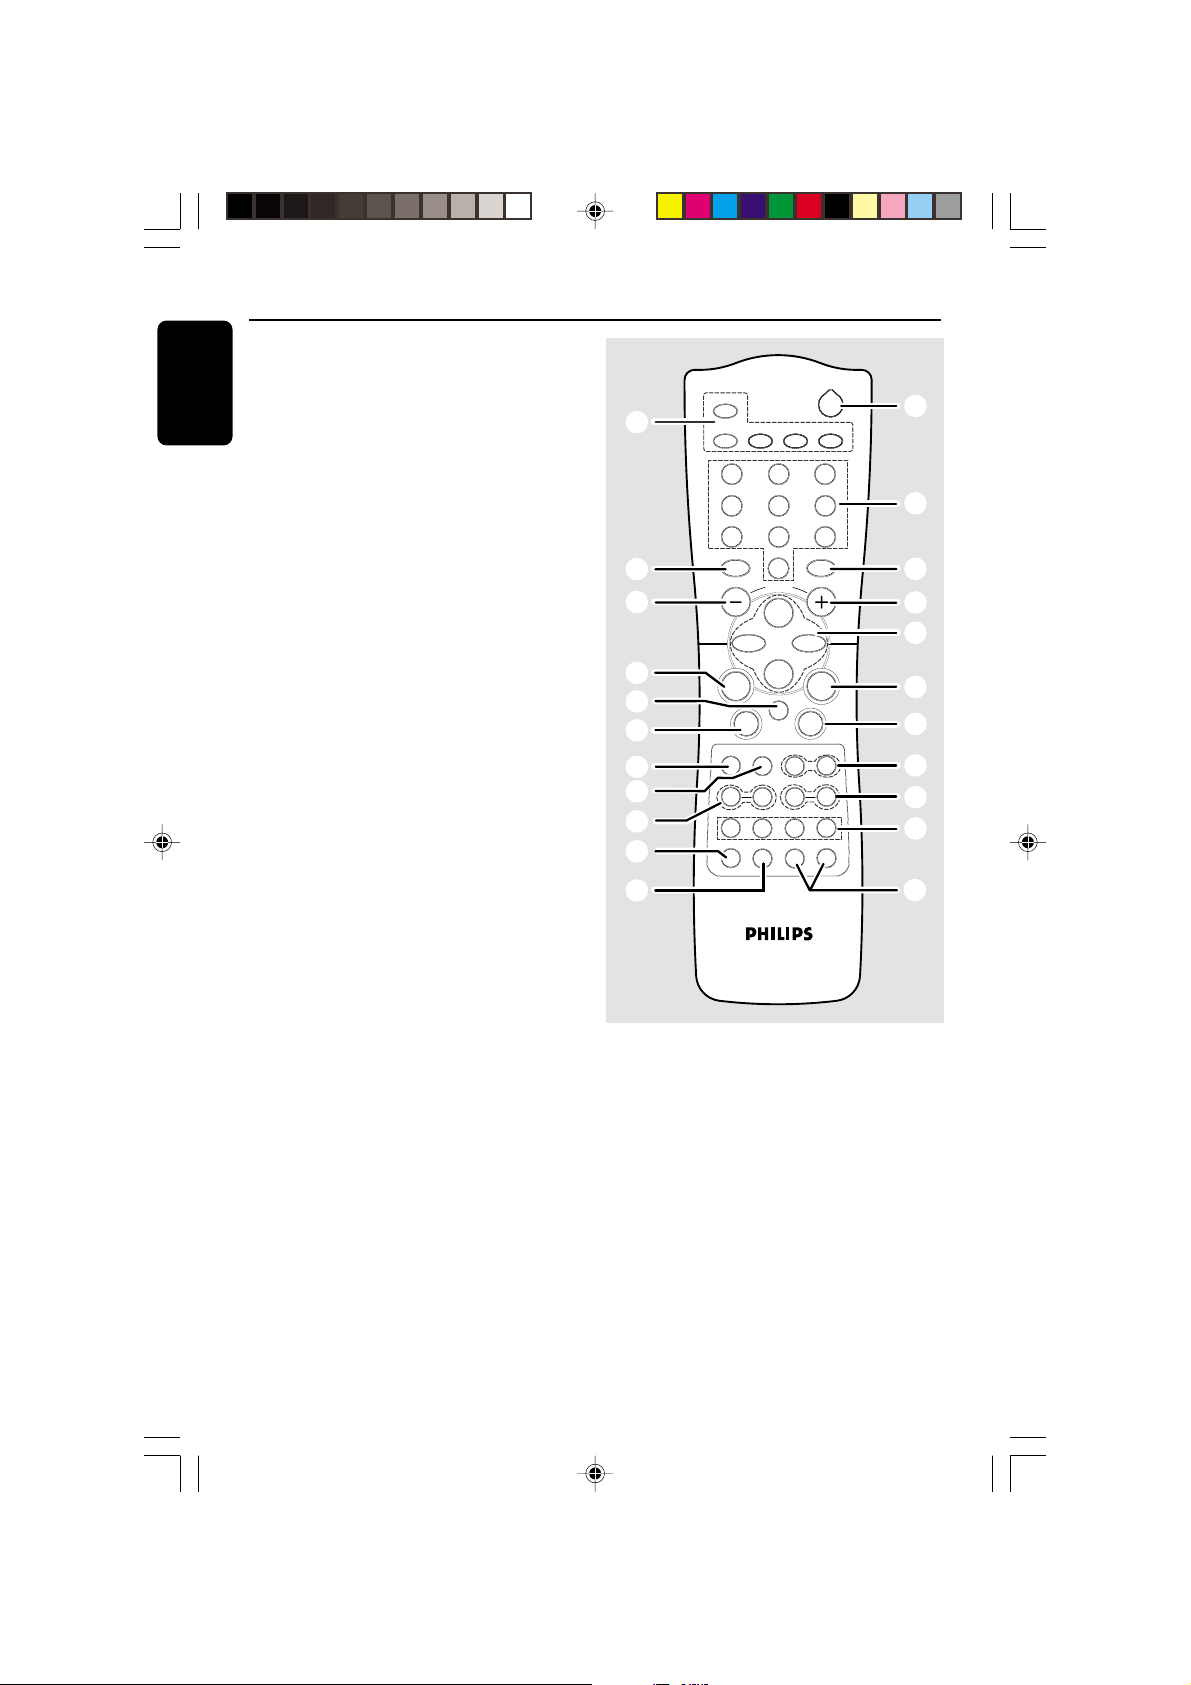
Controls
™ BASS/TREBLE CONTROL – to adjust the
English
BASS/TREBLE level :
BASS # $
– to increase or decrease the low tone.
TREBLE # $
– to increase or decrease the high tone.
£ AUTO REVERSE
– to select the desired playback modes in tape
deck 2 only.
≤ wOOx ON•OFF
– to select enhanced or normal wOOx sound
effect.
wOOx LEVEL
– to select desired wOOx level : WOOX 1,
WOOX 2 or WOOX 3.
∞ TAPE DECK 2
§ TAPE DECK 1
≥ CLOCK
– to view the clock display.
• REPEAT
– to playback track(s)/disc(s)/program repeatedly.
ª TEST TONE
– to check the sound level of the Front Left, Front
Right, Center and Surround speakers.
º CENTER +/-
– to adjust the sound level of the center speaker.
⁄ TIMER ON/OFF
– to activate or deactivate the timer.
¤ SLEEP
– to activate, deactivate or set the sleep timer.
‹ REAR +/-
– to adjust the sound level of the surround
speakers.
› BALANCE L/R
– to balance the sound level of the front left and
right speakers.
fi SHUFFLE
– to playback all available discs and their tracks/
program in random order.
fl DIGITS 0 – 9
(numbers consisting of more than two figures must
be keyed in within 2 seconds.)
for CD ................. to key in a CD track for playback
or programming.
for TUNER ........ to key in a preset radio station.
‡ B
– to switch the system to Standby mode or Eco
Power Standby mode.
0
≥
)
*
9
•
&
ª
º
⁄
TV/AV
CD 123
1
4
CLOCK
TV VOL
à
DPL TEST TONE
-
PER.
TIMER ON/OFF
7
CENTER
í
REPEAT
TUNER
DSC
SLEEP
+
2
5
8
0
VOLUME
ÅÉ
Ç
DIM
TAPE 1/2
L
-
VEC
WOOX
AUTO REV.
ë
SHUFFLE
BALANCE
REAR
WOOX LEVEL
2
AUX/CDR
3
6
9
TV VOL
á
R
+
BTC
¤
Notes for remote control:
– First, select the source you wish to
control by pressing one of the source select
keys on the remote control (CD 123 or
TUNER, for example).
– Then select the desired function (É,
ë
, for example).
‡
fl
£
)
*
*
fi
›
‹
5
≤
í
,
14
pg 001-032/P880/37-Eng 12/8/00, 1:54 PM14
3139 115 20421
Page 15
STANDBY-ON
ECO POWER
IR SENSOR
Basic Functions
TV/AV
MINI HIFI SYSTEM
LEFT CENTER RIGHT
LEFT CENTER RIGHT
SURR
SURR
SURR
SURR
PRO LOGIC
PRO LOGIC
CD 1•2•3
FM•AM
TAPE 1•2
BANDC1 • 2 • 3
CD
TUNER
B
A
S
S
C
E
/
T
V
R
E
B
L
C
S
D
L
A
N
O
S
R
E
P
E
JOG CONTROL
SEARCH•TUNING
PROG
BASS
DEMO STOP
STOP•CLEAR
CLOCK/
TIMER
ON•OFF
DYNAMIC AMPLIFICATION CONTROL
PLAY PAUSE
DIM
REVERSE
wOOx
CDR/DVD
CDR
TAPE
AUX
▲
PRESET
▲
PREV NEXTSIDE
DUB
AUTO
RECORD
(HSD)
LEVEL
TREBLE
U
M
L
O
E
V
TV VOL
TUNER
CD 123
1
4
7
VOLUME
í
Ç
à
REPEAT
DPL TEST TONE
CENTER
+
-
DSC
PER BTC
SLEEP
TIMER ON/OFF
2
TAPE 1/2
AUX/CDR
3
2
6
5
8
9
AUTO REV.CLOCK
0
ÅÉ
ë
TV VOL
á
DIM
SHUFFLE
BALANCE
R
L
REAR
+
-
BTC
VEC
WOOX
WOOX LEVEL
English
IMPORTANT!
Before you operate the system, complete
the preparation procedures.
Demonstration mode
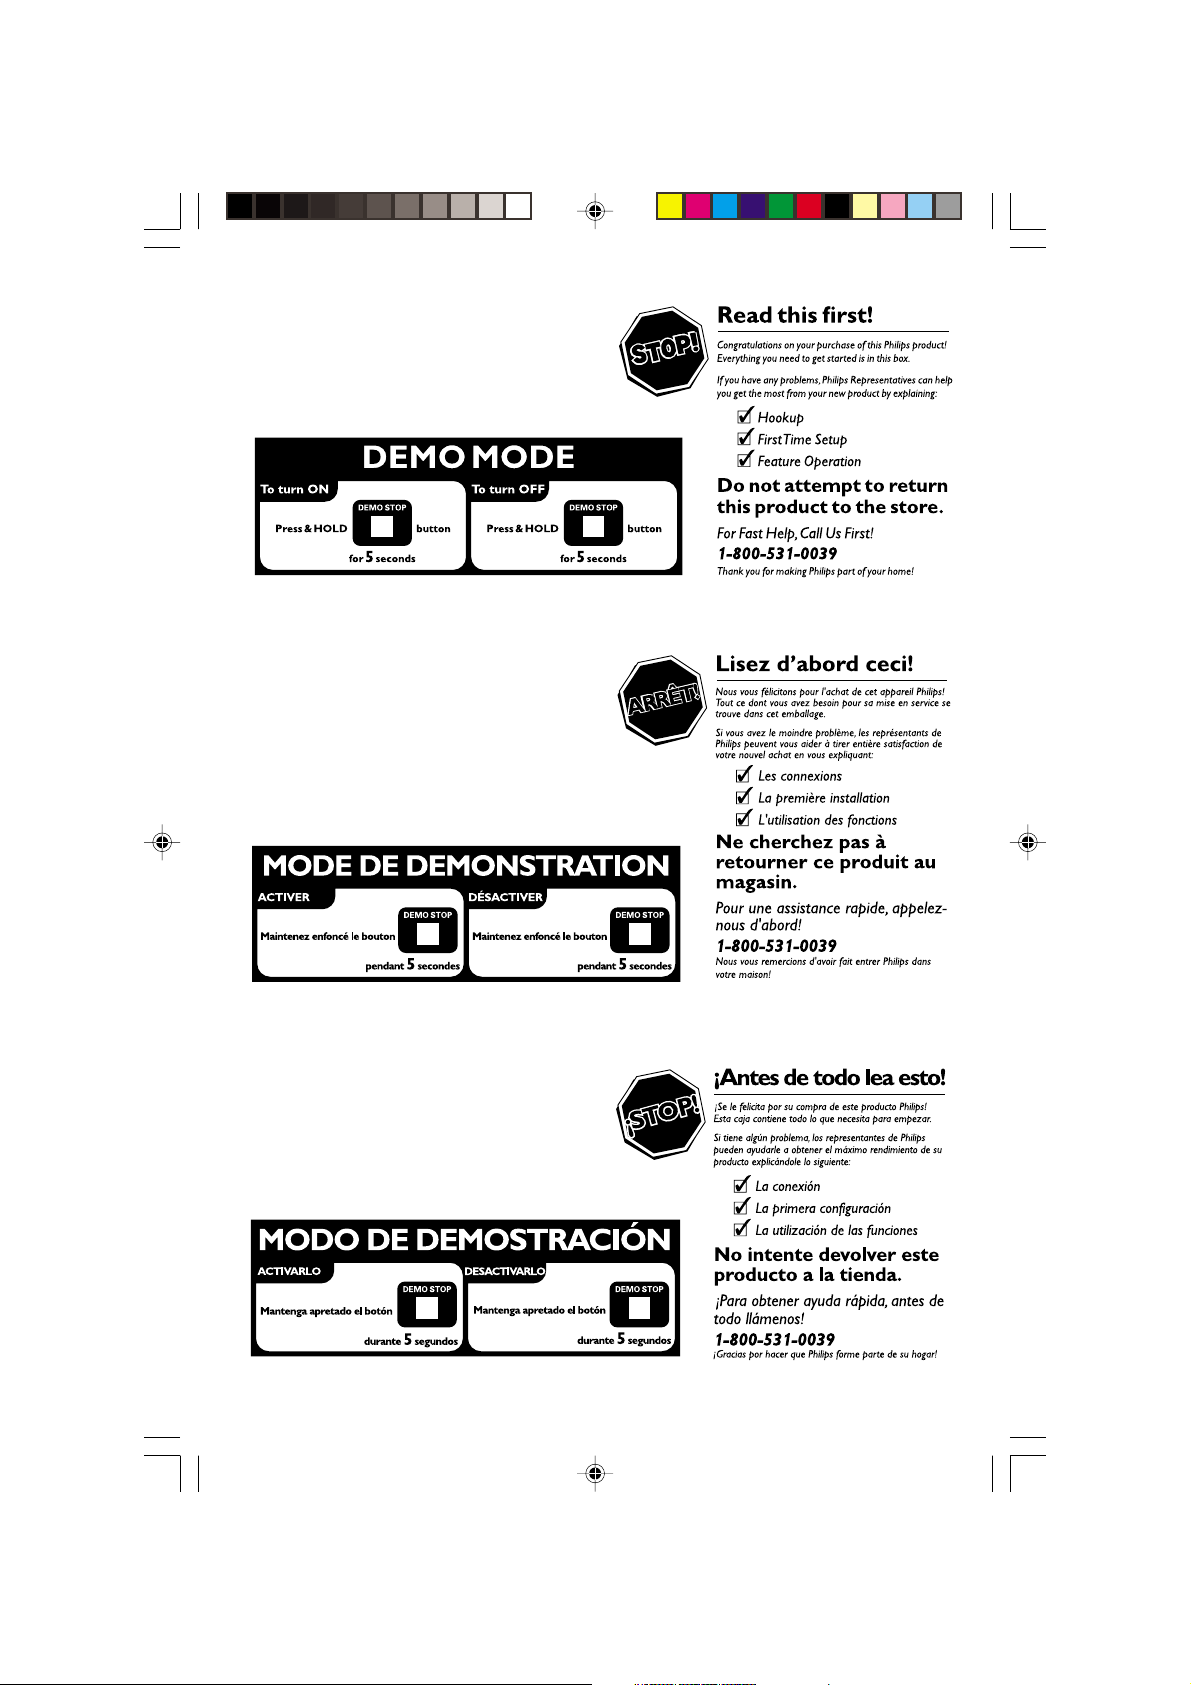
The system has a demonstration mode that
shows the various features offered by the system.
To activate the demonstration
● In Standby mode, press and hold DEMO
STOPÇon the system until "DEMO ON" is
displayed.
➜ The demonstration will begin.
To deactivate the demonstration
● Press and hold DEMO STOP Çon the system
until "DEMO OFF" is displayed.
➜ The system will switch to Standby mode.
Notes:
– Even if you remove the AC power cord and
reconnect it to the wall socket, the demonstration
will remain off until you activate it again.
– When the power is turned on, the disc tray may
open and close to initialize the system.
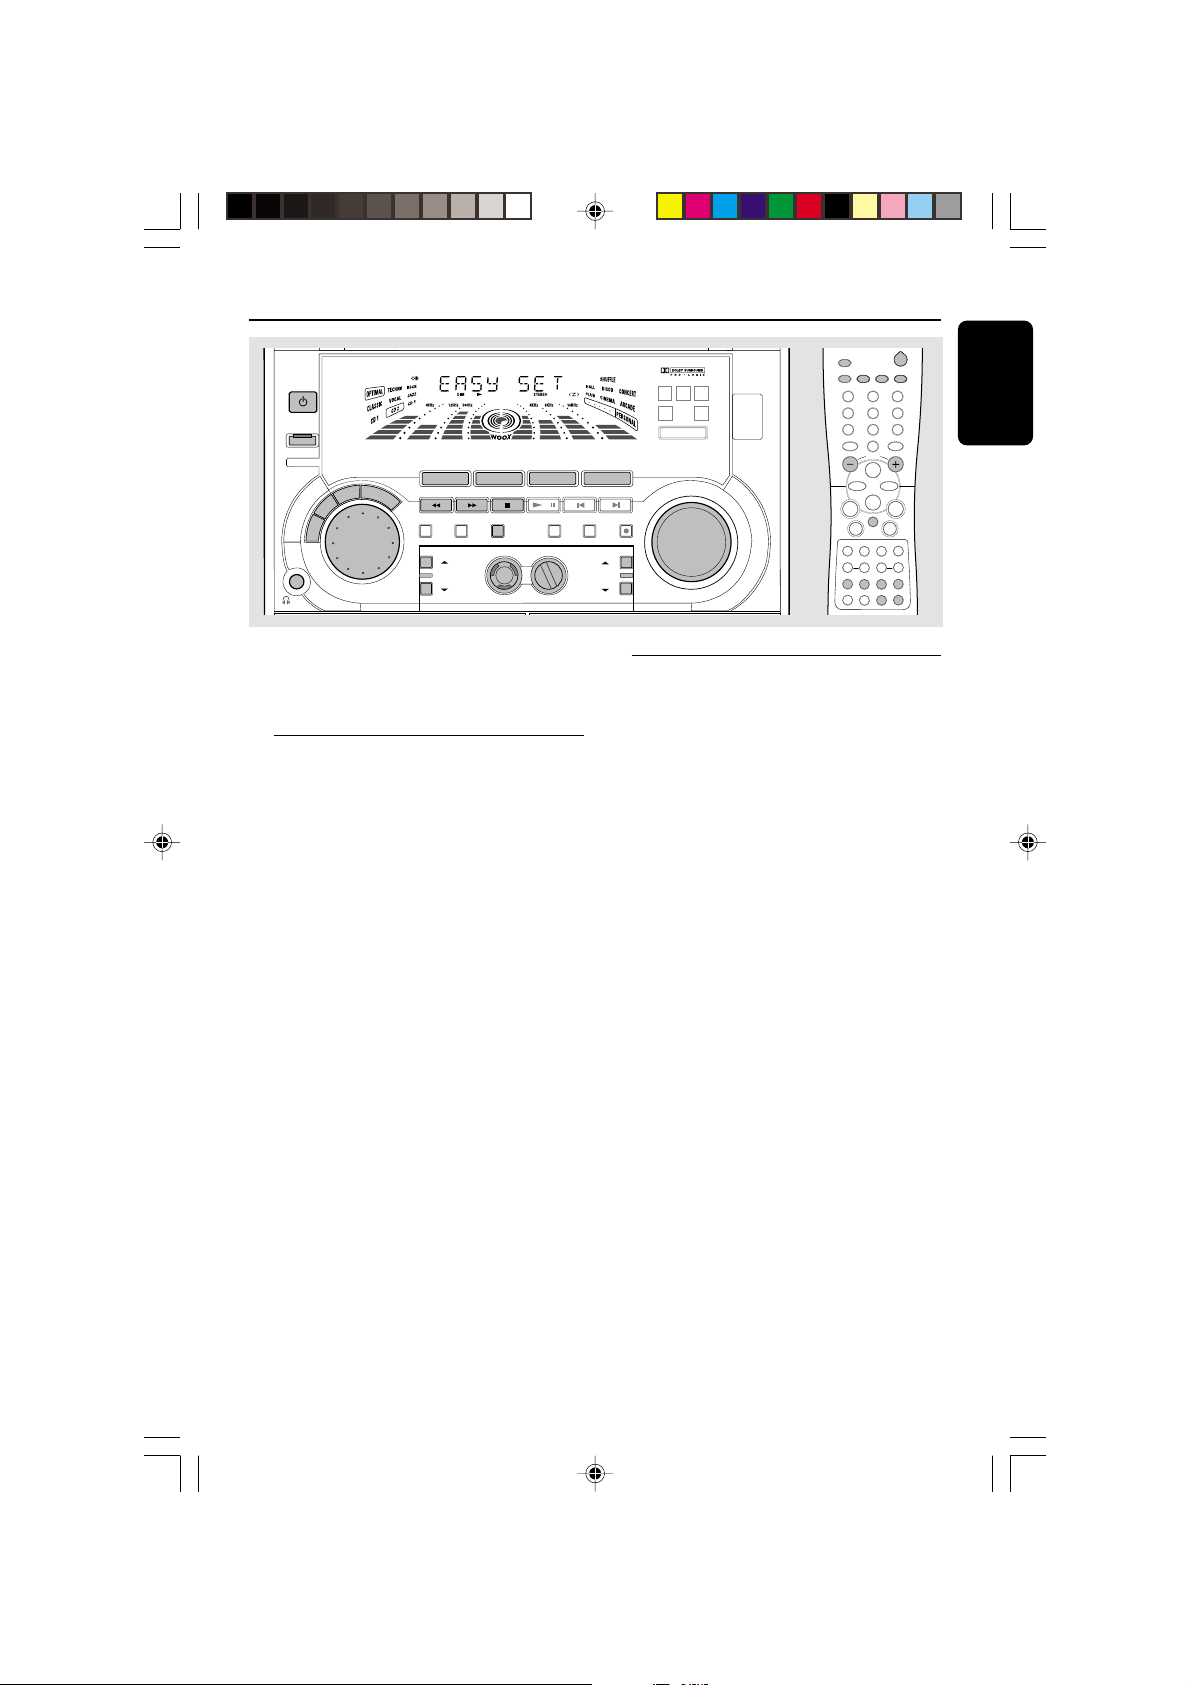
Easy Set
EASY SET allows you to store all available radio
stations automatically.
● In Standby or Demonstration mode, press and
hold STANDBY ON until "EASY SET" is
displayed.
➜ The system will search for all radio stations
on the FM band, then the AM band.
➜ All available radio stations with sufficient signal
strength will be stored automatically.
➜ The system will stop searching when all the
available radio stations are stored or when the
memory for 40 preset radio stations is used.
➜ The last preset radio station will play when
Easy Set completed.
Note:
– When EASY SET is used, all previously stored
radio stations will be replaced.
pg 001-032/P880/37-Eng 12/8/00, 1:54 PM15
15
3139 115 20421
Page 16
Basic Functions
English
Switching the system on
In Standby mode
● Press STANDBY ON or CD/TUNER/
TAPE/AUX on the system.
➜ The system will switch to the last selected
source or the selected source.
● Press any one of the DISC DIRECT PLAY
buttons or OPEN•CLOSE.
➜ The system will switch to CD mode.
In Eco Power Standby mode
● Press CD 123, TUNER, TAPE 1/2 or AUX/
CDR on the remote control.
➜ The system will switch to the selected source.
Switching the system to Standby
mode
In Demonstration mode
● Press and hold DEMO STOP Ç on the
system.
In Eco Power Standby mode
● Press ECO POWER.
In any other source mode
● Press STANDBY ON (or B on the remote
control).
➜ The clock will appear on the display when the
system is in Standby mode.
Power Saving Automatic Standby
As a power-saving feature, the system will
automatically switch to Standby mode if you do
not press any buttons within 30 minutes after a
disc or tape has stopped playing.
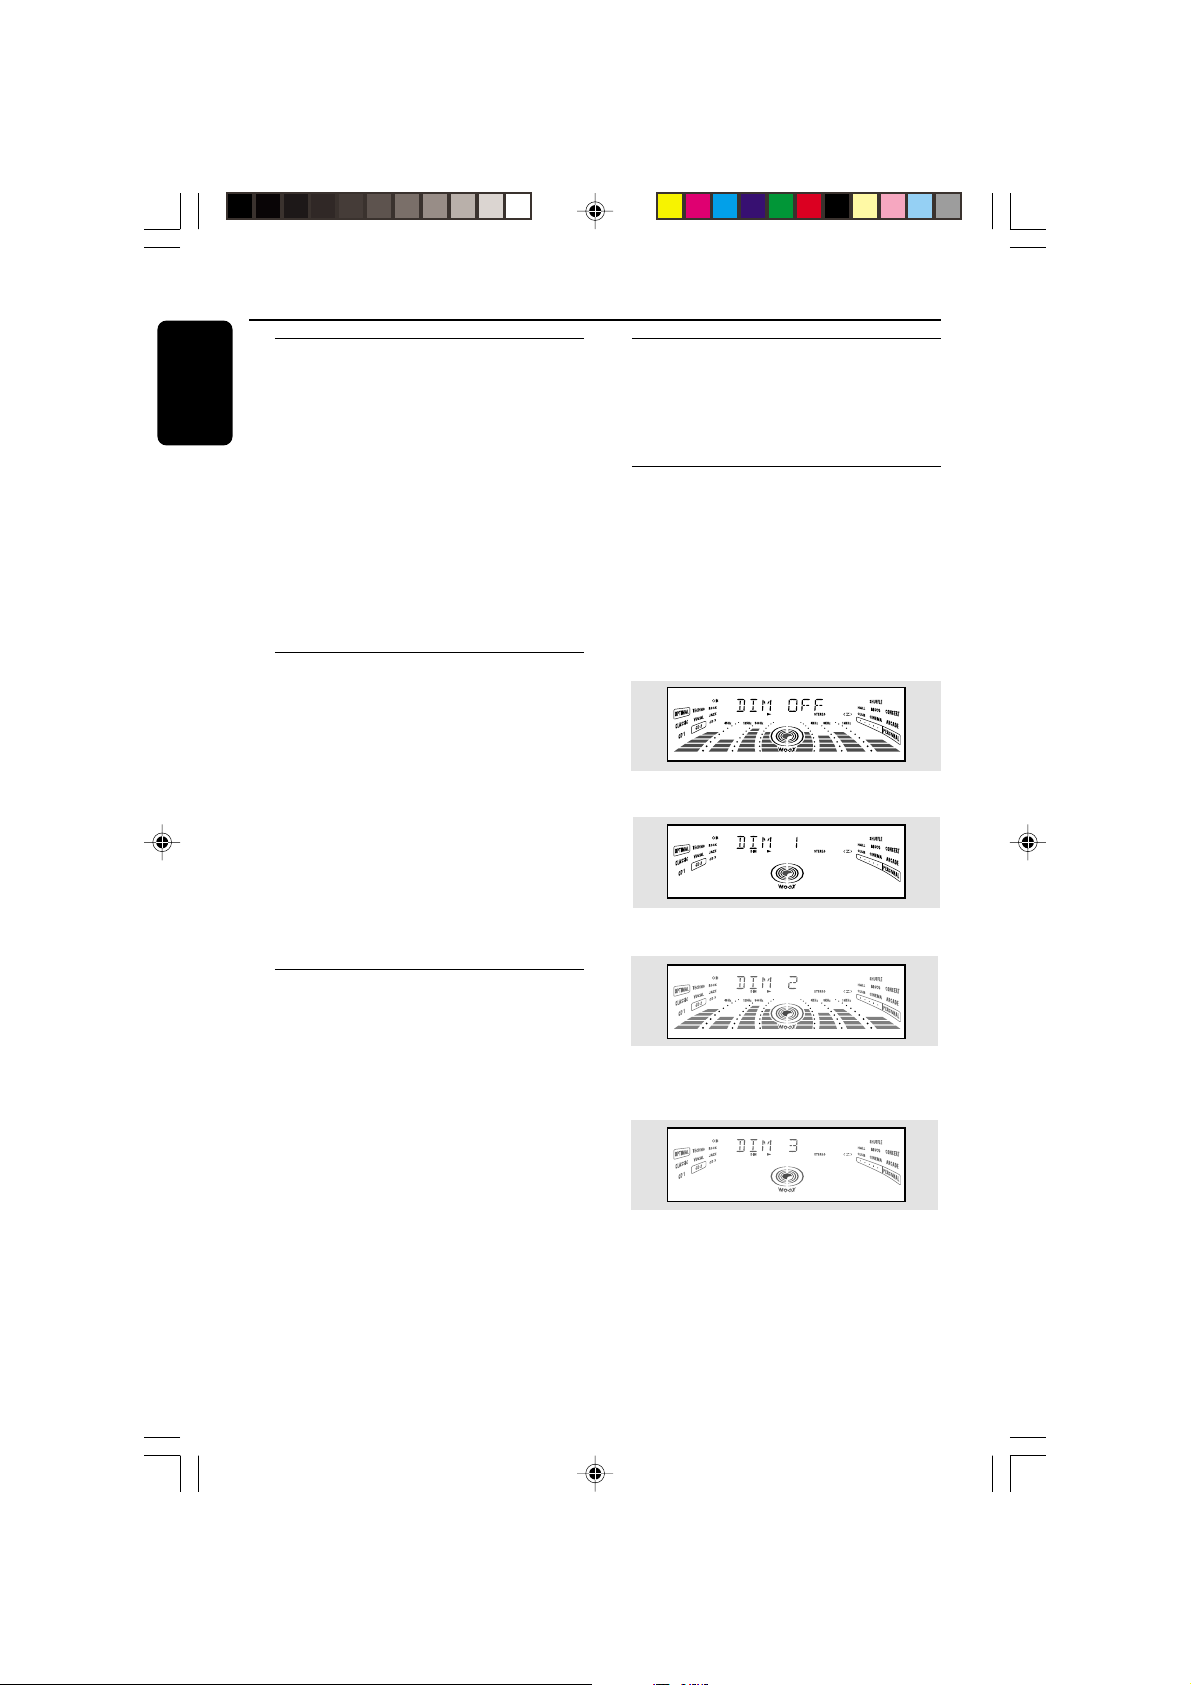
Dim mode
You can select the desired brightness for the
display.
● Press DIM repeatedly to select DIM 1, DIM 2,
DIM 3 or DIM OFF.
➜ DIM appears on the display, except for DIM
OFF mode.
DIM OFF - normal brightness with
Spectrum Analyzer On
DIM 1 - normal brightness with Spectrum
Analyzer Off
DIM 2 - half brightness with Spectrum
Analyzer On
Switching the system to Eco
Power Standby mode
● Press ECO POWER (or press and hold B on
the remote control).
➜ "LOW POWER STANDBY ON" will be
displayed, then the display screen will go blank.
➜ The low power STANDBY ON LED will be
lighted.
Note:
– If you have not deactivated the demonstration, it
will resume five seconds after the system switches
to Eco Power Standby or Standby mode.
16
pg 001-032/P880/37-Eng 12/8/00, 1:54 PM16
DIM 3 - half brightness with Spectrum
Analyzer Off and all LEDs on the system
will be switched off.
3139 115 20421
Page 17
Basic Functions
Volume Control
Adjust VOLUME to increase (turn knob
clockwise or press VOLUME +) or decrease
(turn knob counter-clockwise or press
VOLUME -) the sound level.
To listen through the headphones
● Connect the headphones plug to the n socket
at the front of the system.
➜ The speakers will be muted.
Interactive Sound Control
For optimal sound listening, select only one
of the following interactive sound controls
at a time : PERSONAL, DSC, VEC or BASS/
TREBLE.
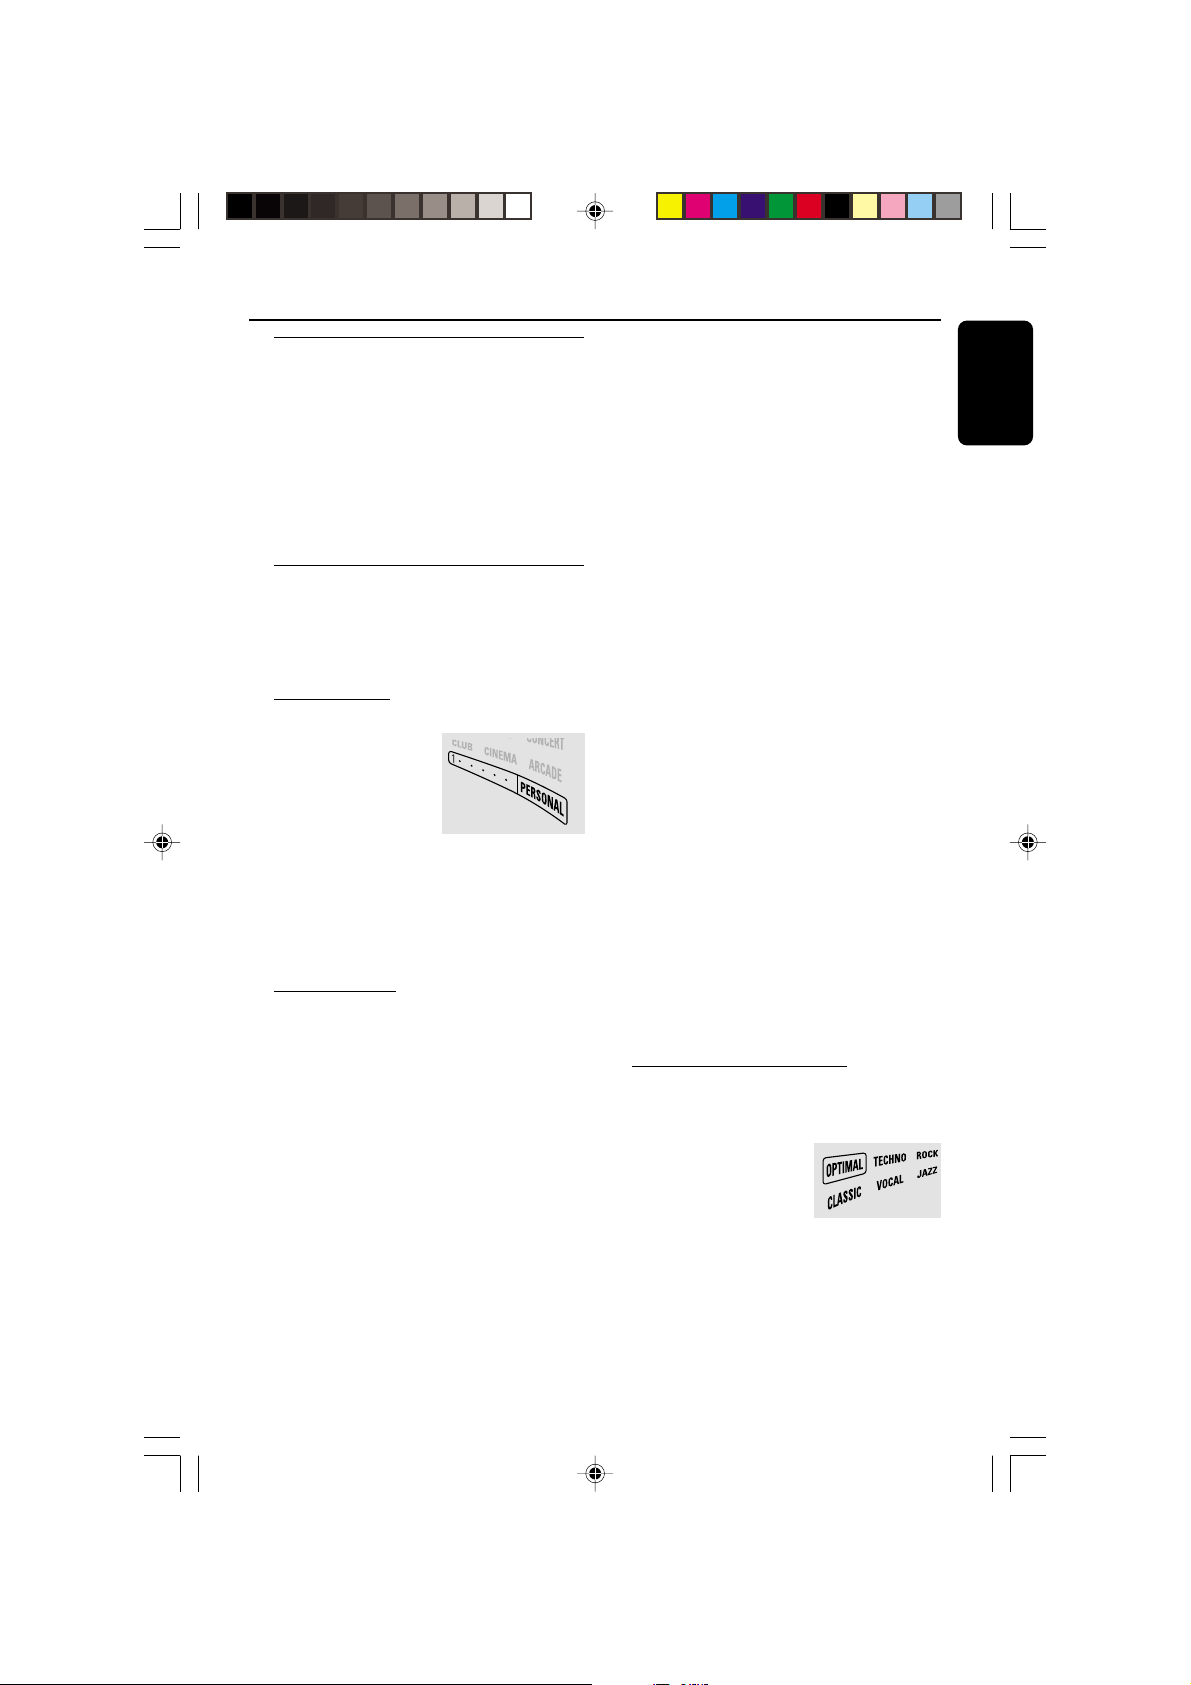
Personal Sound
1 Press PERSONAL.
2 Adjust the JOG
CONTROL (or press
PER. on the remote
control repeatedly) to
select the desired
Personal setting.
➜ The selected Personal setting number will
appear on the display.
➜ If no name has been stored previously,
“PERSONAL X" will be displayed. "X" is the
setting number.
Personal Setting
You can use the JOG CONTROL to adjust the
Personal setting to your desired level. Up to six
Personal settings can be stored.
1 Press and hold PERSONAL on the system
until "SELECT PRESET NUMBER" is displayed.
2 Adjust the JOG CONTROL to select the
desired Personal setting number and press á
on the system to confirm the selection.
➜ "ADAPT LOW FREQ LEVEL" will be
displayed.
3 Adjust the JOG CONTROL to select the
desired Spectrum Analyzer band level for low
frequency.
➜ The level will increase or decrease
between+3 and -3.
4 Press á to confirm the selection.
➜ "ADAPT MID FREQ LEVEL" will be
displayed, followed by "ADAPT HIGH FREQ
LEVEL".
● Repeat steps 3–4 to select the desired middle
and high frequency Spectrum Analyzer band
levels.
5 You can edit the name for the personal setting.
➜ The first character of the setting name will be
flashing.
6 Adjust the JOG CONTROL to select the
desired letter, number or symbol.
➜ "A to Z", "0 to 9" or "*, -, +, \, /, _".
7 Press á to confirm the selection.
➜ The next character for editing will be flashing.
● Repeat steps 6–7 to store up to 10 characters.
8 To store the setting, press PERSONAL on the
system again.
To change any previous setting before
storing
● Press à on the system to retrace the steps in
reverse order and make the changes accordingly.
To exit without storing the setting
● Press Çon the system.
Notes:
– During personal setting, if no button is pressed
within 90 seconds, the system will exit the Personal
setting mode automatically.
– The wOOx level cannot be stored as part of the
Personal setting.
– When making a Personal setting, it is not
possible to adjust the Bass/Treble level, "USE
JOG" will be displayed.
Digital Sound Control (DSC)
The DSC feature enables you to adjust the
system to suit your type of music.
1 Press DSC.
2 Adjust the JOG
CONTROL (or press
DSC on the remote control
repeatedly) to select the desired Digital Sound
Control effect : OPTIMAL, CLASSIC, TECHNO,
VOCAL, ROCK or JAZZ.
➜ The selected DSC will be encircled.
Note:
– For a neutral sound effect, select CLASSIC.
English
pg 001-032/P880/37-Eng 12/8/00, 1:54 PM17
17
3139 115 20421
Page 18
Basic Functions
English
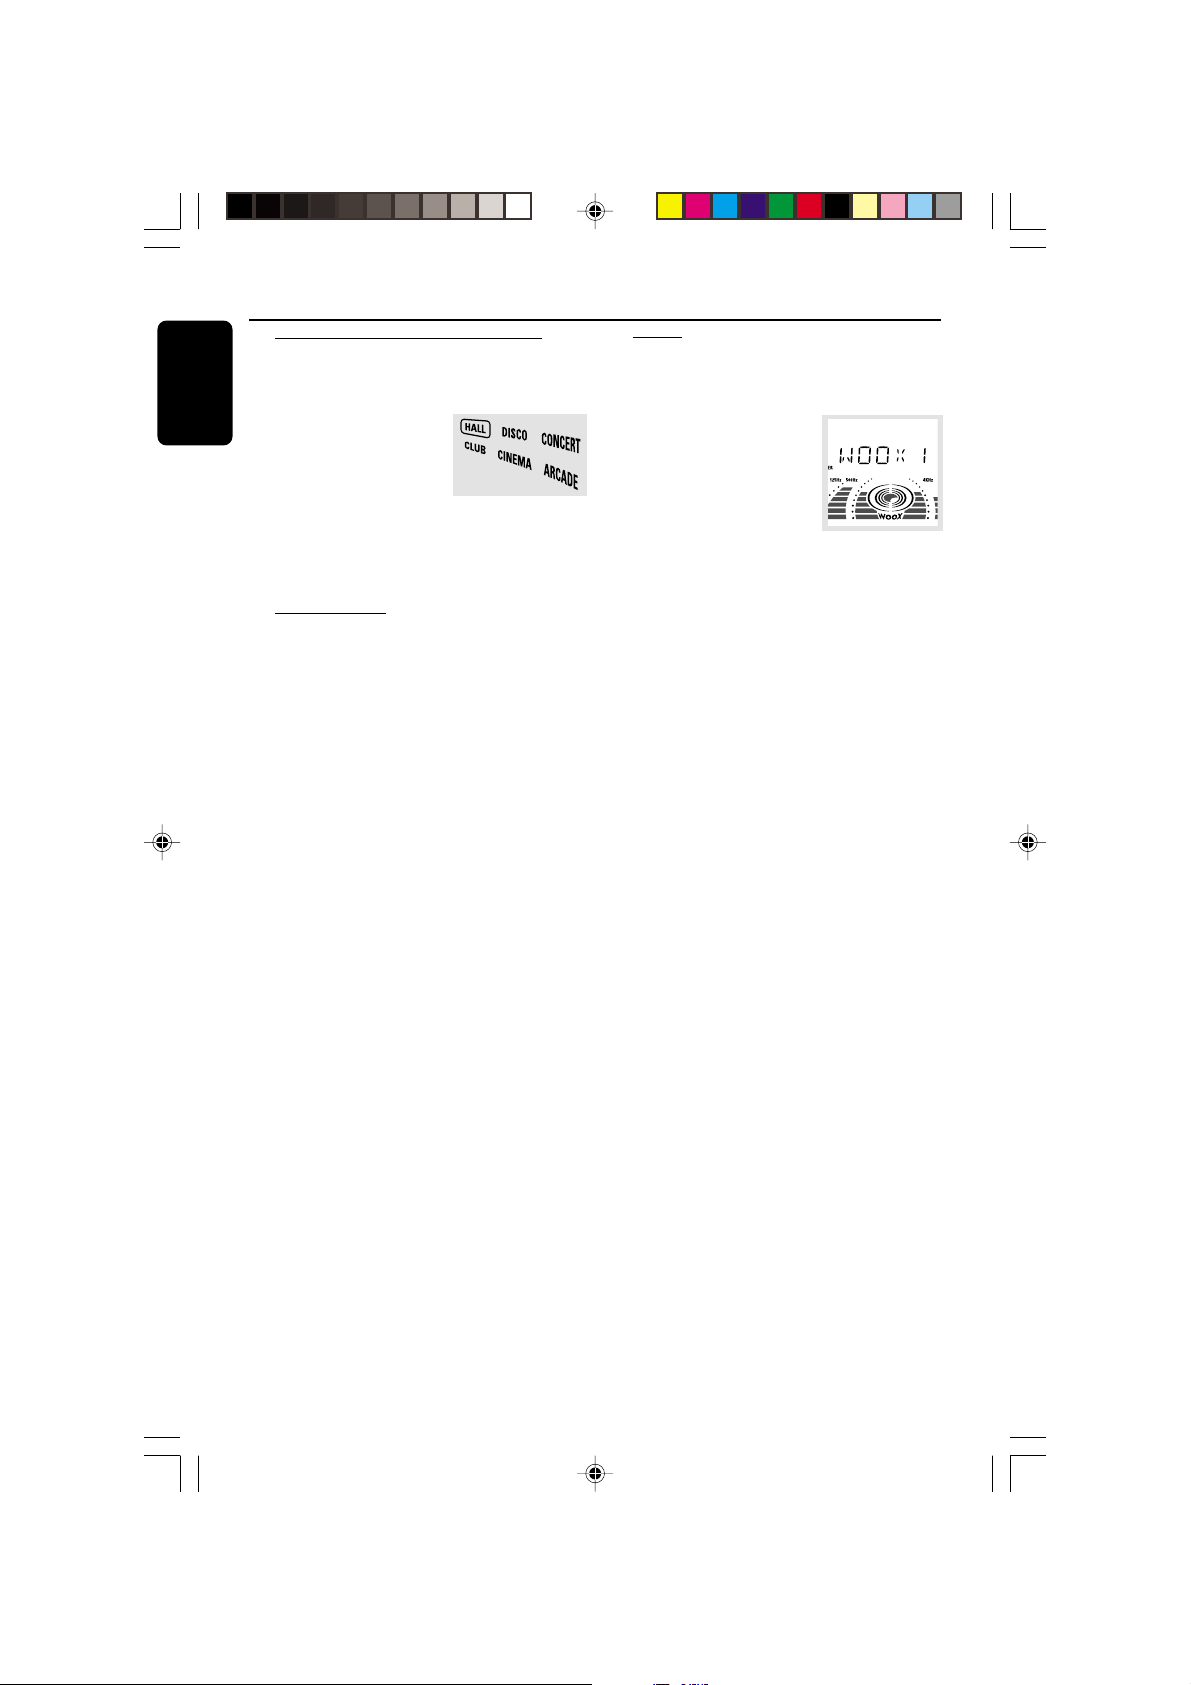
Virtual Environment Control (VEC)
The VEC feature enables you to adjust the
system to select a type of environment.
1 Press VEC.
2 Adjust the JOG
CONTROL (or press
VEC on the remote
control repeatedly) to
select the desired Vir tual Environment Control
effect : HALL, CLUB, DISCO, CINEMA,
CONCERT or ARCADE.
➜ The selected VEC will be encircled.
BASS/TREBLE
The BASS/TREBLE feature enables you to define
the sound-processor settings for Bass and Treble.
1 Press BASS/TREBLE (BTC).
➜ The BASS and TREBLE LEDs will be lighted.
➜ "ADAPT BASS AND TREBLE LEVELS"
will be displayed.
2 Use the BASS/TREBLE controls to select the
desired BASS or TREBLE levels respectively.
➜ The BASS/TREBLE level will increase or
decrease between level +3 and -3.
● Press BASS # or $ repeatedly to select the
low tone level.
➜ "BASS -X" or "BASS +X" will be displayed.
● Press TREBLE # or $ repeatedly to select the
high tone level.
➜ "TREBLE -X" or "TREBLE +X" will be
displayed.
Note:
– "X" denotes the sound level.
wOOx
There are three wOOx settings to enhance the
bass response.
1 Press wOOx ON•OFF (or
wOOx on the remote
control) to switch ON
(enhanced) or OFF (normal)
the wOOx sound effect.
● When wOOx is switched on;
➜ The
● When wOOx is switched off;
WOOX will appear on the display.
➜ The display will show "WOOX NORM" and
WOOX will disappear from the display.
2 When wOOx is switched on, adjust wOOx
LEVEL to select the desired wOOx settings:
WOOX 1, WOOX 2 or WOOX 3.
Notes:
– When Personal or Bass/Treble sound control is
selected, wOOx will be switched off automatically.
– Some discs or tapes might be recorded in high
modulation, which causes a distortion at high
volume. If this occurs, deactivate wOOx or reduce
the volume.
Automatic DSC-wOOx / VEC-wOOx
selection
The best wOOx setting is generated
automatically for each DSC or VEC selection.
You can manually select the wOOx setting that
best suits your listening environment.
18
pg 001-032/P880/37-Eng 12/8/00, 1:54 PM18
3139 115 20421
Page 19
CD Operation
3
CD CHANGER
CLOCK.TIMER
VOLUME
DEMO
PRESET TUNING
SHUFFLE
TIMER
PLAY
MODE
SIDE
SET CLOCK
TIMER SET
BAND
RECORD
DUBBING
CD TAPE
PROGRAM
CLEAR
RDS
MODE
1
2
3
TIMER
DBB
PROGRAM
AMPM
SHUFFLE
FMMW
LWSW
STEREO
NR
FRONT
BACK
RECORD
HSD
2
2
1
DISC CHANGE
DISC 1 DISC 2 DISC 3
OPEN•CLOSE
1
STANDBY-ON
ECO POWER
IR SENSOR
DISC CHANGE
MINI HIFI SYSTEM
B
A
S
S
C
E
/
T
V
R
C
S
D
L
A
N
O
S
R
E
P
JOG CONTROL
DISC 1 DISC 2 DISC 3
CD 1•2•3
CD
SEARCH•TUNING
E
B
L
E
CLOCK/
PROG
TIMER
ON•OFF
BASS
FM•AM
BANDC1 • 2 • 3
TUNER
DEMO STOP
PLAY PAUSE
STOP•CLEAR
DIM
REVERSE
wOOx
DYNAMIC AMPLIFICATION CONTROL
TAPE 1•2
AUTO
TAPE
LEVEL
IMPORTANT!
– This system is designed for regular discs.
Therefore, do not use any accessories such
as disc stabilizer rings or disc treatment
sheets, etc., as offered on the market,
because they may jam the changer
mechanism.
– Do not load more than one disc into
each tray.
PREV NEXTSIDE
DUB
(HSD)
CDR/DVD
AUX
▲
PRESET
TREBLE
CDR
RECORD
▲
OPEN•CLOSE
3
LEFT CENTER RIGHT
LEFT CENTER RIGHT
SURR
SURR
DC
CHANGER
PRO LOGIC
PRO LOGIC
O
V
SURR
SURR
U
M
L
E
TV/AV
CD 123
TV VOL
TIMER ON/OFFSLEEP
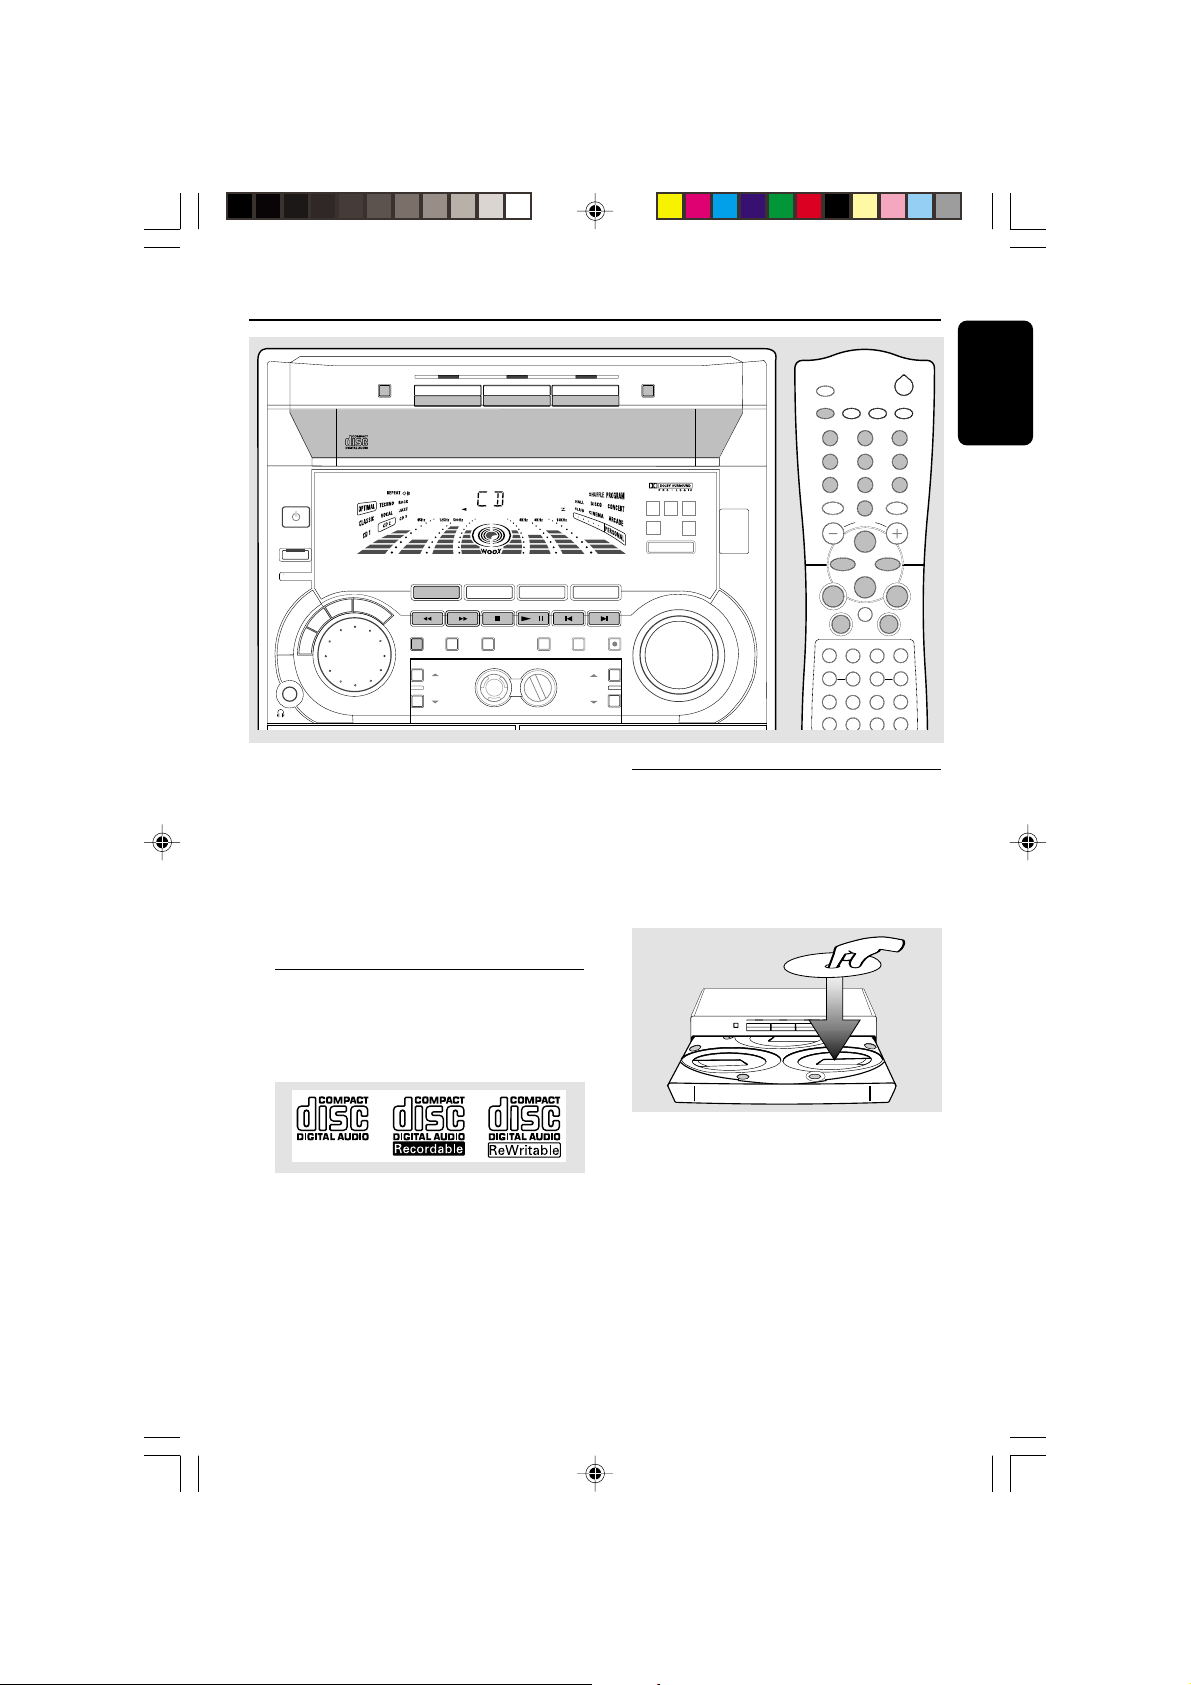
Loading Discs
1 Press CD to select CD mode.
2 Press OPEN•CLOSE to open the disc tray.
3 Load up to two discs on the individual disc trays.
To load the third disc, press DISC CHANGE.
➜ The disc tray will rotate until the empty tray
is ready for loading.
TUNER
1
4
7
í
à
REPEAT
DPL TEST TONE
CENTER
+
-
DSC
PER
VOLUME
Ç
2
5
8
0
ÅÉ
DIM
TAPE 1/2
VEC
WOOX
BALANCE
L
-
AUX/CDR
AUTO REV.CLOCK
ë
á
SHUFFLE
REAR
WOOX LEVEL
2
English
3
6
9
TV VOL
R
+
BTC
Discs for Playback
This system can playback all digital audio CD,
finalized digital audio CD-Recordable (CDR)
discs and finalized digital audio CD-Rewritable
(CDRW)discs.
pg 001-032/P880/37-Eng 12/8/00, 1:54 PM19
4 Press OPEN•CLOSE to close the disc tray.
➜ "READING" will be displayed. The selected
disc, total number of tracks and the playing time
will appear on the display.
➜ A lighted button indicates that a disc is loaded
on the disc tray.
Notes:
– Load the discs with the label side facing up.
– To ensure good system performance, wait until
the disc tray completely reads the disc(s) before
proceeding.
19
3139 115 20421
Page 20
CD Operation
English
Disc Playback
To playback all discs on the disc tray
● Press PLAYÉÅ.
➜ All the available discs will playback once, then
stop.
➜ During playback, the selected disc tray, track
number and elapsed playing time of the current
track will appear on the display.
To playback one disc only
● Press the DISC DIRECT PLAY button : DISC 1,
DISC 2 or DISC 3.
➜ The selected disc will playback once, then
stop.
To interrupt playback
● Press PAUSEÉÅ.
● To resume playback, press PLAYÉÅ again.
To stop playback
● Press Ç.
To search for a particular passage during
playback
● Press and hold à or á and release it when
the desired passage is located.
➜ During searching, the volume will be reduced.
To select a desired track
● Press í or ë repeatedly (or Digits 0–9 on
the remote control) until the desired track
appears on the display.
● If playback is stopped, press PLAYÉÅ to start
playback.
Note:
– In Shuffle mode, pressingí will cause the
player to skip only to the beginning of the current
track.
To skip to the beginning of the current
track during playback
● Press í once.
Replace discs during playback
1 Press DISC CHANGE.
2 To change the inner disc, press DISC
CHANGE again.
➜ "DISC CHANGE" will be displayed and the
disc will stop playing.
➜ The disc tray will close to retrieve the inner
disc, then reopen with the inner disc accessible.
Programming the disc tracks
Programming tracks is possible when playback is
stopped. Up to 40 tracks can be stored in the
memory in any order.
1 Load the desired discs on the disc tray (refer to
“Loading Discs”).
2 Press PROG to start programming.
➜ PROGRAM will start flashing.
3 Press CD (CD 1•2•3) or DISC 1/2/3 button
to select a disc.
4 Press í or ë (or Digits 0–9 on the remote
control) to select the desired track.
5 Press PROG to store the track.
● Repeat steps 3–5 to store other discs and
tracks.
6 Press PLAYÉÅ to start program playback.
➜ "PLAY PROGRAM" will be displayed.
● To end programming without starting playback,
pressÇ once .
➜ The total number of tracks programmed and
the total playing time will appear on the display.
Notes:
– If the total playing time is more than "99:59"
or if one of the programmed tracks has a number
greater than 30, then "--:--" will appear on the
display instead of the total playing time.
– If you attempt to program more than 40 tracks,
"PROGRAM FULL" will be displayed.
– If you press any of the DISC DIRECT PLAY
buttons, the system will playback the selected disc
or track, and the stored program will be ignored
temporarily. The PROGRAM symbol also will
disappear temporarily from the display. It will
reappear when playback of the selected disc ends.
– During programming, if no button is pressed
within 20 seconds, the system will exit the Program
mode automatically.
20
pg 001-032/P880/37-Eng 12/8/00, 1:54 PM20
3139 115 20421
Page 21
CD Operation
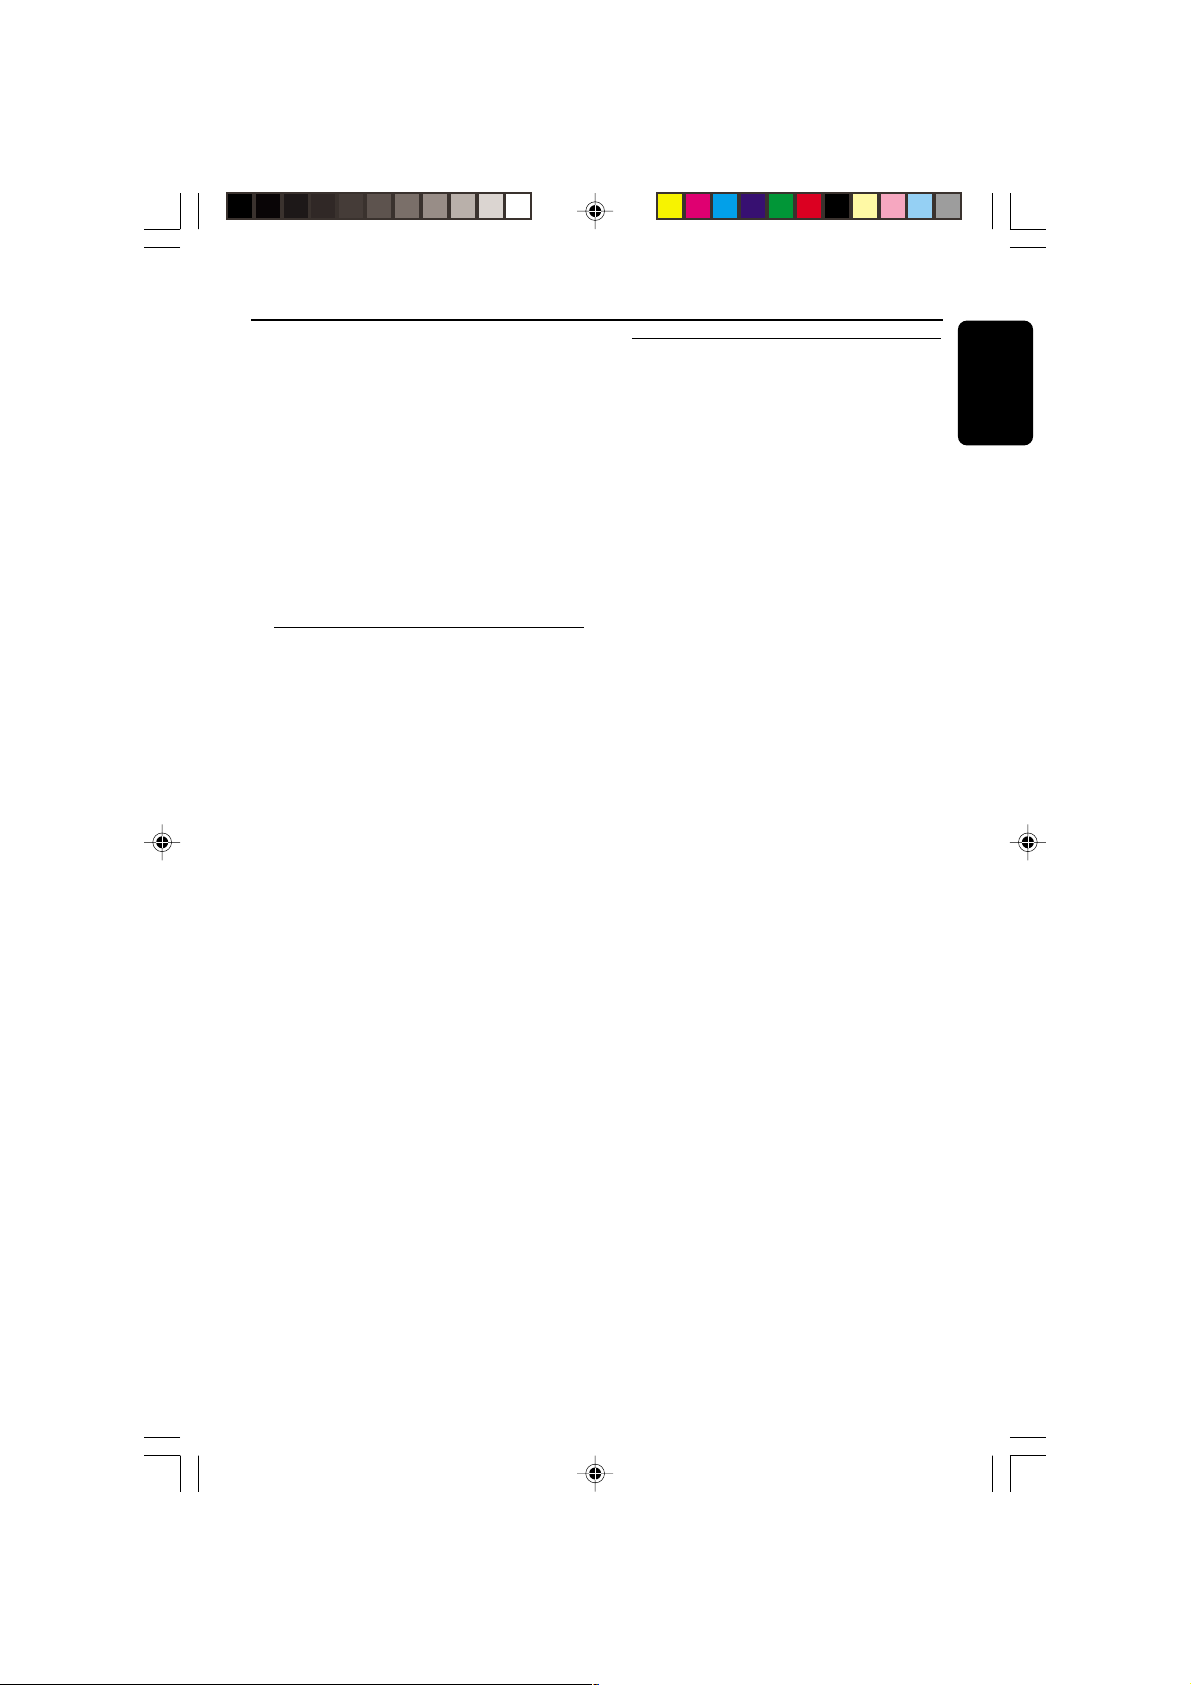
To review the program
● Stop playback and press í or ë repeatedly.
● To exit review mode, press Ç.
To erase the entire program
● Press Ç once when playback is stopped or
twice during playback.
➜ "PROGRAM CLEARED" will be displayed.
➜ PROGRAM will disappear from the display.
Note:
– The program will be erased when the system is
disconnected from the power supply or when the
disc tray is opened.
Repeat
The current track, a disc, all available discs or all
programmed tracks can be played repeatedly.
1 Press REPEAT on the remote control
repeatedly to select various repeat modes.
● In normal playback
➜ "TRACK" – to repeat the current track.
"DISC" – to repeat the entire disc.
"ALL DISC" – to repeat all available discs.
➜ REPEAT appears on the display.
● In program playback
➜ "TRACK" – to repeat the current
programmed track.
"PROGRAM" – to repeat all programmed
tracks.
➜ REPEAT and PROGRAM will appear on the
display.
● The selected track/disc(s)/program will now be
played repeatedly until you press Ç.
2 To resume normal playback, press REPEAT
until the "OFF" mode is displayed.
➜ REPEAT will disappear from the display.
Note:
– Selecting SHUFFLE during repeat playback will
cancel all repeat modes.
Shuffle
All the available discs and their tracks or all the
programmed tracks can be played in random
order.
1 Press SHUFFLE on the remote control.
➜ "SHUFFLE" and SHUFFLE will appear on the
display.
● The discs and the tracks will be played in
random order until you press Ç.
2 To resume normal playback, press SHUFFLE
again.
➜ SHUFFLE will disappear from the display.
When REPEAT is selected during
shuffling
● In normal shuffled playback
➜ "TRACK" and "ALL DISC" repeat modes are
available for selection.
➜ REPEAT and SHUFFLE will appear on the
display.
● In program shuffled playback
➜ "TRACK" or "PROGRAM" repeat modes are
available for selection.
➜ REPEAT, PROGRAM and SHUFFLE will appear on
the display.
For Recording, please refer to “Tap e
Operation/Recording”.
English
pg 001-032/P880/37-Eng 12/8/00, 1:54 PM21
21
3139 115 20421
Page 22
Radio Reception
English
STANDBY-ON
ECO POWER
IR SENSOR
MINI HIFI SYSTEM
CD 1•2•3
FM•AM
BANDC1 • 2 • 3
CD
B
A
S
S
C
E
/
T
V
R
E
B
L
C
S
D
L
A
N
O
S
R
E
P
E
JOG CONTROL
SEARCH•TUNING
PROG
BASS
CLOCK/
TIMER
TUNER
ON•OFF
Storing Preset Radio Stations
You can store up to 40 preset radio stations in
the memory.
Automatic Preset Programming
● EASY SET setting (refer to “Basic Functions -
EAST SET”).
OR
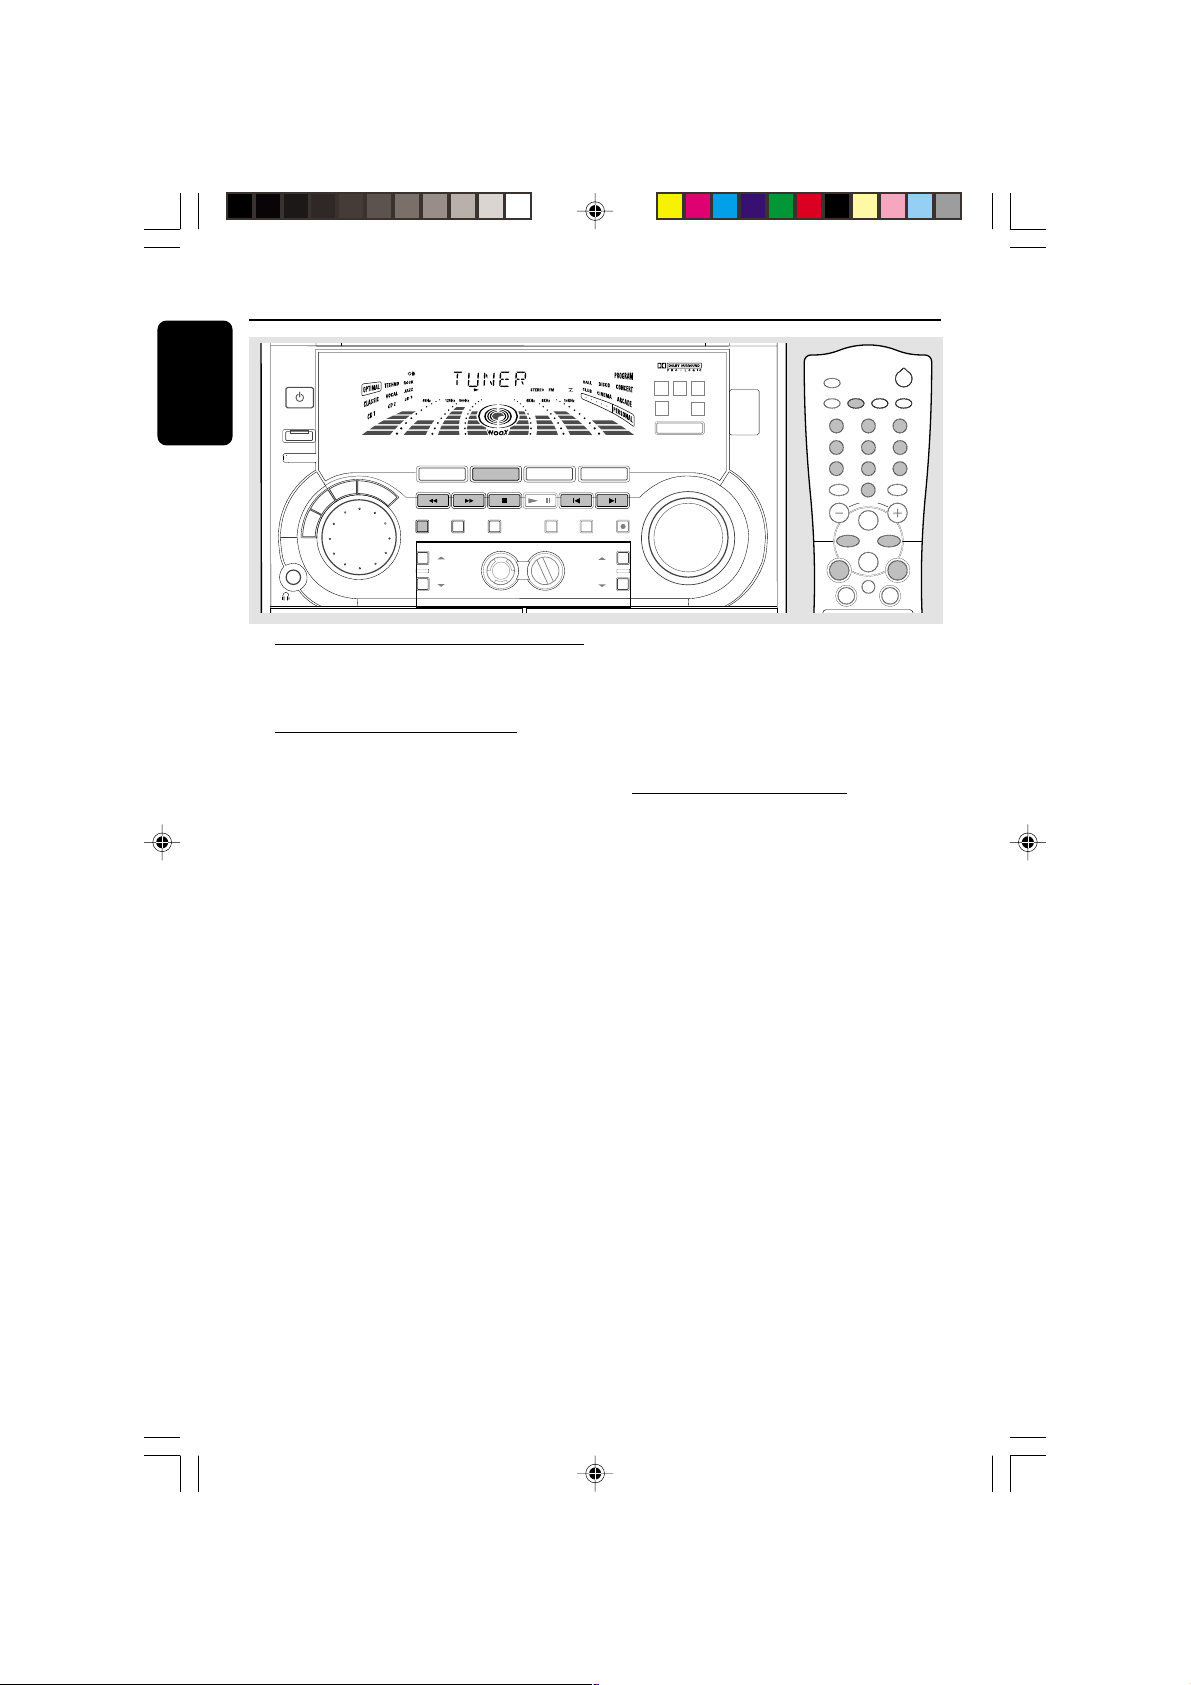
1 Press TUNER (FM•AM) to select TUNER
mode.
➜ "TUNER" will be displayed. A few seconds
later, the current radio frequency will be
displayed.
To begin automatic preset from a desired
preset number
● Press í or ë (or Digits 0–9 on the remote
control) to select the desired preset number.
➜ For those radio stations that had been stored
in one of the preset will not be restored again to
another preset number.
2 Press and hold PROG until "AUTO" appears on
the display.
➜ PROGRAM will start flashing.
➜ The system will start searching for all radio
stations on the FM band and then the AM band.
➜ All available radio stations with sufficient signal
strength will be stored automatically.
➜ The system will stop searching when all the
available radio stations are stored or when the
memory for 40 preset radio stations is used.
➜ The last preset radio station will then be
played when completed.
TAPE 1•2
TAPE
DEMO STOP
PLAY PAUSE
STOP•CLEAR
AUTO
DIM
REVERSE
wOOx
DYNAMIC AMPLIFICATION CONTROL
LEFT CENTER RIGHT
LEFT CENTER RIGHT
SURR
SURR
SURR
SURR
PRO LOGIC
PRO LOGIC
CDR/DVD
CDR
AUX
▲
PRESET
▲
PREV NEXTSIDE
DUB
RECORD
(HSD)
LEVEL
TREBLE
U
M
L
O
E
V
To stop storing the automatic preset
● Press PROG or Ç on the system.
Note:
– If no preset number is selected, automatic preset
will begin from preset (1) and all your former
presets will be overridden.
Manual Preset Programming
1 Press TUNER (FM•AM) repeatedly to select
the desired waveband : FM or AM.
2 Press PROG.
➜ PROGRAM will start flashing.
➜ The next available preset number will be
displayed for selection.
3 Press and hold à or á until the frequency
indication starts to change, then release.
➜ The display will show "SEARCH" until a radio
station with sufficient signal strength is found.
To store the radio station to another
preset number
● Press í or ë (or Digits 0–9 on the remote
control) to select the desired preset number.
4 Press PROG again to store the radio station.
➜ PROGRAM will disappear from the display.
● Repeat steps 2–4 to store other preset radio
stations.
Tuning to a weak radio station
● Press à or á briefly and repeatedly until the
optimal reception is found.
To stop storing the manual preset
● Press Ç on the system.
TV/AV
CD 123
1
4
7
à
2
TAPE 1/2
TUNER
AUX/CDR
3
2
6
5
8
9
AUTO REV.CLOCK
0
VOLUME
ÅÉ
ë
í
TV VOLTV VOL
Ç
á
DIM
REPEAT
SHUFFLE
22
pg 001-032/P880/37-Eng 12/8/00, 1:54 PM22
3139 115 20421
Page 23
Notes:
– If you attempt to store more than 40 preset
radio stations, "PROGRAM FULL" will be
displayed.
– During programming, if no button is pressed
within 20 seconds, the system will exit the Program
mode automatically.
Tuning to Preset Radio Stations
● Press í or ë (or Digits 0–9 on the remote
control) to select the desired preset number.
➜ The preset number, radio frequency, and
waveband will appear on the display.
For Recording, please refer to “Tape
Operation/Recording”.
Radio Reception
English
External Sources
MINI HIFI SYSTEM
CD 1•2•3
FM•AM
TAPE 1•2
TAP E
PREV NEXTSIDE
CDR/DVD
▲
PRESET
BANDC1 • 2 • 3
CD
TUNER
B
A
S
S
C
E
/
T
V
R
E
B
L
E
SEARCH•TUNING
DEMO STOP
STOP•CLEAR
PLAY PAUSE
Listening to External Sources
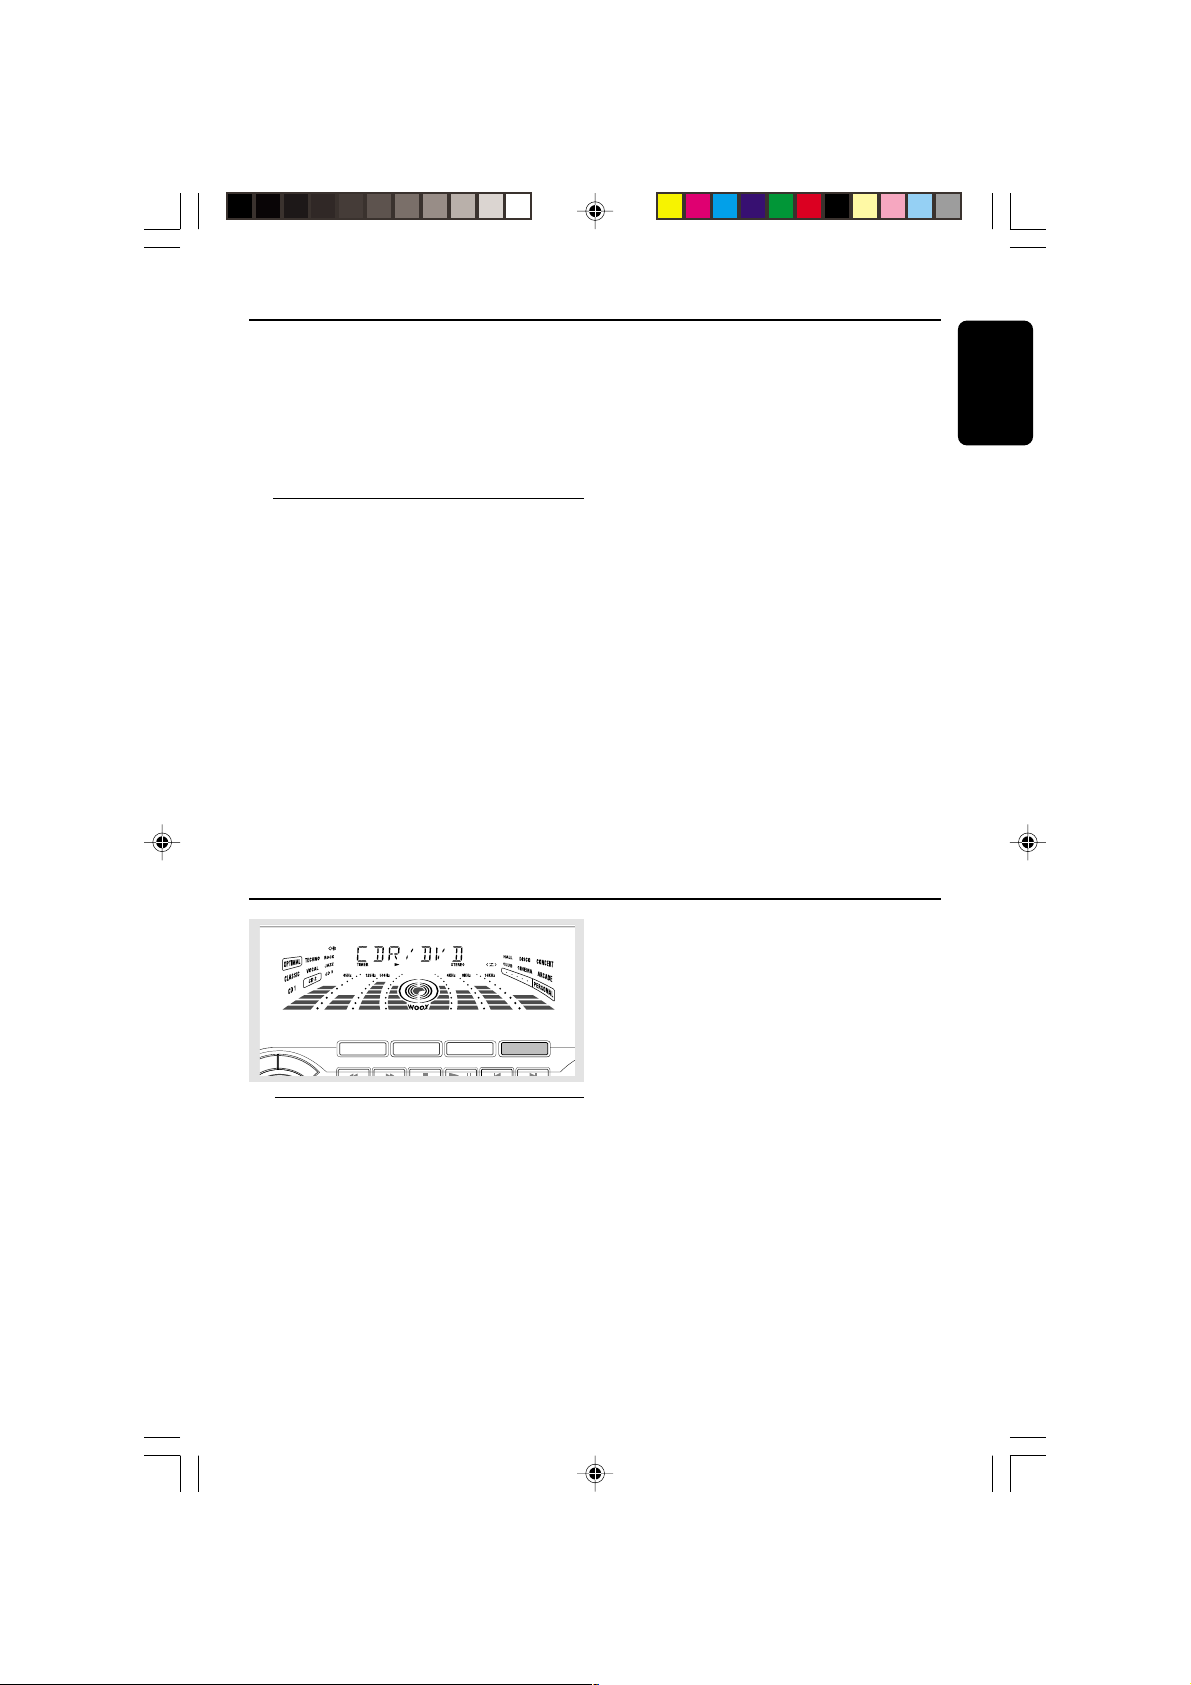
1 Connect the audio out terminals of the external
equipment (TV, VCR, Laser Disc player, DVD
player or CD Recorder) to the AUX/CDR IN
terminals of your system.
2 Press AUX (CDR/DVD) repeatedly to select
CDR/DVD or normal AUX mode.
➜ "CDR/DVD" or "AUX" will be displayed.
● When CDR/DVD mode is selected, any audio
equipment connected to the LINE OUT
terminals of this mini system will be muted. You
will not be able to record or listen to the sound
from the LINE OUT source.
pg 001-032/P880/37-Eng 12/8/00, 1:54 PM23
CDR
AUX
● If the sound from the external source is
distorted, select CDR/DVD mode for listening.
Notes:
– You are advised not to listen to and record from
the same source simultaneously.
– All the interactive sound control features (DSC
▲
or VEC, for example) are available for selection.
– Refer to the operating instructions for the
connected equipment for details.
For Recording, please refer to “Tape
Operation/Recording”.
23
3139 115 20421
Page 24
Tape Operation/Recording
English
MINI HIFI SYSTEM
STANDBY-ON
ECO POWER
IR SENSOR
OPEN
B
C
E
V
C
S
D
L
A
N
O
S
R
E
P
A
S
S
/
T
R
E
B
L
E
JOG CONTROL
CD 1•2•3
CD
SEARCH•TUNING
PROG
BASS
FM•AM
BANDC1 • 2 • 3
TUNER
DEMO STOP
STOP•CLEAR
CLOCK/
TIMER
ON•OFF
DYNAMIC AMPLIFICATION CONTROL
DIM
wOOx
PLAY PAUSE
AUTO
REVERSE
TAPE 1•2
TAPE
LEFT CENTER RIGHT
LEFT CENTER RIGHT
SURR
SURR
SURR
SURR
PRO LOGIC
PRO LOGIC
CDR/DVD
CDR
AUX
▲
PRESET
▲
PREV NEXTSIDE
DUB
RECORD
(HSD)
LEVEL
TREBLE
U
M
L
O
E
V
TV/AV
CD 123
1
4
7
à
OPEN
REPEAT
DPL TEST TONE
CENTER
-
PER
TIMER ON/OFFSLEEP
2
TAPE 1/2
TUNER
AUX/CDR
3
2
6
5
8
9
AUTO REV.CLOCK
0
VOLUME
ÅÉ
ë
í
TV VOLTV VOL
Ç
á
DIM
SHUFFLE
BALANCE
R
L
REAR
+
+
-
BTC
VEC
DSC
WOOX
WOOX LEVEL
IMPORTANT!
– Before playing a tape, check and tighten
slack tape with a pencil. Slack tape may get
jammed or may burst in the mechanism.
– C-120 tape is extremely thin and is easily
deformed or damaged. It is not
recommended for use in this system.
– Store the tapes at room temperature and
do not put them too close to a magnetic
field (for example, a transformer, TV or
speaker).
24
pg 001-032/P880/37-Eng 12/8/00, 1:54 PM24
Tape Playback
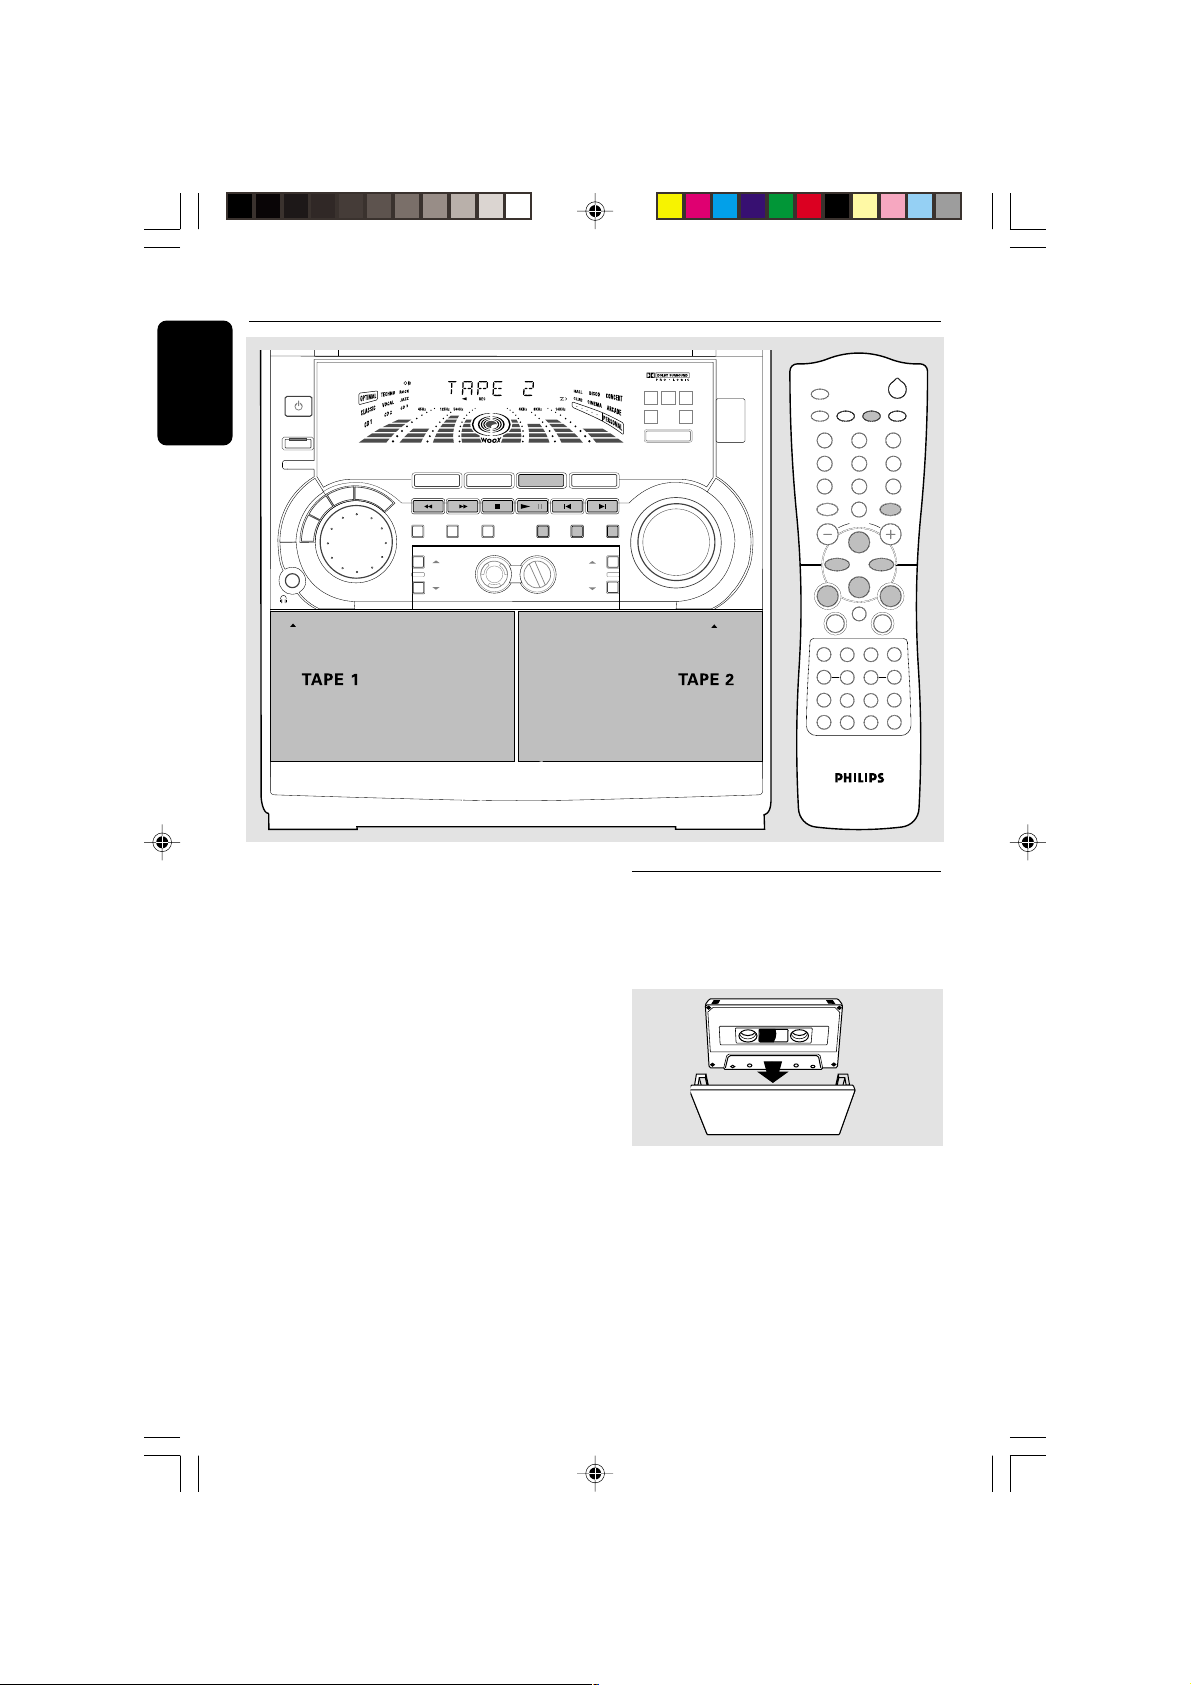
1 Press # OPEN to open the tape deck door.
2 Insert a recorded tape and close the tape door.
● Load the tape with the open side down and the
full spool to the left.
3 Press TAPE (TAPE 1•2) repeatedly to select
tape deck 1 or tape deck 2.
➜ The selected tape deck number is displayed.
4 Press PLAYÉÅ to start playback.
To stop playback
● Press Ç.
3139 115 20421
Page 25
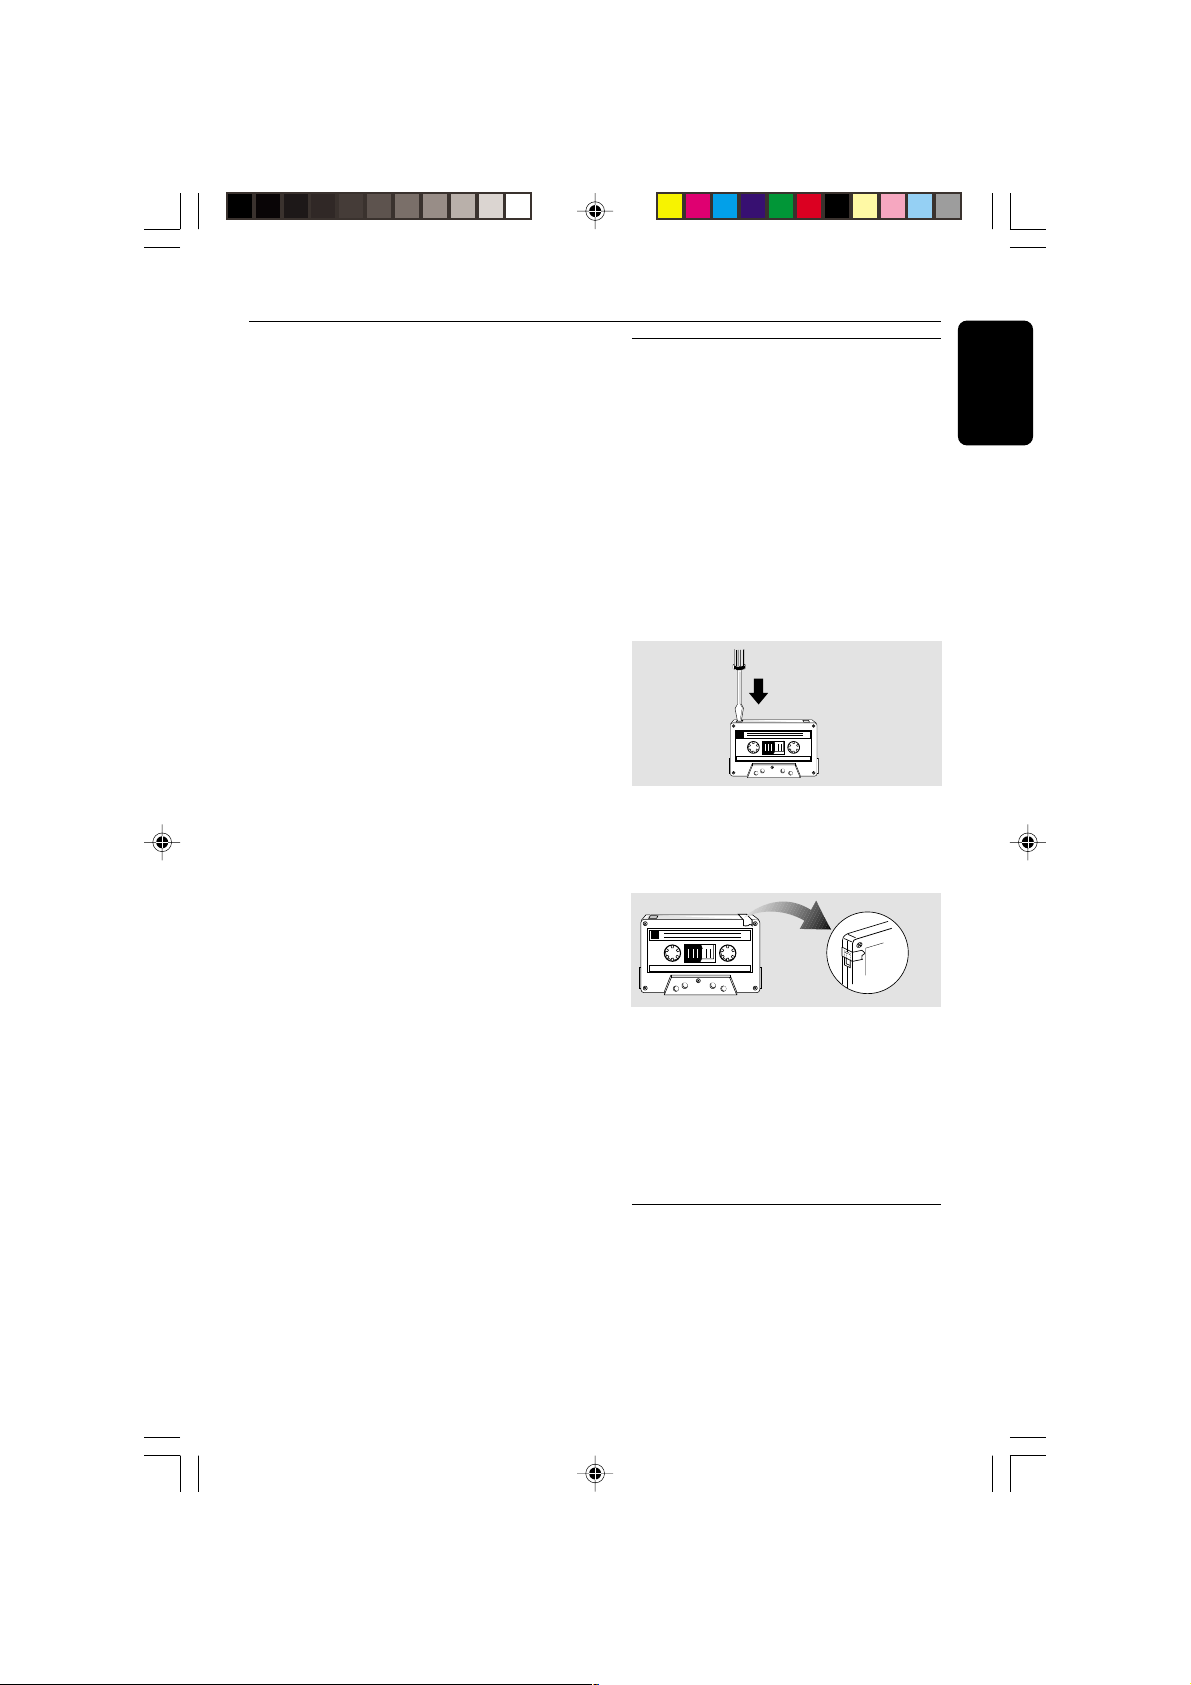
Tape Operation/Recording
To change the playback side on tape
deck 2 only
● Press í or ë.
➜ The A (BACK) or B (FRONT) will appear
on the display, depending on the tape side
selected.
To change the playback mode on tape
deck 2 only
● Press AUTO REVERSE repeatedly to select
the different playback modes.
å : playback on one side of the tape only.
∂ : both sides are played once.
∫ : both sides are played repeatedly, up
to 10 times each side unless you pressÇ.
To rewind or fast forward during
playback
● Press and hold à or á until the desired
passage is reached, then release.
➜ The tape continues playing.
● The tape will stop automatically at the end of the
rewinding or fast forwarding.
➜ During searching, the sound is reduced to a
low volume.
To rewind or fast forward when playback
is stopped
1 Press à or á.
2 Press Ç when you reached the desired passage.
General Information on
Recording
● For recording, use only tape of IEC type I
(normal tape) or IEC type II (Cr02).
● The recording level is set automatically,
regardless of the position of the Volume, VEC,
DSC and so forth.
● The tape is secured at both ends with leader
tape. At the beginning and end of the tape,
nothing will be recorded for six to seven
seconds.
● To prevent accidental recording, break out the
tab on the left shoulder of the tape side you
want to protect.
● If “CHECK TAPE” is displayed, the protection
tab has been broken. Put a piece of clear
adhesive tape over the opening. Do not cover
the Cr02 tape detection hole when covering the
tab opening.
English
Note:
– During rewinding or fast forwarding of a tape, it
is also possible to select another source (CD,
TUNER or AUX, for example).
pg 001-032/P880/37-Eng 12/8/00, 1:54 PM25
IMPORTANT!
– Recording is permissible if copyright or
other rights of third parties are not
infringed upon.
– Recording is possible only on tape deck 2.
– Switch off Dolby Pro Logic when
recording.
Preparation for Recording
1 Press TAPE (TAPE 1•2) to select TAPE 2.
2 Load a recordable tape into tape deck 2.
3 Press í or ë to select the recording tape side.
➜ A appears on the display for the reverse
side.
➜ B appears on the display for the forward
side.
25
3139 115 20421
Page 26
Tape Operation/Recording
English
4 Press AUTO REVERSE repeatedly to select a
recording mode.
➜ å for recording on one side only.
∂ ∂
➜
∂ for recording on both sides.
∂ ∂
5 Prepare the source to be recorded.
CD – load the disc(s).
TUNER – tune to the desired radio station.
TAPE – load the prerecorded tape into tape
deck 1 with the full spool to the left.
AUX – connect external equipment.
When recording is in progress
➜ REC starts flashing.
● It is not possible to change tape side.
● It is not possible to listen to another source
except for dubbing tapes.
● It is not possible to activate the timer function.
One Touch Recording
1 Press CD, TUNER or AUX to select the
source.
2 Start playback of the selected source.
3 Press RECORD to start recording.
To stop recording
● Press Ç.
Note:
– One Touch Recording is not possible in TAPE
mode, "SELECT SOURCE" will be displayed.
CD Synchro Recording
1 Press CD 1•2•3 to select the disc.
● Press í or ë (or Digits 0–9 on the remote
control) to select the desired track to start
recording.
● You can program the tracks in the order you
want them to be recorded (refer to “CD
Operation - Programming the disc tracks”).
2 Press RECORD to start recording.
➜ The disc will start playback automatically.
To stop recording
● Press Ç.
➜ Recording and disc playback will stop
simultaneously.
Dubbing Tapes
1 Load the prerecorded tape in tape deck 1.
● You can set the tape to the desired passage
where recording will start.
2 Press DUB (HSD) once for normal speed
dubbing or twice (within 2 seconds) for high
speed dubbing.
➜ Playing and recording will start simultaneously.
➜ "NORMAL" (normal speed) or "FAST" (high
speed) will be displayed, followed by "DUB" with
an indication on the selected tape side direction.
➜ During high speed dubbing, the volume will
be reduced and HSD will appear on the display.
● Dubbing of tapes is possible on one side of the
tape only. To continue record on the reverse
side, at the end of side A, flip the tapes to side B
and repeat the procedure.
To stop dubbing
● Press Ç.
Notes:
– Only å mode is available during dubbing.
– Dubbing of tapes is possible only from tape
deck 1 to tape deck 2.
– To ensure good dubbing, use tapes of the same
length.
– You can listen to another source while dubbing.
Digital Recording via Digital Out
For CD digital recording, please refer to the
instruction manuals for the CD recorder, digital
audio equipment and so forth.
To select another track during recording
1 Press PAUSEÉÅ to interrupt recording.
2 Pressí or ë (or Digits 0–9 on the remote
control) to select the desired track.
3 Press PLAYÉÅ to resume recording.
26
pg 001-032/P880/37-Eng 12/8/00, 1:54 PM26
3139 115 20421
Page 27
STANDBY-ON
ECO POWER
IR SENSOR
Clock/Timer
TV/AV
MINI HIFI SYSTEM
LEFT CENTER RIGHT
LEFT CENTER RIGHT
SURR
SURR
SURR
SURR
PRO LOGIC
PRO LOGIC
CD 1•2•3
FM•AM
TAPE 1•2
BANDC1 • 2 • 3
CD
TUNER
B
A
S
S
C
E
/
T
V
R
E
B
L
C
S
D
L
A
N
O
S
R
E
P
E
JOG CONTROL
SEARCH•TUNING
PROG
BASS
DEMO STOP
STOP•CLEAR
CLOCK/
TIMER
ON•OFF
DYNAMIC AMPLIFICATION CONTROL
PLAY PAUSE
DIM
REVERSE
wOOx
CDR/DVD
CDR
TAPE
AUX
▲
PRESET
▲
PREV NEXTSIDE
AUTO
DUB
RECORD
(HSD)
LEVEL
TREBLE
U
M
L
O
E
V
TUNER
CD 123
1
4
7
0
VOLUME
í
Ç
à
DIM
REPEAT
DPL TEST TONE
CENTER
+
-
DSC
PER BTC
TIMER ON/OFFSLEEP
2
TAPE 1/2
AUX/CDR
3
2
6
5
8
9
AUTO REV.CLOCK
ÅÉ
ë
TV VOLTV VOL
á
SHUFFLE
BALANCE
R
L
REAR
+
-
BTC
VEC
WOOX
WOOX LEVEL
English
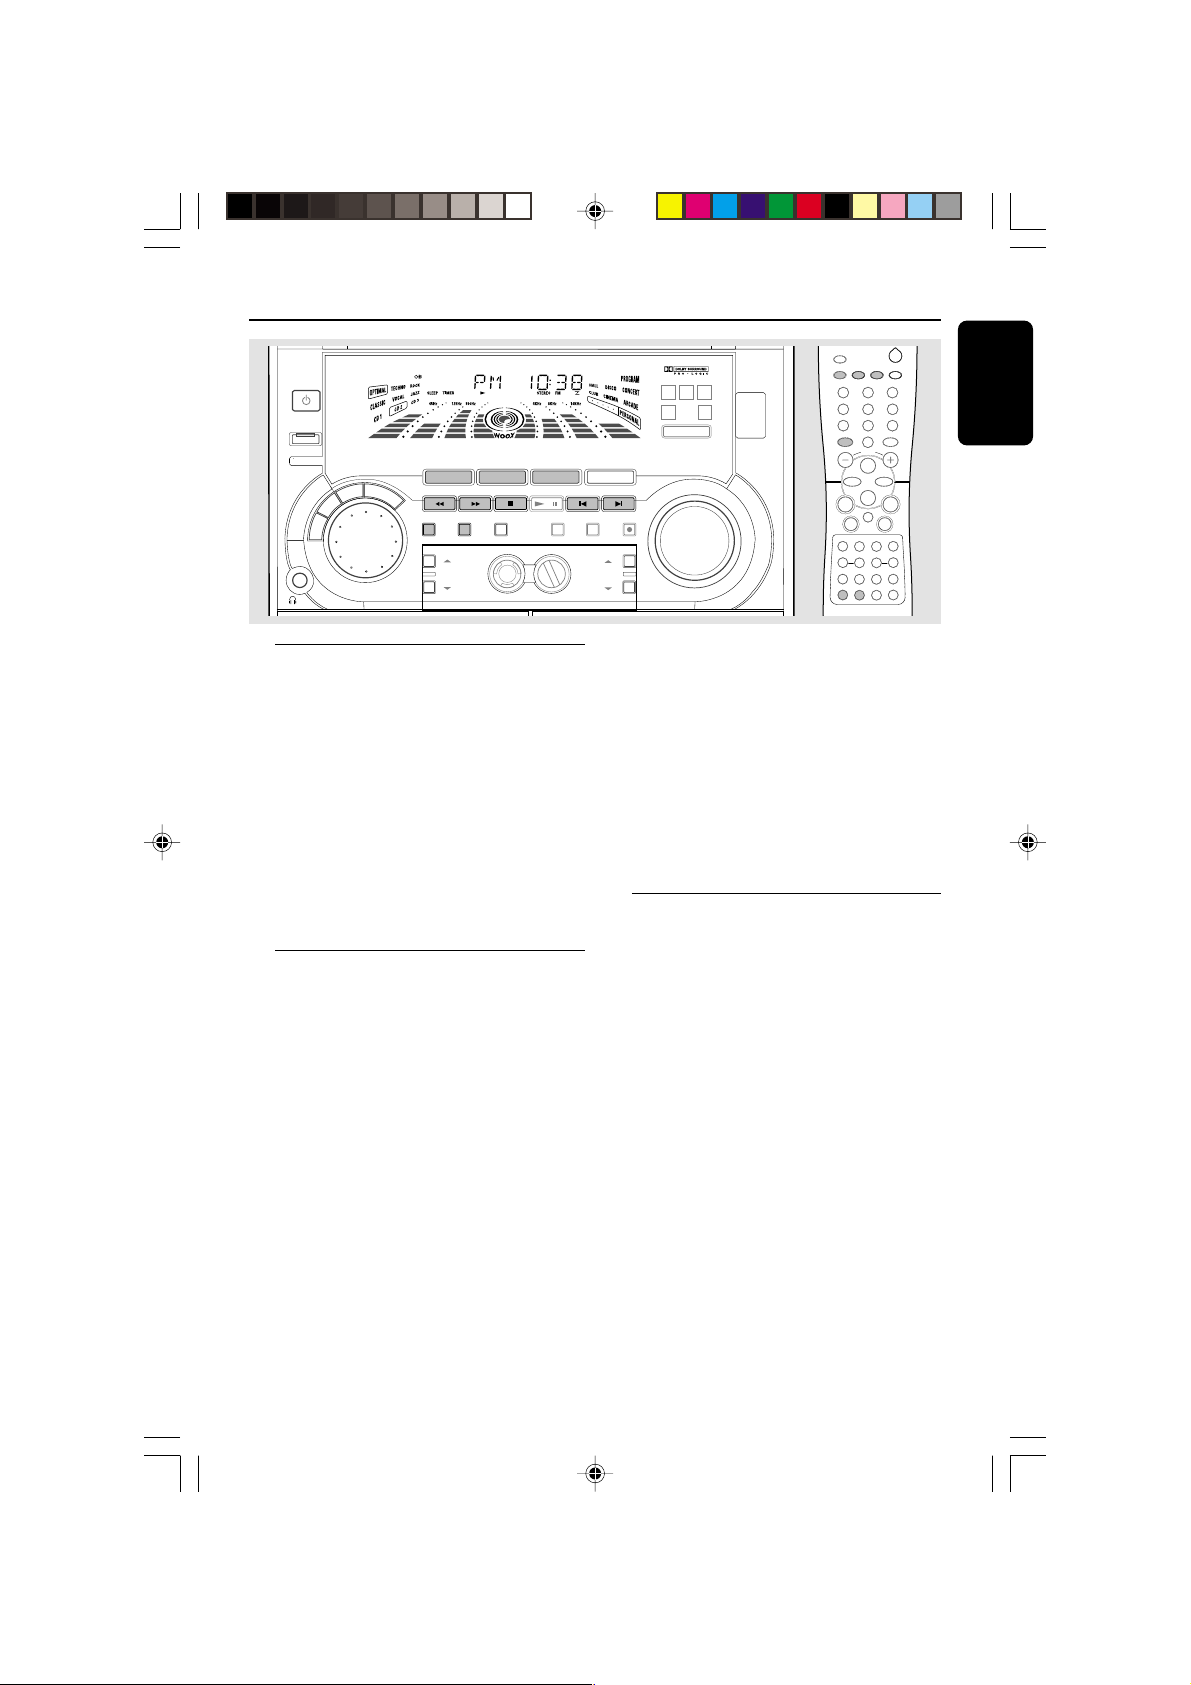
View Clock
The clock (if it is set) will be shown in Standby
mode.
To view the clock in any source mode
(CD or TUNER, for example)
● Press CLOCK/TIMER briefly (or CLOCK on
the remote control).
➜ The clock will be displayed for a few seconds.
➜ If the clock has not been set, "--:--" will be
displayed.
Note:
– When in Eco Power Standby mode, the clock will
not be displayed.
Clock Setting
The clock can be set in either 12-hour or
24-hour mode ("AM 12:00" or "00:00" for
example)
1 Press CLOCK/TIMER twice.
2 Press PROG on the system repeatedly to select
clock mode.
➜ If 12-hour mode is selected, "AM 12:00" will
start flashing.
➜ If 24-hour mode is selected, "00:00" will start
flashing.
3 Press à or á on the system repeatedly to set
the hour.
4 Press í or ë on the system repeatedly to set
the minute.
5 Press CLOCK/TIMER again to store the
setting.
➜ The clock will start working.
To exit without storing the setting
● Press Çon the system.
Notes:
– The clock setting will be cancelled when the
power cord is disconnected or if a power failure
occurs.
– When in Eco Power Standby mode, the clock/
timer function will not operate.
– During clock setting, if no button is pressed
within 90 seconds, the system will exit clock setting
mode automatically.
Timer Setting
The system can switch on to CD, TUNER, or
TAPE 2 mode automatically at a preset time,
serving as an alarm to wake you up.
IMPORTANT!
– Before setting the timer, ensure that the
clock is set correctly.
– The timer will always be switched on
after it has been set.
– The timer will not start if a recording is in
progress.
– The volume of the timer will increase
gradually from the minimum level until it
reaches the last tuned volume level.
1 Press and hold CLOCK/TIMER for more than
two seconds to select timer mode.
➜ "AM 12:00" or "00:00" or the last timer
setting will start flashing.
➜ TIMER will start flashing.
➜ The selected source will be lighted while
other available sources are flashing.
pg 001-032/P880/37-Eng 12/8/00, 1:54 PM27
27
3139 115 20421
Page 28
Clock/Timer
2 Press CD, TUNER or TAPE to select the
English
desired source.
● Make sure the music source has been prepared.
CD – Load the disc(s). To start from a specific
track, make a program (refer to “CD Operation -
Programming the disc tracks”).
TUNER – tune to the desired radio station.
TAPE – load the prerecorded tape into tape
deck 2.
3 Press à or á on the system repeatedly to set
the hour for the timer to start.
4 Press í or ë on the system repeatedly to set
the minute for the timer to start.
5 Press CLOCK/TIMER to store the start time.
➜ The timer is now set and activated.
➜ TIMER will remain on the display.
● At the preset time, the selected source will play.
Sleep Timer Setting
The sleep timer enables the system to switch to
Standby mode automatically at a preset time.
1 Set the clock (refer to “Clock Setting”).
2 Press SLEEP on the remote control repeatedly
to select a preset time.
➜ The selections are as follows (time in
minutes):
60 ™ 45 ™ 30 ™ 15 ™ OFF ™ 60 …
➜ "SLEEP XX" or "OFF" will be displayed. "XX"
is the time in minutes.
3 When you reach the desired length of time, stop
pressing the SLEEP button.
➜ The Sleep Timer is now set. After this
amount of time passes, the system will switch to
Standby mode.
To exit without storing the setting
● Press Çon the system.
Notes:
– If the selected source (CD) is not available when
preset timer is reached, TUNER will be selected
automatically.
– If the source selected is TAPE, and if the preset
time is reached during dubbing, TUNER will be
selected automatically.
– During timer setting, if no button is pressed
within 90 seconds, the system will exit timer setting
mode automatically.
To deactivate the TIMER
● Press TIMER ON/OFF on the remote control.
➜ The display will show "CANCEL" and TIMER
will disappear from the display.
To activate the TIMER
● Press TIMER ON/OFF on the remote control.
➜ The last set timer information will be shown
for a few seconds and TIMER will appear on the
display.
To deactivate the Sleep Timer
● Press SLEEP repeatedly until "OFF" is displayed,
or press the STANDBY ON button.
28
pg 001-032/P880/37-Eng 12/8/00, 1:54 PM28
3139 115 20421
Page 29
Specifications
AMPLIFIER
Output power
Total power ........................................................... 400 W
DPL Mode
Left/Right Channel ............... 2 x 150 W RMS
Center Channel ....................... 50 W RMS, 12 Ω
Surround Channel ............ 2 x 25 W RMS, 6 Ω
Stereo Mode ............................. 2 x 150 W RMS
(1)
............................................................. 2 x 120 W FTC
Signal-to-noise ratio .......................... ≥ 75 dBA (IEC)
Frequency response .........40 – 20000 Hz, ± 3 dB
Input sensitivity
AUX In / CDR/DVD In .................... 500 mV / 1V
Output
Speakers ....................................................................≥ 6 Ω
Center Speaker ..................................................≥ 12 Ω
Surround Speakers ..............................................≥ 6 Ω
Headphones...................................... 32 Ω – 1000 Ω
Subwoofer Out .............. 1.5 V ±2dB, > 22000 Ω
Line Out ......................500 mV ±2dB, > 22000 Ω
Digital Out .................................... IEC 958, 44.1 kHz
Surround Out (wireless) ............................. 350 mV
(1) (6 Ω, 60 Hz – 12.5 kHz, 10% THD)
CD PLAYER
Number of programmable tracks ......................... 40
Frequency response .......................... 40 – 20000 Hz
Signal-to-noise ratio ....................................... ≥ 76 dBA
Channel separation ..........................≥ 79 dB (1 kHz)
Total harmonic distortion ............ < 0.02% (1 kHz)
TUNER
FM wave range ...................................87.5 – 108 MHz
AM wave range .................................. 530 – 1700 kHz
Number of presets ........................................................ 40
Antenna
FM ............................................... 300 Ω dipole wire
AM........................................................ Loop antenna
TAPE PLAYER
Frequency response
CrO2 tape (type II) .......... 60 – 15000 Hz (5 dB)
Normal tape (type I) ...... 60 – 15000 Hz (5 dB)
Signal-to-noise ratio
CrO2 tape (type II) ..................................... ≥ 50 dBA
Normal tape (type I) ................................. ≥ 47 dBA
Wow and flutter ......................................... ≤ 0.4% DIN
SPEAKERS
Front left/right
System ..................... 3-way; Bass reflex system with
(1)
Impedance........................................................................ 6 Ω
top firing wOOx
English
wOOx ................... 1 x 6.5" top firing wOOx driver
Woofer ................................................ 1 x 6.5" full range
/
(1)
Tweeter ............................................... 1 x 2.5" Ferrofluid
Polydome Tweeter ................................................... 1 x 1"
Dimensions (w x h x d) .240 x 335 x 347 (mm)
............................................. 9.45 x 13.19 x 13.66 (inch)
Weight............................................................. 4.81 kg each
............................................................... 10.58 pounds each
Surround speakers
System .........................................................closed satellite
Impedance........................................................................ 6 Ω
Speaker Driver .................................... 1 x 4” full range
Dimensions (w x h x d) .235 x 135 x 155 (mm)
.................................................. 9.25 x 5.31 x 6.10 (inch)
Weight................. 1.07 kg each / 2.36 pounds each
Center speaker
System ..............................................shielded bass reflex
Impedance..................................................................... 12 Ω
Speaker Driver .................................... 1 x 4” full range
Dimensions (w x h x d) .235 x 135 x 155 (mm)
.................................................. 9.25 x 5.31 x 6.10 (inch)
Weight......................................... 1.21 kg / 2.67 pounds
GENERAL
Material/finish ................................... Polystyrene/Metal
AC Power ................................................... 120 V / 60 Hz
Power Consumption
Active ...................................................................... 180 W
Standby ................................................................. < 20 W
Eco Power Standby........................................... < 2 W
Dimensions (w x h x d) .. 265 x 310 x 390 (mm)
............................................10.43 x 12.20 x 15.35 (inch)
Weight (without speakers) 9.7 kg / 21.34 pounds
Specifications and external appearance are
subject to change without notice.
pg 001-032/P880/37-Eng 12/8/00, 1:54 PM29
29
3139 115 20421
Page 30
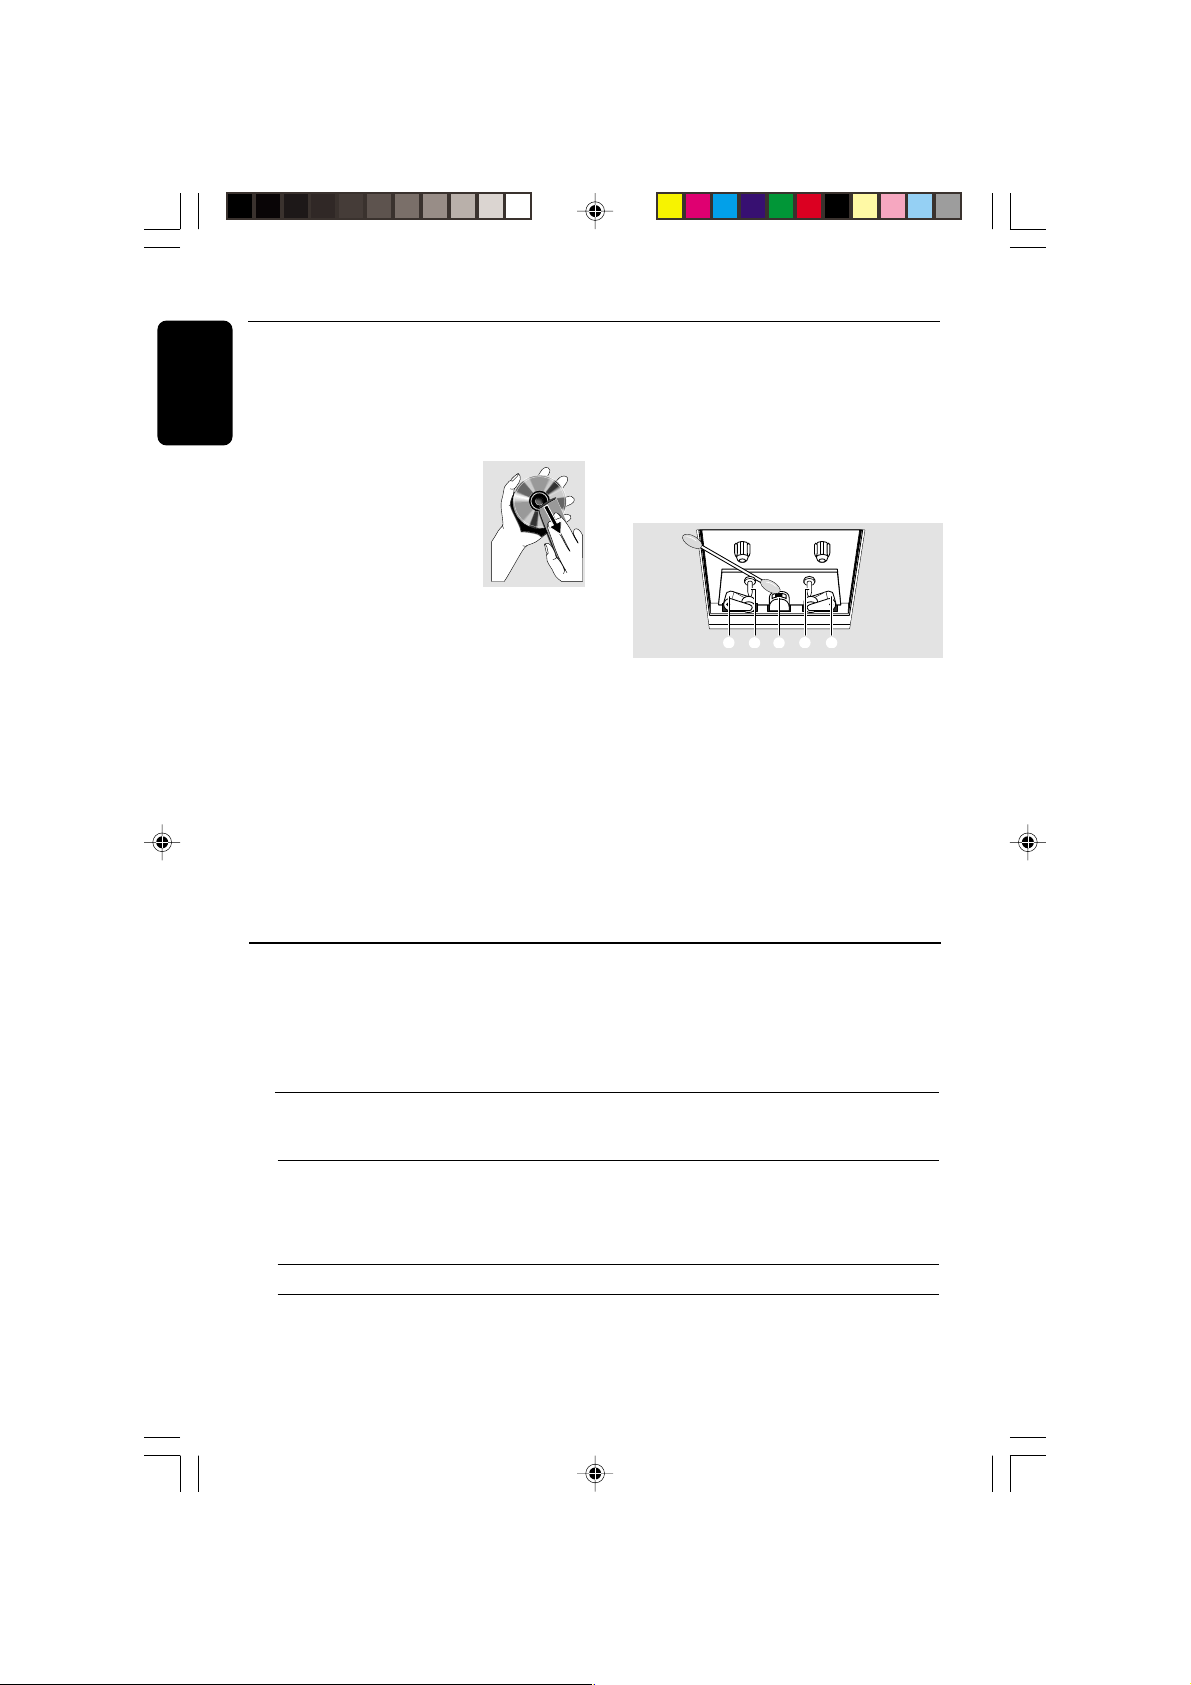
Maintenance
C CB
B
A
English
Cleaning the Cabinet
● Use a soft cloth slightly moistened with a mild
detergent solution. Do not use a solution
containing alcohol, spirits, ammonia or abrasives.
Cleaning Discs
● When a disc becomes dir ty,
clean it with a cleaning cloth.
Wipe the disc from the center
out. Do not wipe in a circular
motion.
● Do not use solvents such as
benzine, thinner, commercially
available cleaners, or antistatic spray intended for
analog records.
Cleaning the disc lens
● After prolonged use, dirt or dust may
accumulate at the disc lens. To ensure good
playback quality, clean the disc lens with Philips
CD Lens Cleaner or any commercially available
cleaner. Follow the instructions supplied with
cleaner.
Troubleshooting
Cleaning the Heads and the Tape Paths
● To ensure good recording and playback quality,
clean the heads A, the capstan(s) B, and
pressure roller(s) C after every 50 hours of
tape operation.
● Use a cotton swab slightly moistened with
cleaning fluid or alcohol.
● You also can clean the heads by playing a
cleaning tape once.
Demagnetizing the heads
● Use a demagnetizing tape available at your
dealer.
WARNING
Under no circumstances should you try to repair the system yourself, as this will invalidate the
warranty. Do not open the system as there is a risk of electric shock.
If a fault occurs, first check the points listed below before taking the system for repair. If you
are unable to remedy a problem by following these hints, consult your dealer or service center.
Problem Solution
CD OPERATION
“NO DISC” is displayed. – Insert a disc.
– Check if the disc is inserted upside down.
– Wait until the moisture condensation at the lens
has cleared.
– Replace or clean the disc, see “Maintenance”.
“DISC NOT FINALIZED” is displayed. – Use a finalized CD-R(W) or CD-R.
30
pg 001-032/P880/37-Eng 12/8/00, 1:54 PM30
3139 115 20421
Page 31
Troubleshooting
RADIO RECEPTION
Radio reception is poor. – If the signal is too weak, adjust the antenna or
connect an external antenna for better reception.
– Increase the distance between the Mini HiFi
System and your TV or VCR.
TAPE OPERATION/RECORDING
Recording or playback cannot be made. – Clean deck parts, see “Maintenance”.
– Use only NORMAL (IEC I) or IEC type II (Cr02)
tape.
– Apply a piece of adhesive tape over the missing
tab space.
The tape deck door cannot open. – Remove and reconnect the AC power plug and
switch on the system again.
Recorded material sounds strange. – Switch off Dolby Pro Logic mode when
recording.
GENERAL
The system does not react when buttons – Remove and reconnect the AC power plug and
are pressed. switch on the system again.
Sound cannot be heard or is of poor – Adjust the volume.
quality. – Disconnect the headphones.
– Check that the speakers are connected correctly.
– Check if the stripped speaker wire is clamped.
The left and right sound outputs are – Check the speaker connections and location.
reversed.
The remote control does not function – Select the source (CD or TUNER, for example)
properly. before pressing the function button (É,í,ë).
– Reduce the distance between the remote control
and the system.
– Insert the batteries with their polarities
(+/– signs) aligned as indicated.
– Replace the batteries.
– Point the remote control in the direction of the
system’s IR sensor.
The timer is not working. – Set the clock correctly.
– Press the TIMER ON/OFF to switch on the timer.
– If recording is in progress, stop recording.
Not all lighted buttons are showing light. – Press DIM to select DIM OFF display mode.
The Clock/Timer setting is erased. – Power has been interrupted or the power cord
has been disconnected. Reset the clock/timer.
The system displays features – Press and hold DEMO STOP Çon the system
automatically and buttons start flashing. to switch off the demonstration.
English
pg 001-032/P880/37-Eng 12/8/00, 1:54 PM31
31
3139 115 20421
Page 32
LIMITED WARRANTY
AUDIO
One Year Free Labor
One Year Free Service on Parts
This product must be carried in for repair.
WHO IS COVERED?
You must have proof of purchase to receive warranty service. A sales
receipt or other document showing that you purchased the product
is considered proof of purchase.
WHAT IS COVERED?
Warranty coverage begins the day you buy your product. For one year
thereafter, all parts will be repaired or replaced, and labor is free.
After one year from the day of purchase, you pay for the replacement
or repair of all parts, and for all labor charges.
All parts, including repaired and replaced parts, are covered only for
the original warranty period.When the warranty on the product
expires, the warranty on all replaced and repaired parts also expires.
WHAT IS EXCLUDED?
Your warranty does not cover:
• labor charges for installation or setup of the product, adjustment
of customer controls on the product, and installation or repair of
antenna systems outside of the product.
• product repair and/or part replacement because of misuse,
accident, unauthorized repair or other cause not within the
control of Philips Consumer Electronics Company.
• reception problems caused by signal conditions or cable or
antenna systems outside the unit.
• a product that requires modification or adaptation to enable it to
operate in any country other than the country for which it was
designed, manufactured, approved and/or authorized, or repair of
products damaged by these modifications.
• incidental or consequential damages resulting from the product.
(Some states do not allow the exclusion of incidental or
consequential damages, so the above exclusion may not apply to
you.This includes, but is not limited to, prerecorded material,
whether copyrighted or not copyrighted.)
• a product that is used for commercial or institutional purposes.
WHERE IS SERVICE AVAILABLE?
Warranty service is available in all countries where the product is
officially distributed by Philips Consumer Electronics Company. In
countries where Philips Consumer Electronics Company does not
distribute the product, the local Philips service organization will
attempt to provide service (although there may be a delay if the
appropriate spare parts and technical manual(s) are not readily
available).
MAKE SURE YOU KEEP...
Please keep your sales receipt or other document showing proof of
purchase.Attach it to this owner’s manual and keep both nearby. Also
keep the original box and packing material in case you need to return
your product.
SYSTEM
BEFORE REQUESTING SERVICE...
Please check your owner’s manual before requesting service.
Adjustments of the controls discussed there may save you a service
call.
TO GET WARRANTY SERVICE IN U.S.A.,
PUERTO RICO OR U.S. VIRGIN ISLANDS...
Take the product to a Philips factory service center (see enclosed
list) or authorized service center for repair.When the product has
been repaired, you must pick up the unit at the center. Centers may
keep defective parts.
(In U.S.A., Puerto Rico and U.S.Virgin Islands, all implied warranties,
including implied warranties of merchantability and fitness for a
particular purpose, are limited in duration to the duration of this
express warranty. But, because some states do not allow limitations
on how long an implied warranty may last, this limitation may not
apply to you.)
TO GET WARRANTY SERVICE IN CANADA...
Please contact Philips at:
1-800-661-6162 (French Speaking)
1-800-363 7278 (English Speaking)
(In Canada, this warranty is given in lieu of all other warranties. No
other warranties are expressed or implied, including any implied
warranties of merchantability or fitness for a particular purpose.
Philips is not liable under any circumstances for any direct,indirect,
special, incidental or consequential damages,howsoever incurred,
even if notified of the possibility of such damages.)
REMEMBER...
Please record the model and serial numbers found on the product
below.Also, please fill out and mail your warranty registration card
promptly. It will be easier for us to notify you if necessary.
MODEL # ________________________________________
SERIAL # ________________________________________
This warranty gives you specific legal rights. You may have other rights which vary from state/province to state/province.
Philips Service Solutions Group, P.O. Box 2976, Longview,Texas 75606, USA, (903) 242-4800
32
pg 001-032/P880/37-Eng 12/8/00, 1:54 PM32
EL4965E006 / MAC 4110 / 12-98
3139 115 20421
 Loading...