


Version 1.0
FWM653
3141 785 35320
400W Subwoofer Mini Hi-Fi System
-/55/77/BK
Published by LX 1024 Service Audio Subject to modification
©
Copyright 2010 Philips Consumer Electronics B.V. Eindhoven, The Netherlands
All rights reserved. No part of this publication may be reproduced, stored in a retrieval
system or transmitted, in any form or by any means, electronic, mechanical, photocopying,
or otherwise without the prior permission of Philips.
CONTENTS
�
Technical specification ..................................................................1-2
Version variation ...........................................................................1-2
Service measurement setup..........................................................1-3
Service aids .................................................................................1-4
Instructions on CD playability ................................................2-1..2-2
Block diagram ................................................................................3-1
Wiring diagram ..............................................................................4-1
Disassembly diagram............ ................................................5-1..5-2
Tuner board
Circuit diagram .........................................................................6-1
Layout diagram .........................................................................6-2
Main board
Circuit diagram .........................................................................7-1
Layout diagram ..................................................................7-2..7-3
Front board
Circuit diagram .........................................................................8-1
Layout diagram ..................................................................8-2..8-3
AMP Board
Circuit diagram. ........................................................................
9-1
Layout diagram ..................................................................
9-2..9-3
CD board
Circuit diagram .......................................................................10-1
Layout diagram ..............................................................10-2..10-3
MCU Board
Circuit diagram. ......................................................................
11-1
Layout diagram ..............................................................
11-2..11-3
Exploded view diagram ...............................................................12-1

Sound
• Total Sound Power (RMS): 400 W
• Output power (RMS): 4x60W/ch + 160W
• Sound Enhancement: MAX Sound, Dynamic Bass
Bo
ost 3 steps, Incredible Surround, Digital Sound
Control 4 modes, Virtual Ambience Control
• Output Power: 6500W PMPO
Loudspeakers
• Number of Loudspeakers: 3
• Main Speaker: 2" tweeter, Bass Reflex Speaker
Sys
tem, 5.25" woofer
• Subwoofer driver: 8" woofer
• Subwoofer type: Passive
Audio Playback
• Loader Type: 3 CD Carousel
• Number of Discs: 3
• Playback Media: CD, CD-R, CD-RW, MP3-CD,
WMA-CD
• Disc Playback Modes: 40-Track Programmable,
Rep
eat/one/disk/program, Shuffle Play
• USB Direct Modes: Play/Pause, Stop, Previous/
Next, Fast B
ackward/Fast Forward, Repeat,
Shuffle, Delete
Tuner/Reception/Transmission
• Auto digital tuning
• Station presets: 40
• Tuner Bands: MW, FM Stereo
• Tuner Enhancements: Auto Store, Easy Set (Plug &
Play)
Connectivity
• Audio Connections: RCA Aux in, 3.5mm stereo
line in -MP3 link
• USB: USB host
• Microphone: Dual Microphone sockets
• Other connections: FM Antenna, MW Antenna
Convenience
• Alarms: CD Alarm, USB alarm, Radio Alarm, Sleep
timer
• Clock: On main display
• Display Type: LCD
• Karaoke: MIC volume, Echo control
Accessories
• Remote control: 36-key with 2xAAA batteries
• User Manual: Spanish, B-Portuguese
• Quick start guide: Spanish, B-Portuguese
• Guarantee booklet: Global version
• Included accessories: FM/MW Antenna, Batteries
for re
mote control, *Flat pin adaptor, AC Power
Cord
• Cables: MP3 line-in cable
Dimensions
• Set dimensions (W x H x D): 269 x 310 x 352 mm
• Subwoofer dimensions (W x H x D):
26
0 x 310 x 426 mm
• Packaging dimensions (W x H x D):
10
85 x 498 x 367 mm
• Weight incl. Packaging: 23.5 kg
• Speaker Depth: 292 mm
• Speaker Height: 310 mm
• Speaker Width: 209 mm
Power
• Power supply: 100-240VAC, 50/60Hz
•
TECHNICAL SPECIFICATION
1 - 2
Type /Versions:
Features
Board in used:
FWM653
Service policy
MAIN BOARD
* TIPS : C -- Component Lever Repair.
M -- Module Lever Repair
-- Used
/55 /00
/77
89/39/KB/
Feature diffrence
RDS
VOLTAGE SELECTOR
ECO STANDBY - DARK
Type /Versions:
FWM653
/55 /00
/77
89/39/KB/
VERSION VARIATION
C/M
TUNER BOARD
AMP BOARD
49/
C/M
C/M
C/M
C/M
C/M
C/M
C/M
C/M
C/M
C/M
C/M
C/M
C/M
C/M
C/M
C/M
C/M
49/
FRONT BOARD
CD BOARD
MCU BOARD

1-3
LF Generator
e.g. PM5110
Recorder
Use Universal Test Cassette CrO2 SBC419 4822 397 30069
LEVEL METER
e.g. Sennheiser UPM550
with FF-filter
S/N and distortion met
e
e.g. Sound Technology ST170
L
R
DUT
or Universal Test Cassette
Fe SBC420 4822 397 30071
LEVEL METER
e.g. Sennheiser UPM550
-
S/N and distortion meter
e.g. Sound Technology ST1700B
L
R
DUT
CD
Use Audio Signal Disc
(replaces test disc 3)
SBC429 4822 397 30184
Bandpass
250Hz-15kHz
e.g. 7122 707 48001
LF Voltmeter
e.g. PM2534
DUT
S/N and distortion meter
e.g. Sound Technology ST1700B
Frame aerial
e.g. 7122 707 89001
Tuner AM (MW,LW)
To avoid atmospheric interference all AM-measurements have to be carried out in a Faraday´s cage.
Use a bandpass filter (or at least a high pass filter with 250Hz) to eliminate hum (50Hz, 100Hz).
RF Generator
e.g. PM5326
Ri=50:
Bandpass
250Hz-15kHz
e.g. 7122 707 48001
LF Voltmeter
e.g. PM2534
DUT
RF Generator
e.g. PM5326
S/N and distortion meter
e.g. Sound Technology ST1700B
Use a bandpass filter to eliminate hum (50Hz, 100Hz) and disturbance from the pilottone (19kHz, 38kHz).
Ri=50:
Tuner FM
MEASUREMENT SETUP

1-4
SERVICE AIDS
GB
WARNING
All ICs and many other semi-conductors are
susceptible to electrostatic discharges (ESD).
Careless handling during repair can reduce life
drastically.
When repairing, make sure that you are
connected with the same potential as the mass
of the set via a wrist wrap with resistance.
Keep components and tools also at this
potential.
ESD
CLASS 1
LASER PRODUCT
GB
Safety regulations require that the set be restored to its original
condition and that parts which are identical with those specified,
be used
Safety components are marked by the symbol
!
.
Lead free

Set remains closed!
N
Y
Play a CD
for at least 10 minutes
Y
playability
ok ?
N
playability
ok ?
add Info for customer
"SET OK"
check playability
N
Y
playability
ok ?
check playability
check playability
return set
Customer complaint
"CD related problem"
"fast" lens cleaning
1
2
3
For flap loaders (= access to CD drive possible)
cleaning method
4 is recommended
INSTRUCTIONS ON CD PLAYABILITY
2 - 1
Exchange CDM
1 - 4 For description - see following pages

1
PLAYABILITY CHECK
For sets which are compatible with CD-RW discs
use CD-RW Printed Audio Disc....................7104 099 96611
TR 3 (Fingerprint)
TR 8 (600µ Black dot) maximum at 01:00
• playback of these two tracks without audible disturbance
playing time for: Fingerprint
10seconds
Black dot from 00:50 to 01:10
• jump forward/backward (search) within a reasonable time
For all other sets
use CD-DA SBC 444A..................................4822 397 30245
TR 14 (600µ Black dot) maximum at 01:15
TR 19 (Fingerprint)
TR 10 (1000µ wedge)
• playback of all these tracks without audible disturbance
playing time for: 1000µ wedge 10seconds
Fingerprint 10seconds
Black dot from 01:05 to 01:25
• jump forward/backward (search) within a reasonable time
2
CUSTOMER INFORMATION
It is proposed to add an addendum sheet to the set which
informs the customer that the set has been checked
carefully - but no fault was found.
The problem was obviously caused by a scratched, dirty or
copy-protected CD. In case problems remain, the customer
is requested to contact the workshop directly.
The lens cleaning (method 3) should be mentioned in the
addendum sheet.
The final wording in national language as well as the printing
is under responsibility of the Regional Service Organizations.
4
LIQUID LENS CLEANING
Because the material of the lens is synthetic and coated
with a special anti-reflectivity layer, cleaning must be done
with a non-aggressive cleaning fluid. It is advised to use
“Cleaning Solvent
The actuator is a very precise mechanical component and
may not be damaged in order to guarantee its full function.
Clean the lens gently (don’t press too hard) with a soft and
clean cotton bud moistened with the special lens cleaner.
The direction of cleaning must be in the way as indicated in
the picture below.
Before touching the lens it is advised to clean the
surface of the lens by blowing clean air over it.
This to avoid that little particles make scratches on
the lens.
INSTRUCTIONS ON CD PLAYABILITY
2 - 2

BLOCK DIAGRAM
3-1
3-1
CD SERVO
BU9543
MCU
BX8804
128pin QFP
INPUT
RC5/RC6 CODE
LCD
ET8862Q& KEY
PART
TDA8922CTH
MAIN L/R
INPUT
RC
SENSOR
16M SDRAM
8M SERIAL
FALSH
EN25T80
PICK UP
MOTOR
ADC
WM8782
3CDC
DRIVER IC
TDA7073A
MUX
74LVC157
AUX
TUNER
SI4730 OR
TUENR
PACK
MICRO
PHONE
USB/SD
MOTOR DRIVER
BA5826
IIC
MUL-L/R
IIC
PCM
,DATE
PCM
CD L/R
TUNER L/R
CONTROL DATA
CD PCM
BCK,LRCK,
DATE
TDA8920CTH
FR
FUNCTION IC
TDA7468D
3CD LOADER
TDA8922CTH
SUB
FL
FHR
FHL
2 X 50W
2 X 50W
MP3 LINE
INPUT
AMP
3CDC
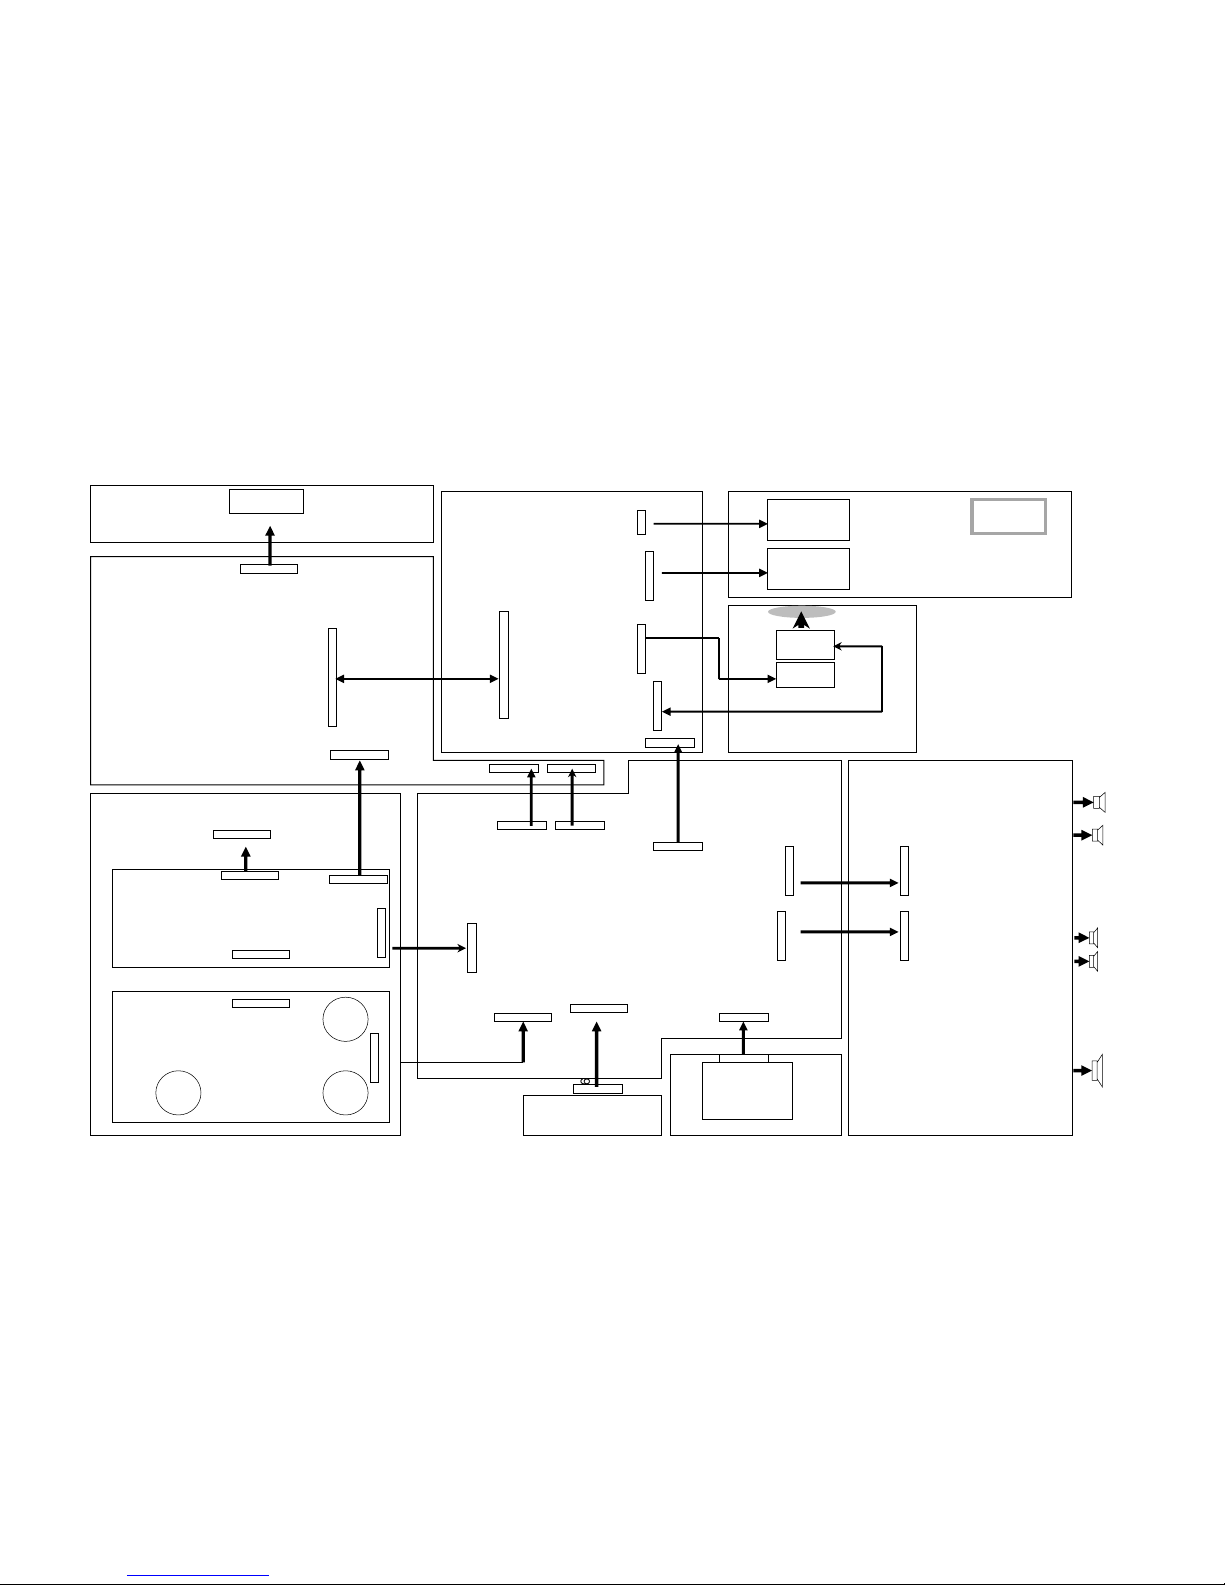
PICK UP
MOTOR
TUNER
SI4730 OR
TUENR
PACK
MICRO
PHONE
3CD LOADER
SUB
FL
FHR
FHL
2*50W
2*50W
1*200W
MP3
LINE
AMP BOARD
3CDC
8P/120MM
CN903 TO CON301
8P/150MM
CN611 TO CON302
FR
6P/120MM
CN602 TO CON521
5P/150MM
CN607 TO CW105
10P/120MM(AB)
CN607 TO CW105
18P/130MM
(
AA
)
CN603 TO CW101
5P 150/330MM(
3+2P
)
CN904 TO CN609/CN612
4P/150MM
CN903 TO J6
3CDC KEY
4P/150MM
CN912 TO CN913
4P/220MM(AA)
CN906 TO CN907
USB
4P/220MM
CW104 TO CN904
16P/170MM(AA)
CN501 TO CD RF
6P/200MM
CN505 TO CD MOTOR
5P/200MM
(
AA)
CN504 TO CON2
3CD
OPEN/CLOSE
2P/200MMCN551 TO
CON1
28P/80MM(AA)
CW101 TO CON589
MICRO
PHONE
MAIN BOARD
KEY BOARD
MCU BOARD
USB BOARD
CD BOARD
14P/180MM(AB)
CN901 TO CW1
POWER SUPPLY
AC CORD
6F (BLACK)
WIRING DIAGRAM
4-1
4-1

DISMANTLING INSTRUCTIONS
1) Loosen 4 screws to remove the Cover Top of the set.
2) Loosen 3 screws to remove the Panel Left and 3 screws to
remove the Panel Right of the set.
3) Slide out the CDC Tray as shown in the diagram below with
the help of a flat head screw driver.
Dismantling of the CDC Module and Front Panel
Remove CDC Module
4) Remove the Cover Tray CDC as indicated.
Sliding Out The CDC Tray
Front View CDC
Remove Cover Tray CDC
5) Loosen 2 screws A and 2 screws B to remove the CDC
Module as indicated.
6) Remove 2 screws at the bottom to separate the
Front Panel Assembly from the Plate Bottom.
B
B
5-1 5-1

Dismantling of Rear Portion
Dismantling of the PCB Board
1)Remove 3 screws C as indicated to loosen the Tuner Board.
3)Remove 4 screws E and 4 screws I as indicated to loosen the Amp Board.
4)Remove 3 screws F as indicated to loosen the Bottom Cabinet.
5)Remove 4 screws G as indicated to loosen the fan.
2)Remove 5 screws D and 4 screws J as indicated to loosen the Main Board.
2)Remove 2 screws M as indicated to loosen the USB Board.
1)Remove 27 screws K&L as indicated to loosen the KEY1&2 Board.
C
F
D
E
I
J
K
L
M
G
5-2 5-2

CIRCUIT DIAGRAM - TUNER BOARD
6-1 6-1

LAYOUT DIAGRAM - TUNER BOARD
6-2 6-2

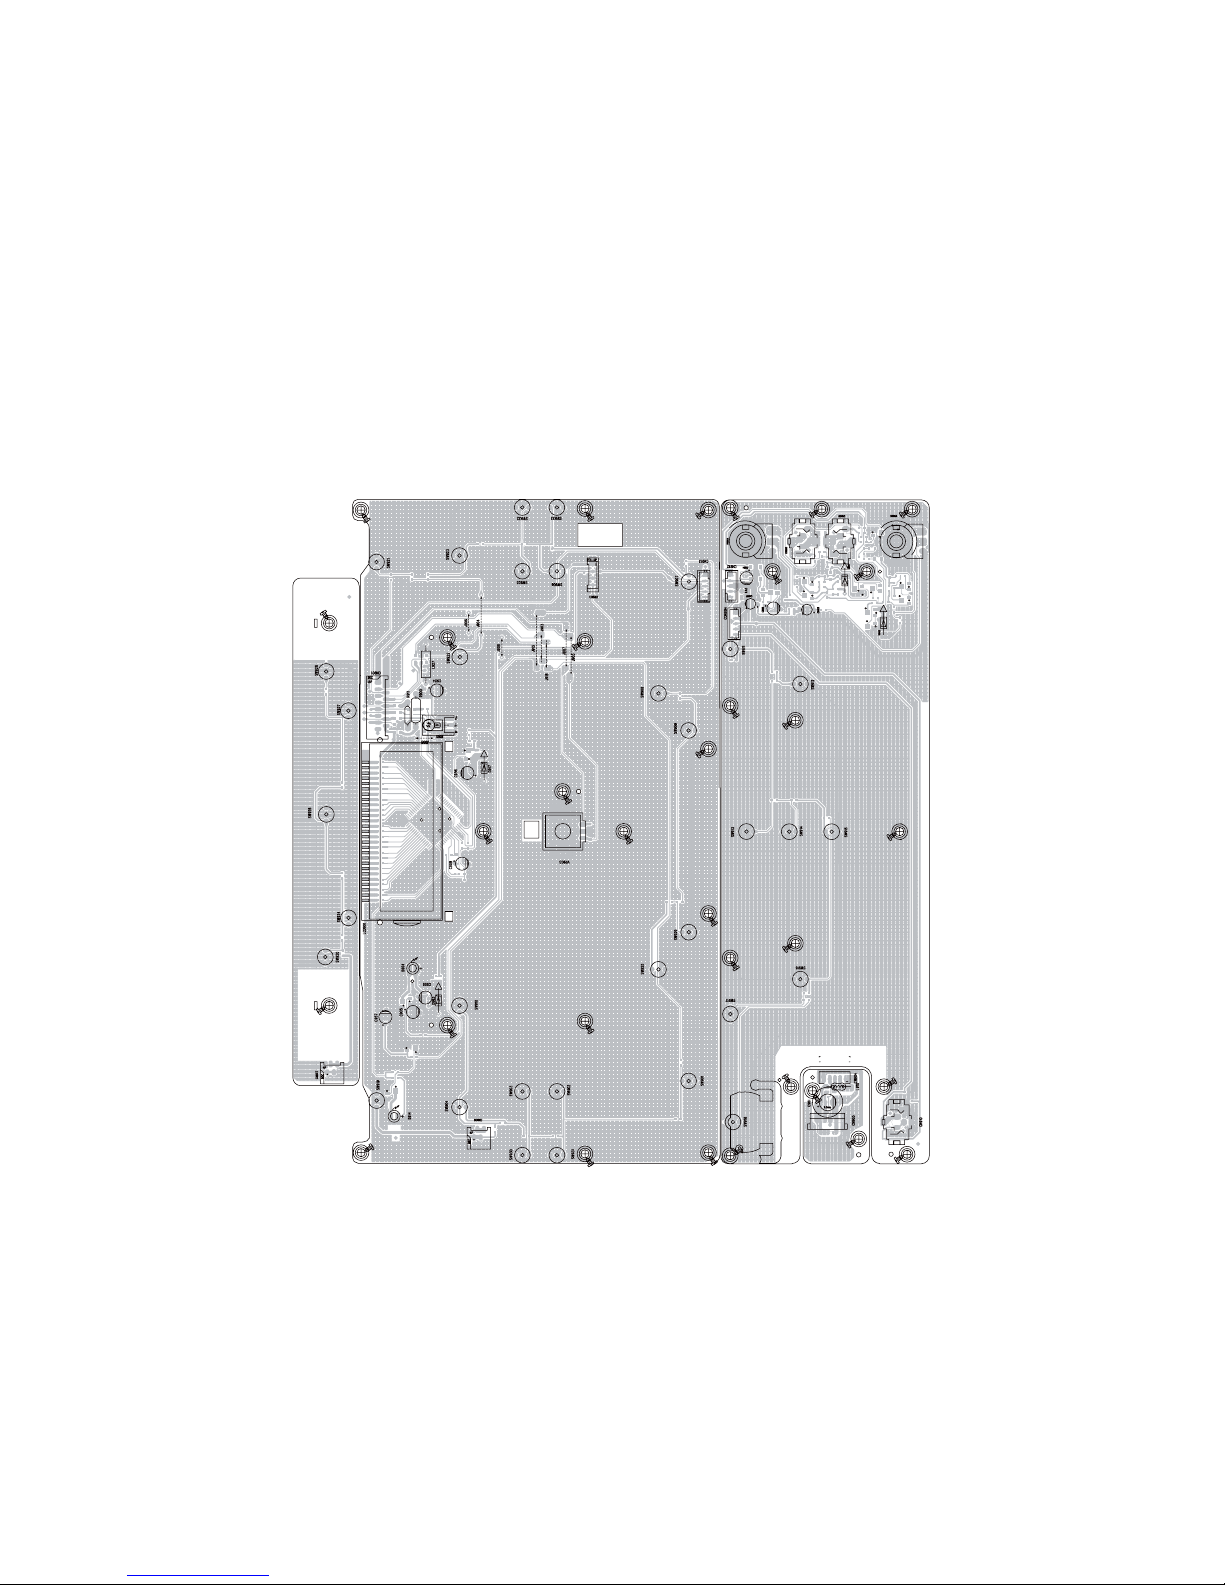
CIRCUIT DIAGRAM - MAIN BOARD
7-1
7-1

PCB LAYOUT - MAIN BOARD
TOP SIDE
7-2
7-2

CIRCUIT DIAGRAM - MAIN BOARD
BOTTOM SIDE
7-3
7-3

CIRCUIT DIAGRAM - DISPLAY/KEY BOARD
8-1
8-1
HEADPHONE
USB SOCKET
USB BOARD
TO MCU
TO MAIN
STAND-BY
TO MAIN
TO MCU
ECO
VR901
VR902
MODE
MAX SOUND
D914
BLUE
R951
10K
R900
47R
C954
47U/16V
1
2
3
VR903
C968
100P
C967
100P
L911 10uH(1.15Ω)
L912 10uH(1.15Ω)
L914
10uH(1.15Ω)
L917
10uH(1.15Ω)
Q903
MMBT8050
D917
3V9
R962
1K2
C956
47U/16V
C955
100N
R963
2R2
L902
10uH
C949
100N
L910
10uH(1.15Ω)
54321
1
2
3
4
5
CN904
L915
10uH(1.15Ω)
L913
10uH(1.15Ω)
L916
10uH(1.15Ω)
L918
10uH(1.15Ω)
L919
10uH(1.15Ω)
1
IP2V-
3
V+
IR901
FM-6038TM2-5A
1
2
3
4
5
6
7
CN910
HP JACK(3.5mm TC38-103-01)
V-
V+
DD+
1
2
3
4
5
6
CN905
KEY3
MIC-DET
VOLVOL+
1
2
3
4
5
6
7
CN908
HP JACK(3.5mm TC38-103-01)
1
2
3
4
5
6
7
CN909
HP JACK(3.5mm TC38-103-01)
R9001
47K
R9003
2K2
R9005
56K
R9009
330K
R9011
2K7
R9007
2K7
R9015
47R
Q972
BC847B
Q971
BC857B
R9013
47R
C9005
1N
C9003
2U2
C9001
100P
L9005
FB1k
C9007
10P
C9009
470N
Q975
BC847B
Q974
BC847B
C9011
1UF
R9019
1M
R9021
1K
D901
1N4148
R9017 1K
R9002
47K
R9004
2K2
R9006
56K
R9036
330K
R9010
2K7
R9008
2K7
R9014
47R
Q982
BC847B
Q981
BC857B
R9012
47R
C9006
1N
C9004
2U2
C9002
100p
L9006
FB1k
C9008
10P
C9010
470N
Q984
BC847B
Q983
BC847B
C9012
1UF
R9020
1M
R9022
1K
D902
1N4148
R9018
1K
R9023
10K
R9024
10K
C9013
0.47/50V
R9025
10K
R9026
1K
L9002
FB1k
L9001
FB1k
L9004
FB1k
L9003
FB1k
Q970
BC847B
R9038
NC
R9042
1K
R9040
1K
R9037
NC
J18
0R
C9014
100P
KEY0
KEY1
GND1
LCD-DATD
LCD-WR
LCD-CS
DATA-OUT
REMOCON
GND2
VDD3V3
NC
USB-VCC
D+
DUSB-G
USB-G2
C961
220U/10V
R901 1K
R917
1K
R918
1K
R919
1K
R920
1K
R921
1K
R932
1K
R931
1K
R930
1K
R929
1K
R928
1K
R927 1K
R926
1K
R925
1K
R924
1K
R923
1K
R922
1K
R912
1K
R911
220R
R910
220R
R909
1R
R908
1K
R907
91R
R906
56K
R905 1K
R904
220R
R903
1K
R9021K
C902
104
C901
470P
R940
1K
R934
1K
R935 1K
R936
1K
R937
1K
R938
1K
R939
1K
R933
1K
R976
15K
R977
15K
J4 0R
C948
100N
L927
100MHZ/80R
12
CN936
R978
10K
R979
10K
141210864
1513119753
2
1
1
2
3
4
5
6
7
8
9
10
11
12
13
14
15
CN901
123
50K x2
456
50K x2
27
26
25
24
23
22
21
20
19
18
17
16
15
14
13
12
11
10
9
8
7
6
5
4
3
2
1
LCD901
C909
47U/16V
24
351
CN911
24
351
CN914
Q909
PMBT3904
24
351
CN903
1
2
3
CON904
C904
1000P
C903
1000P
D903
5V1
C906
47U/16V
C907
100N
Q901
PMBT3904
D904
WHITE
R953
100R
C905
47U/16V
R954
330R
R980
10K
R981
330R
C9017
10U/16V
1
CS
2
RD
3
WR
4
DATE
5
VSS
6
OSC1
7
VDD
8
VLCD
9
IRQ
10
BZ
11
BZ1
12
T1
13
T2
14
T3
15
COM0
16
COM1
17NC18NC19
COM220COM321COM422COM523COM624COM725SEG026SEG127SEG228SEG329SEG430SEG531SEG632NC
33
NC
34
NC
35
NC
36
SEG7
37
SEG8
38
SEG9
39
SEG10
40
SEG11
41
SEG12
42
SEG13
43
SEG14
44
SEG15
45
SEG16
46
SEG17
47
SEG18
48
SEG19
49NC50NC51
SEG2052SEG2153SEG2254SEG2355SEG2456SEG2557SEG2658SEG2759SEG2860SEG2961SEG3062SEG31
63NC64
NC
IC901
ET8662Q
C9065
4N7
R9103
4K7
R983
100R
Q9101
PMBT3904
C957
1UF
R942
820
R947
0
R915
390
R916
510
SW921
DISPAY
SW903
CLOCK
SW904
DISC
SW906
PROG
R941
560
SW910
USB
SW901
STOP
R964
0
R965
390
SW902
SLEEP/TIME
SW923
MP3 LINE/AUX
SW922
TUNER
SW919
POWER
SW920
DSC1
SW924
DISC CHANGE
SW905
R968
1k5
R961
1K2
R960
1K
R946
820
R966
510
R967
560
R959
1k5
R958
1K2
R957
1k
R956
820
R913
0R
SW917
JAZZ
SW914
SW912
TECHNO
SW927
OPEN/CLOSE
SW911
POP
SW913
USB RECORD
SW916
OPTIMAL
SW918
USB DELETE
R948
390
R949
510
R955
560
R969
2k2
SW915
DBB
SW926
DSC2
R970
3K6
R974
3K6
SW907
PLAY/PAUSE
SW925
PREVIOUS
R943
1K
R944
1K2
SW909
ALUUM/PRESET+
SW908
NEXT
SW929
ALBUM/PRESET-
R945
1k5
R973
2k2
SW928
DSC3
R971
5K6
D905
2V7
R914
330R
ECO_POWER
3V3
REMOTE-INT
REMOTE-INT
LCD-DATE
SERIAL
KEY1
VCC10V
VOL-O
VOL+O
VOL+IN
VOL-IN
3V3
LCD-CLK
VCC10V
VCC10V
VCC10V
VCC10V
MIC-OUT
AGND
AGND
AGND
AGND
AGND
AGND
AGND
VCC10V
MIC-DET
KEY3
DAT-OUT
GND-D
GND
DGND-I
DGND-I
CPU/VCC
VCC10V
GND-D
3V3
DGND-I
MIC-DET
AGND
VCC10V
DET
LCD-CLK
SERIAL
LCD-DATE
GND
KEY0
LIN-IN-R
LINE-IN-L
KEY0
DIM
DIM
DET
VCC10V
GND
KEY0
DGND-I
KEY0
KEY3
DGND-I
DGND-I
KEY1
LAYOUT DIAGRAM - DISPLAY/KEY BOARD
TOP SIDE
8-2
8-2

LAYOUT DIAGRAM - DISPLAY/KEY BOARD
BOTTOM SIDE
8-3
8-3

CIRCUIT DIAGRAM - AMP BOARD
9-1 9-1

LAYOUT DIAGRAM - AMP BOARD
TOP SIDE
9-2 9-2

LAYOUT DIAGRAM - AMP BOARD
BOTTOM SIDE
9-3 9-3

CIRCUIT DIAGRAM-CD BOARD
10-110-1

LAYOUT DIAGRAM-CD BOARD
TOP SIDE
10-2 10-2

LAYOUT DIAGRAM-CD BOARD
BOTTOM SIDE
10-3 10-3

CIRCUIT DIAGRAM-MCU BOARD
11-1 11-1

LAYOUT DIAGRAM-MCU BOARD
TOP SIDE
11-2 11-2

LAYOUT DIAGRAM-MCU BOARD
BOTTOM SIDE
11-3 11-3

SET EXPLODED VIEW
12-1 12-1
 Loading...