

Page 1
A
L
A
R
M
R
E
S
E
T
/ R
A
D
IO
O
F
F
A
L
A
R
M
2
-
B
U
Z
Z
E
R
P
R
E
S
E
T
V
O
L
U
M
E
B
A
N
D
A
L
A
R
M
2
-
R
A
D
I
O
T
I
M
E
•
•
C
L
O
C
K
ALARM
1 •
ALA
RM
2
•
SLEEP /
R
ADIO
O
N
S
E
T
A
L
A
R
M
R
E
S
E
T
/
R
A
D
I
O
O
F
F
A
L
A
R
M
2
-
B
U
Z
Z
E
R
P
R
E
S
E
T
V
O
L
U
M
E
B
A
N
D
A
L
A
R
M
2
-
R
A
D
I
O
T
I
M
E
•
•
C
L
O
C
K
ALARM
1 •
AL
AR
M
2 •
SLEEP /
RADIO ON
S
E
T
H
R
M
I
N
H
R
M
I
N
P
R
E
S
E
T
AL1-RAD
F
M
AJ3430
D
I
G
I
T
A
L
T
U
N
E
R
C
L
O
C
K
R
A
D
I
O
AJ3430
D
I
G
I
T
A
L
T
U
N
E
R
C
L
O
C
K
R
A
D
I
O
R
E
P
E
A
T
A
L
A
R
M
B
R
IG
H
T
N
E
S
S
C
O
N
T
R
O
L
R
E
P
E
A
T
A
L
A
R
M
B
R
IG
H
T
N
E
S
S
C
O
N
T
R
O
L
R
E
P
E
A
T
A
L
A
R
M
B
R
IG
H
T
N
E
S
S
C
O
N
T
R
O
L
1
2
3
4
5
1
2
3
4
5
Clock Radio
AJ 3430
Page 2

Important notes for users in the U.K.
Mains plug
This apparatus is fitted with an approved moulded 13 Amp plug.
To change a fuse in this type of plug proceed as follows:
• Remove fuse cover and fuse.
• Fix new fuse which should be a BS1362 5 Amp, A.S.T.A. or
BSI approved type.
• Refit the fuse cover.
If the fitted plug is not suitable for your socket outlets, it should be
cut off and an appropriate plug fitted in its place.
If the mains plug contains a fuse, this should have a value of
5 Amp. If a plug without a fuse is used, the fuse at the distribution
board should not be greater than 5 Amp.
Note: The severed plug must be disposed to avoid a possible
shock hazard should it be inserted into a 13 Amp socket elsewhere.
How to connect a plug
The wires in the mains lead are coloured with the following code:
blue = neutral (N), brown = live (L).
As these colours may not correspond with the colour markings
identifying the terminals in your plug, proceed as follows:
• Connect the blue wire to the terminal marked N or coloured black.
• Connect the brown wire to the terminal marked L or coloured red.
• Do not connect either wire to the earth terminal in the plug,
marked E (or e) or coloured green (or green and yellow).
Before replacing the plug cover, make certain that the cord grip is
clamped over the sheath of the lead - not simply over the two
wires.Copyright in the U.K.: Recording and playback of material
may require consent. See Copyright Act 1956 and The Performer’s
Protection Acts 1958 to 1972.
2
INDEX
English ...................................................................4
Français ............................................................. 10
Español ............................................................... 16
Deutsch .............................................................. 22
Nederlands ................................................... 28
Italiano ................................................................ 34
Polski....................................................................... 40
Portugûes ....................................................... 46
Dansk .................................................................... 52
Svenska ............................................................. 58
Suomi ................................................................... 64
Έλληνικά ...................................................... 70
Page 3

P
R
E
S
E
T
AL1-RAD
FM
A
J3
43
0
DIGITAL TUNER CLOCK RADIO
R
E
P
E
A
T
A
L
A
R
M
B
R
IG
H
T
N
E
S
S
C
O
N
T
R
O
L
A
L
A
R
M
R
E
S
E
T
/
R
A
D
I
O
O
F
F
A
L
A
R
M
2
-
B
U
Z
Z
E
R
1
2
3
4
5
P
R
E
S
E
T
V
O
L
U
M
E
B
A
N
D
A
L
A
R
M
2
-
R
A
D
I
O
SLEEP /
RADIO
ON
H
R
M
I
N
T
I
M
E
•
•
C
L
O
C
K
A
L
A
R
M
1
•
A
L
A
R
M
2
•
S
E
T
1 32 08 !
@ #
754 6 9
3
Page 4

CONTROLS
1 SLEEP/ RADIO ON
English
– displays/ adjusts/ switches off sleep time
– switches on radio; displays radio frequency
2 SET control
– sets the times for •ALARM 1, •ALARM 2, •TIME
and to run on •CLOCK time
3 TIME SET/ TUNING: HR, MIN and 7, 8
– adjusts the hours (7) and minutes (8)
for clock/ alarm times
– tunes (up 7, down 8) to radio stations
4 ALARM 1 - RADIO and also PRESET 1
– selects radio mode on or off for alarm 1
– PRESET station 1
5 ALARM 2 - BUZZER and also PRESET 2
– selects buzzer mode on or off for alarm 2
– PRESET station 2
6 ALARM RESET/ RADIO OFF
– stops the active alarm for 24 hours
– stops radio /sleep function
Environmental information
We have reduced packaging to the minimum for easy separation into two materials: cardboard (box) and polyethylene (bags,
protective foam).
Your set consists of materials, which can be recycled if disassembled by a specialized company. Please observe
the local regulations to dispose of packing materials, exhausted batteries and old equipment.
4
7 PRESET 3, 4 and 5
– stores and selects preset stations
8 REPEAT ALARM/ BRIGHTNESS CONTROL
– switches off the alarm for a 9 minute period
– changes the brightness of the display illumination
– switches off sleep function
9 Display
– shows the clock/ alarm times and status of the set
0 BAND
– selects FM/ MW/ LW waveband
! VOLUME
– adjusts the sound level
@ Pigtail aerial
– (on the bottom of the set) improves FM reception
# Mains lead
– for mains supply
The type plate is located on the bottom of the set.
Page 5

INSTALLATION BASIC FEATURES
MAINS SUPPLY AND DEMO MODE
1. Check if the power voltage, shown on the type plate on the
bottom of the set, corresponds to your local mains supply. If
it does not, consult your dealer or service centre.
2. Connect the mains plug into the wall socket. The mains
supply is now switched on and the display will show the
PHILIPS demo mode.
™ PH..IL ..IPS scrolls across the display continuously.
• Turn the SET control to SET TIME to exit the demo mode.
3. To disconnect the set completely from the mains supply,
withdraw the mains plug from the wall socket.
POWER BACK-UP
The power back-up conveniently allows your preset stations,
alarm and clock time settings to be stored for up to 3 minutes
when there is a power interruption e.g. AC mains failure.
The complete clock radio and display illumination will be
switched off. As soon as the mains supply returns, the display
will indicate the correct time.
If mains supply returns after 3 minutes and the display shows:
• clock time blinking – indicates you need to re-adjust the
clock time
• PHILIPS demo mode – indicates you need to re-enter preset
stations and the clock and alarm times.
ILLUMINATION BRIGHTNESS
1. Check if the SET control is turned to CLOCK position and the
radio is switched off.
2. Press REPEAT ALARM/
– The brightness of the display will change in this
sequence:
BRIGHT y MEDIUM y LOW y BRIGHT...
Note:
when an alarm or the SLEEP function is active, brightness
cannot be adjusted.
RESET
Should the display and electronic functions of your set receive
interference e.g. static electricity from carpets, thunderstorms,
etc. RESET allows you to clear all previous settings and start
up again.
• Use a ballpoint pen to press the RESET hole found on the
bottom of the set.
BRIGHTNESS CONTROL once or more.
English
5
Page 6

SETTING THE CLOCK RADIO
The time is displayed using the 24 hour clock.
English
1. Turn the SET control to TIME.
2. Press 7 repeatedly or hold down on the button to adjust the
hours.
Release 7 when you reach the correct hour.
3. Press 8 repeatedly or hold down on the button to adjust the
minutes.
Release 8 when you reach the correct minute setting.
4. Turn the SET control to CLOCK.
RADIO
1. Press SLEEP/ RADIO ON once to switch on the radio.
™ Display shows the radio frequency of the last selected
waveband briefly before returning to the clock time. Your
preset station is also shown if you are listening to a
preset.
2. Press BAND if you wish to change waveband.
3. Adjust the sound using VOLUME.
4. Press ALARM RESET/ RADIO OFF to switch off.
6
TUNING TO RADIO STATIONS
Automatic tuning
• Press 7 or 8 one second or more to tune to your station.
™ The radio automatically tunes to a station of sufficient
reception.
Manual tuning
• Press 7 or 8 briefly and repeatedly until you reach the
desired frequency.
To improve reception:
FM: Adjust the pigtail aerial for optimum reception.
MW/ LW: Uses a built-in aerial inside the set. Direct the
STORING AND USING PRESET STATIONS
You can store up to a total of 10 radio stations in the memory,
5 on each waveband.
1.
2. To store a preset, hold down briefly on a PRESET button 1-5
3. Repeat steps 1 and 2 to store your other stations.
• You can overwrite a preset station by storing another
4. Press a PRESET button 1-5 to listen to a preset station.
antenna by adjusting the position of your set.
Tune to your desired station (see TUNING TO RADIO STATIONS).
until you hear a double beep.
™ Display shows the preset number of your station.
frequency in its place.
Page 7

GENERAL
Two different alarm times can be set. This can be useful when
you need to be woken up at a different time e.g. during the
week and at the weekend:
• ALARM 1 – radio mode
• ALARM 2 – buzzer mode. The gentle wake buzzer alarm
increases its beep tone frequency within seconds.
SETTING THE ALARM TIME AND MODE
1. Turn the SET control to ALARM 1 or ALARM 2.
™ Display shows the alarm time digits with the
or indicators flashing.
2. Press 7 repeatedly or hold down on the button to adjust the
hours.
Release 7 when you reach the correct hour.
3. Press 8 repeatedly or hold down on the button to adjust the
minutes.
Release 8 when you reach the correct minute setting.
4. Turn the SET control back to CLOCK.
5. While the radio is switched off, select your choice of alarm
mode by pressing ALARM 1-RADIO or ALARM 2-BUZZER.
™ Display shows or .
USING THE ALARM
Notes: If you have selected the ALARM 1 RADIO, make sure
you have properly tuned to a station before turning off
the set.
If you set and activate the same alarm time for both
alarms, only the ALARM 2-BUZZER will be activated at
the set time.
SWITCHING OFF THE ALARM
There are three ways of switching off the alarm. Unless you
cancel the alarm completely, the 24 hour alarm resetoption
will be automatically selected after 59 minutes, from the time
your alarm time first goes off.
24 hour alarm reset
If you want the alarm mode to be stopped immediately but also
wish to retain the same alarm setting for the following day:
• Press ALARM RESET/ RADIO OFF.
™ You will hear a beep tone confirming 24 hour reset
activation.
English
7
Page 8

USING THE ALARM SLEEP
Cancelling the alarm completely
English
To cancel the set alarm time before it goes off, or during the
alarm call:
• With the radio switched off, press ALARM 1-RADIO or
ALARM 2-BUZZER once or more until the selected alarm
indicator disappears from the display.
Repeat alarm
This repeats your alarm call at 9-minute intervals.
1. During the alarm call, press REPEAT ALARM/ BRIGHTNESS
CONTROL.
™ Display shows or flashing
during a repeat alarm.
2. Repeat if desired up to 6 times.
ABOUT SLEEP
This set has a built-in sleep timer which enables the set to be
automatically switched off during radio playback after a set
period of time. There are four sleep times before the set turns
itself off: 60, 30, 15 minutes and off.
SETTING SLEEP
1. Press SLEEP/ RADIO ON to switch on the radio.
2. Within 1 second, press SLEEP/ RADIO ON again once or
more until the display shows and SL:60.
8
While in the SLEEP display, press SLEEP/ RADIO ON once or
more to select your sleep time.
™ Display shows in sequence: and the sleep
period time options: SL:60, SL:30, SL:15 and OFF.
™ The sleep time and radio frequency appear briefly before
showing standby clock time with the
indicator, if SLEEP is activated.
3. To cancel sleep, press either:
• ALARM RESET/ RADIO OFF
• REPEAT ALARM/
• SLEEP/ RADIO ON once or more until
disappears from the display.
MAINTENANCE
• If you do not intend to use the set for a long time, withdraw
the mains plug from the wall socket.
• Do not expose the set to humidity, rain, sand or excessive
heat caused by heating equipment or direct sunlight.
• To clean the set, use a soft, slightly dampened chamois
leather. Do not use any cleaning agents containing alcohol,
ammonia, benzene or abrasives as these may harm the
housing.
BRIGHTNESS CONTROL
Page 9

TROUBLESHOOTING
If a fault occurs, first check the points listed below before taking the set for repair. If you are unable to remedy a problem by
following these hints, consult your dealer or service centre.
WARNING: Under no circumstances should you try to repair the set yourself, as this will invalidate the
guarantee.
PROBLEM
– POSSIBLE CAUSE
• REMEDY
No sound
– Volume not adjusted
• Adjust the VOLUME
Display error/ no reaction to any controls
– Electrostatic discharge
• Press RESET
Occasional crackling sound during FM broadcast
– Weak signal
• Adjust the position of the pigtail aerial
This product complies with the radio interference requirements of the European Union.
Continuous crackling/ hiss disturbance during
MW/ LW broadcast
– Electrical interference from TV, computer, fluorescent lamp,
mobile phone, etc.
• Move set away from other electrical equipment
The alarm does not function
– Alarm time/mode not set
• See SETTING THE ALARM
– Volume too low for ALARM 1-RADIO
• Adjust the volume
– ALARM 1-RADIO not tuned to a radio station
• Check if the set is tuned to a radio station before setting
the ALARM 1-RADIO, and when switching off
English
9
Page 10

COMMANDES
1 SLEEP/ RADIO ON
– pour afficher/ régler/ arrêter la fonction sommeil
– pour allumer la radio; pour afficher la fréquence radio
2 Sélecteur SET
– pour régler l'heure de •ALARM 1, •ALARM 2, •TIME
Français
et pour afficher l’heure d’horloge •CLOCK
TIME SET/ TUNING: HR, MIN et 7, 8
3
– pour régler les heures (7) et les minutes (8) pour l’heure
d’horloge/ réveil
– pour rechercher des stations de radio (vers le haut 7, vers
le bas 8)
4 ALARM 1 - RADIO and also PRESET 1
– pour sélectionner ou arrêter le mode radio pour le réveil 1
PRESET station 1
–
5 ALARM 2 - BUZZER et aussi PRESET 2
– pour sélectionner ou arrêter le mode ronfleur pour le réveil 2
PRESET station 2
–
6 ALARM RESET/ RADIO OFF
– pour arrêter le réveil actif pendant 24 heures
– pour éteindre la radio/ arrêter la fonction sommeil
Informations sur l’environnement
Nous avons fait le maximum pour autoriser la séparation des matériaux d’emballage en deux catégories: le carton (boîte) et le
polyéthylène (sachets, mousse de protection).
Votre équipement est constitué de matériaux recyclables, à condition d’être démonté par une firme spécialisée.
Veuillez observer les règles locales en vigueur pour le rebut des matériaux d’emballage, les piles usées et les
anciens équipements.
10
7 PRESET 3, 4 et 5
– pour mémoriser et sélectionner les stations préréglées
8 REPEAT ALARM/
BRIGHTNESS CONTROL
– pour éteindre le réveil pendant une durée de 9 minutes
– pour changer la luminosité de l'éclairage de l’afficheur
– pour arrêter la fonction sommeil
9 Afficheur
– indique les heures d'horloge/réveil ainsi que l'état de l'appareil
0 BAND
– pour sélectionner la bande d'onde FM/ MW/ LW
! VOLUME
– pour ajuster le niveau de son
@ Antenne en ‘tire bouchon’
– (sous l’appareil) pour améliorer la réception FM
# Cordon d’alimentation
– pour l’alimentation secteur
La plaque signalétique se trouve sous l'appareil.
Page 11

INSTALLATION FONCTIONS DE BASE
ALIMENTATION SECTEUR ET MODE DE DÉMONSTRATION
1. Vérifiez que la tension secteur indiquée sur la plaque
signalétique sous l'appareil correspond à la tension de
secteur local. Si ce n'est pas le cas, consultez votre
revendeur ou le centre de service après-vente.
2. Branchez la fiche d'alimentation dans la prise murale.
L'alimentation est maintenant sous tension et l’afficheur
indique le mode de démonstration PHILIPS.
™ PH..IL ..IPS défile de façon continue à l'afficheur.
• Tournez le sélecteur SET sur SET TIME pour annuler le
mode de démonstration.
3. Pour couper entièrement l'alimentation secteur, retirez la
fiche secteur de la prise murale.
MEMOIRE AUTONOME
La mémoire autonome permet commodément de mémoriser les
stations radio préréglées et vos réglages de réveil et d’horloge
pendant 3 minutes au maximum en cas de panne d’alimentation,
par exemple une panne de courant. Le radio-réveil complet ainsi
que le rétro-éclairage de l’afficheur sont mis hors service. Dès
que l’alimentation secteur est rétablie, l’afficheur indiquera
l’heure exacte.
Si l’alimentation revient après 3 minutes et sur l’afficheur:
• l’heure d’horloge clignote – il vous faudra réintroduire
l’heure d’horloge
• le mode de démonstration PHILIPS apparaît – il vous faudra
réintroduire les stations radio préréglées et vos réglages de
réveil et d’horloge.
LUMINOSITE D'ECLAIRAGE
1. Contrôlez si le sélecteur SET se trouve en position CLOCK et
la radio est éteinte.
2. Appuyez une ou plusieurs fois sur
REPEAT ALARM/
– La luminosité de l’afficheur change dans l’ordre suivant:
BRIGHT y MEDIUM y LOW y BRIGHT...
Remarque:
il est impossible de changer la luminosité lorsque un des
réveils ou la fonction sommeil est active.
RESET (réinitialisation)
S’il y a des interférences externes telles que l’électricité
statique de tapis, d’orages, etc. qui affectent l’affichage et les
fonctions électroniques de votre équipement, la fonction
RESET vous permettra d’effacer tous les réglages précédents
et de recommencer depuis le début.
• Utilisez la pointe d’un bic pour appuyer sur RESET prévu à la
base de l’équipement.
BRIGHTNESS CONTROL.
Français
11
Page 12

REGLAGE DE L'HORLOGE RADIO
L’heure est affichée sur la base de 24 heures.
1. Tournez le sélecteur SET sur TIME.
2. Appuyez plusieurs fois sur 7 ou maintenez enfoncé pour
régler les heures.
Relâchez 7 lorsque vous aurez obtenu l’heure correcte.
Français
3. Appuyez plusieurs fois sur 8 ou maintenez enfoncé pour
régler les minutes. Relâchez 8 lorsque vous aurez obtenu le
réglage correct des minutes.
4. Tournez le sélecteur SET sur CLOCK.
RADIO
1. Appuyez une fois sur SLEEP/ RADIO ON pour allumer la radio.
™ L’afficheur indique la fréquence radio de la bande d’onde
sélectionnée en dernier avant de passer à l’affichage de
l’heure d’horloge. Si vous écoutez une station préréglée,
cette station est également affichée.
2. Appuyez sur BAND si vous désirez changer la bande d’onde.
3. Réglez le son à laide de VOLUME.
4. Appuyez sur ALARM RESET/ RADIO OFF pour éteindre.
RECHERCHE DE STATIONS
Syntonisation automatique
• Appuyez sur 7 ou 8 pendant une seconde ou plus pour
rechercher la station désirée.
™ La radio se règle automatiquement sur une station radio
à réception suffisante.
12
RECHERCHE DE STATIONS
Syntonisation automatique
• Appuyez sur 7 ou 8 pendant une seconde ou plus pour
rechercher la station désirée.
™ La radio se règle automatiquement sur une station radio
à réception suffisante.
Syntonisation manuelle
• Appuyez plusieurs fois brièvement sur 7 ou 8 jusqu'a ce que
vous obteniez la fréquence désirée.
Pour améliorer la réception
FM: Adjust the pigtail aerial for optimum reception.
MW/ LW: Utilise une antenne incorporée. Dirigez l'antenne
MEMORISATION ET SELECTION DES STATIONS
PREREGLEES
Vous pouvez mémoriser jusqu’à 10 stations radio, 5 sur chaque
longueur d’onde.
1.
2. Pour programmer une station, maintenez enfoncée
en réglant la position de l'appareil.
Syntonisez sur la station souhaitée (voir Recherche de stations).
brièvement une des touches PRESET entre 1 et 5 jusqu'à ce
vous entendiez un double bip.
™ L’afficheur indique le numéro de la station préréglée.
Page 13

RADIO EMPLOI DU REVEIL
3. Répétez les opérations 1 et 2 pour mémoriser d'autres stations.
• Vous pouvez "écraser" une station préréglée en mémorisant
une autre fréquence à sa place.
4. Appuyez sur une des touches PRESET entre 1 et 5 pour
rechercher une station préréglée.
GENERALITES
Il est possible de régler deux heures de réveil différentes. Ceci
peut s'avérer utile, si par exemple, vous désirez vous réveiller
à une heure différente en semaine et le week-end:
• ALARM 1 – mode radio
• ALARM 2 – mode ronfleur. Le niveau de volume du ronfleur
devient de plus en plus fort au bout de quelques secondes.
REGLAGE DE L'HEURE ET DU MODE DE REVEIL
1. Tournez le sélecteur SET sur ALARM 1 ou ALARM 2.
™ L’afficheur indique les chiffres de l’heure de réveil et les
indicateurs ou clignotent.
2. Appuyez plusieurs fois sur 7 ou maintenez enfoncé pour
régler les heures.
Relâchez 7 lorsque vous aurez obtenu l’heure correcte.
3. Appuyez plusieurs fois sur 8 ou maintenez enfoncé pour
régler les minutes.
Relâchez 8 lorsque vous aurez obtenu le réglage correct des
minutes.
4. Tournez le sélecteur SET à nouveau sur CLOCK.
5. Lorsque la radio est éteinte, sélectionnez le mode de réveil
désiré en appuyant sur ALARM 1-RADIO ou ALARM 2-BUZZER.
™ L’afficheur indique ou .
Remarques: Si vous avez sélectionné ALARM 1 RADIO,
assurez-vous que vous avez effectivement une
réception radio avant d’éteindre l’appareil.
Si vous réglez les deux réveils à la même heure,
seulement ALARM 2-BUZZER sera activé à
l’heure réglée.
ARRET DU REVEIL
Vous pouvez arrêter le réveil de trois façons. A moins que vous
ne choisissiez d'arrêter complètement le réveil, 24 hour alarm
reset sera automatiquement sélectionnée 59 minutes après la
première sonnerie du réveil.
24 hour alarm reset (Arrêt pendant 24 heures)
Si vous désirez arrêter immédiatement le réveil tout en
conservant le réglage valide pour le lendemain:
• Appuyez sur ALARM RESET/ RADIO OFF.
™ Vous entendrez un bip confirmant l'activation du réveil au
bout de 24 heures.
Français
13
Page 14
EMPLOI DU REVEIL SLEEP
Arrêt définitif du réveil
Pour arrêter définitivement le réveil avant qu’il ne se mette en
marche ou pendant qu’il est actif:
• Pendant que la radio est éteinte, appuyez une ou plusieurs
fois sur ALARM 1-RADIO ou ALARM 2-BUZZER jusqu’à ce que
Français
l’indicateur de réveil sélectionné disparaisse de l’afficheur.
Répétition du réveil
Cette fonction réactive le réveil plusieurs fois à des intervalles
de 9 minutes.
1. Appuyez sur REPEAT ALARM/ BRIGHTNESS CONTROL
pendant que le réveil se fait entendre.
™ ou clignote sur l’afficheur
pendant la période active de répétition du réveil.
2. Au besoin, répétez jusqu’à 6 reprises.
A PROPOS DE LA FONCTION SLEEP (SOMMEIL)
Cet appareil est doté d’une minuterie incorporée qui permet
d’éteindre automatiquement la radio au bout d'une période de
temps déterminée. Quatre périodes sont prévues à cet effet
avant que l'appareil s'éteigne automatiquement: 60, 30, 15
minutes et hors service.
ACTIVATION DE LA FONCTION SLEEP (SOMMEIL)
1. Appuyez sur SLEEP/ RADIO ON pour allumer la radio.
2. Dans la seconde, appuyez à nouveau une ou plusieurs fois
sur SLEEP/ RADIO ON jusqu’à ce que l’afficheur indique
14
et SL:60.
En mode d’affichage SLEEP, appuyez une ou plusieurs fois
sur SLEEP/ RADIO ON pour sélectionner la durée de
sommeil désirée.
™ L’afficheur indique et une des options de la
durée de sommeil dans l’ordre suivant: SL:60, SL:30,
SL:15 et OFF.
™ La durée de sommeil et la fréquence radio apparaissent
brièvement avant de retourner à l’affichage de l’heure en
mode veille avec l’indicateur si la fonction
SLEEP (sommeil) est activée.
3. Pour arrêter la fonction sommeil, vous pouvez appuyer sur:
• ALARM RESET/ RADIO OFF
• REPEAT ALARM/
• SLEEP/ RADIO ON une ou plusieurs fois jusqu’à ce que
ENTRETIEN
• Si n'avez pas l'intention d'utiliser l’appareil pendant
longtemps, débranchez-le de la prise d'alimentation.
• Ne pas exposer l’équipement ni les piles à l’humidité, à la
pluie, au sable ni à la chaleur excessive causée par un
équipement de chauffage ou les rayons directs du soleil.
• Pour nettoyer l’équipement, utilisez une peau de chamois
humide. Ne pas utiliser de détergents contenant de l’alcool,
de l’ammoniaque, du benzène ou des abrasifs, car ceux-ci
peuvent endommager le boîtier.
BRIGHTNESS CONTROL
n’apparaisse plus sur l’afficheur.
Page 15

DEPANNAGE
Si un défaut apparaît, vérifiez tout d’abord les points listés ci-dessous, avant de porter votre poste chez un réparateur. S’il ne
vous est pas possible de remédier à un problème en suivant ces instructions, prenez contact avec votre vendeur ou le centre de
service après-vente.
ATTENTION: N’essayez sous aucun prétexte d’effectuer vous-même la réparation, car ceci annulerait la
validité de la garantie.
PROBLEME
– CAUSE POSSIBLE
• REMEDE
Pas de son
– Volume non réglé
• Réglez le VOLUME
Erreur affichage/ aucune commande ne fonctionne
– Décharge électrostatique
• Appuyez sur RESET
Craquements intermittents pendant une émission FM
– Signal faible
• Ajustez l’orientation de l’antenne en ‘tire bouchon’
Ce produit satisfait aux conditions imposées par l’Union Européenne en matière d’interférences radio.
Craquements continus/ sifflements pendant une
émission MW/ LW
– Interférences électriques dues à un téléviseur, un ordinateur,
des tubes fluorescents, des téléphones mobiles, etc.
• Déplacez l’équipement à distance des autres équipements
électriques
Le réveil ne fonctionne pas
– Heure/mode de réveil non réglé
• Voir REGLAGE DE L'HEURE ET DU MODE DE REVEIL
– Volume trop bas pour ALARM 1-RADIO
• Réglez le volume
– ALARM 1-RADIO pas syntonisé sur une station radio
• Contrôlez si l’appareil est syntonisé sur une station radio
avant de régler ALARM 1-RADIO, et avant d’éteindre
Français
15
Page 16

CONTROLES
1 SLEEP/ RADIO ON
– visualiza/ ajusta/ detiene la función de dormitado
– enciende la radio; muestra la frecuencia de radio
2 Control SET
– ajusta las horas de •ALARM 1, •ALARM 2, •TIME y
muestra la hora del reloj •CLOCK
3 TIME SET/ TUNING: HR, MIN y 7, 8
– ajusta las horas (7) y los minutos (8) de la hora del
reloj/alarma
Español
– sintoniza (subir 7, bajar 8) las emisoras de radio
4 ALARM 1 - RADIO y también PRESET 1
– selecciona o desactiva el modo radio para la alarma 1
– PRESET station 1
5 ALARM 2 - BUZZER y también PRESET 2
– selecciona o desactiva el modo zumbador para la alarma 2
– PRESET station 2
6 ALARM RESET/ RADIO OFF
– detiene la alarma activa durante 24 horas
– apaga la radio /detiene la función de dormitado
Información medioambiental
Se ha prescindido de cualquier material de embalaje innecesario. El embalaje esta compuesto de dos materiales fácilmente
separables: cartón (la caja) y polietileno (bolsas, plancha protectora de espuma).
El aparato está fabricado con materiales que se pueden reciclar si son desmontados por una empresa especializada.
Observe las normas locales concernientes a la eliminación de estos materiales, pilas usadas y equipos desechables.
16
7 PRESET 3, 4 y 5
– programa y selecciona las presintonías
8 REPEAT ALARM/ BRIGHTNESS CONTROL
– detiene la alarma durante un período de 9 minutos
– cambia la intensidad de iluminación de la pantalla
– detiene la función de dormitado
9 Pantalla
– muestra la hora del reloj/alarma y el estado del aparato
0 BAND
– selecciona la banda de onda FM/ MW/ LW
! VOLUME
– ajusta el nivel del volumen
@ Antena flexible
– (en la base del aparato) mejora la recepción en FM
# Cable de alimentación
– alimenta el aparato
La placa de características se encuentra en la base del aparato.
Page 17

INSTALACIÓN CARACTERÍSTICAS BÁSICAS
ALIMENTACIÓN Y MODO DE DEMOSTRACIÓN
1. Compruebe que la tensión de alimentación, que encontrará
indicada en la base del aparato, coincide con la que usted
consume. Si no fuera así, consulte a su vendedor o servicio
técnico.
2. Conecte el cable de alimentación en el enchufe de la pared.
De este modo, alimentará el aparato y la pantalla mostrará el
modo de demostración PHILIPS (PHILIPS demo mode).
™ Después, la palabra PH..IL ..IPS recorrerá la pantalla
continuamente.
• Gire el control SET hasta la posición TIME SET para salir
del modo demostración.
3. Para desconectar el aparato por completo, desenchúfelo.
ALIMENTACIÓN DE SALVAGUARDA
El sistema de alimentación de salvaguarda mantiene las
presintonías y los ajustes de alarma y hora durante 3 minutos en
el caso de que se produjera una interrupción de la alimentación
(por ejemplo, fallo en la red eléctrica). Durante este tiempo, la
radio reloj y la iluminación de la pantalla se desconectarán. Tan
pronto como se restablezca el suministro de energía eléctrica, la
pantalla volverá a indicar la hora correcta.
Si el suministro eléctrico volviera transcurridos más de
3 minutos y en la pantalla:
• parpadea la hora – deberá volver a introducir la hora del reloj
• aparece el modo de demostración PHILIPS – deberá volver a
introducir las presintonías y la hora del reloj y de la alarma
INTENSIDAD DE LA ILUMINACIÓN
1. Compruebe si el control SET está en la posición CLOCK y si
la radio está apagada.
2. Pulse la tecla REPEAT ALARM/
más veces.
– La intensidad de la pantalla cambiará según la siguiente
secuencia:
BRIGHT y MEDIUM y LOW y BRIGHT...
Nota:
no es posible cambiar la intensidad de la iluminación cuando una
de las alarmas o la función de dormitado SLEEP está activada.
RESET (reajuste)
Si recibe alguna interferencia externa por ej. una descarga de
electricidad estática de una alfombra, una tormenta etc. que
pueda afectar a las funciones electrónicas o la pantalla del
aparato, RESET le permite borrar los ajustes anteriores y
reintroducir los nuevos.
• Utilice un bolígrafo para presionar RESET, en la parte
inferior del aparato.
BRIGHTNESS CONTROL una o
Español
17
Page 18

AJUSTE DEL RELOJ RADIO
La hora se visualiza en el sistema de 24 horas.
1. Gire el control SET hasta la posición TIME.
2. Pulse 7 repetidamente o mantenga pulsado para ajustar las
horas. Suelte 7 cuando llegue a la hora deseada.
3. Pulse 8 repetidamente o mantenga pulsado para ajustar los
minutos.
Suelte 8 cuando llegue al ajuste deseado de los minutos.
4. Gire el control SET hasta la posición CLOCK.
Español
RADIO
1. Pulse SLEEP/ RADIO ON una vez para encender la radio.
™ La pantalla muestra la frecuencia de radio de la última
banda de onda seleccionada antes de volver a mostrar la
hora del reloj. Aparece también el número di presintonía
se está escuchando una presintonía.
2. Pulse BAND si desea cambiar la banda de onda.
3. Ajuste el sonido con VOLUME.
4. Pulse ALARM RESET/ RADIO OFF para apagar.
SINTONIZACIÓN DE EMISORAS
Sintonización automática
• Pulse 7 o 8 durante un segundo o más para sintonizar su
emisora.
™ La radio sintonizará automáticamente una emisora que
tenga la recepción suficiente.
18
Sintonización manual
• Pulse 7 o 8 brevemente y repetidamente hasta que alcance
la frecuencia deseada.
Para mejorar la recepción
FM: Ajusta la antena flexible para la mejora recepción
MW/ LW: El aparato utiliza una antena interior. Dirija la
ALMACENAMIENTO Y SELECCIÓN DE PRESINTONÍAS
Puede almacenar en memoria las frecuencias de hasta
10 emisoras de radio, 5 en cada banda de onda.
1.
2. Para memorizar una presintonía, mantenga pulsado
3. Repita los pasos 1 y 2 para presintonizar otras emisoras.
• Usted puede sobrescribir las presintonías guardando otra
4. Pulse uno de los botones PRESET de 1 a 5 para seleccionar
antena variando la posición del aparato.
Sintonice la emisora que desee (Vea Sintonización de emisoras).
brevemente uno de los botones PRESET de 1 a 5 hasta que
escuche un pitido doble.
™ La pantalla muestra el número de la presintonía
seleccionada.
frecuencia en su lugar.
una presintonía.
Page 19

GENERAL
Se pueden ajustar dos horas de alarma diferentes. Éste sistema
es útil cuando, por ejemplo, usted necesita despertarse a
diferentes horas durante la semana o el fin de semana:
• ALARM 1 – modo radio
• ALARM 2 – modo zumbador. La alarma del zumbador
comienza suavemente y aumenta la frecuencia del tono en
algunos segundos.
AJUSTE DE LA HORA Y DEL MODO DE ALARMA
1. Gire el control SET hasta la posición ALARM 1 o ALARM 2.
™ La pantalla muestra los dígitos de la hora de alarma y los
indicadores o parpadean.
2. Pulse 7 repetidamente o mantenga pulsado para ajustar las
horas. Suelte 7 cuando llegue a la hora deseada.
3. Pulse 8 repetidamente o mantenga pulsado para ajustar los
minutos. Suelte 8 cuando llegue al ajuste deseado de los
minutos.
4. Vuelva a girar el control SET hasta la posición CLOCK.
5. Mientras la radio está apagada, seleccione el modo de
alarma pulsando ALARM 1-RADIO o ALARM 2-BUZZER.
™ La pantalla muestra o .
PARA UTILIZAR LA ALARMA
Notas: Si ha seleccionado ALARM 1 RADIO, compruebe que
ha sintonizado con una emisora antes de apagar el
aparato.
Si ha ajustado y activado la misma hora para las dos
alarmas, sólo ALARM 2-BUZZER se activa a la hora
seleccionada.
DESCONEXIÓN DE LA ALARMA
Existen tres maneras de desconectar la alarma. A menos que
la desconecte por completo, el reajuste de la alarma de
24 horas actuará automáticamente después de transcurridos
59 minutos desde el momento en que la alarma se disparó por
primera vez.
24 hour alarm reset (Reajuste de la alarma de 24 horas)
Si desea que el modo de alarma se pare inmediatamente,
pero, al mismo tiempo, desea que el ajuste de la alarma se
guarde para el día siguiente:
• Pulse ALARM RESET/ RADIO OFF.
™ Escuchará un tono de confirmación de la activación del
reajuste de 24 horas.
Español
19
Page 20

PARA UTILIZAR LA ALARMA SLEEP
Cancelación de la alarma por completo
Para cancelar la hora ajustada de la alarma antes de que se
dispare, o durante la activación de la alarma:
• Con la radio apagada, pulse ALARM 1-RADIO o ALARM 2BUZZER una o más veces hasta que el indicador de alarma
seleccionado desaparezca de la pantalla.
Repetición de alarma
Repite la llamada de alarma a intervalos de 9 minutos.
Español
1. Durante la llamada de la alarma, pulse REPEAT ALARM/
BRIGHTNESS CONTROL.
™ o parpadea en la pantalla
durante la llamada de la alarma.
2. Si lo desea, repita hasta 6 veces.
SOBRE LA FUNCIÓN DE SLEEP
El aparato tiene un temporizador interno que permite que el
aparato se apague automáticamente durante la reproducción
de la radio después de un período de tiempo determinado.
Existen cuatro tiempos de dormitado preprogramados para que
se apague por sí mismo: 60, 30, 15 minutos y apagado.
AJUSTE DEL TIEMPO DE SLEEP
1. Pulse SLEEP/ RADIO ON para encender la radio.
2. En menos de 1 segundo, vuelva a pulsar SLEEP/ RADIO ON
una o más veces hasta que la pantalla muestre
20
pulse SLEEP/ RADIO ON una o más veces para seleccionar
el tiempo de dormitado.
™ La pantalla muestra en secuencia: y las
™ La pantalla muestra brevemente el tiempo de dormitado
3. Para cancelar la función de dormitado, pulse:
• ALARM RESET/ RADIO OFF
• REPEAT ALARM/
• SLEEP/ RADIO ON una o más veces hasta que
desaparezca de la pantalla.
MANTENIMIENTO
• Si no va a utilizar su aparato durante un largo tiempo,
desconecte el enchufe de la toma de la pared.
• No exponga el aparato a la humedad, la lluvia, la arena o a
un calor excesivo provocado por un calentamiento del
equipo o la luz directa del sol.
• Para limpiar el aparato, utilice una gamuza suave
humedecida ligeramente. No utilice limpiadores que
contengan alcohol, disolventes, amoniaco o que sean
abrasivos, ya que éstos pueden dañar la carcasa.
y SL:60. Durante la visualización SLEEP,
opciones del tiempo de dormitado: SL:60, SL:30, SL:15 y
OFF.
y la frecuencia de radio antes de volver a mostrar la hora
del reloj con el indicador , cuando la función
de dormitado está activada.
BRIGHTNESS CONTROL
Page 21

SOLUCIÓN DE PROBLEMAS
Si ocurriera algún fallo, primero compruebe los puntos que aparecen en la siguiente lista antes de llevar el aparato a un servicio
técnico. Si no es capaz de solucionar el problema, siguiendo estas indicaciones, póngase en contacto con su vendedor o con su
servicio técnico.
ADVERTENCIA: Bajo ninguna circunstancia intente repararlo por su cuenta: invalidaría la garantía.
PROBLEMA
– POSIBLE CAUSA
• SOLUCIÓN
No hay sonido
– Volumen no ajustado
• Ajuste el VOLUMEN
Error en la pantalla/ los controles no funcionan
– Descarga electrostática
• Pulse RESET
Se oye un chisporroteo ocasional durante la recepción
de la FM
– Señal débil
• Ajuste la posición del antena flexible
Este producto cumple los requisitos sobre interferencias de radio de la Unión Europea.
Constante distorsión/zumbido en la recepción de MW/ LW
– Interferencias eléctricas de la TV, ordenador, lámparas
fluorescentes, teléfonos portátiles, etc.
• Posicione el aparato a cierta distancia de los equipos
eléctricos
La alarma no funciona
– La hora/ el modo de alarma no están activados
• Vea el capítulo AJUSTE DE LA HORA Y DEL MODO DE
ALARMA
– El volumen de ALARM 1-RADIO está demasiado bajo
• Ajústelo
– ALARM 1-RADIO no está sintonizado con una emisora
• Compruebe que ha sintonizado con una emisora antes de
seleccionar ALARM 1-RADIO y de apagar
Español
21
Page 22

BEDIENELEMENTE
1 SLEEP/ RADIO ON
– Anzeigen/ Einstellen/ Abschalten der Schlafzeit
– Einschalten des Radio; Anzeige der Radiofrequenz
2 SET Regler
– Festlegen der Zeiten für •ALARM 1, •ALARM 2, •TIME
und für die „normale" Uhrzeitfunktion •CLOCK
3 TIME SET/ TUNING: HR, MIN und 7, 8
– Einstellen der Stunden (7) und Minuten (8)
für Uhr-/ Weckzeiten
– Abstimmen (auf 7, ab 8) auf Radiosender
4 ALARM 1 - RADIO und auch PRESET 1
– Wahl von Radiomodus ein oder aus für Wecker 1
– PRESET station (Vorwahlsender) 1
5 ALARM 2 - BUZZER und auch PRESET 2
Deutsch
– Wahl von Summermodus ein oder aus für Wecker 2
– PRESET station (Vorwahlsender) 2
6 ALARM RESET/ RADIO OFF
– 24 Stunden langes Anhalten des aktiven Weckers
– Unterbinden der Radio- /Schlaffunktion
Umweltinformationen
Alles überflüssige Verpackungsmaterial wurde vermieden, damit die Verpackung leicht in zwei Materialien aufteilbar ist:
Ihr Gerät besteht aus Materialien, die von darauf spezialisierten Betrieben wiederverwertet werden können. Bitte
halten Sie sich beim Recy-celn von Verpackungsmaterial, erschöpften Batterien und alter Ausrüstung an örtliche
Bestimmungen.
22
7 PRESET 3, 4 and 5
– Speichern und Wählen von Vorwahlsendern
8 REPEAT ALARM/ BRIGHTNESS CONTROL
– 9 Minuten langes Abschalten des Weckers
– Helligkeitsänderung der Anzeigebeleuchtung
– Abschalten der Schlaffunktion
9 Anzeige
– zeigt die Uhr-/ Weckzeiten und Status des Gerätes
0 BAND
– Wahl des FM-/ MW-/ LW-Wellenbereichs
! VOLUME
– Einstellen des Schallpegels
@ Drahtantenne
– (auf der Geräteunterseite) verbessert FM-Empfang
# Netzkabel
– für Stromversorgung
Das Typenschild befindet sich auf der Geräteunterseite.
Page 23

INSTALLATION GRUNDFUNKTIONEN
NETZANSCHLUSS UND DEMO-MODUS
1. Prüfen, ob die auf dem Typenschild (auf der Geräteunterseite)
angegebene Netzspannung mit Ihrer örtlichen Netzspannung
übereinstimmt. Wenn dies nicht der Fall ist, sich an Ihren
Fachhändler oder an Ihre Service-Organisation wenden.
2. Den Netzstecker in die Steckdose stecken. Die
Stromversorgung ist jetzt eingeschaltet, und in der Anzeige
erscheint der PHILIPS demo mode.
™ PH..IL ..IPS rollt ununterbrochen über die Anzeige.
• Den Regler SET auf SET TIME drehen, um den Demo-Modus
zu verlassen.
3. Um das Gerät vollständig von der Stromversorgung zu
trennen, ist der Netzstecker zu ziehen.
RESERVESTROMVERSORGUNG
Die Reservestromversorgung bietet Ihnen das nützliche
Merkmal, Ihre Vorwahlsender, Weck- und Uhrzeiteinstellungen
bis zu 3 Minuten lang zu speichern, wenn eine Unterbrechung
der Stromversorgung wie z.B. Ausfall des Wechselstromnetzes
vorliegt. Die gesamte Radiowecker- und Anzeigebeleuchtung
wird abgeschaltet. Sobald die Stromversorgung
wiederhergestellt ist, erscheint die richtige Zeit in der Anzeige.
Falls die Stromversorgung nach 3 Minuten wiederhergestellt
wird und in der Anzeige erscheint:
• blinkende Uhrzeit – so zeigt dies an, daß die Uhrzeit neu
eingestellt werden muß
• PHILIPS demo mode – so zeigt dies an, daß die
Vorwahlsender und die Uhr- und Weckzeiten neu
eingegeben werden müssen.
BELEUCHTUNGSHELLIGKEIT
1. Prüfen, ob der Regler SET in die Stellung CLOCK gedreht
und das Radio abgeschaltet ist.
2. REPEAT ALARM/
drücken.
– Die Helligkeit der Anzeige ändert sich in der folgenden
Sequenz:
BRIGHT y MEDIUM y LOW y BRIGHT...
Hinweis:
Wenn ein Wecker oder die SLEEP-Funktion aktiv ist, kann die
Helligkeit nicht eingestellt werden.
RESET (RÜCKSTELLEN)
Falls die Anzeige und elektronischen Funktionen Ihres Gerätes
Störungen erfahren, z.B. statische Elektrizität von Teppichen,
Gewittern usw., ermöglicht RESET es Ihnen, alle bisherigen
Funktionen zu löschen und wieder von vorne anzufangen.
• Mit einem Kugelschreiber das RESET Loch drücken, das auf
der Geräteunterseite zu finden ist.
BRIGHTNESS CONTROL einmal oder mehrmals
Deutsch
23
Page 24

EINSTELLEN DER UHR(ZEIT) RADIO
Die Zeit wird im 24 Stunden-Format angezeigt.
1. Den Regler SET auf TIME drehen.
2. 7 wiederholt drücken oder die Taste gedrückt halten, um die
Stunden einzustellen. 7 loslassen, wenn Sie die richtige
Stunde erreichen.
3. 8 wiederholt drücken oder die Taste gedrückt halten, um die
Minuten einzustellen. 8 loslassen, wenn Sie die richtige
Minuteneinstellung erreichen.
4. Den Regler SET auf CLOCK drehen.
RADIO
1. SLEEP/ RADIO ON einmal drücken, um das Radio einzuschalten.
™ Die Anzeige zeigt die Radiofrequenz des letzten
gewählten Wellenbereiches kurz, bevor zur Uhrzeit
Deutsch
zurückgekehrt wird. Ihr Vorwahlsender wird ebenfalls
angezeigt, wenn Sie einer Vorwahl zuhören.
2. BAND drücken, wenn Sie den Wellenbereich ändern wollen.
3. Den Sound mit VOLUME einstellen.
4. Zum Abschalten wird ALARM RESET/ RADIO OFF gedrückt.
ABSTIMMEN AUF RADIOSENDER
Automatischer Suchlauf
• 7 oder 8 eine Sekunde oder länger drücken, um sich auf den
Sender einzustellen.
™ Das Radio wird automatisch auf einen Sender mit
ausreichendem Empfang abgestimmt.
24
Manuelles Abstimmen
• 7 oder 8 kurz und wiederholt drücken, bis die gewünschte
Frequenz erreicht wird.
Zur Verbesserung des Empfangs:
FM: Die Drahtantenne für optimalen Empfang einstellen.
MW/ LW: Benutzt eine eingebaute Antenne im Gerät selbst.
SPEICHERN UND BENUTZEN VON VORWAHLSENDERN
Sie können insgesamt bis zu 10 Radiosender abspeichern, 5 in
jedem Wellenbereich.
1.
2. Zum Speichern einer Vorwahl wird eine PRESET Taste von 1-5
3. Schritte 1 und 2 wiederholen, um weitere Sender
• Sie können einen Vorwahlsender überschreiben, indem Sie
4. Eine PRESET Taste von 1-5 drücken, um einem
Die Antenne durch Einstellen der Geräteposition
ausrichten.
Auf den gewünschten Sender einstellen (siehe ABSTIMMEN
AUF RADIOSENDER).
kurz gedrückt gehalten, bis man einen doppelten Piepton hört.
™ In der Anzeige erscheint die Vorwahlnummer Ihres Senders.
abzuspeichern.
an seiner Stelle eine andere Frequenz speichern.
Vorwahlsender zuzuhören.
Page 25

ALLGEMEINES
Es können zwei verschiedene Weckzeiten eingestellt werden.
Dies kann sich als sinnvoll erweisen, wenn Sie zu
verschiedenen Zeiten geweckt werden müssen, z.B. während
der Woche und am Wochenende:
• ALARM 1 – Radio-Modus
• ALARM 2 – Summer-Modus. Der sanfte Wecksummer
erhöht seine Pieptonfrequenz innerhalb weniger Sekunden.
EINSTELLEN VON WECKZEIT UND -MODUS
1. Den Regler SET auf ALARM 1 oder ALARM 2 einstellen.
™ In der Anzeige erscheinen die Weckzeitziffern, wobei die
Anzeiger oder blinken.
2. 7 wiederholt drücken oder die Taste gedrückt halten, um die
Stunden einzustellen.
7 loslassen, wenn Sie die richtige Stunde erreichen.
3. 8 wiederholt drücken oder die Taste gedrückt halten, um die
Minuten einzustellen. 8 loslassen, wenn Sie die richtige
Minuteneinstellung erreichen.
4. Den Regler SET wieder auf CLOCK drehen.
5. Bei abgeschaltetem Radio Ihren Weckmodus wählen, indem
ALARM 1-RADIO oder ALARM 2-BUZZER gedrückt wird.
™ In der Anzeige erscheint oder .
BENUTZUNG DER WECKFUNKTION
Zu Beachtung: Wenn ALARM 1 RADIO gewählt wurde, ist
sicherzustellen, daß – vor Abschalten des
Gerätes – die vorschriftsmäßige Abstimmung
auf einen Sender erfolgte.
Wenn Sie dieselbe Weckzeit für beide
Wecker einstellen und aktivieren, wird nur
der ALARM 2-BUZZER zum eingestellten
Zeitpunkt aktiviert.
ABSCHALTEN DES WECKERS
Der Wecker kann auf dreierlei Weise abgestellt werden. Wenn
Sie den Wecker nicht völlig abstellen, wird die 24 Stunden-
Weckerrückstelloption nach 59 Minuten automatisch gewählt,
ab dem Zeitpunkt der erstmaligen Aktivierung des Weckers.
24 Stunden-Weckerrückstellung
Wenn Sie den Weckmodus sofort unterbinden möchten, aber
auch dieselbe Weckereinstellung für den darauffolgenden Tag
beibehalten wollen:
• ALARM RESET/ RADIO OFF drücken.
™ Sie hören einen Piepton, der 24 Stunden-
Rückstellaktivierung bestätigt.
Deutsch
25
Page 26

BENUTZUNG DER WECKFUNKTION SLEEP
Völliges Abstellen des Weckers
Zum Abstellen des Weckers, bevor er aktiviert wird, oder
während des Weckrufs:
• Bei abgeschaltetem Radio ALARM 1-RADIO oder ALARM 2BUZZER einmal oder mehrmals drücken, bis der gewählte
Weckanzeiger aus der Anzeige verschwindet.
Weckwiederholung
Dadurch wird der Weckruf in 9 minütigen Intervallen
wiederholt.
1. Während des Weckrufs REPEAT ALARM/ BRIGHTNESS
CONTROL drücken.
™ In der Anzeige blinkt oder
während einer Weckwiederholung
2. Bis zu 6mal wiederholen, falls gewünscht.
Deutsch
INFO ÜBER SLEEP
Dieses Gerät hat einen eingebauten Sleep Timer, der es ermöglicht,
das Gerät nach einer festgelegten Zeitspanne bei laufendem Radio
automatisch abzuschalten. Es gibt vier Schlafzeiten, bevor sich das
Gerät abschaltet: 60, 30, 15 Minuten und aus.
EINSTELLEN DER SLEEP-FUNKTION
1. SLEEP/ RADIO ON drücken, um das Radio einzuschalten.
2. Innerhalb 1 Sekunde SLEEP/ RADIO ON erneut einmal oder
mehrmals drücken, bis und SL:60 in der
Anzeige erscheint.
26
In der SLEEP-Anzeige befindlich wird SLEEP/ RADIO ON
einmal oder mehrmals gedrückt, um die Schlafzeit zu wählen.
™ In der Anzeige erscheinen der Reihe nach
und die Schlafzeitraum-Zeitoptionen: SL:60, SL:30, SL:15
und OFF.
™ Die Schlafzeit und Radiofrequenz erscheinen kurz, bevor
die Standby-Uhrzeit mit dem Anzeiger
gezeigt wird, wenn SLEEP aktiviert ist.
3. Zum Abstellen der Schlaffunktion drückt man entweder:
• ALARM RESET/ RADIO OFF
• REPEAT ALARM/
• SLEEP/ RADIO ON einmal oder mehrmals, bis
aus der Anzeige verschwindet.
PFLEGE
• Wenn Sie das Gerät längere Zeit nicht zu benutzen
gedenken, den Netzstecker ziehen.
• Das Gerät nicht Feuchtigkeit, Regen, Sand oder durch
Heizkörper oder direkte Sonneneinstrahlung verursachter
übermäßiger Wärme aussetzen.
• Ein weiches, leicht angefeuchtetes Ledertuch wird zum
Reinigen des Gerätes benutzt. Keine Reinigungsmittel
verwenden, die Alkohol, Ammoniak, Benzol oder scheuernde
Bestandteile enthalten, weil dadurch das Gehäuse
beschädigt werden könnte.
BRIGHTNESS CONTROL
Page 27

FEHLERSUCHE
Wenn ein Fehler auftritt, zuerst die nachstehenden Punkte überprüfen, bevor das Gerät zur Reparatur gegeben wird. Wenn Sie das
Problem nicht durch Befolgen dieser Ratschläge lösen können, sollten Sie sich an Ihren Händler oder an Ihr Reparaturzentrum wenden.
WARNHINWEIS: Unter gar keinen Umständen sollten Sie versuchen, das Gerät selbst zu reparieren, weil
die Garantie dadurch erlischt.
PROBLEM
– MÖGLICHE URSACHE
• ABHILFE
Kein Ton
– Lautstärke nicht eingestellt
• Lautstärke einstellen
Anzeigefehler/ Gerät spricht auf kein Bedienelement an
– Elektrostatische Entladung
• RESET drücken
Gelegentliches ‚Knistern‘ während einer FM-Sendung
– Schwaches Signal
• Position der Drahtantenne einstellen
Dieses Produkt entspricht den Funkentstörvorschriften der Europäischen Union.
Ständiges Knistern/Zischen während MW-/ LW-Sendung
– Electrical interference from TV, computer, fluorescent lamp,
mobile phone, etc.
• Move set away from other electrical equipment
Der Wecker funktioniert nicht
– Weckzeit/-modus nicht eingestellt
• Siehe EINSTELLEN DES WECKERS
– Lautstärke zu gering für ALARM 1-RADIO
• Die Lautstärke einstellen
– ALARM 1-RADIO nicht auf einen Radiosender abgestimmt
• Prüfen, ob das Gerät auf einen Radiosender abgestimmt ist,
bevor ALARM 1-RADIO eingestellt wird, und beim Abschalten
Deutsch
27
Page 28

TOETSEN
1 SLEEP/ RADIO ON
– om de inslaaptijd weer te geven/ in te stellen/ uit te
schakelen
– om de radio aan te zetten; om de radiofrequentie in het
display weer te geven
2 SET-knop
– om de tijd in te stellen voor •ALARM 1, •ALARM 2,
•TIME en om de klok te laten lopen •CLOCK
3 TIME SET/ TUNING: HR, MIN en 7, 8
– om het uur (7) en de minuten (8) in te stellen voor de
klok/ de wekkers
– om af te stemmen op een radiozender (hoger 7, lager 8)
4 ALARM 1 - RADIO en tevens PRESET 1
– om de radio in of uit te schakelen voor wekker 1
– PRESET (voorkeurzender) 1
5 ALARM 2 - BUZZER en tevens PRESET 2
– om de zoemer in of uit te schakelen voor wekker 2
– PRESET (voorkeurzender) 2
6 ALARM RESET/ RADIO OFF
Nederlands
– om de wekker voor 24 uur uit te zetten
– om de radio/ de SLEEP-functie uit te schakelen
Met het oog op het milieu...
Wij hebben het verpakkingsmateriaal zoveel mogelijk beperkt zodat het gemakkelijk in twee materialen te scheiden is: karton
(doos) en polyethyleen (zakken, beschermfolie).
Uw systeem bestaat uit materialen die door een gespecialiseerd bedrijf gerecycleerd en hergebruikt kunnen
worden. Informeer waar u verpakkingsmateriaal, lege batterijen en oude apparatuur kunt inleveren.
28
7 PRESET 3, 4 en 5
– programmeert en selecteert voorkeurzenders
8 REPEAT ALARM/ BRIGHTNESS CONTROL
– om de wekker voor 9 minuten uit te zetten
– om de sterkte van de displayverlichting te wijzigen
– om de SLEEP-functie uit te schakelen
9 Display
– geeft de tijd/ de wektijden weer en geeft informatie over
het apparaat
0 BAND
– om het golfgebied te kiezen: FM/ MW/ LW
! VOLUME
– om het geluidsniveau in te stellen
@ Draadantenne
– (aan de onderkant van het apparaat) om de FM-ontvangst
te verbeteren
# Netsnoer
– voor de netvoeding
Het typeplaatje vindt u op de onderkant van het apparaat.
Page 29

INSTALLATIE BASISFUNCTIES
NETVOEDING EN DEMONSTRATIEPROGRAMMA
1. Controleer of de netspanning aangegeven op het
typeplaatje op de onderkant van het apparaat overeenkomt
met de plaatselijke netspanning. Is dit niet het geval,
raadpleeg dan uw leverancier of serviceorganisatie.
2. Steek de netstekker in het stopcontact.
De netvoeding is nu ingeschakeld en in het display
verschijnt de PHILIPS demo mode.
™ PH..IL ..IPS loopt keer op keer over het display.
• Draai de SET-knop op SET TIME om het
demonstratieprogramma af te sluiten.
3. Trek de netstekker uit het stopcontact als u de netvoeding
helemaal wilt uitschakelen.
BACK-UP-VOEDING
Dankzij de back-up-voeding blijven uw geprogrammeerde
zenders en uw wek- en tijdsinstellingen gedurende 3 minuten
bewaard wanneer de voeding onderbroken wordt bijvoorbeeld
bij stroomuitval. De hele klokradio en de displayverlichting
worden uitgeschakeld. Zodra de stroom terugkeert, geeft het
display opnieuw de juiste tijd aan.
Als na 3 minuten de stroom terugkeert en u ziet in het display:
• de tijd knipperen – dan moet u de klok opnieuw instellen
• PHILIPS demo mode – dan moet u de voorkeurzenders
opnieuw programmeren en de klok en de wektijden
opnieuw instellen.
STERKTE VAN DE DISPLAYVERLICHTING
1. Controleer of de SET-knop op CLOCK staat en de radio
uitstaat.
2. Druk één of meerdere keren op REPEAT ALARM/
CONTROL
.
BRIGHTNESS
– De sterkte van de displayverlichting verandert als volgt:
BRIGHT y MEDIUM y LOW y BRIGHT...
Opmerking:
wanneer een wekker of de inslaapfunctie ingeschakeld is, kan
de displayverlichting niet ingesteld worden.
RESET
Als u last heeft van storingen bijvoorbeeld door statische
elektriciteit van de vloerbedekking, onweer enzovoort, die het
display en de elektronische functies van uw apparaat
beïnvloeden dan kunt u met RESET alle bestaande instellingen
wissen en opnieuw beginnen.
• Druk met een balpen in het RESET-gaatje op de onderkant
van het apparaat.
Nederlands
29
Page 30

INSTELLEN VAN DE KLOK RADIO
Voor het weergeven van de tijd in het display wordt een
24-uurssysteem gebruikt.
1. Draai de SET-knop op TIME.
2. Druk herhaaldelijk op 7 of houd de toets ingedrukt om het uur
in te stellen. Laat 7 los zodra u het juiste uur bereikt heeft.
3. Druk herhaaldelijk op 8 of houd de toets ingedrukt om de
minuten in te stellen. Laat 8 los zodra u de juiste instelling
voor de minuten bereikt heeft.
4. Draai de SET-knop op CLOCK.
RADIO
1. Druk eenmaal op SLEEP/ RADIO ON om de radio aan te zetten.
™ In het display wordt de radiofrequentie van het
golfgebied dat u als laatste gekozen heeft kort
weergegeven en vervolgens verschijnt opnieuw de tijd.
Als u naar een geprogrammeerde zender luistert, wordt
tevens het bijbehorende zendernummer weergegeven.
2. Druk op BAND als u een ander golfgebied wilt kiezen.
3. Stel het geluid in met VOLUME.
Nederlands
4. Druk op ALARM RESET/ RADIO OFF om de radio uit te
schakelen.
AFSTEMMEN OP EEN RADIOZENDER
Automatisch afstemmen
• Houd 7 of 8 gedurende één seconde of langer ingedrukt om
af te stemmen op een zender.
™ De radio stemt automatisch af op een zender die sterk
genoeg is.
30
Manual tuning
• Druk herhaaldelijk kort op 7 of 8 tot u de gewenste
frequentie bereikt heeft.
Verbeteren van de ontvangst:
FM: Richt de draadantenne voor de beste ontvangst.
MW/ LW: Voor MW/LW wordt een ingebouwde antenne
PROGRAMMEREN VAN EN AFSTEMMEN OP
VOORKEURZENDERS
U kunt in het totaal 10 radiozenders in het geheugen opslaan,
5 voor elk golfgebied.
1.
2. Om een zender op te slaan houd u kort één van de PRESET-
3. Herhaal de stappen 1 en 2 om nog meer zenders op te slaan.
• U kunt een geprogrammeerde zender wissen door een
4. Druk op een van de PRESET-toetsen 1 tot 5 om te luisteren
gebruikt. Richt de antenne door het apparaat te
draaien.
Stem af op de gewenste zender (zie AFSTEMMEN OP EEN
RADIOZENDER).
toetsen 1 tot 5 ingedrukt tot u een dubbele piep hoort.
™ In het display verschijnt het nummer van de
geprogrammeerde zender.
andere frequentie op dezelfde plaats op te slaan.
naar een geprogrammeerde zender.
Page 31

ALGEMEEN
U kunt twee verschillende wektijden instellen. Dit is handig als
u doordeweeks op een andere tijd gewekt moet worden dan in
het weekend:
• ALARM 1 – de radio
• ALARM 2 – de zoemer. De pieptonen van de zoemer volgen
elkaar binnen enkele seconden steeds sneller op zodat u
zachtjes gewekt wordt.
INSTELLEN VAN DE WEKTIJD EN DE MANIER VAN
WEKKEN
1. Draai de SET-knop op ALARM 1 of ALARM 2.
™ In het display verschijnen de cijfers die de wektijd aangeven
en de indicator of knippert.
2. Druk herhaaldelijk op 7 of houd de toets ingedrukt om het uur
in te stellen. Laat 7 los zodra u het juiste uur bereikt heeft.
3. Druk herhaaldelijk op 8 of houd de toets ingedrukt om de
minuten in te stellen. Laat 8 los zodra u de juiste instelling
voor de minuten bereikt heeft.
4. Draai de SET-knop terug op CLOCK.
5. Kies, terwijl de radio uitstaat, de manier waarop u gewekt
wilt worden door op ALARM 1-RADIO of ALARM 2-BUZZER
te drukken.
™ In het display verschijnt of .
GEBRUIK VAN DE WEKKER
Opmerkingen: Als u de radio (ALARM 1 RADIO) gekozen
heeft, controleer dan of u correct afgestemd
heeft op een zender voor u het apparaat uitzet.
Indien u beide wekkers op dezelfde tijd
ingesteld en gezet heeft dan zal op de
ingestelde tijd enkel de zoemer
(ALARM 2-BUZZER) afgaan.
UITZETTEN VAN DE WEKKER
U kunt de wekker op drie manieren uitzetten. Als u de wekker
niet zelf helemaal uitschakelt dan wordt automatisch,
59 minuten nadat de wekker voor het eerst afging, de optie
‘Uitzetten voor 24 uur’ gekozen.
Uitzetten voor 24 uur
Als u de wekker meteen wilt uitzetten maar deze tegelijk zo wilt
instellen dat hij de volgende dag op dezelfde tijd en op dezelfde
manier weer afgaat:
• Druk op ALARM RESET/ RADIO OFF.
™ Een pieptoon geeft aan dat de wekker opnieuw gezet is
voor 24 uur later.
Nederlands
31
Page 32

GEBRUIK VAN DE WEKKER SLEEP
De wekker helemaal uitschakelen
Om de wekker uit te schakelen voor deze afgegaan is, of
terwijl deze afgaat:
• Druk, terwijl de radio uitstaat, één of meerdere keren op
ALARM 1-RADIO of ALARM 2-BUZZER tot de indicator van
het gekozen weksignaal uit het display verdwijnt.
Het weksignaal herhalen
Met deze optie gaat de wekker om de 9 minuten opnieuw af.
1. Druk terwijl de wekker afgaat op REPEAT ALARM/
BRIGHTNESS CONTROL.
™ In het display knippert of in
afwachting dat de wekker opnieuw afgaat.
2. U kunt dit desgewenst tot 6 keer toe herhalen.
OVER DE SLEEP-FUNCTIE
Dit apparaat heeft een ingebouwde timer, die het apparaat
automatisch uitzet na een door u ingestelde periode. Voor de
Nederlands
duur van de inslaaptijd kunt u kiezen uit vier mogelijkheden:
60, 30, 15 minuten en uit.
INSTELLEN VAN DE SLEEP-FUNCTIE
1. Druk op SLEEP/ RADIO ON om de radio aan te zetten.
2. Druk binnen 1 seconde nogmaals één of meerdere keren op
SLEEP/ RADIO ON tot in het display en
SL:60 verschijnt.
32
Druk, terwijl in het display de inslaaptijden weergegeven
worden, één of meerdere keren op SLEEP/ RADIO ON om de
gewenste inslaaptijd te kiezen.
™ In het display verschijnt achtereenvolgens:
en de verschillende inslaaptijden: SL:60, SL:30, SL:15 en
OFF (UIT).
™ De SLEEP-tijd en de radiofrequentie worden kort
weergegeven waarna de tijd verschijnt met
indicator, wanneer de SLEEP-functie ingeschakeld is
3. Om de SLEEP-functie uit te schakelen drukt u ofwel op:
• ALARM RESET/ RADIO OFF
• REPEAT ALARM/
• of één of meerdere keren op SLEEP/ RADIO ON tot
ONDERHOUD
• Trek de stekker uit het stopcontact als u het apparaat
langere tijd niet zult gebruiken.
• Bescherm het apparaat tegen vocht, regen, zand en extreem
hoge temperaturen zoals bij verwarmingsapparatuur of in
de volle zon.
• Maak het apparaat schoon met een zachte, vochtige
zeemlap. Gebruik geen schoonmaakmiddelen die alcohol,
ammonia, benzine of schuurmiddel bevatten want die
kunnen uw apparaat beschadigen.
BRIGHTNESS CONTROL
uit het display verdwijnt.
Page 33

VERHELPEN VAN STORINGEN
Als zich een probleem voordoet, controleer dan eerst de punten op de onderstaande lijst voor u het apparaat ter reparatie aanbiedt.
Kunt u het probleem niet oplossen aan de hand van deze aanwijzingen, raadpleeg dan uw leverancier of serviceorganisatie.
WAARSCHUWING: Probeer in geen geval zelf het apparaat te repareren want dan vervalt de garantie.
PROBLEEM
– MOGELIJKE OORZAAK
• OPLOSSING
Geen geluid
– Het volume staat te zacht
• Zet het volume harder
Het display functioneert niet correct/ het apparaat
reageert op geen enkele toets
– Elektrostatische ontlading
• Druk op RESET
Af en toe gekraak bij FM-ontvangst
– Zwak signaal
• Verplaats de draadantenne
Dit apparaat voldoet aan de radio-ontstoringseisen van de Europese Unie.
Constant gekraak/ gefluit bij MW/LW-ontvangst
– Elektrische storingen van tv’s, computers, tl-lampen, gsm’s
enzovoort
• Zet het apparaat uit de buurt van andere elektrische
apparatuur
De wekker werkt niet
– De wektijd/ de manier van wekken is niet ingesteld
• Zie hoofdstuk INSTELLEN VAN DE WEKTIJD EN DE MANIER
VAN WEKKEN
– Het volume staat te zacht voor ALARM 1-RADIO
• Zet het volume harder
– Er is niet afgestemd op een zender voor ALARM 1-RADIO
• Controleer of het apparaat afgestemd is op een zender voor
u ALARM 1-RADIO instelt en het apparaat uitzet
Nederlands
33
Page 34

COMANDI
1 SLEEP/ RADIO ON
– visualizza/ regola/ spegne la funzione sleep (sonno)
– accende la radio; visualizza la frequenza radio
2 Comando SET
– imposta l'ora per •ALARM 1, •ALARM 2, •TIME
e proseguire l'orario dell'orologio •CLOCK
3 TIME SET/ TUNING: HR, MIN e 7, 8
– regola le ore (7) ed i minuti (8) per l'ora
dell'orologio/allarme
– sintonizza (verso l'alto 7, il basso 8) sulle stazioni radio
4 ALARM 1 - RADIO ed anche PRESET 1
– attiva e disattiva il modo radio per allarme 1
– PRESET (la stazione preselezionata) 1
5 ALARM 2 - BUZZER ed anche PRESET 2
– attiva e disattiva il modo buzzer (cicalino) per allarme 2
– PRESET (la stazione preselezionata) 2
6 ALARM RESET/ RADIO OFF
– arresta l'allarme attivo per 24 ore
– arresta la radio /la funzione sonno
Informazioni ambientali
Abbiamo ridotto al minimo il materiale d'imballaggio per una facile separazione in due materiali: cartone (scatola) e polietilene
(sacchetti, espanso di protezione).
Italiano
L'apparecchio è composto da materiali che possono essere riciclati, se smontato da una compagnia specializzata.
Osservare le norme locali sullo smaltimento dei materiali di imballaggio, delle batterie esaurite e delle
apparecchiature obsolete.
34
7 PRESET 3, 4 e 5
– memorizza e seleziona le stazioni preselezionate
8 REPEAT ALARM/ BRIGHTNESS CONTROL
– spegne l'allarme per un periodo di 9 minuti
– cambia la brillantezza dell'illuminazione del display
– spegne la funzione sleep (sonno)
9 Display
– visualizza l’ora della sveglia/allarme e lo stato
dell'apparecchio
0 BAND
– seleziona le bande di lunghezza d'onda FM/ MW/ LW
! VOLUME
– regola il livello del suono
@ Antenna a filo
– (in fondo all'apparecchio) antenna per migliorare la
ricezione FM
# Cavo di rete
– per l'alimentazione di rete
La piastrina del modello si trova sul fondo all'apparecchio.
Page 35

INSTALLAZIONE CARATTERISTICHE BASE
ALIMENTAZIONE DI RETE E MODO DI DIMOSTRAZIONE
1. Controllare che la tensione di rete, indicata sulla targhetta
del modello sul fondo dell'apparecchio, corrisponda a quella
della tensione domestica. Nel caso contrario, consultare il
rivenditore o il centro di assistenza.
2. Collegare la spina di rete nella presa a muro.
L'alimentazione di rete a questo punto è inserita e sul
display si visualizza il PHILIPS demo mode.
™ PH..IL ..IPS scorre in continuazione per tutto il display.
• Girare il comando SET a SET TIME per uscire dal modo di
dimostrazione.
3. Per scollegare l'apparecchio completamente
dell'alimentazione di rete, tirare la spina dalla presa a muro.
ALIMENTAZIONE DI RISERVA
L'alimentazione di riserva consente di memorizzare per 3 minuti le
stazioni preselezionate e l’ora della sveglia e dell’orologio quando
si verifica un'interruzione di alimentazione, es. mancanza di
corrente. La completa radio sveglia e l’illuminazione del display si
spengono. Appena l'alimentazione di rete ritorna il display indica
il corretto orario. Se l'alimentazione di rete ritorna dopo 3 minuti e
il display visualizza:
• l'ora della sveglia lampeggiante – indica che bisogna
regolare l'ora dell'orologio
• il PHILIPS demo mode – indica che bisogna impostare di nuovo le
stazioni preselezionate e gli orari dell'orologio e dell'allarme.
BRILLANTEZZA DELL'ILLUMINAZIONE
1. Controllare che il comando SET sia impostato alla posizione
CLOCK e che la radio sia spenta.
2. Premere REPEAT ALARM/
volte.
– La brillantezza del display cambierà in questa sequenza:
BRIGHT y MEDIUM y LOW y BRIGHT...
Nota:
Quando un allarme o la funzione SLEEP (sonno) è attiva, la
brillantezza non può essere regolata.
RESET (RIPRISTINO)
Nell'eventualità che durante le funzioni del display ed
elettroniche dell'apparecchio si ricevono interferenze, es.
statica da tappeti, temporali, ecc. RESET consente di annullare
tutte le impostazioni precedenti e ricominciare daccapo.
• Usare una penna a sfera per premere nel foro RESET che si
trova sul fondo dell'apparecchio.
BRIGHTNESS CONTROL una o più
Italiano
35
Page 36

IMPOSTAZIONE DELLA SVEGLIA RADIO
L'ora si visualizza secondo l'orologio di 24 ore
1. Girare il comando SET a TIME.
2. Premere 7 ripetutamente o tenere premuto il tasto per
regolare le ore. Rilasciare 7 quando si raggiunge l'ora corretta.
3. Premere 8 ripetutamente o tenerlo premuto per regolare i
minuti. Rilasciare 8 quando si raggiunge la corretta
impostazione dei minuti.
4. Turn the SET control to CLOCK.
RADIO
1. Premere SLEEP/ RADIO ON una volta per accendere la radio.
™ Il display visualizza brevemente la frequenza radio
dell'ultima lunghezza d'onda selezionata prima di
ritornare all'ora della sveglia. La stazione preselezionata
viene anche visualizzata se la si sta ascoltando.
2. Premere BAND se si desidera cambiare lunghezza d'onda.
3. Regolare il suono usando VOLUME.
4. Premere ALARM RESET/ RADIO OFF per spegnere
l'apparecchio.
SINTONIZZAZIONE SULLE STAZIONI RADIO
Sintonizzazione automatica
• Premere 7 o 8 per un secondo o più per sintonizzarsi sulla
Italiano
stazione desiderata.
™ La radio si sintonizza automaticamente su di una
stazione di sufficiente ricezione.
36
Sintonizzazione manuale
• Premere 7 o 8 brevemente e ripetutamente fino a trovare la
frequenza desiderata.
Per ottimizzare la ricezione:
FM: Regolare l'antenna a filo per ottenere ricezione
MW/ LW: Utilizza un'antenna incorporata. Dirigere l'antenna
MEMORIZZAZIONE E USO DI STAZIONI PRESELEZIONATE
Si possono memorizzare fino a 10 stazioni radio nella memoria,
5 per ogni lunghezza d'onda.
1.
2. Per memorizzare una stazione, tenere premuto brevemente
3. Ripetere i passi 1 e 2 per memorizzare le altre stazioni.
• Si può sovrascrivere una stazione preselezionata
4. Premere un tasto PRESET (1-5) per ascoltare una stazione
ottimale.
regolando la posizione dell'apparecchio.
Sintonizzarsi sulla stazione desiderata (vedi SINTONIZZAZIONE
SULLE STAZIONI RADIO).
un tasto PRESET (1-5) fino ad udire un doppio blip.
™ Il display visualizza il numero preselezionato della stazione.
memorizzando un'altra frequenza al suo posto.
preselezionata.
Page 37

IMPOSTAZIONE DELL'ORA DELL'ALLARME
NOTE GENERALI
Si possono impostare due orari diversi di allarme. Questo
potrebbe essere utile quando è necessario essere svegliati ad
orari diversi es. durante la settimana ed al week-end:
• ALARM 1 – modo radio
• ALARM 2 – modo buzzer. Il dolce volume di sveglia
dell'allarme gradualmente aumenta entro secondi.
IMPOSTAZIONE DELL'ORA E MODO DI ALLARME
1. Girare il comando SET ad ALARM 1 o ALARM 2.
™ Il display visualizza l'ora di allarme con gli indicatori
o lampeggianti.
2. Premere 7 ripetutamente o tenerlo premuto per regolare le
ore. Rilasciare 7 quando si raggiunge l'ora corretta.
3. Premere 8 ripetutamente o tenerlo premuto per regolare i
minuti. Rilasciare 8 quando si raggiunge la corretta
impostazione dei minuti.
4. Girare il comando SET a CLOCK.
5. Con l'apparecchio spento, selezionare il modo preferito di
allarme, premendo ALARM 1-RADIO o ALARM 2-BUZZER.
™ Il display visualizza o .
Note: Se si è selezionato ALARM 1 RADIO, assicurarsi di
essere sintonizzati correttamente su di una stazione,
prima di spegnere l'apparecchio.
Se si imposta e si attiva la stessa ora di allarme per
entrambi i modi di allarme, solamente
ALARM 2-BUZZER verrà attivato all'ora impostata.
COME SPEGNERE L'ALLARME
Vi sono tre modi per spegnere l'allarme. A meno che l'allarme
non venga azzerato completamente, l'opzione di ripristino
allarme 24 ore viene selezionato automaticamente dopo
59 minuti, dall'ora in cui l'allarme scatta per la prima volta.
Ripristino allarme 24 ore
Se si desidera arrestare l'allarme immediatamente ma si
desidera anche conservare la stessa impostazione di allarme per
il giorno successivo:
• Premere ALARM RESET/ RADIO OFF.
™ Si udirà un suono di beep che conferma l'attivazione del
ripristino a 24 ore.
Italiano
37
Page 38

COME USARE L'ALLARME SLEEP
Come annullare l'allarme completamente
Per annullare l'allarme impostato prima che scatti, o durante la
chiamata di allarme:
• Con la radio spenta, premere ALARM 1-RADIO o ALARM 2BUZZER una o più volte fino a quando l'indicatore di allarme
selezionato scompare dal display.
Ripetizione dell'allarme
Questo fa ripetere la chiamata di allarme a 9 minuti d'intervallo.
1. Durante la chiamata di allarme, premere REPEAT ALARM/
BRIGHTNESS CONTROL.
™ Il display visualizza o
lampeggiante durante una ripetizione di allarme.
2. Ripetere se desiderato fino a 6 volte.
CENNI SU SLEEP (SONNO)
Quest'apparecchio ha un temporizzatore incorporato che
permette che l'apparecchio si spenga automaticamente
durante la riproduzione radio dopo un determinato periodo di
tempo. Vi sono quattro periodi di sonno prima che
l'apparecchio si spegne: 60, 30, 15 minuti e spento.
IMPOSTAZIONE DEL SLEEP (SONNO)
Italiano
1. Premere SLEEP/ RADIO ON per accendere la radio.
2. Entro 1 secondo, premere SLEEP/ RADIO ON una o più volte
fino a quando il display visualizza e SL:60.
38
Dal display della funzione sonno, premere SLEEP/ RADIO ON
una o più volte per selezionare il periodo di sonno.
™ Il display visualizza in sequenza: e le opzioni
SL:60, SL:30, SL:15 e OFF (spento).
™ Il tempo di sonno e la frequenza radio appaiono
brevemente prima di visualizzare l'ora dell'orologio con
l'indicatore , se quest'ultimo è stato attivato.
3. Per azzera la funzione sonno, premere o:
• ALARM RESET/ RADIO OFF
• REPEAT ALARM/
• SLEEP/ RADIO ON una o più volte fino a quando
MANUTENZIONE
• Se l'apparecchio non deve essere usato per un lungo periodo
di tempo, estrarre la spina dalla presa di rete a muro.
• Non esporre l'apparecchio all'umidità, alla pioggia, alla
sabbia o all'eccessivo calore prodotto da attrezzature di
riscaldamento oppure alla diretta luce del sole.
• Per pulire l'apparecchio, usare una pelle di daino morbida
leggermente inumidita. Non usare nessun agente di pulizia
che contenga alcool, ammoniaca o abrasivi poiché questi
potrebbero danneggiare l'involucro.
BRIGHTNESS CONTROL
scompare dal display.
Page 39

RETTIFICA DEI GUASTI
Nel caso si verifichi un guasto, controllare i punti elencati qui di seguito prima di portare l'apparecchio per la riparazione. Se non
si è in grado di rettificare un problema seguendo questi suggerimenti, consultare il rivenditore o il centro di assistenza.
AVVERTENZA: In nessuna circostanza si deve tentare di riparare l'apparecchio da se stessi poiché, ciò ne
invaliderebbe la garanzia.
PROBLEMA
– POSSIBILE CAUSA
• RIMEDIO
Assenza di suono
– Volume non regolato
• Regolare il volume
Errore di display/ nessuna reazione a qualsiasi
azionamento dei tasti
– Scarica elettrostatica
• Premere RESET
Occasionale scoppiettio durante la trasmissione FM
– Segnale debole
• Regolare la posizione dell'antenna a filo
Continuo disturbo di scoppiettio/ frusci durante la
trasmissione MW/ LW
– Interferenza elettrica da TV, computer, lampade fluorescenti,
cellulare etc.
• Distanziare l'apparecchio da altre attrezzature elettriche
L'allarme non funziona
– L'orario/modo di allarme non impostato
• Vedi IMPOSTAZIONE DELL'ORA E MODO DI ALLARME
– Volume troppo basso per il modo ALARM 1-RADIO
• Regolare il volume
– ALARM 1-RADIO non sintonizzato su una stazione radio
• Controllare che l'apparecchio sia sintonizzato su una
stazione radio prima d'impostare ALARM 1-RADIO, e
quando si spegne
Questo prodotto è conforme ai requisiti delle interferenze radio dell'Unione Europea.
Italiano
39
Page 40

REGULATORY
1 SLEEP/ RADIO ON
Polski
– wyœwietlanie/ ustawianie/ anulowanie czasu, po którym
urzådzenie zostanie automatycznie wy¬åczone
– w¬åczanie tunera; wyœwietlanie czêstotliwoœci danej stacji
2 PrzeŒcznik SET
– ustawianie czasów •ALARM 1, •ALARM 2, •TIME oraz
powrót do wyœwietlania godziny •CLOCK
TIME SET/ TUNING: HR, MIN oraz 7, 8
3
– nastawianie godziny (7) i minut (8) zegara/ czasów budzenia
– strojenie stacji radiowych (do przodu 7, do ty¬u 8)
4 ALARM 1 - RADIO oraz PRESET 1
– w¬åczanie/ wy¬åczanie budzenia za pomocå tunera
(pierwszy czas budzenia) 1
PRESET 1 (wybór pierwszej zaprogramowanej stacji radiowej)
–
5 ALARM 2 - BUZZER oraz PRESET 2
– w¬åczanie/ wy¬åczanie budzenia za pomocå brzêczyka
(drugi czas budzenia) 2
PRESET 2 (wybór drugiej zaprogramowanej stacji radiowej)
–
6 ALARM RESET/ RADIO OFF
– anulowanie czasu budzenia na jednå dobê
РwyŒczanie tunera/ funkcji wyŒcznika czasowego
Ochrona œrodowiska
Opakowanie nie zawiera zbêdnych materia¬ów, dziêki czemu mo¿na je ¬atwo podzieliæ na dwa rodzaje surowców wtórnych:
karton (opakowanie zewnêtrzne) i polietylen (worki, pianka ochronna).
Urzådzenie wyprodukowano z materia¬ów, które po rozebraniu przez wykwalifikowany personel mogå zostaæ
powtórnie wykorzystane. Przy utylizacji sprzêtu, opakowania i baterii przestrzegaæ norm i przepisów
obowiåzujåcych w danym kraju.
40
7 PRESET 3, 4 oraz 5
– zapamiêtywanie oraz wybór zaprogramowanych stacji
radiowych
8 REPEAT ALARM/
BRIGHTNESS CONTROL
– wy¬åczanie sygna¬u budzenia na 9 minut
– zmiana jasnoœci podœwietlenia wyœwietlacza
РwyŒczanie funkcji wyŒcznika czasowego
9 Wyœwietlacz
– wskazywanie bie¿åcego czasu/ czasów budzenia oraz
informowanie o uaktywnionych funkcjach urzådzenia
0 BAND
– wybór zakresu FM/ MW/ LW
! VOLUME
– regulacja natê¿enia dŸwiêku
@ Kabel antenowy (na spodzie urzådzenia)
– do poprawienia odbioru sygna¬u z zakresu FM
# Przewód sieciowy
– do pod¬åczenia urzådzenia do prådu
Tabliczkê z parametrami urzådzenia umieszczono na spodzie
obudowy.
Page 41

POD£ÅCZANIE URZÅDZENIA DO PRÅDU GLÓWNE FUNKCJE
ZASILANIE SIECIOWE I TRYB DEMONSTRACYJNY
1. Sprawdziæ, czy napiêcie zasilania, podane na tabliczce
znajdujåcej siê na spodzie urzådzenia, jest zgodne z napiêciem w
instalacji elektrycznej danego kraju. W razie niezgodnoœci nale¿y
skontaktowaæ siê z dystrybutorem bådŸ punktem serwisowym.
2. Pod¬åczyæ przewód sieciowy do gniazdka elektrycznego.
Gotowoœæ urzådzenia do pracy sygnalizowana jest przez
uruchomienie trybu demonstracyjnego.
™ Na wyœwietlaczu pojawia siê przesuwajåcy siê napis PH..IL ..IPS.
• Tryb demonstracyjny wy¬åcza siê przez ustawienie
prze¬åcznika SET w po¬o¿eniu SET TIME.
3. W celu ca¬kowitego wy¬åczenia zasilania urzådzenia wyciågnåæ
z gniazdka elektrycznego wtyczkê przewodu sieciowego.
ZASILANIE AWARYJNE
Dziêki zasilaniu awaryjnemu w przypadku braku zasilania
sieciowego, np. z powodu awarii instalacji elektrycznej, pamiêæ
urzådzenia zawierajåca informacje o zaprogramowanych stacjach
radiowych i czasach budzenia oraz o nastawionej godzinie jest
podtrzymywana za pomocå baterii (przez maksymalnie 3 minuty).
Wy¬åczony zostaje wówczas wyœwietlacz i zegar tunera.
Bezpoœrednio po przywróceniu zasilania sieciowego wyœwietlony
zostanie bie¿åcy czas. Jeœli zasilanie sieciowe zostanie
przywrócone po up¬ywie trzech minut, a na wyœwietlaczu:
• pojawiå siê migajåce cyfry godziny i minut – nale¿y
ponownie nastawiæ godzinê,
• w¬åczony zostanie tryb demonstracyjny – nale¿y ponownie
zaprogramowaæ stacje radiowe, bie¿åcy czas oraz czasy budzenia.
REGULACJA JASNOŒCI PODŒWIETLENIA
1. Sprawdziæ, czy prze¬åcznik SET jest ustawiony w po¬o¿eniu
CLOCK oraz czy tuner jest wyŒczony.
2. Naciskajåc przycisk REPEAT ALARM/ BRIGHTNESS CONTROL
odpowiedniå iloœæ razy ustawiæ ¿ådanå jasnoœæ
podœwietlenia wyœwietlacza.
– Bêdzie siê ona zmieniaæ w nastêpujåcej kolejnoœci:
BRIGHT y MEDIUM y LOW y BRIGHT...
Uwaga:
Jasnoœci podœwietlenia nie mo¿na regulowaæ, jeœli
uaktywniony zosta¬ jeden z czasów budzenia lub funkcja
wyŒcznika czasowego (SLEEP).
RESET (KASOWANIE USTAWIEÑ)
W przypadku wadliwych wskazañ wyœwietlacza bådŸ
wystêpowania zak¬óceñ w funkcjonowaniu urzådzenia,
wywo¬anych np. oddzia¬ywaniem ¬adunków elektrostatycznych
z dywanu czy wy¬adowaniami atmosferycznymi, za pomocå
przycisku RESET mo¿na skasowaæ pamiêæ urzådzenia i
wprowadziæ nowe ustawienia.
• W tym celu do otworu RESET na spodzie obudowy nale¿y
wprowadziæ koñcówkê d¬ugopisu i wcisnåæ znajdujåcy siê
tam przycisk.
Polski
41
Page 42

NASTAWIANIE ZEGARA TUNER
Czas wyœwietlany jest w formacie 24-godzinnym.
Polski
1. Ustawiæ prze¬åcznik SET w po¬o¿eniu TIME.
2. Naciskajåc lub wciskajåc przycisk 7 nastawiæ godzinê.
Po nastawieniu godziny zwolniæ przycisk.
3. Naciskajåc lub wciskajåc przycisk 8 nastawiæ minuty.
Po nastawieniu minut zwolniæ przycisk.
4. Ustawiæ prze¬åcznik SET w po¬o¿eniu CLOCK.
TUNER
1. Nacisnåæ jeden raz przycisk SLEEP/ RADIO ON, aby w¬åczyæ
tuner.
™ Na wyœwietlaczu pojawi siê na chwilê czêstotliwoœæ
ostatnio wybranej stacji, po czym ponownie wyœwietlany
bêdzie bie¿åcy czas. W przypadku wyboru jednej z
zaprogramowanych stacji wyœwietlana bêdzie równie¿
odpowiednia informacja.
2. Nacisnåæ przycisk BAND, aby zmieniæ zakres fal radiowych.
3. Za pomocå pokrêt¬a VOLUME ustawiæ ¿ådany poziom
natê¿enia dŸwiêku.
4. W celu wy¬åczenia tunera nacisnåæ przycisk ALARM RESET/
RADIO OFF.
STROJENIE TUNERA
Strojenie automatyczne
• Nacisnåæ przycisk 7 lub 8 i przytrzymaæ przez co najmniej
sekundê, aby dostroiæ tuner do najbli¿szej stacji radiowej.
™ Tuner automatycznie wyszuka stacjê o wystarczajåco
silnym sygnale.
42
Strojenie rêczne
• Naciskaæ przycisk 7 lub 8 do momentu wyszukania ¿ådanej
stacji.
Poprawa jakoœci odbieranego sygna¬u:
FM: Ustawiæ kabel antenowy w po¬o¿eniu
MW/ LW: Do odbioru sygna¬u z tych zakresów s¬u¿y
ZAPAMIÊTYWANIE I KORZYSTANIE Z
ZAPROGRAMOWANYCH STACJI RADIOWYCH
Tuner posiada pamiêæ 10 stacji radiowych, po 5 na ka¿dym
zakresie.
1.
2. Aby zapisaæ wyszukanå stacjê w pamiêci urzådzenia,
3. W celu zaprogramowania kolejnych stacji powtórzyæ
• W miejscu zaprogramowanej stacji mo¿na ustawiæ innå,
4. Aby pos¬uchaæ zaprogramowanej stacji, nacisnåæ przycisk
gwarantujåcym optymalny odbiór.
wbudowana antena. Jakoœæ odbieranego sygna¬u
mo¿na poprawiæ przez obrócenie urzådzenia.
Dostroiæ tuner do ¿ådanej stacji (patrz STROJENIE TUNERA).
nacisnåæ przycisk PRESET 1-5 i przytrzymaæ do momentu
us¬yszenia podwójnego sygna¬u dŸwiêkowego.
™ Na wyœwietlaczu pojawi siê numer przypisany stacji.
czynnoœci opisane w punktach 1i 2.
przydzielajåc jej dany numer.
PRESET 1-5.
Page 43
INFORMACJE OGÓLNE
Istnieje mo¿liwoœæ ustawienia dwóch czasów budzenia.
Funkcja ta jest przydatna w przypadku, gdy dana osoba budzi
siê o dwóch ró¿nych porach, np. inaczej w tygodniu i inaczej w
czasie weekendu:
• ALARM 1 – budzenie przez w¬åczenie tunera.
• ALARM 2 – budzenie przez w¬åczenie brzêczyka.
Czêstotliwoœæ dŸwiêku generowanego przez brzêczyk, z
poczåtku cichego, zwiêksza siê wraz z up¬ywem czasu.
USTAWIANIE CZASU I TRYBU BUDZENIA
1. Ustawiæ prze¬åcznik SET w po¬o¿eniu ALARM 1 lub ALARM 2.
™ Na wyœwietlaczu pojawiå siê migajåce cyfry czasu
budzenia: lub .
2. Naciskajåc lub wciskajåc przycisk 7 ustawiæ ¿ådanå godzinê
w¬åczenia budzika. Po ustawieniu godziny zwolniæ przycisk.
3. Naciskajåc lub wciskajåc przycisk 8 ustawiæ minuty czasu
budzenia. Po ustawieniu minut zwolniæ przycisk.
4. Ponownie ustawiæ prze¬åcznik SET w po¬o¿eniu CLOCK.
5. Przy wy¬åczonym tunerze ustawiæ ¿ådany tryb budzenia,
naciskajåc odpowiednio ALARM 1-RADIO lub
ALARM 2-BUZZER.
™ Na wyœwietlaczu pojawiå siê symbole lub
.
CZASY BUDZENIA
Uwaga: W przypadku ustawienia trybu ALARM 1 RADIO,
przed wy¬åczeniem urzådzenia nale¿y upewniæ siê, ¿e
wybrana stacja radiowa zosta¬a poprawnie
zaprogramowana.
Jeœli uaktywnione zostanå oba tryby budzenia i
ustawiona zostanie dla nich ta sama godzina, zadzia¬a
tylko ALARM 2-BUZZER.
WY£ÅCZANIE BUDZIKA
Budzik mo¿na wy¬åczyæ na trzy sposoby. Jeœli czas budzenia nie
zostanie ca¬kowicie anulowany, po up¬ywie 59 minut od
momentu wŒczenia budzika automatycznie uaktywniona
zostanie funkcja jego wyŒczenia na 24 godziny.
WyŒczanie budzika na 24 godziny
Jeœli budzik ma zostaæ wy¬åczony natychmiast, lecz ten sam czas
budzenia ma obowiåzywaæ dla nastêpnego dnia:
• Nacisnåæ przycisk ALARM RESET/ RADIO OFF.
™ Rozlegnie siê brzêczyk potwierdzajåcy uaktywnienie
funkcji wyŒczenia budzika na 24 godziny.
Polski
43
Page 44
CZASY BUDZENIA SLEEP
Anulowanie czasu budzenia
Polski
Aby anulowaæ ustawiony czas budzenia przed w¬åczeniem
budzika lub w trakcie sygna¬u dŸwiêkowego:
• Przy wy¬åczonym tunerze nacisnåæ przycisk ALARM 1-RADIO
lub ALARM 2-BUZZER tyle razy, ile bêdzie konieczne do
wygaszenia na wyœwietlaczu symbolu w¬åczonego budzika.
Chwilowe wy¬åczenie sygna¬u budzenia
Funkcja s¬u¿åca do wstrzymania sygna¬u budzenia na 9 minut.
1. Po w¬åczeniu siê sygna¬u budzenia nacisnåæ przycisk
REPEAT ALARM/ BRIGHTNESS CONTROL.
™ Po ponownym w¬åczeniu siê sygna¬u budzenia na
wyœwietlaczu pojawiå siê migajåce symbole
lub .
2. Funkcjê mo¿na ka¿dorazowo uaktywniaæ do szeœciu razy.
UWAGI O FUNKCJI WY£ÅCZNIKA CZASOWEGO
Urzådzenie wyposa¿ono w wy¬åcznik czasowy (timer)
umo¿liwiajåcy automatyczne wy¬åczenie tunera po up¬ywie
zadanego czasu. Dostêpne så nastêpujåce ustawienia: 60, 30,
15 minut lub off (funkcja wyŒczona).
USTAWIANIE CZASU DLA FUNKCJI WY£ÅCZNIKA
CZASOWEGO
1. Nacisnåæ przycisk SLEEP/ RADIO ON, aby w¬åczyæ tuner.
2. W przeciågu sekundy ponownie nacisnåæ przycisk SLEEP/
RADIO ON a¿ wyœwietlacz wska¿e oraz SL:60.
44
W trakcie wyœwietlania informacji o funkcji SLEEP nacisnåæ
przycisk SLEEP/ RADIO ON aby wybraæ ¿ådany czas.
™ Na wyœwietlaczu pokazujå siê kolejno symbole:
oraz dostêpne opcje: SL:60, SL:30, SL:15 oraz OFF.
™ Po uaktywnieniu funkcji SLEEP na wyœwietlaczu pojawi siê
na krótko ustawiony czas oraz czêstotliwoœæ ostatnio
wybranej stacji radiowej, po czym pokazywany bêdzie
symbol funkcji oraz czas wy¬åczenia urzådzenia.
3. W celu wy¬åczenia funkcji SLEEP nacisnåæ jeden z
nastêpujåcych przycisków:
• ALARM RESET/ RADIO OFF
• REPEAT ALARM/ BRIGHTNESS CONTROL
• SLEEP/ RADIO ON raz lub kilka razy, a¿ z wyœwietlacza
zniknie symbol .
KONSERWACJA
• W przypadku, gdy urzådzenie nie bêdzie u¿ywane przez
d¬u¿szy czas, od¬åczyæ je od prådu, wyciågajåc z gniazdka
elektrycznego wtyczkê przewodu sieciowego.
• Chroniæ urzådzenie przed wilgociå, deszczem, piaskiem oraz
nadmiernå temperaturå. Nie umieszczaæ go w pobli¿u Ÿróde¬ ciep¬a,
takich jak grzejniki lub w miejscach silnie nas¬onecznionych.
• Do czyszczenia urzådzenia u¿ywaæ miêkkiej, lekko zwil¿onej
szmatki, najlepiej irchowej. Nie u¿ywaæ œrodków chemicznych z
zawartoœciå alkoholu, amoniaku lub benzenu oraz materia¬ów o
szorstkiej, œciernej powierzchni, gdy¿ ich stosowanie mo¿e
doprowadziæ do uszkodzenia powierzchni obudowy.
Page 45

USUWANIE DROBNYCH USTEREK
W przypadku wyståpienia problemu, przed oddaniem urzådzenia do naprawy, wykonaæ opisane poni¿ej czynnoœci kontrolne. Jeœli
usuniêcie problemu bêdzie w dalszym ciågu niemo¿liwe, skorzystaæ z pomocy dystrybutora lub punktu serwisowego.
OSTRZE¯ENIE: Pod groŸbå utraty gwarancji kategorycznie zabrania siê dokonywania samodzielnych
napraw.
PROBLEM
– MOΩLIWA PRZYCZYNA
• ROZWIÅZANIE
Brak dŸwiêku
– Zbyt niski poziom g¬oœnoœci
• Zwiêkszyæ poziom g¬oœnoœci
Nieprawid¬owa praca wyœwietlacza/ brak reakcji
urzådzenia na naciskanie przycisków, obracanie pokrêt¬a
regulacji g¬oœnoœci itp.
– Wy¬adowanie elektrostatyczne
• U¿yæ przycisku RESET na spodzie obudowy
Podczas ods¬uchu stacji na zakresie FM od czasu do
czasu s¬ychaæ trzaski
– S¬aby sygna¬
• Ustawiæ kabel antenowy na spodzie urzådzenia w po¬o¿eniu
gwarantujåcym optymalny odbiór
Niniejszy produkt spe¬nia wymagania Unii Europejskiej z zakresu zak¬óceñ radiowych.
Intensywne trzaski/ szum podczas ods¬uchu stacji na
zakresach MW/ LW
– Zak¬ócenia elektryczne spowodowane pracå odbiornika
telewizyjnego, komputera, œwietlówki, telefonu
komórkowego itp.
• Zwiêkszyæ odleg¬oœæ pomiêdzy radiobudzikiem i innymi
urzådzeniami elektrycznymi
Budzik nie dzia¬a
– Nie ustawiono czasu/ trybu budzenia
• Patrz USTAWIANIE CZASU I TRYBU BUDZENIA
– Zbyt niski poziom g¬oœnoœci przy budzeniu w trybie ALARM
1-RADIO
• Zwiêkszyæ poziom g¬oœnoœci
– W trybie ALARM 1-RADIO w¬åcza siê nie dostrojona stacja
• Dostroiæ ¿ådanå stacjê radiowå przed ustawieniem czasu
budzenia w trybie ALARM 1-RADIO i wy¬åczeniem urzådzenia
Polski
45
Page 46

COMANDOS
1 SLEEP/ RADIO ON
– visualiza/ regula/ desliga o tempo de sonolência
– liga o rádio; visualiza a frequência do rádio
2 Comando SET
– define a hora de •ALARM 1, •ALARM 2, •TIME também
Português
para funcionar com a hora do relógio •CLOCK
3 TIME SET/ TUNING: HR, MIN e 7, 8
– acerta as horas (7) e os minutos (8) da hora do relógio e
do despertador
– sintoniza estações de rádio (para cima 7, para baixo 8)
4 ALARM 1 - RADIO e também PRESET 1
– selecciona ligar ou desligar o modo de rádio para o alarme 1
– PRESET station (estação pré-sintonizada) 1
5 ALARM 2 - BUZZER e também PRESET 2
– selecciona ligar ou desligar o modo de besouro para o
alarme 2
– PRESET station (estação pré-sintonizada) 2
6 ALARM RESET/ RADIO OFF
– interrompe o alarme activado por um período de 24 horas
– interrompe a função de rádio /tempo de sonolência
Informação relativa ao ambiente
Reduzimos a embalagem ao mínimo para a tornar fácil de separar em dois materiais: cartão (caixa) e polietileno (sacos, espuma
de protecção).
O aparelho consiste em materiais que podem ser reciclados desde que sejam desmontados por uma empresa
especializada. Queira, por favor, respeitar as regulamentações locais relativas à eliminação de materiais de
embalagem, pilhas gastas e equipamento obsoleto.
46
7 PRESET 3, 4 e 5
– memoriza e selecciona estações pré-sintonizadas
8 REPEAT ALARM/ BRIGHTNESS CONTROL
– desliga o despertador por um período de 9 minutos
– altera a luminosidade do visor
– desliga a função de tempo de sonolência
9 Visor
– visualiza a hora do relógio ou do despertador e o estado
do aparelho
0 BAND
– selecciona a faixa de radiofrequência de FM/ MW/ LW
! VOLUME
– regula o nível do som
@ Antena externa
– (na base do aparelho) melhora a recepção em FM
# Cabo de alimentação
– para alimentação de corrente da rede
A placa de tipo encontra-se na base do aparelho.
Page 47

INSTALAÇÃO CARACTERÍSTICAS BÁSICAS
ALIMENTAÇÃO DE CORRENTE DA REDE E MODO DE
DEMONSTRAÇÃO
1. Verifique se a tensão da corrente indicada na placa de tipo
que se encontra na base do aparelho corresponde à da sua
rede local. Se não corresponder, contacte o seu
concessionário ou o centro encarregado da assistência.
2. Ligue a ficha à tomada da parede. A alimentação de
corrente está agora ligada e no visor aparecerá o PHILIPS
demo mode.
™ A indicação PH..IL ..IPS passa continuamente no visor.
• Rode o comando SET para SET TIME para sair do modo de
demonstração.
3. Para desligar completamente o aparelho, tire a ficha da
tomada da parede.
MEMÓRIA DE SEGURANÇA AUTO-ALIMENTADA
A memória de segurança auto-alimentada permite, para sua
conveniência, que as estações pré-sintonizadas bem como as
definições da hora do relógio e do alarme sejam memorizadas
até 3 minutos quando se verifica uma interrupção na
alimentação, por ex. um corte de corrente da rede. O relógiorádio e a iluminação são completamente desligados. Assim
que a alimentação de corrente da rede for restabelecida, o
visor indicará a hora correcta.
Se a alimentação de corrente da rede for restabelecida depois
dos 3 minutos, o visor indicará:
• a hora do relógio a piscar – indica que precisa de voltar a
acertar a hora
• o PHILIPS demo mode – indica que precisa de voltar a
inserir as estações pré-sintonizadas e a hora do relógio e do
despertador.
LUMINOSIDADE DO VISOR
1. Verifique se o comando SET se encontra na posição CLOCK
e se o rádio está desligado.
2. Pressione REPEAT ALARM/
– A luminosidade do visor será alterada pela ordem seguinte:
BRIGHT y MEDIUM y LOW y BRIGHT...
Nota:
quando o despertador ou a função SLEEP (tempo de sonolência)
se encontram activados, não é possível ajustar a luminosidade.
REINICIALIZAR (RESET)
Na eventualidade de o visor e as funções electrónicas do
aparelho sofrerem interferência, por ex. electricidade estática
originada por alcatifas, trovoadas, etc., RESET permite apagar
todas as definições anteriores e começar de novo.
• Utilize uma esferográfica para pressionar o orifício RESET
que se encontra na base do aparelho.
BRIGHTNESS CONTROL uma vez ou mais.
Português
47
Page 48

ACERTAR O RELÓGIO RÁDIO
A hora é visualizada utilizando o relógio de 24 horas.
1. Rode o comando SET para a posição TIME.
2. Pressione repetidamente 7 ou mantenha o botão
pressionado para acertar as horas.
Português
Solte 7 quando atingir a hora correcta.
3. Pressione repetidamente 8 ou mantenha o botão
pressionado para acertar os minutos.
Solte 8 quando atingir os minutos correctos.
4. Rode o comando SET para a posição CLOCK.
RÁDIO
1. Pressione SLEEP/ RADIO ON uma vez para ligar o rádio.
™ No visor aparece por momentos a frequência de rádio da
última faixa de radiofrequência seleccionada e volta depois a
ser visualizada a hora do relógio. É também indicada a estação
pré-sintonizada, se estiver a ouvir uma destas estações.
2. Pressione BAND se desejar mudar de faixa de radiofrequência.
3. Regule o som utilizando o VOLUME.
4. Pressione ALARM RESET/ RADIO OFF para desligar.
SINTONIZAR ESTAÇÕES DE RÁDIO
Sintonização automática
• Pressione 7 ou 8 um segundo ou mais para sintonizar uma
estação.
™ O rádio sintoniza automaticamente uma estação com um
sinal suficientemente forte.
48
Sintonização manual
• Pressione 7 ou 8 momentânea e repetidamente até atingir a
frequência desejada.
Para melhorar a recepção:
FM: Ajuste a antena externa para obter uma recepção
MW/ LW: É utilizada uma antena interna incorporada.
MEMORIZAR E UTILIZAR ESTAÇÕES PRÉ-SINTONIZADAS
Pode armazenar na memória um máximo de 10 estações, 5 em
cada faixa de radiofrequência.
1.
2. Para memorizar uma estação pré-sintonizada, pressione por
3. Repita os pontos 1 e 2 para memorizar outras estações.
• Pode substituir uma estação pré-sintonizada memorizando
4. Pressione um botão PRESET (1 a 5) para ouvir uma estação
óptima.
Oriente a antena ajustando a posição do aparelho.
Sintonize a estação desejada (vide SINTONIZAR ESTAÇÕES DE
RÁDIO).
momentos um dos botões PRESET (1 a 5) até ouvir um "bip"
duplo.
™ O visor indica o número de pré-sintonização da estação.
outra frequência no seu lugar.
pré-sintonizada.
Page 49
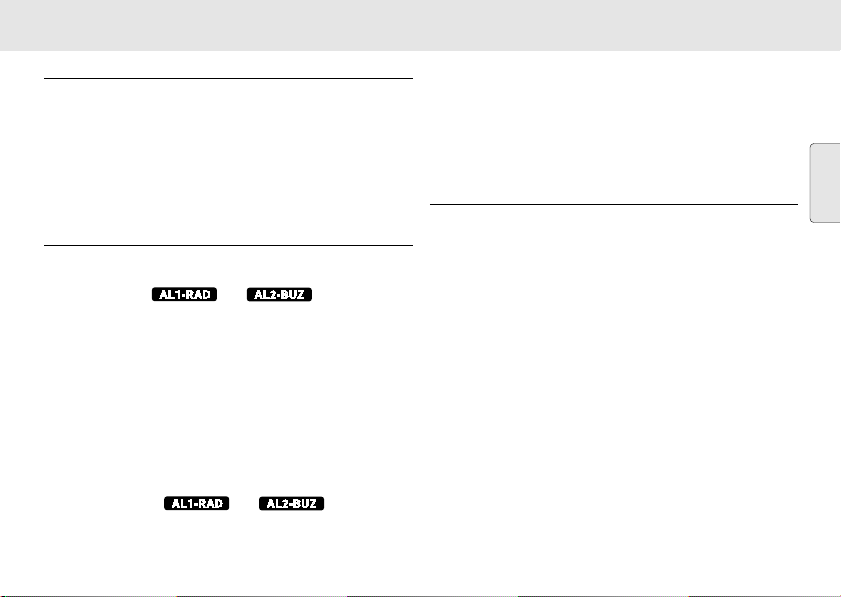
GENERALIDADES
Podem ser programadas duas horas do despertador diferentes.
Isto pode ser útil, por exemplo, se precisar de acordar a uma
hora diferente durante a semana e no fim de semana.
• ALARM 1 – modo de rádio
• ALARM 2 – modo de besouro. O toque de despertar do
besouro começa suavemente e aumenta de intensidade no
espaço de poucos segundos.
PROGRAMAR A HORA E O MODO DE DESPERTAR
1. Rode o comando SET para ALARM 1 ou ALARM 2.
™ O visor mostra os dígitos da hora do despertador com os
indicadores ou a piscar.
2. Pressione repetidamente 7 ou mantenha o botão
pressionado para acertar as horas.
Solte 7 quando atingir a hora correcta.
3. Pressione repetidamente 8 ou mantenha o botão
pressionado para acertar os minutos.
Solte 8 quando atingir os minutos correctos.
4. Volte a colocar o comando SET na posição CLOCK.
5. Com o rádio desligado, seleccione o modo de despertar da
sua preferência pressionando ALARM 1-RADIO ou
ALARM 2-BUZZER.
™ O visor indica ou .
UTILIZAR O DESPERTADOR
Notas: Se seleccionou ALARM 1 RADIO, certifique-se de que
sintonizou devidamente uma estação antes de desligar
o aparelho.
Se programar e activar a mesma hora de despertar
para os dois toques do despertador, apenas o
ALARM 2-BUZZER será activado à hora programada.
DESLIGAR O DESPERTADOR
Existem três formas de desligar o despertador. A não ser que
cancele completamente o alarme, a reactivação do
despertador passadas 24 horas será automaticamente
seleccionada ao fim de 59 minutos, a contar da hora a que o
despertador começa a tocar.
Reactivação do despertador passadas 24 horas
Se deseja parar imediatamente o despertador mas quer manter a
mesma hora de despertar para o dia seguinte:
• Pressione ALARM RESET/ RADIO OFF.
™ Ouvirá um "bip" a confirmar que foi activada a
reactivação do despertador passadas 24 horas.
Português
49
Page 50

UTILIZAR O DESPERTADOR SLEEP
Cancelar completamente o alarme
Para cancelar a hora definida para o despertador antes que
este comece a tocar, ou durante o toque de despertar:
• Com o rádio desligado, pressione ALARM 1-RADIO ou
ALARM 2-BUZZER uma vez ou mais até o indicador do
Português
alarme seleccionado desaparecer do visor.
Repetição do toque de despertar
Esta função repete o toque de despertar a intervalos de 9 minutos.
1. Enquanto o despertador estiver a tocar, pressione REPEAT
ALARM/ BRIGHTNESS CONTROL.
™ No visor, aparece a indicação ou
piscar durante a repetição do toque de despertar.
2. Repita, se o desejar, até um máximo de 6 vezes.
ACERCA DO SLEEP (TEMPO DE SONOLÊNCIA)
O relógio-rádio tem um dispositivo temporizador de tempo de
sonolência incorporado que permite que o aparelho seja
automaticamente desligado durante a reprodução do rádio
passado um período de tempo definido. Existem quatro tempos
de sonolência até o aparelho se desligar: 60, 30, 15 minutos e
desligado.
PROGRAMAR O TEMPO DE SONOLÊNCIA
1. Pressione SLEEP/ RADIO ON para ligar o rádio.
2. No espaço de 1 segundo, volte a pressionar SLEEP/ RADIO ON
uma vez ou mais até o visor indicar e SL:60.
50
Com o visor a indicar o tempo de sonolência, pressione
SLEEP/ RADIO ON uma vez ou mais para seleccionar o
tempo desejado.
™ O visor mostra, sequencialmente: e as opções
de tempo de sonolência: SL:60, SL:30, SL:15 e OFF.
™ O tempo de sonolência e a frequência de rádio aparecem
por momentos antes de ser visualizada a hora do relógio
em espera com o indicador , se o tempo de
sonolência tiver sido activado.
3. Para cancelar o tempo de sonolência, pressione uma das
seguintes opções:
• ALARM RESET/ RADIO OFF
• REPEAT ALARM/
• SLEEP/ RADIO ON uma vez ou mais até a indicação
MANUTENÇÃO
• Se não tenciona utilizar o aparelho senão daqui por muito
tempo, tire a ficha da tomada da parede.
• Não exponha o aparelho a humidade, chuva, areia, ou a
calor excessivo provocado por equipamento de aquecimento
ou pela luz directa do sol.
• Para limpar o aparelho, utilize uma camurça macia
ligeiramente humedecida. Não utilize quaisquer agentes de
limpeza que contenham álcool, amoníaco, benzeno ou
abrasivos, já que tais produtos poderão danificar a caixa.
BRIGHTNESS CONTROL
desaparecer do visor.
Page 51

RESOLUÇÃO DE PROBLEMAS
Se ocorrer uma avaria, verifique primeiro os pontos a seguir indicados antes de levar o aparelho para reparação. Se não
conseguir resolver um problema seguindo estas sugestões, consulte o concessionário ou o centro encarregado da assistência.
ATENÇÃO: Em nenhuma circunstância deverá você mesmo tentar reparar o aparelho, já que isso iria invalidar
a garantia.
PROBLEMA
– CAUSA POSSÍVEL
• SOLUÇÃO
Não há som
– O volume não está regulado
• Regule o volume
Erro do visor/ não há resposta ao accionamento dos
comandos
– Descarga electrostática
• Pressione RESET
Estalidos ocasionais durante a recepção de FM
– Sinal fraco
• Ajuste a posição da antena externa
Este produto obedece aos requisitos respeitantes a interferência de rádio estabelecidos pela União Europeia.
Estalidos/ sibilação contínua durante a recepção de
MW/ LW
– Interferência eléctrica de um televisor, um computador, uma
lâmpada fluorescente, um telemóvel, etc.
• Afaste o aparelho de outro equipamento eléctrico
O despertador não funciona
– Não foi programada a hora ou o modo de despertar
• Veja PROGRAMAR O DESPERTADOR
– O volume está demasiado baixo para o ALARM 1-RADIO
• Regule o volume
– Não foi sintonizada uma estação para o ALARM 1-RADIO
• Verifique se o aparelho tem uma estação sintonizada antes
de programar o ALARM 1-RADIO e ao desligar
Português
51
Page 52

BETJENINGSANORDNINGER
1 SLEEP/ RADIO ON
– viser/ indstiller/ afbryder slumrefunktionen
– tænder for radioen; viser radiofrekvensen
2 SET knap
– indstiller tidspunkterne for •ALARM 1, •ALARM 2,
•TIME og til at virke på urets tid •CLOCK
3 TIME SET/ TUNING: HR, MIN og 7, 8
– indstiller timetal (7) og minuttal (8) for ur/vækketider
– indstiller (op 7, ned 8) på radiostationer
4 ALARM 1 - RADIO og også PRESET 1
Dansk
– vælger radiofunktion til eller fra for vækker 1
– PRESET (forvalgt) station 1
5 ALARM 2 - BUZZER og også PRESET 2
– vælger summetonefunktion til eller fra for vækker 2
– PRESET (forvalgt) station 2
6 ALARM RESET/ RADIO OFF
– standser den aktive vækker i 24 timer
– standser radio/slumrefunktion
Miljøinformation
Vi har reduceret emballagen til et minimum, så den let kan inddeles i to materialekategorier: almindeligt pap (kassen) og
polyethylen (plastposer og beskyttende skumplast).
Apparatet består af materialer, der kan genbruges. Når man derfor til sin tid skal kassere apparatet, bør det
afleveres til en genbrugsstation e.l. Man bedes venligst overholde de lokale regler for bortkastning af
indpakningsmaterialer, opbrugte batterier og kasserede apparater.
52
7 PRESET 3, 4 og 5
– lagrer og vælger forvalgte stationer
8 REPEAT ALARM/ BRIGHTNESS CONTROL
– afbryder vækkeren i 9 minutter
– ændrer lysstyrken på displayets baggrundsbelysning
– afbryder slumrefunktionen
9 Display
– viser ur/vækketidspunkterne og apparatets status
0 BAND
– vælger FM/MW/LW-bølgeområde
! VOLUME
– regulerer lydstyrken
@ Ledningsantenne
– (på apparatets underside) forbedrer FM-modtagelsen
# Lysnetledning
– til lysnetforsyning
Typeskiltet findes på apparatets underside.
Page 53

INSTALLATION GRUNDFUNKTIONER
LYSNETFORSYNING OG DEMO-FUNKTION
1. Kontrollér om strømspændingen, der er vist på typeskiltet
på apparatets underside, svarer til den lokale
lysnetspænding. Hvis den ikke gør det, skal man rådføre sig
med forhandleren eller servicecentret.
2. Sæt el-stikket i en stikkontakt. Lysnetforsyningen er nu
tilsluttet og displayet viser PHILIPS demo mode.
™ PH..IL ..IPS ruller konstant hen over displayet.
• Drej SET knappen til SET TIME for at afslutte demo-
funktionen.
3. Apparatet afbrydes fuldstændigt fra lysnettet ved at tage
el-stikket ud af stikkontakten.
STRØMOPBAKNING
Med strømopbakningen bliver indstillingerne for de forvalgte
stationer, vækketidspunkterne og urets tid gemt i op til
3 minutter, når der er en strømafbrydelse f.eks. i tilfælde af
strømsvigt. Hele clockradioen og displayets baggrundsbelysning
vil blive afbrudt. Så snart lysnetforsyningen kommer igen, viser
displayet det korrekte tidspunkt. Hvis lysnetforsyningen kommer
igen efter 3 minutters forløb og displayet viser:
• blinkende urtid – angiver, at det er nødvendigt at indstille
urets tid igen
• PHILIPS demo mode – ngiver, at det er nødvendigt at
indstille de forvalgte stationer og vækketidspunkterne igen.
BAGGRUNDSBELYSNINGENS LYSSTYRKE
1. Kontrollér om SET knappen står på CLOCK og om der er
slukket for radioen.
2. Tryk en eller flere gange på REPEAT ALARM/
CONTROL
.
BRIGHTNESS
– Lysstyrken på displayets baggrundsbelysning ændres i
følgende rækkefølge:
BRIGHT y MEDIUM y LOW y BRIGHT...
Bemærk:
Når en vækker eller SLUMRE-funktionen er aktiv, kan
lysstyrken ikke reguleres.
RESET (NULSTILLING)
Skulle apparatets display eller elektroniske funktioner modtage
forstyrrelser, f.eks. statisk elektricitet fra gulvtæpper,
tordenvejr mv. kan man med RESET fjerne alle tidligere
indstillinger og begynde forfra igen.
• Stik spidsen af en kuglepen ind i RESET hullet på
apparatets underside og tryk.
Dansk
53
Page 54

INDSTILLING AF URET RADIO
Tidspunktet vises med 24-timers ursystemet.
1. Drej SET knappen til TIME.
2. Tryk gentagne gange på 7 eller hold knappen nede for at
indstille timetallet.
Når timetallet på uret er korrekt, slipper man 7.
3. Tryk gentagne gange på 8 eller hold knappen nede for at
indstille minuttallet.
Når minuttallet på uret er korrekt, slipper man 8.
4. Drej SET knappen til CLOCK.
Dansk
RADIO
1. Tryk en gang på SLEEP/ RADIO ON for at tænde for radioen.
™ Displayet viser radiofrekvensen af det sidst valgte
bølgeområde et øjeblik, før det vender tilbage til urtiden.
Den forvalgte station vises også, hvis man lytter til en.
2. Tryk på BAND for at vælge et andet bølgeområde.
3. Indstil lydstyrken med VOLUME.
4. Tryk på ALARM RESET/ RADIO OFF for at slukke for radioen.
INDSTILLING PÅ RADIOSTATIONER
Automatisk indstilling
• Tryk mindst 1 sekund på 7 eller 8 for at indstille på stationen.
™ Radioen indstilles automatisk på en station med
tilstrækkelig signalstyrke.
54
Manuel indstilling
• Tryk kort gentagne gange på 7 eller 8, til radioen er
indstillet på den ønskede frekvens.
Forbedring af radiomodtagelsen:
FM: Indstil ledningsantennen for optimal modtagelse.
MW/ LW: Anvender en indbygget antenne inde i apparatet.
LAGRING OG BRUG AF FORVALGTE STATIONER
Man kan lagre op til 10 radiostationer i hukommelsen,
5 på hvert bølgeområde.
1.
2. Man lagrer en forvalgt station ved at holde en PRESET knap
3. Man gentager punkt 1 og 2 for at lagre andre stationer.
• Man kan overskrive en forvalgt station ved at lagre en
4. Tryk på en PRESET knap 1-5 for at lytte til en forvalgt
Antennen indstilles ved at flytte rundt på hele
apparatet.
Indstil på den ønskede station (se INDSTILLING PÅ
RADIOSTATIONER).
1-5 nede, indtil man hører et dobbelt-bip.
™ Displayet viser det forvalgte nummer på stationen.
anden frekvens på samme nummer.
station.
Page 55

GENERELT
Der kan indstilles to forskellige vækketidspunkter. Denne
funktion kan være nyttig, hvis man f.eks. ønsker at blive
vækket på et forskelligt tidspunkt om hverdagen og i
weekenden:
• ALARM 1 – radiofunktion
• ALARM 2 – summetonefunktion. Ved den blide vækning
med summetone øges bip-tonens frekvens i løbet af nogle
sekunder.
INDSTILLING AF VÆKKETIDSPUNKT OG -FUNKTION
1. Drej SET knappen til ALARM 1 eller ALARM 2.
™ Displayet viser vækketidspunktets cifre med blinkende
eller indikator.
2. Tryk gentagne gange på 7 eller hold knappen nede for at
indstille timetallet.
Når timetallet på uret er korrekt, slipper man 7.
3. Tryk gentagne gange på 8 eller hold knappen nede for at
indstille minuttallet.
Når minuttallet på uret er korrekt, slipper man 8.
4. Drej SET knappen tilbage til CLOCK.
5. Mens der er slukket for radioen, vælger man den ønskede
vækkefunktion ved at trykke på ALARM 1-RADIO eller
ALARM 2-BUZZER.
™ Displayet viser eller .
BRUG AF VÆKKEREN
Bemærk: Hvis man har valgt ALARM 1 RADIO, skal man
sørge for, at man har indstillet korrekt på en station,
før man slukker for apparatet.
Hvis man indstiller og aktiverer vækketidspunktet
for begge vækkere, vil kun ALARM 2-BUZZER blive
aktiveret på den indstillede tidspunkt.
VÆKKER FRA
Vækkeren kan afbrydes på tre forskellige måder. Medmindre
man har annulleret vækkeren fuldstændigt, vælges 24-timers
genindstilling af vækkeren automatisk 59 minutter efter det
tidspunkt, hvor vækkeren først lyder.
24-timers genindstilling af vækker
Hvis man ønsker, at vækkeren skal standse med det samme, men
gerne vil vækkes på samme tidspunkt næste dag:
• Tryk på ALARM RESET/ RADIO OFF.
™ Man vil høre en bip-tone, der bekræfter, at 24-timers
genindstilling af vækker er aktiveret.
Dansk
55
Page 56

BRUG AF VÆKKEREN SLEEP
Fuldstændig annullering af vækkeren
Hvis man ønsker at annullere det indstillede vækketidspunkt,
før vækkeren aktiveres eller under vækningen:
• Med vækkeren afbrudt tryk en eller flere gange på
ALARM 1-RADIO eller ALARM 2-BUZZER, indtil den valgte
vækkeindikator ikke længere ses på displayet.
Gentagen vækning
Med denne funktion gentages vækningen med 9-minutters
mellemrum.
Dansk
1. Under vækning tryk på REPEAT ALARM/ BRIGHTNESS CONTROL.
™ Displayet viser blinkende eller
under gentagen vækning.
2. Man kan gentage vækningen op til 6 gange, hvis man
ønsker det.
OM SLEEP (SLUMRE-FUNKTIONEN)
Dette apparat har en indbygget slumretimer, som gør det muligt
for apparatet blive automatisk afbrudt, mens radioen spiller efter
en indstillet tidsperiode. Der findes fire slumretider, før der
automatisk slukkes for apparatet: 10, 30, 60, 15 minutter og off.
INDSTILLING AF SLUMRETID
1. Tryk på SLEEP/ RADIO ON for at tænde for radioen.
2. Inden 1 sekund tryk igen en eller flere gange på SLEEP/
RADIO ON, til displayet viser og SL:60.
56
Mens SLEEP-displayet ses, tryk igen en eller flere gange på
SLEEP/ RADIO ON for at vælge slumretiden.
™ Displayet viser i rækkefølge: og de mulige
slumretider, man kan vælge imellem: SL:60, SL:30, SL:15
og OFF.
™ Slumretiden og radiofrekvensen vises et øjeblik, før
standby-urtiden ses med indikatoren, hvis
SLEEP er aktiveret.
3. Slumrefunktionen annulleres ved at trykke på enten:
• ALARM RESET/ RADIO OFF
• REPEAT ALARM/
• Tryk en eller flere gange på SLEEP/ RADIO ON, indtil
VEDLIGEHOLDELSE
• Hvis man ikke har i sinde at anvende apparatet i længere
tid, skal apparatet afbrydes ved at tage el-stikket ud af
stikkontakten.
• Undgå at udsætte apparatet for fugt, regn, sand eller
ekstrem varme (f.eks. fra varmeafgivende apparater eller
direkte sollys).
• Apparatet kan rengøres udvendigt med et blødt, let fugtet
vaskeskind. Brug aldrig rengøringsmidler, der indeholder
alkohol, ammoniak, benzen eller skrappe midler, da disse
kan beskadige huset.
BRIGHTNESS CONTROL
ikke længere ses på displayet.
Page 57

FEJLFINDING
Hvis der skulle opstå en fejl, bedes man venligst først kontrollere nedenstående punkter, før man indleverer apparatet til
reparation. Hvis problemet ikke kan afhjælpes ved at følge disse råd, skal man søge hjælp hos forhandleren eller servicecentret.
ADVARSEL: Forsøg under ingen omstændigheder selv at reparere apparatet, da garantien derved bortfalder.
PROBLEM
– MULIG ÅRSAG
• AFHJÆLPNING
Ingen lyd
– Lydstyrken er ikke indstillet
• Indstil lydstyrken
Display-fejl/ ingen reaktion på betjeningsanordninger
– Elektrostatisk afladning
• Tryk på RESET
Der kommer undertiden knasende lyde under FMudsendelser
– Svagt signal
• Indstil ledningsantennens position
Dette apparat overholder EU's krav vedrørende radiostøj.
Konstant knasende/pibende lyde under
MW/LW-udsendelser
– Støj fra andet elektrisk udstyr, f.eks. TV-apparater,
computere, lysstofrør mv.
• Flyt apparatet væk fra andet elektrisk udstyr
Vækkeren fungerer ikke
– Vækketidspunkt/funktion er ikke indstillet
• Se INDSTILLING AF VÆKKEREN
– Lydstyrken er for lav til ALARM 1-RADIO
• Indstil lydstyrken
– ALARM 1-RADIO er ikke indstillet på en radiostation
• Kontrollér om apparatet er indstillet på en radiostation, før
der indstilles på ALARM 1-RADIO og når apparatet afbrydes
Dansk
57
Page 58

KNAPPAR
1 SLEEP/ RADIO ON
– för att visa/ justera/ stänga av insomningstiden
– för att koppla på radion och visa radiofrekvensen
2 SET-knappen
– för att ställa in tiden för •ALARM 1, •ALARM 2, •TIME
och starta klockan •CLOCK
3 TIME SET/ TUNING: HR, MIN och 7, 8
– för att ställa in timmarna (7) och minuterna (8) för klockan
och väckningen
– för att ställa in radiostationer (upp 7, ner 8)
4 ALARM 1 - RADIO och också PRESET 1
– för att ställa radioläge på eller av för Alarm 1
– PRESET station (inprogrammerad station) 1
5 ALARM 2 - BUZZER och också PRESET 2
Svenska
– för att ställa ringningsläge på på eller av för Alarm 2
– PRESET station (inprogrammerad station) 2
6 ALARM RESET/ RADIO OFF
– för att stänga av aktivt larm i 24 timmar
– för att stänga av radio/insomningsfunktionen
Miljöinformation
Vi har använts så litet förpackningsmaterial som möjligt för att göra det enkelt att källsortera det i två material: papp
(kartongen) och polyeten (påsar, skumplast).
Din apparat består av material som kan återvinnas om den plockas isär av ett specialistföretag. Rätta dig efter
lokala bestämmelser för vad du gör med förpackningsmaterial, uttjänta batterier och gammal utrustning.
58
7 PRESET 3, 4 och 5
– för att lagra eller ställa in inprogrammerade stationer
8 REPEAT ALARM/ BRIGHTNESS CONTROL
– för att stänga av väckningen i 9 minuter
– för att ändra ljusstyrkan i rutans belysning
– för att stänga av insomningsfunktionen
9 Rutan
– för att visa tiden för klockan/väckning och apparatens
status
0 BAND
– för att välja våglängdsband FM/ MW/ LW
! VOLUME
– för att ställa in ljudnivån
@ Trådantenn
– (på apparatens botten) för att ge bättre FM-mottagning
# Nätkabel
– för nätmatning
Typplåten finns på apparatens undersida.
Page 59

INSTALLATION GRUNDFUNKTIONER
NÄTMATNING OCH DEMONSTRATIONSLÄGE
1. Se efter att nätspänningen, som anges på apparatens
undersida, stämmer med eltypen där du bor. Om inte, rådgör
med butiken eller en serviceverkstad.
2. Sätt i nätkontakten i ett vägguttag. Då får apparaten ström,
och i rutan visas PHILIPS demo mode.
™ PH..IL ..IPS rullar oavbrutet över rutan.
• Ställ knappen SET till SET TIME för att lämna
demonstrationsläget.
3. För att klockradion ska vara helt spänningslös måste
stickproppen vara utdragen ur vägguttaget.
STRÖMUPPBACKNING
Tack vare strömuppbackningen lagras veckodagen,
väckningsinställningarna och klockan i upp till 3 minuter om
strömtillförseln bryts t.ex. vid strömavbrott. Hela klockradion
stängs då av, och belysningen slocknar. Så snart som
strömmen kommer tillbaka, visas rätt tid i rutan igen.
Om det har gått mer än 3 minuter när strömmen kommer
tillbaka,
• clock time blinking – för att ange att du måste ställa om
klockan, och
• PHILIPS demo mode – rullar i rutan för att tala om att du
behöver programmera in dina stationer, ställa klockan och
ställa in väckningen igen.
BELYSNINGENS LJUSTYRKA
1. Kontrollera att SET står i läget CLOCK och att radion är
avstängd.
2. Tryck på en eller flera gånger på
REPEAT ALARM/
– Ljusstyrkan ändras i följande ordning:
BRIGHT y MEDIUM y LOW y BRIGHT...
OBS:
medan väckning eller insomningsfunktionen är aktiv går det
inte att ändra ljusstyrkan.
RESET (ÅTERSTÄLL)
Om rutan eller de elektroniska funktionerna i apparaten skulle
störas från t.ex. statisk elektricitet från mattor, åskväder etc
kan du radera alla tidigare inställningar med RESET och börja
om från början.
• Använd en kulspetspenna för att trycka i hålet RESET på
apparatens undersida.
BRIGHTNESS CONTROL.
Svenska
59
Page 60

STÄLLA KLOCKAN RADIO
Tiden visas enligt 24-timmarssystemet.
1. Ställ SET på TIME.
2. Tryck upprepade gånger på 7 eller håll ner knappen för att
ställa in timmen. Släpp upp 7 när du kommer till rätt timme.
3. Tryck upprepade gånger på 8 eller håll ner knappen för att
ställa in minuterna. Släpp upp 8 när du kommer till rätt minut.
4. Ställ SET på CLOCK.
RADIO
1. Tryck på SLEEP/ RADIO ON en gång för att koppla på radion.
™ Frekvensen för det sist valda våglängdsbandet visas helt
kort, och därefter visas klockan. Om du lyssnar till en
inprogrammerad station visas också programnumret.
Svenska
2. Tryck på BAND om du vill byta våglängdsband.
3. Ställ in ljudet med VOLUME.
4. Tryck på ALARM RESET/ RADIO OFF för att stänga av.
STÄLLA IN RADIOSTATIONER
Automatisk inställning
• Tryck på 7 eller 8 i minst en sekund för att ställa in din
station.
™ Då ställer radion automatiskt in en station med
tillräckligt god mottagning.
60
Manuell inställning
• Tryck helt kort upprepade gånger på 7 eller 8 tills du
kommer till önskad frekvens.
Hur du förbättrar mottagningen:
FM: Justera trådantennen för bäst mottagning.
MW/ LW: Det finns en inbyggd antenn inuti apparaten. Du
LAGRA OCH ANVÄNDA INPROGRAMMERADE STATIONER
Du kan lagra upp till sammanlagt 10 radiostationer i minnet,
5 på varje våglängdsband.
1.
2. För att lagra en inprogrammering håller du helt kort ner en
3. Upprepa moment 1 och 2 för att lagra dina andra stationer.
• Du kan skriva över en inprogrammerad station genom att
4. Tryck på en PRESET-knapp 1-5 för att lyssna på en
riktar antennen genom att vrida på hela radion.
Ställ in önskad station (se STÄLLA IN RADIOSTATIONER).
PRESET-knapp 1-5 tills du hör ett dubbelt pip.
™ I rutan visas programnumret för din station.
lagra en annan frekvens på samma plats.
inprogrammerad station.
Page 61

ALLMÄNT
Det går att ställa in två olika väckningstider. Det kan vara
praktiskt om du behöver vakna vid olika tider olika dagar, t.ex.
en vardag och över veckoslutet:
• ALARM 1 – radioläge
• ALARM 2 – ringningsläge. Ringningssignalen börjar
försiktigt och piper sedan allt fortare efter ett par sekunder.
STÄLLA IN VÄCKNINGSTID OCH VÄCKNINGSLÄGE
1. Ställ SET på ALARM 1 eller ALARM 2.
™ I rutan visas väckningstiden och eller
blinkar.
2. Tryck upprepade gånger på 7 eller håll ner knappen för att
ställa in timmen.
Släpp upp 7 när du kommer till rätt timme.
3. Tryck upprepade gånger på 8 eller håll ner knappen för att
ställa in minuterna.
Släpp upp 8 när du kommit till rätt minut.
4. Ställ tillbaka SET till CLOCK.
5. Välj väckningstyp genom att trycka på ALARM 1-RADIO
eller ALARM 2-BUZZER medan radion är av.
™ Då visas eller i rutan.
ANVÄNDA VÄCKNINGEN
OBS: Om du har valt ALARM 1 RADIO, måste du se till att du
har ställt in en station ordentligt innan du stänger av
radion.
Om du ställer in och aktiverar samma väckningstid för
båda väckningssätten, aktiveras bara ALARM 2-BUZZER
vid den inställda tiden.
STÄNGA AV VÄCKNINGEN
Det finns tre sätt att stänga av väckningen. Om du inte stänger
av väckningen helt och hållet, väljs automatiskt
nästadygnsinställning 59 minuter efter det att väckningen
startar.
Nästadygnsinställning
Om du vill avbryta väckningen omedelbart men vill behålla
samma väckningsinställning nästa dygn:
• Tryck på ALARM RESET/ RADIO OFF.
™ Ett pip bekräftar att nästadygnsinställning har aktiverats.
Svenska
61
Page 62
ANVÄNDA VÄCKNINGEN SLEEP
Avbeställa väckningen helt
För att avbeställa inställd väckning före eller under pågående
väckning:
• Med radion avstängd, tryck på ALARM 1-RADIO eller
ALARM 2-BUZZER en eller flera gånger tills den aktiva
väckningssymbolen försvinner i rutan.
Upprepad väckning
Med denna funktion upprepas väckningen med 9 minuters
mellanrum.
1. Tryck på REPEAT ALARM/ BRIGHTNESS CONTROL under
pågående väckning.
™ I rutan blinkar eller under
upprepad väckning.
Svenska
2. Upprepa vid behov upp till 6 gånger.
OM SLEEP (INSOMNINGSFUNKTIONEN)
Apparaten har en inbyggd timer som gör att den kan stänga av
sig automatiskt under radiospelning efter en viss tid. Du kan
välja mellan fyra olika tidsrymder innan radion stänger av sig:
60, 30, 15 minuter och off (av).
STÄLLA IN INSOMNING
1. Tryck på SLEEP/ RADIO ON för att koppla på radion.
2. Tryck inom 1 sekund på SLEEP/ RADIO ON igen en eller
flera gånger tills det står och SL:60 i rutan.
62
Medan det fortfarande visas i rutan trycker du på SLEEP/
RADIO ON en eller flera gånger för att välja din
insomningstid.
™ I rutan visas i tur och ordning: och de olika
valen för insomningstid: SL:60, SL:30, SL:15 och OFF.
™ Insomningstiden och radiofrekvensen visas helt kort, och
därefter visas klockan med -indikatorn, om
insomningsfunktionen är aktiverad.
3. För att stänga av insomningsfunktionen trycker du antingen
på:
• ALARM RESET/ RADIO OFF
• REPEAT ALARM/
• SLEEP/ RADIO ON en eller flera gånger tills
slocknar i rutan.
UNDERHÅLL
• Om du inte tänker använda klockradion på en längre tid bör
du koppla från den genom att dra ut kontakten ur
vägguttaget.
• Utsätt inte radion eller batterierna för fukt, regn, sand eller
för stark värme från värmeelement eller direkt solljus.
• Gör ren apparaten med ett mjukt, något fuktigt sämskskinn.
Använd inga rengöringsmedel som innehåller alkohol,
ammoniak, bensin eller skurmedel som kan skada höljet.
BRIGHTNESS CONTROL
Page 63

FELSÖKNING
Om det uppstår ett fel ber vi dig att först kontrollera nedanstående innan du tar in radion för reparation. Om du inte kan lösa
problemet med hjälp av följande tips kan du vända dig till butiken eller en serviceverkstad.
VARNING: Försök under inga omständigheter att reparera apparaten själv, eftersom det gör garantin ogiltig.
PROBLEM
– MÖJLIG ORSAK
• ÅTGÄRD
Inget ljud
– Volymen inte inställd
• Ställ in volymen
Rutan visar fel/ ingen reaktion på knapparna
– Statisk urladdning
• Tryck på RESET
Periodvis knastrande ljud under FM-sändning
– Svag signal
• Ändra trådantennens läge
Denna produkt uppfyller kraven i EU:s avstörningdirektiv.
Kontinuerligt knastrande/brus under MV/LW-sändning
– Elektrisk störning från TV, dator, lysrör, mobiltelefoner etc.
• Flytta bort radion från annan utrustning
Väckningen fungerar inte
– Väckningstid/väckningsläge inte inställt
• Se STÄLLA IN VÄCKNING
– Volymen för låg för ALARM 1-RADIO
• Ställ in volymen
– ALARM 1-RADIO inte inställd på någon radiostation
• Kontrollera att radion är inställd på en radiostation innan du
ställer in ALARM 1-RADIO och när du stänger av den
Svenska
63
Page 64

SÄÄTIMET
1 SLEEP/ RADIO ON
– näyttää/ säätää/ katkaisee uniajastintoiminnon
– kytkee radion; esittää radiotaajuuden
2 SET-säädin
– asettaa ajat toiminnoille •ALARM 1, •ALARM 2, •TIME
ja ajamisen kelloaikaan •CLOCK
3 TIME SET/ TUNING: HR, MIN ja 7, 8
– säätää tunnit (7) ja minuutit (8) kello/ heräytysaikoja varten
– virittää (ylös 7, alas 8) radiokanaville
4 ALARM 1 - RADIO ja myös PRESET 1
– valitsee radiotilan kytkennän tai katkaisun herätystä 1 varten
– PRESET station (ohjelmoi kanavan) 1
5 ALARM 2 - BUZZER ja myös PRESET 2
– valitsee äänimerkkitilan kytkennän tai katkaisun herätystä
2 varten
– PRESET station (ohjelmoi kanavan) 2
6 ALARM RESET/ RADIO OFF
– pysäyttää aktiivisen heätyshälytyksen 24 tunniksi
– pysäyttää radion /uniajastintoiminnon
Suomi
Ympäristöä koskevia tietoja
Olemme pitäneet pakkauksen mahdollisimman vähäisenä sen erottelemiseksi helposti kahdeksi materiaaliksi: pahvi (laatikko) ja
polyeteeni (pussit, suojavaahtomuovi).
Laite sisältää materiaaleja, jotka voidaan kierrättää edellyttäen, että tehtävä annetaan siihen erikoistuneen yhtiön
suoritettavaksi. Noudata paikallisia asetuksia pakkausmateriaalien, tyhjentyneiden paristojen ja käytöstä
poistetun laitteen hävittämisessä.
64
7 PRESET 3, 4 ja 5
– tallentaa ja valitsee ohjelmoituja kanavia
8 REPEAT ALARM/ BRIGHTNESS CONTROL
– katkaisee herätyshälytyksen 9 minuutin ajaksi
– muuttaa näytön kirkkauden
– katkaisee uniajastintoiminnon
9 Näyttö
– esittää kello/ herätysajat ja laitteen tilan
0 BAND
– FM/ MW/ LW-aaltokaistan
! VOLUME
– säätää äänitason
# Saparoantenni
– (laitteen pohjassa) parantaa FM-vastaanottoa
# Sähköjohto
– verkkovirran syöttöä varten
Tyyppikilpi sijaitsee laitteen pohjassa.
Page 65

ASENNUS PERUSTOIMINNOT
VERKKOSYÖTTÖ JA DEMO-TILA
1. Tarkista, vastaako laitteen pohjassa olevan tyyppikilven
ilmoittama jännite paikallista virtasyöttöä. Jos näin ei ole,
ota yhteys myyntiliikkeeseen tai huoltokeskukseen.
2. Liitä sähkökosketin pistorasiaan. Virtasyöttö on nyt kytketty
ja näyttö esittää PHILIPS demo mode.
™ PH..IL ..IPS vierittyy jatkuvasti näytön poikki.
• Käännä SET-säädin toimintoon SET TIME demo-tilasta
poistumiseksi.
3. Laitteen katkaisemiseksi kokonaan virtasyötöstä irrota
sähkökosketin pistorasiasta.
VIRRAN VARMISTUS
Virran varmistus mahdollistaa ohjelmoitujen kanavien,
herätyshälytyksen ja kelloaika-asetusten tallennuksen enintään
3 minuutin ajaksi, mikäli aiheutuu virtakatkos, esim.
vaihtovirtavika. Kelloradion ja näytön toiminta katkaistaan.
Heti kun virransyöttö palautuu, näyttö tulee osoittamaan
oikeaa aikaa. Jos virtasyöttö palautuu vasta 3 minuutin
kuluttua ja näytössä näkyy:
• vilkkuva kelloaika – merkitsee, että joudut asettamaan
kelloajan
• PHILIPS demo mode – merkitsee, että joudut
uudelleensyöttämään ohjelmoidut kanavat ja kello- ja
herätysajat.
TAUSTAVALON KIRKKAUS
1. Tarkista, onko SET-säädin käännetty asentoon CLOCK ja
onko radion toiminta katkaistu.
2. Paina kerran tai useammin
REPEAT ALARM/
– Näytön kirkkaus muuttuu tässä järjestyksessä:
BRIGHT y MEDIUM y LOW y BRIGHT...
Huomautus:
Kun herätyshälytys tai SLEEP-uniajastintoiminto on aktiivinen,
kirkkautta ei voida säätää.
RESET (NOLLAUS)
Jos laitteen näyttöön tai elektronisiin toimintoihin aiheutuu
häiriö, jonka aiheuttaa esim. mattojen välittämä staattinen
sähkö, ukkosilma jne., RESET-toiminto mahdollistaa kaikkien
aikaisempien asetusten nollauksen ja uudelleenkäynnistyksen.
• Käyttämällä kuulakärkikynän kärkeä paina laitteen pohjassa
olevaa RESET-koloa.
BRIGHTNESS CONTROL.
Suomi
65
Page 66

KELLON ASETUS RADIO
Aika esitetään käyttämällä 24 tunnin kelloa.
1. Käännä SET-säädin toimintoon TIME.
2. Paina 7 toistuvasti tai pidä painiketta painettuna tuntien
säätämiseksi. Vapauta 7 oikean tunnin saatuasi.
3. Paina 8 toistuvasti tai pidä painiketta painettuna minuuttien
säätämiseksi. Vapauta 8 oikean minuuttiasetuksen saatuasi.
4. Käännä SET-säädin toimintoon CLOCK.
RADIO
1. Paina kerran SLEEP/ RADIO ON radion kytkemiseksi.
™ Näytössä näkyy viimeiseksi valitun aaltokaistan
radiotaajuus hetken ajan ennen kelloaikaan palaamista.
Jos olet kuuntelemassa ohjelmoitua kanavaa, myös se
esitetään näytössä.
2. Paina BAND, jos haluat vaihtaa aaltokaistaa.
3. Säädä ääni käyttämällä äänenvoimakkuustoimintoa VOLUME.
4. Paina ALARM RESET/ RADIO OFF toiminnon katkaisemiseksi.
Suomi
VIRITYS RADIOKANAVILLE
Automaattinen viritys
• Paina 7 tai 8 sekunnin ajan tai sitä kauemmin kanavalle
virittäytymiseksi.
™ Radio virittyy automaattisesti riittävän kuuluvuuden
omaavalle kanavalle.
66
Manuaalinen viritys
• Paina 7 tai 8 hetken ajan ja toistuvasti, kunnes saat halutun
taajuuden.
Vastaanoton parantamiseksi:
FM: Säädä saparoantenni parhaan mahdollisen
MW/ LW: Käyttää laitteen sisälle rakennettua antennia.
OHJELMOITUJEN KANAVIEN TALLENNUS JA KÄYTTÖ
Pystyt tallentamaan muistiin enintään 10 radiokanavaa, 5
kullekin aaltokaistalle.
1.
2. Ennalta ohjelmoidun kanavan tallentamiseksi pidä hetken
3. Toista vaiheet 1 ja 2 muiden kanavien tallentamiseksi.
• Pystyt ylikirjoittamaan ohjelmoidun kanavan tallentamalla
4. Paina PRESET-painiketta 1-5 ohjelmoitua kanavaa
vastaanoton saamiseksi.
Kohdista antenni laitteesi asentoa muuntelemalla.
Viritä haluamallesi kanavalle (katso jaksoa VIRITYS
RADIOKANAVILLE).
ajan painettuna PRESET-painiketta 1-5, kunnes kuulet
kaksoispiippauksen.
™ Näyttö esittää kyseisen kanavan ohjelmoinnin numeron.
toisen taajuuden sen tilalle.
kuunnellaksesi.
Page 67

YLEISTÄ
Voit asettaa kaksi erilaista herätysaikaa. Tämä voi olla
hyödyllistä, kun joudut heräämään eri aikoina esim. arkipäivinä
ja viikonlopun aikana:
• ALARM 1 – radiotila
• ALARM 2 – äänimerkkitila. Hiljainen
herätysäänimerkkihälytys lisää äänitaajuuttaan
sekunneissa.
HERÄTYSAJAN JA TILAN ASETUS
1. Käännä SET-säädin herätykseen ALARM 1 tai ALARM 2.
™ Näytössä esitetään aikanumerot - tai
-valomerkkien vilkkuessa.
2. Paina 7 toistuvasti tai pidä painiketta painettuna tuntien
säätämiseksi. Vapauta 7 oikean tunnin saatuasi.
3. Paina 8 toistuvasti tai pidä painiketta painettuna minuuttien
säätämiseksi. Vapauta 8 oikean minuuttiasetuksen saatuasi.
4. Käännä SET-säädin takaisin toimintoon CLOCK.
5. Radion toiminnan ollessa katkaistuna valitse haluamasi
herätystila painamalla ALARM 1-RADIO tai
ALARM 2-BUZZER.
™ Näytössä näkyy tai .
HERÄTYSHÄLYTYKSEN KÄYTTÖ
Huomautuksia: Jos olet valinnut herätystoiminnoksi
ALARM 1 RADIO, varmista, että olet
virittäytynyt oikein kanavalle ennen laitteen
toiminnan katkaisemista.
Jos asetat ja aktivoit saman ajan molempiin
herätyksiin, ainoastaan ALARM 2-BUZZER
aktivoidaan asetettuna aikana.
HERÄTYKSEN KATKAISU
Tarjolla on kolme tapaa herätyksen katkaisemiseksi. Paitsi jos
täysin peruutat herätyksen, 24 tunnin herätyksen nollaus
valitaan automaattisesti 59 minuutin kuluttua laskettuna
ajasta, jolloin herätys kuultiin ensimmäistä kertaa.
24 tunnin herätyksen nollaus
Jos haluat herätystilan pysäytettäväksi välittömästi, mutta haluat
myös ylläpitää saman herätysasetuksen seuraavaa päivää varten:
• Paina ALARM RESET/ RADIO OFF.
™ Kuulet piippauksen, mikä vahvistaa 24 tunnin nollauksen
aktivoimisen.
Suomi
67
Page 68

HERÄTYKSEN KÄYTTÖ SLEEP
Herätyksen peruuttamiseksi kokonaisuudessaan
Asetetun herätyksen peruuttamiseksi ennen sen kuulumista tai
herätyshälytyksen aikana:
• Radion toiminnan ollessa katkaistuna paina ALARM 1-RADIO
tai ALARM 2-BUZZER kerran tai useammin, kunnes valittu
herätysvalomerkki häviää näytöstä.
Herätyksen toistaminen
Tämä toistaa herätyshälytyksen 9 minuutin väliajoin.
1. Herätyshälytyksen kuuluessa paina REPEAT ALARM/
BRIGHTNESS CONTROL.
™ Toistoherätyshälytyksen kuuluessa näytössä vilkkuu
2. Toista haluttaessa enintään 6 kertaa.
SLEEP (UNIAJASTINTA) KOSKEVIA TIETOJA
Tässä laitteessa on sisään rakennettu uniajastin, joka
mahdollistaa laitteen toiminnan automaattisen katkaisun
radion toiston aikana asetetun aikajakson jälkeen. Tarjolla on
Suomi
neljä uniajastinaikaa ennen kuin virta katkaistaan laitteesta:
60, 30, 15 minuuttia ja virran katkaisu.
UNIAJASTIMEN ASETUS
1. Paina SLEEP/ RADIO ON radion kytkemiseksi.
2. Paina uudelleen sekunnin sisällä SLEEP/ RADIO ON kerran
tai useammin, kunnes näytössä on ja SL:60.
68
tai .
SLEEP-uniajastinnäytön ollessa esillä paina SLEEP/ RADIO
ON kerran tai useammin uniajastinajan valitsemiseksi.
™ Näytössä näkyy seuraavassa järjestyksessä:
ja uniajastinaikajakson ajan vaihtoehdot: SL:60, SL:30,
SL:15 ja OFF.
™ Uniajastinaika ja radiotaajuus ilmestyvät näyttöön hetken
ajaksi ennen kellon valmiusajan näyttämistä
on aktivoitu.
3. Uniajastimen peruuttamiseksi paina yhtä seuraavista:
• ALARM RESET/ RADIO OFF
• REPEAT ALARM/
• SLEEP/ RADIO ON kerran tai useammin, kunnes
HUOLTOTOIMET
• Jos et aio käyttää laitetta pitkähköön aikaan, irrota
sähköjohto pistorasiasta.
• Älä altista laitetta kosteudelle, sateelle, hiekalle tai
lämmityslaitteiden tai suoran auringonpaisteen välittämälle
kuumuudelle.
• Käytä laitteen puhdistuksessa pehmeää, hivenen
kostutettua säämiskää. Älä käytä spriitä, ammoniakkia,
benseeniä tai hankausaineita sisältäviä puhdistusaineita,
sillä ne voivat vahingoittaa koteloa.
-osoittimen yhteydessä, jos SLEEP-uniajastin
BRIGHTNESS CONTROL
häviää näytöstä.
Page 69

VIANHAKU
Vian ilmetessä tarkista ensin alla luetellut seikat ennen laitteen viemistä korjattavaksi. Jos et pysty ratkaisemaan ongelmaa
näitä vihjeitä noudattamalla, ota yhteys myyntiliikkeeseen tai huoltokeskukseen.
VAROITUS: Älä missään tapauksessa ryhdy korjaamaan laitetta itse, muuten takuu ei ole voimassa.
ONGELMA
– MAHDOLLINEN SYY
• KORJAUSTOIMI
Ei ääntä
– Ei ole säädetty äänenvoimakkuutta
• Säädä äänenvoimakkuus
Näyttövirhe/ säätimet eivät toimi
– Sähköstaattinen purkaus
• Paina RESET
Ajoittainen särinä FM-lähetyksen aikana
– Heikko signaali
• Säädä saparoantennin asento
Tämä tuote täyttää Euroopan unionin radiohäirintää koskevat vaatimukset.
Jatkuva särinä/ suhinahäiriö MW/LW–lähetyksen
aikana
– Television, tietokoneen, lositevalaisimen, kännykän tms.
aiheuttama sähköhäiriö.
• Siirrä laite pois muiden sähkölaitteiden läheisyydestä
Herätyshälytys ei toimi
– Ei ole asetettu herätysaikaa/tilaa
• Katso jaksoa HERÄTYKSEN ASETUS
– Äänenvoimakkuus liian alhainen toiminnolle
ALARM 1-RADIO
• Säädä äänenvoimakkuus
– Toimintoa ALARM 1-RADIO ei ole viritetty radiokanavalle
• Tarkista, onko laite viritetty radiokanavalle ennen toiminnon
ALARM 1-RADIO asetusta ja virta katkaistaessa
Suomi
69
Page 70

ΠΛΗΚTΡΑ ΡΥΘΜIΣΗΣ
1 SLEEP/ RADIO ON
– εµφάνιση/ ρύθµιση/ απενεργοποίηση του
χρονοδιακπτη ύπνου
– ενεργοποίηση του ραδιοφώνου / εµφάνιση της
ραδιοφωνικής συχντητας
2
ρυθµιστικ SET
–
ρύθµιση της ώρας για
και εκκίνηση της λειτουργίας του ρολογιού
3 TIME SET/ TUNING: HR, MIN
–
ρύθµιση των ωρών
του ρολογιού/ ξυπνητηριού
–
συντονισµς (πάνω 7, κάτω 8) σε ραδιοφωνικούς
σταθµούς
4 ALARM 1 - RADIO
–
επιλογή / ακύρωση της επιλογής του ραδιοφώνου για
το ξυπνητήρι 1
– PRESET
5 ALARM 2 - BUZZER
Πληροφορίες σχετικά µε το περιβάλλον
Εχει παραλειφθεί κάθε περιττ υλικ συσκευασίας, ώστε να είναι δυνατς ο εύκολος διαχωρισµς της συσκευασίας σε
Ελληνικά
δύο υλικά: χαρτνι (κουτί) και πολυαιθυλένιο (σακούλες, προστατευτικ αφρώδες φύλλο).
Η συσκευή σας αποτελείται απ υλικά που µπορούν να ανακυκλωθούν εάν αποσυναρµολογηθεί απ κάποια εταιρεία που
εξειδικεύεται στον τοµέα αυτ. Σας παρακαλούµε να τηρήσετε τους κανονισµούς που ισχύουν στη χώρα σας ως προς
τη διάθεση των υλικών συσκευασίας και παλαιών συσκευών.
70
προεπιλεγµένος σταθµς
–
επιλογή / ακύρωση της επιλογής του βοµβητή για το
ξυπνητήρι
– PRESET
προεπιλεγµένος σταθµς
•ALARM 1, •ALARM 2, •TIME
και
(7)
και των λεπτών
καθώς και
καθώς και
2
7, 8
PRESET 1
1
PRESET 2
2
•CLOCK
(8)
για την ώρα
6 ALARM RESET/ RADIO OFF
–
διακοπή του ενεργού ξυπνητηριού για 24 ώρες
–
διακοπή της λειτουργίας του ραδιοφώνου/ χρονοδιακπτη ύπνου
7 PRESET 3, 4
–
αποθήκευση και επιλογή προεπιλεγµένων σταθµών
8 REPEAT ALARM/ BRIGHTNESS CONTROL
καθώς
–
απενεργοποίηση του ξυπνητηριού για ένα χρονικ
διάστηµα 9 λεπτών
–
αλλαγή της φωτειντητας της οθνης
–
απενεργοποίηση του χρονοδιακπτη ύπνου
9
Oθνη
–
δείχνει την ώρα του ρολογιού/ των ξυπνητηριών και
την κατάσταση λειτουργίας της συσκευής
0 BAND
–
επιλογή της ζώνης συχνοτήτων FM/ MW/ LW
! VOLUME
–
ρύθµιση της στάθµης του ήχου
@
Καλώδιο κεραίας
–
(στη βάση της συσκευής) βελτίωση της λήψης των FM
#
Καλώδιο τροφοδοσίας
–
για την παροχή ρεύµατος
Η πινακίδα τύπου βρίσκεται στη βάση της συσκευής.
και
5
Page 71

ΕΓΚΑTΑΣTΑΣΗ BΑΣIΚΕΣ ΛΕITOΥΡΓIΕΣ
TΡOΦO∆OΣIΑ ΚΑI ΛΕITOΥΡΓIΑ ΕΠI∆ΕIOΗΣ
1.
Ελέγξτε αν η ηλεκτρική τάση που αναγράφεται στην
πινακίδα τύπου στη βάση της συσκευής, αντιστοιχεί
στην τοπική σας τάση δικτύου. Αν δεν αντιστοιχεί,
απευθυνθείτε στο κατάστηµα απ το οποίο αγοράσατε
τη συσκευή ή στο κέντρο τεχνικής εξυπηρέτησης.
2.
Συνδέστε το καλώδιο τροφοδοσίας στην πρίζα του
τοίχου. Tώρα, η παροχή ρεύµατος έχει ενεργοποιηθεί
και η οθνη θα δείχνει τη λειτουργία επίδειξης
™
Στην οθνη κυλάει συνεχώς το µήνυµα
•
Γυρίστε το ρυθµιστικ SET στη θέση SET TIME για να
εγκαταλείψετε τη λειτουργία επίδειξης.
3.
Bγάλτε το καλώδιο απ την πρίζα του τοίχου αν θέλετε να
αποσυνδέσετε τελείως τη συσκευή απ το ηλεκτρικ δίκτυο.
ΕΦΕ∆ΡIΚΗ TΡOΦO∆OΣIΑ
Η εφεδρική τροφοδοσία αποθηκεύει τους προεπιλεγµένους
σταθµούς και τις ρυθµίσεις του ξυπνητηριού και του
ρολογιού για ένα χρονικ διάστηµα µέχρι 3 λεπτών ταν
διακπτεται η τροφοδοσία, για παράδειγµα σε περίπτωση
διακοπής του ρεύµατος. Oλκληρο το ραδιορολι και ο
φωτισµς θα τεθούν εκτς λειτουργίας. Μλις
επανασυνδεθεί η τροφοδοσία, η οθνη θα δείχνει τη σωστή
ώρα. Αν επανασυνδεθεί η τροφοδοσία µετά απ 3 λεπτά,
στην οθνη θα φαίνονται τα εξής:
PHILIPS
PH..IL ..IPS
•
η ώρα του ρολογιού θα αναβοσβήνει, δείχνοντας τι
πρέπει να επαναρρυθµίσετε την ώρα
•
η - δείχνει τι πρέπει να εισάγετε εκ νέου τους
προεπιλεγµένους σταθµούς και την ώρα του ρολογιού
και του ξυπνητηριού.
ΦΩTΕIΝOTΗTΑ OΘOΝΗΣ
1.
Bεβαιωθείτε τι το ρυθµιστικ SET βρίσκεται στη θέση
CLOCK, και τι το ραδιφωνο είναι σβησµένο.
.
2.
.
Πιέστε µία ή περισστερες φορές το πλήκτρο
ALARM/ BRIGHTNESS CONTROL.
–
Η φωτειντητα της οθνης αλλάζει µε την ακλουθη
σειρά:
BRIGHT y MEDIUM y LOW y BRIGHT...
Σηµείωση:
Η φωτειντητα δεν µπορεί να ρυθµιστεί ταν
πραγµατοποιείται αφύπνιση ή ταν έχει ενεργοποιηθεί ο
χρονοδιακπτης ύπνου.
RESET (ΕΠΑΝΑΡΡΥΘΜIΣΗ)
Σε περίπτωση που η οθνη και οι ηλεκτρονικές λειτουργίες
της συσκευής σας δέχονται παρεµβολές, για παράδειγµα
στατικ ηλεκτρισµ απ µοκέτες, καταιγίδες κλπ., το
RESET σας επιτρέπει να καταργήσετε λες τις
προηγούµενες ρυθµίσεις και να ξαναρχίσετε απ την αρχή.
•
Χρησιµοποιήστε ένα στυλ για να πιέσετε στην οπή
RESET που βρίσκεται στη βάση της συσκευής.
REPEAT
71
Ελληνικά
Page 72

ΡΥΘΜIΣΗ TOΥ ΡOΛOΓIOΥ ΡΑ∆IOΦΩΝO
Tο ρολι χρησιµοποιεί την 24-ωρη κλίµακα.
1.
Γυρίστε το ρυθµιστικ SET στη θέση TIME.
2.
Πιέστε επανειληµµένα το πλήκτρο 7ή κρατήστε το
πατηµένο για να ρυθµίσετε τις ώρες. Αφήστε το
7
πλήκτρο
3.
Πιέστε επανειληµµένα το πλήκτρο 8ή κρατήστε το
πατηµένο για να ρυθµίσετε τις ώρες. Αφήστε το πλήκτρο
8
4.
Γυρίστε το ρυθµιστικ SET στη θέση CLOCK.
ΡΑ∆IOΦΩΝO
1.
Πιέστε µία φορά SLEEP/ RADIO ON για να
ενεργοποιήσετε το ραδιφωνο.
™
2.
Πιέστε BAND αν θέλετε να αλλάξετε τη ζώνη
συχνοτήτων.
3.
Ρυθµίστε τον ήχο χρησιµοποιώντας το ρυθµιστικ VOLUME.
4.
Πιέστε ALARM RESET/ RADIO OFF για να σβήσετε το
Ελληνικά
ραδιφωνο
72
µλις φθάσετε στη σωστή ώρα.
µλις φθάσετε στη σωστή ρύθµιση των λεπτών.
Η οθνη δείχνει σύντοµα τη ραδιοφωνική συχντητα
της τελευταίας επιλεγµένης ζώνης συχνοτήτων πριν
επιστρέψει στην ώρα του ρολογιού. Αν ακούτε
προεπιλεγµένο σταθµ, φαίνεται επίσης και ο
αριθµς προεπιλογής.
.
ΣΥΝTOΝIΣΜOΣ ΣΕ ΡΑ∆IOΦΩΝIΚOΥΣ ΣTΑΘΜOΥΣ
Αυτµατος συντονισµς
•
Πιέστε για ένα ή περισστερα δευτερλεπτα 7ή 8για να
συντονίσετε τη συσκευή στον επιθυµητ σας σταθµ.
™
Tο ραδιφωνο συντονίζεται αυτµατα σε έναν σταθµ
µε αρκετά ισχυρ σήµα.
Συντονισµς µε το χέρι
•
Πιέστε σύντοµα και επανειληµµένα 7ή 8µέχρι να
φθάσετε στην επιθυµητή συχντητα.
Για να βελτιώσετε τη λήψη:
FM:
MW/ LW:
Αλλάξτε τη θέση του καλωδίου της κεραίας
µέχρι να πετύχετε την καλύτερη δυνατή λήψη.
Χρησιµοποιείται η ενσωµατωµένη κεραία στο
εσωτερικ της συσκευής. Μπορείτε να
κατευθύνετε την κεραία αλλάζοντας τη θέση
της συσκευής σας.
Page 73

ΡΑ∆IOΦΩΝO ΧΡΗΣΗ TOΥ OΥΠΝΗTΗΡIOΥ
ΑΠOΘΗΚΕΥΣΗ ΚΑI ΧΡΗΣΗ ΠΡOΕΠIΛΕΓΜΕΝΩΝ ΣTΑΘΜΩΝ
Μπορείτε να αποθηκεύσετε µέχρι και 10 ραδιοφωνικούς
σταθµούς στη µνήµη, 5 για κάθε ζώνη συχνοτήτων.
1.
Συντονίστε τη συσκευή στον επιθυµητ σας σταθµ (δείτε
ΣΥΝTOΝIΣΜOΣ ΣΕ ΡΑ∆IOΦΩΝIΚOΥΣ ΣTΑΘΜOΥΣ).
2.
Για να αποθηκεύσετε έναν σταθµ προεπιλογής,
κρατήστε για λίγο πατηµένο ένα απ τα πλήκτρα
PRESET 1-5 µέχρι να ακούσετε ένα διπλ ηχητικ σήµα.
™
Η οθνη δείχνει τον αριθµ του σταθµού προεπιλογής.
3.
Επαναλαµβάνετε τα βήµατα 1 και 2 για να
αποθηκεύσετε και άλλους σταθµούς.
•
Μπορείτε να διαγράψετε ένα προεπιλεγµένο σταθµ
απ τη µνήµη αποθηκεύοντας τη συχντητα ενς άλλου
σταθµού στη θέση του.
4.
Πιέστε ένα απ τα πλήκτρα PRESET 1-5 για να ακούσετε
τον αντίστοιχο σταθµ προεπιλογής.
ΓΕΝIΚΑ
Έχετε τη δυναττητα να ρυθµίσετε δύο διαφορετικές
ώρες αφύπνισης. Αυτ µπορεί να είναι χρήσιµο αν πρέπει
να ξυπνάτε σε διαφορετικές ώρες, για παράδειγµα τις
καθηµερινές ηµέρες και το σαββατοκύριακο.
• ALARM 1 –
• ALARM 2 –
ηχητικού σήµατος του βοµβητή αυξάνεται µέσα σε λίγα
δευτερλεπτα.
αφύπνιση µε ραδιφωνο
αφύπνιση µε βοµβητή. Η συχντητα του
Ρύθµιση του τρπου και της ώρας αφύπνισης
1.
Γυρίστε το ρυθµιστικ SET στη θέση ALARM 1 ή ALARM 2.
™
Η οθνη δείχνει τα ψηφία της ώρας αφύπνισης,
καθώς αναβοσβήνει µία απ τις ενδείξεις
ή .
2.
Πιέστε επανειληµµένα το πλήκτρο 7ή κρατήστε το
πατηµένο για να ρυθµίσετε τις ώρες. Αφήστε το
πλήκτρο 7µλις φθάσετε στη σωστή ώρα.
3.
Πιέστε επανειληµµένα το πλήκτρο 8ή κρατήστε το
πατηµένο για να ρυθµίσετε τις ώρες. Αφήστε το πλήκτρο
8
µλις φθάσετε στη σωστή ρύθµιση των λεπτών.
4.
Γυρίστε το ρυθµιστικ SET στη θέση CLOCK.
5.
Έχοντας σβησµένο το ραδιφωνο, επιλέξτε τον τρπο
αφύπνισης, πιέζοντας ALARM 1-RADIO ή ALARM 2-BUZZER.
™
Η οθνη δείχνει ή .
Σηµειώσεις: Αν έχετε επιλέξει ALARM 1-RADIO, βεβαιωθείτε
τι το ραδιφωνο είναι σωστά συντονισµένο σε
κάποιον σταθµ πριν σβήσετε τη συσκευή.
Αν ρυθµίσετε και ενεργοποιήσετε την ίδια ώρα
αφύπνισης για και τα δύο τα ξυπνητήρια, στη
ρυθµισµένη ώρα θα ενεργοποιηθεί µνο ο
βοµβητής ALARM 2-BUZZER.
73
Ελληνικά
Page 74

ΧΡΗΣΗ TOΥ OΥΠΝΗTΗΡIOΥ ΧΡOΝO∆IΑΚOΠTΗΣ ΥΠΝOΥ
ΑΠΕΝΕΡΓOΠOIΗΣΗ TOΥ OΥΠΝΗTΗΡIOΥ
Υπάρχουν τρεις τρποι απενεργοποίησης του ξυπνητηριού.
Αν δεν ακυρώσετε τελείως την αφύπνιση, θα επιλεγεί
αυτµατα η 24-ωρη επαναρρύθµιση του ξυπνητηριού,
59 λεπτά µετά απ τη στιγµή που θα ηχήσει για πρώτη
φορά το ξυπνητήρι σας.
24-ωρη επαναρρύθµιση ξυπνητηριού
Αν θέλετε να σταµατήσετε αµέσως τη λειτουργία του
ξυπνητηριού, ενώ θέλετε παράλληλα να διατηρήσετε την ίδια
ρύθµιση του ξυπνητηριού για την επµενη ηµέρα:
•
Πιέστε ALARM RESET/ RADIO OFF.
™
Θα ακούσετε ένα ηχητικ σήµα ως επιβεβαίωση τι
ενεργοποιήθηκε η 24-ωρη επαναρρύθµιση του
ξυπνητηριού.
Oλική ακύρωση της αφύπνισης
Για να ακυρώσετε την προγραµµατισµένη ώρα αφύπνισης
πριν ηχήσει το ξυπνητήρι, ή κατά τη διάρκεια της αφύπνισης:
•
Έχοντας σβησµένο το ραδιφωνο, πιέστε µία ή
περισστερες φορές ALARM 1-RADIO ή ALARM 2BUZZER µέχρι να σβήσει η ένδειξη του επιλεγµένου
ξυπνητηριού στην οθνη.
Ελληνικά
74
Επανάληψη αφύπνισης
Με τον τρπο αυτ, το ξυπνητήρι επανενεργοποιείται ανά
διαστήµατα 9 λεπτών.
1.
Κατά τη διάρκεια της αφύπνισης, πιέστε REPEAT
ALARM/ BRIGHTNESS CONTROL.
™
Κατά την επανάληψη της αφύπνισης, στην οθνη
αναβοσβήνει η ένδειξη ή .
2.
Αν επιθυµείτε, µπορείτε να επαναλαµβάνετε το
προηγούµενο βήµα µέχρι 6 φορές.
ΣΧΕTIΚΑ ΜΕ TOΝ ΧΡOΝO∆IΑΚOΠTΗ ΥΠΝOΥ
Η συσκευή σας διαθέτει έναν ενσωµατωµένο
χρονοδιακπτη, ο οποίος της παρέχει τη δυναττητα να
σβήνει αυτµατα κατά τη διάρκεια της λειτουργίας του
ραδιοφώνου, ύστερα απ ένα προκαθορισµένο χρονικ
διάστηµα λειτουργίας. Μπορείτε να επιλέξετε ανάµεσα σε
τέσσερα χρονικά διαστήµατα λειτουργίας µέχρι την
αυτµατη απενεργοποίηση της συσκευής: 60, 30, 15 λεπτά
ή απενεργοποίηση του χρονοδιακπτη.
Page 75

ΡΥΘΜIΣΗ TOΥ ΧΡOΝO∆IΑΚOΠTΗ ΥΠΝOΥ
1.
Πιέστε SLEEP/ RADIO ON για να ενεργοποιήσετε το
ραδιφωνο.
2.
Μέσα σε 1 δευτερλεπτο, ξαναπατήστε µία ή
περισστερες φορές SLEEP/ RADIO ON µέχρι να δείξει
η οθνη και
Ενώ βρίσκεστε ακµη στην οθνη του χρονοδιακπτη
ύπνου, πιέστε µία ή περισστερες φορές SLEEP/ RADIO
ON για να επιλέξετε τον επιθυµητ χρνο λειτουργίας.
™
Η οθνη δείχνει διαδοχικά: και τις
επιλογές του χρνου λειτουργίας:
και
OFF.
™
Αν ενεργοποιηθεί ο χρονοδιακπτης SLEEP,
εµφανίζονται για λίγο ο επιλεγµένος χρνος
λειτουργίας και η ραδιοφωνική συχντητα. Στη
συνέχεια η οθνη δείχνει την ώρα του ρολογιού και
την ένδειξη .
3.
Για την ακύρωση της λειτουργίας του χρονοδιακπτη
ύπνου µπορείτε να πιέσετε:
• ALARM RESET/ RADIO OFF
• REPEAT ALARM/ BRIGHTNESS CONTROL
• SLEEP/ RADIO ON
σβήσει η ένδειξη στην οθνη.
SL:60.
SL:60, SL:30, SL:15
µία ή περισστερες φορές µέχρι να
ΧΡOΝO∆IΑΚOΠTΗΣ ΥΠΝOΥ
ΣΥΝTΗΡΗΣΗ
•
Αν δεν σκοπεύετε να χρησιµοποιήσετε τη συσκευή για
µεγάλο χρονικ διάστηµα, βγάλτε το καλώδιο
τροφοδοσίας απ την πρίζα του τοίχου.
•
Μην εκθέτετε τη συσκευή σε υγρασία, βροχή, άµµο ή σε
υψηλές θερµοκρασίες, για παράδειγµα απ συσκευές
θέρµανσης ή απ άµεση ηλιακή ακτινοβολία.
•
Καθαρίζετε τη συσκευή µε ένα κοµµάτι δέρµατος το
οποίο έχετε υγραίνει ελαφρά. Μη χρησιµοποιείτε
καθαριστικά που περιέχουν αλκολη, οινπνευµα,
αµµωνία ή διαβρωτικά, διτι ενδέχεται να προκαλέσουν
βλάβη στο περίβληµα.
Ελληνικά
75
Page 76

ΕΠIΛΥΣΗ ΠΡOBΛΗΜΑTΩΝ
Στην περίπτωση που αντιµετωπίσετε κάποιο πρβληµα, και πριν πάτε τη συσκευή για επισκευή, ελέγξτε πρώτα τα σηµεία
που αναφέρονται παρακάτω. Εάν δεν είστε σε θέση να λύσετε κάποιο πρβληµα ακολουθώντας αυτές τις συµβουλές,
απευθυνθείτε στο κατάστηµα απ το οποίο αγοράσατε τη συσκευή ή στο κέντρο τεχνικής εξυπηρέτησης.
ΠΡOΕI∆OΠOIΗΣΗ: Σε καµία περίπτωση δεν θα πρέπει να προσπαθήσετε να επισκευάσετε µνοι σας τη συσκευή,
αφού εάν κάνετε κάτι τέτοιο θα ακυρωθεί η εγγύησή σας.
ΠΡOBΛΗΜΑ
– Πιθανή αιτία
• Λύση
∆εν υπάρχει ήχος
– ∆εν έχει ρυθµιστεί η ένταση
• Ρυθµίστε την ένταση
Σφάλµα οθνης / καµία ανταπκριση ταν πιέζετε κάποιο
πλήκτρο
– Ηλεκτροστατική εκκένωση
• Πιέστε RESET
Ακούγονται τριγµοί στα FM
– Αδύναµο σήµα σταθµού
• Αλλάξτε τη θέση του καλωδίου της κεραίας
Ελληνικά
Αυτ το προϊν πληροί τις απαιτήσεις της Ευρωπαϊκής Ένωσης ως προς τις ραδιοπαρεµβολές.
76
Ακούγονται συνεχώς τριγµοί / συριγµοί στα MW/ LW
– Ηλεκτρικές παρεµβολές απ τηλεοπτικές συσκευές,
υπολογιστές, λαµπτήρες φθορισµού, κινητά τηλέφωνα κ.λπ.
• Αποµακρύνετε τη συσκευή απ άλλες ηλεκτρικές
συσκευές
Tο ξυπνητήρι δεν λειτουργεί
– ∆εν έχει ρυθµιστεί η ώρα/ ο τρπος αφύπνισης
• ∆είτε ΡΥΘΜIΣΗ TOΥ oΥΠΝΗTΗΡIOΥ
– Εχει ρυθµιστεί πολύ χαµηλή ένταση για τη λειτουργία
ALARM 1-RADIO
• Ρυθµίστε την ένταση
– Η συσκευή δεν είναι συντονισµένη σε ραδιοφωνικ
σταθµ για τη λειτουργία ALARM 1-RADIO
• Bεβαιωθείτε τι η συσκευή είναι συντονισµένη σε
ραδιοφωνικ σταθµ προτού ρυθµίσετε τη λειτουργία
ALARM 1-RADIO, και ταν σβήνετε τη συσκευή
Page 77
English
Français
Español
AJ 3430 - Clock Radio
Meet Philips at the internet: http://www.philips.com
Meet Philips at the internet: http://www.philips.com
Polski
Português
Dansk
n Norge
n Norge
Deutsch
Advarsel: For å redusere faren for brann eller elektrisk støt; skal apparatet
Advarsel: For å redusere faren for brann eller elektrisk støt; skal apparatet
ikke utsettes for regn eller fuktighet.
ikke utsettes for regn eller fuktighet.
Typeskilt finnes på apparatens underside.
Typeskilt finnes på apparatens underside.
Observer: Nettbryteren er sekundert innkoplet. Den innebygde netdelen er
Observer: Nettbryteren er sekundert innkoplet. Den innebygde netdelen er
Nederlands
derfor ikke frakoplet nettet så lenge apparatet er tilsluttet nettkontakten.
derfor ikke frakoplet nettet så lenge apparatet er tilsluttet nettkontakten.
Italiano
i Italia
i Italia
DICHIARAZIONE DI CONFORMITA’
DICHIARAZIONE DI CONFORMITA’
Si dichiara che l’apparecchio AJ 3430 Philips risponde alle prescrizioni
Si dichiara che l’apparecchio AJ 3430 Philips risponde alle prescrizioni
dell’art. 2 comma 1 del D. M. 28 Agosto 1995 n. 548.
dell’art. 2 comma 1 del D. M. 28 Agosto 1995 n. 548.
Philips Consumer Electronics
Philips Consumer Electronics
Philips, Glaslaan 2,
5616 JB Eindhoven, The Netherlands
5616 JB Eindhoven, The Netherlands
Printed in Hong Kong TCtext/RM/0003
Philips, Glaslaan 2,
Svenska
Suomi
Ελληνικά
 Loading...