

Page 1
Register your product and get support at
www.philips.com/welcome
FC9219-FC9200
Page 2
Page 3
1
Page 4

Page 5

ENGLISH 6
简体中文 19
FC9219-FC9200
Page 6

6
ENGLISH
Introduction
Congratulations on your purchase and welcome to Philips! To fully benefit
from the support that Philips offers, register your product at
www.philips.com/welcome.
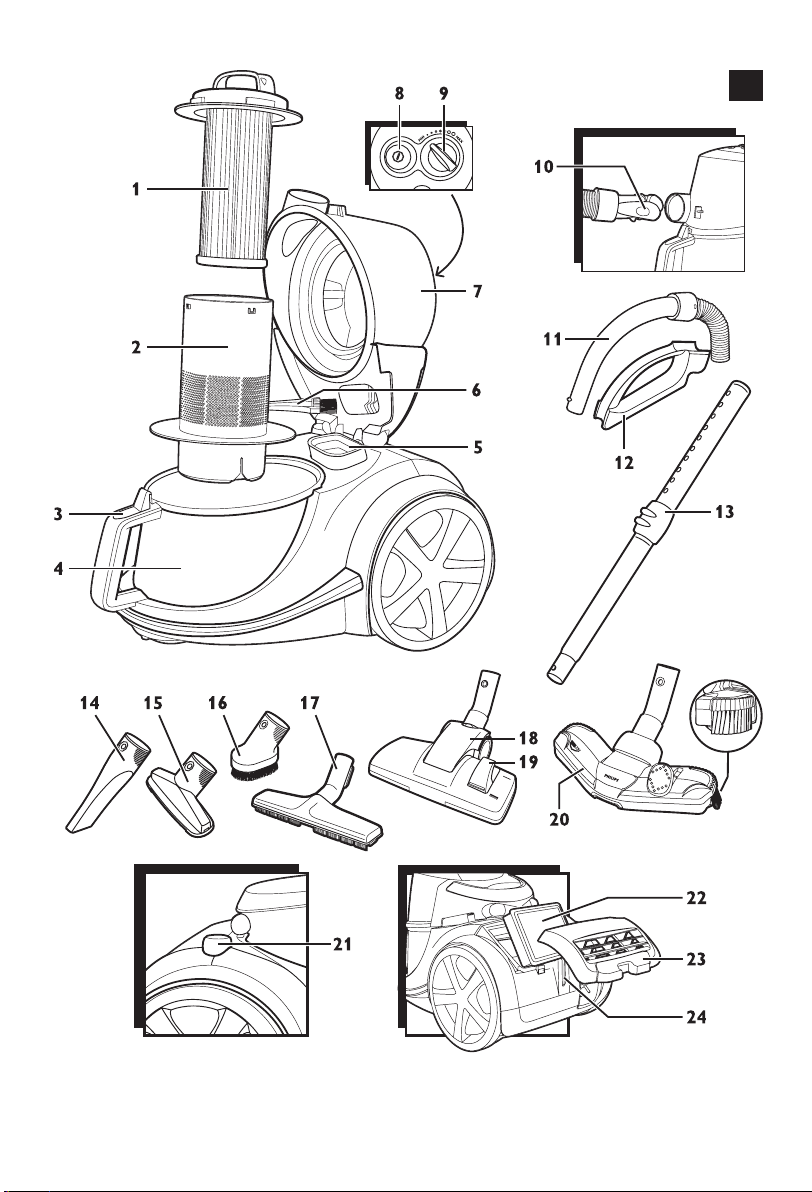
General description (Fig. 1)
1 Filter cylinder
2 Filter cylinder case
3 Dust bucket release button
4 Dust bucket
5 Motor protection filter
6 Cleaning brush
7 Cover
8 On/off button
9 Suction power knob
10 Hose connector
11 Handgrip
12 Accessory holder
13 Telescopic tube
14 Crevice tool
15 Small nozzle
16 Small brush (specific types only)
17 Parquet nozzle (specific types only)
18 Combination nozzle (specific types only)
19 Rocker switch for carpet/hard floor settings
20 Tri-Active nozzle (specific types only)
21 Cord rewind button
22 Super Clean Air Filter, Super Clean Air HEPA 12 filter or Ultra Clean
Air HEPA 13 filter
23 Filter grille
24 Parking slot
Important
Read this user manual carefully before you use the appliance and save it for
future reference.
Danger
- Never suck up water or any other liquid. Never suck up flammable
substances and do not suck up ashes until they are cold.
Warning
- Check if the voltage indicated on the appliance corresponds to the
local mains voltage before you connect the appliance.
- Do not use the appliance if the plug, the mains cord or the appliance
itself is damaged.
- If the mains cord is damaged, you must have it replaced by Philips, a
service centre authorised by Philips or similarly qualified persons in
order to avoid a hazard.
- This appliance is not intended for use by persons (including children)
with reduced physical, sensory or mental capabilities, or lack of
experience and knowledge, unless they have been given supervision or
Page 7
ENGLISH 7
instruction concerning use of the appliance by a person responsible for
their safety.
- Children should be supervised to ensure that they do not play with the
appliance.
- Do not point the hose, the tube or any other accessory at the eyes
or ears nor put it in your mouth when it is connected to the vacuum
cleaner and the vacuum cleaner is switched on.
Caution
- Do not suck up large objects, as this may cause the air passage in the
tube or hose to become obstructed.
- When you use the vacuum cleaner to vacuum ashes, fine sand, lime,
cement dust and similar substances, the pores of the filter cylinder
become clogged. If you notice a strong decrease in suction power, clean
the filter cylinder.
- Sucking up large objects may cause the air passage in the tube or hose
to become obstructed. If this happens, the blockage indicator turns red
to indicate that there is an obstruction that needs to be removed.
- Never use the appliance without the motor protection filter. This
damages the motor and shortens the life of the appliance.
- Only use the Philips filter cylinder supplied with the appliance.
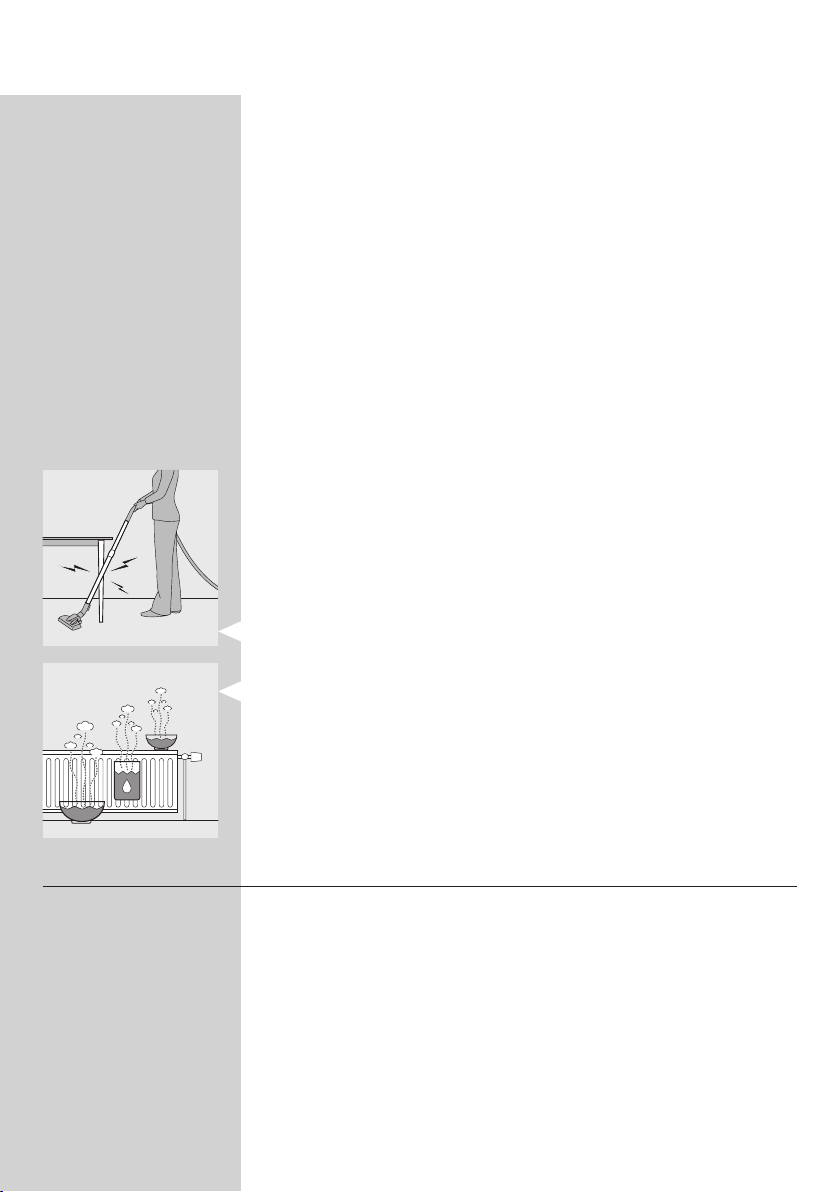
- During vacuum cleaning, especially in rooms with low air humidity,
your vacuum cleaner builds up static electricity. As a result you can
experience electric shocks when you touch the tube or other steel
parts of your vacuum cleaner. These shocks are not harmful to you and
do not damage the appliance. To reduce this inconvenience we advise
you:
1 to discharge the appliance by frequently holding the tube against other
metal objects in the room (for example legs of a table or chair, radiator
etc.);
2 to raise the air humidity level in the room by placing water in the room.
For example, you can hang containers filled with water from your
radiators or place bowls filled with water on or near your radiators.
Electromagnetic fields (EMF)
This Philips appliance complies with all standards regarding electromagnetic
fields (EMF). If handled properly and according to the instructions in this
user manual, the appliance is safe to use based on scientific evidence
available today.
Page 8
ENGLISH8
Preparing for use
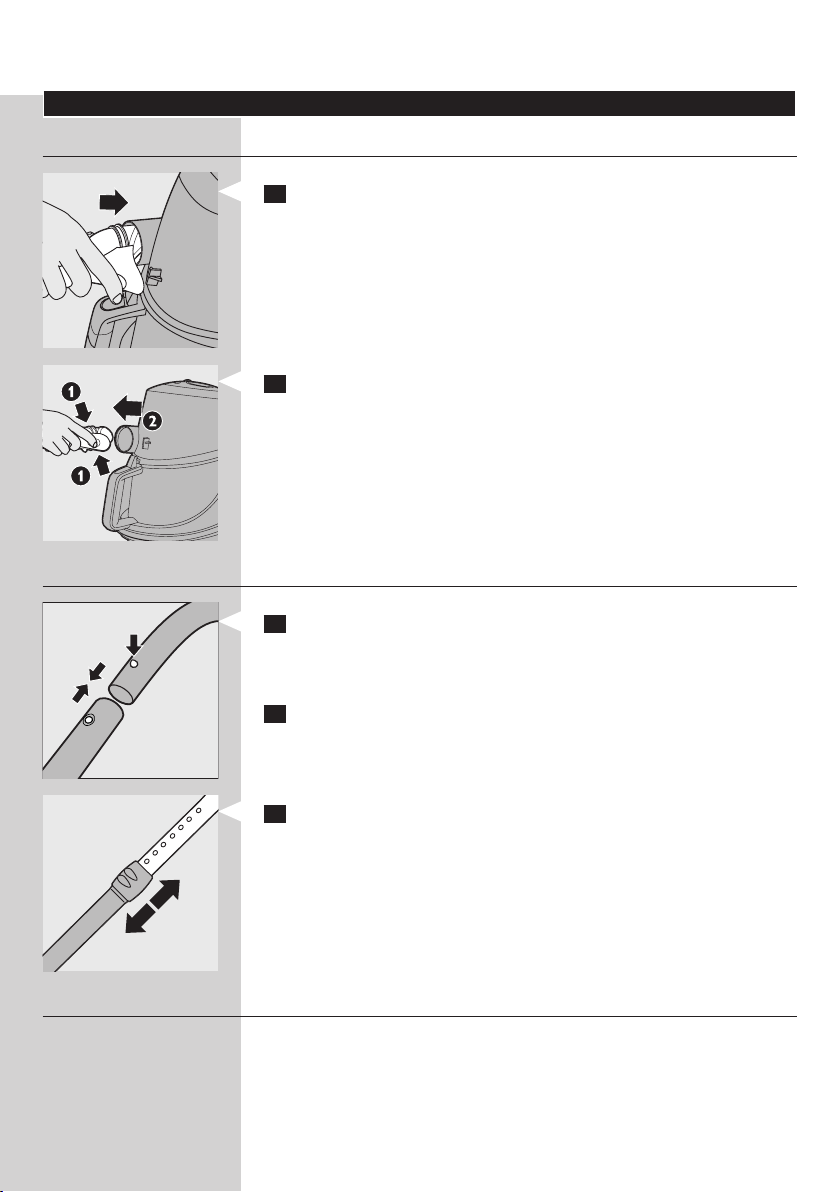
Hose
1 To connect the hose, push it firmly into the appliance (‘click’).
2 To disconnect the hose, press the release button and pull the hose
out of the appliance.
Telescopic tube
1 To connect the tube to the handgrip of the hose, press the spring-
loaded lock button on the handgrip and insert the handgrip into the
tube. Fit the spring-loaded lock button into the opening in the tube
(‘click’).
2 To disconnect the tube from the handgrip, press the spring-loaded
lock button and pull the handgrip out of the tube.
Use the same method to connect and disconnect the nozzles.
3 Adjust the tube to the length you find most comfortable during
vacuum cleaning.
Tri-Active nozzle (specific types only)
The Tri-Active nozzle is a multi-purpose nozzle for carpets and hard floors.
Page 9
ENGLISH 9
- The side brushes catch more dust and dirt at the sides of the nozzle
and allow you to clean better along furniture and other obstacles.
- The opening at the front of the nozzle allows you to suck up larger
particles.
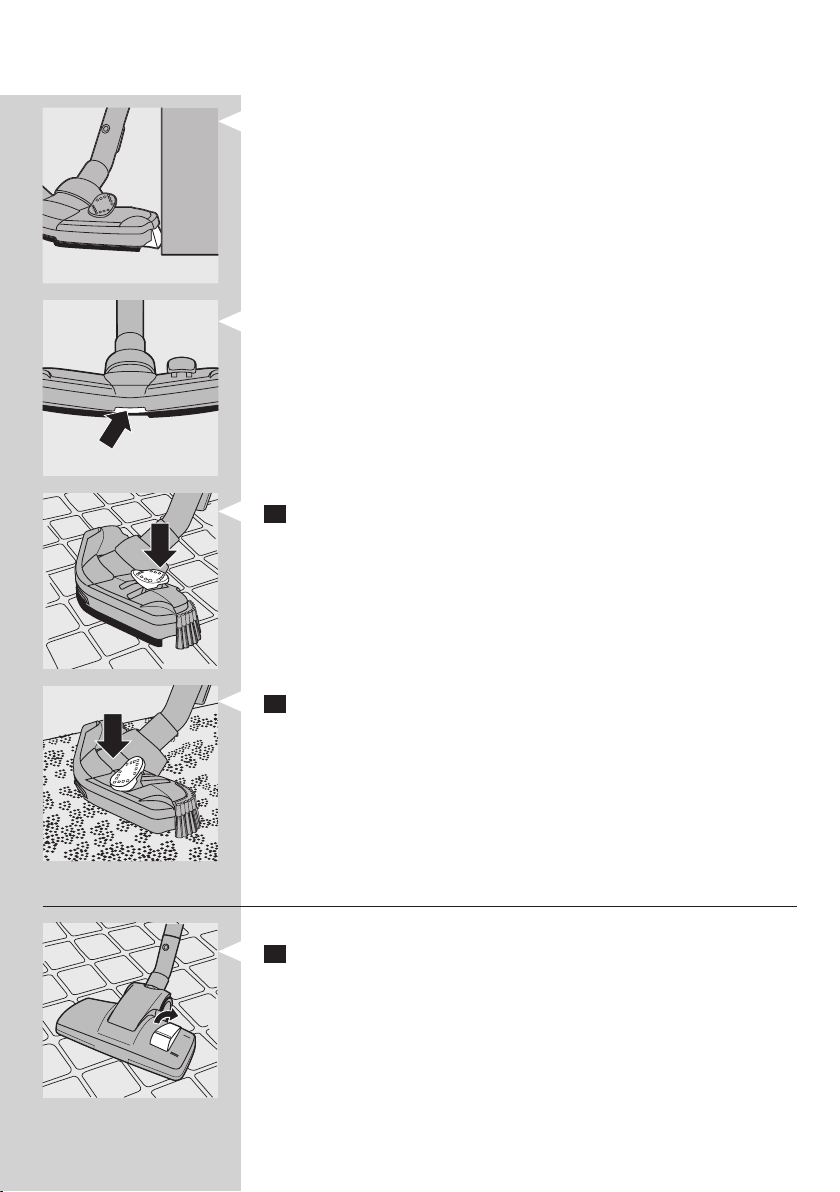
1 To clean hard floors, push the rocker switch on top of the nozzle
with your foot.
, The brush strip for cleaning hard floors comes out of the housing.
At the same time, the wheel is lifted to prevent scratching and to
increase manoeuvrability.
2 To clean carpets, push the rocker switch again.
, The brush strip disappears into the nozzle housing and the wheel is
lowered automatically.
Combination nozzle (specific types only)
The combination nozzle can be used on either carpets or hard floors.
1 To clean hard floors, push the rocker switch on top of the nozzle
with your foot.
, The brush strip for cleaning hard floors comes out of the nozzle
housing.
Page 10
ENGLISH10
2 To clean carpets, push the rocker switch again.
, The brush strip disappears into the nozzle housing.
Parquet nozzle (specific types only)
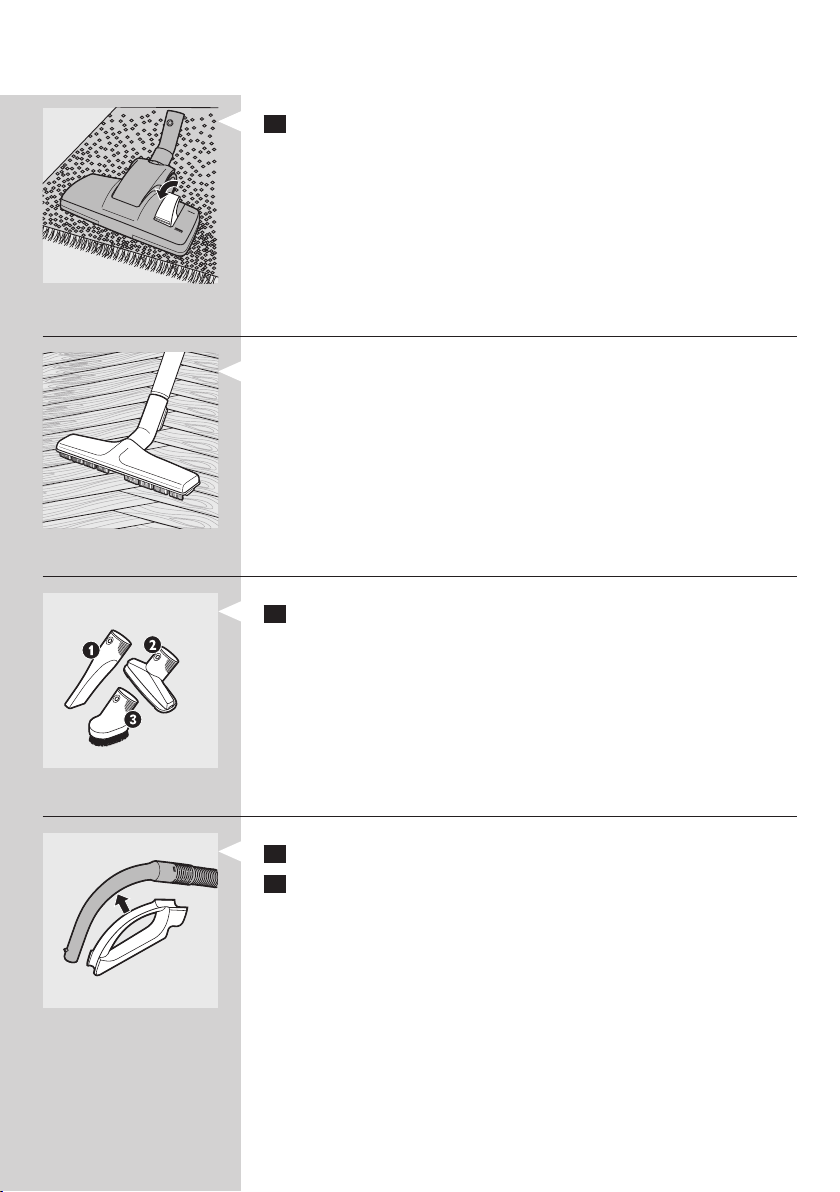
- The parquet nozzle is designed for gentle cleaning of hard floors.
Crevice tool, small nozzle and small brush
1 Connect the crevice tool (1), the small nozzle (2) or the small brush
(specific types only) (3) directly to the handgrip or to the tube.
Accessory holder
1 Snap the accessory holder onto the handgrip.
2 Snap two accessories into the accessory holder:
Page 11
ENGLISH 11
- Crevice tool and small nozzle.
Note: Make sure the suction opening of the small nozzle points away from the
holder.
- Crevice tool and small brush.
Note: Make sure the suction opening of the small brush points towards the
holder.
Using the appliance
1 Pull the cord out of the appliance and put the mains plug in the wall
socket.
2 Press the on/off button on top of the appliance to switch on the
appliance.
3 During vacuum cleaning, you can adjust the suction power with the
knob on top of the appliance.
- Use maximum suction power to vacuum very dirty carpets and hard
floors.
- Use minimum suction power to vacuum curtains, table carpets, etc.
4 If you want to pause for a moment, insert the ridge on the nozzle
into the parking slot to park the tube in a convenient position.
Page 12

ENGLISH12
Storage
1 Switch off the appliance and remove the mains plug from the wall
socket.
2 Press the cord rewind button to rewind the mains cord.
3 Insert the ridge on the nozzle into the parking slot to attach the
nozzle to the appliance. Store the appliance in horizontal position,
with all wheels touching the floor.
4 Always put the Tri-Active nozzle in the carpet setting when you store
it. Also prevent the side brushes from becoming bent.
Emptying the dust bucket
Always unplug the appliance before you empty the dust bucket.
The dust bucket is not dishwasher-proof.
- Empty the dust bucket as soon as the dust level has reached the round
disc of the filter cylinder case.
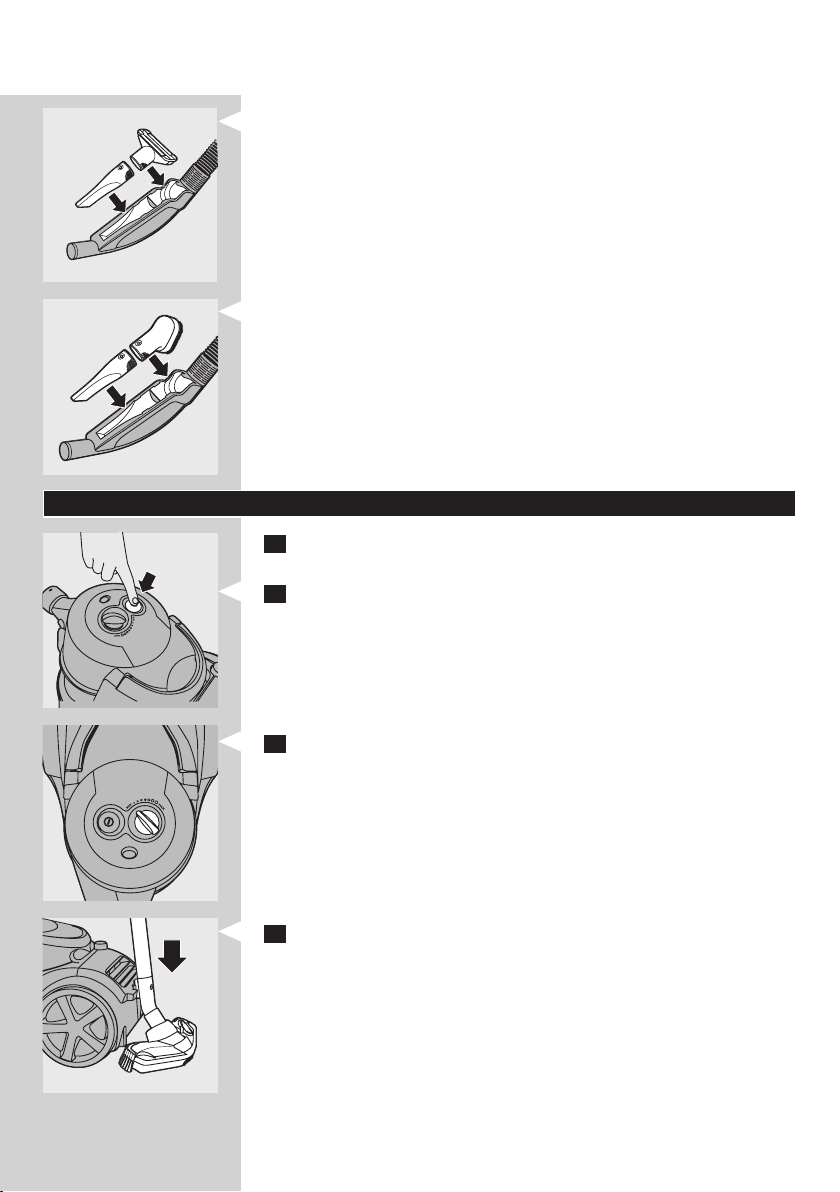
1 Switch off the appliance and remove the hose.
2 Press the release button on top of the dust bucket handle to unlock
the cover (1). Swing open the cover (2).
Page 13

ENGLISH 13
3 Lift the dust bucket out of the appliance.
4 Hold the dust bucket over a dustbin and lift the filter cylinder case
out of the bucket. Empty the bucket.
5 If you wish, you can clean the dust bucket with cold tap water and
some washing-up liquid.
6 Put the filter cylinder case back into the dust bucket and put the
bucket back into the appliance.
7 Close the cover firmly (‘click’).
Always put the filter cylinder case back into the bucket, otherwise the
appliance cannot be switched on.
Cleaning and maintenance of filters
Always unplug the appliance before you clean or replace the filters.
The filter cylinder and the filter cylinder case are not dishwasher-proof.
Filter cylinder
Clean the filter cylinder every 2 months.
1 Switch off the appliance and remove the hose.
2 Press the release button on top of the dust bucket handle to unlock
the cover (1). Swing open the cover (2).
3 Lift the dust bucket out of the appliance.
Page 14

ENGLISH14
4 Lift the filter cylinder case out of the bucket.
5 Turn the handle on top of the filter cylinder case anticlockwise (1)
and lift the filter cylinder out of the case (2).
6 Clean the filter cylinder and the case with the brush supplied. Brush
from the top of the filter downwards along the ribs of the filter.
Only use the brush supplied. Other brushes may damage the filter
cylinder.
7 If there is dirt on the inside of the case, empty the case over a
dustbin.
8 If you wish, you can clean the filter cylinder case with cold tap water
and some washing-up liquid.
9 If you want to wash the filter cylinder, wash it thoroughly with only
water. Do not use any soap, washing-up liquid or other detergent
to clean the filter. Let the filter cylinder dry completely before you
reinsert it into the case.
10 Put the filter cylinder back into the case and turn the handle
clockwise until the filter cylinder locks into position.
Make sure the filter cylinder is securely fixed in the case.
11 Put the case with the filter cylinder back into the dust bucket.
Motor protection filter
Clean the permanent motor protection filter every time you clean the filter
cylinder case.
1 Take the motor protection filter out of the appliance. Clean the filter
by tapping the dust out of it over a dustbin.
If the motor protection filter is very dirty, you can also rinse it with cold tap
water.
Do not use washing-up liquid or any other cleaning agent to clean the
motor protection filter.
2 Press the clean filter firmly back into the filter compartment to
ensure that it is properly placed.
Page 15

ENGLISH 15
Super Clean Air filter, Super Clean Air HEPA 12 filter or Ultra
Clean Air HEPA 13 filter
This appliance is equipped with either the Super Clean Air filter, the Super
Clean Air HEPA 12 filter or the Ultra Clean Air HEPA 13 filter. These filters
are located in the back of the appliance.
Note: To guarantee optimal dust retention and performance of the vacuum
cleaner, always replace the filter with an original Philips filter of the correct
type (see chapter ‘Ordering accessories’).
Super Clean Air filter
The Super Clean Air filter filters a large par t of the smaller par ticles from
the exhaust air with its electrostatically charged fibres.
Replace the Super Clean Air filter every six months. This filter is not
washable.
1 Remove the filter grille.
2 Remove the old filter.
3 Insert the new filter into the appliance.
4 Reattach the top of the filter grille and push the bottom corners
until they snap home (‘click’).
Super Clean Air HEPA 12 filter
The Super Clean Air HEPA 12 filter is able to remove 99.5% of all particles
down to 0.0003mm in size from the outlet air. This not only includes
normal house dust, but also harmful microscopic vermin such as dust mites
and their excrements, which are well-known causes of respiratory allergies.
Replace the Super Clean Air HEPA 12 filter every six months. This filter is
not washable.
To replace the Super Clean Air HEPA 12 filter, follow steps 1-4 of section
‘Super Clean Air filter’ above.
Washable Ultra Clean Air HEPA 13 filter
The Ultra Clean Air HEPA 13 filter is able to remove 99.95% of all particles
down to 0.0003mm in size from the outlet air. This not only includes
normal house dust, but also harmful microscopic vermin such as dust mites
and their excrements, which are well-known causes of respiratory allergies.
Clean the washable Ultra Clean Air HEPA 13 filter every 6 months. You can
clean the washable Ultra Clean Air HEPA 13 filter max. 4 times. Replace
the filter after it has been cleaned 4 times.
Page 16

ENGLISH16
1 Remove the filter grille.
2 Take out the washable HEPA 13 filter.
3 Rinse the pleated side of the HEPA 13 filter under a hot slow-
running tap.
- Hold the filter in such a way that the pleated side points upwards and
the water flows parallel to the pleats. Hold the filter at an angle so that
the water washes away the dirt inside the pleats.
- Turn the filter 180° and let the water flow along the pleats in opposite
direction.
- Continue this process until the filter is clean.
Never clean the washable filter with a brush.
Note: Cleaning does not restore the original colour of the filter, but does restore
its filtration power.
4 Carefully shake the water from the surface of the filter. Let the filter
dry at least 2 hours before you put it back into the vacuum cleaner.
Page 17

ENGLISH 17
5 Put the filter back into the appliance. Reattach the top of the filter
grille and push the bottom corners until they snap home (‘click’).
Ordering accessories
If you have any difficulties obtaining filters or other accessories for this
appliance, please contact the Philips Customer Care Centre in your
country or consult the worldwide guarantee leaflet.
- Philips filter cylinders are available under service number 4322 005
17520.
- Super Clean Air filters are available under type number FC8030.
- Non-washable Super Clean Air HEPA 12 filters are available under type
number FC8031.
- Washable Ultra Clean Air HEPA 13 filters are available under type
number FC8038.
Environment
- Do not throw the appliance away with the normal household waste
at the end of its life, but hand it in at an official collection point for
recycling. By doing this, you help to preserve the environment.
Guarantee & service
If you need information or if you have a problem, please visit the Philips
website at www.philips.com or contact the Philips Customer Care Centre
in your country. You find its phone number in the worldwide guarantee
leaflet. If there is no Customer Care Centre in your country, go to your
local Philips dealer or contact the Service Depar tment of Philips Domestic
Appliances and Personal Care BV.
Troubleshooting
This chapter summarises the most common problems you could
encounter with the appliance. If you are unable to solve the problem with
the information below, contact the Customer Care Centre in your country.
1 The suction power is insufficient.
- Check if the suction power knob is in maximum position.
- Check if the filter cylinder is filled with dirt.
If necessary, clean the filter cylinder.
- Check if the other filters need to be cleaned or replaced.
Page 18

ENGLISH18
- Check if the blockage indicator has changed colour. If it has changed
colour, the nozzle, tube or hose may be blocked up.
To remove the obstruction, disconnect the blocked-up item and connect it
(as far as possible) the other way around. Switch on the vacuum cleaner to
force the air through the blocked-up item in opposite direction.
2 The appliance cannot be switched on.
- Check if the filter cylinder case with the filter cylinder in it has been
inserted into the dust bucket.
Page 19

简体中文
简介
感谢您的惠顾,欢迎光临飞利浦!为了您能充分享受飞利浦提供的
支持,请在 www.philips.com/welcome 上注册您的产品。
一般说明 (图 1)
1 滤芯
2 滤芯罩
3 集尘桶释放钮
4 集尘桶
5 马达保护滤网
6 清洁刷
7 上盖
8 开/关按钮
9 吸力控制旋钮
10 软管接口
11 手柄
12 附件夹
13 伸缩管
14 缝隙吸嘴
15 小号吸嘴
16 小号毛刷(仅限于特定型号)
17 地板吸嘴(仅限于特定型号)
18 组合吸嘴(仅限于特定型号)
19 地毯/硬地板设置转换开关
20 Tri-Active 全方位清洁吸尘嘴(仅限于特定型号)
21 电源线自动回卷按钮
22 超洁空气过滤网、超洁空气 HEPA 12 过滤网或超洁空气 HEPA
13 过滤网
23 滤网栅格
24 摆放固定槽
19
注意事项
使用本产品之前,请仔细阅读本使用说明书,并妥善保管以备日后
参考。
危险
- 切勿吸入水或其它液体。切勿吸入易燃物质,也不要吸入未冷却
的灰烬。
警告
- 在将产品连接电源之前,请先检查产品所标电压与当地的供电电
压是否相符。
- 如果插头、电源线或产品本身受损,请勿使用本产品。
- 如果电源软线损坏,为了避免危险,必须由制造商、其维修部或
类似部门的专业人员来更换。
- 本产品不打算由肢体不健全、感觉或精神上有障碍或缺乏相关经
验和知识的人(包括儿童)使用,除非有负责他们安全的人对他
们使用本产品进行监督或指导。
- 应照看好儿童,确保他们不玩耍本产品。
- 当连接到真空吸尘器及真空吸尘器打开时,请勿将软管、硬管或
任何其它附件指向眼睛或耳朵,也不要放在口中。
Page 20

简体中文20
注意
- 切勿吸取体积较大的脏物,否则可能阻塞硬管或软管中的空气
通道。
- 在使用真空吸尘器吸取灰尘、细沙、石灰、水泥灰和类似的物质
时,滤芯孔将被堵塞。如果您注意到吸力显著下降,则可以清
洁滤芯。
- 吸取体积较大的物体可能阻塞硬管或软管中的空气通道。如果
出现这种情况,阻塞指示灯将变为红色,表示存在需要清除的
阻塞物。
- 切勿在未安装马达保护滤网的情况下使用本产品。这将使马达受
损,并缩短产品的使用寿命。
- 只能使用本产品随附的飞利浦滤芯。
- 进行真空吸尘时,尤其是在空气湿度较低的房间中吸尘时,吸尘
器会积聚静电。因而当您触摸硬管或吸尘器的其它部件时,可能
会感受到轻微电击。这种电击对人体无害,也不会损坏产品。但
为了尽量减少这种不便,建议您:
1 经常握住硬管使其与房间中的其它金属物体接触(例如,桌椅脚
或电炉等);
2 在房间中放水,增加空气湿度。例如,可将装有水的容器挂在电
炉上,或将装有水的碗放在电炉上或附近。
电磁场 (EMF)
这款飞利浦产品符合关于电磁场 (EMF) 的相关标准。据目前的科学
证明,如果正确使用并按照本用户手册中的说明进行操作,本产品
是安全的。
使用准备
软管
1 要连接软管,请将其推入到产品中(可听到“咔哒”一声)。
Page 21

简体中文 21
2 取下软管时,按下释放钮,将软管从吸尘器中拔出。
伸缩管
1 将伸缩管与软管的握把连结时,按下握把上的弹簧锁按纽,将握
把插入吸管。将弹簧锁按钮对准,插入硬管的开口(听到喀哒一
声)。
2 要将握把从硬管中拉出,按下弹簧式锁定钮,将握把从硬管中拔
出。
请通过同样的方法来连接及拆卸吸嘴。
3 将硬管调整到吸尘过程中感觉最舒适的长度。
Tri-Active 全方位清洁吸尘嘴(仅限于特定型号)
Tri-Active 吸尘嘴是用于清洁地毯和硬质地板的一种多用途吸尘嘴。
- 吸尘嘴侧面的侧毛刷可以清洁更多灰尘和污垢,让您可以沿家具
和其他障碍物边缘进行清洁。
Page 22

简体中文22
- 吸尘嘴正面的开口允许吸取体积较大的灰尘微粒。
1 要清洁硬质地板,请用脚推动吸嘴顶部的转换开关。
, 用于清洁硬质地板的刷条从外壳中伸出。同时,轮子将伸出,以
防止擦伤地板并提高灵活性。
2 要清洁地毯,请再次推动转换开关。
, 刷条将没入吸尘嘴外壳中,轮子将自动降低。
组合吸嘴(仅限于特定型号)
在地毯或硬地板上均可使用两用吸嘴。
1 要清洁硬质地板,请用脚推动吸嘴顶部的转换开关。
, 用于清洁硬质地板的刷条将从吸嘴中伸出。
2 要清洁地毯,请再次推动转换开关。
, 刷条将收入吸嘴中。
Page 23

简体中文 23
地板吸嘴(仅限于特定机型)
- 地板吸嘴专为柔和地清洁硬地板而设计。
缝隙吸嘴,小号吸嘴和小号毛刷
1 将缝隙吸嘴(1)、小号吸嘴(2)或小号毛刷(仅限于特定型号)
(3)直接连接到手柄或硬管上。
附件夹
1 将附件夹扣合到手柄上。
2 将两个附件扣入附件夹中:
- 缝隙吸嘴和小号吸嘴。
注意:确保小号吸嘴的吸口不指向附件夹。
Page 24

简体中文24
- 缝隙吸嘴和小号毛刷。
注意:确保小号毛刷的吸口不指向附件夹。
使用本产品
1 将电源线从吸尘器中拉出,并将电源插头插入插座。
2 按下产品上的开/关按钮打开产品电源。
3 吸尘时,可用吸尘器顶端的吸力控制旋钮来调整吸力强度。
- 对于特别脏的地毯和硬地板,可用最大吸力吸尘。
- 清洁门帘、台布或其他物品时,可用最小吸力。
4 如要暂停使用吸尘器,可通过将吸嘴上的夹片插入摆放固定槽以
将硬管放妥。
存储
1 关闭产品电源并拔出电源插头。
Page 25

简体中文 25
2 按下电源线回卷按钮将电线回卷到吸尘器中。
3 将吸嘴上的夹片插入摆放固定槽,将吸嘴固定在产品上。水平放
置产品,使所有轮子着地。
4 存放时,必须让全方位清洁吸嘴处于地毯设置。并防止侧面的毛
刷弯曲。
倒空集尘桶
倒空集尘桶之前,切记拔下吸尘器的插头。
集尘桶不能使用洗碗机清洗。
- 当灰尘累积到达滤芯罩的圆盘处时,应立即倒空集尘桶。
1 关闭产品并取下软管。
2 按集尘桶把手顶部的释放钮,将上盖解锁(1)。旋开上盖(2)。
Page 26

简体中文26
3 将集尘桶从产品中提出。
4 在垃圾箱的上方,将滤芯罩从集尘桶中提出。将集尘桶倒空。
5 如果您愿意,您还可以用洗涤剂清洗集尘桶,并在自来水龙头下
用冷水冲洗。
6 将滤芯罩放回集尘桶,并将集尘桶放回吸尘器。
7 将机盖关紧(可听到“咔哒”一声)。
请始终将滤芯放回集尘桶,否则无法打开产品。
滤网的清洁和保养
在清洁或更换滤尘网之前,请拔掉产品插头。
滤芯和滤芯罩不可用洗碗机清洗。
滤芯
每 2 个月清洁一次滤芯。
1 关闭产品并取下软管。
2 按集尘桶把手顶部的释放钮,将上盖解锁(1)。旋开上盖(2)。
3 将集尘桶从产品中提出。
Page 27

简体中文 27
4 将滤芯罩从集尘桶中提出。
5 逆时针转动滤芯罩顶端的把手(1),将滤芯从滤芯罩中提出(2)。
6 用随附的刷子清洁滤芯。沿着过滤器的纹路,从上到下刷。
只能使用随附的刷子。其他刷子可能损坏滤芯。
7 如果滤芯罩内有灰尘,应在垃圾桶的上方将其倒空。
8 如果您愿意,您还可以用洗涤剂清洗滤芯罩,并在自来水龙头下
用冷水冲洗。
9 如果您要清洗滤芯,只用水将其彻底清洗。不要使用肥皂、洗涤
剂或其他清洁剂清洗滤芯。在将滤芯重新插入滤芯罩之前,让滤
芯完全变干。
10 将滤芯装回滤芯罩内,顺时针转动把手,直到滤芯锁定位置为
止。
确保滤芯完全固定在滤芯罩内。
11 将带滤芯的滤芯罩放回集尘桶中。
马达保护滤网
每次清洁滤芯罩时,应清洗永久马达保护滤网。
1 将马达保护滤网从吸尘器中取出,在垃圾桶上方轻拍马达保护滤
网,以将灰尘清除。
如果马达保护滤网已经很脏,也可以在水龙头下用冷水冲洗。
请勿使用洗涤剂或任何其它清洁剂清洗马达保护滤网。
2 将干净的滤网放回滤网架,确保安装得当。
Page 28

简体中文28
超洁空气过滤网、超洁空气 HEPA 12 过滤网或超洁空气 HEPA 13
过滤网
本产品配备有超洁空气过滤网、超洁空气 HEPA 12 过滤网或超洁空
气 HEPA 13 过滤网。这些滤网位于产品背部。
注意:为保证吸尘器的最佳吸尘效果和性能,请务必用正确型号的
原装飞利浦过滤网来替换滤网(请参阅“订购附件”一章)。
超洁空气过滤网
超洁空气过滤网可通过静电放电纤维过滤掉排气中大部分较小的微
粒。
每 6 个月更换一次超洁空气过滤网。此滤网不可水洗。
1 取出滤网栅格。
2 取出旧的滤网。
3 将新的滤网插入吸尘器。
4 重新安装滤网栅格的顶端并推动下面的角,直到卡住其位置(可
听到咔嗒声)。
超洁空气 HEPA 12 过滤网
超洁空气 HEPA 12 过滤网能够从排出空气中过滤 99.5% 的最小为
0.0003 毫米的微粒。这不仅能过滤普通的室内灰尘,还能过滤显微
镜级别的寄生虫,如尘螨及其排泄物。众所周知,这些都是呼吸道
过敏源。
每 6 个月更换一次超洁空气 HEPA 12 过滤网。此滤网不可水洗。
要更换超洁空气 HEPA 12 过滤网,请遵循以上“超洁空气过滤网”
部分中的步骤 1 至 4。
可水洗超洁空气 HEPA 13 滤网
超洁空气 HEPA 13 过滤网能够从排出空气中过滤 99.95% 的最小为
0.0003 毫米的微粒。这不仅能过滤普通的室内灰尘,还能过滤显微
镜级别的寄生虫,如尘螨及其排泄物。众所周知,这些都是呼吸道
过敏源。
每 6 个月应清洗一次可水洗超洁空气 HEPA 13 过滤网。可水洗超
洁空气 HEPA 13 过滤网最多可清洗 4 次。清洗过 4 次之后,请更
换滤网。
1 取出滤网栅格。
Page 29

简体中文 29
2 取出可水洗HEPA13滤网。
3 在热水龙头下以慢流速冲洗HEPA13过滤网的褶皱面。
- 握住过滤网,使褶皱面朝上,让水平行流入褶皱。以一定的角度
握住过滤网,让水能够洗尽褶皱内的脏污。
- 将过滤网旋转 180°,让水流入相反方向的褶皱。
- 继续此过程,直到滤网清洗干净。
切勿用刷子清洁可清洗过滤网。
注意:清洗并不能恢复滤网原来的颜色,但可以恢复其过滤性能。
4 小心地甩掉过滤网表面的水份。让滤网干燥至少2个小时,然
后将其放回吸尘器。
5 将过滤网放回产品中。重新安装滤网栅格的顶部并推动底角,直
至其卡入到位(可听到“咔哒”一声)。
订购附件
如果您购买本产品的滤网或其他附件有困难,请和您所在国家的飞
利浦客户服务中心联系,或参阅全球保修卡。
Page 30

简体中文30
- 飞利浦滤芯的订购号码为 4322 005 17520。
- 超洁空气过滤网的供应型号为 FC8030。
- 不可水洗超洁空气 HEPA 12 过滤网的供应型号是 FC8031。
- 可水洗超洁空气 HEPA 13 过滤网的供应型号是 FC8038。
环保
- 弃置产品时,请不要将其与一般生活垃圾堆放在一起;应将其交
给官方指定的回收中心。这样做有利于环保。
保修与服务
如果您需要了解信息或有任何问题,请访问飞利浦网站 www.
philips.com。您也可以与您所在国家/地区的飞利浦客户服务中心联
系。您可以从全球保修卡中找到电话号码。如果您所在国家/地区没
有飞利浦客户服务中心,请与当地的飞利浦经销商或飞利浦家电和
个人护理 BV 的维修部门联系。
故障种类和处理方法
本章归纳了本产品在使用时最常遇到的问题。如果您无法用下面的
信息解决问题,请与贵国(地区)的飞利浦客户服务中心联系。
1 吸力不足。
- 检查吸力控制旋钮是否在最大位置。
- 检查滤芯是否充满灰尘。
如有必要,请清洁滤芯。
- 检查其他过滤器是否需要清洁或更换。
- 检查阻塞指示灯是否改变颜色。如果改变了颜色,吸嘴、硬管或
软管被阻塞。
要清除阻塞物,请将被阻塞的部分拆下,并将它以相反方向连接(
尽可能离的远一些)。打开吸尘器的电源,强迫气流从相反方向通
过被阻塞的部分。
2 产品无法启动。
- 检查是否将带滤芯的滤芯罩插入集尘桶中。
Page 31

Page 32

Page 33

Page 34

4222.003.3098.4
 Loading...