

Page 1
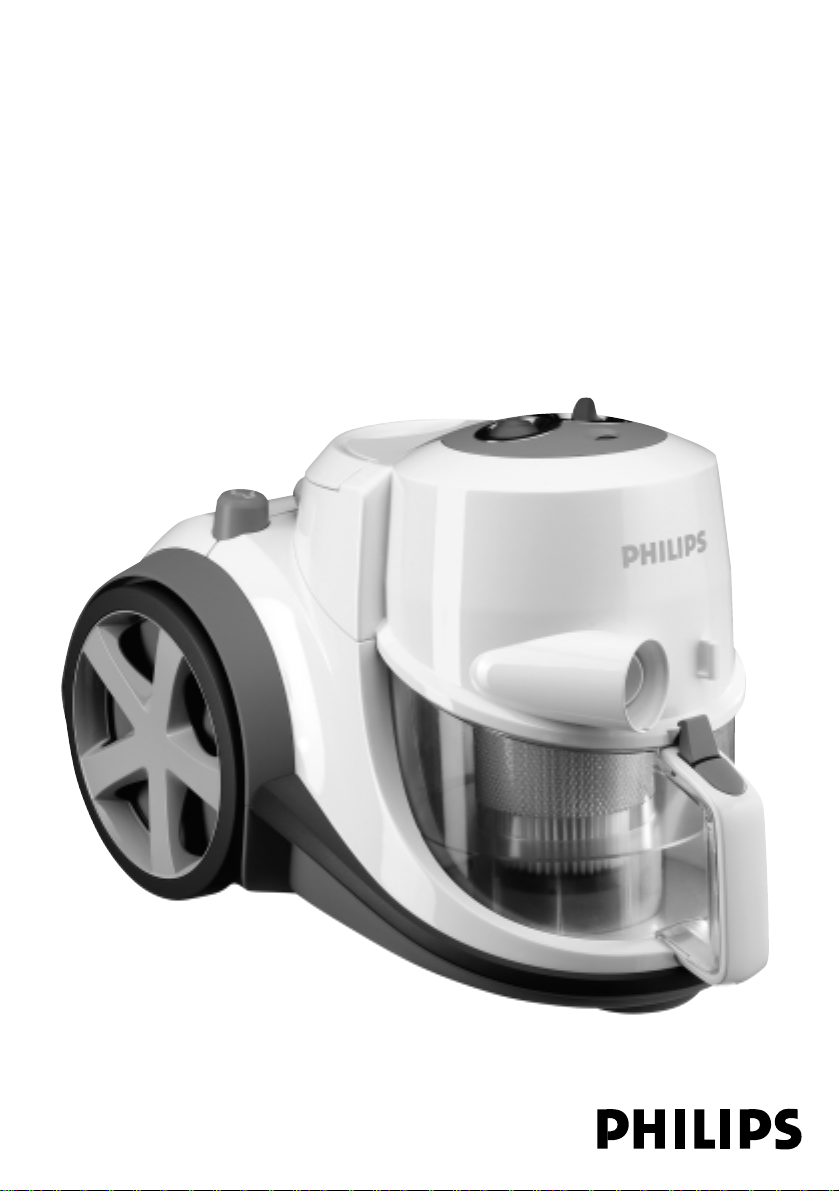
Marathon
Page 2
2
Page 3
3
J
K
B C
L
I
A
H
D
M
E
G
F
U
N
O
P Q
R
S
T
Page 4

4
Page 5
ENGLISH 6
11
16
MARATHON
Page 6

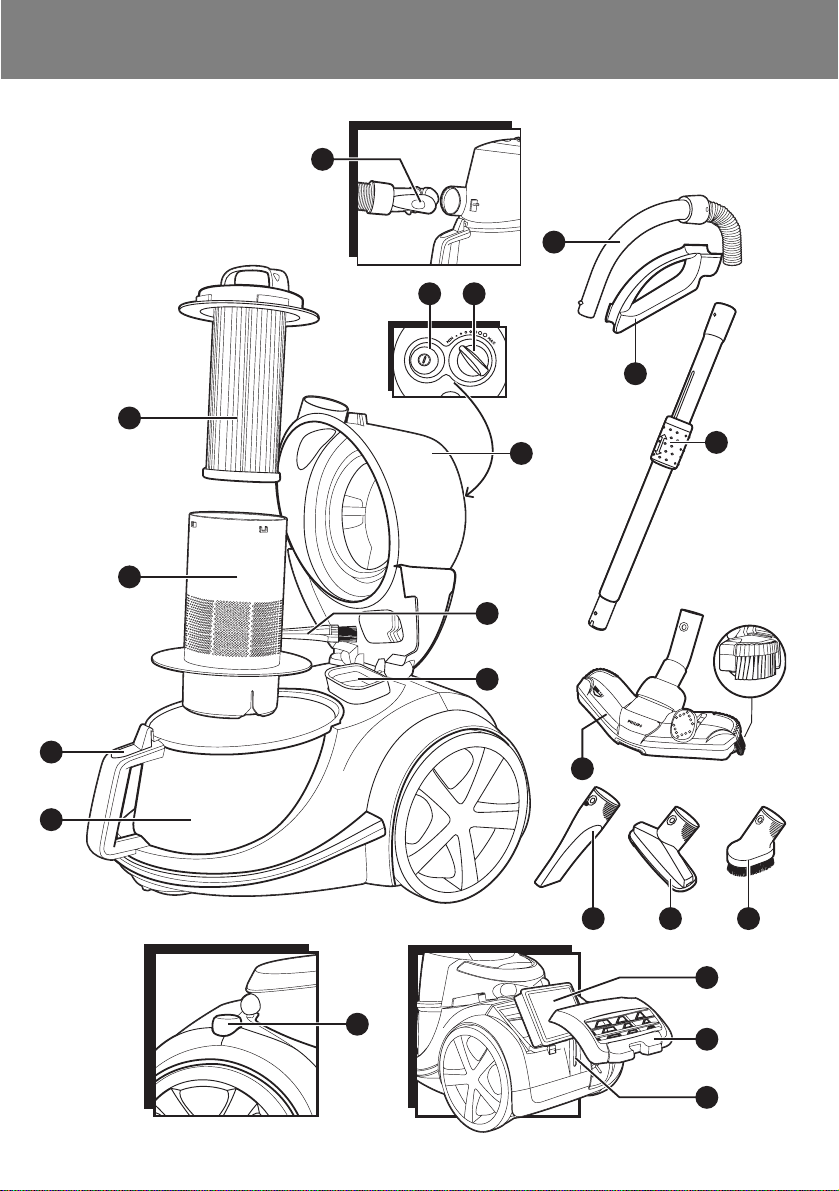
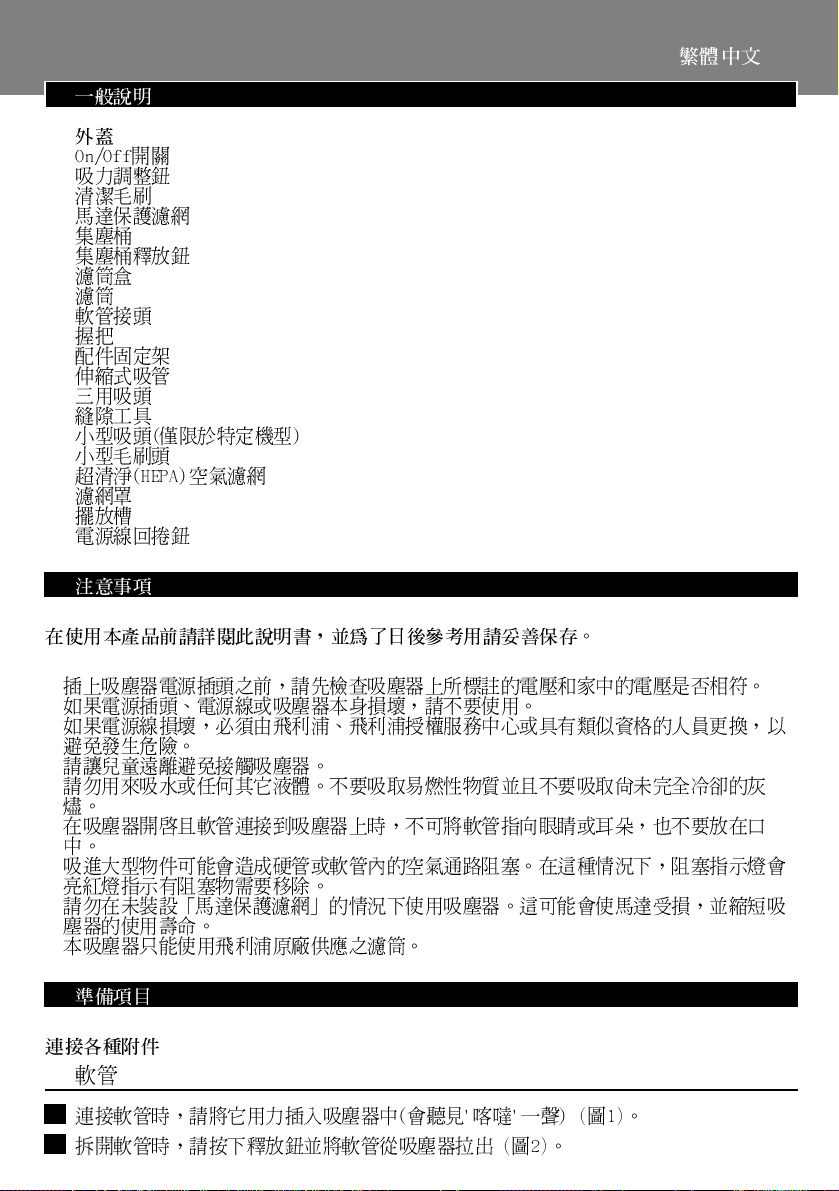
General description
A Cover
B On/off button
C Suction power knob
D Cleaning brush
E Motor Protection Filter
F Dust bucket
G Dust bucket release button
H Filter cylinder case
I Filter cylinder
J Hose connector
K Handgrip
L Accessory holder
M Telescopic tube
N Tri-Active nozzle
O Crevice tool
P Small nozzle (specific types only)
Q Small brush
R Super Clean Air (HEPA) Filter
S Filter grille
T Parking slot
U Cord rewind button
Important
Read these instructions for use carefully before using the appliance and save them for future
reference.
◗ Check if the voltage indicated on the appliance corresponds to the local mains voltage before
you connect the appliance.
◗ Do not use the appliance if the plug, the cord or the appliance itself is damaged.
◗ If the mains cord of this appliance is damaged, it must be replaced by Philips, a service centre
authorised by Philips or similarly qualified persons in order to avoid a hazard.
◗ Keep the appliance out of the reach of children.
◗ Never suck up water or any other liquid. Never suck up flammable substances and do not
suck up ashes until they are cold.
◗ Do not point the hose at the eyes or ears nor put it in your mouth when the vacuum
cleaner is switched on and the hose is connected to the vacuum cleaner.
◗ Sucking up large objects may cause the air passage in the tube or hose to become
obstructed. If this happens, the blockage indicator will turn red to indicate that there is an
obstruction that needs to be removed.
◗ Never use the appliance without the Motor Protection Filter.This could damage the motor
and shorten the life of the appliance.
◗ Only use the Philips filter cylinder supplied with the appliance.
Preparing for use
Connecting accessories
Hose
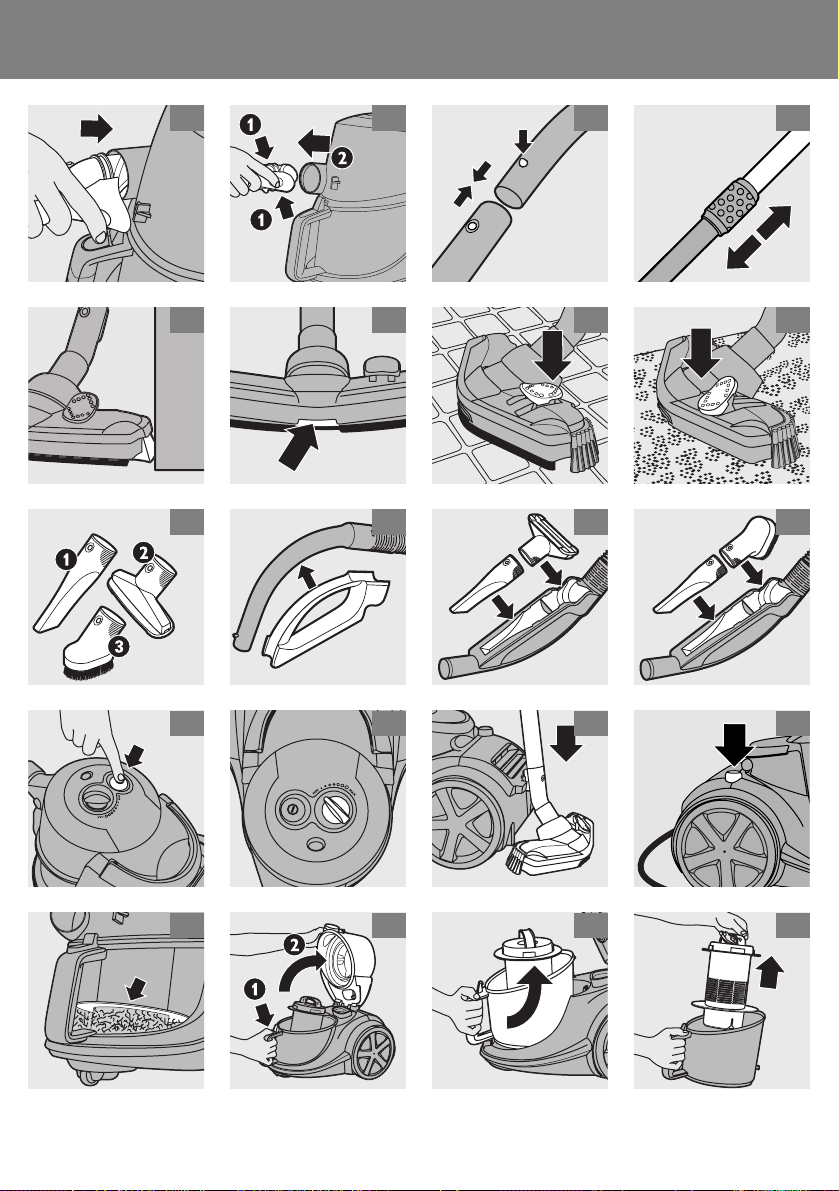
1 To connect the hose, push it firmly into the appliance ('click') (fig. 1).
2 To disconnect the hose, press the release button and pull the hose out of the appliance (fig. 2).
ENGLISH6
Page 7
Telescopic tube
1 Connect the tube to the handgrip of the hose by pressing the spring-loaded lock button on
the handgrip and inserting the handgrip into the tube. Fit the spring-loaded lock button into
the opening in the tube ('click') (fig. 3).
2 To disconnect the tube from the handgrip, press the spring-loaded lock button and pull the
handgrip out of the tube.
Use the same method to connect and disconnect the nozzles.
3 Adjust the tube to the length you find most comfortable during vacuum cleaning (fig. 4).
Tri-Active nozzle
◗ The Tri-Active nozzle is a multi-purpose nozzle for carpets and hard floors (fig. 5).
The side brushes catch more dust and dir t at the sides of the nozzle and allow you to clean better
along furniture and other obstacles.
◗ The opening at the front of the nozzle allows you to suck up larger particles (fig. 6).
Hard floor setting:
1 Push the rocker switch on top of the nozzle with your foot to make the brush strip come
out of the housing.At the same time the wheel will be lifted to prevent scratching and to
increase manoeuvrability (fig. 7).
Carpet setting:
2 Push the rocker switch again to make the brush strip disappear into the nozzle housing.
The wheel will be lowered automatically (fig. 8).
Crevice tool, small nozzle and small brush
1 Connect the crevice tool, the small nozzle (specific types only) or the small brush directly to
the handgrip or to the tube (fig. 9).
Accessory holder
◗ The accessory holder can simply be snapped onto the handgrip (fig. 10).
The accessories can be stored in the accessory holder by pushing them into the holder. To detach
the accessories, pull them out of the holder.
You can store two accessories at a time in the accessory holder:
◗ Crevice tool and small nozzle (specific types only) (fig. 11).
Please note the way in which the small nozzle must be placed in the accessory holder.
◗ Crevice tool and small brush (fig. 12).
Using the appliance
1 Pull the cord out of the appliance and put the mains plug in the wall socket.
2 Switch the appliance on by pressing the on/off button on top of the appliance (fig. 13).
◗ During vacuum cleaning you can adjust the suction power by means of the knob on top of
the appliance (fig. 14).
- Use maximum suction power for vacuum cleaning very dirty carpets and hard floors.
- Use minimum suction power for vacuum cleaning curtains, table carpets, etc.
ENGLISH 7
Page 8
◗ If you want to pause for a moment, you can park the tube in a convenient position by
inserting the ridge on the nozzle into the parking slot (fig. 15).
Storage
1 Switch the appliance off and remove the mains plug from the wall socket.
2 Rewind the mains cord by pressing the cord rewind button (fig. 16).
3 Attach the nozzle to the appliance by inserting the ridge on the nozzle into the slot. Store
the appliance in horizontal position, with all wheels touching the floor (fig. 15).
4 Always put the Tri-Active nozzle in the carpet setting when you store it and prevent the side
brushes from becoming bent (fig. 8).
Emptying the dust bucket
Always unplug the appliance before emptying the dust bucket.
The dust bucket is not dishwasher-proof.
◗ Empty the dust bucket as soon as the dust level has reached the round disc of the filter
cylinder case (fig. 17).
1 Switch the appliance off and disconnect the hose from the appliance.
2 Unlock the cover by pressing the release button on top of the handle of the dust bucket (1).
Swing the cover open (2) (fig. 18).
3 Remove the bucket by lifting it out of the appliance (fig. 19).
4 Hold the bucket over a dustbin and lift the filter cylinder case out of the bucket. Empty the
bucket (fig. 20).
5 If you wish, you can clean the dust bucket with cold tap water and some washing-up liquid.
6 Put the filter cylinder case back into the dust bucket and put the bucket back into the
appliance.
7 Close the cover firmly ('click').
Always put the filter cylinder case back into the bucket, otherwise the appliance cannot be
switched on.
Cleaning and maintenance of filters
Always unplug the appliance before cleaning or replacing the filters.
The filter cylinder and the filter cylinder case are not dishwasher-proof.
Filter cylinder
Clean the filter cylinder every 2 months.
1 Turn the handle on top of the filter cylinder case anticlockwise (1) and lift the filter cylinder
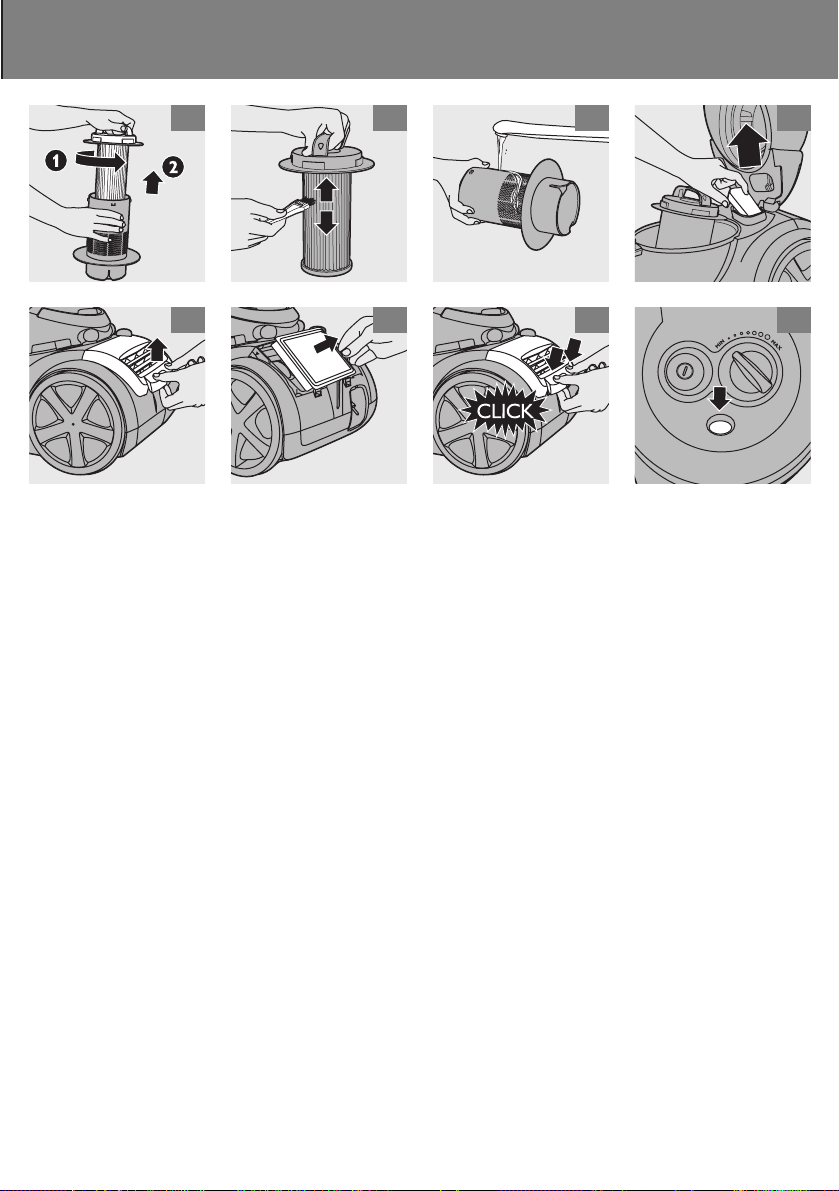
out of the case (2) (fig. 21).
2 Clean the filter cylinder and the case with the brush supplied. Brush from the top of the filter
downwards along the ribs of the filter (fig. 22).
Only use the brush supplied! Other brushes may damage the filter cylinder.
3 If there is dirt on the inside of the case, empty the case over a dustbin.
ENGLISH8
Page 9
4 If you wish, you can clean the filter cylinder case with cold tap water and some washing-up
liquid. Rinse the filter cylinder thoroughly with cold tap water and let it dry completely
before reinserting it into the case (fig. 23).
5 Put the filter cylinder back into the case and turn the handle clockwise until the filter
cylinder locks into position.
Make sure the filter cylinder is securely fixed in the case.
6 Put the case with the filter cylinder back into the dust bucket.
Motor Protection Filter
Clean the Permanent Motor Protection Filter every time you clean the filter cylinder case.
1 Take the Motor Protection Filter out the appliance and clean the filter by tapping the dust
out of it over a dustbin (fig. 24).
2 Press the clean filter firmly back into the filter compartment to ensure that it is properly
placed.
◗ If the Motor Protection Filter is very dirty, you can also rinse it with cold tap water.
Do not use any soap, cleaning agent or other detergent to clean the filter!
Super Clean Air Filter
The Super Clean Air Filter located in the back of the appliance filters a large par t of the smaller
particles from the exhaust air by means of its electrostatically charged fibres.
Replace the Super Clean Air Filter every six months.
1 Open the filter grille (fig. 25).
2 Remove the old filter (fig. 26).
3 Insert the new filter into the appliance.
4 Close the filter grille and push the bottom corners until they snap home (fig. 27).
Super Clean Air HEPA Filter (specific types only)
Instead of with the Super Clean Air Filter, this appliance can also be equipped with the special Super
Clean Air HEPA Filter. This filter is able to remove 99.5% of all particles down to 0.0003 mm in size
from the outlet air. This not only includes normal house dust, but also harmful microscopic vermin
such as house dust mites and their excrements, which are well-known causes of respiratory allergies.
Replace the Super Clean Air HEPA Filter every six months. The Super Clean Air HEPA Filter can be
replaced in the same way as the Super Clean Air Filter.
Ordering accessories and filters
If you have any difficulties obtaining filters or other accessories for this appliance, please contact the
Philips Customer Care Centre in your country or consult the worldwide guarantee leaflet.
- Philips filter cylinders are available under service number 4322 005 17520.
- Super Clean Air filters are available under type number FC8030.
- Super Clean Air HEPA Filters are available under type number FC8031.
ENGLISH 9
Page 10

Guarantee & service
If you need information or if you have a problem, please visit the Philips website at www.philips.com
or contact the Philips Customer Care Centre in your country (you will find its phone number in the
worldwide guarantee leaflet). If there is no Customer Care Centre in your country, turn to your
local Philips dealer or contact the Service Depar tment of Philips Domestic Appliances and Personal
Care BV.
Troubleshooting
1 The suction power is insufficient.
◗ Check if the suction power knob is in maximum position.
◗ Check if the filter cylinder is filled with dirt. If necessary, clean this filter.
◗ Check if the other filters need to be cleaned or replaced.
◗ Check if the blockage indicator has changed colour. If so, the nozzle, tube or hose may be
blocked up.To remove the obstruction, disconnect the blocked-up item and connect it (as far
as possible) the other way around.Switch the vacuum cleaner on to force the air through the
blocked-up item in opposite direction (fig. 28).
2 The appliance cannot be switched on.
◗ Check if the filter cylinder case with the filter cylinder in it has been inserted into the dust
bucket.
ENGLISH10
Page 11
11
A
B
C
D
E
F
G
H
I
J
K
L
M
N
O
P
Q
R
S
T
V
◗
◗
◗
◗
◗
◗
◗
◗
◗
1
2
Page 12
1
2
3
◗
◗
1
2
1
◗
◗
◗
1
2
◗
12
Page 13
13
◗
1
2
3
4
◗
1
2
3
4
5
6
7
1
2
Page 14
14
3
4
5
6
1
2
◗
1
2
3
4
Page 15
15
1
◗
◗
◗
◗
2
◗
Page 16
A
B
C
D
E
F
G
H
I
J
K
L
M
N
O
P
Q
R
S
T
V
◗
◗
◗
◗
◗
◗
◗
◗
◗
16
Page 17
◗✴
◗
◗
17
Page 18
◗
◗
◗
◗
◗
18
Page 19
◗
19
Page 20
◗
◗
◗
◗
◗
20
Page 21
21
Page 22
22
1 2 3 4
5 6 7 8
9 10 11 12
13 14 15 16
17 18 19 20
Page 23
23
21 22 23 24
25 26 27 28
Page 24

www.philips.com
4222 003 30972
u
 Loading...