

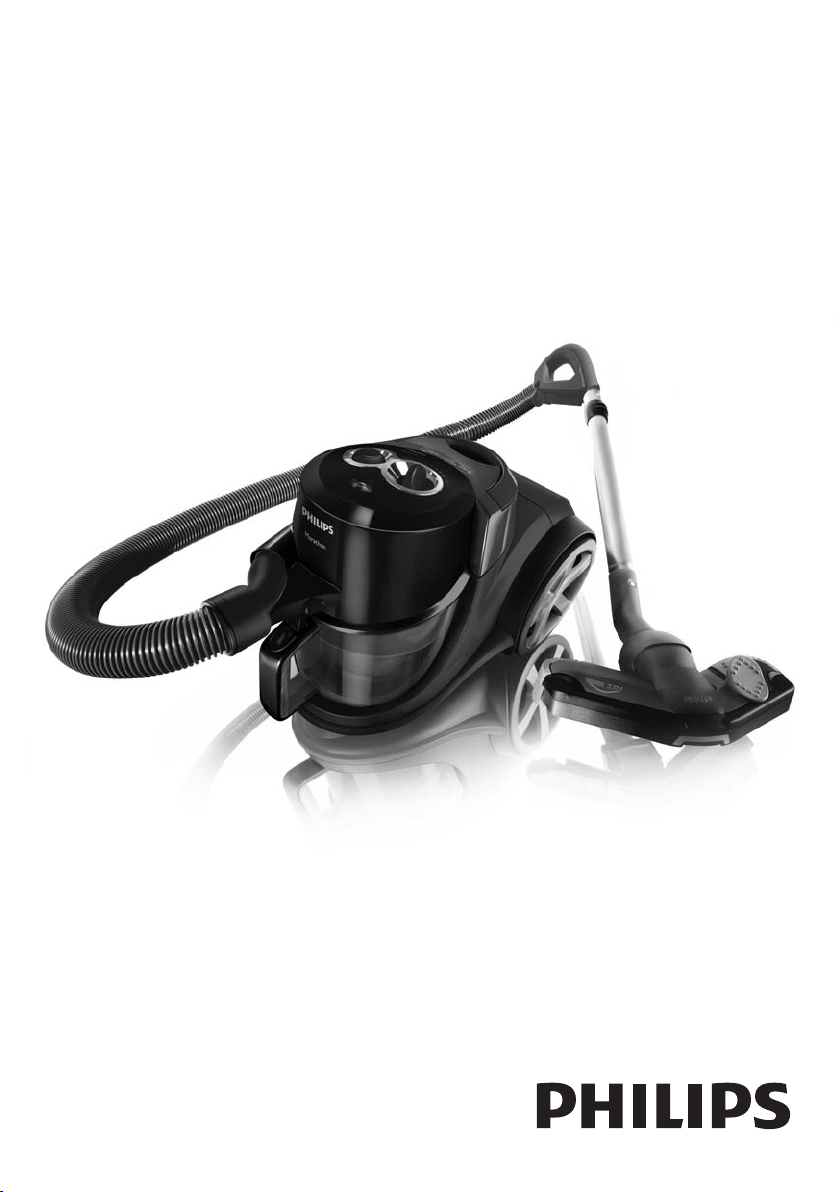
Page 1
Register your product and get support at
www.philips.com/welcome
FC9219-FC9200
Page 2
Page 3

1
1
Page 4

Page 5

ENGLISH 6
DANSK 19
DEUTSCH 32
ΕΛΛΗΝΙΚΑ 45
ESPAÑOL 60
SUOMI 73
FRANÇAIS 86
ITALIANO 99
NEDERLANDS 112
NORSK 125
PORTUGUÊS 138
SVENSKA 151
TÜRKÇE 164
FC9219-FC9200
Page 6

6
ENGLISH
Introduction
Congratulations on your purchase and welcome to Philips! To fully benefit
from the support that Philips offers, register your product at
www.philips.com/welcome.
General description (Fig. 1)
1 Filter cylinder
2 Filter cylinder case
3 Dust bucket release button
4 Dust bucket
5 Motor protection filter
6 Cleaning brush
7 Cover
8 On/off button
9 Suction power knob
10 Hose connector
11 Handgrip
12 Accessory holder
13 Telescopic tube
14 Crevice tool
15 Small nozzle
16 Small brush (specific types only)
17 Parquet nozzle (specific types only)
18 Combination nozzle (specific types only)
19 Rocker switch for carpet/hard floor settings
20 Tri-Active nozzle (specific types only)
21 Cord rewind button
22 Super Clean Air Filter, Super Clean Air HEPA 12 filter or Ultra Clean
Air HEPA 13 filter
23 Filter grille
24 Parking slot
Important
Read this user manual carefully before you use the appliance and save it for
future reference.
Danger
- Never suck up water or any other liquid. Never suck up flammable
substances and do not suck up ashes until they are cold.
Warning
- Check if the voltage indicated on the appliance corresponds to the
local mains voltage before you connect the appliance.
- Do not use the appliance if the plug, the mains cord or the appliance
itself is damaged.
- If the mains cord is damaged, you must have it replaced by Philips, a
service centre authorised by Philips or similarly qualified persons in
order to avoid a hazard.
- This appliance is not intended for use by persons (including children)
with reduced physical, sensory or mental capabilities, or lack of
experience and knowledge, unless they have been given supervision or
Page 7
ENGLISH 7
instruction concerning use of the appliance by a person responsible for
their safety.
- Children should be supervised to ensure that they do not play with the
appliance.
- Do not point the hose, the tube or any other accessory at the eyes
or ears nor put it in your mouth when it is connected to the vacuum
cleaner and the vacuum cleaner is switched on.
Caution
- Do not suck up large objects, as this may cause the air passage in the
tube or hose to become obstructed.
- When you use the vacuum cleaner to vacuum ashes, fine sand, lime,
cement dust and similar substances, the pores of the filter cylinder
become clogged. If you notice a strong decrease in suction power, clean
the filter cylinder.
- Sucking up large objects may cause the air passage in the tube or hose
to become obstructed. If this happens, the blockage indicator turns red
to indicate that there is an obstruction that needs to be removed.
- Never use the appliance without the motor protection filter. This
damages the motor and shortens the life of the appliance.
- Only use the Philips filter cylinder supplied with the appliance.
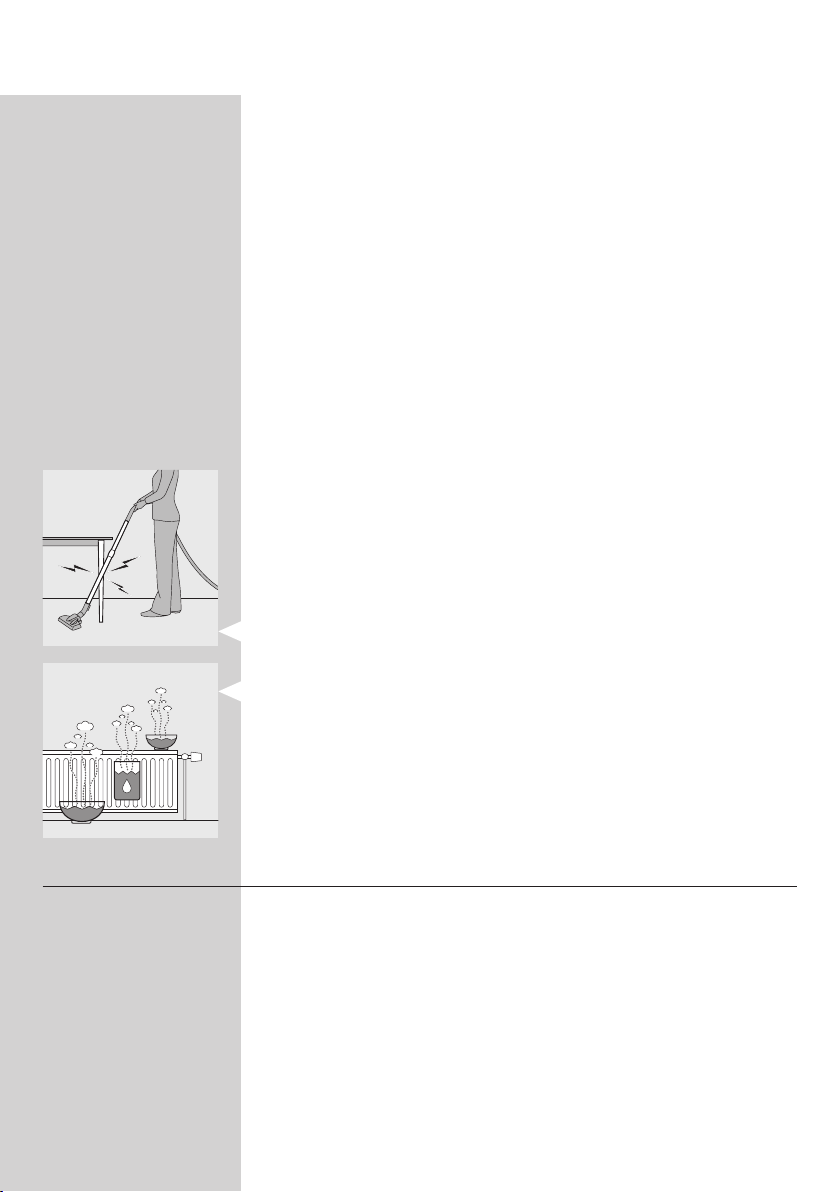
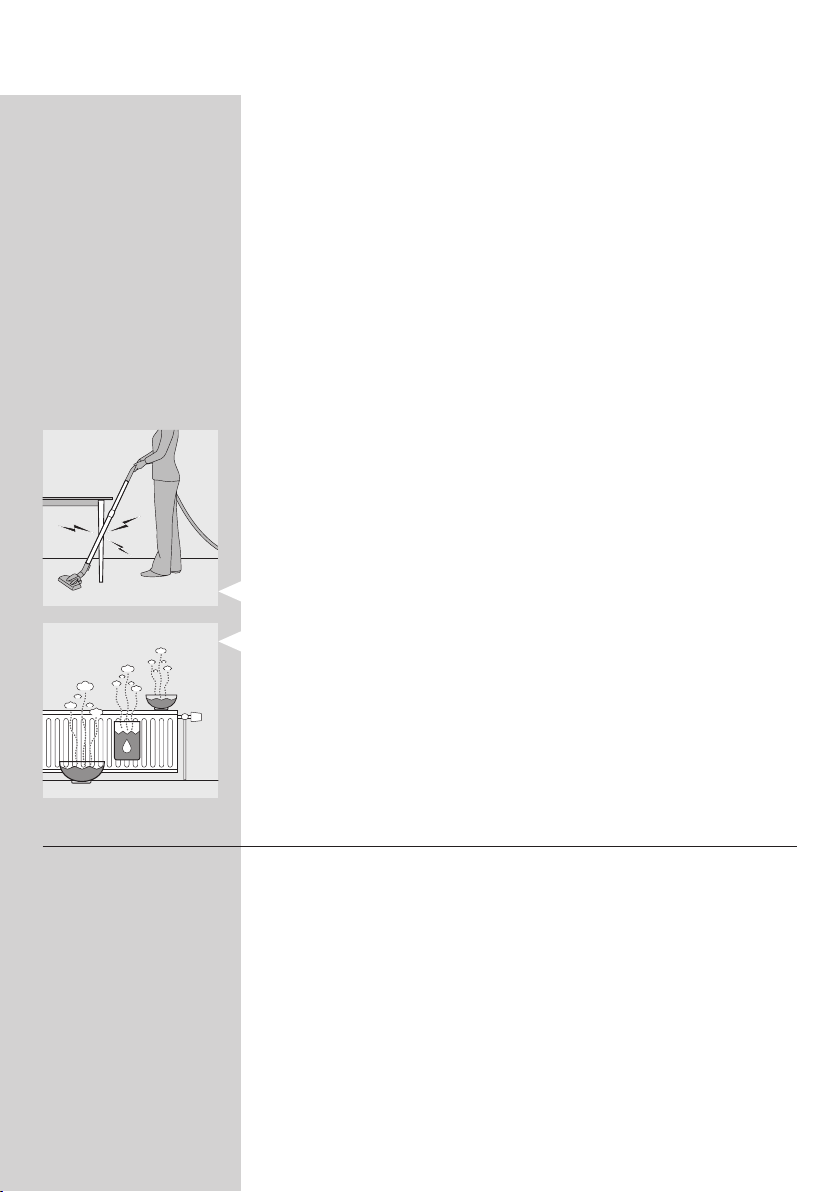
- During vacuum cleaning, especially in rooms with low air humidity,
your vacuum cleaner builds up static electricity. As a result you can
experience electric shocks when you touch the tube or other steel
parts of your vacuum cleaner. These shocks are not harmful to you and
do not damage the appliance. To reduce this inconvenience we advise
you:
1 to discharge the appliance by frequently holding the tube against other
metal objects in the room (for example legs of a table or chair, radiator
etc.);
2 to raise the air humidity level in the room by placing water in the room.
For example, you can hang containers filled with water from your
radiators or place bowls filled with water on or near your radiators.
Electromagnetic fields (EMF)
This Philips appliance complies with all standards regarding electromagnetic
fields (EMF). If handled properly and according to the instructions in this
user manual, the appliance is safe to use based on scientific evidence
available today.
Page 8
ENGLISH8
Preparing for use
Hose
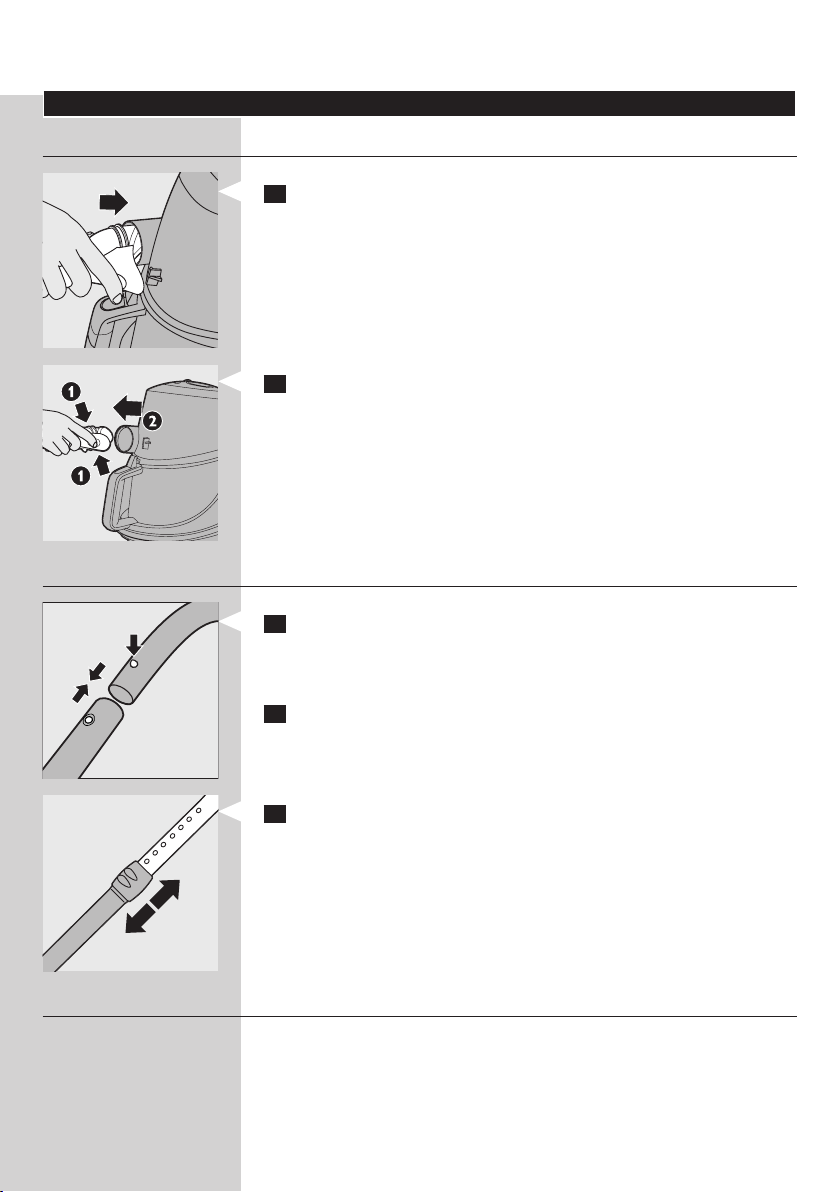
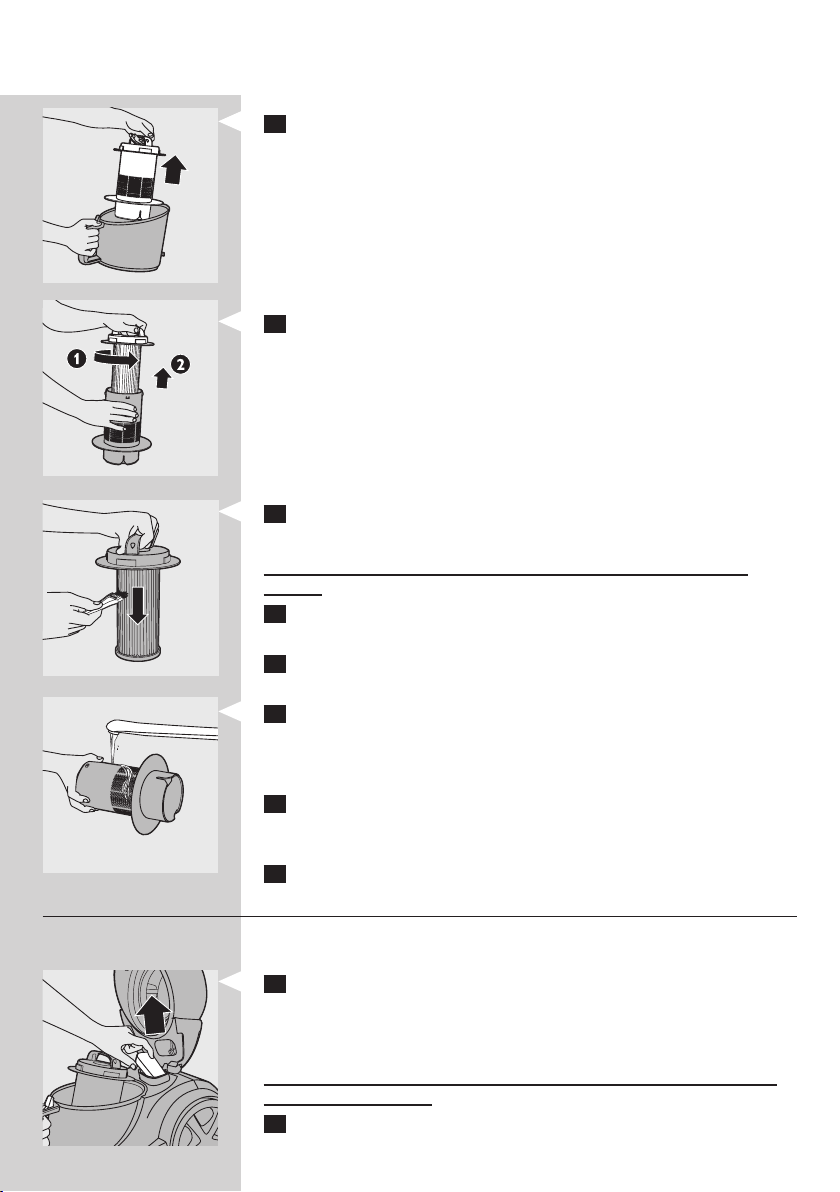
1 To connect the hose, push it firmly into the appliance (‘click’).
2 To disconnect the hose, press the release button and pull the hose
out of the appliance.
Telescopic tube
1 To connect the tube to the handgrip of the hose, press the spring-
loaded lock button on the handgrip and insert the handgrip into the
tube. Fit the spring-loaded lock button into the opening in the tube
(‘click’).
2 To disconnect the tube from the handgrip, press the spring-loaded
lock button and pull the handgrip out of the tube.
Use the same method to connect and disconnect the nozzles.
3 Adjust the tube to the length you find most comfortable during
vacuum cleaning.
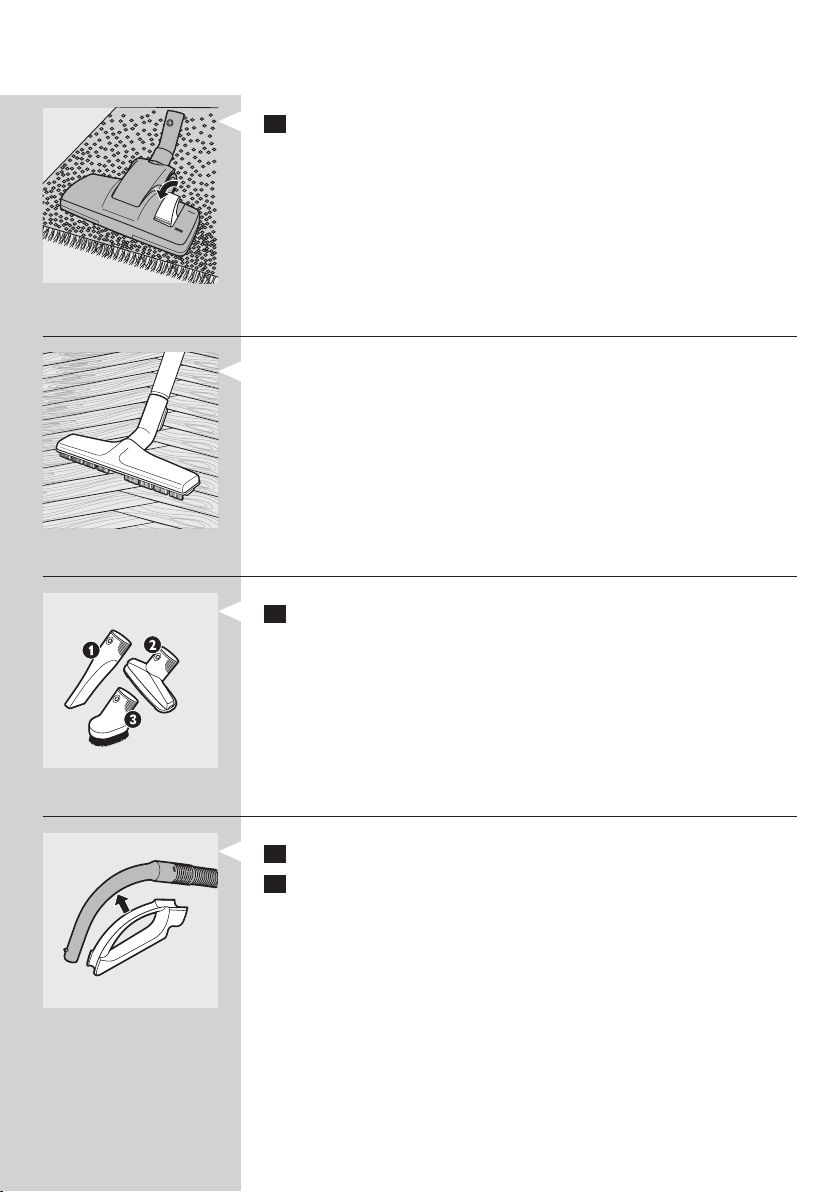
Tri-Active nozzle (specific types only)
The Tri-Active nozzle is a multi-purpose nozzle for carpets and hard floors.
Page 9

ENGLISH 9
- The side brushes catch more dust and dirt at the sides of the nozzle
and allow you to clean better along furniture and other obstacles.
- The opening at the front of the nozzle allows you to suck up larger
particles.
1 To clean hard floors, push the rocker switch on top of the nozzle
with your foot.
, The brush strip for cleaning hard floors comes out of the housing.
At the same time, the wheel is lifted to prevent scratching and to
increase manoeuvrability.
2 To clean carpets, push the rocker switch again.
, The brush strip disappears into the nozzle housing and the wheel is
lowered automatically.
Combination nozzle (specific types only)
The combination nozzle can be used on either carpets or hard floors.
1 To clean hard floors, push the rocker switch on top of the nozzle
with your foot.
, The brush strip for cleaning hard floors comes out of the nozzle
housing.
Page 10
ENGLISH10
2 To clean carpets, push the rocker switch again.
, The brush strip disappears into the nozzle housing.
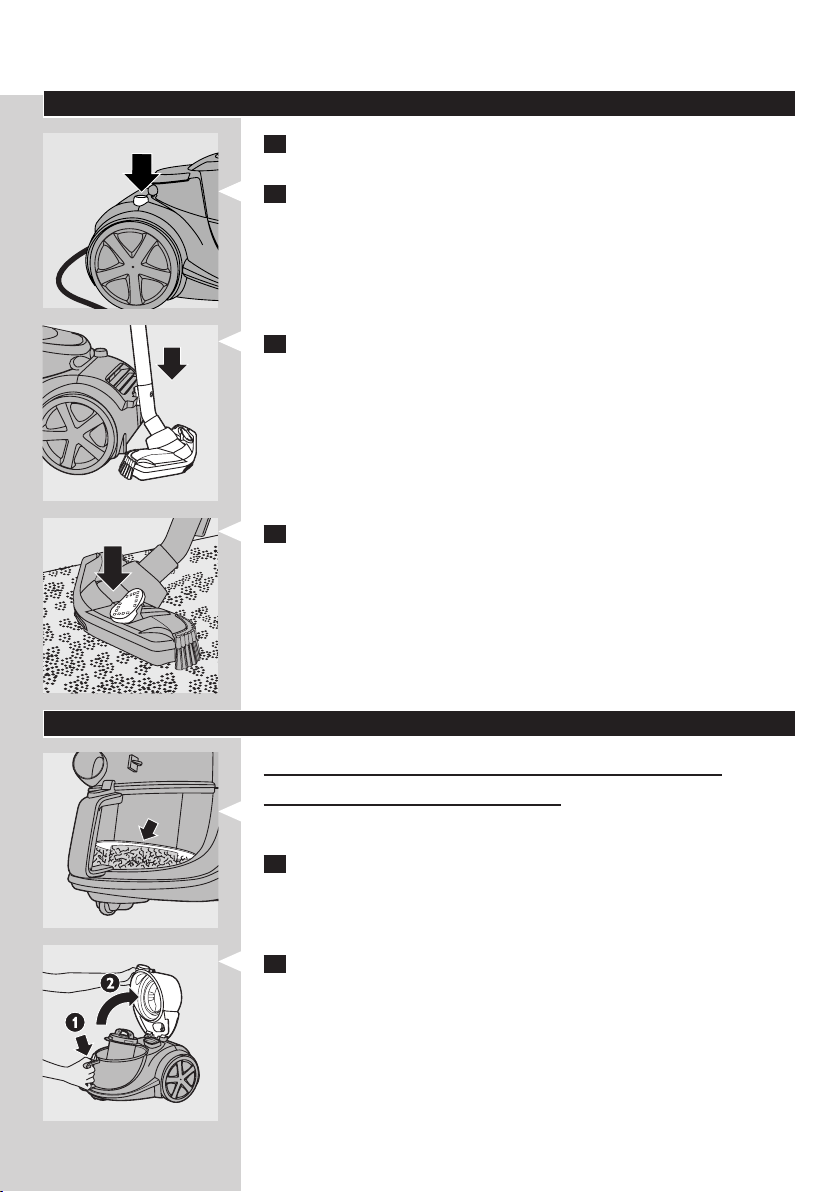
Parquet nozzle (specific types only)
- The parquet nozzle is designed for gentle cleaning of hard floors.
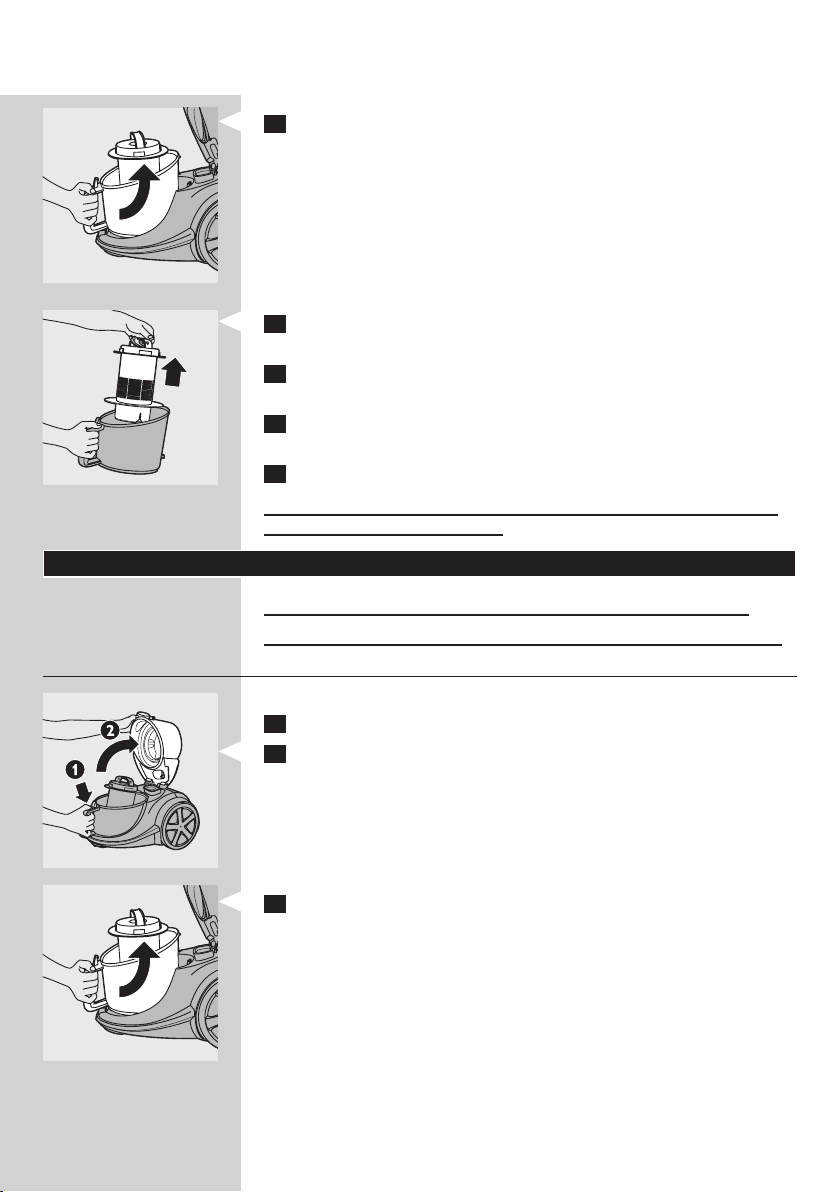
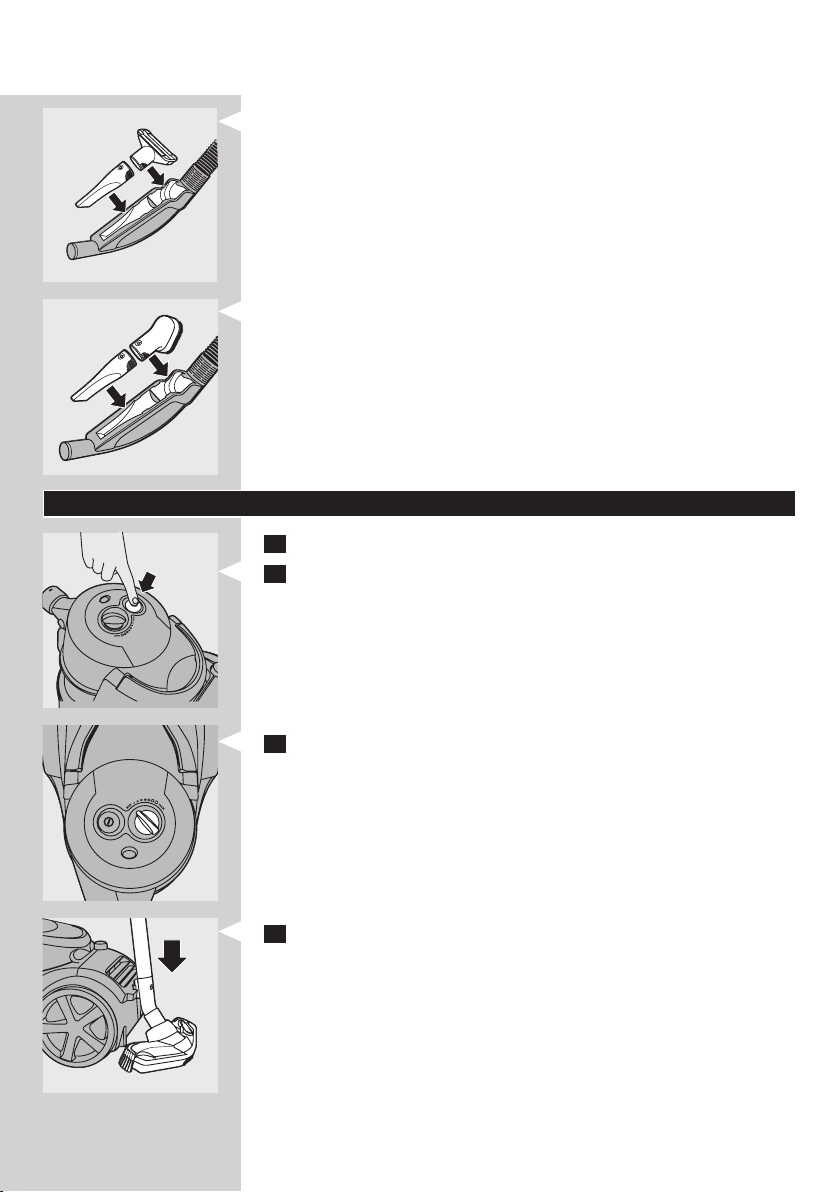
Crevice tool, small nozzle and small brush
1 Connect the crevice tool (1), the small nozzle (2) or the small brush
(specific types only) (3) directly to the handgrip or to the tube.
Accessory holder
1 Snap the accessory holder onto the handgrip.
2 Snap two accessories into the accessory holder:
Page 11

ENGLISH 11
- Crevice tool and small nozzle.
Note: Make sure the suction opening of the small nozzle points away from the
holder.
- Crevice tool and small brush.
Note: Make sure the suction opening of the small brush points towards the
holder.
Using the appliance
1 Pull the cord out of the appliance and put the mains plug in the wall
socket.
2 Press the on/off button on top of the appliance to switch on the
appliance.
3 During vacuum cleaning, you can adjust the suction power with the
knob on top of the appliance.
- Use maximum suction power to vacuum very dirty carpets and hard
floors.
- Use minimum suction power to vacuum curtains, table carpets, etc.
4 If you want to pause for a moment, insert the ridge on the nozzle
into the parking slot to park the tube in a convenient position.
Page 12
ENGLISH12
Storage
1 Switch off the appliance and remove the mains plug from the wall
socket.
2 Press the cord rewind button to rewind the mains cord.
3 Insert the ridge on the nozzle into the parking slot to attach the
nozzle to the appliance. Store the appliance in horizontal position,
with all wheels touching the floor.
4 Always put the Tri-Active nozzle in the carpet setting when you store
it. Also prevent the side brushes from becoming bent.
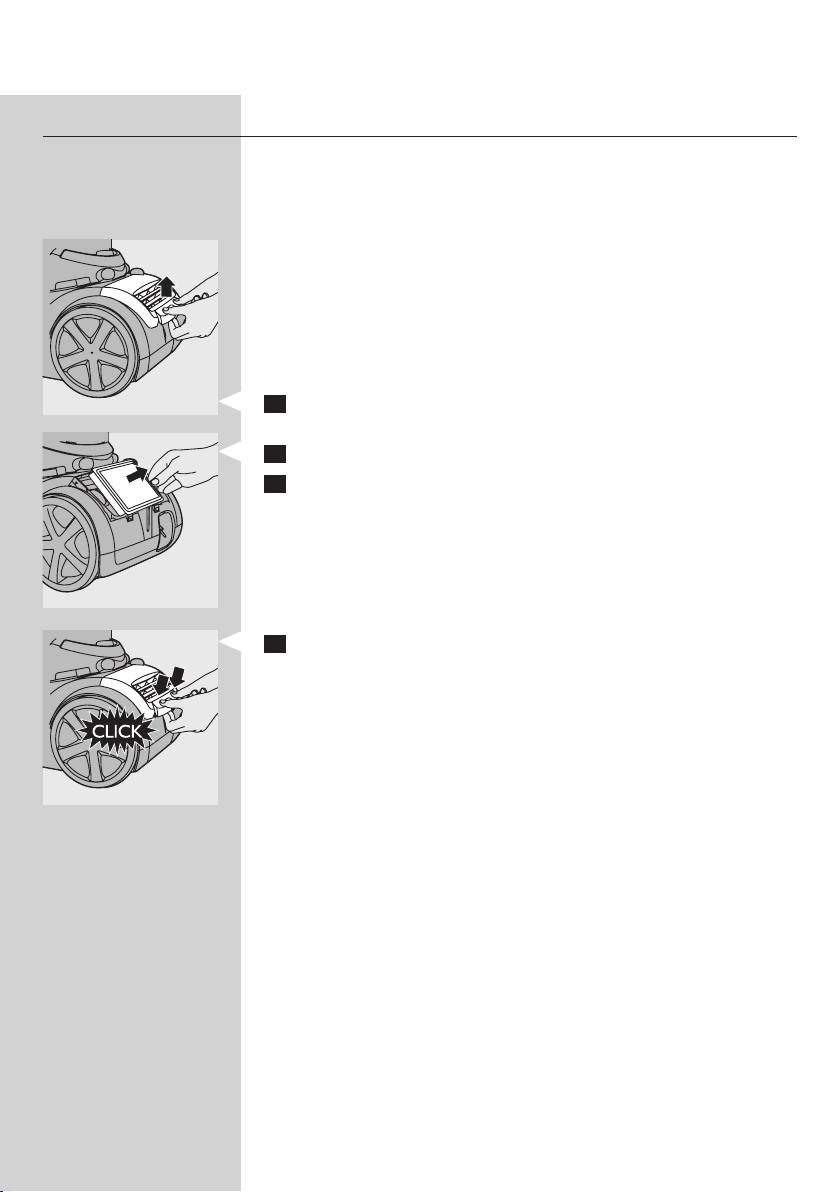
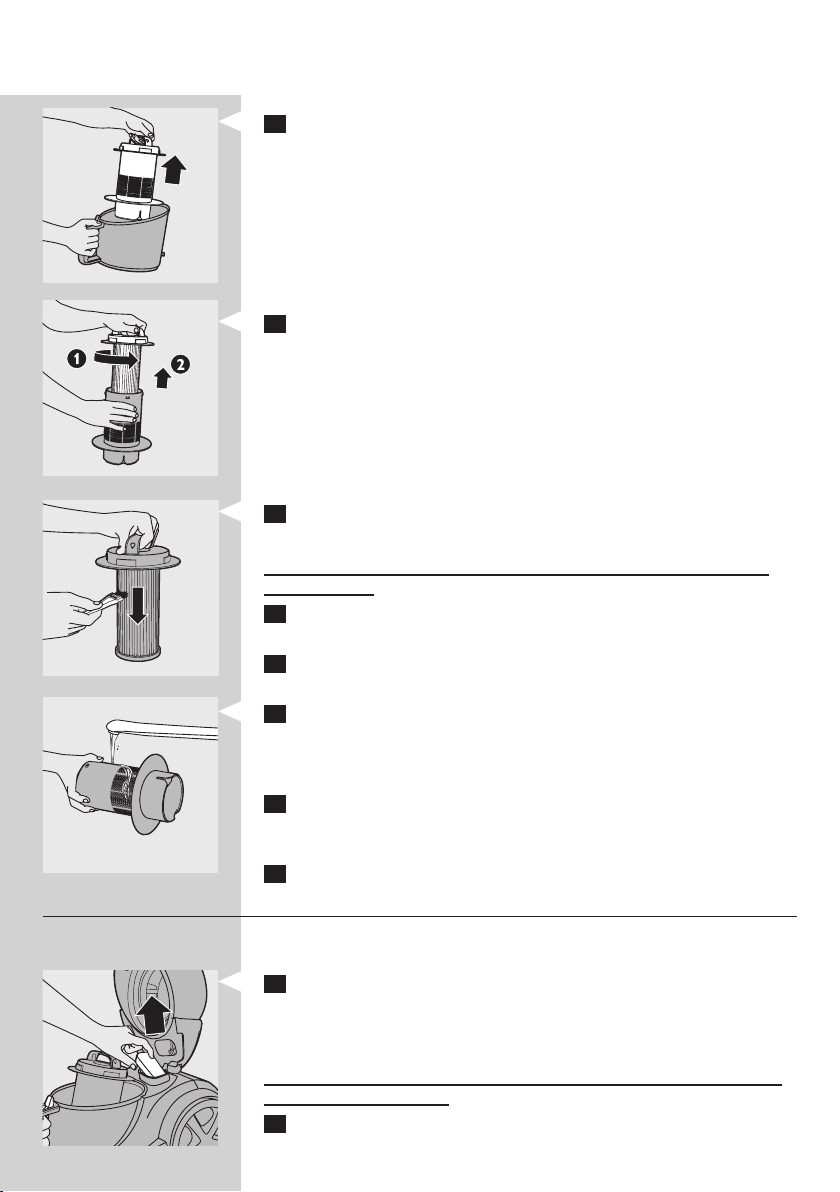
Emptying the dust bucket
Always unplug the appliance before you empty the dust bucket.
The dust bucket is not dishwasher-proof.
- Empty the dust bucket as soon as the dust level has reached the round
disc of the filter cylinder case.
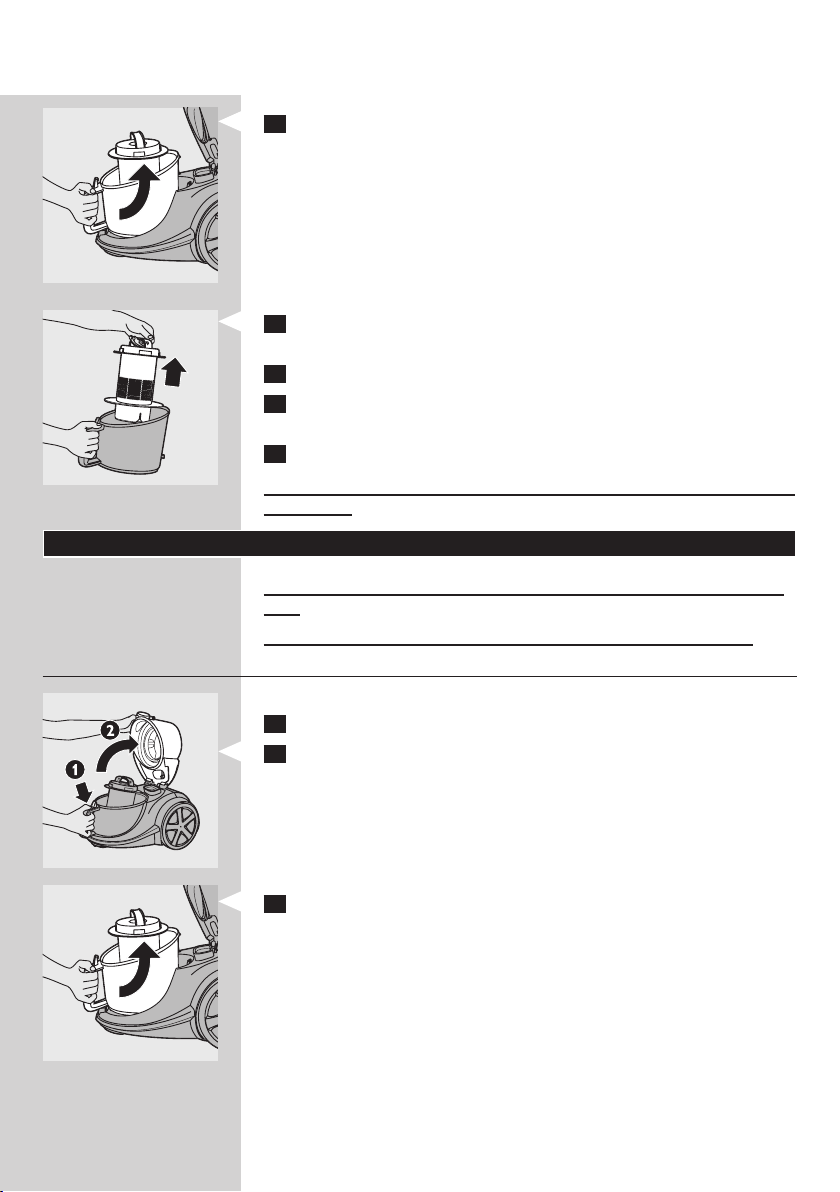
1 Switch off the appliance and remove the hose.
2 Press the release button on top of the dust bucket handle to unlock
the cover (1). Swing open the cover (2).
Page 13
ENGLISH 13
3 Lift the dust bucket out of the appliance.
4 Hold the dust bucket over a dustbin and lift the filter cylinder case
out of the bucket. Empty the bucket.
5 If you wish, you can clean the dust bucket with cold tap water and
some washing-up liquid.
6 Put the filter cylinder case back into the dust bucket and put the
bucket back into the appliance.
7 Close the cover firmly (‘click’).
Always put the filter cylinder case back into the bucket, otherwise the
appliance cannot be switched on.
Cleaning and maintenance of filters
Always unplug the appliance before you clean or replace the filters.
The filter cylinder and the filter cylinder case are not dishwasher-proof.
Filter cylinder
Clean the filter cylinder every 2 months.
1 Switch off the appliance and remove the hose.
2 Press the release button on top of the dust bucket handle to unlock
the cover (1). Swing open the cover (2).
3 Lift the dust bucket out of the appliance.
Page 14
ENGLISH14
4 Lift the filter cylinder case out of the bucket.
5 Turn the handle on top of the filter cylinder case anticlockwise (1)
and lift the filter cylinder out of the case (2).
6 Clean the filter cylinder and the case with the brush supplied. Brush
from the top of the filter downwards along the ribs of the filter.
Only use the brush supplied. Other brushes may damage the filter
cylinder.
7 If there is dirt on the inside of the case, empty the case over a
dustbin.
8 If you wish, you can clean the filter cylinder case with cold tap water
and some washing-up liquid.
9 If you want to wash the filter cylinder, wash it thoroughly with only
water. Do not use any soap, washing-up liquid or other detergent
to clean the filter. Let the filter cylinder dry completely before you
reinsert it into the case.
10 Put the filter cylinder back into the case and turn the handle
clockwise until the filter cylinder locks into position.
Make sure the filter cylinder is securely fixed in the case.
11 Put the case with the filter cylinder back into the dust bucket.
Motor protection filter
Clean the permanent motor protection filter every time you clean the filter
cylinder case.
1 Take the motor protection filter out of the appliance. Clean the filter
by tapping the dust out of it over a dustbin.
If the motor protection filter is very dirty, you can also rinse it with cold tap
water.
Do not use washing-up liquid or any other cleaning agent to clean the
motor protection filter.
2 Press the clean filter firmly back into the filter compartment to
ensure that it is properly placed.
Page 15
ENGLISH 15
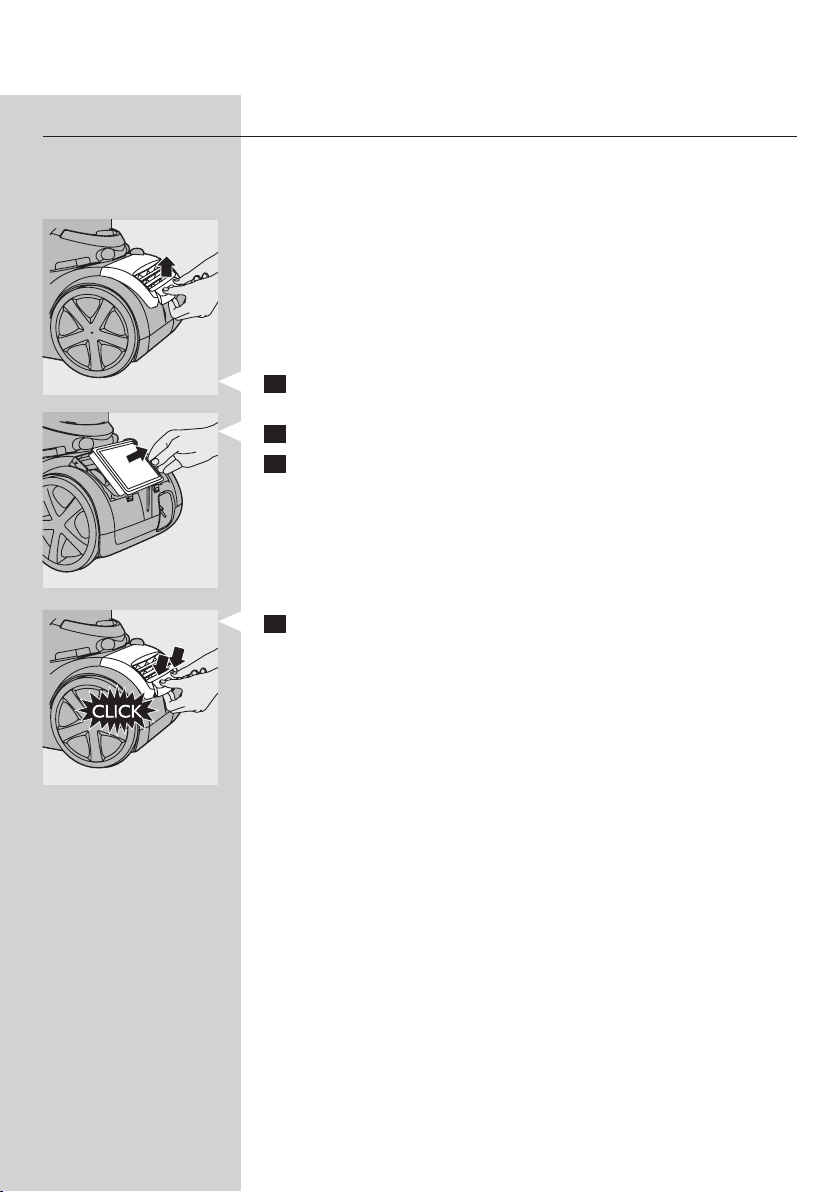
Super Clean Air filter, Super Clean Air HEPA 12 filter or Ultra
Clean Air HEPA 13 filter
This appliance is equipped with either the Super Clean Air filter, the Super
Clean Air HEPA 12 filter or the Ultra Clean Air HEPA 13 filter. These filters
are located in the back of the appliance.
Note: To guarantee optimal dust retention and performance of the vacuum
cleaner, always replace the filter with an original Philips filter of the correct
type (see chapter ‘Ordering accessories’).
Super Clean Air filter
The Super Clean Air filter filters a large par t of the smaller par ticles from
the exhaust air with its electrostatically charged fibres.
Replace the Super Clean Air filter every six months. This filter is not
washable.
1 Remove the filter grille.
2 Remove the old filter.
3 Insert the new filter into the appliance.
4 Reattach the top of the filter grille and push the bottom corners
until they snap home (‘click’).
Super Clean Air HEPA 12 filter
The Super Clean Air HEPA 12 filter is able to remove 99.5% of all particles
down to 0.0003mm in size from the outlet air. This not only includes
normal house dust, but also harmful microscopic vermin such as dust mites
and their excrements, which are well-known causes of respiratory allergies.
Replace the Super Clean Air HEPA 12 filter every six months. This filter is
not washable.
To replace the Super Clean Air HEPA 12 filter, follow steps 1-4 of section
‘Super Clean Air filter’ above.
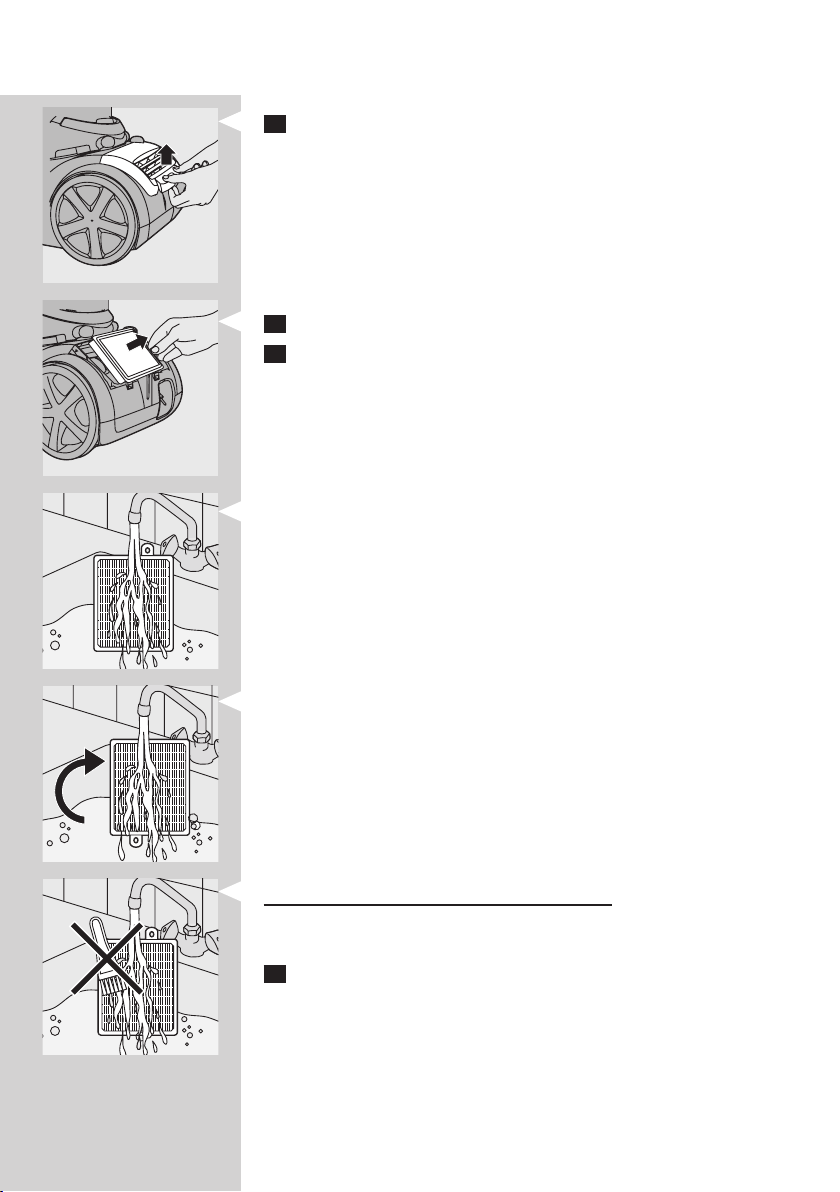
Washable Ultra Clean Air HEPA 13 filter
The Ultra Clean Air HEPA 13 filter is able to remove 99.95% of all particles
down to 0.0003mm in size from the outlet air. This not only includes
normal house dust, but also harmful microscopic vermin such as dust mites
and their excrements, which are well-known causes of respiratory allergies.
Clean the washable Ultra Clean Air HEPA 13 filter every 6 months. You can
clean the washable Ultra Clean Air HEPA 13 filter max. 4 times. Replace
the filter after it has been cleaned 4 times.
Page 16

ENGLISH16
1 Remove the filter grille.
2 Take out the washable HEPA 13 filter.
3 Rinse the pleated side of the HEPA 13 filter under a hot slow-
running tap.
- Hold the filter in such a way that the pleated side points upwards and
the water flows parallel to the pleats. Hold the filter at an angle so that
the water washes away the dirt inside the pleats.
- Turn the filter 180° and let the water flow along the pleats in opposite
direction.
- Continue this process until the filter is clean.
Never clean the washable filter with a brush.
Note: Cleaning does not restore the original colour of the filter, but does restore
its filtration power.
4 Carefully shake the water from the surface of the filter. Let the filter
dry at least 2 hours before you put it back into the vacuum cleaner.
Page 17

ENGLISH 17
5 Put the filter back into the appliance. Reattach the top of the filter
grille and push the bottom corners until they snap home (‘click’).
Ordering accessories
If you have any difficulties obtaining filters or other accessories for this
appliance, please contact the Philips Customer Care Centre in your
country or consult the worldwide guarantee leaflet.
- Philips filter cylinders are available under service number 4322 005
17520.
- Super Clean Air filters are available under type number FC8030.
- Non-washable Super Clean Air HEPA 12 filters are available under type
number FC8031.
- Washable Ultra Clean Air HEPA 13 filters are available under type
number FC8038.
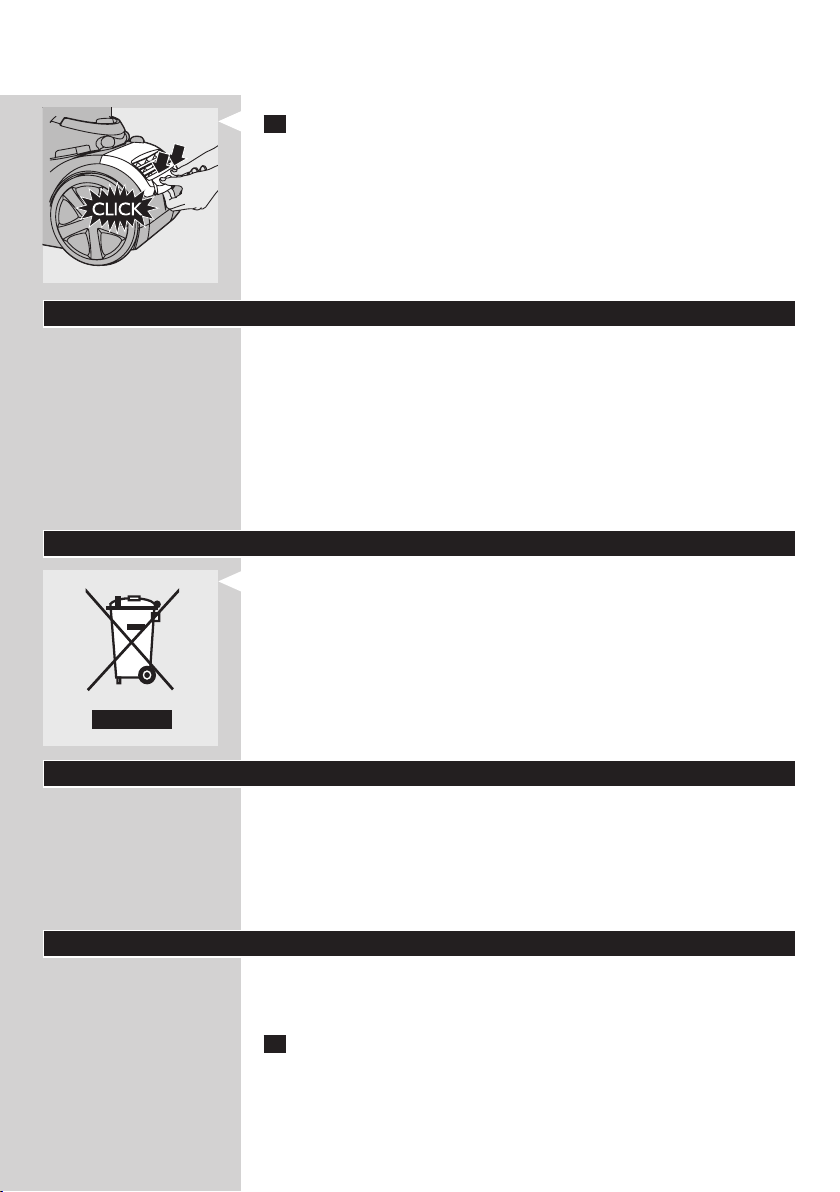
Environment
- Do not throw the appliance away with the normal household waste
at the end of its life, but hand it in at an official collection point for
recycling. By doing this, you help to preserve the environment.
Guarantee & service
If you need information or if you have a problem, please visit the Philips
website at www.philips.com or contact the Philips Customer Care Centre
in your country. You find its phone number in the worldwide guarantee
leaflet. If there is no Customer Care Centre in your country, go to your
local Philips dealer or contact the Service Depar tment of Philips Domestic
Appliances and Personal Care BV.
Troubleshooting
This chapter summarises the most common problems you could
encounter with the appliance. If you are unable to solve the problem with
the information below, contact the Customer Care Centre in your country.
1 The suction power is insufficient.
- Check if the suction power knob is in maximum position.
- Check if the filter cylinder is filled with dirt.
If necessary, clean the filter cylinder.
- Check if the other filters need to be cleaned or replaced.
Page 18

ENGLISH18
- Check if the blockage indicator has changed colour. If it has changed
colour, the nozzle, tube or hose may be blocked up.
To remove the obstruction, disconnect the blocked-up item and connect it
(as far as possible) the other way around. Switch on the vacuum cleaner to
force the air through the blocked-up item in opposite direction.
2 The appliance cannot be switched on.
- Check if the filter cylinder case with the filter cylinder in it has been
inserted into the dust bucket.
Page 19

DANSK
Introduktion
Tillykke med dit køb og velkommen til Philips! For at få fuldt udbytte af den
support, Philips tilbyder, skal du registrere dit produkt på
www.philips.com/welcome.
Generel beskrivelse (fig. 1)
1 Filtercylinder
2 Kabinet til filtercylinder
3 Udløserknap til støvkammeret
4 Støvbeholder
5 Motorbeskyttelsesfilter
6 Rensebørste
7 Dæksel
8 On/off-knap
9 Knap til regulering af sugestyrke
10 Slangetilslutning
11 Håndgreb
12 Tilbehørsholder
13 Teleskoprør
14 Sprækkemundstykke
15 Lille mundstykke
16 Lille børste (kun bestemte typer)
17 Parketmundstykke (kun nogle modeller)
18 Kombimundstykke (kun nogle modeller)
19 Vippeknap til indstilling til tæpper/hårde gulve
20 Tri-Active mundstykke (kun nogle modeller)
21 Knap til ledningsoprul
22 Super Clean Air-filter, Super Clean Air HEPA 12-filter eller Ultra Clean
Air HEPA 13-filter
23 Filtergitter
24 Parkeringsbeslag
19
Vigtigt
Læs denne brugsvejledning omhyggeligt igennem, inden apparatet tages i
brug, og gem den til eventuelt senere brug.
Fare
- Opsug aldrig vand eller andre former for væske. Opsug aldrig
brandbare substanser eller aske, før denne er blevet helt kold.
Advarsel
- Kontrollér, om den angivne netspænding på apparatet svarer til den
lokale netspænding, før du slutter strøm til apparatet.
- Brug aldrig apparatet, hvis netstik, netledning eller selve apparatet er
beskadiget.
- Hvis netledningen beskadiges, må den kun udskiftes af Philips, et
autoriseret Philips-serviceværksted eller en tilsvarende kvalificeret
fagmand for at undgå enhver risiko.
- Dette apparat er ikke beregnet til at blive brugt af personer (herunder
børn) med nedsatte fysiske og mentale evner, nedsat følesans eller
manglende erfaring og viden, medmindre de er blevet vejledt eller
Page 20
DANSK20
instrueret i apparatets anvendelse af en person, der er ansvarlig for
deres sikkerhed.
- Apparatet bør holdes uden for børns rækkevidde for at sikre, at de ikke
kan komme til at lege med det.
- Slange, rør eller andet tilbehør må aldrig rettes mod øjne eller ører
eller kommes i munden, mens de er tilsluttet den tændte støvsuger.
Forsigtig
- Undgå at opsuge store objekter, da dette kan medføre, at luftstrømmen
i rør eller slange bliver tilstoppet.
- Når du bruger støvsugeren til at støvsuge aske, fint sand, kalk,
cementstøv og lignende substanser, tilstoppes porerne i filtercylinderen.
Hvis du oplever en stærkt nedsat sugestyrke, skal filtercylinderen
rengøres.
- Luftstrømmen i rør eller slange kan blive stoppet af store objekter. Hvis
det sker, bliver blokeringsindikatoren rød for at angive, at et objekt skal
fjernes.
- Anvend aldrig apparatet uden motorbeskyttelsesfilter, da det vil
beskadige motoren og forkorte apparatets levetid.
- Brug kun Philips’ filtercylinder, der følger med apparatet.
- Når du støvsuger, især i rum med lav luftfugtighed, genererer din
støvsuger statisk elektricitet. Derfor kan du opleve elektriske stød, når
du rører ved støvsugerrøret eller andre ståldele på støvsugeren. Disse
stød er ikke farlige for dig og skader ikke apparatet. Hvis du vil undgå
dette fremover, anbefaler vi, at du:
1 jævnligt aflader apparatet ved at holde røret mod andre metalobjekter i
rummet (f.eks. bord- og stoleben, radiatorer osv.);
2 øger luftfugtigheden ved at placere vand i rummet. Du kan f.eks. hænge
beholdere med vand på dine radiatorer eller placere skåle med vand
på eller i nærheden af dine radiatorer.
Elektromagnetiske felter (EMF)
Dette Philips-apparat overholder alle standarder for elektromagnetiske
felter (EMF). Ved korrekt anvendelse i overensstemmelse med
instruktionerne i denne brugervejledning er apparatet sikkert at anvende
ifølge den videnskabelige viden, der er tilgængelig i dag.
Page 21

DANSK 21
Klargøring
Slange
1 Slangen tilsluttes ved at skubbe den fast på apparatet (“klik”).
2 Den tages af igen ved at trykke på udløserknappen og trække slangen
ud af apparatet.
Teleskoprør
1 Teleskoprøret sluttes til slangens håndgreb ved at trykke på den
fjederbelastede låsetap på håndgrebet og stikke håndgrebet ind i
røret, indtil den fjederbelastede låsetap klikker på plads i det lille hul i
røret (“klik”).
2 Rør og håndgreb adskilles ved at trykke på den fjederbetjente
låseknap og trække håndgrebet ud af røret.
Mundstykkerne sættes på og tages af på samme måde.
3 Justér røret til den længde, der er mest behagelig, når du støvsuger.
Tri-Active mundstykke (kun nogle modeller)
Tri-Active-mundstykket er multifunktionelt og til både tæpper og hårde
gulve.
Page 22

DANSK22
- Sidebørsterne fanger mere støv og skidt ved mundstykkets sider, så du
bedre kan rengøre langs møbler og andre forhindringer.
- Åbningen på mundstykkets forside giver mulighed for opsugning af
større emner.
1 Ved støvsugning af hårde gulve trykkes på vippekontakten oven på
kombimundstykket med foden.
, Børsterne til rengøring af hårde gulve skydes ud af mundstykket.
Hjulet bliver samtidig løftet op for at undgå at ridse gulvet og for at
gøre mundstykket lettere at manøvrere.
2 Ved støvsugning af tæpper, trykkes på vippekontakten igen.
, Børsterne trækkes tilbage i mundstykket og hjulet sænkes
automatisk.
Kombimundstykke (kun nogle modeller)
Kombimundstykket kan både bruges til støvsugning af tæpper og hårde
gulve.
1 Ved støvsugning af hårde gulve trykkes på vippekontakten oven
på kombimundstykket med foden.
, Børsten til støvsugning af hårde gulve skydes ud.
Page 23

DANSK 23
2 Ved støvsugning af tæpper, trykkes på vippekontakten igen.
, Børsterne trækkes tilbage i mundstykket.
Parketmundstykke (kun nogle modeller)
- Parketmundstykket er designet til blid rengøring af hårde gulve.
Sprækkemundstykke, lille mundstykke og lille børste
1 Sæt sprækkemundstykket (1), det lille mundstykke (2) eller det lille
børstemundstykke (3) (kun nogle modeller) direkte på håndgrebet
eller røret.
Tilbehørsholder
1 Sæt tilbehørsholderen fast på håndgrebet.
2 Sæt to stykker tilbehør fast på tilbehørsholderen:
Page 24
DANSK24
- Sprækkemundstykke og lille mundstykke.
Bemærk: Sørg for, at sugeåbningen på det lille mundstykke peger væk fra
holderen.
- Sprækkemundstykke og lille børstestykke.
Bemærk: Sørg for, at sugeåbningen på det lille børstemundstykke peger væk fra
holderen.
Sådan bruges apparatet
1 Træk ledningen ud af apparatet, og sæt stikket i stikkontakten.
2 Tryk på on/off-knappen oven på apparatet for at tænde for det.
3 Under støvsugningen kan sugestyrken reguleres ved hjælp af knappen
oven på støvsugeren.
- Brug maksimal sugestyrke til støvsugning af meget snavsede tæpper og
hårde gulve.
- Brug minimal sugestyrke til gardiner, duge osv.
4 Ønsker du at holde pause et øjeblik, kan røret parkeres i en praktisk
stilling ved at sætte rillen på mundstykket i parkeringsbeslaget.
Page 25

DANSK 25
Opbevaring
1 Sluk for apparatet, og tag stikket ud af stikkontakten.
2 Tryk på knappen til indspoling af ledningen, så den ruller ind.
3 Sæt rillen på mundstykket ned i parkeringsbeslaget for at fastgøre
mundstykket til apparatet. Opbevar apparatet i vandret position med
alle hjul på gulvet.
4 Sæt altid Tri-Active-mundstykket på gulvtæppeindstilling under
opbevaring. Sørg for, at sidebørsterne ikke bøjes.
Tømning af støvbeholderen
Tag altid stikket ud af kontakten, før du tømmer støvkammeret.
Støvbeholderen kan ikke vaskes i opvaskemaskinen.
- Tøm støvbeholderen så snart støvniveauet er nået op til den runde
disk i filtercylinder-kabinettet.
1 Sluk for apparatet, og fjern slangen.
2 Tryk på udløserknappen oven på støvkammerets håndtag for at låse
dækslet af (1). Drej dækslet op (2).
Page 26
DANSK26
3 Løft støvkammeret ud af apparatet.
4 Hold støvkammeret over en skraldespand og løft filtercylinder og
kabinet ud af støvkammeret. Tøm kammeret.
5 Støvkammeret kan rengøres med koldt vand og lidt opvaskemiddel.
6 Sæt filtercylinder-kabinettet tilbage i støvbeholderen, og sæt
støvbeholderen tilbage i apparatet.
7 Luk dækslet ordentligt (der lyder et “klik”).
Sæt altid filtercylinder-kabinettet tilbage i kammeret. Ellers kan apparatet
ikke tændes.
Rengøring og vedligeholdelse af filtre
Tag altid stikket ud af stikkontakten, inden rengøring eller udskiftning af
filtre.
Filtercylinderen og filtercylinder-kabinettet tåler ikke maskinopvask.
Filtercylinder
Rengør filtercylinderen hver anden måned.
1 Sluk for apparatet, og fjern slangen.
2 Tryk på udløserknappen oven på støvkammerets håndtag for at låse
dækslet af (1). Drej dækslet op (2).
3 Løft støvkammeret ud af apparatet.
Page 27
DANSK 27
4 Løft filtercylinder-kabinettet ud af støvkammeret.
5 Drej håndtaget øverst på filtercylinder-kabinettet mod uret (1), og
løft filtercylinderen ud af kabinettet (2).
6 Rengør filtercylinderen og kabinettet med den medfølgende børste.
Børst forsigtigt oppe fra og ned langs filterets ribber.
Brug kun den medfølgende børste, da du ellers risikerer at beskadige
filtercylinderen.
7 Hvis der er snavs på indersiden af kabinettet, tømmes kammeret
over en skraldespand.
8 Filtercylinder-kabinettet kan rengøres med koldt vand og lidt
opvaskemiddel.
9 Hvis du vil vaske filtercylinderen, kan den rengøres udelukkende
ved brug af vand. Undgå brug af sæbe, opvaskemiddel eller andre
rengøringsmidler ved rengøring af filteret. Lad filtercylinderen tørre
fuldstændigt, før den sættes tilbage i filtercylinder-kabinettet.
10 Sæt filtercylinderen tilbage i kabinettet og drej håndtaget med uret,
indtil filtercylinderen låser på plads.
Sørg for, at filtercylinderen sidder sikkert fast i kabinettet.
11 Sæt kabinettet med filtercylinderen tilbage i støvkammeret.
Motorbeskyttelsesfilter
Rengør det permanente motorbeskyttelsesfilter, hver gang du rengør
filtercylinder-kabinettet
1 Tag motorbeskyttelsesfilteret ud af apparatet, og rengør det ved at
ryste støvet ud af det over en skraldespand.
Hvis motorbeskyttelsesfilteret er meget snavset, kan det også skylles under
den kolde hane.
Brug aldrig opvaskemiddel eller andre rengøringsmidler til rengøring af
motorbeskyttelsesfilteret.
2 Tryk det rengjorte filter fast tilbage i filterrummet, for at sikre at det
sidder ordentligt i.
Page 28
DANSK28
Super Clean Air-filter, Super Clean Air HEPA 12-filter eller
Ultra Clean Air HEPA 13-filter
Dette apparat er udstyret med enten Super Clean Air-filteret, Super Clean
Air HEPA 12-filteret eller Ultra Clean Air HEPA 13-filteret. Disse filtre
sidder bagerst i apparatet.
Bemærk: Udskift altid filteret med et originalt Philips-filter af den rigtige
type (se kapitlet “Bestilling af tilbehør”) for at garantere, at støvsugeren
fungerer og tilbageholder støvpartikler optimalt.
Super Clean Air-filter
Super Clean Air-filteret filtrerer en stor del af de mindre partikler fra
udblæsningsluften ved hjælp af elektrostatisk ladede fibre.
Udskift Super Clean Air-filteret hver 6. måned. Filteret er ikke vaskbart.
1 Tag filtergitteret ud.
2 Fjern det gamle filter.
3 Sæt det nye filter i apparatet.
4 Sæt toppen af gitteret på igen, og skub de nederste hjørner ind igen,
indtil de klikker på plads.
Super Clean Air HEPA 12-filter
Super Clean Air HEPA 12-filteret fjerner 99,5 % af alle partikler ned til
en størrelse på 0,0003 mm fra udblæsningsluften. Dette omfatter ikke
blot almindeligt husstøv, men også skadelige mikroorganismer som f.eks.
støvmider og deres ekskrementer, der er en kendt årsag til luftvejsallergi.
Udskift Super Clean Air HEPA 12-filteret hver 6. måned. Filteret er ikke
vaskbart.
Udskift Super Clean Air HEPA 12-filteret ved at følge trin 1-4 i afsnittet
“Super Clean Air-filter” ovenfor.
Vaskbart Ultra Clean Air HEPA 13-filter
Ultra Clean Air HEPA 13-filteret fjerner 99,95 % af alle par tikler ned til
en størrelse på 0,0003 mm fra udblæsningsluften. Dette omfatter ikke
blot almindeligt husstøv, men også skadelige mikroorganismer som f.eks.
støvmider og deres ekskrementer, der er en kendt årsag til luftvejsallergi.
Rengør det vaskbare Ultra Clean Air HEPA 13-filter hver 6. måned. Det
vaskbare Ultra Clean Air HEPA 13-filter kan maks. vaskes 4 gange. Derefter
skal det udskiftes.
Page 29
DANSK 29
1 Tag filtergitteret ud.
2 Tag det vaskbare HEPA 13-filter ud.
3 Skyl den plisserede side af HEPA 13-filteret under en varm, tynd
stråle vand fra hanen.
- Hold filteret sådan, at den plisserede side peger opad, og vandet flyder
parallelt med plisseringen. Hold filteret med en vinkel, så vandet skyller
snavset i plisseringen væk.
- Drej filteret 180°, og lad vandet flyde langs med plisseringerne i
den modsatte retning.
- Fortsæt denne proces, indtil filteret er rent.
Rengør aldrig det vaskbare filter med en børste.
Bemærk: Rengøring giver ikke filteret dets originale farve tilbage, men
genopretter filterkraften.
4 Ryst forsigtigt vandet af filterets overflade. Lad filteret tørre i mindst
2 timer, før du sætter det tilbage i støvsugeren.
Page 30
DANSK30
5 Sæt filteret på plads i apparatet. Sæt toppen af filtergitteret på igen,
og skub de nederste hjørner ind igen, indtil de klikker på plads.
Bestilling af tilbehør
Hvis du har problemer med at skaffe filtre eller andet tilbehør til dette
apparat, bedes du kontakte dit lokale Philips Kundecenter eller se i folderen
“World-Wide Guarantee”.
- Philips filtercylindre fås under servicenr. 4322 005 17520.
- Super Clean Air-filtre fås under typenummer FC8030.
- Ikke-vaskbare Super Clean Air HEPA 12-filtre fås under typenummer
FC8031.
- Vaskbare Super Clean Air HEPA 13-filtre fås under typenummer
FC8038.
Miljøhensyn
- Apparatet må ikke smides ud sammen med det almindelige
husholdningsaffald, når det på et tidspunkt kasseres. Aflevér det i
stedet på en kommunal genbrugsstation. På den måde er du med til at
beskytte miljøet.
Reklamationsret og service
For alle yderligere oplysninger eller ved eventuelle problemer med
apparatet henvises til Philips’ hjemmeside på adressen www.philips.com
eller det nærmeste Philips Kundecenter. Telefonnumre findes i vedlagte
“World-Wide Guarantee”-folder. Hvis der ikke findes et kundecenter
i dit land, bedes du venligst kontakte din lokale Philips-forhandler eller
Serviceafdelingen i Philips Domestic Appliances and Personal Care BV.
Fejlfinding
Dette kapitel opsummerer de mest almindelige problemer, du kan støde
på ved brug af apparatet. Hvis du ikke kan løse problemet ved hjælp af
nedenstående oplysninger, bedes du kontakte dit lokale Philips Kundecenter.
1 Sugestyrken er utilstrækkelig.
- Kontrollér, om knappen til regulering af sugestyrken står på maksimum.
- Kontroller, om filtercylinderen er fyldt med støv.
Hvis det er nødvendigt, skal filtercylinderen rengøres.
- Kontroller, om andre filtre skal rengøres eller udskiftes.
Page 31

DANSK 31
- Kontroller, om blokeringsindikatoren har skiftet farve. Hvis det er
tilfældet, er mundstykket, røret eller slangen muligvis tilstoppet.
En eventuel tilstoppelse fjernes ved at tage det tilstoppede tilbehør af og
(så vidt det er muligt) sætte det omvendt på. Tænd så igen for støvsugeren,
så der blæses luft den modsatte vej gennem slange og/eller rør.
2 Apparatet tænder ikke.
- Kontroller, om filtercylinder-kabinettet med filtercylinderen i er sat i
støvkammeret.
Page 32

32
DEUTSCH
Einführung
Herzlichen Glückwunsch zu Ihrem Kauf und willkommen bei Philips! Um
die Unterstützung von Philips optimal nutzen zu können, registrieren Sie Ihr
Produkt bitte unter www.philips.com/welcome.
Allgemeine Beschreibung (Abb. 1)
1 Filter
2 Filtergehäuse
3 Entriegelungstaste für Staubbehälter
4 Staubbehälter
5 Motorschutzfilter
6 Reinigungsbürste
7 Gehäusedeckel
8 Ein-/Ausschalter
9 Saugleistungsregler
10 Schlauchanschluss
11 Handgriff
12 Zubehörhalterung
13 Teleskoprohr
14 Fugendüse
15 Kleine Saugdüse
16 Kleine Bürstendüse (nur bestimmte Gerätetypen)
17 Parkettdüse (nur bestimmte Gerätetypen)
18 Kombi-Düse (nur bestimmte Gerätetypen)
19 Kippschalter für Teppiche/Har tböden
20 Tri-Active-Düse (nur bestimmte Gerätetypen)
21 Kabelaufwicklungstaste
22 Super-Clean-Air-Filter, Super-Clean-Air-HEPA-12-Filter oder Ultra-
Clean-Air-HEPA-13-Filter
23 Filtergitter
24 Parkschlitz
Wichtig
Lesen Sie diese Bedienungsanleitung vor dem Gebrauch des Geräts
aufmerksam durch, und bewahren Sie sie für eine spätere Verwendung auf.
Gefahr
- Saugen Sie mit diesem Gerät niemals Wasser, andere Flüssigkeiten oder
leicht entzündbare Substanzen auf. Saugen Sie Asche erst auf, wenn sie
völlig ausgekühlt ist.
Warnhinweis
- Prüfen Sie, bevor Sie das Gerät in Betrieb nehmen, ob die
Spannungsangabe auf dem Gerät mit der örtlichen Netzspannung
übereinstimmt.
- Verwenden Sie das Gerät nicht, wenn der Netzstecker, das Netzkabel
oder das Gerät selbst defekt oder beschädigt sind.
- Um Gefährdungen zu vermeiden, darf ein defektes Netzkabel nur
von einem Philips Service-Center oder einer von Philips autorisier ten
Werkstatt durch ein Original-Ersatzkabel ausgetauscht werden.
- Dieses Gerät ist für Benutzer (einschl. Kinder) mit eingeschränkten
physischen, sensorischen oder psychischen Fähigkeiten bzw. ohne
Page 33

DEUTSCH 33
jegliche Erfahrung oder Vorwissen nur dann geeignet, wenn eine
angemessene Aufsicht oder ausführliche Anleitung zur Benutzung des
Geräts durch eine verantwortliche Person sichergestellt ist.
- Achten Sie darauf, dass Kinder nicht mit dem Gerät spielen.
- Richten Sie Saugschlauch, Saugrohr oder anderes Zubehör nicht auf
Augen oder Ohren, und stecken Sie keines der Teile in den Mund,
wenn es am Staubsauger angeschlossen oder der Staubsauger
eingeschaltet ist.
Achtung
- Saugen Sie keine größeren Gegenstände auf, da dadurch das Saugroh+r
oder der Saugschlauch verstopfen kann.
- Beim Aufsaugen von Asche, feinem Sand, Kalk, Zementstaub o. Ä.
verstopfen die Poren des Filters. Sollte die Saugleistung stark
nachlassen, reinigen Sie den Filter.
- Größere Gegenstände, die eingesaugt werden, können sich verkanten
und den Luftdurchfluss im Rohr oder Schlauch blockieren. Eine
Warnleuchte weist Sie darauf hin, dass eine Verstopfung vorliegt, die
entfernt werden muss.
- Betreiben Sie das Gerät keinesfalls ohne den Motorschutzfilter, da dies
den Motor beschädigen und die Lebensdauer des Geräts verkürzen
würde.
- Verwenden Sie ausschließlich den im Lieferumfang enthaltenen Philips
Staubfilter.
- Besonders in Räumen mit niedriger Luftfeuchtigkeit kann sich Ihr
Gerät beim Staubsaugen statisch aufladen. Dadurch kann es zu kleinen
elektrischen Schlägen kommen, wenn Sie das Saugrohr oder andere
Metallteile Ihres Staubsaugers berühren. Diese elektrischen Schläge
sind jedoch weder für Sie noch für das Gerät schädlich. Um diese
Unannehmlichkeit zu vermeiden, empfehlen wir Folgendes:
1 Entladen Sie das Gerät regelmäßig, indem Sie mit dem Saugrohr andere
metallene Gegenstände wie Tisch- oder Stuhlbeine oder Heizkörper
berühren;
2 Erhöhen Sie die Luftfeuchtigkeit des Raums, indem Sie Behälter mit
Wasser aufstellen. Sie können diese an Heizkörper hängen oder sie
darauf bzw. in der Nähe abstellen.
Elektromagnetische Felder
Dieses Philips Gerät erfüllt sämtliche Normen bezüglich
elektromagnetischer Felder (EMF). Nach aktuellen wissenschaftlichen
Erkenntnissen ist das Gerät sicher im Gebrauch, sofern es ordnungsgemäß
und entsprechend den Anweisungen in dieser Bedienungsanleitung
gehandhabt wird.
Page 34

DEUTSCH34
Für den Gebrauch vorbereiten
Schlauch
1 Um den Schlauch anzuschließen, schieben Sie ihn fest in das Gerät. Er
rastet hörbar ein.
2 Zum Abnehmen drücken Sie die Entriegelungstaste, und ziehen Sie
den Schlauch aus dem Gerät.
Teleskoprohr
1 Um das Rohr mit dem Handgriff des Schlauchs zu verbinden, drücken
Sie die Federtaste am Handgriff und stecken Sie den Griff in das
Rohr. Lassen Sie die Federtaste in die Öffnung im Rohr einrasten (Sie
hören ein Klicken).
2 Zum Lösen des Saugrohrs vom Handgriff drücken Sie die Federtaste
und ziehen Sie den Griff aus dem Rohr heraus.
Auch die Düsen werden in der gleichen Weise aufgesteckt und
abgenommen.
3 Stellen Sie das Saugrohr auf die Länge ein, bei der Sie am bequemsten
staubsaugen können.
Tri-Active-Düse (nur bestimmte Gerätetypen)
Die Tri-Active-Düse ist eine Mehrzweckdüse für Teppiche und Hartböden.
Page 35

DEUTSCH 35
- Die Seitenbürsten erfassen seitlich mehr Staub und Schmutz, sodass Sie
besser an Möbeln und anderen Gegenständen entlang saugen können.
- Über die vorne befindliche Öffnung der Saugdüse können Sie auch
größere Schmutzpartikel aufsaugen.
1 Drücken Sie zum Saugen von Hartböden den Kippschalter oben auf
der Saugdüse mit dem Fuß nach unten.
, Dadurch tritt der Bürstenstreifen für Hartböden hervor. Gleichzeitig
wird das Laufrad angehoben, wodurch ein Verkratzen des Bodens
verhindert und die Beweglichkeit des Staubsaugers erhöht wird.
2 Drücken Sie den Kippschalter zum Saugen von Textilböden in die
andere Richtung.
, Der Bürstenstreifen wird wieder im Gehäuse der Saugdüse versenkt,
dabei tritt automatisch das Laufrad heraus.
Kombi-Düse (nur bestimmte Gerätetypen)
Mit der Kombi-Düse können Sie harte und weiche Böden saugen.
1 Drücken Sie zum Saugen von Hartböden den Kippschalter oben auf
der Saugdüse mit dem Fuß nach unten.
, Dadurch tritt der Bürstenstreifen aus dem Gehäuse hervor.
Page 36

DEUTSCH36
2 Drücken Sie den Kippschalter zum Saugen von Textilböden in die
andere Richtung.
, Der Bürstenstreifen wird wieder im Gehäuse der Saugdüse versenkt.
Parkettbürste (nur bestimmte Gerätetypen)
- Die Parkettdüse ist für die schonende Reinigung von Hartböden
vorgesehen.
Fugendüse, kleine Saugdüse und kleine Bürste
1 Verbinden Sie die Fugendüse (1), die kleine Düse (2) oder die kleine
Bürste (3) (nur bestimmte Gerätetypen) direkt mit dem Handgriff
oder dem Saugrohr.
Zubehörhalterung
1 Stecken Sie die Zubehörhalterung an den Handgriff.
2 Stecken Sie zwei Zubehörteile an die Zubehörhalterung:
Page 37

DEUTSCH 37
- Fugendüse und kleine Saugdüse
Hinweis: Überprüfen Sie, dass die Ansaugöffnung der kleinen Düse nicht in
Richtung der Halterung zeigt.
- Fugendüse und kleine Bürstendüse.
Hinweis: Überprüfen Sie, dass die Ansaugöffnung der kleinen Bürste in
Richtung der Halterung zeigt.
Das Gerät benutzen
1 Ziehen Sie das Netzkabel aus dem Gerät, und stecken Sie den
Stecker in eine Steckdose.
2 Drücken Sie zum Einschalten den Ein-/Ausschalter auf der Oberseite
des Geräts.
3 Sie können die Saugleistung während des Staubsaugens mit dem
Saugleistungsregler auf dem Gerät einstellen.
- Saugen Sie sehr stark verschmutzte Teppiche und Har tböden bei
maximaler Saugleistung.
- Verwenden Sie minimale Saugleistung zum Absaugen von Vorhängen,
Tischläufern usw.
4 Wenn Sie eine kleine Saugpause machen möchten, können Sie das
Saugrohr ganz bequem parken, indem Sie die Leiste an der Saugdüse
in den dafür vorgesehenen Parkschlitz stecken.
Page 38

DEUTSCH38
Aufbewahrung
1 Schalten Sie das Gerät aus, und ziehen Sie den Netzstecker aus der
Steckdose.
2 Drücken Sie die Kabelaufwicklungstaste, um das Netzkabel
aufzuwickeln.
3 Stecken Sie die Leiste an der Düse in den dafür vorgesehenen
Parkschlitz, um die Düse am Gerät festzumachen. Stellen Sie den
Staubsauger waagerecht ab, sodass alle Räder Bodenkontakt haben.
4 Bringen Sie die Tri-Active-Düse in die Teppichposition, wenn Sie
das Gerät wegstellen. Achten Sie dabei auch darauf, dass sich die
Seitenbürsten nicht verbiegen.
Den Staubbehälter leeren
Ziehen Sie vor dem Entleeren des Staubbehälters stets den Netzstecker
aus der Steckdose.
Der Staubbehälter ist nicht spülmaschinenfest.
- Entleeren Sie den Staubbehälter, wenn der Staub die runde Scheibe
des Filtergehäuses erreicht hat.
1 Schalten Sie das Gerät aus und entfernen Sie den Schlauch.
2 Drücken Sie die Entriegelungstaste auf dem Staubbehältergriff um
den Gehäusedeckel zu öffnen (1). Schwenken Sie den Deckel auf (2).
Page 39

DEUTSCH 39
3 Heben Sie den Behälter aus dem Gerät.
4 Halten Sie den Staubbehälter über eine Mülltonne, und nehmen Sie
das Filtergehäuse heraus. Entleeren Sie den Behälter.
5 Reinigen Sie den Staubbehälter bei Bedarf mit kaltem Leitungswasser
und etwas Geschirrspülmittel.
6 Setzen Sie das Filtergehäuse wieder in den Staubbehälter und diesen
wieder in das Gerät ein.
7 Schließen Sie den Deckel, bis er hörbar einrastet.
Setzen Sie das Filtergehäuse stets wieder in den Staubbehälter ein,
ansonsten kann das Gerät nicht eingeschaltet werden.
Die Filter reinigen und warten
Ziehen Sie stets den Netzstecker aus der Steckdose, bevor Sie die Filter
reinigen oder auswechseln.
Filter und Filtergehäuse sind nicht spülmaschinenfest.
Filter
Reinigen Sie den Filter alle 2 Monate.
1 Schalten Sie das Gerät aus und entfernen Sie den Schlauch.
2 Drücken Sie die Entriegelungstaste auf dem Staubbehältergriff um
den Gehäusedeckel zu öffnen (1). Schwenken Sie den Deckel auf (2).
3 Heben Sie den Behälter aus dem Gerät.
Page 40

DEUTSCH40
4 Nehmen Sie das Filtergehäuse aus dem Behälter.
5 Drehen Sie den Griff auf der Oberseite des Filtergehäuses entgegen
dem Uhrzeigersinn (1) und ziehen Sie den Filter aus dem Gehäuse
(2).
6 Reinigen Sie den Filter mit der mitgelieferten Bürste, indem Sie die
Filterrippen von oben nach unten abbürsten.
Verwenden Sie zu diesem Zweck nur die mitgelieferte Bürste. Andere
Bürsten könnten den Filter beschädigen.
7 Sollte sich an der Innenseite des Gehäuses Staub abgesetzt haben,
entleeren Sie es über einem Mülleimer.
8 Reinigen Sie das Filtergehäuse bei Bedarf mit kaltem Leitungswasser
und etwas Geschirrspülmittel.
9 Wenn Sie den Filter waschen möchten, spülen Sie ihn gründlich mit
Wasser ganz ohne Zusätze aus. Verwenden Sie dazu weder Seife
noch Geschirrspülmittel oder andere Reinigungsmittel. Lassen Sie
den Filter vollständig durchtrocknen, bevor Sie ihn wieder in das
Gehäuse einsetzen.
10 Setzen Sie den Filter wieder in das Gehäuse und drehen Sie den Griff
im Uhrzeigersinn, bis der Filter richtig einrastet.
Achten Sie darauf, dass der Filter fest im Gehäuse sitzt.
11 Setzen Sie das Filtergehäuse mit dem Filter wieder in den
Staubbehälter.
Motorschutzfilter
Reinigen Sie den Motorschutz-Dauerfilter jedes Mal, wenn Sie den
Filterbehälter reinigen.
Page 41

DEUTSCH 41
1 Nehmen Sie den Motorschutzfilter aus dem Gerät und reinigen
Sie ihn, indem Sie ihn über eine Mülltonne halten und den Staub
herausklopfen.
Ist der Motorschutzfilter stark verschmutzt, können Sie ihn auch unter
fließendem kaltem Wasser abspülen.
Verwenden Sie zum Reinigen des Motorschutzfilters kein
Geschirrspülmittel oder andere Reinigungsmittel!
2 Drücken Sie den sauberen Filter wieder fest in das Filterfach, damit
er dort richtig sitzt.
Super-Clean-Air-Filter, Super-Clean-Air-HEPA-12-Filter oder
Ultra-Clean-Air-HEPA-13-Filter
Dieses Gerät ist entweder mit dem Super-Clean-Air-Filter, dem SuperClean-Air-HEPA 12-Filter oder dem Ultra-Clean-Air-HEPA-13-Filter
ausgestattet. Diese Filter befinden sich am rückwärtigen Ende des
Staubsaugers.
Hinweis: Um die optimale Staubaufnahme und Leistung des Staubsaugers zu
gewährleisten, ersetzen Sie den Filter immer durch einen Original Philips Filter
des richtigen Typs (siehe “Zubehör bestellen”).
Super-Clean-Air-Filter
Der Super-Clean-Air-Filter filtert mithilfe seiner elektrostatisch geladenen
Fasern einen hohen Anteil kleinster Partikel aus der Abluft.
Tauschen Sie den Super Clean-Luftfilter alle 6 Monate gegen einen neuen
aus. Dieser Filter ist nicht abwaschbar.
1 Nehmen Sie das Filtergitter ab.
2 Nehmen Sie den alten Filter heraus.
3 Setzen Sie den neuen Filter in das Gerät ein.
4 Stecken Sie den oberen Rand des Filtergitters wieder auf und
drücken Sie die unteren Kanten ein, bis sie hörbar einrasten.
Super Clean Air HEPA 12-Filter
Der Super-Clean-Air-HEPA-12-Filter kann 99,5 % aller Staubteilchen bis
zu einer Größe von 0,0003 mm aus der Abluft herausfiltern. Dies betrifft
nicht nur normale Hausstaubpartikel, sondern auch gesundheitsschädigende
mikroskopisch kleine Schädlinge wie Hausstaubmilben und deren
Exkremente, die bekannte Auslöser für Atemwegsallergien sind.
Tauschen Sie den Super Clean Air HEPA 12-Filter alle 6 Monate gegen
einen neuen aus. Dieser Filter ist nicht abwaschbar.
Um den Super-Clean-Air-HEPA-12-Filter auszutauschen befolgen Sie die
Schritte 1 bis 4 des Abschnitts ‘Super-Clean-Air-Filter’ weiter oben.
Page 42

DEUTSCH42
Abwaschbarer Ultra-Clean-Air-HEPA-13-Filter
Der Super-Clean-Air-HEPA-13-Filter kann 99,95 % aller Staubteilchen bis
zu einer Größe von 0,0003 mm aus der Abluft herausfiltern. Dies betrifft
nicht nur normale Hausstaubpartikel, sondern auch gesundheitsschädigende
mikroskopisch kleine Schädlinge wie Hausstaubmilben und deren
Exkremente, die bekannte Auslöser für Atemwegsallergien sind.
Reinigen Sie den abwaschbaren Ultra-Clean-Air-HEPA-13-Filter alle 6
Monate. Sie können den abwaschbaren Ultra-Clean-Air-HEPA-13-Filter
max. viermal reinigen. Tauschen sie den Filter nach der vier ten Reinigung
aus.
1 Nehmen Sie das Filtergitter ab.
2 Nehmen Sie den abwaschbaren HEPA-13-Filter heraus.
3 Waschen Sie die Seite mit den Falten des HEPA-13-Filters unter
heißem, langsam fließendem Wasser ab.
- Halten Sie den Filter so, dass die Seite mit den Falten nach oben zeigt
und das Wasser parallel zu den Falten fließt. Halten Sie den Filter so,
dass das Wasser den Schmutz aus den Falten spült.
- Drehen Sie den Filter um 180°, und lassen sie das Wasser nun entlang
der Falten in die entgegengesetzte Richtung fließen.
- Fahren Sie mit diesem Vorgang fort, bis der Filter sauber ist.
Reinigen Sie den abwaschbaren Filter niemals mit einer Bürste.
Hinweis: Durch das Reinigen wird zwar die ursprüngliche Farbe des Filters
nicht wieder hergestellt, wohl aber dessen Filtrierleistung.
4 Schütteln Sie das Wasser sorgfältig von der Oberfläche des Filters ab.
Lassen Sie den Filter mindestens zwei Stunden trocknen, bevor Sie
ihn wieder in den Staubsauger einsetzen.
Page 43

DEUTSCH 43
5 Setzen Sie den Filter wieder in das Gerät ein. Stecken Sie den oberen
Rand des Filtergitters wieder auf und drücken Sie die unteren
Kanten ein, bis sie hörbar einrasten.
Zubehör bestellen
Sollten Sie Schwierigkeiten bei der Beschaffung von Filtern oder anderem
Zubehör für diesen Staubsauger haben, wenden Sie sich bitte an das Philips
Service-Center in Ihrem Land. Beachten Sie auch die Angaben in der
internationalen Garantieschrift.
- Philips Staubfilter sind unter der Service-Nr. 4322 005 17520 erhältlich.
- Super-Clean-Air-Filter sind unter der Typennummer FC8030 erhältlich.
- Nicht abwaschbare Super-Clean-Air-HEPA 12-Filter sind unter der
Typennummer FC8031 erhältlich.
- Abwaschbare Ultra-Clean-Air-HEPA-13-Filter sind unter der
Typennummer FC8038 erhältlich.
Umwelt
- Werfen Sie das Gerät am Ende seiner Lebensdauer nicht in den
normalen Hausmüll, sondern bringen Sie es zum Recycling zu einer
offiziellen Sammelstelle. Auf diese Weise tragen Sie zum Umweltschutz
bei.
Garantie und Kundendienst
Benötigen Sie weitere Informationen oder treten Probleme auf, wenden
Sie sich bitte an Ihren Philips Händler, oder setzen Sie sich mit einem Philips
Service-Center in Ihrem Land in Verbindung. Die Telefonnummer finden Sie
in der Garantieschrift. Besuchen Sie auch die Philips Website
(www.philips.com). Sie können auch direkt die Service-Abteilung von
Philips Domestic Appliances and Personal Care BV kontaktieren.
Fehlerbehebung
In diesem Kapitel sind die häufigsten Probleme aufgeführt, die beim
Gebrauch Ihres Geräts auftreten können. Sollten Sie ein Problem mithilfe
der nachstehenden Informationen nicht beheben können, wenden Sie sich
bitte an das Philips Service Center in Ihrem Land.
1 Die Saugleistung ist unzureichend.
- Überprüfen Sie, ob der Saugleistungsregler auf der höchsten Stufe
steht.
- Überprüfen Sie, ob der Filter mit Staub angefüllt ist.
Page 44

DEUTSCH44
Reinigen Sie den Filter wenn nötig.
- Überprüfern Sie, ob die anderen Filter gereinigt oder ausgetauscht
werden müssen.
- Überprüfen Sie, ob die Warnanzeige ihre Farbe geändert hat. Wenn ja,
können Düse, Saugrohr oder Schlauch verstopft sein.
Die Verstopfung können Sie beseitigen, indem Sie – soweit möglich – das
Teil verkehrt herum anschließen. Saugen Sie dann in der Gegenrichtung
Luft hindurch.
2 Das Gerät lässt sich nicht einschalten.
- Überprüfen Sie, ob das Filtergehäuse mit dem darin befindlichen Filter
in den Staubbehälter eingesetzt wurde.
Page 45

ΕΛΛΗΝΙΚΑ
Εισαγωγή
Συγχαρητήρια για την αγορά σας και καλώς ήρθατε στη Philips! Για
να επωφεληθείτε πλήρως από την υποστήριξη που παρέχει η Philips,
καταχωρήστε το προϊόν σας στην ιστοσελίδα
www.philips.com/welcome.
Γενική περιγραφή (Εικ. 1)
1 Κυλινδρικό φίλτρο
2 Θήκη κυλινδρικού φίλτρου
3 Κουμπί απασφάλισης δοχείου συλλογής σκόνης
4 Δοχείο συλλογής σκόνης
5 Φίλτρο προστασίας του μοτέρ
6 Βουρτσάκι καθαρισμού
7 Κάλυμμα
8 Κουμπί on/off
9 Διακόπτης απορροφητικής δύναμης
10 Σύνδεση εύκαμπτου σωλήνα
11 Λαβή
12 Στήριγμα εξαρτημάτων
13 Τηλεσκοπικός σωλήνας
14 Eξάρτημα για γωνίες
15 Εξάρτημα για ταπετσαρίες επίπλων
16 Εξάρτημα βούρτσας (μόνο σε συγκεκριμένους τύπους)
17 Πέλμα για παρκέ (μόνο σε συγκεκριμένους τύπους)
18 Πέλμα πολλαπλών χρήσεων (μόνο σε συγκεκριμένους τύπους)
19 Διακόπτης για ρυθμίσεις χαλιών/σκληρών δαπέδων
20 Πέλμα Tri-Active (μόνο σε συγκεκριμένους τύπους)
21 Κουμπί περιτύλιξης καλωδίου
22 Φίλτρο Super Clean Air, φίλτρο Super Clean Air HEPA 12 ή φίλτρο
Ultra Clean Air HEPA 13
23 Γρίλια φίλτρου
24 Σχισμή παρκαρίσματος
45
Σηαντικό
Διαβάστε προσεκτικά το παρόν εγχειρίδιο χρήσης προτού
χρησιμοποιήσετε τη συσκευή και κρατήστε το για μελλοντική αναφορά.
Κίνδυνος
- Μην απορροφάτε ποτέ νερό ή οποιοδήποτε άλλο υγρό. Μην
απορροφάτε ποτέ εύφλεκτες ουσίες ούτε στάχτες, εάν δεν έχουν
πρώτα κρυώσει.
Προειδοποίηση
- Ελέγξτε εάν η τάση που αναγράφεται στη συσκευή αντιστοιχεί στην
τοπική τάση ρεύματος προτού συνδέσετε τη συσκευή.
- Μην χρησιμοποιείτε τη συσκευή εάν το φις, το καλώδιο ή η ίδια η
συσκευή έχει υποστεί φθορά.
- Εάν το καλώδιο υποστεί φθορά, θα πρέπει να αντικατασταθεί από
ένα κέντρο σέρβις εξουσιοδοτημένο από τη Philips ή από εξίσου
εξειδικευμένα άτομα προς αποφυγή κινδύνου.
- Αυτή η συσκευή δεν προορίζεται για χρήση από άτομα
(συμπεριλαμβανομένων των παιδιών) με περιορισμένες σωματικές,
Page 46

ΕΛΛΗΝΙΚΑ46
αισθητήριες ή διανοητικές ικανότητες ή από άτομα χωρίς εμπειρία
και γνώση, εκτός και εάν τη χρησιμοποιούν υπό επιτήρηση ή
έχουν λάβει οδηγίες σχετικά με τη χρήση της συσκευής από άτομο
υπεύθυνο για την ασφάλειά τους.
- Τα παιδιά θα πρέπει να επιβλέπονται προκειμένου να διασφαλιστεί
ότι δεν θα παίζουν με τη συσκευή.
- Μην στρέφετε τον εύκαμπτο σωλήνα, τον άκαμπτο σωλήνα ή
οποιοδήποτε άλλο εξάρτημα στα μάτια ή τα αυτιά σας και μην τον
βάζετε στο στόμα σας όταν είναι συνδεδεμένος στην ηλεκτρική
σκούπα και η ηλεκτρική σκούπα είναι ενεργοποιημένη.
Προσοχή
- Μην απορροφάτε μεγάλα αντικείμενα, γιατί μπορεί να προκληθεί
παρακώλυση της διόδου του αέρα μέσα από τον άκαμπτο ή τον
εύκαμπτο σωλήνα.
- Όταν χρησιμοποιείτε την ηλεκτρική σκούπα για να απορροφήσετε
στάχτη, ψιλή άμμο, ασβέστη, τσιμεντόσκονη και παρόμοιες ουσίες,
οι πόροι του κυλινδρικού φίλτρου φράσσονται. Εάν παρατηρήσετε
σημαντική μείωση της απορροφητικής δύναμης, καθαρίστε το
κυλινδρικό φίλτρο.
- Η απορρόφηση μεγάλων αντικειμένων μπορεί να προκαλέσει
παρακώλυση της διόδου του αέρα μέσα από τον άκαμπτο
ή τον εύκαμπτο σωλήνα. Σε αυτή την περίπτωση, η ένδειξη
μπλοκαρίσματος γίνεται κόκκινη υποδεικνύοντας ότι υπάρχει
κάποιο εμπόδιο που πρέπει να απομακρυνθεί.
- Μην χρησιμοποιείτε ποτέ τη συσκευή χωρίς το φίλτρο προστασίας
του μοτέρ καθώς φθείρεται το μοτέρ και μειώνεται η διάρκεια
ζωής της συσκευής.
- Να χρησιμοποιείτε μόνο το κυλινδρικό φίλτρο της Philips που
παρέχεται με τη συσκευή.
- Κατά τη διάρκεια του σκουπίσματος, ιδιαίτερα σε δωμάτια
με χαμηλά επίπεδα υγρασίας αέρα, η ηλεκτρική σας σκούπα
δημιουργεί στατικό ηλεκτρισμό. Σαν αποτέλεσμα, μπορεί να
αισθανθείτε τον ηλεκτρισμό όταν αγγίζετε τον άκαμπτο σωλήνα
ή άλλα μεταλλικά μέρη της ηλεκτρικής σκούπας σας. Αυτός
ο ηλεκτρισμός δεν είναι επιβλαβής ούτε για εσάς ούτε για τη
συσκευή. Για να μειώσετε αυτή την ενόχληση, σας συμβουλεύουμε:
1 να αποφορτίζετε τη συσκευή ακουμπώντας συχνά τον άκαμπτο
σωλήνα σε άλλα μεταλλικά αντικείμενα στο δωμάτιο (για
παράδειγμα στα πόδια ενός τραπεζιού ή μιας καρέκλας, στο
καλοριφέρ κ.λπ.),
2 να αυξάνετε το επίπεδο υγρασίας του αέρα τοποθετώντας νερό
στο δωμάτιο. Για παράδειγμα, μπορείτε να κρεμάσετε δοχεία με
νερό από τα καλοριφέρ σας ή να τοποθετήσετε μπολ με νερό
επάνω ή κοντά στα καλοριφέρ σας.
Ηλεκτροαγνητικά Πεδία (EMF)
Η συγκεκριμένη συσκευή της Philips συμμορφώνεται με όλα τα
πρότυπα που αφορούν τα ηλεκτρομαγνητικά πεδία (EMF). Εάν
γίνει σωστός χειρισμός και σύμφωνα με τις οδηγίες του παρόντος
Page 47

ΕΛΛΗΝΙΚΑ 47
εγχειριδίου χρήσης, η συσκευή είναι ασφαλής στη χρήση, βάσει των
επιστημονικών αποδείξεων που είναι διαθέσιμες μέχρι σήμερα.
Page 48

ΕΛΛΗΝΙΚΑ48
Προετοιασία για χρήση
Εύκαπτος σωλήνας
1 Για να συνδέσετε τον εύκαμπτο σωλήνα, σπρώξτε τον σταθερά
μέσα στη συσκευή (‘κλικ’).
2 Για να αποσυνδέσετε τον εύκαμπτο σωλήνα, πιέστε το κουμπί
απασφάλισης και τραβήξτε τον εύκαμπτο σωλήνα από τη
συσκευή.
Τηλεσκοπικός σωλήνας
1 Για να συνδέσετε τον άκαμπτο σωλήνα στη λαβή του εύκαμπτου
σωλήνα, πιέστε το κουμπί κλειδώματος με ελατήριο που
βρίσκεται στη λαβή και εισαγάγετε τη λαβή μέσα στον άκαμπτο
σωλήνα. Προσαρμόστε το κουμπί κλειδώματος με ελατήριο μέσα
στο άνοιγμα του άκαμπτου σωλήνα (‘κλικ’).
2 Για να αποσυνδέσετε τον άκαμπτο σωλήνα από τη λαβή, πιέστε
το κουμπί κλειδώματος με ελατήριο και τραβήξτε τη λαβή από
τον άκαμπτο σωλήνα.
Χρησιμοποιήστε την ίδια μέθοδο για να συνδέσετε και να
αποσυνδέσετε το πέλμα.
3 Προσαρμόστε τον άκαμπτο σωλήνα στο μήκος που σας βολεύει
κατά τη διάρκεια του σκουπίσματος.
Πέλα Tri-Active (όνο σε συγκεκριένους τύπους)
Το πέλμα Tri-Active είναι ένα πέλμα πολλαπλών χρήσεων για χαλιά και
σκληρά δάπεδα.
Page 49

ΕΛΛΗΝΙΚΑ 49
- Οι πλαϊνές βούρτσες συλλέγουν περισσότερη σκόνη και βρομιά
στα πλαϊνά μέρη του πέλματος και σας επιτρέπουν καλύτερο
καθαρισμό κατά μήκος των επίπλων ή άλλων εμποδίων.
- Το άνοιγμα στο μπροστινό μέρος του πέλματος σάς επιτρέπει την
απορρόφηση μεγαλύτερων σωματιδίων.
1 Για να καθαρίσετε σκληρά δάπεδα, πιέστε το διακόπτη στο
επάνω μέρος του πέλματος με το πόδι σας.
, Το βουρτσάκι για τον καθαρισμό σκληρών δαπέδων βγαίνει από
την υποδοχή. Ταυτόχρονα, ο τροχός ανασηκώνεται για αποφυγή
γρατζουνιών και για αύξηση της ευελιξίας.
2 Για να καθαρίσετε χαλιά, πιέστε ξανά το διακόπτη.
, Το βουρτσάκι μπαίνει μέσα στην υποδοχή του πέλματος και ο
τροχός κατεβαίνει αυτόματα.
Πέλα πολλαπλών χρήσεων (όνο σε συγκεκριένους
τύπους)
Μπορείτε να χρησιμοποιήσετε το πέλμα πολλαπλών χρήσεων σε χαλιά
ή σκληρά δάπεδα.
Page 50

ΕΛΛΗΝΙΚΑ50
1 Για να καθαρίσετε σκληρά δάπεδα, πιέστε το διακόπτη στο
επάνω μέρος του πέλματος με το πόδι σας.
, Το βουρτσάκι για τον καθαρισμό σκληρών δαπέδων βγαίνει από
την υποδοχή του πέλματος.
2 Για να καθαρίσετε χαλιά, πιέστε ξανά το διακόπτη.
, Το βουρτσάκι μπαίνει μέσα στην υποδοχή του πέλματος.
Πέλα για παρκέ (όνο σε συγκεκριένους τύπους)
- Το πέλμα για παρκέ είναι σχεδιασμένο για τον ήπιο καθαρισμό
των σκληρών δαπέδων.
Εξάρτηα για γωνίες, εξάρτηα για ταπετσαρίες επίπλων και
εξάρτηα βούρτσας
1 Συνδέστε το εξάρτημα για γωνίες (1), το μικρό πέλμα (2) ή τη
μικρή βούρτσα (μόνο σε συγκεκριμένους τύπους) (3) απευθείας
στη χειρολαβή ή στον άκαμπτο σωλήνα.
Page 51

ΕΛΛΗΝΙΚΑ 51
Στήριγα εξαρτηάτων
1 Εφαρμόστε το στήριγμα εξαρτημάτων πάνω στη λαβή.
2 Εφαρμόστε δύο εξαρτήματα στο στήριγμα εξαρτημάτων:
- Εξάρτημα για γωνίες και εξάρτημα για ταπετσαρίες επίπλων.
Σημείωση: Βεβαιωθείτε ότι το άνοιγμα απορρόφησης του εξαρτήματος για
ταπετσαρίες επίπλων είναι στραμμένο προς την αντίθετη κατεύθυνση από
το στήριγμα.
- Εξάρτημα για γωνίες και εξάρτημα βούρτσας.
Σημείωση: Βεβαιωθείτε ότι το άνοιγμα απορρόφησης του εξαρτήματος
βούρτσας είναι στραμμένο προς το στήριγμα.
Χρήση της συσκευής
1 Τραβήξτε το καλώδιο από τη συσκευή και συνδέστε το φις στην
πρίζα.
2 Πιέστε το κουμπί on/off στο επάνω μέρος της συσκευής για να
ενεργοποιήσετε τη συσκευή.
3 Κατά τη διάρκεια του σκουπίσματος, μπορείτε να προσαρμόσετε
την απορροφητική δύναμη μέσω του κουμπιού στο επάνω μέρος
της συσκευής.
- Χρησιμοποιήστε τη μέγιστη απορροφητική δύναμη για να
σκουπίσετε πολύ βρόμικα χαλιά και σκληρά δάπεδα.
- Χρησιμοποιήστε την ελάχιστη απορροφητική δύναμη για να
σκουπίσετε κουρτίνες, καλύμματα τραπεζιών, κλπ.
Page 52

ΕΛΛΗΝΙΚΑ52
4 Εάν θέλετε να διακόψετε για λίγο, εισαγάγετε την προεξοχή του
πέλματος μέσα στη σχισμή παρκαρίσματος προκειμένου να
στερεώσετε τον άκαμπτο σωλήνα σε βολική θέση.
Συστήατα αποθήκευσης
1 Απενεργοποιήστε τη συσκευή και αποσυνδέστε το φις από την
πρίζα.
2 Πιέστε το κουμπί περιτύλιξης καλωδίου για να περιτυλίξετε το
καλώδιο.
3 Εισαγάγετε την προεξοχή του πέλματος μέσα στη σχισμή
παρκαρίσματος για να στερεώσετε το πέλμα στη συσκευή.
Αποθηκεύστε τη συσκευή σε οριζόντια θέση, με όλους τους
τροχούς να αγγίζουν το δάπεδο.
4 Θέτετε πάντα το πέλμα Tri-Active στη ρύθμιση για χαλιά, κατά
την αποθήκευση του. Επίσης, αποφεύγετε να λυγίζουν οι πλαϊνές
βούρτσες.
Άδειασα του δοχείου συλλογής σκόνης
Αποσυνδέετε πάντα τη συσκευή από την πρίζα πριν αδειάσετε το
δοχείο συλλογής σκόνης.
Το δοχείο συλλογής σκόνης δεν πλένεται σε πλυντήριο πιάτων.
Page 53

ΕΛΛΗΝΙΚΑ 53
- Αδειάστε το δοχείο συλλογής σκόνης όταν η στάθμη της σκόνης
φτάσει στον στρογγυλό δίσκο της θήκης κυλινδρικού φίλτρου.
1 Απενεργοποιήστε τη συσκευή και αφαιρέστε τον εύκαμπτο
σωλήνα.
2 Πιέστε το κουμπί απασφάλισης στο επάνω μέρος της λαβής του
δοχείου συλλογής σκόνης για να απασφαλίσετε το κάλυμμα (1).
Ανοίξτε το κάλυμμα προς τα επάνω (2).
3 Ανασηκώστε το δοχείο συλλογής σκόνης από τη συσκευή.
4 Κρατήστε το δοχείο συλλογής σκόνης πάνω από έναν κάδο
απορριμμάτων και βγάλτε τη θήκη κυλινδρικού φίλτρου από το
δοχείο. Αδειάστε το δοχείο.
5 Εάν θέλετε, μπορείτε να καθαρίσετε το δοχείο συλλογής σκόνης
με κρύο νερό βρύσης και λίγο υγρό απορρυπαντικό.
6 Τοποθετήστε ξανά τη θήκη του κυλινδρικού φίλτρου μέσα
στο δοχείο συλλογής σκόνης και τοποθετήστε το δοχείο στη
συσκευή.
7 Κλείστε καλά το κάλυμμα (‘κλικ’).
Τοποθετείτε πάντα τη θήκη του κυλινδρικού φίλτρου στο δοχείο
συλλογής σκόνης, διαφορετικά δεν ενεργοποιείται η συσκευή.
Καθαρισός και συντήρηση φίλτρων
Αποσυνδέετε πάντα τη συσκευή από την πρίζα πριν καθαρίσετε ή
αντικαταστήσετε τα φίλτρα.
Το κυλινδρικό φίλτρο και η θήκη του κυλινδρικού φίλτρου δεν
πλένονται στο πλυντήριο πιάτων.
Page 54

ΕΛΛΗΝΙΚΑ54
Κυλινδρικό φίλτρο
Καθαρίζετε το κυλινδρικό φίλτρο κάθε 2 μήνες.
1 Απενεργοποιήστε τη συσκευή και αφαιρέστε τον εύκαμπτο
σωλήνα.
2 Πιέστε το κουμπί απασφάλισης στο επάνω μέρος της λαβής του
δοχείου συλλογής σκόνης για να απασφαλίσετε το κάλυμμα (1).
Ανοίξτε το κάλυμμα προς τα επάνω (2).
3 Ανασηκώστε το δοχείο συλλογής σκόνης από τη συσκευή.
4 Ανασηκώστε τη θήκη του κυλινδρικού φίλτρου από το δοχείο
συλλογής.
5 Γυρίστε τη λαβή που βρίσκεται πάνω στη θήκη κυλινδρικού
φίλτρου αριστερόστροφα (1) και ανασηκώστε το κυλινδρικό
φίλτρο από τη θήκη (2).
6 Καθαρίστε το κυλινδρικό φίλτρο και τη θήκη με τη βούρτσα που
παρέχεται. Βουρτσίστε από την κορυφή του φίλτρου προς τα
κάτω κατά μήκος των ραβδώσεών του.
Χρησιμοποιείτε μόνο τη βούρτσα που παρέχεται. Άλλες βούρτσες
μπορεί να προκαλέσουν φθορά στο κυλινδρικό φίλτρο.
7 Εάν υπάρχει ακαθαρσία στο εσωτερικό της θήκης, αδειάστε τη
θήκη πάνω από έναν κάδο απορριμμάτων.
8 Εάν θέλετε, μπορείτε να καθαρίσετε τη θήκη του κυλινδρικού
φίλτρου με κρύο νερό βρύσης και λίγο υγρό απορρυπαντικό.
Page 55

ΕΛΛΗΝΙΚΑ 55
9 Εάν θέλετε να καθαρίσετε το κυλινδρικό φίλτρο, χρησιμοποιήστε
μόνο νερό. Μην χρησιμοποιείτε σαπούνι, υγρό απορρυπαντικό
ή άλλο απορρυπαντικό για να καθαρίσετε το φίλτρο. Αφήστε το
κυλινδρικό φίλτρο να στεγνώσει εντελώς πριν το τοποθετήσετε
ξανά στη θήκη.
10 Τοποθετήστε το κυλινδρικό φίλτρο μέσα στη θήκη και γυρίστε τη
λαβή δεξιόστροφα μέχρι το φίλτρο να ασφαλίσει στη θέση του.
Βεβαιωθείτε ότι το κυλινδρικό φίλτρο έχει στερεωθεί σωστά στη θήκη.
11 Τοποθετήστε τη θήκη με το κυλινδρικό φίλτρο στο δοχείο
συλλογής σκόνης.
Φίλτρο προστασίας του οτέρ
Καθαρίζετε το μόνιμο φίλτρο προστασίας του μοτέρ κάθε φορά που
καθαρίζετε τη θήκη του κυλινδρικού φίλτρου.
1 Αφαιρέστε το φίλτρο προστασίας του μοτέρ από τη συσκευή
και καθαρίστε το χτυπώντας το ελαφρά πάνω από έναν κάδο
απορριμμάτων.
Εάν το φίλτρο προστασίας του μοτέρ είναι πολύ βρόμικο, μπορείτε
επίσης να το ξεπλύνετε με κρύο νερό βρύσης.
Μην χρησιμοποιείτε υγρό απορρυπαντικό ή οποιαδήποτε άλλη
καθαριστική ουσία για τον καθαρισμό του φίλτρου προστασίας του
μοτέρ.
2 Πιέστε σταθερά το καθαρό φίλτρο μέσα στη θήκη του έτσι ώστε
να διασφαλίσετε τη σωστή τοποθέτησή του.
Φίλτρο Super Clean Air, φίλτρο Super Clean Air HEPA 12 ή
φίλτρο Ultra Clean Air HEPA 13
Η συσκευή αυτή διαθέτει φίλτρο Super Clean Air ή φίλτρο Super
Clean Air HEPA 12 ή φίλτρο Ultra Clean Air HEPA 13. Αυτά τα φίλτρα
βρίσκονται στο πίσω μέρος της συσκευής.
Σημείωση: Για να εξασφαλίσετε βέλτιστη συγκράτηση της σκόνης και
απόδοση της ηλεκτρικής σκούπας, αντικαθιστάτε πάντα το φίλτρο με
ένα γνήσιο φίλτρο Philips σωστού τύπου (δείτε το κεφάλαιο ‘Παραγγελία
εξαρτημάτων’).
Φίλτρο Super Clean Air
Το φίλτρο Super Clean Air φιλτράρει ένα μεγάλο μέρος των μικρότερων
σωματιδίων από τον αέρα εξαγωγής μέσω των ηλεκτροστατικά
φορτισμένων ινών του.
Αντικαθιστάτε το φίλτρο Super Clean Air κάθε έξι μήνες. Αυτό το
φίλτρο δεν πλένεται.
Page 56

ΕΛΛΗΝΙΚΑ56
1 Αφαιρέστε τη γρίλια του φίλτρου.
2 Αφαιρέστε το παλιό φίλτρο.
3 Τοποθετήστε το καινούριο φίλτρο στη συσκευή.
4 Επανατοποθετήστε το επάνω μέρος της γρίλιας και πιέστε τις
κάτω γωνίες μέχρι να ασφαλίσουν στη θέση τους (‘κλικ’).
Φίλτρο Super Clean Air HEPA 12
Το φίλτρο Super Clean Air HEPA 12 μπορεί να αφαιρέσει το 99,5% όλων
των σωματιδίων μεγέθους έως και 0,0003 χιλ. από τον αέρα εξαγωγής.
Στα σωματίδια αυτά περιλαμβάνονται όχι μόνο η κανονική οικιακή
σκόνη, αλλά και επιβλαβή μικροσκοπικά ζωύφια όπως τα ακάρεα
σκόνης και τα περιττώματά τους, τα οποία αποτελούν πασίγνωστες
αιτίες αναπνευστικών αλλεργιών.
Αντικαθιστάτε το φίλτρο Super Clean Air HEPA 12 κάθε έξι μήνες. Αυτό
το φίλτρο δεν πλένεται.
Για να αντικαταστήσετε το φίλτρο Super Clean Air HEPA 12,
ακολουθήστε τα βήματα 1-4 της ενότητας ‘Φίλτρο Super Clean Air’
παραπάνω.
Πλενόενο φίλτρο Ultra Clean Air HEPA 13
Το φίλτρο Ultra Clean Air HEPA 13 μπορεί να αφαιρέσει το 99,95%
όλων των σωματιδίων μεγέθους έως και 0,0003 χιλ. από τον αέρα
εξαγωγής. Στα σωματίδια αυτά περιλαμβάνονται όχι μόνο η κανονική
οικιακή σκόνη, αλλά και επιβλαβή μικροσκοπικά ζωύφια όπως
τα ακάρεα σκόνης και τα περιττώματά τους, τα οποία αποτελούν
πασίγνωστες αιτίες αναπνευστικών αλλεργιών.
Καθαρίζετε το πλενόμενο φίλτρο Ultra Clean Air HEPA 13 κάθε έξι
μήνες. Μπορείτε να καθαρίσετε το πλενόμενο φίλτρο Ultra Clean Air
HEPA 13 έως 4 φορές. Αντικαταστήστε το φίλτρο μετά από 4 πλύσεις.
Page 57

ΕΛΛΗΝΙΚΑ 57
1 Αφαιρέστε τη γρίλια του φίλτρου.
2 Αφαιρέστε το πλενόμενο φίλτρο HEPA 13.
3 Ξεπλύνετε την πλευρά με τις πτυχώσεις του φίλτρου HEPA 13 με
ζεστό νερό βρύσης μικρής πίεσης.
- Κρατήστε το φίλτρο με τέτοιο τρόπο ώστε η πλευρά με τις
πτυχώσεις να έχει φορά προς τα επάνω και το νερό να τρέχει
παράλληλα με τις πτυχώσεις. Κρατήστε το φίλτρο σε γωνία, ώστε
το νερό να ξεπλένει τη βρωμιά μέσα από τις πτυχώσεις.
- Γυρίστε το φίλτρο 180° και αφήστε το νερό να τρέξει κατά μήκος
των πτυχώσεων στην αντίθετη κατεύθυνση.
- Συνεχίστε αυτή τη διαδικασία μέχρι το φίλτρο να καθαρίσει.
Μην καθαρίζετε ποτέ το πλενόμενο φίλτρο με βούρτσα.
Σημείωση: Ο καθαρισμός δεν επαναφέρει το αρχικό χρώμα του φίλτρου,
αποκαθιστά όμως την ισχύ φιλτραρίσματος.
4 Τινάξτε προσεκτικά το νερό από την επιφάνεια του φίλτρου.
Αφήστε το φίλτρο να στεγνώσει για τουλάχιστον 2 ώρες προτού
το τοποθετήσετε ξανά στην ηλεκτρική σκούπα.
Page 58

ΕΛΛΗΝΙΚΑ58
5 Τοποθετήστε ξανά το φίλτρο στη συσκευή. Τοποθετήστε ξανά το
επάνω μέρος της γρίλιας του φίλτρου και πιέστε τις κάτω γωνίες
μέχρι να εφαρμόσουν στη θέση τους (‘κλικ’).
Παραγγελία εξαρτηάτων
Εάν αντιμετωπίσετε δυσκολίες στην ανεύρεση φίλτρων ή άλλων
εξαρτημάτων για τη συσκευή, επικοινωνήστε με το Κέντρο
Εξυπηρέτησης Καταναλωτών της Philips στη χώρα σας ή
συμβουλευτείτε το φυλλάδιο διεθνούς εγγύησης.
- Τα κυλινδρικά φίλτρα της Philips διατίθενται με αρ. σέρβις 4322 005
17520.
- Τα φίλτρα Super Clean Air διατίθενται υπό τον τύπο FC8030.
- Τα μη πλενόμενα φίλτρα Super Clean Air HEPA 12 διατίθενται υπό
τον τύπο FC8031.
- Τα πλενόμενα φίλτρα Ultra Clean Air HEPA 13 διατίθενται υπό τον
τύπο FC8038.
Περιβάλλον
- Στο τέλος της ζωής της συσκευής μην την πετάξετε μαζί με τα
συνηθισμένα απορρίμματα του σπιτιού σας, αλλά παραδώστε τη
σε ένα επίσημο σημείο συλλογής για ανακύκλωση. Με αυτόν τον
τρόπο, θα βοηθήσετε στην προστασία του περιβάλλοντος.
Εγγύηση & σέρβις
Εάν χρειάζεστε πληροφορίες ή εάν αντιμετωπίζετε κάποιο πρόβλημα,
επισκεφθείτε την τοποθεσία της Philips στη διεύθυνση
www.philips.com ή επικοινωνήστε με το Κέντρο Εξυπηρέτησης
Καταναλωτών της Philips στη χώρα σας (θα βρείτε το τηλέφωνο στο
φυλλάδιο διεθνούς εγγύησης). Εάν δεν υπάρχει Κέντρο Εξυπηρέτησης
Καταναλωτών στη χώρα σας, απευθυνθείτε στον τοπικό αντιπρόσωπο
της Philips ή επικοινωνήστε με το Τμήμα Επισκευών των Οικιακών
Συσκευών και Ειδών Προσωπικής Περιποίησης της Philips.
Οδηγός ανεύρεσης/επίλυσης προβληάτων
Σε αυτό το κεφάλαιο συνοψίζονται τα πιο συνηθισμένα προβλήματα
που μπορεί να αντιμετωπίσετε με τη συσκευή. Εάν δεν μπορείτε
να επιλύσετε το πρόβλημα βάσει των παρακάτω πληροφοριών,
επικοινωνήστε με το Κέντρο Εξυπηρέτησης Καταναλωτών στη χώρα
σας.
Page 59

ΕΛΛΗΝΙΚΑ 59
1 Η απορροφητική δύναμη είναι ανεπαρκής.
- Ελέγξτε εάν ο διακόπτης απορροφητικής δύναμης βρίσκεται στη
μέγιστη ρύθμιση.
- Ελέγξτε εάν το κυλινδρικό είναι βρόμικο.
Εάν είναι απαραίτητο, καθαρίστε το κυλινδρικό φίλτρο.
- Ελέγξτε εάν τα άλλα φίλτρα χρειάζονται καθαρισμό ή
αντικατάσταση.
- Ελέγξτε εάν η ένδειξη μπλοκαρίσματος έχει αλλάξει χρώμα. Εάν
έχει αλλάξει χρώμα, τότε ενδέχεται να έχει μπλοκάρει το πέλμα, ο
άκαμπτος σωλήνας ή ο εύκαμπτος σωλήνας.
Για να αφαιρέσετε το εμπόδιο, αποσυνδέστε το μπλοκαρισμένο
εξάρτημα και συνδέστε το (εφόσον είναι εφικτό) από την ανάποδη.
Ενεργοποιήστε την ηλεκτρική σκούπα προκειμένου ο αέρας να περάσει
με αντίθετη κατεύθυνση μέσα από το εξάρτημα που έχει μπλοκάρει.
2 Η συσκευή δεν ενεργοποιείται.
- Ελέγξτε εάν η θήκη του κυλινδρικού φίλτρου με το κυλινδρικό
φίλτρο μέσα έχουν τοποθετηθεί μέσα στο δοχείο συλλογής σκόνης.
Page 60

60
ESPAÑOL
Introducción
Enhorabuena por la compra de este producto y bienvenido a Philips. Para
sacar el mayor partido de la asistencia que Philips le ofrece, registre su
producto en www.philips.com/welcome.
Descripción general (fig. 1)
1 Filtro cilíndrico
2 Carcasa del filtro cilíndrico
3 Botón de liberación de la cubeta para el polvo
4 Cubeta para el polvo
5 Filtro protector del motor
6 Cepillo de limpieza
7 Cubierta
8 Botón de encendido/apagado
9 Botón de potencia de succión
10 Conector de la manguera
11 Mango
12 Soporte para accesorios
13 Tubo telescópico
14 Boquilla estrecha
15 Boquilla pequeña
16 Cepillo pequeño (sólo en modelos específicos)
17 Cepillo Parquet (sólo en modelos específicos)
18 Cepillo para suelos (sólo en modelos específicos)
19 Conmutador para alfombras/suelos duros
20 Cepillo Tri-Active (sólo en modelos específicos)
21 Botón recogecable
22 Filtro Super Clean Air, filtro HEPA 12 Super Clean Air o filtro HEPA 13
Ultra Clean Air
23 Rejilla del filtro
24 Ranura para aparcar
Importante
Antes de usar el aparato, lea atentamente este manual de usuario y
consérvelo por si necesitara consultarlo en el futuro.
Peligro
- No aspire nunca agua ni ningún otro líquido. No aspire nunca
sustancias inflamables ni cenizas hasta que éstas estén frías.
Advertencia
- Antes de enchufar el aparato, compruebe si el voltaje indicado en el
mismo se corresponde con el voltaje de red local.
- No utilice el aparato si la clavija, el cable de alimentación o el propio
aparato están dañados.
- Si el cable de alimentación está dañado, debe ser sustituido por Philips
o por un centro de servicio autorizado por Philips, con el fin de evitar
situaciones de peligro.
- Este aparato no debe ser usado por personas (adultos o niños) con su
capacidad física, psíquica o sensorial reducida, ni por quienes no tengan
los conocimientos y la experiencia necesarios, a menos que sean
Page 61

ESPAÑOL 61
supervisados o instruidos acerca del uso del aparato por una persona
responsable de su seguridad.
- Asegúrese de que los niños no jueguen con este aparato.
- No oriente la manguera, el tubo o cualquier otro accesorio hacia los
ojos ni los oídos, ni se los ponga en la boca cuando estén conectados
al aspirador y éste esté encendido.
Precaución
- No aspire objetos grandes, ya que pueden obstruir el paso de aire por
el tubo o la manguera.
- Si usa el aspirador para aspirar cenizas, arena fina, cal, cemento o
sustancias similares, los poros del filtro cilíndrico se taponarán. En caso
de que la potencia de succión disminuya, limpie el filtro cilíndrico.
- Aspirar objetos grandes podría obstruir el paso del aire por el tubo o
la manguera. Si esto ocurre, el indicador de atasco se pondrá en rojo
para indicar que hay una obstrucción que es necesario eliminar.
- No utilice nunca el aparato sin el filtro protector del motor, ya que se
podría dañar el motor y reducir la vida útil del aparato.
- Utilice sólo el filtro cilíndrico Philips que se suministra con el aparato.
- Durante la aspiración, especialmente en las habitaciones con poca
humedad en el aire, el aspirador creará electricidad estática. Por
tanto puede sufrir descargas eléctricas al tocar el tubo u otras
piezas de acero del aspirador. Estas descargas no son dañinas para
usted ni tampoco dañan el aparato. Para reducir este problema le
recomendamos:
1 descargar el aparato apoyando frecuentemente el tubo sobre otros
objetos de metal de la habitación (como por ejemplo, las patas de una
mesa o silla, radiador, etc.);
2 elevar el nivel de humedad en el aire de la habitación colocando un
recipiente con agua en la habitación. Por ejemplo, puede colgar botellas
de agua en los radiadores o colocar recipientes llenos de agua en los
radiadores o cerca de ellos.
Campos electromagnéticos (CEM)
Este aparato Philips cumple todos los estándares sobre campos
electromagnéticos (CEM). Si se utiliza correctamente y de acuerdo con las
instrucciones de este manual, el aparato se puede usar de forma segura
según los conocimientos científicos disponibles hoy en día.
Page 62

ESPAÑOL62
Preparación para su uso
Manguera
1 Para conectar la manguera, acóplela al aparato presionando
firmemente hasta que encaje (“clic”).
2 Para desconectar la manguera, pulse el botón de liberación y tire de
ella.
Tubo telescópico
1 Para conectar el tubo a la empuñadura de la manguera, presione el
botón de bloqueo de la empuñadura e inserte ésta en el tubo. Encaje
el botón de bloqueo en el orificio correspondiente del tubo (“clic”).
2 Para desconectar el tubo del mango presione el botón de bloqueo y
tire del mango para sacarlo del tubo.
Haga lo mismo para conectar y desconectar los cepillos o boquillas.
3 Ajuste el tubo a la longitud que le resulte más cómoda para aspirar.
Cepillo Tri-Active (sólo en modelos específicos)
El cepillo Tri-Active puede utilizarse para limpiar alfombras y suelos duros.
Page 63

ESPAÑOL 63
- Los cepillos laterales atrapan más polvo y suciedad por los lados del
cepillo, y le permiten limpiar mejor junto a muebles y otros obstáculos.
- La abertura de la parte delantera del cepillo le permite aspirar
partículas más grandes.
1 Para limpiar suelos duros, empuje con el pie el conmutador situado
en la parte superior del cepillo.
, La tira de cepillos para limpiar suelos duros saldrá de la carcasa y,
al mismo tiempo, la rueda subirá para evitar arañazos y facilitar el
manejo.
2 Para limpiar alfombras, empuje de nuevo el conmutador.
, La tira de cepillos desaparecerá dentro de la carcasa del cepillo y la
rueda bajará automáticamente.
Cepillo para suelos (sólo en modelos específicos)
El cepillo para suelos puede utilizarse tanto sobre alfombras como sobre
suelos duros.
1 Para limpiar suelos duros, empuje con el pie el conmutador situado
en la parte superior del cepillo.
, La tira de cepillos para limpiar suelos duros saldrá de la carcasa.
Page 64

ESPAÑOL64
2 Para limpiar alfombras, empuje de nuevo el conmutador.
, La tira de cepillos desaparecerá dentro de la carcasa.
Cepillo Parquet (sólo en modelos específicos)
- El cepillo para parquet está diseñado para la limpieza suave de suelos
duros.
Boquilla estrecha, boquilla pequeña y cepillo pequeño
1 Conecte la boquilla estrecha (1), la boquilla pequeña (2) o el cepillo
pequeño (3) (sólo en modelos específicos) directamente a la
empuñadura o al tubo.
Soporte para accesorios
1 Encaje el soporte para accesorios en el mango.
2 Encaje los dos accesorios en el soporte para accesorios:
Page 65

ESPAÑOL 65
- Boquilla estrecha y boquilla pequeña.
Nota: Asegúrese de que la abertura de succión de la boquilla pequeña esté
orientada hacia fuera del soporte.
- Boquilla estrecha y cepillo pequeño.
Nota: Asegúrese de que la abertura de succión del cepillo pequeño esté
orientada hacia el soporte.
Uso del aparato
1 Tire del cable para sacarlo del aparato y enchufe la clavija a la toma
de corriente.
2 Pulse el botón de encendido/apagado de la parte superior del
aparato para encenderlo.
3 Durante el funcionamiento del aparato, puede ajustar la potencia de
succión mediante el botón situado en la parte superior del mismo.
- Utilice la potencia de succión máxima para aspirar alfombras y suelos
duros que estén muy sucios.
- Utilice la potencia de succión mínima para aspirar cortinas, tapetes, etc.
4 Si quiere hacer una pausa, inserte el saliente del cepillo en la ranura
para aparcar con el fin de fijar el tubo en una posición cómoda.
Page 66

ESPAÑOL66
Almacenamiento
1 Apague el aparato y desenchúfelo de la toma de corriente.
2 Pulse el botón de recogida del cable para recoger el cable de
alimentación.
3 Introduzca el saliente del cepillo en la ranura para aparcar para
acoplarlo al aparato. Guarde el aparato en posición horizontal, con
todas las ruedas apoyadas en el suelo.
4 Cuando guarde el aparato, coloque siempre el cepillo Tri-Active en la
posición para alfombras y evite que se doblen los cepillos laterales.
Cómo vaciar la cubeta para el polvo
Desenchufe siempre el aparato antes de vaciar la cubeta para el polvo.
La cubeta para el polvo no se puede lavar en el lavavajillas.
- Vacíe la cubeta para el polvo cuando el nivel de polvo llegue al disco de
la carcasa del filtro cilíndrico.
1 Apague el aparato y quite la manguera.
2 Pulse el botón de liberación del asa de la cubeta para el polvo para
desbloquear la cubierta (1) y abra la cubierta (2).
Page 67

ESPAÑOL 67
3 Saque la cubeta para el polvo del aparato.
4 Sujete la cubeta para el polvo sobre un cubo de la basura y saque la
carcasa del filtro cilíndrico de la cubeta. Vacíe la cubeta.
5 Si lo desea, puede limpiar la cubeta para el polvo con agua fría del
grifo y un poco de detergente líquido.
6 Vuelva a colocar la carcasa del filtro cilíndrico en la cubeta y ésta en
el aparato.
7 Cierre la cubierta firmemente (“clic”).
Vuelva a colocar siempre la carcasa del filtro cilíndrico en la cubeta para
el polvo, ya que de lo contrario no podría encender el aparato.
Limpieza y mantenimiento de los filtros
Desenchufe siempre el aparato antes de limpiar o sustituir los filtros.
El filtro cilíndrico y su carcasa no pueden lavarse en el lavavajillas.
Filtro cilíndrico
Limpie el filtro cilíndrico cada 2 meses.
1 Apague el aparato y quite la manguera.
2 Pulse el botón de liberación del asa de la cubeta para el polvo para
desbloquear la cubierta (1) y abra la cubierta (2).
3 Saque la cubeta para el polvo del aparato.
Page 68

ESPAÑOL68
4 Saque la carcasa del filtro cilíndrico de la cubeta.
5 Gire el asa de la parte superior de la carcasa del filtro cilíndrico en
sentido contrario al de las agujas del reloj (1) y saque el filtro de la
carcasa (2).
6 Limpie el filtro cilíndrico y la carcasa con en el cepillo suministrado.
Cepille el filtro desde arriba hacia abajo a lo largo de las varillas.
Utilice únicamente el cepillo suministrado, ya que otros cepillos podrían
dañar el filtro cilíndrico.
7 Si hay suciedad en el interior de la carcasa, vacíela en el cubo de la
basura.
8 Si lo desea, puede limpiar la carcasa del filtro cilíndrico con agua fría
del grifo y un poco de detergente líquido.
9 Si desea lavar el filtro cilíndrico, lávelo completamente sólo con agua.
No utilice jabón, detergente líquido ni cualquier otro detergente
para lavar el filtro. Deje que éste se seque completamente antes de
volver a introducirlo en la carcasa.
10 Vuelva a colocar el filtro cilíndrico en la carcasa y gire el asa en el
sentido de las agujas del reloj hasta que el filtro cilíndrico encaje en
su posición.
Asegúrese de que el filtro cilíndrico quede bien fijado a la carcasa.
11 Vuelva a colocar la carcasa con el filtro cilíndrico en la cubeta para el
polvo.
Filtro protector del motor
Limpie el filtro permanente protector del motor cada vez que limpie la
carcasa del filtro cilíndrico.
Page 69

ESPAÑOL 69
1 Saque el filtro protector del motor del aparato y límpielo sacudiendo
el polvo sobre el cubo de la basura.
Si el filtro protector del motor está muy sucio, puede lavarlo también con
agua fría del grifo.
No utilice detergente líquido ni cualquier otro agente de limpieza para
limpiar el filtro protector del motor.
2 Vuelva a colocar el filtro limpio en el compartimento del filtro
presionando firmemente para asegurarse de que queda bien
colocado.
Filtro Super Clean Air, filtro HEPA 12 Super Clean Air o filtro
HEPA 13 Ultra Clean Air
Este aparato está equipado con el filtro Super Clean Air, el filtro HEPA
12 Super Clean Air o el filtro HEPA 13 Ultra Clean Air. Estos filtros están
situados en la parte posterior del aparato.
Nota: Para garantizar la mejor retención del polvo y el rendimiento óptimo
del aspirador, sustituya siempre el filtro por un filtro Philips original del modelo
correcto (consulte el capítulo “Solicitud de accesorios”).
Filtro Super Clean Air
El filtro Super Clean Air filtra gran parte de las partículas más
pequeñas contenidas en el aire de salida, mediante sus fibras cargadas
electrostáticamente.
Cambie el filtro Super Clean Air cada seis meses. Este filtro no se puede
lavar.
1 Quite la rejilla del filtro.
2 Quite el filtro usado.
3 Introduzca el nuevo filtro en el aparato.
4 Vuelva a colocar la parte superior de la rejilla del filtro y presione las
esquinas inferiores hasta que encajen en su sitio (“clic”).
Filtro HEPA 12 Super Clean Air
El filtro HEPA 12 Super Clean Air puede eliminar el 99,5% de las partículas
de hasta 0,0003 mm del aire de salida. Esto incluye no sólo el polvo
normal de la casa, sino también organismos microscópicos dañinos como
los ácaros del polvo y sus excrementos, conocidos causantes de alergias
respiratorias.
Cambie el filtro HEPA 12 Super Clean Air cada seis meses. Este filtro no se
puede lavar.
Para cambiar el filtro HEPA 12 Super Clean Air, siga los pasos del 1 al 4 de
la sección anterior “Filtro Super Clean Air”.
Page 70

ESPAÑOL70
Filtro lavable HEPA 13 Ultra Clean Air
El filtro HEPA 13 Super Clean Air puede eliminar el 99,95% de las
partículas de hasta 0,0003 mm del aire de salida. Esto incluye no sólo el
polvo normal de la casa, sino también organismos microscópicos dañinos
como los ácaros del polvo y sus excrementos, conocidos causantes de
alergias respiratorias.
Lave el filtro HEPA 13 Ultra Clean Air cada 6 meses. Puede lavar el filtro
HEPA 13 Ultra Clean Air hasta 4 veces. Sustituya el filtro después de
haberlo lavado 4 veces.
1 Quite la rejilla del filtro.
2 Saque el filtro lavable HEPA 13.
3 Enjuague la cara plisada del filtro HEPA 13 bajo el grifo de agua
caliente a poca presión.
- Sujete el filtro de modo que la cara plisada esté orientada hacia arriba
y que el agua fluya en paralelo a los pliegues. Mantenga el filtro en un
ángulo apropiado para que el agua elimine la suciedad del interior de
los pliegues.
- Gire el filtro 180° y deje que el agua fluya por los pliegues en dirección
contraria.
- Continúe con este proceso hasta que el filtro quede limpio.
No frote nunca el filtro lavable con un cepillo.
Nota: La limpieza del filtro no le devuelve a éste su color original, sino que
restablece su capacidad de filtrado.
4 Sacuda con cuidado el agua de la superficie del filtro y deje que éste
se seque al menos durante 2 horas antes de colocarlo de nuevo en
el aspirador.
Page 71

ESPAÑOL 71
5 Vuelva a colocar el filtro en el aparato y ponga de nuevo la parte
superior de la rejilla del filtro, presionando las esquinas inferiores
hasta que encajen en su sitio (“clic”).
Solicitud de accesorios
Si tuviera algún problema para encontrar filtros u otros accesorios para
su aparato, póngase en contacto con el Servicio de Atención al Cliente de
Philips en su país o consulte el folleto de garantía mundial.
- Los filtros cilíndricos Philips están disponibles con el número de
repuesto 4322 005 17520.
- Los filtros Super Clean Air están disponibles con el número de modelo
FC8030.
- Los filtros no lavables HEPA 12 Super Clean Air están disponibles con
el número de modelo FC8031.
- Los filtros lavables HEPA 13 Ultra Clean Air están disponibles con el
número de modelo FC8038.
Medio ambiente
- Al final de su vida útil, no tire el aparato junto con la basura normal del
hogar. Llévelo a un punto de recogida oficial para su reciclado. De esta
manera, ayudará a conservar el medio ambiente.
Garantía y servicio
Si necesita información o tiene algún problema, visite la página Web de
Philips en www.philips.com, o póngase en contacto con el Servicio de
Atención al Cliente de Philips en su país (hallará el número de teléfono en
el folleto de la garantía mundial). Si no hay Servicio de Atención al Cliente
de Philips en su país, diríjase a su distribuidor local Philips o póngase en
contacto con el Service Depar tment de Philips Domestic Appliances and
Personal Care BV.
Guía de resolución de problemas
En este capítulo se resumen los problemas más frecuentes que pueden
surgir. Si no puede resolver el problema, póngase en contacto con el
Servicio de Atención al Cliente de su país.
1 La potencia de succión es insuficiente.
- Compruebe si el botón de potencia de succión está en su posición
máxima.
Page 72

ESPAÑOL72
- Compruebe si el filtro cilíndrico está lleno de suciedad.
Si es necesario, limpie el filtro cilíndrico.
- Compruebe si es necesario limpiar o cambiar otros filtros.
- Compruebe si el indicador de atasco ha cambiado de color. En ese
caso, puede que la boquilla, el cepillo, el tubo o la manguera estén
obstruidos.
Para eliminar la obstrucción, desconecte la pieza obstruida y conéctela al
revés (en la medida que sea posible). Ponga en marcha el aspirador para
hacer que el aire pase a través de la pieza obstruida en dirección contraria.
2 El aparato no se enciende.
- Compruebe que ha introducido la carcasa del filtro con el filtro dentro
en la cubeta para el polvo.
Page 73

SUOMI
Johdanto
Onnittelut ostoksestasi ja tervetuloa Philips-tuotteiden käyttäjäksi!
Hyödynnä Philipsin tuki ja rekisteröi tuotteesi osoitteessa
www.philips.com/welcome.
Yleiskuvaus (Kuva 1)
1 Suodatinsylinteri
2 Suodatinsylinterin kotelo
3 Pölysäiliön avauspainike
4 Pölysäiliö
5 Moottorinsuojasuodatin
6 Puhdistusharja
7 Kansi
8 Käynnistyspainike
9 Imutehon säädin
10 Letkun liitin
11 Kädensija
12 Lisäosan pidike
13 Teleskooppiputki
14 Rakosuutin
15 Pieni suutin
16 Pieni harjasuutin (vain tietyissä malleissa)
17 Parkettisuutin (vain tietyissä malleissa)
18 Lattia- ja mattosuutin (vain tietyissä malleissa)
19 Keinukytkin lattia- ja mattoasetuksille
20 Tri-Active-suutin (vain tietyissä malleissa)
21 Johdon kelauspainike
22 Super Clean Air -suodatin, Super Clean Air HEPA 12 -suodatin tai Ultra
Clean Air HEPA 13 -suodatin
23 Suodattimen pidike
24 Taukopidike
73
Tärkeää
Lue tämä käyttöopas huolellisesti ennen käyttöä ja säilytä se myöhempää
tarvetta varten.
Vaara
- Älä imuroi vettä tai muuta nestettä. Älä imuroi herkästi syttyviä aineita
tai kuumaa tuhkaa.
Varoitus
- Tarkista, että laitteeseen merkitty käyttöjännite vastaa paikallista
verkkojännitettä, ennen kuin liität laitteen pistorasiaan.
- Älä käytä laitetta, jos pistoke, johto tai itse laite on vaurioitunut.
- Jos virtajohto on vahingoittunut, se on oman turvallisuutesi vuoksi
hyvä vaihdattaa Philipsin valtuuttamassa huoltoliikkeessä tai muulla
ammattitaitoisella korjaajalla.
- Laitetta ei ole tarkoitettu lasten tai sellaisten henkilöiden käyttöön,
joiden fyysinen tai henkinen toimintakyky on rajoittunut tai joilla
ei ole kokemusta tai tietoa laitteen käytöstä, muuten kuin heidän
turvallisuudestaan vastaavan henkilön valvonnassa ja ohjauksessa.
- Pienten lasten ei saa antaa leikkiä laitteella.
Page 74

SUOMI74
- Älä osoita letkulla, putkella tai muilla osilla ketään silmiin tai korviin. Älä
laita suuhusi letkua, joka on kytketty käynnissä olevaan pölynimuriin.
Varoitus
- Älä imuroi suuria esineitä, sillä ne voivat tukkia letkun tai putken.
- Kun imuroit tuhkaa, hienoa hiekkaa, kalkkia. sementtiä tai muita vastaavia
aineita, suodatinsylinterin huokoset tukkeutuvat. Jos imuteho heikkenee
selvästi, puhdista suodatinsylinteri.
- Suurten esineiden imuroiminen saattaa tukkia letkun tai putken. Jos näin
tapahtuu, tukoksesta ilmoittava merkkivalo syttyy punaiseksi merkkinä
siitä, että tukos on poistettava.
- Älä käytä laitetta ilman moottorisuojasuodatinta, sillä silloin moottori
vioittuu ja laitteen käyttöikä lyhenee.
- Käytä vain laitteen mukana toimitettua Philips-suodatinsylinteriä.
- Pölynimuri saa imuroinnin aikana aikaan staattista sähköä varsinkin
huoneissa, joiden ilma on kuiva. Sen tuloksena voit saada pieniä
sähköiskuja, kun kosketat pölyimurin putkea tai muita teräsosia. Nämä
sähköiskut eivät ole vaarallisia sinulle, eivätkä ne vahingoita laitetta. Voit
vähentää sähköisyyttä seuraavilla tavoilla:
1 Pura laitteen varaus koskettamalla putkella usein muita huoneessa
olevia metalliesineitä (esimerkiksi pöydän tai tuolin jalkoja,
lämpöpatteria tms.).
2 Nosta huoneen ilmankosteutta pitämällä huoneessa vesiastiaa. Voit
esimerkiksi ripustaa vedellä täytettyjä astioita lämpöpattereihin tai
asettaa niitä lämpöpatterien päälle tai viereen.
Sähkömagneettiset kentät (EMF)
Tämä Philips-laite vastaa kaikkia, sähkömagneettisia kenttiä (EMF) koskevia
standardeja. Jos laitetta käytetään oikein ja tämän käyttöohjeen ohjeiden
mukaisesti, sen käyttäminen on turvallista tämänhetkisen tutkimustiedon
perusteella.
Käyttöönoton valmistelu
Letku
1 Kiinnitä letku työntämällä sitä tiukasti kiinni laitteeseen, kunnes
kuulet napsahduksen.
Page 75

SUOMI 75
2 Irrota letku painamalla vapautuspainiketta ja vetämällä letku irti
laitteesta.
Teleskooppiputki
1 Liitä putki letkun kädensijaan painamalla kädensijan lukitusnappia ja
työntämällä kädensija putkeen. Sovita lukitusnappi putkessa olevaan
reikään (kuulet napsahduksen).
2 Voit irrottaa putken kädensijasta painamalla lukitusnuppia ja vetämällä
kädensijan irti putkesta.
Suuttimet kiinnitetään ja irrotetaan samalla tavalla.
3 Säädä putken pituus itsellesi sopivaksi imurointia varten.
Tri-Active-suutin (vain tietyissä malleissa)
Tri-Active-suutinta voi käyttää monenlaisten mattojen ja kovien
lattiapintojen imurointiin.
- Suuttimen reunoilla olevat sivuharjat keräävät tehokkaasti pölyä ja likaa,
mikä helpottaa esimerkiksi huonekalujen jalkojen imurointia.
Page 76

SUOMI76
- Suuttimen kärjessä oleva isokokoinen aukko imee helposti isommatkin
roskat.
1 Kun imuroit lattiapintoja, paina suuttimen päällä olevaa keinukytkintä
jalallasi.
, Lattiapinnoille tarkoitettu harjaosa tulee ulos syvennyksestä. Samalla
suuttimen pyörä nousee ylös, jotta lattiapinnat eivät naarmuuntuisi ja
laite liikkuisi mahdollisimman ketterästi.
2 Kun imuroit mattoja, paina keinukytkintä uudelleen.
, Harjaosa vetäytyy takaisin suuttimen syvennykseen ja pyörä laskeutuu
alas automaattisesti.
Lattia- ja mattosuutin (vain tietyissä malleissa)
Lattia- ja mattosuutinta voi käyttää sekä matoilla että kovilla lattiapinnoilla.
1 Kun imuroit lattiapintoja, paina suuttimen päällä olevaa keinukytkintä
jalallasi.
, Lattiapinnoille tarkoitettu harjaosa tulee ulos syvennyksestä.
2 Kun imuroit mattoja, paina keinukytkintä uudelleen.
, Harjaosa vetäytyy takaisin suuttimen syvennykseen.
Page 77

SUOMI 77
Parkettisuutin (vain tietyissä malleissa)
- Parkettisuutin on suunniteltu kovien lattiapintojen hellävaraiseen
puhdistukseen.
Rakosuutin, pieni suutin ja pieni harjasuutin
1 Kiinnitä rakosuutin (1), pieni suutin (2) tai pieni harjasuutin (vain
tietyissä malleissa) (3) suoraan kädensijaan tai putkeen.
Lisäosan pidike
1 Napsauta tarviketeline kiinni kädensijaan.
2 Napsauta kaksi lisävarustetta tarviketelineeseen:
- rakosuutin ja pieni suutin
Huomautus: Varmista, pienen suuttimen imuaukko osoittaa pidikkeestä
poispäin.
Page 78

SUOMI78
- Rakosuutin ja pieni harjasuutin.
Huomautus: Varmista, pienen harjan imuaukko on pidikkeeseen päin.
Käyttö
1 Vedä virtajohto ulos laitteesta ja liitä se pistorasiaan.
2 Kytke laitteeseen virta painamalla laitteen päällä olevaa
käynnistyspainiketta.
3 Voit säätää imutehoa imuroinnin aikana laitteen päällä olevasta
säätimestä.
- Käytä likaisten mattojen ja kovien lattiapintojen imurointiin
maksimitehoa.
- Käytä esimerkiksi verhojen ja pöytäliinojen imurointiin minimitehoa.
4 Jos haluat keskeyttää imuroinnin hetkeksi, aseta suuttimessa oleva
pidike taukopidikkeeseen.
Säilytys
1 Katkaise laitteesta virta ja irrota pistoke pistorasiasta.
Page 79

SUOMI 79
2 Kelaa virtajohto takaisin painamalla kelauskytkintä.
3 Kiinnitä suutin laitteeseen asettamalla suuttimen pidike
taukopidikkeeseen. Säilytä laitetta vaaka-asennossa siten, että kaikki
pyörät koskettavat lattiaa.
4 Aseta aina Tri-Active-suutin matonpuhdistusasentoon säilytyksen
ajaksi, jotta suuttimen harjat säilyisivät suorina.
Pölysäiliön tyhjennys
Irrota laite aina pistorasiasta ennen pölysäiliön puhdistamista.
Pölysäiliö ei ole konepesun kestävä.
- Tyhjennä pölysäiliö heti, kun pölyä on kertynyt suodatinsylinterin kotelon
pyöreään levyyn asti.
1 Katkaise laitteesta virta ja poista letku.
2 Avaa kansi (1) painamalla pölysäiliön päällä olevaa avauspainiketta.
Kierrä kansi auki (2).
Page 80

SUOMI80
3 Nosta pölysäiliö irti laitteesta.
4 Pidä pölysäiliötä roskakorin päällä ja nosta suodatinsylinterin kotelo
irti säiliöstä. Tyhjennä säiliö.
5 Voit puhdistaa pölysäiliön kylmällä juoksevalla vedellä ja muutamalla
tipalla astianpesuainetta.
6 Aseta suodatinsylinterin kotelo takaisin pölysäiliöön ja aseta säiliö
takaisin laitteeseen.
7 Sulje kansi tiiviisti, kunnes se napsahtaa paikoilleen.
Aseta suodatinsylinterin kotelo aina takaisin pölysäiliöön. Muuten laitetta
ei voi käynnistää.
Suodattimien puhdistus ja huolto
Irrota pistoke pistorasiasta aina ennen laitteen puhdistamista tai
suodatinten vaihtamista.
Suodatinsylinteriä ja suodatinsylinterin koteloa ei voi pestä
astianpesukoneessa.
Suodatinsylinteri
Puhdista suodatinsylinteri kahden kuukauden välein.
1 Katkaise laitteesta virta ja poista letku.
2 Avaa kansi (1) painamalla pölysäiliön päällä olevaa avauspainiketta.
Kierrä kansi auki (2).
3 Nosta pölysäiliö irti laitteesta.
Page 81

SUOMI 81
4 Nosta suodatinsylinterin kotelo irti säiliöstä.
5 Kierrä suodattimen yläosassa olevaa kädensijaa vastapäivään (1) ja
nosta suodatinsylinteri pois kotelosta (2).
6 Puhdista suodatinsylinteri ja sen kotelo mukana toimitetulla harjalla.
Harjaa suodatinsylinteri ylhäältä alaspäin tukikaarten mukaan.
Käytä vain laitteen mukana toimitettavaa harjaa. Muut harjat voivat
vahingoittaa suodatinsylinteriä.
7 Jos suodatinsylinterin kotelon sisällä on likaa, tyhjennä kotelo roska-
astian päällä.
8 Voit halutessasi puhdistaa suodatinsylinterin kotelon kylmällä
juoksevalla vedellä ja muutamalla tipalla astianpesuainetta.
9 Jos haluat pestä suodatinsylinterin, käytä pesussa pelkkää vettä. Älä
käytä saippuaa, astianpesuainetta tai muuta puhdistusainetta. Anna
suodatinsylinterin kuivua kokonaan, ennen kuin asetat sen takaisin
koteloon.
10 Aseta suodatinsylinteri takaisin koteloon ja kierrä kädensijaa, kunnes
sylinteri napsahtaa paikoilleen.
Tarkista, että suodatinsylinteri on tiukasti kiinni kotelossa.
11 Aseta kotelo ja suodatinsylinteri takaisin pölysäiliöön.
Moottorinsuojasuodatin
Puhdista moottorinsuojasuodatin aina suodatinsylinterin kotelon
puhdistuksen yhteydessä.
1 Irrota moottorinsuojasuodatin laitteesta ja puhdista se ravistelemalla
siitä pölyt roskakoriin.
Jos moottorinsuojasuodatin on erittäin likainen, voit myös huuhdella sen
juoksevalla, kylmällä vedellä.
Älä käytä pesuaineita tai muita puhdistusaineita
moottorinsuojasuodattimen puhdistamiseen.
2 Paina puhdas suodatin tiukasti takaisin suodatinlokeroon.
Page 82

SUOMI82
Super Clean Air -suodatin, Super Clean Air HEPA 12 -suodatin
tai Ultra Clean Air HEPA 13 -suodatin
Tässä laitteessa on Super Clean Air -suodatin, Super Clean Air HEPA
12 -suodatin tai Ultra Clean Air HEPA 13 -suodatin. Nämä suodattimet
sijaitsevat laitteen takaosassa.
Huomautus: Jotta imurin suorituskyky säilyisi, vaihda aina suodatin sopivaan
alkuperäiseen Philips-suodattimeen (katso luku Tarvikkeiden tilaaminen).
Super Clean Air -suodatin
Super Clean Air -suodattimen staattisella sähköllä varatut kuidut
suodattavat suuren osan laitteen poistoilman pienemmistä hiukkasista.
Vaihda Super Clean Air -suodatin puolen vuoden välein. Suodatinta ei voi
pestä.
1 Irrota suodattimen pidike.
2 Irrota vanha suodatin.
3 Aseta uusi suodatin laitteeseen.
4 Kiinnitä pidikkeen yläosa ja paina alakulmista, kunnes pidike napsahtaa
paikoilleen.
Super Clean Air HEPA 12 -suodatin
Super Clean Air -HEPA 12 -suodatin suodattaa poistoilmasta 99,5 %
kaikista halkaisijaltaan vähintään 0,0003 mm:n hiukkasista. Näihin kuuluvat
tavallisen huonepölyn lisäksi haitalliset pölypunkit ja pölypunkkipöly, jotka
tunnetusti aiheuttavat hengitysteiden allergioita.
Vaihda Super Clean Air HEPA 12 -suodatin puolen vuoden välein.
Suodatinta ei voi pestä.
Vaihda Super Clean Air HEPA 12 -suodatin edellä esitetyn Super Clean Air
-suodatin -ohjeen vaiheiden 1-4 mukaisesti.
Pestävä Ultra Clean Air HEPA 13 -suodatin
Ultra Clean Air HEPA 13 -suodatin suodattaa poistoilmasta 99,95 % kaikista
halkaisijaltaan vähintään 0,0003 mm:n hiukkasista. Näihin kuuluvat tavallisen
huonepölyn lisäksi haitalliset pölypunkit ja pölypunkkipöly, jotka tunnetusti
aiheuttavat hengitysteiden allergioita.
Puhdista Ultra Clean Air HEPA 13 -suodatin puolen vuoden välein. Voit
puhdistaa pestävän Ultra Clean Air HEPA 13 -suodattimen enintään 4
kertaa. Vaihda suodatin neljän puhdistuskerran jälkeen.
Page 83

SUOMI 83
1 Irrota suodattimen pidike.
2 Irrota pestävä HEPA 13 -suodatin.
3 Huuhtele HEPA 13 -suodattimen laskostettu puoli lämpimän, hitaasti
virtaavan vesihanan alla.
- Pidä suodatinta niin, että laskostettu puoli osoittaa ylöspäin ja vesi virtaa
laskosten suuntaan. Pidä suodatin sellaisessa kulmassa, että vesi huuhtoo
lian laskosten välistä.
- Käännä suodatinta 180 astetta niin, että vesi virtaa laskosten myötä
vastakkaiseen suuntaan.
- Toista nämä toimet, kunnes suodatin on puhdas.
Älä koskaan puhdista pestävää suodatinta harjalla.
Huomautus: Puhdistus ei palauta suodattimen alkuperäistä väriä, mutta se
palauttaa suodatustehon.
4 Ravista vesi huolellisesti suodattimen pinnasta. Anna suodattimen
kuivua vähintään kaksi tuntia, ennen kuin asetat sen takaisin
pölynimuriin.
Page 84

SUOMI84
5 Aseta suodatin takaisin laitteeseen. Aseta suodattimen pidikkeen
yläosa paikalleen ja paina alakulmista, kunnes ne napsahtavat
paikoilleen.
Tarvikkeiden tilaaminen
Jos suodattimien tai muiden lisäosien ostamisessa on hankaluuksia, ota
yhteys Philipsin maakohtaiseen asiakaspalveluun tai katso lisätietoja
kansainvälisestä takuulehtisestä.
- Philipsin suodatinsylintereitä on saatavissa huoltonumerolla 4322 005
17520.
- Super Clean Air -suodattimien tuotenumero on FC8030.
- Super Clean Air HEPA 12 -suodattimien tuotenumero on FC8031.
- Super Clean Air HEPA 13 -suodattimien tuotenumero on FC8038.
Ympäristöasiaa
- Älä hävitä vanhoja laitteita tavallisen talousjätteen mukana, vaan
toimita ne valtuutettuun kierrätyspisteeseen. Näin autat vähentämään
ympäristölle aiheutuvia haittavaikutuksia.
Takuu & huolto
Jos haluat lisätietoja tai laitteen suhteen on ongelmia, käy Philipsin internetsivuilla osoitteessa www.philips.com tai ota yhteys Philipsin asiakaspalveluun
(puhelinnumero löytyy takuulehtisestä). Voit myös ottaa yhteyttä Philipsjälleenmyyjään tai Philipsin valtuuttamaan huoltoliikkeeseen.
Vianmääritys
Tässä luvussa kuvataan tavallisimmat laitteen käyttöön liittyvät ongelmat.
Ellet onnistu ratkaisemaan ongelmaa alla olevien ohjeiden avulla, ota yhteys
Philipsin maakohtaiseen asiakaspalveluun.
1 Imuteho ei riitä.
- Tarkista, onko imutehon säädin enimmäisteholla.
- Tarkista, onko suodatinsylinterissä likaa.
Puhdista suodatin tarvittaessa.
- Tarkista, onko muut suodattimet puhdistettava tai vaihdettava.
Page 85

SUOMI 85
- Tarkista, palaako tukoksen merkkivalo. Jos valo palaa, suutin, putki tai
letku voivat olla tukossa.
Poista tukos irrottamalla tukkeutunut osa ja liittämällä se (niin tiukasti kuin
mahdollista) toisin päin laitteeseen. Käynnistä pölynimuri, jotta vastakkainen
ilmavirta irrottaisi tukoksen.
2 Laite ei käynnisty.
- Tarkista, ovatko suodatinsylinterin kotelo ja suodatinsylinteri kunnolla
paikallaan pölysäiliössä.
Page 86

86
FRANÇAIS
Introduction
Félicitations pour votre achat et bienvenue dans l’univers Philips ! Pour
profiter pleinement de l’assistance Philips, enregistrez votre produit sur le
site à l’adresse suivante : www.philips.com/welcome.
Description générale (fig. 1)
1 Filtre cylindrique
2 Logement du filtre cylindrique
3 Bouton de déverrouillage du récupérateur de poussière
4 Récupérateur de poussière
5 Filtre de protection du moteur
6 Brossette de nettoyage
7 Couvercle
8 Bouton marche/arrêt
9 Bouton de puissance d’aspiration
10 Raccord du flexible
11 Poignée
12 Porte-accessoires
13 Tube télescopique
14 Suceur plat
15 Petite brosse
16 Petite brosse (certains modèles uniquement)
17 Brosse parquet (certains modèles uniquement)
18 Brosse combinée (certains modèles uniquement)
19 Sélecteur pour moquettes/sols durs
20 Brosse Tri-Active (certains modèles uniquement)
21 Bouton d’enroulement du cordon
22 Filtre Super Clean Air, HEPA 12 ou HEPA 13
23 Grille du filtre
24 Insert pour rangement du tube
Important
Lisez attentivement ce mode d’emploi avant d’utiliser l’appareil et
conservez-le pour un usage ultérieur.
Danger
- N’aspirez jamais d’eau, de liquides, de substances inflammables, ni de
cendres encore chaudes.
Avertissement
- Avant de brancher l’appareil, vérifiez que la tension indiquée sur
l’appareil correspond à la tension supportée par le secteur local.
- N’utilisez jamais l’appareil si la fiche, le cordon d’alimentation ou
l’appareil lui-même est endommagé.
- Si le cordon d’alimentation est endommagé, il doit être remplacé
par Philips, par un Centre Service Agréé Philips ou par un technicien
qualifié afin d’éviter tout accident.
- Cet appareil n’est pas destiné à être utilisé par des personnes
(notamment des enfants) dont les capacités physiques, sensorielles
ou intellectuelles sont réduites, ou par des personnes manquant
d’expérience ou de connaissances, à moins que celles-ci ne soient sous
Page 87

FRANÇAIS 87
surveillance ou qu’elles n’aient reçu des instructions quant à l’utilisation
de l’appareil par une personne responsable de leur sécurité.
- Veillez à ce que les enfants ne puissent pas jouer avec l’appareil.
- Ne dirigez pas le flexible, le tube ou tout autre accessoire vers les yeux
ou les oreilles et ne les placez pas dans votre bouche lorsqu’ils sont
raccordés à l’aspirateur et que celui-ci est sous tension.
Attention
- N’aspirez pas d’objets de grande taille car ils peuvent bloquer le
passage de l’air dans le tube ou le tuyau.
- Lorsque vous aspirez des cendres, du sable fin, de la chaux, de la
poussière de ciment ou d’autres substances similaires, les pores du filtre
cylindrique se bouchent. Si vous constatez une forte diminution de la
puissance d’aspiration, nettoyez le filtre cylindrique.
- L’aspiration d’objets de grande taille peut bloquer le passage de l’air
dans le tube ou le tuyau. Si tel est le cas, le voyant de blocage devient
rouge pour vous signaler que les objets à l’origine de l’obstruction
doivent être retirés.
- N’utilisez jamais l’appareil sans filtre de protection du moteur car vous
risqueriez d’endommager le moteur et de réduire la durée de vie de
l’appareil.
- Utilisez exclusivement le filtre cylindrique Philips fourni avec l’appareil.
- Lors de l’aspiration, notamment dans des pièces où l’air est peu
humide, l’aspirateur produit de l’électricité statique. Lorsque vous
touchez le tube ou d’autres parties en acier de l’aspirateur, vous
pouvez par conséquent ressentir de légères décharges électriques sans
danger pour votre santé et l’appareil. Pour réduire ce désagrément,
nous vous conseillons :
1 de décharger l’appareil en plaçant fréquemment le tube contre d’autres
objets métalliques de la pièce (par exemple, des pieds de table ou de
chaise, un radiateur, etc.) ;
2 d’augmenter le niveau d’humidité de l’air dans la pièce en y plaçant de
l’eau, par exemple dans un humidificateur suspendu à vos radiateurs ou
dans des bols posés dessus ou à proximité.
Champs électromagnétiques (CEM)
Cet appareil Philips est conforme à toutes les normes relatives aux champs
électromagnétiques (CEM). Il répond aux règles de sécurité établies
sur la base des connaissances scientifiques actuelles s’il est manipulé
correctement et conformément aux instructions de ce mode d’emploi.
Page 88

FRANÇAIS88
Avant l’utilisation
Flexible
1 Pour raccorder le flexible, insérez-le fermement dans l’appareil (clic).
2 Pour détacher le tuyau, appuyez sur le bouton de déverrouillage et
retirez le tuyau de l’appareil.
Tube télescopique
1 Pour fixer le tube à la poignée du tuyau, appuyez sur le bouton
de verrouillage de la poignée et insérez la poignée dans le tube.
Enclenchez le bouton de verrouillage dans l’orifice du tube (clic).
2 Pour détacher le tube de la poignée, appuyez sur le bouton de
verrouillage et séparez les deux parties.
Procédez de la même façon pour fixer et détacher les embouts.
3 Réglez le tube à la longueur qui vous convient.
Brosse Tri-Active (certains modèles uniquement)
La brosse Tri-Active est multifonctionnelle ; elle s’adapte aussi bien aux
moquettes qu’aux sols durs.
Page 89

FRANÇAIS 89
- Les brossettes latérales permettent de ramasser plus de poussière et
de saleté de part et d’autre de la brosse, pour un meilleur résultat le
long des meubles ou d’autres obstacles.
- L’ouverture à l’avant de la brosse permet d’aspirer les particules de
plus grande taille.
1 Pour nettoyer les sols durs, actionnez du pied le sélecteur situé sur
la brosse.
, La brossette pour sols durs sort ainsi de son logement. La roue
se soulève également afin d’éviter les rayures et d’augmenter la
maniabilité de l’appareil.
2 Pour nettoyer les moquettes, actionnez de nouveau le sélecteur.
, La brossette rentre dans son logement et la roue descend
automatiquement.
Brosse combinée (certains modèles uniquement)
La brosse combinée vous permet de passer l’aspirateur sur des sols durs
ou moquettes.
1 Pour nettoyer les sols durs, actionnez du pied le sélecteur situé sur
la brosse.
, La brossette pour sols durs sort de son logement.
Page 90

FRANÇAIS90
2 Pour nettoyer les moquettes, actionnez de nouveau le sélecteur.
, La brossette rentre dans son logement.
Brosse parquet (certains modèles uniquement)
- La brosse parquet est conçue pour un nettoyage en douceur des sols
durs.
Suceur plat, petit embout et petite brosse
1 Fixez le suceur plat (1), le petit embout (2) ou la petite brosse (3)
(certains modèles uniquement) directement sur la poignée ou le
tube.
Porte-accessoires
1 Fixez le porte-accessoires sur la poignée.
2 Fixez les deux accessoires sur le support.
Page 91

FRANÇAIS 91
- Suceur plat et petit embout
Remarque : Assurez-vous que l’orifice d’aspiration du petit embout sorte bien
du support.
- Suceur plat et petite brosse
Remarque : Assurez-vous que l’orifice d’aspiration de la brossette soit face au
support.
Utilisation de l’appareil
1 Sortez le cordon d’alimentation de l’appareil et branchez-le sur une
prise secteur.
2 Appuyez sur le bouton marche/arrêt de l’appareil pour l’allumer.
3 En cours d’utilisation, vous pouvez régler la puissance d’aspiration à
l’aide du bouton situé sur l’appareil.
- La puissance d’aspiration maximale permet de nettoyer des moquettes
ou des sols durs très sales.
- La puissance d’aspiration minimale permet de nettoyer des rideaux,
tapis de table, etc.
4 Si vous souhaitez interrompre momentanément votre tâche, insérez
l’ergot de rangement de la brosse dans l’insert du tube pour ranger
ce dernier dans une position pratique.
Page 92

FRANÇAIS92
Rangement
1 Mettez l’appareil hors tension et débranchez-le du secteur.
2 Enroulez le cordon d’alimentation en appuyant sur le bouton
d’enroulement.
3 Insérez la clavette de l’embout dans le logement du tube pour
accrocher celui-ci par l’embout à l’appareil. Rangez l’appareil en
position horizontale ; toutes les roues doivent toucher le sol.
4 Veillez à toujours rentrer la brossette de la brosse Tri-Active lorsque
vous rangez l’appareil pour éviter que les brosses latérales ne se
tordent.
Vidage du récupérateur de poussière
Débranchez toujours l’appareil avant de vider le récupérateur de
poussière.
Le récupérateur de poussière ne peut pas être nettoyé au lave-vaisselle.
- Videz le récupérateur de poussière dès que le niveau de poussière
atteint le disque du logement du filtre cylindrique.
1 Éteignez l’appareil et retirez le tuyau.
2 Appuyez sur le bouton de déverrouillage sur la poignée du
récupérateur de poussière pour déverrouiller le couvercle (1).
Ouvrez le couvercle (2).
Page 93

FRANÇAIS 93
3 Retirez le récupérateur de poussière de l’appareil.
4 Retirez le logement du filtre cylindrique du récupérateur de
poussière tout en maintenant ce dernier au-dessus d’une poubelle.
Videz le récupérateur.
5 Si vous le souhaitez, vous pouvez nettoyer le récupérateur à l’eau
froide avec un peu de liquide vaisselle.
6 Remettez le filtre cylindrique dans le récupérateur à poussière et
replacez ce dernier dans l’appareil.
7 Fermez le couvercle (vous devez entendre un clic).
Replacez toujours le logement du filtre cylindrique dans le récupérateur
de poussière, sans quoi il sera impossible d’allumer l’appareil.
Nettoyage et entretien des filtres
Débranchez toujours l’appareil avant de nettoyer ou de remplacer les
filtres.
Le filtre cylindrique et le logement du filtre cylindrique ne peuvent pas
être nettoyés au lave-vaisselle.
Filtre cylindrique
Nettoyez le filtre cylindrique tous les 2 mois.
1 Éteignez l’appareil et retirez le tuyau.
2 Appuyez sur le bouton de déverrouillage sur la poignée du
récupérateur de poussière pour déverrouiller le couvercle (1).
Ouvrez le couvercle (2).
3 Retirez le récupérateur de poussière de l’appareil.
Page 94

FRANÇAIS94
4 Retirez le logement du filtre cylindrique du récupérateur de
poussière.
5 Tournez la poignée du logement du filtre cylindrique dans le sens
inverse des aiguilles d’une montre (1), puis retirez le filtre cylindrique
de son logement (2).
6 Nettoyez le filtre cylindrique et son logement à l’aide de la brosse
fournie. Brossez le filtre du haut vers le bas, le long des rainures.
Utilisez uniquement la brosse fournie ! D’autres brosses pourraient
endommager le filtre cylindrique.
7 Si l’intérieur du logement contient de la poussière, videz-le au-dessus
d’une poubelle.
8 Si nécessaire, vous pouvez nettoyer le logement du filtre cylindrique
à l’eau froide du robinet avec un peu de liquide vaisselle.
9 Si vous souhaitez nettoyer le filtre cylindrique plus en profondeur,
utilisez uniquement de l’eau. N’utilisez pas de savon, de liquide
vaisselle ni d’autre détergent pour nettoyer le filtre. Laissez le filtre
cylindrique sécher complètement avant de le réinsérer dans son
logement.
10 Replacez le filtre cylindrique dans son logement et faites tournez
la poignée dans le sens des aiguilles d’une montre jusqu’à ce que le
filtre cylindrique s’enclenche.
Assurez-vous que le filtre cylindrique est correctement fixé au logement.
11 Replacez le logement contenant le filtre cylindrique dans le
récupérateur de poussière.
Filtre de protection du moteur
Nettoyez le filtre permanent de protection du moteur chaque fois que
vous nettoyez le logement du filtre cylindrique.
Page 95

FRANÇAIS 95
1 Sortez le filtre de protection du moteur de l’appareil et nettoyez-le
en le secouant au-dessus d’une poubelle pour en retirer la poussière.
Si le filtre de protection du moteur est trop sale, vous pouvez le rincer à
l’eau froide du robinet.
N’utilisez pas de liquide vaisselle ni d’autre détergent pour nettoyer le
filtre de protection du moteur.
2 Replacez correctement le filtre nettoyé dans son logement.
Filtre Super Clean Air, HEPA 12 ou HEPA 13
Cet appareil est équipé d’un filtre Super Clean Air, HEPA 12 ou HEPA 13,
qui est situé à l’arrière de l’appareil.
Remarque : Pour garantir les performances et les qualités d’aspiration de
l’aspirateur, remplacez toujours le filtre par un filtre Philips approprié (voir le
chapitre « Commande d’accessoires »).
Filtre Super Clean Air
Le filtre Super Clean Air permet de filtrer une grande partie des petites
particules de l’air sortant grâce à ses fibres chargées électrostatiquement.
Remplacez le filtre Super Clean Air tous les 6 mois. Ce filtre n’est pas
lavable.
1 Retirez la grille du filtre.
2 Retirez le filtre usagé.
3 Insérez le nouveau filtre dans l’appareil.
4 Replacez le haut de la grille du filtre, puis poussez sur les coins
inférieurs jusqu’à ce qu’ils s’enclenchent (clic).
Filtre HEPA 12
Le filtre HEPA 12 permet de supprimer 99,5 % des particules de plus de
0,0003 mm, c’est-à-dire non seulement la poussière domestique normale,
mais également les parasites microscopiques tels que les acariens, ainsi que
leurs excréments, causes connues d’allergies respiratoires.
Remplacez le filtre HEPA 12 tous les 6 mois. Ce filtre n’est pas lavable.
Pour remplacer le filtre HEPA 12, suivez les étapes 1 à 4 du chapitre cidessus « Filtre Super Clean Air »
Filtre HEPA 13 lavable
Le filtre HEPA 13 permet de supprimer 99,95 % des particules de plus de
0,0003 mm, c’est-à-dire non seulement la poussière domestique normale,
mais également les parasites microscopiques tels que les acariens, ainsi que
leurs excréments, causes connues d’allergies respiratoires.
Page 96

FRANÇAIS96
Nettoyez le filtre HEPA 13 lavable tous les 6 mois. Vous pouvez nettoyer le
filtre HEPA 13 lavable 4 fois. Remplacez-le après l’avoir utilisé 4 fois.
1 Retirez la grille du filtre.
2 Retirez le filtre HEPA 13 lavable.
3 Rincez le côté plissé du filtre HEPA 13 sous l’eau chaude.
- Tenez le filtre de façon à ce que les zones plissées soient orientées vers
le haut et que l’eau s’écoule parallèlement à celles-ci. Puis, tenez le filtre
de façon à ce que l’eau élimine la poussière incrustée dans les zones
plissées.
- Tournez le filtre de 180° de façon à ce que l’eau s’écoule dans l’autre
sens, le long des zones tissées.
- Répétez cette opération jusqu’à ce que le filtre soit propre.
Ne nettoyez jamais le filtre lavable à l’aide d’une brosse.
Remarque : Le nettoyage ne permet pas au filtre de retrouver sa couleur
d’origine. En revanche, il lui permet de retrouver ses qualités de filtration.
4 Secouez le filtre pour en retirer l’excès d’eau. Laissez-le sécher
pendant au moins 2 heures avant de le replacer dans l’aspirateur.
Page 97

FRANÇAIS 97
5 Replacez le filtre dans l’appareil. Replacez la partie supérieure de la
grille du filtre, puis poussez sur les coins inférieurs jusqu’à ce qu’ils
s’enclenchent (clic).
Commande d’accessoires
Si vous rencontrez des problèmes pour vous procurer des filtres ou autres
accessoires, contactez le Service Consommateurs Philips de votre pays ou
consultez le dépliant de garantie internationale.
- Les filtres cylindriques Philips sont disponibles sous la référence 4322
005 17520.
- Les filtres Super Clean Air sont disponibles sous la référence FC8030.
- Les filtres HEPA 12 Super Clean Air sont disponibles sous la référence
FC8031.
- Les filtres lavables HEPA 13 sont disponibles sous la référence FC8038.
Environnement
- Lorsqu’il ne fonctionnera plus, ne jetez pas l’appareil avec les ordures
ménagères. Déposez-le à un endroit assigné à cet effet, où il pourra
être recyclé. Vous contribuerez ainsi à la protection de l’environnement.
Garantie et service
Si vous souhaitez obtenir des informations supplémentaires ou si vous
rencontrez un problème, visitez le site Web de Philips à l’adresse
www.philips.com ou contactez le Service Consommateurs Philips de
votre pays. Vous trouverez le numéro de téléphone correspondant
sur le dépliant de garantie internationale. S’il n’existe pas de
Service Consommateurs Philips dans votre pays, renseignez-vous auprès
de votre revendeur Philips local ou contactez le « Service Department of
Philips Domestic Appliances and Personal Care BV ».
Dépannage
Cette rubrique présente les problèmes les plus courants que vous
pouvez rencontrer avec votre appareil. Si vous ne parvenez pas à
résoudre le problème à l’aide des informations ci-dessous, contactez le
Service Consommateurs Philips de votre pays.
1 La puissance d’aspiration est insuffisante.
- Vérifiez si le bouton de la puissance d’aspiration est sur la position
maximale.
Page 98

FRANÇAIS98
- Le filtre cylindrique est peut-être sale.
Nettoyez-le si nécessaire.
- Vérifiez si les autres filtres doivent être nettoyés ou remplacés.
- Vérifiez la couleur du voyant de blocage. S’il a changé de couleur,
l’embout, le tube ou le tuyau est peut-être bouché.
Le cas échéant, détachez l’élément bouché et raccordez-le (tant que
possible) dans le sens inverse. Allumez l’aspirateur pour forcer l’air à
traverser l’élément bouché dans l’autre sens.
2 L’appareil ne peut pas être mis en marche.
- Vérifiez que le logement du filtre cylindrique équipé de son filtre a
correctement été inséré dans le récupérateur de poussière.
Page 99

ITALIANO
Introduzione
Congratulazioni per l’acquisto e benvenuti in Philips! Per trarre il massimo
vantaggio dall’assistenza Philips, registrate il vostro prodotto su
www.philips.com/welcome.
Descrizione generale (fig. 1)
1 Cilindro del filtro
2 Alloggiamento del cilindro del filtro
3 Pulsante di sgancio del contenitore polvere
4 Contenitore polvere
5 Filtro di protezione del motore
6 Spazzolina per la pulizia
7 Coperchio
8 Pulsante on/off
9 Manopola potenza aspirazione
10 Connettore del tubo flessibile
11 Impugnatura
12 Supporto accessori
13 Tubo telescopico
14 Bocchetta a lancia
15 Bocchetta piccola
16 Bocchetta piccola (solo alcuni modelli)
17 Spazzola per parquet (solo alcuni modelli)
18 Spazzola Combi (solo alcuni modelli)
19 Interruttore a leva per le impostazioni tappeto o parquet
20 Spazzola Tri-Active (solo alcuni modelli)
21 Pulsante di riavvolgimento del cavo
22 Filtro Super Clean Air, filtro HEPA 12 Super Clean Air o HEPA 13 Ultra
Clean Air
23 Griglia del filtro
24 Alloggiamento fermo di blocco
99
Importante
Prima di utilizzare l’apparecchio, leggete attentamente il presente manuale e
conservatelo per eventuali riferimenti futuri.
Pericolo
- Non aspirare mai acqua o altre sostanze liquide. Non aspirare in
nessun caso sostanze infiammabili e cenere se non completamente
fredda.
Avviso
- Prima di collegare l’apparecchio, verificate che la tensione riportata sulla
spina corrisponda alla tensione disponibile.
- Non utilizzate l’apparecchio se la spina, il cavo di alimentazione o
l’apparecchio stesso sono danneggiati.
- Nel caso in cui il cavo di alimentazione fosse danneggiato, dovrà essere
sostituito presso i centri autorizzati Philips, i rivenditori specializzati
oppure da personale debitamente qualificato, per evitare situazioni
pericolose.
- L’apparecchio non è destinato a persone (inclusi bambini) con capacità
mentali, fisiche o sensoriali ridotte, fatti salvi i casi in cui tali persone
Page 100

ITALIANO100
abbiano ricevuto assistenza o formazione per l’uso dell’apparecchio da
una persona responsabile della loro sicurezza.
- Adottate le dovute precauzioni per evitare che i bambini giochino con
l’apparecchio.
- Non puntate il flessibile, il tubo o qualsiasi altro accessorio in direzione
degli occhi o delle orecchie né introducetelo in bocca quando è
collegato all’aspirapolvere e quest’ultimo è acceso.
Attenzione
- Se si aspirano oggetti di grandi dimensioni, il passaggio dell’aria nel tubo
o nel flessibile potrebbe ostruirsi.
- Quando utilizzate l’aspirapolvere per aspirare cenere, sabbia fine, calce,
polvere di cemento e sostanze simili, è possibile che i fori del cilindro
del filtro si ostruiscano. Se notate una sensibile diminuzione della
potenza di aspirazione, pulite il cilindro del filtro.
- Se si aspirano oggetti di grandi dimensioni, è possibile che si blocchi il
passaggio dell’aria nel tubo o nel flessibile. Se questo accade, l’indicatore
di blocco si illumina di rosso a segnalare un’ostruzione che deve essere
rimossa.
- Utilizzate l’apparecchio sempre in combinazione con il filtro di
protezione del motore onde evitare di danneggiare il motore e
compromettere il funzionamento dell’aspirapolvere.
- Utilizzate solo il cilindro del filtro Philips fornito in dotazione con
l’apparecchio.
- Durante la pulizia, specialmente in stanze con una bassa umidità
dell’aria, l’aspirapolvere genera elettricità statica. Di conseguenza,
quando toccate il tubo o altre parti in acciaio dell’apparecchio, è
possibile avvertire delle scariche elettriche. Queste ultime non sono
dannose né per l’uomo, né per l’apparecchio. Per ovviare a questo
inconveniente, vi consigliamo di:
1 scaricare a terra l’apparecchio appoggiando spesso il tubo su altri
oggetti di metallo presenti nella stanza (ad esempio sulle gambe di un
tavolo o di una sedia oppure contro un radiatore, ecc...);
2 aumentare il livello di umidità dell’aria nella stanza utilizzando dell’acqua.
Potete, ad esempio, appendere contenitori o recipienti pieni d’acqua sui
radiatori oppure nelle loro vicinanze.
Campi elettromagnetici (EMF)
Questo apparecchio Philips è conforme a tutti gli standard relativi ai campi
elettromagnetici (EMF). Se utilizzato in modo appropriato seguendo le
istruzioni contenute nel presente manuale d’uso, l’apparecchio consente
un utilizzo sicuro come confermato dai risultati scientifici attualmente
disponibili.
 Loading...