

Page 1
FC8972, FC8776,
FC8774, FC8772
Page 2
Page 3
1
2
3
4
5
6
7
8
9 10
12
13
14
15
18
19
20
21
2223O
17
11
16
1
Page 4

Page 5

English 6
Čeština 16
Eesti 26
Hrvatski 37
Latviešu 49
Lietuviškai 59
Magyar 70
Polski 81
Română 93
Slovenščina 104
Slovensky 114
Български 124
Русский 136
Українська 148
Қазақша
159
Page 6

6
English
Introduction
Congratulations on your purchase and welcome to Philips! To fully benefit from the support that
Philips offers, register your product at www.philips.com/welcome.
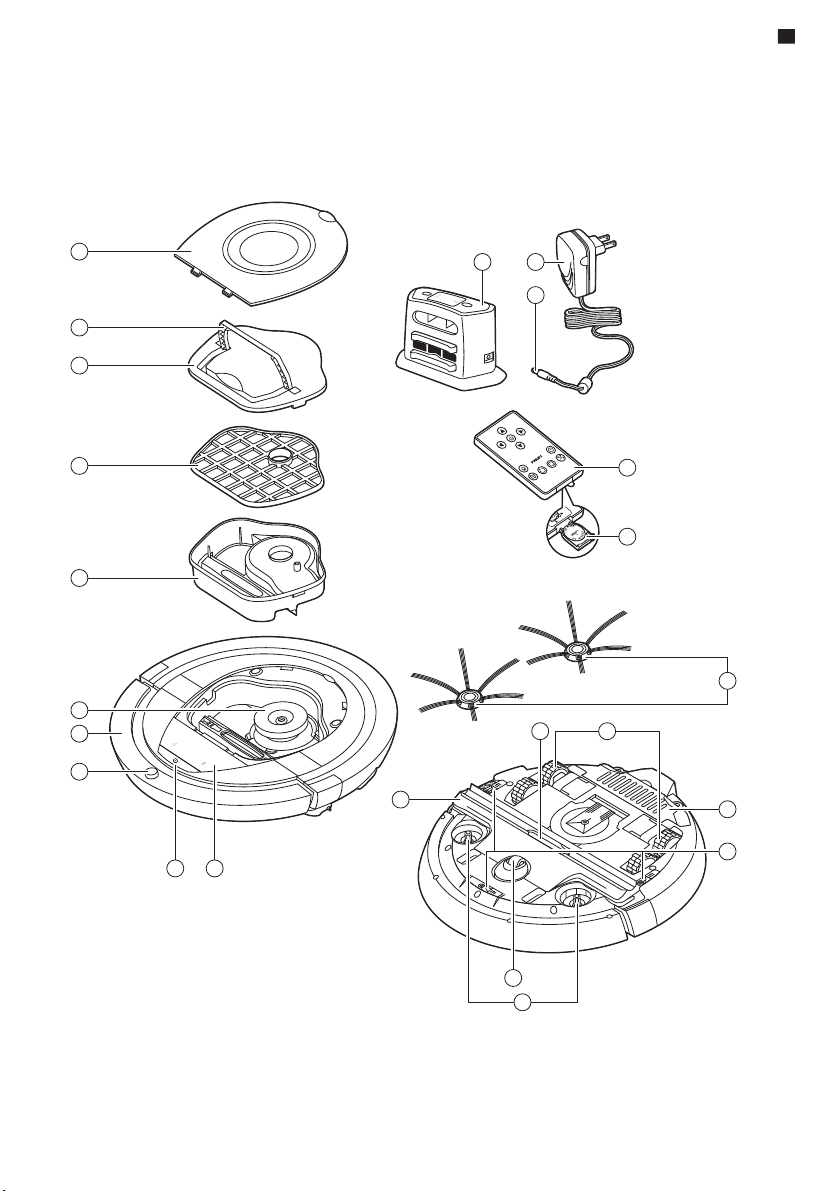
General description (Fig. 1)
1 Top cover
2 Handle of dust container lid
3 Dust container lid
4 Filter
5 Dust container
6 Fan
7 Bumper
8 Docking station sensor
9 Start/stop button (to start or stop the robot)
10 Display
11 TriActive XL nozzle
12 Front wheel
13 Side brush shafts
14 Drop-off sensors
15 Battery compartment
16 Wheels
17 Suction opening
18 Side brushes
19 Battery holder
20 Remote control
21 Small plug
22 Adapter
23 Docking station
Display and remote control
Display (Fig. 2):
1 Warning indicator
2 Dust container full indicator
Remote control (Fig. 3):
1 Navigation buttons and start/stop
2 Docking button
3 Cleaning time button
4 Cleaning mode buttons
How your robot works
What your robot cleans
This robot is equipped with features that make it a suitable cleaner to help you clean the floors in your
home.
The robot is especially suitable for cleaning hard floors, such as wooden, tiled or linoleum floors. It
may experience problems cleaning soft floors, such as carpet or rugs. If you use the robot on a carpet
or rug, please stay close by the first time to see if the robot can deal with this type of floor. The robot
also needs supervision when you use it on very dark or shiny hard floors.
Page 7

English
How your robot cleans
Cleaning system
The robot has a 2-stage cleaning system to clean your floors efficiently.
-
The two side brushes help the robot clean in corners and along walls. They also help to remove dirt
from the floor and move it towards the suction opening (Fig. 4).
-
The suction power of the robot picks up loose dirt and transports it through the suction opening
into the dust container (Fig. 5).
Cleaning patterns
In its auto cleaning mode, the robot uses an automatic sequence of cleaning patterns to clean each
area of the room optimally. The cleaning patterns it uses are:
1 Z-pattern or zigzag pattern (Fig. 6)
2 Random pattern (Fig. 7)
3 Wall-following pattern (Fig. 8)
4 Spot-cleaning pattern (Fig. 9)
In its auto cleaning mode, the robot uses these patterns in a fixed sequence:z-pattern, random
pattern, wall-following pattern, and spot-cleaning pattern.
When the robot has completed this sequence of patterns, it starts moving in Z-pattern again. The
robot continues to use this sequence of patterns to clean the room until the rechargeable battery runs
low, or until it is switched off manually.
Note: You can also select each mode individually by pressing the appropriate button on the remote
control. For more details, see chapter 'Using your robot', section 'Cleaning modes'.
7
How your robot avoids height differences
The robot has three drop-off sensors in its bottom. It uses these drop-off sensors to detect and avoid
height differences such as staircases.
Note: It is normal for the robot to move slightly over the edge of a height difference, as its front dropoff sensor is located behind the bumper.
Caution: In some cases, the drop-off sensors may not detect a staircase or other height difference
in time. Therefore monitor the robot carefully the first few times you use it, and when you operate it
near a staircase or another height difference. It is important that you clean the drop-off sensors
regularly to ensure the robot continues to detect height differences properly (see chapter ' Cleaning
and maintenance' for instructions).
Before first use
Mounting the side brushes
1 Unpack the side brushes and place the robot upside down on a table or on the floor.
2 Push the side brushes onto the shafts on the bottom of the robot (Fig. 10).
Note: Make sure you attach the side brushes properly. Press them onto the shaft until you hear
them lock into position with a click.
Removing the protection tag from the remote control
The remote control works on a CR2025 coin-shaped battery. This battery is protected with a
protection tag that has to be removed before use.
Page 8

8
English
1 Pull the battery protection tag out of the battery compartment of the remote control (Fig. 11).
Now the remote control is ready for use.
Preparing for use
Installing the docking station
1 Insert the small plug of the adapter into the socket on the docking station (1) and insert the adapter
into the wall socket (2) (Fig. 12).
2 Place the docking station on a horizontal, level floor against a wall.
Note: Make sure that there are no obstacles or height differences 80 cm in front, 30 cm to the right
and 100 cm to the left of the docking station (Fig. 13).
Important note: deep sleep mode
In deep sleep mode, the robot does not respond at all when you press a button. To reactivate the
robot when it is in deep sleep mode:
1 Press the start/stop button on the robot to bring the robot from deep sleep mode to standby
mode.
2 Press the start/stop button on the robot (Fig. 19) or on the remote control to start the robot.
3 If the robot does not start cleaning, place it on the plugged-in docking station to recharge its
rechargeable battery.
The robot enters deep sleep mode when you press the start/stop button for 3 seconds. It may also
enter the deep sleep mode when its battery is empty. The battery may, for instance, run empty if the
robot is unable to find its docking station.
Note: You cannot get the robot out of its deep sleep mode with the start/stop button on the remote
control. You need to press the on/off button on the robot.
Charging
-
When charging for the first time and when the rechargeable battery of the robot is empty, the
charging time is four hours.
-
When the rechargeable battery is fully charged, your robot can clean for up to 100 minutes.
-
Your robot can only be charged on the docking station.
Charging on the docking station
1 Press the start/stop button on the robot.
2 Place the robot on the plugged-in docking station (Fig. 14).
3 The start/stop button starts flashing slowly (Fig. 15).
4 When the rechargeable battery is fully charged, the start/stop button lights up continuously (Fig.
16).
Charging automatically during use
1 When the robot has finished cleaning or when only 15% of the battery power remains, it
automatically searches for the docking station to recharge. When the robot searches for the
docking station, the start/stop button flashes quickly (Fig. 17).
2 When the rechargeable battery is fully charged, the start/stop button lights up continuously.
Page 9

English
Note: The robot only searches for the docking station automatically when it started cleaning from the
docking station.
Preparing the room for a cleaning run
Before you start the robot on its cleaning run, make sure that you remove all loose and fragile objects
from the floor (Fig. 18).
Also remove all cables, wires and cords from the floor.
Using your robot
Starting and stopping
1 Press the start/stop button.
-
You can press the start/stop button on the robot (Fig. 19).
-
You can also press the start/stop button on the remote control (Fig. 20).
2 The start/stop button is continuously on and the robot starts cleaning (Fig. 21).
3 The robot cleans in the auto-cleaning mode until its battery runs low. In the auto-cleaning mode, it
follows repeated sequences of Z-pattern, random, wall-following and spot-cleaning patterns (Fig.
22).
Note: To select an individual mode, press one of the mode buttons on the remote control. See
section 'Cleaning mode selection' for more details.
4 When the battery runs low, the start/stop button starts flashing and the robot searches for the
docking station to recharge (Fig. 17).
5 You can also press the start/stop button to interrupt or stop the cleaning run. If you press the
start/stop button again and there is still enough energy in the rechargeable battery, the robot
continues cleaning in the auto-cleaning mode.
6 To make the robot return to the docking station before the rechargeable battery runs low, press
the docking button on the remote control (Fig. 23).
The start/stop button starts flashing and the robot searches for the docking station (Fig. 24).
Note: If you did not start the robot from the docking station, it does not search for the docking
station automatically when the rechargeable battery runs low. If there is still enough energy in the
rechargeable battery, you can press the docking button on the remote control to make the robot
return to the docking station. If the rechargeable battery is completely empty, you have to place
the robot on the docking station manually.
9
Operating the docking station
The docking station has two controls that can be used to operate the robot.
Battery full and go button
If you press the battery full and go button on the docking station while the robot is charging, the robot
starts cleaning as soon as the rechargeable battery is full (Fig. 25).
24h button
If you press the 24h button on the docking station, the docking station starts to count down the 24
hours until the next cleaning run. When the countdown is finished, the robot starts cleaning until its
battery runs low and then returns to the docking station automatically to recharge (Fig. 26).
Page 10
10
English
Cleaning mode selection
Next to the auto-cleaning mode, this robot has four individual cleaning modes that can each be
activated by pressing the appropriate button on the remote control.
Z-pattern mode
In Z-pattern mode, the robot cleans by making Z-shaped loops through the room to clean large areas
(Fig. 27).
Random mode
In this mode, the robot cleans the room in a mixed pattern of straight and crisscross movements (Fig.
28).
Wall-following mode
In this mode, the robot follows the walls of the room to give the area alongside the walls an extra
clean (Fig. 29).
Spot-cleaning mode
In this mode, the robot moves randomly on a small area to clean this area thoroughly (Fig. 30).
Note: The manually selected modes are only active for a couple of minutes. After that, the robot
switches to auto-cleaning mode.
Manual driving
1 Use the arrow buttons above and below and to the left and right of the start/stop button on the
remote control to navigate the robot through the room. (Fig. 31)
Note: Be careful when you drive the robot manually close to height differences and staircases.
Note: The vacuuming function and the side brushes only work when the robot is driven forward.
The left, right or back buttons are only for maneuvering the robot.
Using the cleaning time button
Press the cleaning time button on the remote control to make the robot clean for 35 minutes. When
the cleaning time is finished, the robot returns to the docking station to recharge (Fig. 32).
Signals and their meaning
The robot has a display with two indicators: a warning indicator and the dust container full indicator.
The start/stop button gives light signals. The table below explains the meaning of the signals.
Signal
The start/stop button is on continuously. The robot is ready to clean.
The start/stop button flashes slowly. The robot is charging.
The start/stop button flashes quickly. The robot is is searching for the docking station.
The dust container full indicator lights up. The dust container is full.
The warning indicator lights up. The robot was lifted while it was cleaning.
Meaning
The rechargeable battery of the robot is low.
Page 11
English
Signal Meaning
The bumper of the robot is stuck.
A wheel or side brush is stuck.
The top cover is not present or is not closed
properly.
The robot cannot find the docking station.
Clap response
The clap response is enabled when the robot enters sleep mode in the following situations:
-
when it stops cleaning due to an error
-
when it cannot find its docking station in 20 minutes
If you do not see the robot, you can locate it by clapping your hands once. The robot will respond by
beeping and by lighting up all icons on its display.
Cleaning and maintenance
Emptying and cleaning the dust container
Empty and clean the dust container when the dust container full indicator lights up continuously.
1 Remove the cover (Fig. 33).
2 Pull up the handle of the dust container lid and lift the dust container out of the dust container
compartment (Fig. 34).
Note: When you remove or reinsert the dust container, take care not to damage the blades of the
motor fan.
3 Carefully lift the lid off the dust container (1) and take out the filter (2) (Fig. 35).
4 Shake the dust container over a dustbin to empty it. Clean the filter and the inside of the dust
container with a cloth or a toothbrush with soft bristles. Also clean the suction opening in the
bottom of the dust container (Fig. 36).
Caution: Do not clean the dust container and the filter with water or in the dishwasher.
5 Put the filter back into the dust container (1). Then place the lid on the dust container(2) (Fig. 37).
6 Put the dust container back into the dust container compartment and put the top cover back on
the robot (Fig. 38).
Caution: Always make sure the filter is present inside the dust container. If you use the robot
without the filter inside the dust container, the motor will be damaged.
11
Cleaning the robot
To maintain good cleaning performance, you have to clean the drop-off sensors, the wheels, the side
brushes and the suction opening from time to time.
1 Place the robot upside down on a flat surface.
2 Use a brush with soft bristles (e.g. a toothbrush) to remove dust or fluff from the drop-off sensors.
(Fig. 39)
Note: It is important that you clean the drop-off sensors regularly. If the drop-off sensors are dirty,
the robot may fail to detect height differences or staircases.
Page 12

12
English
3 Use a brush with soft bristles (e.g. a toothbrush) to remove dust or fluff from the front wheel and
side wheels (Fig. 40).
4 To clean the side brushes, grab them by the bristles and pull them off their shafts (Fig. 41).
5 Remove fluff, hairs and threads from the shaft and from the side brush with a soft brush (e.g. a
toothbrush) or a cloth (Fig. 42).
6 Check the side brushes and the bottom of the robot for any sharp objects that could damage your
floor.
7 After you have removed the side brushes from their shafts, undo the snap connections of the
TriActive XL nozzle by inserting your fingers at the places marked with arrows and pull the TriActive
nozzle off the robot (Fig. 43).
8 Clean the suction opening with a soft brush (e.g. a toothbrush) (Fig. 44).
9 Remove all visible dirt from the TriActive nozzle (Fig. 45).
10 Insert the snap hooks of the TriActive nozzle into the holes in the bottom of the robot (Fig. 46).
Push the TriActive nozzle back into position. Check if the nozzle can move a few millimeters up and
down freely.
Replacement
Ordering accessories
To buy accessories or spare parts, visit www.shop.philips.com/service or go to your Philips dealer.
You can also contact the Philips Consumer Care Center in your country (see the international warranty
leaflet for contact details).
Replacing the filter
Replace the filter if it is very dirty or damaged. You can order a new filter under order number FC8012.
See 'Emptying and cleaning the dust container' in chapter 'Cleaning and maintenance' for instructions
on how to remove the filter from the dust container and how to place it in the dust container.
Replacing the side brushes
Replace the side brushes after some time to ensure proper cleaning results.
Note: Always replace the side brushes when you notice signs of wear or damage. We also recommend
that you replace both side brushes at the same time. You can order spare side brushes as a set under
order number FC8013.
1 To replace the side brushes, grab the old side brushes by the bristles and pull them off their shafts
(Fig. 41).
2 Push the new side brushes onto the shafts (Fig. 10).
Replacing the rechargeable battery
The rechargeable battery of the robot may only be replaced by qualified service engineers. Take the
robot to an authorized Philips service center to have the battery replaced when you can no longer
recharge it or when it runs out of power quickly. You can find the contact details of the Philips
Consumer Care Center in your country in the international warranty leaflet or go to
www.philips.com/support.
Page 13
English
Replacing the battery of the remote control
The remote control works on a CR2025 coin-shaped battery. Replace the battery when the robot no
longer responds when you press the buttons on the remote control.
1 Hold the remote control upside down. Push the release button on the battery holder and at the
same time slide the battery holder out of the remote control (Fig. 47).
2 Remove the empty battery from the battery holder and place a new battery in the battery holder.
Then slide the battery holder back into the remote control (Fig. 48).
Storage
When you are not going to use the robot for more than one month, press the start/stop button on the
robot for 3 seconds to make the robot enter deep sleep mode to protect its rechargeable battery.
Unplug the docking station to save energy.
Removing the rechargeable battery
Warning: Only remove the rechargeable battery when you discard the appliance. Make
sure the battery is completely empty when you remove it.
To remove the rechargeable battery, follow the instructions below. You can also take the robot to a
Philips service center to have the rechargeable battery removed. Contact the Philips Consumer Care
Center in your country for the address of a service center near you.
1 Start the robot from a place somewhere in the room and not from the docking station.
2 Let the robot run until the rechargeable battery is empty to make sure that the rechargeable
battery is completely discharged before you remove it and dispose of it.
3 Undo the screws of the battery compartment lid and remove the lid (Fig. 49).
4 Lift out the rechargeable battery and disconnect it (Fig. 50).
5 Take the robot and the rechargeable battery to a collection point for electrical and electronic
waste.
13
Troubleshooting
This chapter summarizes the most common problems you could encounter with the appliance. If you
are unable to solve the problem with the information below, visit www.philips.com/support for a list
of frequently asked questions or contact the Consumer Care Center in your country.
Problem
The robot does not start
cleaning when I press the
start/stop button.
Possible cause Solution
The rechargeable battery is
empty.
The robot is in deep sleep
mode.
Charge the rechargeable battery (see
chapter 'Preparing for use').
Press the start/stop button once to
reactivate the robot.When you press the
start/stop button again the robot starts
cleaning. If the rechargeable battery is
empty,place the robot on the plugged-in
docking station.
Page 14
14
English
Problem Possible cause Solution
The robot does not
respond when I press
one of the buttons.
The robot's rechargeable
battery is empty'.
Place the robot on the plugged-in
docking station. After a few seconds, the
robot beeps and the display lights up.
The warning indicator
flashes quickly.
The robot does not clean
properly.
One or both wheels are
stuck.
One or both side brushes are
stuck.
The top cover is not present
or is not closed properly.
The bumper is stuck. Lift the robot so that its bumper comes
The robot was lifted while it
was cleaning.
The bristles of one or both
side brushes are crooked or
bent.
The filter in the dust
container is dirty.
Remove the fluff, hair, thread or wire that
is caught around the wheel suspension.
Clean the side brushes (see chapter
'Cleaning and maintenance').
When the top cover is not present or is
not closed properly, the robot does not
work. Place the top cover on the robot
properly.
free. Place the robot at some distance
from the obstacle and press the
start/stop button to make it resume
cleaning.
Place the robot on the floor. Then press
the start/stop button to make the robot
resume cleaning.
Soak the brush or brushes in warm water
for a while. If this does not restore the
bristles to their proper shape, replace the
side brushes (see chapter 'Replacement').
Clean the filter in the dust container with
a cloth or a toothbrush with soft bristles.
You can also clean the filter and dust
container with a regular vacuum cleaner
at a low suction power setting.
The suction opening in the
bottom of the dust container
is clogged.
The front wheel is jammed
with hair or other dirt.
The robot is cleaning a very
dark or shiny surface, which
triggers the drop-off sensors.
This causes the robot to
move in an unusual pattern.
If brushing or vacuuming does not help to
clean the filter, replace the filter with a
new one. We advise you to replace the
filter at least once a year.
Clean the suction opening (see chapter
'Cleaning and maintenance').
Clean the front wheel (see chapter
'Cleaning and maintenance').
Press the start/stop button and then
move the robot to a lighter colored piece
of the floor. If the problem continues to
occur on lighter colored floors, please go
to www.philips.com/support or contact
the Consumer Care Center in your
country.
Page 15
Problem Possible cause Solution
The robot is cleaning a floor
that reflects sunlight quite
strongly. This triggers the
drop-off sensors and causes
the robot to move in an
unusual pattern.
Close the curtains to block sunlight from
entering the room. You can also start
cleaning when the sunlight is less bright.
English
15
The rechargeable battery
can no longer be charged
or runs empty very fast.
The battery of the
remote control runs
empty too fast.
The robot is moving in
circles.
The robot cannot find the
docking station.
The rechargeable battery has
reached the end of its life.
Perhaps you did not insert
the correct type of battery.
The robot is in spot-cleaning
mode.
There is not enough room for
the robot to navigate
towards the docking station.
The robot is still actively
searching.
The robot was not started
from the docking station.
Have the rechargeable battery replaced
by a Philips service center (see chapter
'Replacement').
For the remote control, you need a
CR2025 coin-shaped battery. If the
problem persists, go to
www.philips.com/support or contact the
Consumer Care Center in your country.
This is normal behavior. The spot-cleaning
mode can be activated when a lot of dirt
is detected on the floor for a thorough
clean. It is also part of the auto cleaning
mode. After approximately one minute
the robot resumes its normal cleaning
pattern. You can also stop the spotcleaning mode by selecting a different
cleaning mode on the remote control.
Try to find another place for the docking
station. See 'Installing the docking station'
in chapter 'Preparing for use'.
Give the robot around 20 minutes to
return to the docking station.
If you want the robot to return to the
docking station after a cleaning run, start
it from the docking station.
Page 16

16
Čeština
Úvod
Společnost Philips Vám gratuluje ke koupi a vítá Vás! Chcete-li využívat všech výhod podpory
nabízené společností Philips, zaregistrujte svůj výrobek na stránkách www.philips.com/welcome.
Všeobecný popis (obr. 1)
1 horní kryt
2 rukojeť víka nádoby na prach
3 víko nádoby na prach
4 Filtr
5 nádoba na prach
6 ventilátor
7 nárazník
8 čidlo dokovací stanice
9 tlačítko spuštění/zastavení (pro spuštění a zastavení robota)
10 Displej
11 hubice TriActive XL
12 přední kolečko
13 hřídele postranních kartáčků
14 senzory pádu
15 Přihrádka na baterie
16 kolečka
17 sací otvor
18 postranní kartáčky
19 držák baterie
20 dálkový ovladač
21 Malá zástrčka
22 Adaptér
23 dokovací stanice
Displej a dálkový ovladač
Displej (obr. 2):
1 indikátor varování
2 indikátor naplnění nádoby na prach
Dálkový ovladač (obr. 3):
1 navigační tlačítka aspuštění/zastavení
2 tlačítko dokování
3 tlačítko doby čištění
4 Tlačítka režimu čištění
Jak robot funguje
Co robot uklízí
Tento robot je vybaven funkcemi, které umožňují, aby se stal vaším praktickým pomocníkem při úklidu
podlah.
Robot je vhodný především pro čištění tvrdých podlah ze dřeva, dlaždic, linolea apod. Čištění měkkých
podlah, např. koberců, mu může činit potíže. Pokud robota používáte kčištění koberce, zůstaňte při
prvním použití poblíž, abyste viděli, zda si dokáže stímto typem podlahy poradit. Na robota je také
třeba dohlížet při používání na velmi tmavých nebo lesklých tvrdých podlahách.
Page 17

Čeština
Jak robot uklízí
Systém čištění
Robot je vybaven dvoufázovým systémem čištění, který zajišťuje efektivní úklid podlah.
-
Dva postranní kartáčky pomáhají robotovi při čištění proniknout do rohů a oblastí podél zdí. Také
pomáhají sbírat špínu ze země a posouvat ji směrem ksacímu otvoru (obr. 4).
-
Volnou špínu robot sebere díky dostatečně výkonnému sání a skrze sací otvor ji uloží do nádoby na
prach (obr. 5).
Schémata čištění
Vrežimu automatického čištění používá robot automatické pořadí úklidových schémat prooptimální
čištění jednotlivých oblastí místnosti. Používaná úklidová schémata jsou:
1 schéma (obr. 6) Z, nebo cik- cak
2 náhodné schéma (obr. 7)
3 schéma (obr. 8) pohybu podél zdi
4 schéma (obr. 9) bodového čištění
Vrežimu automatického čištění robot používá tato schémata vpevném pořadí: schéma Z, náhodné
schéma, schéma pohybu podél zdi a schéma bodového čištění.
Když robot dokončí toto pořadí schémat, začne se znovu pohybovat podle schématu Z. Robot bude
pokračovat včištění místnosti pomocí tohoto pořadí schémat, dokud se jeho baterie skoro nevybije
nebo dokud ho ručně nevypnete.
Poznámka: Jednotlivé režimy můžete také vybrat ručně stisknutím příslušného tlačítka na dálkovém
ovladači. Podrobnosti najdete vkapitole „Používání robota“ včásti „Režimy čištění“.
17
Jak se robot vyhýbá výškovým rozdílům
Ve spodní části je robot vybaven třemi senzory pádu. Tyto senzory pádu slouží ktomu, aby robot
rozpoznal výškové rozdíly, například schody.
Poznámka: Pokud se robot dostane mírně nad hranu stupně svýškovým rozdílem, je to normální,
protože senzory pádu jsou umístěny až za nárazníkem.
Upozornění: V některých případech senzory pádu nemusí schodiště nebo jiný výškový rozdíl
rozpoznat včas. Proto robota při několika prvních použitích a při provozu v blízkosti schodiště nebo
jiného výškového rozdílu bedlivě sledujte. Senzory pádu je důležité pravidelně čistit, aby si robot
zachoval schopnost správně rozpoznat výškové rozdíly (instrukce naleznete v kapitole „Čištění a
údržba“).
Před prvním použitím
Montáž postranních kartáčků
1 Vybalte postranní kartáčky apoložte robota vzhůru nohama na stůl nebo na podlahu.
2 Nasaďte postranní kartáčky na hřídele ve spodní části robota (obr. 10).
Poznámka: Ujistěte se, že postranní kartáčky jste upevnili správně. Nasaďte je na hřídel, až uslyšíte,
že skliknutím zapadly na své místo.
Odebrání ochranného štítku zdálkového ovladače
Dálkový ovladač je napájen knoflíkovou baterií CR2025. Baterie je opatřena ochranným štítkem, který
je nutné před prvním použitím vyjmout.
Page 18

18
Čeština
1 Vytáhněte ochranný štítek zprostoru pro baterii dálkového ovladače (obr. 11).
Dálkový ovladač je připraven kpoužití.
Příprava k použití
Instalace dokovací stanice
1 Zapojte malou zástrčku adaptéru do zásuvky na dokovací stanici (1) a adaptér zapojte do zásuvky
ve zdi (2) (obr. 12).
2 Umístěte dokovací stanici na vodorovný povrch ke zdi.
Poznámka: Zkontrolujte, že ve vzdálenosti 80cm vpředu, 30cm napravo a100cm nalevo od
dokovací stanice (obr. 13) nejsou žádné překážky.
Důležitá poznámka: režim hlubokého spánku
Robot vrežimu hlubokého spánku vůbec nereaguje na stisknutí tlačítka. Opětovná aktivace robota,
který je vrežimu hlubokého spánku:
1 Stisknutím tlačítka spuštění/zastavení na robotovi přepnete robota zrežimu hlubokého spánku do
pohotovostního režimu.
2 Robota spusťte stisknutím tlačítka spuštění/zastavení na robotovi (obr. 19) nebo na dálkovém
ovladači.
3 Pokud robot nezačne uklízet, umístěte jej do dokovací stanice připojené kelektrické zásuvce, aby
se znovu nabil jeho akumulátor.
Robot přejde do režimu hlubokého spánku, pokud stisknete tlačítko spuštění/zastavení po dobu
3sekund. Do režimu hlubokého spánku může také přejít, pokud je vybitý akumulátor. Kvybití
akumulátoru může například dojít, když robot nemůže najít svoji dokovací stanici.
Poznámka: Robota nelze zrežimu hlubokého spánku probudit stisknutím tlačítka spuštění/zastavení
na dálkovém ovladači. Je nutno stisknout vypínač na robotu.
Nabíjení
-
První nabíjení robota, stejně jako nabíjení zcela vybitého akumulátoru, trvá čtyři hodiny.
-
Na plně nabitý akumulátor může robot uklízet až 100minut.
-
Robota lze nabíjet pouze v dokovací stanici.
Nabíjení vdokovací stanici
1 Stiskněte tlačítko spuštění/zastavení na robotovi.
2 Umístěte robota do dokovací stanice (obr. 14) připojené kelektrické zásuvce.
3 Tlačítko spuštění/zastavení začne pomalu blikat (obr. 15).
4 Když je akumulátor plně nabitý, tlačítko spuštění/zastavení nepřetržitě svítí (obr. 16).
Automatické nabíjení při používání
1 Když robot dokončí čištění nebo když nabití akumulátoru klesne pod 15%, robot automaticky
vyhledá dokovací stanici, aby dobil akumulátor. Když robot hledá dokovací stanici, tlačítko
spuštění/zastavení rychle bliká (obr. 17).
2 Když je akumulátor plně nabitý, tlačítko spuštění/zastavení nepřetržitě svítí.
Poznámka: Robot dokovací stanici vyhledá pouze vpřípadě, že čištění zahájil zní.
Page 19

Čeština
Příprava místnosti na úklid
Než pošlete robota uklízet, seberte zpodlahy všechny volné a křehké předměty (obr. 18).
Také ze země odstraňte veškeré kabely a dráty.
Používání robota
Spuštění azastavení
1 Stiskněte tlačítko spuštění/zastavení.
-
Můžete stisknout tlačítko spuštění/zastavení na robotovi (obr. 19).
-
Také lze stisknout tlačítko spuštění/zastavení na dálkovém ovladači (obr. 20).
2 Tlačítko spuštění/zastavení bude nepřetržitě svítit arobot začne uklízet (obr. 21).
3 Robot bude uklízet vrežimu automatického čištění, dokud se baterie skoro nevybije. Vrežimu
automatického čištění robot opakuje předem dané pořadí schémat pohybu Z, náhodného čištění,
pohybu podél stěn a bodového čištění (obr. 22).
Poznámka: Chcete-li vybrat jeden režim, stiskněte příslušné tlačítko režimu čištění na dálkovém
ovladači. Další podrobnosti najdete včásti „Výběr čisticího režimu“.
4 Když nabití baterie klesne, tlačítko spuštění/zastavení začne blikat a robot vyhledá dokovací
stanici, aby se nabil (obr. 17).
5 Stisknutím tlačítka spuštění/zastavení lze také čištění přerušit nebo zastavit. Když tlačítko
spuštění/zastavení stisknete znovu a baterie je dostatečně nabitá, robot bude pokračovat vrežimu
automatického čištění.
6 Když budete chtít, aby se robot vrátil do dokovací stanice dříve, než bude baterie skoro vybitá,
stiskněte dokovací tlačítko na dálkovém ovladači (obr. 23).
Tlačítko spuštění/zastavení začne blikat a robot vyhledá dokovací stanici (obr. 24).
Poznámka: Pokud jste robota nespustili zdokovací stanice, při vybití baterie robot stanici
automaticky nevyhledá. Pokud je vbaterii ještě dostatek energie, můžete stisknout dokovací
tlačítko na dálkovém ovladači, aby se robot vrátil do dokovací stanice. Pokud je baterie zcela
vybitá, musíte robota do dokovací stanice umístit ručně.
19
Ovládání dokovací stanice
Dokovací stanice má dva ovládací prvky, kterými lze robota ovládat.
Tlačítko plného nabití a spuštění
Pokud během nabíjení robota stisknete na dokovací stanici tlačítko plného nabití a spuštění, začne
robot po úplném nabití (obr. 25) baterie uklízet.
Tlačítko 24h
Pokud stisknete tlačítko 24h na dokovací stanici, spustí dokovací stanice odpočet 24 hodin do příštího
čištění. Po skončení odpočítávání robot začne čistit, dokud se jeho baterie skoro nevybije, a poté se
automaticky vrátí do dokovací stanice, aby se nabil (obr. 26).
Výběr čisticího režimu
Výběr čisticího režimu
Robot má kromě režimu automatického čištění další čtyři režimy čištění, které můžete vybrat
stisknutím příslušného tlačítka na dálkovém ovladači.
Page 20
20
Čeština
Schéma Z
Při čištění podle schématu Z čistí robot velké plochy (obr. 27) vmístnosti pohybem ve smyčkách tvaru
písmene Z.
Náhodný režim
Vtomto režimu se robot při čištění místnosti pohybuje střídavě rovnými a křížovými pohyby (obr. 28).
Režim pohybu podél stěn
Vtomto režimu se robot pohybuje podél stěn místnosti, aby oblasti podél stěn vyčistil pečlivěji (obr.
29).
Režim bodového čištění
Vtomto režimu se robot pohybuje náhodně na malé oblasti, aby ji důkladně vyčistil (obr. 30).
Poznámka: Ručně vybrané režimy jsou aktivní pouze po několik minut. Poté se robot přepne do
režimu automatického čištění.
Ruční ovládání
1 Pohyb robota pomístnosti (obr. 31) můžete ovládat tlačítky šipek kolem tlačítka spuštění/zastavení
na dálkovém ovladači.
Poznámka: Když robota ovládáte ručně, dávejte pozor na výškové rozdíly a schody.
Poznámka: Funkce vysávání a postranní kartáčky fungují, pouze když robot jede dopředu. Tlačítka
doleva, doprava a dozadu slouží pouze kmanévrování srobotem.
Používání tlačítka doby čištění
Stisknutím tlačítka doby čištění na dálkovém ovladači přikážete robotovi uklízet po dobu 35 minut. Po
uplynutí doby čištění se robot vrátí do dokovací stanice, aby se nabil (obr. 32).
Signalizace a její význam
Robot je vybaven displejem se dvěma indikátory: indikátor varování a indikátor naplnění nádoby na
prach. Tlačítko spuštění/zastavení je vybaveno světelnou signalizací. Níže uvedená tabulka vysvětluje
význam signalizace.
Signalizace
Tlačítko spuštění/zastavení nepřetržitě svítí. Robot je připraven kčištění.
Tlačítko spuštění/zastavení pomalu bliká. Robot se nabíjí.
Tlačítko spuštění/zastavení rychle bliká. Robot hledá dokovací stanici.
Indikátor naplnění nádoby na prach svítí. Nádoba na prach je plná.
Indikátor varování svítí. Robot byl během čištění zvednut.
Význam
Baterie robota je skoro vybitá.
Robotovi se zasekl nárazník.
Zaseklo se kolečko nebo postranní kartáček.
Horní kryt chybí nebo není správně zavřený.
Page 21
Čeština
Signalizace Význam
Robot nemůže najít dokovací stanici.
Reakce na tlesknutí
Reakce na tlesknutí, když se robot nachází vrežimu spánku, je aktivní vnásledujících situacích:
-
čištění bylo zastaveno zdůvodu chyby,
-
naprogramovali jste příliš krátký čas čištění,
-
robot nedokázal během 20minut najít dokovací stanici.
Pokud robota nevidíte, můžete ho najít jedním tlesknutím. Robot zareaguje vydáním zvukového
signálu arozsvícením všech ikon na displeji.
Čištění a údržba
Vyprazdňování a čištění nádoby na prach
Pokud indikátor naplnění nádoby na prach nepřetržitě svítí, vysypte avyčistěte nádobu na prach.
1 Sejměte kryt (obr. 33).
2 Zatáhněte za rukojeť víka nádoby na prach avyndejte nádobu zprostoru pro nádobu na prach
(obr. 34).
Poznámka: Když nádobu na prach vyjímáte nebo vracíte na místo, dejte pozor, abyste nepoškodili
lopatky ventilátoru.
3 Opatrně zvedněte víko nádoby na prach (1) a vyjměte filtr (2) (obr. 35).
4 Vyklepejte nádobou na prach nad odpadkovým košem. Vyčistěte filtr a vnitřek nádoby na prach
hadříkem nebo kartáčkem směkkými štětinami. Také vyčistěte sací otvor vdolní části nádoby na
prach (obr. 36).
Upozornění: Nádobu na prach ani filtr nemyjte vodou ani v myčce na nádobí.
5 Vložte filtr zpět do nádoby na prach (1). Poté nádobu na prach (2) (obr. 37) přikryjte víkem.
6 Vraťte nádobu na prach zpět do jejího prostoru avraťte horní kryt robota na místo (obr. 38).
Upozornění: Vždy se ujistěte, že se v nádobě na prach nachází filtr. Pokud robota budete
používat bez filtru v nádobě na prach, dojde k poškození motoru.
21
Čištění robota
Aby robot mohl stále dobře uklízet, je nutné občas vyčistit senzory pádu, kolečka,postranní kartáčky a
sací otvor.
1 Položte robot vzhůru nohama na rovný povrch.
2 Pomocí kartáčku směkkými štětinami (např. kartáčku na zuby) odstraňte prach a nečistoty ze
senzorů pádu (obr. 39).
Poznámka: Senzory pádu je důležité čistit pravidelně. Když jsou senzory pádu špinavé, robot
nemusí rozpoznat výškové rozdíly nebo schody.
3 Pomocí kartáčku směkkými štětinami (např. kartáčku na zuby) odstraňte prach a nečistoty
zpředního kolečka abočních koleček (obr. 40).
4 Postranní kartáčky před čištěním uchopte za štětiny astáhněte je zhřídelí (obr. 41).
5 Pomocí měkkého kartáčku (např. kartáčku na zuby) nebo hadříku (obr. 42) odstraňte nečistoty,
vlasy a nitě zhřídelí a zpostranních kartáčků.
Page 22

22
Čeština
6 Zkontrolujte, zda na postranních kartáčcích nebo na spodní straně robota nejsou nějaké ostré
předměty, které by mohly poškodit podlahu.
7 Po stažení postranních kartáčků zhřídelí odpojte připojení hubice TriActive XL vložením prstů na
místa označená šipkami a vytáhněte hubici TriActive zrobota ven (obr. 43).
8 Očistěte sací otvor pomocí kartáčku směkkými štětinami (např. kartáčku na zuby) (obr. 44).
9 Odstraňte veškeré viditelné nečistoty zhubice TriActive (obr. 45).
10 Vložte pojistné háčky hubice TriActive do děr ve spodní části robota (obr. 46). Zatlačte hubici
TriActive zpět na své místo. Ověřte, že se hubice může volně pohybovat o několik milimetrů nahoru
a dolů.
Výměna
Objednávání příslušenství
Chcete-li koupit příslušenství nebo náhradní díly, navštivte adresu www.shop.philips.com/service
nebo se obraťte na prodejce výrobků Philips. Můžete se také obrátit na středisko péče ozákazníky
společnosti Philips ve své zemi (kontaktní údaje naleznete na letáčku scelosvětovou zárukou).
Výměna filtru
Pokud je filtr velmi špinavý nebo poškozený, vyměňte ho. Nový filtr si můžete objednat pod
objednacím číslem FC8012. Včásti „Vyprazdňování a čištění nádoby na prach“ vkapitole „Čištění
aúdržba“ najdete pokyny, jak filtr vyjmout znádoby na prach a jak ho vložit zpět.
Výměna postranních kartáčků
Po určité době postranní kartáčky vyměňte, abyste zajistili kvalitní výsledky čištění.
Poznámka: Postranní kartáčky měňte vždy, když si všimnete známek opotřebení nebo poškození.
Doporučujeme měnit vždy oba kartáčky najednou. Náhradní postranní kartáčky lze objednat jako
sadu pod objednacím číslem FC8013.
1 Postranní kartáčky, které chcete vyměnit, uchopte za štětiny astáhněte je zhřídelí (obr. 41).
2 Na hřídele nasaďte nové postranní kartáčky (obr. 10).
Výměna akumulátoru
Výměnu akumulátoru robota smějí provádět pouze kvalifikovaní servisní technici. Pokud akumulátor
nelze nabít nebo se příliš rychle vybíjí, odneste robota do autorizovaného servisního střediska Philips,
kde si ho můžete nechat vyměnit. Podrobnosti ostředisku zákaznické péče společnosti Philips ve své
zemi naleznete na letáku smezinárodně platnou zárukou nebo na adrese www.philips.com/support.
Výměna baterie dálkového ovladače
Dálkový ovladač je napájen knoflíkovou baterií CR2025. Baterii vyměňte, pokud robot nereaguje na
stisknutí tlačítek dálkového ovladače.
1 Podržte dálkový ovladač vzhůru nohama. Stiskněte uvolňovací tlačítko na držáku baterie a zároveň
zdálkového ovladače (obr. 47) vysuňte držák baterie.
2 Vyjměte vybitou baterii zdržáku baterie a vložte do něj novou baterii. Poté držák baterie zasuňte
zpět do dálkového ovladače (obr. 48).
Page 23
Čeština
Skladování
Pokud nebudete robota používat po dobu delší než jeden měsíc, stisknutím tlačítka
spuštění/zastavení na robotovi po dobu 3sekund přepněte robota do režimu hlubokého spánku,
abyste chránili jeho akumulátor. Odpojte dokovací stanici, abyste ušetřili energii.
Vyjmutí akumulátoru
Varování: Až budete přístroj likvidovat, vyjměte z něj akumulátor. Před vyjmutím
akumulátoru se ujistěte, že je úplně prázdný.
Při vyjmutí akumulátoru postupujte podle kroků uvedených níže. Můžete také robota odnést do
servisního střediska Philips, kde bude akumulátor vyjmut. Chcete-li získat adresu svého nejbližšího
servisního střediska, obraťte se na Středisko péče o zákazníky Philips ve vaší zemi.
1 Spusťte robota zlibovolného místa vpokoji (anikoliv zdokovací stanice).
2 Nechte robota zapnutého, dokud se akumulátor nevybije, abyste se ujistili, že bude akumulátor
zcela vybitý, než jej vyjmete zpřístroje a zlikvidujete.
3 Odmontujte šrouby víka přihrádky na baterie a sejměte víko (obr. 49).
4 Zdvihněte akumulátor aodpojte ho (obr. 50).
5 Odevzdejte robota aakumulátor na sběrném místě pro likvidaci elektroodpadu.
Řešení problémů
Tatokapitola uvádí přehled nejběžnějších problémů, sekterýmisemůžete utohoto přístroje setkat.
Pokud se vám nepodaří problém vyřešit za pomoci následujících informací, navštivte web
www.philips.com/support, kde najdete odpovědi na nejčastější dotazy. Případně kontaktujte
středisko péče ozákazníky ve své zemi.
23
Řešení problémů
Problém
Po stisknutí tlačítka
spuštění/zastavení robot
nezačne uklízet.
Robot nereaguje na
stisknutí tlačítek.
Indikátor varování rychle
bliká.
Možná příčina Řešení
Akumulátor je vybitý. Nabijte akumulátor (viz kapitola „Příprava
Robot je vrežimu hlubokého
spánku.
Akumulátor robota je vybitý. Umístěte robota do dokovací stanice
Zaseklo se jedno nebo obě
kolečka.
kpoužití“).
Robota opět aktivujete stisknutím tlačítka
spuštění/zastavení. Po dalším stisknutí
tlačítka spuštění/zastavení začne robot
uklízet. Pokud je akumulátor zcela vybitý,
umístěte robota do dokovací stanice
připojené kelektrické zásuvce.
připojené kelektrické zásuvce. Po
několika sekundách robot vydá zvukový
signál adisplej se rozsvítí.
Odstraňte nečistoty, vlasy a kousky nití
nebo drátů, které se zachytily kolem
závěsu kolečka.
Page 24
24
Čeština
Problém Možná příčina Řešení
Zasekl se jeden nebo oba
postranní kartáčky.
Vyčistěte postranní kartáčky (viz kapitola
„Čištění a údržba“).
Horní kryt chybí nebo není
správně zavřený.
Zasekl se nárazník. Zvedněte robota, aby se jeho nárazník
Robot byl během čištění
zvednut.
Robot neuklízí řádně. Štětiny jednoho nebo obou
kartáčků jsou zkřivené nebo
ohnuté.
Filtr vnádobě na prach je
znečištěný.
Sací otvor vdolní části
nádoby na prach je ucpaný.
Robot nefunguje, když chybí horní kryt
nebo není správně uzavřen. Umístěte
horní kryt na robota správně.
uvolnil. Umístěte robota dále od překážky
a stiskněte tlačítko spuštění/zastavení,
aby včištění pokračoval.
Položte robota na podlahu. Stiskněte
tlačítko spuštění/zastavení, aby robot
pokračoval včištění.
Namočte kartáček nebo kartáčky na chvíli
do teplé vody. Pokud se tímto štětiny
nenarovnají, postranní kartáčky vyměňte
(viz kapitola „Výměna“).
Vyčistěte filtr nádoby na prach hadříkem
nebo kartáčkem směkkými štětinami. Filtr
a nádobu na prach můžete vyčistit rovněž
běžným vysavačem nastaveným na nízký
sací výkon.
Pokud čištění kartáčkem nebo vysavačem
nepomůže filtr zbavit nečistot, vyměňte
filtr za nový. Doporučujeme filtr vyměnit
aspoň jednou ročně.
Vyčistěte sací otvor (viz kapitola Čištění a
údržba).
Akumulátor již není
možné nabít nebo se
velmi rychle vybíjí.
Přední kolečko se zaneslo
vlasy nebo jinými
nečistotami.
Robot uklízí velmi tmavý
nebo lesklý povrch, který
aktivuje senzory pádu. To
způsobuje neobvyklý pohyb
robota.
Robot čistí podlahu, která
velmi silně odráží sluneční
světlo. To aktivuje senzory
pádu a způsobuje neobvyklý
pohyb robota.
Životnost akumulátoru
skončila.
Vyčistěte přední kolečko (viz kapitola
Čištění a údržba).
Stiskněte tlačítko spuštění/zastavení a
přesuňte robota na světlejší podlahu.
Pokud problém přetrvává i na světlejších
podlahách, navštivte webovou stránku
www.philips.com/support nebo se obraťte
na středisko péče ozákazníky ve své zemi.
Zatažením závěsů zabraňte slunečnímu
světlu vpřístupu do místnosti. Popřípadě
můžete čištění spustit, až bude slunce
méně svítit.
Zajistěte výměnu akumulátoru vservisním
středisku Philips (viz kapitola „Výměna“).
Page 25
Problém Možná příčina Řešení
Baterie dálkového
ovladače se příliš rychle
vybíjí.
Možná jste do ovladače
vložili špatný typ baterie.
Pro dálkový ovladač potřebujete
knoflíkovou baterii CR2025. Pokud
problém přetrvává, navštivte webovou
stránku www.philips.com/support nebo se
obraťte na středisko péče ozákazníky ve
své zemi.
Čeština
25
Robot se pohybuje
vkruzích.
Robot nemůže najít
dokovací stanici.
Robot je vrežimu bodového
čištění.
Robot nemá dost místa, aby
se dostal kdokovací stanici.
Robot stále aktivně
vyhledává.
Robot nebyl spuštěn
zdokovací stanice.
Jedná se o normální chování. Režim
bodového čištění lze aktivovat, když je na
podlaze mnoho špíny, aby bylo zaručeno
důkladné vyčištění. Také je součástí
režimu automatického čištění. Po přibližně
jedné minutě se robot vrátí do svého
normálního úklidového schématu. Režim
bodového čištění můžete zastavit také
tím, že na dálkovém ovladači zvolíte jiný
režim čištění.
Zkuste pro dokovací stanici najít jiné
místo. Viz „Instalace dokovací stanice“
vkapitole „Příprava kpoužití“.
Dejte robotovi zhruba 20 minut, aby se
vrátil do dokovací stanice.
Pokud chcete, aby se robot po dokončení
čištění vrátil do dokovací stanice, spusťte
ho zní.
Page 26

26
Eesti
Sissejuhatus
Õnnitleme ostu puhul ja tervitame Philipsi poolt! Philipsi pakutava tootetoe eeliste täielikuks
kasutamiseks registreerige oma toode veebisaidil www.philips.com/welcome.
Üldine kirjeldus
1 Ülemine kate
2 Tolmukambri kaane käepide
3 Tolmukambri kaas
4 Filter
5 Tolmukamber
6 Ventilaator
7 Põrkeraam
8 Dokkimisjaama andur
9 Käivitamis-/seiskamisnupp (robottolmuimeja käivitamiseks või seiskamiseks)
10 Ekraan
11 Toitelüliti (robottolmuimeja sisse- ja väljalülitamiseks)
12 TriActive XL otsak
13 Esiratas
14 Külgmiste harjade võllid
15 Kukkumissensorid
16 Akupesa
17 Rattad
18 Imemisava
19 Külgmised harjad
20 Patareihoidik
21 Kaugjuhtimispult
22 Väike pistik
23 Adapter
24 Dokkimisjaam
Ekraan ja kaugjuhtimispult
Ekraan (joon. 2):
1 Hoiatustuli
2 Tolmukambri täitumise näidik
Kaugjuhtimispult (joon. ):
1 Navigeerimisnupud ja käivitamine/seiskamine
2 Dokkimisnupp
3 Puhastusaja nupp
4 Puhastusrežiimi nupud
Kuidas teie robottolmuimeja töötab?
Mida teie robottolmuimeja puhastada suudab?
Tänu oma omadustele on see robottolmuimeja teile kodus heaks abiliseks põrandate puhastamisel.
Robottolmuimeja sobib eriti hästi kõvade põrandate, nagu puit, kivi või linoleum, puhastamiseks.
Sellega võib tekkida probleeme pehmete põrandate, nagu vaipade ja mattide puhastamisel. Kui
kasutate robottolmuimejat vaibal või matil esimest korda, palun jääge masina lähedusse, et näha kas
Page 27

Eesti
robottolmuimeja antud tüüpi põrandaga hakkama saab. Robottolmuimeja vajab järelvalvet ka siis, kui
kasutate seda väga tumedatel või läikivatel kõvadel põrandatel.
27
Kuidas teie robottolmuimeja puhastab?
Puhastussüsteem
Robottolmuimejal on 2-etapiline puhastussüsteem põrandate tõhusaks puhastamiseks.
-
Kaks külgmist harja aitavad tolmuimejal puhastada nurki ja seinaääri. Samuti aitavad need
põrandalt mustust lahti saada ja seda imemisava (joon. 3) suunas liigutada.
-
Robottolmuimeja tõmbab imedes lahtise sodi enda külge ja suunab selle imemisava kaudu
tolmukambrisse (joon. 4).
Puhastusrežiimid
Automaatse puhastamise režiimis kasutab robottolmuimeja toa optimaalseks puhastamiseks
puhastusrežiimide automaatset järjestust. Kasutatavad puhastusrežiimid on:
1 siksakiline liikumismuster (joon. 5);
2 juhuslik liikumismuster (joon. 6);
3 seina mööda kulgev liikumismuster (joon. 7);
4 asukohapõhine liikumismuster (joon. 8).
Automaatse puhastamise režiimis järgib robottolmuimeja neid mustreid kindlas järjestuses: siksakiline,
juhuslik, seina mööda kulgev ja asukohapõhine muster.
Kui robottolmuimeja on selle mustrite järjestuse lõpetanud, hakkab see uuesti siksakilises mustris
liikuma. Robottolmuimeja jätkab selle mustrite järjestuse kasutamist toa puhastamisel seni, kuni aku
hakkab tühjaks saama või kuni see käsitsi välja lülitatakse.
Märkus. saate valida iga režiimi ka eraldi kaugjuhtimispuldil vastavat nuppu vajutades. Lisateabe
saamiseks vt peatükis „Robottolmuimeja kasutamine“ jaotist „Puhastusrežiimid“.
Kuidas teie robottolmuimeja väldib kõrguseerinevusi?
Robottolmuimeja põhjal on kolm kukkumissensorit. See kasutab neid sensoreid pinna
kõrguseerinevuste, nagu treppide tuvastamiseks ja vältimiseks.
Märkus. on normaalne, et robottolmuimeja liigub veidi üle erineva kõrgusega pinna serva, sest
eesmine kukkumissensor paikneb põrkeraami taga.
Ettevaatust! Mõningatel juhtudel ei pruugi kukkumissensorid treppi või mõnda muud
kõrguseerinevust õigeaegselt tuvastada. Seetõttu jälgige robottolmuimejat hoolikalt paaril
esimesel kasutuskorral ja siis, kui kasutate seda trepi või teiste erikõrgustega kohtade läheduses.
On oluline, et te puhastaksite kukkumissensoreid regulaarselt, tagamaks, et robottolmuimeja
korralikult kõrguseerinevusi tuvastada suudaks (juhiste jaoks vt ptk „Puhastamine ja hooldus”).
Enne esimest kasutamist
Külgmiste harjade paigaldamine
1 Pakkige lahti külgmised harjad ja pange robottolmuimeja tagurpidi lauale või põrandale.
2 Lükake külgmised harjad robottolmuimeja (joon. 9) põhjal olevatele võllidele.
Märkus. veenduge, et kinnitate külgmised harjad korralikult. Vajutage need võllile kuni kuulete, et
need on klõpsatusega kohale asetunud.
Page 28

28
Eesti
Kaugjuhtimispuldilt kaitsesildi eemaldamine
Kaugjuhtimispult töötab CR2025 müntpatareiga. Seda patareid kaitseb kaitsesilt, mis tuleb enne
kasutamist eemaldada.
1 Tõmmake patarei kaitsesilt kaugjuhtimispuldi (joon. 10) patareipesast välja.
Nüüd on kaugjuhtimispult kasutusvalmis.
Kasutamiseks valmistumine
Dokkimisjaama paigaldamine
1 Sisestage adapteri väike pistik dokkimisjaama pessa (1) ja adapter seinakontakti (2) (joon. 11).
2 Asetage dokkimisjaam horisontaalsele tasasele põrandale vastu seina.
Märkus. veenduge, et dokkimisjaamast (joon. 12) 80 cm eespool, 30 cm paremal ja 100 cm vasakul
puuduksid takistused või kõrguseerinevused.
Oluline märkus! Sügav puhkerežiim
Sügavas puhkerežiimis olles ei reageeri robottolmuimeja ühegi nupu vajutusele. Robottolmuimeja
taasaktiveerimiseks sügavast puhkerežiimist:
1 Robottolmuimeja toomiseks sügavast puhkerežiimist valmisolekurežiimi, vajutage
robottolmuimejal olevat käivitamis-/seiskamisnuppu.
2 Robottolmuimeja käivitamiseks vajutage robottolmuimejal (joon. 19) või kaugjuhtimispuldil olevat
käivitamis-/seiskamisnuppu.
3 Kui robottolmuimeja ei alusta koristamist, asetage see aku laadimiseks pistikuga ühendatud
dokkimisjaama.
Robottolmuimeja lülitub sügavasse puhkerežiimi siis, kui hoiate käivitamis-/seiskamisnuppu 3
sekundit all. See võib sügavasse puhkerežiimi lülituda ka siis, kui selle aku on tühi. Aku võib tühjaks
joosta näiteks juhul, kui robottolmuimeja ei suuda dokkimisjaama leida.
Märkus. sellisel juhul ei saa robottolmuimejat sügavast puhkerežiimist kaugjuhtimispuldil olevat
käivitamis-/seiskamisnuppu vajutades välja tuua. Peate vajutama robottolmuimejal olevat sisse/väljalülitamise nuppu.
Laadimine
Robottolmuimeja esmakordsel laadimisel ja siis, kui robottolmuimeja aku on tühjaks saanud, on
laadimisaeg neli tundi.
Teie robottolmuimejat saab laadida kahel viisil:
-
dokkimisjaamas, kas käsitsi või automaatselt kasutamise ajal;
-
ühendades robottolmuimeja otse vooluvõrku.
Märkus. kuiaku on täis laetud, suudab teie robottolmuimeja puhastada kuni 100 minutit.
Dokkimisjaamas laadimine
1 Seadke toitelüliti asendisse „on”.
2 Asetage robottolmuimeja vooluvõrguga ühendatud dokkimisjaama (joon. 13).
3 Käivitamis-/seiskamisnupp hakkab aeglaselt vilkuma (joon. 14).
4 Kui aku on täis laetud, jääb käivitamis-/seiskamisnupp pidevalt põlema (joon. 15).
Page 29

Eesti
Automaatne laadimine kasutamise ajal
1 Kui robottolmuimeja on lõpetanud puhastamise või kui aku laetust on järel vaid 15%, hakkab see
laadimiseks automaatselt dokkimisjaama otsima. Kui robottolmuimeja otsib dokkimisjaama, vilgub
käivitamis-/seiskamisnupp kiiresti (joon. 16).
2 Kui aku on täis laetud, jääb käivitamis-/seiskamisnupp pidevalt põlema.
Märkus. robottolmuimeja otsib automaatselt dokkimisjaama üksnes siis, kui see alustas puhastamist
dokkimisjaamast.
Laadimine otse vooluvõrgust
1 Robottolmuimeja sisselülitamiseks vajutage toitelülitit.
2 Sisestage adapteri väike pistik robottolmuimejal asuvasse pistikusse (1). Sisestage adapter
seinakontakti (2) (joon. 17).
3 Kui robottolmuimeja on õigesti vooluvõrku ühendatud, hakkab alustamis-/seiskamisnupp väga
aeglaselt vilkuma. See näitab, et robottolmuimeja laeb.
4 Kui aku on täis laetud, jääb käivitamis-/seiskamisnupp pidevalt põlema.
Ruumi ettevalmistamine puhastustsükliks
Enne robottolmuimeja puhastustsükli alustamist veenduge, et eemaldasite põrandalt kõik lahtised ja
õrnad esemed (joon. 18).
Eemaldage põrandalt kõik kaablid, juhtmed ja nöörid.
Robottolmuimeja kasutamine
29
Käivitamine ja seiskamine
1 Vajutage käivitamis-/seiskamisnuppu.
-
Võite vajutada robottolmuimejal (joon. 19) olevat käivitamis-/seiskamisnuppu.
-
Võite vajutada ka kaugjuhtimispuldil (joon. 20) olevat käivitamis-/seiskamisnuppu.
2 Käivitamis-/seiskamisnupp jääb pidevalt sisse ning robottolmuimeja hakkab puhastama (joon. 21).
3 Robottolmuimeja puhastab automaatse puhastamise režiimis kuni aku langeb madalale tasemele.
Automaatse puhastamise režiimis järgib see siksakilise, juhusliku, seina mööda kulgeva ja
asukohapõhise režiimi mustrite (joon. 22) korduvaid seeriaid.
Märkus. eraldi režiimi valimiseks vajutage ühte kaugjuhtimispuldi režiiminuppudest. Lisateabe
saamiseks vt jaotist „Puhastusrežiimi valimine“.
4 Kui aku on tühjaks saamas, hakkab käivitamis-/seiskamisnupu tuli vilkuma ja robottolmuimeja
hakkab laadimiseks dokkimisjaama (joon. 16) otsima.
5 Samuti võite puhastustsükli katkestamiseks või seiskamiseks vajutada käivitamis-
/seiskamisnupule. Kui vajutate uuesti käivitamis-/seiskamisnuppu ja akus on veel piisavalt
energiat, jätkab robottolmuimeja automaatse puhastamise režiimi.
6 Et robottolmuimeja naaseks dokkimisjaama enne aku tühjaks saamist, vajutage kaugjuhtimispuldil
olevat dokkimisnuppu (joon. 23).
Käivitamis-/seiskamisnupp hakkab vilkuma ning robot otsib dokkimisjaama (joon. 24).
Märkus. Kui te ei käivitanud robottolmuimejat dokkimisjaamast, ei hakka see madala aku taseme
korral automaatselt dokkimisjaama otsima. Kui akus on piisavalt energiat, võite robottolmuimeja
naasmiseks dokkimisjaama vajutada dokkimisnuppu kaugjuhtimispuldil. Kui aku on täiesti tühi,
peate robottolmuimeja dokkimisjaama asetama käsitsi.
Page 30

30
Eesti
Dokkimisjaama kasutamine
Dokkimisjaamal on robottolmuimeja juhtimiseks kaks juhikut.
Aku täis ja alustamise nupp
Kui vajutate robottolmuimeja laadimise ajal dokkimisjaamal olevat aku täis ja alustamise nuppu,
alustab robottolmuimeja puhastamist niipea, kui aku on täis (joon. 25).
24 h nupp
Kui vajutate dokkimisjaamal 24 h nuppu, hakkab dokkimisjaam loendama 24 tundi järgmise
puhastustsüklini. Kui loendus on lõppenud, hakkab robottolmuimeja puhastama kuni selle aku langeb
madalale tasemele ning seejärel naaseb see laadimiseks (joon. 26) automaatselt dokkimisjaama.
Puhastusrežiimi valimine
Lisaks automaatse puhastamise režiimile on robottolmuimejal neli eraldi puhastusrežiimi, mille saab
aktiveerida kaugjuhtimispuldi vastavat nuppu vajutades.
Siksakilise liikumise režiim
Siksakilise liikumise režiimis teeb robottolmuimeja suurte pindade (joon. 27) puhastamiseks kogu
ruumis siksakke.
Juhusliku liikumise režiim
Selles režiimis puhastab robottolmuimeja ruumi sirgeid ja siksakilisi liigutusi (joon. 28) omavahel
segades.
Seina mööda liikumise režiim
Selles režiimis kulgeb robottolmuimeja mööda ruumi seina, et teha seinaääred eriti puhtaks (joon. 29).
Asukohapõhine režiim
Selles režiimis liigub robottolmuimeja juhuslikult väikeses piirkonnas, et see piirkond põhjalikult (joon.
30) puhastada.
Märkus. käsitsi valitud režiimid jäävad aktiivseks vaid mõneks minutiks. Pärast neid lülitab
robottolmuimeja automaatse puhastamise režiimile.
Käsitsi juhtimine
1 Kasutage kaugjuhtimispuldi käivitamis-/seiskamisnupust üleval ja all ning vasakul ja paremal
olevaid noolenuppe robottolmuimeja läbi ruumi (joon. 31) navigeerimiseks.
Märkus. Olge ettevaatlik robottolmuimejat käsitsi erinevate kõrguste ja treppide lähedal juhtides.
Märkus. Tolmu imemise funktsioon ja külgmised harjad töötavad ainult siis, kui robottolmuimeja
sõidab otse. Nupud vasakule, paremale ja tagasi on ette nähtud robottolmuimejaga
manööverdamiseks.
Puhastusaja nupu kasutamine
Selleks, et robottolmuimeja 35 minutit puhastaks, vajutage kaugjuhtimispuldil puhastusaja nuppu. Kui
puhastusaeg on läbi, naaseb robottolmuimeja laadimiseks (joon. 32) dokkimisjaama.
Page 31

Eesti
Toitelüliti kasutamine
Toite lülitamine asendisse „off” paneb robottolmuimeja sügavasse puhkerežiimi. Selles režiimis olles
robottolmuimeja enam ei reageeri.
-
Kui soovite robottolmuimejat laadida, peate lülitama toitelüliti asendisse „on”.
-
Kui robottolmuimeja siseneb sügavasse puhkerežiimi keset kasutamist, saate selle taasaktiveerida
lülitades toitelüliti asendisse „on” ning robottolmuimejat laadides. Pärast paari sekundit hakkab
robottolmuimeja uuesti reageerima.
-
Kui te ei plaani robottolmuimejat kasutada kuu või pikema aja jooksul, siis lülitage toitelüliti
asendisse „off” ning ühendage laetava aku kaitsmiseks ja energia säästmiseks dokkimisjaam või
adapter lahti.
Signaalid ja nende tähendused
Robottolmuimejal on ekraan kahe näidikuga: hoiatusmärgutuli ning tolmukambri täitumise märgutuli.
Käivitamis-/seiskamisnupp annab valgussignaale. Allolev tabel selgitab signaalide tähendusi.
Probleem
Käivitamis-/seiskamisnupp põleb pidevalt. Robottolmuimeja on puhastamiseks valmis.
Käivitamis-/seiskamisnupp vilgub aeglaselt. Robottolmuimeja laeb.
Käivitamis-/seiskamisnupp vilgub kiiresti. Robottolmuimeja otsib dokkimisjaama.
Tolmukambri täitumise märgutuli süttib põlema. Tolmukamber on täis.
Tähendus
Robottolmuimeja laetava aku tase on madal.
31
Hoiatustuli süttib põlema. Robottolmuimejat tõsteti puhastamise ajal.
Robottolmuimeja põrkeraam on kinni jäänud.
Ratas või külgmine hari on kinni jäänud.
Ülemine kate puudub või ei ole korralikult kinni.
Robottolmuimeja ei suuda leida dokkimisjaama.
Plaksule reageerimine
Plaksule reageerimine, kui robottolmuimeja siseneb puhkerežiimi, on lubatud järgmistes olukordades:
-
kui see lõpetab puhastamise vea tõttu;
-
kui olete programmeerinud lühikese puhastusaja;
-
kui see ei leia 20 minuti jooksul dokkimisjaama.
Kui te robottolmuimejat ei näe, saate määrata selle asukoha oma käsi ühe korra plaksutades.
Robottolmuimeja vastab piiksatuse ning ekraanil kõikide kujutiste põlema süttimisega.
Puhastamine ja hooldus
Tolmukambri tühjendamine ja puhastamine
Kui tolmukambri täitumise märgutuli süttib pidevalt põlema, tühjendage ja puhastage tolmukamber.
1 Eemaldage kate (joon. 33).
Page 32

32
Eesti
2 Tõmmake tolmukambri kaane käepide üles ja tõstke tolmukamber oma pesast välja (joon. 34).
Märkus. Tolmukambri väljavõtmisel või tagasipanemisel olge ettevaatlik, et te ei kahjustaks mootori
ventilaatori terasid.
3 Tehke tolmukambri pesa kaas ettevaatlikult lahti (1) ja võtke filter välja (2) (joon. 35).
4 Tühjendamiseks raputage tolmukambrit prügikasti kohal. Puhastage filtrit ja tolmukambri sisemust
lapi või pehmete harjastega hambaharjaga. Puhastage ka tolmukambri (joon. 36) põhjal olev
imemisava.
Ettevaatust! Ärge puhastage tolmukambrit veega ega ka nõudepesumasinas.
5 Pange filter tagasi tolmukambrisse (1). Seejärel pange tolmukambrile (joon. 37) kaas peale (2).
6 Pange tolmukamber tagasi selle pessa ja pange ülemine kate robottolmuimejale (joon. 38) tagasi.
Ettevaatust! Veenduge, et tolmukambris oleks filter alati olemas. Robottolmuimejat ilma filtrita
kasutades saab mootor kahjustada.
Robottolmuimeja puhastamine.
Tõhusaks puhastamiseks tuleb aeg-ajalt kukkumissensoreid, rattaid, külgmisi harju ja imamisava
puhastada.
1 Pange robottolmuimeja tagurpidi tasasele pinnale.
2 Kasutage kukkumissensorite (joon. 39) juurest tolmu või ebemete eemaldamiseks pehmete
harjastega harja (nt hambaharja).
Märkus. on tähtis, et puhastaksite kukkumissensoreid regulaarselt. Kui kukkumissensorid on
mustad, ei pruugi robottolmuimeja õigesti kõrguserinevusi või treppe tuvastada.
3 Kasutage esiratta ja külgmiste rataste (joon. 40) juurest tolmu või ebemete eemaldamiseks
pehmete harjastega harja (nt hambaharja).
4 Külgmiste harjade puhastamiseks haarake selle harjastest ja tõmmake need võllide küljest (joon.
41) ära.
5 Võtke pehmete harjastega harja (nt hambaharja) või riidetüki (joon. 42) abil võlli ja harja küljest ära
ebemed, karvad ja niidijupid.
6 Kontrollige robottolmuimeja külgmisi harju ja põhja teravate esemete suhtes, mis võiksid teie
põrandat kahjustada.
7 Kui olete külgmised harjad nende võllide küljest eemaldanud, tehke lahti TriActive XL otsaku
plõksühendused, sisestades selleks oma näpud nooltega märgitud kohtadele ning tõmmates
TriActive-otsaku robottolmuimeja küljest ära (joon. 43).
8 Puhastage imemisava pehme harjaga (nt hambaharjaga) (joon. 44).
9 Eemaldage TriActive-otsakult (joon. 45) kõik nähtav mustus.
10 Sisestage TriActive-otsaku plõkskonksud robottolmuimeja (joon. 46) põhjal asuvatesse aukudesse.
Lükake TriActive-otsak oma asendisse tagasi. Kontrollige, kas otsak saab paari millimeetri ulatuses
vabalt üles ja alla liikuda.
Osade vahetamine
Tarvikute tellimine
Seadme jaoks tarvikute või varuosade ostmiseks minge veebilehele www.shop.philips.com/service
või külastage Philipsi edasimüüjat. Samuti võite pöörduda oma riigi Philipsi klienditoe keskusesse (vt
kontaktandmeid ülemaailmse garantii lehelt).
Page 33

Eesti
Filtri vahetamine
Vahetage filter, kui see on väga must või kahjustatud. Uue filtri saate tellida tellimuse numbriga
FC8012. Juhiseid selle kohta, kuidas filtrit tolmukambrist eemaldada ja tolmukambrisse asetada, vt
peatükist „Puhastamine ja hooldus” jaotisest „Tolmukambri tühjendamine ja puhastamine”.
Külgmiste harjade vahetamine
Korraliku puhastustulemuse saavutamiseks vahetage mõne aja möödumisel külgmised harjad välja.
Märkus. Vahetage külgmised harjad alati, kui märkate neil kulumisjälgi või kahjustusi. Soovitame
mõlemad külgmised harjad samaaegselt välja vahetada. Külgmiste harjade lisapaare saab tellida
tellimuse numbriga FC8013.
1 Külgmiste harjade väljavahetamiseks võtke vanade külgmiste harjade harjastest kinni ja tõmmake
need võllide (joon. 41) küljest ära.
2 Lükake uued külgmised harjad võllide (joon. 9) külge.
Laetava aku vahetamine
Laetavat akut tohib vahetada vaid selleks kvalifitseeritud hoolduseinsener. Kui laetavat akut ei ole
enam võimalik laadida või kui see saab kiiresti tühjaks, viige robottolmuimeja aku asendamiseks
Philipsi volitatud hoolduskeskusesse. Philipsi klienditeeninduskeskuse kontaktandmed teie
asukohariigis leiate ülemaailmse garantii lehelt.
Kaugjuhtimispuldi patarei vahetamine
Kaugjuhtimispult töötab CR2025 müntpatareiga. Asendage patarei, kui robottolmuimeja
kaugjuhtimispuldil olevate nuppude vajutamisel enam ei reageeri.
1 Hoidke kaugjuhtimispulti tagurpidi. Vajutage patareihoidikul olevat vabastusnuppu ja samal ajal
lükake patareihoidik kaugjuhtimispuldist (joon. 47) välja.
2 Eemaldage tühi patarei patareipesast ja asetage patareipesasse uus patarei. Seejärel libistage
patareihoidik tagasi kaugjuhtimispulti (joon. 48).
33
Laetava aku eemaldamine
Hoiatus. Eemaldage akupatarei seadmest vaid siis, kui seadme kasutusest kõrvaldate.
Enne aku eemaldamist kontrollige, et see oleks täiest tühi.
Laetava aku eemaldamiseks järgige allpool kirjeldatud samme. Võite robottolmuimeja selle laetava
aku eemaldamiseks Philipsi volitatud hoolduskeskusesse viia. Teie lähipiirkonnas asuva
hoolduskeskuse aadressi saamiseks võtke ühendust oma asukohariigi Philipsi
klienditeeninduskeskusega.
1 Käivitage robottolmuimeja kusagil toas, kuid mitte dokkimisjaamas.
2 Laske robottolmuimejal töötada seni, kuni aku on tühi; nii hoolitsete selle eest, et aku on täiesti
tühi enne selle eemaldamist ja utiliseerimist.
3 Keerake akupesa kruvid lahti ja eemaldage kate (joon. ).
4 Võtke laetav aku välja ning ühendage see lahti (joon. 50).
5 Viige robottolmuimeja ning laetav aku elektriliste ja elektrooniliste jäätmete kogumispunkti.
Page 34

34
Eesti
Veaotsing
Selles peatükis võetakse kokku kõige levinumad probleemid, mis teil seadmega tekkida võivad. Kui te
ei suuda alljärgneva teabe abil ise probleemi lahendada, külastage veebilehte
www.philips.com/support, kus on loetelu korduma kippuvatest küsimustest, või võtke ühendust oma
riigi klienditeeninduskeskusega.
Probleem
Robottolmuimeja ei
hakka puhastama, kui ma
vajutan käivitamis/seiskamisnupule.
Võimalik põhjus Lahendus
Laetav aku on tühi. Laadige akut (vt ptk „Kasutamiseks
valmistumine“).
Robottolmuimeja ei
vasta, kui ühele
nuppudest vajutan.
Väike pistik on ikka veel
robottolmuimeja pistikupesas.
Toitelüliti ei ole seatud
asendisse „on” (I).
Lülitasite toitelüliti asendisse
„off”.
Robottolmuimeja ei suutnud
leida dokkimisjaama ning aku
sai tühjaks.
Robottolmuimeja ei tööta vooluvõrgu
peal. See töötab vaid oma laetava aku
peal. Seega eemaldage adapter enne
kasutamist nii robottolmuimeja küljest
kui vooluvõrgust.
Lülitage toitelüliti asendisse „on”.
Asetage robottolmuimeja vooluvõrguga
ühendatud dokkimisjaama või
ühendage adapter väikese pistikuga
robottolmuimejasse. Paari sekundi
pärast hakkab robottolmuimeja
piiksuma ning selle ekraan süttib
põlema.
Lülitage toitelüliti asendisse „on”.
Asetage robottolmuimeja vooluvõrguga
ühendatud dokkimisjaama või
ühendage adapter väikese pistikuga
robottolmuimejasse. Paari sekundi
pärast hakkab robottolmuimeja
piiksuma ning selle ekraan süttib
põlema.
Asetage robottolmuimeja vooluvõrguga
ühendatud dokkimisjaama või
ühendage adapter väikese pistikuga
robottolmuimejasse. Paari sekundi
pärast hakkab robottolmuimeja
piiksuma ning selle ekraan süttib
põlema.
Hoiatustuli vilgub kiiresti. Üks ratas või mõlemad rattad
on kinni jäänud.
Üks külgmine ratas või
mõlemad külgmised rattad on
takerdunud.
Lülitage toitelüliti asendisse „off”.
Eemaldage ebemed, karvad, niidi- või
traadijupid, mis on ratta vedru külge
jäänud.
Puhastage külgmised harjad (vt ptk
„Puhastamine ja hooldus“).
Page 35

Probleem Võimalik põhjus Lahendus
Ülemine kate puudub või ei ole
korralikult kinni.
Kui ülemine kate puudub või ei ole
korralikult kinni, siis robottolmuimeja ei
tööta. Asetage ülemine kate korralikult
robottolmuimejale.
Eesti
35
Robottolmuimeja ei
puhasta põrandat
korralikult.
Põrkeraam on kinni jäänud. Vajutage käivitamis-/seiskamisnuppu.
Robottolmuimejat tõsteti
puhastamise ajal.
Ühe või mõlema külgmise
harja harjased on kõverad või
viltu.
Tolmukambri filter on must. Puhastage tolmukambri filtrit lapi või
Tolmukambri põhjal olev
imemisava on ummistunud.
Tõstke robottolmuimejat nii, et selle
põrkeraam tuleks lahti. Asetage
robottolmuimeja takistuse juurest
lühikesele kaugusele ja vajutage
puhastamise jätkamiseks käivitamis/seiskamisnuppu.
Vajutage käivitamis-/seiskamisnuppu.
Pange robottolmuimeja põrandale.
Seejärel vajutage puhastamise
jätkamiseks käivitamis/seiskamisnupule.
Leotage harja või harjasid mõnda aega
soojas vees. Kui see ei taasta harjaseid
õigele kujule, vahetage külgede harjad
välja (vt ptk „Asendamine”).
pehmete harjastega hambaharjaga.
Filtrit ja tolmukambrit võib puhastada ka
tavalise tolmuimejaga madala
imemisjõu seadel.
Kui filtrit ei õnnestu harjaga ega
tolmuimejaga puhastada, vahetage see
uue vastu välja. Soovitame filtrit
vahetada vähemalt üks kord aastas.
Puhastage imemisava (vt ptk
„Puhastamine ja hooldus“).
Esimese ratta ümber on
kogunenud juukseid või muud
sodi.
Robottolmuimeja puhastab
väga tumedat või läikivat
pinda, mis aktiveerib
kukkumissensorid. Selle
tulemusel hakkab
robottolmuimeja ebatavaliselt
liikuma.
Puhastage esimene ratas (vt ptk
„Puhastamine ja hooldus“).
Vajutage käivitamis-/seiskamisnupule
ning seejärel viige robottolmuimeja
heledamat värvi pinnaga põrandale. Kui
probleem püsib ka heledamat värvi
pindadel, külastage veebilehte
www.philips.com/support või võtke
ühendust oma asukohariigi
klienditeeninduskeskusega.
Page 36

36
Eesti
Probleem Võimalik põhjus Lahendus
Robottolmuimeja puhastab
põrandat, mis peegeldab
tugevasti päikesevalgust. See
aktiveerib kukkumissensorid,
mille tulemusel hakkab
robottolmuimeja ebatavaliselt
liikuma.
Tõmmake kardinad ette, et
päikesevalgus ei pääseks tuppa. Võite
alustada puhastamist ka siis, kui päike
on vähem ere.
Akut ei ole enam võimalik
laadida või see saab
väga kiiresti tühjaks.
Kaugjuhtimispuldi
patarei saab liiga kiiresti
tühjaks.
Robottolmuimeja liigub
ringides.
Robottolmuimeja ei
suuda leida
dokkimisjaama.
Aku kasutusiga on lõppenud. Laske aku Philipsi hoolduskeskuses välja
Võib-olla pole te sisestanud
õiget tüüpi patareid.
Robottolmuimeja on
asukohapõhises režiimis.
Robottolmuimejal ei ole
piisavalt ruumi dokkimisjaama
suunas navigeerimiseks.
Robottolmuimeja otsib
jätkuvalt.
vahetada (vt ptk „Asendamine”).
Kaugjuhtimispuldi jaoks vajate CR2025
müntpatareid. Kui probleem püsib,
minge veebilehele
www.philips.com/support või võtke
ühendust oma asukohariigi
klienditeeninduskeskusega.
Selline käitumine on normaalne.
Asukohapõhise režiimi võib aktiveerida,
kui põrandal on näha palju mustust ning
see vajab põhjalikku puhastamist. See
on osaks ka automaatsest puhastamise
režiimist. Pärast umbes ühte minutit
jätkab robottolmuimeja tavalise
puhastamise mustrit. Asukohapõhise
puhastamise režiimi saate peatada ka
selleks kaugjuhtimispuldilt mõne teise
puhastamise režiimi valides.
Püüdke leida dokkimisjaama jaoks mõni
teine koht. Vaadake jaotist
„Dokkimisjaama paigaldamine” peatükis
„Kasutamiseks valmistumine“.
Lubage robottolmuimejale
dokkimisjaama naasmiseks umbes 20
minutit.
Robottolmuimejat ei käivitatud
dokkimisjaamast.
Kui soovite, et robottolmuimeja pärast
puhastustsüklit dokkimisjaama naaseks,
siis käivitage see dokkimisjaamast.
Page 37

Hrvatski
Uvod
Čestitamo na kupnji i dobro došli u Philips! Kako biste potpuno iskoristili podršku koju nudi tvrtka
Philips, registrirajte svoj proizvod na www.philips.com/welcome.
Općeniti opis
1 Gornji poklopac
2 Ručka poklopca spremnika za prašinu
3 Poklopac spremnika za prašinu
4 Filtar
5 Spremnik za prašinu
6 Ventilator
7 Odbojnik
8 Upravljanje priključnom stanicom
9 Gumb za pokretanje/zaustavljanje (kako biste pokrenuli ili zaustavili robotski usisavač)
10 Zaslon
11 Prekidač za napajanje (kako biste uključili ili isključili robotski usisavač)
12 Mlaznica TriActive XL
13 Prednji kotač
14 Osovine bočnih četki
15 Senzori za sprječavanje pada
16 Odjeljak za baterije
17 Kotači
18 Usisni otvor
19 Bočne četke
20 Držač baterije
21 Daljinski upravljač
22 Mali utikač
23 Adapter
24 Priključna stanica
37
Zaslon i daljinski upravljač
Zaslon (sl. 2):
1 Indikator upozorenja
2 Indikator punog spremnika za prašinu
Daljinski upravljač (sl. ):
1 Gumbi za navigaciju i pokretanje/zaustavljanje
2 Tipka za priključnu stanicu
3 Tipka za vrijeme čišćenja
4 Tipke za način čišćenja
Način na koji robotski usisavač radi
Što robotski usisavač čisti
Ovaj robotski usisavač opremljen je značajkama koje ga čine pogodnim aparatom za čišćenje koji će
vam pomoći da očistite podove u svojem domu.
Robotski usisavač osobito je prikladan za čišćenje tvrdih podova, kao što su drveni podovi, ili podovi
prekriveni pločicama ili linoleumom. Do problema može doći pri čišćenju mekih podova, kao što su
sagovi ili tepisi. Ako se robotskim usisavačem koristite na tepihu ili sagu, prvi put budite u blizini kako
Page 38

38
Hrvatski
biste vidjeli može li se nositi s takvim podom. Robotskom je usisavaču također potreban nadzor ako
ga upotrebljavate na vrlo tamnim ili sjajnim tvrdim podovima.
Način na koji robotski usisavač čisti
Sustav za čišćenje
Robotski usisavač ima sustav za čišćenje u 2 faze koji mu omogućava učinkovito čišćenje podova.
-
Dvije bočne četke pomažu robotskom usisavaču da očisti kutove i uzduž zidova. One mu pomažu u
uklanjanju prljavštine s poda i guranju prljavštine prema otvoru za usisavanje (sl. 3).
-
Usisna snaga robotskom usisavaču omogućava hvatanje slobodne prljavštine i njezin prijenos kroz
otvor za usisavanje u spremnik za prašinu (sl. 4).
Obrasci čišćenja
U automatskom načinu rada robotski usisavač koristi se automatskim redoslijedom obrazaca za
optimalno čišćenje svakog područja prostorije. Upotrebljava sljedeće obrasce čišćenja:
1 Z-obrazac ili cik-cak obrazac (sl. 5)
2 Nasumični obrazac (sl. 6)
3 Obrazac (sl. 7) čišćenja uz zid
4 Obrazac (sl. 8) čišćenja mjesta
Ako je u automatskom načinu čišćenja, robotski usisavač koristit će se ovim obrascima zadanim
redoslijedom: Z-obrazac, nasumični obrazac, obrazac čišćenja uz zid i obrazac čišćenja mjesta.
Kada robotski usisavač dovrši taj slijed obrazaca, ponovno se započne kretati u Z-obrascu. Robotski
usisavač nastavlja se koristiti tim slijedom obrazaca za čišćenje sobe dok se punjiva baterija ne
isprazni ili dok se ručno ne isključi.
Napomena: Načine rada možete birati i pojedinačno pritiskom odgovarajuće tipke na daljinskom
upravljaču. Više pojedinosti potražite u poglavlju „Uporaba robotskog usisavača”, odjeljak „Načini
čišćenja”.
Kako vaš robotski usisavač izbjegava mjesta koja se razlikuju visinom
Na donjem dijelu robotskog usisavača nalaze se tri senzora za sprječavanje pada. Tim se senzorima za
sprječavanje pada koristi za prepoznavanje i izbjegavanje mjesta s visinskom razlikom, kao što su
stubišta.
Napomena: Robotski usisavač mogao bi prijeći preko ruba mjesta koje se razlikuje visinom jer se
prednji senzor za sprječavanje pada nalazi iza odbojnika.
Oprez: U nekim slučajevima senzori za sprječavanje pada možda neće pravodobno prepoznati
stubište ili visinsku razliku. Stoga pažljivo motrite robotski usisavač tijekom prvih nekoliko uporaba
i kada se njime koristite blizu stubišta ili drugog mjesta s visinskom razlikom. Važno je redovito
čistiti senzore za sprječavanje pada kako bi se osiguralo da robotski usisavač i dalje pravilno
prepoznaje visinske razlike (upute pronađite u poglavlju „Čišćenje i održavanje”).
Prije prve uporabe
Montaža bočnih četki
1 Raspakirajtebočne četke i okrenite robotski usisavač naopako, na stol ili pod.
2 Gurnite bočne četke na osovine na donjem dijelu robotskog usisavača (sl. 9).
Page 39

Hrvatski
Napomena: Pobrinite se da bočne četke budu ispravno pričvršćene. Pritisnite ih na osovinu dok ne
čujete da su uglavljene na položaj zvukom „klik”.
Uklanjanje zaštitne oznake s daljinskog upravljača
Daljinski upravljač radi s pomoću dugmaste baterije CR2025. Ta je baterija zaštićena jezičcem koji je
prije uporabe potrebno ukloniti.
1 Izvucite zaštitni jezičac iz odjeljka za bateriju daljinskog upravljača (sl. 10).
Nakon toga moći ćete koristiti daljinski upravljač.
Priprema za uporabu
Postavljanje priključne stanice
1 Umetnite mali utikač adaptera u utičnicu na priključnoj stanici (1) i uključite adapter u zidnu utičnicu
(2) (sl. 11).
2 Priključnu stanicu postavite na vodoravan, ravan pod i naslonite je uza zid.
Napomena: Pobrinite se da 80cm ispred, 30cm udesno i 100cm ulijevo od priključne stanice (sl.
12) ne bude prepreka ni visinskih razlika.
Važna napomena: stanje dubokog mirovanja
Ako u stanju dubokog mirovanja pritisnete neki gumb, robotski usisavač uopće ne reagira. Da
ponovno aktivirali robotski usisavač kada je u stanju dubokog mirovanja:
1 pritisnite gumb za pokretanje/zaustavljanje na robotskom usisavaču kako biste ga iz stanja
dubokog mirovanja prebacili u stanje pripravnosti.
2 Da biste pokrenuli robotski usisavač (sl. 19), na njemu ili na daljinskom upravljaču pritisnite gumb za
pokretanje/zaustavljanje.
3 Ako robotski usisavač ne počne čistiti, postavite ga na ukopčanu priključnu stanicu kako biste
napunili njegovu punjivu bateriju.
Robotski usisavač ulazi u stanje dubokog mirovanja kada pritisnete i 3 sekunde zadržite gumb za
pokretanje/zaustavljanje. U stanje dubokog mirovanja može ući i kada mu je baterija prazna. Baterija
se može isprazniti na primjer kada robot ne može pronaći svoju priključnu stanicu.
39
Napomena: Pomoću gumba za pokretanje/zaustavljanje na daljinskom upravljaču robotski usisavač
ne možete prebaciti iz stanja dubokog mirovanja u nego drugo stanje. Za to trebate pritisnuti gumb za
uključivanje/isključivanje na robotskom usisavaču.
Punjenje
Kada je punite prvi put ili kada je punjiva baterija robotskog usisavača prazna, ciklus punjenja traje
četiri sata.
Robotski usisavač možete napuniti na dva načina:
-
Putem priključne stanice, ručno ili automatski tijekom uporabe;
-
Priključivanjem robotskogusisavača izravno na napajanje.
Napomena: Kadase punjiva baterija potpuno napuni, vaš će robotskiusisavač moći raditido 100
minuta.
Page 40

40
Hrvatski
Punjenje na priključnoj stanici
1 Postavite prekidač za napajanje u položaj „on” (uključeno).
2 Postavite robotski usisavač na ukopčanu priključnu stanicu (sl. 13).
3 Gumb za pokretanje/zaustavljanje počne sporo treptati (sl. 14).
4 Kada se punjiva baterija potpuno napuni, gumb za pokretanje/zaustavljanje počet će svijetliti bez
prekida (sl. 15).
Automatsko punjenjetijekom uporabe
1 Nakon što robotski usisavač završi s čišćenjem ili kad mu preostane svega 15 % napajanja baterije,
automatski će tražiti priključnu stanicu radi punjenja. Dok robotski usisavač traži priključnu stanicu,
gumb za pokretanje/zaustavljanje brzo treperi (sl. 16).
2 Kada se punjiva baterija potpuno napuni, gumb za pokretanje/zaustavljanje počet će svijetliti bez
prekida.
Napomena: Robotskiusisavač automatski traži priključnustanicu samo ako je čišćenje započeo od
priključne stanice.
Punjenje izravno iz električne mreže
1 Za uključivanje robotskog usisavača pritisnite prekidač za napajanje.
2 Uključite mali utikač adaptera u utičnicu na robotskom usisavaču (1). Uključite adapter u zidnu
utičnicu (2) (sl. 17).
3 Ako je robotski usisavač ispravno priključen na napajanje, gumb za pokretanje/zaustavljanje počne
treptati vrlo sporo. To naznačuje da se robotski usisavač puni.
4 Kada se punjiva baterija potpuno napuni, gumb za pokretanje/zaustavljanje počet će svijetliti bez
prekida.
Priprema prostorije za čišćenje
Prije no što pokrenete čišćenje robotskim usisavačem, s poda maknite sve nepričvršćene i lomljive
predmete (sl. 18).
S poda također uklonite sve kabele i žice.
Korištenje robotskog usisavača
Pokretanje i zaustavljanje
1 Pritisnite gumb za pokretanje/zaustavljanje.
-
Možete pritisnuti gumb za pokretanje/zaustavljanje na robotskom usisavaču (sl. 19).
-
Možete pritisnuti i gumb za pokretanje/zaustavljanje na daljinskom upravljaču (sl. 20).
2 Gumb za pokretanje/zaustavljanje neprekidno je uključen i robotski usisavač započinje čistiti (sl.
21).
3 Robotski usisavač čisti u automatskom načinu čišćenja dok mu se baterija ne isprazni. U načinu
automatskog čišćenja prati ponavljane sljedove Z-obrasca, nasumičnog obrasca, obrasca čišćenja
uza zid i obrasca čišćenja mjesta (sl. 22).
Napomena: Kako biste odabrali zasebni način rada, pritisnite jednu od tipki za način rada na
daljinskom upravljaču. Više pojedinosti pronađite u odjeljku „Odabir načina čišćenja”.
4 Kada mu se baterija isprazni, gumb za pokretanje/zaustavljanje počne treptati i robotski usisavač
traži priključnu stanicu radi punjenja. (sl. 16)
Page 41

Hrvatski
5 Možete pritisnuti i gumb za pokretanje/zaustavljanje kako biste prekinuli ili zaustavili čišćenje. Ako
ponovo pritisnete gumb za pokretanje/zaustavljanje, a u punjivoj bateriji još ima dovoljno energije,
robotski usisavač nastavit će čistiti u automatskom načinu čišćenja.
6 Robotski usisavač možete vratiti na priključnu stanicu prije pražnjenja punjive baterije pritiskom
gumba za priključnu stanicu na daljinskom upravljaču (sl. 23).
Gumb za pokretanje/zaustavljanje počne treperiti, a robotski usisavač traži priključnu stanicu (sl.
24)
Napomena: Ako robotski usisavač niste pokrenuli na priključnoj stanici, neće automatski tražiti
priključnu stanicu kada se punjiva baterija isprazni. Ako u punjivoj bateriji i dalje ima dovoljno
energije, na daljinskom upravljaču možete pritisnuti gumb za priključnu stanicu kako bi se robotski
usisavač vratio na priključnu stanicu. Ako je punjiva baterija ispražnjena do kraja, robotski usisavač
morat ćete ručno postaviti na priključnu stanicu.
Upravljanje priključnom stanicom
Priključna stanica ima dva upravljača kojima se možete koristiti za upravljanje robotskim usisavačem.
Gumb za napunjenu bateriju i pokretanje
Ako pritisnete gumb za napunjenu bateriju i pokretanje na priključnoj stanici dok se robotski usisavač
puni, robotski usisavač započet će se čišćenjem čim se punjiva baterija napuni (sl. 25).
Gumb 24h
Ako pritisnete gumb 24h na priključnoj stanici, priključna stanica započet će odbrojavanje 24 sata do
sljedećeg čišćenja. Kada se odbrojavanje završi, robotski usisavač započinje čistiti dok se baterija ne
isprazni, a onda se automatski vrati na priključnu stanicu radi punjenja (sl. 26).
41
Odabir načina čišćenja
Osim automatskog načina čišćenja, ovaj robotski usisavač ima četiri zasebna načina čišćenja koje
možete aktivirati pritiskom odgovarajuće tipke na daljinskom upravljaču.
Obrazac u obliku slova Z
U načinu rada u Z-obrascu robotski usisavač čisti radeći petlje u obliku slova Z po sobi kako bi očistio
velika područja (sl. 27).
Nasumični obrazac
U ovom načinu rada robotski usisavač prostorije čisti kombiniranim obrascem pravocrtnih i unakrsnih
pokreta (sl. 28).
Obrazac čišćenja uz zid
U ovom načinu rada robotski usisavač kreće se uza zidove prostorije kako bi površine uza zid bile što
bolje očišćene (sl. 29).
Način čišćenja mjesta
U ovom načinu rada robotski usisavač kreće se nasumično na malom području kako bi temeljito (sl.
30) očistio taj dio.
Napomena: Ručno odabrani načini rada aktivni su samo nekoliko minuta. Nakon toga robotski
usisavač prebacuje se u automatski način čišćenja.
Page 42

42
Hrvatski
Ručna navigacija
1 Koristite se gumbima sa strelicama gore i dolje te lijevo i desno od gumba za
pokretanje/zaustavljanje na daljinskom upravljaču kako biste upravljali robotskim usisavačem kroz
prostoriju (sl. 31).
Napomena: Budite oprezni kada robotskim usisavačem ručno upravljate blizu visinskih razlika i
stuba.
Napomena: Funkcija usisavanja i bočne četke rade samo kad se robotskim upravljačem upravlja
prema naprijed. Gumbi za lijevo, naprijed ili natrag služe samo za manevriranje robotskim
usisavačem.
Korištenje gumba za vrijeme čišćenja
Pritisnite gumb za vrijeme čišćenja na daljinskom upravljaču kako bi robotski usisavač čistio 35 minuta.
Kada vrijeme čišćenja istekne, robotskiusisavač automatski se vraća na priključnustanicu radi
punjenja (sl. 32).
Upotreba prekidača za napajanje
Postavljanjem napajanja u položaj „off” (isključeno) robotski usisavač prelazi u stanje dubokog
mirovanja. U tom načinu rada robotski usisavač više ne reagira.
-
Ako želite napuniti robotski usisavač, morate pritisnuti prekidač za napajanje u položaj „on”
(uključeno).
-
Ako robotski usisavač prijeđe u stanje dubokog mirovanja tijekom upotrebe, možete ga ponovno
aktivirati postavljanjem prekidača za napajanje na „on” (uključeno) i punjenjem. Nakon nekoliko
sekundi robotski usisavač ponovno će reagirati
-
Ako robotski usisavač nećete upotrebljavati mjesec dana ili više, pritisnite prekidač za napajanje na
„off” (isključeno) te isključite priključnu stanicu ili adapter iz napajanja kako biste zaštitili punjivu
bateriju i uštedjeli energiju.
Signali i njihovo značenje
Robotski usisavač ima zaslon s dva indikatora: indikator upozorenja i indikator punog spremnika za
prašinu. Gumb za pokretanje/stanje daje svjetlosne signale. U tablici u nastavku objašnjena su
značenja signala.
Signal
Gumb za pokretanje/zaustavljanje neprekidno je
uključen.
Gumb za pokretanje/zaustavljanje treperi sporo. Robotski usisavač se puni.
Gumb za pokretanje/zaustavljanje treperi brzo. Robotski usisavač traži priključnu stanicu.
Indikator punog spremnika za prašinu se uključio. Spremnik za prašinu je pun.
Indikator upozorenja se uključio. Robotski usisavač je podignut tijekom čišćenja.
Značenje
Robotski usisavač spreman je za čišćenje.
Punjiva baterija robotskog usisavača je
ispražnjena.
Odbojnik robotskog usisavača je zapeo.
Kotač ili bočna četka je zapela.
Page 43

Hrvatski
Signal Značenje
Gornji poklopac nije na svojem mjestu ili nije
ispravno zatvoren.
Robotski usisavač ne može pronaći priključnu
stanicu.
Odziv na pljeskanje dlanovima
Odziv na pljeskanje dlanovima omogućen je ako robotski usisavač prijeđe u stanje mirovanja u
sljedećim situacijama:
-
kada prestane čistiti zbog greške
-
kad ste ga programirali na kratko vrijeme čišćenja
-
kad ne pronađe priključnu stanicu u roku od 20 minuta
Ako ne vidite robotski usisavač, možete ga locirati jednim pljeskom dlanova. Robotski usisavač
odazvat će se zvučnim signalom i uključivanjem svih ikona na zaslonu.
Čišćenje i održavanje
Pražnjenje i čišćenje spremnika za prašinu
Kada indikator punog spremnika za prašinu svijetli neprekidno, ispraznite i očistite spremnik za
prašinu.
1 Skinite poklopac (sl. 33).
2 Ručku poklopca spremnika za prašinu povucite prema gore i podignite spremnik za prašinu iz
odjeljka spremnika za prašinu (sl. 34).
Napomena: Prilikom vađenja ili ponovnog umetanja spremnika za prašinu pazite da ne oštetite
lopatice ventilatora motora.
3 Pažljivo podignite poklopac sa spremnika za prašinu (1) i izvadite filter (2) (sl. 35).
4 Prljavštinu iz spremnika za prašinu istresite u košaru za otpatke. Očistite filtar i unutarnji dio
spremnika za prašinu krpom ili četkicom za zube s mekim vlaknima. Također očistite usisni otvor na
dnu spremnika za prašinu (sl. 36).
Oprez: Spremnik za prašinu i filter nemojte prati vodom ili u stroju za pranje posuđa.
5 Vratite filtar natrag u spremnik za prašinu (1). Zatim postavite poklopac natrag na spremnik za
prašinu (2) (sl. 37).
6 Vratite spremnik za prašinu natrag u odjeljak spremnika za prašinu i vratite gornji poklopac natrag
na robotski usisavač (sl. 38).
Oprez: Uvijek provjerite je li filtar unutar spremnika za prašinu. Ako se koristite robotskim
usisavačem dok je filtar izvan spremnika za prašinu, ošteti ćete motor.
43
Čišćenje robotskog usisavača
Kako biste osigurali dobru učinkovitost čišćenja, morate povremeno čistiti senzore za sprječavanje
pada, kotače, bočne četke i otvor za usis.
1 Robotski usisavač stavite naopako na ravnu površinu.
2 S pomoću četke s mekim vlaknima (npr. četkice za zube) uklonite prašinu i dlake iz senzora za
sprječavanje pada (sl. 39).
Page 44

44
Hrvatski
Napomena: Važno je redovito čistiti senzore za sprječavanje pada. Ako su senzori za sprječavanje
pada prljavi, robotski usisavač možda neće moći prepoznati visinske razlike ili stube.
3 S pomoću četke s mekim vlaknima (npr. četkice za zube) uklonite prašinu ili dlake s prednjeg i
bočnih kotača (sl. 40).
4 Kako biste očistili bočne četke, uhvatite ih za vlakna i povucite ih s osovina (sl. 41).
5 S pomoću mekane četke (npr. četkice za zube) ili krpe (sl. 42) uklonite dlake, kosu i niti s osovine i
bočnih četki.
6 Provjerite ima li na bočnim četkama i donjem dijelu robotskog usisavača oštrih predmeta koji bi
mogli oštetiti pod.
7 Nakon što ukinite bočne četke s osovina, odvežite veze za podešavanje mlaznice TriActive XL
umetanjem prstiju na mjesta označena strelicama i povucite mlaznicu TriActive s robotskom
usisavača (sl. 43).
8 Otvor za usis očistite mekanom četkom (npr. četkice za zube) (sl. 44).
9 Uklonite svu vidljivu prljavštinu s mlaznice TriActive (sl. 45).
10 Umetnite kukice za vezivanje mlaznice TriActive u otvore na donjem dijelu robotskog usisavača (sl.
46). Gurnite mlaznicu TriActive natrag u položaj. Provjerite može li se mlaznica slobodno pomicati
nekoliko milimetara prema gore i prema dolje.
Zamjena dijelova
Naručivanje dodatnog pribora
Da biste kupili dodatke ili rezervne dijelove, posjetite www.shop.philips.com/service ili se obratite
dobavljaču tvrtke Philips. Također se možete obratiti centru za potrošače tvrtke Philips u svojoj državi
(pogledajte međunarodni jamstveni list radi detalja o kontaktu).
Zamjena filtera
Filtar zamijenite ako je vrlo prljav ili oštećen. Novi filtar možete naručiti pod brojem narudžbe FC8012.
Upute o uklanjanju i postavljanju filtra iz spremnika za prašinu potražite u odjeljku „Pražnjenje i
čišćenje spremnika za prašinu” u poglavlju „Čišćenje i održavanje”.
Zamjena bočnih četki
Nakon nekog vremena zamijenite bočne četke kako biste osigurali dobre rezultate čišćenja.
Napomena: Uvijek zamijenite bočne četke kada uočite znakove habanja ili oštećenja. Također
preporučujemo da istodobno promijenite obje bočne četke. Rezervne bočne četke možete naručiti u
paru pod brojem narudžbe FC8013.
1 Kako biste zamijenili bočne četke, stare bočne četke uhvatite za vlakna i povucite ih s osovina (sl.
41).
2 Gurnite nove bočne četke na osovine (sl. 9).
Zamjena punjive baterije
Punjivu bateriju mogu zamijeniti samo kvalificirani servisni inženjeri. Odnesite robotski usisavač u
ovlašteni servisni centar tvrtke Philips kako bi vam zamijenili bateriju kada je više ne budete mogli
puniti ili se počne brzo prazniti. Detalje za kontakt centra za korisničku podršku tvrtke Philips u svojoj
zemlji možete pronaći u međunarodnom jamstvenom listu.
Page 45

Hrvatski
45
Zamjena baterije daljinskog upravljača
Daljinski upravljač radi s pomoću dugmaste baterije CR2025. Bateriju zamijenite ako robotski usisavač
više ne reagira na pritisak tipki na daljinskom upravljaču.
1 Držite daljinski upravljač preokrenut prema dolje. Pritisnite gumb za otpuštanje na držaču baterije
te istodobno pogurajte držač baterije iz daljinskog upravljača (sl. 47).
2 Izvadite praznu bateriju iz držača baterije te umetnite novu bateriju u držač baterije. A zatim kliznite
držač baterije natrag u daljinski upravljač (sl. 48).
Uklanjanje punjive baterije
Upozorenje: Uklonite punjivu bateriju tek kada uklonite uređaj. Pobrinite se da baterija
bude potpuno prazna dok je uklanjate.
Kako biste izvadili punjivu bateriju, slijedite upute u nastavku. Također možete odnijeti robotski
usisavač u servisni centar tvrtke Philips kako bi vam uklonili punjivu bateriju. Obratite se centru za
korisničku podršku tvrtke Philips u svojoj državi radi adrese servisnog centru u vašoj blizini.
1 Pokrenite robotski usisavač s određenog mjesta u prostoriji, a ne s priključne stanice.
2 Ostavite robotski usisavač da radi dok se punjiva baterija ne isprazni kako biste bili sigurni da je
punjiva baterija potpuno prazna prije nego što je izvadite i bacite.
3 Odvrnite vijke poklopca na odjeljku za baterije i uklonite poklopac (sl. ).
4 Podignite punjivu bateriju i isključite je (sl. 50).
5 Odnesite robotski usisavač i punjivu bateriju na mjesto za prikupljanje električnog i elektroničkog
otpada.
Rješavanje problema
U ovom je poglavlju sažetak osnovnih problema uređaja s kojima se možete susresti. Ako ne možete
riješiti problem s dolje navedenim informacijama, posjetite www.philips.com/support za popis
najčešćih pitanja ili kontaktirajte Korisnički centar u vašoj državi.
Problem
Robotski usisavač ne
počinje čistiti kada
pritisnem gumb za
pokretanje/zaustavljanje.
Mogući uzrok Rješenje
Punjiva baterija je prazna. Napunite punjivu bateriju (pogledajte
Mali utikač još uvijek je
umetnut u utičnicu na
robotskom usisavaču.
Prekidač za napajanje nije
postavljen u položaj „on” (I)
(uključeno).
poglavlje "Priprema za uporabu").
Robotski usisavač ne radi dok je
priključen na napajanje. Radi samo dok
je priključen na svojoj punjivoj bateriji.
Stoga, uvijek isključite adapter iz
robotskog usisavača i napajanja prije
upotrebe.
Pritisnite prekidač za napajanje u
položaj „on” (uključeno). Postavite
robotski usisavač na uključenu priključnu
stanicu ili uključite mali utikač adaptera.
Nakon nekoliko sekundi robotski
usisavač oglasit će se zvučnim signalom,
a zaslon se uključuje.
Page 46

46
Hrvatski
Problem Mogući uzrok Rješenje
Robotski usisavač ne
reagira kada pritisnem
jedan od gumba.
Prekidač za
uključivanje/isključivanje
postavili ste na „off”
(isključeno).
Pritisnite prekidač za napajanje u
položaj „on” (uključeno). Postavite
robotski usisavač na uključenu priključnu
stanicu ili uključite mali utikač adaptera.
Nakon nekoliko sekundi robotski
usisavač oglasit će se zvučnim signalom,
a zaslon se uključuje.
Indikator upozorenja
brzo bljeska.
Robotski usisavač nije mogao
pronaći priključnu stanicu i
baterija se ispraznila.
Jedan kotač ili oba kotača su
zapela.
Jedna bočna četka ili obje
bočne četke su zapele.
Gornji poklopac nije na svojem
mjestu ili nije ispravno
zatvoren.
Odbojnik je zapeo. Pritisnite gumb za
Robotski usisavač je podignut
tijekom čišćenja.
Postavite robotski usisavač na uključenu
priključnu stanicu ili uključite mali utikač
adaptera. Nakon nekoliko sekundi
robotski usisavač oglasit će se zvučnim
signalom, a zaslon se uključuje.
Prekidač za napajanje postavite na „off”
(isključeno). Uklonite nakupine dlake,
kosu, niti ili žice koje su se uhvatile oko
ovjesa kotača.
Očistite bočne četke (pogledajte
poglavlje „Čišćenje i održavanje”).
Kad nema gornjeg poklopca ili nije
ispravno zatvoren, robotski usisavač ne
radi. Gornji poklopac pravilno postavite
na robotski usisavač.
pokretanje/zaustavljanje. Podignite
robotski usisavač kako bi odbojnik bio
slobodan. Postavite robotski usisavač na
određenu udaljenost od prepreke i
pritisnite gumb za
pokretanje/zaustavljanje kako bi
nastavio s čišćenjem.
Pritisnite gumb za
pokretanje/zaustavljanje. Postavite
robotski usisavač na pod. Zatim pritisnite
gumb za pokretanje/zaustavljanje kako
bi robotski usisavač nastavio s
čišćenjem.
Robotski usisavač ne čisti
kako treba.
Vlakna na jednoj ili obje bočne
četke iskrivljene su ili savijene.
Filter u spremniku za prašinu je
prljav.
Četku ili četke namačite neko vrijeme u
toploj vodi. Ako se time vlakna ne vrate
u svoj pravilan oblik, zamijenite bočne
četke (pogledajte poglavlje „Zamjena”).
Očistite filtar u spremniku za prašinu
krpom ili četkicom za zube s mekim
vlaknima. Filtar i spremnik za prašinu
također možete očistiti običnim
usisavačem uz postavku male jačine
usisa.
Page 47

Problem Mogući uzrok Rješenje
Ako četkanjem ili usisavanjem ne
uspijete očistite filtar, zamijenite ga
novim. Preporučujemo da filtar
zamijenite barem jednom godišnje.
Hrvatski
47
Punjiva baterija se više
ne može puniti ili se brzo
prazni.
Baterija daljinskog
upravljača previše se
brzo prazni.
Usisni otvor na dnu spremnika
za prašinu je začepljen.
Prednji kotač blokiran je
dlakama i drugom
prljavštinom.
Robotski usisavač čisti vrlo
tamnu ili sjajnu površinu, čime
se aktiviraju senzori za
sprječavanje pada. Zbog toga
se robotski usisavač kreće
neobičnim obrascem.
Robotski usisavač čisti pod koji
poprilično jako reflektira
sunčevu svjetlost. To aktivira
senzore za sprječavanje pada i
zbog toga se robotski usisavač
kreće neobičnim obrascem.
Punjiva baterija dosegla je kraj
vijeka trajanja.
Možda niste umetnuli bateriju
odgovarajuće vrste.
Očistite otvor za usisavanje (pogledajte
poglavlje "Čišćenje i održavanje").
Očistite prednji kotač (pogledajte
poglavlje "Čišćenje i održavanje").
Pritisnite gumb za
pokretanje/zaustavljanje, a zatim
premjestite robotski usisavač u dio poda
svijetlije boje. Ako se problem nastavi na
podovima svijetlije boje, posjetite
www.philips.com/support ili se obratite
centru za korisničku podršku u svojoj
zemlji.
Navucite zavjese kako biste spriječili
dopiranje sunčeve svjetlosti u prostoriju.
Možete započeti s čišćenjem kada
sunčeva svjetlost bude manje jarka.
Punjivu bateriju zamijenite u servisnom
centru tvrtke Philips (pogledajte
poglavlje „Zamjena”).
Za daljinski upravljač potrebna vam je
dugmasta baterija CR2025. Ako se
problem nastavi, posjetite
www.philips.com/support ili se obratite
centru za korisničku podršku u svojoj
zemlji.
Robotski usisavač kreće
se u krugovima.
Robotski usisavač ne
može pronaći priključnu
stanicu.
Robotski usisavač čisti u
načinu čišćenja mjesta.
Robotski usisavač nema
dovoljno prostora kako bi
došao do priključne stanice.
To je uobičajeno ponašanje. Način
čišćenja mjesta može se aktivirati kad se
na podu otkrije mnogo prljavštine radi
temeljitog čišćenja. To je također dio
automatskog načina čišćenja. Nakon
otprilike jedne minute robotski usisavač
nastavlja svoj uobičajeni obrazac
čišćenja. Način čišćenja mjesta također
možete zaustaviti odabirom drugog
načina čišćenja na daljinskom
upravljaču.
Pokušajte pronaći drugo mjesto za
priključnu stanicu. Pogledajte
„Postavljanje priključne stanice” u
poglavlju „Priprema za uporabu”.
Page 48

48
Hrvatski
Problem Mogući uzrok Rješenje
Robotski usisavač i dalje
aktivno traži.
Omogućite robotskom usisavaču 20
minuta da se vrati na priključnu stanicu.
Robotski usisavač ne pokrenut
s priključne stanice.
Ako želite da se robotskiusisavač vrati
na priključnu stanicu nakon čišćenja,
pokrenite da s priključne stanice.
Page 49

Latviešu
Ievads
Apsveicam ar pirkumu un laipni lūdzam Philips! Lai pilnvērtīgi izmantotu Philips piedāvātā atbalsta
iespējas, reģistrējiet produktu vietnē www.philips.com/welcome.
Vispārīgs apraksts (1. att.)
1 Augšējais pārsegs
2 Putekļu tvertnes vāka rokturis
3 Putekļu tvertnes vāks
4 Filtrs
5 Putekļu tvertne
6 Ventilators
7 Buferis
8 Dokstacijas sensors
9 Ieslēgšanas/apturēšanas poga (robota ieslēgšanai vai apturēšanai)
10 Displejs
11 TriActiveXL uzgalis
12 Priekšējais ritenītis
13 Sānu birstu lūkas
14 Nokrišanas sensori
15 Bateriju nodalījums
16 Ritentiņi
17 Sūkšanas atvere
18 Sānu birstes
19 Akumulatora turētājs
20 Tālvadība
21 Mazais spraudnis
22 Adapteris
23 Dokstacija
49
Displejs un tālvadība
Displejs (att. 2):
1 Brīdinājuma indikators
2 Pilnas putekļu tvertnes indikators
Tālvadība (att. 3)
1 Navigācijas pogas un ieslēgšana/apturēšana
2 Dokošanas poga
3 Tīrīšanas laika poga
4 Tīrīšanas režīma pogas
Robota darbības princips
Ko robots tīra
Šis robots ir aprīkots ar funkcijām, kas to padara piemērotu mājokļa grīdu tīrīšanai.
Robots ir īpaši piemērots cietu grīdu tīrīšanai, piemēram, koka, lamināta vai linoleja grīdām. Tam var
rasties problēmas, tīrot mīkstas grīdas, piemēram, paklājus vai grīdsegas. Ja izmantojat robotu uz
paklāja vai grīdsegas, lūdzu, pirmoreiz palieciet tuvumā, lai redzētu, vai robots spēj notīrīt šādu grīdas
segumu. Robotam uzraudzība nepieciešama arī tad, ja izmantojat to uz ļoti tumšām un spīdīgām
cietām grīdām.
Page 50

50
Latviešu
Kā robots tīra
Tīrīšanas sistēma
Robotam ir divpakāpju tīrīšanas sistēma, lai efektīvi notīrītu grīdas.
-
Divas sānu birstes palīdz robotam iztīrīt stūrus un vietas gar sienām. Tās arī palīdz savākt netīrumus
no grīdas un pārvietot tos uz sūkšanas atveri (att. 4).
-
Robota sūkšanas jauda savāc netīrumus un cauri sūkšanas atverei novirza tos uz putekļu tvertni
(att. 5).
Tīrīšanas trajektorijas
Automātiskajā tīrīšanas režīmā robots izmanto automātisku tīrīšanas trajektoriju secību, lai optimāli
iztīrītu katru telpas zonu. Tas izmanto tālāk norādītās tīrīšanas trajektorijas.
1 Zveida trajektorija vai zigzaga trajektorija (att. 6)
2 Nejauši izvēlēta trajektorija (att. 7)
3 Darbība gar sienām (att. 8)
4 Tīrīšana vienā vietā (att. 9)
Automātiskajā tīrīšanas režīmā robots šīs trajektorijas izmanto noteiktā secībā: Zveida trajektorija,
nejauši izvēlēta trajektorija, darbība gar sienām un tīrīšana vienā vietā.
Pēc šīs trajektoriju secības pabeigšanas robots atkal uzsāk Zveida trajektorijas darbību. Robots
turpina izpildīt šo trajektoriju secību telpas tīrīšanai, līdz akumulatora līmenis ir zems vai līdz tas tiek
manuāli izslēgts.
Piezīme. Varat arī atlasīt katru režīmu atsevišķi, nospiežot atbilstošo pogu uz tālvadības pults.
Papildinformāciju skatiet nodaļas “Robota izmantošana” sadaļā “Tīrīšanas režīmi”.
Kā robots izvairās no augstuma starpības
Robots ir aprīkots ar trim nokrišanas sensoriem tā apakšpusē. Tas šos nokrišanas sensorus izmanto, lai
noteiktu un izvairītos no augstuma starpības, piemēram, kāpnēm.
Piezīme. Tā ir normāla parādība, ja robots pārvietojas mazliet pāri augstuma starpības malai, jo
priekšējais nokrišanas sensors atrodas aiz bufera.
Ievērībai! Dažreiz nokrišanas sensoriem neizdodas laikus noteikt kāpnes vai citas virsmas augstuma
izmaiņas. Tāpēc rūpīgi uzraugiet robota darbību dažas pirmās lietošanas reizes un tad, kad robots
darbojas tuvu kāpnēm vai citām virsmām ar augstuma starpību. Ļoti svarīgi ir regulāri notīrīt
nokrišanas sensorus, lai nodrošinātu, ka robots var turpināt pareizi noteikt augstuma atšķirības
(norādījumus skatiet nodaļā “Tīrīšana un apkope”).
Pirms pirmās lietošanas reizes
Sānu birstu uzstādīšana
1 Izņemiet sānu birstes no iepakojuma un apgrieziet robotu otrādi uz galda vai uz grīdas.
2 Uzlieciet sānu birstes uz vārpstām robota (att. 10) apakšā.
Piezīme. Pārliecinieties, vai sānu birstes ir pareizi uzliktas. Spiediet tās uz vārpstas, līdz tās ar klikšķi
fiksējas pozīcijā.
Aizsargplombas noņemšana no tālvadības pults
Tālvadības pults darbojas ar pogveida baterijuCR2025. Šo bateriju aizsargā plomba, kas ir jāizņem
pirms lietošanas.
Page 51

Latviešu
1 Izvelciet baterijas aizsargplombu no tālvadības pults (att. 11) baterijas nodalījuma.
Tālvadības pults ir gatava lietošanai.
Sagatavošana lietošanai
Dokstacijas uzstādīšana
1 Ievietojiet mazo adaptera spraudni dokstacijas(1) ligzdā un ievietojiet adapteri sienas
kontaktligzdā(2) (att. 12).
2 Novietojiet dokstaciju uz horizontālas, līdzenas virsmas pret sienu.
Piezīme. Pārliecinieties, vai nav nekādu šķēršļu vai augstuma starpības 80cm uz priekšu, 30cm pa
labi un 100cm pa kreisi no dokstacijas (att. 13).
Svarīga piezīme: snaudas režīms
Robots atrodas snaudas režīmā un nekādi nereaģē, kad nospiežat pogu. Lai atkal aktivizētu robotu,
kad tas atrodas snaudas režīmā, veiciet tālāk norādītās darbības.
1 Nospiediet robota ieslēgšanas/apturēšanas pogu, lai pārslēgtu robotu no snaudas režīma
gaidstāves režīmā.
2 Nospiediet ieslēgšanas/apturēšanas pogu uz robota (att. 19) vai tālvadības pults, lai ieslēgtu
robotu.
3 Ja robots nesāk tīrīt, novietojiet to dokstacijā, kas ir pievienota elektrotīklam, lai atkārtoti
uzlādējamais akumulators uzlādētos.
Robots pārslēdzas snaudas režīmā, ja turat nospiestu ieslēgšanas/apturēšanas pogu 3sekundes. Tas
var pārslēgties snaudas režīmā arī tad, ja akumulators pilnībā izlādējas. Akumulators var izlādēties tad,
ja, piemēram, robots nevar atrast dokstaciju.
51
Piezīme. Nav iespējams aktivizēt robotu no snaudas režīma ar tālvadības ieslēgšanas/apturēšanas
pogu. Nospiediet ieslēgšanas/izslēgšanas pogu uz robota.
Uzlāde
-
Uzlādējot pirmo reizi un kad robota atkārtoti uzlādējamais akumulators ir tukšs, uzlādes laiks ir
četras stundas.
-
Kad uzlādējamais akumulators ir pilnībā uzlādēts, robots var tīrīt līdz pat 100minūtēm.
-
Robotu var uzlādēt tikai dokstacijā.
Uzlāde dokstacijā
1 Nospiediet ieslēgšanas/apturēšanas pogu uz robota.
2 Novietojiet robotu uz strāvas apgādei pieslēgtās dokstacijas (att. 14).
3 Ieslēgšanas/apturēšanas poga sāk lēni mirgot (att. 15).
4 Kad atkārtoti uzlādējamais akumulators ir pilnībā uzlādēts, ieslēgšanas/apturēšanas poga deg
nepārtraukti (att. 16).
Automātiska uzlāde lietošanas laikā
1 Kad robots ir pabeidzis tīrīšanu vai atlikuši tikai 15% akumulatora enerģijas, tas automātiski meklē
dokstaciju, lai veiktu uzlādi. Kad robots meklē dokstaciju, ieslēgšanas/apturēšanas poga ātri mirgo
(att. 17).
2 Kad atkārtoti uzlādējamais akumulators ir pilnībā uzlādēts, ieslēgšanas/apturēšanas poga deg
nepārtraukti.
Page 52

52
Latviešu
Piezīme. Robots automātiski meklē dokstaciju tikai tad, ja tīrīšana sākta no dokstacijas.
Telpas sagatavošana tīrīšanai
Pirms uzsākat robota tīrīšanas ciklu, pārliecinieties, vai no grīdas (att. 18) ir pacelti visi nenostiprinātie
un trauslie priekšmeti.
Novāciet no grīdas arī visus kabeļus un vadus.
Robota izmantošana
Sākums un apturēšana
1 Nospiediet ieslēgšanas/apturēšanas pogu.
-
Varat nospiest ieslēgšanas/apturēšanas pogu uz robota (att. 19).
-
Varat arī nospiest ieslēgšanas/apturēšanas pogu uz tālvadības pults (att. 20).
2 Ieslēgšanas/apturēšanas poga ir nepārtraukti ieslēgta un robots sāk tīrīšanu (att. 21).
3 Robots tīra automātiskajā tīrīšanas režīmā, līdz akumulatora uzlādes līmenis ir zems. Automātiskajā
tīrīšanas režīmā tas izpilda atkārtotas Zveida trajektorijas, nejaušas trajektorijas, darbības gar
sienām un tīrīšanu vienā vietā (att. 22).
Piezīme. Lai izvēlētos individuālu režīmu, nospiediet vienu no režīma pogām uz tālvadības pults.
Papildinformāciju skatiet sadaļā “Tīrīšanas režīma izvēle”.
4 Kad akumulatora līmenis ir zems, sāk mirgot ieslēgšanas/apturēšanas poga un robots meklē
dokstaciju, lai veiktu uzlādi (att. 17).
5 Varat arī nospiest ieslēgšanas/apturēšanas pogu, lai pārtrauktu vai apturētu tīrīšanas darbību. Ja
atkārtoti nospiežat ieslēgšanas/apturēšanas pogu un akumulatorā joprojām ir pietiekami daudz
enerģijas, robots turpina tīrīšanu automātiskajā tīrīšanas režīmā.
6 Lai robots atgrieztos dokstacijā, pirms akumulators ir izlādējies, nospiediet dokstacijas pogu uz
tālvadības pults (att. 23).
Sāk mirgot ieslēgšanas/apturēšanas poga un robots meklē dokstaciju (att. 24).
Piezīme. Ja nestartējāt robotu no dokstacijas, tas automātiski neatgriežas dokstacijā, kad
uzlādējamā akumulatora līmenis ir zems. Ja akumulatorā joprojām ir pietiekami daudz enerģijas,
varat nospiest dokošanas pogu uz tālvadības pults, lai robots atgrieztos dokstacijā. Ja akumulators
ir pilnībā tukšs, jums manuāli jānovieto robots dokstacijā.
Dokstacijas lietošana
Uz dokstacijas ir divas vadīklas, ko var izmantot robota darbināšanai.
Pilna akumulatora un sākšanas poga
Nospiežot pilna akumulatora un sākšanas pogu uz dokstacijas robota uzlādes laikā, robots sāk
tīrīšanu, tiklīdz uzlādējamais akumulators ir uzlādēts (att. 25).
24h poga
Nospiežot 24h pogu uz dokstacijas, dokstacija sāk 24stundu laika atskaiti līdz nākamajai tīrīšanas
reizei. Pēc laika atskaites beigām robots sāk tīrīšanu un turpina to, līdz akumulatora uzlādes līmenis ir
zems. Pēc tam tas automātiski atgriežas dokstacijā, lai veiktu uzlādi (att. 26).
Page 53

Latviešu
Tīrīšanas režīma izvēle
Papildus automātiskajam tīrīšanas režīmam šim robotam ir četri individuāli tīrīšanas režīmi, ko
iespējams aktivizēt, nospiežot attiecīgo pogu uz tālvadības pults.
Z trajektorijas režīms
Zveida trajektorijas režīmā robots tīra, veicot Zformas cilpas telpā, lai iztīrītu plašas zonas (att. 27).
Nejaušas trajektorijas režīms
Šajā režīmā robots tīra telpu ar jauktu trajektoriju, ko veido taisnas un šķērsvirziena kustības (att. 28).
Sienu režīms
Šajā režīmā robots tīra gar telpas sienām, lai īpaši rūpīgi notīrītu zonu gar sienām (att. 29).
Tīrīšanas vienā vietā režīms
Šajā režīmā robots veic nejaušas trajektorijas kustības nelielas zonas robežās, lai to rūpīgi (att. 30)
iztīrītu.
Piezīme. Manuāli izvēlētie režīmi ir aktīvi tikai dažas minūtes. Pēc tam robots pārslēdzas uz
automātisko tīrīšanas režīmu.
Manuāla vadība
1 Izmantojiet bultiņu pogas, kas atrodas apkārt ieslēgšanas/apturēšanas pogai uz tālvadības pults,
lai vadītu robotu telpā. (att. 31)
Piezīme. Uzmanieties, kad manuāli virzāt robotu tuvu vietām, kur ir augstuma atšķirības un kāpnes.
Piezīme. Putekļu sūkšanas funkcija un sānu birstes darbojas tikai tad, kad robots tiek virzīts uz
priekšu. Pogas virzīšanai pa kreisi, pa labi vai atpakaļ ir paredzētas tikai robota pārvietošanai telpā.
53
Tīrīšanas laika pogas izmantošana
Nospiediet tīrīšanas laika pogu uz tālvadības pults, lai ieslēgtu tīrīšanu uz 35minūtēm. Kad tīrīšanas
laiks ir pagājis, robots atgriežas dokstacijā, lai veiktu uzlādi (att. 32).
Signāli un to nozīme
Robota displejā ir divi indikatori: brīdinājuma indikators un pilnas putekļu tvertnes indikators.
Ieslēgšanas/apturēšanas poga raida lampiņas signālus. Tālāk esošajā tabulā ir aprakstīta signālu
nozīme.
Signāls
Ieslēgšanas/izslēgšanas poga deg nepārtraukti. Robots ir gatavs tīrīšanai.
Ieslēgšanas/apturēšanas poga lēni mirgo. Notiek robota uzlāde.
Ieslēgšanas/apturēšanas poga ātri mirgo. Robots meklē dokstaciju.
Iedegas pilnas putekļu tvertnes indikators. Putekļu nodalījums ir pilns.
Iedegas brīdinājuma indikators. Robots tika pacelts tīrīšanas laikā.
Nozīme
Zems robota akumulatora uzlādes līmenis.
Robota buferis ir iestrēdzis.
Page 54

54
Latviešu
Signāls Nozīme
Ritenītis vai sānu birste ir iestrēgusi.
Nav uzlikts vai pareizi aizvērts augšējais pārsegs.
Robots nevar atrast dokstaciju.
Reakcija uz plaukšķināšanu
Reakcija uz plaukšķināšanu ir iespējota, kad robots pāriet snaudas režīmā šādās situācijās:
-
kad tas pārtrauc tīrīšanu kļūdas dēļ;
-
kad ir ieprogrammēts īss tīrīšanas laiks;
-
kad tas nevar atrast dokstaciju 20minūšu laikā.
Ja neredzat robotu, varat atrast to, vienreiz sasitot plaukstas. Robots atbildēs, radot pīkstiena signālu
un iedegot visas ikonas displejā.
Tīrīšana un kopšana
Putekļu tvertnesiztukšošana un tīrīšana
Iztukšojiet un iztīriet putekļu tvertni, kad nepārtraukti deg pilnas putekļu tvertnes indikators.
1 Noņemiet vāciņu (att. 33).
2 Paceliet putekļu tvertnes vāka rokturi un izceliet putekļu tvertni ārā no putekļu tvertnes nodalījuma
(att. 34).
Piezīme. Izņemot vai ievietojot atpakaļ putekļu tvertni, uzmanieties, lai nesabojātu motora
ventilatora lāpstiņas.
3 Uzmanīgi paceliet vāku no putekļu tvertnes(1) un izņemiet filtru(2) (att. 35).
4 Izkratiet putekļu tvertni virs atkritumu groza, lai to iztukšotu. Iztīriet putekļu tvertnes filtru un
iekšpusi ar drānu vai zobu birsti ar mīkstiem sariem. Iztīriet arī sūkšanas atveri putekļu tvertnes (att.
36) apakšā.
Ievērībai! Netīriet putekļu tvertni un filtru ar ūdeni vai trauku mazgāšanas mašīnā.
5 Ievietojiet filtru atpakaļ putekļu tvertnē(1). Pēc tam uzlieciet vāku uz putekļu tvertnes(2) (att. 37).
6 Ielieciet putekļu tvertni atpakaļ nodalījumā un uzlieciet augšējo pārsegu atpakaļ uz robota (att. 38).
Ievērībai! Vienmēr pārliecinieties, vai putekļu tvertnē atrodas filtrs. Izmantojot robotu bez filtra
putekļu tvertnē, tiks sabojāts motors.
Robota tīrīšana
Lai saglabātu labu tīrīšanas sniegumu, ir regulāri jānotīra nokrišanas sensori, ritenīši, sānu birstes un
sūkšanas atvere.
1 Nolieciet robotu otrādi apgrieztā veidā uz līdzenas virsmas.
2 Izmantojiet birsti ar mīkstiem sariem (piemēram, zobu birsti), lai noņemtu putekļus vai pūkas no
nokrišanas sensoriem. (att. 39)
Piezīme. Ir ļoti svarīgi regulāri notīrīt nokrišanas sensorus. Ja nokrišanas sensori ir netīri, robotam
var neizdoties noteikt augstuma atšķirības vai kāpnes.
3 Izmantojiet birsti ar mīkstiem sariem (piemēram, zobu birsti), lai noņemtu putekļus vai pūkas no
priekšējā ritenīša un sānu ritenīšiem (att. 40).
Page 55

Latviešu
4 Lai notīrītu sānu birstes, satveriet tās aiz sariem un novelciet no vārpstām (att. 41).
5 Noņemiet pūkas, matus un diegus no vārpstas un sānu birstes, izmantojot mīkstu birsti (piemēram,
zobu birsti) vai drānu (att. 42).
6 Pārbaudiet sānu birstes un robota apakšu, vai tur nav asi priekšmeti, kas var sabojāt grīdu.
7 Kad ir noņemtas sānu birstes no vārpstām, atvienojiet TriActiveXL uzgaļa savienojumus, ievietojot
pirkstus vietās, kas apzīmētas ar bultiņām, un noņemiet TriActive uzgali no robota (att. 43).
8 Iztīriet sūkšanas atveri ar mīkstu birsti (piemēram, zobu birsti) (att. 44).
9 Notīriet visus redzamos netīrumus no TriActive uzgaļa (att. 45).
10 Ievietojiet TriActive uzgaļa fiksatorus atverēs robota (att. 46) apakšā. Iespiediet TriActive uzgali
atpakaļ pozīcijā. Pārbaudiet, vai uzgalis var brīvi kustēties dažus milimetrus uz augšu un uz leju.
Nomaiņa
Piederumu pasūtīšana
Lai iegādātos piederumus vai rezerves daļas, apmeklējiet vietni www.shop.philips.com/service vai
vērsieties pie sava Philips izplatītāja. Varat arī sazināties ar Philips klientu apkalpošanas centru savā
valstī (kontaktinformāciju varat atrast bukletā par garantiju visā pasaulē).
Filtra nomaiņa
Nomainiet filtru, ja tas ir ļoti netīrs vai bojāts. Varat pasūtīt jaunu filtru ar pasūtījuma numuruFC8012.
Skatiet sadaļu “Putekļu tvertnes iztukšošana un tīrīšana” nodaļā “Tīrīšana un apkope”, lai uzzinātu, kā
izņemt filtru no putekļu tvertnes un ievietot to putekļu tvertnē.
55
Sānu birstu nomaiņa
Pēc noteikta laika nomainiet sānu birstes, lai nodrošinātu atbilstošus tīrīšanas rezultātus.
Piezīme. Vienmēr nomainiet sānu birstes, ja pamanāt nodiluma pazīmes vai bojājumus. Ieteicams
nomainīt abas sānu birstes vienlaikus. Varat pasūtīt rezerves sānu birstes kā komplektu ar pasūtījuma
numuruFC8013.
1 Lai nomainītu sānu birstes, satveriet vecās birstes aiz sariem un novelciet no vārpstām (att. 41).
2 Uzstumiet jaunās sānu birstes uz vārpstām (att. 10).
Atkārtoti uzlādējamā akumulatora maiņa
Robota atkārtoti uzlādējamā akumulatora nomaiņu drīkst veikt tikai kvalificēti apkopes tehniķi. Ja
akumulatoru vairs nevar uzlādēt vai tas ātri izlādējas, nogādājiet robotu pilnvarotajā Philips tehniskās
apkopes centrā, lai nomainītu akumulatoru. Savas valsts Philips klientu apkalpošanas centra
kontaktinformāciju varat skatīt bukletā par starptautisko garantiju vai dodieties uz vietni
www.philips.com/support.
Tālvadības pults baterijas nomaiņa
Tālvadības pults darbojas ar pogveida baterijuCR2025. Nomainiet bateriju, kad robots vairs nereaģē
uz tālvadības pults pogu nospiešanu.
1 Turiet tālvadības pulti ar augšpusi uz leju. Nospiediet pogu uz baterijas turētāja un vienlaikus virziet
baterijas turētāju ārā no tālvadības pults (att. 47).
2 Izņemiet tukšo bateriju no baterijas turētāja un ievietojiet tajā jaunu bateriju. Pēc tam bīdiet
baterijas turētāju atpakaļ tālvadības pultī (att. 48).
Page 56

56
Latviešu
Glabāšana
Ja plānojat mēnesi vai ilgāk neizmantot robotu, turiet nospiestu robota ieslēgšanas/apturēšanas pogu
3sekundes, lai robots pārslēgtos snaudas režīmā un tiktu pasargāts uzlādējamais akumulators.
Atvienojiet dokstaciju no elektrotīkla, lai ietaupītu enerģiju.
Atkārtoti uzlādējamā akumulatora izņemšana
Brīdinājums. Uzlādējamo bateriju izņemiet tikai tad, kad izmetat ierīci. Izņemot bateriju,
pārliecinieties, ka tā ir pilnīgi tukša.
Lai izņemtu uzlādējamo akumulatoru, izpildiet tālāk norādītās darbības. Varat arī nogādāt robotu
pilnvarotā Philips tehniskās apkopes centrā, lai izņemtu uzlādējamo akumulatoru. Sazinieties ar savas
valsts Philips klientu apkalpošanas centru, lai noskaidrotu jums tuvumā esoša tehniskās apkopes
centra adresi.
1 Palaidiet robotu no kādas vietas istabā, neizmantojot dokstaciju.
2 Ļaujiet robotam darboties, līdz akumulators ir tukšs, lai nodrošinātu, ka akumulators ir pilnībā
izlādēts, pirms to izņemt un utilizēt.
3 Atskrūvējiet akumulatora nodalījuma vāka skrūves un noņemiet vāku (att. 49).
4 Izceliet uzlādējamo akumulatoru un atvienojiet to (att. 50).
5 Nogādājiet robotu un uzlādējamo akumulatoru uz elektrisko un elektronisko iekārtu atkritumu
savākšanas punktu.
Problēmu novēršana
Šajā nodaļā ir apkopotas izplatītākās problēmas, kas var rasties, izmantojot šo ierīci. Ja jūs nevarat
atrisināt problēmu, izmantojot tālāk norādīto informāciju, apmeklējiet www.philips.com/support un
skatiet bieži uzdoto jautājumu sarakstu vai sazinieties ar klientu apkalpošanas centru savā valstī.
Problēma
Robots nesāk tīrīšanu
pēc
ieslēgšanas/apturēšanas
pogas nospiešanas.
Iespējamais cēlonis Risinājums
Atkārtoti uzlādējamais
akumulators ir tukšs.
Uzlādējiet akumulatoru (skatiet nodaļu
„Sagatavošana lietošanai”).
Robots nereaģē pēc
kādas no pogu
nospiešanas.
Ātri mirgo brīdinājuma
indikators.
Robots atrodas snaudas
režīmā.
Robota atkārtoti
uzlādējamais akumulators ir
tukšs.
Iestrēdzis viens vai abi
ritenīši.
Vienu reizi nospiediet
ieslēgšanas/apturēšanas pogu, lai atkal
aktivizētu robotu. Nospiežot
ieslēgšanas/apturēšanas pogu vēlreiz,
robots sāk tīrīt. Ja atkārtoti uzlādējamais
akumulators ir tukšs, novietojiet robotu
dokstacijā, kas ir pievienota elektrotīklam.
Novietojiet robotu uz strāvas apgādei
pieslēgtās dokstacijas. Pēc pāris
sekundēm robots nopīkst, un iedegas
displejs.
Iztīriet pūkas, matiņus, pavedienus vai
vadus, kas saķērušies ap ritenīšu
balstiekārtu.
Page 57

Problēma Iespējamais cēlonis Risinājums
Iestrēgusi viena vai abas
sānu birstes.
Iztīriet sānu birstes (skatiet nodaļu
„Tīrīšana un apkope”).
Latviešu
57
Nav uzlikts vai pareizi aizvērts
augšējais pārsegs.
Iestrēdzis buferis. Paceliet robotu, lai atbrīvotu tā buferi.
Robots tika pacelts tīrīšanas
laikā.
Robots netīra pareizi. Vienas vai abu sānu birstu
sari ir saliekti vai izliekušies.
Putekļu tvertnes filtrs ir netīrs. Iztīriet putekļu tvertnes filtru ar drānu vai
Sūkšanas atvere putekļu
tvertnes apakšā ir
nosprostota.
Kad augšējais pārsegs nav uzlikts vai nav
pareizi aizvērts, robots nedarbojas. Pareizi
uzlieciet augšējo pārsegu uz robota.
Novietojiet robotu nelielā attālumā no
šķēršļa un nospiediet
ieslēgšanas/apturēšanas pogu, lai tas
atsāktu tīrīšanu.
Novietojiet robotu uz grīdas. Pēc tam
nospiediet ieslēgšanas/apturēšanas
pogu, lai robots atsāktu tīrīšanu.
Uz brīdi iemērciet birsti vai birstes siltā
ūdenī. Ja šādi neizdodas atjaunot birstēm
pareizo formu, nomainiet sānu birstes
(skatiet nodaļu „Nomaiņa”).
zobu birsti ar mīkstiem sariem. Filtru un
putekļu tvertni var iztīrīt arī parastu
putekļu sūcēju, izmantojot zemu sūkšanas
jaudas iestatījumu.
Ja filtru neizdodas iztīrīt ar birstīti vai
putekļu sūcēju, nomainiet filtru pret jaunu.
Filtru ieteicams nomainīt vismaz reizi
gadā.
Iztīriet sūkšanas atveri (skatiet nodaļu
„Tīrīšana un apkope”).
Priekšējā ritenīti iestrēguši
mati vai citi netīrumi.
Robots tīra ļoti tumšu vai
spīdīgu virsmu, kas aktivizē
nokrišanas sensorus. Tāpēc
robots virzās pa neparastu
trajektoriju.
Robots tīra grīdu, kas spēcīgi
atstaro saules gaismu. Tas
aktivizē nokrišanas sensorus
un izraisa robota
pārvietošanos pa neparastu
trajektoriju.
Notīriet priekšējo ritenīti (skatiet nodaļu
„Tīrīšana un apkope”).
Nospiediet ieslēgšanas/apturēšanas pogu
un pēc tam pārvietojiet robotu uz
gaišākas krāsas grīdas segumu. Ja
problēmu neizdodas novērst arī uz
gaišākām grīdām, lūdzu, apmeklējiet vietni
www.philips.com/support vai sazinieties
ar savas valsts klientu apkalpošanas
centru.
Aizveriet aizkarus, lai saules gaisma
nevarētu iespīdēt telpā. Varat arī sākt
tīrīšanu laikā, kad saules gaisma nav tik
spilgta.
Page 58

58
Latviešu
Problēma Iespējamais cēlonis Risinājums
Akumulatoru vairs nevar
uzlādēt, vai tas ļoti ātri
izlādējas.
Iespējams, akumulators ir
sasniedzis kalpošanas laika
beigas.
Nomainiet uzlādējamo akumulatoru
Philips tehniskās apkopes centrā (skatiet
nodaļu „Nomaiņa”).
Tālvadības pults baterija
iztukšojas pārāk ātri.
Robots pārvietojas pa
apļiem.
Robots nevar atrast
dokstaciju.
Iespējams, neesat ievietojis
pareizā tipa bateriju.
Robots darbojas režīmā
tīrīšanai vienā vietā.
Robotam nepietiek vietas, lai
pārvietotos uz dokstaciju.
Robots joprojām aktīvi meklē. Dodiet robotam aptuveni 20minūtes, lai
Robots netika palaists no
dokstacijas.
Tālvadības pultij ir nepieciešama
pogveida baterijaCR2025. Ja problēmu
neizdodas novērst, atveriet vietni
www.philips.com/support vai sazinieties
ar klientu apkalpošanas centru savā valstī.
Tā ir normāla darbība. Režīmu tīrīšanai
vienā vietā var aktivizēt, lai rūpīgi iztīrītu
vietu, kurā konstatēts daudz netīrumu. Tā
ir arī daļa no automātiskā tīrīšanas režīma.
Pēc aptuveni vienas minūtes robots atsāk
parasto tīrīšanas trajektoriju. Varat arī
apturēt režīmu tīrīšanai vienā vietā, uz
tālvadības pults atlasot citu tīrīšanas
režīmu.
Novietojiet dokstaciju citā vietā. Skatiet
nodaļas „Sagatavošana lietošanai” sadaļu
„Dokstacijas uzstādīšana”.
tas atgrieztos dokstacijā.
Ja vēlaties, lai pēc tīrīšanas cikla robots
atgrieztos dokstacijā, palaidiet to no
dokstacijas.
Page 59

Lietuviškai
Įvadas
Sveikiname įsigijus „Philips“ gaminį ir sveiki atvykę! Norėdami pasinaudoti visa „Philips“ siūloma
pagalba, savo gaminį užregistruokite adresu www.philips.com/welcome.
Bendrasis aprašymas
1 Viršutinis dangtelis
2 Dulkių talpyklos dangtelio rankena
3 Dulkių talpyklos dangtelis
4 Filtras
5 Dulkių talpykla
6 Ventiliatorius
7 Buferis
8 Doko jutiklis
9 Paleidimo ir stabdymo mygtukas (robotui paleisti arba stabdyti).
10 Ekranas
11 Maitinimo jungiklis (robotui įjungti arba išjungti).
12 „TriActive“ XL antgalis
13 Priekinis ratukas
14 Šoninių šepečių velenėliai
15 Aukščio jutikliai
16 Maitinimo elementų skyrius
17 Ratukai
18 Siurbimo anga
19 Šoniniai šepečiai
20 Baterijos laikiklis
21 Nuotolinio valdymo pultas
22 Mažas kištukas
23 Adapteris
24 Dokas
59
Ekranas ir nuotolinio valdymo pultas
Ekranas (pav. 2)
1 Įspėjamasis indikatorius
2 Dulkių talpyklos prisipildymo indikatorius
Nuotolinio valdymo pultas (pav. ):
1 Naršymo mygtukai ir paleidimo ir stabdymo mygtukas
2 Doko mygtukas
3 Valymo laiko mygtukas
4 Valymo režimo mygtukai
Kaip veikia jūsų robotas
Ką jūsų robotas valo
Šiame robote įdiegtos funkcijos, kurios jį padaro tinkamu valytuvu, padedančiu jums valyti savo namų
grindis.
Šis robotas ypač tinkamas valyti kietas grindis, kaip medines, plytelių ar linoleumo grindis. Gali kilti
problemų valant minkštas grindis, kaip kilimus ar demblius. Jei naudojate robotą ant kilimo ar demblio,
Page 60

60
Lietuviškai
pirmą kartą būkite netoliese, kad pamatytumėte, ar robotas gali susidoroti su šio tipo grindimis.
Robotui taip pat reikalinga priežiūra, kai naudojate jį ant labai tamsių ar blizgančių kietų grindų.
Kaip jūsų robotas valo
Valymo sistema
Robotas turi 2 pakopų valymo sistemą, kad veiksmingai valytų jūsų grindis.
-
Du roboto šoniniai šepečiai padeda robotui išvalyti kampus ir pasienius. Jie taip pat padeda
pašalinti purvą nuo grindų ir perkelti jį link įsiurbimo angos (pav. 3).
-
Roboto įsiurbimo galia surenkamas palaidas purvas ir perkeliamas per įsiurbimo angą į dulkių
talpyklą (pav. 4).
Valymo trajektorijos
Automatiniu valymo režimu robotas naudoja automatines valymo trajektorijas, kad optimaliai išvalytų
visas patalpos sritis. Naudojamos šios valymo trajektorijos:
1 Z arba zigzago trajektorija (pav. 5)
2 Atsitiktinė trajektorija (pav. 6)
3 Trajektorija (pav. 7) palei sieną
4 Taškinio valymo trajektorija (pav. 8)
Automatiniu valymo režimu robotas naudoja šias trajektorijas fiksuota seka: zigzago trajektoriją,
trajektoriją palei sieną ir taškinio valymo trajektoriją.
Kai robotas užbaigia šią trajektorijų seką, jis vėl pradeda judėti Z trajektorija. Robotas toliau naudoja
šią trajektorijų seką valyti patalpai, kol pakartotinai įkraunama baterija ima sekti, arba kol yra
išjungiamas rankomis.
Pastaba. Taip pat kiekvieną režimą galite įjungti patys, paspausdami atitinkamą nuotolinio valdymo
pulto mygtuką. Išsamesnę informaciją žr. skyriaus „Jūsų roboto naudojimas“ skirsnyje „Valymo
režimai“.
Kaip robotas išvengia aukščio skirtumų
Roboto apatinėje dalyje yra trys aukščio jutikliai. Šiuos aukščio jutiklius jis naudoja nustatyti aukščio
skirtumus ir jų išvengti, pvz., laiptinių.
Pastaba. Normalu, kad robotas juda šiek tiek už aukščio skirtumo krašto, nes priekinis aukščio jutiklis
yra už buferio.
Atsargiai! Kai kuriais atvejais aukščio jutikliai gali laiku neaptikti laiptinės ar kitų aukščio skirtumų.
Todėl atidžiai stebėkite robotą pirmus kelis naudojimo kartus ir kai jį naudojate šalia laiptinės ar
kito aukščio skirtumo. Svarbu reguliariai valyti aukščio jutiklius norint užtikrinti, kad robotas ir
toliau tinkamai aptiks aukščio skirtumus (instrukcijas žr. skyriuje „Valymas ir priežiūra“).
Prieš naudojant pirmą kartą
Šoninių šepečių tvirtinimas
1 Išpakuokite šoninius šepečius ir padėkite apverstą robotą ant stalo ar grindų.
2 Užstumkite šoninius šepečius ant roboto (pav. 9) apačioje esančių velenėlių.
Pastaba. Įsitikinkite, kad tinkamai uždėjote šoninius šepečius. Spauskite juos ant velenėlio, kol
išgirsite, kad jie spragtelėję užsifiksavo.
Page 61

Lietuviškai
Apsauginės juostelės ištraukimas iš nuotolinio valdymo pulto
Nuotolinio valdymo pulte naudojama CR2025 monetos formos baterija. Ši baterija yra apsaugota
apsaugine juostele, kurią prieš naudojant reikia ištraukti.
1 Ištraukite baterijos apsauginę juostelę iš nuotolinio valdymo pulto (pav. 10) baterijos skyriaus.
Dabar nuotolinio valdymo pultas paruoštas naudoti.
Paruošimas naudoti
Doko montavimas
1 Mažą adapterio kištuką įstatykite į doko lizdą (1), o adapterį prijunkite prie sieninio elektros lizdo (2)
(pav. 11).
2 Doką padėkite ant horizontalaus, lygaus grindų paviršiaus prie sienos.
Pastaba. Įsitikinkite, kad nėra jokių kliūčių ar aukščio skirtumų 80 cm priekyje, 30 cm dešinėje ir 100
cm kairėje doko pusėje (pav. 12).
Svarbi pastaba: gilaus miego režimas
Gilaus miego režimu robotas visiškai nereaguoja, kai jūs spaudžiate mygtuką. Norėdami vėl aktyvinti
robotą, kai jis veikia gilaus miego režimu:
1 Paspauskite roboto paleidimo ir stabdymo mygtuką, kad pervestumėte robotą iš gilaus miego
režimo į budėjimo režimą.
2 Norėdami įjungti robotą paspauskite paleidimo ir stabdymo mygtuką ant roboto (pav. 19) ar
nuotolinio valdymo pulte.
3 Jei robotas nepradeda valyti, padėkite jį į doką, kad būtų įkrauta jo pakartotinai įkraunama baterija.
Robotas pereina į gilaus miego režimą, kai jūs spaudžiate paleidimo ir stabdymo mygtuką 3 sekundes.
Jis taip pat pereina į gilaus miego režimą, kai jo baterija išeikvota. Baterija gali būti visiškai išeikvota,
kai, pavyzdžiui, robotas neranda doko.
61
Pastaba. Negalite pervesti roboto iš gilaus miego režimo paleidimo ir stabdymo mygtuku nuotolinio
valdymo pulte. Jums reikia paspausti roboto paleidimo ir stabdymo mygtuką.
Įkrovimas
Įkraunant pirmą kartą ir roboto pakartotinai įkraunamai baterijai esant visiškai išeikvotai įkrovimas
trunka keturias valandas.
Robotą galite įkrauti dviem būdais:
-
doke rankomis arba automatiškai, naudojant;
-
prijungę robotątiesiogiai prie elektros tinklo.
Pastaba. Kai pakartotinai įkraunama baterija visiškai įkraunama, robotas veikia iki 100 minučių.
Įkrovimas doke
1 Nustatykite maitinimo jungiklį į įjungimo padėtį.
2 Padėkite robotą ant doko (pav. 13), prijungto prie elektros lizdo.
3 Paleidimo ir stabdymo mygtukas pradeda retai mirksėti (pav. 14).
4 Kai pakartotinai įkraunama baterija yra visiškai įkrauta, paleidimo ir stabdymo mygtukas šviečia
nuolat (pav. 15).
Page 62

62
Lietuviškai
Automatinis įkrovimasnaudojant
1 Kai robotas baigia valyti arba kai lieka tik 15 % baterijos įkrovos, jis automatiškai ieško doko įsikrauti.
Kai robotas ieško doko, paleidimo ir stabdymo mygtukas mirksi dažnai (pav. 16).
2 Kai pakartotinai įkraunama baterija yra visiškai įkrauta, paleidimo ir stabdymo mygtukas šviečia
nuolat.
Pastaba. Robotas doko ieško automatiškai tik tada, kai valyti pradeda nuo doko.
Įkrovimas tiesiai iš elektros tinklo
1 Paspauskite maitinimo jungiklį, kad robotą įjungtumėte.
2 Įkiškite mažąjį adapterio kištuką į roboto lizdą (1). Adapterį įjunkite į sieninį elektros lizdą (2) (pav. 17).
3 Kai robotas tinkamai prijungtas prie elektros tinklo, paleidimo ir stabdymo mygtukas pradeda laba
retai mirksėti. Tai rodo, kad robotas įkraunamas.
4 Kai pakartotinai įkraunama baterija yra visiškai įkrauta, paleidimo ir stabdymo mygtukas šviečia
nuolat.
Patalpos paruošimas valyti
Prieš paleisdami robotą valyti, būtinai nuo grindų pakelkite visus palaidus ir trapius daiktus (pav. 18).
Taip pat nuo grindų pašalinkite visus kabelius, laidus ir virves.
Roboto naudojimas
Paleidimas ir sustabdymas
1 Paspauskite paleidimo ir stabdymo mygtuką.
-
Galite paspausti roboto (pav. 19) paleidimo ir stabdymo mygtuką.
-
Taip pat galite paspausti paleidimo ir stabdymo mygtuką nuotolinio valdymo pulte (pav. 20).
2 Paleidimo ir stabdymo mygtukas šviečia nuolat ir robotas pradeda valyti (pav. 21).
3 Robotas valo automatiniu valymo režimu, kol jo baterija pradeda išsekti. Automatiniu režimu jis
kartoja Z formos, atsitiktinę, pasienio ir taškinio valymo trajektorijų sekas (pav. 22).
Pastaba. Norėdami pasirinkti atskirą režimą, paspauskite vieną iš režimo mygtukų nuotolinio
valdymo pulte. Išsamesnę informaciją žr. skyriuje „Valymo režimo pasirinkimas“.
4 Kai baterija pradeda išsekti, paleidimo ir sustabdymo mygtukas pradeda mirksėti, o robotas ieško
doko, kad įsikrautų (pav. 16).
5 Taip pat galite paspausti paleidimo ir stabdymo mygtuką, kad nutrauktumėte valymo eigą. Jei vėl
paspausite paleidimo ir stabdymo mygtuką ir vis dar pakaks pakartotinai įkraunamos baterijos
energijos, robotas tęs valymą automatinio valymo režimu.
6 Kad robotas sugrįžtų prie doko prieš pradedant išsekti pakartotinai įkraunamai baterijai,
nuotoliniame valdymo pulte paspauskite doko mygtuką (pav. 23).
Paleidimo ir stabdymo mygtukas pradeda mirksėti ir robotas ieško doko (pav. 24).
Pastaba. Jei nepaleidžiate roboto nuo doko, jis neieško automatiškai doko, kai pakartotinai
įkraunama baterija pradeda sekti. Jei vis dar pakanka pakartotinai įkraunamos baterijos energijos,
galite paspausti doko mygtuką nuotolinio valdymo pulte, kad robotas grįžtų į doką. Jei pakartotinai
įkraunama baterija visiškai išeikvota, jums reikia įdėti robotą į doką rankomis.
Doko naudojimas
Dokas turi du valdiklius, kuriuos galima naudoti robotui valdyti.
Page 63

Lietuviškai
63
Paleidimo įkrovus bateriją mygtukas
Jei paspausite paleidimo įkrovus bateriją doko mygtuką įkraunant robotą, robotas pradės valyti, kai tik
įkraunamoji baterija bus visiškai įkrauta (pav. 25).
24 h mygtukas
Jei paspausite doko „24 h“ mygtuką, dokas pradės atgalinę 24 h atskaitą iki kito valymo ciklo. Kai
atgalinė atskaita baigsis, robotas pradės valyti ir tęs, kol jo baterija pradės išsieikvoti, tada
automatiškai grįš į doką įsikrauti (pav. 26).
Valymo režimo pasirinkimas
Valymo režimo pasirinkimas
Be automatinio valymo režimo, šiame robote yra keturi atskiri valymo režimai, kurių kiekvienas gali būti
suaktyvintas paspaudus atitinkamą nuotolinio valdymo pulto mygtuką.
Z trajektorijos režimas
Z trajektorijos režimu robotas valo, patalpoje darydamas Z formos kilpas, kad išvalytų didelį plotą (pav.
27).
Atsitiktinis režimas
Šiuo režimu robotas valo patalpą, įvairiomis trajektorijomis judėdamas tiesiai ir įstrižai (pav. 28).
Valymo palei sieną režimas
Šiuo režimui robotas juda palei patalpos sieną ir papildomai išvalo (pav. 29)vietas palei sienas.
Taškinio valymo režimas
Šiuo režimu robotas juda atsitiktiniu būdu nedidelėje srityje, kad kruopščiai (pav. 30)šią sritį išvalytų.
Pastaba. Rankomis pasirinkti režimai aktyvūs tik kelias minutes. Paskui robotas persijungia į
automatinio valymo režimą.
Rankinis judėjimo reguliavimas
1 Naudodami rodyklių mygtukus aukščiau, žemiau, kairėje ir dešinėje nuo paleidimo ir stabdymo
mygtuko nuotolinio valdymo pulte reguliuokite roboto judėjimą patalpoje (pav. 31).
Pastaba. Valdydami robotą rankomis būkite atsargūs arti aukščio skirtumų ir laiptinių.
Pastaba. Siurbimo funkcija ir šoniniai šepečiai veikia tik robotui judant pirmyn. Mygtukai kairėn,
dešinėn ir atgal skirti tik roboto manevravimui.
Valymo laiko mygtuko naudojimas
Paspauskite valymo laiko mygtuką nuotolinio valdymo pulte, kad robotas valytų 35 minutes. Valymo
laikui pasibaigus robotas grįžta į doką įsikrauti (pav. 32).
Maitinimo jungiklio naudojimas
Nustačius maitinimo išjungimo padėtį, robotas perjungiamas į gilaus užmigimo režimą. Šiuo režimu
robotas nebereaguoja.
-
Jeigu norite įkrauti robotą, jums reikia paspausti maitinimo jungiklį į įjungimo padėtį.
-
Jai robotas persijungia į gilaus užmigimo režimą naudojant, galite vėl jį aktyvinti nustatę maitinimo
jungiklį į įjungimo padėtį ir įkraudami robotą. Po kelių sekundžių robotas vėl reaguos.
Page 64

64
Lietuviškai
-
Jei neketinate naudoti roboto mėnesį ar ilgiau, paspauskite maitinimo jungiklį į išjungimo padėtį ir
atjunkite doką arba adapterį, kad apsaugotumėte pakartotinai įkraunamą bateriją ir taupytumėte
energiją.
Signalai ir jų reikšmės
Robotas turi ekraną su dviem indikatoriais: įspėjimo indikatoriumi ir dulkių talpyklos prisipildymo
indikatoriumi. Paleidimo ir stabdymo mygtukas skleidžia šviesos signalus. Tolesnėje lentelėje
paaiškinta signalų reikšmė.
Signalas
Paleidimo ir stabdymo mygtukas šviečia nuolat. Robotas paruoštas valyti.
Paleidimo ir stabdymo mygtukas retai mirksi. Robotas įkraunamas.
Paleidimo ir stabdymo mygtukas dažnai mirksi. Robotas ieško doko.
Reikšmė
Roboto įkraunamoji baterija baigiama išeikvoti.
Dulkių talpyklos prisipildymo indikatorius
nušvinta.
Įspėjimo indikatorius nušvinta. Robotas valant buvo pakeltas.
Dulkių talpykla yra pilna.
Užstrigo roboto buferis.
Užstrigo ratukas arba šoninis šepetys.
Nėra viršutinio dangtelio arba jis netinkamai
uždarytas.
Robotas neranda doko.
Atsakas į plojimą
Atsakas į plojimą įjungtas, kai robotas persijungia į laukimo režimą šiose situacijose:
-
kai jis nustoja valyti įvykus klaidai;
-
kai jūs užprogramuojate trumpą valymo laiką;
-
kai jis neranda doko per 20 minučių.
Jei jūs nematote roboto, galite jį rasti vieną kartą suploję rankomis. Robotas atsakys pyptelėdamas ir
visos piktogramos jo ekrane nušvis.
Valymas ir priežiūra
Dulkių talpyklos ištuštinimas ir valymas
Kai dulkių talpyklos prisipildymo indikatorius nuolat šviečia, ištuštinkite ir išvalykite dulkių talpyklą.
1 Nuimkite dangtelį (pav. 33).
2 Patraukite dulkių talpyklos dangtelio rankeną ir iškelkite dulkių talpyklą iš jos skyriaus (pav. 34).
Pastaba. Dulkių talpyklą išimkite ir įdėkite atgal atsargiai, kad neapgadintumėte variklio
ventiliatoriaus menčių.
3 Atsargiai pakelkite dulkių talpyklos dangtelį (1) ir išimkite filtrą (2) (pav. 35).
Page 65

Lietuviškai
4 Pakratykite dulkių talpyklą virš šiukšliadėžės, kad ją ištuštintumėte. Šluoste ar dantų šepetėliu
minkštais šereliais išvalykite filtrą ir dulkių talpyklos vidų. Taip pat išvalykite siurbimo angą dulkių
talpyklos (pav. 36) apačioje.
Atsargiai! Neplaukite dulkių talpyklos ir filtro vandeniu ar indaplovėje.
5 Įdėkite filtrą atgal į dulkių talpyklą (1). Tada uždėkite dulkių talpyklos (pav. 37) dangtelį (2).
6 Įstatykite dulkių talpyklą atgal į jos skyrių ir uždėkite ant roboto (pav. 38) viršutinį dangtelį.
Atsargiai! Visada įsitikinkite, kad filtras yra dulkių talpykloje. Jei naudosite robotą be filtro dulkių
talpykloje, variklis bus apgadintas.
65
Roboto valymas
Kad palaikytumėte gerą roboto valymo veiksmingumą, kartais turite reikia nuvalyti aukščio jutiklius,
ratukus, šoninius šepečius ir siurbimo angą.
1 Įsitikinkite, kad maitinimo jungiklis yra išjungimo padėtyje.
2 Padėkite apverstą robotą ant lygaus paviršiaus
3 Norėdami nuvalyti dulkes ar pūkus nuo aukščio jutiklių, (pav. 39) naudokite šepetėlį su švelniais
šereliais (pvz., dantų šepetėlį).
Pastaba. Svarbu, kad reguliariai valytumėte aukščio jutiklius. Jei aukščio jutikliai nešvarūs, robotas
gali neaptikti aukščio skirtumų ar laiptinių.
4 Jei norite nuvalyti dulkes ar pūkus nuo priekinio ir šoninių ratukų (pav. 40), naudokite šepetėlį
minkštais šereliais (pvz., dantų šepetėlį).
5 Jei norite išvalyti šoninius šepečius, suimkite juos už šerelių ir nutraukite nuo jų velenėlių (pav. 41).
6 Pašalinkite pūkus, plaukus ir siūlus nuo velenėlio ir šoninio šepečių naudodami minkštą šepetėlį
(pvz., dantų šepetėlį) arba šluostę (pav. 42).
7 Patikrinkite šoninius šepečius ir apatinę roboto dalį, ar nėra kokių nors aštrių daiktų, kurie galėtų
apgadinti grindis.
8 Nuėmę šoninius šepečius nuo jų velenėlių, atjunkite užsifiksuojančias „TriActive“ XL antgalio jungtis,
įkišę pirštus į rodyklėmis pažymėtas vietas, ir nutraukite „TriActive“ antgalį nuo roboto (pav. 43).
9 Valykite siurbimo angą minkštu šepetėliu (pvz., dantų šepetėliu) (pav. 44).
10 Pašalinkite visą matomą purvą iš „TriActive“ antgalio (pav. 45).
11 Įstatykite užsifiksuojančius „TriActive“ antgalio kablius į kiaurymes roboto (pav. 46) apačioje.
Įstumkite „TriActive“ antgalį atgal į vietą. Patikrinkite, ar antgalis gali laisvai judėti kelis milimetrus
aukštyn ir žemyn.
Pakeitimas
Priedų užsakymas
Norėdami įsigyti priedų ar atsarginių dalių, apsilankykite www.shop.philips.com/service arba
kreipkitės į „Philips“ platintoją. Taip pat galite susisiekti su „Philips“ klientų aptarnavimo centru savo
šalyje (kontaktinius duomenis žr. visame pasaulyje galiojančios garantijos lankstinuke).
Filtro pakeitimas
Pakeiskite filtrą, jei jis labai nešvarus ar apgadintas. Naują filtrą galite užsisakyti naudodami užsakymo
numerį FC8012. Instrukcijas, kaip išimti filtrą iš dulkių talpyklos ir jį įstatyti, rasite skyriaus „Valymas ir
priežiūra“ skirsnyje „Dulkių talpyklos ištuštinimas ir valymas“.
Page 66

66
Lietuviškai
Šoninių šepečių keitimas
Kad būtų užtikrinti tinkami valymo rezultatai, praėjus tam tikram laikui pakeiskite šoninius šepečius.
Pastaba. Visada pakeiskite šoninius šepečius, jei pastebite nusidėvėjimo ar apgadinimo ženklų. Mes
taip pat rekomenduojame abu šoninius šepečius keisti tuo pačiu metu. Atsarginių šoninių šepečių
rinkinį galima užsisakyti naudojant užsakymo numerį FC8013.
1 Jei norite pakeisti šoninius šepečius, suimkite senuosius šepečius už šerelių ir nutraukite nuo
velenėlių (pav. 41).
2 Užstumkite naujus šoninius šepečius ant velenėlių (pav. 9).
Pakartotinai įkraunamos baterijos keitimas
Pakartotinai įkraunamą bateriją gali pakeisti tik kvalifikuoti priežiūros inžinieriai. Perduokite robotą į
įgaliotąjį „Philips“ priežiūros centrą, kad būtų pakeista baterija, jei jums nebepavyksta jo įkrauti ar
energija greitai baigiasi. „Philips“ klientų aptarnavimo centro savo šalyje kontaktinius duomenis žr.
visame pasaulyje galiojančios garantijos lankstinuke.
Nuotolinio valdymo pulto baterijos keitimas
Nuotolinio valdymo pulte naudojama CR2025 monetos formos baterija. Bateriją keiskite, kai robotas
nebereaguoja į nuotolinio valdymo pulto mygtukų paspaudimus.
1 Laikykite nuotolinio valdymo pultą apverstą. Spauskite atlaisvinimo mygtuką ant baterijos laikiklio ir
tuo pat metu nustumkite baterijos laikiklį nuo nuotolinio valdymo pulto (pav. 47).
2 Išimkite išeikvotą bateriją iš baterijos laikiklio ir į baterijos laikiklį įdėkite naują bateriją. Tada
įstumkite baterijos laikiklį atgal į nuotolinio valdymo pultą (pav. 48).
Pakartotinai įkraunamos baterijos išėmimas
Įspėjimas. Įkraunamą maitinimo elementą išimkite tik tada, kai išmetate prietaisą.
Išimdami maitinimo elementą užtikrinkite, kad jis būtų visiškai išeikvotas.
Norėdami išimti pakartotinai įkraunamą bateriją, laikykitės tolesnių instrukcijų. Taip pat galite perduoti
robotą į „Philips“ priežiūros centrą, kad išimtų pakartotinai įkraunamą baterija. Kreipkitės į jūsų šalyje
esantį „Philips“ vartotojų aptarnavimo centrą, kad gautumėte netoli jūsų esančio priežiūros centro
adresą.
1 Paleiskite robotą iš kokios nors vietos patalpoje, ne iš doko.
2 Prieš išimdami ir šalindami pakartotinai įkraunamą bateriją leiskite robotui veikti tol, kol ji išseks,
kad užtikrintumėte, kad pakartotinai įkraunama baterija visiškai išeikvota.
3 Atsukite baterijos skyriaus dangtelio sraigtus ir nuimkite dangtelį (pav. ).
4 Iškelkite pakartotinai įkraunamą bateriją ir atjunkite ją (pav. 50).
5 Nugabenkite robotą ir pakartotinai įkraunamą bateriją į elektros ir elektronikos atliekų surinkimo
punktą.
Trikčių diagnostika ir šalinimas
Šiame skirsnyje apibendrintos dažniausios problemos, su kuriomis galite susidurti naudodami
prietaisą. Jei toliau pateikta informacija nepadės išspręsti problemos, apsilankykite
www.philips.com/support, ten rasite dažnai užduodamų klausimų sąrašą, arba kreipkitės į savo šalies
klientų aptarnavimo centrą.
Page 67

Trikčių diagnostika ir šalinimas
Problema
Paspaudus įjungimo ir
išjungimo mygtuką
robotas nepradeda valyti.
Galima priežastis Sprendimas
Pakartotinai įkraunama
baterija išeikvota.
Lietuviškai
Įkraukite pakartotinai įkraunamą bateriją
(žr. skyrių „Pasiruošimas naudoti“).
67
Paspaudus vieną iš
mygtukų robotas
nereaguoja.
Dažnai mirksi įspėjimo
indikatorius.
Mažas kištukas vis dar įkištas į
roboto lizdą.
Maitinimo jungiklis
nenustatytas į įjungimo (I)
padėtį.
Jūs nustatėte įjungimo ir
išjungimo jungiklio padėtį
„Išjungta“.
Robotas neranda doko ir
baterija išeikvota..
Užstrigo vienas arba abu
ratukai.
Užstrigo vienas arba abu
šoniniai šepečiai.
Nėra viršutinio dangtelio arba
jis netinkamai uždarytas.
Robotas neveikia maitinamas iš elektros
tinklo. Jis veikia tik maitinamas iš savo
pakartotinai įkraunamos baterijos. Todėl
prieš naudodami visada atjunkite
adapterį nuo roboto ir elektros tinklo.
Paspauskite maitinimo jungiklį į įjungimo
padėtį. Padėkite robotą ant prijungto
doko arba įkiškite mažą adapterio
kištuką. Po kelių sekundžių robotas
supypsi ir ekranas nušvinta.
Paspauskite maitinimo jungiklį į įjungimo
padėtį. Padėkite robotą ant prijungto
doko arba įkiškite mažą adapterio
kištuką. Po kelių sekundžių robotas
supypsi ir ekranas nušvinta.
Padėkite robotą ant prijungto doko arba
įkiškite mažą adapterio kištuką. Po kelių
sekundžių robotas supypsi ir ekranas
nušvinta.
Maitinimo jungiklį nustatykite į išjungimo
padėtį. Pašalinkite pūkus, plaukus, siūlus
ar laidą, apsivyniojusius apie ratuko
pakabą.
Išvalykite šoninius šepečius (žr. skyrių
„Valymas ir priežiūra“).
Kai nėra viršutinio dangtelio arba jis
netinkamai uždarytas, robotas neveikia.
Tinkamai uždėkite viršutinį dangtelį ant
roboto.
Užstrigo buferis. Paspauskite paleidimo ir stabdymo
Robotas valant buvo pakeltas. Paspauskite paleidimo ir stabdymo
mygtuką. Pakelkite robotą, kad buferis
atsilaisvintų. Padėkite robotą atokiau
nuo kliūties ir paspauskite paleidimo ir
stabdymo mygtuką, kad jis tęstų valymą.
mygtuką. Padėkite robotą ant grindų.
Tada paspauskite paleidimo ir stabdymo
mygtuką, kad robotas tęstų valymą.
Page 68

68
Lietuviškai
Problema Galima priežastis Sprendimas
Robotas tinkamai nevalo. Vieno ar abiejų šoninių šepečių
šereliai yra sulenkti.
Šiek tiek pamirkykite šepetį ar šepečius
šiltame vandenyje. Jei taip nepavyksta
atkurti tinkamos šerelių formos,
pakeiskite šoninius šepečius (žr. skyrių
„Pakeitimas“).
Dulkių talpykloje esantis filtras
yra purvinas.
Užsikimšo dulkių talpyklos
apačioje esanti siurbimo anga.
Priekinis ratukas užstrigo
apsivijus plaukams ar kitokiam
purvui.
Robotas valo labai tamsų arba
blizgantį paviršių, dėl kurio
suveikia aukščio jutikliai. Dėl to
robotas pradeda judėti
neįprasta trajektorija.
Robotas valo grindis, kurios
gana stipriai atspindi saulės
šviesą. Dėl to suveikia aukščio
jutikliai ir robotas pradeda
judėti neįprasta trajektorija.
Šluoste ar dantų šepetėliu minkštais
šereliais išvalykite dulkių talpykloje
esantį filtrą. Taip pat galite valyti filtrą ir
dulkių talpyklą paprastu dulkių siurbliu,
nustatę mažą siurbimo galią.
Jei valant šepetėliu ar dulkių siurbliu
nepavyksta išvalyti filtro, pakeiskite filtrą
nauju. Mes patariame keisti filtrą bent
kartą per metus.
Išvalykite siurbimo angą (žr. skyrių
„Valymas ir priežiūra“).
Išvalykite priekinį ratuką (žr. skyrių
„Valymas ir priežiūra“).
Paspauskite paleidimo ir stabdymo
mygtuką, tada perkelkite robotą ant
šviesesnės grindų dalies. Jei problema
neišnyksta ant šviesesnių grindų,
apsilankykite www.philips.com/support
arba susisiekite su savo šalies klientų
aptarnavimo centru.
Užtraukite užuolaidas, kad saulės šviesa
nepatektų į patalpą. Taip pat galite
pradėti valyti, kai saulės šviesa yra
mažiau ryški.
Pakartotinai įkraunamos
baterijos nebeįmanoma
įkrauti arba ji labai greitai
išsenka.
Nuotolinio valdymo pulto
baterija išsenka per
greitai.
Baigėsi pakartotinai
įkraunamos baterijos
naudojimo laikas.
Gali būti, kad įdėjote
netinkamo tipo bateriją.
Kreipkitės į „Philips“ priežiūros centrą,
kad pakeistų pakartotinai įkraunamą
bateriją (žr. skyrių „Keitimas“).
Nuotolinio valdymo pultui reikalinga
CR2025 monetos formos baterija. Jei
problema neišnyksta, apsilankykite
www.philips.com/support arba
kreipkitės į savo šalies klientų
aptarnavimo centrą.
Page 69

Problema Galima priežastis Sprendimas
Robotas juda ratais. Robotas veikia taškinio valymo
režimu.
Tai normalu. Taškinio valymo režimą
galima aktyvinti aptikus daug purvo ant
grindų, kad būtų kruopščiai išvalyta. Tai
taip pat yra automatinio valymo režimo
dalis. Praėjus maždaug vienai minutei
robotas vėl valo normalia trajektorija.
Taip pat galite sustabdyti taškinio
valymo režimą, pasirinkdami kitokį
valymo režimą nuotolinio valdymo pulte.
Lietuviškai
69
Robotas neranda doko. Robotui nepakanka vietos
judėti link doko.
Robotas vis dar aktyviai ieško. Suteikite robotui apie 20 minučių grįžti į
Robotas nebuvo paleistas iš
doko.
Bandykite padėti doką kitoje vietoje. Žr.
„Doko montavimas“ skyriuje
„Pasiruošimas naudoti“.
doką.
Jei norite, kad robotas grįžtų į doką po
valymo ciklo, paleiskite jį iš doko.
Page 70

70
Magyar
Bevezetés
Köszönjük, hogy Philips terméket vásárolt, és üdvözöljük a Philips világában! A Philips által biztosított
támogatás teljes körű igénybevételéhez regisztrálja a terméket a www.philips.com/welcome címen.
Általános leírás (1. ábra)
1 Felső fedél
2 Portartályfedél fogantyúja
3 Portartály fedele
4 Szűrő
5 Portartály
6 Ventilátor
7 Ütköző
8 Dokkolóegység érzékelője
9 Start/stop gomb (a robotporszívó elindításához vagy leállításához)
10 Kijelző
11 TriActive XL szívófej
12 Első kerék
13 Oldalsó kefetengelyek
14 Mélységérzékelők
15 Akkumulátortartó rekesz
16 Kerekek
17 Szívónyílás
18 Oldalkefék
19 Elemtartó
20 Távvezérlő
21 Kisméretű csatlakozódugasz
22 Adapter
23 Dokkolóegység
Kijelző és távvezérlő
Kijelző (ábra 2):
1 Figyelmeztető jelzőfény
2 A portartály telítettségjelzője
Távvezérlő (ábra 3):
1 Navigációs gombok, illetve start/stop gomb
2 Dokkolás gomb
3 Takarítási idő gomb
4 Takarítási üzemmód gombok
Hogyan működik a robotporszívó?
Mit tisztít a robotporszívó?
A robotporszívó olyan funkciókkal van ellátva, amelyeknek köszönhetően megfelelő segítséget nyújt
az otthoni padlótisztításban.
A robotporszívó különösen alkalmas kemény padlók, például fa-, csempe- vagy linóleumpadlók
tisztítására. Puha padlók, például szőnyegek vagy lábtörlők tisztítása során problémák merülhetnek
fel. Ha a robotporszívót első alkalommal használja szőnyeg vagy lábtörlő tisztítására, maradjon a
Page 71

Magyar
közelben, hogy meggyőződjön róla, hogy a készülék alkalmas az ilyen típusú padlók tisztítására.
Fekete és fényes kemény padlók tisztítása során a robotporszívó szintén felügyeletet igényel.
Hogyan tisztít a robotporszívó?
Tisztítórendszer
A robotporszívó kétlépcsős tisztítórendszerrel tisztítja hatékonyan a padlót.
-
A két oldalsó kefe segít a robotnak megtisztítani a padlót a sarkokban és a fal mentén. Továbbá
segítenek fellazítani a padlóról a lerakódott szennyeződést, és továbbítják azt a szívónyíláshoz
(ábra 4).
-
A robotporszívó szívóereje felszedi a laza szennyeződést, és a szívónyíláson keresztül a
portartályba (ábra 5) szállítja azt.
Takarítási minták
Automatikus takarítás üzemmódban a robotporszívó a takarítási minták automatikus sorozatát
használva a szoba minden egyes területét optimálisan megtisztítja. Az alábbi takarítási mintákat
használja:
1 Z minta vagy cikkcakk minta (ábra 6)
2 Véletlenszerű minta (ábra 7)
3 Falkövető minta (ábra 8)
4 Spirál minta (ábra 9)
A robotporszívó az automatikus takarítási üzemmódban fix sorrendben végrehajtja a Z mintából, a
véletlenszerű, a falkövető és a spirál mintából álló sorozat mozdulatait.
Ha a robotporszívó befejezte a mintasorozatot, ismét Z mintában kezd el mozogni. A robotporszívó
mindaddig folytatja a mintasorozat végrehajtását a szoba tisztítása érdekében, amíg az akkumulátor
le nem merül, vagy amíg kézzel ki nem kapcsolja.
71
Megjegyzés: Az egyes üzemmódokat külön is kiválaszthatja, ha megnyomja a távirányító megfelelő
gombját. További részletekért lásd „A robotporszívó használata” című fejezet „Takarítási üzemmódok”
című részét.
Hogyan kerüli el a robotporszívó a magasságkülönbségeket?
A robotporszívó alján három mélységérzékelő található. A robotporszívó ezek segítségével érzékeli és
kerüli el a magasságkülönbségeket, például a lépcsőket.
Megjegyzés: Normális jelenség, hogy a robotporszívó kissé átmegy a magasságkülönbségek szélén,
mivel az első mélységérzékelője az ütköző mögött található.
Figyelem! Bizonyos esetekben előfordulhat, hogy a mélységérzékelők nem érzékelik kellő időben a
lépcsőt vagy más magasságkülönbséget. Ezért az első néhány használat során, vagy amikor lépcső
vagy más magasságkülönbség közelében használja, fordítson kellő figyelmet a robotporszívóra.
Annak érdekében, hogy a robotporszívó megfelelően észlelje a magasságkülönbségeket, fontos,
hogy a mélységérzékelőket rendszeresen tisztítsa (a további információkat lásd a „Tisztítás és
karbantartás” című fejezetben).
Teendők az első használat előtt
Az oldalsó kefék felszerelése
1 Csomagolja ki az oldalsó keféket, és helyezze a robotot fejjel lefelé egy asztalra vagy a padlóra.
Page 72

72
Magyar
2 Nyomja rá az oldalsó keféket a robotporszívó (ábra 10) alján található tengelyekre.
Megjegyzés: Győződjön meg róla, hogy az oldalsó keféket megfelelően rögzítette. Nyomja őket a
tengelyre mindaddig, amíg egy kattanás kíséretében nem rögzítődnek a helyükre.
A védőcímke eltávolítása a távvezérlőről
A távvezérlő egy CR2025 típusú gombelemmel működik. Az elemet védőcímke védi, amelyet
használat előtt el kell távolítani.
1 Húzza ki az elem védőcímkéjét a távvezérlő (ábra 11) elemtartó rekeszéből.
Ekkor a távvezérlő készen áll a használatra.
Előkészítés a használatra
A dokkolóegység beszerelése
1 Csatlakoztassa az adapter kis méretű csatlakozódugóját a dokkolóegység (1) aljzatába és
csatlakoztassa az adaptert a fali aljzatba (2) (ábra 12).
2 Helyezze a dokkolóegységet vízszintes, sík padlóra a fal előtt.
Megjegyzés: Győződjön meg róla, hogy nincsenek akadályok vagy magasságkülönbségek a
dokkolóegység (ábra 13) elejétől 80 cm-re, a jobb oldalától 30 cm-re és a bal oldalától 100 cm-re.
Fontos megjegyzés: mélyalvó üzemmód
Mélyalvó üzemmódban a robotporszívó nem reagál, ha megnyom rajta egy gombot. A robotporszívó
mélyalvó üzemmódból való újbóli bekapcsolása:
1 Nyomja meg a start/stop gombot, hogy a robot mélyalvó üzemmódból készenléti üzemmódba
váltson.
2 A robot elindításához nyomja meg a start/stop gombot a robotporszívón (ábra 19) vagy a
távvezérlőn.
3 Ha a robot nem kezd el takarítani, helyezze a hálózatra csatlakoztatott dokkolóegységre, hogy az
akkumulátora feltöltődjön.
A robot mélyalvó üzemmódba vált, ha 3 másodpercig lenyomva tartja a start/stop gombot. Akkor is
mélyalvó üzemmódra vált, ha akkumulátora lemerül. Az akkumulátor például akkor merülhet le, ha a
robotporszívó nem találja meg a dokkolóegységet.
Megjegyzés: A robotporszívót nem tudja felébreszteni mélyalvó üzemmódból a távirányítón található
start/stop gomb megnyomásával. A roboton található be-/kikapcsoló gombot kell megnyomnia.
Töltés
-
Az első töltés alkalmával, illetve ha a robotporszívó akkumulátora lemerült, a töltési idő négy óra.
-
Ha az akkumulátor teljesen feltöltődött, a robotporszívó akár 100 percig használható tisztításra.
-
A robotot csak a dokkolóegységen lehet tölteni.
Töltés a dokkolóegységen
1 Nyomja meg a start/stop gombot a roboton.
2 Helyezze a robotot a hálózatra csatlakoztatott dokkolóegységre (ábra 14).
3 A start/stop gomb lassan villogni kezd (ábra 15).
4 Amikor az akkumulátor teljesen feltöltődött, az indítás és leállítás gomb folyamatosan világít (ábra
16).
Page 73

Magyar
Automatikus töltés használat közben
1 Amikor a robotporszívó befejezte a tisztítást, illetve amikor az akkumulátor töltöttsége már csak
15%, a robotporszívó automatikusan megkeresi a dokkolóegységet, hogy feltöltődjön. Amikor a
robotporszívó a dokkolóegységet keresi, a start/stop gomb gyorsan villog (ábra 17).
2 Amikor az akkumulátor teljesen feltöltődött, a start/stop gomb folyamatosan világít.
Megjegyzés: A robotporszívó csak akkor keresi automatikusan a dokkolóegységet, ha a tisztítást a
dokkolóegységről kezdte.
A szoba előkészítése a tisztításhoz
Mielőtt elindítaná a robotporszívó a tisztító munkamenetét, távolítson el a padlóról minden laza és
törékeny tárgyat (ábra 18).
Távolítson el a padlóról minden kábelt és vezetéket is.
A robotporszívó használata
Indítás és leállítás
1 Nyomja meg a start/stop gombot.
-
A start/stop gombot a roboton (ábra 19) is megnyomhatja,
-
, de megnyomhatja a távvezérlő (ábra 20) start/stop gombját is.
2 A start/stop gomb folyamatosan be van kapcsolva, és a robotporszívó elkezdi a tisztítást (ábra 21).
3 A robotporszívó mindaddig automatikus takarítási üzemmódban működik, amíg az akkumulátor le
nem merül. Az automatikus takarítási üzemmódban ismételten végrehajtja a Z mintából, a
véletlenszerű, a falkövető és a spirál mintából álló sorozat (ábra 22) mozdulatait.
Megjegyzés: Az egyes üzemmódok kiválasztásához nyomja meg a távvezérlőn az üzemmód
gombok egyikét. További részletekért lásd a „Takarítási üzemmód kiválasztása” című részt.
4 Ha az akkumulátor lemerült, a start/stop gomb jelzőfénye villogni kezd, és a robotporszívó
megkeresi a dokkolóegységet, hogy feltöltődjön (ábra 17).
5 A start/stop gomb megnyomásával meg is szakíthatja vagy leállíthatja a takarítási folyamatot. Ha
ismét megnyomja a start/stop gombot, és az akkumulátor még mindig elegendő energiával
rendelkezik, a robotporszívó automatikus takarítási üzemmódban folytatja a takarítást.
6 Ha azt akarja, hogy a robotporszívó visszatérjen a dokkolóegységre, mielőtt az akkumulátor
lemerülne, nyomja meg a távvezérlőn a dokkolás gombot (ábra 23).
A start/stop gomb villogni kezd, és a robotporszívó megkeresi a dokkolóegységet (ábra 24).
Megjegyzés: Ha a robotot nem a dokkolóegységről indította, az nem tér oda vissza automatikusan,
ha az akkumulátor töltöttségi szintje alacsony. Ha az akkumulátor még mindig elegendő energiával
rendelkezik, a távvezérlő dokkolás gombját megnyomva visszatérítheti a robotot a
dokkolóegységre. Ha az akkumulátor teljesen lemerült, manuálisan kell felhelyeznie a robotot a
dokkolóegységre.
73
A dokkolóegység működtetése
A dokkolóegységnek két vezérlőeleme van, amelyekkel a robotporszívó működtethető.
Indítás az akkumulátor teljes feltöltése esetén gomb
Ha a robotporszívó töltése közben megnyomja az Indítás az akkumulátor teljes feltöltöttsége esetén
gombot, a robotporszívó elkezdi a tisztítást, amint az akkumulátor teljesen feltöltődött (ábra 25).
Page 74

74
Magyar
24h gomb
Ha a dokkolóegységen megnyomja a 24h gombot, a dokkolóegység elkezdi a 24 óra visszaszámlálását
a következő tisztítási folyamatig. Ha a visszaszámlálás befejeződött, a robotporszívó elkezdi a
tisztítást, amíg az akkumulátor töltöttsége alacsony nem lesz, majd automatikusan visszatér a
dokkolóegységre, hogy feltöltődjön (ábra 26).
Takarítási üzemmód kiválasztása
Takarítási üzemmód kiválasztása
Az automatikus takarítási üzemmód mellett, a robotporszívó négy önálló takarítási üzemmóddal
rendelkezik, melyek mindegyike a távvezérlőn lévő megfelelő gomb megnyomásával aktiválható.
Z mintájú üzemmód
Z mintájú üzemmódban a robotporszívó Z alakú mozdulatokból álló hurkokat rajzolva tisztítja a szoba
nagy területeit (ábra 27).
Véletlenszerű mintájú üzemmód
Ebben az üzemmódban a robotporszívó egyenes és cikkcakk mozdulatokból (ábra 28)álló vegyes
mintát rajzolva tisztítja a szobát.
Falkövető üzemmód
Ebben az üzemmódban a robotporszívó követi a szoba falait, és a falak mentén mozogva tökéletesen
megtisztítja (ábra 29)az adott területet.
Spirál mintából álló üzemmód
Ebben az üzemmódban a robotporszívó véletlenszerű mozgást végez egy kisebb területen, így
alaposan (ábra 30) megtisztítja azt.
Megjegyzés: A kézzel kiválasztott üzemmódok csak néhány percig maradnak aktívak. Ezt követően a
robotporszívó visszatér az automatikus takarítási üzemmódhoz.
Kézi vezérlés
1 A távirányító start/stop gombja felett, alatt, bal, illetve jobb oldalán található nyílgombok
segítségével irányíthatja a robotporszívó mozgását a szobában. (ábra 31)
Megjegyzés: Legyen óvatos, amikor a robotporszívót kézzel működteti magasságkülönbség vagy
lépcső közelében.
Megjegyzés: A porszívózás csak a robotporszívó előre történő haladása közben történik, illetve az
oldalsó kefék is csak ekkor működnek. A balra, jobbra és hátra gombok csak a robotporszívó
irányítására szolgálnak.
A takarítási idő gombjának használata
Nyomja meg a takarítási idő gombot a távvezérlőn, hogy a robotporszívó 35 percig takarítson. Ha a
robotporszívó befejezte a takarítást, visszatér a dokkolóegységre, hogy feltöltődjön (ábra 32).
Jelzőfények jelei és jelentésük
A robot kijelzője két jelzőfényt tartalmaz: a figyelmeztető jelzőfényt és a portartály-telítettség jelzőt. A
start/stop gomb fényjelzéseket ad. Az alábbi táblázat magyarázza a jelzések jelentését.
Page 75

Magyar
Jelzés Jelentés
A start/stop gomb folyamatosan világít. A robotporszívó készen áll a takarításra.
A start/stop gomb lassan villog. A robotporszívó töltése folyamatban van.
A start/stop gomb gyorsan villog. A robotporszívó keresi a dokkolóegységet.
A robotporszívó akkumulátorának töltése
alacsony.
A portartály-telítettség jelző világít. Megtelt a portartály.
A figyelmeztető jelzőfény világít. A robotot felemelte, miközben az takarított.
A robotporszívó ütközője beszorult.
A kerék vagy az oldalsó kefe beszorult.
A felső fedél nincs a helyén vagy nincs
megfelelően lezárva.
A robotporszívó nem találja a dokkolóegységet.
Válasz tapssal
Ez az üzemmód akkor lép működésbe, amikor a robotporszívó alvó üzemmódba lép a következő
helyzetekben:
-
amikor egy hiba miatt abbahagyja a takarítást
-
amikor rövid takarítási időt programozott be
-
amikor 20 perc alatt nem találta meg a dokkolóegységet
Ha nem látja a robotporszívót, akkor úgy találhatja meg, hogy egyet tapsol a kezével. A robotporszívó
ekkor hangjelzéssel és a kijelzőn az összes ikon világításával válaszol.
75
Tisztítás és karbantartás
A portartály ürítése és tisztítása
Ürítse ki és tisztítsa meg a portartályt, ha a portartály-telítettség jelző folyamatosan világít.
1 Vegye le a borítást (ábra 33).
2 Húzza fel a portartály fedelének fogantyúját, és emelje ki a portartályt a tartójából (ábra 34).
Megjegyzés: Amikor eltávolítja vagy visszahelyezi a portartályt, ügyeljen arra, hogy ne sértse meg a
motor ventilátorának lapátjait.
3 Óvatosan emelje fel a portartály fedelét (1), és vegye ki a szűrőt (2) (ábra 35).
4 A szemetes fölött rázva ürítse ki a portartályt. Tisztítsa meg a szűrőt és a portartály belsejét egy
ronggyal vagy egy puha sörtéjű fogkefével. Tisztítsa meg a portartály (ábra 36) alján található
szívónyílást is.
Figyelem! Ne tisztítsa a portartályt vagy a szűrőt vízzel vagy mosogatógépben.
5 Helyezze vissza a szűrőt a portartályba (1). Tegye rá a fedelet a portartályra (2) (ábra 37).
6 Tegye vissza a portartályt a portartály-rekeszbe, és tegye vissza a felső fedelet a robotporszívóra
(ábra 38).
Page 76

76
Magyar
Figyelem! Mindig győződjön meg róla, hogy a szűrő a portartályban van. Ha a robotot úgy
használja, hogy a portartályban nincs szűrő, a motor károsodhat.
A robotporszívó tisztítása
A kiváló tisztító teljesítmény fenntartása érdekében rendszeresen tisztítsa meg a mélységérzékelőket,
a kerekeket, az oldalsó keféket és a szívónyílást.
1 Helyezze a robotot fejjel lefelé egy sima felületre.
2 Egy puha sörtéjű kefével (pl. fogkefével) távolítsa el a port és a szöszt a mélységérzékelőkről. (ábra
39)
Megjegyzés: Fontos, hogy a mélységérzékelőket rendszeresen tisztítsa. Ha az érzékelők
szennyezettek, a robotporszívó nem megfelelően észleli magasságkülönbségeket.
3 Egy puha sörtéjű kefével (pl. fogkefével) távolítsa el a port és a szöszt a az első kerékről és az
oldalsó kerekekről (ábra 40).
4 Az oldalsó kefék tisztításához fogja meg azok sörtéit, és húzza le a keféket a tengelyekről (ábra 41).
5 Egy puha kefével (pl. fogkefével) vagy ruhával) (ábra 42) távolítsa el a szöszöket, hajszálakat és
cérnaszálakat a tengelyről és az oldalkeféről.
6 Ellenőrizze, hogy az oldalsó kefékből és a robotporszívó aljából nem állnak-e ki éles tárgyak,
amelyek megsérthetik a padlót.
7 Miután az oldalsó keféket eltávolította tengelyükről, nyissa szét a TriActive XL szívónyílás pattintó
csatlakozóit: ehhez helyezze ujjait a nyilakkal jelölt helyre, majd húzza le a TriActive szívófejet a
robotporszívóról (ábra 43).
8 Tisztítsa meg a szívónyílást egy puha kefe (pl. egy fogkefe) (ábra 44) segítségével.
9 Távolítsa el a lerakódott szennyeződést a TriActive szívófejből (ábra 45).
10 Illessze be a TriActive szívófej kampóit a robotporszívó (ábra 46) alján található lyukakba. Nyomja
vissza a TriActive szívófejet normál helyzetbe. Győződjön meg róla, hogy a szívófej pár milliméterrel
felfelé és lefelé egyaránt elmozdítható.
Csere
Tartozékok rendelése
Tartozékok és pótalkatrészek vásárlásához látogasson el a www.shop.philips.com/service weboldalra
vagy forduljon Philips márkakereskedőjéhez. Fordulhat az országában működő Philips
vevőszolgálathoz is (az elérhetőségi információkat megtalálja a világszerte érvényes garancialevélen).
A szűrő cseréje
Cserélje ki a szűrőt, ha az nagyon piszkos vagy sérült. Új szűrőt a CP0108 rendelési szám alatt
rendelhet. A szűrő portartályból való kivételével, illetve visszahelyezésével kapcsolatos további
információkat lásd a „Tisztítás és karbantartás” című fejezet „A portartály ürítése és tisztítása” c.
részében.
Az oldalsó kefék cseréje
A megfelelő tisztítási eredmények biztosítása érdekében bizonyos idő után cserélje ki az oldalsó
keféket.
Page 77

Magyar
Megjegyzés: Mindig cserélje ki az oldalsó keféket, ha kopásra vagy sérülésre utaló jeleket tapasztal.
Javasoljuk továbbá, hogy mindkét oldalsó kefét egyszerre cserélje ki. Tartalék oldalsó keféket
készletként rendelhet az FC8013 rendelési számmal.
1 Az oldalsó kefék cseréjéhez fogja meg a régi oldalsó kefék sörtéit, és húzza le a keféket a
tengelyükről (ábra 41).
2 Nyomja az új oldalsó keféket a tengelyekre (ábra 10).
Az akkumulátor cseréje
A robot akkumulátorát csak szakképzett szerviztechnikus cserélheti ki. Vigye be a robotot egy
hivatalos Philips szakszervizbe, ahol az akkumulátort kicserélik, ha azt már nem lehet újra feltölteni
vagy gyorsan lemerül. Az országában működő Philips vevőszolgálat elérhetőségi adatait a nemzetközi
garancialevélen találhatja meg, vagy látogasson el a www.philips.com/support weboldalra.
A távvezérlő elemének cseréje
A távvezérlő egy CR2025 típusú gombelemmel működik. Cserélje ki az elemet, ha a robotporszívó már
nem válaszol, amikor megnyomja a távvezérlő gombjait.
1 Tartsa a távvezérlőt fejjel lefelé. Nyomja meg az elemtartó kioldó gombját, és ugyanakkor
csúsztassa ki az elemtartót a távvezérlőből (ábra 47).
2 Vegye ki a lemerült elemet az elemtartóból, és helyezze be az új elemet. Ezután csúsztassa vissza
az elemtartót a távvezérlőbe (ábra 48).
Tárolás
Ha több mint egy hónapig nem fogja használni a robotporszívót, akkor az akkumulátor védelme
érdekében tartsa lenyomva 3 másodpercig a roboton található start/stop gombot, hogy a készülék
mélyalvó üzemmódba váltson. Az energiatakarékosság érdekében húzza ki a dokkolóegység
vezetékét a fali aljzatból.
77
Az akkumulátor eltávolítása
Figyelmeztetés: Az akkumulátort csak akkor távolítsa el, ha leselejtezi a készüléket. Az
akkumulátor eltávolítása előtt győződjön meg arról, hogy teljesen lemerült.
Az akkumulátor eltávolításához kövesse az alábbi utasításokat. Az akkumulátor eltávolításához a
robotot beviheti egy Philips szakszervizbe is. A legközelebbi szakszerviz címét a Philips
vevőszolgálatától tudhatja meg.
1 A robotporszívót indítsa el valahonnan a szobából, ne a dokkolóegységről.
2 Hagyja a robotot addig működni, amíg az akkumulátor teljesen le nem merül, hogy az akkumulátor
teljesen lemerüljön, mielőtt kivenné és kidobná.
3 Csavarhúzóval lazítsa ki az akkumulátortartó rekesz fedelének csavarjait, majd vegye le a fedelet
(ábra 49).
4 Emelje ki az akkumulátort, majd csatlakoztassa le (ábra 50).
5 Vigye a robotporszívót és az akkumulátort egy elektromos és elektronikus hulladékok gyűjtését
végző hulladékudvarba.
Page 78

78
Magyar
Hibaelhárítás
Ez a fejezet összefoglalja a készülékkel kapcsolatban leggyakrabban felmerülő problémákat. Ha a
hibát az alábbi útmutató segítségével nem tudja elhárítani, látogasson el a www.philips.hu/support
weboldalra a gyakran felmerülő kérdések listájáért, vagy forduljon az országában illetékes
ügyfélszolgálathoz.
Hibaelhárítás
Probléma
A robotporszívó a
start/stop gomb
megnyomását követően
nem kezdi el a tisztítást.
Lehetséges ok Megoldás
Lemerült az akkumulátor. Töltse fel az akkumulátort (lásd az
„Előkészítés a használatra” című
fejezetet).
A robotporszívó nem
reagál, amikor
megnyomom az egyik
gombot.
A figyelmeztető jelzőfény
gyorsan villog.
A robotporszívó mélyalvó
üzemmódban van.
Lemerült az akkumulátor. Helyezze a robotot a hálózatra
Az egyik vagy mindkét kerék
beszorult.
Az egyik vagy mindkét
oldalsó kefe beszorult.
A felső fedél nincs a helyén
vagy nincs megfelelően
lezárva.
Az ütköző beszorult. Emelje fel úgy a robotot, hogy az ütközője
A robotot felemelte,
miközben az takarított.
Nyomja meg egyszer a start/stop gombot
a robotporszívó újbóli bekapcsolásához.
Ha ismét megnyomja a start/stop
gombot, a robot takarítani kezd. Ha az
akkumulátor teljesen lemerült, helyezze a
robotot a hálózatra csatlakoztatott
dokkolóegységre.
csatlakoztatott dokkolóegységre. Néhány
másodperc múlva a robot hangjelzést ad,
a kijelző pedig elkezd világítani.
Távolítsa el a kerék felfüggesztésére
tapadt szöszt, hajat, cérnát vagy
vezetéket.
Tisztítsa meg az oldalsó keféket (lásd a
„Tisztítás és karbantartás” című fejezetet).
Ha a felső fedél nincs a helyén vagy nincs
megfelelően lezárva, a robotporszívó nem
működik. Helyezze fel megfelelően a felső
fedelet a robotporszívóra.
szabaddá váljon. Helyezze a robotot
megfelelő távolságra az akadálytól, és
nyomja meg a start/stop gombot, hogy a
robotporszívó folytassa a takarítást.
Helyezze a robotot a padlóra. Ezt
követően nyomja meg a start/stop
gombot, hogy a robotporszívó folytassa a
takarítást.
A robotporszívó nem
tisztít megfelelően.
Az egyik vagy mindkét
oldalsó kefe sörtéi görbültek
vagy hajlottak.
Egy kis időre áztassa be a keféket meleg
vízbe. Ha ennek hatására a sörték nem
nyerik vissza eredeti alakjukat, cserélje ki
az oldalsó keféket (lásd a „Csere” című
fejezetet).
Page 79

Probléma Lehetséges ok Megoldás
A portartályban lévő szűrő
szennyezett.
Tisztítsa meg a portartályban lévő szűrőt
egy ruhával vagy egy puha sörtéjű
fogkefével. A szűrőt és a portartályt
alacsony szívóerővel működtetett
porszívóval is megtisztíthatja.
Ha a kefével vagy a porszívóval nem
sikerül megtisztítania a szűrőt, cserélje ki a
szűrőt egy újra. Azt javasoljuk, hogy
legalább évente egyszer cserélje ki a
szűrőt.
Magyar
79
Az akkumulátor már nem
tölthető, vagy nagyon
gyorsan lemerül.
A távvezérlő eleme
nagyon gyorsan lemerül.
A portartály alján található
szívónyílás eltömődött.
Az első kerék a rátapadt haj
és egyéb szennyeződés miatt
beszorult.
A robotporszívó nagyon sötét
vagy fényes felületet tisztít,
ami elindítja a
mélységérzékelőket. Ennek
következtében a
robotporszívó szokatlan
módon mozoghat.
A robotporszívó olyan padlót
tisztít, amely elég erősen
visszatükrözi a napfényt. Ez
elindítja a
mélységérzékelőket, aminek
következtében a
robotporszívó szokatlan
módon mozoghat.
Az akkumulátor elérte
élettartama végét.
Előfordulhat, hogy nem a
megfelelő típusú elemet
helyezte be.
Tisztítsa ki a szívónyílást (lásd a „Tisztítás
és karbantartás” című fejezetet).
Tisztítsa meg az első kereket (lásd a
„Tisztítás és karbantartás” című fejezetet).
Nyomja meg start/stop gombot, majd
helyezze a robotot a padló világosabb
színű részére. Ha a probléma itt is fennáll,
látogasson el a www.philips.com/support
weboldalra, vagy forduljon az országában
működő Philips ügyfélszolgálathoz.
Ha szeretné megakadályozni, hogy a
napfény bevilágítson a helyiségbe, húzza
össze a függönyöket. Érdemes a takarítást
akkorra időzíteni, amikor a nap már
kevésbé süt.
Cseréltesse ki az akkumulátort egy Philips
szakszervizben (lásd a „Csere” című
fejezetet).
A távvezérlő csak CR2025 típusú
gombelemmel működik. Ha a probléma
továbbra is fennáll, látogasson el a
www.philips.com/support weboldalra,
vagy forduljon az országában működő
Philips ügyfélszolgálathoz.
Page 80

80
Magyar
Probléma Lehetséges ok Megoldás
A robotporszívó körkörös
mozgással végzi a
tisztítást.
A robotporszívó spirál
mintájú mozgásból álló
üzemmódban van.
Ez normális jelenség. A spirál mintájú
üzemmód akkor aktiválódik, amikor a
készülék egy erősen szennyezett területet
szeretne megtisztítani a padlón. Ez az
automatikus üzemmód része. Körülbelül
egy perc elteltével a robotporszívó
visszatér a normál tisztítási üzemmódhoz.
A spirál mintából álló üzemmódot úgy is
megszakíthatja, ha egy másik tisztítási
üzemmódot választ ki a távirányítón.
A robotporszívó nem
találja a
dokkolóegységet.
A helyiségben nem áll
rendelkezésre elegendő hely
ahhoz, hogy a robotporszívó
visszatérjen a
dokkolóegységhez.
A robot még mindig keresi a
dokkolóegységet.
A robotporszívót nem a
dokkolóegységről indította el.
Helyezze máshová a dokkolóegységet.
Lásd az „Előkészítés a használatra” fejezet
„A dokkolóegység beszerelése” részét.
Várjon körülbelül 20 percet, hogy a
robotporszívó visszatérjen a
dokkolóegységre.
Ha azt szeretné, hogy a robotporszívó
tisztítás után a dokkolóegységre térjen
vissza, a tisztítást a dokkolóegységről
kezdje.
Page 81

Polski
Wprowadzenie
Gratulujemy zakupu i witamy w gronie użytkowników produktów Philips! Aby w pełni skorzystać z
obsługi świadczonej przez firmę Philips, należy zarejestrować zakupiony produkt na stronie
www.philips.com/welcome.
Opis ogólny (rys. 1)
1 Górna pokrywa
2 Uchwyt pokrywy pojemnika na kurz
3 Pokrywa pojemnika na kurz
4 Filtr
5 Pojemnik na kurz
6 Wentylator
7 Zderzak
8 Czujnik stacji dokującej
9 Przycisk uruchomienia/zatrzymania (do uruchomienia lub zatrzymania odkurzacza
automatycznego).
10 Wyświetlacz
11 Nasadka TriActive XL
12 Kółko przednie
13 Wałki bocznych szczotek
14 Czujniki spadku poziomu powierzchni
15 Komora baterii
16 Kółka
17 Otwór ssący
18 Szczotki boczne
19 Komora baterii
20 Pilot zdalnego sterowania
21 Mała wtyczka
22 Zasilacz
23 Stacja dokująca
81
Wyświetlacz i pilot zdalnego sterowania
Wyświetlacz (rys. 2):
1 Wskaźnik ostrzeżenia
2 Wskaźnik zapełnienia pojemnika na kurz
Pilot zdalnego sterowania (rys. 3):
1 Przyciski nawigacyjne i włącznik/wyłącznik
2 Przycisk dokowania
3 Przycisk czasu czyszczenia
4 Przyciski trybu czyszczenia
Jak działa odkurzacz automatyczny?
Co czyści odkurzacz automatyczny?
Ten odkurzacz automatyczny jest wyposażony w funkcje, które sprawiają, że doskonale nadaje się do
czyszczenia podłóg w domu.
Ten odkurzacz automatyczny nadaje się szczególnie do czyszczenia twardych powierzchni, na
przykład drewnianych, z płytek ceramicznych bądź z linoleum. Mogą wystąpić problemy podczas
Page 82

82
Polski
czyszczenia miękkich powierzchni, takich jak wykładziny lub dywany. W przypadku używania
odkurzacza automatycznego do czyszczenia wykładziny lub dywanu przy pierwszym użyciu należy
pozostać w jego pobliżu, aby się przekonać, czy poradzi sobie z tego rodzaju podłogą. Odkurzacz
automatyczny wymaga też nadzoru, gdy jest używany na bardzo ciemnych lub lśniących twardych
podłogach.
W jaki sposób odkurzacz automatyczny czyści podłogę?
System czyszczenia
Odkurzacz automatyczny jest wyposażony w 2-stopniowy system czyszczenia, który skutecznie
odkurza podłogi.
-
Dwie boczne szczotki wspomagają odkurzanie w rogach i wzdłuż ścian. Ułatwiają również zbieranie
brudu z podłogi i przesuwanie go w stronę otworu ssącego (rys. 4).
-
Siła ssania odkurzacza automatycznego podnosi luźny brud i przenosi go przez otwór ssący do
pojemnika na kurz (rys. 5).
Schematy odkurzania
W trybie automatycznego czyszczenia odkurzacz automatyczny stosuje sekwencję schematów
odkurzania w celu optymalnego wyczyszczenia wszystkich obszarów pomieszczenia. Używane
schematy odkurzania to:
1 Schemat (rys. 6) litery Z lub zygzak
2 Schemat (rys. 7) losowy
3 Schemat (rys. 8) podążania wzdłuż ścian
4 Schemat (rys. 9) odkurzania punktowego
W trybie automatycznego czyszczenia odkurzacz automatyczny używa tych schematów w stałej
kolejności: schemat litery Z, losowy, podążania wzdłuż ścian i punktowy.
Gdy odkurzacz automatyczny zakończy tę sekwencję schematów, zaczyna ponownie poruszać się
według schematu litery Z. Odkurzacz automatyczny będzie powtarzać tę sekwencję schematów
odkurzania pomieszczenia do czasu, gdy akumulator będzie bliski rozładowania lub do ręcznego
wyłączenia.
Uwaga: Można również wybrać każdy tryb oddzielnie, naciskając odpowiedni przycisk na pilocie
zdalnego sterowania. Więcej informacji można znaleźć w rozdziale „Korzystanie z odkurzacza
automatycznego” w części „Tryby czyszczenia”.
W jaki sposób odkurzacz automatyczny unika różnic wysokości?
Odkurzacz automatyczny jest wyposażony w trzy umieszczone na spodzie czujniki spadku poziomu
powierzchni. Wykorzystuje je do wykrywania różnic wysokości, np. schodów.
Uwaga: To normalne, że odkurzacz automatyczny przesuwa się nieco poza krawędź różnicy
wysokości, ponieważ przedni czujnik spadku poziomu powierzchni znajduje się za zderzakiem.
Przestroga: W niektórych przypadkach czujniki spadku mogą nie wykryć na czas schodów lub
innych różnic wysokości. Dlatego należy uważnie monitorować odkurzacz automatyczny przy
pierwszym użyciu oraz gdy działa w pobliżu schodów lub innych miejsc, w których występują
różnice wysokości. Ważne jest, aby regularnie czyścić czujniki w celu zagwarantowania poprawnego
wykrywania różnic wysokości (instrukcje zawiera rozdział „Czyszczenie i konserwacja”).
Page 83

Polski
Przed pierwszym użyciem
Montaż szczotek bocznych
1 Rozpakuj szczotki boczne i połóż odkurzacz automatyczny spodem do góry na stole lub na
podłodze.
2 Wciśnij boczne szczotki na wałki na spodzie odkurzacza automatycznego (rys. 10).
Uwaga: Zadbaj o prawidłowe umocowanie szczotek bocznych. Wciśnij je na wałek w taki sposób,
aby słychać było, że zatrzasnęły się w odpowiedniej pozycji (będzie słychać „kliknięcie”).
Wyjmowanie metki zabezpieczającej z pilota zdalnego sterowania
Pilota zdalnego sterowania jest zasilany baterią CR2025 w kształcie pastylki. Pod baterią znajduje się
metka zabezpieczająca, którą przed użyciem należy usunąć.
1 Wyjmij metkę zabezpieczającą z komory baterii pilota zdalnego sterowania (rys. 11).
Teraz pilot zdalnego sterowania jest gotowy do użycia.
Przygotowanie do użycia
Instalacja stacji dokującej
1 Włóż małą wtyczkę zasilacza do gniazda w stacji dokującej (1) i podłącz zasilacz do gniazdka
elektrycznego (2) (rys. 12).
2 Umieść stację dokującą na poziomej, równej powierzchni pod ścianą.
Uwaga: Upewnij się, że nie ma żadnych przeszkód ani różnicy wysokości 80cm przed stacją
dokującą (rys. 13), 30cm po jej prawej i 100cm po jej lewej stronie.
83
Ważna uwaga: tryb głębokiego uśpienia
Pozostający w trybie głębokiego uśpienia odkurzacz automatyczny nie reaguje na naciśnięcie
przycisku. Aby ponownie uruchomić pozostający w trybie głębokiego uśpienia odkurzacz
automatyczny:
1 Naciśnij przycisk uruchomienia/zatrzymania na odkurzaczu automatycznym, aby przełączyć
odkurzacz z trybu głębokiego uśpienia w tryb uśpienia.
2 Naciśnij przycisk uruchomienia/zatrzymania na odkurzaczu automatycznym (rys. 19) lub pilocie
zdalnego sterowania, aby uruchomić odkurzacz.
3 Jeśli odkurzacz automatyczny nie rozpoczyna odkurzania, należy umieścić go w stacji dokującej
podłączonej do sieci elektrycznej w celu naładowania akumulatora odkurzacza.
Odkurzacz automatyczny przechodzi w tryb głębokiego uśpienia po naciśnięciu i przytrzymaniu
przycisku uruchomienia/zatrzymania przez 3 sekundy. Może również przejść w tryb głębokiego
uśpienia w wyniku rozładowania się akumulatora. Akumulator może na przykład się rozładować, jeśli
odkurzacz automatyczny nie może znaleźć stacji dokującej.
Uwaga: Nie można wyłączyć trybu głębokiego uśpienia odkurzacza automatycznego za pomocą
przycisku uruchomienia/zatrzymania na pilocie zdalnego sterowania. Należy nacisnąć wyłącznik na
odkurzaczu automatycznym.
Ładowanie
-
Przed pierwszym użyciem urządzenia i wtedy, gdy akumulator odkurzacza automatycznego się
rozładuje, czas ładowania wynosi 4godziny.
Page 84

84
Polski
-
Gdy akumulator jest w pełni naładowany, odkurzacz automatyczny może pracować nawet przez
100minut.
-
Odkurzacz można ładować tylko w stacji dokującej.
Ładowanie za pośrednictwem stacji dokującej
1 Naciśnij przycisk uruchomienia/zatrzymania na odkurzaczu automatycznym.
2 Umieść odkurzacz automatyczny w stacji (rys. 14) dokującej podłączonej do sieci elektrycznej.
3 Przycisk uruchomienia/zatrzymania zacznie wolno migać (rys. 15).
4 Gdy akumulator jest w pełni naładowany, przycisk uruchomienia/zatrzymania świeci w sposób
ciągły (rys. 16).
Ładowanie automatyczne podczas użytkowania
1 Gdy odkurzacz automatyczny skończy odkurzać lub gdy poziom naładowania akumulatora
spadnie do 15%, odkurzacz automatycznie szuka stacji dokującej, by naładować akumulator. Gdy
odkurzacz automatyczny szuka stacji dokującej, przycisk włączenia/wyłączenia szybko miga (rys.
17).
2 Gdy akumulator jest w pełni naładowany, przycisk uruchomienia/zatrzymania świeci w sposób
ciągły.
Uwaga: Odkurzacz automatyczny automatycznie szuka stacji dokującej tylko wtedy, gdy rozpoczął
odkurzanie, będąc na stacji dokującej.
Przygotowanie pomieszczenia do odkurzania
Przed rozpoczęciem odkurzania za pomocą odkurzacza automatycznego należy usunąć z podłogi
(rys. 18) wszystkie luźno leżące i kruche przedmioty.
Należy też usunąć kable, przewody i sznury.
Korzystanie z odkurzacza automatycznego
Uruchamianie i zatrzymywanie
1 Naciśnij przycisk uruchomienia/zatrzymania.
-
Można nacisnąć przycisk uruchomienia/zatrzymania na odkurzaczu automatycznym (rys. 19).
-
Można również nacisnąć przycisk uruchomienia/zatrzymania na pilocie zdalnego sterowania
(rys. 20).
2 Przycisk uruchomienia/zatrzymania świeci się cały czas, a odkurzacz automatyczny rozpoczyna
odkurzanie (rys. 21).
3 Odkurzacz automatyczny działa w trybie automatycznym do czasu, aż akumulator będzie bliski
rozładowania. W trybie automatycznego czyszczenia odkurzacz powtarza sekwencję schematów
odkurzania: schemat litery Z, losowy, podążania wzdłuż ścian i punktowy (rys. 22).
Uwaga: Aby wybrać konkretny schemat, naciśnij jeden z przycisków trybu na pilocie zdalnego
sterowania. Więcej szczegółowych informacji można znaleźć w sekcji „Wybór trybu czyszczenia”.
4 Gdy akumulator będzie bliski rozładowania, przycisk uruchomienia/zatrzymania zacznie migać, a
odkurzacz zacznie szukać stacji dokującej w celu naładowania (rys. 17).
5 Można również nacisnąć przycisk uruchomienia/zatrzymania aby wstrzymać/przerwać odkurzanie.
Jeśli ponownie naciśniesz przycisk uruchomienia/zatrzymania, a akumulator będzie naładowany w
wystarczającym stopniu, odkurzacz będzie kontynuował odkurzanie w trybie automatycznego
czyszczenia.
Page 85

Polski
6 Aby odkurzacz automatyczny powrócił do stacji dokującej, zanim akumulator będzie bliski
rozładowania, naciśnij przycisk dokowania na pilocie zdalnego sterowania (rys. 23).
Przycisk włączenia/wyłączenia zacznie migać, a odkurzacz automatyczny zacznie szukać stacji
dokującej (rys. 24).
Uwaga: Jeśli odkurzacz automatyczny nie rozpoczął odkurzania, będąc na stacji dokującej, nie
będzie automatycznie jej szukać, gdy akumulator będzie bliski rozładowania. Jeśli akumulator
będzie zawierać wystarczającą ilość energii, można nacisnąć przycisk dokowania na pilocie
zdalnego sterowania, aby spowodować, by odkurzacz automatyczny powrócił do stacji dokującej.
Jeśli akumulator jest całkowicie rozładowany, należy ręcznie umieścić odkurzacz automatyczny na
stacji dokującej.
85
Obsługa stacji dokującej
Stacja dokująca zawiera dwa przyciski, za pomocą których można sterować odkurzaczem
automatycznym.
Przycisk akumulator naładowany i uruchom
W przypadku naciśnięcia przycisku akumulator naładowany i uruchom na stacji dokującej, gdy trwa
ładowanie odkurzacza automatycznego, urządzenie rozpocznie odkurzanie zaraz po pełnym (rys. 25)
naładowaniu akumulatora.
Przycisk 24h
W przypadku naciśnięcia przycisku 24h na stacji dokującej, stacja ładująca zacznie odliczać 24 godziny
do rozpoczęcia następnego odkurzania. Gdy odliczanie zakończy się, odkurzacz automatyczny
zacznie odkurzanie i będzie działać do czasu, gdy akumulator będzie bliski rozładowania, po czym
automatycznie wróci do stacji dokującej w celu naładowania (rys. 26).
Wybór trybu czyszczenia
Wybór trybu czyszczenia
Oprócz automatycznego trybu czyszczenia odkurzacz automatyczny ma cztery osobne tryby
czyszczenia, które można włączyć, naciskając odpowiednie przyciski na pilocie zdalnego sterowania.
Tryb litery Z
W trybie litery Z odkurzacz automatyczny czyści podłogę, wykonując na niej pętle w kształcie litery Z,
aby odkurzyć duże powierzchnie (rys. 27).
Tryb losowy
W tym trybie odkurzacz automatyczny czyści pomieszczenie, wykonując na przemian na podłodze
ruchy po linii prostej i po skosie (rys. 28).
Tryb podążania wzdłuż ścian
W tym trybie odkurzacz automatyczny podąża wzdłuż ścian w pomieszczeniu, aby bardzo dokładnie
odkurzyć (rys. 29) podłogę pod ścianami.
Tryb punktowy
W tym trybie odkurzacz porusza się losowo po niewielkim obszarze w celu dokładnego (rys. 30)
wyczyszczenia go.
Uwaga: Ręcznie wybrane tryby czyszczenia pozostają aktywne zaledwie przez kilka minut. Gdy ten
czas upłynie, odkurzacz przełącza się do trybu automatycznego.
Page 86

86
Polski
Obsługa ręczna
1 Za pomocą przycisków strzałek na pilocie zdalnego sterowania, umieszczonych nad i pod
przyciskiem uruchomienia/zatrzymania oraz po jego lewej i prawej stronie, można sterować
odkurzaczem automatycznym poruszającym się po pomieszczeniu (rys. 31).
Uwaga: Zachowaj ostrożność podczas ręcznego sterowania odkurzaczem automatycznym, gdy
znajduje się w pobliżu schodów lub miejsca, w którym występuje różnica wysokości.
Uwaga: Funkcja odkurzania oraz szczotki boczne działają tylko podczas ruchu odkurzacza do
przodu. Przyciski w lewo, prawo i do tyłu służą wyłącznie do manewrowania odkurzaczem
automatycznym.
Korzystanie z przycisku czasu czyszczenia
Naciśnij przycisk czasu czyszczenia na pilocie zdalnego sterowania, aby odkurzać przez 35 minut. Gdy
upłynie czas czyszczenia, odkurzacz powróci do stacji dokującej w celu naładowania (rys. 32).
Sygnały i ich znaczenie
Wyświetlacz odkurzacza automatycznego ma dwa wskaźniki: wskaźnik ostrzeżenia i wskaźnik
zapełnienia pojemnika na kurz. Przycisk uruchamiania/zatrzymania wysyła sygnały świetlne. W
poniższej tabeli objaśniono znaczenie sygnałów.
Sygnał
Przycisk uruchomienia/zatrzymania świeci w
sposób ciągły.
Znaczenie
Odkurzacz automatyczny jest gotowy do
odkurzania.
Przycisk uruchomienia/zatrzymania miga wolno. Trwa ładowanie odkurzacza automatycznego.
Przycisk uruchomienia/zatrzymania miga szybko. Odkurzacz automatyczny szuka stacji dokującej.
Akumulator odkurzacza automatycznego jest
bliski rozładowania.
Zapala się wskaźnik zapełnienia pojemnika na
kurz.
Zapala się wskaźnik ostrzeżenia. Odkurzacz automatyczny został podniesiony
Pojemnik na kurz jest pełny.
podczas odkurzania.
Zderzak odkurzacza automatycznego jest
zablokowany.
Kółko lub szczotka boczna jest zablokowana.
Brak górnej pokrywy lub pokrywa nie jest
prawidłowo założona.
Odkurzacz automatyczny nie możesz znaleźć
stacji dokującej.
Reakcja na klaśnięcie
Reakcja na klaśnięcie jest włączana, jeśli odkurzacz przechodzi w tryb uśpienia w następujących
sytuacjach:
-
po przerwaniu czyszczenia z powodu błędu
Page 87

Polski
-
jeśli zaprogramowano krótki czas czyszczenia
-
jeśli w ciągu 20 minut nie znajdzie stacji dokującej
Jeśli nie widać odkurzacza automatycznego, można go zlokalizować za pomocą jednego klaśnięcia.
Odkurzacz zareaguje dźwiękiem i zaświeceniem wszystkich ikon na wyświetlaczu.
Czyszczenie i konserwacja
Opróżnianie i czyszczenie pojemnika na kurz
Należy opróżniać i czyścić pojemnik na kurz, gdy wskaźnik zapełnienia pojemnika na kurz świeci się w
sposób ciągły.
1 Zdejmij pokrywę (rys. 33).
2 Pociągnij za uchwyt pokrywy pojemnika na kurz i wyjmij pojemnik na kurz z komory (rys. 34).
Uwaga: Podczas wyjmowania i ponownego wkładania pojemnika na kurz uważaj, aby nie uszkodzić
łopatek wentylatora silnika.
3 Ostrożnie podnieś pokrywę pojemnika na kurz (1) i wyjmij filtr (2) (rys. 35).
4 Opróżnij pojemnik na kurz, potrząsając nim nad koszem na śmieci. Wyczyść filtr oraz wnętrze
komory szmatką lub szczoteczką do zębów o miękkim włosiu. Wyczyść też otwór ssący na spodzie
pojemnika na kurz (rys. 36).
Przestroga: Nie myj pojemnika na kurz ani filtra w wodzie ani w zmywarce.
5 Umieść filtr z powrotem w pojemniku na kurz (1). Następnie załóż pokrywkę na pojemnik na kurz (2)
(rys. 37).
6 Umieść pojemnik na kurz z powrotem w komorze, a następnie załóż górną pokrywę na odkurzacz
automatyczny (rys. 38).
Przestroga: Zawsze sprawdzaj, czy w pojemniku na kurz znajduje się filtr. Używanie odkurzacza
automatycznego bez filtra w pojemniku na kurz spowoduje zniszczenie silnika.
87
Czyszczenie odkurzacza automatycznego
Aby zapewnić dobre działanie odkurzacza, trzeba od czasu do czasu czyścić czujniki spadku poziomu
powierzchni, kółka, szczotki boczne i otwór ssący.
1 Połóż odkurzacz automatyczny spodem do góry na płaskiej powierzchni.
2 Za pomocą szczotki o miękkim włosiu (np. szczoteczki do zębów) usuń brud i kurz z czujników
spadku (rys. 39).
Uwaga: Regularne czyszczenie czujników spadku jest bardzo ważne. Jeśli czujniki spadku będą
brudne, odkurzacz automatyczny może nie wykryć schodów lub innych różnic wysokości.
3 Za pomocą szczotki o miękkim włosiu (np. szczoteczki do zębów) usuń brud i kurz z kółka
przedniego i kółek bocznych (rys. 40).
4 Aby wyczyścić szczotki boczne, chwyć je za włosie i zdejmij z wałków (rys. 41).
5 Za pomocą miękkiej szczotki (np. szczoteczki do zębów) lub szmatki (rys. 42) usuń kurz, włosy i nitki
z wałka i szczotki bocznej.
6 Sprawdź, czy w szczotkach bocznych i na spodzie odkurzacza automatycznego nie znajdują się
żadne ostre przedmioty, które mogłyby uszkodzić podłogę.
7 Po zdjęciu szczotek bocznych z wałków rozepnij zatrzaski nasadki TriActive XL, wkładając palce w
miejscach oznaczonych strzałkami i wyciągając nasadkę TriActive XL z odkurzacza (rys. 43).
8 Za pomocą szczotki o miękkim włosiu (np. szczoteczki do zębów) (rys. 44) oczyść otwór ssący.
9 Usuń wszelkie widoczne zabrudzenia z nasadki TriActive (rys. 45).
Page 88

88
Polski
10 Wsuń haczyki zatrzasków nasadki TriActive w otwory u dołu odkurzacza automatycznego (rys. 46).
Wepchnij nasadkę TriActive na miejsce. Sprawdź, czy nasadka może się swobodnie poruszać kilka
milimetrów w górę i w dół.
Wymiana
Zamawianie akcesoriów
Akcesoria i części zamienne można kupić na stronie www.shop.philips.com/service lub u sprzedawcy
produktów firmy Philips. Można też skontaktować się z Centrum Obsługi Klienta firmy Philips w swoim
kraju (dane kontaktowe znajdują się w ulotce gwarancyjnej).
Wymiana filtra
Wymień filtr, jeśli uległ uszkodzeniu lub jest bardzo brudny. Nowy filtr można zamówić, podając numer
FC8012. Instrukcje dotyczące wyjmowania filtra i wkładania go do pojemnika na kurz można znaleźć w
części „Opróżnianie i czyszczenie pojemnika na kurz” w rozdziale „Czyszczenie i konserwacja”.
Wymiana szczotek bocznych
Aby urządzenie działało skutecznie, po pewnym czasie należy wymienić szczotki boczne.
Uwaga: Wymień szczotki boczne, gdy zauważysz jakiekolwiek oznaki zużycia lub uszkodzenia.
Zalecamy jednoczesną wymianę obu szczotek bocznych. Szczotki boczne można zamawiać w
zestawach, podając numer FC8013.
1 Aby wymienić szczotki boczne, chwyć je za włosie i zdejmij z wałków (rys. 41).
2 Wciśnij nowe szczotki boczne na wałki (rys. 10).
Wymiana akumulatora
Akumulator odkurzacza automatycznego mogą wymienić jedynie uprawieni inżynierowie serwisu. Jeśli
akumulator nie daje się naładować albo szybko się rozładowuje, przekaż odkurzacz automatyczny do
autoryzowanego centrum serwisowego firmy Philips, gdzie akumulator zostanie wymieniony.
Informacje na temat kontaktu z Centrum Obsługi Klienta firmy Philips w swoim kraju możesz znaleźć w
ulotce międzynarodowej gwarancji lub na stronie www.philips.com/support.
Wymiana baterii pilota zdalnego sterowania
Pilota zdalnego sterowania jest zasilany baterią CR2025 w kształcie pastylki. Wymień baterię pilota,
gdy odkurzacz automatyczny nie reaguje na naciskanie przycisków na pilocie.
1 Trzymaj pilot zdalnego sterowania do góry nogami. Naciśnij przycisk zwalniający baterię i w tym
samym czasie wysuń uchwyt baterii z pilota zdalnego sterowania (rys. 47).
2 Wyjmij wyczerpaną baterię i umieść w uchwycie nową. Wsuń uchwyt baterii do pilota zdalnego
sterowania (rys. 48).
Przechowywanie
Jeśli odkurzacz automatyczny ma nie być używany przez ponad miesiąc, należy nacisnąć i
przytrzymać przycisk uruchomienia/zatrzymania na odkurzaczu przez 3 sekundy w celu przełączenia
odkurzacza automatycznego w tryb głębokiego uśpienia, aby chronić jego akumulator. Należy też
wyłączyć z gniazdka stację dokującą w celu oszczędzenia energii.
Page 89

Polski
89
Wyjmowanie akumulatora
Ostrzeżenie: Przed wyrzuceniem zużytego urządzenia należy wyjąć z niego jedynie
akumulator. Usuwając akumulator, należy upewnić się, że jest on całkowicie
rozładowany.
Aby wyjąć akumulator, postępuj zgodnie z poniższymi instrukcjami. Możesz także oddać odkurzacz
automatyczny do centrum serwisowego firmy Philips i zlecić wyjęcie akumulatora. Skontaktuj się z
Centrum Obsługi Klienta firmy Philips w swoim kraju, aby uzyskać adres najbliższego centrum
serwisowego.
1 Uruchom odkurzacz, zaczynając od dowolnego miejsca w pomieszczeniu, ale nie od stacji
dokującej.
2 Pozostaw odkurzacz automatyczny włączony aż do całkowitego rozładowania akumulatora, aby
mieć pewność, że akumulator jest całkowicie rozładowany przed jego wyjęciem i wyrzuceniem.
3 Odkręć śruby i komory akumulatora i zdejmij pokrywkę (rys. 49).
4 Wyjmij akumulator i rozłącz go (rys. 50).
5 Zanieś odkurzacz i akumulator do punktu zbiórki śmieci elektrycznych i elektronicznych.
Rozwiązywanie problemów
W tym rozdziale opisano najczęstsze problemy, z którymi można się zetknąć podczas korzystania z
urządzenia. Jeśli poniższe wskazówki okażą się niewystarczające do rozwiązania problemu, odwiedź
stronę www.philips.com/support, na której znajduje się lista często zadawanych pytań, lub skontaktuj
się z Centrum Obsługi Klienta w swoim kraju.
Rozwiązywanie problemów
Problem
Odkurzacz automatyczny
nie rozpoczyna
odkurzania, gdy
naciskam przycisk
uruchomienia/zatrzyman
ia.
Odkurzacz automatyczny
nie reaguje, gdy
naciskam jeden z
przycisków.
Prawdopodobna
przyczyna
Akumulator jest
rozładowany.
Odkurzacz automatyczny jest
w trybie głębokiego uśpienia.
Akumulator odkurzacza
automatycznego jest
rozładowany.
Rozwiązanie
Naładuj akumulator (patrz rozdział
„Przygotowanie do użycia”).
Naciśnij jeden raz przycisk
uruchomienia/zatrzymania, aby ponownie
uruchomić odkurzacz. Po ponownym
naciśnięciu przycisku
uruchomienia/zatrzymania odkurzacz
automatyczny rozpoczyna odkurzanie.
Jeśli akumulator jest rozładowany, należy
umieścić odkurzacz automatyczny w stacji
dokującej podłączonej do sieci
elektrycznej.
Umieść odkurzacz automatyczny w stacji
dokującej podłączonej do sieci
elektrycznej. Po kilku sekundach
odkurzacz wygeneruje dźwięk, a
wyświetlacz zaświeci się.
Page 90

90
Polski
Problem Prawdopodobna
przyczyna
Wskaźnik ostrzeżenia
miga szybko.
Odkurzacz automatyczny
nie odkurza dobrze.
Jedno lub oba kółka są
zablokowane.
Jedna lub obie szczotki
boczne są zablokowane.
Brak górnej pokrywy lub
pokrywa nie jest prawidłowo
założona.
Zderzak jest zablokowany. Unieś odkurzacz automatyczny, aby
Odkurzacz automatyczny
został podniesiony podczas
odkurzania.
Włosie jednej lub obu
szczotek bocznych jest
krzywe lub zgięte.
Rozwiązanie
Usuń kłaczki, włosy, nitki lub przewód,
który zakręcił się wokół zawieszenia kółka.
Wyczyść szczotki boczne (patrz rozdział
„Czyszczenie i konserwacja”).
Gdy brak górnej pokrywy lub pokrywa nie
jest prawidłowo założona, odkurzacz
automatyczny nie będzie działać. Umieść
prawidłowo górną pokrywę na
odkurzaczu automatycznym.
uwolnić zderzak. Odsuń odkurzacz
automatyczny od przeszkody i naciśnij
przycisk uruchomienia/zatrzymania, aby
wznowić odkurzanie.
Umieść odkurzacz automatyczny na
podłodze. Następnie naciśnij przycisk
uruchomienia/zatrzymania, aby wznowić
odkurzanie.
Zanurz na chwilę szczotkę lub szczotki w
ciepłej wodzie. Jeśli nie spowoduje to
przywrócenia prawidłowego kształtu
włókien, wymień szczotki boczne (patrz
rozdział „Wymiana”).
Filtr w pojemniku na kurz jest
brudny.
Otwór ssący na spodzie
pojemnika na kurz jest
zapchany.
Przednie kółko jest
zablokowane przez włosy lub
inne zabrudzenia.
Wyczyść filtr w pojemniku na kurz za
pomocą szmatki lub szczoteczki do
zębów o miękkim włosiu. Filtr i pojemnik
na kurz można też oczyścić zwykłym
odkurzaczem, stosując niską siłę ssącą.
Jeśli filtra nie da się wyczyścić za pomocą
szczotki lub odkurzacza, wymień filtr na
nowy. Zalecamy wymianę filtra
przynajmniej raz w roku.
Wyczyść otwór ssący (patrz rozdział
„Czyszczenie i konserwacja”).
Wyczyść kółko przednie (patrz rozdział
„Czyszczenie i konserwacja”).
Page 91

Polski
91
Problem Prawdopodobna
przyczyna
Odkurzacz automatyczny
odkurza bardzo ciemną lub
lśniącą powierzchnię, co
powoduje aktywację
czujników spadku poziomu
powierzchni. Z tego powodu
odkurzacz automatyczny
porusza się w nietypowy
sposób.
Odkurzacz automatyczny
czyści podłogę, która mocno
odbija promienie słoneczne.
Aktywuje to czujniki spadku
poziomu powierzchni i
powoduje, że odkurzacz
automatyczny porusza się w
nietypowy sposób.
Nie można już
naładować akumulatora
lub akumulator bardzo
szybko się rozładowuje.
Bateria w pilocie
zdalnego sterowania
zbyt szybko się
rozładowuje.
Okres eksploatacji
akumulatora dobiegł końca.
Być może nie włożono baterii
odpowiedniego typu.
Rozwiązanie
Naciśnij przycisk
uruchomienia/zatrzymania, a następnie
przesuń odkurzacz automatyczny na
jaśniejszy fragment podłogi. Jeśli problem
dalej będzie występować na jaśniejszym
fragmencie podłogi, odwiedź stronę
internetową www.philips.com/support lub
skontaktuj się z Centrum Obsługi Klienta
w swoim kraju.
Zasuń zasłony, aby światło słoneczne nie
wpadało do pomieszczenia. Możesz także
rozpocząć odkurzanie, gdy światło
słoneczne jest słabsze.
Zleć wymianę akumulatora centrum
serwisowemu firmy Philips (patrz rozdział
„Wymiana”).
Do zasilania pilota zdalnego sterowania
potrzebna jest bateria CR2025 w kształcie
pastylki. Jeśli problem się utrzymuje,
przejdź do strony internetowej
www.philips.com/support lub skontaktuj
się z Centrum Obsługi Klienta w swoim
kraju.
Odkurzacz automatyczny
porusza się po okręgach.
Odkurzacz automatyczny
nie może znaleźć stacji
dokującej.
Odkurzacz automatyczny jest
w trybie czyszczenia
punktowego.
W pomieszczeniu nie ma
dość miejsca, aby odkurzacz
automatyczny mógł dojechać
do stacji dokującej.
Odkurzacz automatyczny
cały czas aktywnie poszukuje
stacji dokującej.
Jest to zjawisko normalne. Tryb
czyszczenia punktowego może zostać
uaktywniony, gdy zostanie wykryta mocno
zabrudzona podłoga. Jest to także część
automatycznego trybu czyszczenia. Po
około minucie odkurzacz automatyczny
zaczyna działać według normalnego
schematu czyszczenia. Możesz przerwać
tryb czyszczenia punktowego, wybierając
inny tryb za pomocą pilota zdalnego
sterowania.
Spróbuj ustawić stację dokującą w innym
miejscu. Patrz część „Instalacja stacji
dokującej” w rozdziale „Przygotowanie do
użycia”.
Daj odkurzaczowi automatycznemu jakieś
20 minut na powrót do stacji dokującej.
Page 92

92
Polski
Problem Prawdopodobna
przyczyna
Odkurzacz automatyczny nie
został uruchomiony, gdy
znajdował się w stacji
dokującej.
Rozwiązanie
Jeśli chcesz, aby odkurzacz automatyczny
powrócił do stacji dokującej po
zakończeniu czyszczenia, uruchom go,
gdy znajduje się w stacji dokującej.
Page 93

Română
Introducere
Felicitări pentru achiziţie şi bun venit la Philips! Pentru a beneficia pe deplin de asistenţa oferită de
Philips, înregistraţi-vă produsul la www.philips.com/welcome.
Descriere generală (Fig. 1)
1 Capac superior
2 Mânerul capacului pentru compartimentul pentru praf
3 Capac pentru compartimentul pentru praf
4 Filtru
5 Compartiment pentru praf
6 Ventilator
7 Amortizor
8 Senzor staţie de andocare
9 Buton Start/stop (pentru pornirea şi oprirea robotului)
10 Afişaj
11 Cap de aspirare TriActive XL
12 Roată frontală
13 Axe perii laterale
14 Senzori de deplasare
15 Compartiment pentru baterii
16 Roţi
17 Orificiu de aspirare
18 Perii laterale
19 Suport pentru baterie
20 Telecomandă
21 Conector mic
22 Adaptor
23 Staţie de andocare
93
Afişaj şi telecomandă
Afişaj (Fig. 2):
1 Indicator de avertizare
2 Indicator container pentru praf plin
Telecomandă (Fig. 3):
1 Butoane de navigare şi start/stop
2 Buton de andocare
3 Buton pentru timpul de curăţare
4 Butoane pentru modul de curăţare
Cum funcţionează robotul
Ce poate curăţa robotul
Acest robot este prevăzut cu funcţii care îl transformă într-un aspirator adecvat pentru a vă ajuta să
curăţaţi podelele acasă.
Robotul este potrivit în special pentru curăţarea suprafeţelor dure, ca de exemplu, podele acoperite
cu lemn, faianţă sau linoleum. Este posibil să apară probleme la curăţarea podelelor acoperite cu
materiale moi, ca de exemplu, carpete sau covoare. Dacă utilizaţi robotul pe o carpetă sau un covor,
vă rugăm să staţi în apropiere prima dată pentru a vedea dacă robotul poate acţiona pe acea
Page 94

94
Română
suprafaţă. Robotul necesită, de asemenea, supraveghere la utilizarea pe podele dure foarte închise la
culoare sau foarte lucioase.
Modul de curăţare al robotului
Sistem de curăţare
Robotul dispune de un sistem de curăţare din 2 trepte, pentru curăţarea eficientă a podelelor.
-
Cele două perii laterale ajută robotul să cureţe în colţuri şi de-a lungul pereţilor. De asemenea,
ajută la îndepărtarea prafului de pe podea şi la deplasare acestuia către orificiul de aspirare (Fig. 4).
-
Puterea de aspirare a robotului preia particulele de murdărie libere şi le transportă, prin orificiul de
aspirare în compartimentul pentru praf (Fig. 5).
Modele de curăţare
În modul său de curăţare automată, robotul utilizează o succesiune automată de modele de curăţare
pentru a curăţa fiecare zonă a camerei în mod optim. Modelele de curăţare pe care le utilizează sunt:
1 Modelul (Fig. 6) în Z sau zigzag
2 Modelul (Fig. 7) aleatoriu
3 Modelul (Fig. 8) după linia peretelui
4 Modelul (Fig. 9) de curăţare a unei zone
În modul de curăţare automată, robotul utilizează aceste modele într-o succesiune prestabilită:
modelul în z, modelul aleatoriu, modelul după linia peretelui şi modelul de curăţare a unei zone.
Când robotul a terminat această succesiune de modele, începe să se mişte, din nou, în modelul în Z.
Robotul continuă să utilizeze această succesiune de modele pentru a curăţa camera până când
bateria reîncărcabilă se descarcă sau până când este oprit manual.
Notă: Puteţi, de asemenea, să selectaţi fiecare mod individual prin apăsarea butonului corespunzător
de pe telecomandă. Pentru mai multe detalii, consultaţi capitolul „Utilizarea robotului”, secţiunea
„Moduri de curăţare”.
Cum evită robotul diferenţele de înălţime
Robotul este prevăzut, în partea inferioară, cu trei senzori de deplasare. Acesta utilizează aceşti
senzori de deplasare pentru a detecta şi evita diferenţele de nivel, ca de exemplu scările.
Notă: Este normal ca robotul să se deplaseze ușor peste marginea unei diferenţe de înălţime,
deoarece senzorul său de deplasare frontal este situat în spatele amortizorului.
Atenţie: În unele cazuri, este posibil ca senzorii de deplasare să nu detecteze o scară sau o altă
diferenţă de nivel la timp. De aceea, urmăriţi robotul cu atenţie primele dăţi când îl utilizaţi şi când
îl folosiţi lângă o scară sau o altă diferenţă de nivel. Este important să curăţaţi senzorii de
deplasare în mod regulat pentru a asigura faptul că robotul detectează diferenţele de nivel în mod
corespunzător (consultaţi capitolul „Curăţare şi întreţinere” pentru instrucţiuni).
Înainte de prima utilizare
Montarea periilor laterale
1 Despachetaţiperiile laterale şi aşezaţi robotul invers pe o masă sau pe podea.
2 Apăsaţi periile laterale pe axele din partea inferioară a robotului (Fig. 10).
Page 95

Română
Notă: Asiguraţi-vă că montaţi periile laterale corespunzător. Apăsaţi pe ax până când auziţi că
acestea sunt blocate în poziţie cu un clic.
95
Îndepărtarea plăcuței de protecție de pe telecomandă
Telecomanda funcţionează cu o baterie în formă de monedă de tip CR2025. Bateria este protejată cu
o etichetă de protecţie care trebuie îndepărtată înainte de utilizare.
1 Trageţi eticheta de protecţie în afara compartimentului bateriei telecomenzii (Fig. 11).
Acum telecomanda este pregătită pentru utilizare.
Pregătirea pentru utilizare
Instalarea staţiei de andocare
1 Introduceţi mufa mică a adaptorului în priza staţiei de andocare (1) şi introduceţi adaptorul în priza
de perete (2) (Fig. 12).
2 Aşezaţi staţia de andocare pe o podea orizontală, lângă un perete.
Notă: Asiguraţi-vă ca nu există obstacole sau diferenţe de nivel la 80 cm în faţă, 30 cm la dreapta şi
100 cm la stânga staţiei de andocare (Fig. 13).
Observaţie importantă: mod inactivitate profundă
În modul de inactivitate profundă, robotul nu răspunde deloc dacă apăsaţi pe un buton. Pentru a
reactiva robotul atunci când acesta este în modul de inactivitate profundă:
1 Apăsaţi butonul pornire/oprire de pe robot pentru a comuta robotul din modul de inactivitate
profundă în modul standby.
2 Apăsaţi butonul pornire/oprire de pe robot (Fig. 19) sau de pe telecomandă pentru a porni robotul.
3 Dacă robotul nu începe curăţarea, conectaţi robotul la staţia de andocare conectată la priză pentru
a-i reîncărca bateria.
Robotul intră în modul de inactivitate profundă atunci când ţineţi apăsat pe butonul de pornire/oprire
timp de 3 secunde. Acesta poate, de asemenea, să intre în modul de inactivitate profundă atunci când
bateria este descărcată. De exemplu, bateria poate să se consume dacă robotul nu poate să-şi
găsească staţia de andocare.
Notă: Nu puteţi scoate robotul din modul de inactivitate profundă cu butonul de pornire/oprire de pe
telecomandă. Trebuie să apăsaţi butonul pornit/oprit de pe robot.
Încărcare
-
Când efectuaţi încărcarea pentru prima dată şi când bateria reîncărcabilă a robotului este goală,
durata de încărcare este de patru ore.
-
Atunci cândbateria reîncărcabilă este complet încărcată, robotul dvs. poate curăţa pânăla 100 de
minute.
-
Puteţi încărca robotul doar în staţia de andocare.
Încărcarea pe staţia de andocare
1 Apăsaţi butonul pornire/oprire al robotului.
2 Aşezaţi robotul pe staţia (Fig. 14) de andocare conectată.
3 Butonul start/stop începe să ilumineze intermitent rar (Fig. 15).
4 Când bateria reîncărcabilă este complet încărcată, butonul start/stop iluminează continuu (Fig. 16).
Page 96

96
Română
Încărcarea automatăîn timpul utilizării
1 Atunci când robotul a încheiat curăţarea sau când nivelul bateriei este de numai 15%, acesta caută
automat staţia de andocare pentru a se reîncărca. Când robotul caută staţia de andocare, butonul
start/stop iluminează intermitent rapid (Fig. 17).
2 Când bateria reîncărcabilă este complet încărcată, butonul start/stop iluminează continuu.
Notă: Robotulcaută automat staţia de andocare numaicând a început curăţarea de la staţia de
andocare.
Pregătirea camerei pentru o cursă de curăţare
Înainte de a porni robotul pentru cursa sa de curăţare, asiguraţi-vă că îndepărtaţi toate obiectele
libere și fragile de pe podea (Fig. 18).
De asemenea, îndepărtaţi toate cablurile, firele şi şnururile de pe podea.
Utilizarea robotului
Pornirea şi oprirea
1 Apăsaţi butonul Start/Stop.
-
Puteţi să apăsaţi butonul start/stop al robotului (Fig. 19).
-
Puteţi, de asemenea, să apăsaţi butonul start/stop al telecomenzii (Fig. 20).
2 Butonul start/stop este apăsat continuu şi robotul începe curăţarea (Fig. 21).
3 Robotul este în modul curăţare automată până când bateria se descarcă. În modul curăţare
automată, acesta urmează succesiunea model în Z, aleatoriu, după linia peretelui şi curăţare a unei
zone (Fig. 22).
Notă: Pentru a selecta un anumit mod, apăsaţi unul dintre butoanele de mod de pe telecomandă.
Consultaţi secţiunea „Selectarea modului de curăţare” pentru mai multe detalii.
4 Când bateria se descarcă, butonul start/stop începe să ilumineze intermitent şi robotul caută staţia
de andocare pentru a se reîncărca (Fig. 17).
5 Puteţi, de asemenea, să apăsaţi butonul start/stop pentru a întrerupe cursa de curăţare. Dacă
apăsaţi butonul start/stop din nou şi există suficientă energie în bateria reîncărcabilă, robotul
continuă curăţarea în modul curăţare automată.
6 Pentru a face robotul să revină la staţia de andocare înainte ca bateria reîncărcabilă să se
descarce, apăsaţi butonul de andocare de pe telecomandă (Fig. 23).
Butonul start/stop începe să lumineze intermitent şi robotul caută staţia de andocare (Fig. 24).
Notă: Dacă nu aţi pornit robotul de la staţia de andocare, acesta nu caută staţia de andocare
automat când bateria reîncărcabilă este descărcată. Dacă bateria reîncărcabilă are suficientă
energie, puteţi apăsa butonul de andocare de pe telecomandă pentru a face robotul să revină la
staţia de andocare. Dacă bateria reîncărcabilă este complet epuizată, trebuie să poziţionaţi robotul
pe staţia de andocare manual.
Funcţionarea staţiei de andocare
Staţia de andocare are două comenzi care pot fi utilizate pentru a utiliza robotul.
Buton baterie încărcată şi pornire
Dacă apăsaţi butonul baterie încărcată şi pornire de pe staţia de andocare în timp ce robotul se
încarcă, robotul începe curăţarea imediat ce bateria reîncărcabilă este complet încărcată (Fig. 25).
Page 97

Română
Buton 24 ore
Dacă apăsaţi butonul 24 de ore de pe staţia de andocare, staţia de andocare începe numărătoarea
inversă a 24 de ore până la următoarea cursă de curăţare. Când numărătoarea inversă este încheiată,
robotul începe curăţarea până când bateria se descarcă şi acesta revine la staţia de andocare
automat pentru reîncărcare (Fig. 26).
Selectarea modului de curăţare
Selectarea modului de curăţare
Pe lângă modul de curăţare automată, acest robot dispune de patru moduri de curățare individuale
care pot fi activate prin apăsarea butonului corespunzător de pe telecomandă.
Modul model în Z
În modul în Z, robotul curăţă prin realizarea de bucle în formă de Z în cameră pentru curăţarea unor
zone mari (Fig. 27).
Modul aleator
În acest mod, robotul curăţă camera într-un model amestecat de mişcări în linii drepte şi încrucişate
(Fig. 28).
Modul de urmărire a peretelui
În acest mod, robotul urmăreşte pereţii camerei pentru a realiza o curăţare suplimentară (Fig. 29) a
zonelor aflate de-a lungul pereţilor.
Modul de curăţare a unei zone
În acest mod, robotul se deplasează aleatoriu pe o zonă redusă pentru a curăţa acea zonă complet
(Fig. 30).
97
Notă: Modurile selectate manual sunt active doar timp de două minute. După aceea, robotul comută
pe modul de curăţare automată.
Acționarea manuală
1 Utilizaţi butoanele-săgeată de deasupra şi dedesubtul şi la stânga şi la dreapta butonului
start/stop de pe telecomandă pentru a deplasa robotul prin cameră. (Fig. 31)
Notă: Fiţi atent când conduceţi manual robotul în apropierea unor diferenţe de nivel şi scări.
Notă: Funcţia de aspirare şi periile laterale funcţionează numai când robotul este condus înainte.
Butoanele stânga, dreapta şi înapoi sunt doar pentru manevrarea robotului.
Utilizarea butonului timp de curăţare
Apăsaţi butonul timp de curăţare de pe telecomandă pentru a face robotul să cureţe timp de 35 de
minute. La terminarea timpului de curăţare, robotul revine la staţia de andocare pentru reîncărcare
(Fig. 32).
Semnale şi semnificaţia acestora
Robotul are un afişaj cu două indicatoare: un indicator de avertizare şi indicatorul de umplere a
containerului de praf. Butonul start/stop oferă semnale luminoase. Tabelul de mai jos explică
semnificaţia semnalelor.
Page 98

98
Română
Semnal Semnificaţie
Butonul start/stop este aprins continuu. Robotul este pregătit pentru curăţare.
Butonul start/stop luminează intermitent rar. Robotul se încarcă.
Butonul start/stop luminează intermitent rapid. Robotul caută staţia de andocare.
Bateria reîncărcabilă a robotului este descărcată.
Indicatorul de umplere a containerului de praf se
aprinde.
Indicatorul de avertizare se aprinde. Robotul a fost ridicat în timpul operaţiilor de
Compartimentul pentru praf este plin.
curăţare.
Amortizorul robotului este blocat.
O roată sau o perie laterală este blocată.
Capacul superior nu este prezent sau nu este
închis corespunzător.
Robotul nu poate găsi staţia de andocare.
Răspuns la bătaia din palme
Funcţia de răspuns la bătaia din palme este activată când robotul intră în modul inactiv în
următoarele situaţii:
-
când întrerupe curăţarea din cauza unei erori
-
când aţi programat un timp scurt de curăţare
-
când nu îşi poate găsi staţia de andocare în 20 de minute
Dacă nu vedeţi robotul, puteţi să-l localizaţi bătând o dată din palme. Robotul va răspunde emiţând
un sunet şi aprinzând toate pictogramele de pe afişajul său.
Curăţare şi întreţinere
Golirea şi curăţarea compartimentului pentru praf
Goliţi şi curăţaţi containerul de praf când indicatorul de umplere a containerului de praf este aprins
continuu.
1 Desfaceţi capacul (Fig. 33).
2 Trageţi în sus mânerul containerului de praf şi ridicaţi containerul de praf din compartimentul
containerului de praf (Fig. 34).
Notă: La scoaterea sau la reintroducerea compartimentului pentru praf, aveţi grijă să nu deterioraţi
palele ventilatorului motorului.
3 Ridicaţi cu atenţie capacul containerului de praf (1) şi extrageţi filtrul (2) (Fig. 35).
4 Scuturaţi compartimentul pentru praf deasupra unei lăzi de gunoi, pentru a-l goli. Curăţaţi filtrul şi
interiorul containerului de praf cu o cârpă sau o periuţă de dinţi cu peri moi. De asemenea, curăţaţi
orificiul de aspirare din partea inferioară a containerului de praf (Fig. 36).
Atenţie: Nu curăţaţi compartimentul pentru praf şi filtrul cu apă sau în maşina de spălat vase.
Page 99

Română
5 Puneţi filtrul la loc în containerul de praf (1). Apoi poziţionaţi capacul pe containerul de praf(2) (Fig.
37).
6 Poziţionaţi containerul înapoi în compartimentul containerului de praf şi montaţi capacul înapoi pe
robot (Fig. 38).
Atenţie: Asiguraţi-vă întotdeauna că filtrul este prezent în containerul de praf. Dacă utilizaţi
robotul fără filtru în interiorul containerului de praf, motorul acestuia va fi deteriorat.
Curăţarea robotului
Pentru a menţine performanţe de curăţare corespunzătoare, trebuie să curăţaţi din când în când
senzorii de deplasare, roţile, periile laterale şi orificiul de aspirare.
1 Întoarceţi invers robotul pe o suprafaţă plată.
2 Utilizaţi o perie cu peri moi (de ex., o periuţă de dinţi) pentru a elimina praful de pe senzorii de
deplasare. (Fig. 39)
Notă: Este important să curăţaţi în mod regulat senzorii de deplasare. Dacă senzorii de deplasare
sunt murdari, este posibil ca robotul să nu poată detecta diferenţele de nivel sau scările.
3 Utilizaţi o perie cu peri moi (de ex., o periuţă de dinţi) pentru a îndepărta praful sau scamele de pe
roata frontală şi de pe roţile laterale (Fig. 40).
4 Pentru a curăţa periile laterale, prindeţi-le de peri şi trageţi-le de pe axele acestora (Fig. 41).
5 Îndepărtaţi scamele, părul şi firele de pe axe şi de pe periile laterale cu o perie moale (de ex., o
perie de dinţi) sau cu o cârpă (Fig. 42).
6 Verifică periile laterale şi partea inferioară a robotului pentru a te asigura că nu prezintă obiecte
ascuţite care ar putea deteriora podea.
7 După demontarea periilor laterale de pe axele acestora, desfaceţi conexiunile clemelor capului de
aspirare TriActive XL prin introducerea degetelor în zonele marcate cu săgeţi şi tragerea capului de
aspirare TriActive de pe robot (Fig. 43).
8 Curăţaţi orificiul de aspirare cu o perie moale (de ex., perie de dinţi) (Fig. 44).
9 Curăţaţi tot praful vizibil de pe capul de aspirare TriActive (Fig. 45).
10 Introduceţi cârligele de prindere ale capului de aspirare TriActive în orificiile din partea inferioară a
robotului (Fig. 46). Apăsaţi capul de aspirare TriActive înapoi în poziţia sa. Verificaţi dacă, capul de
aspirare se poate deplasa liber câţiva milimetri în sus şi în jos.
99
Înlocuirea
Comandarea accesoriilor
Pentru a cumpăra accesorii sau piese de schimb, vizitaţi www.shop.philips.com/service sau
contactaţi distribuitorul dvs. Philips local. Puteţi, de asemenea, contacta Centrul de asistenţă pentru
clienţi Philips din ţara dvs. (veţi găsi datele de contact în broşura de garanţie internaţională).
Înlocuirea filtrului
Înlocuiţi filtrul dacă acesta este foarte murdar sau deteriorat. Poţi comanda un nou filtru cu numărul
de comandă FC8012. Consultaţi „Golirea şi curăţarea containerului de praf” în capitolul „Curăţare şi
întreţinere” pentru instrucţiuni referitoare la modul de demontare a filtrului din containerul de praf şi
modul de montare a acestuia în containerul de praf.
Page 100

100
Română
Înlocuirea periilor laterale
Înlocuiţi periile laterale după un timp, pentru a asigura rezultate de curăţare corespunzătoare.
Notă: Înlocuiţi întotdeauna periile laterale când observaţi semne de uzură sau deteriorare. Este
recomandat, de asemenea, să înlocuiţi ambele perii laterale în acelaşi moment. Puteţi să comandaţi
perii laterale ca set cu numărul de comandă FC8013.
1 Pentru a înlocui periile laterale, prindeţi periile laterale vechi de peri şi trageţi-le de pe axe (Fig. 41).
2 Împingeţi noile perii laterale pe axe (Fig. 10).
Înlocuirea bateriei reîncărcabile
Bateria reîncărcabilă a robotului poate fi înlocuită doar de ingineri de service calificați. Duceți robotul
la un centru de service autorizat Philips pentru a înlocui bateria, atunci când nu mai este posibilă
încărcarea acesteia sau când se descarcă rapid. Puteți găsi detaliile de contact pentru Centrul de
asistență pentru clienți Philips din țara dvs. în broșura de garanție internațională sau accesați adresa
www.philips.com/support.
Înlocuirea bateriei telecomenzii
Telecomanda funcţionează cu o baterie în formă de monedă de tip CR2025. Înlocuiţi materia atunci
când robotul nu mai reacționează când apăsaţi butoanele de pe telecomandă.
1 Ţineţi telecomanda întoarsă invers. Apăsaţi butonul de eliberare al capacului bateriei şi în acelaşi
timp glisaţi capacul bateriei de pe telecomandă (Fig. 47).
2 Îndepărtai bateria descărcată din capacul bateriei şi introduceţi o nouă baterie în capacul bateriei.
Apoi glisaţi capacul bateriei înapoi în telecomandă (Fig. 48).
Depozitare
Când nu utilizaţi robotul timp de o lună sau mai mult, ţineţi apăsat butonul pornire/oprire de pe robot
timp de 3 secunde pentru a introduce robotul în modul de inactivitate profundă şi pentru a proteja
bateria reîncărcabilă. Deconectaţi staţia de andocare de la priză pentru a economisi energie.
Îndepărtarea bateriei reîncărcabile
Avertisment: Scoateţi bateria reîncărcabilă când aruncaţi aparatul. Asiguraţi-vă că
bateria este complet epuizată înainte de a o scoate.
Pentru a scoate bateria reîncărcabilă, urmaţi instrucţiunile de mai jos. De asemenea, puteţi duce
robotul la un centru de service Philips pentru a scoate bateria reîncărcabilă. Contactaţi Centrul Philips
de asistenţă pentru clienţi din ţara dvs. pentru a afla adresa unui centru de service din apropierea dvs.
1 Porniţi robotul dintr-o poziţie oarecare din cameră şi nu de la staţia de andocare.
2 Lasă robotul să funcţioneze până când bateria reîncărcabilă se descarcă, pentru a te asigura că
este complet descărcată înainte de a o scoate şi de a o casa.
3 Desfaceţi şuruburile capacului compartimentului bateriei şi demontaţi capacul (Fig. 49).
4 Ridicaţi bateria reîncărcabilă şi deconectaţi-o (Fig. 50).
5 Duceţi robotul şi bateria reîncărcabilă la un punct de colectare pentru deşeuri electrice şi
electronice.
 Loading...