

Page 1

FC8972, FC8776, FC8774, FC8772
Page 2

Page 3
1
2
3
4
5
6
7
8
9 10 11
13
14
15
16
19
20
21
22
2324
18
12
17
1
Page 4

Page 5

English 6
Čeština 17
Latviešu 28
Magyar 39
Polski 50
Română 62
Slovenščina 73
Slovensky 84
Русский 95
Українська 107
Қазақша 118
Page 6

6
English
Introduction
Congratulations on your purchase and welcome to Philips! To fully benefit from the support that
Philips offers, register your product at www.philips.com/welcome.
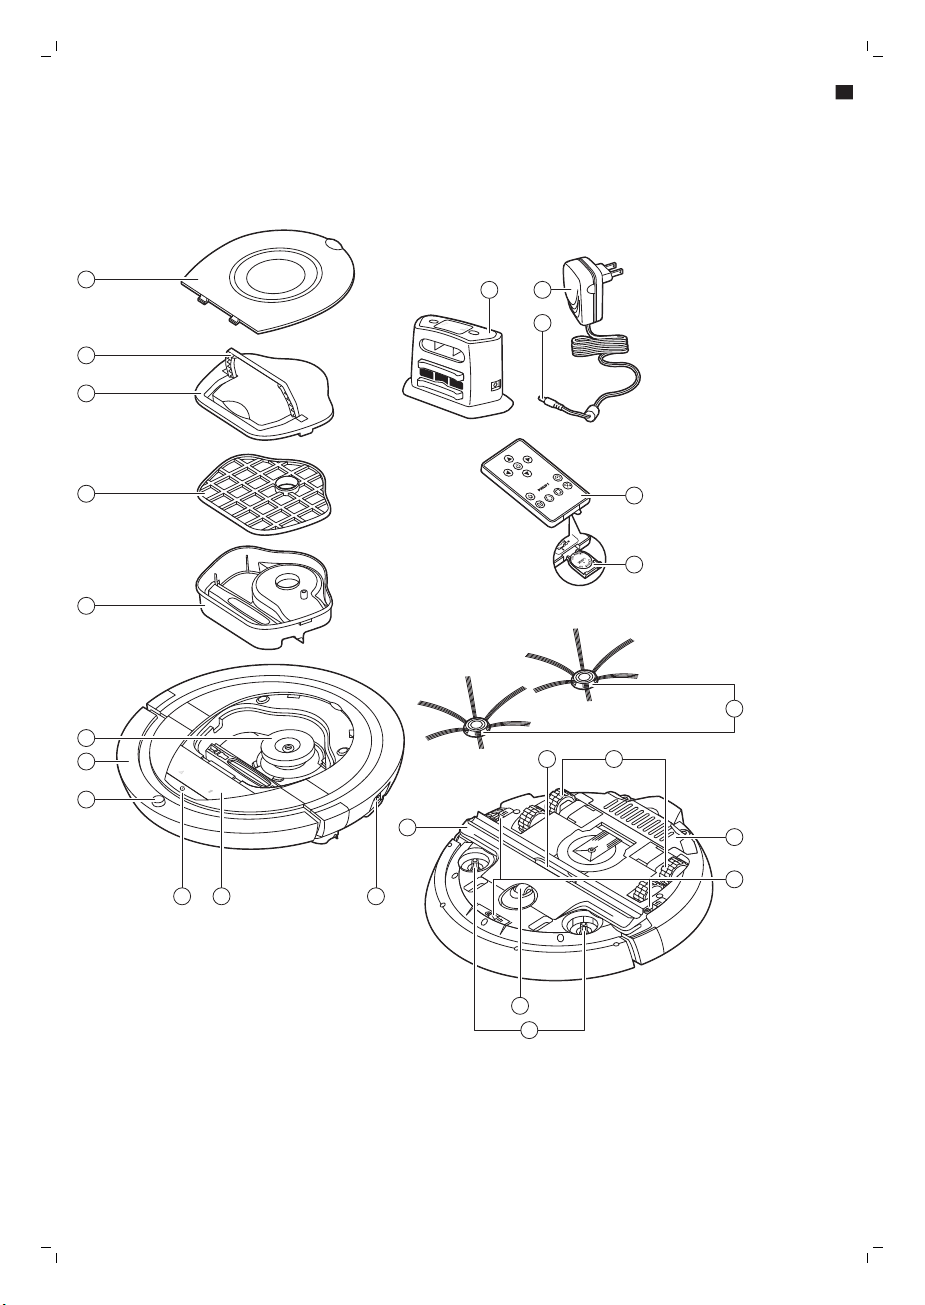
General description
1 Top cover
2 Handle of dust container lid
3 Dust container lid
4 Filter
5 Dust container
6 Fan
7 Bumper
8 Docking station sensor
9 Start/stop button (to start or stop the robot)
10 Display
11 Power switch (to switch the robot on or off)
12 TriActive XL nozzle
13 Front wheel
14 Side brush shafts
15 Drop-off sensors
16 Battery compartment
17 Wheels
18 Suction opening
19 Side brushes
20 Battery holder
21 Remote control
22 Small plug
23 Adapter
24 Docking station
Display and remote control
Display (Fig. 2):
1 Warning indicator
2 Dust container full indicator
Remote control:
1 Navigation buttons and start/stop
2 Docking button
3 Cleaning time button
4 Cleaning mode buttons
How your robot works
What your robot cleans
This robot is equipped with features that make it a suitable cleaner to help you clean the floors in your
home.
The robot is especially suitable for cleaning hard floors, such as wooden, tiled or linoleum floors. It
may experience problems cleaning soft floors, such as carpet or rugs. If you use the robot on a carpet
English
Page 7

English
or rug, please stay close by the first time to see if the robot can deal with this type of floor. The robot
also needs supervision when you use it on very dark or shiny hard floors.
How your robot cleans
Cleaning system
The robot has a 2-stage cleaning system to clean your floors efficiently.
-
The two side brushes help the robot clean in corners and along walls. They also help to remove dirt
from the floor and move it towards the suction opening (Fig. 3).
-
The suction power of the robot picks up loose dirt and transports it through the suction opening
into the dust container (Fig. 4).
Cleaning patterns
In its auto cleaning mode, the robot uses an automatic sequence of cleaning patterns to clean each
area of the room optimally. The cleaning patterns it uses are:
1 Z-pattern or zigzag pattern (Fig. 5)
2 Random pattern (Fig. 6)
3 Wall-following pattern (Fig. 7)
4 Spot-cleaning pattern (Fig. 8)
In its auto cleaning mode, the robot uses these patterns in a fixed sequence:z-pattern, random
pattern, wall-following pattern, and spot-cleaning pattern.
When the robot has completed this sequence of patterns, it starts moving in Z-pattern again. The
robot continues to use this sequence of patterns to clean the room until the rechargeable battery runs
low, or until it is switched off manually.
Note: You can also select each mode individually by pressing the appropriate button on the remote
control. For more details, see chapter 'Using your robot', section 'Cleaning modes'.
7
How your robot avoids height differences
The robot has three drop-off sensors in its bottom. It uses these drop-off sensors to detect and avoid
height differences such as staircases.
Note: It is normal for the robot to move slightly over the edge of a height difference, as its front dropoff sensor is located behind the bumper.
Caution: In some cases, the drop-off sensors may not detect a staircase or other height difference
in time. Therefore monitor the robot carefully the first few times you use it, and when you operate
it near a staircase or another height difference. It is important that you clean the drop-off sensors
regularly to ensure the robot continues to detect height differences properly (see chapter '
Cleaning and maintenance' for instructions).
Before first use
Mounting the side brushes
1 Unpack the side brushes and place the robot upside down on a table or on the floor.
2 Push the side brushes onto the shafts on the bottom of the robot (Fig. 9).
Note: Make sure you attach the side brushes properly. Press them onto the shaft until you hear
them lock into position with a click.
Page 8

8
English
Removing the protection tag from the remote control
The remote control works on a CR2025 coin-shaped battery. This battery is protected with a
protection tag that has to be removed before use.
1 Pull the battery protection tag out of the battery compartment of the remote control (Fig. 10).
Now the remote control is ready for use.
Preparing for use
Installing the docking station
1 Insert the small plug of the adapter into the socket on the docking station (1) and insert the adapter
into the wall socket (2) (Fig. 11).
2 Place the docking station on a horizontal, level floor against a wall.
Note: Make sure that there are no obstacles or height differences 80 cm in front, 30 cm to the right
and 100 cm to the left of the docking station (Fig. 12).
Important note: deep sleep mode
How to reset the robot when it is in deep sleep mode (robot does not respond):
-
Set the power switch to 'on' position (Fig. 13).
-
Charge the robot. After a few seconds the robot will respond again.
Note: The robot will enter deep sleep mode every time you set the power switch to 'off' position and
when the battery is empty. The battery may, for instance, run empty if the robot is unable to find its
docking station.
Charging
When charging for the first time and when the rechargeable battery of the robot is empty, the charging
time is four hours.
Your robot can be charged in two ways:
-
On the docking station, either manually or automatically during use;
-
By connecting the robot directly to the mains.
Note: When the rechargeable battery is fully charged, your robot can clean for up to 100 minutes.
Charging on the docking station
1 Set the power switch to 'on' position (Fig. 13).
2 Place the robot on the plugged-in docking station (Fig. 14).
3 The start/stop button starts flashing slowly (Fig. 15).
4 When the rechargeable battery is fully charged, the start/stop button lights up continuously (Fig.
16).
Charging automatically during use
1 When the robot has finished cleaning or when only 15% of the battery power remains, it
automatically searches for the docking station to recharge. When the robot searches for the
docking station, the start/stop button flashes quickly (Fig. 17).
2 When the rechargeable battery is fully charged, the start/stop button lights up continuously.
Page 9

English
Note: The robot only searches for the docking station automatically when it started cleaning from the
docking station.
Charging directly from the mains
1 Press the power switch to switch on the robot.
2 Insert the small plug of the adapter into the socket on the robot (1). Insert the adapter into a wall
socket (2) (Fig. 18).
3 When the robot is connected to the mains correctly, the start/stop button starts flashing very
slowly. This indicates that the robot is charging.
4 When the rechargeable battery is fully charged, the start/stop button lights up continuously.
Preparing the room for a cleaning run
Before you start the robot on its cleaning run, make sure that you remove all loose and fragile objects
from the floor (Fig. 19).
Also remove all cables, wires and cords from the floor.
Using your robot
Starting and stopping
1 Press the start/stop button.
-
You can press the start/stop button on the robot (Fig. 20).
-
You can also press the start/stop button on the remote control (Fig. 21).
2 The start/stop button is continuously on and the robot starts cleaning (Fig. 22).
3 The robot cleans in the auto-cleaning mode until its battery runs low. In the auto-cleaning mode, it
follows repeated sequences of Z-pattern, random, wall-following and spot-cleaning patterns (Fig.
23).
Note: To select an individual mode, press one of the mode buttons on the remote control. See
section 'Cleaning mode selection' for more details.
4 When the battery runs low, the start/stop button starts flashing and the robot searches for the
docking station to recharge (Fig. 17).
5 You can also press the start/stop button to interrupt or stop the cleaning run. If you press the
start/stop button again and there is still enough energy in the rechargeable battery, the robot
continues cleaning in the auto-cleaning mode.
6 To make the robot return to the docking station before the rechargeable battery runs low, press the
docking button on the remote control (Fig. 24).
The start/stop button starts flashing and the robot searches for the docking station (Fig. 25).
Note: If you did not start the robot from the docking station, it does not search for the docking
station automatically when the rechargeable battery runs low. If there is still enough energy in the
rechargeable battery, you can press the docking button on the remote control to make the robot
return to the docking station. If the rechargeable battery is completely empty, you have to place
the robot on the docking station manually.
9
Operating the docking station
The docking station has two controls that can be used to operate the robot.
Page 10
10
English
Battery full and go button
If you press the battery full and go button on the docking station while the robot is charging, the robot
starts cleaning as soon as the rechargeable battery is full (Fig. 26).
24h button
If you press the 24h button on the docking station, the docking station starts to count down the 24
hours until the next cleaning run. When the countdown is finished, the robot starts cleaning until its
battery runs low and then returns to the docking station automatically to recharge (Fig. 27).
Cleaning mode selection
Next to the auto-cleaning mode, this robot has four individual cleaning modes that can each be
activated by pressing the appropriate button on the remote control.
Z-pattern mode
In Z-pattern mode, the robot cleans by making Z-shaped loops through the room to clean large areas
(Fig. 28).
Random mode
In this mode, the robot cleans the room in a mixed pattern of straight and crisscross movements (Fig.
29).
Wall-following mode
In this mode, the robot follows the walls of the room to give the area alongside the walls an extra
clean (Fig. 30).
Spot-cleaning mode
In this mode, the robot moves randomly on a small area to clean this area thoroughly (Fig. 31).
Note: The manually selected modes are only active for a couple of minutes. After that, the robot
switches to auto-cleaning mode.
Manual driving
1 Use the arrow buttons above and below and to the left and right of the start/stop button on the
remote control to navigate the robot through the room. (Fig. 32)
Note: Be careful when you drive the robot manually close to height differences and staircases.
Note: The vacuuming function and the side brushes only work when the robot is driven forward.
The left, right or back buttons are only for maneuvering the robot.
Using the cleaning time button
Press the cleaning time button on the remote control to make the robot clean for 35 minutes. When
the cleaning time is finished, the robot returns to the docking station to recharge (Fig. 33).
Using the power switch
Setting the power to 'off' position places the robot in deep sleep mode. In this mode, the robot does
not respond anymore.
-
If you want to charge the robot, you need to press the power switch to 'on'.
-
If the robot goes into deep sleep mode during use, you can reactivate it by setting the power
switch to 'on' and by charging the robot. After a few seconds the robot will respond again
Page 11

English
-
When you are not going to use the robot for a month or more, press the power switch to 'off' and
unplug the docking station or the adapter to protect the rechargeable battery and to save energy.
Signals and their meaning
The robot has a display with two indicators: a warning indicator and the dust container full indicator.
The start/stop button gives light signals. The table below explains the meaning of the signals.
Signal
The start/stop button is on continuously. The robot is ready to clean.
The start/stop button flashes slowly. The robot is charging.
The start/stop button flashes quickly. The robot is is searching for the docking station.
The dust container full indicator lights up. The dust container is full.
The warning indicator lights up. The robot was lifted while it was cleaning.
Meaning
The rechargeable battery of the robot is low.
The bumper of the robot is stuck.
A wheel or side brush is stuck.
The top cover is not present or is not closed
properly.
The robot cannot find the docking station.
11
Clap response
The clap response is enabled when the robot enters sleep mode in the following situations:
-
when it stops cleaning due to an error
-
when it cannot find its docking station in 20 minutes
If you do not see the robot, you can locate it by clapping your hands once. The robot will respond by
beeping and by lighting up all icons on its display.
Cleaning and maintenance
Emptying and cleaning the dust container
Empty and clean the dust container when the dust container full indicator lights up continuously.
1 Remove the cover (Fig. 34).
2 Pull up the handle of the dust container lid and lift the dust container out of the dust container
compartment (Fig. 35).
Note: When you remove or reinsert the dust container, take care not to damage the blades of the
motor fan.
3 Carefully lift the lid off the dust container (1) and take out the filter (2) (Fig. 36).
4 Shake the dust container over a dustbin to empty it. Clean the filter and the inside of the dust
container with a cloth or a toothbrush with soft bristles. Also clean the suction opening in the
bottom of the dust container (Fig. 37).
Page 12

12
English
Caution: Do not clean the dust container and the filter with water or in the dishwasher.
5 Put the filter back into the dust container (1). Then place the lid on the dust container(2) (Fig. 38).
6 Put the dust container back into the dust container compartment and put the top cover back on
the robot (Fig. 39).
Caution: Always make sure the filter is present inside the dust container. If you use the robot
without the filter inside the dust container, the motor will be damaged.
Cleaning the robot
To maintain good cleaning performance, you have to clean the drop-off sensors, the wheels, the side
brushes and the suction opening from time to time.
1 Place the robot upside down on a flat surface.
2 Use a brush with soft bristles (e.g. a toothbrush) to remove dust or fluff from the drop-off sensors.
(Fig. 40)
Note: It is important that you clean the drop-off sensors regularly. If the drop-off sensors are dirty,
the robot may fail to detect height differences or staircases.
3 Use a brush with soft bristles (e.g. a toothbrush) to remove dust or fluff from the front wheel and
side wheels (Fig. 41).
4 To clean the side brushes, grab them by the bristles and pull them off their shafts (Fig. 42).
5 Remove fluff, hairs and threads from the shaft and from the side brush with a soft brush (e.g. a
toothbrush) or a cloth (Fig. 43).
6 Check the side brushes and the bottom of the robot for any sharp objects that could damage your
floor.
7 After you have removed the side brushes from their shafts, undo the snap connections of the
TriActive XL nozzle by inserting your fingers at the places marked with arrows and pull the TriActive
nozzle off the robot (Fig. 44).
8 Clean the suction opening with a soft brush (e.g. a toothbrush) (Fig. 45).
9 Remove all visible dirt from the TriActive nozzle (Fig. 46).
10 Insert the snap hooks of the TriActive nozzle into the holes in the bottom of the robot (Fig. 47).
Push the TriActive nozzle back into position. Check if the nozzle can move a few millimeters up and
down freely.
Replacement
Ordering accessories
To buy accessories or spare parts, visit www.shop.philips.com/service or go to your Philips dealer.
You can also contact the Philips Consumer Care Centre in your country (see the international warranty
leaflet for contact details).
Replacing the filter
Replace the filter if it is very dirty or damaged. You can order a new filter under order number FC8012.
See 'Emptying and cleaning the dust container' in chapter 'Cleaning and maintenance' for instructions
on how to remove the filter from the dust container and how to place it in the dust container.
Replacing the side brushes
Replace the side brushes after some time to ensure proper cleaning results.
Page 13
English
Note: Always replace the side brushes when you notice signs of wear or damage. We also recommend
that you replace both side brushes at the same time. You can order spare side brushes as a set under
order number FC8013.
1 To replace the side brushes, grab the old side brushes by the bristles and pull them off their shafts
(Fig. 42).
2 Push the new side brushes onto the shafts (Fig. 9).
13
Replacing the rechargeable battery
The rechargeable battery may only be replaced by qualified service engineers. Take the robot to an
authorized Philips service center to have the battery replaced when you can no longer recharge it or
when it runs out of power quickly. You can find the contact details of the Philips Consumer Care
Center in your country in the worldwide guarantee leaflet.
Replacing the battery of the remote control
The remote control works on a CR2025 coin-shaped battery. Replace the battery when the robot no
longer responds when you press the buttons on the remote control.
1 Hold the remote control upside down. Push the release button on the battery holder and at the
same time slide the battery holder out of the remote control (Fig. 48).
2 Remove the empty battery from the battery holder and place a new battery in the battery holder.
Then slide the battery holder back into the remote control (Fig. 49).
Removing the rechargeable battery
Warning: Only remove the rechargeable battery when you discard the appliance. Make
sure the battery is completely empty when you remove it.
To remove the rechargeable battery, follow the instructions below. You can also take the robot to a
Philips service center to have the rechargeable battery removed. Contact the Philips Consumer Care
Center in your country for the address of a service center near you.
1 Start the robot from a place somewhere in the room and not from the docking station.
2 Let the robot run until the rechargeable battery is empty to make sure that the rechargeable
battery is completely discharged before you remove it and dispose of it.
3 Undo the screws of the battery compartment lid and remove the lid (Fig. 50).
4 Lift out the rechargeable battery and disconnect it (Fig. 51).
5 Take the robot and the rechargeable battery to a collection point for electrical and electronic
waste.
Troubleshooting
This chapter summarizes the most common problems you could encounter with the appliance. If you
are unable to solve the problem with the information below, visit www.philips.com/support for a list
of frequently asked questions or contact the Consumer Care Center in your country.
Problem
The robot does not start
cleaning when I press the
start/stop button.
Possible cause Solution
The rechargeable battery is
empty.
Charge the rechargeable battery (see
chapter 'Preparing for use').
Page 14

14
English
Problem Possible cause Solution
The small plug is still inserted
in the socket on the robot.
The robot does not work on mains
power. It only works on its rechargeable
battery. Therefore, always disconnect
the adapter from the robot and the
mains before use.
The robot does not
respond when I press
one of the buttons.
The warning indicator
flashes quickly.
The power switch is not set to
'on' (I) position.
You set the on/off switch to
'off'.
The robot could not find the
docking station and the
battery ran out.
One or both wheels are stuck. Set the power switch to 'off'. Remove
One or both side brushes are
stuck.
The top cover is not present or
is not closed properly.
The bumper is stuck. Press the start/stop button. Lift the
Press the power switch to 'on'. Place the
robot on the plugged-in docking station
or plug in the small plug of the adapter.
After a few seconds, the robot beeps
and the display lights up.
Press the power switch to 'on'. Place the
robot on the plugged-in docking station
or plug in the small plug of the adapter.
After a few seconds, the robot beeps
and the display lights up.
Place the robot on the plugged-in
docking station or plug in the small plug
of the adapter. After a few seconds, the
robot beeps and the display lights up.
the fluff, hair, thread or wire that is
caught around the wheel suspension.
Clean the side brushes (see chapter
'Cleaning and maintenance').
When the top cover is not present or is
not closed properly, the robot does not
work. Place the top cover on the robot
properly.
robot so that its bumper comes free.
Place the robot at some distance from
the obstacle and press the start/stop
button to make it resume cleaning.
The robot does not clean
properly.
The robot was lifted while it
was cleaning.
The bristles of one or both side
brushes are crooked or bent.
Press the start/stop button. Place the
robot on the floor. Then press the
start/stop button to make the robot
resume cleaning.
Soak the brush or brushes in warm water
for a while. If this does not restore the
bristles to their proper shape, replace
the side brushes (see chapter
'Replacement').
Page 15
Problem Possible cause Solution
The filter in the dust container
is dirty.
Clean the filter in the dust container with
a cloth or a toothbrush with soft bristles.
You can also clean the filter and dust
container with a regular vacuum cleaner
at a low suction power setting.
If brushing or vacuuming does not help
to clean the filter, replace the filter with
a new one. We advise you to replace the
filter at least once a year.
English
15
The rechargeable battery
can no longer be charged
or runs empty very fast.
The battery of the
remote control runs
empty too fast.
The suction opening in the
bottom of the dust container is
clogged.
The front wheel is jammed
with hair or other dirt.
The robot is cleaning a very
dark or shiny surface, which
triggers the drop-off sensors.
This causes the robot to move
in an unusual pattern.
The robot is cleaning a floor
that reflects sunlight quite
strongly. This triggers the dropoff sensors and causes the
robot to move in an unusual
pattern.
The rechargeable battery has
reached the end of its life.
Perhaps you did not insert the
correct type of battery.
Clean the suction opening (see chapter
'Cleaning and maintenance').
Clean the front wheel (see chapter
'Cleaning and maintenance').
Press the start/stop button and then
move the robot to a lighter colored
piece of the floor. If the problem
continues to occur on lighter colored
floors, please go to
www.philips.com/support or contact the
Consumer Care Center in your country.
Close the curtains to block sunlight from
entering the room. You can also start
cleaning when the sunlight is less bright.
Have the rechargeable battery replaced
by a Philips service center (see chapter
'Replacement').
For the remote control, you need a
CR2025 coin-shaped battery. If the
problem persists, go to
www.philips.com/support or contact the
Consumer Care Center in your country.
The robot is moving in
circles.
The robot is in spot-cleaning
mode.
This is normal behavior. The spotcleaning mode can be activated when a
lot of dirt is detected on the floor for a
thorough clean. It is also part of the auto
cleaning mode. After approximately one
minute the robot resumes its normal
cleaning pattern. You can also stop the
spot-cleaning mode by selecting a
different cleaning mode on the remote
control.
Page 16
16
English
Problem Possible cause Solution
The robot cannot find the
docking station.
There is not enough room for
the robot to navigate towards
the docking station.
Try to find another place for the docking
station. See 'Installing the docking
station' in chapter 'Preparing for use'.
The robot is still actively
searching.
The robot was not started from
the docking station.
Give the robot around 20 minutes to
return to the docking station.
If you want the robot to return to the
docking station after a cleaning run, start
it from the docking station.
Page 17

Čeština
Úvod
Společnost Philips Vám gratuluje ke koupi a vítá Vás! Chcete-li využívat všech výhod podpory
nabízené společností Philips, zaregistrujte svůj výrobek na stránkách www.philips.com/welcome.
Všeobecný popis
1 horní kryt
2 rukojeť víka nádoby na prach
3 víko nádoby na prach
4 filtr
5 nádoba na prach
6 ventilátor
7 nárazník
8 čidlo dokovací stanice
9 tlačítko spuštění/zastavení (pro spuštění a zastavení robota)
10 Displej
11 vypínač (pro zapnutí a vypnutí robota)
12 hubice TriActive XL
13 přední kolečko
14 hřídele postranních kartáčků
15 senzory pádu
16 Přihrádka na baterie
17 kolečka
18 sací otvor
19 postranní kartáčky
20 držák baterie
21 dálkový ovladač
22 Malá zástrčka
23 Adaptér
24 dokovací stanice
17
Displej a dálkový ovladač
Displej (obr. 2):
1 indikátor varování
2 indikátor naplnění nádoby na prach
Dálkový ovladač:
1 navigační tlačítka a spuštění/zastavení
2 tlačítko dokování
3 tlačítko doby čištění
4 tlačítka režimu čištění
Jak robot funguje
Co robot uklízí
Tento robot je vybaven funkcemi, které umožňují, aby se stal vaším praktickým pomocníkem při úklidu
podlah.
Robot je vhodný především pro čištění tvrdých podlah ze dřeva, dlaždic, linolea apod. Čištění
měkkých podlah, např. koberců, mu může činit potíže. Pokud robota používáte k čištění koberce,
Čeština
Page 18

18
Čeština
zůstaňte při prvním použití poblíž, abyste viděli, zda si dokáže s tímto typem podlahy poradit. Na
robota je také třeba dohlížet při používání na velmi tmavých nebo lesklých tvrdých podlahách.
Jak robot uklízí
Systém čištění
Robot je vybaven dvoufázovým systémem čištění, který zajišťuje efektivní úklid podlah.
-
Dva postranní kartáčky pomáhají robotovi při čištění proniknout do rohů a oblastí podél zdí. Také
pomáhají sbírat špínu ze země a posouvat ji směrem k sacímu otvoru (obr. 3).
-
Volnou špínu robot sebere díky dostatečně výkonnému sání a skrze sací otvor ji uloží do nádoby
na prach (obr. 4).
Schémata čištění
V režimu automatického čištění používá robot automatické pořadí úklidových schémat pro optimální
čištění jednotlivých oblastí místnosti. Používaná úklidová schémata jsou:
1 schéma (obr. 5) Z, nebo cik- cak
2 náhodné schéma (obr. 6)
3 schéma (obr. 7) pohybu podél zdi
4 schéma (obr. 8) bodového čištění
V režimu automatického čištění robot používá tato schémata v pevném pořadí: schéma Z, náhodné
schéma, schéma pohybu podél zdi a schéma bodového čištění.
Když robot dokončí toto pořadí schémat, začne se znovu pohybovat podle schématu Z. Robot bude
pokračovat v čištění místnosti pomocí tohoto pořadí schémat, dokud se jeho baterie skoro nevybije
nebo dokud ho ručně nevypnete.
Poznámka: Jednotlivé režimy můžete také vybrat ručně stisknutím příslušného tlačítka na dálkovém
ovladači. Podrobnosti najdete v kapitole „Používání robota“ v části „Režimy čištění“.
Jak se robot vyhýbá výškovým rozdílům
Ve spodní části je robot vybaven třemi senzory pádu. Tyto senzory pádu slouží k tomu, aby robot
rozpoznal výškové rozdíly, například schody.
Poznámka: Pokud se robot dostane mírně nad hranu stupně s výškovým rozdílem, je to normální,
protože senzory pádu jsou umístěny až za nárazníkem.
Upozornění: V některých případech senzory pádu nemusí schodiště nebo jiný výškový rozdíl
rozpoznat včas. Proto robota při několika prvních použitích a při provozu v blízkosti schodiště nebo
jiného výškového rozdílu bedlivě sledujte. Senzory pádu je důležité pravidelně čistit, aby si robot
zachoval schopnost správně rozpoznat výškové rozdíly (instrukce naleznete v kapitole „Čištění a
údržba“).
Před prvním použitím
Montáž postranních kartáčků
1 Vybalte postranní kartáčky a položte robota vzhůru nohama na stůl nebo na podlahu.
2 Nasaďte postranní kartáčky na hřídele ve spodní části robota (obr. 9).
Poznámka: Ujistěte se, že postranní kartáčky jste upevnili správně. Nasaďte je na hřídel, až uslyšíte,
že s kliknutím zapadly na své místo.
Page 19

Čeština
Odebrání ochranného štítku z dálkového ovladače
Dálkový ovladač je napájen knoflíkovou baterií CR2025. Baterie je opatřena ochranným štítkem, který
je nutné před prvním použitím vyjmout.
1 Vytáhněte ochranný štítek z prostoru pro baterii dálkového ovladače (obr. 10).
Dálkový ovladač je připraven k použití.
Příprava k použití
Instalace dokovací stanice
1 Zapojte malou zástrčku adaptéru do zásuvky na dokovací stanici (1) a adaptér zapojte do zásuvky
ve zdi (2) (obr. 11).
2 Umístěte dokovací stanici na vodorovný povrch ke zdi.
Poznámka: Zkontrolujte, že ve vzdálenosti 80 cm vpředu, 30 cm napravo a 100 cm nalevo od
dokovací stanice (obr. 12) nejsou žádné překážky.
Důležitá poznámka: režim hlubokého spánku
Postup resetování robota v režimu hlubokého spánku (robot nereaguje):
-
Přepněte vypínač do polohy „zapnuto (obr. 13)“.
-
Nabijte robota. Robot začne znovu reagovat během několika sekund.
Poznámka: Robot přejde do režimu hlubokého spánku vždy, když přepnete vypínač do polohy
„vypnuto“ nebo v případě vybití akumulátoru. K vybití akumulátoru může například dojít, když robot
nemůže najít svoji dokovací stanici.
19
Nabíjení
První nabíjení robota, stejně jako nabíjení zcela vybité baterie, trvá čtyři hodiny.
Robota lze nabíjet dvěma způsoby:
-
v dokovací stanici buď ručně nebo automaticky při používání;
-
připojením robota přímo do zásuvky.
Poznámka: Na plně nabitou baterii může robot uklízet až 100 minut.
Nabíjení v dokovací stanici
1 Přepněte vypínač do polohy „zapnuto (obr. 13)“.
2 Vložte robota do dokovací stanice (obr. 14) připojené k elektrické zásuvce.
3 Tlačítko spuštění/zastavení začne pomalu blikat (obr. 15).
4 Když je akumulátor plně nabit, tlačítko spuštění/zastavení nepřetržitě svítí (obr. 16).
Automatické nabíjení při používání
1 Když robot dokončí čištění nebo když nabití baterie klesne pod 15 %, robot automaticky vyhledá
dokovací stanici, aby dobil baterii. Když robot hledá dokovací stanici, tlačítko spuštění/zastavení
rychle bliká (obr. 17).
2 Když je akumulátor plně nabit, tlačítko spuštění zastavení nepřetržitě svítí.
Poznámka: Robot dokovací stanici vyhledá pouze v případě, že čištění zahájil z ní.
Page 20

20
Čeština
Nabíjení přímo ze zásuvky
1 Zapněte robota stisknutím vypínače.
2 Zapojte malou zástrčku adaptéru do zdířky na robotovi (1). Adaptér zapojte do zásuvky ve zdi (2)
(obr. 18).
3 Pokud je robot správně připojen k elektrické zásuvce, tlačítko spuštění/zastavení bude velmi
pomalu blikat na znamení toho, že robot se nabíjí.
4 Když je akumulátor plně nabit, tlačítko spuštění zastavení nepřetržitě svítí.
Příprava místnosti na úklid
Než pošlete robota uklízet, seberte z podlahy všechny volné a křehké předměty (obr. 19).
Také ze země odstraňte veškeré kabely a dráty.
Používání robota
Spuštění a zastavení
1 Stiskněte tlačítko spuštění/zastavení.
-
Můžete stisknout tlačítko spuštění/zastavení na robotovi (obr. 20).
-
Také lze stisknout tlačítko spuštění/zastavení na dálkovém ovladači (obr. 21).
2 Tlačítko spuštění/zastavení bude nepřetržitě svítit a robot začne uklízet (obr. 22).
3 Robot bude uklízet v režimu automatického čištění, dokud se baterie skoro nevybije. V režimu
automatického čištění robot opakuje předem dané pořadí schémat pohybu Z, náhodného čištění,
pohybu podél stěn a bodového čištění (obr. 23).
Poznámka: Chcete-li vybrat jeden režim, stiskněte příslušné tlačítko režimu čištění na dálkovém
ovladači. Další podrobnosti najdete v části „Výběr čisticího režimu“.
4 Když nabití baterie klesne, tlačítko spuštění/zastavení začne blikat a robot vyhledá dokovací
stanici, aby se nabil (obr. 17).
5 Stisknutím tlačítka spuštění/zastavení lze také čištění přerušit nebo zastavit. Když tlačítko
spuštění/zastavení stisknete znovu a baterie je dostatečně nabitá, robot bude pokračovat v režimu
automatického čištění.
6 Když budete chtít, aby se robot vrátil do dokovací stanice dříve, než bude baterie skoro vybitá,
stiskněte dokovací tlačítko na dálkovém ovladači (obr. 24).
Tlačítko spuštění/zastavení začne blikat a robot vyhledá dokovací stanici (obr. 25).
Poznámka: Pokud jste robota nespustili z dokovací stanice, při vybití baterie robot stanici
automaticky nevyhledá. Pokud je v baterii ještě dostatek energie, můžete stisknout dokovací
tlačítko na dálkovém ovladači, aby se robot vrátil do dokovací stanice. Pokud je baterie zcela
vybitá, musíte robota do dokovací stanice umístit ručně.
Ovládání dokovací stanice
Dokovací stanice má dva ovládací prvky, kterými lze robota ovládat.
Tlačítko plného nabití a spuštění
Pokud během nabíjení robota stisknete na dokovací stanici tlačítko plného nabití a spuštění, začne
robot po úplném nabití (obr. 26) baterie uklízet.
Page 21
Čeština
Tlačítko 24h
Pokud stisknete tlačítko 24h na dokovací stanici, spustí dokovací stanice odpočet 24 hodin do příštího
čištění. Po skončení odpočítávání robot začne čistit, dokud se jeho baterie skoro nevybije, a poté se
automaticky vrátí do dokovací stanice, aby se nabil (obr. 27).
Výběr čisticího režimu
Výběr čisticího režimu
Robot má kromě režimu automatického čištění další čtyři režimy čištění, které můžete vybrat
stisknutím příslušného tlačítka na dálkovém ovladači.
Schéma Z
Při čištění podle schématu Z čistí robot velké plochy (obr. 28) v místnosti pohybem ve smyčkách tvaru
písmene Z.
Náhodný režim
V tomto režimu se robot při čištění místnosti pohybuje střídavě rovnými a křížovými pohyby (obr. 29).
Režim pohybu podél stěn
V tomto režimu se robot pohybuje podél stěn místnosti, aby oblasti podél stěn vyčistil pečlivěji (obr.
30).
Režim bodového čištění
V tomto režimu se robot pohybuje náhodně na malé oblasti, aby ji důkladně vyčistil (obr. 31).
Poznámka: Ručně vybrané režimy jsou aktivní pouze po několik minut. Poté se robot přepne do
režimu automatického čištění.
21
Ruční ovládání
1 Pohyb robota po místnosti (obr. 32) můžete ovládat tlačítky šipek kolem tlačítka spuštění/zastavení
na dálkovém ovladači.
Poznámka: Když robota ovládáte ručně, dávejte pozor na výškové rozdíly a schody.
Poznámka: Funkce vysávání a postranní kartáčky fungují, pouze když robot jede dopředu. Tlačítka
doleva, doprava a dozadu slouží pouze k manévrování s robotem.
Používání tlačítka doby čištění
Stisknutím tlačítka doby čištění na dálkovém ovladači přikážete robotovi uklízet po dobu 35 minut. Po
uplynutí doby čištění se robot vrátí do dokovací stanice, aby se nabil (obr. 33).
Používání vypínače
Přepnutím vypínače do polohy „vypnuto“ uvedete robota do režimu hlubokého spánku. V tomto
režimu robot nebude reagovat.
-
Chcete-li robota nabít, bude nutné přepnout vypínač do polohy „zapnuto“.
-
Pokud robot při činnosti přejde do režimu hlubokého spánku, můžete ho znovu aktivovat tak, že
přepnete vypínač do polohy „zapnuto“ a nabijete ho. Robot začne znovu reagovat během několika
sekund.
Page 22

22
Čeština
-
Pokud nebudete robota používat po dobu delší než jeden měsíc, přepněte vypínač do polohy
„vypnuto“ a odpojte dokovací stanici či adaptér, abyste chránili akumulátor a šetřili elektrickým
proudem.
Signalizace a její význam
Robot je vybaven displejem se dvěma indikátory: indikátor varování a indikátor naplnění nádoby na
prach. Tlačítko spuštění/zastavení je vybaveno světelnou signalizací. Níže uvedená tabulka vysvětluje
význam signalizace.
Signalizace
Tlačítko spuštění/zastavení nepřetržitě svítí. Robot je připraven k čištění.
Tlačítko spuštění/zastavení pomalu bliká. Robot se nabíjí.
Tlačítko spuštění/zastavení rychle bliká. Robot hledá dokovací stanici.
Indikátor naplnění nádoby na prach svítí. Nádoba na prach je plná.
Indikátor varování svítí. Robot byl během čištění zvednut.
Význam
Baterie robota je skoro vybitá.
Robotovi se zasekl nárazník.
Zaseklo se kolečko nebo postranní kartáček.
Horní kryt chybí nebo není správně zavřený.
Robot nemůže najít dokovací stanici.
Reakce na tlesknutí
Reakce na tlesknutí, když se robot nachází v režimu spánku, je aktivní v následujících situacích:
-
čištění bylo zastaveno z důvodu chyby,
-
naprogramovali jste příliš krátký čas čištění,
-
robot nedokázal během 20 minut najít dokovací stanici.
Pokud robota nevidíte, můžete ho najít jedním tlesknutím. Robot zareaguje vydáním zvukového
signálu a rozsvícením všech ikon na displeji.
Čištění a údržba
Vyprazdňování a čištění nádoby na prach
Pokud indikátor naplnění nádoby na prach nepřetržitě svítí, vysypte a vyčistěte nádobu na prach.
1 Sejměte kryt (obr. 34).
2 Zatáhněte za rukojeť víka nádoby na prach a vyndejte nádobu z prostoru pro nádobu na prach
(obr. 35).
Poznámka: Když nádobu na prach vyjímáte nebo vracíte na místo, dejte pozor, abyste nepoškodili
lopatky ventilátoru.
3 Opatrně zvedněte víko nádoby na prach (1) a vyjměte filtr (2) (obr. 36).
Page 23
Čeština
4 Vyklepejte nádobou na prach nad odpadkovým košem. Vyčistěte filtr a vnitřek nádoby na prach
hadříkem nebo kartáčkem s měkkými štětinami. Také vyčistěte sací otvor v dolní části nádoby na
prach (obr. 37).
Upozornění: Nádobu na prach ani filtr nemyjte vodou ani v myčce na nádobí.
5 Vložte filtr zpět do nádoby na prach (1). Poté nádobu na prach (2) (obr. 38) přikryjte víkem.
6 Vraťte nádobu na prach zpět do jejího prostoru a vraťte horní kryt robota na místo (obr. 39).
Upozornění: Vždy se ujistěte, že se v nádobě na prach nachází filtr. Pokud robota budete
používat bez filtru v nádobě na prach, dojde k poškození motoru.
23
Čištění robota
Aby robot mohl stále dobře uklízet, je nutné občas vyčistit senzory pádu, kolečka, postranní kartáčky a
sací otvor.
1 Položte robot vzhůru nohama na rovný povrch.
2 Pomocí kartáčku s měkkými štětinami (např. kartáčku na zuby) odstraňte prach a nečistoty ze
senzorů pádu (obr. 40).
Poznámka: Senzory pádu je důležité čistit pravidelně. Když jsou senzory pádu špinavé, robot
nemusí rozpoznat výškové rozdíly nebo schody.
3 Pomocí kartáčku s měkkými štětinami (např. kartáčku na zuby) odstraňte prach a nečistoty
z předního kolečka a bočních koleček (obr. 41).
4 Postranní kartáčky před čištěním uchopte za štětiny a stáhněte je z hřídelí (obr. 42).
5 Pomocí měkkého kartáčku (např. kartáčku na zuby) nebo hadříku (obr. 43) odstraňte nečistoty,
vlasy a nitě z hřídelí a z postranních kartáčků.kartáčkem (např. zubním kartáčkem) nebo hadříkem
(obr. 43).
6 Zkontrolujte, zda na postranních kartáčcích nebo na spodní straně robota nejsou nějaké ostré
předměty, které by mohly poškodit podlahu.
7 Po stažení postranních kartáčků z hřídelí odpojte připojení hubice TriActive XL vložením prstů na
místa označená šipkami a vytáhněte hubici TriActive z robota ven (obr. 44).
8 Očistěte sací otvor pomocí kartáčku s měkkými štětinami (např. kartáčku na zuby) (obr. 45).
9 Odstraňte veškeré viditelné nečistoty z hubice TriActive (obr. 46).
10 Vložte pojistné háčky hubice TriActive do děr ve spodní části robota (obr. 47). Zatlačte hubici
TriActive zpět na své místo. Ověřte, že se hubice může volně pohybovat o několik milimetrů nahoru
a dolů.
Výměna
Objednávání příslušenství
Chcete-li koupit příslušenství nebo náhradní díly, navštivte adresu www.shop.philips.com/service
nebo se obraťte na prodejce výrobků Philips. Můžete se také obrátit na středisko péče o zákazníky
společnosti Philips ve své zemi (kontaktní údaje naleznete na letáčku s celosvětovou zárukou).
Výměna filtru
Pokud je filtr velmi špinavý nebo poškozený, vyměňte ho. Nový filtr si můžete objednat pod
objednacím číslem FC8012. V části „Vyprazdňování a čištění nádoby na prach“ v kapitole „Čištění
a údržba“ najdete pokyny, jak filtr vyjmout z nádoby na prach a jak ho vložit zpět.
Page 24
24
Čeština
Výměna postranních kartáčků
Po určité době postranní kartáčky vyměňte, abyste zajistili kvalitní výsledky čištění.
Poznámka: Postranní kartáčky měňte vždy, když si všimnete známek opotřebení nebo poškození.
Doporučujeme měnit vždy oba kartáčky najednou. Náhradní postranní kartáčky lze objednat jako
sadu pod objednacím číslem FC8013.
1 Postranní kartáčky, které chcete vyměnit, uchopte za štětiny a stáhněte je z hřídelí (obr. 42).
2 Na hřídele nasaďte nové postranní kartáčky (obr. 9).
Výměna akumulátoru
Výměnu akumulátoru smějí provádět pouze odborně kvalifikovaní pracovníci. Pokud akumulátor nelze
nabít, nebo dochází k jeho příliš rychlému vybíjení, odneste robota do autorizovaného servisního
střediska Philips, kde si ho můžete nechat vyměnit. Podrobnosti o středisku zákaznické péče
společnosti Philips ve své zemi naleznete na letáčku s celosvětovou zárukou.
Výměna baterie dálkového ovladače
Dálkový ovladač je napájen knoflíkovou baterií CR2025. Baterii vyměňte, pokud robot nereaguje na
stisknutí tlačítek dálkového ovladače.
1 Podržte dálkový ovladač vzhůru nohama. Stiskněte uvolňovací tlačítko na držáku baterie a zároveň
z dálkového ovladače (obr. 48) vysuňte držák baterie.
2 Vyjměte vybitou baterii z držáku baterie a vložte do něj novou baterii. Poté držák baterie zasuňte
zpět do dálkového ovladače (obr. 49).
Vyjmutí akumulátoru
Varování: Až budete přístroj likvidovat, vyjměte z něj akumulátor. Před vyjmutím
akumulátoru se ujistěte, že je úplně prázdný.
Při vyjmutí akumulátoru postupujte podle kroků uvedených níže. Můžete také robota odnést do
servisního střediska Philips, kde bude akumulátor vyjmut. Chcete-li získat adresu svého nejbližšího
servisního střediska, obraťte se na Středisko péče o zákazníky Philips ve vaší zemi.
1 Spusťte robota z libovolného místa v pokoji (a nikoliv z dokovací stanice).
2 Nechte robota zapnutého, dokud se akumulátor nevybije, abyste se ujistili, že bude akumulátor
zcela vybitý, než jej vyjmete z přístroje a zlikvidujete.
3 Odmontujte šrouby víka přihrádky na baterie a sejměte víko (obr. 50).
4 Zdvihněte akumulátor a odpojte ho (obr. 51).
5 Odevzdejte robota a akumulátor na sběrném místě pro likvidaci elektroodpadu.
Řešení problémů
V této kapitole jsou shrnuty nejběžnější problémy, se kterými se můžete u zastřihovače setkat. Pokud
se vám nepodaří problém vyřešit podle následujících informací, navštivte web
www.philips.com/support, kde jsou uvedeny odpovědi na nejčastější dotazy, nebo kontaktujte středisko
zákaznické péče ve své zemi.
Page 25
Řešení problémů
Problém
Po stisknutí tlačítka
spuštění/zastavení robot
nezačne uklízet.
Čeština
Možná příčina Řešení
Je vybitá baterie. Nabijte baterii (viz kapitola „Příprava
k použití“).
25
Robot nereaguje na
stisknutí tlačítek.
Indikátor varování rychle
bliká.
Malá zástrčka je stále zapojena
v zásuvce robota.
Vypínač není v poloze
„zapnuto“ (I).
Vypínač byl nastaven do
pozice „vypnuto“.
Robot nenašel dokovací stanici
a akumulátor se vybil.
Zaseklo se jedno nebo obě
kolečka.
Zasekl se jeden nebo oba
postranní kartáčky.
Horní kryt chybí nebo není
správně zavřený.
Robota nelze provozovat pomocí
síťového napájení. Lze ho napájet pouze
z baterie. Proto před použitím vždy
odpojte adaptér od robota a ze síťové
zásuvky.
Přepněte vypínač do polohy „zapnuto“.
Umístěte robota do připojené dokovací
stanice nebo připojte malou zástrčku
adaptéru. Po několika sekundách robot
vydá zvukový signál a displej se rozsvítí.
Přepněte vypínač do polohy „zapnuto“.
Umístěte robota do připojené dokovací
stanice nebo připojte malou zástrčku
adaptéru. Po několika sekundách robot
vydá zvukový signál a displej se rozsvítí.
Umístěte robota do připojené dokovací
stanice nebo připojte malou zástrčku
adaptéru. Po několika sekundách robot
vydá zvukový signál a displej se rozsvítí.
Přepněte vypínač do polohy „vypnuto“.
Odstraňte nečistoty, vlasy a kousky nití
nebo drátů, které se zachytily kolem
závěsu kolečka.
Vyčistěte postranní kartáčky (viz kapitola
„Čištění a údržba“).
Robot nefunguje, když chybí horní kryt
nebo není správně uzavřen. Umístěte
horní kryt na robota správně.
Zasekl se nárazník. Stiskněte tlačítko spuštění/zastavení.
Robot byl během čištění
zvednut.
Zvedněte robota, aby se jeho nárazník
uvolnil. Umístěte robota dále od
překážky a stiskněte tlačítko
spuštění/zastavení, aby v čištění
pokračoval.
Stiskněte tlačítko spuštění/zastavení.
Položte robota na podlahu. Stiskněte
tlačítko spuštění/zastavení, aby robot
pokračoval v čištění.
Page 26
26
Čeština
Problém Možná příčina Řešení
Robot neuklízí řádně. Štětiny jednoho nebo obou
kartáčků jsou zkřivené nebo
ohnuté.
Namočte kartáček nebo kartáčky na
chvíli do teplé vody. Pokud se tímto
štětiny nenarovnají, postranní kartáčky
vyměňte (viz kapitola „Výměna“).
Filtr v nádobě na prach je
znečištěný.
Sací otvor v dolní části nádoby
na prach je ucpaný.
Přední kolečko se zaneslo
vlasy a jinými nečistotami.
Robot uklízí velmi tmavý nebo
lesklý povrch, který aktivuje
senzory pádu. To způsobuje
neobvyklý pohyb robota.
Robot čistí podlahu, která
velmi silně odráží sluneční
světlo. To aktivuje senzory
pádu a způsobuje neobvyklý
pohyb robota.
Vyčistěte filtr nádoby na prach hadříkem
nebo kartáčkem s měkkými štětinami.
Filtr a nádobu na prach můžete vyčistit
rovněž běžným vysavačem nastaveným
na nízký sací výkon.
Pokud čištění kartáčkem nebo
vysavačem nepomůže filtr zbavit
nečistot, vyměňte filtr za nový.
Doporučujeme filtr vyměnit aspoň
jednou ročně.
Vyčistěte sací otvor (viz kapitola Čištění
a údržba).
Vyčistěte přední kolečko (viz kapitola
Čištění a údržba).
Stiskněte tlačítko spuštění/zastavení a
přesuňte robota na světlejší podlahu.
Pokud problém přetrvává i na světlejších
podlahách, navštivte webovou stránku
www.philips.com/support nebo se
obraťte na středisko péče o zákazníky ve
své zemi.
Zatažením závěsů zabraňte slunečnímu
světlu v přístupu do místnosti. Popřípadě
můžete čištění spustit, až bude slunce
méně svítit.
Baterii již není možné
nabít nebo se velmi
rychle vybíjí.
Baterie dálkového
ovladače se příliš rychle
vybíjí.
Životnost akumulátoru
skončila.
Možná jste do ovladače vložili
špatný typ baterie.
Zajistěte výměnu akumulátoru
v servisním středisku Philips (viz kapitola
„Výměna“).
Pro dálkový ovladač potřebujete
knoflíkovou baterii CR2025. Pokud
problém přetrvává, navštivte webovou
stránku www.philips.com/support nebo
se obraťte na středisko péče o zákazníky
ve své zemi.
Page 27

Problém Možná příčina Řešení
Robot se pohybuje
v kruzích.
Robot je v režimu bodového
čištění.
Jedná se o normální chování. Režim
bodového čištění lze aktivovat, když je
na podlaze mnoho špíny, aby bylo
zaručeno důkladné vyčištění. Také je
součástí režimu automatického čištění.
Po přibližně jedné minutě se robot vrátí
do svého normálního úklidového
schématu. Režim bodového čištění
můžete také zastavit výběrem jiného
režimu čištění na dálkovém ovladači.
Čeština
27
Robot nemůže najít
dokovací stanici.
Robot nemá dost místa, aby se
dostal k dokovací stanici.
Robot stále aktivně vyhledává. Dejte robotovi zhruba 20 minut, aby se
Robot nebyl spuštěn
z dokovací stanice.
Zkuste pro dokovací stanici najít jiné
místo. Viz „Instalace dokovací stanice“
v kapitole „Příprava k použití“.
vrátil do dokovací stanice.
Pokud chcete, aby se robot po
dokončení čištění vrátil do dokovací
stanice, spusťte ho z ní.
Page 28

28
Latviešu
Ievads
Apsveicam ar pirkumu un laipni lūdzam Philips! Lai pilnvērtīgi izmantotu Philips piedāvātā atbalsta
iespējas, reģistrējiet produktu vietnē www.philips.com/welcome.
Vispārīgs apraksts
1 Augšējais pārsegs
2 Putekļu tvertnes vāka rokturis
3 Putekļu tvertnes vāks
4 Filtrs
5 Putekļu tvertne
6 Ventilators
7 Buferis
8 Dokstacijas sensors
9 Ieslēgšanas/apturēšanas poga (robota ieslēgšanai vai apturēšanai)
10 Displejs
11 Jaudas slēdzis (robota ieslēgšanai vai izslēgšanai)
12 TriActive XL uzgalis
13 Priekšējais ritenītis
14 Sānu birstu lūkas
15 Nokrišanas sensori
16 Bateriju nodalījums
17 Ritentiņi
18 Sūkšanas atvere
19 Sānu birstes
20 Akumulatora turētājs
21 Tālvadība
22 Mazais spraudnis
23 Adapters
24 Dokstacija
Displejs un tālvadība
Displejs (att. 2):
1 Brīdinājuma indikators
2 Pilnas putekļu tvertnes indikators
Tālvadība
1 Navigācijas pogas un ieslēgšana/apturēšana
2 Dokošanas poga
3 Tīrīšanas laika poga
4 Tīrīšanas režīma pogas
Robota darbības princips
Ko robots tīra
Šis robots ir aprīkots ar funkcijām, kas to padara piemērotu mājokļa grīdu tīrīšanai.
Robots ir īpaši piemērots cietu grīdu tīrīšanai, piemēram, koka, lamināta vai linoleja grīdām. Tam var
rasties problēmas, tīrot mīkstas grīdas, piemēram, paklājus vai grīdsegas. Ja izmantojat robotu uz
paklāja vai grīdsegas, lūdzu, pirmoreiz palieciet tuvumā, lai redzētu, vai robots spēj notīrīt šādu grīdas
Latviešu
Page 29
Latviešu
segumu. Robotam uzraudzība nepieciešama arī tad, ja izmantojat to uz ļoti tumšām un spīdīgām
cietām grīdām.
29
Kā robots tīra
Tīrīšanas sistēma
Robotam ir divpakāpju tīrīšanas sistēma, lai efektīvi notīrītu grīdas.
-
Divas sānu birstes palīdz robotam iztīrīt stūrus un vietas gar sienām. Tās arī palīdz savākt netīrumus
no grīdas un pārvietot tos uz sūkšanas atveri (att. 3).
-
Robota sūkšanas jauda savāc netīrumus un cauri sūkšanas atverei novirza tos uz putekļu tvertni
(att. 4).
Tīrīšanas trajektorijas
Automātiskajā tīrīšanas režīmā robots izmanto automātisku tīrīšanas trajektoriju secību, lai optimāli
iztīrītu katru telpas zonu. Tas izmanto tālāk norādītās tīrīšanas trajektorijas.
1 Z veida trajektorija vai zigzaga trajektorija (att. 5)
2 Nejauši izvēlēta trajektorija (att. 6)
3 Darbība gar sienām (att. 7)
4 Tīrīšana vienā vietā (att. 8)
Automātiskajā tīrīšanas režīmā robots šīs trajektorijas izmanto noteiktā secībā: Z veida trajektorija,
nejauši izvēlēta trajektorija, darbība gar sienām un tīrīšana vienā vietā.
Pēc šīs trajektoriju secības pabeigšanas robots atkal uzsāk Z veida trajektorijas darbību. Robots turpina
izpildīt šo trajektoriju secību telpas tīrīšanai, līdz akumulatora līmenis ir zems vai līdz tas tiek manuāli
izslēgts.
Piezīme. Varat arī atlasīt katru režīmu atsevišķi, nospiežot atbilstošo pogu uz tālvadības pults.
Papildinformāciju skatiet nodaļas “Robota izmantošana” sadaļā “Tīrīšanas režīmi”.
Kā robots izvairās no augstuma starpības
Robots ir aprīkots ar trim nokrišanas sensoriem tā apakšpusē. Tas šos nokrišanas sensorus izmanto, lai
noteiktu un izvairītos no augstuma starpības, piemēram, kāpnēm.
Piezīme. Tā ir normāla parādība, ja robots pārvietojas mazliet pāri augstuma starpības malai, jo
priekšējais nokrišanas sensors atrodas aiz bufera.
Ievērībai! Dažreiz nokrišanas sensoriem neizdodas laikus noteikt kāpnes vai citas virsmas
augstuma izmaiņas. Tāpēc rūpīgi uzraugiet robota darbību dažas pirmās lietošanas reizes un tad,
kad robots darbojas tuvu kāpnēm vai citām virsmām ar augstuma starpību. Ļoti svarīgi ir regulāri
notīrīt nokrišanas sensorus, lai nodrošinātu, ka robots var turpināt pareizi noteikt augstuma
atšķirības (norādījumus skatiet nodaļā “Tīrīšana un apkope”).
Pirms pirmās lietošanas reizes
Sānu birstu uzstādīšana
1 Izņemiet sānu birstes no iepakojuma un apgrieziet robotu otrādi uz galda vai uz grīdas.
2 Uzlieciet sānu birstes uz vārpstām robota (att. 9) apakšā.
Piezīme. Pārliecinieties, vai sānu birstes ir pareizi uzliktas. Spiediet tās uz vārpstas, līdz tās ar klikšķi
fiksējas pozīcijā.
Page 30
30
Latviešu
Aizsargplombas noņemšana no tālvadības pults
Tālvadības pults darbojas ar pogveida bateriju CR2025. Šo bateriju aizsargā plomba, kas ir jāizņem
pirms lietošanas.
1 Izvelciet baterijas aizsargplombu no tālvadības pults (att. 10) baterijas nodalījuma.
Tālvadības pults ir gatava lietošanai.
Sagatavošana lietošanai
Dokstacijas uzstādīšana
1 Ievietojiet mazo adaptera spraudni dokstacijas (1) ligzdā un ievietojiet adapteri sienas
kontaktligzdā (2) (att. 11).
2 Novietojiet dokstaciju uz horizontālas, līdzenas virsmas pret sienu.
Piezīme. Pārliecinieties, vai nav nekādu šķēršļu vai augstuma starpības 80 cm uz priekšu, 30 cm pa
labi un 100 cm pa kreisi no dokstacijas (att. 12).
Svarīga piezīme: snaudas režīms
Kā atiestatīt robotu, ja tas ir snaudas režīmā (robots nereaģē).
-
Iestatiet jaudas slēdzi ieslēgtā pozīcijā (att. 13).
-
Uzlādējiet robotu. Pēc pāris sekundēm robots atkal reaģēs.
Piezīme. Robots pāriet snaudas režīmā katrreiz, kad jaudas slēdzi iestatāt izslēgtā pozīcijā un kad
akumulators ir tukšs. Akumulators var izlādēties tad, ja, piemēram, robots nevar atrast dokstaciju.
Uzlāde
Uzlādējot pirmo reizi un kad robota akumulators ir tukšs, uzlādes laiks ir četras stundas.
Robotu var uzlādēt divējādi:
-
dokstacijā, vai nu manuāli vai automātiski lietošanas laikā;
-
pievienojot robotu tieši elektrotīklam.
Piezīme. Kad uzlādējamais akumulators ir pilnībā uzlādēts, robots var tīrīt līdz pat 100 minūtēm.
Uzlāde dokstacijā
1 Iestatiet jaudas slēdzi ieslēgtā pozīcijā (att. 13).
2 Novietojiet robotu uz pievienotās dokstacijas (att. 14).
3 Ieslēgšanas/apturēšanas poga sāk lēni mirgot (att. 15).
4 Kad akumulators ir pilnībā uzlādēts, ieslēgšanas/apturēšanas poga deg nepārtraukti (att. 16).
Automātiska uzlāde lietošanas laikā
1 Kad robots ir pabeidzis tīrīšanu vai atlikuši tikai 15% akumulatora enerģijas, tas automātiski meklē
dokstaciju, lai veiktu uzlādi. Kad robots meklē dokstaciju, ieslēgšanas/apturēšanas poga ātri mirgo
(att. 17).
2 Kad akumulators ir pilnībā uzlādēts, ieslēgšanas/apturēšanas poga deg nepārtraukti.
Piezīme. Robots automātiski meklē dokstaciju tikai tad, ja tīrīšana sākta no dokstacijas.
Page 31

Latviešu
Uzlāde tieši no elektrotīkla
1 Nospiediet jaudas slēdzi, lai ieslēgtu robotu.
2 Ievietojiet mazo adaptera spraudni robota (1) ligzdā. Iespraudiet adapteri sienas kontaktligzdā (2)
(att. 18).
3 Kad robots ir pareizi pievienots elektrotīklam, sāk ļoti lēni mirgot ieslēgšanas/izslēgšanas poga. Tas
norāda, ka notiek robota uzlāde.
4 Kad akumulators ir pilnībā uzlādēts, ieslēgšanas/apturēšanas poga deg nepārtraukti.
Telpas sagatavošana tīrīšanai
Pirms uzsākat robota tīrīšanas ciklu, pārliecinieties, vai no grīdas (att. 19) ir pacelti visi nenostiprinātie
un trauslie priekšmeti.
Novāciet no grīdas arī visus kabeļus un vadus.
Robota izmantošana
Sākums un apturēšana
1 Nospiediet ieslēgšanas/apturēšanas pogu.
-
Varat nospiest ieslēgšanas/apturēšanas pogu uz robota (att. 20).
-
Varat arī nospiest ieslēgšanas/apturēšanas pogu uz tālvadības pults (att. 21).
2 Ieslēgšanas/apturēšanas poga ir nepārtraukti ieslēgta un robots sāk tīrīšanu (att. 22).
3 Robots tīra automātiskajā tīrīšanas režīmā, līdz akumulatora uzlādes līmenis ir zems. Automātiskajā
tīrīšanas režīmā tas izpilda atkārtotas Z veida trajektorijas, nejaušas trajektorijas, darbības gar
sienām un tīrīšanu vienā vietā (att. 23).
Piezīme. Lai izvēlētos individuālu režīmu, nospiediet vienu no režīma pogām uz tālvadības pults.
Papildinformāciju skatiet sadaļā “Tīrīšanas režīma izvēle”.
4 Kad akumulatora līmenis ir zems, sāk mirgot ieslēgšanas/apturēšanas poga un robots meklē
dokstaciju, lai veiktu uzlādi (att. 17).
5 Varat arī nospiest ieslēgšanas/apturēšanas pogu, lai pārtrauktu vai apturētu tīrīšanas darbību. Ja
atkārtoti nospiežat ieslēgšanas/apturēšanas pogu un akumulatorā joprojām ir pietiekami daudz
enerģijas, robots turpina tīrīšanu automātiskajā tīrīšanas režīmā.
6 Lai robots atgrieztos dokstacijā, pirms akumulators ir izlādējies, nospiediet dokstacijas pogu uz
tālvadības pults (att. 24).
Sāk mirgot ieslēgšanas/apturēšanas poga un robots meklē dokstaciju (att. 25).
Piezīme. Ja nestartējāt robotu no dokstacijas, tas automātiski neatgriežas dokstacijā, kad
uzlādējamā akumulatora līmenis ir zems. Ja akumulatorā joprojām ir pietiekami daudz enerģijas,
varat nospiest dokošanas pogu uz tālvadības pults, lai robots atgrieztos dokstacijā. Ja akumulators
ir pilnībā tukšs, jums manuāli jānovieto robots dokstacijā.
31
Dokstacijas lietošana
Uz dokstacijas ir divas vadīklas, ko var izmantot robota darbināšanai.
Pilna akumulatora un sākšanas poga
Nospiežot pilna akumulatora un sākšanas pogu uz dokstacijas robota uzlādes laikā, robots sāk
tīrīšanu, tiklīdz uzlādējamais akumulators ir uzlādēts (att. 26).
Page 32

32
Latviešu
24 h poga
Nospiežot 24 h pogu uz dokstacijas, dokstacija sāk 24 stundu laika atskaiti līdz nākamajai tīrīšanas
reizei. Pēc laika atskaites beigām robots sāk tīrīšanu un turpina to, līdz akumulatora uzlādes līmenis ir
zems. Pēc tam tas automātiski atgriežas dokstacijā, lai veiktu uzlādi (att. 27).
Tīrīšanas režīma izvēle
Papildus automātiskajam tīrīšanas režīmam šim robotam ir četri individuāli tīrīšanas režīmi, ko
iespējams aktivizēt, nospiežot attiecīgo pogu uz tālvadības pults.
Z trajektorijas režīms
Z veida trajektorijas režīmā robots tīra, veicot Z formas cilpas telpā, lai iztīrītu plašas zonas (att. 28).
Nejaušas trajektorijas režīms
Šajā režīmā robots tīra telpu ar jauktu trajektoriju, ko veido taisnas un šķērsvirziena kustības (att. 29).
Sienu režīms
Šajā režīmā robots tīra gar telpas sienām, lai īpaši rūpīgi notīrītu zonu gar sienām (att. 30).
Tīrīšanas vienā vietā režīms
Šajā režīmā robots veic nejaušas trajektorijas kustības nelielas zonas robežās, lai to rūpīgi (att. 31)
iztīrītu.
Piezīme. Manuāli izvēlētie režīmi ir aktīvi tikai dažas minūtes. Pēc tam robots pārslēdzas uz
automātisko tīrīšanas režīmu.
Manuāla vadība
1 Izmantojiet bultiņu pogas, kas atrodas apkārt ieslēgšanas/apturēšanas pogai uz tālvadības pults, lai
vadītu robotu telpā. (att. 32)
Piezīme. Uzmanieties, kad manuāli virzāt robotu tuvu vietām, kur ir augstuma atšķirības un kāpnes.
Piezīme. Putekļu sūkšanas funkcija un sānu birstes darbojas tikai tad, kad robots tiek virzīts uz
priekšu. Pogas virzīšanai pa kreisi, pa labi vai atpakaļ ir paredzētas tikai robota pārvietošanai telpā.
Tīrīšanas laika pogas izmantošana
Nospiediet tīrīšanas laika pogu uz tālvadības pults, lai ieslēgtu tīrīšanu uz 35 minūtēm. Kad tīrīšanas
laiks ir pagājis, robots atgriežas dokstacijā, lai veiktu uzlādi (att. 33).
Jaudas slēdža lietošana
Iestatot jaudas slēdzi izslēgtā pozīcijā, robots pāriet snaudas režīmā. Šajā režīmā robots vairs nereaģē.
-
Ja vēlaties uzlādēt robotu, jaudas slēdzis ir jāpārslēdz ieslēgtā pozīcijā.
-
Ja robots pāriet snaudas režīmā tā lietošanas laikā, varat to atkārtoti aktivizēt, iestatot jaudas slēdzi
ieslēgtā pozīcijā un uzlādējot robotu. Pēc pāris sekundēm robots atkal reaģēs.
-
Ja plānojat mēnesi vai ilgāk neizmantot robotu, nospiediet jaudas slēdzi izslēgtā pozīcijā un
atvienojiet dokstaciju vai adapteri, lai pasargātu uzlādējamo akumulatoru un taupītu enerģiju.
Page 33

Latviešu
Signāli un to nozīme
Robota displejā ir divi indikatori: brīdinājuma indikators un pilnas putekļu tvertnes indikators.
Ieslēgšanas/apturēšanas poga raida lampiņas signālus. Tālāk esošajā tabulā ir aprakstīta signālu
nozīme.
Signāls
Ieslēgšanas/izslēgšanas poga deg nepārtraukti. Robots ir gatavs tīrīšanai.
Ieslēgšanas/apturēšanas poga lēni mirgo. Notiek robota uzlāde.
Ieslēgšanas/apturēšanas poga ātri mirgo. Robots meklē dokstaciju.
Iedegas pilnas putekļu tvertnes indikators. Putekļu nodalījums ir pilns.
Iedegas brīdinājuma indikators. Robots tika pacelts tīrīšanas laikā.
Nozīme
Zems robota akumulatora uzlādes līmenis.
Robota buferis ir iestrēdzis.
Ritenītis vai sānu birste ir iestrēgusi.
Nav uzlikts vai pareizi aizvērts augšējais pārsegs.
Robots nevar atrast dokstaciju.
Reakcija uz plaukšķināšanu
Reakcija uz plaukšķināšanu ir iespējota, kad robots pāriet snaudas režīmā šādās situācijās:
-
kad tas pārtrauc tīrīšanu kļūdas dēļ;
-
kad ir ieprogrammēts īss tīrīšanas laiks;
-
kad tas nevar atrast dokstaciju 20 minūšu laikā.
Ja neredzat robotu, varat atrast to, vienreiz sasitot plaukstas. Robots atbildēs, radot pīkstiena signālu
un iedegot visas ikonas displejā.
33
Tīrīšana un kopšana
Putekļu tvertnes iztukšošana un tīrīšana
Iztukšojiet un iztīriet putekļu tvertni, kad nepārtraukti deg pilnas putekļu tvertnes indikators.
1 Noņemiet vāciņu (att. 34).
2 Paceliet putekļu tvertnes vāka rokturi un izceliet putekļu tvertni ārā no putekļu tvertnes nodalījuma
(att. 35).
Piezīme. Izņemot vai ievietojot atpakaļ putekļu tvertni, uzmanieties, lai nesabojātu motora
ventilatora lāpstiņas.
3 Uzmanīgi paceliet vāku no putekļu tvertnes (1) un izņemiet filtru (2) (att. 36).
4 Izkratiet putekļu tvertni virs atkritumu groza, lai to iztukšotu. Iztīriet putekļu tvertnes filtru un iekšpusi
ar drānu vai zobu birsti ar mīkstiem sariem. Iztīriet arī sūkšanas atveri putekļu tvertnes (att. 37)
apakšā.
Ievērībai! Netīriet putekļu tvertni un filtru ar ūdeni vai trauku mazgāšanas mašīnā.
5 Ievietojiet filtru atpakaļ putekļu tvertnē (1). Pēc tam uzlieciet vāku uz putekļu tvertnes (2) (att. 38).
Page 34

34
Latviešu
6 Ielieciet putekļu tvertni atpakaļ nodalījumā un uzlieciet augšējo pārsegu atpakaļ uz robota (att. 39).
Ievērībai! Vienmēr pārliecinieties, vai putekļu tvertnē atrodas filtrs. Izmantojot robotu bez filtra
putekļu tvertnē, tiks sabojāts motors.
Robota tīrīšana
Lai saglabātu labu tīrīšanas sniegumu, ir regulāri jānotīra nokrišanas sensori, ritenīši, sānu birstes un
sūkšanas atvere.
1 Nolieciet robotu otrādi apgrieztā veidā uz līdzenas virsmas.
2 Izmantojiet birsti ar mīkstiem sariem (piemēram, zobu birsti), lai noņemtu putekļus vai pūkas no
nokrišanas sensoriem. (att. 40)
Piezīme. Ir ļoti svarīgi regulāri notīrīt nokrišanas sensorus. Ja nokrišanas sensori ir netīri, robotam var
neizdoties noteikt augstuma atšķirības vai kāpnes.
3 Izmantojiet birsti ar mīkstiem sariem (piemēram, zobu birsti), lai noņemtu putekļus vai pūkas no
priekšējā ritenīša un sānu ritenīšiem (att. 41).
4 Lai notīrītu sānu birstes, satveriet tās aiz sariem un novelciet no vārpstām (att. 42).
5 Noņemiet pūkas, matus un diegus no vārpstas un sānu birstes, izmantojot mīkstu birsti (piemēram,
zobu birsti) vai drānu (att. 43).birsti (piemēram, zobu birsti) vai drānu (att. 43).
6 Pārbaudiet sānu birstes un robota apakšu, vai tur nav asi priekšmeti, kas var sabojāt grīdu.
7 Kad ir noņemtas sānu birstes no vārpstām, atvienojiet TriActive XL uzgaļa savienojumus, ievietojot
pirkstus vietās, kas apzīmētas ar bultiņām, un noņemiet TriActive uzgali no robota (att. 44).
8 Iztīriet sūkšanas atveri ar mīkstu birsti (piemēram, zobu birsti) (att. 45).
9 Notīriet visus redzamos netīrumus no TriActive uzgaļa (att. 46).
10 Ievietojiet TriActive uzgaļa fiksatorus atverēs robota (att. 47) apakšā. Iespiediet TriActive uzgali
atpakaļ pozīcijā. Pārbaudiet, vai uzgalis var brīvi kustēties dažus milimetrus uz augšu un uz leju.
Nomaiņa
Piederumu pasūtīšana
Lai iegādātos piederumus vai rezerves daļas, apmeklējiet vietni www.shop.philips.com/service vai
vērsieties pie sava Philips izplatītāja. Varat arī sazināties ar Philips klientu apkalpošanas centru savā
valstī (kontaktinformāciju varat atrast bukletā par garantiju visā pasaulē).
Filtra nomaiņa
Nomainiet filtru, ja tas ir ļoti netīrs vai bojāts. Varat pasūtīt jaunu filtru ar pasūtījuma numuru FC8012.
Skatiet sadaļu “Putekļu tvertnes iztukšošana un tīrīšana” nodaļā “Tīrīšana un apkope”, lai uzzinātu, kā
izņemt filtru no putekļu tvertnes un ievietot to putekļu tvertnē.
Sānu birstu nomaiņa
Pēc noteikta laika nomainiet sānu birstes, lai nodrošinātu atbilstošus tīrīšanas rezultātus.
Piezīme. Vienmēr nomainiet sānu birstes, ja pamanāt nodiluma pazīmes vai bojājumus. Ieteicams
nomainīt abas sānu birstes vienlaikus. Varat pasūtīt rezerves sānu birstes kā komplektu ar pasūtījuma
numuru FC8013.
1 Lai nomainītu sānu birstes, satveriet vecās birstes aiz sariem un novelciet no vārpstām (att. 42).
2 Uzstumiet jaunās sānu birstes uz vārpstām (att. 9).
Page 35

Latviešu
Akumulatora nomaiņa
Atkārtoti uzlādējamā akumulatora nomaiņu drīkst veikt tikai kvalificēti apkopes tehniķi. Ja akumulatoru
vairs nevar uzlādēt vai tas ātri izlādējas, nogādājiet robotu pilnvarotajā Philips tehniskās apkopes
centrā, lai nomainītu akumulatoru. Savas valsts Philips klientu apkalpošanas centra kontaktinformāciju
varat skatīt bukletā par garantiju visā pasaulē.
Tālvadības pults baterijas nomaiņa
Tālvadības pults darbojas ar pogveida bateriju CR2025. Nomainiet bateriju, kad robots vairs nereaģē
uz tālvadības pults pogu nospiešanu.
1 Turiet tālvadības pulti ar augšpusi uz leju. Nospiediet pogu uz baterijas turētāja un vienlaikus virziet
baterijas turētāju ārā no tālvadības pults (att. 48).
2 Izņemiet tukšo bateriju no baterijas turētāja un ievietojiet tajā jaunu bateriju. Pēc tam bīdiet
baterijas turētāju atpakaļ tālvadības pultī (att. 49).
Atkārtoti uzlādējamā akumulatora izņemšana
Brīdinājums. Uzlādējamo bateriju izņemiet tikai tad, kad izmetat ierīci. Izņemot bateriju,
pārliecinieties, ka tā ir pilnīgi tukša.
Lai izņemtu uzlādējamo akumulatoru, izpildiet tālāk norādītās darbības. Varat arī nogādāt robotu
pilnvarotā Philips tehniskās apkopes centrā, lai izņemtu uzlādējamo akumulatoru. Sazinieties ar savas
valsts Philips klientu apkalpošanas centru, lai noskaidrotu jums tuvumā esoša tehniskās apkopes
centra adresi.
1 Palaidiet robotu no kādas vietas istabā, neizmantojot dokstaciju.
2 Ļaujiet robotam darboties, līdz akumulators ir tukšs, lai nodrošinātu, ka akumulators ir pilnībā
izlādēts, pirms to izņemt un utilizēt.
3 Atskrūvējiet akumulatora nodalījuma vāka skrūves un noņemiet vāku (att. 50).
4 Izceliet uzlādējamo akumulatoru un atvienojiet to (att. 51).
5 Nogādājiet robotu un uzlādējamo akumulatoru uz elektrisko un elektronisko iekārtu atkritumu
savākšanas punktu.
35
Traucējummeklēšana
Šajā nodaļā ir apkopotas izplatītākās problēmas, kādas var rasties, izmantojot šo ierīci. Ja nevarat
atrisināt problēmu, izmantojot tālāk norādīto informāciju, apmeklējiet vietni www.philips.com/support un
skatiet bieži uzdoto jautājumu sarakstu vai sazinieties ar klientu apkalpošanas centru savā valstī.
Problēma
Robots neuzsāk tīrīšanu
pēc
ieslēgšanas/apturēšanas
pogas nospiešanas.
Iespējamais iemesls Risinājums
Atkārtoti uzlādējamais
akumulators ir tukšs.
Mazais spraudnis joprojām ir
pievienots robota ligzdai.
Uzlādējiet akumulatoru (skatiet nodaļu
"Sagatavošana lietošanai").
Robots nedarbojas ar elektrotīkla strāvu.
Tas darbojas tikai ar tā uzlādējamo
akumulatoru. Tāpēc pirms lietošanas
vienmēr atvienojiet adapteri no robota
un elektrotīkla.
Page 36

36
Latviešu
Problēma Iespējamais iemesls Risinājums
Jaudas slēdzis nav iestatīts
ieslēgtā (I) pozīcijā.
Nospiediet jaudas slēdzi ieslēgtā
pozīcijā. Novietojiet robotu uz
pievienotās dokstacijas vai iespraudiet
mazo adaptera spraudni. Pēc pāris
sekundēm robots izdod pīkstienu un
iedegas displejs.
Robots nereaģē pēc
kādas no pogu
nospiešanas.
Ātri mirgo brīdinājuma
indikators.
Ieslēgšanas/izslēgšanas
slēdzis iestatīts izslēgtā
pozīcijā.
Robots nevarēja atrast
dokstaciju, un akumulators
izlādējās.
Iestrēdzis viens vai abi ritenīši. Iestatiet jaudas slēdzi izslēgtā pozīcijā.
Iestrēgusi viena vai abas sānu
birstes.
Nav uzlikts vai pareizi aizvērts
augšējais pārsegs.
Iestrēdzis buferis. Nospiediet ieslēgšanas/apturēšanas
Nospiediet jaudas slēdzi ieslēgtā
pozīcijā. Novietojiet robotu uz
pievienotās dokstacijas vai iespraudiet
mazo adaptera spraudni. Pēc pāris
sekundēm robots izdod pīkstienu un
iedegas displejs.
Novietojiet robotu uz pievienotās
dokstacijas vai iespraudiet mazo
adaptera spraudni. Pēc pāris sekundēm
robots izdod pīkstienu un iedegas
displejs.
Iztīriet pūkas, matiņus vai pavedienus,
kas saķērušies ap ritenīšu balstiekārtu.
Iztīriet sānu birstes (skatiet nodaļu
"Tīrīšana un apkope").
Kad augšējais pārsegs nav uzlikts vai nav
pareizi aizvērts, robots nedarbojas.
Pareizi uzlieciet augšējo pārsegu uz
robota.
pogu. Paceliet robotu, lai atbrīvotu tā
buferi. Novietojiet robotu zināmā
attālumā no šķēršļa un nospiediet
ieslēgšanas/apturēšanas pogu, lai tas
atsāktu tīrīšanu.
Robots tika pacelts tīrīšanas
laikā.
Robots netīra pareizi. Vienas vai abu sānu birstu sari
ir saliekti vai izliekušies.
Putekļu tvertnes filtrs ir netīrs. Iztīriet putekļu tvertnes filtru ar drānu vai
Nospiediet ieslēgšanas/apturēšanas
pogu. Novietojiet robotu uz grīdas. Pēc
tam nospiediet ieslēgšanas/apturēšanas
pogu, lai robots atsāktu tīrīšanu.
Uz brīdi iemērciet birsti vai birstes siltā
ūdenī. Ja šādi neizdodas atjaunot
birstēm pareizo formu, nomainiet sānu
birstes (skatiet nodaļu “Nomaiņa”).
zobu birsti ar mīkstiem sariem. Filtru un
putekļu tvertni var iztīrīt arī parastu
putekļu sūcēju, izmantojot zemu
sūkšanas jaudas iestatījumu.
Page 37

Problēma Iespējamais iemesls Risinājums
Ja filtru neizdodas iztīrīt ar birstīti vai
putekļu sūcēju, nomainiet filtru pret
jaunu. Filtru ieteicams nomainīt vismaz
reizi gadā.
Latviešu
37
Akumulatoru vairs nevar
uzlādēt, vai tas ļoti ātri
izlādējas.
Tālvadības pults baterija
izbeidzas pārāk ātri.
Sūkšanas atvere putekļu
tvertnes apakšā ir nosprostota.
Priekšējā ritenīti iestrēguši mati
vai citi netīrumi.
Robots tīra ļoti tumšu vai
spīdīgu virsmu, kas aktivizē
nokrišanas sensorus. Tāpēc
robots virzās pa neparedzētu
trajektoriju.
Robots tīra grīdu, kas spēcīgi
atstaro saules gaismu. Tas
aktivizē nokrišanas sensorus
un izraisa robota
pārvietošanos pa neparedzētu
trajektoriju.
Iespējams, akumulators ir
sasniedzis kalpošanas laika
beigas.
Iespējams, neesat ievietojis
pareizā tipa bateriju.
Iztīriet sūkšanas atveri (skatiet nodaļu
"Tīrīšana un apkope").
Notīriet priekšējo ritenīti (skatiet nodaļu
"Tīrīšana un apkope").
Nospiediet ieslēgšanas/apturēšanas
pogu un pēc tam pārvietojiet robotu uz
gaišākas krāsas grīdas segumu. Ja
problēma pastāv arī uz gaišākām
grīdām, lūdzu, apmeklējiet vietni
www.philips.com/support vai sazinieties
ar savas valsts klientu apkalpošanas
centru.
Aizveriet aizkarus, lai novērstu saules
gaismas iekļūšanu telpā. Varat arī sākt
tīrīšanu laikā, kad saules gaisma nav tik
spilgta.
Nomainiet uzlādējamo akumulatoru
Philips tehniskās apkopes centrā (skatiet
nodaļu “Nomaiņa”).
Tālvadības pultij ir nepieciešama
pogveida baterija CR2025. Ja problēma
joprojām pastāv, atveriet vietni
www.philips.com/support vai sazinieties
ar klientu apkalpošanas centru savā
valstī.
Robots pārvietojas pa
apļiem.
Robots nevar atrast
dokstaciju.
Robots ir tīrīšanas vienā vietā
režīmā.
Robotam nepietiek vietas, lai
pārvietotos uz dokstaciju.
Robots joprojām aktīvi meklē. Dodiet robotam aptuveni 20 minūtes, lai
Tā ir normāla darbība. Tīrīšanas vienā
vietā režīms var tikt aktivizēts, lai rūpīgi
iztīrītu vietu, kurā konstatēts daudz
netīrumu. Tā ir arī daļa no automātiskā
tīrīšanas režīma. Pēc aptuveni vienas
minūtes robots atsāk parasto tīrīšanas
trajektoriju. Varat arī apturēt tīrīšanas
vienā vietā režīmu, uz tālvadības pults
atlasot citu tīrīšanas režīmu.
Novietojiet dokstaciju citā vietā. Skatiet
nodaļas “Sagatavošana lietošanai”
sadaļu “Dokstacijas uzstādīšana”.
tas atgrieztos dokstacijā.
Page 38

38
Latviešu
Problēma Iespējamais iemesls Risinājums
Robots netika palaists no
dokstacijas.
Ja vēlaties, lai pēc tīrīšanas cikla robots
atgrieztos dokstacijā, palaidiet to no
dokstacijas.
Page 39

Magyar
Bevezetés
Köszönjük, hogy Philips terméket vásárolt, és üdvözöljük a Philips világában! A Philips által biztosított
támogatás teljes körű igénybevételéhez regisztrálja a terméket a www.philips.com/welcome címen.
Általános leírás
1 Felső fedél
2 Portartályfedél fogantyúja
3 Portartály fedele
4 Szűrő
5 Portartály
6 Ventilátor
7 Ütköző
8 Dokkolóegység érzékelője
9 Start/stop gomb (a robotporszívó elindításához vagy leállításához)
10 Kijelző
11 Bekapcsológomb (a robotporszívó bekapcsolásához vagy kikapcsolásához)
12 TriActive XL szívófej
13 Első kerék
14 Oldalsó kefetengelyek
15 Mélységérzékelők
16 Akkumulátortartó rekesz
17 Kerekek
18 Szívónyílás
19 Oldalkefék
20 Elemtartó
21 Távvezérlő
22 Kisméretű csatlakozódugasz
23 Adapter
24 Dokkolóegység
39
Kijelző és távvezérlő
Kijelző (ábra 2):
1 Figyelmeztető jelzőfény
2 A portartály telítettségjelzője
Távvezérlő:
1 Navigációs gombok, illetve start/stop gomb
2 Dokkolás gomb
3 Takarítási idő gomb
4 Takarítási üzemmód gombok
Hogyan működik a robotporszívó?
Mit tisztít a robotporszívó?
A robotporszívó olyan funkciókkal van ellátva, amelyeknek köszönhetően megfelelő segítséget nyújt
az otthoni padlótisztításban.
A robotporszívó különösen alkalmas kemény padlók, például fa-, csempe- vagy linóleumpadlók
tisztítására. Puha padlók, például szőnyegek vagy lábtörlők tisztítása során problémák merülhetnek
fel. Ha a robotporszívót első alkalommal használja szőnyeg vagy lábtörlő tisztítására, maradjon a
Magyar
Page 40

40
Magyar
közelben, hogy meggyőződjön róla, hogy a készülék alkalmas az ilyen típusú padlók tisztítására.
Fekete és fényes kemény padlók tisztítása során a robotporszívó szintén felügyeletet igényel.
Hogyan tisztít a robotporszívó?
Tisztítórendszer
A robotporszívó kétlépcsős tisztítórendszerrel tisztítja hatékonyan a padlót.
-
A két oldalsó kefe segít a robotnak megtisztítani a padlót a sarkokban és a fal mentén. Továbbá
segítenek fellazítani a padlóról a lerakódott szennyeződést, és továbbítják azt a szívónyíláshoz
(ábra 3).
-
A robotporszívó szívóereje felszedi a laza szennyeződést, és a szívónyíláson keresztül a
portartályba (ábra 4) szállítja azt.
Takarítási minták
Automatikus takarítás üzemmódban a robotporszívó a takarítási minták automatikus sorozatát
használva a szoba minden egyes területét optimálisan megtisztítja. Az alábbi takarítási mintákat
használja:
1 Z minta vagy cikkcakk minta (ábra 5)
2 Véletlenszerű minta (ábra 6)
3 Falkövető minta (ábra 7)
4 Spirál minta (ábra 8)
A robotporszívó az automatikus takarítási üzemmódban fix sorrendben végrehajtja a Z mintából, a
véletlenszerű, a falkövető és a spirál mintából álló sorozat mozdulatait.
Ha a robotporszívó befejezte a mintasorozatot, ismét Z mintában kezd el mozogni. A robotporszívó
mindaddig folytatja a mintasorozat végrehajtását a szoba tisztítása érdekében, amíg az akkumulátor le
nem merül, vagy amíg kézzel ki nem kapcsolja.
Megjegyzés: Az egyes üzemmódokat külön is kiválaszthatja, ha megnyomja a távirányító megfelelő
gombját. További részletekért lásd „A robotporszívó használata” című fejezet „Takarítási üzemmódok”
című részét.
Hogyan kerüli el a robotporszívó a magasságkülönbségeket?
A robotporszívó alján három mélységérzékelő található. A robotporszívó ezek segítségével érzékeli és
kerüli el a magasságkülönbségeket, például a lépcsőket.
Megjegyzés: Normális jelenség, hogy a robotporszívó kissé átmegy a magasságkülönbségek szélén,
mivel az első mélységérzékelője az ütköző mögött található.
Figyelem! Bizonyos esetekben előfordulhat, hogy a mélységérzékelők nem érzékelik kellő időben a
lépcsőt vagy más magasságkülönbséget. Ezért az első néhány használat során, vagy amikor lépcső
vagy más magasságkülönbség közelében használja, fordítson kellő figyelmet a robotporszívóra.
Annak érdekében, hogy a robotporszívó megfelelően észlelje a magasságkülönbségeket, fontos,
hogy a mélységérzékelőket rendszeresen tisztítsa (a további információkat lásd a „Tisztítás és
karbantartás” című fejezetben).
Teendők az első használat előtt
Az oldalsó kefék felszerelése
1 Csomagolja ki az oldalsó keféket, és helyezze a robotot fejjel lefelé egy asztalra vagy a padlóra.
Page 41

Magyar
2 Nyomja rá az oldalsó keféket a robotporszívó (ábra 9) alján található tengelyekre.
Megjegyzés: Győződjön meg róla, hogy az oldalsó keféket megfelelően rögzítette. Nyomja őket a
tengelyre mindaddig, amíg egy kattanás kíséretében nem rögzítődnek a helyükre.
A védőcímke eltávolítása a távvezérlőről
A távvezérlő egy CR2025 típusú gombelemmel működik. Az elemet védőcímke védi, amelyet
használat előtt el kell távolítani.
1 Húzza ki az elem védőcímkéjét a távvezérlő (ábra 10) elemtartó rekeszéből.
Ekkor a távvezérlő készen áll a használatra.
Előkészítés a használatra
A dokkolóegység beszerelése
1 Csatlakoztassa az adapter kis méretű csatlakozódugóját a dokkolóegység (1) aljzatába és
csatlakoztassa az adaptert a fali aljzatba (2) (ábra 11).
2 Helyezze a dokkolóegységet vízszintes, sík padlóra a fal előtt.
Megjegyzés: Győződjön meg róla, hogy nincsenek akadályok vagy magasságkülönbségek a
dokkolóegység (ábra 12) elejétől 80 cm-re, a jobb oldalától 30 cm-re és a bal oldalától 100 cm-re.
Fontos megjegyzés: mélyalvó üzemmód
Hogyan hozható mélyalvó üzemmódból alaphelyzetbe a robotporszívó (a robotporszívó nem reagál):
-
Állítsa a bekapcsológombot „on” (bekapcsolt) (ábra 13) helyzetbe.
-
Töltse fel a robotporszívót. Néhány másodperc múlva a robotporszívó újra reagálni fog.
41
Megjegyzés: A robotporszívó mindig mélyalvó üzemmódba lép, ha a bekapcsológombot „off”
(kikapcsolt) helyzetbe állítja, illetve ha lemerül az akkumulátora. Az akkumulátor például akkor
merülhet le, ha a robotporszívó nem találja meg a dokkolóegységet.
Töltés
Az első töltés alkalmával, illetve ha a robotporszívó akkumulátora lemerült, a töltési idő négy óra.
A robotporszívó feltöltése két módon lehetséges:
-
A dokkolóegységen, manuálisan vagy automatikusan használat közben;
-
A robotporszívó közvetlen csatlakoztatásával a hálózathoz.
Megjegyzés: Ha az akkumulátor teljesen feltöltődött, a robotporszívó akár 100 percig használható
tisztításra.
Töltés a dokkolóegységen
1 Állítsa a bekapcsológombot „on” (bekapcsolt) (ábra 13) helyzetbe.
2 Helyezze a robotot a hálózatra csatlakoztatott dokkolóegységre (ábra 14).
3 A start/stop gomb lassan villogni kezd (ábra 15).
4 Amikor az akkumulátor teljesen feltöltődött, a start/stop gomb folyamatosan világít (ábra 16).
Page 42

42
Magyar
Automatikus töltés használat közben
1 Amikor a robotporszívó befejezte a tisztítást vagy amikor az akkumulátor töltöttsége már csak 15%,
a robotporszívó automatikusan megkeresi a dokkolóegységet, hogy feltöltődjön. Amikor a
robotporszívó a dokkolóegységet keresi, a start/stop gomb gyorsan villog (ábra 17).
2 Amikor az akkumulátor teljesen feltöltődött, a start/stop gomb folyamatosan világít.
Megjegyzés: A robotporszívó csak akkor keresi automatikusan a dokkolóegységet, ha a tisztítást a
dokkolóegységről kezdte.
Töltés közvetlenül az elektromos hálózatról
1 A bekapcsológomb megnyomásával kapcsolja be a robotot.
2 Illessze az adapter kis méretű csatlakozódugóját a robotporszívó aljzatába (1). Csatlakoztassa az
adaptert a fali aljzatba (2) (ábra 18).
3 Ha a robotporszívó megfelelően csatlakozik a hálózatra, a start/stop gomb nagyon lassan villogni
kezd. Ez azt jelzi, hogy a robotporszívó töltése folyamatban van.
4 Amikor az akkumulátor teljesen feltöltődött, a start/stop gomb folyamatosan világít.
A szoba előkészítése a tisztításhoz
Mielőtt elindítaná a robotporszívó a tisztító munkamenetét, távolítson el a padlóról minden laza és
törékeny tárgyat (ábra 19).
Távolítson el a padlóról minden kábelt és vezetéket is.
A robotporszívó használata
Indítás és leállítás
1 Nyomja meg a start/stop gombot.
-
A start/stop gombot a roboton (ábra 20) is megnyomhatja,
-
, de megnyomhatja a távvezérlő (ábra 21) start/stop gombját is.
2 A start/stop gomb folyamatosan be van kapcsolva, és a robotporszívó elkezdi a tisztítást (ábra 22).
3 A robotporszívó mindaddig automatikus takarítási üzemmódban működik, amíg az akkumulátor le
nem merül. Az automatikus takarítási üzemmódban ismételten végrehajtja a Z mintából, a
véletlenszerű, a falkövető és a spirál mintából álló sorozat (ábra 23) mozdulatait.
Megjegyzés: Az egyes üzemmódok kiválasztásához nyomja meg a távvezérlőn az üzemmód
gombok egyikét. További részletekért lásd a „Takarítási üzemmód kiválasztása” című részt.
4 Ha az akkumulátor lemerült, a start/stop gomb jelzőfénye villogni kezd, és a robotporszívó
megkeresi a dokkolóegységet, hogy feltöltődjön (ábra 17).
5 A start/stop gomb megnyomásával meg is szakíthatja vagy leállíthatja a takarítási folyamatot. Ha
ismét megnyomja a start/stop gombot, és az akkumulátor még mindig elegendő energiával
rendelkezik, a robotporszívó automatikus takarítási üzemmódban folytatja a takarítást.
6 Ha azt akarja, hogy a robotporszívó visszatérjen a dokkolóegységre, mielőtt az akkumulátor
lemerülne, nyomja meg a távvezérlőn a dokkolás gombot (ábra 24).
A start/stop gomb villogni kezd, és a robotporszívó megkeresi a dokkolóegységet (ábra 25).
Megjegyzés: Ha a robotot nem a dokkolóegységről indította, az nem tér oda vissza automatikusan,
ha az akkumulátor töltöttségi szintje alacsony. Ha az akkumulátor még mindig elegendő energiával
rendelkezik, a távvezérlő dokkolás gombját megnyomva visszatérítheti a robotot a
dokkolóegységre. Ha az akkumulátor teljesen lemerült, manuálisan kell felhelyeznie a robotot a
dokkolóegységre.
Page 43

Magyar
43
A dokkolóegység működtetése
A dokkolóegységnek két vezérlőeleme van, amelyekkel a robotporszívó működtethető.
Indítás az akkumulátor teljes feltöltése esetén gomb
Ha a robotporszívó töltése közben megnyomja az Indítás az akkumulátor teljes feltöltöttsége esetén
gombot, a robotporszívó elkezdi a tisztítást, amint az akkumulátor teljesen feltöltődött (ábra 26).
24h gomb
Ha a dokkolóegységen megnyomja a 24h gombot, a dokkolóegység elkezdi a 24 óra
visszaszámlálását a következő tisztítási folyamatig. Ha a visszaszámlálás befejeződött, a robotporszívó
elkezdi a tisztítást, amíg az akkumulátor töltöttsége alacsony nem lesz, majd automatikusan visszatér
a dokkolóegységre, hogy feltöltődjön (ábra 27).
Takarítási üzemmód kiválasztása
Takarítási üzemmód kiválasztása
Az automatikus takarítási üzemmód mellett, a robotporszívó négy önálló takarítási üzemmóddal
rendelkezik, melyek mindegyike a távvezérlőn lévő megfelelő gomb megnyomásával aktiválható.
Z mintájú üzemmód
Z mintájú üzemmódban a robotporszívó Z alakú mozdulatokból álló hurkokat rajzolva tisztítja a szoba
nagy területeit (ábra 28).
Véletlenszerű mintájú üzemmód
Ebben az üzemmódban a robotporszívó egyenes és cikkcakk mozdulatokból (ábra 29)álló vegyes
mintát rajzolva tisztítja a szobát.
Falkövető üzemmód
Ebben az üzemmódban a robotporszívó követi a szoba falait, és a falak mentén mozogva tökéletesen
megtisztítja (ábra 30)az adott területet.
Spirál mintából álló üzemmód
Ebben az üzemmódban a robotporszívó véletlenszerű mozgást végez egy kisebb területen, így
alaposan (ábra 31) megtisztítja azt.
Megjegyzés: A kézzel kiválasztott üzemmódok csak néhány percig maradnak aktívak. Ezt követően a
robotporszívó visszatér az automatikus takarítási üzemmódhoz.
Kézi vezérlés
1 A távirányító start/stop gombja felett, alatt, bal, illetve jobb oldalán található nyílgombok
segítségével irányíthatja a robotporszívó mozgását a szobában. (ábra 32)
Megjegyzés: Legyen óvatos, amikor a robotporszívót kézzel működteti magasságkülönbség vagy
lépcső közelében.
Megjegyzés: A porszívózás csak a robotporszívó előre történő haladása közben történik, illetve az
oldalsó kefék is csak ekkor működnek. A balra, jobbra és hátra gombok csak a robotporszívó
irányítására szolgálnak.
Page 44

44
Magyar
A takarítási idő gombjának használata
Nyomja meg a takarítási idő gombot a távvezérlőn, hogy a robotporszívó 35 percig takarítson. Ha a
robotporszívó befejezte a takarítást, visszatér a dokkolóegységre, hogy feltöltődjön (ábra 33).
A bekapcsológomb használata
A bekapcsológomb „off” (kikapcsolt) helyzetbe állítása mélyalvó üzemmódba helyezi a
robotporszívót. Ebben az állapotban a robotporszívó nem reagál.
-
Ha tölteni szeretné a robotporszívót, akkor „on” (bekapcsolt) helyzetbe kell nyomnia
bekapcsológombot.
-
Ha a robotporszívó mélyalvó üzemmódba lépett a használat során, akkor úgy hozhatja újra
működésbe, hogy a bekapcsológombot átállítja „on” (bekapcsolt) állásba, és feltölti a
robotporszívót. Néhány másodperc múlva a robotporszívó újra reagálni fog.
-
Ha egy hónapig vagy még tovább nem fogja használni a robotporszívót, akkor az akkumulátor
védelme és az energiatakarékosság érdekében állítsa „off” (kikapcsolt) helyzetbe a
bekapcsológombot, és húzza ki a dokkolóegység vagy az adapter csatlakozóját.
Jelzőfények jelei és jelentésük
A robot kijelzője két jelzőfényt tartalmaz: a figyelmeztető jelzőfényt és a portartály-telítettség jelzőt. A
start/stop gomb fényjelzéseket ad. Az alábbi táblázat magyarázza a jelzések jelentését.
Jelzés
A start/stop gomb folyamatosan világít. A robotporszívó készen áll a takarításra.
A start/stop gomb lassan villog. A robotporszívó töltése folyamatban van.
Jelentés
A start/stop gomb gyorsan villog. A robotporszívó keresi a dokkolóegységet.
A robotporszívó akkumulátorának töltése
alacsony.
A portartály-telítettség jelző világít. Megtelt a portartály.
A figyelmeztető jelzőfény világít. A robotot felemelte, miközben az takarított.
A robotporszívó ütközője beszorult.
A kerék vagy az oldalsó kefe beszorult.
A felső fedél nincs a helyén vagy nincs
megfelelően lezárva.
A robotporszívó nem találja a dokkolóegységet.
Válasz tapssal
Ez az üzemmód akkor lép működésbe, amikor a robotporszívó alvó üzemmódba lép a következő
helyzetekben:
-
amikor egy hiba miatt abbahagyja a takarítást
-
amikor rövid takarítási időt programozott be
-
amikor 20 perc alatt nem találta meg a dokkolóegységet
Ha nem látja a robotporszívót, akkor úgy találhatja meg, hogy egyet tapsol a kezével. A robotporszívó
ekkor hangjelzéssel és a kijelzőn az összes ikon világításával válaszol.
Page 45

Magyar
Tisztítás és karbantartás
A portartály ürítése és tisztítása
Ürítse ki és tisztítsa meg a portartályt, ha a portartály-telítettség jelző folyamatosan világít.
1 Vegye le a borítást (ábra 34).
2 Húzza fel a portartály fedelének fogantyúját, és emelje ki a portartályt a tartójából (ábra 35).
Megjegyzés: Amikor eltávolítja vagy visszahelyezi a portartályt, ügyeljen arra, hogy ne sértse meg a
motor ventilátorának lapátjait.
3 Óvatosan emelje fel a portartály fedelét (1), és vegye ki a szűrőt (2) (ábra 36).
4 A szemetes fölött rázva ürítse ki a portartályt. Tisztítsa meg a szűrőt és a portartály belsejét egy
ronggyal vagy egy puha sörtéjű fogkefével. Tisztítsa meg a portartály (ábra 37) alján található
szívónyílást is.
Figyelem! Ne tisztítsa a portartályt vagy a szűrőt vízzel vagy mosogatógépben.
5 Helyezze vissza a szűrőt a portartályba (1). Tegye rá a fedelet a portartályra (2) (ábra 38).
6 Tegye vissza a portartályt a portartály-rekeszbe, és tegye vissza a felső fedelet a robotporszívóra
(ábra 39).
Figyelem! Mindig győződjön meg róla, hogy a szűrő a portartályban van. Ha a robotot úgy
használja, hogy a portartályban nincs szűrő, a motor károsodhat.
A robotporszívó tisztítása
A kiváló tisztító teljesítmény fenntartása érdekében rendszeresen tisztítsa meg a mélységérzékelőket,
a kerekeket, az oldalsó keféket és a szívónyílást.
1 Helyezze a robotot fejjel lefelé egy sima felületre.
2 Egy puha sörtéjű kefével (pl. fogkefével) távolítsa el a port és a szöszt a mélységérzékelőkről. (ábra
40)
Megjegyzés: Fontos, hogy a mélységérzékelőket rendszeresen tisztítsa. Ha az érzékelők
szennyezettek, a robotporszívó nem megfelelően észleli magasságkülönbségeket.
3 Egy puha sörtéjű kefével (pl. fogkefével) távolítsa el a port és a szöszt a az első kerékről és az
oldalsó kerekekről (ábra 41).
4 Az oldalsó kefék tisztításához fogja meg azok sörtéit, és húzza le a keféket a tengelyekről (ábra 42).
5 Egy puha kefével (pl. fogkefével) vagy ruhával) (ábra 43) távolítsa el a szöszöket, hajszálakat és
cérnaszálakat a tengelyről és az oldalkeféről.kefe (pl. fogkefe) vagy ruha (ábra 43).
6 Ellenőrizze, hogy az oldalsó kefékből és a robotporszívó aljából nem állnak-e ki éles tárgyak,
amelyek megsérthetik a padlót.
7 Miután az oldalsó keféket eltávolította tengelyükről, nyissa szét a TriActive XL szívónyílás pattintó
csatlakozóit: ehhez helyezze ujjait a nyilakkal jelölt helyre, majd húzza le a TriActive szívófejet a
robotporszívóról (ábra 44).
8 Tisztítsa meg a szívónyílást egy puha kefe (pl. egy fogkefe) (ábra 45) segítségével.
9 Távolítsa el a lerakódott szennyeződést a TriActive szívófejből (ábra 46).
10 Illessze be a TriActive szívófej kampóit a robotporszívó (ábra 47) alján található lyukakba. Nyomja
vissza a TriActive szívófejet normál helyzetbe. Győződjön meg róla, hogy a szívófej pár
milliméterrel felfelé és lefelé egyaránt elmozdítható.
45
Page 46

46
Magyar
Csere
Tartozékok rendelése
Tartozékok és pótalkatrészek vásárlásához látogasson el a www.shop.philips.com/service
weboldalra vagy forduljon Philips márkakereskedőjéhez. Fordulhat az országában működő Philips
vevőszolgálathoz is (az elérhetőségi információkat megtalálja a világszerte érvényes garancialevélen).
A szűrő cseréje
Cserélje ki a szűrőt, ha az nagyon piszkos vagy sérült. Új szűrőt a CP0108 rendelési szám alatt
rendelhet. A szűrő portartályból való kivételével, illetve visszahelyezésével kapcsolatos további
információkat lásd a „Tisztítás és karbantartás” című fejezet „A portartály ürítése és tisztítása” c.
részében.
Az oldalsó kefék cseréje
A megfelelő tisztítási eredmények biztosítása érdekében bizonyos idő után cserélje ki az oldalsó
keféket.
Megjegyzés: Mindig cserélje ki az oldalsó keféket, ha kopásra vagy sérülésre utaló jeleket tapasztal.
Javasoljuk továbbá, hogy mindkét oldalsó kefét egyszerre cserélje ki. Tartalék oldalsó keféket
készletként rendelhet az FC8013 rendelési számmal.
1 Az oldalsó kefék cseréjéhez fogja meg a régi oldalsó kefék sörtéit, és húzza le a keféket a
tengelyükről (ábra 42).
2 Nyomja az új oldalsó keféket a tengelyekre (ábra 9).
Az akkumulátor cseréje
Az akkumulátort csak szakképzett szerviztechnikus cserélheti ki. Vigye be a robotot egy hivatalos
Philips szakszervizbe, ahol az akkumulátort kicserélik, ha azt már nem lehet újra feltölteni vagy
gyorsan lemerül. Az országában működő Philips vevőszolgálat elérhetőségi adatait a világszerte
érvényes garancialevélen találhatja meg.
A távvezérlő elemének cseréje
A távvezérlő egy CR2025 típusú gombelemmel működik. Cserélje ki az elemet, ha a robotporszívó már
nem válaszol, amikor megnyomja a távvezérlő gombjait.
1 Tartsa a távvezérlőt fejjel lefelé. Nyomja meg az elemtartó kioldó gombját, és ugyanakkor
csúsztassa ki az elemtartót a távvezérlőből (ábra 48).
2 Vegye ki a lemerült elemet az elemtartóból, és helyezze be az új elemet. Ezután csúsztassa vissza
az elemtartót a távvezérlőbe (ábra 49).
Az akkumulátor eltávolítása
Figyelmeztetés: Az akkumulátort csak akkor távolítsa el, ha leselejtezi a készüléket. Az
akkumulátor eltávolítása előtt győződjön meg arról, hogy teljesen lemerült.
Az akkumulátor eltávolításához kövesse az alábbi utasításokat. Az akkumulátor eltávolításához a
robotot beviheti egy Philips szakszervizbe is. A legközelebbi szakszerviz címét a Philips
vevőszolgálatától tudhatja meg.
Page 47

Magyar
1 A robotporszívót indítsa el valahonnan a szobából, ne a dokkolóegységről.
2 Hagyja a robotot addig működni, amíg az akkumulátor teljesen le nem merül, hogy az akkumulátor
teljesen lemerüljön, mielőtt kivenné és kidobná.
3 Csavarhúzóval lazítsa ki az akkumulátortartó rekesz fedelének csavarjait, majd vegye le a fedelet
(ábra 50).
4 Emelje ki az akkumulátort, majd csatlakoztassa le (ábra 51).
5 Vigye a robotporszívót és az akkumulátort egy elektromos és elektronikus hulladékok gyűjtését
végző hulladékudvarba.
Hibaelhárítás
Ez a fejezet összefoglalja a készülékkel kapcsolatban leggyakrabban felmerülő problémákat. Ha a
hibát az alábbi útmutató segítségével nem tudja elhárítani, látogasson el a www.philips.com/support
weboldalra a gyakran felmerülő kérdések listájáért, vagy forduljon az országában illetékes
ügyfélszolgálathoz.
Hibaelhárítás
Probléma
A robotporszívó a
start/stop gomb
megnyomását követően
nem kezdi el a tisztítást.
Lehetséges ok Megoldás
Lemerült az akkumulátor. Töltse fel az akkumulátort (lásd az
„Előkészítés a használatra” című
fejezetet).
47
A robotporszívó nem
reagál, amikor
megnyomom az egyik
gombot.
A kisméretű csatlakozódugó
még mindig be van dugva a
robotporszívó
csatlakozóaljzatába.
A bekapcsológombot nem
állította „on” (bekapcsolt)
helyzetbe.
Kikapcsolta a be/kikapcsoló
gombot („off” helyzet).
A robotporszívó nem találta
meg a dokkolóegységet, és
lemerült az akkumulátora.
A robot elektromos hálózatról nem
működik, csak a saját akkumulátoráról.
Ezért használat előtt mindig válassza le
az adaptert a robotporszívóról és a
hálózatról.
Nyomja a bekapcsológombot „on”
(bekapcsolt) helyzetbe. Helyezze a
robotot a hálózatra kapcsolt
dokkolóegységre, vagy csatlakoztassa
az adapter kisebb csatlakozóját. Néhány
másodperc múlva a robot hangjelzést
ad, a kijelző pedig elkezd világítani.
Nyomja a bekapcsológombot „on”
(bekapcsolt) helyzetbe. Helyezze a
robotot a hálózatra kapcsolt
dokkolóegységre, vagy csatlakoztassa
az adapter kisebb csatlakozóját. Néhány
másodperc múlva a robot hangjelzést
ad, a kijelző pedig elkezd világítani.
Helyezze a robotot a hálózatra kapcsolt
dokkolóegységre, vagy csatlakoztassa
az adapter kisebb csatlakozóját. Néhány
másodperc múlva a robot hangjelzést
ad, a kijelző pedig elkezd világítani.
Page 48

48
Magyar
Probléma Lehetséges ok Megoldás
A figyelmeztető jelzőfény
gyorsan villog.
Az egyik vagy mindkét kerék
beszorult.
A bekapcsológombot állítsa „off”
(kikapcsolt) helyzetbe. Távolítsa el a
kerék felfüggesztésére tapadt szöszt,
hajat, cérnát vagy vezetéket.
A robotporszívó nem
tisztít megfelelően.
Az egyik vagy mindkét oldalsó
kefe beszorult.
A felső fedél nincs a helyén
vagy nincs megfelelően
lezárva.
Az ütköző beszorult. Nyomja meg a start/stop gombot.
A robotot felemelte, miközben
az takarított.
Az egyik vagy mindkét oldalsó
kefe sörtéi görbültek vagy
hajlottak.
A portartályban lévő szűrő
szennyezett.
Tisztítsa meg az oldalsó keféket (lásd a
„Tisztítás és karbantartás” című
fejezetet).
Ha a felső fedél nincs a helyén vagy
nincs megfelelően lezárva, a
robotporszívó nem működik. Helyezze
megfelelően a felső fedelet a
robotporszívóra.
Emelje fel úgy a robotot, hogy az
ütközője szabaddá váljon. Helyezze a
robotot megfelelő távolságra az
akadálytól, és nyomja meg a start/stop
gombot, hogy a robotporszívó folytassa
a takarítást.
Nyomja meg a start/stop gombot.
Helyezze a robotot a padlóra. Ezt
követően nyomja meg a start/stop
gombot, hogy a robotporszívó folytassa
a takarítást.
Egy kis időre áztassa be a keféket meleg
vízbe. Ha ennek hatására a sörték nem
nyerik vissza eredeti alakjukat, cserélje ki
az oldalsó keféket (lásd a „Csere” című
fejezetet).
Tisztítsa meg a portartályban lévő szűrőt
egy ruhával vagy egy puha sörtéjű
fogkefével. A szűrőt és a portartályt
alacsony szívóerővel működtetett
porszívóval is megtisztíthatja.
A portartály alján található
szívónyílás eltömődött.
Az első kerék a rátapadt haj és
egyéb szennyeződés miatt
beszorult.
Ha a kefével vagy a porszívóval nem
sikerül megtisztítania a szűrőt, cserélje ki
a szűrőt egy újra. Azt javasoljuk, hogy
legalább évente egyszer cserélje ki a
szűrőt.
Tisztítsa ki a szívónyílást (lásd a „Tisztítás
és karbantartás” című fejezetet).
Tisztítsa meg az első kereket (lásd a
„Tisztítás és karbantartás” című
fejezetet).
Page 49

Probléma Lehetséges ok Megoldás
A robotporszívó nagyon sötét
vagy fényes felületet tisztít,
ami elindítja a
mélységérzékelőket. Ennek
következtében a robotporszívó
szokatlan módon mozoghat.
Nyomja meg start/stop gombot, majd
helyezze a robotot a padló világosabb
színű részére. Ha a probléma itt is
fennáll, látogasson el a
www.philips.com/support weboldalra
vagy forduljon az országában működő
Philips ügyfélszolgálathoz.
Magyar
49
Az akkumulátor már nem
tölthető, vagy nagyon
gyorsan lemerül.
A távvezérlő eleme
nagyon gyorsan lemerül.
A robotporszívó körkörös
mozgással végzi a
tisztítást.
A robotporszívó nem
találja a
dokkolóegységet.
A robotporszívó olyan padlót
tisztít, amely elég erősen
visszatükrözi a napfényt. Ez
elindítja a mélységérzékelőket,
aminek következtében a
robotporszívó szokatlan
módon mozoghat.
Az akkumulátor elérte
élettartama végét.
Előfordulhat, hogy nem a
megfelelő típusú elemet
helyezte be.
A robotporszívó spirál mintájú
mozgásból álló üzemmódban
van.
A helyiségben nem áll
rendelkezésre elegendő hely
ahhoz, hogy a robotporszívó
visszatérjen a
dokkolóegységhez.
Ha szeretné megakadályozni, hogy a
napfény bevilágítson a helyiségbe,
húzza össze a függönyöket. Érdemes a
takarítást akkorra időzíteni, amikor a nap
már kevésbé süt.
Cseréltesse ki az akkumulátort egy
Philips szakszervizben (lásd a „Csere”
című fejezetet).
A távvezérlő csak CR2025 típusú
gombelemmel működik. Ha a probléma
továbbra is fennáll, látogasson el a
www.philips.com/support weboldalra,
vagy forduljon az országában működő
Philips ügyfélszolgálathoz.
Ez normális jelenség. A spirál mintájú
üzemmód akkor aktiválódik, amikor a
készülék egy erősen szennyezett
területet szeretne megtisztítani a padlón.
Ez az automatikus üzemmód része.
Körülbelül egy perc elteltével a
robotporszívó visszatér a normál
tisztítási üzemmódhoz. A spirál mintából
álló üzemmódot úgy is megszakíthatja,
ha egy másik tisztítási üzemmódot
választ ki a távirányítón.
Helyezze máshová a dokkolóegységet.
Lásd az „Előkészítés a használatra”
fejezetben „A dokkolóegység
beszerelése” részt.
A robot még mindig keresi a
dokkolóegységet.
A robotporszívót nem a
dokkolóegységről indította el.
Várjon körülbelül 20 percet, hogy a
robotporszívó visszatérjen a
dokkolóegységre.
Ha azt szeretné, hogy a robotporszívó
tisztítás után a dokkolóegységre térjen
vissza, a tisztítást a dokkolóegységről
kezdje.
Page 50

50
Polski
Wprowadzenie
Gratulujemy zakupu i witamy w gronie użytkowników produktów Philips! Aby w pełni skorzystać z
obsługi świadczonej przez firmę Philips, należy zarejestrować zakupiony produkt na stronie
www.philips.com/welcome.
Opis ogólny
1 Górna pokrywa
2 Uchwyt pokrywy pojemnika na kurz
3 Pokrywa pojemnika na kurz
4 Filtr
5 Pojemnik na kurz
6 Wentylator
7 Zderzak
8 Czujnik stacji dokującej
9 Przycisk uruchomienia/zatrzymania (do uruchomienia lub zatrzymania odkurzacza
automatycznego).
10 Wyświetlacz
11 Przełącznik zasilania (do włączania i wyłączania odkurzacza automatycznego)
12 Nasadka TriActive XL
13 Kółko przednie
14 Wałki bocznych szczotek
15 Czujniki spadku poziomu powierzchni
16 Komora baterii
17 Kółka
18 Otwór ssący
19 Szczotki boczne
20 Komora baterii
21 Pilot zdalnego sterowania
22 Mała wtyczka
23 Zasilacz
24 Stacja dokująca
Wyświetlacz i pilot zdalnego sterowania
Wyświetlacz (rys. 2):
1 Wskaźnik ostrzeżenia
2 Wskaźnik zapełnienia pojemnika na kurz
Pilot zdalnego sterowania:
1 Przyciski nawigacyjne i włącznik/wyłącznik
2 Przycisk dokowania
3 Przycisk czasu czyszczenia
4 Przyciski trybu czyszczenia
Jak działa odkurzacz automatyczny?
Co czyści odkurzacz automatyczny?
Ten odkurzacz automatyczny jest wyposażony w funkcje, które sprawiają, że doskonale nadaje się do
czyszczenia podłóg w domu.
Polski
Page 51

Polski
Ten odkurzacz automatyczny nadaje się szczególnie do czyszczenia twardych powierzchni, na
przykład drewnianych, z płytek ceramicznych bądź z linoleum. Mogą wystąpić problemy podczas
czyszczenia miękkich powierzchni, takich jak wykładziny lub dywany. W przypadku używania
odkurzacza automatycznego do czyszczenia wykładziny lub dywanu przy pierwszym użyciu należy
pozostać w jego pobliżu, aby się przekonać, czy poradzi sobie z tego rodzaju podłogą. Odkurzacz
automatyczny wymaga też nadzoru, gdy jest używany na bardzo ciemnych lub lśniących twardych
podłogach.
W jaki sposób odkurzacz automatyczny czyści podłogę?
System czyszczenia
Odkurzacz automatyczny jest wyposażony w 2-stopniowy system czyszczenia, który skutecznie
odkurza podłogi.
-
Dwie boczne szczotki wspomagają odkurzanie w rogach i wzdłuż ścian. Ułatwiają również zbieranie
brudu z podłogi i przesuwanie go w stronę otworu ssącego (rys. 3).
-
Siła ssania odkurzacza automatycznego podnosi luźny brud i przenosi go przez otwór ssący do
pojemnika na kurz (rys. 4).
Schematy odkurzania
W trybie automatycznego czyszczenia odkurzacz automatyczny stosuje sekwencję schematów
odkurzania w celu optymalnego wyczyszczenia wszystkich obszarów pomieszczenia. Używane
schematy odkurzania to:
1 Schemat (rys. 5) litery Z lub zygzak
2 Schemat (rys. 6) losowy
3 Schemat (rys. 7) podążania wzdłuż ścian
4 Schemat (rys. 8) odkurzania punktowego
W trybie automatycznego czyszczenia odkurzacz automatyczny używa tych schematów w stałej
kolejności: schemat litery Z, losowy, podążania wzdłuż ścian i punktowy.
Gdy odkurzacz automatyczny zakończy tę sekwencję schematów, zaczyna ponownie poruszać się
według schematu litery Z. Odkurzacz automatyczny będzie powtarzać tę sekwencję schematów
odkurzania pomieszczenia do czasu, gdy akumulator będzie bliski rozładowania lub do ręcznego
wyłączenia.
51
Uwaga: Można również wybrać każdy tryb oddzielnie, naciskając odpowiedni przycisk na pilocie
zdalnego sterowania. Więcej informacji można znaleźć w rozdziale „Korzystanie z odkurzacza
automatycznego” w części „Tryby czyszczenia”.
W jaki sposób odkurzacz automatyczny unika różnic
wysokości?
Odkurzacz automatyczny jest wyposażony w trzy umieszczone na spodzie czujniki spadku poziomu
powierzchni. Wykorzystuje je do wykrywania różnic wysokości, np. schodów.
Uwaga: To normalne, że odkurzacz automatyczny przesuwa się nieco poza krawędź różnicy
wysokości, ponieważ przedni czujnik spadku poziomu powierzchni znajduje się za zderzakiem.
Przestroga: W niektórych przypadkach czujniki spadku mogą nie wykryć na czas schodów lub
innych różnic wysokości. Dlatego należy uważnie monitorować odkurzacz automatyczny przy
pierwszym użyciu oraz gdy działa w pobliżu schodów lub innych miejsc, w których występują
różnice wysokości. Ważne jest, aby regularnie czyścić czujniki w celu zagwarantowania
Page 52

52
Polski
poprawnego wykrywania różnic wysokości (instrukcje zawiera rozdział „Czyszczenie i
konserwacja”).
Przed pierwszym użyciem
Montaż szczotek bocznych
1 Rozpakuj szczotki boczne i połóż odkurzacz automatyczny spodem do góry na stole lub na
podłodze.
2 Wciśnij boczne szczotki na wałki na spodzie odkurzacza automatycznego (rys. 9).
Uwaga: Zadbaj o prawidłowe umocowanie szczotek bocznych. Wciśnij je na wałek w taki sposób,
aby słychać było, że zatrzasnęły się w odpowiedniej pozycji (będzie słychać „kliknięcie”).
Wyjmowanie metki zabezpieczającej z pilota zdalnego sterowania
Pilota zdalnego sterowania jest zasilany baterią CR2025 w kształcie pastylki. Pod baterią znajduje się
metka zabezpieczająca, którą przed użyciem należy usunąć.
1 Wyjmij metkę zabezpieczającą z komory baterii pilota zdalnego sterowania (rys. 10).
Teraz pilot zdalnego sterowania jest gotowy do użycia.
Przygotowanie do użycia
Instalacja stacji dokującej
1 Włóż małą wtyczkę zasilacza do gniazda w stacji dokującej (1) i podłącz zasilacz do gniazdka
elektrycznego (2) (rys. 11).
2 Umieść stację dokującą na poziomej, równej powierzchni pod ścianą.
Uwaga: Upewnij się, że nie ma żadnych przeszkód ani różnicy wysokości 80 cm przed stacją
dokującą (rys. 12), 30 cm po jej prawej i 100 cm po jej lewej stronie.
Ważna uwaga: tryb głębokiego uśpienia
Resetowanie odkurzacza automatycznego pozostającego w trybie głębokiego uśpienia (odkurzacz nie
reaguje):
-
Ustaw wyłącznik w pozycji włączenia (rys. 13).
-
Doładuj odkurzacz. Po kilku sekundach odkurzacz zacznie ponownie reagować.
Uwaga: Odkurzacz automatyczny przechodzi w stan głębokiego uśpienia po każdym ustawieniu
przełącznika zasilania w pozycji wyłączenia i po rozładowaniu akumulatora. Akumulator może na
przykład się rozładować, jeśli odkurzacz automatyczny nie może znaleźć stacji dokującej.
Ładowanie
Przed pierwszym użyciem urządzenia i wtedy, gdy akumulator odkurzacza automatycznego się
rozładuje, czas ładowania wynosi 4 godziny.
Odkurzacz automatyczny może być ładowany na dwa sposoby:
-
Za pośrednictwem stacji dokującej — ręcznie lub automatycznie podczas użytkowania
-
Przez podłączenie bezpośrednio do sieci elektrycznej.
Page 53

Polski
Uwaga: Gdy akumulator jest w pełni naładowany, odkurzacz automatyczny może pracować nawet
przez 100 minut.
Ładowanie za pośrednictwem stacji dokującej
1 Ustaw wyłącznik w pozycji włączenia (rys. 13).
2 Umieść odkurzacz automatyczny w stacji (rys. 14) dokującej podłączonej do sieci elektrycznej.
3 Przycisk uruchomienia/zatrzymania zacznie wolno migać (rys. 15).
4 Gdy akumulator jest w pełni naładowany, przycisk uruchomienia/zatrzymania świeci w sposób
ciągły (rys. 16).
Ładowanie automatyczne podczas użytkowania
1 Gdy odkurzacz automatyczny skończy odkurzać lub gdy poziom naładowania akumulatora
spadnie do 15%, odkurzacz automatycznie szuka stacji dokującej, by naładować akumulator. Gdy
odkurzacz automatyczny szuka stacji dokującej, przycisk włączenia/wyłączenia szybko miga (rys.
17).
2 Gdy akumulator jest w pełni naładowany, przycisk uruchomienia/zatrzymania świeci w sposób
ciągły.
Uwaga: Odkurzacz automatyczny automatycznie szuka stacji dokującej tylko wtedy, gdy rozpoczął
odkurzanie, będąc na stacji dokującej.
Ładowanie bezpośrednio z sieci elektrycznej
1 Naciśnij przełącznik zasilania, aby włączyć odkurzacz automatyczny.
2 Włóż małą wtyczkę zasilacza do gniazda na odkurzaczu automatycznym (1). Podłącz zasilacz do
gniazdka elektrycznego (2) (rys. 18).
3 Gdy odkurzacz automatyczny zostanie poprawnie podłączony do sieci elektrycznej, przycisk
włączenia/wyłączenia zacznie migać bardzo wolno. To oznacza, że trwa ładowanie odkurzacza
automatycznego.
4 Gdy akumulator jest w pełni naładowany, przycisk uruchomienia/zatrzymania świeci w sposób
ciągły.
53
Przygotowanie pomieszczenia do odkurzania
Przed rozpoczęciem odkurzania za pomocą odkurzacza automatycznego należy usunąć z podłogi
(rys. 19) wszystkie luźno leżące i kruche przedmioty.
Należy też usunąć kable, przewody i sznury.
Korzystanie z odkurzacza automatycznego
Uruchamianie i zatrzymywanie
1 Naciśnij przycisk uruchomienia/zatrzymania.
-
Można nacisnąć przycisk uruchomienia/zatrzymania na odkurzaczu automatycznym (rys. 20).
-
Można również nacisnąć przycisk uruchomienia/zatrzymania na pilocie zdalnego sterowania
(rys. 21).
2 Przycisk uruchomienia/zatrzymania świeci się cały czas, a odkurzacz automatyczny rozpoczyna
odkurzanie (rys. 22).
3 Odkurzacz automatyczny działa w trybie automatycznym do czasu, aż akumulator będzie bliski
rozładowania. W trybie automatycznego czyszczenia odkurzacz powtarza sekwencję schematów
odkurzania: schemat litery Z, losowy, podążania wzdłuż ścian i punktowy (rys. 23).
Page 54

54
Polski
Uwaga: Aby wybrać konkretny schemat, naciśnij jeden z przycisków trybu na pilocie zdalnego
sterowania. Więcej szczegółowych informacji można znaleźć w sekcji „Wybór trybu czyszczenia”.
4 Gdy akumulator będzie bliski rozładowania, przycisk uruchomienia/zatrzymania zacznie migać, a
odkurzacz zacznie szukać stacji dokującej w celu naładowania (rys. 17).
5 Można również nacisnąć przycisk uruchomienia/zatrzymania aby wstrzymać/przerwać odkurzanie.
Jeśli ponownie naciśniesz przycisk uruchomienia/zatrzymania, a akumulator będzie naładowany w
wystarczającym stopniu, odkurzacz będzie kontynuował odkurzanie w trybie automatycznego
czyszczenia.
6 Aby odkurzacz automatyczny powrócił do stacji dokującej, zanim akumulator będzie bliski
rozładowania, naciśnij przycisk dokowania na pilocie zdalnego sterowania (rys. 24).
Przycisk włączenia/wyłączenia zacznie migać, a odkurzacz automatyczny zacznie szukać stacji
dokującej (rys. 25).
Uwaga: Jeśli odkurzacz automatyczny nie rozpoczął odkurzania, będąc na stacji dokującej, nie
będzie automatycznie jej szukać, gdy akumulator będzie bliski rozładowania. Jeśli akumulator
będzie zawierać wystarczającą ilość energii, można nacisnąć przycisk dokowania na pilocie
zdalnego sterowania, aby spowodować, by odkurzacz automatyczny powrócił do stacji dokującej.
Jeśli akumulator jest całkowicie rozładowany, należy ręcznie umieścić odkurzacz automatyczny na
stacji dokującej.
Obsługa stacji dokującej
Stacja dokująca zawiera dwa przyciski, za pomocą których można sterować odkurzaczem
automatycznym.
Przycisk akumulator naładowany i uruchom
W przypadku naciśnięcia przycisku akumulator naładowany i uruchom na stacji dokującej, gdy trwa
ładowanie odkurzacza automatycznego, urządzenie rozpocznie odkurzanie zaraz po pełnym (rys. 26)
naładowaniu akumulatora.
Przycisk 24h
W przypadku naciśnięcia przycisku 24h na stacji dokującej, stacja ładująca zacznie odliczać 24
godziny do rozpoczęcia następnego odkurzania. Gdy odliczanie zakończy się, odkurzacz
automatyczny zacznie odkurzanie i będzie działać do czasu, gdy akumulator będzie bliski
rozładowania, po czym automatycznie wróci do stacji dokującej w celu naładowania (rys. 27).
Wybór trybu czyszczenia
Wybór trybu czyszczenia
Oprócz automatycznego trybu czyszczenia odkurzacz automatyczny ma cztery osobne tryby
czyszczenia, które można włączyć, naciskając odpowiednie przyciski na pilocie zdalnego sterowania.
Tryb litery Z
W trybie litery Z odkurzacz automatyczny czyści podłogę, wykonując na niej pętle w kształcie litery Z,
aby odkurzyć duże powierzchnie (rys. 28).
Tryb losowy
W tym trybie odkurzacz automatyczny czyści pomieszczenie, wykonując na przemian na podłodze
ruchy po linii prostej i po skosie (rys. 29).
Page 55

Polski
Tryb podążania wzdłuż ścian
W tym trybie odkurzacz automatyczny podąża wzdłuż ścian w pomieszczeniu, aby bardzo dokładnie
odkurzyć (rys. 30) podłogę pod ścianami.
Tryb punktowy
W tym trybie odkurzacz porusza się losowo po niewielkim obszarze w celu dokładnego (rys. 31)
wyczyszczenia go.
Uwaga: Ręcznie wybrane tryby czyszczenia pozostają aktywne zaledwie przez kilka minut. Gdy ten
czas upłynie, odkurzacz przełącza się do trybu automatycznego.
Obsługa ręczna
1 Za pomocą przycisków strzałek na pilocie zdalnego sterowania, umieszczonych nad i pod
przyciskiem uruchomienia/zatrzymania oraz po jego lewej i prawej stronie, można sterować
odkurzaczem automatycznym poruszającym się po pomieszczeniu (rys. 32).
Uwaga: Zachowaj ostrożność podczas ręcznego sterowania odkurzaczem automatycznym, gdy
znajduje się w pobliżu schodów lub miejsca, w którym występuje różnica wysokości.
Uwaga: Funkcja odkurzania oraz szczotki boczne działają tylko podczas ruchu odkurzacza do
przodu. Przyciski w lewo, prawo i do tyłu służą wyłącznie do manewrowania odkurzaczem
automatycznym.
Korzystanie z przycisku czasu czyszczenia
Naciśnij przycisk czasu czyszczenia na pilocie zdalnego sterowania, aby odkurzać przez 35 minut. Gdy
upłynie czas czyszczenia, odkurzacz powróci do stacji dokującej w celu naładowania (rys. 33).
55
Używanie przełącznika zasilania
Ustawienie przełącznika zasilania w pozycji wyłączenia przełącza odkurzacz automatyczny do trybu
głębokiego uśpienia. W tym trybie odkurzacz automatyczny przestaje reagować.
-
Jeśli chcesz doładować odkurzacz automatyczny, musisz nacisnąć przełącznik zasilania do pozycji
włączenia.
-
Jeśli odkurzacz przejdzie w stan głębokiego uśpienia w czasie pracy, można uaktywnić go
ponownie, ustawiając przełącznik zasilania w pozycji włączenia i doładowując odkurzacz. Po kilku
sekundach odkurzacz zacznie ponownie reagować
-
Jeśli odkurzacz automatyczny nie będzie używany przez miesiąc lub dłużej, należy nacisnąć
przełącznik zasilania do pozycji wyłączenia i odłączyć stację dokującą lub adapter, aby chronić
akumulator i oszczędzać energię.
Sygnały i ich znaczenie
Wyświetlacz odkurzacza automatycznego ma dwa wskaźniki: wskaźnik ostrzeżenia i wskaźnik
zapełnienia pojemnika na kurz. Przycisk uruchamiania/zatrzymania wysyła sygnały świetlne. W
poniższej tabeli objaśniono znaczenie sygnałów.
Sygnał
Przycisk uruchomienia/zatrzymania świeci w
sposób ciągły.
Przycisk uruchomienia/zatrzymania miga wolno. Trwa ładowanie odkurzacza automatycznego.
Znaczenie
Odkurzacz automatyczny jest gotowy do
odkurzania.
Page 56

56
Polski
Sygnał Znaczenie
Przycisk uruchomienia/zatrzymania miga szybko. Odkurzacz automatyczny szuka stacji dokującej.
Akumulator odkurzacza automatycznego jest
bliski rozładowania.
Zapala się wskaźnik zapełnienia pojemnika na
kurz.
Zapala się wskaźnik ostrzeżenia. Odkurzacz automatyczny został podniesiony
Pojemnik na kurz jest pełny.
podczas odkurzania.
Zderzak odkurzacza automatycznego jest
zablokowany.
Kółko lub szczotka boczna jest zablokowana.
Brak górnej pokrywy lub pokrywa nie jest
prawidłowo założona.
Odkurzacz automatyczny nie możesz znaleźć
stacji dokującej.
Reakcja na klaśnięcie
Reakcja na klaśnięcie jest włączana, jeśli odkurzacz przechodzi w tryb uśpienia w następujących
sytuacjach:
-
po przerwaniu czyszczenia z powodu błędu
-
jeśli zaprogramowano krótki czas czyszczenia
-
jeśli w ciągu 20 minut nie znajdzie stacji dokującej
Jeśli nie widać odkurzacza automatycznego, można go zlokalizować za pomocą jednego klaśnięcia.
Odkurzacz zareaguje dźwiękiem i zaświeceniem wszystkich ikon na wyświetlaczu.
Czyszczenie i konserwacja
Opróżnianie i czyszczenie pojemnika na kurz
Należy opróżniać i czyścić pojemnik na kurz, gdy wskaźnik zapełnienia pojemnika na kurz świeci się w
sposób ciągły.
1 Zdejmij pokrywę (rys. 34).
2 Pociągnij za uchwyt pokrywy pojemnika na kurz i wyjmij pojemnik na kurz z komory (rys. 35).
Uwaga: Podczas wyjmowania i ponownego wkładania pojemnika na kurz uważaj, aby nie
uszkodzić łopatek wentylatora silnika.
3 Ostrożnie podnieś pokrywę pojemnika na kurz (1) i wyjmij filtr (2) (rys. 36).
4 Opróżnij pojemnik na kurz, potrząsając nim nad koszem na śmieci. Wyczyść filtr oraz wnętrze
komory szmatką lub szczoteczką do zębów o miękkim włosiu. Wyczyść też otwór ssący na spodzie
pojemnika na kurz (rys. 37).
Przestroga: Nie myj pojemnika na kurz ani filtra w wodzie ani w zmywarce.
5 Umieść filtr z powrotem w pojemniku na kurz (1). Następnie załóż pokrywkę na pojemnik na kurz (2)
(rys. 38).
Page 57

Polski
6 Umieść pojemnik na kurz z powrotem w komorze, a następnie załóż górną pokrywę na odkurzacz
automatyczny (rys. 39).
Przestroga: Zawsze sprawdzaj, czy w pojemniku na kurz znajduje się filtr. Używanie odkurzacza
automatycznego bez filtra w pojemniku na kurz spowoduje zniszczenie silnika.
57
Czyszczenie odkurzacza automatycznego
Aby zapewnić dobre działanie odkurzacza, trzeba od czasu do czasu czyścić czujniki spadku poziomu
powierzchni, kółka, szczotki boczne i otwór ssący.
1 Połóż odkurzacz automatyczny spodem do góry na płaskiej powierzchni.
2 Za pomocą szczotki o miękkim włosiu (np. szczoteczki do zębów) usuń brud i kurz z czujników
spadku (rys. 40).
Uwaga: Regularne czyszczenie czujników spadku jest bardzo ważne. Jeśli czujniki spadku będą
brudne, odkurzacz automatyczny może nie wykryć schodów lub innych różnic wysokości.
3 Za pomocą szczotki o miękkim włosiu (np. szczoteczki do zębów) usuń brud i kurz z kółka
przedniego i kółek bocznych (rys. 41).
4 Aby wyczyścić szczotki boczne, chwyć je za włosie i zdejmij z wałków (rys. 42).
5 Za pomocą miękkiej szczotki (np. szczoteczki do zębów) lub szmatki (rys. 43) usuń kurz, włosy i nitki
z wałka i szczotki bocznej.szczotka (np. szczotka do zębów) lub szmatka (rys. 43).
6 Sprawdź, czy w szczotkach bocznych i na spodzie odkurzacza automatycznego nie znajdują się
żadne ostre przedmioty, które mogłyby uszkodzić podłogę.
7 Po zdjęciu szczotek bocznych z wałków rozepnij zatrzaski nasadki TriActive XL, wkładając palce w
miejscach oznaczonych strzałkami i wyciągając nasadkę TriActive XL z odkurzacza (rys. 44).
8 Za pomocą szczotki o miękkim włosiu (np. szczoteczki do zębów) (rys. 45) oczyść otwór ssący.
9 Usuń wszelkie widoczne zabrudzenia z nasadki TriActive (rys. 46).
10 Wsuń haczyki zatrzasków nasadki TriActive w otwory u dołu odkurzacza automatycznego (rys. 47).
Wepchnij nasadkę TriActive na miejsce. Sprawdź, czy nasadka może się swobodnie poruszać kilka
milimetrów w górę i w dół.
Wymiana
Zamawianie akcesoriów
Akcesoria i części zamienne można kupić na stronie www.shop.philips.com/service lub u sprzedawcy
produktów firmy Philips. Można też skontaktować się z Centrum Obsługi Klienta firmy Philips w swoim
kraju (dane kontaktowe znajdują się w ulotce gwarancyjnej).
Wymiana filtra
Wymień filtr, jeśli uległ uszkodzeniu lub jest bardzo brudny. Nowy filtr można zamówić, podając
numer FC8012. Instrukcje dotyczące wyjmowania filtra i wkładania go do pojemnika na kurz można
znaleźć w części „Opróżnianie i czyszczenie pojemnika na kurz” w rozdziale „Czyszczenie i
konserwacja”.
Wymiana szczotek bocznych
Aby urządzenie działało skutecznie, po pewnym czasie należy wymienić szczotki boczne.
Page 58

58
Polski
Uwaga: Wymień szczotki boczne, gdy zauważysz jakiekolwiek oznaki zużycia lub uszkodzenia.
Zalecamy jednoczesną wymianę obu szczotek bocznych. Szczotki boczne można zamawiać w
zestawach, podając numer FC8013.
1 Aby wymienić szczotki boczne, chwyć je za włosie i zdejmij z wałków (rys. 42).
2 Wciśnij nowe szczotki boczne na wałki (rys. 9).
Wymiana akumulatora
Akumulator mogą wymienić jedynie uprawieni inżynierowie serwisu. Jeśli akumulator nie daje się
naładować albo szybko się rozładowuje, przekaż odkurzacz automatyczny do autoryzowanego
centrum serwisowego firmy Philips, gdzie akumulator zostanie wymieniony. Informacje na temat
kontaktu z Centrum Obsługi Klienta firmy Philips w swoim kraju możesz znaleźć w ulotce
gwarancyjnej.
Wymiana baterii pilota zdalnego sterowania
Pilota zdalnego sterowania jest zasilany baterią CR2025 w kształcie pastylki. Wymień baterię pilota,
gdy odkurzacz automatyczny nie reaguje na naciskanie przycisków na pilocie.
1 Trzymaj pilot zdalnego sterowania do góry nogami. Naciśnij przycisk zwalniający baterię i w tym
samym czasie wysuń uchwyt baterii z pilota zdalnego sterowania (rys. 48).
2 Wyjmij wyczerpaną baterię i umieść w uchwycie nową. Wsuń uchwyt baterii do pilota zdalnego
sterowania (rys. 49).
Wyjmowanie akumulatora
Ostrzeżenie: Przed wyrzuceniem zużytego urządzenia należy wyjąć z niego jedynie
akumulator. Usuwając akumulator, należy upewnić się, że jest on całkowicie
rozładowany.
Aby wyjąć akumulator, postępuj zgodnie z poniższymi instrukcjami. Możesz także oddać odkurzacz
automatyczny do centrum serwisowego firmy Philips i zlecić wyjęcie akumulatora. Skontaktuj się z
Centrum Obsługi Klienta firmy Philips w swoim kraju, aby uzyskać adres najbliższego centrum
serwisowego.
1 Uruchom odkurzacz, zaczynając od dowolnego miejsca w pomieszczeniu, ale nie od stacji
dokującej.
2 Pozostaw odkurzacz automatyczny włączony aż do całkowitego rozładowania akumulatora, aby
mieć pewność, że akumulator jest całkowicie rozładowany przed jego wyjęciem i wyrzuceniem.
3 Odkręć śruby i komory akumulatora i zdejmij pokrywkę (rys. 50).
4 Wyjmij akumulator i rozłącz go (rys. 51).
5 Zanieś odkurzacz i akumulator do punktu zbiórki śmieci elektrycznych i elektronicznych.
Rozwiązywanie problemów
W tym rozdziale opisano najczęstsze problemy, z którymi można się zetknąć, korzystając z
urządzenia. Jeśli poniższe wskazówki okażą się niewystarczające do rozwiązania problemu, odwiedź
stronę www.philips.com/support, na której znajduje się lista często zadawanych pytań, lub skontaktuj
się z Centrum Obsługi Klienta w swoim kraju.
Page 59

Rozwiązywanie problemów
Problem
Odkurzacz automatyczny
nie rozpoczyna
odkurzania, gdy
naciskam przycisk
uruchomienia/zatrzyma
nia.
Prawdopodobna
przyczyna
Akumulator jest rozładowany. Naładuj akumulator (patrz rozdział
Rozwiązanie
„Przygotowanie do użycia”).
Polski
59
Odkurzacz automatyczny
nie reaguje, gdy
naciskam jeden z
przycisków.
Wskaźnik ostrzeżenia
miga szybko.
Mała wtyczka nadal znajduje
się w gnieździe odkurzacza
automatycznego.
Przełącznik zasilania nie
znajduje się w pozycji
„włączenia” (I).
Wyłącznik został ustawiony w
pozycji wyłączenia.
Odkurzacz automatyczny nie
może znaleźć stacji dokującej,
a akumulator wyczerpał się.
Jedno lub oba kółka są
zablokowane.
Odkurzacz automatyczny nie działa, gdy
jest podłączony do gniazda
zasilającego. Odkurzacz automatyczny
działa wyłącznie, gdy jest zasilany z
akumulatora. Dlatego przed użyciem
zawsze odłącz zasilacz od odkurzacza i
od sieci elektrycznej.
Naciśnij przełącznik do pozycji
włączenia. Umieść odkurzacz na
podłączonej do zasilania stacji dokującej
lub podłącz małą wtyczkę adaptera. Po
kilku sekundach odkurza wygeneruje
dźwięk, a wyświetlacz zaświeci się.
Naciśnij przełącznik do pozycji
włączenia. Umieść odkurzacz na
podłączonej do zasilania stacji dokującej
lub podłącz małą wtyczkę adaptera. Po
kilku sekundach odkurza wygeneruje
dźwięk, a wyświetlacz zaświeci się.
Umieść odkurzacz na podłączonej do
zasilania stacji dokującej lub podłącz
małą wtyczkę adaptera. Po kilku
sekundach odkurza wygeneruje dźwięk,
a wyświetlacz zaświeci się.
Ustaw przełącznik zasilania w pozycji
wyłączenia. Usuń kurz, włosy, nitki lub
przewód, który zakręcił się wokół
zawieszenia kółka.
Jedna lub obie szczotki
boczne są zablokowane.
Brak górnej pokrywy lub
pokrywa nie jest prawidłowo
założona.
Wyczyść szczotki boczne (patrz rozdział
„Czyszczenie i konserwacja”).
Gdy brak górnej pokrywy lub pokrywa
nie jest prawidłowo założona, odkurzacz
nie będzie działać. Umieść prawidłowo
górną pokrywę na odkurzaczu.
Page 60

60
Polski
Problem Prawdopodobna
przyczyna
Zderzak jest zablokowany. Naciśnij przycisk
Odkurzacz automatyczny
został podniesiony podczas
odkurzania.
Odkurzacz automatyczny
nie odkurza dobrze.
Włosie jednej lub obu szczotek
bocznych jest krzywe lub
zgięte.
Filtr w pojemniku na kurz jest
brudny.
Rozwiązanie
uruchomienia/zatrzymania. Unieś
odkurzacz automatyczny, aby uwolnić
zderzak. Odsuń odkurzacz
automatyczny od przeszkody i naciśnij
przycisk uruchomienia/zatrzymania, aby
wznowić odkurzanie.
Naciśnij przycisk
uruchomienia/zatrzymania. Umieść
odkurzacz na podłodze. Następnie
przycisk uruchomienia/zatrzymania, aby
wznowić odkurzanie.
Zanurz na chwilę szczotkę lub szczotki w
ciepłej wodzie. Jeśli nie spowoduje to
przywrócenia prawidłowego kształtu
włókien, wymień szczotki boczne (patrz
rozdział „Wymiana”).
Wyczyść filtr w pojemniku na kurz za
pomocą szmatki lub szczoteczki do
zębów o miękkim włosiu. Filtr i pojemnik
na kurz można też oczyścić zwykłym
odkurzaczem, stosując niską siłę ssącą.
Jeśli filtra nie da się wyczyścić za
pomocą szczotki lub odkurzacza,
wymień filtr na nowy. Zalecamy
wymianę filtra przynajmniej raz w roku.
Otwór ssący na spodzie
pojemnika na kurz jest
zapchany.
Kółko przednie jest
zablokowane przez włosy lub
inne zabrudzenia.
Odkurzacz automatyczny
odkurza bardzo ciemną lub
lśniącą powierzchnię, co
powoduje aktywację czujników
spadku poziomu powierzchni.
Z tego powodu odkurzacz
automatyczny porusza się w
nietypowy sposób.
Wyczyść otwór ssący (patrz rozdział
„Czyszczenie i konserwacja”).
Wyczyść kółko przednie (patrz rozdział
„Czyszczenie i konserwacja”).
Naciśnij przycisk
uruchomienia/zatrzymania, a następnie
przesuń odkurzacz na jaśniejszy
fragment podłogi. Jeśli problem dalej
będzie występować na jaśniejszym
fragmencie podłogi, odwiedź stronę
internetową www.philips.com/support
lub skontaktuj się z Centrum Obsługi
Klienta w swoim kraju.
Page 61

Polski
61
Problem Prawdopodobna
przyczyna
Odkurzacz automatyczny
czyści podłogę, która mocno
odbija promienie słoneczne.
Aktywuje to czujniki spadku
poziomu powierzchni i
powoduje, że odkurzacz
automatyczny porusza się w
nietypowy sposób.
Nie można już
naładować akumulatora
lub akumulator bardzo
szybko się rozładowuje.
Bateria w pilocie
zdalnego sterowania
zbyt szybko się
rozładowuje.
Odkurzacz automatyczny
porusza się po okręgach.
Okres eksploatacji
akumulatora dobiegł końca.
Być może nie włożono baterii
odpowiedniego typu.
Odkurzacz automatyczny jest
w trybie czyszczenia
punktowego.
Rozwiązanie
Zasuń zasłony, aby światło słoneczne
nie wpadało do pomieszczenia. Możesz
także rozpocząć odkurzanie, gdy światło
słoneczne jest słabsze.
Zleć wymianę akumulatora centrum
serwisowemu firmy Philips (patrz
rozdział „Wymiana”).
Do zasilania pilota zdalnego sterowania
potrzebna jest bateria CR2025 w
kształcie pastylki. Jeśli problem się
utrzymuje, przejdź do strony
internetowej www.philips.com/support
lub skontaktuj się z Centrum Obsługi
Klienta w swoim kraju.
Jest to zjawisko normalne. Tryb
czyszczenia punktowego może zostać
uaktywniony, gdy zostanie wykryta
mocno zabrudzona podłoga. Jest to
także część automatycznego trybu
czyszczenia. Po około minucie
odkurzacz zaczyna działać według
normalnego schematu czyszczenia.
Możesz przerwać tryb czyszczenia
punktowego, wybierając inny tryb za
pomocą pilota zdalnego sterowania.
Odkurzacz automatyczny
nie możesz znaleźć stacji
dokującej.
W pomieszczeniu nie ma dość
miejsca, aby odkurzacz mógł
dojechać do stacji dokującej.
Odkurzacz cały czas aktywnie
poszukuje stacji dokującej.
Odkurzacz automatyczny nie
został uruchomiony, gdy
znajdował się na stacji
dokującej.
Spróbuj ustawić stację dokującą w
innym miejscu. Patrz część „Instalacja
stacji dokującej” w rozdziale
„Przygotowanie do użycia”.
Daj odkurzaczowi jakieś 20 minut na
powrót do stacji dokującej.
Jeśli chcesz, aby odkurzacz
automatycznie powrócił do stacji
dokującej po zakończeniu czyszczenia,
uruchom go, gdy znajduje się na stacji
dokującej.
Page 62

62
Română
Introducere
Felicitări pentru achiziţie şi bun venit la Philips! Pentru a beneficia pe deplin de asistenţa oferită de
Philips, înregistraţi-vă produsul la www.philips.com/welcome.
Descriere generală
1 Capac superior
2 Mânerul capacului pentru compartimentul pentru praf
3 Capac pentru compartimentul pentru praf
4 Filtru
5 Compartiment pentru praf
6 Ventilator
7 Amortizor
8 Senzor staţie de andocare
9 Buton Start/stop (pentru pornirea şi oprirea robotului)
10 Afişaj
11 Comutator alimentare (pentru pornirea şi oprirea robotului)
12 Cap de aspirare TriActive XL
13 Roată frontală
14 Axe perii laterale
15 Senzori de deplasare
16 Compartiment pentru baterii
17 Roţi
18 Orificiu de aspirare
19 Perii laterale
20 Suport pentru baterie
21 Telecomandă
22 Conector mic
23 Adaptor
24 Staţie de andocare
Afişaj şi telecomandă
Afişaj (Fig. 2):
1 Indicator de avertizare
2 Indicator container pentru praf plin
Telecomandă:
1 Butoane de navigare şi start/stop
2 Buton de andocare
3 Buton pentru timpul de curăţare
4 Butoane pentru modul de curăţare
Cum funcţionează robotul
Ce poate curăţa robotul
Acest robot este prevăzut cu funcţii care îl transformă într-un aspirator adecvat pentru a vă ajuta să
curăţaţi podelele acasă.
Robotul este potrivit în special pentru curăţarea suprafeţelor dure, ca de exemplu, podele acoperite
cu lemn, faianţă sau linoleum. Este posibil să apară probleme la curăţarea podelelor acoperite cu
materiale moi, ca de exemplu, carpete sau covoare. Dacă utilizaţi robotul pe o carpetă sau un covor,
Română
Page 63

Română
vă rugăm să staţi în apropiere prima dată pentru a vedea dacă robotul poate acţiona pe acea
suprafaţă. Robotul necesită, de asemenea, supraveghere la utilizarea pe podele dure foarte închise la
culoare sau foarte lucioase.
Modul de curăţare al robotului
Sistem de curăţare
Robotul dispune de un sistem de curăţare din 2 trepte, pentru curăţarea eficientă a podelelor.
-
Cele două perii laterale ajută robotul să cureţe în colţuri şi de-a lungul pereţilor. De asemenea,
ajută la îndepărtarea prafului de pe podea şi la deplasare acestuia către orificiul de aspirare (Fig. 3).
-
Puterea de aspirare a robotului preia particulele de murdărie libere şi le transportă, prin orificiul de
aspirare în compartimentul pentru praf (Fig. 4).
Modele de curăţare
În modul său de curăţare automată, robotul utilizează o succesiune automată de modele de curăţare
pentru a curăţa fiecare zonă a camerei în mod optim. Modelele de curăţare pe care le utilizează sunt:
1 Modelul (Fig. 5) în Z sau zigzag
2 Modelul (Fig. 6) aleatoriu
3 Modelul (Fig. 7) după linia peretelui
4 Modelul (Fig. 8) de curăţare a unei zone
În modul de curăţare automată, robotul utilizează aceste modele într-o succesiune prestabilită:
modelul în z, modelul aleatoriu, modelul după linia peretelui şi modelul de curăţare a unei zone.
Când robotul a terminat această succesiune de modele, începe să se mişte, din nou, în modelul în Z.
Robotul continuă să utilizeze această succesiune de modele pentru a curăţa camera până când
bateria reîncărcabilă se descarcă sau până când este oprit manual.
63
Notă: Puteţi, de asemenea, să selectaţi fiecare mod individual prin apăsarea butonului corespunzător
de pe telecomandă. Pentru mai multe detalii, consultaţi capitolul „Utilizarea robotului”, secţiunea
„Moduri de curăţare”.
Cum evită robotul diferenţele de înălţime
Robotul este prevăzut, în partea inferioară, cu trei senzori de deplasare. Acesta utilizează aceşti
senzori de deplasare pentru a detecta şi evita diferenţele de nivel, ca de exemplu scările.
Notă: Este normal ca robotul să se deplaseze ușor peste marginea unei diferenţe de înălţime,
deoarece senzorul său de deplasare frontal este situat în spatele amortizorului.
Atenţie: În unele cazuri, este posibil ca senzorii de deplasare să nu detecteze o scară sau o altă
diferenţă de nivel la timp. De aceea, urmăriţi robotul cu atenţie primele dăţi când îl utilizaţi şi când
îl folosiţi lângă o scară sau o altă diferenţă de nivel. Este important să curăţaţi senzorii de
deplasare în mod regulat pentru a asigura faptul că robotul detectează diferenţele de nivel în mod
corespunzător (consultaţi capitolul „Curăţare şi întreţinere” pentru instrucţiuni).
Înainte de prima utilizare
Montarea periilor laterale
1 Despachetaţi periile laterale şi aşezaţi robotul invers pe o masă sau pe podea.
2 Apăsaţi periile laterale pe axele din partea inferioară a robotului (Fig. 9).
Page 64

64
Română
Notă: Asiguraţi-vă că montaţi periile laterale corespunzător. Apăsaţi pe ax până când auziţi că
acestea sunt blocate în poziţie cu un clic.
Îndepărtarea plăcu ei de protec ie de pe telecomandă
Telecomanda funcţionează cu o baterie în formă de monedă de tip CR2025. Bateria este protejată cu
o etichetă de protecţie care trebuie îndepărtată înainte de utilizare.
1 Trageţi eticheta de protecţie în afara compartimentului bateriei telecomenzii (Fig. 10).
Acum telecomanda este pregătită pentru utilizare.
Pregătirea pentru utilizare
Instalarea staţiei de andocare
1 Introduceţi mufa mică a adaptorului în priza staţiei de andocare (1) şi introduceţi adaptorul în priza
de perete (2) (Fig. 11).
2 Aşezaţi staţia de andocare pe o podea orizontală, lângă un perete.
Notă: Asiguraţi-vă ca nu există obstacole sau diferenţe de nivel la 80 cm în faţă, 30 cm la dreapta şi
100 cm la stânga staţiei de andocare (Fig. 12).
Observaţie importantă: mod inactivitate profundă
Procedura de resetare a robotului când acesta se află în modul inactivitate profundă (robotul nu
răspunde):
-
Setaţi comutatorul de alimentare pe poziţia „pornit” (Fig. 13).
-
Încărcaţi robotul. După câteva secunde robotul va răspunde din nou.
Notă: Robotul va intra în modul inactivitate profundă de fiecare dată când setaţi comutatorul de
alimentare pe poziţia „oprit” şi când bateria este consumată. De exemplu, bateria poate să se
consume dacă robotul nu poate să-şi găsească staţia de andocare.
Încărcare
Când efectuezi încărcarea pentru prima dată şi când bateria reîncărcabilă a robotului este goală,
durata de încărcare este de patru ore.
Robotul tău poate fi încărcat în două moduri:
-
Pe staţia de andocare, fie manual, fie în mod automat în timpul utilizării;
-
Prin conectarea robotului direct la priză.
Notă: Atunci când bateria reîncărcabilă este complet încărcată, robotul dvs. poate curăţa până la 100
de minute.
Încărcarea pe staţia de andocare
1 Setaţi comutatorul de alimentare pe poziţia „pornit” (Fig. 13).
2 Aşezaţi robotul pe staţia (Fig. 14) de andocare conectată.
3 Butonul start/stop începe să ilumineze intermitent rar (Fig. 15).
4 Când bateria reîncărcabilă este complet încărcată, butonul start/stop iluminează continuu (Fig. 16).
Page 65

Română
Încărcarea automată în timpul utilizării
1 Atunci când robotul a încheiat curăţarea sau când nivelul bateriei este de numai 15%, acesta caută
automat staţia de andocare pentru a se reîncărca. Când robotul caută staţia de andocare, butonul
start/stop iluminează intermitent rapid (Fig. 17).
2 Când bateria reîncărcabilă este complet încărcată, butonul start/stop iluminează continuu.
Notă: Robotul caută automat staţia de andocare numai când a început curăţarea de la staţia de
andocare.
Încărcarea direct de la priză
1 Apăsaţi comutatorul de alimentare pentru a porni robotul.
2 Introduceţi mufa mică a adaptorului în priza robotului (1). Introduceţi adaptorul într-o priză de
perete (2) (Fig. 18).
3 Atunci când robotul este conectat la priză corect, butonul start/stop începe să ilumineze
intermitent foarte rar. Acest lucru indică faptul că robotul se încarcă.
4 Când bateria reîncărcabilă este complet încărcată, butonul start/stop iluminează continuu.
Pregătirea camerei pentru o cursă de curăţare
Înainte de a porni robotul pentru cursa sa de curăţare, asiguraţi-vă că îndepărtaţi toate obiectele
libere și fragile de pe podea (Fig. 19).
De asemenea, îndepărtaţi toate cablurile, firele şi şnururile de pe podea.
Utilizarea robotului
65
Pornirea şi oprirea
1 Apăsaţi butonul Start/Stop.
-
Puteţi să apăsaţi butonul start/stop al robotului (Fig. 20).
-
Puteţi, de asemenea, să apăsaţi butonul start/stop al telecomenzii (Fig. 21).
2 Butonul start/stop este apăsat continuu şi robotul începe curăţarea (Fig. 22).
3 Robotul este în modul curăţare automată până când bateria se descarcă. În modul curăţare
automată, acesta urmează succesiunea model în Z, aleatoriu, după linia peretelui şi curăţare a unei
zone (Fig. 23).
Notă: Pentru a selecta un anumit mod, apăsaţi unul dintre butoanele de mod de pe telecomandă.
Consultaţi secţiunea „Selectarea modului de curăţare” pentru mai multe detalii.
4 Când bateria se descarcă, butonul start/stop începe să ilumineze intermitent şi robotul caută staţia
de andocare pentru a se reîncărca (Fig. 17).
5 Puteţi, de asemenea, să apăsaţi butonul start/stop pentru a întrerupe cursa de curăţare. Dacă
apăsaţi butonul start/stop din nou şi există suficientă energie în bateria reîncărcabilă, robotul
continuă curăţarea în modul curăţare automată.
6 Pentru a face robotul să revină la staţia de andocare înainte ca bateria reîncărcabilă să se descarce,
apăsaţi butonul de andocare de pe telecomandă (Fig. 24).
Butonul start/stop începe să lumineze intermitent şi robotul caută staţia de andocare (Fig. 25).
Notă: Dacă nu aţi pornit robotul de la staţia de andocare, acesta nu caută staţia de andocare
automat când bateria reîncărcabilă este descărcată. Dacă bateria reîncărcabilă are suficientă
energie, puteţi apăsa butonul de andocare de pe telecomandă pentru a face robotul să revină la
staţia de andocare. Dacă bateria reîncărcabilă este complet epuizată, trebuie să poziţionaţi robotul
pe staţia de andocare manual.
Page 66

66
Română
Funcţionarea staţiei de andocare
Staţia de andocare are două comenzi care pot fi utilizate pentru a utiliza robotul.
Buton baterie încărcată şi pornire
Dacă apăsaţi butonul baterie încărcată şi pornire de pe staţia de andocare în timp ce robotul se
încarcă, robotul începe curăţarea imediat ce bateria reîncărcabilă este complet încărcată (Fig. 26).
Buton 24 ore
Dacă apăsaţi butonul 24 de ore de pe staţia de andocare, staţia de andocare începe numărătoarea
inversă a 24 de ore până la următoarea cursă de curăţare. Când numărătoarea inversă este încheiată,
robotul începe curăţarea până când bateria se descarcă şi acesta revine la staţia de andocare automat
pentru reîncărcare (Fig. 27).
Selectarea modului de curăţare
Selectarea modului de curăţare
Pe lângă modul de curăţare automată, acest robot dispune de patru moduri de cură are individuale
care pot fi activate prin apăsarea butonului corespunzător de pe telecomandă.
Modul model în Z
În modul în Z, robotul curăţă prin realizarea de bucle în formă de Z în cameră pentru curăţarea unor
zone mari (Fig. 28).
Modul aleator
În acest mod, robotul curăţă camera într-un model amestecat de mişcări în linii drepte şi încrucişate
(Fig. 29).
Modul de urmărire a peretelui
În acest mod, robotul urmăreşte pereţii camerei pentru a realiza o curăţare suplimentară (Fig. 30) a
zonelor aflate de-a lungul pereţilor.
Modul de curăţare a unei zone
În acest mod, robotul se deplasează aleatoriu pe o zonă redusă pentru a curăţa acea zonă complet
(Fig. 31).
Notă: Modurile selectate manual sunt active doar timp de două minute. După aceea, robotul comută
pe modul de curăţare automată.
Ac ionarea manuală
1 Utilizaţi butoanele-săgeată de deasupra şi dedesubtul şi la stânga şi la dreapta butonului
start/stop de pe telecomandă pentru a deplasa robotul prin cameră. (Fig. 32)
Notă: Fiţi atent când conduceţi manual robotul în apropierea unor diferenţe de nivel şi scări.
Notă: Funcţia de aspirare şi periile laterale funcţionează numai când robotul este condus înainte.
Butoanele stânga, dreapta şi înapoi sunt doar pentru manevrarea robotului.
Utilizarea butonului timp de curăţare
Apăsaţi butonul timp de curăţare de pe telecomandă pentru a face robotul să cureţe timp de 35 de
minute. La terminarea timpului de curăţare, robotul revine la staţia de andocare pentru reîncărcare
(Fig. 33).
Page 67

Română
Utilizând comutatorul de alimentare.
Setarea alimentării pe poziţia „oprit” are efect intrarea robotului în modul inactivitate profundă. În
acest mod, robotul nu mai răspunde.
-
Dacă doriţi să încărcaţi robotul, trebuie să apăsaţi comutatorul de alimentare pe poziţia „pornit”.
-
Dacă robotul intră în modul inactivitate profundă în cursul utilizării, puteţi să-l reactivaţi prin setarea
comutatorului de alimentare pe poziţia „pornit” şi prin încărcarea robotului. După câteva secunde
robotul va răspunde din nou
-
Când nu utilizaţi robotul timp de o lună sau mai mult, apăsaţi comutatorul de alimentare pe poziţia
„oprit” şi deconectaţi staţia de andocare sau adaptorul pentru a proteja bateria reîncărcabilă şi
pentru a economisi energie.
Semnale şi semnificaţia acestora
Robotul are un afişaj cu două indicatoare: un indicator de avertizare şi indicatorul de umplere a
containerului de praf. Butonul start/stop oferă semnale luminoase. Tabelul de mai jos explică
semnificaţia semnalelor.
Semnal
Butonul start/stop este aprins continuu. Robotul este pregătit pentru curăţare.
Butonul start/stop luminează intermitent rar. Robotul se încarcă.
Butonul start/stop luminează intermitent rapid. Robotul caută staţia de andocare.
Semnificaţie
Bateria reîncărcabilă a robotului este descărcată.
67
Indicatorul de umplere a containerului de praf se
aprinde.
Indicatorul de avertizare se aprinde. Robotul a fost ridicat în timpul operaţiilor de
Compartimentul pentru praf este plin.
curăţare.
Amortizorul robotului este blocat.
O roată sau o perie laterală este blocată.
Capacul superior nu este prezent sau nu este
închis corespunzător.
Robotul nu poate găsi staţia de andocare.
Răspuns la bătaia din palme
Funcţia de răspuns la bătaia din palme este activată când robotul intră în modul inactiv în următoarele
situaţii:
-
când întrerupe curăţarea din cauza unei erori
-
când aţi programat un timp scurt de curăţare
-
când nu îşi poate găsi staţia de andocare în 20 de minute
Dacă nu vedeţi robotul, puteţi să-l localizaţi bătând o dată din palme. Robotul va răspunde emiţând
un sunet şi aprinzând toate pictogramele de pe afişajul său.
Page 68

68
Română
Curăţare şi întreţinere
Golirea şi curăţarea compartimentului pentru praf
Goliţi şi curăţaţi containerul de praf când indicatorul de umplere a containerului de praf este aprins
continuu.
1 Desfaceţi capacul (Fig. 34).
2 Trageţi în sus mânerul containerului de praf şi ridicaţi containerul de praf din compartimentul
containerului de praf (Fig. 35).
Notă: La scoaterea sau la reintroducerea compartimentului pentru praf, aveţi grijă să nu deterioraţi
palele ventilatorului motorului.
3 Ridicaţi cu atenţie capacul containerului de praf (1) şi extrageţi filtrul (2) (Fig. 36).
4 Scuturaţi compartimentul pentru praf deasupra unei lăzi de gunoi, pentru a-l goli. Curăţaţi filtrul şi
interiorul containerului de praf cu o cârpă sau o periuţă de dinţi cu peri moi. De asemenea, curăţaţi
orificiul de aspirare din partea inferioară a containerului de praf (Fig. 37).
Atenţie: Nu curăţaţi compartimentul pentru praf şi filtrul cu apă sau în maşina de spălat vase.
5 Puneţi filtrul la loc în containerul de praf (1). Apoi poziţionaţi capacul pe containerul de praf(2) (Fig.
38).
6 Poziţionaţi containerul înapoi în compartimentul containerului de praf şi montaţi capacul înapoi pe
robot (Fig. 39).
Atenţie: Asiguraţi-vă întotdeauna că filtrul este prezent în containerul de praf. Dacă utilizaţi
robotul fără filtru în interiorul containerului de praf, motorul acestuia va fi deteriorat.
Curăţarea robotului
Pentru a menţine performanţe de curăţare corespunzătoare, trebuie să curăţaţi din când în când
senzorii de deplasare, roţile, periile laterale şi orificiul de aspirare.
1 Întoarceţi invers robotul pe o suprafaţă plată.
2 Utilizaţi o perie cu peri moi (de ex., o periuţă de dinţi) pentru a elimina praful de pe senzorii de
deplasare. (Fig. 40)
Notă: Este important să curăţaţi în mod regulat senzorii de deplasare. Dacă senzorii de deplasare
sunt murdari, este posibil ca robotul să nu poată detecta diferenţele de nivel sau scările.
3 Utilizaţi o perie cu peri moi (de ex., o periuţă de dinţi) pentru a îndepărta praful sau scamele de pe
roata frontală şi de pe roţile laterale (Fig. 41).
4 Pentru a curăţa periile laterale, prindeţi-le de peri şi trageţi-le de pe axele acestora (Fig. 42).
5 Îndepărtaţi scamele, părul şi firele de pe axe şi de pe periile laterale cu o perie moale (de ex., o
perie de dinţi) sau cu o cârpă (Fig. 43).perie (de exemplu, o periuţă de dinţi) sau o lavetă (Fig. 43).
6 Verifică periile laterale şi partea inferioară a robotului pentru a te asigura că nu prezintă obiecte
ascuţite care ar putea deteriora podea.
7 După demontarea periilor laterale de pe axele acestora, desfaceţi conexiunile clemelor capului de
aspirare TriActive XL prin introducerea degetelor în zonele marcate cu săgeţi şi tragerea capului de
aspirare TriActive de pe robot (Fig. 44).
8 Curăţaţi orificiul de aspirare cu o perie moale (de ex., perie de dinţi) (Fig. 45).
9 Curăţaţi tot praful vizibil de pe capul de aspirare TriActive (Fig. 46).
10 Introduceţi cârligele de prindere ale capului de aspirare TriActive în orificiile din partea inferioară a
robotului (Fig. 47). Apăsaţi capul de aspirare TriActive înapoi în poziţia sa. Verificaţi dacă, capul de
aspirare se poate deplasa liber câţiva milimetri în sus şi în jos.
Page 69

Română
Înlocuirea
Comandarea accesoriilor
Pentru a cumpăra accesorii sau piese de schimb, vizitaţi www.shop.philips.com/service sau
contactaţi distribuitorul dvs. Philips local. Puteţi, de asemenea, contacta Centrul de asistenţă pentru
clienţi Philips din ţara dvs. (veţi găsi datele de contact în broşura de garanţie internaţională).
Înlocuirea filtrului
Înlocuiţi filtrul dacă acesta este foarte murdar sau deteriorat. Poţi comanda un nou filtru cu numărul
de comandă FC8012. Consultaţi „Golirea şi curăţarea containerului de praf” în capitolul „Curăţare şi
întreţinere” pentru instrucţiuni referitoare la modul de demontare a filtrului din containerul de praf şi
modul de montare a acestuia în containerul de praf.
Înlocuirea periilor laterale
Înlocuiţi periile laterale după un timp, pentru a asigura rezultate de curăţare corespunzătoare.
Notă: Înlocuiţi întotdeauna periile laterale când observaţi semne de uzură sau deteriorare. Este
recomandat, de asemenea, să înlocuiţi ambele perii laterale în acelaşi moment. Puteţi să comandaţi
perii laterale ca set cu numărul de comandă FC8013.
1 Pentru a înlocui periile laterale, prindeţi periile laterale vechi de peri şi trageţi-le de pe axe (Fig. 42).
2 Împingeţi noile perii laterale pe axe (Fig. 9).
69
Înlocuirea bateriei reîncărcabile
Bateria reîncărcabilă poate fi înlocuită doar de ingineri de service calificaţi. Duceţi robotul la un centru
de service autorizat Philips pentru a înlocui bateria, atunci când nu mai este posibilă încărcarea
acesteia sau când se descarcă rapid. Puteţi găsi detaliile de contact pentru Centrul Philips de asistenţă
clienţi din ţara dvs. în broşura de garanţie internaţională.
Înlocuirea bateriei telecomenzii
Telecomanda funcţionează cu o baterie în formă de monedă de tip CR2025. Înlocuiţi materia atunci
când robotul nu mai reac ionează când apăsaţi butoanele de pe telecomandă.
1 Ţineţi telecomanda întoarsă invers. Apăsaţi butonul de eliberare al capacului bateriei şi în acelaşi
timp glisaţi capacul bateriei de pe telecomandă (Fig. 48).
2 Îndepărtai bateria descărcată din capacul bateriei şi introduceţi o nouă baterie în capacul bateriei.
Apoi glisaţi capacul bateriei înapoi în telecomandă (Fig. 49).
Îndepărtarea bateriei reîncărcabile
Avertisment: Scoateţi bateria reîncărcabilă când aruncaţi aparatul. Asiguraţi-vă că
bateria este complet epuizată înainte de a o scoate.
Pentru a scoate bateria reîncărcabilă, urmaţi instrucţiunile de mai jos. De asemenea, puteţi duce
robotul la un centru de service Philips pentru a scoate bateria reîncărcabilă. Contactaţi Centrul Philips
de asistenţă pentru clienţi din ţara dvs. pentru a afla adresa unui centru de service din apropierea dvs.
1 Porniţi robotul dintr-o poziţie oarecare din cameră şi nu de la staţia de andocare.
Page 70

70
Română
2 Lasă robotul să funcţioneze până când bateria reîncărcabilă se descarcă, pentru a te asigura că
este complet descărcată înainte de a o scoate şi de a o casa.
3 Desfaceţi şuruburile capacului compartimentului bateriei şi demontaţi capacul (Fig. 50).
4 Ridicaţi bateria reîncărcabilă şi deconectaţi-o (Fig. 51).
5 Duceţi robotul şi bateria reîncărcabilă la un punct de colectare pentru deşeuri electrice şi
electronice.
Depanare
Acest capitol rezumă cele mai frecvente probleme care pot surveni la utilizarea aparatului. Dacă nu
puteţi rezolva problema cu ajutorul informaţiilor de mai jos, accesaţi www.philips.com/support pentru
o listă de întrebări frecvente sau contactaţi Centrul de asistenţă pentru clienţi din ţara dvs.
Depanare
Problemă
Robotul nu începe
curăţarea când apăs
butonul start/stop.
Cauză posibilă Soluţie
Bateria reîncărcabilă este
goală.
Încarcă bateria reîncărcabilă (consultă
capitolul „Pregătirea pentru utilizare”).
Robotul nu răspunde
atunci când apăs unul
dintre butoane.
Indicatorul de
avertisment luminează
intermitent, cu frecvenţă
mare.
Mica fişă este în continuare
introdusă în priza de la robot.
Comutatorul de alimentare nu
este în poziţia „pornit” (I).
Aţi setat comutatorul de
pornire/oprire pe poziţia
„oprit”.
Robotul nu a putut găsi staţia
de andocare şi bateria s-a
consumat.
Una sau ambele roţi sunt
blocate.
Robotul nu funcţionează cu energie de
la prize. Funcţionează numai pe baza
bateriei sale reîncărcabile. De aceea,
deconectaţi întotdeauna adaptorul de la
robot şi de la priză înainte de utilizare.
Apăsaţi comutatorul de alimentare pe
poziţia „pornit”. Poziţionaţi robotul pe
staţia de andocare conectată la priză
sau cuplaţi conectorul mic al
adaptorului. După câteva secunde,
robotul emite un sunet şi afişajul se
aprinde.
Apăsaţi comutatorul de alimentare pe
poziţia „pornit”. Poziţionaţi robotul pe
staţia de andocare conectată la priză
sau cuplaţi conectorul mic al
adaptorului. După câteva secunde,
robotul emite un sunet şi afişajul se
aprinde.
Poziţionaţi robotul pe staţia de
andocare conectată la priză sau cuplaţi
conectorul mic al adaptorului. După
câteva secunde, robotul emite un sunet
şi afişajul se aprinde.
Apăsaţi comutatorul de alimentare pe
poziţia „oprit”. Îndepărtaţi scamele,
părul, aţele sau firele prinse în jurul
suspensiei roţii.
Page 71

Problemă Cauză posibilă Soluţie
Una sau ambele perii laterale
sunt blocate.
Curăţă periile laterale (consultă capitolul
„Curăţarea şi întreţinerea”).
Română
71
Robotul nu curăţă
corespunzător.
Capacul superior nu este
prezent sau nu este închis
corespunzător.
Amortizorul este blocat. Apăsaţi butonul Start/Stop. Ridicaţi
Robotul a fost ridicat în timpul
operaţiilor de curăţare.
Perii uneia sau ambelor perii
laterale sunt îndoiţi sau
deformaţi.
Filtrul din compartimentul
pentru praf este murdar.
Când capacul superior lipseşte sau nu
este închis corespunzător, robotul nu
funcţionează. Poziţionaţi corect capacul
superior pe robot.
robotul astfel încât amortizorul acestuia
să fie eliberat. Poziţionaţi robotul la
distanţă de obstacol şi apăsaţi butonul
start/stop pentru a reîncepe curăţarea.
Apăsaţi butonul Start/Stop. Puneţi
robotul pe podea. Apoi apăsaţi butonul
start/stop pentru a face robotul să
continue curăţarea.
Înmuiaţi peria sau periile în apă caldă un
timp. Dacă aceasta nu readuce perii la
forma lor corespunzătoare, înlocuiţi
periile laterale (consultaţi capitolul
„Înlocuire”).
Curăţă filtrul din compartimentul pentru
praf cu o cârpă sau cu o periuţă de dinţi
cu peri moi. Puteţi, de asemenea, să
curăţaţi filtrul şi containerul de praf cu
un aspirator de praf obişnuit la setarea
de putere de aspirare redusă.
Dacă perierea sau aspirarea nu ajută la
curăţarea filtrului, înlocuiţi filtrul cu unul
nou. Este recomandată înlocuirea
filtrului cel puţin o dată pe an.
Orificiul de aspirare din partea
inferioară a compartimentului
pentru praf este înfundat.
Roata faţă este blocată de păr
sau alte impurităţi.
Robotul curăţă o suprafaţă
foarte întunecată sau lucioasă,
ceea ce declanşează senzorii
de deplasare. Aceasta
determină robotul să se
deplaseze într-un mod
neobişnuit.
Curăţă orificiul de aspirare (consultă
capitolul „Curăţarea şi întreţinerea”).
Curăţă roata fa ă (consultă capitolul
„Curăţarea şi întreţinerea”).
Apăsaţi butonul start/stop şi apoi
deplasaţi robotul pe o zonă de culoare
mai deschisă a podelei. Dacă problema
continuă pe podele de culoare mai
deschisă, vă rugăm să vizitaţi
www.philips.com/support sau să
contactaţi Centrul de asistenţă pentru
clienţi din ţara dvs.
Page 72

72
Română
Problemă Cauză posibilă Soluţie
Robotul curăţă o podea care
reflectă puternic lumina
soarelui. Aceasta declanşează
senzorii de deplasare şi
determină robotul să se
deplaseze într-un mod
neobişnuit.
Trage perdelele pentru a nu permite
luminii solare să pătrundă în cameră.
Puteţi de asemenea să începeţi
curăţarea când soarele nu este atât de
puternic.
Bateria reîncărcabilă nu
se mai poate încărca sau
se descarcă foarte rapid.
Bateria telecomenzii se
descarcă prea repede.
Robotul se deplasează în
cercuri.
Robotul nu poate găsi
staţia de andocare.
Este posibil ca bateria
reîncărcabilă să fi ajuns la
sfârşitul duratei sale de viaţă.
Este posibil să nu fi introdus
tipul corect de baterie.
Robotul este în modul curăţare
a unei zone.
Nu există suficient spaţiu
pentru ca robotul să navigheze
către staţia de andocare.
Robotul caută încă în mod
activ.
Solicitaţi înlocuirea bateriei reîncărcabile
de către un centru de service Philips
(consultaţi capitolul „Înlocuire”).
Pentru telecomandă, aveţi nevoie de o
baterie în formă de monedă CR2025.
Dacă problema persistă, vizitaţi
www.philips.com/support sau contactaţi
Centrul de asistenţă pentru clienţi din
ţara dvs.
Acest comportament este normal.
Modul de curăţare a unei zone poate fi
activat pentru o curăţare minuţioasă
atunci când este detectată o cantitate
mare de praf pe podea. De asemenea,
acest mod este o parte a modului de
curăţare automată. După aproximativ un
minut, robotul continuă modelul său
normal de curăţare. De asemenea,
puteţi să opriţi modul de curăţare a unei
zone prin selectarea unui mod diferit de
curăţare de pe telecomandă.
Încercaţi să găsiţi un alt loc pentru staţia
de andocare. Consultaţi „Instalarea
staţiei de andocare” în capitolul
„Pregătire pentru utilizare”.
Lăsaţi robotului aproximativ 20 de
minute pentru a se întoarce la staţia de
andocare.
Robotul nu a fost pornit de la
staţia de andocare.
Dacă doriţi ca robotul să se întoarcă la
staţia de andocare după o cursă de
curăţare, porniţi-l de la staţia de
andocare.
Page 73

Slovenščina
Uvod
Čestitamo za nakup in pozdravljeni pri Philipsu! Če želite popolnoma izkoristiti podporo, ki jo ponuja
Philips, izdelek registrirajte na spletnem mestu www.philips.com/welcome.
Splošni opis
1 Zgornji pokrov
2 Ročaj pokrova posode za prah
3 Pokrov posode za prah
4 Filter
5 Posoda za prah
6 Ventilator
7 Gumijasta zaščita
8 Senzor priključne postaje
9 Gumb start/stop (zagon/ustavitev robotskega sesalnika)
10 Zaslon
11 Stikalo za vklop/izklop (vklop ali izklop robotskega sesalnika)
12 Šoba TriActive XL
13 Sprednje kolesce
14 Osi za stranski krtači
15 Senzorji za zaščito pred padci
16 Prostor za baterije
17 Kolesca
18 Sesalna odprtina
19 Stranski krtači
20 Nosilec baterije
21 Daljinski upravljalnik
22 Manjši vtič
23 Napajalnik
24 Priključna postaja
73
Zaslon in daljinski upravljalnik
Zaslon (Sl. 2):
1 Opozorilni indikator
2 Indikator polne posode za prah
Daljinski upravljalnik:
1 Tipke za pomikanje in vklop/izklop
2 Gumb za priključitev
3 Gumb za čas čiščenja
4 Gumbi za načine čiščenja
Kako deluje robotski sesalnik
Kaj robotski sesalnik čisti
Robotski sesalnik je opremljen s funkcijami, zaradi katerih je nadvse primeren za čiščenje tal v vašem
domu.
Posebej primeren je za čiščenje trdih tal, na primer lesa, ploščic ali linoleja. Pri čiščenju mehkih tal, kot
so preproge, lahko pride do težav. Če nameravate robotski sesalnik uporabiti na preprogi, ga pri prvi
Slovenščina
Page 74

74
Slovenščina
uporabi nadzirajte, da ugotovite, ali je kos takim tlom. Robotski sesalnik imejte pod nadzorom tudi, ko
ga uporabljate na zelo temnih ali svetlečih se trdih tleh.
Kako robotski sesalnik čisti
Čistilni sistem
Sesalnik je opremljen z 2-stopenjskim čistilnim sistemom za učinkovito čiščenje tal.
-
Stranski krtači pripomoreta k lažjemu čiščenju kotov in vzdolž sten. Pomagata tudi s tal odstraniti
umazanijo in jo pomakniti proti sesalni odprtini (Sl. 3).
-
Sesalna moč robotskega sesalnika pobira delce umazanije in jih prek sesalne odprtine odvaja v
posodo za prah (Sl. 4).
Vzorci čiščenja
Sesalnik v načinu samodejnega čiščenja uporablja samodejno zaporedje vzorcev čiščenja, s katerimi
optimalno očisti posamezna območja sobe. Uporablja te vzorce čiščenja:
1 Z-vzorec ali cikcakast vzorec (Sl. 5)
2 Naključni vzorec (Sl. 6)
3 Vzorec (Sl. 7) vzdolž stene
4 Vzorec (Sl. 8) za točkovno čiščenje
Sesalnik med samodejnim čiščenjem v fiksnem zaporedju uporablja te vzorce: z-vzorec, naključni
vzorec, vzorec vzdolž stene in vzorec za točkovno čiščenje.
Ko robotski sesalnik konča to zaporedje vzorcev, se začne znova gibati v Z-vzorcu. To zaporedje
vzorcev uporablja za čiščenje sobe, dokler se ne izprazni akumulatorska baterija ali ga ročno izklopite.
Opomba: S pritiskom na ustrezen gumb na daljinskem upravljalniku lahko načine izberete tudi
posamično. Za podrobnosti glejte razdelek »Načini čiščenja« v poglavju »Uporaba sesalnika«.
Kako se sesalnik izogiba višinskim razlikam
Na spodnji strani robotskega sesalnika so trije senzorji za zaščito pred padci. Z njimi zaznava višinske
razlike, kot so stopnišča, in se jim izogiba.
Opomba: Povsem običajno je, da se sesalnik premakne rahlo čez rob višinske razlike, saj je sprednji
senzor za zaščito pred padci postavljen za gumijasto zaščito.
Pozor: Senzorji za zaščito pred padci v nekaterih primerih morda ne bodo pravočasno zaznati
stopnišča ali druge višinske razlike. Robotski sesalnik zato pri prvih nekaj uporabah in v bližini
stopnišča ali drugih višinskih razlik skrbno nadzorujte. Senzorje za zaščito pred padci redno čistite,
da zagotovite pravilno zaznavanje višinskih razlik (navodila so v poglavju »Čiščenje in
vzdrževanje«).
Pred prvo uporabo
Namestitev stranskih krtač
1 Stranski krtači vzemite iz embalaže in sesalnik s spodnjo stranjo navzgor postavite na mizo ali na
tla.
2 Stranski krtači potisnite na osi na spodnji strani robotskega sesalnika (Sl. 9).
Opomba: Poskrbite, da bosta stranski krtači pravilno nameščeni. Pritisnite ju na os, da se zaskočita
v ustrezen položaj.
Page 75

Slovenščina
75
Odstranitev zaščitne folije iz daljinskega upravljalnika
Daljinski upravljalnik uporablja gumbasto baterijo CR2025. Pred uporabo morate odstraniti zaščitno
folijo baterije.
1 Zaščitno folijo povlecite iz predala za baterije daljinskega upravljalnika (Sl. 10).
Daljinski upravljalnik je nato pripravljen na uporabo.
Priprava pred uporabo
Namestitev priključne postaje
1 Manjši vtič napajalnika vstavite v vtičnico na priključni postaji (1), napajalnik pa v stensko vtičnico (2)
(Sl. 11).
2 Priključno postajo postavite na vodoravna in ravna tla ob steno.
Opomba: Poskrbite, da 80 cm pred priključno postajo ter 30 cm na desni in 100 cm na levi strani
priključne postaje (Sl. 12) ne bo ovir ali višinskih razlik.
Pomembno: način globokega mirovanja
Ponastavitev sesalnika, ko je v načinu globokega mirovanja (se ne odziva):
-
Stikalo za vklop/izklop postavite v položaj »on« (Sl. 13) (vklop).
-
Sesalnik napolnite. Po nekaj sekundah se bo spet odzival.
Opomba: Sesalnik bo v način globokega mirovanja preklopil vsakič, ko stikalo za vklop/izklop
premaknete v položaj za izklop in ko se baterija izprazni. Baterija se lahko na primer izprazni, če
sesalnik ne najde priključne postaje.
Polnjenje
Ko prvič polnite sesalnik ali ima prazno akumulatorsko baterijo, ga je treba polniti štiri ure.
Sesalnik lahko polnite na dva načina:
-
v priključni postaji, ročno ali samodejno med uporabo;
-
s priključitvijo sesalnika neposredno v električno omrežje.
Opomba: Ko je akumulatorska baterija popolnoma napolnjena, lahko sesalnik čisti največ 100 minut.
Polnjenje v priključni postaji
1 Stikalo za vklop/izklop postavite v položaj »on« (Sl. 13) (vklop).
2 Sesalnik postavite v priključno postajo (Sl. 14).
3 Gumb start/stop začne počasi utripati (Sl. 15).
4 Ko je akumulatorska baterija povsem napolnjena, gumb start/stop sveti neprekinjeno (Sl. 16).
Samodejno polnjenje med uporabo
1 Ko robotski sesalnik konča čiščenje ali pa je na voljo samo še 15 % zmogljivosti baterije, samodejno
poišče priključno postajo in se napolni. Ko išče priključno postajo, začne gumb start/stop hitro
utripati (Sl. 17).
2 Ko je akumulatorska baterija povsem napolnjena, gumb start/stop sveti neprekinjeno.
Opomba: Sesalnik samodejno išče priključno postajo samo, če je začel čiščenje iz nje.
Page 76

76
Slovenščina
Polnjenje neposredno iz omrežnega napajanja
1 Pritisnite stikalo za vklop/izklop, da vklopite robotski sesalnik.
2 Manjši vtič napajalnika vstavite v vtičnico na robotskem sesalniku (1). Napajalnik priključite v
omrežno vtičnico (2) (Sl. 18).
3 Ko je robotski sesalnik pravilno priključen na električno omrežje, začne gumb start/stop zelo počasi
utripati. To pomeni, da se sesalnik polni.
4 Ko je akumulatorska baterija povsem napolnjena, gumb start/stop sveti neprekinjeno.
Priprava prostora za čiščenje
Preden sesalnik začne čiščenje, se prepričajte, da na tleh ni raztresenih ali lomljivih predmetov (Sl. 19).
S tal odstranite tudi vse kable in žice.
Uporaba sesalnika
Zagon in zaustavitev
1 Pritisnite gumb za vklop/izklop.
-
Na sesalniku (Sl. 20) lahko pritisnete gumb start/stop.
-
Pritisnete lahko tudi gumb start/stop na daljinskem upravljalniku (Sl. 21).
2 Gumb start/stop neprekinjeno sveti in robotski sesalnik začne čistiti (Sl. 22).
3 Sesalnik čisti v načinu samodejnega čiščenja, dokler se ne izprazni baterija. V načinu samodejnega
čiščenja uporablja ponovljena zaporedja gibanja v Z-vzorcu, naključnem vzorcu, vzorcu vzdolž sten
in vzorcu za točkovno čiščenje (Sl. 23).
Opomba: Če želite izbrati posamezni način, pritisnite enega od gumbov za način na daljinskem
upravljalniku. Za več podrobnosti si oglejte razdelek »Izbira načina čiščenja«.
4 Ko je baterija skoraj prazna, začne gumb start/stop utripati in robotski sesalnik se vrne v priključno
postajo, da se napolni (Sl. 17).
5 Gumb start/stop lahko pritisnete tudi, če želite prekiniti ali ustaviti čiščenje. Če znova pritisnete
gumb start/stop in je v akumulatorski bateriji še dovolj energije, sesalnik nadaljuje čiščenje v načinu
samodejnega čiščenja.
6 Če želite, da se sesalnik vrne v priključno postajo, preden se akumulatorska baterija skoraj izprazni,
na daljinskem upravljalniku pritisnite gumb za priključitev (Sl. 24).
Gumb start/stop začne utripati in robotski sesalnik poišče priključno postajo (Sl. 25).
Opomba: Če sesalnika niste zagnali iz priključne postaje, se vanjo ne vrne samodejno, ko je
akumulatorska baterija skoraj prazna. Če je v akumulatorski bateriji še vedno dovolj energije, lahko
na daljinskem upravljalniku pritisnete gumb za priključitev, da se sesalnik vrne v priključno postajo.
Če je akumulatorska baterija popolnoma prazna, morate sesalnik ročno postaviti v priključno
postajo.
Uporaba priključne postaje
Priključna postaja ima gumba, s katerima lahko upravljate robotski sesalnik.
Gumb »full and go« (napolni in začni)
Če med polnjenjem robotskega sesalnika na priključni postaji pritisnete gumb »full and go« (napolni in
začni), robotski sesalnik začne čiščenje takoj, ko je akumulatorska baterija polna (Sl. 26).
Page 77

Slovenščina
Gumb »24h« (24 h)
Če na priključni postaji pritisnete gumb »24h« (24 h), začne odštevati 24 ur do naslednjega čiščenja.
Ko je odštevanje končano, začne robotski sesalnik čistiti, dokler ni baterija skoraj prazna, nato pa se
samodejno vrne v priključno postajo in napolni (Sl. 27).
Izbira načina čiščenja
Izbira načina čiščenja
Poleg načina samodejnega čiščenja ima ta sesalnik štiri ločene načine čiščenja, ki jih lahko vklopite s
pritiskom ustreznega gumba na daljinskem upravljalniku.
Način Z-vzorca
V načinu Z-vzorca se sesalnik po sobi premika v obliki črke Z, s čimer očisti večje površine (Sl. 28).
Naključni način
Sesalnik v tem načinu čisti sobo z mešanico premikanja naravnost in cikcakastega vzorca (Sl. 29).
Način vzdolž zidovom
Sesalnik v tem načinu sledi zidovom v sobi, s čimer zagotovi dodatno čiščenje (Sl. 30) obstenskih
območij.
Način za točkovno čiščenje
Robotski sesalnik se v tem načinu naključno pomika po majhnem območju in ga temeljito (Sl. 31)
očisti.
Opomba: Ročno izbrani načini so aktivni samo dve minuti. Robotski sesalnik po tem preklopi v način
samodejnega čiščenja.
77
Ročno upravljanje
1 Sesalnik lahko premikate po sobi (Sl. 32) s puščičnimi gumbi na daljinskem upravljalniku pod in nad
gumbom start/stop ter na njegovi levi in desni strani.
Opomba: Pri ročnem vodenju robotskega sesalnika bodite pozorni na višinske razlike in stopnice.
Opomba: Funkcija sesanja in stranski krtači delujeta samo, če se robotski sesalnik premika naprej.
Gumbi s puščicami v levo in desno ter nazaj so samo za manevriranje robotskega sesalnika.
Uporaba gumba za čas čiščenja
Na daljinskem upravljalniku pritisnite gumb za čas čiščenja, da bo sesalnik 35 minut čistil. Ko sesalnik
konča čiščenje, se vrne na polnjenje (Sl. 33) v priključno postajo.
Uporaba stikala za vklop/izklop.
Če stikalo za vklop/izklop premaknete v položaj za izklop, sesalnik preklopi v način globokega
mirovanja. Sesalnik se v tem načinu ne bo več odzival.
-
Če želite sesalnik napolniti, morate stikalo za vklop/izklop premaknite v položaj za vklop.
-
Če sesalnik med uporabo preklopi v način globokega stanja, ga lahko znova aktivirate tako, da
stikalo za vklop/izklop premaknete v položaj za vklop in napolnite sesalnik. Sesalnik se bo po nekaj
sekundah spet odzival.
-
Če sesalnika ne boste uporabljali mesec ali več, stikalo za vklop/izklop premaknite v položaj za
izklop in izključite priključno postajo, da zaščitite akumulatorsko baterijo in prihranite energijo.
Page 78

78
Slovenščina
Signali in njihov pomen
Robotski sesalnik ima zaslon z dvema indikatorjema: opozorilni indikator in indikator polne posode za
prah. Gumb start/stop prikaže svetlobne signale. Njihov pomen je pojasnjen v spodnji tabeli.
Signal
Gumb start/stop neprekinjeno sveti. Robotski sesalnik je pripravljen za čiščenje.
Gumb start/stop počasi utripa. Sesalnik se polni.
Gumb start/stop hitro utripa. Robotski sesalnik išče priključno postajo.
Sveti indikator polne posode za prah. Posoda za prah je polna.
Sveti opozorilni indikator. Sesalnik je bil dvignjen med tem, ko je čistil.
Pomen
Akumulatorska baterija je skoraj prazna.
Gumijasta zaščita sesalnika se je zataknila.
Kolesce ali stranska krtača se je zataknila.
Zgornji pokrov ni nameščen ali ni pravilno zaprt.
Sesalnik ne more najti priključne postaje.
Odziv na ploskanje
Odziv na ploskanje je omogočen, ko sesalnik v naslednjih primerih preklopi v način mirovanja:
-
ko zaradi napake neha čistiti;
-
če ste programirali kratek čas čiščenja;
-
če v 20 minutah ne najde priključne postaje.
Če sesalnika ne vidite, ga lahko poiščete tako, da enkrat zaploskate. Sesalnik se bo odzval s piskanjem
in z osvetljevanjem vseh ikon na zaslonu.
Čiščenje in vzdrževanje
Praznjenje in čiščenje posode za prah
Ko indikator polne posode za prah sveti neprekinjeno, izpraznite in očistite posodo za prah.
1 Odstranite pokrov (Sl. 34).
2 Ročaj posode za prah povlecite navzgor in jo dvignite iz prostora za posodo za prah (Sl. 35).
Opomba: Pazite, da pri odstranjevanju ali vnovičnem vstavljanju posode za prah ne poškodujete
lopatic ventilatorja motorja.
3 S posode za prah (1) previdno dvignite pokrov in odstranite filter (2) (Sl. 36).
4 Posodo za prah očistite tako, da jo stresete nad košem za smeti. Filter in notranjost posode za prah
očistite s krpo ali zobno ščetko z mehkimi ščetinami. Očistite tudi sesalno odprtino na dnu posode
(Sl. 37) za prah.
Pozor: Posode za prah in filtra ne čistite z vodo ali v pomivalnem stroju.
5 Filter namestite nazaj v posodo za prah (1). Nato na posodo (Sl. 38) za prah (2) postavite pokrov.
6 Posodo za prah znova namestite v prostor zanjo, nato pa zgornji pokrov namestite nazaj na
robotski sesalnik (Sl. 39).
Page 79

Slovenščina
Pozor: Poskrbite, da bo filter vedno v posodi za prah. Če robotski sesalnik uporabljate brez filtra
v posodi za prah, boste poškodovali motor.
Čiščenje robotskega sesalnika
Če želite ohraniti dobro učinkovitost čiščenja, občasno očistite senzorje za zaščito pred padci, kolesca,
stranski krtači in sesalno odprtino.
1 Sesalnik položite na ravno površino, tako da bo zgornja stran navzdol.
2 S krtačo z mehkimi ščetinami (npr. z zobno krtačko) odstranite prah in vlakna na senzorjih za
zaščito pred padci (Sl. 40).
Opomba: Senzorje za zaščito pred padci redno čistite. Če so senzorji za zaščito pred padci
umazani, robotski sesalnik morda ne bo zaznal razlik v višini ali stopnic.
3 S krtačo z mehkimi ščetinami (na primer z zobno krtačko) s sprednjega in stranskih kolesc (Sl. 41)
odstranite prah in vlakna.
4 Stranske krtače očistite tako, da jih primete za ščetine in jih povlečete z njihovih osi (Sl. 42).
5 Z mehko krtačo (na primer z zobno krtačko) ali krpo (Sl. 43) odstranite vlakna, lase in niti na osi in
na stranski krtači.krtačo (npr. z zobno ščetko) ali krpo (Sl. 43).
6 Preverite, ali so v stranskih krtačah ali na spodnji strani sesalnika ostri predmeti, ki bi lahko
poškodovali tla.
7 Ko stranske krtače odstranite z osi, odprite zaskočne povezave šobe TriActive XL tako, da na
mestih, označenih s puščicami, vstavite prsta in šobo TriActive povlečete z robotskega sesalnika (Sl.
44).
8 Sesalno odprtino očistite z mehko ščetko (na primer z zobno ščetko) (Sl. 45).
9 S šobe TriActive (Sl. 46) odstranite vso vidno umazanijo.
10 Zaskočne kavlje šobe TriActive vstavite v odprtine na dnu robotskega sesalnika (Sl. 47). Šobo
TriActive potisnite nazaj v ustrezen položaj. Preverite, ali se lahko šoba prosto premika nekaj
milimetrov navzgor in navzdol.
79
Zamenjava
Naročanje dodatne opreme
Dodatno opremo ali rezervne dele lahko kupite na spletni strani www.shop.philips.com/service ali pri
Philipsovem prodajalcu. Lahko se tudi obrnete na Philipsov center za pomoč uporabnikom v vaši
državi (podatki za stik so na mednarodnem garancijskem listu).
Zamenjava filtra
Zelo umazan ali poškodovan filter zamenjajte. Novega lahko naročite s številko naročila FC8012. Za
navodila, kako filter odstranite iz posode za prah in ga namestite vanjo, glejte razdelek »Praznjenje in
čiščenje posode za prah« v poglavju »Čiščenje in vzdrževanje«.
Zamenjava stranskih krtač
Po določenem času zamenjajte stranski krtači, da zagotovite učinkovito čiščenje.
Opomba: Če na stranskih krtačah opazite znake obrabe ali poškodbe, jih vedno zamenjajte.
Priporočamo tudi, da zamenjate obe krtači hkrati. Nove stranske krtače lahko naročite v kompletu s
številko naročila FC8013.
Page 80

80
Slovenščina
1 Za vnovično namestitev stranskih krtač primite stari stranski krtači za ščetine in jih povlecite z osi (Sl.
42).
2 Potisnite novi stranski krtači na osi (Sl. 9).
Zamenjava akumulatorske baterije
Akumulatorsko baterijo lahko zamenja samo ustrezno usposobljeno servisno osebje. Ko baterije ne
morete več napolniti ali se hitro izprazni, sesalnik odnesite v Philipsov pooblaščeni servisni center, da
jo zamenjajo. Podrobnosti za stik s Philipsovim centrom za pomoč uporabnikom v vaši državi so na
mednarodnem garancijskem listu.
Zamenjava baterije daljinskega upravljalnika
Daljinski upravljalnik uporablja gumbasto baterijo CR2025. Baterijo zamenjajte, ko se sesalnik ne
odziva več ob pritisku gumbov na daljinskem upravljalniku.
1 Daljinski upravljalnik obrnite navzdol. Pritisnite gumb za sprostitev na nosilcu baterije in nosilec
baterije hkrati potisnite iz daljinskega upravljalnika (Sl. 48).
2 Prazno baterijo odstranite iz nosilca baterije in vanj namestite novo baterijo. Nosilec baterije nato
potisnite nazaj v daljinski upravljalnik (Sl. 49).
Odstranitev akumulatorske baterije
Opozorilo: Akumulatorsko baterijo odstranite samo, če boste aparat zavrgli. Preden
baterijo odstranite, se prepričajte, da je popolnoma izpraznjena.
Za odstranitev akumulatorske baterije uporabite spodnji postopek. Sesalnik lahko odnesete tudi na
Philipsov pooblaščeni servis, kjer bodo odstranili akumulatorsko baterijo. Za naslov najbližjega
servisnega centra se obrnite na Philipsov center za pomoč uporabnikom v svoji državi.
1 Sesalnik zaženite nekje na sredi sobe, ne v priključni postaji.
2 Preden odstranite in zavržete akumulatorsko baterijo, se prepričajte, da je popolnoma prazna tako,
da sesalnik pustite delovati, dokler se baterija ne izprazni.
3 Odvijte vijake prostora za baterije in odstranite njegov pokrov (Sl. 50).
4 Dvignite akumulatorsko baterijo in jo izključite (Sl. 51).
5 Robotski sesalnik in akumulatorsko baterijo odnesite na zbirno točko za elektronske odpadke.
Odpravljanje težav
V tem poglavju je povzetek najpogostejših težav, ki se lahko pojavijo pri uporabi aparata. Če težave ne
morete odpraviti s spodnjimi nasveti, na strani www.philips.com/support poiščite seznam pogostih
vprašanj ali se obrnite na center za pomoč uporabnikom v svoji državi.
Odpravljanje težav
Težava
Sesalnik ne začne čistiti,
ko pritisnem gumb
start/stop.
Možni vzrok Rešitev
Akumulatorska baterija je
prazna.
Napolnite akumulatorsko baterijo
(oglejte si poglavje »Priprava za
uporabo«).
Page 81

Težava Možni vzrok Rešitev
Manjši vtič je še vedno
vstavljen v vtičnico na
sesalniku.
Robotski sesalnik ne deluje na električno
napajanje. Deluje samo na
akumulatorsko baterijo. Napajalnik pred
uporabo zato vedno izključite iz
robotskega sesalnika in električnega
omrežja.
Slovenščina
81
Sesalnik se ne odzove,
ko pritisnem enega od
gumbov.
Opozorilni indikator hitro
utripa.
Stikalo za vklop/izklop ni v
vklopljenem položaju (I).
Stikalo za vklop/izklop ste
nastavite na »off« (izklop).
Sesalnik ni našel priključne
postaje in baterija se je
izpraznila.
Eno ali obe kolesci sta se
zataknili.
Ena ali obe stranski krtači sta
se zataknili.
Zgornji pokrov ni nameščen ali
ni pravilno zaprt.
Stikalo za vklop/izklop preklopite v
položaj »on« (vklop). Sesalnik postavite
v priključeno priključno postajo ali
priključite manjši vtič napajalnika.
Sesalnik čez nekaj sekund zapiska in
zaslon zasveti.
Stikalo za vklop/izklop preklopite v
položaj »on« (vklop). Sesalnik postavite
v priključeno priključno postajo ali
priključite manjši vtič napajalnika.
Sesalnik čez nekaj sekund zapiska in
zaslon zasveti.
Sesalnik postavite v priključeno
priključno postajo ali priključite manjši
vtič napajalnika. Sesalnik čez nekaj
sekund zapiska in zaslon zasveti.
Stikalo za vklop/izklop nastavite v
izklopljen položaj. Odstranite vlakna,
lase, niti ali žice, ujete okrog vzmetenja
kolesc.
Očistite stranski krtači (oglejte si
poglavje »Čiščenje in vzdrževanje«).
Ko zgornji pokrov ni nameščen ali ni
pravilno zaprt, robotski sesalnik ne
deluje. Pravilno namestite zgornji pokrov
robotskega sesalnika.
Gumijasta zaščita se je
zataknila.
Sesalnik je bil dvignjen med
tem, ko je čistil.
Sesalnik ne čisti pravilno. Ščetine ene ali obeh stranskih
krtač so ukrivljene ali zvite.
Pritisnite gumb za vklop/izklop. Robotski
sesalnik dvignite tako, da sprostite
gumijasto zaščito. Postavite ga na
primerno razdaljo od ovire in pritisnite
gumb start/stop, da nadaljuje čiščenje.
Pritisnite gumb za vklop/izklop. Sesalnik
postavite na tla. Nato pritisnite gumb
start/stop, da nadaljuje čiščenje.
Krtačo ali krtači za nekaj časa namočite
v topli vodi. Če se krtači ne vrneta v
prvotno obliko, ju zamenjajte (oglejte si
poglavje »Zamenjava«).
Page 82

82
Slovenščina
Težava Možni vzrok Rešitev
Filter v posodi za prah je
umazan.
Filter v posodi za prah očistite s krpo ali
zobno ščetko z mehkimi ščetinami. Filter
in posodo za prah lahko očistite tudi z
navadnim sesalnikom, nastavljenim na
nizko stopnjo moči sesanja.
Če s ščetkanjem ali sesanjem ne uspete
očistiti filtra, ga zamenjajte z novim.
Priporočamo, da filter zamenjate vsaj
enkrat letno.
Akumulatorske baterije ni
več mogoče napolniti ali
pa se zelo hitro izprazni.
Baterija daljinskega
upravljalnika se prehitro
izprazni.
Sesalna odprtina na dnu
posode za prah je zamašena.
Sprednje kolesce je blokirano
zaradi las ali drugih delcev
umazanije.
Sesalnik čisti zelo temno ali
svetlečo se površino, zato se
sprožijo senzorji za zaščito
pred padci. Sesalnik se zato
premika v nenavadnem vzorcu.
Sesalnik čisti tla, ki močno
odsevajo sončno svetlobo. To
sproži senzorje za zaščito pred
padci, zato se sesalnik premika
v nenavadnem vzorcu.
Potekla je življenjska doba
akumulatorske baterije.
Morda ste vstavili napačno
vrsto baterije.
Očistite sesalno odprtino (oglejte si
poglavje "Čiščenje in vzdrževanje").
Očistite sprednje kolesce (oglejte si
poglavje "Čiščenje in vzdrževanje").
Pritisnite gumb start/stop in robotski
sesalnik premaknite na tla svetlejše
barve. Če se težava ponovi na tleh
svetlejše barve, obiščite
www.philips.com/support ali se obrnite
na center za pomoč uporabnikom v svoji
državi.
Zagrnite zavese, da zastrete sončno
svetlobo, ki vstopa v prostor. Čistiti lahko
začnete tudi, ko je sončna svetloba manj
svetla.
Akumulatorsko baterijo naj vam
zamenjajo v Philipsovem servisnem
centru (glejte poglavje »Zamenjava«).
Za daljinski upravljalnik potrebujete
gumbasto baterijo CR2025. Če težave ne
morete odpraviti, obiščite
www.philips.com/support ali se obrnite
na center za pomoč uporabnikom v svoji
državi.
Robotski sesalnik se
premika v krogih.
Robotski sesalnik je v načinu
za točkovno čiščenje.
To je običajno. Način za točkovno
čiščenje se lahko vklopi, če sesalnik na
tleh zazna veliko umazanije, ki jo je treba
temeljito očistiti. To je tudi del načina
samodejnega čiščenja. Robotski sesalnik
bo po približno eni minuti nadaljeval z
običajnim vzorcem čiščenja. Način za
točkovno čiščenje lahko izklopite tudi
tako, da na daljinskem upravljalniku
izberete drug način čiščenja.
Page 83

Težava Možni vzrok Rešitev
Sesalnik ne najde
priključne postaje.
Ni dovolj prostora, da bi
robotski sesalnik prišel do
priključne postaje.
Poskusite priključno postajo namestiti
drugam. V poglavju »Priprava pred
uporabo« si oglejte razdelek
»Namestitev priključne postaje«.
Slovenščina
83
Robotski sesalnik še vedno
aktivno išče.
Robotski sesalnik čiščenja ni
začel iz priključne postaje.
Za vrnitev v priključno postajo potrebuje
približno 20 minut.
Če želite, da se po čiščenju vrne v
priključno postajo, čiščenje začnite iz
priključne postaje
Page 84

84
Slovensky
Úvod
Gratulujeme Vám k nákupu a vítame Vás medzi zákazníkmi spoločnosti Philips! Ak chcete využiť
všetky výhody zákazníckej podpory spoločnosti Philips, zaregistrujte svoj výrobok na
www.philips.com/welcome.
Opis zariadenia
1 Vrchný kryt
2 Rukoväť veka zásobníka na prach
3 Veko zásobníka na prach
4 Filter
5 Zásobník na prach
6 Ventilátor
7 Nárazník
8 Snímač dokovacej stanice
9 Tlačidlo spustenia/zastavenia (na spustenie a zastavenie robota)
10 Displej
11 Hlavný vypínač (na zapnutie a vypnutie robota)
12 Nástavec TriActive XL
13 Predné koliesko
14 Hriadele bočných kief
15 Snímače proti pádu
16 Priečinok na batérie
17 Kolieska
18 Sací otvor
19 Bočné kefy
20 Držiak batérie
21 Diaľkové ovládanie
22 Malá koncovka
23 Adaptér
24 Dokovacia stanica
Displej a diaľkové ovládanie
Displej (Obr. 2):
1 Výstražný indikátor
2 Indikátor plného zásobníka na prach
Diaľkové ovládanie:
1 Navigačné tlačidlá a spustenie/zastavenie
2 Tlačidlo dokovania
3 Tlačidlo času na vysávanie
4 Tlačidlá režimu vysávania
Ako robot funguje
Povrchy, ktoré robot povysáva
Tento robot je vybavený funkciami, vďaka ktorým je vhodný na vysávanie podláh vo vašej
domácnosti.
Robot sa hodí najmä na vysávanie tvrdých podláh, napríklad drevených podláh, dlažby alebo linolea.
Môže mať problémy pri vysávaní mäkkých povrchov, ako sú rôzne druhy kobercov. Ak použijete
Slovensky
Page 85

Slovensky
robota na vysávanie koberca, prvý raz zostaňte nablízku, aby ste sa presvedčili, ako si robot s týmto
typom podlahy poradí. Dohľad nad činnosťou robota sa vyžaduje aj pri vysávaní veľmi tmavých alebo
lesklých tvrdých podláh.
Ako robot vysáva
Čistiaci systém
Na výkonné vysávanie podláh je robot vybavený dvojstupňovým čistiacim systémom.
-
Dve bočné kefy pomáhajú pri vysávaní v rohoch miestnosti a priestorov pozdĺž stien. Taktiež
pomáhajú uvoľniť nečistoty z podlahy a presunúť ich k saciemu otvoru (Obr. 3).
-
Sací výkon robota vysaje uvoľnené nečistoty a cez sací otvor ich nasaje do zásobníka na prach
(Obr. 4).
Vzory pohybu pri vysávaní
V režime automatického vysávania robot používa automatickú postupnosť vzorov pohybu pri
vysávaní, čo mu umožňuje optimálne povysávanie každej časti miestnosti. Robot používa nasledujúce
vzory vysávania:
1 Pohyb v tvare Z alebo kľukatý pohyb (Obr. 5)
2 Náhodný pohyb (Obr. 6)
3 Pohyb pozdĺž stien (Obr. 7)
4 Pohyb na vysávanie konkrétnych miest (Obr. 8)
V režime automatického vysávania robot využíva tieto typy pohybu v pevne stanovených
sekvenciách: pohyb v tvare Z, náhodný pohyb, pohyb popri stene a pohyb na vysávanie konkrétnych
miest.
Keď robot túto sekvenciu pohybov dokončí, znova sa začne pohybovať v tvare Z. Robot bude naďalej
používať túto sekvenciu pohybov pri vysávaní miestnosti, kým sa nabíjateľná batéria nevybije alebo
ho manuálne nevypnete.
85
Poznámka: Môžete tiež vybrať každý režim samostatne stlačením príslušného tlačidla na diaľkovom
ovládaní. Podrobnejšie informácie nájdete v kapitole „Používanie robota“ v časti „Režimy vysávania“.
Ako sa robot vyhýba výškovým rozdielom
Robot má v spodnej časti tri snímače proti pádu. Tieto snímače proti pádu používa na zisťovanie
výškových rozdielov, ako sú napríklad schody, a ich obchádzanie.
Poznámka: Je normálne, keď sa robot pohybuje mierne cez okraj výškového rozdielu, pretože jeho
predný snímač proti pádu je umiestnený za nárazníkom.
Výstraha: V niektorých prípadoch snímače proti pádu nemusia včas zaregistrovať schody či iný
výškový rozdiel. Preto robota pozorne sledujte pri prvom použití a rovnako aj v blízkosti schodov či
iného miesta s výškovým rozdielom. Je dôležité, aby ste snímače proti pádu pravidelne čistili, čím
zaistíte, aby robot naďalej správne rozpoznával výškové rozdiely (pokyny nájdete v kapitole
„Čistenie a údržba“).
Pred prvým použitím
Montáž bočných kief
1 Rozbaľte bočné kefy a robot položte spodnou stranou nahor na stôl alebo na podlahu.
2 Zatlačte bočné kefy na hriadele v spodnej časti robota (Obr. 9).
Page 86

86
Slovensky
Poznámka: Dbajte na to, aby ste bočné kefy riadne nasadili. Zatlačte ich na hriadeľ, kým
nezacvaknú na miesto.
Odstránenie ochrannej značky z diaľkového ovládania
Diaľkové ovládanie využíva plochú batériu CR2025. Táto batéria je chránená ochrannou značkou,
ktorú je treba pred použitím odstrániť.
1 Vytiahnite ochrannú značku batérie z priečinka na batériu na diaľkovom ovládači (Obr. 10).
Teraz je diaľkové ovládanie pripravené na použitie.
Príprava na použitie
Inštalácia dokovacej stanice
1 Zapojte malú koncovku adaptéra do konektora pre malú koncovku na dokovacej stanici (1)
a adaptér zasuňte do sieťovej zásuvky (2) (Obr. 11).
2 Dokovaciu stanicu umiestnite na vodorovnú, rovnú podlahu a oprite o stenu.
Poznámka: Uistite sa, že vo vzdialenosti 80 cm pred, 30 cm doprava a 100 cm doľava od dokovacej
stanice nie sú žiadne prekážky a výškové rozdiely (Obr. 12).
Dôležitá poznámka: režim hlbokého spánku
Ako resetovať robota, keď sa nachádza v režime hlbokého spánku (robot nereaguje):
-
Nastavte hlavný vypínač do polohy „zapnuté“ (Obr. 13).
-
Nabite robota. Po niekoľkých sekundách bude robot znova reagovať.
Poznámka: Robot prejde do režimu hlbokého spánku pri každom nastavení hlavného vypínača do
polohy „vypnuté“ a pri vybití batérie. Batéria sa môže vybiť napríklad vtedy, ak robot nedokáže nájsť
svoju dokovaciu stanicu.
Nabíjanie
Keď zariadenie nabíjate po prvýkrát a keď je nabíjateľná batéria robota vybitá, doba nabíjania je štyri
hodiny.
Robota možno nabíjať dvomi spôsobmi:
-
v dokovacej stanici, a to buď manuálne, alebo automaticky počas používania;
-
pripojením robota priamo do elektrickej siete.
Poznámka: Keď je nabíjateľná batéria úplne nabitá, robot dokáže vysávať až 100 minút.
Nabíjanie na dokovacej stanici
1 Nastavte hlavný vypínač do polohy „zapnuté“ (Obr. 13).
2 Robota položte na dokovaciu stanicu pripojenú do elektrickej siete (Obr. 14).
3 Tlačidlo spustenia/zastavenia sa pomaly rozbliká (Obr. 15).
4 Keď je nabíjateľná batéria úplne nabitá, tlačidlo spustenia/zastavenia nepretržite svieti (Obr. 16).
Automatické nabíjanie počas používania
1 Keď robot dokončí vysávanie alebo keď ostáva len 15 % nabitia batérie, robot automaticky vyhľadá
dokovaciu stanicu, aby sa mohol dobiť. Keď robot vyhľadáva dokovaciu stanicu, tlačidlo
spustenia/zastavenia rýchlo bliká (Obr. 17).
2 Keď je nabíjateľná batéria úplne nabitá, tlačidlo spustenia/zastavenia nepretržite svieti.
Page 87

Slovensky
Poznámka: Robot vyhľadáva dokovaciu stanicu automaticky, len ak začal vysávanie z dokovacej
stanice.
Nabíjanie priamo zo siete
1 Zapnutie vykonajte stlačením hlavného vypínača robota.
2 Malú koncovku adaptéra pripojte do konektora robota (1). Adaptér pripojte do sieťovej zásuvky (2)
(Obr. 18).
3 Keď je robot správne pripojený do siete, tlačidlo spustenia/zastavenia začne veľmi pomaly blikať.
Signalizuje, že sa robot nabíja.
4 Keď je nabíjateľná batéria úplne nabitá, tlačidlo spustenia/zastavenia nepretržite svieti.
Príprava priestoru na vysávanie
Kým spustíte vysávanie robotom, odložte všetky voľné a krehké predmety z podlahy (Obr. 19).
Z podlahy odstráňte aj všetky káble, vodiče a šnúry.
Používanie robota
Spustenie a zastavenie
1 Stlačte tlačidlo spustenia/zastavenia.
-
Môžete stlačiť tlačidlo spustenia/zastavenia na robote (Obr. 20).
-
Môžete tiež stlačiť tlačidlo spustenia/zastavenia na diaľkovom ovládaní (Obr. 21).
2 Tlačidlo spustenia/zastavenia nepretržite svieti a robot začne vysávať (Obr. 22).
3 Robot vysáva v automatickom režime, kým sa batéria takmer nevybije. V režime automatického
vysávania sa pohybuje v opakovaných sekvenciách v tvare Z, náhodným pohybom, popri stene
a pohybom na vysávanie konkrétnych miest (Obr. 23).
Poznámka: Na výber individuálneho režimu stlačte jedno z tlačidiel ovládania režimu na diaľkovom
ovládaní. Podrobnejšie informácie nájdete v časti „Výber režimu vysávania“.
4 Keď je batéria takmer vybitá, tlačidlo spustenia/zastavenia začne blikať a robot vyhľadá dokovaciu
stanicu, aby sa nabil (Obr. 17).
5 Ak chcete prerušiť alebo zastaviť vysávanie, môžete stlačiť aj tlačidlo spustenia/zastavenia na
diaľkovom ovládaní. Ak znova stlačíte tlačidlo spustenia/zastavenia a ak je k dispozícii dostatok
energie v nabíjateľnej batérii, robot pokračuje vo vysávaní v režime automatického vysávania.
6 Ak chcete, aby sa robot vrátil do dokovacej stanice skôr, ako bude nabíjateľná batéria takmer
vybitá, stlačte tlačidlo dokovania na diaľkovom ovládaní (Obr. 24).
Tlačidlo spustenia/zastavenia začne blikať, keď robot vyhľadáva dokovaciu stanicu (Obr. 25).
Poznámka: Ak ste robota nespustili z dokovacej stanice, v prípade vybitia nabíjateľnej batérie
dokovaciu stanicu nevyhľadáva automaticky. Ak má nabíjateľná batéria ešte dostatočné množstvo
energie, môžete stlačiť tlačidlo dokovania na diaľkovom ovládači a robot sa vráti do dokovacej
stanice. Ak je nabíjateľná batéria úplne vybitá, musíte robota umiestniť do dokovacej stanice
manuálne.
87
Prevádzka dokovacej stanice
Dokovacia stanica je vybavená dvoma ovládacími prvkami na prevádzku robota.
Page 88

88
Slovensky
Tlačidlo nabitej batérie a chodu
Ak stlačíte tlačidlo nabitej batérie a chodu na dokovacej stanici, kým sa robot nabíja, robot začne
vysávať hneď, ako je nabíjateľná batéria úplne nabitá (Obr. 26).
Tlačidlo 24 h
Po stlačení tlačidla 24 h na dokovacej stanici dokovacia stanica začne odpočítavať 24 hodín do
nasledujúceho vysávania. Po skončení odpočítavania robot začne vysávať. Vysávať bude až do vybitia
batérie, keď sa automaticky vráti do dokovacej stanice, aby sa mohol dobiť (Obr. 27).
Výber režimu vysávania
Výber režimu vysávania
Okrem režimu automatického vysávania má tento robot štyri samostatné režimy vysávania, ktoré je
možné aktivovať stlačením príslušného tlačidla na diaľkovom ovládaní.
Režim pohybu v tvare Z
V režime pohybu v tvare Z robot vysáva veľké plochy tak, že sa pohybuje v slučkách v tvare Z po celej
miestnosti (Obr. 28).
Režim náhodného pohybu
V tomto režime robot vysáva miestnosť rovnými a kľukatými pohybmi (Obr. 29).
Režim pohybu popri stene
V tomto režime sa robot pohybuje popri stenách miestnosti, aby dôkladne povysával oblasti popri
stenách (Obr. 30).
Režim vysávania konkrétnych miest
V tomto režime sa robot pohybuje náhodne na malej ploche, aby túto plochu dôkladne povysával
(Obr. 31).
Poznámka: Manuálne vybraté režimy sa zapnú len na niekoľko minút. Potom sa robot prepne do
režimu automatického vysávania.
Manuálne riadenie
1 Pomocou tlačidiel so šípkami nad, pod, vľavo a vpravo od tlačidla spustenia/zastavenia na
diaľkovom ovládaní navigujte robota po miestnosti. (Obr. 32)
Poznámka: Dávajte pozor počas manuálneho ovládania robota v blízkosti výškových rozdielov
alebo schodov.
Poznámka: Funkcia vysávania a bočné kefy fungujú, len keď sa robot pohybuje dopredu. Tlačidlá
doľava, doprava a dozadu slúžia len na ovládanie smeru pohybu robota.
Používanie tlačidla s časom vysávania
Po stlačení tlačidla s časom vysávania na diaľkovom ovládači bude robot vysávať 35 minút. Po
uplynutí času vysávania sa robot vráti do dokovacej stanice, aby sa dobil (Obr. 33).
Používanie hlavného vypínača
Nastavením hlavného vypínača do polohy „vypnuté“ prejde robot do režimu hlbokého spánku.
V tomto režime už robot viac nereaguje.
Page 89

Slovensky
-
Ak chcete robota nabiť, musíte stlačiť hlavný vypínač do polohy „zapnuté“.
-
Ak robot prejde počas používania do režimu hlbokého spánku, môžete ho opätovne aktivovať
nastavením hlavného vypínača do polohy „zapnuté“ a nabitím robota. Po niekoľkých sekundách
bude robot znova reagovať.
-
Ak robota nebudete mesiac alebo dlhšie používať, stlačte hlavný vypínač do polohy „vypnuté“
a odpojte dokovaciu stanicu alebo adaptér, aby ste chránili nabíjateľnú batériu a šetrili energiu.
Signály a ich význam
Robot má displej s dvoma indikátormi: výstražným indikátorom a indikátorom plného zásobníka na
prach. Tlačidlo spustenia/zastavenia využíva svetelné signály. V ďalšej tabuľke sa uvádza význam
týchto signálov.
Signál
Tlačidlo spustenia/zastavenia nepretržite svieti. Robot je pripravený na vysávanie.
Tlačidlo spustenia/zastavenia pomaly bliká. Robot sa nabíja.
Tlačidlo spustenia/zastavenia bliká rýchlo. Robot vyhľadáva dokovaciu stanicu.
Indikátor plného zásobníka na prach svieti. Je plný zásobník na prach.
Výstražný indikátor svieti. Robot ste počas vysávania zodvihli.
Význam
Nabíjateľná batéria robota je takmer vybitá.
Zasekol sa ochranný prvok robota.
Zaseklo sa koliesko alebo bočná kefa.
89
Vrchný kryt nie je nasadený alebo nie je správne
zavretý.
Robot nedokáže nájsť dokovaciu stanicu.
Odozva na tlesknutie
Odozva na tlesknutie sa aktivuje, keď robot prejde do režimu spánku v nasledujúcich situáciách:
-
keď prestane vysávať z dôvodu chyby,
-
keď ste naprogramovali krátky čas vysávania,
-
keď nedokáže v priebehu 20 minút nájsť svoju dokovaciu stanicu.
Ak robota nevidíte, môžete ho vyhľadať jedným tlesknutím rúk. Robot zareaguje pípaním
a rozsvietením všetkých ikon na displeji.
Čistenie a údržba
Vyprázdňovanie a čistenie zásobníka na prach
Vyprázdnite a vyčistite zásobník na prach, keď indikátor plného zásobníka na prach nepretržite svieti.
1 Zložte kryt (Obr. 34).
2 Zdvihnite rukoväť veka zásobníka na prach a zásobník na prach vytiahnite z priečinka zásobníka na
prach (Obr. 35).
Page 90

90
Slovensky
Poznámka: Pri vyberaní alebo opätovnom vkladaní zásobníka na prach dávajte pozor, aby ste
nepoškodili lopatky ventilátora motora.
3 Opatrne nadvihnite veko zásobníka na prach (1) a vyberte filter (2) (Obr. 36).
4 Potrasením vyprázdnite zásobník na prach do koša. Vyčistite filter vo vnútri zásobníka na prach
pomocou tkaniny alebo zubnej kefky s jemnými štetinkami. Vyčistite aj sací otvor v spodnej časti
zásobníka na prach (Obr. 37).
Výstraha: Zásobník na prach a filter nečistite vodou ani v umývačke riadu.
5 Filter vložte späť do zásobníka na prach (1). Na zásobník na prach (2) potom založte kryt (Obr. 38).
6 Zásobník na prach vložte späť do priečinka na zásobník na prach a vrchný kryt nasaďte späť na
robota (Obr. 39).
Výstraha: Vždy sa uistite, či sa v zásobníku na prach nachádza filter. V prípade používania
robota bez filtra vnútri zásobníka na prach sa poškodí motor.
Čistenie robota
Na zachovanie dobrého výkonu vysávania je potrebné z času na čas vyčistiť snímače proti pádu,
kolieska, bočné kefy a sací otvor.
1 Robota prevráťte hore dnom a položte na rovný povrch.
2 Pomocou kefky s jemnými štetinami (napr. zubnej kefky) odstráňte zo snímačov proti pádu prach
alebo chumáče prachu. (Obr. 40)
Poznámka: Pravidelné čistenie snímačov proti pádu je dôležité. V prípade, že sú snímače proti
pádu znečistené, robot nemusí správne zaregistrovať výškové rozdiely alebo schody.
3 Pomocou kefky s jemnými štetinami (napr. zubnej kefky) odstráňte z predného a bočných koliesok
prach alebo chumáče prachu (Obr. 41).
4 Keď čistíte bočné kefy, chyťte ich štetiny a vytiahnete kefy z hriadeľov (Obr. 42).
5 Pomocou jemnej kefky (napr. zubnej kefky) alebo handričky odstráňte z hriadeľa a bočnej kefy
chumáče prachu, vlasy a vlákna (Obr. 43).kefky (napr. zubnej kefky) alebo handričky (Obr. 43).
6 Skontrolujte, či na bočných kefách a spodnej časti robota nie sú žiadne ostré predmety, ktoré môžu
poškodiť podlahu.
7 Po odobratí bočných kief z hriadeľov uvoľnite spoje nástavca TriActive XL zasunutím prstov na
miesta označené šípkami a nástavec TriActive vytiahnite z robota (Obr. 44).
8 Mäkkou kefkou vyčistite sací otvor (napr. zubnou kefkou) (Obr. 45).
9 Z nástavca TriActive odstráňte všetky viditeľné nečistoty (Obr. 46).
10 Zachytávacie háčiky nástavca TriActive zasuňte do otvorov v spodnej časti robota (Obr. 47).
Nástavec TriActive zatlačte späť do určenej polohy. Skontrolujte, či sa nástavcom dá o pár
milimetrov pohybovať hore a dolu.
Výmena
Objednávanie príslušenstva
Ak chcete kúpiť príslušenstvo alebo náhradné diely, prejdite na webovú stránku
www.shop.philips.com/service alebo sa obráťte na svojho predajcu výrobkov značky Philips. Môžete
sa obrátiť aj na Stredisko starostlivosti o zákazníkov spoločnosti Philips vo svojej krajine (kontaktné
údaje nájdete v celosvetovo platnom záručnom liste).
Page 91

Slovensky
Výmena filtra
Filter vymeňte, ak je poškodený alebo znečistený. Nový filter si môžete objednať pod objednávacím
číslom FC8012. Pozrite si časť „Vyprázdňovanie a čistenie zásobníka na prach“ v kapitole „Čistenie a
údržba“, kde nájdete pokyny na výber filtra zo zásobníka na prach a jeho umiestnenie do zásobníka
na prach.
Výmena bočných kief
Na zabezpečenie optimálnych výsledkov vysávania bočné kefy po určitom čase vymeňte.
Poznámka: Vždy, keď spozorujete prejavy opotrebovania alebo poškodenia, bočné kefy vymeňte.
Rovnako odporúčame vymeniť obidve bočné kefy súčasne. Náhradné bočné kefy si môžete objednať
ako súpravu pod objednávacím číslom FC8013.
1 Ak chcete vymeniť bočné kefy, chyťte staré bočné kefy za štetiny a vytiahnite ich z hriadeľov (Obr.
42).
2 Zatlačte nové bočné kefy na hriadele (Obr. 9).
Výmena nabíjateľnej batérie
Nabíjateľnú batériu môžu vymieňať len kvalifikovaní servisní technici. Ak už batériu nie je možné nabiť
alebo ak sa rýchlo vybíja, odneste robota do autorizovaného servisného strediska spoločnosti Philips
a požiadajte o výmenu batérie. Kontaktné údaje Strediska starostlivosti o zákazníkov spoločnosti
Philips vo vašej krajine nájdete v celosvetovo platnom záručnom liste.
Výmena batérie diaľkového ovládania
Diaľkové ovládanie využíva plochú batériu CR2025. Batériu treba vymeniť, keď robot nereaguje na
stlačenie tlačidiel na diaľkovom ovládaní.
1 Diaľkové ovládanie otočte spodnou stranou nahor. Zatlačte uvoľňovacie tlačidlo držiaka batérie
a súčasne posuňte držiak batérie z diaľkového ovládania (Obr. 48).
2 Z držiaka batérie vyberte vybitú batériu a vložte na miesto novú batériu. Držiak batérie potom
zasuňte späť do diaľkového ovládania (Obr. 49).
91
Vybratie nabíjateľnej batérie
Varovanie: Nabíjateľnú batériu odstráňte len vtedy, keď zariadenie vyhadzujete. Dbajte
na to, aby bola batéria pri odstraňovaní úplne vybitá.
Pri vyberaní nabíjateľnej batérie postupujte podľa nasledujúcich pokynov. Robota tiež môžete odniesť
do servisného strediska spoločnosti Philips a požiadať o vybratie nabíjateľnej batérie. Adresu
servisného strediska vo vašej blízkosti vám poskytne Stredisko starostlivosti o zákazníkov spoločnosti
Philips vo vašej krajine.
1 Robota spustite z ľubovoľného miesta v miestnosti a nie z dokovacej stanice.
2 Aby sa zabezpečilo, že je nabíjateľná batéria pred odstránením a likvidáciou úplne vybitá, nechajte
robota zapnutého, kým sa batéria úplne nevybije.
3 Odskrutkujte skrutky krytu priečinka na batériu a odmontujte kryt (Obr. 50).
4 Nadvihnite nabíjateľnú batériu a odpojte ju (Obr. 51).
5 Robota a nabíjateľnú batériu zaneste na zberné miesto elektrických a elektronických výrobkov.
Page 92

92
Slovensky
Riešenie problémov
Táto kapitola obsahuje prehľad najbežnejších problémov, s ktorými by ste sa mohli stretnúť pri
používaní tohto zariadenia. Ak problém neviete vyriešiť pomocou informácií uvedených nižšie,
navštívte webovú stránku www.philips.com/support , na ktorej nájdete zoznam najčastejších otázok,
alebo kontaktujte Stredisko starostlivosti o zákazníkov vo svojej krajine.
Riešenie problémov
Problém
Po stlačení tlačidla
spustenia/zastavenia
robot nezačne vysávať.
Možná príčina Riešenie
Nabíjateľná batéria je vybitá. Nabíjateľnú batériu nabite (pozrite si
kapitolu „Príprava na použitie“).
Po stlačení jedného
z tlačidiel robot
nereaguje.
Výstražný indikátor
rýchlo bliká.
V konektore robota je stále
zapojená malá koncovka.
Hlavný vypínač nie je v polohe
„zapnuté“ (I).
Vypínač ste nastavili do polohy
„vypnuté“.
Robot nedokázal nájsť
dokovaciu stanicu a batéria sa
vybila.
Zaseklo sa jedno alebo obe
kolieska.
Zasekla sa jedna alebo obe
bočné kefy.
Robot nefunguje po pripojení do siete.
Funguje len na nabíjateľnú batériu. Preto
pred použitím robota vždy odpojte
adaptér od robota a od siete.
Stlačte hlavný vypínač do polohy
„zapnuté“. Robota položte na dokovaciu
stanicu pripojenú k elektrickej sieti alebo
zapojte malú koncovku adaptéra. Po
niekoľkých sekundách robot zapípa
a displej sa rozsvieti.
Stlačte hlavný vypínač do polohy
„zapnuté“. Robota položte na dokovaciu
stanicu pripojenú k elektrickej sieti alebo
zapojte malú koncovku adaptéra. Po
niekoľkých sekundách robot zapípa
a displej sa rozsvieti.
Robota položte na dokovaciu stanicu
pripojenú k elektrickej sieti alebo zapojte
malú koncovku adaptéra. Po niekoľkých
sekundách robot zapípa a displej sa
rozsvieti.
Hlavný vypínač prepnite do polohy
„vypnuté“. Odstráňte chumáče prachu,
vlasy, vlákna alebo kábel zachytený na
závese kolieska.
Vyčistite bočné kefy (pozrite si kapitolu
„Čistenie a údržba“).
Vrchný kryt nie je nasadený
alebo nie je správne zavretý.
Keď vrchný kryt nie je nasadený alebo je
nasadený nesprávne, robot nefunguje.
Na robota riadne nasaďte vrchný kryt.
Page 93

Problém Možná príčina Riešenie
Zasekol sa nárazník. Stlačte tlačidlo spustenia/zastavenia.
Robota nadvihnite, aby sa jeho nárazník
uvoľnil. Presuňte robota ďalej od
prekážky a stlačením tlačidla
spustenia/zastavenia pokračujte vo
vysávaní.
Slovensky
93
Robota ste počas vysávania
zodvihli.
Robot nevysáva správne. Štetiny jednej alebo oboch
bočných kief sú pokrivené
alebo ohnuté.
Filter v zásobníku na prach je
znečistený.
Sací otvor v spodnej časti
zásobníka na prach je upchatý.
Na prednom koliesku sa
zachytili vlasy alebo iné
nečistoty.
Pri vysávaní veľmi tmavého
alebo lesklého povrchu sa
aktivujú snímače proti pádu.
Preto môže robot vykonávať
nezvyčajné pohyby.
Stlačte tlačidlo spustenia/zastavenia.
Robota položte na podlahu. Po stlačení
tlačidla spustenia/zastavenia robot
bude pokračovať vo vysávaní.
Kefu alebo kefy na určitý čas nechajte
v teplej vode. Ak sa neobnoví správny
tvar štetín, bočné kefy vymeňte (pozrite
si kapitolu „Výmena“).
Vyčistite filter v zásobníku na prach
pomocou tkaniny alebo zubnej kefky
s jemnými štetinkami. Filter a zásobník
na prach môžete vyčistiť aj bežným
vysávačom nastaveným na nízky sací
výkon.
Ak sa filter nedá dostatočne vyčistiť
kefou ani vysávačom, filter vymeňte za
nový. Výmenu filtra odporúčame
vykonať minimálne raz ročne.
Vyčistite sací otvor (pozrite si kapitolu
„Čistenie a údržba“).
Vyčistite predné koliesko (pozrite si
kapitolu „Čistenie a údržba“).
Stlačte tlačidlo spustenia/zastavenia
a potom presuňte robota na svetlejšiu
časť podlahy. Ak sa problém bude
naďalej vyskytovať na podlahách
svetlejšej farby, navštívte stránku
www.philips.com/support alebo sa
obráťte na Stredisko starostlivosti
o zákazníkov vo vašej krajine.
Nabíjateľnú batériu
nemožno nabiť alebo sa
veľmi rýchlo vybije.
Robot vysáva podlahu, ktorá
veľmi intenzívne odráža
slnečné. Aktivujú sa snímače
proti pádu a dôsledkom sú
nezvyčajné pohyby robota.
Nabíjateľná batéria dosiahla
koniec svojej životnosti.
Zatiahnutím závesov zabráňte
prenikaniu slnečných lúčov do
miestnosti. S vysávaním môžete začať,
keď už slnko nebude tak silno svietiť.
O výmenu nabíjateľnej batérie
požiadajte v servisnom stredisku
spoločnosti Philips (pozrite si kapitolu
„Výmena“).
Page 94

94
Slovensky
Problém Možná príčina Riešenie
Batéria diaľkového
ovládania sa príliš rýchlo
vybíja.
Pravdepodobne ste nevložili
správny typ batérie.
Diaľkové ovládanie využíva plochú
batériu CR2025. Ak problém pretrváva,
navštívte webovú stránku
www.philips.com/support alebo
kontaktujte Stredisko starostlivosti
o zákazníkov vo svojej krajine.
Robot sa pohybuje
v kruhoch.
Robot nedokáže nájsť
dokovaciu stanicu.
Robot je v režime vysávania
konkrétnych miest.
Na nasmerovanie robota
k dokovacej stanici nie je
dostatok priestoru.
Robot stále aktívne vyhľadáva
stanicu.
Robot nebol spustený
z dokovacej stanice.
Je to bežný jav. Režim vysávania
konkrétnych miest možno aktivovať, keď
sa na podlahe nachádza priveľa nečistôt
a vykonáva sa dôkladné vysávanie.
Režim je aj súčasťou automatického
režimu vysávania. Asi po uplynutí jednej
minúty sa robot pri vysávaní vráti
k bežným pohybom. Režim vysávania
konkrétnych miest môžete zastaviť aj
výberom iného režimu vysávania
pomocou diaľkového ovládania.
Skúste dokovaciu stanicu premiestniť
inam. Pozrite si kapitolu „Príprava na
použitie“ a časť „Inštalácia dokovacej
stanice“.
Na návrat do dokovacej stanice nechajte
robotu asi 20 minút.
Ak chcete, aby sa robot po vysávaní
vrátil do dokovacej stanice, spustite ho
z dokovacej stanice.
Page 95

Русский
Введение
Поздравляем с покупкой продукции Philips! Чтобы воспользоваться всеми преимуществами
поддержки Philips, зарегистрируйте изделие на веб-сайте www.philips.com/welcome.
Общее описание
1 Верхняя крышка
2 Ручка крышки пылесборника
3 Крышка пылесборника
4 Фильтр
5 Пылесборник
6 Вентилятор
7 Бампер
8 Датчик док-станции
9 Кнопка «Старт/стоп» (для запуска или остановки робота-пылесоса)
10 Дисплей
11 Выключатель (для включения или выключения робота-пылесоса)
12 Сопло TriActive XL
13 Переднее колесо
14 Валы для боковых щеток
15 Датчики перепада высот
16 Отсек для аккумуляторов
17 Колеса
18 Всасывающее отверстие
19 Боковые щетки
20 Держатель элемента питания
21 Пульт дистанционного управления
22 Маленький штекер
23 Адаптер
24 Док-станция
95
Дисплей и пульт дистанционного управления
Дисплей (Рис. 2):
1 Предупреждающий индикатор
2 Индикатор заполнения пылесборника
Пульт дистанционного управления:
1 Кнопки навигации и кнопка «Старт/стоп»
2 Кнопка подключения к док-станции
3 Кнопка времени уборки
4 Кнопки режима уборки
Принцип работы робота-пылесоса
Области применения робота-пылесоса
Робот-пылесос оснащен полезными функциями, благодаря которым можно выполнить качественную
уборку полов в доме.
Робот-пылесос идеально подходит для уборки твердых напольных покрытий: паркета, плитки или
линолеума. При уборке мягких напольных покрытий, например ковров или ковровых покрытий, могут
возникнуть трудности. Если робот-пылесос используется для уборки ковровых покрытий или ковров,
Русский
Page 96

96
Русский
первое время понаблюдайте за его работой, Помимо этого, за роботом-пылесосом необходимо
следить, если он используется для очистки очень темного или блестящего жесткого пола.
Функции робота-пылесоса
Система очистки
Робот-пылесос оснащен 2-ступенчатой системой очистки, которая эффективно справляется с
уборкой полов.
-
Две боковые щетки помогают собрать пыль в углах и вдоль стен, а также удаляют прилипшую
грязь, направляя ее к всасывающему отверстию (Рис. 3).
-
Благодаря мощной силе всасывания робот-пылесос собирает сухую грязь, которая попадает через
всасывающее отверстие в пылесборник (Рис. 4).
Программы уборки
В автоматическом режиме уборки робот-пылесос автоматически применяет заданную
последовательность программ уборки для оптимальной очистки всех зон помещения. Используются
следующие программы уборки:
1 Z-программа, или зигзаг (Рис. 5)
2 Произвольная программа (Рис. 6)
3 Программа «Вдоль стен» (Рис. 7)
4 Программа точечной очистки (Рис. 8)
В автоматическом режиме уборки робот-пылесос применяет эти программы в фиксированной
последовательности: Z-программа, произвольная программа, программа «Вдоль стен» и программа
точечной очистки.
Завершив выполнение этой последовательности программ, робот-пылесос снова начинает работать
по Z-программе, а затем повторяет все программы в той же последовательности, пока не разрядится
аккумулятор или пока робот-пылесос не выключат вручную.
Примечание. Можно также отдельно выбрать любой режим, нажав соответствующую кнопку на пульте
ДУ. Дополнительные сведения см. в главе «Использование робота-пылесоса», в разделе «Режимы
уборки».
Как робот-пылесос распознает перепады высот
Робот-пылесос оснащен тремя датчиками перепада высот, расположенными на его нижней стороне.
С помощью этих датчиков робот-пылесос распознает перепады высот (например, лестницы) и
избегает их.
Примечание. Робот-пылесос может перемещаться рядом с отличающимся по высоте от пола
объектом, поскольку фронтальный датчик перепада высот расположен за бампером.
Внимание! В некоторых случаях датчики перепада высот могут не обнаружить лестницу или другой
перепад высот в нужный момент. Поэтому вы должны внимательно следить за роботом-пылесосом
при первом использовании и при уборке рядом с лестницей или другим перепадом высот. Регулярно
очищайте датчики перепада высот, чтобы робот-пылесос всегда должным образом распознавал
перепады высот (инструкции см. в главе «Очистка и обслуживание»).
Page 97

Русский
Перед первым использованием
Установка боковых щеток
1 Распакуйте боковые щетки и положите робот-пылесос на стол или на пол вверх дном.
2 Наденьте боковые щетки на валы на нижней части робота-пылесоса (Рис. 9).
Примечание. Убедитесь, что боковые щетки надежно зафиксированы. Прижмите их к валу до
щелчка.
Удаление защитного ярлыка с пульта дистанционного управления
В пульте дистанционного управления установлена батарея CR2025 монетного типа. Эта батарея
покрыта защитным ярлыком, который необходимо удалить перед использованием.
1 Извлеките защитный ярлык из отсека для батареи в пульте (Рис. 10) дистанционного управления.
Теперь пульт дистанционного управления готов к использованию.
Подготовка прибора к работе
Установка док-станции
1 Подключите маленький штекер адаптера к гнезду на док-станции (1) и вставьте адаптер в
электрическую розетку (2) (Рис. 11).
2 Разместите док-станцию на горизонтальном, ровном участке пола у стены.
Примечание. Убедитесь, что на расстоянии 80 см спереди от док-станции (Рис. 12), 30 см справа и
100 см слева нет препятствий или перепадов высот.
97
Важное примечание. режим глубокого сна
Чтобы вывести робот-пылесос из режима глубокого сна (робот-пылесос не реагирует на команды):
-
Установите переключатель питания в положение «Включено (Рис. 13)».
-
Зарядите робот-пылесос. Через несколько секунд робот-пылесос будет снова реагировать на
команды.
Примечание. Робот-пылесос переходит в режим глубокого сна каждый раз при переключении
выключателя в положение «Выключено» и когда аккумулятор полностью разряжен. Например,
аккумулятор может полностью разрядиться, если робот-пылесос не может найти свою док-станцию.
Зарядка
При первой зарядке, а также при зарядке полностью разряженного аккумулятора робота-пылесоса
время полной зарядки составляет четыре часа.
Робот-пылесос можно заряжать двумя способами.
-
На док-станции в ручном режиме или в автоматическом режиме во время использования.
-
Посредством прямого подключения робота-пылесоса к электросети.
Примечание. При полностью заряженном аккумуляторе робот-пылесос может выполнять уборку до
100 минут.
Зарядка на док-станции
1 Установите переключатель питания в положение «Включено (Рис. 13)».
2 Поместите робот-пылесос на подключенную док-станцию (Рис. 14).
Page 98

98
Русский
3 Кнопка «Старт/стоп» начнет медленно мигать (Рис. 15).
4 Когда аккумулятор будет полностью заряжен, кнопка «Старт/стоп» начнет светиться, не мигая
(Рис. 16).
Автоматическая зарядка во время уборки
1 По завершении уборки или когда в аккумуляторе осталось только 15 % заряда, робот-пылесос
автоматически ищет док-станцию для подзарядки. Во время поиска док-станции кнопка
«Старт/стоп» быстро мигает (Рис. 17).
2 Когда аккумулятор будет полностью заряжен, кнопка «Старт/стоп» начнет светиться, не мигая.
Примечание. Робот-пылесос осуществляет автоматический поиск док-станции только в случае, если
уборка началась с док-станции.
Зарядка от электросети
1 Включите робот-пылесос, нажав на переключатель питания.
2 Подключите маленький штекер адаптера к гнезду на корпусе робота-пылесоса (1). Вставьте
адаптер в электрическую розетку (2) (Рис. 18).
3 При правильном подключении робота-пылесоса к электросети кнопка «Старт/стоп» начинает
очень медленно мигать. Это свидетельствует о том, что робот-пылесос заряжается.
4 Когда аккумулятор будет полностью заряжен, кнопка «Старт/стоп» начнет светиться, не мигая.
Подготовка помещения к уборке
Перед уборкой уберите с пола все незакрепленные и хрупкие объекты (Рис. 19),
а также кабели, провода и шнуры.
Эксплуатация робота-пылесоса
Начало и окончание работы
1 Нажмите кнопку «Старт/стоп».
-
Можно использовать кнопку «Старт/стоп» на корпусе робота-пылесоса (Рис. 20)
-
или на пульте дистанционного управления (Рис. 21).
2 Кнопка «Старт/стоп» загорится, и робот-пылесос начнет уборку (Рис. 22).
3 Уборка будет выполняться в автоматическом режиме до тех пор, пока аккумулятор робота-
пылесоса не разрядится. В автоматическом режиме уборки робот-пылесос повторяет
последовательность программ уборки: Z-программу, произвольную программу, программу «Вдоль
стен» и программу точечной очистки (Рис. 23).
Примечание. Чтобы выбрать отдельный режим, нажмите соответствующую кнопку на пульте
дистанционного управления. Дополнительные сведения см. в разделе «Выбор режима уборки».
4 Когда аккумулятор разряжен, кнопка «Старт/стоп» начинает мигать и робот-пылесос ищет док-
станцию для подзарядки (Рис. 17).
5 Нажатием кнопки «Старт/стоп» также можно приостановить или полностью прекратить уборку.
Если при повторном нажатии кнопки «Старт/стоп» уровень заряда аккумулятора достаточно высок,
робот-пылесос продолжает уборку в автоматическом режиме.
6 Чтобы робот-пылесос вернулся на док-станцию прежде, чем разрядится аккумулятор, нажмите
кнопку подключения к док-станции на пульте дистанционного управления (Рис. 24).
Кнопка «Старт/стоп» замигает и робот-пылесос начнет искать док-станцию (Рис. 25).
Page 99

Русский
Примечание. Если робот-пылесос был запущен не от док-станции, он не будет автоматически
искать ее, когда аккумулятор разрядится. Если уровень заряда аккумулятора достаточно высок, то
робот-пылесос можно вернуть к док-станции, нажав кнопку подключения к док-станции на пульте
дистанционного управления. Если аккумулятор полностью разряжен, робот-пылесос необходимо
поставить на док-станцию вручную.
Управление док-станцией
На док-станции есть две кнопки, с помощью которых можно управлять роботом-пылесосом.
Кнопка «Уборка после зарядки»
Если нажать кнопку «Уборка после зарядки» на док-станции во время зарядки робота-пылесоса,
робот-пылесос приступит к уборке, как только аккумулятор будет полностью заряжен (Рис. 26).
Кнопка «24 часа»
Если нажать кнопку «24 часа» на док-станции, станция начнет обратный отчет 24 часов до
следующей уборки. По завершении обратного отсчета робот-пылесос начнет уборку и продолжит ее
до тех пор, пока аккумулятор не разрядится. Затем робот-пылесос автоматически вернется на докстанцию для подзарядки (Рис. 27).
Выбор режима уборки
Выбор режима уборки
Помимо автоматического режима уборки данный робот-пылесос поддерживает четыре отдельных
режима уборки, каждый из которых можно активировать соответствующей кнопкой на пульте
дистанционного управления.
99
Z-программа
Если включена Z-программа, робот-пылесос перемещается по комнате Z-образными движениями.
Эта программа предназначена для очистки крупных участков (Рис. 28).
Произвольная программа
В этом режиме робот-пылесос производит уборку помещения, совершая произвольные перемещения
по прямой и крест-накрест (Рис. 29).
Программа «Вдоль стен»
В этом режиме робот-пылесос передвигается вдоль стен, обеспечивая более тщательную уборку
(Рис. 30) данного участка помещения.
Программа точечной уборки
В этом режиме робот-пылесос произвольно перемещается по небольшому участку пола, чтобы
тщательно (Рис. 31) его очистить.
Примечание. Программа, выбранная вручную, выполняется только несколько минут. Затем роботпылесос переключается в автоматический режим уборки.
Ручное управление
1 Для управления передвижением робота-пылесоса по помещению (Рис. 32) используйте кнопки со
стрелками вверх, вниз, влево и вправо рядом с кнопкой «Старт/стоп» на пульте дистанционного
управления.
Page 100

100
Русский
Примечание. Соблюдайте осторожность, когда управляете роботом-пылесосом вручную рядом с
перепадами высот и лестницами.
Примечание. Функция пылесоса и боковые щетки работают, только когда робот-пылесос едет
вперед. Кнопки перемещения влево, вправо и назад предназначены исключительно для навигации.
Использование кнопки времени уборки
Чтобы робот-пылесос выполнял уборку в течение 35 минут, нажмите кнопку времени уборки на
пульте дистанционного управления. По завершении заданного времени уборки робот-пылесос
вернется на док-станцию для подзарядки (Рис. 33).
Использование выключателя
Когда выключатель переводится в положение «Выключено», робот-пылесос переходит в режим
глубокого сна. В этом режиме робот-пылесос не реагирует ни на какие команды.
-
Если необходимо зарядить робот-пылесос, нажмите на выключатель, чтобы перевести его в
положение «Включено».
-
Если робот-пылесос перешел в режим глубокого сна в процессе использования, его можно
вывести из этого режима, переключив выключатель в положение «Включено» или зарядив робот-
пылесос. Через несколько секунд робот-пылесос будет снова реагировать на команды
-
Если вы не собираетесь использовать робот-пылесос в течение длительного времени (месяц и
более), переключите выключатель в положение «Выключено» и отсоедините док-станцию или
адаптер для защиты аккумулятора и экономии энергии.
Сигналы и их значение
Робот-пылесос оснащен дисплеем с двумя индикаторами: предупреждающим индикатором и
индикатором заполнения пылесборника. Кнопка «Старт/стоп» подает световые сигналы. Значение
этих сигналов представлено в таблице ниже.
Сигнал Значение
Кнопка «Старт/стоп» ровно светится. Робот-пылесос готов к уборке.
Кнопка «Старт/стоп» медленно мигает. Робот-пылесос заряжается.
Кнопка «Старт/стоп» быстро мигает. Робот-пылесос ищет док-станцию.
Аккумулятор робота-пылесоса разряжен.
Светится индикатор заполнения пылесборника. Пылесборник заполнен.
Светится предупреждающий индикатор. Вы подняли работающий робот-пылесос.
Заклинило бампер робота-пылесоса.
Заклинило колесо или боковую щетку.
Верхняя крышка отсутствует или установлена
неправильно.
Роботу-п
ылесосу не удается найти док-станцию.
 Loading...