

Page 1
Home Cinema Speaker Systems
FB735 FB755
FB965 FB975
Page 2

INDEX
English
English .....................................3
Français ...................................8
Español ..................................13
Deutsch..................................18
Nederlands............................24
Italiano...................................29
Svenska .................................34
Dansk .....................................39
Suomi .....................................44
Português ..............................49
∂ППЛУИО¿
Chinese
2
.............................. 54
................................ 60
FB735
FB965
FB755
FB975
Page 3
INTRODUCTION CONNECTIONS
Introduction
Congratulations!!! You are now a proud owner of PHILIPS
HOME CINEMA SPEAKER SYSTEM which have been
developed to produce superb sound for many years of
listening pleasure.
Please read this manual carefully before connecting your
speakers. You will find a number of useful tips for getting
the best sound performance out of your home cinema
surround sound speaker system.
Environmental notes
• All redundant packaging material has been omitted. The
packaging is easily separable into three mono-materials:
– cardboard (box)
– expandable polystyrene (buffer)
– polyethylene (bags, protective foam sheet)
• Your set consists of materials which can be recycled if
disassembled by a specialized company.
• Please observe the local regulations regarding the
disposal of packing materials and old equipment.
Other Home Cinema Sound Products
These speakers have been designed together with Philips
Home Cinema Receiver range (FR735/FR755/FR960/FR970)
in order to optimise performance.
For more impressive bass performance these systems can
be extended with a 50W (FB201*) or 100W (FB301*)
subwoofer.
*not available in all countries
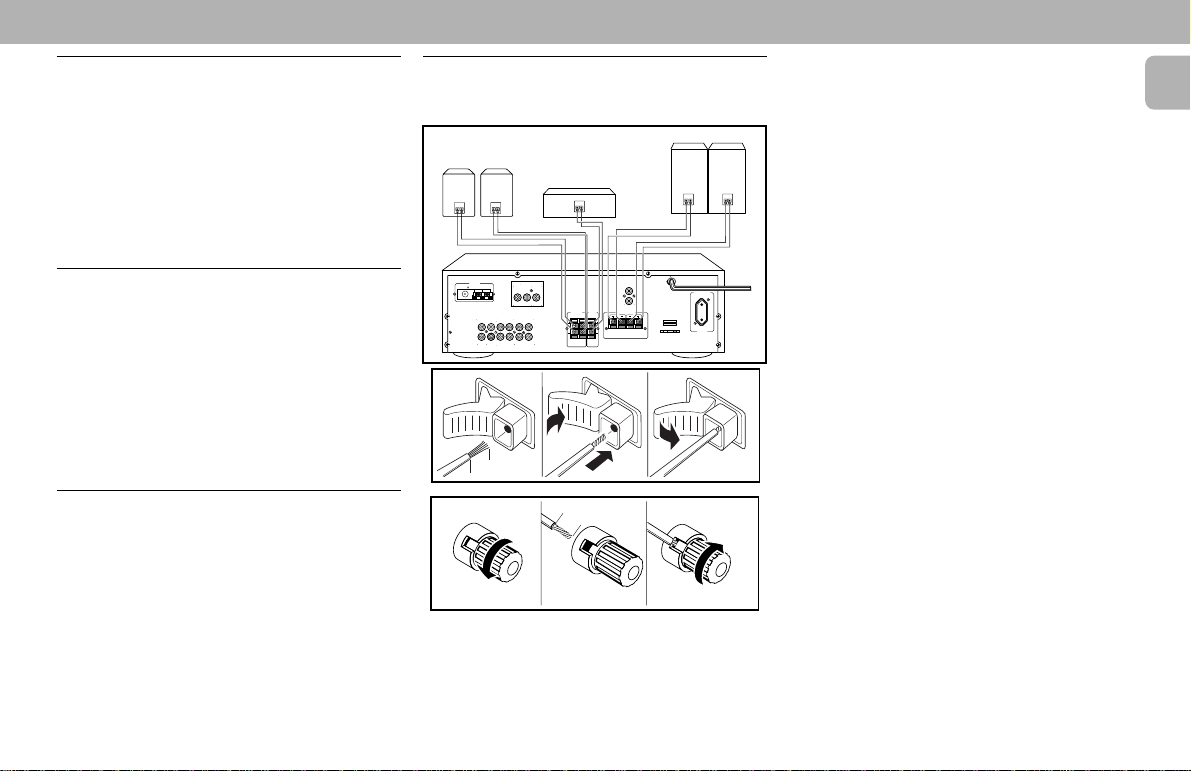
Connecting your loudspeakers
Important! Always switch off your amplifier/receiver
Connectors on the speakers
• At the back of the speakers you will find two click fit or
before making any connections!
SURROUND SPEAKERS
LR
–
–
+
+
ANTENNA
VIDEO IN/OUT
75
GNDFMAM
MONLVCR1
OUTIN OUT
AUDIO IN/OUT
CD/V-CD
TV/ AUX VCR 1
TAPE/DCC
L
R
IN IN RECPLAY RECPLAY
1
mm
1
screw connectors (, a black one marked - and a red one
(for the front speakers), a blue one (for the center
speaker) or a grey one (for the surround speakers)
marked +.
CENTER SPEAKER
–
+
SURROUND
CENTER
SPEAKERS
SPEAKER
RL
8 mm
SYSTEM
CONTROL
RC5
FRONT SPEAKERS
RL
2
2
FRONT SPEAKERS
R
–
+
MAINS OUTLETS
230V 50HZ
SWITCHED
100W MAX
• 100 W Front/Surround speakers have gold plated screw
terminals.
• One of the speaker wires is usually marked with a color
English
or a sleeve so that you can distinguish between them.
• In order to prevent phase problems make a habit of
L
+
–
connecting the marked (colored) wire to the colored +
speaker terminal and the unmarked wire to the black speaker terminal.
Connectors on the amplifier/receiver
The speaker connections on the amplifier or receiver may
be either screw connectors or click-fit connectors.
• At the rear of the amplifier/receiver you will find a red
colored or + terminal and a black or - terminal for each
speaker.
• Connect the marked or sleeved speaker wire to the red
or + terminal, and the unmarked wire to the black or terminal of the amplifier/receiver.
• After connecting the speakers, do not forget to adjust
the relative sound level between the speakers, see
chapter “Adjusting the relative speaker balance”.
3
Note:
– Since Left/Right Front speakers are identical to the Left/
Right Surround speakers of the FB965/FB975 packages,
all connectors are same code (Black/Red), speaker
terminal and wire for surrounds are still Grey/Black
coded.
3
3
Page 4

POSITIONING THE SPEAKERS ADJUSTMENTS
English
Positioning the speakers
SURROUND
(REAR)
FRONT
LEFT
LEFT
CENTER
TV
FRONT
RIGHT
RIGHT
General hints for positioning
• For your convenience each speaker has color-coded
speaker terminals so you can easily distinguish the
different types of speakers.
red ™ front speakers;
blue ™ center speakers;
gray ™ surround speakers. (FB 735 only)
• Placing the speakers behind curtains, furniture etc. will
reduce the treble response, thus reducing the stereo
effect considerably. The listener should position the
Front speakers so that they are in the line of sight from
his listening area.
• Each room has different acoustic characteristics and the
positioning possibilities are often limited. You can find
the best position for your speakers by experimenting. In
general, the speakers should be arranged as
symmetrically as possible in the room.
SURROUND
(REAR)
Positioning the front speakers
• The front speakers should be arranged so that, viewed
from the listener’s position, the speaker connected to
the “Left” terminals of the amplifier/receiver is on the
left and the speaker connected to the “Right” terminals
is on the right in front of the listener in the room. This
can be checked with the balance control and/or test
tone set-up function on the amplifier/receiver.
• The best stereo effect is obtained when the 2 front
speakers and the listener build an equilateral triangle.
• The best height for the front speakers is when the high
tone speakers (tweeter) are at ear height (while seated).
Positioning the center speaker
• The center speaker should be placed in the center
between both front speakers and should always be
placed in line with the television (e.g. underneath or on
top of the TV).
• Position the center speaker so that the tweeter is
directed at the listeners ear while seated. You can do so
by adjusting the angle that the center speaker is facing
(using the positioning pin).
Positioning the surround speakers
• The surround speaker connected to the “Surround Left”
terminal of the amplifier/receiver should be on the left
and the speaker connect to the “Surround Right”
terminal on the right of the listener in the room. This can
be checked with the balance control on the amplifier/
receiver.
• For best results, we suggest that the surround speakers
be place in line with the listening area at a height of 6
or 7 feet. You may also place them behind the listening
area.
Adjusting the relative speaker balance
After installing your speakers, you will have to find a good
sound balance between the Surround, the Center and the
Front speakers.
• On the amplifier/receiver, switch on the SURROUND
mode.
• In the instruction booklet of the amplifier/receiver you
will find a section describing how to adjust the sound
level of the center and the surround speakers.
• For the surround speakers, it may be possible to adjust
the delay time as well. We suggest that you experiment
with the delay time to best match the acoustic
characteristics of your unique listening environment.
• Adjust the sound level of the surround and center
speakers, and also the delay time for the surround
speakers to your personal taste. The settings are kept by
the amplifier or receiver.
4
Page 5

TROUBLESHOOTING ADDITIONAL INFORMATION
WARNING
Under no circumstances should you try to repair the
speaker yourself, as this would invalidate the
guarantee.
If a fault occurs, first check the points listed below before
taking the speakers for repair.
If you are unable to remedy a problem by following these
hints, consult your dealer or service center.
No sound
• VOLUME is not turned up.
™
Turn up the VOLUME.
• SPEAKERS A/B switches on the amplifier/receiver are
in positions off.
™
Press the relevant SPEAKERS A or B switch.
• Headphones are connected.
™
Disconnect headphones.
• Speakers are not (or wrongly) connected.
™
Connect the speakers securely.
No sound on left of right side
• BALANCE control on the amplifier/receiver is not in the
middle position.
™
Set the BALANCE control to the middle position.
• One speaker is wrongly connected or the speaker cable
damaged.
™
Connect the speaker properly or replace the cable.
Reversed left and right sound
• Speakers are wrongly connected.
™
Connect speakers properly, L to left, R to right; check
with BALANCE control.
No sound at the surround or center speaker
• SURROUND mode is not switched on.
™
On the amplifier or receiver, switch on the SURROUND
mode.
• Surround and/or Center speakers are not (properly)
connected.
™
Connect the speakers properly.
• Only one Surround speaker is connected.
™
Always connect both Surround speakers.
• One speaker is wrongly connected or the speaker cable
damaged.
™
Connect the speaker properly or replace the cable.
Poor bass sound
• Speakers are not in phase.
™
Connect speakers properly, + to + pole (red marked
or sleeved cable); - to - pole (unmarked cable).
Bad sound
• Badly matching SURROUND setting for the given type
of music.
™
On the amplifier or receiver, choose a matching
SURROUND setting for the given type of music.
Surround sound level is too low or too high
• The sound level of the Surround sound is not properly
adjusted.
™
On the amplifier or receiver, adjust the level and the
delay time of the Surround sound.
Center sound level is too low or too high
• The sound level of the Center channel is not properly
adjusted.
™
On the amplifier or receiver, adjust the level of the
Center channel.
The type plate can be found on the bottom or the back of
the speaker. This product complies with the radio
interference requirements of the European Community.
Power handling
Each amplifier or receiver used at high power over a long
period of time can produce distortion which may seriously
damage your speakers.
Your ears will warn you, since the speakers will indicate
overloading by giving distortion.
If this happens reduce the volume and tone controls to a
level where the sound is acceptable again.
When using microphones, avoid microphone feedback
which occurs when microphones may pick up sound from
the speakers, resulting in a dangerous howling sound.
Keep the microphones away from the speakers of reduce
the volume.
Note:
– Speakers are most often damaged when they are
overdriven by under-powered amplifiers. The clipping of
the amplifiers will damage the tweeters.
English
5
Page 6

FB735 TECHNICAL DATA FB965 TECHNICAL DATA
English
Technical Data
Subject to change without notice
Center Speaker
Impedence . . . . . . . . . . . . . . . . . . . . . . . . . . . . . . . . . . 6 Ω
Frequency Range . . . . . . . . . . . . . . . . . . . . 75 – 20,000 Hz
Power Handling
Normal. . . . . . . . . . . . . . . . . . . . . . . . . . . . . . . . 50 Watts
Maximum. . . . . . . . . . . . . . . . . . . . . . . . . . . . . 100 Watts
Sensitivity . . . . . . . . . . . . . . . . . . . . . . . . . . . . . . . . . . 89 dB
Tweeter. . . . . . . . . . . . . . . . . . . . . . . . . . . . . . . . . . . . . . . 2"
Loudspeaker . . . . . . . . . . . . . . . . . . . . . . . . . . . . . . . . 2 x 4"
Crossover Frequency . . . . . . . . . . . . . . . . . . . . . . . 4500 Hz
Connectors . . . . . . . . . . . . . . . . . . . . . Click Fit (Blue/Black)
Material . . . . . . . . . . . . . . . . . . . . High Impact Polystyrene
Wires . . . . . . . . . . . . . . . . . . 3 Meter AWG22 (Blue/Black)
Dimensions (h x w x d) . . . . . . . . . . . . 131 x 435 x 122 mm
Volume (internal/External) . . . . . . . . . . . . . . . . 4.5/5.1 liter
Weight . . . . . . . . . . . . . . . . . . . . . . . . . . . . . . . . . . . . 1.8 kg
Front Speakers
Impedence . . . . . . . . . . . . . . . . . . . . . . . . . . . . . . . . . . 6 Ω
Frequency Range . . . . . . . . . . . . . . . . . . . . 40 – 20,000 Hz
Power Handling
Normal. . . . . . . . . . . . . . . . . . . . . . . . . . . . . . . . 50 Watts
Maximum. . . . . . . . . . . . . . . . . . . . . . . . . . . . . 100 Watts
Sensitivity . . . . . . . . . . . . . . . . . . . . . . . . . . . . . . . . . . 89 dB
Tweeter. . . . . . . . . . . . . . . . . . . . . . . . . . . . . . . . . . . . . . . 2"
Loudspeaker . . . . . . . . . . . . . . . . . . . . . . . . . . . . . . . . 5.25"
Passive Radiator . . . . . . . . . . . . . . . . . . . . . . . . . . . . . . 6.5"
Crossover Frequency . . . . . . . . . . . . . . . . . . . . . . . 4500 Hz
Connectors . . . . . . . . . . . . . . . . . . . . . Click Fit (Red/Black)
Material . . . . . . . . . . . . . . . . . . . . High Impact Polystyrene
Wires . . . . . . . . . . . . . . . . . . 4 Meter AWG22 (Red/Black)
Dimensions (h x w x d) . . . . . . . . . . . . 421 x 219 x 191 mm
Volume (Internal/External) . . . . . . . . . . . . . . 10.5/11.5 liter
Weight . . . . . . . . . . . . . . . . . . . . . . . . . . . . . . . . . . . . 2.5 kg
6
Surround Speakers
Impedence . . . . . . . . . . . . . . . . . . . . . . . . . . . . . . . . . . 6 Ω
Frequency Range . . . . . . . . . . . . . . . . . . . 150 – 20,000 Hz
Power Handling
Normal. . . . . . . . . . . . . . . . . . . . . . . . . . . . . . . . 25 Watts
Maximum. . . . . . . . . . . . . . . . . . . . . . . . . . . . . . 50 Watts
Sensitivity . . . . . . . . . . . . . . . . . . . . . . . . . . . . . . . . . . 89 dB
Loudspeaker . . . . . . . . . . . . . . . . . . . . . . . . . . . . . . . . . . . 4"
Connectors . . . . . . . . . . . . . . . . . . . . . Click Fit (Grey/Black)
Material . . . . . . . . . . . . . . . . . . . . High Impact Polystyrene
Wires . . . . . . . . . . . . . . . . 12 Meter AWG22 (White/Black)
Dimensions (h x w x d) . . . . . . . . . . . . . 179 x 181 x 92 mm
Volume (internal/External) . . . . . . . . . . . . . . . . 1.2/1.5 liter
Weight . . . . . . . . . . . . . . . . . . . . . . . . . . . . . . . . . . . . 0.7 kg
Technical Data
Subject to change without notice
Center Speaker
Impedence . . . . . . . . . . . . . . . . . . . . . . . . . . . . . . . . . . 6 Ω
Frequency Range . . . . . . . . . . . . . . . . . . . . 75 – 20,000 Hz
Power Handling
Normal. . . . . . . . . . . . . . . . . . . . . . . . . . . . . . . . 50 Watts
Maximum. . . . . . . . . . . . . . . . . . . . . . . . . . . . . 100 Watts
Sensitivity . . . . . . . . . . . . . . . . . . . . . . . . . . . . . . . . . . 89 dB
Tweeter. . . . . . . . . . . . . . . . . . . . . . . . . . . . . . . . . . . . . . . 2"
Loudspeaker . . . . . . . . . . . . . . . . . . . . . . . . . . . . . . . . 2 x 4"
Crossover Frequency . . . . . . . . . . . . . . . . . . . . . . . 4500 Hz
Connectors . . . . . . . . . . . . . . . . . . . . . Click Fit (Blue/Black)
Material . . . . . . . . . . . . . . . . . . . . High Impact Polystyrene
Wires . . . . . . . . . . . . . . . . . . 3 Meter AWG22 (Blue/Black)
Dimensions (h x w x d) . . . . . . . . . . . . 131 x 435 x 122 mm
Volume (internal/External) . . . . . . . . . . . . . . . . 4.5/5.1 liter
Weight . . . . . . . . . . . . . . . . . . . . . . . . . . . . . . . . . . . . 1.8 kg
Front and Surround Speakers (4)
Impedence . . . . . . . . . . . . . . . . . . . . . . . . . . . . . . . . . . 6 Ω
Frequency Range . . . . . . . . . . . . . . . . . . . . 40 – 20,000 Hz
Power Handling
Normal. . . . . . . . . . . . . . . . . . . . . . . . . . . . . . . . 50 Watts
Maximum. . . . . . . . . . . . . . . . . . . . . . . . . . . . . 100 Watts
Sensitivity . . . . . . . . . . . . . . . . . . . . . . . . . . . . . . . . . . 89 dB
Tweeter. . . . . . . . . . . . . . . . . . . . . . . . . . . . . . . . . . . . . . . 2"
Loudspeaker . . . . . . . . . . . . . . . . . . . . . . . . . . . . . . . . 5.25"
Passive Radiator . . . . . . . . . . . . . . . . . . . . . . . . . . . . . . 6.5"
Crossover Frequency . . . . . . . . . . . . . . . . . . . . . . . 4500 Hz
Connectors . . . . . . . . . . . . . . . . . . . . . Click Fit (Red/Black)
Material . . . . . . . . . . . . . . . . . . . . High Impact Polystyrene
Wires . . . . . . . . . . . . . . . . . . 4 Meter AWG22 (Red/Black)
. . . . . . . . . . . . . . . . . . . . . 12 Meter AWG22 (White/Black)
Dimensions (h x w x d) . . . . . . . . . . . . 421 x 219 x 191 mm
Volume (Internal/External) . . . . . . . . . . . . . . 10.5/11.5 liter
Weight . . . . . . . . . . . . . . . . . . . . . . . . . . . . . . . . . . . . 2.5 kg
Page 7

FB755 TECHNICAL DATA FB975 TECHNICAL DATA
Technical Data
Subject to change without notice
Center Speaker
Impedence . . . . . . . . . . . . . . . . . . . . . . . . . . . . . . . . . . 6 Ω
Frequency Range . . . . . . . . . . . . . . . . . . . . 75 – 20,000 Hz
Power Handling
Normal. . . . . . . . . . . . . . . . . . . . . . . . . . . . . . . 100 Watts
Maximum. . . . . . . . . . . . . . . . . . . . . . . . . . . . . 200 Watts
Sensitivity . . . . . . . . . . . . . . . . . . . . . . . . . . . . . . . . . . 89 dB
Tweeter. . . . . . . . . . . . . . . . . . . . . . . . . . . . . . . . 2.5" Dome
Loudspeaker . . . . . . . . . . . . . . . . . . . . . . . . . . . . . . . . 2 x 5"
Crossover Frequency . . . . . . . . . . . . . . . . . . . . . . . 4500 Hz
Connectors . . . . . . . . . . . . . . . . . . . . . Click Fit (Blue/Black)
Material . . . . . . . . . . . . . . . . . . . . High Impact Polystyrene
Wires . . . . . . . . . . . . . . . . . . 3 Meter AWG22 (Blue/Black)
Dimensions (h x w x d) . . . . . . . . . . . . 149 x 435 x 159 mm
Volume (internal/External) . . . . . . . . . . . . . . . . . . 5.2/6 liter
Weight . . . . . . . . . . . . . . . . . . . . . . . . . . . . . . . . . . . . 2.5 kg
Front Speakers
Impedence . . . . . . . . . . . . . . . . . . . . . . . . . . . . . . . . . . 6 Ω
Frequency Range . . . . . . . . . . . . . . . . . . . . 40 – 20,000 Hz
Power Handling
Normal. . . . . . . . . . . . . . . . . . . . . . . . . . . . . . . 100 Watts
Maximum. . . . . . . . . . . . . . . . . . . . . . . . . . . . . 200 Watts
Sensitivity . . . . . . . . . . . . . . . . . . . . . . . . . . . . . . . . . . 89 dB
Tweeter. . . . . . . . . . . . . . . . . . . . . . . . . . . . . . . . 2.5" Dome
Loudspeaker . . . . . . . . . . . . . . . . . . . . . . . . . . . . . . . . 5.25"
Passive Radiator . . . . . . . . . . . . . . . . . . . . . . 7.5" wOOx TM
Crossover Frequency . . . . . . . . . . . . . . . . . . . . . . . 4500 Hz
Connectors . . . . . . . . . . . . Screw, Gold Plated (Red/Black)
Material . . . . . . . . Wood + High Impact Polystyrene Front
Wires . . . . . . . . . . . . . . . . . . 4 Meter AWG18 (Red/Black)
Dimensions (h x w x d) . . . . . . . . . . . . 530 x 276 x 212 mm
Volume (Internal/External) . . . . . . . . . . . . . . . . . 7.9/20 liter
Weight . . . . . . . . . . . . . . . . . . . . . . . . . . . . . . . . . . . . 5.4 kg
Surround Speakers
Impedence . . . . . . . . . . . . . . . . . . . . . . . . . . . . . . . . . . 6 Ω
Frequency Range . . . . . . . . . . . . . . . . . . . . 40 – 20,000 Hz
Power Handling
Normal. . . . . . . . . . . . . . . . . . . . . . . . . . . . . . . . 50 Watts
Maximum. . . . . . . . . . . . . . . . . . . . . . . . . . . . . 100 Watts
Sensitivity . . . . . . . . . . . . . . . . . . . . . . . . . . . . . . . . . . 89 dB
Tweeter. . . . . . . . . . . . . . . . . . . . . . . . . . . . . . . . . . . . . . . 2"
Loudspeaker . . . . . . . . . . . . . . . . . . . . . . . . . . . . . . . . 5.25"
Passive Radiator . . . . . . . . . . . . . . . . . . . . . . . . . . . . . . 6.5"
Crossover Frequency . . . . . . . . . . . . . . . . . . . . . . . 4500 Hz
Connectors . . . . . . . . . . . . . . . . . . . . . Click Fit (Red/Black)
Material . . . . . . . . . . . . . . . . . . . . High Impact Polystyrene
Wires . . . . . . . . . . . . . . . . 12 Meter AWG22 (White/Black)
Dimensions (h x w x d) . . . . . . . . . . . . 421 x 219 x 191 mm
Volume (internal/External) . . . . . . . . . . . . . . . . 8.5/9.5 liter
Weight . . . . . . . . . . . . . . . . . . . . . . . . . . . . . . . . . . . . 2.5 kg
Technical Data
Subject to change without notice
Center Speaker
Impedence . . . . . . . . . . . . . . . . . . . . . . . . . . . . . . . . . . 6 Ω
Frequency Range . . . . . . . . . . . . . . . . . . . . 75 – 20,000 Hz
Power Handling
Normal. . . . . . . . . . . . . . . . . . . . . . . . . . . . . . . 100 Watts
Maximum. . . . . . . . . . . . . . . . . . . . . . . . . . . . . 200 Watts
Sensitivity . . . . . . . . . . . . . . . . . . . . . . . . . . . . . . . . . . 89 dB
Tweeter. . . . . . . . . . . . . . . . . . . . . . . . . . . . . . . . 2.5" Dome
Loudspeaker . . . . . . . . . . . . . . . . . . . . . . . . . . . . . . . . 2 x 5"
Crossover Frequency . . . . . . . . . . . . . . . . . . . . . . . 4500 Hz
Connectors . . . . . . . . . . . . . . . . . . . . . Click Fit (Blue/Black)
Material . . . . . . . . . . . . . . . . . . . . High Impact Polystyrene
Wires . . . . . . . . . . . . . . . . . . 3 Meter AWG22 (Blue/Black)
Dimensions (h x w x d) . . . . . . . . . . . . 149 x 435 x 159 mm
Volume (internal/External) . . . . . . . . . . . . . . . . . . 5.2/6 liter
Weight . . . . . . . . . . . . . . . . . . . . . . . . . . . . . . . . . . . . 2.5 kg
Front and Surround Speakers (4)
Impedence . . . . . . . . . . . . . . . . . . . . . . . . . . . . . . . . . . 6 Ω
Frequency Range . . . . . . . . . . . . . . . . . . . . 40 – 20,000 Hz
Power Handling
Normal. . . . . . . . . . . . . . . . . . . . . . . . . . . . . . . 100 Watts
Maximum. . . . . . . . . . . . . . . . . . . . . . . . . . . . . 200 Watts
Sensitivity . . . . . . . . . . . . . . . . . . . . . . . . . . . . . . . . . . 89 dB
Tweeter. . . . . . . . . . . . . . . . . . . . . . . . . . . . . . . . 2.5" Dome
Loudspeaker . . . . . . . . . . . . . . . . . . . . . . . . . . . . . . . 5.25"
Passive Radiator . . . . . . . . . . . . . . . . . . . . . . 7.5" wOOx TM
Crossover Frequency . . . . . . . . . . . . . . . . . . . . . . . 4500 Hz
Connectors . . . . . . . . . . . . Screw, Gold Plated (Red/Black)
Material . . . . . . . . Wood + High Impact Polystyrene Front
Wires . . . . . . . . . . . . 4 Meter AWG18 (Transparent/Black)
. . . . . . . . . . . . . . . . 12 Meter AWG18 (Transparent/Black)
Dimensions (h x w x d) . . . . . . . . . . . . 530 x 276 x 212 mm
Volume (Internal/External) . . . . . . . . . . . . . . . . . 7.9/20 liter
Weight . . . . . . . . . . . . . . . . . . . . . . . . . . . . . . . . . . . . 5.4 kg
English
7
 Loading...