

Page 1

Register your product and get support at
www.philips.com/dictation
EN User manual
DVT2500
DVT2700
Page 2

2
Table of contents
Page 3

Table of contents
1 Important safety information 5
1.1 Safety instructions 5
2 About this user manual 7
2.2 Symbols used 7
3 Your recorder 8
3.1 Product highlights 8
3.2 Package contents 9
3.3 Product overviews 10
3.3.1 Front and rear sides 10
3.3.2 Keys 11
3.4 Start-up screen 12
3.4.1 Menu overview 13
4 First steps 14
4.1 Inserting the batteries 14
4.2 Power on/o 15
4.3 Initial installation process 15
4.3.1 Select language 15
4.3.2 Set date & time 15
4.4 Enabling/disabling the keypad lock 16
4.5 Insert microSD card 17
4.6 Accessories 17
4.6.1 How to connect headphones 17
4.7 Connecting to a computer 18
4.7.1 Transferring files from or to the device 19
4.7.2 Disconnecting from a computer 19
5 Record 20
5.1 Creating a recording 20
5.2 Starting recording automatically 21
5.2.1 Use Timer function 21
5.2.2 Use voice activation 21
6 Playback 22
6.1 Select a recording 22
6.1.1 Find recording with calendar search 22
6.2 Playing a recording back 23
6.3 Adjusting playback speed 23
6.4 Quick search 23
6.5 Repeat a file / repeat a sequence 24
7 Edit & delete 25
7.1 Edit a recording 25
7.1.1 Add to or overwrite a recording 25
7.1.2 Split a recording 26
7.2 Deleting recordings on the device 26
8 Settings 27
8.1 Recording settings 27
8.1.1 Set file location 27
8.1.2 Setting recording quality 27
8.1.3 Setting microphone sensitivity 28
8.1.4 Setting editing mode 29
8.1.5 Enabling/disabling silent recording 29
8.1.6 Setting the timer 30
8.1.7 Enabling/disabling voice-activated recording 30
Table of contents
3
Page 4

8.1.8 Setting auto divide 31
8.1.9 Enable/disable the recording indicator 32
8.2 Display settings 32
8.2.1 Select language 32
8.2.2 Adjusting the display contrast 33
8.2.3 Adjusting the backlight 33
8.2.4 Setting demonstration mode 33
8.3 Device settings 34
8.3.1 Set date & time 34
8.3.2 Enabling/disabling ClearVoice 35
8.3.3 AUTO-OFF 35
8.3.4 Alarm clock 36
8.3.5 Enabling/disabling key and signal tones 36
9 Service 37
9.1 Service functions 37
9.1.1 Display device information 37
9.1.2 Memory formatting 37
9.2 Updating the firmware 38
9.3 Troubleshooting 39
10 Appendix 40
10.1 Technical data 40
4
Table of contents
Page 5

1 Important safety information
Do not make any adjustments and modifications that are not described
in this manual. Follow all safety instructions to ensure proper
operation of the device. The manufacturer assumes no liability for
damages resulting from non-compliance with the safety instructions.
1.1 Safety instructions
• Protect the device from rain or water to prevent a shor t circuit.
• Do not expose the device to excessive heat caused by placing it on a
heating device or in direct sunlight.
• Protect the cables from damage by being trapped, particularly at the
plugs and where cables exit the housing.
• Back up your data and recordings. The manufacturer cannot be held
responsible for any loss of data.
• Do not perform any maintenance operations that are not
described in this user manual. Do not disassemble the device into
its component parts to carry out repairs. The device may only be
repaired in authorised service centres.
1.1.1 Batteries and rechargeable batteries
• Only use AA A batteries with the device.
• Never try to recharge alkaline or non-rechargeable batteries.
• Remove batteries or rechargeable batteries from the device if it
will not be used for an extended period of time. The device can be
damaged by leaking batteries or rechargeable batteries.
• Do not remove batteries or rechargeable batteries from the device
while it is recording. If you do this, data may be damaged or lost.
Device malfunctions may also occur.
• Batteries and rechargeable batteries contain substances that may
pollute the environment. Used batteries and rechargeable batteries
should be disposed of at an ocial collection point.
1.1.2 Memory cards
• The device suppor ts microSD memory cards up to 32 GB in
capacity.
• Make sure that the card has a suciently high data transfer rate. The
manufacturer makes no guarantee for trouble free operation.
• Formatting a memory card erases all data on the card. The memory
card must always be formatted in the device to ensure that the
format is correct. Formatting the memory card using a computer
can lead to eventual errors when reading or writing data.
Table of contents
5
Page 6

1.1.3 Hearing protection
1.1.5 Legal restrictions on recording
Observe the following guidelines when using headphones:
• Set the volume to a moderate level and do not use headphones to
listen for excessively long periods of time.
• Be particularly careful to avoid adjusting the volume to a level that
your hearing cannot deal with.
• Do not turn the volume up so high that you cannot hear what is
going on around you.
• In potentially dangerous situations you must be very careful, or
temporarily discontinue use.
• Do not use headphones while operating a motorised vehicle, cycling,
or skateboarding, etc. You could be a hazard to yourself and other
road users, and possibly be breaking the law.
1.1.4 Maximum sound power
• The manufacturer guarantees compliance with the maximum sound
power of its audio players as determined by relevant regulatory
bodies, but only with the original model of headphones supplied. If
you need to replace these headphones, we recommend contacting
your dealer to order the respective original Philips model.
• The use of the device's recording function is subject to the legal
restrictions that may apply in your country. You should also respect
the privacy and personal rights of the third parties if you record
talks or lectures.
• Please note that, in certain countries, you may be legally required
to inform the person you are conversing with on the telephone
that you are recording the conversation, or that the recording of
telephone conversations is illegal. Please check if the use of such
data is legal in your country prior to recording telephone calls.
6
Table of contents
Page 7
2 About this user manual
You can find a quick overview of your device in the following pages.
For detailed description, see the following chapters of this user
manual. Read this user manual carefully.
2.1 Model-specific features and diagrams
This user manual describes a number of models of the device product
range. Please note that some features are only available on certain
models.
2.2 Symbols used
Tip
• This symbol identifies information that helps you to use your
device more eciently and simply.
Note
• This symbol indicates notices which you must observe when
handling or operating the device.
Caution
• This symbol warns of damage to the device and possible data loss.
Damage can be caused by improper handling.
Warning
• This symbol warns of danger to persons. Bodily injury or damage
could be caused by improper handling.
Table of contents
7About this user manual
Page 8

3 Your recorder
We are delighted that you have chosen a Philips device. Visit our
website for comprehensive support such as user manuals, software
downloads, warranty information and much more:
www.philips.com/dictation.
3.1 Product highlights
• Stereo recording in MP3 format for excellent sound quality
• ClearVoice for clear and natural reproduction of speech
• Voice-activated recording mode without pressing buttons (handsfree operation)
• Recording and power supply via a USB port for unlimited recordings
• Large color display for clear status information of recording
• Slot for microSD card for extra storage
• Calendar search to find all recordings quickly
8
Your recorder
Table of contents
Page 9
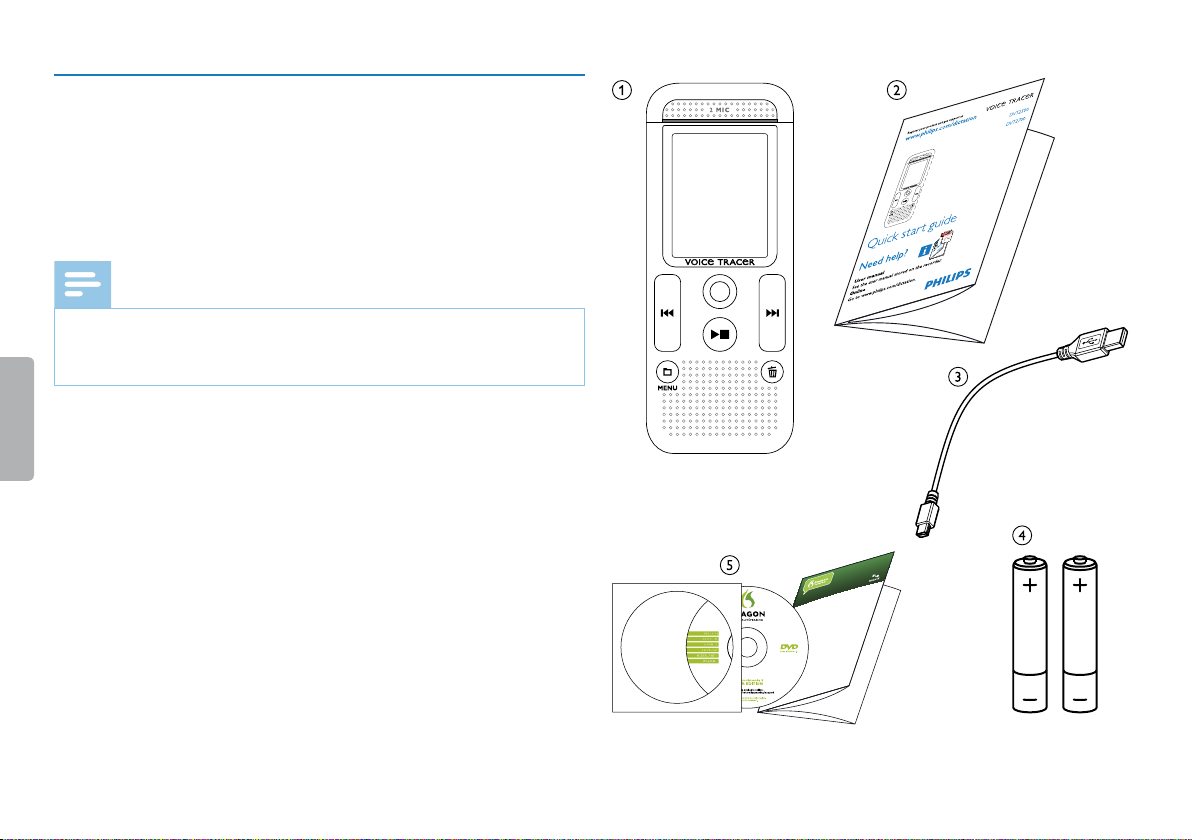
3.2 Package contents
Using Dragon NaturallySpeaking Recorder Edition, you can dictate into a portable
recorder and then have Dragon NaturallySpeaking transcribe your recorded speech.
Installing Dragon NaturallySpeaking
1. Exit all open programs. If you’re running a virus checker, turn it o.
2. Put the Dragon DVD into your DVD drive. Setup begins automatically. If it doesn’t,
double-click the le Setup.exe on your DVD.
3. Follow the on-screen prompts. Optionally, you can enable the QuickStart option.
QuickStart launches Dragon at system start-up and adds an icon to the Windows
task bar.
4. Click Finish to complete the installation. You may be prompted to reboot your
computer.
Starting Dragon NaturallySpeaking
Start Dragon by:
tDouble-clicking the Dragon desktop icon.
tSelecting Programs > Dragon NaturallySpeaking from the Start menu.
tRight-clicking the QuickStart task bar icon and selecting Start Dragon
NaturallySpeaking , if the QuickStart option is enabled.
Teaching the program how you speak
The rst time you start Dragon, the program automatically starts the Prole Creation
Wizard.
Step 1: Create a user prole
1. Name the prole with your name or any other unique name. Click Next.
2. Select the language you will use for this prole, and your age group. Click Next.
3. Select the region of the world you are in and your accent. Click Next.
4. Select the audio source that you will use: Digital les on disk (.wav, .mp3, .wma,
.dss, .ds2) . Click Next.
5. Review your choices and click Create to create your prole.
DRAGON DVR EDITI ON
QUICK START GUIDE
EN
a Device
b Quick start guide
c USB cable to connect to a computer
d Two AAA batteries
e DVT2700: DVD with speech recognition software
Note
• Please note that some individual components may not be included
in delivery with your model. If any item is missing or damaged,
please contact your distributor.
Table of contents
Your recorder
9
Page 10

3.3 Product overviews
3.3.1 Front and rear sides
a Eye for wrist strap
b ON/OFF switch / HOLD (keypad lock)
c Slot for memory card (microSD card)
d Microphone
e Status LED:
Red–device is recording
Green–device is playing back
Orange–data is being transferred to/from the computer
f Display
g Operating panel with keys
h Speaker
i Micro USB port for computer connection
j Headphone socket (stereo jack plug, 3.5 mm)
k Battery compartment
10
Your recorder
Table of contents
Page 11

3.3.2 Keys
aa Stop mode: short press: change folder, long press: Call menu
functions (MENU key);
Recording with voice activation: adjust activation level;
Replay: adjust volume;
Menu navigation: call next menu register
b~ Playback recording (playback button);
End playback (Stop key);
End recording (Stop key);
Menu navigation: end menu
ch Playback: short press: jump to the start, jump to the previous
recording, long press: fast seek rewind mode;
Menu navigation: Select menu function, change value
dg Start recording (record key);
confirm selection
eb Playback: short press: jump to the end, jump to the next
recording, long press: fast seek forward mode;
Menu navigation: Select menu function, change value
fz Delete recording (delete key)
Table of contents
Your recorder
11
Page 12

3.4 Start-up screen
aj Playback: S–Normal, j–Stop, c–Slow, U–Fast,
g–Recording, |–Recording paused, VW–Search
bƒ Set recording quality: ‡–PCM, …–SHQ, ƒ–HQ,
ˆ–SP, †–LP
c ‚–Voice activation switched on
d Microphone sensitivity °–Dictation, ±–Speech to text,
¯–Conversation, µ–Zoom function: Lecture
e Editing mode set: Å–Add recording, Æ–Overwrite
recording
f Ç–ClearVoice turned on (for better playback quality)
g Set repeat mode / continuous loop: –Repeat file playback,
Á–Repeat folder playback, ÖRepeat selection/sequence,
Ä–random repeat mode
h À–Timer on, ¿–Alarm on
i Battery charge level
ju Selected folder, depending on the selected storage medium
(u–internal memory, à–microSD card)/ number of
the current recording / total number of recordings in the
folder
k Position indicator of current playback/recording
l Playback /recording duration, total time of recording
m Playback /recording level of the right and left channels
Note
• The position and appearance of the symbols may vary, depending
on the model, the mode and the selected functions.
12
Your recorder
Table of contents
Page 13

3.4.1 Menu overview
Note
• The symbol of the selected menu tab is
highlighted in blue.
aØ Folder and file menu:
Find recording with calendar search
Split a recording
Repeat a file / repeat a sequence
bÓ Recording settings:
Creating a recording
Setting microphone sensitivity
Setting recording quality
Setting editing mode
Enabling/disabling silent recording
Setting the timer
Enabling/disabling voice-activated recording
Setting auto divide
cÔ Display settings:
Select language
Adjusting the display contrast
Adjusting the backlight
Setting demonstration mode
d× Device settings:
Set date & time
Enabling/disabling ClearVoice
AUTO-OFF
Alarm clock
Memory formatting
Enable/disable the recording indicator
Enabling/disabling key and signal tones
Set file location
Display device information
e Title of the selected menu tab
f List of available menu functions
Table of contents
Your recorder
13
Page 14

4 First steps
Use the installation guide on the following pages to start using your
device quickly and easily.
Caution
• Follow the instructions on handling the device, especially the
batteries and rechargeable batteries (see also chapter 1.1.1
Batteries and rechargeable batteries, page 5).
4.1 Inserting the batteries
Your device is supplied with two A AA batteries.
Slide the battery compartment cover downwards.
1
Insert the batteries or rechargeable batteries into the device as
2
shown. Make sure the polarity is correct.
Close the battery compartment cover.
3
14
First steps
Table of contents
Page 15
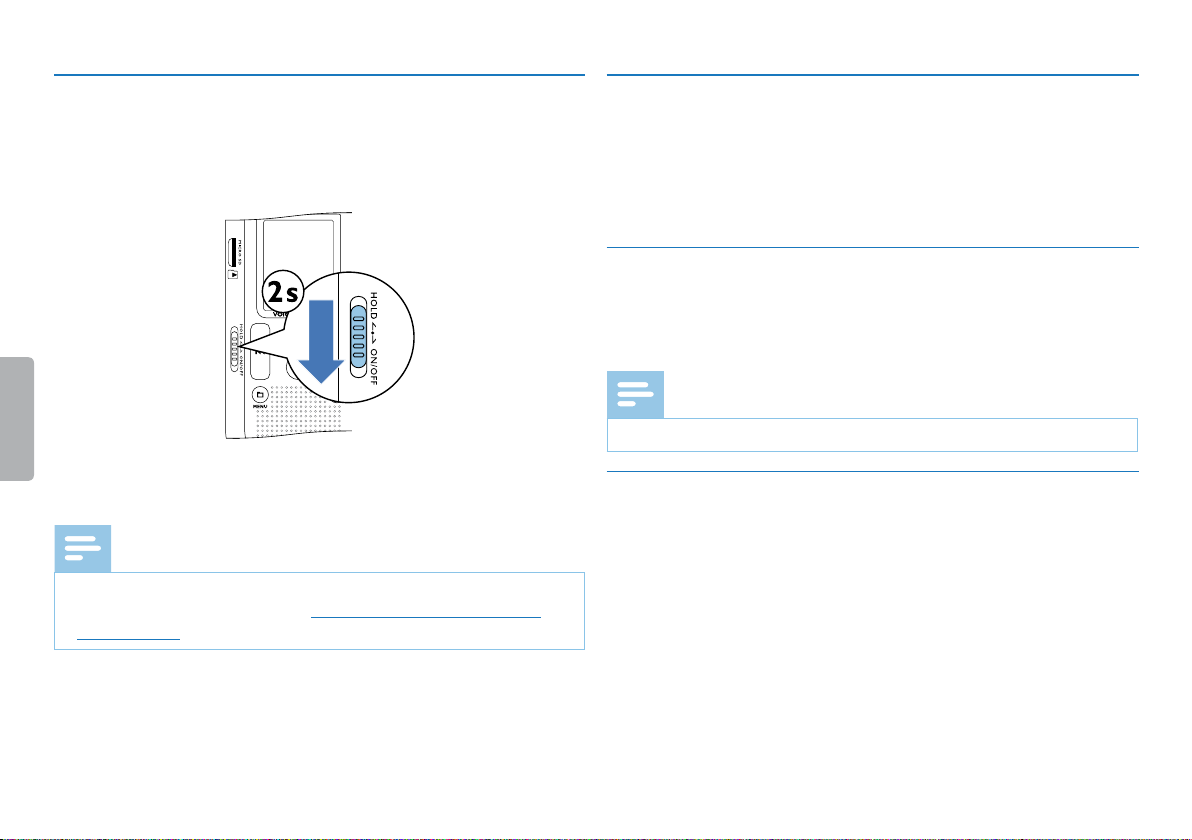
4.2 Power on/o
4.3 Initial installation process
Slide the on/o switch on the side of the device downwards for
1
approximately two seconds.
X The device turns on and the start-up screen is displayed.
To power o, pull down the power switch on the side of the device
2
again and hold for about two seconds.
Note
• The device switches itself o automatically if no key is pressed
within a pre-set period of time (see also chapter 8.3.3 AUTO-
OFF, page 35).
The initial installation process starts when first using the device or
possibly if there has been a long interruption to the power supply. The
date and time entered are saved with each recording as the recording
time.
4.3.1 Select language
Press h / b to select the required display language.
1
Press the record key, g, to confirm.
2
Note
• Your language might not be available. Select an alternative one.
4.3.2 Set date & time
Press h / b to select the required year.
1
Press the record key g.
2
Press h / b to set the month.
3
Press the record key g.
4
Press h / b to set the day.
5
Table of contents
First steps
15
Page 16
Press the record key g.
6
Press h / b to switch between the 12/24-hour system.
7
Press the record key g.
8
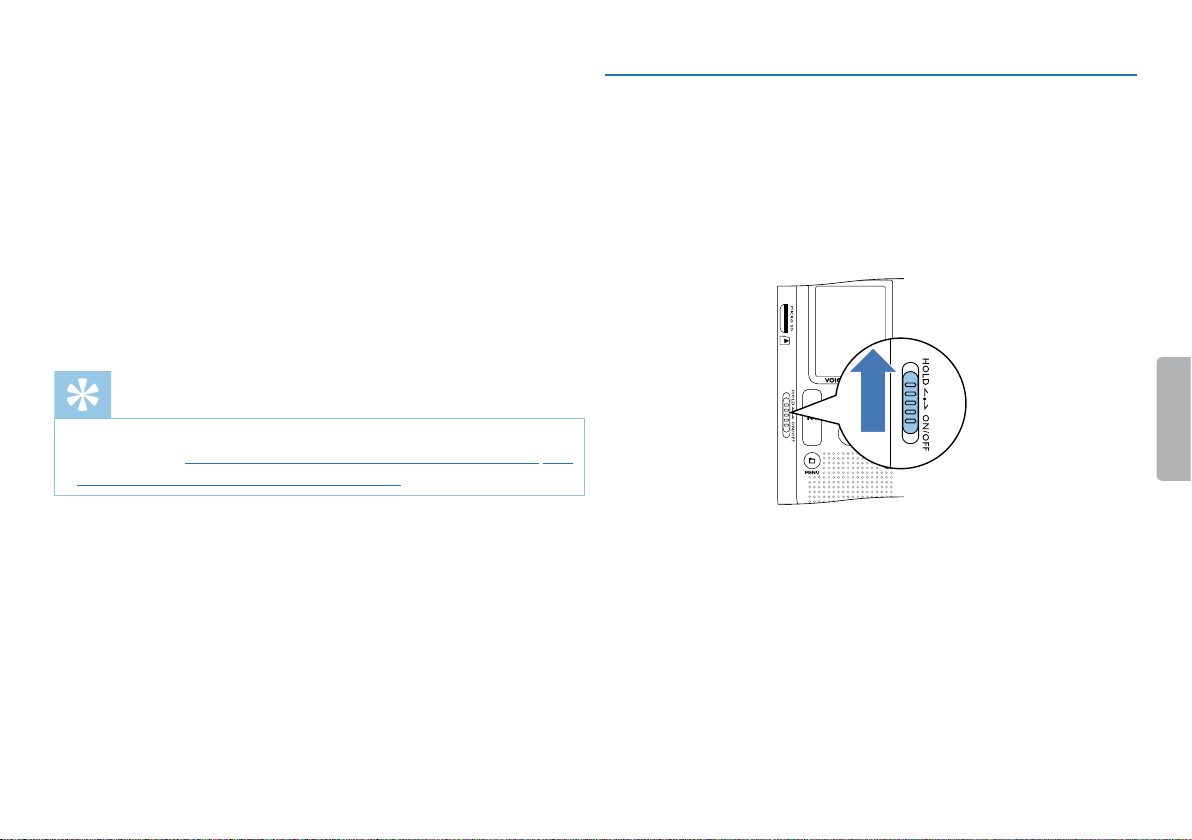
4.4 Enabling/disabling the keypad lock
The keypad lock deactivates all keys on the device. The timer function
of the device continues to function.
Press h / b to set the hours.
9
Press the record key g.
10
Press h / b to set the minutes.
11
Press the record key, g, to confirm.
12
Tip
• You can change the language, date and time at any time using the
settings menu (see also chapter 8.2.1 Select language, page 32) (see
also chapter 8.3.1 Set date & time, page 34).
16
First steps
Slide the HOLD switch up into the HOLD position to lock the
1
keypad of the device.
X The display briefly shows
Slide the HOLD switch down to the O position to disengage the
2
keypad lock.
X The display briefly shows
On Hold and turns o.
Off Hold and turns o.
Table of contents
Page 17
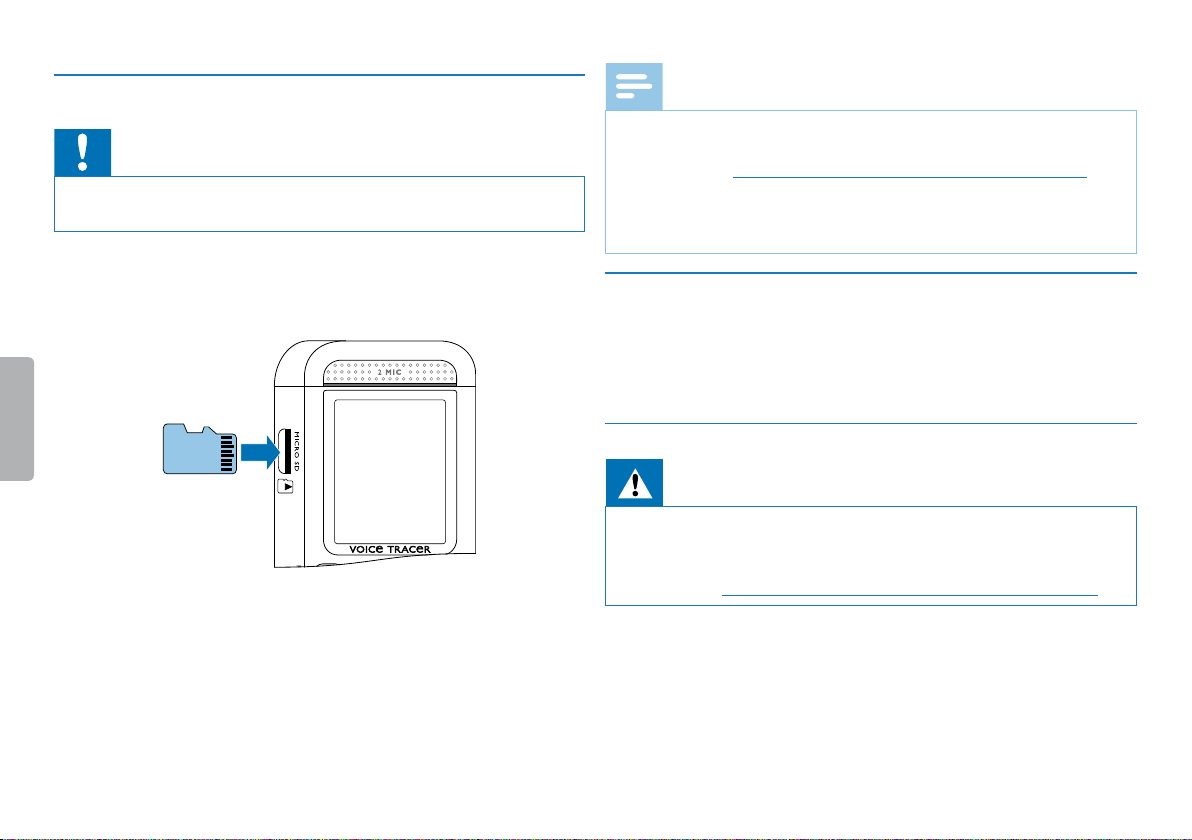
4.5 Insert microSD card
Caution
• Do not remove the memory card while recording is in progress. If
you do this, data may be damaged or lost.
Flip the memory card slot cover to the side.
1
Note
• To ensure that the device stores the recordings on the memory
card, you must switch from the internal memory to microSD
memory card (see also chapter 8.1.1 Set file location, page 27). The
display shows a folder icon which indicates where the recordings
are currently being stored: u , v, w, x–internal memory, à,
á, â, ã–memory card.
Insert the microSD card into the card slot with the contacts facing
2
upwards.
Insert the memory card until it snaps into place.
3
To remove the card press the memory card slightly until the
4
snapping mechanism unlocks and the card is ejected.
Table of contents
4.6 Accessories
Depending on the type of the device, the product package may include
various accessories. Additional accessories may be obtained directly
from your retailer.
4.6.1 How to connect headphones
Warning
• Set the volume to a moderate level and do not use headphones
to listen for excessively long periods of time. Exposure to intense
sound can cause hearing damage. Observe the Hearing safety
instructions (see also chapter 1.1.3 Hearing protection, page 6).
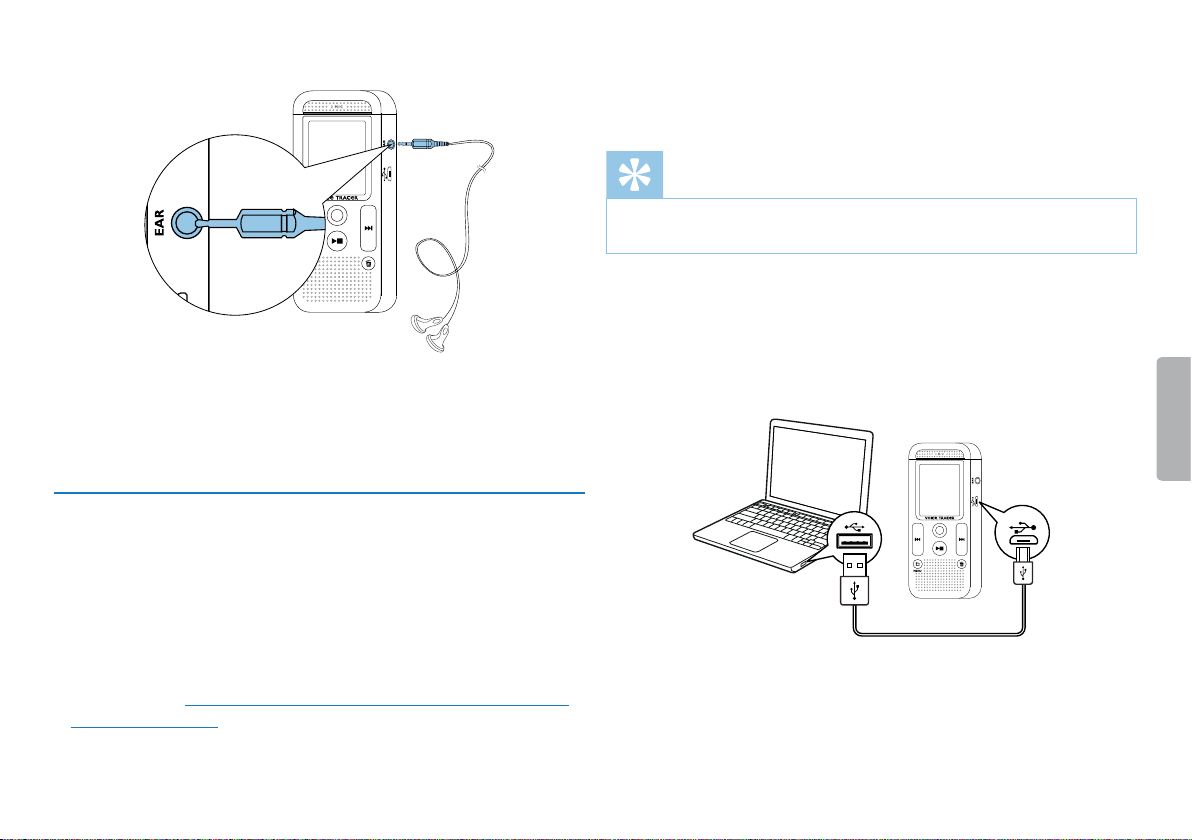
Turn down the volume of the device before you plug in the
1
headphones.
Insert the stereo jack into the headphone connection EAR on the
2
side of the device.
First steps
17
Page 18
Turn up the volume until you reach a comfortable listening level.
3
The speaker is switched o when headphones are connected.
4.7 Connecting to a computer
You can select one of the following options once you have connected
the device to a computer
• A USB mass storage device: You can use the File Explorer to
access the device data without installing additional software. It is
automatically displayed as a mass storage device similarly to a USB
memory stick or card. It is a convenient way to store, back up and
and move files. (see also chapter 4.7.1 Transferring files from or to
the device, page 19).
• Power supply via USB: Record while powered through USB
without draining the battery. You can record until the memory is
full.
Tip
• To start recording press the record key g for at least two
seconds while the device is connected to the computer.
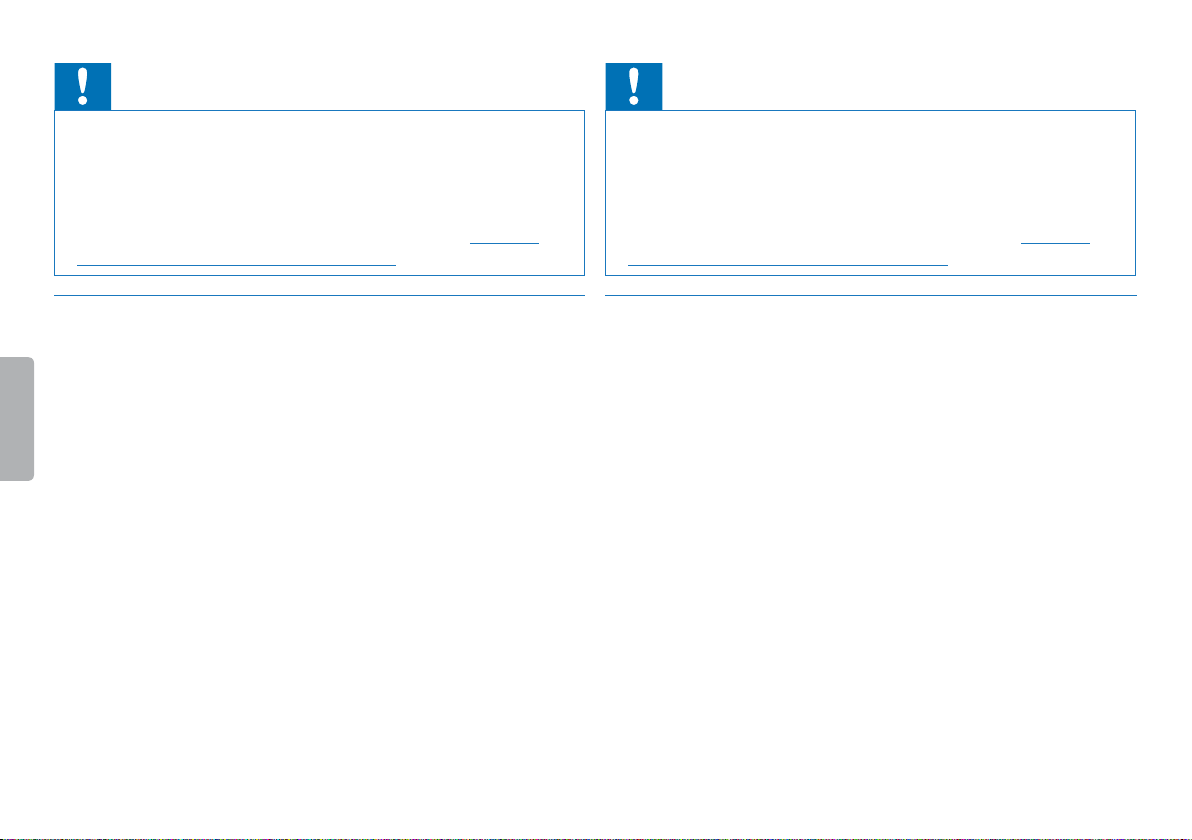
Plug the USB connector into a USB port on your computer.
1
Insert the micro USB plug into the USB port on the bottom of the
2
device.
X The device is displayed as a mass storage device in File
Explorer.
18
First steps
Table of contents
Page 19
Caution
Caution
• Do not disconnect the device from the computer while files are
transferred from or to the device (the status LED indicatorflashes
orange when data is being transferred). This this may damage or
corrupt the files.
• Do not format the drive of the device on a computer. If you want
to delete all data, use the
chapter 9.1.2 Memory formatting, page 37).
4.7.1 Transferring files from or to the device
You can use the File Explorer to access the device data without
installing additional software. It is automatically displayed as a mass
storage device similarly to a USB memory stick or card.
Connect the device to the computer as described.
1
Open File Explorer.
2
X The device will be displayed as a mass storage device named
PHILIPS. The Voice folder on the device contains recordings.
Copy or move files to your computer or delete files to archive
3
recordings and free up space on the device.
Format memory function (see also
• Do not disconnect the device from the computer while files are
transferred from or to the device (the status LED indicatorflashes
orange when data is being transferred). This this may damage or
corrupt the files.
• Do not format the drive of the device on a computer. If you want
to delete all data, use the
chapter 9.1.2 Memory formatting, page 37).
4.7.2 Disconnecting from a computer
Select Eject USB in File Explorer.
1
Disconnect the USB cable from the computer.
2
Format memory function (see also
Table of contents
First steps
19
Page 20
5 Record
The device oers many features that you can use during recording
or to improve the quality of a recording. Use the timer and the voice
activation functions to start recording automatically.
5.1 Creating a recording
Before starting a recording, set the required recording quality and
microphone sensitivity.
In stop mode (start-up screen), press a to select the desired
1
folder for the recording.
X The following symbols will be displayed, depending on the
selected location folder: u , v , w, x–internal memory, à, á,
â, ã–memory card displayed.
Point the built-in microphone toward the sound source and press
2
g.
X The record/play indicator lights red. The recording duration
and the remaining recording time are displayed in the selected
folder on the display.
Check the recording level/volume.
3
Press g to pause recording.
4
X The record/play indicator will blink red.
Press the g key to resume recording.
5
Press the ~ key to stop recording.
6
X The device returns to stop mode.
Note
• Start a new recording: To stop the current recording and start
a new one, press b.
• To prevent files becoming too big during a long recording, for
example a meeting lasting several hours, you can automatically
split recordings (see also chapter 8.1.8 Setting auto divide, page 31).
• Each folder can store up to 99 files. The size of the memory
depends on the location folder and the quality of a recording (see
also chapter 8.1.2 Setting recording quality, page 27).
If the recording time or the number of files exceeds the available
capacity, recording stops and a message is displayed. You can not
make any more recordings. Delete the recordings which you no
longer require, or connect the device to a computer and transfer
the files to your computer.
Tip
• If you are to start a long recording session, replace or recharge
the batteries before you begin. You can also connect the device
to a computer using the USB cable. The device is supplied with
power over the USB cable when connected to the computer and
the batteries are not drained.
20
Record
Table of contents
Page 21
5.2 Starting recording automatically
You have two options to start automatic recording: Timer function
and voice activation.
5.2.1 Use Timer function
You can use this function to start a recording at a specified date and
time. The device can record from the device's microphone, the radio
or an external sound source.
Customize the timer settings in the Settings menu and turn on the
1
feature (see also chapter 8.1.6 Setting the timer, page 30).
X If this feature is on, the À icon is displayed. The device will
start recording at a specified time. The device can be switched o
at this time or the keypad can be locked.
5.2.2 Use voice activation
When voice-activated recording is enabled, recording will start
when you begin speaking. When you stop speaking, the device will
automatically pause recording after three seconds of silence, and
resume only when you begin speaking again.
Use the voice activation level to set the volume at which the device
should begin recording.
Customize the voice-activated recording settings in the Settings
1
menu and turn on the feature (see also chapter 8.1.7 Enabling/
disabling voice-activated recording, page 30).
X If this feature is on, the ‚ icon is displayed.
Press the g key.
2
X The devices switches to standby mode. The (|) symbol will
be displayed. Recording will star t when you begin speaking. When
you stop speaking, the device will automatically pause recording
after three seconds of silence.
Press the ~ key to stop recording.
3
X The device returns to stop mode.
Tip
• Press a and h / b during recording to adjust the voice
activation level.
Table of contents
Record
21
Page 22
6 Playback
Tip
• Turn on the ClearVoice function for better playback quality. Quiet
fragments are dynamically adjusted, making soft voices clearer and
more understandable (see also chapter 8.3.2 Enabling/disabling
ClearVoice, page 35).
6.1.1 Find recording with calendar search
The search function of the device provides a listing of all stored files
sorted by the record date.
In stop mode (start-up screen), press a/MENU for at least two
1
seconds.
Press the record key, g, to confirm.
2
Press h / b to select the desired day.
3
6.1 Select a recording
Press a to select the desired folder while the device is stopped.
1
X The following symbols will be displayed, depending on the
selected location folder: u , v , w, x–internal memory, à, á,
â, ã, ä–memory card displayed.
Press b while the device is stopped.
2
aThe position indicator jumps to the end of a file.
bThe position indicator jumps to the start of the next file.
Press h while the device is stopped.
3
aThe position indicator jumps to the start of a file.
bThe position indicator jumps to the end of the previous file.
22
Playback
Press h / b to select the required recording.
4
X The first ten seconds of each highlighted file can be played as
a preview.
Press ~ to playback the selected file.
5
Table of contents
Page 23
6.2 Playing a recording back
6.3 Adjusting playback speed
Tip
• When the device is in the stop mode, playback will start with a
three-second rewind. This function is especially helpful during
transcription of recordings.
Select the required file as described.
1
Press ~ to playback the selected file.
2
X The record/play indicator will light green. The total playback
time of the current file will be shown on the display.
Press a and adjust the volume with h / b.
3
Press the ~ key to stop playback.
4
X The playback is paused at the current position. The device
returns to stop mode. When you resume playback, it will start
three seconds before the current position.
Press ~ to continue playback from the previous position.
5
Press h / b to jump to the start or the end of the file.
6
Press and hold the ~ key for at least two seconds during playback.
1
aThis will switch the device to slow playback. The c icon will be
displayed.
bThis will switch the device to fast playback. The U icon will be
displayed.
cThis will switch the device to normal playback. The S icon will
be displayed.
6.4 Quick search
You can scan backward or forward in the current file at a fast speed.
This allows to find a specific part of the recording.
Press and hold the h or b buttons during playback or when the
1
device is stopped
X to scan backward or forward in the current file at a fast
speed.
Release the key
2
X to resume playback at the selected speed form the current
position.
Table of contents
Playback
23
Page 24

6.5 Repeat a file / repeat a sequence
You can automatically repeat playback of a certain file or entire folder
(=endless loop).
In stop mode (start-up screen), press a/MENU for at least two
1
seconds.
Press h / b to select the function Repeat.
2
Press the record key, g, to confirm.
3
Using either h / b, select whether you wish either the playback
4
of an individual recording/file or a folder to repeat automatically.
X The symbol of the selected repeat mode is displayed on the
display:
–repeat a file
Á–repeat all files in a folder
Örandom repeat mode
Press the record key, g, to confirm.
5
X Playback of the recording or folder starts.
24
Playback
Table of contents
Page 25
7 Edit & delete
You can overwrite part of a recording or insert a new one. You can
split a large recording into separate files so that it can be easily edited.
You can delete individual recordings from the device.
7.1 Edit a recording
7.1.1 Add to or overwrite a recording
You can edit an existing recording by overwriting a part of it or adding
a new recording at its end. You can use the Overwrite mode to delete
the existing recording from its current position!
Caution
• You can use the Overwrite mode to delete the existing recording
from its current position!
In stop mode (start-up screen) select the folder in which you wish
2
to edit a recording by pressing a.
Press h / b to select the recording that you wish to edit.
3
Overwrite a recording Play the recording up to the point where
4
you wish to add a new part; use the quick search function.
Press the g key to start recording the new part.
5
X The new file overwrites the rest of the recording or is added
to its end, according to the editing mode set.
Note
• When you edit, the recording quality of the original recording is
used.
Set the required editing mode (see also chapter 8.1.4 Setting
1
editing mode, page 29).
X The selected editing mode icon will be displayed.
Å–add a recording
Æ–overwrite a recording
Table of contents
Press g to pause recording.
6
Press the ~ key to stop recording.
7
X The device returns to stop mode.
Edit & delete
25
Page 26
7.1.2 Split a recording
Split a large recording into two separate recordings so that it can be
more easily archived or transferred via e-mail, or to delete a section of
the recording.
7.2 Deleting recordings on the device
You can delete individual recordings from the device. Connect the
device to a computer if you want to rename or delete entire folders.
In stop mode (start-up screen) select the folder in which you wish
1
to divide a recording by pressing a.
Press h / b to select the recording that you wish to split.
2
To split a recording, play and stop at the position where the split
3
should be made. Press the ~ key to stop the playback.
Press a/MENU for at least two seconds.
4
Press h / b to select the function Split.
5
Press the record key, g, to confirm.
6
Select OK by pressing h / b.
7
Press the record key, g, to confirm.
8
X The recording is split. Sequential file numbers are reassigned
automatically.
26 Edit & delete
Caution
• Only delete the recordings that you no longer need. Keep in mind
that deleted recordings can not be recovered.
In stop mode (start-up screen) select the folder in which you wish
1
to delete a recording by pressing a.
Press h / b to select the recording that you wish to delete.
2
Press and hold the zkey for at least 2 seconds.
3
Press g to confirm the deletion.
4
X The recording is deleted. Sequential file numbers are
reassigned automatically.
Table of contents
Page 27
8 Settings
Press and hold the a/MENU key for two seconds while the device is
stopped (start-up screen) to enter the Settings menu..
Press h / b, to select if you want to save the files in the internal
5
memory or on the microSD card.
Press the record key, g, to confirm.
6
Press the ~ key to exit the menu.
7
Note
• Press the ~ key at the end of an operation to return to stop
mode. Press the ~ key during the operation to cancel the
operation without saving and return to stop mode.
8.1 Recording settings
8.1.1 Set file location
The display shows a folder icon which indicates where the recordings
are currently being stored: u , v, w, x–internal memory, à, á , â,
ã–memory card.
In stop mode (start-up screen), press a/MENU for at least two
1
seconds.
Press a to select the device settings menu × .
2
Press h / b to select the function Memory select.
3
Press the record key, g, to confirm.
4
Table of contents
Tip
• Press the ~ key to cancel the operation without saving and return
to stop mode.
8.1.2 Setting recording quality
Use the recording quality settings to set the file format and the quality
of the recording as the data rate (bit rate). The higher the recording
quality the bigger the file and the less recordings you can create.
In stop mode (start-up screen), press a/MENU for at least two
1
seconds.
Press a to select the recording settings menu Ó.
2
Press h / b to select the function Quality settings.
3
Press the record key, g, to confirm.
4
27Settings
Page 28
Press h / b to select the required recording quality.
5
X The selected quality setting symbol is shown on the display.
‡–highest quality, uncompressed, format: WAV, 1,411 kbit/s
…–excellent quality, format: MP3, 192 kbit/s
ƒ–high quality, format: MP3, 96 kbit/s
ˆ–above-average recording time: Format: MP3, 64 kbit/s
†– longer recording time, format: MP3, 8 kbit/s
Press the record key, g, to confirm.
6
Press the ~ key to exit the menu.
7
Tip
• Press the ~ key to cancel the operation without saving and return
to stop mode.
Press h / b to select the required recording quality.
5
X The selected microphone/recording sensitivity symbol is
shown on the display:
°–
Dictation – optimized setting for the recording of a sound
source close to the device.
±–
Speech to text – optimized recording for subsequent editing
using speech recognition software.
¯–
Conversation – optimized setting for the recording of
multiple sound sources in close proximity to the device.
µ–
Lecture – optimized setting for the recording of a sound
source at a larger distance.
Press the record key, g, to confirm.
Press the ~ key to exit the menu.
6
Tip
8.1.3 Setting microphone sensitivity
You can customize the microphone settings to suit the recording
conditions. Adjust the recording sensitivity to avoid recording
background noises and to adapt to the recording environment.
In stop mode (start-up screen), press a/MENU for at least two
1
seconds.
Press a to select the recording settings menu Ó.
2
Press h / b to select the function Mic sensitivity.
3
Press the record key, g, to confirm.
4
28
Settings
• Press the ~ key to cancel the operation without saving and return
to stop mode.
Table of contents
Page 29
8.1.4 Setting editing mode
8.1.5 Enabling/disabling silent recording
You can edit an existing recording by overwriting a part of it or adding
a new recording at its end. You can use the Overwrite mode to delete
the existing recording from its current position!
In stop mode (start-up screen), press a/MENU for at least two
1
seconds.
Press a to select the recording settings menu Ó.
2
Press h / b to select the function Edit mode.
3
Press the record key, g, to confirm.
4
Press h / b to select if you wish to add a new part to an existing
5
recording, whether you want to delete a part of an existing
recording and overwrite it, or turn o the function.
X The selected editing mode icon will be displayed.
Å–add a recording
Æ–overwrite a recording
Press the record key, g, to confirm.
6
Press the ~ key to exit the menu.
7
Tip
• Press the ~ key to cancel the operation without saving and return
to stop mode.
Use this function to turn o display indication, LED status, and the
signal tones during a recording. This allows you to record while there is
no visible indication on the display that a recording is being made.
In stop mode (start-up screen), press a/MENU for at least two
1
seconds.
Press a to select the recording settings menu Ó.
2
Press h / b to select the function Silent recording.
3
Press the record key, g, to confirm.
4
Press h / b, to select whether you want to turn the function on
5
or o.
Press the record key, g, to confirm.
6
Press the ~ key to exit the menu.
7
Tip
• Press the ~ key to cancel the operation without saving and return
to stop mode.
Table of contents
Settings
29
Page 30
8.1.6 Setting the timer
You can use this function to start a recording at a specified date and
time.
In stop mode (start-up screen), press a/MENU for at least two
1
seconds.
Press the record key, g, to confirm.
11
X If this feature is on, the À icon is displayed. The device will
start recording at a specified time.
Press h / b to select the Of f function, to turn o the timer.
12
Tip
Press a to select the recording settings menu Ó.
2
Press h / b to select the function Timer.
3
Press the record key, g, to confirm.
4
Press h / b to select the function Set time, in order to set the
5
time at which recording starts.
Set the date and time for the start of recording as described in (see
6
also chapter 8.3.1 Set date & time, page 34).
Press the record key, g, to confirm.
7
Set the date and time for the end of recording as described in (see
8
also chapter 8.3.1 Set date & time, page 34).
Press the record key, g, to confirm.
9
Press h / b to select the desired folder for the recording.
10
30
Settings
• Press the ~ key to cancel the operation without saving and return
to stop mode.
8.1.7 Enabling/disabling voice-activated recording
If voice-activated recording is enabled, recording session will start
when you begin speaking. When you stop speaking, the device will
automatically pause recording after three seconds of silence, and
resume only when you begin speaking again.
Use the voice activation level to set the volume at which the device
should begin recording.
In stop mode (start-up screen), press a/MENU for at least two
1
seconds.
Press a to select the recording settings menu Ó.
2
Press h / b to select the function Voice Activation.
3
Press the record key, g, to confirm.
4
Table of contents
Page 31
Press h / b to select the function On.
5
8.1.8 Setting auto divide
Press the record key, g, to confirm.
6
Press h / b to switch between voice activation level 1 (very
7
sensitive, the device switches on at low volume) and level 9 (lowest
sensitivity, the device turns on at higher volume). Press h / b
when the device is in recording mode to adjust the voice activation
level.
Press the record key, g, to confirm.
8
X If this feature is on, the ‚ icon is displayed.
Press h / b to select the Of f function, to turn o voice
9
activation.
Tip
• Press the ~ key to cancel the operation without saving and return
to stop mode.
You can automatically divide large recordings, such as a multi-hour
meeting recording. Once the set time has been reached, the device
stops the current recording and automatically starts a new one.
In stop mode (start-up screen), press a/MENU for at least two
1
seconds.
Press a to select the recording settings menu Ó.
2
Press h / b to select the function Auto divide.
3
Press the record key, g, to confirm.
4
Press h / b, to select whether longer recordings are to be
5
automatically divided after 30 or 60 minutes, or switch the feature
o.
Press the record key, g, to confirm.
6
Press the ~ key to exit the menu.
7
Tip
• Press the ~ key to cancel the operation without saving and return
to stop mode.
Table of contents
Settings
31
Page 32
8.1.9 Enable/disable the recording indicator
This function allows you to switch o the status LED.
8.2 Display settings
In stop mode (start-up screen), press a/MENU for at least two
1
seconds.
Press a to select the device settings menu × .
2
Press h / b to select the function Record lamp.
3
Press the record key, g, to confirm.
4
Press h / b, to select whether you want to turn the status LED
5
on or o.
Press the record key, g, to confirm.
6
Press the ~ key to exit the menu.
7
Tip
• Press the ~ key to cancel the operation without saving and return
to stop mode.
8.2.1 Select language
Note
• Your language might not be available. Select an alternative one.
In stop mode (start-up screen), press a/MENU for at least two
1
seconds.
Press a to select the device settings menu Ô.
2
Press h / b to select the function Language.
3
Press the record key, g, to confirm.
4
Press h / b to select the required display language.
5
Press the record key, g, to confirm.
6
Press the ~ key to exit the menu.
7
Tip
• Press the ~ key to cancel the operation without saving and return
to stop mode.
32
Settings
Table of contents
Page 33
8.2.2 Adjusting the display contrast
Press the record key, g, to confirm.
4
In stop mode (start-up screen), press a/MENU for at least two
1
seconds.
Press a to select the device settings menu Ô.
2
Press h / b to select the function Contrast.
3
Press the record key, g, to confirm.
4
Press h / b to select the required display contrast.
5
Press the record key, g, to confirm.
6
Press the ~ key to exit the menu.
7
Tip
• Press the ~ key to cancel the operation without saving and return
to stop mode.
8.2.3 Adjusting the backlight
In stop mode (start-up screen), press a/MENU for at least two
1
seconds.
Press a to select the device settings menu Ô.
2
Press h / b to select from the following settings: Off, 8s, 20s,
5
On.
Press the record key, g, to confirm.
6
Press the ~ key to exit the menu.
7
Tip
• Press the ~ key to cancel the operation without saving and return
to stop mode.
8.2.4 Setting demonstration mode
Using Demonstration mode you can display images on the screen.
Note
• The images, with the following properties, must be stored in the
root directory of the device: File format: 24 bit .bmp; resolution:
128 × 160 pixels; File name: 01.bmp, 02.bmp, … .
In stop mode (start-up screen), press a/MENU for at least two
1
seconds.
Press a to select the device settings menu Ô.
2
Press h / b to select the function Backlit.
3
Table of contents
Press h / b to select the function Demo Mode.
3
Settings
33
Page 34
Press the record key, g, to confirm.
4
Press the record key, g, to confirm.
4
Press h / b to select the function On.
5
Press the record key, g, to confirm.
6
X If this feature is on, the saved images are output sequentially
to the display.
Press the ~ key to end demonstration mode.
7
Press the ~ key to exit the menu.
8
Tip
• Press the ~ key to cancel the operation without saving and return
to stop mode.
8.3 Device settings
8.3.1 Set date & time
The date and time entered are saved with each recording as the
recording time.
In stop mode (start-up screen), press a/MENU for at least two
1
seconds.
Press a to select the device settings menu × .
2
Press h / b to select the required year.
5
Press the record key g.
6
Press h / b to set the required month.
7
Press the record key g.
8
Press h / b to set the required day.
9
Press the record key g.
10
Press h / b to switch between the 12/24-hour system.
11
Press the record key g.
12
Press h/ b to set the hours.
13
Press the record key g.
14
Press h/ b to set the minutes.
15
Press the record key, g, to confirm.
16
Press the ~ key to exit the menu.
17
Press h / b to select the function Date/time.
3
34
Settings
Table of contents
Page 35
Tip
Tip
• Press the ~ key to cancel the operation without saving and return
to stop mode.
8.3.2 Enabling/disabling ClearVoice
Turn on the ClearVoice function for better playback quality. Dynamic
emphasis on quiet passages to improve the intelligibility of quiet voices.
In stop mode (start-up screen), press a/MENU for at least two
1
seconds.
Press a to select the device settings menu × .
2
Press h / b to select the function ClearVoice.
3
Press the record key, g, to confirm.
4
Press h / b, to select whether you want to turn the function on
5
or o.
X If the feature is on, the Ç icon is displayed.
Press the record key, g, to confirm.
6
Press the ~ key to exit the menu.
7
• Press the ~ key to cancel the operation without saving and return
to stop mode.
8.3.3 AUTO-OFF
The device switches o automatically if no key is pressed within a preset period of time. This saves power.
In stop mode (start-up screen), press a/MENU for at least two
1
seconds.
Press a to select the device settings menu ×.
2
Press h / b to select the function Auto off.
3
Press the record key, g, to confirm.
4
Press h / b, to automatically turn the device o after 5, 15, 30
5
or 60 minutes' inactivity.
Press the record key, g, to confirm.
6
Press the ~ key to exit the menu.
7
Tip
• Press the ~ key to cancel the operation without saving and return
to stop mode.
Table of contents
Settings
35
Page 36
8.3.4 Alarm clock
Press h / b to select the Of f function, to turn o the alarm.
11
You can use the device as an alarm clock or an appointment reminder.
The alarm goes o or a selected file is played at a pre-set time.
In stop mode (start-up screen), press a/MENU for at least two
1
seconds.
Press a to select the device settings menu × .
2
Press h / b to select the function Alarm.
3
Press the record key, g, to confirm.
4
Press h / b to select the Set time function, to set the alarm
5
time.
Set date and time as described (see also chapter 8.3.1 Set date &
6
time, page 34).
Press the record key, g, to confirm.
7
Press h / b to select the Set source function, to set the alarm
8
signal.
Press h / b to select between an alarm signal or a selected
9
recording of your choice to be played as an alarm sound.
Press the record key, g, to confirm.
10
X If this feature is on, the ¿ icon will be displayed.
Tip
• Press the ~ key to cancel the operation without saving and return
to stop mode.
8.3.5 Enabling/disabling key and signal tones
In stop mode (start-up screen), press a/MENU for at least two
1
seconds.
Press a to select the device settings menu ×.
2
Press h / b to select the function Device sounds.
3
Press the record key, g, to confirm.
4
Press h / b, to enable/disable the key and signal tones.
5
Press the record key, g, to confirm.
6
Press the ~ key to exit the menu.
7
Tip
• Press the ~ key to cancel the operation without saving and return
to stop mode.
36
Settings
Table of contents
Page 37
9 Service
9.1.2 Memory formatting
Caution
Do not perform any maintenance operations that are not described in
this user manual. Do not disassemble the device into its component
parts to carry out repairs. The device may only be repaired in
authorised service centres.
9.1 Service functions
9.1.1 Display device information
In stop mode (start-up screen), press a/MENU for at least two
1
seconds.
Press a to select the device settings menu × .
2
Press h / b to select the function Information.
3
Press the record key, g, to confirm.
4
X General device information is displayed on the screen:
current date and time, remaining recording time in the selected
memory, firmware version of the device.
Press the Stop key ~ to return to stop mode.
5
• Formatting the memory deletes all recordings and files saved on
the device.
You can use this feature to delete all data and format the selected
memory.
Select the memory that you want to format (internal memory or
1
microSD card memory) (see also chapter 8.1.1 Set file location,
page 27).
In stop mode (start-up screen), press a/MENU for at least two
2
seconds.
Press a to select the device settings menu ×.
3
Press h / b to select the function Format memory.
4
Press the record key, g, to confirm.
5
Select OK by pressing h / b.
6
Press the record key, g, to confirm.
7
Press g to confirm the formatting.
8
Press the ~ key to exit the menu.
9
Table of contents
Service
37
Page 38
Tip
• Press the ~ key to cancel the operation without saving and return
to stop mode.
9.2 Updating the firmware
Your device is controlled by an internal program called firmware. As
a part of ongoing product maintenance, the firmware is upgraded and
errors are corrected.
It is possible that a newer version (an “update”) of the firmware has
been released since you purchased the device. In this case you can
easily update your device to the latest version.
Caution
• New batteries should be inserted into the device when updating
the firmware, or the rechargeable batteries should be fully
charged. This is to prevent the power supply being interrupted.
Connect the device to your computer as described (see also
1
chapter 4.7 Connecting to a computer, page 18).
Download the firmware update for your model from the website
2
www.philips.com/dictation onto your computer.
X The firmware is automatically updated. This will only take a
few minutes. The device will then switch o.
Caution
• Wait until the firmware update is complete before calling up other
device functions. Failure to properly update the firmware may
result in the device malfunctioning.
Copy the new firmware file to the root directory of the device.
3
Disconnect the device from the computer.
4
38
Service
Table of contents
Page 39
9.3 Troubleshooting
Problem Possible cause/solution
Problem Possible cause/solution
I cannot hear anything from
the speaker.
• A headset is connected to the device.
• The volume is at the lowest setting.
The device does not turn on • The batteries or rechargeable batteries
are not inser ted correctly.
X Check to ensure that the batteries
or rechargeable batteries are correctly
inserted. Make sure the polarity is
correct.
• Batteries are empty.
X Replace or recharge the batteries.
The device does not playback
recordings
• The keypad lock may be enabled.
X Slide the HOLD switch to the
“O” position.
• No recordings are saved in the device.
The device does not
respond.
microSD card can not be
selected as a recording
location
• Remove the batteries/rechargeable
batteries and insert them again.
• There is no memory card in the device.
X Inser t a memory card into the
device.
• Memory card is not formatted (file
system FAT32).
X Format the memory card in the
device.
The recording session does
not start
I cannot hear anything from
the headphones.
• Pre-recording or voice-activated
recording mode may be enabled.
• The keypad lock may be enabled.
X Slide the HOLD switch to the
“O” position.
• The maximum number of recordings
may have been reached or the available
space for recording is full.
X Delete some recordings or move
them to an external device.
X Select another location folder.
• The headphones are incorrectly
connected.
X Check the headphone connection.
• The volume is at the lowest setting.
Table of contents
Service
39
Page 40
10 Appendix
The information in this user manual has been produced to the best of
our knowledge. It (particularly the technical data) may be modified or
updated at any time without prior notice.
10.1 Technical data
Technical data
Memory card microSD card
up to 32 GB SDHC
Recording format PCM – WAV, 1,411 kbits/s
SHQ – MP3, 192 kbits/s
HQ – MP3, 96 kbits/s
SP – MP3, 64 kbits/s
LP – MP3, 8 kbits/s
Technical data
Dimensions 45 × 113 × 20 mm
Weight 79 g (incl. batteries/rechargeable
batteries)
Batteries 2 × AAA alkaline batteries
USB connection High-speed 2.0, Micro-USB
USB input USB 5 V/DC ª, 500 mA
Headset connection Stereo jack, 3.5 mm
Display 1.77"
Resolution: 128 × 160 pixels
Internal memory NAND-Flash, 4 GB
40
Appendix
Speaker Frequency range: 70 – 15.000 Hz
Output: 110 mW
Recording time
Internal storage
Battery life Recording in LP mode (built-in memory /
Sampling rate PCM/SHQ – 44.1 kHz
PCM – 6 h
SHQ – 47 h
HQ – 94 h
SP – 141 h
LP – 1,135 h
microSD memory card)
Up to 50 h/25 h (alkaline battery)
HQ – 32 kHz
SP – 22 kHz
LP – 16 kHz
Table of contents
Page 41

Technical data
System requirements Operating system: Windows 8, 7, Vista,
Mac OS X, Linux
Temperature 5 ºC – 45 ºC / 41 ºF – 113 ºF
Humidity 10 % – 90 %, non-condensing
Table of contents
Appendix
41
Page 42

˜
The conformity with the relevant EU directives is confirmed by the CE
mark.
Declaration of Conformity
Speech Processing Solutions GmbH hereby declares that the devices
DVT2500 and DVT2700 fully comply with the basic requirements and
other relevant provisions of Directives 2006/95/EC, 2004/108/EC and
2009/125/EC.
A complete Declaration of Conformity for this product is available at
www.philips.com/dictation.
This product was manufactured using high-quality materials and
components which may be recycled and reused. Adhere to the
applicable statutory provisions, and only dispose of these products at
ocial collection points. The proper disposal of the device helps avoid
potential adverse impacts on environment and health.
— Ÿ
Packaging: Please observe the recycling and packaging provisions
applicable in your country.
Batteries: Used batteries should be disposed of at an ocial
collection point.
›
Product: The crossed dustbin symbol on your product indicates that
special waste regulations shall apply to the electrical and electronic
equipment contained therein.
In keeping with the provisions of the EU Directive relating to the
disposal of waste electrical and electronic equipment and the
protection of the environment and the health, old devices which are
no longer required, may be disposed of as follows:
• Your dealer will take care of the old equipment when you buy a new
device from him.
• Used devices should be disposed of at an ocial collection point.
Neither Speech Processing Solutions GmbH nor its aliates shall be
liable to the purchaser of this product or third parties with respect to
claims for damages, losses, costs or expenses incurred by purchaser or
third parties as a result of an accident, misuse or abuse of this product
or unauthorized modifications, repair, modification of the product or
failure to meet the operating and maintenance instructions provided
by Philips.
This User Manual is a document with no contractual nature.
We accept no liability for changes, mistakes or printing errors.
Philips and the Philips’ Shield Emblem are registered trademarks of
Koninklijke Philips N.V. and are used by Speech Processing Solutions
GmbH under license from Koninklijke Philips N.V. Trademarks are the
property of their respective owners.
42
Appendix
Table of contents
Page 43

Table of contents
43
Page 44

© 2014 Speech Processing Solutions GmbH. All rights reserved.
Document Version 1.0, 2014/06/18
 Loading...