

Philips DVP5100-02 User Manual
DVD VIDEO PLAYER
User manual
Thank you for choosing Philips.
Need help fast?
Read your User’s Manual first for quick tips that make using
your Philips product more enjoyable.
If you have read your instructions and still need assistance,
you may access our online help at www.philips.com/support
DVP5100
01-39 DVP5100_EU_02A 17/03/05, 10:53 AM1
3139 246 15661

Important notes for users in the
U.K.
Mains plug
This apparatus is fitted with an approved 13
Amp plug. To change a fuse in this type of plug
proceed as follows:
1 Remove fuse cover and fuse.
2 Fix new fuse which should be a BS1362 5 Amp,
A.S.T.A. or BSI approved type.
3 Refit the fuse cover.
If the fitted plug is not suitable for your jack
outlets, it should be cut off and an appropriate
plug fitted in its place.
If the mains plug contains a fuse, this should
have a value of 5 Amp. If a plug without a fuse
is used, the fuse at the distribution board
should not be greater than 5 Amp.
Note: The severed plug must be disposed to
avoid a possible shock hazard should it be
inserted into a 13 Amp jack elsewhere.
How to connect a plug
The wires in the mains lead are coloured with
the following code: blue = neutral (N),
brown = live (L).
¶ As these colours may not correspond with the
colour markings identifying the terminals in
your plug, proceed as follows:
– Connect the blue wire to the terminal
marked N or coloured black.
– Connect the brown wire to the terminal
marked L or coloured red.
– Do not connect either wire to the earth
terminal in the plug, marked E (or e) or
coloured green (or green and yellow).
Before replacing the plug cover, make certain
that the cord grip is clamped over the sheath
of the lead - not simply over the two wires.
CAUTION
Use of controls or adjustments or
performance of procedures other
than herein may result in hazardous
radiation exposure or other unsafe
operation.
VAROITUS
Muiden kuin tässä esitettyjen
toimintojen säädön tai asetusten
muutto saattaa altistaa vaaralliselle
säteilylle tai muille vaarallisille
toiminnoille.
Copyright in the U.K.
Recording and playback of material may
require consent. See Copyright Act 1956 and
The Performer’s Protection Acts 1958 to 1972.
01-39 DVP5100_EU_02A 17/03/05, 10:53 AM2
3139 246 15661

DK
Advarsel: Usynlig laserstråling ved
åbning når sikkerhedsafbrydere er ude
af funktion. Undgå utsættelse for
stråling.
Bemærk: Netafbryderen er sekundært
indkoblet og ofbryder ikke strømmen
fra nettet. Den indbyggede netdel er
derfor tilsluttet til lysnettet så længe
netstikket sidder i stikkontakten.
S
Klass 1 laseraparat
Varning! Om apparaten används på
annat sätt än i denna bruksanvisning
specificerats, kan användaren utsättas
för osynlig laserstrålning, som
överskrider gränsen för laserklass 1.
Observera! Stömbrytaren är sekundärt
kopplad och bryter inte strömmen från
nätet. Den inbyggda nätdelen är
därför ansluten till elnätet så länge
stickproppen sitter i vägguttaget.
SF
Luokan 1 laserlaite
Varoitus! Laitteen käyttäminen muulla
kuin tässä käyttöohjeessa mainitulla
tavalla saattaa altistaa käyttäjän
turvallisuusluokan 1 ylittävälle
näkymättömälle lasersäteilylle.
Oikeus muutoksiin varataan. Laite ei
saa olla alttiina tippu-ja roiskevedelle.
Huom. Toiminnanvalitsin on kytketty
toisiopuolelle, eikä se kytke laitetta irti
sähköverkosta. Sisäänrakennettu
verkko-osa on kytkettynä
sähköverkkoon aina silloin, kun pistoke
on pistorasiassa.
The apparatus shall not be exposed to dripping
or splashing and that no objects filled with
liquids, such as vases, shall be placed on
apparatus.
Due to the inconsistency of disc formats
provided by various disc manufacturers, your
DVD system may require a playability
enhancement or upgrade. As DVD technology
advances, these enhancements will become
common and will be easy to complete.
Go to www.philips.com/support for
software upgrade.
01-39 DVP5100_EU_02A 17/03/05, 10:53 AM3
‘CONSUMERS SHOULD NOTE THAT NOT
ALL HIGH DEFINITION TELEVISION SETS
ARE FULLY COMPATIBLE WITH THIS
PRODUCT AND MAY CAUSE ARTIFACTS
TO BE DISPLAYED IN THE PICTURE. IN
CASE OF 525 OR 625 PROGRESSIVE SCAN
PICTURE PROBLEMS, IT IS RECOMMENDED
THAT THE USER SWITCH THE
CONNECTION TO THE ‘STANDARD
DEFINITION’ OUTPUT. IF THERE ARE
QUESTIONS REGARDING OUR TV SET
COMPATIBILITY WITH THIS MODEL 525p
AND 625p DVD PLAYER, PLEASE CONTACT
OUR CUSTOMER SERVICE CENTER.’
3139 246 15661

General Information
Environmental Information
All unnecessary packaging has been
omitted. The packaging has been made
easy to separate into two materials:
cardboard (box, buffer) and polyethylene
(bags, protective foam sheet).
Your DVD player consists of materials
which can be recycled and reused if
disassembled by a specialised company.
Please observe the local regulations
regarding the disposal of packaging
materials, exhausted batteries and old
equipment.
Manufactured under license from Dolby
Laboratories. “Dolby”, “Pro Logic” and the
double-D symbol are trademarks of Dolby
Laboratories.
DivX, DivX Certified, and
associated logos are
trademarks of
DivXNetworks, Inc and are
used under license.
Windows Media is a trademark of
Microsoft Coporation.
Laser safety
This unit employs a laser. Due to possible
eye injury, only a qualified service person
should remove the cover or attempt to
service this device.
NOTE:
PICTURES SHOWN MAYBE
DIFFERENT BETWEEN
COUNTRIES.
CAUTION
(WARNING LOCATION: ON THE
BACKPLATE OF THE SET)
NEVER MAKE OR CHANGE
CONNECTIONS WITH THE
POWER SWITCHED ON.
Important Note:
Due to the numerous versions of new
CD-Audio copy protection or
enhanced CD-Audio protection
recently available on certain discs,
Philips is unable to guarantee that
this DVD Player is fully compatible
with such new discs. Should you have
difficulty playing any such CD-Audio
discs, kindly refer them to your CDAudio disc retailer.
Specifications are subject to change
without notice. Trademarks are the
property of Koninklijke Philips Electronics
N.V. or their respective owners.
For Customer Use:
Read carefully the information located at
the rear of your DVD VIDEO player and
enter below the Serial No. Retain this
information for future reference.
Model No. DVP 5100
Serial No. _______________
01-39 DVP5100_EU_02A 17/03/05, 10:53 AM4
This compact DVD player is in
conformity with the EMC directive
and low-voltage directive.
LASER
Type Semiconductor laser
GaAlAs
Wave length 650 nm (DVD)
780 nm (VCD/CD)
Output Power 7 mW (DVD)
10 mW (VCD/CD)
Beam divergence 60 degree
3139 246 15661

CAUTION
VISIBLE AND INVISIBLE LASER
RADIATION WHEN OPEN.
AVOID EXPOSURE TO BEAM.
ADVARSEL
SYNLIG OG USYNLIG
LASERSTRÅLING VED ÅBNING
UNDGÅ UDSÆTTELSE FOR STRÅLING
VARNING
SYNLIG OCH OSYNLIG
LASERSTRÅLNING NÄR DENNA DEL
ÄR ÖPPNAD BETRAKTA EJ STRÅLEN
VARO!
AVATTAESSA OLET ALTTIINA
NÄKYVÄLLE JA NÄKYMÄTTÖMÄLLE
LASER SÄTEILYLLE. ÄLÄ KATSO
SÄTEESEEN
VORSICHT
GEFAHR VON SICHTBARER UND
UNSICHTBARER LASERSTRAHLUNG
BEI GEÖFFNETEM GEHÄUSE.
ATTENTION
RAYONNEMENT LASER VISIBLE ET
INVISIBLE EN CAS D’OUVERTURE
EXPOSITION DANGEREUSE AU
FAISCEAU
Index
English --------------------------------------- 6
English
Français ------------------------------------ 40
Français
Deutsch ------------------------------------ 74
Deutsch
Español ----------------------------------- 108
Español
Italiano ------------------------------------ 142
Italiano
Swedish -----------------------------------176
Swedish
Dansk -------------------------------------- 210
Dansk
01-39 DVP5100_EU_02A 17/03/05, 10:53 AM5
5
3139 246 15661

Contents
English
Introduction
Supplied accessories ....................................... 8
Care and safety information.......................... 8
Connections
Connecting TV ............................................ 9-10
Using SCART jack........................................... 9
Using Composite Video jacks (CVBS) ........ 9
Using Component Video jacks (Pr Pb Y) . 10
Using an accessory RF modulator ............ 10
Connecting the power cord........................ 11
Optional : Connecting to an Audio System .
........................................................................... 12
Stereo system has Dolby Pro Logic or Right
/ Left Audio In jack ....................................... 12
Optional: Connecting Digital AV Receiver ...
........................................................................... 12
Receiver has a PCM, Dolby Digital, or
MPEG2 decoder............................................ 12
Functional Overview
Front and Rear Panels .................................. 13
Remote Control ............................................ 14
Getting Started
Step 1: Inserting batteries into the
Remote Control ............................................ 15
Using the Remote Control to operate the
Player ............................................................... 15
Step 2: Setting up the TV ........................ 15-17
Setting up Progressive Scan feature (for
Progressive Scan TV only) ........................... 16
To deactivate Progressive manually .......... 17
Selecting the colour system that
corresponds to your TV .............................. 17
Step 3: Setting language preference ...........18
Setting the OSD Language.......................... 18
Setting the Audio, Subtitle and Disc menu
language .......................................................... 18
Disc Operations
Playable Discs ................................................. 19
Region Codes .................................................19
Playing discs..................................................... 19
Basic playback controls................................. 20
Selecting various repeat/shuffle functions 20
Repeat play mode ......................................... 20
Repeating a section within a chapter/track .
.........................................................................
Operations for video playback ...................21
Using the Disc Menu.................................... 21
Zooming in ..................................................... 21
Resuming playback from the last stopped
point ................................................................ 21
Slow motion................................................... 21
Using the OSD menu .................................. 21
Special DVD features ....................................22
Playing a Title ................................................. 22
Camera Angle ................................................ 22
Changing the Audio Language ....................22
Subtitles .......................................................... 22
Special VCD & SVCD Features ............. 22-23
Playback Control (PBC) .............................. 22
Preview ........................................................... 23
Playing DivX disc ........................................... 23
Playing MP3/Windows Media™ Audio/
MPEG-4/JPEG/Kodak Picture CD .............. 24
General Operation ....................................... 24
Selecting a folder and track/file ................. 24
Special picture disc features ........................ 25
Preview Function ..........................................25
Zoom picture ................................................ 25
Playback with multi-angles .......................... 25
Scan Effect ...................................................... 25
Playing MP3/Windows Media™ Audio music
and JPEG picture simultaneously............... 25
20
6
01-39 DVP5100_EU_02A 17/03/05, 10:53 AM6
3139 246 15661

DVD Menu Options
General Setup menu ...............................26-27
Locking/Unlocking the disc for viewing ... 26
Dimming system’s display screen .............. 26
Programming disc tracks.......................26-27
OSD Language ............................................... 27
Screen Saver - turning on/off .....................27
Sleep ................................................................ 27
DivX VOD registration code ..................... 27
Audio Setup Menu ................................... 28-29
Analogue output ........................................... 28
Digital Audio Setup ....................................... 28
Sound Mode ................................................... 29
CD Upsampling ............................................. 29
Night Mode - turning on/off....................... 29
Video Setup Menu ...................................30-32
TV Type ........................................................... 30
Setting the TV Display ................................. 30
Progressive - turning on/off........................ 31
Picture Setting ........................................ 31-32
Switching the YUV/RGB .............................. 32
Preference Page........................................ 33-35
Audio, Subtitle, Disc Menu .......................... 33
Restricting playback by Parental Control .....
......................................................................... 33
PBC .................................................................. 34
MP3/JPEG Menu - turning on/off............... 34
Changing the Password ...............................34
Setting the DivX Subtitle ............................ 35
Restoring to original settings ..................... 35
Contents
English
Troubleshooting ......................... 36–37
Specifications ......................................38
Glossary ......................................................................39
Language Code............................................ 244
01-39 DVP5100_EU_02A 17/03/05, 10:53 AM7
7
3139 246 15661
Introduction
PREVIEW
MUTE
10 cm
(4 inches)
10 cm
(4 inches)
10 cm
(4 inches)
PHILIPS
English
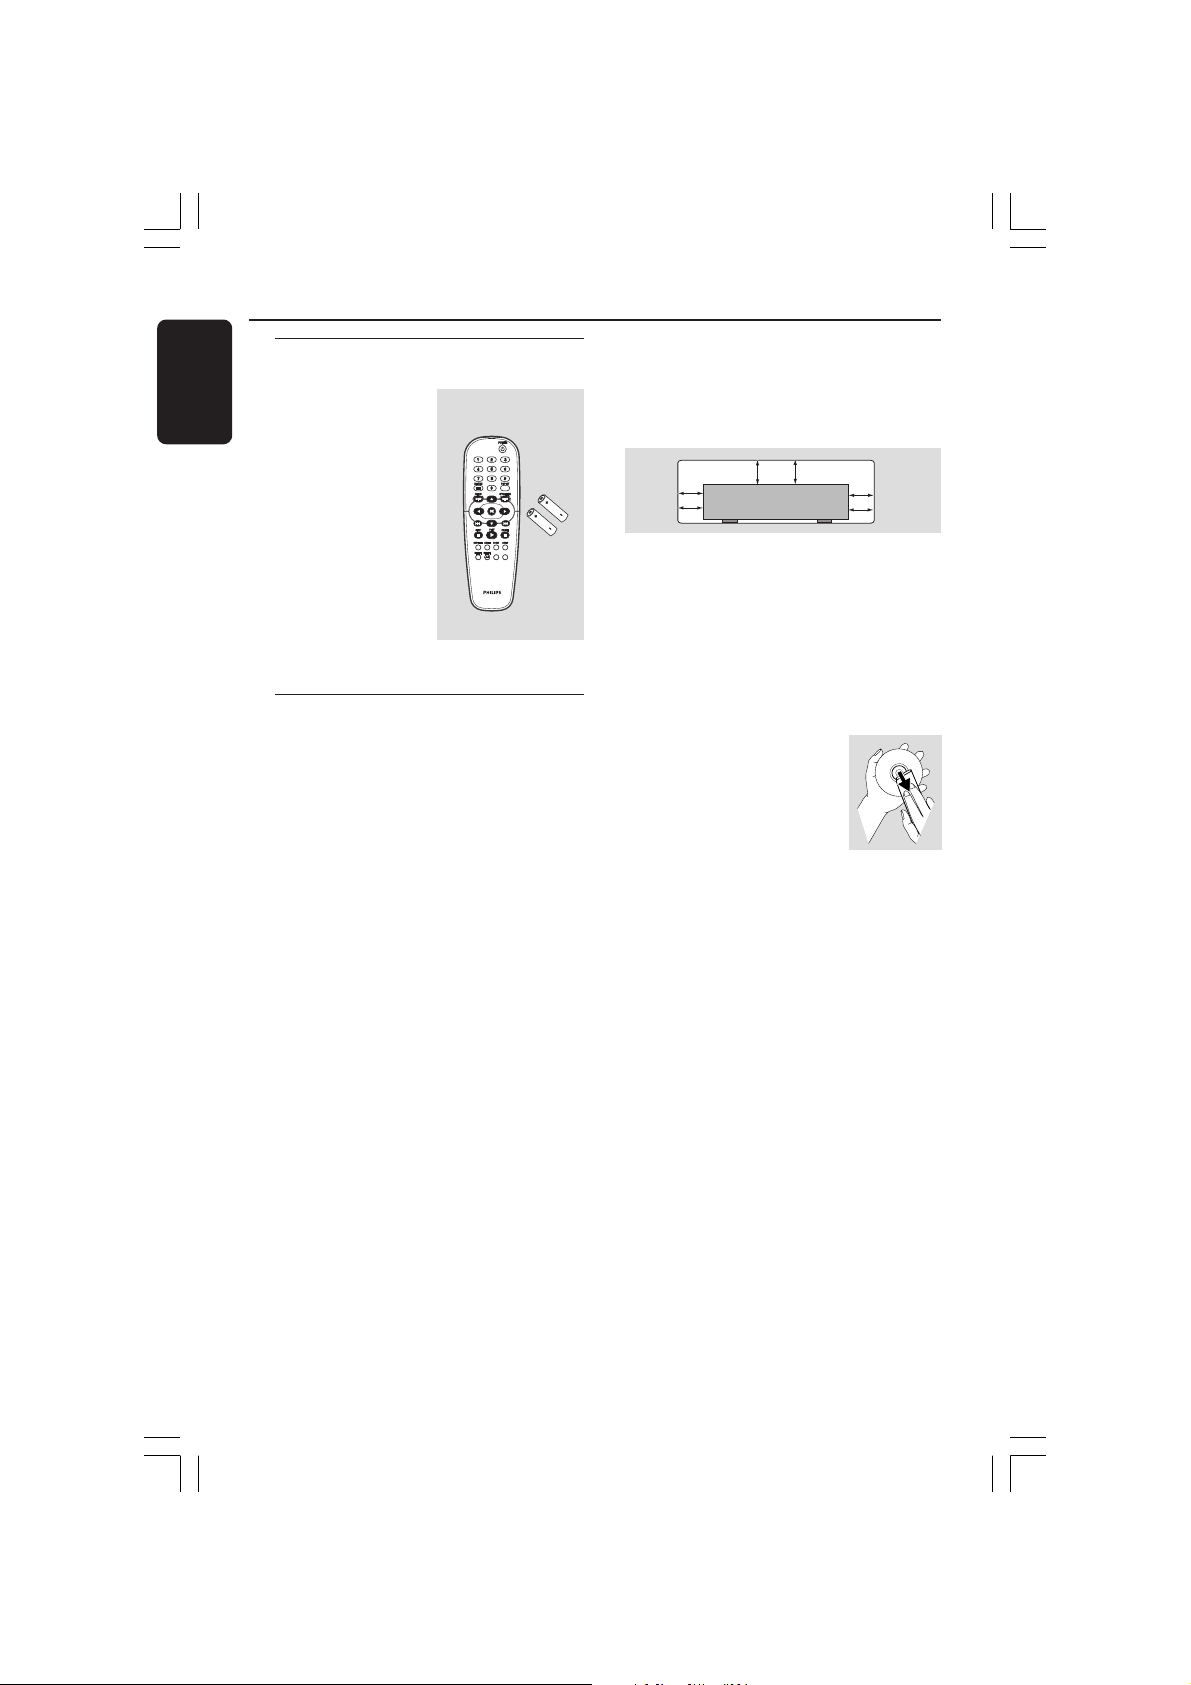
Supplied accessories
Remote Control
and
two AA batteries
Care and safety information
● Power consumption
– When the system is switched to
Standby mode, it is still consuming power.
To disconnect the system from the power
supply completely, remove the AC power
plug from the wall jack.
● Avoid high temperatures, moisture,
water and dust
– Do not expose the player, batteries or
discs to humidity, rain, sand or excessive
heat (caused by heating equipment or
direct sunlight.)
● Avoid condensation problem
– The lens may cloud over when the
player is suddenly moved from cold to
warm surroundings, making it impossible
to play a disc. Leave the player in the
warm environment until the moisture
evaporates.
● Do not block the vents
– Do not operate the DVD Player in an
enclosed cabinet, allow about 10 cm (4
inch) of free space all around the player
for adequate ventilation.
PREVIEW
MUTE
● Care of the cabinet
– Use a soft cloth slightly moistened with
a mild detergent solution. Do not use a
solution containing alcohol, spirits,
ammonia or abrasives.
● Finding a suitable location
– Place the player on a flat, hard, and
stable surface.
● Disc handling
– To clean a CD, wipe it in a
straight line from the center
towards the edge using a soft,
lint-free cloth. A cleaning
agent may damage the disc!
– Write only on the printed
side of a CDR(W) and only with a soft felttipped pen.
– Handle the disc by its edge, do not
touch the surface.
8
01-39 DVP5100_EU_02A 17/03/05, 10:53 AM8
3139 246 15661
Connecting TV
AUDIO
IN
S-VIDEO
IN
VIDEO IN
TV IN
AUDIO
IN
S-VIDEO
IN
VIDEO IN
TV IN
2
1
S-VIDEO
IN
AUDIO
IN
VIDEO IN
Connections
English
TV IN
S-VIDEO
IN
AUDIO
TV IN
IN
VIDEO IN
1
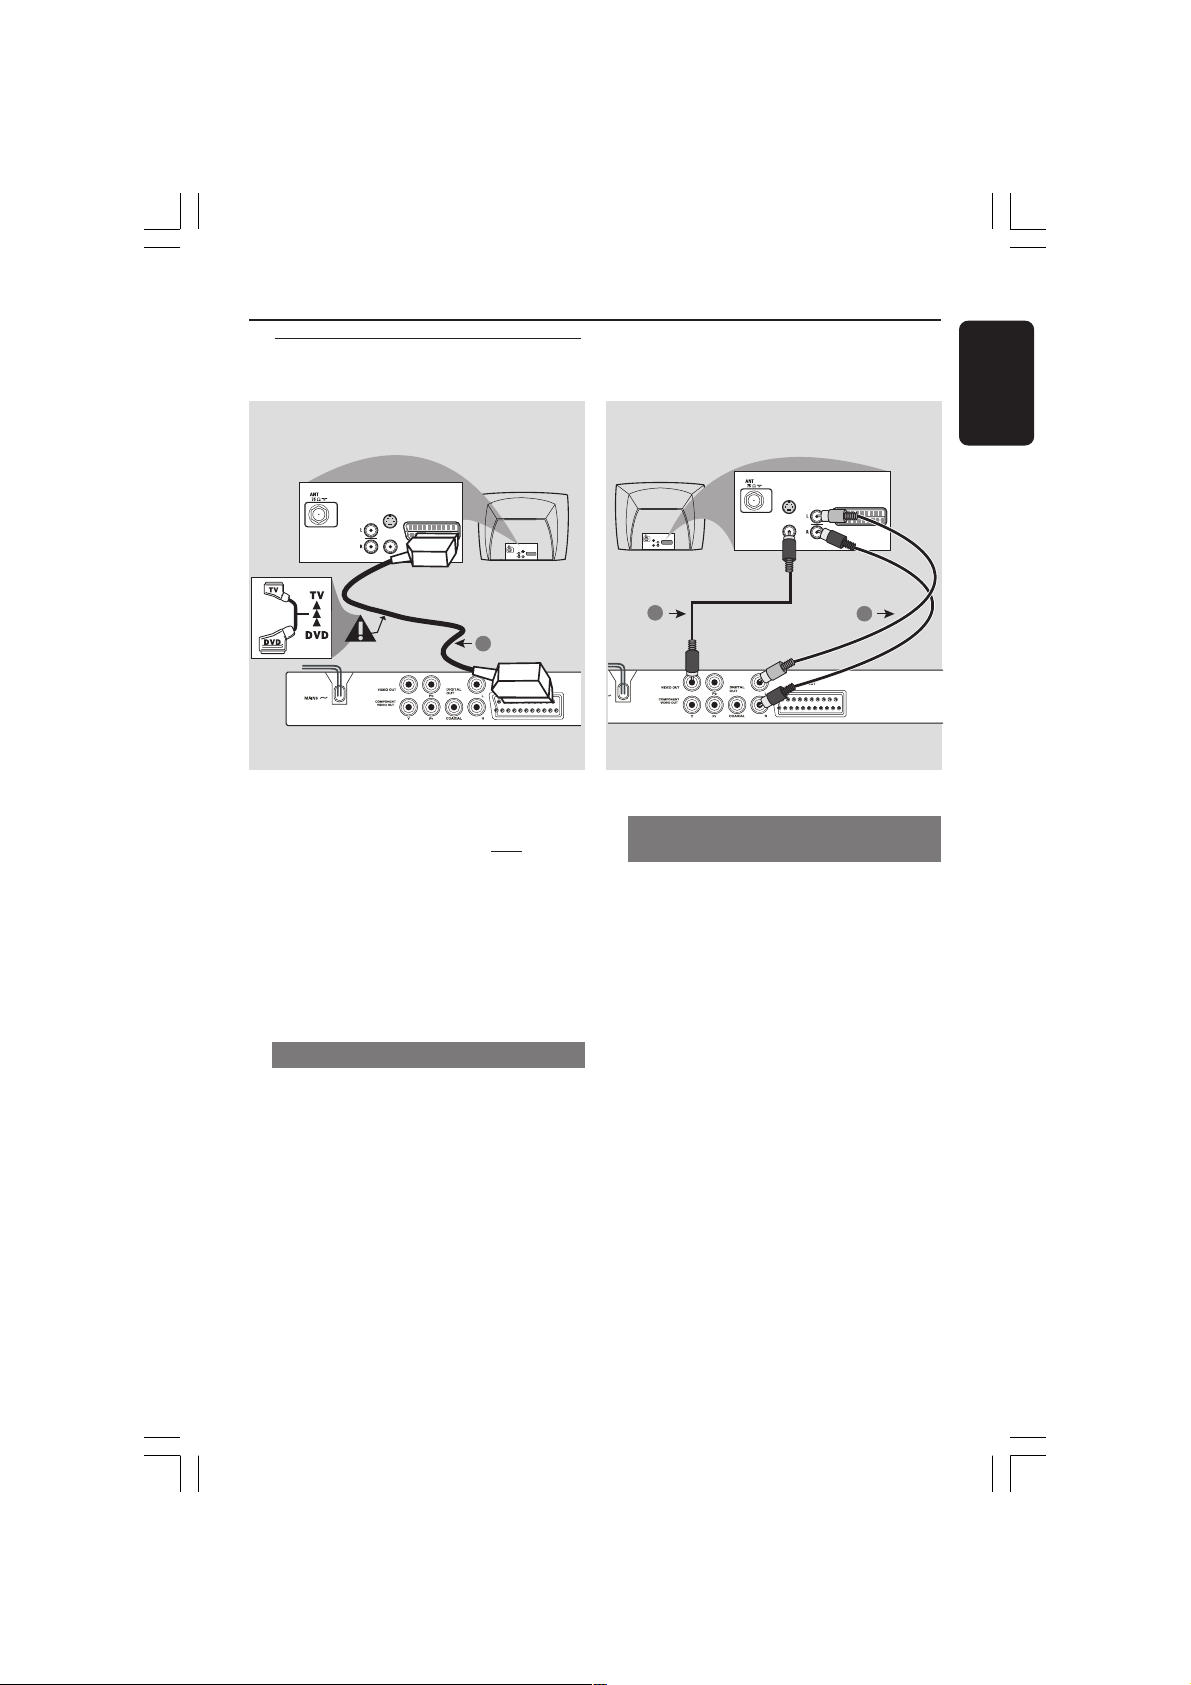
IMPORTANT!
– You only need to make
one video
connection from the following
options, depending on the
capabilities of your TV system.
– Connect the DVD system directly
to the TV.
– A SCART connection will let you
use features both Audio and Video
on the DVD Player.
Using SCART jack
● Use the SCART cable (black) to connect
the DVD Player’s SCART jack (TV OUT)
to the corresponding Scart input jacks on
the TV (cable not supplied).
Helpful Hint:
– Ensure that the “TV” indication on
SCART cable is connected to the TV
set and “DVD” indication on SCART
cable is connected to the DVD Player.
Using Composite Video jacks
(CVBS)
1 Use the composite video cable (yellow) to
connect the DVD Player’s CVBS (VIDEO)
jack to the video input jack (or labeled as
A/V In, Video In, Composite or Baseband)
on the TV (cable not supplied).
2 To hear the sound of this DVD Player
through your TV, use the audio cables
(white/red) to connect AUDIO OUT (L/
R) jacks of the DVD Player to the
corresponding AUDIO IN jacks on the TV
(cable not supplied).
9
01-39 DVP5100_EU_02A 17/03/05, 10:53 AM9
3139 246 15661

Connections
AUDIO IN
R L
VIDEO
IN
TO TVINT IN
CH3 CH4
2
1
English
RF coaxial cable to TV
COMPONENT
VIDEO IN
S-VIDEO
IN
V (Pr/Cr)
AUDIO
IN
U (Pb/Cb)
COMPONENT
VIDEO IN
S-VIDEO
IN
V (Pr/Cr)
AUDIO
IN
U (Pb/Cb)
VIDEO IN
Y
1
VIDEO IN
Y
2
IMPORTANT!
– The progressive scan video
quality is only possible when using Y
Pb Pr and a progressive scan TV is
required.
Using Component Video jacks
(Y Pb Pr)
1 Use the component video cables (red/
blue/green) to connect the DVD system’s
Y Pb Pr jacks to the corresponding
Component video input jacks (or labeled
as Y Pb Pr) on the TV (cable not supplied).
2 To hear the sound of this DVD Player
through your TV, use the audio cables
(white/red) to connect AUDIO OUT (L/
R) jacks of the DVD Player to the
corresponding AUDIO IN jacks on the TV
(cable not supplied).
3 Proceed to page 16 for detailed
Progressive Scan set up.
Back of RF Modulator
(example only)
Antenna or
Cable TV signal
IMPORTANT!
– If your TV only has a single
Antenna In jack (or labeled as 75
ohm or RF In,) you will need an RF
modulator in order to view the DVD
playback on the TV. See your
electronics retailer or contact
Philips for details on RF modulator
availability and operations.
Using an accessory RF modulator
1 Use the composite video cable (yellow) to
connect the DVD Player’s CVBS jack to
the video input jack on the RF modulator.
2 Use the RF coaxial cable (not supplied) to
connect the RF modulator to your TV’s
RF jack.
10
01-39 DVP5100_EU_02A 17/03/05, 10:53 AM10
3139 246 15661
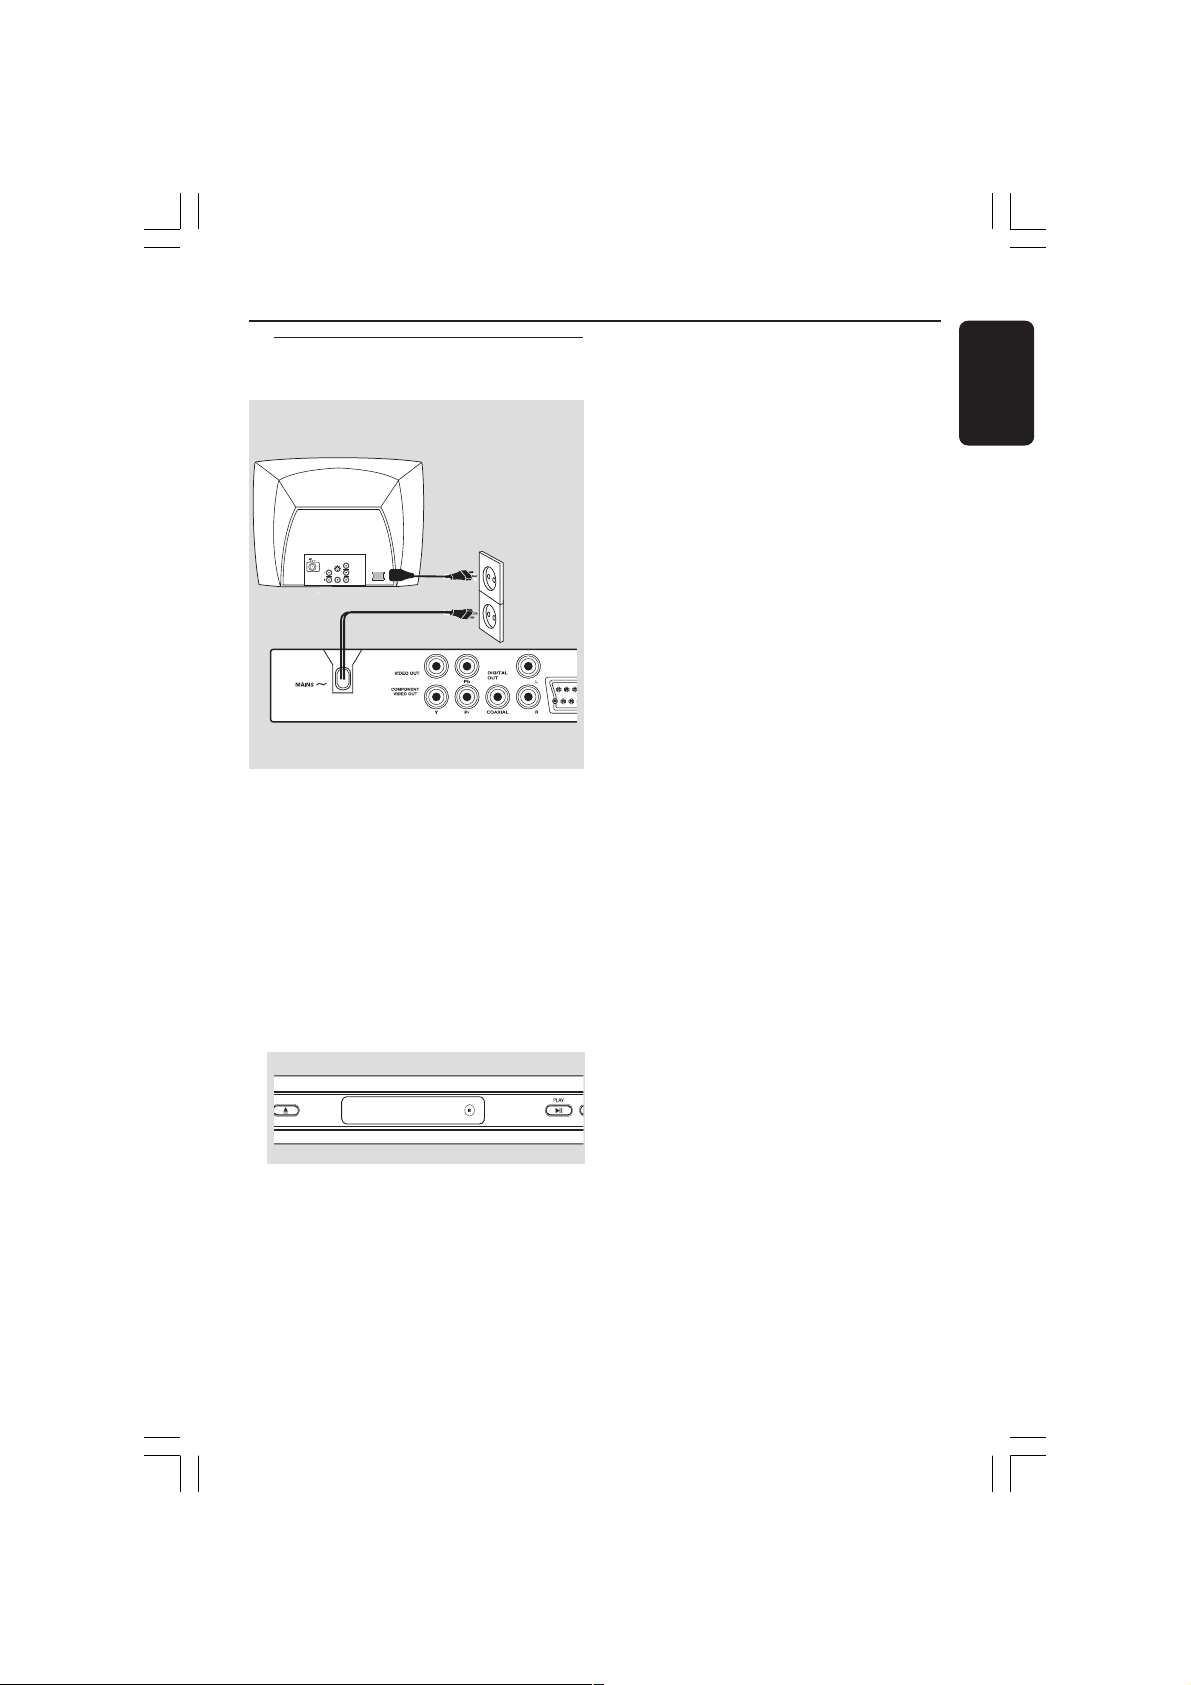
Connecting the power cord
COMPONENT
VIDEO IN
S-VIDEO
IN
V (Pr/Cr)
AUDIO
OUT
~ AC MAINS
U (Pb/Cb)
VIDEO IN
Y
After everything is connected
properly, plug in the AC power cord
to the power outlet.
Never make or change any connections
with the power switched on.
Connections
English
When no disc is loaded, press
STANDBY ON on the DVD Player
front panel,
“EJECT” may appear on the display
panel.
EJECT
01-39 DVP5100_EU_02A 17/03/05, 10:53 AM11
EJECT
11
3139 246 15661
Connections
AUDIO
IN
DIGITAL
AV Receiver
English
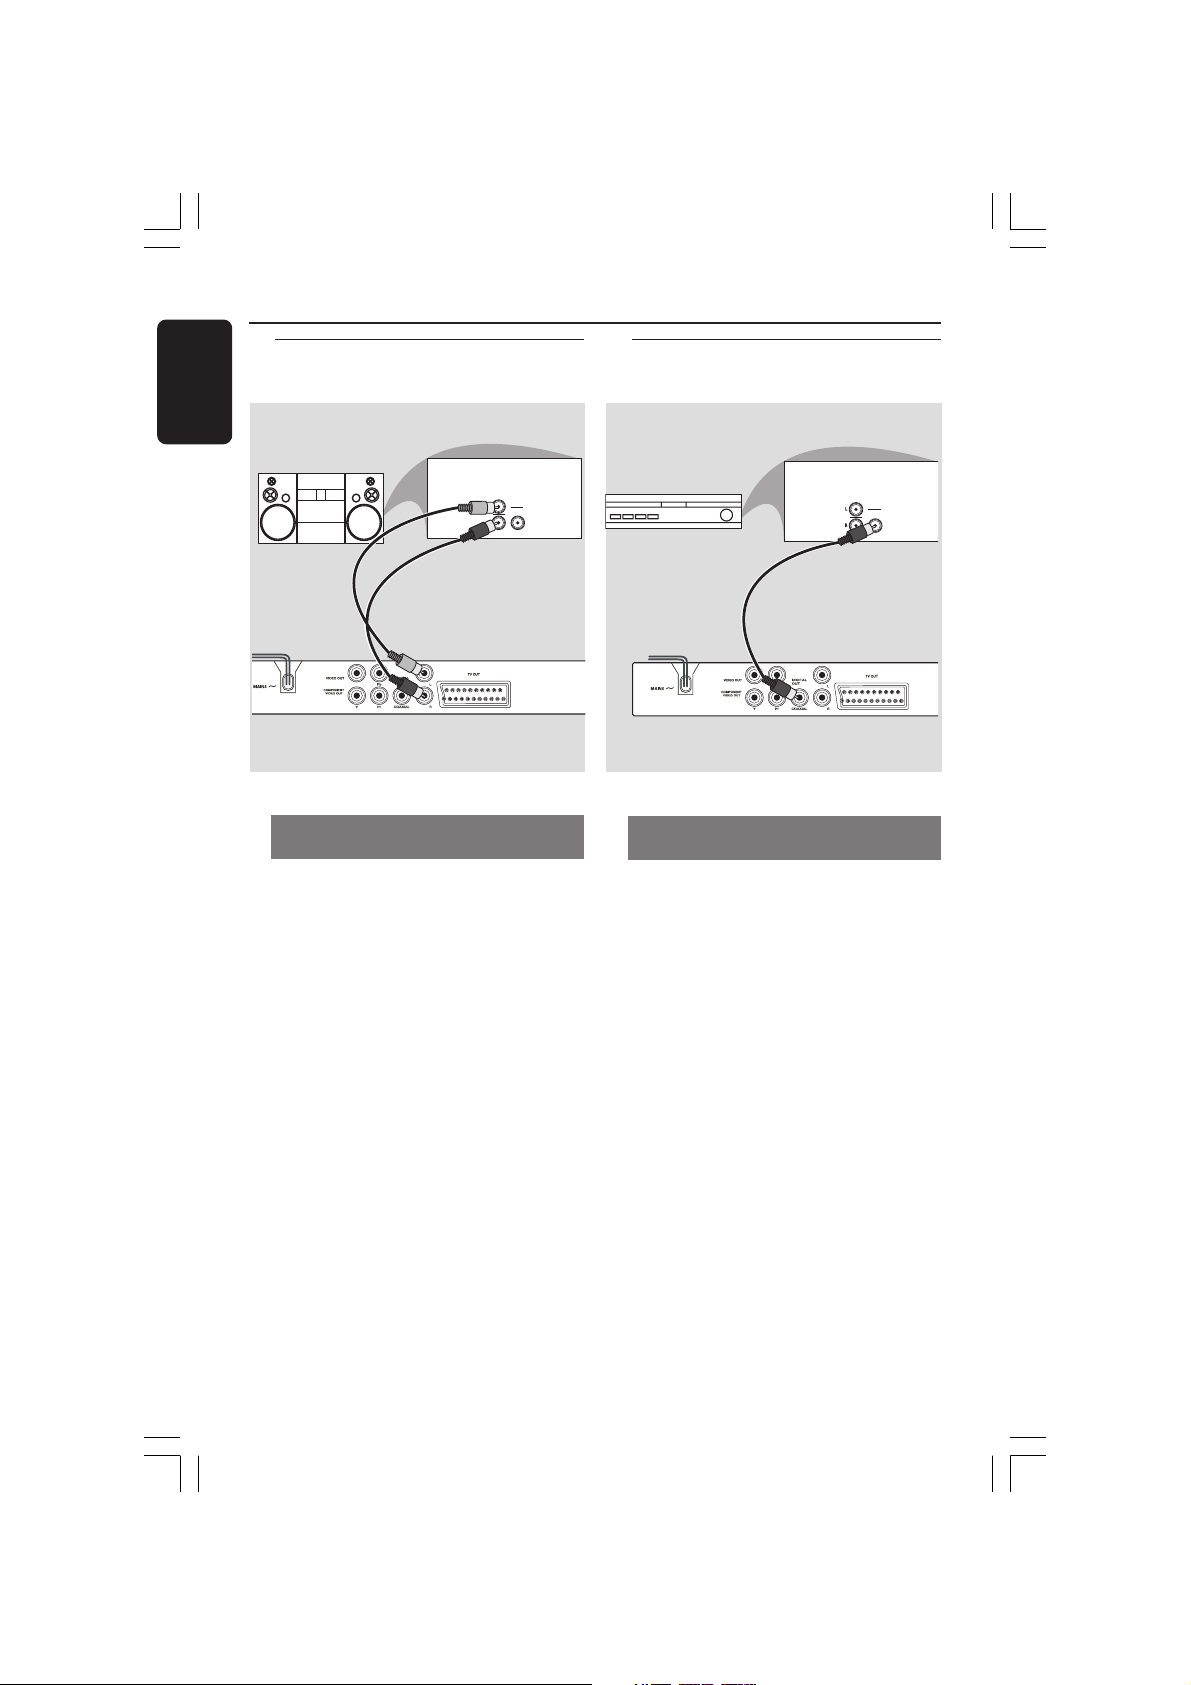
Optional: Connecting to an
Audio System
STEREO
Stereo system has Dolby Pro Logic
or Right / Left Audio In jack
1 Select one of the video connections
(CVBS VIDEO IN, SCART or
COMPONENT VIDEO IN) depending on
the options available on your TV.
2 Use the audio cables (white/red) to
connect AUDIO OUT (L/R) jacks of
the DVD Player to the corresponding
AUDIO IN jacks on the stereo system
(cable not supplied).
Optional: Connecting Digital AV
Receiver
AUDIO
IN
DIGITAL
Receiver has a PCM, Dolby Digital,
or MPEG2 decoder
1 Select one of the video connections
(CVBS VIDEO IN, SCART or
COMPONENT VIDEO IN) depending on
the options available on your TV.
2 Connect the COAXIAL jack of the DVD
Player to the corresponding Digital Audio
In jack on your Receiver (cable not
supplied).
3 Set the DVD Player’s Digital Output to
PCM-ONLY or ALL depending on the
capabilities of your Receiver (see page 28
“Digital Output”).
12
01-39 DVP5100_EU_02A 17/03/05, 10:53 AM12
Helpful Hint:
– If the audio format of the Digital Output
does not match the capabilities of your
receiver, the receiver will produce a strong,
distorted sound or no sound at all.
3139 246 15661
 Loading...