

Philips DVP3350V-05 User Manual

DVP3350V/05
Register your product and get support at
www.philips.com/welcome
EN DVD Video Player 4
DVD VIDEO PLAYER
User manual
Thank you for choosing Philips.
Need help fast?
Read your User’s Manual first for quick tips that make using
your Philips product more enjoyable.
If you have read your instructions and still need assistance,
you may access our online help at www.philips.com/welcome
DVP 3100V
2
Safety Precautions
This lightning flash with arrowhead symbol within an
equilateral triangle is intended to alert the user to the
presence of uninsulated dangerous voltage within the
product’s enclosure that may be of sufficient magnitude
to constitute a risk of electric shock to persons.
The exclamation mark within an equilateral triangle is
intended to alert the user to the presence of important
operating and maintenance (servicing) instructions in
the literature accompanying the product.
WARNING: Do not install this equipment in a confined space
such as a book case or similar unit. Slots and openings in the
cabinet are provided for ventilation and to ensure reliable
operation of the product and to protect it from over heating.
The openings should be never be blocked by placing the
product on a bed, sofa, rug or other similar surface.This product
should not be placed in a built-in installation such as a
bookcase or rack unless proper ventilation is provided or the
manufacturer's instruction have been adhered to.
CAUTION:
This Digital Video Disc Player employs a Laser System.
VISIBLE AND INVISIBLE LASER RADIATION WHEN OPEN
AND INTERLOCKS DEFEATED
To ensure proper use of this product, please read this owner’s
manual carefully and retain for future reference, should the
unit require maintenance, contact an authorized service
location-see service procedure.
Use of controls, adjustments or the performance of procedures
other than those specified herein may result in hazardous
radiation exposure.
To prevent direct exposure to laser beam, do not try to open
the enclosure. Visible laser radiation when open. DO NOT
STARE INTO BEAM.
CAUTION: The apparatus shall not be exposed to water,
dripping or splashing and that no objects filled with liquids,
such as vases, shall be placed on the apparatus.
This product is manufactured to comply with the
EEC DIRECTIVE 89/336/EEC, 93/68/EEC and
2006/95/EC.
Notes on copyrights:
It is forbidden by law to copy,broadcast, show, broadcast via cable, play
in public, or rent copyright material without permission.
This product features the copy protection function developed by
Macrovision. Copy protection signals are recorded on some discs.
This product incorporates copyright protection technology that is
protected by method claims of certain U.S. patents and other intellectual
property rights owned by Macrovision Corporation and other rights
owners. Use of this copyright protection technology must be authorized
by Macrovision Corporation, and is intended for home and other limited
viewing uses only unless otherwise authorized by Macrovision
Corporation. Reverse engineering or disassembly is prohibited.
"The making of unauthorized copies of copy-protected material,
including computer programmes, files, broadcasts and sound recordings,
may be an infringement of copyrights and constitute a criminal offence.
This equipment should not be used for such purposes."
SERIAL NUMBER:The serial number is found on the back of this
unit.This number is unique to this unit and not available to others.You
should record requested information here and retain this guide as a
permanent record of your purchase.
Model No. ___________________________________
Serial No. ___________________________________
Features:
• Complete versatility to play DVD,DivX,VCDs, audio CDs or VHS
Ta pes.
• Watch a DVD while recording a TV show to the VCR.
• Remote controls DVD and VCR decks.
• Records from DVD to VHS (unless DVD is copy protected with
Macrovision).
• Hi-Fi Stereo VCR.
WARNING:TO REDUCE THE RISK OF FIRE OR ELECTRIC
SHOCK, DO NOT EXPOSE THIS PRODUCT TO RAIN OR
MOISTURE.
CAUTION
RISK OF ELECTRIC SHOCK
DO NOT OPEN
CAUTION:TO REDUCE THE RISK
OF ELECTRIC SHOCK
DO NOT REMOVE COVER (OR BACK)
NO USER-SERVICEABLE PARTS INSIDE
REFER SERVICING TO QUALIFIED SERVICE
PERSONNEL.
CONSUMERS SHOULD NOTE THAT NOT ALL HIGH
DEFINITION TELEVISION SETS ARE FULLY COMPATIBLE
WITH THIS PRODUCT AND MAY CAUSE ARTIFACTS TO
BE DISPLAYED IN THE PICTURE. IN CASE OF 625
PROGRESSIVE SCAN PICTURE PROBLEMS, IT IS
RECOMMENDED THAT THE USER SWITCH THE
CONNECTION TO THE ‘STANDARD DEFINITION’
OUTPUT. IF THERE ARE QUESTIONS REGARDING OUR
TV SET COMPATIBILITY WITH THIS MODEL 625p DVD
PLAYER, PLEASE CONTACT OUR CUSTOMER SERVICE
CENTER.
VIDEO Plus+ and PlusCode are registered trademarks of
Gemstar Development Corporation.
The VIDEO Plus+ system is manufactured under license from
Gemstar Development Corporation.
"Official DivX® Certified product"
"Plays all versions of DivX® video (including DivX® 6) with
standard playback of DivX® media files"
"DivX, DivX Certified, and associated logos are trademarks of
DivX, Inc. and are used under license."

3
Important Note
DK
Advarsel:
Laserrudstråling ved åbning når sikkerhesafbrydere er ude af funktion.
Undgå u tsættelse for stråling.
Bemærk:
Netafbryderen POWER er sekundært indkoblet og afbryder ikke
strømmen fra nette. Den indbyggede netdel er derfor tilsluttet til
lysnettet så længe netstikket sidder i stikkontakten.
N
Observer:
Nettbryteren POWER er sekundert innkoplet. Den
innebygdenetdelen er derfor ikke frakoplet nettet så lenge apparatet er
tilsluttet nettkontakten.
S
Klass 1 laserapparat
Varning!
Om apparaten används på annat sätt än i denna bruksanvisning
specificerats, kann användaren utsättas för laserstrålning, som
översjruder gränsen för läserklass 1.
Observera!
Strömbrytaren POWER är sekundärt kopplad och inte bryter
strömmen fråan nätet Den inbyggda nätdelen är därför ansluten till
elnätet så länge stickproppen sitter i v ägguttaget.
SF
Luokan 1 laserlaite + Klass 1 laserapparat Varoitus!
Laitteen käyttäminen muulla kuin tässä käyttöohjeessa mainitulla tavalla
saattaa altistaa käyttäjän turvallisuusluokan 1 ylittävälle lasersäleilille.
Huom.
Toiminnanvalitsin POWER on kytketty toisiopuolelle, eikä se kytke
laitetta irti sähköverkosta. Sisäänrakennettu verkko-osa on kytkettynä
sähköverkkoon aina silloin, kun pistoke on pistorasiassa.
Important Note for Users in the UK
Mains plug
This apparatus is fitted with an approved 13 Amp plug.To
change a fuse in this type of plug proceed as follows:
1 Remove fuse cover and fuse.
2 Fix new fuse which should be a BS1362 5 Amp,
A.S.T.A. or BSI approved type.
3 Refit the fuse cover.
If the fitted plug is not suitable for your socket outlets, it
should be cut off and an appropriate plug fitted in its place. If
the mains plug contains a fuse, this should have a value of 5
Amp. If a plug without a fuse is used, the fuse at the
distribution board should not be greater than 5 Amp.
Note:The severed plug must be disposed of to avoid a
possible shock hazard should it be inserted into a 13 Amp
socket elsewhere.
How to connect a plug
The wires in the mains lead are coloured with the following
code: blue = neutral (N), brown = live (L).
As these colours may not correspond with the colour
markings identifying the terminals in your plug, proceed as
follows:
• Connect the blue wire to the terminal marked N or
coloured black.
• Connect the brown wire to the terminal marked L
or coloured red.
• Do not connect either wire to the earth terminal in
the plug, marked E (or e) or coloured green
(or green and yellow).
Before replacing the plug cover, make certain that the cord
grip is clamped over the sheath of the lead - not simply over
the two wires.
Copyright in the U.K.
Recording and playback of material may require
consent. See Copyright Act 1956 and The Performer’s
Protection Acts 1958 to 1972.

4
Contents
Introduction
Safety Precautions ............................................................2
Index ..................................................................................3
Contents ............................................................................4
Before Use ......................................................................5-6
Playable Discs ..................................................................................5
Remote Control Operation Range ............................................5
Precautions ......................................................................................6
Notes on Discs ..............................................................................6
About Symbols ................................................................................6
Selecting the Viewing Source........................................................6
Front Panel and Display Window ....................................7
Remote Control ................................................................8
Rear Panel ..........................................................................9
Preparation
Connections................................................................10-11
Connecting to a TV & Decoder................................................10
Connecting to Optional Equipment ........................................11
Before Operation - VCR part....................................12-16
Tuning in a video channel on your TV ....................................12
Using your DVD+VCR for the very first time......................12
Setting the clock Manually..........................................................13
To set the colour system............................................................13
How to using the main menu....................................................14
Tuning in TV stations Automatically ........................................14
Tuning in TV stations Manually ..................................................15
Changing the order of TV stations ..........................................16
Deleting TV stations ....................................................................16
Before Operation - DVD part ..................................17-20
General Explanation ....................................................................17
On-Screen Display........................................................................17
Initial Settings ..........................................................................18-20
● General Operation ............................................................18
● Language ..............................................................................18
● Display ..................................................................................18
● Audio ....................................................................................19
● Others ..................................................................................19
● LOCK (Parental Control) ................................................20
Operation
Operation with Tape ..................................................21-24
Playing a tape ................................................................................21
● SKIP ......................................................................................21
● OPR (Optimum Picture Response) ..............................21
Instant Timer Recording (ITR) ..................................................22
VIDEO Plus+ Programming........................................................23
Timer recording using On Screen Display ............................24
Operation with DVD and Video CD ........................25-27
Playing a DVD and Video CD ....................................................25
General Features ..........................................................................25
● Moving to another TITLE ................................................25
● Moving to another CHAPTER/TRACK........................25
● Search....................................................................................25
● Still Picture and Frame-by-Frame Playback..................25
● Slow Motion ........................................................................26
● Repeat ..................................................................................26
● Repeat A-B ..........................................................................26
● Time Search ........................................................................26
● Screen Saver........................................................................26
● Zoom ....................................................................................27
● Marker Search ....................................................................27
Special DVD Features..................................................................27
● Title Menu ............................................................................27
● Disc Menu ............................................................................27
● Camera Angle......................................................................27
● Changing the Audio Language ........................................27
● Changing the Audio Channel ..........................................27
● Subtitles ................................................................................27
Operation with Audio and MP3/Windows Media
TM
Audio Disc ..................................................................28-29
Playing an Audio CD and MP3/Windows Media
TM
Audio
Disc............................................................................................28-29
● Notes on MP3/Windows Media
TM
Audio Recordings28
● Pause ....................................................................................29
● Moving to another Track..................................................29
● Repeat Track/All/Off ..........................................................29
● Search....................................................................................29
● Shuffle....................................................................................29
● Repeat A-B ..........................................................................29
Operation with JPEG Disc..............................................30
Viewing a JPEG disc ....................................................................30
●
Slide Show
..........................................................................30
● Moving to another File......................................................30
● Still Picture ..........................................................................30
● Zoom ....................................................................................30
● To r otate Picture ................................................................30
● To listen to MP3/Windows Media
TM
Audio music
watching picture ......................................................................30
● Notes on JPEG Recordings..............................................30
Programmed Playback....................................................31
Programmed Playback with Audio CD and MP3/Windows
Media
TM
Audio Disc ......................................................................31
● Repeat Programmed Tracks ............................................31
● Erasing a Track from Program list ..................................31
● Erasing the Complete Program list................................31
Operation with DVD VR Disc ........................................32
Playing a DVD VR format Disc ..................................................32
Maintenance and Service ............................................................32
● Handling the unit................................................................32
Operation with DivX Disc..............................................33
Playing a DivX Movie Disc ........................................................33
Additional Operation ................................................34-35
On Screen Display........................................................................34
Ta pe Counter Memory Stop ....................................................34
Video Doctor (Self-Diagnosis) ..................................................34
Hi-Fi Stereo Sound System ........................................................35
Wide Screen Compatibility 16:9 ..............................................35
To set the decoder ......................................................................35
Last Condition Memory..............................................................35
Special Recording............................................................36
Copying from DVD to VCR ......................................................36
Recording from another video recorder................................36
Reference
Tr oubleshooting ..............................................................37
Language Code List ........................................................38
Country/Area Code list ..................................................39
Specification ....................................................................40
5
Before Use
Playable Discs
DVD
(8 cm / 12 cm disc)
Video CD (VCD)
(8 cm / 12 cm disc)
Audio CD
(8 cm / 12 cm disc)
In addition, this unit can play DVD±R, DVD±RW,
SVCD, and CD-R or CD-RW that contains audio
titles, MP3/Windows
MediaTMAudio
and/or JPEG
files.
This indicates a product feature that is capable of
playing DVD-RW discs recorded with Video
Recording format.
Notes
– Depending on the conditions of the recording
equipment or the CD-R/RW (or DVD±R/±RW) disc itself,
some CD-R/RW (or DVD±R/±RW) discs cannot be
played on the unit.
– Do not attach any seal or label to either side (the labelled
side or the recorded side) of a disc.
– Do not use irregular shaped CDs (e.g., heart-shaped or
octagonal). It may result in malfunctions.
Notes on DVDs and Video CDs
Some playback operations of DVDs and Video CDs may
be intentionally fixed by software manufacturers.As this
unit plays DVDs and Video CDs according to disc content
designed by the software manufacturer, some playback
features of the unit may not be available, or other
functions may be added.
Refer also to the instructions applied with the DVDs and
Video CDs. Some DVDs made for business purposes may
not be played on the unit.
Regional code of the DVD player and DVDs
This DVD player is designed and manufactured for
playback of region “2” encoded DVD software.
The region code on the labels of some DVD discs
indicates which type of player can play those discs.This
unit can play only DVD discs labelled “2” or “ALL”. If you
try to play any other discs, the message “Check Regional
Code” will appear on the TV screen. Some DVD discs may
not have a region code label even though their playback is
prohibited by area limits.
Disc-related terms
Title (DVD only)
The main film content or accompanying feature content
or additional feature content, or music album. Each title is
assigned a title reference number enabling you to locate it
easily.
Chapter (DVD only)
Sections of a picture or a musical piece that are smaller
than titles.
A title is composed of one or several chapters. Each
chapter is assigned a chapter number, enable you to locate
the chapter you want. Depending on the disc, no chapters
may be recorded.
Track
Sections of a picture or a musical piece on a video CD or
an audio CD. Each track is assigned a track number,
enabling you to locate the track you want.
Scene
On a video CD with PBC (Playback control) functions,
moving pictures and still pictures are divided into
sections called “Scenes”. Each scene is displayed in the
menu screen and assigned a scene number, enabling you to
locate the scene you want.A scene is composed of one or
several tracks.
DivX
DivX is the name of a revolutionary new video codec
which is based on the new MPEG-4 compression.
Types of video CDs
There are two types of video CDs:
Video CDs equipped with PBC (Version 2.0)
PBC (Playback control) functions allow you to interact
with the system via menus, search functions, or other
typical computer-like operations. Moreover, still pictures of
high resolution can be played if they are included in the
disc.
Video CDs not equipped with PBC (Version 1.1)
Operated in the same way as audio CDs, these discs allow
playback of video pictures as well as sound, but they are
not equipped with PBC.
2
Remote Control Operation Range
Point the remote control at the remote sensor and press
the buttons.
● Distance: About 23 ft (7 m) from the front of the
remote sensor
● Angle: About 30° in each direction of the front of the
remote sensor
Remote control battery installation
Detach the battery cover on the rear of the
remote control, and insert two (size AAA)
batteries with and aligned correctly.
Caution
Do not mix old and new batteries. Never mix different
types of batteries (standard, alkaline, etc.).
DivX, DivX Certified, and associated
logos are trademarks of DivXNetworks,
Inc and are used under license.
6
Before Use (Cont’d)
Precautions
Handling the unit
When shipping the unit
The original shipping carton and packing materials come in
handy. For maximum protection, re-pack the unit as it was
originally packed at the factory.
When setting the unit
The picture and sound of a nearby TV or radio may be
distorted during playback. In this case, position the unit
away from the TV or radio, or turn off the unit after
removing the disc.
To k eep the surface clean
Do not use volatile liquids, such as insecticide spray, near
the unit. Do not leave rubber or plastic products in
contact with the unit for a long period of time.They will
leave marks on the surface.
Cleaning the unit
To clean the cabinet
Use a soft, dry cloth. If the surfaces are extremely dirty,
use a soft cloth lightly moistened with a mild detergent
solution. Do not use strong solvents, such as alcohol,
benzine, or thinner, as these might damage the surface of
the unit.
To obtain a clear picture
The DVD player is a high-tech, precision device. If the
optical pick-up lens and disc drive parts are dirty or worn
down, the picture quality will be poor.
Regular inspection and maintenance are recommended
after every 1,000 hours of use. (This depends on the
operating environment.)
For details, please contact your nearest dealer.
Notes on Discs
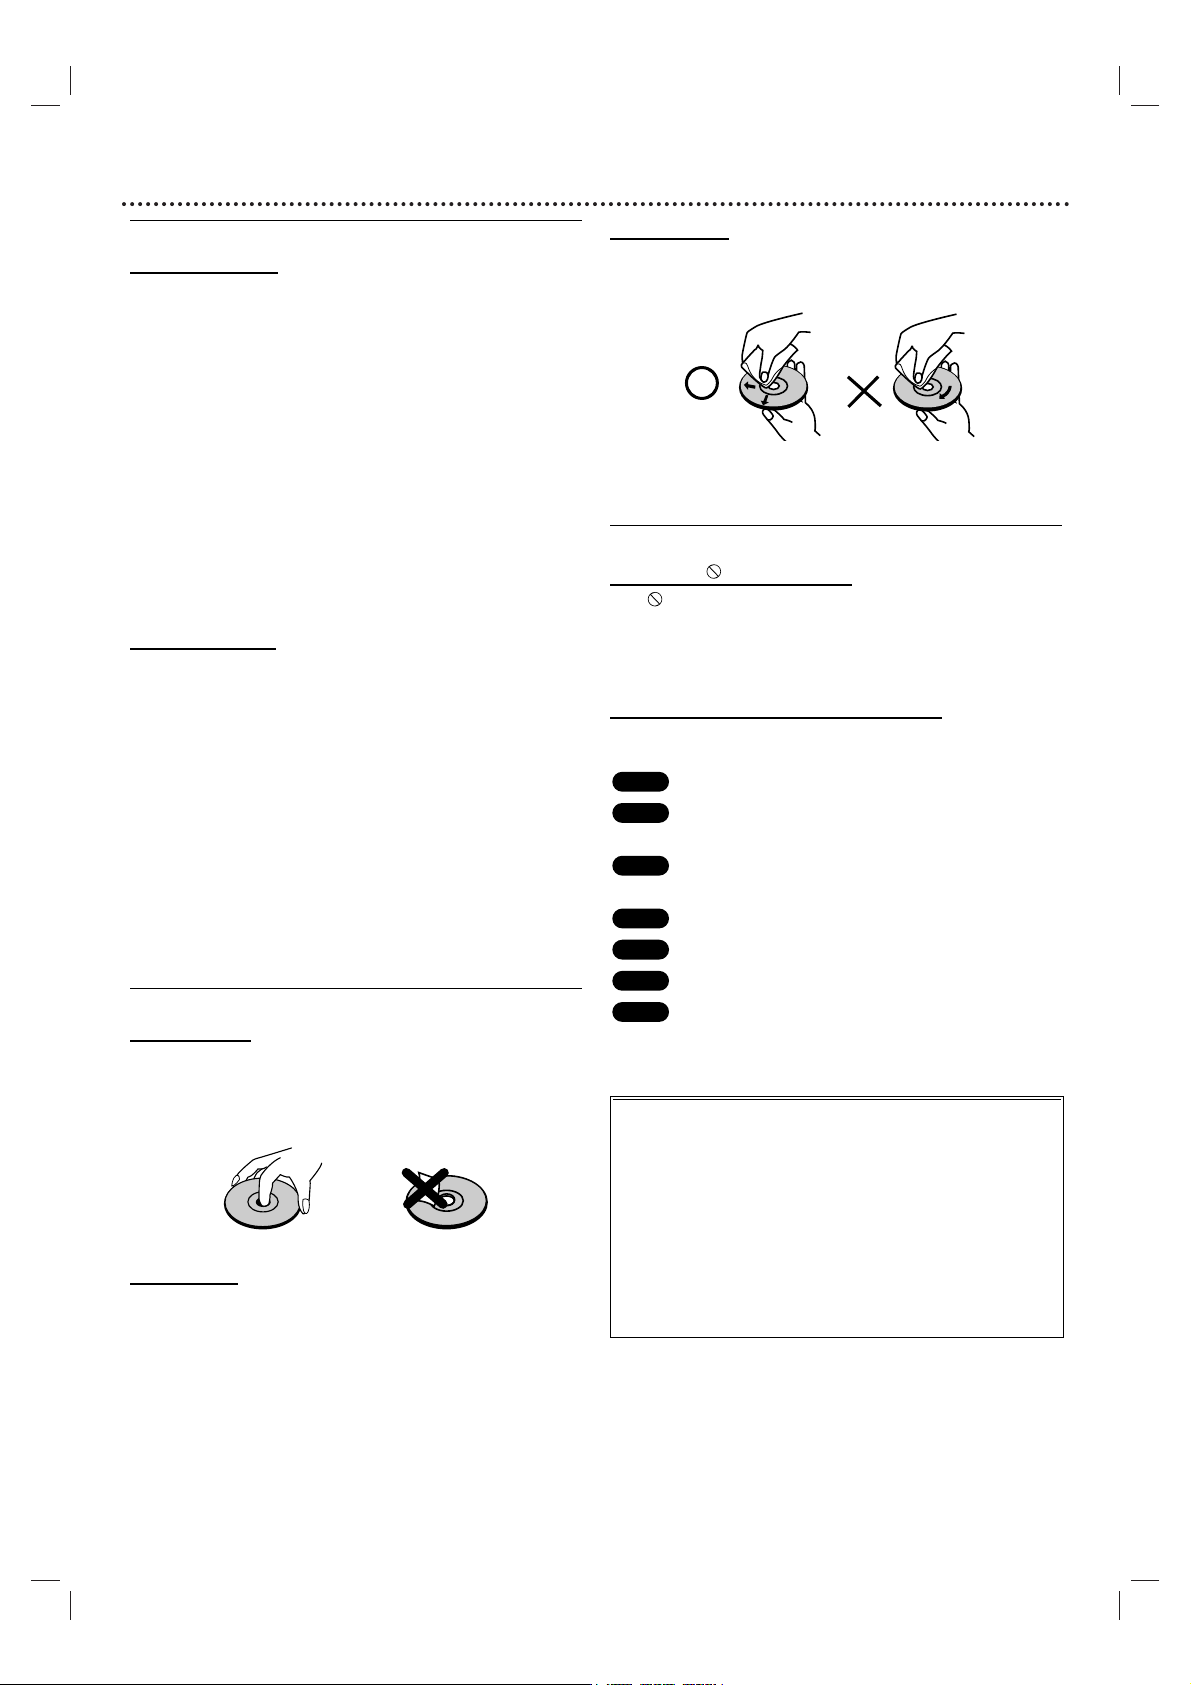
Handling discs
Do not touch the playback side of the disc.
Hold the disc by the edges so that fingerprints will not get
on the surface.
Do not stick paper or tape on the disc.
Storing discs
After playing, store the disc in its case.
Do not expose the disc to direct sunlight or sources of
heat, or leave it in a parked car exposed to direct sunlight,
as there may be a considerable temperature increase
inside the car.
Cleaning discs
Fingerprints and dust on the disc can cause poor picture
quality and sound distortion. Before playing, clean the disc
with a clean cloth.Wipe the disc from the center out.
Do not use strong solvents such as alcohol, benzine,
thinner, commercially available cleaners, or anti-static spray
intended for older vinyl records.
About Symbols
About the symbol display
“ ” may appear on the TV screen during operation.
This icon means the function explained in this owner’s
manual is not permitted by the DVD+VCR or is not
available on that specific DVD video disc.
About the disc symbols for instructions
A section whose title has one of the following symbol is
applicable only to the disc represented by the symbol.
DVD
Video CDs with the PBC (playback control)
function.
Video CDs without the PBC (playback control)
function.
Audio CDs.
MP3 disc.
JPEG disc.
DivX disc.
DivX
JPEG
MP3
CD
VCD1.1
VCD2.0
DVD
Selecting the Viewing Source
You must select one of your output sources (DVD or
VCR) to view on the TV screen.
● If you want to view DVD deck output source:
Press DVD on the remote or SOURCE on the front panel
and output source of DVD deck is viewed on the TV screen.
● If you want to view VCR deck output source:
Press VCR on the remote or SOURCE on the front panel
and output source of VCR deck is viewed on the TV
screen.
Notes
● If you insert a disc while the DVD+VCR is in the VCR
mode, the DVD+VCR will switch to DVD mode
automatically.
● If you insert a cassette tape without prevention tab while
the DVD+VCR is in the DVD mode, the DVD+VCR will
switch to VCR mode automatically.
7
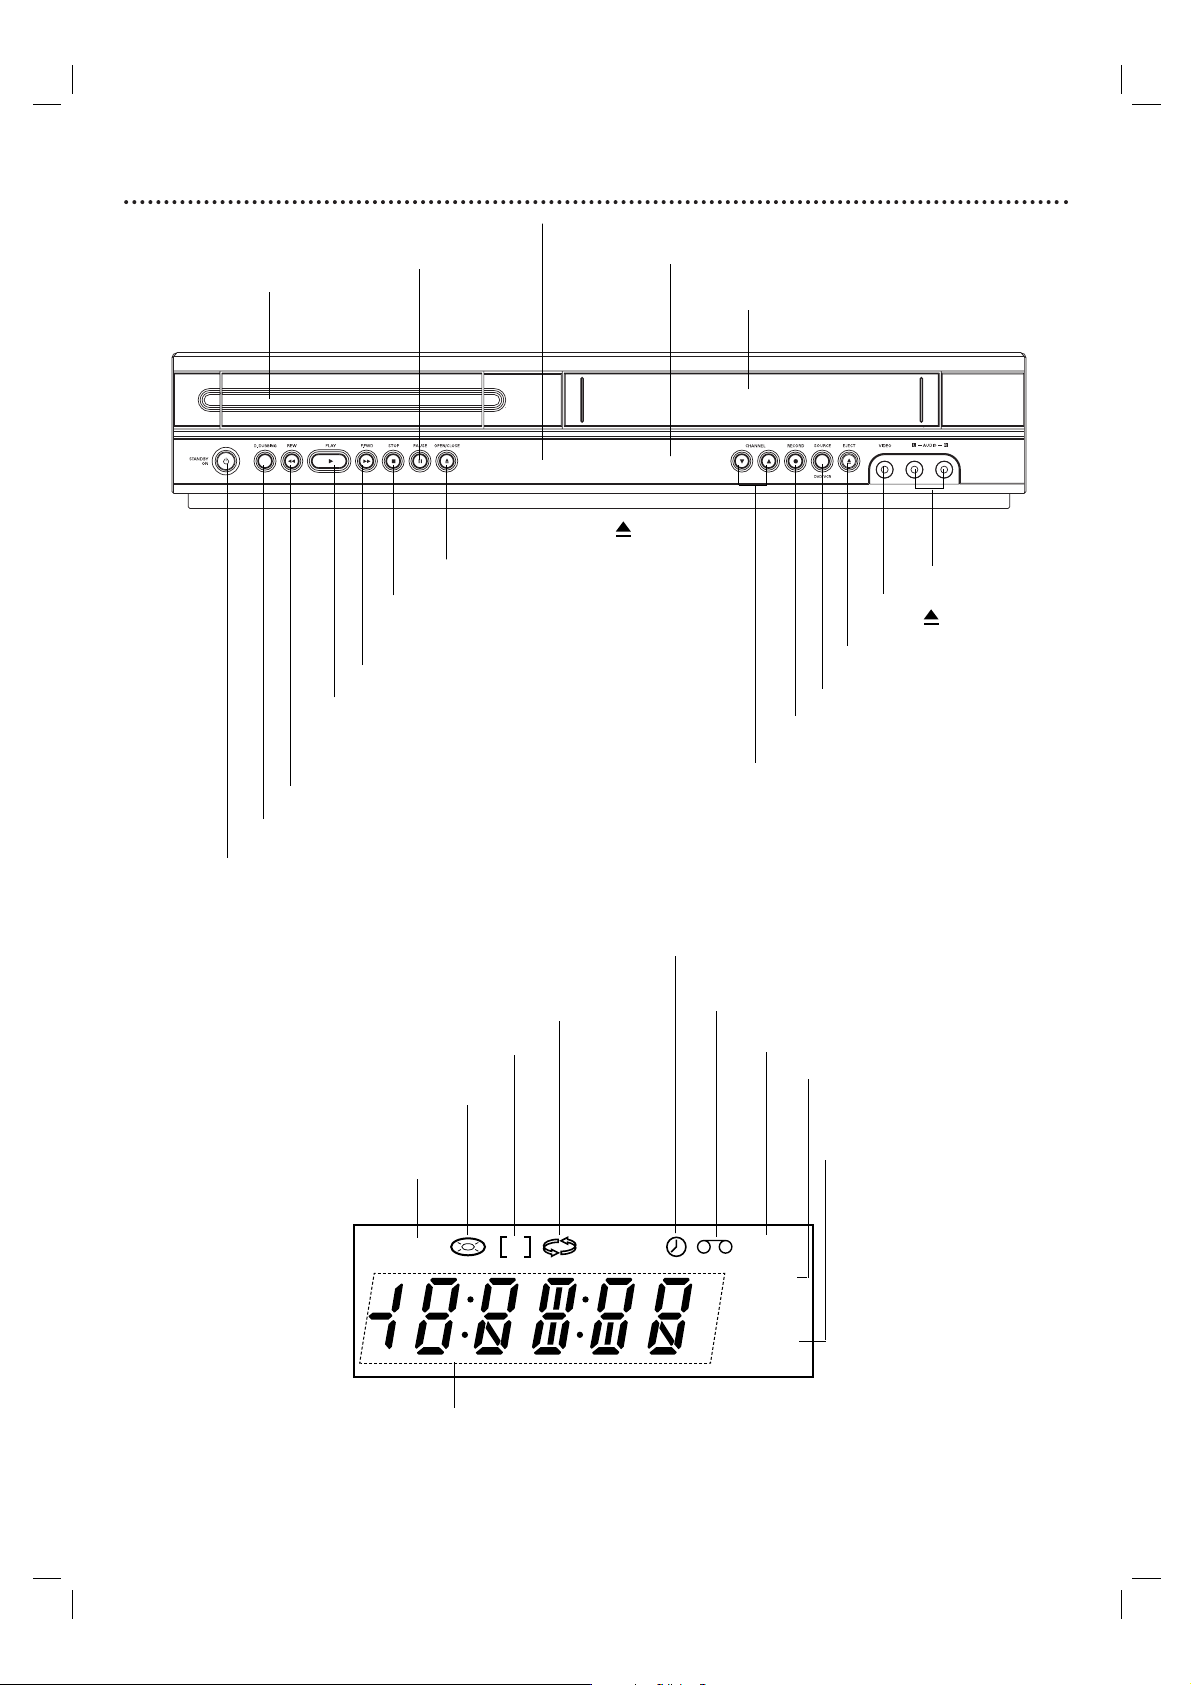
Front Panel and Display Window
Forward Skip/Scan/Fast-Forward
Go to NEXT chapter/track.Press and hold for
two seconds for a fast forward search.
Winds the tape forwards.
Reverse Skip/Scan, Rewind
Go to beginning of current chapter/track or to
PREVIOUS chapter/track. Press and hold for two
seconds for a fast reverse search.
Rewinds the tape.
Ta pe Compartment
PLAY ( NN) Starts playback.
STOP ( xx) Stops playback.
DVD OPEN/CLOSE ( )
Opens or closes the disc tray.
EJECT ( )
Ta pe Eject.
VCR Record
CHANNEL
3 4
Channel selection
Display window
Shows the current status of the unit.
PA USE(
\\ \\
)
Pause palyback
temporarily/ frame-
by-frame playback.
Video IN Jack
Audio IN
(L/R) Jacks
Disc Tray
Insert a disc here.
POWER
Switches the unit to ON or OFF.
Remote Sensor
Point the remote control here.
SOURCE
DVD/VCR Selector
VCR deck is selected.
DVD tray is selected.
Indicates repeat mode.
Indicates TV mode.
(See Notes on page 22.)
Indicates total playing time, elapsed time, or current deck status
A disc is loaded in the DVD deck.
(Lights when a disc is loaded in the DVD tray and
flashes when no disc is loaded.)
DVD+VCR is in timer recording or a timer
recording is programmed
Indicates the Progressive Scan
is set to On mode.
A cassette is in the VCR deck.
VCR recording is engaged.
DVD to VCR copy is in
progress.
DVD to VCR copy
DVD
P
VCR
REC
TV
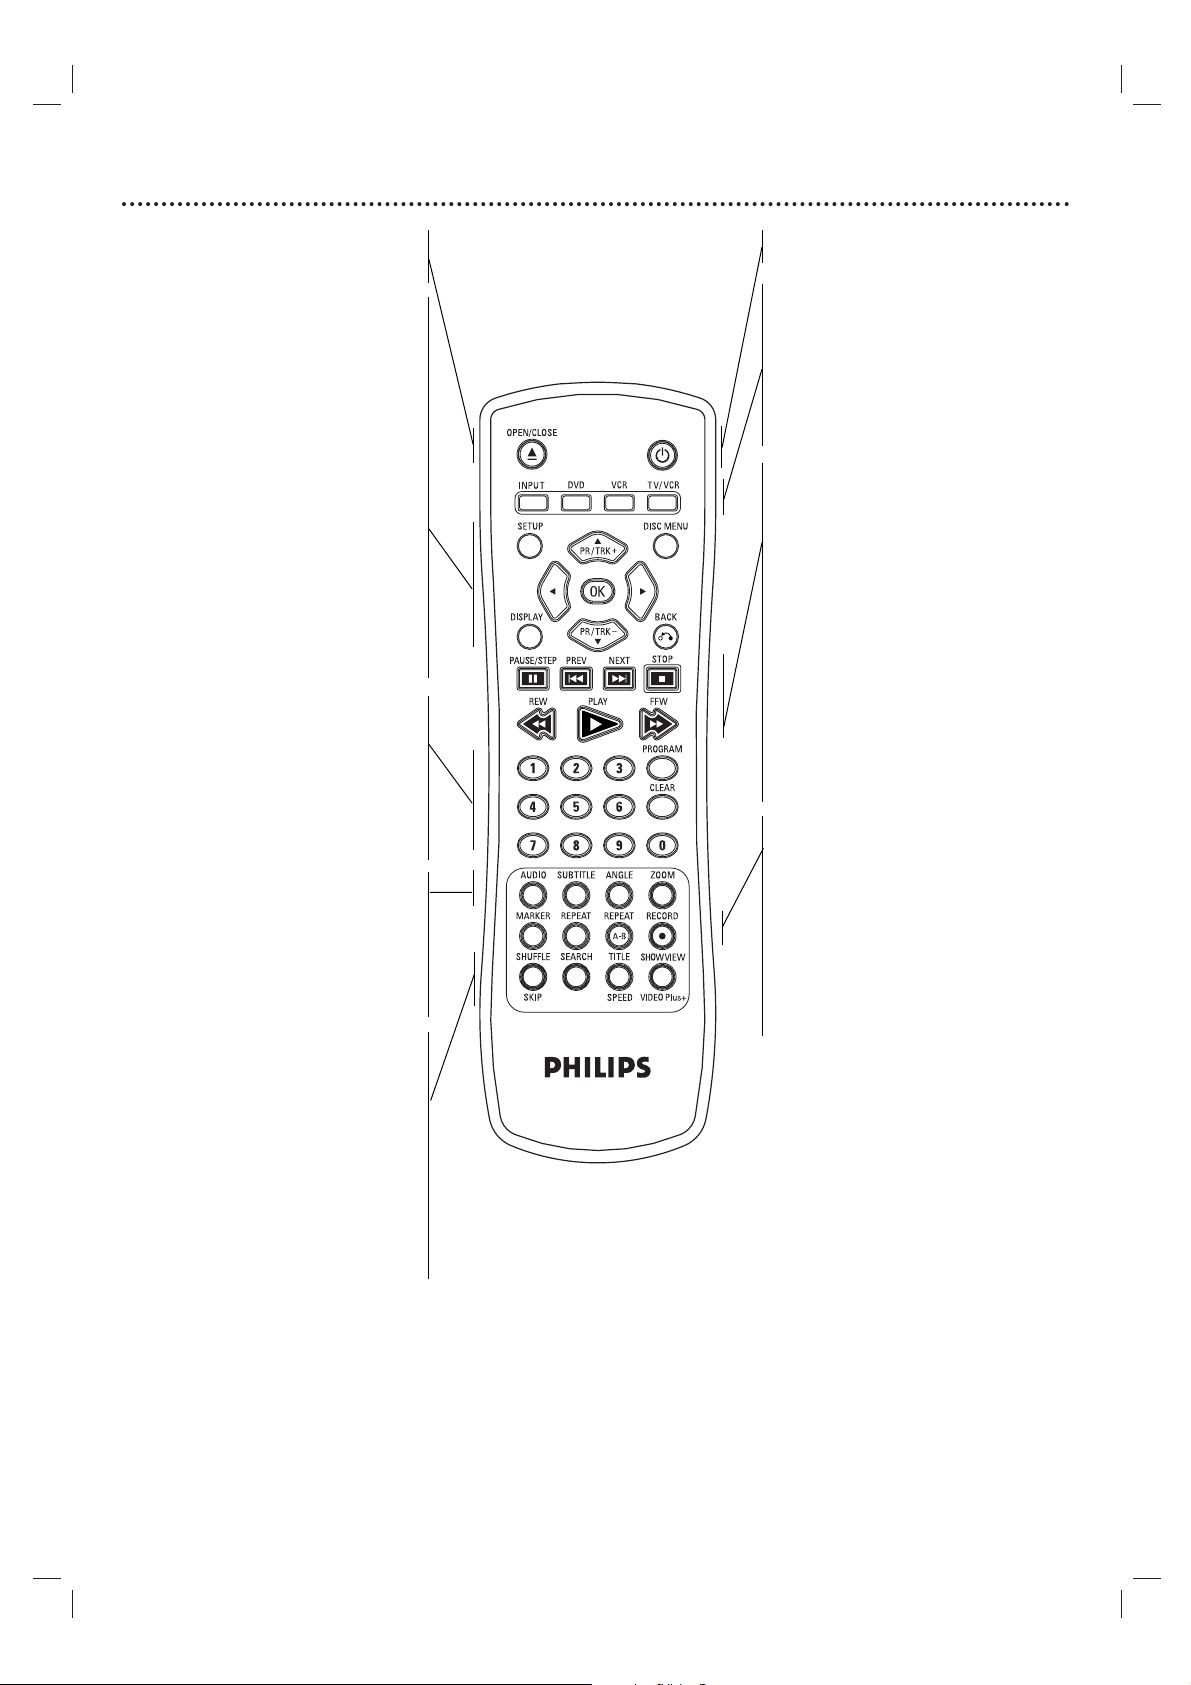
Remote Control
8
Note
This remote control use the same buttons for VCR and DVD
functions (ex. PLAY).
When using a VCR, first press the VCR button.
When using a DVD, first press the DVD button.
EJECT, OPEN/CLOSE
- Opens and closes the disc tray.
- Ejects the tape in the VCR deck.
SETUP
Accesses or removes DVD setup menu and
VCR menu.
DISC MENU
Accesses menu on a DVD disc.
b/B/v/V (left/right/up/down)
Select an item in the menu.
PR/TRK(+/-)
Select channel programme of VCR.
To adjust tracking.
To control vertical tremble during
picture still.
OK
Acknowledge menu selection.
DISPLAY
Accesses On-Screen display.
Switches among the clock, tape counter and
tape remaining modes.
BACK (OO)
Displays the menu of a Video CD with PBC.
0-9 numerical buttons
Selects numbered options in a menu.
PROGRAM
Accesses or removes Program menu.
CLEAR
- Resets tape counter to M 0:00:00
- Removes a track number on the
program menu or a mark on the
MARKER SEARCH menu.
AUDIO
Selects an audio language (DVD).
SUBTITLE
Selects a subtitle language.
ANGLE
Selects a DVD camera angle if available.
ZOOM
Enlarges DVD/VCD video image.
SHUFFLE/SKIP
Plays tracks in random order.
SKIP.
SEARCH
Displays MARKER SEARCH menu.
TITLE
Displays the disc’s Title menu, if
available.
SPEED
Select the recording speed of the tape.
VIDEO Plus+
To display the programme menu for VIDEO
Plus+ programming.
POWER
11
Switches DVD+VCR ON and OFF.
INPUT
To select the VCR deck’s source
(Tuner,AV1,AV2 or AV3).
DVD/VCR select button
Select the output source (DVD or VCR) to
view on the TV screen.
TV/VCR
To view channels selected by the VCR tuner
or by the TV tuner.
PA USE/STEP (X)
Pause playback or recording
Press repeatedly for frame-by-frame
playback during pause.
PREV/NEXT (./>)
Go to next chapter or track.
Returns to beginning of current chapter or
track or go to previous chapter or track
STOP (xx)
Stops playback.
REW/FWD
(m / M)
DVD: Search backward or forward.
VCR: Rewinds the tape during the STOP
mode, for fast reverse picture search and
Advances the tape during the STOP mode,
fast forward picture search.
PLAY (
B)
Starts playback.
MARKER
Marks any point during playback.
REPEAT
Repeat chapter, track, title, all.
REPEAT A-B
- Repeats sequence.
- This button also controls the speed of the
VCR recording. For more info, please refer
to page 22.
RECORD (zz)
Records normally or activates Instant Timer
Recording with repeated presses.
DVD/VCR PLAYER
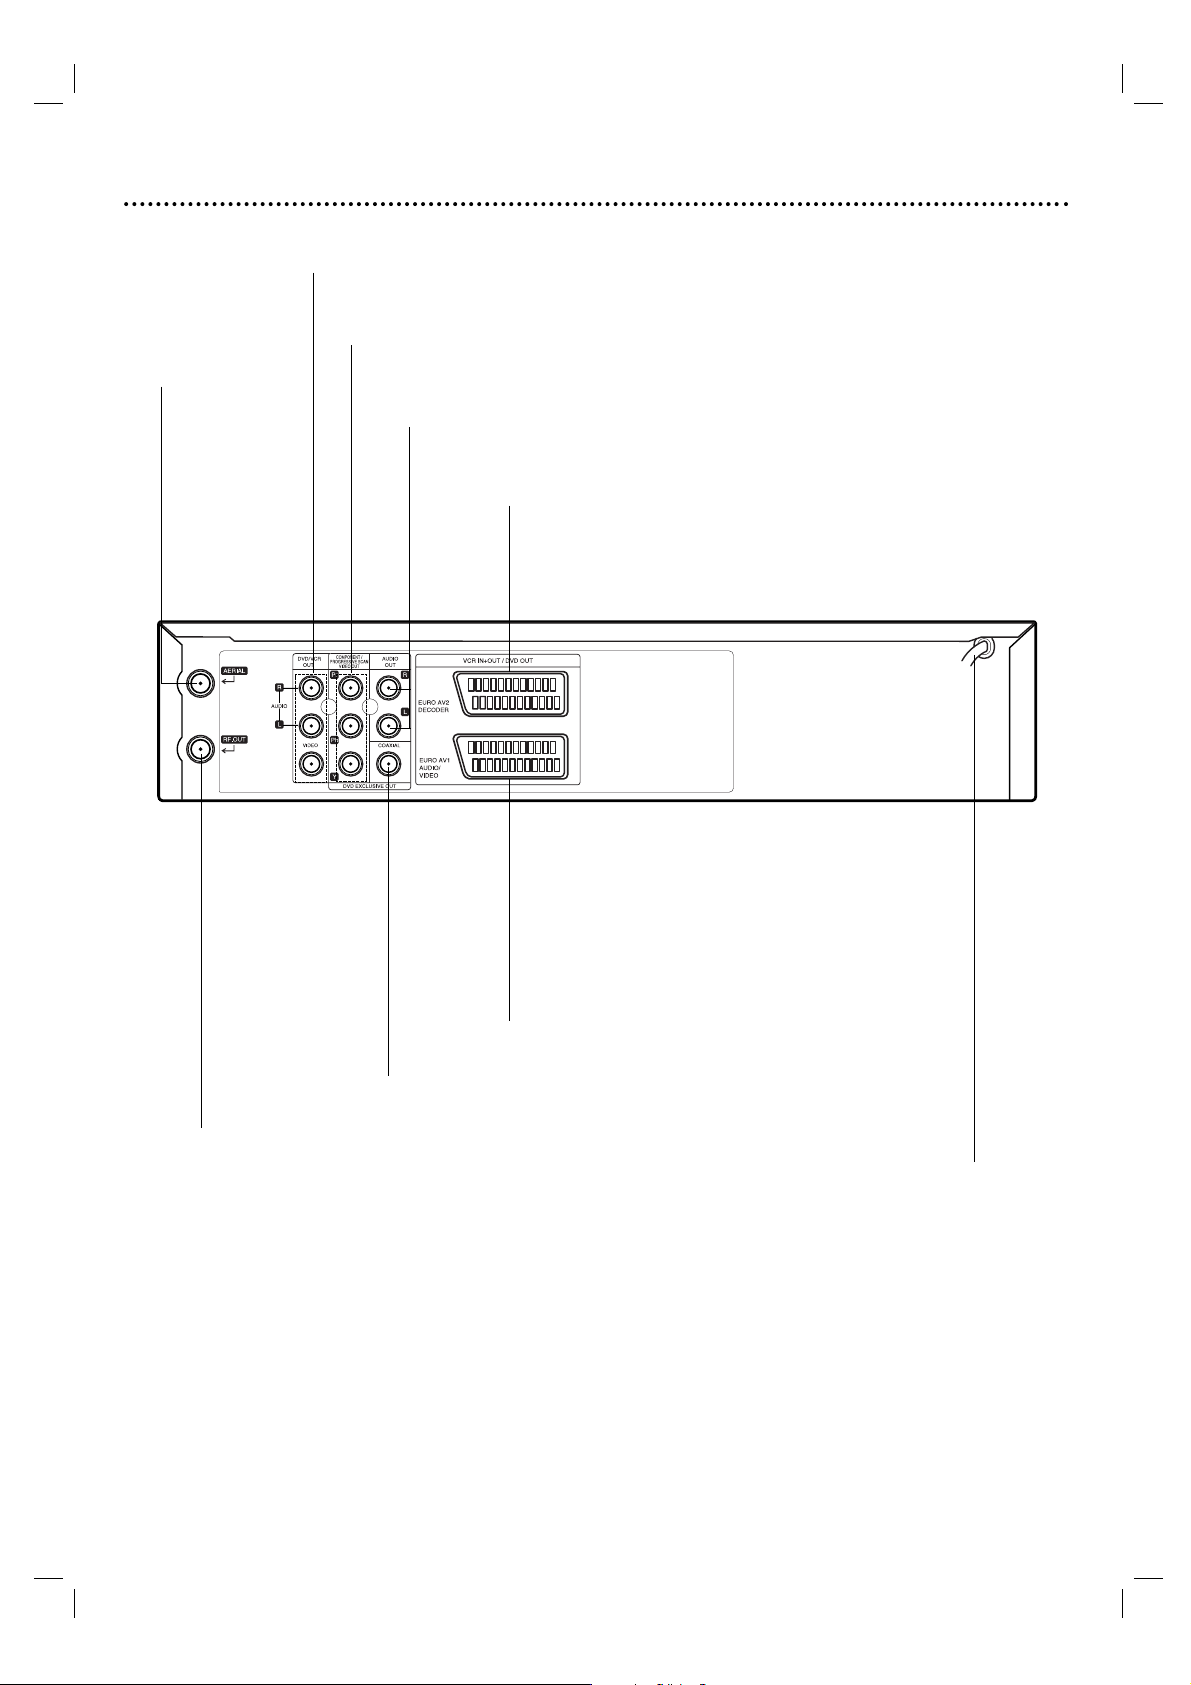
Rear Panel
9
Caution
Do not touch the inner pins of the jacks on the
rear panel. Electrostatic discharge may cause
permanent damage to the unit.
AUDIO OUT (Left/Right) (DVD EXCLUSIVE OUT)
Connect to an amplifier, receiver or stereo system.
VIDEO/AUDIO OUT(Left/Right) (DVD/VCR OUT)
Connect to a TV with video and audio inputs.
AERIAL
Connect the aerial
using this jack.
COAXIAL (Digital audio out jack) (DVD EXCLUSIVE OUT)
Connect to digital (coaxial) audio equipment.
RF OUT
Connect to your TV using this jack.
EURO AV1 AUDIO/VIDEO (VCR IN+OUT/DVD OUT)
Connect to your TV set or another video recorder.
AC Power Cord
Connect to a power source.
COMPONENT/PROGRESSIVE SCAN VIDEO OUT (Y Pb Pr)
(DVD EXCLUSIVE OUT)
Connect to a TV with Y Pb Pr inputs.
EURO AV2 DECODER
Connect to pay-TV decoder or another video recorder.
Connections
10
Tips
● Depending on your TV and other equipment you wish to
connect, there are various ways you could connect the
unit.
● Please refer to the manuals of your TV, Stereo System or
other devices as necessary to make the best connections.
● For better sound reproduction, connect this unit’s AUDIO
OUT jacks to the audio in jacks of your amplifier, receiver,
stereo or audio/video equipment. See “Connecting to
optional equipment” on page 11.
Caution
– Make sure this unit is connected directly to the TV. Set the
TV to the correct video input channel.
– Do not connect this unit’s AUDIO OUT jack to the
phono in jack (record deck) of your audio system.
Connecting to a TV & Decoder
● Make one of the following connections, depending on the
capabilities of your existing equipment.
Basic connection (AV)
1
Connect the EURO AV1 AUDIO/VIDEO on the rear
panel of this unit to the SCART input socket on the TV
using a SCART lead.
2
Some TV broadcasters transmit encoded television signals
which you can only see with a purchased or rented
decoder.You can connect such a decoder (descrambler) to
the DVD+VCR.
Note:
The encoded television signals (CANAL+ or
PREMIERE) are not decoded in the 1W Mode (see p.
34).
Basic connection (RF)
1
Connect the RF antenna cable from your indoor/ outdoor
antenna to AERIAL jack on the rear panel of this unit.
2
Connect the supplied RF antenna cable from the RF OUT
jack on the rear panel of this unit to your television’s
Antenna Input.
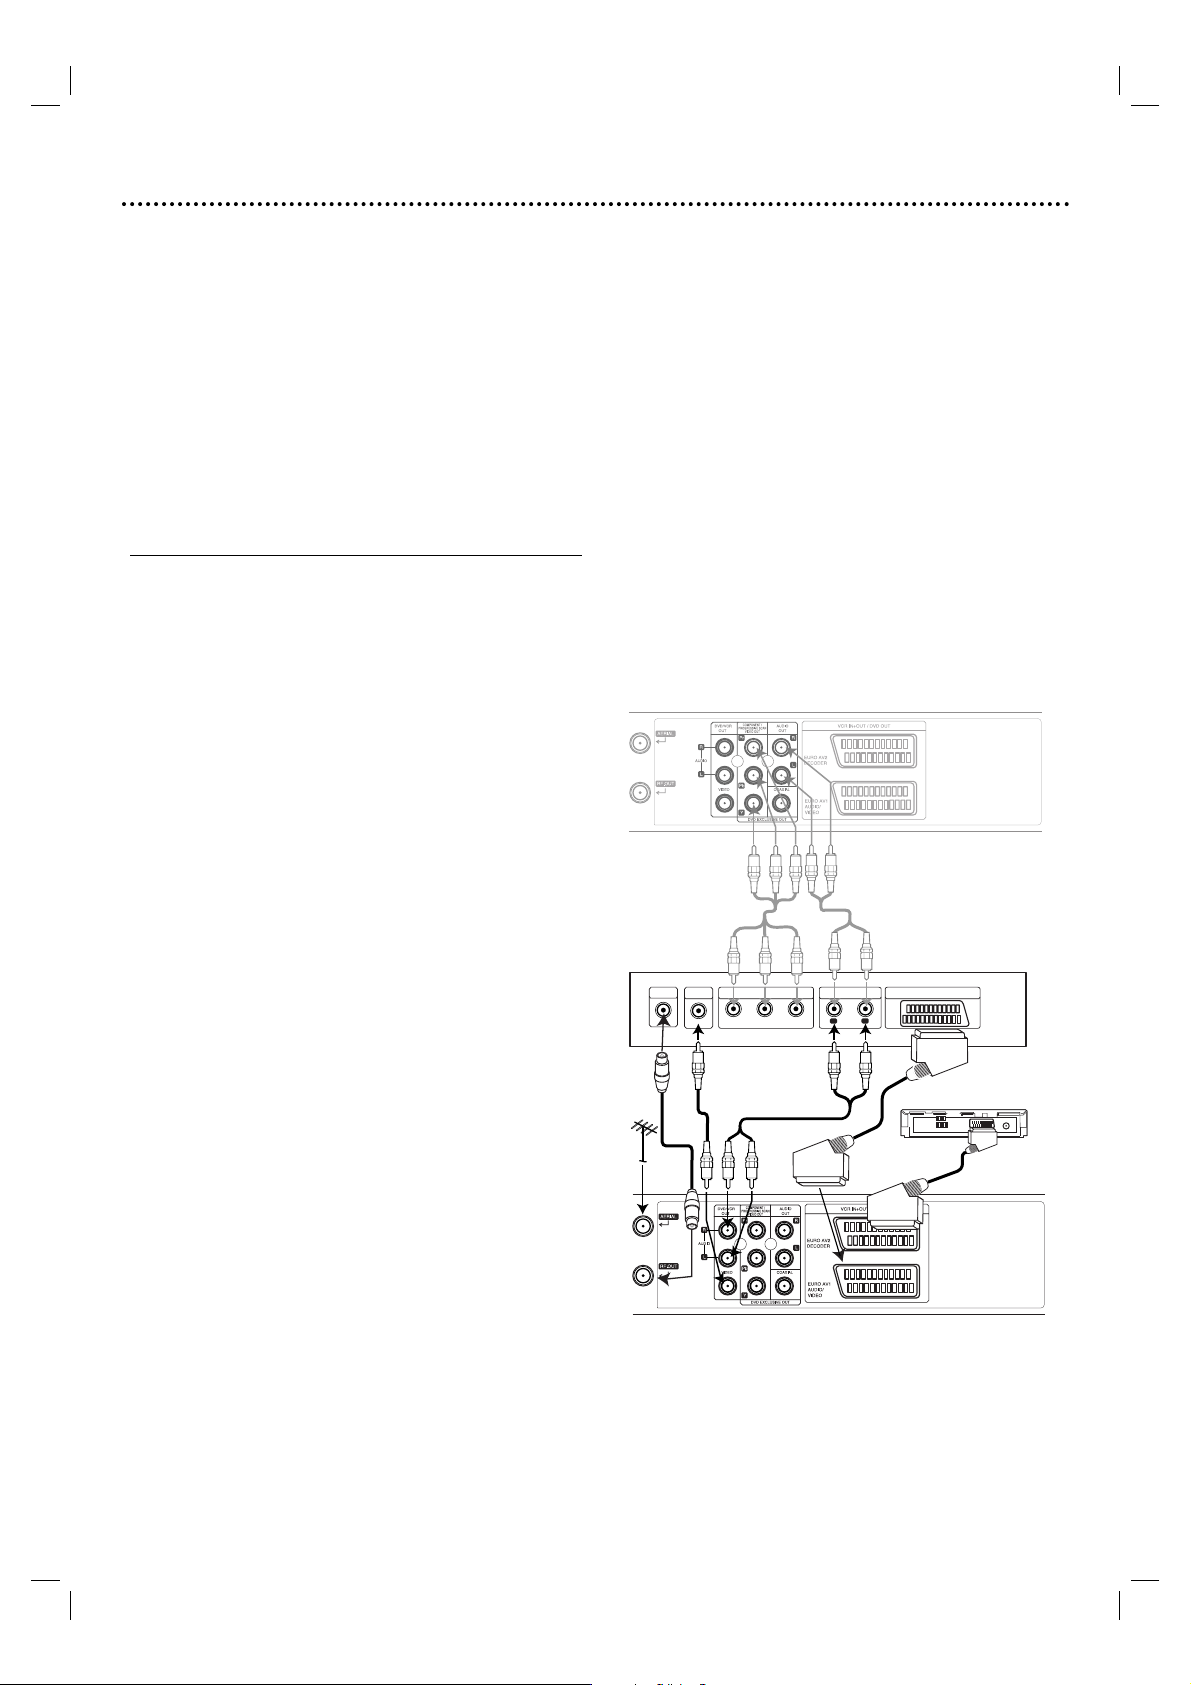
DVD exclusive out connection
● Component Video (Color Stream®) connection
1
Connect the COMPONENT/PROGRESSIVE
SCAN VIDEO OUT jacks on the DVD Player to the
corresponding in jacks on the TV using the Y Pb Pr
cable.
2
Connect the Left and Right AUDIO OUT jacks of the
DVD Player to the audio left/right in jacks on the TV
using the audio cables.
Progressive Scan (ColorStream®Pro) connection
● If your television is a high-definition or “digital ready”
television, you may take advantage of the DVD Player’s
progressive scan output for the highest video resolution
possible.
● If your TV does not accept the Progressive Scan format,
the picture will appear scrambled if you try Progressive
Scan on the DVD Player.
1
Connect the COMPONENT/ PROGRESSIVE
SCAN VIDEO OUT jacks on the DVD Player to the
corresponding in jacks on the TV using the Y Pb Pr
cable.
2
Connect the Left and Right AUDIO OUT jacks of the
DVD Player to the audio left/right in jacks on the TV
using the audio cables.
Notes
– Set the Progressive to “On” on the setup menu for
progressive signal, see page 18.
–Progressive scan does not work with the analog video
connections (yellow VIDEO OUT jack).
Rear of this unit (DVD exclusive out connection)
Rear of TV
VIDEO
INPUT
COMPONENT VIDEO INPUT/
PROGRESSIVE SCAN
Pb Y
Pr
AUDIO INPUT
L
SCART INPUT
R
Decoder
AERIAL
Rear of this unit (Basic connection)

Connections (Cont’d)
11
Connecting to Optional
Equipment
Connecting to an amplifier equipped with two
channel analog stereo or Dolby Pro Logic II/ Pro
Logic
Connect the Left and Right DVD/VCR AUDIO OUT or
AUDIO OUT (DVD EXCLUSIVE OUT) jacks on this
unit to the audio left and right in jacks on your amplifier,
receiver or stereo system, using the audio cables.
Connecting to an amplifier equipped with two
channel digital stereo (PCM) or to an Audio/ Video
receiver equipped with a multi-channel decoder
(Dolby Digital™ or MPEG 2)
1
Connect one of this unit’s DIGITAL AUDIO OUT jack
(COAXIAL) to the corresponding in jack on your
amplifier. Use an optional digital (coaxial) audio cable.
2
You will need to activate this unit’s digital output. (See
“Audio” on page 19).
Digital Multi-channel sound
A digital multi-channel connection provides the best
sound quality. For this you need a multi-channel
Audio/Video receiver that supports one or more of the
audio formats supported by your unit (MPEG 2 and Dolby
Digital). Check the receiver manual and the logos on the
front of the receiver.
Notes
– If the audio format of the digital output does not match
the capabilities of your receiver, the receiver will
produce a strong, distorted sound or no sound at all.
–To see the audio format of the current DVD in the
On-Screen Display, press AUDIO.
L
R
AUDIO INPUT
DIGITAL INPUT
COAXIAL
DIGITAL INPUT
OPTICAL
Amplifier (Receiver)
2 channel analog stereo or Dolby Pro Logic II/Pro Logic connection.
Rear of this unit
Digital multi-channel connection (DVD exclusive out connecttion)
DVD exclusive out
DVD/VCR OUT
Before Operation - VCR part
12
Tuning in a video channel on your
TV
Video channel (RF output channel) is the channel on
which your TV receives picture and sound signals from the
DVD+VCR through the RF cable.
If you have used a
SCART lead you will not have to tune
your TV,simply select the AV channel.The AV channel is
already pre-tuned for optimum video playback on your TV.
Perform the following steps only if interference appears in
the TV picture after you have moved to a different area or
a new station has started broadcasting in your area, or if
you change the connection from RF connection to AV
connection, or vise versa.
1
Turn on DVD+VCR and TV.
2
Set the vacant position 36 on your TV.
3
Press11on the remote control to enter the standby
mode (the clock indicator will be dimmed).
4
Press and hold CHANNEL 3 or 4 on the DVD+
VCR for more than 4 secs.
RF 36 will appear in the DVD+VCR display.
The following picture will be displayed on the TV screen.
If the picture is snowy, move to step 5. If the picture is
clean, press 11on the DVD+VCR to finish.
5
Press
CHANNEL 3 or 4
on the DVD+VCR to set
the video channel to a vacant position between 22
and 68 which is not occupied by any local station in
your area.
Note
The RF channel will not change until step 6 has been
executed.
6
Press11to store the new RF video channel into the
DVD+VCR memory.
Now tune your TV set to the new DVD+VCR RF
channel.
Note
If the TV picture was clear in step 4, do not retune your
TV.
Using your DVD+VCR for the very first time
For the following steps we assume that you have just
connected your DVD+VCR for the very first time.
To make tuning TV stations an easy task your DVD+VCR
incorporates the Automatic Channel Memory
System (ACMS).This system will automatically tune,
store TV channels and set the clock (date & time) in your
DVD+VCR.
1
Make sure that you have correctly installed your
DVD+VCR.
Press11to turn on your DVD+VCR.
If the initial Menu Screen doesn’t appear on screen, make
sure that you have tuned your TV to a video channel. Or if
this is correct it may mean that your DVD+VCR is already
tuned.
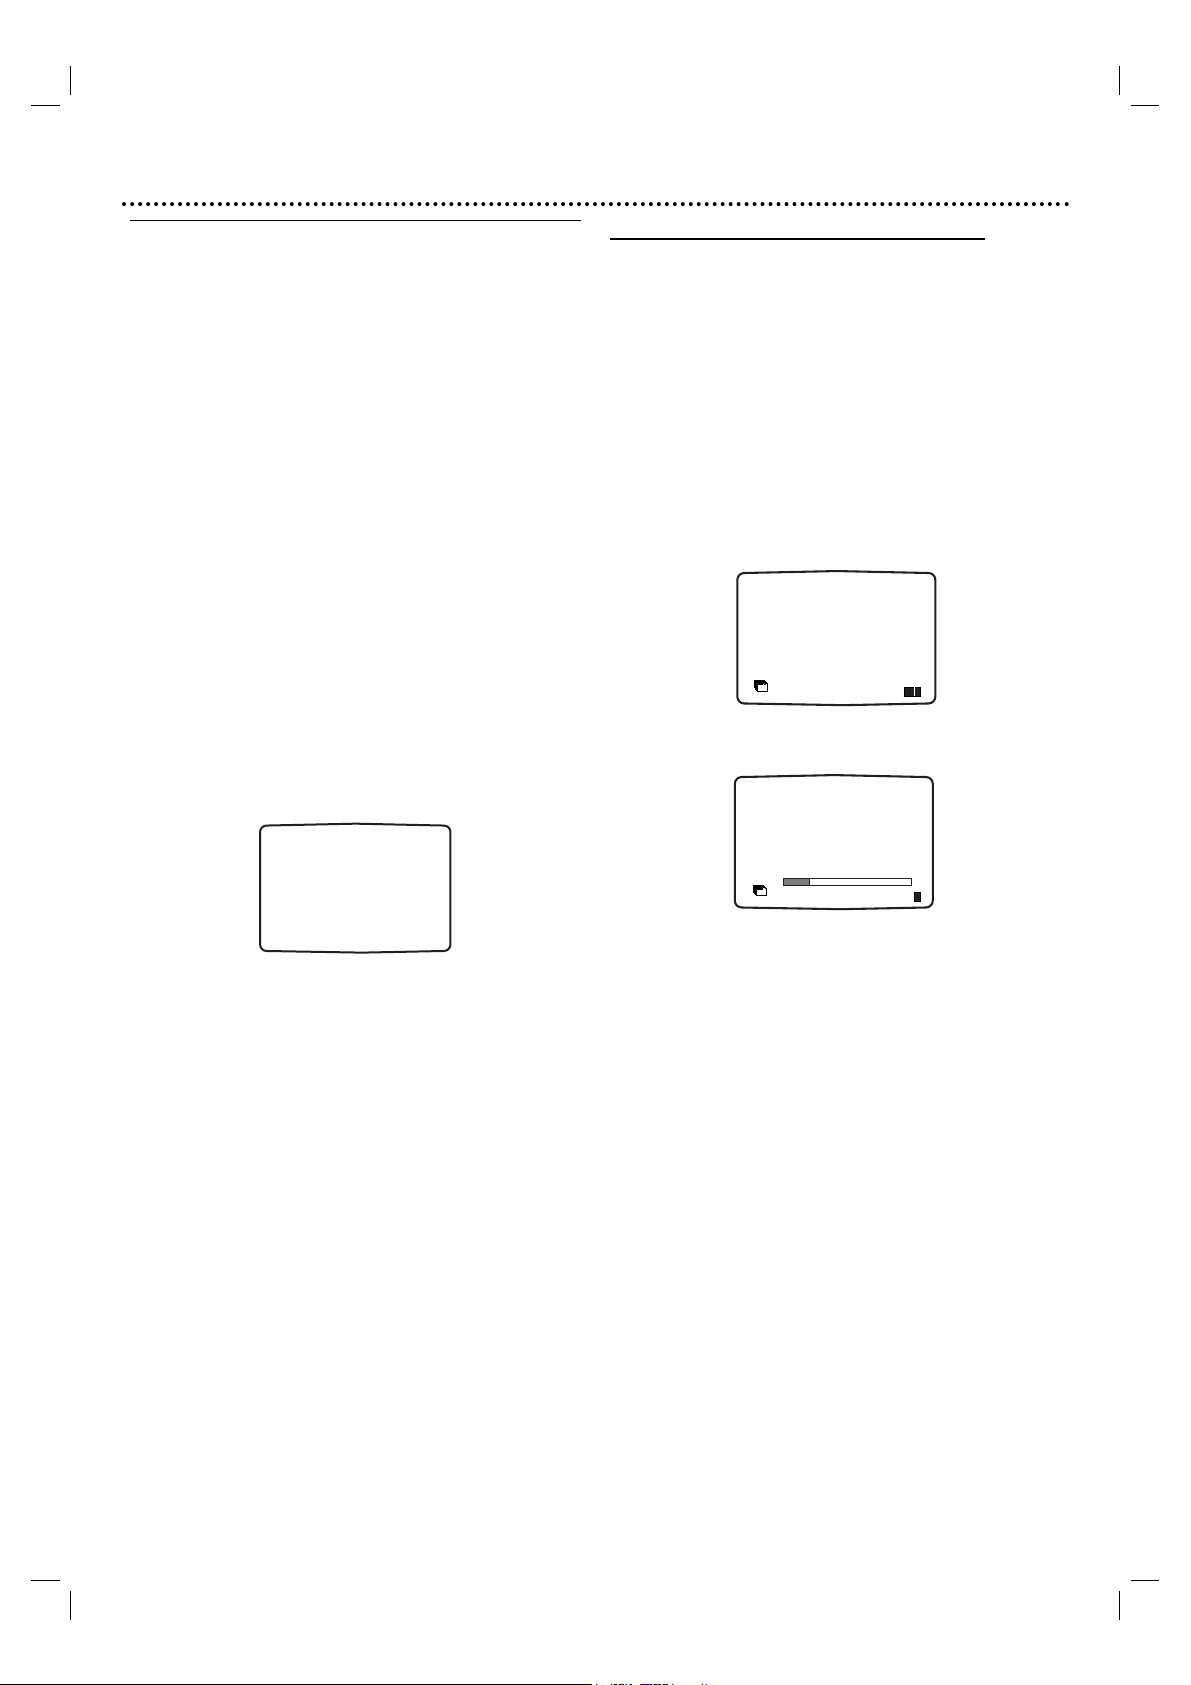
2
Press OK to start the automatic tuning process.
Programme number TV Station
PR01 BBC1
PR02 BBC2
PR03 ITV
PR04 CH4
PR05 CH5
PR06 Satellite
The TV station shown above may vary according to the
area you live in.
3
Press SETUP to remove the menus from the TV
screen.
01 C02 00 BBC1
02 C03 00 BBC2
03 C04 00 ITV
ES
i
Pr-12
ACMS
OK
i
Pr-12
ACMS
ACMS
RF CHANNEL 36
Before Operation - VCR part
13
Setting the clock Manually
The clock in your DVD+VCR controls time and date
settings for your DVD+VCR.
The clock is set automatically during ACMS (Automatic
Channel Memory System) when your DVD+VCR detects
a channel that broadcasts a Teletext signal. If the broadcast
signal is weak the clock will not be set and will require
setting manually.
1
Press SETUP.
Press b or B to select SET.
Press OK.
The auto adjust mode mode can be set to ‘OFF’ by
pressing OK if you want to set the time manually.
2
Use 3 or 4 on the remote control to alter the
HOURS, MINUTES,DAY, MONTH and YEAR.
Please note your DVD+VCR uses a 24 hour clock. e.g.
1pm will be displayed as 13:00.
The day of the week will appear automatically when you
enter the year.
3
If you make a mistake press bbor BBand enter the
correct details.
4
Press SETUP.
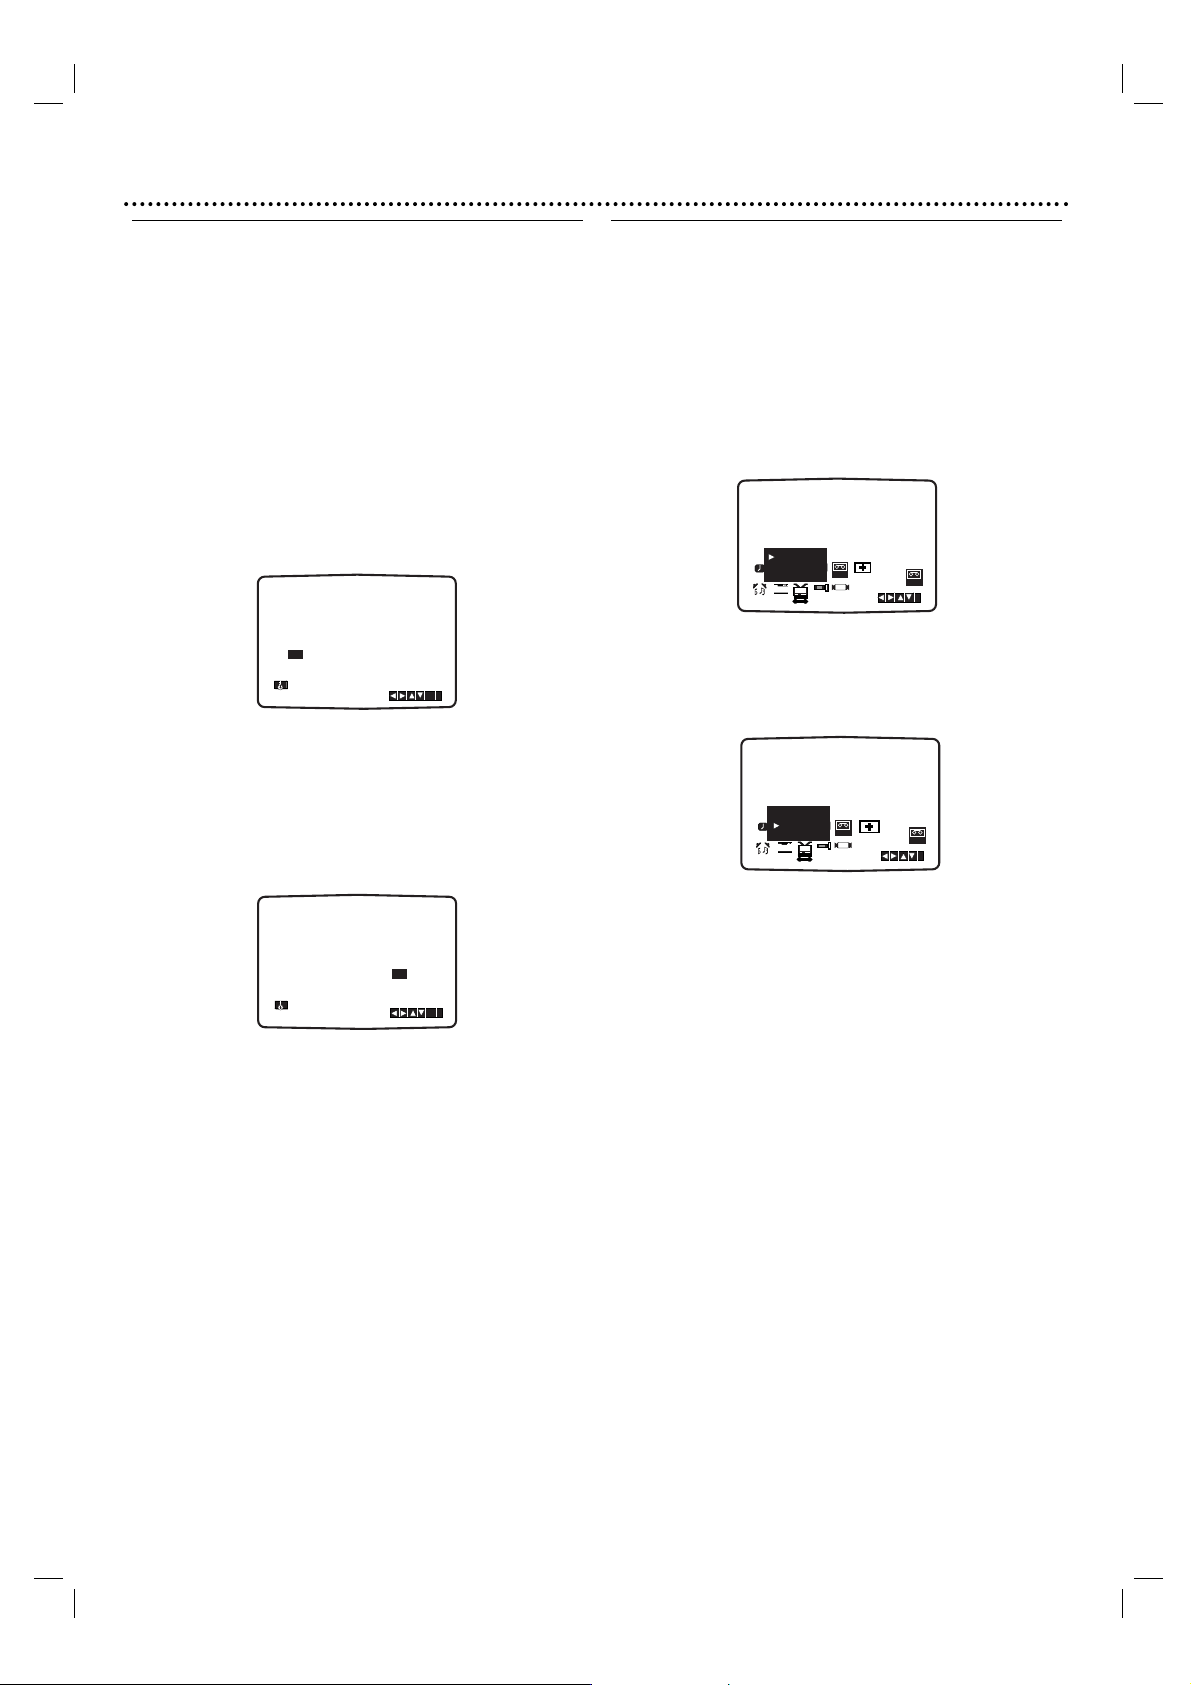
To set the colour system
1
Press SETUP.
2
The main menu will appear on the TV screen.
3
Press 1 or 2 to select the SYS and press OK.
4
Press 3 or 4 to select according to the COLOUR
system used.
5
Press 2 to select the RF AUDIO.
Press 3 or 4 to select according to the RF AUDIO
used.
6
Press SETUP to remove the menus from the TV
screen.
HH MM DD MM YY
:..- -
- -
12
SET
- - - -
- - - - -
ACSS : ON
i
OK
AUTO
12
PAL
Pr-12
MESECAM
SET
ACMS
f
OSD
OSD
RF - I/I
RF - B/G
Pr-12
P
RF - D/K
SET
ACMS
R
f
OSD
OSD
ON
OFF
SET
+
DECO-
DER
+
DECO-
SYS
-
NIC
SYS
SET
-
NIC
DER
SYS
i
SYS
i
P
REC
R
ON
AUD
OFF
REC
AUD
HH MM DD MM YY
8
:..00 1 01 07 MON
12
SET
ACSS : OFF
i
OK
 Loading...