

Page 1
Owner's Manual
DVD962SAD VD Video / SACD Player
DVD962SA
1
Page 2

Important Note
DK
Advarsel:
Laserrudstråling ved åbning når sikkerhesafbrydere er ude af
funktion. Undgå u tsættelse for stråling.
Bemærk:
Netafbryderen POWER er sekundært indkoblet og afbryder ikke
strømmen fra nette. Den indbyggede netdel er derfor tilsluttet til
lysnettet så længe netstikket sidder i stikkontakten.
N
Observer:
Nettbryteren POWER er sekundert innkoplet. Den
innebygdenetdelen er derfor ikke frakoplet nettet så lenge apparatet
er tilsluttet nettkontakten.
S
Klass 1 laserapparat
Varning!
Om apparaten används på annat sätt än i denna bruksanvisning
specificerats, kann användaren utsättas för laserstrålning, som
översjruder gränsen för läserklass 1.
Observera!
Strömbrytaren POWER är sekundärt kopplad och inte bryter
strömmen fråan nätet Den inbyggda nätdelen är därför ansluten till
elnätet så länge stickproppen sitter i v ägguttaget.
SF
Luokan 1 laserlaite + Klass 1 laserapparat
Varoitus!
Laitteen käyttäminen muulla kuin tässä käyttöohjeessa mainitulla
tavalla saattaa altistaa käyttäjän turvallisuusluokan 1 ylittävälle
lasersäleilille.
Huom.
Toiminnanvalitsin POWER on kytketty toisiopuolelle, eikä se kytke
laitetta irti sähköverkosta. Sisäänrakennettu verkko-osa on
kytkettynä sähköverkkoon aina silloin, kun pistoke on pistorasiassa.
Important Note for Users in the UK
Mains plug
This apparatus is fitted with an approved 13 Amp plug. To
change a fuse in this type of plug proceed as follows:
1 Remo
2 Fix new fuse which should be a BS1362 5 Amp,
3 Refit the fuse cover.
If the fitted plug is not suitable for your socket outlets, it should
be cut off and an appropriate plug fitted in its place.
If the mains plug contains a fuse, this should have a value of 5
Amp.If a plug without a fuse is used, the fuse at the
distribution board should not be greater than 5 Amp.
Note:The severed plug must be disposed of to avoid a possible
shock hazard should it be inserted into a 13 Amp socket
elsewhere.
ve fuse cover and fuse.
A.S.T.A.or BSI approved type.
How to connect a plug
The wires in the mains lead are coloured with the following
code: blue = neutral (N), brown = live (L).
As these colours ma
markings identifying the terminals in your plug, proceed as
follows:
• Connect the blue wire to the terminal marked N or
coloured black.
• Connect the brown wire to the terminal marked L
or coloured red.
• Do not connect either wire to the ear th ter minal in
the plug, mar ked E (or e) or coloured green
(or green and yellow).
Before replacing the plug cover, make certain that the cord grip
is clamped over the sheath of the lead - not simply over the
two wires.
Copyright in the U.K.
Recording and playback of material may require
consent. See Copyright Act 1956 and The Performer’s
Protection
Acts 1958 to 1972.
y not correspond with the colour
2
IMPORTANT NOTE
Page 3

Index
English -------------------------------------------------------- 5
English
Français ------------------------------------------------------33
Français
Español ------------------------------------------------------ 61
Español
Deutsch -----------------------------------------------------89
Deutsch
Nederlands ----------------------------------------------- 117
Italiano ----------------------------------------------------- 145
Svenska ---------------------------------------------------- 173
Dansk ------------------------------------------------------ 201
Suomi ------------------------------------------------------ 229
Nederlands
Italiano
Svenska
DanskSuomi
Português ------------------------------------------------- 257
Norge------------------------------------------------------ 285
INDEX
Português
Norge
3
Page 4
General Information
Laser safety
This unit employs a laser. Due to possible eye injury, only a
qualified service person should remove the cover or
attempt to service this device.
USE OF CONTROLS OR ADJUSTMENTS OR
PERFORMANCE OF PROCEDURES OTHER
THAN THOSE SPECIFIED HEREIN MAY
RESULT IN HAZARDOUS RADIATION
EXPOSURE.
LASER
Type Semiconductor laser GaAlAs
Wave length 650 nm (DVD)
780 nm (VCD/CD)
Output Power 7 mW (DVD)
10 mW (VCD/CD)
Beam divergence 60 degree
Manufactured under license from Dolby Laboratories.
“Dolby”, “Pro Logic” and the double-D symbol are
trademarks of Dolby Laboratories.
CAUTION
VISIBLE AND INVISIBLE LASER RADIATION WHEN
OPEN AVOID EXPOSURE TO BEAM
ADVARSEL
SYNLIG OG USYNLIG LASERSTRÅLING VED ÅBNING
UNDGÅ UDSÆTTELSE FOR STRÅLING
VARNING
SYNLIG OCH OSYNLIG LASERSTRÅLNING NÄR
DENNA DEL ÄR ÖPPNAD BETRAKTA EJ STRÅLEN
VARO!
AVATTAESSA OLET ALTTIINA NÄKYVÄLLE JA
NÄKYMÄTTÖMÄLLE LASER SÄTEILYLLE. ÄLÄ KATSO
SÄTEESEEN
VORSICHT
SICHTBARE UND UNSICHTBARE LASERSTRAHLUNG
WENN ABDECKUNG GEÖFFNET NICHT DEM
STRAHL AUSSETSEN
ATTENTION
RAYONNEMENT LASER VISIBLE ET INVISIBLE EN CAS
D’OUVERTURE EXPOSITION DANGEREUSE AU
FAISCEAU
The DVD VIDEO player is in conformity
with the EMC directive and low-voltage
directive.
This product incorporates copyright protection technology
that is protected by method claims of certain U.S. patents
and other intellectual property rights owned by Macrovision
Corporation and other rights owners. Use of this copyright
protection technology must be authorized by Macrovision
Corporation, and is intended for home and other limited
viewing uses only unless otherwise authorized by
Macrovision Corporation. Reverse engineering or
disassembly is prohibited.
Tr uSur round and the symbol are trademar ks of SRS
Labs, Inc . TruSur round technology is incorpor ated under
license from SRS Labs, Inc.
“DTS” and “DTS DIGITAL OUT” are registered trademar ks
of Digital Theater Systems, Inc.
The region code for this DVD Video Player is 2.
2
Since DVD movies are released at different times in
different regions of the world, all players have region
codes and discs can have an optional region code. If you
load a disc of a different region code into your player,
you will see the region code notice on the screen. The
disc will not play and should be unloaded.
NOTE:
PICTURES SHOWN MAY BE DIFFERENT
BETWEEN COUNTRIES.
CAUTION
VISIBLE AND INVISIBLE RADIATION WHEN
OPEN. AVOID EXPOSURE O BEAM.
(WARNING LOCATION: ON THE BACKPLATE
OF SET)
NEVER MAKE OR CHANGE CONNECTIONS
WITH THE POWER SWITCHED ON.
For Customer Use:
Read carefully the information located at the bottom of your DVD Video player and enter below the Serial No. Retain
this information for future reference.
Model No. DVD VIDEO 962SA Serial No. __________________________
GENERAL INFORMATION
4
Page 5

Contents
Introduction
Reality reproduced: Super Audio CD ------------------- 6
The next standard: hybrid disc --------------------------- 6
SACD : reality in sound...and vision -------------------6-7
Digital video ------------------------------------------------- 7
Unpacking ---------------------------------------------------- 8
Placement ---------------------------------------------------- 8
Infrared remote control ----------------------------------- 8
Functional summary
Front and Rear Panels ------------------------------------- 9
Display -------------------------------------------------------10
Remote Control ------------------------------------------- 11
On-screen display information .....12
Preparation
General Notes ---------------------------------------------13
Connecting to audio equipment - analogue ------13-14
Connecting to audio equipment - digital --------------14
Connecting to a TV --------------------------------------- 15
6 Channel settings ----------------------------------------- 15
Delay times -------------------------------------------------16
Connecting power supply-------------------------------- 16
English
Operation
General Explanation -------------------------------------- 17
Switching on ------------------------------------------------ 17
Personal Preferences----------------------------------18-20
Loading an SACD or Audio disc ------------------------21
Playing an SACD or Audio disc ---------------------21-22
FTS (Favorite Track Selection) - Audio CD only -----22
Access Control: Child Lock (DVD and VCD) --------23
Access Control: Parental Control (DVD only) ------- 24
Loading DVD or VCD discs ----------------------------- 25
Playing a DVD-video discs ------------------------------- 25
Playing a Video CD ---------------------------------------- 25
General Features --------------------------------------26-28
Special DVD Features------------------------------------- 29
Special VCD features -------------------------------------- 29
Enhanced use ----------------------------------------------- 30
Cleaning discs ---------------------------------------------- 30
Diagnostic program ---------------------------------------30
Before Requesting Service
Trouble-shooting checklist -------------------------------31
Specifications .............................................32
CONTENTS
5
Page 6

Introduction
English
Reality reproduced: Super
SACD: reality in sound...and
Audio CD
The future in digital sound reproduction is no longer limited
to a closely simulating of reality. The new audio standard IS
reality! The human ear is no longer capable of distinguishing
audible reality from digital reproduction. At Philips the
future starts today with the Super Audio Compact Disc
player. This Super Audio CD player combines superior
sound quality with the possibility of playing almost all
existing audio and video formats with a single player. Your
precious CD collection retains its value!
The Super Audio standard is based on Direct Stream
Digital (DSD) technology. This new direct-stream digital
format comprises a 1-bit system that has a digital sampling
frequency that is 64 times higher than that of conventional
audio CD. The results are spectacular: a frequency response
of over 50k Hz and a 120dB dynamic range over the entire
audible spectrum. Mixed with as many of the original
frequencies as possible, the audio information audible for
human ears sounds much more natural. All audible
frequencies are, after all, embedded in the frequency range
as emitted by the sound source. A better reproduction
does not exist! For the first time your ears will relive reality.
The next standard: hybrid disc
The Super Audio CD is the evolution of the CD that
provides ultra-high-quality sound. Additional features,
including multi-channel, can be offered. On the high density
(HD) Super Audio CD you may have access to separate
areas, containing two-channel stereo and multi-channel.
But that is not all! The hybrid version of the SACD
guarantees backward compatibility with the installed base of
CD and DVD players. In addition to the HD layer, the
hybrid disc contains a standard density CD layer with
conventional two-channel stereo CD audio information.
The two layers are read from the same side of the disc. The
HD layer is read by and DVD laser. The bottom reflective
layer with conventional CD sound is read by the CD laser
through the second, semi-transmissive HD layer.
vision
This SACD player will not only surprise you with its
superior reproduction of almost all existing audio formats.
Connected to your TV, your SACD player presents VCD
and DVD-video information as perfect digital studio-quality
images with truly 3-dimensional digital multi-channel audio.
Story sequences can be screened from your own choice of
camera angle. You can break down language barriers with
sound tracks in as many as eight languages, plus - if available
on disc - as many as 16 subtitling languages. Video becomes
a new experience. That makes the SACD player an essential
component in a state-of-the-art audio-video system.
Super Audio CD
You will recognize Super Audio CDs by the logo. There are
three types of Super Audio CDs: single-layer, dual-layer and
hybrid discs. Each type may contain two areas of recorded
information: a High Quality Stereo area and a High Quality
Multi-channel area.
– The single layer disc may contain both information areas.
– The dual layer disc may contain both information areas
but a double amount of information can be stored on the
disc thanks to the second layer.
– The hybrid disc may contain not only both information
areas but also a second, standard CD layer, making it
playable on standard CD players.
Recorded information may vary per area. This is indicated in
the disc inlay. Areas can be selected separately before or
during playback, while playing Super Audio CDs via the
remote control or via the On-Screen Display on your TV.
1 CD Layer that plays on any of
your existing CD players
High Density layer containing:
2 - High Quality DSD Stereo
3 - High Quality DSD Multi-channel
SACD Disc Types
6
INTRODUCTION
Single layer Disc
HD layer HD layer HD layer
Dual layer Disc Hybrid layer Disc
CD layer
Page 7

Audio CD (CDDA)
Audio CDs contain music tracks only. You will recognise
these CDs by their logo. You can play them in conventional
style through a stereo system, using the keys on the remote
control and/or front panel, or via the TV using the Onscreen Display (OSD).
Note:
– Please note that the DTS audio format is only supported on
DVD. This product does not support the playback of DTS
encoded CDs.
Digital video
DVD-Video uses state-of-the-art MPEG 2 data
compression technology to register an entire movie on a
single 5-inch disc. DVD’s variable bitrate compression,
running at up to 9.8 Mbits/second, captures even the most
complex images in their original quality.
The crystal-clear digital images have a horizontal resolution
of over 500 lines, with 720 pixels (picture elements) to
each line. The resolution is more than double that of VHS,
superior to Laser Disc, and entirely comparable with digital
masters made in recording studios.
DVD-Video discs conform to either the PAL or NTSC
video standard. This dual-standard player can play both
types, and presents them in the best possible way on your
multi-standard TV screen.
As the universal video system of the future, DVD-Video
offers optimal images on any TV screen.
Video CD
You will recognize Video CDs by the logo. Depending on
the material on the disc (a movie, video clips, a drama
series, etc.), these discs may have one or more tracks, and
tracks may have one or more indexes, as indicated on the
disc case. To make access easy and convenient, your player
lets you move between tracks and between indexes.
English
DVD Video
You will recognize DVD-Video discs by the logo. Depending
on the material on the disc (a movie, video clips, a drama
series, etc.), these discs may have one or more Titles, and
each Title may have one or more Chapters. To make access
easy and convenient, your player lets you move between
Titles and between Chapters.
INTRODUCTION
7
Page 8

English
+
-
+
-
Unpacking
Infrared remote control
First check and identify the contents of your SACD player
package, as listed below:
– SACD player
– AC power cord
– Remote Control with batteries
– Audio cable
– CVBS Video cable
– SC ART cable
– Instructions for use
If any item is damaged or missing, please inform your
supplier immediately.
Save the packaging materials; you may need them to
transport your player in future.
Placement
/
¶ Place the player on a firm, flat surface.
¶ Keep the player away from domestic heating equipment
and direct sunlight.
¶ In a cabinet, allow about 2.5 cm (1 inch) of free space all
around the player for adequate ventilation.
¶ If the SACD player cannot read SACDs/CDs/DVDs/VCDs
correctly, use a commonly available cleaning CD/DVD to
clean the lens before taking the SACD player to be
repaired. Other cleaning methods may destroy the lens.
Always keep the tray closed to avoid dust on the lens.
¶ When it is moved from a cold to a warm environment,
allow the SACD player to acclimatize for at least 2 hours in
order to avoid damage. When suddenly placed in a warm
environment, the lens may cloud over. Playing an SACD/
CD/DVD will not be possible then. Wait until moisture
evaporates.
Loading the batteries
1 Open the battery compartment cover.
2 Insert two ‘AA’ (LR-6) batteries as indicated inside the
battery compartment.
3 Close the cover.
Caution: Do not mix old and new batteries. Also
never mix differ ent types of batteries (standar d,
alkaline, etc.).
8
INTRODUCTION
Page 9
Functional Overview
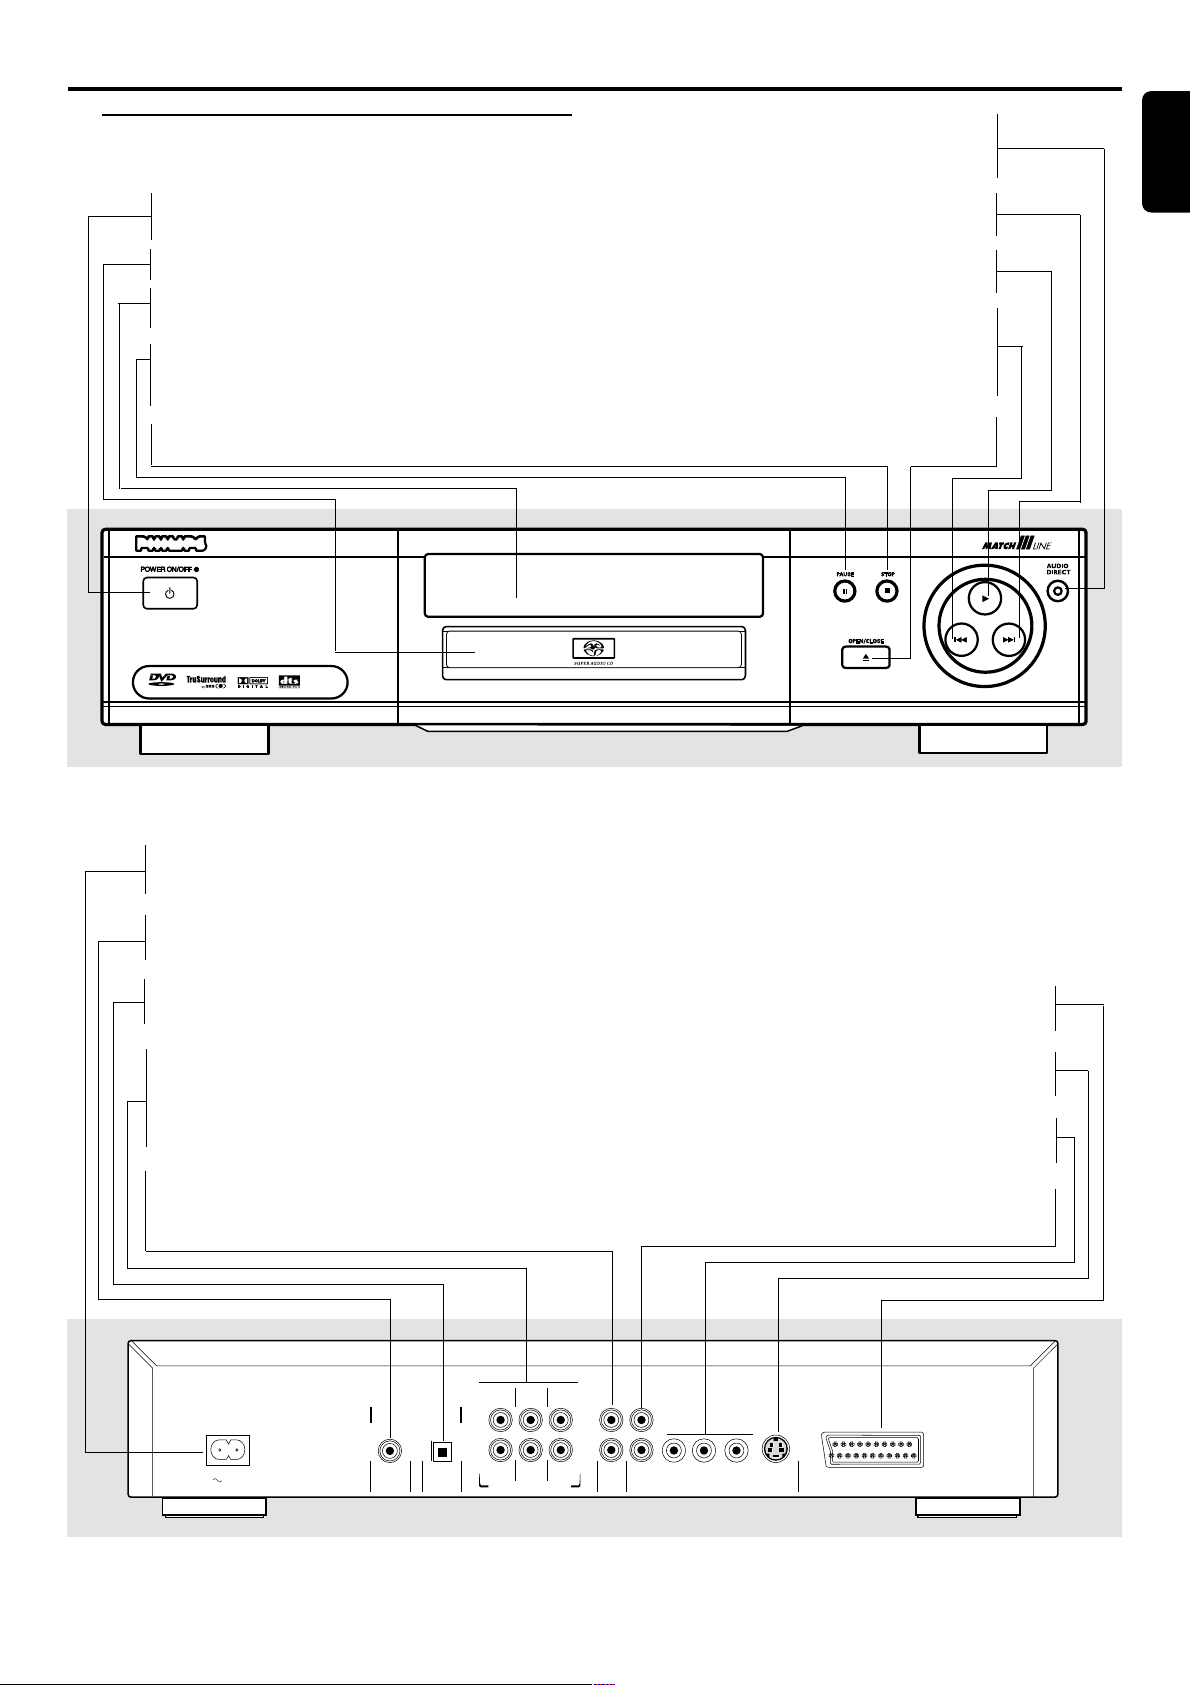
Front and Rear Panels
POWER ON/OFF
– switches the player on/off
Disc Loading Tray
DISPLAY
– display the current status of the player
; PA USE
– interrupts audio/video playback or moves to
the next frame
9 STOP
– stops audio/video playback
DVD
962SA
DVD-VIDEO/SACD PLAYER
VIDEO
AUDIO DIRECT
– shut down video circuity to have better
audio quality
T NEXT
– selects next track/title/chapter/index
B PLAY
– star ts audio/video playback
S PREV
– selects previous track/title/chapter/index
or return to beginning of current tr ack/
title/chapter/index
/ OPEN/CLOSE
– opens/closes the disc tray
English
MAINS (AC Power)
– connect to power source
COAXIAL (Digital audio out)
– connect to digital (coaxial) audio equipment
OPTICAL (Digital audio out)
– connect to digital (optical) audio equipment
MUL TICHANNEL A UDIO OUT
(For connection to a multichannel receiver)
– center speaker, subwoofer, front and
surround speakers connection
AUDIO OUT (Left/Right)
– connect to an amplifier, receiver or stereo
system
SURROUND
CENTER
L
R
SURROUND
SUB WF
MULTICHANNEL AUDIO OUT
MAINS
DIGITAL AUDIO OUT
PCM/MPEG2/AC-3/DTS
COAXIAL
OPTICAL
FRONT
FRONT
TV OUT (SCART)
– connect to a TV with SCART
S-VIDEO OUT
– connect to a TV with S-Video inputs
Pr/Cr Pb/Cb Y VIDEO OUT
– connect to a TV with Pr/Cr Pb/Cb Y inputs
CVBS VIDEO OUT
– connect to a TV with CVBS video inputs
L
R
AUDIO
OUT
CVBS
1
2
b/Cb
Pr/C
r
P
VIDEO OUT
S-VIDEO
Y
TV OUT
Caution: Do not touch the inner pins of the jacks on the rear panel. Electrostatic discharge may cause
permanent damage to the unit.
FUNCTIONAL OVERVIEW
9
Page 10

English
CD
N
N
E
N
N
S
S
Display
SVCD
SACD
SACD
SVCD
CD
STEREO
MCH
Super Video CD inser ted
Super Audio CD inserted
Audio CD inser ted
Video CD inser ted
indicated the current active sound mode
VIDEO
TITLE
DVD video disc inserted
TR
- number of titles on DVD in Stop mode
- number of current title
CK
TITLE
TRACK
Number of current chapter
- number of tracks on SACD/CD/VCD in Stop mode
I
CHAPTER
- number of current track
TOTAL REM TRACK TIME
SHUFFLE
TOTAL REM TRACK TIME
track time in hour s, minutes and seconds
disc/program time in hours, minutes and seconds
REM TIME remaining track time in hour s, minutes and seconds when Display
mode is set to Remaining time
T
SVCD
CD
SACD
STEREO
MCH
VGA
PIC
ALBUM TITLE
HDCDVIDEO AUDIO
GROUP
DTS MCH
3
DSUR SPOTLIGHT ALLA-B REPEAT
SCANINDEXCHAPTERTRACK
TOTAL REM TRACK TIME
SHUFFLE
CHAPTER TRACKTITLE
F S
DIGITAL
NATURAL
MOTION
Playback temporarily interr upted (not active when setting Personal Preferences)
SCAN
A-B REPEAT
HUFFLE
REPEAT
T
F S
First 10 seconds of each track/chapter are played
A passage (a-b) is being repeated
Tr acks/chapter s are played in random order
CHAPTER TRACKTITLE
Repeat Title/Chapter/Tr ack/All active
FTS (Favourite track selection) program available for CD/DVD/VCD inserted
Remote control active (flashing)
DTS
MCH
SUR
3
D
10
FUNCTIONAL OVERVIEW
DTS (Digital Theatre Sound) audio on the digital output
Sound mode button (for DVD) is set to Multi-channel
Sound mode button (for DVD/VCD) is set to Dolby Surround-compatible
Sound mode button (for DVD/VCD) is set to 3D Sound
Page 11

Remote Control
English
T- C
– select title/chapter
RESUME
– to continue playback from
STOP/PAUSE mode
FTS
– activate/deactivate Favourite
Tr ack Selection
SOUND MODE
– selects required sound mode
• for SACD: CD, Stereo or Multichannel (if available)
• for DVD/VCD: Stereo, Dolby
Surround-compatible, 3D
sound or Multi-channel
RETURN
– go back to previous menu
DISC MENU
– access menu of a DVD disc
S
– search backward* / go to a
previous chapter or track
REPEAT
– repeat chapter, track, title , disc
REPEAT (A-B)
– repeat a specific segment
SHUFFLE
– play tracks in random order
POWER
2
SOUND MODE
T-C RESUME
12
4
7
RETURN
FTS
3
5
8
6
9
DISPLAY DIM
0
DISC SYSTEM
MENU
STOP
Ç
OK
É
Éë
PLAY
É
ANGLE ZOOM AUDIOSUBTITLE
REPEAT SHUFFLE SCANREPEAT
A-B
MENU
É
É
É
Éë
PAUSE
Å
POWER B
– switches DVD Video player ON
or to standby mode
0-9 numerical key pad
– select numbered items in a
menu
DISPLAY DIM
– to select 3 different brightnesses
for the display
SYSTEM MENU
– access or remove the player’s
menu
1 2 3 4
– (left/right/up/down) select an
item in the menu
OK
– acknowledge menu selection
T
– search forward* / go to the next
chapter or track
STOP ( 9 )
– stops playback
PLAY ( B )
– star ts playback
PAUSE ( ; )
– pause playback temporarily /
frame-by-frame playback
SCAN
– play the first 10 seconds of
each track/chapter within a disc
* Press and hold key for about two seconds
SUBTITLE
– select a subtitle language
ANGLE
– select a DVD camera angle
ZOOM
– enlar ge video image
AUDIO
– select an audio language
FUNCTIONAL OVERVIEW
11
Page 12

On screen display information
English
Menu bar/Status window
Temporary Feedback Field
V Personal Preferences d Sound
W Title/Track e Picture by Picture
X Chapter/Index f Slow motion
Z Subtitle language g Fast motion
} Angle h Time search
a Zoom Y Audio language
c Video FTS Sound Mode
off no off
no disc stop
Status window icons
The status window displays the current status of the player
and is displayed together with the first part of the menu bar
if activated in the Features menu (see Personal
Preferences).
General
Disc type
icons
Scan
Repeat All
Repeat Title
Repeat T rack
Repeat Chapter
Shuffle
Shuffle Repeat
Repeat A to end
Repeat A-B
Current camera angle/number of available
camera angles
Child Lock On
Child Safe
Tray status
Default screen
The default screen is displayed when the player is in STOP
mode.
It may contain in a status window (see ‘Status Window’)
and a ‘Temporary Feedback Field,’ which gives information
concerning prohibited actions, playback modes, available
angles, etc.
Resume
Action prohibited
off no off
12
ON SCREEN DISPLAY INFORMATION
Page 13

Preparation
COAXIAL
OPTICAL
DIGITAL AUDIO OUT
PCM/MPEG2/AC-3/DTS
TV OUT
MAINS
FRONT
MULTICHANNEL AUDIO OUT
FRONT
CVBS
VIDEO OUT
AUDIO
OUT
S-VIDEO
Y
P
b/CbPr/Cr
SURROUND
SURROUND
L
R
CENTER
SUB WF
L
R
1
2
AMPLIFIER
1
General Notes
¶ Depending on your TV and other equipment you wish to
connect, there are various ways you could connect the
player. Use only one of the connections described below.
¶ For some connections, settings for digital and/or analogue
output are required. These settings have to be made in the
‘Personal Preferences’ menu which is only accessible via
your TV screen. In these cases you will need to connect the
player to the TV as well.
¶ Please refer to the manuals of your TV, VCR, Stereo System
or other devices as necessary to make the best
connections.
Caution:
– Do not connect the player’s audio out jack to
the phono in jack of your audio system.
Connecting to audio
equipment - analog
Connecting to an amplifier/receiver
equipped with two channel analogue stereo
¶ Connect the audio Left and Right outputs for Front speaker
connection (1) to the corresponding sockets on your
amplifier, receiver or stereo system using the audio cable
supplied.
AMPLIFIER
English
Connecting to a Multi-channel Audio/
(Video) receiver with 6 connectors
The SACD player contains a multi-channel decoder. This
enables playback of SACDs recorded in Multi-channel. You
only need to select Multi-channel using the Sound Mode
key.
1 Connect the audio Left and Right outputs for Front speaker
connection (1) to the corresponding input sockets on your
receiver using the audio cable supplied.
2 Connect the audio Left and Right outputs for Surround
speaker connection (3) to the corresponding inputs on
your receiver using an optional audio cable.
3 Connect the audio outputs for Center speaker and
Subwoofer connection (2) to the corresponding inputs on
your receiver using an optional audio cable.
1
FRONT
SURROUND
OPTICAL
CENTER
L
R
SURROUND
SUB WF
MULTICHANNEL AUDIO OUT
L
1
R
2
FRONT
P
b/CbPr/Cr
AUDIO
CVBS
OUT
VIDEO OUT
S-VIDEO
Y
TV OUT
DIGITAL AUDIO OUT
PCM/MPEG2/AC-3/DTS
MAINS
COAXIAL
Important:
– For the best sound quality with playback of
audio CDs and stereo SACDs, always use the left
and right connector of the high-quality stereo/
Multi-channel audio output. The separate stereo
output is intended only for connection to video
equipment such as a TV set.
Note:
– If the subwoofer is equipped with its own amplifier, the
Subwoofer connection should be connected directly to the
subwoofer.
AMPLIFIER
1
2
3
FRONT
SURROUND
OPTICAL
CENTER
L
R
SURROUND
SUB WF
MULTICHANNEL AUDIO OUT
L
1
1
R
2
2
FRONT
b/CbPr/Cr
P
AUDIO
CVBS
OUT
VIDEO OUT
S-VIDEO
Y
TV OUT
DIGITAL AUDIO OUT
PCM/MPEG2/AC-3/DTS
MAINS
COAXIAL
PREPARATION
13
Page 14

English
Connecting to an amplifier/receiver
equipped with Dolby Pro Logic
1 Connect the audio Left and Right outputs for Front speaker
connection (1) to the corresponding inputs on the Dolby
Pro Logic Audio/Video amplifier/receiver using the audio
cable supplied.
2 Set Analogue Output to Dolby Surround-compatible in the
‘Personal Preferences’ menu.
If you connect the player to a TV equipped with a
Dolby Pro Logic decoder
¶ Connect the player to the TV as described in the section
‘Connecting to a TV - Audio connections as above’.
Notes:
– If the audio format of the digital output does not match the
capabilities of your receiver, the receiver will produce a strong,
distorted sound. The audio format of the DVD disc in play is
displayed in the Status Window when changing the audio
format.
– 6 Channel Digital Surround Sound via digital connection
can only be obtained if your receiver is equipped with a Digital
Multi-channel decoder. If your receiver does not contain a
decoder, you can make the analogue connections as described
in the section ‘Connecting to a Multi-channel Audio/(Video)
receiver with 6 connectors’ to obtain 6 Channel Digital
Surround Sound.
– SACD Multi-channel sound cannot be obtained via digital
connection.
Connecting to audio
equipment - digital
The digital output of the SACD player does not provide
PCM (Pulse Code Modulation) signals. If your amplifier/
receiver can only decode PCM and not multi-channel
signals such as Dolby Digital, do not connect your SACD
player using the digital input. This could damage your
amplifier and/or speakers.
Connecting to an Audio/(Video) receiver
with multi-channel decoder (Dolby Digital,
MPEG 2 and DTS)
Digital Multi-channel sound (not for SACD)
For this you need a multi-channel A/V receiver that
supports one or more of the DVD audio formats
supported by your SACD player (MPEG 2, Dolby Digital
and DTS). Check the receiver manual and the logos on
front of the receiver.
1 Connect the player’s digital audio output (optical 4 or
coaxial 5) to the corresponding input on the receiver.
Use an optional digital (optical 4 or coaxial 5) audio cable.
AMPLIFIER
Connecting to a TV
Notes:
– Depending on your TV, there are various ways to connect
the player. These are shown in the illustration below.
– Please refer to your TV, VCR and any other User Manual(s)
as necessary to make the optimal connections.
– Do not connect your SACD-player via your VCR because the
video quality could be distorted by the copy protection system.
SCART connection
1 Connect the SCART to the corresponding connector on
the TV using the SCART cable supplied
2 If your TV is not equipped with a SCART you can select
one of the following alternative connections:
S-Video (Y/C) connection
1 Connect the S-VIDEO OUT (Y/C) socket (7) to the
corresponding socket on the TV using an optional S-Video
cable.
2 If you wish to receive the sound via your TV, connect the
STEREO OUT Left and Right output sockets (1) to the
corresponding sockets on the TV using the audio cable
supplied.
(6).
14
PREPARATION
45
FRONT
SURROUND
OPTICAL
CENTER
L
R
SURROUND
SUB WF
MULTICHANNEL AUDIO OUT
L
1
R
2
FRONT
b/CbPr/Cr
P
AUDIO
CVBS
OUT
VIDEO OUT
S-VIDEO
Y
TV OUT
DIGITAL AUDIO OUT
PCM/MPEG2/AC-3/DTS
MAINS
COAXIAL
Page 15

Video CVBS connection
1 Connect the VIDEO OUT (CVBS) socket (8) to the
corresponding socket on the TV using the video cable
supplied.
2 If you wish to receive the sound via your TV, connect the
STEREO OUT Left and Right output sockets (1) to the
corresponding sockets on the TV using the audio cable
supplied.
6781
6 Channel settings
Front speaker
L (Large): When the front speakers can reproduce
low frequency signals below 120Hz
S (Small): When the front speaker s cannot produce
low frequency signals below 120Hz
Center Speaker
L (Large): When the center speaker can reproduce
low frequency signals below 120Hz
S (Small): When the center speaker cannot produce
low frequency signals below 120Hz
Off: When the center speaker is not connected
Surround speakers
L (Large): When the surround speakers can
reproduce low frequency signals below
120Hz
S (Small): When the sur round speaker s cannot
produce low frequency signals below
120Hz
Off: When the surround speakers are not
connected
English
FRONT
SURROUND
OPTICAL
CENTER
L
R
SURROUND
SUB WF
MULTICHANNEL AUDIO OUT
L
1
R
2
FRONT
P
b/CbPr/Cr
AUDIO
CVBS
OUT
VIDEO OUT
S-VIDEO
Y
TV OUT
DIGITAL AUDIO OUT
PCM/MPEG2/AC-3/DTS
MAINS
COAXIAL
Component Video (Pr/Cr Pb/Cb Y)
connection
1 Connect the Pr/Cr Pb/Cb Y VIDEO OUT jacks on the DVD
player to the corresponding in jacks on the TV using an
optional Pr/Cr Pb/Cb Y cable (9).
2 Connect the Left and Right AUDIO OUT jacks of the DVD
player to the audio left/right in jacks on the TV (1).
TV
1
9
Subwoofer
On: When you connect a subwoofer
Off: When a subwoofer is not connected
* Notes:
– You can use your TV as center speaker. Please refer to your
TV User Manual to check if your TV can reproduce low
frequency signals below 120Hz. If not, set Center Speaker to
S(small).
– When Center Speaker is selected in the ‘Personal
Preferences’ menu, the sound from both center speaker and
audio L/R as well as the audio from the Euroconnector will
contain the center speaker audio.
CENTER
3
Reference
listening
position
FRONT
RIGHT
1
1
0
°
0
-
°
1
2
0
°
RIGHT
SURROUND
LEFT
SURROUND
FRONT
LEFT
SUBWOOFER
FRONT
SURROUND
OPTICAL
CENTER
L
R
SURROUND
SUB WF
MULTICHANNEL AUDIO OUT
L
1
R
2
FRONT
P
b/CbPr/Cr
AUDIO
CVBS
OUT
VIDEO OUT
S-VIDEO
Y
TV OUT
PREPARATION
15
DIGITAL AUDIO OUT
PCM/MPEG2/AC-3/DTS
MAINS
COAXIAL
Page 16

English
)
Delay times
Connecting the power supply
The SACD player is set to reproduce correctly
synchronized Digital Surround Sound in a listening area
where the surround speakers are about 150cm nearer to
the listening position than the front speakers, and the
center speaker is in line with the front speakers. To adjust
for other listening area arrangements, adapt delay times
according to the following:
Digital Surround
Measure the distances in centimeters from the front
speaker plane and from the surround speaker plane to the
listening positioning plane.
Subtract the surround distance from the front distance and
divide by 30. The result is the required Surround Channel
delay time in milliseconds.
If the center speaker is on the front speaker plane, no
center speaker delay is needed. If, however, it is nearer to
the listening position, measure the distance in centimeters
between the front and center speaker planes, and divide by
30. The result is the required Center Channel delay time in
milliseconds.
Digital Surround Delay
40
35
30
25
0 ms
0 ms
20
15
10
Distance from surround speakers (feet)
0 ms
5
0
0
5 10152025303540
Distance from front speakers (feet)
0 ms
5 ms
10 ms
15 ms
15 ms
15 ms
10ms5
ms
0 ms
0 ms
0 ms
0 ms
-5 ms
-10 ms
Differential
arrival time
Preferred
Acceptable
Not recommended
1 Check if the power voltage as shown on the type plate (on
the back of the player) corresponds to your local power
voltage.
2 Plug the female end of the power cable supplied into the
Power connector POWER SUPPLY on the rear of the
player.
3 Plug the male end of the cord into an AC outlet.
Note:
– When the player is in the STANDBY or OFF position, it will
still consume some power.
– If you wish to disconnect your player completely from the
power supply, pull the plug from the AC Outlet.
Caution:
Only qualified service personnel should remove
the cover or attempt to service this device.
M
A
I
N
S
Dolby Pro Logic
If the delay times for Surround Channel and Center
Channel are set for Digital Surround mode, the delay times
for Dolby Pro Logic mode will automatically be calculated
and set.
Pro Logic Surround Delay
40
35
30
25
15 ms
0 ms
20
15
10
Distance from surround speakers (feet)
15 ms
5
0
0
5 10152025303540
Distance from front speakers (feet
15 ms
20 ms
25 ms
30 ms
30 ms
30 ms
25ms20
ms
15 ms
15 ms
15 ms
15 ms
10 ms
5 ms
Differential
arrival time
Preferred
Acceptable
Not recommended
16
PREPARATION
Page 17

Operation
General Explanation
About this manual
This manual gives the basic instructions for operating the
SACD pla yer.
Some DVDs require specific operation or allow only limited
operation during playback. When this occurs, the symbol
Ä appears on the TV screen, indicating that the operation
is not permitted by the player or the disc.
Remote control operation
¶ Unless stated, all operations can be performed by the
remote control. Always point the remote control directly at
the player, making sure there are no obstructions between
the remote and the player.
¶ Corresponding keys on the front panel of the player can
also be used.
Menu bar operation
¶ A number of operations can also be performed using the
menu bar on the screen. The menu bar can be activated by
pressing any of the following keys on the remote control:
SYSTEM MENU, T-C, Angle, Audio Language, Subtitle
Language, Zoom and FTS.
– The following functions can be operated via the menu bar.
– Personal Preferences
– Track/title selection
– Chapter selection
– Audio language selection
– Subtitle language selection
– Angle selection
– Zoom
– Video FTS selection
– Sound mode
– Picture-by-picture
– Slow motion
– Fast motion
– Time search
¶ The various items can be selected using the 1 2 (left/right
cursor) keys or by pressing the relevant keys on the remote
control.
¶ By pressing SYSTEM MENU, the menu bar can be removed
from the screen.
¶ When selecting an item in the menu bar, the selected item
will be highlighted and the cursor keys (on the remote
control) for operating the function are displayed below the
icon.
¶ < or > indicates that more items are available at the left/
right hand side of the menu bar. Press 1 2 (left/right
cursor) to select these items.
Switching on
DVD
962SA
DVD-VIDEO/SACD PLAYER
VIDEO
1 If necessary, switch on the TV and select the video input for
your SACD player.
2 Press ON/OFF on the player front panel or STANDBY on
the remote control.
➜ The player display will light up.
➜ If the player is connected to the TV, the start-up screen
appears.
English
OPERATION
17
Page 18

English
TV shape
Black Level shift
Video shift
Colour settings
Personal colour
OK to exit
V Personal Preferences
In this mode you can set your personal preferences for a
number of player features. Some settings must always be
selected. This depends on the type of audio equipment
connected. For this see the section ‘Connecting to audio
equipment.’
General operation:
1 Press SYSTEM MENU on the remote control.
2 Select V in the menu bar and press 4 (down cursor).
➜ The Personal Preferences menu appears.
¶ Use the 1 2 3 4 (left/right/up/down) keys to toggle
through the menus, submenus and submenu options.
➜When a menu item is selected, the cursor keys (on the
remote control) to operate the item are displayed next to
the item.
¶ Press OK to confirm and return to the main menu.
The following items can be adapted:
Picture
– TV Shape
If you have a wide screen (16:9) TV, select 16:9.
If you have a regular (4:3) TV, select 4:3.
If you have a 4:3 TV, you can also select between:
Letterbox for a ‘wide-screen’ picture with black bars top
and bottom, or Pan Scan, for a full-height picture with the
sides trimmed. If a disc supports the format, the picture will
be shown accordingly.
– Video shift
Use this setting to personalize the position of the picture
on your TV by shifting it to the left or right. Use 1 2 keys to
shift and OK to exit.
q Sound
– Digital and Analog output Settings for DVD/
VCD
Connected audio system Digital out Analog out
Amplifier or TV with
two channel analog stereo Off Stereo or 3D Sound
Amplifier or TV with Dolby Surround
Dolby Surround Off - compatible
Amplifier with two channel
digital stereo PCM only Stereo or 3D Sound
A/V receiver with multi-channel Stereo, 3D Sound,
decoder (Dolby Digital, MPEG, DTS) All Dolby Surround
Multi-channel A/V receiver
with 6-ch connectors Off Multi-channel
-compatible or
Multi-channel
VIEWING ON 16:9
VIEWING ON 4:3
LETTERBOX
PAN SCAN
– Black level shift (NTSC only)
Select ON for adapting the colour dynamics to obtain
richer contrasts.
– Digital output
Factory setting is ALL. If you connect equipment with a
digital input change the setting to ALL or PCM (Pulse Code
Modulation - see below) only. Both coaxial and optical
outputs are then switched on (not for SACD). If your
equipment doesn’t include a digital multichannel decoder,
set the digital output to PCM. Both coaxial and optical
outputs are then switched on. See ‘Digital and Analog
output Settings for DVD/VCD’ above.
18
OPERATION
Page 19

– PCM output
PCM (Pulse Code Modulation) is a method of encoding
audio information in a digital format. PCM samples analog
audio information at a fixed sampling rate and measures the
amplitude (volume) of the audio signal with a precision
determined by the sampling size. Audio is encoded on CDs
in the PCM format with a sampling frequency of 44.1kHz
and a 16-bit sampling size. A 16-bit sample size can contain
65,536 possible levels of sound volume which corresponds
to a dynamic range of 96dB. A DVD can be encoded in
PCM with a sampling frequency of up to 96kHz and a 24bit sample size.
off1no off
Digital output
PCM output
Analog output
Night mode
Karaoke vokal
Speakers
48 KHz
96 KHz
– Analogue output
Select Digital and Analog output settings for DVD/VCD.
Select Stereo, Dolby Surround-compatible, 3D Sound or
Multi-channel. Factory setting is Multi-channel.
Multi-channel: Select this setting when using a multi-channel
audio/(video) receiver with six inputs. In this mode, the
player will perform Dolby Digital 5.1-channel decoding
when applicable, and Dolby Pro Logic decoding on DVDVideo and Video-CD discs with 2-channel sound tracks. No
Dolby Pro Logic decoding is done with (Super) Audio CD
discs.
Dolby Surround-compatible: Select this setting when using an
equipment with a Dolby Surround Pro Logic decoder. In
this setting, the 5.1 audio channels (Dolby Digital, MPEG-2)
are downmixed to a Dolby Surround-compatible 2-channel
output.
3D-Sound: In a setup without rear speakers (analog stereo
output), 3D Sound remixes the six channels of digital
surround into a two-speaker output while retaining all of
the original audio information. The result is the listening
sensation of being surrounded by multiple speakers.
During DVD or Video-CD playback, these values can be
selected directly with the ‘SOUND MODE’ key.
English
The PCM setting on your player allows you to select the
PCM sample-rate frequency of the analog and digital
outputs. You can set it to either 48kHz or 96kHz. Factory
setting is 48kHz. Note when using digital outputs:
¶ If you have a digital amplifier with a PCM input of 96kHz,
connected via digital output, choose this frequency in the
menu. Do not choose 96kHz if your amplifier has a digital
PCM input of 48kHz since then a strong distorted sound
may be produced.
¶ Due to copy-protection the digital outputs may be muted
when 96kHz is selected, while the analog outputs will
remain active. Switching the PCM output back to 48kHz
will reactivate the digital output.
– Night Mode
Optimizes the dynamics of the sound for low-volume
playback. This setting can only be used with discs that
support the Night Mode feature.
– Speaker settings
Allows you to select speaker settings, volume balance and
delay time, and to test the speaker settings.
Speaker settings are only active on the Multi-Channel Audio
Out outputs for both DVD and SACD. Speaker settings will
not be used during playback in the SACD Stereo mode.
Speakers
Front L R
Centre
Surround L
Surround R
Sub woofer
Press OK to Exit
Settings
Note:
– Volume level setting is not applicable for SACD playback.
– To preserve highest sound quality for playback of
multichannel SACD, bass filter for speakers will only be
activated when ALL speakers are set to small in speaker
setting.
OPERATION
19
Page 20

English
– Karaoke vocal
Put this setting to ON only when a multi-channel karaoke
DVD is being played. The karaoke channels on the disc will
then be mixed into a normal stereo sound.
r Language
Select the required Menu, Audio and Subtitle language.
Audio language - The sound will be in the language you
select, provided it is available on the disc in play. If not,
speech will revert to the first spoken language on the disc.
You can choose from 16 different languages.
Subtitle language - The subtitles will be in the language you
select, provided it is available on the disc in play. If not,
subtitles will revert to the first subtitle language on the disc.
You can choose from 16 different languages.
Menu language - The On-screen Menus will be displayed in
the language you select. You can choose from 8 different
languages.
Audio language and Subtitle language can also be adapted
via the Menu bar on the screen.
s Features
– Access Control (DVD/VCD only)
Access Control contains the following features:
Disc Lock - When Disc Lock is set to ON, a 4-digit PIN
code must be entered in order to play discs.
Parental control - Allows the conditional presentation of
DVD discs containing Parental Control information.
– Status Window
Displays the current status of the player and appears with
the menu bar. When disc playback is stopped, it is displayed
with the ‘Temporary Feedback Field’ in the default screen.
See ‘On-Screen Display’ information.
The factory setting is ON. Select OFF to suppress display of
the Status Window.
– Sound Mode (SACD only)
Selection of default SACD Sound Mode: Stereo or Multichannel. Sound Mode setting can be changed during
playback with the Sound Mode button on the player or the
remote control. When selecting Multi-channel make sure
your sound mode is set up for Multi-channel reproduction.
off1no off
Access control
Status window
Low power standby
Sound mode
Display
PBC
SACD Stereo
SACD Multichannel
Display information
– Display
Elapsed time - during playback the elapsed playing time will
be displayed.
Remaining time - during playback the remaining playing time
will be displayed.
Display setting can be changed during playback using the
DISPLAY key on the remote control.
off1no off
Access control
Status window
Low power standby
Sound mode
Display
PBC
Total time
Remaining time
no disc stop
– Low Power Standby
If this setting is set to ON, the player will go in low-power
standby when the Stand-by key (remote control) is pressed.
While in low-power standby, scart AUX-I/O will no longer
be available.
20
OPERATION
– Player Display Dim (via remote control)
This feature allows you to set the front panel display
brightness. By repeatedly pressing the DIM key on the
remote control you can select from 3 different brightness
levels.
– PBC (Playback Control)
This feature allows you to disable or enable the PBC
(Playback Control) menu of VCD discs. See under ‘Special
VCD features’: Factory setting is ON.
Page 21

Operation - Audio (Super Audio CD and CD)
Loading an SACD or Audio
disc
1 Press / OPEN/CLOSE on the front of the player to open
the disc tray.
2 Load your chosen disc in the tray, label side up. Make sure it
is properly inserted in the correct recess.
3 Gently push the tray, or press / OPEN/CLOSE, to close
the tray.
➜ READ will appear on the player display and in the status
window (if TV is on).
If a Super Audio CD is inserted, the Sound Modes available
on the disc will be shown on the player display. The current
Sound Mode is indicated on both player display (with a
bullet) and screen (if TV is on).
Playing an SACD or Audio disc
➜ If a default Sound Mode (Stereo/Multi-channel) is
selected in the Personal Preferences menu and this Sound
Mode is not available on the inserted disc, playback will
start in the first available Sound Mode on the the disc.
➜ Playback will stop at the end of the disc.
¶ To stop play at any other time, press 9 STOP.
➜ The number of tracks and the total playing time will be
shown on the player display (and on the screen).
Sound Mode - SACD playback
¶ Press SOUND MODE on the remote control to select the
desired sound mode:
Stereo - Super Audio Stereo reproduction.
Multi-channel - Super Audio Multi-channel reproduction.
CD - normal CD stereo reproduction (press 9 STOP first,
then press SOUND MODE).
The sound modes available on the disc will be indicated on
the display. When selecting Multi-channel, make sure your
speaker configuration is set up for Multi-channel
reproduction.
Pause
¶ Press ; PAUSE during playback.
¶ To return to playback, press B PLAY.
English
¶ Press B PLAY to start playback.
➜ During playback of Super Audio CDs and audio discs, all
functions can be operated via the keys on the remote
control and the front player.
➜ If the TV is on, the Super Audio CD or the Audio CD
screen will appear.
➜ During play, the current track number and its elapsed
playing time will be shown on the player display (on the
screen). If a default Display Time setting (Total Time/
Remaining Time) is made in the Personal Preferences menu,
the relevant time will be indicated during playback. With the
DISPLAY key on the remote control other time indications
can be selected.
➜ When playing a Super Audio CD, the currently selected
Sound Mode will be indicated on the display with a bullet.
➜ At the beginning of each track, the number of front
channels and surround channels will be displayed (e.g. 3/2).
If a subwoofer channel is present this will also be displayed
(+1).
Search
¶ To search backward or forward through the disc at four
times the normal speed, hold down 5 REVERSE or 6
FORWARD for about one second during playback.
➜ Search begins, and sound is partially muted.
¶ To step up to eight times the normal speed, press 5
REVERSE or 6 FORWARD again.
➜ Search goes to eight times the speed, and the sound is
muted.
¶ To return to four times the normal speed, press 5
REVERSE or 6 FORWARD again.
¶ If the TV is on, search speed and direction are indicated on
the screen each time 5 REVERSE or 6 FORWARD is
pressed.
¶ To end the search, press B PLAYto resume playback or
press 9 STOP to stop playback.
Moving to another track
¶ Press K NEXT or J PREVIOUS briefly during playback to go
to the next track or to return to the beginning of the
current track.
¶ Press J PREVIOUS briefly to step back to the previous
track.
¶ To go directly to any track, enter the track number using
the numerical keys (0-9).
OPERATION - AUDIO
21
Page 22

English
Shuffle
¶ Press SHUFFLE during playback.
➜ The playing order of the tracks is changed.
¶ To return to normal playback, press SHUFFLE again.
Repeat track/disc
¶ To repeat the current track, press REPEAT.
➜ REPEAT TRACK appears on the display.
¶ To repeat the entire disc, press REPEAT a second time.
➜ REPEAT appears on the display.
¶ To exit Repeat mode, press REPEAT a third time.
Storing a FTS program
1 Load a disc and stop playback.
CD 8 10321
stereo track
stop
stop
fts On Off
track 1 2 3 4 5 6 7 8
program
Clear all
Audio Disk Mode
time
total tracks
total time
Repeat A-B
To repeat a specific portion of a track:
¶ Press REPEAT A-B at your chosen starting point.
➜ A- appears on the player display.
¶ Press REPEAT A-B again at your chosen end point.
➜ A-B appears on the display, and the sequence begins to
play repeatedly.
¶ To cancel the sequence and continue playback, press
REPEA T A-B.
Scan
Scanning plays the first 10 seconds of each track on the
disc.
¶ Press SCAN.
¶ To continue playback at your chosen track, press SCAN
again or press B PLAY.
FTS (Favourite Track
Selection) - Audio CD only
¶ The FTS Programme allows you to store your favourite
tracks for a particular disc in the player memory.
¶ Each FTS Programme can contain 20 tracks.
¶ Each time a FTS program is played it will be placed at top
of the list. When the list is full and a new program is added,
the last program on the list will be removed from the list.
¶ The selections can be called up and played at any time.
¶ FTS programming is not possible in Audio Direct mode.
2 Use 4 (down cursor) to go to the list of available tracks.
3 Use 1 and 2 (left/right cursor) to select tracks from the list.
To go directly to any track, enter the track number using
the numerical keys (0-9).
4 Store each track by pressing OK.
➜ The track numbers will be added to the list.
➜ The number of tracks and the playing time of the
programme will be shown on the TV screen and the player
display.
When your FTS program is complete, press B PLAY to
start playing; the FTS program will be automatically
memorized.
¶ Press FTS or use the 1 2 (left/right cursor) to set FTS to
ON or OFF.
Erasing a track from a FTS-program
1 Use 4 (down cursor) to go to the list of selected tracks.
2 Use 1 and 2 (left/right cursor) to select the track number
you wish to erase. To go directly to any track, enter the
track number using the numeric keys 0-9.
3 Press OK.
➜ The track number will be erased from the list of selected
tracks.
Erasing the complete program
¶ Use 4 (down cursor) to select CLEAR ALL and press OK.
➜ The complete FTS Programme for the disc will be
erased.
22
OPERATION - AUDIO
Page 23

Operation - Video (DVD and VCD)
Access control; disc lock (DVD
and VCD)
Activating/deactivating the disc lock
1 In the STOP mode, select ACCESS CONTROL in the
features menu s using the 4/3 (down/up) keys and
press 2 (right cursor).
2 Enter a 4-digit code of your own choice.
3 Enter the code a second time.
4 Move to “CHILD LOCK” using the 4/3 (down/up) keys.
Acces control
Status window
Low power standby
Sound mode
Display
PBC
Child lock
Parental level
Change country
Change code
Authorizing discs
¶ Insert the disc. See ‘Loading discs’.
➜ The ‘child protect’ dialog will appear.
You will be asked to enter your secret code for ‘Play Once
‘or ‘Play Always.’ If you select ‘Play Once’, the disc can be
played as long as it is in the player and the player is ON. If
you select ‘Play Always’, the disc will become child safe
(authorized) and can always be played, even if the Child
Lock is set to ON.
Notes:
– The player memory maintains a list of 120 authorized
(‘Child safe’) disc titles. A disc will be placed in the list when
‘Playback Always’ is selected in the ‘child protect’ dialog.
– Each time a ‘child safe’ disc is played, it will be placed on
top of the list. When the list is full and a new disc is added, the
last disc in the list will be removed from the list.
– Double-sided DVDs may have a differ ent ID for each side.
In order to make the disc ‘child safe’, each side has to be
authorized.
– Multi-volume VCDs may have a different ID for each
volume. In order to make the complete set ‘child safe’, each
volume has to be authorized.
English
5 Move to Ç É using the 2 (right cursor) key.
6 Select Ç using the 4/3 (down/up) keys.
7 Press OK to confirm or 1 (left cursor) to confirm and press
1 (left cursor) again to exit the menu.
➜ Now unauthorized discs will not be played unless the
4-digit code is entered.
8 Select É to deactivate the Disc Lock.
Note: Confirmation of the 4-digit code is necessary when:
– The code is entered for the very first time (see above),
– The code is changed (see ‘Changing the 4-digit code’),
– The code is cancelled (see ‘Changing the 4-digit code’);
– Both Disc Lock and Parental Control are switched Off and
the code is requested.
locked
Play once
Play always
Choose Play always for inserting disc in the
child safe list
Acces Control
Deauthorizing discs
¶ Insert the disc. See ‘Loading discs’.
➜ Playback starts automatically.
¶ Press 9 STOP while { is visible.
➜ The | will appear and the disc is now deauthorized.
OPERATION - VIDEO
23
Page 24

English
Access control; Parental
control (DVD-Video only)
Movies on DVDs may contain scenes not suitable for
children. Therefore, discs may contain ‘P arental Control’
information which applies to the complete disc or to
certain scenes on the disc. These scenes are rated from 1
to 8, and alternative, more suitable scenes are available on
the disc. Ratings are country dependent. The ‘Parental
Control’ feature allows you to prevent discs from being
played by your children or to have certain discs played with
alternative scenes.
Activating/Deactivating Parental Control
1 In STOP mode, select ACCESS CONTROL in the features
menu using the 4/3 (down/up) keys and press 2 (right
cursor).
Access control
Status window
Low power standby
Sound mode
Display
PBC
enter code
Access control
Status window
Low power standby
Sound mode
Display
PBC
Child lock
Parental level
Change country
Change code
6 Press OK or 1 (left cursor) to confirm and press 1 (left
cursor) again to exit from the menu.
Country
1 In STOP mode, select ACCESS CONTROL in the features
menu using the 4/3 (down/up) keys and press 2 (right
cursor).
2 Enter the 4-digit code.
3 Move to CHANGE COUNTRY using the 4 (down) key.
4 Press the 2 (right) key.
5 Select a country using 4/3 (down/up cursor).
6 Press OK or 1 (left cursor) to confirm and press 1 (left
cursor) again to exit from the menu.
2 Enter your 4-digit code. If necessary, enter the code a
second time.
3 Move to PARENTAL LEVEL using the 4/3 (down/up) keys.
4 Move to Value Adjustment (1-8) using the 2 (right cursor)
key.
5 Then use the 4/3 (down/up) keys or the numerical keys
on the remote control to select a rating from 1 to 8 for the
disc inserted.
Rating 0 (displayed as ‘– –’):
Parental Control is not activated. The Disc will be played in
full.
Ratings 1 (child safe) to 8 (adults only):
The disc contains scenes not suitable for children. If you set
a rating for the player, all scenes with the same rating or
lower will be played. Higher rated scenes will not be played
unless an alternative is available on the disc. The alternative
must have the same rating or a lower one. If no suitable
alternative is found, playback will stop and the 4-digit code
has to be entered.
Changing the 4-digit code
1 In STOP mode, select ACCESS CONTROL in the features
menu using the 4/3 (down/up) keys and press 2 (right
cursor).
2 Enter the old code.
3 Move to CHANGE CODE using the 4 (down) key.
4 Press the 2 (right) key.
5 Enter the new 4-digit code.
6 Enter the code a second time and reconfirm by pressing
OK.
7 Press 1 (left cursor) to exit the menu.
If you forget your 4 digit code
1 Press 9 STOP to exit the ‘Child Protect’ screen.
2 Select ACCESS CONTROL in the features menu using the
4/3 (down/up) keys.
3 The 4-digit code can be cancelled by pressing 9 STOP four
times in the ‘Access Control’ dialog.
4 You can then enter a new code (twice!) as described above
(Changing the 4 digit code).
24
OPERATION - VIDEO
Page 25

Loading DVDs or VCDs
1 Press / OPEN/CLOSE on the front of the player to open
the disc tray.
2 Load your chosen disc in the tray, label side up. Make sure it
is properly inserted in the correct recess.
3 Gently push the tray, or press / OPEN/CLOSE, to close
the tray.
➜ READ will appear in the status window and on the
player display and playback will start automatically.
Note:
– If ‘Disc Lock’ is set to ON and the disc inserted is not
authorized, the 4-digit code must be entered and/or the disc
must be authorized (see ‘Access Control’).
Playing a DVD-video disc
¶ To stop playback, press 9 STOP.
➜ The default screen will appear, giving information about
the current status.
¶ You can resume playback from the point at which you
stopped playback. Press B PLAY; when you see the .
RESUME on the screen, press B PLAY again.
➜ The RESUME feature applies not only to the disc in the
player, but also to the last four discs you have played. Simply
reload the disc and press RESUME on the remote control.
Or, press B PLAY when you see the . RESUME on the
screen, then press B PLAY again.
Notes:
– Since it is usual for DVD movies to be released at different
times in different regions of the world, all players have region
codes and discs may have an optional region code.
– If you load a disc with a different region code than your
player, you will see the region code notice on the screen.
– The disc will not play, and should be unloaded.
Playing a video CD
English
Playing a title
➜ After inserting the disc and closing the tray, playback
starts automatically. The status window of the player display
shows the type of disc loaded, as well as the disc’s
information and playing time.
➜ The disc may invite you to select an item from a menu. If
the selections are numbered, press the appropriate
numerical key 0-9; if not, use the 4/3, 1/2 (down/up/left/
right) keys to highlight your selection, then press OK.
➜ The currently-playing title and chapter number will be
displayed in the menu bar and the player display. The
elapsed playing time will be indicated in the status window
and on the player display.
➜ At the beginning of each title, the number of front
channels and surround channels will be displayed (e.g. 3/2).
If a subwoofer channel is present this will also be displayed
(+1).
➜ If the audio format (MPEG, Dolby Digital, etc.) of a title
changes during play, this will be indicated on the display.
¶ If required, you can use the SOUND MODE key to select
Stereo, Dolby Surround-compatible, 3D-Sound or Multichannel reproduction. Play may stop at the end of the Title;
this can result in returning to menu.
Playing a disc
➜ After inserting the disc and closing the tray, playback
starts automatically. The status window of the player display
shows the type of disc loaded, as well as the disc’s
information and playing time.
➜ The disc may invite you to select an item from the menu.
If the selections are numbered, press the appropriate
numeric key 0-9.
➜ The track number currently playing will be displayed in
the menu bar and the player display. The elapsed playing
time will be indicated in the status window and the player
display.
¶ If required, you can use the SOUND MODE key to select
Stereo, Dolby Surround-compatible or 3D-Sound
reproduction.
¶ To stop playback, press 9 STOP.
➜ The default screen will appear.
¶ You can resume playback from the point at which you
stopped playback. Press B PLAY; when you see the .
RESUME on the screen, press B PLAY again.
➜ The RESUME feature applies not only to the disc in the
player, but also to the last four discs you have played. Simply
reload the disc and press RESUME on the remote control.
Or, press B PLAY when you see the . RESUME on the
screen, then press B PLAY again.
OPERATION - VIDEO
25
Page 26

English
General features
Note:
– Unless stated, all operations described are based on remote
control use. Some operations can be carried out using the
menu bar on the screen.
Moving to another title/track
When a disc has more than one title or track (which you
can see from both menu bar and the player display), you
can move to another title as follows:
¶ Press T-C (title), then press K NEXT briefly during play to
select the next title/track.
¶ Press T-C (title), then press J PREVIOUS briefly during play
to return to the beginning of the current title/track. Press J
PREVIOUS briefly again to move back to the previous title/
track.
¶ To go directly to any title or track, press enter the track T-C
(title), then enter the title number using the numeric keys 0-
9.
Notes:
– If the number has more than one digit, press the keys in
rapid succession.
Moving to another chapter/index
When a title on a disc has more than one chapter or a
track has more than one index (which you can see from
the player display and on the menu bar), you can move to
another chapter/index as follows:
¶ Press K NEXT briefly during play to select the next chapter/
index.
¶ Press J PREVIOUS briefly during play to return to the
beginning of the current chapter/index. Press J PREVIOUS
briefly again to move back to the previous chapter/index.
¶ To go directly to any chapter or index, press T-C (chapter),
then enter the chapter or index number using the numeric
keys 0-9.
Notes:
– If the number has more than one digit, press the keys in
rapid succession.
Still Picture and Step Frame
¶ Select e (STEP BY STEP) in the menu bar.
¶ Use the 4 (down) key to enter the step by step menu.
➜ Playback will pause.
¶ Use the 1 2 (left/right) to select the previous or next
picture frame.
¶ To exit step by step playback, press B (PLAY).
You can also step forward by pressing ; PAUSE repeatedly
on the remote control.
Search
¶ Select g (FAST MOTION) in the menu bar.
¶ Use the 4 (down) keys to enter the FAST MOTION
menu.
¶ Use the 1 2 (left/right) keys to select the required speed: -
32, -8 or -4 (backward), or +4, +8, +32 (forward).
¶ Select 1 to play the disc at normal speed again.
¶ To exit FAST MOTION mode, press B PLAY and then 3
(up cursor).
To search forward or backward through different speeds,
you can also hold down 5 or 6.
Repeat
DVD-Video Discs - Repeat chapter/title/disc
¶ To repeat the current chapter, press REPEAT.
➜ REPEAT CHAPTER appears on the player display.
¶ To repeat the current title, press REPEAT a second time.
➜ REPEAT TITLE appears on the display.
¶ To repeat the entire disc, press REPEAT a third time.
➜ REPEAT ALL appears on the display.
¶ To exit Repeat mode, press REPEAT a fourth time.
Video CDs
Repeat track/disc
¶ To repeat the current track, press REPEAT.
➜ REPEAT TRACK appears on the player display.
¶ To repeat the entire disc, press REPEAT a second time.
➜ REPEAT appears on the display and the TV screen.
¶ To exit Repeat mode, press REPEAT a third time.
Slow Motion
¶ Select f (SLOW MOTION) in the menu bar.
¶ Use the 4 (down) keys to enter the SLOW MOTION
menu.
➜ Playback will pause.
¶ Use the 1 2 (left/right) keys to select the required speed:
-1, -1/2, -1/4 or -1/8 (backward), or +1/8, +1/4, +1/2 or +1
(forward).
¶ Select 1 to play the disc at normal speed again.
¶ If ; is pressed, the speed will be set to zero (PAUSE).
¶ To exit slow motion mode, press B PLAY and 3 (up
cursor).
You can also select Slow motion speeds by using the H key
on the remote control.
26
OPERATION - VIDEO
Page 27

Repeat A-B
To repeat a specific portion of a title:
¶ Press REPEAT A-B at your chosen starting point.
➜ A appears briefly on the screen.
¶ Press REPEAT A-B again at your chosen end point.
➜ REPEAT A-B appears briefly on the display, and the repeat
sequence begins.
¶ To cancel the sequence and continue playback, press
REPEA T A-B.
Scan
Scanning plays the first 10 seconds of each chapter/track on
the disc.
¶ Press SCAN.
¶ To continue playback at your chosen chapter/track, press
SCAN again or press B PLAY.
Shuffle
DVD-Video discs
This shuffles the playing order of chapters within a title, if
the title has more than one chapter.
¶ Press SHUFFLE during playback.
➜ The shuffle icon will appear on the screen for about 2
seconds.
¶ To return to normal playback, press SHUFFLE again.
Zoom
The Zoom function allows you to enlarge the video image
and to pan through the enlarged image.
¶ Select a (ZOOM) in the menu bar.
¶ Press 4/3 (down/up) keys to activate the ZOOM function
and select the required zoom factor: 1.33 or 2 or 4.
➜ Playback will pause.
➜ The selected zoom factor appears below the Zoom icon
in the menu bar, and ‘Press OK to pan’ appears below the
menu bar.
➜ The picture will change accordingly.
¶ Press OK to confirm the selection.
➜ The panning icons appear on the screen.
¶ Use the 1 2 3 4 (left/right/down/up) keys to pan across
the screen.
¶ When OK is pressed only the zoomed picture will be
shown on the screen.
¶ If you wish to zoom at any moment, press a ZOOM and
select the required zoom factor as described above.
¶ To exit ZOOM mode:
– Press B PLAY to resume playback.
Press OK to pan
English
Video CDs
This feature shuffles the playing order of tracks, if the disc
has more than one track.
¶ Press SHUFFLE during playback.
➜ The shuffle icon will appear on the screen for about 2
seconds.
¶ To return to normal playback, press SHUFFLE again.
Time search
The Time Search function allows you to start playing at any
chosen time on the disc.
¶ Select h (TIME SEARCH) in the menu bar.
¶ Press 4 (down cursor).
➜ Playback will pause.
➜ A time edit box appears on the screen, showing the
elapsed playing time of the current disc.
¶ Use the numeric keys to enter the required start time.
Enter hours, minutes and seconds from left to right in the
box.
➜ Each time an item has been entered, the next item will
be highlighted.
¶ Press OK to confirm the start time.
➜ The time edit box will disappear and playback starts
from the selected time on the disc.
OPERATION - VIDEO
27
Page 28

English
FTS-Video
¶ The FTS-Video function allows you to store your favourite
titles and chapters (DVD) and favourite tracks and indexes
(VCD) for a particular disc in the player memory.
¶ FTS programme can contain 20 items (titles, chapters etc.).
¶ A programmed FTS will be placed on top of the list when
playback is activated. When the list is full, a new programme
will replace the last programme on the list.
¶ The programme can be selected and played at any time.
Storing a FTS-Video Programme
¶ While playback is stopped, select VIDEO FTS c in the
menu bar.
¶ Press 4 (down cursor) to open the menu.
➜ The VIDEO FTS menu appears.
Storing titles/tracks
¶ Press 4 (down) key to select TITLE.
¶ Use 1 2 (left/right) keys to select the required title.
¶ Press OK if you wish to store the entire title.
➜ The title number will be added to the list of selections.
Erasing all selections
¶ While playback is stopped, select VIDEO FTS c in the
menu bar.
¶ Use 4 (down) key to select CLEAR ALL.
¶ Press OK.
➜ All selections will be erased.
¶ Press 3 (up) key or SYSTEM MENU to exit the VIDEO
FTS c menu.
Switch FTS Video ON or OFF
¶ Select VIDEO FTS c in the menu bar and press 4 (down)
key.
➜ The video FTS menu appears.
¶ Press 1 2 (left/right) keys to select ON or OFF.
¶ Press 3 (up) key or SYSTEM MENU to exit the VIDEO
FTS c menu.
You can also switch FTS Video ON or OFF by using the
FTS button on the remote control.
Storing chapters
¶ Press 4 (down) key on the selected title number.
➜ The title number will be marked and the highlight moves
to the first available chapter number for this title.
¶ Use 1 2 (left/right) keys to select the required chapter
number.
¶ Press OK to confirm the selection.
➜ The title/chapter selection will be added to the list of
selections.
¶ Press OK or SYSTEM MENU to exit the VIDEO FTS c
menu.
Erasing an FTS-Video Programme
¶ While playback is stopped, select VIDEO FTS c in the
menu bar.
¶ Use 4 (down) key to select PROGRAM.
¶ Use 1 2 (left/right) keys to select the required number.
¶ Press OK to erase the selection.
¶ Press 3 (up) key or SYSTEM MENU to exit the VIDEO
FTS c menu.
Favorite Track Selection
On Off
Clear all
28
OPERATION - VIDEO
Page 29

Special DVD-features
Checking the contents of DVD Video discs:
Menus
DVDs may contain menus to navigate the disc and access
special features. To use the menu, press the appropriate
numerical key or use the 4, 3, 2, 1 (down/up/left/right)
keys to highlight your selection, then press OK.
Title menus
¶ Press DISC MENU.
➜ If the current title has a menu, the menu will appear on
the screen. Otherwise, the disc menu will be displayed.
¶ The menu can list camera angles, spoken language and
subtitle options, and chapters for the title.
¶ To remove the title menu, press DISC MENU again.
Menu Disc
¶ Press T-C followed by DISC MENU.
➜ The disc menu is displayed.
¶ To remove the disc menu, press DISC MENU again.
Subtitles
¶ Select Z (SUBTITLE) in the menu bar.
¶ Press SUBTITLE or 4/3 (down/up) keys repeatedly to see
the different subtitles.
¶ You can enter the required subtitle number directly using
the numerical keys 0-9.
Special Video-Features
Playback Control (PBC)
¶ Load a Video CD with PBC and press B PLAY.
➜ The PBC menu appears on the TV screen.
¶ Go through the menu with the keys indicated on the TV
screen until your chosen passage starts to play. If a PBC
menu consists of a list of titles, you can select a title directly.
¶ Enter your choice with the numerical keys (0-9).
¶ Press RETURN to go back to the previous menu.
¶ You may also select PBC OFF under Personal Preferences.
English
Camera Angle
If the disc contains sequences recorded from different
camera angles, the angle icon } appears, showing the
number of available angles and the angle being shown
currently. You can then change the camera angle if you wish.
¶ Use the 4/3 (down/up) keys to select the required angle.
¶ To go to any angle directly, enter the angle number using
the numerical keys 0-9.
➜ After a while, playback changes to the selected angle. The
angle icon remains displayed until multiple angles are no
longer available.
Changing the audio language
¶ Select Y (AUDIO) in the menu bar.
¶ Press AUDIO or 4/3 (down/up) keys repeatedly to see
the different languages.
¶ You can enter the required language number directly using
the numerical keys 0-9.
OPERATION - VIDEO
29
Page 30

English
Enhanced use
Cleaning Discs
Audio Direct Mode
¶ Audio Direct feature can be activated or deactivated by
pressing the AUDIO DIRECT button on front of the player.
This feature will minimise any interaction between the
video and audio circuity thereby allowing maximum
audio quality produced from the player.
1 Press AUDIO DIRECT button on front of the player.
➜ Video section of the SACD player will be “switched off”
and pictures will disappear on the TV screen.
2 Press AUDIO DIRECT button again;
➜ Pictures will appear on the TV screen.
¶ The Audio Direct cannot be activated when playing a video
disc (e.g., DVD/VCD/SVCD).
¶ Audio Direct mode will be deactivated whenever the
player is switched to standby or off.
When AUDIO DIRECT is switched to ON:
¶ OSD related keys are disable (e.g., SYSTEM MENU, TITLE,
CHAPTER, etc.)
¶ If a video disc is inserted into the player, audio direct mode
will be automatically deactivated and picture will be
displayed on the TV screen.
Note:
– It is recommended that the Audio Direct mode is turned off
before you play any video disc.
¶ The player will react similar to a CD player. Thus for audio
discs (e.g., CDDA, SACD) it is possible use T NEXT /
S PREVIOUS keys for track selection.
Some problems occur because the disc inside the player is
dirty. To avoid these problems clean your discs regularly, in
the following way:
¶ When a disc becomes dirty, clean it with a cleaning cloth.
Wipe the disc from the centre out, in a straight line.
Caution:
– Do not use solvents such as benzine, thinner,
commercially available cleaners, or anti-static
spray intended for analog discs.
Diagnostic program
If the player is still faulty you can start the Diagnostic
Program in the player.
You can operate the Diagnosis Program by following the
step-by-step instructions below.
Instructions
1 Switch the player OFF with the ON/OFF button.
2 Press the / OPEN/CLOSE and ; button simultaneously
and keep them pressed while you turn the player ON.
➜ On the display the message BUSY appears together
with a counter that counts down as the test is running,
reaching zero by the end of the test.
➜ After a few minutes, the message on the local display
changes from BUSY to FAIL or to PASS.
➜ If the message FAIL appears on the display, there is
apparently a failure in your player and your player should be
repaired.
3 Consult your dealer or the Philips Customer Care Centre
for the nearest Service Repair Shop in your country. The
phone number is given in your warranty booklet.
4 If the message PASS appears on the display, there is
apparently no failure in your player. In this case the failure
can be caused by incorrect interpretation of the operating
instructions, the use of a wrong disc or the fact the your
player is incorrectly connected. In this case, you should
consult your dealer or the Philips Customer Care Centre
for further assistance in solving the problem.
5 If the problem remains, return to point 3 of this instruction
to find the nearest repair shop.
6 Switch the player OFF with the ON/OFF button to leave
the diagnostic program.
30
OPERATION
Page 31

Before Requesting Service
If it appears that the DVD Video player is faulty, first consult this
checklist. Something may have been overlooked. Under no
circumstances should you attempt to repair the system yourself;
this will invalidate the warranty.
Look for the specific symptom(s). Then perform only the actions
listed to remedy the specific symptom(s).
Symptom Remedy
No power – Make sure the power cord is properly connected.
– Check if there is power at the AC outlet by plugging in another appliance.
No sound – Check audio connections.
– If you are using a HiFi amplifier, try another sound source.
– DTS-CD do not play on the SACD player.
Distorted sound from HiFi amplifier – Check to make sure that no audio connections are made to the amplifier’s
phono input.
Disc can’t be played – Ensure the disc label is facing up.
– Clean the disc.
– Check if the disc is defective by trying another disc.
English
No picture – Check if the TV is switched on.
– Check the video connection.
– Check if Audio Direct is turned off (only for CD and SACD).
Distorted picture – Check the disc for fingerprints and clean the disc with a soft cloth, wiping
from the center to the edge in a straight line.
– Sometimes a small amount of picture distortion may appear .This is not a
malfunction.
Completely distorted picture – The NTSC/PAL switch may be in the wrong status.
or no Colour with player menu – Press the 9 STOP and T NEXT buttons simultaneously and keep them
pressed while you turn the player ON.
No return to start-up screen when – Reset the unit by switching the player OFF, then ON again.
disc is removed – Check to see if the program requires another disc to be loaded.
The player does not respond to – Aim the remote control directly at the sensor on the front of the player.
the remote control – Remove any obstacles between the player and the remote control.
– Inspect or replace the batteries in the remote control.
Distorted or black/white picture – The disc format does not match your TV’s video signal (PAL/NTSC).
with DVD or Video CD
No audio at digital output – Check the digital connections.
– Check the settings menu to make sure the digital output is set to on.
– Check if the audio format of the selected audio language matches your
receiver capabilities.
Buttons do not work – Reset by switching the player OFF then ON again.
Audible ‘clicks’ from player’s internal – During operation the relais of the player may be switched, leading to an
audible ‘click’. This is not a malfunction.
Player does not respond to some – Operations may not be permitted by the disc. Refer to the instructions of
operating commands during the disc.
playback
BEFORE REQUESTING SERVICE
31
Page 32

Specifications
English
PLAYBACK SYSTEM
SACD Stereo
SACD multi-channel
DVD Video
Video CD
S-Video CD
CD (CD-R and CD-RW)
DVD+RW and DVD-R
OPTICAL READOUT SYSTEM
Lasertype Semiconductor AlGaAs
Numerical Aperture 0.60 (DVD)
Wavelength 650 nm (DVD)
SACD DISC FORMAT
Medium Optical Disc
Diameter 12cm (8 cm)
DVD DISC FORMAT
Medium Optical Disc
Diameter 12cm (8 cm)
Playing time (12 cm) One layer 2.15 h
TV STANDARD EUROPE USA
Number of lines 625 525
Playback Multistandard (PAL/NTSC)
AUDIO FORMAT
Digital DSD Uncompressed Digital
Analog Sound Stereo
Dolby Surround-compatible downmix from multi-channel sound
Full decoding of Dolby Digital multi-channel surround sound
3D Sound (TruSurround) for virtual 5.1 channel sound on 2 speakers
VIDEO FORMAT
Digital Compression MPEG2 for DVD,
DVD 50 Hz 60 Hz
Horiz. resolution 720 pixels 720 pixels
Vertical resolution 576 lines 480 lines
VCD 50 Hz 60 Hz
Horiz. resolution 352 pixels 352 pixels
Vertical resolution 288 lines 240 lines
0.45 (VCD/CD)
780 nm (VCD/CD)
Dual layer 4 h
Two side, 4.30 h
single layer
Two side, 8 h
dual layer
(PAL/50Hz) (NTSC/60Hz)
MPEG Compressed Digital
DTS/Dolby Digital
PCM 16, 20, 24 bits
fs, 44.1, 48, 96 kHz
MPEG1 for VCD
VIDEO PERFORMANCE
Video output 1 Vpp into 75 ohm
S-Video output Y: 1 Vpp into 75 ohm
C: 0.3 Vpp into 75 ohm
Component video output Y: 1 Vpp into 75 ohm
Pb/Cb Pr/Cr: 0.7 Vpp into 75 ohm
RGB (SCART) output 0.7 Vpp into 75 ohm
Black Level Shift On/Off
Video Shift Left/Right
AUDIO PERFORMANCE (TYPICAL)
DA Converter 24 bits
DVD fs 96 kHz 4 Hz - 44 kHz
fs 48 kHz 4 Hz - 22 kHz
Video CD fs 48 kHz 4 Hz - 22 kHz
CD fs 44.1 kHz 4 Hz - 20 kHz
Signal-Noise (1kHz) < 100 dB
Dynamic Range (1kHz) < 95 dB
Crosstalk (1kHz) < 105 dB
Distortion and Noise (1kHz) < 92 dB
CONNECTIONS
SCART Euroconnector
Y Output Cinch (green)
Pb/Cb Output Cinch (blue)
Pr/Cr Output Cinch (red)
S-Video output Mini DIN, 4 pins
Video output Cinch (yellow) 2x
Audio L+R output Cinch (white/red)
6 Channel analog output
Audio Front Left/Right Cinch (white/red)
Audio Surr. Left/Right Cinch (white/red)
Audio Centre Cinch (blue)
Audio Subwoofer Cinch (black)
Digital Audio Output 1 coaxial, 1 optical
IEC958 for CDDA/LPCM
IEC1937 for MPEG1/2, Dolby Digital,
DTS
POWER SUPPLY (UNIVERSAL)
Power inlet 110-240V, 50/60Hz
Power usage Approx. 23 Watt
Power usage standby less than 3 Watt
CABINET
Dimensions 435 x 100 x 321 mm (w x h x d)
Weight approx. 4.2 kg
PACKAGE CONTENTS
SACD player
AC power cord
Remote Control with batteries
Audio/Video cable
CVBS Video cable
SCART cable
Instructions for use
SACD AUDIO PERFORMANCE
DA Converter DSD
SACD fs 2.8224 MHz DC - 100 kHz
Max. output voltage (0dB) 2 V rms
Channel unbalance < 0.5 dB
Cut-off frequency
Front L/R, Stereo 50 kHz
Surr. L/R, Center 40 kHz
Signal-Noise (1kHz) 110 dB
Total harmonic distortion (1kHz) 100 dB
Dynamic Range (1kHz) 105 dB
Crosstalk (1kHz) 110 dB
32
SPECIFICATIONS
* typical playing time for movie with 2 spoken languages and 3 subtitle languages
Specifications subject to change without prior notice
 Loading...