

Page 1
Instructions For Use
DVD762K
DVD/SuperVCD/VCD/CD Player
DVD762K
DVD/SuperVCD/VCD/CD Player
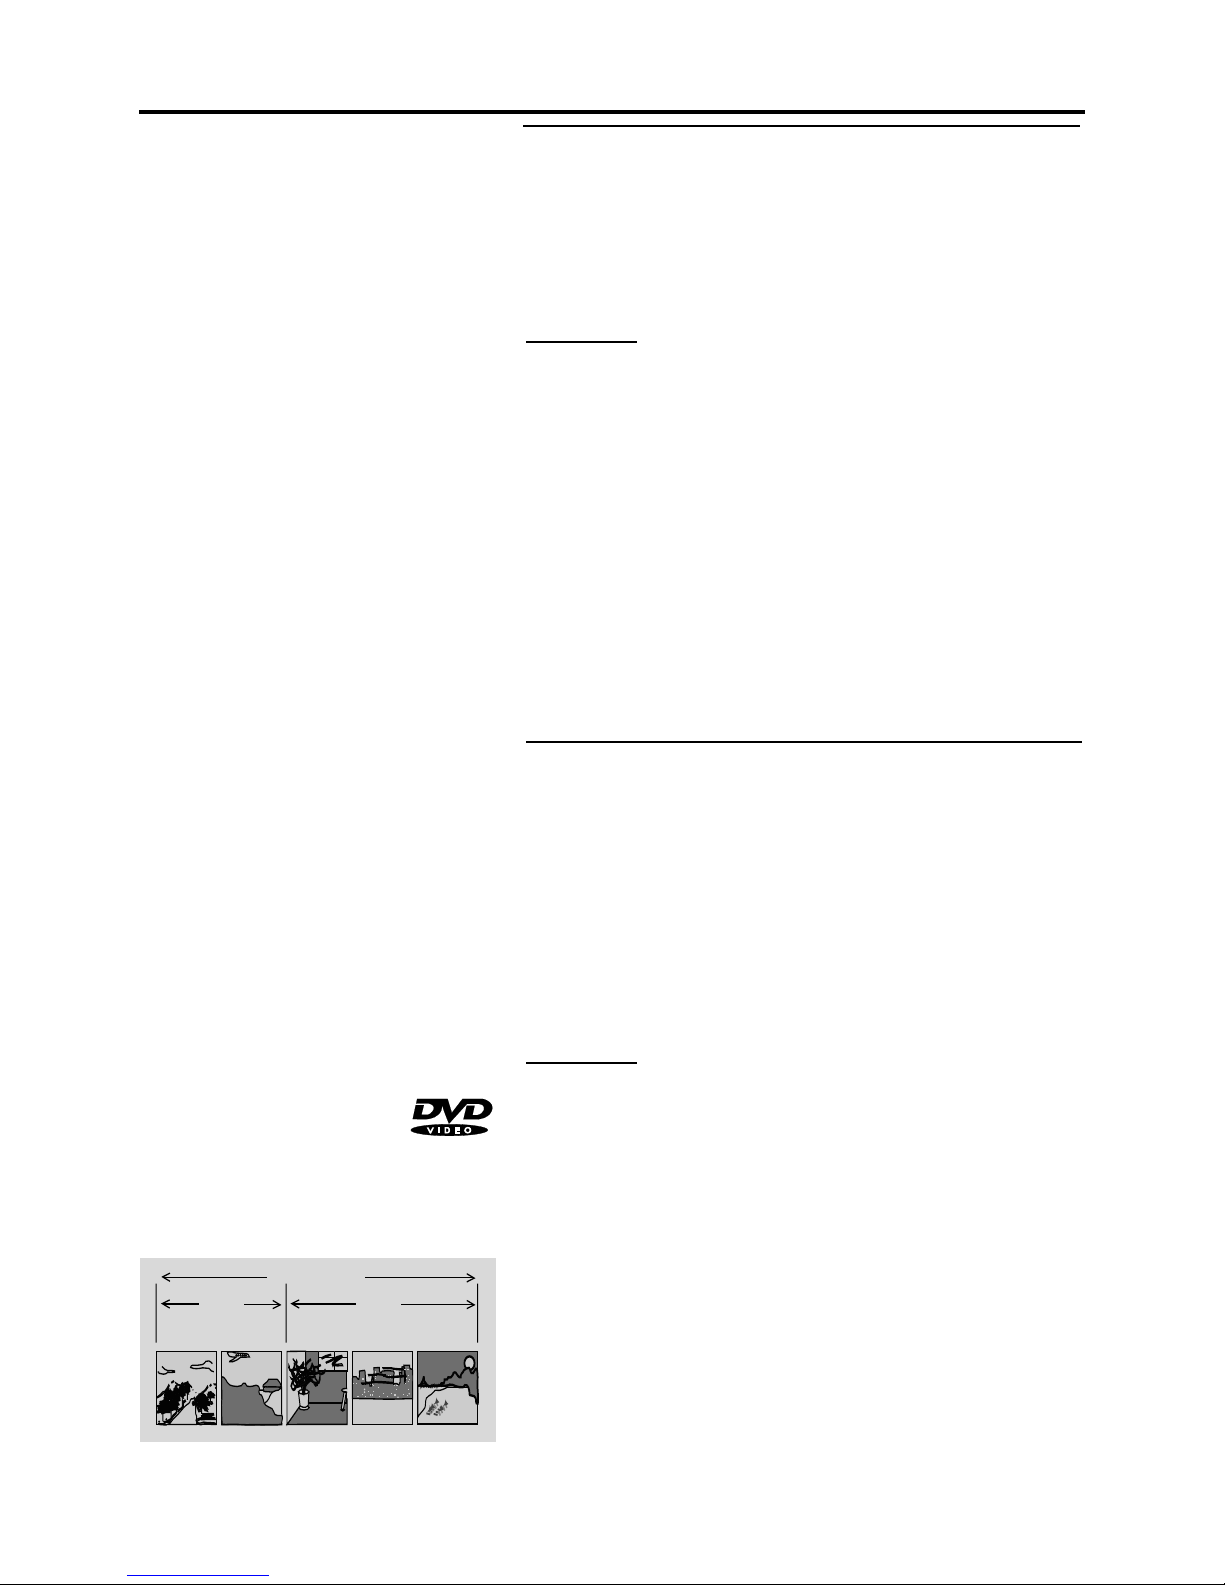
DVD
DVD
Page 2

3
Laser safety
This unit employs a laser. Due to possible eye injury, only a
qualified service person should remove the cover or attempt
to service this device.
USE OF CONTROLS OR ADJUSTMENTS OR
PERFORMANCE OF PROCEDURES O THER THAN
THOSE SPECIFIED HEREIN MAY RESULT IN
HAZARDOUS RADIATION EXPOSURE.
General InformationGeneral Information
General InformationGeneral Information
General Information
Manufactured under license from Dolby Laboratories. “Dolby and the
double-D symbol are trademarks of Dolby Laboratories. Confidential
Unpublished Works. © 1992-1997 Dolby Laboratories , Inc. All rights
reserved.
This product incorporates copyright protection technology that is
protected by method claims of certain U.S. patents and other intellectual
property rights owned by MacrovisionCorporation and other rights
owners. Use of this cop yright protection technology must be authorized
by Macrovision Corporation, and is intended for home and other limited
viewing uses only unless otherwise authorized by Macrovision
Corporation. Reverse engineering or disassembly is prohibited.
“ DTS “ and “ DTS DIGITAL SURROUND “ are registered trademarks
of Digital Theater Systems, Inc.
The region code for Singapore & Taiwan Region is 3
The apparatus type is DVD762K/69X
3
4
The region code for Australia & New Zealand is 4
The apparatus type is DVD762K/75X
Since DVD movies ar e released a different times in diff erent regions
of the world, all players have region codes and discs can have an
optional region code. If you load a disc of a differ ent region code
into your play er, y ou will see the region code notice on the scr een.
The disc will not play and should be unloaded.
NOTE:
PICTURES SHOWN MAY BE DIFFERENT BETWEEN
COUNTRIES.
NEVER MAKE OR CHANGE
CONNECTIONS WITH THE POWER SWITCHED ON.
CAUTION
VISIBLE AND INVISIBLE RADIATION WHEN OPEN
A V OID EXPOSURE T O BEAM (WARNING LOCATION:
ON THE BACKPLATE OF SET)
For Customer Use:
Read carefully the information located at the bottom of your DVD Video player and enter below the Serial No. Retain this inf ormation
for future reference.
Model No. DVD VIDEO 762K Serial No.______________________________
Page 3

4
Setup menu
Enter the setup menu .......................................................23
The way of operations........................................................23
General setup menu............................................................23
Disc lock.....................................................................................23
Program......................................................................................24
Video output..............................................................................24
Screen size..................................................................................25
TV type.....................................................................................25
OSD language.............................................................................26
Screen saver...............................................................................26
Speaker setup page.........................................................26
DOWNMIX mode..............................................................27
D.R.C..................................................................................27
Center speaker....................................................................27
Surround speaker...............................................................28
Subwoofer speaker.............................................................28
Center delay........................................................................28
Surround delay....................................................................28
Test tone..............................................................................29
Pro Logic setup.....................................................................29
SPDIF setup.............................................................................29
SPDIF OUT setup.......................................................................30
LPCM 96K mode........................................................................30
Preferences setup..................................................................30
Audio language......................................................................30
Subtitle language....................................................................31
Disc menu language..............................................................31
Password....................................................................................31
Parental control........................................................................32
Default setup.........................................................................32
Playing a DVD-video disc
Playing a SuperVCD/VCD/CD disc
Video control during playback ..........................................14
Audio control during playback...........................................14
Playing title/chapter...........................................................15
Special DVD features .......................................................16
Video control during playback ................................................17
Audio control during playback................................................17
Playing title/track.................................................................18-20
Special VCD-features.................................................................20
Contents
Introduction
Entertainment for new millennium ...............................................5
Introduction ...............................................................................5
Unpacking .....................................................................................6
Placement ..................................................................................6
Functional overview
Front panel ................................................................................7
Rear panel .................................................................................8
Display ......................................................................................9
Remote control ...................... .....................................................10
Connection
General explanation ...................................................................11
Video connection .....................................................................11
Audio connection .....................................................................12
General operation
Connecting the power supply..................................................13
Turning on the power ..................................................................13
Loading disc .................................................................................13
Remote control battery installation ........................................13
Remote control operation ...........................................................13
Before requesting service
Before requesting service .......................................................34
Australia Warranty
Australia Warrasnty ....................................................................35
New Zealand Warranty
New Zealand Warranty.............................................................36
Preview function
Preview function.....................................................................21
Karaoke function
General operation of karaoke function....................................22
General setup of karaoke function...........................................22
Karaoke learning and language learning function
Karaoke learning and language learning function..................20
Disc maintains ........................................................................ 33
Disc maintains
Environmental information
Environmental information ........................................................33
Specifications
Specifications ..............................................................................37
Page 4
TITLE 1 TITLE 2
CHAPTER 1 CHAPTER 2 CHAPTER 1 CHAPTER 2 CHAPTER 3
DVD-VIDEO DISC
Introduction
5
Entertainment for the new millennium
Video was never like this bef ore! Digital video discs pr ovide perfect digital, studioquality pictures; three dimensional digital, multi-channel audio; story sequences
screened from your choice of camera angle; sound tracks in as many as eight
languages; and up to 32 subtitles (if available on disc).Whether y ou watch DVDVideo on wide-screen or regular TV, you always see it the way it was meant to
be.
Digital video
DVD-Video uses state-of-the-art MPEG2 data compression technology to register
an entire movie on a single 5-inch disc. DVD's variable bitrate compression,
running at up to 9.8 Mbits/second, captures even the most complex pictures in
their original quality.
The crystal-clear digital pictures have a horizontal resolution of over 500 lines,
with 720 pixels (picture elements) to each line. This resolution is more than
double that of VHS, superior to Laser Disc, and entirely comparable with digital
masters made in recording studios.
DVD-Video discs conform to either the PAL or NTSC video standard.
This player can play both PAL and NTSC discs, presenting them in the best
possible way on your multi-standard TV screen.
As the universal video system of the future, DVD-Video offers optimal pictures
on any TV screen.
Introduction
Your Philips DVD-Video player will play digital video discs conforming to the
universal DVD-Video standard. With it, you will be able to enjoy full- length
movies with true cinema picture quality, as well as stereo or m ulti-channel sound
(depending on the disc and your playback setup).
The unique features of DVD-Video, such as selection of sound track, subtitle
languages and different camera angles (again depending on the disc), ar e all included.
What's more, Philips Child Lock lets you decide which discs your children will
be able to see.You will find the On-Screen Display, player display, and remote
control make the player easy to use.This manual provides all the information
you will need, so read on!
DVD-Video
You will recognize DVD-Video discs by the logo shown on left.
Depending on the material on the disc (a movie, video clips, a drama series, etc.)
the disc may ha ve one or more Titles. Each title ma y ha ve one or more chapters.To
make playback easy and con venient, your player lets y ou select titles and pla yback
chapters.
Page 5

6
TRACK 1 TRACK 2
INDEX 1 INDEX 2 INDEX 1 INDEX 2 INDEX 3
VIDEO CD
/
Video CD
You will recognize Video CDs by the logo shown on left.
Depending on the material on the disc (a movie, video clips, a drama series, ect)
the disc may have one or many tracks. Tracks may have one or more indexes, as
indicated on the disc case. To make playback easy and conv enient, your player lets
you select tracks and indexes.
Some Video CDs have Play Back Control (PBC), which is a predefined playback
sequence stored on the disc.
Super VCD
Super VCD discs are based on the super VCD 1.0 Standard, refering to the Standard
of the Information Industry Department of the People’s Republic of China.
Audio CD
Audio CDs contain music tracks only.
You will recognize Audio CDs by their logo which is shown on left.
You can play them in conventional style through a stereo system, using the keys
on the remote control and/or front panel, or via the TV using the On-Screen
Display (OSD).
You can play audio CDs using the OSD or, through a stereo system only, using
keys on the remote control and/or front panel.
Unpacking
First check and identify the contents of your DVD-Video player package.
You should have the following items.
- DVD-Video player
- Remote Control with batteries
- Audio/video cable
- AC cord
- Instructions for use
If any item is damaged or missing, contact your retailer or Philips.
Keep the packaging materials; you may need them to transport your pla y er in the
future.
Placement
- Place the player on a firm, flat surface.
- Keep the player away from domestic heating equipment an direct sunlight.
- In a cabinet, allow about 2.5cm (1 inch) of free space all around the player for
adequate ventilation.
- The lens may cloud over when the DVD-Video player is suddenly moved from
cold to warm surroundings. Playing a CD/DVD is not possible then.
Leave the D VD-Video pla yer in a warm envir onment until the moisture eva porates.
- To view the typeplate, please refer to the bottom of the player.
Introduction
Page 6
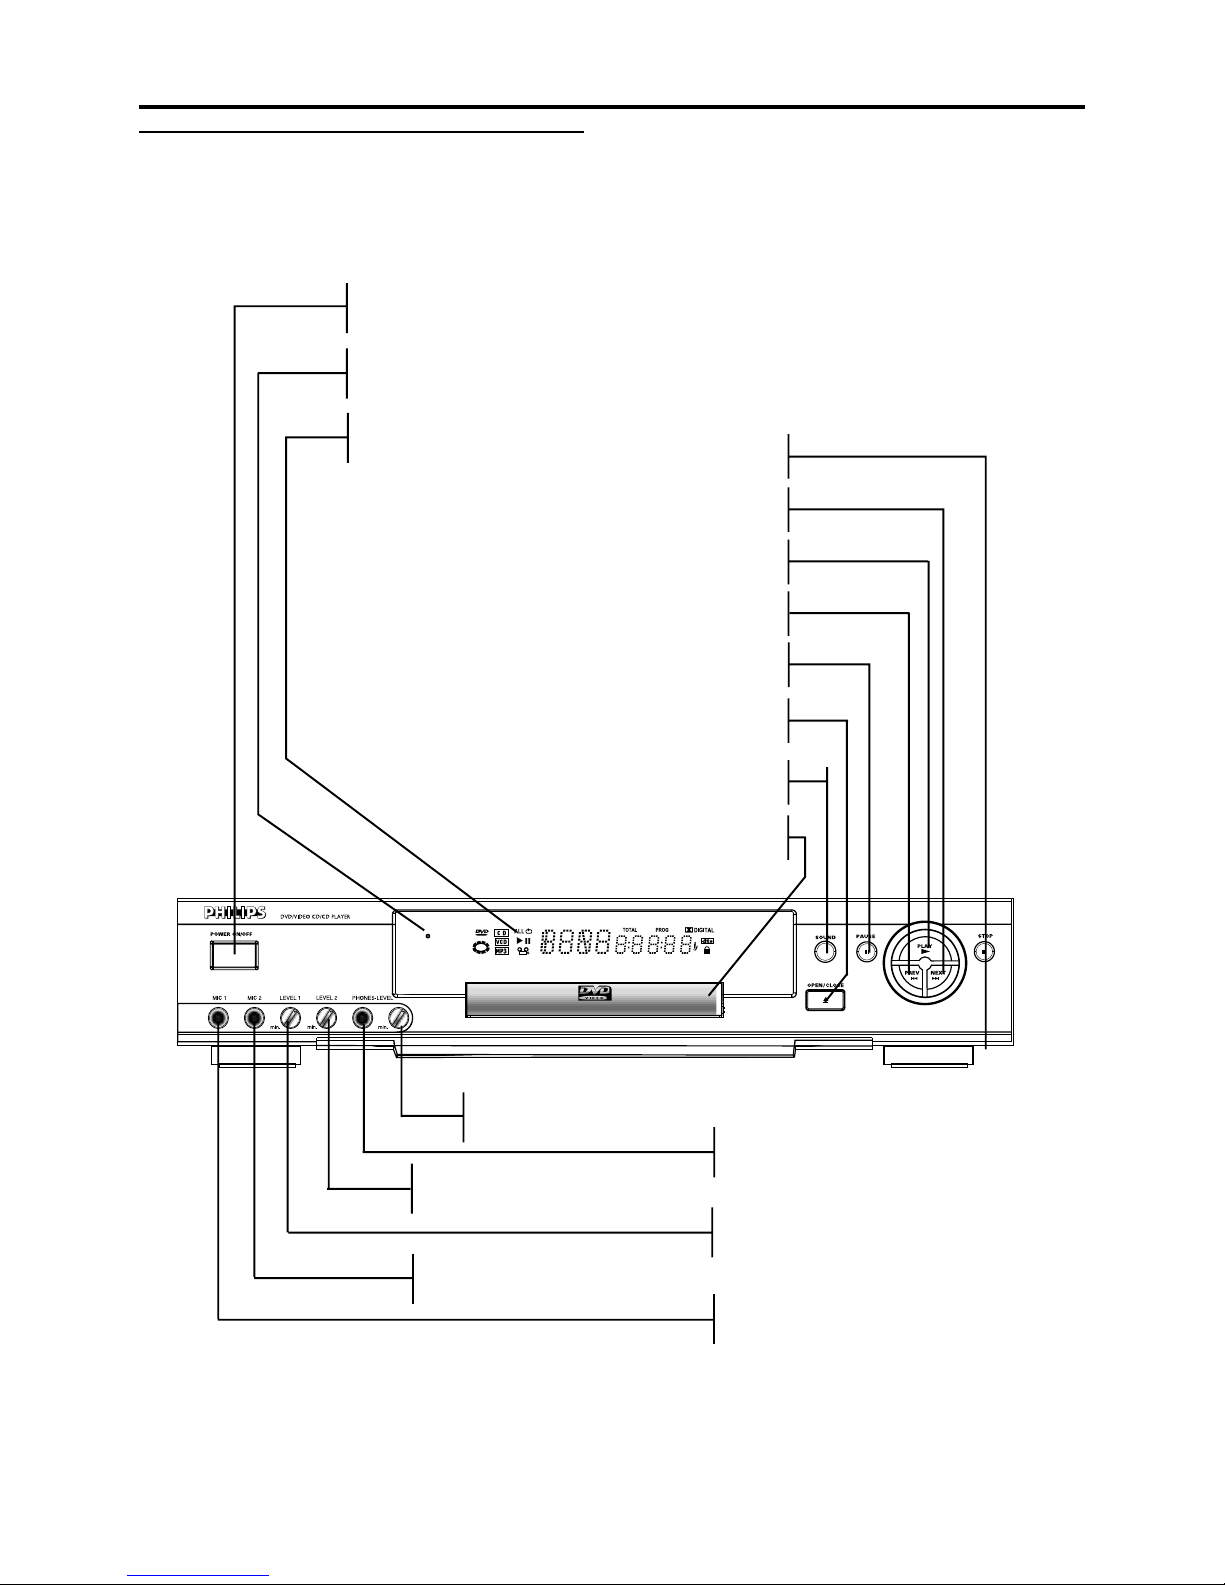
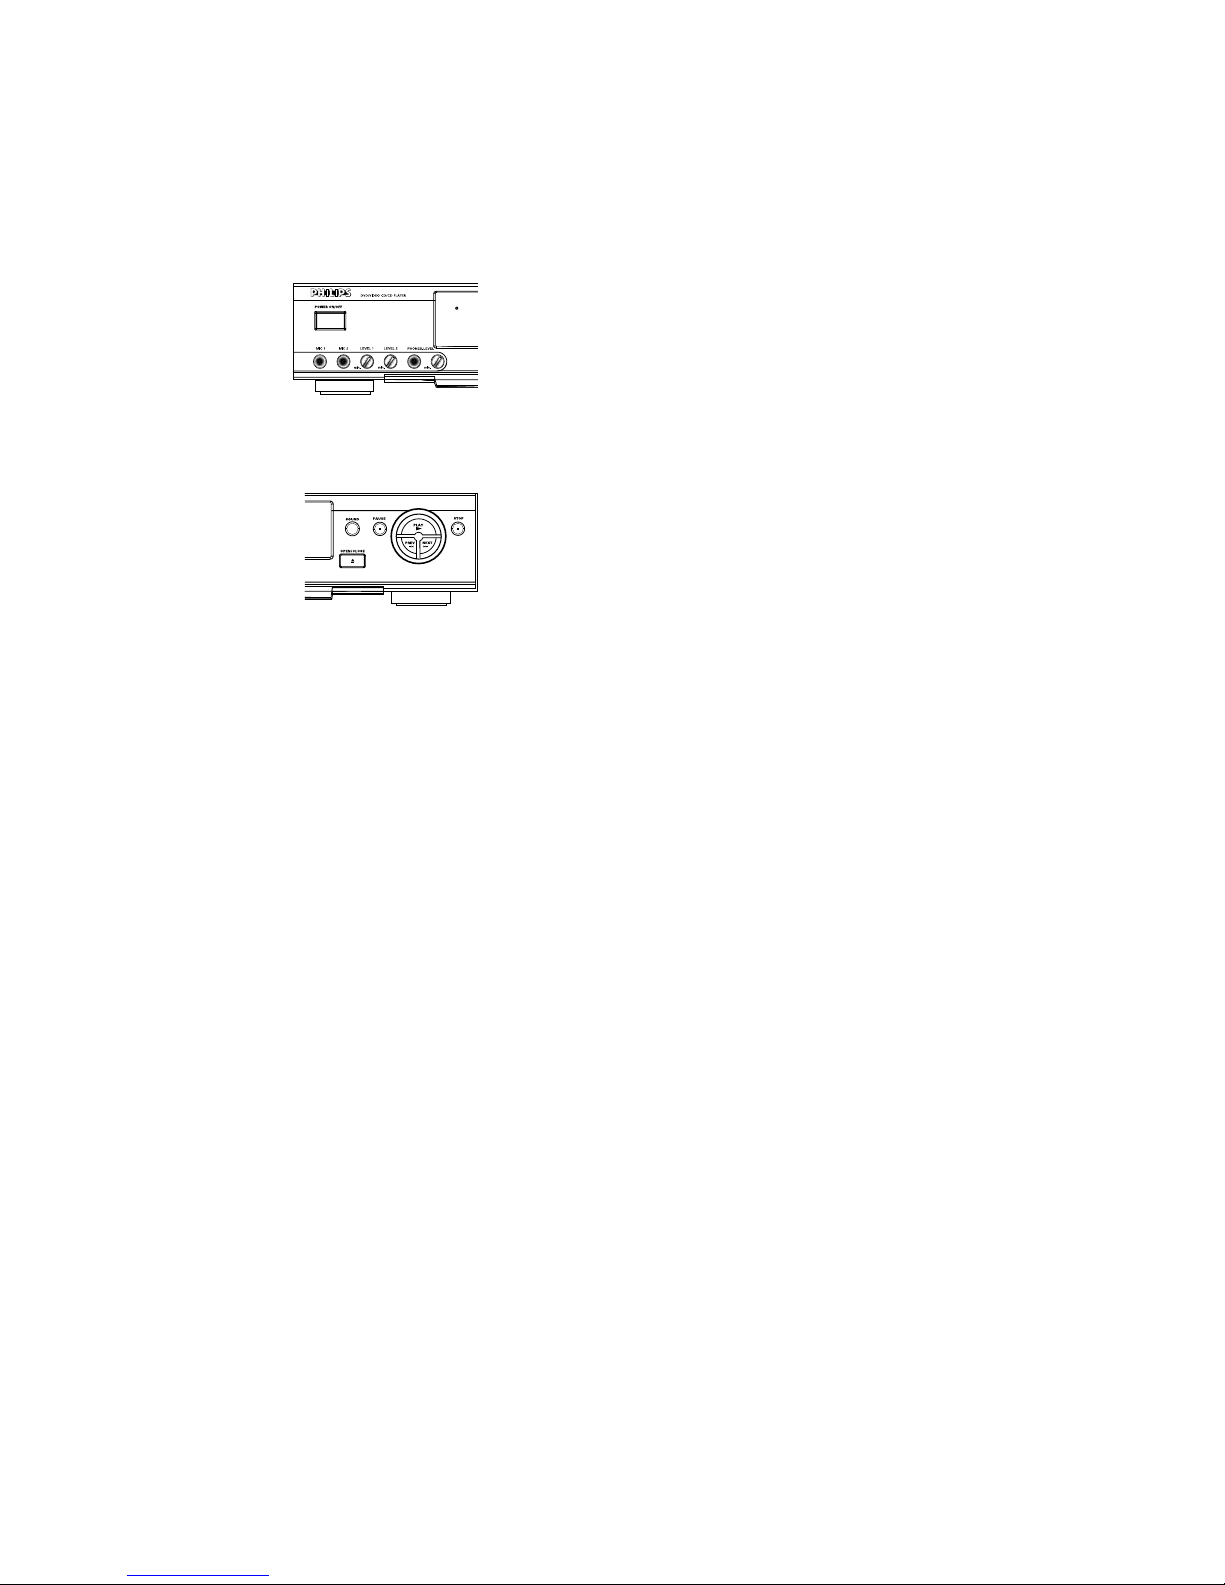
Functional overview
POWER ON/OFF
- Switch the player to on/off mode
Disc tray
/ OPEN/CLOSE
- Open/close the disc tray
SOUND
- Switch on/off surround sound
T - NEXT title/chapter/track
S - PREV title/chapter/track
; PAUSE
9 STOP
Headphone volume control
Headphone socket
MIC 1 volume control for karaoke
MIC socket 2 for karaoke
MIC socket 1 for karaoke
DISPLAY
- Show the current status of the player
Standby indicator
- Light up when the player is in standby mode
Front panel
7
MIC 2 volume control for karaoke
Page 7
8
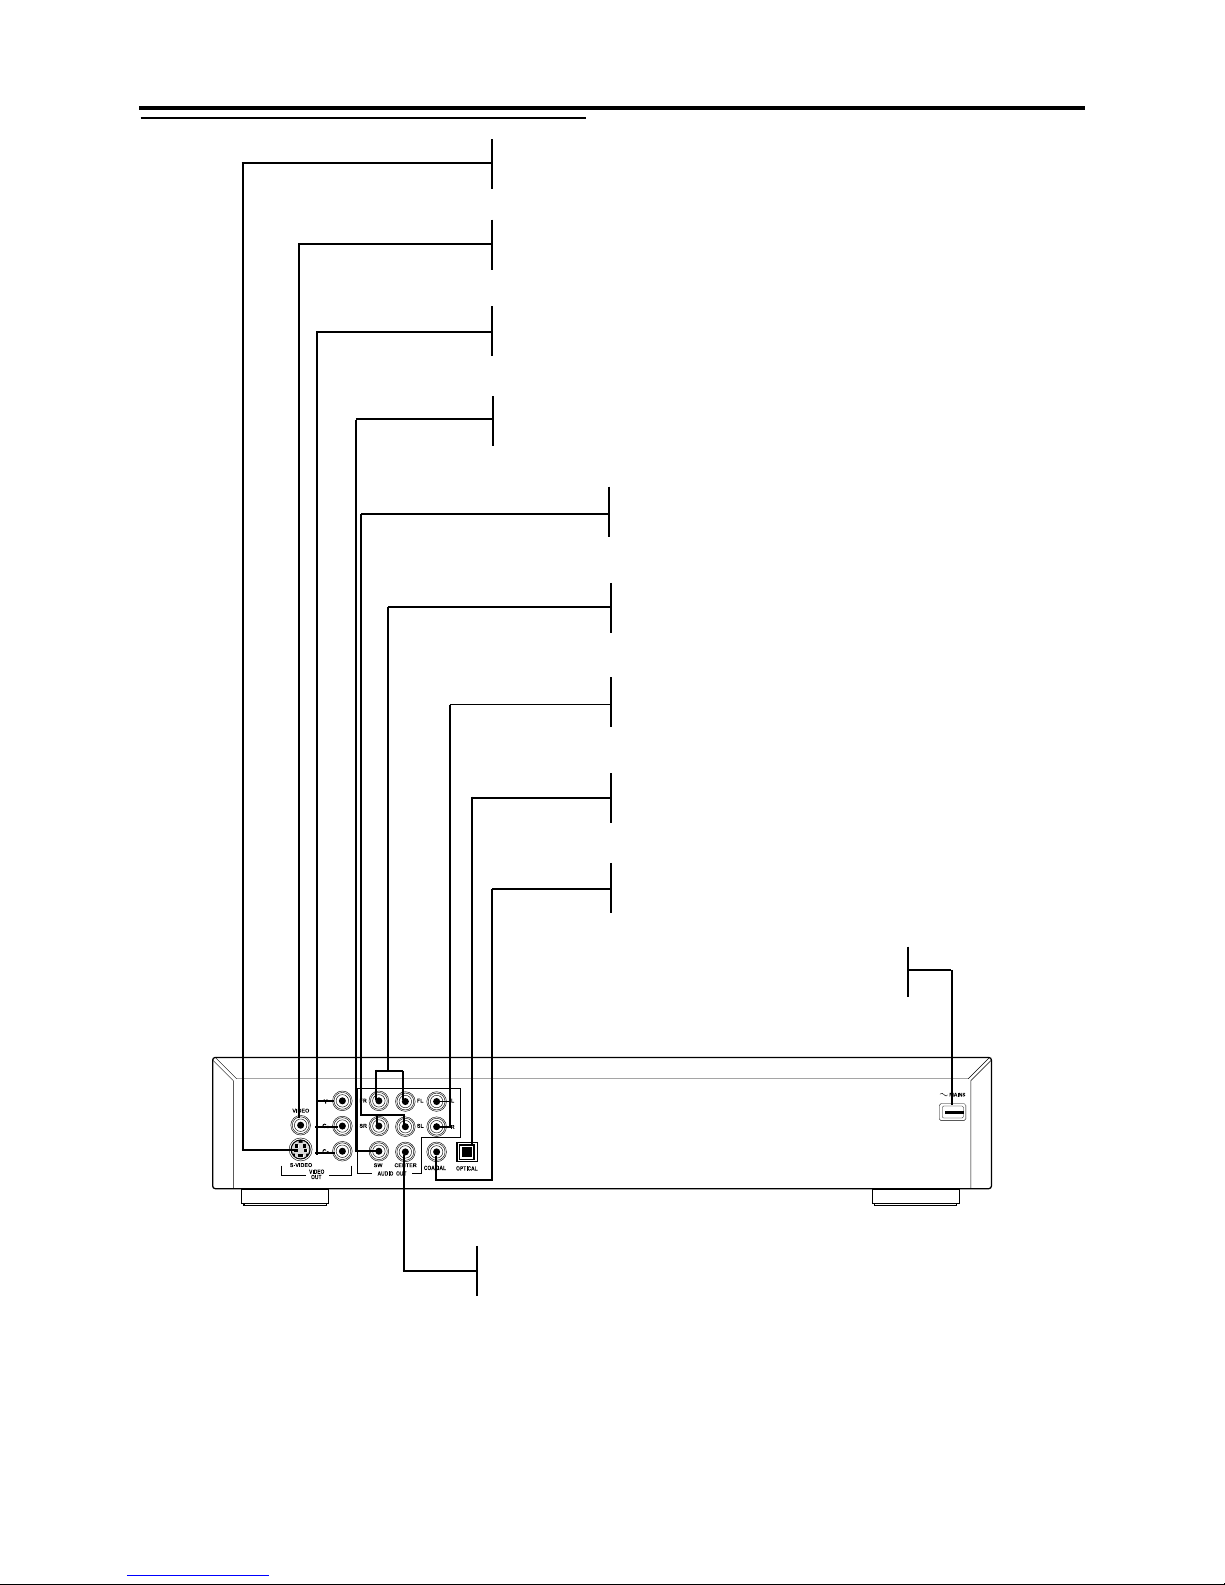
Rear panel
Functional overview
Mains socket
- Connect to the AC cord
Digital Audio out jack (optical)
- Connect to digital equipment
Digital Audio out jack (coaxial)
- Connect to digital equipment
Video out jack (CVBS)
- Connect to a TV with CVBS video inputs
Video out jack (S-Video)
- Connect to a TV with S-video (Y/C) inputs
Audio out L/R (Left/Right)
- Connect to an amplifier , receiver or stereo system
CAUTION:
- Do not touch the inner pins of the jacks on the rear panel connectors,
Electrostatic discharge may cause permanent damage to the unit.
Video out jack (Y/CB/CR)
- Connect to a TV with Y/CB/CR video inputs
Center speaker signal out jack
- Connect to an amplifier, receiver or stereo system
Front speaker signal out jack
- Connect to an amplifier, receiver or stereo system
Subwoofer signal out jack
- Connect to an amplifier, receiver or stereo system
Surround speaker signal out jack
- Connect to an amplifier, receiver or stereo system
Page 8
3
4
5
Functional overview
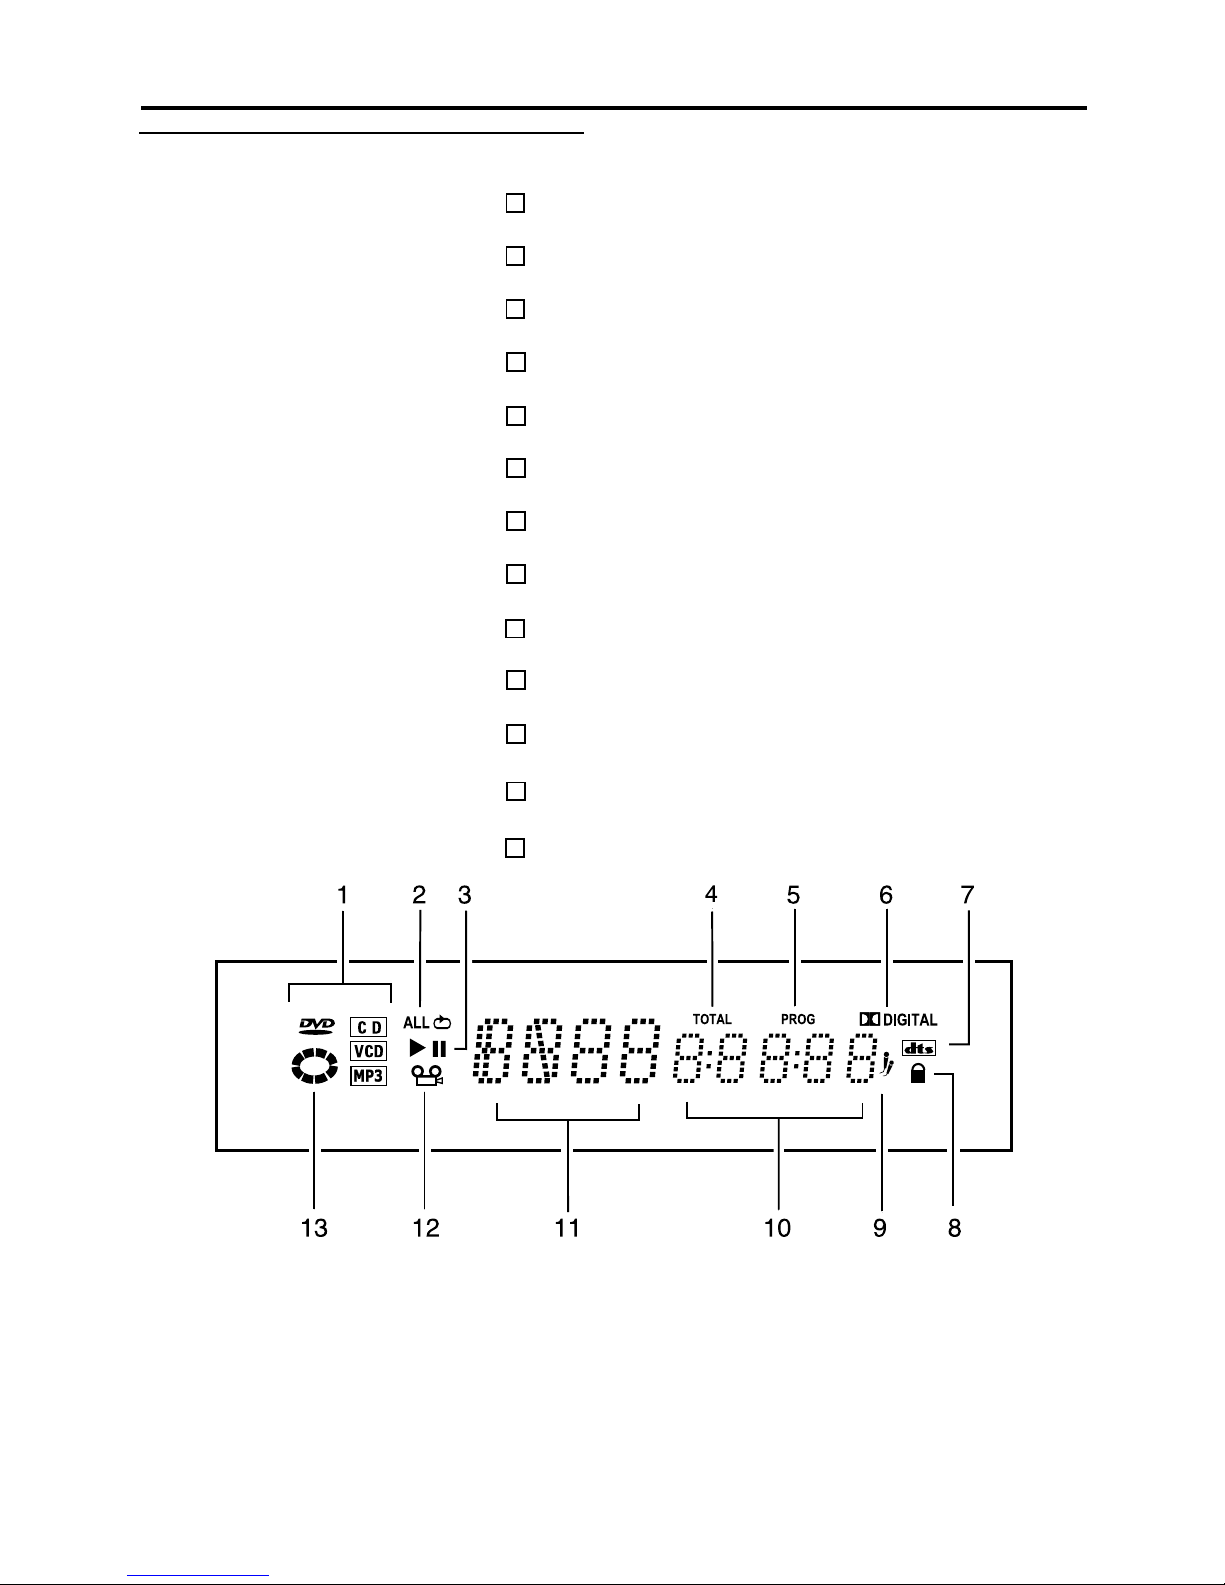
Display
The whole time of the current disc
Play/Pause
Repeat playback hint
Category of discs
Playback under your favorite sequence
DVD disc with Dolby Digital audio signal
DVD disc with DTS digital audio signal
The current disc is locked
9
10
8
7
6
Karaoke is eabled
Time in hours, minutes and seconds
Status indicator
11
The DVD disc is playing back with multi-angles12
9
13
The DVD player is reading disc
1
2
Page 9
10
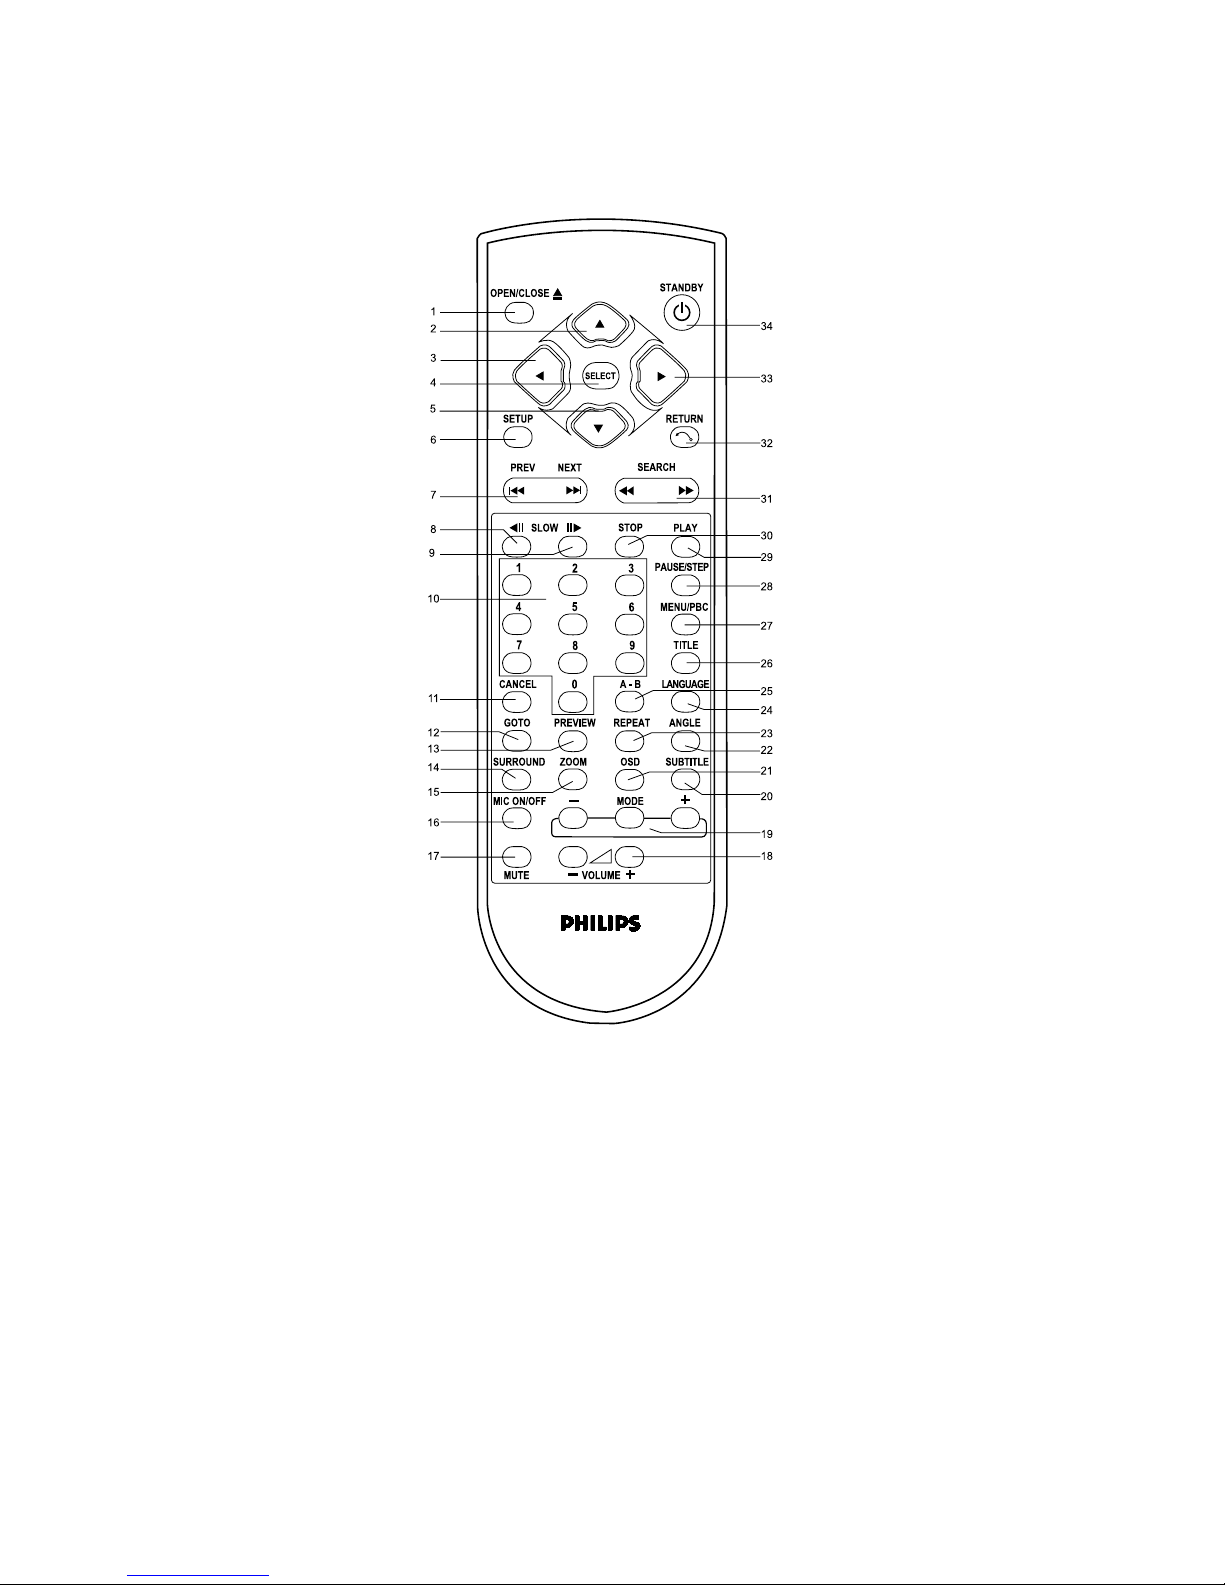
34. ST ANDBY
33. DIRECTION KEY (RIGHT)
32. RETURN
31. FAST FORWARD/FAST
BACKWARD
30. STOP
29. PLAY
28. PAUSE/STEP
27. MENU/PBC
26. TITLE
25. A-B key
24. LANGUAGE
23. REPEAT
22. ANGLE
21. OSD (On-Sreen Display)
20. SUBTITLE
19. MODE
18. VOLUME
Remote control
Functional overview
OPEN/CLOSE .1
DIRECTION KEY (UP) .2
DIRECTION KEY (LEFT) .3
SELECT .4
DIRECTION KEY (DOWN) .5
SETUP .6
PREV/NEXT .7
SLOW BACKWARD KEY .8
SLOW FORWARD KEY .9
NUMBER KEY .10
CANCEL .11
GOTO .12
PREVIEW .13
SURROUND SOUND .14
ZOOM .15
MIC ON/OFF .16
MUTE .17
NOTE :
0 The usage of the key SETUP(6) and RETURN(32), please refer to chapter [ Setup Menu ].
0 The other keys are used for general operation, please see the chapter [ Playing a DVD-video disc ] and [ Playing a
SuperVCD/VCD/CD disc ] for details.
Page 10
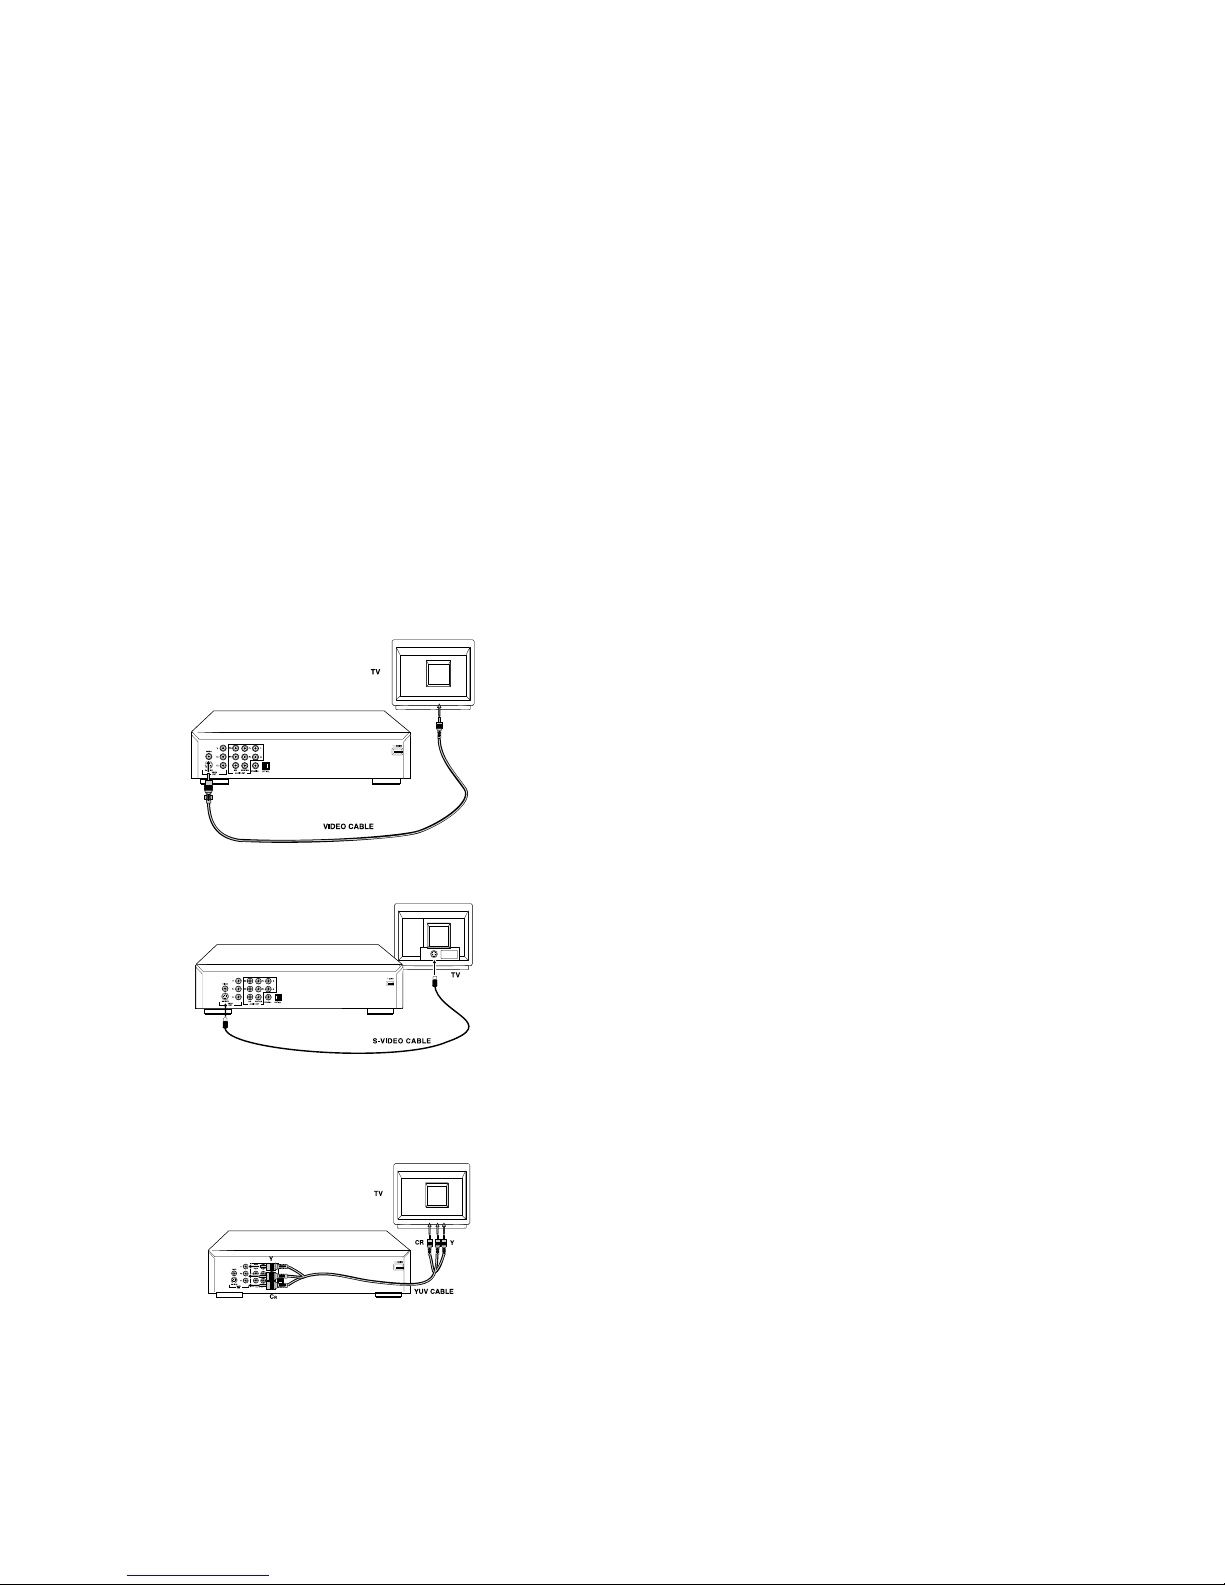
General explanation
0 Video connection and Audio connection can be totally separate. That means you
can connect the Video output to one equipment and connect the audio output to
another with no problems. Depending on your TV and other equipment you want
to connect, there are various ways you connect the player. Possible connections
are shown in the following drawings.
0 Please refer to the manuals of your TV, VCR, stereo system or other devices as
necessary to make the best connections.
0 Do not connect your DVD-player via your VCR. The video quality could be distorted
by the copy protection system.
0 For better sound reproduction, conncet the player's audio out jacks to the audio in
jacks of your amplifier, receiver , stereo or A/V equipment. see [ Audio Connection].
Caution: Do not connect the player's audio out jack to the PHONO IN jack of your
audio system.
Video connection
Video CVBS connection
0 CVBS video output is the most common video format in use now, it combines
brightness signal and chroma signal together and only uses one cable for output.
Plugs of the cable are both yellow in color.
0 Connect the V ideo socket on the rear of the player to the corresponding socket on
the TV using the cable supplied.
S-Video connection.
0 S-video output includes two separated signals, they are brightness and chroma.
Reproducing high quality picture is its advantage.
0 Connect the S-Video connector on the rear of the player to the corresponding
connector on the TV using the S-Video cable (not supplied).
Connection
Component video connection (Y/CB/CR)
0 Component video of Y/CB/CR format includes three component signals, they are
Y; CBLUE ; CRED.
0 Connect the Y/CB/CR connector on the rear of the player to the corresponding
connector on the TV using the component video cable (not supplied).
Caution: Component video and S-video can not work at the same time, so you have
to set one of them to be active by the such way as shown on the chapter
[Video output].
11
Page 11

12
MAINS
Audio connection
Connect Audio output to TV
0 Use the TV speaker for sound reproduction, connect the audio left and right
channel sockets on the player rear panel to the corresponding sockets on your
TV with the audio cable. (supplied)
Connecting to an A/V receiver equipment
0 Digital multi-channel connection provides the best sound quality. For this you
need a multi-channel receiver that supports one or more of the audio formats
supplied by your DVD player ( Dolby DigitalTM , MPEG 2 and DTS). Check
the receiver manual and the logos on the front of the receiver.
Connect to A/V receiver with digital coaxial cable
0 Connect the player's digital coaxial output to the corresponding input on the
receiver using the normal audio or video cable which is supplied in the package.
0 You might need to set the item[ SPDIF setup] in the setup menu for adapting
your receiver. Please refer to the chapter [ Setup Menu] for details.
0 In this case, do not use the player's audio left and right output.
Connect to A/V receiver with digital optical cable
0 Connect the player's digital optical output to the corresponding input on the
receiver using the digital optical cable(not supplied).
0 You might need to set the item[ SPDIF setup] in the setup menu for adapting
your receiver. Please refer to the chapter [ Setup Menu] for details.
NOTE: If the audio format of the digital output does not match the capabilities
of your receiver, the sound will be muted.
Connection
Analog connection to a multi-channel A/V receiver with 6CH connectors
0 This DVD player contains a multi-channel decoder. This enables playback of
DVDs recorded in multi-channel surround without the need of optional decoder.
Connect the audio out jacks to the coresponding jacks of your A/V receiver
with six cables. In the SPEAKER SETUP menu, select DOWNMIX to OFF
and enable the 6CH decode function by the method introduced on the chapter
[ Setup Menu ].
MAINS
Page 12
Turning on the power
0 Be sure that audio and video output has been well connected to TV.
0 Choose the available AV input connection on your TV set to connect ot the
DVD player.
0 Press the power on/off button on the front panel to turn on the player.
Loading discs
0 Press the OPEN/CLOSE button on the front of the player, the disc tray opens.
0 Load your chosen disc in the tray, with label side up (also when a double sided
DVD is inserted). Make sure the disc is placed properly in the correct recess.
0 Press OPEN/CLOSE button to close the tray, then the disc will be played
automatically.
Remote control battery installation
0 Open the battery compartment cover.
0 Insert two batteries inside the battery compartment as per the indicator.
0 Close the cover.
CAUTION: Don’t mix old and new batteries. Never mix different types of batteries
(standard, alkaline, etc.)
Remote control operation
0 Unless mentioned specially , all operations can be carried out with the remote control.
Always point the remote control directly at the player, making sure there are no
obstructions in the path of the infrared beam.
0 When there are corresponding keys on the front panel, they can also be used.
General operation
13
Connecting the power supply
1. Plug the female end of the power cable supplied into the Power connector on the
rear of the player.
2. Plug the male end of the cord into an AC outlet.
Page 13

14
Playing a DVD-video disc
Video control during playback
STOP
0 You can resume the play from the point at which you stopped last time, if you just
press the STOP key once. It will start from the beginning if you press the STOP key
twice to stop playback.
PAUSE/STEP
0 To get a still picture, press PAUSE/STEP key during playback.
0 To step forward to the next frame picture, press PAUSE/STEP key again.
0 To resume normal playback, press PLAY.
Search
0 To search the contents in fast speed, press the SEARCH key for fast forward/
backward searching.
0 Press the SEARCH again to increase the speed for searching.
0 Press PLAY to return to the normal playback.
Slow Forward / Backward
0 T o get slow motion effect during playback, press SLOW FORWARD/BACKWARD.
0 Press SLOW again, you can get different playback speeds.
0 Press PLAY to return to the normal play back.
Surround sound
0 The DVD player can reproduce virtual surround sound effect. You can
press the Surround key on the remote control or the Sound button on the front
panel to switch on/off the surround sound effect.
Audio control during playback
Mute
0 Press the MUTE key to mute the sound output.
0 Press the MUTE key again to remove the mute.
Volume
0 Press the VOLUME + or VOLUME - to adjust the loudness.
NOTE: The mute function,volume function and surround sound function will not
influence digital coaxial output or digital optical output.
NOTE: Before select the surround sound effect, you must set DOWNMIX at the
mode of STEREO, LT/RT or VSS( please refer to SPEAKER SETUP in SETUP
MENU) and switch on Karaoke function.
Page 14

` ` `
` `
q
q
asa=ÇáëÅ
Playing title/chapter
Title & chapter
A DVD disc may have one or more titles , and each title may have one or more
chapters. This depends on the content (a movie, video clips, a drama series, etc) on
the disc.
Playing a title
0 After you load a disc, information about the content shows on the screen waiting
for your selection. Likewise, you can press the TITLE key on the remote control to
turn back to the title menu during playback.
0 If the items of the menu are numbered, press the appropriate number key on the
remote control, if not, use the 3412 keys to highlight your selection.
0 Press the SELECT key to confirm your selection.
Playing a chapter
0 While you have selected a title, it may include one or more chapters.
0 Any time you want to watch another chapter during playback, press MENU/PBC
key to turn back to the chapter menu and choose it again, if not, please press the
PREV/NEXT key to do it.
GOTO function
0 Press GOTO key on the remote control.
0 Press the 1 2 keys to highlight the item TITLE, you can set a certain title.
- Enter an available title number then press the SELECT key to confirm it.
0 Press the 1 2 keys to highlight the item CHAPTER, you can set a certain chapter.
- Enter an available chapter number then press the SELECT key to confirm it.
Press the GOTO key again
0 Press the 1 2 keys to highlight the item TITLE, you can set a certain title.
- Enter an available title number then press the SELECT key to confirm it.
0 Press the 1 2 keys to highlight the item TIME and you can play from any point of
the disc.
- Enter an available time( e.g. 0:34:27) then press the SELECT key to confirm it.
NOTE: GOTO key is not available for some DVD discs.
REPEAT function
Y ou can playback a title or a chapter repeatedly by pressing the REPEAT key .
Pay attention to the hint on the screen.
0 Press the REPEAT key once to repeat the current chapter.
0 Press the REPEAT key again to repeat the current title.
0 Press the REPEAT key the third time to quit the repeat function.
REPEA T A-B
A-B key enables you to choose a certain slice of program to repeat.
Pay attention to the hint on the screen.
0 Press the A-B key once to set a start point A.
0 Press the A-B key again to set an end point B. At the same monent, DVD player
begins to playback from the start point A.
0 Press the A-B key the third time to quit REPEAT A-B function.
Playing a DVD-video disc
15
Page 15

16
зкбЦбе~д=йбЕнмкЙ
тззгЙЗ=йбЕнмкЙ
Bonjour
Hello
~åÖäÉ=N
Good night
Bonsoir!
Special DVD features
Playing a DVD-video disc
Zoom
0 Press the ZOOM key on the remote control to get the magnified picture. Use the
3412 key to view the rest part of the zoomed picture.
0 Press the ZOOM key again to return to the original size.
NOTE: This function is NOT available for some DVD discs. It depends on the
discs.
Camera angle
0 Scenes from different camera angles can be recorded in a DVD disc will enable
you to watch a scene from different angles. You can switch the camera angles by
just pressing the ANGLE key on your remote control.
NOTE: the function is available for the DVD discs which have recorded several
angles movie.
Subtitles
0 If the DVD is recorded with multi-subtitles, you can select the subtitle you want by
pressing the SUBTITLE key on your remote control.
Audio languages
0 If the DVD is recorded with multi-languages audio tracks, you can select the
language you want by pressing the LANGUAGE key on your remote control.
~åÖäÉ=O
Page 16

NOTE: This function does not influence digital coaxial output and digital optical
output.
Disc Specification Icons
This icon indicates the following description of functions are availible for CD.
This icon indicates the following description of functions are availible for VCD.
This icon indicates the following description of functions are availible for SVCD.
Still picture and step frame
0 To get a still picture, press the PAUSE/STEP key during play.
0 To step forward to the next picture frame, press the PAUSE/STEP key again.
0 To return to play, press PLAY.
Search
0 To search the content in fast speed, press the SEARCH key for fast forward/
backward searching.
0 Press the SEARCH key again to accelerate the speed during searching.
0 While you find the point you want, press PLA Y key to return to the normal play state.
Slow Forward
0 To get slow motion effect during playback, press the SLOW key.
0 Press the SLOW key again, you can get different playback speeds.
0 Use the PLAY key to return to the normal play back.
NOTE: The SLOW BACKWARD key is not available for the super VCD/VCD/CD
disc.
Mute
0 Press the MUTE key to mute the sound output or not.
0 When the sound is mute, the video will continue playing.
Audio channel selection
0 SVCD has two stereo audio channels which are used for playing karaoke or the
audio language selection. ( for instance, you can choose one channel for only the
music background of the song while you play the karaoke.)
0 Press the LANGUAGE key on the remote control to select the audio channels
you want.
0 VCD has only one stereo audio channel, you can select mono left audio channel or
mono right audio channel by pressing the LANGUAGE key on the remote control.
Audio control during playback
Surround sound
0 The DVD player can produce virtual surround sound effect. You can press the
SURROUND key on the remote control or the SOUND button on the front panel
to switch on/off the surround sound effect.
Video control during playback
17
Playing a Super VCD/VCD/CD
Disc
NOTE: Before switch on the surr ound sound effect, you must set DOWNMIX at the
mode of STEREO, LT/RT or VSS( please refer to SPEAKER SETUP in SETUP
MENU) and switch on Karaoke function.
Page 17

18
PBC off
0 If you switch PBC function off, you will just start the disc from the beginning.
0 When you play the karaoke disc, you still can use the PREV/NEXT key on the
remote control or on the front panel to select the page you like, even if PBC function
is off.
0 You also can press the numerical keys and then press SELECT key to confirm
your optional track.
0Press the RETURN key to enter the index menu during the play back.
NOTE:
1. The content of the index menu depends on the disc. Please refer to the
disc instruction for detail.
2. If the disc doesn't include the PBC information, this function will have no
effect.
Playing title/track
PBC on (PlayBack Control)
0 Playback control is a kind of title/track index protocol between player and discs.
When a disc is recorded in a standard VCD or SVCD format, there will be a menu
which include titles/tracks for users to select the content of a movie or other video
programs.
0 When you switch on the PBC function you will enter the index menu which is
available for selection after loading the SVCD or VCD disc.
0 You can switch the PBC function simply by pressing the MENU/PBC key on the
remote control. Pay attention to hint on the screen.
0 Use the PREV/NEXT key on the remote control or on the front panel to select the
page you like.
0 If the items of the index menus are numbered, press the appropriate number key on
the remote control, if not, use the 341 2 keys to highlight it, then press the SELECT
key to confirm your selection.
Playing a SuperVCD/VCD/CD Disc
Page 18

oÉéÉ~í=éä~óÄ~Åâ=íê~Åâ
oÉéÉ~í=éä~óÄ~Åâ=ÇáëÅ
oÉéÉ~í=éä~óÄ~Åâ=çÑÑ
REPEAT A-B
A-B key enables you to choose a certain portion of program to repeat.
Pay attention to the hint on the screen.
0 Press the A-B key once to set a start point.
0 Press the A-B key again to set an end point. At the same moment, DVD player
begins to playback from the start point.
0 Press the A-B key the third time to quit REPEAT A-B function.
GOTO
The player can playback from any point of the track being played by using the
GOTO key at the state of PLAY.
0 Press GOTO key, you can set a start point time of the current track.
- Enter an available time( e.g. 0:03:27) then press the SELECT key to confirm it.
REPEAT
You can repeat to playback a track or a chapter by press the REPEAT key. Please
turn the PBC off at the moment.
Pay attention to the hint on the screen.
0 Press the REPEAT key once, repeat the current track.
0 Press the REPEAT key again, repeat the whole disc.
0 Press the REPEAT key the third time, quit repeat state.
19
Playing a SuperVCD/VCD/CD
Disc
Page 19

Video Control
Zoom
0 Press the ZOOM key on the remote control, you will get the magnified picture
by different sizes. Use the 341 2 keys to view the rest part of the zoomed
picture.
0 Press the ZOOM key again to return to the original size.
Changing subtitles
0 Press the SUBTITLE key on your remote control to select the subtitle you want.
NOTE: This function is only availalbe for the discs with multi-subtitle tracks.
OSD (On-Screen Display )
0 This function will provide some information about your playing disc on the
screen.
- Press OSD on the remote control.
Resume
When PBC is OFF,
0 Press the STOP key once, the words: PRESS PLAY TO CONTINUE.
0 Press the PLAY key, you can resume the play from the point at which you stop
last time.
Karaoke learning and language learning function
0 Utilize the function by following method:
- Press the MODE key accompanied by the such words as RECORD OFF displayed
on the screen.
- Before the OSD information disappears, press the + key beside the MODE key to
open the function and you can see the words of SING MODE appeared.
- After the OSD information disappears, start to record after pressing the - key
beside the MODE key accomplied with the words of RECORDING displayed.
- As soon as you finish recording, press the + key to end record.
0 Now the player will repeat the recorded segment from the start point with the
words of CONTRASTING displayed on the screen.
0 Close karaoke and language learning function
- Press the MODE key to enter it.
- After the OSD information disappears, press the + key to close this function.
- The screen hint: RECORD OFF
Playing a SuperVCD/VCD/CD
Disc
20
Page 20

Preview function
At STOP mode, press the PREVIEW key to enter previewing menu, shown on the
left.
1. Disc introduction
Select this function, DVD player will play back every track several seconds with
full screen, that makes you understand the content of disc.
- Press the numerical key 1.
- Press SELECT key to confirm it.
- Press STOP key to quit previewing.
2. Disc preview
This function will minify the picture of one track enough to display every
nine of these tracks on the full screen which will help you to preview a disc.
- Press the numerical key 2.
- Press SELECT key to confirm it.
- Select the other tracks beyond this page by pressing the PREV/NEXT key.
- Press the numerical keys to choose the desired track.
- Press the SELECT key to confirm it.
3. Track pr eview
This function is used to divided a single track into nine parts and display them
on the full screen which will help you to preview the selected track.
- Press the numerical key 3.
- Press the SELECT key to confirm it.
- Preview other tracks, press the PREV/NEXT key.
- Press numerical key to choose the start point.
- Press the SELECT key to playback the start point.
IV. Quit preview function
- Press the numberical key 4.
- Press the SELECT key to exit.
Playing a SuperVCD/VCD/CD
Disc
21
Page 21

General operation of karaoke function
0 Connect microphone to MIC1 or MIC2 or to both sockets. Be sure the player has
been properly connected to your TV or audio system.
0 Press the MIC key on the remote control to switch the MIC function on. The hint
‘MIC ON’ appears on TV screen to indicate Karaoke function is available.
0 Load a karaoke disc, press PLAY to playback.
0 Turn on the microphone which is connected with the DVD player and you can enjoy
the Karaoke immediatly.
0 Microphone volume adjustment
You can adjust the volume of microphone by turning the knob LEVEL on the right
of MIC jack.
0 When karaoke is finished, press the MIC key once to exit Karaoke function.
KARAOKE
22
ECHO :
0 Press the MODE key to select ECHO.
0 Press the MODE + or MODE - to adjust echo level.
Audio channels option :
With this function, you can choose audio channels during karaoke is available.
0 Press the LANGUAGE key on the remote control to choose STEREO, LEFT
VOCAL, RIGHT VOCAL, MONO RIGHT and MONO LEFT . Especially MONO
RIGHT & MONO LEFT options can fade out the original vocal.
NOTE: Please set the option DOWNMIX to LT/RT or VSS or STEREO, otherwise
Karaoke can not work properly.
General setup of karaoke function
Press the MODE key to choose the KARAOKE options.
KEY CONTROL :
0 Press the MODE key to select KEY CONTROL.
0 Press the MODE + or MODE - key located at the both sides of the MODE key to
adjust the key to meet your voice.
Page 22

23
Enter the setup menu
0 Enter the SETUP menu by pressing the SETUP key in STOP mode. When you quit
the setup menu, the settings will be stored in the player’s memory even when the
player is switched to power off.
The way of operations
Press the SETUP key in the STOP mode and the SETUP menu will be displayed on the
screen.
0 Press the SELECT key on the remote control to open the next level submenu or confirm
your selection.
0 Press the 1 2 keys on the remote control to enter the submenu or return to the previous
menu.
0 Press the 34 keys on the remote control to highlight the option in menus.
0 When setup is completed, press SETUP key to quit the setup menu.
Setup Menu
General setup menu
Some settings are needed in this menu. they are: DISC LOCK, PROGRAM,
TV DISPLA Y, VIDEO OUTPUT , TV TYPE, OSD LANGUAGE and SCREEN SAVER.
Follow the steps below:
1. Press the SETUP key to enter the setup menu.
2. Press the 34 keys to choose the GENERAL SETUP menu.
3. Press the SELECT key to confirm selection.
Disc lock
When the disc is locked, the player will store its typical code into the memory
for the future identification. For the next playback, the DVD player will prompt to enter
the password.
1. Press the 34 keys to highlight the DISC LOCK item in the GENERAL SETUP
menu.
2. Press the SELECT key.
3. Enter its submenu by pressing the 2
key.
- LOCK: Lock the disc being played.
- UNLOCK: unlock the disc.
4. Press the 1 key to return to the GENERAL SETUP menu.
NOTE:
1. When playback a locked disc, the DVD player will prompt to enter your passwor d or
3308 (default) password.
2. To change the password , refer to the option PASSWORD in the
PREFERENCE menu (see page 31).
Page 23

Setup Menu
24
Program (not available for DVD discs)
1. Press the 34 keys to choose the PROGRAM item.
2. Press the SELECT key open its submenu.
3. Move the cursor to the field of the submenu by pressing the 2 key.
4. Choose the item ON or OFF by pressing the 34 keys.
- ON: Enter the PROGRAM item.
- OFF: Quit the PROGRAM item.
5. Press the SELECT key to enter the program page.
Input your favorite track
- Input valid track number by pressing the numerical keys,
- Press the 1 234 keys to move the cursor to the next selected position.
- Repeat the steps above to input another track number until the whole program
is completed.
Exclude a track
- Press the 1 234 keys to move the cursor to track you want to exclude.
- Press the CANCEL key.
Cancel all tracks
- Press the 1 234 keys to move the cursor to the CLEAR button.
- Press the SELECT key, all tracks will be cancelled.
- Now you can input your favorite tracks again.
Playback tracks
When programing is completed,
- Press the 1 234 keys to move the cursor to the PROG button.
- Press the SELECT key, DVD player will playback the selected program in
sequence under the programed sequence.
Stop the program playback
At the PROGRAM page, When programing is completed,
- Press the 1 234 keys to move the cursor to the QUIT button.
- Press the SELECT key to quit this menu.
At playback mode, you can:
- Press the STOP key twice to exit.
Video output
In this menu, you can select the video output for high quality picture.
1. Press the 34 keys to highlight VIDEO OUTPUT in the GENERAL SETUP
menu.
2. Press the SELECT key to open its submenu.
3. Press the 2 key to highlight the item of the submenu.
4. Press the 34 keys to choose an item.
- S-VIDEO: Video signals will send an output from the S-VIDEO on the rear
panel of the DVD player.
- YCBCR: If your TV set is equiped with Y/C B/CR input, you can choose for
high quality picture.
5. Press the SELECT key.
6. Press the 1 key to return to the GENERAL SETUP menu.
NOTE: Any selection will not influence the signal output of composite video.
Page 24

25
ÑáÖK=N
4:3 Letter Box
4:3 Pan Scan
16:9 Wide Screen
Screen size (shown on the left)
0 If a disc is recorded in the size of wide-screen 16:9, it will have some problem, like
distortion or narrowing when playing on a normal TV set with the screen size of 4:3.
and the function SCREEN SIZE is used.
0 There are three selections in the item to modify the distorted screen picture:
1. 4:3 LB --- used for 16:9 format movie discs played in 4:3 TV set. It sacrifices
certain top and bottom screen space for getting 16:9 picture size. ( refer to fig .1 )
2. 4:3 PS --- used for 16:9 format movie discs play in 4:3 TV set. It sacrifices certain
picture part for getting 4:3 effect. ( refer to fig .2 )
3. 16:9 wide-screen --- used for 16:9 format movie discs play in 16:9 TV set. if the
disc is recorded in 4:3 format, the picture will also have some distortion.
Setup Menu
ÑáÖK=O
ÑáÖK=P
Setup the item as follows:
1. Press the 34 keys to highlight the TV DISPLAY item in the GENERAL SETUP
menu.
2. Press the SELECT key.
3. Enter its submenu by pressing the 2 key.
4. Move the cursor by pressing the 34 keys to highlight the selected item.
5. Press the SELECT key to confirm.
6. Press the 1 key to return to the GENERAL SETUP menu.
TV type (shown on the left)
There are 2 major TV systems, PAL and NTSC. Normally both of them are available
in our modern TV set. The system of your TV set must be
according with the DVD player’s and setup the item as follows:
1. Press the 34 keys to highlight TV TYPE in the GENERAL SETUP menu.
2. Press the SELECT key.
3. Enter its submenu by pressing the 2 key.
4. Move the cursor by pressing the 34 keys to highlight the requisite item.
5. Press the SELECT key to confirm.
6. Press the 1 key to return to the GENERAL SETUP menu.
NOTE: Choosing NTSC item indicates that the player will output by NTSC system,
Similarly, you can sacquire PAL system by choosing the PAL item.
And the item MULTI means video output is depending on the format of DVD
or VCD discs.
Page 25

Setup Menu
26
OSD language
0 There are two options available for information display on TV screen.
1. Press the 34 keys to highlight OSD LANG in the GENERAL SETUP menu.
2. Press the SELECT key.
3. Enter its submenu by pressing the 2
key.
4. Move the cursor by pressing the 34 keys to highlight the selected item.
- ENGLISH: OSD information will be displayed in English.
- CHINESE: OSD information will be displayed in Chinese.
5. Press the SELECT key to confirm.
6. Press the 1 key to return to the GENERAL SETUP menu.
Screen saver
This function is used to turn on or off the screen saver.
1. Press the 34 keys to highlight SCR SAVER in the GENERAL SETUP menu.
2. Press the SELECT key.
3. Enter its submenu by pressing the 2 key.
4. Move the cursor by pressing the 34 keys to highlight the selected item.
- ON: At STOP mode, if nothing is happened within 2 minutes, screen saver will
turn on .
- OFF: Screen saver is disable.
5. Press the SELECT key to confirm.
6. Press the 1 key to return to the GENERAL SETUP menu.
This menu contains setup options of your speaker system, such as DOWNMIX,
D.R.C.(Dynamic Range Compression), CENTER, REAR, SUBWOOFER, CENTER
DELA Y, REAR DELA Y and TEST TONE, which gives the setup system to reproduce
high quality surround sound.
1. Press the SETUP key.
2. Press the 34 keys to highlight the SPEAKER SETUP item.
3. Press the SELECT key to confirm.
Speaker setup page
Page 26

27
Setup Menu
DOWNMIX mode
1. Press the 34 keys to highlight the DOWNMIX item.
2. Press the SELECT key to open its submenu.
3. Enter its submenu by pressing the 2
key.
4. Move the cursor by pressing the 34 keys to highlight the selected item.
- LT/RT
This item will be used only if your DVD player is connected with Dobly
Prologic decoder. Meanwhile, the DVD player can send the output of Dobly
Prologic signals.
- STEREO
This item will help to downmix the signal of Dobly Digital and DTS into stereo
signals directly outputing from L/R port.
- VSS
This function is to make DVD player reproduce virtual surround sound effects.
- OFF
Disable the DOWNMIX mode so that you can setup your speaker system.
5. Press the SELECT key.
6. Press the 1 key and return to the SPEAKER SETUP menu.
D.R.C. (Dynamic Range Compression)
DVD player will compress dynamic range of sound effect output, when you do
not want to disturb your neighbours and your famliy in midnight.
1. Press the 34 keys to highlight D.R.C.,
2. Press the SELECT key to open its submenu.
3. Enter its submenu by pressing the 2
key.
4. Move the cursor by pressing the 34 keys to highlight the selected item.
- ON: Enable D.R.C.
- OFF: Disable D.R.C.
5. Press the SELECT key.
6. Press the 1 key to return to the SPEAKER SETUP menu.
Note: This function is not available for some DVD discs.
Center speaker
This function is effective only when DOWNMIX is OFF. When you are using a
center speaker, set to CENTER on in the menu.
1. Press the 34 keys to highlight the
CENTER item.
2. Press the SELECT key to open its submenu.
3. Enter its submenu by pressing the 2
key.
4. Move the cursor by pressing the 34 keys to highlight the selected item.
- ON: Enable signal output for center speaker.
- OFF: Disable signal output for center speaker.
5. Press the SELECT key.
6. Press the 1 key and return to the SPEAKER SETUP menu.
Page 27

Surround speaker
This function is effective only when DOWNMIX is OFF. When you are using
rear surround speaker, set to REAR on in the menu.
1. Press the 34 keys to highlight the REAR item.
2. Press the SELECT key to open its submenu.
3. Enter its submenu by pressing the 2
key.
4. Move the cursor by pressing the 34 keys to highlight the selected item.
- ON: Enable signal output for surround speaker.
- OFF: Disable signal output for surround speaker.
5. Press the SELECT key.
6. Press the 1 key to return to the SPEAKER SETUP menu.
Subwoofer speaker
This function is effective only when DOWNMIX is OFF. When you are using a
subwoofer speaker, set to SUBWOOFER on in the menu.
1. Press the 34 keys to highlight the SUBWOOFER item.
2. Press the SELECT key to open its submenu.
3. Enter its submenu by pressing the 2 key.
4. Move the cursor by pressing the 34 keys to highlight the selected item.
- ON: Enable signal output for subwoofer speaker.
- OFF: Disable signal output for subwoofer speaker.
5. Press the SELECT key.
6. Press the 1 key to return to the SPEAKER SETUP menu.
Center delay
Set CENTER to on in the setup to delay the sound reproduction from the
center speaker.
1. Press the 34 keys to highlight the CNTR DELAY item.
2. Press the SELECT key to open its submenu.
3. Enter its submenu by pressing the 2
key.
4. Move the cursor by pressing the 34 keys to highlight the selected item.
5. Press the SELECT key.
6. Press the 1 key and return to the SPEAKER SETUP menu.
Surround delay
Set REAR on then you can setup this option to delay the sound
reproduction from the surround speakers.
1. Press the 34 keys to highlight the REAR DELAY item.
2. Press the SELECT key to open its submenu.
3. Enter its submenu by pressing the 2
key.
4. Move the cursor by pressing the 34 keys to highlight the requisite item.
5. Press the SELECT key.
6. Press the 1 key and return to the SPEAKER SETUP menu.
28
Setup Menu
Page 28

Test tone
This item is used to check the connection of the audio system. When TEST TONE
is ON, a fizzy sound from every speakers will appear.
1. Press the 34 keys to highlight the TEST TONE item.
2. Press the SELECT key to open its submenu.
3. Enter its submenu by pressing the 2 key.
4. Move the cursor by pressing the 34 keys to highlight the selected item.
- ON: Enable test tone.
- OFF: Disable test tone.
5. Press the SELECT key.
6. Press the 1 key and return to the SPEAKER SETUP menu.
Pro Logic setup
This item is used for settings on Dolby Pro Logic signals.
1. Press the SETUP key to enter the SETUP menu.
2. Press the 34 keys to choose the PRO LOGIC SETUP menu.
3. Press the SELECT key to enter.
4. Press the 34 keys to highlight the PRO LOGIC item.
5. Press the SELECT key to open its submenu.
6. Enter its submenu by pressing the 2 key.
7. Move the cursor by pressing the 34 keys to highlight the selected item.
- ON: Output the Dolby Pro Logic signals.
- OFF: Forbid the Dolby Pro Logic signals to send output.
- AUTO: Whether PRO LOGIC is ON or OFF, it depends on the audio format of
the disc you playback.
8. Press the SELECT key.
9. Press the 1 key and return to the SPEAKER SETUP menu.
10. Press the 34 keys to highlight the MAIN PAGE and confirm by pressing the
SELECT key.
SPDIF setup
In this menu, you can set up digital audio format outputing from coaxial and optical
terminals.
1. Press the SETUP key to enter the SETUP menu.
2. Press the 34 keys to choose the SPDIF SETUP menu.
3. Press the SELECT key to enter.
29
Setup Menu
NOTE:
SPDIF is the abbreviation of Sony Philips Digital Interface which is a protocol of
digital data transfering.
Page 29

SPDIF OUT setup
1. Press the 34 keys to highlight the SPDIF OUT item.
2. Press the SELECT key to open its submenu.
3. Enter its submenu by pressing the 2 key.
4. Press the 34 keys to highlight the selected item.
- RAW: Original digital signals output.
- PCM: Convert to PCM signals to output.
5. Press the SELECT key.
6. Press the 1 key and return to the SPDIF SETUP menu.
LPCM 96K mode
In this menu, you can set up sampling rate to decode LPCM audio.
1. Press the 34 keys to highlight the LPCM 96K item.
2. Press the SELECT key to open its submenu.
3. Enter its submenu by pressing the 2 key.
4. Move the cursor by pressing the 34 keys to highlight the selected item.
- ON: Detect the loading disc for appropriate sampling rate.
- OFF: The decoding process is under the sampling rate of 48KHz.
5. Press the SELECT key.
6. Press the 1 key to return to the SPDIF SETUP menu.
Preferences setup
There are items included in PREFERENCES menu as AUDIO, SUBTITLE,
DISC MENU, PARENTAL CONTROL, PASSWORD and DEFAULT.
1. Press the STOP key twice.
2. Press the SETUP key to enter its menu.
3. Highlight the PREFERENCES item by pressing the 34 keys.
4. Press the SELECT key to confirm your selection.
Audio language
DVD discs are available for multiple audio languages. Use this item to choose
your preferred default audio language.
1. Press the 34 keys to highlight the AUDIO item.
2. Press the SELECT key to open its submenu.
3. Enter its submenu by pressing the 2
key.
4. Move the cursor by pressing the 34 keys to highlight the selected item.
5. Press the SELECT key.
6. Press the 1 key to return to the PREFERENCES menu.
NOTE: Your DVD disc may not include the audio language which you set in the
SETUP menu. If so, the player will use other audio language instead.
Setup Menu
Page 30

Disc menu language
DVD discs are available for multiple disc menu languages. This item is used to
choose default disc menu language.
1. Press the 34 keys to highlight the DISC MENU item.
2. Press the SELECT key to open its submenu.
3. Enter its submenu by pressing the 2 key.
4. Move the cursor by pressing the 34 keys to highlight the selected tem.
5. Press the SELECT key.
6. Press the 1 key to return to the PREFERENCES menu.
NOTE: If your DVD disc doesn’t include disc menu language you have set, the
player will use other recorded language instead.
Subtitle language
DVD discs are available for multi-subtitle language. This item is used to choose
default subtitle language.
1. Press the 34 keys to highlight the SUBTITLE item.
2. Press the SELECT key to open its submenu.
3. Enter its submenu by pressing the 2
key.
4. Move the cursor by pressing the 34 keys to highlight the selected item.
5. Press the SELECT key.
6. Press the 1 key to return to the PREFERENCES menu.
NOTE: Your DVD disc may not include the subtitle which you set in the SETUP
menu. If so, the player will use other audio language and subtitle instead.
Password
This password is used for the parental control and disc lock. Enter your password
when you are required by the DVD player.
1. Press the 34 keys to highlight the PASSWORD item.
2. Press the SELECT key to open its submenu.
3. Enter its submenu by pressing the 2
key.
4. Move the cursor by pressing the 34 keys to highlight the selected item.
5. Input the four digits original password.
6. If successful, the player will prompt for a new one.
7. After that, enter the new password again to reconfirm.
8. Press the PLAY key to return to the PREFERENCES menu.
NOTE:
1. You can change the setup of parental control and disc lock with a recognise
password being entered.
2. If you forget the passwor d, you can enter the default password 3308 and replace
your password after logging on.
Setup Menu
31
Page 31

Parental control
0 DVD disc can be set with levels which define the movie degrees of violence,
horror or iroticism. There are 8 levels defined in a standard literature for the
setting by distributors. From level 1 to level 8, the ponderance increases gradually.
If the parental control is activated, only the movies which the degree is lower
than the level you set can be admitted to show, otherwise, you have to enter the
password for authorization.
0 VCD, SVCD, CD has no level defination, so parental control function has no
effect on those kinds of discs as well as most of illegal DVD discs.
0 You can follow the steps below to setup the parental control:
1. Press the 34 keys to highlight the PARENTAL item.
2. Press the SELECT key to open its menu.
3. Enter its submenu by pressing the 2 key.
4. Move the cursor by pressing the 34 keys to highlight the selected level.
5. Press the SELECT key.
6. Press the 1 key and return to the PREFERENCES menu.
Default setup (shown on the left)
If problems occur during setting DVD, the item DEFAULT is used to reset all
items to factory default and all your personal setting will be erased.
1. Press the 34 keys to highlight the DEFAULT item.
2. Press the SELECT key to open its menu.
3. Enter its menu by pressing the 2 key.
4. Press the SELECT key.
NOTE: When this function is executed, all setups will be reset to factory defaults.
NOTE: If you forget the password, you can enter the default password 3308 and
replace your password after logging on.
32
Setup Menu
Page 32

Disc maintains
Some problems occur because the disc inside the player is dirty. To avoid those
problems clean your discs regularly.
0 When the disc becomes dirty, clean it with a cleaning cloth. Wipe the disc from
center to out side.
Caution: Do not use solvents such as benzine, thinner, commercially available
cleaners, or anti-static spray intended for analog discs.
Environmental information
All redundant packing material has been omitted. W e have done our utmost to make
the packaging easily separable into three mono materials: cardboard (box),
polystyrene foam (buffer) and polyethylene (bags, protective foam sheet.)
Your set consists of material which can be recycled if disassembled by a specialized
company. Please observe the local regulations regarding to the disposal of packing
materials, dead batteries and old equipment.
33
Page 33

34
Before requesting service
Page 34

Philips Product Warranty ( FOR AUSTRALIA ONLY)
Warranty conditions valid for Colour Television, video Cassette Recorders, CD Recordable, DVD Players, Audio
Systems, and Portable Audio.
The benefits given to the purchaser by this warranty are in addition to all other rights and remedies which the purchaser has
in respect of the product under the Trade practices Act or other Commonwealth or State Law.
Philips Consumer Electronics warrants its Products to the Purchaser as follows and subject to the stated conditions.
12 months free service.
Conditions of warranty
l All claims for warranty service should be made to your nearest Philips Authorized Service Center. Reasonable evidence
of date of purchase must be Provided.
2 This warranty extends only to defects occurring under normal use of the Product when operated in accordance with the
instructions.
3 Home service within the normal service area of one of our Authorised Service Centres will be Provided for television
receivers with screen size 48cm and above. All other Products are to be brought or sent to your nearest Authorized
Service Centre.
4 This warranty does not cover:
a) Mileage or traveling time, pickup or delivery, cost of insurance.
b) Service costs arising from failure to correctly adjust the controls of the product or to observe the instructions, or
inspections that reveal that the product is in normal working order.
c) Product failures caused by misuse, neglect, normal wear and tear, accidental breakage, transit damage, inexpert
repairs or modification by unauthorized persons, Lightning strikes, vermin infestation or liquid spillage.
d) Cleaning of video or audio heads.
e) Inadequate receiving antennae.
f) Replacement of worn or used batteries, styli or other consumables.
The conditions contained in this warranty replace and override the Provision of the World-Wide Guarantee for Products sold
in Australia.
Philips Authorised service centers
To contact your nearest Philips Authorised Service Centre call 1 300-36-13-92 from anywhere in Australia.
Sydney
Canberra
Adelaide
Newcastle
Melbourne
Hobart
Perth
Brisbane
Wollongong
Service is provided through 350 accredited service dealers throughout Australia. To find out about you r nearest centre, call
1300-36-13-92.
Please record the following information for your records and keep in a safe place.
Model No: ................................................
Serial No: ................................................
Please retain your purchase receipt which is required to claim service under warranty
Philips Consumer Electronics Australia Limited
ACN 008 445 743, 3 Figtree Drive
Homebush NSW 2140
35
Australia W arranty
Page 35

Guarantee and Service for New Zealand
Thank-you for purchasing this quality Philips Product.
Philips New Zealand Ltd. guarantees this Product against defective components and faulty workmanship for a Period of 12
months.
Any defect in materials or workmanship occurring within 12 months from the date of Purchase subject to the following
conditions will be rectified free of charge by the retailer from whom this product was purchased.
Conditions
1 The Product must have been purchased in New Zealand. As proof of Purchase, retain the original sales docket indicating
the date of purchase.
2 The guarantee applies only to faults caused by defective components, or faulty workmanship on the part of the manufacturer
3 The guarantee does not cover failures caused by misuse, neglect, normal wear and tear, accidental breakage, use on the
incorrect voltage, use contrary to operating instructions, or unauthorized modification to the product or repair by an
unauthorized technician.
4 Reasonable evidence (in the form of a sales docket) must be supplied to indicate that the Product was purchased no
more than 12 months prior to the date of your claim.
5 In the event of a failure, Philips shall be under no liability for any injury, or any loss or damage caused to Property or
products other than the product under guarantee.
This guarantee does not prejudice your rights under common law and statute, and is in addition to the normal responsibilities
of the retailer and Philips.
How to claim
Should your Philips Product fail within the guarantee Period, please return it to the retailer from whom it was Purchased. In
most cases the retailer will be able to satisfactorily repair or replace the Product.
However, should the retailer not be able to conclude the matter satisfactorily, or if you have other difficulties claiming under
this guarantee, Please contact:
The Guarantee Controller
Philips New Zealand Ltd.
4 P.O. Box 41.021
Auckland
Tel: 3 (09) 84 94 160
Fax: 3 (09) 84 97 858
New Zealand Warranty
36
Page 36

Specifications
Specification subject to change without prior notice.
* Power consumption
* Video standard
<25W
NTSC/PAL changable
CABINET
* Dimensions
* W eight
WxHxD: 435x91x320 mm
about 3.8Kg
DIGIT AL AUDIO OUTPUT
MPEG
DTS
Dolby Digital
PCM
VIDEO PERFORMANCE
* CVBS 1Vpp --- 75Ω
* S-VIDEO Y: 1.00Vpp --- 75Ω
C: 0.30Vpp --- 75Ω
* YUV Y: 1.00Vpp --- 75Ω
C
R: 0.7Vpp --- 75Ω
CB: 0.7Vpp --- 75Ω
MICPHONE: 6.3mm
* Digital
ANALOG AUDIO OUTPUT
* output voltage
* frequency responds range
* S/N (signal/noise)
left/right
2.0V 2 dB
20Hz - 20KHz 2dB
90 dB
GENERAL
* audio channels
37
HEADPHONE : 6.3mm
Page 37

DVD762K
Meet PHILIPS at the internet
http://www.PHILIPS.com
3141 016 17971
 Loading...