


INTRODUCTION ..................................................................P 5
INSTALLATION ....................................................................P 7
STANDARD CONNECTIONS................................................P 9
GETTING STARTED..............................................................P 11
PLAYING A DVD-VIDEO DISC ..............................................P 12
PLAYING A VIDEO CD..........................................................P 16
PLAYING AN AUDIO CD ......................................................P 18
SETTINGS ............................................................................P 20
PARENTAL CONTROL ..........................................................P 22
BEFORE REQUESTING SERVICE ..........................................P 23
CONTENTS
english
5
INTRODUCTION CONTENTS
THE ENTERTAINMENT MEDIUM FOR THE MILLENIUM
Video was never like this before! Perfect digital studio-quality
pictures with truly 3-dimensional digital multichannel audio.
Story sequences screened from your own choice of camera
angle.
Language barriers broken down by sound tracks in as many as
eight languages, plus subtitles - if available on disc - in as
many as 32. And whether you watch DVD-Video on widescreen or regular TV, you always see it the way it was meant
to be.
DIGITAL VIDEO
DVD-Video uses state-of-the-art MPEG2 data compression
technology to register an entire movie on a single 5-inch disc.
DVD’s variable bitrate compression, running at up to 9.8
Mbits/second, captures even the most complex pictures in
their original quality.
The crystal-clear digital pictures have a horizontal resolution
of over 500 lines, with 720 pixels (picture elements) to each
line. This resolution is more than double that of VHS, superior
to Laser Disc, and entirely comparable with digital masters
made in recording studios.
DVD-Video discs conform to either the PAL or NTSC video
standard. This dual-standard player can play both types, and
present them in the best possible way on your multistandard
TV screen.
As the universal video system of the future, DVD-Video offers
optimal pictures on any TV screen.
Manufactured under license from Dolby Labaratories.
“Dolby” and the double-D symbol are trademarks of
Dolby Labaratories. Confidential Unpublished Works.
©1992-1999 Dolby Labaratories Inc. All rights reserved.
DVD-VIDEO
6
english
Your Philips DVD-Video player plays digital video discs conforming to the universal DVD-Video standard. With it, you will
be able to enjoy full-length movies with true cinema picture
quality, and stereo or multichannel sound (depending on the
disc, and on your playback set-up). The unique features of
DVD-Video, such as selection of sound track and subtitle languages, and of different camera angles (again depending on
the disc), are all included. What’s more, Philips Parental
Control lets you decide which discs your children will be able
to see.
You will find your player remarkably easy to use, by way of
the On-Screen Display and player display, in combination with
the remote control.
In addition to DVD-Video discs, you will also be able to play
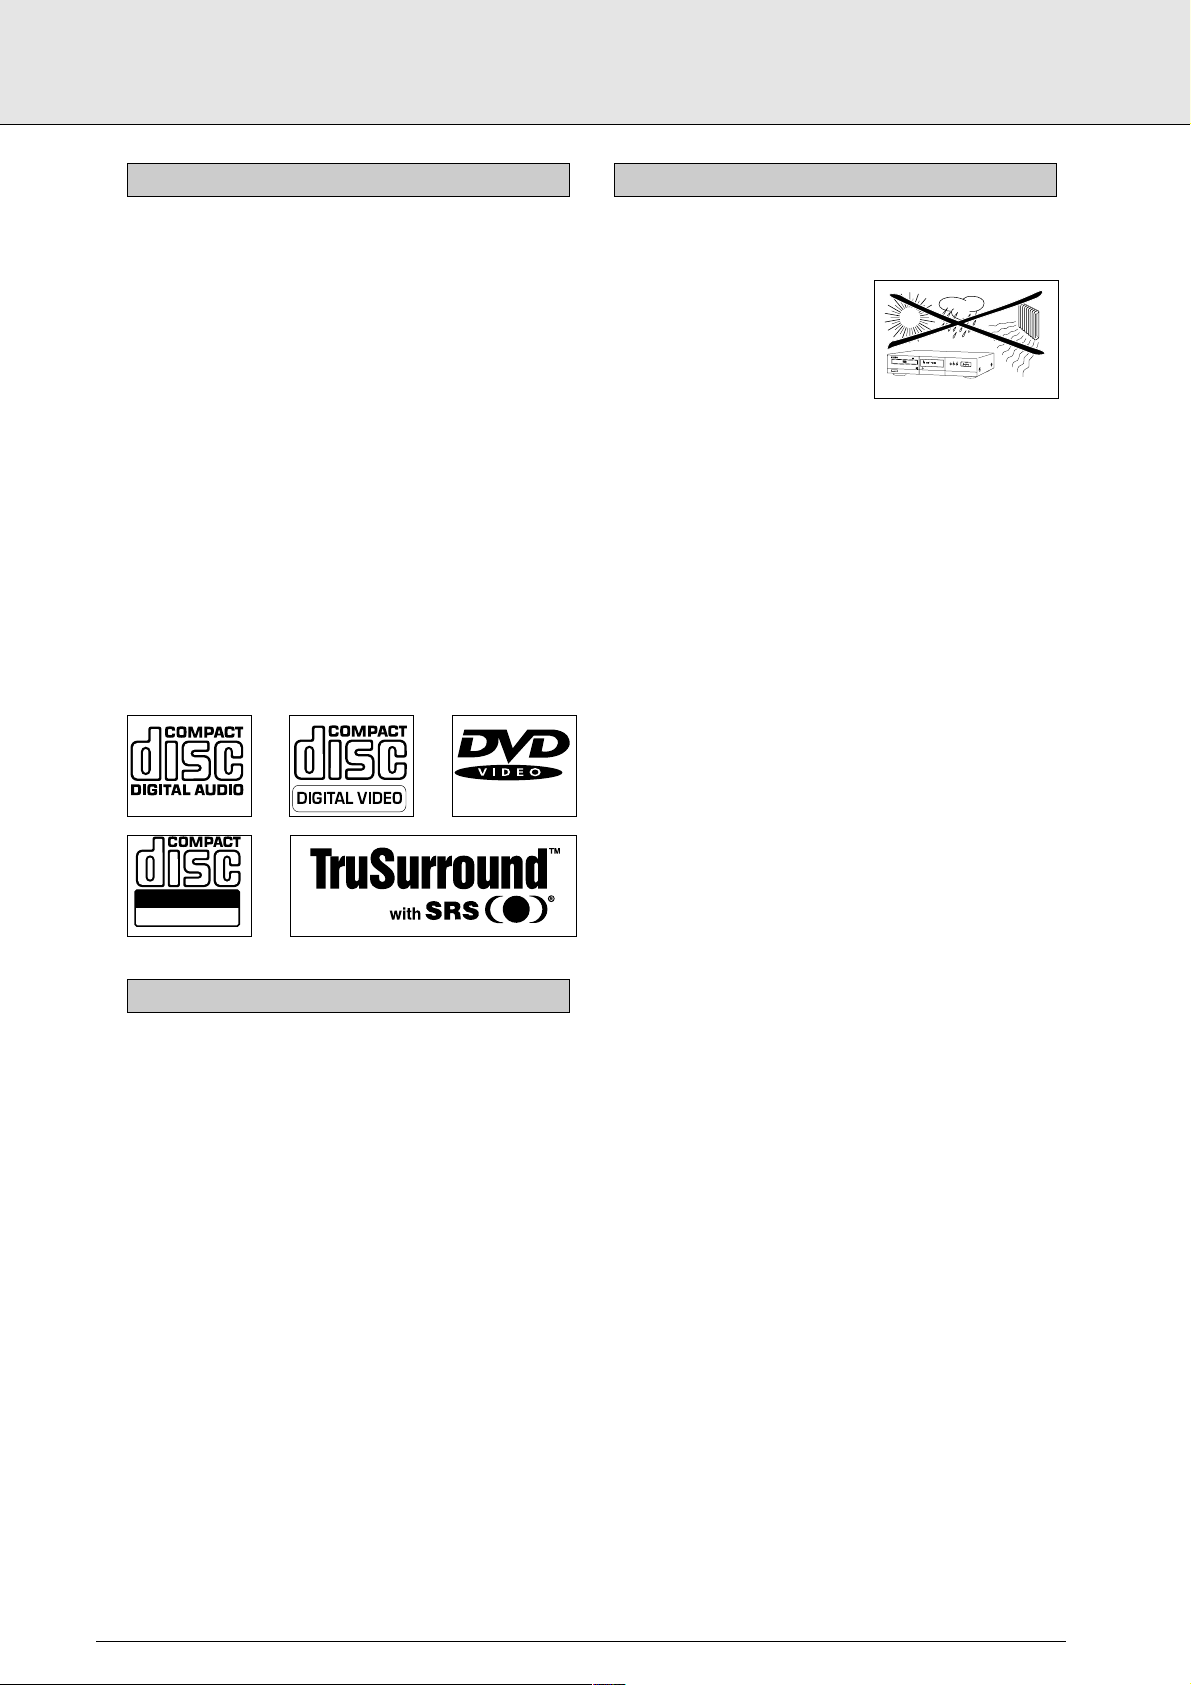
all Video CDs and audio CDs. The disc types which run on the
player feature one or more of these logos on the disc packaging:
First check and identify the contents of your DVD-Video player
package, as listed below:
- DVD-Video player
- Remote Control Handset with separately-packed batteries
- 2-core power cord
- Euroconnector cable (only for DVD710)
- User Manual
If any item should be damaged or missing, please inform your
supplier without delay.
Keep the packaging materials; you may need them to transport your player in the future.
• Place the player on a firm, flat surface.
• Keep away from domestic
heating equipment and direct
sunlight.
• In a cabinet, allow about 2.5 cm
(1 inch) of free space all around
the player for adequate ventilation.
• If the DVD-Video player fails to read discs correctly use a
commonly available cleaning CD/DVD to clean the lens
before taking the DVD-Video player for repair. Avoid other
cleaning methods, which may destroy the lens. Always
keep the tray closed to avoid dust on the lens.
• The lens may cloud over when the DVD-Video player is suddenly moved from cold to warm surroundings. Playing a
CD/DVD is not possible in such a situation. Leave the DVDVideo player in the warm environment until the moisture
evaporates.
PLACEMENT
UNPACKING
Recordable
ReWritable
INTRODUCTION
INTRODUCTION
M
P
E
D
G
V
D
7
X
M
0
u
D
l
t
i
V
c
h
D
a
/
n
V
n
I
e
D
l
E
O
C
D
/
C
D
P
L
A
Y
E
R
S
H
REPEAT
U
F
F
L
E
P
A
U
S
E
P
A
R
E
V
R
E
P
E
A
T
N
E
XT
STOP
T
I
T
L
E
T
I
T
L
E
T
O
T
A
L
R
E
M
T
I
M
E
..
.
.
.
1
.
2
.
3
.
4
.
5
.
6
7
.
8
.
9
.
1
0
.
1
1
1
2
1
3
1
+
4
1
5
P
A
ON
/
OFF
USE
OPEN/
C
LOSE
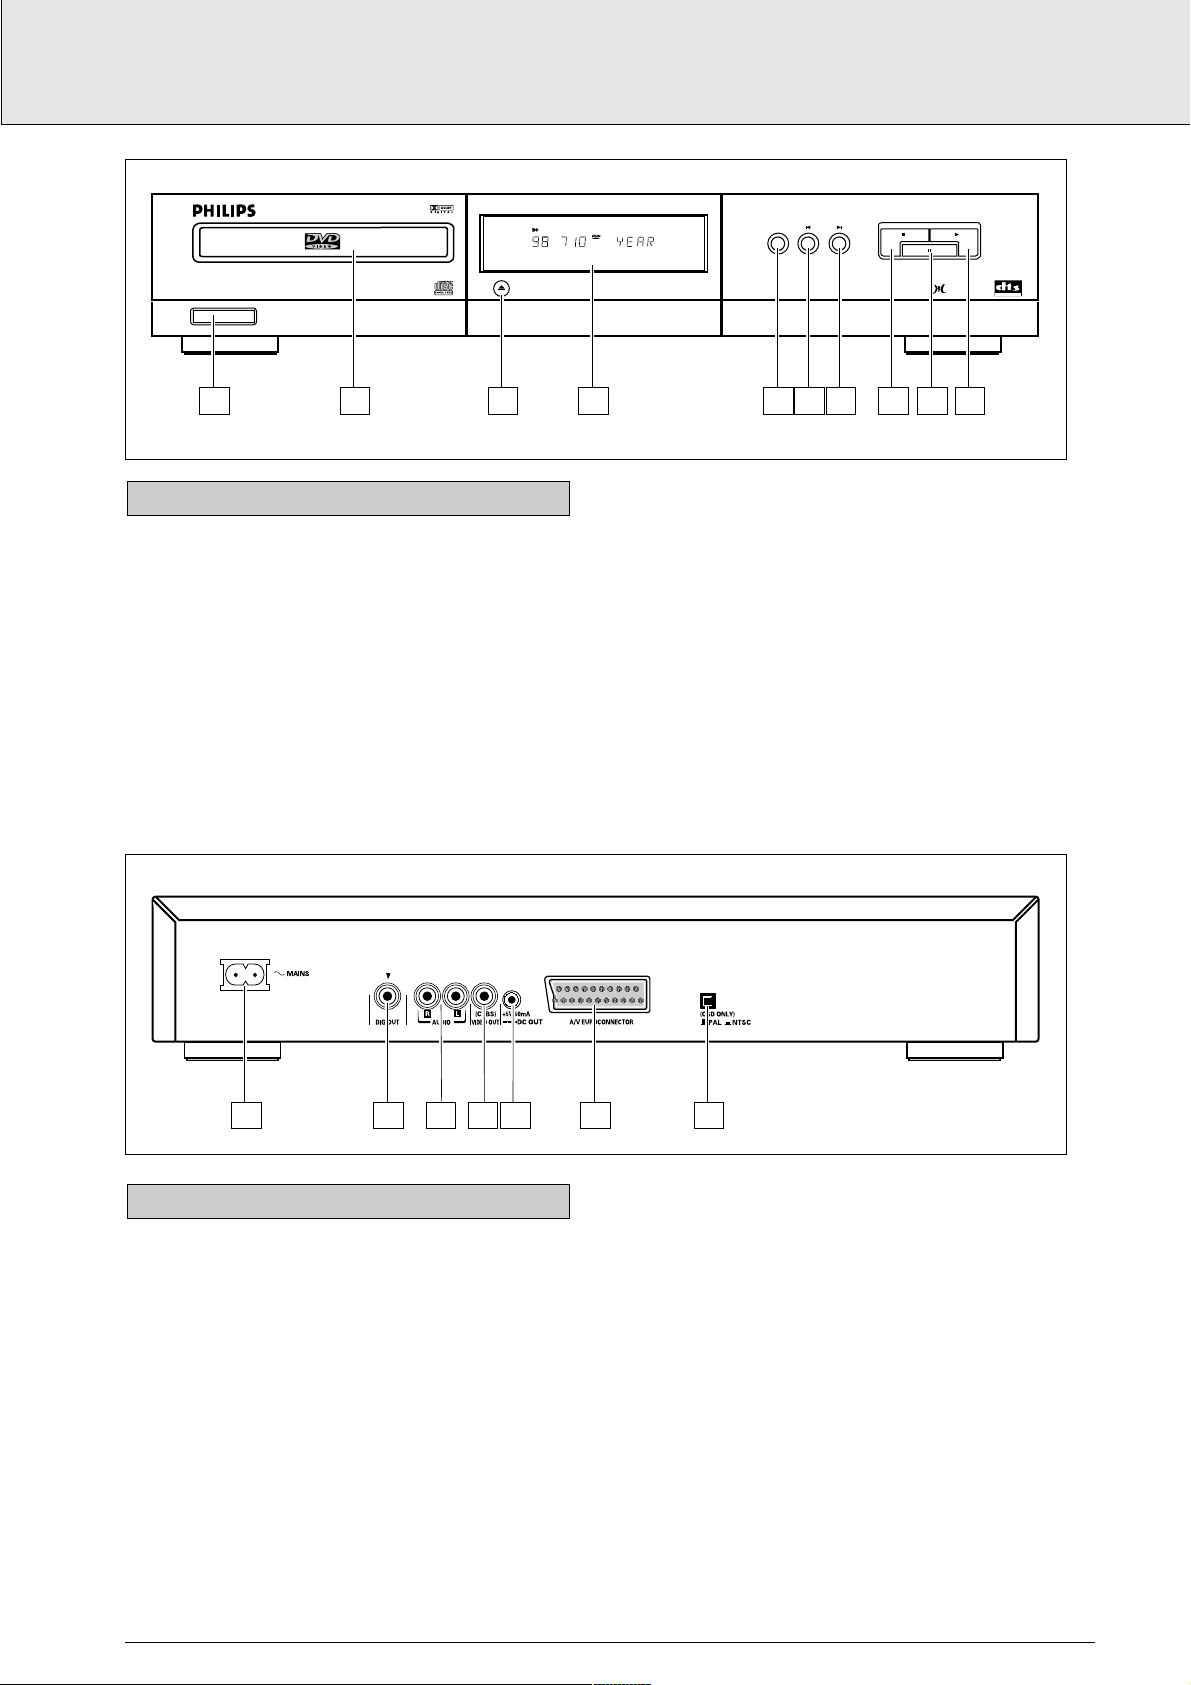
1 ON/OFF
2 Disc tray
3 Tray OPEN/CLOSE
4 Display
5 REPEAT/chapter/track/title/disc
6
O PREVious title/chapter/track
7
P NEXT title/chapter/track
8
9 STOP
9
; PAUSE/Still/Step
0
2 PLAY
FRONT OF PLAYER
english
7
INSTALLATION
1 Power supply
2 Digital audio output
3 Audio R; Audio output R
Audio L; Audio output L
4 Video (CVBS); Video output
5 DC Power output (for optional external RF modulator)
6 A/V Euroconnector
7 NTSC/PAL switch (for player menus)
CAUTION
Do not touch the inner pins of rear-panel connectors.
Electrostatic discharge may cause permanent damage
to the unit.
REAR OF PLAYER
ON/OFF
1 2 3 4 5 6 7 8 9 10
DVD7X0 DVD/VIDEO CD/CD PLAYER
SHUFFLE
TITLE
.......... . . . .
1 2 3 4 5 6 7 8 9 10 11 12 13 14 15
OPEN/CLOSE
PLAY
A
TITLEPAUSE
REPEAT
TIMETOTAL REM
+
REPEAT PREV NEXT
STOP
PAUSE
MPEG Multichannel
DIGITAL OUT
1 2 3 4 5 6 7
20 18 16 14 12 108642
21
19 17 15 13 11 9 7 5 3 1
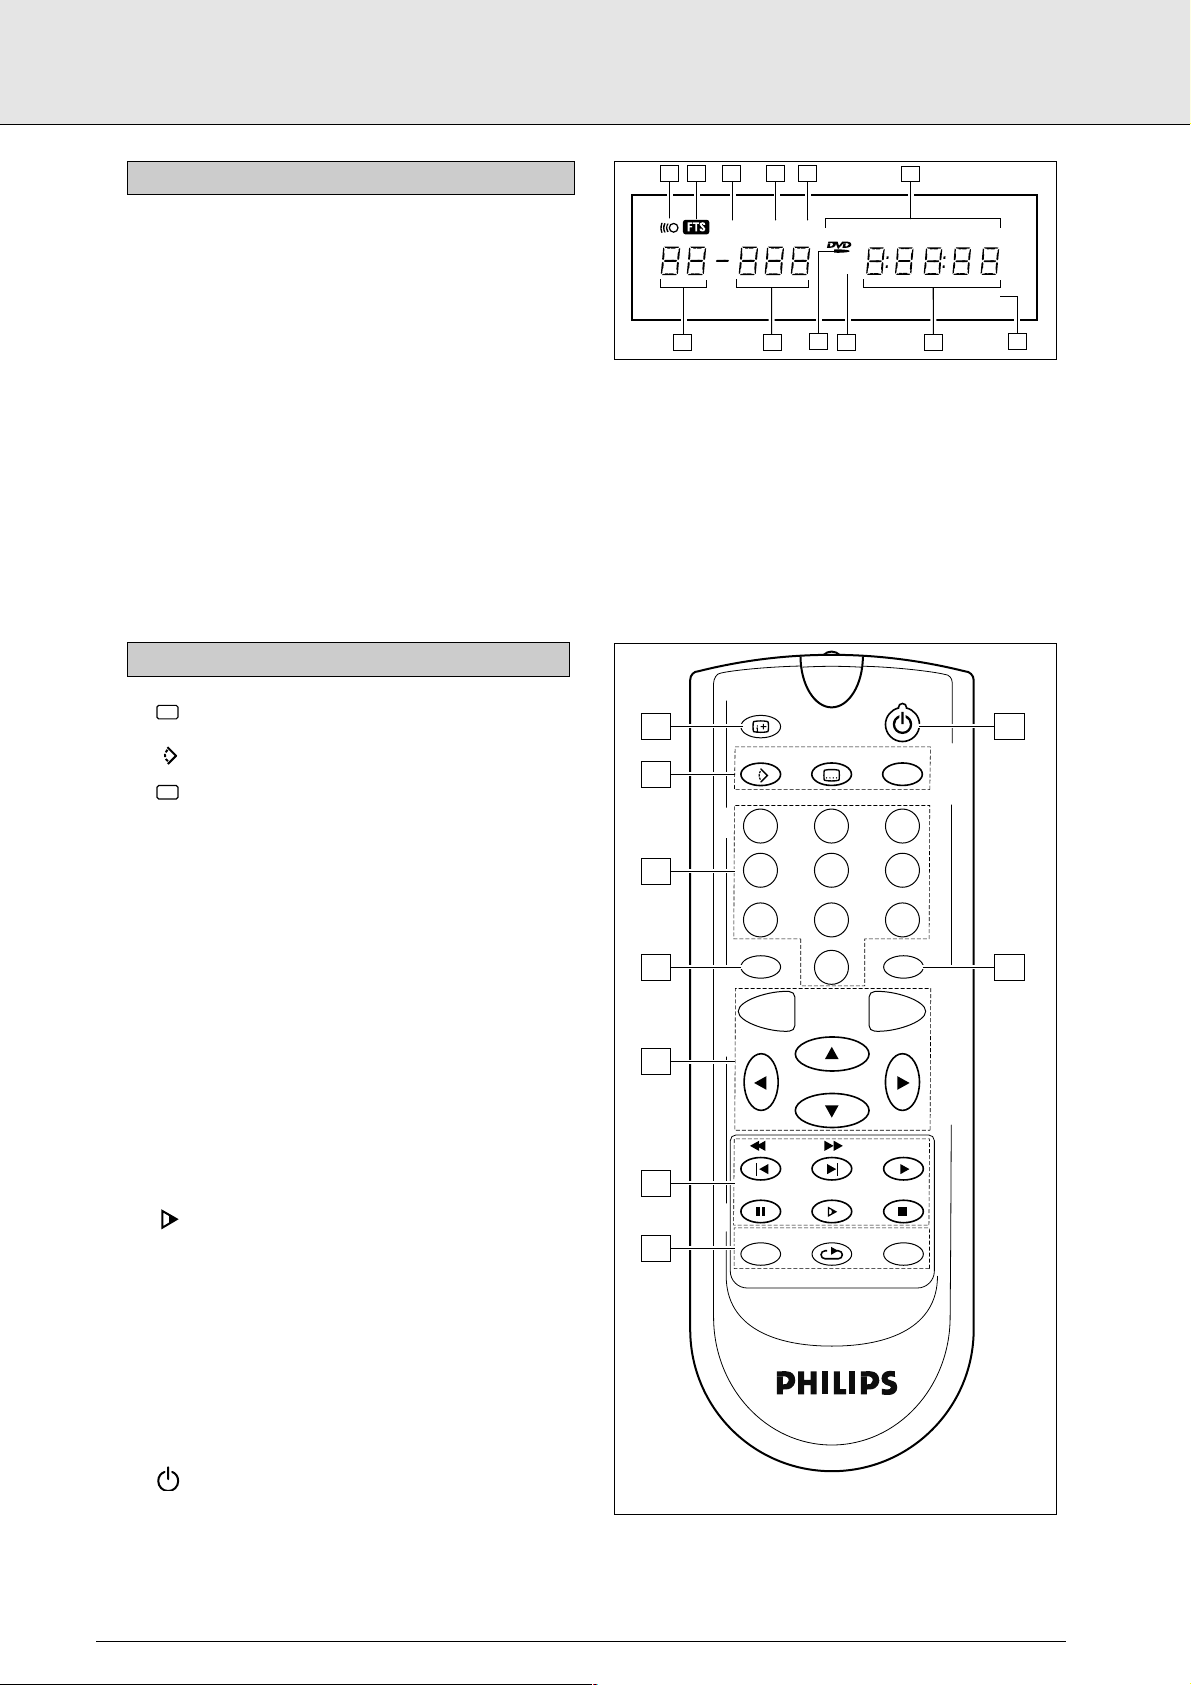
1 Remote control active (flashing)
2 FTS (Favourite Track Selection) active
3 SHUFFLE active
4 PAUSE active
5 SCAN active
6 A-B REPEAT/CHAPTER/TITLE/TRACK mode active
7 Chapter or track calendar
8 TOTAL/REMaining/TRACK TIME in hours, minutes and
seconds
9 (V)CD disc inserted
0 DVD disc inserted
! DVD CHAPTER or VCD/CD TRACK number
@ DVD TITLE number
1
OSD ........(On-Screen Display) on/off
2 ANGLE ....select DVD camera angle
SUBTITLE language selector or subtitle on/off
AUDIO ............spoken language selector
3 0-9....................numerical key pad
4 T- C ..................title/chapter mode selector
5 MENU ............select DVD-defined menu
OK....................acknowledge menu selection.
bolrup/down/left/right cursor movement
6 5 J ............previous chapter or track / search back
6 K ............next chapter or track/ search forward
2 ......................play
; ......................pause or still frame /step frame
..................slow motion (1/2, 1/4, 1/8 speed)
9 ......................stop
7 SETUP ............select player settings menu (in stop mode
only)
REPEAT*/A-B REPEAT chapter, track, title, disc
SHUFFLE/SCAN* shuffle or scan on/off
8 RETURN..........go back to previous menu step
9
..................standby
* Press key for about 1 second
REMOTE CONTROL
DISPLAY
english
8
INSTALLATION
+ j
....
1 2 4 53
-BA
OSD
SCAN
-BA
CD
V
CD
V
10
1112
SHUFFLE
SHUFFLE
CHAPTERTITLE TRACK
CHAPTERTITLE TRACK
......... . . . . .
......... . . . . .
1 2 3 4 5 6 7 8 9 10 11 12 13 14 15
1 2 3 4 5 6 7 8 9 10 11 12 13 14 15
REPEAT
REPEAT
6
CHAPTER
CHAPTER
1
ANGLE SUBTITLE AUDIO
2
123
TRACKTITLEPAUSE
TRACKTITLEPAUSE
TIMETRACKTOTAL REM
TIMETRACKTOTAL REM
+
+
89
7
9
3
456
789
T-C RETURN
4
MENU OK
0
5
6
SETUP
A-B REPEAT
7
SHUFFLE
SCAN
8
- Depending on your TV and other equipment, there are various ways you could connect the DVD-Video player. These
are shown below.
- Please refer to your TV, VCR, Stereo System and any other
User Manual(s) as necessary to make the optimal connections.
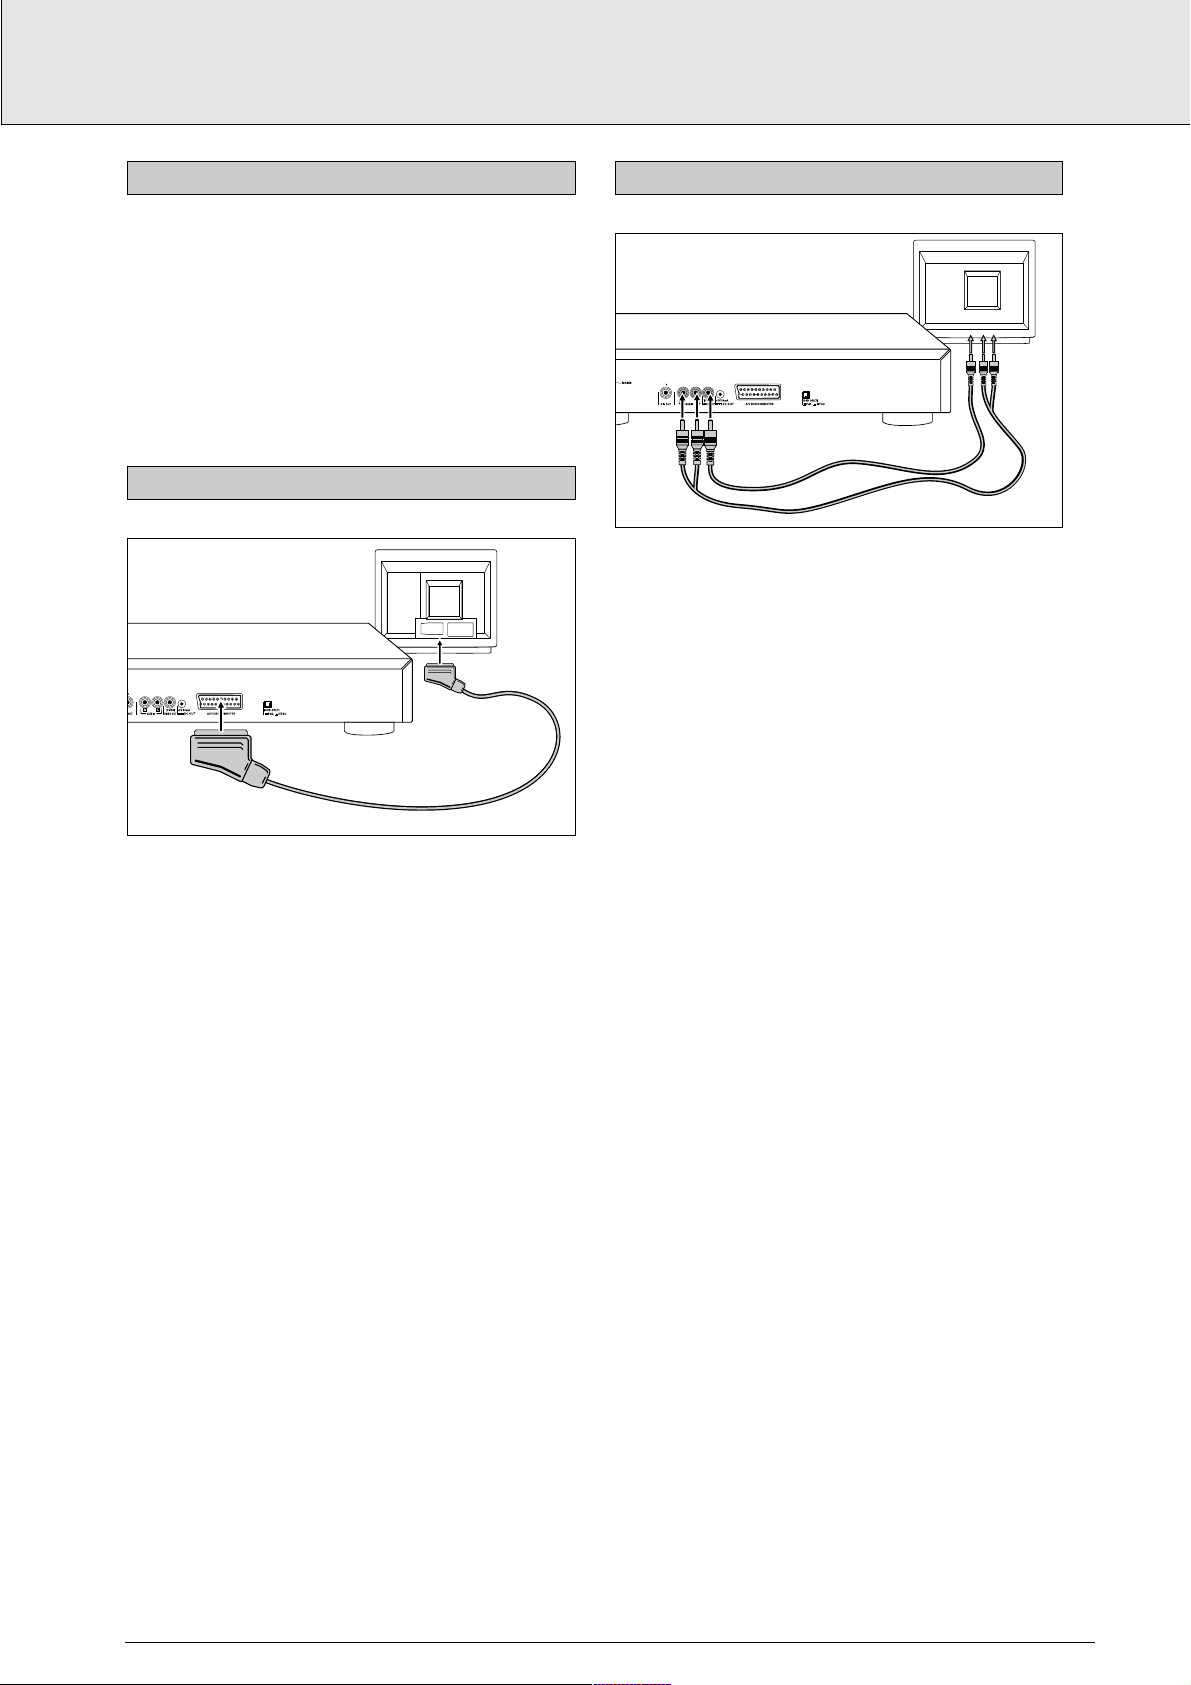
Connection to a TV with an A/V Euroconnector socket.
1 Connect the A/V Euroconnector on the rear of the player to
the
corresponding connector on the TV using the cable sup-
plied.
2 Optionally you can also connect the audio Left and Right
channel sockets on the rear of the player to the corresponding sockets on your stereo system.
NOTE
- Do not connect your DVD-player via your VCR, because the
video quality could be distorted by the copy protected system.
Connection to a TV with a video (CVBS) socket.
1 Connect the Video socket on the rear of the player to the
corresponding socket on the TV using the cable supplied.
2 Connect the audio Left and Right channel sockets on the
rear of the player to the corresponding sockets on the TV
using the cable supplied. Alternatively, you can use the
same cable to connect the audio Left and Right sockets on
the rear of the player to the corresponding sockets on your
stereo system.
CAUTION
Do not connect the player’s audio output to the phono
input of your stereo system.
EXCELLENT A/V CONNECTION
HIGHEST QUALITY A/V CONNECTION
GENERAL NOTE
english
9
STANDARD CONNECTIONS
TV
20 18 16 14 12 108642
21
19 17 15 13 11 9 7 5 3 1
A/V EUROCONNECTOR CABLE
VIDEO
AUDIO
IN
IN
TV
20 18 16 14 12 108642
21
19 17 15 13 11 9 7 5 3 1
VIDEO CABLE
AUDIO CABLE
For multichannel sound, your player provides both digital and
analog audio outputs.
DIGITAL (MPEG 2 MULTICHANNEL OR DOLBY
DIGITAL™) MULTICHANNEL SOUND
1 For this, which provides the highest multichannel sound
quality, you need a digital multichannel A/V receiver.
2 Connect the digital audio output on the rear of the player to
a suitable input on the receiver using a digital audio cable
(available as option). In this case, do not use the player’s
audio Left and Right outputs.
3 You will need to activate the digital output of the player
(See Settings p. 20).
4 The audio format of the digital output is dependent on the
audio format of the selected audio stream. Make sure that
the selected audio stream matches the capabilities of the
receiver connected to the digital output.
ANALOG (DOLBY PRO LOGIC™) MULTICHANNEL
SOUND
1 If your TV set has a Dolby Pro Logic™ decoder, simply hook
up the player to the TV using the A/V Euroconnector, or
Video (CVBS) and audio connections as on p. 9.
2 If not, make the A/V Euroconnector, or Video (CVBS) con-
nection to the TV p. 9, and connect the player’s audio Left
and Right outputs to suitable inputs on a Dolby Pro Logic™
Audio/Video receiver, using the cable supplied.
3 For speaker connections, follow the instructions given in
the TV set or A/V receiver user manual.
NOTE
-
You cannot use the RF Modulator option for home theatre.
- If the audio format of the digital output does not match the
capabilities of your receiver, the sound will be muted.
For this connection, which produces the highest possible
stereo sound quality, you need an audio amplifier with digital
input, and the digital output of the player must be activated
(see Settings p. 20). Connect the player’s digital audio output
to the corresponding input on the amplifier. In this case, do
not use the player’s audio Left and Right outputs.
Use the NTSC/PAL switch on the rear of the player to set the
Video CD and player menu according to the standard used by
your TV-set.
NOTE
- The video output standard for video CD and DVD-Video discs
most corresponds to the disc being played.
1 Plug the female end of the power cord supplied into the
Power connector on the rear of the player.
2 Plug the male end of the cord into an AC outlet.
NOTE
- The player automatically adjust to the local AC voltage.
- When the player is in the “OFF” position, it still consumes
some power. If you wish to disconnect your player completely from the power supply, withdraw the plug from the
AC Outlet.
CAUTION
Only qualified service personnel should remove the
cover or attempt to service this device.
CONNECTING THE POWER SUPPLY
NTSC/PAL SETTING
DIGITAL AUDIO (STEREO) SOUND
CONNECTION
MULTICHANNEL SOUND FOR HOME THEATRE
english
10
STANDARD CONNECTIONS
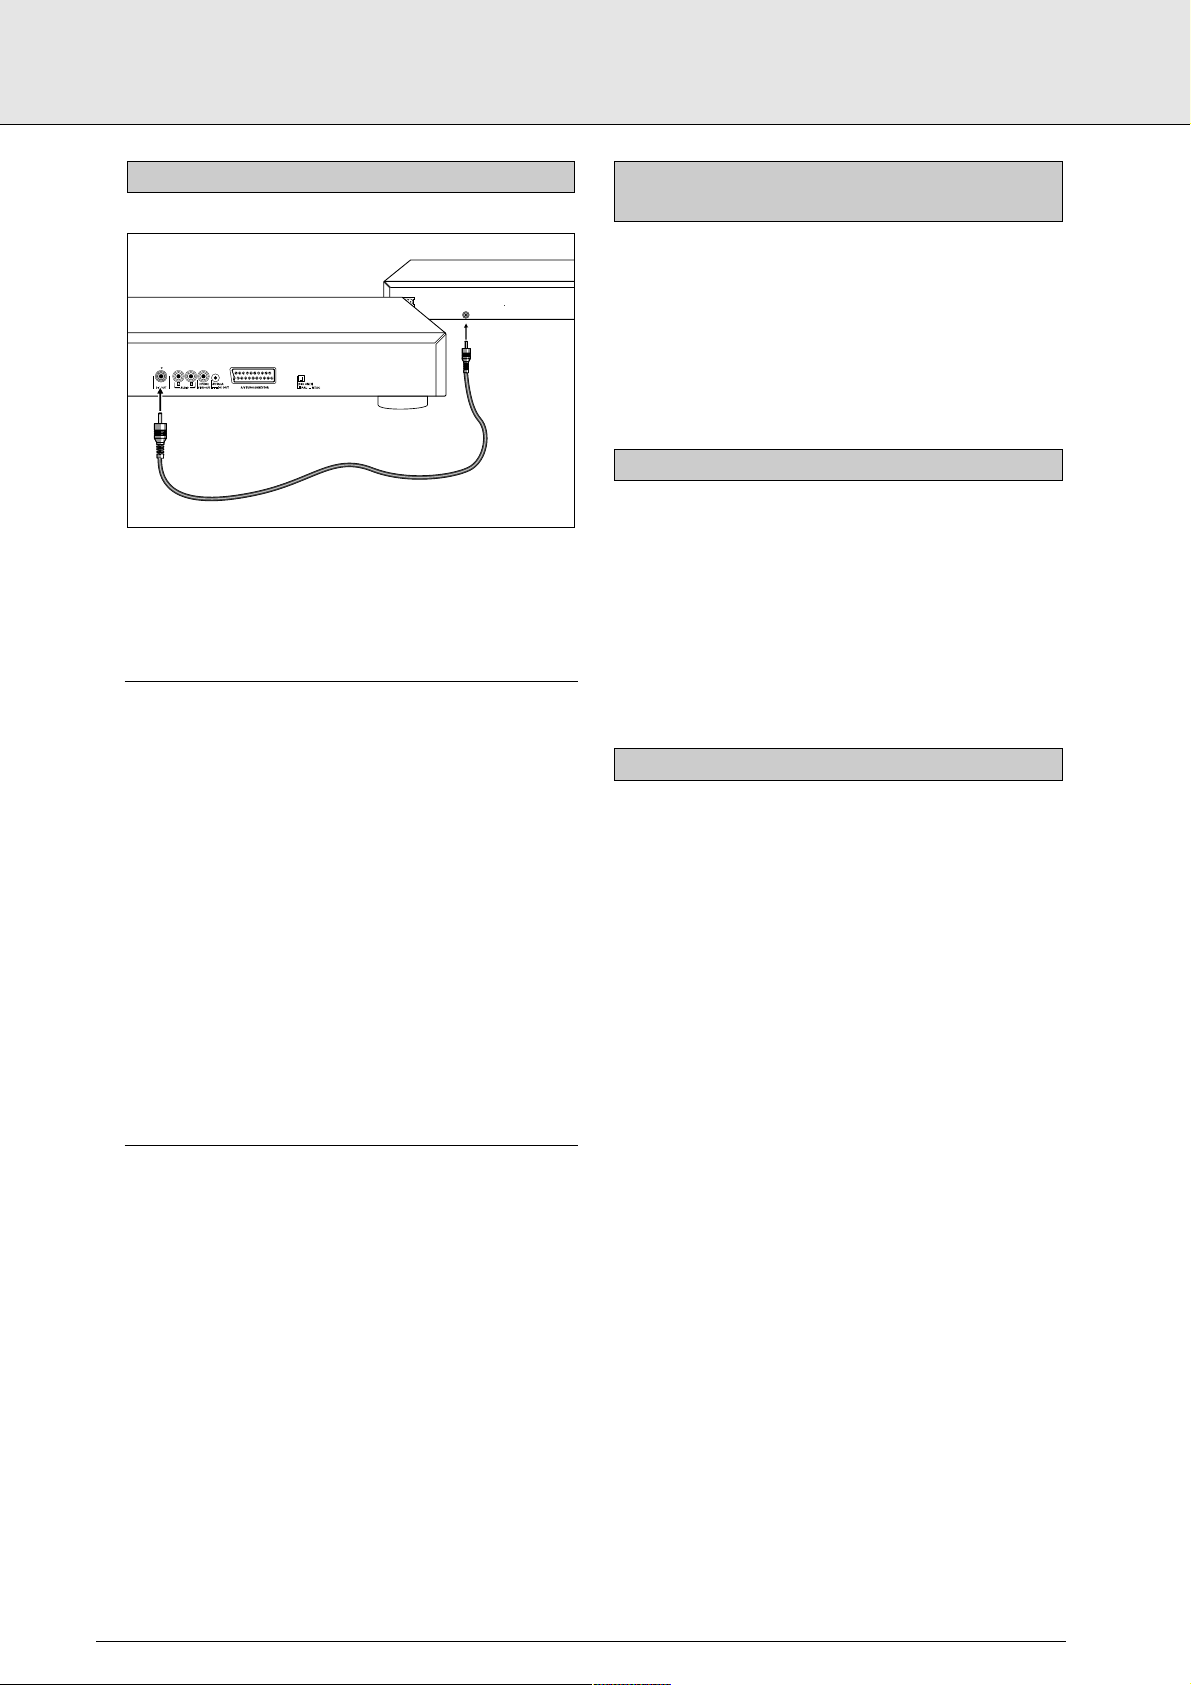
DIGITAL AUDIO
IN
RECEIVER
20 18 16 14 12 108642
21
19 17 15 13 11 9 7 5 3 1
DIGITAL AUDIO
CABLE
 Loading...