

Page 1
DVD Video Player
Hookup Pages
DVD-703
DVD-703
1
Page 2
Functional Overview
English
Front and Rear Panels
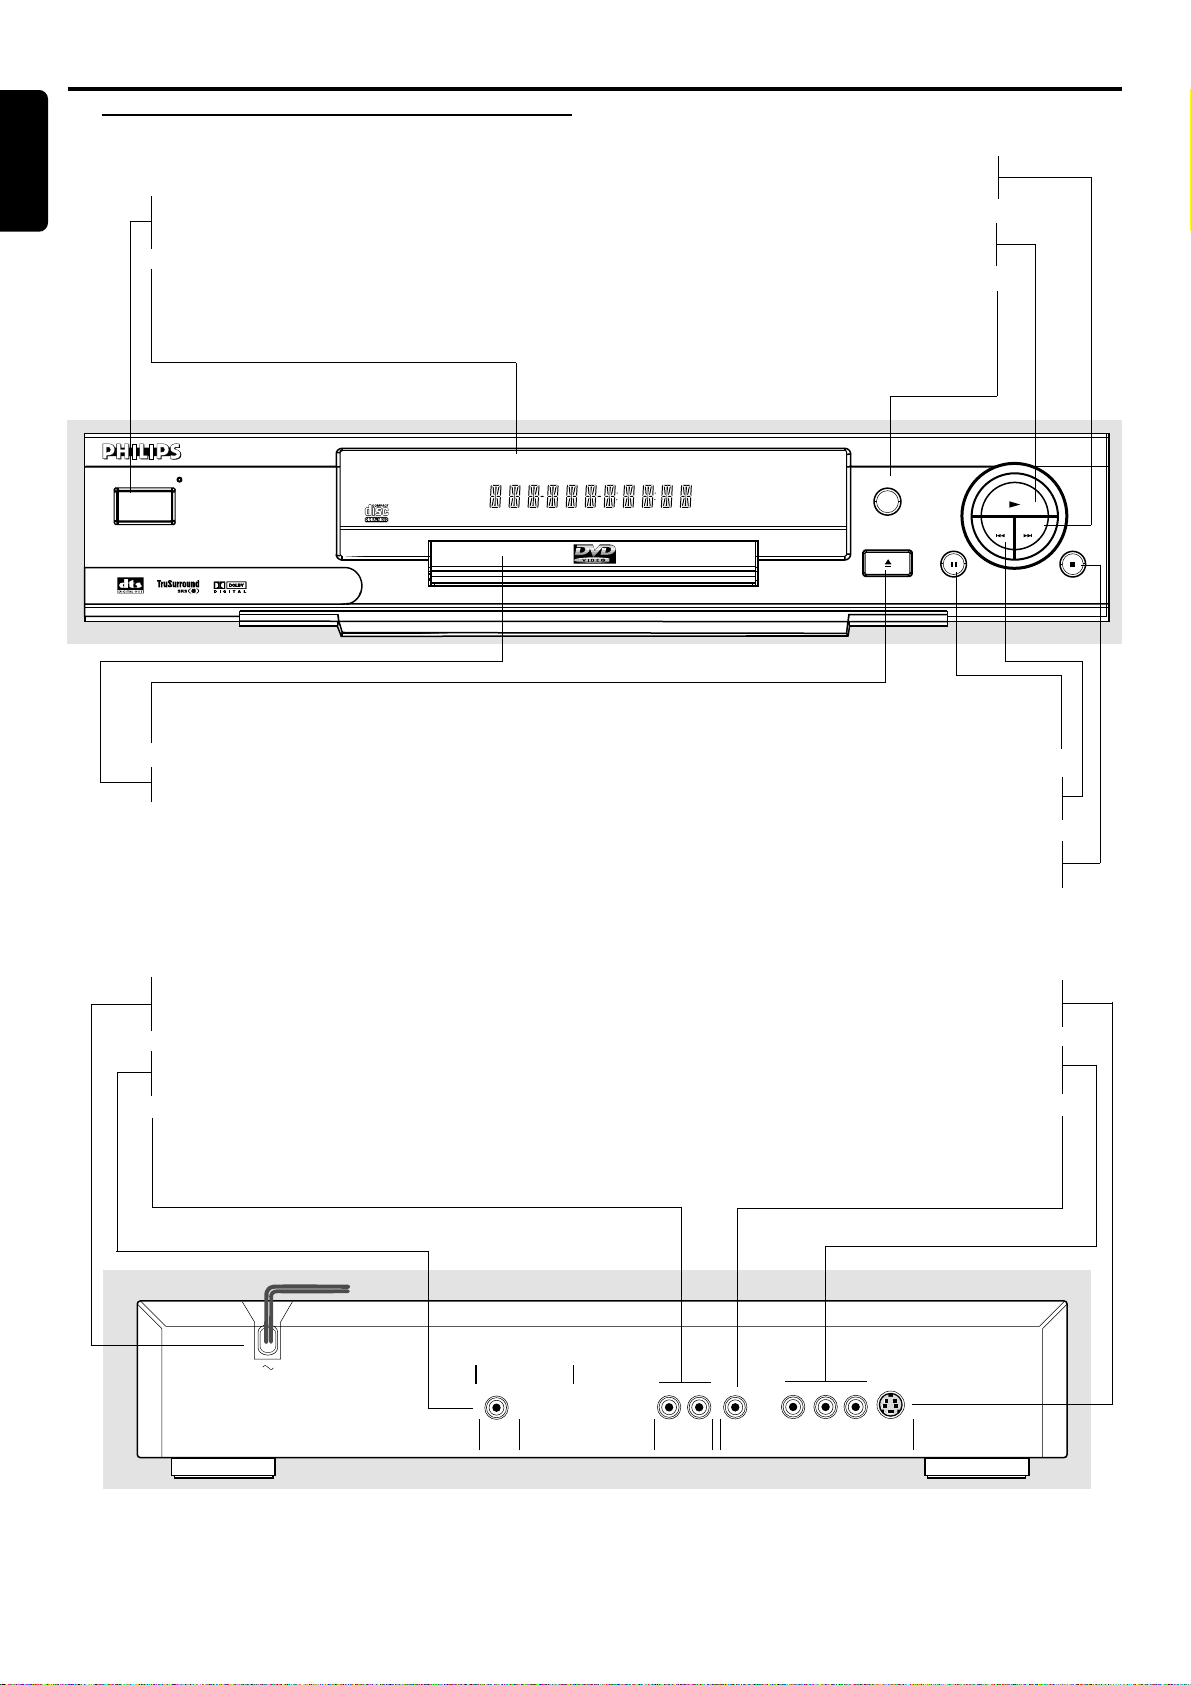
POWER ON/OFF
– switches the player to ON or OFF
DISPLAY
– shows the current status of the player
DVD/VIDEO CD/CD PLAYER
DVD 703
POWER ON/OFF
by
T NEXT
– go to next chapter or track
B PLAY
– to start playback
SOUND
– selects Stereo, Dolby Surround or
3D Sound (TruSurround)
SOUND
OPEN / CLOSE
PAUSE
PREV
PLAY
NEXT
STOP
/ OPEN/CLOSE
– opens/closes the disc tray
Disc Tray
MAINS (AC Power)
– connect to power source
COAXIAL (Digital audio out)
– connect to digital (coaxial) audio equipment
AUDIO OUT (Left/Right)
– connect to amplifier, receiver or stereo
system
; PAUSE
– to interrupt playback
S PREV
– go to previous chapter or track
9 STOP
– to stop playback
S-VIDEO (VIDEO OUT)
– connect to a TV with S-Video (Y/C) inputs
PR /CR PB /CB Y (VIDEO OUT)
– connect to a TV with PR/CR PB/CB Y inputs
CVBS (VIDEO OUT)
– connect to a TV with CVBS video inputs
DIGITAL AUDIO OUT
PCM-MPEG2-Dolby Digital-DTS
COAXIAL
R
AUDIO OUT
PR/C
R
B/CB
L
(CVBS)
P
VIDEO OUT
S-VIDEO
Y
Caution: Do not touch the inner pins of the jacks on the rear panel. Electrostatic discharge may cause
permanent damage to the unit.
6
FUNCTIONAL OVERVIEW
Page 3
Preparation
English
General Notes
¶ Depending on your TV and other equipment you wish to
connect, there are various ways you could connect the
player. Use only one of the connections described below.
¶ Please refer to the manuals of your TV, VCR, Stereo System
or other devices as necessary to make the best
connections.
¶ For better sound reproduction, connect the player’s audio
out jacks to the audio in jacks of your amplifier, receiver,
stereo or audio/video equipment. See ‘Connecting to
optional equipment’.
Caution:
– Make sure the DVD player is connected directly
to the TV. Set the TV to the correct video input
channel.
– Do not connect the player’s audio out jack to
the phono in jack of your audio system.
– Do not connect your DVD player to the TV via
your VCR. The DVD image could be distorted by
the copy protection system.
Connecting to a TV
TV
Z
DIGITAL AUDIO OUT
PCM-MPEG2-Dolby Digital-DTS
PR/C
R
Y
B/CB
COAXIAL
R
AUDIO OUT
L
P
(CVBS)
VIDEO OUT
Connecting to Optional
Equipment
YXA
S-VIDEO
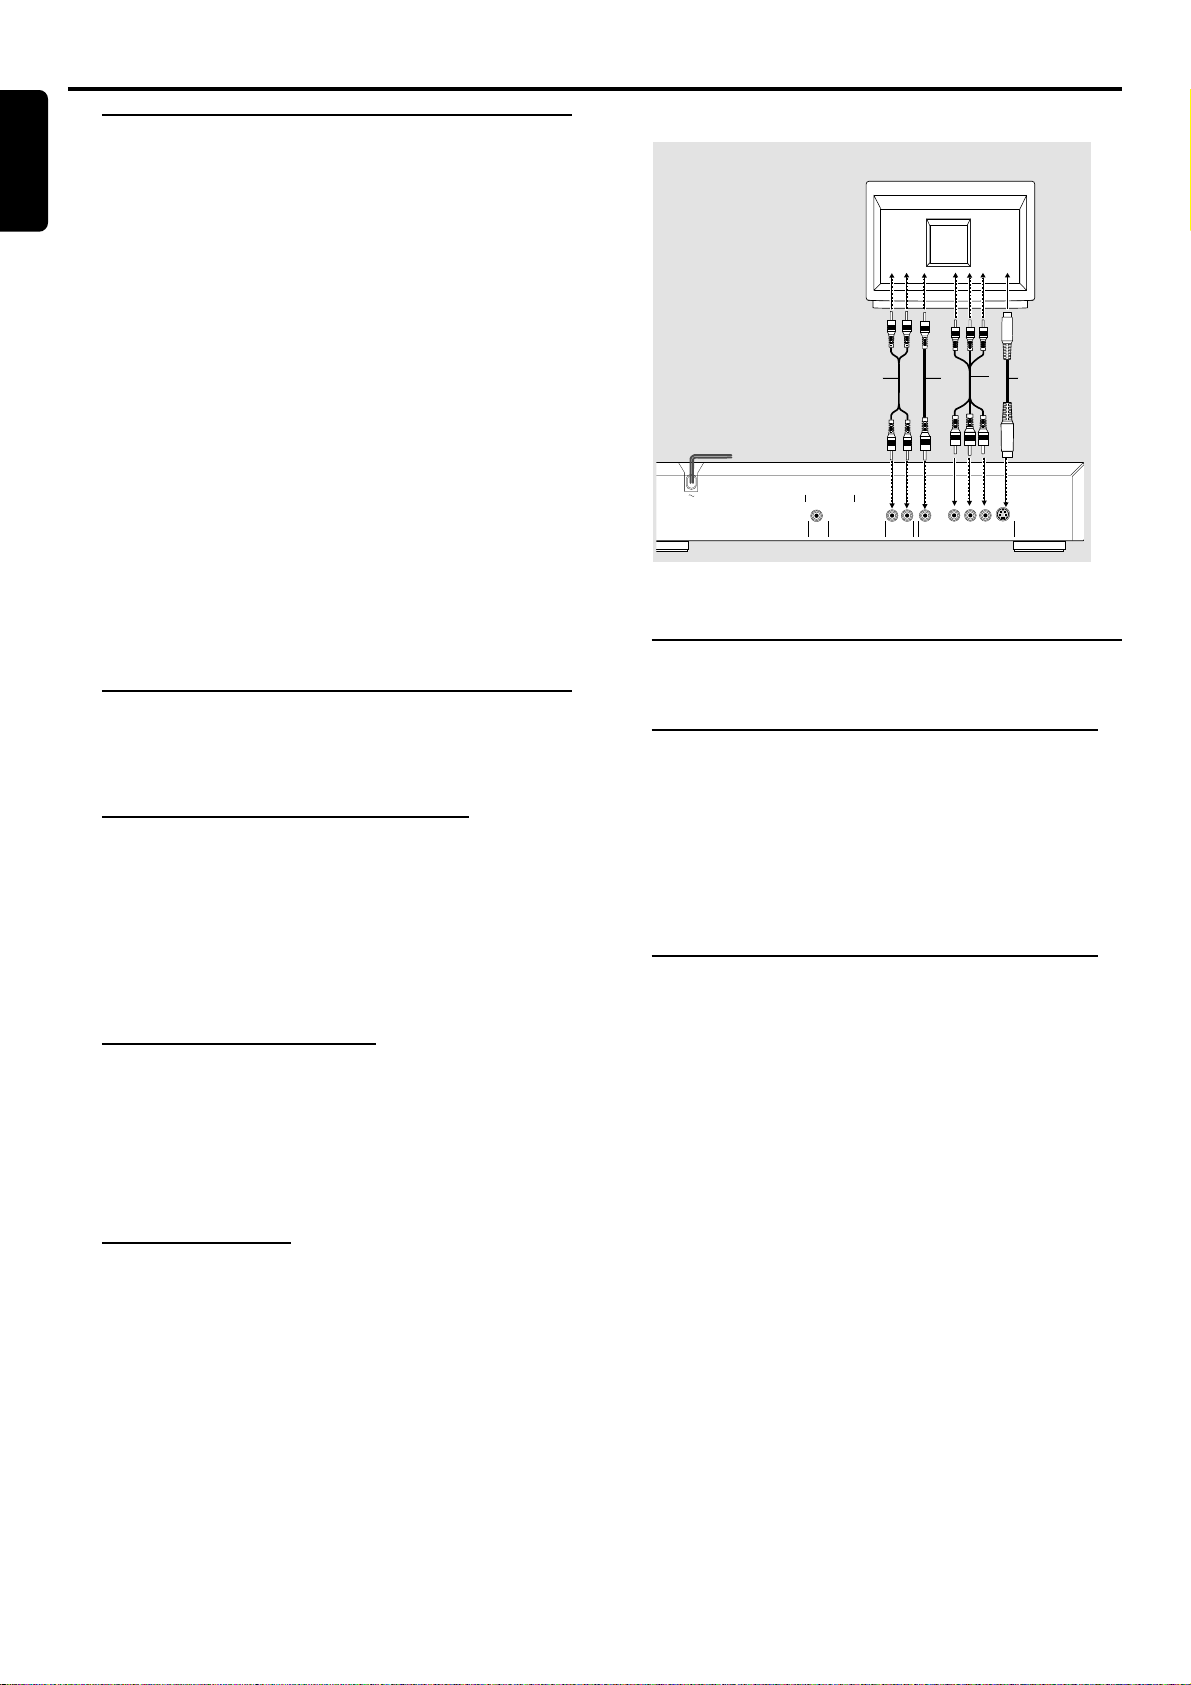
¶ Make one of the following connections, depending on the
capabilities of your existing equipment.
Component Video (PR/CR PB/CB Y)
connection
1 Connect the PR/CR, PB/CB, Y video out jacks on the DVD
player to the corresponding in jacks on the TV using an
optional PR/CR, PB/CB, Y cable (Z).
2 Connect the Left and Right audio out jacks of the DVD
player to the audio left/right in jacks on the TV (A).
S-Video (Y/C) connection
1 Connect the S-Video video out jack on the DVD player to
the S-Video in jack on the TV using an optional S-Video
cable (Y).
2 Connect the Left and Right audio out jacks of the DVD
player to the audio left/right in jacks on the TV (A).
CVBS connection
1 Connect the CVBS video out jack on the DVD player to
the video in jack on the TV using the video cable supplied
(X).
2 Connect the Left and Right audio out jacks to the audio
left/right in jacks on the TV (A).
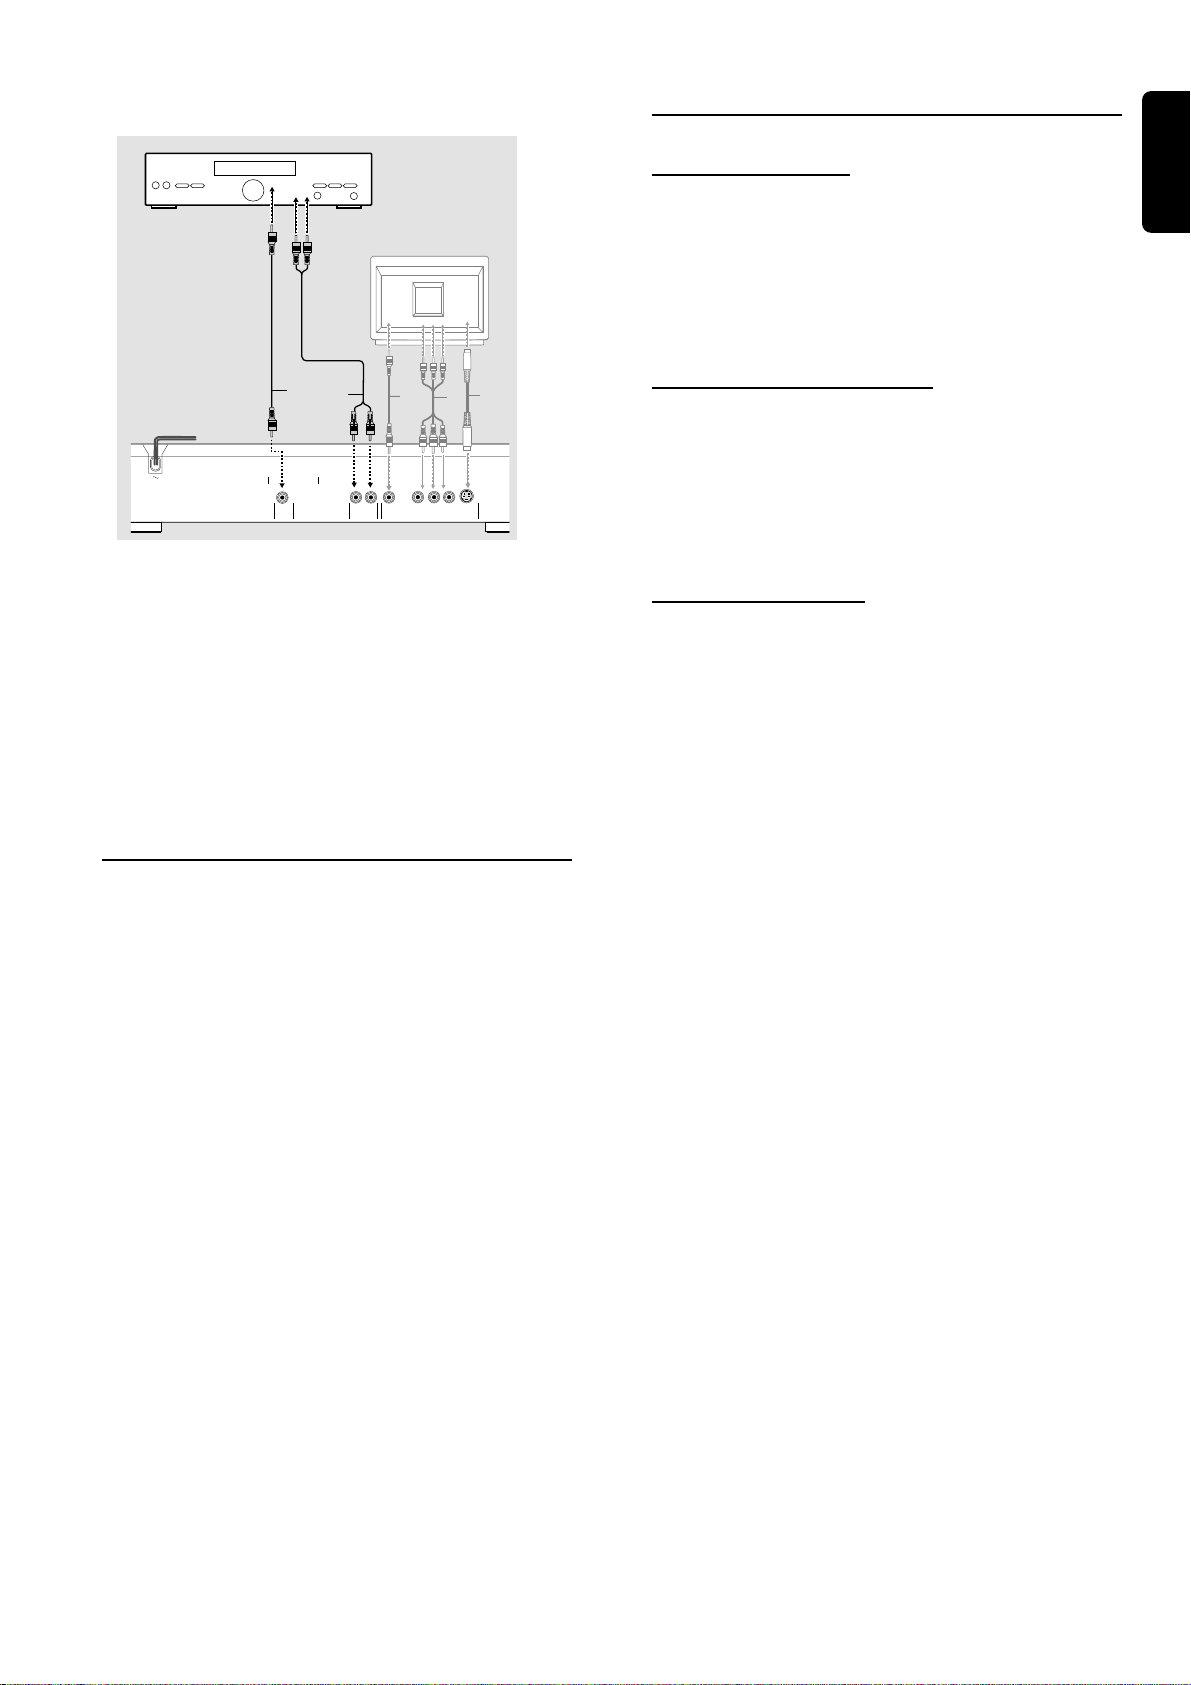
Connecting to an amplifier equipped with
two channel analog stereo or Dolby
Surround
1 Connect the Left and Right audio out jacks of the DVD
player to the audio left and right in jacks on your amplifier,
receiver or stereo system, using the supplied audio cable
(A).
Connecting to an amplifier equipped with
two channel digital stereo (PCM) or to an
Audio/Video receiver equipped with a
multi-channel decoder (Dolby Digital™,
MPEG 2 or DTS)
1 Connect the player’s coaxial digital audio out jack to the
corresponding coaxial digital audio in on your amplifier. Use
an optional digital audio cable (F).
2 You will need to activate the player’s digital output (see
‘Personal Preferences’).
Digital Multi-channel sound
The digital multi-channel connection provides the best
sound quality. For this you need a multi-channel Audio/
Video receiver that supports one or more of the audio
formats supported by your DVD player (MPEG 2, Dolby
Digital™ or DTS). Check the receiver manual and the logos
on the front of the receiver.
8
PREPARATION
Page 4
AMPLIFIER
General explanation
About this manual
English
TV
F
DIGITAL AUDIO OUT
PCM-MPEG2-Dolby Digital-DTS
COAXIAL
A
X
PR/C
R
L
(CVBS)
R
AUDIO OUT
VIDEO OUT
Y
Z
S-VIDEO
Y
B/CB
P
Note:
– If the audio format of the digital output does not match the
capabilities of your receiver, the receiver will produce a strong,
distorted sound or no sound at all.
– Six Channel Digital Surround Sound via digital connection
can only be obtained if your receiver has a Digital Multichannel decoder.
– To see the selected audio format of the current DVD in the
Status Window, press SYSTEM MENU or Audio.
NTSC/PAL Settings
This manual gives the basic instructions for operating the
DVD player. Some DVDs require specific operation or
allow only limited operation during playback. When this
occurs, the symbol Ä appears on the TV screen, indicating
that the operation is not permitted by the player or the
disc.
Remote control operation
¶ Unless stated, all operations can be performed by the
remote control. Always point the remote control directly at
the player, making sure there are no obstructions between
the remote and the player.
Corresponding keys on the front panel of the player can
also be used.
Menu bar operation
¶ A number of operations can be done with the menu bar
on the screen. The menu bar can be accessed by pressing
the cursor keys on the remote control.
¶ Pressing SYSTEM MENU while the menu bar is displayed
will clear the menu bar from the screen.
¶ The selected item will be highlighted, and the appropriate
cursor keys to operate it will be displayed below the icon.
¶ The symbols < or > indicates that more items are available
at the left/right of the menu bar. Press 1 or 2 to select
these items.
You can switch the NTSC/PAL setting of the DVD player to
match the video signal of your TV. This setting only affects
the television’s on-screen display that shows the stop and
setup modes. You may select either NTSC or PAL. To
change the DVD player setting to PAL or NTSC, follow the
steps below.
1 Press the POWER ON/OFF button on the front panel of
the DVD player to turn OFF the DVD player.
2 Press and hold 9 and T on the front of the DVD player.
While holding 9 and T press POWER ON/OFF.
3 After PAL or NTSC appears on the display panel of the
DVD player, release 9 and T at the same time. The PAL
or NTSC indicator that appears on the display panel
indicates the current setting.
4 To change the setting, press T within three seconds. The
new setting (PAL or NTSC) will appear on the display
panel.
PREPARATION
9
 Loading...