

Philips DVD625K, DVD751, DVD691, DVD692, DVD131 Service Manual
...
Published by Liu BZH 0272 Service BPAVC Printed in the Netherlands Subject to modification EN 3122 785 12823
©
Copyright 2002 Philips consumer Electronics B.V. Eindhoven, The Netherlands,
All rights reserved. No part of this publication may be reproduced, stored in a
retrieval system or transmitted, in any form or by any means, electronic,
mechanical, photocopying, or otherwise without the prior permission of Philips.
DVD-Video Player DVD625(K) DVD627K
DVD625K/931/751/691/692/131/031
DVD625/781/782/785, DVD627K/781/782
Contents Page
1 Technical Specs and Connection Facilities 2
2 Safety Instructions, Warnings, Notes,
and Service Hints
3
3 Directions for Use 5
4 Mechanical and Dismantling Instructions 19
5 Diagnostic Software, Trouble Shooting and Test
Instructions
21
6
Wiring, Block Diagrams
Block Diagram 27
Wiring Diagram 28
7
Electrical Diagrams and Print-Layouts Diagram PWB
Power Supply Unit (MITSUMI) 29 30
MPEG Board: INDEX 33 39-40
MPEG Board: RF Part 34 39-40
MPEG Board: SERVO 35 39-40
MPEG Board: MEMORY 36 39-40
MPEG Board: VIDEO 37 39-40
MPEG Board: AUDIO 38 39-40
Front Board 41 42
8 Alignments (Not Applicable) 43
9 Circuit Descriptions (Not Applicable) 43
10 Spare Parts List 44
Spare Parts List DVD625K/691/692/131 52
Spare Parts List DVD625K/751 48
Spare Parts List DVD625K/931 44
56Spare Parts List DVD625K/031
Power Supply Unit (EPM) 31 32
Spare Parts List DVD625/781/782/785 60
Contents Page
11 Revision List 68
Spare Parts List DVD627K/781/782/785 64
Appendix:
Service Information 312378540780
1 Technical Specifications
DVD625K/
931/751/691/031
Specifications
625K/931/751/691/031
PLAYBACK SYSTEM
Specifications subject to change without prior notice
AUDIO PERFORMANCE
DA Converter 24bit
Signal-Noise (1KHz) 100dB
Dynamic range(1KHz) >90dB
DVD fs 96 kHz 4Hz- 44kHz
fs 48 kHz 4Hz- 22kHz
SVCD fs 48 kHz 4Hz- 22kHz
fs 44.1kHz 4Hz- 20kHz
CD/VCD fs 44.1kHz 4Hz- 20kHz
TV STANDARD (PAL/50Hz) (NTSC/60Hz)
Number of lines 625 525
Playback Multistandard (PAL/NTSC)
CONNECTIONS
Component Video Output Cinch
S-Video Output Mini DIN 4-pins
Video Output Cinch
Audio Output(L+R) Cinch
Digital Output 1 coaxial
IEC958 for CDDA / LPCM/ MPEG1
IEC1937 for MPEG 2, Dolby
Digital and DTS
CABINET
Dimensions (w x d x h) 360 x 285 x 43 mm
Weight Approximately 2.2 Kg
POWER CONSUMPTION
Power consumption in Standby mode 1W
DVD Video
Video CD & SVCD
CD
PICTURE CD
MP3-CD
CD-R, CD-RW
DVD+R, DVD+RW
VIDEO PERFORMANCE
* CVBS 1Vpp --- 75
* S-VIDEO Y: 1.00Vpp --- 75
C: 0.30Vpp --- 75
*Component video Y: 1.00Vpp --- 75
Pr : 0.7Vpp --- 75
Pb: 0.7Vpp --- 75
AUDIO FORMAT
Digital Mpeg/ AC-3/ DTS compressed Digital
PCM 16, 20, 24 bits
fs, 44.1, 48, 96 kHz
MP3(ISO 9660) 24, 32, 56, 64, 96, 128,
256 kbps & variable
bit rate fs, 16, 22.05,
24, 32, 44.1, 48 kHz
Analog Sound Stereo
2
Safety Instructions, Warnings, Notes, and Service Hints
2. Safety Instructions, Warnings, Notes, and Service Hints
2.1 Safety Instructions
2.1.1 General Safety
Safety regulations require that during a repair:
Connect the unit to the mains via an isolation transformer.
Replace safety components, indicated by the symbol ,
only by components identical to the original ones. Any
other component substitution (other than original type) may
increase risk of fire or electrical shock hazard.
Safety regulations require that after a repair, you must return
the unit in its original condition. Pay, in particular, attention to
the following points:
Route the wires/cables correctly, and fix them with the
mounted cable clamps.
Check the insulation of the mains lead for external
damage.
Check the electrical DC resistance between the mains plug
and the secondary side:
1. Unplug the mains cord, and connect a wire between
the two pins of the mains plug.
2. Set the mains switch to the 'on' position (keep the
mains cord unplugged!).
3. Measure the resistance value between the mains plug
and the front panel, controls, and chassis bottom.
4. Repair or correct unit when the resistance
measurement is less than 1 Mohm.
5. Verify this, before you return the unit to the customer/
user (ref. UL-standard no. 1492).
6. Switch the unit ‘off’, and remove the wire between the
two pins of the mains plug.
2.1.2 Laser Safety
This unit employs a laser. Only qualified service personnel may
remove the cover, or attempt to service this device (due to
possible eye injury).
Laser Device Unit
Type : Semiconductor laser
GaAlAs
Wavelength : 650 nm (DVD)
: 780 nm (VCD/CD)
Output Power : 20 mW
(DVD+RW writing)
(DVD reading)
: 0.3mW
(VCD/CD reading)
Beam divergence : 60 degree
Figure 2-1
Note: Use of controls or adjustments or performance of
procedure other than those specified herein, may result in
hazardous radiation exposure. Avoid direct exposure to beam.
2.2 Warnings
2.2.1 General
All ICs and many other semiconductors are susceptible to
electrostatic discharges (ESD, ). Careless handling
during repair can reduce life drastically. Make sure that,
during repair, you are at the same potential as the mass of
the set by a wristband with resistance. Keep components
and tools at this same potential.
Available ESD protection equipment:
– Complete kit ESD3 (small tablemat, wristband,
connection box, extension cable and earth cable) 4822
310 10671.
– Wristband tester 4822 344 13999.
Be careful during measurements in the live voltage section.
The primary side of the power supply (pos. 1005), including
the heatsink, carries live mains voltage when you connect
the player to the mains (even when the player is 'off'!). It is
possible to touch copper tracks and/or components in this
unshielded primary area, when you service the player.
Service personnel must take precautions to prevent
touching this area or components in this area. A 'lightning
stroke' and a stripe-marked printing on the printed wiring
board, indicate the primary side of the power supply.
Never replace modules, or components, while the unit is
‘on’.
2.2.2 Laser
The use of optical instruments with this product, will
increase eye hazard.
Only qualified service personnel may remove the cover or
attempt to service this device, due to possible eye injury.
Repair handling should take place as much as possible
with a disc loaded inside the player.
Text below is placed inside the unit, on the laser cover
shield:
Figure 2-2
2.2.3 Notes
Dolby
Manufactered under licence from Dolby Laboratories. “Dolby”,
“Pro Logic” and the double-D symbol are trademarks of Dolby
Laboratories. Confidential Unpublished Works.
©1992-1997 Dolby Laboratories, Inc. All rights reserved.
Figure 2-3
Trusurround
TRUSURROUND, SRS and symbol (fig 2-4) are trademarks of
SRS Labs, Inc. TRUSURROUND technology is manufactured
under licence frm SRS labs, Inc.
Figure 2-4
CAUTION VISIBLE AND INVISIBLE LASER RADIATION WHEN OPEN AVOID EXPOSURE TO BEAM
ADVARSEL SYNLIG OG USYNLIG LASERSTRÅLING VED ÅBNING UNDGÅ UDSÆTTELSE FOR STRÅLING
ADVARSEL SYNLIG OG USYNLIG LASERSTRÅLING NÅR DEKSEL ÅPNES UNNGÅ EKSPONERING FOR STRÅLEN
VARNING SYNLIG OCH OSYNLIG LASERSTRÅLNING NÄR DENNA DEL ÄR ÖPPNAD BETRAKTA EJ STRÅLEN
VARO! AVATT AESSA OLET ALTTIINA NÄKYVÄLLE JA NÄKYMÄTTÖMÄLLE LASER SÄTEILYLLE. ÄLÄ KATSO SÄTEESEEN
VORSICHT SICHTBARE UND UNSICHTBARE LASERSTRAHLUNG WENN ABDECKUNG GEÖFFNET NICHT DEM STRAHL AUSSETSEN
DANGER VISIBLE AND INVISIBLE LASER RADIATION WHEN OPEN AVOID DIRECT EXPOSURE TO BEAM
ATTENTION RAY ONNEMENT LASER VISIBLE ET INVISIBLE EN CAS D'OUVERTURE EXPOSITION DANGEREUSE AU FAISCEAU
0.8 mW
:
3
Safety Instructions, Warnings, Notes, and Service Hints
2.3 Service Hints
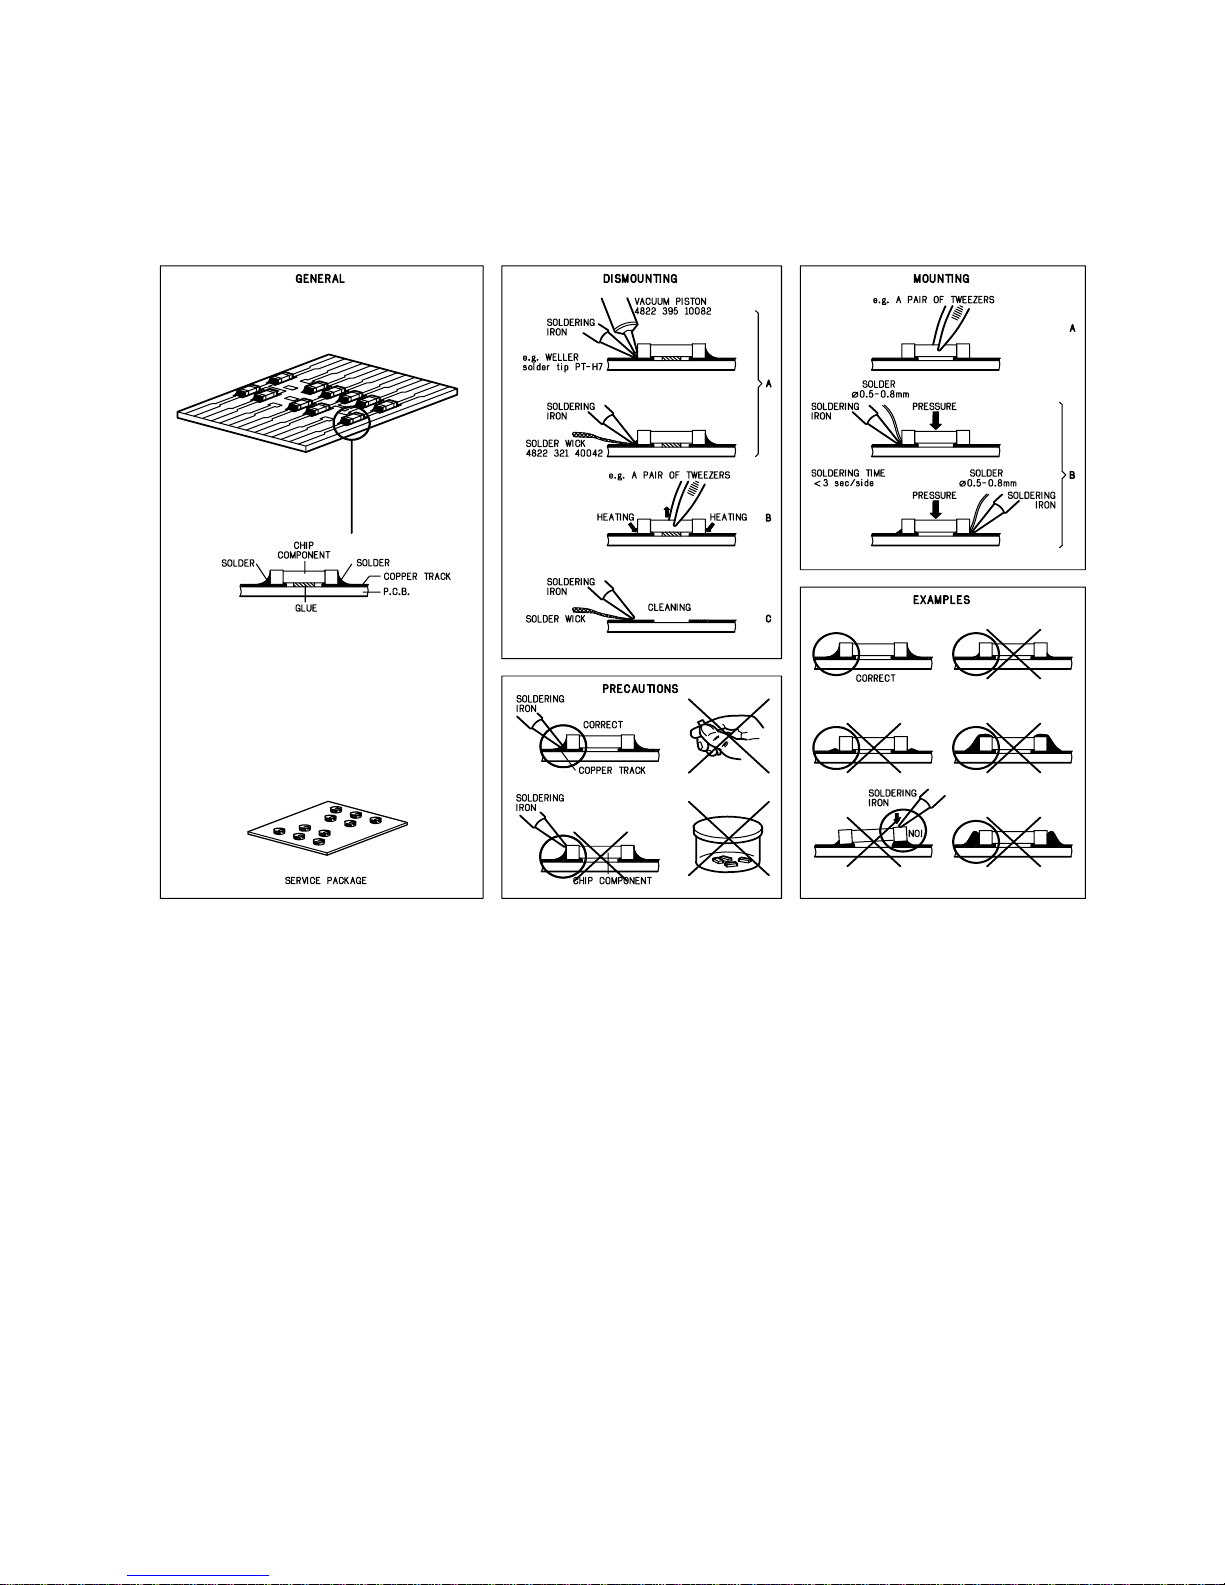
2.3.1 Handling Chip Components
Figure 2-5 Handling Chip Components
2.4 Service Tools
Test discs
– Audio signals disc 4822 397 30184
Torx screwdrivers
– Set (straight, T2 to T20 4822 395 50145
– Set (square, T10, T15, T20to T20 4822 395 50132
2.5 Revision Information
Service Manual Version : 1.1
Issue Date : March, 2003
Revision Information :
1. Update so that DVD625/781/782/785 and DVD625K/131/692 covered.
2. Add trouble shooting and test instructions
3. Correct the mapping in layout Mpeg board components side
4. Correct the wiring diagram.
5. Update the schematics Mpeg
6. Add the spare parts list DVD625/781/782/785, DVD625K/692/131.
CL 26532047_002.eps
050402
4
3. Directions for User
5
5
OPEN/CLOSE
STANDBY-ON
DVD625K DVD VIDEO PLAYER
KARAOKE
STOP
MIC
LEVEL
PLAY/PAUSE
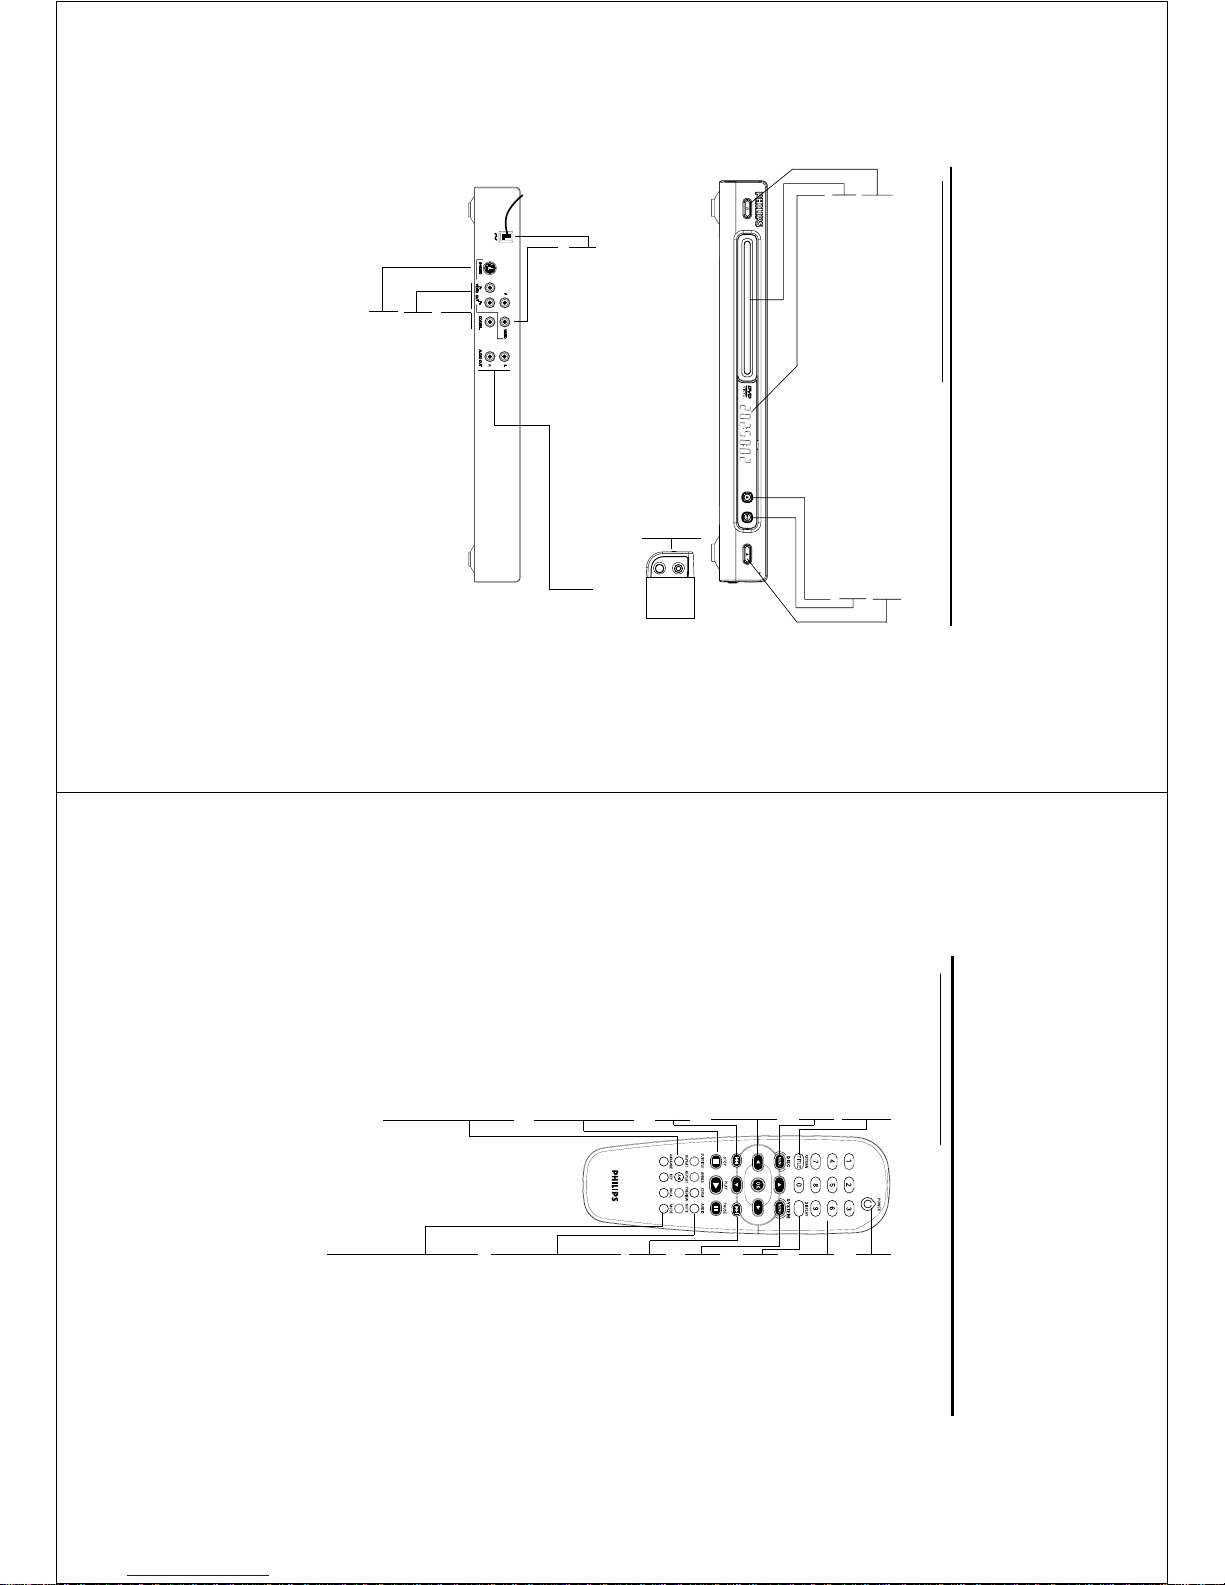
Functional Overview
Front and Rear Panels
Mains Cord
– connect to power outlet
Video out (CVBS)
– connect to a TV with CVBS inputs
AUDIO OUT (Left/Right)
– connect to AUDIO inputs of an
amplifier, receiver or stereo system
Video out (S-Video)
– connect to a TV with S-Video inputs
Coaxial output
– connect to a receiver with coaxial inputs
Caution: Do not touch the inner pins of the jacks on the rear panel. Electrostatic
discharge may cause permanent damage to the unit.
STANDBY-ON
– switches DVD ON or to standby-on mode
Disc T ray
DISPLAY
– shows the current status of the player
/ OPEN/CLOSE
– opens/closes the disc tray
B PLAY/PAUSE
– starts/interr upts playback
9 STOP
– stops playback
Video out (Y Pb Pr)
– connect to a TV with component video inputs
MIC
– MIC socket for karaoke
LEVEL
– MIC volume control for karaoke
6
Functional Overview
Remote Control
RETURN / TITLE
– go back to previous menu /
show title menu
DISC MENU
– access menu of a DVD disc
/switch PBC on/off for VCD disc
1 2 3 4
– select an item in the menu/
fast forward/backward, slow
forward/backward
OK
– acknowledge menu selection
S
– go to a previous chapter or
track
STOP ( 9 )
– stops playback
PLAY ( B )
– starts playback
PAUSE ( ; )
– pause playback temporarily /
frame-by-frame playback
REPEAT
– repeat chapter, track, title, disc
REPEAT (A-B)
– repeat a specific segment
PREVIEW
– Preview the content of a track
or whole disc
MUTE
– Disable or enable sound output
POWER B
– switches DVD ON or to
standby-on mode
0-9 numerical key pad
– select numbered items in a
menu
DISPLAY
– display information on TV
screen during playback
SYSTEM MENU
– access or remove player’s
system menu
T
– go to next chapter or track
SUBTITLE
– subtitle language selector
/switch off subtitle
ANGLE
– select DVD camera angle
ZOOM
– change the size of image
AUDIO
– audio language selector
KARAOKE
– display Karaoke menu to set
MIC on or off
KEY
– display Karaoke menu to set
key control
VOCAL
– choose audio channels or
karaoke methods
MODE
– display karaoke menu
Note:
Press “STOP” for about 2 seconds to
OPEN or CLOSE disc tray.
7
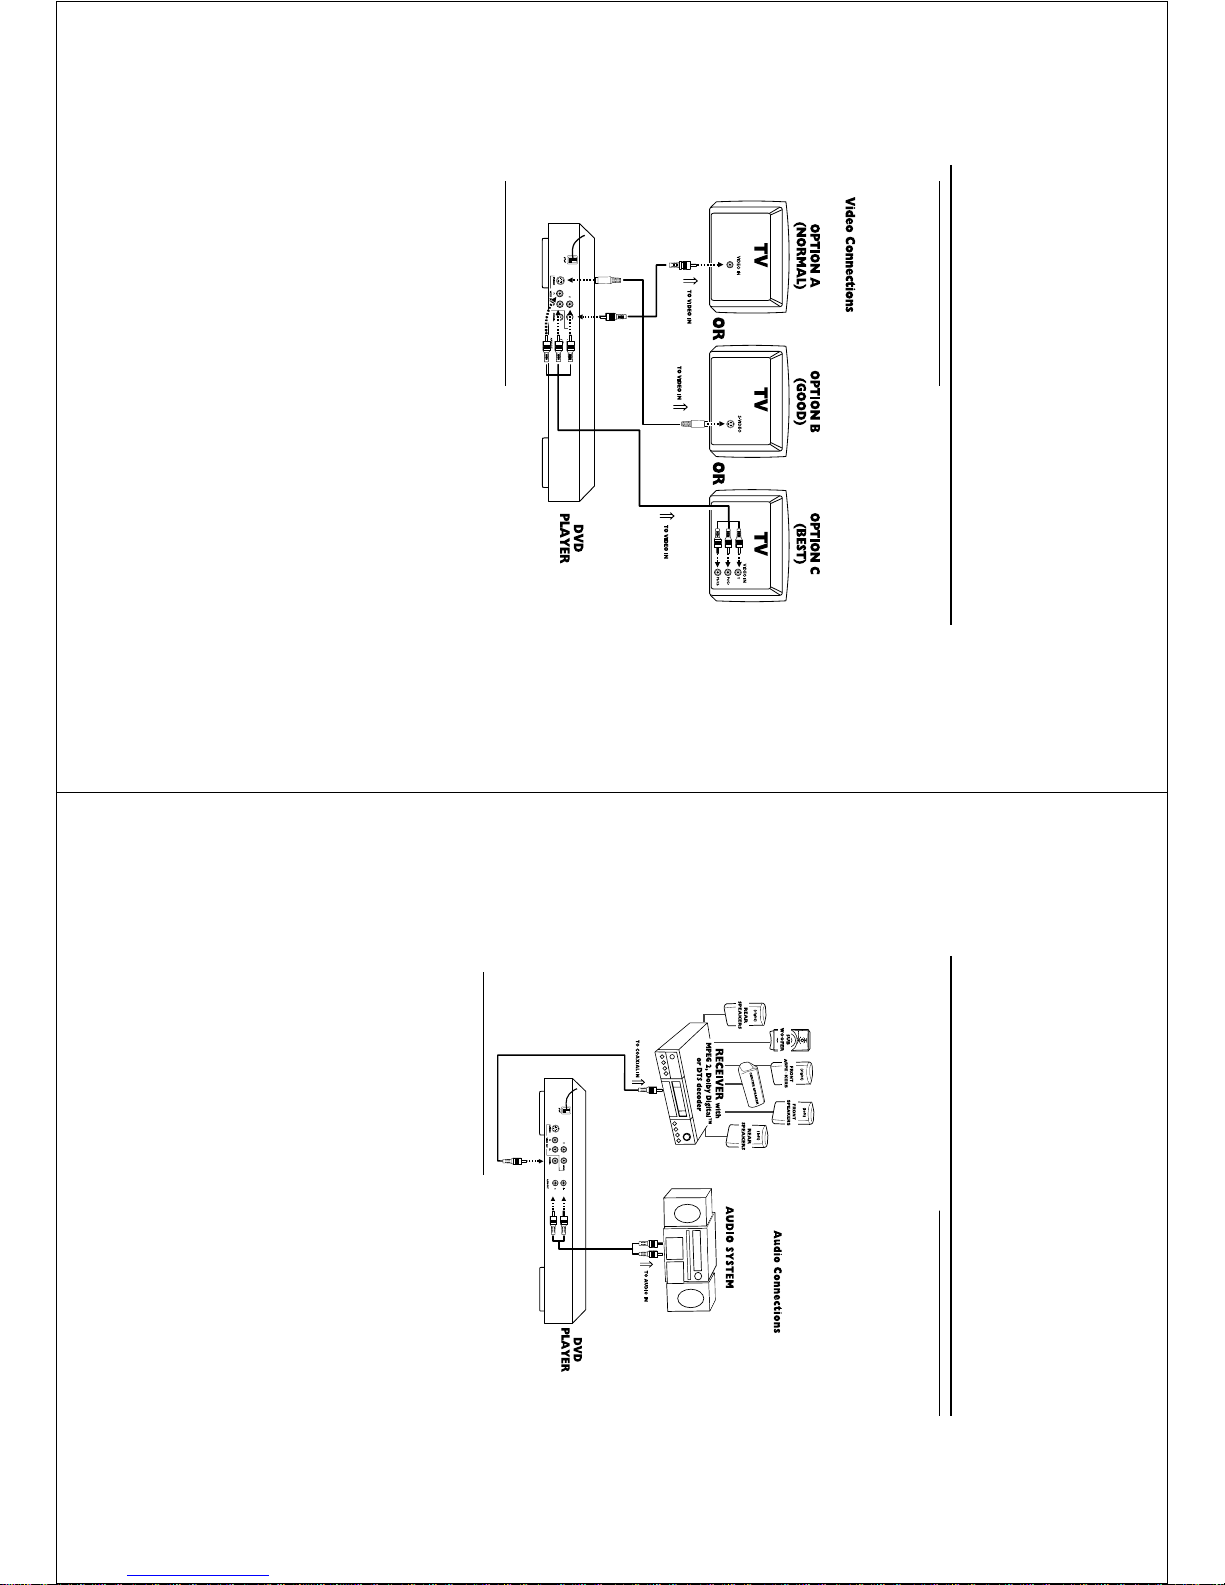
Basic Connections
● Please refer to the instruction books of your TV,
VCR, Stereo System or other devices as
necessary to make the best connections.
● Make one of the following connections,
depending on the capabilities of your existing
equipment.
The following guidelines are options for the best
picture and sound quality available on your DVD
player.
Connecting to a TV
If your TV has a CVBS Video input
connector,
0 Connect the CVBS VIDEO OUT jack on the DVD
player to the corresponding CVBS VIDEO IN jack
on your TV (cable supplied).
If your TV has a S-Video input connector,
0 Connect the S-Video OUT jack on the DVD
player to the corresponding S-Video IN jack on
your TV (not supplied).
If your TV has a Component video
(Y/P
b/Pr)input connector,
0 Connect the Y/Pb/Pr VIDEO OUT on the DVD
player to the corresponding connector on the TV
using the component video cable (not supplied).
Warning!
– Never make or change connections with
the power switched on.
– Connect the DVD player directly to your
TV, instead of eg. a VCR, to avoid
distortion because DVD video discs are
copy protected.
– Do not connect the DVD player AUDIO
OUT to PHONO IN of your player.
Preparation
8
Connecting to a Audio System
1
You can also listen to the sound of audio CDs and
DVD video discs by connecting to an optional
stereo systems.
2 Connect the Left and Right AUDIO OUT on the
DVD player to the Left and Right AUDIO IN on
the stereo systems.
Sound
1 Digital audio connections provide the clearest
sound. Connect one of the DVD player’s
COAXIAL DIGITAL AUDIO OUT to your
amplifier or receiver.
2 If digital connections are not possible, connect
the DVD player’s red and white AUDIO OUT
jacks to the left and right AUDIO IN jacks on
your amplifier, receiver, stereo or TV.
Connecting to Optional
Equipment
● A digital component with a built-in MPEG 2,
Dolby Digital™ or DTS decoder allows you to
enjoy the surround sound while producing the
effect of being in a movie theater or a concert
hall.
If your receiver has a Dolby Digital™,
MPEG 2 or DTS decoder,
Connect to A/V receiver with digital
coaxial cable
● Connect the DIGITAL COAXIAL AUDIO OUT
jack of the DVD player to the corresponding
input jack on the receiver using the normal audio
or video cable supplied.
Notes:
– If the audio format of the digital output does
not match the capabilities of your receiver, the
receiver will produce a strong, distorted sound or no
sound at all.
– To set the audio format of the current DVD in
the Setup Menu, refer to the chapter [ Setup
Menu].
-In this case, do not use the player's audio left and
right output.
Preparation

9
Preparation
Inserting batteries into the
Remote Control
1
Open the battery cover by pressing in the tab,
then lifting off the cover.
2 Insert batteries with the correct polarity as
indicated by the + and - symbols inside the
battery compartment.
3 Close the cover.
+
-
+
-
CAUTION!
– Remove batteries if they are exhausted
or not to be used for a long time.
– Do not use old and new or different
types of batteries in combination.
– Batteries contain chemical substances,
so they should be disposed off properly and
kept away from children.
Using the Remote Control
● Direct the remote control at the remote sensor
of the DVD player.
● Do not drop or give the remote control a shock.
● Do not leave the remote control near extremely
hot or humid place.
● Do not spill water or put anything wet on the
remote control.
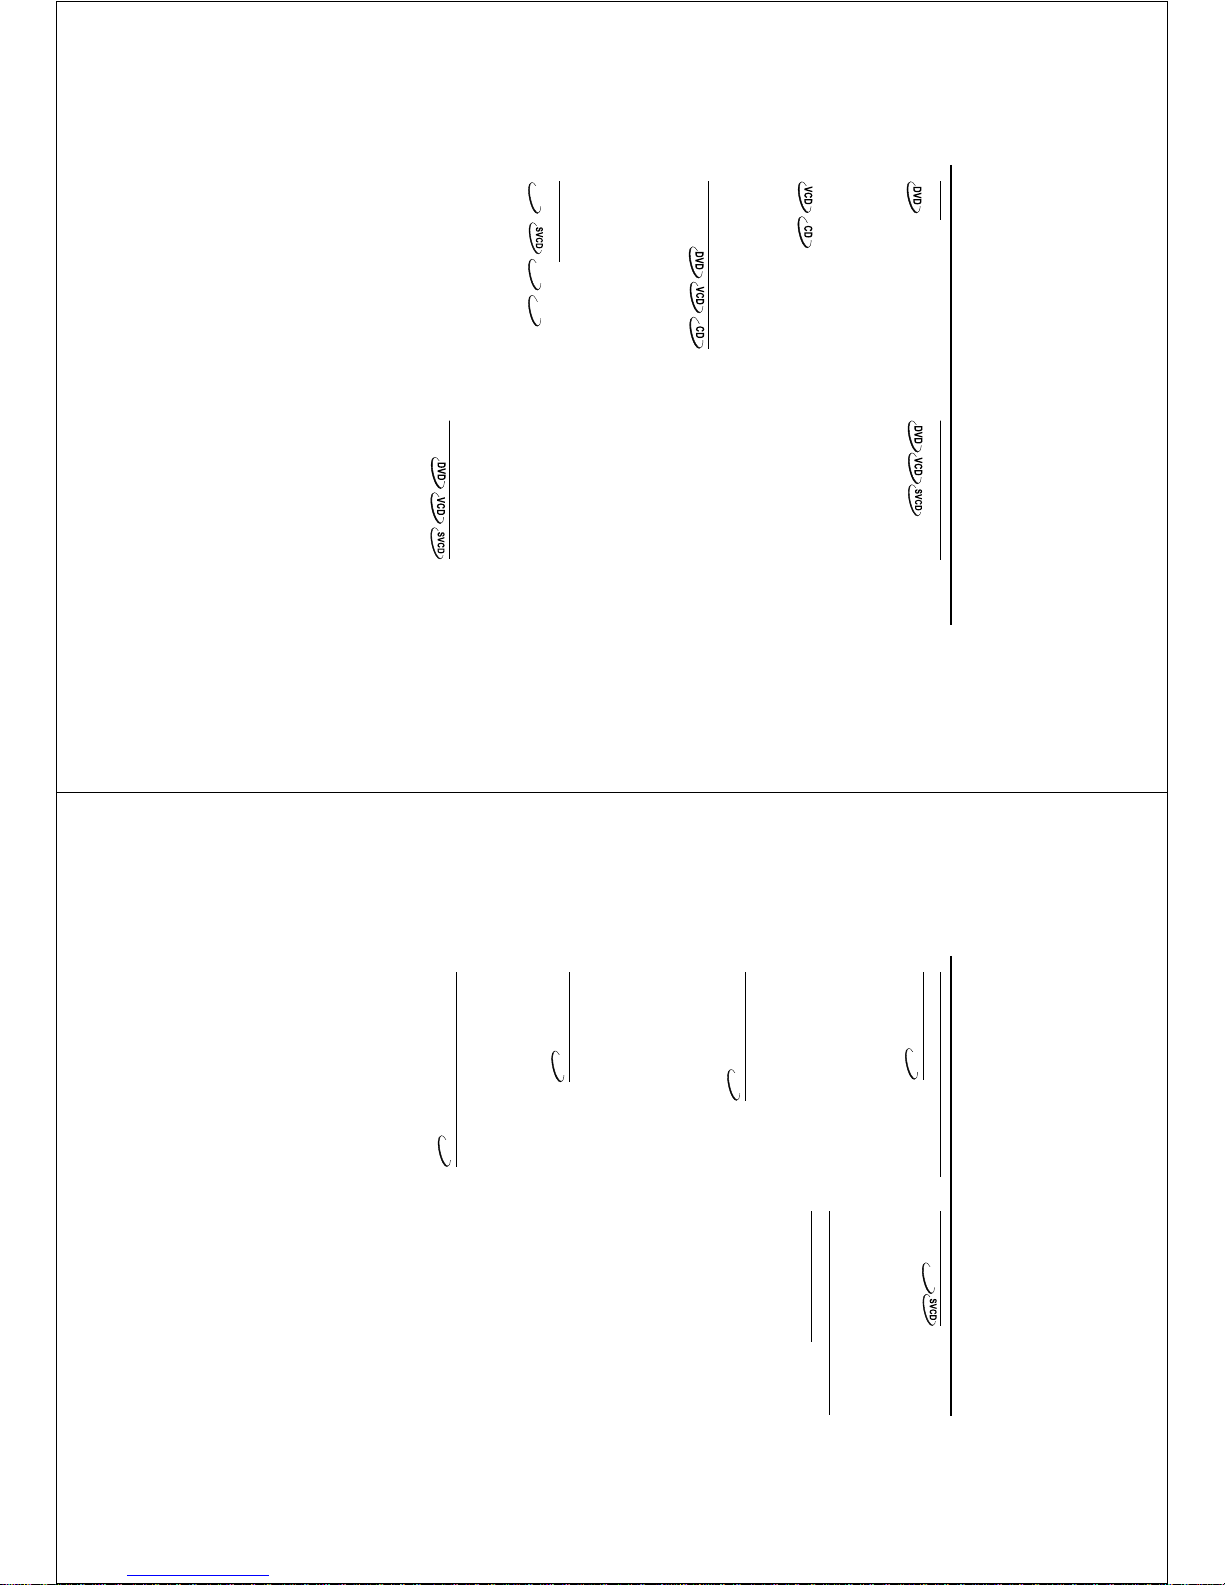
NTSC/PAL Conversion
This player is equipped with a NTSC/PAL
conversion feature to convert the video output
of the disc to match your TV system. The
conversions supported are as below:
NTSC
PAL
NTSC
NTSC
PAL
PAL
NTSC
PAL
NTSC
NTSC
PAL
PAL
Disc
Output format
Type
DVD
VCD
NTSC
Format
Selected mode
PAL
NTSC
PAL
NTSC
PAL
AUTO
Notes:
– AUTO can only be selected when using a TV
that has both the NTSC and PAL systems.
– Slight picture distortions may occur due to this
conversion. This is normal. Thus, the AUTO format is
most suitable for the best picture quality.
Switching On
1
Be sure that the DVD player has well connected
to the TV and audio equipment.
2 Switch on the TV and DVD player.
3 Set the TV to the correct Video In channel. (eg.
EXT1, EXT2, A V1, AV2, AUDIO/VIDEO, etc.
Please refer to your TV owner’s manual for detail)
➜ The player display lights and the default screen
appears on the TV.
4 If you are using an external equipment (eg. audio
system or receiver), turn them on and select the
appropriate input source that was used to
connect to the DVD player output. Refer to the
equipment owner’s manual for detail.
Smart Power On/Off
At STOP or NO DISC mode, the DVD player will
switch to standby mode after 15 minutes without
any operations for saving energy. It is easily
reactivated by pressing the POWER key on the
remote control or the STANDBY-ON button on
the front panel.
10
Slow Motion
1 To get slow motion effect during playback, press
3 or 4.
2 Press 3 or 4 again, you can get different playback
forward/backward speeds.
3 Press PLAY to return to the normal play back.
1 To get slow motion eff ect during playback, press
4.
2 Press 4 again, you can get different playback
forward speeds.
3 Press the PLAY key to return to the normal play
back.
NOTE:
- The SLOW BACKWARD function is not available
for the Super VCD/VCD/CD disc.
Audio control during playback
MUTE
1 Press the MUTE key to disable the sound output.
2 Press the MUTE key again to remove the mute.
Audio channel selection
1 Super VCD has two stereo audio channels which
are used for playing karaoke or the audio
language selection. ( for instance, you can choose
one channel for only the music background of the
song while you play the karaoke.)
2 Press the AUDIO key on the remote control to
select the audio channels you want.
3 VCD has only one stereo audio channel, you can
select STEREO, LEFT MONO, RIGHT MONO or
MIX-MONO by pressing the AUDIO key on the
remote control.
➜ STEREO: Output the left and right audio
channels of the disc through the left and right
audio jack accordingly.
➜ LEFT MONO: Output the left audio channels
of the disc through the left and right audio jack.
➜ RIGHT MONO: Output the right audio
channels of the disc through the left and right
audio jack.
➜ MIX-MONO: each of the audio jacks can
output the same audio effect as stereo.
Note: If you choose digital audio output and set
DIGITAL OUTPUT to ALL, you can not select LEFT
MONO and RIGHT MONO by A UDIO key.
Operation
Basic Playback
1
Press STANDBY-ON on the front panel.
2 Press OPEN/CLOSE on the front panel to open
disc loading tray.
3 Place the chosen disc in the tray, with the label
facing up.
4 Press OPEN/CLOSE again to close the tray.
➜ After recognizing this disc the player begin to
playback automatically.
POWER ON/OFF
Notes:
– DVDs may have a region code. Your player will
not play discs that have a region code different
from the region code of your player.
– If ‘Disc Lock’ is set to LOCK and the disc
inserted is not authorized, the 6-digit code must be
entered and/or the disc must be authorized (see
‘Disc Lock’).
General Operation
Video control during playback
STOP
1 You can resume the play from the point at which
you stopped last time, if you just press the STOP
key once. It will start from the beginning if you
press the STOP key twice to stop playback.
PAUSE/STEP
1 To get a still picture, press PAUSE key during
playback.
2 To step forward to the next frame picture, press
PAUSE key again.
3 To resume normal playback, press PLAY.
SEARCH
1 To search the contents in fast speed, press the 2
or 1 for fast forward/backward searching.
2 Press the 1 or
2 again to increase the speed for
searching.
3 Press PLAY to return to the normal playback.
11
Operation
Repeat
Repeat chapter/title/disc
● To repeat the current chapter, press REPEAT.
● To repeat the current title, press REPEAT a
second time.
● To repeat the whole disc, press REPEAT a third
time.
● To exit REPEAT mode, press REPEAT again.
Repeat track/disc
At the state of PBC OFF,
● To repeat the current track, press REPEAT.
● To repeat the entire disc, press REPEAT a second
time.
● To exit Repeat mode, press REPEAT again.
Repeat A-B
DVD-Video Discs: repeat a sequence in a
title
Video and Audio CDs: repeat a sequence in a
track
1 Press REPEAT A-B at your chosen starting point.
2 Press REPEAT A-B again at your chosen end
point.
➜ The repeat sequence begins.
3 To exit the sequence, press REPEAT A-B.
5 Disc Resume
DVD
VCD
CD
This player can resume the playback of last 5
discs, even if the disc is ejected or the power is
off.
1 Load one disc, which is one of the last 5 discs.
2
Press PLAY when DVD player is recognizing the
disc. If the information of this disc has been
stored in the memory of DVD player, it will be
played back from the stop point last time.
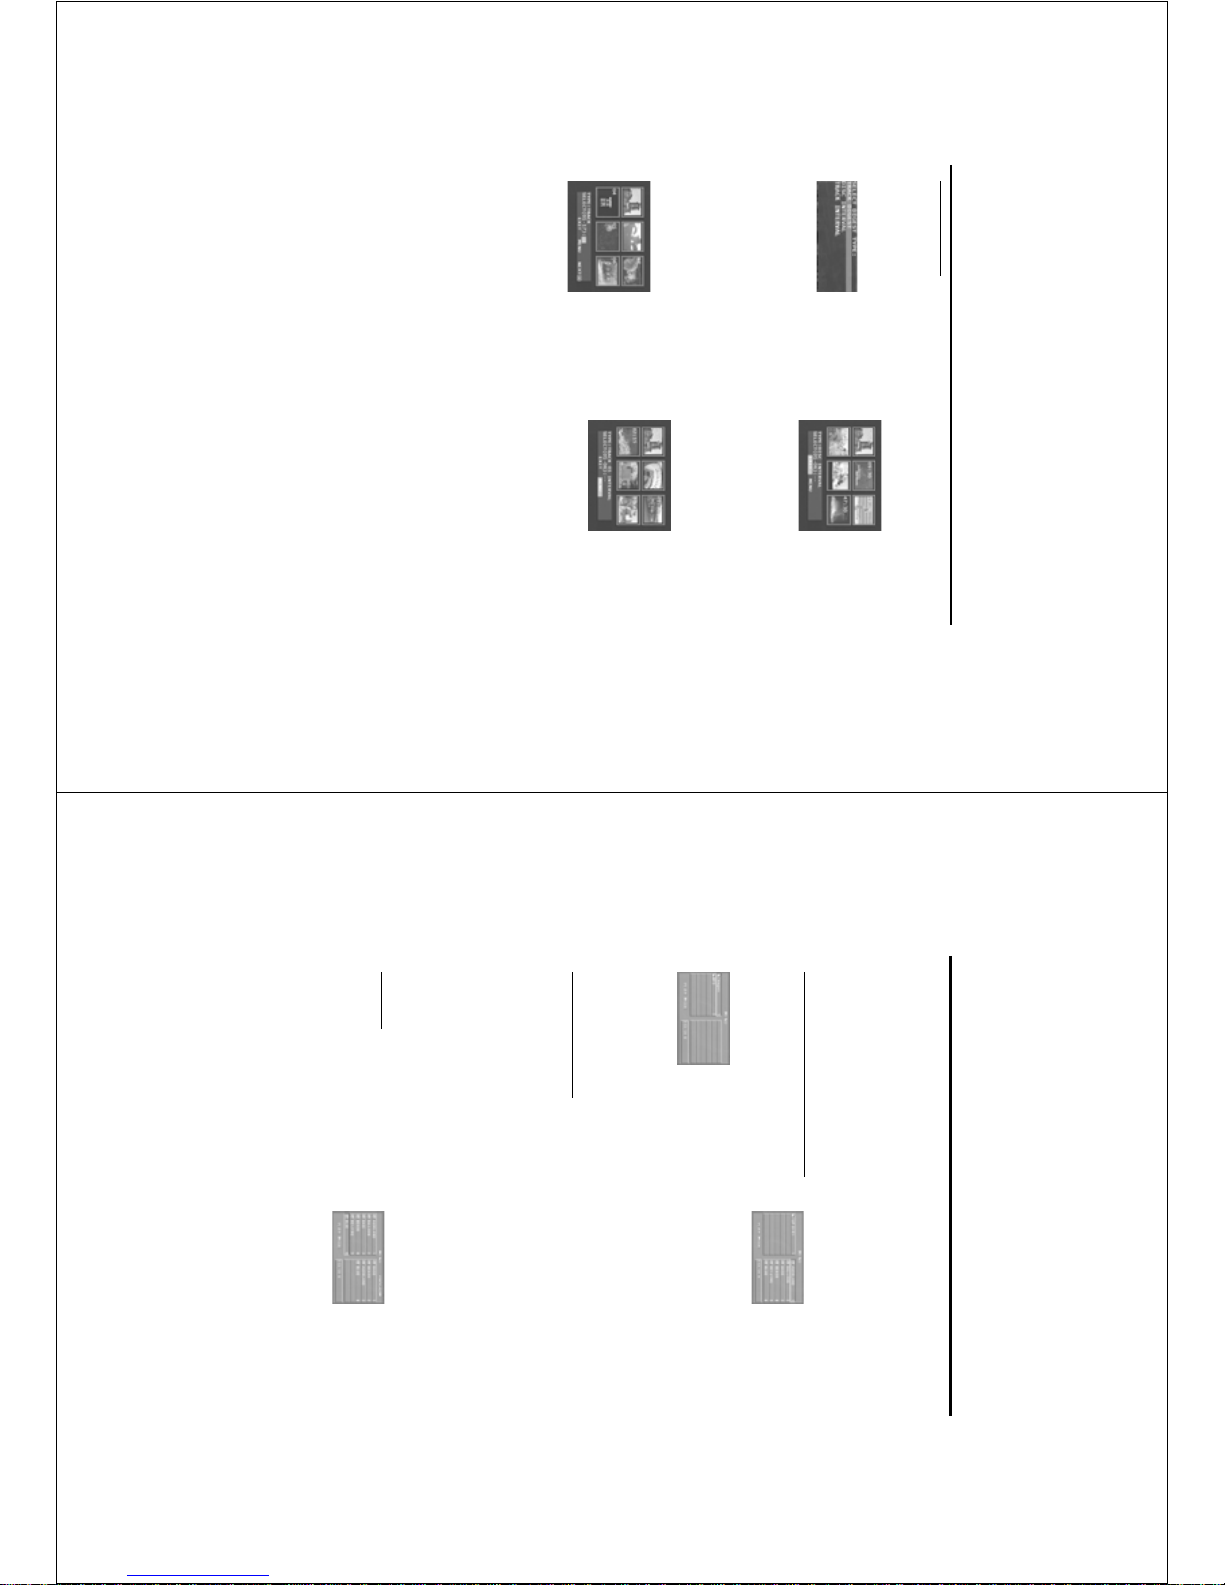
OSD (On-Screen Display)
This function will provide some information about
your playing disc on the screen.
0 Press DISPLAY key on the remote control.
Title Selection
1 Press 1 2 to highlight option Title number.
2 Press 3 4 to change the title number.
➜ DVD player will playback selected title.
Chapter Selection
1 Press 1 2 to highlight option chapter number.
2 Press 3 4 to change the chapter number.
➜ DVD player will playback selected chapter.
Time Search
0 Press 1 2 to highlight time display area.
For DVD discs:
➜ CC refers to the past time of the current
chapter. CR refers to the remanent time of the
current chapter. TC refers to the past time of the
current title. TR refers to the remanent time of
the current title.
For Super VCD or VCD disc
➜ DC refers to the past time of the current disc.
DR refers to the remanent time of the current
disc. TC refers to the past time of the current
track. TR refers to the remanent time of the
current track.
Press 3 to make the selection.
0 Press the 1 2 keys to highlight the item TIME and
you can play from any point of the disc.
➜ Enter hours, minutes and seconds from left to
right in the time edit box using remote control
numerical key pad.( e.g. 0:34:27)
➜ Press the OK key to confirm it.
Zoom
The Zoom function allows you to change the
image size.
1 Press the ZOOM key to activate the function.
➜ Use the 341 2 key to view the rest part of
the zoomed picture.
➜ Playback will continue.
2 Press the ZOOM key repeatedly to return to the
original size.
NOTE: This function is NOT available for PAL
DVD discs or some DVD discs.
12
Subtitles
DVD
0 Press SUBTITLE repeatedly to select the different
subtitles.
0 Press SUBTITLE for about 2 seconds to switch
subtitle on or off.
NOTE: The function will be activated, only if the
DVD or Super VCD is recorded with multi-subtitles.
Special VCD & SVCD Features
Playback Control (PBC)
PBC function can make you enter the index
menu which is used to select a track after loading
the VCD & SVCD disc.
If you want to activate the function,
during the playback or after pressing the
STOP key twice,
1 press the DISC MENU key on the remote control
to set the PBC On.
➜ Pay attention to the hint on the screen.
2 Use the ¡1 or
2™ key to select the page you
like.
➜ If the items of the index menus are numbered,
press the appropriate numerical key on the
remote control.
➜ press the OK key to confirm.
3 Press the RETURN key to enter the index menu
during the playback.
NOTE:
- The content of the index menu depends on the
disc. Please refer to the disc’s instructions for
details.
- If the disc doesn't include the PBC information,
this function will have no effect.
If you want to skip the index menu and
playback directly from the beginning,
1 press the DISC MENU key on the remote control
to switch off the function.
Operation
Special DVD Features
Playing a Title
DVD
A DVD disc may have one or more titles. This
depends on the content (a movie, video clips, a
drama series, etc.) on the disc.
0 After you load a disc, information about the
content shows on the screen waiting for your
selection. Likewise, you can press the TITLE key
on the remote control to turn back to the title
menu during playback.
➜ Press the appropriate numerical key or 341
2 keys on the remote control to highlight your
selection.
➜ Press the OK key to confirm it.
Playing a Chapter
DVD
While you have selected a title, it may include
one or more chapters.
0 Any time you want to watch another chapter
during playback, press DISC MENU key to turn
back to the chapter menu(If disc has chapter
menu).
➜ Press the appropriate numerical key or 341
2 keys on the remote control to highlight your
selection.
➜ Press the OK key to confirm it.
➜ After a chapter has been selected, you also can
press the ¡1 or
2™ key to make a change.
Camera Angle
DVD
Some discs contain scenes which have been shot
simultaneously from various angles.
This DVD player allows you to select the desired
camera angle.
0
pressing the ANGLE key on your remote control.
NOTE: The function is available for the DVD discs
which have recorded several angles movie.
Changing the Audio Language
DVD
0 Press AUDIO repeatedly to select the different
languages.
NOTE: The function will be activated, only if the
DVD is recorded with multi-languages audio tracks.
13
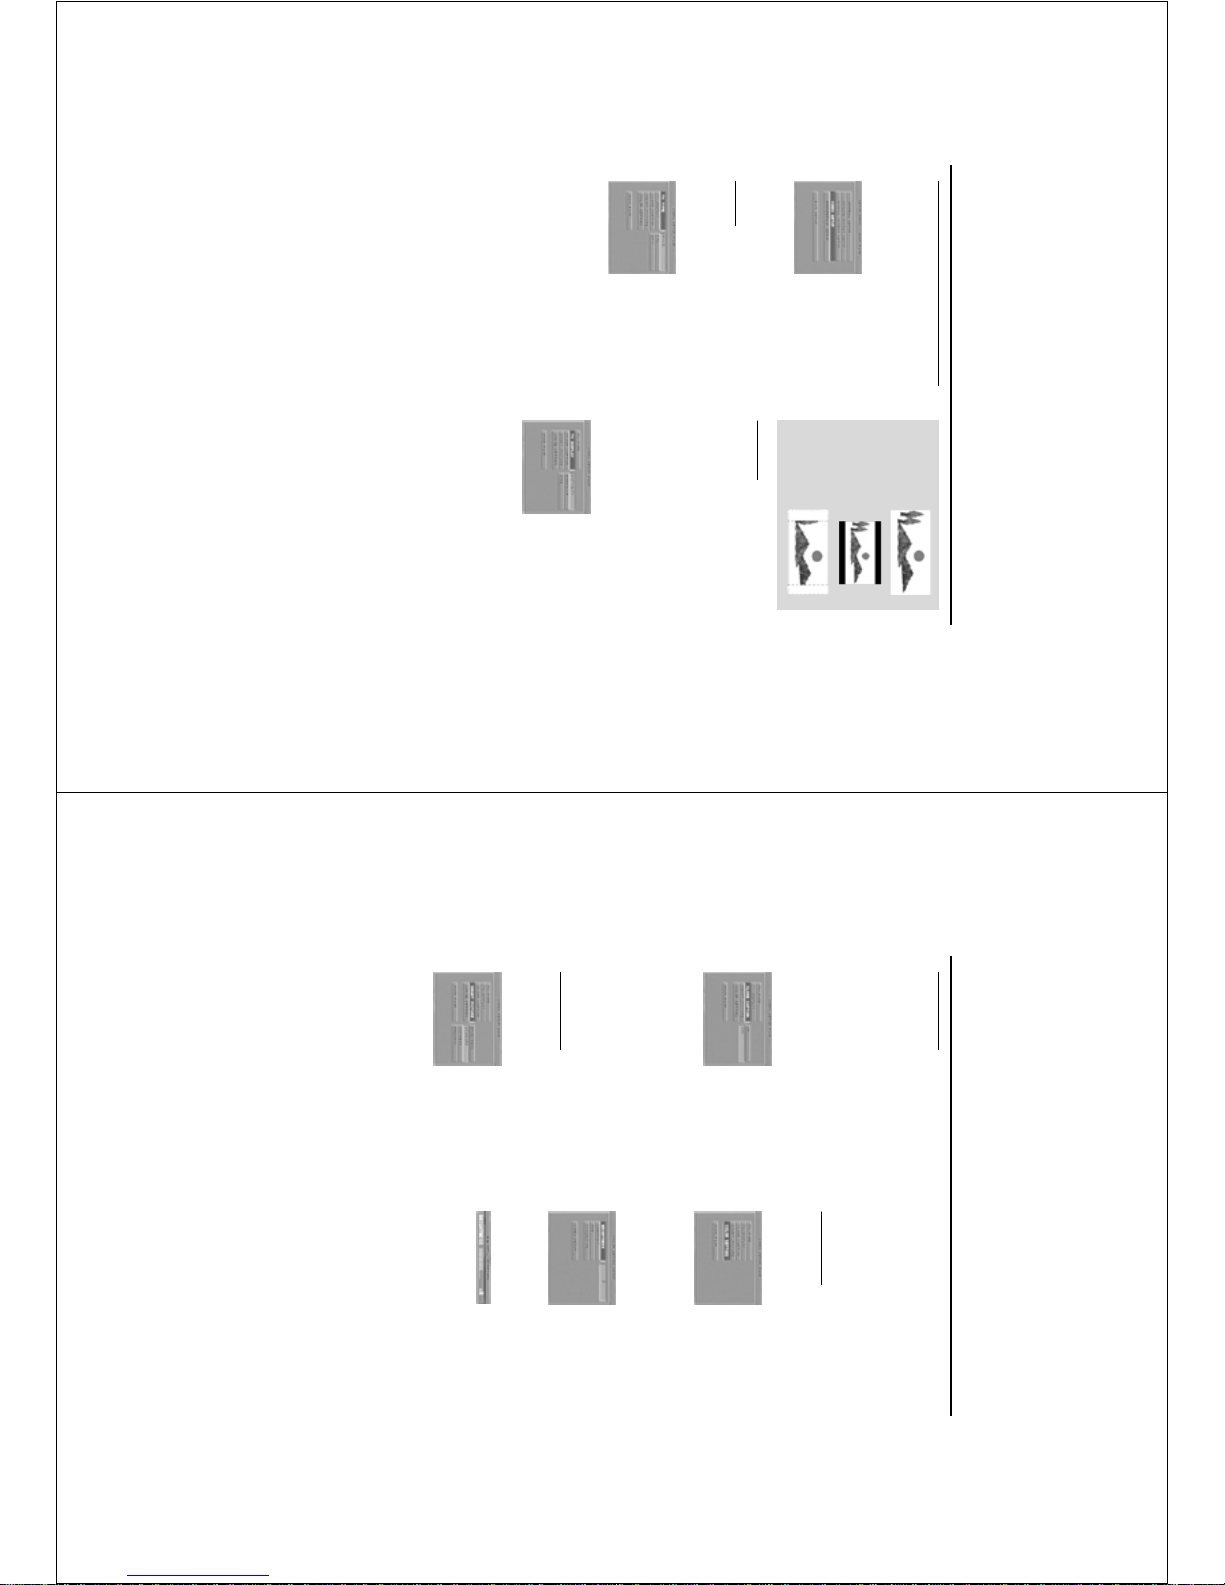
Operation
2 Disc Interval
This function is used to divided a disc into six
parts by regular intervals and display them on one
page to help you preview the whole disc.
- To choose the desired track, please press 341 2
to highlight the second line and input the numerical
keys on the place beside “SELECT”.
- Press the OK key to confirm.
3 Track Interval
This function is used to divided a single track into
six parts by regular intervals and display them on
one page to help you preview the selected track.
- To choose the desired track, please press 341 2
to highlight the second line and input the numerical
keys on the place beside “SELECT”.
- Press the OK key to confirm.
Preview Function
0 Press the PREVIEW key to enter previewing
menu.
0 Press 34 key to highlight TRACK DIGEST, DISC
INTERVAL or TRACK INTERVAL.
0 Press OK key to open one option.
0 After you enter the menu of any digest type,
➜ To quit preview function: Press 341 2 to
highlight EXIT and press OK to confirm.
➜ To return to the previewing menu for selecting
the other digest type: Press 341 2 to highlight
MENU and press OK to confirm.
1 Track Dig est
This function will minify the picture of every track
in order to display every six of these tracks on
the screen to help you know the content of
every track on the disc.
- To choose the desired track, please press 341 2
to highlight the second line and input the
numerical keys on the place beside “SELECT”.
➜ Select the others out of the current six by
pressing the ¡1 or
2™ key to open the previous
or next page.
- Press the OK key to confirm.
14
This player can playback JPEG format pictures and
MP3 files on a personally recorded CD-R/RW
disc or commercial CD, and especially can be
compatible with Kodak Photo CD.
0 Playback pictures or songs one by one
automatically.
0 Album and track selection.
0 Repeat (disc / album / track / picture).
0 Draw out any musics or pictures from the disc to
playback them together.
0 Maximum files numbers in one folder is 500.
0 Maximum files Programmable is 100.
General Operation
0 If you choose WITH MENU in the Setup Menu
(Please refer to the MP3 & JPEG navigator below
), the Picture CD/MP3 CD menu will be shown
on the screen before playback.
0 At any time during playback, press DISC MENU
one time to return to the menu for Selection/
Repeat / Shuffle / Single playback.
0 Both columns on every page of the menu contain
six files or folders, you can press 1 2 to highlight
either of the column and then press 2™ or ¡1 to
open the next or previous six files or folders.
MP3 & JPEG Navigator
1 At STOP mode, press the SYSTEM MENU key to
open the setup menu.
2 Press the 3 4 key to highlight PREFERENCE.
3 Press OK to open the PREFERENCE menu.
4 Press the 3 4 to highlight the MP3/JPEG NAV
menu.
5 Press the 2 key to enter the menu.
6 Press the 3 4 key to highlight the NO MENU
or WITH MENU item.
➜ NO MENU: playback all files in sequence
under the burning date automatically.
➜ WITH MENU:playback files in the selected
folder.
8 Press the OK key to confirm your selection.
Play Mode
Auto Playback
After you choose NO MENU, the DVD player
will playback Picture CD/MP3 CD in sequence
automatically when it is loaded.
Selection Playback
0 One way is to press the number of your favourite
file at any time during the playback.
0 The other is to select in the menu, and also don’t
forget to make MP3 at STOP mode.
1 Press DISC MENU to open the Picture CD/MP3
CD menu.
2 After the menu is shown on the screen, press the
3 4 key to select the folder you want and press
the OK to open it.
3 Press the 2 to enter the file list.
4 Press the 3 4 to highlight one option, or press
its number directly at this time.
➜ You also can press 2™ or ¡1 to go to the
next or previous page.
5 press OK key to confirm.
➜ The playback will start from this selected file to
the last in this folder.
Repeat / Shuffle / Single Playback
0 When the Picture CD/MP3 CD menu is shown
on the screen, Press REPEAT key repeatedly, the
button beside PLAY MODE will display different
option,
➜ SINGLE: The file will be played one time and
then return to the menu.
➜ REPEAT ONE: For the JPEG picture, it will be
still on the screen. For the MP3 music, it will be
replayed time after time.
➜ REPEAT FOLDER: All files in this folder will be
replayed time after time.
➜ SHUFFLE: All files in this folder will be played
at random without any repeat.
0 If you press REPEAT key during playback, the
option will be displayed on the screen accordingly.
Program Playback
1 When the Picture CD/MP3 CD menu is shown
on the screen, Press DISC MENU key.
➜ The left column is the original files and the
right one is the programed files.
2 Press the 3 4 to select one file.
➜ You also can press 2™ or ¡1 to open the
next six files to choose.
Picture CD & MP3 Playback
15
3 Press OK or PLAY key to add the selected file
from the left column to the right column.
➜ The maximum is 100 files.
4 Press STOP key to remove the programed file
from the right column.
5 Highlight one file of the right column and press
OK key, then the programed files will start playing
back.
Special JPEG Features
Function Introduction
Picture CD is a disc with the collection of JPEG
format pictures, and all extension filename should
be ended with 'JPG'. The CD can be burned on
every computer, and pictures maybe from digital
camera or scanner. If the customers prefer, they
can make this CD become a Digital Album.
You can choose any general function introduced
in GENERAL OPERATION, besides, you also can,
0 Display the thumbnails of 12 pictures.
0 Zoom the picture.
0 Rotate the picture.
0 Flip the picture vertically or horizontally.
0 Scan pictures by different effects.
Preview Function
This function can help you know the content of
the current folder or the whole disc.
1 Press the STOP key during playback JPEG
pictures. You will see the thumbnails of 12 pictures
on the screen.
2 Press 2™ or ¡1 key to display the other pictures
on the next or the previous page.
3 Press the 1 2 3 4 key to highlight one of them
and press OK to playback, or,
Move the cursor to highlight Slide Show on the
bottom of the page to start playback from the
first picture on the current page.
4 Press DISC MENU to go to the Picture CD/MP3
CD menu.
Zoom picture
0 During playback, press ZOOM key to display the
picture with different scales.
0 Press the 1 2 3 4 key to view the rest of the
zoomed picture.
Picture CD & MP3 Playback
Playback with multi-angles
When displaying one picture on TV screen
0 Press the 3 4 1 2 key to get different effects.
3 key: Flip the picture vertically.
4 key: Flip the picture horizontally.
1 key: rotate the picture anti-clockwise.
2 key: rotate the picture clockwise.
Wipe T ype
0 Press ANGLE key repeatedly to choose different
wipe types.
Special MP3 Features
Function Introduction
“MP3” stands for “MPEG Audio Layer-3”. and is a
part of the MPEG standard. A CD can store up to
around 10 hours of MP3 audio, which is nearly 10
times as much as an Audio CD. Every song is
recorded as a file. You can choose any general
function introduced in GENERAL OPERATION,
besides, you also can choose different playback
speed control.
Playback Speed Control
Press RETURN/TITLE key to switch to
MP3+NAV mode,
0 Press 1 2, you can get different playback
backward/forward speeds.
0 You also can press 2™ or ¡1 to change the
tracks.
JPEG and MP3 simultaneous
playback
1
Playback a MP3 music under the operation
introduced in Selection playback firstly.
2 Please switch to MP3+JPEG+NAV by pressing
RETURN/TITLE.
3 Then select a picture to playback. Please refer to
the way introduced in Selection playback.
➜ At this time, the pictures will be played back in
sequence together with MP3 music.
4 To quit simultaneous playback, press DISC MENU
key to return to the Picture CD/MP3 CD menu,
then pictures will be stopped. After that, press
STOP key, then MP3 music will be stopped also.
Note: In the function of JPEG and MP3
Simultaneous Playback, 2™ and ¡1 are invalid on
MP3.
16
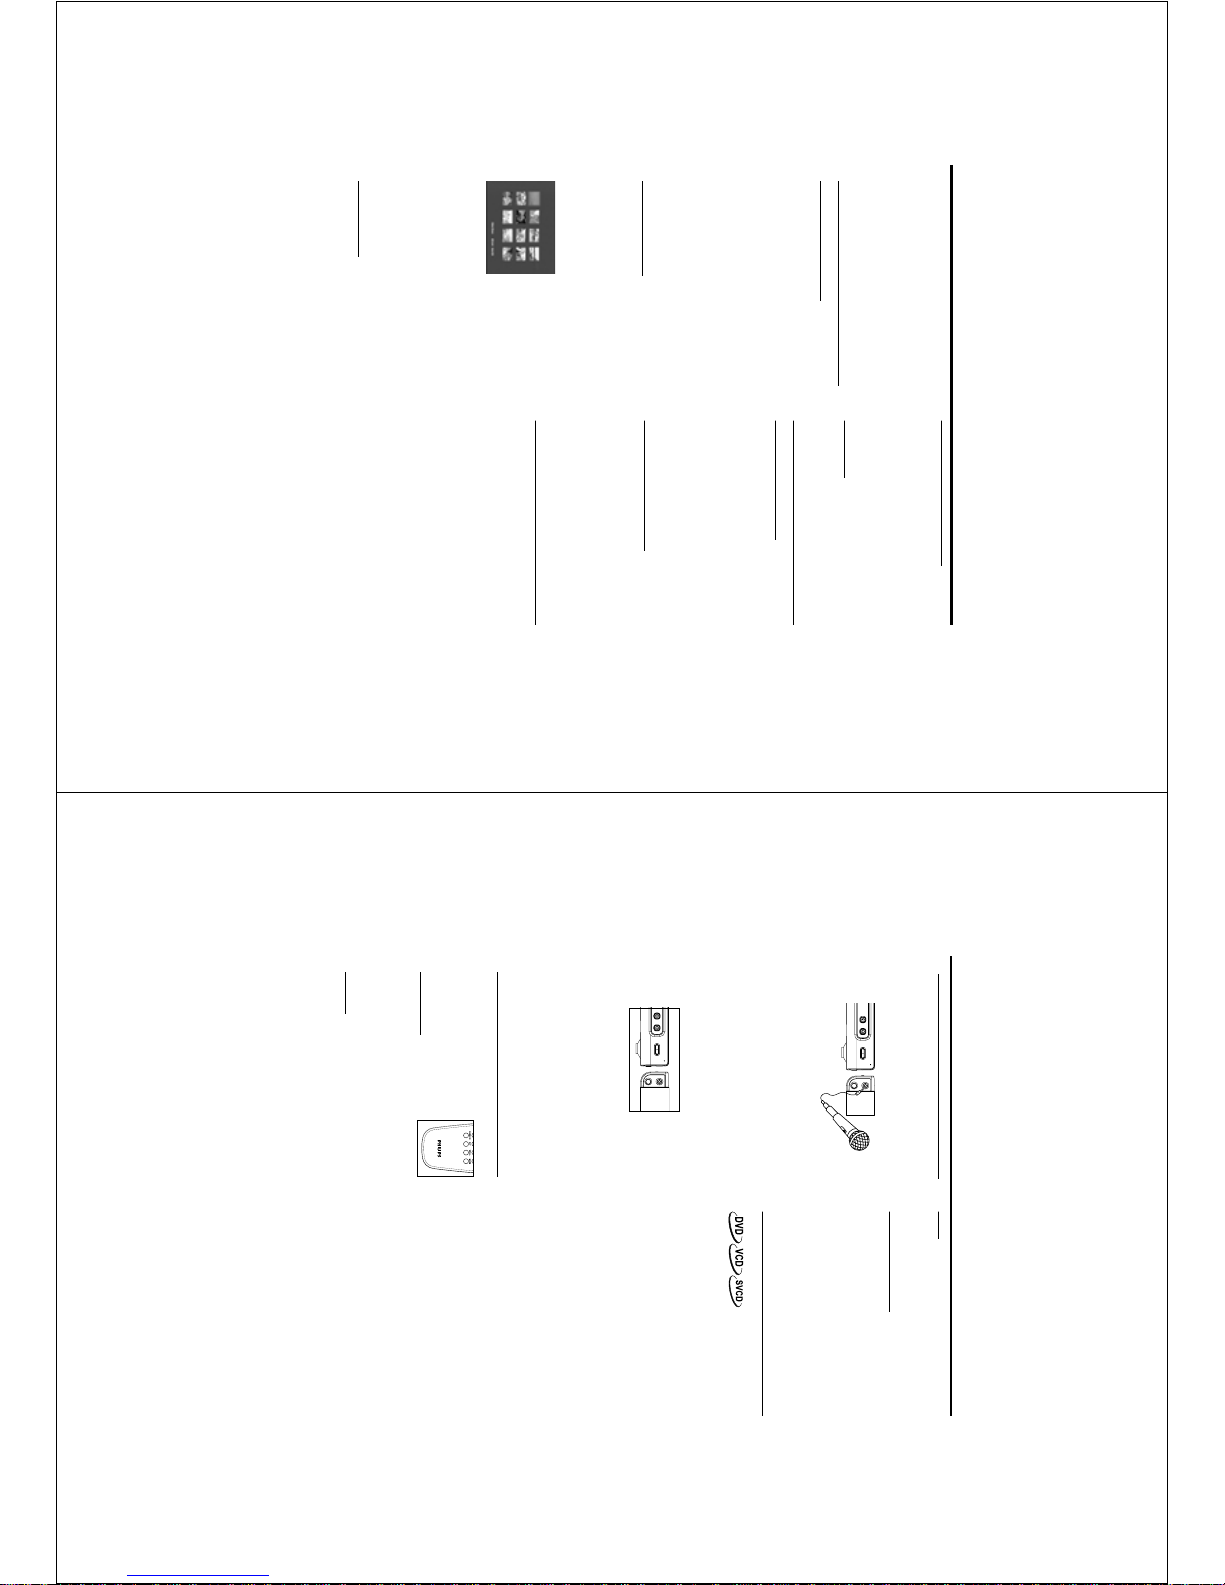
General Operation of Karaoke
1
Connect microphone to MIC. Be sure the player
has been properly connected to your TV or audio
system.
2 Press KARAOKE on the remote control to display
karaoke menu.
➜ karaoke menu appears on TV screen, and the
option ‘MIC’ is highlighted.
0 Press 3 4 or KARAOKE key to switch on
karaoke function.
3 Load a karaoke disc and press PLAY to playback.
4 Turn on the microphone which is connected with
the DVD player and you can enjoy the Karaoke
immediately.
➜ Press the LEVEL key on the right profile of
the DVD player and then turn it to adjust the
volume of microphone.
5 Press KARAOKE on the remote control to display
karaoke menu.
➜ karaoke menu appears on TV screen, and the
option ‘MIC’ is highlighted.
0 Press 3 4 or KARAOKE key to switch off
karaoke function.
KARAOKE
General setup of karaoke
Press MODE to display karaoke
menu (Karaoke menu will
disappear if you do not press any
key in a minute).
Key control
1 Press 1 2 to choose the option KEY or directly
press KEY key to highlight the item.
2 Press 3 4 to adjust the pitch to adopt your
voice.
Volume
1 Press 1 2 to highlight the option VOLUME.
2 Press 3 4 to adjust the VOLUME to adopt your
voice.
Echo
1 Press 1 2 to highlight the option ECHO.
2 Press 3 4 to adjust the echo level.
Vocal assist option
With this function, you can choose vocal assist
during karaoke is available.
1 Press VOCAL on the remote control to choose
VOICE CANCEL, LEFT VOCAL, RIGHT VOCAL,
NO VOCAL ASSIST.
➜ Depending on the VCD format, you can select
VOICE CANCEL, LEFT VOCAL or RIGHT
VOCAL to erase one channel.
Enhanced Karaoke
1 Press MODE/KARAOKE/KEY to display karaoke
menu.
➜ Make sure you have set MIC on.
2 Press 1 2 to highlight RECORD OFF.
3 Press 3 to set RECORD ON.
4 Press 3 again to start recording.
➜ DVD player will record your voice and
original karaoke music.
➜ The recording time must be less than two
minutes.
➜ Press PLAY, you can cancel recording.
➜ This function is available within one track at a
time.
5 Press 3 again to end recording.
➜ On the screen, display “CONTRASTING 1/2/
3”. DVD player will playback the recorded
segment three time at most to let you make a
comparison.
➜ To stop contrasting, press 4 to restart normal
playback and display the karaoke menu.
6 Follow the instructions of step 4 to step 5 to
record other sequences.
Note: - During you use the karaoke and enhanced
karaoke functions, 3 4 keys will have some
special usages. At this time, slow motion effect is
invalid. Quit these functions and close karaoke
menu, then 3 4 will get slow motion into effect
again.
- If you want to use both DIGITAL OUTPUT (like
coaxial or optical) and VOCAL ASSIST achieved by
choosing left or right channel, PCM must be
selected in DIGITAL OUTPUT menu. Please refer
to the “Digital Output” chapter for operations.
OPEN/CLOSE
KARAOKE
STOP
MIC
LEVEL
PLAY/PAUSE
OPEN/CLOSE
KARAOKE
STOP
MIC
LEVEL
PLAY/PAUSE
17
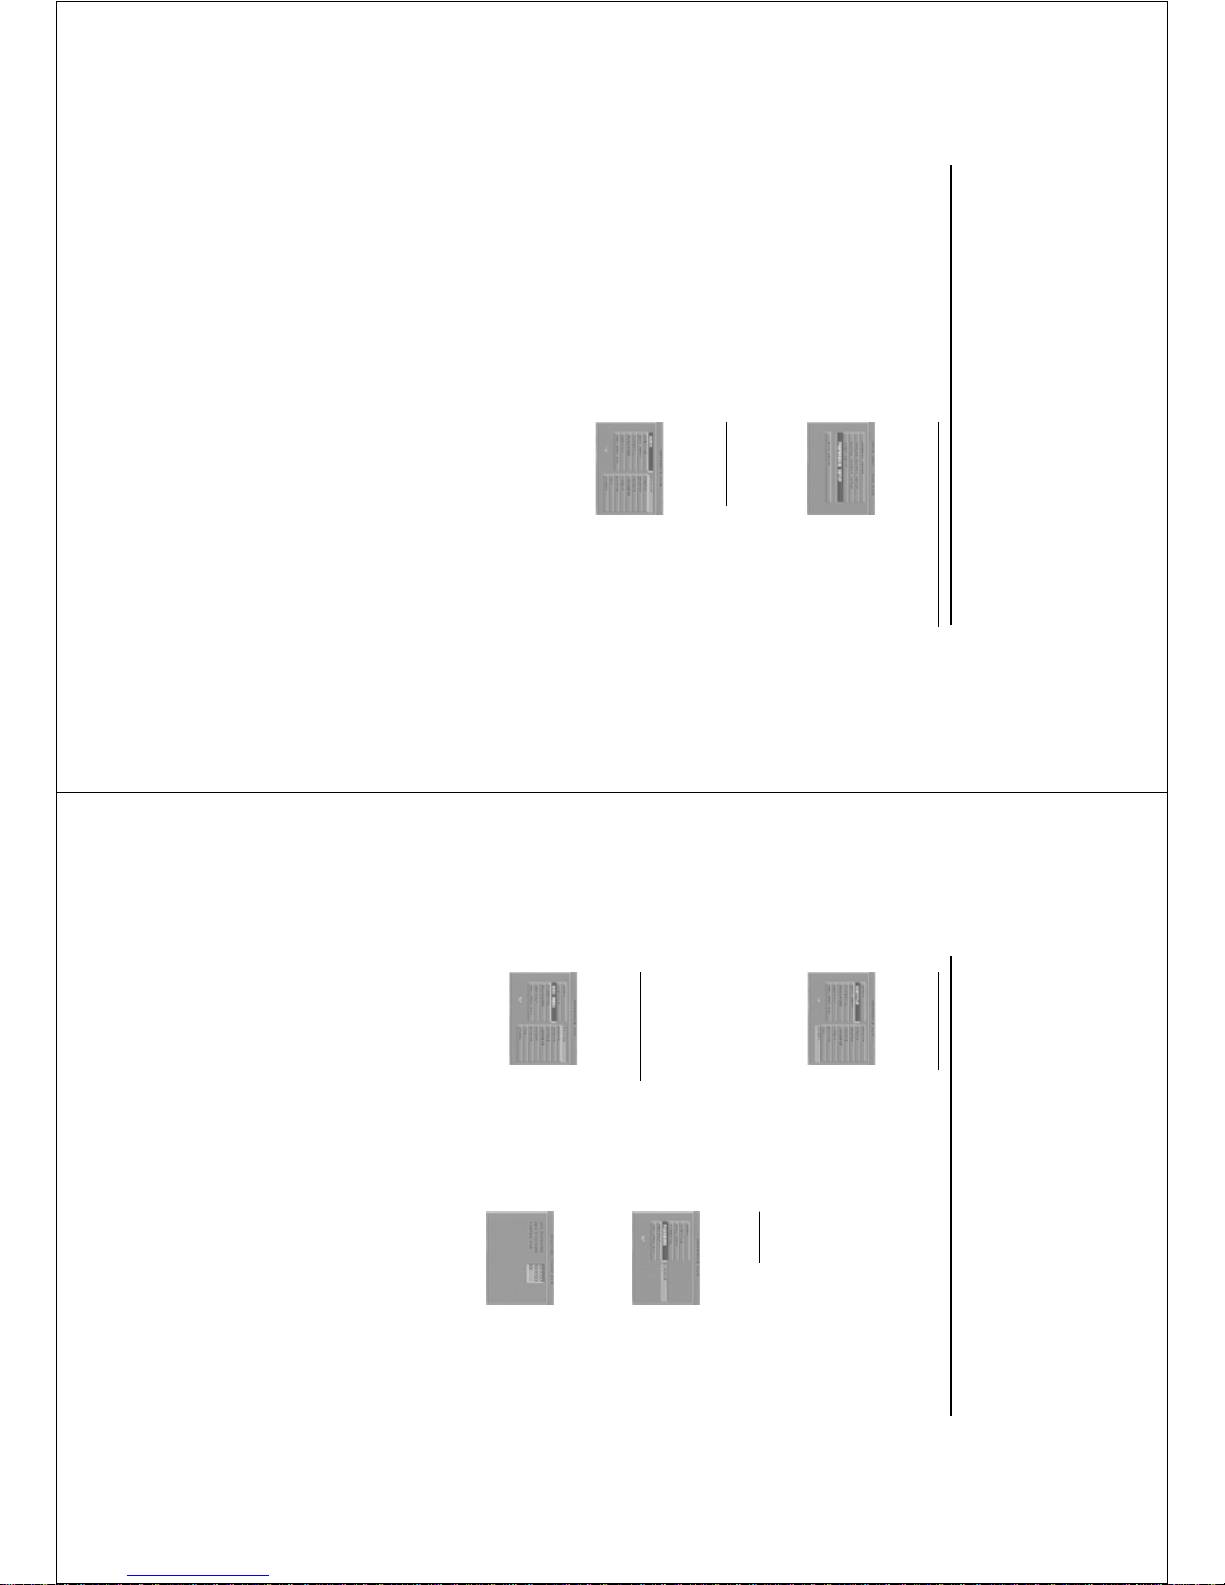
Basic Operation
1
Press SYSTEM MENU in the
STOP mode to enter the Setup
Menu.
2 Press the OK key to open the
next level submenu or confirm your selection.
3
Press the 1 2 keys to enter the submenu or
return to the previous menu.
4 Press the 34 keys to highlight the desired menu.
5 Press SYSTEM MENU to quit the setup menu.
➜ When you quit the setup menu, the settings
will be stored in the player’s memory even if the
player is switched to power off.
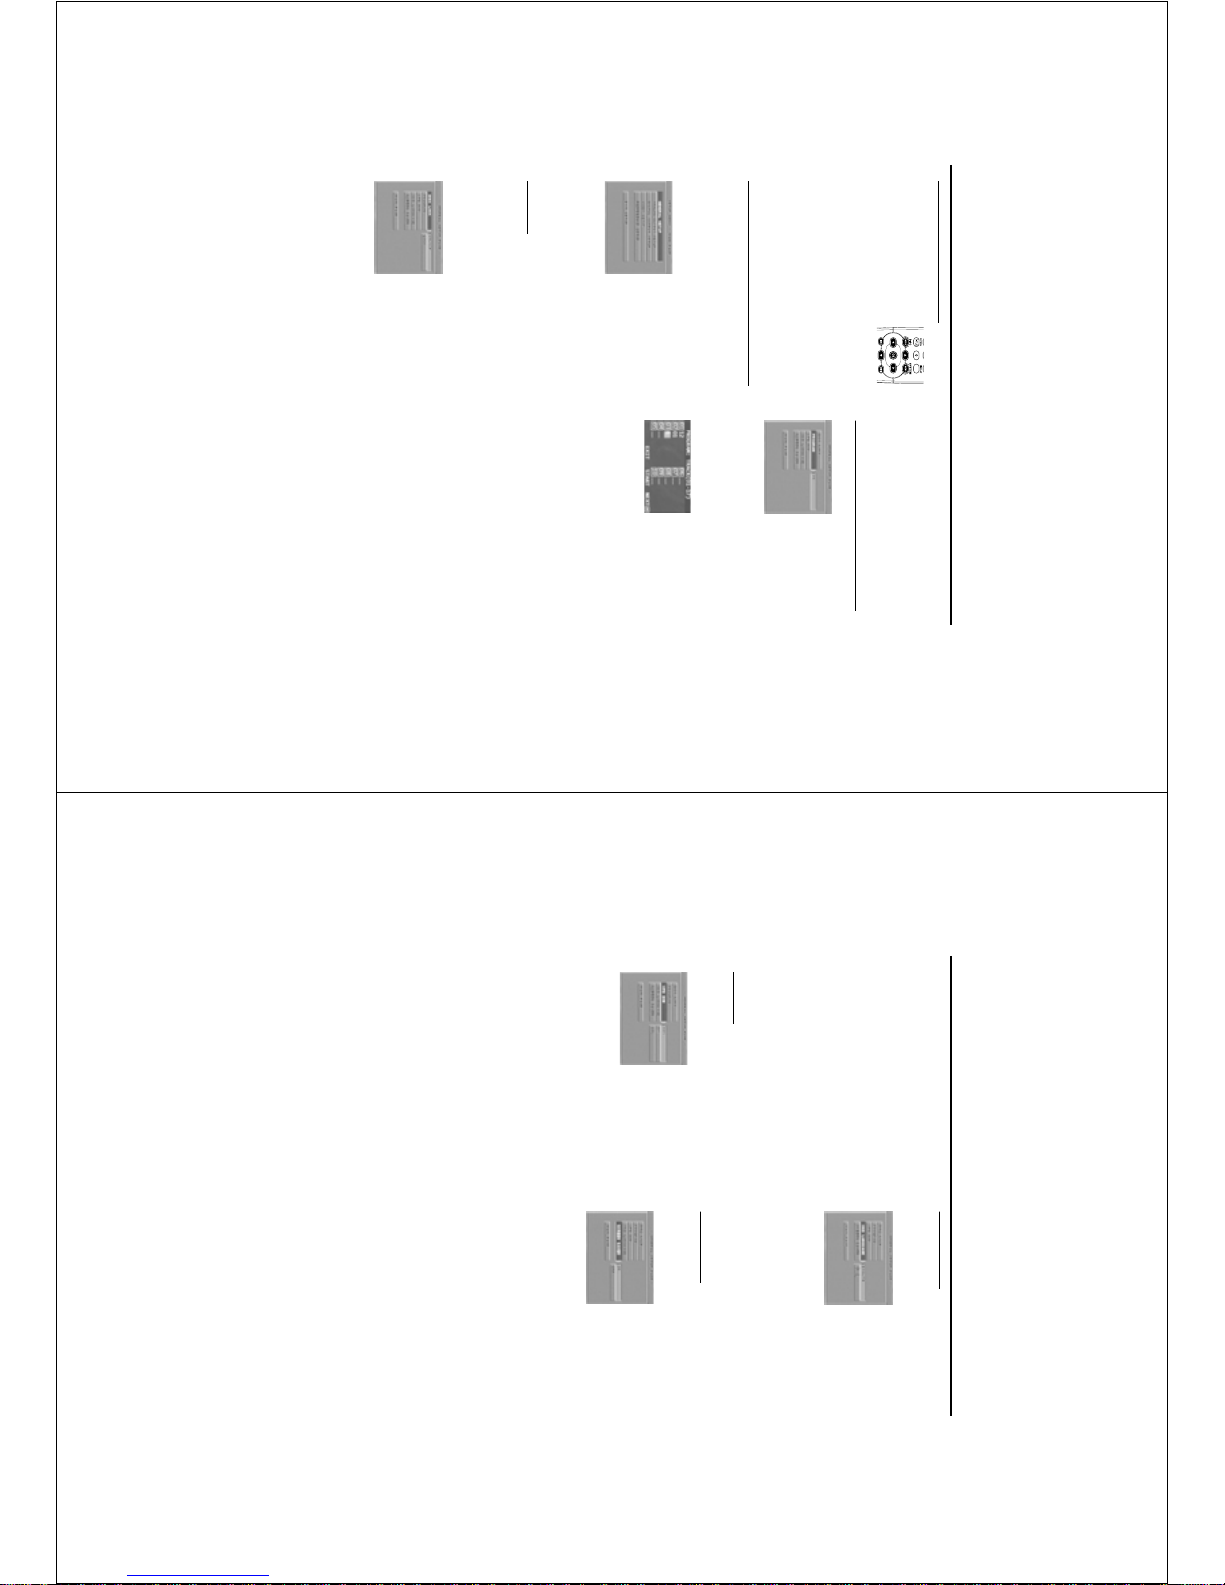
General Setup menu
Some settings are needed in this menu. They are:
DISC LOCK, PROGRAM, VFD DIM, OSD
LANGUAGE and SCREEN SAVER.
Follow the steps below:
1 Press the SYSTEM MENU key to enter the setup
menu.
2 Press the 34 keys to choose the GENERAL
SETUP.
3 Press the OK key to confirm selection.
Disc Lock
When the disc is locked, the player will store its
typical code into the memory for the future
identification. For the next playback, the DVD
player will prompt to enter the password. And
then, press OK to load the disc.
1 Press the 34 keys to highlight DISC LOCK in the
GENERAL SETUP menu.
2 Enter its submenu by pressing the 2 key.
➜ LOCK: Lock the disc being played.
➜ UNLOCK: unlock the disc.
3 Press the 1 key to return to the GENERAL
SETUP menu.
NOTE:
1. When a locked disc is loading, the DVD player
will prompt to enter your password (842100 is the
super password).
2. To change the password , refer to the option
PASSWORD in the PREFERENCE SETUP menu .
Program (not for Picture CD/MP3)
1 To choose PROGRAM, press 34 keys.
2
Press the 2 key to move the cursor to the field of
the submenu to choose the item ON.
➜ ON: Enter the PROGRAM item.
3 Press OK to enter the program page.
Input your favorite track
1 Input valid track number by pressing the
numerical keys.
2 Press the 1 234 keys to move the cursor to the
next selected position.
➜ If the track number is out of ten, press 2™ to
open the next page and go on programing, or
press 1 234 to highlight NEXT button, and then
press OK.
3
Repeat this steps to input another track number
until the whole program is completed.
Remove a track
1 Press the 1 234 keys to move the cursor to the
track you want to remove.
2 Press OK or PLAY key to remove this track from
the program menu.
Playback tracks
When programing is completed,
1 Press the 1 234 keys to move the cursor to the
START button.
2 Press OK.
➜ DVD player will playback the selected tracks
under the programed sequence.
Setup Menu
18
Setup Menu
OSD language
There are two options available for information
display on TV screen.
1 Press the 34 keys to highlight OSD
LANGUAGE in the GENERAL SETUP menu.
2 Enter its submenu by pressing the 2 key.
3 Move the cursor by pressing the 34 keys to
highlight the selected language.
4 Press the OK key to confirm.
5 Press the 1 key to return to the GENERAL
SETUP menu.
Screen Saver
This function is used to turn on or off the screen
saver.
1 Press the 34 keys to highlight SCREEN SAVER
in the GENERAL SETUP menu.
2 Enter its submenu by pressing the 2 key.
3 Move the cursor by pressing the 34 keys to
highlight the selected item.
➜ ON: At STOP mode, if nothing operation is
done within 5~6 minutes, screen saver will turn
on.
➜ OFF: Screen saver is disable.
4 Press OK to confirm.
5 Press the 1 key to return to the GENERAL
SETUP menu.
Quit the program playback
At the PROGRAM page,
1 Press the 1 234 keys to move the cursor to the
EXIT button.
2 Press the OK key to quit this menu.
Stop the program playback
0 During playing the programed tracks, press STOP
key. Then after you press PLAY key, the DVD
player will resume normal playback.
Repeat the program playback
0 During playing the programed tracks, press
REPEAT key, the programed tracks can be played
again.
VFD Dim
This function is used to adjust the brightness of
VFD on the front panel.
1 Press the 34 keys to highlight VFD DIM in the
GENERAL SETUP menu.
2 Enter its submenu by pressing the 2 key.
➜ pressing the 34 keys to select 100%/70%/
40% item.
3 Press OK to confirm.
4 Press the 1 key to return to the GENERAL
SETUP menu.
19
D.R.C. (Dynamic Range
Compression)
DVD player will compress dynamic range of
sound effect output, when you do not want to
disturb your neighbours and your family in
midnight.
1 Press the 34 keys to highlight D.R.C..
2 Enter its submenu by pressing the 2 key.
3 Move the cursor by pressing the 34 keys to
highlight the selected item.
➜ ON: Enable D.R.C.
➜ OFF: Disable D.R.C.
4 Press OK.
5 Press the 1 key to return to the ANALOG
OUTPUT SETUP menu.
Digital Output Setup menu
In this menu, you can set up digital audio
outputting from digital terminals, such as coaxial
or optical.
1 Press SYSTEM MENU to enter the SETUP menu.
2 Press the 34 keys to choose the DIGITAL
OUTPUT SETUP.
3 Press OK.
Setup Menu
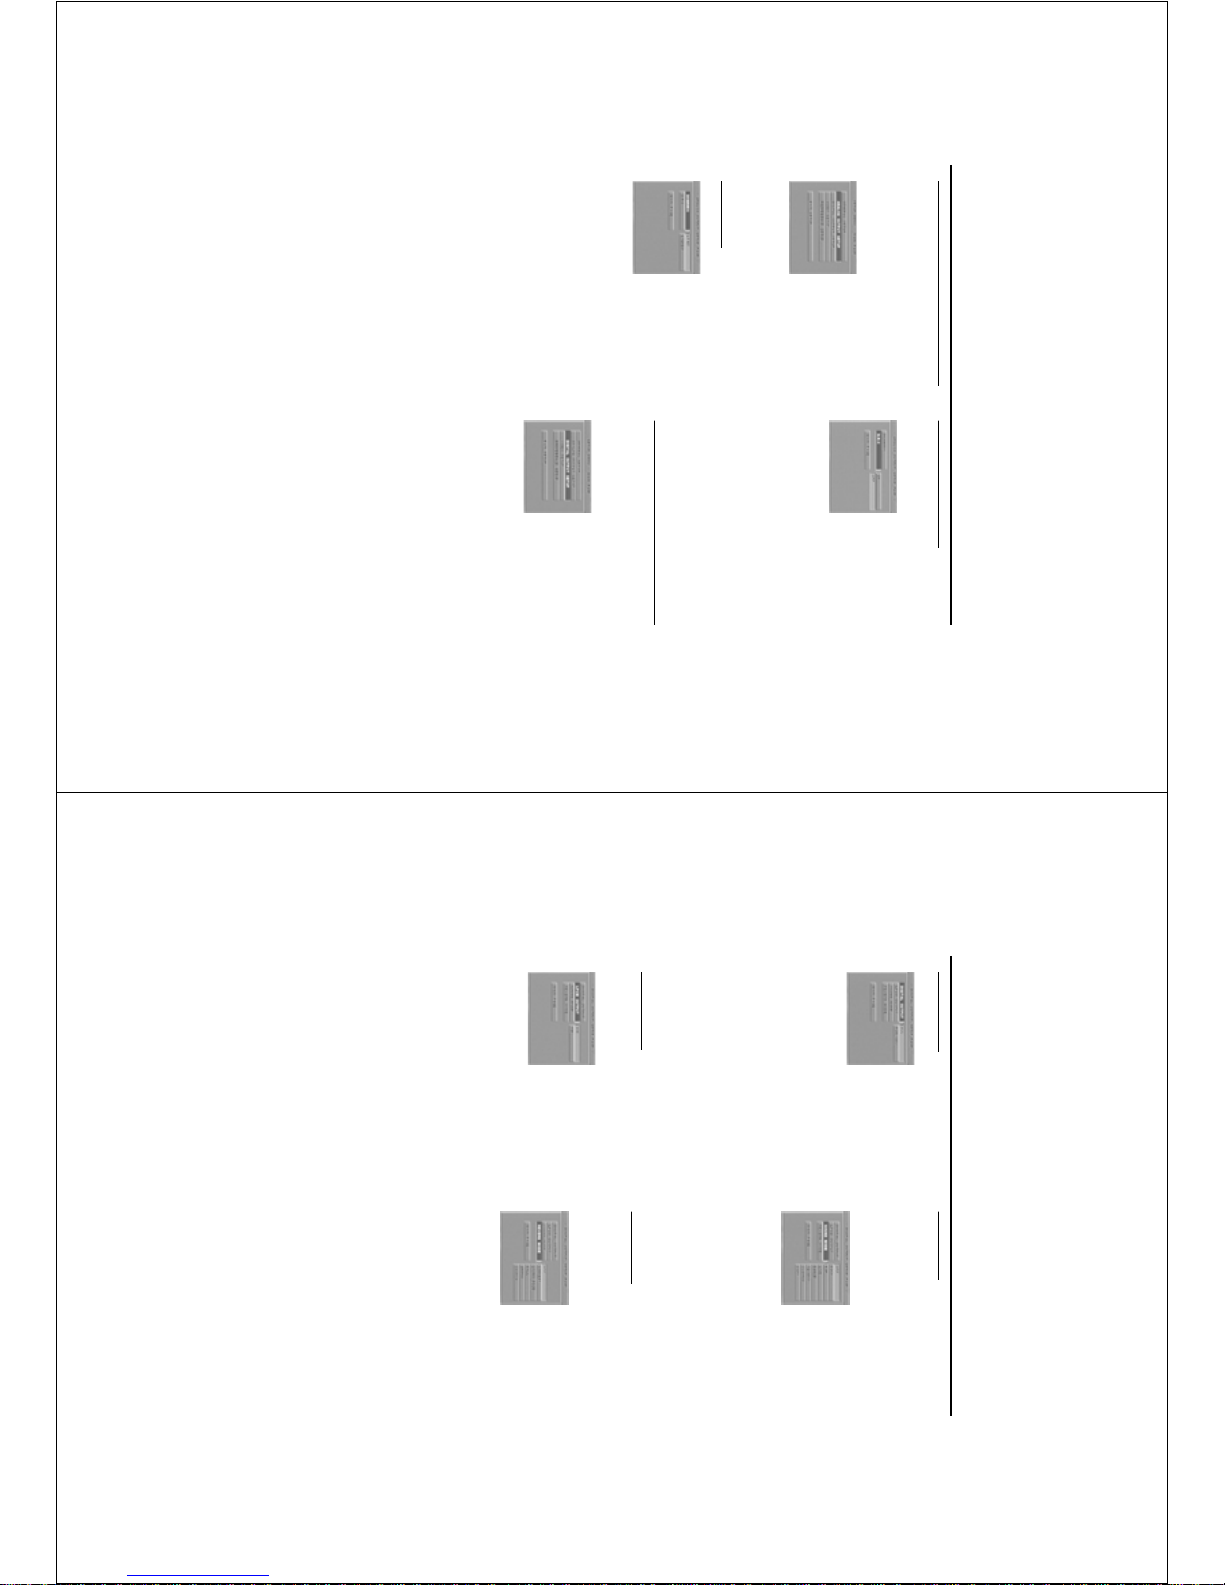
Analog Output Setup menu
This menu contains setup options of your analog
audio output, such as DOWNMIX, D.R.C.
(Dynamic Range Compression)which makes the
setup system reproduce high quality surround
sound.
1 Press SYSTEM MENU.
2 Press the 34 keys to highlight the ANALOG
OUTPUT SETUP.
3 Press OK to confirm.
DOWNMIX
1 Press the 34 keys to highlight the DOWNMIX.
2 Enter its submenu by pressing the 2 key.
3 Move the cursor by pressing the 34 keys to
highlight the selected item.
0 LT/RT
➜ This item will be used only if your DVD player
is connected with Dolby Prologic decoder.
Meanwhile, the DVD player can send the output
of Dolby Prologic signals.
0 STEREO
➜ This item will help to downmix the signal of
Dolby Digital into stereo signals directly
outputting from L/R port.
4 Press OK.
5 Press the 1 key to return to the ANALOG
OUTPUT SETUP menu.
20
Setup Menu
Digital Output
1 Press the 34 keys to highlight DIGITAL
OUTPUT.
2 Enter its submenu by pressing the 2 key.
3 Press the 34 keys to highlight the selected item.
➜ ALL: Original digital signals output, at this
mode, all audio setups except MUTE are invalid.
➜ PCM only: Convert to PCM signals to output,
which only contains left/right audio signals.
4 Press OK.
5 Press the 1 key and return to the DIGITAL
OUTPUT SETUP menu.
Note: If set the function of DIGITAL OUTPUT to
ALL, all audio setups except MUTE are invalid.
LPCM Output
In this menu, you can set up sampling rate to
decode LPCM audio.
1 Press the 34 keys to highlight the LPCM
OUTPUT.
2 Enter its submenu by pressing the 2 key.
3 Move the cursor by pressing the 34 keys to
highlight the selected item.
➜ 48K: The decoding process is under the
sampling rate of 48KHz.
➜ 96K: The decoding process is under the
sampling rate of 96KHz.
4 Press OK.
5 Press the 1 key to return to the DIGITAL
OUTPUT SETUP menu.
Sound Mode
The SOUND MODE allow you to select from
various preset modes that control the frequency
bands of sound to optimize certain musical styles.
It greatly enhances the excitement and enjoyment
of your favourite music.
1 Press the 34 keys to highlight the SOUND
MODE.
2 Enter its submenu by pressing the 2 key.
3 Move the cursor by pressing the 34 keys to
highlight the selected item.
➜ OFF: Playback the disc under the original
sound effect.
4 Press OK.
5 Press the 1 key to return to the DIGITAL
OUTPUT SETUP menu.
Reverb Mode
The REVERB MODE can simulate the echoes and
frequency response of some particular places so
as to make you feel like personally on the place.
1 Press the 34 keys to highlight the REVERB
MODE.
2 Enter its submenu by pressing the 2 key.
3 Move the cursor by pressing the 34 keys to
highlight the selected item.
➜ OFF: Playback the disc under the original
sound effect.
4 Press OK.
5 Press the 1 key to return to the DIGITAL
OUTPUT SETUP menu.
21
16:9
4:3
Normal/LB
4:3
Normal/PS
Setup Menu
Video Setup menu
There are items included in VIDEO SETUP menu
as TV TYPE, VIDEO OUTPUT, TV DISPLAY,
CLOSE CATION, TV MODE, SMART PICTURE,
COLOR SETTING.
1 Press SYSTEM MENU to enter its menu.
2 Highlight VIDEO SETUP by pressing the 34 keys.
3 Press OK.
TV T ype
Before viewing the DVD or VCD, ensure that the
PAL or NTSC setting of the system matches your
TV set.
1 Press the 34 keys to highlight TV TYPE in the
VIDEO SETUP menu.
2
Enter its submenu by pressing the 2 key.
3 Move the cursor by pressing the 34 keys to
highlight one option.
4 Press OK.
5 Press the 1 key to return to the VIDEO SETUP
menu.
NOTE: Choosing NTSC item indicates that the
player will output by NTSC system, Similarly, you
can get PAL system by choosing the PAL item. And
the item MULTI means video output is depending
on the format of DVD or VCD discs.
TV Display
Select the aspect ratio of the TV to be connected.
16:9 ➜ when you connect a wide-screen TV to
the DVD player.
4:3 NORMAL LB ➜ when you connect a
normal TV to the DVD player. Displays a wide
picture with bands displayed on the upper and
lower portions of the TV screen.
4:3 NORMAL PS ➜ when you connect a
normal TV to the DVD player. Displays the wide
picture on the whole TV screen with a portion
automatically cut off.
Setup the item as follows,
1 Press the 34 keys to highlight the TV DISPLAY
item in the VIDEO SETUP menu.
2
Enter its submenu by pressing the 2 key.
3 Move the cursor by pressing the 34 keys to
highlight the selected item.
4 Press OK.
5 Press the 1 key to return to the VIDEO SETUP
menu.
Note: If the DVD discs are not recorded the
information of WIDE-SCREEN (16:9) or 4:3
NORMAL PS, the DVD player can not convert
properly.
22
Setup Menu
Close Caption
Close captions are captions that are hidden in the
video signal, invisible without a special decoder.
The differences between subtitles and captions
are that subtitles are intended for hearing
audiences and captions for deaf audiences.
Subtitles rarely show all of the audio. For example,
captions show sound effects (e.g., "phone ringing"
and "footsteps"), while subtitles don't.
Before you choose this function, please ensure
that the disc contains captions information and
your TV set also have the function.
1 Press the 34 keys to highlight CLOSE
CAPTION in the VIDEO SETUP menu.
2
Enter its submenu by pressing the 2 key.
3 Move the cursor by pressing the 34 keys to
highlight one option.
➜ ON: Enable ClOSE CAPTION.
➜ OFF: Disable CLOSE CAPTION.
4 Press OK.
5 Press the 1 key to return to the VIDEO SETUP
menu.
Smart Picture
In this menu, you can choose one picture setting
from a fixed set of ideal predefined picture
setting.
1 Press the 34 keys to highlight SMART PICTURE
in the VIDEO SETUP men u.
2
Press the 2 key to highlight the item of the
submenu.
3 Press the 34 keys to choose an item.
➜ BRIGHTNESS: make the TV screen brighter.
➜ STANDARD: select a standard picture setting.
➜ SOFTNESS: make the TV screen softer.
➜ PERSONAL: achieve the color effect set in
the COLOR SETTING menu.
4 Press OK.
5
Press 1 key to return to the VIDEO SETUP menu.
Color Setting
In this menu, you can personalize your picture
color by adjusting brightness, contrast, hue and
saturation.
1 Press the 34 keys to highlight COLOR
SETTING in the VIDEO SETUP menu.
2 Press OK to open its submenu.
Brightness
1 Press the 34 keys to highlight BRIGHTNESS in
the COLOR SETTING menu.
2
Press the 2 key to open the level bar.
➜ Display on the bottom of the screen.
3 Press the 2 1 keys to increase and decrease the
brightness level.
4 Press the 34 or OK key to return to the
COLOR SETTING menu.
23
Contrast
1 Press the 34 keys to highlight CONTRAST in
the COLOR SETTING menu.
2
Press the 2 key to open the level bar.
➜ Display on the bottom of the screen.
3 Press the 2 1 keys to increase and decrease the
contrast level.
4 Press the 34 or OK key to return to the
COLOR SETTING menu.
Hue
1 Press the 34 keys to highlight HUE in the
COLOR SETTING menu.
2
Press the 2 key to open the level bar.
➜ Display on the bottom of the screen.
3 Press the 2 1 keys to increase and decrease the
hue level.
4 Press the 34 or OK key to return to the
COLOR SETTING menu.
Saturation
1 Press the 34 keys to highlight SATURATION in
the COLOR SETTING menu.
2
Press the 2 key to open the level bar.
➜ Display on the bottom of the screen.
3 Press the 2 1 keys to increase and decrease the
saturation level.
4 Press the 34 or OK key to return to the
COLOR SETTING menu.
Setup Menu
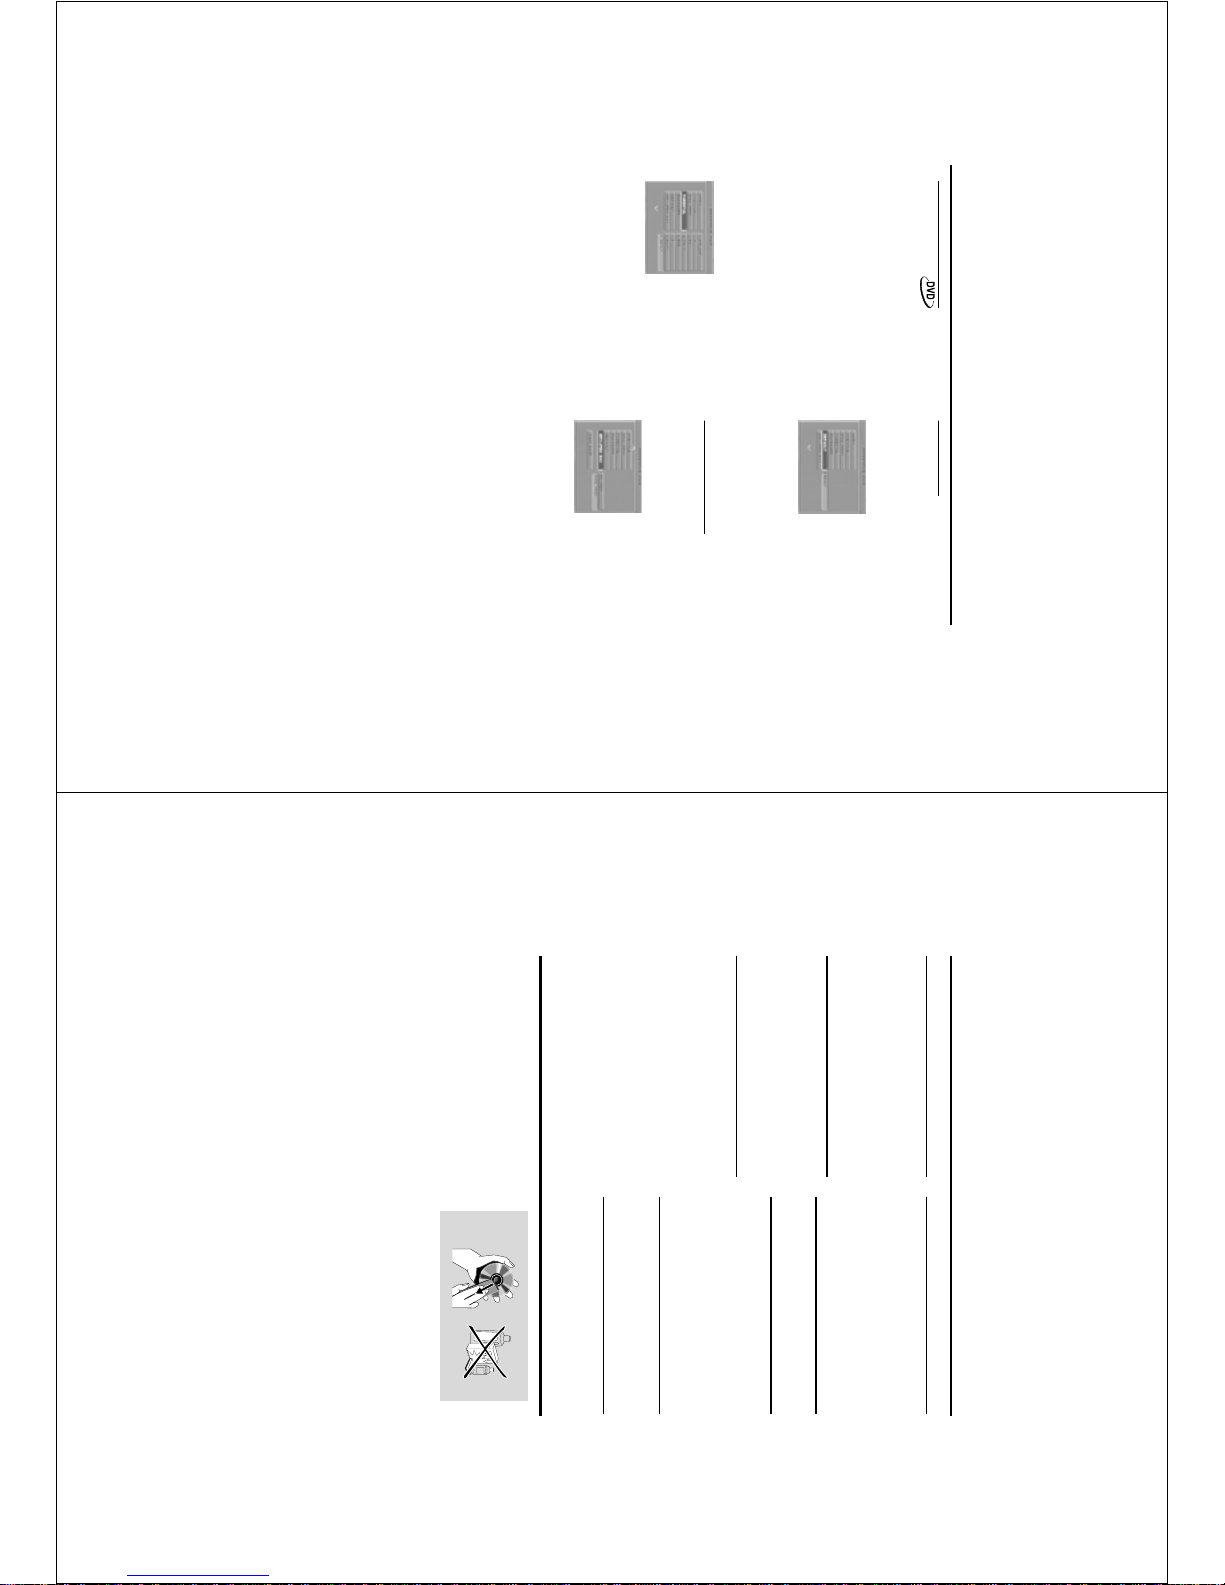
Preference Setup menu
There are items included in PREFERENCE menu
as AUDIO, SUBTITLE, DISC MENU, PARENTAL,
PASSWORD, DEFAULT and MP3/JPEG NAV.
1 Press the STOP key twice.
2 Press SYSTEM MENU to enter its menu.
3 Highlight the PREFERENCE SETUP by pressing
the 34 keys.
4 Press OK to confirm your selection.
Audio language
DVD discs are available for multiple audio
languages. Use this item to choose your preferred
default audio language.
1 Press the 34 keys to highlight AUDIO.
2 Enter its submenu by pressing the 2 key.
3 Move the cursor by pressing the 34 keys to
highlight the selected item.
➜ If you want to choose other languages, please
refer to the instructions in the next page.
4 Press OK.
5 Press the 1 key to return to the PREFERENCE
menu.
NOTE: Your DVD disc may not include the audio
language which you set in the AUDIO menu. If so,
the player will use other audio language instead.
24
If you choose OTHERS in AUDIO,
SUBTITLE or DISC MENU menu,
You can select other languages. Please do as
follows,
1 Move the cursor by pressing the 34 keys to
highlight OTHERS.
2 Press OK.
➜ The DVD player will prompt to enter a
language code (Four digits).
3 Input a language code by pressing numerical keys.
➜ Please look up your expected language code
in LANGUAGE CODE.
4 Press OK.
Password
This item is used for the parental control and disc
lock. Enter your six digits password when a hint is
displayed on the screen.
1 Press the 34 keys to highlight the PASSWORD
item.
2 Enter its submenu by pressing the 2 key.
3 Press OK key to open the PASSWORD
CHANGE page.
4 Enter the current 6 digits code.
➜ In your first time to set the password, the
DVD player will skip this step and ask you to
input a new password directly.
5 If successful, the player will prompt for a new one.
6 After that, enter the new password again to
reconfirm.
7 Press the OK key to return to the PREFERENCE
menu.
➜ The new 6 digits code will take effect.
NOTE:
1. You can change the setup of parental control
and load a locked disc with a valid password.
2. If you forget the password, you can input the
super password 842100 to load it.
Setup Menu
Subtitle language
DVD discs are available for multi-subtitle
languages. This item is used to choose default
subtitle language.
1 Press the 34 keys to highlight SUBTITLE.
2 Enter its submenu by pressing the 2 key.
3 Move the cursor by pressing the 34 keys to
highlight the selected item.
➜ If you want to choose other languages, please
refer to the following instructions.
4 Press OK.
5 Press 1 key to return to the PREFERENCE menu.
NOTE: Your DVD disc may not include the subtitle
which you set in the SUBTITLE menu. If so, the
player will use other subtitle language instead.
Disc Menu language
DVD discs are available for multiple disc menu
languages. This item is used to choose default disc
menu language.
1 Press the 34 keys to highlight DISC MENU.
2 Enter its submenu by pressing the 2 key.
3 Move the cursor by pressing the 34 keys to
highlight the selected item.
➜ If you want to choose other languages, please
refer to the following instructions.
4 Press OK.
5 Press 1 key to return to the PREFERENCE menu.
NOTE: If your DVD disc doesn’t include disc menu
language you have set, the player will use other
recorded language instead.
25
Default Setup
If some problems occur during setting DVD, the
DEFAULT function is used to reset all items to
factory default and all your personal setting will
be erased.
1 Press 34 to highlight DEFAULT.
2 Highlight RESET by pressing the 2 key.
3 Press OK.
NOTE: When this function is activated, all setups
will be reset to factory defaults.
MP3/JPEG Navigator
This menu allow you to make the alternate
setting when you playback picture CD and MP3
CD.
1 Press 3 4 to highlight MP3/JPEG NAV.
2 Press 2 to enter the submenu.
3 Press 3 4 to highlight NO MENU or WITH
MENU.
➜ NO MENU: playback all pictures or MP3
musics in sequence automatically.
➜ WITH MENU:playback pictures or MP3 musics
in the selected folder.
5 Press OK key to confirm your selection.
Setup Menu
Parental Control
Movies on DVDs may contain scenes not suitable
for children. Therefore, discs may contain ‘Parental
Control’ information which applies to the
complete disc or to certain scenes on the disc.
These scenes are rated from 1 to 8, and
alternative, more suitable scenes are available on
the disc. Ratings are country dependent. The
‘Parental Control’ feature allows you to prevent
discs from being played by your children or to
have certain discs played with alternative scenes.
0 VCD, SVCD, CD has no level defination, so
parental control function has no effect on those
kinds of discs as well as most of illegal DVD discs.
0 You can follow the steps below to setup the
parental control:
1 Press the 34 keys to highlight PARENTAL.
2 Move to its submenu by pressing the 2 key.
3 Then use the 3/4 keys to highlight a rating for
the disc inserted.
4 Press OK to confirm, then press the 1 key to
return to the PREFERENCE menu.
No Parental Control
Parental Control is not activated. The Disc will be
played in full.
1 Select ADULT item.
2 Press OK.
Ratings 1 to 7:
Some discs contain scenes not suitable for
children. All scenes with the higher rating than you
set will be erased during playback. But if the disc
contains alternate scenes according with what
you set, the substitutes will playback automatically.
If not, the playback will stop and the six digits
code will be asked for being entered again.
26
PLAYBACK SYSTEM
DVD Video
Video CD & SVCD
CD
PICTURE CD
MP3-CD
CD-R, CD-RW
DVD+R, DVD+RW
VIDEO PERFORMANCE
* CVBS 1Vpp --- 75Ω
* S-VIDEO Y: 1.00Vpp --- 75Ω
C: 0.30Vpp --- 75Ω
*Component video Y: 1.00Vpp --- 75Ω
Pr: 0.7Vpp --- 75Ω
Pb: 0.7Vpp --- 75Ω
AUDIO FORMAT
Digital Mpeg/ AC-3/ DTS compressed Digital
PCM 16, 20, 24 bits
fs, 44.1, 48, 96 kHz
MP3(ISO 9660) 24, 32, 56, 64, 96, 128,
256 kbps & variable
bit rate fs, 16, 22.05,
24, 32, 44.1, 48 kHz
Analog Sound Stereo
AUDIO PERFORMANCE
DA Converter 24bit
Signal-Noise (1KHz) 100dB
Dynamic range(1KHz) >90dB
DVD fs 96 kHz 4Hz- 44kHz
fs 48 kHz 4Hz- 22kHz
SVCD fs 48 kHz 4Hz- 22kHz
fs 44.1kHz 4Hz- 20kHz
CD/VCD fs 44.1kHz 4Hz- 20kHz
TV STANDARD (PAL/50Hz) (NTSC/60Hz)
Number of lines 625 525
Playback Multistandard (PAL/NTSC)
CONNECTIONS
Component Video Output Cinch
S-Video Output Mini DIN 4-pins
Video Output Cinch
Audio Output(L+R) Cinch
Digital Output 1 coaxial
IEC958 for CDDA / LPCM/ MPEG1
IEC1937 for MPEG 2, Dolby
Digital and DTS
CABINET
Dimensions (w x d x h) 360 x 285 x 43 mm
Weight Approximately 2.2 Kg
POWER CONSUMPTION
Power consumption in Standby mode 1W
Specifications
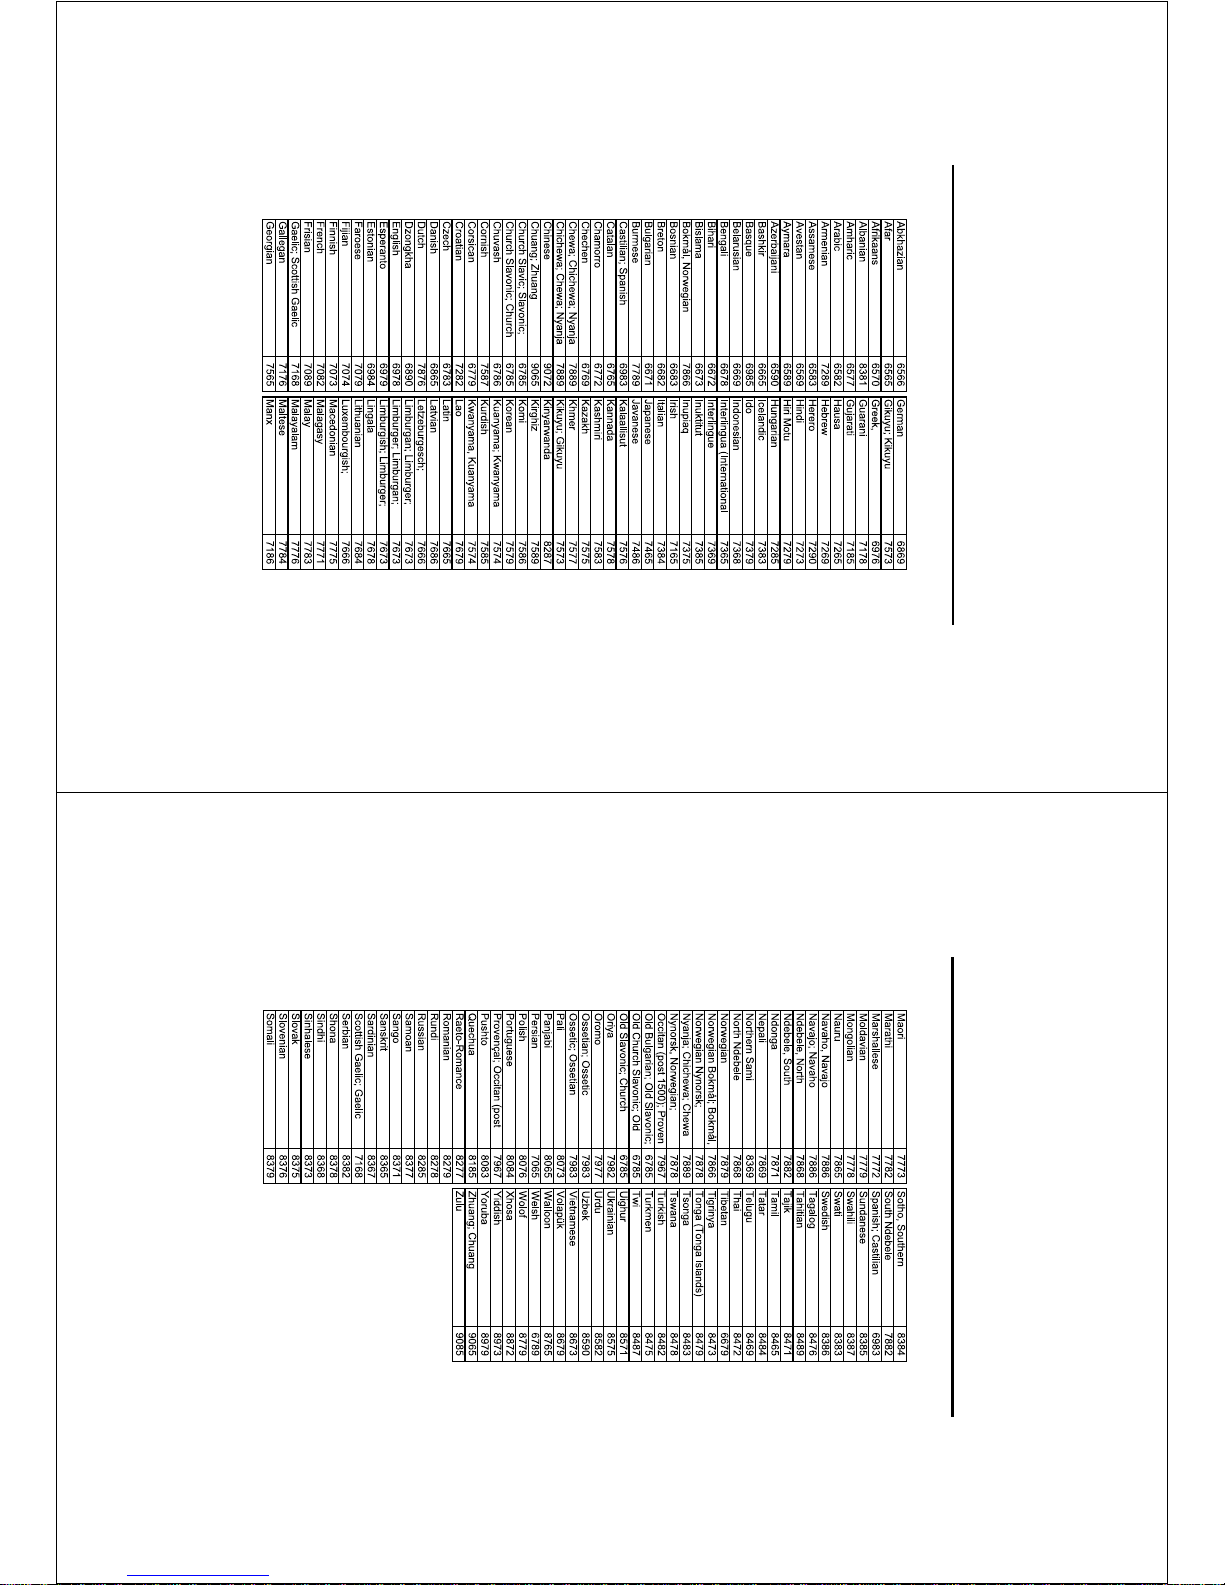
Cleaning the Cabinet
¶ Use a soft cloth slightly moistened with a mild
detergent solution. Do not use a solution
containing alcohol, spirits, ammonia or abrasives.
Cleaning Discs
¶ When a disc becomes dirty, clean it with a
cleaning cloth. Wipe the disc from the center out.
Do not wipe in a circular motion.
¶ Do not use solvents such as benzine, thinner,
commercially available cleaners, or antistatic spray
intended for analog records.
Maintenance
Specifications subject to change without prior notice
27
Language Code
This sheet is for choosing other languages apart from the options in AUDIO, SUBTITLE
or DISC MENU.
28
Language Code
This sheet is for choosing other languages apart from the options in AUDIO, SUBTITLE
or DISC MENU.

29
Troubleshooting
WARNING
Under no circumstances should you try to repair the system yourself, as this will invalidate the
warranty. Do not open the system as there is a risk of electric shock.
If a fault occurs, first check the points listed below before taking the system for repair. If you are
unable to remedy a problem by following these hints, consult your dealer or service center.
Problem Solution
No power – Check if the AC power cord is properly connected.
No picture – Check if the TV is switched on.
– Check the video connection.
Distorted picture – The disc is badly scratched or dirty.
– Sometimes a small amount of picture distortion
may appear .This is not a malfunction.
Completely distorted picture or – Make sure the NTSC/PAL setting at the DVD
black/white picture with DVD player matches the video signal of your television.
or Video CD (See NTSC/PAL CONVERSION)
– If the picture becomes distorted after switching
between PAL and NTSC, please set the SMART
PICTURE to STANDARD.
No sound or distorted sound – Adjust the volume.
– Check that the speakers are connected correctly.
No audio at digital output – Check the digital connections.
– Check if your receiver can decode MPEG-2 or DTS
and if not, please make sure the digital output is set
to PCM.
– Check if the audio format of the selected audio
language matches your receiver capabilities.
Disc can’t be played – The DVD+R/DVD+RW/CD-R must be finalized.
– Ensure the disc label is facing up.
– Check if the disc is defective by trying another disc.
_ If the Picture CD or MP3 CD is burned by yourself,
please ensure that your disc contains at least about
6~10 pictures or 2~3 MP3 musics before using it
on the player."
No return to start-up screen when – Reset the unit by switching the player off, then on
disc is removed again.
The player does not respond to – Aim the remote control directly at the sensor on
the remote control the front of the player.
– Reduce the distance to the player.
– Replace the batteries in the remote control.
– Insert the batteries with their polarities (+/– signs)
as indicated.
Buttons do not work – In order to completely reset the player, unplug the
AC cord from the AC outlet.
Player does not respond to some – Operations may not be permitted by the disc.
operating commands during playback Refer to the instructions of the disc.
DVD Video player cannot read – Use a commonly available cleaning CD/DVD to
CDs/DVDs clean the lens before sending the DVD Video player
for repair.
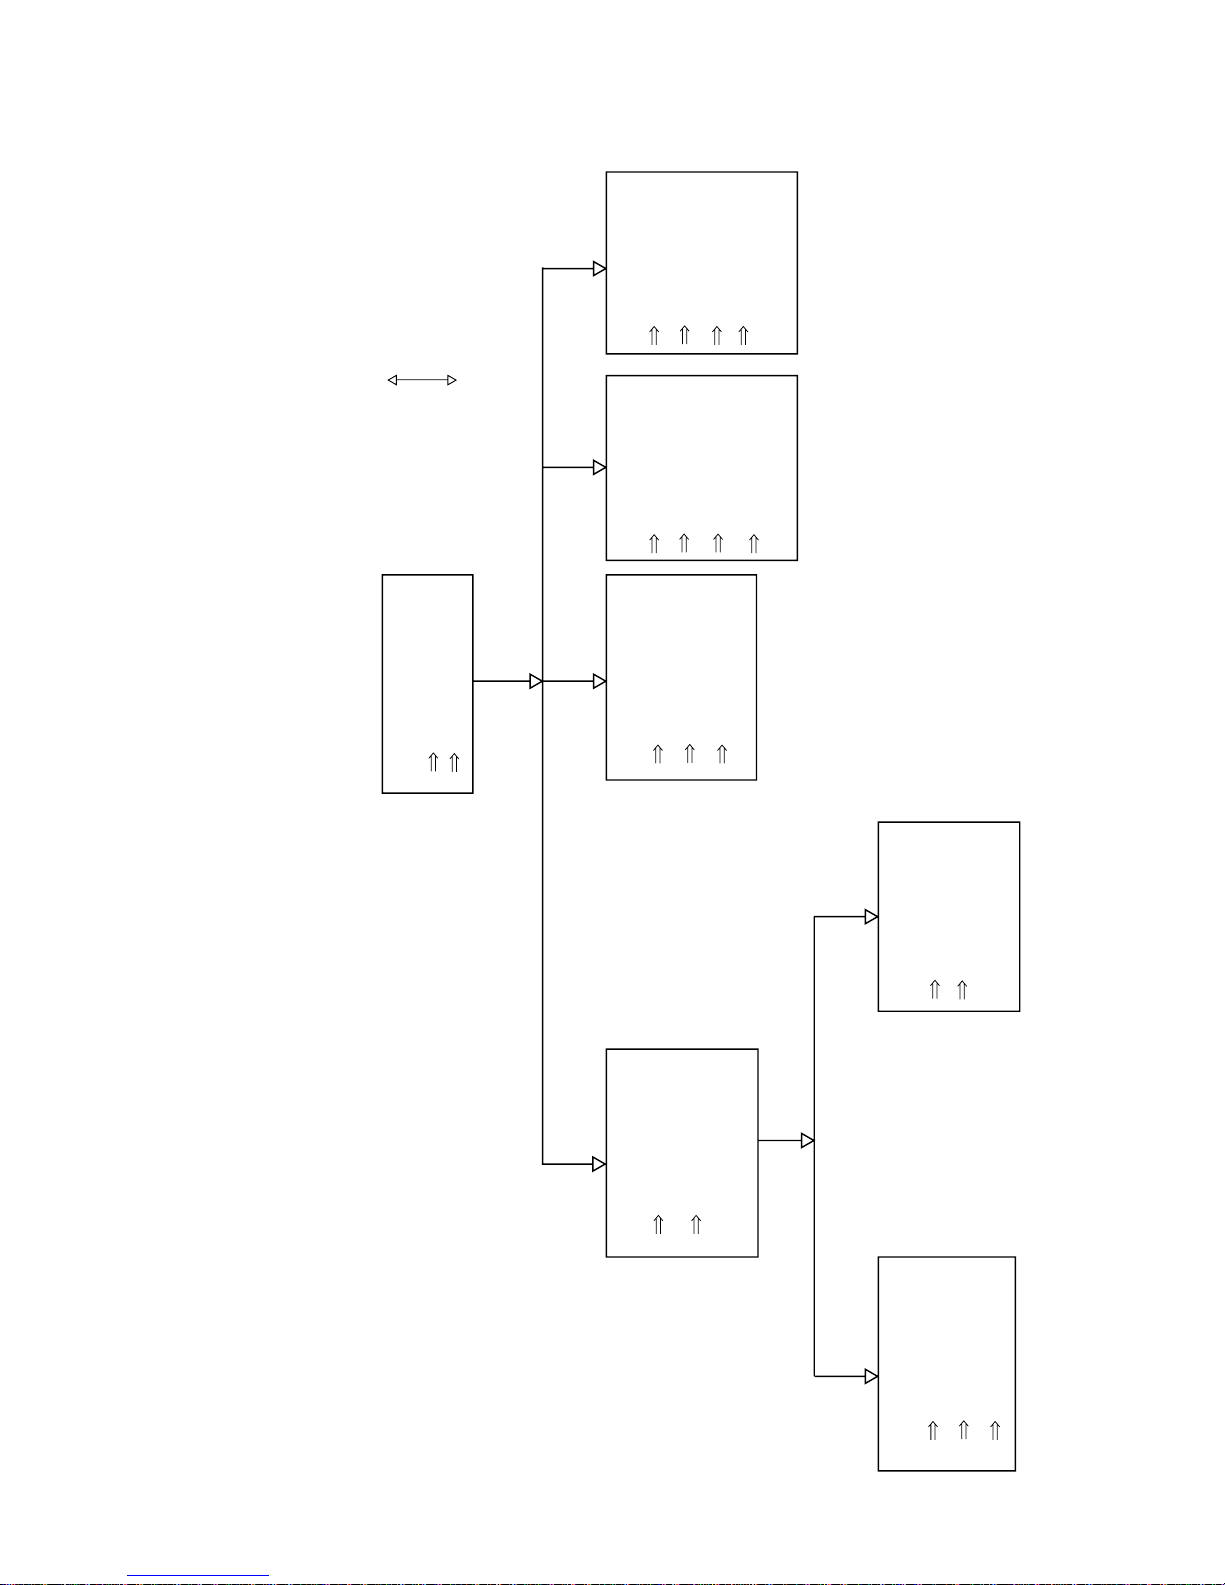
4. Dismantling instructions and exploded view
DISMANTLING INSTRUCTIONS DVD625K/931/751/691/692/131/031 & DVD625/781/782/785
See exploded view for item numbers
Cover 232
Remove screws
Lift cover at rearside to remove
Front assy 200
Unlock front from frame by
releasing successively snaps
Place front assy in front of
the set (service position)
Display board 1004
Remove screws
(board to front)
Demount board
Remove volume knob
by pulling it forward
Switch assy
Remove screws
Demount switch assy
Loader module 1003
Remove screws
(loader to bracket)
Demount loader module
Remove connections to
MPEG and PSU board
Remove screws
(MPEG board to frame)
Remove screws
(MPEG board to back plate)
Demount board
Remove flex connections to
MPEG board
Remove screws
(PSU board to frame)
Release snap of 1 spacer
locking (board to frame)
Demount board
Remove flex connections to
PSU board
MPEG board 1002
PSU board 1001
Mounting
Demounting
19
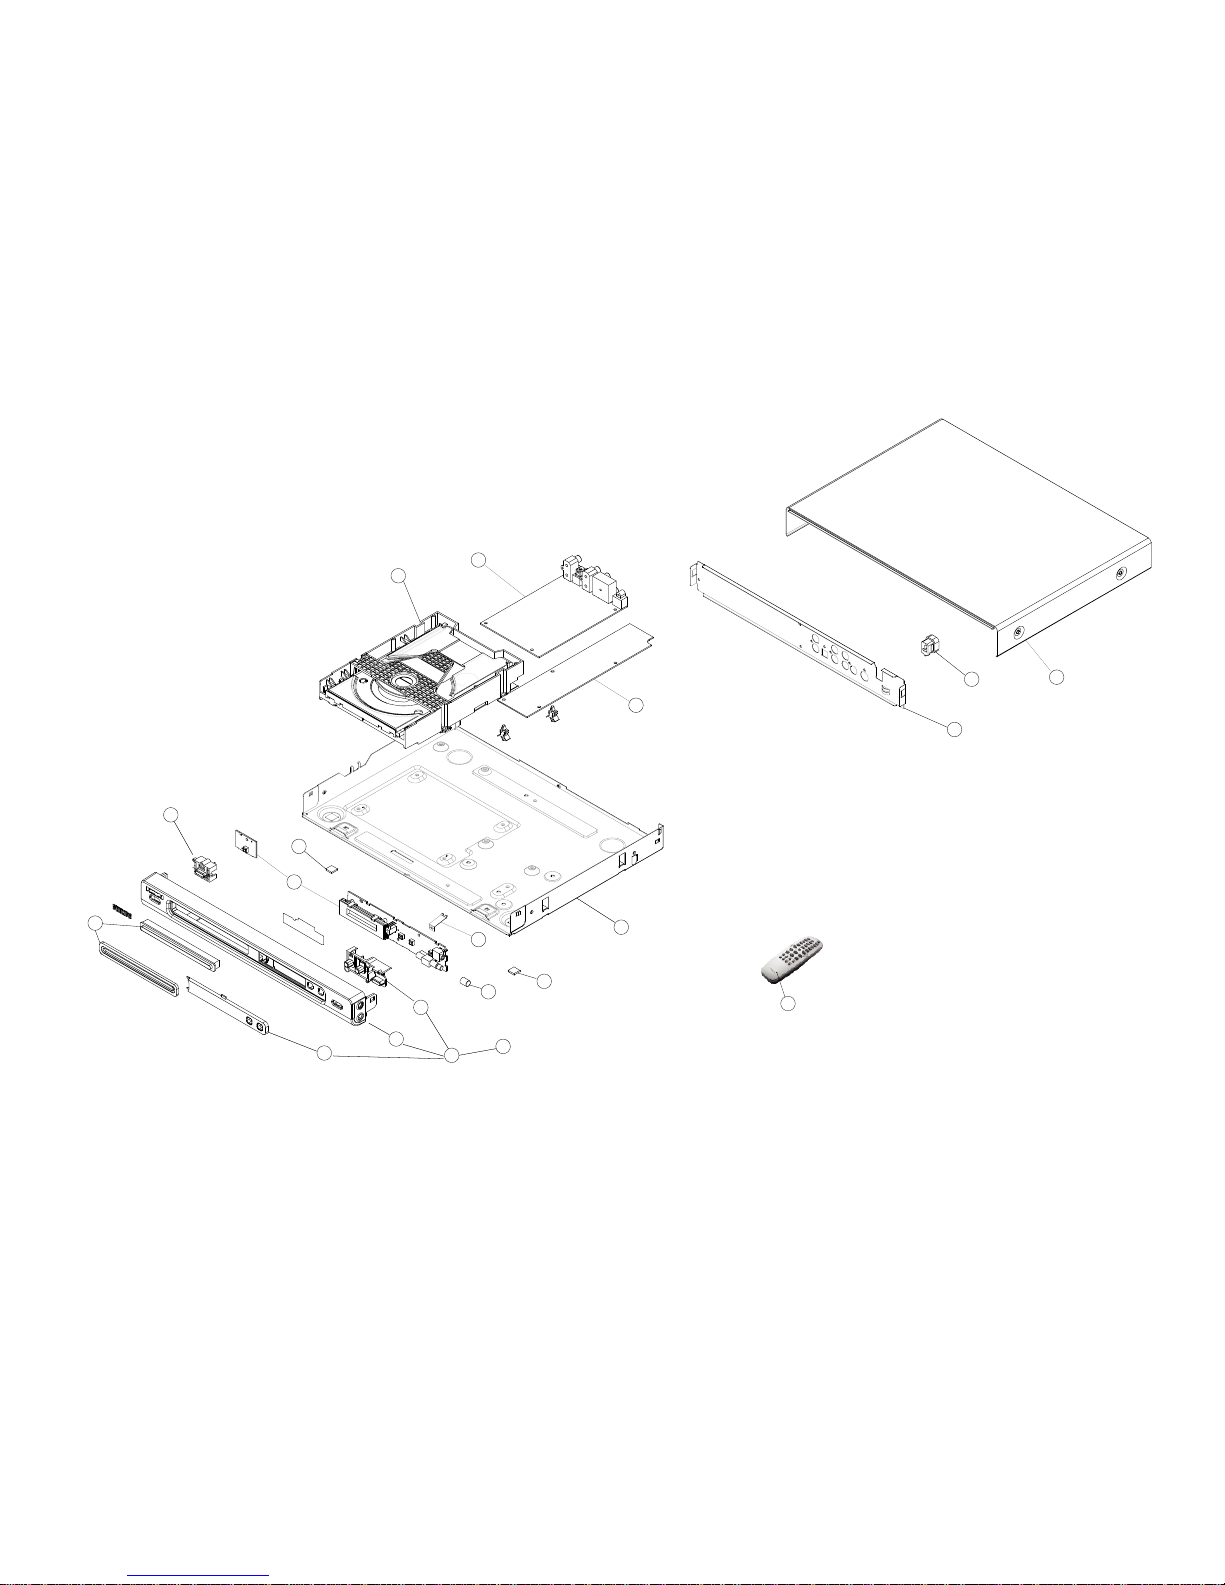
0209
0213
384
0207
0224
0232
0260
0240
1001
1005
1002
1004
0200
0040
0010
0030
0050
0050
0244
0244
Exploded View DVD625K/931/751/691/692/131/031
20
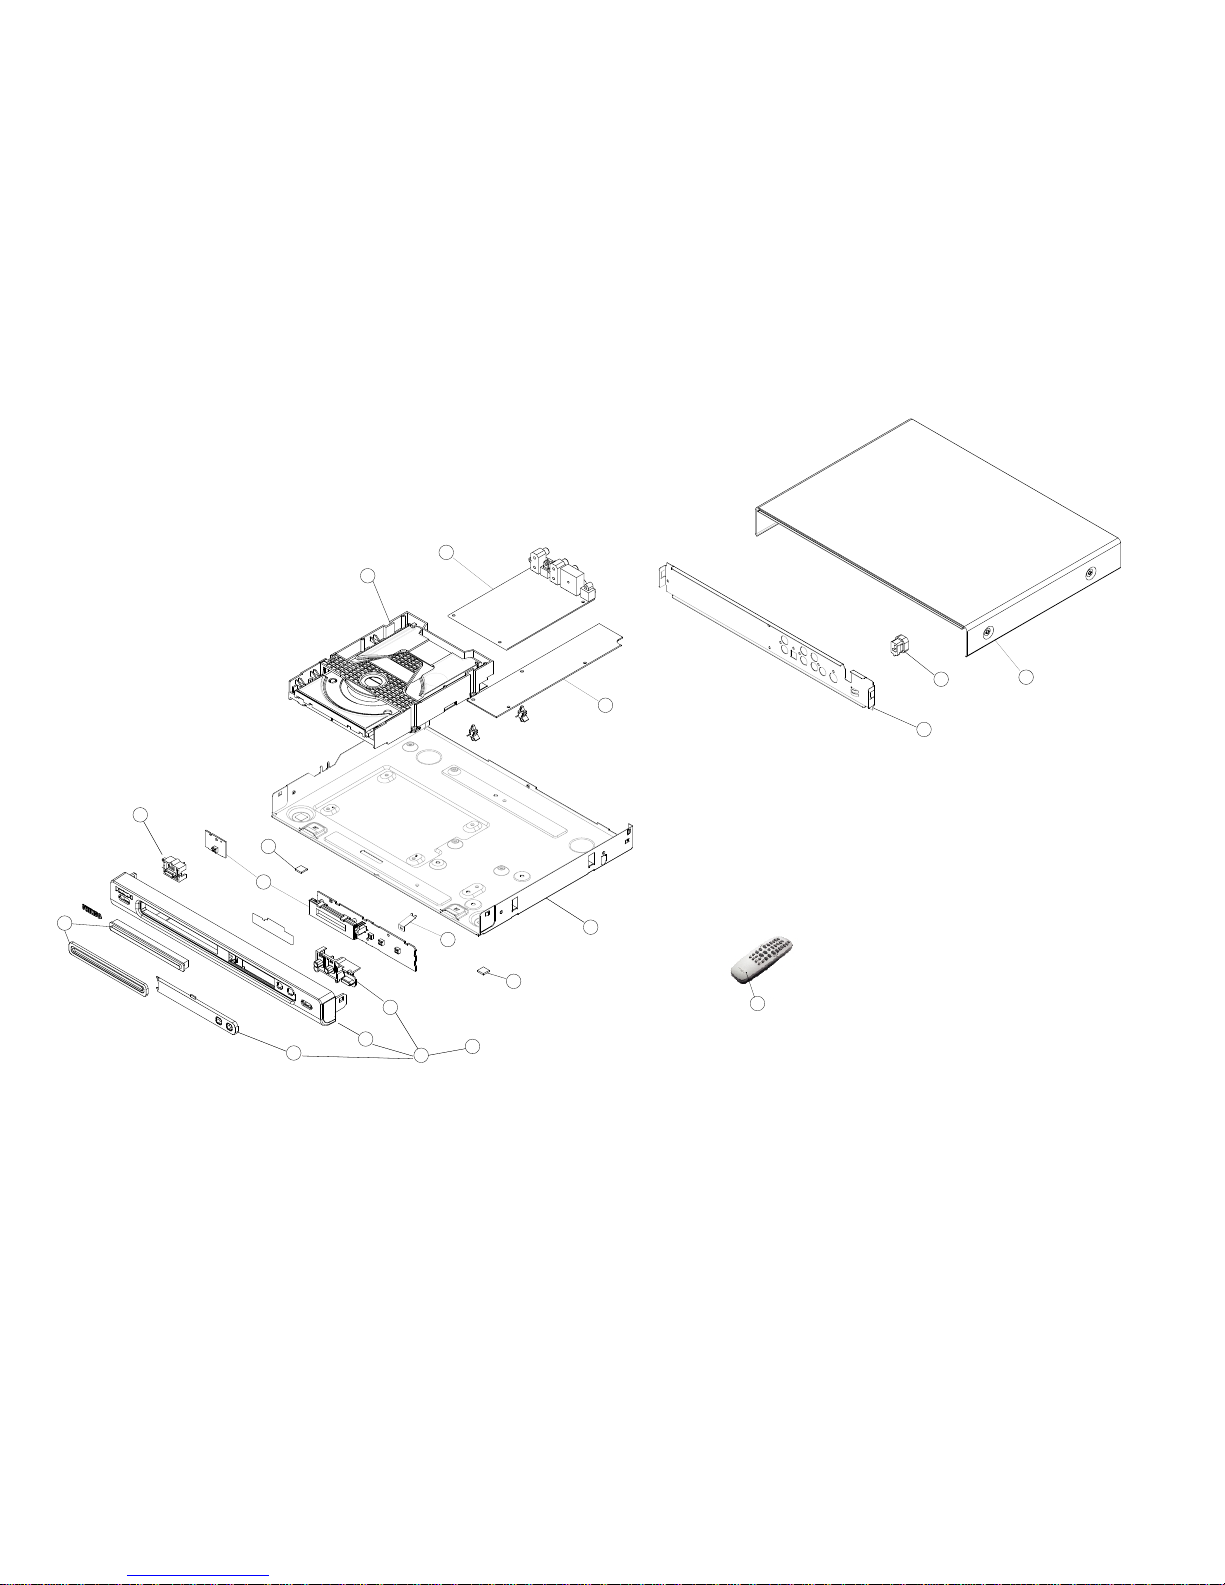
0213
384
0207
0224
0232
0260
0240
1001
1005
1004
0200
0040
0010
0030
0050
0050
0244
0244
Exploded View DVD625/781/782/785
1002
21
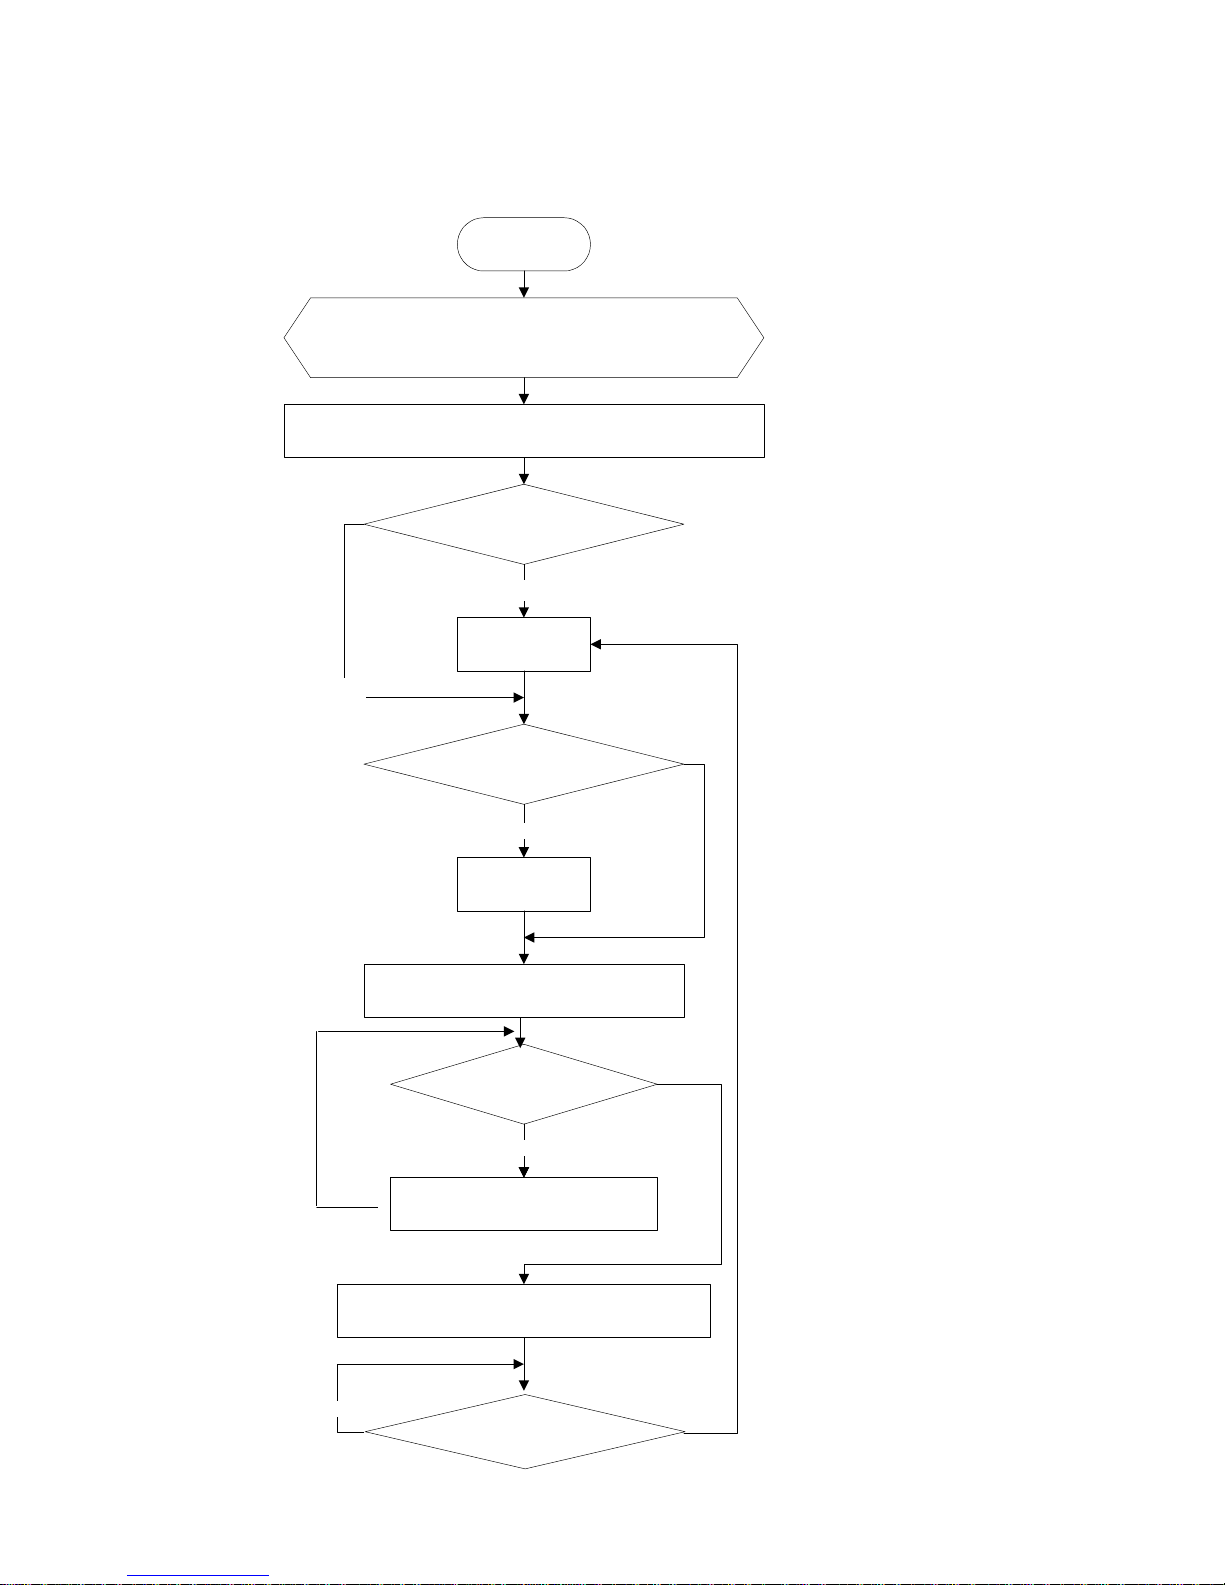
5. Diagnostic Software, Trouble Shooting and Test Instructions
Diagnostic Software reserved. It will be prepared later.
5.1 System working procedure for MediaTeK DVD-Player (MT1379 + MT1366)
Power on
Display LOGO
Does tray close?
close tray
Move to inside
Does SLED move to inside?
1. Judge if a disc has loaded
2. Jump to related subroutine acc. to the type
of disc
Do it receive a command
to open the tray?
1. Key scan or receive RC singnal
2. Run the other subroutine
N
NoNo
1. Stop play disc, then open tray completely
2. Display picture and information of opening
Does it receive the command to close
tray?
YES
No
No
No
1. Initialize related registers (servo, DSP, RISC)
2. Move code related with RISC to SDRAM
3. Reset RISC
Yes
YES
YES
No
22

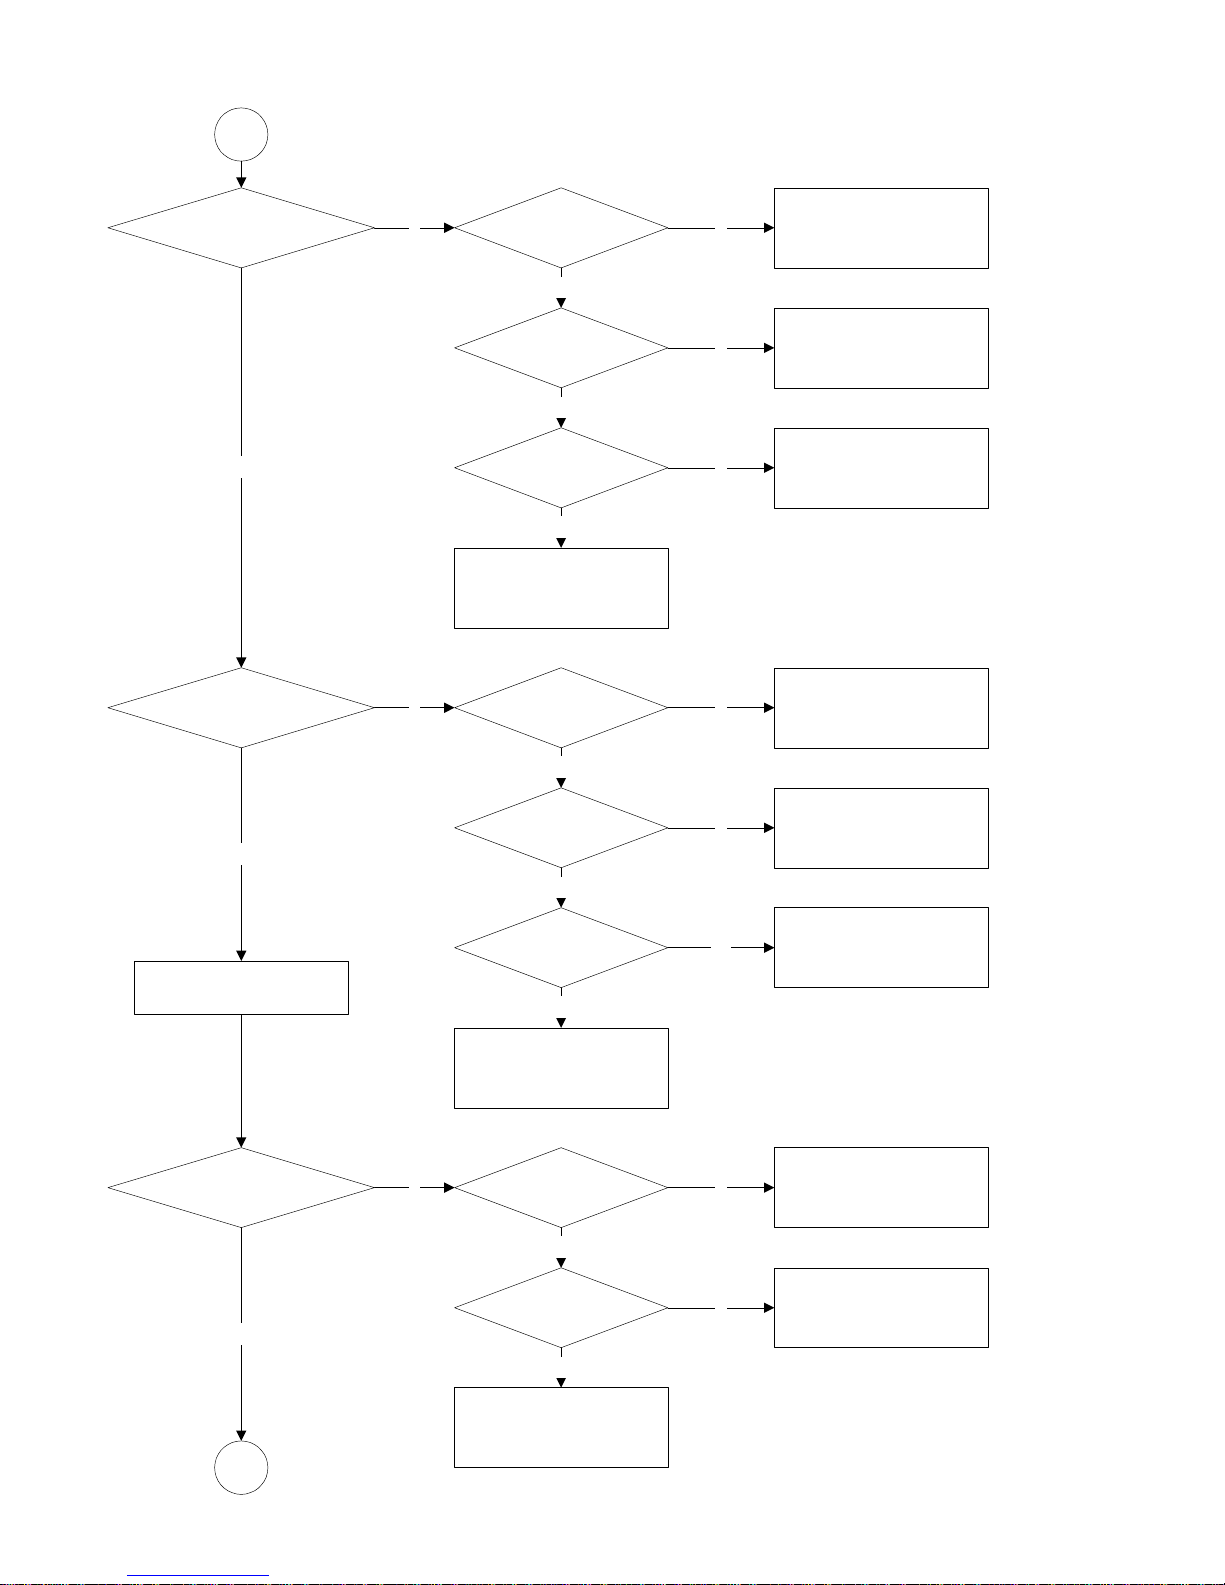
5.2 Maintenance Flow chart
Start
Confirm if AC is compatible with
the DVD-Player require
Replace extainal
PSU or a
transform need
Power on
Voltages
in all pins of item 1601 are
normal?
1. Check Cable
2. Replace PSU if Mono PWB is not short, otherwise find out
where short first
Are
DV33 and V25
normal?
Check regulator LD1117 (item7601) and diode 1N4002 (item6604)
and peripheral circuit
Display LOGO?
Is
Main Clock
normal?
1. Check oscillation circiut.
Is
reset signal
normal?
1. Check reset circiut.
Is
signal on FLASHl
normal?
Is
signal on SDRAM
normal?
Is input
signal of TV encoder
normal?
Is output
signal of TV encoder
normal?
Check the circuit of video
filter, amplifying and cables
with TV
Check peripheral circiut of FLASH
Check peripheral circiut of SDRAM
Check peripheral circiut of TV
Encoder
Check peripheral circiut of TV
Encoder
A
Yes
No
Yes
No
Yes
No
Yes
No
Y
N
Y
N
Y
N
Y
N
Y
N
Y
N
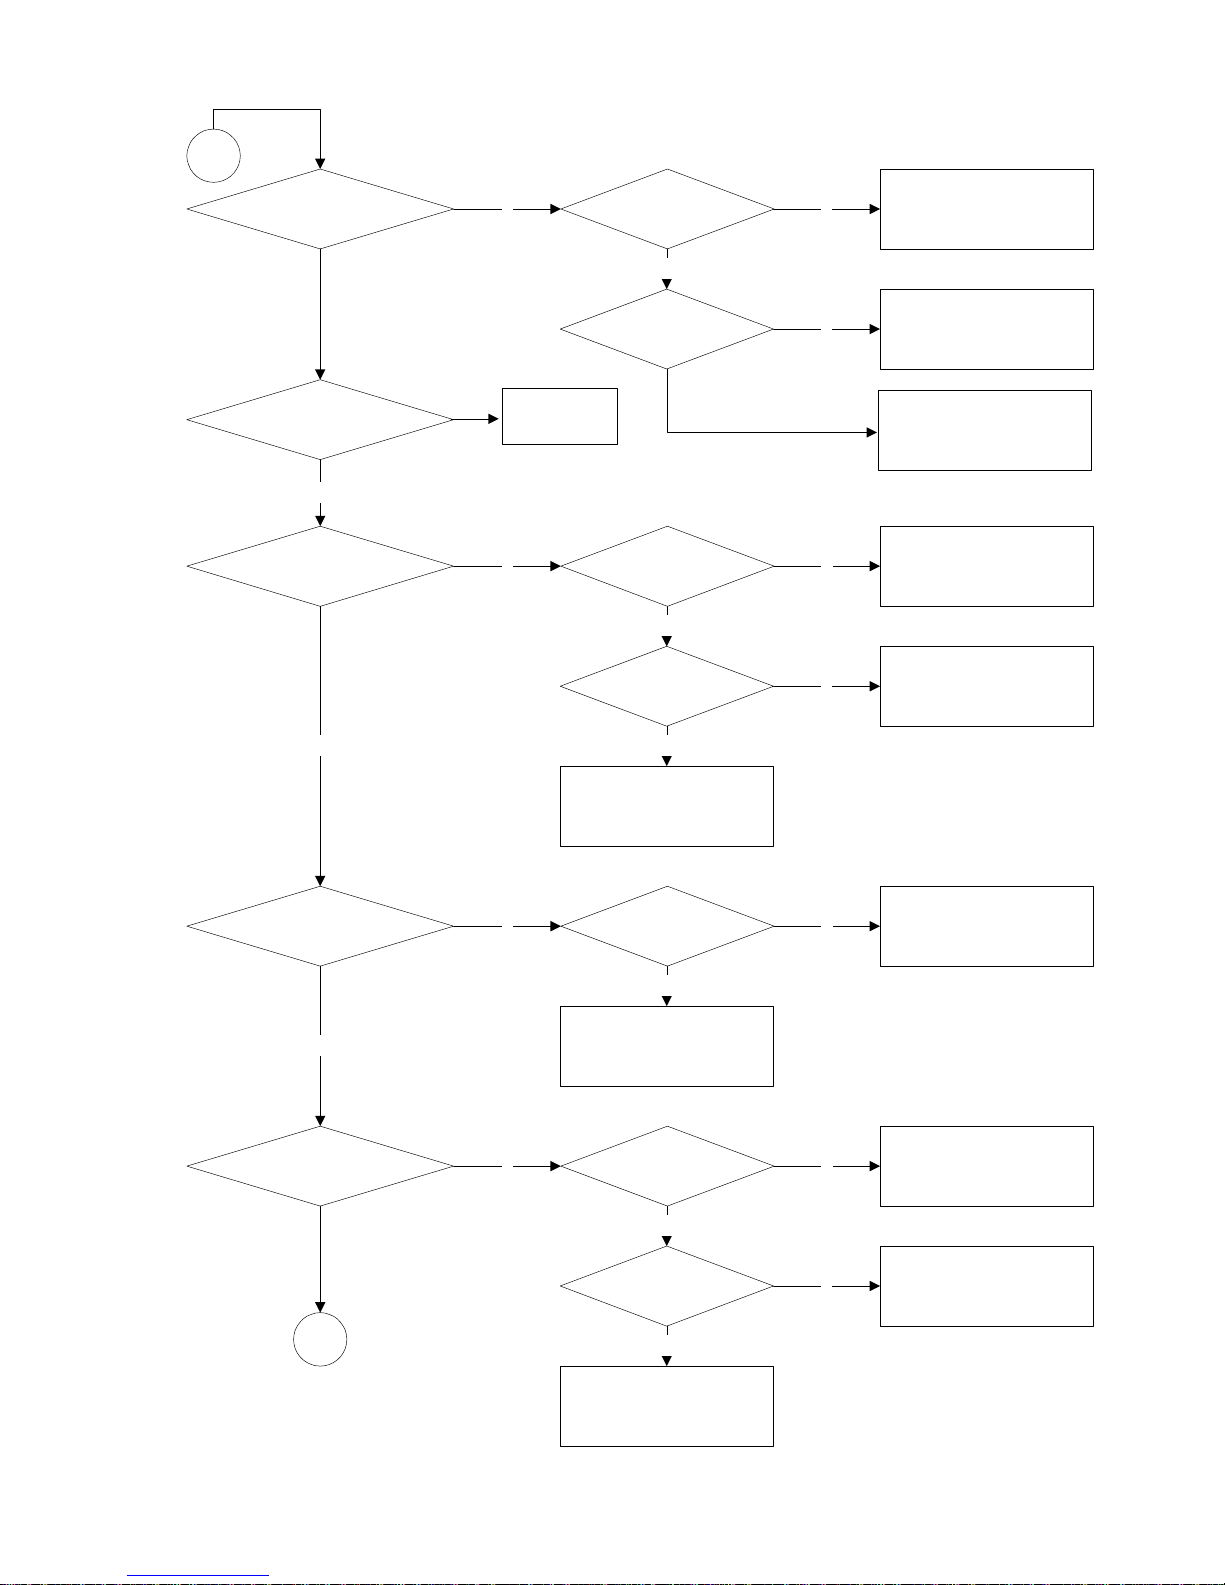
A
If will the tray
close automatically when
it is open
Signal
TROUT and TRIN is
correct?
Signal
TRCLOSE & TROPEN
correct?
Signal
LOAD+ & LOAD-
correct?
Check the circuit to
connect LOADER
Check the position-switch
in LOADER
Check the circuit between
MT1336 and driver IC
(item7603)
Check Motor driver IC
(item7603) and peripheral
N N
N
Y
Y
N
Y
Sledge move to
inside automatically when
it is in outside?
YES
Signal
STBY on driver IC is high
level?
Check the circuit related
with STBY
Signal
FMSO is more than
1.4V?
Signal
SL+ & SL-
correct?
Check the copper trace or
cable connect to LOAD ER
Check the circuit related
with FMSO
Check Motor Driver
N N
Y
N
Yes
Y
No
Y
NO disc on tray
Have
the Loader action
to find disc
Have
FOSO on driver IC
any signal ?
1. Check the signal from
MT1379 to Motor Drive r ;
2. Maybe MT1379 is n ot
work
Signal
F+ & F-
correct?
Check the peripheral
circuit of Motor driv er
Check the cable and
circuit between Loader and
Motor driver (BA5954)
N N
Y
Y
N
Y
B
B
When read disc,
Laser ON OK?
N
Signal
LDO1 and LDO2 is
normal?
Voltage of
TP22 &TP24
OK?
Check the circuit to
connect LOADER
OPU maybe damaged
Check the peripheral
circuit of MT1366
Check the peripheral
circuit of two transistor
(item 7620 & 7621)
Check the peripheral
circuit of two transistor
(item 7620 & 7621)
N
N
Y
Y
Load a disc?
Y
Laser off
N
Focus On ok?
Y
N
Signal FEO
(pin18 of MT1336)
correct?
Check the circuit from
Pin18 of MT1336 to Pin205
of MT1379
Check the circuit between
Loader and MT1336
Check the peripheral
circuit of MT1336
N
N
Y
Y
Any signal
on pins A B C D E F
of MT1366
Disc ID correct?
Y
N
Check the circuit from
Pin19 of MT1336 to Pin206
of MT1379
Check the peripheral
circuit of MT1336 and
itself.
N
Signal of
Pin 19 (RFL) of MT1336
normal?
Y
Spindle on OK? N
Signal
SP+ & SP-
correct?
Check the connection
between spindle driver and
BA5945
Check BA5945 (motor
driver) and its peripheral
circuit
N
N
Y
Y
DMSO
(pin18 of MT1379)
normal?
Y
Check MT1379 and its
peripheral circuit.
C
 Loading...